

Page 1

Rugged
Reader
Getting Started Guide
Contents
Welcome ........................................................................ 1
Device Hardware..........................................................2
Setting up your RuggedReader................................... 3
Working with your RuggedReader............................. 5
Connecting to your PC............................................... 13
Microsoft Pocket Outlook.......................................... 17
Companion Programs ............................................... 18
Caring for your RuggedReader ................................ 20
Hardware Specifi cations............................................ 21
Safe Use of your RuggedReader ...............................22
Troubleshooting RuggedReader ............................... 23
Regulatory Information............................................. 29
Declaration of Conformity ........................................29
Reference Materials ...................................................31
Welcome
Congratulations on purchasing the RuggedReaderTM handheld computer
with Microsoft® Windows MobileTM 2003 software for Pocket PCs.
The immersible and shock-resistant design of the RuggedReader
allows you to work in harsh outdoor environments. You can run your
Pocket PC applications in blazing heat, subzero cold, driving rain,
dusty job sites—anywhere you could never take a handheld before.
1
Page 2
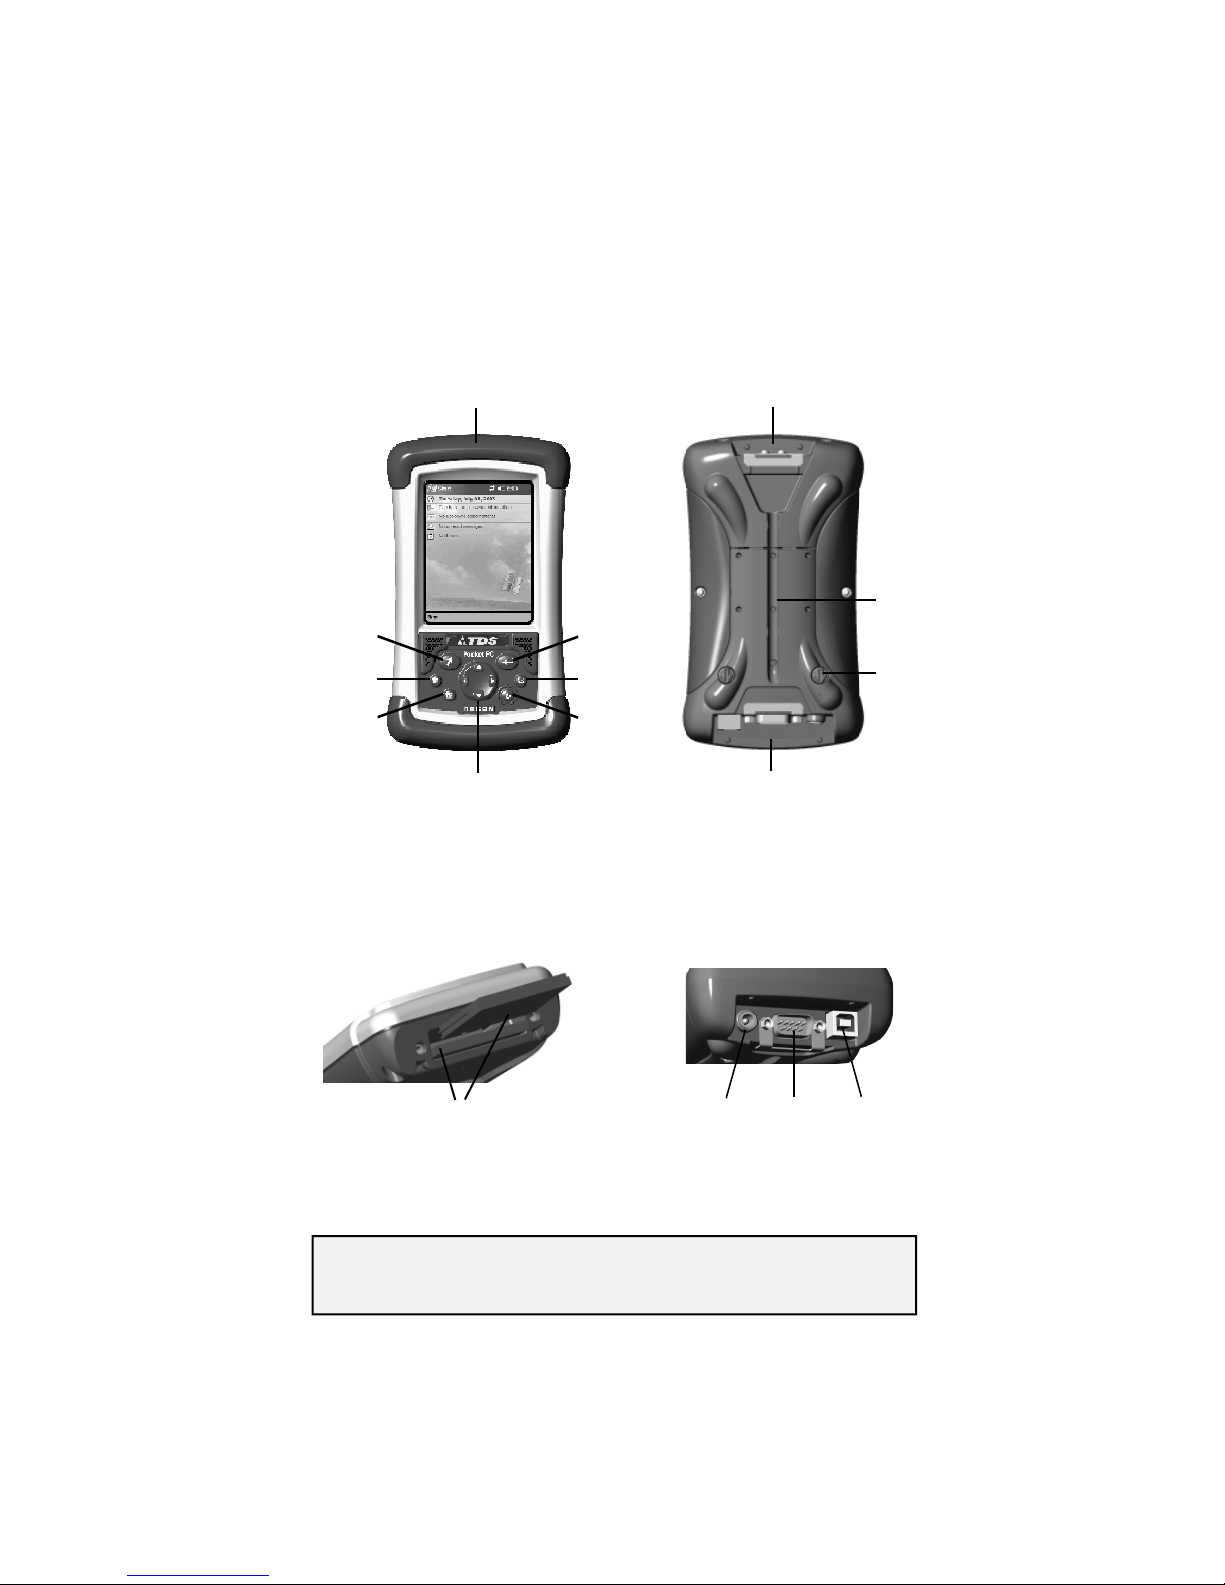
Device Hardware
Front Panel
Removable CF-Cap covers
two CompactFlash card slots
Start Menu
(button 1)
Calendar
(button 2)
Contacts
(button 3)
*
*
*
*
Assignable application buttons;
Navigation pad
see Settings.
Enter
Inbox
(button 4)
Power
Back Panel
*
PowerBoot Module
CF-Cap
Stylus
holder
Latches
Top View- without Cap Bottom View
CompactFlash card slots
External
Power
Note: Be sure to read the warranty and safety information in the
manual prior to using your RuggedReader.
2
Serial USB
Page 3
Setting up your RuggedReader
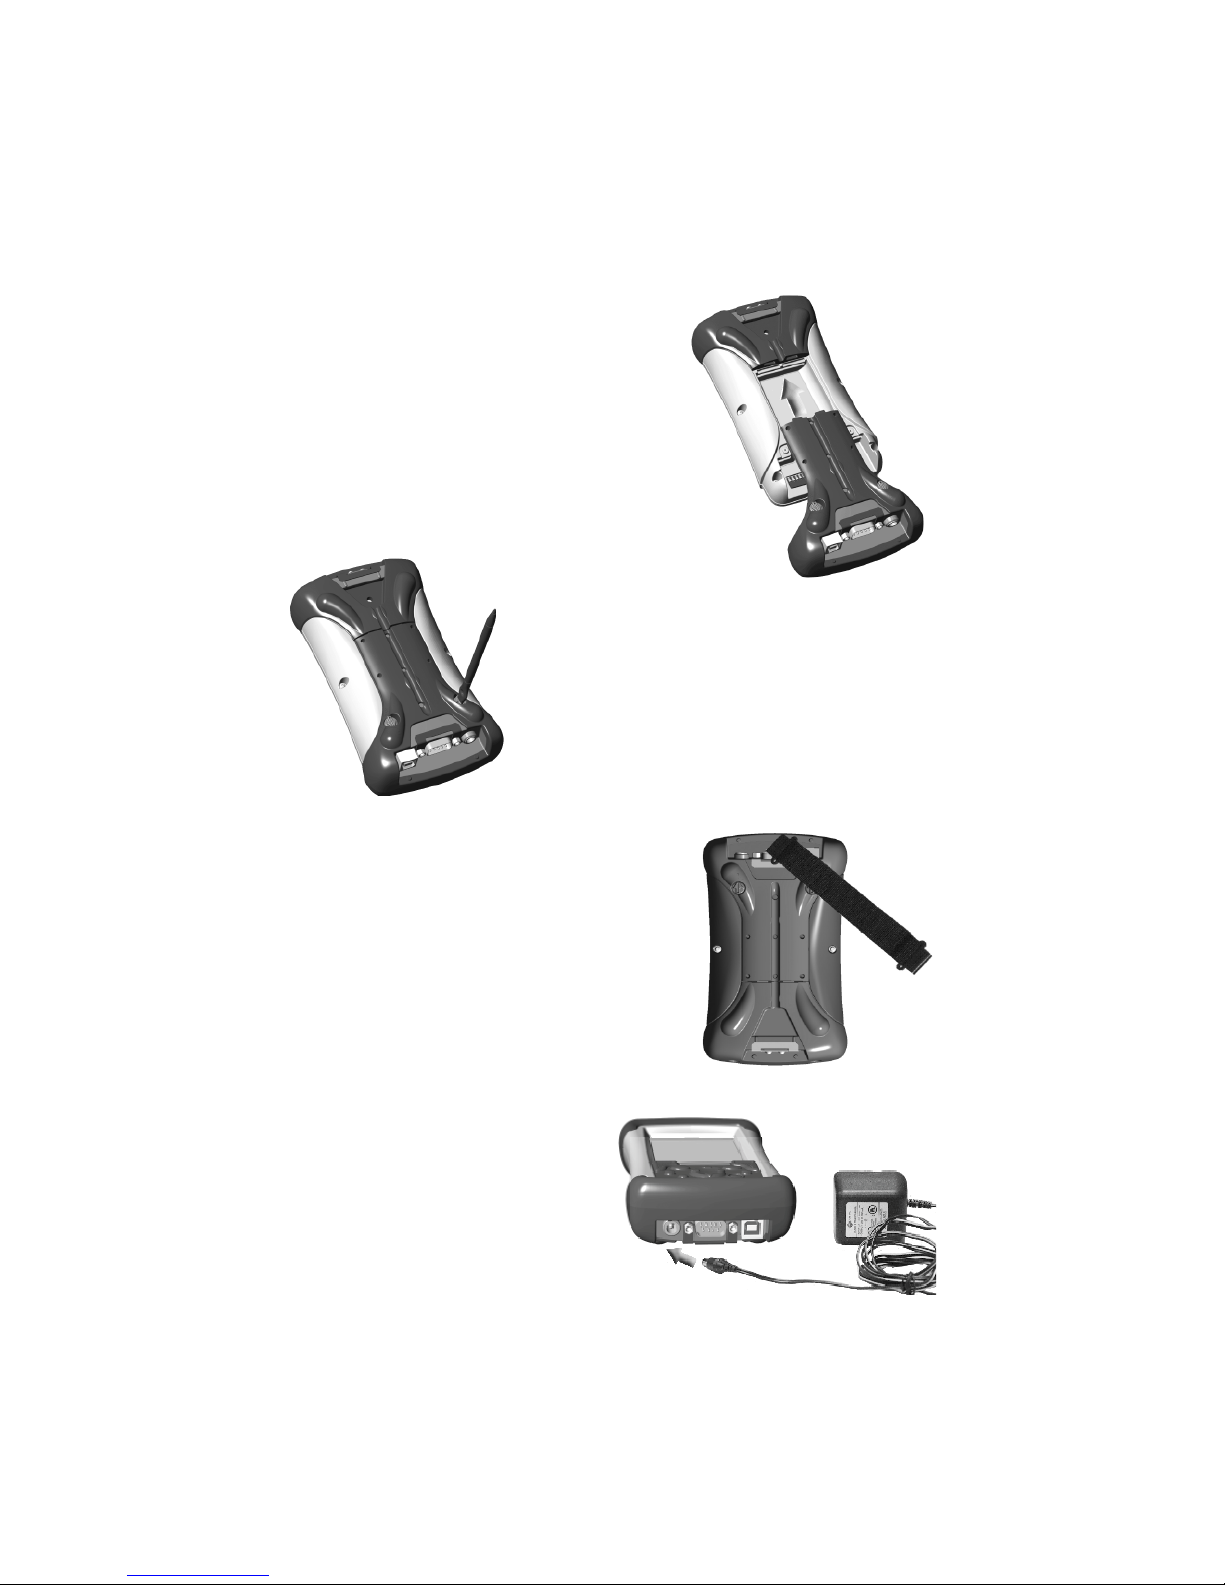
1. Attach the PowerBoot
The PowerBoot ModuleTM for your
RuggedReader is shipped unattached. To
attach the PowerBoot, turn the latches
counter-clockwise until they are parallel to
the stylus holder, with the arrows pointing
towards the communication ports located
at the bottom of the PowerBoot.
Firmly slide the
PowerBoot onto
the main unit as shown. Pressure should
be applied downward and forward as the
PowerBoot is positioned.
Use the stylus to lock the PowerBoot
latches, by turning them clockwise one half
turn until they are pointed away from the
communication ports.
2. Attach the hand strap
To connect the hand strap to your
RuggedReader, hold the hand strap
clip at a 45 degree angle and push the
clip onto the RuggedReader bracket.
Repeat the process with the other end
of the hand strap.
3. Charge your RuggedReader
Connect the AC adapter to the
external power port on your
RuggedReader. Charge for at least
12 hours before using. For best
results, turn the RuggedReader off
while charging.
3
Page 4
Battery life varies greatly depending on the application and
environment. At moderate or high temperatures with no display light,
usage over 30 hours is possible. In typical use, with default display
light setting and two CompactFlash
expect 15 to 20 hours of battery life. At cold temperatures (-20C or
less) with heavy use of display light and/or non-memory CompactFlash
cards (e.g. wireless LAN), battery life may be only a few hours.
The keys to extended battery life are managing the display light,
keeping the batteries warm in cold environments, and using
CompactFlash cards that use power conservatively.
®
memory cards installed, you can
4. Align the touch screen
When the RuggedReader fi rst turns on (or after a hard reset), the touch
screen will require calibration. Tap the screen to set it up. Using a
stylus, tap the targets fi rmly and accurately at each location until the
screen is aligned.
5. Turning your RuggedReader on and off
One of the most convenient features of the RuggedReader is “instant
on.” There is no waiting for it to start up or shut down. To start
working immediately, press the power button. (“Instant on” does not
occur on the fi rst boot up.) When you have fi nished working, turn off
your RuggedReader by pressing the power button.
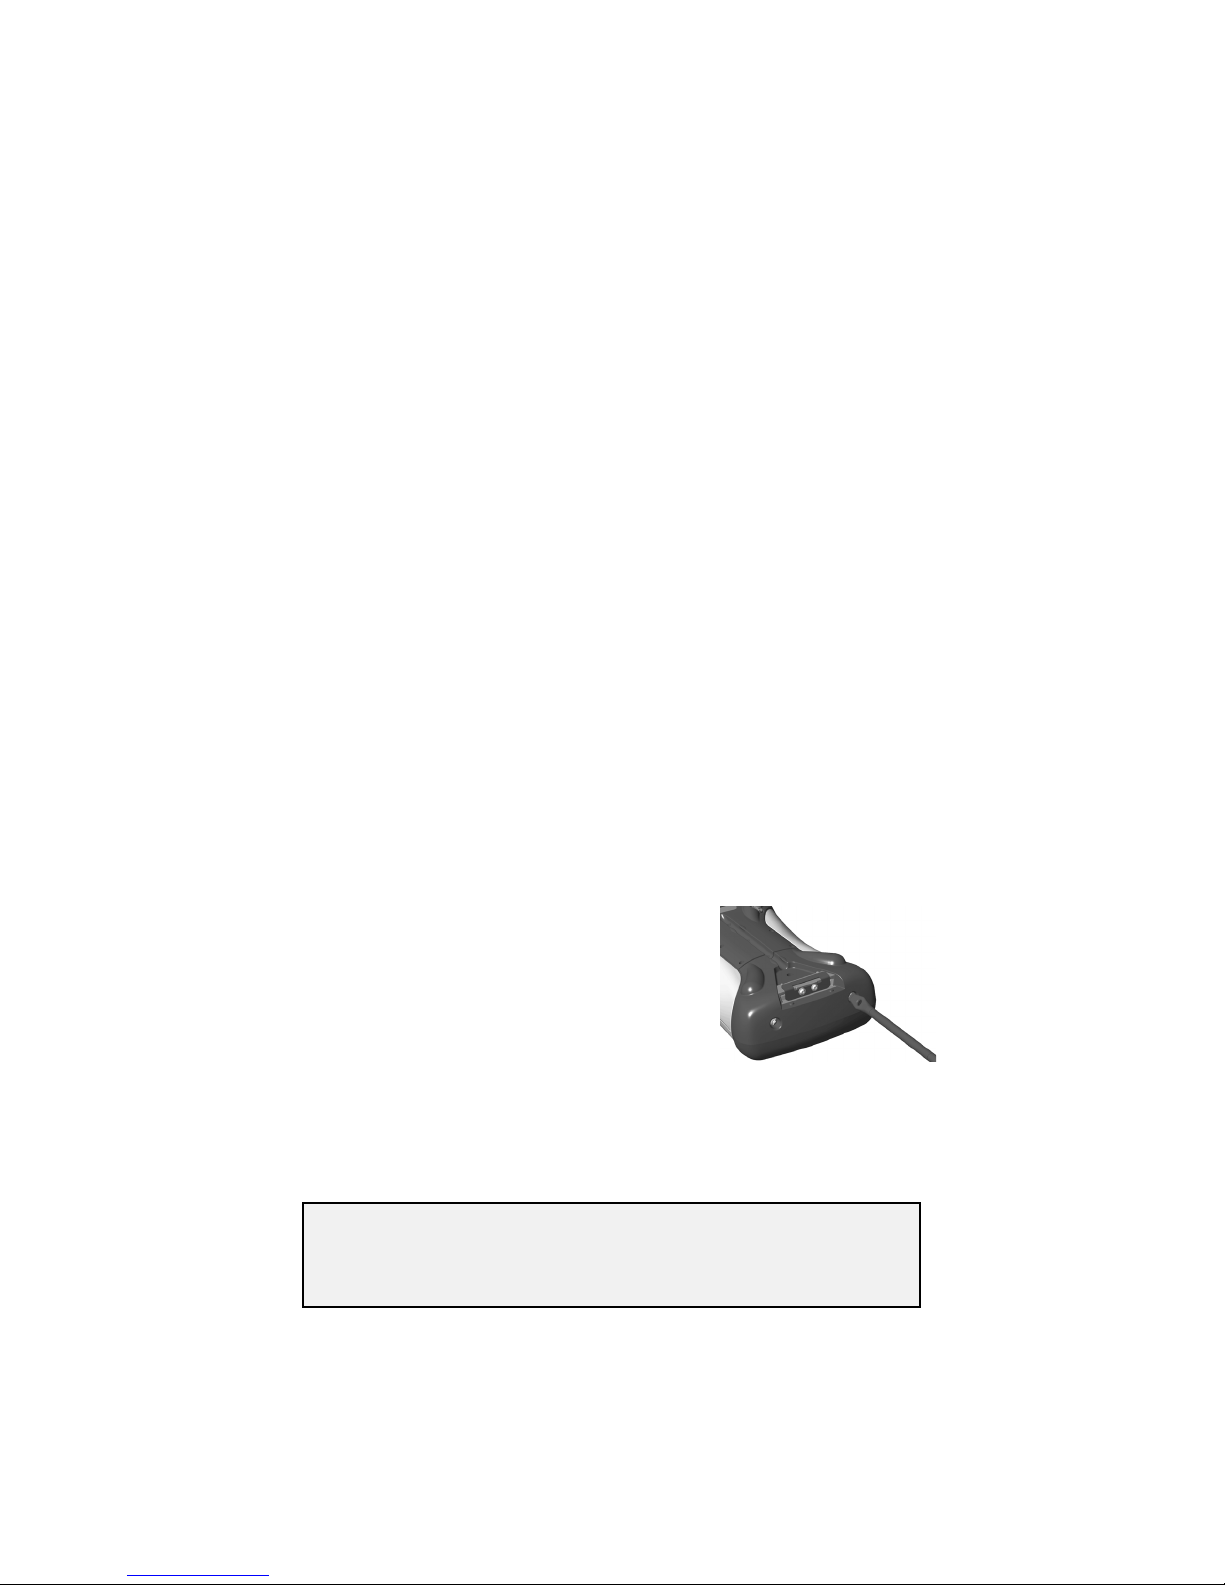
6. Using the CF Expansion Slots
To use the CompactFlash expansion slots,
you must fi rst remove the CF-CapTM . To do
this, unscrew the two screws on the top of
the CF-Cap. Slide the cap off the main unit.
Gently insert a CompactFlash card or device
into one of the two CF slots. Do not force
the card into the slot. Cards must be inserted with the face toward the
display side of the RuggedReader. Replace the CF-Cap and tighten the
screws to reseal.
Note: Be sure to reattach the CF-Cap when you are fi nished. The
RuggedReader is NOT sealed when the cap is off. Water damage
caused by improper installation of the cap is not covered by
warranty.
4
Page 5

Working with your RuggedReader
Using the Stylus
The touch screen on your RuggedReader works like a mouse on a PC.
Use the stylus to navigate and select objects on the screen.
Tap: Tap the screen with the stylus to select or open an item. Tapping
is equivalent to clicking an item with the mouse on your PC.
Touch and hold: When you touch and hold, a circle of red dots
appears around the stylus to indicate that a pop-up menu will soon
appear. Touching and holding is equivalent to right-clicking your PC
mouse button.
Drag: Hold the stylus on the screen and drag across the screen to
select text and images. Drag in a list to select multiple items.
RuggedReader Memory
The RuggedReader has built-in non-volatile, Nand fl ash storage.
The content of this storage is retained no matter what happens to
battery power or other environmental conditions. You should keep
your data and programs in this storage area. Built-in storage is 64
MB. Approximately 16 MB of this storage is used by the Pocket PC
operating system. The balance is available for your use. There is also
64 MB of volatile RAM; about 58 MB is available to run programs and
to store temporary data.
If you need additional memory, third-party CompactFlash memory
cards can be used with your RuggedReader. They work the same way
as built-in storage except that they are removable. The picture on the
next page shows how these different kinds of memory appear within
File Explorer (Start / Programs / File Explorer). The non-volatile builtin storage is at the top of the list.
5
Page 6
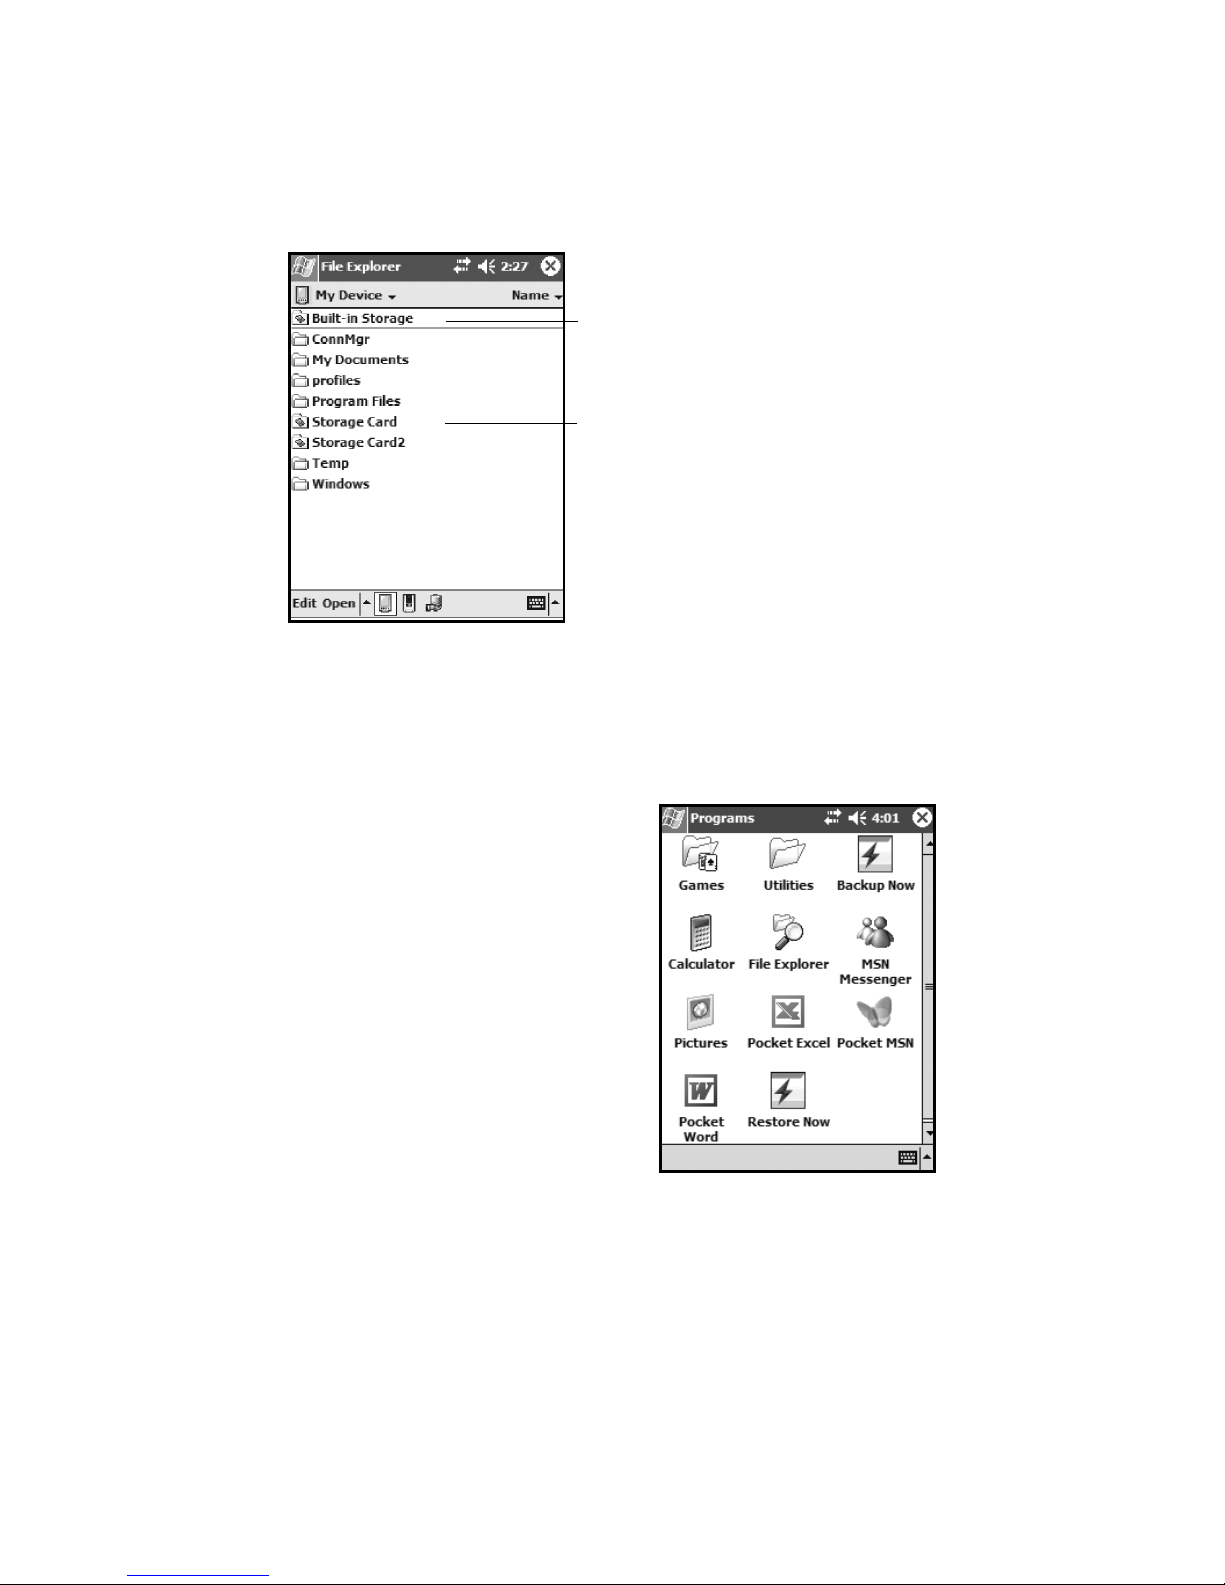
Built-in Storage: The contents are found in this
folder in File Explorer.
Storage Cards: If CompactFlash memory cards are
present, the contents are found in these folders in
File Explorer.
RAM: All other fi les and folders displayed by File
Explorer are stored in RAM and will need to be
backed up.
Some data and some programs do not give you the option of keeping
them in built-in storage. Your Pocket Outlook data and CompactFlash
card drivers are two examples of this type of information. Should you
experience a hard reset, this data will be lost. To prevent this type of
loss you should frequently use the built-in backup software to back up
all of this information to built-in storage.
Backup and Restore
Run Backup Now (Start / Programs /
Backup Now).
This easy-to-use program takes all
information that might be lost during a
hard reset and stores it safely in builtin storage in a folder called System
in a fi le called backupimg. When the
RuggedReader goes through a hard
reset, it automatically checks for the
presence of this fi le and gives you an
opportunity to restore the most recent
backup.
The Pocket Backup program can be confi gured to give you a great deal
of fl exibility for both backup and restore including scheduled backups.
You can fi nd it in the Utilities folder of the Start / Programs area.
6
Page 7
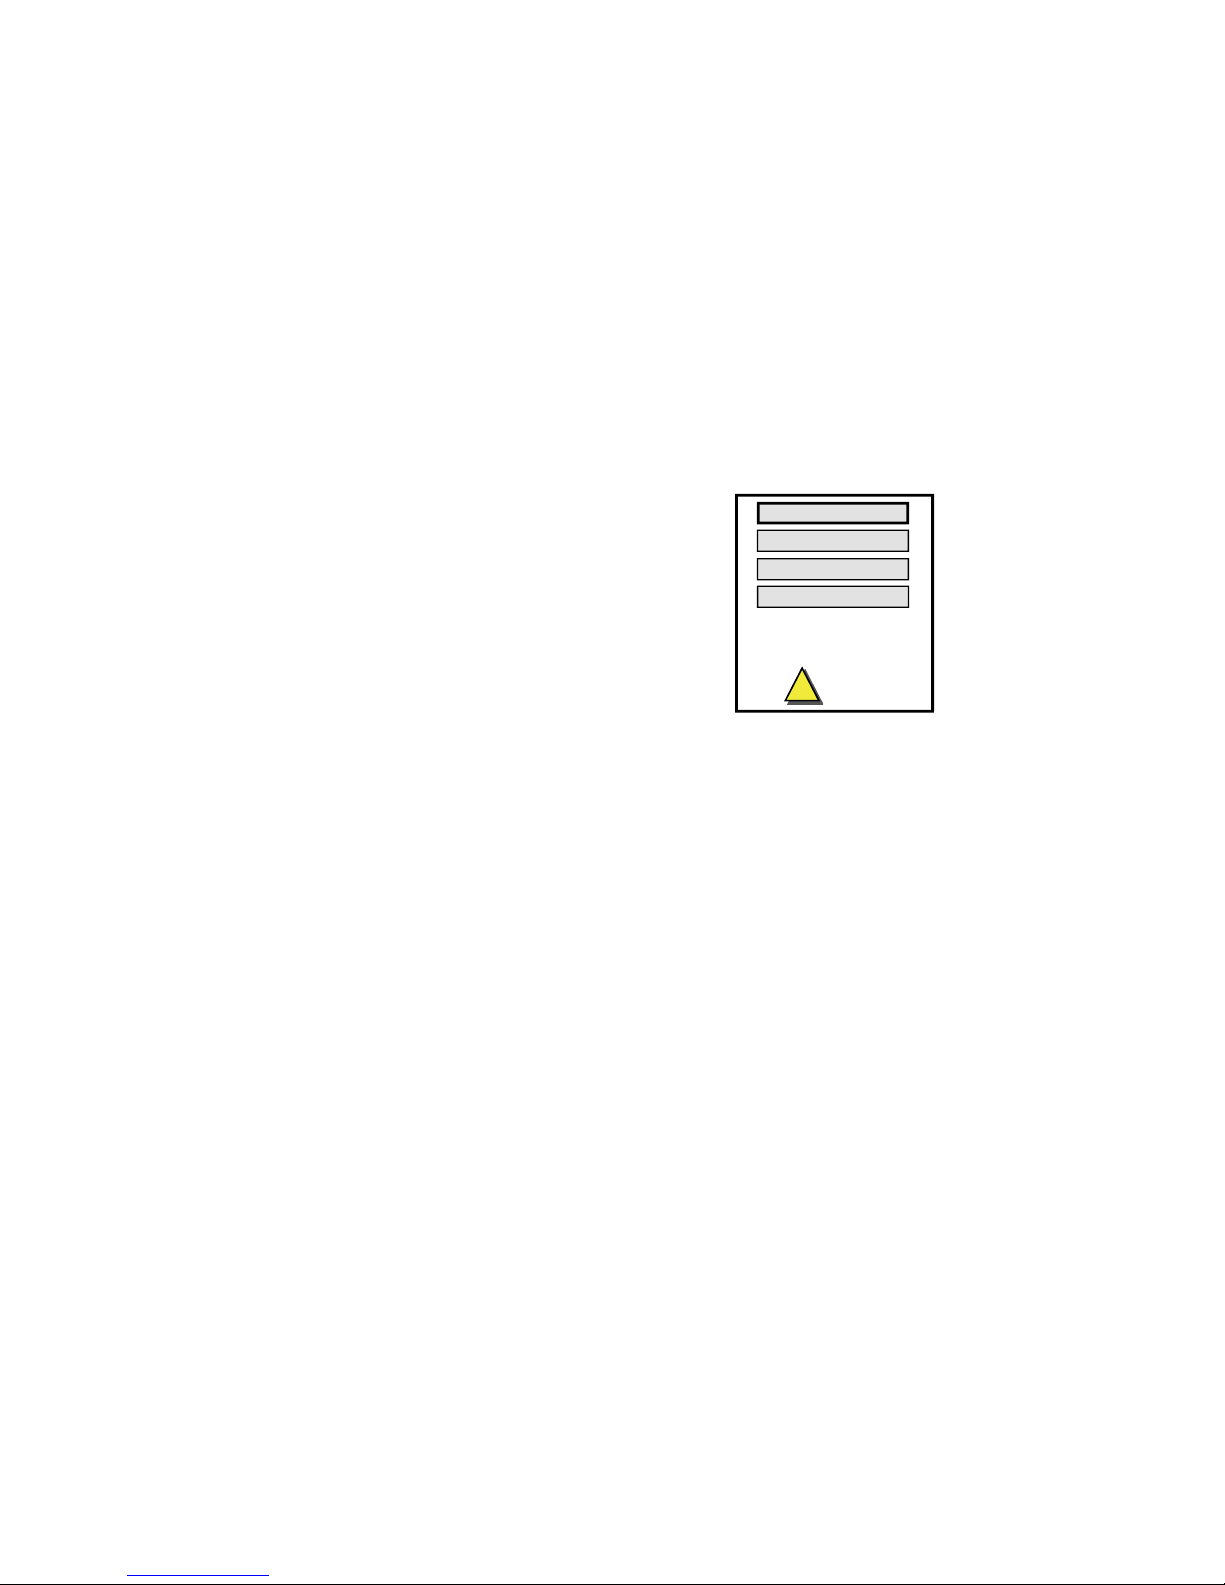
Power Button Features
The power button turns the RuggedReader on and off and can perform
a number of additional useful tasks.
Turn Backlight on/off -- Hold down the power button for about
1 second to manually toggle the backlight state. Note: Manually
turning the backlight off disables auto turn on with screen taps or
button presses until the backlight is manually turned back on or the
RuggedReader is turned off and back on.
Power Menu -- Hold down the power button
for about 3 seconds to bring up a screen with a
menu and a countdown in progress. Continuing
to hold the power button will cause a soft reset
when the countdown reaches zero. Releasing
the power button allows access to this menu.
Tap an option or press power again to exit.
Clean touch screen - Disables the touch screen.
After cleaning, press enter to enable touch screen and exit.
Align touch screen - Use a stylus to align the touch screen.
Soft reset - See the description below.
Exit - Takes you back to the previous screen.
Clean touch screen
Align touch screen
Soft reset
Exit
Release power button to use menu.
Continue to hold power button to
soft reset in countdown seconds.
!
5
Soft Reset -- A soft reset is comparable to rebooting your PC, which
stops all running programs. It is occasionally used when installing new
software.
To perform a soft reset, use the power menu or hold the power button
down for about eight to ten seconds. (The power menu may or may not
appear.)
Hard Reset -- A hard reset should be avoided if at all possible. It
should only be used if a soft reset fails to resolve an issue. Some
software programs store database information in RAM which would be
erased during a hard reset. So it is strongly recommended that you back
up your data before you perform a hard reset. See Backup and Restore.
To perform a hard reset, hold down the power button and application
button 1 (Start Menu) at the same time for about eight to ten seconds.
(The power menu may or may not appear.) When the message
“Booting - - - ->” appears in the display, release the buttons. If a
backup has been performed, the RuggedReader will prompt to restore.
7
Page 8
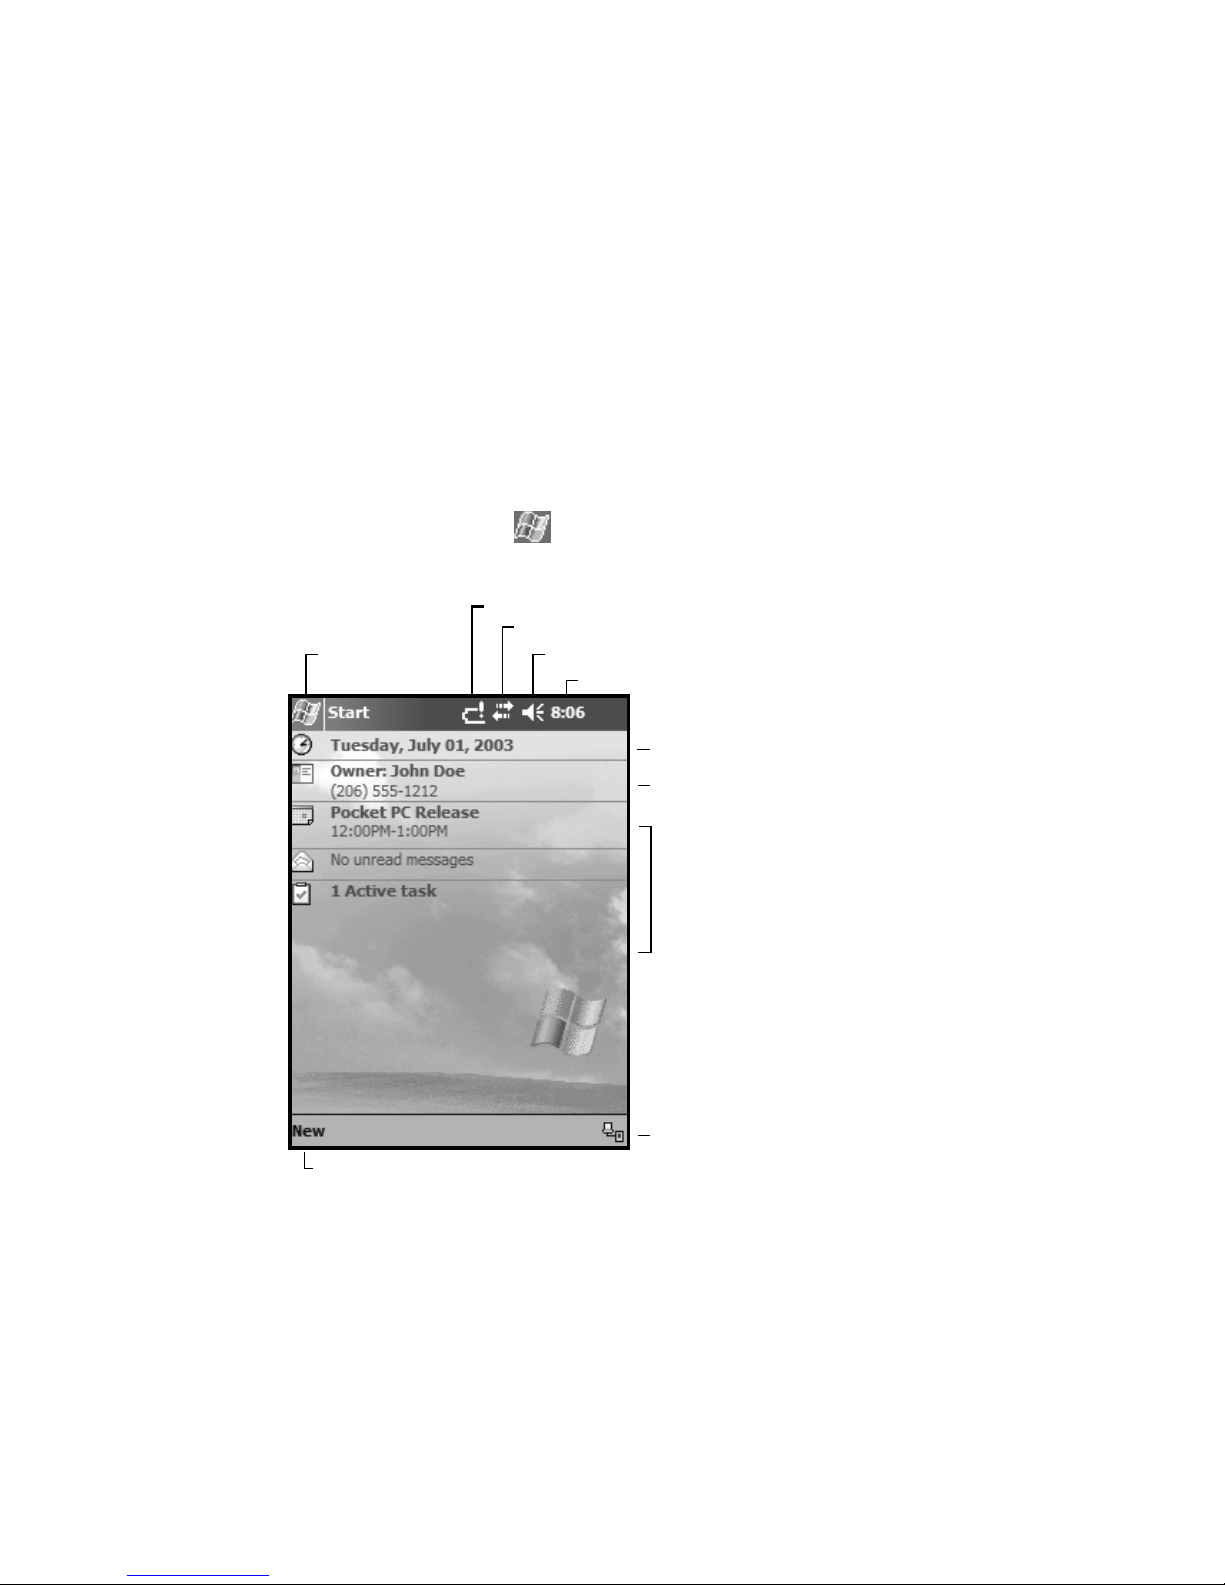
The Today Screen
The center of the Today screen provides information that you need for
the day. Tap an item to view or edit details.
At the top of the screen are status icons. Tap an icon to view details or
change options. (These icons appear at the top of every screen on your
RuggedReader, and not only the Today screen.)
When you turn on your RuggedReader for the fi rst time each day (or
after four hours of inactivity), the Today screen displays. You can also
view it by tapping and then Today.
Tap to view notifi cation information.
Tap to view network status and options.
Tap to go to
a program.
Tap to change volume or mute all sounds.
Touch and hold to change time format.
Tap to change date, time, or
time zone.
Tap to change owner information.
Tap to create a new item.
8
Your day at a glance. Tap to
open the associated program.
Tap to view connection status
Page 9
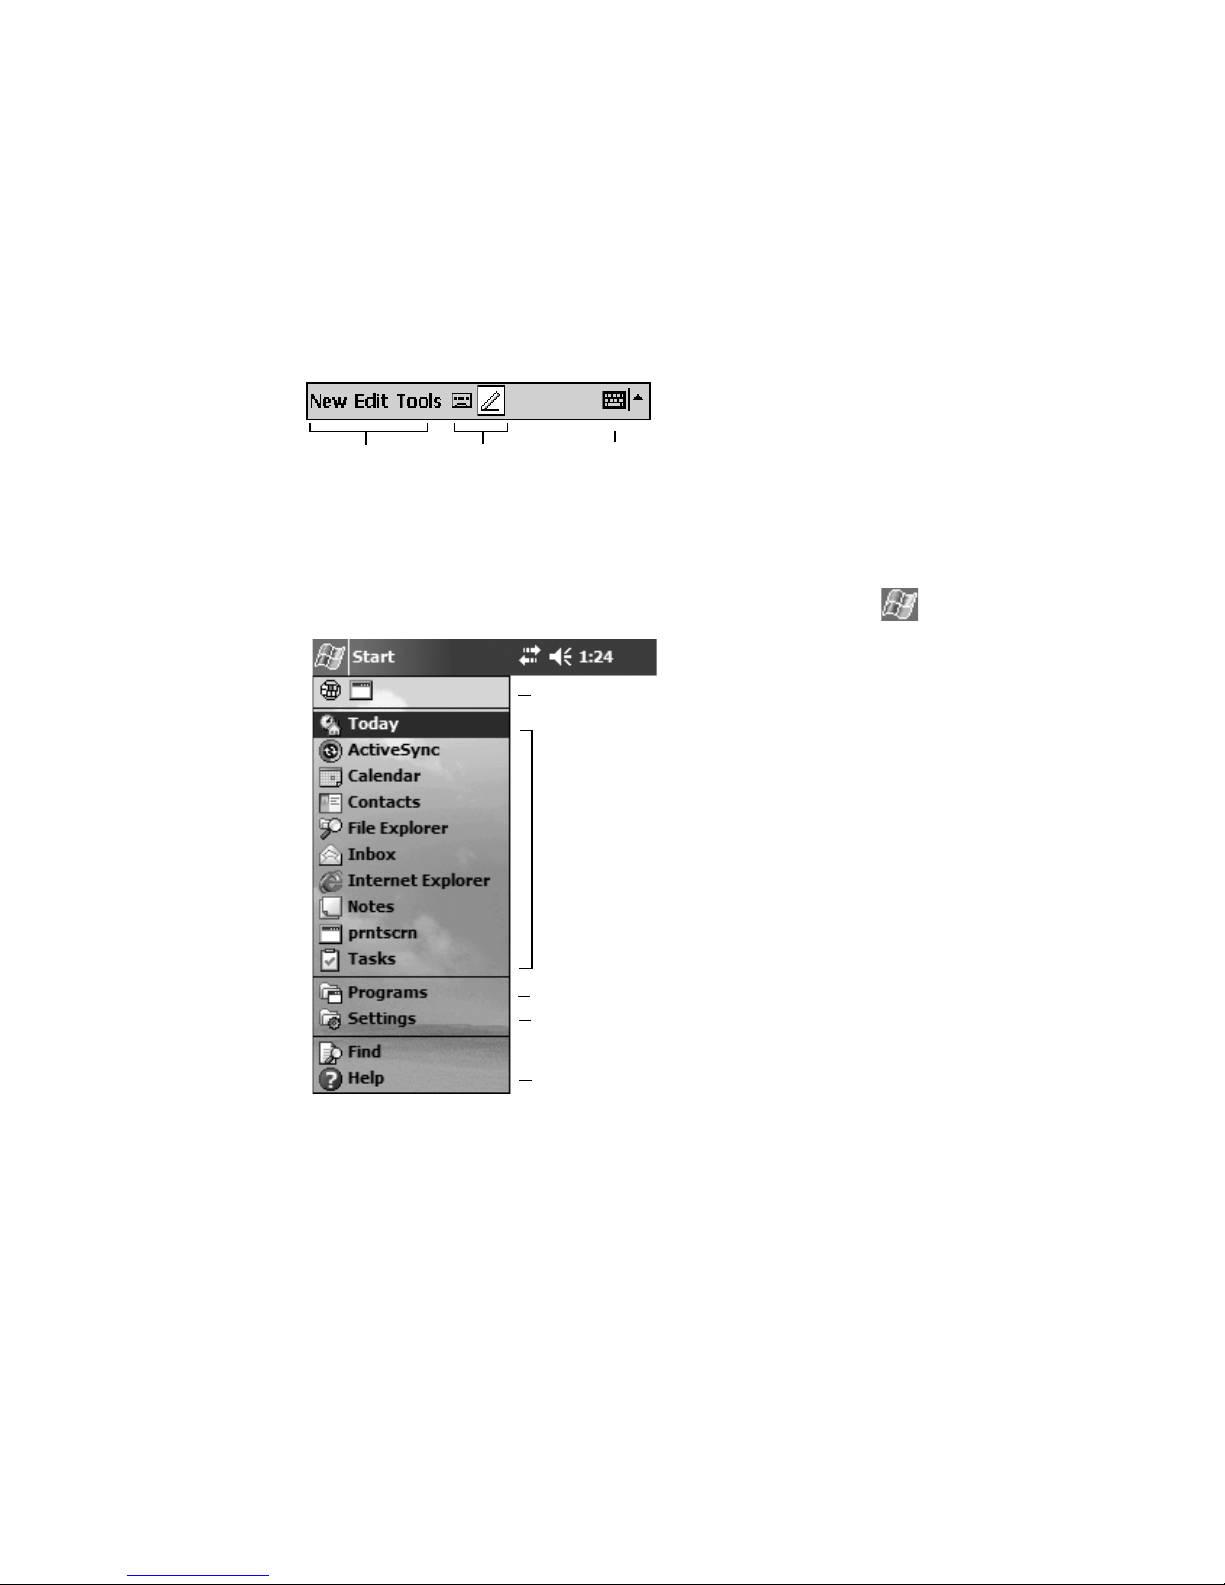
The Command Bar
At the bottom of the screen is the command bar. You can use its menus
and buttons to perform tasks in programs. Depending upon which
program you are using, the buttons may vary from those depicted.
Tap to select menu
commands.
Tap to select button
commands.
Tap to display the
input panel.
The Start Menu
From the Start Menu, you can select programs, settings, and help
topics. To display the Start Menu, from the top of any screen, tap .
Tap to switch to a program that you recently used.
Tap to switch to a program.
Tap to see more programs.
Tap to change device settings.
Tap to see a Help topic for the current screen.
9
Page 10
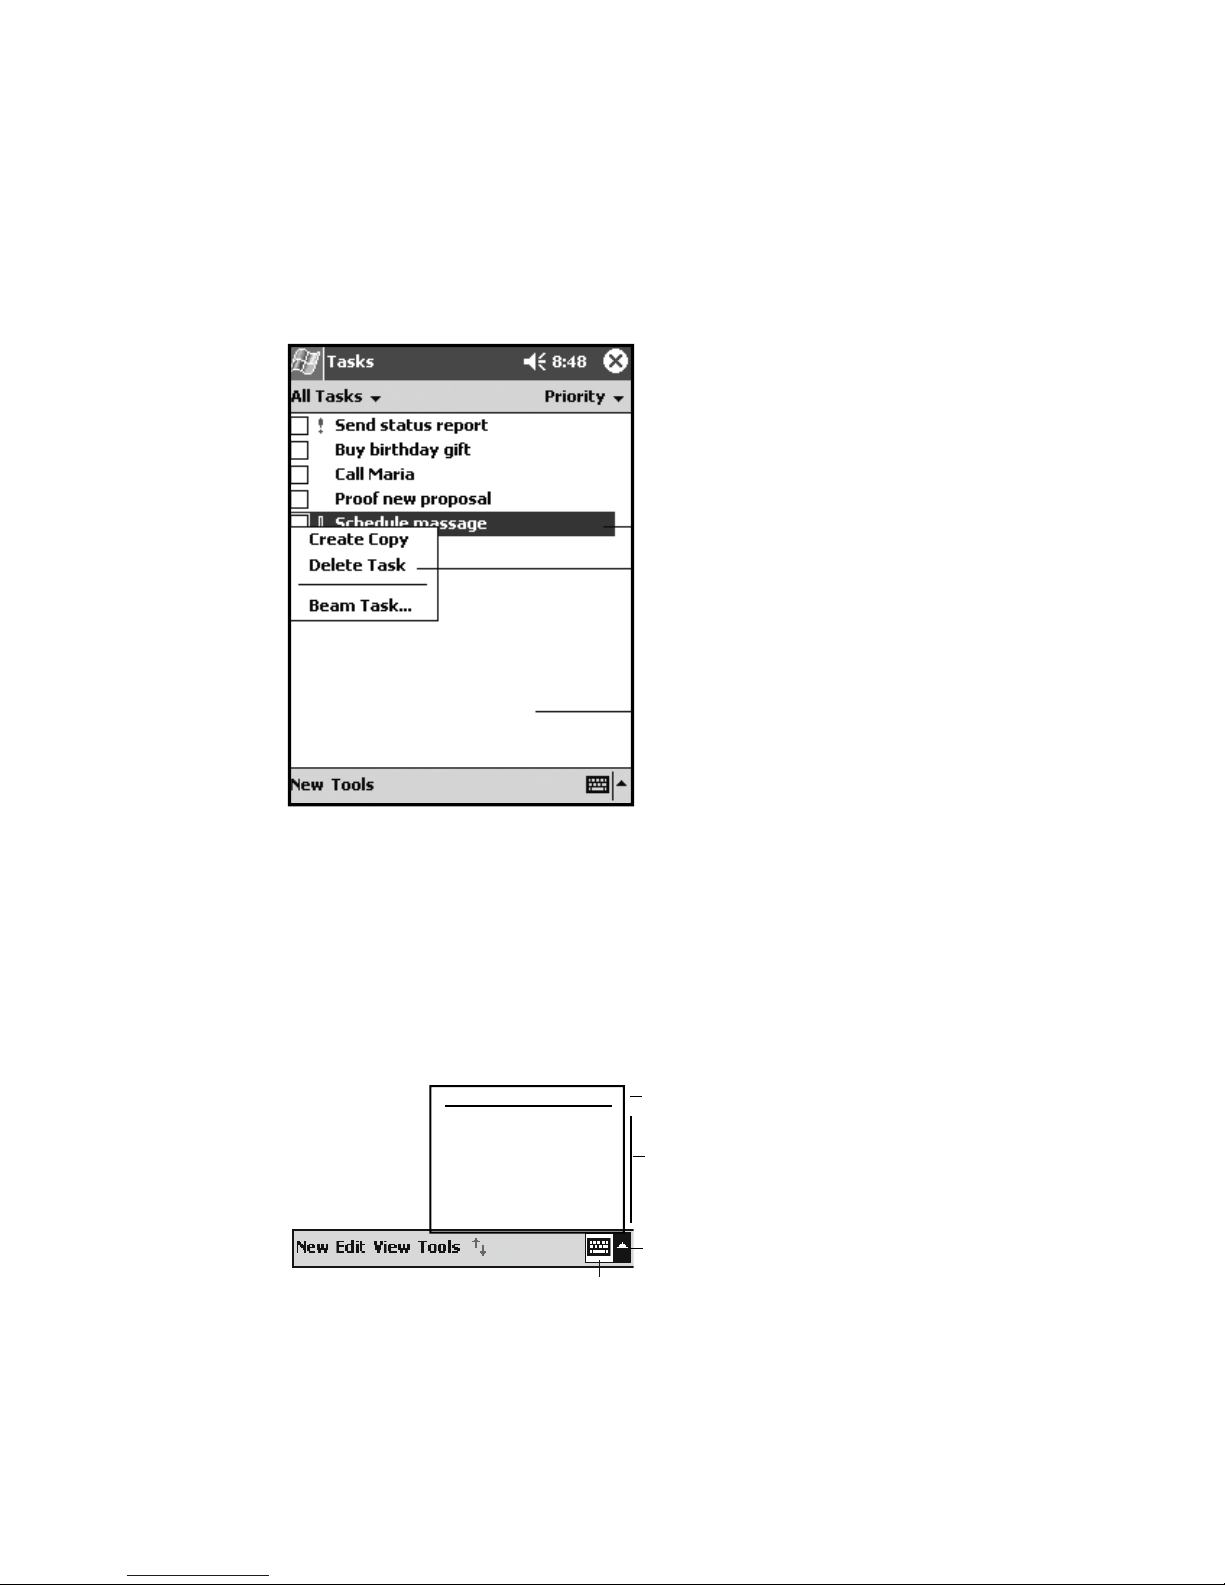
Pop-up Menus
You can use pop-up menus to quickly select an action for an item. To
access a pop-up menu, tap and hold the stylus on an item name.
Touch and hold to display the pop-up menu.
Lift the stylus and tap the action you want.
Tap outside the menu to close it without
performing an action.
Text Input Panels
Use the input panel to enter information in any program on your
RuggedReader. You can type using the standard Keyboard or the Recon
Keyboard. You can write using Block Recognizer, Letter Recognizer,
or Transcriber. The characters appear as typed text on the screen.
Select the input panel that is easiest for you to use.
To change input panels, tap the arrow next to the Input Panel icon and
then tap the input panel that you want.
Options
Block Recognizer
Keyboard
Letter Recognizer
• Recon Keyboard
Transcriber
Tap icon to open the selected input panel.
Tap to change input panel options
Tap to select an input panel.
Tap to change input panel.
10
Page 11
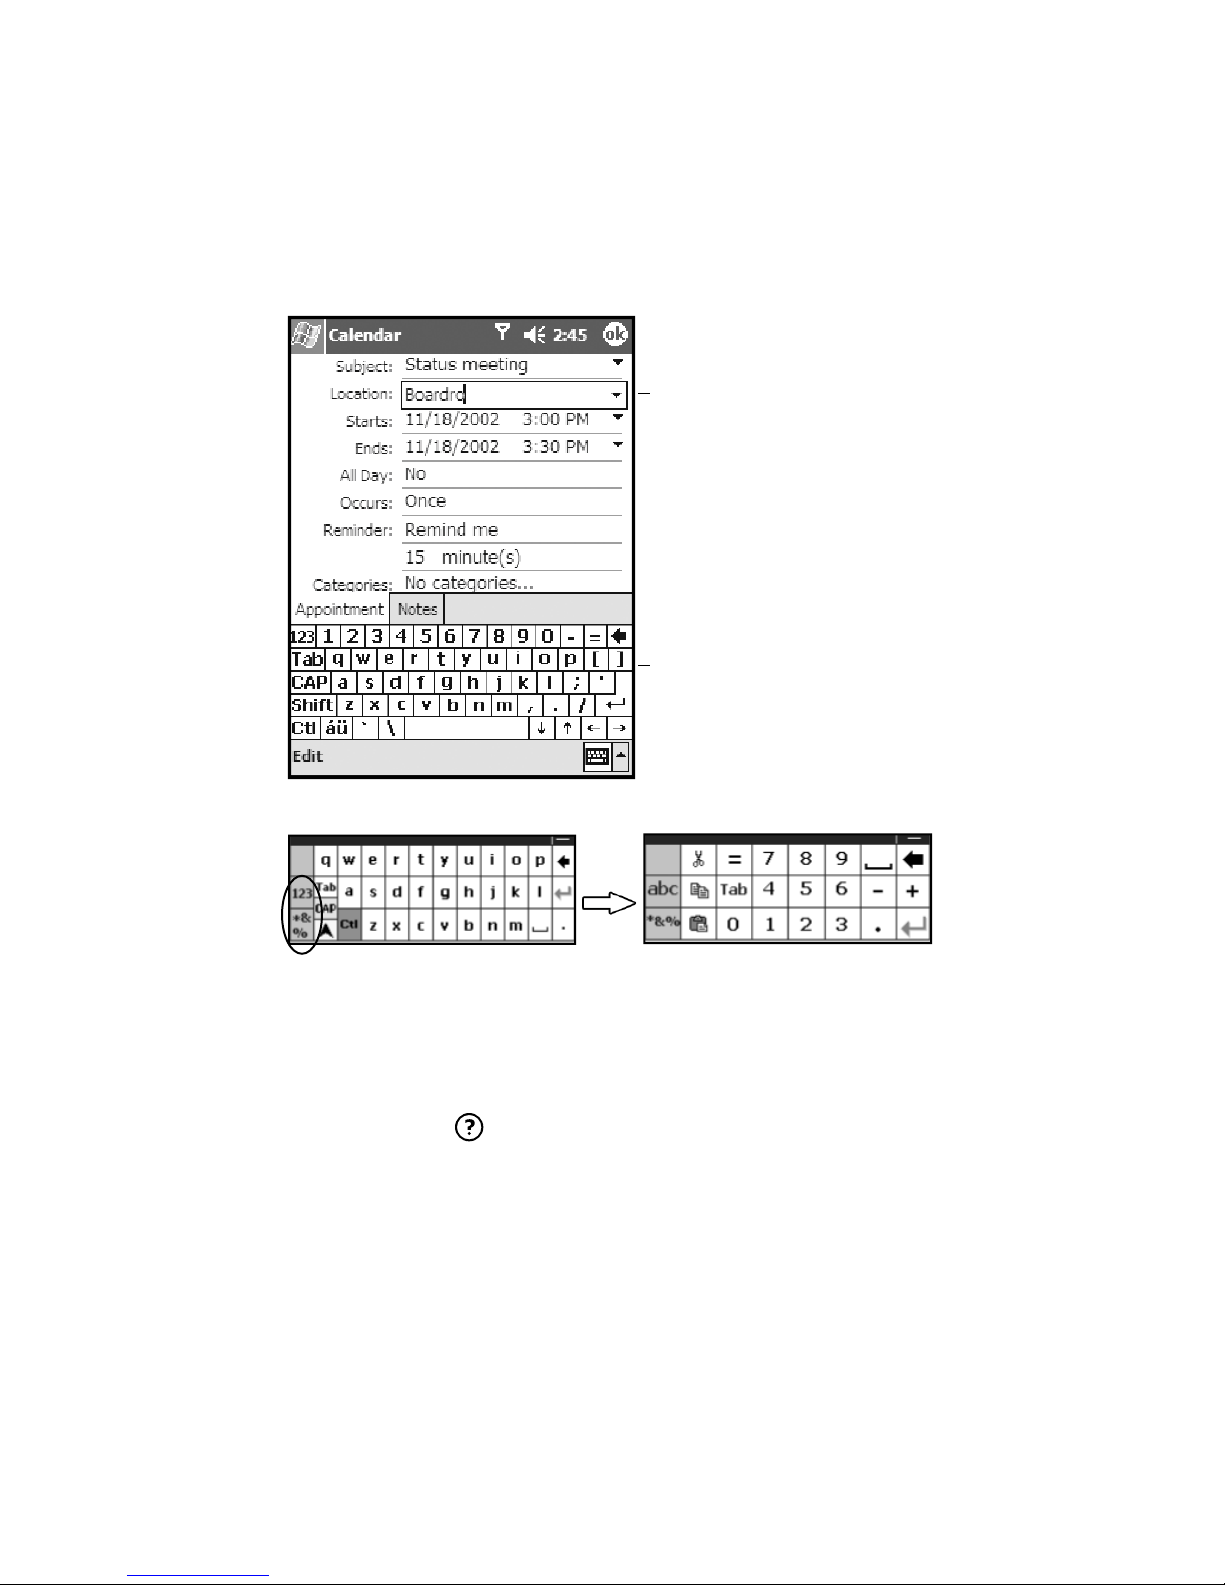
When you tap in a text entry area, such as a text box or notes page, the
currently selected input panel activates as shown in the example below.
Tap a text box to edit the text using the
current input panel. In this example, the
keyboard is selected.
To enter characters, tap on the Keyboard
input panel.
The Recon Keyboard has larger keys than the standard keyboard.
Tapping on the “123” or “*&%”, identifi ed in the circle above, gives
additional characters.
The Block Recognizer and Letter Recognizer input panels render
individual characters that you write as “typed.” The Transcriber input
panel converts handwritten words and symbols into typed characters.
Tap Start / Help for more information and demonstrations on these
input panels.
11
Page 12

Settings on your RuggedReader
Tap , then tap Settings. You can tap any of the icons on the
Personal, System, or Connections tabs to customize the RuggedReader
settings to your own preferences.
The following features appear in the RuggedReader Pocket PC user
interface, but are non-functional due to the special rugged design:
* Recording/Microphone functions are not available.
* Beam/Infrared communications are not available.
* Backup Battery is not available.
Here are a few settings on the RuggedReader that are worth noting.
Application Buttons
Tap the Personal tab at the bottom. Tap on the Buttons icon. The four
application buttons can be reassigned to your favorite programs.
Input
Tap the Personal tab at the bottom. Tap on the Input icon. You can
change settings related to input panels, such as Block Recognizer,
Keyboard, Letter Recognizer, Recon Keyboard, and Transcriber.
Backlight
Tap the System tab at the bottom. Tap on the Backlight icon. Choose
the settings in the Battery Power, External Power, and Brightness tabs
as needed for your use of the RuggedReader. (The display backlight
has signifi cant impact on battery life.) Tap “OK” to exit.
Memory
Closing Programs still leaves them running in the background. If you
need more resources to run your programs, tap the System tab at the
bottom. Tap on the Memory icon and tap the Running Programs tab
at the bottom. You can stop the individual programs or tap Stop All to
free memory.
Power
Tap the System tab at the bottom. Tap on the Power icon to view
the approximate battery power remaining. Tap the Advanced tab and
choose the settings that work best for you. Tap “OK” to exit.
12
Page 13
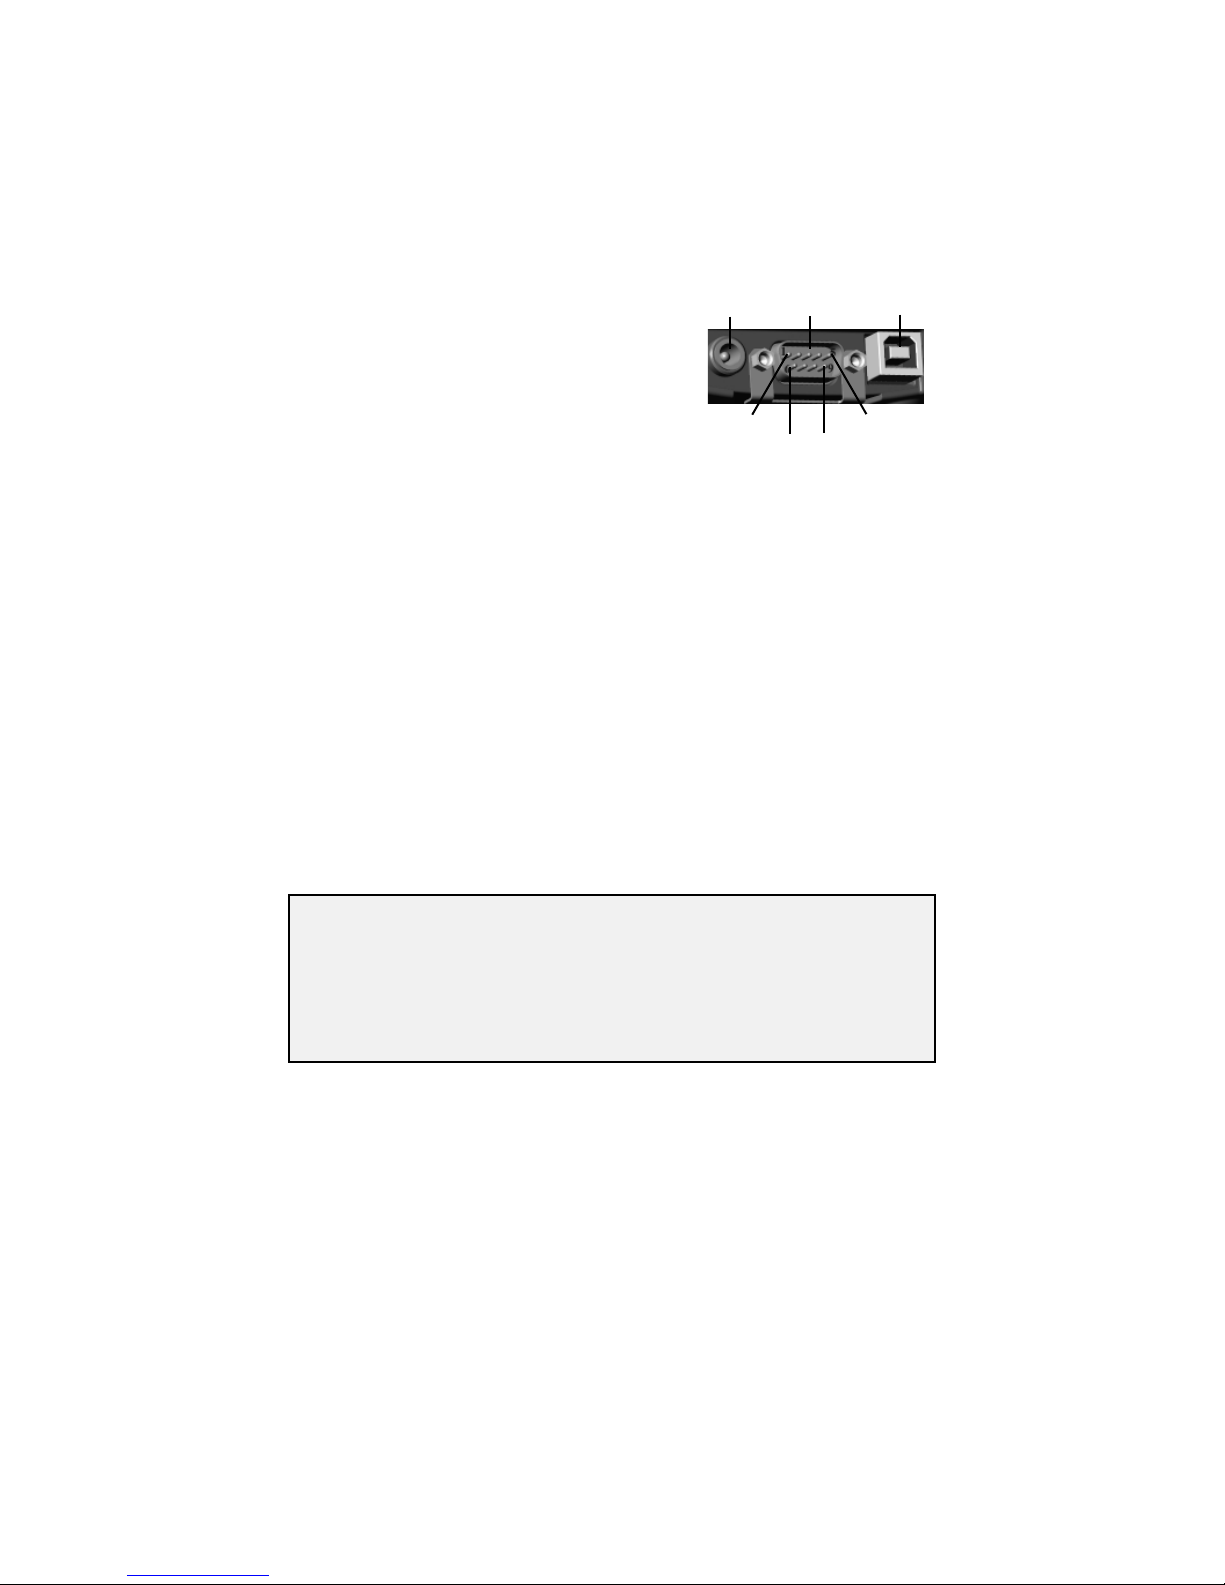
Connecting to your PC
External
Power
Serial USB
I/O ports
The RuggedReader supports connections
to other devices via USB and 9-pin serial
ports. USB connections to your PC
require an A-B USB cable (included with
Pin 1
Pin 6 Pin 9
Pin 5
the RuggedReader). USB is faster, more
reliable and does not have baud rates or com ports to select. Serial
connections require a 9-pin null-modem serial cable (not included).
You may also increase your connectivity options through using
RuggedReader-compatible CompactFlash cards.
ActiveSync
Using Microsoft® ActiveSync®, you can synchronize information
and copy fi les between your desktop or laptop computer and your
RuggedReader. ActiveSync compares the data on your RuggedReader
with the data on your PC, then updates all locations with the most
recent information.
ActiveSync is already installed on your RuggedReader. Before
connecting your RuggedReader to your PC, install ActiveSync on your
PC from the Recon Pocket PC Companion CD.
Note: If you don’t have Microsoft® Outlook® 98 or later installed
®
on your PC, please install Microsoft
Outlook® 2002 from the
Companion CD. Even if you have Outlook 98 or Outlook 2000
installed, you are encouraged to upgrade. Microsoft recommends that
users choosing to install Outlook 2002 from this CD do so before
installing ActiveSync.
You can also download the most current version of PC ActiveSync
at: http://www.microsoft.com/mobile/pocketpc/downloads/. The
installation instructions for ActiveSync may vary if you use a version
other than the version originally shipped on the Recon Companion CD.
Setting Up ActiveSync
DO NOT connect your RuggedReader until the installation is complete.
13
Page 14
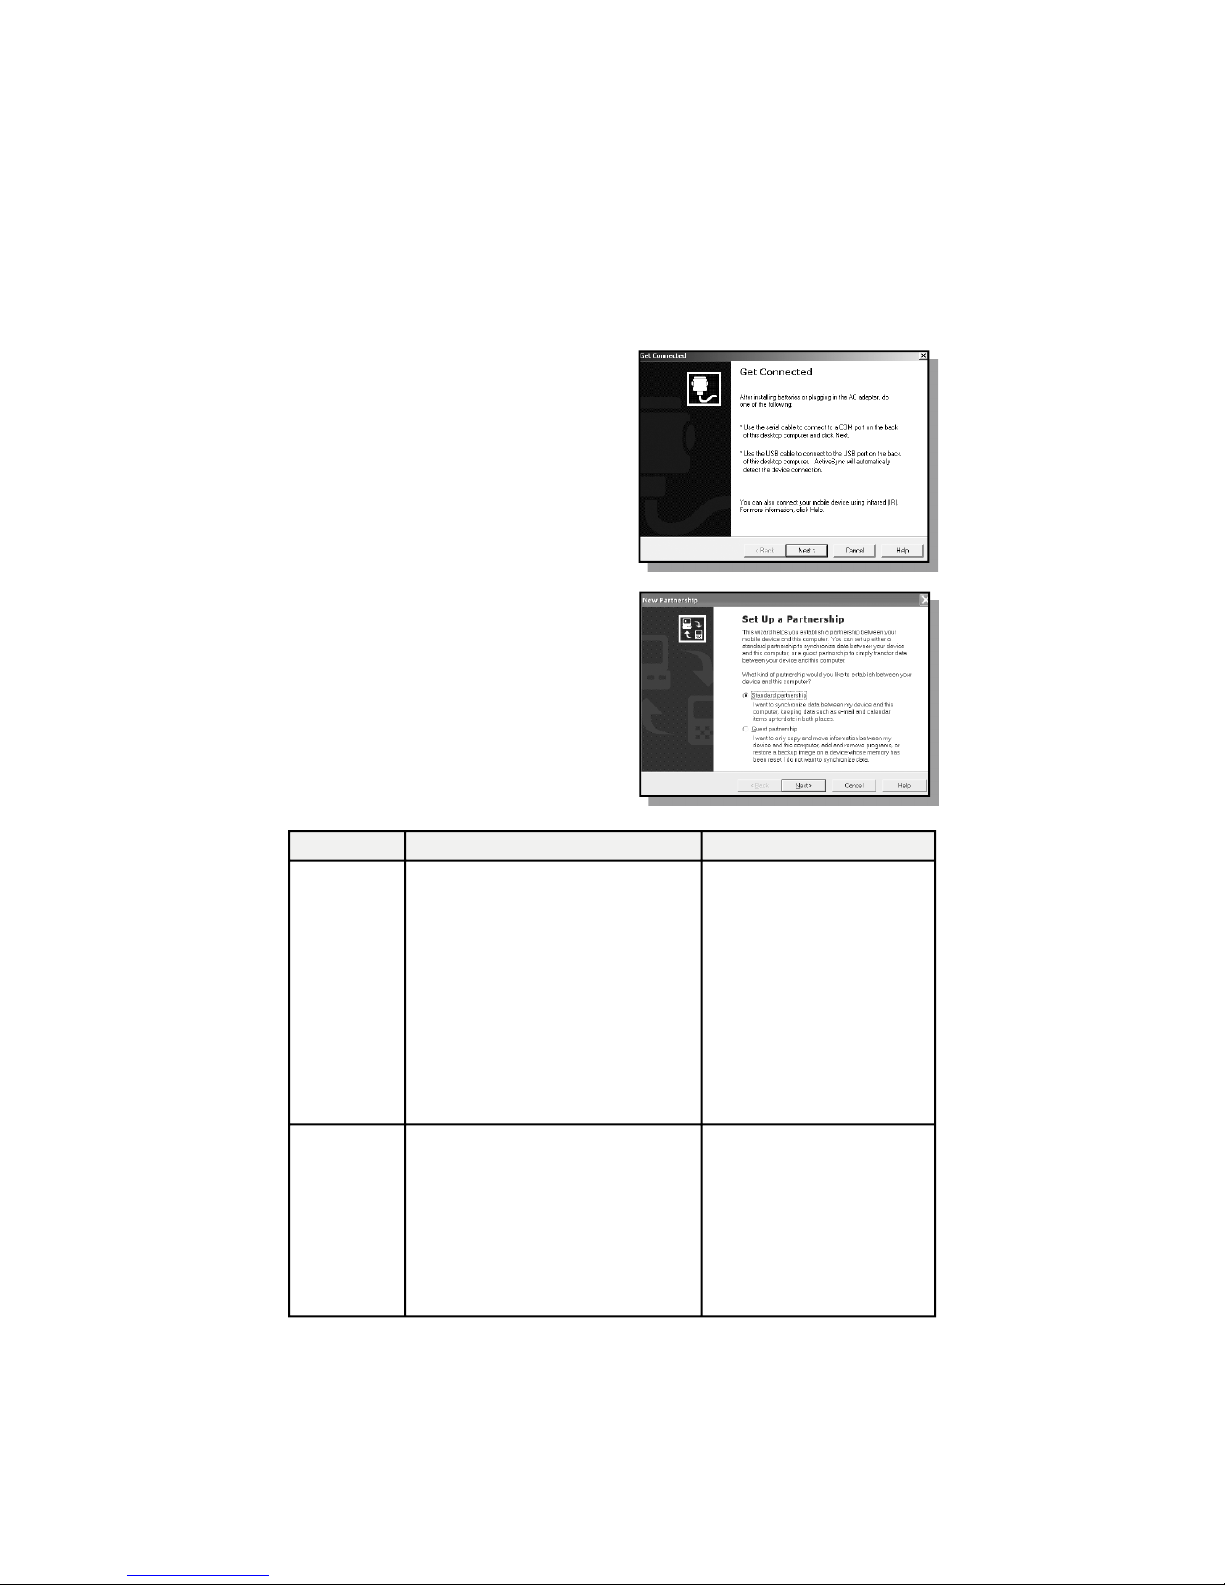
When installing ActiveSync on the PC, you will see the screen “Set
Up Microsoft ActiveSync 3.7. Click Next. A screen will appear asking
what folder to install to. We recommend using the default setting.
Click Next.
The “Get Connected” dialog box
will automatically appear on the
PC. Connect the RuggedReader to
your PC using USB. Click Next.
There are two types of ActiveSync
connections. The table below
summarizes the advantages and
disadvantages of each choice. The
Standard Partnership synchronizes
data and is recommended for ease
of connection. Click Next.
Connection Advantages Disadvantages
Standard
Partnership
Guest
Partnership
Information is synchronized.
Subsequent connections are
automatic.
More options for fi le sharing.
Once a partnership is established,
you can connect to your PC via
wired or wireless LAN.
Your PDA’s clock gets set to
match your PC’s clock.
Use to manually move and copy
fi les.
Safer because synchronization
cannot adversely impact data
either on your PDA or your PC.
For use on borrowed or shared
PCs.
More questions to answer
on initial connection.
If the clock on your PC
is wrong, it will make
the clock on your PDA
wrong.
Partnership will be deleted
when the RuggedReader is
hard reset, unless a backup
has been run.
Slower subsequent
connections (one more
step per connection that
requests for partnership).
LAN connection is not
possible.
14
Page 15
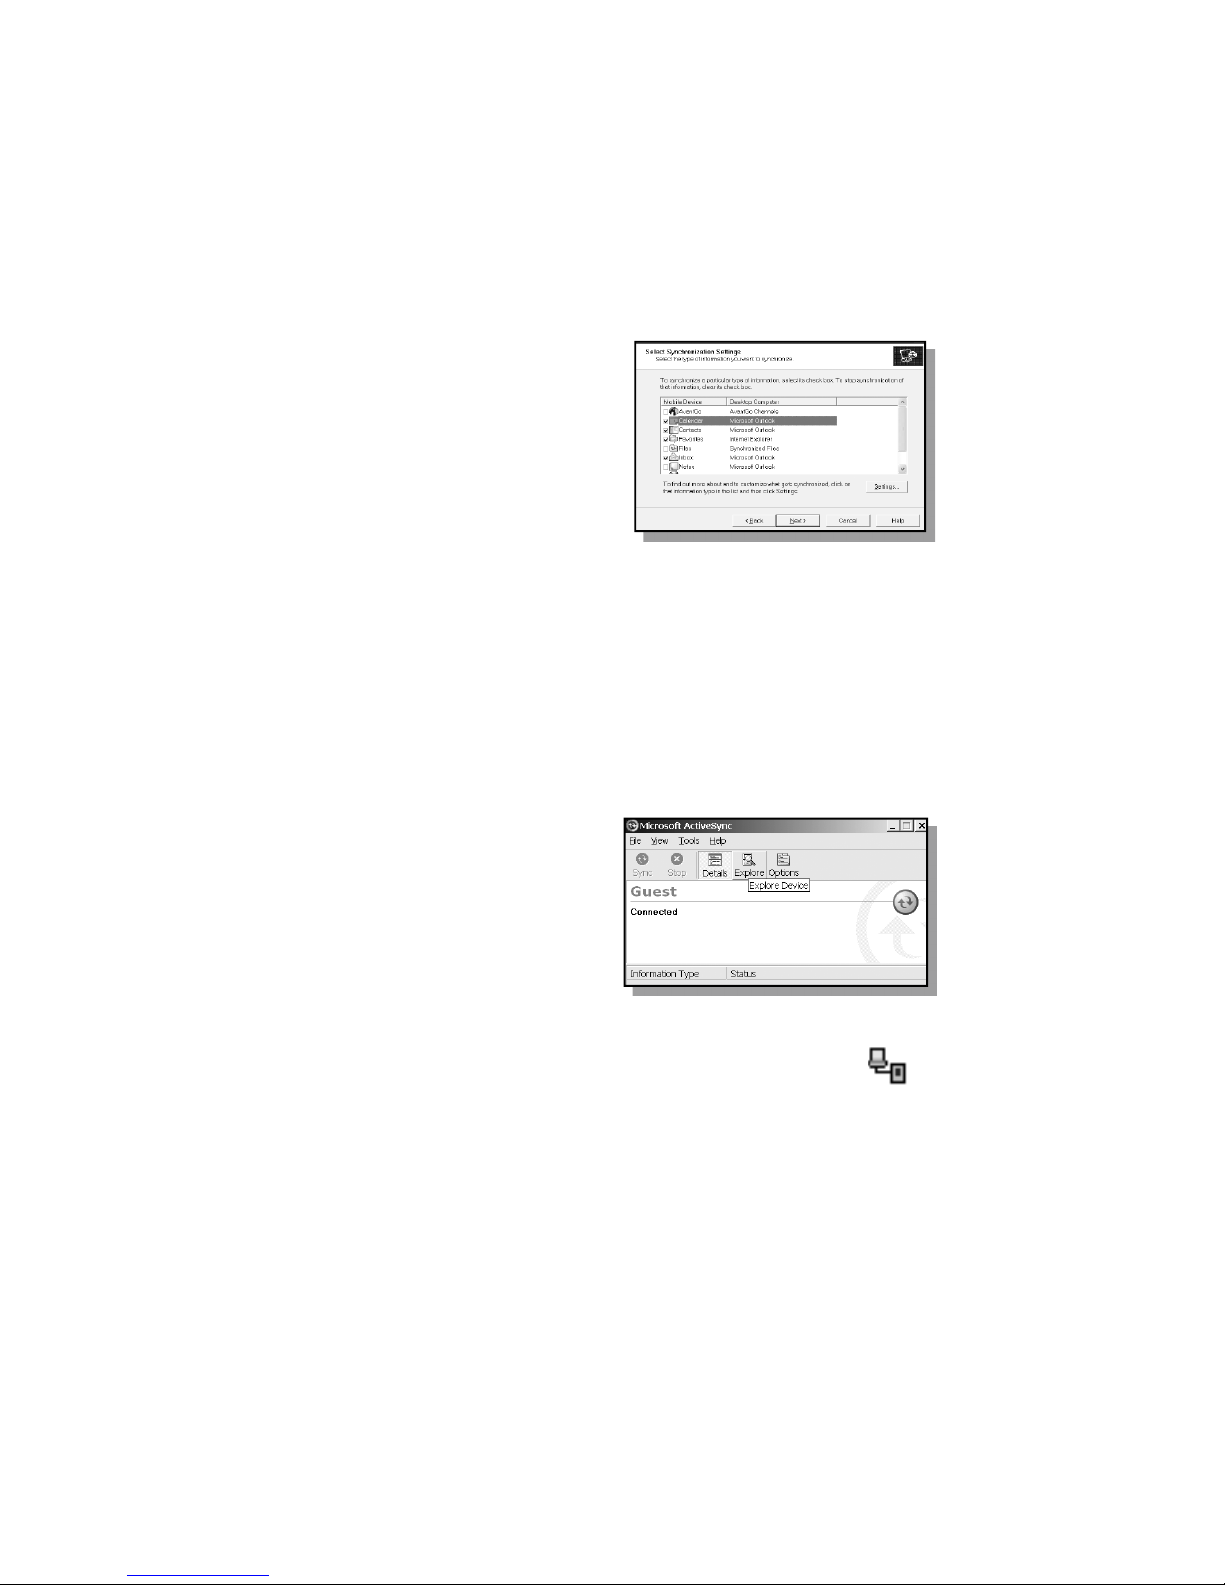
Standard Partnership only - Choose to synchronize your Rugged
Reader with your PC. Click Next. You can have up to two partnerships
or have a partnership only with this computer. Enter a unique name
for your RuggedReader and click
Next.
Select the type of information you
want to synchronize. To customize
settings for each program, click on
the information type and click on
settings. Click next.
Running ActiveSync
Start ActiveSync on your PC. Connect the RuggedReader with the
USB cable and wait while ActiveSync automatically establishes a
connection. (This may require several seconds.)
Standard Partnership - ActiveSync will automatically synchronize the
settings chosen. To change those settings, go to ActiveSync on the PC
and click Tools, Options.
Guest Partnership - ActiveSync will ask you each time if you want the
Standard or Guest Partnership.
Click on the Explore icon on the
PC to view the fi le structure on the
RuggedReader, which now looks
and acts like the Windows Explorer
on your PC.
Disconnecting ActiveSync
To avoid connection problems, disconnect ActiveSync
on the RuggedReader by tapping the ActiveSync
connection icon in the lower right corner of the Today Screen
before removing the cable from either the PC or the RuggedReader.
Tap “Disconnect” and then remove the cable.
For additional information on using ActiveSync, visit the Microsoft
website and search for articles on ActiveSync. For information specifi c
to the use of ActiveSync with RuggedReader, see the Troubleshooting
section of this manual.
15
Page 16

Additional Connectivity
The RuggedReader supports several kinds of connections in addition
to direct ActiveSync connections to a PC. Note that you will need to
purchase third party accessories (such as CompactFlash modems or
Bluetooth cards) in order to implement these connections:
• Modem -- The RuggedReader supports dial-up connections to an
Internet Service Provider and sending and receiving e-mail with fi le
attachments. (You will need to purchase a modem and cable or a
CompactFlash modem.)
• Web-enabled Cell Phones -- The RuggedReader can connect to
the Internet via web-enabled cell phones that are compatible with
Pocket PC devices. Refer to your phone service provider for more
information on establishing Internet connections via your cell phone.
• Bluetooth -- Pocket PC-compatible Bluetooth CompactFlash cards
are supported by the RuggedReader. Bluetooth is used for wireless
communication over distances of up to 10 meters. Typical Bluetooth
applications include sending fi les to a PC or another RuggedReader,
or communicating with a printer or cell phone.
• Wireless LAN -- Pocket PC-compatible Wireless LAN (or 802.11)
CompactFlash cards can be used with RuggedReader. These cards
allow you to maintain a wireless connection to the LAN and the
Internet while within range of an 802.11 network.
• VPN -- The RuggedReader includes support for VPN (Virtual
Private Network) connections. Used together with a connection to
the Internet, a VPN connection allows you to browse network fi les
from a remote site and also supports remote synchronization with
your PC via ActiveSync. Note that the network you access must be
confi gured to allow VPN connections.
• Ethernet -- Pocket PC-compatible Ethernet CompactFlash cards
can be used with RuggedReader. These connections allow the
RuggedReader to connect to a LAN and browse network fi le
shares. You can also use ActiveSync over an Ethernet connection
to synchronize with your PC. Note that the RuggedReader does not
expose fi le shares and cannot be browsed by PCs on the network.
For more information on creating these connections, see the website
listed under reference materials on the last page of this manual.
16
Page 17
Installing additional software on your RuggedReader
The RuggedReader can run third-party software designed for Microsoft
Windows Mobile 2003 Pocket PC devices.
Most third-party software is installed by running a setup program
on the PC while the RuggedReader is connected with ActiveSync. If
prompted by the installation wizard, perform a soft reset to complete
the installation.
Note: For best results, follow the setup instructions that came with
your software.
Microsoft Pocket Outlook
Microsoft Pocket Outlook includes Calendar, Contacts, Inbox,
Notes and Tasks. Open the program and then tap Start / Help for
instructions on using the various programs. To synchronize information
on your PC with your RuggedReader, see the information on using
ActiveSync.
Calendar Use Calendar to schedule appointments, including
meetings and other events. You can check your
appointments in one of several views (Day, Week,
Month, and Agenda) and set the Calendar to remind
you of appointments with a sound or other method. Tap
the Today icon to view the current date.
Contacts
Inbox
Use Contacts to maintain a list of both business and
personal information so that you can easily fi nd the
information you’re looking for, whether you’re at home
or on the road.
You can send and receive e-mail by synchronizing
with your PC, or by connecting to a POP3 or IMAP4
mail server. You need to set up e-mail accounts for
each method that you use except for ActiveSync,
which is set up by default. The ActiveSync folder on
the RuggedReader is used to store messages that you
send and receive through Synchronization with a PC.
Account names appear as folders in the folder list in the
Inbox message list.
17
Page 18
Notes
Notes helps you quickly capture your ideas, notes, and
thoughts. You can create a note using written and typed
text and drawings. You can also share your notes with
others through e-mail and synchronization with your PC.
Tasks
Use Tasks to keep track of things you need to do. You can
use categories to help organize tasks and set reminders
for them. If you use Outlook on your PC, you can
synchronize tasks between the RuggedReader and the PC.
Companion Programs
Your RuggedReader comes with the following programs installed.
Open the program and then tap Start / Help for instructions on
using the various programs.
Pocket
Excel
Pocket
Word
You can use Pocket Excel much the same way you use
Excel on your PC. Use split panes to view different parts
of a worksheet at the same time. You can also use freeze
panes to keep row and column labels or other data visible
as you scroll through a sheet.
Excel fi les (.xls) and templates (.xlt) created in Excel
version 5.0/95 or later on the PC are converted to Pocket
Excel workbook (.pxl) or template (.pxt) fi les when they
are synchronized or copied to the RuggedReader or when
you open an e-mail message with an Excel fi le as an
attachment. Pocket Excel workbooks are converted to
Excel workbooks when they’re synchronized or copied
to the PC. During conversion, some formatting attributes
may be changed or lost. For more information, see
ActiveSync Help on the PC.
You can enter information by working in different modes,
which you select from the View menu.
• Typing. Using the input panel, enter typed text into the
document.
• Writing. Use your stylus to write directly on the screen.
Lines are displayed as a guide.
• Drawing. Use your stylus to draw directly on the
screen. A drawing box appears, indicating a single object.
18
Page 19
Pocket
Word
(continued)
Word documents (.doc) and templates (.dot) created
in Word 6.0 or later on the PC are converted to
Pocket Word documents (.psw) and templates
(.psw) when they’re synchronized or copied from
the PC to your RuggedReader, or when you open
an e-mail message with an attached Word fi le on
your RuggedReader. Pocket Word documents
are converted to Word documents when they’re
synchronized or copied back to the PC. During
conversion, some formatting attributes may
be changed or lost. For more information, see
ActiveSync Help on the PC.
Calculator Tap the Calculator buttons to enter numbers and
perform calculations. To clear the current calculation,
tap C. To clear the displayed number, tap CE. To
clear the last digit entered in a multi-digit entry, tap
the arrow to the right of the entry box.
To store a number, tap the box to the left of the
entry box. An M will appear in the box. To add the
displayed number to the number that’s already in
memory, tap M+. To display the number in memory,
tap MR. To clear memory, tap MC.
MSN
Messenger
MSN Messenger on your RuggedReader provides
the same chat environment as MSN Messenger on
your PC. You need a Microsoft Passport account
or Microsoft exchange e-mail account that your
employer provides.
Pocket
Internet
Explorer
You can use Pocket Internet explorer to view Web
pages on your RuggedReader in two ways: by
downloading pages through synchronization or by
connecting to the internet. While browsing, you can
also download new fi les and programs to your device
from the Internet. Favorites are stored in the Mobile
Favorites subfolder of Favorites in Internet Explorer
on the PC. This folder was created when you selected
the Favorites information type for synchronization in
ActiveSync on your PC. Favorites must be stored in
this folder to be synchronized.
19
Page 20
Caring for your RuggedReader
Changing the PowerBoot Module
You can purchase additional PowerBoot Modules. Before removing
the PowerBoot, back up your RuggedReader to built-in storage.
Built-in storage is not affected by a hard reset. In the rare event that
you experience a hard reset while changing the PowerBoot, you will
easily be able to restore the state of your RuggedReader from this fresh
backup. See RuggedReader Memory and Backup and Restore.
With the RuggedReader turned off, you will have at least 30 seconds to
change the PowerBoot without danger of a hard reset.
1. Before changing the PowerBoot, back up your RuggedReader to
built-in storage using the preinstalled backup program.
2. Turn off the RuggedReader.
3. Remove the hand strap .
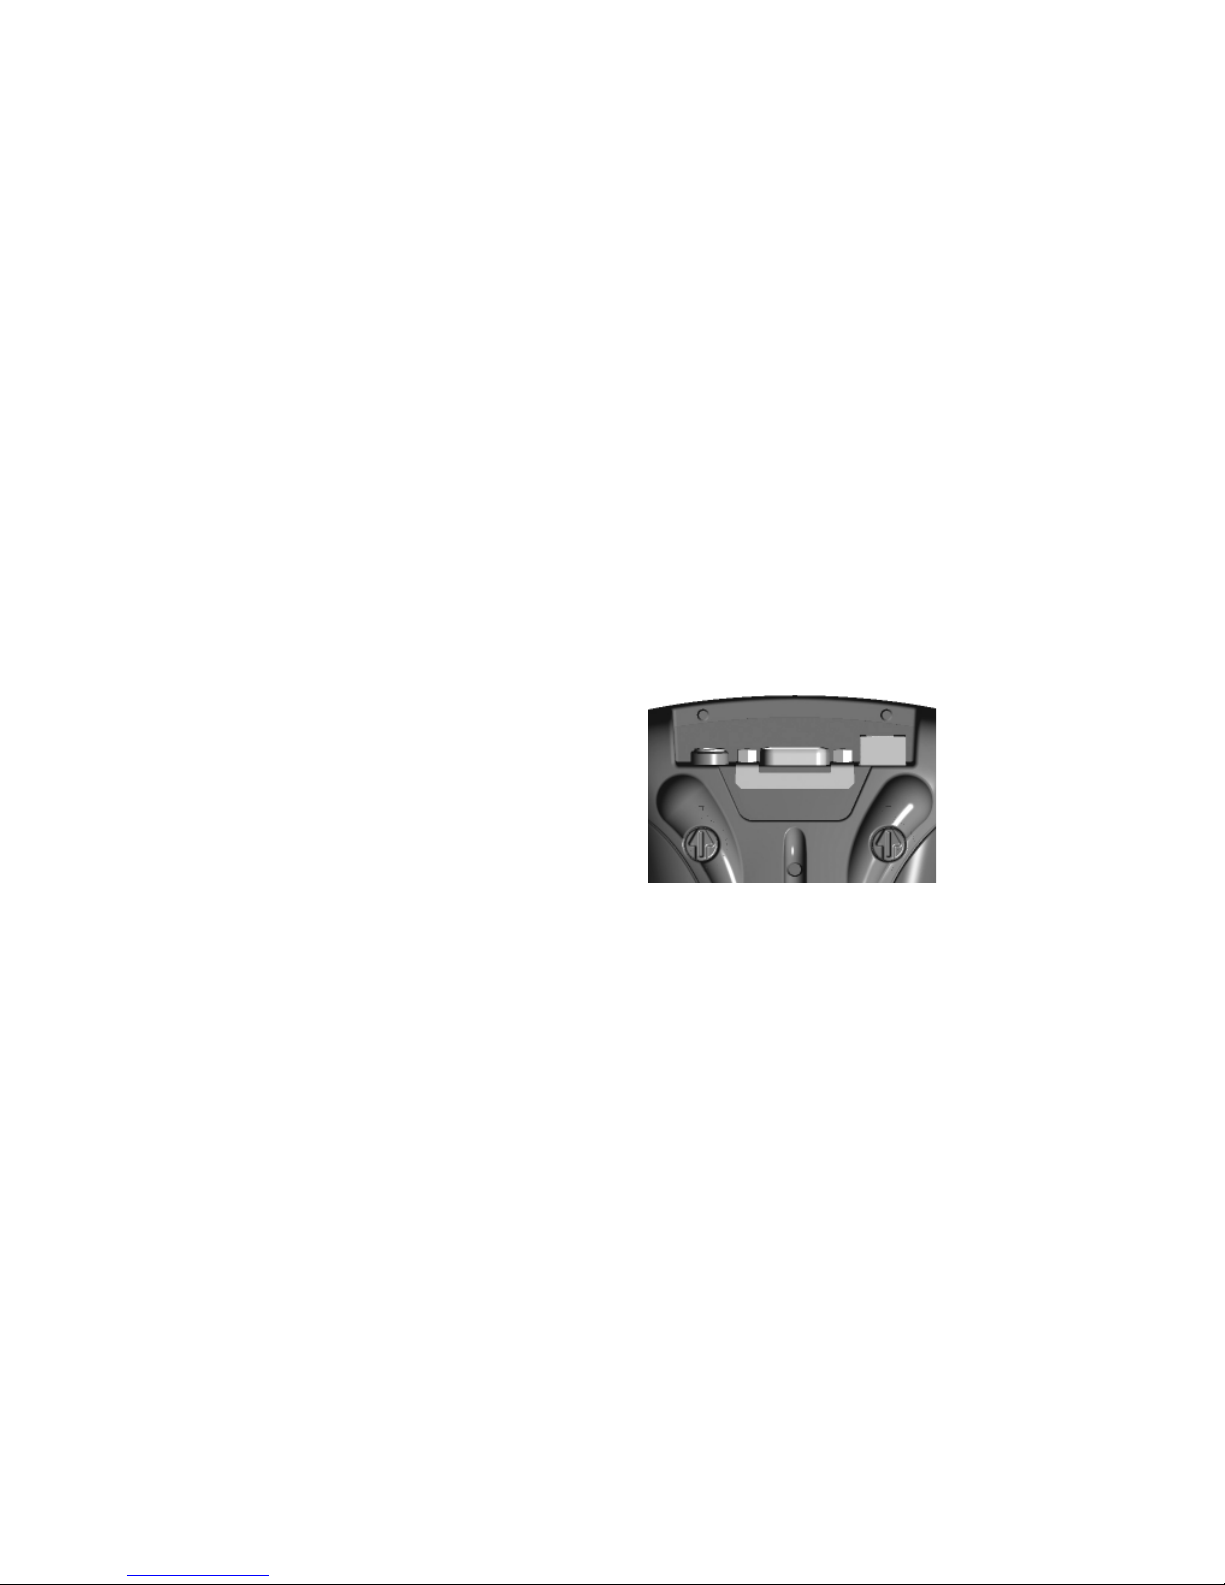
4. To unlock the PowerBoot latches,
turn them counter-clockwise until
the arrows point towards the I/O
ports. Ensure the latches on your
new PowerBoot are also in the
unlocked position.
5. Remove the PowerBoot using both
thumbs to push on the PowerBoot
as the arrows indicate.
6. Quickly (within 30 seconds) slide the new PowerBoot onto the
RuggedReader. Lock the latches and replace the hand strap.
Push Here
ÏÏ
Cleaning the RuggedReader
Clean with a soft cloth dampened with water or a diluted mild
detergent. Do not put the RuggedReader in the dishwasher.
Water
The RuggedReader is designed to withstand accidental immersion.
To maintain the water resistant seal, it is important to ensure that the
screws on the CF-Cap are tightened after replacing CompactFlash
cards. Removal of the back case torx screws, or failure to tighten the
CF-Cap screws could cause leakage, and will void your warranty.
20
Page 21
Shock
The RuggedReader is designed to resist damage for drops up to 122
cm (4 ft). However, you should protect the display from impact,
pressure, or abrasive substances that can scratch it or crack it. The
RuggedReader should not be dropped unnecessarily.
Care of the touch screen
Abrasives may scratch touch screens. Keep the touch screen clean
by gently wiping the display, using a soft cloth dampened either with
clean water or glass cleaner. Do not apply any cleaner directly to the
display. Do not use any abrasive cleaners.
Applying screen protectors
Use the screen protectors included with the RuggedReader to keep
the touch screen clean and protected. To apply a screen protector,
fi rst clean the display thoroughly. Peel the backing from the screen
protector. Align the edge, then drop the remainder onto the display.
Use a credit card, if necessary, to squeegee the air from underneath the
screen protector.
Temperature Range
Although the RuggedReader is designed to be rugged, do not leave it in
direct sunlight or a parked vehicle in the sunlight for extended periods.
Operating temperature -22°F to +140°F (-30C to +60C)
Storage temperature
1
-40°F to +158°F (-40C to +70C)
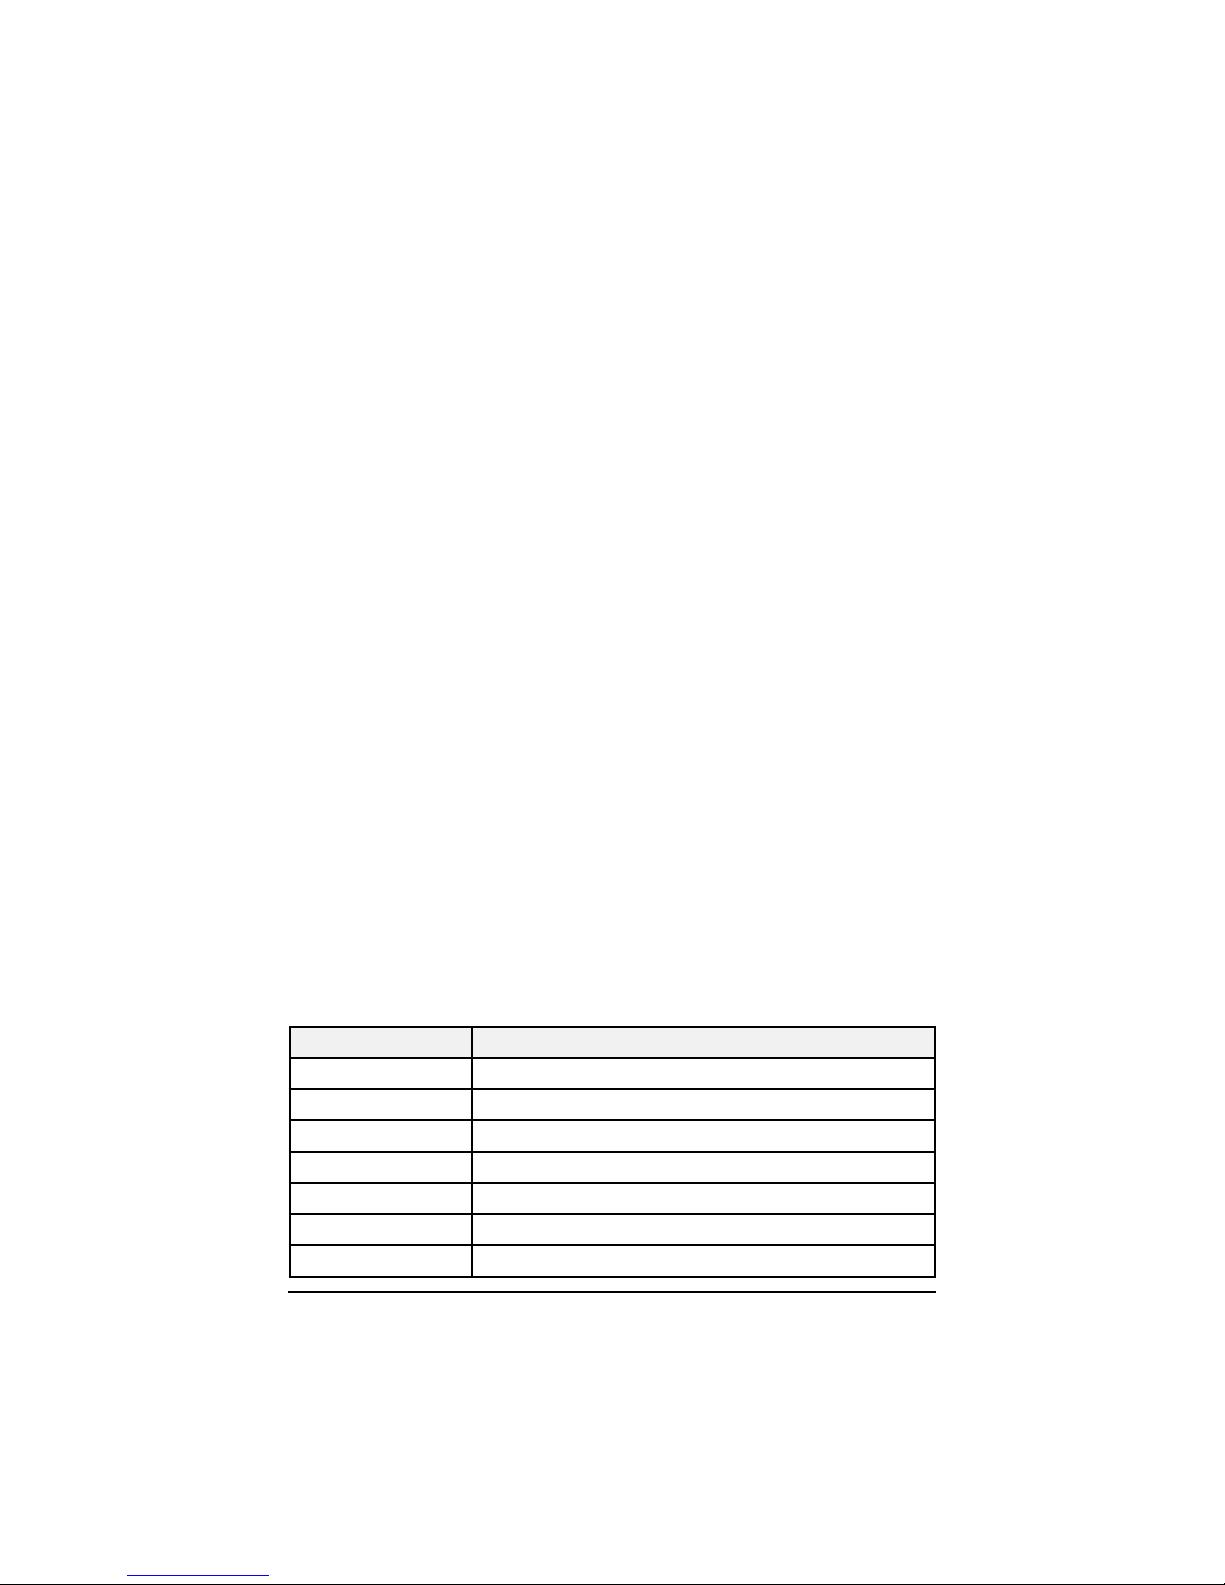
Hardware Specifi cations
Features RuggedReader Series
Operating System
Processor
Memory
Storage
Display
Batteries
I/O
1
Storing the PowerBoot in long-term temperatures above 35C (95°F) may shorten battery life.
Microsoft Pocket PC 2003
200 MHz or 400 MHz XScale
64 MB SDRAM
64 MB non-volatile Flash
1/4 VGA color TFT with LED frontlight
NiMH rechargeable pack
9-pin D-shell RS232 serial, USB, charging port
21
Page 22

Safe Use of your RuggedReader
Repair
Please do not attempt to dismantle the unit for repair. There are no
user-serviceable parts inside. For service, please use the contact details
listed on the last page of this manual or your local dealer for assistance.
Obtaining an additional PowerBoot Module
Replacement PowerBoot Modules are available. See the contact
details listed on the last page of this manual.
Battery safety
• To reduce the risk of fi re or burns, do not disassemble, mutilate, or
puncture the PowerBoot Module. There are no user-serviceable parts
inside.
• Handle a damaged or leaking battery with extreme care. If the electrolyte
comes in contact with your skin, wash the exposed area with soap and
water. If it comes in contact with the eye, fl ush the eye with water for 15
minutes and seek medical attention.
• Do not expose the PowerBoot Module to storage temperatures above
35C (95°F) for extended periods.
• Do not charge the PowerBoot Module if the ambient temperature
exceeds 35C (95°F) or is below 0C (32°F).
• Contact your local waste disposal provider regarding the disposal or
recycling of the PowerBoot Module.
Environmental Hazards
The RuggedReader contains no mercury or cadmium.
AC adapter safety
• Use only AC adapters intended for the RuggedReader. Using any other
external power source can damage your product and may void your
warranty.
• Make certain that the input voltage on the adapter matches the
voltage in your location.
• Make certain that the adapter has prongs compatible with your
outlets.
• AC adapters are designed for indoor use only. Avoid using the AC
adapter in wet, outdoor areas.
• Unplug the AC adapter from power when not in use.
• Do not short the output connector.
22
Page 23

Troubleshooting RuggedReader
A – Pocket-Situ and connections
Problem: The RuggedReader display does not come on when the
power button is pressed.
Solution 1: Make sure the PowerBoot is connected and locked
in position. The arrows on the PowerBoot locking tabs should
point towards the bottom of the unit when installing or removing
the PowerBoot. After the PowerBoot has been attached to the
RuggedReader, rotate the locking tabs so that they point towards the
top of the unit.
Solution 2: Charge the battery. If the battery is totally dead it should
be charged for several hours. If the battery does not seem to be
charging, remove the PowerBoot from the RuggedReader and charge it
while detached.
Problem: There is no shortcut to Pocket-Situ on the RuggedReader
Start Menu.
Solution: If Pocket-Situ is installed, it can be launched as follows: Tap
on the Start menu, select File Explorer, navigate to the Built-in Storage
folder (usually under “My Device”), select the Pocket-Situ folder, and
tap on Pocket-Situ 4.
To create a shortcut on the Start Menu:
1. Use File Explorer to navigate to the folder called Built-in Storage.
2 Open the Pocket-Situ folder. Tap and hold on the Pocket-Situ4 icon
and select “Copy” from the resulting pop-up menu.
3. In the File Explorer, open the Windows folder and select Start
Menu. Tap and hold on a clear space at the bottom of the Start Menu.
Select “Paste Short cut” from the resulting pop-up menu.
Problem: Pocket-Situ cannot be found anywhere on the
RuggedReader. There is no shortcut on the Start Menu, and there is no
Pocket-Situ folder in Built-in Storage.
Solution: Pocket-Situ has been deleted from the RuggedReader or
23
Page 24

was never installed. Follow the installation instruction guide (separate
sheet)
Problem: When Pocket-Situ is launched, the Connection Wizard
appears.
Solution: Select “Direct connection” and “One” device on the fi rst
screen of the Connection Wizard, and then tap Next. On the second
screen, select COM1 as the port and tap Next. COM1 is the only val id
com mu ni ca tion port on the RuggedReader. On the third screen, select
19200 as the baud rate. This rate is ide al for most ap pli ca tions. If you
are us ing very long cables and fi nd com mu ni ca tions with an instrument
to be slow, then you may need to drop the baud rate to 9600. On the
fi nal screen, name the con nec tion anything that you wish (or simply
accept the default name given) and tap Finish. You will use this one
connection setting regardless of the number of individual dataloggers
to which you will be con nect ing, so there is not need to create multiple
connection settings. After completing the Connection Wizard, the new
connection setting will appear in the navigation tree at the top of the
screen. Close Pocket-Situ by fi rst high light ing the Home level in the
Nav i ga tion Tree, then tapping Exit at the bottom of the screen. This
will save the connection setting for future use and will eliminate the
need to go through the Connection Wizard again.
Problem: No device is found.
Solution 1: Verify that the connection settings are correct as listed
above. To edit the connection settings, highlight the connection line in
the Navigation tree and tap Edit at the bottom of the screen.
Solution 2: Verify that the instrument communication cable or ComIT
is fi rmly attached to the serial port connector on the bottom of the
RuggedReader.
Solution 3: Check the instrument batteries, elastomer, and Bulgin pins
as referenced in the Operator’s Manual for your In-Situ instrument.
Problem: Communications with an instrument is automatically
initiated and/or Profi ler automatically comes up whenever Pocket-Situ
is launched and this is not desirable to the user.
Solution: In Pocket-Situ, highlight the Home level of the navigation
24
Page 25

tree and tap Setup at the bottom of the screen. Tap the Settings tab and
un-check the top box labeled “Start application in Profi ler mode.”
Problem: When launching the Profi ler, Pocket-Situ no longer asks for
a data fi le name.
Solution: Highlight the Home level of the navigation tree and tap
Setup at the bottom of the screen. Tap the Settings tab and check the
box labeled “Re-Enable ‘Don’t ask again’ dialogs.”
B – Operating system
Problem: The RuggedReader locks up, is non-responsive, or
otherwise does something unexpected.
Solution: The operating system on the RuggedReader may need to be
reset. Refer to page 7 above for information on a “Soft Reset” and a
“Hard Reset.” A hard reset should be avoided if possible as it will erase
any information in RAM, including the Start Menu shortcut to PocketSitu 4. Pocket-Situ itself and all associated fi les (including data fi les)
are stored in a non-volatile portion of memory called Built-in Storage
and will survive a hard reset, but the Start Menu shortcut will need to
be restored. See page 23 above.
Problem: Multiple instruments are being used and Pocket-Situ locks
up when changing from one to another.
Solution: Pocket-Situ and the RuggedReader must be told when you
are chang ing from one instrument to another, and the fi rst connection
must be properly resolved. Highlight the connection setting line in
the navigation tree and tap Drop at the bottom of the screen before
detaching any instrument cables. This will properly terminate the
connection to the fi rst instrument and reset the communication port,
making it ready to accept com mu ni ca tions with the next instrument.
Similarly, highlight the Home level of the navigation tree and tap Exit
whenever you are fi nished using Pocket-Situ and wish to close the
software.
25
Page 26

Problem: How does one view the battery charge status on the
RuggedReader?
Solution: Tap the Start menu, and then select Settings > System Tab >
Power.
C – Transferring data from the RuggedReader to a
desktop PC
Problem: Win-Situ on the desktop PC does not connect to the
RuggedReader.
Solution: Win-Situ does not communicate directly with the
RuggedReader. Communications between the two computers is
handled by Microsoft ActiveSync, a companion program to the
Microsoft WindowsCE operating system. Microsoft ActiveSync was
supplied on a CD in the original RuggedReader packaging. It may also
be downloaded from the Microsoft website at www.microsoft.com
Problem: A connection cannot be established between the
RuggedReader and PC through Microsoft ActiveSync.
Solution: The default setting is for the RuggedReader to communicate
through Microsoft ActiveSync using a USB (Universal Serial Bus)
connection. The USB driver for the RuggedReader must be installed
at a specifi c time during the initial ActiveSync installation. DO NOT
connect the RuggedReader USB cable to your PC until instructed to
do so during the Microsoft ActiveSync installation process. Doing so
may result in communication problems with Microsoft ActiveSync
and the need to re-install the software, as well as remove the driver for
the RuggedReader from the PC’s operating system (Start > Settings >
Control Panel > Add/Remove Hardware).
.
Windows 95 and Windows NT do not support USB. If using a PC
with either of these operating systems, you will need to connect using
the 9-pin serial communication ports on each computer. An op tion al
serial communications cable will be required. If the serial COM ports
will be used, the PC connection setting on the RuggedReader must be
changed. Tap the Start menu, and then ActiveSync. In the ActiveSync
screen, tap the Tools menu at the bottom and select Options. On the
next screen, tap the Options button. A new screen will appear that
defi nes the connection to be used for ActiveSync. Check the box
26
Page 27

“Enable PC Sync Using This Connection:” then change the connection
type in the drop-down box from “USB Default” to “19200 Default”
and tap OK in the upper right hand corner of the screen. Tap OK again,
then exit out of the ActiveSync screen by tapping the “X” in the upper
right hand corner.
Note that both Pocket-Situ on the RuggedReader and Win-Situ
on the PC will use the same serial COM ports to communicate
with instruments as Microsoft ActiveSync will be trying to use to
communicate between the two computers. Before attempting serial
port communications in Microsoft ActiveSync make certain that you
drop any active connections with instruments (highlight the connection
line in the Navigation Tree and tap Drop) and close both Pocket-Situ
(highlight the Home level in the Navigation Tree and tap Exit) on the
RuggedReader and Win-Situ on the PC.
Problem: How are data fi les transferred between the RuggedReader
and PC?
Solution: All data fi les extracted from dataloggers using the
RuggedReader are stored by default in the Pocket-Situ Data folder. All
data fi les for Win-Situ on the PC will be stored in a parallel Win-Situ
Data folder on that computer. To transfer data fi les between the two
computers, fi rst establish a connection between them using Microsoft
ActiveSync. With a connection established, click on the Explore
button at the tope of the ActiveSync window on the PC. This will
bring up a File Explorer window that will allow navigation through
the RuggedReader’s memory from the desktop PC. Navigate to My
Pocket PC > Built-in Storage > PocketSitu > Data to access data fi les.
Data fi les cre at ed using the LowFlow wizard will be located within the
LowFlow sub-directory within the Data folder. Highlight the data fi les
of interest and copy them. Go to the desktop of the PC and doubleclick on the My Computer icon. Navigate to C:\Win-Situ\Data and
paste the copied fi les into this directory. If you are pasting LowFlow
data fi les, they should be pasted into the LowFlow sub-directory of the
Data folder.
Data fi les are in a compressed binary format that only Win-Situ and
Pocket-Situ can read. These fi les must be opened through Win-Situ
or Pocket-Situ, and cannot be opened by double-clicking on them in
the File Explorer. Launch Win-Situ to view data fi les on the PC. Any
fi les that are in the Win-Situ Data folder will be accessible through the
27
Page 28

Data Folder section of the Navigation Tree on the left side of the screen
(or the Flow Sense line of the Navigation Tree for LowFlow fi les).
Win-Situ organizes these data fi les fi rst by in stru ment type, then by
individual instrument serial number. If you wish to open a data fi le that
is on your PC in a location other than the Win-Situ data folder, select
“Open BIN File…” from the Win-Situ fi le menu and browse to the fi le.
A data fi le can be exported to a spreadsheet (Excel, etc.) by selecting
“Export to Excel…” from the Win-Situ File menu while the data fi le
is being viewed in text format. See the Win-Situ manual for further
details.
28
Page 29

Regulatory Information
U.S.A.
This equipment has been tested and found to comply with the limits for
a Class B digital device, pursuant to Part 15 of the FCC Rules. These
limits are designed to provide reasonable protection against harmful
interference when the equipment is used in a commercial or residential
environment. This equipment generates, uses and can radiate radio
frequency energy and, if not used in accordance with the instruction
manual, may cause harmful interference to radio communications.
Operation of this equipment is subject to the following two conditions:
(1) The device may not cause harmful interference.
(2) This device must accept any interference received, including
interference that may cause undesired operation.
Canada
This digital apparatus does not exceed the Class B limits for radio noise
emissions from digital apparatus as set out in the radio interference
regulations of the Canadian Department of Communications.
Le présent appareil numérique n’émet pas de bruits radioélectriques
dépassant les limites applicables aux appareils numériques de Classe B
prescrites dans le règlement sur le brouillage radioélectrique édicté par le
Ministère des Communications du Canada.
Declaration of Conformity
Europe
According to ISO / IEC Guide 22 and EN 450 14
Manufacturer’s Name: Tripod Data Systems, Inc.
Manufacturer’s Address: 345 SW Avery Ave.
Corvallis, OR 97333 USA
Declares, under our sole responsibility, that the product:
Product Name: Field Data Collector
Model Number: Recon
Product Options: ALL
29
Page 30

conforms to the following Product Specifi cations:
Safety: EN 60950: 1992 +A1, A2, A3, A4, A11
EMC: EN 55022: 1994 +A1, A2:1997
EN 55022: 1998 +A1:2000
EN 61000-3-2, 1995+A1+A2:1998
EN 61000-3-2:2000
EN 61000-3-3:1995
EN 61000-3-3:1995+A1:2001
CFR 47, Part 15, Subpart B
EN 55024:1998**
EN 55024:1998+A1:2001**
Supplementary Information:
The product herewith complies with the requirements of the Low
Voltage Directive 73/23/EEC, amended by 93/68/EEC and the EMC
Directive 89/336/EEC, amended by 93/68/EEC. In addition to meeting
the above EMC requirements during system test, the AC Adapter
provided with this product has been certifi ed to IEC 60950 +A1, A2,
A3, A4, A11.
* Product has less than 20-Watts active input power.
** Product is battery powered.
Corvallis, OR USA
CAUTION:
Only approved accessories may be used with this equipment. In
general, all cables must be high quality, shielded, correctly terminated,
and normally restricted to two meters in length. AC adapters approved
for this product employ special provisions to avoid radio interference
and should not be altered or substituted.
Unapproved modifi cations or operations beyond or in confl ict with
these instructions for use may void authorization by the authorities to
operate the equipment.
30
101703
Page 31

Reference Materials
Rugged Reader support (In-Situ Inc.)
email: [email protected]
phone: 800.446.7488
www.in-situ.com
ActiveSync:
www.microsoft.com/mobile/pocketpc/downloads
Windows Mobile:
www.microsoft.com/windowsmobile/default.mspx
Accessories:
You can expand the RuggedReader handheld computer’s capabilites by
purchasing accessories. Please refence the In-Situ website or contact
your sales representative for more information.
Copyright © 2003 by In-Situ Inc. In-Situ, the In-Situ logo, Win-Situ, Pocket-Situ, miniTROLL,
TROLL, Quick-Connect, ComIT, and Rugged Reader are trademarks or registered trademarks
of In-Situ Inc.
ActiveSync, Microsoft, Outlook, Windows and the Windows logo are registered trademarks
or trademarks of Microsoft Corporation in the United States and/or other countries. Microsoft
products are licensed to OEMs by Microsoft Licensing, Inc., a wholly owned subsidiary of
Microsoft Corporation.
Other brand names and trademarks are property of their respective owners.
Display images shown may vary slightly from actual display. Specifi cations subject to change.
31
 Loading...