

Page 1

Innovations in
Innovations in
Water Monitoring
Water Monitoring
Instruction Sheet
Technical Note
pH/ORP Sensor
Part Number 0059520 (TROLL® 9500 Instrument), 0060000 (Aqua TROLL® 400, SMARTROLL™ MP Instrument)
Description
The In-Situ® Inc. pH/ORP sensor is a combination,
single-junction electrode that contains a platinum ORP
sensor, a glass pH sensing bulb, a replaceable junction,
and rellable reference electrolyte solution. The
sensor is designed and manufactured for long-lasting,
accurate results in a variety of environmental waters.
Installation
Unpack and install the pH/ORP sensor into its
designated port on the multiparameter instrument.
1. Remove the restrictor or Cal Cup from the front
end of the instrument. This allows access to the
sensor block.
2. Remove the sensor hydration bottle from the
sensor and save it for future sensor storage.
3. Rinse the sensor with clean water.
4. Remove any moisture or dirt from the area and
remove the plug from the port. Retain the plug for
future storage.
5. Remove any moisture or dirt from the port
connector with a clean swab or tissue.
6. Remove the cap from the sensor connector. Check
lubrication of the sensor O-rings. If the O-rings
appear dry, apply silicone lubricant, provided in
the sensor box, before installation.
7. Visually align the sensor connector pins with the
port connector pins.
8. Press the sensor firmly into the port until you
feel it join with the port connector.
Calibration
The pH/ORP sensor requires separate calibrations for
pH and ORP.
ORP
A 1-point calibration in a solution with known
potential at a given temperature is sucient to
calibrate ORP. Several options are provided.
• QuickCal: A 1-point calibration in In-Situ Quick
Cal solution results in calculation of sensor oset.
• Traditionalcalibration: A 1-point calibration in
a solution specically formulated for calibrating
ORP, such as ZoBell’s (reference mV value
available in the software) results in calculation for
sensor oset.
• Defaultcoecients: Resets the factory defaults,
no solutions are required.
pH
Although pH may be calibrated with Quick Cal (1
point at pH 7), for best results, In-Situ recommends a
2- or 3-point calibration. These options are available in
the software:
• Traditionalcalibration–1point:requires a single
solution; results in calculation of sensor oset for a
single pH value (pH 4, 7, or 10). Select a calibration
solution for the pH range you expect to measure.
• Traditionalcalibration–2point:requires 2
solutions; results in calculation of sensor slope and
oset for one pH range (pH 4-7 or pH 7-10). Choose
solutions for the pH range you expect to measure.
• Traditionalcalibration–3point:requires 3
solutions; results in calculation of slope and oset
for 2 ranges (pH 4-7 and pH 7-10). The correct
slope for the pH values being monitored will
automatically be applied.
• DefaultCoecients: Resets factory defaults to the
sensor. No solutions are required.
Page 1 Page 1
Page 2

Calibration Procedure
The pH/ORP sensor requires separate calibrations for
pH and ORP. In-Situ recommends the following process
for calibrating both parameters.
ORP—Quick Cal
The Quick Cal procedure produces excellent results for
ORP as long as the solution is stored as recommended
and used before its expiration date.
1. Fill the Cal Cup with Quick Cal solution and place
the instrument in the solution.
2. Follow the instructions in the Calibration Wizard
until the calibration is complete.
pH—Traditional Calibration
The pH sensor is most accurate after a multi-point
traditional calibration. After using the Quick Cal
solution to calibrate ORP, empty the Cal Cup, rinse it
and the sensors in clean water then in the lowest pH
buer you intend to use.
1. Fill the Cal Cup with the lowest pH buer you
intend to use for calibration.
2. Follow the Calibration Wizard in the software or on
the Con TROLL® PRO.
3. In the pH Calibration Wizard, specify how many
calibration points you intend to use, and the
solution for each. Click Next and follow the wizard
to perform a 2- or 3-point calibration. Be sure to
rinse the Cal Cup and sensors between solutions.
4. At the end of the Wizard, click Finish to write the
newly calculated calibration coecients to the
sensor. The pH/ORP sensor is now calibrated and
ready to use.
If the instrument will be used in a day or so, leave the
sensors installed. Remove the Cal Cup and rinse it and
the sensors. Add about 50-100 mL of tap water to the Cal
Cup. Return the probe to the Cal Cup for transport. For
longer storage, see Sensor Handling and Storage below.
Calibration Notes:
• pH 4, pH 7, and pH 10 buers are available from
In-Situ Inc. for pH calibration. Always begin with the
lowest buer value when performing a multi-point
calibration.
• Ensure that every port is lled with a sensor or a
plug before calibrating.
• For best results, calibrate at the same temperature
as the expected sample temperature.
• Prior to calibrating, rinse the Cal Cup and the front
end of the instrument in clean water, and shake dry.
• The Cal Cup ll line indicates the approximate
amount of solution to use. The temperature sensor
should be submerged at least one half inch.
• Most sensors stabilize in 1 to 3 minutes if
properly hydrated before calibration. To minimize
stabilization time, do not handle the instrument
during calibration readings.
• To shorten the calibration time, you have the option
to accept the calibration when stability is “Nominal.”
If the early value is accepted, the calibration point
will be designated “USER SET” in the calibration
report. If the calibration was performed through to
stability then the sensor will operate according to
specications.
• Cal solutions may be ushed down the drain with
running water, or saved in a separate container and
used to rinse the next time you calibrate with the
same solution.
• Calibrate the sensor after replacing the reference
junction and/or the lling solution, during routine,
scheduled maintenance, or every 2-6 weeks in the
absence of other indicators.
• Recalibrate the sensor after replacing the
reference junction or the lling solution; during
scheduled maintenance, or every 2-6 weeks if
sensor readings drift.
Software Indicators During
Calibration:
UNSTABLE indicates the sensor response does not
meet the criteria for a valid calibration point.
• Only one solution is required for ORP calibration.
Quick Cal or ZoBell’s solution are recommended and
available from In-Situ Inc. The reference millivolt
value is available in the software for a traditional
calibration with ZoBell’s. A custom solution may be
used in a traditional calibration if the mV value at
the calibration temperature is known.
NOMINAL indicates the sensor deviation meets early
stabilization criteria. The Accept button becomes
available when stability is nominal. You may accept the
early value, or wait for complete stability.
Page 2
Page 3
STABLE is displayed when the readings have stabilized.
Usage Recommendations
• Temperature and barometric pressure may be
displayed for some calibrations.
• Sensor Reading: The current sensor response in
indicated units.
• Sensor Deviation: Change in sensor response
between the last two readings.
Resetting Default Coefficients
Sensor calibration may be reset to factory defaults at
any time. This option is most eective when the sensor
is new. This is also a good option for the ORP sensor if
the results of a recent calibration are suspect because
the calibration solution has deteriorated. Results for each
parameter must be set separately.
Sensor Slope and Offset
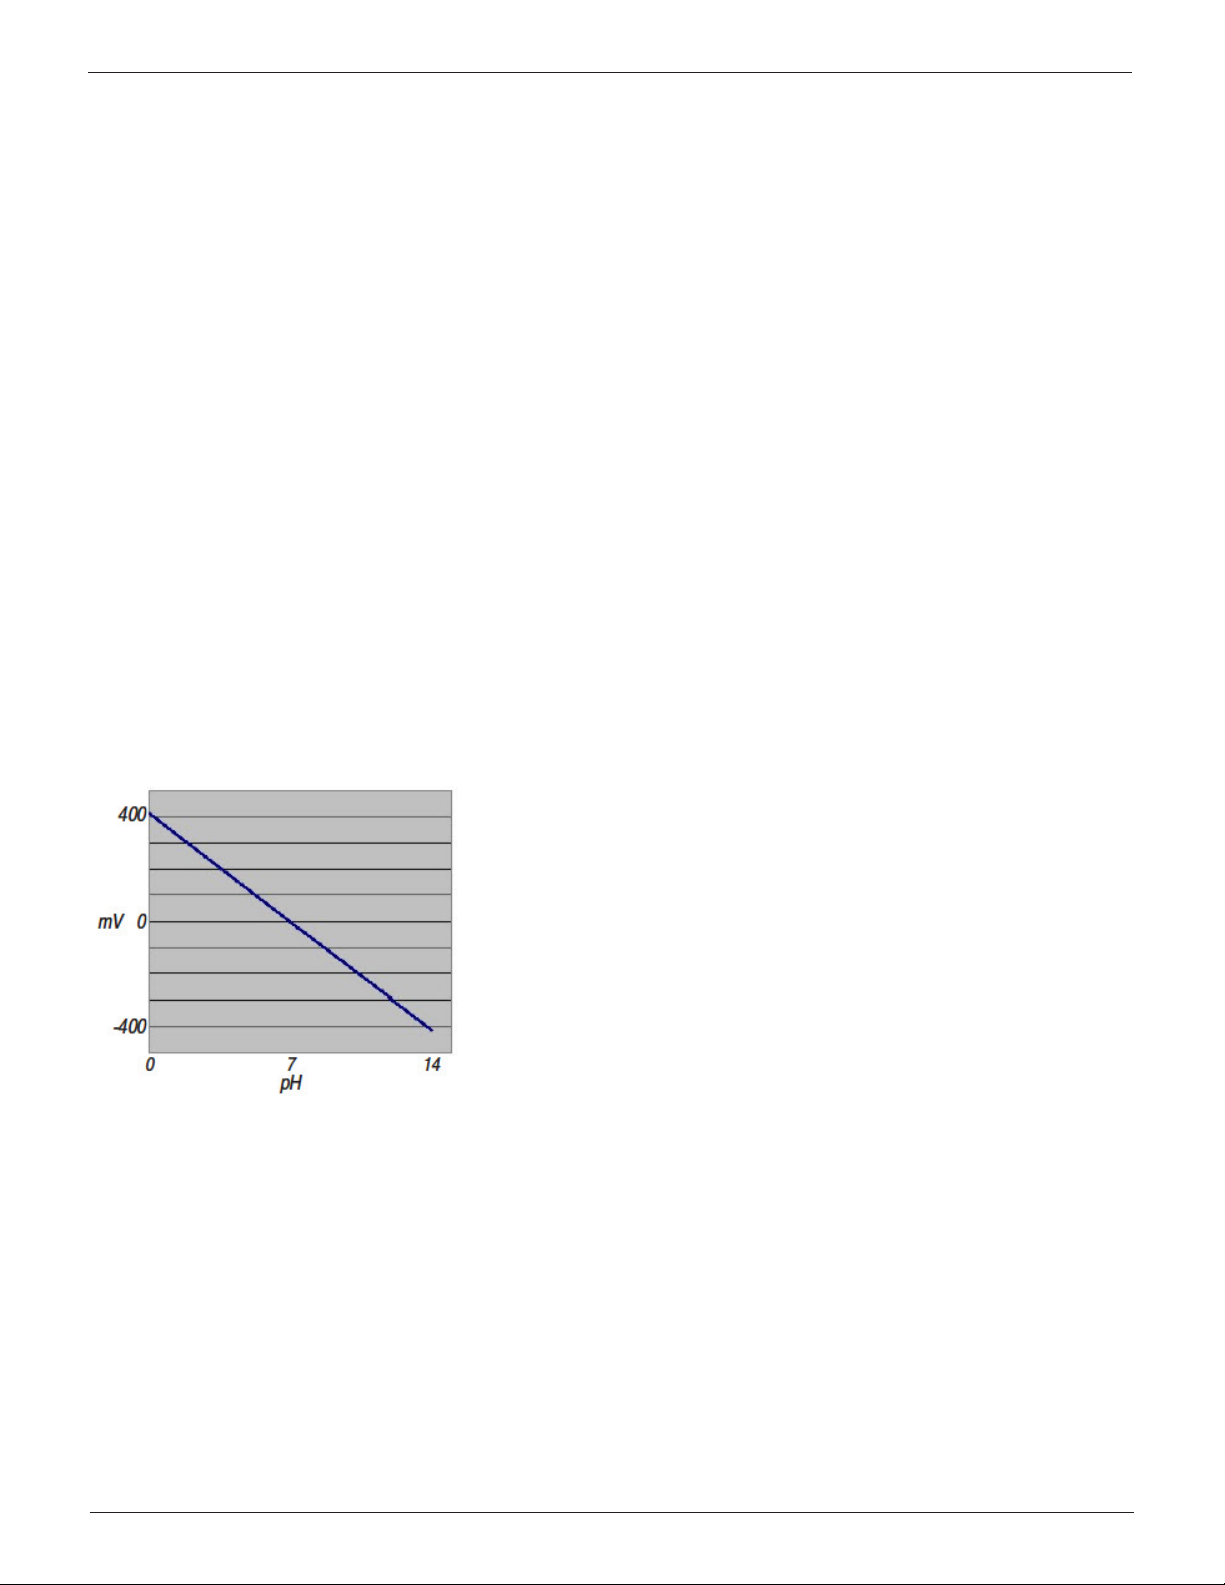
The pH calibration curve pivots around pH 7 (0 mV
response). The oset calculated by the software when
calibrating at pH 7 will typically be between (350-450
mV). If the oset falls outside these limits, replace the
lling solution or the junction.
• The ORP sensor readings vary slightly due to
temperature changes. These variations are not
easily corrected because, unlike pH, the ORP value is
dependant on the activity of many ions in solution.
The pH values are more easily corrected because
they are a result of the activity of one ion, H+.
• Temperature compensation is provided in the
software to account for measurements taken
at temperatures dierent from the calibration
temperature. For most accurate results, try to
calibrate at the same temperature as the expected
sample temperature.
• After an initial 1-2 week settling period, during
which the sensor should be calibrated weekly,
calibration frequency will depend on the nature
of the sample and degree of accuracy required. In
clean water samples, the pH sensor should retain
its accuracy specication for 2-6 weeks before
requiring calibration.
• A small error in pH will occur in basic solutions
(>pH 10) that contain high levels of sodium salts
(>0.01M) due to sodium interference.
• pH readings in pure water samples (<100µS/cm
conductivity—also known as “low ionic strength”
samples) may require up to 20 minutes after
calibration to stabilize and begin producing
accurate results. After calibration, condition the
sensor in a low conductivity solution.
• Like all platinum ORP electrodes, the In-Situ pH/
ORP sensor may provide unstable readings in
solutions that contain chromous, vanadous,
titanous, and other ions that are stronger reducing
agents than hydrogen or platinum.
Figure 1. pH sensor calibration graph
The ideal slope is between (-54 mV/pH and -62 mV/pH). A
calculated slope greater than (-50 mV/pH or less than -66
mV/pH) is acceptable but indicates that the sensor may
soon require maintenance.
The oset for ORP is a “zero oset” and is typically (0 ± 20
mV). If the oset calculated during calibration is outside
this range, inspect the sensor and clean it if necessary.
Ensure that the calibration has been stored properly and
has not expired.
Sensor Handling and Storage
Routine Maintenance
If the ORP platinum electrode is dull or dirty, it can be
cleaned with a swab and methanol or isopropyl alcohol.
Rub the electrode gently until it is shiny.
The pH sensor must be kept moist for the life of the sensor.
The sensor ll solution has a shelf life of 2 years. Replace
the ll solution every 5 to 6 months or when:
• The sensor fails to calibrate within the acceptable
slope and oset range.
• Sensor readings vary.
Page 3
Page 4
• Readings during calibration at pH 7 are greater
than +30 mV or less than -30 mV.
• Sensor is slow to respond.
Note: If the sensor fails to calibrate after you replace the ll
solution, replace the reference junction.
Replacing the Filling Solution
1. TROLL 9500—Use the sensor removal tool to pry
the sensor up and out of the instrument. Aqua
TROLL 400—Grasp the sensor by the nger grip
and pull out of the instrument.
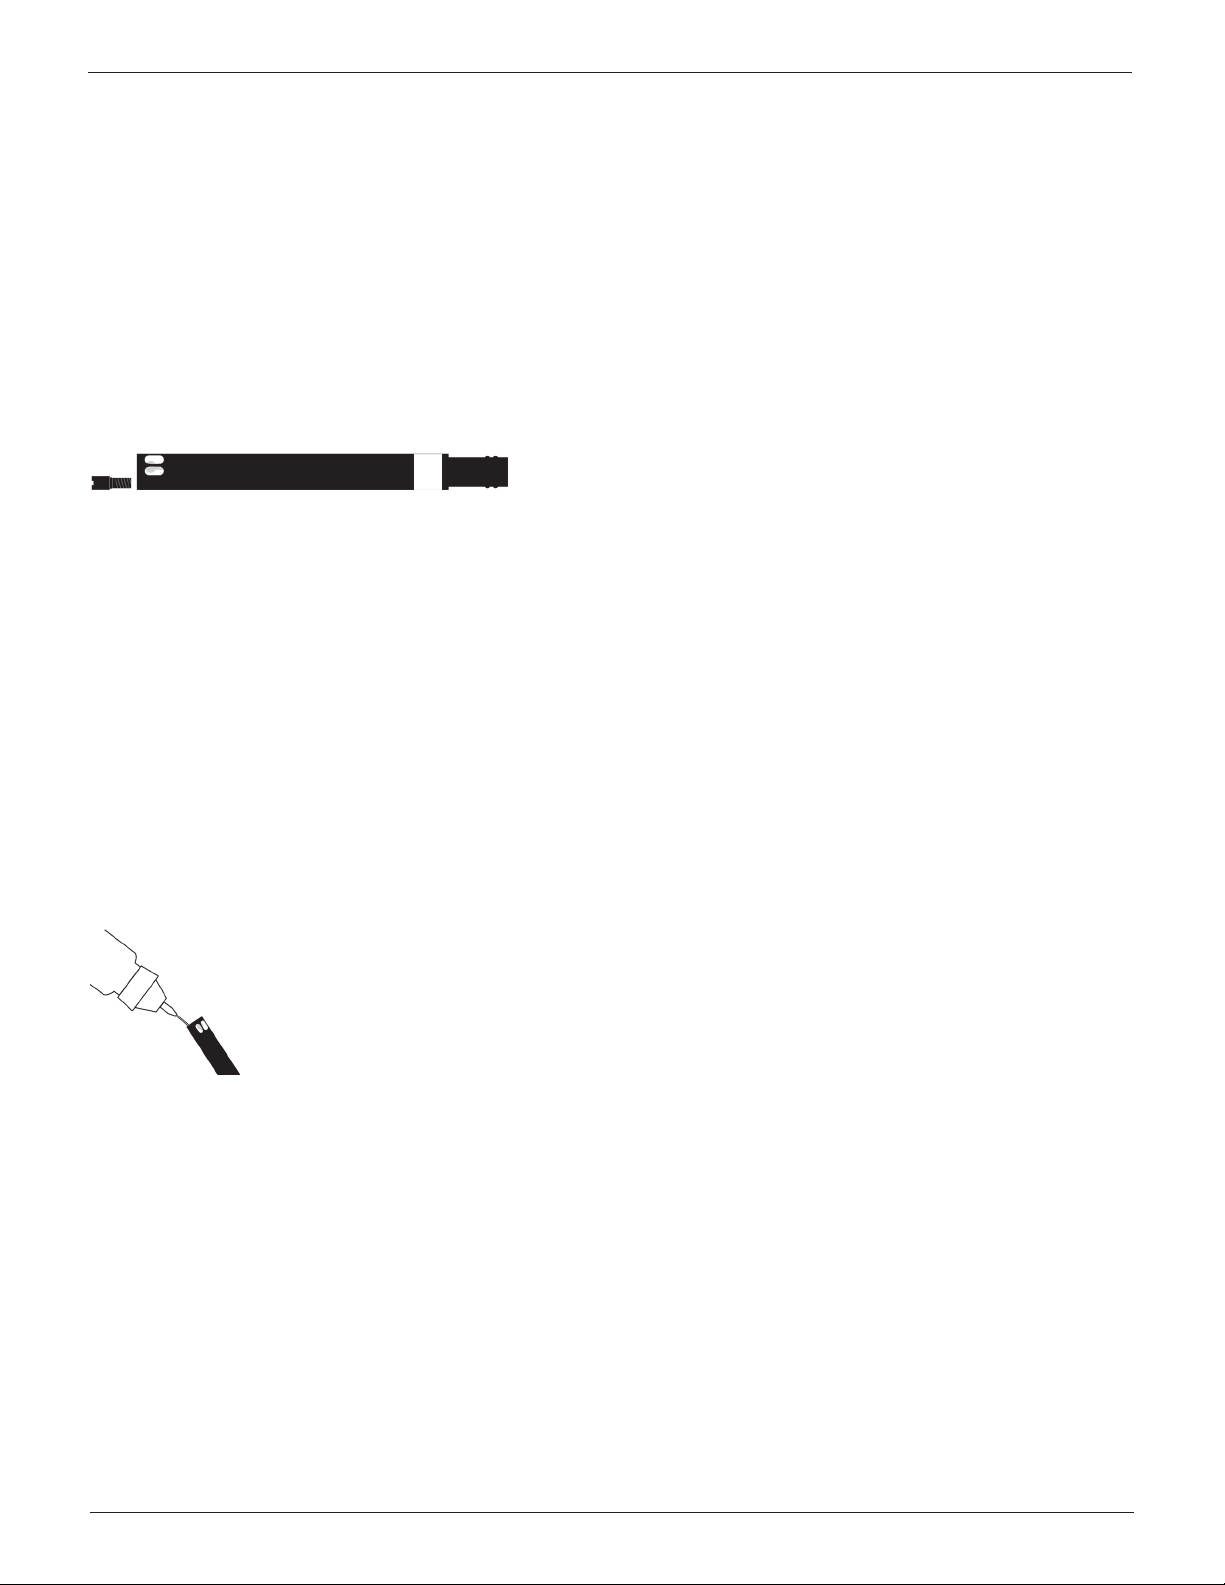
2. Unscrew the reference junction. See Figure 2.
Figure 2. pH sensor with reference junction removed
Replacing the Junction
Replace the junction when the sensor fails to calibrate
with a reasonable slope and oset, even after you have
replaced the lling solution.
1. Unscrew the reference junction and discard.
2. Replace the lling solution and screw in a new
reference junction.
3. Soak for 15 minutes, then calibrate the sensor.
Note: Keep the junction damp at all times to avoid a lengthy
rewetting process.
Cleaning
Begin with the most gentle cleaning method and
continue to the other methods only if necessary. Do not
directly wipe the glass bulb.
3. Protect the connector end of the sensor with
the dust cap it shipped with, or wrap the sensor
in a paper towel to prevent lling solution from
entering the electrical connector.
4. Hold the sensor at an angle and shake out the old
lling solution.
5. Using the dispenser cap on the lling solution
bottle, insert the tube into the bottom of the empty
reservoir as shown. Squeeze a steady stream of
solution into the reservoir until it overows and no
bubbles are observed. Continue to add solution
while pulling the tube out of the reservoir.
Figure 3. Fill the pH reservoir
6. Attach the reference junction to the sensor and
hand-tighten until rmly attached. Some lling
solution will overow. Wipe the excess o the
sensor body.
7. Soak the sensor in tap water for at least 15 minutes.
8. Calibrate the sensor.
Note: If necessary, thoroughly clean the sensor connector to
remove lling solution: Using a disposable pipette, ll the
connector with isopropyl alcohol (70% - 100%). Shake to
dry. Repeat 3 times. Dry overnight. When thoroughly dry,
calibrate the sensor.
To clean the pH sensor, gently rinse with cold water.
If further cleaning is required, consider the nature of
the debris.
To remove crystalline deposits:
• Clean the sensor with warm water and mild soap.
• Soak the sensor in 5% HCI solution for 10 to 30 minutes.
• If deposits persist, alternate soaking in 5% HCI and
5% NaOH solutions.
To remove oily or greasy residue:
• Clean the sensor with warm water and mild soap.
• Methanol or isopropyl alcohol may be used for
short soaking periods, up to 1 hour.
• Do not soak the sensor in strong solvents, such
as chlorinated solvents, ethers, or ketones, such
as acetone.
To remove protein-like material, or slimy lm:
• Clean the sensor with warm water and mild soap.
• Soak the sensor in 0.1M HCI solution for 10 minutes
and then rinse with deionized DI water.
After performing any of these cleaning methods, rinse
the sensor with water, then soak overnight in pH 4 buer.
Sensor Removal
You can store the pH sensor on the instrument, or you
can remove the sensor. If you remove the sensor from
the instrument, seal the port with a port plug and place a
dust cap on the port side of the pH sensor.
Page 4
Page 5

Short-term Storage
Up to 1 week: Fill the electrode storage bottle with pH 4 buer and immerse the sensor tip in the buer. Tighten
the cap to prevent drying. Alternatively, pH 7 buer can be used for a few days.
Long-term Storage
Greater than 1 week: Fill the electrode storage bottle with 10-20 mL of storage solution (Order No. 0065370) and
immerse the sensor. Tighten the cap to prevent drying.
Storage Recommendations
Prior to using the pH sensor after long-term storage, rinse the sensor with DI water and then soak it in pH 4 buer
for 1 or 2 hours. This will saturate the glass bulb with hydrogen ions and prepare it for use.
Do not store the pH sensor in DI water because it will deplete the reference solution and drastically reduce the life
of the sensor.
Specifications
Type: Platinum wire and glass sensing bulb with Ag/AgCl reference half-cell, replaceable
single junction, single junction, replaceable reference lling solution
Range: 0 to 12 pH units, ± 1400 mV ORP
Pressure Rating: 211 m (692 ft)
Accuracy: ± 0.1 pH unit, ± 5 mV (ORP)
Resolution: 0.01 pH unit
Operating Temperature: 0 to 50° C (32 to 122° F)
Replacement Parts
Reference Filling Solution (60 mL)................................................................................................................................................0056900
ZoBell’s Solution (1L)..........................................................................................................................................................................0032100
pH Calibration Kit (1 L each pH 4, pH 7, pH 10, DI water)......................................................................................................0032080
Quick Cal (4 x 250 mL).......................................................................................................................................................................0033250
Reference Junction Kit (3 junctions, 60 mL reference lling solution...............................................................................0059620
Storage Solution (500 mL)................................................................................................................................................................0065370
For more information, contact In-Situ Inc.
221 East Lincoln Avenue, Fort Collins, CO 80524
1-800-446-7488 (toll-free in U.S. & Canada)
1-970-498-1500 (international & domestic)
www.in-situ.com
Information subject to change without notice. In-Situ, In-Situ logo, iSitu, Baro Merge, Baro TROLL, HERMIT, iSitu, RDO, Pocket-Situ, RuggedCable, RuggedReader, TROLL, and Win-Situ
are trademarks or registered trademarks of In-Situ Inc. © 2013. All rights reserved.
0059522 Rev. 006 04/13
Page 5
 Loading...