

Page 1
INSTALLATION, CARE AND USE MANUAL
The Model LC-50 food waste disposer is designed specifically for light commercial use in applications such as:
• Grocery/convenience stores
• Fast food restaurants
• Office/church kitchens
• Bed and breakfast inns
This manual clearly describes the installation procedure, operating instructions, maintenance instructions, and safety instructions.
Following this manual will help you enjoy all the benefits from using a
food waste disposer in your operation.
TOOLS AND MATERIALS YOU WILL NEED
? Screwdriver
? Pipe wrench
? Hammer
? Plumber's putty (1/4 Ib.)
? Wire nuts (2 - size 54)
INSTALLATION DIMENSIONS
Dimension A B* C* D E
TOOLS AND MATERIALS YOU MAY NEED
? Plumber's drain auger or rod
? On-off electrical switch (1/2 H.P., 15-20 amps)
? Hack saw
? Worm gear clamp
? Copper wire (12 or 14 gauge)
? Connector kit (Part #8301)
? Solenoid valve (Part #11475)
? Syphon breaker (Part #11477)
? Flow control valve (Part #11033D)
Inches
Cm
14 9/16 6 13/16 4 8 5%
37.0 17.3 10.2 20.3 14.6
B* - Distance from bottom of sink to center line of disposer outlet. Add '/z" when stainless steel
sinks are used.
C* - Length of discharge tube from center line of disposer outlet to end of discharge tube.
IMPORTANT: Plumb waste line to prevent standing water in disposer motor housing.
For Service Information Call Toll Free 1-800-558-5712 (U.S.) or 1-414-554-5432 (Canada)
IN-SINK-ERATOR DIVISION
EMERSON ELECTRIC CO.
4700 21st STREET, RACINE, WIS. 53406
Page 2
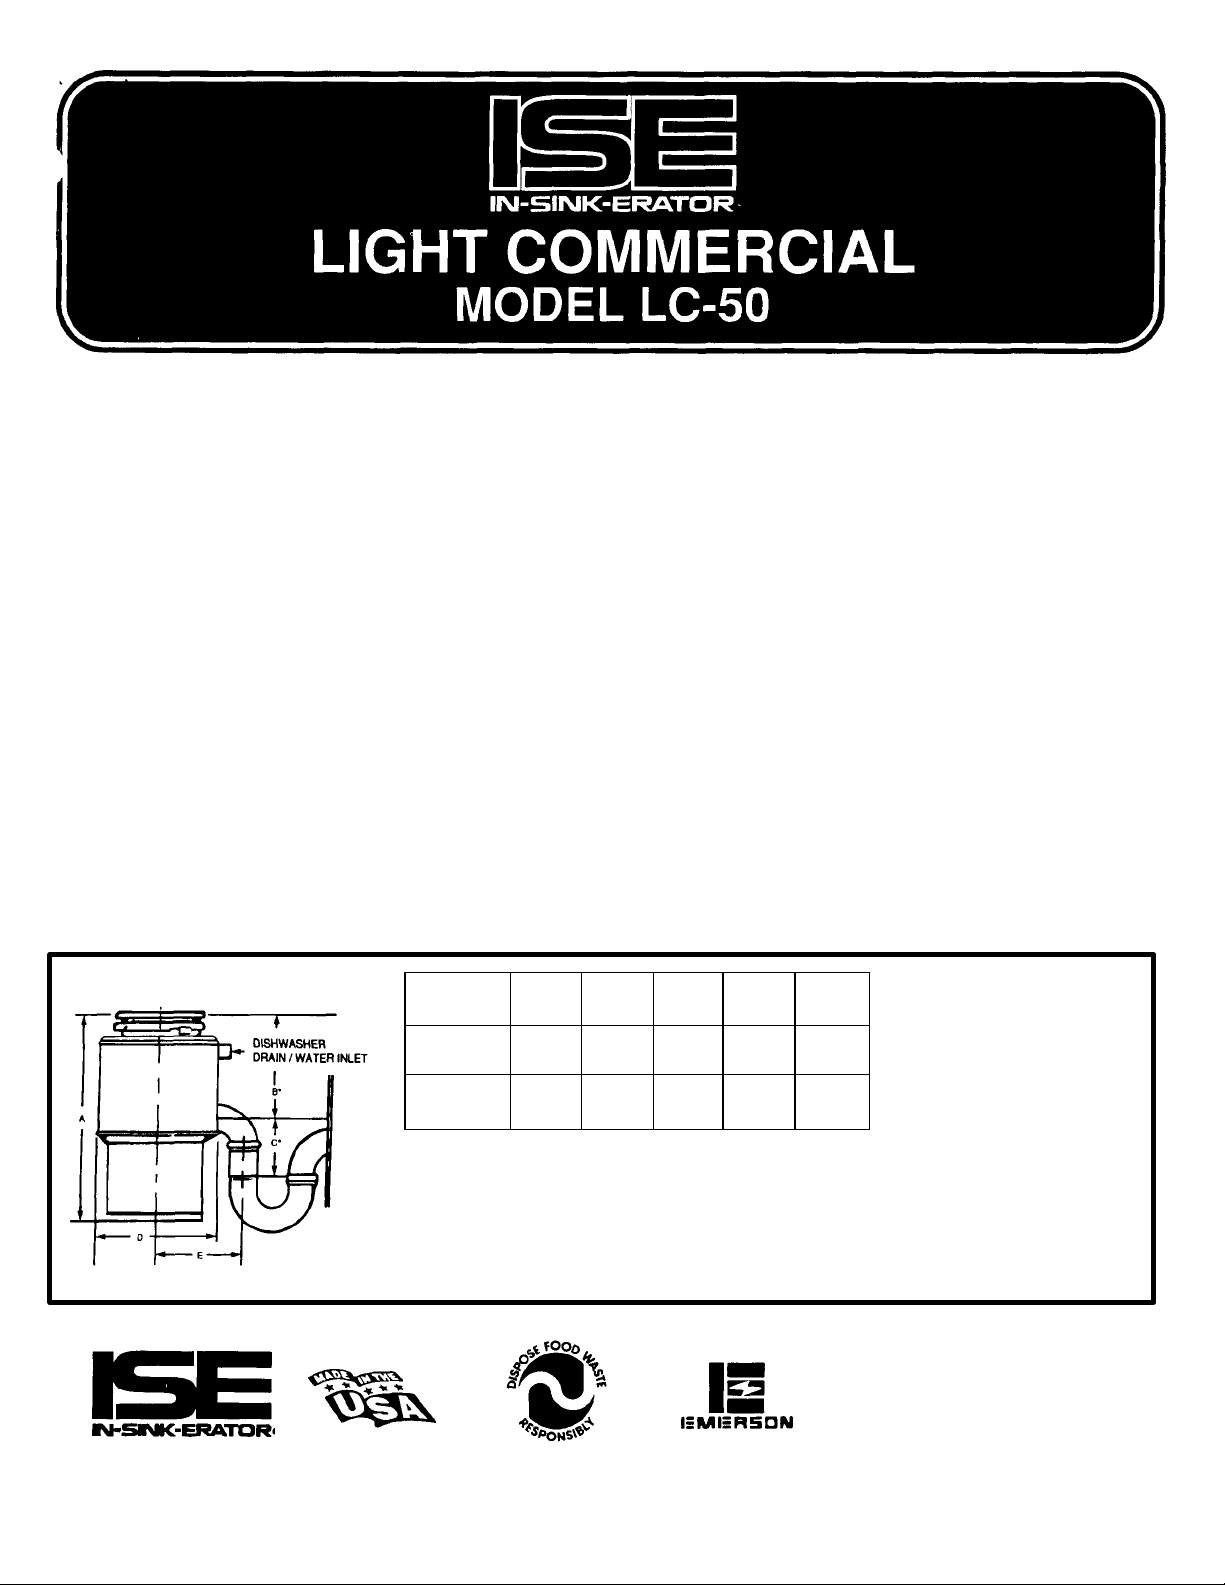
CHECK THE PARTS AGAINST THE DRAWINGS BELOW AND MAKE SURE
EVERYTHING IS THERE
THE MOUNTING
ASSEMBLY CONSISTING
OF:
SELF-SERVICE
"WRENCHETTE”
DISCHARGE TUBE, GASKET,
METAL FLANGE AND
SCREWS
THE DISPOSER ITSELF
CLEANING YOUR SINK'S DRAIN LINE
We recommend cleaning the line before connecting your new disposer. You can do the job yourself with a drain
auger. Remove the drain trap and, using the auger, clean out the horizontal drain pipe that runs from the trap to the
main waste pipe. Make certain that the auger removes the hardened material that forms at the intersection of the
horizontal pipe and the main waste pipe.
ELECTRICAL SUPPLY
First, remove the fuse or open the circuit
breaker on the circuit you plan to use for your
disposer. Use a separate 15 or 20 amp, 120
volt circuit for the disposer. If you are
replacing a unit, skip to step 4. Next, use 1520 amp, 120 volt cable to make a connection
from the junction box to the on-off switch.
NOTE: See 10&11 for final electrical connections.
Install a junction box and switch. (Obtain 1/2
H.P., 15-20 amp rated on-off switch and
electrical wiring locally.) Position the switch in
any convenient location, and connect to
junction box. All wiring must comply with
local electrical codes. 14 gauge size wire is the
smallest permissible for use with a 15 amp
circuit, and 12 gauge is the smallest
permissable for use with a 20 amp circuit.
Page 3
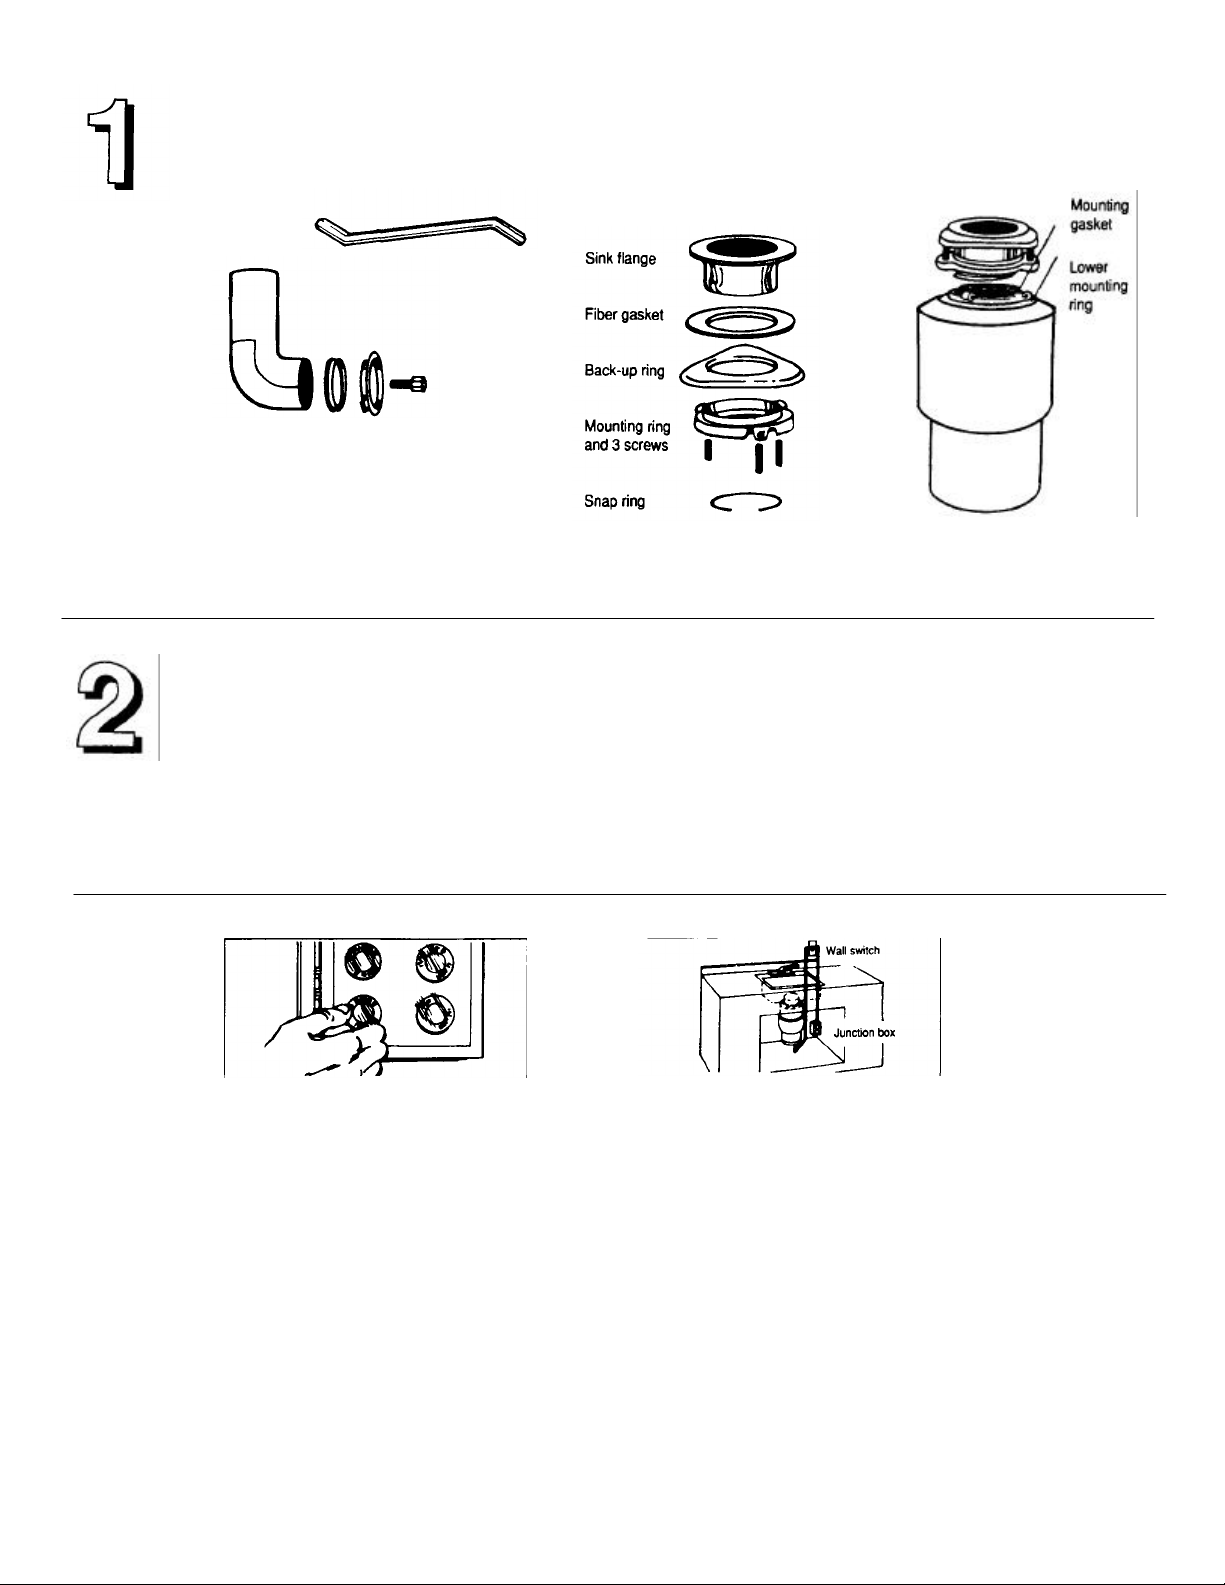
REPLACING AN OLD DISPOSER
FIRST, TURN OFF ELECTRICAL POWER at the service panel (fuse box or circuit breaker box). If the mounting is the same as your new
disposer's mounting, you can use the existing mounting. Follow instructions A, B, D and E, Step 4, then go on to Step 6.
IF YOUR OLD DISPOSER HAS A DIFFERENT MOUNTING THAN
YOUR NEW ONE, GO ON TO INSTRUCTION C.
If your old disposer has the same mounting as your new one, insert the
end of your "wrenchette" or screwdriver into the right side of one of the
disposer mounting ring lugs at the top of the disposer. Then, turn the
"wrenchette" or screwdriver to the left (counter-clockwise) until the lug
lines up with one of the sink mounting assembly screws.
Use a pipe wrench to
disconnect the drain line
where it attaches to the
disposer discharge tube.
CAUTION: Be sure to hold the disposer with one hand while performing this step or
it may fall when the mounting ring is disconnected from the sink mounting assembly.
GO TO INSTRUCTION D.
If your old disposer has a different
mounting than your new one, use a pliers
or adjustable wrench to remove the nuts
on the mounting ring. Then remove old
disposer. (Some disposers have to be
removed by taking off a clamp or by
twisting the disposer to remove it from its
mounting. Easy to figure out.)
Once the disposer is off, turn
it upside down and remove the
electrical plate.
INSTALLING A FIRST-TIME DISPOSER
Use a wrench to loosen the nut at
the top of the "P"-trap.
The nut should be loosened
enough that you can spin it off by
hand.
Next, remove the nut at the top of
the sink strainer and remove the
extension pipe.
Now, push the strainer assembly
up through the sink hole and
remove it.
Now, remove the large-diameter nut at the base of the strainer by placing
the tip of your screwdriver on the edge of the nut. (There are usually
ridges to hold your screwdriver.)
Page 4

CLEAN THE OLD SEALANT FROM THE RIM OF THE
Make a nice fat snake of
Apply this roll under the rim of
Then, place the sink flange into
SINK HOLE
Use your screwdriver or a putty knife to scrape away all traces of
the old putty or caulking from the edge of the sink drain hole. Make
sure you get this as clean as possible so that you'll have a good,
water-tight seal for your new disposer sink flange.
SEPARATE THE PARTS IN THE MOUNTING ASSEMBLY
First, remove the mounting
assembly from the lower mounting
ring. Holding the mounting assembly
with one hand, insert your
Then, loosen the screws on the
mounting assembly until they are
just level with the surface of the
mounting ring.
Now, use a screwdriver to pry off
the snap ring.
wrenchette or screwdriver into one
of the lugs of the lower mounting
ring and turn it to the left
(counterclockwise) with your other
hand.
The assembly will now come apart. Set it aside and move to the next
step.
APPLY PUTTY TO THE SINK FLANGE
plumber's putty by rolling it
between your hands.
the sink flange.
the sink drain hole and push
down making sure it sits evenly
in the putty.
Page 5

ATTACH THE UPPER MOUNTING ASSEMBLY
Simply attach the third green
If you don't have a ground supply
First, working from under the sink, slip the
fiber gasket and next the metal back-up
ring (flat side up) up and over the sink
flange.
Hold the fiber gasket and metal back-up
ring in place with one hand and place the
mounting ring with its three screws onto the
sink sleeve.
Tighten the three mounting screws with your screwdriver until the whole mounting
assembly is seated evenly and tightly against the sink.
ELECTRICAL CONNECTIONS
Remove the electrical plate from the bottom of the disposer and
pull out the two electrical wires. The ground screw is also
under the plate.
Connect the wires from the switch to the disposer wires. In
making this connection, electrical wire nuts can be used or
wires may be securely soldered together. Be sure to connect
white to white and black to black. Wrap wire connections with
electrical tape and put wires inside of disposer housing. Check
for proper grounding, then replace the electrical cover.
Now, push the fiber gasket, metal backup
ring and the mounting ring further up on
the sink sleeve. Slide the snap ring onto
the sink sleeve until it pops into place in
the groove on the sleeve.
GROUNDING THE DISPOSER
WARNING: IF NOT PROPERLY GROUNDED, a hazard of electrical shock may exist. DO NOT reconnect electrical current at main service
panel until proper ground is installed. For your safety, DO NOT ground to a gas supply pipe.
wire to the green ground screw
on the unit.
conductor, buy a length of copper
wire from your hardware store that
is no smaller in size than the
supply wire and attach one end to
the green ground screw on the
unit.
If you have a water meter in your home, check the meter to see if there is a wire that comes
across it. If there is no wire, your cold water pipe is NOT GROUNDED. To properly ground it, add
a #6 copper wire as shown for 200 amp service or less. Use (Underwriters Laboratories Inc.,
listed for the U.S.A.) ground clamps to attach wire to pipe.
Attach the other end of this ground wire to the METAL cold
water pipe. NOTE: Be sure that this cold water pipe is
continuous METAL pipe from the sink to the ground. Use
(Underwriters Laboratories Inc., listed for the U.S.A.) ground
clamp to attach wire to pipe. If any doubt, or if NON-METAL
pipe is used in your home water connections or if plastic pipe
is used In your water supply pipe, you will need a qualified
electrician to install a proper ground.
Page 6

OPTIONAL STEP
If you do NOT plan to use this
step, go to step 13.
from an overhead faucet. As an option, the
water/dishwasher drain inlet can be used for direct water
The model LC-50 is designed to be used with water
A. Preparing the water/dishwasher drain inlet
Lay the disposer on its side and insert the tip of
your screwdriver into the water/drain inlet
opening at an angle.
B. Connecting direct water line or dishwasher drain hose to the disposer. This is done after step 13.
Remove the clamp or fittings
from the end of your dishwasher
drain hose. (Dishwasher
application only.)
Slide large end of adaptor over
inlet tube of disposer. Fasten
the adaptor to the disposer with
a proper size clamp.
connections, or as a connection for your dishwasher drain.
Tap the end of the screwdriver with a
hammer until the molded plug pops out.
MAKE SURE YOU TAKE THE LOOSE
PLUG OUT OF YOUR DISPOSER.
Then determine the outside diameter
of dishwasher drain line and cut
rubber adaptor to correct size. (Most
commercial water lines are 1/2" so
no cuts are necessary.)
Slip the remaining clamp over the
water line or dishwasher drain hose
and back two or three inches. Now,
slip the drain hose or water line into
the adaptor. Then slide clamp into
position and tighten.
NOTE: Both types of connections are recommended to be used with an In-Sink-Erator Connection kit, part number 8301 (shown above).
IMPORTANT: It you connect your dishwasher drain hose to the disposer, the discharge water must go through an air gap. Direct water
connections require a solenoid valve (Part #11475), and a syphon breaker (Part #11477). If your water line velocity is greater than 3 GPM, it is
recommended you use a flow control valve (Part #110330). Connections should comply to local plumbing codes. Check the three clamps to make
sure all of them are tightened.
CONNECTING THE DISPOSER TO ITS MOUNTING ASSEMBLY
Lift the disposer and position it so that the
disposer's three mounting lugs are lined up
under the three sink mounting assembly screws.
Then, while holding the disposer in place, turn the lower mounting
ring with the lugs to the right until all three ears are engaged on the
mounting assembly. You will lock this ring later, after the
plumbing connections are made.
Page 7

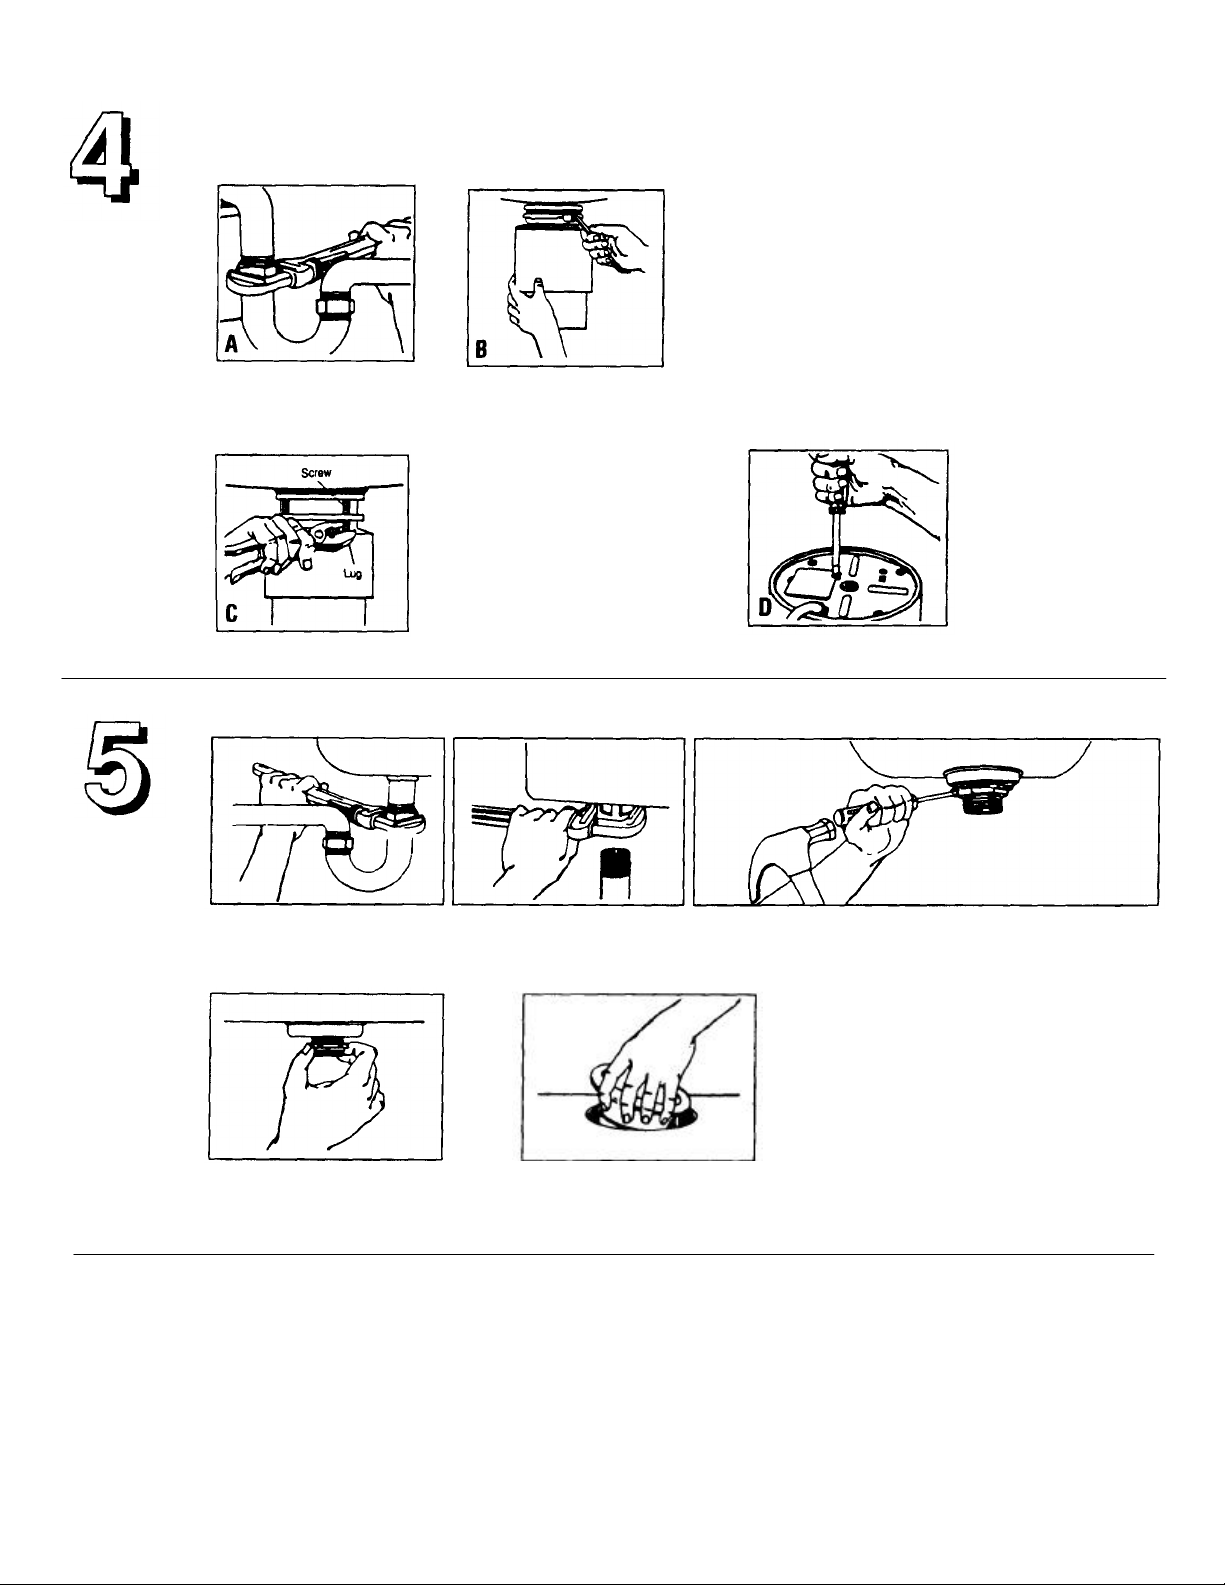
ATTACH THE DISPOSER DISCHARGE TUBE TO YOUR SINK'S DRAIN TRAP
First, check inside the disposer
grinding chamber to remove any objects or dirt that might have dropped
in.
Turn the disposer so that the
discharge tube aligns with your
drain trap.
Rotate the disposer around and attach the discharge
tube to the disposer. First, insert the rubber washer in
the discharge opening. Then, put the metal flange
over the discharge tube and screw the tube into place
using the bolts provided.
TUBE TOO LONG? Simply cut off as
much as necessary with a hack saw,
making sure you have a clean, straight
cut.
Install the discharge tube
gasket onto the discharge
tube. Gasket must be installed
as shown to assure a leakproof installation.
TUBE TOO SHORT? If the discharge
tube doesn't reach your drain outlet,
measure the difference and buy a drain
trap extension tube.
IF IT FITS - Simply tighten the slip nut on the trap to make your connection to the
discharge tube complete. IF DOUBLE SINK EXISTS, WE RECOMMEND USE OF
SEPARATE TRAPS FOR DISPOSER AND SECOND SINK. NOTE: Be sure to
comply with all applicable plumbing codes.
LOCK DISPOSER IN PLACE AND CHECK FOR LEAKS
Place the end of your "wrenchette" or a
screwdriver into the left side of one of the
disposer mounting lugs ... at the top of the
disposer. Then, turn the "wrenchette" or
screwdriver to the right until the disposer locks
in place.
Run water slowly through the unit.Then,
place the stopper in seal position and fill
the sink with water.
Finally, remove the stopper and permit
the water to flow. check for leaks and
correct, if necessary.
Page 8

IN-SINK-ERATOR DISPOSER WARRANTY INFORMATION
following into a disposer:
possible drain blockage
MODEL LC-50 FULL 1 YEAR WARRANTY
Covers all replacement parts and repair labor to correct defects in material or workmanship for the full warranty period from the date of installation. If service is
required during the warranty period, an In-Sink-Erator Factory Authorized Service Center must be contacted to replace or repair the disposer i no charge to the
customer.
If the manufacturer determines the unit should be replaced rather than repaired, the warranty on the replacement unit will be limited to the unexpired term i the original
warranty.
If you have questions concerning your disposer, or when service is needed, please call In-Sink-Erator's Automated Service Information System at 1-80( 558-5700 for
the nearest In-Sink-Erator Factory Authorized Service Center. In Canada call 1-414-554-5432. This warranty gives you specific legal rights, and you may also have other
rights which vary from state to state.
NO OTHER EXPRESS WARRANTY, WRITTEN OR ORAL APPLIES
If your disposer will not operate, follow these steps, in order:
1. Check the things you can do yourself. Be sure disposer is plugged firmly into appropriate receptacle or is properly electrically connected in some other manner. Be
sure fuses and circuit breakers are in good order. Reread instruction booklet to assure that you are using correct operating procedure. Mai unnecessary service calls
result in the service man doing what you can do yourself.
2. Check with your local authorized service center. For the location of your nearest factory authorized service center call toll free 1 -800-558-5700 or 1 -414 554-5432.
3. Write to us if a satisfactory solution is not reached in steps 1 and 2. Our address is:
IMPORTANT: The model LC-50 is designed specifically for light commercial use. Examples of these applications include: grocery/convenience store deli's, fast food
restaurants, office/church kitchens, and bed and breakfast inns. Use of this disposer in applications other than those named above may void your warranty. If you are
unsure of a potential application, call the factory at 1-800-558-5712, ext. 3536 or 3537.
HOW TO OBTAIN SERVICE
IN-SINK-ERATOR, SERVICE DEPARTMENT
4700-21st Street
Racine, Wisconsin 53406 U.S.A.
OPERATING INSTRUCTIONS
MODEL LC-50
1. Remove the stopper from the disposer sink sleeve and turn on the cold water fo//flow. (Water should remain on during complete
disposer operation.) Failure to turn on a full flow of water before turning on the disposer can cause drain blockages.
2. "Flip" the switch to the on position to start disposer. Feed food waste into the disposer white it is running. To avoid drain pipe
blockage allow water to flow sufficient time after grinding Is completed to be sure all waste is flushed away. Ground waste and
water mixture flows at the rate of 2 seconds per foot in a horizontal drain line.
NOTE: After all the food waste has been fed into the disposer place the stopper in the sink sleeve In the drain/grind
position (see Illustrations) to minimize the possible ejection of material while grinding. DO NOT INSERT HAND INTO
DISPOSER.
Stopper in drain/grind position
DO'S AND DON'TS
DO...
? use a strong flow of cold water while grinding
? grind hard materials such as bones, fruit pits, etc.
? grind citrus and melon rinds
? grind coffee grounds
? dispose of grease/fats with strong flow of cold water
? flush disposer for cleaning
SAFETY
IMPORTANT SAFETY INSTRUCTIONS
WARNING: When using electric appliances, basic precautions should always be followed, including the following:
1. Read all the instructions.
2. To reduce the risk of injury, close supervision is necessary when used near children.
3. Do not put fingers or hands into disposer.
4. Turn the power switch to the off position before attempting to clear a jam or remove an object from the disposer.
5. When attempting to loosen a jam in a waste disposer, use a self service wrenchette as described below.
6. When attempting to remove objects from a waste disposer use long-handled tongs or pliers.
7. To reduce the risk of injury by materials that may be expelled by a garbage disposer place the stopper in the drain/grind position when grinding. Do not put the
a. Clam and oyster shells
b. Drain cleaner
c. Glass, china, plastic or plastic wrap
d. Large whole bones
e. Metal objects
Continued on next page.
DON'T...
• use hot water while grinding food waste
• turn off disposer or water until grinding is complete
• grind extremely fibrous materials like corn husks, artichokes, etc. to avoid
• grind plastic, plastic wrap, glass, cardboard, metal, clam and oyster shells,
or large whole bones
Page 9

Safety Instructions continued.
8. When not operating a disposer, leave the stopper in place to reduce the risk of objects falling into the disposer.
9. Before pressing red reset button, (see Fig. 4), be sure the wall switch Is In the off position.
10. GROUNDING INSTRUCTIONS FOR PERMANENTLY CONNECTED UNITS: This appliance must be connected to a permanent metal ground, per
National Electric Code, and in accordance with all local codes.
DANGER - Improper connection of the equipment-grounding conductor can result in a risk of electric shock. Check with a qualified electrician or serviceman if you
are in doubt as to whether the appliance is property grounded.
SAVE THESE INSTRUCTIONS
TROUBLE SHOOTING
Loud noises while your disposer is operating are usually caused by the accidental entry of a spoon, bottle cap, or similar object. To correct this, turn off the
disposer switch and water. After grinding disc has stopped turning, investigate.
Motor stops while your disposer is operating. This can be caused by overloading the unit. First, check the cause of the overload - often some foreign material
is in the disposer. To avoid personal Injury turn off the disposer switch and water. Remove object as previously explained. If motor remains inoperative,
check your fuse box and replace any blown fuses, or look for a tripped circuit breaker.
NOTE: If the water does not drain as readily as you think it should and food waste tends to float or take too long to grind, don't reduce water How to solve this
problem. It is very likely that the drain line is partially clogged. To save the cost of a service call, use applications of a disposer safe cleanser and degreaser
until drain runs smoothly. If you see no improvement after several applications, a drain auger should be used to remove the blockage. Like any precision
machine, your disposer was built to perform a particular job. If unusual demands are placed on it, service interruptions are possible. These service
interruptions, mentioned below, are usually not serious and in most cases, can be remedied without calling a service man.
TO FREE JAMS FROM FOREIGN OBJECTS
To save the cost of a service call to free a jam. The accidental entry of foreign material will cause any disposer to jam occasionally. To free jammed material, follow
thesesteps to avoid personal Injury:
1. Turn off disposer and shut off cold water.
2. Insert one end of your Self Service Wrench provided with your disposer, into the center hole of the bottom of the disposer as shown.
3. Work the wrench back and forth until it moves freely for at least one complete revolution. Remove wrench before restarting disposer.
4. Wait 3 to 5 minutes to allow disposer motor to cool and then push red reset button, (Fig. 4). Before pressing red reset button be sure the wall switch
is In the off position.
Follow this procedure to save the cost of a service call to free a tight jam.
Be sure wall switch is turned off. Use a flashlight to determine the direction the unit was running at the time of the jam. A pry bar or tool should be inserted through the sink
opening into the disposer. The end then must be placed alongside the grinding protrusion near the outside edge of the grinding disc. Be sure to place the pry tool on the proper
side of the protrusion so when pressure is applied the grinding disc will move in the proper direction to unjam the disposer (see figure 5).
Do not drop or hammer on pry bar.
Lose Your Self Service Wrenchette?
If you should ever lose your Self Service Wrench just write to us and a replacement will be sent at no charge.
WRITE TO: WRENCHETTE
c/o IN-SINK-ERATOR
SERVICE DEPT.
4700 21st Street
Racine, Wisconsin 53406
For Service Information Call Toll Free 1-800-558-5712 (U.S.) or 1-414-554-5432 (Canada)
 Loading...