

Page 1
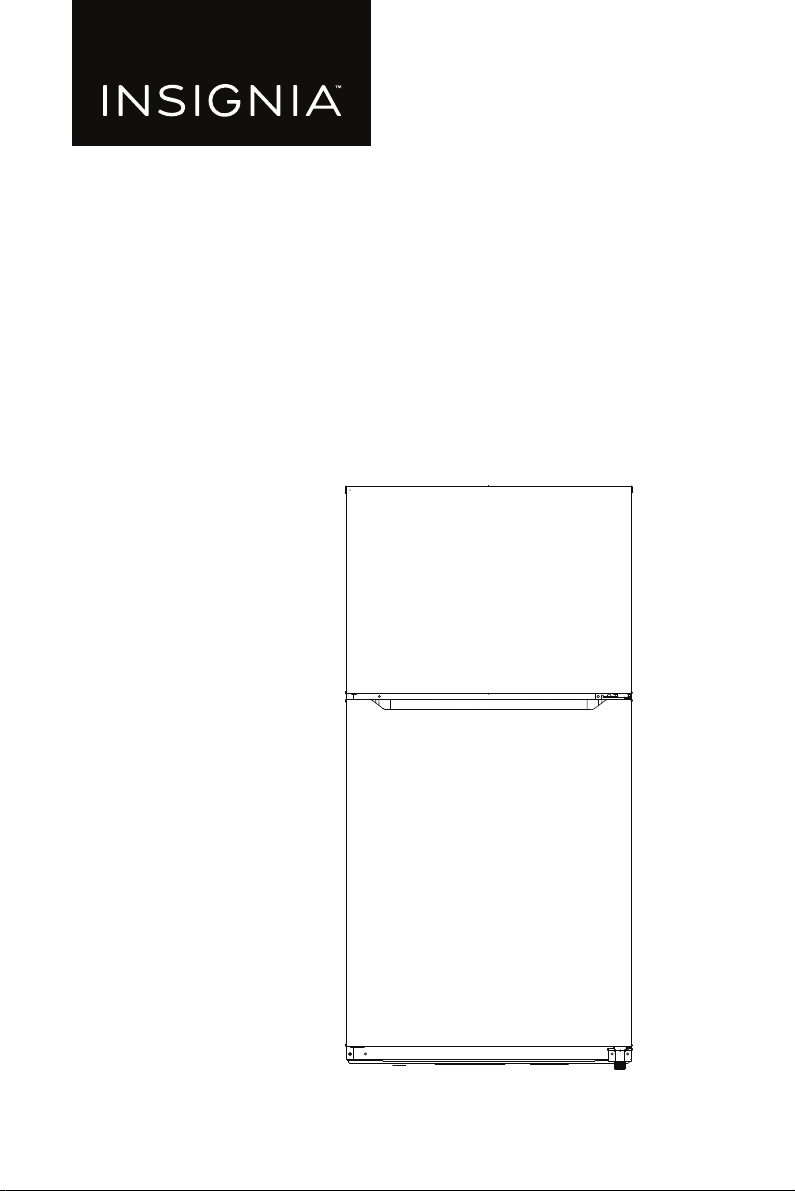
21 Cu. Ft. Top Mount
Refrigerator
NS-RTM21SS7/NS-RTM21BS8
USER GUIDE
Before using your new product, please read these instructions to prevent any damage.
Page 2
Contents
IMPORTANT SAFETY INSTRUCTIONS . . . . . . . . . . . . . . . . . . . . . . . . . . . . . . . . . . . . . 3
Grounding requirement . . . . . . . . . . . . . . . . . . . . . . . . . . . . . . . . . . . . . . . . . . . . . 5
Features . . . . . . . . . . . . . . . . . . . . . . . . . . . . . . . . . . . . . . . . . . . . . . . . . . . . . . . . . . . . . . . .6
Package contents . . . . . . . . . . . . . . . . . . . . . . . . . . . . . . . . . . . . . . . . . . . . . . . . . . .6
Main components. . . . . . . . . . . . . . . . . . . . . . . . . . . . . . . . . . . . . . . . . . . . . . . . . . .6
Setting up your refrigerator. . . . . . . . . . . . . . . . . . . . . . . . . . . . . . . . . . . . . . . . . . . . . . 7
Before using your refrigerator . . . . . . . . . . . . . . . . . . . . . . . . . . . . . . . . . . . . . . . 7
Finding a suitable location . . . . . . . . . . . . . . . . . . . . . . . . . . . . . . . . . . . . . . . . . .7
Leveling your refrigerator . . . . . . . . . . . . . . . . . . . . . . . . . . . . . . . . . . . . . . . . . . . 7
Providing proper ventilation. . . . . . . . . . . . . . . . . . . . . . . . . . . . . . . . . . . . . . . . . 7
Providing a proper power supply . . . . . . . . . . . . . . . . . . . . . . . . . . . . . . . . . . . . 7
Using your refrigerator . . . . . . . . . . . . . . . . . . . . . . . . . . . . . . . . . . . . . . . . . . . . . . . . . . 9
Setting the refrigerator temperature . . . . . . . . . . . . . . . . . . . . . . . . . . . . . . . . . 9
Reversing the door position . . . . . . . . . . . . . . . . . . . . . . . . . . . . . . . . . . . . . . . . . . . .10
Preparing to reverse the door position . . . . . . . . . . . . . . . . . . . . . . . . . . . . . .10
Reversing the door position . . . . . . . . . . . . . . . . . . . . . . . . . . . . . . . . . . . . . . . .10
Installing the optional ice maker (sold separately) . . . . . . . . . . . . . . . . . . . . . . .18
Maintaining your refrigerator . . . . . . . . . . . . . . . . . . . . . . . . . . . . . . . . . . . . . . . . . . .18
Defrosting the freezer . . . . . . . . . . . . . . . . . . . . . . . . . . . . . . . . . . . . . . . . . . . . . .18
Shutting down your refrigerator - long vacations (several months) . . . . . . .18
Moving your refrigerator . . . . . . . . . . . . . . . . . . . . . . . . . . . . . . . . . . . . . . . . . . . . . . .19
Tips on saving energy . . . . . . . . . . . . . . . . . . . . . . . . . . . . . . . . . . . . . . . . . . . . . . . . . .19
Troubleshooting . . . . . . . . . . . . . . . . . . . . . . . . . . . . . . . . . . . . . . . . . . . . . . . . . . . . . . .20
Error codes . . . . . . . . . . . . . . . . . . . . . . . . . . . . . . . . . . . . . . . . . . . . . . . . . . . . . . . .20
Specifications . . . . . . . . . . . . . . . . . . . . . . . . . . . . . . . . . . . . . . . . . . . . . . . . . . . . . . . . . .22
ONE-YEAR LIMITED WARRANTY . . . . . . . . . . . . . . . . . . . . . . . . . . . . . . . . . . . . . . . . .23
2
www.insigniaproducts.com
Page 3
21 Cu. Ft. Top Mount Refrigerator
IMPORTANT SAFETY
INSTRUCTIONS
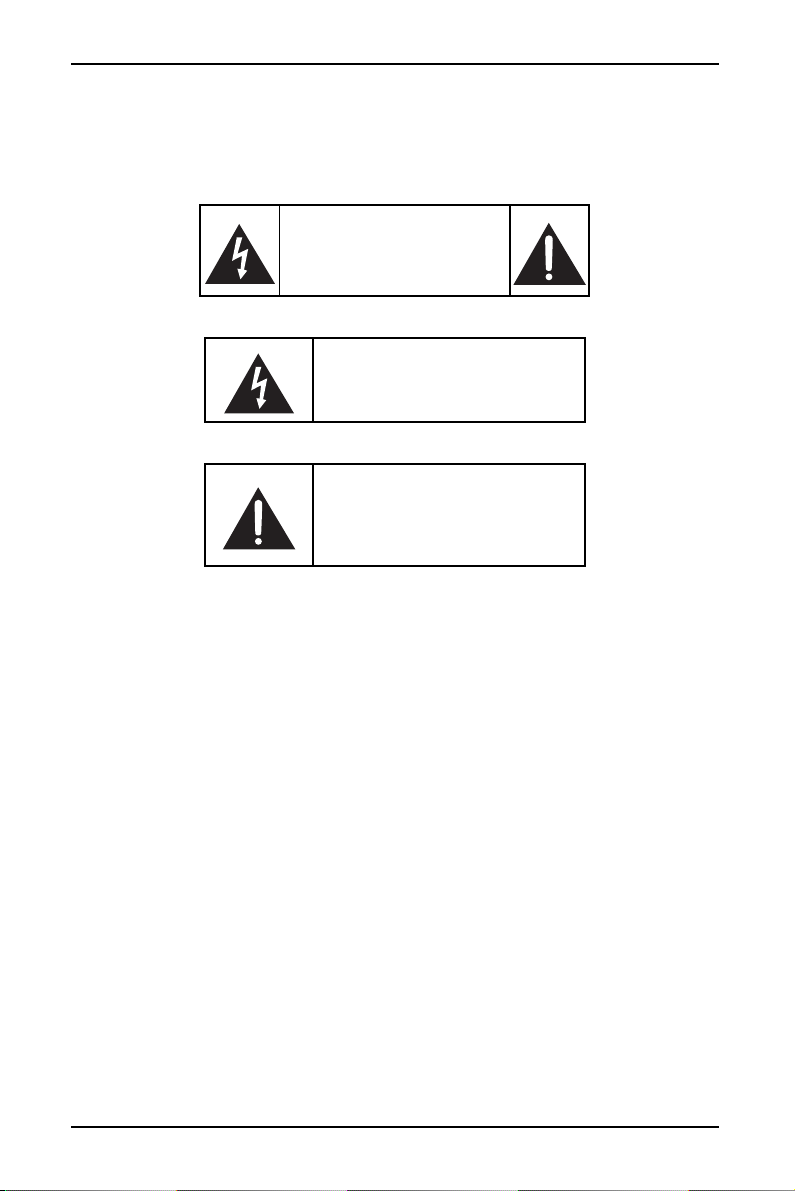
CAUTION
RISK OF ELECTRIC SHOCK
DO NOT OPEN
This symbol indicates that
dangerous voltage constituting a
risk of electric shock is present
within your refrigerator.
This symbol indicates that there
are important operating and
maintenance instructions in the
literature accompanying your
refrigerator.
WAR NIN G
1 Read these instructions.
2 Keep these instructions.
3 Heed all warnings.
4 Follow all instructions.
5 Do not use this appliance near water.
6 Clean only with a damp cloth.
7 Do not block any ventilation openings. Install in accordance with the
manufacturer's instructions.
8 Do not install near any heat sources such as radiators, heat registers, stoves, or
other apparatus (including amplifiers) that produce heat.
9 Do not defeat the safety purpose of the polarized or grounding-type plug. A
polarized plug has two blades with one wider than the other. A grounding
type plug has two blades and a third grounding prong. The wide blade or the
third prong are provided for your safety. If the provided plug does not fit into
your outlet, consult an electrician for replacement of the obsolete outlet.
10 Protect the power cord from being walked on or pinched particularly at plugs,
convenience receptacles, and the point where they exit from the appliance.
11 Do not attempt to modify or extend the power cord of this appliance.
12 Unplug this appliance during lightning storms or when it will not be used for
long periods of time.
www.insigniaproducts.com
3
Page 4
NS-RTM21SS7/NS-RTM21BS8
13 Make sure that the available AC power matches the voltage requirements of
this appliance.
14 Do not handle the plug with wet hands. This could result in an electric shock.
15 Unplug the power cord by holding the plug, never by pulling the cord.
16 Do not turn the appliance on or off by plugging or unplugging the power
cord.
17 Turn off the appliance before unplugging it.
18 Refer all servicing to qualified service personnel. Servicing is required when
the appliance has been damaged in any way, such as the power-supply cord
or plug is damaged, liquid has been spilled or objects have fallen into the
appliance, the appliance has been exposed to rain or moisture, does not
operate normally, or has been dropped.
19 To reduce the risk of fire or electric shock, do not expose this appliance to rain,
moisture, dripping, or splashing, and no objects filled with liquids should be
placed on top of it.
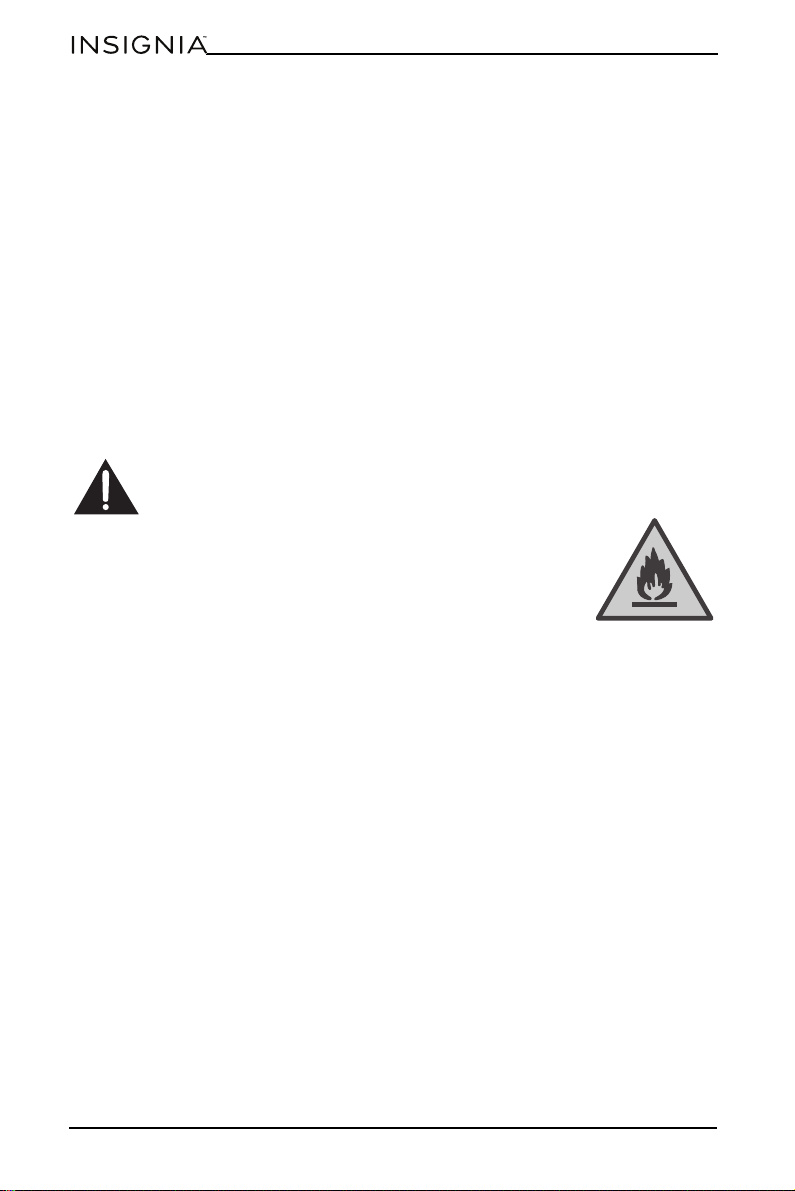
WARNING
Electric Shock Hazard
Failure to follow these instructions can result in electric
shock, fire, or death.
1 WAR NIN G–Keep ventilation openings in the appliance
enclosure or in the built-in structure clear of obstruction.
2 WAR NIN G–Do not touch the interior of the chiller
compartment with wet hands. This could result in frost bite.
3 WAR NIN G–Do not use mechanical devices or other means to accelerate the
defrosting process, other than those recommended by the manufacturer.
4 WAR NIN G–Do not damage the refrigerant circuit.
5 WAR NIN G–Do not use electrical appliances inside the food storage
compartment of the appliance, unless they are of the type recommended by
the manufacturer.
6 WAR NIN G–Never allow children to play with, operate, or crawl inside the
refrigerator.
Risk of child entrapment. Before you throw away your old refrigerator or
freezer:
1) Take off the doors
2) Leave the shelves in place so that children may not easily climb inside
7 Unplug the refrigerator before carrying out user maintenance on it.
8 This appliance is not intended for use by persons (including children) with
reduced physical, sensory, or mental capabilities, or lack of experience and
knowledge, unless they have been given supervision or instruction
concerning use of the appliance by a person responsible for their safety.
Children should be supervised to ensure that they do not play with the
appliance.
9 If a component part is damaged, it must be replaced by the manufacturer, its
service agent, or similar qualified persons in order to avoid a hazard.
4
www.insigniaproducts.com
Page 5

21 Cu. Ft. Top Mount Refrigerator
10 Dispose of the refrigerator according to local regulations as the refrigerator
contains flammable gas and refrigerant.
11 Follow local regulations regarding disposal of the refrigerator due to
flammable refrigerant and gas. All refrigeration products contain refrigerants,
which under the guidelines of federal law must be removed before disposal. It
is the consumer's responsibility to comply with federal and local regulations
when disposing of this product.
12 This refrigerator is intended to be used in household and similar
environments.
13 Do not store or use gasoline or any flammable liquids inside or in the vicinity
of this refrigerator.
14 Do not use extension cords or ungrounded (two prong) adapters with this
refrigerator. If the power cord is too short, have a qualified electrician install an
outlet near the refrigerator.
15 If the supply cord is damaged, it must be replaced by the manufacturer, its
service agent, or a similarly qualified person in order to avoid a hazard.
Grounding requirement
This appliance must be grounded. This appliance is equipped with a cord having a
grounding wire with a grounding plug. The plug must be inserted into an outlet
that is properly installed and grounded.
Improper use of the grounding plug can result in a risk of electric shock. Consult a
qualified electrician or service person if the grounding instructions are not
completely understood, or if doubt exists as to whether the appliance is properly
grounded.
www.insigniaproducts.com
5
Page 6
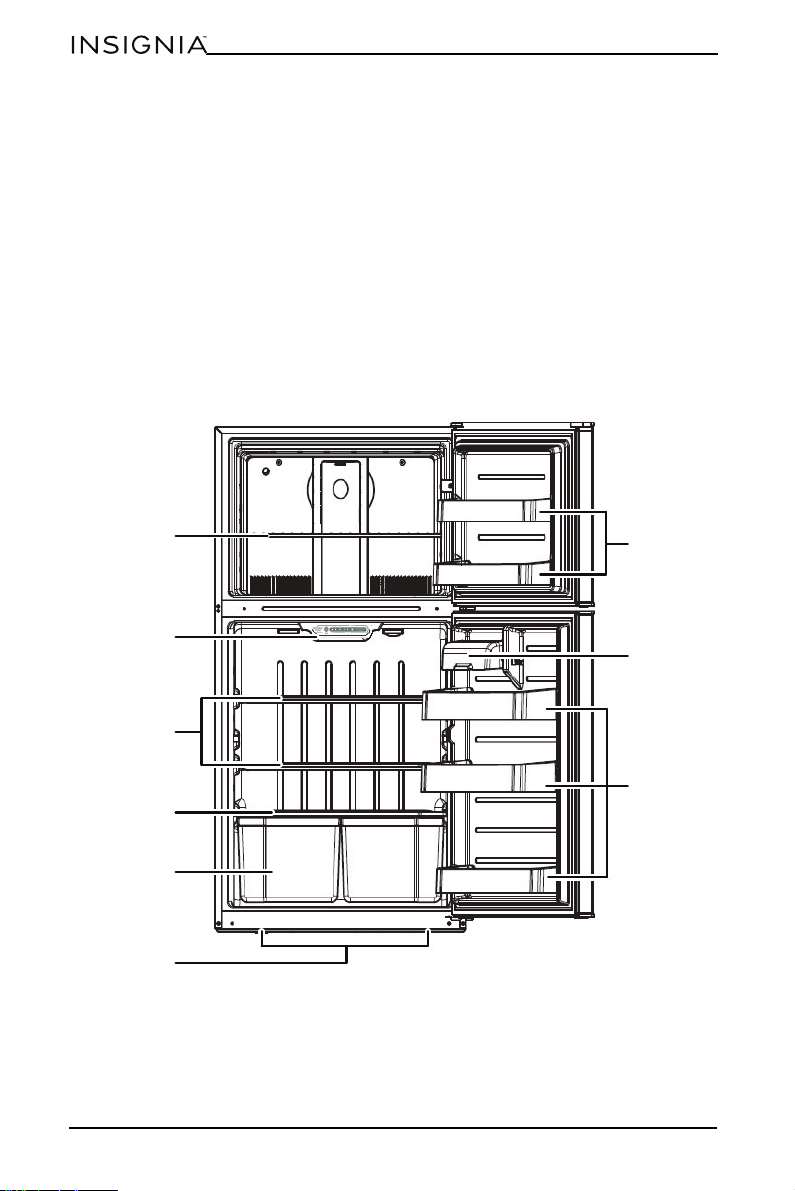
Features
Glass shelves
Crispers
Leveling feet
Freezer door
racks
Butter keeper
Refrigerator
control panel
with LED
Door racks
Wire shelf
Glass crisper cover
• 21 cubic foot capacity
• Electronic control
• Glass spill-safe shelves (2)
• Humidity-controlled crisper drawers
•LED lighting
• Frost free
Package contents
• 21 Cu. Ft. top mount refrigerator
•Hinge kit
• User Guide
Main components
NS-RTM21SS7/NS-RTM21BS8
6
www.insigniaproducts.com
Page 7
21 Cu. Ft. Top Mount Refrigerator
Setting up your refrigerator
Before using your refrigerator
1 Remove the interior packing.
2 Let the refrigerator stand upright for approximately four hours before
connecting it to power. This reduces the possibility of a malfunction in the
cooling system from improper handling during transportation.
3 Clean the interior surface with lukewarm water using a soft cloth.
4 Wait for approximately 24 hours after the thermostat has been set before
placing any food in your refrigerator.
Finding a suitable location
• This refrigerator is designed to be free standing only, and should not be
recessed or built-in.
• Place your refrigerator on a floor that is strong enough to support the
refrigerator when it is fully loaded.
• Locate the refrigerator in your home or garage away from direct sunlight
because it may affect the acrylic coating and heat sources may increase
electrical consumption. To ensure optimal performance, install in areas with
an ambient temperature between 41°F (5°C) and 109°F (42.8°C).
• Avoid locating the refrigerator in moist areas.
• The refrigerator door must be able to swing fully open.
Leveling your refrigerator
• It is very important for the refrigerator to be level. If the refrigerator is not
leveled during installation, the doors may not close or seal properly, causing
cooling, frost, or moisture problems.
• To level your refrigerator, rotate the leveling feet clockwise (to raise) the
refrigerator or counter-clockwise (to lower).
Note: Having someone push against the top of the refrigerator helps to take
some weight off the leveling foot, making it easier to adjust.
Providing proper ventilation
Place the refrigerator at least five inches from the wall to ensure proper airflow to
the compressor. Do not place the refrigerator near any heat sources, such as a
heater or stove, as this may put a strain on the compressor.
Providing a proper power supply
Check your local power source. This refrigerator requires a 110V-120V, 60Hz power
supply.
www.insigniaproducts.com
7
Page 8
NS-RTM21SS7/NS-RTM21BS8
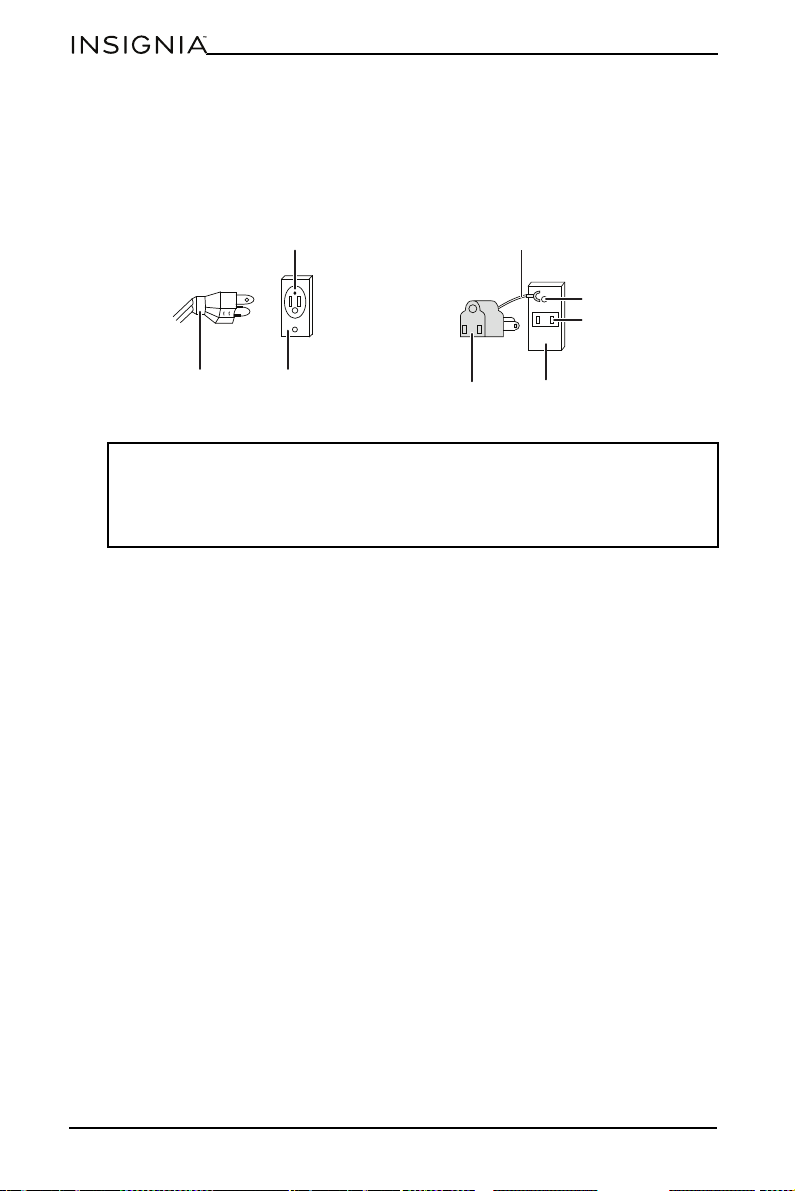
3-prong receptacle
Receptacle box cover3-prong plug
Grounding lead
Grounding adapter Receptacle box cover
Screw
Receptacle
Using a 3-prong plug and outlet
Using a grounding adapter
Use a receptacle that accepts the grounding prong. The power cord is equipped
with a 3-prong (grounding) plug which mates with a standard 3-prong
(grounding) wall outlet to minimize the possibility of electric shock hazard from
this refrigerator.
Notes:
• The refrigerator should always be plugged into its own individual electrical
outlet which has a voltage rating that matches the rating plate.
• Never unplug your refrigerator by pulling on the power cord. Always grip the
plug firmly and pull straight out from the outlet.
8
www.insigniaproducts.com
Page 9
Using your refrigerator
Setting the refrigerator temperature
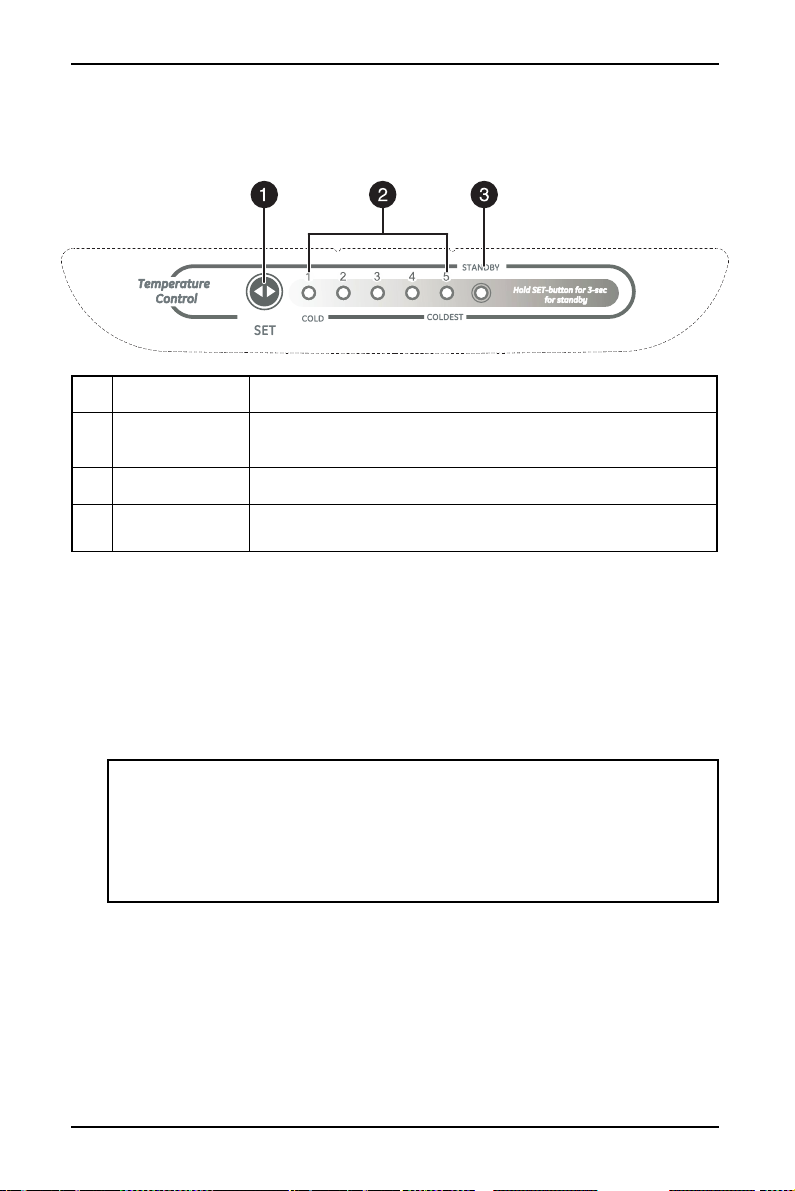
# ITEM DESCRIPTION
21 Cu. Ft. Top Mount Refrigerator
1SET button
2 LED indicators Light to show the current refrigerator setting.
3 STANDBY LED
• The first time you turn the refrigerator on, the control panel LEDs turn on for
three seconds, then displays the current setting (default = 3). Your refrigerator
runs continuously for several hours until it reaches the preset temperature.
After your refrigerator is fully cooled, you can adjust the temperature up or
down to your personal preference.
• To temporarily suspend cooling in the refrigerator and freezer, press and hold
the SET button for three seconds. The STANDBY LED turns on and cooling is
turned off. Press the SET button again to cancel standby mode and resume
cooling.
Notes:
• If the refrigerator is unplugged or loses power, you must wait three to five
minutes before restarting it. If you attempt to restart before this time delay,
the refrigerator will not start.
• Large amounts of food will lower the cooling efficiency of the refrigerator.
• If you choose to change the thermostat setting, adjust it by one increment at
a time. Allow 24 hours for the temperature to stabilize between adjustments.
Press to change the refrigerator setting from 1 (cold) to 5
(coldest).
Lights to indicate when the refrigerator is in standby mode
(refrigerator and freezer are turned off).
www.insigniaproducts.com
9
Page 10
NS-RTM21SS7/NS-RTM21BS8
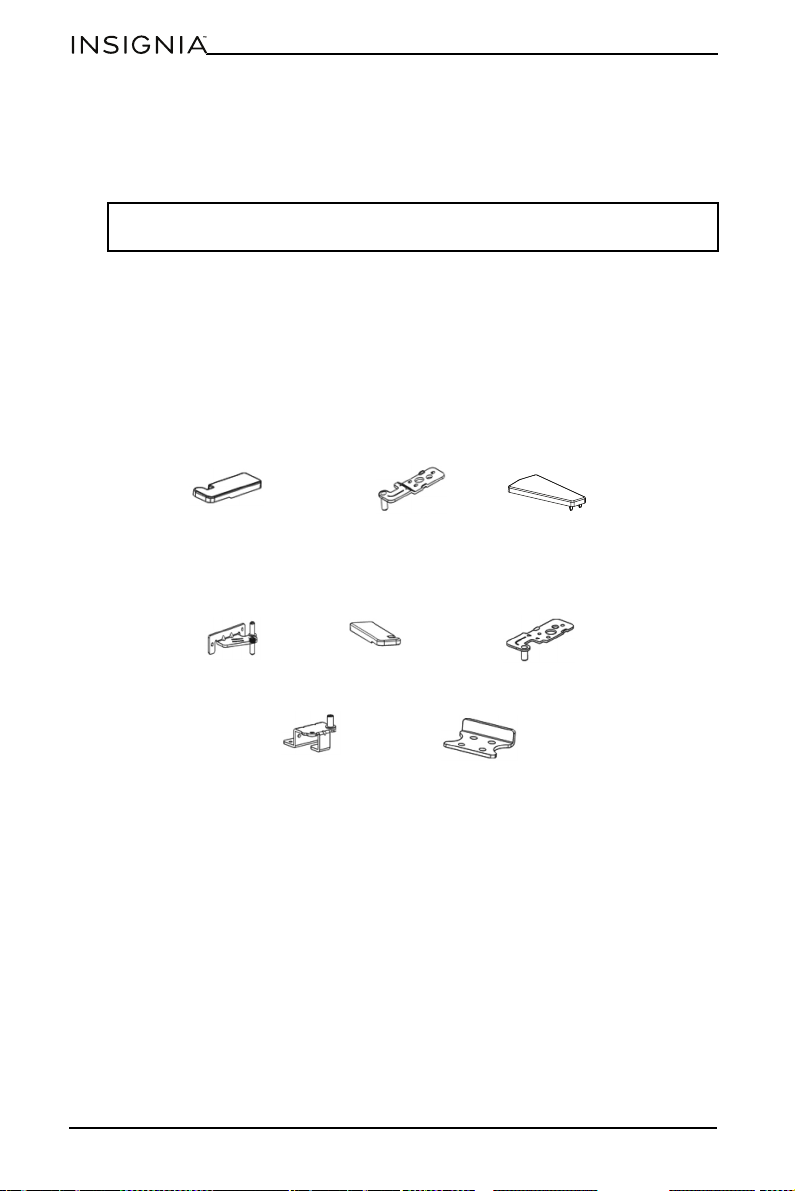
Left top hinge cover
Top left hinge
Cover
Center hinge
Right top hinge cover
Top right hinge
Door block
Bottom hinge
Reversing the door position
Based on the location where you plan to use your refrigerator, you may find it
more convenient to reverse the position of the door, to have it open from right to
left instead of left to right.
CAUTION: To avoid injury to yourself or your property, we recommend that
someone assist you during the door reversal process.
Preparing to reverse the door position
You will need: A standard screwdriver, a Phillips screwdriver, and the included
Allen wrench.
• Make sure that your refrigerator is unplugged and empty.
• Have someone available to assist you in the process.
• Keep all of the parts you remove to reuse them later.
Reversing the door position
Parts included with the hinge kit:
Parts already mounted on the door (as shipped):
10
www.insigniaproducts.com
Page 11
21 Cu. Ft. Top Mount Refrigerator
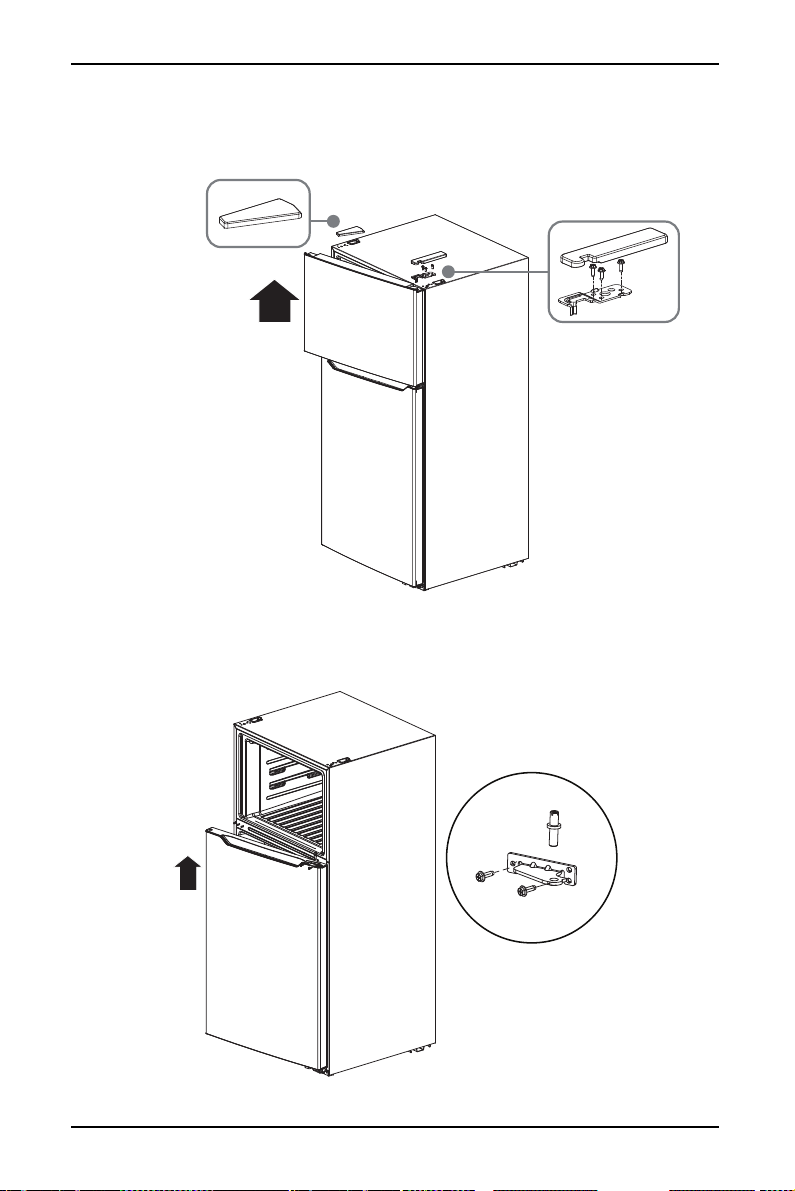
Right top hinge cover
Left cover p late
Center hinge
1 Unplug your refrigerator and remove all food from the door shelves.
2 Remove the left cover plate and the right top hinge cover, then unscrew and
remove the right top hinge. Keep the screws to reuse.
3 Lift the freezer door up and away from your refrigerator.
4 Remove the hinge pin, the three screws, and the center hinge, then lift the
refrigerator door up and away from your refrigerator. Save the screws to reuse.
www.insigniaproducts.com
11
Page 12
NS-RTM21SS7/NS-RTM21BS8
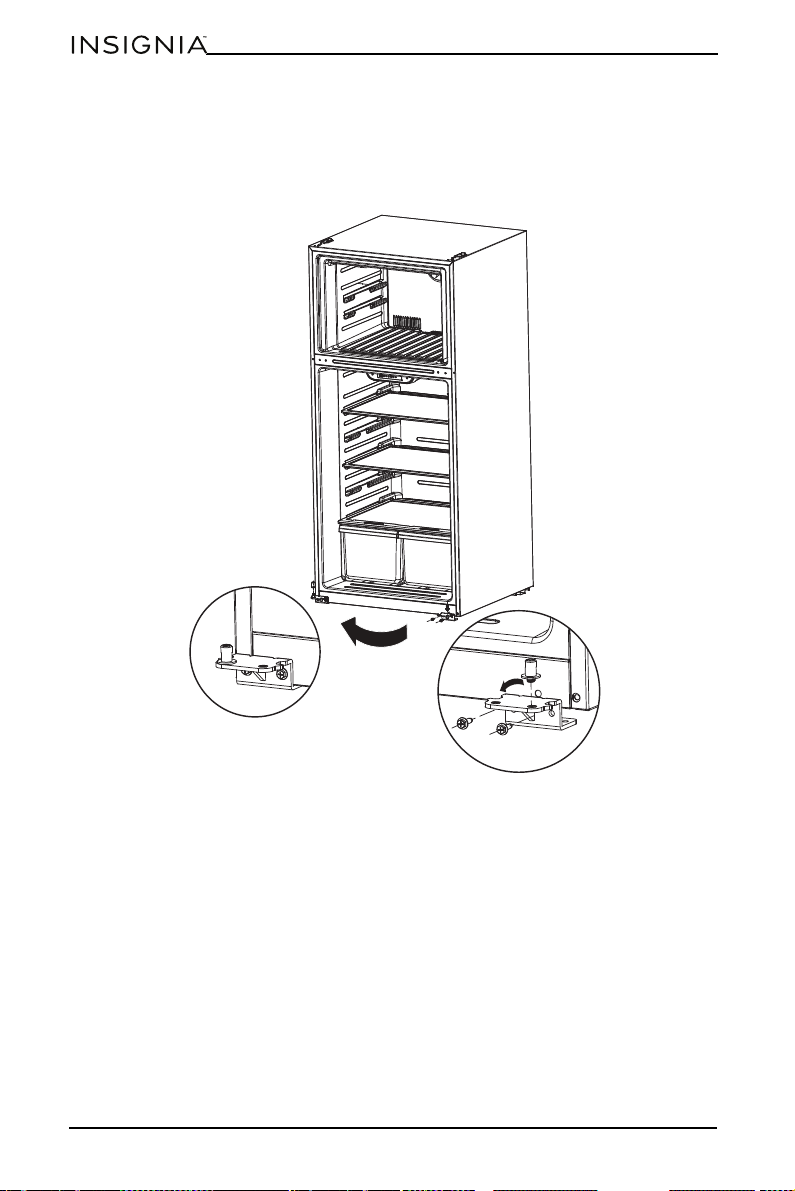
5 Unscrew the two screws holding the bottom hinge, then remove the bottom
hinge from the bottom right side of the refrigerator.
6 Unscrew the hinge pin from the right side of the bottom hinge and move it to
the left side, then screw the bottom hinge to the bottom left side of the
refrigerator, using the screws you removed previously.
12
www.insigniaproducts.com
Page 13
21 Cu. Ft. Top Mount Refrigerator
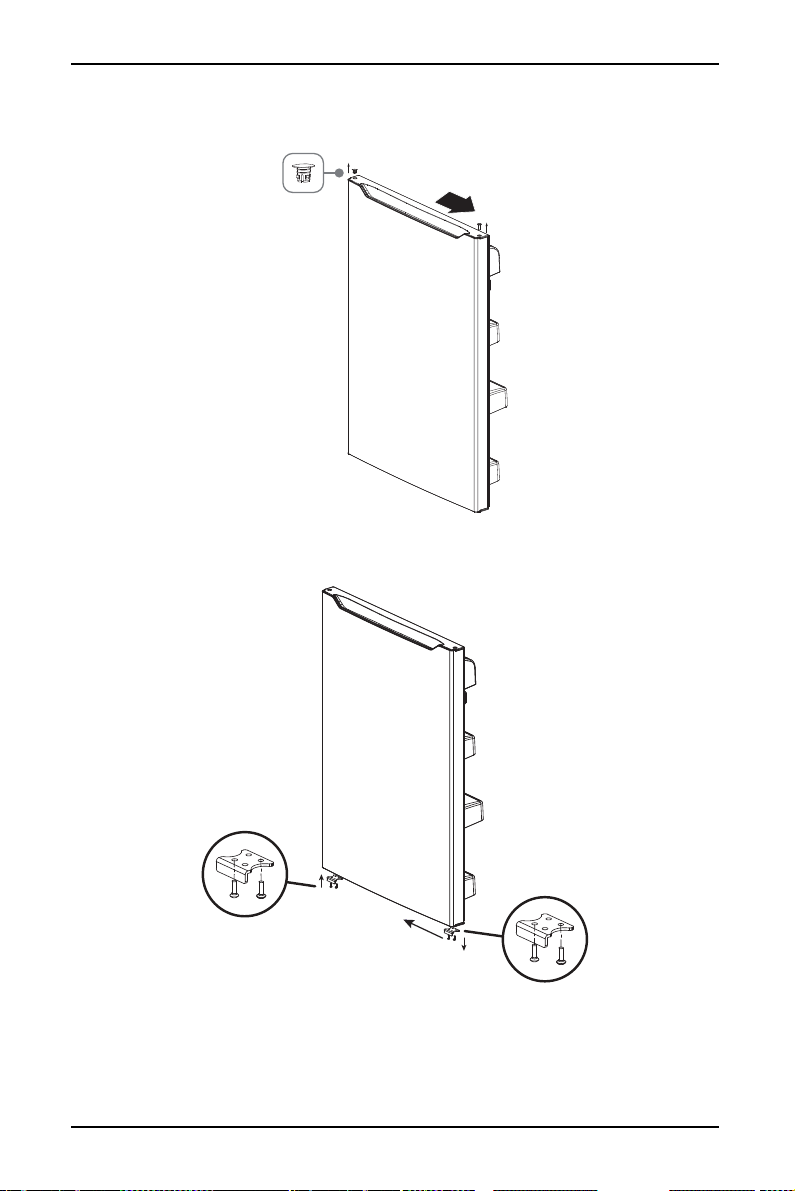
7 Remove the hole cap from the top left of the refrigerator door and insert it in
the other side.
8 Remove the door block from the bottom, right side of the refrigerator door
and attach it to the other side.
www.insigniaproducts.com
13
Page 14
NS-RTM21SS7/NS-RTM21BS8
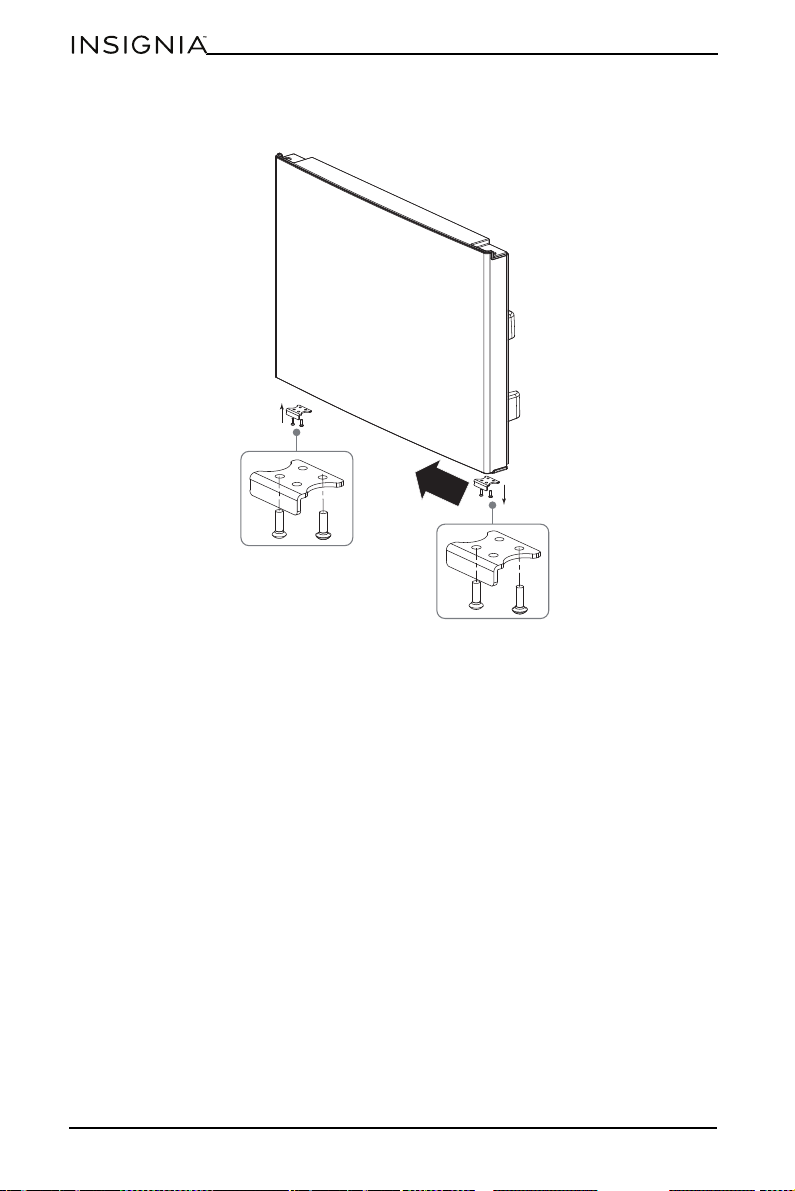
9 Remove the door block from the bottom, right side of the freezer door and
attach it to the bottom, left side.
14
www.insigniaproducts.com
Page 15
21 Cu. Ft. Top Mount Refrigerator
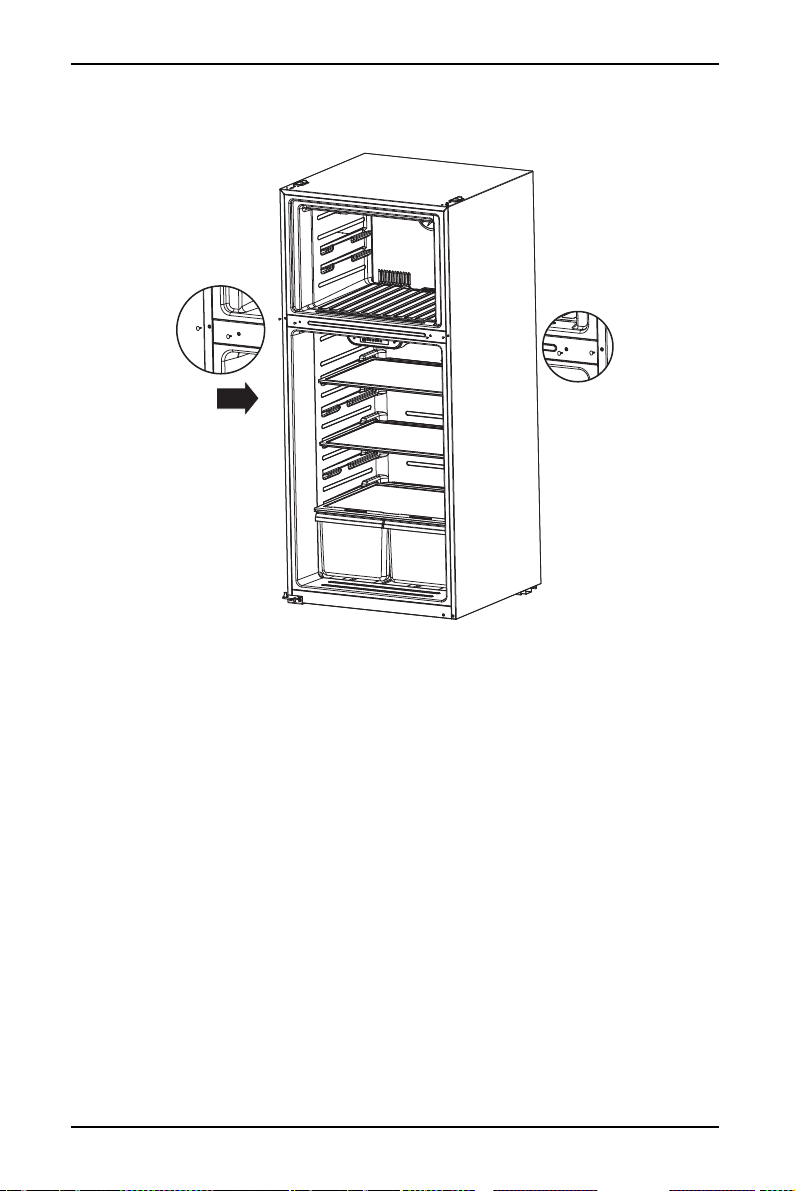
10 Remove the two hole caps from the left side, where the center hinge will go,
and insert them into the other side.
www.insigniaproducts.com
15
Page 16
NS-RTM21SS7/NS-RTM21BS8
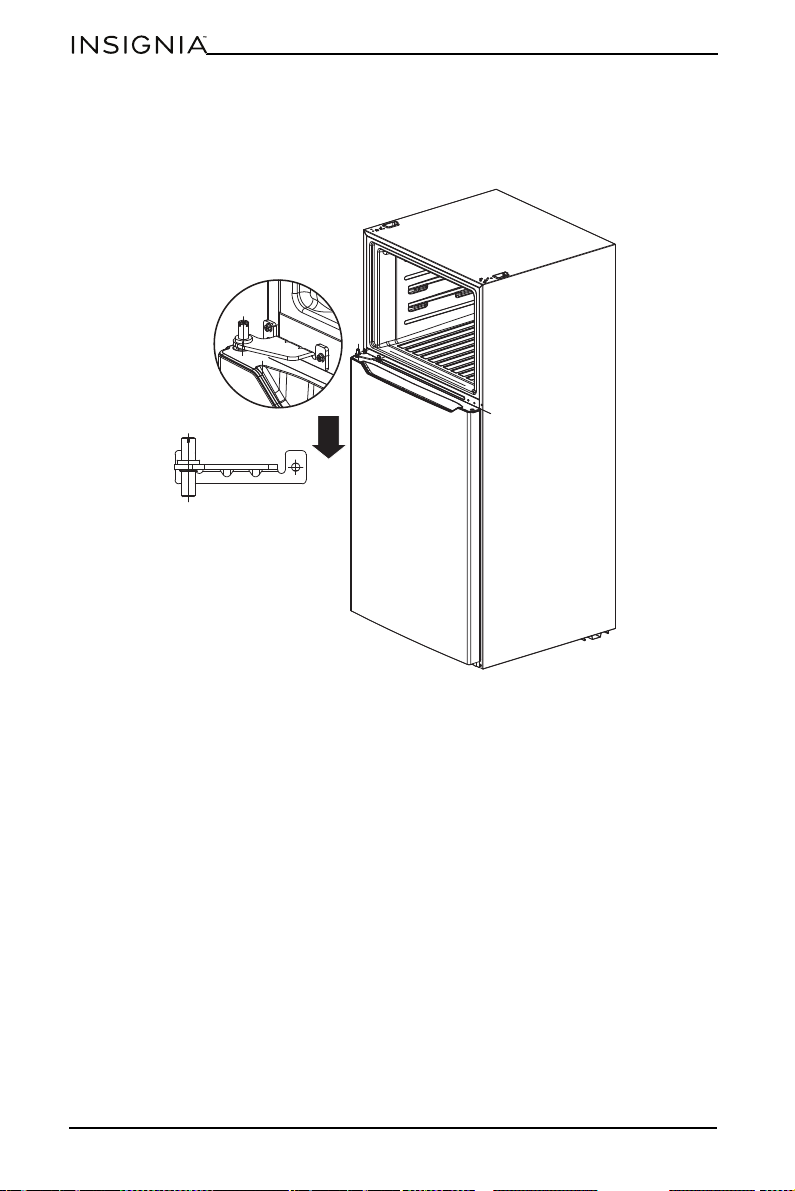
11 Attach the refrigerator door on the bottom hinge, then attach the center left
hinge to the left side of the refrigerator with two screws. Insert the hinge pin
into the center hinge and tighten with a Phillips screwdriver until the shoulder
of the hinge pin is touching the center hinge.
16
www.insigniaproducts.com
Page 17
21 Cu. Ft. Top Mount Refrigerator
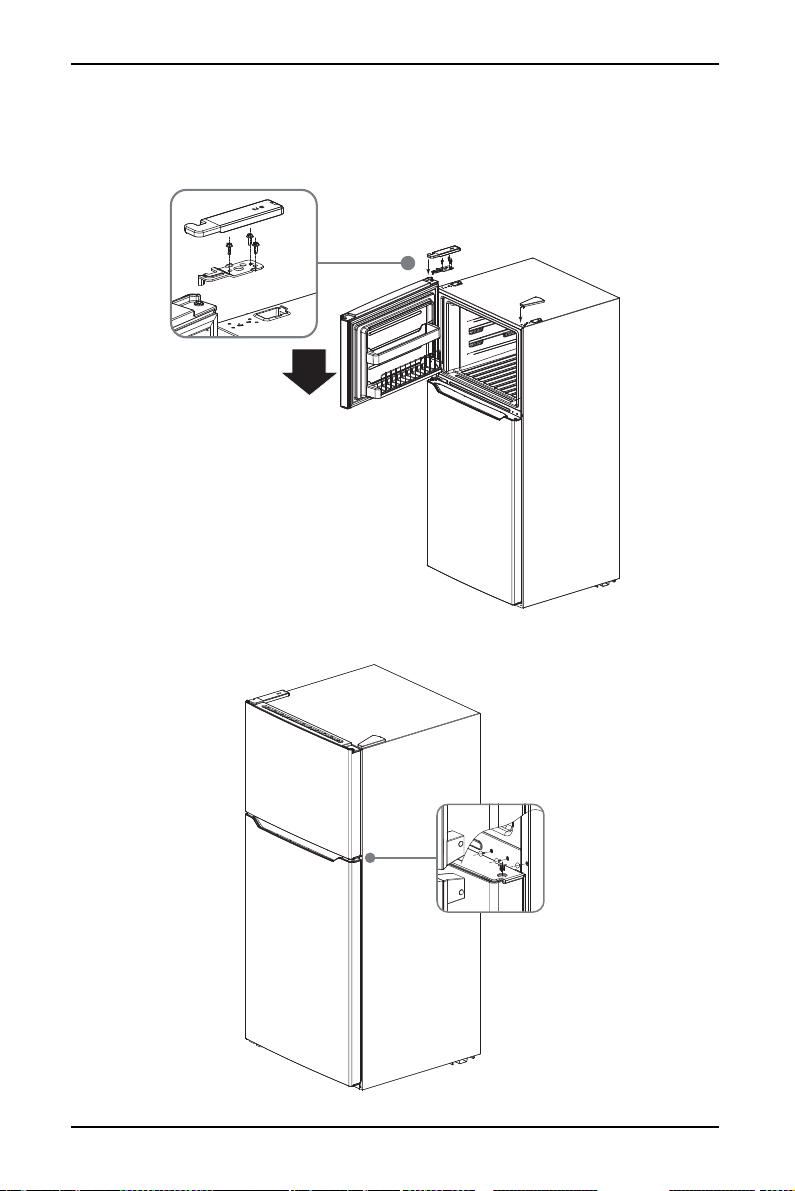
Attach the top left hinge
12 Put the freezer door onto the center left hinge, then attach the top left hinge
to the top of refrigerator. Cover the hinge with the top left hinge cover and
cover the screw holes on the right side of the top with the cover plate you
previously removed.
13 Add covers to the screw holes and hinge pivot.
www.insigniaproducts.com
17
Page 18
NS-RTM21SS7/NS-RTM21BS8
Installing the optional ice maker (sold separately)
The refrigerator comes set up for ice maker installation. This refrigerator is
compatible with the Insignia NS-IMK20WH7 ice maker. Installation instructions
will come with the ice maker.
Maintaining your refrigerator
Your refrigerator is designed for year-round use with only minimal cleaning and
maintenance.
When you first receive it, wipe the cabinet with a mild detergent and warm water,
then wipe dry with a dry cloth. Do this periodically to keep your refrigerator
looking new.
CAUTION: To prevent damage to the finish, do not use:
• Gasoline, benzine, thinner, or other similar solvents.
• Abrasive cleaners.
1 Turn off the refrigerator and unplug it from the wall outlet.
2 Remove all food.
3 Wash the inside with a damp warm cloth soaked in a solution of one quart of
lukewarm water to two tablespoons of baking soda solution.
4 Be sure to keep the door gasket (seal) clean to keep the refrigerator running
efficiently.
5 Dry the interior and exterior with a soft cloth.
Note: If the interior LED light should require changing, contact Customer
Service to have it replaced.
Defrosting the freezer
This refrigerator is frost free, so you don't need to defrost it. You just need to clean
it periodically, following the above instructions.
Shutting down your refrigerator - long vacations
(several months)
1 Turn off the refrigerator and unplug it from the wall outlet.
2 Remove all food.
3 Clean the refrigerator.
4 Leave the door open slightly to avoid possible formation of condensation,
mold, or odor.
CAUTION: Use extreme caution with children. The refrigerator should not be
accessible to child's play.
18
www.insigniaproducts.com
Page 19

21 Cu. Ft. Top Mount Refrigerator
Moving your refrigerator
1 Turn off the refrigerator and unplug it from the wall outlet.
2 Remove all food.
3 Securely tape down all loose items inside your refrigerator.
4 Tape the doors shut.
Be sure the refrigerator stays in the upright position during transportation.
Tips on saving energy
• Locate your refrigerator in the coolest area of the room, away from heat
producing appliances or heating ducts and out of the direct sunlight.
• Let hot foods cool before placing them in the refrigerator. Overloading the
refrigerator forces the compressor to run longer. Foods that freeze too slowly
may lose quality or spoil.
• Wrap foods properly and wipe containers dry before placing them in the
refrigerator. This cuts down on frost build-up inside the refrigerator.
• Organize and label food to reduce door openings and extended searches.
www.insigniaproducts.com
19
Page 20
NS-RTM21SS7/NS-RTM21BS8
Troubleshooting
CAUTION: Do not try to repair your refrigerator yourself. Doing so invalidates
the warranty.
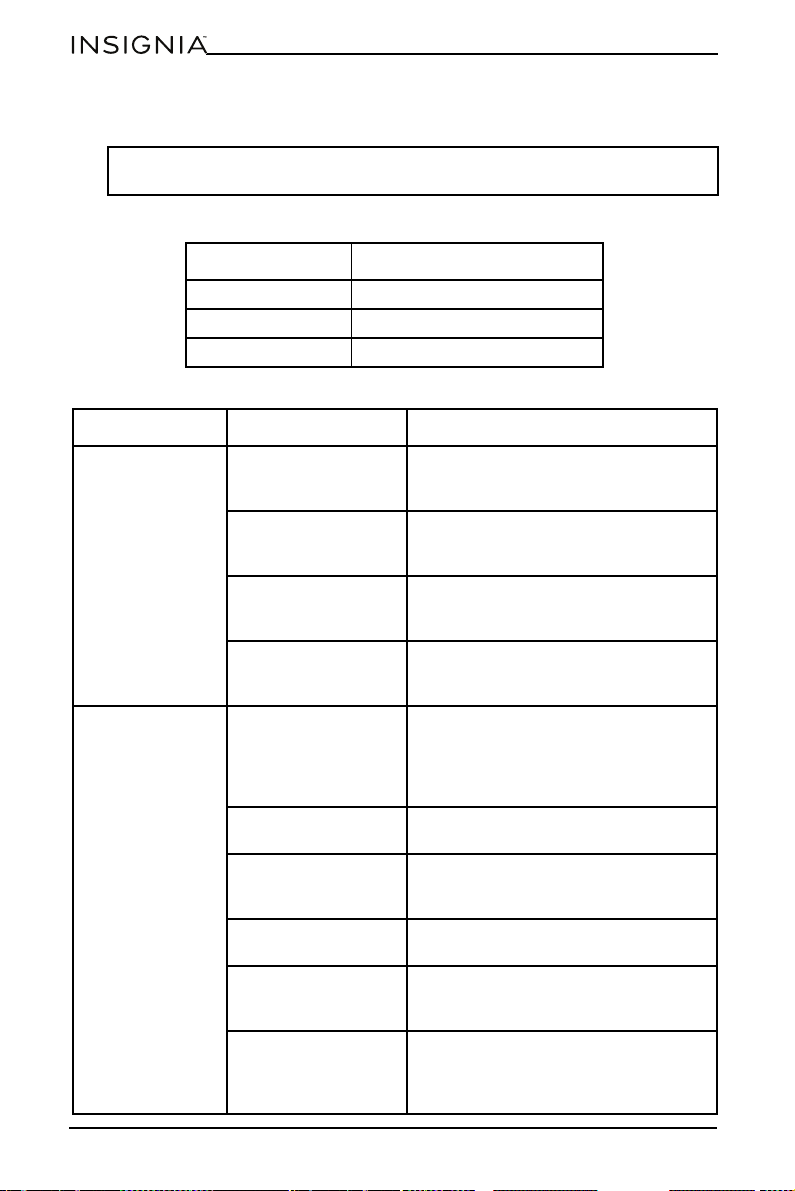
Error codes
LED DISPLAY PROBLEM
LED 1 and LED 2 lit Temperature sensor circuit
LED 1 and LED 3 lit Freezer defrost sensor
LED 1 and LED 4 lit Ambient temperature sensor
PROBLEM POSSIBLE CAUSE POSSIBLE SOLUTION
The refrigerator
does not operate.
The compressor
turns on and off
frequently.
The refrigerator is
unplugged.
The thermostat is set
to the STANDBY
position.
The fuse on the circuit
is blown or the circuit
breaker is tripped.
Power failure. If a power failure occurs, the refrigerator
The door has been
opened too often or
was not closed
properly. The door seal
may be dirty.
The room temperature
is hotter than normal.
A large amount of food
was recently added to
the refrigerator.
The thermostat is not
set correctly.
The refrigerator does
not have the correct
clearances.
The refrigerator has
recently been
disconnected for a
period of time.
Make sure that the refrigerator is
plugged in and that the plug is pushed
completely into the outlet.
Press the SET button until LED 3 lights.
Check the house fuse/circuit breaker box
and replace the fuse or reset the circuit
breaker.
turns off. Wait until the power is
restored.
Make sure that the door is closed
properly. Clean the door seal if
necessary.
This is normal, under the circumstances.
This is normal, under the circumstances.
Reset the thermostat correctly.
The refrigerator should be no closer than
five inches from the adjacent walls.
Allow four hours for the refrigerator to
cool down completely.
20
www.insigniaproducts.com
Page 21
21 Cu. Ft. Top Mount Refrigerator
PROBLEM POSSIBLE CAUSE POSSIBLE SOLUTION
Food in the
refrigerator
compartment is
freezing.
Food in the
refrigerator
compartment is
not cold.
The refrigerator
makes unusual
noises.
Moisture is
building up in the
interior of the
refrigerator.
The thermostat is set
too cold.
The door has been
opened too often or
was not closed
properly.
You have just added a
large amount of food
to the refrigerator or
freezer compartments.
The thermostat is set
too warm.
The door gasket does
not seal properly.
The refrigerator has
recently been
disconnected for a
period of time.
The refrigerator may
not be level on the
floor.
The body of the
refrigerator is touching
a wall.
The door has been
opened too often or
was not closed
properly.
The refrigerator is in a
location that is very
humid.
The food in the
refrigerator is not
packaged properly.
Set the thermostat to a warmer setting.
Make sure that the door is closed
properly.
Allow time for the new food to cool,
then check again.
Adjust the thermostat to a colder
setting.
Clean the gasket.
Allow four hours for the refrigerator to
cool completely.
Level the refrigerator with the leveling
feet.
Move the refrigerator out from the wall.
Make sure that the door is closed
properly.
Move the refrigerator to a dryer location.
Repackage the food in the refrigerator to
make sure that it is sealed.
www.insigniaproducts.com
21
Page 22
NS-RTM21SS7/NS-RTM21BS8
PROBLEM POSSIBLE CAUSE POSSIBLE SOLUTION
The refrigerator
door does not close
completely.
The exterior of the
refrigerator is
warm.
There is a popping
or crackling sound
when the
compressor comes
on.
There is a bubbling
or gurgling sound,
like water boiling.
Vibrations. The refrigerator is not
There is moisture
forming on the
external walls of
the refrigerator.
Food packages are
interfering with the
door.
The shelves are out of
position.
The door gaskets are
dirty.
The refrigerator is not
level.
This is normal.
This is normal. The sound should level off or disappear
This is normal.
on a level or sturdy
surface.
The refrigerator may
be touching a wall.
The door may be
slightly open.
Move the food packages or remove
some food.
Adjust the shelves properly.
Clean the door gaskets.
Level the refrigerator with the leveling
feet.
as the refrigerator continues to run.
Make sure that the refrigerator is on a
level, sturdy surface. Level the
refrigerator with the leveling legs.
Make sure that the refrigerator is not
touching a wall.
Make sure that the door closes
completely.
Specifications
Dimensions (H × W × D) 66.2 × 32.8 × 32.3 in. (168.1 × 83.4 × 82 cm)
Weight 198 lbs (90 kg)
Power requirements 115 V~60 Hz
Current 2 A without icemaker
3.3 A with icemaker
Power consumption (annual) 396 kwh
22
www.insigniaproducts.com
Page 23

21 Cu. Ft. Top Mount Refrigerator
ONE-YEAR LIMITED WARRANTY
Definitions:
The Distributor* of Insignia branded products warrants to you, the original purchaser of this
new Insignia-branded product (“Product”), that the Product shall be free of defects in the
original manufacturer of the material or workmanship for a period of one (1) year from the
date of your purchase of the Product (“Warranty Period”).
For this warranty to apply, your Product must be purchased in the United States or Canada
from a Best Buy branded retail store or online at www.bestbuy.com or www.bestbuy.ca and
is packaged with this warranty statement.
How long does the coverage last?
The Warranty Period lasts for 1 year (365 days) from the date you purchased the Product.
Your purchase date is printed on the receipt you received with the Product.
What does this warranty cover?
During the Warranty Period, if the original manufacture of the material or workmanship of
the Product is determined to be defective by an authorized Insignia repair center or store
personnel, Insignia will (at its sole option): (1) repair the Product with new or rebuilt parts; or
(2) replace the Product at no charge with new or rebuilt comparable products or parts.
Products and parts replaced under this warranty become the property of Insignia and are
not returned to you. If service of Products or parts are required after the Warranty Period
expires, you must pay all labor and parts charges. This warranty lasts as long as you own your
Insignia Product during the Warranty Period. Warranty coverage terminates if you sell or
otherwise transfer the Product.
How to obtain warranty service?
If you purchased the Product at a Best Buy retail store location or from a Best Buy online
website (www.bestbuy.com or www.bestbuy.ca), please take your original receipt and the
Product to any Best Buy store. Make sure that you place the Product in its original packaging
or packaging that provides the same amount of protection as the original packaging.
To obtain warranty service, in the United States and Canada call 1-877-467-4289. Call agents
may diagnose and correct the issue over the phone.
Where is the warranty valid?
This warranty is valid only in the United States and Canada at Best Buy branded retail stores
or websites to the original purchaser of the product in the country where the original
purchase was made.
What does the warranty not cover?
This warranty does not cover:
• Customer instruction/education
•Installation
•Set up adjustments
• Cosmetic damage
• Damage due to weather, lightning, and other acts of God, such as power surges
• Accidental damage
•Misuse
•Abuse
•Negligence
• Commercial purposes/use, including but not limited to use in a place of business or in
communal areas of a multiple dwelling condominium or apartment complex, or
otherwise used in a place of other than a private home.
• Modification of any part of the Product, including the antenna
• Display panel damaged by static (non-moving) images applied for lengthy periods
(burn-in).
• Damage due to incorrect operation or maintenance
www.insigniaproducts.com
23
Page 24
NS-RTM21SS7/NS-RTM21BS8
• Connection to an incorrect voltage or power supply
• Attempted repair by any person not authorized by Insignia to service the Product
• Products sold “as is” or “with all faults”
•Consumable
• s, including but not limited to batteries (i.e. AA, AAA, C etc.)
• Products where the factory applied serial number has been altered or removed
• Loss or Theft of this product or any part of the product
• Display panels containing up to three (3) pixel failures (dots that are dark or incorrectly
illuminated) grouped in an area smaller than one tenth (1/10) of the display size or up to
five (5) pixel failures throughout the display. (Pixel based displays may contain a limited
number of pixels that may not function normally.)
• Failures or Damage caused by any contact including but not limited to liquids, gels or
pastes.
REPAIR REPLACEMENT AS PROVIDED UNDER THIS WARRANTY IS YOUR EXCLUSIVE REMEDY
FOR BREACH OF WARRANTY. INSIGNIA SHALL NOT BE LIABLE FOR ANY INCIDENTAL OR
CONSEQUENTIAL DAMAGES FOR THE BREACH OF ANY EXPRESS OR IMPLIED WARRANTY ON
THIS PRODUCT, INCLUDING, BUT NOT LIMITED TO, LOST DATA, LOSS OF USE OF YOUR
PRODUCT, LOST BUSINESS OR LOST PROFITS. INSIGNIA PRODUCTS MAKES NO OTHER
EXPRESS WARRANTIES WITH RESPECT TO THE PRODUCT, ALL EXPRESS AND IMPLIED
WARRANTIES FOR THE PRODUCT, INCLUDING BUT NOT LIMITED TO ANY IMPLIED
WARRANTIES OF AND CONDITIONS OF MERCHANTABILITY AND FITNESS FOR A PARTICULAR
PURPOSE, ARE LIMITED IN DURATION TO THE WARRANTY PERIOD SET FORTH ABOVE AND
NO WARRANTIES, WHETHER EXPRESS OR IMPLIED, WILL APPLY AFTER THE WARRANTY
PERIOD. SOME STATES, PROVINCES AND JURISDICTIONS DO NOT ALLOW LIMITATIONS ON
HOW LONG AN IMPLIED WARRANTY LASTS, SO THE ABOVE LIMITATION MAY NOT APPLY TO
YOU. THIS WARRANTY GIVES YOU SPECIFIC LEGAL RIGHTS, AND YOU MAY ALSO HAVE OTHER
RIGHTS, WHICH VARY FROM STATE TO STATE OR PROVINCE TO PROVINCE.
Contact Insignia:
1-877-467-4289
www.insigniaproducts.com
INSIGNIA is a trademark of Best Buy and its affiliated companies.
*Distributed by Best Buy Purchasing, LLC
7601 Penn Ave South, Richfield, MN 55423 U.S.A.
©2020 Best Buy. All rights reserved.©2020 Best Buy. All rights reserved.
24
www.insigniaproducts.com
Page 25
www.insigniaproducts.com
1-877-467-4289 (U.S. and Canada) or 01-800-926-3000 (Mexico)
INSIGNIA is a trademark of Best Buy and its affiliated companies.
Distributed by Best Buy Purchasing, LLC
7601 Penn Ave South, Richfield, MN 55423 U.S.A.
©2020 Best Buy. All rights reserved.
V7 ENGLISH
20-0738
 Loading...