

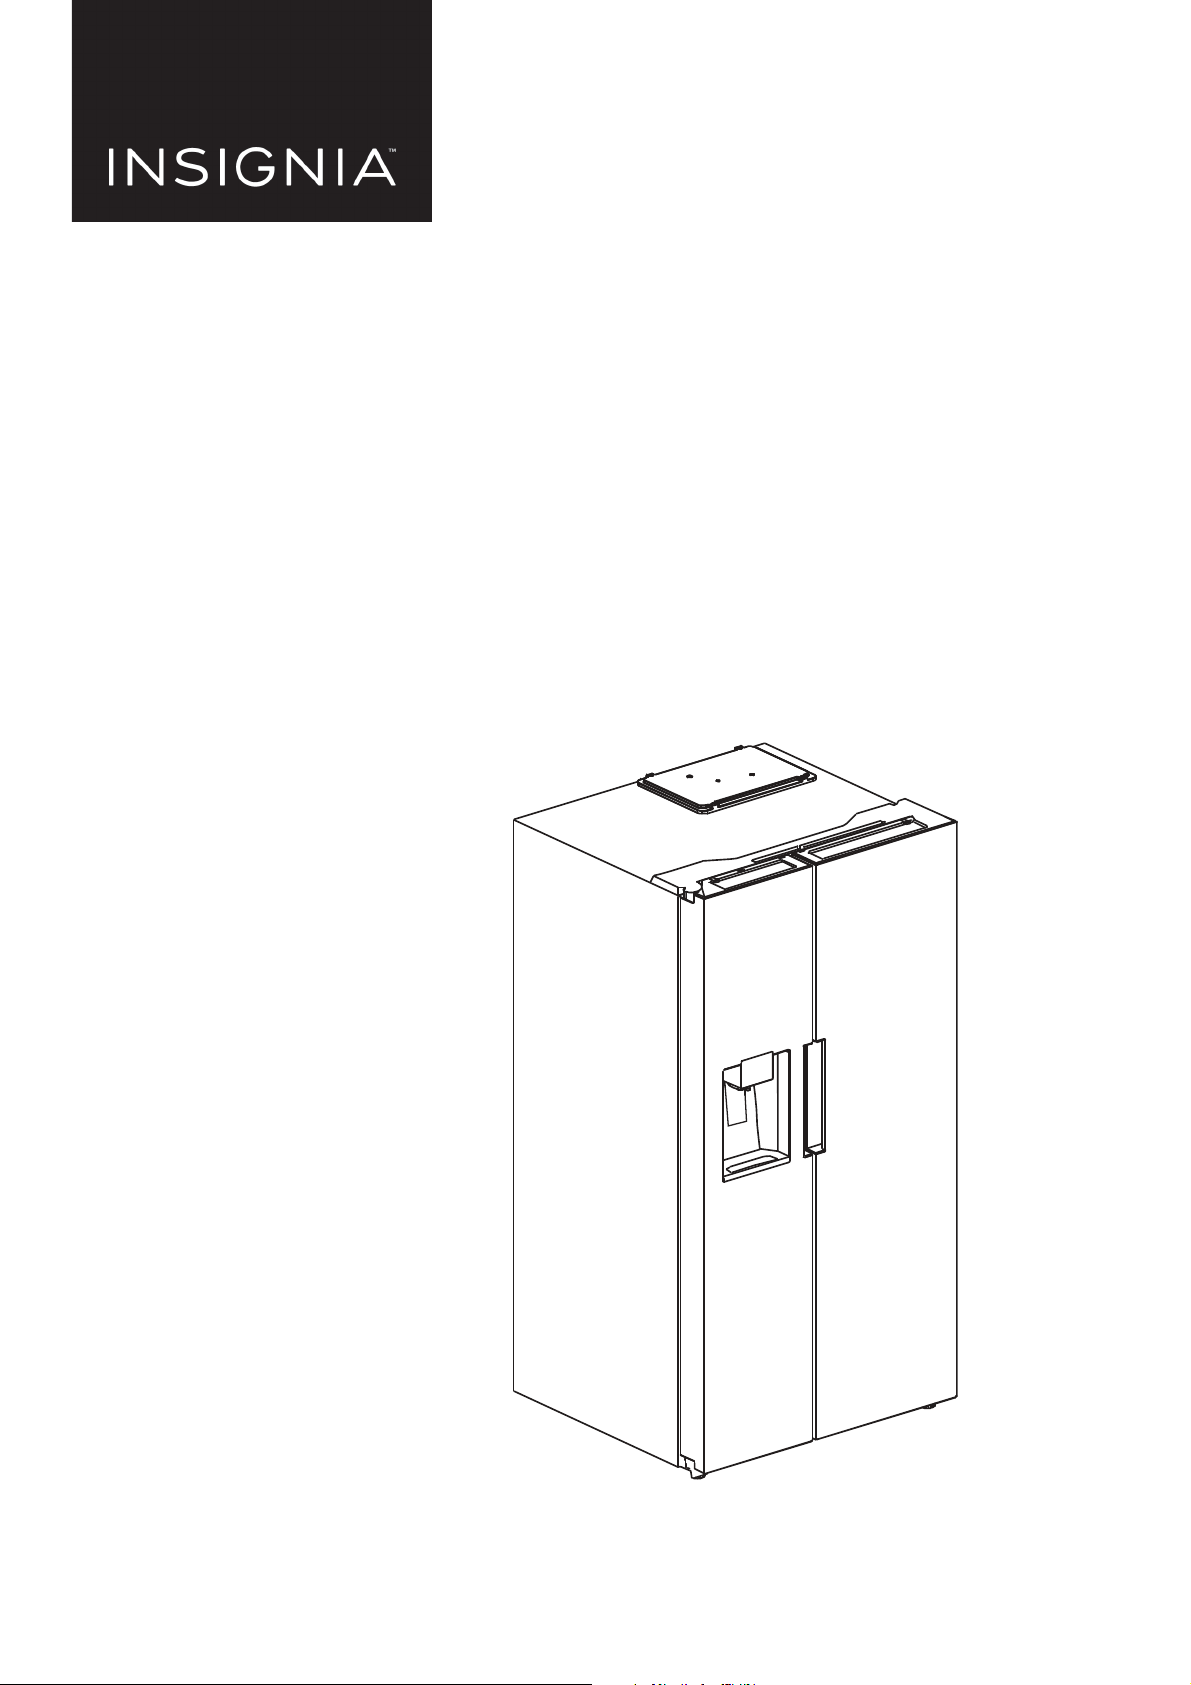
USER GUIDE
26.3 Cu. Ft.
Side-by-Side Refrigerator
NS-RSS26SS0/NS-RSS26WH0
Before using your new product, please read these instructions to prevent any damage.

Contents
Introduction . . . . . . . . . . . . . . . . . . . . . . . . . . . . . . . . . . . . . . . . . . . . . . . . . . . . . . . . . . . . . . . . . . . . . . . . . . . . . . . . . . . . . . . . . . 3
IMPORTANT SAFETY INSTRUCTIONS . . . . . . . . . . . . . . . . . . . . . . . . . . . . . . . . . . . . . . . . . . . . . . . . . . . . . . . . . . . . . . . . . . . 3
Grounding requirement . . . . . . . . . . . . . . . . . . . . . . . . . . . . . . . . . . . . . . . . . . . . . . . . . . . . . . . . . . . . . . . . . . . . . . . . . . . . . . . . . . . . . . . . . . 5
Features . . . . . . . . . . . . . . . . . . . . . . . . . . . . . . . . . . . . . . . . . . . . . . . . . . . . . . . . . . . . . . . . . . . . . . . . . . . . . . . . . . . . . . . . . . . . . . 6
Package contents . . . . . . . . . . . . . . . . . . . . . . . . . . . . . . . . . . . . . . . . . . . . . . . . . . . . . . . . . . . . . . . . . . . . . . . . . . . . . . . . . . . . . . . . . . . . . . . . . 6
Dimensions. . . . . . . . . . . . . . . . . . . . . . . . . . . . . . . . . . . . . . . . . . . . . . . . . . . . . . . . . . . . . . . . . . . . . . . . . . . . . . . . . . . . . . . . . . . . . . . . . . . . . . . 6
Interior . . . . . . . . . . . . . . . . . . . . . . . . . . . . . . . . . . . . . . . . . . . . . . . . . . . . . . . . . . . . . . . . . . . . . . . . . . . . . . . . . . . . . . . . . . . . . . . . . . . . . . . . . . . 7
Exterior. . . . . . . . . . . . . . . . . . . . . . . . . . . . . . . . . . . . . . . . . . . . . . . . . . . . . . . . . . . . . . . . . . . . . . . . . . . . . . . . . . . . . . . . . . . . . . . . . . . . . . . . . . . 8
Control panel. . . . . . . . . . . . . . . . . . . . . . . . . . . . . . . . . . . . . . . . . . . . . . . . . . . . . . . . . . . . . . . . . . . . . . . . . . . . . . . . . . . . . . . . . . . . . . . . . . . . . 9
Setting up your refrigerator . . . . . . . . . . . . . . . . . . . . . . . . . . . . . . . . . . . . . . . . . . . . . . . . . . . . . . . . . . . . . . . . . . . . . . . . . . 10
Before using your refrigerator . . . . . . . . . . . . . . . . . . . . . . . . . . . . . . . . . . . . . . . . . . . . . . . . . . . . . . . . . . . . . . . . . . . . . . . . . . . . . . . . . . . . 10
Finding a suitable location . . . . . . . . . . . . . . . . . . . . . . . . . . . . . . . . . . . . . . . . . . . . . . . . . . . . . . . . . . . . . . . . . . . . . . . . . . . . . . . . . . . . . . . 10
Providing correct ventilation . . . . . . . . . . . . . . . . . . . . . . . . . . . . . . . . . . . . . . . . . . . . . . . . . . . . . . . . . . . . . . . . . . . . . . . . . . . . . . . . . . . . . 11
Providing room for doors to open . . . . . . . . . . . . . . . . . . . . . . . . . . . . . . . . . . . . . . . . . . . . . . . . . . . . . . . . . . . . . . . . . . . . . . . . . . . . . . . . 11
Providing the correct power source . . . . . . . . . . . . . . . . . . . . . . . . . . . . . . . . . . . . . . . . . . . . . . . . . . . . . . . . . . . . . . . . . . . . . . . . . . . . . . 12
Leveling your refrigerator . . . . . . . . . . . . . . . . . . . . . . . . . . . . . . . . . . . . . . . . . . . . . . . . . . . . . . . . . . . . . . . . . . . . . . . . . . . . . . . . . . . . . . . . 13
Leveling the refrigerator door (optional) . . . . . . . . . . . . . . . . . . . . . . . . . . . . . . . . . . . . . . . . . . . . . . . . . . . . . . . . . . . . . . . . . . . . . . . . . . 14
Connecting the water supply. . . . . . . . . . . . . . . . . . . . . . . . . . . . . . . . . . . . . . . . . . . . . . . . . . . . . . . . . . . . . . . . . . . . . . . . . 15
Connecting the water supply to your refrigerator . . . . . . . . . . . . . . . . . . . . . . . . . . . . . . . . . . . . . . . . . . . . . . . . . . . . . . . . . . . . . . . . . 17
Using your refrigerator. . . . . . . . . . . . . . . . . . . . . . . . . . . . . . . . . . . . . . . . . . . . . . . . . . . . . . . . . . . . . . . . . . . . . . . . . . . . . . . 19
Switching between Fahrenheit and Celsius . . . . . . . . . . . . . . . . . . . . . . . . . . . . . . . . . . . . . . . . . . . . . . . . . . . . . . . . . . . . . . . . . . . . . . . 19
Setting the refrigerator temperature . . . . . . . . . . . . . . . . . . . . . . . . . . . . . . . . . . . . . . . . . . . . . . . . . . . . . . . . . . . . . . . . . . . . . . . . . . . . . 19
Setting the freezer temperature . . . . . . . . . . . . . . . . . . . . . . . . . . . . . . . . . . . . . . . . . . . . . . . . . . . . . . . . . . . . . . . . . . . . . . . . . . . . . . . . . . 19
Using the ice/water dispenser . . . . . . . . . . . . . . . . . . . . . . . . . . . . . . . . . . . . . . . . . . . . . . . . . . . . . . . . . . . . . . . . . . . . . . . . . . . . . . . . . . . . 19
Using Super Cool to speed refrigerator cooling . . . . . . . . . . . . . . . . . . . . . . . . . . . . . . . . . . . . . . . . . . . . . . . . . . . . . . . . . . . . . . . . . . . 20
Using Super Freeze to speed freezing . . . . . . . . . . . . . . . . . . . . . . . . . . . . . . . . . . . . . . . . . . . . . . . . . . . . . . . . . . . . . . . . . . . . . . . . . . . . 20
Using the Energy Saving mode . . . . . . . . . . . . . . . . . . . . . . . . . . . . . . . . . . . . . . . . . . . . . . . . . . . . . . . . . . . . . . . . . . . . . . . . . . . . . . . . . . . 20
Using the door trays . . . . . . . . . . . . . . . . . . . . . . . . . . . . . . . . . . . . . . . . . . . . . . . . . . . . . . . . . . . . . . . . . . . . . . . . . . . . . . . . . . . . . . . . . . . . . 21
Adjusting the glass shelves. . . . . . . . . . . . . . . . . . . . . . . . . . . . . . . . . . . . . . . . . . . . . . . . . . . . . . . . . . . . . . . . . . . . . . . . . . . . . . . . . . . . . . . 21
Moving the deli drawer . . . . . . . . . . . . . . . . . . . . . . . . . . . . . . . . . . . . . . . . . . . . . . . . . . . . . . . . . . . . . . . . . . . . . . . . . . . . . . . . . . . . . . . . . . 22
Unlocking the control panel. . . . . . . . . . . . . . . . . . . . . . . . . . . . . . . . . . . . . . . . . . . . . . . . . . . . . . . . . . . . . . . . . . . . . . . . . . . . . . . . . . . . . . 23
Maintaining your refrigerator . . . . . . . . . . . . . . . . . . . . . . . . . . . . . . . . . . . . . . . . . . . . . . . . . . . . . . . . . . . . . . . . . . . . . . . . 23
Removing the fruit and vegetable crisper drawers . . . . . . . . . . . . . . . . . . . . . . . . . . . . . . . . . . . . . . . . . . . . . . . . . . . . . . . . . . . . . . . . 23
Cleaning your refrigerator. . . . . . . . . . . . . . . . . . . . . . . . . . . . . . . . . . . . . . . . . . . . . . . . . . . . . . . . . . . . . . . . . . . . . . . . . . . . . . . . . . . . . . . . 23
Defrosting the freezer compartment . . . . . . . . . . . . . . . . . . . . . . . . . . . . . . . . . . . . . . . . . . . . . . . . . . . . . . . . . . . . . . . . . . . . . . . . . . . . . 24
Replacing the water filter . . . . . . . . . . . . . . . . . . . . . . . . . . . . . . . . . . . . . . . . . . . . . . . . . . . . . . . . . . . . . . . . . . . . . . . . . . . . . . . . . . . . . . . . 24
Replacing the LED light . . . . . . . . . . . . . . . . . . . . . . . . . . . . . . . . . . . . . . . . . . . . . . . . . . . . . . . . . . . . . . . . . . . . . . . . . . . . . . . . . . . . . . . . . . 26
Storing your refrigerator . . . . . . . . . . . . . . . . . . . . . . . . . . . . . . . . . . . . . . . . . . . . . . . . . . . . . . . . . . . . . . . . . . . . . . . . . . . . . 26
Moving your refrigerator . . . . . . . . . . . . . . . . . . . . . . . . . . . . . . . . . . . . . . . . . . . . . . . . . . . . . . . . . . . . . . . . . . . . . . . . . . . . . 26
Tips on saving energy. . . . . . . . . . . . . . . . . . . . . . . . . . . . . . . . . . . . . . . . . . . . . . . . . . . . . . . . . . . . . . . . . . . . . . . . . . . . . . . . 26
Tips on storing food . . . . . . . . . . . . . . . . . . . . . . . . . . . . . . . . . . . . . . . . . . . . . . . . . . . . . . . . . . . . . . . . . . . . . . . . . . . . . . . . . 27
Tips for shopping for frozen foods. . . . . . . . . . . . . . . . . . . . . . . . . . . . . . . . . . . . . . . . . . . . . . . . . . . . . . . . . . . . . . . . . . . . 27
Troubleshooting. . . . . . . . . . . . . . . . . . . . . . . . . . . . . . . . . . . . . . . . . . . . . . . . . . . . . . . . . . . . . . . . . . . . . . . . . . . . . . . . . . . . . 27
Error codes . . . . . . . . . . . . . . . . . . . . . . . . . . . . . . . . . . . . . . . . . . . . . . . . . . . . . . . . . . . . . . . . . . . . . . . . . . . . . . . . . . . . . . . . . . . . . . . . . . . . . . 29
Specifications. . . . . . . . . . . . . . . . . . . . . . . . . . . . . . . . . . . . . . . . . . . . . . . . . . . . . . . . . . . . . . . . . . . . . . . . . . . . . . . . . . . . . . . . 30
General. . . . . . . . . . . . . . . . . . . . . . . . . . . . . . . . . . . . . . . . . . . . . . . . . . . . . . . . . . . . . . . . . . . . . . . . . . . . . . . . . . . . . . . . . . . . . . . . . . . . . . . . . . 30
Water filter . . . . . . . . . . . . . . . . . . . . . . . . . . . . . . . . . . . . . . . . . . . . . . . . . . . . . . . . . . . . . . . . . . . . . . . . . . . . . . . . . . . . . . . . . . . . . . . . . . . . . . 30
ONE-YEAR LIMITED WARRANTY . . . . . . . . . . . . . . . . . . . . . . . . . . . . . . . . . . . . . . . . . . . . . . . . . . . . . . . . . . . . . . . . . . . . . . 32
2
www.insigniaproducts.com
NS-RSS26SS0/NS-RSS26WH0
26.3 Cu. Ft. Side-by-Side Refrigerator
Introduction
Congratulations on your purchase of a high-quality Insignia product. Your NS-RSS26SS0/NS-RSS26WH0 represents the
state of the art in refrigerator design and is designed for reliable and trouble-free performance.
IMPORTANT SAFETY INSTRUCTIONS
Warning: risk of fire/flammable materials
WARNINGS
1 This appliance is intended to be used in household and similar applications, such as staff kitchen areas in shops, offices,
and other working environments, farm houses, and by clients in hotels, motels, and other residential type
environments, bed and breakfast type environments, catering, and similar non-retail applications.
2 This appliance is not intended for use by persons (including children) with reduced physical, sensory, or mental
capabilities, or lack of experience and knowledge, unless they have been given supervision or instruction concerning
the use of the appliance by a person responsible for their safety.
3 Children should be supervised to make sure that they do not play with the appliance.
4 If the supply cord is damaged, it must be replaced by the manufacturer, its service agent, or similarly qualified person,
in order to avoid a hazard.
5 Do not store explosive substances, such as aerosol cans with a flammable propellant, in this appliance.
6 Unplug this appliance after use and before carrying out user maintenance on the appliance.
7 WAR NIN G–Risk of fire/flammable materials.
8 WAR NIN G–Keep ventilation openings, in the appliance enclosure or in the built-in structure, clear of obstruction.
9 WAR NIN G–Do not use mechanical devices or other means to accelerate the defrosting process, other than those
recommended by the manufacturer.
10 WAR NIN G–Do not damage the refrigerant circuit.
11 WAR NIN G–Do not use electrical appliances inside the food storage compartments of the appliance, unless they are of
the type recommended by the manufacturer.
12 WAR NIN G–Follow local regulations regarding disposal of your refrigerator due to flammable refrigerant and gas.
13 Do not use extension cords or ungrounded (two prong) adapters.
14 DANGER–Risk of child entrapment. Before you throw away your old refrigerator or freezer:
•Take off the doors
• Leave the shelves in place so that children can’t easily climb inside
15 The refrigerator must be disconnected from the source of electrical supply before attempting the installation of
accessories.
16 WAR NIN G–Connect to potable water supply only.
WARNING SYMBOLS
This manual contains important safety information which shall be observed by the users.
This is a prohibition symbol.
Any noncompliance with instructions marked with this symbol may result in
damage to the product or endanger the personal safety of the user.
This is a warning symbol.
It is required to operate in strict observance of instructions marked with this symbol;
or otherwise damage to the product or personal injury may be caused.
This is a caution symbol.
Instructions marked with this symbol require special caution. Insufficient caution
may result in slight or moderate injury, or damage to the product.
www.insigniaproducts.com
3
WARNINGS - ELECTRICAL
• Do not pull on the power cord when unplugging the refrigerator. Firmly grasp
• To ensure safe use, do not damage the power cord or use the power cord when it
• Use a dedicated power socket. The power socket shall not be shared with other
• The power cord should be firmly inserted into the socket or else fires may result.
• Make sure that the grounding electrode of the power socket is equipped with a
• In case of a gas leak, turn off the gas valve, then open your doors and windows.
• Do not use electrical appliances inside the food storage compartments of the
WARNINGS - USE
• Do not disassemble or reassemble the refrigerator, nor damage the refrigerant
• A damaged power cord must be replaced by the manufacturer, its maintenance
26.3 Cu. Ft. Side-by-Side Refrigerator
the plug and pull it from the socket directly.
is damaged or worn.
electrical appliances.
reliable grounding line.
Do not unplug the refrigerator or other electrical appliances. The resulting spark
may cause a fire.
appliance, unless they are of the type recommended by the manufacturer.
circuit. Maintenance of the appliance must be conducted by a specialist.
department, or related professionals in order to avoid danger.
• The gaps between the refrigerator doors and between the doors and the
• Do not pick up food or containers with wet hands in the freezer when the
• To avoid suffocation or injury from a fall, do not allow children to get into or
• Do not place heavy objects on the top of the refrigerator. Objects may fall when
• Unplug the refrigerator in case of power failure or when cleaning. Do not plug in
WARNINGS - PLACEMENT
• Do not put flammable, explosive, volatile, and highly corrosive items in the
• Do not place flammable items near the refrigerator to avoid fires.
• The refrigerator is intended for household use, such as storage of foods. It shall
• Do not store beer, beverages, or other fluid contained in bottles or enclosed
refrigerator body are small. Do not put your hand in these areas to prevent
squeezing your finger. Gently close the refrigerator door to avoid knocking over
the contents.
refrigerator is running. Metal containers may cause frostbite.
climb on the refrigerator.
opening or closing the door, and accidental injuries might be caused.
the refrigerator within five minutes of unplugging it in order to prevent damages
to the compressor due to successive starts.
refrigerator to prevent damage to the product or fire accidents.
not be used for other purposes, such as storage of blood, drugs, or biological
products.
containers in the freezer. Bottles or enclosed containers may crack due to
freezing.
WARNINGS - ENERGY
• Refrigerators might not operate consistently (possibility of defrosting contents or temperature becoming too warm in
the frozen food compartment) when located for an extended period of time below the cold end of the range of
temperatures for which the refrigerating appliance is designed.
• Carbonated drinks should not be stored in freezer compartments or cabinets or in low-temperature compartments or
cabinets. Some products, such as water ices, should not be consumed too cold.
• Do not exceed the storage time(s) recommended by the food manufacturers for any kind of food and particularly for
commercially quick-frozen food in food-freezer and frozen-food storage compartments or cabinets.
• Wrap frozen food in several layers of newspaper to prevent an undue rise in the temperature of the frozen food while
defrosting the freezer.
• A rise in temperature of frozen food during manual defrosting, maintenance, or cleaning could shorten its storage life.
4
www.insigniaproducts.com
NS-RSS26SS0/NS-RSS26WH0
• To prevent children from being locked inside, keep keys out of the reach of children and not in the vicinity of the
refrigerator.
WARNINGS - DISPOSAL
Refrigerant and cyclopentane foaming material used for the
refrigerator are flammable. Therefore, when the refrigerator is
scrapped, it shall be kept away from any fire source and be
recovered by a special recovery company with proper
qualifications, and not be disposed of by burning, so as to prevent
damage to the environment or any other harm.
When the refrigerator is scrapped, disassemble the doors, and
remove the door gasket and shelves. Put the doors and shelves in
a proper place, so as to prevent trapping of any child.
Grounding requirement
Your refrigerator must be grounded. Your refrigerator is equipped with a cord having a grounding wire with a grounding
plug. The plug must be inserted into an outlet that is correctly installed and grounded.
Incorrect use of the grounding plug can result in a risk of electric shock. Consult a qualified electrician or service person if
the grounding instructions are not completely understood, or if doubt exists as to whether your refrigerator is correctly
grounded.
www.insigniaproducts.com
5
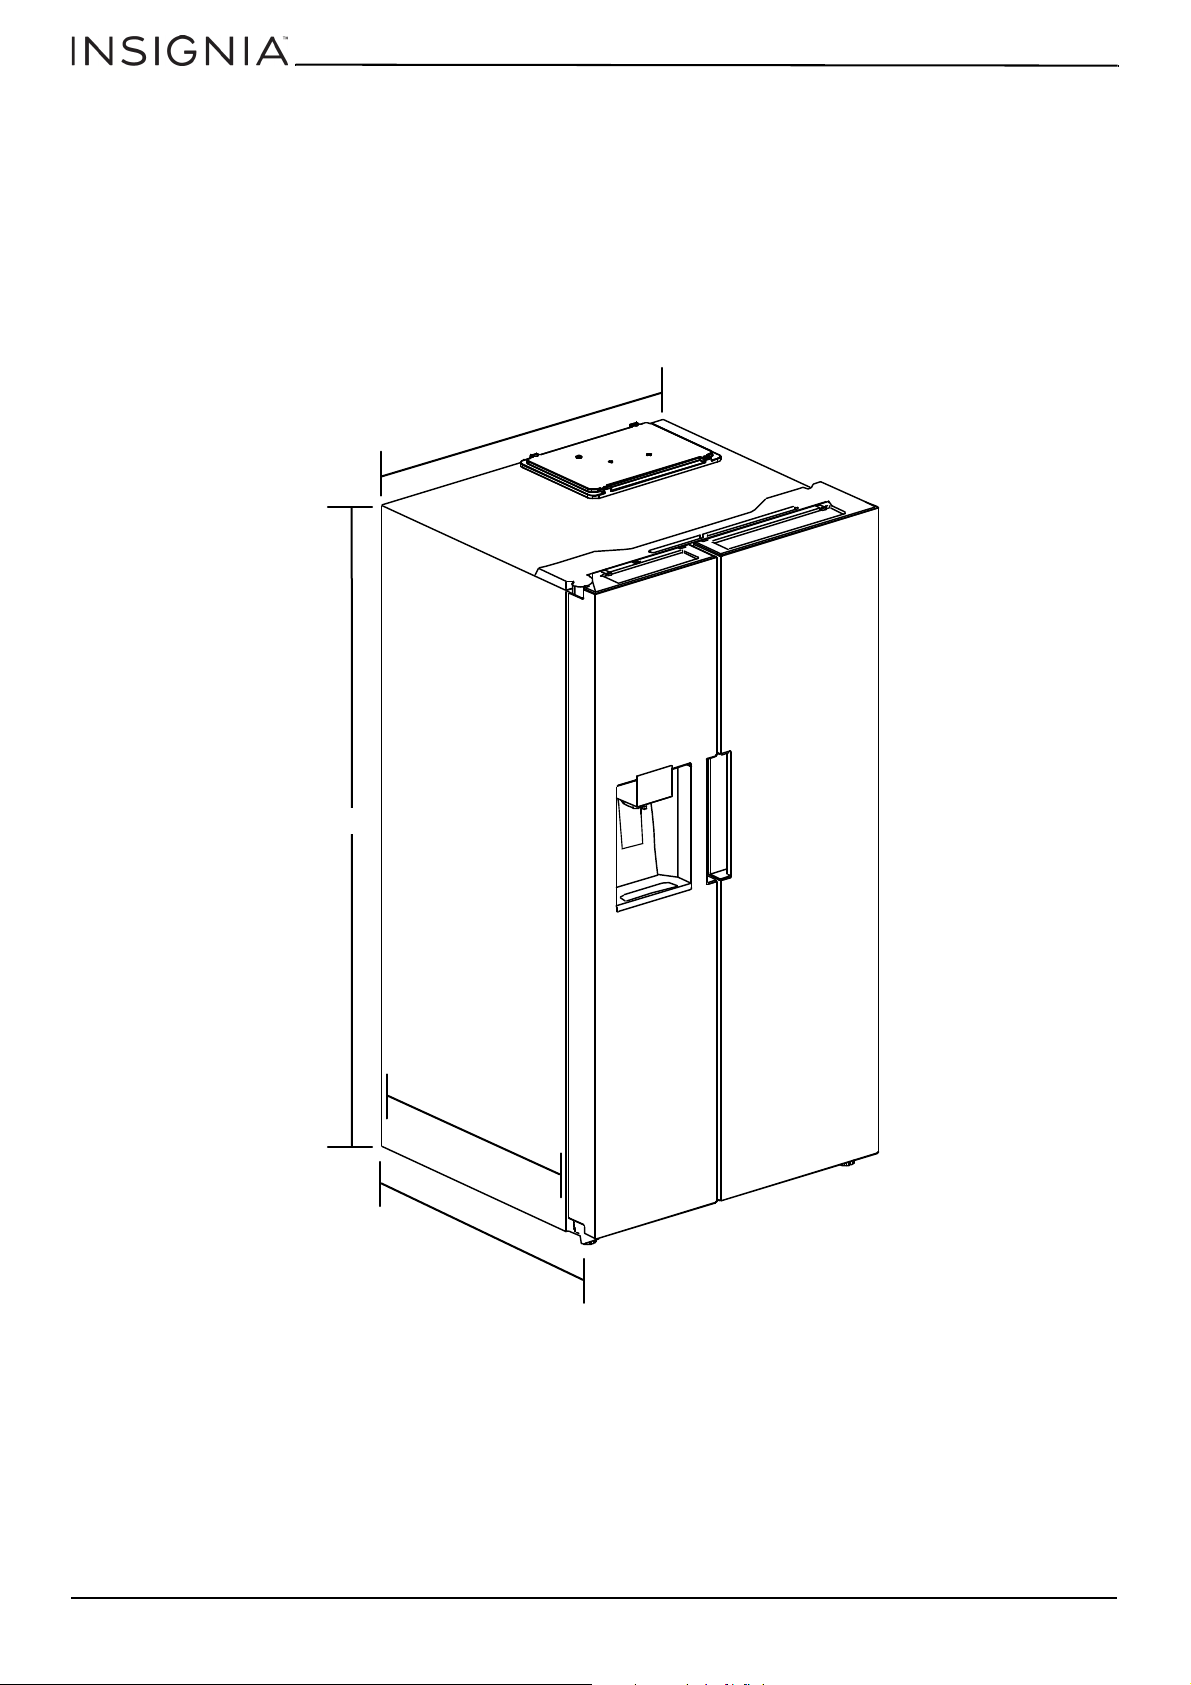
Features
3
5
.
8
i
n
.
(
9
1
c
m
)
3
3
.
9
i
n
.
(
8
6
c
m
)
69.8 in. (177.5 cm)
2
9
.
1
i
n
.
(
7
4
c
m
)
Package contents
• 26.3 cu. ft. Side-by-Side Refrigerator
•Water Filter (1)
• Wrench (door adjustment)
•User Guide
Dimensions
26.3 Cu. Ft. Side-by-Side Refrigerator
6
www.insigniaproducts.com
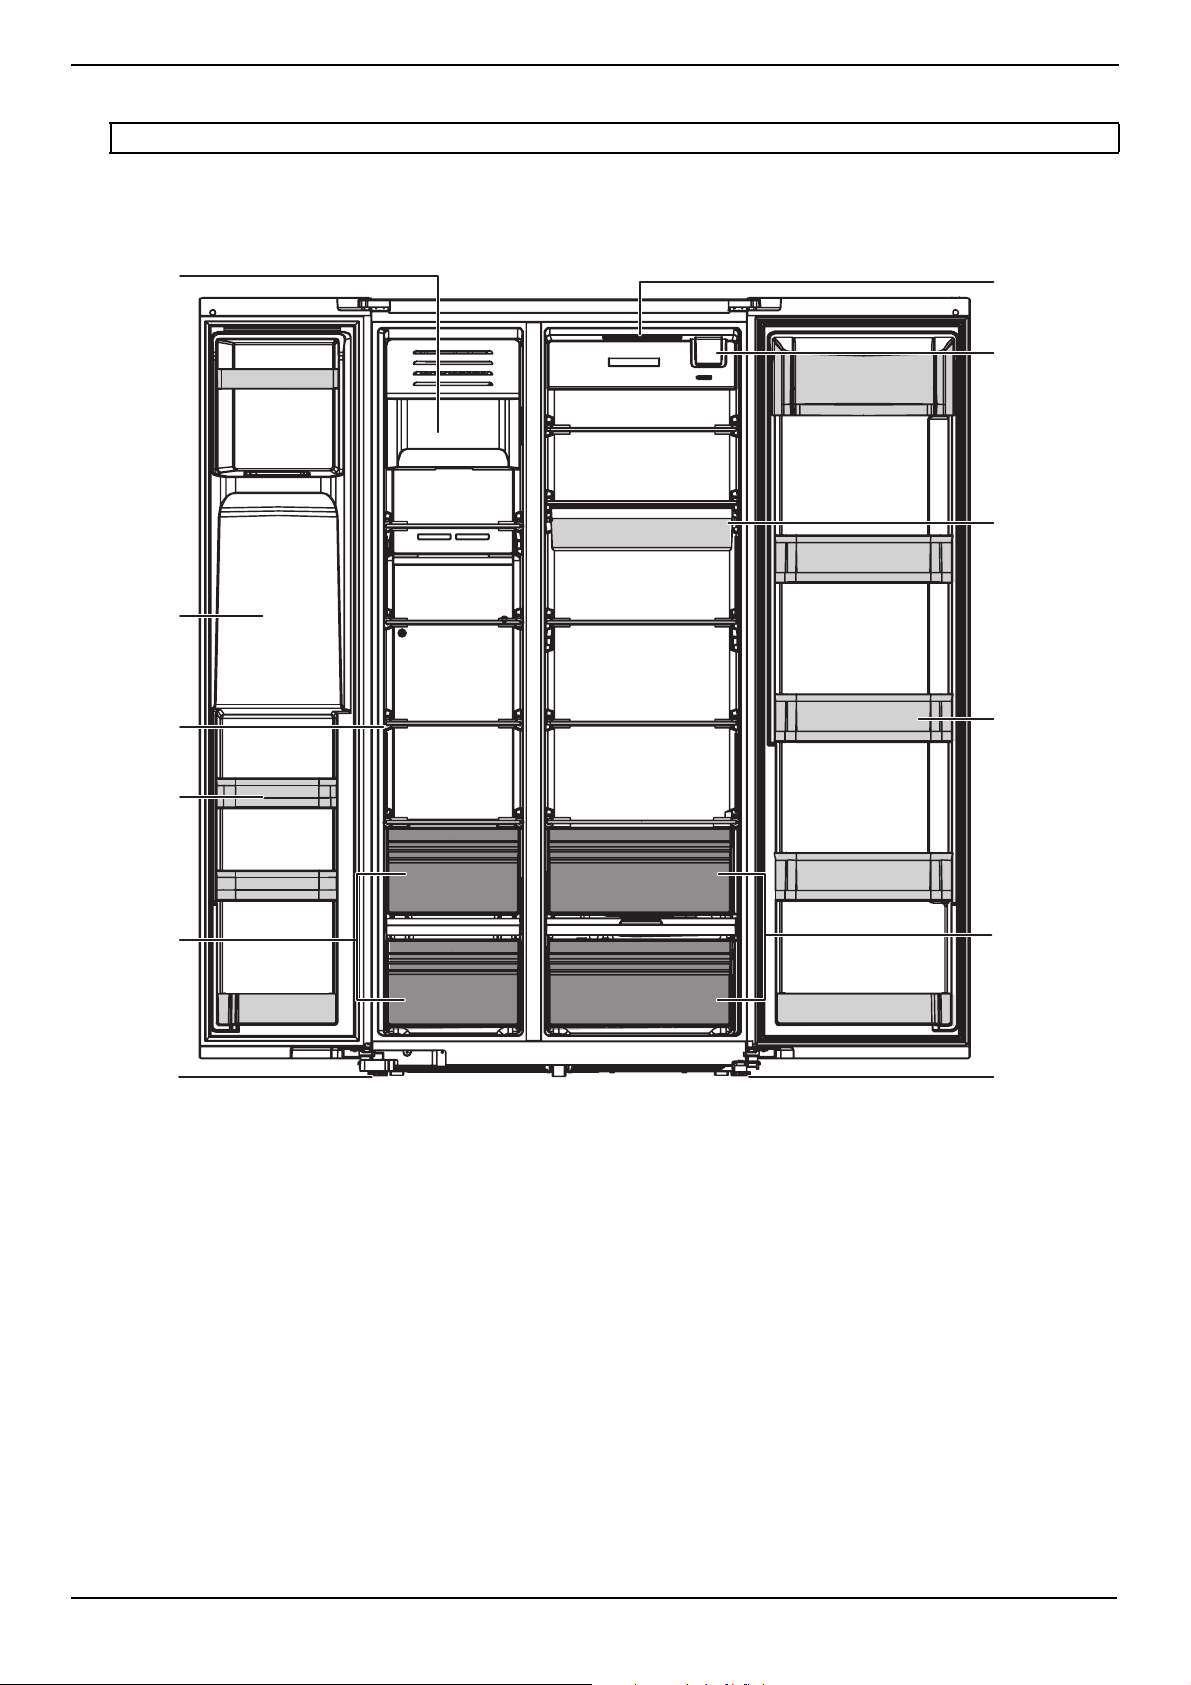
Interior
Ice storage
bin
Ice/water
dispenser
Fruit and
vegetable
crisper drawers
Freezer
drawers
Refrigerator
LED light
Door tray
Deli drawer
Glass shelf
Door tray
Freezer compartment
Refrigerator compartment
Leveling foot
Leveling foot
Water filter
Note: The illustrations shown in this user guide are only for reference. The actual product may differ slightly.
NS-RSS26SS0/NS-RSS26WH0
www.insigniaproducts.com
7
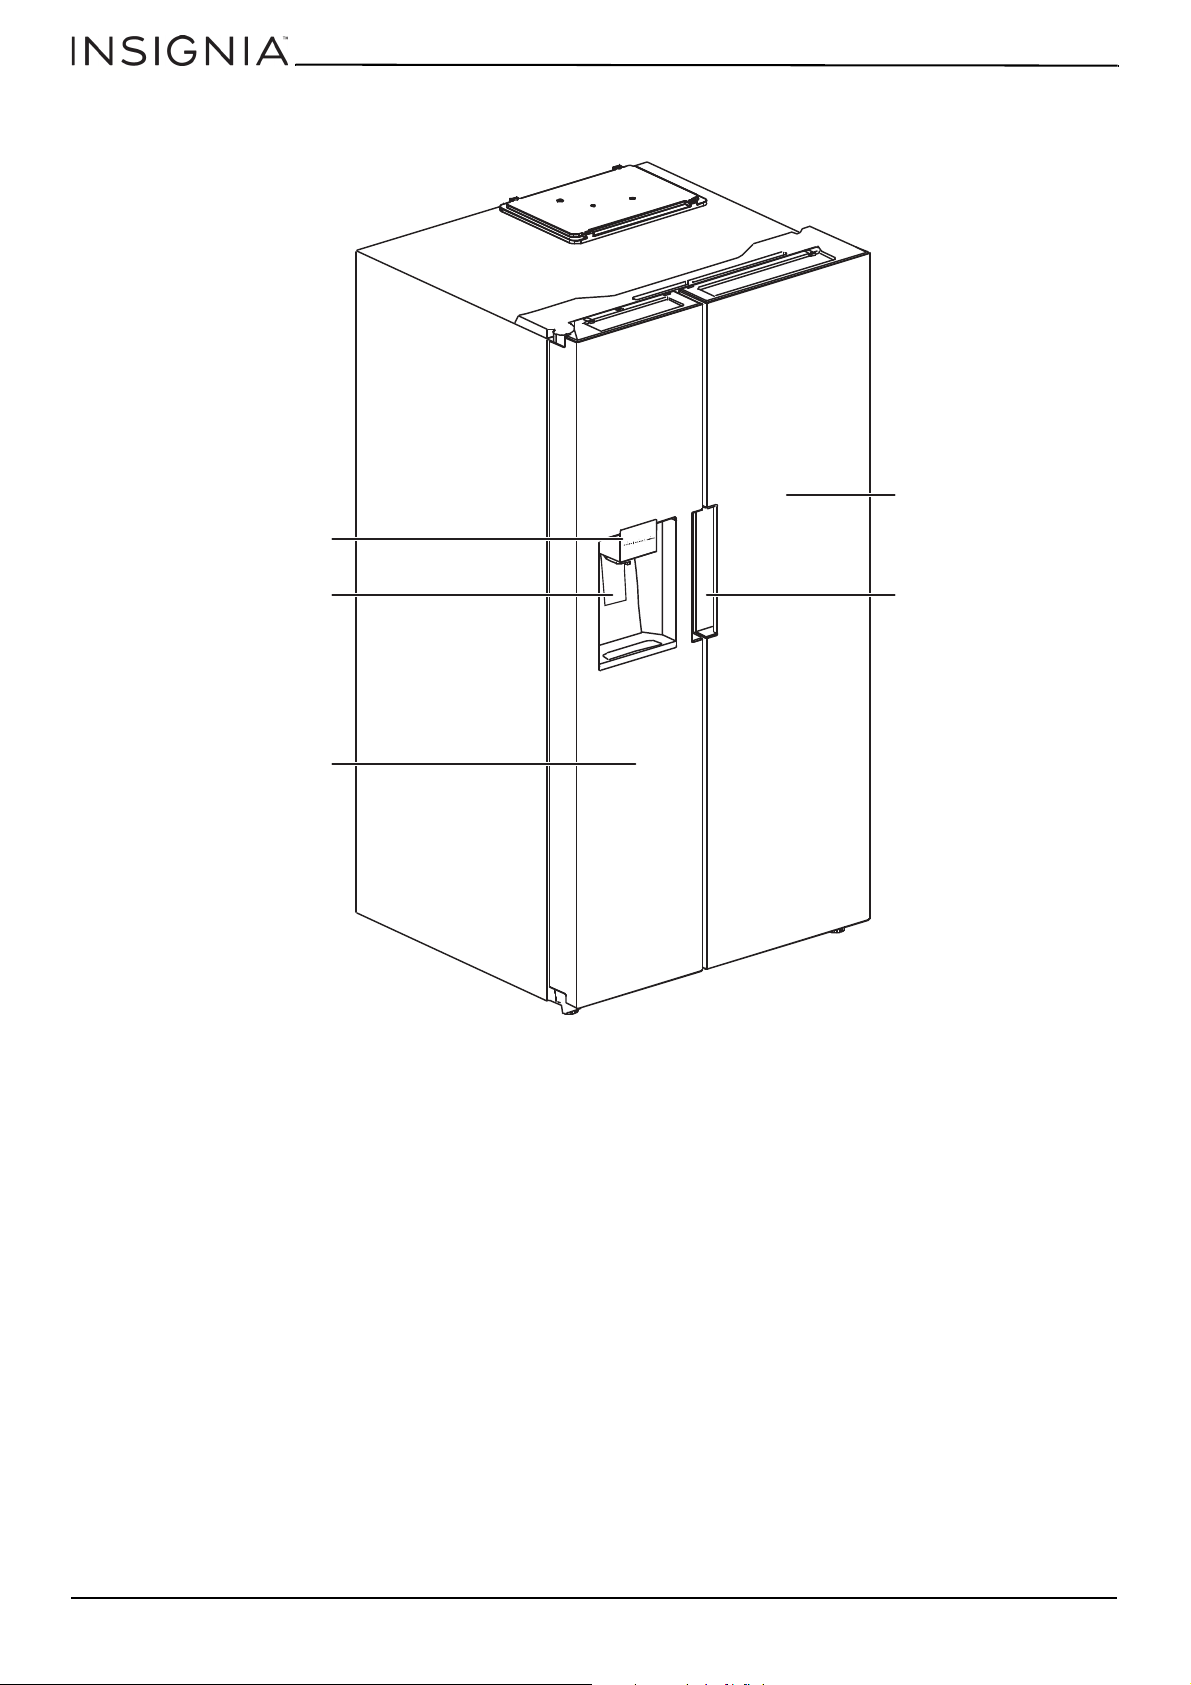
Exterior
Handles
Freezer door
Refrigerator door
Ice/Water dispenser
Ice/Water dispenser
control panel
26.3 Cu. Ft. Side-by-Side Refrigerator
8
www.insigniaproducts.com
NS-RSS26SS0/NS-RSS26WH0
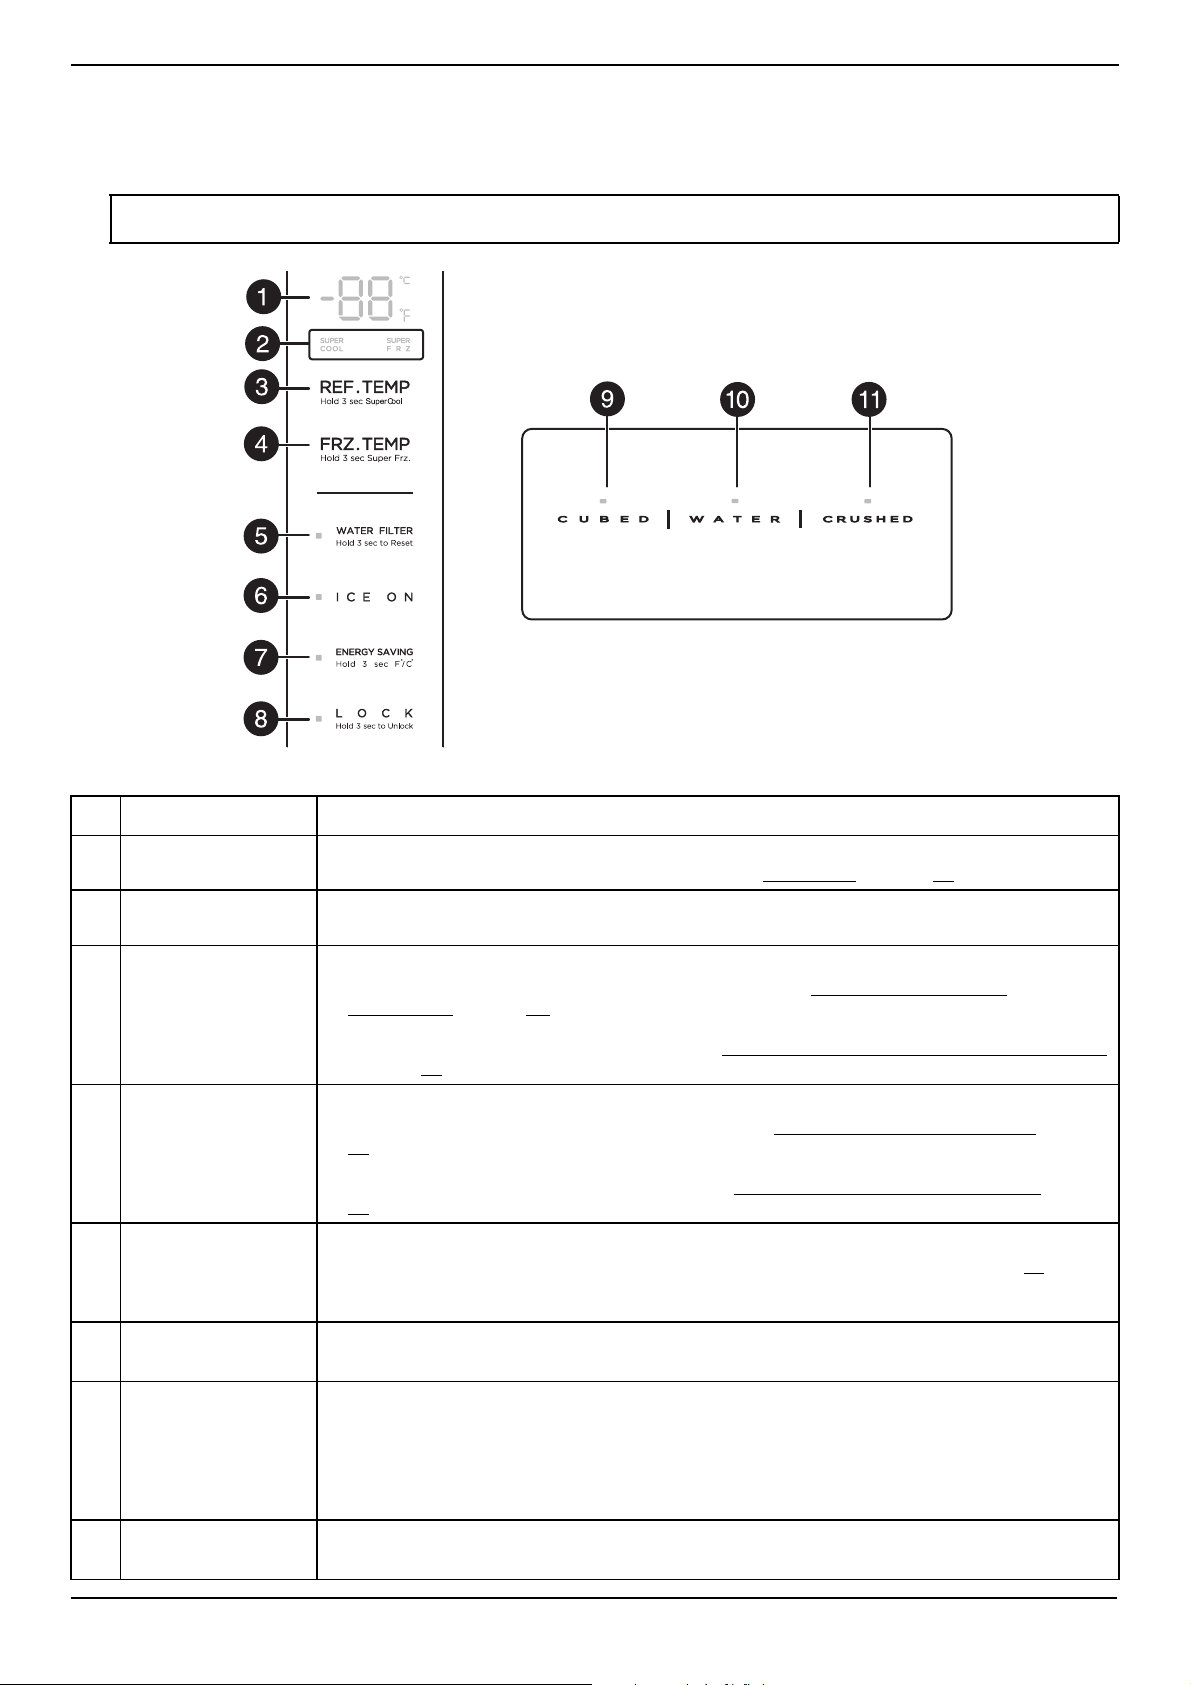
Control panel
The control panel is located on the freezer door, just above the handle.
The first time you connect your refrigerator to power, the control panel icons light for three seconds and a buzzer sounds.
When you open the refrigerator compartment door, the control panel lights.
CAUTION:
depending on how much food you store, where you place it, and the ambient temperature.
Temperatures inside each compartment may vary ±3.6°F (±2°C) from the temperature displayed on the control panel,
NO.
Temperature indicator
1
SUPER COOL
2
SUPER FRZ
REF. TEMP button
3
FRZ. TEMP button
4
WATER FILTER
5
indicator and button
ICE ON indicator and
6
ice maker button
ITEM DESCRIPTION
Displays the current refrigerator or freezer temperature.
Displays error codes when an error has occurred. See Error codes
Super cool and super freeze indicators. Light when super cool and/or super freeze modes are
turned on.
• Press to show the refrigerator temperature on the temperature indicator.
• Press again to change the refrigerator temperature. See Setting the refrigerator
temperatureon page 19.
• Press and hold for three seconds to turn on Super Cool mode, which lowers the refrigerator
compartment temperature to 34°F (1°C). See Using Super Cool to speed refrigerator cooling
on page 20
• Press to show the freezer temperature on the temperature indicator.
• Press again to change the freezer temperature. See Setting the freezer temperature
.
19
• Press and hold for three seconds to turn on Super Freeze mode, which lowers the freezer
compartment temperature to -7°F (-22°C). See Using Super Freeze to speed freezing
.
20
• Lights when the water filter has been in use for 150 days, or blinks when the water filter has
been in use for 180 days. Replace the filter. See Replacing the water filter on page 24
instructions on changing the water filter.
• Press and hold for three seconds to reset the water filter indicator.
• Lights when the ice maker is turned on.
• Press to turn the ice maker on or off.
.
on page 29.
on page
on page
for
ENERGY SAVING
indicator and button
7
°F / °C button
LOCK button and
8
indicator
• Press to turn on the Energy Saving mode. The indicator lights and the Energy Saving mode
turns on, which automatically sets your refrigerator temperature to 44°F (7°C) and your
freezer temperature to 7°F (-14°C).
• Press again to turn off the Energy Saving mode. The refrigerator/freezer returns to
previously set levels.
• Press and hold for three seconds to toggle the temperature display between °F and °C.
• Lights when the control panel lock is turned on.
• Press and hold for three seconds to lock or unlock the control panel.
www.insigniaproducts.com
9
26.3 Cu. Ft. Side-by-Side Refrigerator
NO.
CUBED button and
9
indicator
WATER button and
10
indicator
CRUSHED button and
11
indicator
ITEM DESCRIPTION
• Press to select ice cubes to be dispensed.
• Indicator lights when ice cubes are selected.
• Press to select cold water to be dispensed.
• Indicator lights when cold water is selected.
• Press to select crushed ice to be dispensed.
• Indicator lights when crushed ice is selected.
Setting up your refrigerator
Before using your refrigerator
• Remove the interior packaging, including bottom cushions, foam pads, and tapes.
• Remove the protective film from the doors and refrigerator body.
• Let your refrigerator stand upright for about 30 minutes before connecting it to power. This reduces the possibility of a
malfunction in the cooling system from improper handling during transportation.
• Wash the inside with a damp warm cloth soaked in a solution of one quart of lukewarm water to two tablespoons of
baking soda.
• Before putting in any fresh or frozen foods, let your freezer run for two to three hours. If the ambient temperature is
high, for example in summer, wait for four or more hours.
• Adjust the feet to keep your refrigerator level. See Leveling your refrigerator
• When moving your refrigerator, do not tilt it beyond 45° from the upright position.
Finding a suitable location
• Place your refrigerator on a floor that is strong enough to support your refrigerator when it is fully loaded.
• Do not install your refrigerator on carpeting or a rug.
• Your refrigerator is designed to be free standing and should not be recessed or built-in.
• If you locate your refrigerator next to a fixed wall, allow sufficient space on the sides for the doors to swing open.
• Position your refrigerator away from direct sunlight and sources of heat, such as a stove, heater, or radiator. Direct
sunlight may affect the acrylic coating and heat sources may increase electrical consumption. Extremely cold
temperatures may also prevent your refrigerator from performing correctly.
• Avoid locating your refrigerator in moist areas.
Your refrigerator is designed to operate in a temperature range of 50° F (10° C) and 109° F (43° C). If you operate your
refrigerator outside this temperature range, your refrigerator may not work correctly.
on page 13.
10
www.insigniaproducts.com

NS-RSS26SS0/NS-RSS26WH0
2 in. (5 cm)
.375 in. (1 cm)
2 in. (5 cm)
.375 in. (1 cm)
35.6 in. (91.1 cm)
48.3 in. (122.6 cm)
61.4 in. (156 cm)
29.1 in. (74.0 cm)
130°
Providing correct ventilation
Your refrigerator needs at least .375 in. (1 cm) between it and all surrounding walls and at least 2 in. (5 cm) between it and
the ceiling.
Providing room for doors to open
Make sure that you have enough room in front of your refrigerator to swing the doors open.
www.insigniaproducts.com
11
26.3 Cu. Ft. Side-by-Side Refrigerator
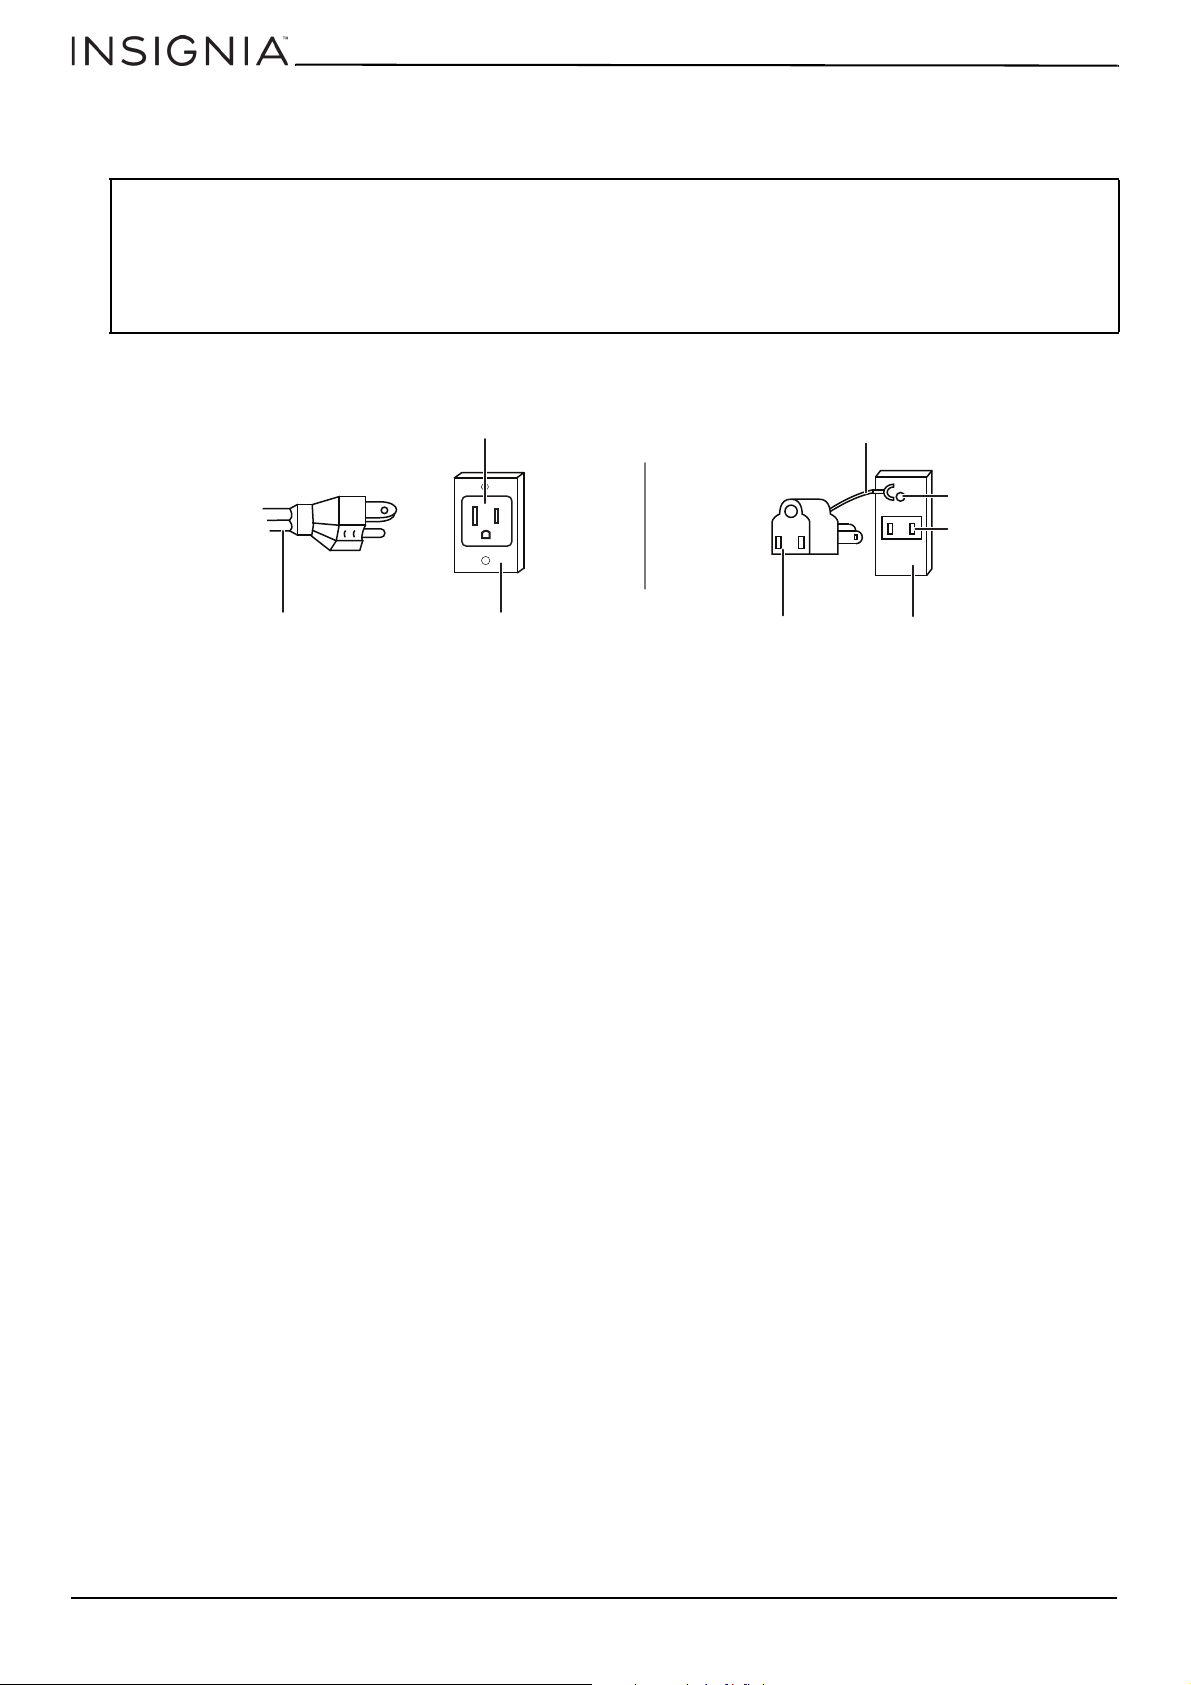
3-prong outlet
Outlet
cover
3-prong
plug
Grounding lead
Grounding
adapter
Outlet
cover
Screw
Outlet
Using a 3-prong plug and outlet
Using a grounding adapter
Providing the correct power source
Check your power outlet. Your refrigerator requires a 115 V, 60 Hz power supply.
WAR NIN GS :
Make sure that:
• The power outlet accepts a 3-prong grounding plug. The third prong on the power cord plug grounds your refrigerator to minimize
the possibility of electric shock. Do not modify the power plug.
• You DO NOT plug anything else into the same power outlet as your refrigerator. You may overload the circuit which can cause a fire.
• You DO NOT use an extension cord. If your refrigerator is too far from the power outlet, move your refrigerator or have an
electrician install an outlet closer to your refrigerator.
• The power outlet cannot be turned off with a switch or pull string.
12
www.insigniaproducts.com
NS-RSS26SS0/NS-RSS26WH0
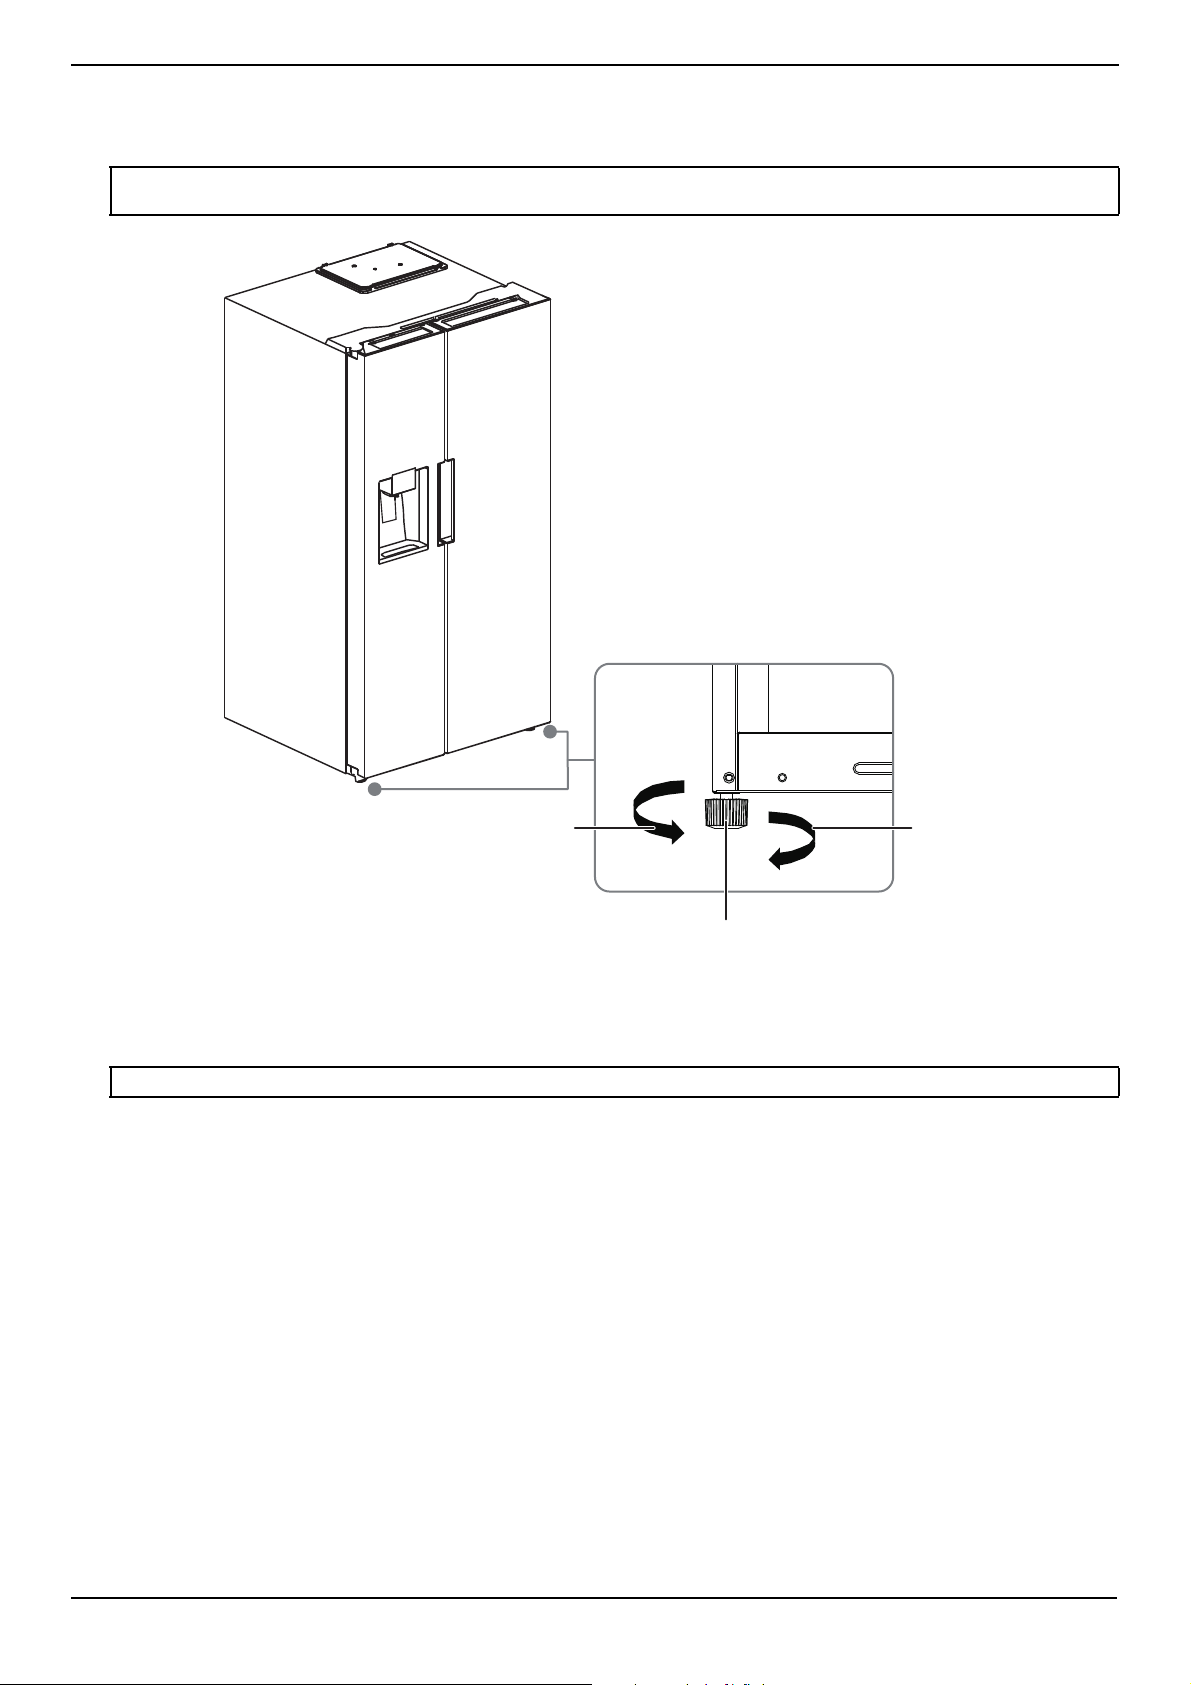
Adjustable foot
Lower Raise
Leveling your refrigerator
Leveling your refrigerator is important. If you do not level your refrigerator during installation, the doors may not close or
seal correctly, causing cooling, frost, and moisture problems.
CAUTION: The rollers are not casters. Use the rollers to move your refrigerator forward or backward. Do not use the rollers to move
your refrigerator from side to side. You might damage the floor or the rollers.
• Rotate the adjustable feet clockwise to raise or counter-clockwise to lower your refrigerator. To make sure that the
doors close automatically, tilt the top of your refrigerator backward about 0.4 in. (1 cm) to 0.6 in. (1.5 cm). If necessary,
use a wrench to adjust the feet.
Note: To make it easier to adjust the feet, have someone tilt your refrigerator while you adjust the feet.
www.insigniaproducts.com
13

26.3 Cu. Ft. Side-by-Side Refrigerator
The door is not level
Wrench (provided)
Locking nut
Adjusting nut
Locking nut
Leveling the refrigerator door (optional)
Leveling your refrigerator door is important. If you do not level your refrigerator door during installation, the doors may
not close or seal correctly which can cause cooling, frost, or moisture problems.
You need the following tool to level the refrigerator door:
1 Make sure that your refrigerator is unplugged.
2 With the refrigerator compartment door shut, loosen the locking nut with a wrench (provided) by turning it clockwise
(left).
3 Using the same wrench, turn the adjusting nut counter-clockwise (right) to raise the door, or clockwise (left) to lower
the door.
4 Check the top of the refrigerator door to see if it is level with the freezer door. Continue adjusting until the doors are
level.
5 When the doors are level, tighten the locking nut by turning it counter-clockwise (right) until tight.
14
www.insigniaproducts.com

NS-RSS26SS0/NS-RSS26WH0
Phillips screwdriver
Flat-blade screwdriver
1/4" saddle-type
shutoff valve (1)
1/4"
compression
nut (1)
Ferrule
(sleeve) (1)
Drill
1/4" drill bit
1/2" or adjustable wrench
Water supply
installation kit
Cold water line
Pipe clamp
Shutoff valve
Connecting the water supply
Your refrigerator comes with a water dispenser and an ice maker. To use these features, you need to connect your
refrigerator to a drinking (potable) water supply. In order for the ice maker to operate correctly, the water pressure needs
to be between 30 and 125 psi.
CAUTIONS:
• A qualified plumber should make the water connection.
• Using water pressure that is outside the 30 to 125 psi range can cause serious malfunction and severe, damaging water leaks.
Note: If you install your refrigerator in an area with low water pressure (below 30 psi), you can install a booster pump to compensate
for the low pressure.
You will need the following tools and parts (not included):
You need to purchase several items to complete this connection. You may find these items sold as a kit at your local
hardware store.
CAUTIONS:
Make sure that you:
• Use the tubing that came with your refrigerator and the water supply installation kit. Do not use old tubing.
• Connect to the cold water pipe. If you connect to the hot water pipe, the purifier may malfunction.
• Do not contaminate the water pipes during installation.
1 Shut off the main water supply.
2 Using a 1/4" drill bit, drill a hole into the cold water line, then install the saddle-type shutoff valve.
www.insigniaproducts.com
15
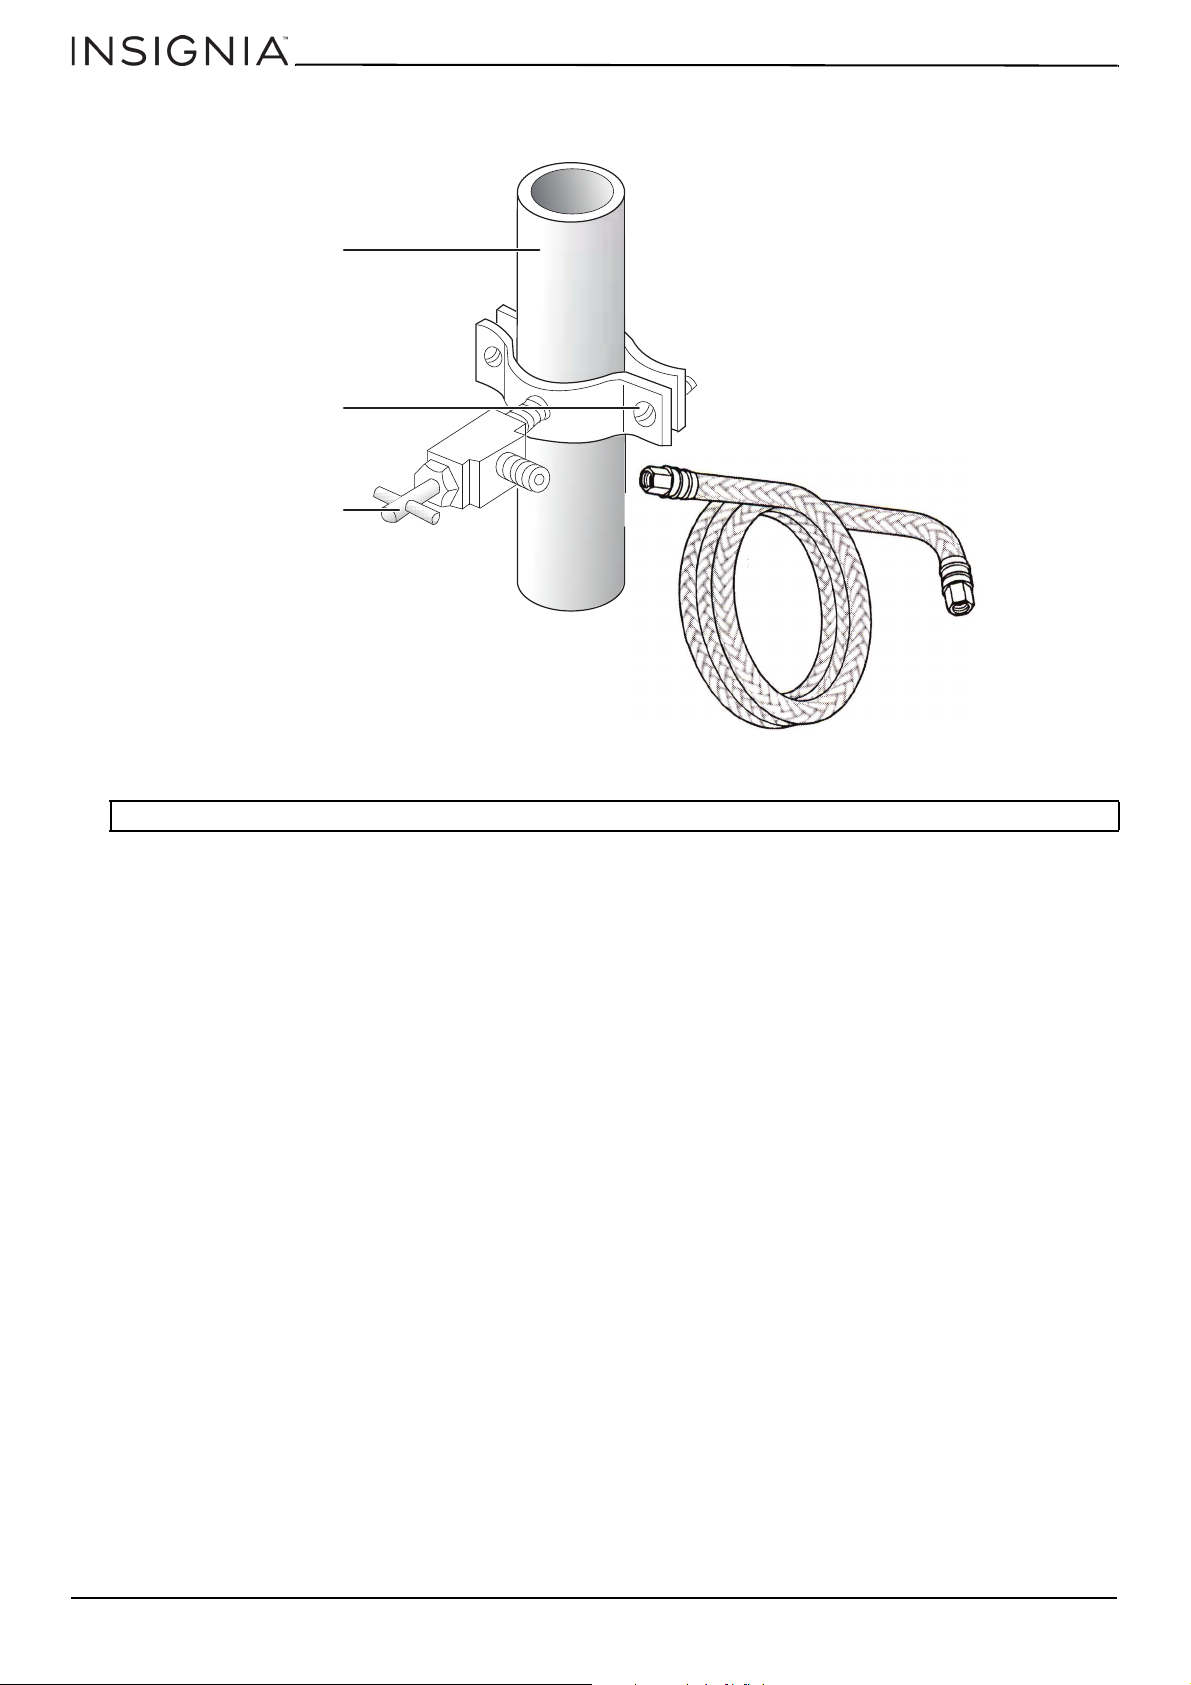
3 Connect the 1/4" extension tubing (included) to the shutoff valve.
Shutoff valve
Cold water line
Pipe clamp
Water line installation kit
26.3 Cu. Ft. Side-by-Side Refrigerator
4 Turn the main water supply back on, then turn on the shutoff valve and flush out the tubing until the water runs clear.
Note: The initial dark discoloration of water is normal.
5 Turn off the shutoff valve.
16
www.insigniaproducts.com
NS-RSS26SS0/NS-RSS26WH0
Compression nut
(assembled)
Ferrule
Copper tubing
(not supplied)
Plastic tubing
(not supplied)
Stainless steel tubing
(not supplied)
Molded end
(bulb)
Compression nut (1/4")
(not supplied)
Compression nut (1/4")
Plastic tubing
(assembled)
Compression fitting
(assembled)
Refrigerator
Water supply line
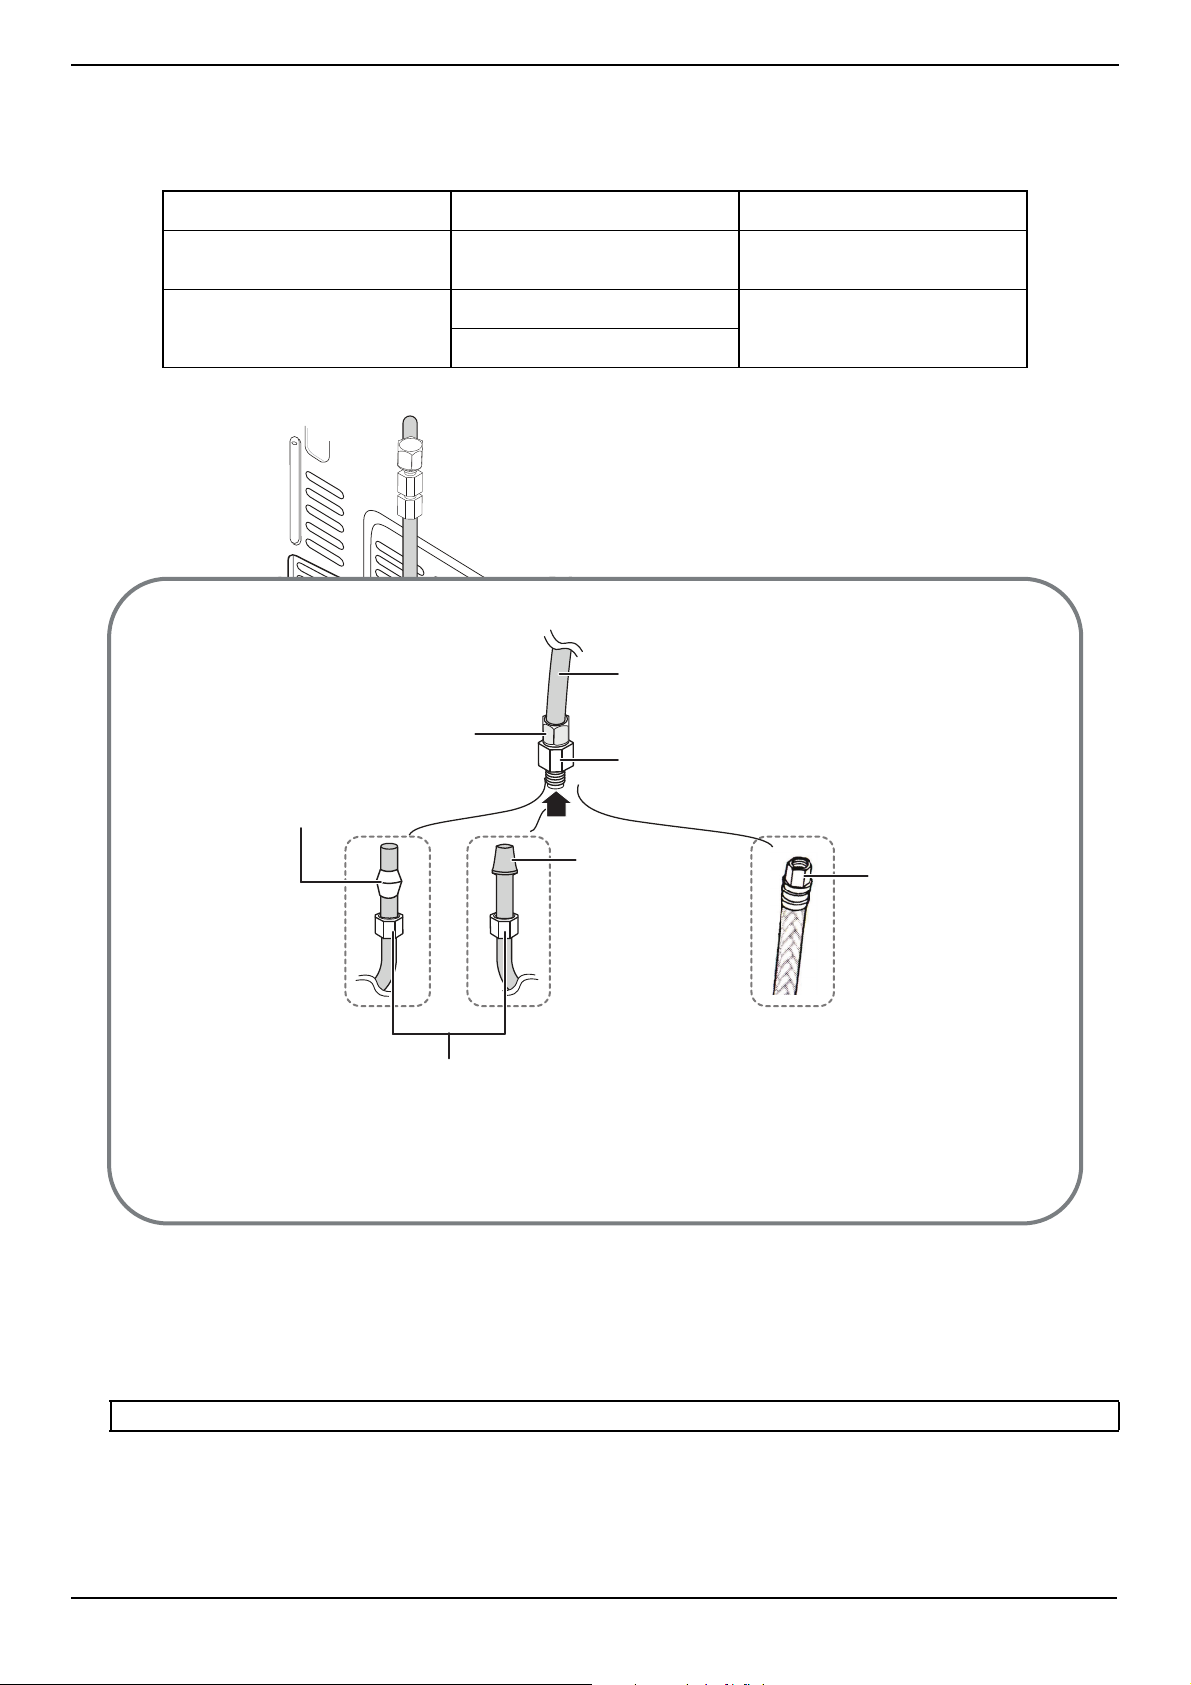
Connecting the water supply to your refrigerator
You need to purchase several items to complete this connection. You may find these items sold as a kit at your local
hardware store.
You can use plastic tubing, copper tubing, or stainless steel tubing.
PLASTIC TUBING COPPER TUBING STAINLESS STEEL TUBING
• 1/4" plastic tubing
with molded end (bulb)
• 1/4” compression nut (1) • 1/4" compression nut (1) • 1/4" compression nut (1)
• 1/4" copper tubing • 1/4" copper tubing
• Ferrule (2)
1 Connect the household water line to the assembled compression fitting.
If you are using copper tubing, slip the compression nut (not supplied) and ferrule (not supplied) on the copper tubing
(not supplied).
OR
If you are using plastic tubing, insert the molded end (bulb) of the plastic tubing into the compression fitting.
Important: Do not use without the molded end (bulb) of the plastic tubing.
OR
If you are using stainless steel tubing, slip the compression nut on the copper tubing (not supplied).
2 Tighten the compression nut onto the compression fitting. Do not over-tighten the compression nut.
3 Turn the water on and check for any leakage. If you find water drops or leakage in the connection areas, turn off the
main water supply, then check the connections and tighten, if necessary.
www.insigniaproducts.com
17

26.3 Cu. Ft. Side-by-Side Refrigerator
4 Flush one gallon of water through the filter before drinking or using the water from your refrigerator. (Flush
approximately five minutes.)
To flush, press a large glass or cup against the water dispenser lever. Fill the glass, then empty it into the kitchen sink.
Repeat until you dispense about one gallon of water.
5 After you turn on the refrigerator, let the ice maker make ice for one to two days. Over that period of time, throw out the
first one or two buckets of ice the freezer makes to make sure that all impurities have been removed from the water
line.
Notes:
• Make sure that you connect the water line to a drinkable water source.
• You can test the water line quickly using a paper cup.
• The first time you use the water dispenser, you may hear the sound of water pushing air out of the water dispenser. This is normal.
• If you have to repair or disassemble the water line, cut off 1/4" of the plastic tubing to make sure you get a snug, leak-free
connection.
18
www.insigniaproducts.com
NS-RSS26SS0/NS-RSS26WH0
Using your refrigerator
The first time you plug in your refrigerator the control panel turns on for three seconds and a startup tone sounds, then the
refrigerator begins normal operation. The default temperature for the refrigerator and freezer compartments is 39°F and
0°F, respectively. Fahrenheit is the default temperature setting.
Before storing foods in your refrigerator, turn on the refrigerator and freezer compartments, then wait for two hours to
make sure that they are working correctly and to let both compartments reach the correct temperatures.
If the refrigerator door is not closed for two minutes, a buzzer sounds once a second until the door is closed.
CAUTION: Never close the refrigerator or freezer doors while the shelves, drawers, or telescopic slides are extended. It may damage
both them and your refrigerator.
If an error code is displayed on the temperature readout on the control panel, refer to Error codes
information. If this should happen, the refrigerator and freezer functions may still work, but you should contact your place
of purchase or Insignia customer service at 1-877-467-4289.
on page 29 for additional
Switching between Fahrenheit and Celsius
To toggle between Celsius and Fahrenheit on the display, press and hold the ENERGY SAVING button for three seconds.
Setting the refrigerator temperature
Press the REF.TEMP button to select the refrigerator compartment and display, then press the button again to lower
temperature in the refrigerator compartment by one degree.
Notes:
• If you have set the temperature type to Fahrenheit, the temperature settings cycle from 44°F to 34°F in one degree increments.
• If you have set the temperature type to Celsius, the temperature settings cycle from 7°C to 1°C in one degree increments.
Setting the freezer temperature
Press the FRZ.TEMP button to select the freezer compartment and display, then press the button again to lower the
temperature in the freezer compartment by one degree.
Notes:
• If you have set the temperature type to Fahrenheit, the temperature settings cycle from 7°F to -7°F in one degree increments.
• If you have set the temperature type to Celsius, the temperature settings cycle from -14°C and -22°C in one degree increments.
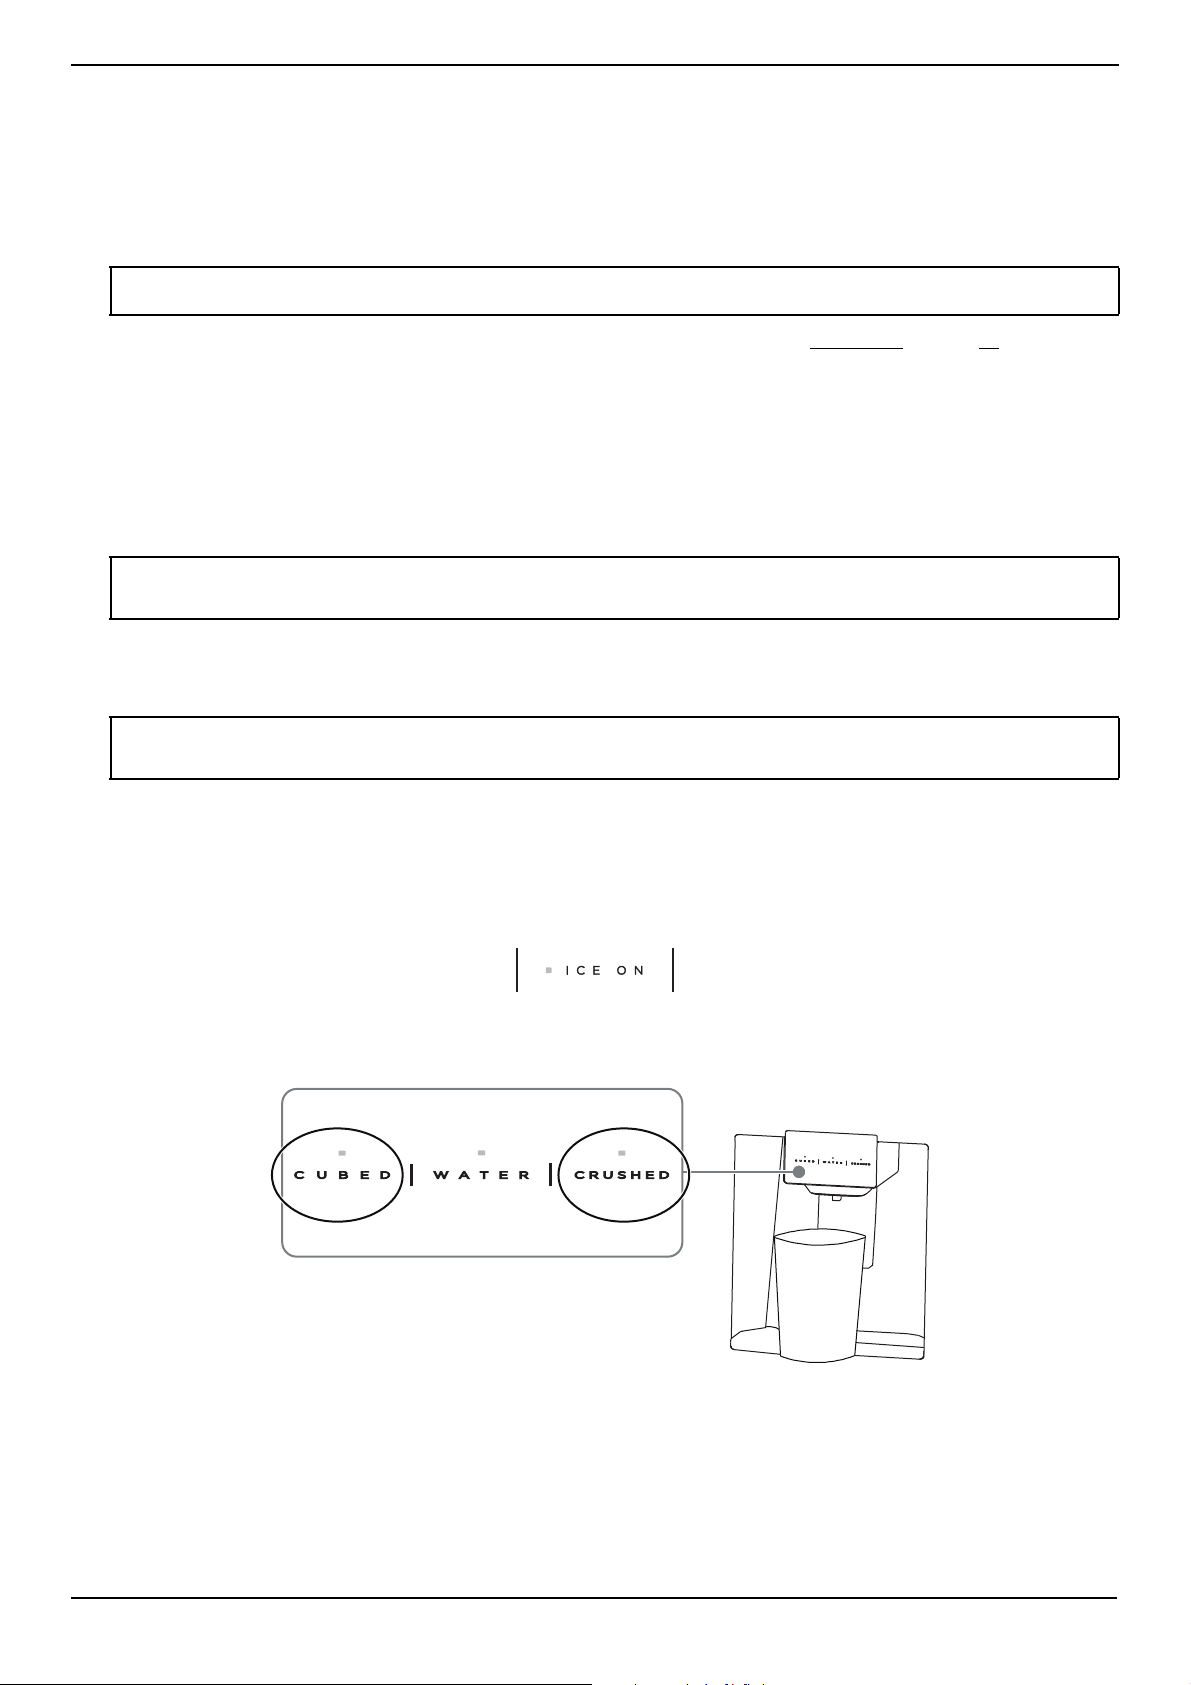
Using the ice/water dispenser
The ice/water dispenser is located on the outside of the freezer compartment door. It offers a choice of cubed or crushed
ice, or cold water. The dispenser only works when the freezer compartment door is closed.
The ice maker and ice storage bins are located at the top of the freezer compartment.
• Press the ICE ON button on the control panel to turn the ice maker on or off. When the ice maker is turned on, the ICE
ON indicator lights.
• To dispense ice, press the CUBED or CRUSHED button on the door dispenser, then press a glass or container into the
dispenser lever.
• If you need a large amount of cubed ice, open the freezer door and remove the ice storage bin from the freezer. Replace
the ice storage bin when you are finished.
www.insigniaproducts.com
19

26.3 Cu. Ft. Side-by-Side Refrigerator
• To dispense water, press the WATE R button on the door dispenser, then press a glass or container into the dispenser
lever.
Note: The water coming into your refrigerator flows through the filter under pressure. When you dispense water, the pressure
decreases which makes bubbles. The water may temporarily look misty or cloudy. The bubbles disappear and the water clears in a few
seconds.
Using Super Cool to speed refrigerator cooling
You can quickly lower the refrigerator compartment temperature to cool your food faster than usual. Use the Super Cool
mode to speed up cooling when you add a large amount of food to the refrigerator compartment.
When the Super Cool mode is on, the refrigerator temperature lowers to 34°F (1°C). The Super Cool mode automatically
turns off after six hours (maximum), and the refrigerator temperature returns to the last refrigerator temperature setting.
1 Press and hold the REF.TEMP button on the control panel for three seconds to turn on the Super Cool mode. “SUPER
COOL” lights on the control panel.
2 To manually turn off the Super Cool mode, press and hold the REF.TEMP button for three seconds.
Using Super Freeze to speed freezing
Note: When you set the freezer temperature, we recommend that you wait about six hours before using the Super Freeze mode.
You can quickly lower the freezer temperature to freeze your food faster than usual. Fast-freezing can help retain more of
the vitamins and nutrition in fresh food and keep your food fresh longer. The Super Freeze mode also speeds up freezing
when you add a large amount of food to the freezer compartment.
When the Super Freeze mode is on, the freezer compartment temperature lowers to -7°F (-22°C). The Super Freeze mode
automatically turns off after 26 hours (maximum), and the freezer temperature returns to the last freezer temperature
setting.
1 Press and hold the FRZ.TEMP button on the control panel for three seconds to turn on the Super Freeze mode.
“SUPER F R Z” lights on the control panel.
2 To manually turn off the Super Freeze mode, press and hold the FRZ.TEMP button for three seconds.
Using the Energy Saving mode
To save energy, you can turn on the Energy Saving mode. When you use the Energy Saving mode, the refrigerator
compartment temperature is automatically set to 44°F (7°C) and the freezer compartment temperature is automatically set
to 7°F (-14°C). When you turn off the Energy Saving mode, the refrigerator and freezer temperatures return to the last
temperature settings.
Note: When you turn on the Energy Saving mode, you cannot change the refrigerator or freezer compartment temperature.
• Press the ENERGY SAVING button to turn the Energy Saving mode on or off. When the Energy Saving mode is turned
on the ENERGY SAVING indicator lights.
20
www.insigniaproducts.com

NS-RSS26SS0/NS-RSS26WH0
Backstop support
Glass shelf
Using the door trays
CAUTION: Do not put too many heavy items in the door trays. You may break the trays.
Your refrigerator has six door trays designed to store canned liquids, bottled drinks, and packaged food.
1 To remove a tray, remove all items from the tray, then press the sides of the tray in slightly while lifting up to pull it out
of the door.
2 To relocate a tray, align the tray above the notches in the door, then push the tray down.
Adjusting the glass shelves
The glass shelves inside the refrigerator compartment are adjustable.
1 To remove a shelf, lift the back of the shelf vertically, then pull the shelf out of your refrigerator.
2 To install the shelf in a new location, hold the shelf flat, then slide the shelf into the slot in the backstop support and
lower it.
www.insigniaproducts.com
21

26.3 Cu. Ft. Side-by-Side Refrigerator
Moving the deli drawer
The deli drawer can be located in either of two positions in the refrigerator to accommodate spacing needs. The drawer is
initially positioned in the upper half of the refrigerator to allow for quick, easy access to smaller items. You can move it to a
lower position, just above the crisper drawers, to allow for taller items between the upper shelves.
1 Keeping the drawer and glass shelf together, lift the back of the drawer vertically, then pull the drawer and shelf out of
your refrigerator together.
2 To install the deli drawer in the lower part of the refrigerator, hold the drawer and shelf together flat, then slide them
into the slots just above the crisper drawers.
22
www.insigniaproducts.com
NS-RSS26SS0/NS-RSS26WH0
Unlocking the control panel
The control panel automatically locks after 30 seconds if a door has not been opened or a button has not been pressed. To
unlock the control panel, press and hold the LOCK button for three seconds. A buzzer sounds and the LOCK indicator turns
off.
• To lock the control panel, press and hold the LOCK button for three seconds. A buzzer sounds and the LOCK indicator
lights.
Maintaining your refrigerator
Your refrigerator is designed for year-round use with only minimal cleaning and maintenance.
When you first receive it, wipe the cabinet with a mild detergent and warm water, then wipe dry with a dry cloth. Do this
periodically to keep your refrigerator looking new.
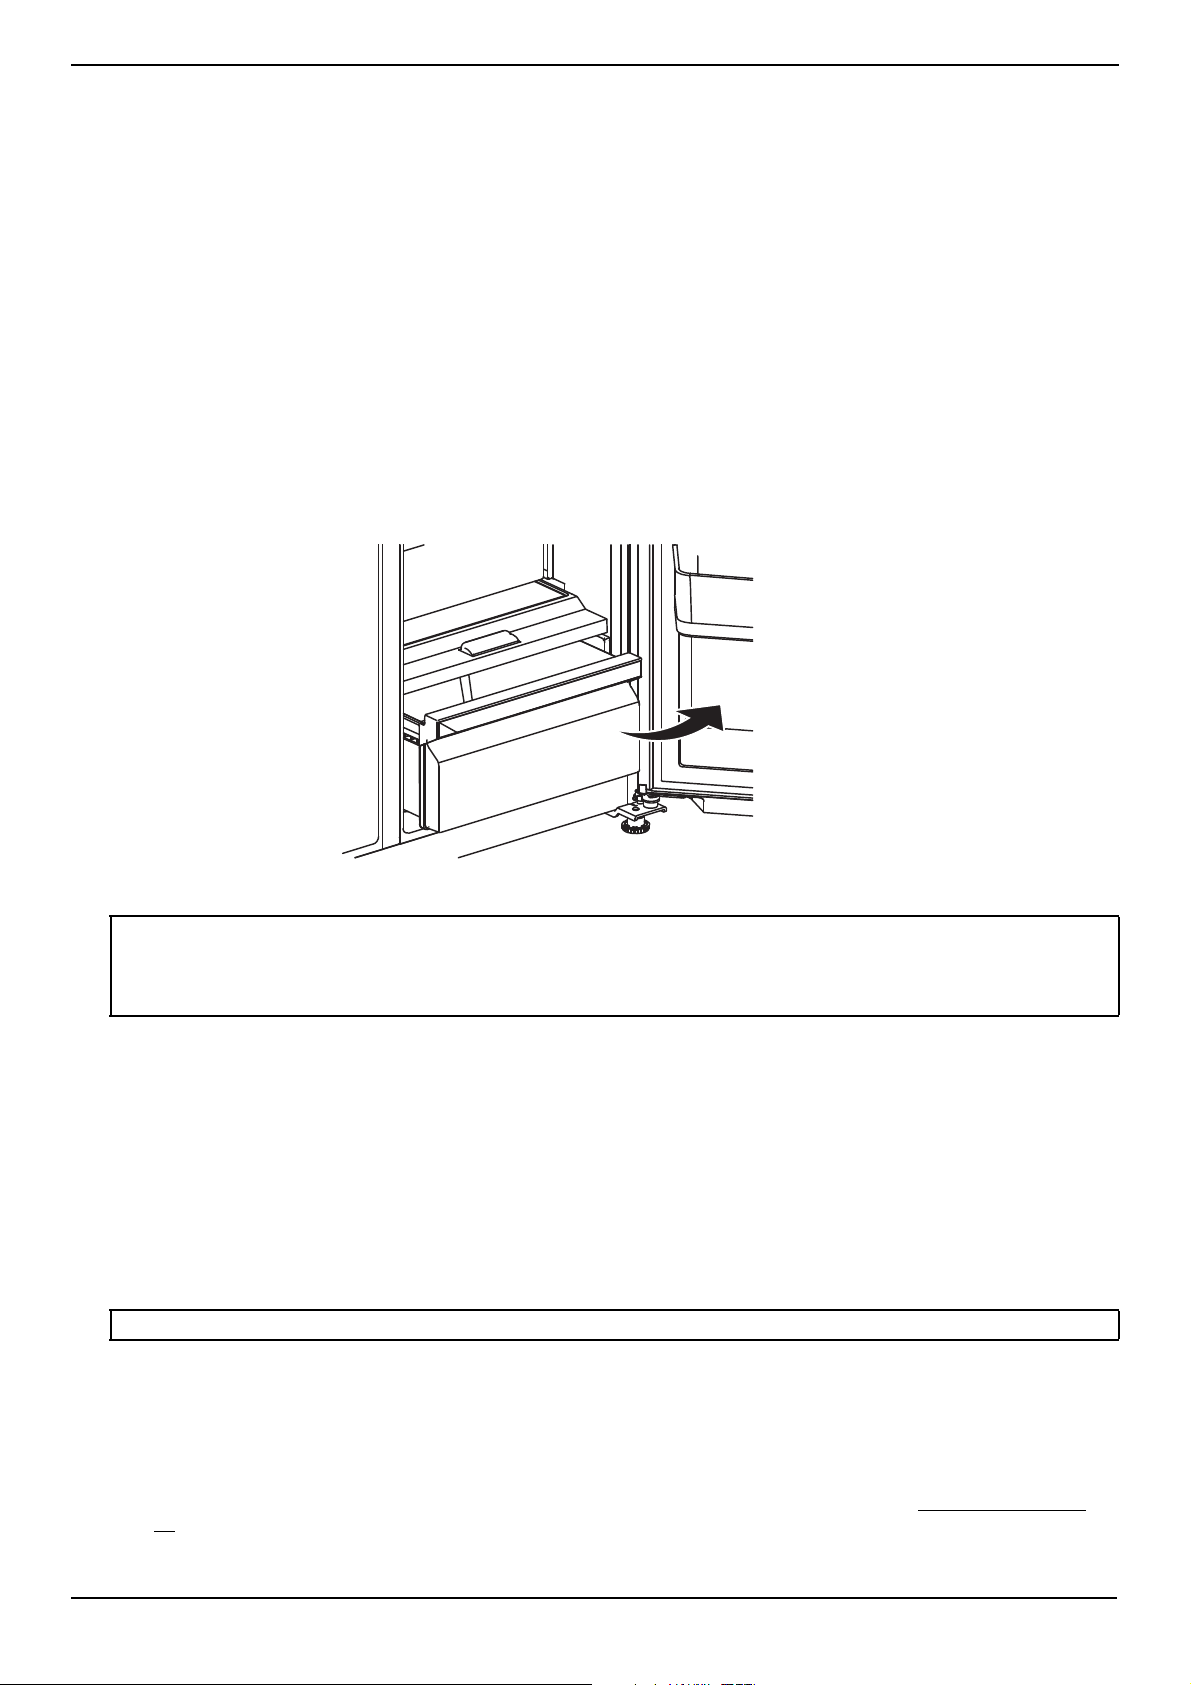
Removing the fruit and vegetable crisper drawers
The fruit and vegetable crisper drawers are designed to store fruits and vegetables. Putting fruits and vegetables inside the
drawers prevents moisture loss and flavor from getting into other foods.
1 Open the refrigerator door all the way.
2 Pull the drawer completely open and move the front of the drawer slightly upward, then lift the drawer up and pull it
out of your refrigerator.
Cleaning your refrigerator
CAUTIONS:
To prevent damage to the finish:
• Do not use gasoline, benzine, thinner, or other similar solvents.
• Do not use abrasive cleaners.
• Do not use sharp objects because they are likely to scratch the surface.
We recommend that you do the following every time you clean your refrigerator to keep it running odor-free and
efficiently:
1 Unplug your refrigerator from the power outlet.
2 Remove all food.
3 Clean the doors, handles, and cabinet surfaces with a mild detergent, then rinse with warm water using a wrung-out
sponge or cloth.
4 Wash the inside with a damp warm cloth soaked in a solution of one quart of lukewarm water to two tablespoons of
baking soda solution, then rinse with warm water using a wrung-out sponge or cloth.
5 Clean the trays, shelves, and drawers with a mild detergent and soft cloth, then rinse with warm water.
6 Make sure that you keep the door gaskets (seals) clean so that the door seals tightly. This helps your refrigerator run
efficiently.
CAUTION: Make sure that the door gaskets are completely dry before you plug your refrigerator into the power outlet.
7 Dry all surfaces and removable parts before putting them back into place.
8 Move your refrigerator out from the wall to clean dust from behind and under the refrigerator to promote efficient
cooling and energy savings. Move it back when finished.
9 Plug your refrigerator into the power outlet.
Cleaning the door trays
Clean the trays by washing in warm water with mild detergent, then drying them thoroughly. See Using the door trays
page 21
for information on removing and replacing trays.
www.insigniaproducts.com
on
23

26.3 Cu. Ft. Side-by-Side Refrigerator
Cleaning the ice storage bin
You may need to clean the ice storage bin to remove blockages or break up ice clumps that may hinder ice dispensing. The
ice storage bin should be cleaned regularly to prevent bad tasting or smelling ice.
1 Remove the ice storage bin by pulling it up and out of the freezer compartment with both hands.
2 Clean the ice storage bin by washing in warm water with mild detergent, then drying it thoroughly.
Cleaning the glass shelves
Clean the shelves by washing in warm water with mild detergent, then drying them thoroughly. See Adjusting the glass
shelves on page 21 for information on removing and replacing glass shelves.
Defrosting the freezer compartment
Tip: To avoid standing water when you defrost, place some towels on the floor in front of your refrigerator.
Although the freezer compartment automatically defrosts, a layer of frost may occur on the compartment’s interior walls if
the freezer is opened frequently or kept open too long. If the frost is too thick, choose a time when the freezer is nearly
empty, then:
1 Unplug your refrigerator.
2 Remove all food from the freezer compartment, and place the food into containers that will prevent it from melting.
3 Leave the freezer compartment open.
4 To speed the defrosting, you can:
• Place open containers with hot water inside the refrigerator.
• Use a plastic or wooden ice shovel (like a spatula) to remove thick layers of ice or frost. Do not use a sharp utensil (like
a knife) because you may damage your refrigerator.
5 When you finish defrosting, wipe the inside with a dry towel. If you need to clean the compartment, see Cleaning your
refrigerator on page 23.
6 Close the freezer compartment, plug your refrigerator into the power outlet, then put the food back into the freezer
compartment.
Replacing the water filter
After your refrigerator has operated for approximately six months (or 200 gallons), the WATER FILTER indicator turns on to
remind you to replace the water filter. For the best water quality, you should replace the water filter at that time.
• It is normal for black carbon fines (particles) to appear on the outside of your filter. This happens when the filter is jarred
in shipping. It is safe, so simply wipe it off.
• The filter connectors are larger to prevent leaks. You might have to twist the filter hard to make sure the connection is
secure.
• We apply a safe, NSF approved, food-grade silicone lubricant to our filter connectors.
24
www.insigniaproducts.com

Carefully remove the plastic cap from the new filter before installation.
1 Press and hold the sides of the filter box, then pull down to remove the box.
2 Press and rotate the old filter counterclockwise to remove the filter.
NS-RSS26SS0/NS-RSS26WH0
3 Press the new filter into the compartment then rotate clockwise to install the filter.
4 Close the filter cover until it clicks into place.
5 Run one gallon or less (two to three liters) of water through your refrigerator to remove air and loose carbon pieces.
Notes:
• When you pull out the water filter, a little water may leak from the opening which is normal. To minimize the water leakage, keep the
filter horizontal when you pull it out.
• For estimated costs of replacement elements, contact Best Buy.
• To drink the freshest and cleanest water from your refrigerator, change the filter on time.
Operating conditions /License Listing
• Flow rate: 0.5 GPM (1.9 LPM)
• Pressure: 30 - 125 PSI (207-862 kPa)
• Temperature: 34-100° F (1-38°C)
• Service life: 6 Months
• Capacity: 200 Gal. (757 L)
• Function: Chemical/Mechanical
Operating Notices
• Do not use with water that is micro-biologically unsafe or of unknown quality without adequate disinfection before or
after using the filtration system.
• Systems certified for cyst reduction may be used on disinfected water that may contain filterable cyst.
• For cold water only.
• Replace the filter for every 6 months
• Testing was performed under standard laboratory conditions, actual performance may vary.
• Check for compliance with the state and local laws and regulations.
www.insigniaproducts.com
25

26.3 Cu. Ft. Side-by-Side Refrigerator
• Systems must be installed and operated in accordance with the manufacturer’s recommended procedures and
guidelines.
• Spent adsorption media will not be regenerated and used.
War ra nty
• The filter is warranted for a period of 12 months.
• Filters are warranted for defects in material and workmanship only.
• Replacement Cartridge No.: NS-WF26SS0-1
Reverse osmosis system
If your cold water supply is connected to a reverse osmosis system:
• The water pressure to the reverse osmosis system needs to be between 40 psi to 60 psi (276 KPa to 414 KPa).
• The water pressure at the inlet valve on your refrigerator needs to be between 30 psi to 125 psi (207 KPa to 862 KPa).
If the water pressure to the reverse osmosis system is less than 40 psi (276 KPa):
• Check the sediment filter on the system, and replace the filter if necessary.
• Allow the storage tank on the system to refill after heavy usage.
• If the water pressure is still too low, your refrigerator's water filter may be further reducing the water pressure. Remove
the water filter.
Replacing the LED light
CAUTION: The LED light must be replaced by a qualified service technician.
If the LED light is damaged:
1 Unplug your refrigerator.
2 Remove the light cover by lifting it up.
3 While pressing the connector latch with one hand, pull the LED light out.
4 Replace the LED light and snap it correctly in place, then replace the light cover.
Storing your refrigerator
CAUTION: This appliance is designed to run continuously. If the operation of the refrigerator is interrupted, the service life of the
appliance may be impaired.
1 Unplug your refrigerator from the power outlet.
2 Remove all food.
3 Clean your refrigerator.
4 Take off the doors, and leave the shelves in place so that children cannot easily climb inside.
WAR NIN G: If a door accidentally closes while a child is inside your refrigerator, the child may suffocate.
Moving your refrigerator
1 Unplug your refrigerator from the power outlet.
2 Remove all food.
3 Securely tape down all loose items inside your refrigerator.
4 Tap e t he door shut.
5 Make sure that your refrigerator does not tilt more than 45° from the upright position during transportation.
Tips on saving energy
• Locate your refrigerator in the coolest area of the room, away from heat producing appliances or heating ducts and out
of direct sunlight.
• Let hot foods cool to room temperature before placing them in your refrigerator. Overloading your refrigerator forces
the compressor to run longer. Foods that freeze too slowly may lose quality or spoil.
• Wrap foods correctly and wipe containers dry before placing them in your refrigerator. This cuts down on frost
build-up.
• Do not line the refrigerator storage shelves with aluminum foil, wax paper, or paper toweling. Liners interfere with cold
air circulation and make your refrigerator less efficient.
• Organize and label food to reduce door openings and extended searches. Remove as many items as needed at one
time, and close the door as soon as possible.
• If a large quantity of food is placed in either the refrigerator or freezer compartments over a short period of time, you
should turn on the Super Cool or Super Freeze modes, as appropriate. See Using Super Cool to speed refrigerator
cooling on page 20 or Using Super Freeze to speed freezing on page 20 for additional information.
26
www.insigniaproducts.com

NS-RSS26SS0/NS-RSS26WH0
Tips on storing food
• Always store cooked meats on a refrigerator shelf above raw meats to avoid bacterial transfer. Keep raw meat on a plate
which is large enough to collect juices, and cover the plate with cling film or foil.
• Leave space around food. This allows cold air to circulate around your refrigerator so that all parts of your refrigerator
are kept cool.
• To prevent transfer of flavors and food drying out, wrap or cover each food item separately. Fruit and vegetables need
not be wrapped.
• Let hot food cool down before placing it in the refrigerator or freezer compartment. Placing hot food in the
fridge-freezer could spoil other food and lead to higher temperatures.
• To prevent cold air from escaping, try to limit the number of times you open the doors. When retuning from shopping,
sort foods to be kept in the refrigerator compartment before opening the doors. Only open the door to put food in or
take it out.
• Do not store food in the refrigerator which goes bad easily at low temperature, such as bananas and melons.
• When storing food in the refrigerator compartment, use a container with a lid whenever possible. This prevents
moisture from evaporating, and helps food keep its taste and nutrients.
• When storing food in the freezer compartment, wrap the food in polyethylene film, aluminum foil, or other types of
freezer storage products.
• Do not block air vents inside either compartment with food. Smooth circulation of cold air keeps the refrigerator and
freezer temperatures even.
• Do not open the doors frequently. Opening the doors lets warm air enter the compartments and can cause the
temperature to rise.
• To adjust the temperature control easily, do not store food near the temperature controls.
• Never keep too many foods in the door rack, because this may stop the door from fully closing.
• Do not store bottles in the freezer compartment. They may break when frozen.
• Do not refreeze food that has been thawed. This causes a loss of taste and nutrition.
• Store fruits and vegetables in the crisper to prevent excessive evaporation of water and freshness.
• Leave a small amount of “air space” when freezing liquids to allow for expansion.
• To make the best use of freezer space, freeze liquids (or solids with liquids, such as stew) in square blocks. Pour the
liquid into a freezer bag placed inside a square-sided container and freeze it. When the liquid is frozen, remove the bag
from the container and seal the bag.
Tips for shopping for frozen foods
• When you are buying frozen food, look at the storage guidelines on the packaging. Check the “Best Before” date. Do
not use food that is past this date.
• Check the temperature of the frozen food cabinet in the store where you buy your frozen foods.
• Make sure that the frozen food package is in perfect condition.
• Always buy frozen products last to avoid thawing while you shop.
• Keep frozen food together while shopping and on the trip home, to help to keep the food cooler.
• Don't buy frozen food unless you can freeze it right away.
• When transporting frozen food, use special insulated bags that you can buy from most supermarkets and hardware
stores. These keep frozen food colder longer.
• Freeze food in small quantities. It freezes faster and takes less time to thaw.
• If you are freezing large amounts of fresh food, turn on Super Freeze mode. This lowers the temperature in the freezer
so your food freezes faster. When the food is frozen, adjust the temperature back to its normal mode.
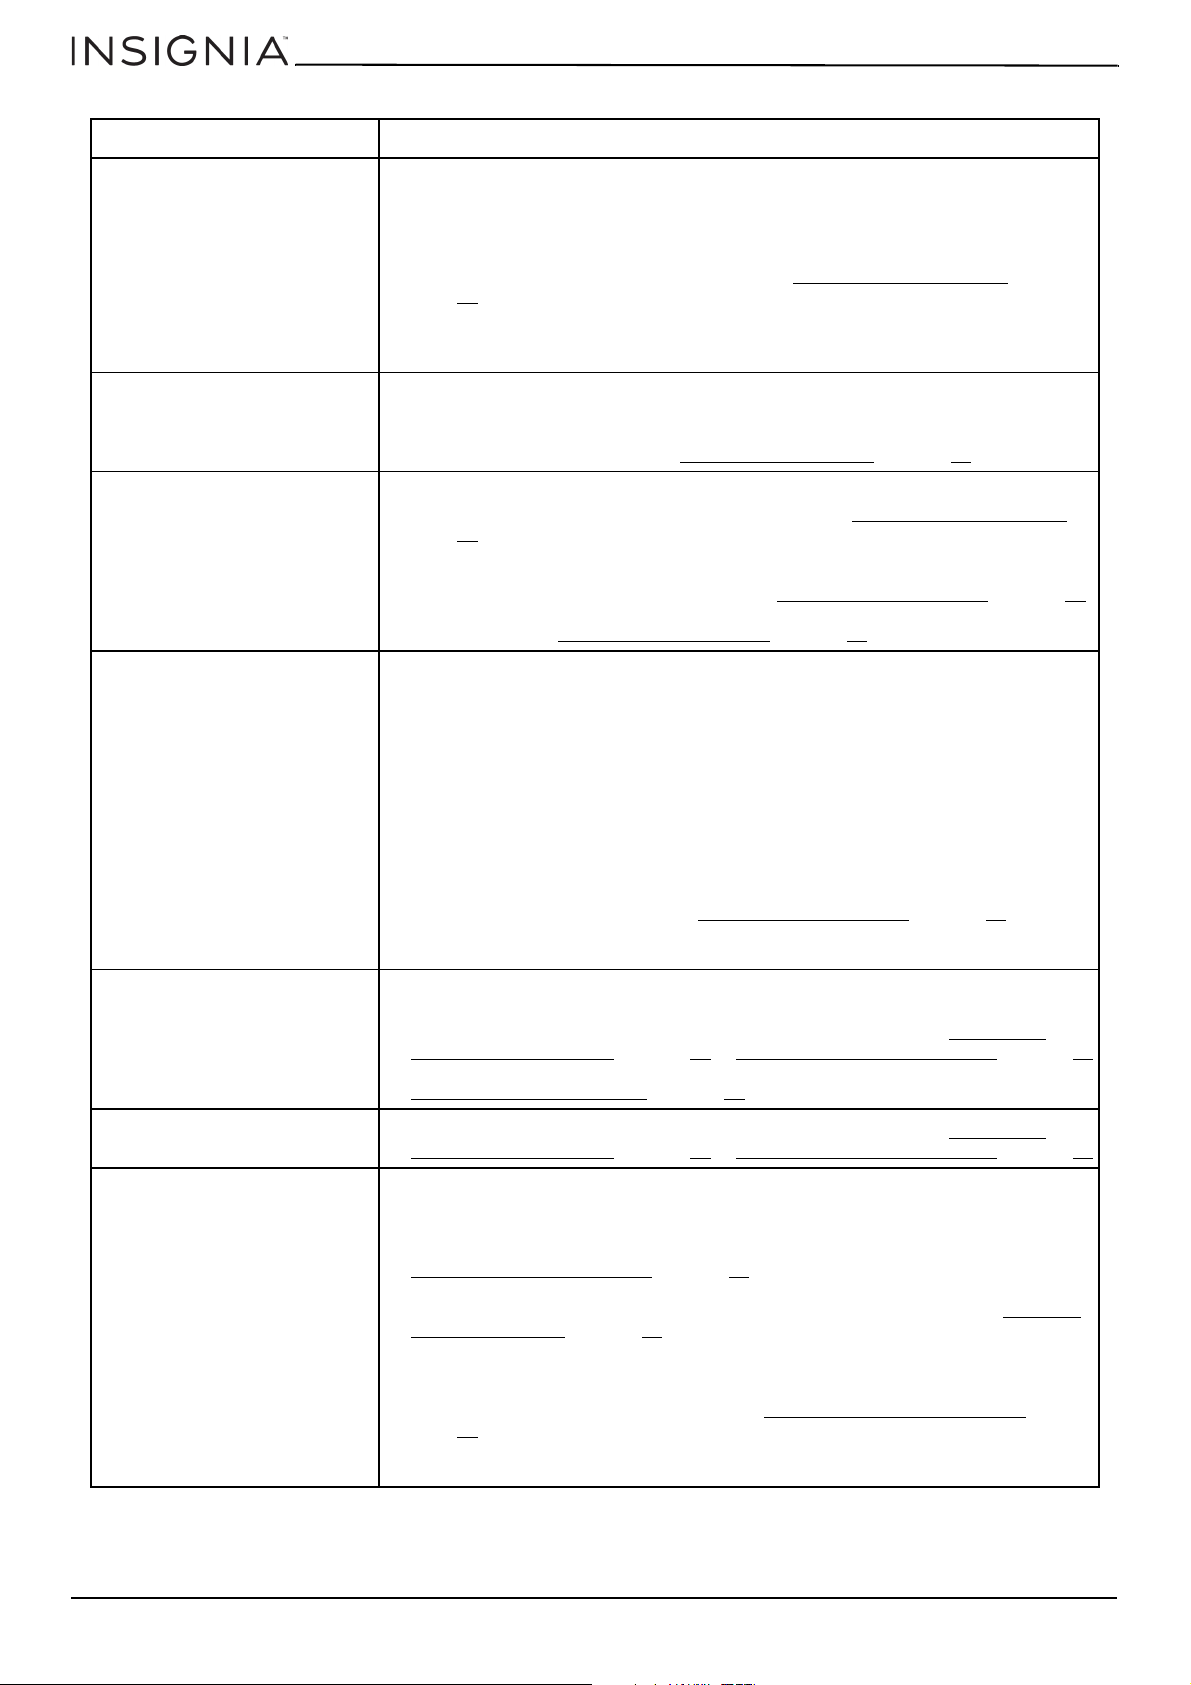
Troubleshooting
CAUTION: Do not try to repair your refrigerator yourself. Doing so invalidates the warranty.
PROBLEM SOLUTION
• Make sure that your refrigerator is securely plugged into a working outlet.
• Make sure that your power source has the correct voltage. Your refrigerator’s
My refrigerator does not work.
voltage rating is on a label on the back of your refrigerator.
• Check the house fuse or circuit breaker box and replace the fuse or reset the circuit
breaker.
The refrigerator compartment
has a bad odor.
• Make sure that all food with a strong odor (like onions) is wrapped or stored in
airtight packaging.
• Certain containers and wrapping materials (such as paper, foil, or plastic) can cause
odors. If you think this might be the case, try using different containers or a
different brand of wrapping material.
• Check for spoiled food and remove it.
• Clean the inside of your refrigerator. See Cleaning your refrigerator
www.insigniaproducts.com
on page 23.
27
PROBLEM SOLUTION
The compressor runs longer if:
• The room temperature is high.
• You just added a large amount of food. Wait for the food to freeze, then check
The compressor runs for a long
time or turns on and off
frequently.
The light inside the refrigerator
does not turn on.
The refrigerator doors do not
close completely.
The refrigerator makes unusual
noises or vibrations.
again.
• You open and close the door frequently.
• The door gasket is dirty. Clean the gasket. See Cleaning your refrigerator
page 23.
• Your refrigerator has been disconnected for a period of time. Wait for your
refrigerator to cool (about four hours) before adding food.
• You have the temperature set too low.
• Make sure that your refrigerator is plugged into a working outlet.
• If a door stays open too long, your refrigerator automatically turns off the light.
• Check to see if the light is damaged. If the light is damaged, have it replaced by a
qualified service technician. See Replacing the LED light
• Make sure that no food packages are in the way.
• Make sure that the door gaskets (seals) are clean. See Cleaning your refrigerator
page 23
• If the door gasket does not seal, try heating then cooling the seal. You can use an
electric hair dryer to heat the seal.
• Make sure that your refrigerator is level. See Leveling your refrigerator
• Make sure that the top of your refrigerator is tilted backward about 0.4" (10 mm) to
0.6" (15 mm). See Leveling your refrigerator
The following sounds are normal:
• Compressor running noises.
• Air movement noise from the small fan motor in the freezer compartment or other
compartments.
• Gurgling sound similar to water boiling.
• Popping noise during automatic defrosting.
• Clicking noise before the compressor starts.
• Clicking noise when you get the water.
• Motor running noises when you get the ice.
• Clunking noises when ice cubes fall into the ice storage bin.
Other unusual noises or vibrations may occur:
• If you have items on the top of your refrigerator. Remove the items.
• If your refrigerator is not level. See Leveling your refrigerator
• If your refrigerator is touching walls. Move it away from the walls.
• If the shelves or drawers are installed incorrectly.
26.3 Cu. Ft. Side-by-Side Refrigerator
on
on page 26.
on
.
on page 13.
on page 13.
on page 13.
The temperature is too hot.
The temperature is too cold.
Ice is not dispensing.
• You may have left the doors open too long or opened them too frequently.
• Make sure that no obstacle is keeping the doors from closing correctly.
• Adjust the refrigerator or freezer compartment temperature. See Setting the
refrigerator temperature on page 19 or Setting the freezer temperature on page 19.
• Your refrigerator may not have enough clearance from walls or the ceiling. See
Providing correct ventilation
• Adjust the refrigerator or freezer compartment temperature. See Setting the
refrigerator temperature on page 19 or Setting the freezer temperature on page 19.
• After you install the water supply line, you should wait 12 hours before you try
dispensing ice. If the water is not sufficiently cooled, your refrigerator takes longer
to make ice.
• Make sure that the water line is connected and the water valve open. See
Connecting the water supply
• Make sure that the ice dispenser is not in off mode.
• Make sure that no ice is blocking the ice maker bucket or ice chute. See Cleaning
the ice storage bin on page 24.
• If the water pressure is less than 30 psi, try installing a booster pump to
compensate for the low pressure.
• Make sure that the freezer compartment temperature is not set too warm. Try
setting the freezer temperature lower. See Setting the freezer temperature
page 19
• If you just dispensed a large amount of ice, wait at least 90 minutes before
dispensing more ice.
.
on page 11.
on page 15.
on
28
www.insigniaproducts.com

PROBLEM SOLUTION
• Make sure that the water line is connected and the water valve open. See
Connecting the water supply
• Make sure that the water line is not kinked or bent.
Water is not dispensing.
• Make sure that the refrigerator compartment temperature is not set too low. If the
temperature is too low, the water in the dispenser tank may freeze. See Setting the
refrigerator temperature on page 19.
• Make sure that the water filter is correctly installed. See Replacing the water filter
on page 24
NS-RSS26SS0/NS-RSS26WH0
on page 15.
.
My water dispenser is dripping.
My water is cloudy or contains
black carbon pieces.
My new filter is making noises or
sputtering.
My water tastes bad.
My refrigerator dispenses water
slowly.
A layer of frost occurs in one of
the compartments.
The refrigerator door is hard to
open or close.
The outside of the refrigerator is
hot.
• A few drops are normal. If water drips constantly, have a service technician check
your refrigerator’s water valve.
• Cloudy water is caused by microscopic air bubbles. Run one gallon or less (two to
three liters) of water from your dispenser to clear the air bubbles out.
• Black carbon pieces in the water are normal and appear with all carbon filters.
• Run one gallon or less (two to three liters) of water through your dispenser to
remove loose carbon pieces.
• Make sure that you soaked your filter in water for 15 minutes before installing.
• Noises and sputtering are caused by trapped air pockets. Run two to three gallons
(seven to 11 liters) gallons of water from your dispenser to push the air out.
• If you do not use your water dispenser for more than four days, run two gallons
(seven liters) of water through the dispenser before using it.
• Make sure that you replace your filter every three to six months to prevent bacteria
growth.
• Replace the water filter.
• A layer of frost may occur on the compartment’s interior walls if the freezer is
opened frequently or kept open too long.
• Make sure that the air outlets on the upper inside of the cabinets are not blocked
by food.
• Make sure that the doors are fully closed.
To remove the frost, see Defrosting the freezer compartment
• When you open the refrigerator door, warm air rushes inside. When you close the
door, the warm air rushes to the condenser which causes a vacuum. This causes the
door to be hard to open for about 10 to 15 seconds after closing.
• If the door is hard to open at other times, try rubbing paraffin wax or petroleum
jelly along the edges of the entire gasket. Paraffin wax is used for canning and is
safe for use around food.
Heat dissipation from the condenser may make the outside feel hot. This is normal and
happens if:
• The room temperature is high.
• You have too much food in your refrigerator.
• You open and close the doors excessively.
on page 24.
• Condensation on the exterior surface and door seal is normal when the room
Water condenses on the outside
of the refrigerator.
Water pan overflows.
humidity is high.
• When you open the door, warm, moist outside air meets the cold dry air inside your
refrigerator. This is normal.
• There is too much food in the refrigerator compartment or the food has too high a
water content.
• The doors are not closed properly, resulting in too much frost.
Error codes
If an error code is displayed on the control panel, contact your place of purchase or Insignia customer service at
1-877-467-4289.
ERROR CODE ERROR DESCRIPTION
E0 Ice maker fault
E1 Temperature sensor fault in refrigerator
compartment
E2 Temperature sensor fault in freezer
compartment
www.insigniaproducts.com
29

Specifications
General
Exterior dimensions (H x W × D) 69.9 x 35.8 × 34 in. (177.5 × 91.1 × 86 cm)
Interior dimensions (H x W × D) Refrigerator compartment: 64.5 × 13.8 × 26.7 in.
Weight
Temperature ranges Refrigerator: 34~44°F (1~7°C)
Power requirements 115 V ~ 60 Hz
Current requirements 2.5 A
Defrosting power 240 W
Power consumption per year 715 kWh/year
Power cord length 5.5 ft. (1.7 m)
Certifications UL
26.3 Cu. Ft. Side-by-Side Refrigerator
ERROR CODE ERROR DESCRIPTION
E5 Defrost sensor fault in freezer compartment
E6 Communication fault in display board
E7 Ambient temperature fault
EH Humidity sensor fault
EE Ice maker sensor fault
CA Communication fault in ice maker board
(163.9 x 35.1× 67.8 cm)
Freezer compartment: 64.5 × 19.6 × 23.6 in. (163.9 × 49.8 × 60 cm)
Refrigerator shelves:
Top: 17.0 × 18.5 in. (43.1 × 47.0 cm)
Middle: 17.0 × 20.1 in. (43.1 × 51.1 cm)
Bottom: 17.1 × 17.6 in. (43.4 × 44.8 cm)
Freezer shelves: 12.1 × 16.2 in. (30.7 × 41.2 cm)
Crispers:
Top: 16.6 × 18.5 × 7 in. (42.1× 44.3 × 17.7 cm)
Bottom: 16.6 × 17.4 × 7 in. (42.1 × 44.3 × 17.7 cm)
Freezer Drawers:
Top: 12.0 × 16.4 × 7 in. (30.5 × 41.6 × 17.7 cm)
Bottom: 12.0 × 16.2 × 7 in. (30.5 × 41.1 × 17.7cm)
Depth with open door at 90°: 50.1 in. (127.3 cm)
Gross Weight: 308.6 lbs (141 kg)
Net Weight: 275.6 lbs (129 kg)
Freezer: -7~7°F (-22~-14°C)
Water filter
SUBSTANCE
Chlorine 2 mg/L±10% 93.7 50% water concentration
Particulate Reduction, Class I 100000#/mL (0.5-1 μm) >99.9% 85% N/A
Cyst Live Cryptosporidium 100000#/L >99.9% 99.95% N/A
Lead Reduction pH 6.5 0.15 mg/l 99.6% N/A 0.01 mg/L
Lead Reduction pH 8.5 0.15 mg/l 99.6% N/A 0.01 mg/L
30
INFLUENT CHALLENGE
CONCENTRATION
www.insigniaproducts.com
AVERAGE
REDUCTION
REDUCTION
REQUIREMENT
MAX.PERMISSABLE
PRODUCT

NS-RSS26SS0/NS-RSS26WH0
REPLACEMENT
ELEMENT
Chlorine Taste and Odor Reduction
This system has been tested according to NSF/ANSI 42 and 53 for reduction of the substances listed below.
The concentration of the indicated substances in water entering the system was reduced to a concentration less
than or equal to the permissible limit for water leaving the system, as specified in NSF/ANSI 42 and 53.
System tested and certified by NSF International against NSF/ANSI Standards
42 and 53 in Model NS-WF26SS0-1 for reduction claims specified on the
Performance Data Sheet.
California
TRADEMARK/MODEL DESIGNATION REPLACEMENT ELEMENTS
WF26SS0-1 NS-WF26SS0-1
Rated Service Capacity:200 GAL Rated Service Flow: 0.5 GPM
CAUTION: Refer to the owner’s manual for proper maintenance and operation. If this device is not maintained and operated as
specified in the owner’s manual, there is a risk of exposure to contaminants. For more information, visit the manufacturer's Internet
web site at www.bestbuy.com or the California State Water Resources Control Board’s web site at www.waterboards.ca.gov.
www.insigniaproducts.com
31

26.3 Cu. Ft. Side-by-Side Refrigerator
ONE-YEAR LIMITED WARRANTY
Definitions:
The Distributor* of Insignia branded products warrants to you, the original purchaser of this new Insignia-branded product (“Product”), that the
Product shall be free of defects in the original manufacturer of the material or workmanship for a period of one (1) year from the date of your purchase
of the Product (“Warranty Period”).
For this warranty to apply, your Product must be purchased in the United States or Canada from a Best Buy branded retail store or online at
www.bestbuy.com or www.bestbuy.ca and is packaged with this warranty statement.
How long does the coverage last?
The Warranty Period lasts for 1 year (365 days) from the date you purchased the Product. Your purchase date is printed on the receipt you received
with the Product.
What does this warranty cover?
During the Warranty Period, if the original manufacture of the material or workmanship of the Product is determined to be defective by an authorized
Insignia repair center or store personnel, Insignia will (at its sole option): (1) repair the Product with new or rebuilt parts; or (2) replace the Product at
no charge with new or rebuilt comparable products or parts. Products and parts replaced under this warranty become the property of Insignia and are
not returned to you. If service of Products or parts are required after the Warranty Period expires, you must pay all labor and parts charges. This
warranty lasts as long as you own your Insignia Product during the Warranty Period. Warranty coverage terminates if you sell or otherwise transfer the
Product.
How to obtain warranty service?
If you purchased the Product at a Best Buy retail store location or from a Best Buy online website (www.bestbuy.com or www.bestbuy.ca), please take
your original receipt and the Product to any Best Buy store. Make sure that you place the Product in its original packaging or packaging that provides
the same amount of protection as the original packaging.
To obtain warranty service, in the United States and Canada call 1-877-467-4289. Call agents may diagnose and correct the issue over the phone.
Where is the warranty valid?
This warranty is valid only in the United States and Canada at Best Buy branded retail stores or websites to the original purchaser of the product in the
country where the original purchase was made.
What does the warranty not cover?
This warranty does not cover:
• •Customer instruction/education
••Installation
••Set up adjustments
••Cosmetic damage
• •Damage due to weather, lightning, and other acts of God, such as power surges
• •Accidental damage
••Misuse
••Abuse
••Negligence
• •Commercial purposes/use, including but not limited to use in a place of business or in communal areas of a multiple dwelling condominium or
apartmentcomplex, or otherwise used in a place of other than a private home.
• •Modification of any part of the Product, including the antenna
• •Display panel damaged by static (non-moving) images applied for lengthy periods (burn-in).
• •Damage due to incorrect operation or maintenance
• •Connection to an incorrect voltage or power supply
• •Attempted repair by any person not authorized by Insignia to service the Product
• •Products sold “as is” or “with all faults”
• •Consumables, including but not limited to batteries (i.e. AA, AAA, C etc.)
• •Products where the factory applied serial number has been altered or removed
• •Loss or Theft of this product or any part of the product
• •Display panels containing up to three (3) pixel failures (dots that are dark or incorrectly illuminated) grouped in an area smaller than one tenth
(1/10) of the display size or up to five (5) pixel failures throughout the display. (Pixel based displays may contain a limited number of pixels that
may not function normally.)
• •Failures or Damage caused by any contact including but not limited to liquids, gels or pastes.
REPAIR REPLACEMENT AS PROVIDED UNDER THIS WARRANTY IS YOUR EXCLUSIVE REMEDY FOR BREACH OF WARRANTY. INSIGNIA SHALL NOT BE
LIABLE FOR ANY INCIDENTAL OR CONSEQUENTIAL DAMAGES FOR THE BREACH OF ANY EXPRESS OR IMPLIED WARRANTY ON THIS PRODUCT,
INCLUDING, BUT NOT LIMITED TO, LOST DATA, LOSS OF USE OF YOUR PRODUCT, LOST BUSINESS OR LOST PROFITS. INSIGNIA PRODUCTS MAKES NO
OTHER EXPRESS WARRANTIES WITH RESPECT TO THE PRODUCT, ALL EXPRESS AND IMPLIED WARRANTIES FOR THE PRODUCT, INCLUDING BUT NOT
LIMITED TO ANY IMPLIED WARRANTIES OF AND CONDITIONS OF MERCHANTABILITY AND FITNESS FOR A PARTICULAR PURPOSE, ARE LIMITED IN
DURATION TO THE WARRANTY PERIOD SET FORTH ABOVE AND NO WARRANTIES, WHETHER EXPRESS OR IMPLIED, WILL APPLY AFTER THE WARRANTY
PERIOD. SOME STATES, PROVINCES AND JURISDICTIONS DO NOT ALLOW LIMITATIONS ON HOW LONG AN IMPLIED WARRANTY LASTS, SO THE ABOVE
LIMITATION MAY NOT APPLY TO YOU. THIS WARRANTY GIVES YOU SPECIFIC LEGAL RIGHTS, AND YOU MAY ALSO HAVE OTHER RIGHTS, WHICH VARY
FROM STATE TO STATE OR PROVINCE TO PROVINCE.
Contact Insignia:
1-877-467-4289
www.insigniaproducts.com
INSIGNIA is a trademark of Best Buy and its affiliated companies.
*Distributed by Best Buy Purchasing, LLC
7601 Penn Ave South, Richfield, MN 55423 U.S.A.
©2021 Best Buy. All rights reserved.
32
www.insigniaproducts.com
For product inquiries, please contact us with the information below:
1-877-467-4289
www.insigniaproducts.com
INSIGNIA is a trademark of Best Buy and its affiliated companies.
Distributed by Best Buy Purchasing, LLC
7601 Penn Ave South, Richfield, MN 55423 U.S.A.
©2021 Best Buy. All rights reserved.
V4 ENGLISH
21-0242
 Loading...