

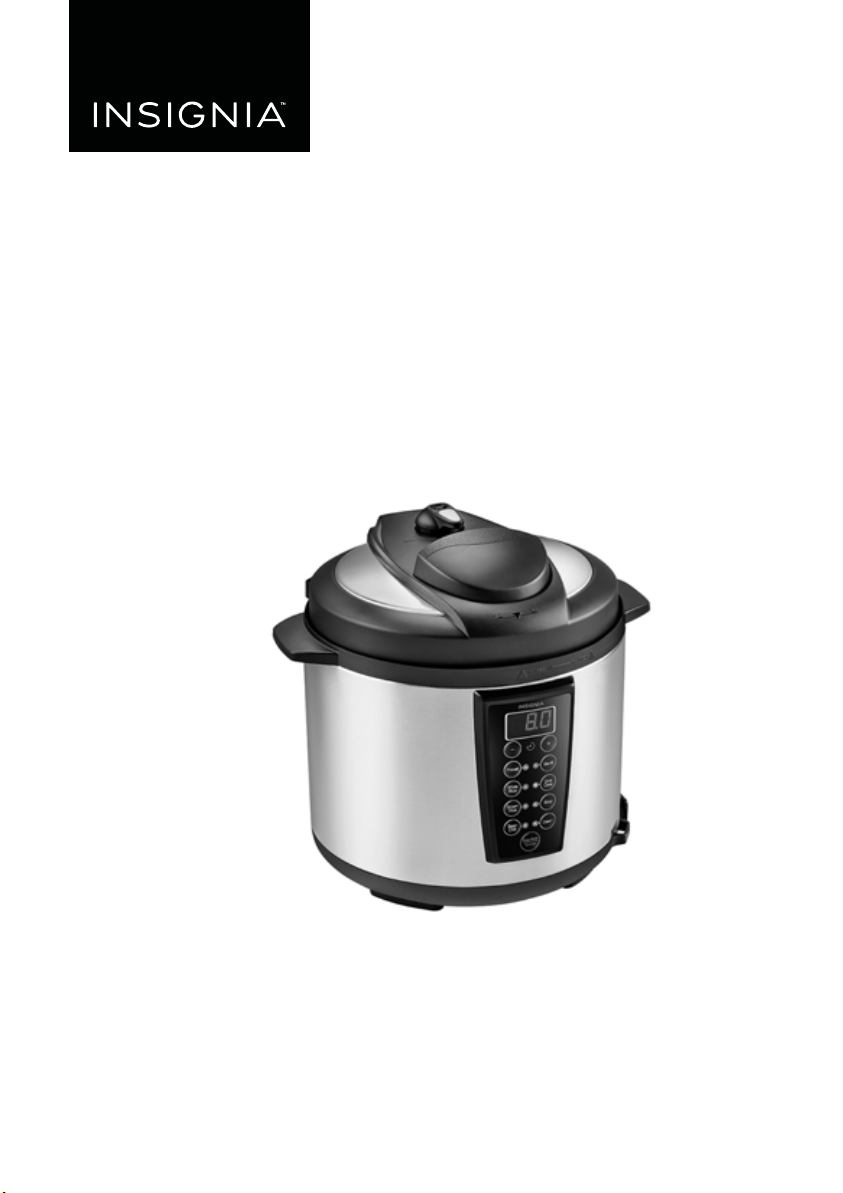
6 Quart Pressure
Cooker
NS-PC6SS7
USER GUIDE
Recipes are included with this manual!
Before using your new product, please read these instructions to prevent any damage.

Contents
Introduction . . . . . . . . . . . . . . . . . . . . . . . . . . . . . . . . . . . . . . . . . . . . . . . . . . . . .2
IMPORTANT SAFETY INSTRUCTIONS . . . . . . . . . . . . . . . . . . . . . . . . . . . . . . 2
Features . . . . . . . . . . . . . . . . . . . . . . . . . . . . . . . . . . . . . . . . . . . . . . . . . . . . . . . . .5
Using your pressure cooker. . . . . . . . . . . . . . . . . . . . . . . . . . . . . . . . . . . . . . .8
Recipes . . . . . . . . . . . . . . . . . . . . . . . . . . . . . . . . . . . . . . . . . . . . . . . . . . . . . . . . .11
Cleaning and maintaining your pressure cooker. . . . . . . . . . . . . . . . . .13
Troubleshooting . . . . . . . . . . . . . . . . . . . . . . . . . . . . . . . . . . . . . . . . . . . . . . . .15
Specifications . . . . . . . . . . . . . . . . . . . . . . . . . . . . . . . . . . . . . . . . . . . . . . . . . . .16
ONE-YEAR LIMITED WARRANTY . . . . . . . . . . . . . . . . . . . . . . . . . . . . . . . . . .17
NS-PC6SS7
Package contents . . . . . . . . . . . . . . . . . . . . . . . . . . . . . . . . . . . . . . . . . . .5
Main features . . . . . . . . . . . . . . . . . . . . . . . . . . . . . . . . . . . . . . . . . . . . . . .6
Control panel . . . . . . . . . . . . . . . . . . . . . . . . . . . . . . . . . . . . . . . . . . . . . . .7
Preparing to cook . . . . . . . . . . . . . . . . . . . . . . . . . . . . . . . . . . . . . . . . . . .8
Opening the cover safely . . . . . . . . . . . . . . . . . . . . . . . . . . . . . . . . . . . .9
Cooking - general . . . . . . . . . . . . . . . . . . . . . . . . . . . . . . . . . . . . . . . . . .10
Using the preset timer . . . . . . . . . . . . . . . . . . . . . . . . . . . . . . . . . . . . .10
Cooking frozen meats . . . . . . . . . . . . . . . . . . . . . . . . . . . . . . . . . . . . . .11
Cooking Rice . . . . . . . . . . . . . . . . . . . . . . . . . . . . . . . . . . . . . . . . . . . . . .11
Cooking Beef in red wine. . . . . . . . . . . . . . . . . . . . . . . . . . . . . . . . . . .12
Cooking Butter Chicken . . . . . . . . . . . . . . . . . . . . . . . . . . . . . . . . . . . .12
Removing and installing the anti-block shield. . . . . . . . . . . . . . .13
Removing and installing the rubber gasket . . . . . . . . . . . . . . . . .14
Cleaning your pressure cooker . . . . . . . . . . . . . . . . . . . . . . . . . . . . .14
Introduction
Congratulations on your purchase of a high-quality Insignia product. Your
NS-PC6SS7 represents the state of the art in pressure cooker design and is
designed for reliable and trouble-free performance.
IMPORTANT SAFETY INSTRUCTIONS
When using a pressure cooker, basic precautions should always be
followed, including the following:
READ ALL INSTRUCTIONS BEFORE USING
1 Do not touch hot surfaces - use handles.
2 To avoid the risk of electric shock, do not immerse the pressure cooker
or cord in water or other liquids.
3 Keep the pressure cooker away from children to avoid accidents. Close
supervision is necessary when any appliance is used by or near
children.
2
www.insigniaproducts.com

6 Quart Pressure Cooker
4 Unplug from the wall outlet when not in use or before cleaning. Allow
to cool before installing or removing parts and before cleaning.
5 Do not operate the pressure cooker with a damaged cord or if the
pressure cooker has been dropped or damaged. To avoid the risk of
electric shock, do not disassemble the pressure cooker. Take it to a
qualified serviceman for examination and repair. Incorrect assembly
might result in a risk of electric shock when the pressure cooker is used
after reassembly.
6 Use of accessories not recommended by the manufacturer may cause
injuries.
7 Do not use outdoors.
8 Do not let the cord hang over the edge of a table or counter, or touch
hot surfaces.
9 Do not place on or near a gas or electric burner or an oven. Never put
the whole appliance in a dishwasher (only the inner cooking pot is
dishwasher safe).
10 Extreme caution must be used when moving an appliance containing
hot oil or other hot liquids.
11 To disconnect, push the Keep Warm/Cancel button on the control
panel and remove the plug from the wall outlet.
12 Only use this pressure cooker for its intended purpose.
13 This appliance is for household use only.
14 Caution - to reduce the risk of electric shock, cook only in the included
inner cooking pot.
15 Do not place the unit on an unstable surface or on a surface that might
block the vent hole on the bottom, such as newspapers or foam.
16 Do not use this pressure cooker in a location near water or fire, or in a
place exposed to direct sunlight or splashing oil.
17 Put the appliance in a place out of reach of children.
18 Do not immerse the pressure cooker, power cord, or plug in water or
other liquid in order to protect against electric shock hazards.
19 If the electric cord or plug is damaged, or if the pressure cooker
malfunctions, turn it off immediately and send it to the service center
for examination, repair, or adjustment.
20 Do not replace any parts inside the pressure cooker yourself. Send it to
the service center for repairs.
21 Prior to each use, be sure to check the anti-block shield, float valve,
and pressure release valve for obstructions. Wipe the surface of the
inner cooking pot and the heating plate to confirm that they free of
any foreign objects. Make sure that the pressure relief valve is in the
Closed Vent position.
www.insigniaproducts.com
3

NS-PC6SS7
22 Do not use an extension cord with this appliance. A short power cord
should be used to reduce the risk of becoming entangled in or
tripping on a longer cord.
23 Some foods are not suitable for cooking in a pressure cooker. Do not
attempt to cook any of the following in this cooker, as they tend to
froth, foam, and sputter and may result in clogging the pressure
release devices:
•Applesauce
• Cranberries
•Rhubarb
• Oatmeal/cereals
• Noodles, macaroni, spaghetti, or any other pasta
•Split peas
• Pearl barley
24 Make sure that you use the appropriate amount of liquid when
cooking.
25 Do not fill the cooker above the MAX FILL line inside the inner cooking
pot with liquid or food.
26 Do not move this product or forcefully remove the cover when the
pressure cooker is in operation.
27 Do not place your hands or face over the pressure release valve or float
valve when the pressure cooker is in operation to avoid a serious burn.
28 After cooking, use extreme caution when removing the cover. Serious
burns can result from the steam inside the unit.
29 When opening the cover after cooking, do not touch the inner
cooking pot or cover with your hands to avoid burns.
30 Do not cover the pressure release valve.
31 Never deep fry or pressure fry in this pressure cooker. It is dangerous
and may cause a fire or serious damage.
32 This appliance cooks under pressure. Improper use may result in
scalding injuries. Make sure that the unit is properly closed before
operating.
33 Do not fill the pressure cooker over 2/3 full. When cooking foods that
expand during cooking, such as rice, beans, or dried vegetables, do
not fill the unit over 1/2 full. Overfilling may cause a risk of clogging
the vent and developing excess pressure.
34 Always check the pressure release devices to make sure that they are
free of debris and clogs before use.
35 DO NOT OPEN THE PRESSURE COOKER UNTIL THE UNIT HAS COOLED
AND ALL INTERNAL PRESSURE HAS BEEN RELEASED. If it is difficult to
open the lid, it indicates that the cooker is still pressurized - do not
force it open. Any pressure in the cooker can be hazardous.
4
www.insigniaproducts.com

36 Make sure that the handles are assembled and fastened properly
before each use. Cracked or damaged handles should be replaced.
37 This appliance is not intended for use by persons (including children)
with reduced physical, sensory, or mental capabilities, or lack of
experience and knowledge, unless they have been supervised by a
person responsible for their safety.
38 Do Not use this pressure cooker for pressure frying with oil.
39 Never use metal utensils with this appliance. Use plastic or wooden
utensils to protect the inner cooking pot from scratches.
SAVE THESE INSTRUCTIONS
Polarized power plug
This appliance has a polarized plug (one blade is wider than the other).To
reduce the risk of electric shock, this plug is intended to fit into a polarized
outlet only one way. If the plug does not fit fully into the outlet, reverse
the plug. If it still does not fit, contact a qualified electrician. Do not
attempt to modify the plug in any way.
Features
Package contents
• 6 quart pressure cooker
• Rice spoon
• Soup spoon
•Measuring cup
•Power cord
•User Guide
6 Quart Pressure Cooker
www.insigniaproducts.com
5
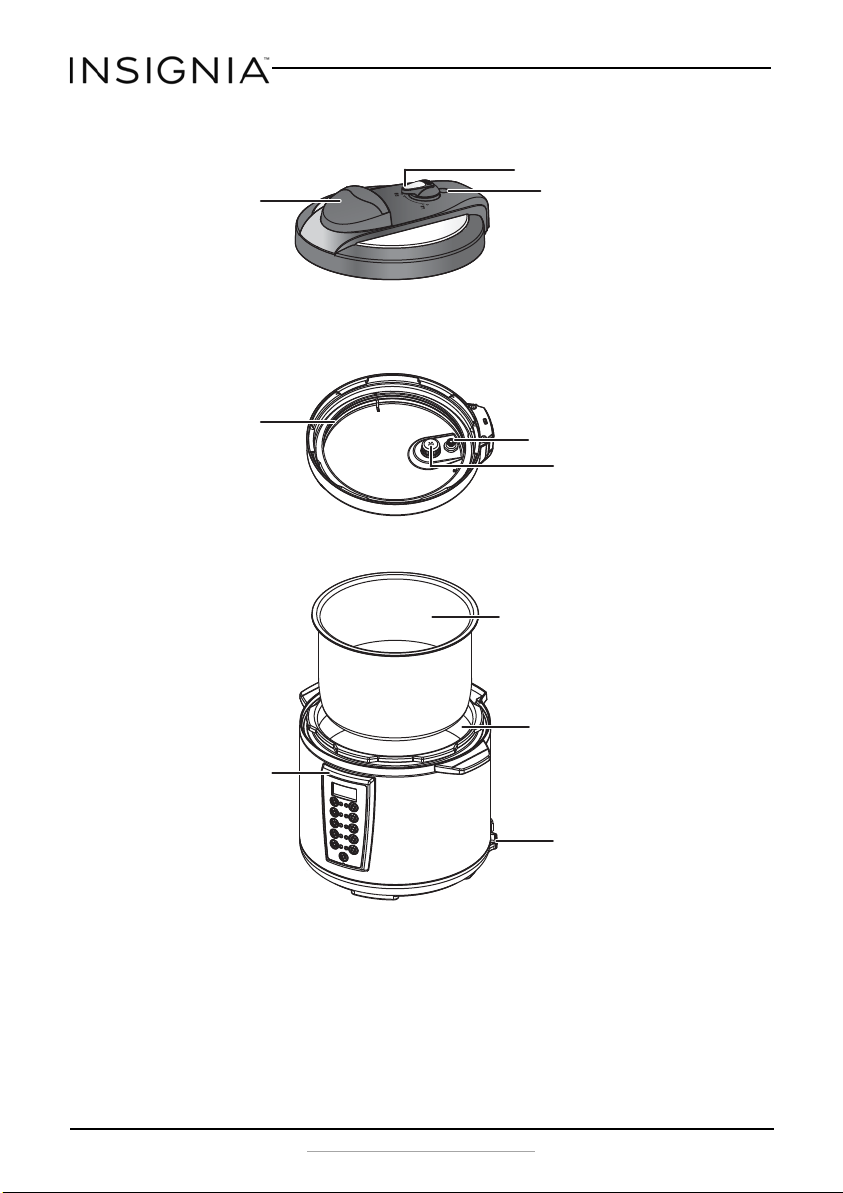
Main features
Rubber gasket
Exhaust valve
Inner pot
Float valve gasket ring
Control panel
Cover handl e
Outer pot
Float valve
Anti-block shield
Rice spoon shelf
Top o f lid
Bottom of lid
Pressure cooker
NS-PC6SS7
6
www.insigniaproducts.com

Control panel
Keep Warm
Preset
Slow
Cook
Brown
Rice
Bean
Chili
Soup
Steam
White
Rice
Sauté
Cancel
6 Quart Pressure Cooker
Preset button Possible solution
White Rice, Brown Rice,
Bean/Chili, and Soup
Slow Cook Sets a preset length of time for pressure cooking (from four to eight hours). You can adjust the
Preset Sets the end of cooking time. Change the cooking time by pressing the + or - keys.
Saute Use before pressure cooking, with the lid off to shorten the time it takes to get to full pressure.
Keep Warm/Cancel Keeps cooked food warm for up to 12 hours. Or cancel the current preset and return to standby.
Steam Boils water to stea m foods.
Sets a preset length of time for pressure cooking. You can adjust the time by pressing the + or keys.
time by pressing the + or - keys.
You can soften vegetables or cook food like rice.
www.insigniaproducts.com
7

Using your pressure cooker
Preparing to cook
1 Unplug the pressure cooker.
2 Open the cover by holding the cover handle with one hand, then
rotating the cover until the cover marking aligns with the “Open”
mark on the housing, then open the cover.
3 Check the float valve and exhaust valve for obstructions and confirm
that all parts are installed properly, especially the rubber gasket and
anti-block shield. Do this prior to each use.
4 Remove the stainless steel inner pot, then remove any foreign objects
and water droplets from the outside of the inner pot and the inside of
the housing.
5 Add food and water to the inner pot. The total amount of food and
water should not exceed the MAX level indicated for the inner pot.
NS-PC6SS7
6 Put the inner pot into the electric pressure cooker housing, then rotate
the inner pot slightly left to right to ensure good contact between the
inner pot and heating plate.
7 Close the cover completely by holding the cover handle with one
hand and rotating the cover until the cover marking aligns with the
“Close” mark on the housing.
8
www.insigniaproducts.com

6 Quart Pressure Cooker
6($/,1*
9(17,1*
9(17,1*
9(17,1*
9(17,1*
6($/,1*
9(17,1*
9(17,1*
6($/,1*
Sealed position
Venting position
8 Turn the exhaust valve handle to the “sealing” mark, indicating that
the pressure cooker is in airtight condition.
Notes
• To manually exhaust the pressure cooker, turn the exhaust
valve to the Venting icon.
• Make sure that the float valve has fallen.
9 Plug in the pressure cooker.
10 After each use, remove any foreign objects or materials from the
rubber gasket and anti-block shield. Keep clean to avoid odor.
Cautions
• Never pull the rubber gasket. Pulling the gasket may
deform it, affecting the sealing and pressure of your cooker.
• Never use your pressure cooker with a damaged gasket. If
your cooker has a damaged gasket, it should be sent to the
service center for replacement.
Opening the cover safely
1 Unplug the pressure cooker.
2 Make sure that the pressure is released.
• For solid foods:
You can either turn the exhaust valve to the “Venting” position
until the float valve falls or put a wet towel on the cover to quicken
cooling until the float valve falls.
•For liquids:
Let the pressure cooker cool naturally, until the float valve falls on
its own.
3 Open the cover by holding the cover handle with one hand, then
rotating the cover until the cover marking aligns with the “Open”
mark on the housing, then lift and open the cover.
Note
When cooking a small quantity of food, the inner pot may stick
to the cover when it is opened. In this case, shake the inner pot
manually, and remove the cover after the inner pot falls into the
cooker body.
www.insigniaproducts.com
9

Cooking - general
After the initial preparations are complete and the pressure cooker is
closed and ready, do the following:
1 Turn on the pressure cooker by plugging it in. The display blinks and
shows a red horizontal line “---”, indicating that the pressure cooker is
ready.
2 Press the desired preset button. The indicator next to the preset
button turns red and 10 seconds later cooking begins. The display
shows a bright red horizontal line “---”.
3 After the selected cooking cycle is completed your cooker
automatically enters the Keep Warm state, the selected function
indicator goes out, and the Keep Warm indictor turns on. At this time
the display screen shows “0.0”, and the cooker beeps 10 times.
NS-PC6SS7
Notes
• Cooking time varies with different preset selections. The
greater the food amount, the longer the cooking time.
• You can cancel the current preset and return to standby by
pressing the Keep Warm/Cancel button.
• Within 10 seconds you can re-select preset time and
function level. The electric pressure cooker will star t
working within 10 seconds after selection.
• While cooking, the cooker may sometimes generate the
“cluck” sound. This is not a malfunction.
Using the preset timer
You can adjust the cook times of the preset modes to fit a desired recipe.
1 Select the preset you want. Note that you cannot select a Preset time
for Saute mode.
2 Within 10 seconds, press Preset. The time flashes on the display and
the indicator next to Preset blinks.
3 Press + or - to adjust the time (in half hour increments between 2 and
24 hours), then press Preset. The indicator next to Preset turns green
and 10 seconds later cooking begins.
• The display shows the remaining time until cooking ends. To
cancel the operation, press Keep Warm/Cancel.
• After cooking, the pressure cooker enters the Keep Warm state
automatically. This maintains your food at between 140° and 176° F
(60° and 80° C).
• The Keep Warm feature can also be turned on by pressing the
Keep Warm/Cancel button. We recommend that you don’t use the
Keep Warm feature for more than eight hours.
10
www.insigniaproducts.com

Cooking frozen meats
If you use meats that are 1” thick or less, the cooking time stated in the
recipe can remain the same, it will just take longer for the pressure cooker
to reach the pressure point. For example, if the recipe calls for the meat to
be cooked for 15 minutes after pressure has been achieved, it will still be
15 minutes. It just takes longer for pressure to be achieved.
Larger cuts of meat will increase cooking times and they won’t cook as
well as meats that were fully or partially thawed and browned first.
Recipes
We’ve provided a few recipes to get you started, but you'll find plenty of
recipes online on such websites as Food52, Epicurious, CookEatShare, and
the Food Network. Just search for Pressure Cooker Recipes.
Cooking Rice
1 Measure the amount of rice you want to cook in a measuring cup
(level) and clean it.
• One measuring cup of rice is about 150 grams.
• We don’t recommended washing rice in the inner pot.
2 Put the cleaned rice into the inner pot and fill it with water to the
correct water level.
• The scale line inside the inner pot indicates how much water to
add. For example, to cook two cups of rice, add water to line 2.
• Water quantity can vary with rice type and hardness, but never
exceed the MAX level inside the inner pot.
3 Place the inner pot (wiped clean) into the cooker body, then rotate it
slightly from left to right to ensure full contact between inner pot and
heating plate.
4 Put the cover in place and turn on the pressure cooker.
5 Press the White Rice button. The White Rice preset function indicator
lights and, after 10 seconds, the cooker begins cooking.
Cooking time is around 35 minutes, but the time may slightly vary with
rice amount or rice quality. After cooking, the pressure cooker switches
to Keeping Warm automatically.
6 Open the cover (see “Using the preset timer” on page 10).
After cooking, the rice should be served after about one to three
minutes on Keeping Warm.
6 Quart Pressure Cooker
Notes
• Cooking time varies with different preset selections. The
greater the food amount, the longer the cooking time.
• You can cancel the current preset and return to standby by
pressing the Keep Warm/Cancel button.
www.insigniaproducts.com
11

Cooking Beef in red wine
• 4.4 lbs (2 kg) blade or chuck steak, cubed
• 1 cup (150 g) flour
• Salt and pepper, to taste
• 2 tablespoons (40 g) butter
• 2 tablespoons (40 ml) olive oil
•2 onions, diced
• 1 leek, finely chopped
• 2 carrots, chopped
• 2 cloves garlic, minced
• 2 tablespoons parsley, chopped
• 2 tablespoons chives, chopped
• 1.6 pints (750 ml) red wine
1 In a plastic bag, toss the meat in flour and seasonings.
2 Press the Sauté button. The Sauté preset function indicator turns on
and, after 10 seconds, the cooker begins cooking.
3 Melt the butter and oil, then place the meat into the inner pot in four
batches, searing each for five minutes each.
4 Add onions, leek, carrots, garlic, parsley, and chives.
5 Pour the red wine over the top of the food and bring to the boil.
6 Press the Keep Warm/Cancel button, then press the Slow Cook
preset button. The Slow Cook preset function indicator turns on and,
after 10 seconds, the cooker begins cooking.
After cooking, the pressure cooker switches to Keeping Warm
automatically.
7 Open the cover (see “Using the preset timer” on page 10).
NS-PC6SS7
Cooking Butter Chicken
• 2 tablespoons olive oil
• 1 teaspoon ginger, minced
• 3 small onions, sliced thinly
• 2 teaspoons cayenne pepper, ground
• 2 teaspoons paprika, ground
• 1 teaspoon coriander seeds, ground
• 2 teaspoons turmeric, ground
• 2 teaspoons cumin, ground
• 2 x 14.2 oz. (420 ml) cans tomatoes, diced
• 4.4 lbs. (2 kg) chicken breast, diced
• 10 oz. (300 ml) pure cream
• Fresh coriander to taste
1 Finish cooking preparation according to “Preparing to cook” on
page 8.
12
www.insigniaproducts.com

6 Quart Pressure Cooker
Anti-block
shield
Turn the anti-block shield
counterclockwise until it comes off.
Insert and turn the anti-block
shield clockwise until it seats firmly.
2 Press the Sauté button. The Sauté preset function indicator turns on
and, after 10 seconds, the cooker begins cooking.
3 Add the oil, garlic, and onions and saute until softened.
4 Add the spices and stir until combined.Stir the tomatoes and chicken
breast until everything is evenly coated.
5 Pour the stock over the chicken, then securely place and seal the lid
onto the pressure cooker.
6 Press the Keep Warm/Cancel button.
7 Press the Bean/Chili button. The Bean/Chili preset function indicator
turns on and, after 10 seconds, the cooker begins cooking.
After cooking, the pressure cooker switches to Keeping Warm
automatically.
8 Open the cover on according to “Opening the cover safely” on page 9.
Cleaning and maintaining your pressure cooker
Removing and installing the anti-block shield
www.insigniaproducts.com
13

Removing and installing the rubber gasket
Rubber
gasket
Gently grip the gasket and remove
it from the groove.
Press the gasket into the groove in
the cover until it seats firmly.
1 Prior to each use, make sure that the rubber gasket and anti-block
shield are installed on the upper cover.
2 After each use, remove any foreign objects or cooked food from the
gasket and anti-block shield. Keep clean to avoid odors.
Never pull the gasket. Pulling the gasket could cause deformation
which may affect sealing and pressure.
A damaged gasket should never be used. Send the damaged gasket to
the service center for replacement.
NS-PC6SS7
Cleaning your pressure cooker
After each use, clean your pressure cooker thoroughly.
1 Before cleaning, unplug the pressure cooker and wait until it cools
down completely.
2 Remove the cover and inner pot, then wash them with a detergent,
rinse with fresh water, and wipe them dry with a soft cloth.
3 Using clear water, clean the cover, including the rubber gasket,
exhaust valve, anti-block shield, exhaust valve core, and float valve,
then wipe them clean with a rag. After cleaning install them on the
cover correctly.
4 Clean the cooker body with a rag. Do not immerse the cooker in water
14
or wash with running water.
www.insigniaproducts.com

6 Quart Pressure Cooker
Troubleshooting
Caution
Do not try to repair your pressure cooker yourself. Doing so
invalidates the warranty.
If this occurs Do this
The power cord and plug suffer from expansion, deformation, discoloration, or are
damaged.
A portion of the power cord and the plug are hotter than usual.
When you plug it in, there is an unusual sound or shock.
There is dust or dirt on the plug or socket. Remove dust or dirt with a dry
Problem Possible cause Possible solution
It’s difficult to close the
cover
It’s difficult to open the
cover
The cover is leaking No rubber gasket. Install the rubber gasket correctly.
The float valve is
leaking
The float valve won’t
rise
The exhaust valve does
not seal
All indicator lights flash
and C1 or C2 appears on
the display
The rubber gasket is not positioned
well.
The red push rod on the top of the lid
is jammed by the float valve.
The float valve fails to fall after the
steam has been released.
There is pressure inside the cooker. Wait until the pressure is lower.
Food debris on the rubber gasket. Clean the rubber gasket.
Worn rubber gasket. Replace the rubber gasket.
The cover is not closed completely. Close the cover again.
Food debris on the float valve
gasket.
Float valve gasket ring worn. Replace the float valve gasket.
Excessive food and water in the
cooker.
The cover or exhaust valve are
leaking.
The exhaust valve is not in the
SEALED position.
The pressure control is failing. Return to the service center for inspection or repair.
Sensor failure. Return to the service center for inspection or repair.
Reposition the rubber gasket.
Push the push rod gently by hand.
Press the float valve gently with the rice spoon.
Clean the float valve gasket.
Remove food and water down to the MAX fill level.
Return to a Best Buy store near you for inspec tion or repair.
Turn the exhaust valve to the SEALED position.
Stop using the pressure cooker
immediately and send to an
authorized service center for
repai r.
brush.
www.insigniaproducts.com
15

Problem Possible cause Possible solution
All indicator lights flash
and C5 appears on the
display
All indicator lights flash
and C6 appears on the
display
The rice is half cooked
or too hard
The rice is too soft Too much water in the inner pot. Reduce the water level.
The temperature is too high because
there is no water in the inner pot.
The temperature is too high because
the inner pot is not positioned
correctly.
The pressure switch has failed. Return to the service center for inspection or repair.
There is not enough water in the
inner pot.
The cover was closed prematurely. When the cooking time expires, release the steam and open
Add water as required.
Reposition the inner pot correctly.
Add water.
the cover in five minu tes.
Specifications
Volume 6 Quarts
Weight 11.6 lbs. (5.26 kg)
Power 120 V ~ 60 Hz
Power consumption 1000W
NS-PC6SS7
This marking indicates that this product should not be disposed with other household
wastes throughout the EU. To prevent possible harm to the environment or human health
from uncontrolled waste disposal, recycle it responsibly to promote the sustainable reuse of
material resources. To return your used device, please use the return and collection systems
or contact the retailer where the product was purchased. They can take this product for
environmental safe recycling.
16
www.insigniaproducts.com

ONE-YEAR LIMITED WARRANTY
Definitions:
The Distributor* of Insignia branded products warrants to you, the original purchaser of this
new Insignia-branded product (“Product”), that the Product shall be free of defects in the
original manufacturer of the material or workmanship for a period of one (1) year from the
date of your purchase of the Product (“Warranty Period”).
For this warranty to apply, your Product must be purchased in the United States or Canada
from a Best Buy branded retail store or online at www.bestbuy.com or www.bestbuy.ca, and
is packaged with this warranty statement.
How long does the coverage last?
The Warranty Period lasts for 1 year (365 days) from the date you purchased the Product.
Your purchase date is printed on the receipt you received with the Product.
What does this warranty cover?
During the Warranty Period, if the original manufacture of the material or workmanship of
the Product is determined to be defective by an authorized Insignia repair center or store
personnel, Insignia will (at its sole option): (1) repair the Product with new or rebuilt parts; or
(2) replace the Product at no charge with new or rebuilt comparable products or parts.
Products and parts replaced under this warranty become the property of Insignia and are
not returned to you. If service of Products or parts are required after the Warranty Period
expires, you must pay all labor and parts charges. This warranty lasts as long as you own your
Insignia Product during the Warranty Period. Warranty coverage terminates if you sell or
otherwise transfer the Product.
How to obtain warranty service?
If you purchased the Product at a Best Buy retail store location, please take your original
receipt and the Product to any Best Buy store. Make sure that you place the Product in its
original packaging or packaging that provides the same amount of protection as the original
packaging. If you purchased the Product from a Best Buy online web site (www.bestbuy.com
or www.bestbuy.ca), mail your original receipt and the Product to the address listed on the
web site. Make sure that you put the Product in its original packaging or packaging that
provides the same amount of protection as the original packaging.
To obtain warranty service, in the United States call 1-888-BESTBUY, Canada call
1-866-BESTBUY. Call agents may diagnose and correct the issue over the phone.
6 Quart Pressure Cooker
Where is the warranty valid?
This warranty is valid only in the United States and Canada at Best Buy branded retail stores
or websites to the original purchaser of the product in the county where the original
purchase was made.
What does the warranty not cover?
This warranty does not cover:
• Food loss/spoilage due to failure of refrigerator or freezer
• Customer instruction/education
•Installation
•Set up adjustments
•Cosmetic damage
• Damage due to weather, lightning, and other acts of God, such as power surges
•Accidental damage
•Misuse
•Abuse
www.insigniaproducts.com
17

NS-PC6SS7
•Negligence
• Commercial purposes/use, including but not limited to use in a place of business or in
communal areas of a multiple dwelling condominium or apartment complex, or
otherwise used in a place of other than a private home.
• Modification of any part of the Product, including the antenna
• Display panel damaged by static (non-moving) images applied for lengthy periods
(burn-in).
• Damage due to incorrect operation or maintenance
• Connection to an incorrect voltage or power supply
• Attempted repair by any person not authorized by Insignia to service the Product
• Products sold “as is” or “with all faults”
• Consumables, including but not limited to batteries (i.e. AA, AAA, C etc.)
• Products where the factory applied serial number has been altered or removed
• Loss or Theft of this product or any part of the product
• Display panels containing up to three (3) pixel failures (dots that are dark or incorrectly
illuminated) grouped in an area smaller than one tenth (1/10) of the display size or up
to five (5) pixel failures throughout the display. (Pixel based displays may contain a
limited number of pixels that may not function normally.)
• Failures or Damage caused by any contact including but not limited to liquids, gels or
pastes.
REPAIR REPLACEMENT AS PROVIDED UNDER THIS WARRANTY IS YOUR EXCLUSIVE REMEDY
FOR BREACH OF WARRANTY. INSIGNIA SHALL NOT BE LIABLE FOR ANY INCIDENTAL OR
CONSEQUENTIAL DAMAGES FOR THE BREACH OF ANY EXPRESS OR IMPLIED WARRANTY ON
THIS PRODUCT, INCLUDING, BUT NOT LIMITED TO, LOST DATA, LOSS OF USE OF YOUR
PRODUCT, LOST BUSINESS OR LOST PROFITS. INSIGNIA PRODUCTS MAKES NO OTHER
EXPRESS WARRANTIES WITH RESPECT TO THE PRODUCT, ALL EXPRESS AND IMPLIED
WARRANTIES FOR THE PRODUCT, INCLUDING, BUT NOT LIMITED TO, ANY IMPLIED
WARRANTIES OF AND CONDITIONS OF MERCHANTABILITY AND FITNESS FOR A PARTICULAR
PURPOSE, ARE LIMITED IN DURATION TO THE WARRANTY PERIOD SET FORTH ABOVE AND
NO WARRANTIES, WHETHER EXPRESS OR IMPLIED, WILL APPLY AFTER THE WARRANTY
PERIOD. SOME STATES, PROVINCES AND JURISDICTIONS DO NOT ALLOW LIMITATIONS ON
HOW LONG AN IMPLIED WARRANTY LASTS, SO THE ABOVE LIMITATION MAY NOT APPLY TO
YOU. THIS WARRANTY GIVES YOU SPECIFIC LEGAL RIGHTS, AND YOU MAY ALSO HAVE OTHER
RIGHTS, WHICH VARY FROM STATE TO STATE OR PROVINCE TO PROVINCE.
Contact Insignia:
For customer service please call 1-877-467-4289
www.insigniaproducts.com
INSIGNIA is a trademark of Best Buy and its affiliated companies.
Distributed by Best Buy Purchasing, LLC
7601 Penn Ave South, Richfield, MN 55423 U.S.A.
©2016 Best Buy. All rights reserved.
Made in China
18
www.insigniaproducts.com

www.insigniaproducts.com
1-877-467-4289 (U.S. and Canada) or 01-800-926-3000 (Mexico)
INSIGNIA is a trademark of Best Buy and its affiliated companies.
Distributed by Be st Buy Purchasing, LLC
7601 Penn Ave South, Richfield, MN 55423 U.S.A.
©2016 Best Buy. All rights reserved.
Made in China.
V2 ENGLISH
16-0639
 Loading...