

Insignia NS-HDVD18 User Manual
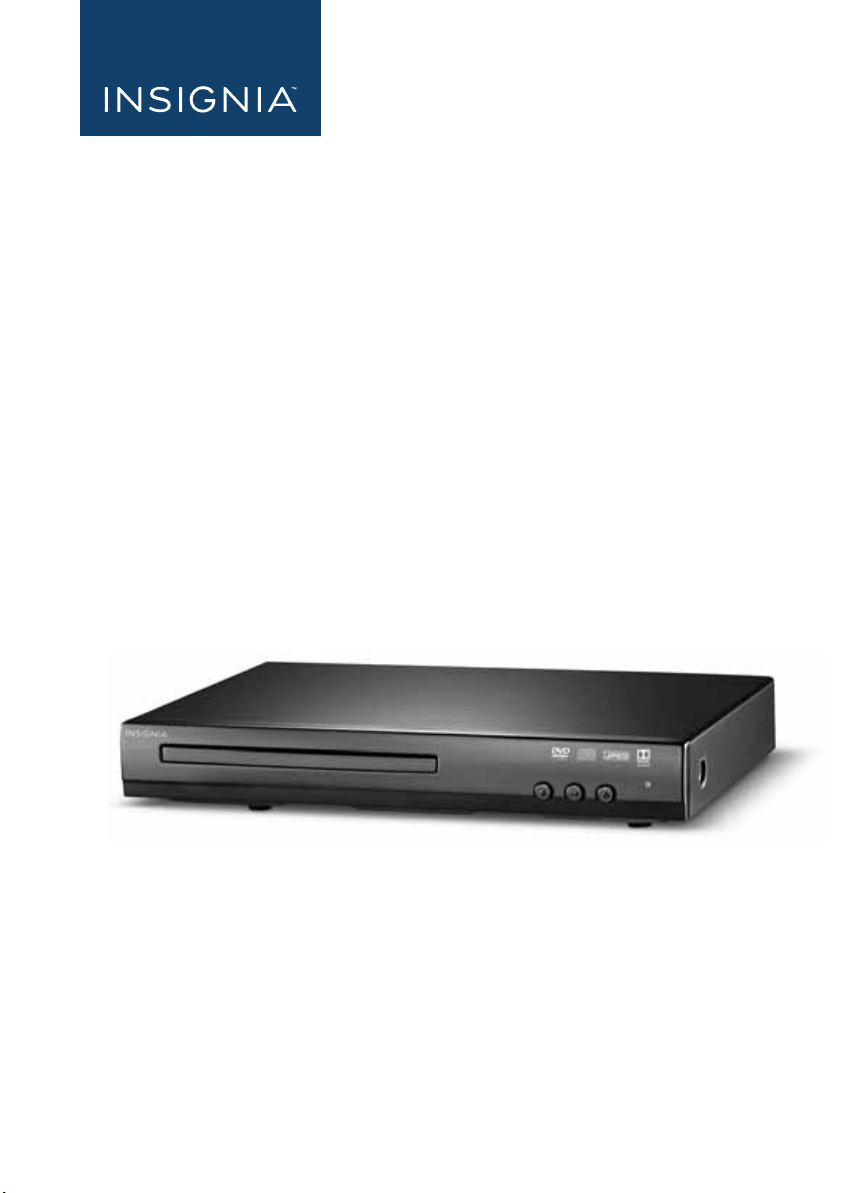
DVD Player
NS-HDVD18
USER GUIDE
Before using your new product, please read these instructions to prevent any damage.
Contents
Important Safety Instructions. . . . . . . . . . . . . . . . . . . . . . . . . . . . . . . . . . . . .2
Features . . . . . . . . . . . . . . . . . . . . . . . . . . . . . . . . . . . . . . . . . . . . . . . . . . . . . . . . .4
Package contents . . . . . . . . . . . . . . . . . . . . . . . . . . . . . . . . . . . . . . . . . . .4
DVD player . . . . . . . . . . . . . . . . . . . . . . . . . . . . . . . . . . . . . . . . . . . . . . . . .4
Setting up your DVD player. . . . . . . . . . . . . . . . . . . . . . . . . . . . . . . . . . . . . . . 6
Connecting to AC power . . . . . . . . . . . . . . . . . . . . . . . . . . . . . . . . . . . .6
Connecting the DVD player . . . . . . . . . . . . . . . . . . . . . . . . . . . . . . . . .6
Using your DVD player . . . . . . . . . . . . . . . . . . . . . . . . . . . . . . . . . . . . . . . . . . .8
Powering your DVD player . . . . . . . . . . . . . . . . . . . . . . . . . . . . . . . . . .8
Playing a DVD or audio CD . . . . . . . . . . . . . . . . . . . . . . . . . . . . . . . . . .8
Controlling DVD or audio CD playback. . . . . . . . . . . . . . . . . . . . . . . 9
Adjusting the volume . . . . . . . . . . . . . . . . . . . . . . . . . . . . . . . . . . . . . . .9
Programming your DVD player . . . . . . . . . . . . . . . . . . . . . . . . . . . . . .9
Using the Setup menus . . . . . . . . . . . . . . . . . . . . . . . . . . . . . . . . . . . . .9
Troubleshooting . . . . . . . . . . . . . . . . . . . . . . . . . . . . . . . . . . . . . . . . . . . . . . . .12
Maintaining. . . . . . . . . . . . . . . . . . . . . . . . . . . . . . . . . . . . . . . . . . . . . . . . . . . . .12
Cleaning your DVD player . . . . . . . . . . . . . . . . . . . . . . . . . . . . . . . . . .12
Handling discs . . . . . . . . . . . . . . . . . . . . . . . . . . . . . . . . . . . . . . . . . . . . .12
Cleaning discs . . . . . . . . . . . . . . . . . . . . . . . . . . . . . . . . . . . . . . . . . . . . .13
Specifications . . . . . . . . . . . . . . . . . . . . . . . . . . . . . . . . . . . . . . . . . . . . . . . . . . .13
Legal notices. . . . . . . . . . . . . . . . . . . . . . . . . . . . . . . . . . . . . . . . . . . . . . . . . . . .13
ONE-YEAR LIMITED WARRANTY . . . . . . . . . . . . . . . . . . . . . . . . . . . . . . . . . .15
Important Safety Instructions
CAUTION
RISK OF ELECTRIC SHOCK
DO NOT OPEN
This symbol indicates that dangerous voltage
constituting a risk of electric shock is present
within your DVD player.
This symbol indicates that there are important
operating and maintenance instructions in the
literature accompanying your DVD player.
www.insigniaproducts.com
2

DVD Player
Double insulation.
This is a class II apparatus.
This unit contains a low-power laser device. There is no danger of hazardous
radiation outside this unit.
1 Read these instructions.
2 Keep these instructions.
3 Heed all warnings.
4 Follow all instructions.
5 Do not use this apparatus near water.
6 Clean only with a dry cloth.
7 Do not block any ventilation openings. Install in accordance with the
manufacturer's instructions.
8 Do not install near any heat sources such as radiators, heat registers,
stoves, or other apparatus (including amplifiers) that produce heat.
9 Do not defeat the safety purpose of the polarized or grounding-type
plug. The wide blade is provided for your safety. If the provided plug
does not fit into your outlet, consult an electrician for replacement of
the obsolete outlet.
10 Protect the power cord from being walked on or pinched particularly
at plugs, convenience receptacles, and the point where they exit from
the apparatus.
11 Only use attachments/accessories specified by the manufacturer.
12 Unplug this apparatus during lightning storms or when unused for
long periods of time.
13 Refer all servicing to qualified service personnel. Servicing is required
when the apparatus has been damaged in any way, such as when the
power-supply cord or plug is damaged, liquid has been spilled or
objects have fallen into the apparatus, the apparatus has been
exposed to rain or moisture, does not operate normally, or has been
dropped.
14 To reduce the risk of fire or electric shock, do not expose this device to
rain, moisture, dripping, or splashing, and do not place objects filled
with liquids, such as vases, on it.
www.insigniaproducts.com
3
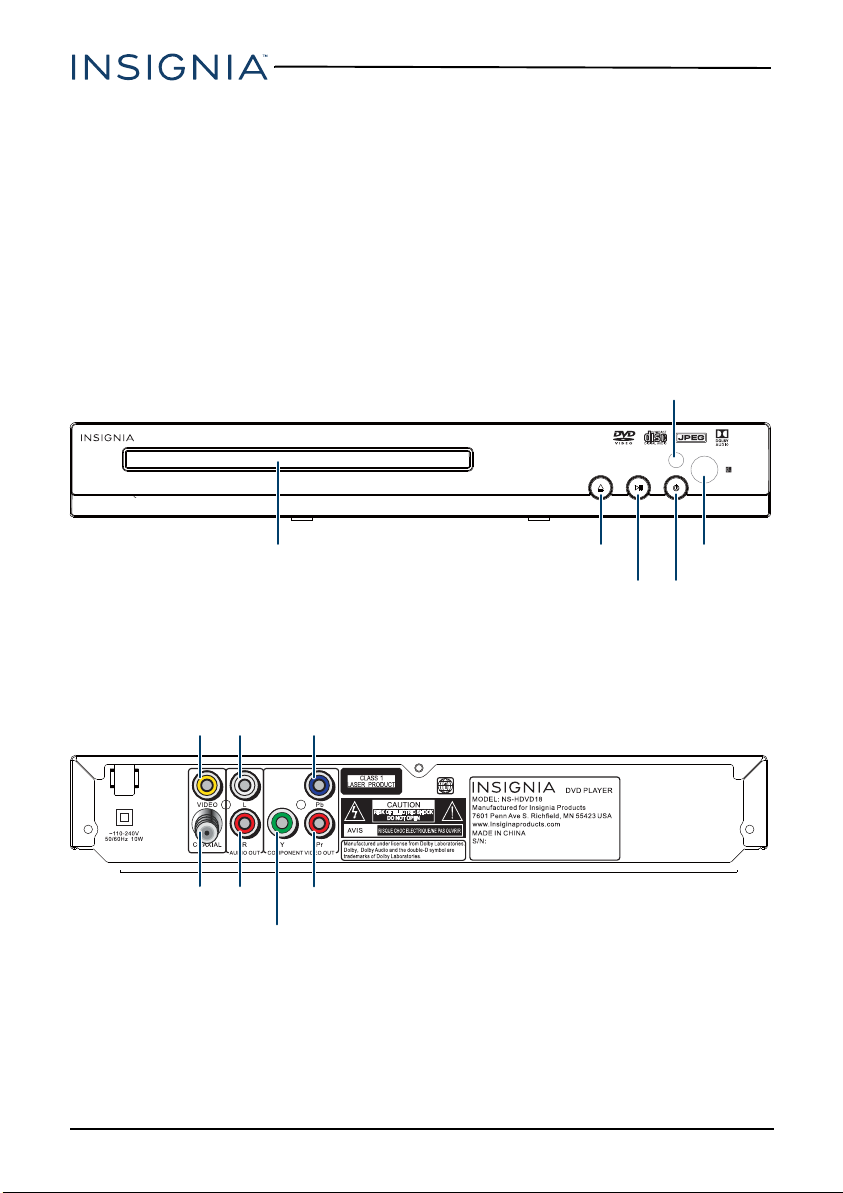
Features
Power on/standby LED
Disc tray
Open/close disc tray
Play/pause Power on/off
Remote control
receiver
Composite v ideo output
Coaxial audio output
Component video Pb output
Component video Pr output
Right
audio
output
Left
audio
output
Component video Y output
Package contents
•DVD player
• Remote control (includes two AAA batteries)
• AV cable (to connect to a TV )
•Quick Setup Guide
DVD player
Front view
NS-HDVD18
Back view
4
www.insigniaproducts.com
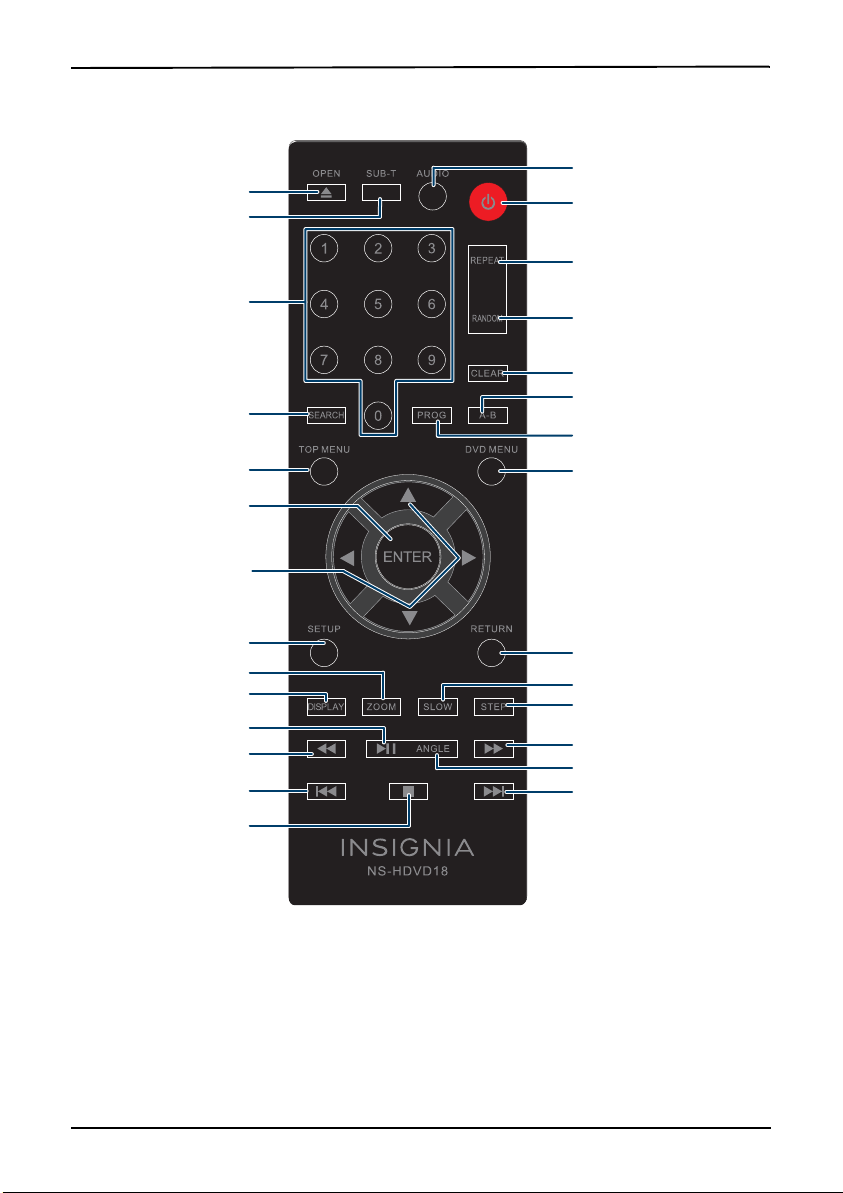
Remote control
Open or close the disc tray
DISPLAY (time, title, chapter)
Numbers
SEARCH
SETUP (opens setup menu)
ENTER (confirm selection)
Menu navigation
TOP MENU
Next
Play/Paus e
CLEAR
REPEAT
STOP
A-B (set up a repeat play segment)
ANGLE
RANDOM (begin playback from a
random chapter or track)
STEP (play frame by frame)
SLOW
DVD MENU
RETURN
PROG (select and play a specific
chapter)
ZOOM
SUB-T (select subtitles)
Fast for ward
Fast back
Power on/off
AUDIO (choose language)
Previous
DVD Player
www.insigniaproducts.com
5
NS-HDVD18
Component video (RCA) cable (not
included) (better)
TV or monitor
RCA audio
cables
Stereo or Home Theater system
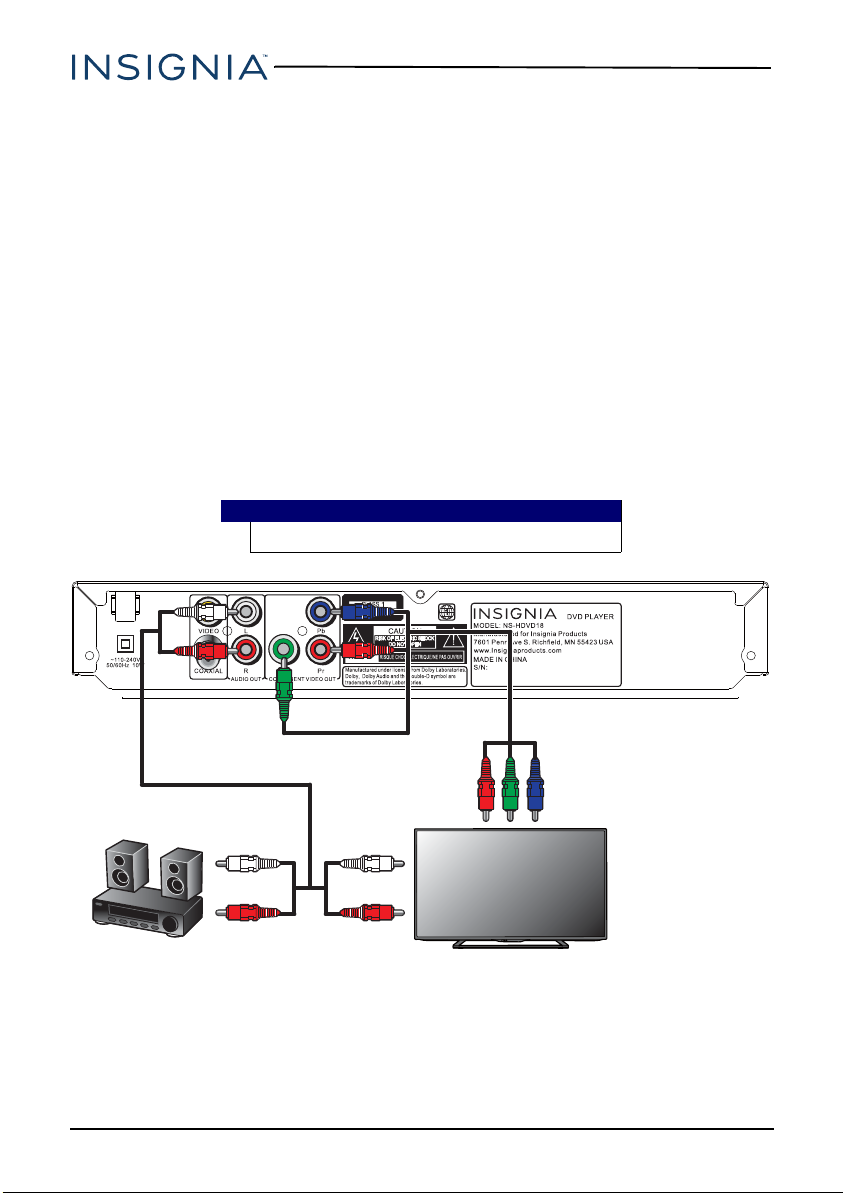
Setting up your DVD player
Connecting to AC power
• Plug the AC power cord into an AC wall outlet.
Connecting the DVD player
You can connect your DVD player to a TV or monitor so you can watch DVDs and to a
stereo or home theater system for enhanced audio.
Component video (best)
1 Plug the green, blue, and red connectors from an RCA cable (not included)
into the COMPONENT VIDEO OUT connectors (Y, Pb, and Pr) on the back of
your DVD player. Make sure that the colors on the connectors match the jacks.
2 Plug the red, green, and blue connectors on the other end of the RCA cable
into the component video in jacks on your TV or monitor, making sure to
match the colors on the connectors with the jacks.
Note
You may have to select the correct input on your TV or monitor.
3 Connect the white (Left) and red (Right) connectors from an RCA audio cable
to the L and R AUDIO OUT jacks on your DVD player.
4 Connect the white (Left) and red (Right) connectors from the other end of the
RCA audio cable to the white (Left) and red (Right) audio in connectors on
your TV, monitor, stereo, or home theater system.
6
www.insigniaproducts.com
 Loading...