

Page 1

User Guide
HD Radio Tuner
NS-HDTUNE
Page 2

Page 3

NS-HDTUNE
Insignia NS-HDTUNE
HD Radio Tuner
Contents
Introduction. . . . . . . . . . . . . . . . . . . . . . . 1
Safety information . . . . . . . . . . . . . . . . . . 2
Features . . . . . . . . . . . . . . . . . . . . . . . . . 4
Setting up your radio . . . . . . . . . . . . . . . .13
Using your radio . . . . . . . . . . . . . . . . . . .19
Troubleshooting. . . . . . . . . . . . . . . . . . . .21
Specifications . . . . . . . . . . . . . . . . . . . . .22
Legal notices. . . . . . . . . . . . . . . . . . . . . .23
Introduction
Congratulations on your purchase of a high-quality
Insignia product. Your NS-HDTUNE represents the state
of the art in HD radio tuner design and is designed for
reliable and trouble-free performance.
www.insignia-products.com
1
Page 4
Safety information
NS-HDTUNE
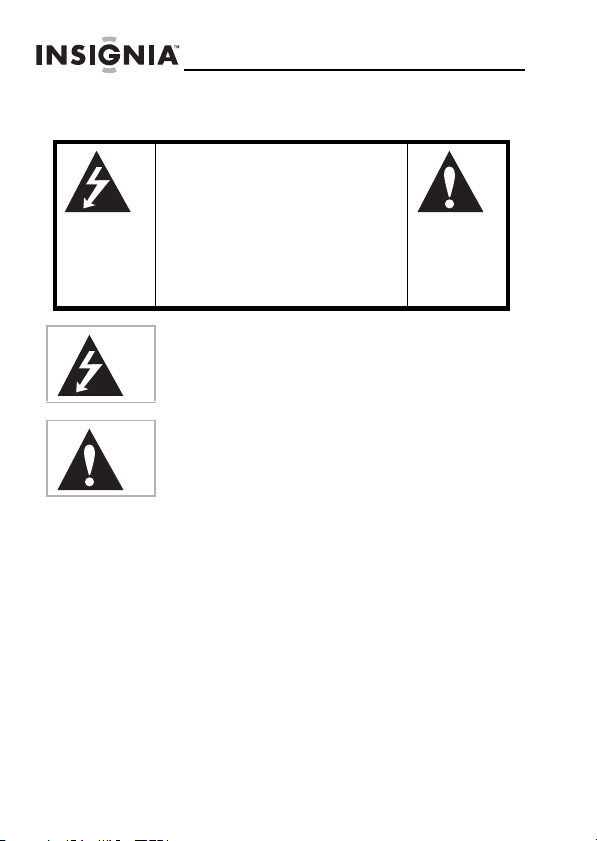
RISK OF ELECTRIC SHOCK
ELECTRIQUE, NE PAS OUVRIR
This symbol indicates that dangerous voltage
constituting a risk of electric shock is present
within your raido. This label is located on the back
of your radio.
This symbol indicates that there are important
operating and maintenance instructions in the
literature accompanying your radio.
CAUTION
DO NOT OPEN
ATTE NT IO N
RISQUE DE CHOC
PRECAUCION
RIESGO DE CHOQUE
ELECTRICO NO ABRIR
Important safety instructions
1 Read these instructions.
2 Keep these instructions.
3 Heed all warnings.
4 Follow all instructions.
5 Do not use your radio near water.
6 Clean with a dry cloth only.
7 Do not block any ventilation openings. Install in
accordance with the manufacturer’s instructions.
2
www.insignia-products.com
Page 5

NS-HDTUNE
8
9 Do not defeat the safety purpose of the polarized or
10 Protect the power cord from being walked on or
11 Only use attachments or accessories specified by
12 Use only with a cart, stand, tripod,
13 Unplug your radio during lightning
14 Refer all servicing to qualified service personnel.
Do not install near any heat sources such as
radiators, heat registers, stoves, or other apparatus
(including amplifiers) that produce heat.
grounding-type plug. A polarized plug has two
blades with one wider than the other. A grounding
type plug has two blades and a third grounding
prong. The wide blade or the third prong is provided
for your safety. If the provided plug does not fit into
your outlet, consult an electrician for replacement of
the obsolete outlet.
pinched particularly at plugs, convenience
receptacles, and the point where they exit from your
radio.
the manufacturer.
bracket, or table specified by the
manufacturer. When a cart is used,
use caution when moving the cart
and radio combination to avoid
injury frm tip-over.
storms or when unused for long periods of time.
Servicing is required when your radio has been
damaged in any way, such as the power-supply cord
or plug is damaged, liquid has been spilled or objects
have fallen into your radio, your radio has been
exposed to rain or moisture, does not operate
normally, or has been dropped.
• Make sure that you leave at least 2 inches (5 cm)
on all sides of your radio for ventilation.
• Do not place your radio in a closed bookcase or
rack without proper ventilation.
www.insignia-products.com
3
Page 6

• Do not cover the ventilation openings with any
items, such as newspapers, tablecloths, or
curtains.
• Do not place objects on top of your radio, such
as vases or candles.
• Do not use your radio in an area with extremely
high or low temperature.
• Do not expose your radio to dripping or
splashing water. If your radio gets wet, an
electrical short may occur which can lead to a
shock or fire.
• The power cord is the main disconnect device for
your radio. Make sure that the power outlet is
easy to reach.
• When you install the remote control battery,
make sure that the + symbol on the battery faces
out.
• When you replace the battery, make sure that
the replacement battery is of the same type and
voltage. If you use the wrong type battery, an
explosion may occur.
• When you dispose of batteries, follow your local
hazardous waste regulations.
Features
Package contents
• HD radio tuner
• FM antenna
• AM antenna
• Remote control with battery
• Right and left audio ouput cables
• User Guide
NS-HDTUNE
4
www.insignia-products.com
Page 7
NS-HDTUNE
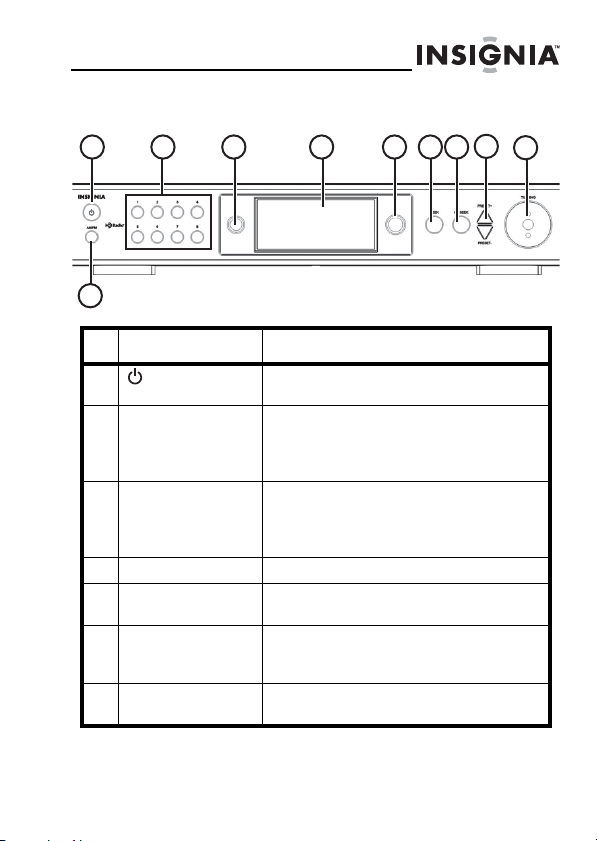
Front
8
6
1 2 3
4
10
# Component Description
1 Power button Press to turn on your radio or put it into
2 Number buttons Press a number button for more than
3 HD logo Lights when your radio is tuned to an
4 LCD Shows status information.
5 Remote control
sensor
6 SEEK button Press to go to the next FM, AM, or HD
7 HD SEEK button Press to go to the next HD radio station
standby mode.
two seconds to store the currently
playing station to a preset number.
Press to go to a stored (preset) station.
HD broadcast.
Blinks when your raido is tuning to an
HD broadcast.
Receives signals from the remote
control. Do not block.
radio station. The button will not tune to
an HD radio multicast station.
or HD radio multicast station.
5
7
9
www.insignia-products.com
5
Page 8
NS-HDTUNE
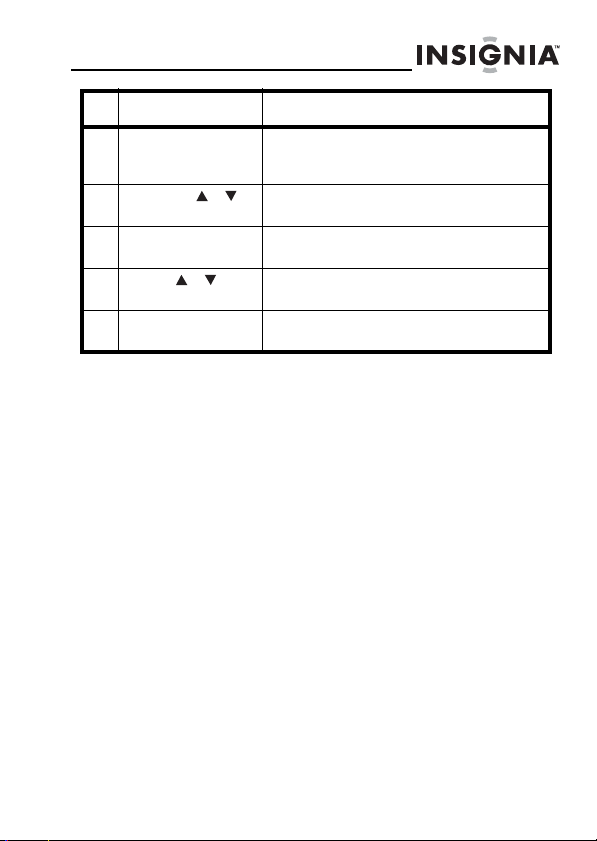
# Component Description
8 PRESET /
buttons
9 TUNING knob Turn the knob clockwise to tune to a
10 AM/FM button Press to switch between AM, FM1.
Press to go to the next or previous
preset station.
higher frequency, or turn it
counter-clockwise to tune to a lower
frequency.
amd FM2 tuning bands.
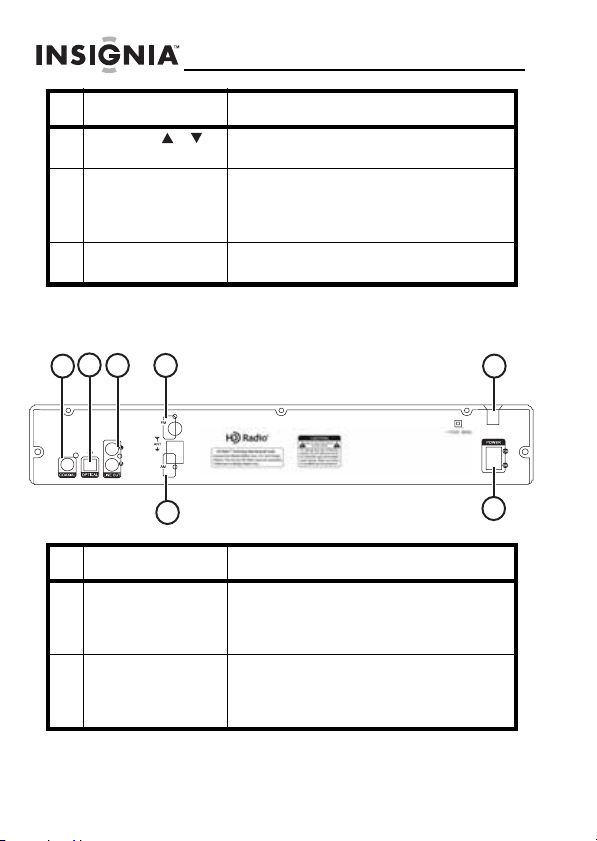
Back
2
3 4
1
5
6
# Component Description
1 COAXIAL jack Connect a coaxial audio cable to this
2 OPTICAL jack Connect an optical audio cable to this
6
jack and to the COAXIAL IN jack on a
sound system to listen to your radio
through the sound system.
jack and to the OPTICAL IN jack on a
sound system to listen to your radio
through the sound system.
www.insignia-products.com
7
Page 9
NS-HDTUNE
# Component Description
3 LINE OUT jacks Connect a standard audio cable to
4 FM antenna
connector
5 Power cord Connect the power cord to a power
6 AM antenna
connector
7 POWER ON/OFF
switch
these jacks and to the LINE IN or AV L
and R audio jacks on a sound system
to listen to your radio through the
sound system.
Connect the FM antenna to this
connector.
outlet.
Connect the AM antenna to this
connector.
Press this switch to turn the power on
and off. The button on the front of
your radio or on the remote control
does not turn off the power. The
button puts your radio into standby
mode or brings it out of standby mode.
The POWER ON/OFF button must be
in the ON position for the button to
work.
www.insignia-products.com
7
Page 10

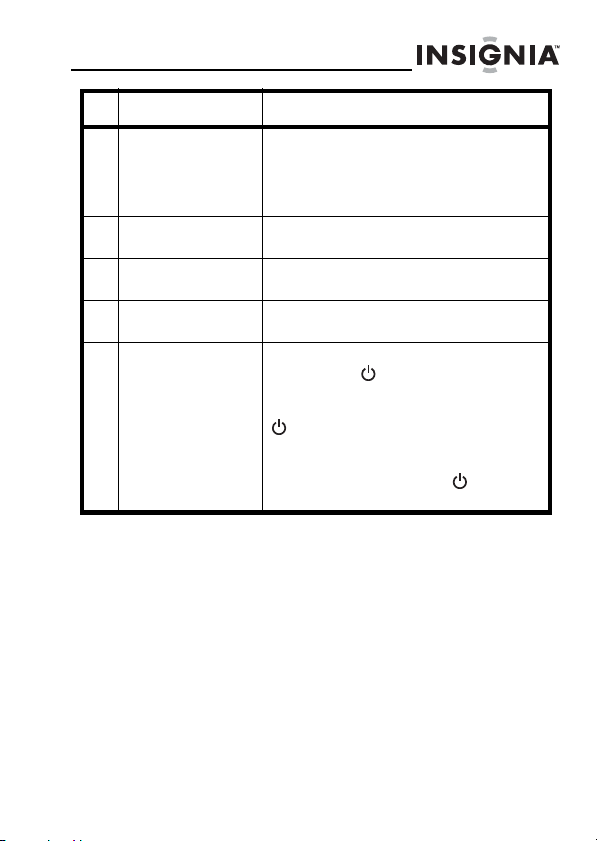
Remote control
NS-HDTUNE
1
5
2
3
4
6
7
# Button Description
1 Power Press to turn on your radio or to put it
2 Numbers Press a number button for more than
into standby mode.
two seconds to store the currently
playing station to a preset number.
Press to go to a stored (preset) station.
8
www.insignia-products.com
Page 11
NS-HDTUNE
# Button Description
3 SEEK Press to go to the next FM, AM, or HD
4 PRESET / Press to go to the next or previous
5 AM/FM Press to switch between AM, FM1, and
6 TUNE / Press to tune to a station with a higher
7 HD SEEK Press to go to the next HD radio station
radio station. The button will not tune to
an HD radio multicast station.
preset station.
FM2 tuning bands.
or lower frequency.
or HD radio multicast station.
www.insignia-products.com
9
Page 12

LCD display
HD radio broadcast display
When receiving an HD radio broadcast, the following
information appears on the LCD.
NS-HDTUNE
10
1
2
3
6
7
# Description
1 Shows the frequency band, AM, FM1,
or FM2.
2 Station call letters
3 HD radio broadcast indicator
4 Signal strength
5 Broadcast frequency
6Artist
7 Song title or radio show title
www.insignia-products.com
4
5
Page 13

NS-HDTUNE
RBDS radio broadcast display
When receiving an RBDS radio broadcast, the following
information appears on the LCD.
1
# Description
1 Shows the frequency band, AM, FM1,
or FM2
2 Station call letters
3 Broadcast frequency
4 Genre
5RBDS text
2
Changing frequency examples
Display Description
Entering AM radio
3
4
5
www.insignia-products.com
11
Page 14

Display Description
Pressing SEEK in AM/FM
mode (the frequency will go
up or down step by step)
Pressing HD SEEK (the
frequency will go up or down
step by step)
NS-HDTUNE
12
www.insignia-products.com
Page 15

NS-HDTUNE
Setting up your radio
Installing the remote control battery
To install the remote control battery:
Press in and hold the battery release clip (1) on the
1
back of the remote control while pulling the battery
bracket (2) out of the remote control.
2
1
2 Place the battery in the bracket with the + symbol
facing out. When the battery is in the bracket, the +
symbol should be visible.
www.insignia-products.com
13
Page 16
3 Push the battery bracket into the battery
compartment until it clicks into place.
Notes
• If the remote control only works within a
short distance from your radio, replace
the battery.
• If you do not plan to use the remote
control for an extended period of time or
if you plan to store the remote control,
remove the battery.
• When you replace the battery, make
sure that you use a battery of the same
type and voltage. The battery is a
CR2025 3 V battery.
• Dispose of used batteries by following
your local hazardous waste regulations.
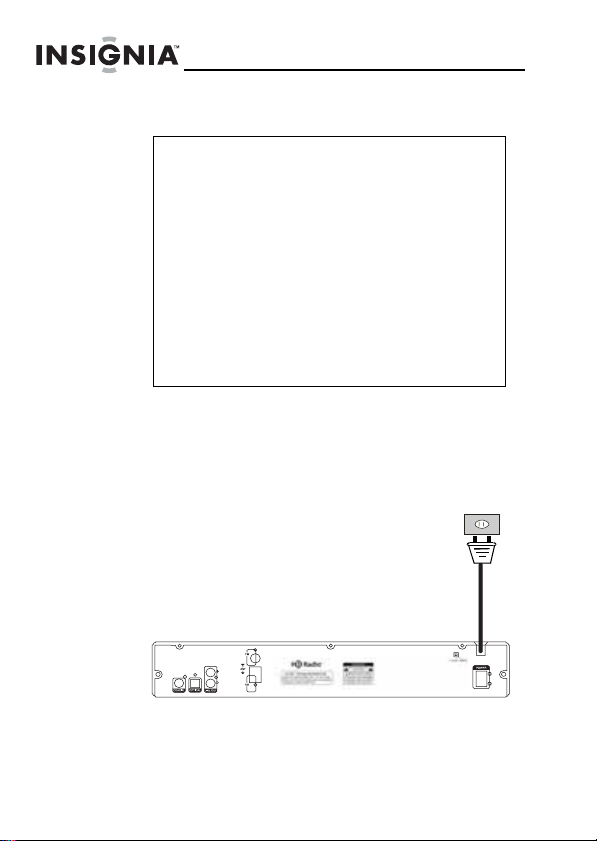
Connecting the power cord
To connect the power cord:
• Plug the power cord into a power outlet.
NS-HDTUNE
Power cord
14
www.insignia-products.com
Page 17
NS-HDTUNE
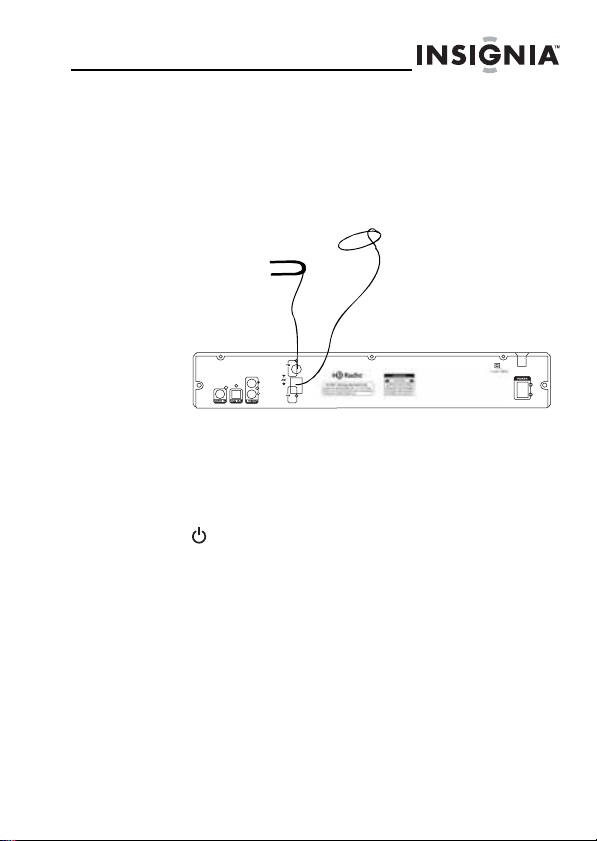
Connecting the antennas
To connect the antennas:
Connect the FM antenna to the FM connector on the
1
back of your radio, then connect the AM antenna to
the AM connector on the back of your radio.
FM antenna
2 Fully extend the antenna wires. You may need to
adjust the antennas to get the best reception.
Turning on power
Your radio has a POWER ON/OFF switch on the back.
The Power button on the front of your radio and on the
remote control puts your radio in standby mode, but they
do not turn off power.
To turn on power:
• After you connect the power cord, slide the
POWER ON/OFF switch to the ON position.
www.insignia-products.com
AM antenna
15
Page 18
NS-HDTUNE
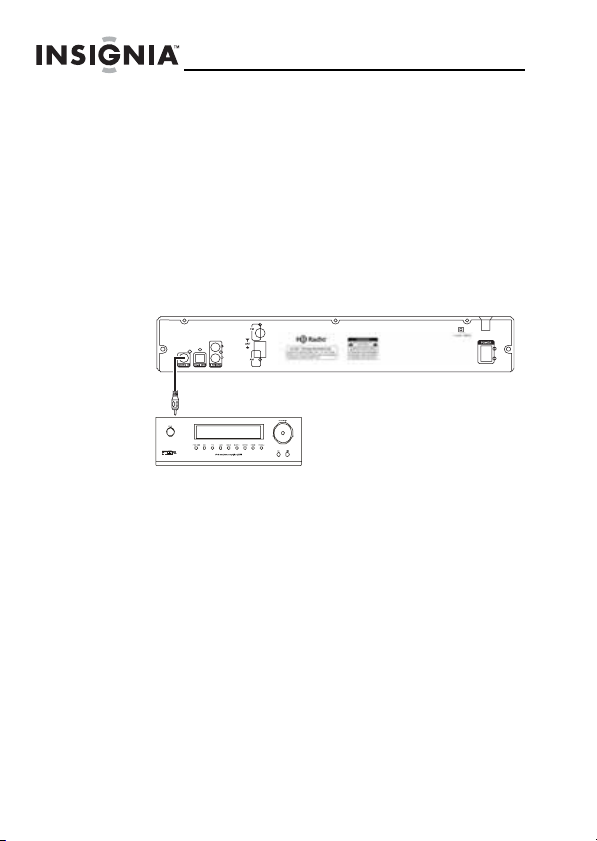
Connecting to a sound system
You can connect your radio to a sound system using a
coaxial audio, optical, or standard audio cable.
To connect to a sound system using a
coaxial audio cable:
Make sure that your radio and the sound system are
1
turned off and the power cords are unplugged.
2 Connect one end of a coaxial audio cable to the
COAXIAL jack on the back of your radio.
Coaxial audio
cable
3 Connect the other end of the cable to the COAXIAL
IN jack on a sound system.
4 Reconnect the power cables, then turn on your radio
and the sound system.
5 Select the audio input on your sound system that
matches the audio output jack you connected your
radio to.
16
www.insignia-products.com
Page 19

NS-HDTUNE
To connect to a sound system using an
optical audio cable:
1
2 Connect one end of a coaxial audio cable to the
Optical audio
cable
3 Connect the other end of the cable to the OPTICAL
4 Reconnect the power cables, then turn on your radio
5 Select the audio input on your sound system that
Make sure that your radio and the sound system are
turned off and the power cords are unplugged.
OPTICAL jack on the back of your radio.
IN jack on a sound system.
and the sound system.
matches the audio output jack you connected your
radio to.
www.insignia-products.com
17
Page 20
NS-HDTUNE
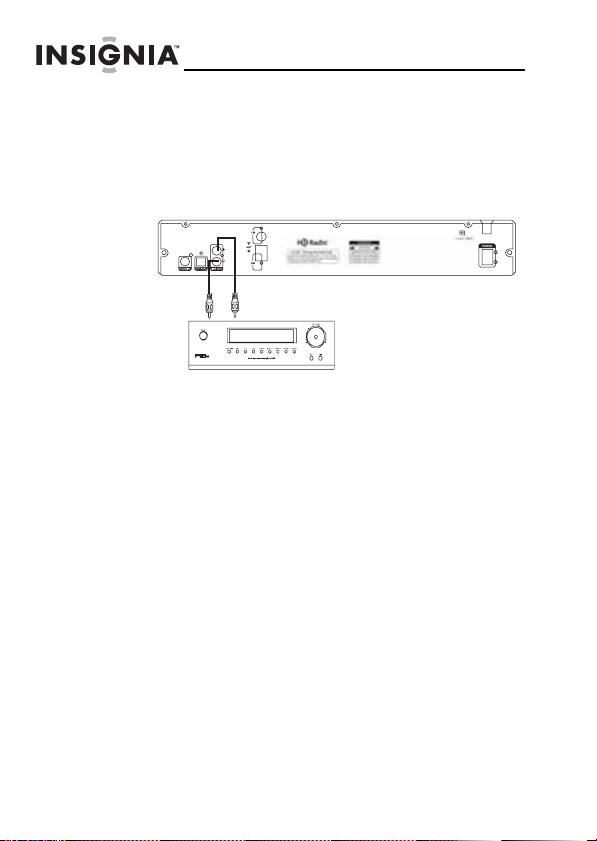
To connect to a sound system using a
standard audio cable:
Make sure that your radio and the sound system are
1
turned off and the power cords are unplugged.
2 Connect one end of a standard AV audio cable to the
LINE OUT jacks on the back of your radio.
Standard AV
audio cable
3 Connect the other end of the cable to the LINE IN or
AV AUDIO IN jacks on a sound system.
4 Reconnect the power cables, then turn on your radio
and the sound system.
5 Select the audio input on your sound system that
matches the audio output jack you connected your
radio to.
18
www.insignia-products.com
Page 21

NS-HDTUNE
Using your radio
Turning on your radio
To turn on your radio:
Make sure that the POWER ON/OFF switch on the
1
back of your radio is in the ON position.
2 Press (power) on the front of your radio or remote
control.
3 To put your radio in standby mode, press (power)
again.
Selecting the tuning band
To select the tuning band:
•Press AM/FM on the front of your radio or on the
remote control to select AM, FM1, or FM2. The
band you selected appears on the LCD.
Tuning to a station
To tune to a station:
•Press SEEK on the front of your radio or remote
control. Your radio searches for the next clear
analog or HD station.
•Press HD SEEK on the front of your radio or
remote control. Your radio searches for the next
clear HD station.
www.insignia-products.com
19
Page 22

• Turn the tuning knob on the front of your radio
clockwise to step up or counter-clockwise to step
down. Each step changes 0.1 MHz in frequency
and changes from HD-1 to HD-2 within a
frequency. For example, you would tune up to
99.1 HD-1 to 99.1 HD-2, then to 99.2.
• Press TUNE or TUNE on the remote
control to step up or down in 0.1 MHz
increments.
• Press PRESET or PRESET on the front of
your radio or remote control to go to the next or
previous preset station.
• Press a number button to tune to a stored
(preset) station.
Storing stations in memory
Your radio can store 8 stations (1 through 8 ) per band
(AM, FM1, and FM2) in memory. When you store a
station in memory, you can tune to the stored (preset)
station by pressing the number button for the station
preset number or by pressing PRESET or PRESET
on the front of your radio or on the remote control.
To store stations in memory:
Tune to the station you want to store.
1
2 Press and hold a number button for more that two
seconds. Your radio stores the station information to
the corresponding preset number. For example, if
you want to store a station to preset number 2, press
and hold 2 for more than two seconds. After you
store the station, you can quickly tune to the station
by pressing 2.
NS-HDTUNE
20
www.insignia-products.com
Page 23

NS-HDTUNE
Troubleshooting
Problem Solution
Radio does not turn on. • Make sure that the power
Remote control does not
turn on.
No sound. • Make sure that the audio
Radio does not work at all. • The embedded micro
cord is fully inserted in the
power outlet.
• Make sure that you point
the remote control at the
remote control sensor on
the front of your radio.
• The battery may be
depleted. Replace the
battery.
cable is connected correctly
and securely to the back of
your radio and to the sound
system.
• Make sure that the sound
system is set to the correct
audio input.
• If you are listening to a
broadcast on the HD-2
band, try another station.
There may not be a
broadcast on the HD-2
band.
• Turn the POWER ON/OFF
switch on the back of your
radio off, then back on.
computer may have failed
because of a lightning
strike, static, or other
inference.
www.insignia-products.com
21
Page 24

Specifications
NS-HDTUNE
Audio outputs • Coaxial
Power supply ~110 V/60z
Maximum power
consumption
FM frequency 87.50 MHZ ~ 107.90 MHz
AM frequency 530 KHz ~ 1710 KHz
• Optical fiber
• Standard AV
9W
22
www.insignia-products.com
Page 25

NS-HDTUNE
Legal notices
FCC Part 15
This device complies with Part 15 of the FCC Rules.
Operation of this product is subject to the following two
conditions: (1) this device may not cause harmful
interference, and (2) this device must accept any
interference received, including interference that may
cause undesired operation.
This equipment has been tested and found to comply
within the limits for a class B digital device, pursuant to
Part 15 of the FCC Rules. These limits are designed to
provide reasonable protection against harmful
interference in a residential installation. This equipment
generates, uses, and can radiate radio frequency energy
and, if not installed and used in accordance with the
instructions, may cause harmful interference to radio
communications. However, there is no guarantee that
interference will not occur in a particular installation. If
this equipment does cause harmful interference to radio
or television reception, which can be determined by
turning the equipment off and on, the user is encouraged
to try to correct the interference by one or more of the
following measures:
• Reorient or relocate the receiving antenna.
• Increase the separation between the equipment
and receiver.
• Connect the equipment into an outlet on a circuit
different from that to which the receiver is
connected.
• Consult the dealer or an experienced technician
for help.
FCC warning
Changes or modifications not expressly approved by the
party responsible for compliance with the FCC Rules
could void the user’s authority to operate this equipment.
www.insignia-products.com
23
Page 26

NS-HDTUNE
24
www.insignia-products.com
Page 27

NS-HDTUNE
90-Day Limited Warranty
Insignia Products (“Insignia”) warrants to you, the original
purchaser of this new NS-HDTUNE (“Product”), that the Product
shall be free of defects in the original manufacture of the material
or workmanship for a period of 90 days from the date of your
purchase of the Product (“Warranty Period”). This Product must
be purchased from an authorized dealer of Insignia brand
products and packaged with this warranty statement. This
warranty does not cover refurbished Product. If you notify
Insignia during the Warranty Period of a defect covered by this
warranty that requires ser vice, terms of this warranty apply.
How long does the coverage last?
The Warranty Period lasts for 90 days from the date you
purchased the Product. The purchase date is printed on the
receipt you received with the Product.
What does this warranty cover?
During the Warranty Period, if the original manufacture of the
material or workmanship of the Product is determined to be
defective by an authorized Insignia repair center or store
personnel, Insignia will (at its sole option): (1) repair the Product
with new or rebuilt parts; or (2) replace the Product at no charge
with new or rebuilt comparable products or parts. Products and
parts replaced under this warranty become the property of
Insignia and are not returned to you. If ser vice of Products or
parts are required after the Warranty Period expires, you must
pay all labor and parts charges. This warranty lasts as long as
you own your Insignia Product during the Warranty Period.
Warranty coverage terminates if you sell or otherwise transfer the
Product.
www.insignia-products.com
25
Page 28

NS-HDTUNE
How to obtain warranty service?
If you purchased the Product at a retail store location, take your
original receipt and the Product to the store you purchased it
from. Make sure that you place the Product in its original
packaging or packaging that provides the same amount of
protection as the original packaging. If you purchased the
Product from an online web site, mail your original receipt and the
Product to the address listed on the web site. Make sure that you
put the Product in its original packaging or packaging that
provides the same amount of protection as the or iginal
packaging.
To obtain in-home warranty service for a television with a screen
25 inches or larger, call 1-888-BESTBUY. Call agents will
diagnose and correct the issue over the phone or will have an
Insignia-approved repair person dispatched to your home.
Where is the warranty valid?
This warranty is valid only to the original purchaser of the product
in the United States, Canada, and Mexico.
What does the warranty not cover?
This warranty does not cover:
• Customer instruction
• Installation
• Set up adjustments
• Cosmetic damage
• Damage due to acts of God, such as lightning strikes
• Accident
•Misuse
•Abuse
• Negligence
• Commercial use
• Modification of any part of the Product, including the
antenna
• Plasma display panel damaged by static (non-moving)
images applied for lengthy periods (burn-in).
This warranty also does not cover:
• Damage due to incorrect operation or maintenance
• Connection to an incorrect voltage supply
• Attempted repair by anyone other than a facility authorized
by Insignia to service the Product
• Products sold as is or with all faults
26
www.insignia-products.com
Page 29

NS-HDTUNE
• Consumables, such as fuses or batteries
• Products where the factory applied serial number has been
REPAIR REPLACEMENT AS PROVIDED UNDER THIS
WARRANTY IS YOUR EXCLUSIVE REMEDY. INSIGNIA SHALL
NOT BE LIABLE FOR ANY INCIDENTAL OR CONSEQUENTIAL
DAMAGES FOR THE BREACH OF ANY EXPRESS OR
IMPLIED WARRANTY ON THIS PRODUCT, INCLUDING, BUT
NOT LIMITED TO, LOST DATA, LOSS OF USE OF YOUR
PRODUCT, LOST BUSINESS OR LOST PROFITS. INSIGNIA
PRODUCTS MAKES NO OTHER EXPRESS WARRANTIES
WITH RESPECT TO THE PRODUCT, ALL EXPRESS AND
IMPLIED WARRANTIES FOR THE PRODUCT, INCLUDING,
BUT NOT LIMITED TO, ANY IMPLIED WARRANTIES OF AND
CONDITIONS OF MERCHANTABILITY AND FITNESS FOR A
PARTICULAR PURPOSE, ARE LIMITED IN DURATION TO THE
WARRANTY PERIOD SET FORTH ABOVE AND NO
WARRANTIES, WHETHER EXPRESS OR IMPLIED, WILL
APPLY AFTER THE WARRANTY PERIOD. SOME STATES,
PROVINCES AND JURISDICTIONS DO NOT ALLOW
LIMITATIONS ON HOW LONG AN IMPLIED WARRANTY
LASTS, SO THE ABOVE LIMITATION MAY NOT APPLY TO
YOU. THIS WARRANTY GIVES YOU SPECIFIC LEGAL
RIGHTS, AND YOU MAY ALSO HAVE OTHER RIGHTS, WHICH
VARY FROM STATE TO STATE OR PROVINCE TO PROVINCE.
Contact Insignia:
For customer service please call 1-877-467-4289
www.insignia-products.com
Distributed by Best Buy Purchasing, LLC
7601 Penn Avenue South, Richfield, Minnesota, U.S.A.
55423-3645
© 2008 Best Buy Enterprise Services, Inc.
All rights reserved. INSIGNIA is a trademark of Best Buy
Enterprise Services, Inc. Registered in some countries. All other
products and brand names are trademarks of their respective
owners.
altered or removed
www.insignia-products.com
27
Page 30

NS-HDTUNE
28
www.insignia-products.com
Page 31

NS-HDTUNE
www.insignia-products.com
29
Page 32

ENGLISH
08-1449
www.insignia-products.com (877) 467-4289
Distributed by Best Buy Purchasing, LLC
7601 Penn Avenue South, Richfield, MN USA 55423-3645
All rights reserved. INSIGNIA is a trademark of Best Buy Enterprise Services, Inc. Registered in
All other products and brand names are trademarks of their respective owners.
© 2008 Best Buy Enterprise Services, Inc.
some countries.
 Loading...