

Insignia NS-HAIOR18-C, NS-HAIOR18 Quick Setup Manual
QUICK SETUP GUIDE
AL
M
The
sub
har
rec
M
76
Av
PR
FC
Mo
S
FEATURES
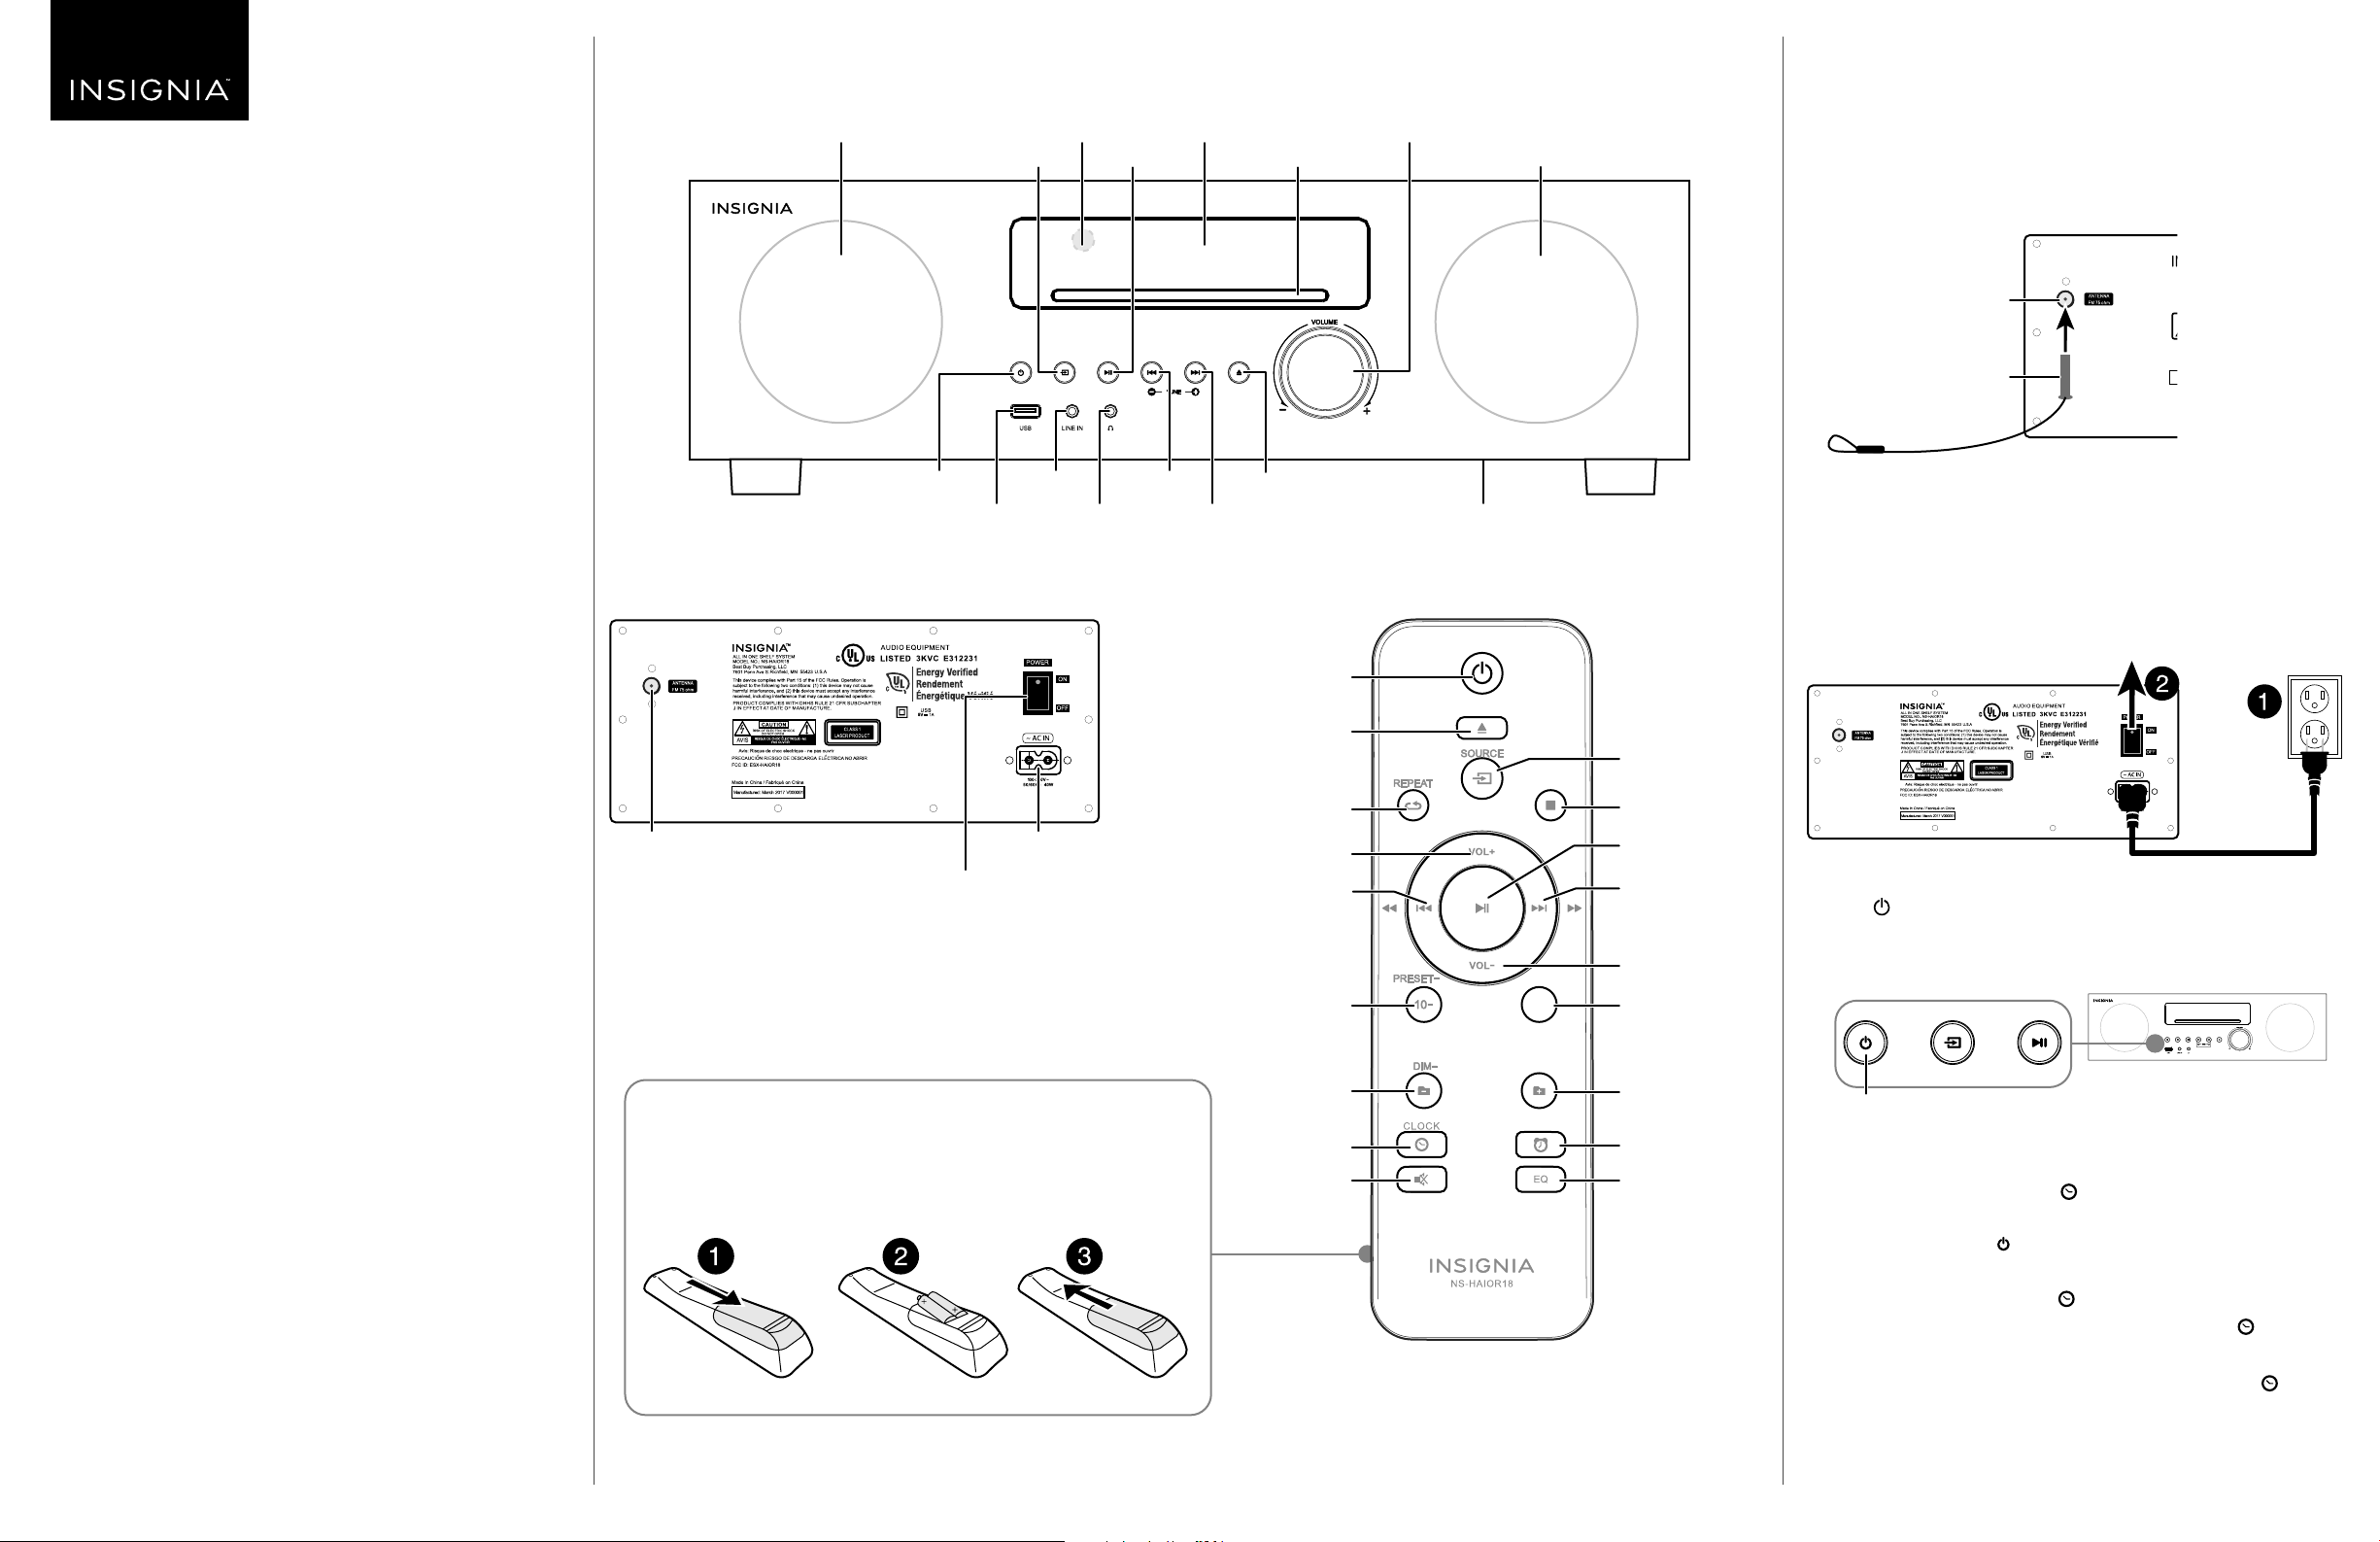
Front view
SPEAKER
REMOTE SENSOR
SOURCE
PLAY/PAUSE
DISPLAY
DISC SLOT
VOLUME /+
SPEAKER
SETTING UP YOUR SHELF SYSTEM
CONNECTING THE FM ANTENNA
1 Connect the FM antenna to the ANTENNA jack on the back of your shelf
system.
2 Adjust the antenna until you nd the best reception.
Back panel
All-in-One
Shelf System
NS-HAIOR18 / NS-HAIOR18-C
PACKAGE CONTENTS
• All-in-One Shelf System
• Power cord
• FM antenna
• Remote control
• 2 AAA batteries
• Quick Setup Guide
Back panel
FM ANTENNA
JACK
IC ID:10485A-HAIOR18
CAN ICES-3(B)/NMB-3(B)
STANDBY
USB PORT HEADPHONE
AC POWER
POWER
ON/OFF
LINE IN
INPUT
JACK
PREVIOUS
EJECT DISC
NEXT SUBWOOFER
Remote control
STANDBY
EJECT DISC
REPEAT
VOLUME +
REWIND/
PREVIOUS/
TUNE
PRESET /10 –
AUTO
PRESET+
10+
SOURCE
AUTO/STOP
PLAY/PAUSE
FAST FORWARD/
NEXT/TUNE +
VOLUME -
PRESET+/10+
FM ANTENNA JACK
FM ANTENNA
TURNING ON YOUR SHELF SYSTEM
1 Connect the power cord to the AC jack on the back of your shelf system,
then plug the other end into a power outlet.
2 Press the power switch on the back to turn your shelf system ON.
Back panel
IC ID:10485A-HAIOR18
CAN ICES-3(B)/NMB-3(B)
3 Press (standby) on your shelf system or remote. The shelf system
greets you with "HELLO."
Front view
FEATURES
• 80W RMS total power for a superior listening experience
• 20W RMS left and right channels play audio in surround sound
• 40W RMS built-in subwoofer for rich bass
• Bluetooth connects to devices wirelessly
• FM tuner lets you listen to the radio
• CD player provides a variety of audio options
• USB port supports MP3 playback
• 3.5 mm audio input connects to analog devices
• Headphone jack enables private listening
Before using your new product, please read
these instructions to prevent any damage.
INSTALLING THE REMOTE CONTROL BATTERIES
1 Remove the remote’s battery cover.
2 Insert two AAA batteries into the compartment. Make sure that the + and –
symbols on the battery match the symbols in the compartment.
3 Replace the cover.
FOLDER /DIM
CLOCK
MUTE
DIM+
PROG
FOLDER+/DIM+
ALARM/PROGRAM
Equalizer mode
STANDBY
SETTING THE CLOCK
1 In standby mode, press and hold CLOCK on your remote.
Note: To enter standby mode, ip ON the power switch on the back of your shelf
system, but do not press the standby button the front.
2 Press (previous) or (next) to select a 12-hour (“12H”) or 24-hour
(“24H”) clock display, then press CLOCK to save.
3 Press (previous) or (next) to set the hour, then press CLOCK to
save.
(previous) or (next) to set the minutes, then press CLOCK
4 Press
to save.
USING YOUR SHELF SYSTEM
BLUETOOTH
Pairing your device
1 Make sure that your Bluetooth device (like a music player or phone) is
turned on and within 33 feet (10 meters) of your shelf system.
2 On your Bluetooth device, navigate to your Bluetooth settings:
• For iOS devices: Tap Settings > General > Bluetooth.
• For Android devices: Tap Settings > Wireless and networks. Tap
to activate Bluetooth, then tap Bluetooth settings.
• For PC or Mac computers: See the instructions that came with your
computer for more information.
3 Press SOURCE repeatedly until the shelf system displays “BT.” Your
shelf system enters Bluetooth pairing mode.
Note: If your shelf system isn’t paired in 15 seconds, “NOBT” appears on the screen.
Press SOURCE repeatedly to cycle back to "BT" to re-enter pairing mode. For best
results, try to enable Bluetooth on your Bluetooth device (step 2) and select the source on
your shelf system (step 3) at the same time.
4 On your Bluetooth device, select NS-HAIOR18 in the list of devices. The shelf
system beeps twice when paired.
Note: If prompted, enter “0000” as the passcode.
Playback
• Use your Bluetooth device to select audio.
• Make sure that your Bluetooth device’s volume is set to at least 50%.
• Control playback with your Bluetooth device, remote, and the controls on
the shelf speaker system (play/pause, mute, previous/next).
USING THE FM RADIO
Note: Make sure that your antenna is attached.
1 Press SOURCE until the display says “FM.”
2 To select a radio station:
• To incrementally tune the radio frequency, press (previous) or (next).
• To search for the next available station, press and hold
(next).
• To skip to a preset station, press PRESET- or PRESET+ repeatedly.
Note: See “Adding a preset station“ for instructions about creating preset stations.
Adding a preset station
Note: You can program up to 20 stations.
1 Select the station, then press PROG on your remote.
2 Press PRESET - or PRESET + to select a program number.
3 Press PROG again to save the preset station.
OR
To program all stations, press AUTO. Your shelf system automatically assigns
a program number to each available station.
(previous) or
USING THE CD PLAYER
Your CD player works with CD, CD-R, and CD-RW formats.
1 Press SOURCE until the display says “CD.”
2 Insert your CD label-side up into the disc slot. Playback begins
automatically.
3 Use your remote or shelf system to control playback. See your online User
Guide for more information.
4 When nished, press (eject) to eject your disc.
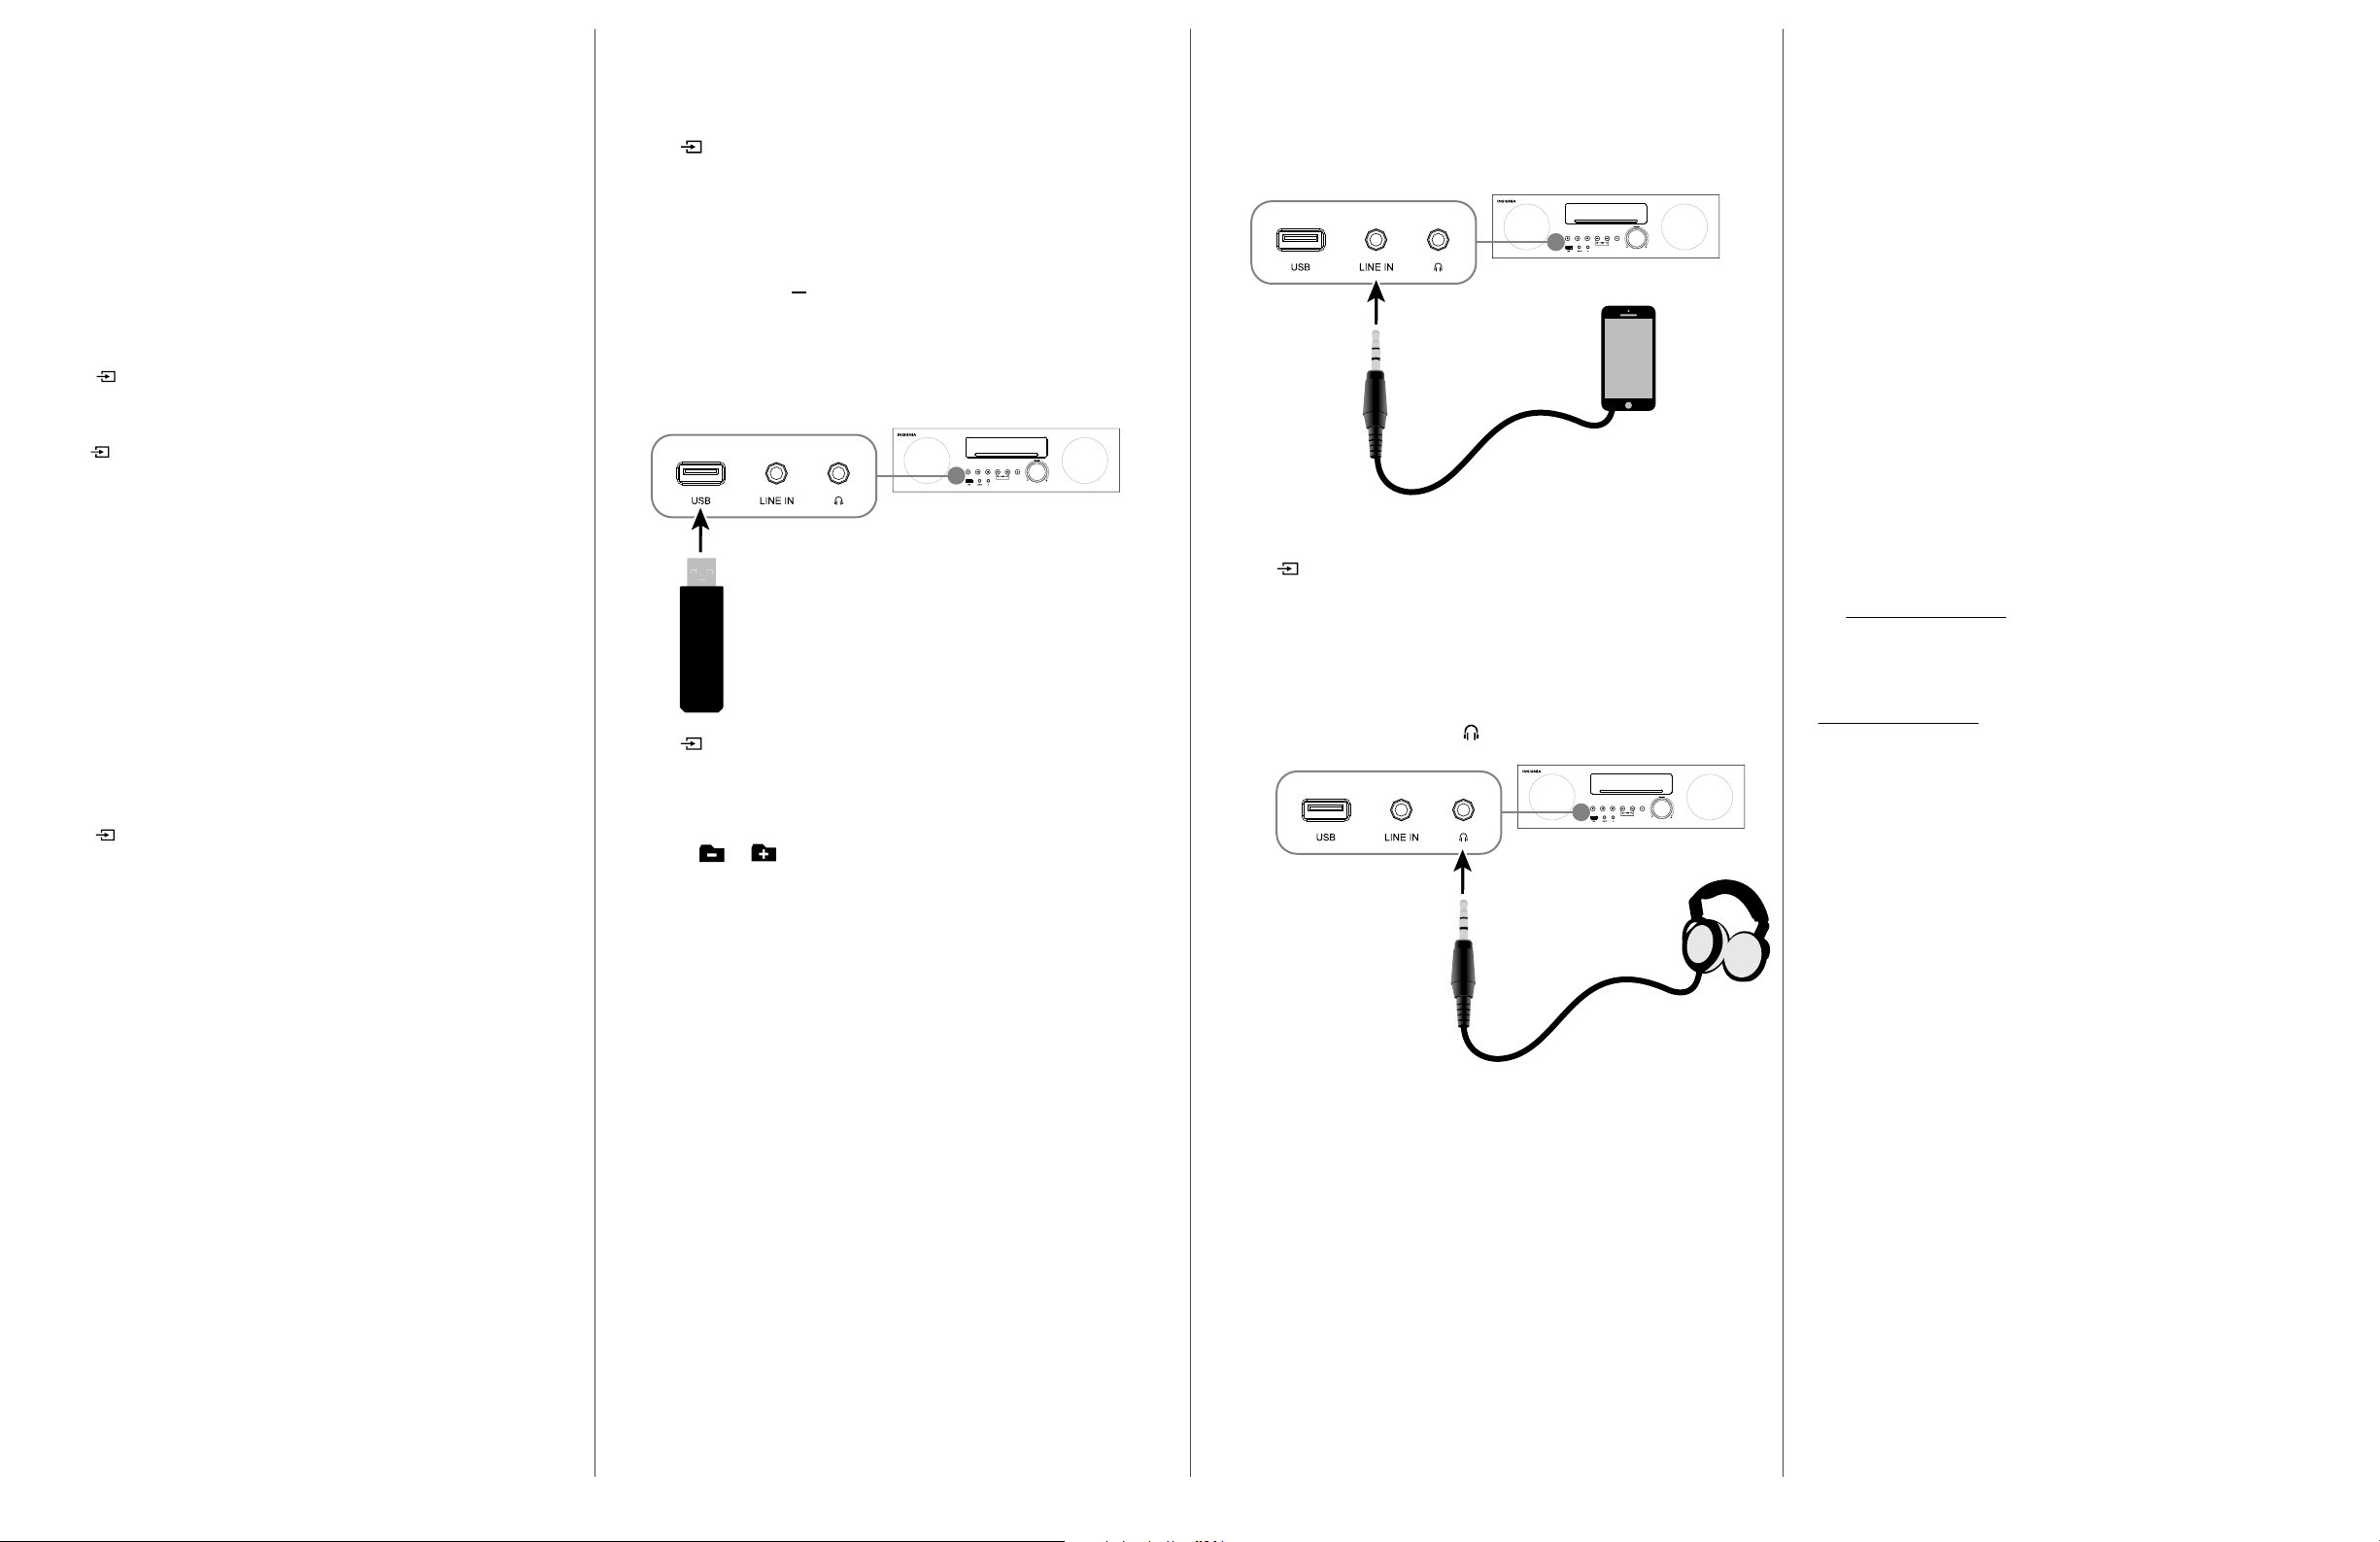
CONNECTING WITH USB
Note: You can charge USB devices through the USB port (5V/1A output).
1 Connect a USB ash drive to your shelf system's USB port.
2 Press SOURCE repeatedly until the display says “USB.”
3 Use the controls on your shelf speaker system or remote to control
playback:
• Press or to skip to the previous or next track.
• Press or to navigate through your USB ash drive's folders.
• Turn the volume knob or press Vol+ or Vol- on your remote to adjust
the volume.
CONNECTING WITH AN AUDIO CABLE
1 Connect a 3.5 mm audio cable (not included) from your audio device to
the shelf system's LINE IN jack.
2 Press SOURCE repeatedly until the display says “LINE IN.”
3 Use your audio device to control playback and the controls on your shelf
system to adjust the volume.
Note: Make sure that your audio device’s volume is set to at least 50
%.
CONNECTING HEADPHONES
• Connect your headphones to the headphone jack.
SPECIFICATIONS
• Dimensions (HxWxD): 5.51 x 11.22 x 18.5 in. (140 x 285 x 470 mm)
• Weight: 12.8 lbs. (5.8 kg)
• Power supply: ~100-240V AC, 50/60Hz
• Audio output power: 20W × 2 + 40W
• Frequency response: 20Hz~20kHz (±3dB)
• CD compatibility: CDs, CD-Rs, CD-RWs in standard or 3” size
• Supported le formats (USB): MP3
• FM frequency: 87.5 - 107.9 MHz
• Operating environment: 14°~95°F (-10°~35°C), 5~90% humidity
• Bluetooth: 2.4 GHz, 33 ft. (10 m) working distance
• Input jacks: USB and LINE IN
FCC STATEMENT
Changes or modications not expressly approved by the party responsible for compliance
could void the user's authority to operate the equipment.
RSS-Gen & RSS-210 statement:
This device complies with Industry Canada licence-exempt RSS standard(s).
Operation is subject to the following two conditions: (1) this device may not cause
interference, and (2) this device must accept any interference, including interference that
may cause undesired operation of the device.
Le présent appareil est conforme aux CNR d'Industrie Canada applicables aux appareils radio
exempts de licence. L'exploitation est autorisée aux deux conditions suivantes : (1) l'appareil
ne doit pas produire de brouillage, et (2) l'utilisateur de l'appareil doit accepter tout
brouillage radioélectrique subi, même si le brouillage est susceptible d'en compromettre le
fonctionnement.
RSS-102 Statement:
This equipment complies with Industry Canada radiation exposure limits set forth for an
uncontrolled environment.
Cet équipement est conforme à l'exposition aux rayonnements Industry Canada limites
établies pour un environnement non contrôlé.
ONE-YEAR LIMITED WARRANTY
Visit www.insigniaproducts.com for details.
CONTACT INSIGNIA:
For customer service, call 1-877-467-4289 (U.S. and Canada) or 01-800-926-3000 (Mexico)
www.insigniaproducts.com
INSIGNIA is a trademark of Best Buy and its aliated companies.
Distributed by Best Buy Purchasing, LLC
©2017 Best Buy. All rights reserved.
Made in China
V2 ENGLISH 17-0532
 Loading...