

Page 1

User Guide | Guide de l’utilisateur | Guía del Usuario
DVD/VCR Home Theater System
Système de cinéma maison avec lecteur de
DVD/magnétoscope
Sistema de teatro en casa con NS-H4005 reproductor de
DVD/VCR
NS-H4005
Page 2

Page 3

Contents
Welcome . . . . . . . . . . . . . . . . . . . . . . . . . . . . . . . . . . . . . . . . . . 2
Safety information . . . . . . . . . . . . . . . . . . . . . . . . . . . . . . . . . . . 3
Features . . . . . . . . . . . . . . . . . . . . . . . . . . . . . . . . . . . . . . . . . . 7
Accessories . . . . . . . . . . . . . . . . . . . . . . . . . . . . . . . . . . . . . 7
Front . . . . . . . . . . . . . . . . . . . . . . . . . . . . . . . . . . . . . . . . . . 7
Display window . . . . . . . . . . . . . . . . . . . . . . . . . . . . . . . . . . 9
Back. . . . . . . . . . . . . . . . . . . . . . . . . . . . . . . . . . . . . . . . . . 10
Setting up your home theater system . . . . . . . . . . . . . . . . . . . 15
Connecting a TV . . . . . . . . . . . . . . . . . . . . . . . . . . . . . . . . 15
Connecting an external audio/video device . . . . . . . . . . . .17
Connecting radio antennas . . . . . . . . . . . . . . . . . . . . . . . . 18
Connecting speakers . . . . . . . . . . . . . . . . . . . . . . . . . . . . . 19
Attaching the ferrite core . . . . . . . . . . . . . . . . . . . . . . . . . . 20
Using the VCR . . . . . . . . . . . . . . . . . . . . . . . . . . . . . . . . . . . . 21
Playing a videotape . . . . . . . . . . . . . . . . . . . . . . . . . . . . . . 21
Controlling videotape playback . . . . . . . . . . . . . . . . . . . . . 22
Adjusting the tracking . . . . . . . . . . . . . . . . . . . . . . . . . . . . 23
Displaying videotape information. . . . . . . . . . . . . . . . . . . . 24
Displaying the clock and real-time counter . . . . . . . . . . . . 25
Selecting the VCR audio mode . . . . . . . . . . . . . . . . . . . . . 25
Setting the clock . . . . . . . . . . . . . . . . . . . . . . . . . . . . . . . . 26
Marking a starting point on a videotape. . . . . . . . . . . . . . . 28
Recording a videotape . . . . . . . . . . . . . . . . . . . . . . . . . . . . 28
Copying from a camcorder or external VCR . . . . . . . . . . . 29
Copying from the DVD player to the VCR . . . . . . . . . . . . . 29
Using the DVD player . . . . . . . . . . . . . . . . . . . . . . . . . . . . . . . 30
Playing a DVD . . . . . . . . . . . . . . . . . . . . . . . . . . . . . . . . . . 30
Controlling DVD playback . . . . . . . . . . . . . . . . . . . . . . . . . 31
Playing an audio CD . . . . . . . . . . . . . . . . . . . . . . . . . . . . . 32
Playing MP3 or WMA CDs. . . . . . . . . . . . . . . . . . . . . . . . . 33
Controlling audio CD, MP3, or WMA playback . . . . . . . . .34
Playing a JPEG CD . . . . . . . . . . . . . . . . . . . . . . . . . . . . . . 35
Controlling JPEG playback . . . . . . . . . . . . . . . . . . . . . . . . 35
Selecting the sound mode for a DVD . . . . . . . . . . . . . . . . 36
Selecting the sound mode for a CD. . . . . . . . . . . . . . . . . . 36
Repeating a DVD chapter or title . . . . . . . . . . . . . . . . . . . . 36
Repeating an audio, MP3, or WMA track or CD . . . . . . . .36
Repeating a section of a DVD . . . . . . . . . . . . . . . . . . . . . . 37
Repeating a section of an audio CD . . . . . . . . . . . . . . . . . 37
Programming an audio, MP3, or WMA playlist . . . . . . . . . 37
Using ZOOM . . . . . . . . . . . . . . . . . . . . . . . . . . . . . . . . . . . 38
Searching by time on a DVD . . . . . . . . . . . . . . . . . . . . . . . 39
Insignia NS-H4005
Home Theater System
www.insignia-products.com
1
Page 4

Insignia NS-H4005 Home Theater System
Marking a starting point on a DVD. . . . . . . . . . . . . . . . . . . 39
Using DVD menus . . . . . . . . . . . . . . . . . . . . . . . . . . . . . . . 40
Viewing different camera angles . . . . . . . . . . . . . . . . . . . . 40
Changing the DVD audio language . . . . . . . . . . . . . . . . . . 40
Viewing DVD subtitles . . . . . . . . . . . . . . . . . . . . . . . . . . . . 41
Using the DVD setup menu . . . . . . . . . . . . . . . . . . . . . . . . 42
Changing the setup menu language . . . . . . . . . . . . . . . . . 42
Selecting an aspect ratio . . . . . . . . . . . . . . . . . . . . . . . . . . 43
Using progressive scan . . . . . . . . . . . . . . . . . . . . . . . . . . . 44
Setting up 5.1 speakers . . . . . . . . . . . . . . . . . . . . . . . . . . . 45
Turning dynamic range control (DRC) on or off. . . . . . . . . 46
Mixing karaoke channels for stereo sound . . . . . . . . . . . . 46
Automatically playing DVDs. . . . . . . . . . . . . . . . . . . . . . . . 47
Setting parental controls . . . . . . . . . . . . . . . . . . . . . . . . . . 47
Changing the password . . . . . . . . . . . . . . . . . . . . . . . . . . . 49
Resetting the password . . . . . . . . . . . . . . . . . . . . . . . . . . . 49
Using the radio . . . . . . . . . . . . . . . . . . . . . . . . . . . . . . . . . . . . 50
Tuning to a radio station . . . . . . . . . . . . . . . . . . . . . . . . . . 50
Presetting radio stations . . . . . . . . . . . . . . . . . . . . . . . . . . 51
Tuning to a preset station . . . . . . . . . . . . . . . . . . . . . . . . . 52
Erasing a preset station . . . . . . . . . . . . . . . . . . . . . . . . . . . 52
Adding a label to a preset station . . . . . . . . . . . . . . . . . . . 52
Troubleshooting . . . . . . . . . . . . . . . . . . . . . . . . . . . . . . . . . . . 53
Maintaining . . . . . . . . . . . . . . . . . . . . . . . . . . . . . . . . . . . . . . . 55
Cleaning the cabinet . . . . . . . . . . . . . . . . . . . . . . . . . . . . . 55
Getting a clear picture . . . . . . . . . . . . . . . . . . . . . . . . . . . . 55
Moisture Condensation . . . . . . . . . . . . . . . . . . . . . . . . . . . 55
Handling discs . . . . . . . . . . . . . . . . . . . . . . . . . . . . . . . . . . 56
Storing discs . . . . . . . . . . . . . . . . . . . . . . . . . . . . . . . . . . . 56
Legal notices. . . . . . . . . . . . . . . . . . . . . . . . . . . . . . . . . . . . . . 61
1-year limited warranty . . . . . . . . . . . . . . . . . . . . . . . . . . . . . . 63
Français . . . . . . . . . . . . . . . . . . . . . . . . . . . . . . . . 63
Español. . . . . . . . . . . . . . . . . . . . . . . . . . . . . . . . 133
Welcome
Congratulations on your purchase of a high-quality Insignia product.
Your NS-H4005 represents the state of the art in home theater
system and is designed for reliable and trouble-free performance.
2
www.insignia-products.com
Page 5

Insignia NS-H4005 Home Theater System
Safety information
CAUTION
RISK OF ELECTRIC SHOCK
DO NOT OPEN
Warning
To reduce the risk of electric shock, do not remove the cover
or back. No user serviceable parts inside. Refer servicing to
qualified service personnel.
Caution
To prevent electric shock, match the wide blade on the power
cord plug to the wide slot on an electric outlet. If the plug does
not fit, consult a licensed electrician to replace the obsolete
outlet. Do not modify the power cord plug, or you will defeat
this safety feature.
This symbol indicates that dangerous
voltage constituting a risk of electric shock
is present within your home theater system.
This label is located on the back of your
home theater system.
This symbol indicates that there are
important operating and maintenance
instructions in the literature accompanying
your home theater system.
Read instructions
Read all of the safety and operating instructions before you use your
home theater system.
Retain instructions
Retain safety and operating instructions for future reference.
Follow warnings and instructions
Follow all warnings on your home theater system and in the operating
instructions. Follow all operating and use instructions.
Water and moisture
Do not use your home theater system near water. For example, do
not use it near a bath tub, wash bowl, kitchen sink, or laundry tub, in a
wet basement, or near a swimming pool.
www.insignia-products.com
3
Page 6

Cleaning
Unplug your home theater system before cleaning. Do not use liquid
or aerosol cleaners. Use only a damp cloth to clean the exterior of
your home theater system.
Ventilation
Slots and openings in the cabinet and the back or bottom are
provided for ventilation, reliable operation, and protection from
overheating. These openings must not be blocked or covered. Do not
block the openings by placing your home theater system on a bed,
sofa, rug, or other similar surface. Do not place your home theater
system near or over a radiator or heat register. Do not place your
home theater system in a built-in installation, such as a bookcase or
rack, unless you provide correct ventilation or follow the
manufacturer’s instructions.
Heat
Make sure that your home theater system is located away from heat
sources such as radiators, heat registers, stoves, or other products
(including amplifiers) that produce heat.
Grounding or polarization
Do not defeat the safety purpose of the polarized or grounding-type
plug. A polarized plug has two blades with one wider than the other. A
grounding type plug has two blades and a grounding prong. The wide
blade or grounding prong are provided for your safety. If the plug
does not fit, contact an electrician to replace the obsolete outlet.
Insignia NS-H4005 Home Theater System
Power cord protection
Route power cords so that they are not likely to be walked on or
pinched by items placed on or against them. Pay particular attention
to cords at plugs, convenience receptacles, and the point where they
exit from your home theater system.
Attachments
Do not use attachments not recommended by Insignia because they
may cause hazards.
4
www.insignia-products.com
Page 7

Insignia NS-H4005 Home Theater System
Stand
Do not place your home theater system on an unstable cart, stand,
tripod, bracket, or table. Your home theater system may fall, causing
serious personal injury and serious damage to your home theater
system. Use only with a cart, stand, tripod, bracket, or table
recommended by the manufacturer, or sold with your home theater
system.
Lightning
For added protection for your home theater system during a lightning
storm or when it is left unattended and unused for long periods of
time, unplug it from the power outlet and disconnect the antenna.
This helps prevent damage to your home theater system from
lightning and power line surges.
Servicing
Do not attempt to service your home theater system yourself because
opening or removing covers may expose you to dangerous voltage or
other hazards. Refer all servicing to qualified service personnel.
Replacement parts
When replacement parts are required, make sure that the service
technician uses replacement parts specified by the manufacturer that
have the same characteristics as the original part. Unauthorized
substitutions may result in fire, electric shock, personal injury, or other
hazards.
Damage requiring service
Unplug your home theater system from the power outlet and refer
servicing to qualified service personnel under the following
conditions:
• When the power supply cord or plug is damaged or frayed.
• If liquid has been spilled or objects have fallen into your home
theater system.
• If your home theater system has been exposed to rain or
water.
• If your home theater system does not operate normally by
following the operating instructions. Adjust only those controls
that are covered by the operating instructions because
incorrect adjustment of other controls may result in damage
and will often require extensive work by a qualified technician
to restore your home theater system to its normal operation.
• If your home theater system has been dropped or damaged in
any way.
www.insignia-products.com
5
Page 8

Insignia NS-H4005 Home Theater System
• When your home theater system exhibits a distinct change in
performance.
Safety check
After completing any service or repair to your home theater system,
ask the service technician to perform routine safety checks to
determine that your home theater system is in correct operating
condition.
Overloading
Do not overload power outlets and extension cords because this can
result in a risk of fire or electric shock.
Object and liquid entry
Never push objects of any kind into your home theater system
through openings because objects may touch dangerous voltage
points or short out parts that could result in a fire or electric shock.
Never spill liquid of any kind on your home theater system.
Shipping your home theater system
Save the original shipping carton and packing materials. For
maximum protection, re-pack your home theater system as it was
originally packaged at the factory.
Setting up your home theater system
The picture and sound of a nearby TV, VCR, or radio may be
distorted during playback. In this case, position your home theater
system away from the TV, VCR, or radio, or turn off your home
theater system after removing the disc.
6
www.insignia-products.com
Page 9

Insignia NS-H4005 Home Theater System
Features
Accessories
Make sure that the following accessories are provided in the
packaging:
• Video cable (1)
• Audio cable (1)
• Speakers (6)
• FM antenna cable (1)
• AM antenna cable(1)
• Remote control (1)
• Batteries (AAA) (2)
• Ferrite core (1)
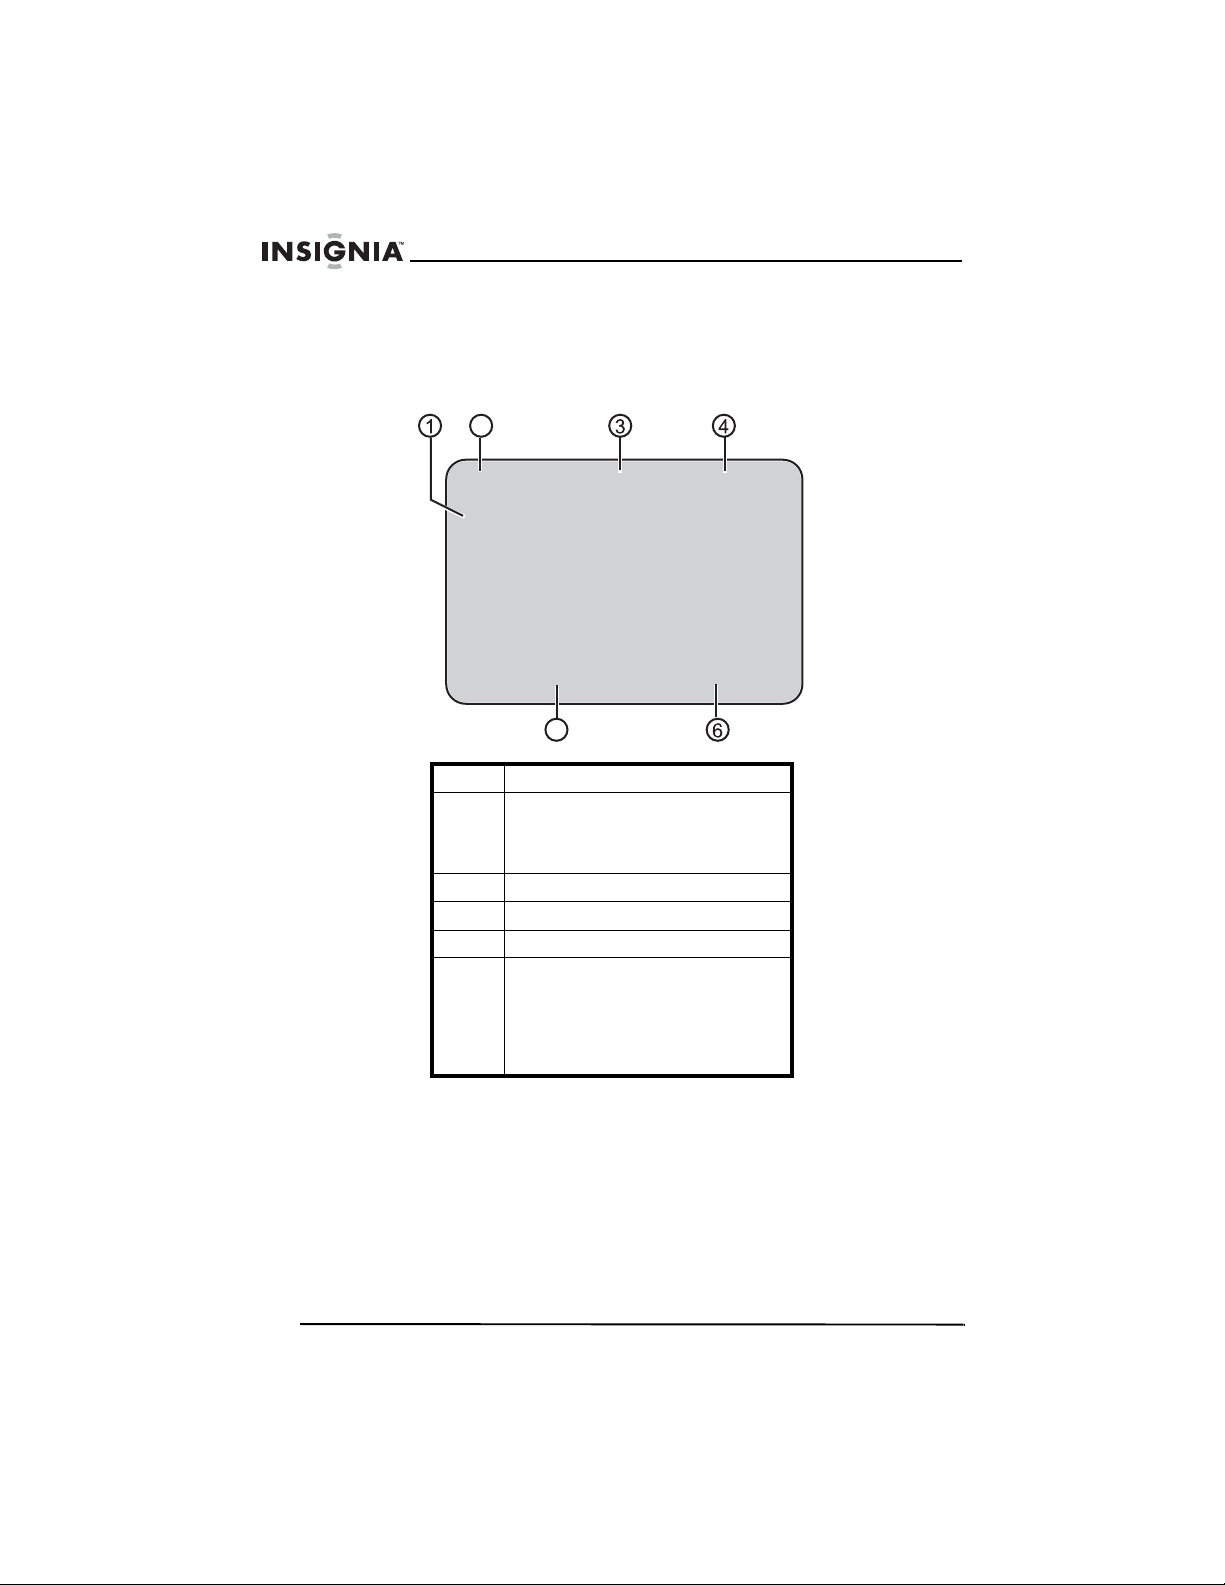
Front
1
56789
No Component Description
1 Disc tray Insert a disc into this tray.
2 OPEN/CLOSE Press to open or close the disc tray.
3 Videotape compartment Insert a videotape into this compartment.
4 (Eject) Press to eject a videotape from the
5 STANDBY/ON Press to turn your home theater system on
6 Front A/V jacks (LINE 2) Plug the audio and video jacks on a
10 1 1
2
videotape compartment.
and off.
standard A/V cable into these jacks and into
the A/V out jacks on an external device
such as a TV, audio system, or another
VCR).
34
18 19
13 14 15 16
12
17
www.insignia-products.com
7
Page 10

Insignia NS-H4005 Home Theater System
No Component Description
7 INPUT SELECT Press to select the VCR’s input source. You
8 FM/AM Press to select FM or AM radio.
9 PRESET+
PRESET–
10 Remote sensor Received signals from the remote control
11 Display window Displays information about the status of
12 DVD/VCR Press to select DVD or VCR as the video
13 (Record/ITR) Press to record to a videotape or to start
14 (Reverse skip/Scan) In DVD mode, press to go to the previous
15 (Play) Press to playback a disc or videotape.
16 (Forward skip/Scan) In DVD mode, press to go to the next
17 (Stop) Press to stop disc or videotape playback.
18 PAUSE/STEP( ) Press to pause disc or videotape playback.
19 VOL. Turn clockwise to increase volume and
can select LINE 1 or LINE2).
Press to select a preset radio station.
Do not block.
your home theater system. For more
information, see “Display window” on
page 9.
source for the TV screen.
and instant timer recording (ITR).
chapter or track. Press and hold for two
seconds to fast-reverse on a disc.
In VCR mode, press to rewind the
videotape when playback is stopped or
press to fast-reverse search when the
videotape is playing.
chapter or track. Press and hold for two
seconds to fast-forward on a disc.
In VCR mode, press to advance the
videotape when playback is stopped or
press to fast-forward search when the
videotape is playing.
Press one or more times to advance a DVD
or videotape one frame at a time.
counter-clockwise to decrease the volume.
8
www.insignia-products.com
Page 11
Insignia NS-H4005 Home Theater System
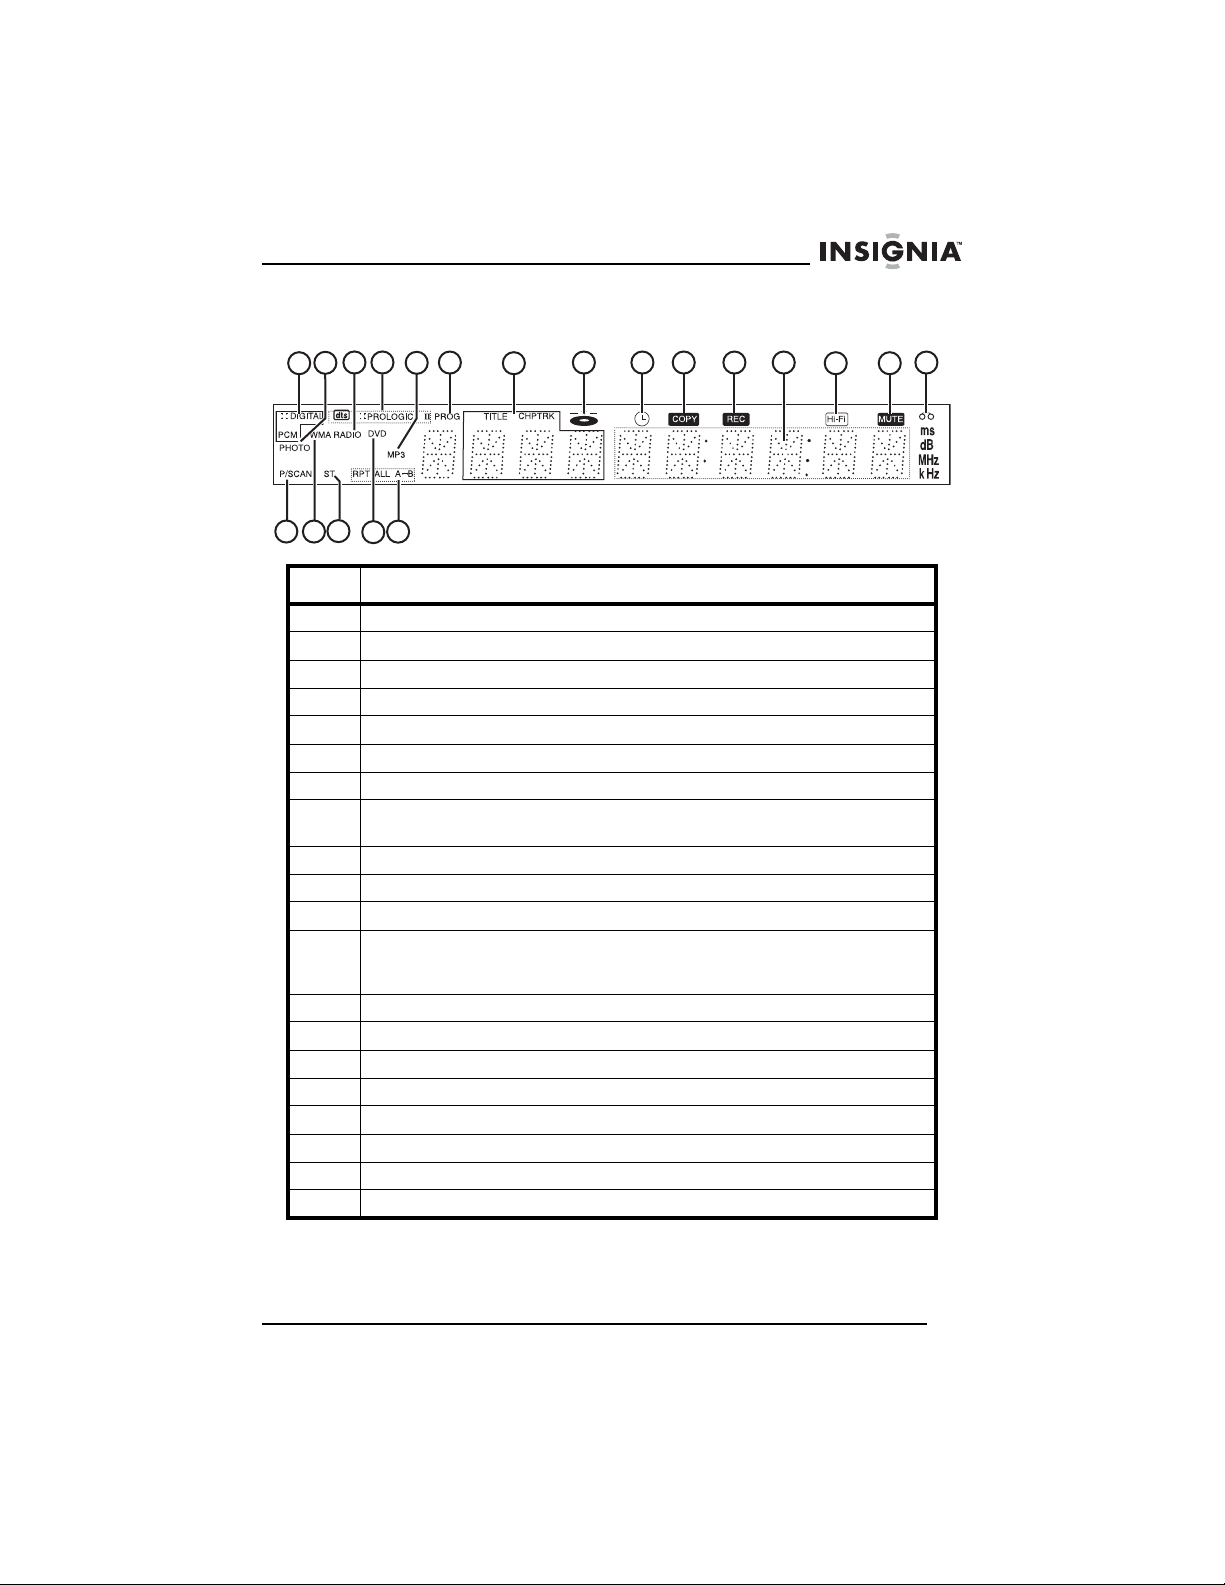
Display window
16
1
17
3 4
2 5
18
19
20
6
7
8 9
10 11 12
13
No Indicator
1 Indicates the current audio stream.
2 Indicates a JPEG file disc is in the disc tray.
3 Indicates radio mode is active.
4 Indicates the current surround mode.
5 Indicates an MP3 disc is in the disc tray.
6 Indicates programmed playback active.
7 Displays the current chapter, track, or preset radio station number.
8 Indicates a disc is in the DVD tray. (Lights solid when a disc is in the
9 Indicates a VCR timer recording is in progress or scheduled.
10 Indicates a DVD to VCR copy is in progress.
11 Indicates a recording in progress.
12 Displays the total playing time, elapsed time, radio frequency,
13 Indicates the videotape that is playing was recorded in Hi-Fi.
14 Indicates the volume is muted.
15 Indicates a videotape is in the videotape compartment.
16 Indicates your home theater system is in progressive scan mode.
17 Indicates a WMA disc inserted.
18 Indicates a stereo broadcast is being received.
19 Indicates a DVD is inserted.
20 Displays the repeat playback mode.
disc tray, and the tray is closed. Flashes when the disc tray is opened.)
remaining time, current DVD or VCR status, surround mode, and
volume indicators.
14
15
www.insignia-products.com
9
Page 12
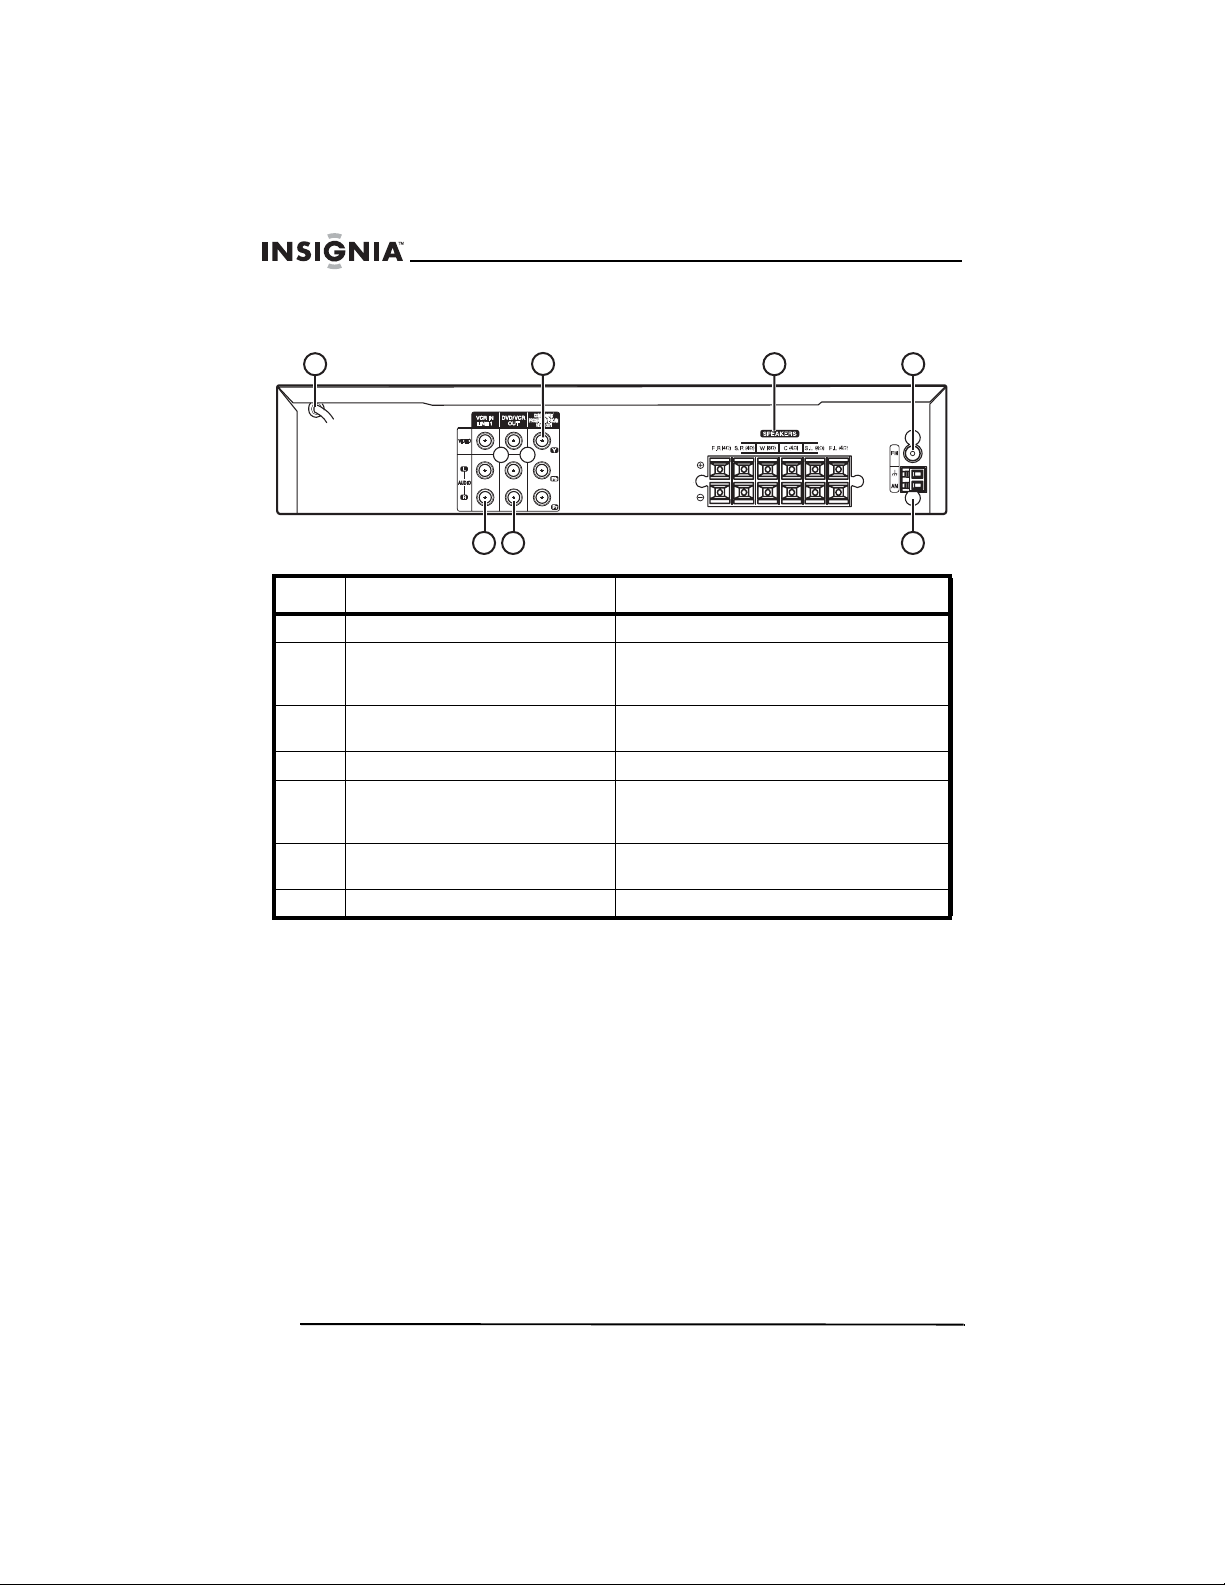
Back
Insignia NS-H4005 Home Theater System
1
2
34
56 7
No Component Description
1 Power cord Plug this cord into the power outlet.
2 COMPONENT/PROGRESSIVE
SCAN
VIDEO OUT
3 SPEAKERS Connect the speaker wires to these
4 FM Connect the FM antenna to this jack.
5 VCR IN LINE 1 Connect an external audio or video
6 DVD/VCR OUT Connect a TV with standard video and
7 AM Connect the AM antenna to this jack.
Y, Pb, and Pr jacks. Connect a
component or progressive scan TV to
these jacks.
jacks.
device to these jacks, such as an audio
system, TV, monitor, or another VCR.
audio jacks.
10
www.insignia-products.com
Page 13

Insignia NS-H4005 Home Theater System
Remote control
POWER
1
CD/DVD VCR FM/AM
2
3
4
PROGRAM
CLEAR
5
6
DISPLAY/
CLK/CNT
7
SOUND MODE
TRK/PRESET
EJECT
OPEN/CLOSE
INPUT
AUDIO
SET UP/
MENU
19
20
21
22
23
24
10
11
12
13
14
15
16
17
18
8
9
RETURN
REC/ITR
STOP
MARKER SEARCH
ANGLE REPEAT A-B REPEAT
CM SKIP SPEED
MEMORY
/
ENTER
TRK/PRESET
BACKWARD FORWARD
PAUSE/STEP PLAY
TUNING
DISC MENU
VOLUME
S-TITLE MUTE
TITLE ZOOM
25
26
27
28
29
30
31
32
33
34
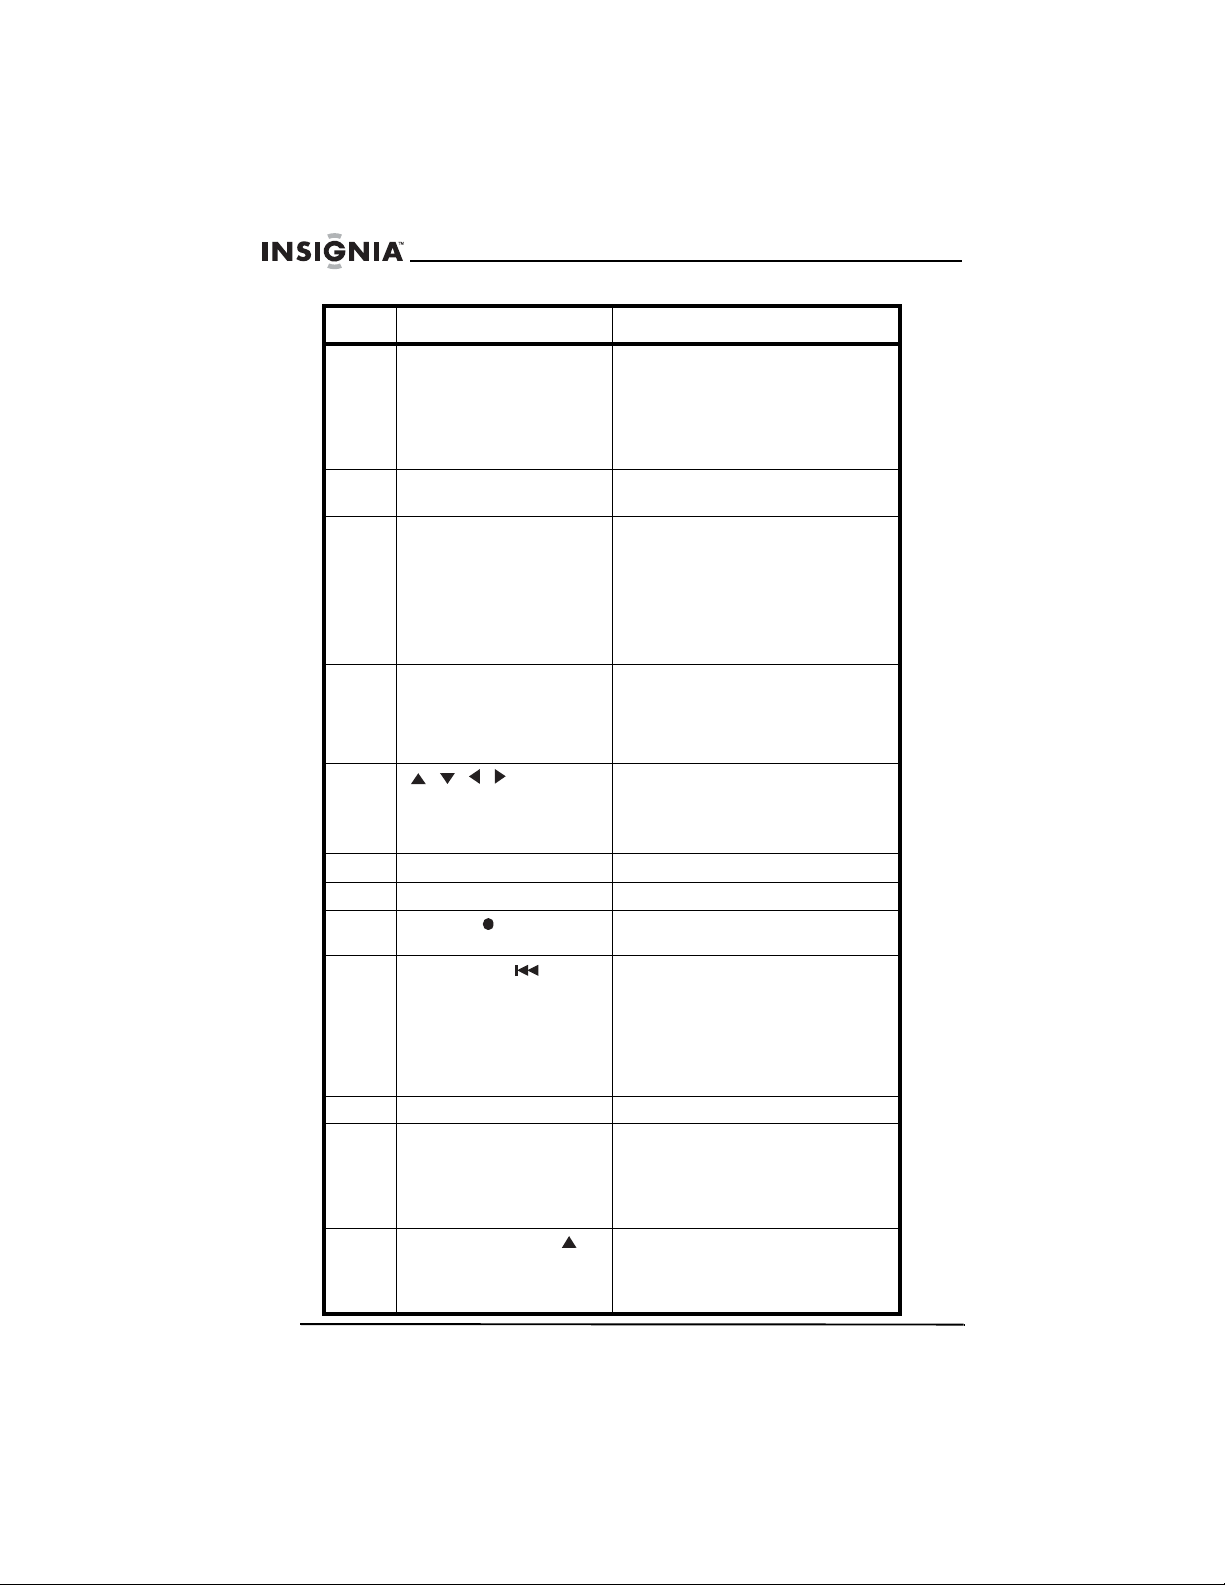
No. Component Description
1 POWER Press to turn your home theater
2 CD/DVD Press to select CD/DVD mode.
3 VCR Press to select VCR mode.
system on or off.
www.insignia-products.com
11
Page 14
Insignia NS-H4005 Home Theater System
No. Component Description
4 Number buttons Press to enter chapter or track
5 PROGRAM Press to open or close the
6 CLEAR Press to delete a track number
7 DISPLAY/CLK/CNT Press to open the on-screen
8 , , , Press to select menu options.
9 MEMORY/ENTER Press to confirm entries.
10 RETURN Press to close the setup menu.
11 REC/ITR Press to start a recording or to
12 BACKWARD Press to go to the previous chapter
13 STOP Press to stop playback.
14 PAUSE/STEP Press to pause playback or
15 MARKER/TUNING During DVD playback, press to
numbers.
Press to enter the parental control
password.
Press to select numbered options
in a menus.
Program menu.
from a playlist.
Press to delete a DVD marker.
Press to delete a preset radio
station.
Press to delete incorrect entries in
menus.
display. Press one or more times
to switch between the clock, tape
counter and remaining time
displays.
Press to adjust the tracking on
videotapes.
Press to select radio stations.
activate Instant Timer recording.
or track. Press and hold to search
backward on a DVD or CD.
In stop mode, press to rewind a
videotape. In playback mode,
press to fast-reverse on a
videotape.
recording.
In pause mode, press repeatedly
to advance the video one frame at
a time.
mark a starting point on the DVD.
When playing the radio, press to
tune to a radio station.
12
www.insignia-products.com
Page 15
Insignia NS-H4005 Home Theater System
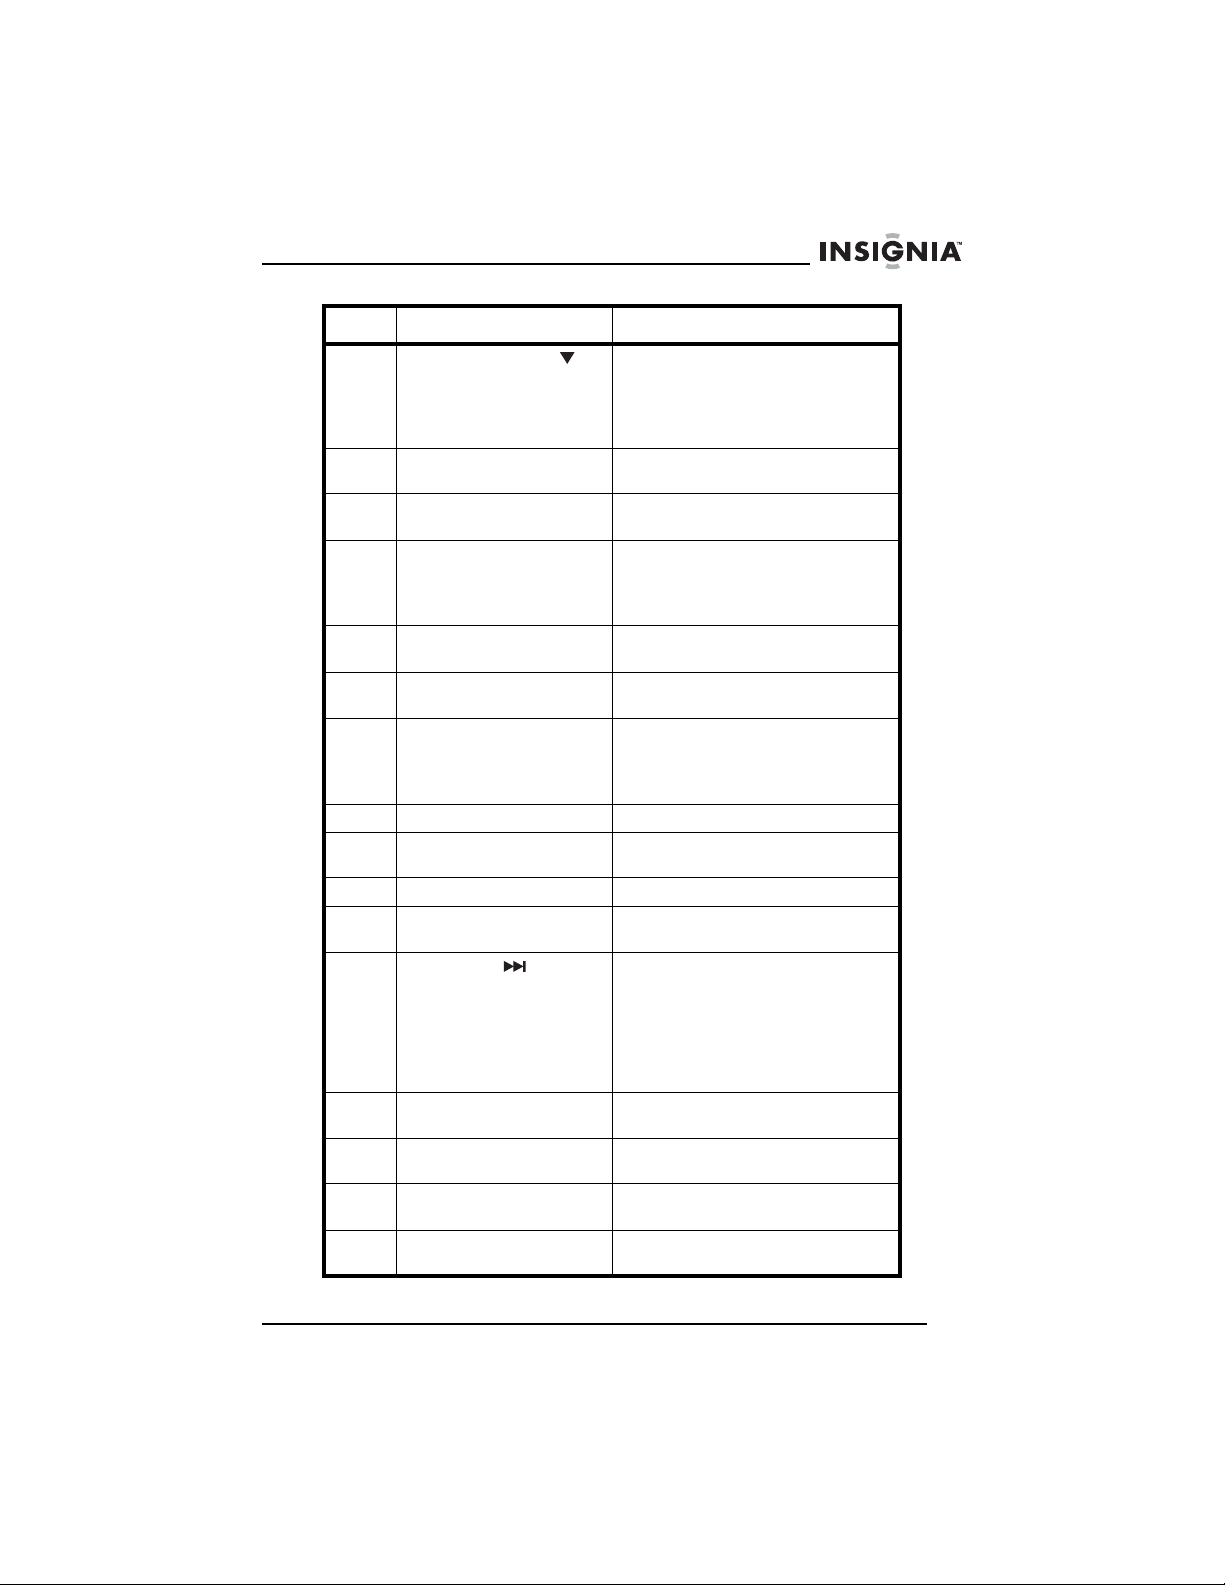
No. Component Description
16 SEARCH/TUNING During DVD playback, press to
17 ANGLE Press to select different camera
18 CM SKIP Press to fast-forward through 30
19 EJECT OPEN/CLOSE Press to opens and closes the disc
20 FM/AM Press to select the FM or AM radio
21 INPUT Press to selects the VCR’s source
22 AUDIO Press to select an audio language
23 SOUND MODE Press to select the sound mode.
24 SET UP MENU Press to open the DVD or VCR
25 DISC MENU Press to open a DVD disc menu.
26 VOLUME +
VOLUME –
27 FORWARD Press to go to the beginning of the
28 PLAY Press to start DVD or videotape
29 MUTE Press to turn off the sound. Press
30 S-TITLE Press to select a subtitle
31 REPEAT Press to repeat the current chapter
open the
menu.
When playing the radio, press to
tune to a radio station.
angles on a DVD, if available.
seconds of a videotape.
tray.
Press to eject a videotape from the
videotape compartment.
band.
(LINE 1 or LINE 2).
for a DVD.
Press to select an audio channel
for a CD.
setup menu.
Press to increase or decrease the
volume.
current chapter. Press again to got
the previous chapter. Press and
hold to search forward on a DVD
or CD.
Press to fast-reverse on a
videotape.
playback.
again to restore the sound.
language.
or track.
MARKER SEARCH
www.insignia-products.com
13
Page 16

Insignia NS-H4005 Home Theater System
No. Component Description
32 REPEAT A-B/SPEED Press to repeat a section of a DVD
33 ZOOM Press to enlarge the DVD video
34 TITLE Press to open DVD’s Title menu, if
or CD.
Press to selects videotape
recording speed.
image.
available.
Installing remote control batteries
To install the remote control batteries:
1 Remove the remote control battery compartment cover.
2 Insert two AAA batteries into the battery compartment. Make sure
that the + and – symbols on the batteries match the + and –
symbols inside the battery compartment.
3 Replace the battery compartment cover.
Using the remote control
To use the remote control:
• Point the remote control directly at your home theater system,
within a 30° angle of the remote control sensor on the front of
your home theater system, and within 23 feet (7 m).
14
www.insignia-products.com
Page 17

Insignia NS-H4005 Home Theater System
Setting up your home theater system
Connecting a TV
Back of TV
Back of your home
theater system
To connect a TV with standard A/V jacks:
1 Plug the supplied video cable (V) into the DVD/VCR VIDEO OUT
jack on the back of your home theater system, then plug the other
end of the cable into the VIDEO IN jack on the TV.
www.insignia-products.com
15
Page 18

Insignia NS-H4005 Home Theater System
2 Plug the left and right audio connectors on the supplied audio
cable (A) into the left and right DVD/VCR AUDIO OUT L and R
jacks on the back of your home theater system, then plug the
connectors on the other end of the cable into the AUDIO IN L and
R jacks on the back of the TV.
Note
If you use this connection, set the TV’s input source to
VIDEO.
To connect a TV with component or progressive scan jacks:
Note
The DVD player can play through the
COMPONENT/PROGRESSIVE SCAN VIDEO OUT jack.
The VCR and radio can only play through the standard A/V
jacks.
1 Plug the connectors on the supplied component A/V cable (C) into
the COMPONENT/PROGRESSIVE SCAN VIDEO OUT (Y, Pb,
and Pr) jacks on the back of the home theater system, then plug
the connectors on the other end of the cable into the appropriate
jacks on the back of the TV.
2 Plug the left and right audio connectors on the supplied audio
cable (A) into the left and right DVD/VCR AUDIO OUT L and R
jacks on the back of your home theater system, then plug the
connectors on the other end of the cable into the AUDIO IN L and
R jacks on the back of the TV.
16
Note
If your television is a high-definition or “digital ready”
television, you can use your home theater system’s
progressive scan output for the highest video resolution
possible.
If you are using a Progressive Scan connection, turn on
Progressive Scan in the on-screen display (OSD). For more
information, see “Using progressive scan” on page 44.
If your TV does not support the Progressive Scan format,
the picture will appear scrambled if you turn on Progressive
Scan.
www.insignia-products.com
Page 19
Insignia NS-H4005 Home Theater System
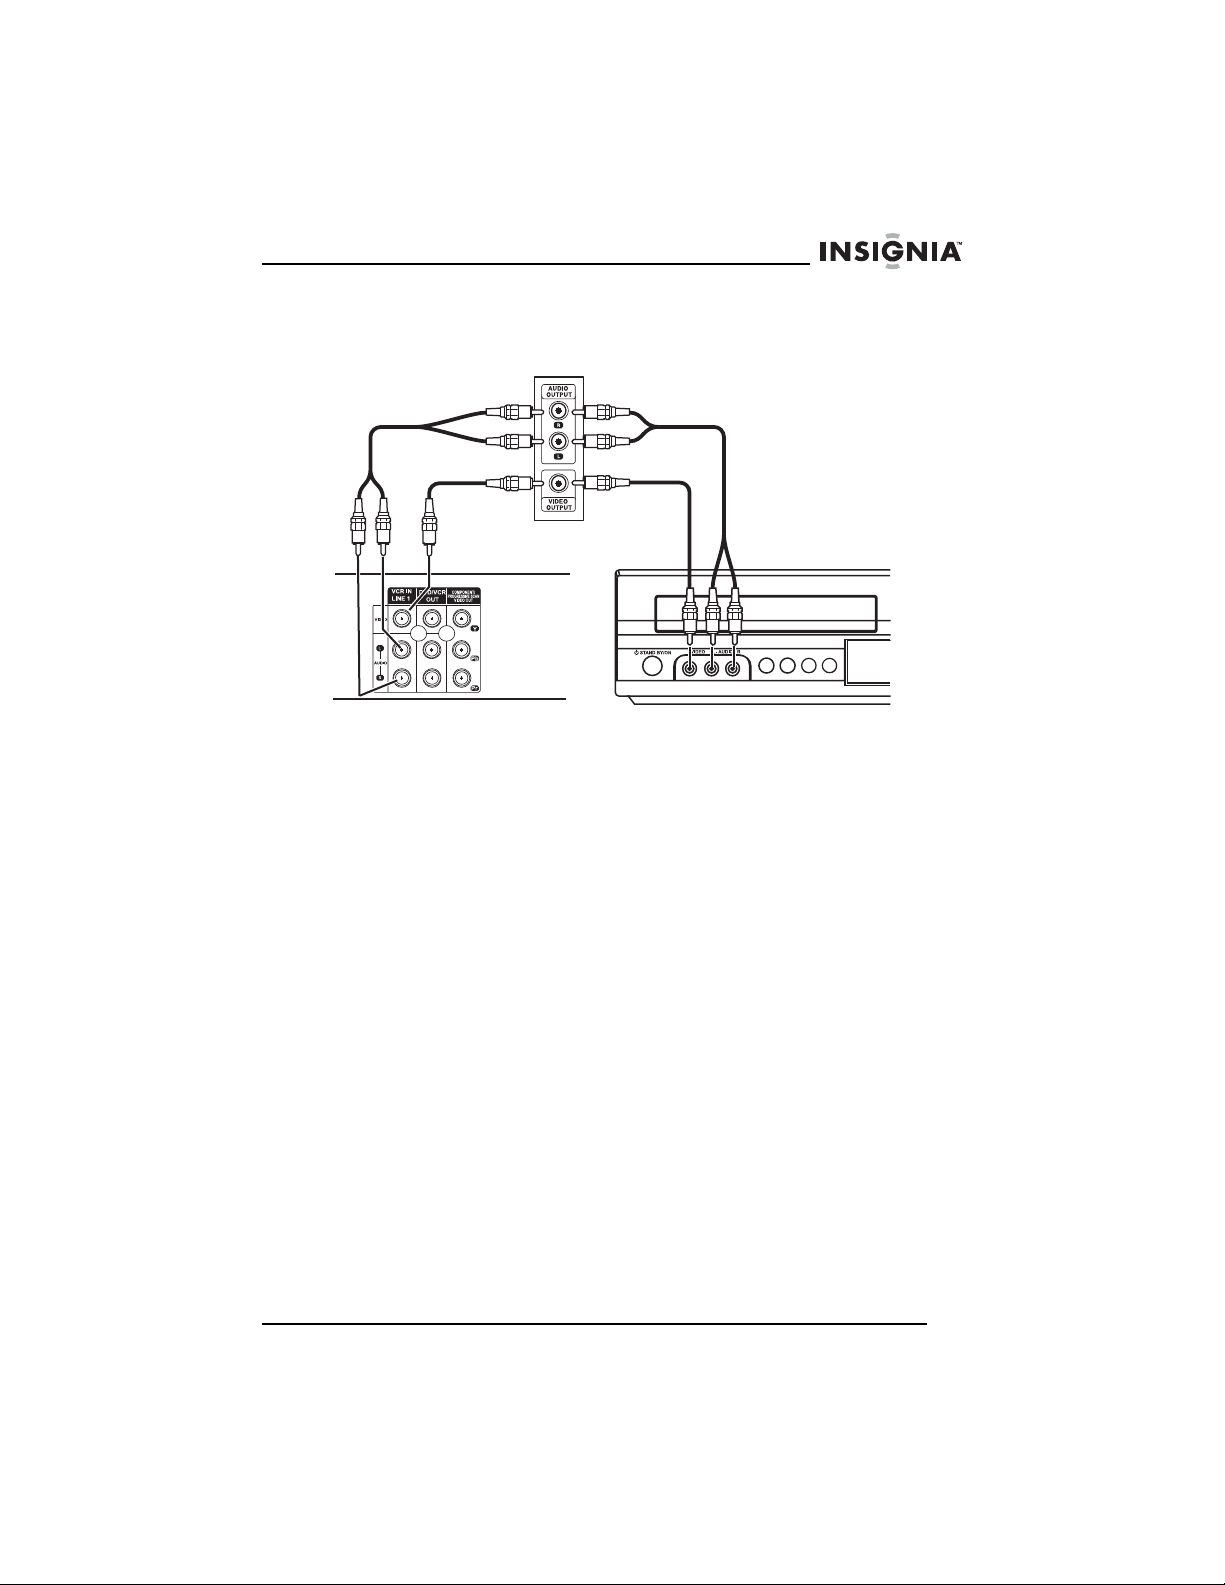
Connecting an external audio/video device
External device
OR
Back of your home
theater system
To connect an external audio/video device:
1 Plug the video and audio connectors on a standard video cable
(not supplied) into the VCR IN LINE 1 jack on the back of your
home theater system or into the LINE 2 jacks on front of your
home theater system.
2 Plug the connectors on the other end of the cable into the
AUDIO/VIDEO OUT jacks on the external device.
Front of your home
theater system
www.insignia-products.com
17
Page 20
Insignia NS-H4005 Home Theater System
Connecting radio antennas
AM loop antenna
FM wire antenna
To connect the radio antennas:
1 Connect the AM loop antenna (supplied) to the AM antenna jack
on the back of your home theater system.
2 Connect he FM wire antenna (supplied) to the FM antenna jack on
the back of your home theater system.
18
Note
To prevent noise interference, keep the AM loop antenna
away from a DVD+Hi-Fi VCR or other devices.
Make sure that you fully extend the FM wire antenna.
After connecting the FM wire antenna, keep it as close to
horizontal as possible.
www.insignia-products.com
Page 21
Insignia NS-H4005 Home Theater System
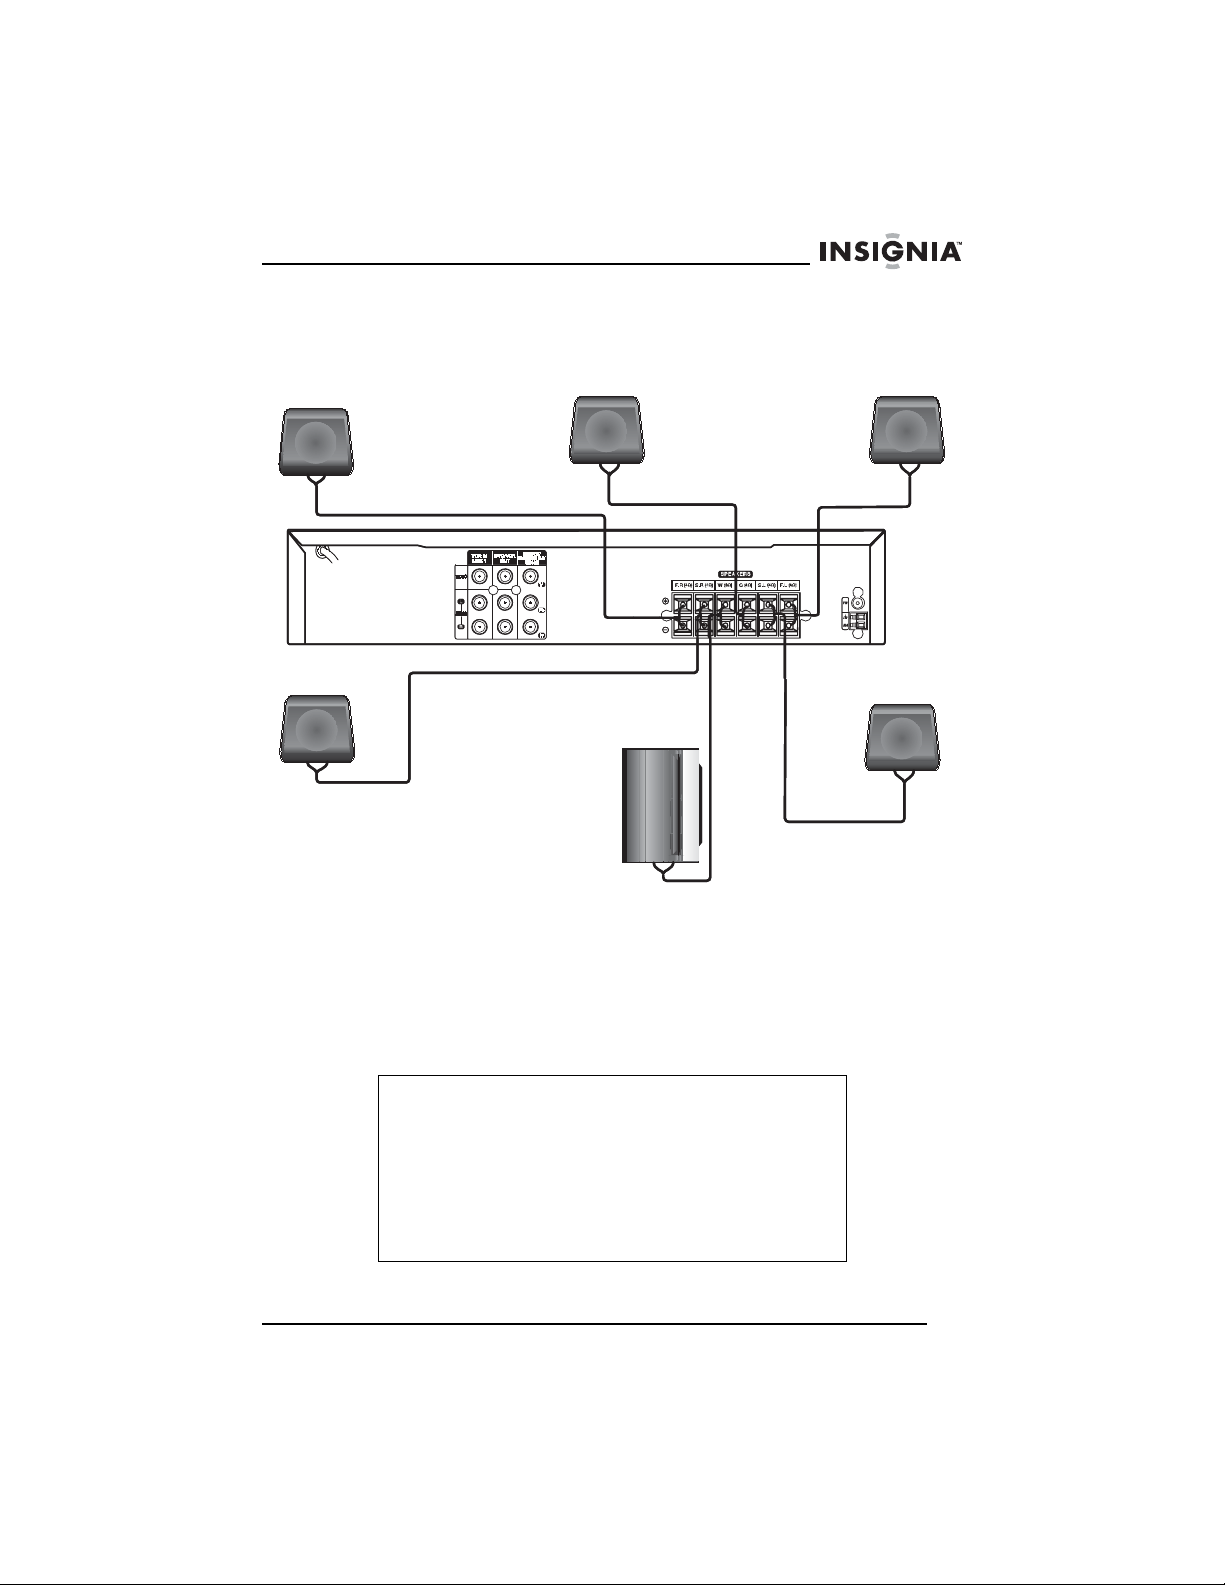
Connecting speakers
Front right
speaker
Back right
speaker
Center speaker
Subwoofer
Front left
speaker
Back left
speaker
To connect speakers:
• Connect the speakers wires on the speakers to the speaker
jacks on your home theater system. Make sure that you match
the + and – speaker jacks on your home theater system with
the + and – speaker wires on the speakers. If the wires are
reversed, sound will be distorted and there will be no bass.
Note
To get the best possible surround sound, adjust the
speakers. For example adjust the distance between the
speakers and the height of the speakers.
When adjust the volume, avoid excessive volume. Sound
may be distorted and you may damage your speakers.
In VCR mode, only 2-channel stereo (front left, front right,
and subwoofer) is available. You may not hear sound from
center or rear speakers.
Do not remove the front covers from the supplied speakers.
www.insignia-products.com
19
Page 22
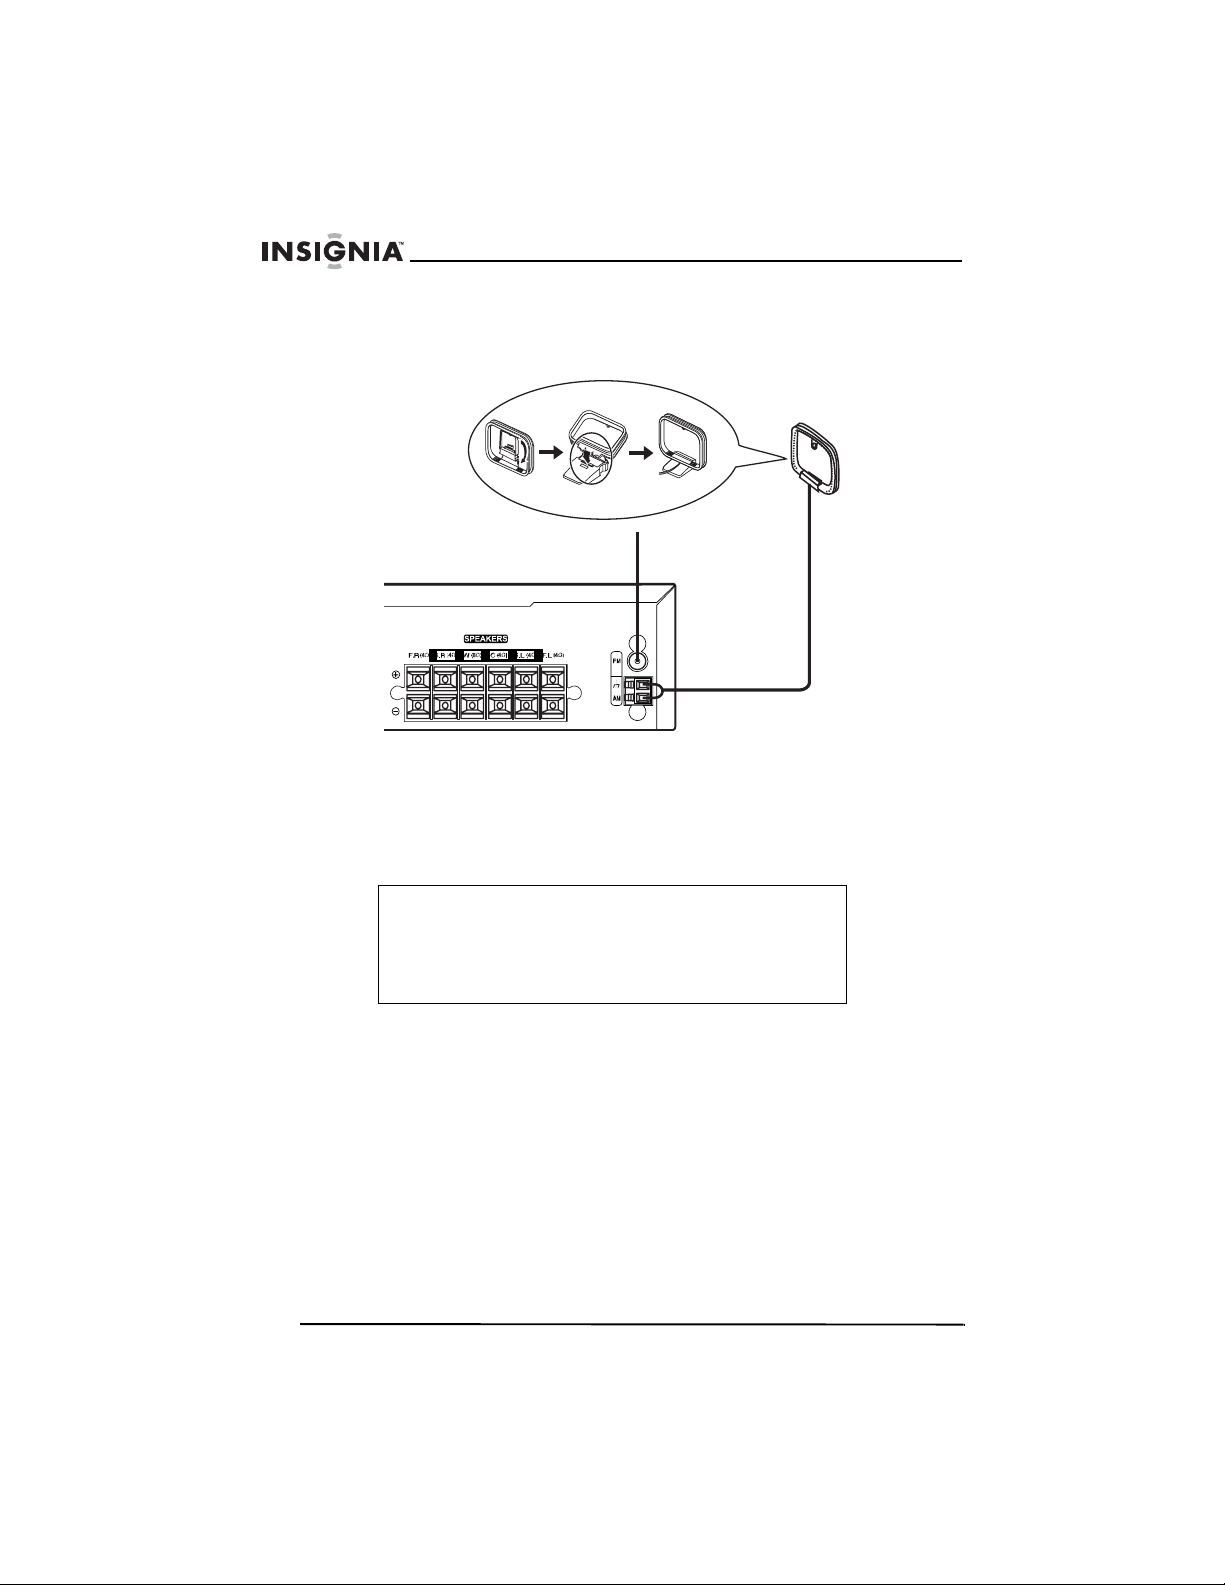
Attaching the ferrite core
The ferrite core reduces interference.
To attach the ferrite core:
1 Press the stopper on the ferrite core to open the core.
2 Place the ferrite core as close to speaker jacks on your home
theater system as you can without pulling on the wires, then wind
the speaker cables once around the ferrite core.
Insignia NS-H4005 Home Theater System
Stopper
20
www.insignia-products.com
Page 23

Insignia NS-H4005 Home Theater System
3 Press the ferrite core together until it clicks together.
Using the VCR
Playing a videotape
To play a videotape:
1 Make sure that the power cord is plugged into a power outlet.
2 Make sure that the indicator is not lit in the display window. If
the indicator is lit, press POWER to turn it off.
3 Insert a videotape into the videotape compartment. Your home
theater system turns on automatically, and the appears in the
display window.
4 If the videotape does not begin to playback automatically, press
PLAY .
www.insignia-products.com
21
Page 24

Insignia NS-H4005 Home Theater System
5 To stop playback, press STOP .
Note
Your home theater system has an Auto Play System
feature. If your home theater system is turned off and you
insert a videotape with the erase-prevention tab removed,
your home theater system automatically turns on and plays
the videotape. When playback is complete, your home
theater system rewinds and ejects the videotape, then turns
off.
Controlling videotape playback
To control videotape playback:
• To search while the videotape is playing, press
BACKWARD or FORWARD . Press PLAY to resume
normal playback.
Note
Horizontal lines appear in search mode. They will disappear
when you resume playback.
Sound is muted while in search mode.
When you end high speed search mode, your home theater
system takes a few seconds to stabilize the tape speed.
During this time, you may see slight interference on the
screen.
If the VCR is in search mode for more than three minutes,
your home theater system starts normal playback to protect
the videotape and video heads.
22
• To freeze the image and pause playback, press
PAUSE/STEP . Press PLAY to resume normal playback.
Note
If the still picture vibrates vertically, press or to adjust
the picture.
If the VCR is in still mode for more than three minutes, your
home theater system goes into stop mode to protect the
videotape and video heads.
• To advance the videotape one frame at a time, freeze the
image, then press PAUSE/STEP one or more times. Each
time you press the button, the videotape advances one frame.
Press PLAY to resume normal playback.
www.insignia-products.com
Page 25

Insignia NS-H4005 Home Theater System
• To play the videotape in slow motion, freeze the image, then
press FORWARD . The videotape plays 1/19 slower than
normal playback. Press PLAY to resume normal playback.
Note
If you experience “noise” while playing a videotape in slow
motion, press or to adjust the picture.
If the VCR is in slow motion mode for more than three
minutes, your home theater system starts normal playback
to protect the videotape and video heads.
• To skip forward 30 seconds on the videotape, press CM SKIP.
(This feature is useful when you want to skip commercials or
short program segments.) Each time you press CM SKIP, the
tape skip forward 30 seconds. You can skip forward a
maximum of three minutes. When the skip is complete, your
home theater system resumes normal playback.
Adjusting the tracking
The tracking function adjusts the picture to remove snow or streaks.
Your home theater system automatically adjusts tracking when:
• A tape is played for the first time.
• Tape speed (SP or SLP) changes.
• Streaks or snow appear because of scratches on the tape.
If the automatic tracking feature does not get rid of “noise,” you can
manually adjust the tracking.
To manually adjust the tracking:
• Press TRK/PRESET or TRK/PRESET on the remote
control until the noise on the screen is reduced.
Note
If a vertical “jitter” appears on the screen, adjust the tracking
slowly.
Tracking is reset to normal when a videotape is ejected or
the power cord is unplugged for more than three seconds.
www.insignia-products.com
23
Page 26
Insignia NS-H4005 Home Theater System
Displaying videotape information
To display videotape information:
1 Press MEMORY/ENTER. The following screen appears:
2
PLAY HI-FI LINE 1
SP
JAN 1 , SUN 2:15 PM
5
1 Tape speed.
2 Playback or recording status. For
3 Audio mode.
4 Video input source.
5 Current date.
6 Clock, counter, or remaining time.
2 Press the MEMORY/ENTER button one or more times to close
the display.
example, if a videotape is playing,
PLAY appears. If playback is
stopped, STOP appears.
Each time you press
MEMORY/ENTER, the display
changes from the current time, to
the elapsed time, to the remaining
time.
24
www.insignia-products.com
Page 27
Insignia NS-H4005 Home Theater System
Displaying the clock and real-time counter
To display the clock and real-time counter:
• Press CLK/CNT one or more times. Each time you press the
button, the display changes.
• First press shows the current time.
• Second press shows the elapsed time (real-time counter).
• Third press shows the remaining time. REM appears in the
display window.
Note
The remaining time display may not be accurate depending
on the condition of the videotape and the type of videotape
(T-140, T-160, T-210, and so forth).
• Fourth press closes the display.
Selecting the VCR audio mode
Your home theater system has two audio modes: HI-FI and
NORMAL.
• HI-FI–Plays separate left and right channels.
• NORMAL–Plays mono through both channels.
Most prerecorded videotape are recorded in both audio modes so the
videotape can be played on a system that does not have the Hi-Fi
mode.
To select the VCR audio mode:
1 Make sure that your home theater system is turned on
2 Press VCR to select VCR mode.
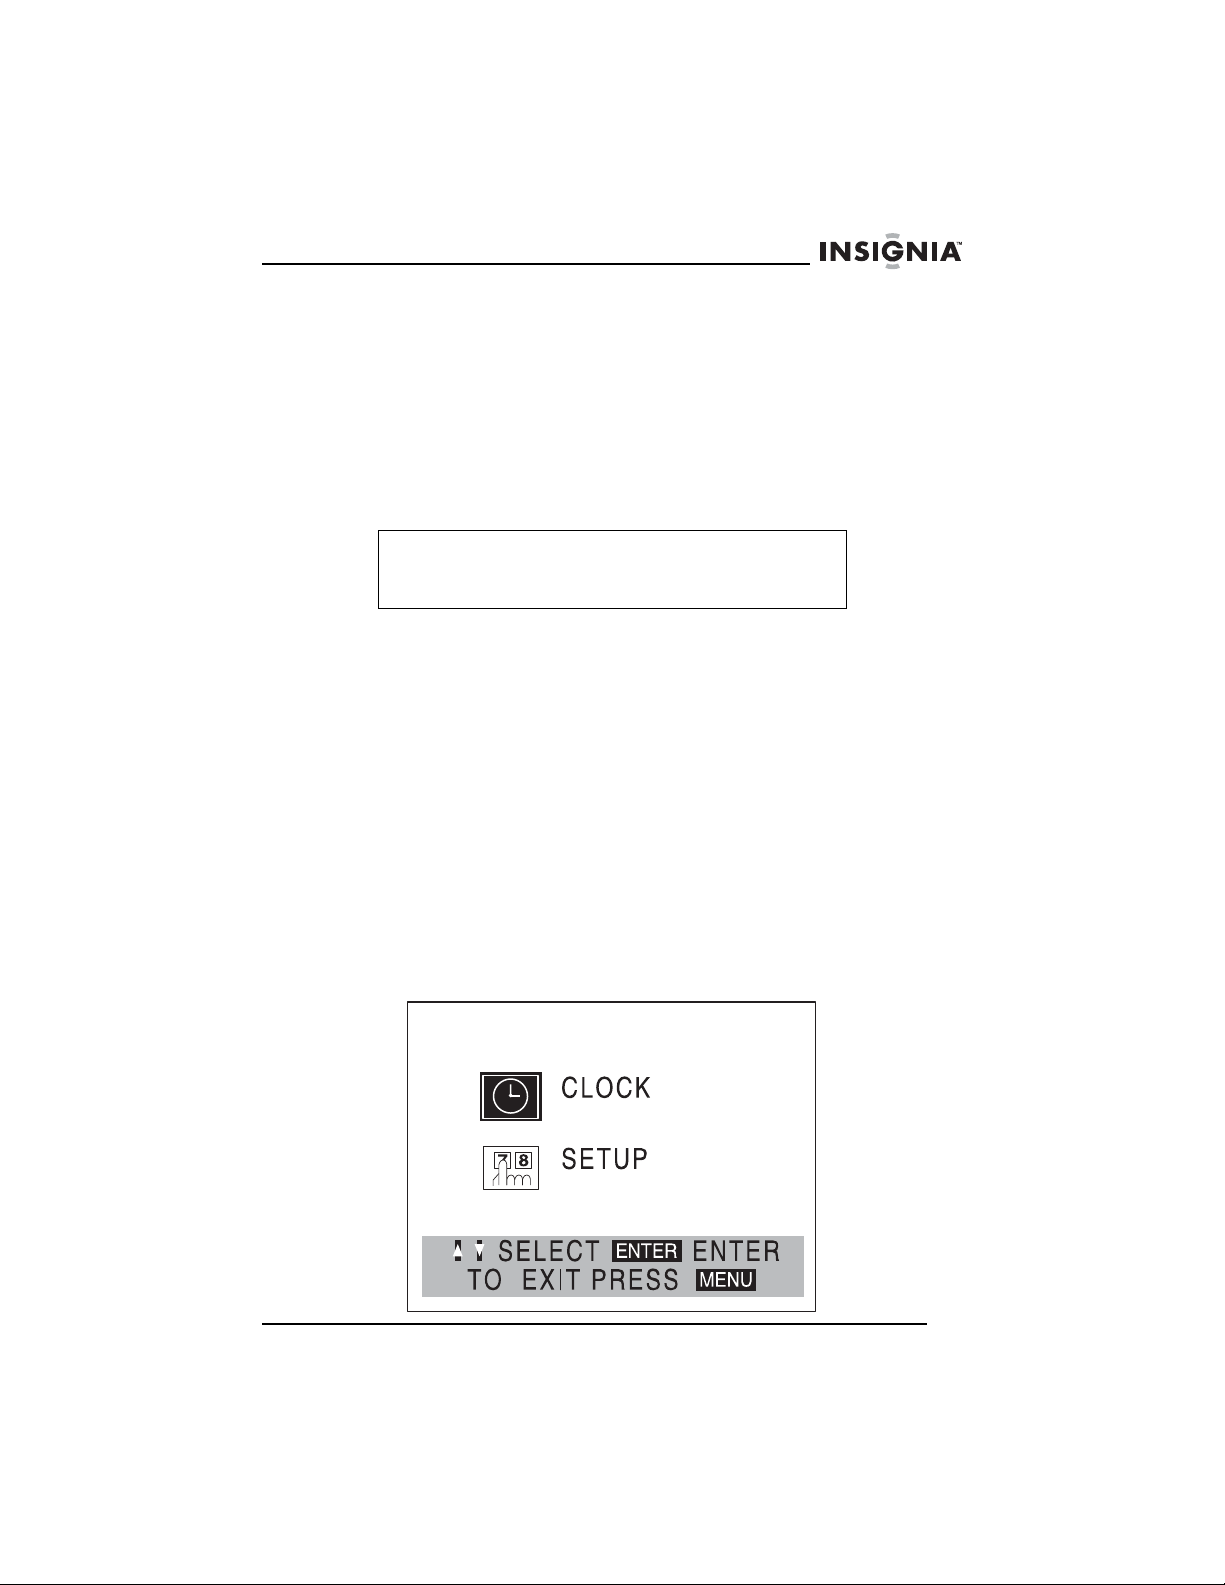
3 Press MENU. The VCR menu opens.
www.insignia-products.com
25
Page 28
Insignia NS-H4005 Home Theater System
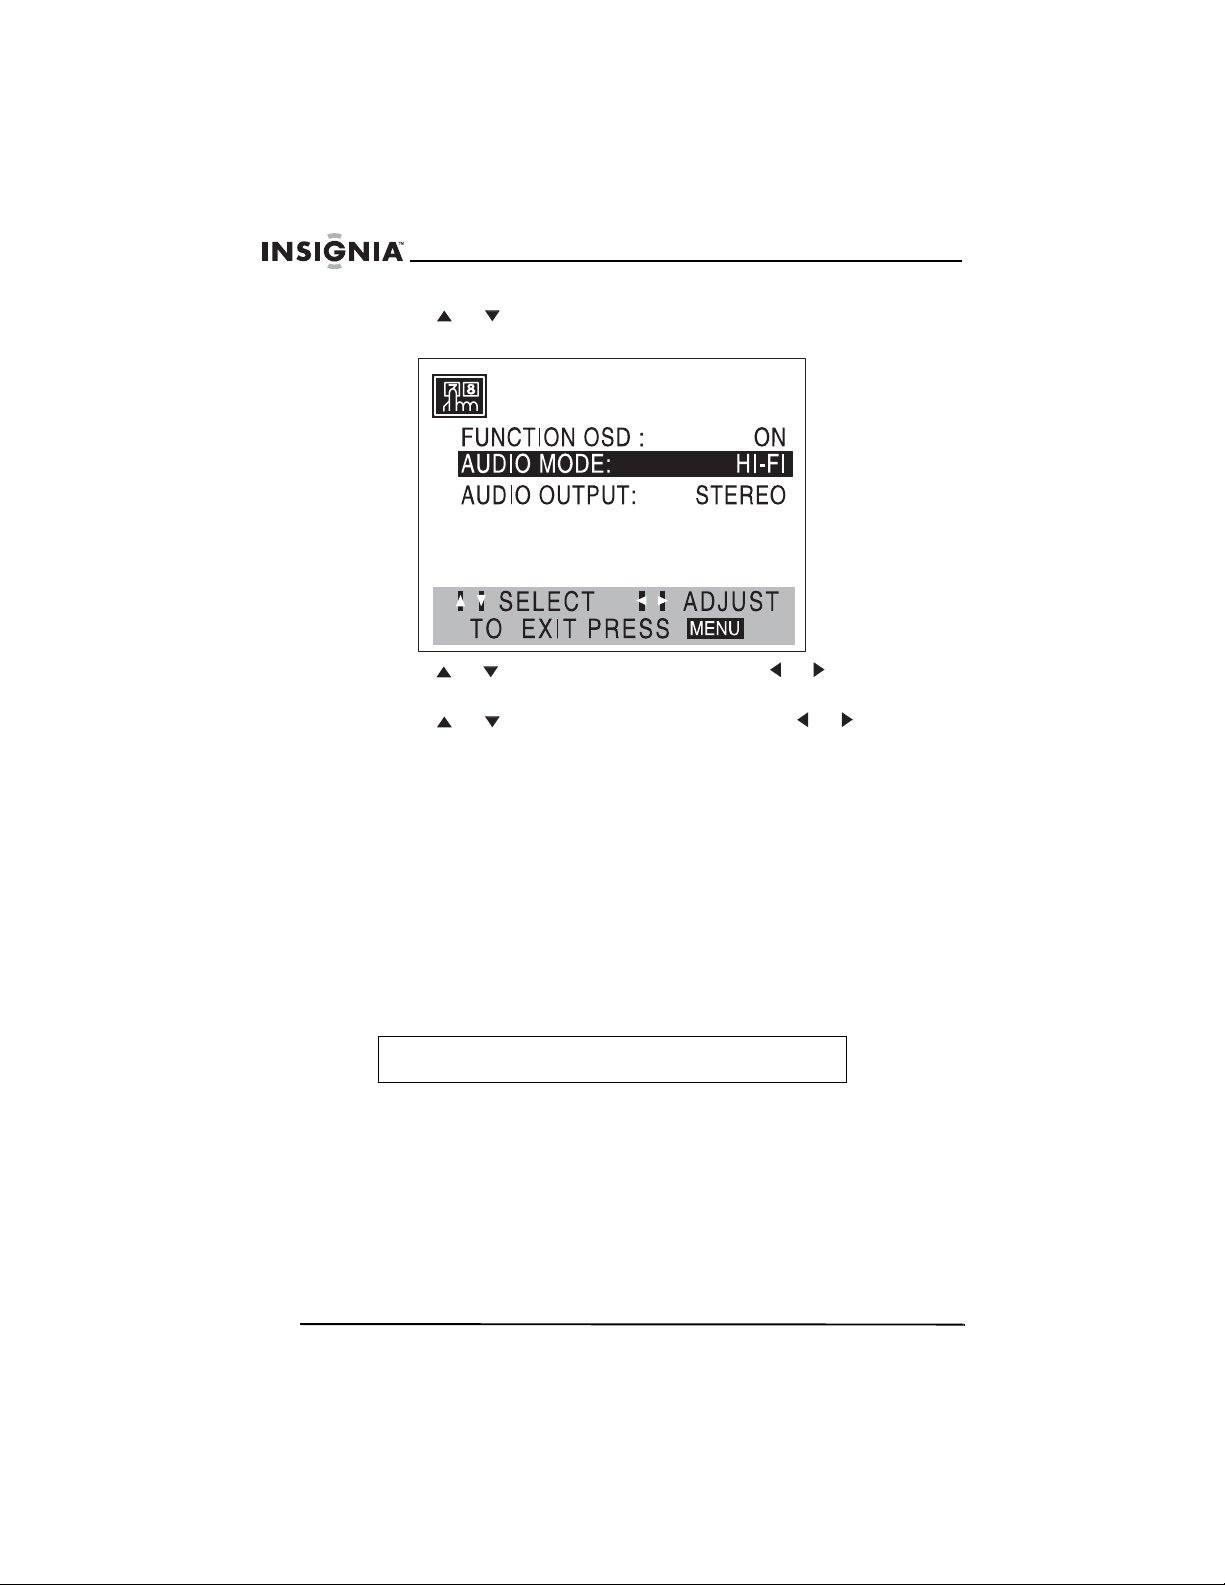
4 Press or to select SETUP, then press MEMORY/ENTER.
The setup menu opens.
5 Press or to select AUDIO MODE, then or to select HI-FI
(recommended) or NORMAL.
6 Press or to select AUDIO OUTPUT, then or to select
one of the following:
• STEREO–(Recommended) The left audio channel is sent to
the left speaker, and the right audio channel is sent to the right
speaker.
• LEFT–The left audio channel is sent to both the left and right
speakers.
• RIGHT–The right audio channel is sent to both the left and
right speakers.
7 Press MENU to close the menu.
Setting the clock
You need to set the clock if you want to set up timer recordings.
Note
The initial clock setting is JANUARY 1, 2007, 12:00 AM.
To set the clock:
1 Make sure that your home theater system is turned on.
2 Press VCR to select VCR mode.
26
www.insignia-products.com
Page 29

Insignia NS-H4005 Home Theater System
3 Press MENU. The VCR menu opens.
4 Press or to select CLOCK, then press MEMORY/ENTER.
The clock menu opens.
5 Press to select MONTH, the press or to select the month.
6 Press to select DAY, then press or to select the day of the
month. The day of the week appears next to the day of the month.
7 Press to select YEAR, then press or to select the year.
8 Press to select TIME, then press or to select the time. You
can press and hold or to advance the time quickly.
Note
The clock uses the 12-hour system. Make sure that you set
AM or PM correctly. If PM is selected, PM appears on the
display. If AM is selected, AM does not appear on the
display.
9 Press MENU to close the menu.
www.insignia-products.com
27
Page 30

Insignia NS-H4005 Home Theater System
Marking a starting point on a videotape
If you want to quickly locate a section of a videotape where you want
playback to begin, you can add a marker to the videotape.
To mark a starting point on a videotape:
1 Begin playing or recording a videotape.
2 Press CLK/CNT twice to display the real-time counter (elapsed
time).
3 When the videotape reaches the point you want to mark, press
CLEAR. The real-time counter is reset to 00:00:00.
4 Continue to play or record.
5 When playback or recording ends, press STOP twice.
6 Press BACKWARD . The videotape rewinds to the place you
marked and starts playback.
Recording a videotape
To record a videotape:
1 Insert a videotape with an erase-prevention tab into the videotape
compartment.
2 Press INPUT to select LINE 1 or LINE 2. Select LINE 1 to record
from a device connected to the A/V jacks on the back of your
home theater system. Select LINE 2 to record from a device
connected to the A/V jacks on the front of your home theater
system.
3 Press SPEED to select the tape speed. You can select SP or
SLP. (Your home theater system does not support LP tape
speed.)
4 Press REC/ITR once. The REC indicator lights in the display
window, and your home theater system starts recording.
28
Note
If the videotape does not have an erase-prevention tab, the
videotape is ejected.
The REC indicator only appears when your home theater
system is in VCR mode.
5 If you want to pause the recording, press PAUSE/STEP . The
REC indicator flashes in the display window.
Note
If the VCR is in pause mode for more than five minutes, your
home theater system goes into stop mode to protect the
videotape and video heads.
www.insignia-products.com
Page 31

Insignia NS-H4005 Home Theater System
6 Press STOP twice to stop the recording.
Copying from a camcorder or external VCR
You can connect a camcorder or another VCR to the A/V jacks on
your home theater system, and copy from the camcorder or external
VCR to the built-in VCR.
To copy from a camcorder or external VCR:
1 Connect the camcorder or external VCR to the A/V jacks on the
back or front of your home theater system. For more information,
see “Connecting an external audio/video device” on page 17.
2 Press INPUT to select the video source. If you connected the
camcorder or external VCR to the back A/V jacks, select LINE1. If
you connected the camcorder or external VCR to the front A/V
jacks, select LINE2.
3 Start playback on the camcorder or external VCR. If you have a
TV connected to your home theater system, you can watch as you
play.
4 When you reach the point where you want to record, press
REC/ITR . Your home theater system starts recording from the
camcorder or external VCR.
5 Press STOP twice to stop the recording.
Copying from the DVD player to the VCR
Note
Some DVDs have copy-protection. You cannot copy these
DVDs. If a DVD is protected by Macovision, LOCK appears
when you try to copy.
To copy from the DVD player to the VCR:
1 Insert a DVD into the DVD tray.
2 Insert a blank videotape with an erasure-protection tab into the
videotape compartment.
3 Press on the front of your home theater system. If a DVD menu
opens, you play have to press again.
www.insignia-products.com
29
Page 32

4 Press REC/ITR . The VCR starts copying the DVD, and COPY
appears in the display window.
5 When the copying is complete, press STOP or POWER twice.
Note
You must manually stop the recording, or your DVD/VCR
may replay and record over and over.
If you stop DVD playback during the recording, VCR
recording also stops.
Using the DVD player
Playing a DVD
Note
A DVD may have a regional code. The regional code for
your home theater system is 1. If the regional code for the
DVD does not match the regional code for your home
theater system, you cannot play the DVD.
If you have blocked movie ratings with the parental controls
and the rating for the DVD is blocked, you must enter the
four-digit password to unblock and watch the DVD.
To play a DVD:
1 Make sure that the power cord is plugged into a power outlet.
2 Press CD/DVD on the remote control or DVD/VCR on the front of
your home theater system to select DVD mode. READING
appears in the display window, and the DVD image appears on
the TV screen.
3 Press AUDIO to select the audio mode.
4 Press OPEN/CLOSE to open the disc tray, insert a DVD into
the tray, then press OPEN/CLOSE to close the tray.
5 If playback does not start immediately, press PLAY .
6 If a DVD menu opens, press , , , or to select the option
you want, then press MEMORY/ENTER.
Insignia NS-H4005 Home Theater System
30
www.insignia-products.com
Page 33

Insignia NS-H4005 Home Theater System
Controlling DVD playback
To control DVD playback:
• To pause playback, press PAUSE/STEP . To resume
playback, press PLAY .
• To go to the beginning of the current DVD chapter or audio CD
track, BACKWARD
audio CD track, press this button twice.
• To go to the next DVD chapter or audio CD track, press
FORWARD
• To go to a specific DVD chapter or audio CD track, press
DISPLAY, press or to select the chapter or track icon,
then use the number buttons to enter the chapter or track
number.
• To go to a different title on a DVD, press DISPLAY, then use
the number buttons to enter the title number.
• To search on a DVD, press and hold BACKWARD or
FORWARD for about two seconds. Each time you press
and hold a button, the search speed changes from ×2 to ×4 to
×16, to ×100. To resume normal playback, press PLAY .
• To play a DVD one frame at a time, press PAUSE/STEP to
freeze the frame and pause playback. Press the
PAUSE/STEP again. The video advances one frame. Each
time you press the button, the video advances one frame. To
resume normal playback, press PLAY .
• To play a DVD in slow motion, press PAUSE/STEP to pause
playback. Press BACKWARD or FORWARD to
reverse or forward the video in slow motion. Each time you
press a button, the reverse or forward speed changes from
1/16 to 1/8 to 1/4 or 1/2 the normal speed. To resume normal
playback, press PLAY .
.
. To go to the previous DVD chapter or
www.insignia-products.com
31
Page 34

Playing an audio CD
To play an audio CD, MP3 disc, or WMA disc:
1 Insert a disc in the disc tray, then close the tray. The CD track
menu opens.
Insignia NS-H4005 Home Theater System
CD
TRACK01
TRACK02
TRACK03
TRACK04
TRACK05
TRACK06
TRACK07
TRACK08
0: 56: 18
Program
Clear All
STER. BYPASS
2 Press or to select a track, then press PLAY or
MEMORY/ENTER to start playback.
3 To stop playback, press STOP .
32
www.insignia-products.com
Page 35

Insignia NS-H4005 Home Theater System
Playing MP3 or WMA CDs
For MP3 or WMA CDs to be playable, they must meet the following
requirements:
• MP3 files must have the .mp3 file extension. WMA files must
have the .wma file extension.
• MP3 and WMA file names are limited to eight or less
characters, and cannot contain special characters, such as
/:*?<or>.
• The total number of files on a CD should be less than 650.
• A single-session CD must have an MP3 or WMA in the track
one slot.
• The recording software you use to create an MP3 or WMA CD
must be able to create a “file system.” Not all software can do
this. We recommend Easy-CD Creator.
• The CD-R physical format should be ISO9660.
• Sampling frequency should be 44.1 kHz for MP3 and 32 to
44.1 kHZ.
• Bit rate should be between 32 and 320 kbps for MP3 and 32 to
128 kbps for WMA.
To play an MP3 or WMA CD:
1 Insert an MP3 or WMA CD in the disc tray, then close the tray.
2 Press or to select MP3/WMA, then press MEMORY/ENTER.
The MP3/WMA folder menu opens.
MP3 WMA
Folder1
Folder2
Folder3
Folder4
Folder5
Folder6
Folder7
Folder8
www.insignia-products.com
Program
Clear All
OFF00:00
33
Page 36

Insignia NS-H4005 Home Theater System
3 Press or to select a folder, then press MEMORY/ENTER.
The MP3/WMA track menu opens.
MP3 WMA
TRACK 1.mp3
TRACK 2.mp3
TRACK 3.mp3
TRACK 4.mp3
TRACK 5.mp3
TRACK 6.mp3
TRACK 7.mp3
TRACK 8.mp3
Program
1
Clear All
OFF00:00
4 Press or to select a track, then press PLAY or
MEMORY/ENTER to start playback. The quality of the audio is
affected by the quality of the recording.
5 To stop playback, press STOP .
Controlling audio CD, MP3, or WMA playback
To control audio CD, MP3, or WMA playback:
• To pause playback, press PAUSE/STEP . To resume
playback, press PLAY or PAUSE/STEP .
• To skip to the beginning of the currently playing track, press
BACKWARD . To go to the previous track, press the button
again.
• To go to the next track, press FORWARD .
• To go to a specific track on an audio CD, use the number
buttons to enter the track number.
• To search on a disc, press and hold BACKWARD or
FORWARD for about two seconds. Your home theater
system goes into search mode. Each time your press and hold
the button, the search speed changes from ×2 to ×4 to ×8. To
resume playback, press PLAY .
34
www.insignia-products.com
Page 37

Insignia NS-H4005 Home Theater System
Playing a JPEG CD
For JPEG CDs to be playable, they must meet the following
requirements:
• When you inset a JPEG CD, your home theater system may
take several minutes to load the files. If you do not see an
on-screen display after several minutes, some of the files may
be too big. Reduce the resolution of the JPEG files to less than
2 mega pixels, then burn another CD.
• The total number of files and folders on a CD should be less
than 650.
• Some CDs may not play depending on the recording format or
the condition of the CD.
• All JPEG files must have the .jpg file extension. File names
ending in .jpe or .jpeg will not play even though they are JPEG
files.
To play a JPEG CD:
1 Insert a JPEG CD in the disc tray, then close the tray.
2 Press or to select JPEG, then press MEMORY/ENTER. The
JPEG menu opens.
3 Press or to select a folder, then press MEMORY/ENTER.
Tip
If you are in a file list and want to return to the folder list,
press
MEMORY/ENTER to return to the previous menu.
or to select the folder icon, then press
4 Press or to select a file, the press MEMORY/ENTER or
PLAY .
5 To stop playback, press STOP .
Controlling JPEG playback
To control JPEG playback:
• To go to the previous or next file, press BACKWARD or
FORWARD .
• To pause the slide show, press PAUSE/STEP . To resume
playback, press PLAY or PAUSE/STEP .
• To rotate a picture, press or .
• To go to the previous menu, press RETURN.
• To go to the next page, press TITLE. To go to the previous
page, press DISC MENU.
• To change the playback speed, press or to select Slide
Speed, press or to select Normal, Slow, or Off, then
press MEMORY/ENTER.
www.insignia-products.com
35
Page 38

Insignia NS-H4005 Home Theater System
Selecting the sound mode for a DVD
To select the sound mode for a DVD:
1 While the DVD is playing, press AUDIO to select 2-channel or
5.1 channel audio.
2 If you selected 2-channel, press SOUND MODE one or more
times to select BYPASS, PROL, MOVIE, MUSIC, MTRX, or
3D SUR.
Or
If you selected 5.1 channel, press SOUND MODE.
Selecting the sound mode for a CD
To select the sound mode for a CD:
• Press SOUND MODE one or more times to select BYPASS,
PROLOGIC, MUSIC, MATRIX, or 3D SURR.
Repeating a DVD chapter or title
To repeat a DVD chapter or title:
1 While the DVD is playing, press REPEAT. The Repeat Chapter
icon appears on the TV screen, and your home theater system
repeats the currently playing chapter.
2 Press REPEAT again. The Repeat Title icon appears on the TV
screen, and your home theater system repeats the currently
playing title.
3 To resume normal playback, press REPEAT. The Repeat Off icon
appears on the TV screen, and your home theater system
resumes normal playback.
Repeating an audio, MP3, or WMA track or CD
To repeat an audio, MP3, or WMA track or CD:
1 While the CD is playing, press REPEAT. The Repeat icon and
TRACK appear in the display window.
2 Press REPEAT again. The Repeat icon and ALL appear in the
display window.
3 To resume normal playback, press REPEAT. The Repeat icon
and OFF appear in the display window.
36
www.insignia-products.com
Page 39

Insignia NS-H4005 Home Theater System
Repeating a section of a DVD
To repeat a section of a DVD:
1 While the DVD is playing, find the beginning of the section you
want to repeat, then press REPEAT A-B. A appears briefly on the
TV screen.
2 Continue playing the DVD until you find the end of the section you
want to repeat, then press REPEAT A-B. A B appears briefly on
the TV screen, and your home theater system beginning playing
the section. While repeat mode is on, A--B appears in the display
window.
3 To cancel the repeat mode, press REPEAT A-B.
Repeating a section of an audio CD
To repeat a section of an audio CD:
1 While the audio CD is playing, find the beginning of the section
you want to repeat, then press REPEAT A-B. A* appears in the
display window.
2 Continue playing the audio CD until you find the end of the section
you want to repeat, then press REPEAT A-B. AB appears in the
display window, and your home theater system beginning playing
the section.
3 To cancel the repeat mode, press REPEAT A-B. The Repeat icon
and OFF appear in the display window.
Programming an audio, MP3, or WMA playlist
You can program as many as 30 tracks.
To program a playlist:
1 During playback, press PROGRAM. An E appears to the right of
Program on the right side of the display window.
2 Press or to select a track, then press MEMORY/ENTER. The
track you selected is added to the playlist.
3 Repeat Step 2 to add additional tracks to the playlist.
4 Press . The last track you added is highlighted in the playlist.
5 Press or to select the track you want to play first. If the
playlist is more than one page, press TITLE to go to the next page
or DISC MENU to go to the previous page.
6 Press PLAY . PROG. appears in the display window, and your
home theater system starts playing the playlist. After all of the
tracks in the playlist play, playback stops.
www.insignia-products.com
37
Page 40

Insignia NS-H4005 Home Theater System
7 If you want to repeat the currently playing track, press REPEAT. If
you want to repeat the entire playlist, press REPEAT again. To
cancel repeat play, press REPEAT a third time.
8 To resume normal playback, select a track, then press
MEMORY/ENTER. PROG. disappears from the display window.
Erasing a track from a programmed playlist
To repeat a track from a programmed playlist:
1 During playback or in stop mode, press PROGRAM. E appears in
the display window.
2 Press to move to the program list.
3 Press or to select the track you want to erase.
4 Press CLEAR. The track is erased from the playlist.
Erasing the playlist
To erase the playlist:
1 During playback or in stop mode, press PROGRAM. E appears in
the display window.
2 Press to move to the program list.
3 Press or to select Clear All, then press MEMORY/ENTER.
The play list is erased.
Note
You can also erase the playlist by removing the CD from the
disc tray.
Using ZOOM
You can enlarge the DVD video image.
To use ZOOM:
1 During playback or pause, press ZOOM one or more times to
enlarge the video image. Each time you press the button the
enlargement increases.
2 Press , , , or to move around the enlarged image.
3 Press CLEAR to resume normal playback or pause.
38
www.insignia-products.com
Page 41

Insignia NS-H4005 Home Theater System
Searching by time on a DVD
To search by time on a DVD:
1 During playback, press DISPLAY. The on-screen display opens
and shows the elapsed playing time.
2 Within 10 seconds, or to select the Time Search icon. -:--:--
appears.
3 Within 10 seconds, use the number button to enter the amount of
time you want to skip forward on the DVD. If you enter the wrong
time, press CLEAR, then enter the time again.
4 Within 10 seconds, press MEMORY/ENTER. Your home theater
system skips forward to the time you specified, then starts
playback. If you enter an invalid time, playback continues
normally.
Marking a starting point on a DVD
Note
You can mark as may as nine markers on a DVD.
To mark a starting point on a DVD:
1 Begin playing a DVD.
2 When you reach the point where you want to begin playback,
press MARKER. The Marker icon appears briefly on the TV
screen.
3 Repeat Step 2 to add additional markers.
Recalling a marker
To recall a marker:
1 During playback, press SEARCH. The
opens.
2 Within 10 seconds, press or to select the marker number you
want to recall.
3 Press MEMORY/ENTER. Your home theater system goes to the
marked point on the DVD.
4 Press SEARCH to close the
MARKER SEARCH
www.insignia-products.com
MARKER SEARCH
menu.
menu
39
Page 42

Erasing a marker
To erase a marker:
1 During playback, press SEARCH. The
opens.
2 Within 10 seconds, press or to select the marker number you
want to recall.
3 Press CLEAR. The marker number is erase from the list.
4 Repeat Step 2 and Step 3 to delete additional markers.
5 Press SEARCH to close the
Using DVD menus
DVDs may have special menus that let you access features recorded
on the DVD, such as a disc or title menu.
To use a DVD menu:
1 Press DISC MENU or TITLE. The disc or title menu opens.
2 Press , , , or to select a menu option, then press
MEMORY/ENTER.
Or
Use the number buttons to enter the number for the menu option
you want.
3 To close the menu, press DISC MENU or TITLE.
Insignia NS-H4005 Home Theater System
MARKER SEARCH
MARKER SEARCH
menu.
menu
Viewing different camera angles
Some DVDs have scenes that were recorded at different camera
angles.
To view different camera angles:
• Press ANGLE one or more times to select a camera angle.
The total number of angles appears on the TV screen.
Changing the DVD audio language
Some DVDs have more than one audio language recorded.
To change the audio language:
• Press AUDIO one or more times to select the audio language
you want.
40
www.insignia-products.com
Page 43

Insignia NS-H4005 Home Theater System
You can also change the audio language from the DVD setup menu.
To change the audio language from the DVD setup menu:
1 Press SET UP MENU. The setup menu opens.
Disc Audio
Disc Subtitle
Disc Menu
Rating
Country Code
TV Aspect
Menu Language
Progressive Scan
5.1 Speaker Setup
Others
2 Press or to select Disc Audio.
3 Press , then press or to adjust the select a language. If you
do not see the language you want, select Others, then use the
number buttons to enter the four-digit code for the language you
want. For a list of language codes, see “Language codes” on
page 58.
4 Press MEMORY/ENTER save your change.
Viewing DVD subtitles
Some DVDs have subtitles for the audio language.
To view subtitles:
• Press S-TITLE one or more times to select a subtitle language.
Original
English
French
German
Spanish
Italian
Chinese
Polish
Hungarian
Other — — — —
www.insignia-products.com
41
Page 44
Insignia NS-H4005 Home Theater System
Using the DVD setup menu
To use the DVD setup menu:
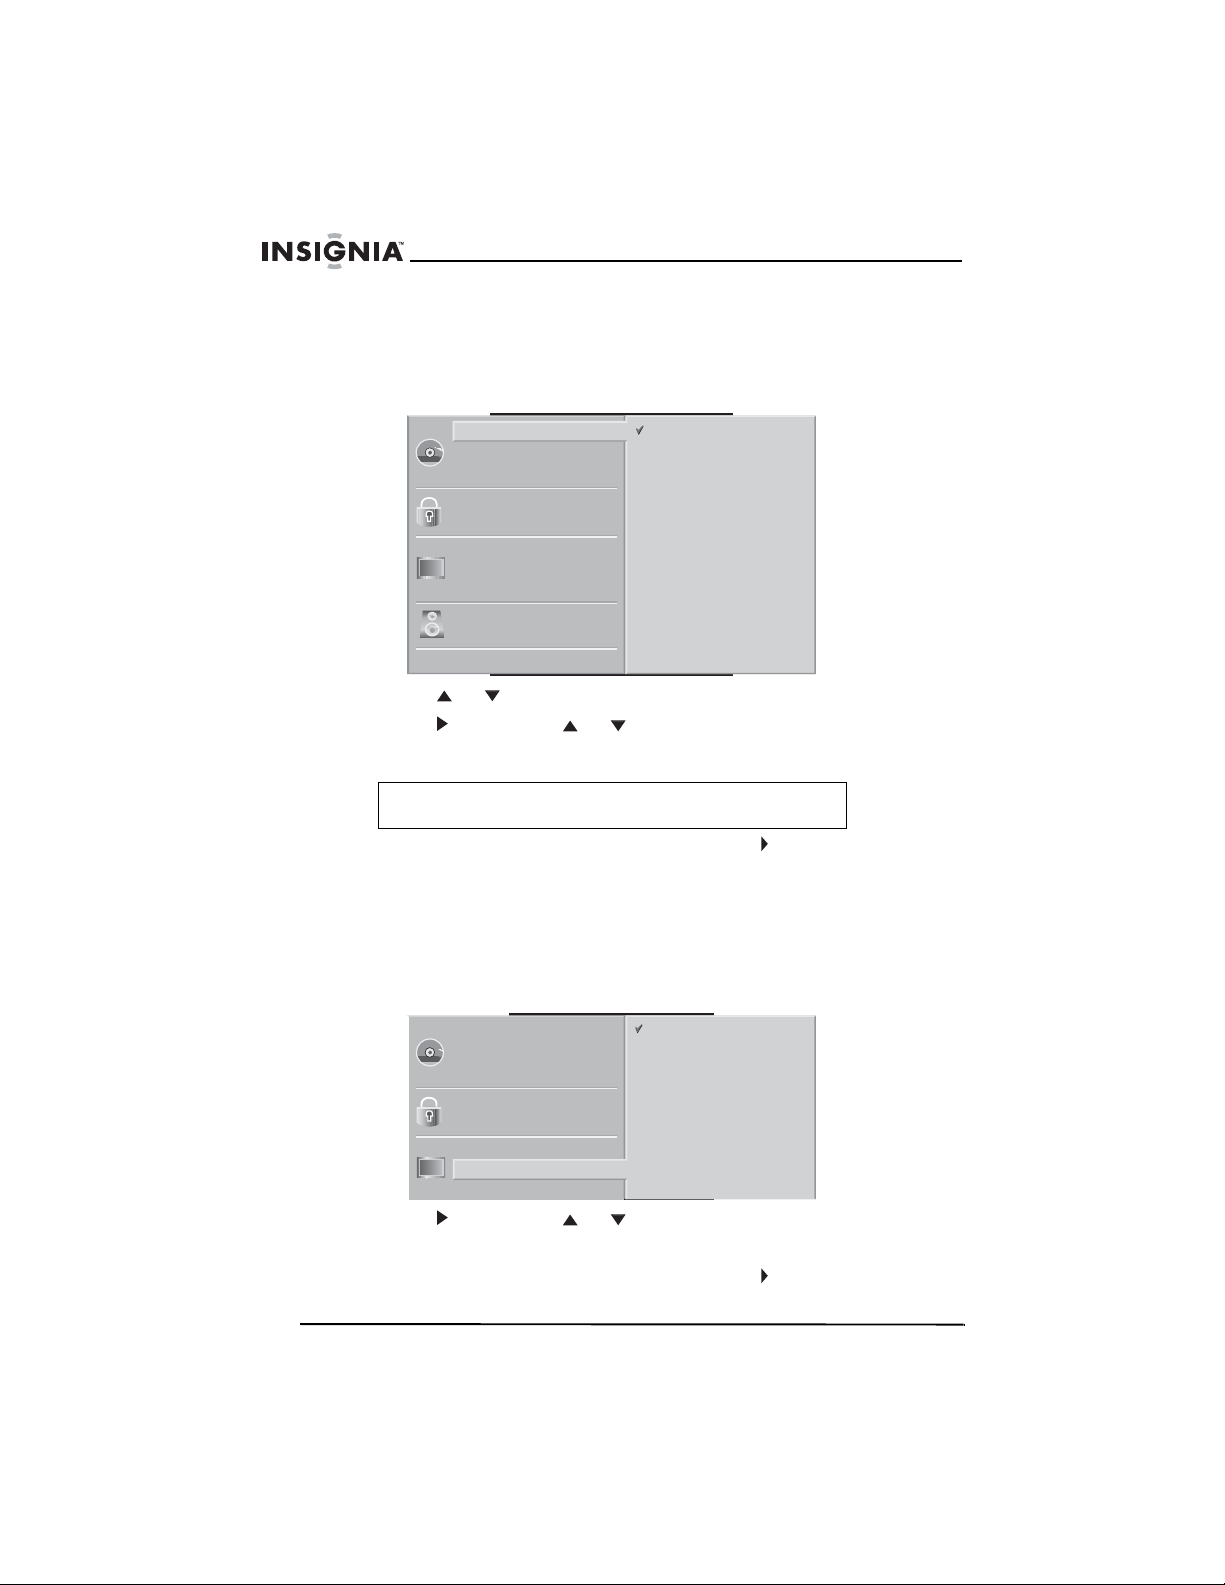
1 Press SET UP MENU. The setup menu opens.
Disc Audio
Disc Subtitle
Disc Menu
Rating
Country Code
TV Aspect
Menu Language
Progressive Scan
5.1 Speaker Setup
Others
Original
English
French
German
Spanish
Italian
Chinese
Polish
Hungarian
Other — — — —
2 Press or to select an option.
3 Press , then press or to adjust the option.
4 Press MEMORY/ENTER save your change.
Note
Adjusting some options takes additional steps.
5 Press SET UP MENU, RETURN, or PLAY to close the menu.
Changing the setup menu language
To change the setup menu language:
1 Open the setup menu, then select Menu Language. The menu
language options appear.
42
Disc Audio
Disc Subtitle
Disc Menu
Rating
Country Code
TV Aspect
Menu Language
Progressive Scan
English
Spanish
French
2 Press , then press or to select a language.
3 Press MEMORY/ENTER save your change.
4 Press SET UP MENU, RETURN, or PLAY to close the menu.
www.insignia-products.com
Page 45

Insignia NS-H4005 Home Theater System
Selecting an aspect ratio
To select an aspect ratio:
1 Open the setup menu, then select TV Aspect. The aspect ratio
options appear.
Disc Audio
Disc Subtitle
Disc Menu
Rating
Country Code
TV Aspect
Menu Language
Progressive Scan
5.1 Speaker Setup
Others
2 Press , then press or to select an aspect ratio. You can
select:
• 4:3 Letterbox–Select for a standard 4:3 TV. The full image
appears on the screen with bars appear above and below the
image.
• 4:3 Panscan–Select for a standard 4:3 TV. The image fills the
screen with the side are cropped off.
• 16:9 Wide–Select for 16:9 TV.
3 Press MEMORY/ENTER save your change.
4 Press SET UP MENU, RETURN, or PLAY to close the menu.
4:3
4:3
16:9
Letterbox
Panscan
Wide
www.insignia-products.com
43
Page 46

Using progressive scan
The Progressive Scan option affects a TV connected to
COMPONENT/PROGRESSIVE SCAN VIDEO OUT jacks on the
back of your home theater system.
To use progressive scan:
1 Open the setup menu, then select Progressive Scan.
Insignia NS-H4005 Home Theater System
Disc Audio
Disc Subtitle
Disc Menu
Rating
Country Code
TV Aspect
Menu Language
Progressive Scan
5.1 Speaker Setup
Others
Off
On
2 Press , then press or to select Off or On.
• If you connected an analog TV, select Off.
• If you connected a progressive scan TV, select On.
3 Press MEMORY/ENTER save your change.
4 Press SET UP MENU, RETURN, or PLAY to close the menu.
Caution
If the connected TV is not a progressive scan TV and you
select On, no image will appear on the screen. You need to
reset the TV to turn off the progressive scan option.
To reset the TV and turn off the progressive scan option:
1 Make sure that there is not a disc in the disc tray. NO DISC should
appear in the display window.
2 Press and hold STOP for five seconds. The option is turned off,
and the image reappears on the TV screen.
44
www.insignia-products.com
Page 47

Insignia NS-H4005 Home Theater System
Setting up 5.1 speakers
To set up speakers:
1 Open the setup menu, then select 5.1 Speaker Setup.
Disc Audio
Disc Subtitle
Disc Menu
Rating
Country Code
TV Aspect
Menu Language
Progressive Scan
5.1 Speaker Setup
Others
2 Press one or more times to select the speaker you want to set
up, the press or to select the speaker option you want to
adjust.
3 Press or adjust the option. You can adjust:
• Volume–Select an output level between -6dB and +6dB.
• Distance–Specify the distance that the speaker is from the
listener. (1 foot=30.48 cm) You cannot set the distance for the
subwoofer.
R R
Front L
Volume 0 dB
Size Small
Distance 1 ft
Test
Return
Note
You cannot adjust Size.
4 Press MEMORY/ENTER to test each speaker signal.
5 Press RETURN to return to the previous menu.
6 Press SET UP MENU, RETURN, or PLAY to close the menu.
www.insignia-products.com
45
Page 48

Insignia NS-H4005 Home Theater System
Turning dynamic range control (DRC) on or off
Dynamic range control (DRC) compresses the range of the audio
output (the difference between the loudest and softest sounds). Using
DRC lets you listen at a low volume without losing clarity.
To turn DRC on or off:
1 Open the setup menu, then select Others.
Disc Audio
Disc Subtitle
Disc Menu
Rating
Country Code
TV Aspect
Menu Language
Progressive Scan
5.1 Speaker Setup
Others
DRC
Vocal
PBC
Auto Play
On
On
On
Off
2 Press or to select DRC, then press MEMORY/ENTER to
select On or Off.
Mixing karaoke channels for stereo sound
Note
Turn this option on only for karaoke DVDs.
To mix karaoke channels for stereo sound:
1 Open the setup menu, then select Others.
Disc Audio
Disc Subtitle
Disc Menu
Rating
Country Code
TV Aspect
Menu Language
Progressive Scan
DRC
Vocal
PBC
Auto Play
On
On
On
Off
46
5.1 Speaker Setup
Others
2 Press or to select Vocal, then press MEMORY/ENTER to
select On or Off.
www.insignia-products.com
Page 49

Insignia NS-H4005 Home Theater System
Automatically playing DVDs
You can set up your home theater system to automatically play a
DVD as soon as you insert it. Your home theater system searches the
DVD for the longest title, and starts playback with that title.
Note
The Auto Play feature may not work with some DVDs.
To automatically play DVDs:
1 Open the setup menu, then select Others.
Disc Audio
Disc Subtitle
Disc Menu
Rating
Country Code
TV Aspect
Menu Language
Progressive Scan
5.1 Speaker Setup
Others
2 Press or to select Auto Play, then press MEMORY/ENTER
to select On.
Setting parental controls
Movies on DVDs may contain scenes that are not suitable for
children. In some cases, DVDs have alternate scenes that are more
appropriate for children. These scenes are rated from 1 to 8. Ratings
are country-specific.
Parental controls let you block inappropriate scenes or entire DVDs.
DRC
Vocal
PBC
Auto Play
On
On
On
Off
www.insignia-products.com
47
Page 50

Insignia NS-H4005 Home Theater System
To set parental controls:
1 Open the setup menu, then select Rating.
Disc Audio
Disc Subtitle
Disc Menu
Rating
Country Code
TV Aspect
Menu Language
Progressive Scan
5.1 Speaker Setup
Others
8
7
6
5
4
3
2
1
Unlock
Change
2 Press . You are asked to enter a password.
3 Use the number buttons to enter a four-digit password, then press
MEMORY/ENTER. If you make a mistake before you press
MEMORY/ENTER, press CLEAR, then enter the password
correctly.
4 If you are setting the password for the first time, use the number
buttons to enter the password again, then press
MEMORY/ENTER.
5 Press or to select a rating. Rating 1 has the least restrictions.
Rating 8 has the most restrictions.
6 Press MEMORY/ENTER to save your setting, then press
SET UP MENU to close the setup menu.
48
Note
If you set a rating and the scene on the DVD is rated, an
alternate screen if played (if available). If an alternate
screen is not available, playback stops.
If you have set a rating and you want to play a DVD that has
been blocked, you must enter the password.
To set the country code for parental controls:
1 Open the setup menu, then select Country Code.
2 Press . You are asked to enter a password.
3 Use the number buttons to enter a four-digit password, then press
MEMORY/ENTER. If you make a mistake before you press
MEMORY/ENTER, press CLEAR, then enter the password
correctly.
4 If you are setting the password for the first time, use the number
buttons to enter the password again, then press
MEMORY/ENTER.
www.insignia-products.com
Page 51

Insignia NS-H4005 Home Theater System
5 Press or to select the first character of the country code, then
press to move to the next character. For a list of country codes,
see “Country codes” on page 57.
6 Repeat Step 6 to enter the rest of the characters in the country
code. After you enter the last character, press MEMORY/ENTER
to save the code.
7 Press SET UP MENU to close the setup menu.
Changing the password
To change the password:
1 Press SET UP MENU. The setup menu opens.
2 Press or to select Rating.
3 Press . You are asked to enter a password.
4 Use the number buttons to enter the old password, then press
MEMORY/ENTER. If you make a mistake before you press
MEMORY/ENTER, press CLEAR, then enter the password
correctly.
5 Press or to select Change, then press MEMORY/ENTER.
6 Use the number buttons to enter the new password, then press
MEMORY/ENTER. If you make a mistake before you press
MEMORY/ENTER, press CLEAR, then enter the password
correctly.
7 Use the number buttons to enter the new password again, then
press MEMORY/ENTER.
8 Press SET UP MENU to close the setup menu.
Resetting the password
If you forget the password, you can reset the password so you can
enter a new one.
To reset the password:
1 Press SET UP MENU. The setup menu opens.
2 Press or to select Rating.
3 Use the number buttons to enter 210499. The password is
cleared.
www.insignia-products.com
49
Page 52

Using the radio
Tuning to a radio station
To tune to a radio station manually:
1 Press FM/AM one or more times until the frequency band appears
in the display window and on the TV screen.
2 Press FM/AM to select FM or AM.
3 Press TUNING or TUNING to select a radio station.
4 To turn off the radio, turn off your home theater system or select
another mode (CD/DVD, VCR, LINE 1, or LINE 2).
To tune to a radio station automatically:
1 Press FM/AM one or more times until the frequency band appears
in the display window and on the TV screen.
2 Press FM/AM to select FM or AM.
3 Press and hold TUNING or TUNING for one or two seconds.
When you release the button, your home theater system goes to
the previous or next available station. If a station has a weak
signal, the automatic tuning feature may skip the station.
Insignia NS-H4005 Home Theater System
50
www.insignia-products.com
Page 53

Insignia NS-H4005 Home Theater System
Presetting radio stations
You can preset 50 stations for FM and AM. Before tuning, make sure
that you have turned down the volume.
To preset radio stations:
1 Press FM/AM one or more times until the frequency band appears
in the display window and on the TV screen.
- - - - - - - RADIO - - - - - - - 1/10
AM 530kHz
AM 1720kHz
AM 600kHz
AM 1400kHz
AM 1000kHz
MEMORY/CLEAR
TUNINGFM/AM
2 Press TRK/PRESET or TRK/PRESET on the remote control
or PRESET + or PRESET – on the front panel to select the station
you want to preset. If you select a blank column, R-SKIP appears
in the display window.
- - - - - - - RADIO - - - - - - - 2/10
FM 87 . 5MHz
FM 108 . 0MHz
FM 90 . 0MHz
FM 106 . 0MHz
FM 98 . 0MHz
TUNINGFM/AM
MEMORY/CLEAR
3 Press FM/AM on the remote control or front panel to select the AM
or FM.
www.insignia-products.com
51
Page 54

Insignia NS-H4005 Home Theater System
4 Press and hole TUNING or TUNING on the remote control
for 1 or 2 seconds. When you release the button, your home
theater system searches for the station.
5 Press MEMORY/ENTER to store the station.
6 Repeat Step 2 through Step 5 to preset additional stations.
Tuning to a preset station
To tune to a preset station:
1 Press FM/AM one or more times until the frequency band appears
on the display and TV screen. The last received station is tuned in.
2 Use TRK/PRESET or TRK/PRESET ) on the remote control
one or more times to select the preset station you want. Each time
you press a button, your home theater system tunes to the next
preset station.
Erasing a preset station
To erase a preset radio station:
1 Press FM/AM on the remote control or on the front panel until the
frequency band appears in the display window and on the TV
screen.
2 Use TRK/PRESET or TRK/PRESET on the remote control to
the station you want to erase.
3 Press CLEAR erase the preset radio station.
Note
If you are in record or record/pause mode, CLEAR function
does not work.
Adding a label to a preset station
You can add a label to a preset station. Each label can be as many as
five characters. When you tune to a station with a label, the label
appears in the display window.
To add a label to a preset station:
1 Press FM/AM on the remote control or on the front panel until the
frequency band appears in the display window and on the TV
screen.
2 Use TRK/PRESET or TRK/PRESET on the remote control to
the station you want to label.
3 Press
52
to move to the station name column.
www.insignia-products.com
Page 55

Insignia NS-H4005 Home Theater System
4 Press the or button to enter the first character of the label,
then use the or buttons to go to the next or previous
character.
5 After you enter the label, press MEMORY/ENTER.
6 Press MEMORY/ENTER on the remote control. The station name
is stored.
Troubleshooting
Check the following guide for the possible cause of a problem before
contacting service.
Symptom Cause Solution
No power. The power cord is
The power is on, but your
home theater system
does not work.
No picture. The TV is not set to
No sound. Digital Audio Output is
disconnected.
No disc or videotape is
inserted.
receive your home
theater system signal
output.
Your home theater
system is set to TV
mode.
The video cable is not
connected securely.
The connected TV power
is turned off.
set to the wrong position.
Plug the power cord into
a power outlet, and make
sure that the outlet is
supplying power.
Insert a disc or videotape.
The disc or videotape
indicator lights in the
display window.
Select the appropriate
video input mode on the
TV so the picture from
your home theater
system appears on the
TV screen.
Press the TV/VCR button
on the remote control
repeatedly to select VCR
mode. TV indicator
disappears from the
display window.
Connect the video cable
securely.
Turn on the TV.
Set Digital Audio Output
to the correct position,
then turn on your home
theater system again.
www.insignia-products.com
53
Page 56

Insignia NS-H4005 Home Theater System
Symptom Cause Solution
The playback picture is
poor.
Your home theater
system does not start
playback.
The remote control does
not work correctly.
Camcorder image does
not appear on the TV
screen
The disc is dirty. Clean the disc.
VCR video heads are
dirty.
The videotape is a rental
or was recorded on
another VCR.
No disc or videotape is
inserted.
An unplayable disc is
inserted.
The disc is placed upside
down.
The disc is not placed
within the guide.
The disc is dirty. Clean the disc.
The remote control is not
pointed at the remote
sensor on your home
theater system.
The remote control is too
far from your home
theater system.
There is an obstacle
between the remote
control and the remote
control sensor.
The batteries in the
remote control are
exhausted.
Your home theater
system is in the wrong
mode.
The wrong video input
source is selected.
Clean the video heads.
Adjust the tracking.
Insert a disc or videotape.
The disc or videotape
indicator lights in the
display window.
Insert a playable disc.
(Check the disc type,
color system, and
regional code.)
Place the disc with the
label facing up.
Make sure that the disc is
placed correctly inside
the guide on the disc tray.
Point the remote control
at the remote sensor of
your home theater
system.
Operate the remote
control within 23 ft. (7 m).
Remove the obstacle.
Replace the batteries.
If you are playing a
videotape, press VCR.
If you are playing a disc,
press DVD/CD.
If the camcorder is
connected to the back
A/V jacks, select LINE 1.
If the camcorder is
connected to the front
A/V jacks, select LINE 2.
54
www.insignia-products.com
Page 57

Insignia NS-H4005 Home Theater System
Symptom Cause Solution
Timer recording is not
possible.
indicator appears after
your home theater
system is turned off.
Audio is not played or
recorded in stereo.
The clock is not set
correctly.
The Timer Recording
was set up incorrectly.
Your home theater
system is in Timer
Recording mode.
The TV is not
stereo-compatible.
The current program is
not in stereo format.
Maintaining
Cleaning the cabinet
Use a soft, dry cloth. If the surfaces are extremely dirty, use a soft
cloth lightly moistened with a mild detergent solution. Do not use
strong solvents such as alcohol, benzine, or thinner because these
might damage the surface of your home theater system.
Set the clock.
Reprogram the Timer
Recording.
This is the normal
indication that your home
theater system is in
TIMER mode.
No action is possible.
No action is possible.
Getting a clear picture
Your home theater system is a high-tech, precision device. If the
optical pick-up lens and disc drive parts are dirty or worn, the picture
quality will be poor.
Regular inspection and maintenance are recommended after every
1,000 hours of use. (This depends on the operating environment.) For
details, contact your nearest dealer.
Moisture Condensation
Moisture condensation can occur:
• When your home theater system is moved from a cold place to
a warm place.
• Under extremely humid conditions
In locations where moisture condensation may occur:
• Keep your home theater system plugged into an power outlet
and turned on. This will help prevent condensation.
• When condensation has occurred, wait a few hours for your
home theater system to dry before using it.
www.insignia-products.com
55
Page 58

Handling discs
A dirty, scratched, or warped disc may cause skipping or noise.
To care for discs:
• Hold discs by their edges.
• Store discs in their cases when you are not using them.
• Do not expose discs to direct sunlight, high humidity, high
temperature, or dust. Prolonged exposure to extreme
temperatures can warp discs.
• Do not stick labels or tape on discs.
To clean a disc:
Insignia NS-H4005 Home Theater System
• With a soft cloth, wipe the disc from the center to the outer
edge.
Caution
Storing discs
After playing, store the disc in its case. Do not expose the disc to
direct sunlight or sources of heat, such as a parked car.
56
Do not use detergent or abrasive cleaning agents.
They will damage the disc surface.
www.insignia-products.com
Page 59

Insignia NS-H4005 Home Theater System
Country codes
Country Code Country Code Country Code
Afghanistan AF Greenland GL Panama PA
Argentina AR Islands HM Paraguay PY
Australia AU Hong Kong HK Philippines PH
Austria AT Hungary HU Poland PL
Belgium BE India IN Portugal PT
Bhutan BT Indonesia ID Romania RO
Bolivia BO Israel IL Russian
Federation
Brazil BR Italy IT Saudi Arabia SA
Cambodia KH Jamaica JM Senegal SN
Canada CA Japan JP Singapore SG
Chile CL Kenya KE Slovak Republic SK
China CN Kuwait KW Slovenia SI
Colombia CO Libya LY South Africa ZA
Congo CG Luxembourg LU South Korea KR
Costa Rica CR Malaysia MY Spain ES
Croatia HR Maldives MV Sri Lanka LK
Czech Republic CZ Mexico MX Sweden SE
Denmark DK Monaco MC Switzerland CH
Ecuador EC Mongolia MN Taiwan TW
Egypt EG Morocco MA Thailand TH
El Salvador SV Nepal NP Turkey TR
Ethiopia ET Netherlands NL Uganda UG
Fiji FJ Dutch Antilles AN Ukraine UA
Finland FI New Zealand NZ United States US
France FR Nigeria NG Uruguay UY
Germany DE Norway NO Uzbekistan UZ
Great Britain GB Oman OM Vietnam VN
Greece GR Pakistan PK Zimbabwe ZW
RU
www.insignia-products.com
57
Page 60

Insignia NS-H4005 Home Theater System
Language codes
Language Code Language Code Language Code
Abkhazian 6566 Hebrew 7387 Rumanian 8279
Afar 6565 Hindi 7273 Russian 8285
Afrikaans 6570 Hungarian 7285 Samoan 8377
Albanian 8381 Icelandic 7383 Sanskrit 8365
Ameharic 6577 Indonesian 7378 Scots Gaelic 7168
Arabic 6582 Interlingua 7365 Serbian 8382
Armenian 7289 Irish 7165 Serbo-Croatian 8372
Assamese 6583 Italian 7384 Shona 8378
Azerbaijani 6590 Japanese 7465 Sindhi 8368
Bashkir 6665 Javanese 7487 Singhalese 8373
Basque 6985 Kannada 7578 Slovak 8375
Bengali; Bangla 6678 Kashmiri 7583 Slovenian 8376
Bhutani 6890 Kazakh 7575 Somali 8379
Bihari 6672 Kirghiz 7589 Spanish 6983
Breton 6682 Korean 7579 Sudanese 8385
Bulgarian 6671 Kurdish 7585 Swahili 8387
Burmese 7789 Laothian 7679 Swedish 8386
Byelorussian 6669 Latin 7665 Tagalog 8476
Cambodian 7577 Latvian, Lettish 7686 Tajik 8471
Catalan 6765 Lingala 7678 Tamil 8465
Chinese 9072 Lithuanian 7684 Tatar 8484
Corsican 6779 Macedonian 7775 Telugu 8469
Croatian 7282 Malagasy 7771 Thai 8472
Czech 6783 Malay 7783 Tibetan 6679
Danish 6865 Malayalam 7776 Tigrinya 8473
Dutch 7876 Maltese 7784 Tonga 8479
English 6978 Maori 7773 Turkish 8482
Esperanto 6979 Marathi 7782 Turkmen 8475
Estonian 6984 Moldavian 7779 Twi 8487
Faroese 7079 Mongolian 7778 Ukrainian 8575
Fiji 7074 Nauru 7865 Urdu 8582
Finnish 7073 Nepali 7869 Uzbek 8590
58
www.insignia-products.com
Page 61

Insignia NS-H4005 Home Theater System
Language Code Language Code Language Code
French 7082 Norwegian 7879 Vietnamese 8673
Galician 7176 Oriya 7982 Volapük 8679
Georgian 7565 Panjabi 8065 Welsh 6789
German 6869 Pashto, Pushto 8083 Wolof 8779
Greek 6976 Persian 7065 Xhosa 8872
Greenlandic 7576 Polish 8076 Yiddish 7473
Guarani 7178 Portuguese 8084 Yoruba 8979
Gujarati 7185 Quechua 8185 Zulu 9085
Hausa 7265 Rhaeto-Romance 8277
Specifications
Design and specifications are subject to change without prior notice.
General
Power requirements AC 120V, 60 Hz
Power consumption 50W
Dimensions (approx.)
(W × H × D)
Weight (approx.) 17.6 lbs (8 kg)
Operating temperature 41°F to 95°F
Operating humidity 5 % to 90 %
Signal system NTSC
16.9 × 3.5 × 13.8 inches
(430 × 90 × 350 mm)
(5°C to 35°C)
Inputs
VHS VIDEO IN (LINE 1 and
LINE 2)
VHS AUDIO IN (LINE1 and
LINE2)
1 Vp-p 75 ohms, sync negative, RCA
jack (2)
-6.0 dBm more than 47 ohms,
L and R RCA jacks (2 sets)
Outputs
MONITOR OUT 1 Vp-p 75 ohms, sync negative
Component Video output (Y) 1.0 V (p-p), 75 Ù, negative sync.,
www.insignia-products.com
RCA jack (1)
(Pb)/(Pr) 0.7 V (p-p), 75 Ù, RCA jack (1)
59
Page 62

Insignia NS-H4005 Home Theater System
VCR Specifications
Head system Four head helical scan azimuth system
Tape speed SP: 33.35 mm/sec, LP: 16.67 mm/sec, SLP:
Tape width 12.7 mm
Maximum recording time SP: 2 HOURS (T-120)
Rewind time About 3 minutes (T-120)
Signal-to-noise ratio More than 65 dB (EE mode)
Dynamic range More than 70 dB (EE mode)
11.12 mm/sec
SLP: 6 HOURS (T-120)
8 HOURS (T-160)
DVD Specifications
Laser system Semiconductor laser, wavelength 650 nm
Frequency response DVD (PCM 96 kHz): 20 Hz to 44 kHz
DVD (PCM 48 kHz): 20 Hz to 22 kHz
CD: 20 Hz to 18 kHz
Signal-to-noise ratio More than 70dB
Harmonic distortion Less than 0.5 %
Dynamic range More than 65 dB (DVD/CD)
Tuner section
System PLL quartz-locked digital synthesizer
Tuning range 87.5 ~ 108.0 MHz (FM)
Antenna Wire antenna (FM)
system
530 ~ 1720 KHz (AM)
Loop antenna (AM)
Speakers
Satellite
(LHS-36SCS)
Type 1 Way 1 Speaker 1 Way 1 Speaker
Impedance 4 ohm 8 ohm
Frequency
response
60
160 - 20,000 Hz 65 - 1,500 Hz
www.insignia-products.com
Passive Subwoofer
(LHS-36SCW)
Page 63

Insignia NS-H4005 Home Theater System
Satellite
(LHS-36SCS)
Sound Pressure Level 82 dB/W (1m) 80 dB/W (1m)
Net dimensions
(W x H x D)
Net weight 1.15 lbs.
3.86 × 3.98 × 4.13 inches
(98 × 101 × 105 mm)
(0.52 kg)
Passive Subwoofer
(LHS-36SCW)
7.13 × 13.82 × 10.94 inches
(181 × 351 × 278 mm)
7.50 lbs
(3.4 kg)
Legal notices
FCC Part 15
This device complies with Part 15 of the FCC Rules. Operation of this product is
subject to the following two conditions: (1) this device may not cause harmful
interference, and (2) this device must accept any interference received, including
interference that may cause undesired operation.
This equipment has been tested and found to comply within the limits for a class B
digital device, pursuant to Part 15 of the FCC Rules. These limits are designed to
provide reasonable protection against harmful interference in a residential installation.
This equipment generates, uses, and can radiate radio frequency energy and, if not
installed and used in accordance with the instructions, may cause harmful interference
to radio communications. However, there is no guarantee that interference will not
occur in a particular installation. If this equipment does cause harmful interference to
radio or television reception, which can be determined by turning the equipment off and
on, the user is encouraged to try to correct the interference by one or more of the
following measures:
• Reorient or relocate the receiving antenna.
• Increase the separation between the equipment and receiver.
• Connect the equipment into an outlet on a circuit different from that to which the
receiver is connected.
• Consult the dealer or an experienced technician for help.
FCC warning
Changes or modifications not expressly approved by the party responsible for
compliance with the FCC Rules could void the user’s authority to operate this
equipment.
Canada ICES-003 statement
This Class B digital apparatus complies with Canadian ICES-003.
Copyright
© 2007 Insignia. Insignia and the Insignia logo are trademarks of Best Buy Enterprise
Services, Inc. Other brands and product names are trademarks or registered
trademarks of their respective holders. Specifications and features are subject to
change without notice or obligation.
For service and support call (877) 467-4289.
www.insignia-products.com
61
Page 64

Insignia NS-H4005 Home Theater System
62
www.insignia-products.com
Page 65

Insignia NS-H4005 Home Theater System
1-year limited warranty
Insignia Products (“Insignia”) warrants to you, the original purchaser of this new
NS-H4005 (“Product”), that the Product shall be free of defects in the original
manufacture of the material or workmanship for a period of one (1) year from the date
of your purchase of the Product (“Warranty Period”). This Product must be purchased
from an authorized dealer of Insignia brand products and packaged with this warranty
statement. This warranty does not cover refurbished Product. If you notify Insignia
during the Warranty Period of a defect covered by this warranty that requires service,
terms of this warranty apply.
How long does the coverage last?
The Warranty Period lasts for 1 year (365 days) from the date you purchased the
Product. The purchase date is printed on the receipt you received with the Product.
What does this warranty cover?
During the Warranty Period, if the original manufacture of the material or workmanship
of the Product is determined to be defective by an authorized Insignia repair center or
store personnel, Insignia will (at its sole option): (1) repair the Product with new or
rebuilt parts; or (2) replace the Product at no charge with new or rebuilt comparable
products or parts. Products and parts replaced under this warranty become the
property of Insignia and are not returned to you. If service of Products or parts are
required after the Warranty Period expires, you must pay all labor and parts charges.
This warranty lasts as long as you own your Insignia Product during the Warranty
Period. Warranty coverage terminates if you sell or otherwise transfer the Product.
How to obtain warranty service?
If you purchased the Product at a retail store location, take your original receipt and the
Product to the store you purchased it from. Make sure that you place the Product in its
original packaging or packaging that provides the same amount of protection as the
original packaging. If you purchased the Product from an online web site, mail your
original receipt and the Product to the address listed on the web site. Make sure that
you put the Product in its original packaging or packaging that provides the same
amount of protection as the original packaging.
To obtain in-home warranty service for a television with a screen 25 inches or larger,
call 1-888-BESTBUY. Call agents will diagnose and correct the issue over the phone
or will have an Insignia-approved repair person dispatched to your home.
Where is the warranty valid?
This warranty is valid only to the original purchaser of the product in the United States
and Canada.
What does the warranty not cover?
This warranty does not cover:
• Customer instruction
• Installation
• Set up adjustments
• Cosmetic damage
• Damage due to acts of God, such as lightning strikes
• Accident
•Misuse
• Abuse
• Negligence
• Commercial use
www.insignia-products.com
63
Page 66

Insignia NS-H4005 Home Theater System
• Modification of any part of the Product, including the antenna
• Plasma display panel damaged by static (non-moving) images applied for lengthy
periods (burn-in).
This warranty also does not cover:
• Damage due to incorrect operation or maintenance
• Connection to an incorrect voltage supply
• Attempted repair by anyone other than a facility authorized by Insignia to service
the Product
• Products sold as is or with all faults
• Consumables, such as fuses or batteries
• Products where the factory applied serial number has been altered or removed
REPAIR REPLACEMENT AS PROVIDED UNDER THIS WARRANTY IS YOUR
EXCLUSIVE REMEDY. INSIGNIA SHALL NOT BE LIABLE FOR ANY INCIDENTAL
OR CONSEQUENTIAL DAMAGES FOR THE BREACH OF ANY EXPRESS OR
IMPLIED WARRANTY ON THIS PRODUCT, INCLUDING, BUT NOT LIMITED TO,
LOST DATA, LOSS OF USE OF YOUR PRODUCT, LOST BUSINESS OR LOST
PROFITS. INSIGNIA PRODUCTS MAKES NO OTHER EXPRESS WARRANTIES
WITH RESPECT TO THE PRODUCT, ALL EXPRESS AND IMPLIED WARRANTIES
FOR THE PRODUCT, INCLUDING, BUT NOT LIMITED TO, ANY IMPLIED
WARRANTIES OF AND CONDITIONS OF MERCHANTABILITY AND FITNESS FOR
A PARTICULAR PURPOSE, ARE LIMITED IN DURATION TO THE WARRANTY
PERIOD SET FORTH ABOVE AND NO WARRANTIES, WHETHER EXPRESS OR
IMPLIED, WILL APPLY AFTER THE WARRANTY PERIOD. SOME STATES,
PROVINCES AND JURISDICTIONS DO NOT ALLOW LIMITATIONS ON HOW LONG
AN IMPLIED WARRANTY LASTS, SO THE ABOVE LIMITATION MAY NOT APPLY
TO YOU. THIS WARRANTY GIVES YOU SPECIFIC LEGAL RIGHTS, AND YOU MAY
ALSO HAVE OTHER RIGHTS, WHICH VARY FROM STATE TO STATE OR
PROVINCE TO PROVINCE.
Contact Insignia:
For customer service please call 1-877-467-4289
www.insignia-products.com
INSIGNIA™ is a trademark of Best Buy Enterprise Services, Inc.
Distributed by Best Buy Purchasing, LLC.
Insignia, 7601 Penn Avenue South, Richfield, Minnesota, U.S.A.
64
www.insignia-products.com
Page 67

Insignia NS-H4005 Système de cinéma maison
Insignia NS-H4005
Système de cinéma maison
Table des matières
Bienvenue . . . . . . . . . . . . . . . . . . . . . . . . . . . . . . . . . . . . . . . . . . . . . . 66
Informations sur la sécurité . . . . . . . . . . . . . . . . . . . . . . . . . . . . . . . . . 67
Fonctionnalités. . . . . . . . . . . . . . . . . . . . . . . . . . . . . . . . . . . . . . . . . . . 71
Accessoires. . . . . . . . . . . . . . . . . . . . . . . . . . . . . . . . . . . . . . . . . . . . . . . . . . 71
Avant . . . . . . . . . . . . . . . . . . . . . . . . . . . . . . . . . . . . . . . . . . . . . . . . . . . . . . . 71
Fenêtre d’affichage . . . . . . . . . . . . . . . . . . . . . . . . . . . . . . . . . . . . . . . . . . . . 73
Face arrière. . . . . . . . . . . . . . . . . . . . . . . . . . . . . . . . . . . . . . . . . . . . . . . . . . 74
Configuration du système de cinéma maison . . . . . . . . . . . . . . . . . . . 80
Connexion à un téléviseur. . . . . . . . . . . . . . . . . . . . . . . . . . . . . . . . . . . . . . . 80
Connexion d’un périphérique audio/vidéo. . . . . . . . . . . . . . . . . . . . . . . . . . . 82
Connexion des antennes radio . . . . . . . . . . . . . . . . . . . . . . . . . . . . . . . . . . . 83
Connexion des haut-parleurs . . . . . . . . . . . . . . . . . . . . . . . . . . . . . . . . . . . . 84
Fixation du tore magnétique . . . . . . . . . . . . . . . . . . . . . . . . . . . . . . . . . . . . . 85
Utilisation du magnétoscope . . . . . . . . . . . . . . . . . . . . . . . . . . . . . . . . 86
Lecture d'une bande vidéo . . . . . . . . . . . . . . . . . . . . . . . . . . . . . . . . . . . . . . 86
Contrôle de la lecture d'une bande vidéo . . . . . . . . . . . . . . . . . . . . . . . . . . . 87
Réglage de l'alignement . . . . . . . . . . . . . . . . . . . . . . . . . . . . . . . . . . . . . . . . 88
Affichage des informations relatives à la bande vidéo . . . . . . . . . . . . . . . . . 89
Affichage de l'horloge et du compteur en temps réel . . . . . . . . . . . . . . . . . . 90
Sélection du mode audio du magnétoscope. . . . . . . . . . . . . . . . . . . . . . . . . 90
Réglage de l’horloge . . . . . . . . . . . . . . . . . . . . . . . . . . . . . . . . . . . . . . . . . . . 92
Marquage d'un point de départ sur une bande vidéo . . . . . . . . . . . . . . . . . . 93
Enregistrement d'une bande vidéo . . . . . . . . . . . . . . . . . . . . . . . . . . . . . . . . 94
Copie à partir d'un caméscope ou d'un magnétoscope externe . . . . . . . . . . 95
Copie du lecteur de DVD vers le magnétoscope . . . . . . . . . . . . . . . . . . . . . 95
Utilisation du lecteur de DVD . . . . . . . . . . . . . . . . . . . . . . . . . . . . . . . . 96
Lecture d’un DVD . . . . . . . . . . . . . . . . . . . . . . . . . . . . . . . . . . . . . . . . . . . . . 96
Contrôle de la lecture d’un DVD . . . . . . . . . . . . . . . . . . . . . . . . . . . . . . . . . . 97
Lecture d'un CD audio. . . . . . . . . . . . . . . . . . . . . . . . . . . . . . . . . . . . . . . . . . 98
Lecture de CD de MP3 ou de WMA . . . . . . . . . . . . . . . . . . . . . . . . . . . . . . . 98
Contrôle de la lecture d'un CD audio, MP3 ou WMA . . . . . . . . . . . . . . . . . 100
Lecture d’un CD JPEG . . . . . . . . . . . . . . . . . . . . . . . . . . . . . . . . . . . . . . . . 100
Contrôle de la lecture des fichiers JPEG. . . . . . . . . . . . . . . . . . . . . . . . . . . 101
Sélection du mode son pour un DVD . . . . . . . . . . . . . . . . . . . . . . . . . . . . . 102
Sélection du mode son pour un CD . . . . . . . . . . . . . . . . . . . . . . . . . . . . . . 102
Répétition d'un chapitre ou d'un titre de DVD . . . . . . . . . . . . . . . . . . . . . . . 102
Répétition d'une piste ou d'un CD audio, MP3 ou WMA. . . . . . . . . . . . . . . 103
Répétition d'une section d’un DVD . . . . . . . . . . . . . . . . . . . . . . . . . . . . . . . 103
Répétition d'une section d’un CD audio . . . . . . . . . . . . . . . . . . . . . . . . . . . 103
Programmation d'une liste de lecture audio, MP3 ou WMA . . . . . . . . . . . . 104
Utilisation de la fonction ZOOM. . . . . . . . . . . . . . . . . . . . . . . . . . . . . . . . . . 105
Recherche horaire sur un DVD . . . . . . . . . . . . . . . . . . . . . . . . . . . . . . . . . . 105
Marquage d'un point de départ sur un DVD . . . . . . . . . . . . . . . . . . . . . . . . 106
Utilisation des menus des DVD. . . . . . . . . . . . . . . . . . . . . . . . . . . . . . . . . . 107
Visualisation de différents angles de prise de vues . . . . . . . . . . . . . . . . . . 107
Changement de la langue audio du DVD . . . . . . . . . . . . . . . . . . . . . . . . . . 107
www.insignia-products.com
65
Page 68

Insignia NS-H4005 Système de cinéma maison
Activation des sous-titres d’un DVD . . . . . . . . . . . . . . . . . . . . . . . . . . . . . . 108
Utilisation du menu de configuration du lecteur de DVD. . . . . . . . . . . . . . . 109
Modification de la langue du menu de configuration. . . . . . . . . . . . . . . . . . 110
Sélection d’un format d’écran . . . . . . . . . . . . . . . . . . . . . . . . . . . . . . . . . . . 110
Utilisation du balayage progressif . . . . . . . . . . . . . . . . . . . . . . . . . . . . . . . . 111
Configuration des haut-parleurs 5.1 . . . . . . . . . . . . . . . . . . . . . . . . . . . . . . 112
Activation ou désactivation de la commande de portée dynamique (DRC) . . 113
Mixage de canaux karaoké pour un son stéréo . . . . . . . . . . . . . . . . . . . . . 114
Lecture automatique des DVD . . . . . . . . . . . . . . . . . . . . . . . . . . . . . . . . . . 114
Configuration du contrôle parental . . . . . . . . . . . . . . . . . . . . . . . . . . . . . . . 115
Modification du mot de passe . . . . . . . . . . . . . . . . . . . . . . . . . . . . . . . . . . . 117
Réinitialisation du mot de passe . . . . . . . . . . . . . . . . . . . . . . . . . . . . . . . . . 117
Utilisation de la radio . . . . . . . . . . . . . . . . . . . . . . . . . . . . . . . . . . . . . 118
Syntonisation d’une station radio . . . . . . . . . . . . . . . . . . . . . . . . . . . . . . . . 118
Mémorisation de stations radio . . . . . . . . . . . . . . . . . . . . . . . . . . . . . . . . . . 119
Syntonisation d’une station mémorisée. . . . . . . . . . . . . . . . . . . . . . . . . . . . 120
Effacement d’une station mémorisée . . . . . . . . . . . . . . . . . . . . . . . . . . . . . 120
Ajout d’une étiquette à une station mémorisée . . . . . . . . . . . . . . . . . . . . . . 121
Problèmes et solutions. . . . . . . . . . . . . . . . . . . . . . . . . . . . . . . . . . . . 121
Entretien. . . . . . . . . . . . . . . . . . . . . . . . . . . . . . . . . . . . . . . . . . . . . . . 124
Nettoyage du boîtier . . . . . . . . . . . . . . . . . . . . . . . . . . . . . . . . . . . . . . . . . . 124
Obtention d'une image nette . . . . . . . . . . . . . . . . . . . . . . . . . . . . . . . . . . . . 124
Condensation de l’humidité. . . . . . . . . . . . . . . . . . . . . . . . . . . . . . . . . . . . . 125
Manipulation des disques . . . . . . . . . . . . . . . . . . . . . . . . . . . . . . . . . . . . . . 125
Rangement des disques . . . . . . . . . . . . . . . . . . . . . . . . . . . . . . . . . . . . . . . 126
Avis juridiques . . . . . . . . . . . . . . . . . . . . . . . . . . . . . . . . . . . . . . . . . . 132
Garantie limitée d’un an . . . . . . . . . . . . . . . . . . . . . . . . . . . . . . . . . . . 133
Bienvenue
Félicitations d’avoir acheté ce produit Insignia de haute qualité. Le
modèle NS-H4005 représente la dernière avancée technologique
dans la conception de systèmes de cinéma maison combiné et a été
conçu pour des performances et une fiabilité exceptionnelles.
66
www.insignia-products.com
Page 69

Insignia NS-H4005 Système de cinéma maison
Informations sur la sécurité
ATTENTION
RISQUE DE CHOC
ÉLECTRIQUE
NE PAS OUVRIR
Avertissement
Afin de réduire le risque de choc électrique, ne pas enlever le
couvercle (ou le panneau arrière). Ne contient aucune pièce
réparable par l'utilisateur. Confier l’entretien à du personnel
qualifié.
Attention
Pour éviter les chocs électriques, introduire la lame la plus
large de la prise du cordon d’alimentation dans la fente
correspondante de la prise secteur. Si la prise ne s'adapte
pas, contacter un électricien afin qu’il remplace la prise
secteur inadéquate. Ne pas modifier la prise du cordon
d’alimentation, sinon ce dispositif de sécurité serait inopérant.
Ce symbole indique qu'une tension
dangereuse, constituant un risque de choc
électrique, est présente dans cet appareil.
Cette étiquette est située au dos de
l’appareil.
Ce symbole indique que d'importantes
instructions concernant le fonctionnement
et la maintenance figurent dans la
documentation qui accompagne cet
appareil.
Lire les instructions
Lire toutes les instructions de sécurité et de fonctionnement avant
d’utiliser cet appareil.
Conserver les instructions
Conserver les instructions de sécurité et de fonctionnement pour
toute référence ultérieure.
Respecter les avertissements et les instructions
Observer tous les avertissements figurant sur cet ensemble ainsi que
dans les instructions d’utilisation. Toutes les instructions d’utilisation
et de fonctionnement doivent être observées.
www.insignia-products.com
67
Page 70

Eau et humidité
Ne pas utiliser cet appareil près de l’eau. Par exemple près d’une
baignoire, un lavabo, un évier ou un baquet à linge, dans un sous-sol
humide ou près d’une piscine.
Nettoyage
Débrancher l’appareil avant tout nettoyage. Ne pas utiliser de
nettoyant liquide ou en aérosol. Utiliser un chiffon humide pour
nettoyer l’extérieur de l’appareil.
Ventilation
Les fentes et ouvertures au dos et au bas du boîtier sont prévues
pour la ventilation, pour assurer un fonctionnement fiable de l'appareil
et le protéger contre toute surchauffe. Ces ouvertures ne doivent être
ni bloquées ni obstruées. Elles ne doivent jamais être bloquées en
installant l'appareil sur un lit, un sofa, une moquette ou toute autre
surface semblable. Ne pas placer l’appareil à proximité ou au-dessus
d’un radiateur ou d’une source de chaleur. Ne pas installer l’appareil
dans un meuble encastré tel qu’une bibliothèque ou sur une étagère,
sauf si une ventilation adéquate a été prévue ou si les instructions du
fabricant ont été respectées.
Chaleur
Vérifier que l’appareil est installé à l’écart de sources de chaleur,
telles que radiateurs, bouches de chaleur, fours ou autres appareils
(y compris les amplificateurs) qui produisent de la chaleur.
Insignia NS-H4005 Système de cinéma maison
Mise à la terre ou polarisation
Ne pas chercher à modifier le dispositif de sécurité de la prise
polarisée ou de type mise à la terre. Une prise polarisée comporte
deux plots, un plus large que l'autre. Une prise de type mise à la terre
est composée de deux plots et d’un troisième de mise à la terre. Ce
troisième plot, large ou rond a été prévu pour la sécurité de
l’utilisateur. Si la fiche ne s'adapte toujours pas à la prise secteur,
contacter un électricien afin qu’il remplace la prise inadéquate.
Protection du cordon d’alimentation
Les cordons d’alimentation électrique doivent être acheminés afin
que personne ne puisse marcher dessus et qu’aucun objet posé
dessus ne vienne les entraver. Prêter particulièrement attention aux
points de branchement du cordon à la prise secteur et à l’endroit d’où
le cordon sort de l’appareil.
68
www.insignia-products.com
Page 71

Insignia NS-H4005 Système de cinéma maison
Périphériques
Ne pas utiliser de périphériques non recommandés par Insignia, car
ils pourraient être source de dangers.
Support
Ne pas placer cet ensemble sur une table roulante, un pied, un
trépied, un support ou une table instables. L’ensemble risque de
tomber et, dans sa chute, de provoquer des blessures graves et de
subir des dommages importants. N’utiliser qu’avec la table roulante,
le pied, le trépied, le support ou la table recommandés par le
fabricant ou vendus avec cet ensemble.
Foudre
Pour protéger l’appareil pendant un orage ou s’il se trouve inutilisé et
sans surveillance pendant une période prolongée, le débrancher de
la prise secteur et débrancher l'antenne. Ceci évitera d’endommager
l’appareil en cas de foudre et de variations de tension du secteur.
Entretien
L’utilisateur ne doit pas essayer de réparer cet ensemble lui-même ;
en effet leur ouverture ou le démontage du boîtier peut l’exposer à
des tensions dangereuses ou à d'autres dangers. Toutes les
réparations doivent être réalisées par un personnel qualifié.
Pièces de rechange
Si des pièces doivent être remplacées, vérifier que le technicien a
utilisé des pièces de rechange spécifiées par le fabricant qui ont les
mêmes caractéristiques que les pièces d’origine. Toute substitution
par des pièces non autorisées risque de provoquer un incendie, un
choc électrique, des blessures ou d'autres dangers.
Dégâts nécessitant un entretien
Débrancher cet appareil de la prise secteur et utiliser les services
d’un technicien qualifié dans les conditions suivantes :
• lorsque le cordon d’alimentation est effiloché ou la prise
endommagée;
• en cas de déversement d'un liquide ou de chute d'objet sur
l’ensemble;
• si l’ensemble a été exposé à la pluie ou à l’eau;
www.insignia-products.com
69
Page 72

Insignia NS-H4005 Système de cinéma maison
• si l’ensemble fonctionne anormalement malgré l'application
des instructions d’utilisation. Ne régler que les commandes
décrites dans les instructions d’utilisation; en effet, le réglage
incorrect d’autres commandes pourrait provoquer des dégâts,
entraînant souvent d'importantes réparations par un technicien
qualifié pour rétablir le fonctionnement normal de l’appareil.
• si les haut-parleurs sont tombés ou s’ils sont endommagés de
quelque façon que ce soit;
• en cas de détérioration marquée des performances des
haut-parleurs.
Contrôle de sécurité
Après toute opération d’entretien ou réparation de cet appareil,
demander au technicien d’effectuer les contrôles de sécurité de
routine pour vérifier qu’il fonctionne correctement.
Surcharge
Les prises secteur et les rallonges ne doivent pas être surchargées,
cela pourrait provoquer des risques d'incendie ou de choc électrique.
Pénétration d’objets ou de liquides
N’enfoncer en aucun cas un objet dans les ouvertures de l’appareil
car il pourrait entrer en contact avec des tensions dangereuses ou
provoquer un court-circuit à l'origine d'un incendie ou d'un choc
électrique. Ne jamais répandre un liquide sur l’ensemble.
Expédition du système de cinéma maison
Conserver le carton d’expédition et le matériel d’emballage d’origine.
Pour une protection maximale, emballer le système de cinéma
maison de la manière dont il avait été emballé à l'origine en usine.
Configuration du système de cinéma maison
L’image et le son d’un téléviseur, d’un magnétoscope ou d’une radio
à proximité risquent d’être déformés lors de la lecture. Dans ce cas,
éloigner le système de cinéma maison du téléviseur, du
magnétoscope ou de la radio, ou mettre le système de cinéma
maison hors tension après avoir retiré le disque.
70
www.insignia-products.com
Page 73

Insignia NS-H4005 Système de cinéma maison
Fonctionnalités
Accessoires
Vérifier que les accessoires suivants sont fournis dans l’emballage :
• Câble vidéo (1)
• Câble audio (1)
• Haut-parleurs (6)
• Câble d'antenne FM (1)
• Câble d'antenne AM (1)
• Télécommande (1)
• Piles de type AAA (2)
• Tore magnétique (1)
Avant
1
56789
N° Éléments Description
1 Plateau à disque Insérer le disque dans ce plateau à disque.
2 OUVRIR/FERMER Permet d’ouvrir ou fermer le plateau à
3 Compartiment à bande
vidéo
4 (Éjecter) Permet d’éjecter le disque de son
5 ATTENTE/MARCHE Pour mettre sous et hors tension
6 Prises A/V avant (LINE 2) Brancher les connecteurs audio et vidéo
10 1 1
2
disque.
Insérer une bande vidéo dans ce
compartiment.
compartiment.
l’ensemble.
d’un câble A/V standard sur ces prises et
sur les prises de sortie AV d'un
périphérique tel qu'un téléviseur, un
système audio ou un autre magnétoscope.
34
18 19
13 14 15 16
12
17
www.insignia-products.com
71
Page 74

Insignia NS-H4005 Système de cinéma maison
N° Éléments Description
7 SÉLECTION DE
L’ENTRÉE
8 AM/FM Permet de sélectionner FM ou AM en mode
9 PRÉRÉGLAGES+ (par
ordre croissant)
PRÉRÉGLAGES– (par
ordre décroissant)
10 Capteur de
télécommande
11 Fenêtre d'affichage Affiche des informations relatives à l'état de
12 Lecteur de
DVD/Magnétoscope
13
(Enregistrement/Enregist
rement programmé)
14 (Saut
arrière/Balayage)
15 (Lecture) Permet la lecture d’un disque ou d’une
16 (Saut
avant/Balayage)
17 (Arrêt) Permet d’interrompre la lecture d’un disque
Permet de sélectionner la source d’entrée
vidéo du magnétoscope. (Sélectionner au
choix LINE 1 ou LINE2) [Ligne 1 ou Ligne
2].
radio.
Permet de sélectionner une station radio
préréglée.
Reçoit des signaux de la télécommande.
Ne pas bloquer.
l’appareil. Pour plus d’informations, voir
“Fenêtre d’affichage” voir page 73.
Permet de sélectionner DVD (lecteur de
DVD) ou VCR (magnétoscope) comme
source vidéo du téléviseur.
Permet d’enregistrer sur une bande vidéo
ou de lancer un enregistrement programmé
instantané (ITR).
En mode DVD, permet de revenir au
chapitre précédent ou à la piste précédente.
Appuyer sans relâcher pendant deux
secondes pour effectuer une recherche
rapide en arrière sur un disque.
En mode magnétoscope, permet de
rembobiner la bande vidéo quand la lecture
est arrêtée ou d’effectuer une recherche
rapide en arrière au cours de la lecture.
bande vidéo.
En mode DVD, permet de passer au
chapitre précédent ou à la piste précédente.
Appuyer sans relâcher pendant deux
secondes pour effectuer une recherche
rapide en avant sur un disque.
En mode magnétoscope, permet de faire
avancer la bande vidéo quand la lecture est
arrêtée ou d’effectuer une recherche rapide
en avant au cours de la lecture.
ou d’une bande vidéo.
72
www.insignia-products.com
Page 75

Insignia NS-H4005 Système de cinéma maison
N° Éléments Description
18 PAUSE/IMAGE PAR
IMAGE
19 VOL. Tourner dans le sens horaire pour
Permet d’interrompre momentanément la
lecture du disque ou de la bande vidéo.
Appuyer sur la touche une ou plusieurs fois
pour faire avancer le DVD ou la bande
vidéo une image à la fois.
augmenter le volume et dans le sens
anti-horaire pour le diminuer.
Fenêtre d’affichage
16
1
17
3 4
2 5
18
19
20
6
7
8 9
10 11 12
13
N° Icône
1 Indique le flux audio actuel.
2 Indique la présence d’un disque JPEG sur le plateau à disque.
3 Indique que le mode radio est actif.
4 Indique le mode d’ambiance actuel.
5 Indique qu'un disque MP3 est sur le plateau à disque.
6 Indique que la lecture programmée est active.
7 Indique le chapitre, la piste ou le numéro de station radio préréglée en
8 Indique qu’un disque est sur le plateau à disque DVD. (S’allume en
9 Indique qu’un enregistrement programmé est en cours ou prévu.
10 Indique que la copie d’un disque DVD sur le magnétoscope est en
11 Indique qu’un enregistrement est en cours.
12 Affiche les indicateurs de durée de lecture totale, de duré écoulée, de
cours.
continu lorsqu'un disque est sur le plateau à disque et que le plateau
est fermé. Clignote lorsque le plateau à disque est ouvert.)
cours.
fréquence, de durée restante, d’état du lecteur de DVD ou du
magnétoscope, de mode d’ambiance et de volume.
14
15
www.insignia-products.com
73
Page 76

Insignia NS-H4005 Système de cinéma maison
N° Icône
13 Signifie que la bande vidéo en cours de lecture a été enregistrée en
14 Indique la mise en sourdine de l’appareil.
15 Indique le chargement d’une bande vidéo dans le compartiment à
16 Indique que le système de cinéma maison est en mode de balayage
17 Indique le chargement d’un disque WMA.
18 Indique qu'une émission stéréo est en cours de réception.
19 Indique le chargement d'un disque DVD.
20 Affiche le mode de lecture répétée.
haute fidélité.
bande vidéo.
progressif.
Face arrière
1
2
34
56 7
N° Éléments Description
1 Cordon d’alimentation Brancher le cordon d’alimentation sur la
2 COMPOSANTES/BALAYAGE
PROGRESSIF
SORTIE VIDÉO
3 HAUT-PARLEURS Brancher les câbles de haut-parleur sur
4 FM Brancher l’antenne FM sur cette prise.
5 ENTRÉE MAGNÉTOSCOPE
LIGNE 1
6 SORTIE LECTEUR DE
DVD/MAGNÉTOSCOPE
7 AM Brancher l’antenne AM sur cette prise.
prise secteur.
Prises Y, Pb et Pr. Brancher une
composante vidéo ou un téléviseur à
balayage progressif sur ces prises.
ces prises
Brancher un périphérique audio ou vidéo
sur ces prises, tel qu’un système audio,
un téléviseur, un moniteur ou un autre
magnétoscope.
Pour la connexion d’un téléviseur avec
connexions vidéo et audio standard.
74
www.insignia-products.com
Page 77

Insignia NS-H4005 Système de cinéma maison
Télécommande
OPEN/CLOSE
SOUND MODE
1
2
3
4
5
6
7
POWER
CD/DVD VCR FM/AM
PROGRAM
CLEAR
DISPLAY/
TRK/PRESET
CLK/CNT
EJECT
INPUT
AUDIO
SET UP/
MENU
19
20
21
22
23
24
10
11
12
13
14
15
16
17
18
8
9
RETURN
REC/ITR
STOP
MARKER SEARCH
ANGLE REPEAT A-B REPEAT
CM SKIP SPEED
MEMORY
/
ENTER
TRK/PRESET
BACKWARD FORWARD
PAUSE/STEP PLAY
TUNING
DISC MENU
VOLUME
S-TITLE MUTE
TITLE ZOOM
25
26
27
28
29
30
31
32
33
34
Nº Éléments Description
1 MARCHE/ARRÊT Permet d'allumer ou d'éteindre
2 CD/DVD Permet de sélectionner le mode
l’appareil.
CD/DVD.
www.insignia-products.com
75
Page 78

Insignia NS-H4005 Système de cinéma maison
Nº Éléments Description
3 Magnétoscope Permet de sélectionner le mode
4 Touches numériques Permettent de saisir le numéro
5 PROGRAMMATION Appuyer sur cette touche pour
6 EFFACER Permet d’effacer un numéro de
7 AFFICHAGE/CLK/CNT) Permet d’accéder au menu
8 , , , Pour sélectionner les options de
9 MÉMOIRE/ENTRÉE Permet de confirmer les saisies.
10 RETOUR Permet de fermer le menu de
11 ENREGISTREMENT/EN
REGISTREMENT
PROGRAMMÉ
Magnétoscope.
d’un chapitre ou d’une piste.
Permettent de saisir le mot de
passe du contrôle parental.
Permettent de sélectionner les
options numérotées dans un
menu.
ouvrir ou fermer le menu Program
(Programme).
piste d’une liste de lecture.
Permet d’effacer un signet de
DVD.
Permet d’effacer une station radio
préréglée.
Permet d’effacer des entrées de
menus incorrectes.
d’écran. Appuyer une ou plusieurs
fois sur la touche pour basculer
entre les affichages d’horloge, de
compteur de cassette et de temps
restant.
menu.
Permet de régler l’alignement des
bandes vidéo.
Permet de sélectionner les
stations radio.
configuration (Setup).
Pour commencer un
enregistrement ou activer la
fonction d'enregistrement
programmé.
76
www.insignia-products.com
Page 79

Insignia NS-H4005 Système de cinéma maison
Nº Éléments Description
12 RETOUR ARRIÈRE Permet de revenir à la piste ou au
13 ARRÊT Permet d’arrêter la lecture.
14 PAUSE/IMAGE PAR
IMAGE
15 RECHERCHE DE
SIGNETS
RECHERCHE DE
SIGNETS
16 ANGLE Permet de sélectionner différents
17 SAUT DES ANNONCES
PUBLICITAIRES
18 ÉJECTER/OUVRIR/FER
MER
19 AM/FM Permet de sélectionner la bande
20 ENTRÉE Pour sélectionner la source du
21 AUDIO Pour sélectionner la langue audio
22 MODE SON Permet de sélectionner le mode
23 MENU DE
CONFIGURATION
24 MENU DISQUE Permet d’afficher le menu Disque
chapitre précédent. Maintenir
appuyée pour une recherche
arrière sur DVD ou un CD.
En mode d’arrêt, permet de
rembobiner une bande vidéo. En
mode lecture, permet d'effectuer
une recherche rapide en arrière
sur une bande vidéo.
Appuyer sur cette touche pour
interrompre momentanément la
lecture ou l'enregistrement.
En mode Pause, appuyer de façon
répétée pour une lecture image
par image.
Permet de marquer un repère sur
un DVD d’où commencer la
lecture.
angles de prise de vue d’un DVD
(si disponible).
Permet de sauter les 30 secondes
suivantes d’une bande vidéo.
Permet d’ouvrir ou de fermer le
plateau à disque.
Permet d’éjecter une bande vidéo
de son compartiment.
radio FM ou AM.
magnétoscope (LINE 1 ou LINE 2)
(Ligne 1 ou Ligne 2).
d’un DVD.
Pour sélectionner le canal audio
d’un CD.
audio.
Permet d’accéder au menu de
configuration du magnétoscope ou
du lecteur de DVD.
d’un DVD.
www.insignia-products.com
77
Page 80

Insignia NS-H4005 Système de cinéma maison
Nº Éléments Description
25 VOLUME +
VOLUME –
26 AVANCE RAPIDE Appuyer une fois sur la touche
27 LECTURE Permet de commencer la lecture
28 SOURDINE Appuyer sur cette touche pour
29 S-TITLE Permet de sélectionner la langue
30 RÉPÉTITION Permet de répéter la lecture du
31 RÉPÉTER A à
B/VITESSE
32 ZOOM Cette touche permet d’agrandir
33 TITRE Permet d’ouvrir le menu Titre d'un
Permet d’augmenter ou de
diminuer le volume.
pour aller au début du chapitre en
cours. Appuyer deux fois pour aller
au chapitre précédent. Maintenir
appuyée pour une recherche
avant sur un DVD ou un CD.
Permet de rembobiner rapidement
une bande vidéo.
d’une bande vidéo ou d’un DVD.
mettre l’appareil en sourdine.
Appuyer de nouveau sur cette
touche pour rétablir le son.
des sous-titres.
chapitre ou de la piste en cours.
Permet de répéter une section
d’un DVD ou d’un CD.
Permet de sélectionner une
vitesse d’enregistrement d’une
bande vidéo.
l’image vidéo d’un DVD.
DVD, s'il en compte un.
78
www.insignia-products.com
Page 81

Insignia NS-H4005 Système de cinéma maison
Installation des piles de la télécommande
Pour installer les piles de la télécommande :
1 Retirer le couvercle du compartiment des piles de la
télécommande.
2 Insérer deux piles AAA dans le compartiment. Veiller à ce que les
pôles + et – des piles coïncident avec les repères + et – figurant à
l'intérieur du compartiment.
3 Replacer le couvercle du compartiment des piles.
Utilisation de la télécommande
Pour utiliser la télécommande :
• Pointer directement la télécommande sur l’appareil, selon un
angle compris entre 0 et 30°, sur le capteur de commande à
distance à l'avant de l'appareil, et à une distance maximale de
23 pieds (7 m).
www.insignia-products.com
79
Page 82

Insignia NS-H4005 Système de cinéma maison
Configuration du système de cinéma maison
Connexion à un téléviseur
Arrière du
téléviseur
80
Arrière du système
de cinéma maison
Pour connecter un téléviseur avec des prises A/V standard :
1 Brancher le câble vidéo (V) fourni sur la prise DVD/VCR VIDEO
OUT (Sortie vidéo DVD/magnétoscope) au dos du système de
cinéma maison, puis brancher l'autre extrémité du câble sur la
prise VIDEO IN (Entrée vidéo) du téléviseur.
www.insignia-products.com
Page 83

Insignia NS-H4005 Système de cinéma maison
2 Brancher les connecteurs audio gauche et droit du câble audio (A)
fourni sur les prises DVD/VCR AUDIO OUT (Sortie audio
DVD/magnétoscope) gauche (L) et droite (R) au dos du système
de cinéma maison, puis brancher les connecteurs à l'autre
extrémité du câble sur les prises AUDIO IN (Entrée audio) gauche
(L) et droite (R) au dos du téléviseur.
Remarque
En cas d’utilisation de cette connexion, régler la source
d'entrée du téléviseur sur VIDEO.
Pour connecter un téléviseur avec des prises vidéo à
composantes ou à balayage progressif :
Remarque
La connexion au lecteur de DVD peut s'effectuer à l'aide de
la prise COMPONENT/PROGRESSIVE SCAN VIDEO OUT
(Sortie vidéo balayage progressif / composantes).
La connexion au magnétoscope et à la radio ne peut
s'effectuer qu’au moyen des prises A/V standard.
1 Brancher les connecteurs du câble A/V à composantes (C) fourni
sur les prises COMPONENT/PROGRESSIVE SCAN VIDEO OUT
(Sortie vidéo balayage progressif / composantes) (Y, Pb et Pr) au
dos du système de cinéma maison, puis brancher les connecteurs
à l'autre extrémité du câble sur les prises appropriées au dos du
téléviseur.
2 Brancher les connecteurs audio gauche et droit du câble audio (A)
fourni sur les prises DVD/VCR AUDIO OUT (Sortie audio
DVD/magnétoscope) gauche (L) et droite (R) au dos du système
de cinéma maison, puis brancher les connecteurs à l'autre
extrémité du câble sur les prises AUDIO IN (Entrée audio) gauche
(L) et droite (R) au dos du téléviseur.
Remarque
Si le téléviseur est du type haute-définition ou compatible au
numérique, il est possible d'utiliser la sortie de balayage
progressif du système de cinéma maison pour obtenir la
plus haute résolution vidéo possible.
Pour utiliser une connexion Progressive Scan (Balayage
progressif), activer Progressive Scan dans le menu d'écran
(OSD). Pour plus d’informations, voir “Utilisation du
balayage progressif” voir page 111.
Si le téléviseur ne prend pas en charge le format
Progressive Scan (Balayage progressif), l’image s’affichera
brouillée si l'option Progressive Scan est activée.
www.insignia-products.com
81
Page 84

Insignia NS-H4005 Système de cinéma maison
Connexion d’un périphérique audio/vidéo
Périphérique
OU
Arrière du système
de cinéma maison
Pour connecter un périphérique audio/vidéo :
1 Brancher les connecteurs vidéo et audio d'un câble vidéo
standard (non fourni) sur la prise VCR IN LINE 1 (Entrée
magnétoscope ligne 1) au dos du système de cinéma maison ou
sur les prises LINE 2 (Ligne 2) à l'avant du système de cinéma
maison.
2 Brancher les connecteurs de l’autre extrémité du câble sur les
prises AUDIO/VIDEO OUT (Sortie audio/vidéo) du périphérique.
Avant du système de
cinéma maison
82
www.insignia-products.com
Page 85

Insignia NS-H4005 Système de cinéma maison
Connexion des antennes radio
Antenne cadre AM
Antenne filaire FM
Pour connecter les antennes radio :
1 Connecter l'antenne cadre AM (fournie) à la prise d'antenne AM
au dos du système de cinéma maison.
2 Connecter l'antenne filaire FM (fournie) à la prise d'antenne FM au
dos du système de cinéma maison.
Remarque
Pour éviter les interférences parasites, écarter l'antenne
cadre AM d'un lecteur de DVD+magnétoscope Hi-Fi ou
d'autres dispositifs.
Veiller à déployer complètement l’antenne filaire FM.
Après connexion de l’antenne filaire FM, garder l’antenne à
l’horizontale autant que possible.
www.insignia-products.com
83
Page 86

Insignia NS-H4005 Système de cinéma maison
Connexion des haut-parleurs
Haut-parleur
avant droit
Haut-parleur
arrière droit
Haut-parleur central
Caisson d’extrêmes
graves
Haut-parleur
avant gauche
Haut-parleur
arrière gauche
84
Pour connecter les haut-parleurs :
• Connecter les câbles des haut-parleurs aux prises pour
haut-parleurs du système de cinéma maison. Veiller à faire
correspondre les prises pour haut-parleurs + et - sur le
système de cinéma maison avec les câbles + et - des
haut-parleurs.
Remarque
Pour obtenir le meilleur son ambiophonique possible,
ajuster les haut-parleurs. Par exemple, ajuster la distance
entre les haut-parleurs et la hauteur des haut-parleurs.
Lors du réglage du volume sonore, éviter un volume
excessif. Le son risquerait d'être déformé et les
haut-parleurs pourraient être endommagés.
En mode magnétoscope, seule la stéréo à 2 canaux (avant
gauche, avant droit et caisson d’extrêmes graves) est
disponible. Aucun son n'est émis du haut-parleur central, ni
des haut-parleurs arrière.
Ne pas retirer le couvercle avant des haut-parleurs fournis.
www.insignia-products.com
Page 87

Insignia NS-H4005 Système de cinéma maison
Fixation du tore magnétique
Le tore magnétique réduit les interférences.
Pour fixer le tore magnétique :
1 Appuyer sur le cliquet qui se trouve sur le tore magnétique pour
ouvrir le tore.
Cliquet
2 Placer le tore magnétique aussi près que possible des prises pour
haut-parleurs du système de cinéma maison, sans tirer sur les fils,
puis enrouler les câbles des haut-parleurs une fois autour du tore
magnétique.
www.insignia-products.com
85
Page 88

Insignia NS-H4005 Système de cinéma maison
3 Refermer le tore magnétique en appuyant jusqu'au déclic.
Utilisation du magnétoscope
Lecture d'une bande vidéo
Pour lire une bande vidéo :
1 Vérifier que le cordon d’alimentation est branché sur une prise
secteur.
2 Veiller à ce que le témoin ne soit pas allumé dans la fenêtre
d'affichage. Si le témoin est allumé, appuyer sur POWER
(Marche/Arrêt) pour l'éteindre.
3 Insérer une bande vidéo dans le compartiment à bande vidéo. Le
système de cinéma maison se met automatiquement en marche,
et apparaît dans la fenêtre d'affichage.
86
www.insignia-products.com
Page 89

Insignia NS-H4005 Système de cinéma maison
4 Si la lecture de la bande vidéo ne commence pas
automatiquement, appuyer sur PLAY (Lecture) .
5 Pour arrêter la lecture, appuyer sur STOP (Arrêt) .
Remarque
Le système de cinéma maison est équipé d'un système de
lecture automatique. Si le système de cinéma maison est
éteint et qu'une bande vidéo dont l'onglet de protection
contre l'effacement a été retiré est insérée, le système de
cinéma maison se met automatiquement en marche et lit la
bande vidéo. Une fois la lecture terminée, le système de
cinéma maison rembobine et éjecte la bande vidéo, puis
s'éteint.
Contrôle de la lecture d'une bande vidéo
Pour contrôler la lecture d'une bande vidéo :
• Pour effectuer une recherche pendant la lecture de la bande
vidéo, appuyer sur BACKWARD (Recherche arrière) ou
FORWARD (Recherche avant) . Appuyer sur PLAY
(Lecture) pour revenir au mode de lecture normal.
Remarque
Des lignes horizontales s'affichent en mode de recherche.
Elles disparaîtront lors de la reprise de la lecture.
Le son est mis en sourdine en mode de recherche.
À la fin d'une recherche à haute vitesse, le système de
cinéma maison prend quelques secondes pour stabiliser la
vitesse de la bande. Pendant cette période, de légères
interférences peuvent être visibles à l'écran.
Si le magnétoscope est en mode de recherche pendant plus
de trois minutes, le système de cinéma maison commence
une lecture normale pour protéger la bande vidéo et les
têtes de lecture vidéo.
• Pour figer l'image et arrêter momentanément la lecture,
appuyer sur PAUSE/STEP (Pause/Image par image) .
Appuyer sur PLAY (Lecture) pour revenir au mode de lecture
normal.
Remarque
Si l'image fixe vibre verticalement, appuyer sur ou
pour régler l'image.
Si le magnétoscope est en mode d'arrêt sur image pendant
plus de trois minutes, le système de cinéma maison passe
en mode d'arrêt pour protéger la bande vidéo et les têtes de
lecture vidéo.
• Pour faire avancer la bande vidéo image par image, figer
l'image, puis appuyer une ou plusieurs fois sur
PAUSE/STEP (Pause/Image par image) . À chaque appui sur
la touche, la bande vidéo avance d'une image. Appuyer sur
PLAY (Lecture) pour revenir au mode de lecture normal.
www.insignia-products.com
87
Page 90

Insignia NS-H4005 Système de cinéma maison
• Pour une lecture au ralenti, figer l'image, puis appuyer sur
FORWARD (Recherche avant) . La lecture de la bande
vidéo s'effectue à 1/19 de la vitesse de lecture normale.
Appuyer sur PLAY (Lecture) pour revenir au mode de lecture
normal.
Remarque
Si des parasites apparaissent lors de la lecture d'une bande
vidéo au ralenti, appuyer sur ou pour ajuster l'image.
Si le magnétoscope est en mode de ralenti pendant plus de
trois minutes, le système de cinéma maison commence une
lecture normale pour protéger la bande vidéo et les têtes de
lecture vidéo.
• Pour faire un saut en avant de 30 secondes sur la bande
vidéo, appuyer sur CM SKIP (Saut des annonces
publicitaires). (Cette fonction est utile pour sauter des
annonces publicitaires ou de courts segments d'émissions.) À
chaque pression de CM SKIP, la bande effectue un saut en
avant de 30 secondes. Il est possible de sauter au maximum
trois minutes. Lorsque le saut est terminé, le système de
cinéma maison reprend la lecture normale.
Réglage de l'alignement
La fonction d'alignement règle l'image pour éliminer la neige ou les
stries. Le système de cinéma maison ajuste automatiquement
l'alignement lorsque :
• Une cassette est lue pour la première fois.
• La vitesse de la cassette (SP ou SLP) change.
• Des stries ou de la neige apparaissent à cause de rayures sur
la cassette.
Si la fonction d'alignement automatique n'élimine pas les parasites,
l'alignement peut être ajusté manuellement.
88
Pour effectuer un alignement manuel :
• Appuyer sur TRK/PRESET (Alignement/Mémorisation) ou
TRK/PRESET sur la télécommande jusqu'à disparition des
parasites à l'écran.
Remarque
Si une « fluctuation » verticale est visible à l'écran, régler
lentement l'alignement.
L'alignement est réinitialisé lorsqu'une bande vidéo est
éjectée ou que le cordon d'alimentation est débranché
pendant plus de trois secondes.
www.insignia-products.com
Page 91

Insignia NS-H4005 Système de cinéma maison
Affichage des informations relatives à la bande
vidéo
Pour afficher les informations relatives à la bande vidéo :
1 Appuyer sur MEMORY/ENTER (Mémoire/Entrée). L’écran suivant
s’affiche :
2
PLAY HI-FI LINE 1
SP
JAN 1 , SUN 2:15 PM
5
1 Vitesse de la bande.
2 État de lecture ou
3 Mode audio.
4 Source d’entrée vidéo.
5 Date actuelle.
6 Horloge, compteur ou durée
2 Appuyer sur MEMORY/ENTER (Mémoire/Entrée) une ou
plusieurs fois pour supprimer l'affichage.
d'enregistrement. Par exemple, si
une bande vidéo est en cours de
lecture, PLAY s'affiche. Si la
lecture est arrêtée, STOP
s'affiche.
restante. L'affichage change à
chaque pression sur
MEMORY/ENTER
(Mémoire/Entrée), indiquant
successivement l'heure, la durée
écoulée et la durée restante.
www.insignia-products.com
89
Page 92

Insignia NS-H4005 Système de cinéma maison
Affichage de l'horloge et du compteur en temps réel
Pour afficher l'horloge et le compteur en temps réel :
• Appuyer une ou plusieurs fois sur CLK/CNT
(Horloge/compteur). À chaque appui sur cette touche,
l'affichage change.
• La première pression affiche l’heure.
• La deuxième pression affiche la durée écoulée (compteur
en temps réel).
• La troisième pression affiche la durée restante. REM
apparaît dans la fenêtre d'affichage.
Remarque
Il est possible que la durée restante affichée ne soit pas
exacte, suivant l'état et le type de la bande vidéo (T-140,
T-160, T-210, etc.).
• La quatrième pression ferme l'affichage.
Sélection du mode audio du magnétoscope
Le système de cinéma maison a deux modes audio : HI-FI et
NORMAL.
• HI-FI – Diffuse le son sur deux canaux séparés (gauche et
droit).
• NORMAL – Diffuse un son mono sur les deux canaux.
La plupart des bandes vidéo préenregistrées sont enregistrées dans
les deux modes audio, afin de pouvoir être lues sur un système ne
disposant pas du mode Hi-Fi.
90
Pour sélectionner le mode audio du magnétoscope :
1 Vérifier que le système de cinéma maison est allumé.
2 Appuyer sur VCR pour sélectionner le mode Magnétoscope.
www.insignia-products.com
Page 93

Insignia NS-H4005 Système de cinéma maison
3 Appuyer sur MENU. Le menu du magnétoscope s’affiche.
4 Appuyer sur ou pour sélectionner SETUP (Configuration),
puis appuyer sur MEMORY/ENTER (Mémoire/Entrée). Le menu
de configuration s’affiche.
5 Appuyer sur ou pour sélectionner AUDIO MODE (Mode
audio), puis sur ou pour sélectionner HI-FI (recommandé) ou
NORMAL.
www.insignia-products.com
91
Page 94

6 Appuyer sur ou pour sélectionner AUDIO OUTPUT (Sortie
audio), puis sur ou pour sélectionner l'une des options
suivantes :
• STEREO (Stéréo) – (Recommandé) Le canal audio gauche
est envoyé vers le haut-parleur gauche, tandis que le canal
audio droit est envoyé vers le haut-parleur droit.
• LEFT (Gauche) – Le canal audio gauche est envoyé à la fois
au haut-parleur gauche et au haut-parleur droit.
• RIGHT (Droit) – Le canal audio droit est envoyé à la fois au
haut-parleur gauche et au haut-parleur droit.
7 Appuyer sur MENU pour fermer le menu.
Réglage de l’horloge
Il est nécessaire de régler l'horloge avant de configurer des
enregistrements programmés.
Remarque
Le réglage initial de l’horloge est JANUARY 1, 2007, 12:00
AM (1e janvier 2007, minuit).
Pour régler l’horloge :
1 Vérifier que le système de cinéma maison est allumé.
2 Appuyer sur VCR pour sélectionner le mode Magnétoscope.
3 Appuyer sur MENU. Le menu du magnétoscope s’affiche.
Insignia NS-H4005 Système de cinéma maison
92
www.insignia-products.com
Page 95
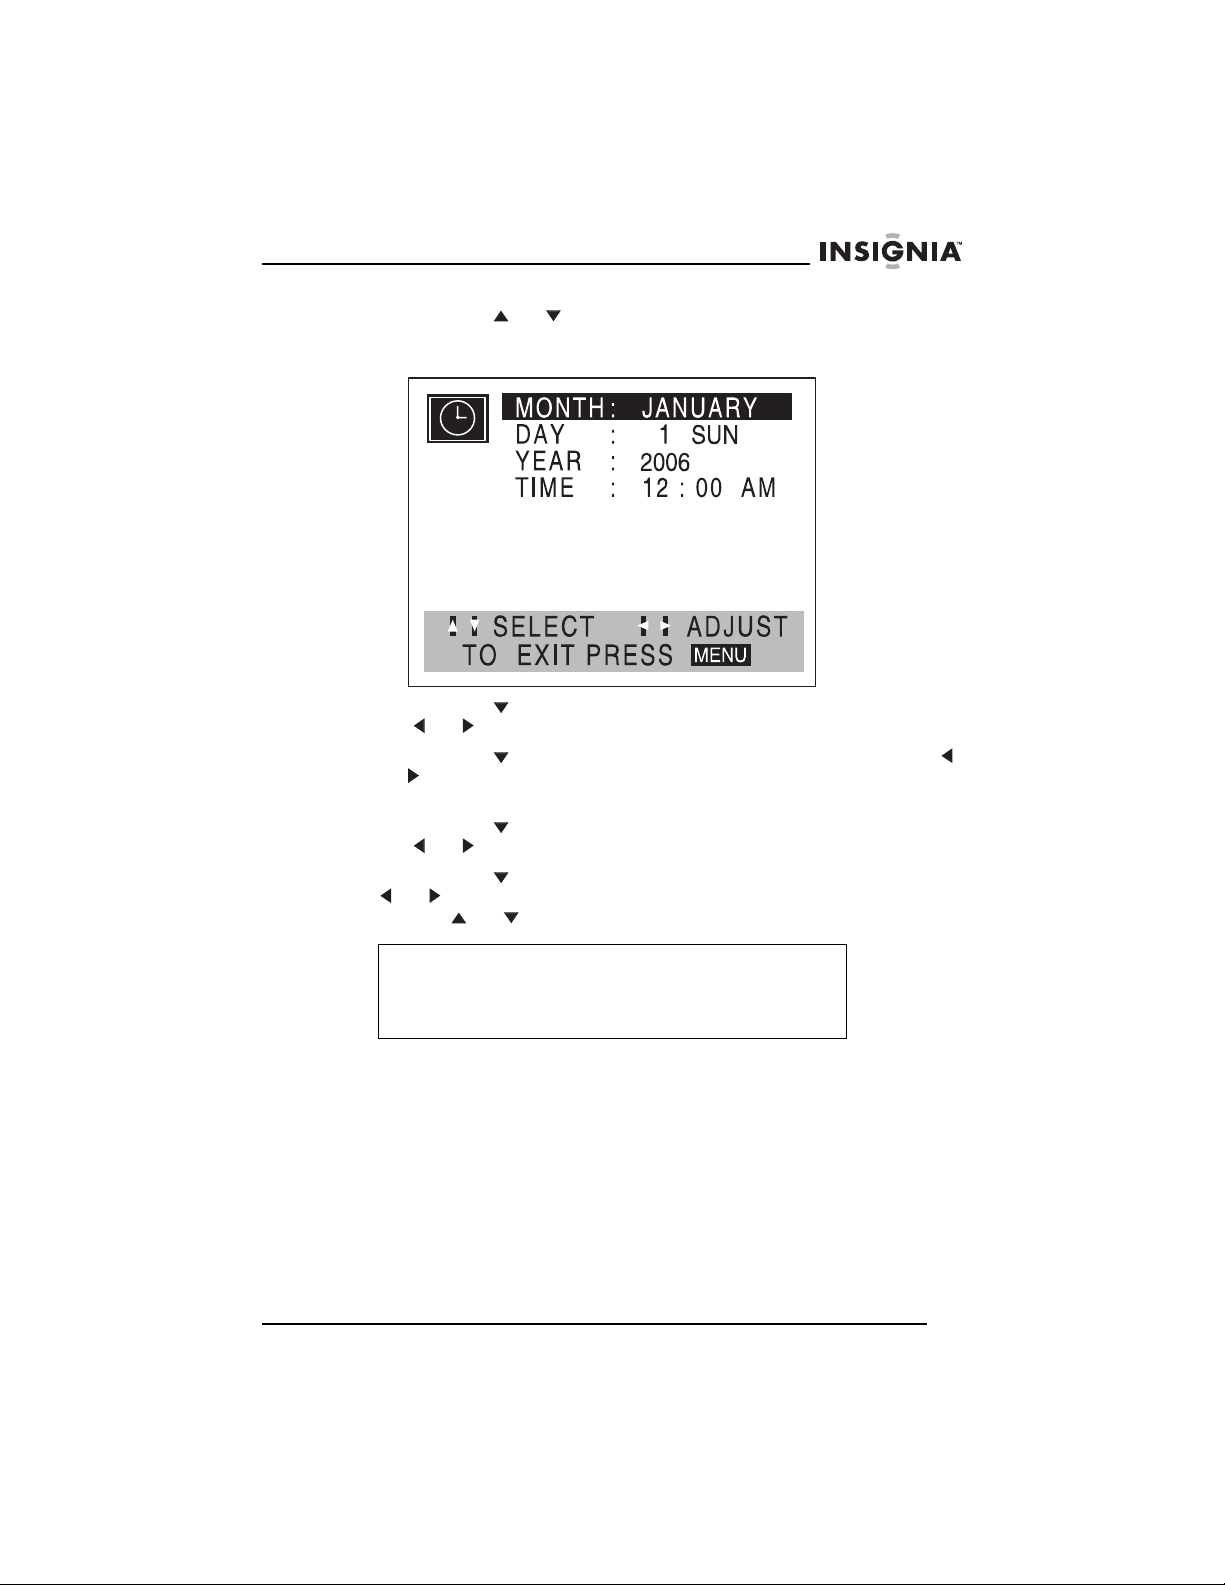
Insignia NS-H4005 Système de cinéma maison
4 Appuyer sur ou pour sélectionner CLOCK (Horloge), puis
appuyer sur MEMORY/ENTER (Mémoire/Entrée). Le menu de
l'horloge s’affiche.
5 Appuyer sur pour sélectionner MONTH (Mois), puis appuyer
sur ou pour sélectionner le mois.
6 Appuyer sur pour sélectionner DAY (Jour), puis appuyer sur
ou pour sélectionner le jour du mois. Le jour de la semaine
affiche à côté du jour du mois.
7 Appuyer sur pour sélectionner YEAR (Année), puis appuyer
sur ou pour sélectionner l'année.
8 Appuyer sur pour sélectionner TIME (Heure), puis appuyer sur
ou pour sélectionner l'heure. Il est possible de maintenir
appuyé ou pour faire avancer l’heure rapidement.
Remarque
L’horloge utilise l’affichage au format 12 heures. Vérifier
d'avoir réglé correctement AM ou PM. Si PM est
sélectionné, PM s'affiche à l'écran. Si AM est sélectionné,
AM ne s'affiche pas à l'écran.
9 Appuyer sur MENU pour fermer le menu.
Marquage d'un point de départ sur une bande vidéo
Pour localiser rapidement une section d'une bande vidéo et
commencer la lecture à partir de ce point, il est possible d'ajouter un
signet à la bande vidéo.
Pour marquer un point de départ sur une bande vidéo :
1 Commencer à lire ou à enregistrer une bande vidéo.
2 Appuyer deux fois sur CLK/CNT (Horloge/compteur) pour afficher
le compteur en temps réel (durée écoulée).
www.insignia-products.com
93
Page 96

Insignia NS-H4005 Système de cinéma maison
3 Lorsque la bande vidéo arrive à l’endroit souhaité pour mettre un
signet, appuyer sur CLEAR (Effacer). Le compteur en temps réel
est réinitialisé à 00:00:00.
4 Continuer à lire ou à enregistrer.
5 Une fois la lecture ou l'enregistrement terminé, appuyer deux fois
sur STOP (Arrêt) .
6 Appuyer sur BACKWARD (Recherche arrière) . Le
magnétoscope rembobine la bande vidéo jusqu'à l'endroit marqué
et commence la lecture.
Enregistrement d'une bande vidéo
Pour enregistrer une bande vidéo :
1 Insérer une bande vidéo munie de son onglet de protection contre
l'effacement dans le compartiment à bande vidéo.
2 Appuyer sur INPUT (Entrée) pour sélectionner LINE 1 (Ligne 1)
ou LINE 2 (Ligne 2). Sélectionner LINE 1 (Ligne 1) pour
enregistrer à partir d'un périphérique connecté aux prises A/V au
dos du système de cinéma maison. Sélectionner LINE 2 (Ligne 2)
pour enregistrer à partir d'un périphérique connecté aux prises
A/V à l'avant du système de cinéma maison.
3 Appuyer sur SPEED (Vitesse) pour sélectionner la vitesse de la
bande. Il est possible de sélectionner SP ou SLP. (Ce système de
cinéma maison ne reconnaît pas la vitesse de bande LP.)
4 Appuyer une fois sur REC/ITR (Enregistrement/Enregistrement
programmé) . Le témoin REC s'allume dans la fenêtre
d'affichage et le système de cinéma maison commence à
enregistrer.
94
Remarque
Si la bande vidéo n'a pas d'onglet de protection contre
l'effacement, elle est éjectée.
Le témoin REC apparaît uniquement lorsque le système de
cinéma maison est en mode Magnétoscope.
5 Pour arrêter momentanément l'enregistrement, appuyer sur
PAUSE/STEP (Pause/Image par image) . Le témoin REC
(Enregistrement) clignote dans la fenêtre d'affichage.
Remarque
Si le magnétoscope est en mode pause pendant plus de
cinq minutes, le système de cinéma maison passe en mode
d'arrêt pour protéger la bande vidéo et les têtes de lecture
vidéo.
6 Appuyer deux fois sur STOP (Arrêt) pour arrêter
l'enregistrement.
www.insignia-products.com
Page 97

Insignia NS-H4005 Système de cinéma maison
Copie à partir d'un caméscope ou d'un
magnétoscope externe
Il est possible de connecter un caméscope ou un autre
magnétoscope aux prises A/V du système de cinéma maison et
d'effectuer une copie du caméscope ou du magnétoscope externe
vers le magnétoscope intégré.
Pour effectuer une copie à partir d'un caméscope ou d'un
magnétoscope externe :
1 Connecter le caméscope ou le magnétoscope externe aux prises
A/V au dos ou à l'avant du système de cinéma maison. Pour plus
d’informations, voir “Connexion d’un périphérique audio/vidéo”
voir page 82.
2 Appuyer sur INPUT (Entrée) pour sélectionner la source vidéo. Si
le caméscope ou le magnétoscope externe est connecté aux
prises A/V arrière, sélectionner LINE1 (Ligne 1). Si le caméscope
ou le magnétoscope externe est connecté aux prises A/V avant,
sélectionner LINE2 (Ligne 2).
3 Commencer la lecture sur le caméscope ou le magnétoscope
externe. Si un téléviseur est connecté au système de cinéma
maison, il est possible de le regarder pendant la lecture.
4 Une fois arrivé au point souhaité pour le début de
l'enregistrement, appuyer sur REC/ITR
(Enregistrement/Enregistrement programmé) . Le système de
cinéma maison commence à enregistrer à partir du caméscope ou
du magnétoscope externe.
5 Appuyer deux fois sur STOP (Arrêt) pour arrêter
l'enregistrement.
Copie du lecteur de DVD vers le magnétoscope
Remarque
Certains DVD sont munis d'un système de protection contre
la copie. Il n’est pas possible de copier ces DVD. Si un DVD
est protégé par Macrovision, LOCK (Verrouillage) s'affiche
lors de toute tentative de copie.
Pour effectuer une copie du lecteur de DVD vers le
magnétoscope :
1 Insérer un DVD dans le plateau à DVD.
2 Insérer une bande vidéo vierge munie de son onglet de protection
contre l'effacement dans le compartiment à bande vidéo.
3 Appuyer sur à l'avant du système de cinéma maison. Si un
menu de DVD s'affiche, appuyer une nouvelle fois sur .
www.insignia-products.com
95
Page 98

Insignia NS-H4005 Système de cinéma maison
4 Appuyer sur REC/ITR (Enregistrement/Enregistrement
programmé) . Le magnétoscope commence à copier le DVD et
COPY (Copie) apparaît dans la fenêtre d'affichage.
5 Une fois la copie terminée, appuyer deux fois sur STOP (Arrêt)
ou POWER (Marche/Arrêt).
Remarque
Il faut arrêter manuellement l'enregistrement, sinon le
lecteur de DVD/magnétoscope risque de relire et
d’enregistrer indéfiniment ce même film.
Si la lecture du DVD est arrêtée pendant l'enregistrement,
l'enregistrement du magnétoscope s'arrête également.
Utilisation du lecteur de DVD
Lecture d’un DVD
Remarque
Un DVD peut avoir un code régional. Le code régional pour
ce système de cinéma maison est 1. Si le code régional du
DVD ne correspond pas au code régional du système de
cinéma maison, il est impossible de lire le DVD.
Si certaines classifications de films sont interdites au moyen
de la fonction de contrôle parental et que la classification du
DVD est interdite, il faut saisir le mot de passe à quatre
chiffres pour lever l'interdiction et regarder le DVD.
96
Pour lire un DVD :
1 Vérifier que le cordon d’alimentation est branché sur une prise
secteur.
2 Appuyer sur CD/DVD sur la télécommande ou sur DVD/VCR à
l'avant du système de cinéma maison pour sélectionner le mode
DVD. READING (Lecture) apparaît dans la fenêtre d'affichage, et
l'image du DVD s'affiche à l'écran du téléviseur.
3 Appuyer sur AUDIO pour sélectionner le mode audio.
4 Appuyer sur OPEN/CLOSE (Ouvrir/Fermer) pour ouvrir le
plateau à disque, insérer un DVD dans le plateau, puis appuyer
sur OPEN/CLOSE pour fermer le plateau.
5 Si la lecture ne commence pas immédiatement, appuyer sur
PLAY (Lecture) .
6 Si un menu de DVD s'affiche, appuyer sur , , ou pour
sélectionner l'option souhaitée, puis appuyer sur
MEMORY/ENTER (Mémoire/Entrée).
www.insignia-products.com
Page 99

Insignia NS-H4005 Système de cinéma maison
Contrôle de la lecture d’un DVD
Pour contrôler la lecture d'un DVD :
• Pour arrêter momentanément la lecture, appuyer sur
PAUSE/STEP (Pause/Image par image) . Pour reprendre la
lecture, appuyer sur PLAY (Lecture) .
• Pour aller au début du chapitre du DVD ou de la piste du CD
audio en cours, appuyer sur BACKWARD (Recherche
arrière)
précédente d’un CD audio, appuyer deux fois sur cette touche.
• Pour aller au chapitre suivant d’un DVD ou à la piste suivante
d’un CD audio, appuyer sur FORWARD (Recherche
avant)
• Pour aller à un chapitre spécifique d'un DVD ou à une piste
spécifique d'un CD audio, appuyer sur DISPLAY (Affichage),
appuyer sur ou pour sélectionner l'icône de chapitre ou
de piste, puis utiliser les touches numériques pour saisir le
numéro du chapitre ou de la piste.
• Pour aller à un autre titre sur un DVD, appuyer sur DISPLAY
(Affichage), puis utiliser les touches numériques pour saisir le
numéro du titre.
• Pour effectuer une recherche sur un DVD, maintenir appuyée
la touche BACKWARD (Recherche arrière) ou
FORWARD (Recherche avant) pendant environ deux
secondes. Chaque fois qu'une touche est maintenue appuyée,
la vitesse de recherche change : de ×2 à ×4, à ×16, à ×100.
Pour reprendre la lecture normale, appuyer sur PLAY
(Lecture) .
• Pour lire un DVD image par image, appuyer sur PAUSE/STEP
(Pause/Image par image) pour figer l'image et arrêter
momentanément la lecture. Appuyer une nouvelle fois sur
PAUSE/STEP (Pause/Image par image) . La vidéo avance
d'une image. À chaque appui sur la touche, la vidéo avance
d'une image. Pour reprendre la lecture normale, appuyer sur
PLAY (Lecture) .
• Pour lire un DVD au ralenti, appuyer sur PAUSE/STEP
(Pause/Image par image) pour arrêter momentanément la
lecture. Appuyer sur BACKWARD (Recherche arrière) ou
FORWARD (Recherche avant) pour faire défiler la vidéo
vers l'arrière ou vers l'avant au ralenti. Chaque fois qu'une
touche est appuyée, la vitesse de défilement vers l'arrière ou
vers l'avant change : de 1/16 à 1/8, 1/4 ou 1/2 de la vitesse
normale. Pour reprendre la lecture normale, appuyer sur PLAY
(Lecture) .
. Pour aller au chapitre précédent d’un DVD ou à la piste
.
www.insignia-products.com
97
Page 100

Insignia NS-H4005 Système de cinéma maison
Lecture d'un CD audio
Pour lire un CD audio, un disque MP3 ou un disque WMA :
1 Insérer un disque dans le plateau à disque et fermer le plateau. Le
menu des pistes du CD s’affiche.
CD
TRACK01
TRACK02
TRACK03
TRACK04
TRACK05
TRACK06
TRACK07
TRACK08
0: 56: 18
Program
Clear All
STER. BYPASS
2 Appuyer sur ou pour sélectionner une piste, puis appuyer
sur PLAY (Lecture) ou MEMORY/ENTER (Mémoire/Entrée)
pour commencer la lecture.
3 Pour arrêter la lecture, appuyer sur STOP (Arrêt) .
Lecture de CD de MP3 ou de WMA
Pour que des CD de MP3 ou de WMA soient lisibles, ils doivent
répondre aux conditions suivantes :
• Les fichiers MP3 doivent avoir l'extension de fichier .mp3. Les
fichiers WMA doivent avoir l'extension de fichier .wma.
• Les noms des fichiers MP3 et WMA sont limités à un maximum
de huit caractères et ne peuvent pas contenir de caractères
spéciaux, tels que / : * ? < ou >.
• Le nombre total de fichiers sur un CD doit être inférieur à 650.
• Un CD à simple session doit avoir un fichier MP3 ou WMA à
l'emplacement de la première piste.
• Le logiciel d'enregistrement utilisé pour créer un CD de MP3
ou de WMA doit être capable de créer un « système de fichiers
». Certains logiciels ne peuvent pas le faire. Il est recommandé
d'utiliser Easy-CD Creator.
• Le format physique du CD-R doit être ISO9660.
• La fréquence d'échantillonnage doit être de 44,1 kHz pour les
MP3 et de 32 à 44,1 kHz pour les WMA.
• Le débit binaire doit être compris entre 32 et 320 kbps pour les
MP3 et entre 32 et 128 kbps pour les WMA.
98
www.insignia-products.com
 Loading...