

Page 1

Home Theater In A Box | Système de cinéma maison | Sistema de Teatro en Casa
NS-H3005
Page 2

Page 3
Insignia NS-H3005
Home Theater
System
Contents
Introduction . . . . . . . . . . . . . . . . . . . . . . . . . . . . . .1
Safety information . . . . . . . . . . . . . . . . . . . . . . . . .1
Features. . . . . . . . . . . . . . . . . . . . . . . . . . . . . . . . .2
Using discs. . . . . . . . . . . . . . . . . . . . . . . . . . . . . . .5
Connecting your home theater system . . . . . . . . .7
Setting up the VCR . . . . . . . . . . . . . . . . . . . . . . .11
Setting up the DVD player . . . . . . . . . . . . . . . . . .14
Using your home theater system . . . . . . . . . . . . .18
Using the VCR . . . . . . . . . . . . . . . . . . . . . . . . . . .18
Using the DVD player. . . . . . . . . . . . . . . . . . . . . .24
Using the radio. . . . . . . . . . . . . . . . . . . . . . . . . . .29
Maintaining. . . . . . . . . . . . . . . . . . . . . . . . . . . . . .30
Troubleshooting . . . . . . . . . . . . . . . . . . . . . . . . . .31
Specifications. . . . . . . . . . . . . . . . . . . . . . . . . . . .32
Accessories . . . . . . . . . . . . . . . . . . . . . . . . . . . . .33
Code lists . . . . . . . . . . . . . . . . . . . . . . . . . . . . . . .33
Limited warranty. . . . . . . . . . . . . . . . . . . . . . . . . .34
Copyright . . . . . . . . . . . . . . . . . . . . . . . . . . . . . . .34
Français. . . . . . . . . . . . . . . . . . . . . . . . 35
Español . . . . . . . . . . . . . . . . . . . . . . . . 74
Manufactured under license from Dolby Laboratories.
“Dolby ,” “Pro Logic,” and the double-D symbol are trademarks
of Dolby Laboratories. Confidential Unpublished works.
Copyright 1992- 1997 Dolby Laboratories. All rights
reserved.
Manufactured under license from Digital Theater Systems,
Inc. US Pat. No. 5,451,942 5,956,674, 5,974,380, 5,978,762
and other worldwide patents issued and pending. “DTS” and
“DTS Digital Surround” are registered trademarks of Digital
Theater Systems, Inc. Copyright 1996, 2003 Digital Theater
Systems, Inc. All rights reserved.
Introduction
Congratulations on your purchase of a
high-quality Insignia product. Your NS-H3005
represents the state of the art in combination
home theater system design and is designed for
reliable and trouble-free performance.
Safety information
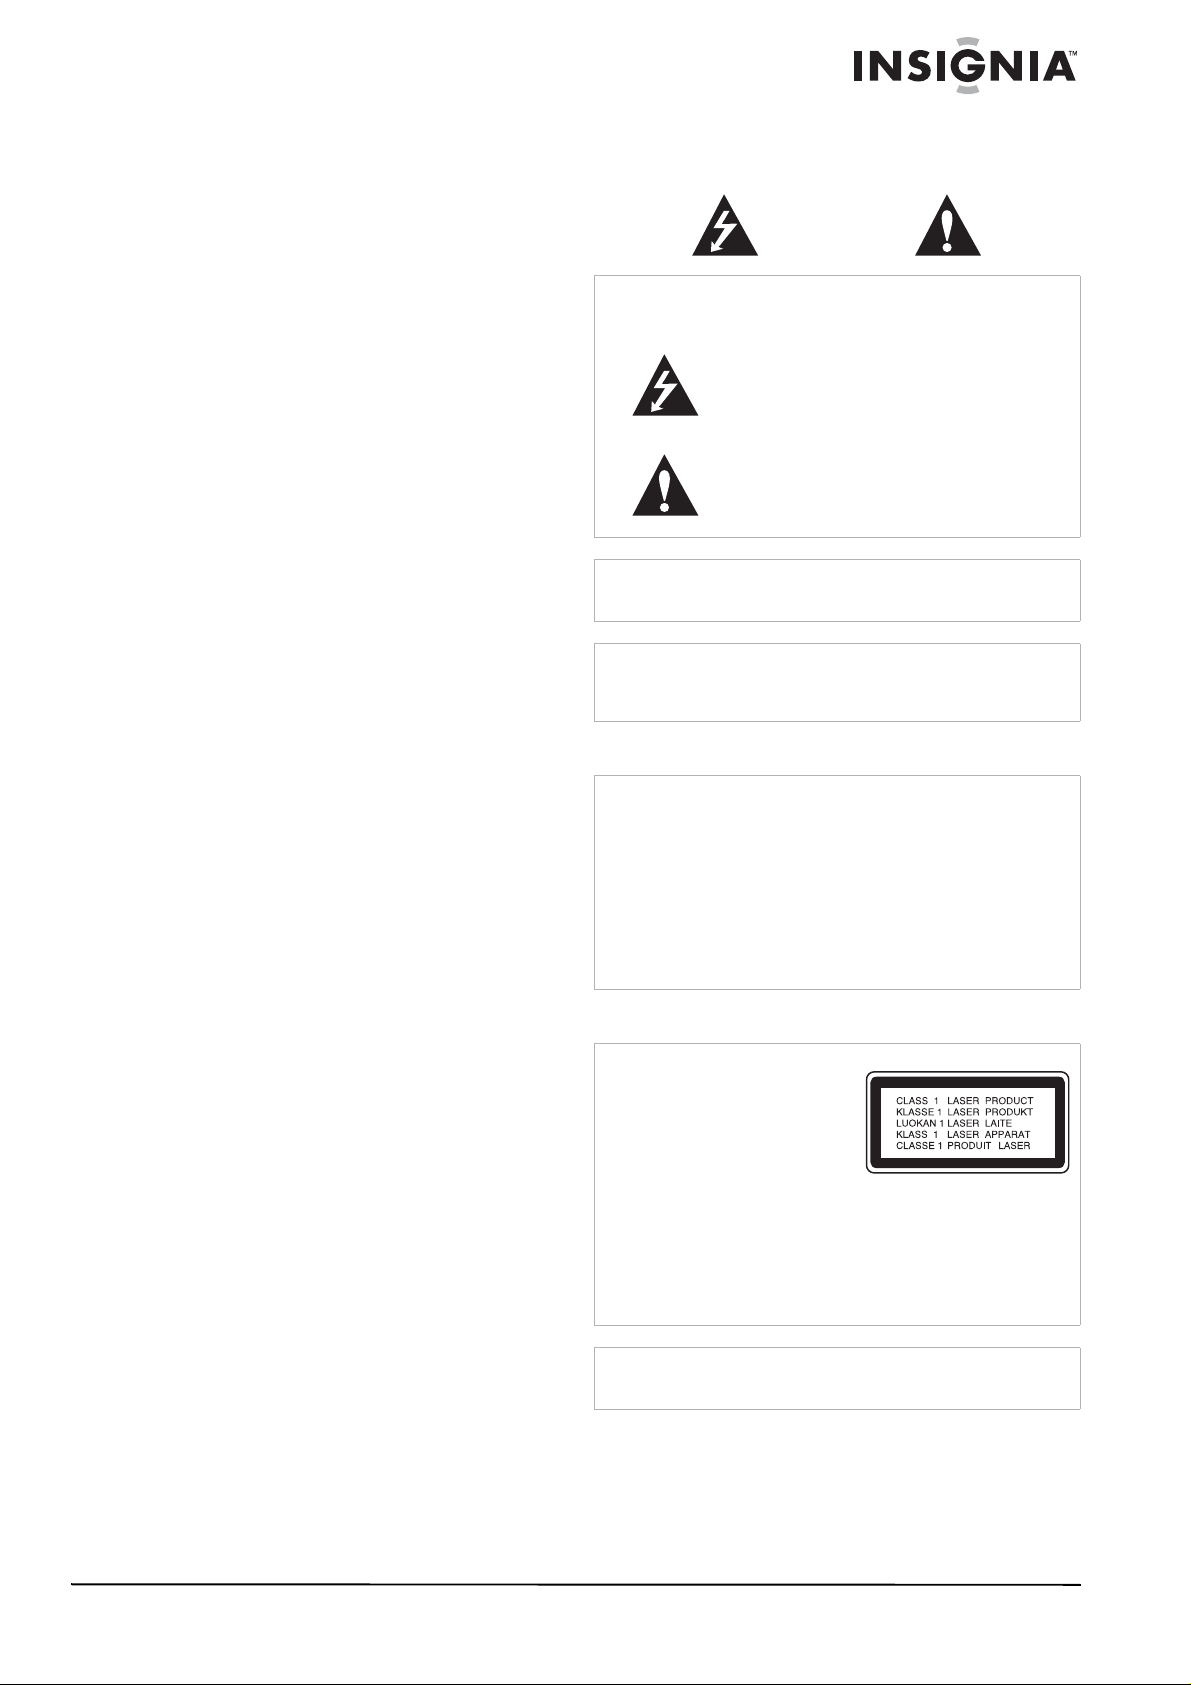
Electric shock warning
CAUTION
Risk of Electric Shock
Do Not Open
Warning
T o reduce the risk of electric shock, do not remove the cover or
back. There are no user-serviceable parts inside. Refer
servicing to qualified service personnel.
Warning
To prevent fire or electric shock hazard, do not expose this
home theater system to rain or moisture.
Caution
The home theater system should not be exposed to water
(dripping or splashing) and no objects filled with liquids, such
as vases, should be placed on the home theater system.
Ventilation
Caution
Do not block any ventilation openings. Install in accordance
with these instructions.
Slots and openings in the cabinet are provided for ventilation
and to ensure reliable operation of the home theater system
and to protect it from over-heating.
The openings should never be blocked by placing the home
theater system on a bed, sofa, rug, or other similar surface.
This home theater system should not be placed in a built-in
installation such as a bookcase or rack unless correct
ventilation is provided or these instructions have been adhered
to.
Laser warning
Warning
This home theater system uses
a laser system.
To ensure correct use of this
home theater system, read this
user guide carefully and retain
it for future reference. Should
the home theater system
require maintenance, contact
an authorized service center.
Changing controls, making adjustments, or carrying out
procedures other than those specified herein may result in
hazardous radiation exposure.
To prevent direct exposure to the laser beam, do not try to
open the enclosure. There is visible laser radiation when open.
Do not stare into the beam.
This lightning flash with arrowhead symbol within
an equilateral triangle is intended to alert the user
to the presence of uninsulated dangerous voltage
within the home theater system’s enclosure that
may be of sufficient magnitude to constitute a risk
of electric shock to persons.
The exclamation point within an equilateral triangle
is intended to alert the user to the presence of
important operating and maintenance (servicing)
instructions in the literature accompanying the
home theater system.
Warning
Visible and invisible laser radiation is present when the home
theater system is open and interlocks are defeated.
www.insignia-products.com
1
Page 4
Insignia NS-H3005 Home Theater System
Power cor d
Caution
We recommend that most appliances be placed upon a
dedicated circuit—a single outlet circuit which powers only that
appliance and has no additional outlets or branch circuits.
Check “Specifications” on page 32 for power requirements.
Do not overload wall outlets. Overloaded wall outlets, loose or
damaged wall outlets, extension cords, frayed power cords, or
damaged or cracked wire insulation are dangerous. Any of
these conditions could result in electric shock or fire.
Periodically examine the home theater system cord, and if its
appearance indicates damage or deterioration, unplug it,
discontinue use of the home theater system, and have the cord
replaced with an exact replacement part by an authorized
service provider.
Protect the power cord from physical or mechanical abuse,
such as being twisted, kinked, pinched, closed in a door, or
walked upon. Pa y particular attention to plugs, wall outlets, and
the point where the cord exits the home theater system.
To disconnect power from the outlet, pull out the plug. When
installing the home theater system, make sure that the plug is
easily accessible.
Important safety instructions
Caution
Read and observe all warnings and instructions in this manual
and those marked on the home theater system. Retain this
manual for future reference.
This home theater system has been designed and
manufactured to assure personal safety. Incorrect use can
result in electric shock or fire hazard. The safeguards
incorporated in this home theater system will protect you if you
observe the following procedures for installation, use, and
servicing. This home theater system does not contain any
parts that can be repaired by you.
Do not remove the cabinet cover or you may be exposed to
dangerous voltage. Refer servicing to qualified service
personnel only .
• Read all of these safety and operating
instructions before the home theater system
is operated.
• Retain the safety, operation, and use
instructions for future reference.
• Adhere to all warnings on the home theater
system and in the operating instructions.
• Follow all operation and use instructions.
• Do not use this home theater system near
water. For example, do not use this home
theater system near a bath tub, wash bowl,
kitchen sink, laundry tub, in a wet basement,
near a swimming pool, and other areas
located near water.
• Clean only with dry cloth. Unplug this home
theater system from the wall outlet before
cleaning. Do not use liquid cleaners.
• Do not block any ventilation openings. Install
in accordance with these instructions. Slots
and openings in the cabinet are provided for
ventilation, to ensure reliable operation of the
home theater system and to protect it from
over-heating. Do not block the openings by
placing the home theater system, on a bed,
sofa, rug or other similar surface. Do not
place this in a built-in installation such as a
bookcase or rack unless proper ventilation is
provided or these instructions have been
adhered to.
• Do not install near any heat sources such as
radiators, heat registers, stoves, or other
electronic devices (including amplifiers) that
produce heat.
• Do not defeat the safety purpose of the
polarized or grounding-type plug. A polarized
plug has two blades with one wider than the
other. A grounding type plug has two blades
and a third grounding prong. The wide blade
or the third prong are provided for your safety.
If the provided plug does not fit into your
outlet, consult an electrician for replacement
of the obsolete outlet.
• Protect the power cord from being walked on
or pinched particularly at plugs, receptacles,
and the point where they exit from the home
theater system.
• Use only attach ments or accessories
specified by Insignia.
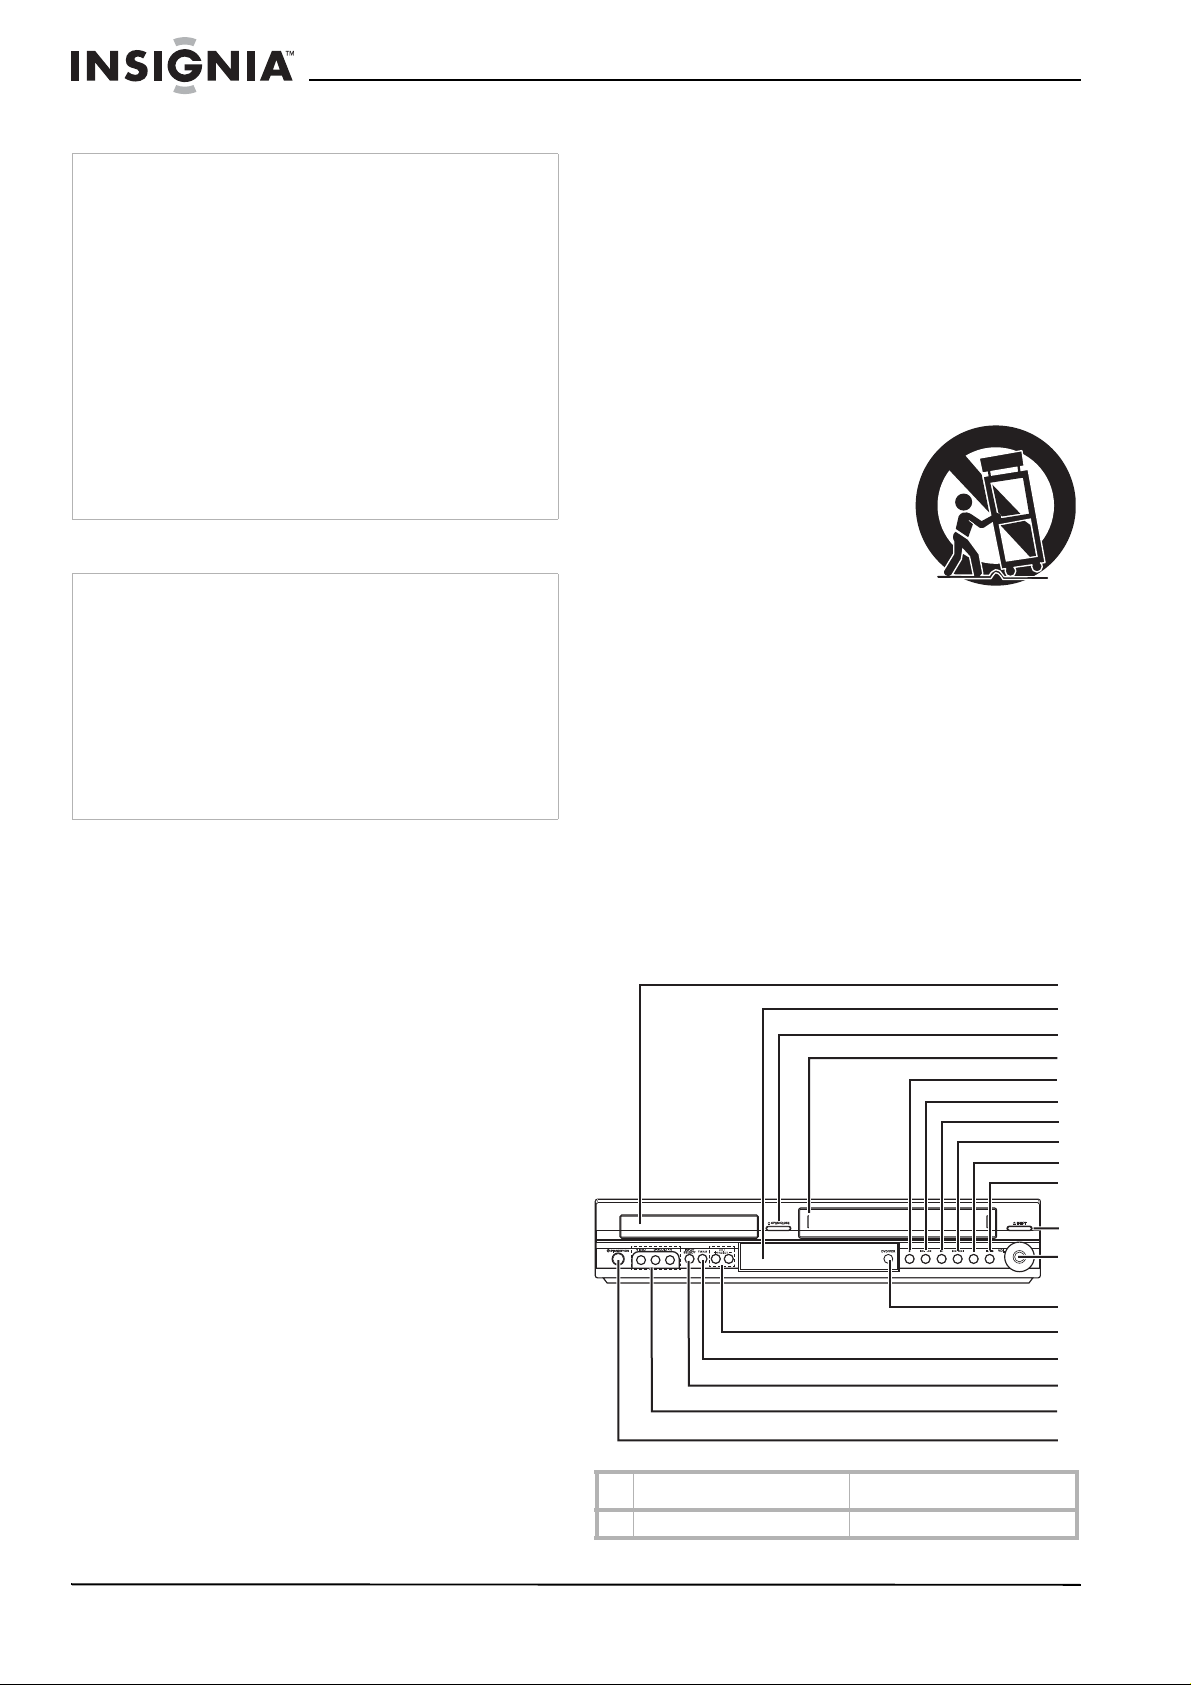
• Use only with the cart,
stand, tripod, bracket, or
table specified by
Insignia, or sold with this
home theater system.
When a cart is used, use
caution when moving the
cart/home theater
system combination to
avoid injury from tip-over.
• Unplug this home theater system during
lightning storms or when unused for long
periods of time.
• Refer all servicing to qualified service
personnel. Servicing is required when the
home theater system has been damaged in
any way, such as power-supply cord or plug
is damaged, liquid has been spilled or objects
have fallen into the home theater system, the
home theater system has been exposed to
rain or moisture, does not operate normally,
or has been dropped.
Features
Front panel
1
2
3
4
5
6
7
8
9
10
11
12
13
14
15
16
17
18
Component Description
1 Disc tray (DVD) Insert a disc here.
2
www.insignia-products.com
Page 5
Insignia NS-H3005 Home Theater System
1
Component Description
2 Remote sensor and display
window
3 Open/Close Opens or closes the disc tray.
4 Tape compartment (VCR) Insert a video tape here.
5 REC/ITR Press to record or to activate
6 Reverse SKIP/SCAN / DVD: Press to go to the
7
Play
8 Forward SKIP/SCAN / DVD: Press to go to the
9 Stop Press to stop playback of a
10
Pause/Step
/
11 Eject Press to eject the tape from
12 V olume control T u r n the kn ob clockwise to
13 DVD/VCR (output select) Press to select DVD or VCR as
14 CH/PRESET +/- Press to scan up or dow n
15 FM/AM Press to switch between FM
16 Input select Select the VCR’s input source
17 Line 2 Video In/Audio In
(Left/Right)
18 Standby/On Press to switch the home
Point the remote control here.
For more information about
the display window, see
“Display window” on page3.
Instant Timer Recording.
beginning of the current
chapter or track or to the
previous chapter or track.
Press and hold for two
seconds to fast reverse
search.
VCR: Press to rewind the tape
during Stop mode or to fast
reverse picture search.
Press to play a recorded tape
or disc.
beginning of the next chapter
or track.
Press and hold for two
seconds to fast forward
search.
VCR: Press to advance the
tape during Stop mode or to
fast forward picture se arch.
tape or disc.
Press to temporarily pause
playback of a tape or disc.
Press repeatedly for
frame-by-frame playback.
the VCR.
increase the volume. Turn the
knob counterclockwise to
decrease the volume.
your output source to view on
the television.
through the radi o or telev ision
stations in memory or to
control tracking during video
tape playback.
and AM bands.
(Tuner, Line1, or Line2)
Connect the audio and vi deo
output from an external
source such as an audio
system, television, monitor, or
VCR.
theater system on or off.
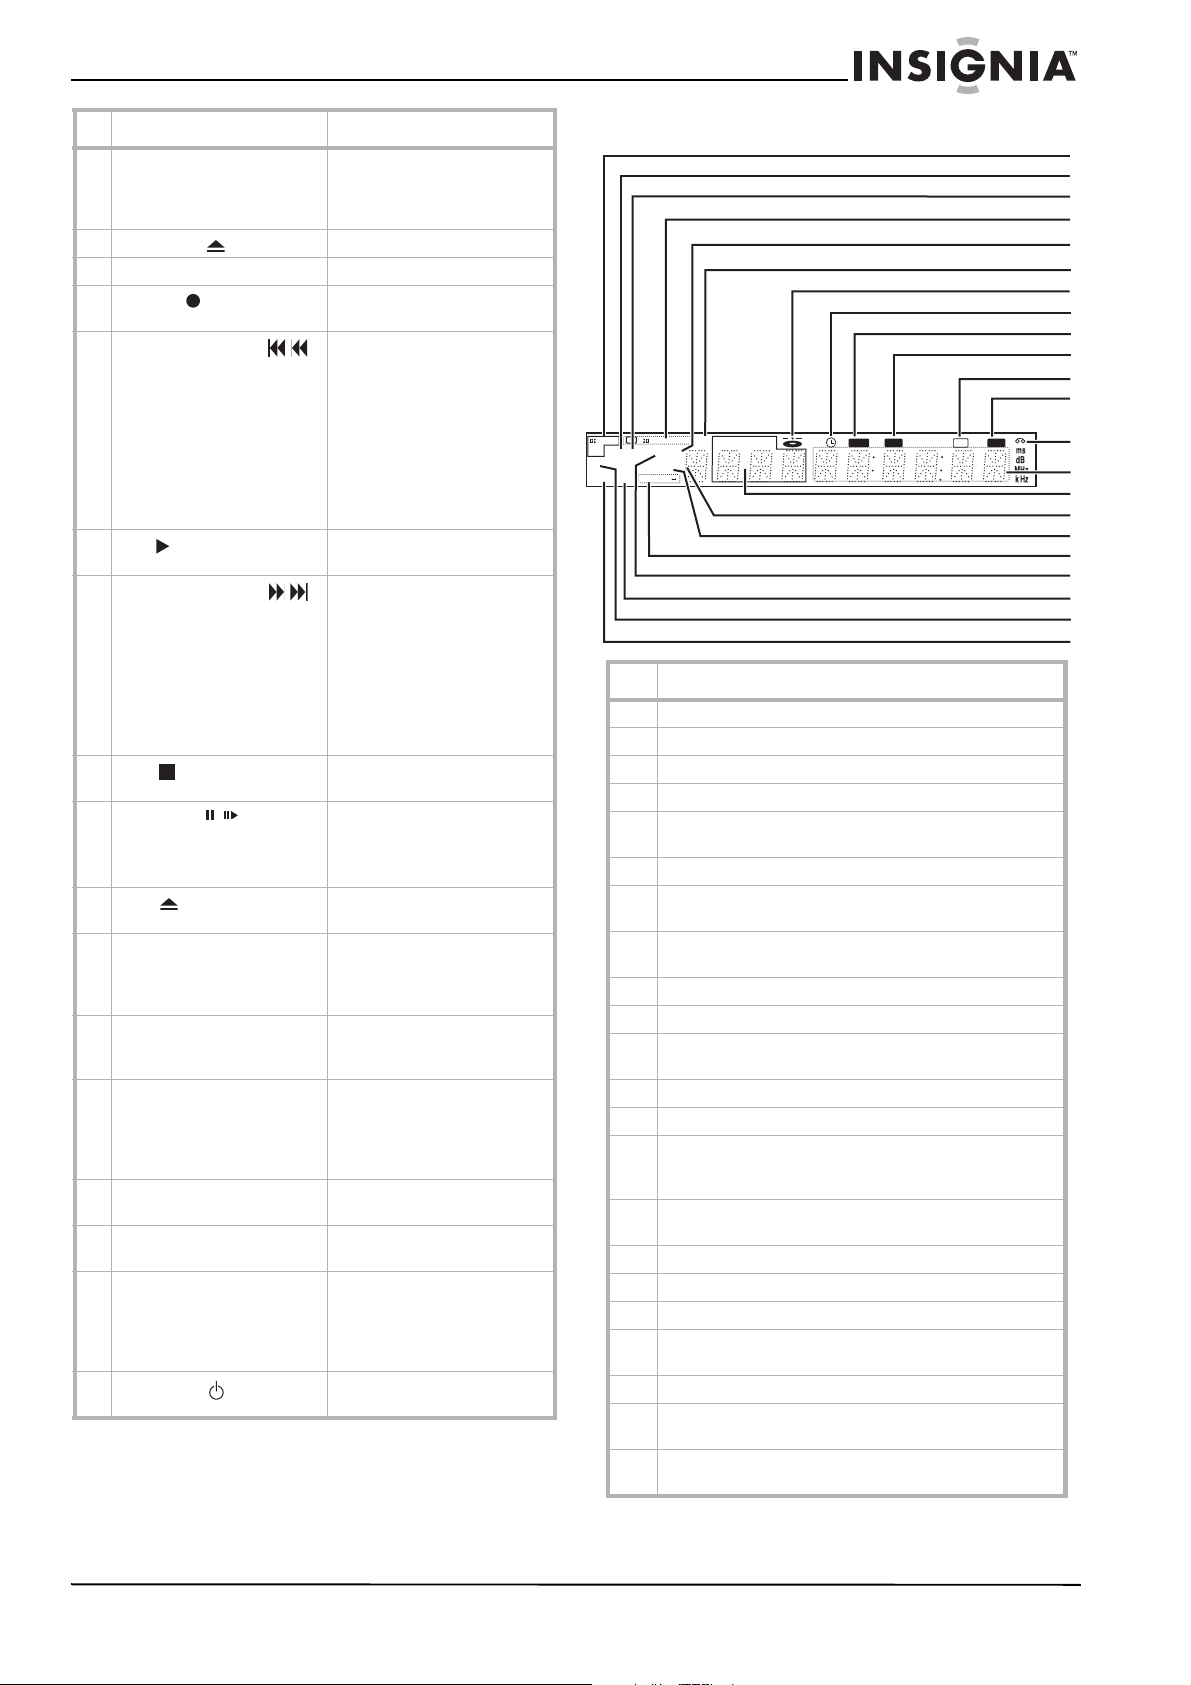
Display window
dts
DIGITAL
PROLOGIC
DVD SAP
RADIO
PCM WMA
PHOTO
P/SCAN
ST
RPT ALL
MP3 TV
A B
Description
1 Displays the current audio stream.
2 Lights up w he n a WMA disc is playing .
3 Lights up when the radio is playing.
4 Displa y s the cu r rent surround mode.
5 Lights up when an SAP bilingual broadcast is being
received.
6 Lights up when the programmed play back is active.
7 Lights up when a disc is loaded in the DVD. Flashes
when the disc tray is opened.
8 Lights up when the VCR is in VCR Timer Recording
mode or a VCR timer recording is programmed.
9 Lights up when a DVD to VCR copy is in pr ogress.
10 Lights up when the VCR is recording a tape.
11 Lights up when the recorder is playing back a tape that
was recorded in Hi-Fi.
12 Lights up when the volume is muted.
13 Lights up when a tape is loaded into the VCR.
14 Displays the total playing time, elapsed playing time,
frequency, remaining time, current deck status ,
surround mode, and volume.
15 Displays the current chapter number, track number, or
channel number.
16 Lights up when the home th eater system is in TV mode.
17 Lights up to indicate an MP3 or WMA disc is inserted.
18 Displa y s th e r ep e at playback mode.
19 Lights up to indicat e a DVD is loaded into the home
theater system.
20 Lights up when a stereo broadcast is being received.
21 Lights up to indicat e a JPEG file disc is loaded into the
home theater system.
22 Lights up to indicate t he home theater system is in
progressive scan mode.
II
PROG
TITLE
CHPTRK
Hi-Fi
2
3
4
5
6
7
8
9
10
11
12
MUTE REC COPY
13
14
15
16
17
18
19
20
21
www.insignia-products.com
3
Page 6

Insignia NS-H3005 Home Theater System
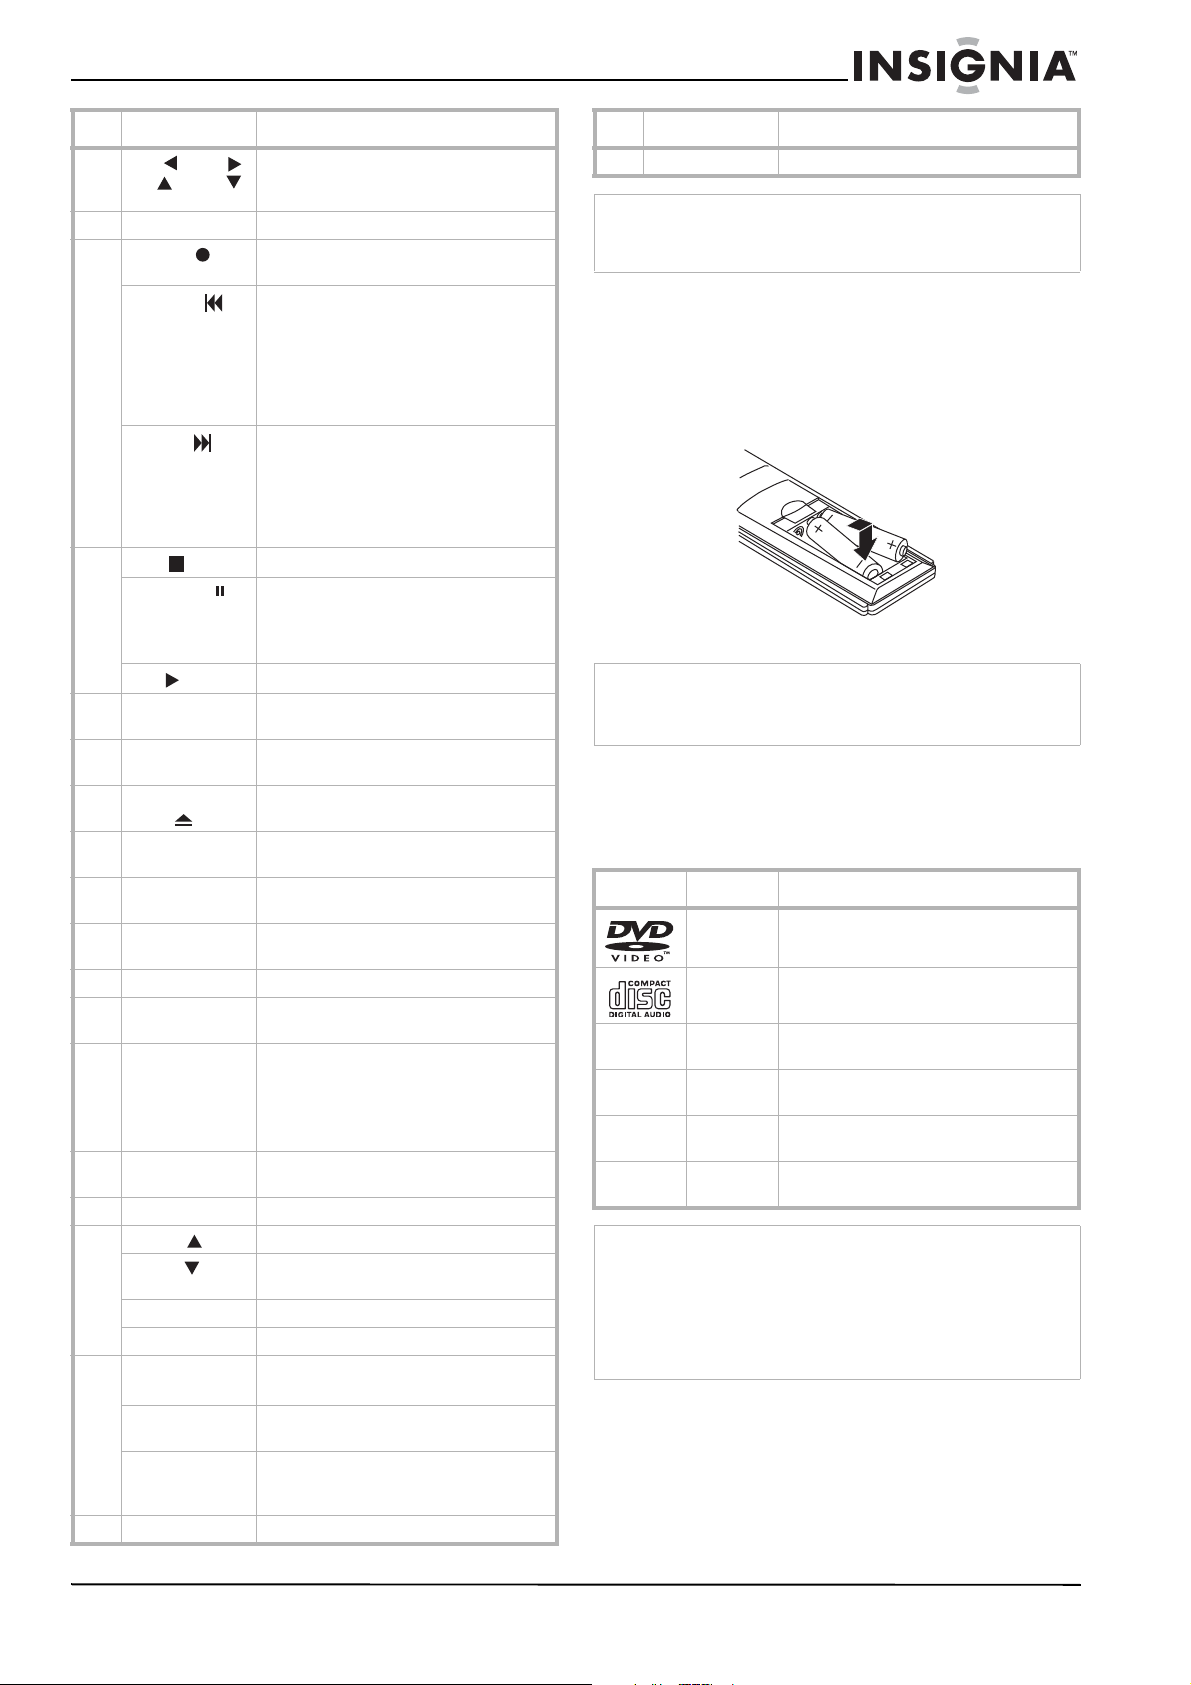
Back panel Remote control
1
2
3
4
5
6
1
2
3
13
14
15
Component Description
1 AC power cord Plug into an electrical outlet .
2 VCR in line 1 (Video
in/Audio in
(left/right))
3 DVD/VCR out video
out/audio out
(left/right))
4 Component/
progressive scan
video out (Y, Pb, Pr)
(DVD out)
5 Television antenn a in Connect the VHF/UHF antenna or
6 FM antenna Connect the FM antenna to this jack.
7 AM antenna Connect the AM antenna to this jack.
8 Speaker connections Connect the six speakers to these
9 Coaxial out Connect to a television that has
Connect the audio/video output of an
external source such as an audio
system, television or monitor, or VCR
to these jacks.
Connect to a televisio n that has audio
and video inputs .
Connect to a television that has
component (Y, Pb, Pr) inputs.
CATV cable to this terminal.
jacks.
coaxial input s .
4
7
8
9
5
6
7
8
9
10
11
12
16
17
18
19
20
21
22
23
24
25
Caution
Do not touch the inner pins of the jacks on the back panel.
Electrostatic discharge may cause permanent damage to the
home theater system.
4
Component Description
1 Power Press to turn the home theater syst em
2 CD/DVD/VCR
select
30-9 number
keypad
4 Program Press to open or close the Program
5 Clear Press to remove a track number on the
6 Displ ay/CLK/CNT Press to view the on-screen displa y.
www.insignia-products.com
on or off.
Press to select the output source
(CD/DVD or VCR) to view on the
television.
Press to enter numbers such as in a
menu.
menu.
Program menu or a mark on the Marker
Search menu.
Press to clear preset stations from the
tuner memory.
Press to switch between the clock, tape
counter, and tape remaining modes on
the display.
Page 7
Insignia NS-H3005 Home Theater System
Component Description
7
Left /Right /
Up /Down
8 Return Press to return from the Setup menu.
9 REC/ITR Press to record a tape or activate Instant
Backward
Forward
10 Stop Press to stop playback.
Pause/Step
Play
11 Angle Press to select a DVD camera angle, if
12 CM Skip Press to skip forward through
13 Eject/Open/
Close
14 FM/AM Tuner
select
15 Input Press to select the VCR’s source (Tuner,
16 Audio Press to select an audio language (DVD)
17 Sound Mode Press to select the sound mode.
18 Set up/Menu P ress t o access or leave the DVD Setup
19 Memory/Enter Press to select a menu item.
20 Disc Menu Press to access the menu on th e DVD
21 Volume (+/-) Press to adjust the speaker volume.
22 Marker Press to mark any point during playback.
Search Press t o display the Marker Search
Subtitle Press to select a subtitle language.
Mute Press to turn the sound on and off.
23 Repeat/A-B/
Speed
Repeat Pr ess to repeat a chapter, track, title, or
TV/VCR Press to switch to view channels
24 Zoom Press to enlarge the DVD video image.
Press to navigate through the on-scr een
menu. Also use to change channels on
the VCR or stations on the radio.
Timer Recording.
In DVD mode: Press and hold to search
backward, press to go to the beginning
of the current chapter or track, or press
to go to the previous chapter or track.
In VCR mode: Press to rewind the tape if
the VCR is in Stop mode or press to
perform a fast reverse picture search.
In DVD mode: Press and hold to search
forward or p ress to go to the beginning
of the next chapter or track.
In VCR mode: Press to advance the tape
if the VCR is in Stop mode or press to
perform a fast forward picture search.
Press to temporarily pause playback or
recording.
Press repeatedly for frame-by-frame
playback.
Press to start playbac k.
one is available on the DVD .
30 seconds of recorded material.
Press to open and close the dis c tray or
eject a tape in the VCR.
Switch between the FM or AM band on
the radio.
Line 1, or Line 2)
or an audio channel (CD).
menu and VCR menu.
Press to display functions o n t he
television screen.
Press to store a radio station’s frequency
in the tuner’s memory.
disc.
menu.
Press to repeat a marked section.
Press to select a recording speed.
all.
selected by the VCR tuner o r b y the
television tuner.
Component Description
25 Title Press to access the DVD’s Title menu.
Note
This remote control uses the same buttons for both the VCR
and the DVD play er . To control the VCR, press the VCR b utton.
To control the DVD, press the DVD button.
Installing batteries in the remote control
To install batteries in the remote control:
1 Detach the battery cover on the back of the
remote control.
2 Insert two AAA (R03) batteries with + and -
aligned correctly.
3 Replace the battery cover.
Caution
• Do not mix old and new batteries.
• Never mix different types of batteries (such as standard and
alkaline).
Using discs
Playable Discs
This DVD player plays the following discs:
Disc Description
DVD DVD video disc (8 or 12 cm)
CD Audio CD disc (8 or 12 cm)
DVD-RW DVDs containing MP3, WMA, or JPEG
DVD+RW DVDs containing MP3, WMA, or JPEG
CD-R CDs containing MP3, WMA, or JPEG
CD-RW CDs containing MP3, WMA, or JPEG
Note
• Depending on the conditions of the recording equipment or
the CD-R/RW (or DVD-RW, DVD+RW) disc itself, some
discs cannot be played on the player.
• Do not attach any seal or label to either side (the labeled
side or the recorded side) of a disc.
• Do not use irregularly shaped CDs (such as heart-shaped
or octagonal). Doing so may result in malfunctions.
DVD basics
Some playback operations of DVDs may be
programmed by the DVD manufacturer. This
player plays DVDs according to disc content
designed by the DVD manufacturer. Some
playback features of the player may not be
available or other functions may be added.
files
files
files
files
www.insignia-products.com
5
Page 8

Insignia NS-H3005 Home Theater System
Make sure that you refer to the instructions
supplied with the DVDs. Some DVDs made for
business purposes may not play on the player.
Regional codes
This DVD player is designed and
manufactured for playback of Region 1
1
encoded DVD software. The region
indicates which type of player can play those
discs. This player can only play DVDs labeled 1
or ALL. If you try to play any other discs, the
message Check Regional Code appears on the
television screen. Some DVDs that have no
region code label may still be subject to area
restrictions and therefore not playable.
code on the labels of some DVDs
Disc glossary
Title (DVD video discs only)
A title is the main film content or accompanying
feature content or additional feature content, or
music album. Each title is assigned a title
reference number to make it easy for you to
locate it.
Chapter (DVD video discs only)
Chapters are sections of a video or a musical
piece that are smaller than titles. A title is
composed of one or more chapters. Each
chapter is assigned a chapter number to make it
easy for you to locate the chapter you want.
Some discs may not have chapter s.
Track (Audio CD only)
Tracks are sections of a musical piece on an
audio CD. Each track is assigned a track number
to make it easy for you to locate the track you
want.
Audio glossary
DTS
Lets you enjoy 5.1(or six) discrete channels of
high quality digital audio from DTS program
sources such as DVDs and CDs bearing the
trademark. DTS Digital Surround delivers up to
six channels of transparent audio and results in
exceptional clarity throughout a true 360 degree
sound field. The term DTS is a trademark of
DTS Technology, LLC. This player is
manufactured under license from DTS
Technology, LLC.
Dolby Digital
The Dolby Digital surround format lets you enjoy
up to 5.1 channels of digital surround sound
from a Dolby Digital program source. If you play
DVDs with the mark, you can enjoy even
better sound quality, greater spatial accuracy,
and improved dynamic range.
Pro Logic
Use this mode when playing a movie or Dolby
Digital 2 channel which carries the mark.
This mode provides the effect of being in a
movie theatre or live concert house—an effect
with an intensity which can only be obtained
through Dolby Pro Logic Surround. The effect of
the front, back, left, and right movement of the
sound image, as well as the sense of fixed
position in the sound image, is much clearer and
more dynamic than before.
Pro Logic (II)
Dolby Pro Logic II creates five full-bandwidth
output channels from two-channel sources. This
is done using an advanced, high-purity matrix
surround decoder that extracts the spatial
properties of the original recording without
adding any new sounds or tonal colorations.
( )
Movie mode
The Movie mode is for use with stereo television
shows and all programs encoded in Dolby
Surround. The result is enhanced sound field
directionality that approaches the quality of
discrete 5.1-channel soun d.
Music mode
The Music mode is for use with any stereo music
recordings.
Matrix mode
The Matrix mode is the same as the Music mode
except that the directional enhancement logic is
turned off. It may be used to enhance mono
signals by making them seem
larger
3D SURROUND
This player can produce a 3D surround effect,
using 3D Surround Sound technology, which
simulates multi-channel audio playback from two
conventional stereo speakers instead of the five
or more speakers normally required to listen to
multi-channel audio from a home theatre. This
feature works with DVDs encoded with Dolby
Pro Logic and Dolby Digital audio tracks.
BYPASS
Software with multichannel surround audio
signals is played according to the way it was
recorded.
Sound mode
You can enjoy surround sound by selecting one
of the pre-programmed sound fields according to
the program you want to listen to.
DVD playback
You can change the Digital Audio Output mode
by pressing the AUDIO button on the remote
control during playback. Although the DVD
contents differ from disc to disc, the following
explains the basic operation when this feature is
used.
• After you select two channel by pressing the
AUDIO button, press the SOUND MODE
button repeatedly. The sound mode
selections are as follows:
•Bypass
• PRO Logic
•Movie
•Music
•Matrix
• 3D Surround
• After you select 5.1 channel by pressing the
AUDIO button, press the SOUND MODE
button. BYPASS is the only option.
.
6
www.insignia-products.com
Page 9

Insignia NS-H3005 Home Theater System
CD playback
Each time you press SOUND, the audio CD
sound mode is changed in the following order:
•Bypass
• PRO Logic
•Music
•Matrix
• 3D Surround
Note
• The player memorizes the last mode setting for each source
individually.
• You can identify the encoding format of program software
by looking at its packaging.
Dolby Digital discs are labeled with the logo .
Dolby Surround encoded programs are labeled with the
logo .
DTS Digital Surround discs are marked with DTS.
• When you play sound tracks with 96kHz sampling
frequency, the output signals are converted to 48kHz
sampling frequency.
Connecting your home
theater system
Note
• Depending on your television and other equipment you
want to connect, there are various ways to connect the
home theater system. Use connections described on
page 7 through page 9.
• Refer to your television, VCR, and Stereo System manuals
to make the best connections.
• Make sure that the home theater system is connected
directly to the television. Tune the television to the correct
video input channel.
• Do not connect your home theater system through another
VCR. The DVD image could be distorted by the copy
protection system.
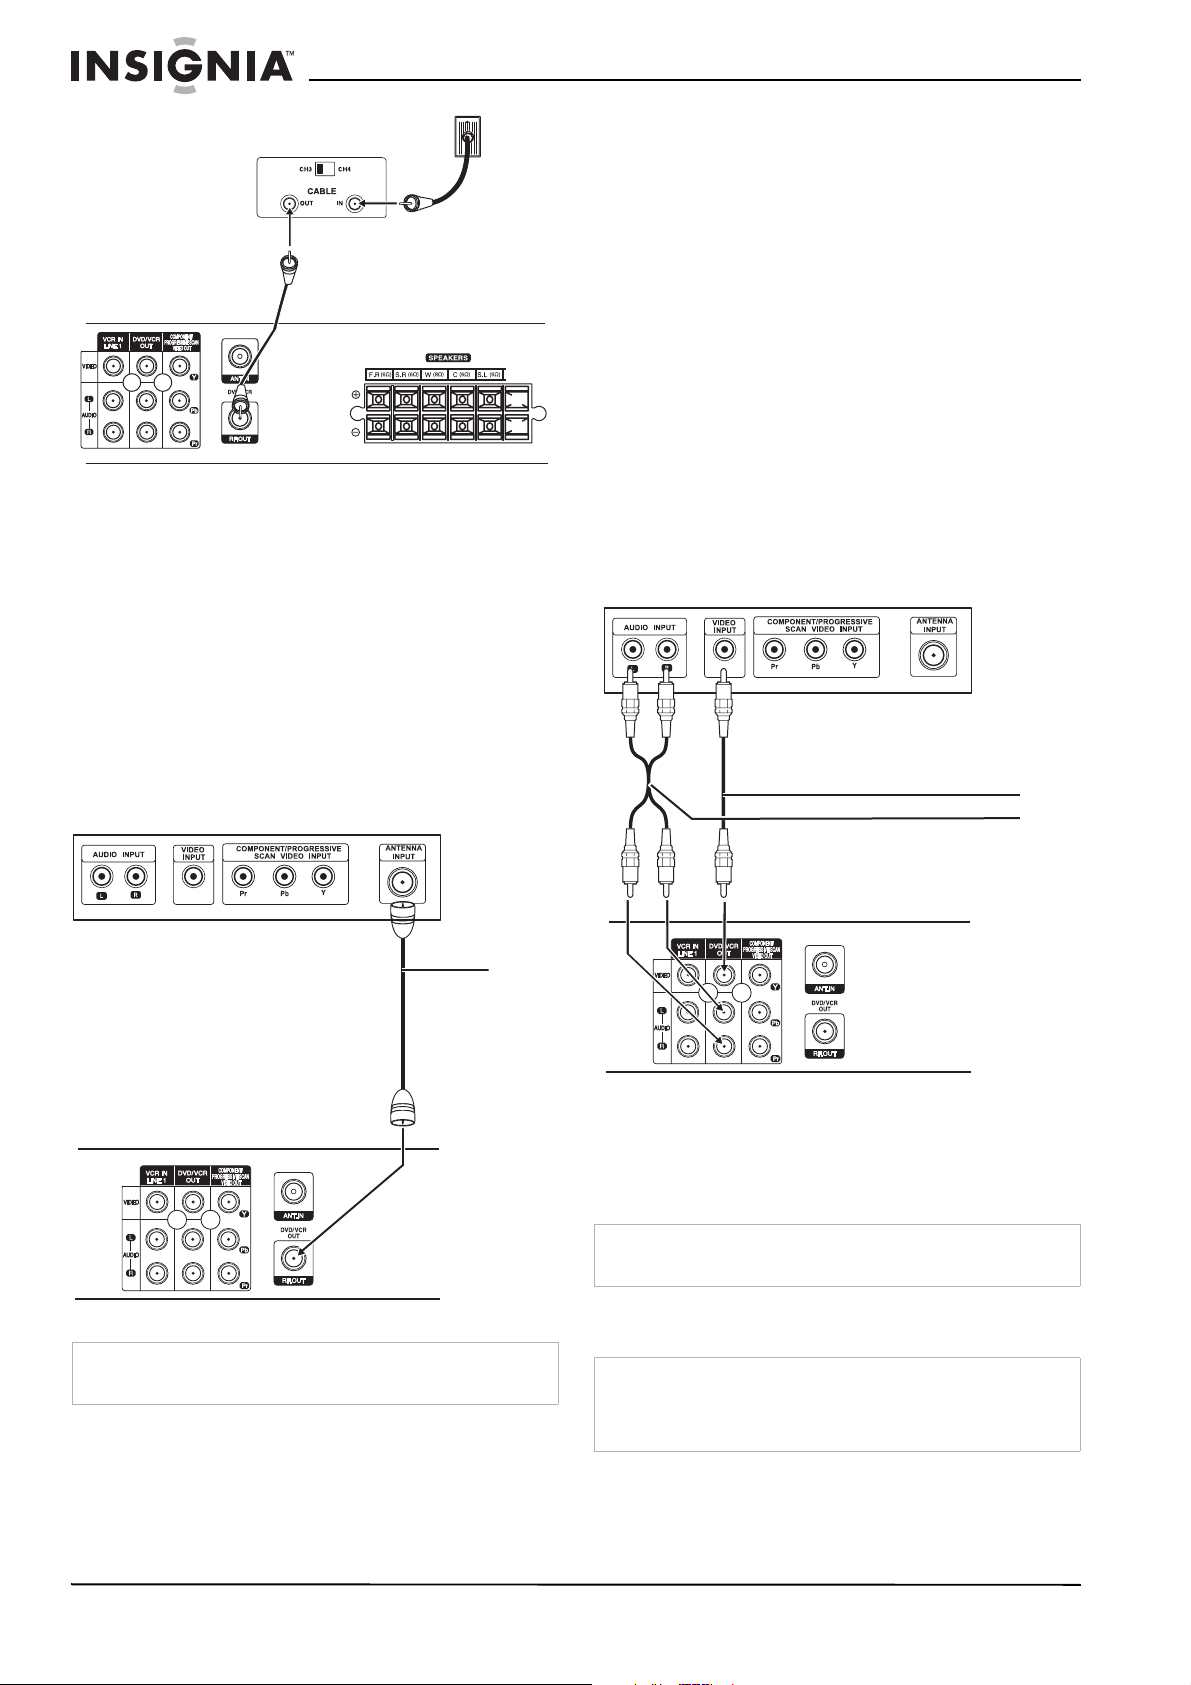
Connecting antenna or cable TV to the
home theater system
To connect the antenna or cable TV to your
home theater system:
1 Disconnect the antenna or cable TV leads
from the back of your television.
2 Identify the type of cable from your antenna
or cable TV. If it is a round cable as
illustrated, it is a 75 ohm coaxial antenna
cable. This cable connects directly to the jack
marked ANTENNA/CABLE IN on your home
theater system.
Note
If your antenna lead wire is a flat type ant enna cable, connect it
to an antenna adapter (300-ohm to 75-ohm) (not supplied) and
plug the adapter onto the ANTENNA/CABLE IN jack. The
adapter does not screw onto the jack, it just plugs over it.
Antenna
Flat Wire
(300 ohm)
300/75
ohm
adapter
(not
supplied)
Note
During DVD or VCR playback, the home theater system is
designed so that sound is heard only from the home theater
system’s five speakers and subwoofer. No sound output is
provided to the television if it is connected to the MONITOR
OUT jack on the home theater system with optional cables.
Antenna
Cable TV
wall jack
Back of home theater system
Connecting without a cable box
If your cable wire is connected to your television
without a converter or descrambler box, unscrew
the wire from your television and attach it to the
ANTENNA/CABLE IN jack on the home theater
system. Use the supplied round coaxial cable to
connect between the home theater system’s
ANTENNA/CABLE OUT jack and the 75 ohm
antenna input jack on the television. With this
connection, you can receive all midband, super
band, and hyperband channels.
Connecting with a cable box
If a cable converter box is required in your cable
system, follow these instructions. This cable
hookup permits both television and home
theater system operation.
To view or record CATV channels:
1 Tune the television to the home theater
system output channel (CH 3 or 4).
2 Set the home theater system channel
selector to the output channel of the cable
converter box by using the or on your
home theater system. (Example: CH3)
3 Select the channel to view or record at the
cable converter box.
Note
• With this connection, you cannot record one program while
viewing another.
• If you are using a cable box to tune channels, it is not
necessary to complete Auto Channel Programming as
indicated on page 12.
www.insignia-products.com
7
Page 10
Insignia NS-H3005 Home Theater System
Back panel of typical
cable box
Back of home theater system
Cable TV
wall jack
Connecting the home theater system to
the television
Connect the home theater system to your
television using one of the following methods:
• “RF coaxial connection” on page 8
• “Audio/Video connection” on page 8
• “Component Video (ColorStream®)
connection” on page 8
• “Progressive Scan (ColorStream® pro)
connection” on page 9
RF coaxial connection
Connect the ANTENNA/CABLE OUT jack on the
home theater system to the ANTENNA in jack
on the television using the 75-ohm coaxial cable.
To set the home theater system’s RF output
channel:
1 While the home theater system is turned off,
press and hold CH/PRESET (-/+) on th e fr ont
panel for about five seconds. The home
theater system turns itself on and RF-03 or
RF-04 appears in the display window.
2 Press CH/PRESET (-/+) on the front panel to
change the RF output channel (CH 03 or CH
04).
3 Turn the home theater system off, then turn it
on again.
4 Select the television’s CH to 3 or 4 depending
on the RF output channel you selected.
Audio/Video connection
To connect the home theater system to the
television using the A/V jacks:
1 Connect the home theater system VIDEO
OUT jack on the home theater system to the
video in jack on the television using the
supplied video cable.
Video
Audio
Back of home theater system
Note
If you use this connection, tune the television to the home
theater system’s RF output channel (CH 3 or 4).
Coaxial
cable
Back of home theater system
2 Connect the left and right home theater
system AUDIO OUT jacks on the home
theater system to the audio left/right in jacks
on the television using the supplied audio
cables.
Note
If you use this connection, set the television’s source selector
to VIDEO.
Component Video (ColorStream®)
connection
Note
DVD playback can also be done using the COMPONENT/
PROGRESSIVE SCAN VIDEO OUT connection. The tuner
and VCR only output through the RF.OUT (R) or home theater
system OUT (A, V) jack.
8
www.insignia-products.com
Page 11

Insignia NS-H3005 Home Theater System
To connect the DVD player to the television
using component video:
1 Connect the COMPONENT/PROGRESSIVE
SCAN VIDEO OUT jacks on the home
theater system to the corresponding in jacks
on the television using Y, Pb, and Pr cables
(C).
Component
Audio
To connect the DVD player to the television
using progressive scan:
1 Connect the COMPONENT/PROGRESSIVE
SCAN VIDEO OUT jacks on the home
theater system to the corresponding in jacks
on the television using Y, Pb, and Pr cable
(C).
Component
Audio
Back of home theater system
2 Connect the left and right home theater
system AUDIO OUT jacks to the audio left
and right in jacks on the television using the
supplied audio cables.
Note
• Set the Progressive Scan to On on the DVD Setup menu f or
progressive scan, see “Picture menu” on page 17.
• Progressive scan does not work with the analog video
connections (yellow VIDEO OUT and S-VIDEO OUT jack).
Progressive Scan (ColorStream® pro)
connection
Note
• DVD playback can also be done using the COMPONENT/
PROGRESSIVE SCAN VIDEO OUT connection. The tuner
and VCR only output through the RF.OUT (R) or home
theater system OUT (A, V) jack.
• If your television is a high-definition or
television, you can take advantage of the home theater
system’s progressive scan output for the highest video
resolution possible.
• If your television does not accept the Progressive Scan
format, the picture appears scrambled if you try using
progressive scan on the home theater system.
digital-ready
Back of home theater system
2 Connect the left and right home theater
system AUDIO OUT jacks to the audio left
and right in jacks on the television (A) using
the supplied audio cables.
Note
• Set the Progressive Scan to On on the DVD Setup menu f or
progressive scan, see “Picture menu” on page 17.
• Progressive scan does not work with the analog video
connections (yellow VIDEO OUT and S-VIDEO OUT jack).
www.insignia-products.com
9
Page 12
Insignia NS-H3005 Home Theater System
Connecting devices to your home theater
system
To connect devices to your home theater
system:
• Connect the LINE 1 or LINE 2 jacks on the
home theater system to the AUDIO/VIDEO
OUT jacks on your accessory component
using the optional audio/video cables.
Accessory component such as a VCR,
camcorder, video camera, satellite
receiver, or laser disc player
Accessory device jack panel
AUD
IO
UTPU
T
O
R
L
VIDEO
UTPU
T
O
OR
Note
• To prevent noise pickup, keep the AM loop antenna away
from the home theater system and other devices.
• Be sure to fully extend the FM wire antenna.
• After connecting the FM wire antenna, keep it as close to
horizontal as possible.
Connecting speakers to your home theater
system
Connect the speakers using the supplied
speaker cables.
To obtain the best possible surround sound,
adjust the speaker distance and level settings.
For more information, see “Speaker Setup” on
page 17.
Front speaker
(right)
Center speaker
Subwoofer
Front speaker
(left)
Rear speaker
(left)
Back of home theater system Front of home theater system
Connecting the radio antennas to your
home theater system
Connect the supplied AM and FM antennas so
you can listen to the radio.
To connect the radio antennas:
1 Connect the AM loop antenna to the AM
antenna connector.
2 Connect the FM wire antenna to the FM
antenna connector.
AM loop antenna
FM wire antenna
Rear speaker (right)
Note
• Make sure that you match the speaker cable to the
appropriate terminal on the connectors: + to + and – to –. If
the cables are reversed, the sound is distorted and lacks
bass.
• When making the sound louder, adjust the sound level
carefully to avoid excessive volume output to the speakers.
• Only 2-channe l stereo (Front Left, Front Right, and
Subwoofer) is available in VCR mode. Sound might not be
heard from center or rear speakers during VCR playback.
(For further details about sound mode, see “Sound mode”
on page 6.)
• Do not remove the front covers of the speakers.
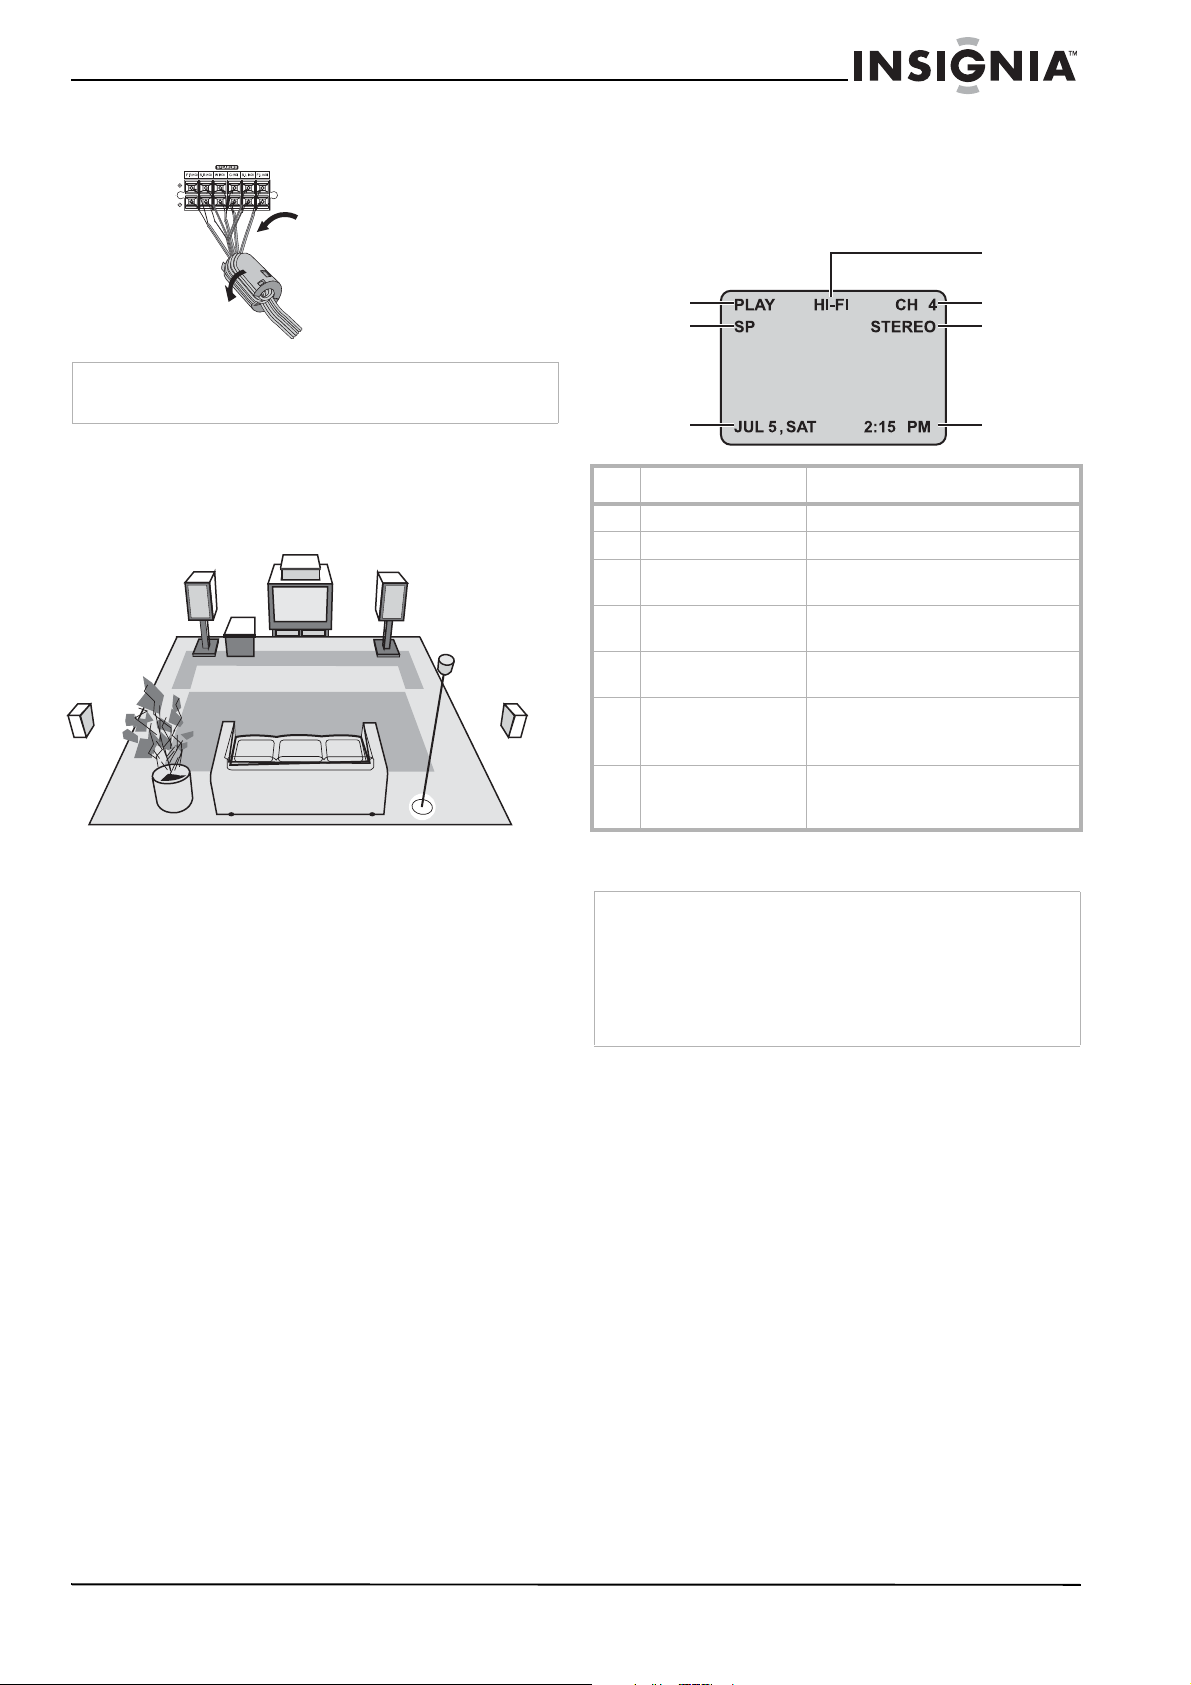
Attaching the ferrite core
Be sure to attach the ferrite core to the speaker
cables. The ferrite core reduces unwanted
noises.
To attach the ferrite core:
1 Open the ferrite core by pressing the stopper.
10
Stopper
2 Wind the cable once around the ferrite core.
www.insignia-products.com
Page 13
Insignia NS-H3005 Home Theater System
3 Close the ferrite core. You should hear a
click.
Connect the
ferrite core as
close as
possible
Note
Attach the ferrite core as close to the home theater system as
possible.
Locating the speakers
For a normal setup, use six speakers (two front
speakers, one center speaker , two rear speakers
and a subwoofer).
Center speaker
Speaker location example
Front speaker
(right)
Front speaker
(left)
Rear speaker
(left)
Front speakers
Center speaker
Rear speakers
Subwoofer
Subwoofer
From your listening position, place the
speakers an equal distance away and with an
angle of 45° between speakers.
The center speakers and front speakers
should be at the same height. Place the
center speaker above or below the television
as shown.
Place left and right rear speakers behind the
listening area. These speakers recreate
sound motion and atmosphere required for
surround sound playback. For best results,
do not install the rear speakers too far behind
the listening position and install them at or
above the lev el of the listener’s ears. It is also
effective to direct the rear speakers towards a
wall or ceiling to further disperse the sound.
For a smaller room size, if the audience is
near the back wall, place the rear speakers
opposite each other, and 24 - 36 inches
above the listeners’ ears.
If you want to hear excellent bass sound or
Dolby Digital surround, you should connect a
subwoofer. Place the subwoofer in any front
position.
Rear speaker
(right)
Setting up the VCR
Using the On-Screen Display (OSD)
Some of these functions appear during VCR
operation.
4
1
2
3
Display Description
1 Function Indicates the function in progress.
2 Tape speed Shows the current tape speed.
3 Date Shows the cu rr e nt date .
4 Hi-Fi Indicates the VCR is playing back
5 Channel Indicates the selecte d channel or
6 Stereo/SAP Show s the type of audio signal
7 Clock/Count/Remain Shows the current time, the tape
(Month/Date/Day of the week format)
tape recorded in Hi-Fi.
LINE1 or LINE2.
received by the VCR tuner.
NOTE: MONO i s not displayed.
counter, and remaining time on the
tape.
Press MEMORY/ENTER to change the
television on-screen displays.
Note
• The function displays remain on the television screen for
five seconds.
• The clock, tape counter, and tape remaining information
continue to be shown until you press MEMORY/ENTER.
• The tape counter and the remaining tape length indicator
appear only when a tape is inserted. Also, the remaining
tape length indicator appears after any tape operation.
Getting easy information
If Extended Data Service (XDS) signals are
provided along with normal television signal in
your area or during playback of a tape recorded
with Extended Data Service (XDS) signals, the
station ID, program title, and program details are
shown on the television screen.
When viewing a channel with Extended Data
Service (XDS) signals, press MEMORY/ENTER
and the station ID appears on the television
screen. Press MEMORY/ENTER again and the
program details appear on the television screen.
When viewing a tape recorded with Extended
Data Service (XDS) signals, press
MEMORY/ENTER twice and the program title
and program details appear on the television
screen.
5
6
7
www.insignia-products.com
11
Page 14

Insignia NS-H3005 Home Theater System
PROGRAM DETAILS
Easy Information Screen
(Station ID)
Easy Information Screen
(Program details)
Detail Description
LENGTH Indicates the run time of a progr a m.
TIME REMAINING Indicates the remaining time of a
RATING Indicates the rating of the current
program.
program (N/A, G, PG, PG-13, R, NC-17,
X, and Not Rated). The rating N/A
means that the motion pict ure ratings
are not applicable to this program.
Accessing the On-Screen menus
The SETUP, clock setting (CLOCK), and timer
recordings (PROGRAM) functions are accessed
with the on-screen menus.
Menu selection
Your VCR lets you use the remote control to
adjust several features.
To adjust a VCR setting:
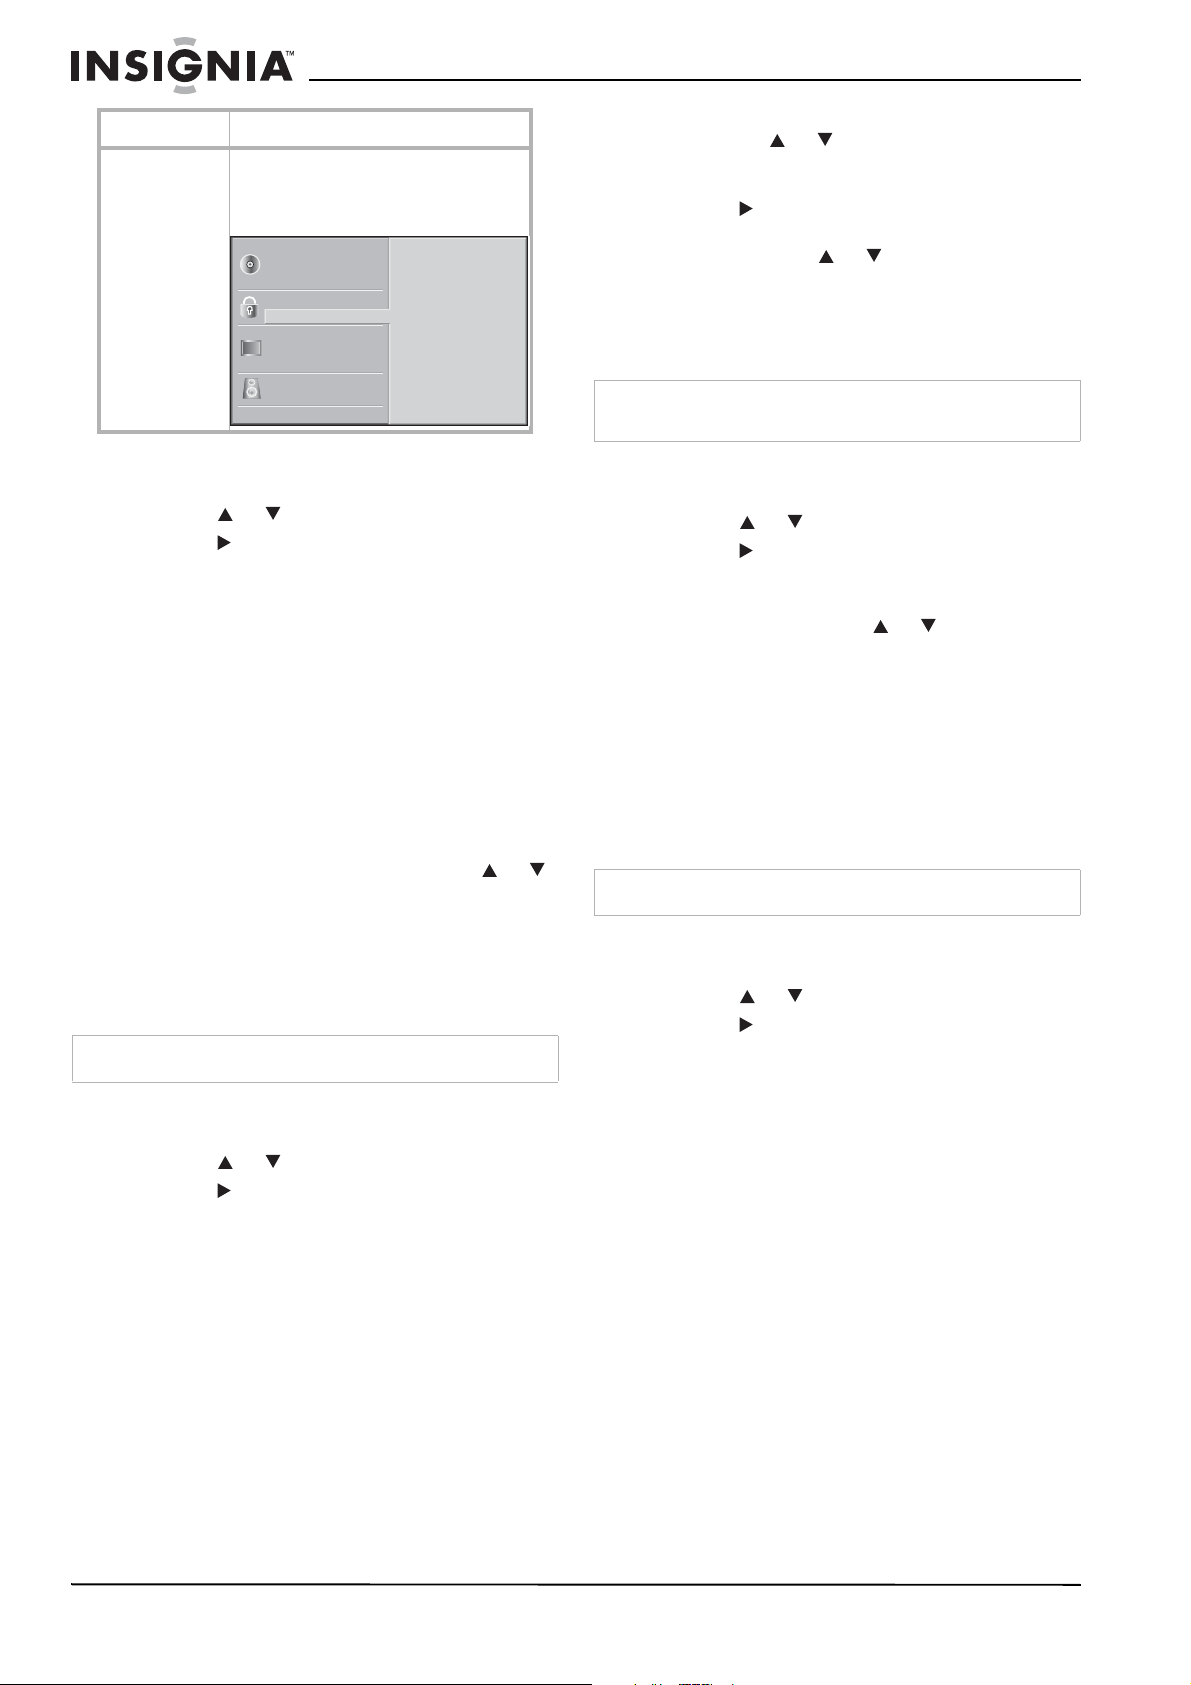
1 Press MENU. The Main menu appears.
2 Select the submenu with the or buttons,
then press MEMORY/ENTER.
Note
Menus remain on-screen for three minutes.
Clock Set (page 13)
Program (page 20)
Tuning (page12)
Setup (page 12)
5 Press MENU when finished making
adjustments.
Setting Description
Function OSD Turn on or turn off the on-screen display.
Select ON and OFF with or .
Audio mode The VCR has two separate audio playback
systems, the high quality VHS Hi-Fi system and
standard NORMAL mono system. The same audio
is generally recorded on both systems. The VHS
Hi-Fi system plays on separate (lef t an d right)
channels, and the NORMAL system plays
monaural sound. The normal track is always
played so the tape can be p layed on a VCR that
does not have VHS Hi-Fi.
Select Hi-Fi or NORMAL with o r .
Broadcast type Multichannel Television Sound (MTS) carries
stereo and Second Audio Program (SAP) bilingual
signals. Set this setting to the value you want
when both MTS stereo and SAP signals are
received. When only one of the MTS signal is
received, the VCR automat ically selects the
corresponding receiving mode (S tereo or SAP)
regardless of the selected value. For normal
operation, the setting should be STEREO. The VCR
then records a stereo program when available, and
records a mono program if the pr ogram is not in
stereo.
For weak stereo or SAP broadcasts, changing the
setting to MONO may give a clearer sound.
Select STEREO, SAP, or MONO with or .
Audio output Used during playback (when AUDIO MODE
(HI-FI/NORMAL) is set to HI-FI) for selecting the
audio output signals from the AUDIO OUT jacks (L
ch and R ch), and RF.OUT.
This display setti ng should normally be left in the
STEREO position, so that when a st ereo tape is
played, the stereo sound is heard through the left
and right channels. I f a mono tape is played and
the audio output i s set to STER EO, the s ame mono
sound is heard from both left and right channe ls.
Select STEREO, LEFT, or RIGHT with or .
Channel Selection
This home theater system is equipped with a
frequency synthesized tuner capable of
receiving up to 181 channels. These include
VHF channels 2-13, UHF channels 14-69 and
CATV channels 1-125.
3 Press MENU when finished making
adjustments.
VCR Setup menu options
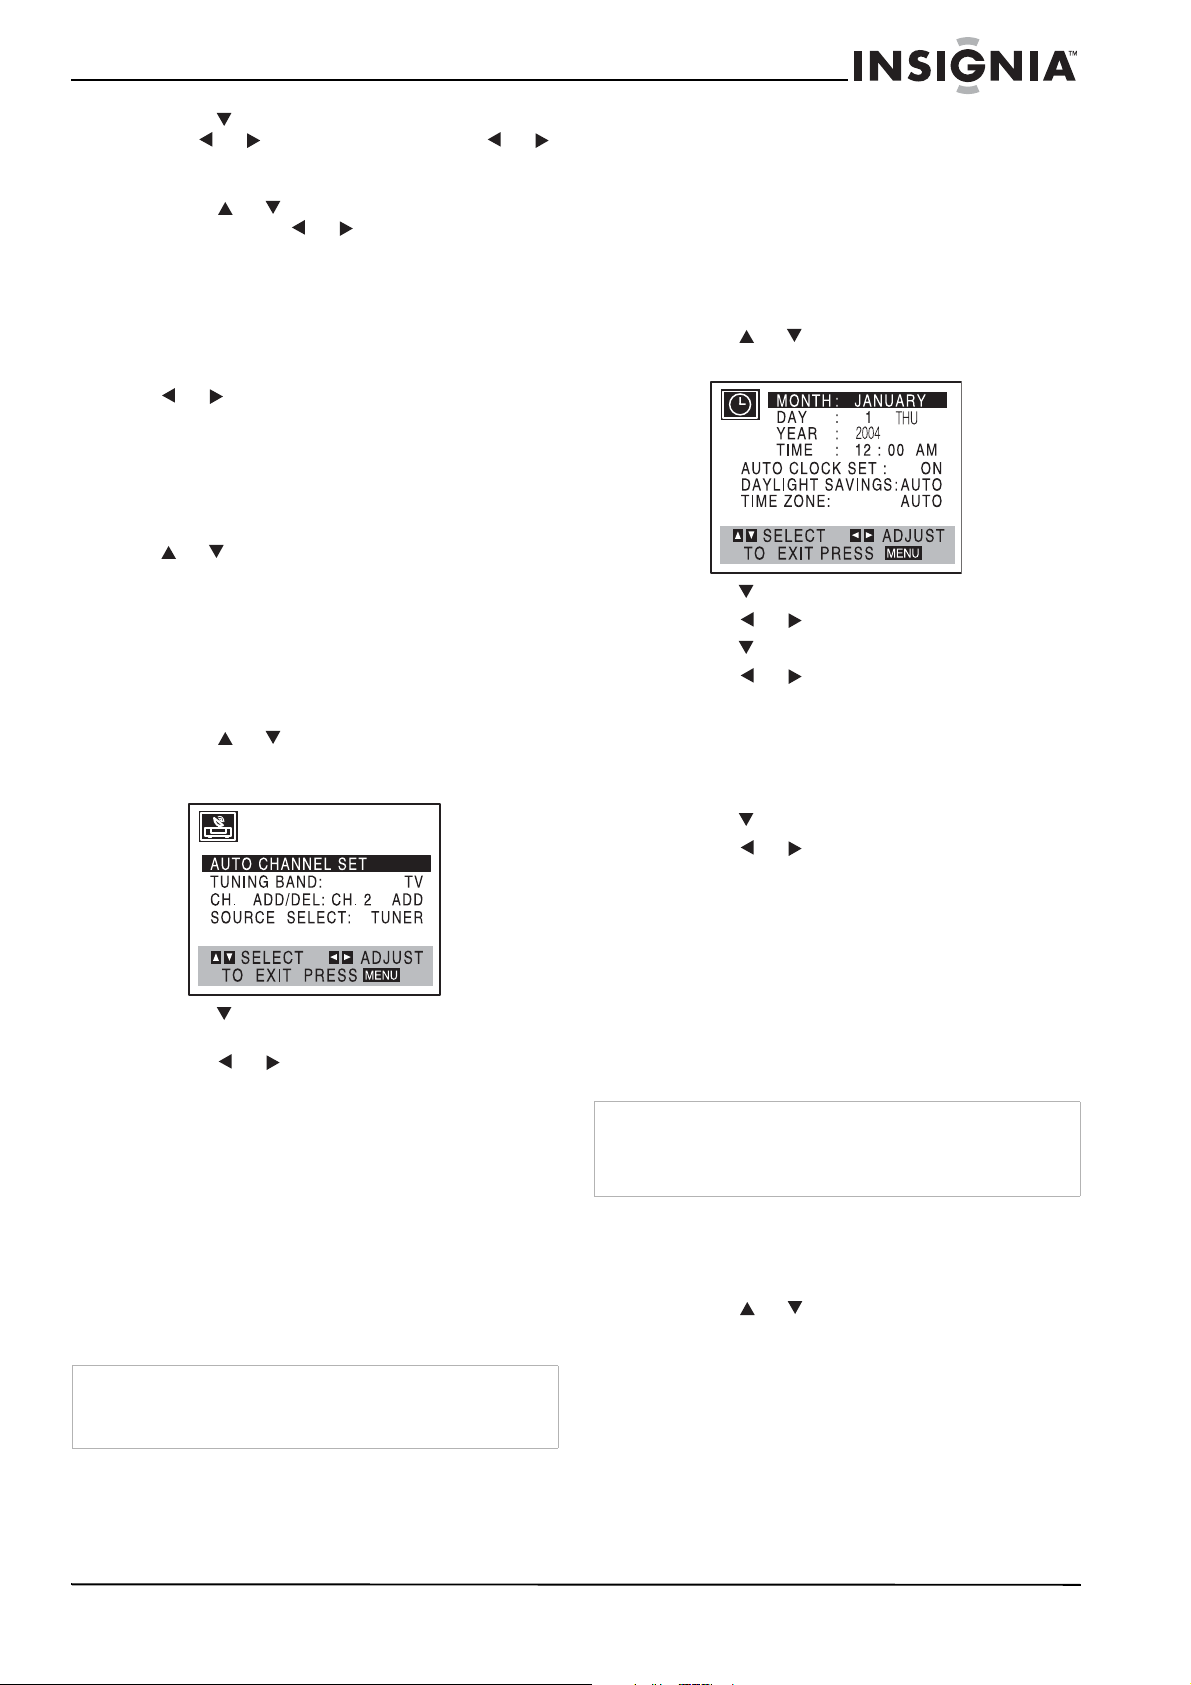
1 Press MENU. The Main menu appears.
2 Press or to select SETUP, then press
MEMORY/ENTER. The Setup menu
appears.
3 Press or to choose an option on th e
Setup menu.
4 Press or to modify a setting.
12
Note
Maker sure that the VCR is connected to an antenna or cable
television.
To complete Auto Channel Programming:
1 Press MENU. The Main menu appears.
2 Press or to select TUNING, then press
MEMORY/ENTER. The Tuning menu
appears.
www.insignia-products.com
Page 15
Insignia NS-H3005 Home Theater System
3 Press to choose SOURCE SELECT, then
use or to select TUNER. Press or
repeatedly to switch among TUNER, LINE1
or LINE2.
4 Press or to choose AUTO CHANNEL
SET, then use or to search for
channels. The tuner automatically cycles
through all available channels in the area and
stores them in the tuner’s memory.
5 After the Auto Channel Programming is
complete, make sure that the TUNING BAND
is set appropriately (TV or CATV). Select the
correct TUNING BAND (TV or CATV) with
or while in the Tuning menu.
Remember, TV is for the air antenna
reception, CATV is for cab le or wirele ss cable
connection.
6 Press MENU to return to the television
screen.
7 Press CH/PRESET (-/+) on the front panel or
or on the remote control to change the
channel on the VCR.
Adding or erasing channels
This feature lets you add or erase channels from
memory manually.
To add or erase channels from memory:
1 Press MENU. The Main menu appears.
2 Press or to select TUNING, then press
MEMORY/ENTER. The Tuning menu
appears.
3 Press to choose CH. ADD/DEL on the
Tuning menu.
4 Press or to select a channel to add or
erase.
5 Press MEMORY/ENTER to add or erase the
channel.
6 Repeat steps 3 through 5 to add or erase
channels.
7 Press MENU to close the menu.
Setting the clock
The home theater system gives you two ways to
set the time and date: the Auto Clock Feature or
manually. The Auto Clock feature enables the
home theater system to set up the clock while
the home theater system is turned off.
Auto Clock Set
The Auto Clock Set feature is set to ON at the
factory. In the ON setting, the home theater
system looks for a channel carrying XDS
(Extended Data Services) information. XDS
updates the clock using the Coordinated
Universal Time.
To use Auto Clock Set:
1 Press MENU. The Main menu appears.
2 Press or to choose CLOCK, then press
MEMORY/ENTER. The Clock menu appears.
3 Press to choose AUTO CLOCK SET.
4 Press or to choose ON.
5 Press to choose DAYLIGHT SAVINGS.
6 Press or to choose AUTO, ON, or OFF.
If you choose AUTO, the VCR sets the clock
using the Daylight Saving Time information
broadcast in the signal (channel).
If you choose ON, the VCR adjusts the clock
for Daylight Saving Time automatically.
7 Press to choose TIME ZONE.
8 Press or to choose the correct time
zone (AUTO, EASTERN, CENTRAL,
MOUNTAIN, PACIFIC, ALASKA, or
HAWAII).
If you select AUTO as the time zone, the VCR
sets the clock using the first Coordinated
Universal Time information it finds in a
broadcast signal.
9 Press MENU when finished.
10 Turn off the home theater system and the
auto clock set feature sets the time.
Note
There are cases where the television station does not send or
sends wrong date and/or time information and the home
theater system sets the incorrect time. If this happens we
recommend that you set the clock manually.
Setting the clock manually
To manually set the clock:
1 Press MENU. The Main menu appears.
2 Press or to choose CLOCK.
Note
The clock uses the 12-hour system. Be sure to set AM and PM
correctly. AM does not appear on the display.
The initial clock setting is January 1, 2006, 12:00 AM.
www.insignia-products.com
13
Page 16

Insignia NS-H3005 Home Theater System
3 Press MEMORY/ENTER. The Clock menu
appears.
4 Press or to choose the month.
5 Press to choose DA Y.
6 Press or to choose the date. The day of
the week displays automatically.
7 Press to choose YEAR.
8 Press or to choose the year.
9 Press to choose TIME.
10 Press or to choose the time.
-ORPress and hold or to advance the clock
continuously.
11 Press to choose DAYLIGHT SAVINGS.
12 Press or to choose AUTO, ON, or OFF.
If you choose AUTO, the VCR sets the clock
using the DST information broadcast in the
signal (channel). If you choose ON, the VCR
adjusts the clock for Daylight Saving Time
automatically.
3 Press or to change the setting of an
item. The number buttons can also be used
for entering numbers.
4 For some functions, press MEMORY/ENTER
to modify the setting.
Temporary Feedback Field Icons
Icon Description
Repeat title
TITLE
Repeat chapter
CHAPT
Repeat track (non-PCB video CD discs only)
TRACK
Repeat all tracks (non-PCB video CD discs
ALL
A B
OFF
Note
• Some discs may not provide all of the features on the
following on-screen display example.
• If no button is pressed for 10 seconds, the on-screen
display disappears.
only)
Repeat A-B
Repeat off
Resume play from this point
Action prohibited or no t av ai lable
13 Press MENU when finished.
Note
If setting the clock manually, AU TO CLOCK SET must be set
to OFF. If AUTO CLOCK SET is set to ON, an incorrect date or
time will be entered again when the home theater system is
turned off.
Setting up the DVD player
Some DVDs require specific operation or allow
only limited operation during playback. When
this occurs, the symbol appears on the
television screen, indicating that the operation is
not permitted by the DVD player or is not
available on the DVD.
Using the On-Screen Display
General playback status can be displayed on the
television screen. Some items can be changed
using the menu.
To use the on-screen display:
1 Press DISPLAY during playback.
2 Press or to select an item. The selected
item is highlighted.
DVD OSD
Items Function
Title number Shows the
1/3
Chapter number Shows the
1/12
Time search Shows the
0:20:09
current title
number and
total number
of titles, and
skips to a title
number.
current
chapter
number and
total number
of chapters,
and skips to a
chapter
number.
elapsed
playing time,
and searches
to the point
directly from
the elapsed
time.
Selection
Method
/, or
Numbers,
MEMORY/
ENTER
/, or
Numbers,
MEMORY/
ENTER, SKIP
Numbers,
MEMORY/
ENTER
14
www.insignia-products.com
Page 17

Insignia NS-H3005 Home Theater System
Items Function
Audio language
and digital audio
output mode
1 ENG
D
5.1 CH
Subtitle language Shows the
OFF
Angle Shows the
1/1
Sound Shows the
BYPASS
Shows the
current audio
soundtrack
language,
encoding
method, and
channel
number, and
changes the
setting.
current
subtitles
language, and
changes the
setting.
current angle
number and
total number
of angles, and
changes the
angle number.
current sound
mode, and
changes the
setting.
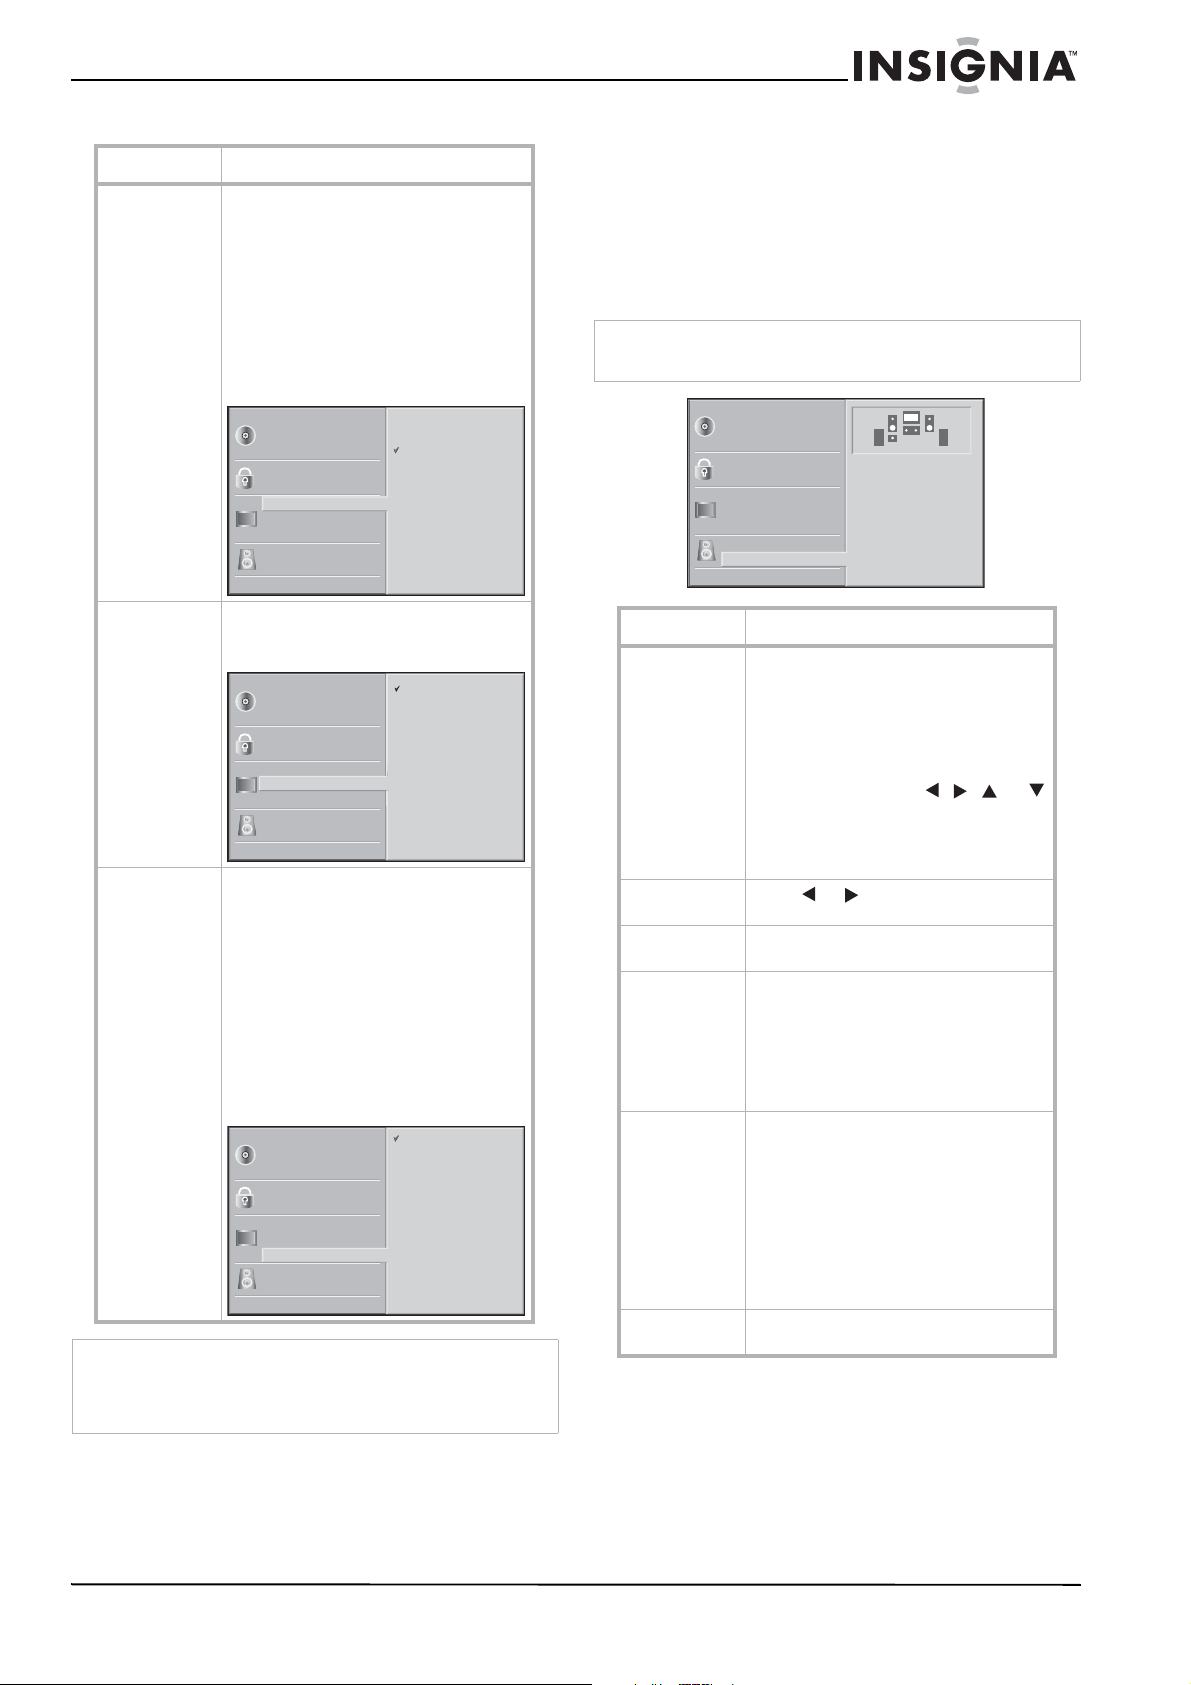
Accessing the On-Screen menus
You can set your own personal preferences on
the DVD player.
General Operation
1 Press SETUP. The Setup menu appears.
Selection
Method
/, or
AUDIO
/, or
SUBTITLE
/, or
ANGLE
/, or
SOUND
MODE
Language menu
Menu Description
Disc language Select a language for the DVD’s menu,
Audio, and Subti tle.
Original: The original language set for the
DVD is selected.
Other: To select another language, press
number buttons to enter the
corresponding 4 -digit number accor ding
to the “Language code list” on page 33. If
you enter the wrong language code, press
CLEAR.
Disc Audio
Disc Subtitle
Disc Menu
Rating
Country Code
TV Aspect
Menu Language
Progressive Scan
5.1 Speaker Setup
Others
Original
English
French
German
Spanish
Italian
Chinese
Polish
Hungarian
Other — — — —
Parental Control
Movies on DVDs may contain scenes not
suitable for children. Therefore, DVDs may
contain Parental Control information that applies
to the complete DVD or to certain scenes on the
DVD. These scenes are rated from 1 to 8, and
alternatively, more suitable scenes are available
for selection on some DVDs. Ratings are
country-dependent. The Parental Control feature
lets you prevent D VDs from being played by your
children or to have certain DVDs played with
alternative scenes.
Disc Audio
Disc Subtitle
Disc Menu
Rating
Country Code
TV Aspect
Menu Language
Progressive Scan
5.1 Speaker Setup
Others
Original
English
French
German
Spanish
Italian
Chinese
Polish
Hungarian
Other — — — —
2 Press or to select the item. The screen
shows the current setting for the selected
item, as well as alternate setting(s).
3 While the item is selected, press , then
or to select the setting.
4 Press MEMORY/ENTER to confirm your
selection. Some items require additional
steps.
5 Press SETUP, RETURN, or PLAY to exit the
Setup menu.
Menu Description
Rating Ratings 1 to 8: Some DVDs contain
scenes not suitable for children. If you
set a rating for the player, all DVD scenes
with the same rating or lower are played.
Higher rated scenes are not p layed
unless an alternative scene is available
on the DVD. The alternative must have
the same rating that you set or a lower
one. If no suitable alternative is found,
playback stops. You must enter the
4-digit password or change the rating
level in order to play the DVD.
Unlock: If you select Unlock, Parental
Control is not active. Any DVD will play in
full.
Disc Audio
Disc Subtitle
Disc Menu
Rating
Country Code
TV Aspect
Menu Language
P
rogr
essive Sca
5.1 Speaker Setup
Others
8
7
6
5
4
3
2
n
1
Unlock
Change
www.insignia-products.com
15
Page 18
Insignia NS-H3005 Home Theater System
Menu Description
Country Code Enter the code of a country/area whose
standards w ere us ed to ra te the D VD. For
more information, see “Country code
list” on page 33.
Disc Audio
Disc Subtitle
Disc Menu
Rating
Country Code
TV Aspect
Menu Language
P
rogr
essive Sca
5.1 Speaker Setup
Others
Code Set
C A
U S
n
To set the parental rating:
1 Press SETUP. The Setup menu appears.
2 Press or to select Rating.
3 Press .
4 Enter the password.
• If you have not created a personal
password, enter a 4-digit password using
the number buttons, then press
MEMORY/ENTER. Enter the same 4-digit
password, then press MEMORY/ENTER
to verify.
• If you have created a personal password,
enter the 4-digit password using the
numbered buttons, then press
MEMORY/ENTER.
• If you make a mistake before pressing
MEMORY/ENTER, press CLEAR, then
enter the 4-digit security password again.
5 Select a rating from 1 to 8 using the or
buttons.
One (1) has the least playback restrictions.
Eight (8) has the most playback restrictions.
6 Press MEMORY/ENTER to confirm your
rating selection, then press SETUP to exit the
menu.
Note
Parental ratings may not work for some DVDs.
To set the country code:
1 Press SETUP. The Setup menu appears.
2 Press or to select Country Code.
3 Press .
4 Enter the password.
• If you have not created a personal
password, enter a 4-digit password using
the number buttons, then press
MEMORY/ENTER. Enter the same 4-digit
password, then press MEMORY/ENTER
to verify.
• If you have created a personal password,
enter the 4-digit password using the
numbered buttons, then press
MEMORY/ENTER.
• If you make a mistake before pressing
MEMORY/ENTER, press CLEAR, then
enter the 4-digit security password again.
5 Select the first character of the country code
using the or buttons. For more
information, see “Country code list” on
page 33
6 Press to move to the next character.
7 Select the second character of the country
code using the or buttons.
8 Press MEMORY/ENTER to confirm your
country code selection, then press SETUP to
exit the menu.
Changing the password
Note
You must confirm the existing password before it can be
changed.
To change the password:
1 Press SETUP. The Setup menu appears.
2 Press or to select Rating.
3 Press .
4 Enter the old password, then press
MEMORY/ENTER.
5 Select Change using or buttons, then
press MEMORY/ENTER.
6 Enter the new 4-digit password, then press
MEMORY/ENTER.
7 Enter exactly the same password a seco nd
time, then press MEMORY/ENTER to verify.
8 Press SETUP to exit the menu.
Clearing the password
If you forget your password, follow the procedure
below to clear it.
Note
The player must be in No Disc mode.
To clear the password
1 Press SETUP. The Setup menu appears.
2 Press or to select Rating.
3 Press .
4 Enter the 6-digit number 210499. The
password is cleared.
5 Enter a new password by following the steps
in “Parental Control” on page 15.
16
www.insignia-products.com
Page 19
Insignia NS-H3005 Home Theater System
Picture menu
Menu Description
TV aspect 4:3 Letterbox: Select when a standard 4:3
Menu language Select a language for the Setup me nu .
Progressive
scan
Note
After the setting for progressive scan output is entered, an
image is only visible on a progressive scan compatible
television or monitor. If you set Progressive Scan to On in
error, you must reset the home theater system.
television is connected. Displays theatrical
movies with masking bars above and
below the picture.
4:3 Panscan: Select when a standard 4:3
television set is connected. theatrical
movies formatted in the Pan & Scan style
are played back in that style (both sides of
the picture are cut off).
16:9 Wide: Select when a 16:9 wide
television is connected.
4:3
Disc Audio
Disc Subtitle
Disc Menu
Rating
Country Code
TV Aspect
Menu Language
Progressive Scan
5.1 Speaker Setup
Others
4:3
16:9
Letterbox
Panscan
Wide
This is the menu you see when you press
SETUP.
Disc Audio
Disc Subtitle
Disc Menu
Rating
Country Code
TV Aspect
Menu Language
Progressive Scan
5.1 Speaker Setup
Others
English
Spanish
French
Progressive Scan Video provides the
highest quality pictures with less
flickering.
If you are using the COMPONENT/
PROGRESSIVE SCAN VIDEO OUT jacks,
but are connecting the DVD Player to a
standard (analog) television, set
Progressive Scan to Off.
If you are using the Comp on e nt Vid e o
jacks for connection to a television or
monitor that is compatible with a
progressive scan signal, set Progressive
Scan to On.
Disc Audio
Disc Subtitle
Disc Menu
Rating
Country Code
TV Aspect
Menu Language
Progressive Scan
5.1 Speaker Setup
Others
Off
On
2 Press STOP and hold it for five seconds
before releasing it. The video output is
restored to the standard setting and a picture
is once again visible on a conventional
analog television or monitor.
Speaker Setup
You can use the Speaker Setup menu to select
speaker settings, including volume balance and
delay time, or test the speaker settings.
Note
Speaker settings are only active on the Analog Multi-Channel
Output.
Disc Audio
Disc Subtitle
Disc Menu
Rating
Country Code
TV Aspect
Menu Language
Progressive Scan
5.1 Speaker Setup
Others
R R
Front L
Volume 0 dB
Size Small
Distance 1 ft
Test
Return
Menu Description
Speaker
selection
Volume Press or to adjust the output level
Size Speaker size settings are fixed, you
Distance If you connected speakers to your home
Test Press MEMORY/ENTER to test the signals
Return Press MEMORY/ENTER to return to the
Select a speaker that you want to set up.
• Front speaker (Left)
• Front speaker (Right)
• Center Speaker
• Rear speaker (Left)
• Rear speaker (Right )
•Subwoofer
Adjust option s by usi ng , , , or
buttons.
Note: Certain speaker settings are
prohibited by the Dolby Digital licensing
agreement.
of the selected speaker. (-6dB ~ +6dB)
cannot change the settings.
theater system, specify the distance from
each speaker to the listen er so the sound
from each speaker reaches the listener at
the same time. (1 foot = 30.48 cm)
Note: You cannot set the distance of the
subwoofer.
of each speaker.
Adjust the volume to mat ch the volum e of
test signals stored in th e system.
• Front Left (Front L)
•Center
• Front Right (Front R)
• Rear Right (Rear R)
• Rear Left (Rear L)
•Subwoofer
previous menu.
To reset the home theater system:
1 Remove any DVD from the player and close
the disc tray. NO DISC is displayed on the
display window.
www.insignia-products.com
17
Page 20
Insignia NS-H3005 Home Theater System
Others setup
Disc Audio
Disc Subtitle
Disc Menu
Rating
Country Code
TV Aspect
Menu Language
P
rogr
essive Sca
5.1 Speaker Setup
Others
n
DRC
Vocal
PBC
Auto Play
On
On
On
Off
Menu Description
Dynamic Range
Control (DRC)
Vocal Set Vocal to On only when a
Auto Play You can set up the DVD player so a DVD
With DVDs, you can hear a program’s
soundtrack in the most accu rate and
realistic presentati on possible, due to
digital audio technology. However, you
may want to compress the dynamic
range of the audio output (the difference
between the loudest sounds and the
quietest ones). Then, you can listen to a
movie at a lower volume without losing
clarity of so und. Set DRC to On for this
effect.
multi-channel karaoke D VD is playing.
The karaoke ch annels on the disc will
mix into normal stereo sound.
automatically starts playing whenever
the DVD is inserted.
If Auto Play mode is set to On, this DVD
player searches a title that has the
longest playback time and then plays
back that title automatically.
On: Auto Play function is activated.
Off: Auto Play function is not activated.
Note: The Auto Play functi on ma y no t
work for some DVDs.
If you want to view the VCR output, press VCR
on the remote or on the front panel of the home
theater system until the VCR indicator lights in
the display window and the VCR output appears
on the television screen.
Note
• If you insert a DVD while the home theater system is in the
VCR mode, the home theater system switches to DVD
mode automatically.
• If you insert a tape without an anti-erasure tab while the
home theater system is in the DVD mode, t he home theater
system switches to VCR mode automatically.
Using the VCR
Watching a video tape
To watch a video tape:
1 Turn on the television.
2 Tune the television to the home theater
system output channel (CH 3 or 4) or set the
television’s source selector t o VID E O.
3 Press VCR on the remote or on the front
panel of the home theater system until the
VCR indicator lights in the display window
and the VCR output appears on the television
screen.
4 Insert a prerecorded video tape. The
indicator lights up.
Note
Make sure that the indicator in the display
window is not lighted. If it is, press POWER once.
If a tape without an anti-erasure tab is inserted,
the VCR starts playback automatically.
5 Press once. PLAY appears on the
television screen.
Using your home theater
system
Using the remote control
To use the remote control:
• Point the remote control at the remote
sensor, then press the buttons.
Limits
Distance: About 23 ft (7 m) from the front of the
remote sensor
Angle: About 30° in each direction of the front of
the remote sensor
Selecting the source
You must select one of your output sources
(DVD or VCR) to view on the television screen.
If you want to view the DVD player output, press
CD/DVD on the remote or on the front panel of
the home theater system until the READING
indicator lights in the display window and the
DVD output appears on the television screen.
Note
• It is not necessary to select the tape speed for
playback. It is automatically selected by the
home theater system.
• In playback, the TV/VCR selector switches to
VCR mode automatically.
6 Press to stop playback. STOP appears on
the television screen.
Note
If the tape reaches the end before is pressed,
the home theater system automatically stops,
rewinds and ejects the tape, then turns itself off.
Note
Only 2-channel stereo (Front Left, Front Right & Subwoofer) is
available for VCR mode, thus sound might not be heard from
center or rear speakers during VCR playback. For more
information about sound mode, see “Sound mode” on page 6.
18
www.insignia-products.com
Page 21

Insignia NS-H3005 Home Theater System
Using the tracking control
Tracking Description
Auto The automatic tracking function adjusts the
Manual If noise appears on the screen during
picture to removes snow or streaks.
The automatic tracking fu nction works in
the following cases:
• A tape is played back for the first
time.
• Tape speed (SP or SLP) changes.
• Streaks or snow appear because of
scratches on the tape.
playback, press either CH/TRK/PRESET
or on the remote control until the
noise on the screen is reduced.
• If vertical jitter is present, adjust the
tracking controls very carefully.
• Tracking is automatically reset to
normal when the tape is ejected or
the power cord is unplugged for
more than three seconds.
Using special effects
Note
• Horizontal lines (noise bars) may appear on the television
screen. This is normal.
• The audio is automatically muted during special effect
modes. There is no sound during search.
• During high-speed pict ure search m ode, a shor t period is
needed to stabilize tape speed when re-entering the Play
mode. You may see slight interference during this period.
Searching
This function lets you quickly and visually search
for a tape section in either forward or reverse.
To search for a scene on a video tape:
1 Press or
theater system enters Search mode.
Note
If the home theater system is left in Search mode
for more than three minutes, the home theater
system automatically returns to Play mode to
protect the tape and video heads.
2 Press to return to playback.
Viewing a still frame
To view a video tape still frame:
1 Press during playback. Picture movement
stops on one frame.
Note
• If the still picture vibrates vertically, stabilize it
by pressing or on the remote control.
• If the home theater system is left in the Still
mode for more than five minutes, the home
theater system automatically enters the Stop
mode to protect the tape and video heads.
2 Press to return to playback.
Viewing Frame-by-Frame Playback
To view a video tape frame-by-frame:
1 Press during playback. Picture movement
stops on one frame.
2 Press repeatedly to advance the video one
frame at a time while viewing a still picture in
Still mode.
during playback. The home
3 Press to return to playback.
Slow Motion
To view a video tape in slow motion:
1 While in Still mode, press FORWARD . The
tape is played back at a speed 1/19 times
slower than the normal speed.
Note
• Dur ing slow playback, use or on the
remote control to minimize noise bands.
• If Slow Motion mode continues for more than
three minutes, the home theater system
automatically changes to Playback mode.
2 Press to return to playback.
CM Skip (Commercial Skip)
CM Skip is useful for skipping commercials or
short program segment s.
To skip commercials:
• Press CM SKIP during playback. The tape
fast forwards through 30 recorded seconds,
then returns to normal playback.
Note
• Skipping time can be extended by pressing CM
SKIP repeatedly.
• Subsequent presses result in advancing the
fast forward picture search time by 30-second
increments (maximum three minutes).
• When the search is complete, the home theater
system goes into Playback mode automatically.
Recording on a video tape
To record on a video tape:
1 Turn on the television and home theater
system.
2 Tune the television to the home theater
system output channel (CH 3 or 4) or set the
television’s source selector t o VIDEO.
3 Press VCR on the remote or on the front
panel of the home theater system until the
VCR indicator lights in the display window
and VCR appears on the television screen.
4 Insert a video tape with the anti-erasure
safety tab intact.
5 Select the channel with or .
-ORIf you are recording from another source
using the audio/video input jacks (on the
back or front panel), select LINE1 or LINE2
using the INPUT button.
6 Set the recording speed (SP or SLP) using
the SPEED button.
Note
This home theater system cannot record in LP
mode.
7 Set the MTS mode. For more information,
see “Broadcast type” on page 12 and “VHS
Hi-Fi stereo system or MTS broadcast” on
page 22.
www.insignia-products.com
19
Page 22
Insignia NS-H3005 Home Theater System
8 Press once. Recording starts and the REC
indicator lights in the display window.
Note
• REC indicator appears only when the Output
Source is set to VC R.
• If a tape with no anti-erasure safety tab is
loaded, the tape is automatically ejected.
9 Press twice to stop recording.
Note
If the tape reaches the end before is pressed,
the home theater system automatically stops,
rewinds and ejects the tape, then turns itself off.
Pausing the recording
To pause while recording:
1 Press to pause the tape during reco rd in g.
The REC indicator flashes in the display
window.
2 When you want to continue recording, press
or .
Note
• After five minutes in Pause mode, the tape
stops automatically to protect the tape and the
video heads.
• Always use for best results when making
changes while recording. For example: To
change channels while recording, first press
to put the VCR in Pause mode. Select the
channel on the home theater system, then
press again to resume recording.
Recording a program while watching another
To record one television program while
watching another:
1 Press TV/VCR to select the TV mode while
recording. The TV indicator appears.
2 Select the channel to be viewed using the
tuner on your television.
Timer Recording
You can program your VCR to record up to eight
different recordings. You can program these
recordings up to one year in advance. For
unattended recording, the timer needs to know
the channels to be recorded and the starting and
ending times.
Note
If you try to set the program timer before setting the clock,
PLEASE SET THE CLOCK appears for a moment and then
the Clock menu appears on the television screen. Set the time
and date before proceeding.
To program the VCR to record a future
program:
1 Turn on the television and home theater
system.
2 Tune the television to the home theater
system output channel (CH 3 or 4) or set the
television’s source selector to VIDEO.
3 Press VCR on the remote or on the front
panel of the home theater system until the
VCR indicator lights in the display window
and VCR appears on the television screen.
4 Insert a video tape with the anti-erasure
safety tab intact.
Note
If the anti-erasure safety tab has been removed
the tape is automatically ejected.
5 Press MENU. The Main menu appears.
6 Press or to choose PROGRAM, then
press MEMORY/ENTER. The Program menu
appears.
Note
If all eight programs have been entered, FULLY
PROGRAMMED appears for a moment and then
PROGRAM 1 appears on the television screen.
7 Press or to choose the program
number (1-8 ).
8 Press to choose MONTH.
9 Press or to choose the month.
10 Press to choose DA Y.
11 Press or to choose the day.
12 Press to choose START.
13 Press or to choose the start time.
14 Press to choose STOP.
15 Press or to choose the stop time.
16 Press to choose CHANNEL.
17 Press or to choose the channel
(Channel, LINE1, or LINE2).
Note
Cable Users: If you have cable TV and use a
cable box converter (see“Conn ecting antenna or
cable TV to the home theater system” on page 7),
you must set the channel in this step to match the
cable box output channel (usually CH 3 or 4). Set
the channel on the cable box instead of with the
home theater system.
18 Press to choose SPEED.
19 Press or to choose the recording speed
(AUTO, SP, or SLP).
Auto mode determines how much tape is left
and switches speed from SP to SLP, if
necessary, to complete recording the
program. There will be some picture and
sound distortion at the point of the speed
change.
20 Press to choose REPEAT.
21 Press or to choose how often to repeat
(ONCE, WEEKLY, or DAILY).
• ONCE
—for recording up to eight
programs on a single day or over the days
within a period of one year.
• WEEKLY
—for recording up to eight
programs on a certain day of every week.
20
www.insignia-products.com
Page 23

Insignia NS-H3005 Home Theater System
• DAIL Y—for recording up to eight
programs at the same time(s) Monday
through Friday.
Tip
If you enter the wrong information, use to
select the incorrect information and correct it using
or .
22 Press MENU. The program is stored in the
home theater system.
• indicator lights in the display window.
• If the program preset time has past, the
PAST TIME PROGRAMMED message
appears on the television screen. Return
to the incorrect program and program it
with the correct time.
• If you entered a past date, timer recording
will be performed on that date of the next
year.
• Additional programs may be entered by
repeating this procedure.
Note
Cable Users: If your cable hookup is through a
cable converter box, you can program multiple
recordings only on the converter box output
channel. This is because the converter
determines what channel you view through your
home theater system.
Tip
If you are finished programming and you want to
set the home theater system to record the
programs you have entered, MAKE SURE YOU
HAVE INSERTED A TAPE INTO THE home
theater system. The home theater system is now
set to record the preset programs.
Note
• If the power fails or the home theater system is
unplugged from the AC outlet, the correct clock
time and timer settings are kept in memory for
approximately 3 seconds. After 3 seconds, the
clock and program timer must be reset when
power is restored. Reset the clock according to
instructions.
• After timer recording is completed, the home
theater system turns off automatically.
• To watch a television program while timer
recording is in progress, select T uner mode by
pressing TV/VCR repeatedly.
• If you want to stop timer recording which has
already started, press STOP or POWER twice.
Program priority
After setting up a
Program 1
Program 2
Program 3
Will not be recorded
timer reco rding,
recording will start if
no other timer
recordings overlap
the start time.
If the recording start and end times of preset
programs overlap on the same day, program
number 2 will not be recorded until program
number 1 is finished.
The first part of program number 2 will not be
recorded. The same thing will happen to
program number 3.
Checking or erasing the timer programming
Programming can be checked whenever the
home theater system is turned on.
To check or erase the timer programming:
1 Press MENU. The Main menu appears.
2 Press or to choose PROGRAM.
3 Press MEMORY/ENTER. The Program menu
appears.
4 Press or to select a program you want
to check or erase.
5 To erase the program, press CLEAR.
6 Press MENU to return to the television
screen.
Using Instant Timer Recording
Instant Timer Recording lets you make a
recording easily of a preset length without using
the programmable timer.
To use the instant timer:
1 Turn on the television and home theater
system.
2 Tune the television to the home theater
system output channel (CH 3 or 4) or set the
television’s source selector t o VIDEO.
3 Press VCR on the remote or on the front
panel of the home theater system until the
VCR indicator lights in the display window
and the VCR output appears on the television
screen.
4 Insert a video tape with the anti-erasure
safety tab intact.
5 Select the channel with or or number
(0-9). The channel number appears on the
television screen.
-ORPress INPUT to select LINE1 or LINE2 if you
are recording from another source using the
audio/video input jacks (at the Back or Front
panel).
6 Press SPEED to select the recording speed
(SP or SLP). The tape speed appears on the
television screen.
7 Press twice. The menu appears on the
television screen and recording starts.
8 Press repeatedly to select the recording
time length.
www.insignia-products.com
21
Page 24
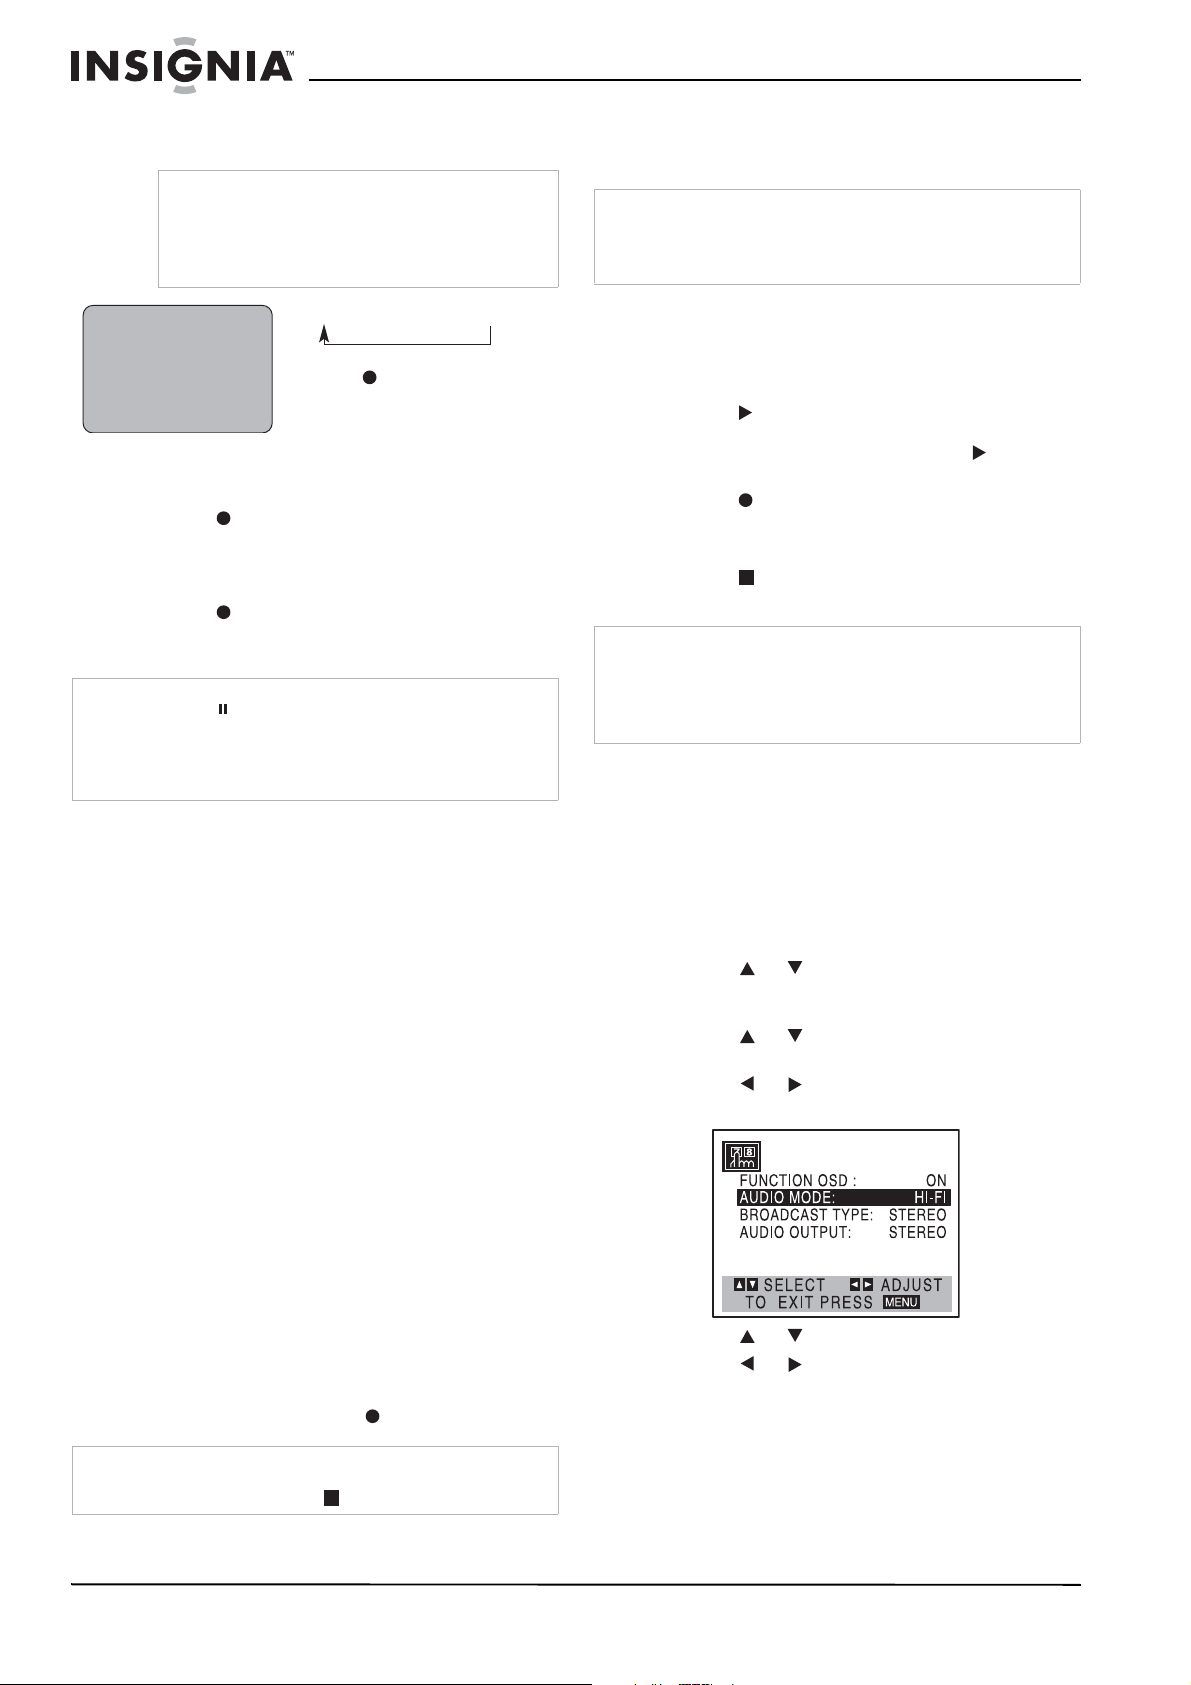
Insignia NS-H3005 Home Theater System
At the end of the recording, the home theater
system stops recording and shuts off.
Note
• While the Instant Timer Recording is active,
you cannot change the channel on the home
theater system.
• To stop the recording, press STOP or POWER
twice.
INSTANT TIMER RECO
CHANN
EL
SPEE
D
AR
T
ST
NGTH 0H30
LE
SP
N
2
OW
M
0H30M ..... 9H00M
RD
Length Display—each additional
press of increases the recording
(
eac
time by 30 minutes.
REC
/ITR ( )
L
engt
h
D
h a
tim
ispl
dditional press o
incr
eases recording
e
30
m
inutes
Checking the recording time
To check the recor ding time:
• Press once to check the recording time.
Extending the recording time
To extend the recording time:
• Press to extend the recording time.
Subsequent presses result in advancing the
recording time by 30-minute increments.
Note
• If you press while in Instant Timer Recording mode, the
home theater system enters the Recording Pause mode.
Instant timer recording is cancelled.
• If the home theater system is set to 0H00M, the home
theater system changes to Normal Recording mode.
Dubbing and editing
If you want to edit or dub your camcorder or VCR
recordings to this home theater system, the back
(or front) panel mounted audio and video (A/V)
input jacks make the connections quick and
easy. These direct A/V jacks also provide better
picture results than using the RF jack on the
back panel.
To dub or edit a recording:
1 Connect the camcorder’s or VCR’s A/V
outputs to your home theater system as
illustrated in “Connecting devices to your
home theater system” on page 10.
2 Press INPUT to set the input channel to
LINE2 if you have connected your camcorder
or VCR to the front A/V jacks.
-ORPress INPUT twice to set the input channel to
LINE1 if you have connected your camcorder
or VCR to the A/V input jacks on the back of
home theater system.
3 Play the tape in the camcorder (or another
VCR). If you have a television attached to
your home theater system, you can see the
video playing.
4 When you want to start recording, press the
home theater system’s once to start.
Note
• Before recording, confirm the recording start position.
• To stop the dubbing, press twice.
ay
0H00
)
Copying from DVD to VCR
This home theater system is capable of copying
the contents of a DVD to a VHS tape.
Note
If the DVD you are attempting to copy is copy protected, you
cannot copy the DVD. It is not permitted to copy Macrovision
encoded DVDs. LOCK is displayed if you try to copy a
Macrovision encoded DVD.
M
To copy from a DVD to a VHS tape:
1 Insert the DVD you want to copy in the DVD
player and close the disc tray.
f
2 Insert a blank tape into the VCR.
3 Press on the front panel or remote control.
The DVD starts to play. If the DVD menu
appears, you may need to press again to
start playing the DVD.
4 Press on the front panel or remote control.
The home theater system goes into Record
mode and the COPY indicator lights.
5 Press or POWER twice to end copying
when the DVD is finished playing.
Note
• When you stop the DVD playback during copying, VCR
Recording mode also stops automatically.
• You must stop the copy process manually when the DVD
movie ends or the home theater system may replay and
record over and over again.
VHS Hi-Fi stereo system or MTS broadcast
This home theater system is equipped with the
VHS Hi-Fi audio sound system for recording and
playback. The following information gives a brief
description of Hi-Fi audio and how to record and
play a tape in the Hi-Fi Audio mode.
To setup the VCR for Hi-Fi Audio mode:
1 Press MENU. The Main menu appears.
2 Press or to select SETUP, then press
MEMORY/ENTER. The Setup menu
appears.
3 Press or to choose AUDIO MODE on
the Setup menu.
4 Press or to set the AUDIO MODE
option to Hi-Fi.
5 Press or to choose AUDIO OUTPUT.
6 Press or to set the AUDIO OUTPUT
option to STEREO.
(STEREO) POSITION: The left channel
sound (L) is heard from the left speaker and
the right channel sound (R) is heard from the
right speaker.
(LEFT) POSITION: The left channel sound
(L) is heard from both speakers.
22
www.insignia-products.com
Page 25
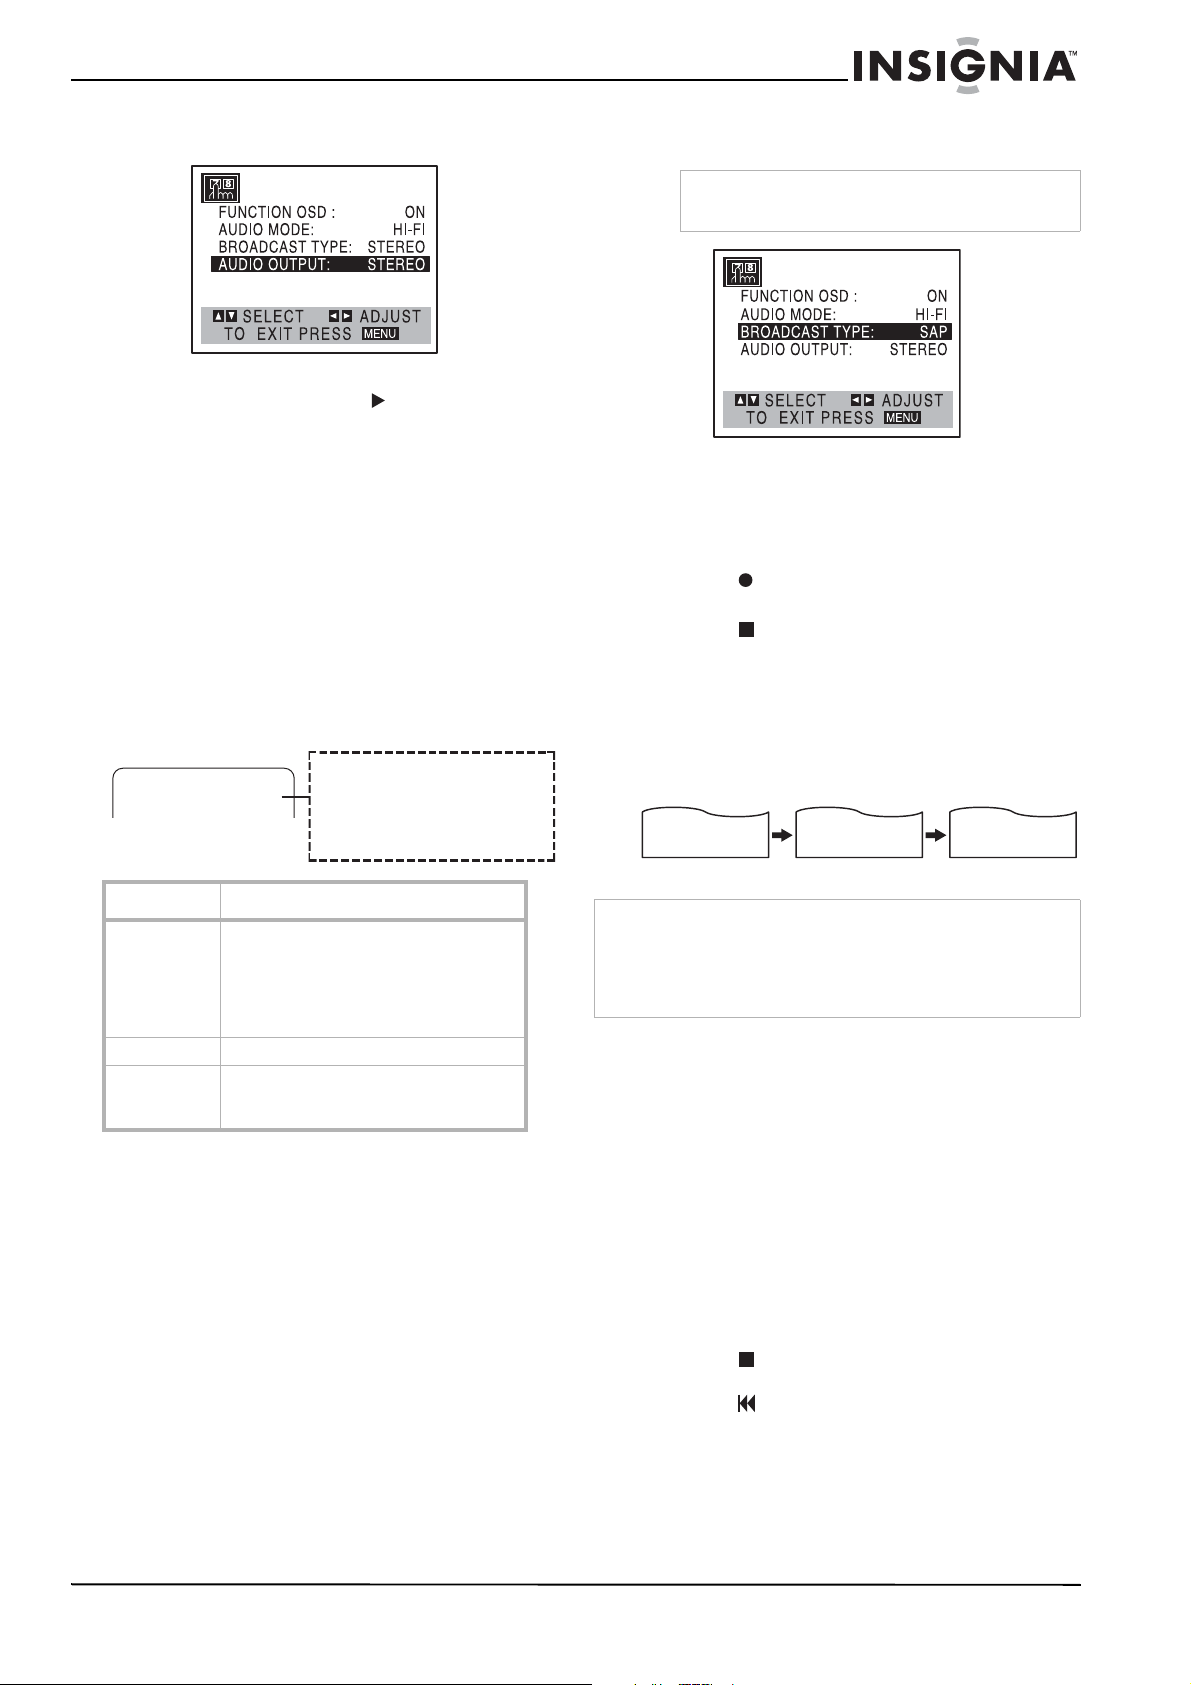
Insignia NS-H3005 Home Theater System
(RIGHT) POSITION: The right channel
sound (R) is heard from both speakers.
7 Press MENU.
8 Insert a tape and press .
9 Adjust the volume at your stereo system.
MTS (Multi-Channel TV Sound)
This home theater system decodes MTS stereo
and bilingual (SAP) off-the-air broadcast sound
signals. It also decodes stereo television sound
from local cable companies, as long as they
operate on assigned cable frequencies and use
the EIA-recommended MTS stereo/bilingual
television sound system.
Multichannel TV Sound display (MTS)
This display appears on the screen when you
press MEMORY/ENTER.
One or both of the displays appear depending on
the MTS broadcast.
TV screen
TV screen
CH 4
STEREO/SAP
STEREO
STEREO
Appears when a stereo broadcast is being
Lights up when a stereo broadcast
received.
is being received.
SAP
SAP
Lights up when a SAP BILINGUAL
Appears when a SAP BILINGUAL
broadcast is being received.
broadcast is being received.
Display Description
STEREO The home theater system can record in
SAP Set the BROADCAST TYPE option to SAP.
STEREO/SAP Use the BROADCAST TYPE option to
stereo onto the VHS Hi-Fi audio tracks
when the BROADCAST TYPE option is in
the STEREO position. The home theater
system also records mono audio onto the
mono audio track.
select the Recording mode (STEREO or
SAP).
SAP (Second Audio Program) Recording
Some stations transmit a Second Audio
Program, which is used for a second language
or additional information. When the station
broadcasts a Second Audio Program, follow this
procedure to record the SAP.
To record the SAP:
1 Insert a video tape with the anti erasure
safety tab intact.
2 Set BRO ADCAST TYPE to SAP in the Setup
menu.
Note
Do this only if SAP appears on the television
screen or you know the program uses the SAP.
3 Press MENU.
4 Press SPEED, then select the recording
speed (SP or SLP).
5 Select the channel. SAP should appear on
the television screen.
6 Press once. You are now recording the
program you see and hear on the television.
7 Press twice to stop recording.
Tape Counter Memory Feature
The real-time counter shows the length of tape
recorded or played in hours, minutes, and
seconds. Pr ess CLK/CNT t o sele ct th e rea l-ti me
counter display.
Every press of CLK/CNT changes the television
screen display as illustrated below.
2:15 AM 0:05:25 REM 1:07
Clock
CLOCK COUNTER REMAINING TIME
Note
• The counter changes to 0:00:00 when the tape is ejected.
• The real-time counter does not operate if nothing is
recorded on the tape.
• The real-time counter does not work unless a tape is
inserted.
Counter
Remainin g time
Counter Memory Feature
The counter memory feature is useful if there is
a section of tape you want to view immediately
after recording or if you want to return to the
same point several times.
To use the counter memory feature:
1 Begin recording or playing a tape.
2 Press CLK/CNT repeatedly to display the
real-time counter on the television screen.
3 At the point that you want to locate later,
reset the real-time counter to 0:00:00 by
pressing CLEAR.
4 Continue to play or record.
5 Press once or twice when recording or
playback finishes.
6 Press . The tape automatically stops when
the tape counter returns to about 0:00:00.
www.insignia-products.com
23
Page 26
Insignia NS-H3005 Home Theater System
Tape Remaining
This function shows the time remaining on the
tape during recording or playback. Press
CLK/CNT repeatedly until the REM indicator
appears on the television screen during
recording or playback.
Note
The remaining tape length indicator may not be displayed
correctly depending on the condition of the tape and the kind
of the tape (such as T-140, T-160, or T-210).
Additional Information
• In manual recording, Timer Recording,
Instant Timer Recording, Playback, or Fast
Forward modes, the home theater system
automatically starts rewinding the tape at the
end of the tape. The tape stops at the
beginning of the tape and is ejected, and the
home theater system turns itself off.
• After you have finished using the home
theater system, rewind, eject, and remove
the tape. Place the tape in its protective
sleeve to protect it from dust. It is not
necessary to rewind the tape before
removing it, but if you do, it will be ready to
play or record the next time you use it.
• Make sure that the home theater system
channel selector is on the correct channel
you want to record. The channel that is being
recorded can always be checked by tuning
the television to the home theater system
channel (3 or 4) and using the TV/VCR
button to turn the home theater system’s TV
indicator off.
• Do not attempt to hook up more than one
television set to the home theater system for
either recording or playback.
Auto Play System
This home theater system features automatic
playback when you load a tape with the safety
tab removed.
• The output source changes to VCR mode
automatically.
• The power turns on automatically and
playback begins.
• At the end of the tape, the home theater
system stops and rewinds the tape.
• The tape is ejected after rewinding and the
VCR turns itself off automatically.
LOAD
TAPE
Note
Auto power off does not function during regular DVD Play
mode. (Home theater system power stays on.)
AUTO
PLAY
AUTO
REWIND
AUTO
EJECT
Using the DVD player
Note
may appear on the television screen during oper ation. This
icon means the function explained in this user guide is not
available on that specific DVD.
AUTO
POWER
OFF
Playing a DVD
To play a DVD:
1 Turn on the television and select the video
input source connected to the DVD player.
2 T urn on the audio system and select the input
source connected to the DVD player.
3 Press OPEN/CLOSE to open the disc
tray.
4 Load your DVD in the tray, with the label side
facing up.
5 Press OPEN/CLOSE to close the tray.
READING appears on the television screen,
and playback starts automatically. If playback
does not star t, press PLAY .
In some cases, the DVD menu might appear
instead.
Tip
The menu screen may be displayed first after loading a DVD
which offers a menu.
6 Press the , , , or buttons to select
the title/chapter you want to view, then press
MEMORY/ENTER to start playback.
7 Press TITLE or DISC MENU to return to the
menu screen.
Note
• If Parental Control is set and the DVD is not within the
Rating settings (not authorized), you must enter the 4-digit
password and to play the DVD (see “Parental Control” on
page 15).
• DVDs may have a regional code. Your DVD player cannot
play DVDs that have a regional code different from your
player. The regional code for this player is one (1) For more
information, see “Regional codes” on page 6.
Note
Unless stated otherwise, all operations described use the
remote control. Some features may also be available on the
Setup menu.
Moving to another title
When a DVD has more than one title, you can
move to another title.
To move to another title:
1 Press DISPLAY.
2 Press the appropriate number button (0-9) to
select a title number.
Moving to another chapter or track
When a title on a DVD has more than one
chapter or a CD has more than one track, you
can move to another chapter or track.
To move to another chapter or track:
• Press or briefly during playback to
select the next chapter or track or to return to
the beginning of the current chapter or track.
• Press twice briefly to step back to the
prev ious chapter or track.
24
www.insignia-products.com
Page 27
Insignia NS-H3005 Home Theater System
• Press DISPLAY, , or to select the
chapter or track icon, then enter the chapter
or track number using the numbered buttons
(0-9).
Note
For two-digit numbers, press the numbered buttons (0-9) in
rapid succession.
Search
This function lets you quickly and visually search
for a DVD section in either forward or reverse.
To search for a scene on a video tape:
1 Press and hold SKIP/SCAN or for
about two seconds during playback. The
player goes into Search mode.
2 Press and hold SKIP/SCAN or
repeatedly to select the required speed:
X2, X4, X16, X100 (backward) or
X2, X4, X16, X100 (forward).
3 Press PLAY to return to normal play.
Pause
To pause playback:
1 Press PAUSE/STEP during playback.
2 Press PLAY to return to playback.
Still Picture and Frame-by-frame playback
To view a DVD still frame:
1 Press PAUSE/STEP during playback. The
home theater system now goes into Pause
mode.
2 Advance the picture frame-by-frame by
pressing PAUSE/STEP repeatedly on the
remote control.
3 Press PLAY to return to normal play.
Slow Motion
To view a DVD in slow motion:
1 Press PAUSE/STEP during playback. The
player enters Pause mode.
2 Press the or to select the required
speed: 1/16, 1/8, 1/4 or 1/2 (backward), or
1/16, 1/8, 1/4 or 1/2 (forward).
3 Press PLAY to return to normal play.
Repeat A-B
To repeat a sequence in a title or group:
1 Press REPEAT A-B at your chosen starting
point. A * appears briefly on the television
screen.
2 Press REPEAT A-B ag ain at your chosen
end point. A B appears briefly on the
television screen, and the repeat sequence
begins (A B appears the display
window).
3 Press REPEAT A-B to cancel the sequence.
Repeat
To repeat a chapter or title:
• To repeat the currently playing chapter, press
REPEAT. The Repeat Chapter icon appears
on the television screen.
• To repeat the title currently playing, press
REPEAT a second time. The Repeat Title
icon appears on the television screen.
• To exit Repeat mode, press REPEAT a third
time. The Repeat Off icon appears on the
television screen.
Time Search
The Time Search function lets you start playing
at any chosen time on the disc.
To use time search:
1 Press DISPLAY during playback. The
on-screen display appears on the screen.
The Time Search box shows the elapsed
playing time of the current disc.
2 Press or within ten seconds to select
the Time Search icon in the on-screen
display. -:--:-- appears in the Time Search
box.
3 Press the number buttons within ten seconds
to enter the required start time. Enter hours,
minutes, and seconds from left to right in the
box.
Note
If you enter the wrong numbers, press CLEAR to
delete the numbers you entered. Then enter the
correct numbers.
4 Press MEMORY/ENTER within ten seconds
to confirm the start time.
Playback starts from the selected time on the
disc. If you enter an invalid time, playback
continues from the current point.
3D Surround
This home theater system can produce a 3D
surround effect, which simulates multi-channel
audio playback from two conventional stereo
speakers, instead of the five or more speakers
normally required to listen to multichannel audio
from a home theater system.
To use 3D surround:
• Press SOUND MODE to select 3D SUR
during playback.
To turn off 3D surround:
• Press SOUND MODE to select BYPASS.
Zoom
The Zoom function lets you enlarge the video
image and to move through the enlarged image.
Note
The zoom function may not work for some DVDs.
To use Zoom:
1 Press ZOOM during playback or still playback
to activate the Zoom function.
Note
If you press ZOOM repeatedly, the magnification
level increases up to six steps.
2 Press the , , , or buttons to move
around the zoomed picture.
3 Press CLEAR to resume normal playback or
return to the paused image.
www.insignia-products.com
25
Page 28

Insignia NS-H3005 Home Theater System
Marker Search
You can start playback from a stored marker.
You can store up to nine markers.
To enter a marker:
1 During disc playback, press MARKER when
playback reaches the spot that you want to
store. The Marker icon appears on the
television screen briefly.
2 Repeat step 1 to enter up to nine markers on
a disc.
To recall a marked scene:
1 During disc playback, press SEA RCH. The
Marker Search menu appears on the screen.
2 Within 10 seconds, press or to select a
marker number that you want to recall.
3 Press MEMORY/ENTER. Playbac k starts
from the marked scene.
4 Press SEARCH to close the Marker Search
menu.
To clear a marked scene:
1 During disc playback, press SEA RCH. The
Marker Search menu appears on the screen.
2 Press or to select the marker number
that you want to erase.
3 Press CLEAR. The marker number is erased
from the list.
4 Repeat steps 2 and 3 to erase additional
marker numbers.
5 Press SEARCH to close the Marker Search
menu.
Checking the contents of DVD Video discs
DVDs may offer menus that allow you to access
special features.
To use the DVD menu:
1 Press DISC MENU.
2 Press the appropriate number button to
select an option.
Or
Press the , , , or buttons to highlight
your select i o n, t h en pre ss MEMORY/ENTER.
3 Press MENU again to close the DVD menu.
Title menu
To use the Ti tle menu:
1 Press TITLE. If the current title has a menu,
the menu appears on the screen. Otherwise,
the disc menu may appear.
The menu can list camera angles, spoken
language and subtitle options, and chapters
for the title.
2 Press TITLE again to close the title menu.
Camera Angle
If the disc contains scenes recorded at different
camera angles, you can change to a different
camera angle during playback.
Press ANGLE repeatedly during playback to
select a different angle. The number of the
current angle appears on the display.
Changing the Audio Language
Press AUDIO repeatedly during playback to hear
a different audio language or audio track.
Subtitles
Press SUBTITLE repeatedly during playback to
see the different subtitle languages.
Note
If appear s, the feature is not available on the disc.
Playing audio, MP3, and WMA discs
The home theater system can play MP3 and
WMA formatted recordings on CD-ROM, CD-R,
or CD-RW discs.
About MP3/WMA recordings
About MP3 files
• An MP3 file is audio data compressed by
using the MPEG1 audio layer-3 file-coding
scheme. Files that have the .mp3 file
extension are called MP3 files.
• The player can not read an MP3 file that has
a file extension other than .mp3.
About WMA files
• A WMA file is a M icr os of t au d io co mp re ss ion
technology.
• WMA (Windows Media Audio) offers double
the audio compression of the MP3 format.
MP3/WMA disc compatibility
MP3/WMA disc compatibility with this home
theater system is limited as follows:
• Sampling frequency—44.1kHz (MP3), 32 -
44.1kHz (WMA)
• Bit rate—between 32- 320kbps (MP3), 32 128kbps (WMA)
• CD-R physical format should be ISO 9660
• If you record MP3 or WMA files using
software which cannot create a FILE
SYSTEM, (for example Direct-CD), you will
not be able to playback the MP3 or WMA
files. We recommend that you use Easy CD
Creator™, which creates an ISO9660 file
system.
• A single session disc requires MP3 or WMA
files in the first track. If there is no MP3 or
WMA file in the first track, the DV D player
cannot playback the MP3 or WMA files. If you
want to playback MP3 or WMA files, format
all the data in the disc or use a new one.
• File names should be named using eight
letters or less and must incorporate the .mp3
or .wma extension. For example:
********.MP3 or ********.WMA
• Do not use special letters such as / : * ? “ < >
• Total number of files on the disc should be
less than 650.
This home theater system requires discs or
recordings to meet certain technical standards in
order to achieve optimal playback quality.
Pre-recorded DVDs are automatically set to
these standards. There are many different types
of recordable disc formats (including CD-R
containing MP3 or WMA files) that require
certain pre-existing condi tions to insure
compatible playback.
26
www.insignia-products.com
Page 29

Insignia NS-H3005 Home Theater System
You should also note that permission is required
in order to download MP3 and WMA files and
music from the Internet. Insignia has no right to
grant such permission. Permission should
always be sought from the copyright owner.
To play audio, MP3, and WMA discs:
1 Insert a disc and close the tray.
Audio CD: The Audio CD menu appears on
the television screen. Go to step 4.
MP3/WMA: The MP3/WMA-JPEG choice
menu appears on the television screen. Go to
step 2.
MP3/WMA
JPEG
2 Press or to select MP3/WMA, then
press MEMORY/ENTER.
The MP3/WMA menu appears on the
television screen.
MP3 WMA
Folder1
Folder2
Folder3
Folder4
Folder5
Folder6
Folder7
Folder8
Program
Clear All
OFF00:00
3 Press RETURN to move to the
MP3/WMA-JPEG choice menu.
4 Press or to select a folder, then press
MEMORY/ENTER. A list of files in the folder
appears.
5 Press or to select a file, then press
PLAY or MEMORY/ENTER. Playback starts.
During playback, the current elapsed playing
time appears on the display window and
menu.
Playback stops at the end of the disc.
Tip
If the track you want to play does not appear on
the screen, press TITLE to move to the next page
or press DISC MENU to move to the previous
page.
CD
TRACK01
TRACK02
TRACK03
TRACK04
TRACK05
TRACK06
TRACK07
TRACK08
0: 56: 18
MP3 WMA
TRACK 1.mp3
TRACK 2.mp3
TRACK 3.mp3
TRACK 4.mp3
TRACK 5.mp3
TRACK 6.mp3
TRACK 7.mp3
TRACK 8.mp3
Program
STER. BYPASS
Audio CD menu
Program
1
MP3/WMA menu
Clear All
Clear All
OFF00:00
Tip
If you are in a file list and want to return to the
Folder list, use the or to highlight and
press MEMORY/ENTER to return to the previous
menu screen.
6 To stop playback at any other time, press
STOP.
Pause
To pause playback:
1 Press PAUSE/STEP during playback.
2 Press PLAY or press PAUSE/STEP again to
return to playback.
Moving to another Track
To move to another track:
• Press or briefly during playback to go to
the next track or to return to the beginning of
the current track.
• Press twice briefly to step back to the
previous track.
• In case of audio CD, to go directly to any
track, enter the track number using the
numbered buttons (0-9) during playback.
Repeat T rack/All/Off
To repeat a track:
1 To repeat the track currently playing, press
REPEAT. The repeat icon and TRACK
appears on the menu screen.
2 To repeat all tracks on a disc, press REPEAT
a second time.
The repeat icon and ALL appears on the
menu screen.
3 Press REPEAT a third time to cancel Repeat
mode.
The repeat icon and OFF appears on the
menu screen.
www.insignia-products.com
27
Page 30
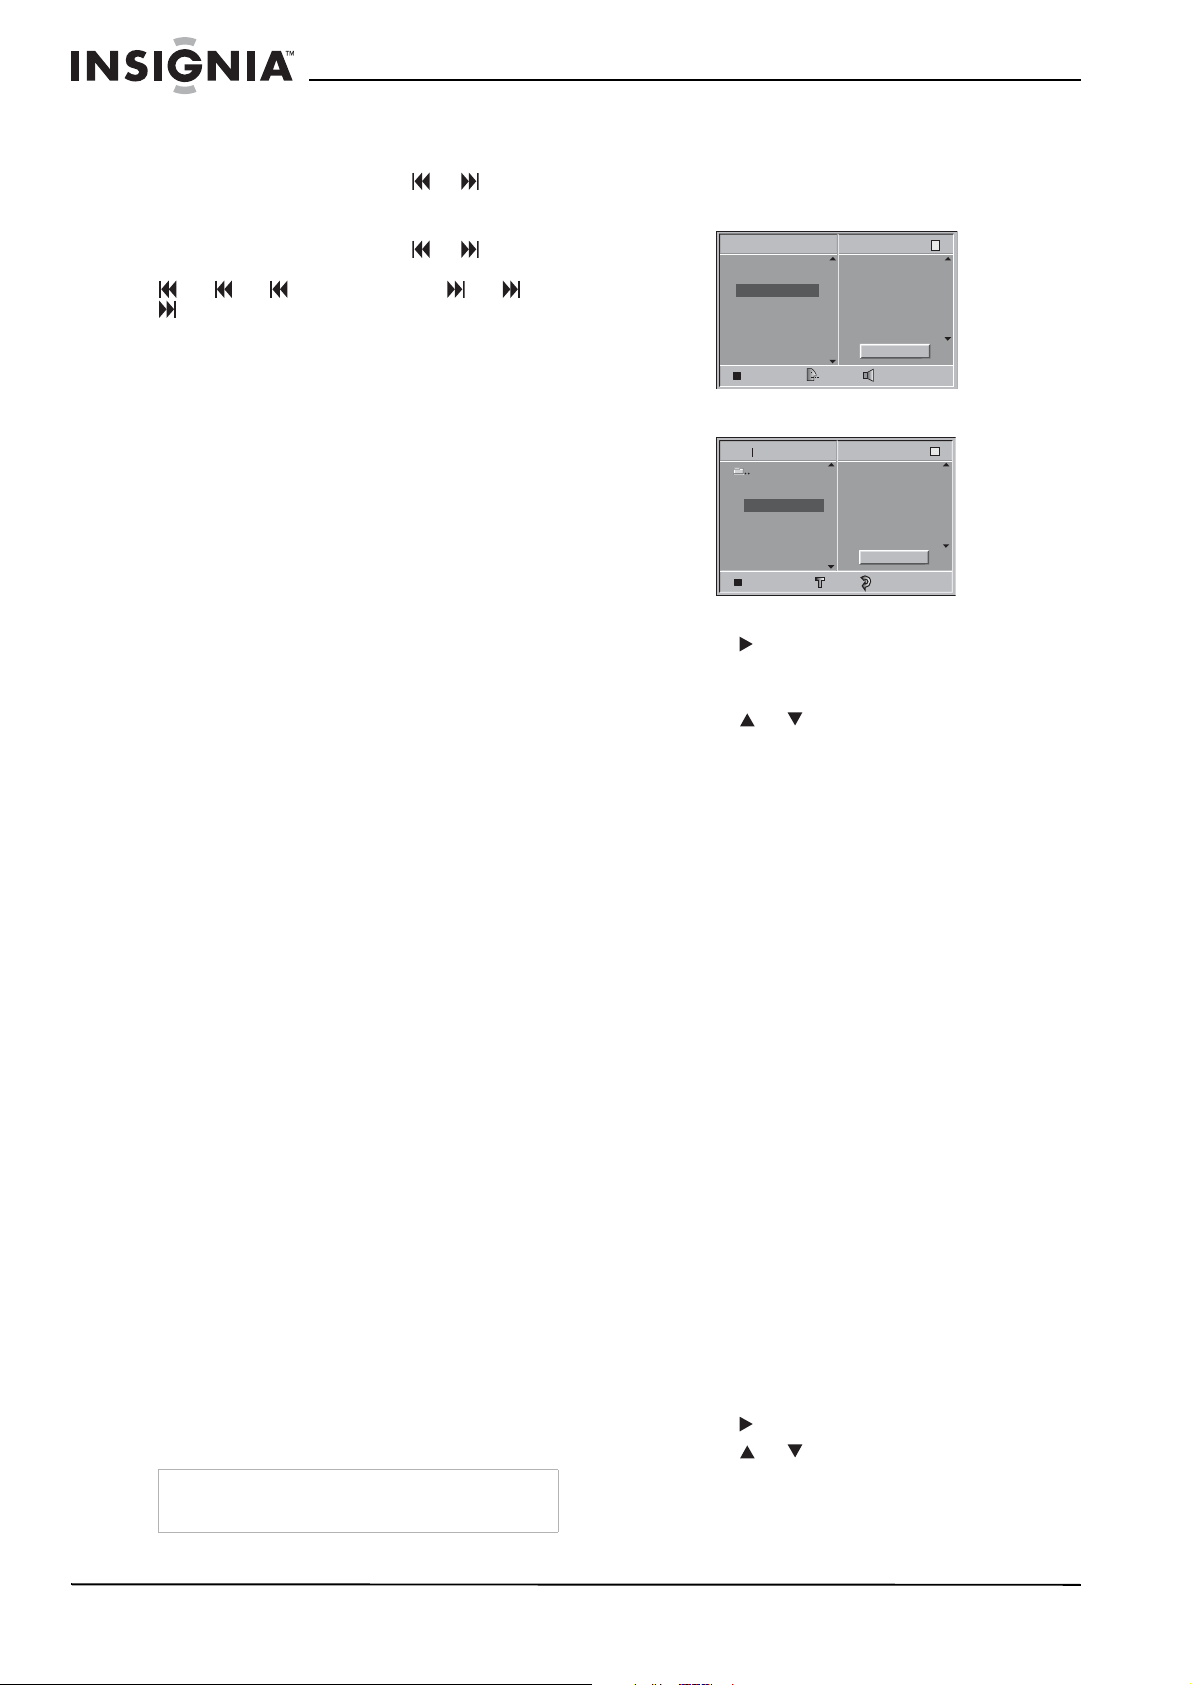
Insignia NS-H3005 Home Theater System
Search
To search for a file:
1 Press and hold SKIP/SCAN or for
about two seconds during playback. The
player goes into Search mode.
2 Press and hold SKIP/SCAN or
repeatedly to select the required speed:
X2, X4, X8 (backward) or X2, X4,
X8 (forward). Search speed and direction
are indicated on the menu screen.
3 Press PLAY to exit Search mode.
Repeat A-B
To repeat a sequence:
1 During disc playback, press REPEAT A -B at
your chosen starting point.
The Repeat icon and A * appears on the
menu screen.
2 Press REPEAT A-B again at your chosen
end point.
The Repeat icon and A B appears on the
menu screen, and the sequence begins to
play repeatedly.
3 Press REPEAT A-B again to exit the
sequence and return to normal play.
The Repeat icon and OFF appears on the
menu screen.
3D Surround
This home theater system can produce a 3D
surround effect, which simulates multi-channel
audio playback from two conventional stereo
speakers, instead of the five or more speakers
normally required to listen to multichannel audio
from a home theater system.
To turn on the 3D surround effect:
• Press SOUND MODE to select 3D SUR
during playback.
To turn off the 3D Surround effect:
• Press SOUND MODE again to select
BYPASS.
Changing the Audio Channel
To change the audio channel:
• Press AUDIO repeatedly during playback to
hear a different audio channel (STER., LEFT,
or RIGHT).
Programmed playback
The Program function lets you store your favorite
tracks from any disc in the DVD player memory.
A program can contain 30 tracks.
To create a Program list and play the list:
1 Press PROGRAM during playback or in the
Stop mode to enter the Program Edit mode.
The mark appears to the right of the word
Program on the right side of the menu
screen.
Note
Press PROGRAM to exit the Program Edit mode.
The mark disappears.
2 Select a track, then press MEMORY/ENTER
to place the selected track on the Program
list.
3 Repeat step 2 to place additional tracks on
the Program list.
CD
TRACK 1
TRACK 2
TRACK 3
TRACK 4
TRACK 5
TRACK 6
TRACK 7
TRACK 8
0: 56: 18
MP3 WMA
TRACK 1.mp3
TRACK 2.mp3
TRACK 3.mp3
TRACK 4.mp3
TRACK 5.mp3
TRACK 6.mp3
TRACK 7.mp3
TRACK 8.mp3
Program
TRACK 12
TRACK 8
TRACK 10
TRACK 3
STER. BYPASS
Audio CD menu
Program
TRACK 8.mp3
TRACK 2.mp3
TRACK 4.mp3
TRACK 3.mp3
3
MP3/WMA menu
E
Clear All
E
Clear All
OFF00:00
4 Press .
The programmed track you selected last is
highlighted on the program list.
5 Press or to select the track you want to
start playing.
• Press TITLE to move to the next page.
• Press MENU to move to the previous
page.
6 Press PLAY to start.
Playback begins in the order in which you
programmed the tracks. PROG. appears on
the menu screen.
Playback stops after all of the tracks on the
Program list have played once.
7 To resume normal playback from
programmed playback, select a CD track,
MP3, or WMA list and then press
MEMORY/ENTER. The PROG. indicator
disappears on the menu screen.
Repeat Programmed Tracks
• To repeat the track currently playing, press
REPEAT. The Repeat icon and TRACK
appears on the menu screen.
• To repeat all tracks on the program list, press
REPEAT a second time. The Repeat icon
and ALL appears on the menu screen.
• To cancel Repeat mode, press REPEAT a
third time. The Repeat icon and OFF appears
on the menu screen.
Erasing a Track from Program List
1 Press PROGRAM during playback (Audio
CD, MP3, or WMA disc only) or in the Stop
mode to enter the Program Edit mode. The
mark appears.
2 Press to move to the Program list.
3 Press or to select the track that you
want to erase from the Program list.
4 Press CLEAR. The track is erased from the
Program list.
28
www.insignia-products.com
Page 31

Insignia NS-H3005 Home Theater System
Erasing the Complete Program List
1 Follow steps 1-2 of “Erasing a T rack from
Program List” on page 28.
2 Press or to select Clear All, then pres s
MEMORY/ENTER.
The complete program list for the disc is
erased. The lists are also cleared when the
disc is removed.
Using JPEG discs
Viewing a JPEG disc
This home theater system can play discs with
JPEG files.
Note
• Depending upon the size and number of the JPEG files, it
could take a long time for the home theater system to read
the disc’s contents. If you do not see an on-screen display
after several minutes, some of the files are too big —
reduce the resolution of the JPEG files to less than 2 mega
pixels and burn another disc.
• Total number of files and folders on the disc should be less
than 650.
• Some discs may be incompatible because of different
recording format or condition of disc.
• When you are using software such as Easy CD Creator to
burn the JPEG files to the CD-R, make sure that all the
selected files have the .jpg extensions when copying into
the CD layout.
• If the files have .jpe or .jpeg extensions, rename them as
.jpg files.
• File names without .jpg extension cannot be read by this
home theater system even though the files are shown as
JPEG image files in Windows Explorer.
4 If you want to view a particular file, press
or to highlight a file, then press
MEMORY/ENTER or PLAY.
File viewing starts.
Note
• During file viewing, press RETURN to move to
the previous menu (JPEG menu).
• Press TITLE to move to the next page.
• Press DISC MENU to move to the previous
page.
Tip
There are three viewing Slide Speed options:
Fast, Normal, Slow, and Off. Press or to
highlight the Slide Speed, press or to select
the option you want to use, then press
MEMORY/ENTER.
5 To stop viewing at any time, press STOP. The
JPEG menu appears.
Moving to another file
Press SKIP/SCAN or once while viewing a
picture to advance to the next file or to the
previous file.
Still Picture
To view a picture:
1 Press PAUSE/STEP during slide show. The
home theater system goes into Pause mode.
2 To return to the slide show, press PLAY or
press PAUSE/STEP again.
To view a JPEG disc:
1 Insert a disc and close the tray.
The MP3/WMA-JPEG choice menu appears
on the television screen.
MP3/WMA
JPEG
2 Press or to select JPEG, then press
MEMORY/ENTER.
The JPEG menu appears on the television
screen.
JPEG
Folder1
Folder2
Folder3
Folder4
Folder5
Folder6
Folder7
Folder8
Slide Speed
Off
3 Press or to select a folder, then press
MEMORY/ENTER.
A list of files in the folder appears. Press
RETURN to move to the MP3/WMA-JPEG
choice menu.
Tip
If you are in a file list and want to return to the
Folder list, use the or to highlight
press MEMORY/ENTER to return to the previous
menu screen.
and
To flip the picture:
• Press or while viewing a picture to flip
the picture horizontally or a vertically.
To rotate picture
• Press or during showing a picture to
rotate the picture clockwise or counter
clockwise.
Using the radio
Presetting stations
You can preset 50 FM and AM stations.
To preset the radio stations:
1 Turn the volume down.
2 Press FM/AM on the remote control or front
panel until the frequency band appears on
the display and television screen.
3 Use CH/TRK/PRESET ( / ) on the remote
control or CH./PRESET (+/-) on the front
panel to select a station.
4 Press FM/AM on the remote control of front
panel to select the band.
5 Hold down TUNING ( / ) on the remote
control for about two seconds. The station is
searched for automatically.
www.insignia-products.com
29
Page 32

Insignia NS-H3005 Home Theater System
6 Press MEMORY/ENTER on the remote
control. The station is stored.
7 Repeat step 3 through 6 to store other
stations.
Listening to the radio
To listen to the radio:
1 Complete the procedure under “Presetting
stations” on page 29.
2 Press FM/AM on the remote control until the
frequency band appears on the display and
television screen. You hear the last station
you listened to.
3 Use CH/TRK/PRESET ( / ) on the remote
control or CH./PRESET (+/-) on the front
panel repeatedly to select a different preset
station.
4 Adjust the volume by rotating VOLUME on
the front panel or by pressing VOLUME (+/-)
on the remote control.
Clearing preset stations
To clear a preset station:
1 Press FM/AM on the remote control until the
frequency band appears on the display and
television screen. You hear the last station
you listened to.
2 Use CH/TRK/PRESET ( / ) on the remote
control or CH./PRESET (+/-) on the front
panel repeatedly to select a preset station to
be cleared.
3 Press CLEAR on the remote control to clear
the preset station.
Note
The CLEAR function may not work if the home
theater system is in Record or Record Pause
mode.
Tuning stations manually
To manually tune radio stations:
1 Press FM/AM on the remote control or front
panel until the frequency band appears on
the display and television screen.
2 Press FM/AM on the remote control of front
panel to select the band.
3 Press TUNING ( / ) on the remote control
to tune the station.
Tuning stations automatically
To automatically tune radio stations:
1 Press FM/AM on the remote control or front
panel until the frequency band appears on
the display and television screen.
2 Press FM/AM on the remote control of front
panel to select the band.
3 Hold down TUNING ( / ) on the remote
control for about two seconds. The next
station is searched for automatically.
Note
The search may not tune in or stop at a station
with a very weak signal.
Labeling stations
You can enter a name of up to five characters for
preset stations. The names appear in the display
window when you select a preset station. You
can enter only one name for a preset station.
To automatically tune radio stations:
1 Press FM/AM on the remote control or front
panel until the frequency band appears on
the display and television screen.
2 Press to move to the station name column.
3 Use the / buttons to select the character,
then use the button to shift to the next
character.
4 Press MEMORY/ENTER to confirm the
station name.
5 Press MEMORY/ENTER. The station name
is stored.
Maintaining
Handling the home theater system
Shipping the home theater system
The original shipping carton and packing
materials come in handy. For maximum
protection, re-pack the home theater system as
it was originally packaged at the factory.
Setting up the home theater system
The picture and sound of a nearby TV, VCR, or
radio may be distorted during playback. In this
case, position the home theater system away
from the TV, VCR, or radio, or turn off the home
theater system after removing the disc.
Keeping home theater system surfaces clean
Do not use volatile liquids, such as insecticide
spray, near the home theater system. Do not
leave rubber or plastic products in contact with
the home theater system for a long period of
time. They will leave marks on the surface.
Cleaning the home theater system
Cleaning the cabinet
Use a soft, dry cloth. If the surfaces are
extremely dirty, use a soft cloth lightly moistened
with a mild detergent solution. Do not use strong
solvents such as alcohol, benzine, or thinne r,
because they might damage the surface of the
home theater system.
To obtain a clear picture
The home theater system is a high-tech,
precision device. If the optical pick-up lens and
disc drive parts are dirty or worn, the picture
quality will be poor.
Regular inspection and maintenance are
recommended after every 1,000 hours of use.
(This depends on the operating environment.)
For details, contact your nearest dealer.
30
www.insignia-products.com
Page 33

Insignia NS-H3005 Home Theater System
Handling discs
Do not touch the playback side of the disc.
Hold the disc by the edges so that fingerprints
will not get on the surface.
Do not stick paper or tape on the disc.
Storing discs
After playing, store the disc in its case.
Do not expose the disc to direct sunlight or
sources of heat, or leave it in a parked car
exposed to direct sunlight, because it may get
very hot inside the car.
Cleaning discs
Fingerprints and dust on the disc can cause
poor picture quality and sound distortion. Before
playing, clean the disc with a clean cloth. Wipe
the disc from the center outward.
Do not use strong solvents such as alcohol,
benzine, thinner, commercially available
cleaners, or anti-static spray intended for older
vinyl records .
Troubleshooting
Check the following guide for the possible cause
of a problem before contacting service.
Symptom Cause Correction
No power The power co r d is
The power is on,
but the home
theater system
does not work.
No picture The televisi on i s no t
No sound. The Digital Audio
disconnected.
No disc or tape is
inserted.
set up to receive
home theater system
signal output
TV/VCR mode for
home theater system
is set to TV.
The video cable is not
connected securely.
The connected
television is turned
off.
Output is set to the
wrong position.
Securely plug the
power cord into the
wall outlet.
Insert a disc or tape.
Make sure that the disc
or tape indicator on the
display window is lit.
Select the ap pr o priate
video input mode on
the television so the
picture from the player
appears on the
television scre en.
Press the TV/VCR
button on the re mote
control repeatedly to
choose VCR mode.
The TV indicator
disappears from the
display window.
Connect the video
cable securely.
Turn on the television.
Set the Digital Audio
Output to the correct
position, then turn on
the home theater
system again by
pressing POWER.
Symptom Cause Correction
The playback
picture is poor.
The home theater
system does not
start playback.
The remote
control does not
work properly.
Some channels
are skipped over
when using
/
Picture and
sound of
broadcasting
channel
are weak or
missing.
Camcorder image
via A/V input to
home theater
system is not
shown on
television screen.
Timer recording
is not possible.
The disc is dirty. Clean the disc.
Video heads are dirty. Clean video heads.
Tape is a rental or was
recorded on
another VCR.
No disc or tape is
inserted.
An unplayable disc is
inserted.
The disc is placed
upside down.
The disc is not placed
within the guide.
The disc is dirty. Clean the disc.
The remote contr ol is
not pointed at the
remote sensor of the
home theater system.
The remote contr ol is
too far from the home
theater system.
There is an obstacle
in the path of the
remote control and
the home theater
system.
The batteries in the
remote control are
exhausted.
This remote control
uses the same
buttons for VCR and
DVD functions (ex.
PLAY).
Those channels were
deleted with the CH.
ADD/DEL option.
Antenna or cables are
loose.
Wrong TUNING BAND
option is being us e d.
Home theater system
SOURCE SELECT is
not set to LINE1 or
LINE2.
Clock in home theater
system is not set to
correct time.
Timer has been
programmed
incorrectly.
indicator does not
appear after
programming timer.
Press
manual tracking
adjustment while tape
is playing.
Insert a disc or tape.
(Check that the disc or
tape indicator in the
display window i s lit.)
Insert a playable disc.
(Check the disc type,
color system, and
Regional code.)
Place the disc with the
label side up.
Place the disc on the
disc tray correctly
inside the guide.
Point the remote
control at the remote
sensor of the home
theater system.
Operate the remote
control within 23ft
(7 m) of the home
theater system.
Remove the obstacle.
Replace the batteries
with new ones.
When using a VCR
tape, first press the
VCR button. When
using a DVD, firs t
press the DVD button.
Press CH. ADD/DEL.
to restore channels.
See “Channel
Selection” on page 12.
Tighten connections or
replace cable.
Try all TUNING BAND
options. See “Channel
Selection” on page 12.
Press INPUT to select
LINE input source
(LINE1 or LINE2).
Set clock to correct
time. See “Setting the
clock” on pag e13.
Reprogram Timer. See
“Timer Recording” on
page 20.
Reprogram the timer.
/ for
www.insignia-products.com
31
Page 34

Insignia NS-H3005 Home Theater System
Symptom Cause Correction
indicator
appears after
home theater
system is turned
off.
Stereo Audio
Record and/or
Playback is not
present.
home theater system
is in Timer Recording
mode.
Television is not
Stereo-compatible.
Broadcast program is
not in stereo format.
Home theater system
BROADCAST TYPE
mode is set to SAP or
MONO.
This is the normal
indication that the
home theater system
is in TIMER mode.
No action is possible.
No action is possible.
Set BROADCAST TYPE
to STEREO. See
“Setting up the VCR”
on page 11.
Moisture condensation
Moisture condensation can occur:
• When the home theater system is moved
from a cold place to a warm place.
• Under extremely humid conditions.
In locations where moisture condensation may
occur:
• Keep the home theater system plugged into
an AC power outlet with POWER On. This
will help prevent condensation.
• When condensation has occurred, wait a few
hours for the home theater system to dry
before using it.
Specifications
Design and specifications are subject to change
without prior notice.
General
Power requirements AC 120V, 60 Hz
Power consumpt ion 50 W
Dimensions (approx.) 16.9 x 3.5 x 13.8 inche s
(430 x 90 x 350 mm)
Weight (approx.) 17.6 lbs (8 kg)
Operating temperature 41°F to 95°F (5°C to 35°C)
Operating humi dity 5% to 90%
Signal system NTSC
Inputs
ANTENNA IN Antenna or CATV input, 75 ohms
VHS VIDEO IN(LINE1, 2) 1 Vp-p 75 ohms sync negative, RCA jack
VHS AUDIO IN(LINE1, 2) -6.0 dBm more than 47 ohms, RCA jack
Outputs
MONITOR OUT 1 Vp-p 75 ohms, sync negative
Component Video output (Y) 1.0 V (p-p), 75 Ù negative sync RCA
VCR
Head system Four head helical scan azimuth system
Timer 12-hour display type with AM, PM
T a pe sp ee d SP: 33.35 mm/sec
x 2
(L, R) x 2
jack x 1 (Pb)/(Pr) 0.7 V (p-p) 75 Ù, RCA
jack x 1
LP: 16.67 mm/sec
SLP: 11.12 mm/sec
Tape width 12.7 mm
Maximum recording
time
Rewind time About 3 minutes (T-120)
Antenna 75 ohms (VHF/UHF)
VHF output signal Channel 3 or 4
Channel coverage VHF: 2-13
Frequency range 200Hz to 8kHz
Signal-to-noise ratio More than 65 dB (EE mode)
Dynamic range More than 70 dB (EE mode)
Channel separation More than 45 dB (EE mode)
SP: 2 hours (T-120)
SLP: 6 hours (T-120)
SLP: 8 hours (T-160)
UHF: 14-69
CATV: 1-125 (4A, A-W, W+1 - W+84,
A-5 - A-1)
DVD
Laser system Semiconductor laser wavelength 650
Frequency response DVD (PCM 96 kHz): 20 Hz to 44 kHz
Signal-to-noise ratio More than 70 dB
Harmonic distortion Less than 0.5%
Dynamic range More than 65 dB (DVD/CD)
nm
DVD (PCM 48 kHz): 20 Hz to 22 kHz
CD: 20 Hz to 18 kHz
Tuner
System PLL quartz-locked digit a l synthesizer
Tuning range 87.5 - 108.0 MHz (FM)
Antenna Wire antenna (FM)
system
530 - 1720 KHz (AM)
Loop antenna (AM)
Satellite (LHS-36SCS) Speakers
Type 1 Way Speakers
Impedance 4 ohm
Frequency Response 140 - 20,000 Hz
Sound Pressure Level 85 dB/W (1m)
Rated Input Power 45W
Max Input Power 90W
Net Dimensions 3.6 x 4.5 x 3.1 inches
(92 x 115 x 80 mm)
Net Weight 1.1 lbs (0.5 kg)
Passive Subwoofer (LHS-36SCW)
Type 1 Way Speaker
Impedance 8 ohm
Frequency Response 60 - 1,500 Hz
Sound Pressure Level 87 dB/W (1m)
Rated Input Power 75W
Max Input Power 150W
Net Dimensions 6.3 x 13.8 x 11.0 inches
(160 x 350 x 280 mm)
Net Weight 7.0 lbs (3.2 kg)
32
www.insignia-products.com
Page 35

Insignia NS-H3005 Home Theater System
Accessories
• Video cable x 1
• Audio cable x 1
• RF 75-ohm Coaxial Cable x 1
• Speaker cable x 5
• FM Antenna cable x 1
• AM Antenna cable x 1
• Remote control x 1
• Batteries (AAA) x 2
• Ferrite core x 1
Code lists
Language code list
Use this list to input your language for the
following initial settings: Disc Audio, Disc
Subtitle, Disc Menu.
Language Code Language Code Language Code
Abkhazian 6566 Hebrew 7387 Rumanian 8279
Afar 6565 Hindi 7273 Russian 8285
Afrikaans 6570 Hungarian 7285 Samoan 8377
Albanian 8381 Icelandic 7383 Sanskrit 8365
Ameharic 6577 Indonesian 737 8 Scots Gaelic 7168
Arabic 6582 Interlingua 7365 Serbian 8382
Armenian 7289 Irish 7165 Serbo-
Assamese 6583 Italian 7384 Shona 8378
Azerbaijani 6590 Japanese 7565 Sindhi 8368
Bashkir 6665 Javanese 7487 Singhalese 8373
Basque 6985 Kannada 7578 Slovak 8375
Bengali;
Bangla
Bhutani 6890 Kazakh 7575 Somali 8379
Bihari 6672 Kirghiz 7589 Spanish 6983
Breton 6682 Korean 7579 Sudanese 8385
Bulgarian 6671 Kurdish 7585 Swahili 8387
Burmese 7789 Laotian 7679 Swedish 8386
Byelorussian 6669 Latin 7665 Tagalog 8476
Cambodian 7577 Latvian,
Catalan 6765 Lingala 7678 Tamil 8465
Chinese 9072 Lithuanian 7684 Tatar 8484
Corsican 6779 Macedonian 7775 Teluga 8469
Croatian 7282 Malagasy 7771 Thai 8472
Czech 6783 Malay 7783 Tibetan 6679
Danish 6865 Malayalam 7776 Tigrinya 8373
Dutch 7876 Maltese 7784 Tonga 8479
English 6978 Maori 7773 Turkish 8482
Esperanto 6979 Marathi 7782 Turkmen 8475
Estonian 6984 Moldavian 7779 Twi 8487
Faroese 7079 Mongolian 7778 Ukrainian 8575
Fiji 7074 Nauru 7865 Urdu 8582
Finnish 7073 Nepali 7869 Uzbek 8590
French 7082 Norwegian 7879 Vietnamese 8673
Galician 7176 Oriya 7982 Volapuk 8679
Georgian 7565 Panjabi 8065 Welsh 6789
6678 Kashmiri 7583 Slovenian 8376
Lettish
Croatian
7686 Tajik 8476
8372
Language Code Language Code Language Code
German 6869 Pashto,
Pushto
Greek 6976 Persian 7065 Xhosa 8872
Greenlandic 7576 Polish 8076 Yiddish 7473
Guarani 7178 Portuguese 8084 Yoruba 8979
Gujarati 7185 Quechua 8185 Zulu 9085
Hausa 7265 Rhaeto-
Romance
8083 Wolof 8779
8277
Country code list
Select a country code from this list.
Country Code Country Code Country Code
Afghanistan AF Greenland GL Panama PA
Argentina AR Island HM Paraguay PY
Australika AU Hong Kong HK Philippines PH
Austria AT Hungary HU Poland PL
Belgium BE India IN Portugal PT
Bhutan BT Indonesia ID Romania RO
Bolivia BO Israel IL Russian
Federation
Brazil BR Italy IT Saudi Arabia SA
Cambodia KH Jamaica JM Senegal SN
Canada CA Japan JP Singapore SG
Chile CL Kenya KE Slovak Republic SK
China CN Kuwait KW Slovenia SI
Colombia CO Libya LY South Afr ica ZA
Congo CG Luxe m bourg LU South Korea KR
Costa Rica CR Malaysia MY Spain ES
Croatia HR Maldives MV Sri Lanka LK
Czech Republic CZ Mexi co MX Sweden SE
Denmark DK Monaco MC Switzerland CH
Ecuador EC Mongolia MN Taiwan TW
Egypt EG Morocco MA Thailand TH
El Salvador SV Nepal NP Turkey TR
Ethiopia ET Netherlands NL Uganda UG
Fiji FJ Dutch Antilles AN Ukraine UA
Finaland FI New Zealand NZ United States US
France FR Nigeria NG Uruguay UY
Germany DE Norway NO Uzbekistan UZ
Great Britain GB Oman OM Vietnam VN
Greece GR Pakistan PK Zimbabwe ZW
RU
www.insignia-products.com
33
Page 36

Insignia NS-H3005 Home Theater System
FCC
Warning
This equipment may generate or use radio frequency energy.
Changes or modifications to this equipment may cause
harmful interference unless the modifications are expressly
approved in this manual. The user could lose the authority to
operate this equipment if an unauthorized change or
modification is made.
Regulatory informa tion: FCC Par t 1 5
This equipment has been tested and found to comply with the
limits for a Class B digital device, pursuant to Part 15 of the
FCC Rules. These limits are designed to provide reasonable
protection against harmful interference when the home theater
system is operated in a residential installation. This home
theater system generates, uses, and can radiate radio
frequency energy and, if not installed and used in accordance
with this manual, may cause harmful interference to radio
communications. However, there is no guarantee that
interference will not occur in a particular installation. If this
home theater system does cause harmful interference to radio
or television reception, which can be determined by turning the
home theater system off and on, the user is encouraged to try
to correct the interference by one or more of the following
measures:
• Reorient or relocate the receiving antenna.
• Increase the separation between the home theater system
and receiver.
• Connect the home theater system into an outlet on a circuit
different from that to which the receiver is connected.
• Consult the dealer or an experienced radio/TV technician
for help.
This warranty is invalid if the factory applied
serial number has been altered or removed from
the Product.
REPAIR REPLACEMENT AS PROVIDED
UNDER THIS WARRANTY IS THE EXCLUSIVE
REMEDY OF THE CONSUMER. INSIGNIA
SHALL NOT BE LIABLE FOR ANY
INCIDENTAL OR CONSEQUENTIAL
DAMAGES FOR BREACH OF ANY EXPRESS
OR IMPLIED WARRANTY ON THIS PRODUCT.
EXCEPT TO THE EXTENT PROHIBITED BY
APPLICABLE L A W , ANY IMPL IED W ARRAN TY,
REPRESENTATION OR CONDITION OF
MERCHANTABILITY OR FITNESS FOR A
PARTICULAR PURPOSE ON THIS PRODUCT
IS LIMITED IN DURATION TO THE DURATION
OF THIS WARRANTY.
Some states or provinces do not allow the
exclusion or limitation of incidental or
consequential damages, or allow limitations on
how long an implied warranty lasts, so the above
limitations or exclusions may not apply to you.
This warranty gives you specific legal rights, and
you may have other rights which var y from state
to state, or province to province.
For customer service please call
1-877-467-4289
www.insignia-products.com
Insignia Products, Richfield, Minnesota, U.S.A.
Limited warranty
Insignia Products warrants to you, the original
purchaser of this Product, that this product shall
be free of defects in material or workmanship for
a period of three hundred sixty five (365) days
from the date of purchase as follows:
1 LABOR: During the Warranty Period if this
Product is determined to be defective,
Insignia will repair or replace the Product, at
its option at no charge, or pay the labor
charges to any Insignia authorized service
facility. After the Warranty Period, you must
pay for all labor charges.
2PARTS: In addition, Insignia will supply, at no
charge, new or rebuilt replacement parts in
exchange for defective parts for the Warranty
Period. After the Warranty Period, you must
pay all parts costs.
To obtain warranty service, you must take the
Product with your original receipt or other proof
of purchase, either in its original packaging or
packaging affording an equal degree of
protection, to your nearest retail store location of
the store or online web site from which you
purchased the Product.
This warranty does not cover cosmetic damage
or damage due to acts of God, lightning strikes,
accident, misuse, abuse, negligence,
commercial use, or modification of, or to any part
of the Product, including the antenna. This
warranty does not cover damage due to
improper operation or maintenance, connection
to improper voltage supply, or attempted repair
by anyone other than a facility authorized by
Insignia to service the Product. This warranty
does not cover Products sold AS IS or WITH
ALL FAULTS, or consumables (such as fuses or
batteries). This warranty is valid only in the
United States and Canada.
Copyright
© 2006 Insignia. Insignia and the Insignia logo are
trademarks of Best Buy Enterprise Services, Inc. Other
brands and product names are trademarks or registered
trademarks of their respective holders. Specifications and
features are subject to change without notice or obligation.
34
www.insignia-products.com
Page 37

Système de cinéma maison Insignia NS-H3005
Système de cinéma
maison Insignia
NS-H3005
Table des matières
Introduction . . . . . . . . . . . . . . . . . . . . . . . . . . . . .35
Informations sur la sécurité . . . . . . . . . . . . . . . . .35
Fonctionnalités. . . . . . . . . . . . . . . . . . . . . . . . . . .37
Utilisation de disques. . . . . . . . . . . . . . . . . . . . . .40
Connexion du système de cinéma maison. . . . . .42
Configuration du magnétoscope . . . . . . . . . . . . .47
Installation du lecteur de DVD . . . . . . . . . . . . . . .50
Fonctionnement de l’appareil. . . . . . . . . . . . . . . .54
Utilisation du magnétoscope . . . . . . . . . . . . . . . .54
Utilisation du lecteur de DVD. . . . . . . . . . . . . . . .61
Fonctionnement de la radio . . . . . . . . . . . . . . . . .67
Entretien. . . . . . . . . . . . . . . . . . . . . . . . . . . . . . . .69
Problèmes et solutions. . . . . . . . . . . . . . . . . . . . .69
Caractéristiques. . . . . . . . . . . . . . . . . . . . . . . . . .71
Accessoires . . . . . . . . . . . . . . . . . . . . . . . . . . . . .71
Liste de codes . . . . . . . . . . . . . . . . . . . . . . . . . . .72
Garantie limitée . . . . . . . . . . . . . . . . . . . . . . . . . .73
Droits d’auteurs . . . . . . . . . . . . . . . . . . . . . . . . . .73
Fabriqué sous licence de Dolby Laboratories. « Dolby », «
Pro Logic » et le symbole double D sont des marques de
commerce de Dolby Laboratories. Travaux confidentiels non
publiés. Droit d’auteur 1992- 1997 Dolby Laboratories. Tous
droits réservés.
Fabriqué sous licence Digital Theater System, Inc. Brevets
US n° 5,451,942, 5,956,674, 5,974,380, 5,978,762 et
d’autres brevets U.S . et mondiaux octroyés ou en instance. «
DTS » et « DTS Digital Surround » sont des marques de
commerce déposées de Digital Theater Systems, Inc.
Copyright 1996, 2003 Digital Theater Systems, Inc. Tous
droits réservés.
Introduction
Félicitati ons d’ av oir ac heté ce produit Insign ia de
haute qualité. Le modèle NS-H3005 représente
la dernière avancée technologique dans la
conception de systèmes de cinéma maison
combiné et a été conçu pour des performances
et une fiabilité exceptionnelles.
Information s su r la sécurité
Risque de choc électrique.
ATTENTION
Risque de choc
électrique
Ne pas ouvrir
Avertissement
Afin de réduire le risque de choc électrique, ne pas enlever le
couvercle (ou le panneau arrière). Aucune pièce interne de
l'appareil ne peut être réparée par l'utilisateur. Confier
l’entretien à du personnel qualifié.
Le symbole d’un éclair à l’intérieur d’un triangle est
destiné à alerter l'utilisateur de la présence d'une
tension dangereuse non isolée à l’intérieur de
l’appareil et dont la puissance est suffisante pour
présenter un risque de choc électrique pour les
personnes.
Le point d’exclamation à l’intérieur d’un triangle
équilatéral est destiné à alerter l’utilisateur de la
présence d’instructions importantes sur le
fonctionnement et sur la maintenance (réparation)
dans la documentation accompagnant l’appareil.
Avertissement
Afin de réduire les risques d’incendie et de choc électrique, ne
pas exposer cet appareil à la pluie ou l’humidité.
Précautions
L’appareil ne doit pas être exposé à des gouttes d’eau ou des
éclaboussures et aucun objet rempli de liquide, tel qu’un vase,
ne doit être posé sur l’appareil.
Ventilation
Précautions
Ne pas obstruer les ouvertures d’aération. Installer l’appareil
conformément à ces instructions.
Les fentes et ouvertures au dos et au bas du boîtier sont
prévues pour la ventilation, pour assurer un fonctionnement
fiable de l’appareil et le protéger contre toute surchauffe.
Elles ne doivent jamais être bloquées en installant l'appareil
sur un lit, un sofa, une moquette ou toute autre surface
semblable. Ne pas installer l'appareil dans un meuble encastré
comme une bibliothèque ou une étagère, sauf si une
ventilation adéquate a été prévue ou si ces instructions ont été
respectées.
Avertissement relatif au laser
Avertissement
Cet appareil utilise un système
au laser.
Pour garantir une utilisation
appropriée de ce produit, lire
ce guide de l’utilisateur avec
attention et le conserver à titre
de référence ultérieure. Si
l'appareil nécessite un
entretien, contacter un service de réparation agréé.
Le recours à des commandes, réglages ou procédures autres
que celles spécifiées dans ce guide, présente des dangers
d'exposition aux rayonnements.
Pour éviter toute exposition directe aux rayons laser, ne pas
essayer d’ouvrir le boîtier. Radiation au laser visible en cas
d'ouverture. Ne pas regarder directement le rayonnement
laser.
Avertissement
Un rayonnement laser visible et invisible est émis quand le
boîtier de l’appareil est ouvert ou que le dispositif de
verrouillage est défectueux.
www.insignia-products.com
35
Page 38

Système de cinéma maison Insignia NS-H3005
Cordon d’alimentation
Précautions
Il est recommandé en général que les appareils
électroménagers soient branchés sur un circuit dédié – une
seule prise secteur qui alimente uniquement l’appareil sans
prises additionnelles ou autres circuits dérivés. Voir
“Caractéristiques” page 71 pour la puissance électrique.
Ne pas surcharger les prises murales. Des prises murales
surchargées, desserrées ou endommagées, des rallonges,
des cordons effilochés ou des isolations de fils endommagées
ou craquelées, sont dangereux. N’importe quelle situation de
ce type peut être la cause d’un choc électrique ou d’un
incendie.
Vérifier régulièrement le cordon de l’appareil et s’il est
endommagé ou détérioré, le débrancher, arrêter d’utiliser
l’appareil et le faire remplacer par un cordon identique dans un
centre agréé.
Protéger le cordon d’alimentation des détériorations résultant
de torsions, déformations, pincements, coincements dans une
porte qui se ferme ou piétinement. Prêter une attention toute
particulière aux points de branchement du cordon à la prise
murale et à l’endroit d’où le cordon sort de l’appareil.
Pour débrancher le cordon, tirer sur la prise. Installer l’appareil
afin que la prise soit facilement accessible.
Instructions de sécurité importantes
Précautions
Lire avec attention tous les avertissements et instructions
indiqués dans ce guide ou sur l’appareil. Conserver ce guide
pour toute référence ultérieure.
Cet appareil a été conçu et fabriqué pour garantir la sécurité
individuelle. Toute utilisation incorrecte peut provoquer un choc
électrique ou un risque d’incendie. Des dispositifs de
protection intégrés à cet appareil protégeront l’utilisateur sous
réserve de respecter les procédures ci-dessous lors de
l’installation, l’utilisation et des tra vaux d’entretien. Cet appareil
ne contient aucune pièce réparable par l'utilisateur.
L’ouverture du boîtier peut exposer l’utilisateur à des tensions
dangereuses. Confier l’entretien à du personnel qualifié.
• Lire toutes les instructions de sécurité et de
fonctionnement avant d’utiliser cet appareil.
• Conserver les instructions de sécurité et de
fonctionnement pour toute référence
ultérieure.
• Observer tous les avertissements figurant sur
l’appareil et dans le mode d’emploi.
• Appliquer toutes les instructions d’utilisation
et de fonctionnement.
• Ne pas utiliser cet appareil près de l’eau. Par
exemple, ne pas utiliser cet appareil, à côté
d’une baignoire, d'un lavabo, d'un évier, d’un
bac à laver, dans une cave humide, à côté
d’une piscine ou à proximité de l’eau.
• Nettoyer uniquement avec un chiffon sec.
Débrancher l'appareil de la prise murale
avant tout nettoyage. Ne pas utiliser de
détergents liquides.
• Ne pas obstruer les ouvertures d’aération.
Installer l’appareil conformément à ces
instructions. Les fentes et ouvertures du
boîtier sont prévues pour la ventilation, pour
assurer un fonctionnement fiable de l’appareil
et pour le protéger contre toute surchauffe.
Elles ne doivent jamais être bloquées en
installant l'appareil sur un lit, un sofa, une
moquette ou toute autre surface semblable.
Ne pas installer l'appareil dans un meuble
encastré comme une bibliothèque ou sur une
étagère, sauf si une ventilation adéquate a
été prévue ou si ces instructions ont été
respectées.
• Installer l’appareil à l’écart de sources de
chaleur, telles que radiateurs, bouches de
chaleur, fours ou autres appareils (y compris
les amplificateurs) qui produisent de la
chaleur.
• Ne pas chercher à modifier le dispositif de
sécurité de la prise polarisée ou de type mise
à la terre. Une prise polarisée comporte deux
plots, un plus large que l’autre. Une prise de
type mise à la terre est composée de deux
plots et d’un troisième de mise à la terre. Ce
troisième plot, large ou rond a été prévu pour
la sécurité de l’utilisateur. Si la prise fournie
ne rentre pas dans la prise murale, faire
appel à un électricien pour qu’il remplace
cette dernière qui est vraisem blablement
obsolète.
• Protéger le cordon d’alimentation afin d’éviter
qu’il soit piétiné ou qu’il soit pincé, en
particulier au niveau des prises murales,
plaques multiprises et à l’endroit où il est
rattaché à l’appareil.
• N’utiliser que des périphériques et
accessoires spécifiés par Insignia.
• N’utiliser qu’avec la table
roulante, le pied, le
trépied, le support ou la
table recommandés par
Insignia ou vendus avec
l'appareil. Lorsqu’une
table roulante est
utilisée, déplacer
l’ensemble appareil/table
roulante avec précaution pour éviter les
blessures provoquées par une éventuelle
chute de l’appareil.
• Débrancher l’appareil lors d’orages ou quand
il n’est pas utilisé pendant une période
prolongée.
• Toutes les réparations doivent être réalisées
par du personnel qualifié. Faire réparer
l’appareil s’il a été endommagé, qu’il s’agisse
du cordon d’alimentation ou de la prise qui
seraient détériorés, de liquide entré dans
l’appareil ou d’objets qui seraient tombés
dessus, d’une exposition à la pluie ou à l’eau,
d’un fonctionnement anormal ou qu’on l’ait
fait tomber.
36
www.insignia-products.com
Page 39

Système de cinéma maison Insignia NS-H3005
Fonctionnalités
Panneau avant
Composant Description
1 Plateau à disque (lecteur de
DVD)
2 Capteur de télécommande et
fenêtre d’affichage
3 Ouvrir/Fermer Pour ouvrir ou fermer le
4 Compartiment de cassette
(magnétoscope)
5 Enregistrement/
Enregistrement
programmé
6 Saut arrière/Balayage / DVD : Appuyer sur cette
7
Lecture
Insérer un disque ici
Pointer la télécommande ici.
Pour de plus amples
renseignements sur la fenêtre
d’affichage, voir “Fenêtre
d’affichage” page 38.
plateau à disque.
Insérer une cassette vidéo ici.
Pour enregistrer ou activer la
fonction d'enregistrement
programmé.
touche pour aller au début du
chapitre ou de la pist e act uell e
ou au chapitre ou à la piste
précédente.
Appuyer sans relâcher
pendant deux secondes pour
une recherche rapide en
arrière.
Magnétoscope : Appuyer sur
cette touche pour remb ob in e r
la cassette en mode Stop
(Arrêt) ou pour effectuer une
recherche rapide d’image en
arrière.
Pour lire une cassette
pré-enregistrée ou un disque.
10
11
12
13
14
15
16
17
18
Composant Description
8 Saut avant/Balayage / DVD : Appu ye r su r la t ou c he
1
2
3
4
5
6
7
8
9
9 Arrêt ( ) Pour arrêter la lecture d’une
10 Pause/Image par
11 Éjecter Pour éjecter la cassette du
12 Commande de volume Tourner le bouton dans le
13 DVD/VCR (sélection de la
14 Mémorisation des
15 AM/FM Pour basculer entre les
16 Sélection de l’entrée Pour sélectionner la source
17 Entrée audio/Entrée vi dé o
18 Attente/Marche Permet d'allumer ou
/
image
sortie : lecteur de DVD ou
magnétoscope)
canaux +/-
Ligne 2 (gauche/droi te)
pour aller au début du chapitre
ou de la piste suivante.
Appuyer sans relâcher
pendant deux secondes pour
une recherche rapide en avant.
Magnétoscope : Appuyer sur
cette touche pour faire
avancer la cassette en mode
Stop (Arrêt) ou pour effectuer
une recherche rapide d’image
en avant.
cassette ou d’un disque.
Pour arrêter momentanément
la lecture d’une cassette ou
d’un disque.
Appuyer plusieurs fois su r
cette touche pour un e le ct ure
image par image.
magnétoscope.
sens horaire pour augmenter
le volume. Tourner le bouton
dans le sens anti-horaire pour
diminuer le volume.
Appuyer pour sélectionner
DVD ou VCR comme la sour ce
en sortie à visualiser sur le
téléviseur.
Appuyer sur cet te touche po ur
balayer en avant ou en arrière
les stations de radio ou de TV
mémorisées ou pour contrôler
les pistes lors de la lecture
d'une cassette vidéo.
bandes FM et AM.
d’entrée du magnétoscope
(syntoniseur, Ligne 1 ou Ligne
2)
Pour la conn exion d’une s ortie
audio et vidéo d’une s ource
externe telle qu'un système
audio, un télévise ur, un
moniteur ou un
magnétoscope.
d'éteindre l’appareil.
www.insignia-products.com
37
Page 40

Système de cinéma maison Insignia NS-H3005
Fenêtre d’affichage
dts
DIGITAL
PROLOGIC
DVD SAP
RADIO
PCM WMA
PHOTO
P/SCAN
ST
RPT ALL
MP3 TV
A B
Description
1 Affiche le flux audio act uel.
2 S’al lume pendant la lecture d’un disque WMA.
3 S’al lume lorsque la radio est en marche.
4 Affiche le mode d’ambiance act uel.
5 S’allume pendant la réception d’une émission bilingue
SAP.
6 S’al lume lorsque la lecture programmée est activée.
7 S’al lume lorsqu’un disque est chargé dans le lecteur de
DVD. Clignote lorsque le plateau à disque es t ouvert.
8 S’al lume lorsque le magnétoscope est en mode
d’enregistrem e nt programmé ou lors qu’un
enregistrement sur magnétoscope est en cours de
programmation.
9 S’allume pendant la copie d’un di sq ue D VD su r le
magnétoscope.
10 S’allume pendant l'enregistrement d'une cassette vidéo
sur le magnétoscope.
11 S’allume pendant la lecture sur le magnétoscope d’une
cassette haute fidél it é.
12 S'allume lorsque le son est mis en sourdine.
13 S'allume lors du chargement d'une cassette dans le
magnétoscope.
14 Affiche la durée de lecture t otale, la duré de lecture
écoulée, la fréquence, la durée restante, l’état de la
platine actuel, le mode d’ambiance et le volume.
15 Affiche le numéro de chap itre ou de piste ou de canal
actuel.
16 S’allume lorsque le système de cinéma maison est en
mode TV.
17 S’allume pour indiquer qu’un dis q ue MP3 ou WM A est
inséré.
18 Affiche le mode de lecture répétée.
19 S’allume pour indiquer qu’un disque DVD est chargé sur
le système de cinéma maison.
20 S’allume pendant la réception d’une émission stéréo.
II
PROG
TITLE
CHPTRK
Hi-Fi
Description
1
21 S’allume pour indiquer qu’un disque de fichiers JPEG
2
3
4
5
Panneau arrière
est chargé sur le système de cinéma maison.
22 S’allume pour indiquer que le système de cinéma
maison est en mode de balayage progressif.
6
7
8
9
10
11
12
1
2
3
4
5
6
MUTE REC COPY
13
14
15
16
17
18
19
20
21
22
7
8
9
Composant Description
1 Cordon
d’alimentation CA
2 Magnétoscope sur
ligne 1 (Entrée
vidéo/Entrée audio
[gauche/droite])
3 Sorties audio et
vidéo
magnétoscope/lecte
ur de DVD
(gauche/droite)
4 Sortie vidéo
balayage progressif /
composantes (Y , Pb,
Pr) (sortie DVD)
5 Ent rée antenne TV P our la connexion d'une antenne
6 Antenne FM Brancher l’antenne FM sur cette prise.
7 Antenne AM Brancher l’antenne AM sur cette
8 Conn exions des
haut-parleurs
9 Sortie coaxiale Pour la connexion à un téléviseur
Précautions
Ne pas toucher les broches internes des prises sur le panneau
arrière. Les décharges électrostatiques peuvent provoquer des
dommages permanents à l’appareil.
Brancher sur une prise secteur.
Connecter la sortie audio /vidéo d’une
source externe (système audio, TV ou
moniteur, magnétoscope) à ces
prises.
Pour la connexion à un té léviseur
équipé d’entrées audio et vidéo.
Pour la connexion à un té léviseur
équipé d’entrées à composantes (Y,
Pb, Pr).
VHF/UHF ou d’un câble de
câblodiffusion à cette borne.
prise.
Connecter les six haut-p arleurs à ces
prises.
équipé d’entrées coaxiales.
38
www.insignia-products.com
Page 41

Système de cinéma maison Insignia NS-H3005
Télécommande
1
2
3
4
5
6
7
8
9
10
11
12
Composant Description
1 Puissance Permet d'allumer ou d'éteindre
2Sélecteur
CD/DVD/VCR
3 Touches
numériques 0-9
4 Programme Appuyer sur cette touc he pour ouvrir ou
5 Effacer Pour effacer un numéro de piste su r le
l’appareil.
Appuyer sur cette commande pour
sélectionner la source de sortie (lecteur
de CD/DVD ou magnétoscope) à
visualiser sur le téléviseur.
Pour saisir des chiffres dans un menu
par exemple.
fermer le menu Program (Programme).
menu Programme ou un signet dans la
menu Marker Search (Recherche des
signets).
Appuyer sur cette touche pour effacer
des chaînes programmées de la
mémoire du syntoniseur.
13
14
15
16
17
18
19
20
21
22
23
24
25
Composant Description
6 Affichage/
CLK/CNT
7
Gauche /
Droite /
Haut /Bas
8 Retour Pour quitter le menu Setup
9 Enregistrement/
Enregistrement
programmé
Arrière
Avant
10 Arrêt ( ) Appuyer sur cette touche pour
Pause/I mag e p ar
image
Lecture
11 Angle Pour sélectionner un angle de prise de
12 CM Skip Appuyer sur cette touche pour sauter
13 Éjecter/Ouvrir/
Fermer
14 Syntoniseur
FM/AM
15 Entrée Pour sélectionner la source du
16 Audio Pour sélectionner une langue audio
17 Mode Son Pour sélectionner le mode son.
18 Configuration/
Menu
Pour visualiser le menu d’écran (OSD).
Appuyer sur cette touche pour basculer
entre les modes horlo ge, compteur de
cassette et durée de lectur e de cassette
restante sur l’affichage.
Pour naviguer sur le menu d’écran. Pour
changer également de canaux sur un
magnétoscope ou des stations à la radio.
(Configuration).
Pour enregistrer sur une cassette ou
activer la fonction d'enregistrement
programmé.
En mode DVD : Appu yer sans relâcher
sur cette touche pour lancer une
recherche arrière ; appuyer sur cette
touche pour aller au début d’un chapitre
ou d’une piste en cours de lecture ou
pour aller au chapitre ou à la piste
précédente.
En mode magnétoscope : Appuyer sur
cette touche pour rembobiner la cassette
si le magnétoscop e est en mode STOP
(Arrêt) ou pour effectuer une recherche
d’image rapide en arrière.
En mode DVD : Appu yer sans relâcher
sur cette touche pour lancer une
recherche avant ou appuyer sur cette
touche pour aller au début du chapitre
ou de la piste suivante.
En mode magnétoscope : Appuyer sur
cette touche pour faire avancer la
cassette si le magnétoscope est en mode
STOP (Arrêt) ou pour effectuer une
recherche d’image rapide en avant.
interrompre la lecture.
Appuyer une fois sur cette touche pour
arrêter momentanément la lecture ou
l'enregistrement.
Appuyer plusieurs fois sur cette touche
pour une lecture image par image.
Pour commencer la lecture.
vues différent si le disqu e DV D en
comporte.
30 secondes de cont enu enregistré.
Appuyer sur cette touche pour ouvrir et
fermer le plateau à disque ou éjecter une
cassette vidéo du magnétoscope.
Pour basculer entre les bandes FM et AM
de la radio.
magnétoscope (syntoniseur, ligne 1 ou
ligne 2).
(DVD) ou un canal aud io (CD).
Appuyer sur cette touche pour accéder à
ou quitter le me n u de c o nfiguration DVD
et le menu magnétoscope.
www.insignia-products.com
39
Page 42

Système de cinéma maison Insignia NS-H3005
Composant Description
19 Mémoire/Entrée Appuyer pour sélectionner un élément
20 Menu du disque Permet d’accéder au menu d’un disque
21 Volume (+/-) Pour régler le volume des haut-parleurs.
22 Signet Appuyer pour marquer un point
Recherche Appuyer sur cette touche pour afficher le
Sous-titres Pour sélectionner la langue des
Sourdine Appuyer activer ou désactiver le son.
23 Lecture en
boucle A-B,
Vitesse
Répéter Pour répét er la lecture d’un chapitre,
TV/
Magnétoscope
24 Zoom Cette touche permet d’agrandir l’image
25 Titre Appuyer sur cette touche pour afficher le
Remarque
Cette télécommande utilise les mêmes boutons pour le
magnétoscope et le lecteur de DVD. Pour contrôler le
magnétoscope, appuyer sur la touche VCR. Pour contrôler le
lecteur de DVD, appuyer sur la touche DVD.
de menu.
Appuyer pour afficher des fonctions sur
l’écran de TV.
Appuyer pour stocker la fréquence d’une
station de radio dans la mémoire du
syntoniseur.
DVD.
quelconque d’un DVD au cours de sa
lecture.
menu de recherche des signets.
sous-titres.
Pour répéter la lecture d’une section
marquée d’un signet.
Pour sélectionn er une vitesse
d’enregistrement.
d’une piste, d’un tit re ou de l’ensemble.
Appuyer pour la visualisation de canaux
sélectionnés par le syntoniseur du
magnétoscope ou d u téléviseur.
vidéo d’un DVD.
menu des titres d’un DVD.
Installation des piles dans la télécommande
Pour installer les piles dans la télécommande
:
1 Détacher le couvercle du compartiment des
piles au dos de la télécommande.
2 Insérer deux piles AAA (R03) en alignant
correctement les polarités (+) et (-).
3 Remettre le couvercle du compartiment des
piles.
Précautions
• Ne jamais mélanger des piles neuves et usagées.
• Ne jamais mélanger des piles de types différents (standard
et alcalines, par exemple).
Utilisation de disques
Disques compatibl es
Le lecteur de DVD est compatible avec les
disques suivants :
Disque Description
DVD Disques vidéo DVD (8 ou 12 cm)
CD Disques CD au dio (8 ou 12 cm)
DVD-RW DVD contenant des fichiers MP3, WMA
DVD+RW DVD contenant des fichiers MP3, WMA
CD-R CD contenant des fichiers MP3, WMA ou
CD-RW CD contenant des fichiers MP3, WMA ou
Remarque
• En fonction des conditions de l’équipement
d’enregistrement ou du disque lui-même (CD-R/RW,
DVD-R W, DVD+R W), certains disques ne pourront pas être
lus sur ce lecteur.
• Ne pas apposer de sceau ou d’étiquette sur une face ou
l’autre (la face étiquette ou la face enregistrement) d’un
disque.
• Ne pas utiliser des CD de forme irrégulière (par exemple,
cordiforme ou octogonal). Des défaillances de
fonctionnement pourraient s’ensuivre.
Fonctionnement de base du lecteur de
DVD
Certaines opérations de lecture de disques DVD
peuvent être programmées par le fabricant de
DVD. Ce lecteur lit des disques DVD en fonction
de leur contenu tel qu’il a été conçu par le
fabricant. Certains fonctionnalités de lecture du
lecteur peuvent être indisponibles ou d'autres
peuvent avoir été ajoutées.
Veiller à consulter les instructions fournies avec
les disques DVD. Certains DVD à usage
commercial peuvent être incompatibles avec ce
lecteur.
Codes régionaux
1
DVD indique quel type de lecteur peut lire ces
disques. Ce lecteur ne peut lire que les DVD
étiquetés 1 ou ALL (Tous). Si d'autres types de
disques sont insérés, le message Check
Regional Code (Vérifier le code régional)
apparaîtra sur l’écran de TV . Certains DVD qui
ne comportent pas d'étiquette de code régional
peuvent néanmoins être sujets à des restrictions
géographiques de lecture et ne seront donc pas
lisibles.
ou JPEG
ou JPEG
JPEG
JPEG
Ce lecteur de DVD a été conçu et
fabriqué pour la lecture de logiciel de
D VD encodé pour la Région 1. Le code
régional sur les étiquettes de certains
40
www.insignia-products.com
Page 43

Système de cinéma maison Insignia NS-H3005
Lexique des disques
Titre (disques vidéo DVD uniquement)
Un titre est le film principal ou documentaire
secondaire ou documentaire complémentaire ou
un album musical. À chaque titre est attribué un
numéro de référence de titre pour faciliter sa
localisation.
Chapitre (disques vidéo DVD uniquement)
Les chapitres sont les sections d’une
composition musicale ou vidéo qui sont plus
petites que les titres. Un titre est composé d’un
ou de plusieurs chapitres. À chaque chapitre est
attribué un numéro de chapitre pour faciliter sa
localisation. Certains disques n’ont pas de
chapitres.
Piste (CD audio uniquement)
Les pistes sont les sections d’une composition
musicale sur un CD audio. À chaque piste est
assigné un numéro pour faciliter la localisation
de la piste souhaitée.
Lexique audio
DTS
Permet d’apprécier 5.1 ou six canaux discrets
d'enregistrements audio de haute qualité en
provenance de sources programmatiques DTS
telles que des DVD ou des CD portant la marque
de commerce. La technologie du son
ambiophonique numérique DTS offre près de six
canaux audio DTS transparents offrant une
clarté sonore exceptionnelle dans un champ
sonore véritable à 360°. L’acronyme DTS est
une marque de commerce de DTS Technology,
LLC. Ce lecteur est fabriqué sous la licence de
DTS Technology, LLC.
Dolby Digital
Le format ambiophonique Dolby Digital offre
près de 5.1 canaux de son ambiophonique
numérique à partir d'une source
programmatique Dolby Digital. La lecture de
DVD portant le label assure un son d’une
qualité encore supérieure, d’une précision
spatiale plus élevée et d’une gamme dynamique
rehaussée.
Pro Logic
Utiliser ce mode pour la lecture d’un film ou d’un
canal Dolby Digital 2 portant le label . Ce
mode simule l’écoute dans une salle de cinéma
ou une salle de concert – un effet d’une intensité
unique à la technologie du son ambiophonique
Dolby Pro Logic. L’effet du mouvement de
l’image son vers l’avant, l’arrière, la gauche et la
droite ainsi que la sensation d’une position fixe
de l’image son n'ont jamais été aussi clairs et
aussi dynamiques.
Pro Logic (II)
Dolby Pro Logic II crée cinq canaux de sortie à
largeur de bande totale depuis des sources à
deux canaux. Cette création est effectuée avec
un décodeur d’ambiance matriciel évolué, de
haute pureté, qui extrait les propriétés spatiales
de l’enregistrement initial sans ajouter de
nouveaux sons ni de colorations tonales.
( )
Mode Movie (Film)
Le mode film est destiné aux émissions
télévisées en stéréo et à tous les programmes à
encodage ambiophonique Dolby . Cela produit un
champ acoustique directionnel amélioré proche
de la qualité sonore de canaux 5.1 discrets.
Mode Music (Musique)
Le mode Musique est destiné à l’écoute des
enregistrements musicaux stéréo.
Mode Matrix (Matriciel)
Équivalent au mode Music sauf pour la logique
d’amélioration directionnelle qui est désactivée.
Cette option peut être utilisée pour améliorer les
signaux mono en donnant l’impression qu’ils
sont
plus puissa nts
.
3D SURROUND (Son ambiophonique 3D)
Ce lecteur peut produire un son ambiophonique
3D, grâce à la technologie du son
ambiophonique 3D, qui simule la lecture audio
multicanal à partir de deux haut-parleurs stéréo
conventionnels, au lieu des cinq haut-parleurs
ou plus généralement requis pour écouter un
programme audio multicanal à partir d'un
système de cinéma maison. Cette fonctionnalité
est disponibles avec les DVD encodés Dolby Pro
Logic et les pistes audio Dolby Digital.
BYPASS (mode Évitement)
Le logiciel avec signaux audio ambiophoniques
multicanaux est exécuté selon la façon dont il a
été enregistré.
Mode son
Profiter du son ambiophonique en sélectionnant
l’un des champs sonores pré-programmés en
fonction du programme à écouter.
Lecture d’un DVD
Il est possible de changer de mode de sortie
audio numérique en appuyant sur la touche
AUDIO de la télécommande au cours de la
lecture. Bien que le contenu d’un DVD varie d’un
disque à l’autre, le fonctionnement de base peut
être décrit de la façon suivante lorsque cette
fonctionnalité est utilisée.
• Après avoir sélectionné deux canaux en
appuyant sur la touche AUDIO appuyer sur la
touche SOUND MODE de façon répétée. Les
options de mode sonore sont les suivantes :
• Bypass (Évite ment)
• PRO Logic
• Movie (Film)
• Music (Mu sique)
• Matrix (Matricé)
• 3D Surround (Son ambiophonique 3D)
• Après avoir sélectionné le canal 5.1 en
appuyant sur la touche AUDIO appuyer sur la
touche SOUND MODE. BYPASS est la seul e
option possible.
www.insignia-products.com
41
Page 44

Système de cinéma maison Insignia NS-H3005
Lecture d’un CD
À chaque pression de la touche SOUND, le
mode son du CD audio est modifié dans l'ordre
suivant :
• Bypass (Évitement)
• PRO Logic
• Music (Musique)
• Matrix (Matricé)
• 3D Surround (Son ambiophonique 3D)
Remarque
• Le lecteur mémorise la dernière configuration de mode
pour chaque source, individuellement.
• Il est possible d’identifier le format d’encodage du logiciel
de programme sur l'emballage.
Les disques Dolby Digital portent le logo .
Les programmes encodés Dolby Surround sont identifiés
par le logo .
Les disques DTS Digital Surround sont marqués du sigle
DTS.
• Lorsque des pistes sonores sont lues à une fréquence
d'échantillonnage de 96 kHz, les signaux de sortie sont
convertis à la fréquence d'échantillonnage de 48kHz.
Connexion du système de
cinéma maison.
Remarque
• Il existe diverses façons de connecter le système de
cinéma maison, en fonction du téléviseur et d'autres
équipements à y connecter. Utiliser les connexions décrites
de la page 42 à la page 44.
• Consulter les manuels du téléviseur, du magnétoscope et
du système stéréo pour effectuer les meilleures
connexions.
• S’assurer que le système de cinéma maison est connect é
directement au téléviseur. Syntoniser le téléviseur au canal
d’entrée vidéo correct.
• Ne pas connecter le système de cinéma maison par
l’intermédiaire d’un autre magnétoscope. L’image DVD
pourrait être déformée par le système de protection contre
la copie.
Connexion d’une antenne ou de la
télévision câblée au système de cinéma
maison.
Pour la connexion d’une antenne ou de la
télévision câblée au système de cinéma
maison :
1 Débrancher les câbles de l'antenne ou de la
télévision câblée de l'arrière du téléviseur.
2 Identifier le type de câble en provenance de
l’antenne ou de la télévision câblée. S’il s’agit
d’un câble rond comme illustré, c’est alors un
câble coaxial d’antenne de 75 ohms. Ce
câble se branche directement à la prise
marquée ANTENNA/CABLE IN (Entrée
antenne/câble) sur le système de cinéma
maison.
Antenne
Fil méplat
(300 ohms)
Adaptateur
300/75
ohms (non
fourni)
Remarque
Pour la lecture d’un DV D ou d’une cassette vidéo, le système
de cinéma maison est conçu de telle façon que le son n’est
transmis que depuis les cinq haut-parleurs et le caisson
d’extrêmes graves du système de cinéma maison. Aucune
sortie son n’est fournie au téléviseur si ce dernier est connecté
à la prise MONITOR OUT (Sortie moniteur) du système de
cinéma maison au moyen de câbles en option.
Antenne
Prise murale
de TV câblée
Arrière du système de cinéma maison
Connexion sans décodeur
Si le câble est connecté au téléviseur sans
décodeur/décr yp teur, dévisser le câble du
téléviseur et le brancher sur la prise d'entrée
ANTENNA/CABLE IN du système de cinéma
maison. Utiliser le câble coaxial rond fourni pour
relier la prise de sortie ANTENNA/CABLE OUT
du système de cinéma maison et la prise
d’entrée d’antenne de 75 ohms du téléviseur.
Grâce à cette connexion, il est possible de
capter tous les canaux de bande moyenne, de
superbande et d’hyperbande.
Connexion à un décodeur
Si le système de TV câble local requiert l’usage
d’un décodeur, observer les instructions
suivantes : Ce branchement de câbles permet le
fonctionnement du téléviseur et du système de
cinéma maison.
Pour visionner ou en registrer un canal de TV
câblée :
1 Syntoniser le téléviseur sur le canal de sortie
du système de cinéma maison (CH 3 ou 4).
2 Régler le sélecteur de canaux du système de
cinéma maison sur le canal de sortie du
décodeur de TV câblée à l’aide de la touche
ou du système de cinéma maison
(exemple : CH3)
3 Sélectionner le canal à visionner ou à
enregistrer au niveau du décodeur.
Remarque
Si le câble d’antenne est du type plat, le brancher sur un
adaptateur d’antenne (300 ohms à 75 ohms) (non fourni) et
brancher l’adaptateur dans la prise ANTENNA/CABLE IN
(Entrée câble/antenne). L’adaptateur ne se visse pas sur la
prise, il s'adapte simple sur elle.
42
Remarque
•Il n’est pas possible d’enregistrer une émission tout en
regardant une autre avec ce type de connexion.
• En cas d'utilisation d'un décodeur pour syntoniser les
canaux, il n'est pas nécessaire d’effectuer la Configuration
automatique des canaux comme indiqué à la page 47.
www.insignia-products.com
Page 45

Système de cinéma maison Insignia NS-H3005
Panneau arrière d’un
décodeur type
Arrière du système de cinéma maison
Prise
murale de
TV câblée
Connexion du système de cinéma maison
au téléviseur
Connecter le système de cinéma maison au
téléviseur à l’aide de l’une des méthodes
suivantes :
• “Connexion coaxiale RF” page 43
• “Connexion audio et vidéo” page 43
• “Connexion descomposantes vidéo
(ColorStream®)” page 43
• “Connexion Progressive Scan [Balayage
progressif] (ColorStream® pro) ” page 44
Connexion coaxiale RF
Connecter la prise de sortie ANTENNA/CABLE
OUT du système de cinéma maison à la prise
d’entrée ANTENNA in du téléviseur à l’aide d’un
câble coaxial de 75 ohms.
Pour régler le canal de sortie RF du système
de cinéma maison :
1 Le système de cinéma maison étant hors
tension, appuyer sans relâcher sur la touche
CH/PRESET (-/+) (Mémorisation des
canaux) du panneau avant pendant plus de
cinq secondes. Le système de cinéma
maison se met sous tension de lui-même et
RF-03 ou RF-04 apparaît sur l’affichage.
2 Appuyer sur la touche CH/PRESET (-/+) du
panneau avant pour changer le canal de
sortie RF (CH 03 ou CH 04).
3 Mettre le système de cinéma maison hors
tension puis de nouveau sous tension.
4 Sélectionner le canal 3 ou 4 du téléviseur, en
fonction du canal de sortie RF sélectionné.
Connexion audio et vidéo
Pour connecter le système de cinéma
maison au téléviseur à l’aide des prises A/V :
1 Connecter la prise VIDEO OUT (Sortie
vidéo) du système de cinéma maison à la
prise d'entrée vidéo du téléviseur à l'aide du
câble vidéo fourni.
Vidéo
Audio
Arrière du système de cinéma maison
Remarque
Pour cette méthode de connexion, syntoniser le téléviseur sur
le canal de sortie RF du système de cinéma maison (CH 3 ou
4).
Câble
coaxial
Arrière du système de cinéma maison
2 Connecter les prises de sortie AUDIO OUT
gauche et droite du système de cinéma
maison aux prises d’entrée audio gauche et
droite du téléviseur à l’aide des câbles audio
fournis.
Remarque
En cas d’utilisation de cette connexion, régler le sélecteur
Source du téléviseur sur VIDEO.
Connexion descomposantes vidéo
®
(ColorStream
Remarque
La lecture de DVD peut également s’effectuer à l’aide de la
connexion COMPONENT/ PROGRESSIVE SCAN VIDEO
OUT (Sortie vidéo balayage progressif / composantes) Le
syntoniseur et le magnétoscope ne communiquent en sortie
que par l’intermédiaire de la prise de sortie RF .OUT (D) ou de
la prise de sortie (A, V) du système de cinémas maison.
)
www.insignia-products.com
43
Page 46

Système de cinéma maison Insignia NS-H3005
Pour connecter le lecteur de DVD au
téléviseur à l’aide des composantes vidéo :
1 Connecter les prises
COMPONENT/PROGRESSIVE SCAN
VIDEO OUT (Sortie vidéo à composantes /
balayage progressif) du système de cinéma
maison aux prises d’entrée correspondantes
du téléviseur à l’aide des câbles Y Pb Pr (C).
Composante
Audio
Pour connecter le lecteur de DVD au
téléviseur à l’aide du balayage progressif :
1 Connecter les prises
COMPONENT/PROGRESSIVE SCAN
VIDEO OUT (Sortie vidéo à composantes /
balayage progressif) de l’appareil aux prises
du téléviseur à l’aide d’un câble Y Pb Pr (C).
Composante
Audio
Arrière du système de cinéma maison
2 Connecter les prises de sortie AUDIO OUT
gauche et droite du système de cinéma
maison aux prises d’entrée audio gauche et
droite du téléviseur à l’aide des câbles audio
fournis.
Remarque
• Régler Pro gressive Scan (balayage progressif) sur On
(Activé) dans le menu de configuration DVD pour le
balayage progressif, voir “Menu image” page 53.
• Le balayage progressif ne fonctionne pas avec les
connexions vidéo analogiques (prise jaune VIDEO OUT
[Sortie vidéo] et S-VIDEO OUT [Sor tie S-V idéo]).
Connexion Progressive Scan [Balayage
progressif] (ColorStream
Remarque
• La lecture de DVD peut également s’effectuer à l’aide de la
connexion COMPONENT/ PROGR ESS IVE SCAN VIDEO
OUT (Sortie vidéo balayage progressif / composantes) Le
syntoniseur et le magnétoscope ne communiquent en
sortie que par l’intermédiaire de la prise de sortie RF.OUT
(D) ou de la prise de sortie (A, V) du système de cinémas
maison.
• Si le téléviseur est du type haute-définition ou
au numérique
balayage progressif du système de cinéma maison pour
obtenir la plus haute qualité vidéo possible.
• Si le téléviseur n’accepte pas le format Progressive Scan,
l’image paraît brouillée si tentative est faite d'utiliser le
balayage progressif sur le système de cinéma maison.
, il est possible de profiter de la sortie de
®
pro)
compatible
Arrière du système de cinéma maison
2 Connecter les prises de sortie AUDIO OUT
gauche et droite du système de cinéma
maison aux prises d’entrée audio gauche et
droite du téléviseur (A) à l’aide des câbles
audio fournis.
Remarque
• Régler Progressive Scan (balayage progressif) sur On
(Activé) dans le menu de configuration DVD pour le
balayage progressif, voir “Menu image” page 53.
• Le balayage progressif ne fonctionne pas avec les
connexions vidéo analogiques (prise jaune VIDEO OUT
[Sortie vidéo] et S-VIDEO OUT [Sortie S-Vidéo]).
44
www.insignia-products.com
Page 47

Système de cinéma maison Insignia NS-H3005
Connexion de périphériques au système
de cinéma maison
Pour connecter des périphériques au
système de cinéma maison :
• Connecter les prises LINE 1 ou LINE 2 du
système de cinéma maison aux prises
AUDIO/VIDEO OUT (Sortie audio/vidéo) de
la composante accessoire à l’aide des câbles
audio/vidéo en option.
Composante accessoire telle que
magnétoscope, caméscope, caméra vidéo,
récepteur satellite ou lecteur de disque laser.
Panneau de prises du périphérique
AUD
IO
UTPU
T
O
R
L
VIDEO
UTPU
T
O
OU
2 Connecter l’antenne filaire FM au connecteur
d’antenne FM.
Antenne cadre AM
Antenne filaire FM
Remarque
• Pour éviter les parasites, écarter l'antenne cadre AM du
système de cinéma maison et d'autres dispositifs.
• Veiller à déployer complètement l’antenne filaire FM.
• Après connexion de l’antenne filaire FM, garder l’antenne à
l’horizontale autant que possible.
Arrière du système de cinéma maison Avant du système de cinéma maison
Connexion des antennes radio au système
de cinéma maison
Connecter les antennes AM et FM fournies afin
de pouvoir écouter la radio.
Pour connecter les antennes radio :
1 Connecter l’antenne AM cadre au connecteur
d’antenne AM.
Connexion des haut-parleurs à l'appareil
Connecter les haut-parleurs à l’aide des câbles
fournis.
Pour obtenir la meilleure sonorité d’ambiance,
ajuster la distance des haut-parleurs et les
réglages de niveau. Pour plus d’informations,
voir “Configuration des haut-parleurs” page 53.
Haut-parleur avant
(droit)
Haut-parleur arrière (droit)
Haut-parleur central
Caisson d’extrêmes graves
Haut-parleur avant
(gauche)
Haut-parleur
arrière (gauche)
www.insignia-products.com
45
Page 48

Système de cinéma maison Insignia NS-H3005
Remarque
• Vér ifier que le câble du haut-parleur est bien branché à la
borne correcte des connecteurs : Le + au + et le – au –. Si
les câbles sont inversés, le son est déformé et les graves
ne seront pas émis.
• Lorsque le son est augmenté, régler le niveau en prenant
soin d’éviter un volume de sortie trop élevé des
haut-parleurs.
• En mode magnétoscope, seulement 2 canaux stéréo
seront disponibles (avant gauche, avant droit et caisson
d’extrêmes graves). Le son des haut-parleurs central et
arrière peut ne pas être audible pendant la lecture par le
magnétoscope (pour plus d’information sur le mode son,
voir “Mode son” page 41.)
• Ne pas retirer le couvercle avant des haut-parleurs.
Fixation du tore magnétique
Ne pas oublier de fixer le tore magnétique aux
câbles des haut-parleurs. Le tore magnétique
réduit les bruits indésirables.
Pour fixer le tore magnétique :
1 Ouvrir le tore magnétique par pression sur le
cliquet
Cliquet
2 Faire un tour de câble autour du tore
magnétique.
3 Refermer le tore magnétique. Un déclic doit
se faire entendre.
Connecter le
tore magnétique
aussi près que
possible
Remarque
Fixer le tore magnétique aussi près que possible de l’appareil.
Agencement des haut-parleurs
Pour une installation normale, utiliser six
haut-parleurs (deux à l’avant, un au centre, deux
à l’arrière et un caisson d’extrêmes graves).
Caisson d’extrêmes graves
Haut-parleur avant
(gauche)
Haut-parleur
arrière
(gauche)
Haut-parleurs ava nt
À partir de la position d’éco ute, écarter les
haut-parleurs d’une distance équivalente en
conservant un angle de 45° entre eux.
Haut-parleur central
Les haut-parleurs central et avant doivent
être à la même hauteur. Placer le
haut-parleur central au-dessus ou
au-dessous du téléviseur, tel qu’illustré.
Haut-parleurs arrière
Placer les haut-parleurs arrière gauche et
droit en arrière de la zone d’écoute. Ces
haut-parleurs recré ent la so norité et
l’atmosphère requis pour la reproduction
ambiophonique. Pour des résultats
optimisés, ne pas installer les haut-parleurs
arrière trop en arrière de la position d’écoute
et les positionner au niveau des oreilles de la
personne qui écoute, voire au-dessus. Il est
aussi efficace de diriger les haut-parleurs
arrière vers un mur ou le plafond pour une
dispersion supplémentaire du son.
Pour une pièce de plus petite taille, si
l’auditeur est proche du mur arrière,
positionner les haut-parleurs arrière à
l’opposé l’un de l’autre et 24 à 36 pouces (61
à 91,4 cm) au-dessus des oreilles de
l’auditeur.
Caisson d’extrêmes graves
Pour obtenir une excellente sonorité des
graves ou un son d’ambiance Dolby Digital, il
convient de connecter un caisson d’extrêmes
graves. Positionner le caisson d’extrêmes
graves n’importe où à l’avant.
Haut-parleur central
Haut-parleur avant
(droit)
Exemple d’agencement de haut-parleurs
Haut-parleur
arrière (droit)
46
www.insignia-products.com
Page 49

Système de cinéma maison Insignia NS-H3005
Configuration du
magnétoscope
Utilisation des menus d’écran (OSD)
Certaines des fonctions suivantes s’affichent
pendant le fonctionnement du magnétoscope.
4
1
2
3
Affichage Description
1 Fonction Affiche la fonction en cours.
2 Vitesse de la cassette Affiche la vitesse de la cassette.
3 Date Affiche la date actuelle (au format
4 H i-Fi (Haute fidélité) Signifie que la cassette en cours de
5 Canal Indique le canal sélectionné ou
6 St éréo/SAP Affiche le type de signal audio reçu
7 Heure/décompte/
durée restante
Mois/Date/Jour)
lecture est enregistrée en hau te
fidélité.
LINE1 ou LINE2.
par le syntoniseur du magnétoscope.
REMARQUE : MONO n’est pas
affiché.
Affiche l’heure, le compteur de
défilement de bande et la durée
restante de la cassette.
Appuyer sur MEMORY/ENTER
(Mémoire/Entrée) pour changer l’affichage de
l’OSD.
Remarque
• La fonction affiche la durée restante sur le téléviseur
pendant cinq secondes.
• L ’heure, le compteur de défilement de bande et l’inf ormation
sur la durée restante continuent de s’afficher jusqu’à
l’appui de la touche MEMORY/ENTER.
• Le compteur de défilement de bande et l’indicateur de la
durée restante de la cassette ne s’affichent que si celle-ci
est insérée. De même, l’indicateur de la durée restante de
la cassette s’affiche après chaque activité de la cassette.
Information rapide
Si les services de données étendues (XDS) sont
intégrés aux signaux normaux de télévision
dans la zone d’émission ou si la cassette en
lecture a été enregistrée avec des signaux XDS,
l’indicatif de la chaîne, le titre et les détails sur
l’émission sont affichés sur le téléviseur.
Lors de la visualisation d’un canal avec des
signaux de services de données étendus (XDS),
appuyer sur MEMORY/ENTER et l’indicatif de la
chaîne s’affiche sur le téléviseur. Appuyer de
nouveau sur MEMORY/ENTER et l’information
sur l’émission s’affiche sur le téléviseur.
Lors de la visualisation d’une cassette
enregistrée avec des signaux de services de
données étendus (XDS), appuyer deux fois sur
MEMORY/ENTER et le titre et les détails de
l’émission s’affichent sur le téléviseur.
5
6
7
DÉTAILS SUR L’ÉMISSION
Écran d’information rapide
(Indicatif de la chaîne)
Écran d’information rapide
(Détails sur l’émission)
Détails Description
LONGUEUR Indique la durée de l’émission .
DURÉE RESTANTE Indique la durée restante de l’émission.
CLASSIFICATION Indique la classifica tion de l’émission
diffusée (N/A, G, PG, PG-13, R, NC-17,
X, et non classifié). N /A signifie que la
classification des films n’est pas
applicable à cette émission.
Accès aux menus d’écran
Les fonctions SETUP (Configuration), CLOCK et
PROGRAM (Enregistrements programmés) sont
accessibles par les menus d’écran.
Sélection du menu
La télécommande permet de régler plusieurs
fonctionnalités du magnétoscope.
Pour régler une fonctionnalité du
magnétoscope :
1 Appuyer sur MENU. Le menu principal
s’affiche.
2 Sélectionner le sous-menu à l’aide des
touches ou , puis appuyer sur
MEMORY/ENTER (Mémoire/Entrée).
Remarque
Les menus restent affichés pendant trois minutes.
Réglage de l’heure
(page 49)
Programmation
(page 56)
Syntonisation
(page 48)
Configuration
(page 47)
3 Appuyer sur MENU quand les réglages ont
été effectués.
Options du menu de configuration du
magnétoscope
1 Appuyer sur MENU. Le menu principal
s’affiche.
www.insignia-products.com
47
Page 50

Système de cinéma maison Insignia NS-H3005
2 Appuyer sur ou pour sélectionner
SETUP (Configuration), puis sur
MEMORY/ENTER (Mémoire/Entrée). Le
menu de configuration s’affiche.
3 Appuyer sur ou pour sélectionner une
option du menu de configuration.
4 Appuyer sur ou pour modifier un
paramètre.
5 Appuyer sur MENU quand les réglages ont
été effectués.
Paramètre Description
Function OSD
(Fonction
OSD)
Audio mode
(Mode audio)
Broadcast type
(Type
d’émission)
Audio output
(Sortie audio)
Permet activer ou de désactiver l’af fichage des
menus d’écran.
Sélectionner ON (Activé) et OFF (D ésactivé) avec
ou .
Le magnétoscope est dot é de deux systèmes de
lecture audio, le syst ème VHS haute fidélité de
haute qualité et le syst ème standard NORMAL
mono. La même audio est en général enregistrée
sur les deux systèmes. Le son du système VHS
haute fidélité est émis par deu x canaux séparés
(gauche et droit) et le système NORMAL émet un
son monophonique. La piste normale est touj ours
lue afin que la cassette puisse être lue sur un
magnétoscop e qui n’ a pa s le VHS ha ute fidélité.
Sélectionner Hi-Fi (Haute fidélité ) ou NORMAL
avec ou .
MTS (Transmission multivoie de signaux sonores
en télévision) transmet la stéréo et les signaux
bilingues de la second e trame sonore (SAP).
Régler ce paramètre sur la valeur souhaitée quand
les deux signaux MTS, stéréo et SAP sont reçus.
Quand seulement l’un des signaux MTS est reçu,
le magnétoscope sélectionne automatiquement le
mode de réception correspondant (Sté réo ou
SAP), quelque soit la va leur sélectionnée. Pour le
fonctionneme nt no r m al, le réglage est sur
STEREO. Le magnét oscope enregistre a lors une
émission en stéréo si elle est dans ce mode ou en
mono si elle n’est pas en sté r éo.
Pour des émissions à signal stéréo ou SAP faible,
le réglage sur MO NO peut permettre d’obtenir un
son plus clair.
Sélectionner STEREO, SAP ou MONO à l’aide des
touches ou .
Est utilisé pendant la lecture (quand AUDIO MODE
[HI-FI/NORMAL] est réglé sur HI-FI) pour la
sélection des signaux de sortie audio à partir des
prises de sortie audio [AUDIO OUT] (canal L [G] et
R [D]) et sortie RF (RF OUT).
Ce réglage doit en principe être mis sur la position
STEREO, ce qui perm et lors de la lecture d’une
cassette stéréo, que le son st éréo soit audible à
travers les canaux gauche et dr oit. Si la cassette
en lecture est mono et que la sortie audio est sur
STEREO, le même son mono est émis par les deux
canaux gauche et droit.
Sélectionner STEREO, LEFT (Gauche) ou RIGHT
(Droit) à l’aide des touches ou .
Sélection des canaux
Cet appareil est doté d’un syntoniseur de 181
canaux à fréquence synthétisée. Cela inclut les
canaux VHF 2 à 13, UHF 14 à 69 et de la
câblodistribution 1 à 125.
Remarque
Vérifier que le magnétoscope est connecté à une antenne ou
au câble.
Pour effectuer la programmation
automatique des canaux :
1 Appuyer sur MENU. Le menu principal
s’affiche.
2 Appuyer sur ou pour sélectionner
TUNING (Syntonisation), puis sur
MEMORY/ENTER (Mémoire/Entrée). Le
menu de syntonisation s’affiche.
3 Appuyer sur pour aller à SOURCE
SELECT (Sélection de la source), puis à
l’aide de ou sélectionner TUNER
(Syntoniseur) Appuyer de façon répétée sur
ou pour basculer de TUNER à LINE1
ou LINE2.
4 Appuyer sur ou pour sélectionner
AUTO CHANNEL SET (Configuration
automatique des canaux), puis utiliser
ou pour rechercher les canaux. Le
syntoniseur recherche automatiquement les
canaux disponibles dans la zone de
réception et les mémorise.
5 Quand la programmation automatique des
canaux est terminée, vérifier que TUNING
BAND (Bande de syntonisation) est réglé
correctement (TV ou CATV
[Câblodistribution]). Sélectionner la bande de
syntonisation correcte (TV ou CATV) à l’aide
de ou dans le menu syntonisation. Se
rappeler : TV est pour la réception
hertzienne, CATV est pour la connexion
câble avec ou sans fil.
6 Appuyer sur MENU pour revenir à l’écran
normal.
7 Appuyer sur CH/PRESET ( Canaux
préréglés) (-/+) sur le panneau avant ou
ou sur la télécommande pour changer
de canal sur le magnétoscope.
Ajout ou suppression de canaux
Cette fonction permet d’ajouter ou de supprimer
manuellement des canaux mémorisés.
Pour ajouter ou supprimer des canaux
mémorisés :
1 Appuyer sur MENU. Le menu principal
s’affiche.
48
www.insignia-products.com
Page 51

Système de cinéma maison Insignia NS-H3005
2 Appuyer sur ou pour sélectionner
TUNING (Syntonisation), puis sur
MEMORY/ENTER (Mémoire/Entrée). Le
menu de syntonisation s’affiche.
3 Appuyer sur pour sélectionner CH.
ADD/DEL (Ajout/Suppression de canaux)
dans le menu Tuning (Syntonisation).
4 Appuyer sur ou pour sélectionner un
canal à ajouter ou supprimer.
5 Appuyer sur MEMORY/ENTER pour ajouter
ou supprimer un canal.
6 Répéter les étapes 3 à 5 pour ajouter ou
supprimer d'autres canaux.
7 Appuyer sur MENU pour fermer le menu.
Réglage de l’horloge
L’appareil permet de régler l’heure et la date de
deux façons : par la fonction réglage
automatique de l’heure ou manuellement. La
fonction de réglage automatique de l’heure
permet à l’appareil de régler l’heure alors qu’il
est éteint.
Remarque
L’horloge utilise l’affichage au format 12 heures. S’assurer de
régler correctement AM et PM. AM ne s’affiche pas.
Le réglage initial de l’horloge est January 1, 2006, 12:00 AM
(1e janvier 2006, minuit).
Réglage automatique de l’horloge
La fonction de réglage automatique de l’horloge
est sur ON (Activée) par défaut. En mode activé
(ON) l’appareil recherche un canal transmettant
l’information XDS (Services de données
étendues). XDS met à jour l’horloge sur la base
du Temps Universel Coordonné.
4 Appuyer sur ou pour sélectionner ON
(Activé).
5 Appuyer sur pour sélectionner DAYLIGHT
SA VINGS (Heure d’été).
6 Appuyer sur ou pour sélectionner
AUTO, ON (Activé) ou OFF (Désactivé).
Si AUTO est sélectionné, le magnétoscope
règle l’horloge en tenant compte de
l’information sur l’heure d’été diffusée par le
signal (canal).
Si ON est sélectionné, le magnétoscope
règle l’horloge automatiquement sur l’heure
d’été.
7 Appuyer sur pour sélectionner TIME
ZONE (Fuseau horaire).
8 Appuyer sur ou pour sélectionner le
fuseau horaire correct (AUTO, EASTERN
(Est) CENTRAL (Centre), MOUNTAIN
(Rocheuses), PACIFIC (Pacifique), ALASKA
ou HAWAII).
Si le fuseau horaire est réglé sur AUTO, le
magnétoscope règle l’horloge sur la base de
l’information sur le Temps Universel
Coordonné diffusée par le signal.
9 Appuyer sur MENU pour terminer.
10 Éteindre l’appareil et la fonction de réglage
automatique de l’horloge règle l’heure.
Remarque
Dans certains cas la station de télévision ne diffuse pas
d’information sur l’heure et la date ou diffuse une information
erronée ; l'appareil indique alors une heure erronée. Si cela se
produit, il est préférable de régler l’heure manuellement.
Réglage de l’horloge manuellement
Pour régler l’horloge manuellement :
1 Appuyer sur MENU. Le menu principal
s’affiche.
2 Appuyer sur ou pour sélectionner
CLOCK (Horloge).
3 Appuyer sur MEMORY/ENTER
(Mémoire/Entrée). Le menu Horloge
s’affiche.
Pour activer le réglage automatique de
l’horloge :
1 Appuyer sur MENU. Le menu principal
s’affiche.
2 Appuyer sur ou pour sélectionner
CLOCK (Horloge), puis sur
MEMORY/ENTER (Mémoire/Entrée). Le
menu Horloge s’affiche.
3 Appuyer sur pour sélectionner AUTO
CLOCK SET (Réglage automatique de
l’horloge).
www.insignia-products.com
4 Appuyer sur ou pour sélectio nne r le
mois (MONTH).
5 Appuyer sur pour sélectionner DAY (Jour)
6 Appuyer sur ou pour sélectio nne r la
date. Le jour de la semaine s’affiche
automatiquement.
7 Appuyer sur pour sélectionner YEAR
(Année).
8 Appuyer sur ou pour sélectionner
l’année.
9 Appuyer sur la touche pour sélectionner
TIME (Heure).
49
Page 52

Système de cinéma maison Insignia NS-H3005
10 Appuyer sur ou pour sélectionner
l’heure.
- OU Maintenir appuyé ou pour faire avancer
l’heure en continu.
11 Appuyer sur pour sélectionner DAYLIGHT
SA VINGS (Heure d’été).
12 Appuyer sur ou pour sélectionner
AUTO, ON (Activé) ou OFF (Désactivé).
Si AUTO est sélectionné, le magnétoscope
règle l’horloge en tenant compte de
l’information sur l’heure d’été diffusée par le
signal (canal). Si ON est sélectionné, le
magnétoscope règle l’horloge
automatiquement sur l’heure d’été.
13 Appuyer sur MENU pour termi ner.
Icônes fonctionnels de retour d’info rmation à
affichage temporaire
Icône Description
Répéter le titre
TITLE
Répéter le chapitre
CHAPT
Répéter la piste (d isques CD vidéo non-PCB
TRACK
ALL
A B
OFF
uniquement)
Répéter toutes les pistes (disques CD vidéo
non-PCB uniquement)
Lecture en boucle A-B,
Répétition désactivée
Reprend la lectur e à partir de ce point
Action interdite ou non disponible
Remarque
En cas de réglage manuel de l’heure, AUTO CLOCK SET
(Réglage automatique de l’horloge) doit être réglé sur OFF
(Désactivé) Si AUTO CLOCK SET est réglé sur ON (Activé) ,
une date ou une heure erronée s’afficheront de nouveau
quand l’appareil est éteint.
Installation du lecteur de
DVD
Certains disques DVD requièrent un mode
d’emploi spécifique ou ne permettent pas
l’utilisation de certaines fonctions pendant la
lecture. Si cela se présente, le symbole
s’affiche sur le téléviseur, indiquant que cette
fonction n’est pas prise en charge par le lecteur
de DVD ou n’est pas disponible sur le DVD.
Utilisation des menus d’écran (OSD)
L’information générale sur la lecture peut être
affichée sur le téléviseur. Certains éléments
peuvent être modifiés à l’aide du menu.
Pour utiliser les menus d’écran (OSD)
1 Appuyer sur DISPLAY (Affichage) pendant la
lecture.
2 Appuyer sur la touche ou pour
sélectionner une option. L’option
sélectionnée est mise en surbrillance.
3 Appuyer sur ou pour modifier les
paramètres d’une option. Les touches
numériques peuvent également être utilisées
pour saisir des chiffres.
4 Pour certaines fonctions, appuyer sur
MEMORY/ENTER afin de modifier le
paramètre.
Remarque
• Certains disques peuvent ne pas être dotés de toutes les
fonctionnalités affichées sur l’exemple d’écran ci-dessous.
• Si aucun bouton n’est appuyé pendant 10 secondes, l’icône
affichée disparaît.
OSD du DVD
Options Fonction
Numéro du titre Affiche le
1/3
Numéro du
chapitre
Recherche en
fonction de la
durée
1/12
0:20:09
numéro du
titre en cours
et le nombre
total de titres
et saute à un
numéro de
titre.
Affiche le
numéro du
chapitre en
cours et le
nombre total
de chapitre s et
saute à un
numéro de
chapitre.
Affiche la
durée de
lecture écoulée
et à partir de
ce point
recherche le
point souhaité.
Mode de
sélection
touches
numériques,
MEMORY/
ENTER
touches
numériques,
MEMORY/
ENTER, SKIP
(Saut)
Touches
numériques,
MEMORY/
ENTER
/ , ou les
/ , ou les
50
www.insignia-products.com
Page 53

Système de cinéma maison Insignia NS-H3005
Options Fonction
Langue audio et
mode de sortie
audio numérique
1 ENG
D
5.1 CH
Langue des
sous-titres
OFF
Angle Affiche le
1/1
Son Affiche le
BYPASS
Affiche la
langue audio
de la piste en
cours de
lecture, la
méthode
d'encodage
ainsi que le
numéro de
canal et
permet de
modifier le
paramètre.
Affiche la
langue actuel le
des sous-titres
et permet de
modifier les
paramètres.
numéro
d’angle actu el
et le nombre
total d’angles
et permet de
changer de
numéro
d'angle.
mode sonore
actuel et
permet de
changer le
paramètre.
Accès aux menus d’ écran (OSD)
Il est possible de régler des préférences
personnalisées pour le lecteur de DVD .
Fonctionnement général
1 Appuyer sur SETUP (Configuration). Le
menu de configuration s’affiche.
Disc Audio
Disc Subtitle
Disc Menu
Rating
Country Code
TV Aspect
Menu Language
Progressive Scan
5.1 Speaker Setup
Others
2 Appuyer sur ou pour sélectionner
l’option. L’écran affiche le réglage actuel de
l’option sélectionnée, ainsi que les autres
paramètres possibles.
3 Quand l’option est sélectionnée, appuyer sur
, puis ou pour sélectionner le
paramètre.
4 Appuyer sur MEMORY/ENTER
(Mémoire/Entrée) pour confirmer la sélection.
Certains éléments requièrent des étapes
supplémentaires.
5 Appuyer sur SETUP, RETURN (Retour), ou
PLAY (Lecture) pour quitter le menu Setup
(Configuration).
Original
English
French
German
Spanish
Italian
Chinese
Polish
Hungarian
Other — — — —
Mode de
sélection
/, ou
AUDIO
/, ou
SUBTITLE
(Sous-titres)
/, ou
ANGLE
/, ou
SOUND
MODE (Mode
sonore)
Langue des menus
Menu Description
Disc language
(Langue du
disque)
Permet de défini r l a langue du menu, de
l’audio et des sous-titres du DVD.
Original : La langue d’origine du DV D est
sélectionnée.
Autre : Pour sélectionner une autre
langue, appuyer sur les tou ches
numériques pour saisir le numéro à 4
chiffres correspondant (voir : “Liste des
codes de langues” pag e 72). Si un code
de langue erroné est saisi, appuyer sur
CLEAR (Effacer).
Disc Audio
Disc Subtitle
Disc Menu
Rating
Country Code
TV Aspect
Menu Language
Progressive Scan
5.1 Speaker Setup
Others
Original
English
French
German
Spanish
Italian
Chinese
Polish
Hungarian
Other — — — —
Contrôle parental
Les films sur DVD peuvent contenir des scènes
qui ne sont pas recommandées pour les enfants.
Aussi, les D VD peuvent contenir une information
relative au contrôle parental qui s’applique à tout
ou partie du DVD. Ces scènes sont classifiées
de 1 à 8 et éventuellement des scènes plus
adaptées peuvent être disponibles au choix sur
certains DVD. Les classifications dépendent de
chaque pays. La fonction Contrôle parental
permet d’empêcher que des DVD puissent être
visualisés par des enfants ou de ne permettre
que la visualisation des scènes de
remplacement.
Menu Description
Rating
(Classification)
Classification de 1 à 8 : Certains DVD
contiennent des sc ènes qui ne sont pas
recommandées pour les enfants. Si une
classification est af fectée au lecteur,
seules les scènes du DVD avec cette
classification ou une qui lui est inférieure
peuvent être visualisées. Les scènes
affectées d’une classification supérieure
ne peuvent pas être visualisées, sauf si
une scène de remplacement est
disponible sur le DVD . La scène de
remplacement doit faire l’objet de la
même classification préréglée ou d’une
qui lui est inférieure. Si aucune scène de
remplacement n’e st disponible, la lecture
s’arrête. Le mot de passe à 4 chiffres doit
être saisi ou la classification modifi ée
pour pouvoir lire le DVD.
Unlock (Déverrouillé) : Si Unlock est
sélectionné, le cont rôle parental est
désactivé. Tout DVD peut être visualisé
dans sa totalité.
Disc Audio
Disc Subtitle
Disc Menu
Rating
Country Code
TV Aspect
Menu Language
P
rogr
essive Sca
5.1 Speaker Setup
Others
8
7
6
5
4
3
2
n
1
Unlock
Change
www.insignia-products.com
51
Page 54

Système de cinéma maison Insignia NS-H3005
Menu Description
Country Code
(Code pays)
Saisir le code d’un pays/zone dont les
standard ont été utilisés pour classifier le
DVD. Pour plus d’informations, voir :
“Code du pays” page 72.
Disc Audio
Disc Subtitle
Disc Menu
Rating
Country Code
TV Aspect
Menu Language
P
rogr
essive Sca
5.1 Speaker Setup
Others
Code Set
C A
U S
n
Pour paramétrer la classification parentale :
1 Appuyer sur SETUP (Configuration). Le
menu de configuration s’affiche.
2 Appuyer sur ou pour sélectionner
Rating (Classification).
3 Appuyer sur .
4 Saisir le mot de passe.
• Si aucun mot de passe personnel n’a été
créé, saisir un mo t de pass e à 4 c hif fres à
l’aide des touches numériques, puis
appuyer sur MEMORY/ENTER
(Mémoire/Entrée). Saisir le même mot de
passe à 4 chiffres, puis appuyer sur
MEMORY/ENTER pour vérifier.
• Si un mot de passe personnel a été créé,
saisir le mot de passe à 4 chiffres à l’aide
des touches numériques, puis appuyer
sur MEMORY/ENTER.
• En cas d’erreur avant d’appuyer sur
MEMORY/ENTER, appuyer sur la touche
CLEAR (Effacer) et saisir de nouveau un
code de sécurité à quatre chiffres.
5 Sélectionner une classification de 1 à 8 à
l’aide de la touche ou .
Un (1) correspond aux restrictions de lecture
minimales. Huit (8) correspond aux
restrictions de lecture maximales.
6 Appuyer sur MEMORY/ENTER pour
confirmer la sélection de la classification,
puis appuyer sur SETUP pour quitter le
menu.
Remarque
La classification parentale peut ne pas être opérante avec
certains DVD.
Pour régler le code pays :
1 Appuyer sur SETUP (Configuration). Le
menu de configuration s’affiche.
2 Appuyer sur ou pour sélectionner
Country Code (Code pays).
3 Appuyer sur .
4 Saisir le mot de passe.
• Si aucun mot de passe personnel n’a été
créé, saisir un mo t de pass e à 4 c hif fres à
l’aide des touches numériques, puis
appuyer sur MEMORY/ENTER
(Mémoire/Entrée). Saisir le même mot de
passe à 4 chiffres, puis appuyer sur
MEMORY/ENTER pour vérifier.
• Si un mot de passe personnel a été créé,
saisir le mot de passe à 4 chiffres à l’aide
des touches numériques, puis appuyer
sur MEMORY/ENTER.
• En cas d’erreur avant d’appuyer sur
MEMORY/ENTER, appuyer sur la touche
CLEAR (Effacer) et saisir de nouveau un
code de sécurité à quatre chiffres.
5 Sélectionner le premier caractère du code
pays à l’aide de la touche ou . Pour plus
d’informations, voir : “Code du pays” page 72.
6 Appuyer sur pour passer au caractère
suivant.
7 Sélectionner le deuxième caractère du code
pays à l’aide de la touche ou .
8 Appuyer sur MEMORY/ENTER pour
confirmer la sélection du code pays, puis
appuyer sur SETUP pour quitter le menu.
Modification du mot de passe
Remarque
Le mot de passe actuel doit d’abord être confirmé avant de
pouvoir le modifier.
Pour modifier le mot de passe :
1 Appuyer sur SETUP (Configuration). Le
menu de configuration s’affiche.
2 Appuyer sur ou pour sélectionner
Rating (Classificatio n).
3 Appuyer sur .
4 Saisir l’ancien mot de passe, puis appuyer
sur MEMORY/ENTER (Mémoire/Entrée).
5 Sélectionner Change (Modifier) à l’aide de la
touche ou , puis appuyer sur
MEMORY/ENTER.
6 Saisir le nouveau mot de passe à 4 chiffres,
puis appuyer sur MEMORY/ENTER.
7 Saisir le même mot de passe une deuxième
fois, puis appuyer sur MEMORY/ENTER pour
vérifier.
8 Appuyer sur SETUP (Configuration) pour
quitter le menu.
Effacer le mot de passe
En cas d’oubli du mot de passe, se reporter à la
procédure ci-dessous pour l’effacer.
Remarque
Le lecteur doit être en mode No Disc (Pas de disque).
Pour effacer le mot de passe :
1 Appuyer sur SETUP (Configuration). Le
menu de configuration s’affiche.
2 Appuyer sur ou pour sélectionner
Rating (Classificatio n).
3 Appuyer sur .
4 Saisir le code à 6 chiffres 210499. Le mot de
passe est effacé.
5 Saisir un nouveau mot de passe en se
reportant aux étapes décrites dans “Contrôle
parental” page 51.
52
www.insignia-products.com
Page 55

Système de cinéma maison Insignia NS-H3005
Menu image
Menu Description
TV aspect
(Format
d’image)
Menu language
(Langue des
menus)
Balayage
progressif
Remarque
Quand le paramétrage pour la sortie en balayage progressif
est entré, une image ne sera visible que sur un téléviseur ou
moniteur compatible avec le balayage progressif. Si
Progressive Scan est activé (On) par erreur, l’appareil doit être
réinitialisé.
4:3 boîte aux lettres : Est utilisé si un
téléviseur standard 4:3 est connecté. Les
films sont affichés avec des bandes noires
au-dessus et au-dessous de l 'i mage.
4:3 Panscan (Balayage panoramique) :
Est utilisé si un téléviseur standard 4:3 est
connecté. Les films au f ormat à balayage
panoramique sont visualisés dans ce
format (les deux côtés de l’image sont
tronqués).
16:9 Wide (Panoramique) : Est utilisé si
un téléviseur 16 :9 est connecté.
4:3
Disc Audio
Disc Subtitle
Disc Menu
Rating
Country Code
TV Aspect
Menu Language
Progressive Scan
5.1 Speaker Setup
Others
4:3
16:9
Letterbox
Panscan
Wide
Permet de sélectionner une langue pour le
menu de configuration. Voici le menu
affiché quand SETUP est appuyé.
Disc Audio
Disc Subtitle
Disc Menu
Rating
Country Code
TV Aspect
Menu Language
Progressive Scan
5.1 Speaker Setup
Others
English
Spanish
French
La vidéo en balayage pr ogressif fournit la
meilleure qualité d’image avec le moins de
scintillement.
En cas d’utilisation des prises de sortie
vidéo à composantes/balayage progressif
(COMPONENT/PROGRESSI VE SCA N
VIDEO OUT), alors qu’un lecteur de DVD
est connecté à un télévis eur standard
(analogique), régler Progressive Scan
(Balayage progressif) sur Off (Désa ctivé).
En cas d’utilisation de prises vidéo à
composantes pour une connexion à un
téléviseur ou moniteur compatible avec un
signal de balayage progressif, régler
Progressive Scan sur On (Activé).
Disc Audio
Disc Subtitle
Disc Menu
Rating
Country Code
TV Aspect
Menu Language
Progressive Scan
5.1 Speaker Setup
Others
Off
On
Pour réinitialiser l’appareil :
1 Retirer le DVD du lecteur et fermer le plateau
à disques. NO DISC (Pas de disque)
s’affiche.
2 Maintenir la touche STOP (Arrêt) appuyée
pendant cinq secondes avant de la relâcher.
La sortie vidéo est réinitialisée au
paramétrage standard et l’image est de
nouveau visible sur un téléviseur ou moniteur
analogique conventionnel.
Configuration des haut-parleurs
Il est possible d’utiliser le menu de configuration
des haut-parleurs (Speaker Setup), pour
accéder aux paramètres possibles tels que la
balance du volume, le temps de retard ou de
tester le paramétrage des haut-parleurs.
Remarque
Les paramètres des haut-parleurs ne sont effectifs qu’en sortie
analogique multicanaux.
Disc Audio
Disc Subtitle
Disc Menu
Rating
Country Code
TV Aspect
Menu Language
Progressive Scan
5.1 Speaker Setup
Others
R R
Front L
Volume 0 dB
Size Small
Distance 1 ft
Test
Return
Menu Description
Sélection des
haut-parleurs
Volume Appuyer sur la touche ou pour
Size
(Dimension)
Distance Si les haut-parleurs sont connectés à
Sélectionner un haut-parleur à co nfigurer.
• Front speake r (Lef t) [Haut-parleur
avant gauche]
• Front speaker (Right)
[Haut-parleur avant droit]
• Center Speaker (Haut-parleur
central)
• Rear speaker (Left) [Haut-parleur
arrière gauche]
• Arrière droit
• Caisson d’extrêmes graves
Régler les options à l’aide des touches
,, ,ou.
Remarque : Certains paramétrages de
haut-parleurs sont int erdits par l’accord
de licence de Dolby Di gital.
augmenter ou dimi nuer le niveau du
haut-parleur sélectionné (- 6 dB à + 6 dB)
Les paramètres relatifs à la dimension des
haut-parleurs sont fixes, il n’est pas
possible de le s modifier.
l’appareil, spécifier la distance de chaque
haut-parleur par rapport à l’auditeur, de
façon à ce que le son de chacun d’entre
eux atteigne l’auditeur en même temps (1
pi = 30,48 cm)
Remarque : Il n’est pas possible de fixer
la distance du caisson d’extrêmes graves.
www.insignia-products.com
53
Page 56

Système de cinéma maison Insignia NS-H3005
Menu Description
Test Appuyer sur MEMORY/ENTER
Retour Appuyer sur MEMORY/ENTER pour
(Mémoire/Entrée) pour tester les signaux
de chaque haut-parleur.
Régler le volume afin de correspondre au
volume des signaux du test enregistrés
dans l’appareil.
• Canal avant gauche (Front L)
• Central
• Canal avant droit (Front R)
• Canal arrière droit (Rear R)
• Canal arrière ga uche (Rear L)
• Caisson d’extrêmes graves
retourner à l'écran précédent.
Autres paramètres de configuration
Disc Audio
Disc Subtitle
Disc Menu
Rating
Country Code
TV Aspect
Menu Language
P
rogr
essive Sca
5.1 Speaker Setup
Others
n
DRC
Vocal
PBC
Auto Play
On
On
On
Off
Menu Description
DRC (Dynamic
Range Control)
[Commande de
portée
dynamique]
Vocal Activer (On) Vocal uniquement lors de la
Auto Play
(Lecture
automatique)
Avec les DVD, il est possible d’écouter
l’enregistrement d’un programme avec
une précision et un réalisme
pratiquement parfait, grâce à la
technologie audio numérique. Toutefois,
il peut être nécessaire de compri mer la
portée dynamiq u e de la so rt ie au di o ( la
différence entre le s sons les plus élevés
et les plus bas). Ensuite, il est possible
de regarder un film avec un nive au de
volume plus bas sans perte de clarté du
son. Activer (On) DRC pour obtenir cet
effet.
lecture d’un DVD de karao ke multicanal.
Les canaux du karaoke sur le disque
seront mixés avec le son stéréo normal.
Il est possible de régler le lecteur de DVD
afin qu’il démarre automatiquement la
lecture dès qu ’u n DV D es t ch a r gé .
Si le mode Auto Play est activé (On), ce
lecteur de DVD recherche le titre qui a la
durée de lecture la plus longue et
démarre la lecture de ce titre
automatiquement.
On : La fonction Auto Play est activée.
Off : La fonction Auto Play est
désactivée.
Remarque : La fonction de lecture
automatique peut être inop érante sur
certains DVD.
Fonctionnement de
l’appareil
Utilisation de la télécommande
Pour utiliser la télécommande :
• Pointer la télécommande vers le capteur de
télécommande, puis utiliser les touches.
Limites
Distance : Environ 23 pi (7 m) de la partie avant
de la télécommande
Angle : Environ 30° dans chaque direction par
rapport à l’avant de la télécommande
Sélection de la source
Il est nécessaire de sélectionner une des
sources de sortie (DVD ou magnétoscope) pour
visualiser sur l’écran du téléviseur.
Pour visualiser une sortie du lecteur de DVD,
appuyer sur la touche CD/DVD de la
télécommande ou du panneau avant de
l’appareil jusqu’à l’affichage de l’indicateur
READING (Lecture) et la sortie du DVD s’affiche
sur le téléviseur.
Pour visualiser une sortie du magnétoscope,
appuyer sur la touche VCR (Magnétoscope) de
la télécommande ou du panneau avant de
l’appareil jusqu’à l’affichage de l’indicateur VCR
et la sortie du magnétoscope s’affiche sur le
téléviseur.
Remarque
• Quand un DVD est chargé alors que l’appareil est en mode
magnétoscope, il bascule automatique en mode DVD.
• Quand une cassette sans l’onglet de protection contre
l’effacement est chargée, alors que l’appareil est en mode
DVD, il bascule automatiquement en mode magnétoscope.
Utilisation du
magnétoscope
Visionnement d'une cassette vidéo
Pour regarder une cassette vidéo :
1 Allumer le téléviseur.
2 Syntoniser le téléviseur sur le canal de sortie
du système de cinéma maison (CH 3 ou 4),
ou régler le sélecteur de source du téléviseur
sur VIDEO (Vidéo).
3 Appuyer sur la touche VCR de la
télécommande ou du panneau avant du
système de cinéma maison jusqu'à ce que le
témoin VCR s'allume dans la fenêtre
d'affichage et que la sortie du magnétoscope
apparaisse à l'écran du téléviseur.
4 Insérer une cassette vidéo préenregistrée. Le
témoin s'allume.
Remarque
Veiller à ce que le témoin de la fenêtre
d'affichage ne soit pas allumé. S'il l'est, appuyer
une fois sur POWER (Marche).
Si une cassette sans l’onglet de protection contre
l’effacement est chargée, le magnétoscope
commence la lecture automatiquement.
5 Appuyer une fois sur . PLAY (Lecture)
s’affiche sur le téléviseur.
Remarque
• Il n'est pas nécessaire de sélectionner la
vitesse de la cassette pour la lecture. Elle est
automatiquement sélectionnée par le système
de cinéma maison.
• En lecture, le sélecteur TV/VCR
(TV/magnétoscope) passe automatiquement
en mode VCR (Magnétoscope).
54
www.insignia-products.com
Page 57

Système de cinéma maison Insignia NS-H3005
6 Appuyer sur pour interrompre la lecture.
STOP (Arrêt) s’affiche sur le téléviseur.
Remarque
Si la cassette atteint la fin avant l’appui sur la
touche , l’appareil s'arrête automatiquement,
rembobine et éjecte la cassette, puis s'éteint.
Remarque
Seule une stéréo à 2 canaux (avant gauche, avant droite et
caisson d'extrêmes graves) est disponible en mode VCR
(magnétoscope) ; par conséquent, aucun son ne sera émis au
niveau des haut-parleurs centraux ou arrière lors de
l’utilisation du magnétoscope. Pour plus d’informations sur le
mode sonore, voir “Mode son” page 41.
Utilisation de la commande d'alignement
Alignement Description
Auto La fonction d'alignement automatique règle
Manuel Si des parasites apparaissent à l'écran
l'image pour éliminer l a neige ou les stries.
La fonction d'alignement automatique
fonctionne dans les cas suivants :
• Une cassette est lue pour la
première fois.
• La vitesse de la cassette (SP ou
SLP) change.
• Des stries ou de la neige
apparaissent à cause de rayures sur
la cassette.
pendant la lecture, appuyer sur
CH/TRK/PRESET ou sur la
télécommande de façon à réduire les
parasites à l'é cran.
• En présence d’une fluctuation
verticale, régler les comman d e s
d'alignement t r ès soigneusement.
• L'alignement est automatiquemen t
réinitialisé lorsque la cassette est
éjectée ou que le co rdon
d'alimentation est débran c hé
pendant plus de trois secondes.
Utilisation d'effets spéciaux
Remarque
• Des lignes horizontales (bandes de parasites) peuvent
s’afficher sur le téléviseur. Ceci est normal.
• Le son est automatiquement mis en sourdine pendant les
modes d'effets spéciaux. Aucun son n’est émis pendant la
recherche.
• Lors de l'utilisation du mode de recherche d'image à haute
vitesse, une courte période est nécessaire pour stabiliser la
vitesse de la cassette au moment du retour en mode de
lecture. De légères interférences peuvent être visibles
pendant cette période.
Recherche
Cette fonction permet de rechercher rapidement
et visuellement une section de la cassette, vers
l'avant ou vers l'arrière.
Pour rechercher une scène sur une cassette
vidéo :
1 Appuyer sur ou
L’appareil se met en mode de recherche.
Remarque
Si l’appareil reste en mode de recherche pendant
plus de trois minutes, il se remet automatiquement
en mode de lecture pour protéger la cassette et
les têtes de lecture vidéo.
pendant la lecture.
2 Appuyer sur la touche pour revenir au
mode de lecture.
Visionnement d'une image fixe
Pour visionner une image fixe d'une cassette
vidéo :
1 Appuyer sur pendant la lecture. L’appareil
s'arrête sur une image.
Remarque
• Si l'image fixe vibre verticalement, la stabiliser
en appuyant sur ou sur la
télécommande.
• Si l’appareil reste en mode d'arrêt sur image
pendant plus de cinq minutes, il se met
automatiquement en mode Arrêt pour protéger
la cassette et les têtes de lecture vidéo.
2 Appuyer sur la touche pour revenir au
mode de lecture.
Lecture image par image
Pour visionner une cassette vidéo image par
image :
1 Appuyer sur pendant la lecture. L’appareil
s'arrête sur une image.
2 Appuyer plusieurs fois sur pour faire
avancer la vidéo une image à la fois, en
visionnant une image fixe en mode d'arrêt sur
image.
3 Appuyer sur la touche pour revenir au
mode de lecture.
Ralenti
Pour visionner une casse tte vidéo au rale nti :
1 En mode d'arrêt sur image, appuyer sur
AVANCE RAPIDE . La cassette est lue à
une vitesse 19 fois plus lente que la vitesse
normale.
Remarque
• Pendant la lecture au ralenti, utiliser ou
sur la télécommande pour minimiser les
bandes de parasites.
• Si le mode de ralenti dure pendant plus de trois
minutes, l’appareil passe automatiquement en
mode de lecture.
2 Appuyer sur la touche pour revenir au
mode de lecture.
CM Skip (Saut des annonces publicitaires)
CM Skip est utile pour sauter les annonces
publicitaires ou de courts segments d'émissions.
Pour sauter les annonces publicitaires :
• Appuyer sur CM SKIP pendant la lecture. La
cassette avance rapidement de 30 secondes
enregistrées, puis revient en mode de lecture
normale.
Remarque
• La durée du saut peut être étendue en
appuyant plusieurs fois sur la touche CM SKIP.
• Chaque pression suivante augmente de 30
secondes la durée de l'avance rapide
(maximum de trois minutes).
• Une fois la recherche terminée, l’appareil se
met automatiquement en mode de lecture.
www.insignia-products.com
55
Page 58

Système de cinéma maison Insignia NS-H3005
Enregistrement sur une cassette vidéo
Pour enregistrer sur une cassette vidéo :
1 Mettre sous tension le téléviseur et le
système de cinéma maison.
2 Syntoniser l e té lé vi se ur s ur l e ca nal de so rtie
du système de cinéma maison (CH 3 ou 4),
ou régler le sélecteur de source du téléviseur
sur VIDEO (Vidéo).
3 Appuyer sur la touche VCR de la
télécommande ou du panneau avant du
système de cinéma maison jusqu'à ce que le
témoin VCR s'allume dans la fenêtre
d'affichage et que VCR (Magnétoscope)
apparaisse à l'écran du téléviseur.
4 Insérer une cassette vidéo munie de son
onglet de protection contre l’effacement.
5 Sélectionner le canal avec ou .
- OU Pour enregistrer à partir d'une autre source
en utilisant les prises d'entrée audio/video
(au dos ou sur le panneau avant),
sélectionner LINE1 ou LINE2 à l'aide de la
touche INPUT (Entrée).
6 Régler la vitesse d'enregistrement (SP ou
SLP) à l'aide de la touche SPEED (Vitesse).
Remarque
Cet appareil ne peut pas enregistrer en mode LP.
7 Régler le mode MTS. Pour des informations
complémentaires, voir “Broadcast type (Type
d’émission)” page 48 et “Système stéréo
VHS Hi-Fi ou diffusion MTS” page 59.
8 Appuyer une fois sur . L'enregistrement
commence et le témoin REC
(Enregistrement) s'allume dans la fenêtre
d'affichage.
Remarque
• Le témoin REC (Enregistrement) s’affiche
uniquement lorsque que la source de sortie est
réglée sur VCR (Magnétoscope).
• Si une cassette sans onglet de protection
contre l’effacement est chargée, elle est
automatiquement éjectée.
9 Appuyer deux fois sur pour arrêter
l'enregistrement.
Remarque
Si la cassette atteint la fin avant qu'une pression
ne soit exercée sur la touche , l’appareil s'arrête
automatiquement, rembobine et éjecte la
cassette, puis s'éteint.
Arrêt momentané de l'enregistrement
Pour arrêter momentanément
l’enregistrement :
1 Appuyer sur pour arrêter momentanément
la cassette pendant l'enregistrement. Le
témoin REC (Enregistrement) clignote dans
la fenêtre d'affichage.
2 Pour reprendre l’enregistrement, appuyer sur
ou .
Remarque
• Après cinq minutes en mode Pause, la
cassette s'arrête automatiquement pour
protéger la cassette et les têtes de lecture
vidéo.
• Toujours utiliser pour obtenir de meilleurs
résultats lorsque des modifications sont
apportés au cours d’un enregistrement. Par
exemple : Pour changer de canal au cours d'un
enregistrement, appuyer d'abord sur pour
mettre le magnétoscope en mode Pause.
Sélectionner le canal sur le système de cinéma
maison, puis appuyer de nouveau sur pour
continuer l'enregistrement.
Enregistrement d’une émission tout en
regardant une autre émission
Pour enregistrer une émission de télévision
tout en regardant une autre :
1 Appuyer sur TV/VCR (TV/magnétoscope)
pour sélectionner le mode TV pendant
l’enregistrement. Le témo in TV s'affiche à
l'écran.
2 Sélectionner le canal à visionner à l'aide du
syntoniseur du téléviseur.
Enregistrement programmé
Le magnétoscope peut être programmé pour
effectuer jusqu'à huit enregistrements différents.
Ces enregistrements peuvent être programmés
jusqu'à un an à l'avance. Pour un enregistrement
sans surveillance, le minuteur a besoin de
connaître les canaux à enregistrer, ainsi que les
heures de début et de fin.
Remarque
Si l'horloge n'est pas réglée au moment de la programmation
du minuteur, le message PLEASE SET THE CLOCK (Régler
l'horloge) apparaît pendant quelques instants, puis le menu
Clock (Horloge) s'affiche sur le téléviseur. Régler l'heure et la
date avant de continuer.
Pour programmer le magnétoscope pour
enregistrer une émission future :
1 Mettre sous tension le téléviseur et le
système de cinéma maison.
2 Syntoniser le téléviseur sur le canal de sortie
du système de cinéma maison (CH 3 ou 4),
ou régler le sélecteur de source du téléviseur
sur VIDEO (Vidéo).
3 Appuyer sur la touche VCR de la
télécommande ou du panneau avant du
système de cinéma maison jusqu'à ce que le
témoin VCR s'allume dans la fenêtre
d'affichage et que VCR (Magnétoscope)
s’affiche sur le téléviseur.
4 Insérer une cassette vidéo munie de son
onglet de protection contre l’effacement.
Remarque
Si l'onglet de protection contre l’effacement a été
retiré, la cassette est automatiquement éjectée.
5 Appuyer sur MENU. Le menu principal
s’affiche.
56
www.insignia-products.com
Page 59

Système de cinéma maison Insignia NS-H3005
6 Appuyer sur ou pour choisir
PROGRAM (Programme), puis appuyer sur
MEMORY/ENTER (Mémoire/entrée). Le
menu des programmes apparaît.
Remarque
Si les huit programmes possibles ont été entrés, le
message FULLY PROGRAMMED (Complètement
programmé) apparaît pendant quelques instants,
puis PROGRAM 1 (Programme 1) s'affiche à
l'écran du téléviseur.
7 Appuyer sur ou pour choisir le numéro
du programme (1-8).
8 Appuyer sur pour choisir MONTH (Mois).
9 Appuyer sur ou pour choisir le mois.
10 Appuyer sur pour choisir DAY (Jour).
11 Appuyer sur ou pour choisir le jour.
12 Appuyer sur pour choisir START (Début).
13 Appuyer sur ou pour choisir l'heure de
début.
14 Appuyer sur pour choisir STOP (Fin).
15 Appuyer sur ou pour choisir l'heure de
fin.
16 Appuyer sur pour choisir CHANNEL
(Canal).
17 Appuyer sur ou pour choisir le canal
(Canal, LINE1 ou LINE2).
Remarque
Utilisateurs du câble : Pour les install ations à TV
câblée qui utilisent un décodeur (voir “Connexion
d’une antenne ou de la télévision câblée au
système de cinéma maison.” page42), il faut
régler le canal dans cette étape pour
correspondre au canal de sortie du décodeur (en
général CH 3 ou 4). Régler le canal sur le
décodeur plutôt qu'avec le système de cinéma
maison.
18 Appuyer sur pour choisir SPEED
(Vitesse).
19 Appuyer sur ou pour choisir la vitesse
d'enregistrement (AUTO, SP ou SLP).
Le mode Auto détermine combien il reste de
la cassette et change la vitesse de SP à SLP,
si nécessaire, pour achever l'enregistrement
de l'émission. Une légère distorsion de
l'image et du son à l'endroit du changement
de vitesse se manifestera.
20 Appuyer sur pour choisir REPEAT
(Répéter).
21 Appuyer sur ou pour choisir la
fréquence de répétition (ONCE [Une fois],
WEEKLY [Toutes les semaines] ou DAIL Y
[Tous les jours]).
• ONCE
(Une fois) — pour enregistrer jusqu'à
huit émissions le même jour ou au cours
d'une période d'une année.
• WEEKLY
(Toutes les semaines) — pour
enregistrer jusqu'à huit émissions un
certain jour de chaque semaine.
• DAIL Y
(Tous les jours) — pour enregistrer
jusqu'à huit émissions à la même heure
du lundi au vendredi.
Conseil
En cas de saisie d'informations erronées, utiliser
pour sélectionner les informations incorrectes
et les corriger en utilisant ou .
22 Appuyer sur MENU. Le programme est
enregistré dans le système de cinéma
maison.
• Le témoin s'allume dans la fenêtre
d'affichage.
• Si l'heure programmée pour une émission
est dépassée, le message PAST TIME
PROGRAMMED (Heure programmée
dépassée) s'affiche sur le téléviseur.
Revenir au programme incorrect et entrer
l'heure correcte.
• Si la date entrée est dépassée,
l'enregistrement programmé aura lieu à
cette date l'année suivante.
• Des programmes supplémentaires
peuvent être entrés en répétant cette
procédure.
Remarque
Utilisateurs du câble : Si le raccordement au
câble a lieu par l'intermédiaire d'un décodeur, il est
seulement possible de programmer plusieurs
enregistrements sur le canal de sortie du
décodeur. Ceci est dû au fait que le décodeur
détermine le canal visionné au moyen du système
de cinéma maison.
Conseil
Une fois la programmation terminée, pour que le
système de cinéma maison soit prêt à enregistrer
les programmes saisis, VEILLER À INSÉRER
UNE CASSETTE dans l’appareil. Le système de
cinéma maison est maintenant prêt pour
enregistrer les émissions programmées.
Remarque
• En cas d'interruption de l'alimentation
électrique ou si l’appareil est débranché de la
prise secteur, l'heure de l'horloge et les
réglages du minuteur sont gardés en mémoire
pendant environ 3 secondes. Après 3
secondes, l'horloge et le minuteur de
programmation doivent être de nouveau réglés
une fois l'alimentation électrique rétablie.
Régler l'horloge conformément aux
instructions.
• À la fin d'un enregistrement programmé,
l’appareil s'éteint automatiquement.
• Pour regarder une émission télévisée pendant
qu'un enregistrement programmé est en cours,
sélectionner le mode syntoniseur en appuyant
plusieurs fois sur TV/VCR (TV/magnétoscope).
• Pour arrêter un enregistrement programmé qui
a déjà commencé, appuyer deux fois sur STOP
ou POWER (Marche).
www.insignia-products.com
57
Page 60

Système de cinéma maison Insignia NS-H3005
Priorité des programmes
Une fois un
Émission 1
Émission 2
Émission 3
Ne sera pas enregistré
enregistrement
programmé,
l'enregistrement
commencera si
aucun autre
enregistrement
programmé ne
chevauche l'heure de début.
Si les heures de début et de fin des
enregistrements programmés se chevauchent le
même jour, l'émission numéro 2 ne sera pas
enregistrée tant que l'émission numéro 1 ne sera
pas terminée.
La première partie de l'émission numéro 2 ne
sera pas enregistrée. La même chose se
produira pour l'émission numér o 3.
Vérification ou effacement d'un
enregistrement programmé
La programmation peut être vérifiée chaque fois
que le système de cinéma maison est mis sous
tension.
Pour vérifier ou effacer un enregistrement
programmé :
1 Appuyer sur MENU. Le menu principal
s’affiche.
2 Appuyer sur ou pour choisir
PROGRAM (Programme).
3 Appuyer sur MEMORY/ENTER
(Mémoire/entrée). Le menu de programme
apparaît.
3 Appuyer sur la touche VCR de la
télécommande ou du panneau avant du
système de cinéma maison jusqu'à ce que le
témoin VCR s'allume dans la fenêtre
d'affichage et que la sortie du magnétoscope
s’affiche sur le téléviseur.
4 Insérer une cassette vidéo munie de son
onglet de protection contre l’effacement.
5 Sélectionner le canal avec ou ou les
touches numériques (0-9). Le numéro du
canal s’affiche sur le téléviseur.
- OU Appuyer sur INPUT (Entrée) pour
sélectionner LINE1 ou LINE2 afin
d'enregistrer à partir d'une autre source en
utilisant les prises d'entrée audio/video (au
dos ou sur le panneau avant).
6 Appuyer sur SPEED (Vitesse) pour
sélectionner la vitesse d'enregistrement (SP
ou SLP). La vitesse de la cassette s’affiche
sur le téléviseur.
7 Appuyer deux fois sur . Le menu s’affiche
sur le téléviseur et l'enregistrement
commence.
8 Appuyer plusieurs fois sur pour
sélectionner la durée de l’enregistrement.
À la fin de l'enregistrement, l’app areil arrête
d'enregistrer et s'éteint.
Remarque
• Pendant que l'enregistrement programmé
instantané est activé, il n'est pas possible de
changer le canal sur le système de cinéma
maison.
• Pour arrêter l'enregistrement, appuyer deux
fois sur STOP ou POWER (Marche).
4 Appuyer sur la touche ou pour
sélectionner le programme à vérifier ou
effacer.
5 Pour effacer le programme, appuyer sur
CLEAR (Effacer).
6 Appuyer sur MENU pour revenir à l'écran du
téléviseur.
Utilisation de l'enregistrement programmé
instantané
L’enregistrement programmé instantané permet
d’effectuer facilement un enregistrement d’une
durée prédéfinie sans utiliser le minuteur
programmable.
Pour utiliser le minuteur instantané :
1 Mettre sous tension le téléviseur et le
système de cinéma maison.
2 Syntoniser l e té lé vi se ur s ur l e ca nal de so rtie
du système de cinéma maison (CH 3 ou 4),
ou régler le sélecteur de source du téléviseur
sur VIDEO (Vidéo).
INSTANT TIMER RECO
CHANN
EL
SPEE
D
AR
T
ST
NGTH 0H30
LE
SP
N
2
OW
M
0H30M ..... 9H00M
RD
Affichage de la durée – chaque appui
supplémentaires de la touche
(
eac
augmente la durée d’enregistrement
REC
/ITR ( )
de 30 minutes.
L
engt
h
D
h a
tim
ispl
dditional press o
incr
eases recording
e
30
m
inutes
Vérification de la durée d’enregi streme n t
Pour vérifier la durée d’enregistrement :
• Appuyer une fois sur pour vérifier la durée
d’enregistrement.
Extension de la durée d’enregistrement
Pour augmenter la durée d’enregistrement :
• Appuyer sur pour augmenter la durée
d’enregistrement. Chaque appui successif de
la touche augmente la durée
d’enregistrement de 30 minutes.
Remarque
• L’appui de la touche en mode d'enregistrement
programmé instantané met l’appareil en mode de pause
d'enregistrement. L'enregistrement programmé instantané
est annulé.
• Si l’appareil est réglé sur 0H00M, il passe en mode
d'enregistrement normal.
ay
0H00
)
M
f
58
www.insignia-products.com
Page 61

Système de cinéma maison Insignia NS-H3005
Duplication et montage
Pour effectuer sur ce système de cinéma maison
le montage ou la duplication d'enregistrements
réalisés à l'aide d'un caméscope ou d'un
magnétoscope, les prises d'entrée audio et
vidéo (A/V) montées sur le panneau arrière (ou
avant) permettent des connexions rapides et
faciles. Ces prises A/V directes donnent
également de meilleurs résultats, en termes
d'image, que les prises RF qui se trouvent sur le
panneau arrière.
Pour réaliser la duplication ou le montage
d'un enregistrement :
1 Connecter les sorties A/V du caméscope ou
du magnétoscope au système de cinéma
maison, comme illustré dans la section
“Connexion de périphériques au système de
cinéma maison” page 45.
2 Si le caméscope ou le magnétoscope est
connecté aux prises A/V avant, appuyer sur
INPUT (Entrée) pour régler le canal d'entrée
sur LINE2.
- OU Si le caméscope ou le magnétoscope est
connecté aux prises d'entrée A/V se trouvant
à l'arrière du système de cinéma maison,
appuyer deux fois sur INPUT (Entrée) pour
régler le canal d'entrée sur LINE1.
3 Lire la cassette dans le caméscope (ou un
autre magnétoscope). Si un téléviseur est
raccordé à l’appareil, il est possible de voir la
vidéo pendant la lecture.
4 Pour commencer l'enregistrement, appuyer
une fois sur la touche du système de
cinéma maison.
Remarque
• Avant l'enregistrement, confirmer la position de début
d'enregistrement.
• Pour arrêter la duplication, appuyer deux fois sur .
Le système de cinéma maison passe en
mode d'enregistrement et le témoin COPY
(Copie) s'allume.
5 Appuyer deux fois sur ou POWER
(Marche) pour arrêter la copie lorsque la
lecture du DVD est terminée.
Remarque
• Si la lecture du DVD est arrêtée pendant la copie, le mode
d'enregistrement du magnétoscope s'arrête
automatiquement.
•Il faut arrêter la procédure de copie manuellement lorsque
le film sur DVD prend fin, sinon le système de cinéma
maison risque de relire et d’enregistrer indéfiniment ce
même film.
Système stéréo VHS Hi-Fi ou diffusion
MTS
Ce système de cinéma maison est équipé du
système audio VHS Hi-Fi pour l'enregistrement
et la lecture. Les informations suivantes donnent
une brève description du système audio Hi-Fi et
de la façon d'enregistrer et de lire une cassette
en mode audio Hi-Fi.
Pour configurer le magnétoscope pour le
mode audio Hi-Fi :
1 Appuyer sur MENU. Le menu principal
s’affiche.
2 Appuyer sur ou pour sélectionner
SETUP (Configuration), puis appuyer sur
MEMORY/ENTER (Mémoire/entrée). Le
menu de configuration s’affiche.
3 Appuyer sur ou pour choisir AUDIO
MODE (Mode audio) dans le menu de
configuration.
4 Appuyer sur ou pour paramétrer
l'option AUDIO MODE (Mode audio) sur
Hi-Fi.
Copie du lecteur de DVD au magnétoscope
Ce système de cinéma maison est capable de
copier le contenu d'un DVD sur une cassette
VHS.
Remarque
Si le DVD est protégé contre la copie, il n'est pas possible de le
copier. Il est illégal de dupliquer des DVD encodés par
Macrovision. LOCK s'affiche lors de toute tentative de copie
d'un DVD encodé par Macrovision.
Pour copier d'un DVD sur une cassette VHS :
1 Insérer le DVD à copier dans le lecteur de
DVD et fermer le plateau à disque.
2 Insérer une cassette vierge dans le
magnétoscope.
3 Appuyer sur la touche sur le panneau
avant ou sur la télécommande. La lecture du
DVD commence. Si le menu DVD apparaît, il
pourra être nécessaire d'appuyer de nouveau
sur la touche pour commencer la lecture
du DVD.
4 Appuyer sur la touche sur le panneau
avant ou sur la télécommande.
5 Appuyer sur ou pour choisir AUDIO
OUTPUT (Sortie audio).
6 Appuyer sur ou pour paramétrer
l'option AUDIO OUTPUT (Sortie audio) sur
STEREO (Stéréo).
POSITION (STEREO) (Stéréo) : Le son du
canal gauche (L) est diffusé par le
haut-parleur gauche et le son du canal droit
(R) est diffusé par le haut-parleur droit.
POSITION (LEFT) (Gauche) : Le son du
canal gauche (L) est diffusé par les deux
haut-parleurs.
www.insignia-products.com
59
Page 62

Système de cinéma maison Insignia NS-H3005
POSITION (RIGHT) (Dro it) : Le son du canal
droit (R) est diffusé par les deux
haut-parleurs.
7 Appuyer sur MENU.
8 Insérer une cassette et appuyer sur .
9 Régler le volume au niveau du système
stéréo.
MTS (Transmission multivoie de signaux
sonores en télévision)
Ce système de cinéma maison décode les
signaux sonores stéréo MTS et bilingues (SAP)
diffusés sur les ondes. Il décode également le
son stéréo pour télévision des câblo-opérateurs
locaux, à condition qu'ils fonctionnent sur des
fréquences de câble assignées et utilisent le
système sonore stéréo/bilingue MTS pour
télévision recommandé par l'EIA.
Affichage MTS (Transmission multivoie de
signaux sonores en télévision)
Cet affichage apparaît à l'écran en appuyant sur
la touche MEMORY/ENTER (Mémoire/entrée).
Un ou deux affichages apparaissent, selon la
diffusion MTS.
Écran du téléviseur
TV screen
CH 4
STEREO/SAP
STEREO (Stéréo)
STEREO
Apparaît lorsqu'une émission stéréo est
Lights up when a stereo broadcast
reçue.
is being received.
SAP
SAP (Seconde trame sonore)
Lights up when a SAP BILINGUAL
Apparaît lorsqu'une émission SAP bilingue
broadcast is being received.
est reçue.
2 Régler l'option BROADCAST TYPE (Type de
diffusion) sur SAP dans le menu de
configuration.
Remarque
Faire cela uniquement si SAP apparaît à l'écran
du téléviseur ou s'il a été établi que le programme
utilise une deuxième trame sonore.
3 Appuyer sur MENU.
4 Appuyer sur SPEED (Vitesse), puis
sélectionner la vitesse d'enregistrement (SP
ou SLP).
5 Sélectionner le canal. SAP doit apparaître à
l'écran du téléviseur.
6 Appuyer une fois sur . L'émission est alors
enregistrée telle qu'elle est diffusée par le
téléviseur.
7 Appuyer deux fois sur pour arrêter
l'enregistrement.
Fonction de mémoire du compteur de la
cassette
Le compteur en temps réel affiche la durée
enregistrée ou lue sur la cassette en heures,
minutes et secondes. Appuyer sur CLK/CNT
(Horloge/compteur) pour sélectionner l'affichage
du compteur en temps réel.
Chaque pression de la touche CLK/CNT change
l'affichage à l'écran du téléviseur comme illustré
ci-dessous.
Affichage Description
STEREO Le système de cinéma maison peut
enregistrer en stéréo sur les pistes audio
VHS Hi-Fi lorsque l'option BROADCAST
TYPE (Type de diffusion) est en position
STEREO (Stéréo). Le système de cinéma
maison enregistre également un son
mono sur la piste audio mono.
SAP Régler l'option BROADCAST TYPE (Type
de diffusion) sur SAP.
STEREO/SAP Utiliser l'option BROADCAST TYPE (Type
de diffusion) po ur sélectionner le mode
d'enregistrement (STEREO ou SAP).
Enregistrement d'une seconde trame sonore
(Second Audio Program, ou SAP)
Certaines stations transmettent une deuxième
trame sonore, qui est utilisée pour une deuxième
langue ou des informations supplémentaires.
Lorsque la station diffuse une deuxième trame
sonore, suivre cette procédure pour l'enregistrer.
Pour enregistrer la deuxième trame sonore :
1 Insérer une cassette vidéo munie de son
onglet de sécurité anti- effacement.
2:15 AM 0:05:25 REM 1:07
Horloge
CLOCK COUNTER REMAINING TIME
Remarque
• Le compteur se remet à 0:00:00 lorsque la cassette est
éjectée.
• Le compteur en temps réel ne fonctionne pas si rien n'est
enregistré sur la cassette.
• Le compteur en temps réel ne fonctionne pas tant qu'une
cassette n'est pas insérée.
Compteur
Temps restant
Fonction de mémoire du compteur
La fonction de mémoire du compteur est utile
pour visionner une section de la cassette
immédiatement après l'avoir e nregistrée, ou
pour revenir plusieurs fois au même point.
Pour utiliser la fonction de mémoire du
compteur :
1 Commencer à enregistrer ou à lire une
cassette.
2 Appuyer plusieurs fois sur CLK/CNT
(Horloge/compteur) pour afficher le compteur
en temps réel à l'écran du téléviseur.
3 Au point à localiser ultérieurement, remettre
le compteur en temps réel à 0:00:00 en
appuyant sur la touche CLEAR (Effacer).
60
www.insignia-products.com
Page 63

Système de cinéma maison Insignia NS-H3005
4 Continuer à lire ou à enregistrer.
5 Appuyer une ou deux fois sur lorsque
l'enregistrement ou la lecture es t terminé.
6 Appuyer sur . La cassette s'arrête
automatiquement lorsque le compteur de la
cassette revient environ à 0:00:00.
Cassette restante
Cette fonction affiche le temps restant sur la
cassette lors de l'enregistrement ou de la
lecture. Appuyer plusieurs fois sur CLK/CNT
(Horloge/compteur), jusqu'à ce que le témoin
REM (Temps restant) s’affiche sur le téléviseur,
pendant l'enregistrement ou la lecture.
Remarque
Il est possible que le témoin de durée restante sur la cassette
ne s'affiche pas correctement, suivant l'état et le type de la
cassette (tel que T-140, T-160 ou T-210).
Informations supplémentaires
• En mode d'enregistrement manuel,
d'enregistrement programmé,
d'enregistrement programmé insta nta né, de
lecture ou d'avance rapide, l’appareil
commence automatiquement à rembobiner
la cassette à l a fin d e la casse tte . La c assette
s'arrête au début de la cassette et est
éjectée, et l’appareil s'éteint.
• Une fois l'utilisation de l’appareil terminée,
rembobiner, éjecter et retirer la cassette.
Mettre la cassette dans sa pochette
protectrice pour la protéger de la poussière. Il
n'est pas nécessaire de rembobiner la
cassette avant de la retirer, mais ainsi, elle
sera prête à lire ou à enregistrer la prochaine
fois qu'elle sera utilisée.
• Veiller à ce que le sélecteur de canal du
système de cinéma maison soit sur le canal
correct à enregistrer. Il est toujours possible
de vérifier le canal enregistré en syntonisant
le téléviseur sur le canal de l’appareil (3 ou 4)
et en utilisant la touche TV/VCR
(Téléviseur/magnétoscope) pour désactiver
le témoin TV de l’appareil.
• Ne pas essayer de raccorder plusieurs
téléviseurs à l’appareil, que ce soit pour
l'enregistrement ou la lecture.
Système de lecture automatique
Ce système de cinéma maison commence
automatiquement la lecture lors de l'insertion
d'une cassette dont l'onglet de sécurité a été
retiré.
• La source de sortie passe automatiquement
en mode magnétoscope.
• La mise sous tension s'effectue
automatiquement et la lecture commence.
• À la fin de la cassette, l’appareil s'arrête et
rembobine la cassette.
• Une fois rembobinée, la cassette est éjectée
et le magnétoscope s'éteint
automatiquement.
LOAD
TAPE
Remarque
La mise hors tension automatique ne fonctionne pas en mode
de lecture de DVD ordinaire (l’appareil reste allumé.)
AUTO
PLAY
AUTO
REWIND
AUTO
EJECT
AUTO
POWER
OFF
Utilisation du lecteur de
DVD
Remarque
peut s’afficher sur le téléviseur pendant le fonctionnement.
Cette icône signifie que la fonction e xpliquée dans ce guide de
l'utilisateur n'est pas disponible sur ce lecteur de DVD
spécifique.
Lecture d’un DVD
Pour lire un DVD :
1 Mettre le téléviseur en marche et
sélectionner la source d'entrée vidéo
connectée au lecteur de DVD.
2 Mettre le système audio en marche et
sélectionner la source d'entrée connectée au
lecteur de DVD.
3 Appuyer sur OPEN/CLOSE
(Ouvrir/fermer) pour ouvrir le plateau à
disque.
4 Charger le DVD sur le plateau avec l’étiquette
vers le haut.
5 Appuyer sur OPEN/CLOSE
(Ouvrir/fermer) pour fermer le plateau à
disque.
READING (Lecture) apparaît à l'écran du
téléviseur, et la lecture commence
automatiquement. Si la lecture ne commence
pas, appuyer sur PLAY (Lecture).
Dans certains cas, le menu du DVD peut
s’afficher à la place.
Conseil
L'écran de menu peut s'afficher d'abord lors du chargement
d'un DVD qui offre un menu.
6 Appuyer sur les touches , , , ou
pour sélectionner le titre/chapitre souhaité,
puis appuyer sur MEMORY/ENTER
(Mémoire/entrée) pour commencer la lecture.
7 Appuyer sur TITLE (Titre) ou DISC MENU
(Menu du disque) pour revenir à l'écran de
menu.
Remarque
• Si le contrôle parental est activé et si le disque DVD ne
satisfait pas aux paramètres de classification retenus, il faut
alors entrer le mot de passe à 4 chiffres pour lire le DVD
(voir “Contrôle parental” page 51).
• Les DVD peuvent avoir un code régional. Le lecteur de D V D
ne peut pas lire les DVD dont le code régional est différent
de celui du lecteur. Le code régional pour ce lecteur est « 1
». Pour plus d’informations, voir “Codes régionaux”
page 40.
Remarque
Sauf mention contraire, toutes les opérations décrites ici
utilisent la télécommande. Certaines fonctions peuvent
également être disponibles dans le menu de configuration.
Passage à un autre titre
Si un DVD contient plusieurs titres, il est possible
de passer à un autre titre.
Pour passer à un autre titre :
1 Appuyer sur DISPLAY (Affichage).
2 Appuyer sur la touche numérique appropriée
(0-9) pour sélectionner un numéro de titre.
www.insignia-products.com
61
Page 64

Système de cinéma maison Insignia NS-H3005
Passage à un autre chapitre ou à une autre
piste
Lorsqu'un titre d'un DVD contient plusieurs
chapitres ou qu'un CD contient plusieurs pistes,
il est possible de passer à un autre chapitre ou à
une autre piste.
Pour passer à un autre chapitre ou à une
autre piste :
• Appuyer brièvement sur ou pendant la
lecture pour sélectionner le chapitre suivant
ou la piste suivante, ou pour revenir au début
du chapitre ou de la piste en cours.
• Appuyer deux fois brièvement sur pour
revenir au chapitre précédent ou à la piste
précédente.
• Appuyer sur DISPLAY (Affichage), , ou
pour sélectionner l'icône de chapitre ou de
piste, puis entrer le numéro du chapitre de la
piste à l'aide des touches numériques (0-9).
Remarque
Pour des numéros à deux chiffres, appuyer successivement
sur deux touches numériques (0-9).
Recherche
Cette fonction permet de rechercher rapidement
et visuellement une section du DVD, vers l'av ant
ou vers l'arrière.
Pour rechercher une scène sur une cassette
vidéo :
1 Appuyer, sans relâcher, sur SKIP/SCAN
(Saut/balayage) ou pendant environ
deux secondes au cours de la lecture. Le
lecteur passe en mode de recherche.
2 Appuyer plusieurs fois, sans relâcher, sur
SKIP/SCAN (Saut/balayage) ou pour
sélectionner de la vitesse requise : X2,
X4, X16, X100 (vers l'arrière) ou
X2, X4, X16, X100 (vers l'avant).
3 Appuyer sur PLAY (Lecture) pour revenir au
mode de lecture normale.
Pause
Pour arrêter momentanément la lecture :
1 Appuyer sur PAUSE/STEP (Pause/image par
image) pendant la lecture.
2 Appuyer sur la touche PLAY (Lecture) pour
revenir au mode de lecture.
Image fixe et lecture image par image
Pour visionner une image fixe d'un DVD :
1 Appuyer sur PAUSE/STEP (Pause/image par
image) pendant la lecture. L’appareil se met
en mode Pause.
2 Avancer image par image en appuyant
plusieurs fois sur la touche PAUSE/STEP
(Pause/image par image) de la
télécommande.
3 Appuyer sur PLAY (Lecture) pour revenir au
mode de lecture normale.
Ralenti
Pour visionner un DVD au ralenti :
1 Appuyer sur PAUSE/STEP (Pause/image par
image) pendant la lecture. Le lecteur se met
en mode Pause.
2 Appuyer sur ou pour sélectionner la
vitesse requise : 1/16, 1/8, 1/4 ou 1/2 (vers
l'arrière), ou 1/16, 1/8, 1/4 ou 1/2 (vers
l'avant).
3 Appuyer sur PLAY (Lecture) pour revenir au
mode de lecture normale.
Lecture en boucle A-B
Pour répéter une séquence dans un titre ou
un groupe :
1 Appuyer sur REPEAT A-B (Répéter A-B) au
point de départ choisi. A * apparaît
brièvement à l'écran du téléviseur.
2 Appuyer de nouveau sur REPEAT A-B
(Répéter A-B) au point de fin choisi. A-B
apparaît brièvement à l’écran du téléviseur,
et la séquence de répétition commence
(A B apparaît dans la fenêtre
d'affichage).
3 Appuyer sur REPEAT A-B (Répéter A-B)
pour annuler la séquence.
Lecture en boucle
Pour répéter un chapitre ou un titre :
• Pour répéter le chapitre dont la lecture est en
cours, appuyer sur REPEAT (Répéter).
L'icône de répétition de chapitre s’affiche sur
le téléviseur.
• Pour répéter le titre dont la lecture est en
cours, appuyer sur REPEAT (Répéter) une
deuxième fois. L'icône de répétition du titre
s’affiche sur le téléviseur.
• Pour sortir du mode de lecture en boucle,
appuyer sur REPEAT (Répéter) une
troisième fois. L'icône de répétition
désactivée s’affiche sur le téléviseur.
Recherche en fonction de la duré e
La fonction de recherche en fonction de la durée
permet de démarrer la lecture à n’importe quel
moment choisi sur le disque.
Pour utiliser la recherche en fonction de la
durée :
1 Appuyer sur DISPLAY (Affichage) pendant la
lecture. L'affichage à l'écran s’affiche. La
boîte de recherche en fonction de la durée
indique la durée de lecture écoul ée pour le
disque en cours.
2 Appuyer sur ou dans les dix secondes
pour sélectionner l'icône de recherche en
fonction de la durée dans l'affichage à
l'écran. -:--:-- apparaît dans la boîte de
recherche en fonction de la durée.
62
www.insignia-products.com
Page 65

Système de cinéma maison Insignia NS-H3005
3 Appuyer sur les touches numériques dans
les dix secondes pour saisir l'heure de début
requise. Entrer les heures, minutes et
secondes de gauche à droite dans la boîte.
Remarque
Si un chiffre erroné a été saisi, appuyer sur
CLEAR (Effacer) pour effacer les chiffres saisis.
Entrer ensuite les chiffres corrects.
4 Appuyer sur MEMORY/ENTER
(Mémoire/entrée) dans les dix secondes pour
confirmer l'heure de début.
La lecture débute à partir de l'heure
sélectionnée sur le disque. Si l'heure saisie
est incorrecte, la lecture continue à partir de
l'endroit actuel.
Son ambiophonique 3D
Cet appareil peut produire un son
ambiophonique 3D qui simule la lecture audio
multicanal à partir de deux haut-parleurs stéréo
conventionnels, au lieu des cinq haut-parleurs
ou plus généralement requis pour écouter un
programme audio multicanal à partir d'un
système de cinéma maison.
Pour utiliser le son ambiophonique 3D :
• Appuyer sur SOUND MODE (Mode Son)
pour sélectionner 3D SUR (Son
ambiophonique 3D) pendant la lecture.
Pour désactiver le son ambiophonique 3D :
• Appuyer sur SOUND MODE (Mode Son)
pour sélectionner BYPASS (Dérivation).
Zoom
La fonction de zoom permet d’agrandir l'image
vidéo et de se déplacer dans l'image agrandie.
Remarque
Il est possible que la fonction de zoom ne fonctionne pas pour
certains DVD.
Pour utiliser le zoom :
1 Appuyer sur ZOOM au cours de la lecture ou
du visionnement d'images fixes pour activer
la fonction de zoom.
Remarque
En appuyant plusieurs fois sur ZOOM, le facteur
de grossissement augmente (jusqu'à six niveaux).
2 Appuyer sur les touches , , , ou
pour se déplacer dans l'image agrandie.
3 Appuyer sur CLEAR (Eff acer) pour reprendre
la lecture normale ou revenir à l'image fixe.
Recherche de signets
Il est possible de commencer la lecture à partir
d'un signet enregistré. Il est possible
d'enregistrer jusqu’à neuf signets.
Pour saisir un signet :
1 Pendant la lecture du disque, appuyer sur
MARKER (Signet) lorsque la lecture atteint
l'endroit souhaité pour enregistrer un signet.
L'icône de signet s’affiche brièvement sur le
téléviseur.
2 Répéter l'étape 1 pour saisir jusqu'à neuf
signets sur un disque.
Pour rappeler une scène marquée d’un
signet :
1 Appuyer sur SEARCH (Recherche) l ors d e la
lecture du disque. Le menu de recherche de
signet apparaît à l’écran.
2 Dans les 10 secondes, appuyer sur ou
pour sélectionner le numéro du signet à
rappeler.
3 Appuyer sur MEMORY/ENTER
(Mémoire/entrée). La lecture débute à partir
de la scène marquée d’un signet.
4 Appuyer sur SEARCH (Recherche) pour
fermer le menu de recherche de signet.
Pour effacer une scène marqu ée d’un signet :
1 Appuyer sur SEARCH (Recherche) l ors d e la
lecture du disque. Le menu de recherche de
signet apparaît à l’écran.
2 Appuyer sur ou pour sélectionner le
numéro du signet à effacer.
3 Appuyer sur CLEAR (Effacer). Le numéro de
signet est effacé de la liste.
4 Répéter les étapes 2 et 3 pour effacer
d'autres numéros de signet.
5 Appuyer sur SEARCH (Recherche) pour
fermer le menu de recherche de signet.
Vérification du contenu de disques
DVD-vidéo
Les DVD peuvent offrir des menus permettant
d'accéder à des fonctions spéciales.
Pour utiliser le menu DVD :
1 Appuyer sur DISC MENU (Menu du disque).
2 Appuyer sur les touches numériques
appropriées pour sélectionner une option.
Ou
Appuyer sur les touches , , , ou
pour mettre en surbrillance une sélection,
puis sur MEMORY/ENTER
(Mémoire/entrée).
3 Appuyer de nouveau sur MENU pour fermer
le menu du DVD.
Menu de titre
Pour utiliser le menu de titre :
1 Appuyer sur TITLE (Titre). Si le titre en cours
a un menu, le menu s’affiche. Sinon, il se
peut que le menu du disque s’affiche.
Le menu peut répertorier les angles de prises
de vue, les options de langue parlée et de
sous-titres, et les chapitres pour le titre.
2 Appuyer de nouveau sur TITLE (Titre) pour
fermer le menu de titre.
Angle de prise de vues
Si le disque contient des scènes enregistrées
sous différents angles de prise de vues, il est
possible de passer à un angle différent en cours
de lecture.
Appuyer sur ANGLE plusieurs fois au cours de
la lecture pour sélectionner un angle différent.
Le numéro de l'angle de prise de vues actuel
apparaît dans la fenêtre d'affichage.
www.insignia-products.com
63
Page 66

Système de cinéma maison Insignia NS-H3005
Changement de la langue audio
Appuyer sur AUDIO à plusieurs reprises au
cours de la lecture pour entendre une langue
audio ou une piste audio différente.
Sous-titres
Appuyer sur SUBTITLE (Sous-titres) à plusieurs
reprises au cours de la lecture pour voir les
sous-titres dans des langues différentes.
Remarque
Si s ’affiche, cette fonction n’est pas disponible sur le
disque.
Lecture de disques audio, MP3 et WMA
Le système de cinéma maison peut lire des
enregistrements aux formats MP3 et WMA sur
des disques CD-ROM, CD-R ou CD-RW.
À propos des enregistrements MP3/WMA
À propos des fichiers MP3
• Un fichier MP3 comporte des données audio
compressées au moyen de l'algorithme de
codage de fichier MPEG1 audio layer-3. Les
fichiers qui ont l'extension de fichier .mp3
sont appelés fichiers MP3.
• Le lecteur ne peut pas lire un fichier MP3
ayant une extension de fichier autre que
.mp3.
À propos des fichiers WMA
• Un fichier WMA est le produit d'une
technologie de compression audio de
Microsoft.
• WMA (Windows Media Audio) offre une
compression audio double du format MP3.
Compatibilité des disques MP3/WMA
La compatibilité des disques MP3/WMA avec ce
système de cinéma maison est limitée comme
suit :
• Fréquence d'échantillonnage — 44,1 kHz
(MP3), 32 à 44,1 kHz (WMA)
• Débit binaire — 32 à 320 kbps (MP3), 32 à
128 kbps (WMA)
• Le format physique du CD-R doit être ISO
9660
• Si les fichiers MP3 ou WMA sont enregistrés
à l'aide d'un logiciel qui ne peut pas créer un
système de fichiers (par exemple,
Direct-CD), il ne sera pas possible de lire les
fichiers MP3 ou WMA. Il est recommandé
d'utiliser Easy CD Creator™, qui crée un
système de fichiers ISO9660.
• Un disque à simple session doit avoir des
fichiers MP3 ou WMA sur la première piste.
Si la première piste ne contient pas de fichier
MP3 ou WMA, le lecteur de D VD ne peut pas
lire les fichiers MP3 ou WMA. Pour lire des
fichiers MP3 ou WMA, formater toutes les
données du disque ou utiliser un nouveau
disque.
• Le nom des fichiers doit être constitué de huit
lettres au maximum et comporter l'extension
.mp3 ou .w ma. Par e x empl e : ********.MP3 ou
********.WMA
• Ne pas utiliser de caractères spéciaux tels
que / : * ? “ < >
• Le nombre total de fichiers sur le disque doit
être inférieur à 650.
Cet appareil requiert que les disques ou
enregistrements satisfassent à certaines
normes techniques afin d'assurer une qualité de
lecture optimale. Les disques DVD
pré-enregistrés satisfont automatiquement à ces
normes. Il existe de nombreux types de format
de disque inscriptible (y compris les disques
CD-R contenant des fichiers MP3 ou WMA) qui
doivent répondre à certaines conditions
préalables pour assurer la compatibilité de leur
lecture.
Noter également qu’une autorisation est requise
pour le téléchargement de fichiers et de
chansons MP3 ou WMA depuis Internet.
Insignia n’est pas habilitée à accorder cette
autorisation. L'autorisation doit toujours être
sollicitée auprès du propriétaire des droits
d’auteur.
Pour lire des disques audio, MP3 et WMA :
1 Insérer un disque et fermer le plateau à
disque.
CD audio : Le menu de CD audio s’affiche
sur le téléviseur. Passer à l'étape 4.
MP3/WMA : Le menu de choix
MP3/WMA-JPEG s’affiche sur le téléviseur.
Passer à l'étape 2.
MP3/WMA
JPEG
2 Appuyer sur ou pour sélectionner
MP3/WMA, puis appuyer sur
MEMORY/ENTER (Mémoire/entrée).
Le menu MP3/WMA s’affiche sur le
téléviseur.
MP3 WMA
Folder1
Folder2
Folder3
Folder4
Folder5
Folder6
Folder7
Folder8
Program
Clear All
OFF00:00
3 Appuyer sur RETURN (Retour) pour passer
au menu de choix MP3/WMA-JPEG.
4 Appuyer sur ou pour sélectionner un
dossier, puis appuyer sur MEMORY/ENTER
(Mémoire/entrée). Une liste de fichiers
apparaît dans le dossier.
5 Appuyer sur ou pour sélectionner un
fichier, puis appuyer sur PLAY (Lecture) ou
MEMORY/ENTER (Mémoire/entrée). La
lecture commence.
Pendant la lecture, la durée de lecture
écoulée actuelle apparaît dans la fenêtre
d'affichage et le menu.
64
www.insignia-products.com
Page 67

Système de cinéma maison Insignia NS-H3005
La lecture s'arrête à la fin du disque.
Conseil
Si la piste souhaitée ne s’affiche pas, appuyer sur
TITLE (Titre) pour passer à la page suivante, ou
sur DISC MENU (Menu du disque) pour revenir à
la page précédente.
CD
TRACK01
TRACK02
TRACK03
TRACK04
TRACK05
TRACK06
TRACK07
TRACK08
0: 56: 18
MP3 WMA
TRACK 1.mp3
TRACK 2.mp3
TRACK 3.mp3
TRACK 4.mp3
TRACK 5.mp3
TRACK 6.mp3
TRACK 7.mp3
TRACK 8.mp3
Conseil
Pour revenir à la liste Folder (Dossiers) à partir
d'une liste de fichiers, utiliser ou pour
mettre en surbrillance , puis appuyer sur
MEMORY/ENTER (Mémoire/entrée) pour revenir
à l’écran de menu précédent.
Program
STER. BYPASS
Menu CD audio
Program
1
Menu MP3/WMA
Clear All
Clear All
OFF00:00
6 Pour arrêter la lecture à tout autre moment,
appuyer sur STOP (Arr êt).
Pause
Pour arrêter momentanément la lecture :
1 Appuyer sur PAUSE/STEP (Pause/image par
image) pendant la lecture.
2 Appuyer sur la touche PLAY (Lecture) ou
appuyer de nouveau sur PAUSE/STEP
(Pause/image par image) pour revenir au
mode de lecture.
Passage à une autre piste
Pour passer à une autre piste :
• Appuyer brièvement sur ou pendant la
lecture pour passer à la piste suivante ou
retourner au début de la piste en cours de
lecture.
• Appuyer deux fois brièvement sur pour
revenir à la piste précédente .
• Dans le cas d’un CD audio, pour aller
directement à une piste quelconque, entrer le
numéro de piste à l’aide des touches
numériques (0-9) lors de la lecture.
Lecture en boucle d'une piste / de toutes les
pistes / désactivée
2 Pour répéter toutes les pistes d'un disque,
appuyer une deuxième fois sur la touche
REPEAT (Répéter).
L'icône de répétition et ALL (Toutes le s
pistes) apparaissent à l'écran de menu.
3 Appuyer sur REPEAT (Répéter) une
troisième fois pour annuler le mode de
lecture en boucle.
L'icône de répétition et OFF (Désactivée)
apparaissent à l'écran de menu.
Recherche
Pour rechercher un fichier :
1 Appuyer, sans relâcher, sur SKIP/SCAN
(Saut/balayage) ou pendant environ
deux secondes au cours de la lectur e. Le
lecteur passe en mode de recherche.
2 Appuyer plusieurs fois, sans relâcher, sur
SKIP/SCAN (Saut/balayage) ou pour
sélectionner de la vitesse requise : X2,
X4, X8 (vers l'arrière) ou X2, X4,
X8 (vers l'avant). La vitesse et la direction
de la recherche sont indiquées à l'écran de
menu.
3 Appuyer sur PLAY (Lecture) pour sortir du
mode de recherche.
Lecture en boucle A-B
Pour répéter une séquence :
1 Pendant la lecture d'un disque, appuyer sur
REPEAT A-B (Répéter A-B) au point de
départ choisi.
L'icône de répétition et A * apparaissent à
l'écran de menu.
2 Appuyer de nouveau sur REPEAT A-B
(Répéter A-B) au point de fin choisi.
L'icône de répétition et A B apparaissent à
l'écran de menu, et la lecture en boucle de la
séquence commence.
3 Appuyer de nouveau sur la touche REPEAT
A-B (Répéter A-B) pour sortir de la séquence
et revenir à la lecture normale.
L'icône de répétition et OFF (Désactivée)
apparaissent à l'écran de menu.
Son ambiophonique 3D
Ce système de cinéma maison peut produire un
son ambiophonique 3D qui simule la lecture
audio multicanal à partir de deux haut-parleurs
stéréo conventionnels, au lieu des cinq
haut-parleurs ou plus généralement requis pour
écouter un programme audio multicanal à partir
d'un système de cinéma maison.
Pour activer le son ambiophonique 3D :
• Appuyer sur SOUND MODE (Mode de son)
pour sélectionner 3D SUR (Son
ambiophonique 3D) pendant la lecture.
Pour répéter une piste :
1 Pour répéter la piste dont la lecture est en
cours, appuyer sur REPEAT (Répéter).
L'icône de répétition et TRACK (Piste)
apparaissent à l'écran de menu.
www.insignia-products.com
Pour désactiver le son ambiophonique 3D :
• Appuyer de nouveau sur SOUND MODE
(Mode Son) pour sélectionner BYPASS
(Dérivation).
65
Page 68

Système de cinéma maison Insignia NS-H3005
Changement du canal audio
Pour changer le canal audio :
• Appuyer sur AUDIO à plus ie urs re prises au
cours de la lecture pour entendre un canal
audio différent (STER. (Stéréo), LEFT
(Gauche), ou RIGHT (Droite)).
Lecture programmée
La fonction de programmation permet
d'enregistrer les pistes favorites de n'importe
quel disque dans la mémoire du lecteu r de DVD.
Un programme peut contenir 30 pistes.
Pour créer une liste de programmation et lire
les pistes de la liste :
1 Appuyer sur PROGRAM (Programmation)
pendant la lecture ou en mode Arrêt pour
passer en mode de modification de
programme.
Le symbole apparaît à droite du mot
Program (Programme), sur le côté droit de
l'écran de menu.
Remarque
Appuyer sur PROGRAM (Programmation) pour
sortir du mode de modification de programme. Le
symbole disparaît.
2 Sélectionner une piste, puis appuyer sur
MEMORY/ENTER (Mémoire/entrée) pour
mettre la piste sélectionnée dans la liste de
programmation.
3 Répéter l’étape 2 pour ajouter d’autres pistes
à la liste de programmation.
CD
TRACK 1
TRACK 2
TRACK 3
TRACK 4
TRACK 5
TRACK 6
TRACK 7
TRACK 8
0: 56: 18
MP3 WMA
TRACK 1.mp3
TRACK 2.mp3
TRACK 3.mp3
TRACK 4.mp3
TRACK 5.mp3
TRACK 6.mp3
TRACK 7.mp3
TRACK 8.mp3
Program
TRACK 12
TRACK 8
TRACK 10
TRACK 3
STER. BYPASS
Menu CD audio
Program
TRACK 8.mp3
TRACK 2.mp3
TRACK 4.mp3
TRACK 3.mp3
3
Menu MP3/WMA
E
Clear All
E
Clear All
OFF00:00
4 Appuyer sur .
La piste programmée sélectionnée la
dernière apparaît en surbrillance dans la liste
de programmation.
5 Appuyer sur ou pour sélectionner la
piste à lire en premier.
• Appuyer sur TITLE (Titre) pour passer à
la page suivante.
• Appuyer sur MENU (Menu) po ur reveni r à
la page précédente.
6 Appuyer sur PLAY (Lecture) pour
commencer la lecture.
La lecture commence dans l'ordre où ont été
programmées les pistes. PROG
(Programme) apparaît à l'écran de menu.
La lecture s'arrête lorsque toutes les pistes
de la liste de programmation ont été lues une
fois.
7 Pour revenir en mode de lecture normale à
partir du mode de lecture programmée,
sélectionner une piste d'un CD, une liste MP3
ou une liste WMA, puis appuyer sur
MEMORY/ENTER (Mémoire/entrée). Le
témoin PROG (Programme) disparaît de
l'écran de menu.
Lecture en boucle des pistes programmées
• Pour répéter la piste dont la lecture est en
cours, appuyer sur REPEAT (Répéter).
L'icône de répétition et TRACK (Piste)
apparaissent à l'écran de menu.
• Pour répéter toutes les pistes de la liste de
programmation, appuyer une deuxième fois
sur la touche REPEAT (Répéter). L'icône de
répétition et ALL (Toutes les pistes)
apparaissent à l'écran de menu.
• Pour annuler le mode de lecture en boucle,
appuyer sur REPEAT (Répéter) une
troisième fois. L'icône de répétition et OFF
(Désactivée) apparaissent à l'écran de menu.
Effacement d'une piste de la liste de
programmation
1 Appuyer sur PROGRAM (Programmation)
pendant la lecture (CD audio CD, disque
MP3 ou disque WMA uniquement) ou en
mode Arrêt pour passer en mode de
modification de programme. Le symbole
apparaît.
2 Appuyer sur pour passer à la liste de
programmation.
3 Appuyer sur ou pour sélectionner la
piste à effacer de la liste de programmation.
4 Appuyer sur CLEAR (Effacer). La piste est
effacée de la liste de programmation.
Effacement de la liste de programmation
complète
1 Suivre les étapes 1 et 2 de la section
“Effacement d'une piste de la liste de
programmation” page 66.
2 Appuyer sur ou pour sélectionner Clear
All (Effacer tout), puis appuyer sur
MEMORY/ENTER (Mémoire/entrée).
La liste de programmation complète pour le
disque est effacée. Les listes sont également
effacées lorsque le disque est retiré.
66
www.insignia-products.com
Page 69

Système de cinéma maison Insignia NS-H3005
Utilisation de disques JPEG
Visionnement d'un disque JPEG
Ce système de cinéma maison peut lire des
disques contenant des fichiers JPEG.
Remarque
• Suivant la taille et le nombre des fichiers JPEG, il se peut
que le système de cinéma maison mette un long moment à
lire le contenu du disque. Si rien ne s'affiche à l'écran après
plusieurs minutes, certains des fichiers sont trop gros.
Réduire la résolution des fichiers JPEG à moins de 2
mégapixels et graver un autre disque.
• Le nombre total de fichiers et de dossiers sur le disque doit
être inférieur à 650.
• Certains disques peuvent être incompatibles à cause d'un
format d'enregistrement différent ou en raison de l'état du
disque.
• Lors de l'utilisation d'un logiciel tel que Easy CD Creator
pour graver les fichiers JPEG sur un CD-R, veiller à ce que
tous les fichiers sélectionnés aient l'extension .jpg lors de la
copie sur le CD.
• Si les fichiers ont comme extension .jpe ou .jpeg, les
renommer en tant que fichiers .jpg.
• Les fichiers qui n'ont pas l'extension .jpg ne peuvent pas
être lus par ce système de cinéma maison, bien que les
fichiers apparaissent en tant que fichiers d'images JPEG
dans Windows Explorer.
Pour visionner un disque JPEG :
1 Insérer un disque et fermer le plateau à
disque.
Le menu de choix MP3/WMA-JPEG apparaît
à l'écran du téléviseur.
MP3/WMA
JPEG
2 Appuyer sur ou pour sélectionner
JPEG, puis appuyer sur MEMORY/ENTER
(Mémoire/entrée).
Le menu JPEG apparaît à l’écran du
téléviseur.
JPEG
Folder1
Folder2
Folder3
Folder4
Folder5
Folder6
Folder7
Folder8
Slide Speed
3 Appuyer sur ou pour sélectionner un
dossier, puis appuyer sur MEMORY/ENTER
(Mémoire/entrée).
Une liste de fichiers apparaît dans le dossier.
Appuyer sur RETURN (Retour) pour passer
au menu de choix MP3/WMA-JPEG.
Conseil
Pour rev enir à liste F older (Dossiers) à partir d'une
liste de fichiers, utiliser ou pour mettre en
surbrillance , puis appuyer sur
MEMORY/ENTER (Mémoire/entrée) pour revenir
à l’écran de menu précédent.
4 Pour voir un fichier particulier, appuyer sur
ou pour mettre en surbrillance un
fichier, puis appuyer sur MEMORY/ENTER
(Mémoire/entrée) ou PLAY (Lecture).
Off
Le fichier s'affiche.
Remarque
• Pendant le visionnement du fichier, appuyer sur
RETURN (Retour) pour revenir au menu
précédent (menu JPEG).
• Appuyer sur TITLE (Titre) pour passer à la
page suivante.
• Appuyer sur DISC MENU (Menu du disque)
pour revenir à la page précédente.
Conseil
Il existe trois options pour la vitesse de
visionnement du diaporama : Fast (Rapide),
Normal, Slow (Lent) et Off (Désactivé). Appuyer
sur ou pour mettre en surbrillance la
vitesse souhaitée pour le diaporama, appuyer sur
ou pour sélectionn er l'option à utiliser, puis
appuyer sur MEMORY/ENTER (Mémoire/entrée).
5 Pour arrêter le visionnement à tout moment,
appuyer sur STOP (Arrêt). Le menu JPEG
apparaît.
Passage à un autre fichier
Appuyer une fois sur SKIP/SCAN
(Saut/balayage) ou pendant le
visionnement d'une image pour passer au fichier
suivant ou revenir au fichier précédent.
Arrêt sur image
Pour visionner une image :
1 Appuyer sur PAUSE/STEP (Pause/image par
image) pendant le diaporama. Le système de
cinéma maison se met en mode Pause.
2 Pour revenir au diaporama, appuyer sur la
touche PLAY (Lecture) ou appuyer de
nouveau sur PAUSE/STEP (Pause/image par
image).
Pour faire pivoter l'image :
• Appuyer sur ou tout en visionnant une
image pour faire pivoter l’image
horizontalement ou verti cale men t.
Pour faire pivoter l'image
• Lorsqu'une image est affichée, appuyer sur
ou pour faire pivoter l'image dans le
sens horaire ou anti-horaire.
Fonctionnement de la radio
Mémorisation des stations
Il est possible de mémoriser jusqu'à 50 stations
FM et AM.
Pour mémoriser des stations de radio :
1 Réduire le volume.
2 Appuyer sur la touche FM/AM de la
télécommande ou du panneau avant jusqu'à
ce que la bande de fréquence apparaisse
dans la fenêtre d'affichage et à l'écran du
téléviseur.
www.insignia-products.com
67
Page 70

Système de cinéma maison Insignia NS-H3005
3 Utiliser la touche CH/TRK/PRESET (/)
de la télécommande ou CH./PRESET (+/ - )
du panneau avant pour sélectionner une
station.
4 Appuyer sur la touche FM/AM sur la
télécommande du panneau avant pour
sélectionner la bande.
5 Appuyer, sans relâcher, sur la touche
TUNING (Syntonisation) de la télécommande
pendant environ deux secondes. La station
est recherchée automatiquement.
6 Appuyer sur la touche MEMORY/ENTER
(Mémoire/entrée) de la télécommande. La
station est mise en mémoire.
7 Répéter les étapes 3 à 6 pour mémoriser des
stations radio supplémentaires.
Écoute de la radio
Pour écouter la radio :
1 Suivre la procédure décrite dans la section
“Mémorisation des stations” page 67.
2 Appuyer sur la touche FM/AM de la
télécommande jusqu'à ce que la bande de
fréquence apparaisse dans la fenêtre
d'affichage et à l'écran du téléviseur. La
station reçue est la dernière station écoutée.
3 Utiliser la touche CH/TRK/PRESET (/)
de la télécommande ou CH./PRESET (+/ - )
du panneau avant pour sélectionner une
autre station mémorisée.
4 Régler le volume en tournant le bouton
VOLUME sur le panneau avant ou en
appuyant sur VOLUME (+/-) sur la
télécommande.
Effacement des stations mémorisées
Pour effacer une station mémorisée :
1 Appuyer sur la touche FM/AM de la
télécommande jusqu'à ce que la bande de
fréquence apparaisse dans la fenêtre
d'affichage et à l'écran du téléviseur. La
station reçue est la dernière station écoutée.
2 Utiliser la touche CH/TRK/PRESET (/)
de la télécommande ou CH./PRESET (+/ - )
du panneau avant pour sélectionner une
station à effacer.
3 Appuyer sur la touche CLEAR (Effacer) de la
télécommande pour effacer la station
mémorisée.
Remarque
Il est possible que la fonction CLEAR (Effacer) ne
fonctionne pas si le système de cinéma maison
est en mode d'enregistrement ou de pause
d'enregistrement.
Syntonisation manuelle des stations
Pour syntoniser manuellement des stations
de radio :
1 Appuyer sur la touche FM/AM de la
télécommande ou du panneau avant jusqu'à
ce que la bande de fréquence apparaisse
dans la fenêtre d'affichage et à l'écran du
téléviseur.
2 Appuyer sur la touche FM/AM sur la
télécommande du panneau avant pour
sélectionner la bande.
3 Appuyer sur la touche TUNING
(Syntonisation) ( / ) de la télécommande
pour syntoniser la station.
Syntonisation automatique des stations
Pour syntoniser automatiquement des
stations de radio :
1 Appuyer sur la touche FM/AM de la
télécommande ou du panneau avant jusqu'à
ce que la bande de fréquence apparaisse
dans la fenêtre d'affichage et à l'écran du
téléviseur.
2 Appuyer sur la touche FM/AM sur la
télécommande du panneau avant pour
sélectionner la bande.
3 Appuyer, sans relâcher, sur la touche
TUNING [Syntonisation] ( / ) de la
télécommande pendant environ deux
secondes. La station suivante est recherchée
automatiquement.
Remarque
Il est possible que la recherche ne syntonise pas
on ne s'arrête pas sur une station dont le signal
est très faible.
Étiquetage des stations
Il est possible d'entrer un nom contenant jusqu'à
cinq caractères pour chaque station mémorisée.
Les noms apparaissent dans la fenêtre
d'affichage lors de la sélection d'une station
mémorisée. Un seul nom peut être entré pou r
chaque station mémorisée.
Pour syntoniser automatiquement des
stations de radio :
1 Appuyer sur la touche FM/AM de la
télécommande ou du panneau avant jusqu'à
ce que la bande de fréquence apparaisse à
l'écran d'affichage et à l'écran du téléviseur.
2 Appuyer sur pour passer à la colonne des
noms de station.
3 Utiliser les touches / pour sélectionner le
caractère, puis utiliser la touche pour
passer au caractère suivant.
4 Appuyer sur MEMORY/ENTER
(Mémoire/entrée) pour confirmer le nom de la
station.
5 Appuyer sur MEMORY/ENTER
(Mémoire/entrée). Le nom de la statio n est
mis en mémoire.
68
www.insignia-products.com
Page 71

Système de cinéma maison Insignia NS-H3005
Entretien
Manipulation du système de cinéma
maison
Expédition du système de cinéma maison
La boîte et les matériaux d'emballage d'origine
sont alors utiles. Pour une protection maximale,
emballer le système de cinéma maison de la
manière dont il avait été emballé à l'origine en
usine.
Configuration du système de cinéma maison
L’image et le son d’un téléviseur, d’un
magnétoscope ou d’une radio à proximité risque
d’être déformés lors de la lecture. Dans ce cas,
éloigner le système de cinéma maison du
téléviseur, du magnétoscope ou de la radio, ou
mettre le système de cinéma maison hors
tension après avoir retiré le disque.
Conserver les surfaces du système de
cinéma maison propres.
Ne pas utiliser de liquide volatil, tels qu'un
insecticide en pulvérisation, à proximité du
système de cinéma maison. Ne pas laisser des
produits en caoutchouc ou en plastique en
contact avec le système de cinéma maison
pendant de longues durées. Ceux-ci laisseront
des marques sur la surface.
Nettoyage du système de cinéma maison
Nettoyage du boîtier
Utiliser un chiffon doux et sec. Si les surfaces
sont extrêmement sales, utiliser un chiffon doux
légèrement humecté d'une solution détergente
douce. Ne pas utiliser des solvants puissants
comme l’alcool, le benzène ou les diluants, étant
donné que ceux-ci peuvent endommager la
surface du système de cinéma maison.
Pour obtenir une image nette
Le système de cinéma maison est un appareil
de précision de haute technologie. Si la lentille
de lecture optique et les pièces du lecteur de
disque sont sales ou usées, la qualité de l'image
sera médiocre.
Une inspection régulière et un entretien sont
recommandés toutes les 1 000 heures
d'utilisation (ceci dépend du milieu de
fonctionnement.)
Pour plus de détails, contacter le détaillant le
plus proche.
Manipulation des disques
Ne pas toucher la surface gravée du disque.
Tenir le disque par les bords, de manière à ne
pas mettre d'empreintes digitales sur la surface.
Ne pas coller du papier ou du ruban adhésif sur
le disque.
Ne pas exposer le disque à la lumière directe du
soleil ou d’autres sources de chaleur, et ne pas
le laisser dans une voiture garée en plein soleil,
étant donné que la température peut devenir très
importante à l'intérieur de la voiture.
Nettoyage des disques
Des empreintes digitales et de la poussière sur
un disque sont sources d’image médiocre et de
son déformé. Nettoyer le disque avec un chiffon
propre avant de l’utiliser. Essuyer le disque en
partant du centre vers l’extérieur.
Ne pas utiliser des solvants puissants comme
l’alcool, le benzène, les diluants, les nettoyants
disponibles dans le commerce ou les
vaporisateurs antistatiques destinés aux anciens
disques en vinyle.
Problèmes et solutions
Avant de contacter le service après-vente, se
reporter au guide ci-après pour identifier la
cause possible d'un problème.
Anomalie Cause Correction
Pas
d’alimentation
Le système de
cinéma maiso n
est sous tension,
mais ne
fonctionne pas.
Absence d’image Le téléviseur n’est pas
Pas de son. La sortie audio
Le cordon
d’alimentation est
débranché.
Aucun
disque/cassette n’a
été inséré.
réglé pour recevoir le
signal de sortie du
système de cinéma
maison.
Le mode TV/VCR
(Téléviseur/magnétos
cope) du système de
cinéma maison est
réglé sur TV.
Le câble vidéo n'est
pas connecté
fermement.
Le téléviseur
connecté est hors
tension.
numérique est réglée
sur la mauvaise
position.
Brancher correctement
le cordon
d’alimentation dans la
prise secteur murale.
Insérer un disque ou
une cassette. Veiller à
ce que le témoin de
disque ou de cassette
de la fenêtre
d'affichage soit allumé.
Sélectionner le mode
d’entrée vidéo
appropri é su r l e
téléviseur afin que
l'image en provenance
du lecteur s'affiche sur
le téléviseur.
Appuyer plusie urs fois
sur la touche TV/VCR
de la télécommande
pour choisir le mod e
VCR (Magnétoscope).
Le témoin TV disparaît
de la fenêtre
d'affichage.
Connecter fermement
le câble vidéo.
Allumer le téléviseur.
Régler la sortie audio
numérique dans la
position correcte, puis
mettre de nouveau le
système de cinéma
maison sous tension
en appuyant sur
POWER (Marche).
Rangement des disques
Après lecture, ranger le disque dans son boîtier.
www.insignia-products.com
69
Page 72

Système de cinéma maison Insignia NS-H3005
Anomalie Cause Correction
L ’image d e lecture
est médiocre.
Le système de
cinéma maison
ne démarre pas la
lecture.
La télécommand e
ne fonctionne p as
correctement.
Certains canaux
sont « sautés » si
lors de
l'utilisation de
/
L’image et le son
d’un canal de
diffusion sont
faibles ou
absents.
Le disque est sale. Nettoyer le disque.
Les têtes de lecture
vidéo sont sales.
La cassette est une
cassette de location
ou a été enregistrée
sur un magnétoscope
différent.
Aucun
disque/cassette n’a
été inséré.
Le disque inséré est
illisible.
Le disque a été inséré
à l’envers.
Le disque inséré ne se
trouve dans les
guides.
Le disque est sale. Nettoyer le disque.
La télécommande
n'est pas pointée sur
le capteur à distance
du système de
cinéma maison.
La télécommande est
trop éloignée du
système de cinéma
maison.
Il y a un obstacle
entre la
télécommande et le
système de cinéma
maison.
Les piles de la
télécommande sont
épuisées.
Cette télécommande
utilise les mêmes
touches pour les
fonctions VCR
(Magnétoscope) et
DVD (par exemple,
PLAY [Lecture]).
Les canaux sautés ont
été supprimés à l’aide
de la fonction CH.
ADD/DEL
(Ajout/Suppression
de canaux).
L’antenne ou les
câbles sont
desserrés.
L'option TUNING
BAND (Bande de
syntonisation) utilisée
est incorrecte.
Nettoyer les têtes de
lecture vidéo.
Appuyer sur
pour régler
manuellement
l'alignement pendant la
lecture de la cassette.
Insérer un disque ou
une cassette. (Vérifier
que le témoin de
disque ou de cassette
de la fenêtre
d'affichage est
allumé.)
Insérer un disque
lisible (vérifier le type
de disque, le standard
couleur et le code
régional).
Placer le disque avec
l'étiquette tourné e vers
le haut.
Placer correctement le
disque sur le platea u, à
l’intérieur des guides.
Pointer la
télécommande vers le
capteur de
télécommande du
système de cinéma
maison.
Utiliser la
télécommande dans
un rayon de 7m
(23 pieds) du système
de cinéma maison.
Enlever l’obstacle.
Remplacer les pi le s
existantes par des
piles neuves.
Pour utiliser u ne
cassette de
magnétoscope,
appuyer d’ ab ord sur la
touche VCR
(Magnétoscope). Pour
utiliser un DVD,
appuyer d’ ab ord sur la
touche DVD.
Appuyer sur CH.
ADD/DEL. pour
restaurer les canaux.
Voir “Sélection des
canaux” page 48.
Serrer les connexions
ou remplacer le câble.
Essayer toutes les
options de bande de
syntonisation. Voir
“Sélecti on des ca naux”
page 48.
/
Anomalie Cause Correction
L'image du
caméscope, via
l'entrée A/V du
système de
cinéma maison,
n'apparaît pas à
l'écran du
téléviseur.
Il n’est pas
possible
d’effectuer un
enregistrement
programmé.
Le témoin
apparaît lorsque
le système de
cinéma maiso n
est mis hors
tension.
Les fonctions
Stereo Audio
Record
(Enregistrement
audio stéréo)
et/ou Playback
(Lecture) ne sont
pas disponibles.
L'option SOURCE
SELECT (Sélection de
source) du système
de cinéma maison
n'est pas réglée sur
LINE1 ou LINE2.
L’horloge du sy stème
de cinéma maison
n'est pas réglée à
l'heure correcte.
La programmation de
l’enregistrement est
incorrecte.
Le témoin
n'apparaît pas après
la programmation de
l'enregistrement.
Le système de cinéma
maison est en mode
d'enregistrement
programmé.
Le téléviseur n’est pas
compatible avec la
stéréo.
L’émission diffusée
n’est pas en format
stéréo.
L'option BROADCAST
TYPE (Type de
diffusion) est rég lé e
sur SAP ou MONO.
Appuyer sur INPUT
(Entrée) pour
sélectionner la source
d'entrée LINE (LINE1
ou LINE2).
Régler l’horloge à
l’heure correcte. Voir
“Réglage de l’horloge”
page 49.
Reprogrammer
l'enregistrement. Voir
“Arrêt momentané de
l'enregistrement”
page 56.
Reprogrammer
l’enregistrement.
Ceci est l'indication
normale que le
système de cinéma
maison est en mode
d'enregistrement
programmé.
Aucune action n'est
possible.
Aucune action n'est
possible.
Régler l'option
BROADCAST TYPE
(Ty pe de diffusion) s ur
STEREO (Stéréo). Voir
“Configuration du
magnétoscope”
page 47.
Condensation de l’humidité
Une condensation de l’humidité peut se produire
:
• Lorsque le système de cinéma maison est
transporté d'un endroit froid à un endroit
chaud.
• Dans des conditions extrêmement humides.
Dans des endroits où une condensation de
l’humidité peut se produire :
• Garder le système de cinéma maison
branché dans une prise secteur CA et sous
tension. Ceci aidera à éviter la condensation.
• Si une condensation a eu lieu, attendre
quelques heures que le système de cinéma
maison sèche avant de l'utiliser.
70
www.insignia-products.com
Page 73

Système de cinéma maison Insignia NS-H3005
Caractéristiques
La conception et les spécifications sont sujettes
à modifications sans avis préalable.
Spécifications
générales
Alimentation 120 V CA, 60 Hz
Consommation
électrique
Dimensions (approx.) 16,9 x 3,5 x 13,8 pouce s
Poids (approx.) 17,6 lbs (8 kg)
Température de service 41 °F à 95 °F (5 °C à 35 °C)
Humidité en
fonctionnement
Standard NTSC
Entrées
ANTENNA IN (Entrée
antenne)
VHS VIDEO IN (Entrée
vidéo magnétoscope)
(LINE1, 2)
VHS AUDIO IN (Entrée
audio magnétoscope)
(LINE1, 2)
Sorties
MONITOR OUT (Sortie
moniteur)
Sortie vidéo à
composantes
Magnétoscope
Système de têtes de
lecture
Minuteur Type à 12 heures d’affichage , avec AM,
Vitesse de la cassette SP : 33,35 mm/s
Largeur de bande 12,7 mm
Durée d'enregistrement
maximale
Durée de rembobin age Environ 3 minutes (T-120)
Antenne 75 ohms (VHF/UHF)
Signal de sort ie VHF Canal 3 ou 4
Canaux accessibles VHF : 2-13
Gamme de fréquence 200 Hz à 8 kHz
Rapport signal sur bruit Plus de 65 dB (mode EE)
Dynamique du signal Plus de 70 dB (mode EE)
Séparation des canaux Plus de 45 dB (mode EE)
DVD
Système laser Semi-conducteur laser, longueur d’onde
50 W
(430 x 90 x 350 mm)
5 % à 90 %
Entrée antenne ou réseau câblé, 75
ohms
1 V c-c 75 ohms sync. négative, pr ise
RCA x 2
-6 dBm, plus de 47 ohm s, pris e RCA (L,
R) x 2
1 V c-c 75 ohms, sync négative
(Y) 1 V (c-c), 75 ohms sync négative,
prise RCA x 1 (Pb)/(Pr) 0,7 V (c-c) 75
ohms, prise RCA x 1
Système de balayage azimut al à quatre
têtes hélicoï dales
PM
LP : 16,67 mm/s
SLP : 11,12 mm/s
SP : 2 heures (T-120)
SLP : 6 heures (T-120)
SLP : 8 heures (T-160)
UHF : 14-69
Réseau câblé : 1-125 (4A, A-W, W+1 -
W+84, A-5 - A-1)
de 650 nm
Réponse en fréquence DVD (PCM 96 kHz) : 20 Hz à 44 kHz
DVD (PCM 48 kHz) : 20 Hz à 22 kHz
CD : 20 Hz à 18 kHz
Rapport signal sur bruit Plus de 70 dB
Distorsion harmonique Inférieure à 0,5 %
Dynamique du signal Plus de 65 dB (DVD/CD)
Syntoniseur
Système Synthétiseur numérique à quartz PLL
Gamme du syntoniseur 87,5 - 108 MHz (FM)
530 - 1720 kHz (AM)
Antenne Antenne filaire (FM)
Antenne cadre (AM)
Haut-parleurs satellites (LHS-36SCS)
Type Haut-parleurs à 1 voie
Impédance 4 ohms
Réponse en fréquenc e 140 -20 000 Hz
Niveau de pression
acoustique
Puissance d'e ntrée
nominale
Puissance d'e ntrée
maximale
Dimensions extér ie u r e s 3,6 x 4,5 x 3,1 pouces
Poids net 1,1 lb (0,5 kg)
85 dB/W (1 m)
45 W
90 W
(92 x 115 x 80 mm)
Caisson d'extrêmes graves passif (LHS-36S CW)
Type Haut-parleur à 1 voie
Impédance 8 ohms
Réponse en fréquenc e 60 -1 500 Hz
Niveau de pression
acoustique
Puissance d'e ntrée
nominale
Puissance d'e ntrée
maximale
Dimensions extérieures 6,3 x 13,8 x 11 pouces
Poids net 7 lb (3,2 kg)
87 dB/W (1 m)
75 W
150 W
(160 x 350 x 280 mm)
Accessoires
• Câble vidéo x 1
• Câble audio x 1
• Câble coaxial RF 75 ohms x 1
• Câble de haut-parleur x 5
• Câble d'antenne FM x 1
• Câble d'antenne AM x 1
• Télécommande x 1
•Piles (AAA) x 2
• Tore magnétique x 1
www.insignia-products.com
71
Page 74

Système de cinéma maison Insignia NS-H3005
Liste de codes
Liste des codes de langues
Utiliser cette liste pour saisir la langue lors du
paramétrage initial des options suivantes: audio,
sous-titres et menu du disque.
Langue Code Langue Code Langue Code
Abkhaze 6566 Hébreu 7387 Roumain 8279
Afar 6565 Hindi 7273 Russe 8285
Afrikaans 6570 Hongrois 7285 Samoan 8377
Albanais 8381 Islandais 7383 Sanskrit 8365
Amehar 6577 Indonésien 7378 Gaélique
écossais
Arabe 6582 Interlingua 7365 Serbe 8382
Arménien 7289 Irlandais 7165 Serbo-
croate
Assamais 6583 Italien 7384 Shona 8378
Azéri 6590 Japonais 7565 Sindhi 8368
Bachkir 6665 Javanais 7487 Cinghalais 8373
Basque 6985 Kannada 7578 Slovaque 8375
Bengali 6678 Cachemiri 7583 Slovène 8376
Bhoutanais 6890 Kazakh 7575 Somali 8379
Bihari 6672 Kirghiz 7589 Espagnol 6983
Breton 6682 Coréen 7579 Soudanais 8385
Bulgare 6671 Kurde 7585 Souahili 8387
Birman 7789 Laotien 7679 Suédois 8386
Biélorusse 6669 Latin 7665 Tagalog 8476
Khmer 7577 Letton 7686 Tadjik 8476
Catalan 6765 Lingala 7678 Tamoul 8465
Chinois 9072 Lituanien 7684 Tatar 8484
Corse 6779 Macédonien 7775 Teluga 8469
Croate 7282 Malgache 7771 Thaï 8472
Tchèque 6783 Malais 7783 Tibétain 6679
Danois 6865 Malayalam 7776 Tigréen 8373
Néerlandais 7876 Maltais 7784 Tonga 8479
Anglais 6978 Maori 7773 Turc 8482
Espéranto 6979 Marathe 7782 Turkmène 8475
Estonien 6984 Moldave 7779 Twi 8487
Féroïen 7079 Mongol 7778 Ukrainien 8575
Fidji 7074 Nauruan 7865 Ourdou 8582
Finlandais 7073 Népalais 7869 Ouzbek 8590
Français 7082 Norvégien 7879 Vietnamien 8673
Galicien 7176 Oriya 7982 Volapük 8679
Géorgien 7565 Pendjabi 8065 Gallois 6789
Allemand 6869 Afghan 8083 Wolof 8779
Grec 6976 Iranien 7065 Xhosa 8872
Groenlandais 7576 Polonais 8076 Yiddish 7473
Guarani 7178 Portugais 8084 Yorouba 8979
Goujrati 7185 Quetchua 8185 Zoulou 9085
Haoussa 7265 Rhéto- roman 8277
Code du pays
Sélectionner un code de pays dans la liste.
7168
8372
Pays Code Pays Code Pays Code
Australie AU Hongkong HK Philippines PH
Autriche AT Hongrie HU Pologne PL
Belgique BE Inde IN Portugal PT
Bhutan BT Indonésie ID Roumanie RO
Bolivie BO Israël IL Fédération russe RU
Brésil BR Italie IT Arabie saoudite SA
Cambodge KH Jamaïque JM Sénégal SN
Canada CA Japon JP Singapour SG
Chili CL Kenya KE République
Chine CN Koweït KW Slovénie SI
Colombie CO Libye LY Afrique du sud ZA
Congo CG Luxe mb ourg LU Corée du Sud KR
Costa Rica CR Malaisie M Y Espagne E S
Croatie HR Maldives MV Sri Lanka LK
République
tchèque
Danemark DK Monaco MC Suisse CH
Équateur EC Mongolie MN Taïwan TW
Égypte EG Maroc MA Thaïlande TH
Le Salvador SV Népal NP Turquie TR
Éthiopie ET Hollande NL Ouganda UG
Fidji FJ Antilles
Finlande FI Nouvelle-
France FR Nigeria NG Uruguay UY
Allemagne DE Norvège NO Ouzbékistan UZ
Grande-
Bretagne
Grèce GR Pakistan PK Zimbabwe ZW
CZ Mexique MX Suède SE
néerlandaises
Zélande
GB Oman OM Vietnam VN
slovaque
AN Ukraine UA
NZ États-Unis US
SK
Pays Code Pays Code Pays Code
Afghanistan AF Groenland GL Panama PA
Argentine AR Islande HM Paraguay PY
72
www.insignia-products.com
Page 75

Système de cinéma maison Insignia NS-H3005
FCC
Avertissement
Cet appareil peut générer ou utiliser de l'énergie
radiofréquence. Les changements ou modifications apportés à
cet appareil peuvent donner lieu à des interférences nuisibles,
à moins que les modifications ne soient expressément
approuvées dans ce manuel. L'utilisateur pourrait perdre le
droit de faire fonctionner cet appareil s'il a subi un changement
ou une modification non autorisée.
Information réglementaire : FCC article 15
Cet équipement a été testé et déclaré conforme aux limitations
prévues dans le cadre de la catégorie B des appareils
numériques, définie par l’article 15 du règlement de la FCC.
Ces limites ont été établies pour fournir une protection
raisonnable contre les interférences nuisibles quand ce
système de cinéma maison fonctionne dans une installation
résidentielle. Cet équipement génère, utilise et diffuse des
ondes radio et s’il n’est pas installé ni utilisé en conformité
avec les instructions dont il fait l’objet, il peut provoquer des
interférences indésirables avec les communications radio.
Cependant, il n’est pas possible de garantir qu’aucune
interférence ne se produira dans une installation particulière.
Si cet équipement cause des interférences gênant la réception
d'ondes radio ou télévisées (déterminé en éteignant et en
rallumant l’équipement), il est recommandé que l’utilisateur
tente de corriger le problème en appliquant au moins l'une des
mesures suivantes :
• Réorienter ou déplacer l’antenne réceptrice.
• Augmenter la distance entre le système de cinéma maison
et le récepteur.
• Brancher l’équipement sur la prise électr ique d’un circuit
différent de celui auquel le récepteur est relié.
• Contacter le revendeur ou un technicien radio/télévision
qualifié.
Garantie limitée
Insignia Products garantit au premier acheteur
de ce Produit qu’il sera exempt de vice de
matériaux ou de fabrication pour une période de
trois cent soixante-cinq jours (365) à compter de
la date d’achat, comme suit :
1 MAIN-D’ŒUVRE : Pendant la période de
garantie, si ce produit est considéré comme
étant défectueux, Insignia le réparera ou le
remplacera, à sa discrétion, gratuitement, ou
paiera les frais de main-d’œuvre à tout
service de réparation agréé par Insignia.
Au-delà de la période de garantie, l’utilisateur
sera redevable de tous les frais afférents à la
main-d’œuvre.
2 PIÈCES DÉTACHÉES : En outre, Insignia
fournira gratuitement les pièces détachées
neuves ou remises à neuf, en échange des
pièces défectueuses pendant la durée de la
garantie. À l’expiration de la période de
garantie le coût de toute pièce détachée sera
à la charge de l’utilisateur.
Pour obtenir le service de la garantie, le produit
devra être présenté accompagné du reçu
original ou de toute autre preuve d’achat, soit
dans son emballage original, soit dans un
emballage procurant des conditions identiques
de protection, au détaillant le plus proche du
magasin ou du site Web où le produit a été
acheté.
Cette garantie ne couvre pas les dommages
esthétiques, ou ceux résultants de catastrophes
naturelles, de la foudre, d’un accident, d’une
mauvaise utilisation, de manipulations abusives,
de négligence, d’une utilisation commerciale ou
d’une modification de tout ou partie du produit, y
compris l’antenne. Cette garantie ne couvre
aucun dommage ayant pour origine une
utilisation ou une maintenance défectueuses, la
connexion à une source électrique dont la
tension est inadéquate ou encore toute
réparation réalisée par quiconque autre qu’un
service de réparation agréé par Insignia. Cette
garantie ne couvre pas les produits vendus « EN
L’ÉTAT » ou « HORS SERVICE », ou les
consommables (tels que les fusibles ou les
piles). Cette garantie n’est applicable qu’aux
États-Unis et au Canada.
La garantie perd sa validité si le numéro de série
usine a été altéré ou enlevé du produit.
LA RÉPARATION OU LE REMPLACEMENT,
TELS QU’OFFERTS PAR LA PRÉSENTE
GARANTIE, CONSTITUENT LE SEUL
RECOURS DU CONSOMMATEUR. INSIGNIA
NE POURRA PAS ÊTRE TENU POUR
RESPONSABLE DE DOMMAGES
ACCESSOIRES OU CONSÉCUTIFS, OU DE
L’INEXÉCUTION D'UNE GARANTIE
EXPRESSE OU IMPLICITE SUR CE PRODUIT.
SAUF DISPOSITIONS CONTRAIRES AUX
LOIS ET RÈGLEMENTS APPLICABLES,
TOUTE GARANTIE IMPLICITE, DÉCLARA TION
OU CONDITION DE QUALITÉ MARCHANDE
OU D’ADAPTATION À UN USAGE
PARTICULIER RELATIVE À CE PRODUIT EST
LIMITÉE À LA PÉRIODE DE GARANTIE
APPLICABLE TELLE QUE DÉCRITE
CI-DESSUS.
Certains états ou provinces ne permettent ni
l'exclusion ni la limitation des dommages
accessoires ou consécutifs, ni les limitations
implicites de durée d'une garantie, de sorte que
les limitations ou exclusions énoncées ci-dessus
peuvent être nulles dans le cas du premier
acheteur. La présente garantie donne au
premier acheteur des garanties juridiques
spécifiques ; il peut aussi bénéficier d'autres
garanties qui varient d'un état ou d'une province
à l'autre.
Pour le service à la clientèle, appeler le
1-877-467-4289
www.insignia-products.com
Insignia Products, Richfield, Minnesota, U.S.A.
Droits d’auteurs
© 2006 Insignia. Insignia et le logo Insignia sont des
marques de commerce de Best Buy Enterpri se Services,
Inc. Les autres noms de marques et de produits mentionnés
sont des marques de commerce ou des marque s déposées
de leurs propriétaires respectifs. Les spécifications et
caractéristiques sont susceptibles d’être modifiées sans
préavis.
www.insignia-products.com
73
Page 76

Sistema de Teatro en Casa Insignia NS-H3005
Sistema de T eatr o en
Casa Insignia
NS-H3005
Contenido
Introducción . . . . . . . . . . . . . . . . . . . . . . . . . . . . .74
Información de seguridad . . . . . . . . . . . . . . . . . .74
Características. . . . . . . . . . . . . . . . . . . . . . . . . . .76
Uso de discos . . . . . . . . . . . . . . . . . . . . . . . . . . .79
Conexión de su sistema de teatro en casa . . . . .81
Preparación del VCR . . . . . . . . . . . . . . . . . . . . . .85
Preparación del reproductor de DVD. . . . . . . . . .89
Uso de su sistema de teatro en casa. . . . . . . . . .93
Preparación del VCR . . . . . . . . . . . . . . . . . . . . . .85
Uso del reproductor de DVD . . . . . . . . . . . . . . .101
Uso de la radio. . . . . . . . . . . . . . . . . . . . . . . . . .107
Mantenimiento . . . . . . . . . . . . . . . . . . . . . . . . . .108
Solución de Problemas . . . . . . . . . . . . . . . . . . .109
Especificaciones . . . . . . . . . . . . . . . . . . . . . . . .110
Accesorios . . . . . . . . . . . . . . . . . . . . . . . . . . . . .111
Lista de Códigos . . . . . . . . . . . . . . . . . . . . . . . .111
Garantía Limitada . . . . . . . . . . . . . . . . . . . . . . .112
Derechos de reproducción. . . . . . . . . . . . . . . . .112
Fabricado bajo licencia de Dolby Laboratories. "Dolby", “Pro
Logic” y el símbolo de la doble D son marcas comerciales de
Dolby Laboratories. Obras confidenciales sin publicación.
Copyright 1992- 1997 Dolby Laboratories. Todos los
derechos reservados.
Fabricado bajo licencia de Digital Theater Systems, Inc.
Patentes Estadounidenses No. 5,451,942 5,956,674,
5,974,380, 5,978,762 y otras patentes globales otorgadas y
pendientes. “DTS” y “DTS Digital Surround” son marcas
comerciales de Digital Theater Systems, Inc. Copyright
1996, 2003 Digital Theater Systems, Inc. Todos los derechos
reservados.
Introducción
Felicitaciones por su compra de un producto de
alta calidad de Insignia. Su NS-H3005
representa el más moderno diseño de sistema
de teatro en casa, y está concebido para brindar
un rendimiento confiable y sin problemas.
Información de seguridad
Advertencia de choque eléctrico
CUIDADO
Riesgo de Choque
Eléctrico
No abra la unidad
Advertencia
Para reducir el riesgo de choque eléctrico, no retire la cubierta
o parte posterior. No existen partes reparables por el usuario
en el interior. Para realizar reparaciones acuda al personal de
servicio calificado.
Este símbolo de relámpago que termina en punta
de flecha y se encuentra dentro de un triángulo
equilátero tiene por finalidad alertar al usuario de
la presencia de voltaje peligroso sin aislamiento en
el interior del sistema de teatro en casa que podría
choque eléctrico para las personas.
Advertencia
Para reducir el riesgo de incendio o choque eléctrico, no
exponga este sistema de sistema de teatro en casa a la lluvia
o humedad.
Cuidado
El sistema de teatro en casa no debe se expuesto al agua
(goteo o salpicaduras) y ningún objeto lleno de líquidos, tal
como vasijas, deberá colocarse sobre el sistema de teatro en
casa.
Ventilación
Cuidado
No bloquee ninguna abertura de ventilación. Instale la unidad
de acuerdo a estas instrucciones.
Ranuras y aberturas en el gabinete se proveen para
ventilación y para asegurar la operación confiable del sistema
de teatro en casa y para protegerlo contra el
sobrecalentamiento.
Las aberturas no deberán bloquearse nunca al colocar el
sistema de teatro en casa sobre una cama, sofá, alfombra u
otra superficie similar. Este sistema de teatro en casa no debe
colocarse en una instalación integrada, tal como un librero o
estantería a menos que se proporcione ventilación apropiada
o se hayan seguido estas instrucciones.
tener potencia suficiente para constituir riesgo de
El signo de admiración que se encuentra dentro de
un triángulo equilátero tiene por finalidad alertar al
usuario de la presencia de importantes
instrucciones de operación y mantenimiento
(servicio) en la literatura que incluida con el
sistema de teatro en casa.
74
Advertencia sobre el láser
Advertencia
Este sistema de teatro en casa
utiliza un sistema láser.
Para asegurar el uso adecuado
de este sistema de teatro en
casa, lea cuidadosamente esta
guía del usuario, y consérvela
para referencia futura. Si su
sistema de teatro en casa
requiere mantenimiento, comuníquese con un centro de
servicio autorizado.
Cambiar controles, hacer ajustes o llevar acabo
procedimientos que no estén especificados en este manual
pueden resultar en una exposición peligrosa a la radiación.
Para impedir la exposición directa al rayo láser, no trate de
abrir la caja del equipo. Cuando se encuentra abierta, existe
radiación láser visible. No vea fijamente el haz de luz.
Advertencia
Radiación láser visible e invisible se encuentra presente
cuando su sistema de teatro en casa está abierto y cuando se
han vencido los seguros.
www.insignia-products.com
Page 77

Sistema de Teatro en Casa Insignia NS-H3005
Cable de alimentación
Cuidado
Recomendamos que la mayoría de los electrodomésticos se
coloquen en un circuito dedicado — un circuito con un
tomacorriente individual que alimenta solo ese
electrodoméstico y no tiene otro tomacorriente o ramas de
circuito. Revise la sección “Especificaciones” página 110 para
los requisitos de alimentación.
No sobrecargue los tomacorrientes de pared. Los
tomacorrientes sobrecargados, los cables de extensión flojos
o dañados, los cables de alimentación pelados o aislamientos
de cables que se hayan dañado o rajado son peligrosos.
Cualquiera de estas condiciones puede resultar en un choque
eléctrico o un incendio.
Examine periódicamente el cable de su sistema de teatro en
casa, y si su apariencia indica daño o deterioración,
desconéctelo, descontinúe el uso de su sistema teatro en
casa, y reemplace el cable con un reemplazo exacto
proporcionado por un proveedor de servicio autorizado.
Proteja el cable de alimentación contra el abuso físico o
mecánico, tal como que se retuerza, doble, apriete, cierre con
una puerta o que se camine sobre él. Preste atención en
particular a los enchufes, tomacorrientes de pared, y el lugar
donde el cable sale del sistema de teatro en casa.
Para desconectar la alimentación del tomacorriente, jale el
enchufe. Cuando instale su sistema de teatro en casa,
verifique que el enchufe se puede acceder fácilmente.
Instrucciones importantes de seguridad
Cuidado
Lea y observe todas las advertencias e instrucciones en este
manual y esas marcadas en su sistema de teatro en casa.
Guarde este manual para una referencia futura.
Este sistema de teatro en casa ha sido diseñado y fabricado
para garantizar la seguridad personal. El uso indebido del
mismo puede ocasionar un choque eléctrico o riesgo de
incendio. Los mecanismos de protección incorporados en este
sistema de teatro en casa le protegerán si observa los
siguientes procedimientos de instalación, uso y
mantenimiento. Este sistema de teatro en casa no contiene
piezas que puedan ser reparadas por el usuario.
No retire la cubierta del gabinete ya que se podrá exponer a
voltajes peligrosos. Para realizar reparaciones acuda
exclusivamente al personal de servicio calificado.
• Lea todas las instrucciones de seguridad y
operación antes de operar el sistema de
teatro en casa.
• Guarde las instrucciones de seguridad,
operación y uso para referencia futura.
• Cumpla con todas las advertencias indicadas
en el sistema de teatro en casa y en las
instrucciones de operación.
• Siga todas las instrucciones de operación y
uso.
• No utilice este sistema de teatro en casa
cerca del agua. Por ejemplo, no use este
sistema de teatro en casa cerca de una
bañera, lavabo, fregadero de coci na, o
lavadero; en un sótano mojado o cerca de
una piscina, o en otras áreas cerca del agua.
• Limpie únicamente con un paño seco.
Desconecte este sistema de teatro en casa
del tomacorriente de pared antes de
limpiarlo. No utilice limpiadores líquidos.
• No bloquee ninguna abertura de ventilación.
Instale la unidad de acuerdo a estas
instrucciones. Ranuras y aberturas en el
gabinete se proveen para ventilación y para
asegurar la operación confiable del sistema
de teatro en casa y para protegerlo contra el
sobrecalentamiento. Las aber tu ras nunca se
deben bloquear si se coloca el sistema de
teatro en casa sobre una cama, un sofá, una
alfombra u otra superficie similar. No coloque
el televisor en una instalación integrada, tal
como un librero o estantería a menos que se
proporcione ventilación apropiada o se hayan
seguido las instrucciones del fabricante.
• No instale la unidad cerca de fuentes de
calor tales como radiadores, estufas u otros
aparatos (incluyendo amplificadores) que
produzcan calor.
• No anule el propósito de seguridad del
enchufe con polarización o con conexión a
tierra. Un enchufe polarizado tiene dos
espigas una más ancha que la otra. Un
enchufe del tipo de conexión a tierra tiene
dos espigas y una tercera clavija de tierra. La
espiga ancha o tercera clavija se
proporcionan para su seguridad. Si el
enchufe proporcionado no entra en el
tomacorriente, consulte con un electricista
para reemplazar el tomacorr i ent e obso leto.
• Evite caminar sobre el cable de alimentación
o que éste sea aplastado especialmente en
los enchufes, los receptáculos y el punto
donde éste sale del sistema de teatro en
casa.
• Use sólo aditamentos y accesorios
especificados por Insi gnia.
• Use solamente con
carros, bases, trípodes,
soportes, o mesas
especificadas por
Insignia o que se vendan
con el sistema de teatro
en casa. Cuando se usa
un carro, se debe tener
precaución cuando
mueve la combinación del carro/sistema de
teatro en casa para evitar lesionarse si el
sistema se da vuelta.
• Desconecte este sistema de teatro en casa
durante tormentas de rayos o cuando no se
utilice por un periodo de tiempo extendido.
• Remita todas las reparaciones al personal de
servicio calificado. La reparación se requiere
cuando el sistema de teatro en casa ha sido
dañado de cualquier manera, como cuando
se ha dañado el cable de corriente o el
enchufe, o se ha derramado líquido u objetos
han caído dentro del sistema de teatro en
casa, o si éste ha sido expuesto a la lluvia o
humedad, cuando éste no funcione
normalmente, o cuando se ha dejado caer.
www.insignia-products.com
75
Page 78

Sistema de Teatro en Casa Insignia NS-H3005
Características
Panel frontal
Componente Descripción
1 Bandeja de discos (DVD) Inserte un disco aquí.
2 Sensor del control remoto y
ventana de visualiz ación
3 Abrir/Cerrar Abre o cierra la bandeja de
4 Compartimiento de la cinta
(VCR)
5 REC/ITR Presione para grabar o para
6 SALTAR/ESCANEAR en
reversa /
7
Reproducir
8 SALTAR/ESCANEAR hacia
adelante /
Apunte el control remoto aquí.
Para más información sobre la
ventana de visualización,
refiérase a “Ventana de
visualización” página 77.
discos.
Inserte una cinta de vídeo
aquí.
activar la Grabación
Instantánea por Temporizador
(ITR).
DVD: Presione para ir al
principio del ca p í tu lo o pista
actual o para ir al capítulo o
pista anterior.
Presione y sostenga por dos
segundos para buscar
rápidamente hacia atrás.
VCR: Presione para
retroceder la cinta mientras se
encuentra en el modo
detenido o para buscar
rápidamente hacia atrás en la
película.
Presione para reproducir una
cinta grabada o un disco.
DVD: Presione para ir al
principio del siguiente c apítulo
o pista.
Presione y sostenga por dos
segundos para buscar
rápidamente hacia adelante.
VCR: Presione para avanzar la
cinta mientras se encuentra en
el modo detenido o para
buscar rápidamente hacia
adelante en la pelí cula.
10
11
12
13
14
15
16
17
18
Componente Descripción
9 Detener Presione para detener la
1
2
3
4
5
6
7
8
9
10
Pausar/Paso
11 Expulsar P resione para expulsar la cinta
12 Control del volumen Gire la perilla en el sentido de
13 DVD/VCR (selección de
salida)
14 CANAL/PREDEFINIDO +/- Presione para bus c ar hac ia
15 FM/AM Presione para alternar entre
16 Selección de entrada Seleccione la fuente de
17 Entrada de Vídeo/Entrada de
Audio (Izquier do/Derecho)
para la Línea 2
18 Standby/Encendido Presione para encender o
/
reproducción de una cinta o
un disco.
Presione para pausar
temporalmente la
reproducción de una cinta o
disco.
Presione repetidamente para
reproducción cuadro por
cuadro.
del VCR.
las agujas del reloj para
aumentar el volumen. Gire la
perilla en el se n tido contrario
a las agujas del reloj para
reducir el volumen.
Presione par a sel e cc ionar
entre DVD o VCR como su
fuente de salida para ver en el
televisor.
arriba o abajo en las
estacione s de radio o
televisión en la memoria o
para controlar el “tracking”
durante la reproducción de
una cinta de vídeo.
las bandas de FM y AM.
entrada para el VCR (Tuner
(Sintonizador), Line1 (Línea
1), o Line2 (Línea 2)
Conecte la salida de audio y
vídeo de una fuente externa tal
como un sistema de audio, un
televisor, un monitor o un
VCR.
apagar su sistema de teatro en
casa.
76
www.insignia-products.com
Page 79

Sistema de Teatro en Casa Insignia NS-H3005
1
V entana de visua liza ción
dts
DIGITAL
PROLOGIC
DVD SAP
RADIO
PCM WMA
PHOTO
P/SCAN
ST
RPT ALL
MP3 TV
A B
Descripción
1 Muest ra la pista de audio actual.
2 Se ilumina cuando se reproduce un disco con archivos
WMA.
3 Se ilumina cuando se escucha la radio.
4 Muest ra el modo de sonido envolvente actual.
5 Se ilumina cuando se está recibiendo una transmisión
bilingüe con SAP.
6 Se ilumina cuando la reproducción programada está
activa.
7 Se ilumina cuando se ha cargado un disco en el
reproductor de DVD. Parpadea cuando la bandeja de
discos se encuentra abierta.
8 Se ilumina cuando el VCR se encuentra en el modo de
Grabación de VCR por Temporizador o cuando se ha
programado una grabación de VCR con temporizador.
9 Se il umina cuando se está realiz ando una copia de DVD
a VCR.
10 Se ilumina cuando el VCR está grabando un a cinta.
11 Se ilumina cuando la grab ador a e stá r ep rod ucien do una
cinta que fue grabada en Hi-Fi (Alta Fidelidad).
12 Se ilumina cuando el volumen se ha silen c iado.
13 Se ilumina cuando se ha cargado una cinta en el VCR .
14 Muestra el tiempo total de reproducción, el tiempo de
reproducción tr anscurrido, la frecuencia, el ti empo
restante, el estado actual del reproductor, el modo de
sonido envolvente, y el volumen.
15 Muestra el número del capítulo actual, el número de
pista o el número del canal.
16 Se ilumina cuando el sistema de teatro en casa se
encuentra en el modo de TV.
17 Se ilumina para i ndicar que un disco con MP3 o WMA
se ha insertado.
18 Muestra el modo de reproducción repetida.
19 Se ilumina para indicar que un DVD se ha cargado en el
sistema de teatro en casa.
II
PROG
TITLE
CHPTRK
Hi-Fi
Descripción
20 Se ilumina cuand o se está recibiendo una transmisión
2
3
4
5
6
7
Panel posterior
8
9
10
11
12
estéreo.
21 Se ilumina para indicar que un disco con archivos JPEG
se ha cargado en el sistema de teatro en casa.
22 Se ilumina para indicar que el sistema de teatro en casa
se encuentra en el modo de barrido progresivo.
1
2
3
4
MUTE REC COPY
13
14
5
6
15
16
17
18
19
20
21
7
8
9
Componente Descripción
1Cable de
alimentación CA
2 Línea 1 de Entrada
de VCR (Entrada de
Vídeo /Entrada de
Audio
(izquierdo/derecho))
3 Salida de DVD/VCR
Salida de
Vídeo/Salida de
Audio
(izquierdo/derecho))
4 Salida de
Componentes/Barrid
o Progresivo (Y, Pb,
Pr) (Salida de DVD)
5 Entrada de la antena
de televisión
6 Antena de FM Conecte la an tena de FM a este
7 Antena de AM Conecte la antena de AM a este
8 Conexiones de los
altavoces
9 Salida coaxial Conecte a un televisor que tiene
Cuidado
No toque los terminales internos de los conectores en la parte
posterior del panel. La descarga electrostática puede causar
daño permanente a su sistema de teatro en casa.
Enchufe en un t omacorriente
eléctrico.
Conecte la salida de au di o/video de
una fuente externa, t al como un
sistema de audio, televisor, monitor,
VCR a estos conectores.
Conecte un televisor que cuenta con
entradas de audio y ví deo.
Conecte a un televisor que tie ne
entradas de componentes (Y, Pb, Pr).
Conecte la antena VHF/UHF o el cable
de CATV a esta terminal.
conector.
conector.
Conecte los seis altavoces a estos
conectores.
entradas coaxiales.
www.insignia-products.com
77
Page 80

Sistema de Teatro en Casa Insignia NS-H3005
Control remoto
1
2
3
4
5
6
7
8
9
10
11
12
Componente Descripción
1 Encen dido P r esione para encender o apagar su
2 Selección de
CD/DVD/VCR
3 Teclado
numérico 0-9
4 Programa Presione para abrir o cerrar el menú de
5 Transparente Para eliminar un número de pista en el
sistema de teatro en casa.
Presione para seleccionar la punta de
fuerza (CD/DVD o VCR) para ver en la
televisor.
Presione para ingresar números tal
como en un menú.
programa.
menú del programa o una marca en el
menú de marcador.
Presione para eliminar emisoras
predefinidas en la memoria del
sintonizador.
13
14
15
16
17
18
19
20
21
22
23
24
25
Componente Descripción
6 Visualización/
Reloj/Contador
7
Izquierdo /
Derecho /
Arriba /
Abajo
8 Retorno Presione para regresar del menú de
9 REC/ITR Presione para grabar una cinta o activar
Hacia Atrás
Hacia
adelante
10 Detener Presione para detener la reproducción.
Pausar/Paso
Reproducir
11 Ángulo Presione para seleccionar el ángulo de
12 Saltar CM Presione para saltar hacia adela nte
13 Expulsar/Abrir/
Cerrar
14 Selección de
Sintonizador
FM/AM
15 Entrada P resione para seleccionar la fu ente del
16 Audio Presione para seleccionar un idioma de
17 Modo de Sonido Presione para seleccionar el modo de
18 Configuración/
Menú
Presione para ver la visual ización en
pantalla.
Presione para alternar entre el rel oj ,
contador de cinta y el mo do de tiempo
restante en la pantalla.
Presione para navegar a través del menú
de pantalla. También utilicelo para
cambiar los canales en el VCR o las
emisoras en el radio.
configuración.
la grabación instan tánea con
temporizador.
En el modo de DVD: Presione y
sostenga para buscar hacia atrás,
presione para ir al pr incipio del capítulo
o pista actual, o presione para ir al
capítulo o pista anterior.
En el modo de VCR: Presione para
retroceder la cinta si el VCR se encuentra
en el modo detenido o presione para
realizar una búsqueda rápida en reversa
con imagen.
En el modo de DVD: Presione y
sostenga para buscar hacia adelante o
presione pa ra i r a l princ ip io d el si guie nte
capítulo o pista.
En el modo de VCR: Presione para
avanzar la cinta si el VCR se encuentra
en el modo detenido o presione para
realizar una búsqueda rápi da hacia
adelante con imagen.
Presione para pausar temporalmente la
reproducción o grabación.
Presione repetidament e para una
reproducción cuadro a cuadr o .
Presione para empezar a reproducir.
cámara del DVD, si uno está disponible
en el DVD.
30 segundos de material grabado.
Presione para abrir y cerrar la bandeja de
discos o para expulsar una cinta que se
encuentre dentro del VCR.
Alterne entre la banda FM o AM del
radio.
VCR [T un er (Sin toniza dor), L ine 1 (Lín ea
1), o Line 2 (Línea 2)]
audio (DVD) o un canal de audio (CD).
sonido.
Presione para acceder o dejar el menú
de configuración del DVD y el menú del
VCR.
78
www.insignia-products.com
Page 81

Sistema de Teatro en Casa Insignia NS-H3005
Componente Descripción
19 Memoria/
Ingresar
20 Menú de Disco Presione para acceder el menú en el
21 Volumen (+/-) Presione para ajustar el volumen del
22 Marcador Presione para marcar cualquier punto
Búsqueda Presione para mo strar el menú de
Subtítulos Presione para seleccionar el idioma de
Silenciar Presione para activar o desactivar el
23 Repetir/A-B/
Velocidad
Repetir Presione para repetir un capítulo, pista,
TV/VCR Presione para alternar entre ver canales
24 Aumento Presione para agrandar la imagen del
25 Título Presione para acceder el menú de títulos
Nota
Este control remoto utiliza los mismos botones tanto para el
VCR como para el reproductor de DVD . P ara controlar el VCR,
presione el botón VCR. Para controlar el DVD, presione el
botón DVD.
Presione para seleccionar un elemento
del menú.
Presione para mostrar funciones en la
pantalla del televisor.
Presione para guardar la frecuencia de la
emisora de radio en la memoria del
sintonizador.
disco DVD.
altavoz.
durante la reproducción.
búsqueda por marcador.
los subtítulos.
sonido.
Presione para repetir una sección
marcada.
Presione para seleccionar una velocidad
de grabación.
título o todo.
seleccionados por el sintonizador del
VCR o por el sintonizador de l televisor.
video DVD.
del DVD.
Instalación de las pilas en el control remoto
Para instalar las pilas en el control remoto:
1 Retire la cubierta de las pilas en la parte
posterior del control remoto.
2 Inserte dos pilas AAA (R03) con las
polaridades + y – alineadas correctamente.
3 Vuelva a colocar la cubierta de las pilas.
Cuidado
• No se deben combinar pilas viejas y nuevas.
• Nunca combine pilas de diferentes tipos (tal como estándar
y alcalinas).
Uso de discos
Discos Compatibles
Este reproductor de DVD puede reproducir los
siguientes discos:
Disco Descripción
DVD Disco de DVD ví de o ( 8 ó 12cm)
CD Disco de CD Audio (8 ó 12 cm)
DVD-RW DVD que contienen archivos MP3, WMA,
DVD+RW DVD que contienen archivos MP3, WMA,
CD-R CD que cont ienen archivos MP3, WMA,
CD-RW CD que contienen archivos MP3 , WMA,
Nota
• Dependiendo de las condiciones del equipo de grabación o
del disco CD-R/RW (o DVD-RW , D VD+RW), algunos discos
no podrán ser reproducidos en el reproductor.
• No pegue ningún sello o etiqueta en ninguno de los lados
(el de la etiqueta o el lado grabado) de un disco.
• No utilice CD con formas irregulares (como con forma de
corazón u octagonal). Su uso puede ser causa de mal
funcionamiento.
Conceptos básicos de DVD
Algunas operaciones de reproducción de DVD
pueden ser programadas por el fabricante del
DVD. Este reproductor reproduce DVD de
acuerdo al contenido del disco diseñado por el
fabricante del DVD. Puede ser que algunas
características de reproducción del reproductor
no estén disponibles o se pueden agregar otras
funciones.
Verifique que se refiera a las instrucciones
proporcionadas con los DVD. Puede ser que no
se puedan reproducir algunos DVD creados
para propósitos de negocios en el reproductor.
Códigos regionales
1
regional en las etiquetas de algunos DVD indica
que tipo de reproductor puede reproducir esos
discos. Este reproductor solo puede reproducir
DVD marcados con 1 o ALL (Todas las
regiones). Si intenta reproducir cualquier otro
disco, el mensaje Check Regional Code
(Verifique el Código Regional) aparecerá en la
pantalla del televisor. Puede ser que algunos
DVD que no tienen una etiqueta de código
regional se sometan a las restricciones de área
y por lo tanto no se reproducirán.
Glosario de Discos
Título (Sólo para discos de DVD video)
Un título es el contenido principal de una
película o el contenido que lo acompaña, o un
álbum de música. Cada título tiene asignado un
número de referencia de título para facilitar su
ubicación.
o JPEG
o JPEG
o JPEG
o JPEG
Este reproductor de DVD está
diseñado y fabricado para la
reproducción de software de DVD
codificado para la Región 1. El código
www.insignia-products.com
79
Page 82

Sistema de Teatro en Casa Insignia NS-H3005
Capítulo (Sólo para discos de DVD video)
Capítulos son secciones de un vídeo o pieza
musical que son más pequeños que los títulos.
Un título esta compuesto por uno o más
capítulos. Cada capítulo tiene asignado un
número de capítulo para facilitar que encuentre
el capítulo que desea. Algunos discos no tienen
capítulos.
Pista (sólo para CD de Audio)
Las pistas son secciones de una pieza musical
en un CD de audio. Cada pista tiene asignado
un número de pista para facilitar que encuentre
la pista que desea.
Glosario de Audio
DTS
Le permite disfr ut ar de 5.1 (o seis ) ca nales
discretos de audio digital de alta calidad
proveniente de fuentes de programas DTS tal
como DVD y CD que presenten la marca
comercial. El DTS Digital Surround provee hasta
seis canales de audio transparente y resulta en
una claridad excepcional en un campo de
sonido verdadero de 360 grados. El termino
DTS es una marca comercial de DTS
Technology, LLC. Este reproductor ha sido
fabricado bajo licencia de DTS Technology, LLC.
Dolby Digital
El formato envolvente Dolby Digital le permite
disfrutar de hasta 5.1 canales de sonido
envolvente digital de una fuente de
programación Dolby Digital. Si reproduce DVD
con la marca , puede disfrutar de sonido de
mejor calidad, más exactitud espacial y un rango
dinámico mejorado.
Pro Logic
Utilice este modo cuando reproduzca una
película o Dolby Digital de 2 canales que lleve la
marca . Este modo le provee el efecto de
estar en un cine o en un salón de concierto en
vivo — un efecto con una intensidad que solo se
puede obtener por medio de Dolby Pro Logic
Surround. El efecto del movimiento de la imagen
de sonido del frente, detrás, izquierda y
derecha, así como el sentido de posición fija en
la imagen de sonido, es mucho más claro y más
dinámic que antes.
Pro Logic (II)
Dolby Pro Logic II crea cinco canales con salida
con total amplitud de banda a partir de fuentes
de dos canales. Esto se hace usando un
decodificador de sonido envolvente de matriz de
alta pureza avanzado que extrae las
propiedades espaciales de la grabación original
sin añadir ningún sonido nuevo ni coloraciones
tonales.
Modo de película
El modo de película se usa con programas de
televisión en estéreo y todos los programas
codificados en Dolby Surround. El resultado es
una mejor direccionalidad del campo de sonido
que se aproxima a la calidad del sonido discreto
de 5.1 canales.
Modo de música
El modo de música se usa con cualquier
grabación de música estéreo.
( )
Modo de matriz
El modo de matriz es igual que el modo de
música excepto que la lógica de mejoramiento
direccional está desactivado. Puede utilizarse
para mejorar señales mono haciéndolas parecer
más grandes
.
ENV OLVENTE 3D
Este reproductor puede reproducir un efecto
envolvente 3D, usando tecnología de sonido
envolvente 3D, la cual simula la reproducción de
audio multicanal usando dos altavoces estéreo
en vez los cinco o más altavoces que se
requieren usualmente para escuchar audio
multicanal con un sistema de teatro en casa.
Esta característica funciona con DVD
codificados con pistas de audio Dolby Pro Logic
y Dolby Digital.
BYPASS
Software con señales de audio envolvente
multicanal se reproduce de acuerdo a la forma
en que fue grabado.
Modo de sonido
Puede disfrutar de sonido envolvente si
selecciona uno de los campos de sonido
preprogramados de acuerdo al programa que
desea escuchar.
Reproducción de DVD
Puede cambiar el modo de salida de audio
digital presionando el botón AUDIO en el control
remoto durante la reproducción. Aunque el
contenido de los D VD cambia de disco a disco,
lo siguiente explica la operación básica cuando
se usa esta función.
• Después que selecciona dos canales por
medio de presionar el botón AUDIO,
presione repetidamente el botón SOUND
MODE (Modo de Sonido). Las opciones de
modo de sonido son las siguientes:
•Bypass
• PRO Logic
• Movie (Película)
• Music (Música)
• Matrix (Matriz)
• 3D Surround (Envolvente 3D)
• Después que selecciona 5.1 canales por
medio de presionar el botón AUDIO,
presione el botón SOUND MODE (Modo de
Sonido). BYPASS es la única opción.
Reproducción de CD
Cada vez que presiona el botón SOUND
(Sonido), el modo de sonido de CD de audio se
cambia en el siguiente orden:
•Bypass
• PRO Logic
• Music (Música)
• Matrix (Matriz)
• 3D Surround (Envolvente 3D)
80
www.insignia-products.com
Page 83

Sistema de Teatro en Casa Insignia NS-H3005
Nota
• El reproductor memoriza el ajuste del último modo para
cada fuente individualmente.
• Puede identificar el formato de codificación del software de
programa si revisa el empaque.
Los discos Dolby Digital están etiquetados con el logo .
Los programas codificados en Dolby Surround están
etiquetados con el logo .
Los discos con DTS Digital Surround están marcados con
DTS.
• Cuando reproduce pistas de sonido con una frecuencia de
muestreo de 96 kHz, las señales de salida se convierten a
una frecuencia de muestreo de 48 kHz.
Conexión de su sistema de
teatro en casa
Nota
• Dependiendo de su televisor y otro equipo que desea
conectar, hay varias formas de conectar su sistema de
teatro en casa. Utilice las conexiones descritas en
página 81 hasta página 83.
• Refiérase al manual de su televisor, VCR y equipo de
sonido para hacer las mejores conexiones.
• Verifique que el sistema de teatro en casa está conectado
directamente al televisor. Sintonice el televisor al canal de
entrada de vídeo correcto.
• No conecte su sistema de teatro en casa a través de otro
VCR. La imagen de DVD se puede distorsionar por el
sistema de protección contra copias.
Conexión de una antena o TV por cable al
sistema de teatro en casa
Para conectar la antena o TV por cable a su
sistema de teatro en casa:
1 Desconecte el cable de la antena o TV por
cable de la parte posterior de su televisor.
2 Identifi que el tipo de cabl e de su an tena o TV
por cable. Si es un cable redondo como se
ilustra, es un cable de antena coaxial de 75
ohmios. Este cable se conecta directamente
al conector marcado ANTENNA/CABLE IN
(Entrada de Antena/Cable) en su sistema de
teatro en casa.
Nota
Si su cable de antena es del tipo plano, conéctelo a un
adaptador de antena (de 300 a 75 ohmios) (no suministrado) y
conecte el adaptador en el conector ANTENNA/CABLE IN. El
adaptador no se atornilla en el conector, sólo se conecte sobre
éste.
Antena
Cable
plano (300
ohmios)
Adaptador de
300/75
ohmios (no
suministrado)
Parte posterior del sistema de teatro en casa
Nota
Durante la reproducción de DVD o VCR, el sistema de teatro
en casa está diseñado para que el sonido se escuche
únicamente de los cinco altavoces y el altavoz de graves del
sistema de teatro en casa. No se provee una salida de sonido
al televisor si esta conectado al conector MONITOR OUT
(Salida de Monitor) del sistema de teatro en casa con cables
opcionales.
Antena
Toma de pared para
TV por cable
Conexión sin una caja de cable
Si su cable de TV por cable está conectado a su
televisor sin una caja conversora o
decodificadora, desenrosque el cable de su
televisor y enrósquelo en el conector
ANTENNA/CABLE IN en el sistema de teatro en
casa. Utilice el cable coaxial redondo
suministrado para conectar el conector
ANTENNA/CABLE OUT (Salida de
Antena/Cable) del sistema de teatro en casa y el
conector de entrada de antena de 75 ohmios en
la parte posterior de su televisor. Con esta
conexión, puede recibir todos los canales de
banda media, super banda y hiper banda.
Conexión con una caja de cable
Si una caja conversora de cable se requiere en
su sistema de TV por cable, siga estas
instrucciones. Esta conexión de cable le permite
el uso del televisor y el sistema de teatro en
casa.
Para ver o grabar canales de CATV:
1 Sintonice el televisor al canal de salida del
sistema de teatro en casa (Canal 3 ó 4).
2 Ajuste el selector de canal del sistema de
teatro en casa al canal de salida de la caja
conversora de cable usando el botón o
en su sistema de teatro en casa. (Ejemplo:
Canal 3)
3 Seleccione el canal a ver o grabar en la caja
conv ersora de cable.
Nota
• Con esta conexión, no puede grabar un programa mientras
se ve otro.
• Si está usando una caja de cable para sintonizar canales,
no es necesario completar la Programación Automática de
Canales como se indica en página 87.
www.insignia-products.com
81
Page 84

Sistema de Teatro en Casa Insignia NS-H3005
Parte posterior de una
caja de cable típica
Parte posterior del sistema de teatro en casa
Toma de
pared para
TV por
cable
Conexión de su sistema de teatro en casa
a su televisor
Conecte su sistema de teatro en casa a su
televisor usando uno de los siguientes métodos:
• “Conexión Coaxial de RF” página 82
• “Conexión de Audio/Vídeo” página 82
• “Conexión de Vídeo de Componentes
(ColorStream®)” página 82
• “Conexión de Barrido Progresivo
(ColorStream® pro)” página 83
Conexión Coaxial de RF
Conecte el co necto r ANT ENNA /CABL E OUT d e
su sistema de teatro en casa al conector de
entrada de antena en su televisor usando el
cable coaxial de 75 ohmios.
Para ajustar el canal de salida de RF del
sistema de teatro en casa:
1 Mientras el sistema de teatro en casa se
encuentra apagado, presione y sostenga el
botón CH/PRESET (-/+) [Canal/Predefinido
-/+] en el panel frontal por alrededor de cinco
segundos. El sistema de teatro en casa se
encenderá por si solo y RF-03 o RF-04
aparecerá en la ventana de visualización.
2 Presione el botón CH/PRESET (-/+) en el
panel frontal para cambiar el canal de salida
RF (Canal 03 o Canal 04).
3 Apague el sistema de teatro en casa, luego
enciéndalo de nuevo.
4 Seleccione el canal de televisión 3 ó 4
dependiendo del canal de salida de RF que
haya seleccionado.
Conexión de Audio/Vídeo
Para conectar el sistema de teatro en casa al
televisor usando los conectores de A/V:
1 Conecte conector VIDEO OUT (Salida de
Vídeo) del sistema de teatro en casa al
conector de entrada de vídeo en el televisor
usando el cable de vídeo suministrado.
Vídeo
Audio
Parte posterior del sistema de teatro en casa
Nota
Si utiliza esta conexión, sintonice el televisor al canal de salida
de RF de su sistema de teatro en casa (Canal 3 ó 4).
Cable
coaxial
Parte posterior del sistema de teatro en casa
2 Conecte los conectores izquierdo y derecho
de AUDIO OUT (Salida de Audio) del sistema
de teatro en casa a los conectores de
entrada izquierdo/derecho en el televisor
usando los cables de audio suministrados.
Nota
Si usa esta conexión, seleccione la fuente de entrada VIDEO
del televisor.
Conexión de Vídeo de Componentes
(ColorStream
Nota
La reproducción de DVD también se puede realizar usando la
conexión COMPONENT/ PROGRESSIVE SCAN VIDEO OUT
(Salida de Vídeo de Componentes/Barrido Progresivo). El
sintonizador y el VCR solamente proveen salida por medio del
conector RF.OUT (R) o el conector OUT (A, V) del sistema de
teatro en casa.
®
)
82
www.insignia-products.com
Page 85

Sistema de Teatro en Casa Insignia NS-H3005
Para conectar el reproduc tor de DVD al
televisor usando vídeo de componentes:
1 Conecte los conectores
COMPONENT/PROGRESSIVE SCAN
VIDEO OUT en el sistema de teatro en casa
a los conectores de entrada
correspondientes en el televisor usando los
cables Y, Pb , y Pr (C).
Componente
Audio
Para conectar el reproductor de DVD al
televisor usando barrido progresivo:
1 Conecte los conectores
COMPONENT/PROGRESSIVE SCAN
VIDEO OUT en el sistema de teatro en casa
a los conectores de entrada
correspondientes en el televisor usando los
cables Y, Pb , y Pr (C).
Componente
Audio
Parte posterior del sistema de teatro en casa
2 Conecte los conectores izquierdo y derecho
de AUDIO OUT (Salida de Audio) del sistema
de teatro en casa a los conectores de
entrada izquierdo/derecho en el televisor
usando los cables de audio suministrados.
Nota
• Ajuste el Barrido Progresivo como On (Activado) en el
menú de configuración para usar barrido progresivo,
refiérase a “Menú de imagen” página 9 2.
• El barrido progresivo no funciona con las conexiones de
vídeo analógico (conector amarillo de VIDEO OUT [Salida
de Vídeo] y S-VIDEO OUT [Salida de S-Video]).
Conexión de Barrido Progresivo
(ColorStream
Nota
• La reproducción de DVD también se puede realizar usando
la conex ión COMP ONEN T / PROGRESSIVE SCAN VID EO
OUT (Salida de Vídeo de Componentes/Barrido
Progresivo). El sintonizador y el VCR solamente proveen
salida por medio del conector RF.OUT (R) o el conector
OUT (A, V) del sistema de teatro en casa.
• Si su televisor es de alta definición o
puede aprovecharse de la salida de barrido progresivo del
sistema de teatro en casa para obtener la resolución de
video más alta posible.
• Si su televisor no acepta el formato de barrido progresivo,
la imagen aparecerá mezclada si intenta usar la opción de
barrido progresivo en el sistema de teatro en casa.
®
pro)
listo para digital
Parte posterior del sistema de teatro en casa
2 Conecte los conectores izquierdo y derecho
de AUDIO OUT (Salida de Audio) del sistema
de teatro en casa a los conectores de
entrada izquierdo/derecho en el televisor (A)
usando los cables de audio suministrados.
Nota
• Ajuste el Barrido Progresivo como On (Activado) en el
menú de configuración para usar barrido progresivo,
refiérase a “Menú de imagen” página 92.
• El barrido progresivo no funciona con las conexiones de
vídeo analógico (conector amarillo de VIDEO OUT [Salida
de Vídeo] y S-VIDEO OUT [Salida de S-Video]).
,
www.insignia-products.com
83
Page 86

Sistema de Teatro en Casa Insignia NS-H3005
Conexión de dispositivos a su sistema de
teatro en casa
Para conectar dispositivos a su sistema de
teatro en casa:
• Conecte los conectores LINE 1 (Línea 1) o
LINE 2 (Línea 2) en su sistema de teatro en
casa a los conectores AUDIO/VIDEO OUT
(Salida de Audio/Vídeo) en su componente
accesorio usando los cables de audio/vídeo
opcionales.
Componente accesorio tal como un VCR,
una cámara de vídeo, receptor de satélite o
reproductor de discos láser
Panel de conectores del dispositivo accesorio
AUD
IO
UTPU
T
O
R
L
VIDEO
UTPU
T
O
O
2 Conecte la antena de FM al conector de
antena FM.
Antena de AM de
bucle
Antena de cable FM
Nota
• Para prevenir la captación de ruido, mantenga la antena de
AM de bucle alejada del sistema de teatro en casa y de
otros dispositivos.
• Asegúres e de extender completamente la antena de FM.
• Después de conectar la antena de FM, manténgala tan
cerca de lo horizontal como sea posible.
Parte posterior del sistema de teatro
en casa
Parte frontal del sistema de teatro
en casa
Conexión de antenas de radio a su
sistema de teatro en casa
Conecte las an te na s d e AM y FM sumi ni st r a d as
para que pueda escuchar la radio.
Para conectar las antenas de radio:
1 Conecte la antena de AM de bucle al
conector de antena AM.
Conexión de altavoces a su sistema de
teatro en casa
Conecte los altavoces usando los cables de
altavoz suministrados.
Para obtener el mejor sonido envolvente posible,
ajuste la configuración de la distancia de los
altavoces y del nivel. Para obtener más
información, vea “Configuración de los
altavoces” página 93.
Altavoz frontal
(derecho)
Altavoz posterior (derecho)
Altavoz central
Altavoz para graves
Altavoz frontal
(izquierdo)
Altavoz posterior
(izquierdo)
84
www.insignia-products.com
Page 87

Sistema de Teatro en Casa Insignia NS-H3005
Nota
• Verifique que está emparejando el cable de altavoz al
terminal apropiado en los conectores: + con + y – con –. Si
los cables se invierten, el sonido se distorsionará y le
faltarán sonidos graves.
• Cuando se aumente el sonido, ajuste el nivel de sonido
cuidadosamente para evitar una salida de volumen
excesiva hacia los altavoces.
• En el modo VCR solamente está disponible la señal
estéreo de 2 canales (Frontal Izquierdo, F rontal Derecho, y
Altavoz de graves). Puede ser que no se escuche sonido
de los altavoces central o posteriores durante la
reproducción de VCR. (Para más detalles acerca del modo
de sonido, vea “Modo de sonido” página80.)
• No retire las cubiertas frontales de los altavoces.
Conexión del núcleo de ferrita
Asegúrese de conectar el núcleo de ferrita a los
cables de los altavoces. El núcleo de ferrita
reduce los ruidos indeseados.
Para conectar el núcleo de ferrita:
1 Abra el núcleo de ferrita presionado el retén.
Retén
2 Enrolle el cable una vez alrededor del núcleo
de ferrita.
3 Cierre el núcleo de ferrita. Escuchará un clic.
Conecte el
núcleo de ferrita
tan cerca como
sea posible
Altavoces frontales
Desde su posición de escucha, coloque los
altavoces a una distancia de separación igual
con un ángulo de 45° entre los altavoces.
Altavoz central
El altavoz central y los frontales deben estar
a la misma altura. Ubique el altavoz central
arriba o debajo del televisor como se
muestra.
Altavoces posteri ores
Ubique los altavoces posteriores izquierdo y
derecho detrás del área de escucha. Estos
altavoces recrean el movimiento de sonido y
el ambiente requerido para la reproducción
de sonido envolvente. Para los mejores
resultados, no instale los altavoces
posteriores detrás de la posición de escucha
e instálelos arriba o debajo del nivel de los
oídos del que escucha. También es efectivo
dirigir los altavoces posteriores hacia una
pared o techo para dispersar el sonido aún
más.
Para un salón de tamaño más pequeño, si la
audiencia se encuentra cerca de la pared,
ubique los altavoces izquierdos en oposición,
y 24 – 36 pulgadas arriba de los oídos del
que escucha.
Altavoz para graves
Si desea escuchar un sonido de graves
excelente o sonido envolvente Dolby Digital,
debería conectar un altavoz para graves.
Ubique el altavoz de grave en cualquier
posición frontal.
Preparación del VCR
Uso de la visualización de pantalla (OSD)
Algunas de estas funciones aparecen durante la
reproducción de VCR.
Nota
Conecte el núcleo de ferrita tan cerca del sistema de teatro en
casa como sea posible.
Ubicación de los altavoces
Para una configuración normal, utilice seis
altavoces (dos frontales, uno central, dos
posteriores y uno de graves).
Altavoz para graves
Parlante frontal
(izquierdo)
Altavoz
posterior
(izquierdo)
Altavoz central
Altavoz frontal
(derecho)
Ejemplo de la ubicación de los altavoces
Altavoz posterior
(derecho)
4
1
2
3
5
6
7
Indicador Descripción
1 Función Indi ca la función que se está
2 Velocidad de la cinta Muestra la velocidad actual de la
3 Fecha Muestra la fecha actual. (En el
4 H i-Fi Indica que el VCR está
5 Canal Indica el canal seleccionado o LINE1
realizando.
cinta.
formato Mes/Fecha/Día de la
semana)
reproduciendo una cinta grabada con
alta fidelidad (Hi-Fi).
(Línea 1) o LINE2 (Línea 2).
www.insignia-products.com
85
Page 88

Sistema de Teatro en Casa Insignia NS-H3005
Indicador Descripción
6 Stereo/SAP
(Estéreo/SAP)
7 Reloj/Contador/
Restante
Muestra el tipo de señal de audio
recibida por el sint onizador del VCR.
NOTA: No se muestra MONO.
Muestra la hora actual, el con tador
de cinta y el tiempo restante en la
cinta.
Presione el botón MEMORY/ENTER
(Memoria/Ingresar) para cambiar la
visualización de pantalla del televisor.
Nota
• Las visualizaciones de función se mantienen en la pantalla
del televisor por cinco segundos.
• El reloj, el contador de cinta, y la información de la cinta
restante continuarán siendo mostradas hasta que presione
el botón MEMORY/ENTER.
• El contador de cinta y el indicador de la cinta restante
aparecerán únicamente cuando se ha insertado una cinta.
T ambién, el indicador de cinta restante aparece después de
cualquier operación de cinta.
Obteniendo información fácil
Si se proveen señales de Servicio Extendido de
Datos (XDS) junto con la señal de televisión
normal en su área o durante la reproducción de
una cinta grabada con señales XDS se mostrará
en la pantalla la identificación de la estac ión, el
título del programa, y los detalles del programa.
Cuando se vea un canal con señales XDS,
presione el botón MEMORY/ENTER y la
identificación de la estación aparecerá en la
pantalla del televisor. Presione el botón
MEMORY/ENTER de nuevo y los detalles del
programa aparecerán en la pantalla.
Cuando se vea una cinta grabada con señales
XDS, prsione el botón MEMORY/ENTER dos
veces y el título del programa y los detalles del
programa aparecerán en la pantalla del
televisor.
DETALLES DEL PROGRAMA
Selección de menú
Su VCR le permite usar el control remoto para
ajustar varias funciones.
Para modificar un ajuste de VCR:
1 Presione MENU. Aparece el menú principal.
2 Selecciones el submenú con el botón o ,
luego presione el botónMEMORY/ENTER.
Nota
Los menús permanecen en pantalla por tres minutos.
Ajustar el rel o j
(página 88)
Programa (página 96)
Sintonización
(página 87)
Ajuste (página 86)
3 Presione el botón MENU cuando termine de
hacer los ajustes.
Opciones del menú de ajuste del VCR
1 Presione el botón MENU. Aparece el menú
principal.
2 Presione el botón o para seleccionar
SETUP (Configuración) y luego presione el
botón MEMORY/ENTER. Aparecerá e l me nú
de Configuración.
Pantalla de Información Fácil
(Identificación de la estación)
Pantalla de Información Fácil
(Detalles del Programa)
Detalle Descripción
LENGTH
(Duración)
TIME REMAINING
(Tiempo Restante)
RATING
(Clasificación)
Indica el tiempo de corri do de un
programa.
Indica el tiempo restante en un
programa.
Indica la clasi ficación del programa
actual (N/A [No Disponible], G, PG,
PG-13, R, NC-17, X, y Not Rated [Sin
Clasificar]). La clasificación N/A
significa que las clasificaciones para
películas no se aplican a este programa.
Acceso a los menú de pantalla
Las funciones de configuración (SETUP), ajuste
del reloj (CLOCK) y las grabaciones por
temporizador (PROGRAM ) se pue den acce der
con los menús de pantalla.
3 Presione el botón o para elegir una
opción en el menú de configuración.
4 Presione o para modificar un ajuste.
5 Presione el botón MENU cuando termine de
hacer los ajustes.
Ajuste Descripción
Function OSD
(Función OSD)
Audio mode
(Modo de
audio)
Activa o desactiva la visualización en pantalla.
Seleccione ON (Activar) y OFF (Desactivar) con los
botones o .
El VCR tiene dos sis temas separados de
reproducción de audio, el sist ema VHS Hi-Fi de
alta calidad y el sistema estándar mono NORMAL.
Generalme nte , el mi smo au dio se g raba en lo s dos
sistemas. El sistema VHS Hi-Fi reproduce en
canales separados (izquierdo y derecho), y el
sistema NORMAL reproduce sonido monofónico.
La pista normal siempre se reproduce para que la
cinta pueda ser reproducida en un V CR que no
tiene VHS Hi-Fi.
Seleccione Hi-Fi o NORMAL con los botones
o.
86
www.insignia-products.com
Page 89

Sistema de Teatro en Casa Insignia NS-H3005
Ajuste Descripción
Tipo de
transmisión
Audio output
(Salida de
audio)
El Sonido de Televisión Multicanal (MTS) contiene
señales estéreo y de Programa de Audio
Secundario (SAP). Seleccione su preferencia para
cuando las dos señales MTS estéreo y SAP se
reciben. Cuando solo una de las señales MTS se
recibe, el VCR seleccion a automáticamente el
modo de recepción correspon diente (Estéreo o
SAP) sin importar la opción seleccionada. Para la
operación normal, el ajuste debe estar en STEREO
(Estéreo). El VCR grabará el programa estéreo
cuando esté disponible, y grabará el programa
mono si el programa no es estéreo.
En el caso de una transmisión estéreo o SAP débil,
cambiar el ajuste a MONO puede resultar en un
sonido más claro.
Seleccione STEREO , SAP, o MONO con los
botones o .
Se usa durante la reproducción (cuando el ajuste
AUDIO MODE (HI-FI/NORMAL) se encuetra en
HI-FI) para seleccionar la señal de salida de los
conectores AUDIO OUT (Canal Izq y Der.) y
RF.OUT.
Este ajuste normalmente deberá ser dejado en la
posición STEREO, para que cuando se reproduzca
una cinta estéreo, se escuch e el sonido estéreo a
través de los canales iz quierdo y derecho. Si una
cinta mono se reproduce y la salida de audio se
configura a STEREO, el mismo sonido mono se
escuchará en lo s ca n ales izquierdo y dere ch o.
Seleccione STER EO, LEFT (Izquierdo), o RIGHT
(Derecho) con los botone s o .
Selección de canales
Este sistema de teatro en casa está equipado
con un sintonizador sintetizado por frecuencia
capaz de recibir hasta 181 canales. Esto
incluyen los canales de VHF 2-13, de UHF
14-69 y de CATV 1-125.
4 Presione el botón o para escoger
AUTO CHANNEL SET (Establecer canales
automáticamente), luego use el botón o
para buscar los canales. El sintonizador cicla
automáticamente a través de todos los
canales disponibles en el área y los guarda
en la memoria del sintoniz ador.
5 Después de que se completado la
Programación Automática de Canales,
asegúrese de que el ajuste TUNING BAND
(Banda de Sintonización) (TV o CATV) esté
ajustado correctamente. Seleccione la banda
de sintonización correcta (TV o CATV) con el
botón o mientras se encuentre en el
menú de sintonización. Recuerde, TV es
para la recepción de antena de aire, CATV
es para la conexión de cable o cable
inalámbrico.
6 Presione el botón MENU para regresar a la
pantalla de televisión.
7 Presione el botón CH/PRESET
[Canal/Predefinido] (-/+) en el panel frontal o
el botón o en el control remoto para
cambiar el canal en el VCR.
Agregar o eliminar canales
Esta función le permite agregar o eliminar
canales manualmente de la memoria.
Para agregar o eliminar canales de la
memoria:
1 Presione el botón MENU. Aparece el menú
principal.
2 Presione el botón o para seleccionar
TUNING(Sintonizar), luego presione el botón
MEMORY/ENTER (Memoria/Ingresar).
Aparece el menú de sintonización.
Nota
Asegúrese de que el VCR está conectado a una antena o a
TV por cable.
Para completar la Programación Automática
de Canales:
1 Presione el botón MENU. Aparece el menú
principal.
2 Presione el botón o para selec c io nar
TUNING(Sintonizar), luego presione el botón
MEMORY/ENTER (Memoria/Ingresar).
Aparece el menú de sintonización.
3 Presione el botón para escoger SOURCE
SELECT (Selección de Fuente), luego use el
botón o para seleccionar TUNER
(Sintonizador). Presione el botón o
repetidamente para cambiar entre TUNER
(Sintonizador), LINE1 (Línea 1) o LINE2
(Línea 2).
3 Presione el botón para escoger CH.
ADD/DEL (Agregar/Eliminar Canal) en el
menú de sintonización.
4 Presione el botón o para seleccionar el
canal a agregar o eliminar.
5 Presione el botón MEMORY/ENTER
(Memoria/Ingresar) para agregar o eliminar
el canal.
6 Repetir los pasos 3 a 5 para agregar o
eliminar canales.
7 Presione el botón MENU para cerrar el
menú.
www.insignia-products.com
87
Page 90

Sistema de Teatro en Casa Insignia NS-H3005
Ajuste del reloj
El sistema de teatro en casa le provee dos
formas de ajustar la hora y la fecha: la función
de Reloj Automático o manualmente. La función
de reloj automático per mi te que el sistema de
teatro en casa para que configure el reloj
mientras el sistema de teatro en casa se
encuentra apagado.
Nota
El reloj utiliza el sistema de 12 horas. Asegúrese de
seleccionar AM y PM correctamente. AM no aparece en la
pantalla.
El ajuste inicial del reloj es 1ro. de Enero de 2006 a las 12:00
AM.
Ajuste de Reloj Automático
La función de Ajuste de Reloj Automático se
encuentra activada de fábrica. En el ajuste ON
(Activado), el sitema de teatro en casa busca un
canal que lleve información XDS (Servicios de
Datos Extendidos). XDS actualiza el reloj
usando el Tiempo Univesal Coordinado.
Para usar el Ajuste de Reloj Automático:
1 Presione el botón MENU. Aparece el menú
principal.
2 Presione el botón o para esco ger
CLOCK (Reloj), luego presione el botón
MEMORY/ENTER (Memoria/Ingresar). El
menú del reloj aparece.
3 Presione el botón para escoger AUTO
CLOCK SET (Ajuste de Reloj Automático).
4 Presione el botón o para seleccionar
ON (Activado).
5 Presione el botón para escoger
DAYLIGHT SAVINGS (Hora de Verano).
6 Presione el botón o para seleccionar
ON (Activado) u OFF (Desactivado).
Si elije AUTO, el VCR ajusta la hora usando
la información de Hora de Verano transmitida
en la señal (canal).
Si elije ON (Activado) el VCR ajusta el reloj
para la Hora de Verano automáticamente.
7 Presione el botón para seleccionar TIME
ZONE (Zona Horaria).
8 Presione el botón o para seleccionar la
zona horaria correcta (AUTO, EASTERN
(Este) CENTRAL, MOUNTAIN (Montaña),
PACIFIC (Pacifico), ALASKA, o HAWAII
[Hawai]).
Si selecciona AUTO como la zona horaria, el
VCR ajusta el reloj usando la primera
información de Tiempo Universal Coordinado
que encuentra en la señal transmitida.
9 Presione el botón MENU cuando termine.
10 Apague el sistema de teatro en casa y la
función de ajuste de reloj automático ajustará
la hora.
Nota
Hay casos en que la estación de televisión no envía o envía la
fecha o información de tiempo equivocada y el sistema de
teatro en casa ajustará la hora equivocada. Si esto sucede le
recomendamos que ajuste el reloj manualmente.
Ajuste manual del reloj
Para ajustar el reloj manualmente:
1 Presione el botón MENU. Aparece el menú
principal.
2 Presione el botón o para seleccionar
CLOCK (Reloj).
3 Presione el botón MEMORY/ENTER
(Memoria/Ingresar). El menú del reloj
aparece.
4 Presione el botón o para seleccionar el
mes.
5 Presione el botón para seleccionar DAY
(Día).
6 Presione el botón o para seleccionar la
fecha. El día de la semana se muestra
automáticamente.
7 Presione el botón para seleccionar YEAR
(Año).
8 Presione el botón o para seleccionar el
año.
9 Presione el botón para seleccionar TIME
(Hora).
10 Presione el botón o para seleccionar la
hora.
- O Presione y sostenga el botón o para
avanzar el reloj continuamente.
11 Presione el botón para seleccionar
DAYLIGHT SAVINGS (Hora de Verano).
12 Presione el botón o para seleccionar
AUTO, ON (Activado) u OFF (Desactivado).
88
www.insignia-products.com
Page 91

Sistema de Teatro en Casa Insignia NS-H3005
Si elije AUTO, el VCR ajusta el reloj usando
la información de la hora de verano
transmitida en la señal (canal). Si elije ON
(Activado), el VCR ajusta el reloj para la hora
de verano automáticamente.
13 Presione el botó n MENU cuando termine.
Nota
Si ajusta el reloj manualmente, AUTO CLOCK SET debe estar
en OFF (Desactivado). Si AUTO CLOCK SET está en ON
(Activado), se ingresará una fecha u hora incorrecta de nuevo
cuando el sistema de teatro en casa se apague.
Preparación del reprod uctor
de DVD
Algunos DVD requieren una operación
especifica o solo permiten una operación
limitada durante la reproducción. Cuando esto
ocurre, el símbolo aparece en la pantala del
televisor, indicando que la operación no está
permitida por el reproductor de DVD o no está
disponible en el DVD.
Usando la visualización de pantalla
El estado general de la reproducción puede ser
mostrado en la pantalla del televisor. Algunos
elementos pueden ser cambiados usando el
menú.
Para usar la visualización de pantalla:
1 Presione el botón DISPLAY (Visualización)
durante la reproducción.
2 Presione el botón o para selec c io nar
un elemento. El elemento seleccionado se
resaltará.
3 Presione el botón o para cambiar el
ajuste de un elemento. Los botones
numéricos pueden ser usados para ingresar
numéros.
4 Para algunas funciones, presione el botón
MEMORY/ENTER (Memoria/Ingresar) para
modificar el ajuste.
Iconos de campo de retroalimentación
temporal
Icono Descripción
Repetir título
TITLE
Repetir capítulo
CHAPT
Repetir pista (sólo para discos de Video CD sin
TRACK
ALL
A B
OFF
Nota
• Puede ser que algunos discos no provean todas las
funciones en el siguiente ejemplo de visualización en
pantalla.
• Si no se presiona ningún botón por 10 segundos, la
visualización de pantalla desaparecerá.
control de reproducción [PCB])
Repetir todas las pistas (só lo para discos de
Video CD sin control de reproducción [PCB])
Repetición de segme nto A-B
Repetición desactivada
Reanuda la reproducción desde este punto
Acción prohibida o no disponible
OSD del DVD
Elementos Función
Número de título Muestra el
1/3
Número de
capítulo
Búsqueda por
tiempo
1/12
0:20:09
número de
título actual y
el número to tal
de títulos, y
salta a un
número de
título.
Muestra el
número de
capítulo actual
y el número
total de
capítulos, y
salta a un
número de
capítulo.
Muestra el
tiempo de
reproducción
transcurrido, y
busca hasta el
punto
directamente
desde el
tiempo
transcurrido.
Método de
selección
/, o
Números,
MEMORY/
ENTER
(Memoria/Ing
resar)
/, o
Números,
MEMORY/
ENTER
(Memoria/Ing
resar), SKIP
(Saltar).
Números,
MEMORY/
ENTER
(Memoria/Ing
resar)
www.insignia-products.com
89
Page 92

Sistema de Teatro en Casa Insignia NS-H3005
Elementos Función
Idioma de audio
y modo de salida
de audio digital
1 ENG
D
5.1 CH
Idioma de
subtítulos
OFF
Ángulo Muestra el
1/1
Sonido Muestra el
BYPASS
Muestra el
idioma de la
pista de audio
actual, el
método de
codificación, y
el número del
canal, y
cambia el
ajuste.
Muestra el
idioma de
subtítulos
actual, y
cambia el
ajuste.
número de
ángulo de
cámara actual
y el número
total de
ángulos, y
cambia el
número de
ángulo.
modo de
sonido actual,
y cambia el
ajuste.
Acceso a los menús de pantalla
Puede establecer sus preferencias personales
en el reproductor de DVD.
Operación general
1 Presione el botón SETUP (Configura ción). El
menú de configuración aparece.
Disc Audio
Disc Subtitle
Disc Menu
Rating
Country Code
TV Aspect
Menu Language
Progressive Scan
5.1 Speaker Setup
Others
2 Presione el botón o para seleccionar el
elemento. La pantala muestra el ajuste actual
para el elemento seleccionado, así como los
ajustes alternativos.
3 Mientras el menú está seleccionado,
presione el botón , luego presione el botón
o para seleccionar el ajuste.
4 Presione el botón MEMORY/ENTER
(Memoria/Ingresar) para confirmar su
selección. Algunos elementos requieren
pasos adicionales.
5 Presione el botón SETUP (Configuración),
RETURN (Retorno), o PLAY (Reproduci r )
para salir del menú de configuración.
Original
English
French
German
Spanish
Italian
Chinese
Polish
Hungarian
Other — — — —
Método de
selección
/, o
AUDIO
/, o
SUBTITLE
(Subtítulos)
/, o
ANGLE
(Ángulo)
/, o
SOUND
MODE (Modo
de Sonido)
Menú de Idioma
Menú Descripción
Idioma del
disco
Seleccione un idioma para los menús, el
audio y los subtítulos del DVD.
Original: El idioma ori ginal para el DVD se
selecciona.
Otro: Para seleccionar otro idioma,
presione los botones numéricos para
ingresar el número de 4 dígi tos
correspondient e de acuerdo a “Lista de
códigos de idiomas” página 111. Si
ingresa un código de idioma incorrecto,
presione el botón CLEAR (Borrar).
Disc Audio
Disc Subtitle
Disc Menu
Rating
Country Code
TV Aspect
Menu Language
Progressive Scan
5.1 Speaker Setup
Others
Original
English
French
German
Spanish
Italian
Chinese
Polish
Hungarian
Other — — — —
Control paternal
Las películas en DVD pueden contener escenas
que no sean aptas para niños. Por lo tanto, los
DVD pueden contener información de control
paternal que se aplica al DVD completo o a
ciertas escenas en el DVD. Estas escen as est án
clasificadas de 1 a 8, y alternativamente,
escenas más aptas están disponibles para su
selección el algunos DVD. Las clasificaciones
dependen del país. La función de control
paternal le permite evitar que DVD sean
reproducidos por sus niños o que se
reproduzcan ciertos DVD con escenas
alternativas.
Menú Descripción
Clasificación Clasificación 1 a 8: Algunos DVD
contienen escenas que no son aptas para
niños. Si selecciona una clasificación
para el reproductor, todas las escenas de
DVD con la misma clasificación o menor
se reproducirán. Escenas clasificadas
más alto no se reproducirán a men os
que una escena alternativa se encuentre
disponible en el DVD. La escena
alternativa tiene que tener la misma
clasificació n que seleccionó o una más
baja. Si no se encuentra una escena
alternativa ade c uada, la reproduc ción de
detiene. Debe ingresar la contraseña de 4
dígitos o cambiar el nivel de clasificación
para poder reproducir el DVD.
Desbloquear: Si selecciona Unlock
(Desbloquear), se desactiva el control
paternal. Cualquier DVD se reproducirá
completamente.
Disc Audio
Disc Subtitle
Disc Menu
Rating
Country Code
TV Aspect
Menu Language
P
rogr
essive Sca
5.1 Speaker Setup
Others
8
7
6
5
4
3
2
n
1
Unlock
Change
90
www.insignia-products.com
Page 93

Sistema de Teatro en Casa Insignia NS-H3005
Menú Descripción
Código de País Ingrese el código de país/área del cual se
usaron los estándares para cla sificar el
DVD. Para obtener más información, vea
“Lista de códigos de país” página 111.
Disc Audio
Disc Subtitle
Disc Menu
Rating
Country Code
TV Aspect
Menu Language
P
rogr
essive Sca
5.1 Speaker Setup
Others
Code Set
C A
U S
n
Para establecer la clasificación paternal:
1 Presione el botón SETUP (Configura ción). El
menú de configuración aparece.
2 Presione el botón o para selec c io nar
Rating (Clasificación).
3 Presionar el botón .
4 Ingresar la contraseña.
• Si no ha creado una contraseña personal,
ingrese una contraseña de 4 dígitos
usando los botones numéricos, luego
presione el botón MEMORY/ENTER
(Memoria/Ingresa r). Ingre se la misma
contraseña de 4 dígitos, luego presione el
botón MEMORY/ENTER para verificar.
• Si ha creado una contraseña personal,
ingrese la contraseña de 4 dígitos usando
los botones numéricos, luego presione el
botón MEMORY/ENTER.
• Si comete un error antes de presionar el
botón MEMORY/ENTER, presione el
botón CLEAR, luego ingrese de nuevo la
contraseña de seguridad de 4 dígitos.
5 Seleccione una clasificación de 1 a 8 usando
el botón o .
Uno (1) tiene menos restricciones de
reproducción que cualquier otra. Ocho (8)
tiene más restricciones de reproducción que
cualquier otra.
6 Presione el botón MEMORY/ENTER para
confirmar su selección de clasificación, luego
presione el botón SETUP para salir del
menú.
Nota
Puede ser que las clasificaciones paternales no funcionen en
algunos DVD.
Para establecer el código de país:
1 Presione el botón SETUP (Configura ción). El
menú de configuración aparece.
2 Presione el botón o para selec c io nar
Country Code (Código de País).
3 Presionar el botón .
4 Ingresar la contraseña.
• Si no ha creado una contraseña personal,
ingrese una contraseña de 4 dígitos
usando los botones numéricos, luego
presione el botón MEMORY/ENTER
(Memoria/Ingresar). Ingrese la misma
contraseña de 4 dígitos, luego presione el
botón MEMORY/ENTER para verifica r.
• Si ha creado una contraseña personal,
ingrese la contraseña de 4 dígitos usando
los botones numéricos, luego presione el
botón MEMORY/ENTER.
• Si comete un error antes de presionar el
botón MEMORY/ENTER, presione el
botón CLEAR, luego ingrese de nuevo la
contraseña de seguridad de 4 dígitos.
5 Seleccione el primer carácter del código de
país usando el botón o . Para obtener
más información, vea “Lista de códigos de
país” página 111.
6 Presione el botón para avanzar al
siguiente carácter.
7 Seleccione el segundo carácter del código
de país usando el botón o .
8 Presione el botón MEMORY/ENTER
(Memoria/Ingresar) para confirmar su
selección de código de país, luego presione
el botón SETUP (Configuración) para salir
del menú.
Cambio de la contraseña
Nota
Debe confirmar la contraseña actual antes de que pueda ser
cambiada.
Para cambiar la contraseña:
1 Presione el botón SETUP (Configura ción). El
menú de configuración aparece.
2 Presione el botón o para seleccionar
Rating (Clasificación).
3 Presionar el botón .
4 Ingrese la contraseña antigua, luego
presione el botón MEMORY/ENTER
(Memoria/Ingresar).
5 Seleccione Change (Cambio) usando el
botón o , luego presione el
botónMEMORY/ENTER (Memoria/Ingresar).
6 Ingrese la contraseña nueva de 4 dígitos,
luego presione el botón MEMORY/ENTER
(Memoria/Ingresar).
7 Ingrese la misma contraseña por segunda
vez, luego presione el botón
MEMORY/ENTER (Memoria/Ingresar) para
verificar.
8 Presione el botón SETUP (Configuración)
para salir del menú.
Borrando la contraseña
Si olvidó su contraseña, siga el siguiente
procedimiento para borrarla.
Nota
El reproductor se debe de encontrar en el modo Sin Disco.
www.insignia-products.com
91
Page 94

Sistema de Teatro en Casa Insignia NS-H3005
Para borrar la contraseña:
1 Presione el botón SETUP (Configura ción). El
menú de configuración aparece.
2 Presione el botón o para selec c io nar
Rating (Clasificación).
3 Presionar el botón .
4 Ingresar el número de 6 dígitos 210499. La
contraseña se ha borrado.
5 Ingrese una nueva contraseña siguiendo los
pasos en “Control paternal” página 90.
Menú de imagen
Menú Descripción
Aspecto del TV 4:3 Letterbox (Buzón): S eleccione cuando
Idioma del
menú
se conecta un televisor est ándar 4:3.
Muestra películas de ci ne con barras
arriba y abajo de la imagen.
4:3 Panscan: Seleccione si se conecta un
televisor estándar 4:3. Las peliculas de
cine formateadas con el estílo Pan & Scan
se reproducen con ese estílo (ambos
lados de la imagen se cortan).
16:9 Wide (Panorámico): Seleccione
cuando se conecta un televisor
panorámico de 16:9.
Letterbox
Disc Audio
Disc Subtitle
Disc Menu
Rating
Country Code
TV Aspect
Menu Language
Progressive Scan
5.1 Speaker Setup
Others
4:3
4:3
16:9
Panscan
Wide
Selecciona el idioma para el menú de
configuració n. Éste es el menú que se ve
cuando presiona el botón SETUP
(Configuración).
Disc Audio
Disc Subtitle
Disc Menu
Rating
Country Code
TV Aspect
Menu Language
Progressive Scan
5.1 Speaker Setup
Others
English
Spanish
French
Menú Descripción
Barrido
progresivo
Nota
Después de seleccionar la opción de barrido progresivo, la
imagen solo se puede ver en un televisor o monitor compatible
con barrido progresivo. Si activa el barrido progresivo por
error, deberá reiniciar el sistema de teatro en casa.
El vídeo con barrido progresivo
proporciona las imágenes con la mejor
calidad y menos parpadeo.
Si está usando los conectores
COMPONENT/ PROGRESSIVE SCAN
VIDEO OUT, pero conecta su reproductor
de DVD a un televisor estándar
(analógico), desactive el barrido
progresivo.
Si esta usando los conectores de vídeo de
componentes para la conexión a un
televisor o monitor que es compatible con
la señal de barrido progresi vo, Active el
barrido progresivo.
Disc Audio
Disc Subtitle
Disc Menu
Rating
Country Code
TV Aspect
Menu Language
Progressive Scan
5.1 Speaker Setup
Others
Off
On
Para reiniciar su sistema de teatro en casa:
1 Remueva cualquier DVD del reproductor y
cierre la bandeja de discos. El mensaje NO
DISC (Sin Disco) se mostrará en la ventana
de visualización .
2 Presione el botón STOP (Detener) y
sosténgalo por cinco segundos antes de
soltarlo . La sali da de vídeo se re staur ar á a l a
configuración estándar y la imagen se podrá
ver de nuevo en un televisor analógico o
monitor convencional.
92
www.insignia-products.com
Page 95

Sistema de Teatro en Casa Insignia NS-H3005
Configuración de los altavoces
Puede usar el menú de configuración de
altavoces para seleccionar los ajustes de los
altavoces, incluyendo el desbalance del
volumen y el tiempo de retraso, o para probar
los ajustes de los altavoces.
Nota
Los ajustes de altavoz sólo se activan en la salida de
multicanal analógico.
Disc Audio
Disc Subtitle
Disc Menu
Rating
Country Code
TV Aspect
Menu Language
Progressive Scan
5.1 Speaker Setup
Others
R R
Front L
Volume 0 dB
Size Small
Distance 1 ft
Test
Return
Menú Descripción
Selección de
altavoces
Volumen Presi one el botón o para ajustar el
Tamaño Los ajustes del tamaño de los altavoces
Distancia Si conec tó altavoces a su sistema de
Prueba Presione el bot ón MEMORY/ENTER
Retorno Presione el botón MEMORY/ENTER
Seleccione un altavoz que desea
configurar.
• Altavoz frontal (Izqu ierdo)
• Altavoz frontal (Derecho)
• Altavoz central
• Altav oz posterior (Izquierdo)
• Altavoz posterior (Derecho)
• Altav oz para graves
Ajuste las opciones usando los botones
,, ,o.
Nota: Ciertos ajustes de altavoces están
prohibidos por el acuerdo de licencia de
Dolby Digital.
nivel de salida del altavoz seleccionado .
(-6 dB ~ +6 dB)
son fijos, no puede camb iar los ajustes.
teatro en casa, especifique la distancia
desde cada altavoz hasta el que escucha
de tal forma que cada altavo z alcance al
que escucha al mismo tiempo. (1 pie =
30.48 cm)
Nota: No puede establecer la distanci a al
altavoz de graves.
(Memoria/Ingr esar) para probar las
señales de cada altavoz.
Ajuste el volumen para corresponder al
volumen de las señales de prueba
guardadas en el sistema.
• Frontal Izquierdo (Front L)
• Central
• Frontal Derecho (Front R)
• Posterior Derecho (Rear R)
• Posterior Izquierdo (Rear L)
• Altav oz para graves
(Memoria/Ingresar) para regresar al menú
anterior.
Configuración de Otros
Disc Audio
Disc Subtitle
Disc Menu
Rating
Country Code
TV Aspect
Menu Language
P
rogr
essive Sca
5.1 Speaker Setup
Others
n
DRC
Vocal
PBC
Auto Play
On
On
On
Off
Menú Descripción
Control de
Rango Dinámico
(DRC)
Vocal Active Vocal sólo cuando reproduce un
Reproducción
automática
Con DVD, puede escuchar la pista de
sonido de un programa en la
presentación más exact a y realista
posible debido a la tecnología de audio
digital. Si n embargo, puede se r que
desee comprimir el rango dinámico de la
salida de audio (la diferencia entre los
sonidos fuertes lo s suaves). Así podra
escuchar una película a un volumen más
bajo sin perder la clarid ad del sonido.
Active el DRC para obtener este efecto.
DVD con karaoke multicanal. Los canales
de karaoke en el disco se mezclarán a un
sonido estéreo normal.
Puede configurar el reproductor de DVD
para que comience a reproduc ir
automáticamente el DVD cuando se
inserte un disco.
Si el modo de reproducción automática
está activado, este reprodu ctor de DVD
buscará un título que ten ga el tiempo de
reproducción más largo y lo reproducirá
automáticamente.
On (Activado): La función de
reproducción automá ti ca está activada.
Off (Apagado): La función de
reproducción automática no está
activada.
Nota: Puede ser qu e la fu nc ió n de
reproducción automática no func ione
con algunos DVD.
Uso de su sistema de teatro
en casa
Uso del control remoto
Para usar el control remoto:
• Apunte el control remoto al sensor del control
remoto, luego presione los botones.
Limites
Distancia: Alrededor de 23 pies (7 m) desde el
frente del sensor del control remoto
Ángulo: Alrededor de 30° en cada dirección
desde el frente del sensor del control remoto
Selección de la fuente
Debe seleccionar una de sus fuentes de salida
(DVD o VCR) para verla en la pantalla del
televisor.
www.insignia-products.com
93
Page 96

Sistema de Teatro en Casa Insignia NS-H3005
Si desea ver la salida del reproductor de DVD,
presione el botón CD/DVD en el control remoto
o en el panel frontal del sistema de teatro en
casa hasta que el indicador READING
(Leyendo) se ilumine en la ventana de
visualización y la salida del DVD aparezca en la
pantalla del televisor.
Si desea ver la salida del VCR, presione el
botón VCR en el control remoto o en el panel
frontal del sistema de teatro en casa hasta que
el indicador VCR se ilumine en la ventana de
visualización y la salida del VCR aparezca en la
pantalla del televisor.
Nota
• Si inserta un DVD mientras el sistema de t eatro en casa se
encuentra en el modo VCR, el sistema de teatro en casa se
cambiará al modo DVD automáticamente.
• Si inserta una cinta sin la lengüeta de seguridad mientras el
sistema de teatro en casa se encuentra en el modo D VD, el
sistema de teatro en casa se cambiará al modo VCR
automáticamente.
Uso del VCR
Viendo una cinta de vídeo
Para ver una cinta de vídeo:
1 Encienda el televisor.
2 Sintonice el televisor al canal de salida del
sistema de teatro en casa (Canal 3 ó 4) o
cambie el selector de fuente del televisor a
VIDEO.
3 Presione el botón VCR en el control remoto o
en el panel frontal del sistema de teatro en
casa hasta que el indicador VCR se ilumine
en la ventana de visualización y la salida del
VCR aparezca en la pantalla del televisor.
4 Inserte una cinta de vídeo pregrabada. El
indicador se iluminará.
Nota
Asegúrese de que el indicador en la pantalla
de visualización no está iluminado. Si lo está,
presione el botón POWER (Encendido) una vez.
Si se inserta una cinta sin una lengüeta de
seguridad, el VCR empieza a reproducirla
automáticamente.
5 Presione una vez. El indicador PLAY
(Reproducir) aparece en la pantalla de
televisión.
Nota
• No es necesa r io seleccionar la velocidad de
cinta para la reproducción. Se selecciona
automáticamente por el sistema de teatro en
casa.
• En la reproducción, el selector de TV/VCR se
cambia al modo VCR automáticamente.
6 Presione para detener la reproducción. El
indicador STOP (Detener) aparec e en la
pantalla de televisión.
Nota
Si la cinta llega al final antes que se presione el
botón , el sistema de teatro en casa se detiene
automáticamente, retrocede la cinta, la expulsa y
luego se apaga solo.
Nota
Solo el modo estéreo de 2 canales (Frontal Izquierdo, Frontal
Derecho y Altavoz de Graves) se encuentra disponible en el
modo VCR, por lo tanto no se escuchará sonido del altavoz
frontal y los altavoces posteriores durante la reproducción de
VCR. Para más información sobre el modo de sonido, vea
“Modo de sonido” página 80.
Uso del control de tracking
Tracking Descripción
Auto La función de tracking automático ajusta la
Manual Si aparece ruido en la pant alla durante la
imagen para remover la nie ve o las bandas.
La función de tracking automático funciona
en los siguien t es ca s os:
• Se reproduce una cinta por primera
vez.
• La veloci dad de la cinta cambia (SP
o SLP).
• Las bandas o la nieve aparecen por
rasguños en la cinta.
reproducción, presione el botón
CH/TRK/PRESET o en el cont r ol
remoto hasta que el rui do de la pantalla se
reduzca.
• Si se observa movimiento vertical,
ajuste los controles de tracking muy
cuidadosamente.
• El tracking se reinicia
automáticamente cuando la cinta se
expulsa o si el cable de alimentación
se desconecta por más de tres
segundos.
Uso de efectos especiales
Nota
• Líneas hor izontales (barras de ruido) pueden aparecer en
la pantalla de televisión. Esto es normal.
• El audio se silencia automáticamente durante los modos de
efecto especial. No se escucha sonido durante la
búsqueda.
• Durante el modo de búsqueda de imagen de alta velocidad,
se necesita un tiempo corto para estabilizar la velocidad de
la cinta cuando se regresa al modo de reproducción. Puede
ser que vea una interferencia ligera durante este tiempo.
Buscando
Esta función le permite buscar rápida y
visualmente una sección de la cinta adelantando
y retrocediendo.
94
Para buscar una escena en una cinta de
vídeo:
1 Presione el botón o
reproducción. El sistema de teatro en casa
ingresa al modo de búsqueda.
Nota
www.insignia-products.com
durante la
Si el sistema de teatro en casa se deja en el modo
de búsqueda por más de tres minutos, el sistema
de teatro en casa regresa automáticamente al
modo de reproducción para proteger la cinta y las
cabezas de vídeo.
Page 97

Sistema de Teatro en Casa Insignia NS-H3005
2 Presione el botón para regresar a la
reproducción.
Viendo un cuadro fijo
Para ver un cuadr o fijo de una c inta de víde o:
1 Presione durante la reproducción. El
movimiento de la imagen se detiene en un
cuadro.
Nota
• Si la imagen fija vibra verticalmente,
estabilícela presionando el botón o en el
control remoto.
• Si el sistema de teatro en casa se deja en el
modo de cuadro fijo por más de cinco minutos,
el sistema de teatro en casa ingresa
automáticamente al modo detenido para
proteger la cinta y las cabezas de vídeo.
2 Presione el botón para regresar a la
reproducción.
Viendo la reproducción cuadro a cuadro
Para ver una cinta de vídeo cuadro a cuadro:
1 Presione durante la reproducción. El
movimiento de la imagen se detiene en un
cuadro.
2 Presione el botón repetidamente para
avanzar el vídeo un cuadro a la vez mientras
se ve la imagen en el modo de cuadro fijo.
3 Presione el botón para regresar a la
reproducción.
Cámara Lenta
Para ver una cinta de vídeo en el cámara
lenta:
1 Mientras se encuentra en el modo de cuadro
fijo, presione el botón FORWARD
(Avanzar) . La cinta se reproduce a una
velocidad de 1/19 veces la velocidad normal.
Nota
• Durante la reproducción lenta, utilice el botón
o en el control remoto para minimizar
las bandas de ruido.
• Si el modo de cámara lenta continúa por más
de tres minutos, el sistema de teatro en casa
se cambia automáticamente al modo de
reproducción.
2 Presione el botón para regresar a la
reproducción.
CM Skip (Salto de Comerciales)
La función CM Skip es útil para saltar
comerciales o segmentos cortos de programas.
Para saltar comerciales:
• Presione el botón CM SKIP durante la
reproducción. La cinta avanzará los
siguientes 30 segundos grabados y retornará
a la reproducción normal.
Nota
• El tiempo de salto se puede extender si se
presiona repetidamente el botón CM SKIP.
• Cada vez que se presione el botón se
extenderá el tiempo de avance de búsqueda
en incrementos de 30 segundos (máximo de
tres minutos).
• Cuando la búsqueda termine, el sistema de
teatro en casa regresará al modo de
reproducción automáticamente.
Grabación de una cinta de vídeo
Para grabar una cinta de vídeo:
1 Encienda el televisor y el sistema de teatro
en casa.
2 Sintonice el televisor al canal de salida del
sistema de teatro en casa (Canal 3 ó 4) o
cambie el selector de fuente del televisor a
VIDEO.
3 Presione el botón VCR en el control remoto o
en el panel frontal del sistema de teatro en
casa hasta que el indicador VCR se ilumine
en la ventana de visualización y la salida del
VCR aparezca en la pantalla del televisor.
4 Inserte una cinta de vídeo con la lengüeta de
seguridad intacta.
5 Seleccione el canal con el botón o .
- O Si está grabando de otra fuente usando los
conectores de entrada de audio/vídeo (en la
parte posterior o frontal), selecione LINE1
(Línea 1) o LINE2 (Línea 2) usando el botón
INPUT (Entrada).
6 Establezca la velocidad de grabación (SP o
SLP) usando el botón SPEED (Velocidad).
Nota
Este sistema de teatro en casa no puede grabar
en el modo LP.
7 Establezca el modo MTS. Para obtener más
información, vea “Tipo de transmisión”
página 87 y “Sistemas de VHS Hi-Fi estéreo
o transmisiones MTS” página 99.
8 Presione una vez. La grabación comienza
y el indicador REC se ilumina en la ventana
de visualización .
Nota
• El indicador REC aparece sólo cuando la
fuente de salida se encuentra en VCR.
• Si una cinta sin lengüeta de seguridad se
inserta, la cinta se expulsa automáticamente.
9 Presione el botón dos veces para detener
la grabación.
www.insignia-products.com
Nota
Si la cinta llega al final antes que se presione el
botón , el sistema de teatro en casa se detiene
automáticamente, retrocede la cinta, la expulsa y
luego se apaga solo.
95
Page 98

Sistema de Teatro en Casa Insignia NS-H3005
Pausa de la grabación
Para pausar mientras se graba:
1 Presione el botón para pausar la cinta
durante la grabación. El indicador REC se
parpadeará en la ventana de visualización.
2 Cuando desee continuar grabando, presione
el botón o .
Nota
• Después de estar cinco minutos en el modo de
Pausa, la cinta se detiene automáticamente
para proteger la cinta y las cabezas de vídeo.
• Siempre utilice el botón para obtener los
mejores resultados cuando haga cambios
durante una grabación. Por ejemplo: Para
cambiar canales mientras se graba, primero
presione el botón para poner el VCR el modo
de Pausa. Seleccione el canal en el sistema de
teatro en casa, luego presione de nuevo
para reanudar la grabación.
Grabación de un programa mientras se ve
otro
Para grabar un progr ama de televisión
mientras se ve otro:
1 Presione el botón TV/VCR para seleccionar
el modo TV durante la grabación. Aparece el
indicador de TV.
2 Seleccione el canal que quiere ver usando el
sintonizador en su televisor.
Grabación por temporizador
Puede programar su VCR para grabar hasta
ocho grabaciones diferentes. Puede programar
estas grabaciones hasta con un año de
anticipación. Para una grabación desatendida, el
temporizador necesita conocer los canales que
se quieren grabar y el tiempo de comienzo y
final.
Nota
Si desea establecer el temporizador del programa antes de
ajustar el reloj, el mensaje PLEASE SET THE CLOCK (Favor
ajustar el reloj) aparece por un momento y luego el menú de
Reloj aparece en la pantalla del televisor. Ajuste la hora y la
fecha antes de continuar.
Para programar el VCR para grabar un
programa futuro:
1 Encienda el televisor y el sistema de teatro
en casa.
2 Sintonice el televisor al canal de salida del
sistema de teatro en casa (Canal 3 ó 4) o
cambie el selector de fuente del televisor a
VIDEO.
3 Presione el botón VCR en el control remoto o
en el panel frontal del sistema de teatro en
casa hasta que el indicador VCR se ilumine
en la ventana de visualización y el indicador
VCR aparezca en la pantalla del televisor.
4 Inserte una cinta de vídeo con la lengüeta de
seguridad intacta.
Nota
Si la lengüeta de seguridad se ha removido la
cinta se expulsará automáticamente.
5 Presione el botón MENU. Aparece el menú
principal.
6 Presione el botón o para escoger
PROGRAM (Programa), luego presione el
botón MEMORY/ENTER (Memoria/Ingresar).
El menú de Programa aparece.
Nota
Si todos los ocho programas se han ingresado, el
mensaje FULLY PROGRAMMED aparece por un
momento y luego el indicador PROGRAM 1
(Programa 1) aparece en la pantalla el televisor.
7 Presione el botón o para seleccionar el
número de programa (1-8).
8 Presione el botón para seleccionar
MONTH (Mes).
9 Presione el botón o para seleccionar el
mes.
10 Presione el botón para seleccionar DAY
(Día).
11 Presione el botón o para seleccionar el
día.
12 Presione el botón para seleccionar
START (Comienzo).
13 Presione el botón o para seleccionar el
tiempo de comienzo.
14 Presione el botón para seleccionar STOP
(Detener).
15 Presione el botón o para seleccionar la
el tiempo de detención.
16 Presione el botón para seleccionar
CHANNEL (Canal).
17 Presionar el botón o para seleccionar
el canal (Channel (Canal), LINE1 (Línea 1) o
LINE2 (Línea 2)).
Nota
Usuarios de Cable: Si tiene TV por cable y usa
una caja convesora (vea“Conexión de una antena
o TV por cable al sistema de teatro en casa”
página 81), debe ajustar el canal en este paso
para que corresponda con el canal de salida de la
caja de cable (usualmente Canal 3 ó 4). Ajuste el
canal en la caja de cable en lugar de en el sistema
de teatro en casa.
18 Presione el botón para seleccionar
SPEED (Velocidad).
19 Presione el botón o para seleccionar la
velocidad de grabación (AUTO, SP, o SLP).
El modo automático determina cuanta cinta
hay disponible y cambia la velocidad de SP a
SLP si es necesario para completar la
grabación del programa. Habrá una
distorsión en la imagen y el sonido en el
punto en que la velocidad cambie.
20 Presione el botón para seleccionar
REPEAT (Repetir).
21 Presione el botón o para seleccionar
que tan frecuente se repetirá (ONCE (Una
vez), WEEKLY (Cada semana) o
DAIL Y[Cada día]).
• ONCE
(Una vez) — para grabar hasta 8
programas en un día o durante los días
dentro de un periodo de un año.
• WEEKLY
(Cada semana) —para grabar hasta
ocho programas en un cierto día de cada
semana.
96
www.insignia-products.com
Page 99

Sistema de Teatro en Casa Insignia NS-H3005
• DAIL Y(Cada día) —para grabar hasta ocho
programas al mismo tiempo de lunes a
viernes.
Consejo
Si ingresa la información incorrecta, utilice el
botón para seleccionar la información correcta
usando el botón o .
22 Presione el botó n MENU. El programa se
guardará en el sistema de teatro en casa.
• El indicador se ilumina en la ventana
de visualiación.
• Si la hora preestablecida del programa ya
sucedió, el mensaje PAST TIME
PROGRAMMED (Tiempo Pasado
Programado) aparecerá en la pantalla del
televisor. Regrese al programa incorrecto
y prográmelo con la hora correcta.
• Si ingresó una fecha pasada, la grabación
por temporizador se realizará en esa
fecha el siguiente año.
• Programas adicionales pueden ser
ingresados si se repite este
procedimiento.
Prioridad de programas
Después de
Programa
Programa
Programa
No se grabará
configurar una
grabación por
temporizador, la
grabación
comenzará si otras
grabaciones por
temporizador no
traslapan el tiempo de comienzo.
Si los tiempos de comienzo y final de grabación
de programas predefinidos traslapan en el
mismo día, el programa número 2 no se grabará
hasta que el programa número 1 termine.
La primera parte del programa número 2 no se
grabará. Lo mismo sucederá con el programa
número 3.
Revisando o borrando la programación por
temporizador
La programación puede ser revisada con tal que
el sistema de teatro en casa esté encendido.
Para revisar o borrar la programación por
temporizador:
1 Presione el botón MENU. Aparece el menú
principal.
2 Presione el botón o para seleccionar
PROGRAM (Programa).
3 Presione el botón MEMORY/ENTER
(Memoria/Ingresar). El menú de Programa
aparece.
Nota
Usuarios de Cable: Si su cone xión de cable es a
través de una caja conversora de cable, puede
programar grabaciones múltiples sólo en el canal
de salida de la caja conversora. Esto sucede
porque el conversor determina que canal verá a
través de su sistema de teatro en casa.
Consejo
Si ha terminado de programar y desea que el
sistema de teatro en casa grabe los programas
que ingresó, ASEGÚRESE DE QUE HA
INSERTADO UNA CINTA en el sistema de teatro
en casa. El sistema de teatro en casa esta
programado para grabar los programas
predefinidos.
Nota
• Si la energía falla o se desconecta el sistema
de teatro en casa del tomacorriente CA, los
ajustes correctos de la hora y los
temporizadores se mantendrán en memoria
por aproximadamente 3 segundos. Después
de 3 segundos, el reloj y el temporizador de
programas deben ser reconfigurados cuando
la alimentación se restaure. Reconfigure el
reloj de acuerdo a las instrucciones.
• Después de completar la grabación por
temporizador, el sistema de teatro en casa se
apagará automáticamente.
• Para ver un programa de televisión mientras la
grabación por temporizador se realiza,
seleccione el modo de sintonizador
presionando el botón TV/VCR repetidamente.
• Si desea detener una grabación por
temporizador que ya comenzó, presione el
botón STOP (Detener) o POWER (Encendido)
dos veces.
4 Presione el botón o para seleccionar el
programa que desea revisar o eliminar.
5 Para eliminar el programa, presione el botón
CLEAR (Eliminar).
6 Presione el botón MENU para regresar a la
pantalla de televisión.
Uso de la grabación instantánea por
temporizador
La grabación instantánea por temporizador le
permite realizar una grabación fácilmente por un
tiempo predefinido sin usar el temporizador
programable.
Para usar el temporizador instantáneo:
1 Encienda el televisor y el sistema de teatro
en casa.
2 Sintonice el televisor al canal de salida del
sistema de teatro en casa (Canal 3 ó 4) o
cambie el selector de fuente del televisor a
VIDEO.
3 Presione el botón VCR en el control remoto o
en el panel frontal del sistema de teatro en
casa hasta que el indicador VCR se ilumine
en la ventana de visualización y la salida del
VCR aparezca en la pantalla del televisor.
www.insignia-products.com
97
Page 100

Sistema de Teatro en Casa Insignia NS-H3005
4 Inserte una cinta de vídeo con la lengüeta de
seguridad intacta.
5 Seleccione el canal con el botón o o el
número (0-9). El número del canal aparece
en la pantalla de televisión.
- O Presione el botón INPUT (Entrada) para
seleccionar LINE1 (Línea 1) o LINE2 (Línea
2) si está grabando de otra fuente de
audio/vídeo usando los conectores de
entrada de audio/vídeo (en el panel posterior
o frontal).
6 Presione el botón SPEED (Velocidad) para
seleccionar la velocidad de grabación (SP o
SLP). La velocidad de cinta aparece en la
pantalla de televisión.
7 Presione dos veces El menú aparece en la
pantalla de televisión y la grabación
comienza.
8 Presione el botón repetidamente para
seleccionar la duración de la grabación.
Al final de la grabación, el sistema de teatro
en casa dejará de grabar y se apagará.
Nota
• Mientras la grabación instantánea por
temporizador se encuentra activa, no puede
cambiar el canal en el sistema de teatro en
casa.
• Para detener la grabación, presione el botón
STOP (Detener) o POWER (Encendido) dos
veces.
INSTANT TIMER RECO
CHANN
EL
SPEE
D
AR
T
ST
NGTH 0H30
LE
SP
N
2
OW
M
0H30M ..... 9H00M
RD
Indicación de Duración — cada vez
que se presiona el botón aumenta
(
eac
el tiempo de grabación por
REC
/ITR ( )
30 minutos.
L
engt
h
h a
dditional press o
incr
tim
e
30
0H00
D
ispl
ay
eases recording
m
inutes
Revisando el tiempo de grabación
Para revisar el tiempo de grabación:
• Presione el botón una vez para revisar el
tiempo de grabación.
Extensión del tiempo de grabación
Para extender el t iempo de grabación:
• Presione el botón para extender el tiempo
de grabación. Presionarlo otra vez resultará
en avanzar el tiempo de grabación en
incrementos de 30 minutos.
Nota
• Si presiona el botón mientras se encuentre en el modo
de grabación instantánea por temporizador. La grabación
instantánea por temporizador se cancelará.
• Si el sistema de teatro en casa se encuentra en 0H00M, el
sistema de teatro en casa cambiará al modo de grabación
normal.
Doblaje y edición
Si desea editar o doblar sus grabaciones de
cámara de vídeo o VCR a este sistema de teatro
en casa, los conectores de entrada de audio y
vídeo (A/V) montados en el panel posterior (o
frontal) facilitan las conexiones. Estos
conectores directos de A/V también proveen una
mejor imagen que si se usa el conector de RF
en el panel posterior.
Para doblar o editar una grabación:
1 Connect the camcorder’s or VCR’s A/V
outputs to your home theater system as
illustrated in “Conexión de dispositivos a su
sistema de teatro en casa” página 84.
2 Presione el botón INPUT (Entrada) para
establecer el canal de entrada a LINE2
(Línea 2) si tiene conectada su cámara de
vídeo o VCR a los conectores de A/V
frontales.
- O Presione el botón INPUT (Entrada) dos
veces para establecer el canal de entrada a
LINE1 (Línea 1) si tiene conectada su
cámara de vídeo o VCR a los conectores de
A/V en la parte posterior del sistema de
teatro en casa.
3 Reproduzca la cinta en la cámara de vídeo (u
otro VCR). Si tiene una televisión conectada
a su sistema de teatro en casa, puede ver el
vídeo reproduciendose.
4 Cuando quiera comenzar a grabar, presione
M
f
)
Nota
Nota
una vez el botón del sistema de teatro en
casa para comenzar.
• Antes de grabar, confirme la posición de comienzo de la
grabación.
• Para detener el doblaje, presione el botón dos veces.
Copiado de DVD a VCR
Este sistema de teatro en casa es capaz de
copiar el contenido de un DVD a una cinta VHS.
Si el DVD que está tratando de copiar esta protegido contra
copias, no podrá copiarlo. No se permite copiar DVD
codificados con Macrovision. El indicador LOCK (Bloqueado)
se muestra si trata de copiar un DVD codificado con
Macrovision.
Para copiar desde un DVD a una cinta VHS:
1 Inserte el DVD que desea copiar en el
reproductor de DVD y cierre la bandeja de
discos.
2 Inserte una cinta en blanco en el VCR.
3 Presione el botón en el panel frontal o el
control remoto. El DVD comenzará a
reproducirse. Si el menú del DVD aparece,
puede necesitar presionar el botón de
nuevo para comenzar a reproducir el DVD.
4 Presione el botón en el panel frontal o el
control remoto.
El sistema de teatro en casa ingresará al
modo de grabación y el indicador COPY
(Copiar) se encenderá.
98
www.insignia-products.com
 Loading...