

Page 1

User Guide | Guide de l’utilisateur
20" Flat Tube TV | Téléviseur à tube plat de 20 po
NS-F20C
Page 2

Page 3

Insignia NS-F20C
Safety information
20" Flat Tube TV
Contents
Introduction . . . . . . . . . . . . . . . . . . . . . . . . . . . . . .3
Safety information . . . . . . . . . . . . . . . . . . . . . . . . .3
Features. . . . . . . . . . . . . . . . . . . . . . . . . . . . . . . . .4
Front. . . . . . . . . . . . . . . . . . . . . . . . . . . . . . . . . . . . . 4
Back . . . . . . . . . . . . . . . . . . . . . . . . . . . . . . . . . . . . . 5
Side . . . . . . . . . . . . . . . . . . . . . . . . . . . . . . . . . . . . . 5
Remote. . . . . . . . . . . . . . . . . . . . . . . . . . . . . . . . . . . 5
Setting up your TV . . . . . . . . . . . . . . . . . . . . . . . . .6
Connecting an antenna or direct cable. . . . . . . . . . . 6
Connecting a cable or satellite receiver . . . . . . . . . . 6
Connecting a standard A/V device. . . . . . . . . . . . . . 6
Connecting a component video device . . . . . . . . . . 7
Connecting an S-Video device. . . . . . . . . . . . . . . . . 7
Connecting an audio system . . . . . . . . . . . . . . . . . . 7
Using your TV . . . . . . . . . . . . . . . . . . . . . . . . . . . .7
Turning your TV on and off. . . . . . . . . . . . . . . . . . . . 7
Changing channels. . . . . . . . . . . . . . . . . . . . . . . . . . 7
Adjusting the volume . . . . . . . . . . . . . . . . . . . . . . . . 8
Adjusting picture quality . . . . . . . . . . . . . . . . . . . . . . 8
Fine-tuning the picture or sound. . . . . . . . . . . . . . . . 8
Selecting the TV signal source. . . . . . . . . . . . . . . . . 9
Selecting the channel system. . . . . . . . . . . . . . . . . . 9
Memorizing channels . . . . . . . . . . . . . . . . . . . . . . . . 9
Adding or deleting channels. . . . . . . . . . . . . . . . . . . 9
Setting the clock. . . . . . . . . . . . . . . . . . . . . . . . . . . 10
Setting the calendar . . . . . . . . . . . . . . . . . . . . . . . . 10
Automatically turning your TV on or off . . . . . . . . . 10
Setting the sleep timer . . . . . . . . . . . . . . . . . . . . . . 11
Setting a favorite channel. . . . . . . . . . . . . . . . . . . . 11
Setting a reminder . . . . . . . . . . . . . . . . . . . . . . . . . 11
Selecting the on-screen display language . . . . . . . 12
Selecting the background. . . . . . . . . . . . . . . . . . . . 12
Turning the black stretch on or off . . . . . . . . . . . . . 12
Improving picture quality . . . . . . . . . . . . . . . . . . . . 12
Selecting the closed caption mode. . . . . . . . . . . . . 13
Setting parental controls. . . . . . . . . . . . . . . . . . . . . 13
Turning parental controls on or off . . . . . . . . . . . . . 15
Changing the password . . . . . . . . . . . . . . . . . . . . . 15
Setting other locks . . . . . . . . . . . . . . . . . . . . . . . . . 16
Maintaining. . . . . . . . . . . . . . . . . . . . . . . . . . . . . .16
Troubleshooting . . . . . . . . . . . . . . . . . . . . . . . . . .16
Specifications. . . . . . . . . . . . . . . . . . . . . . . . . . . .17
Legal notices . . . . . . . . . . . . . . . . . . . . . . . . . . . .17
1 year limited warranty. . . . . . . . . . . . . . . . . . . . .19
Français. . . . . . . . . . . . . . . . . . . . . . . . 21
Introduction
Congratulations on your purchase of a
high-quality Insignia product. Your NS-F20C
represents the state of the art in flat tube TV
design and is designed for reliable and
trouble-free performance.
CAUTION
RISK OF ELECTRIC SHOCK
DO NOT OPEN
Warning
To reduce the risk of electric shock, do not remove
the cover or back. No user serviceable parts
inside. Refer servicing to qualified service
personnel.
To reduce the risk of fire or electric shock, do not
expose your TV to rain or moisture.
Caution
To prevent electric shock, match the wide blade
on the power cord plug to the wide slot on an
electric outlet. If the plug does not fit, consult a
licensed electrician to replace the obsolete outlet.
Do not modify the power cord plug, or you will
defeat this safety feature.
This symbol indicates that dangerous voltage
constituting a risk of electric shock is present
within your TV. This label is located on the back
of your TV.
This symbol indicates that there are important
operating and maintenance instructions in the
literature accompanying your TV.
This symbol indicates that this product
incorporates double insulation between
hazardous mains voltage and user accessible
parts. When servicing, use only identical
replacement parts.
Important safety instructions
1 Read these instructions.
2 Keep these instructions.
3 Heed all warnings.
4 Follow all instructions.
5 Do not use this apparatus near water.
6 Clean only with a dry cloth.
7 Do not block any ventilation openings. Install
in accordance with the manufacturer’s
instructions.
8 Do not install near any heat sources such as
radiators, heat registers, stoves, or other
apparatus (including amplifiers) that produce
heat.
9 Do not defeat the safety purpose of the
polarized or grounding-type plug. A polarized
plug has two blades with one wider than the
other. A grounding type plug has two blades
and a third grounding prong. The wide blade
or the third prong is provided for your safety.
If the provided plug does not fit into your
outlet, consult an electrician for replacement
of the obsolete outlet.
www.insignia-products.com
3
Page 4
Insignia NS-F20C 20" Flat Tube TV
10 Protect the power cord from being walked on
or pinched particularly at plugs, convenience
receptacles, and the point where they exit
from the apparatus.
11 Only use attachments or accessories
specified by the manufacturer.
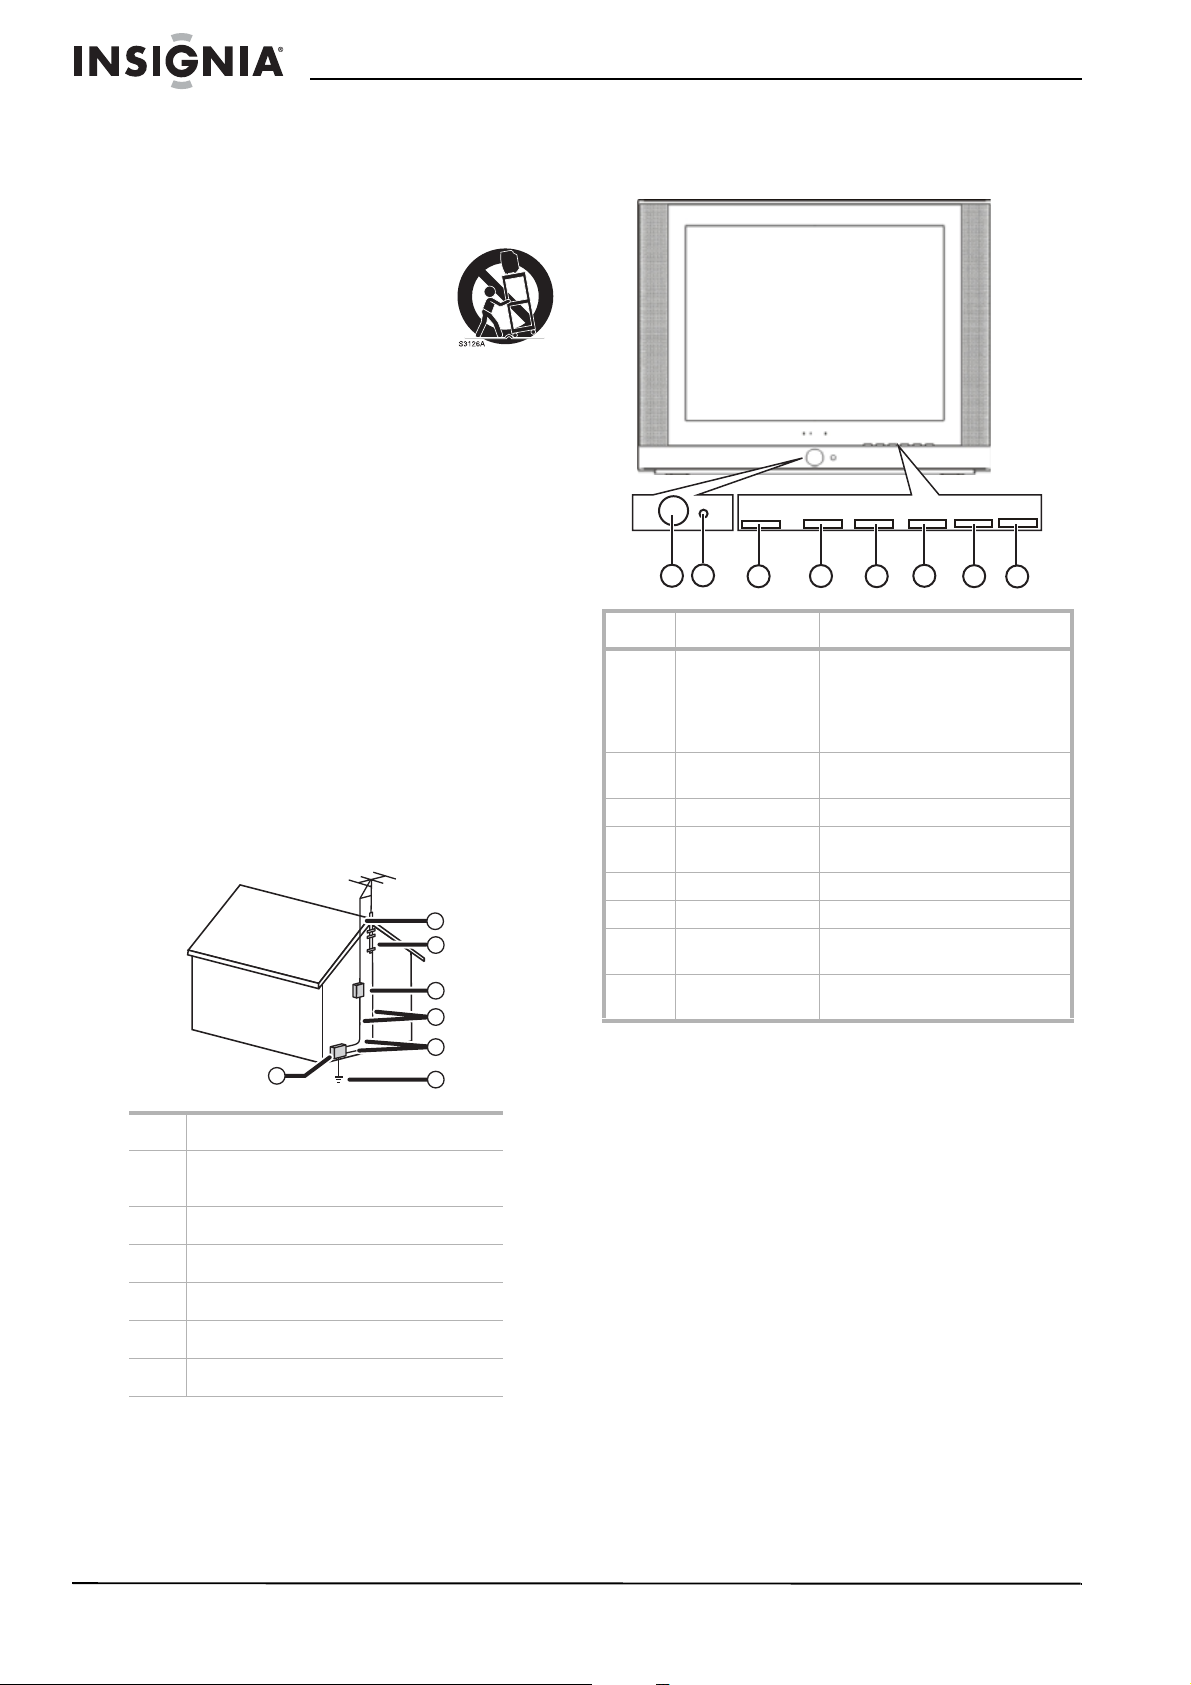
12 Use only with a cart, stand,
tripod, bracket, or table
specified by the manufacturer.
13 Unplug this apparatus during
lightning storms or when
unused for long periods of time.
14 Refer all servicing to qualified service
personnel.
Servicing is required when the apparatus has
been damaged in any way, such as the
power-supply cord or plug is damaged, liquid
has been spilled or objects have fallen into
the apparatus, the apparatus has been
exposed to rain or moisture, does not operate
normally, or has been dropped.
15 If an outside antenna or cable system is
connected to your TV, make sure that the
antenna or cable system is grounded to
provide some protection against voltage
surges and built-up static charges. Article
810 of the National Electrical Code,
ANSI/NFPA No. 70, provides information with
respect to correct grounding of the mast and
supporting structure, grounding of the lead-in
wire to an antenna discharge unit, size of
grounding conductors, location of the
antenna-discharge unit, connection to
grounding electrodes, and requirements for
the grounding electrode.
7
6
5
4
3
1
2
Features
Front
INPUT MENU
VOL+VOL- CH- CH+
INPUT MENU
2
1
3
4
VOL+VOL-
6
5
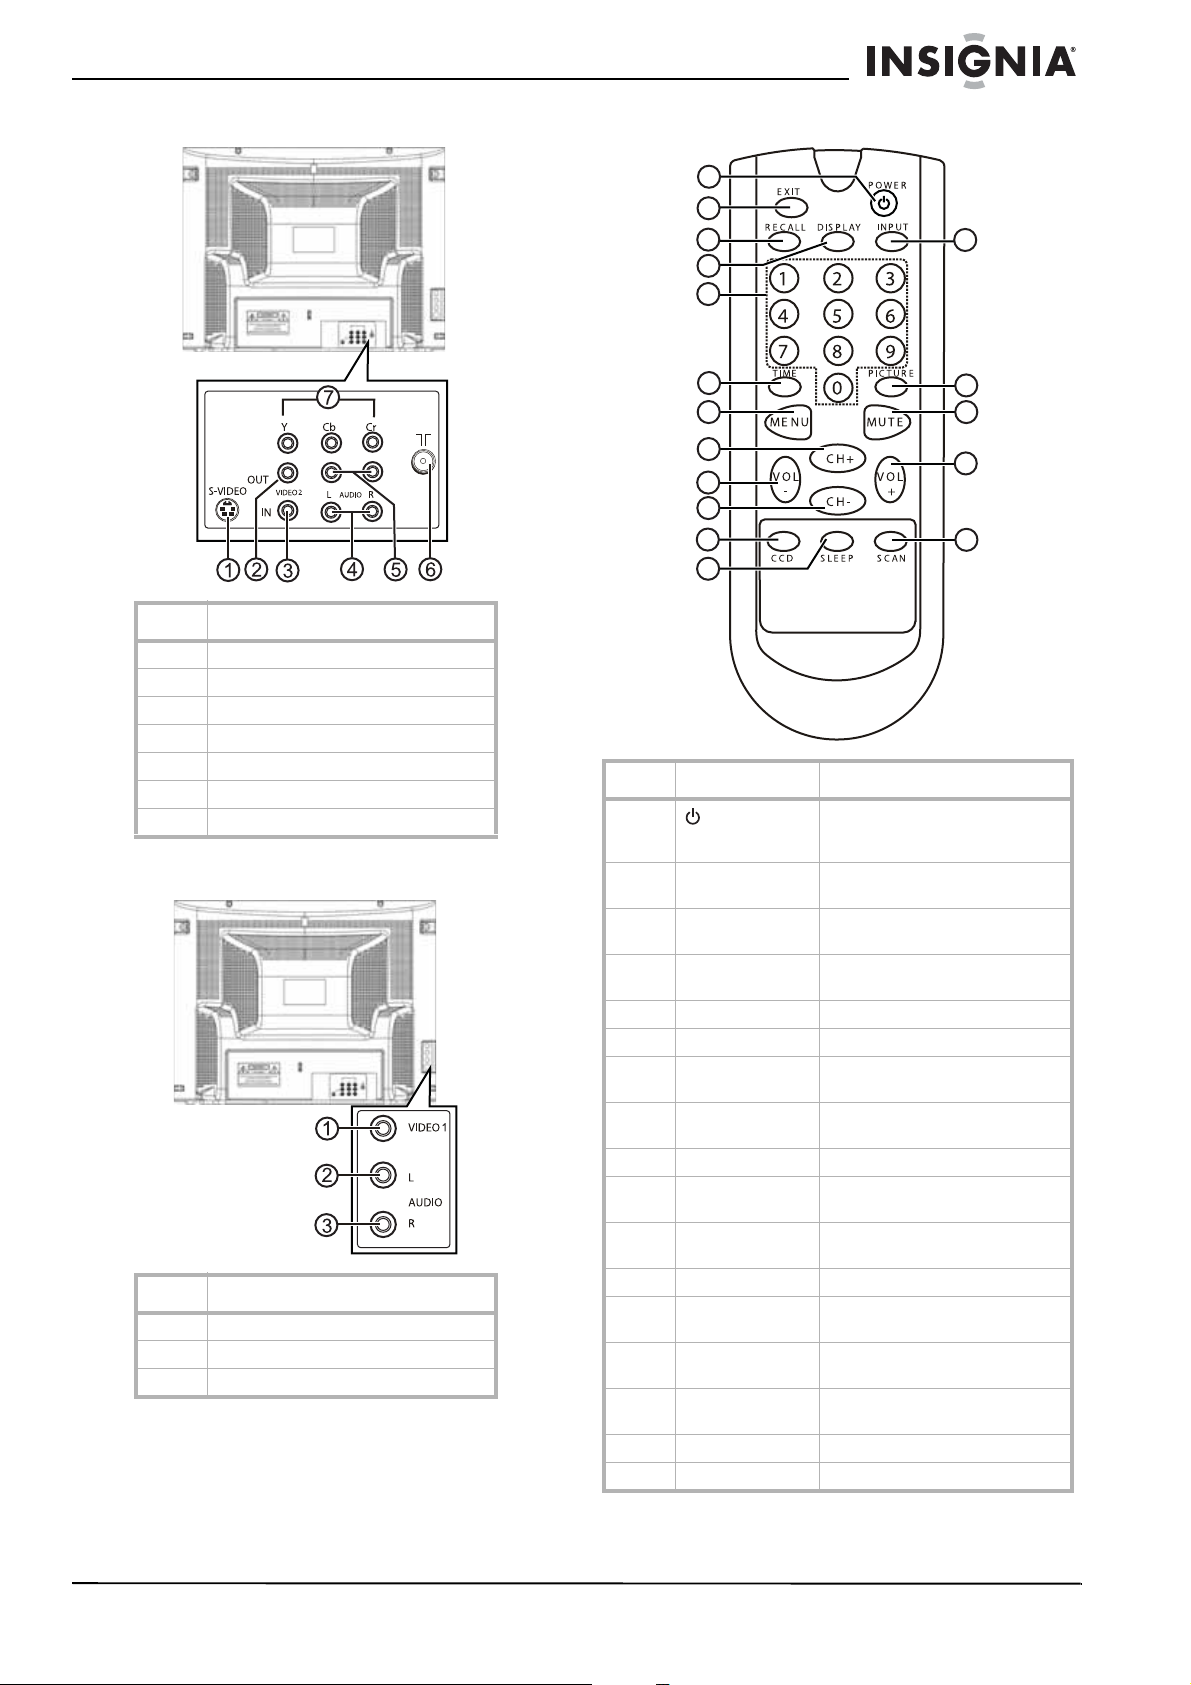
No Feature Description
1Power
button/power
indicator
2 Remote control
sensor
3 INPUT button Press to select the video input.
4 MENU button Press to open the on-screen
5 VOL– button Press to decrease the volume.
6 VOL+ button Press to increase the volume.
7 CH– button Press to change to a channel with
8 CH+ button Press to change to a channel with
Press to turn your TV on or off.
When your TV is turned on, the
power indicator is green. When
your TV is in standby mode, the
power indicator is yellow.
Receives signals from the remote
control. Do not block.
display (OSD).
a lower number.
a higher number.
CH-
7
CH+
8
1 Electric service equipment
2 Power service grounding electrode
system
3 Ground clamps
4 Grounding conductors
5 Antenna discharge unit
6 Grounding clamp
7 Antenna lead-in wire
4
www.insignia-products.com
Page 5
Insignia NS-F20C 20" Flat Tube TV
Back
Side
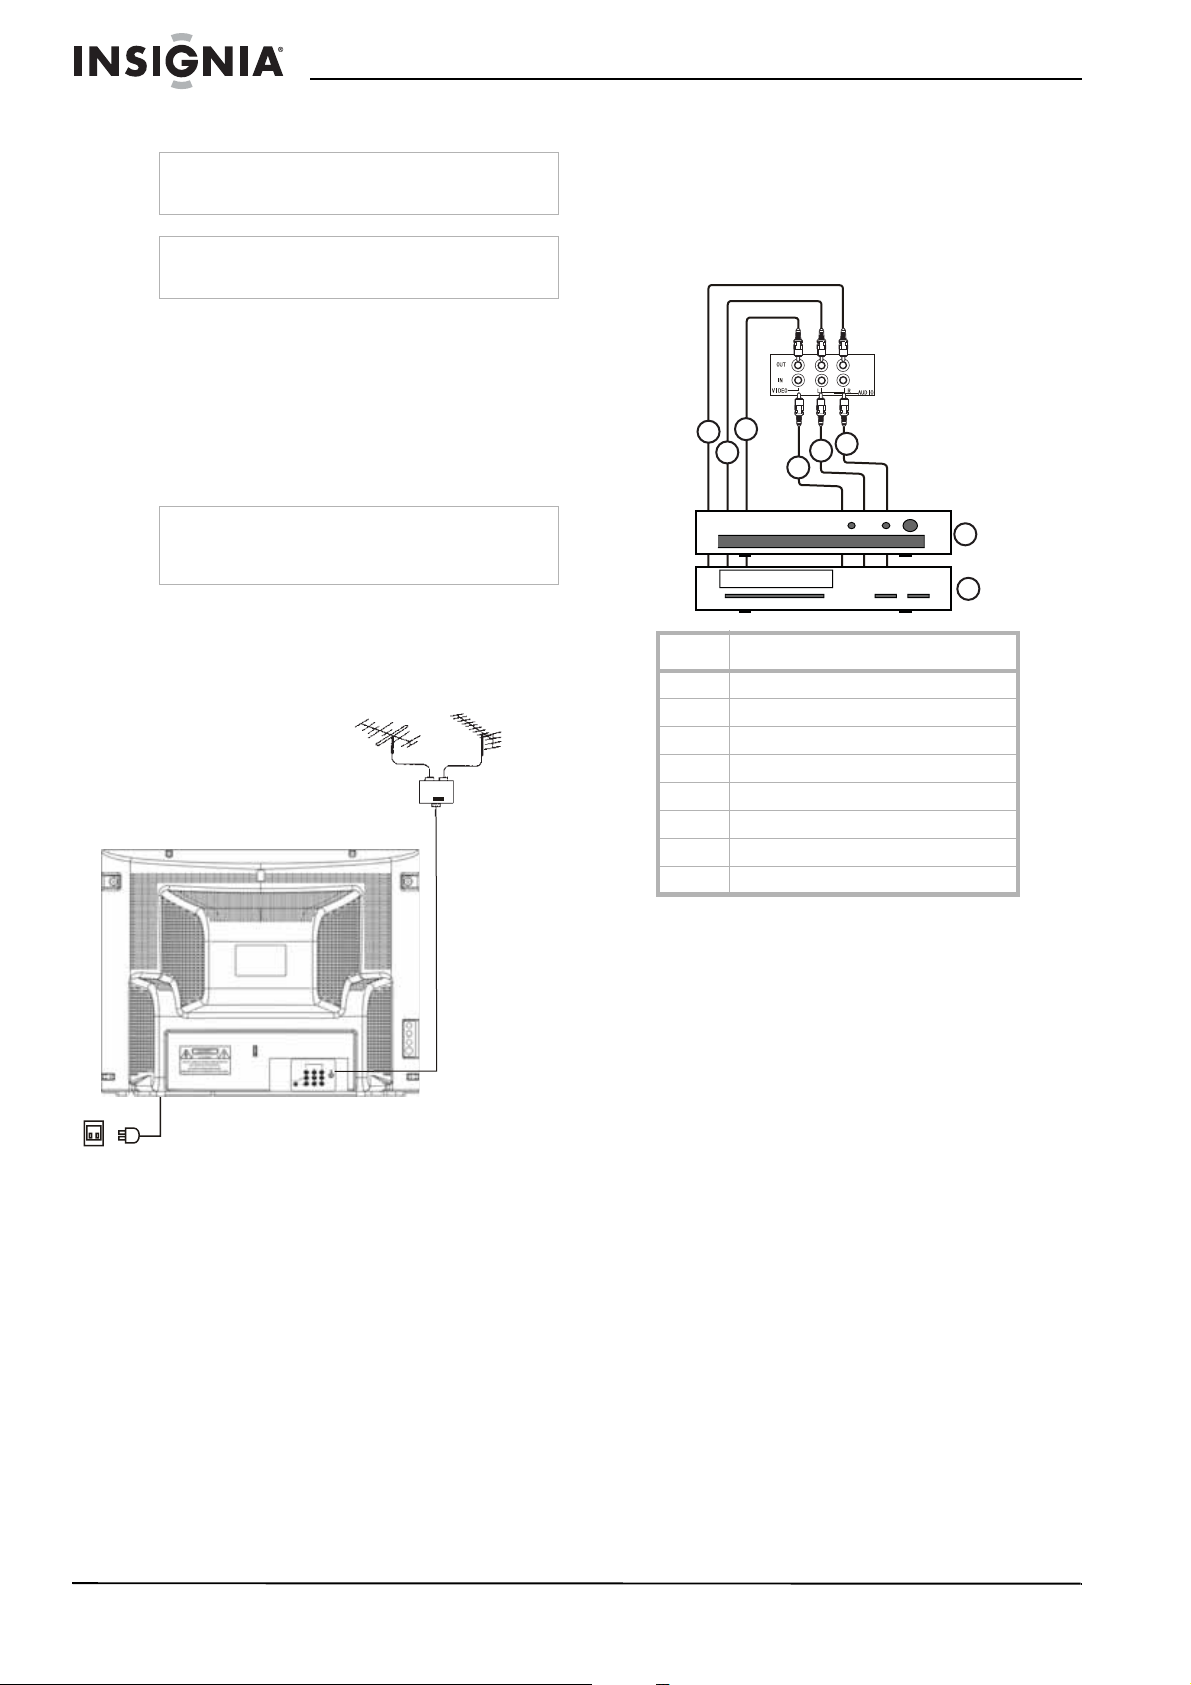
No. Jacks
1S-VIDEO
2VIDEO OUT
3 VIDEO2 IN
4 AUDIO L IN/AUDIO R IN
5 AUDIO L OUT/AUDIO R OUT
6 Antenna
7Y/Cb/Cr
No. Jacks
1VIDEO1
2 AUDIO L
3 AUDIO R
Remote
1
2
3
4
5
6
7
8
9
10
11
12
No. Button Description
1
2 EXIT Press to turn off the channel
3 RECALL Press to return to the previous
4 DISPLAY Press to display channel
5 Number buttons Press to enter channel numbers.
6 TIME Press to open the
7 MENU Press to open the on-screen
8 CH+ Press to change to a channel with
9 VOL– Press to decrease the volume.
10 CH – Press to change to a channel with
11 CCD Press to select the closed caption
12 SLEEP Press to set the sleep timer.
13 INPUT Press to select the video input
14 PICTURE Press to select a preset
15 MUTE Press to mute the sound. Press
16 VOL+ Press to increase the volume.
17 SCAN Press to memorize channels.
POWER
Press to turn your TV on and off
or to bring your TV out of standby
mode.
display and to exit system menus.
channel.
information.
display (OSD).
a higher number.
a lower number.
mode.
mode.
brightness setting.
again to restore the sound.
13
14
15
16
17
Timer
menu.
www.insignia-products.com
5
Page 6
Insignia NS-F20C 20" Flat Tube TV
Installing remote control batteries
Warning
Do not throw the batteries into fire. Dispose of
used batteries as hazardous waste.
Caution
Do not drop or disassemble the remote control. Do
not get the remote control wet.
To install batteries in the remote control:
1 Remove the battery cover.
2 Insert two AAA batteries into the battery
compartment. Make sure that the + and –
symbols on the batteries match the + and –
marks inside the battery compartment.
3 Replace the battery cover.
Note
When the remote control will not be used for a
long period of time or when the batteries are worn
out, remove the batteries to prevent leakage.
Setting up your TV
Connecting an antenna or direct cable
VHF UHF
Mixer (not
included)
Power cord
To connect an antenna or direct cable:
1 Plug one end of a coaxial cable into your
antenna or cable wall jack.
2 Plug the other end of the cable into the
antenna jack on the back of your TV.
Antenna jack
Connecting a standard A/V device
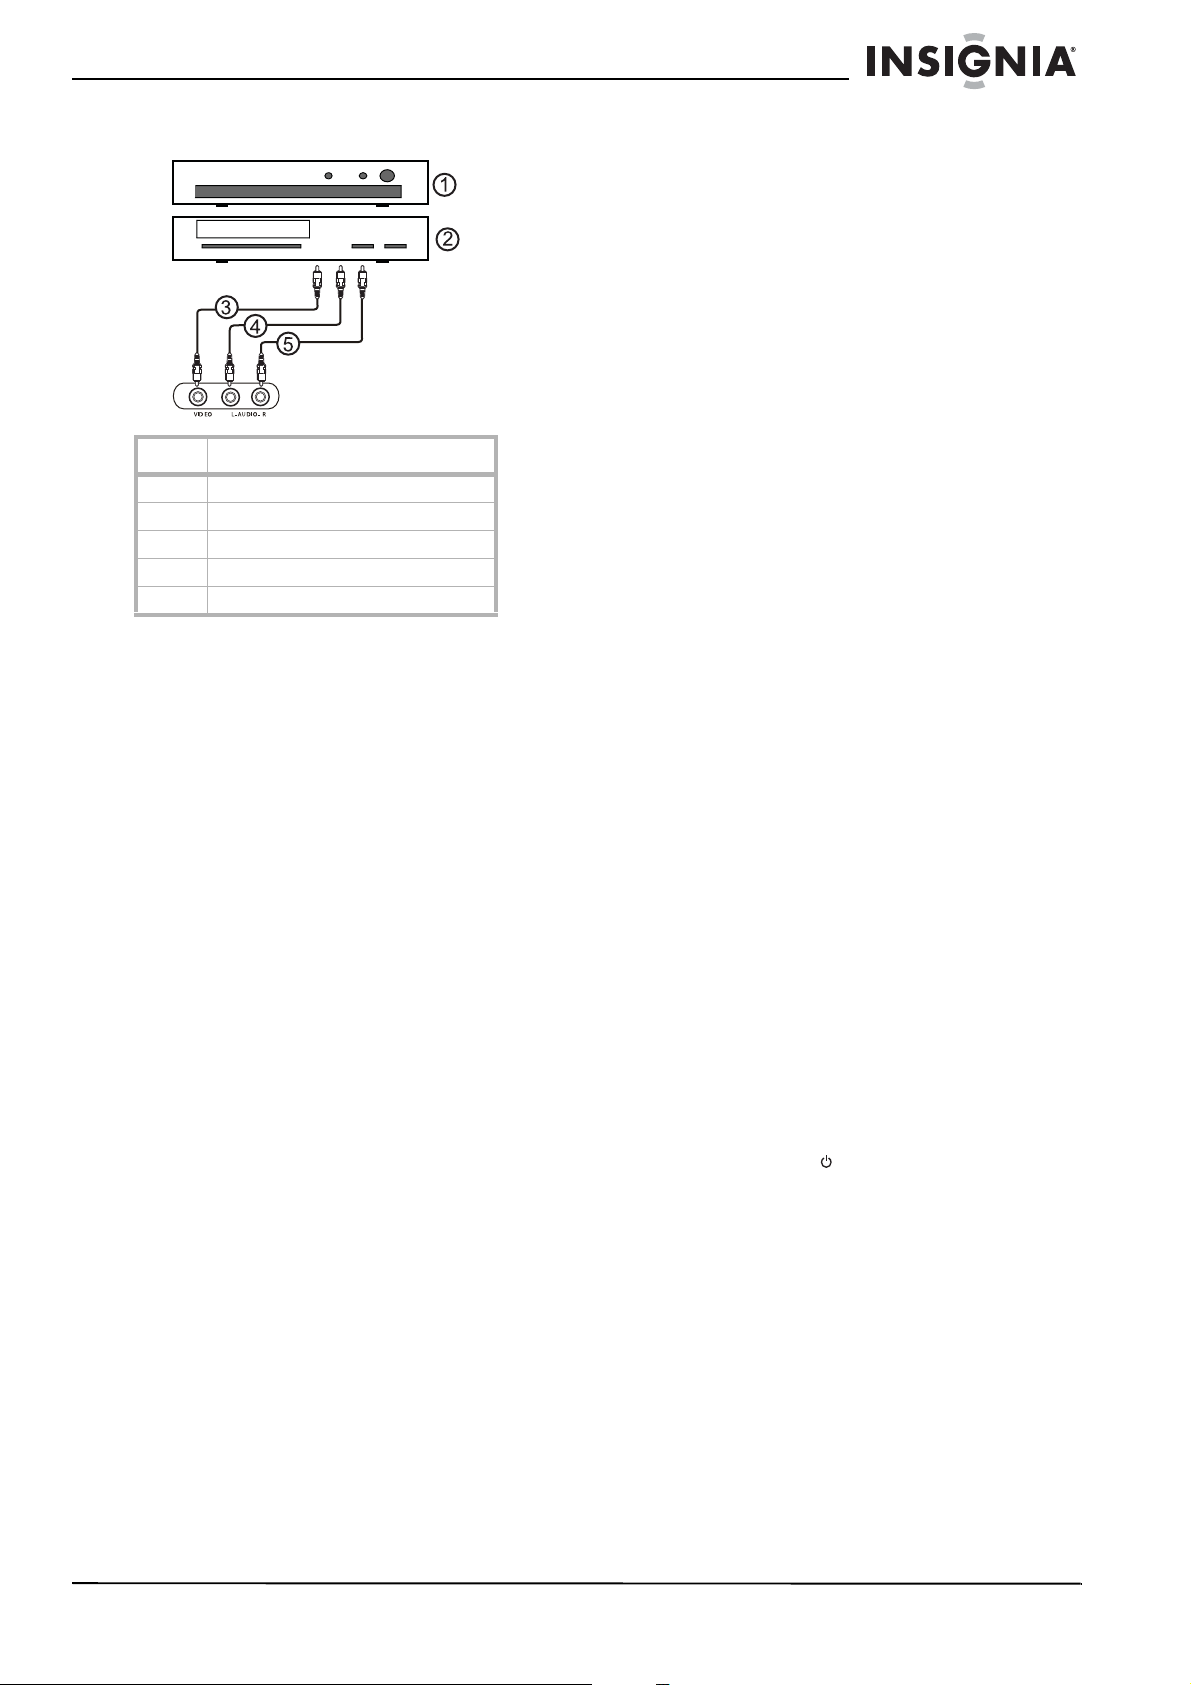
Your TV has two set of standard A/V jacks. One
set is on the back of your TV. The other set is on
the left side of your TV.
To connect a standard A/V device to the back
A/V jacks:
5
3
4
No. Component
1 DVD player
2VCR
3 AUDIO R OUT
4 AUDIO L OUT
5VIDEO OUT
6 VIDEO2 IN
7 AUDIO L IN
8 AUDIO R IN
1 Plug the video (yellow) connector on a
standard A/V cable into the video out jack on
the external device, then connect the other
video (yellow) connector into the VIDEO IN
jack on the back of your TV.
2 Plug the left audio (white) connector on a
standard A/V cable into the left audio out jack
on the external device, then connect the
other left audio (white) connector into the
AUDIO IN L (left) jack on the back of your
TV.
3 Plug the right audio (red) connector on a
standard A/V cable into the right audio jack
on the external device, then connect the
other right audio (red) connector into the
AUDIO IN R (right) jack on the back of your
TV.
8
7
6
1
2
Connecting a cable or satellite receiver
To connect a cable converter box or satellite
receiver:
1 Connect a coaxial cable from your cable or
satellite signal source to the IN jack on cable
converter box or satellite receiver.
2 Plug a coaxial cable into the OUT jack on
your cable converter box or satellite receiver,
then plug the other end of the cable into the
antenna jack on the back of your TV.
6
www.insignia-products.com
Page 7
Insignia NS-F20C 20" Flat Tube TV
To connect a standard A/V device to the side
A/V jacks:
No. Jack
1 DVD player
2VCR
3VIDEO
4 AUDIO L
5 AUDIO R
1 Plug the video (yellow) connector on a
standard A/V cable into the video out jack on
the external device, then connect the other
video (yellow) connector into the VIDEO jack
on the side of your TV.
2 Plug the left audio (white) connector on a
standard A/V cable into the left audio out jack
on the external device, then connect the
other left audio (white) connector into the
AUDIO L (left) jack on the side of your TV.
3 Plug the right audio (red) connector on a
standard A/V cable into the right audio jack
on the external device, then connect the
other right audio (red) connector into the
AUDIO R (right) side on the back of your TV.
Connecting a component video device
5 Plug the right audio (red) connector on a
standard A/V cable into the right audio jack
on the external device, then connect the
other right audio (red) connector into the
AUDIO IN R (right) jack on the back of your
TV.
Connecting an S-Video device
To connect an S-Video device:
1 Plug one end of an S-Video cable into the
S-Video out jack on the external device, then
plug the other end of the S-Video cable into
the S-VIDEO jack on the back of your TV.
2 Plug the left audio (white) connector on a
standard A/V cable into the left audio out jack
on the external device, then connect the
other left audio (white) connector into the
AUDIO IN L (left) jack on the back of your
TV.
3 Plug the right audio (red) connector on a
standard A/V cable into the right audio jack
on the external device, then connect the
other right audio (red) connector into the
AUDIO IN R (right) jack on the back of your
TV.
Connecting an audio system
To connect an audio system:
1 Plug the left audio (white) connector on a
standard A/V cable into the left audio out jack
on the audio system, then connect the other
left audio (white) connector into the
AUDIO OUT L (left) jack on the back of your
TV.
2 Plug the right audio (red) connector on a
standard A/V cable into the right audio jack
on the external device, then connect the
other right audio (red) connector into the
AUDIO OUT R (right) jack on the back of
your TV.
To connect a component video device:
1 Plug the Y (green) connector on a
component video cable into the Y out jack on
the external video device, then plug the other
Y (green) connector into the Y IN jack on the
back of your TV.
2 Plug the Cb (blue) connector on a component
video cable in the Cb out jack on the external
video device, then plug the other Cb (blue)
connector into the Cb IN jack on the back of
your TV.
3 Plug the Cr (red) connector on a component
video cable into the Cr out jack on the
external video device, then plug the other Cr
(red) connector into the Cr In jack on the
back of your TV.
4 Plug the left audio (white) connector on a
standard A/V cable into the left audio out jack
on the external device, then connect the
other left audio (white) connector into the
AUDIO IN L (left) jack on the back of your
TV.
Using your TV
Turning your TV on and off
To turn your TV on and off:
1 Make sure that the power cord is plugged
into a power outlet.
2 Press POWER .
Changing channels
To change channels:
• Press CH+ or CH– to go to the next
higher or lower TV channel.
• Or, use the number buttons to enter the
channel number.
• Or, press RECALL to go to the previous
channel.
• Or, open the on-screen display (OSD),
select the
Ch., then press Vol+ or Vol– to select the
channel you want.
Channel
menu, select Current
www.insignia-products.com
7
Page 8
Insignia NS-F20C 20" Flat Tube TV
Adjusting the volume
To adjust the volume with the remote
control:
1 Press VOL+ or VOL– to increase or
decrease the volume.
2 Press MUTE to turn off the sound. Press this
button again to restore sound.
To adjust the volume from the OSD:
1 Press MENU to open the on-screen display
(OSD).
2 Press VOL+ or VOL– to select the audio
icon . The
Audio
menu opens.
Audio
Volume 45
3 Press CH+ or CH– to select VOLUME.
4 Press VOL+ or VOL- button adjust the
volume.
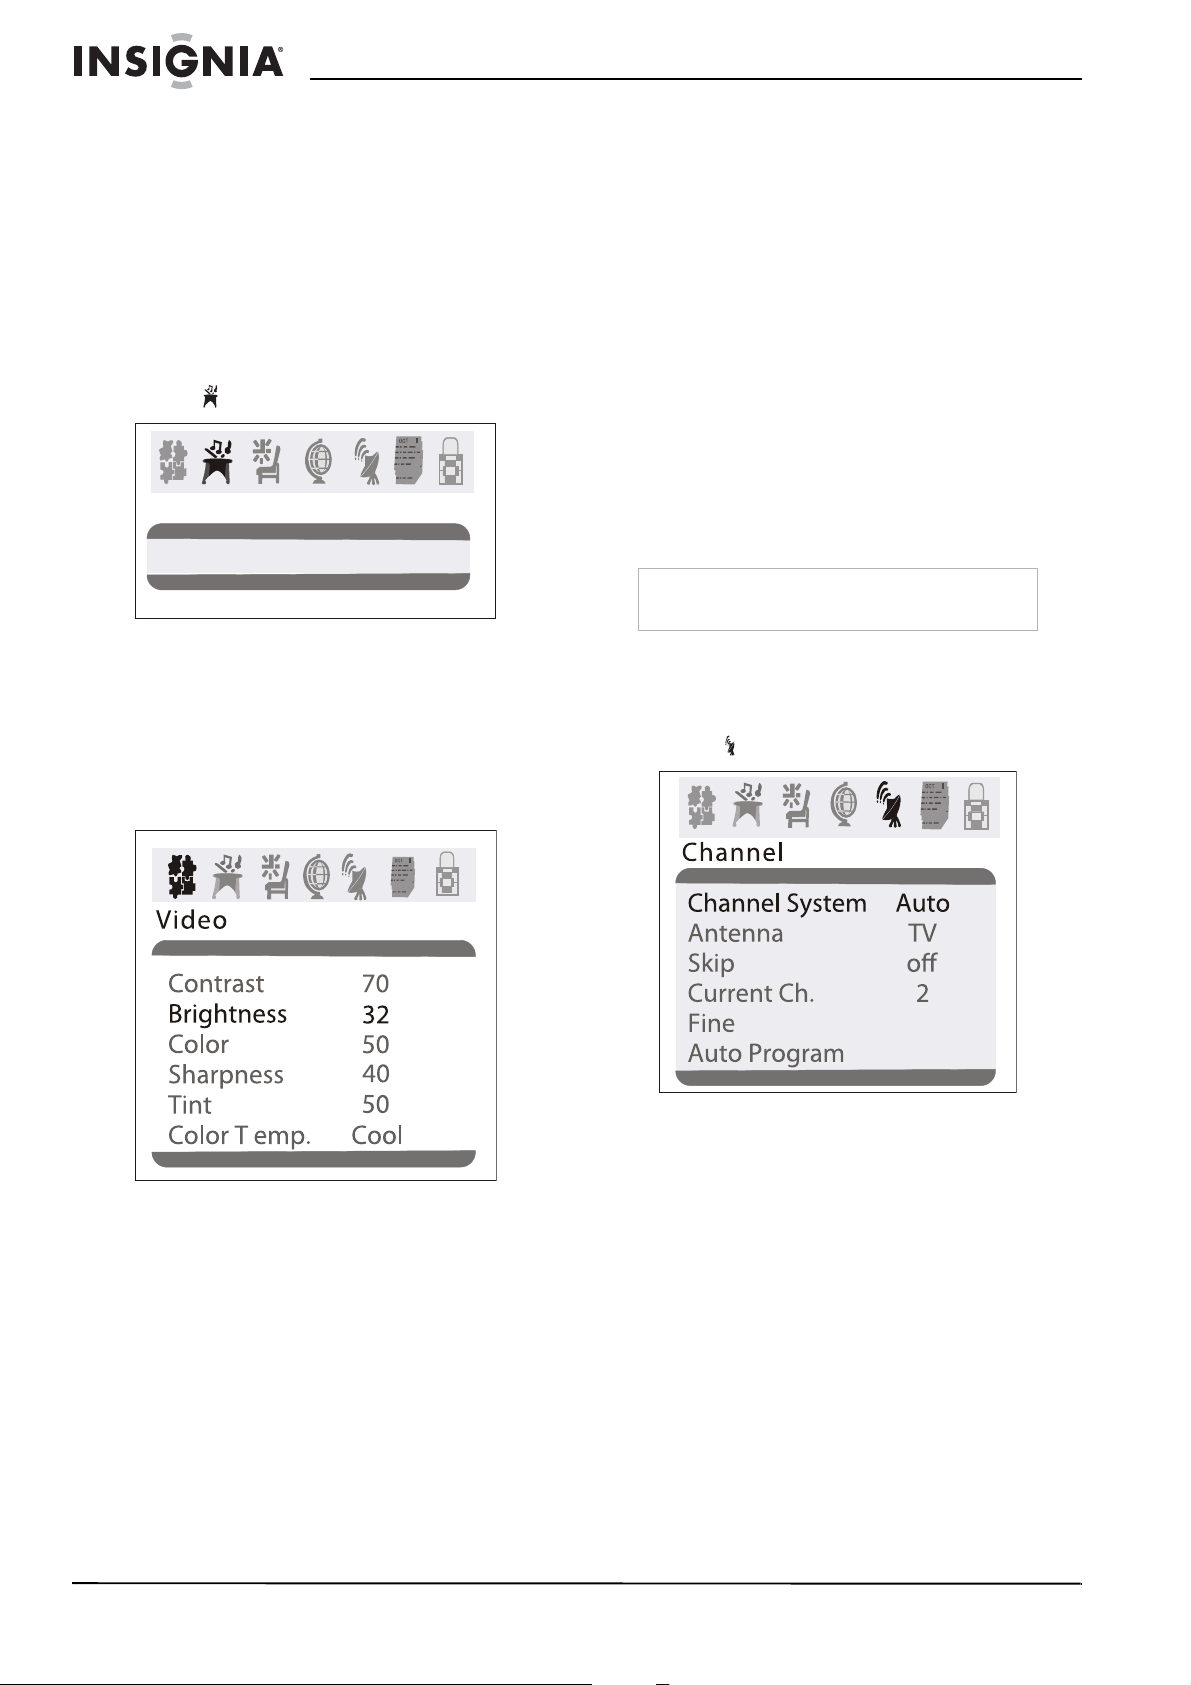
Adjusting picture quality
To adjust picture quality:
1 Press MENU to open the on-screen display
(OSD). The
Video
menu opens.
• Sharpness–Adjust the clarity of the video
image. Increasing the value shows a
cleaner, clearer image. Decreasing the
value shows a smoother image.
• Tint–Adjusts the color tint. Increasing the
value adds more red to skin color.
Decreasing the value adds more green to
skin color.
• Color Temp.–Adjusts the overall color of
the image. You can select Neutral,
Warm, or Cool.
3 Press VOL+ or VOL- button adjust an option.
Fine-tuning the picture or sound
If the picture or sound quality is poor, try
adjusting the picture quality and sound quality
first. For more information, see “Adjusting
picture quality” on page 8.
If picture or sound quality is still poor after you
have adjusted the picture and sound, you can
use the Fine option to improve the quality.
Caution
Do not use this option unless the picture or sound
quality are poor.
To fine-tune the picture or sound:
1 Press MENU to open the on-screen display
(OSD).
2 Press VOL+ or VOL– to select the channel
icon . The
Channel
menu opens.
3 Press CH+ or CH– to select Fine.
4 Press VOL+ or VOL– to start the fine-tuning
process.
2 Press CH+ or CH– to select an option. You
can select:
• Contrast–Adjusts the white and dark
areas in the video image. Increasing the
value adjusts the white areas. Decreasing
the value adjusts the dark areas.
• Brightness–Adjusts the amount of light
and dark in the video image. Increasing
the value adds more light to the dark
areas. Decreasing the value adds more
dark to the light areas.
• Color–Adjusts the color in the video
image.
8
www.insignia-products.com
Page 9
Insignia NS-F20C 20" Flat Tube TV
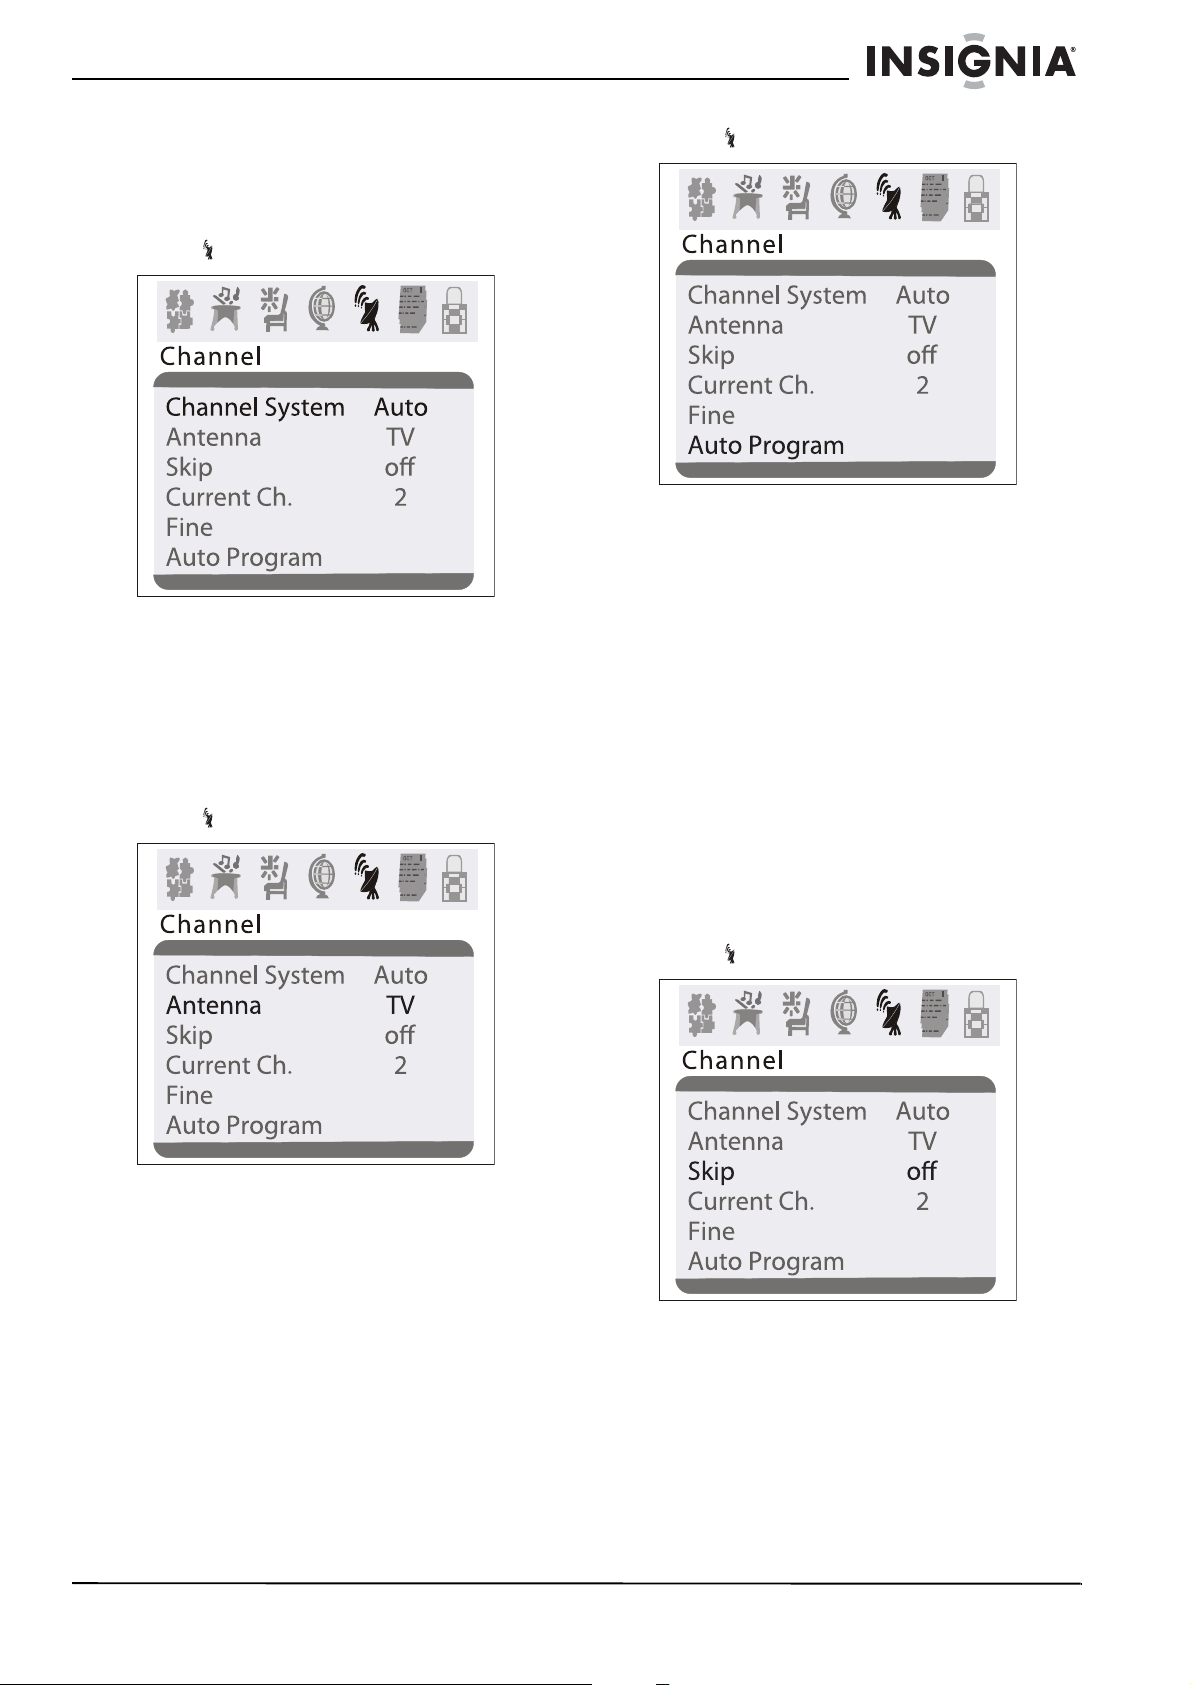
Selecting the TV signal source
To select the TV signal source:
1 Press MENU to open the on-screen display
(OSD).
2 Press VOL+ or VOL– to select the channel
icon . The
3 Press CH+ or CH– to select Channel
System.
4 Press VOL+ or VOL– to select AUTO
(recommended) or NTSC.
Channel
menu opens.
Selecting the channel system
1 Press MENU to open the on-screen display
(OSD).
2 Press VOL+ or VOL– to select the channel
icon . The
Channel
menu opens.
3 Press VOL+ or VOL– to select the channel
icon . The
4 Press CH+ to select Auto Program.
5 Press VOL+ or VOL– to start the scan. Your
TV scans for available channels, and stores
the channel information in memory.
Channel
menu opens.
Adding or deleting channels
If a channel was skipped when your TV
memorized the channels because the signal was
weak, you can add the channel to the channel
list. You can also delete a channel from memory.
To add or delete channels:
1 Tune to the channel you want to add or
delete. If you want to add a channel, use the
number buttons to enter the channel button.
If you want to delete a channel press the
CH+ or CH– button or use the number
buttons to select the channel.
2 Press MENU to open the on-screen display
(OSD).
3 Press VOL+ or VOL– to select the channel
icon . The
Channel
menu opens.
3 Press CH+ or CH– to select Antenna.
4 Press VOL+ or VOL– to select TV or CATV.
Memorizing channels
After you set up your TV, you need to scan for
channels in your area that have a signal. When
your press the CH+ or CH–, your TV only
displays the memorized channels, and skips the
channels that do not have signals.
To memorize channels:
1 Make sure that you have selected the TV
signal source. For more information, see
“Selecting the TV signal source” on page 9.
2 Press MENU to open the on-screen display
(OSD).
4 Press CH+ or CH– to select Skip.
5 Press VOL+ or VOL– to add or delete the
channel.
www.insignia-products.com
9
Page 10
Insignia NS-F20C 20" Flat Tube TV
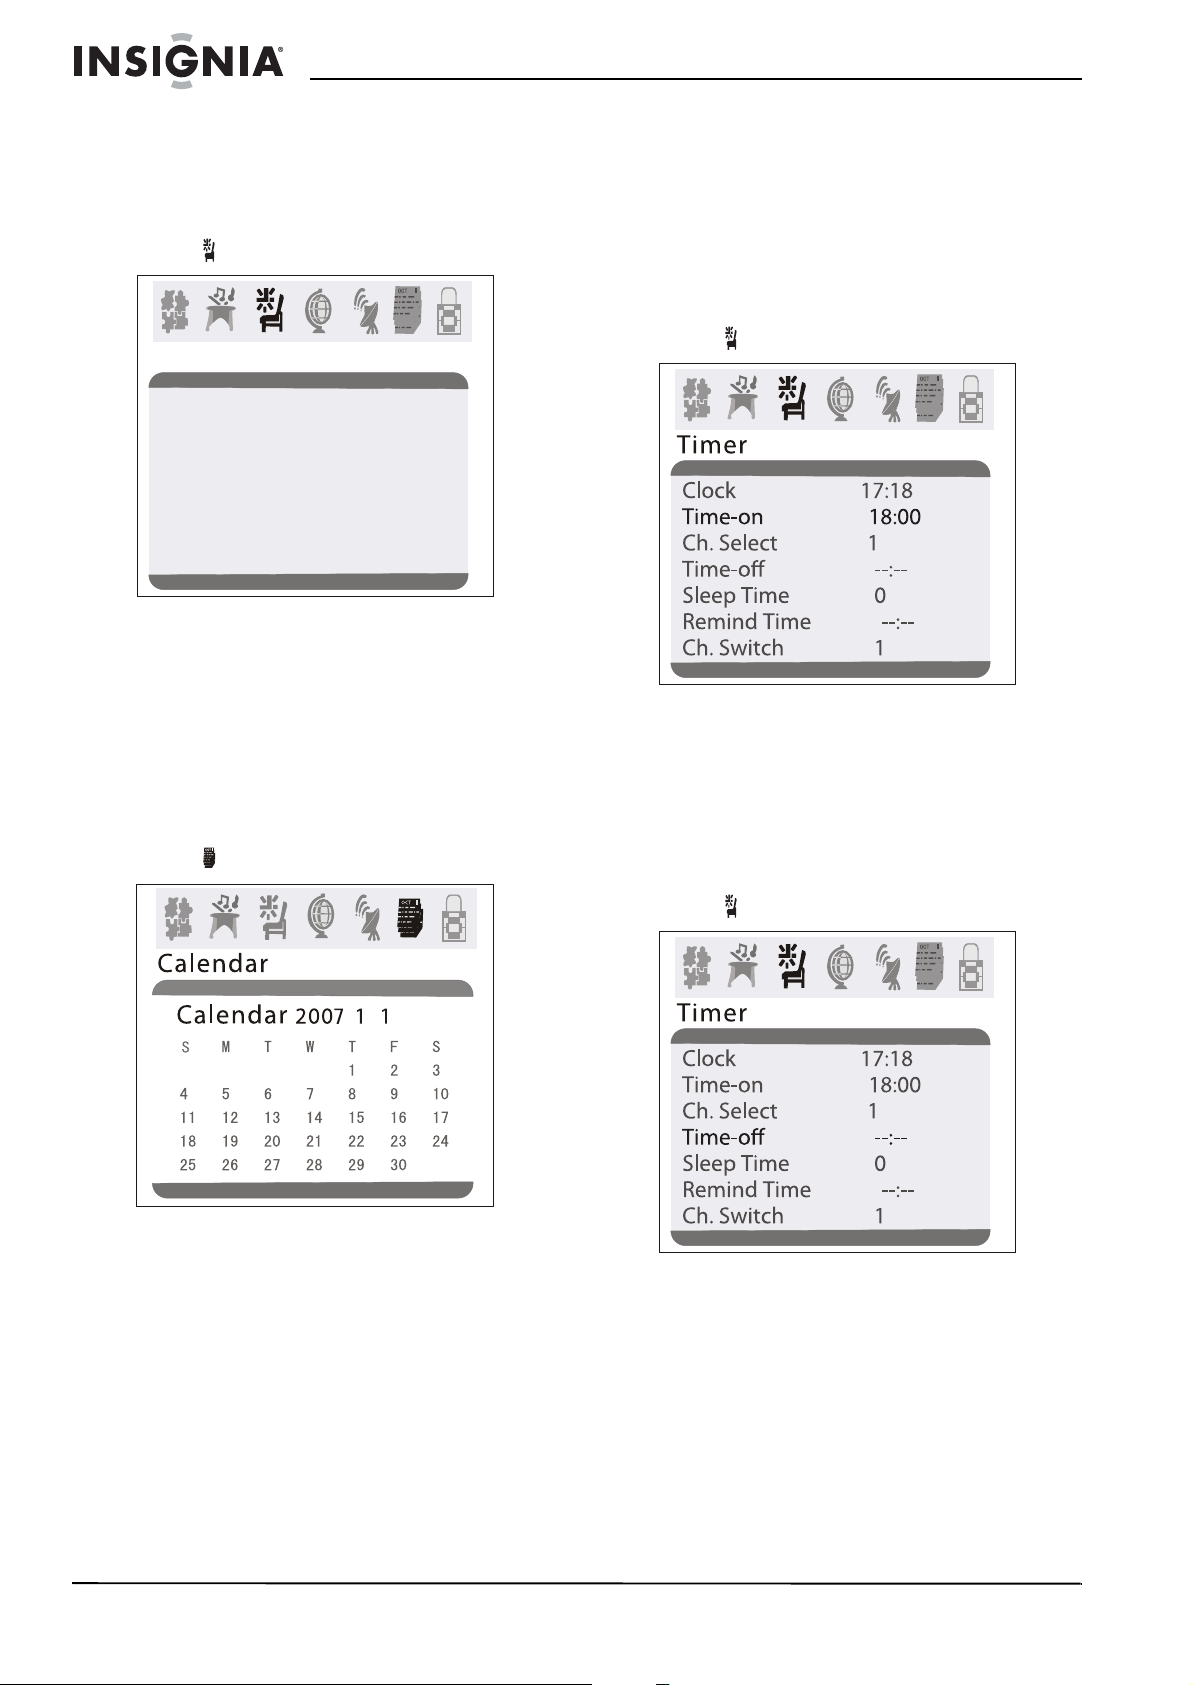
Setting the clock
To set the clock:
1 Press MENU to open the on-screen display
(OSD).
2 Press VOL+ or VOL– to select the timer
icon . The
Timer
Timer
Clock 17:18
Time-on 18:00
Ch. Select 1
Time-o --:-Sleep Time 0
Remind Time --:-Ch. Switch 1
3 Press CH+ or CH– to select Clock.
4 Press VOL+ or VOL– to set the hour, then
press CH+ or CH– to go to the minutes field.
5 Press VOL+ or VOL– to set the minutes.
Setting the calendar
To set the calendar:
1 Press MENU to open the on-screen display
(OSD).
2 Press VOL+ or VOL– to select the calendar
icon . The
Calendar
menu opens.
menu opens.
Automatically turning your TV on or off
You can set timers that will automatically turn
your TV on and off. When you set these timers,
your TV will turn on and off each day at the times
you specify.
To set the timer to turn on your TV:
1 Press MENU to open the on-screen display
(OSD).
2 Press VOL+ or VOL– to select the timer
icon . The
3 Press CH+ or CH– to select Time-On.
4 Press VOL+ or VOL– to set the hour, then
press CH+ or CH– to go to the minutes field.
5 Press VOL+ or VOL– to set the minutes.
To set the timer to turn off your TV:
1 Press MENU to open the on-screen display
(OSD).
2 Press VOL+ or VOL– to select the timer
icon . The
Timer
menu opens.
Timer
menu opens.
10
3 Press CH+ or CH– to highlight the year, then
press VOL+ or VOL– to select the year.
4 Press CH+ or CH– to highlight the month,
then press VOL+ or VOL– to select the
month.
5 Press CH+ or CH– to highlight the day, then
press VOL+ or VOL– to select the day.
6 Press EXIT to close the
Calendar
menu.
www.insignia-products.com
3 Press CH+ or CH– to select Time-Off.
4 Press VOL+ or VOL– to set the hour, then
press CH+ or CH– to go to the minutes field.
5 Press VOL+ or VOL– to set the minutes.
Page 11
Insignia NS-F20C 20" Flat Tube TV
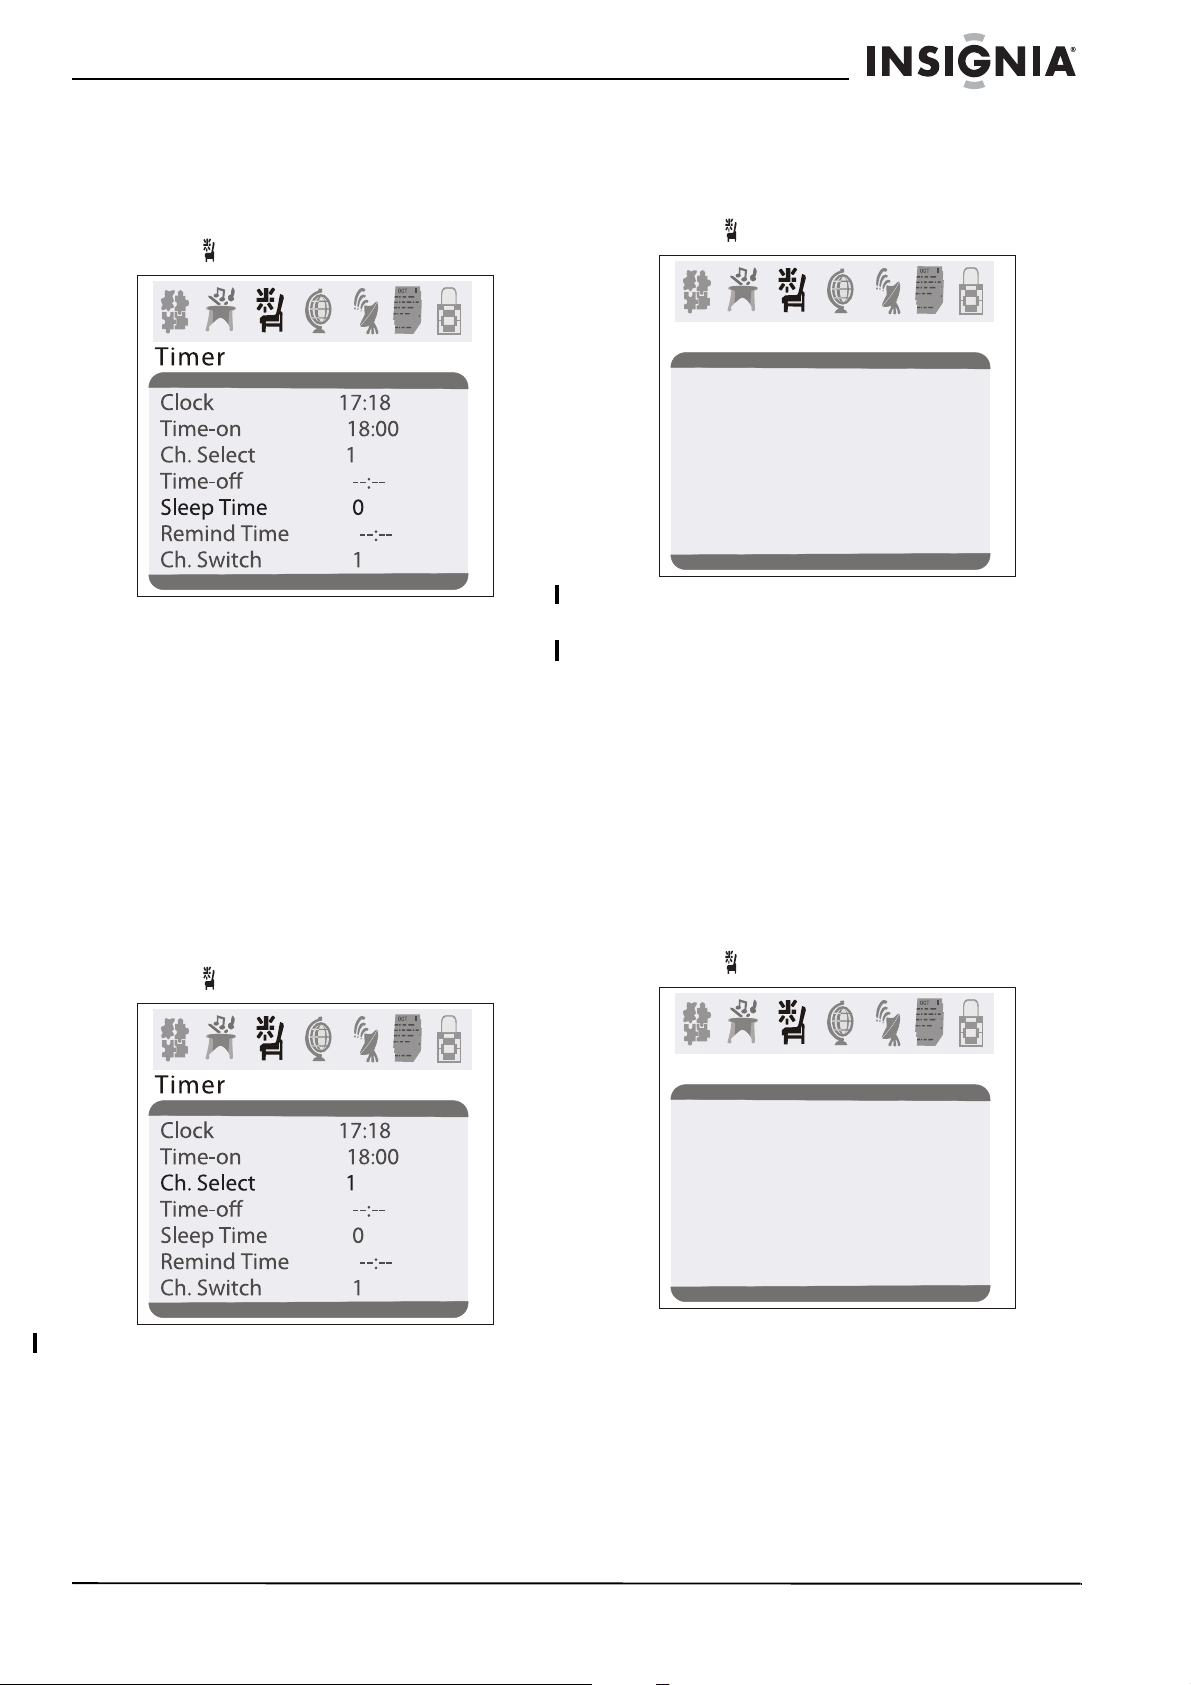
Setting the sleep timer
To set the sleep timer:
1 Press MENU to open the on-screen display
(OSD).
2 Press VOL+ or VOL– to select the timer
icon . The
3 Press CH+ or CH– to select Sleep Time,
then press VOL+ or VOL– to select the
amount of time you want your TV to wait
before it turns off. You can select 0, 5, 10, 15,
30, 45, 60, 90, 120, 180, or 240 minutes.
4 To turn off the sleep timer, repeat this task
and set the sleep time to 0.
Timer
menu opens.
Setting a favorite channel
You can set up a favorite channel and set the
time when you want your TV to switch to a
favorite channel.
To set a favorite channel:
1 Press MENU to open the on-screen display
(OSD).
2 Press VOL+ or VOL– to select the timer
icon . The
Timer
menu opens.
To switch to a favorite channel at a specific
time:
1 Press MENU to open the on-screen display
(OSD).
2 Press VOL+ or VOL– to select the timer
icon . The
Timer
menu opens.
Timer
Clock 17:18
Time-on 18:00
Ch. Select 1
Time-o --:-Sleep Time 0
Remind Time --:-Ch. Switch 1
3 Press CH+ or CH– to select Ch. Switch.
4 Press VOL+ or VOL– to select the channel.
5 Press CH+ or CH– to select Remind Time.
6 Press VOL+ or VOL– to set the hour, then
press CH+ or CH– to go to the minutes field.
7 Press VOL+ or VOL– to set the minutes.
Setting a reminder
You can set a reminder so your TV changes to a
specific channel or shows channel information at
the time you specify.
To set a reminder:
1 Press MENU to open the on-screen display
(OSD).
2 Press VOL+ or VOL– to select the timer
icon . The
Timer
menu opens.
3 Press CH+ or CH– to select Ch. Select.
www.insignia-products.com
Timer
Clock 17:18
Time-on 18:00
Ch. Select 1
Time-o --:-Sleep Time 0
Remind Time --:-Ch. Switch 1
3 Press CH+ or CH– to select Remind Time.
4 Press VOL+ or VOL– to select the channel.
5 Press VOL+ or VOL– to set the hour, then
press CH+ or CH– to go to the minutes field.
6 Press VOL+ or VOL– to set the minutes.
11
Page 12
Insignia NS-F20C 20" Flat Tube TV
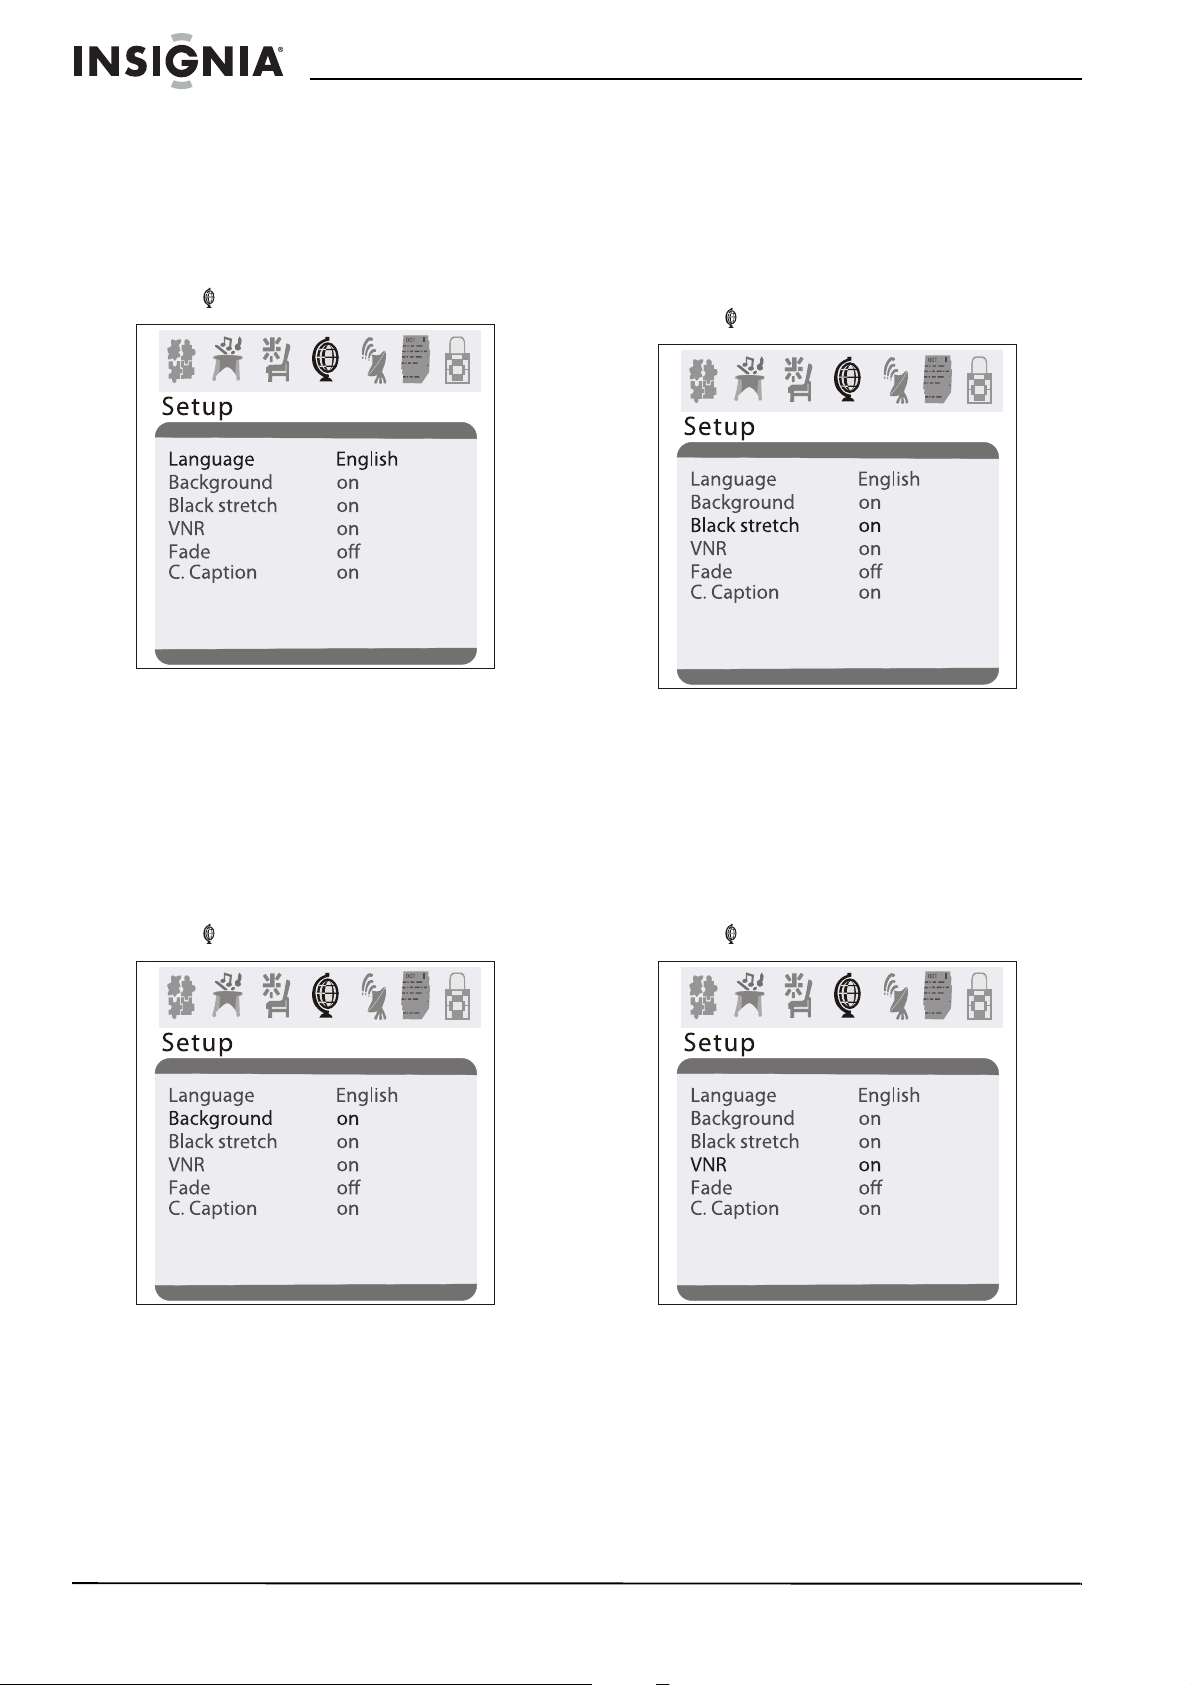
Selecting the on-screen display language
You can select a language for the on-screen
display (OSD).
To select the on-screen display language:
1 Press MENU to open the on-screen display
(OSD).
2 Press VOL+ or VOL– to select the setup
icon . The
3 Press CH+ or CH– to select Language.
4 Press VOL+ or VOL– to select English,
French, or Spanish.
Setup
menu opens.
Turning the black stretch on or off
When the black stretch feature is on, your TV
automatically increase the contrast range for the
video image.
To turn the black stretch on or off:
1 Press MENU to open the on-screen display
(OSD).
2 Press VOL+ or VOL– to select the setup
icon . The
3 Press CH+ or CH– to select Black Stretch.
4 Press VOL+ or VOL– to select ON or OFF.
Setup
menu opens.
Selecting the background
Your TV can display a moving
message when you tune to a channel that does
not have a signal.
1 Press MENU to open the on-screen display
(OSD).
2 Press VOL+ or VOL– to select the setup
icon . The
3 Press CH+ or CH– to select Background.
4 Press VOL+ or VOL– to select ON or OFF.
Setup
menu opens.
NO SIGNAL
Improving picture quality
Your TV has a video noise reduction (VNR)
feature that automatically reduces video noise to
improve picture quality.
1 Press MENU to open the on-screen display
(OSD).
2 Press VOL+ or VOL– to select the setup
icon . The
3 Press CH+ or CH– to select VNR.
4 Press VOL+ or VOL– to select ON or OFF.
Setup
menu opens.
12
www.insignia-products.com
Page 13
Insignia NS-F20C 20" Flat Tube TV
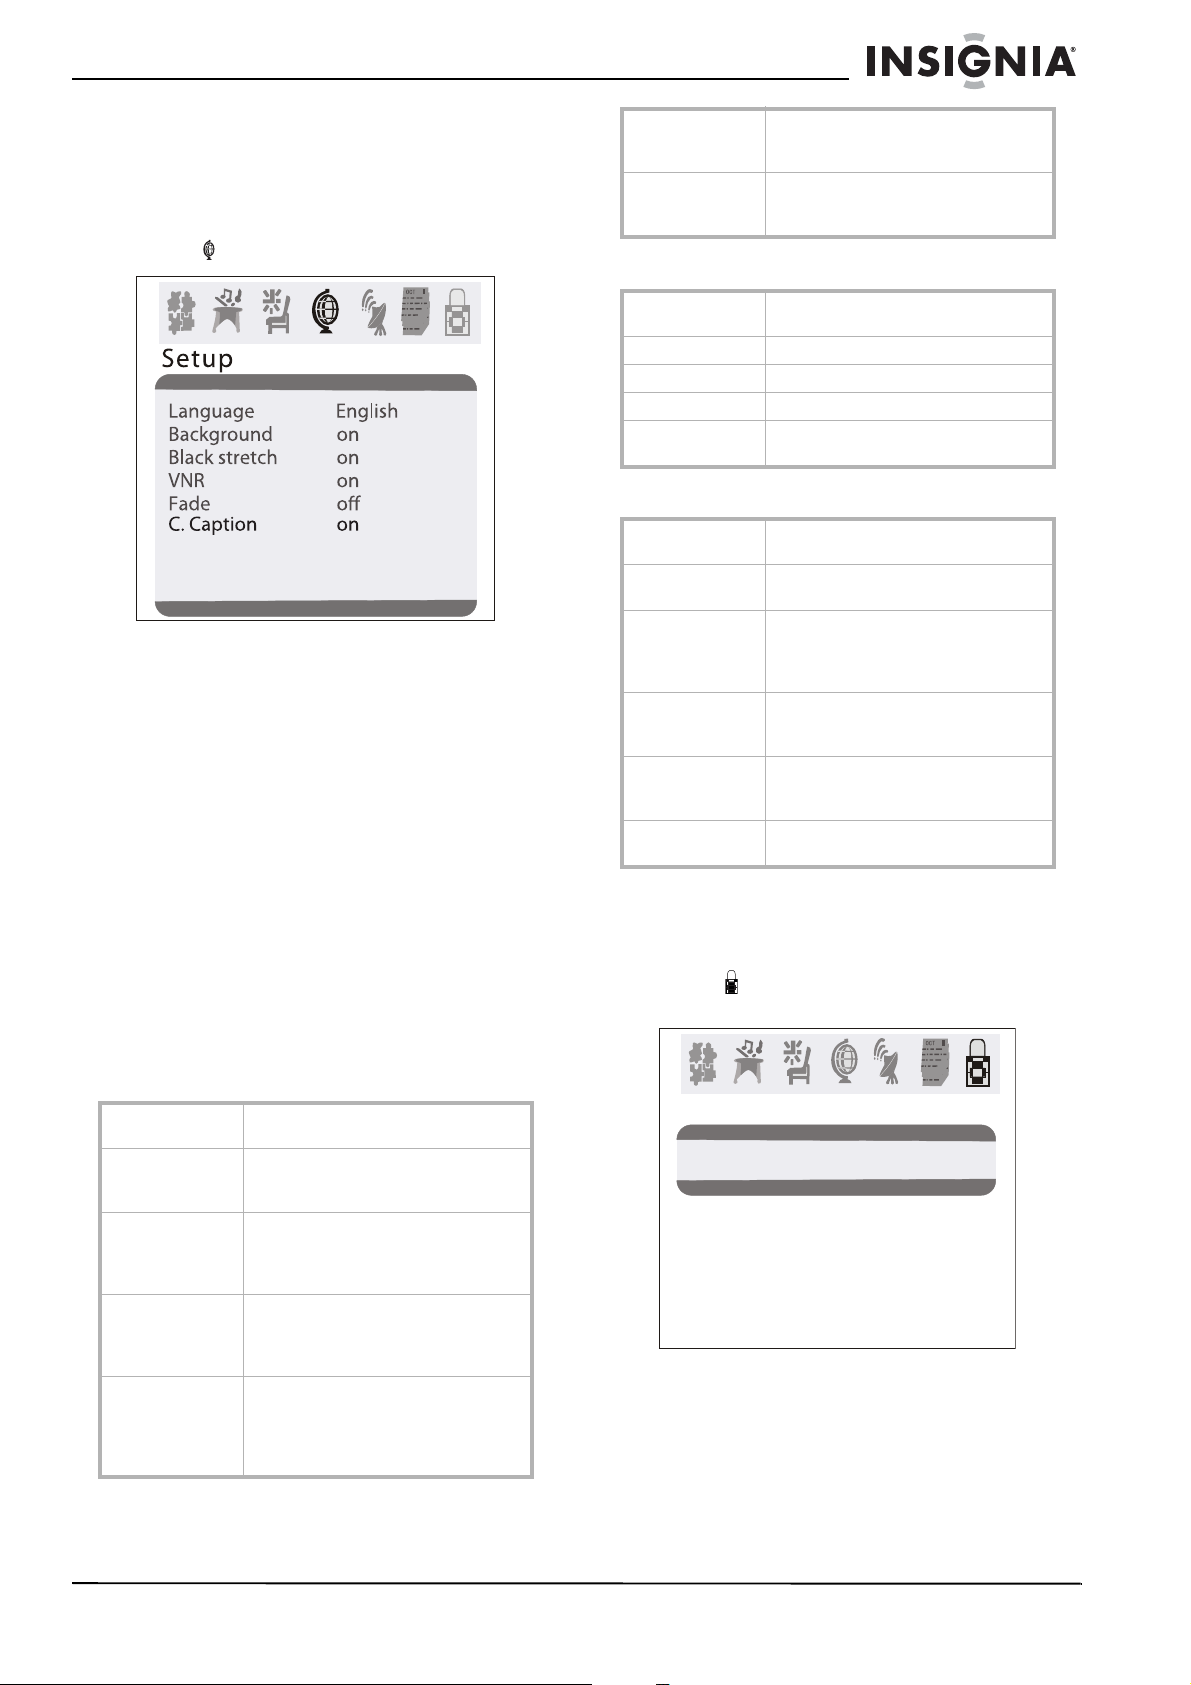
Selecting the closed caption mode
To select the closed caption mode:
1 Press MENU to open the on-screen display
(OSD).
2 Press VOL+ or VOL– to select the setup
icon . The
Setup
menu opens.
3 Press CH+ or CH– to select C.Caption.
4 Press VOL+ or VOL– to select a closed
caption mode. You can select:
• OFF–Turns off closed captions.
• CC1–Displays captions in the primary
language for a TV program.
• CC2 through CC4–Displays other types
of video related broadcast information.
• T1–Displays information such as a
program guide. This option covers a large
portion of the screen.
• T2 through T4–Displays other types of
information provided by the broadcaster.
This option covers a large portion of the
screen.
Setting parental controls
You can block or unblock TV ratings for the U.S.
You can also block or unblock movie ratings.
U.S. TV program ratings
TV-14 Parents strongly cautioned–Programs
TV-MA Mature audience only–Programs may
may contain sexual content, strong
language, and more intense violence.
contain sexual violence, explicit sexual
content and profane language.
U.S. TV content ratings
FV Programs contain fantasy and cartoon
V Programs contain violence.
S Programs contain sex.
L Programs contain offensive language.
D Programs contain dialogue with sexual
violence.
content.
U.S. TV movie ratings
NR Not rated yet–The movie is pending
G General Audience–This movie rating
PG-13 Parents Strongly Cautioned–This
R Restricted–This movie rating means
NC-17 This movie rating means no one 17
X This type of movie rating means adults
government rating approval.
means all ages can see the movie.
movie rating means some material
may not be appropriate for children
under 13.
children under 17 of age require
parental guidance.
and under should see the movie
without parental guidance.
only.
To block or unblock U.S. TV ratings:
1 Press MENU to open the on-screen display
(OSD).
2 Press VOL+ or VOL– to select the password
icon , then press CH+ or CH–. The
Password
menu opens.
NR Not Rated–Programs are not rated or
rating does not apply.
TV-Y For all children–Programs are
designed for a very young audience,
including children from ages 2-6.
TV-Y7 Directed for older children–Programs
may include comedic violence of mild
physical or may frighten children under
the age of 7.
TV-G General Audience–Programs contain
little or no violence, no strong
language, and little or no sexual
dialogue and situations.
TV-PG Parental Guidance Suggested–
Programs may contain limited
violence, some suggestive sexual
dialogue and situations, and profane
language.
www.insignia-products.com
Passsword
Password ----
13
Page 14

Insignia NS-F20C 20" Flat Tube TV
3 Use the number buttons to enter the
password. The default password is 0000.
Parental Lock
The
menu opens.
Rating
4 Press CH+ or CH– to select TV Rating.
5 Press VOL+ or VOL– to open the TV Rating
menu.
TV Rating
3 Use the number buttons to enter the
password. The default password is 0000.
Parental Lock
The
menu opens.
Rating
4 Press CH+ or CH– to select MPAA Rating.
5 Press VOL+ or VOL– to open the MPAA
Rating menu.
OCT
OCT
OCT
MPAA Rating
Ra ting FV
TV -Y
U
>
U
TV -Y 7
U
TV -G
U
TV -P G
U
TV -14
U
TV -MA
DLSV
U
UUUU
UUUU
UUU
6 Press CH+ or CH– to select the rating you
want to block or unblock, then press VOL+ or
VOL– to block or unblock the rating. A B
appears if the rating is blocked. A U appears
if the rating is unblocked.
7 After you set the ratings, press MENU to
return to the previous menu.
To block or unblock movie ratings:
1 Press MENU to open the on-screen display
(OSD).
2 Press VOL+ or VOL– to select the password
icon , then press CH+ or CH–. The
Password
menu opens.
GU
PG U
PG-13 U
RU
NC-17 U
XU
6 Press CH+ or CH– to select the rating you
want to block or unblock, then press VOL+ or
VOL– to block or unblock the rating. A B
appears if the rating is blocked. A U appears
if the rating is unblocked.
7 After you set the ratings, press MENU to
return to the previous menu.
14
Passsword
Password ----
www.insignia-products.com
Page 15

Insignia NS-F20C 20" Flat Tube TV
Turning parental controls on or off
To turn parental controls on or off:
1 Press MENU to open the on-screen display
(OSD).
2 Press VOL+ or VOL– to select the password
icon , then press CH+ or CH–. The
Password
Passsword
menu opens.
Password ----
3 Use the number buttons to enter the
password. The default password is 0000.
The
Parental Lock
menu opens.
Changing the password
To change the password:
1 Press MENU to open the on-screen display
(OSD).
2 Press VOL+ or VOL– to select the password
icon , then press CH+ or CH–. The
Password
Passsword
menu opens.
Password ----
3 Use the number buttons to enter the old
password. The default password is 0000.
The
Parental Lock
menu opens.
Rating
4 Press CH+ or CH– to select Parental Lock.
5 Press VOL+ or VOL– to select off or on.
Rating
4 Press CH+ or CH– to select Change
Password.
5 Enter a new four-digit password, then enter
the new password again.
www.insignia-products.com
15
Page 16

Insignia NS-F20C 20" Flat Tube TV
Setting other locks
In addition to the parental controls lock, you can
also block input from a device connected to the
A/V jacks (AV LOCK) and block the program on
the current channel (PROGRAM LOCK).
To set other locks:
1 Press MENU to open the on-screen display
(OSD).
2 Press VOL+ or VOL– to select the password
icon , then press CH+ or CH–. The
Password
menu opens.
Passsword
Password ----
3 Use the number buttons to enter the
password. The default password is 0000.
Parental Lock
The
menu opens.
Rating
4 Press CH+ or CH– to select Lock Menu.
5 Press VOL+ or VOL– to open the
.
Menu
6 Press CH+ or CH– to select to select
AV LOCK or PROGRAM LOCK.
7 Press VOL+ or VOL– to turn the lock on or
off.
Maintaining
Unplug your TV from the wall outlet before
cleaning.
Do not use liquid cleaners or aerosol cleaners.
Wipe the exterior with a soft cloth dampened
with water. Do not spay water directly on the
screen or exterior.
Lock
Troubleshooting
Problem Solution
Remote control
does not work
Bar on screen Try a different channel. If another
Picture is
distorted
Picture rolls
vertically
No color Adjust color control.
Weak picture Adjust contrast and brightness
Line or streaks in
picture
Check the batteries. They may need
replacing.
Make sure there is not an obstruction
between the remote control and the
remote control sensor.
channel is working correctly, the
station may be having problems.
Make sure that the antenna is securely
connected to the antenna jack on the
back of your TV.
If you are using an outside antenna,
make sure that there are no broken
wires.
Check for local interference.
Try a different channel. If another
channel is working correctly, the
station may be having problems.
Make sure that the antenna is securely
connected to the antenna jack on the
back of your TV.
If you are using an outside antenna,
make sure that there are no broken
wires.
Try a different channel. If another
channel is working correctly, the
station may be having problems.
Make sure that the antenna is securely
connected to the antenna jack on the
back of your TV.
If you are using an outside antenna,
make sure that there are no broken
wires.
Check for local interference.
Try a different channel. If another
channel is working correctly, the
station may be having problems.
Make sure that the antenna is securely
connected to the antenna jack on the
back of your TV.
If you are using an outside antenna,
make sure that there are no broken
wires.
controls.
Try a different channel. If another
channel is working correctly, the
station may be having problems.
Make sure that the antenna is securely
connected to the antenna jack on the
back of your TV.
If you are using an outside antenna,
make sure that there are no broken
wires.
Check for local interference.
Try a different channel. If another
channel is working correctly, the
station may be having problems.
Make sure that the antenna is securely
connected to the antenna jack on the
back of your TV.
If you are using an outside antenna,
make sure that there are no broken
wires.
Check for local interference.
16
www.insignia-products.com
Page 17

Insignia NS-F20C 20" Flat Tube TV
Problem Solution
Ghost picture Try a different channel. If another
Picture blurred Try a different channel. If another
Sound or picture
is poor
No picture or
sound
channel is working correctly, the
station may be having problems.
Make sure that the antenna is securely
connected to the antenna jack on the
back of your TV.
If you are using an outside antenna,
make sure that there are no broken
wires.
Check for local interference.
channel is working correctly, the
station may be having problems.
Make sure that the antenna is securely
connected to the antenna jack on the
back of your TV.
If you are using an outside antenna,
make sure that there are no broken
wires.
Check for local interference.
Adjust contrast and brightness control.
Adjust the sound controls.
Try a different channel. If another
channel is working correctly, the
station may be having problems.
Make sure that the antenna is securely
connected to the antenna jack on the
back of your TV.
If you are using an outside antenna,
make sure that there are no broken
wires.
Check for local interference.
Make sure that your TV is plug into a
power outlet and that the outlet is
supplying power.
Try a different channel. If another
channel is working correctly, the
station may be having problems.
Make sure that the antenna is securely
connected to the antenna jack on the
back of your TV.
If you are using an outside antenna,
make sure that there are no broken
wires.
Check for local interference.
Specifications
Television NTSC-M TV Standard
Av AV IN (NTSC-M)
VHF channels 2-13
UHF channels 14-69
CATV channels 1-125
Tuning 181 channel frequency synthesized
Channel access Direct access keyboard
Antenna terminals VHF/UHF/CATV 75 ohm unbalanced
(F-type)
Sound output 2W + 2W
Remote control Digital encoded infrared
Power 120v, 60Hz
Picture tube 20"
Dimensions
(W × D × H)
22.7 × 19.3× 17.7 inches
(576×490×448 mm)
Weight 50.7 lbs
(23 kg)
Legal notices
FCC Part 15
This device complies with Part 15 of the FCC Rules.
Operation of this product is subject to the following two
conditions: (1) this device may not cause harmful
interference, and (2) this device must accept any
interference received, including interference that may cause
undesired operation.
This equipment has been tested and found to comply within
the limits for a class B digital device, pursuant to Part 15 of
the FCC Rules. These limits are designed to provide
reasonable protection against harmful interference in a
residential installation. This equipment generates, uses, and
can radiate radio frequency energy and, if not installed and
used in accordance with the instructions, may cause harmful
interference to radio communications. However, there is no
guarantee that interference will not occur in a particular
installation. If this equipment does cause harmful
interference to radio or television reception, which can be
determined by turning the equipment off and on, the user is
encouraged to try to correct the interference by one or more
of the following measures:
• Reorient or relocate the receiving antenna.
• Increase the separation between the equipment and
receiver.
• Connect the equipment into an outlet on a circuit
different from that to which the receiver is connected.
• Consult the dealer or an experienced technician for
help.
FCC warning
Changes or modifications not expressly approved by the
party responsible for compliance with the FCC Rules could
void the user’s authority to operate this equipment.
Copyright
© 2007 Insignia. Insignia and the Insignia logo are
trademarks of Best Buy Enterprise Services, Inc. Other
brands and product names are trademarks or registered
trademarks of their respective holders. Specifications and
features are subject to change without notice or obligation.
For service and support call (877) 467-4289.
www.insignia-products.com
17
Page 18

Insignia NS-F20C 20" Flat Tube TV
18
www.insignia-products.com
Page 19

Insignia NS-F20C 20" Flat Tube TV
1 year limited warranty
Insignia Products (“Insignia”) warrants to you, the original
purchaser of this new NS-F20C (“Product”), that the Product
shall be free of defects in the original manufacture of the
material or workmanship for a period of one (1) year from the
date of your purchase of the Product (“Warranty Period”).
This Product must be purchased from an authorized dealer
of Insignia brand products and packaged with this warranty
statement. This warranty does not cover refurbished
Product. If you notify Insignia during the Warranty Period of a
defect covered by this warranty that requires service, terms
of this warranty apply.
How long does the coverage last?
The Warranty Period lasts for 1 year (365 days) from the
date you purchased the Product. The purchase date is
printed on the receipt you received with the Product.
What does this warranty cover?
During the Warranty Period, if the original manufacture of the
material or workmanship of the Product is determined to be
defective by an authorized Insignia repair center or store
personnel, Insignia will (at its sole option): (1) repair the
Product with new or rebuilt parts; or (2) replace the Product
at no charge with new or rebuilt comparable products or
parts. Products and parts replaced under this warranty
become the property of Insignia and are not returned to you.
If service of Products or parts are required after the Warranty
Period expires, you must pay all labor and parts charges.
This warranty lasts as long as you own your Insignia Product
during the Warranty Period. Warranty coverage terminates if
you sell or otherwise transfer the Product.
How to obtain warranty service?
If you purchased the Product at a retail store location, take
your original receipt and the Product to the store you
purchased it from. Make sure that you place the Product in
its original packaging or packaging that provides the same
amount of protection as the original packaging. If you
purchased the Product from an online web site, mail your
original receipt and the Product to the address listed on the
web site. Make sure that you put the Product in its original
packaging or packaging that provides the same amount of
protection as the original packaging.
To obtain in-home warranty service for a television with a
screen 25 inches or larger, call 1-888-BESTBUY. Call agents
will diagnose and correct the issue over the phone or will
have an Insignia-approved repair person dispatched to your
home.
Where is the warranty valid?
This warranty is valid only to the original purchaser of the
product in the United States and Canada.
What does the warranty not cover?
This warranty does not cover:
• Customer instruction
• Installation
• Set up adjustments
• Cosmetic damage
• Damage due to acts of God, such as lightning strikes
• Accident
•Misuse
• Abuse
• Negligence
• Commercial use
• Modification of any part of the Product, including the
antenna
• Plasma display panel damaged by static (non-moving)
images applied for lengthy periods (burn-in).
This warranty also does not cover:
• Damage due to incorrect operation or maintenance
• Connection to an incorrect voltage supply
• Attempted repair by anyone other than a facility
authorized by Insignia to service the Product
• Products sold as is or with all faults
• Consumables, such as fuses or batteries
• Products where the factory applied serial number has
been altered or removed
REPAIR REPLACEMENT AS PROVIDED UNDER THIS
WARRANTY IS YOUR EXCLUSIVE REMEDY. INSIGNIA
SHALL NOT BE LIABLE FOR ANY INCIDENTAL OR
CONSEQUENTIAL DAMAGES FOR THE BREACH OF ANY
EXPRESS OR IMPLIED WARRANTY ON THIS PRODUCT,
INCLUDING, BUT NOT LIMITED TO, LOST DATA, LOSS
OF USE OF YOUR PRODUCT, LOST BUSINESS OR LOST
PROFITS. INSIGNIA PRODUCTS MAKES NO OTHER
EXPRESS WARRANTIES WITH RESPECT TO THE
PRODUCT, ALL EXPRESS AND IMPLIED WARRANTIES
FOR THE PRODUCT, INCLUDING, BUT NOT LIMITED TO,
ANY IMPLIED WARRANTIES OF AND CONDITIONS OF
MERCHANTABILITY AND FITNESS FOR A PARTICULAR
PURPOSE, ARE LIMITED IN DURATION TO THE
WARRANTY PERIOD SET FORTH ABOVE AND NO
WARRANTIES, WHETHER EXPRESS OR IMPLIED, WILL
APPLY AFTER THE WARRANTY PERIOD. SOME
STATES, PROVINCES AND JURISDICTIONS DO NOT
ALLOW LIMITATIONS ON HOW LONG AN IMPLIED
WARRANTY LASTS, SO THE ABOVE LIMITATION MAY
NOT APPLY TO YOU. THIS WARRANTY GIVES YOU
SPECIFIC LEGAL RIGHTS, AND YOU MAY ALSO HAVE
OTHER RIGHTS, WHICH VARY FROM STATE TO STATE
OR PROVINCE TO PROVINCE.
Contact Insignia:
For customer service please call 1-877-467-4289
www.insignia-products.com
INSIGNIA™ is a trademark of Best Buy Enterprise Services,
Inc.
Distributed by Best Buy Purchasing, LLC.
Insignia, 7601 Penn Avenue South, Richfield, Minnesota,
U.S.A.
www.insignia-products.com
19
Page 20

Insignia NS-F20C 20" Flat Tube TV
20
www.insignia-products.com
Page 21

Téléviseur à tube
Informations sur la sécurité
plat de 20 po Insignia
NS-F20C
Contenu
Introduction . . . . . . . . . . . . . . . . . . . . . . . . . . . . .21
Informations sur la sécurité . . . . . . . . . . . . . . . . .21
Fonctionnalités. . . . . . . . . . . . . . . . . . . . . . . . . . .22
Avant . . . . . . . . . . . . . . . . . . . . . . . . . . . . . . . . . . . 22
Face arrière . . . . . . . . . . . . . . . . . . . . . . . . . . . . . . 23
Panneau latéral . . . . . . . . . . . . . . . . . . . . . . . . . . . 23
Télécommande. . . . . . . . . . . . . . . . . . . . . . . . . . . . 24
Installation du téléviseur . . . . . . . . . . . . . . . . . . .24
Connexion à une antenne ou à un câble direct . . . 24
Connexion à un décodeur de câble ou à un récepteur
satellite . . . . . . . . . . . . . . . . . . . . . . . . . . . . . . . . 25
Connexion à un périphérique A/V standard . . . . . . 25
Connexion d’un périphérique vidéo à composantes25
Connexion d’un périphérique S-Vidéo . . . . . . . . . . 26
Connexion d'un système audio . . . . . . . . . . . . . . . 26
Utilisation du téléviseur . . . . . . . . . . . . . . . . . . . .26
Mise sous et hors tension du téléviseur . . . . . . . . . 26
Changement de canal . . . . . . . . . . . . . . . . . . . . . . 26
Réglage du volume . . . . . . . . . . . . . . . . . . . . . . . . 26
Réglage de la qualité de l'image . . . . . . . . . . . . . . 27
Réglage fin du son ou de l'image . . . . . . . . . . . . . . 27
Sélection de la source du signal TV. . . . . . . . . . . . 27
Sélection du système de canal. . . . . . . . . . . . . . . . 28
Mémorisation des canaux . . . . . . . . . . . . . . . . . . . 28
Ajout ou suppression de canaux . . . . . . . . . . . . . . 28
Réglage de l’horloge . . . . . . . . . . . . . . . . . . . . . . . 29
Réglage du calendrier . . . . . . . . . . . . . . . . . . . . . . 29
Pour mettre automatiquement le téléviseur sous et hors
tension. . . . . . . . . . . . . . . . . . . . . . . . . . . . . . . . . 29
Réglage de l’arrêt différé . . . . . . . . . . . . . . . . . . . . 30
Configuration d’un canal favori. . . . . . . . . . . . . . . . 30
Mise en œuvre d'un rappel. . . . . . . . . . . . . . . . . . . 31
Sélection de la langue des menus d’écran. . . . . . . 31
Sélection de l'arrière plan. . . . . . . . . . . . . . . . . . . . 31
Activation ou désactivation de la suramplification du
noir. . . . . . . . . . . . . . . . . . . . . . . . . . . . . . . . . . . . 31
Amélioration de la qualité de l'image . . . . . . . . . . . 32
Sélection du mode des sous-titres codés. . . . . . . . 32
Configuration du contrôle parental . . . . . . . . . . . . . 32
Activer ou désactiver les contrôles parentaux . . . . 34
Modification du mot de passe. . . . . . . . . . . . . . . . . 35
Configuration des autres verrouillages. . . . . . . . . . 35
Entretien. . . . . . . . . . . . . . . . . . . . . . . . . . . . . . . .36
Problèmes et solutions. . . . . . . . . . . . . . . . . . . . .36
Spécifications. . . . . . . . . . . . . . . . . . . . . . . . . . . .37
Avis juridiques . . . . . . . . . . . . . . . . . . . . . . . . . . .37
Garantie limitée d’un an . . . . . . . . . . . . . . . . . . . .39
Introduction
Félicitations pour l’achat de ce produit Insignia
de haute qualité. Le modèle NS-F20C présente
la dernière avancée technologique dans la
conception de téléviseurs à écran plat.
ATT ENT ION
RISQUE DE CHOC ÉLECTRIQUE
NE PAS OUVRIR
Attention
Afin de réduire le risque de choc électrique, ne
pas enlever le couvercle (ou le panneau arrière).
Ne contient aucune pièce réparable par
l'utilisateur. Confier l’entretien à du personnel
qualifié.
Afin de réduire le risque d’incendie et de choc
électrique, ne pas exposer ce téléviseur à la pluie
ou l’humidité.
Attention
Pour éviter des chocs électriques, introduire la
lame la plus large de la prise du cordon
d’alimentation dans la fente correspondante de la
prise secteur. Si la prise ne s'adapte pas,
contacter un électricien afin qu’il remplace la prise
secteur inadéquate. Ne pas modifier la prise du
cordon d’alimentation, sinon ce dispositif de
sécurité serait inopérant.
Ce symbole indique qu'une tension
dangereuse, constituant un risque de choc
électrique, est présente dans cet appareil. Cette
étiquette est située au dos de l’appareil.
Ce symbole indique que d'importantes
instructions concernant le fonctionnement et la
maintenance figurent dans la documentation
qui accompagne cet appareil.
Ce symbole indique que l’appareil est doté d’un
double système d’isolation entre la tension
section dangereuse et les pièces accessibles à
l’utilisateur. Lors de l’entretien, utiliser
exclusivement des pièces de rechange
identiques.
Instructions de sécurité importantes
1 Lire ces instructions.
2 Conserver ces instructions.
3 Respecter tous les avertissements.
4 Respecter toutes les instructions.
5 Ne pas utiliser cet équipement près de l’eau.
6 Nettoyer uniquement avec un chiffon sec.
7 Ne pas obstruer les ouvertures d'aération.
Installer l’appareil conformément aux
instructions du fabricant.
8 Installer l’appareil à l’écart de sources de
chaleur, telles que radiateurs, bouches de
chaleur, fours ou autres appareils (y compris
les amplificateurs) qui produisent de la
chaleur.
Page 22

9 Ne pas chercher à modifier le dispositif de
sécurité de la prise polarisée ou de type mise
à la terre. Une prise polarisée comporte deux
plots, un plus large que l'autre. Une prise de
type mise à la terre est composée de deux
plots et d’un troisième de mise à la terre. La
broche la plus large ou la troisième broche a
été prévue pour la sécurité de l’utilisateur. Si
la prise fournie ne rentre pas dans la prise
secteur, faire appel à un électricien pour qu’il
remplace cette dernière qui est obsolète.
10 Protéger le cordon d’alimentation afin d’éviter
qu’on marche dessus ou qu’il soit pincé, en
particulier au niveau des prises murales,
plaques multiprises et à l’endroit où il est
rattaché à l’appareil.
11 N’utiliser que des périphériques et des
accessoires spécifiés par le fabricant.
12 N’utiliser qu’avec le chariot, le
pied, le trépied, le support ou la
table spécifiés par le fabricant.
13 Débrancher l’appareil lors
d’orages ou quand il n’est pas
utilisé pendant une longue
période.
14 Toutes les réparations doivent être réalisées
par un personnel qualifié.
Faire réparer l’appareil s’il a été endommagé,
qu’il s’agisse du cordon d’alimentation ou de
la prise qui seraient détériorés, de liquide
entré dans l’appareil ou d’objets qui seraient
tombés dessus, d’une exposition à la pluie ou
à l’eau, d’un fonctionnement anormal ou
qu’on l’ait fait tomber.
15 Si cet appareil est connecté à une antenne
extérieure ou à un réseau câblé, vérifier que
l'antenne ou la connexion au réseau câblé
est mis à la terre afin de bénéficier d'une
certaine protection contre les sautes de
tension et les charges électrostatiques.
L'article 810 du Code national de l’électricité
(CNE), ANSI/NFPA Nº 70, fournit des
informations relatives à la mise à la terre
correcte du mât et du support, la mise à la
terre du fil conducteur de l’antenne à l’unité
de décharge de l’antenne, la taille des
conducteurs de mise à la terre,
l’emplacement de l’unité de décharge de
l’antenne, la connexion aux conducteurs de
terre ainsi que les normes en matière de
prise de terre.
Téléviseur à tube plat de 20 po Insignia NS-F20C
7
6
5
4
3
1
1 Équipement de la compagnie d'électricité
2 Système de mise à la terre des électrodes
de la compagnie d’électricité
3 Serre-fils de mise à la terre
4 Conducteurs de mise à la terre
5 Unité de décharge de l’antenne
6 Serre-fil de mise à la terre
7 Fil conducteur de l’antenne
2
Fonctionnalités
Avant
INPUT MENU
VOL+VOL- CH- CH+
INPUT MENU
2
1
3
4
VOL+VOL-
6
5
N° Fonctionnalités Description
1 Touche /témoin
Marche-Arrêt
2 Capteur de
télécommande
3 Touche ENTRÉE Permet de sélectionner la source
4 Touche MENU Permet d’accéder aux menus
5 Touche VOL– Permet de diminuer le volume
Permet d'allumer ou d'éteindre le
téléviseur.
Quand le téléviseur est sous
tension, le témoin marche-arrêt
est bleu. Quand le téléviseur est
en veille, le témoin marche-arrêt
est rouge.
Il reçoit les signaux de la
télécommande. Ne pas obstruer
la transmission des signaux.
d’entrée vidéo.
d’écran (OSD).
sonore.
CH-
7
CH+
8
22
www.insignia-products.com
Page 23
Téléviseur à tube plat de 20 po Insignia NS-F20C
N° Fonctionnalités Description
6 Touche VOL+ Permet d’augmenter le volume
sonore.
7 Touche CH– Permet de syntoniser un canal
inférieur.
8 Touche CH+ Permet de syntoniser un canal
supérieur.
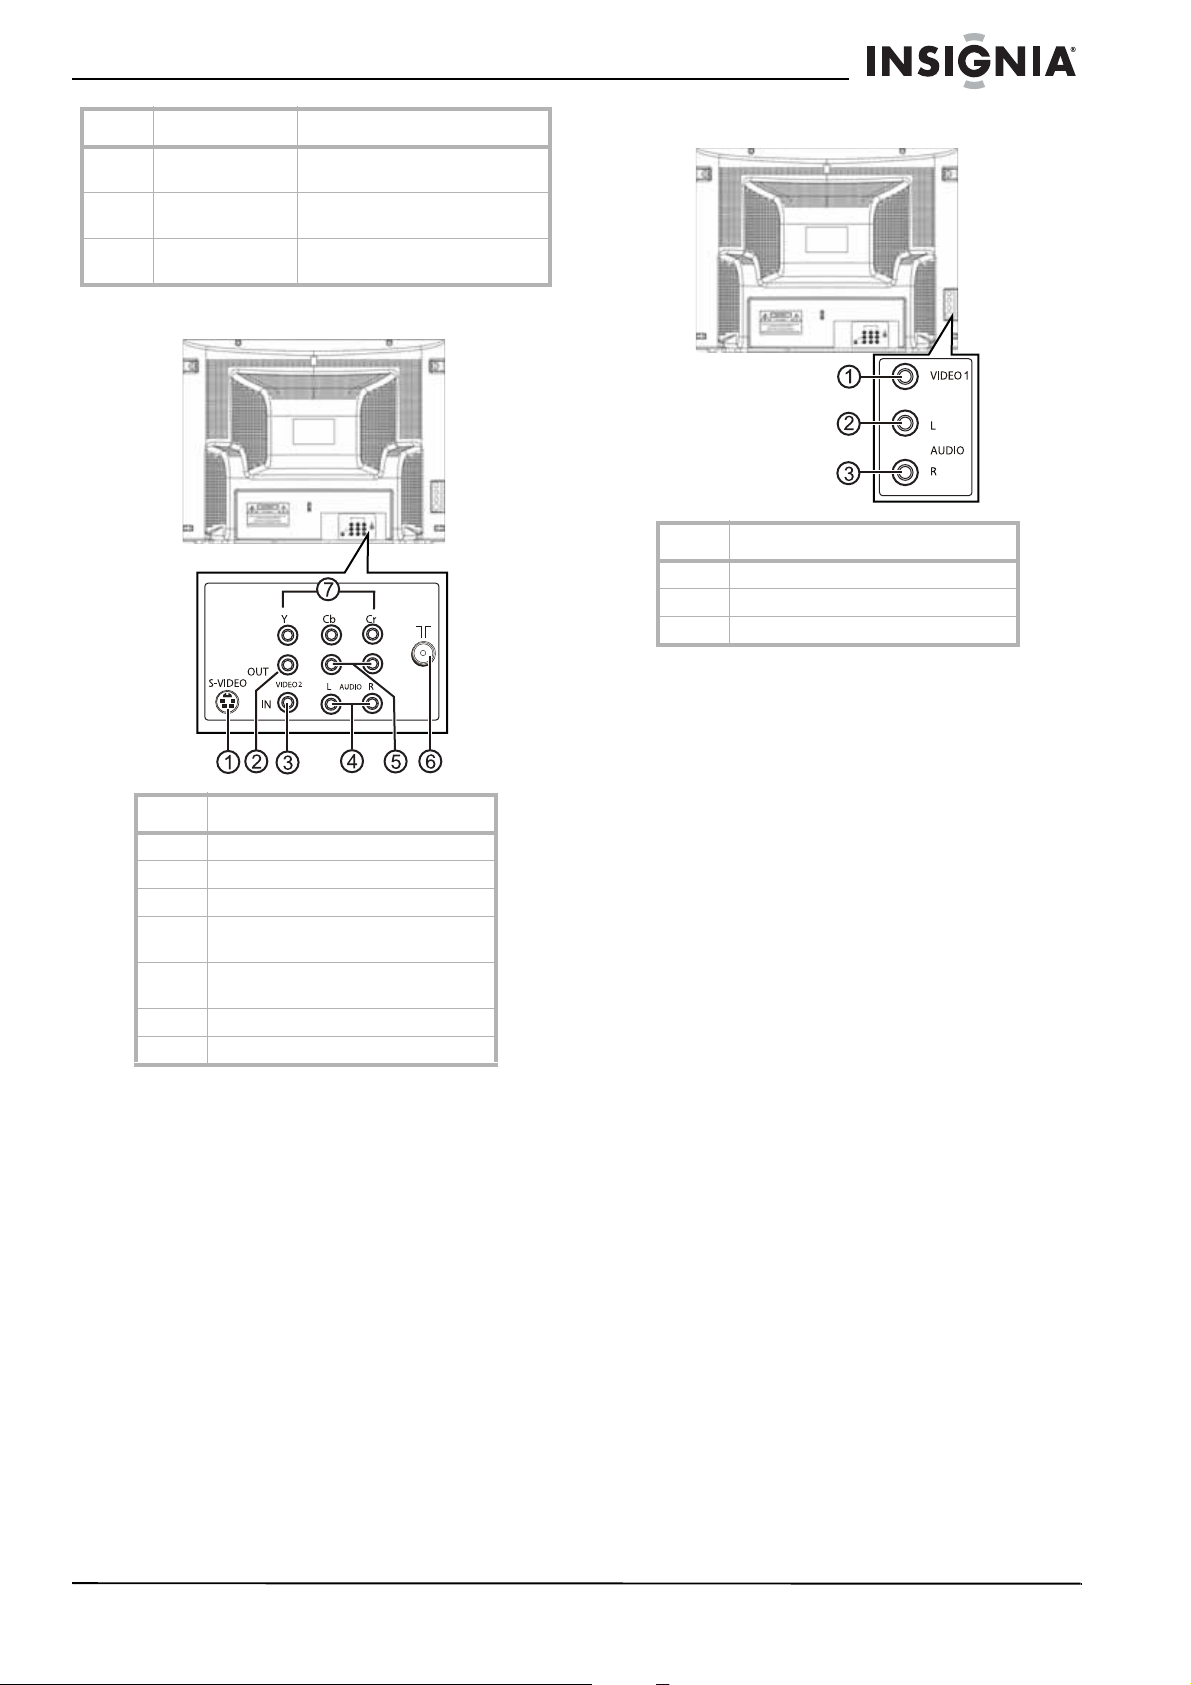
Face arrière
Panneau latéral
Nº Prises
1VIDEO1
2 AUDIO G
3 AUDIO D
Nº Prises
1 S-VIDEO (S-Vidéo)
2 VIDEO OUT (Sortie vidéo)
3 VIDEO2 IN (Entrée vidéo2)
4 AUDIO L IN/AUDIO R IN (Entrée audio
5 AUDIO L OUT/AUDIO R OUT (Sortie
6 Antenne
7Y/Cb/Cr
gauche/Entrée audio droite)
audio gauche/Sortie audio droite)
www.insignia-products.com
23
Page 24

Téléviseur à tube plat de 20 po Insignia NS-F20C
Télécommande
1
2
3
4
5
6
7
8
9
10
11
12
13
14
15
16
17
Nº Touche Description
16 VOL+ Permet d’augmenter le volume
17 BALAYAGE Permet de mémoriser les canaux.
sonore.
Installation des piles de la télécommande
Attention
Ne pas jeter les piles dans le feu. Se débarrasser
des piles usagées en suivant les normes relatives
aux déchets dangereux.
Attention
Ne pas laisser tomber ni démonter la
télécommande. Ne pas mouiller la télécommande.
Pour installer les piles dans la
télécommande :
1 Retirer le couvercle du compartiment des
piles.
2 Insérer deux piles AAA dans le
compartiment. Veiller à faire coïncider les
pôles + et – des piles avec les repères + et –
figurant à l'intérieur du compartiment.
3 Remettre le couvercle du compartiment des
piles.
Nº Touche Description
1
2 QUITTER Permet de désactiver l'affichage
3 RAPPEL Permet de revenir au canal
4 AFFICHAGE Touche d’affichage de
5 Touches
6 DURÉE Appuyer pour ouvrir le menu
7 MENU Permet d’accéder aux menus
8 CH + Permet de syntoniser un canal
9 VOL - Permet de diminuer le volume
10 CH – Permet de syntoniser un canal
11 SOUS-TITRES
12 ARRÊT DIFFÉRÉ Permet de régler l’arrêt différé de
13 ENTRÉE Permet de sélectionner le mode
14 IMAGE Permet de sélectionner un réglage
15 SOURDINE Permet de mettre le son en
Marche/Arrêt
numériques
CODÉS
Permet de mettre sous ou hors
tension l’appareil ou de le sortir
du mode d’attente.
du canal et de quitter les menus
du système.
précédent.
l’information sur le canal.
Permettent de saisir les numéros
de canaux.
Timer
(Temporisateur).
d’écran (OSD).
supérieur.
sonore.
inférieur.
Permet de sélectionner le mode
de sous-titres codés.
l’appareil.
d'entrée vidéo
prédéfini de la luminosité.
sourdine. Appuyer de nouveau
sur cette touche pour rétablir le
son.
Remarque
Pour éviter toute fuite, retirer la pile si la
télécommande ne va pas être utilisée pendant
une période prolongée ou si elle est morte.
Installation du téléviseur
Connexion à une antenne ou à un câble direct
VHF UHF
Mélangeur (non
inclus)
Cordon
d’alimentation
Pour se connecter à une antenne ou à un
câble direct :
1 Brancher l'extrémité d'un câble coaxial dans
l'antenne ou dans la prise murale.
2 Brancher l'autre extrémité du câble dans la
prise d'antenne à l'arrière du téléviseur.
Prise d'antenne
24
www.insignia-products.com
Page 25

Téléviseur à tube plat de 20 po Insignia NS-F20C
Connexion à un décodeur de câble ou à un récepteur satellite
Pour connecter un décodeur de câble ou un
récepteur satellite :
1 Connecter à un câble coaxial entre la source
de signal câblé ou le récepteur de satellite à
la prise IN (Entrée) du décodeur de câble ou
du récepteur satellite.
2 Brancher un câble coaxial dans la prise OUT
(Sortie) du décodeur de câble ou du
récepteur satellite et brancher son autre
extrémité dans la prise d'antenne à l'arrière
du téléviseur.
Connexion à un périphérique A/V standard
Le téléviseur détient deux jeux de prises A/V
normalisées. Un des jeux se trouve à l'arrière du
téléviseur. L'autre se trouve sur le côté gauche
de l'appareil.
Pour connecter un appareil A/V normalisé
sur les prises A/V arrière :
5
3
4
Nº Composantes
1 Lecteur de DVD
2 Magnétoscope
3 AUDIO R OUT (Sortie audio droite)
4 AUDIO L OUT (Sortie audio gauche)
5 VIDEO OUT (Sortie vidéo)
6 VIDEO2 IN (Entrée vidéo2)
7 L AUDIO IN (Entrée audio gauche)
8 R AUDIO IN (Entrée audio droite)
1 Brancher le connecteur vidéo (jaune) d’un
câble A/V normalisé dans la prise de sortie
vidéo du périphérique et brancher l'autre
connecteur vidéo (jaune) sur la prise VIDEO
IN (Entrée vidéo) à l'arrière du téléviseur.
2 Brancher le connecteur audio gauche (blanc)
d'un câble A/V normalisé sur la prise de
sortie audio gauche du périphérique et
brancher ensuite l'autre connecteur audio
gauche (blanc) sur la prise (gauche) AUDIO
IN L à l'arrière du téléviseur
8
7
6
1
2
3 Brancher le connecteur audio droit (rouge)
d'un câble A/V normalisé sur la prise de
sortie audio droite du périphérique et
brancher ensuite l'autre connecteur audio
droit (rouge) sur la prise (droite) AUDIO IN R
à l'arrière du téléviseur
Pour connecter un périphérique A/V
normalisé sur les prises A/V latérales :
Nº Prise
1 Lecteur de DVD
2 Magnétoscope
3VIDÉO
4 AUDIO G
5 AUDIO D
1 Brancher le connecteur vidéo (jaune) d’un
câble A/V normalisé sur la prise de sortie
vidéo du périphérique et brancher l'autre
connecteur vidéo (jaune) sur la prise VIDEO
(Vidéo) à l'arrière du téléviseur.
2 Brancher le connecteur audio gauche (blanc)
d'un câble A/V normalisé sur la prise de
sortie audio gauche du périphérique et
brancher ensuite l'autre connecteur audio
gauche (blanc) sur la prise (gauche) AUDIO
L (Audio gauche) à l'arrière du téléviseur
3 Brancher le connecteur audio droit (rouge)
d'un câble A/V normalisé sur la prise audio
droite du périphérique et brancher ensuite
l'autre connecteur audio droit (rouge) sur la
prise (droite) AUDIO R (Audio droite) à
l'arrière du téléviseur.
Connexion d’un périphérique vidéo à composantes
Pour connecter un périphérique vidéo à
composantes :
1 Brancher le connecteur Y (vert) d’un câble
composantes sur la prise de sortie Y du
périphérique et brancher l'autre connecteur Y
(vert) sur la prise Y IN (Entrée Y) à l'arrière
du téléviseur.
2 Brancher le connecteur Cb (bleu) d’un câble
vidéo à composantes sur la prise de sortie
Cb du périphérique et brancher l'autre
connecteur Cb (bleu) sur la prise Cb IN
(Entrée Cb) à l'arrière du téléviseur.
www.insignia-products.com
25
Page 26
Téléviseur à tube plat de 20 po Insignia NS-F20C
3 Brancher le connecteur Cr (rouge) d’un câble
vidéo à composantes dans la prise de sortie
Cr du périphérique et brancher l'autre
connecteur Cr rouge sur la prise Cr In
(Entrée Cr) à l'arrière du téléviseur.
4 Brancher le connecteur audio gauche (blanc)
d'un câble A/V normalisé sur la prise de
sortie audio gauche du périphérique et
brancher ensuite l'autre connecteur audio
gauche (blanc) sur la prise (gauche) AUDIO
IN L à l'arrière du téléviseur
5 Brancher le connecteur audio droit (rouge)
d'un câble A/V normalisé sur la prise de
sortie audio droite du périphérique et
brancher ensuite l'autre connecteur audio
droit (rouge) sur la prise (droite) AUDIO IN R
à l'arrière du téléviseur
Connexion d’un périphérique S-Vidéo
Pour connecter un périphérique S-Vidéo :
1 Brancher l'extrémité d'un câble S-Vidéo sur
la prise de sortie S-Vidéo d'un périphérique,
puis l’autre extrémité de ce câble à la prise
S-VIDEO à l’arrière de l'appareil.
2 Brancher le connecteur audio gauche (blanc)
d'un câble A/V normalisé sur la prise de
sortie audio gauche du périphérique et
brancher ensuite l'autre connecteur audio
gauche (blanc) sur la prise (gauche) AUDIO
IN L à l'arrière du téléviseur
3 Brancher le connecteur audio droit (rouge)
d'un câble A/V normalisé sur la prise de
sortie audio droite du périphérique et
brancher ensuite l'autre connecteur audio
droit (rouge) sur la prise (droite) AUDIO IN R
à l'arrière du téléviseur
Connexion d'un système audio
Pour connecter un système audio :
1 Brancher le connecteur audio gauche (blanc)
d'un câble A/V normalisé sur la prise de
sortie audio gauche du système audio et
brancher ensuite l'autre connecteur audio
gauche blanc sur la prise (gauche)
AUDIO OUT L (Sortie audio gauche) à
l'arrière du téléviseur.
2 Brancher le connecteur audio droit (rouge)
d'un câble A/V normalisé sur la prise de
sortie audio droite du périphérique et
brancher ensuite l'autre connecteur audio
droit (rouge) sur la prise AUDIO OUT R
(Entrée audio droite) à l'arrière du téléviseur.
Utilisation du téléviseur
Mise sous et hors tension du téléviseur
Pour mettre le téléviseur sous et hors
tension :
1 Vérifier que le cordon d’alimentation est
branché sur une prise secteur.
2 Appuyer sur POWER (Marche/Arrêt).
Changement de canal
Pour changer de canal :
• Appuyer sur CH+ ou sur CH– pour passer
sur le canal supérieur ou inférieur suivant.
• Sinon, appuyer sur les touches
numériques pour saisir un numéro de
canal.
• Ou, appuyer sur RECALL (Rappel) pour
revenir au canal précédent.
• Ou, ouvrir l'affichage à l'écran (OSD),
sélectionner le menu
sélectionner Current Ch. (Canal actuel)
et appuyer sur Vol+ ou sur Vol– pour
sélectionner le canal souhaité.
Réglage du volume
Pour régler le volume avec la
télécommande :
1 Appuyer sur VOL+ ou VOL– pour augmenter
ou diminuer le volume.
2 Appuyer sur MUTE (Sourdine) pour couper le
son. Appuyer de nouveau sur cette touche
pour rétablir le son.
Pour régler le volume à partir du menu
d'écran :
1 Appuyer sur MENUpour accéder aux menus
d’écran (OSD).
2 Appuyer sur VOL+ ou sur VOL– – pour
sélectionner l'icône de l'audio . Le menu
Audio
s’affiche.
Audio
Volume 45
3 Appuyer sur CH+ ou sur CH– pour
sélectionner VOLUME.
4 Appuyer sur VOL+ ou sur VOL- pour régler le
volume.
Channel
(Canal),
26
www.insignia-products.com
Page 27

Téléviseur à tube plat de 20 po Insignia NS-F20C
Réglage de la qualité de l'image
Pour régler la qualité de l'image :
1 Appuyer sur MENUpour accéder aux menus
d’écran (OSD). Le menu
2 Appuyer sur CH+ ou sur CH– pour
sélectionner une option. Il est possible de
sélectionner :
• Contrast (Contraste) – Permet de régler
les zones noires et blanches dans l'image
vidéo. L'augmentation de cette valeur
règle les zones blanches. La diminution
de cette valeur règle les zones sombres.
• Brightness (Luminosité) – Permet de
régler le niveau de clarté de l'image vidéo.
L'augmentation de cette valeur ajoute
plus de lumière dans les zones sombres.
La diminution de cette valeur ajoute de
l'obscurité aux zones lumineuses.
• Color (Couleur) – Permet de régler la
couleur dans l'image vidéo.
• Sharpness (Netteté) – Permet de régler
la clarté de l'image vidéo. L'augmentation
de cette valeur permet d'afficher une
image plus nette et plus claire. La
diminution de cette valeur affichera une
image plus douce.
• Tint (Teinte) – Permet de régler les tons
des couleurs. L'augmentation de cette
valeur ajoute plus de rouge à la couleur
chair. Et la diminution de cette valeur
ajoute plus de vert à la couleur chair.
• COLOR TEMP (Température de couleur)
– Permet de régler la richesse des coloris
de l'image. Il est possible de sélectionner
Neutral (Neutre), Warm (Chaud) ou Cool
(Froid).
3 Appuyer sur VOL+ ou sur VOL- pour régler
une option.
Vidéo
s’affiche.
Réglage fin du son ou de l'image
Si la qualité du son ou de l'image est dégradée,
essayer de régler la qualité de l'image et du son
en commençant par le son. Pour plus
d’informations, voir « Réglage de la qualité de
l'image » à la page 27.
Si la qualité de l'image ou du son reste dégradée
après les avoir réglés, il est possible d'utiliser
l'option Fine (Réglage fin) pour améliorer la
qualité.
Attention
N'utiliser cette option que si la qualité de l'image
ou du son reste dégradée.
Pour procéder au réglage fin du son ou de
l'image :
1 Appuyer sur MENU pour accéder aux menus
d’écran (OSD).
2 Appuyer sur VOL + ou sur VOL– pour
sélectionner l'icône du canal . Le menu
Channel
3 Appuyer sur CH+ ou sur CH– pour
sélectionner Fine.
4 Appuyer sur VOL+ ou sur VOL– pour
commencer le processus de réglage fin.
(Canal) s’affiche.
Sélection de la source du signal TV
Pour sélectionner la source du signal TV :
1 Appuyer sur MENU pour accéder aux menus
d’écran (OSD).
2 Appuyer sur VOL + ou sur VOL– pour
sélectionner l'icône du canal . Le menu
Channel
(Canal) s’affiche.
www.insignia-products.com
27
Page 28

Téléviseur à tube plat de 20 po Insignia NS-F20C
3 Appuyer sur CH+ ou sur CH- pour
sélectionner Channel System (Système de
canal).
4 Appuyer sur VOL+ ou sur VOL– pour
sélectionner AUTO (recommandé) ou sur
NTSC.
Sélection du système de canal
1 Appuyer sur MENU pour accéder aux menus
d’écran (OSD).
2 Appuyer sur VOL + ou sur VOL– pour
sélectionner l'icône du canal . Le menu
Channel
3 Appuyer sur CH+ ou sur CH– pour
sélectionner Antenna (Antenne).
4 Appuyer sur VOL+ ou sur VOL– pour
sélectionner TV ou sur CATV (Câble).
(Canal) s’affiche.
Mémorisation des canaux
Après avoir configuré le téléviseur, l'utilisateur
devra effectuer le balayage des canaux de sa
région portant un signal. En appuyant sur CH+
ou sur CH–, le téléviseur affichera seulement les
canaux mémorisés et sautera ceux ne portant
aucun signal.
Pour mémoriser les canaux :
1 Vérifier d'avoir sélectionné la source du
signal TV. Pour plus d’informations, voir
« Selecting the TV signal source » à la
page 27.
2 Appuyer sur MENU pour accéder aux menus
d’écran (OSD).
3 Appuyer sur VOL + ou sur VOL– pour
sélectionner l'icône du canal . Le menu
Channel
4 Appuyer sur CH+ pour sélectionner Auto
Program (Programme automatique).
5 Appuyer sur VOL+ ou sur VOL– pour
commencer le balayage. Le téléviseur
recherche les canaux disponibles et
enregistre en mémoire les informations sur
les canaux.
(Canal) s’affiche.
Ajout ou suppression de canaux
Si un canal a été sauté pendant la mémorisation
des canaux par le téléviseur en raison de la
faiblesse d'un signal, il est possible de l'ajouter à
la liste des canaux. Il est aussi possible de
supprimer un canal de la mémoire.
Pour ajouter ou supprimer des canaux :
1 Syntoniser le canal à supprimer ou à ajouter.
Pour ajouter un canal, utiliser les touches
numériques pour saisir la touche du canal.
Pour supprimer un canal, appuyer sur CH+
ou CH–, ou sur les touches numériques pour
sélectionner le canal.
2 Appuyer sur MENU pour accéder aux menus
d’écran (OSD).
3 Appuyer sur VOL + ou sur VOL– pour
sélectionner l'icône du canal . Le menu
Channel
(Canal) s’affiche.
28
4 Appuyer sur CH + ou sur CH– pour
sélectionner Skip (Sauter).
5 Appuyer sur VOL+ ou sur VOL– pour
supprimer le canal .
www.insignia-products.com
Page 29

Téléviseur à tube plat de 20 po Insignia NS-F20C
Réglage de l’horloge
Pour régler l’horloge :
1 Appuyer sur MENU pour accéder aux menus
d’écran (OSD).
2 Appuyer sur VOL+ ou sur VOL– pour
sélectionner l'icône du temporisateur . Le
menu
Timer
(Temporisateur) s’affiche.
Timer
Clock 17:18
Time-on 18:00
Ch. Select 1
Time-o --:-Sleep Time 0
Remind Time --:-Ch. Switch 1
3 Appuyer sur CH+ ou sur CH– pour
sélectionner Clock (Horloge).
4 Appuyer sur VOL+ ou sur VOL– pour régler
l'heure puis sur CH+ ou sur CH– pour passer
au champ des minutes.
5 Appuyer sur VOL+ ou sur VOL– pour régler
les minutes.
Pour mettre automatiquement le téléviseur sous et hors tension
Il est possible de régler des temporisateurs qui
mettront automatiquement le téléviseur sous et
hors tension. Après avoir réglé ces
temporisateurs, le téléviseur se mettra sous et
hors tension chaque jour selon les heures
spécifiées.
Pour régler le temporisateur de mise sous
tension du téléviseur :
1 Appuyer sur MENU pour accéder aux menus
d’écran (OSD).
2 Appuyer sur VOL+ ou sur VOL– pour
sélectionner l'icône du temporisateur . Le
menu
Timer
(Temporisateur) s’affiche.
Réglage du calendrier
Pour régler le calendrier :
1 Appuyer sur MENU pour accéder aux menus
d’écran (OSD).
2 Appuyer sur VOL+ ou sur VOL– pour
sélectionner l'icône du calendrier . Le menu
Calendar
3 Appuyer sur CH+ ou sur CH– pour mettre en
surbrillance l'année, puis sur VOL+ ou sur
VOL– pour sélectionner l'année.
4 Appuyer sur CH+ ou sur CH– pour mettre en
surbrillance le mois, puis sur VOL+ ou sur
VOL– pour sélectionner le mois.
5 Appuyer sur CH+ ou sur CH– pour mettre en
surbrillance le jour et ensuite sur VOL+ ou
sur VOL– pour sélectionner le jour.
6 Appuyer sur EXIT pour quitter le menu
Calendar
(Calendrier) s’affiche.
.
3 Appuyer sur CH + ou sur CH - pour
sélectionner Time-On (Heure de mise en
marche).
4 Appuyer sur VOL+ ou sur VOL– pour définir
l'heure, puis sur CH+ ou sur CH– pour
passer au champ des minutes.
5 Appuyer sur VOL+ ou sur VOL– pour définir
les minutes.
Pour régler le temporisateur de mise hors
tension du téléviseur :
1 Appuyer sur MENU pour accéder aux menus
d’écran (OSD).
2 Appuyer sur VOL+ ou sur VOL– pour
sélectionner l'icône du temporisateur . Le
Timer
menu
3 Appuyer sur CH + ou sur CH– pour
sélectionner Time-Off (Heure d’arrêt).
(Temporisateur) s’affiche.
www.insignia-products.com
29
Page 30

Téléviseur à tube plat de 20 po Insignia NS-F20C
4 Appuyer sur VOL+ ou sur VOL– pour définir
l'heure, puis sur CH+ ou sur CH– pour
passer au champ des minutes.
5 Appuyer sur VOL+ ou sur VOL– pour définir
les minutes.
Réglage de l’arrêt différé
Pour régler l'arrêt différé :
1 Appuyer sur MENU pour accéder aux menus
d’écran (OSD).
2 Appuyer sur VOL+ ou sur VOL– pour
sélectionner l'icône du temporisateur . Le
menu
Timer
(Temporisateur) s’affiche.
3 Appuyer sur CH+ ou sur CH– pour
sélectionner Sleep Time (Arrêt différé) et sur
VOL+ ou sur VOL– pour sélectionner la
durée d'attente avant la mise hors tension du
téléviseur. Il est possible de sélectionner 0, 5,
10, 15, 30, 45, 60, 90, 120, 180 ou 240
minutes.
4 Pour désactiver l'arrêt différé, reprendre cette
étape et régler l'arrêt différé sur 0.
3 Appuyer sur CH+ ou sur CH– pour
sélectionner Ch. Select (Sélection canal).
Pour passer sur un canal favori à une heure
spécifiée :
1 Appuyer sur MENU pour accéder aux menus
d’écran (OSD).
2 Appuyer sur VOL+ ou sur VOL– pour
sélectionner l'icône du temporisateur . Le
menu
Timer
(Temporisateur) s’affiche.
Timer
Clock 17:18
Time-on 18:00
Ch. Select 1
Time-o --:-Sleep Time 0
Remind Time --:-Ch. Switch 1
3 Appuyer sur CH+ ou sur CH– pour
sélectionner Ch.Switch (Changer canal).
4 Appuyer sur VOL+ ou sur VOL– pour
sélectionner le canal.
5 Appuyer sur CH+ ou sur CH– pour
sélectionner Remind Time(Heure du rappel).
6 Appuyer sur VOL+ ou sur VOL– pour définir
l'heure, puis sur CH+ ou sur CH– pour
passer au champ des minutes.
7 Appuyer sur VOL+ ou sur VOL– pour définir
les minutes.
Configuration d’un canal favori
Il est possible de configurer un canal favori et de
définir l'heure à laquelle l'utilisateur voudra que
le téléviseur passe sur ce canal favori.
Pour configurer un canal favori :
1 Appuyer sur MENU pour accéder aux menus
d’écran (OSD).
2 Appuyer sur VOL+ ou sur VOL– pour
sélectionner l'icône du temporisateur . Le
Timer
menu
(Temporisateur) s’affiche.
30
www.insignia-products.com
Page 31

Téléviseur à tube plat de 20 po Insignia NS-F20C
Mise en œuvre d'un rappel
Il est possible de mettre en place un rappel pour
que le téléviseur change de canal ou affiche
l'information sur le canal à un moment spécifié.
Pour mettre en œuvre un rappel :
1 Appuyer sur MENU pour accéder aux menus
d’écran (OSD).
2 Appuyer sur VOL+ ou sur VOL– pour
sélectionner l'icône du temporisateur . Le
menu
Timer
(Temporisateur) s’affiche.
Timer
Clock 17:18
Time-on 18:00
Ch. Select 1
Time-o --:-Sleep Time 0
Remind Time --:-Ch. Switch 1
3 Appuyer sur CH + ou sur CH– pour
sélectionner Language (Langue).
4 Appuyer sur VOL+ ou sur VOL– pour
sélectionner English (Anglais), French
(Français) ou Spanish (Espagnol).
Sélection de l'arrière plan
Le téléviseur peut afficher un message
SIGNAL
s'effectue sur un canal sans signal.
1 Appuyer sur MENU pour accéder aux menus
2 Appuyer sur VOL+ ou sur VOL– pour
(Absence de signal) si la syntonisation
d’écran (OSD).
sélectionner l'icône de configuration . Le
menu
Setup
s’affiche.
NO
3 Appuyer sur CH + ou sur CH– pour
sélectionner Remind Time (Heure du
rappel).
4 Appuyer sur VOL+ ou sur VOL– pour
sélectionner le canal.
5 Appuyer sur VOL+ ou sur VOL– pour définir
l'heure, puis sur CH+ ou sur CH– pour
passer au champ des minutes.
6 Appuyer sur VOL+ ou sur VOL– pour définir
les minutes.
Sélection de la langue des menus d’écran
Il est possible de sélectionner la langue des
menus à l'écran (OSD).
Pour sélectionner la langue des menus à
l'écran :
1 Appuyer sur MENU pour accéder aux menus
d’écran (OSD).
2 Appuyer sur VOL+ ou sur VOL– pour
sélectionner l'icône de configuration . Le
menu
Setup
s’affiche.
3 Appuyer sur CH+ ou sur CH– pour
sélectionner Background (Arrière plan).
4 Appuyer sur VOL+ ou sur VOL– pour
sélectionner ON (Activé) ou sur OFF
(Désactivé).
Activation ou désactivation de la suramplification du noir
Lorsque la fonctionnalité de suramplification du
noir est activée, le téléviseur augmente
automatiquement la plage du contraste de
l'image vidéo.
Activation ou désactivation de la
suramplification du noir :
1 Appuyer sur MENU pour accéder aux menus
d’écran (OSD).
www.insignia-products.com
31
Page 32
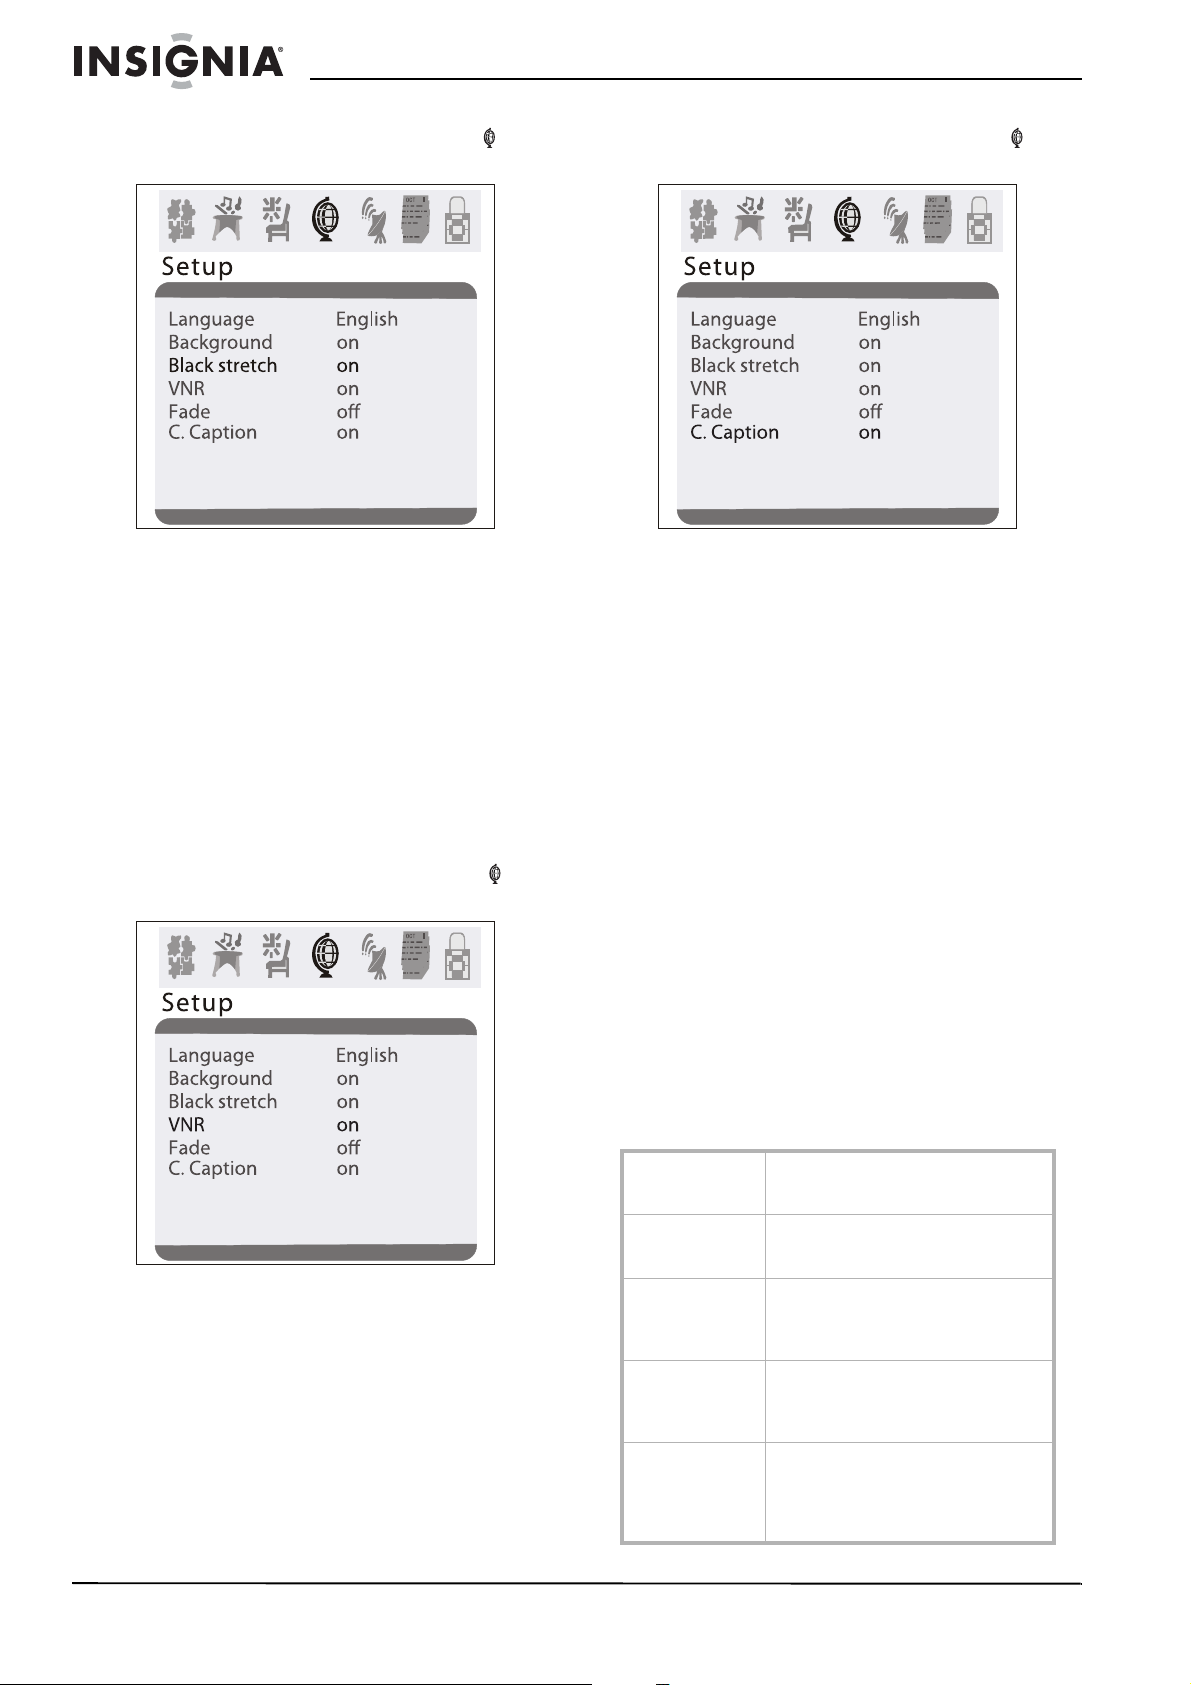
Téléviseur à tube plat de 20 po Insignia NS-F20C
2 Appuyer sur VOL+ ou sur VOL– pour
sélectionner l'icône de configuration . Le
Setup
menu
s’affiche.
3 Appuyer sur CH+ ou sur CH– pour
sélectionner Black Stretch (suramplification
du noir).
4 Appuyer sur VOL+ ou sur VOL– pour
sélectionner ON (Activé) ou sur OFF
(Désactivé).
Amélioration de la qualité de l'image
Le téléviseur est équipé d'une fonctionnalité de
réduction du bruit dans la vidéo (VNR) qui
diminue le bruit vidéo pour améliorer la qualité
de l'image.
1 Appuyer sur MENU pour accéder aux menus
d’écran (OSD).
2 Appuyer sur VOL+ ou sur VOL– pour
sélectionner l'icône de configuration . Le
Setup
menu
s’affiche.
2 Appuyer sur VOL+ ou sur VOL– pour
sélectionner l'icône de configuration . Le
menu
Setup
s’affiche.
3 Appuyer sur CH + ou sur CH– pour
sélectionner C.Caption (Sous-titres codés).
4 Appuyer sur VOL+ ou sur VOL– pour
sélectionner un mode de sous-titres codés. Il
est possible de sélectionner :
• OFF (Désactivé) – Désactive les
sous-titres codés.
• CC1 – Affiche les sous-titres codés dans
la langue principale d'un programme de
télévision.
• CC2 à CC4 – Affiche d'autres types
d'informations sur l'émission vidéo en
cours.
• T1 – Affiche des informations telles qu'un
guide des programmes. Cette option
couvre une large partie de l'écran.
• T2 à T4 – Affiche d'autres types
d'informations fournies par le
télédiffuseur.
3 Appuyer sur CH+ ou sur CH– pour
sélectionner VNR (Réduction du bruit dans la
vidéo).
4 Appuyer sur VOL+ ou sur VOL– pour
sélectionner ON (Activé) ou sur OFF
(Désactivé).
Sélection du mode des sous-titres codés
Pour sélectionner le mode des sous-titres
codés :
1 Appuyer sur MENU pour accéder aux menus
d’écran (OSD).
Configuration du contrôle parental
Il est possible d’autoriser ou d’interdire la
classification TV pour les États-Unis. Il est aussi
possible d’autoriser ou d’interdire la
classification des films.
Classification des émissions de télévision aux
États-Unis
NR Pas de classification – Les
programmes ne sont pas classifiés ou
aucune classification ne s'applique.
TV-Y Pour tous les enfants – Programmes
conçus pour un public très jeune,
incluant des enfants entre 2 et 6 ans.
TV-Y7 Destinés à des enfants plus âgés –
Programmes pouvant contenir une
violence physique retenue ou pouvant
effrayer des enfants de moins de 7 ans.
TV-G Tous Publics – Programmes contenant
peu ou pas de violence, pas de langage
vulgaire, avec peu, voire aucun
dialogue ou scène à caractère sexuel.
TV-PG Surveillance parentale recommandée –
Programmes qui peuvent contenir une
violence limitée, quelques dialogues ou
scènes à caractère sexuel et un
langage vulgaire.
32
www.insignia-products.com
Page 33
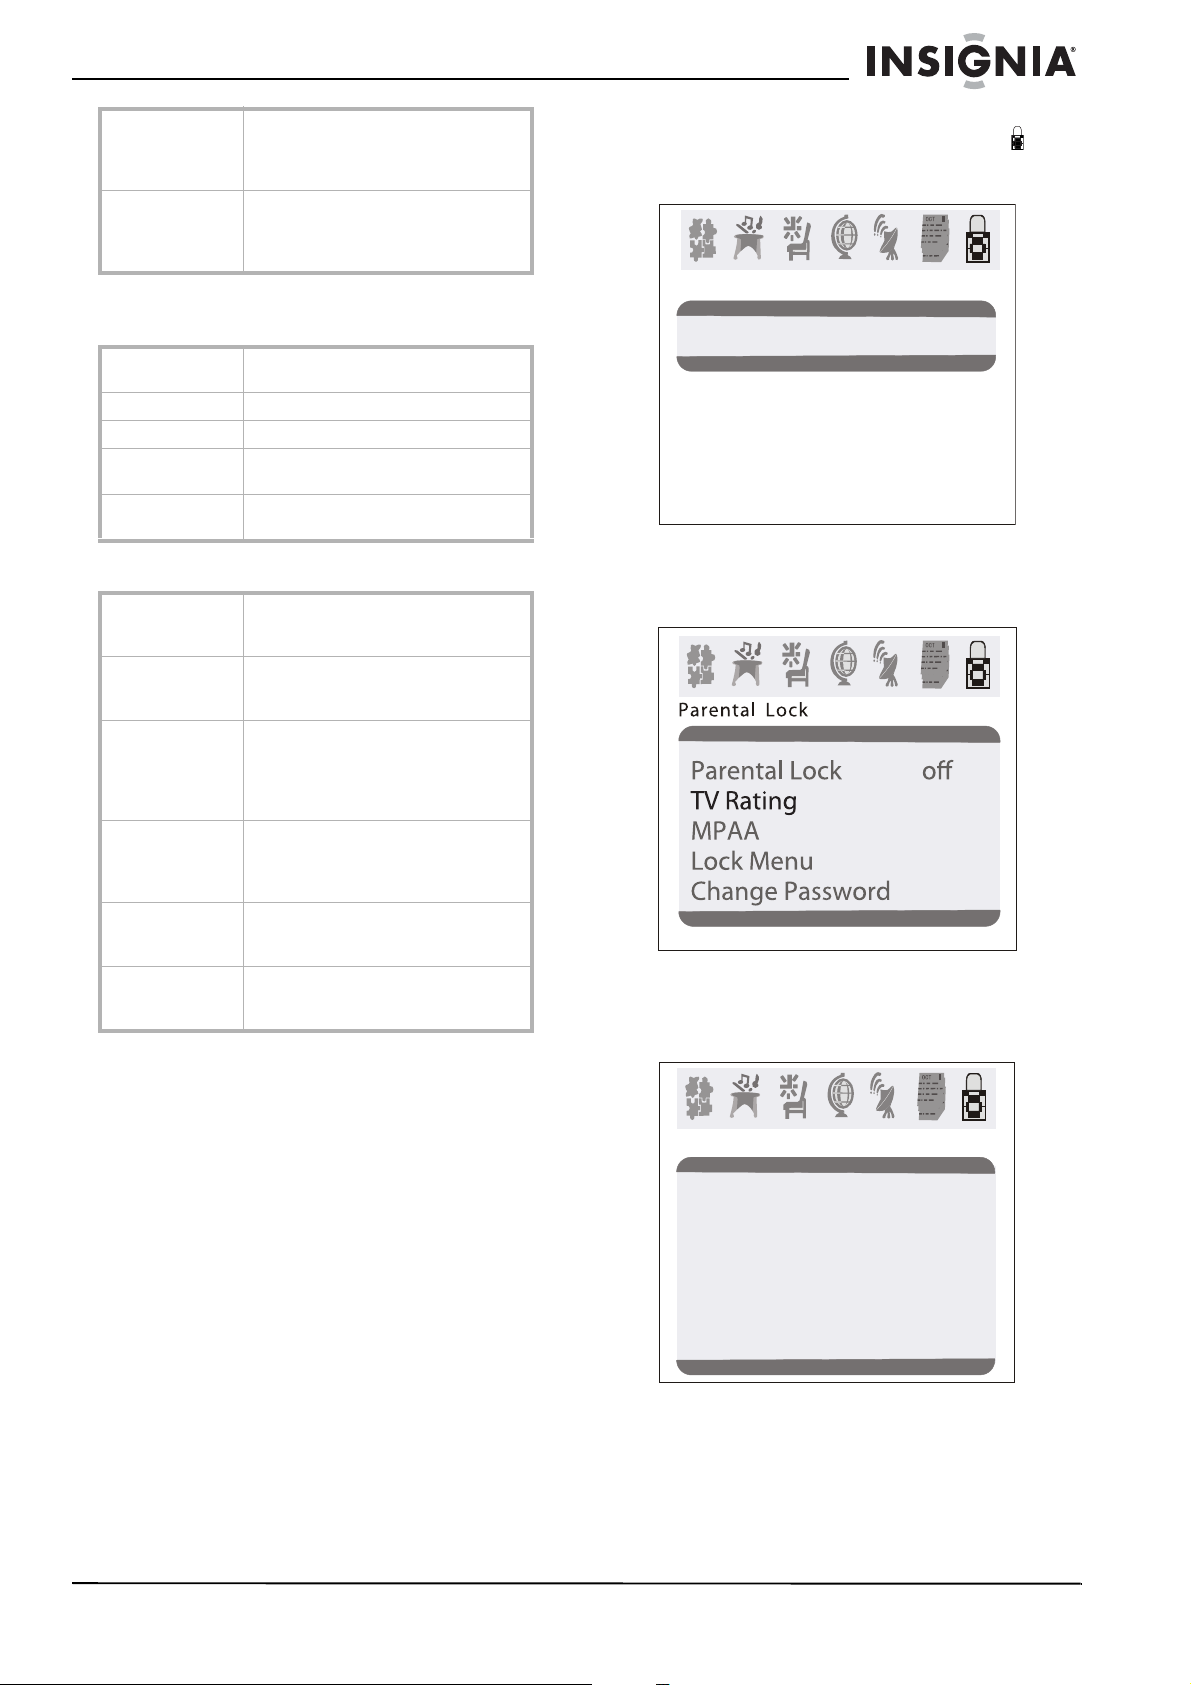
Téléviseur à tube plat de 20 po Insignia NS-F20C
TV-14 Mise en garde sérieuse des parents –
Programmes pouvant présenter un
contenu sexuel, un langage vulgaire et
une violence plus intense.
TV-MA Adultes seulement – Programmes
pouvant présenter un contenu sexuel
violent, un contenu sexuel explicite et
un langage vulgaire.
Classification du contenu des émissions de
télévision aux États-Unis
FV Programmes à contenu fantasmatique
et bandes dessinées violentes.
V Programmes contenant de la violence.
S Programmes au contenu sexuel.
L Programmes contenant un langage
injurieux.
D Programmes contenant des dialogues
au contenu sexuel.
Classification des films aux États-Unis
NR Pas encore classifié – Le film est en
attente d'une classification
gouvernementale.
G Tous publics – Cette classification d'un
film signifie qu'il peut être vu par un
public de tous les âges.
PG-13 Mise en garde sérieuse des parents –
Cette classification d'un film signifie
que certains de ses aspects peuvent ne
pas être appropriés pour des enfants
de moins de 13 ans.
R Interdit – Cette classification d'un film
signifie que les enfants de moins de 17
ans doivent être astreints au contrôle
parental.
NC-17 Cette classification signifie qu'aucun
enfant de 17 ans et moins ne doit voir
ce film sans un contrôle parental.
X Ce type de classification d'un film
signifie qu'il est réservé exclusivement
aux adultes.
Pour interdire ou autoriser certaines
classifications d'émissions TV aux
États-Unis :
1 Appuyer sur MENU pour accéder aux menus
d’écran (OSD).
2 Appuyer sur VOL+ou sur VOL– pour
sélectionner l'icône du mot de passe , puis
sur CH+ ou sur CH–. Le menu
Password
(Mot de passe) s’affiche.
Passsword
Password ----
3 Utiliser les touches numériques pour saisir le
mot de passe. Le mot de passe par défaut
est 0000. Le menu
Parental lock
(Verrouillage parental) s’affiche.
Rating
4 Appuyer sur CH+ ou sur CH– pour
sélectionner TV Rating (Classification TV).
5 Appuyer sur VOL+ ou sur VOL– pour ouvrir
le menu TV Rating.
TV Rating
6 Appuyer sur CH+ ou sur CH– pour
sélectionner la classification à interdire ou à
autoriser, puis sur VOL+ ou sur VOL– pour
interdire ou autoriser cette classification. Un
B apparaît si la classification est interdite. Un
U apparaît si la classification est autorisée.
7 Après avoir défini la classification, appuyer
sur MENU pour revenir au menu précédent.
www.insignia-products.com
Ra ting FV
TV -Y
U
>
U
TV -Y 7
U
TV -G
U
TV -P G
U
TV -14
U
TV -MA
DLSV
U
UUUU
UUUU
UUU
33
Page 34

Téléviseur à tube plat de 20 po Insignia NS-F20C
Pour interdire ou autoriser des
classifications de films :
1 Appuyer sur MENU pour accéder aux menus
d’écran (OSD).
2 Appuyer sur VOL+ou sur VOL– pour
sélectionner l'icône du mot de passe , puis
sur CH+ ou sur CH–. Le menu
Password
(Mot de passe) s’affiche.
Passsword
Password ----
3 Utiliser les touches numériques pour saisir le
mot de passe. Le mot de passe par défaut
est 0000. Le menu
(Verrouillage parental) s’affiche.
Parental lock
6 Appuyer sur CH+ ou sur CH– pour
sélectionner la classification à interdire ou à
autoriser, puis sur VOL+ ou sur VOL– pour
interdire ou autoriser cette classification. Un
B apparaît si la classification est interdite. Un
U apparaît si la classification est autorisée.
7 Après avoir défini la classification, appuyer
sur MENU pour revenir au menu précédent.
Activer ou désactiver les contrôles parentaux
Pour activer ou désactiver les contrôles
parentaux :
1 Appuyer sur MENU pour accéder aux menus
d’écran (OSD).
2 Appuyer sur VOL+ou sur VOL– pour
sélectionner l'icône du mot de passe , puis
sur CH+ ou sur CH–. Le menu
Password
(Mot de passe) s’affiche.
Passsword
Password ----
Rating
4 Appuyer sur CH + ou sur CH - pour
sélectionner MPAA Rating (Classification
des films de Motion Picture Association of
America).
5 Appuyer sur VOL+ ou sur VOL– pour ouvrir
le menu MPAA Rating.
OCT
OCT
OCT
MPAA Rating
GU
PG U
PG-13 U
RU
3 Utiliser les touches numériques pour saisir le
mot de passe. Le mot de passe par défaut
est 0000. Le menu
Parental lock
(Verrouillage parental) s’affiche.
Rating
4 Appuyer sur CH+ ou CH– pour sélectionner
Parental Lock.
5 Appuyer sur VOL+ ou sur VOL– pour
sélectionner off (désactivé) ou sur on
(activé).
34
NC-17 U
XU
www.insignia-products.com
Page 35

Téléviseur à tube plat de 20 po Insignia NS-F20C
Modification du mot de passe
Pour modifier le mot de passe :
1 Appuyer sur MENU pour accéder aux menus
d’écran (OSD).
2 Appuyer sur VOL+ou sur VOL– pour
sélectionner l'icône du mot de passe , puis
sur CH+ ou sur CH–. Le menu
(Mot de passe) s’affiche.
Passsword
Password ----
3 Utiliser les touches numériques pour saisir
l'ancien mot de passe. Le mot de passe par
défaut est 0000. Le menu
(Verrouillage parental) s’affiche.
Parental lock
Password
Configuration des autres verrouillages
En plus du verrouillage du contrôle parental, il
est aussi possible de bloquer l'entrée d'un
appareil connecté sur les prises A/V (AV LOCK
(Verrouillage A/V) et bloquer le programme du
canal en cours (PROGRAM LOCK (Verrouillage
programme).
Pour configurer les autres verrouillages :
1 Appuyer sur MENU pour accéder aux menus
d’écran (OSD).
2 Appuyer sur VOL+ou sur VOL– pour
sélectionner l'icône du mot de passe , puis
sur CH+ ou sur CH–. Le menu
(Mot de passe) s’affiche.
Passsword
Password
Password ----
Rating
4 Appuyer sur CH + ou sur CH– pour
sélectionner Change Password (Modifier le
mot de passe).
5 Entrer un nouveau mot de passe à quatre
chiffres; réintroduire ce nouveau mot de
passe.
3 Utiliser les touches numériques pour saisir le
mot de passe. Le mot de passe par défaut
est 0000. Le menu
(Verrouillage parental) s’affiche.
Parental lock
Rating
4 Appuyer sur CH+ ou sur CH– pour
sélectionner Lock Menu (Menu verrouillage).
5 Appuyer sur VOL+ ou sur VOL– pour ouvrir
Lock Menu
6 Appuyer sur CH+ ou sur CH– pour
sélectionner AV LOCK ou PROGRAM
LOCK (Verrouillage AV ou programme)
7 Appuyer sur VOL+ ou sur VOL– pour activer
ou désactiver le verrouillage.
.
www.insignia-products.com
35
Page 36

Téléviseur à tube plat de 20 po Insignia NS-F20C
Entretien
Débrancher l’appareil de la prise murale avant
tout nettoyage.
Ne pas utiliser de nettoyants liquides ou en
aérosol.
Essuyer l’extérieur avec un chiffon doux
humidifié avec de l’eau. Ne pas asperger
directement l’extérieur ou l’écran avec de l’eau.
Problèmes et solutions
Problème Solution
La télécommande
ne fonctionne pas
Barres à l'écran Essayer un canal différent. Si un autre
L’image est
déformée
L'image défile
verticalement
Pas de couleur Régler les couleurs.
Vérifier les piles. Elles peuvent devoir
être remplacées.
Vérifier l’absence d’obstacles entre le
capteur du téléviseur et la
télécommande.
canal fonctionne correctement, la
station émettrice peut avoir des
problèmes.
Vérifier que l’antenne est correctement
connectée à la prise arrière du
téléviseur.
En cas d'utilisation d'une antenne
extérieure, vérifier qu'aucun câble
n'est rompu.
Vérifier la présence éventuelle
d’interférences locales
Essayer un canal différent. Si un autre
canal fonctionne correctement, la
station émettrice peut avoir des
problèmes.
Vérifier que l’antenne est correctement
connectée à la prise arrière du
téléviseur.
En cas d'utilisation d'une antenne
extérieure, vérifier qu'aucun câble
n'est rompu.
Essayer un canal différent. Si un autre
canal fonctionne correctement, la
station émettrice peut avoir des
problèmes.
Vérifier que l’antenne est correctement
connectée à la prise arrière du
téléviseur.
En cas d'utilisation d'une antenne
extérieure, vérifier qu'aucun câble
n'est rompu.
Vérifier la présence éventuelle
d’interférences locales
Essayer un canal différent. Si un autre
canal fonctionne correctement, la
station émettrice peut avoir des
problèmes.
Vérifier que l’antenne est correctement
connectée à la prise arrière du
téléviseur.
En cas d'utilisation d'une antenne
extérieure, vérifier qu'aucun câble
n'est rompu.
Problème Solution
Image faible Régler le contraste et la luminosité.
Essayer un canal différent. Si un autre
canal fonctionne correctement, la
station émettrice peut avoir des
problèmes.
Vérifier que l’antenne est correctement
connectée à la prise arrière du
téléviseur.
En cas d'utilisation d'une antenne
extérieure, vérifier qu'aucun câble
n'est rompu.
Vérifier la présence éventuelle
d’interférences locales
Lignes ou traînées
dans l'image
Images fantômes Essayer un canal différent. Si un autre
Image floue Essayer un canal différent. Si un autre
Dégradation du
son et de l'image
Essayer un canal différent. Si un autre
canal fonctionne correctement, la
station émettrice peut avoir des
problèmes.
Vérifier que l’antenne est correctement
connectée à la prise arrière du
téléviseur.
En cas d'utilisation d'une antenne
extérieure, vérifier qu'aucun câble
n'est rompu.
Vérifier la présence éventuelle
d’interférences locales
canal fonctionne correctement, la
station émettrice peut avoir des
problèmes.
Vérifier que l’antenne est correctement
connectée à la prise arrière du
téléviseur.
En cas d'utilisation d'une antenne
extérieure, vérifier qu'aucun câble
n'est rompu.
Vérifier la présence éventuelle
d’interférences locales
canal fonctionne correctement, la
station émettrice peut avoir des
problèmes.
Vérifier que l’antenne est correctement
connectée à la prise arrière du
téléviseur.
En cas d'utilisation d'une antenne
extérieure, vérifier qu'aucun câble
n'est rompu.
Vérifier la présence éventuelle
d’interférences locales
Régler le contraste et la luminosité.
Régler le son.
Essayer un canal différent. Si un autre
canal fonctionne correctement, la
station émettrice peut avoir des
problèmes.
Vérifier que l’antenne est correctement
connectée à la prise arrière du
téléviseur.
En cas d'utilisation d'une antenne
extérieure, vérifier qu'aucun câble
n'est rompu.
Vérifier la présence éventuelle
d’interférences locales
36
www.insignia-products.com
Page 37
Téléviseur à tube plat de 20 po Insignia NS-F20C
Problème Solution
Absence d’image
et de son
Vérifier que le téléviseur est branché
sur une prise secteur et que cette
dernière est alimentée.
Essayer un canal différent. Si un autre
canal fonctionne correctement, la
station émettrice peut avoir des
problèmes.
Vérifier que l’antenne est correctement
connectée à la prise arrière du
téléviseur.
En cas d'utilisation d'une antenne
extérieure, vérifier qu'aucun câble
n'est rompu.
Vérifier la présence éventuelle
d’interférences locales
Spécifications
Télévision Standard TV NTSC-M
Av AV IN (NTSC-M) (Entrée AV)
Canaux VHF 2-13
Canaux UHF 14-69
Canaux câblés 1-125
Syntonisation 181 fréquences de canaux synthétisées
Accès aux canaux Clavier d'accès direct
Prise d'antenne VHF/UHF/réseau câblé 75 ohms
Sortie audio 2W+2W
Télécommande Infrarouge numérique codé
Alimentation 120 V, 60 Hz
Tube cathodique 20 po
Dimensions (
L×P×H)
Poids 50,7 lb
dissymétrique (type F)
22,7 × 19,3× 17,7 po
(576 × 490 × 448 mm)
(23 kg)
Avis juridiques
FCC article 15
Cet appareil est conforme à l’article 15 du règlement de la
FCC. Son utilisation est soumise aux deux conditions
suivantes : (1) Cet appareil ne doit pas provoquer
d’interférences préjudiciables et (2) il doit accepter toute
interférence reçue, y compris celles risquant d’engendrer un
fonctionnement indésirable.
Cet équipement a été mis à l’essai et déclaré conforme aux
limites prévues pour un appareil numérique de classe B,
définies dans la section 15 de la réglementation FCC. Ces
limites ont été établies pour fournir une protection
raisonnable contre les interférences préjudiciables lors d’une
installation résidentielle. Cet équipement génère, utilise et
diffuse des ondes radio et, s’il n’est pas installé et utilisé
conformément aux instructions dont il fait l’objet, il peut
provoquer des interférences préjudiciables aux
communications radio. Cependant, il n'est pas possible de
garantir qu’aucune interférence ne se produira pour une
installation particulière. Si cet équipement produit des
interférences importantes lors de réceptions radio ou
télévisées, qui peuvent être détectées en éteignant puis en
rallumant l’appareil, essayer de corriger l’interférence au
moyen de l’une ou de plusieurs des mesures suivantes :
• Réorienter ou déplacer l’antenne réceptrice.
• Augmenter la distance entre l’équipement et le
récepteur.
• Brancher l’équipement sur la prise électrique d’un
circuit différent de celui auquel le récepteur est relié.
• Contacter le revendeur ou un technicien qualifié pour
toute assistance.
Avertissement de la FCC
Tous changements ou modifications qui ne seraient pas
expressément approuvés par les responsables de
l’application des règles FCC pourraient rendre nul le droit de
l’utilisateur d’utiliser cet équipement.
Droits d’auteurs
© 2007 Insignia. Insignia et le logo Insignia sont des
marques de commerce de Best Buy Enterprise Services, Inc.
Les autres noms de marques et de produits mentionnés sont
des marques de commerce ou des marques déposées de
leurs propriétaires respectifs. Les spécifications et
caractéristiques sont susceptibles d’être modifiées sans
préavis.
Pour l’assistance technique, appeler le (877) 467-4289.
www.insignia-products.com
37
Page 38

Téléviseur à tube plat de 20 po Insignia NS-F20C
38
www.insignia-products.com
Page 39

Téléviseur à tube plat de 20 po Insignia NS-F20C
Garantie limitée d’un an
Insignia Products (« Insignia ») garantit au premier acheteur
de ce NS-F20C neuf (« Produit »), qu’il est exempt de vices
de fabrication et de main-d’œuvre à l’origine, pour une
période d’un (1) an à partir de la date d’achat du Produit
(« Période de garantie »). Ce Produit doit avoir été acheté
chez un revendeur agréé des produits de la marque Insignia
et emballé avec cette déclaration de garantie. Cette garantie
ne couvre pas les Produits remis à neuf. Les conditions de la
présente garantie s’appliquent à tout Produit pour lequel
Insignia est notifié pendant la Période de garantie, d’un vice
couvert par cette garantie qui nécessite une réparation.
Quelle est la durée de la couverture?
La Période de garantie dure 1 an (365 jours) à compter de la
date d’achat de ce Produit. La date d’achat est imprimée sur
le reçu fourni avec le Produit.
Que couvre cette garantie?
Pendant la Période de garantie, si un vice de matériau ou de
main-d’œuvre d'origine est détecté sur le Produit par un
service de réparation agréé par Insignia ou le personnel du
magasin, Insignia (à sa seule discrétion) : (1) réparera le
Produit en utilisant des pièces détachées neuves ou remises
à neuf; ou (2) remplacera le Produit par un produit ou des
pièces neuves ou remises à neuf de qualité comparable. Les
produits et pièces remplacés au titre de cette garantie
deviennent la propriété d’Insignia et ne sont pas retournés à
l’acheteur. Si les Produits ou pièces nécessitent une
réparation après l’expiration de la Période de garantie,
l’acheteur devra payer tous les frais de main-d’œuvre et les
pièces. Cette garantie reste en vigueur tant que l’acheteur
reste propriétaire du Produit Insignia pendant la Période de
garantie. La garantie prend fin si le Produit est revendu ou
transféré d’une quelconque façon que ce soit à tout autre
propriétaire.
Comment obtenir une réparation sous garantie?
Si le Produit a été acheté chez un détaillant, le rapporter
accompagné du reçu original chez ce détaillant. Prendre
soin de remettre le Produit dans son emballage d’origine ou
dans un emballage qui procure la même qualité de
protection que celui d’origine. Si le Produit a été acheté en
ligne, l’expédier accompagné du reçu original à l’adresse
indiquée sur le site Web. Prendre soin de remettre le Produit
dans son emballage d’origine ou dans un emballage qui
procure la même qualité de protection que celui d’origine.
Pour obtenir le service de la garantie à domicile pour un
téléviseur avec écran de 25 po ou plus, appeler le
1-888-BESTBUY. L’assistance technique établira un
diagnostic et corrigera le problème au téléphone ou enverra
un technicien agréé par Insignia pour la réparation à
domicile.
Où cette garantie s’applique-t-elle?
Cette garantie ne s’applique qu’à l’acheteur original du
Produit aux États-Unis et au Canada.
Ce qui n’est pas couvert par cette garantie limitée
La présente garantie ne couvre pas :
• la formation du client;
• l'installation;
• les réglages de configuration;
• les dommages esthétiques;
• les dommages résultants de catastrophes naturelles
telles que la foudre;
• les accidents;
• une utilisation inadaptée;
• une manipulation abusive;
• la négligence;
• une utilisation commerciale;
• la modification de tout ou partie du Produit, y compris
l’antenne.
• un écran plasma endommagé par les images fixes
(sans mouvement) qui restent affichées pendant de
longues périodes (rémanentes).
La présente garantie ne couvre pas non plus :
• les dommages ayant pour origine une utilisation ou une
maintenance défectueuse;
• la connexion à une source électrique dont la tension est
inadéquate;
• toute réparation effectuée par quiconque autre qu’un
service de réparation agréé par Insignia pour la
réparation du Produit;
• les Produits vendus en l’état ou hors service;
• les consommables tels que les fusibles ou les piles;
• les produits dont le numéro de série usine a été altéré
ou enlevé.
LA RÉPARATION OU LE REMPLACEMENT, TELS
QU’OFFERTS PAR LA PRÉSENTE GARANTIE,
CONSTITUENT LE SEUL RECOURS DE L’ACHETEUR.
INSIGNIA NE SAURAIT ÊTRE TENU POUR
RESPONSABLE DE DOMMAGES ACCESSOIRES OU
CONSÉCUTIFS, RÉSULTANT DE L’INEXÉCUTION D'UNE
GARANTIE EXPRESSE OU IMPLICITE SUR CE PRODUIT,
Y COMPRIS, SANS S’Y LIMITER, LA PERTE DE
DONNÉES, L’IMPOSSIBILITÉ D’UTILISER LE PRODUIT,
L’INTERRUPTION D’ACTIVITÉ OU LA PERTE DE
PROFITS. INSIGNIA PRODUCTS N’OCTROIE AUCUNE
AUTRE GARANTIE EXPRESSE RELATIVE À CE
PRODUIT; TOUTES LES GARANTIES EXPRESSES OU
IMPLICITES POUR CE PRODUIT, Y COMPRIS MAIS
SANS LIMITATION, TOUTE GARANTIE DE QUALITÉ
MARCHANDE, D'ADÉQUATION À UN BUT PARTICULIER,
SONT LIMITÉES À LA PÉRIODE DE GARANTIE
APPLICABLE TELLE QUE DÉCRITE CI-DESSUS ET
AUCUNE GARANTIE EXPRESSE OU IMPLICITE NE
S’APPLIQUERA APRÈS LA PÉRIODE DE GARANTIE.
CERTAINS ÉTATS ET PROVINCES NE RECONNAISSENT
PAS LES LIMITATIONS DE LA DURÉE DE VALIDITÉ DES
GARANTIES IMPLICITES. PAR CONSÉQUENT, LES
LIMITATIONS SUSMENTIONNÉES PEUVENT NE PAS
S'APPLIQUER À L’ACHETEUR ORIGINAL. LA PRÉSENTE
GARANTIE DONNE À L'ACHETEUR DES GARANTIES
JURIDIQUES SPÉCIFIQUES; IL PEUT AUSSI
BÉNÉFICIER D'AUTRES GARANTIES QUI VARIENT D'UN
ÉTAT OU D'UNE PROVINCE À L'AUTRE.
Pour contacter Insignia :
Pour le service à la clientèle, appeler le 1-877-467-4289
www.insignia-products.com
INSIGNIA
Enterprise Services, Inc.
Distribué par Best Buy Purchasing, LLC
Insignia, 7601 Penn Avenue South, Richfield, Minnesota,
U.S.A.
MC
est une marque de commerce de Best Buy
www.insignia-products.com
39
Page 40

Téléviseur à tube plat de 20 po Insignia NS-F20C
40
www.insignia-products.com
Page 41

Page 42

www.insignia-products.com (877) 467-4289
Distributed by Best Buy Purchasing, LLC
7601 Penn Avenue South, Richfield, MN USA 55423-3645
All rights reserved. INSIGNIA is a registered trademark of Best Buy Enterprise Services, Inc.
All other products and brand names are trademarks of their respective owners.
Tous les autres produits ou noms de marques sont des marques de commerce qui appartiennent à leurs propriétaires respectifs.
Tous droits réservés. INSIGNIA est une marque déposée de Best Buy Enterprise Services, Inc.
Todos los derechos reservados. INSIGNIA es una marca registrada de Best Buy Enterprise Services, Inc.
Todos los demás productos y marcas son marcas comerciales de sus respectivos dueños.
© 2007 Best Buy Enterprise Services, Inc.
Distribué par Best Buy Purchasing, LLC
7601 Penn Avenue South, Richfield, MN USA 55423-3645
© 2007 Best Buy Enterprise Services, Inc.
Distribuido por Best Buy Purchasing, LLC
7601 Penn Avenue South, Richfield, MN USA 55423-3645
© 2007 Best Buy Enterprise Services, Inc.
07-476
 Loading...