

Inovonics TapWatch 3 User Manual

User Manual

Preface
Notice
Copyright 2013 Inovonics
Inovonics intends this manual for use by Inovonics customers only. All
comments concerning the contents of this manual should be directed to the
Inovonics marketing department. No part of this work covered by copyright
may be reproduced in any form either graphically, electronically or
mechanically; including photocopying, recording, taping, or storing in an
information retrieval system without prior written permission from Inovonics.
05855E
Trademarks
Windows is a registered trademark of Microsoft Corporation in the United
States and other countries.
TapWatch is a registered trademark of Inovonics. All other brand names and
product names used in this manual are trademarks, registered trademarks, or
trade names of their respective holders.
Technical Services Contact Information
For Inovonics technical services:
• E-mail: support@inovonics.com
• Phone: (800) 782-2709; (303) 939-9336
05855E 1

Document Conventions
The following notices are used throughout this document:
Note: Emphasizes points, provides supplementary infomation, or indicates minor
problems in an expected outcome.
Caution:Indicates possible damage to equipment or loss of data, as well as potential
problems in an expected outcome.
Warning:Indicates the possibility of minor injury to oneself or others.
Danger:Indicates the possibility of serious or fatal injury to oneself or others.
05855E 2

Table of Contents
Preface 1
Notice .................................... ...................... ....................... ....................... .............1
Trademarks ...........................................................................................................1
Technical Services Contact Information . .... ... ... ... .... ... ... ... .... ... ... ... ... .... .............1
Document Conventions ................... ... ... ... .... .......................................................2
1.1 TapWatch Introduction ..................................................................................7
1.1.1 How TapWatch Works ........................................................................................7
1.1.2 Pulse Meter Transmitter .....................................................................................8
1.1.3 Repeater ...............................................................................................................8
1.1.4 RF Gateway .........................................................................................................8
1.1.5 Data Logger .........................................................................................................9
1.2 TapWatch 3 Software .....................................................................................9
1.2.1 TapWatch Startup ...............................................................................................9
1.2.2 About Window .....................................................................................................9
1.2.3 Standard Software Features ..............................................................................9
1.2.4 The Status Bar .....................................................................................................10
1.3 TapWatch.com Web Portal ........ ... ... ... .... ... ... ... .... ..........................................11
1.3.1 What TapWatch.com Will Do for Your Property ...............................................11
2.1 Minimum System Requirements ................................................................... 13
2.2 Recommended System Requirements ......................................................... 14
2.3 Software Installation ......................................................................................14
2.4 Setting Up the TapWatch 3 Software with Your Network ...........................14
2.5 Connecting to RDL8500 or RF Gateway .......................................... ... ... ... ....16
2.5.1 Directly Connecting to an RDL8500 ..................................................................16
2.5.2 Directly Connecting to an RF gateway ..............................................................16
3.1 Overview ............... ... .... .......................................................... ... .......................17
3.2 Add a New Property ...................................................... .... .............................18
3.3 Import a TapWatch 3 Property ......................................................................18
3.4 Convert a TapWatch 2 Property to TapWatch 3 ................ ... ... ... .... ... ... .......19
3.5 Restore a Property .........................................................................................20
05855E 3

3.6 Export Property List ......... ... .... ... ... ... ... .... ... ... ... .... ... ... ... .... ... ..........................20
3.7 Backup a Property ..........................................................................................20
3.8 Open a Property ................ ... .... ... ... .......................................................... ... ....20
3.9 Delete a Property ............................................................................................21
4.1 Site Summary .......... .... ... ... ... .... ... ... ... ... .... ... ... .................................................22
4.1.1 Site Information ...................................................................................................23
4.1.2 Site Totals ............................................................................................................23
4.1.3 Synchronize Data with the Data Logger ...........................................................24
4.2 Buildings ..................... ... .......................................................... ... ....................25
4.2.1 Add New Building ...............................................................................................25
4.2.2 Synchronize Data with the Data Logger ...........................................................25
4.2.3 Export Buildings List ..........................................................................................26
4.2.4 Building Name .....................................................................................................26
4.2.5 # Apt. Units ..........................................................................................................26
4.2.6 Notes ....................................................................................................................27
4.3 Units ................ ... ....................................................... ... ... .... ... ... ... ... .... .............28
4.3.1 Add New Unit .......................................................................................................28
4.3.2 Enable RF for Registration and Com Port Sniffer ............................................28
4.3.3 Export Unit List ...................................................................................................29
4.3.4 Building ................................................................................................................29
4.3.5 Unit .......................................................................................................................29
4.3.6 TXID ......................................................................................................................29
4.3.7 IMC .......................................................................................................................30
4.3.8 Meter Model .........................................................................................................30
4.3.9 TX Model ..............................................................................................................30
4.3.10 CF .......................................................................................................................30
4.3.11 Util Type .............................................................................................................30
4.3.12 Meter ID ..............................................................................................................30
4.3.13 Notes ..................................................................................................................30
4.4 Repeaters .................... .......................................................... ... ... ....................31
4.4.1 Add New Repeater ..............................................................................................31
4.4.2 Synchronize Data with the Data Logger ...........................................................31
4.4.3 Enable RF for Registration and Com Port Sniffer ............................................32
4.4.4 Repeater Location ...............................................................................................33
4.4.5 TXID ......................................................................................................................33
4.4.6 Notes ....................................................................................................................33
4.5 Comments ...... ... ... ... .... ... ... ... .......................................................... .... .............34
4.5.1 Add New Comment .............................................................................................34
4.5.2 Synchronize Data with the Data Logger ...........................................................34
05855E 4

4.5.3 Export Comments List ........................................................................................35
4.5.4 Timestamp ...........................................................................................................35
4.5.5 User ......................................................................................................................35
4.5.6 General Comments and Service Notes .............................................................36
4.6 Reports ....... .... ... ... ... .... ... ... ... .......................................................... .... .............37
4.6.1 .OUT Files On-Demand .......................................................................................37
4.6.2 Reads ...................................................................................................................42
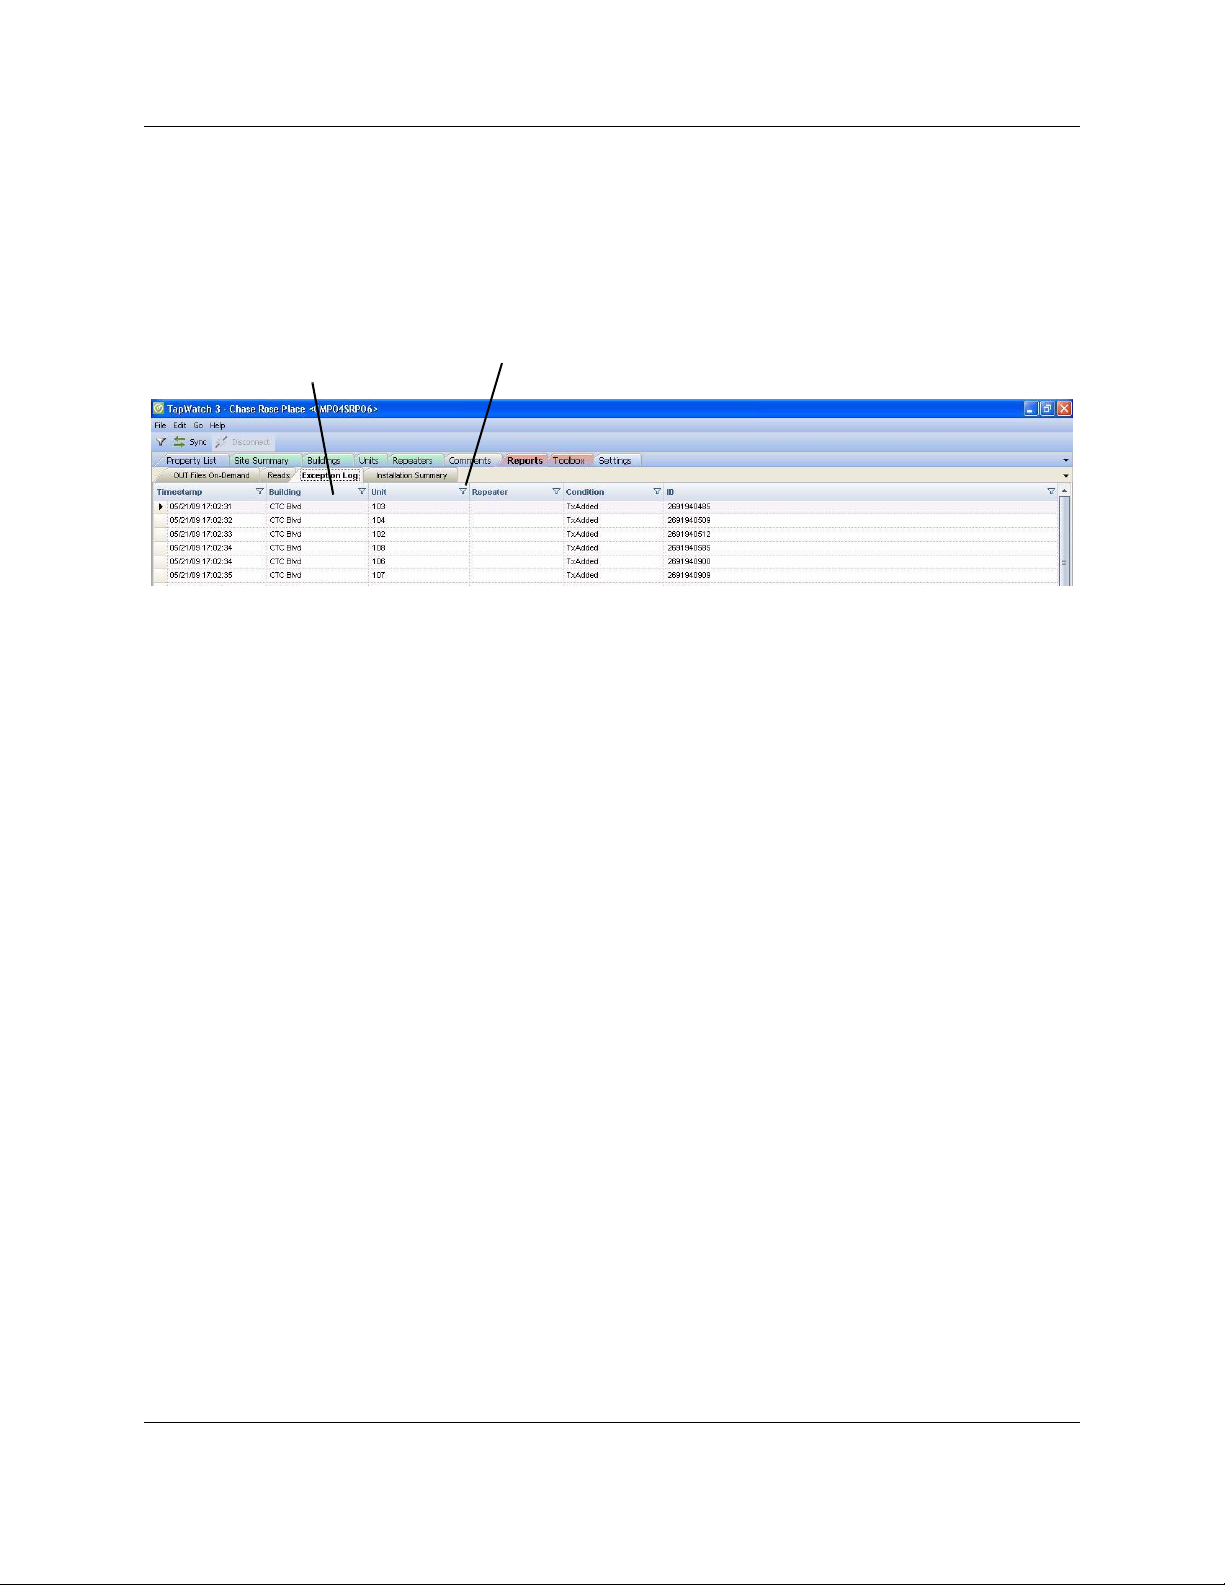
4.6.3 Exception Log .....................................................................................................45
4.6.4 Installation Summary ..........................................................................................47
4.7 Toolbox ................. ... .... ... .......................................................... ... ....................48
4.7.1 Com Port Sniffer .................................................................................................48
4.7.2 Check-In Monitor .................................................................................................52
4.7.3 Settings ................................................................................................................55
4.7.4 Data Logger Contact Info ...................................................................................55
4.7.5 Advanced Options ..............................................................................................56
4.7.6 Synchronize Data with the Data Logger ...........................................................57
5.1 Overview ............... ... .... .......................................................... ... .......................59
5.2 Calendar .................. ........................................................... ... ... .......................60
5.2.1 Add a New Event ............................................................... .. ... .............................60
5.2.2 Delete an Event ...................................................................................................61
5.3 To Do List .......... ... ... .... ... ... ... .... ... .......................................................... ... .......61
5.3.1 Export To Do List ................................................................................................61
5.3.2 Run Event(s) Next ...............................................................................................62
5.3.3 Status ...................................................................................................................62
5.3.4 Timestamp ...........................................................................................................62
5.3.5 Action ...................................................................................................................62
5.3.6 Group ...................................................................................................................62
5.3.7 Property Name ....................................................................................................62
5.3.8 Property ID ...........................................................................................................62
5.4 Event History .............................................. ... ... .... ... ... ....................................63
5.4.1 Export Event History ..........................................................................................63
5.4.2 Status ...................................................................................................................63
5.4.3 Timestamp ...........................................................................................................63
5.4.4 Action ...................................................................................................................64
5.4.5 Group ...................................................................................................................64
5.4.6 Property Name ....................................................................................................64
5.4.7 Property ID ...........................................................................................................64
5.5 Groups ......................................... .......................................................... ... .......65
5.5.1 Group View ..........................................................................................................65
05855E 5

5.5.2 Property View ......................................................................................................67
6.1 Overview ............... ... .... .......................................................... ... .......................69
6.1.1 View Only .............................................................................................................69
6.1.2 Field Technician ..................................................................................................69
6.1.3 Network Administrator .......................................................................................69
6.2 My Keys .......... ... ... ... .... ... ... ... .... .......................................................... ... ..........70
6.2.1 My Keys ...............................................................................................................70
6.2.2 Export My Keys ...................................................................................................70
6.2.3 Request a Key ............................................... .................................. .. ... ...............71
6.2.4 Create a Key ........................................................................................................71
6.2.5 Import a Key ........................................................................ ................................72
6.2.6 Delete Access Key ..............................................................................................72
6.3 Key Assignment History ................................................................... ... ... .......73
6.3.1 Export Key History ..............................................................................................73
6.3.2 Delete Key History Entry ....................................................................................73
6.3.3 Keys Assignment History ...................... ..................................... ... ....................74
05855E 6

Chapter 1
TapWatch Overview
1.1 TapWatch Introduction
TapWatch is a submetering system that reads and collects utility meter reading
data. Already installed in millions of apartments nationwide, TapWatch helps
multifamily property owners increase their net operating income by having
residents pay individually for utilities they use.
Wireless technology allows for quick and easy installation of the TapWatch
system, with minimal disruption to residents. Drilling holes through walls,
running wire to each building, and digging trenches for cabling is not
necessary.
Inovonics created and introduced TapWatch in 1998. Based on 900MHz
spread spectrum wireless technology, this submetering system was created
specifically for the multifamily market. The power of 900MHz technology
allows hundreds of transmitters to send information to one receiver. Using
repeaters, a mesh network can be created to cover large or multi-building
properties.
1.1.1 How TapWatch Works
1. A pulse output meter installed in each apartment is connected to an
Inovonics pulse meter transmitter (PMT).
2. The PMT converts the meter reading into a digital signal and transmits it.
3. Repeaters placed at strategic locations throughout the site receive signals
from the transmitters, verify them, and amplify them for transmission to the
receiver.
4. The data logger decodes transmissions from the receiver and stores the
data for retrieval by TapWatch 3 software.
05855E 7

TapWatch Overview
5. Authorized billing companies access the data logger remotely.
1.1.2 Pulse Meter Transmitter
The pulse meter transmitter (PMT) is a one-way end device that uses a
meter's standard pulse or reed-switched output. As meter counts
consumption, resulting pulses or switch closures are counted by the PMT. The
PMT then transmits the data via the commercial mesh network.
The PMT:
• Accepts data from the water meter
• Transmits the data to the repeater or receiver
• Is self-monitoring
• Is primary battery powered, with an easily replaceable battery
1.1.3 Repeater
The repeater is an optional component of an Inovonics system that expands
the mesh network’s coverage area. Repeaters can be easily included in the
initial installation, or added as the system grows.
The repeater:
• Receives messages and retransmits them at high power
• Optimizes communication paths to effectively manage RF traffic
• Retransmits messages to other repeaters, extending site coverage
1.1.4 RF Gateway
There are several kinds of RF gateway used in Inovonics systems, depending
on the application. TapWatch uses an EN4000 serial receiver to decode
EchoStream signals from EchoStream end devices and repeaters, and/or an
FA403 receiver to decode Frequency Agile (FA) signals from FA end devices
and repeaters, and outputs the data to the data logger.
The EN4000 and FA403:
• Listen for transmitted signals from end devices and repeaters
• Output data in a defined data stream to the data logger
05855E 8

1.1.5 Data Logger
The RDL8500 data logger can store meter readings from up to 2000 meters
for 90 periods. At any time, the billing company can contact the data logger
and download the readings along with site information and any system
exceptions.
The data logger:
• Receives meter data from the receiver
• Stores meter data until needed
• Transmits data to a personal computer using TapWatch 3 software
1.2 TapWatch 3 Software
TapWatch 3 software collect s, manages, and interpret s the dat a received from
the data logger . The software also allows the user to monitor the status of each
PMT and repeater in your TapWatch submetering system.
TapWatch Overview
1.2.1 TapWatch Startup
Start the TapWatch 3 software by either double-clicking the TapWatch 3
desktop icon, or selecting TapWatch 3 from the Inovonics TapWatch 3 folder in
Programs.
1.2.2 About Window
The About window appears while TapWatch 3 loads, displaying the following
information:
Build # The version of TapWatch software loaded on the computer.
1.2.3 Standard Software Features
The TapWatch 3 software has the following features:
• Pressing Alt + an underlined letter on a button will activate the button
• Tab can be used to move from field to field
• Shift + Tab moves between fields in reverse order
• Cursor can be positioned with a mouse click
• Ctrl + C and Ctrl + V shortcuts copy and paste highlighted items
05855E 9
TapWatch Overview
Click anywhere
in the column
to sort
information
Click the filter
icon to filter
information
• Data in fields can be sorted and filtered
1.2.3.1 Sorting and Filtering Data
Screens that include columns of information can be sorted and filtered.
Figure 1-1 Sort and Filter Columns
To sort data:
1. Click anywhere in the column to sort the information in ascending order.
2. Click again to sort the information in descending order.
To filter information:
1. Click on the filter icon.
2. Choose the filter condition.
3. Only fields which meet the selected criteria will appear . To turn the filter off,
click on the filter icon and select (All).
To export a screen as a spreadsheet:
1. Navigate to File > Export.
2. Click on the file you wish to export.
3. To use the default backup location, click Save; to backup elsewhere,
navigate a new location.
1.2.4 The Status Bar
The status bar at the bottom of all TapWatch 3 screens is separated into three
sections, the first showing the time and date of the last synchronization or a
count of the items currently being viewed, the second showing connection
05855E 10

status, and the third displaying a brief update on what the software is currently
Last sync or count of
buildings, units,
repeaters, or
transmitters shown on
the screen
What the
software is
currently doing
Connections
status
doing.
Figure 1-2 The Status Bar
1.3 TapWatch.com Web Portal
Designed to conveniently collect and manage utility reads in conjunction with
TapWatch 3, Inovonics’ read collection web portal offers a new standard in
usability and accessibility for utility submetering and billing companies. Using a
secure Ethernet connection, TapWatch.com provides access to property,
reads, and scheduler information from any computer with internet access,
eliminating the need for expensive or outdated analog phone lines.
TapWatch.com includes extensive online help screens, providing detailed
information about the web portal.
TapWatch Overview
Note: TapWatch 3 communicates with data loggers using TapWatch.com. You must
have a TapWatch.com account to access data loggers over the internet. Contact
your RBC’s TapWatch administrator to establish a TapWatch.com account.
1.3.1 What TapWatch.com Will Do for Your Property
TapWatch.com is not designed to replace TapWatch 3, but to work in
conjunction with it. TapWatch 3 will still be used to configure, troubleshoot, and
manage most site functions; TapWatch.com will be used primarily to securely
and remotely collect reads:
• Eliminating the need to rely on outdated, unsecure, unstable, and
expensive analog phone lines
• Providing ease of use with plug-and-play capability
• Ensuring a secure RDL connection to a managed internet server
• Protecting your data via stable service hosting
05855E 11
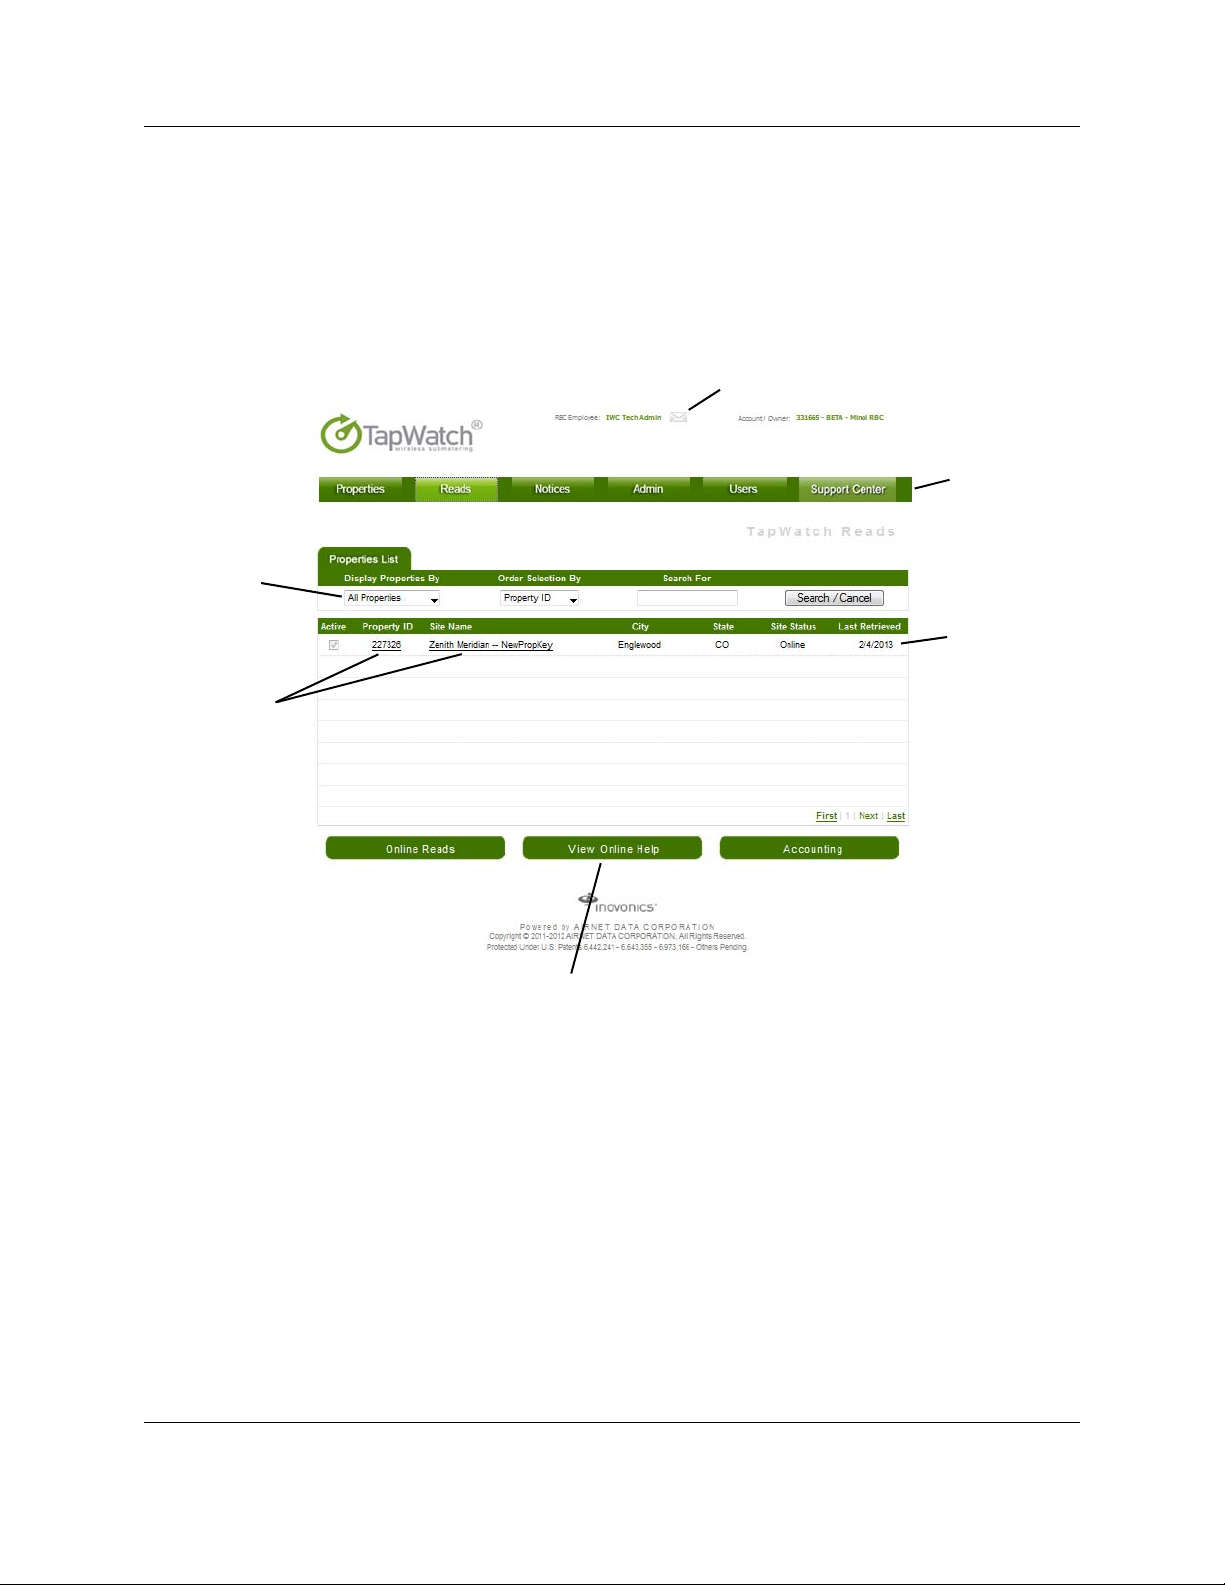
TapWatch Overview
Property
information
fields
Click on the
property ID or
site name to
download/
access reads for
this property
Click to open
online help, which
details screen
fields and options
Property sort
options
Account
notifications
Main menu
options
You will see how TapWatch.com will provide you with the easiest way to
retrieve reads on the market. To ensure that remains the case, Inovonics is
fully committed to maintaining the quality of support you've grown accustomed
to from us. That support includes on-going updates and our complete
commitment to ensuring that TapWatch.com is the most usable and accessible
read collection solution available.
Figure 1-3 TapWatch.com Reads Screen
05855E 12

Chapter 2
TapWatch Software Installation
2.1 Minimum System Requirements
Performance levels may decrease if the minimum requirements are not
maintained.
• PC with 1.2 gigahertz processor
• Windows® XP® with Service Pack 3 installed or Windows 7
• 512 MB RAM if running Windows XP; 1 GB RAM if running or Windows
®
7
• 1 GB of available hard disk space
Note: Additional space may be needed depending on the number of sites, the amount of
meter readings retrieved, and etc.
• Ethernet port
• Available RS232 serial port and DB-9 connector or a USB serial port with
an RS232 serial adapter
• 56k modem
• Video resolution of 1024x768
• CD-ROM or DVD drive
®
05855E 13

2.2 Recommended System Requirements
Following are the recommended performance levels to ensure optimum
performance of the TapWatch 3 software.
• PC with 2 gigahertz processor
TapWatch Software Installation
• 1 GB RAM if running Windows® XP®; 2 GB RAM if running Windows 7
• 2 GB of available hard disk space
2.3 Software Installation
To install TapWatch 3:
1. Double click the TapWatch3-Setup.exe.
2. If you get a warning that the publisher could not be verified, click Run.
3. If you get a notice that an unidentified application wants to access your
computer, click Allow.
4. If you are prompted to reboot your computer during installation, the
installer should restart after the reboot. If the install does not run again, it
will pick up where it left off automatically.
Note: Each time you start TapWatch 3 it will check to see if there is a software update
available. If there is, you will be prompted to update your software.
®
2.4 Setting Up the TapWatch 3 Software with Your Network
During installation of the TapWatch 3 software, you will need to set up the
TapWatch 3 software with your network to ensure only authorized users can
access your network.
05855E 14
TapWatch Software Installation
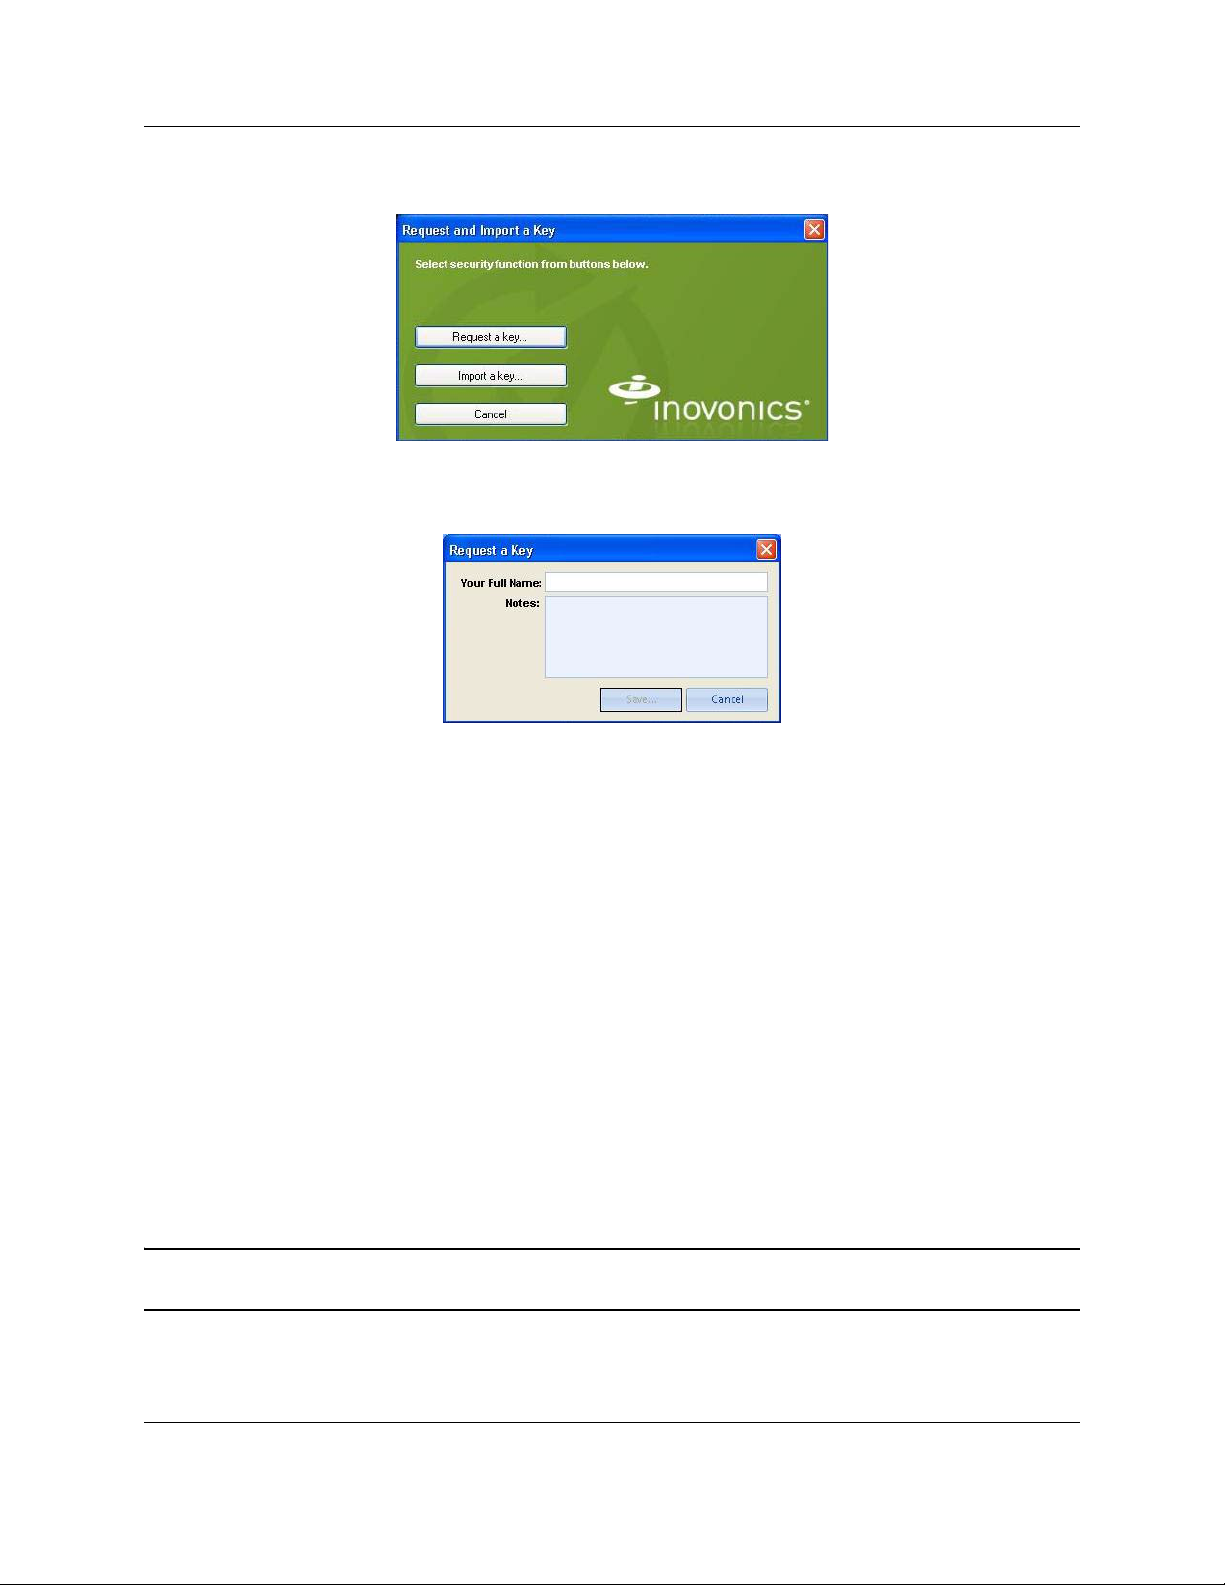
The first time you run TapWatch 3 software, the following window will display:
Figure 2-1 Request and Import a Key Window
1. Click on Request a Key. The key request information dialog box displays.
Figure 2-2 Key Request Information Dialog Box
2. Enter your name in the Your Full Name field.
3. Optionally, enter any notes in the Notes field for the network administrator
who will be creating the key from the key request file.
4. Click Save.
5. The Save As dialog box appears. Navigate to the location where you want
to save the key request file and click Save.
6. Email the key request file to your RBC’s TapWatch administrator. The
TapWatch administrator will synchronize the key with your system and
return it to you.
7. Restart the TapWatch 3 software. When the Request and Import a Key
window displays, select Import a Key.
8. Navigate to the location of the key file in the Import a Key window and
click on Import.
Note: See “Roles & Access” on page 69 for more information.
05855E 15

TapWatch Software Installation
Ethernet Port
2.5 Connecting to RDL8500 or RF Gateway
Connecting to a traditional TapWatch submetering network using the RDL8500
remote data logger and an RF gateway is covered in the RDL8500 Remote
Data Logger Installation Instructions included with the RDL8500. However, a
computer running TapWatch 3 software can also be directly connected to
either an RDL8500 or an RF gateway for purposes of maintenance or
troubleshooting.
2.5.1 Directly Connecting to an RDL8500
The computer running TapWatch 3 software can be directly connected to an
RDL8500 using the RDL8500 ethernet port, shown below.
Figure 2-3 RDL8500 Ethernet Port
2.5.2 Directly Connecting to an RF gateway
The computer running TapWatch 3 software can be directly connected to an
RF gateway using the Inovonics serial and power cable:
• http://www.inovonics.com/ACC643.aspx
05855E 16

Chapter 3
Property List
3.1 Overview
The Property List screen shows all of the properties contained on your PC.
From the List of Sites screen, you can backup, restore, add, open, or delete a
site.
Figure 3-1 Property List Screen
05855E 17
3.2 Add a New Property
To add a new property:
1. Navigate to File > New > Property; or, right click anywhere on the list of
properties and select New > Property.
2. Enter a unique identifier of up to 12 alphanumeric characters in the
required Property ID field.
3. Enter a brief description of up to 25 alphanumeric characters in the
required Site Name field.
4. Enter any relevant property information.
5. Click Save to save the new site; or, if you want to cancel the procedure,
click Cancel to delete all information and return to the Property List
screen.
Property List
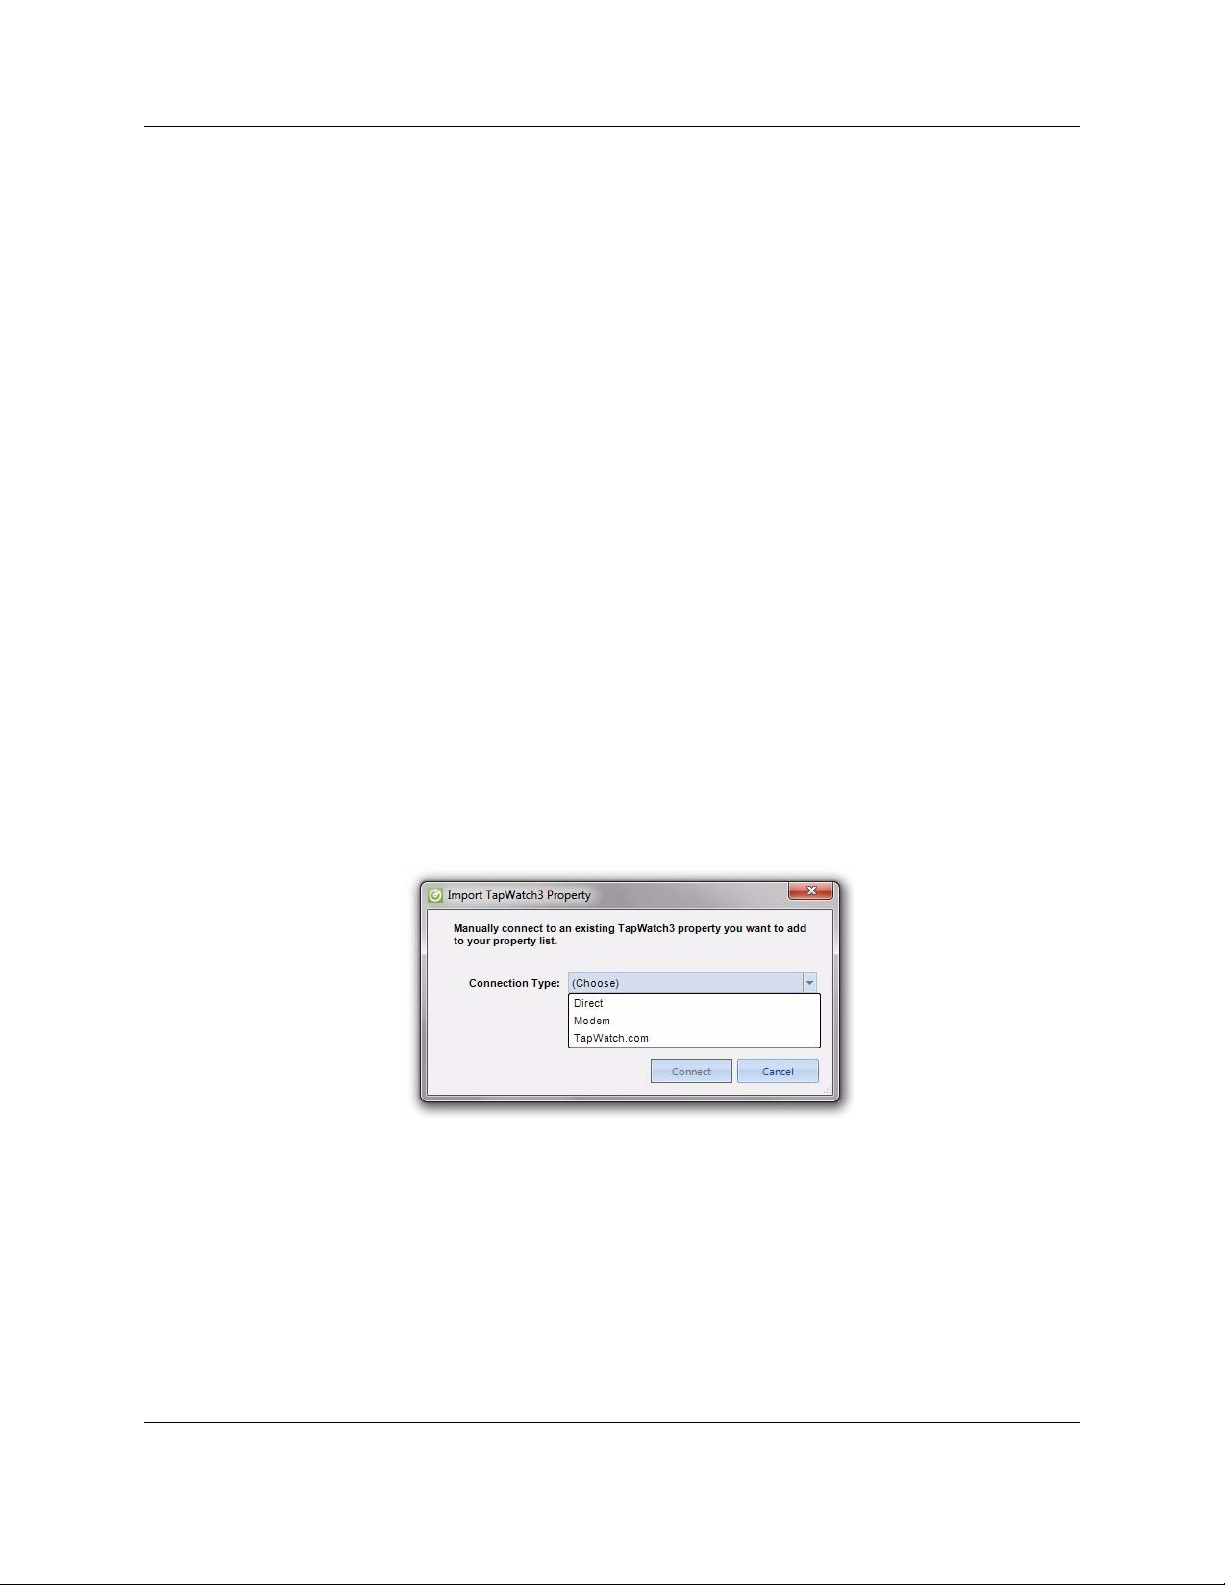
3.3 Import a TapWatch 3 Property
Use this option if a data logger already has site information loaded and you
want to retrieve the information to your computer.
1. Navigate to to File > Import > TapWatch 3 Property.
2. Choose a connection type.
Figure 3-2 Choose Connection Type
• If connecting directly to the data logger, select Direct.
• If you select Modem, enter the modem number of the data logger and
click Connect.
05855E 18
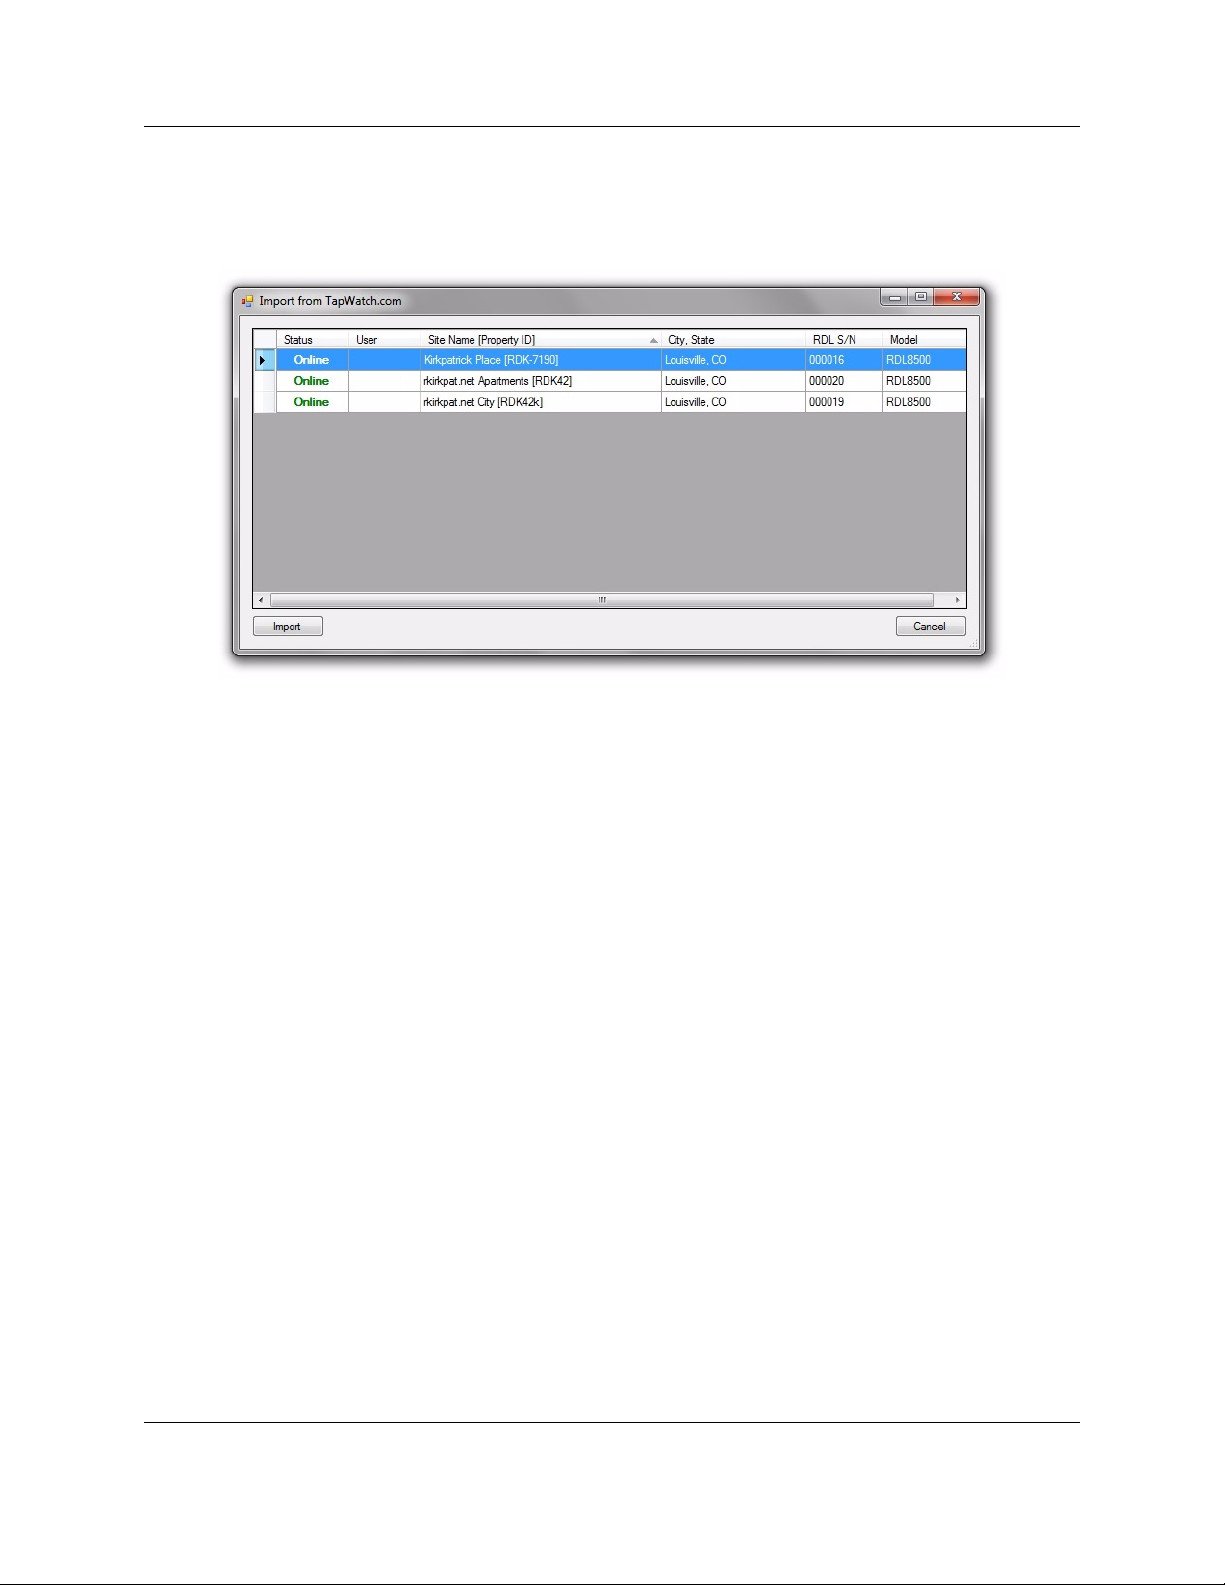
Property List
3. If you select TapWatch.com you will be prompted for your Username and
Password. Enter these and click Submit. Select a property and click
Import.
Figure 3-3 Select a Property
3.4 Convert a TapWatch 2 Property to TapWatch 3
Information formatted for TapWatch 2 can be transferred to TapWatch 3. To do
this, both TapWatch 2, with the site information you wish to transfer, and
TapWatch 3 must be loaded on the same computer.
To import a TapWatch 2 property:
1. Navigate to to File > Import > From TapWatch 2 Dat abase; the TapWatch
2 Data Import screen displays.
2. Click on the property you wish to import.
3. Select your time zone from the Choose Data Logger Time Zone drop-
down menu.
4. Select you network from the Import Into Network drop-down menu.
5. Click Import.
05855E 19

3.5 Restore a Property
If you have a property backup file (*.sdf), you can restore the site information.
To restore a property:
1. Navigate to File > Import > Restore from Backup.
2. The Restore window displays the default restore location. If your backup
file is located elsewhere, nagivate to it.
3. Highlight the backup file and click Open.
3.6 Export Property List
The property list can be exported as a spreadsheet. To export the property list:
1. Highlight a site and navigate to File > Export > Export Property List; or,
right click anywhere on the list of properties and select Export Property
List.
Property List
2. To use the default location, click Save; to save the file elsewhere,
navigate to a new location.
3.7 Backup a Property
It is strongly recommended that all properties be backed up regularly. Sites
that lose data will have to be completely reprogrammed. This will require
reaccessing every apartment, and resetting every transmitter.
1. Highlight the site and navigate to File > Export > Backup Selected
Property; or right click on the property you want to backup, and select
Backup Selected Property.
2. To use the default backup location, click Save; to backup elsewhere,
navigate to a new location.
3. When the confirmation message displays, press OK.
3.8 Open a Property
This option opens a property for editing. To open a property, double click on
the site you want to open.
05855E 20

3.9 Delete a Property
When a property is deleted, all buildings, repeaters, meters, and comments
related to the property will also be deleted. Make sure to perform a backup
before deleting a property.
To delete a property.
1. Highlight a property and navigate to Edit > Delete Property; or, right click
on a property and select Delete.
2. When the confirmation message displays, either click Yes, to delete, or
No, to cancel the deletion.
Property List
05855E 21

Chapter 4
Site Information
4.1 Site Summary
The site summary screen allows the user to view and edit property information,
including buildings, meters, repeaters, and comments.
Figure 4-1 Site Summary Screen
05855E 22
 Loading...