

Inovonics Radius Administrator User Manual

Table of Contents
Preface 5
Notice .................................... ...................... ....................... ....................... .............5
Document Part Number .......................................................................................5
Trademarks ........................................................................................................... 5
US Patent Numbers .......................................................... ... .................................5
Technical Services Contact Information ............................................................6
Document Conventions ................... ... ... ... .... .......................................... ... ... ... ....6
Warranty ................................................................................................................ 6
Chapter 1 Radius Overview 8
1.1 About Radius .................... ... .......................................... .... ... ... ... ....................8
1.2 Radius Server Components ..........................................................................9
1.2.1 Radius Server ......................................................................................................9
1.2.2 Network Coordinator ..........................................................................................9
1.2.3 High Power Repeater ..........................................................................................9
1.2.4 Wireless End Devices .........................................................................................9
1.2.4.1 Pendant Transmitters ...............................................................................9
1.2.4.2 Universal Transmitters .............................................................................9
1.2.4.3 Specialized Transmitters .........................................................................10
1.2.5 Dialogic® Combined Media Board ................................................................... .10
1.2.6 Two-Way Radio Interface ...................................................................................10
1.2.7 Paging Base Station and Pagers .......................................................................10
1.3 Defining the Radius System ......................................................... .... ... ... ... ....10
1.3.1 Monitored Devices ..............................................................................................10
1.3.2 Device Categories ...............................................................................................11
1.3.3 Alert Devices .......................................................................................................11
1.3.4 Alert Groups ........................................................................................................11
1.3.5 Modes and Actions .............................................................................................11
Chapter 2 Radius Home Screen 12
6.24.13 06320D © Inovonics, 2013 - www.inovonics.com 1

2.1 Overview ............... ... .... .......................................... ... ... ... .... ... ..........................12
2.1.1 Alarm Detail .........................................................................................................13
2.1.1.1 Log Time ....................................................................................................13
2.1.1.2 Alert Device ...............................................................................................13
2.1.1.3 Contact Info ...............................................................................................13
2.1.1.4 Status .........................................................................................................13
2.1.1.5 Confirmed By ............................................................................................13
Chapter 3 Setting Up Monitored Devices 14
3.1 Overview ............... ... .... .......................................... ... ... ... .... ... ..........................14
3.2 Create Category ....................... ... ... ... ... .... ... ... ... .... ..........................................15
3.3 Enroll an End Device ......................................................................................16
Chapter 4 Setting Up Alert Devices 18
4.1 Overview ............... ... .... .......................................... ... ... ... .... ... ..........................18
4.2 Set Up an Alert Device ...................................................................................19
4.2.1 Set Up a Pager Alert ...........................................................................................19
4.2.2 Set Up a Phone (Voice Call) Alert ......................................................................20
4.2.3 Set Up an Email/SMS Alert .................................................................................21
4.2.4 Set Up a Overhead Pager or Two-Way Radio ...................................................22
4.3 Delete an Alert Device ......................... .... ... ... ... .... ... ... ... .... ... ... ... ... .... .............23
4.4 Set Up an Alert Group ....................................................................................23
4.5 Delete an Alert Group .............. .......................................... ... ... ... ... .... ... ... ... ....24
Chapter 5 Setting Up Modes and Actions 25
5.1 Overview ............... ... .... .......................................... ... ... ... .... ... ..........................25
5.1.1 Modes ...................................................................................................................26
5.1.2 Actions .................................................................................................................26
5.2 Setting Up Modes ................ .... ... ... ... ... .... ... .......................................... ... ... ....26
5.3 Setting Up Actions .................................. ... ... ... .... ..........................................27
Chapter 6 Resetting Monitored Devices 29
6.1 Overview ............... ... .... .......................................... ... ... ... .... ... ..........................29
6.2 Clear Transmitter Alarms using the Radius Software Interface ................29
6.24.13 06320D © Inovonics, 2013 - www.inovonics.com 2

Chapter 7 Reports 30
7.1 Overview ............... ... .... .......................................... ... ... ... .... ... ..........................30
7.1.1 Alarm History ......................................................................................................31
7.1.2 Average Alarm Response Time .........................................................................32
7.1.3 Track Mobile Devices .........................................................................................32
7.1.4 Mobile Device Tracking Report .........................................................................33
7.1.5 Current Temp/Humidity ......................................................................................33
7.1.6 Temp/Humidity History Report ..........................................................................34
7.1.7 Low Battery Report .............................................................................................34
7.1.8 Scheduled Reports .............................................................................................35
Chapter 8 User Administration 36
8.1 Overview ............... ... .... .......................................... ... ... ... .... ... ..........................36
8.1.1 Setting Up or Editing Radius Users ..................................................................37
Chapter 9 Using Quick Messages 39
9.1 Overview ............... ... .... .......................................... ... ... ... .... ... ..........................39
9.2 Sending Quick Messages ..............................................................................40
9.3 Managing Quick Picks ............................... ... ... .... ... ... ....................................40
9.4 Viewing the Quick Message Log ............................ ... ... .... ... ... ... ... .... ... ... ... ....40
Chapter 10 Using Reminders 41
10.1 Overview ........................................................................................................41
10.2 Sending Reminders ......................................................................................42
Chapter 11 Setting Up the Inovonics Positioning System 43
11.1 Overview ........................................................................................................43
11.2 Selecting a Vector Mapping Method ...........................................................44
11.2.1 The Known Signal Pattern Method ..................................................................44
11.2.2 The Point of Interest Method ............................................................................44
11.3 Setting Up the Known Signal Pattern Method ...........................................45
11.3.1 Ensuring a Robust Inovonics Repeater Layout .............................................45
6.24.13 06320D © Inovonics, 2013 - www.inovonics.com 3

11.3.2 Loading Fixed Device Signal Strengths ..........................................................45
11.3.3 Selecting Categories to Ignore ........................................................................46
11.4 Setting Up the Point of Interest Method .....................................................46
11.5 Setting up the Inovonics Positioning System for Mobile Duress ............48
11.6 Setting up the Inovonics Positioning System for Asset Tracking ...........48
11.6.1 Configuring Zones for Tracked Assets ...........................................................48
Chapter 12 Restarting Services 50
12.1 Restart Services ...........................................................................................50
Chapter 13 Troubleshooting 51
13.1 Overview ........................................................................................................51
13.2 Pendant Alarms Not Displaying Location Information ...................... ... ....51
13.3 Pendant Transmitter Stuck in Alarm ..........................................................51
13.4 Pagers Not Receiving Pages .......................................................................52
13.5 Server not Responding ................................................................................53
13.6 Email Errors ..................................................................................................53
13.7 Process not Updating its Watchdog Timer ................................................ 54
13.8 Server Temperature too Hot ........................................................................54
13.9 End Device or Repeater Missing, Not Responding,
or Alarm not Clearing ...........................................................................................55
6.24.13 06320D © Inovonics, 2013 - www.inovonics.com 4

Preface
Notice
© Inovonics, 2013
Inovonics intends this manual for use by Inovonics customers only. All
comments concerning the contents of this manual should be directed to the
Inovonics marketing department. No part of this work covered by copyright
may be reproduced in any form either graphically, electronically, or
mechanically; including photocopying, recording, taping, or storing in an
information retrieval system without prior written permission from Inovonics.
Document Part Number
06320D
Trademarks
Inovonics, EchoStream and Radius are registered trademarks of Inovonics. All
other brand names and product names used in this manual are trademarks,
registered trademarks, or trade names of their respective holders.
US Patent Numbers
• 7,154,866
• 7,554,932
• 7,746,804
6.24.13 06320D © Inovonics, 2013 - www.inovonics.com 5

Technical Services Contact Information
For Inovonics technical services:
• E-mail: support@inovonics.com
• Phone: (800) 782-2709; (303) 939-9336
Document Conventions
The following notices are used throughout this document:
Note: Emphasizes points, provides supplementary information, or indicates minor
problems in an expected outcome.
Caution: Indicates possible damage to equipment or loss of data, as well as potential
problems in an expected outcome.
Warning: Indicates the possibility of minor injury to oneself or others.
Danger:Indicates the possibility of serious or fatal injury to oneself or others.
Warranty
Inovonics Wireless Corporation ("Inovonics") warrants the Radius server
hardware to conform to its own specifications and to be free of defects in
materials and workmanship under normal use for a period of twelve (12)
months from the date of manufacture. Within the warranty period, Inovonics
will repair or replace, at its option, all or any part of the warranted product.
Inovonics will not be responsible for dismantling and/or reinstallation charges.
To exercise the warranty, the User ("User", "Installer" or "Consumer") must
work directly through their authorized distributor who will be given a Return
Material Authorization ("RMA") Number by Inovonics. Details of shipment will
be arranged directly through the authorized distributor.
6.24.13 06320D © Inovonics, 2013 - www.inovonics.com 6

This warranty is void in cases of improper installation, misuse, failure to follow
installation and operating instructions, unauthorized alteration, accident or
tampering, and repair by anyone other than Inovonics.
This warranty is exclusive and expressly in lieu of all other warranties,
obligations or liabilities, whether written, oral, express, or implied. There is no
warranty by Inovonics that Inovonics product will be merchantable or fit for any
particular purpose, nor is there any other warranty, expressed or implied,
except as such is expressly set forth herein. In no event shall Inovonics be
liable for an incidental, consequential, indirect, special, or exemplary
damages, including but not limited to loss of profit, revenue or contract, loss of
use, cost of down time, or interruption of business, nor any claim made by
distributor's customers or any other person or entity.
This warranty will not be modified or extended. Inovonics does not authorize
any person to act on its behalf to modify or extend this warranty. This warranty
will apply only to the Radius server hardware. Inovonics will not be liable for
any direct, incidental or consequential damage or loss whatsoever, caused by
the malfunction of product due to products, accessories, or attachments of
other manufacturers, including batteries, used in conjunction with Inovonics
products.
6.24.13 06320D © Inovonics, 2013 - www.inovonics.com 7
Chapter 1
Radius Overview
1.1 About Radius
Radius is a revolutionary alert server and awareness engine. Designed to link
people to events in life-safety situations, Radius combines the latest mass
notification capabilities with advanced positioning technology to provide
detailed location information.
Radius provides the central nervous system for your Physical Security
Information Management system. The system integrates data from traditional
security devices, even IP-enabling legacy security and fire panels to do so,
and then coordinates an appropriate response. The location functionality
provided by Inovonics® Positioning Technology™ then ensures those alarms
can be located, so that the response can be effective.
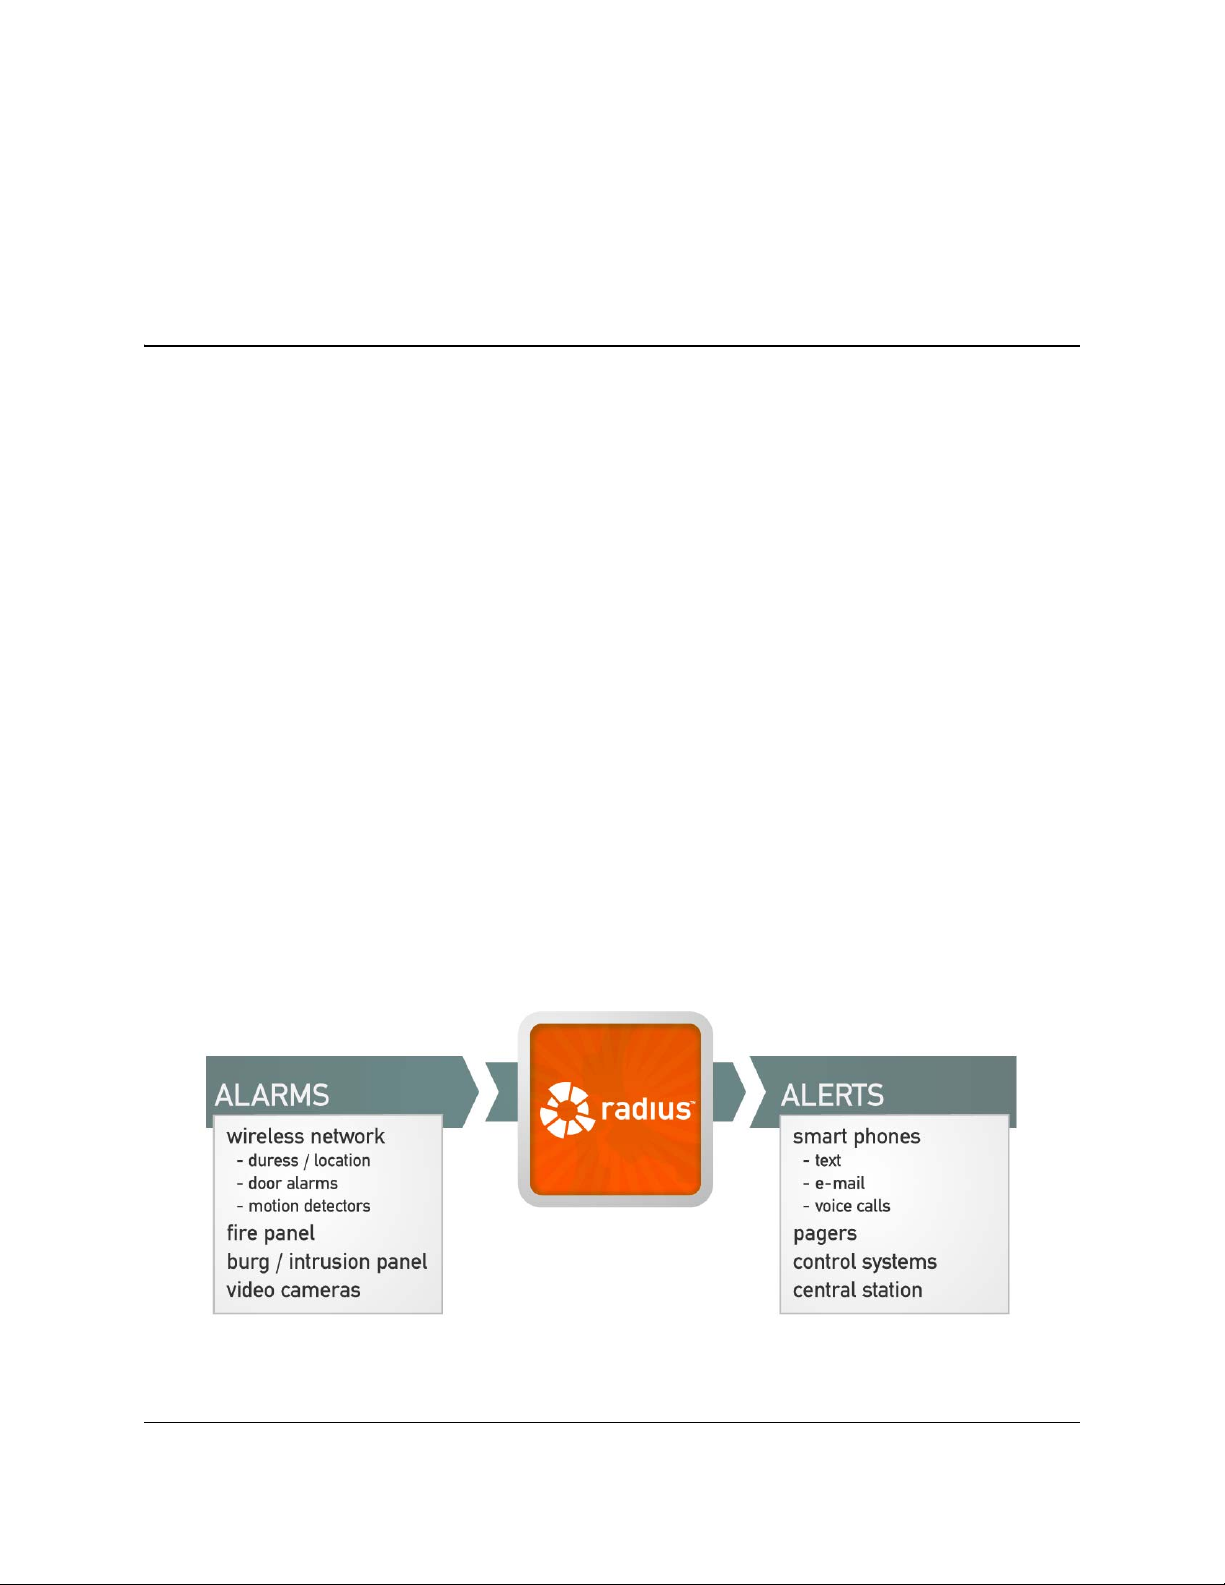
Radius allows users to monitor a variety of end-devices; interface to fire,
access control, and environmental systems; and provide notification to mobile
devices such as cell phones, pagers, and two-way radios.
Figure 1-1 Radius Overview
6.24.13 06320D © Inovonics, 2013 - www.inovonics.com 8

1.2 Radius Server Components
1.2.1 Radius Server
The Radius server is a Windows XP embedded server typically connected to
the local area network (LAN) to allow existing users to view and administer the
Radius system from their workstations.
The Radius server includes four serial ports, one Ethernet port, six USB ports
and four analog telephone jacks.
1.2.2 Network Coordinator
The network coordinator manages signals between the wireless end devices
in the Radius system and the Radius server.
1.2.3 High Power Repeater
Radius Overview
The high power repeater intelligently amplifies transmissions from any
Inovonics EchoStream end device, while ignoring background noise. Virtually
any number of repeaters can be added to a system, scaling the system size as
needed.
• Radius can also use the high power repeater network to provide the
approximate location of wireless end devices sending alert signals.
1.2.4 Wireless End Devices
The Radius system can incorporate any Inovonics wireless end device,
including:
1.2.4.1 Pendant Transmitters
Inovonics wireless pendant transmitters offer virtually limitless opportunities for
panic/duress, life safety, and many custom applications.
• http://www.inovonics.com/pendant-transmitters.aspx
1.2.4.2 Universal Transmitters
Inovonics universal transmitters are designed for use with almost any standard
contact or sensor. They are available in a number of configurations for almost
any application.
• http://www.inovonics.com/universal-transmitters.aspx
6.24.13 06320D © Inovonics, 2013 - www.inovonics.com 9

Radius Overview
1.2.4.3 Specialized Transmitters
Inovonics specialized transmitters are used for unique security, pulse
counting, temperature, and custom applications.
• http://www.inovonics.com/specialized-transmitter.aspx
1.2.5 Dialogic® Combined Media Board
A dialogic combined media board allows the Radius system to make and
receive phone calls. A voice-enabled Radius server includes one four-port
Dialogic board installed.
1.2.6 Two-Way Radio Interface
A two-way radio can be connected to the Radius server using a radio interface
box with a phone connection on one end and a 2.5mm jack to interface to a
base radio. The radio interface box will use one of the RJ1 1 jacks found on the
dialogic board.
1.2.7 Paging Base Station and Pagers
The Radius server can connect to a paging base station via one of the serial
ports to deliver POCSAG compliant messages to pagers.
1.3 Defining the Radius System
Every Radius system will differ depending on the specific application, but they
all have in common that they must turn alarms from end devices into alerts
delivered to the user.
Generally, Radius system components are defined as follows:
1.3.1 Monitored Devices
Monitored devices provide the alarm messages in a Radius system. Every
device that you are watching for an alarm must be defined as a monitored
device. This includes universal transmitters, pendants, door alarms,
temperature devices, smoke detectors, and motion detectors.
6.24.13 06320D © Inovonics, 2013 - www.inovonics.com 10

Radius Overview
1.3.2 Device Categories
Every monitored device must belong to a category. If you are using motion
detectors, you will need a motion detector category; if you are using pendants,
you need a pendant category. It is in the device category section that you
determine what you want Radius to do when an alarm occurs at a monitored
device.
1.3.3 Alert Devices
Every device that will receive an alert from Radius must be defined here,
including pagers, phones, and email addresses.
• Any device to which you want to send a quick message or reminder must
be set up in alert devices.
• Any device that you want included in an alarm escalation under modes
and actions must be set up in alert devices.
• If you want to put together an alert group, all members of the group must
be set up in alert devices.
1.3.4 Alert Groups
This feature allows you to create groups of alert devices that will always be
contacted together. Alert groups are especially useful in situations where you
wish to contact a large group of people; by creating an alert group, you only
have to choose a single entry to send a quick message or reminder.
• If you want to put together an alert group, all members of the group must
be set up in alert devices.
1.3.5 Modes and Actions
Alarms can be escalated using the modes and actions option. This will allow
you to set up time schedules (modes) and specific alert responses (actions) for
each device category.
6.24.13 06320D © Inovonics, 2013 - www.inovonics.com 11

Chapter 2
Radius Home Screen
2.1 Overview
When you log into Radius, the first thing you will see is the home screen. The
home screen shows all devices that are currently in alarm, or have been been
alarmed within the past ten and twenty minutes. It also shows supervised
devices that are not checking into the Radius system.
Figure 2-1 The home screen
6.24.13 06320D © Inovonics, 2013 - www.inovonics.com 12

The icons next to the devices indicate their condition.
• Active event indicates a device that is currently in alarm
• Cleared event less than 10 mins old indicates a device that was in alarm
but has been cleared within the past 10 minutes
• Cleared event less than 20 mins old indicates a device that was in alarm
but has been cleared within the past 20 minutes
• Missing device indicates a device that is not sending a check-in signal to
the Radius system
2.1.1 Alarm Detail
Clicking on any alarm will display additional detail:
2.1.1.1 Log Time
The time the alarm was logged by each device that received it.
Radius Home Screen
2.1.1.2 Alert Device
Details for each person that received the alarm via their alert device.
2.1.1.3 Contact Info
Contact information for the person who received the alarm.
2.1.1.4 Status
The status of the alarm.
2.1.1.5 Confirmed By
How the alarm was confirmed.
To return to the home screen, click “Confirm This Event.”
6.24.13 06320D © Inovonics, 2013 - www.inovonics.com 13

Chapter 3
Setting Up Monitored Devices
3.1 Overview
End devices need to be enrolled into the Radius system before they can be
monitored and send alarms.
All monitored devices are set up from the administration screen.
Figure 3-1 Administration screen
6.24.13 06320D © Inovonics, 2013 - www.inovonics.com 14

3.2 Create Category
End devices enrolled into the Radius system must be added to a device
category. In some cases you will need to create the device category to which
you will add the end device. End devices that will need a device category
created for them include:
• Pendants
• Door alarm transmitters
• Universal transmitters
• Smoke detectors
• Motion detectors
To check current device categories and create new ones:
1 From the home screen, click “Administration.”
2 Click “Device Categories.”
Setting Up Monitored Devices
3 If you do not see the category needed for the end device you’re enrolling,
click “Create a New Category.”
4 In the “Description Field,” enter a description of the device category.
5 In the “Missing Interval” field, enter the time, in minutes, to elapse
between check in messages before a device in this category will be
considered missing.
6 Check the box next to “Do not show devices in this category on the main
status screen” if you want to keep end devices in this category from
displaying on the main screen.
• This can be useful for devices which will only be used used to establish
the vector map necessary for location functionality.
7 If this category will contain pendants, and you want them to be locatable,
check the box for “This category contains pendants - collect location
information.”
8 Edit the “Message for active alarms” field as desired to customize alarm
messages sent for devices in this category. If left blank, the default alarm
message will be used.
• Use the system values in the help pop-up window to include variable
information in your message.
9 Edit the “Message for alarm clears” field as desired to customize alarm
clear messages sent for devices in this category. If left blank, the default
alarm clear message will be used.
6.24.13 06320D © Inovonics, 2013 - www.inovonics.com 15

Setting Up Monitored Devices
• Use the system values in the help pop-up window to include variable
information in your message.
Caution: The Auto Create IDs field is used by Inovonics support personnel. Do not edit
this field with consulting Inovonics technical support.
10 As desired, enter any notes in the “Notes” field.
11 Click “Insert Category”. The new category will now display on the “Device
Categories” screen.
3.3 Enroll an End Device
Once you’ve ensured that the Radius system is set to automatically create
new devices and the appropriate device category exists, you can enroll your
device.
Note: For instructions on setting the Radius system to automatically create new
devices, see section 3.1.1 in the Radius Installer Manual.
1 From the home screen, click “Administration.”
2 Click “Monitored Devices.”
3 Activate the device so that it enrolls in the Radius system. The device will
appear on the monitored devices screen in the “New Devices” category.
Note: Activating the device is usually the easiest way to add it to “New Devices,” but
any message will suffice, even a tamper or check-in message.
• To enroll a motion detector transmitter, trigger the device so it sends an
alarm message.
• To enroll a door window transmitter, activate the reed switch so that it
sends an alarm message.
• To enroll a universal transmitter, open or close the circuit so that it sends
an alarm message.
• To enroll a pendant, push the button(s) to send an alarm message.
6.24.13 06320D © Inovonics, 2013 - www.inovonics.com 16
 Loading...