

Page 1
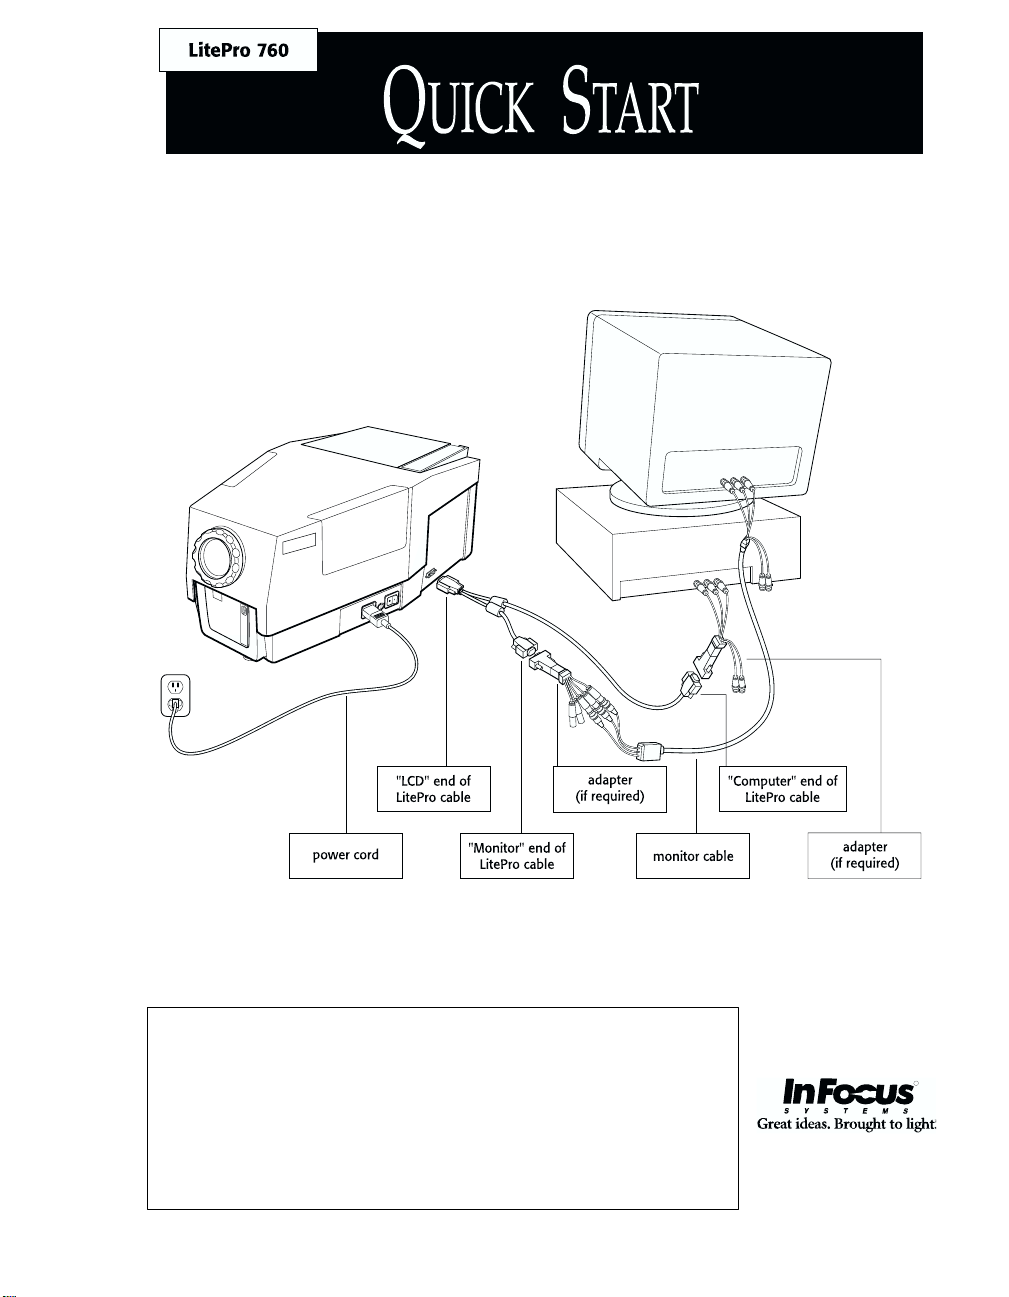
Connecting the LitePro 760 is summarized on the back of this card
fold and tear here fold and tear here
and described in detail in the LitePro 760 User’s Guide.
R
The User’s Guide contains instructions and illustrations for IBMcompatible, Macintosh, PowerBook, X terminals and UNIX
workstations. It also describes the remote control buttons and menu
functions.
Page 2

If you are setting up the LitePro
1
projector for the first time, install
the 2 bulbs that were shipped with
the projector. Refer to the “Read
Me First” card for instructions.
If you want to display the image
7
on your monitor as well as on the
projection screen, plug the
“Monitor” end of the LitePro cable
into the end of the monitor cable.
Place the projector on a flat surface
2
with the lens pointing towards the
projection screen. Remove the lens
cover.
Plug the “LCD” end of the LitePro
3
cable into the “Computer” connector on the side of the projector.
Unplug the computer’s monitor
4
cable from the computer.
If your computer is not an IBM-
5
compatible, find the adapters that
correspond to your computer.
(Refer to the chart below.) Attach
the adapters to the “Monitor” and
“Computer” ends of the LitePro
cable.
Plug the “Computer” end of the
6
LitePro cable into the computer’s
monitor connector.
Plug the power cord into the
8
projector, then into your electrical
outlet.
Press the “1” side of the projector’s
9
power switch. The projector powers up and displays the LitePro test
pattern.
Lift the front of the projector by the
10
handle and release the elevator
foot. When the image is at the
desired height, gently release the
handle. The elevator foot locks in
place.
Adjust the focus by turning the
11
lens focus ring.
If you attached your monitor in
12
Step 7, turn on the monitor.
Turn on the computer. The com-
13
puter image should display on the
projection screen.
If your computer is ... Use these adapters ...
Sun SPARCstation, SGI Indy or Indigo, Intergraph or color NeXTstation
HP, IBM RS6000, DEC VAXstation or
R
DECstation, Tektronix X terminal
Apple Macintosh or PowerBook
IBM-compatible desktop or laptop, SGI Starter, Tadpole SPARCbook
13W3
BNC
Mac
no adapters needed
Page 3

Copyright © 1995 by In Focus Systems, Inc.
Wilsonville, Oregon. All rights reserved.
Page 4

FCC Warning
This equipment has been tested and found to comply with the limits for a Class A digital
device, pursuant to Part 15 of the FCC Rules. These limits are designed to provide reasonable
protection against harmful interference when the equipment is operated in a commercial
environment.
Safety Certifications
UL, CUL, TUV
Instructions to User
This equipment generates, uses and can radiate radio frequency energy and, if not installed and
used in accordance with the instructions in this manual, may cause harmful interference to
radio and television reception. Operation of this equipment in a residential area is likely to
cause harmful interference. If this equipment does cause interference to radio or television
reception, the user is required to correct the interference at his/her own expense. The user may
try to correct the interference by one or more of the following measures:
• Reorient the receiving antenna for the radio or television.
• Relocate the equipment with respect to the receiver.
• Plug the equipment into a different outlet so the equipment and receiver are on different
branch circuits.
• Fasten cables using mounting screws to ensure adequate electromagnetic interference controls.
Trademarks
All trademarks are the property of their respective owners and are used in this publication for
identification purposes only.
The following are trademarks or registered trademarks of their respective companies:
• IBM and PS/2: International Business Machines, Inc.
• Apple, Macintosh, Mac II, LC, PowerBook, Quadra, Performa, and Power Mac: Apple Computer Corp.
• VAXstation and DECstation: Digital Equipment, Inc.
• IRIS, Indy and Indigo: Silicon Graphics Computer Systems
• Sun, SPARCstation: Sun Microsystems, Inc.
• SPA RC b oo k: Ta d p o l e Te c h n o l o g y, I n c.
• LitePro and IN FOCUS SYSTEMS: In Focus Systems, Inc.
• UNIX: AT&T Technologies, Inc.
Page 5

Page 6
Safety Summary
Please read these instructions before using your LitePro projector.
Failure to comply with these instructions could result in fire, electrical
shock, personal injury or equipment damage.
These graphics are used throughout this manual to draw your attention to important information about the LitePro:
Information that may be unusual or unexpected.
Information that helps you avoid damage to your
Information that helps you avoid personal injury.
These graphics are used on the LitePro:
!
Power Source
Use only a three-wire grounding type power source. The power
source should not exceed 250 volts rms between the supply
conductors or between either conductor and the ground.
Power Cord
Use only the power cord that was shipped with the LitePro. Although
other power cords might be similar in appearance, they have not
been safety-tested with the LitePro. Never use a power cord if it has
become damaged or frayed. Contact your In Focus dealer or call In
Focus if you need to replace your LitePro power cord.
Attention
information.
Fuse
- Refer to “Replacing the Fuse” on page 31 of this
User’s Guide for important safety information.
Hot Surface
equipment.
- Refer to the User’s Guide for important safety
- Do not touch until the LitePro has cooled.
LitePro 760 User’s Guide i
Page 7

Safety Summary
Grounding
The LitePro is grounded through the grounding conductor on the
power cord. To avoid electric shock, plug the power cord into a
properly wired receptacle. Do not defeat the purpose of the
grounding-type plug.
Fuse
For protection against the risk of fire, use only a fuse of the specified
type. Refer to page 41 for more information about fuse specifications
and to page 31 for instructions on replacing the fuse.
Lamp
To avoid overheating and unacceptable image quality, replace the
projection lamp with a lamp of the specified type. Refer to page 41 for
lamp specifications and to page 28 for instructions on replacing the
lamps.
Hot Surfaces
The rear of the LitePro becomes very hot during operation. Avoid
touching the exhaust grill on the lamp door. Allow the LitePro to
cools for at least 20 minutes before replacing a lamp. When you open
the lamp door, be very careful not to touch the hot surfaces inside.
Ventilation and Overheating
Openings in the LitePro case provide ventilation to protect it from
overheating. Keep loose papers and other objects well away from the
sides and back of the LitePro. Never operate the LitePro when the
lamp door is open; this disrupts the cooling air flow inside and can
cause the LitePro to overheat. Do not place the LitePro on top of or
close to the computer or other heat-producing equipment.
Liquid Spills
Do not set drinks on top of the LitePro. Spilled liquids can flow inside and damage the LitePro.
Do Not Disassemble
The only user-serviceable parts on the LitePro are inside the lamp
door at the rear. Do not open any other part of the LitePro. Opening
the LitePro case will expose you to electric shock hazard. All service
must be performed by an authorized In Focus service center.
ii LitePro 760 User’s Guide
Page 8

Contents
Introduction
Compatibility 2
Cables and Adapters 2
Usage Guidelines 3
If You Need Assistance 3
Connecting the LitePro 760
Setting Up 5
Connecting your Computer 7
Powering Up the LitePro 15
Turning the LitePro Off 15
Using the LitePro 760
Using the Remote Control 17
Focusing the Image 17
Adjusting the Height 18
Reference to the Remote Control Buttons 19
Using the Menu 21
Menu Functions 22
Switching Projection Lamps 24
Maintenance
Cleaning the Lens 27
Replacing the Projection Lamps 28
Replacing Batteries in the Remote Control 30
Replacing the Fuse 31
17
27
1
5
Troubleshooting
Before You Call for Assistance 35
Solutions to Common Problems 36
Appendix
Compatibility and Cabling 39
Specifications 41
Accessories 43
Cable Connector Pin Assignments 44
Portable and Laptop Activation Chart 46
Index
LitePro 760 User’s Guide iii
35
39
49
Page 9

Page 10
Introduction
The In Focus Systems LitePro 760 LCD projector has a resolution of
1024x768 pixels and 24,389 displayable colors. The LitePro 760’s
liquid crystal display (LCD) is based on In Focus Systems’ patented
Triple Super Twist Nematic (TSTN
performance business, CAD and imaging applications that demand
high resolution and exceptional color quality.
™
) technology. It is ideal for high-
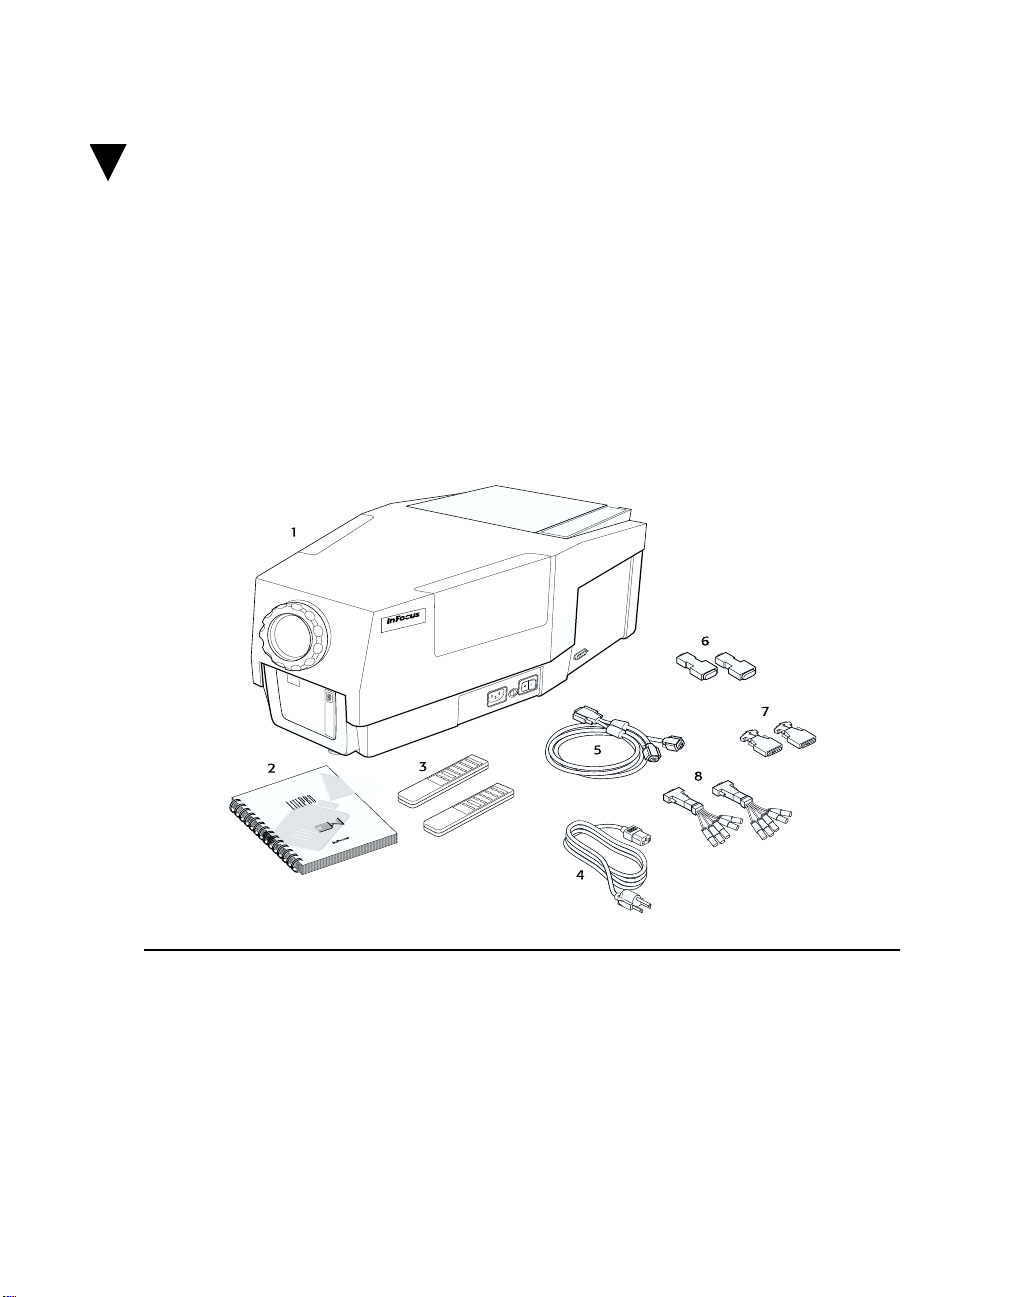
Shipping Box Contents
1. LitePro 760 LCD Projector 7. 13W3 Adapters
2. LitePro 760 User’s Guide 8. BNC Adapters
3. Remote Control (2)
4. Power Cord Fuses
5. LitePro Cable Projection Lamps
6. Mac II Adapters Lens Cover
LitePro 760 User’s Guide 1
not shown:
Carrying Case
Read Me First card
Page 11

Introduction
Compatibility
The LitePro 760 is compatible with a wide variety of computers including:
• IBM-compatible desktop and laptop systems in VGA, SVGA, XGA and VESA modes
• IBM PS/2 in VGA and MCGA modes.
• most Macintosh systems, including PowerBook, Mac II, Performa, Quadra and PowerMac
•UNIX workstations
•X terminals
The LitePro 760 is not compatible with these systems:
• IBM-compatibles in CGA or EGA graphics mode
• Macintosh 128, 512, Plus, SE, SE/30 or Classic
• Macintosh Portable
Refer to the Appendix for a complete list of the systems that have been tested with the LitePro 760.
Cables and Adapters
The LitePro 760 comes with these cables and adapters:
• LitePro cable, this Y-shaped cable connects the LitePro to your
computer and to your monitor. Its ends are labeled “LCD”,
“Monitor” and “Computer.”
• Two Macintosh adapters that attach to the “Monitor” and
“Computer” ends of the LitePro cable for Macintosh systems.
• Two 13W3 adapters that attach to the “Monitor” and “Computer”
ends of the LitePro cable for Sun, SGI, Intergraph or NeXT
workstations.
• Two BNC adapters that attach to the “Monitor” and “Computer”
ends of the LitePro cable for HP, DEC or IBM workstations and
Tektronix X terminals.
•Power cable.
2 LitePro 760 User’s Guide
Page 12

Usage Guidelines
• The back of the LitePro can be very hot to the touch after use. Use
extreme care or let it cool before lifting it.
• Do not block the grills at the back of the LitePro. Restricting the
air flow through the LitePro can cause it to overheat and turn off.
• Handle the LitePro as you would any product with glass
components. Be especially careful not to drop it.
• Avoid leaving the LitePro in direct sunlight or extreme cold for
extended periods of time. If this happens, allow it to reach room
temperature before use.
• Transport the LitePro in the original shipping carton or approved
hard case (see your In Focus dealer for details on approved hard
cases).
If You Need Assistance
Introduction
The first place to look for help is in this manual. Be sure to check the
troubleshooting guidelines in “Troubleshooting” on page 35.
If this manual does not answer your question, call your In Focus
dealer. You can also call In Focus Technical Support directly at
1-800-294-6400
. Call between 6 a.m. and 5 p.m. PST, Monday through
Friday. In Europe, call In Focus in The Netherlands at
31 (0) 2503-23200
.
Your LitePro is backed by a limited one-year warranty. The details of
the warranty are printed at the back of this manual.
LitePro 760 User’s Guide 3
Page 13

Page 14

Connecting the LitePro 760
This chapter describes how to position the LitePro for optimum
viewing and how to connect it to your computer.
Setting Up
Place the projector on a flat surface.
1.
• The projector must be within 6 feet of your power source.
• The projector must be within 6 feet of the computer.
• If you are installing the projector on the ceiling, refer to the
Ceiling Mount Installation Guide
Ceiling Mount Kit is sold separately.)
• For information about projector placement and image size, see
the “LitePro Tips” box on the next page.
Orient the projector so that its lens faces the projection screen.
2.
• If you want to use the LitePro’s Rear Project feature, set it up
behind your translucent screen. Refer to “Rear Projection” on
page 23 for more information.
for recommendations. (The
If the projection lamps have not been installed in the projector
3.
yet, refer to “Replacing the Projection Lamps” on page 28 for
installation instructions.
Remove the lens cover.
4.
Plug the power cord into the projector, then plug it into your elec-
5.
trical outlet.
• While the cord is connected, you can switch the projection
lamp off by pressing the
standby
button on the remote. The
lamp turns off to conserve electricity.
Always use the power cord that was shipped with your LitePro 760.
The projector accepts power from 100 VAC and 220 VAC, 50 or 60
Hz, three-wire type grounded sources. When you disconnect the
projector, always remove the power cord from the electrical outlet
LitePro 760 User’s Guide 5
first, then from the projector.
Page 15
Connecting the LitePro 760
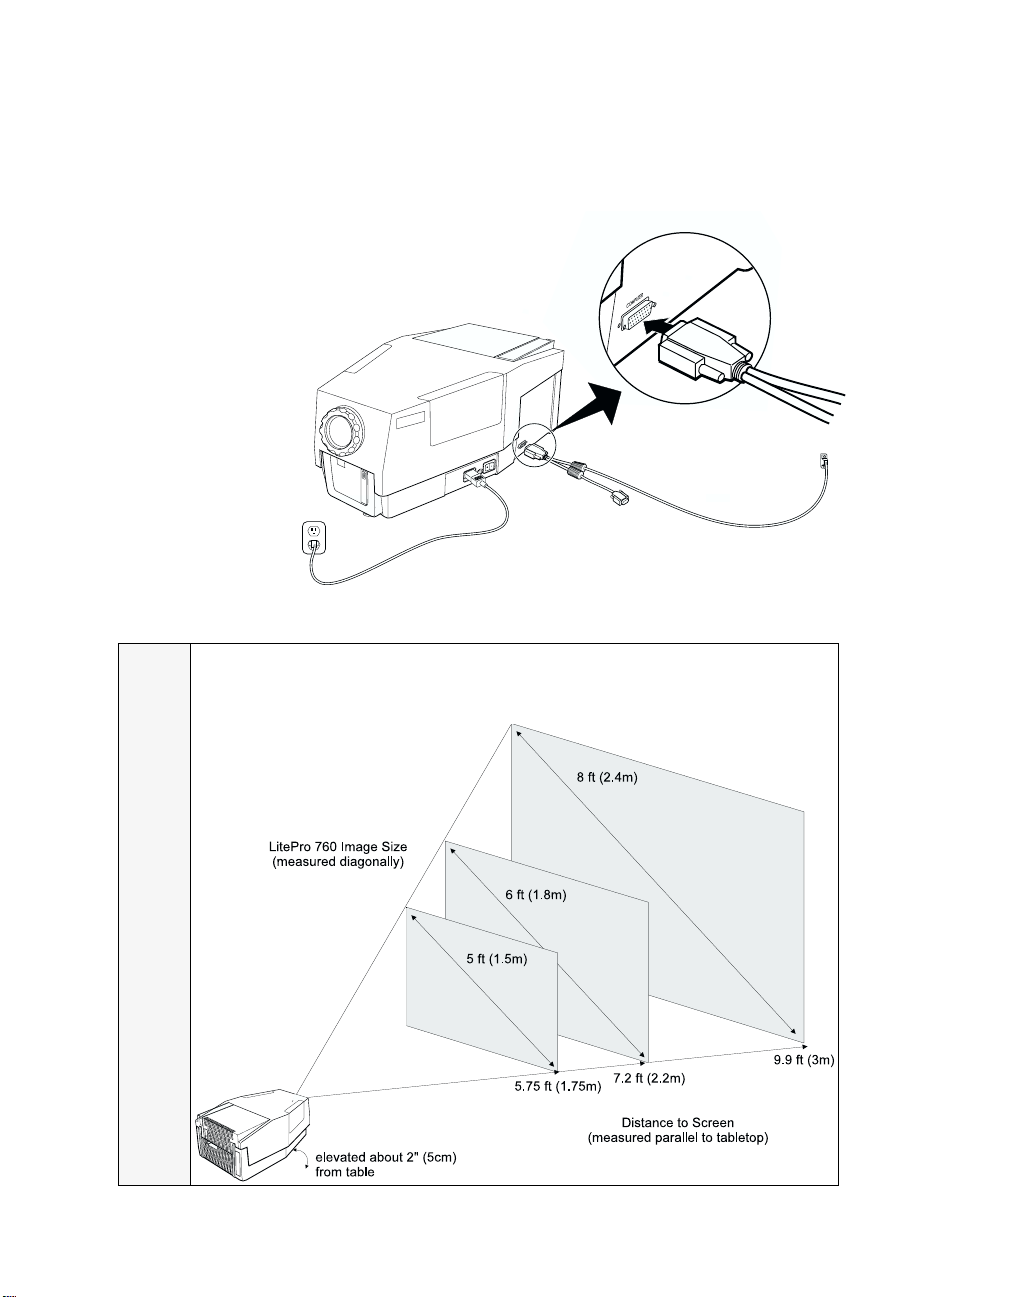
6.
7.
On the Y-shaped LitePro cable that was shipped with the projector, locate the end that says “LCD.” Connect it to the “Computer”
connector on the projector as shown below.
Make sure your computer and monitor are turned off.
IMAGE SIZE
The distance from the LitePro’s lens to the screen determines the size of the projected image as
shown here.
LitePro Tips
6 LitePro 760 User’s Guide
Page 16

Connecting your Computer
To connect the projector to your computer, refer to the table below.
Follow the procedure that corresponds to your computer.
If Your Computer is: You will use: Turn to:
Sun SPARCstation two 13W3 adapters page 8
SGI Indy and Indigo two 13W3 adapters page 8
Intergraph 2400 or 6400 workstation two 13W3 adapters page 8
Color NeXTstation two 13W3 adapters page 8
HP workstation two BNC adapters page 10
IBM RS6000/220 or 250 two BNC adapters page 10
DEC VAXstation or DECstation 3100 two BNC adapters page 10
Tektronix X Terminal two BNC adapters page 10
IBM-compatible desktop computer no adapters page 11
IBM PS/2, 90/XGA or 95/XGA no adapters page 11
SGI Starter 1 no adapters page 11
Macintosh desktop computer two Mac adapters page 12
IBM-compatible laptop computer no adapters page 13
Tadpole SPARCbook no adapters page 13
Macintosh PowerBook one Mac adapter page 14
Connecting the LitePro 760
LitePro 760 User’s Guide 7
Page 17

Connecting the LitePro 760
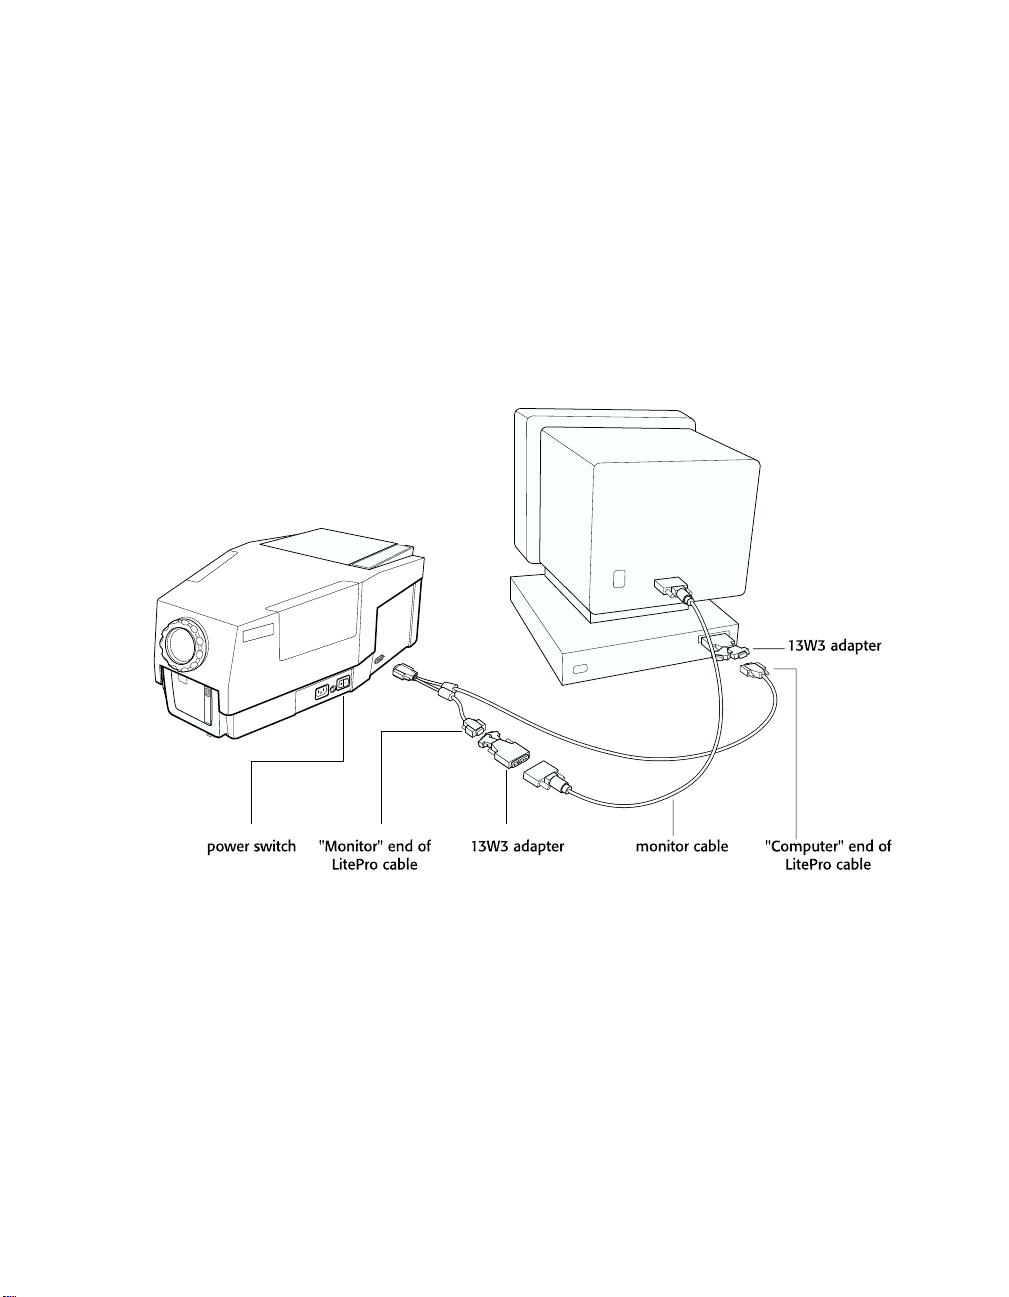
Connecting a Sun, SGI, Intergraph or NeXT Workstation
Follow this procedure if your computer is a Sun SPARCstation, SGI
Indigo or Indy, Intergraph 2400 or 6400, or color NeXTstation.
1.
2.
3.
4.
Locate your monitor cable; it connects the monitor to the computer. Unplug it from the computer. Remember where you
unplugged the cable from the computer, you will plug the
LitePro cable into this same connector in the next step.
Attach one of the 13W3 adapters to the “Computer” end of the LitePro cable.
• If your computer is an SGI, plug the “SGI” end of the adapter
into the “Computer” end of the LitePro cable. For other
computers, use the “Other” connector.
Plug the adapter (with the cable attached) into the monitor connector on the computer.
Attach the other 13W3 adapter to the “Monitor” end of the LitePro cable.
• If your computer is an SGI, plug the “SGI” end of the adapter
into the “Monitor” end of the LitePro cable. For other
computers, use the “Other” connector.
Plug the adapter (with the cable attached) into the computer ’s
5.
monitor cable.
Tighten the thumb screws on all the connectors to ensure proper
6.
grounding.
Turn on the monitor.
7.
Turn on the LitePro 760 by pressing the “1” side of the power
8.
switch. (Refer to “Powering Up the LitePro” on page 15.)
Tur n o n t h e c o mp u t er.
9.
8 LitePro 760 User’s Guide
Page 18
Connecting the LitePro 760
LitePro 760 User’s Guide 9
Page 19
Connecting the LitePro 760
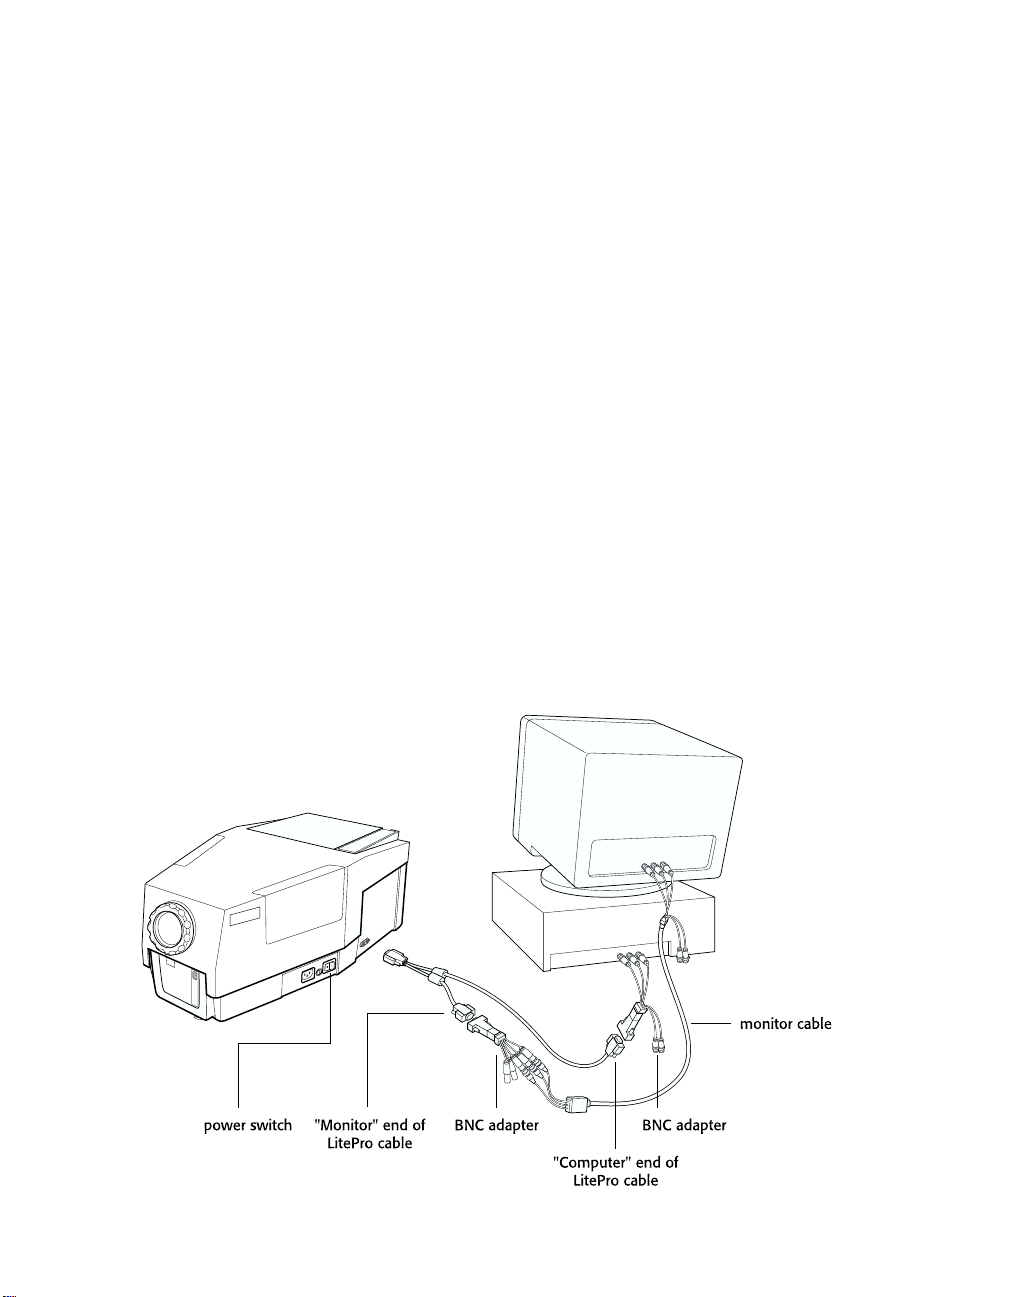
Connecting an HP, DEC or IBM Workstation or
Tektronix X Terminal
Follow this procedure if your computer is an HP workstation or X
terminal, an IBM RS6000/220, a DEC VAXstation or DECstation 3100
or a Tektronix X terminal.
1.
2.
3.
4.
5.
6.
Locate your monitor cable; it connects the monitor to the computer. Unplug it from the computer. Remember where you
unplugged the cable from the computer, you will plug the
LitePro cable into this same connector in the next step.
Attach one of the BNC adapters to the “Computer” end of the
LitePro cable. Plug the adapter (with the cable attached) into the
monitor connector on the computer.
Attach the other BNC adapter to the “Monitor” end of the LitePro
cable. Plug the adapter (with the cable attached) into the computer’s monitor cable.
Tighten the thumb screws on all the connectors to ensure proper grounding.
Turn on the monitor.
Turn on the LitePro 760 by pressing the “1” side of the power
switch. (Refer to “Powering Up the LitePro” on page 15.)
Tur n o n t h e c o mp u t er.
7.
10 LitePro 760 User’s Guide
Page 20

Connecting the LitePro 760
Connecting an IBM-Compatible Desktop Computer or SGI Starter1
Follow this procedure if your computer is an IBM-compatible
desktop computer, IBM PS/2, IBM 90/XGA, IBM 95/XGA or SGI
Starter 1.
Locate your monitor cable; it connects the monitor to the com-
1.
puter. Unplug it from the computer. Remember where you
unplugged the cable from the computer, you will plug the
LitePro cable into this same connector in Step 3.
Attach the computer’s monitor cable to the “Monitor” end of the
2.
LitePro cable.
Attach the “Computer” end of the LitePro cable to the monitor
3.
connector on the computer.
Tighten the thumb screws on all the connectors to ensure proper
4.
grounding.
Turn on the monitor.
5.
Turn on the LitePro 760 by pressing the “1” side of the power
6.
switch. (Refer to “Powering Up the LitePro” on page 15.)
Turn on the computer.
7.
LitePro 760 User’s Guide 11
Page 21

Connecting the LitePro 760
Connecting a Macintosh
Follow this procedure if your computer is a Mac II or any Mac with a separate monitor.
1.
2.
3.
4.
Locate your monitor cable; it connects the monitor to the computer. Unplug it from the computer. Remember where you
unplugged the cable from the computer, you will plug the
LitePro cable into this same connector in the next step.
Attach one of the Mac adapters to the “Computer” end of the
LitePro cable. Plug the adapter (with the cable attached) into the
monitor connector on the computer.
• If your monitor is 13 inches or smaller, set the switch on the
adapter to “LoRes”. If the monitor is larger than 13 inches, set
the switch to “HiRes”. If your computer does not have a
monitor, set the switch to “NoMon”.
Attach the other Mac adapter to the “Monitor” end of the LitePro
cable. Plug the adapter (with the cable attached) into the computer’s monitor cable.
Tighten the thumb screws on all the connectors to ensure proper grounding.
Turn on the monitor.
5.
Turn on the LitePro 760 by pressing the “1” side of the power
6.
switch. (Refer to “Powering Up the LitePro” on page 15.)
Tur n o n t h e c o mp u t er.
7.
12 LitePro 760 User’s Guide
Page 22

Connecting the LitePro 760
Connecting an IBM-Compatible Laptop Computer or SPARCbook
Follow this procedure if your computer is an IBM-compatible laptop or Tadpole SPARCBook.
Attach the “Computer” end of the LitePro cable to the graphics
1.
connector on the computer.
Tighten the thumb screws on the connectors to ensure proper
2.
grounding.
Turn on the LitePro 760 by pressing the “1” side of the power
3.
switch. (Refer to “Powering Up the LitePro” on page 15.)
Turn on the computer.
4.
Many laptop computers automatically turn off their monitor when
another display device is connected. If you want to use the laptop’s
monitor and the LitePro at the same time, you may have to re-activate
your monitor. Refer to your computer’s documentation for
instructions. The Appendix of this manual lists monitor re-activation
commands for some IBM-compatible laptop computers.
LitePro 760 User’s Guide 13
Page 23

Connecting the LitePro 760
Connecting a Macintosh PowerBook
You’ll need an Apple PowerBook video-out cable to use the LitePro with a PowerBook.
1.
2.
3.
4.
5.
6.
7.
8.
Attach the video-out cable to the PowerBook.
Attach one of the Mac adapters to the “Computer” end of the
LitePro cable. Attach the adapter (with the cable attached) to the
PowerBook’s video-out cable. Set the switch on the adapter to
“LoRes”.
Tighten the thumb screws on all connectors.
Turn on the LitePro 760 by pressing the “1” side of the power
switch. (Refer to “Powering Up the LitePro” on page 15.)
Tur n o n t h e c o mp u t er.
Open the PowerBook’s Control Panel.
Click “Mirroring”.
Restart the PowerBook.
14 LitePro 760 User’s Guide
Page 24

Powering Up the LitePro
Turn on the projector by pressing the “|” side of the power switch on the side of the projector.
• After about 5 seconds, the projector test pattern appears. (If it
does not, refer to “Troubleshooting” on page 35. If you are using
an IBM-compatible laptop computer, refer to the Appendix for
monitor re-activation commands.)
• If the image is not projected directly on the screen, adjust the
height of the elevator. Refer to “Adjusting the Height” on page 18
for instructions.
• You may also need to focus the projector. Turn the focus ring on
the projector’s lens until the focus is satisfactory. Refer to
“Focusing the Image” on page 17 for more information.
With some computers, the order in which you power up
the equipment is very important. We recommend that you
always turn on the computer LAST. Turn on all other
pieces of equipment (including the computer’s monitor)
before you turn on the computer.
Connecting the LitePro 760
Turning the LitePro Off
It is very important to allow the projector to cool down before turning
it completely off. Turning the projector off is a two-step process:
Press the
1.
• The bulb turns off, but the fans remain on to cool the LCD.
After a few minutes, when the projector has cooled, press the “O”
2.
side of the power switch to turn the projector completely off.
LitePro 760 User’s Guide 15
standby
button on the remote.
Page 25

Page 26

Using the LitePro 760
This section describes how to use the LitePro 760, including these operations.
• If the image is not completely displayed, adjust the height of the
LitePro (page 18) or use the arrow buttons to center the image
(page 19).
• If the image is out of focus, rotate the lens to focus it (this page).
• If the image still looks bad after you have adjusted the focus,
adjust the signal synchronization (page 20) or the tracking
(page 23).
• If the colors do not look right, adjust the brightness (page 20)
and/or the red/green/blue color balance (page 22), then adjust
the sync again (page 20).
• If you want to project from behind your screen, switch to Rear
Project mode (page 23).
• If the bulb has burned out, switch to the spare lamp (page 24). If
you need to install new lamps, refer to “Replacing the Projection
Lamps” on page 28.
This section also provides a reference to the remote control buttons and the menu commands.
Using the Remote Control
To use the remote control, point it at the projection screen or at the
front of the LitePro. The range for optimum operation of the remote
control is a total of about 25 feet. If you point the remote at the
projection screen, the distance to the screen and back to the LitePro
should equal 25 feet.
Focusing the Image
To focus the image, rotate the projection lens until the image is clear.
Rotate the lens clockwise for a longer focusing distance. Rotate it
counterclockwise for a shorter focusing distance.
LitePro 760 User’s Guide 17
Page 27

Using the LitePro 760
Adjusting the Height
Your LitePro is equipped with a self-locking, quick-release elevator
foot. If the projected image seems wider at the bottom than at the top,
extend the elevator foot until the distortion is corrected.
To raise the LitePro:
Raise the front of the projector off the table by lifting up on the
1.
handle.
Press the quick-release button (just inside the handle). The eleva-
2.
tor foot releases.
Gently lift or lower the projector to the desired height. When you
3.
release the handle, the elevator foot locks into position.
To more closely adjust the projector ’s height, rotate the elevator
4.
foot clockwise to raise the projector. Rotate it counterclockwise to
lower the projector.
To lower the elevator foot:
• Holding the LitePro handle, press the elevator’s quick release
button. Push the elevator back up into the projector.
Always hold the LitePro’s handle when you press the
18 LitePro 760 User’s Guide
elevator’s quick release button.
Page 28

Reference to the Remote Control Buttons
This section provides an alphabetical reference to the remote buttons.
The names of the buttons are shown in
menu
When you press
screen. Press
menu, the LitePro saves any changes you made. Refer to “Menu
Functions” on page 22 for information about the menu functions.
menu
, the LitePro menu appears at the top of the
menu
again to remove the menu. When you remove the
bold
Using the LitePro 760
.
standby
When you press
standby
, the projector turns off its lamp to conserve
electricity. The fans remain on to keep the LCD cool. When the projector cools sufficiently, the fans automatically turn down to a slower
speed. Press any button on your remote to turn the lamp back on.
arrow buttons
The operation of the arrow buttons depends on whether or not the
on-screen menu is displayed. When the menu is displayed, the left
and right arrow buttons move the highlight bar to select a menu
function. The up and down arrow buttons adjust the highlighted
function.
When the menu is not displayed, the arrow buttons move the image
in the direction of the arrow. If your image is wider than 1024x768
pixels, use the arrow buttons to pan to the edges of the image.
LitePro 760 User’s Guide 19
Page 29

Using the LitePro 760
contrast
The arrow buttons are auto-repeating; they repeat their function as
long as you hold down the button.
Adjust the contrast if the white areas of the projected image do not
appear to be solid white. To increase the contrast, press the
button. To decrease the contrast, press the
contrast -
button. There are
contrast +
64 contrast levels.
Both
contrast
buttons are auto-repeating; they continue to adjust the
contrast setting as long as you hold down the button. You cannot
adjust contrast in the LitePro test pattern.
brightness
Adjusting the brightness lightens or darkens the image. To lighten the
image, press the
image, press the
+
(plus) side of the
-
(minus) side of the
brightness
brightness
button. To darken the
button. There are 64
brightness levels.
Adjusting the brightness changes the amounts of red, green and blue
in the image. If the LitePro menu is displayed when you press the
brightness
button, you will see the Red, Green and Blue values change
accordingly.
Both ends of the
brightness
button are auto-repeating; they continue to
adjust the brightness setting as long as you hold down the button.
sync
Adjusting the synchronization fine tunes the LitePro to match the
signals from your computer, decreasing fuzzy, streaked images.
There are 32 sync levels. Press the
sync +
or
sync -
buttons to cycle
through the sync levels until you find the one that best suits your
computer.
20 LitePro 760 User’s Guide
Page 30

Using the Menu
The LitePro 760’s on-screen menu allows you to adjust the individual
colors in the projected image and change the following settings:
• language of the menu • number of displayable colors
• rear projection mode • tracking
• color inversion • reset adjustments
Each of the menu functions is described on the following pages in “Menu Functions”.
Displaying the Menu
To d i s p l ay th e m e n u:
•Press the
off and back on when you display the menu.)
Using the LitePro 760
menu
button on the remote. (The image quickly blinks
To remove the menu from the screen:
•Press the
menu
button again.
Selecting and Adjusting Menu Functions
• Use the left and right buttons to highlight a menu function.
• Use the up and down arrow buttons to adjust or change a menu function.
Returning to Default Settings
To reset all menu settings to their factory default values, select Reset.
(The image quickly blinks off and back on when you reset the
LitePro.)
LitePro 760 User’s Guide 21
Page 31

Using the LitePro 760
Technical Information
Menu Functions
The left side of the menu contains information about the state of the
LitePro. If you need to call In Focus Technical Support for assistance,
they may need to know these values.
Track
•
The current track setting. This value changes as you adjust the
Track bar. (Refer to “Track” on page 23 for more information
about tracking.)
Horiz
•
The horizontal synchronization rate.
Vert
•
The vertical synchronization rate.
Mode
•
This value identifies the mode in which the LitePro is operating.
Follow the instructions given above in “Using the Menu” to access
the menu and select the function you want to change.
Red
Adjusting the Red bar changes the amount of red in the projected
image. As you move the adjustment bar up, the colors turn
increasingly red. As you move the bar down, the colors turn
increasingly cyan (bright blue-green).
Pressing the
brightness
button on the remote changes the red, blue and
green values.
Green
Adjusting the Green bar changes the amount of green in the projected
image. As you move the adjustment bar up, the colors turn
increasingly green. As you move the bar down, the colors turn
increasingly magenta.
Blue
Adjusting the Blue bar changes the amount of blue in the projected
image. As you move the adjustment bar up, the colors turn
increasingly blue. As you move the bar down, the colors turn
increasingly yellow.
22 LitePro 760 User’s Guide
Page 32

Using the LitePro 760
Track
The Track function adjusts the LitePro 760’s internal clock to match
the signal from your computer. The projector usually adjusts the
tracking automatically when you connect your computer. However, if
the display shows evenly spaced, fuzzy, vertical lines or if the
projected image is too wide or too narrow for the screen, you might
be able to improve the image by adjusting the tracking manually.
Contrast
Adjusting the contrast setting affects the amount of white in the
projected image. Adjust the contrast if the white areas do not appear
to be solid white.
Language
Changes the language in which the menu is displayed. You can
choose English, French, German, Spanish or Italian. The default is
English.
Rear Projection
When you select Rear Project, the LitePro 760 reverses the image so
you can project from behind the screen as shown here.
Colors
The Colors function allows you to change the number of displayable
colors. You can select 8 or 24,389 displayable colors. The default is
24,389 colors.
Inverse
When you select Inverse, the LitePro switches all the colors of the
image so that their opposites are displayed instead. Inverting the
image colors is generally used with monochrome images.
LitePro 760 User’s Guide 23
Page 33

Using the LitePro 760
Reset
Switching Projection Lamps
When you select Reset, the LitePro changes all the adjustments you
made back to the factory defaults. These adjustments are reset:
• position • brightness
•contrast •sync
• red, green and blue • colors
•track •inverse
The LitePro was shipped with two projection lamps. To avoid
breaking during shipping, they are not installed in the LitePro at the
factory. You must install them before you can use the LitePro. Refer to
the “Read Me First” document that was shipped with your LitePro.
“Replacing the Projection Lamps” on page 28 also describes this
procedure.
When both lamps are installed in the LitePro, only one is used at a
time. The other is available as a spare for when the active lamp fails.
The average lamp life is 50 hours per lamp.
To switch from the active lamp to the spare lamp:
• Gently slide the lamp changer knob to the other side of the projector as shown here.
24 LitePro 760 User’s Guide
Page 34

When switching lamps, be careful not to touch the exhaust
grill on the door. This area is very hot when the projector
is operating.
Do not switch the lamp changer back and forth rapidly.
This can damage the lamp filaments and shorten the life of
the lamp.
Using the LitePro 760
LitePro 760 User’s Guide 25
Page 35

Page 36

Maintenance
This section describes:
• how to clean the lens,
• how to replace the projection lamps,
• how to replace the batteries in the remote control, and
• how to replace the fuse.
Opening the case will expose you to electric shock hazard.
serviceable parts inside! If you are having problems with
your LitePro, refer to the “Troubleshooting” section of
this manual. Call In Focus Technical Support if necessary.
If your LitePro needs repair, they will refer you to an In
Cleaning the Lens
Follow these steps to clean the projection lens.
Apply a non-abrasive glass cleaner to a soft, dry cleaning cloth.
1.
• Be careful not to use excessive amounts of cleaner.
• Abrasive cleaners, solvents or other harsh chemicals may scratch the lens.
Lightly wipe the cleaning cloth over the lens.
2.
If you will not be using the LitePro immediately, replace the lens
3.
cover.
Do not open the LitePro case!
Except for the projection lamps, there are no user-
Focus Authorized Service Provider.
LitePro 760 User’s Guide 27
Page 37

Maintenance
Replacing the Projection Lamps
When a lamp fails, be sure to replace it with another EVD bulb (36
volt, 400 watt) from General Electric or OSRAM. These bulbs provide
the best performance and longest bulb life.
You can order replacement lamps from In Focus. Refer to
“Accessories” on page 43 for information.
Follow these steps to replace the lamps.
Press the “0” side of the LitePro’s power switch. Then, allow the
1.
LitePro to cool thoroughly (at least 20 minutes).
Allow the LitePro to cool for at least 20 minutes before
you attempt to open the lamp door! The inside of the
LitePro lamp housing can become very hot. Use extreme
While you’re waiting for the LitePro to cool, find a clean soft
2.
cloth that you can use to hold the bulbs. You can also use the plastic bag that came with the lamp. Holding a bulb with your bare
fingers can damage the bulb and shorten its life.
care.
Disconnect the power cord from the LitePro.
3.
Open the lamp door. To do this, push in on the two buttons as
4.
shown below, then lift the door up.
Hold the lamp door open with one hand.
5.
28 LitePro 760 User’s Guide
Page 38

Using the cloth, unplug the old bulb from its socket as shown
6.
below. Be very careful not to touch surfaces that may still be hot.
WARNING VORSICHT ATTENTION
RECOMMENDED LAMP - OSRAM HLX 64663
LAMP AND METAL
PARTS MAY BE HOT
Do not touch the bulbs with your bare fingers. Always
hold them with their plastic bag or a clean cloth. The
natural oil on your skin concentrates the heat and may
LAMP: ANSI-EVD 36V 400W
GLÜHBIRNE UND FLÄCHE
KANN NOCH HEISS SEIN
LA LAMPE ET LES PIECES
METALLIQUES PEUVENT
ETRE ENCORE CHAUDES
destroy the bulbs.
!
Maintenance
Keeping it in its plastic bag, remove one of the replacement bulbs
7.
from the box.
Without forcing it, insert the bulb all the way into the socket. Be
8.
sure to insert the bulb straight into the socket; do not tip it up or
down.
Slide the lamp changer to the other side.
9.
Replace the other bulb if necessary. Be sure not to touch it with
10.
your bare fingers.
• Save the box. You may need it later to pack the bulbs for shipping.
Close the lamp door.
11.
Never operate the LitePro with the lamp door open or removed.
This disrupts the airflow, causing it to overheat.
LitePro 760 User’s Guide 29
Page 39

Maintenance
Bulb Guard
Your LitePro is equipped with a bulb life detection system called Bulb
Guard. When the operating bulb is near the end of its life or has
become degraded, Bulb Guard causes the lamp to blink. When this
happens, switch to the spare lamp. After you have finished your
presentation and the LitePro has cooled, replace the old lamp with a
new one.
Replacing Batteries in the Remote Control
Follow these steps to replace the batteries.
Turn the remote face down in your hand.
1.
Slide the battery cover off in the direction shown.
2.
Remove the old batteries.
3.
Install two new AAA alkaline batteries.
4.
+
-
-
+
Replace the battery cover.
5.
30 LitePro 760 User’s Guide
Page 40

Replacing the Fuse
A power line surge or spike can blow the power supply fuse and
cause the LitePro to stop working. If this happens, you’ll need to
replace the fuse.
Use only the specified power supply fuse. Using a different
The correct fuse for your LitePro depends on the power line voltage
in the country where you are operating the LitePro.
• If your line voltage is 220V to 240V (as in most European
countries), use a 6.3 amp, 250V, 5x20 mm fuse.
• If your line voltage is 100V to 120V (as in Japan, the United States
and most North American countries), use a 10 amp, 250V, 3AB
fuse.
Follow these steps to replace the fuse.
Make sure that the condition that caused the fuse to blow no
1.
longer exists.
Maintenance
fuse may cause serious damage to the LitePro.
Turn off the LitePro by pressing the “O” side of the power switch
2.
on the side of the LitePro.
Unplug the power cord from the LitePro.
3.
Locate the fuse holder on the side of the LitePro between the
4.
power switch and the power cord connector.
LitePro 760 User’s Guide 31
Page 41

Maintenance
Using a small coin or a flat blade screwdriver, turn the fuse
5.
holder a quarter turn in the clockwise direction.
Pull the fuse holder out of the LitePro.
6.
Remove the blown fuse from the fuse holder.
7.
Push the new fuse into the clips of the holder until it is securely
8.
seated.
32 LitePro 760 User’s Guide
Page 42

Place the fuse holder back in the LitePro.
9.
Using the same tool you used in step 5, turn the fuse holder a
10.
quarter turn counter-clockwise.
Plug the power cord back in.
11.
Press the “|” side of the power switch to turn the LitePro
12.
back on.
Maintenance
LitePro 760 User’s Guide 33
Page 43

Page 44

Troubleshooting
Except for the projection lamps, there are no user-
serviceable parts inside. If you are having problems with
your LitePro, read through this section of this manual.
Call In Focus Technical Support if necessary. They will
refer you to an In Focus Authorized Service Provider.
Before You Call for Assistance
Before calling your dealer for assistance, follow these steps in this
order to make sure everything is properly connected.
Make sure you connected the LitePro to you equipment as
1.
described in “Connecting the LitePro 760” starting on page 5.
Check cable connections. Verify that all computer and power
2.
cables are properly connected.
Verify that all power is switched on.
3.
Do not open the LitePro case!
Opening the case may cause electric shock!
Verify that you have pushed the On/Off button on the remote.
4.
If the LitePro still does not display an image, reboot the com-
5.
puter. (Macintosh computers require a specific power-up
sequence: the LitePro must be turned on before you turn on the
computer.)
If the image is still bad, unplug the LitePro from the computer
6.
and check the computer monitor’s display. The problem may be
with your graphics controller rather than with the LitePro. (When
you re-connect the LitePro, remember to turn the computer and
monitor off before you power up the LitePro. Power the equipment back up in this order: LitePro, monitor, computer.)
If the problem still exists, read through the problems and
7.
solutions in this chapter.
LitePro 760 User’s Guide 35
Page 45

Troubleshooting
Solutions to Common Problems
If you call In Focus for assistance:
•Display the menu (press the
menu
button on the remote). Write
down the information that is displayed on the left side of the
menu. (Refer to “Technical Information” on page 22 if you want
to know more about these values.)
• Find out what kind of graphics controller card is installed in your
computer. (This is the circuit board inside your computer to
which the LitePro is connected. Most newer PCs use a VGA
graphics controller.)
Problem: Nothing on screen
• Is the projector switched on? The “|” side of the power switch
should be pressed. Refer to the figures on pages 8 through 14 for
the location of the power switch.
• Is the LitePro properly plugged into a live AC outlet?
• If your Lite Pro is plugged into a power strip, is the power strip turned on?
• Is the lens cap still on the projection lens at the front of the projector?
• Are the lamps installed? Refer to “Replacing the Projection
Lamps” on page 28 or the Read Me First card for installation
instructions.
• Is the bulb burned out? If the bulb is burned out, you can switch
to the spare. Refer to “Switching Projection Lamps” on page 24.
• Has the projector’s fuse blown? Refer to “Replacing the Fuse” on
page 31 for more information.
• Is the LitePro adjusted properly? Adjust the brightness. Refer to
“brightness” on page 20 for more information.
• Does the cable have bent pins in any of the connectors? Check the
pins on all three ends of the LitePro cable. Check the power cord
for bent pins also.
Problem: Color or VGA text not being projected
• The brightness control may need to be adjusted. Adjust the
brightness up or down until the text is visible. Refer to
“brightness” on page 20 for more information.
36 LitePro 760 User’s Guide
Page 46

Troubleshooting
Problem: Image is not centered on the screen
• Use the arrow buttons on the remote to center the image. (The
menu must be off when you re-position the image. When the
menu is displayed, the arrow buttons have a different function.)
Refer to “arrow buttons” on page 19 for more information.
Problem: Only the test pattern is displayed
• Are your cables connected correctly? Check to see that the cable is
connected to the graphics port on the computer (this is the
connector where your monitor cable usually goes).
• Did you turn on the equipment in the correct order? You may
need to repeat the power up sequence. The equipment must be
powered on in this order: LitePro, computer monitor, computer. It
is especially important that this sequence be followed for
Macintosh computers.
• Is your computer graphics system set up correctly? Check the
following:
Is your computer’s graphics board turned on?
-
If your computer has an external video board, is it turned on?
-
Does your computer have a compatible graphics board? The
-
LitePro 760 is not compatible with CGA and EGA graphics.
Problem: Image is too wide or narrow for screen
• You may need to adjust the tracking to reduce or enlarge the
projected image. Refer to “Track” on page 23 for more
information.
Problem: Image is out of focus
• Turn the projection lens to focus the image.
• The projection screen must be at least 4 feet (1.2m) from the
LitePro.
• The projection lens may need cleaning.
LitePro 760 User’s Guide 37
Page 47

Troubleshooting
Problem: Image and menus are reversed left to right
• Rear projection mode is probably set. To switch back to forward projection:
1.
Press the
2.
Select “Rear Projection”. Press the up or down button to
menu
button on the remote to display the menu.
switch back to forward projection.
3.
Press
menu
again to remove the menu.
Problem: LitePro displays vertical lines, “bleeding” or spots
• Adjust the contrast. Refer to “contrast” on page 20 for more
information.
• The projection lens may need cleaning.
Problem: Image is “noisy” or streaked
• Adjust the contrast. Refer to “contrast” on page 20 and page 23
for more information.
• Adjust the Sync. Refer to “sync” on page 20 for more information.
Problem: Projected colors don’t match the monitor’s colors
• Adjust the brightness and/or contrast. Remember that, just as
there are differences in the displays of different monitors, there
are often differences between the computer image and the
projected image. Refer to “contrast” and “brightness” on page 20
and for more information.
Problem: “EEPROM Failed” displays on the menu
• One of the integrated circuits inside the LitePro has failed. The
only functionality that is lost is that the LitePro will reset the
menu functions to their factory defaults when you turn it off. Call
In Focus Technical Support; refer to “If You Need Assistance” on
page 3.
Problem: Remote not operating correctly
• You may need to replace the batteries in the remote. Refer to
“Replacing Batteries in the Remote Control” on page 30 for
instructions.
38 LitePro 760 User’s Guide
Page 48

Appendix
Compatibility and Cabling
The following table lists the computers that the LitePro 760 was
compatible with when this manual was written. The “Adapter”
column on the right lists the adapter set you should use with the
computer.
System Resolution Adapter
IBM VGA 256 colors 640x400 none
IBM VGA graphics 640x480 none
IBM text 720x480 none
Super VGA extended 800x600 none
Super VGA high resolution, interlaced and non-interlaced
132 column text 1056 chars.
IBM XGA and 8514, interlaced 1024x768
IBM RS6000 Model 220, with Gt1 adapter with 8515
IBM RS6000 Model 220, with Gt1 adapter with 6091
Intergraph 1184x884 13W3
SGI Indigo 1024x768 13W3
SGI Indy 1024x768 13W3
Sun SPARCstation 1024x768 13W3
Digital Equipment Corporation (DEC) 1024x864 BNC
NeXTstation color
NeXTstation monochrome
Hewlett Packard 710 Series 16” 1024x768 BNC
Hewlett Packard 16” X terminal 1024x768 BNC
Apple Macintosh 640x480 Mac
Mac with SuperMac 16” color monitor 832x624 Mac
Mac with SuperMac 19” color monitor 1024x768 Mac
Mac with SuperMac 19” or 20” dual mode monitor 1024x768 or
1024x768 none
wide
1024x768 none
1024x768 BNC
1152x900
1120x832
1120x832
1152x870
none
none
2
13W3
2
13W3
2
13W3
Mac
2
1
3
LitePro 760 User’s Guide 39
Page 49

Appendix
System Resolution Adapter
Mac with SuperMac 21” two-page monitor
Mac with Radius 21” Actual Size monitor
Mac with Radius Precision Color/20 Two-Page monitor
Mac with Radius Precision Color/20 Actual Size
1152x870
1056x807
1152x870
1024x768 Mac
2
Mac
2
Mac
2
Mac
monitor
Mac with Radius Precision Color/20 16” mode monitor 832x624 Mac
Mac with Radius Precision Color/19 Actual Size
1024x768 Mac
monitor
Mac with RasterOps 21” color monitor
1152x870
2
Mac
Mac with RasterOps 19” color monitor 1024x768 Mac
Mac with RasterOps Dual Scan monitor 1024x768 Mac
2
1152x870
Mac
Mac with RasterOps 16” color monitor 832x624 Mac
Mac with E-Machines monitor, modes 1 - 8 640x480 to
1152x870
Mac
2
Mac with Apple 16” color monitor 832x624 Mac
Mac with Apple 21” color monitor
1152x870
2
Mac
Lapis LC 21 1024x768 BNC
1
Use the XGA terminator if you do not connect your monitor. Call In Focus Technical Support
for more information.
2
The LitePro 760 displays only a 1024x768 image; some of the higher resolution image will be
cut off.
3
This connection requires a monochrome-to-RGB converter box from Extron.
40 LitePro 760 User’s Guide
Page 50

Specifications
Projection Lamps
Type 400 watt tungsten halogen, ANSI EVD type
Life Average 50 hours each
Fuse
100 to 120V nominal line 10A, 250V, 3AB
220 to 240V nominal line 6.3A, 250V, 5x20mm
Input Power Requirements
100 to 240 VAC, 7.2A to 2500 mA, 50 to 60 Hz.
Remote Control
Battery Two (2) AAA alkaline cells
Range 25 feet (7.62m) when reflected off a white
Appendix
bulbs - manufactured by OSRAM, part
number HLX 64663
wall or projection screen within 45° of the
projection axis
Optical
Brightness minimum 150 lumens
(measured by ANSI 12 point method)
Uniformity 2:1 maximum
(measured by 12 point method)
Projection Range 5 to 15 feet
(1.5 to 4.6 m)
LitePro 760 User’s Guide 41
Page 51

Appendix
Te mp er a tu re
Operating 15° to 32°C
*
Non-operating -20° to 60°C
Altitude
Operating 0 to 10,000 feet (3048 meters)
Non-operating 20,000 feet (6096 meters)
Humidity
Operating and non-operating 10 to 90% RH, non-condensing
Dimensions
LitePro 760 20 x 11.5 x 8 inches
(51 x 29 x 20 cm)
Weigh t
Unpacked 19.5 lbs. (8.8 kg)
As shipped 28 lbs (12.7 kg)
* Maximum operating temperature depends on altitude.
At 8,000ft, the maximum temperature is 31°C.
At 9,000ft (2743m), the maximum temperature is 30°C.
At 10,000ft (3048m), the maximum temperature is 29°C.
42 LitePro 760 User’s Guide
Page 52

Accessories
Contact your In Focus dealer to order. Refer to the In Focus
Accessories Catalog for additional items.
Standard Accessories (ship with LitePro) Part Number
Read Me First card 009-0192-xx
LitePro 760 User’s Guide 010-0086-xx
Soft Carry Case 110-0079-xx
Shipping Box 110-0080-xx
LitePro Cable (VGA cable) 210-0041-xx
Projection Lamp, 36V, 400W 232-0020-xx
Mac Adapters (set of 2) 516-0005-xx
BNC Adapters (2) 515-0028-xx and
13W3 Adapters (2) 515-0030-xx and
Lens Cap 340-0148-xx
Remote Control 590-0142-xx
Appendix
515-0029-xx
515-0031-xx
Power Cords (one ships with LitePro, depends on country)
North American Power Cord 210-0023-xx
Australian Power Cord 210-0027-xx
UK Power Cord 210-0028-xx
European Power Cord 210-0029-xx
Danish Power Cord 210-0030-xx
Swiss Power Cord 210-0031-xx
Fuses and Fuse Holders (one set ships with LitePro, depends on country)
Fuse, 10A, 3AB (use w/110V) 749-0013-xx
Fuse Holder for 10A, 3AB Fuse (use w/110V) 749-0014-xx
Fuse, 6.3A, 5x20mm (use w/220V) 749-0010-xx
Fuse Holder for 6.3A, 5x20mm Fuse (use w/220V) 749-0011-xx
Compatible Product
LitePro Ceiling Mount Kit 591-0098-xx
LitePro 760 User’s Guide 43
Page 53

Appendix
Cable Connector Pin Assignments
The Y-shaped LitePro cable that shipped with your LitePro has three
connectors, they are labeled “Monitor”, “Computer” and “LCD.” The
pin assignments for these connectors are listed here.
“LCD” Connector
The end of the LitePro cable that plugs into the LitePro itself is a male
26-pin D-style connector. The table below lists its pin assignments.
Input Pin Signal Description Output Pin
1 Vertical sync 10
2 Horizontal sync 11
8 Blue analog 14
6 reserved 12
7 reserved 13
9 Red analog 15
16 reserved 3
17 reserved 4
18 Green analog 5
20 GND
21 GND
22 GND
23 Digital/analog video cable ID
24 GND
25 VGA/no video cable ID pin
26 Monochrome digital (Hercules) 19
44 LitePro 760 User’s Guide
Page 54

“Monitor” and “Computer” Connectors
The pin assignments are the same for the “Monitor” and “Computer”
connectors. The “Monitor” connector is a female video RGB, 15-pin
micro-D-style connector. The “Computer” connector is a male video
RGB, 15-pin micro-D-style connector. The table below lists the pin
assignments for both connectors.
Pin Signal Description
1 Red analog input
2 Green analog input with composite sync
3 Blue analog input
4 GND
5 GND
6 Red GND
7 Green GND
8 Blue GND
9NC
10 Sync GND
11 GND
12 NC
13 Horizontal sync/composite sync input
14 Vertical sync input
15 NC
Appendix
LitePro 760 User’s Guide 45
Page 55

Appendix
Portable and Laptop Activation Chart
Most laptop computers de-activate their built-in monitors when a
second display device is connected. The following chart lists the
commands that re-activate the laptop’s monitor. If your computer is
not listed here, refer to the computer’s documentation.
Computer
Acer Ctrl-Alt-Esc (for setup)< Ctrl-Alt-Esc (for setup)
AST FN-D or Ctrl-D FN-D or Ctrl-D
Austin Ctrl-Alt-,, Ctrl-Alt-,
Altima* Shift-Ctrl-Alt-C Shift-Ctrl-Alt-L
Amrel* ** setup menu setup menu
Apple see Mac Portable and Mac PowerBook
BCC automatic - no activation
Bondwell LCD or CRT option LCD or CRT option
Chaplet** setup screen setup screen
Commax Ctrl-Alt-#6 Ctrl-Alt-#5
Compaq** Ctrl-Alt-< Ctrl-Alt->
Data General Ctrl-Alt-Command Ctrl-Alt-Command
Data General Walkabout
Datavue Ctrl-Shift-M Ctrl-Shift-M
Dell* Ctrl-Alt-< Ctrl-Alt->
Digital automatic reboot
Dolch dip switch to CRT dip switch to LCD
Epson dip switch to CRT dip switch to LCD
Everex** setup screen option setup screen option
For-A Ctrl-Alt-Shift-C Ctrl-Shift-Alt-L
Key command to activate port
Ctrl-FN-D Ctrl-FN-D
FN-F5 FN-F5
type from A:/IVGA/CRT type from A:/IVGA/CRT
setup VGA/Conf.Simulscan setup VGA/Conf.Simulscan
Shift-Ctrl-D Shift-Ctrl-D
command needed
FN-F4 FN-F4
2 CRT/X at DOS prompt reboot
Ctrl-Alt-F10 Ctrl-Alt-F10
FN-F2 FN-F2
Key command to de-activate port
reboot computer
46 LitePro 760 User’s Guide
Page 56

Appendix
Computer
Key command to
activate port
Key command to
de-activate port
Gateway 2000 FN-F1 FN-F1
Grid* ** FN-F2, choose auto or
FN-F2
simultaneous
Ctrl-Alt-Tab Ctrl-Alt-Tab
Hyundai setup screen option setup screen option
IBM 970 automatic warm reboot
IBM ThinkPad setup screen option setup screen option
Kris Tech** FN-F8 FN-F8
Mac Portable no video port: not compatible
Mac PowerBook
140, 145, 170 no video port: requires a 3rd-party interface
160, 165, 180, 250 automatic: use Set Mirroring
warm reboot
option
230 requires Apple Docking Station
Mastersport FN-F2 FN-F1
Micro Express automatic warm reboot
Microslave automatic warm reboot
Mitsubishi SW2 On-Off-Off-Off SW2 Off-On-On-On
NCR setup screen option setup screen option
NEC* setup screen option setup screen option
CRT at the DOS prompt LCD at the DOS prompt
Packard Bell* FN-F2 FN-F2
Ctrl-Alt-< Ctrl-Alt->
Panasonic FN-F2 FN-F2
Samsung setup screen option setup screen option
Sanyo setup screen option setup screen option
Sharp dip switch to CRT dip switch to LCD
SPARC-Dataview Ctrl-Shift-M Ctrl-Shift-M
Tandy* ** Ctrl-Alt-Insert Ctrl-Alt-Insert
setup screen option setup screen option
Texas Instruments setup screen option setup screen option
Top-Link* ** setup screen option setup screen option
FN-F6 FN-F6
Toshiba* ** Ctrl-Alt-End Ctrl-Alt-Home
FN-End FN-Home
4500 FN-F5 FN-F5
setup screen option setup screen option
LitePro 760 User’s Guide 47
Page 57

Appendix
Computer
Key command to
activate port
Key command to
de-activate port
Wyse software driver software driver
Zenith FN-F10 FN-F10
* These manufacturers have other models that automatically send video to the external CRT
port when some type of display device is attached.
** These manufacturers offer more than one key command depending on the computer model.
48 LitePro 760 User’s Guide
Page 58

Index
Numerics
13W3 adapters 1, 2, 8
A
accessories 43
activation commands for laptop
computers 46
adapters
13W3 1, 2, 8 BNC 1, 2, 10 for specific computers 2, 7, 39 Macintosh 1, 2, 12, 14 ordering spares 43 shipped with panel 2
shipped with projector 2
air movement inside unit 3
altitude limits 42
Apple,
see Macintosh
arrow buttons
re-positioning image 19
using in menu 19, 21
assistance,
see Technical Support
B
batteries, replacing in remote control 30
blue adjustment 22
BNC adapters 1, 2, 10
brightness
brightness, adjusting 20
Bulb Guard 30
bulb,
button 20, 22
see lamp
C
cables
connecting to LitePro 6
for specific computers 39
LitePro cable 2, 6
monitor 8, 10, 11, 12
pin assignments for LitePro cable 44, 45
power cable 2, 5
shipped with projector 2
CGA graphics 2
colors
adjusting red, green or blue 22
don’t match monitor colors 38
inverting 23
maximum number available 1, 23
not displayed 36
selecting number of 23
Colors menu function 23
compatibility 2, 39
"Computer" end of LitePro cable 8, 10, 11, 12,
13, 14
computers
compatible with LitePro 2, 39
connecting to LitePro 7
contrast
button 20
D
DEC workstation
adapters 2
compatibility 39
connecting 10
defaults, resetting 21
E
EGA graphics 2
"EEPROM failed" displayed 38
F
focusing the image 17
fuse
ordering spares 43
replacing in LitePro 31
specifications 41
fuzzy lines displayed 23
G
green adjustment 22
LitePro 760 User’s Guide 49
Page 59

Index
H
height of LitePro 18
HP workstation
adapters 2
compatibility 39
connecting 10
humidity limits 42
I
IBM workstation
adapters 10
compatibility 39
connecting 10
IBM-compatible personal computers
compatibility 2, 39
desktop, connecting 11
laptop, connecting 13
image
blinks 21, 30
colors don’t match monitor’s colors 38
flashes off and on 30
focusing 17
fuzzy lines 23
has lines or spots 38
not centered 37
not displayed 36
out of focus 17, 37
re-positioning 19
reversed 38
streaked 38
too wide or too narrow 37
Indigo workstation (SGI)
adapters 8
connecting 8
Indy workstation (SGI)
adapters 8
connecting 8
Intergraph workstation
adapters 8
compatibility 39
connecting 8
Inverse menu function 23
inverting image colors 23
L
lamp
average life 24, 41
BulbGuard 30
flashing off and on 30
handling 29
life detection system 30
ordering spares 43
replacing the lamps 28
specifications 41
switching to the spare 24
Language menu function 23
language, selecting for menus 23
laptop computers
activation sequence to allow secondary
display 13, 46
compatibility 2
connecting to LitePro 13, 14
LCD, description 1
"LCD" end of LitePro cable 6
LitePro
accessories 43
adjusting the height 18
connecting to computer 6
displaying menu 19
not working 36
operating limits 42
positioning 5
replacing batteries in the remote 30
replacing fuse 31
replacing lamps 28
specifications 41
switching to the spare bulb 24
turning off lamp 19
LitePro cable
"Computer" end 8, 10, 11, 12, 13, 14
"LCD" end 6
"Monitor" end 8, 10, 11, 12
connecting to LitePro 6
description 2
ordering spares 43
pin assignments 44, 45
50 LitePro 760 User’s Guide
Page 60

Index
M
Macintosh
adapters 1, 2, 12, 14
Classic 2
compatibility 2, 39
connecting to LitePro 12
Performa 2
PowerBook 2, 14
PowerMac 2
Quadra 2
video-out cable 14
MCGA graphics 2
menu
adjusting functions 21
change language of 23
description of functions 22
displaying 19, 21
removing 19
selecting functions 21
menu
button 19
monitor
cable 8, 10, 11, 12
connecting to LitePro 8, 10, 11, 12
projected colors don’t match 38
monitor activation, IBM-compatible laptop
13
"Monitor" end of LitePro cable 8, 10, 11, 12
N
NeXT workstation
adapters 2
compatibility 39
connecting 8
O
optical specifications 41
Q
Quadra,
see Macintosh
R
raise the LitePro 18
Rear Projection menu function 23
red adjustment 22
remote control
description of buttons 19
not working 38
ordering spares 43
range 17
replacing batteries 30
specifications 41
using to display menu 21
using to turn bulb on and off 15, 19
resetting menu adjustments 21
S
SGI workstation
adapters 2
compatibility 39
connecting a Starter 1 11
connecting a workstation 8
shipping contents 1
signal synchronization 20
SPARCbook, connecting 13
spare lamp 24
specifications 41
standby
Starter 1 (SGI), connecting 11
Sun workstation
sync
button 19
adapters 2
compatibility 39
connecting 8
button 20
P
PC,
see IBM-compatible personal computers
Performa,
pin assignments for LitePro cable 44, 45
power cable
power supply specifications 41
PowerBook,
PowerMac,
project from behind the screen 23
LitePro 760 User’s Guide 51
see Macintosh
connecting to LitePro 5
ordering spares 43
see Macintosh
see Macintosh
Page 61

Index
T
Tadpole SPARCbook, connecting 13
Technical Support
diagnostic information 22
in Europe 3
in USA 3
information to have on hand before you
call 36
things to try before you call 35
Tektronix X terminal
adapters 2
connecting 10
temperature limits 41
test pattern, won’t go away 37
text not visible 36
Track menu function 23
tracking
adjusting 23
current setting 22
troubleshooting 35
U
UNIX workstations, compatibility 2, 39
V
vertical lines displayed 23, 38
VGA graphics 2
video (monitor) activation, IBM-compatible
laptop 13
video-out cable, for PowerBook 14
X
X terminals, compatibility 2
52 LitePro 760 User’s Guide
Page 62

LIMITED WARRANTY
In Focus Systems Inc. (“In Focus”) warrants that each LitePro 760 (“the Product”) sold
hereunder will conform to and function in accordance with the written specifications of In
Focus. Said limited warranty shall apply only to the first person or entity that purchases the
Product for personal or business use and not for the purpose of distribution or resale. Said
warranty shall continue for a period of one (1) year from the date of such purchase. In Focus
does not warrant that the Product will meet the specific requirements of the first person or
entity that purchases the Product for personal or business use. In Focus’ liability for the breach
of the foregoing limited warranty is limited to the repair or replacement of the Product or
refund of the purchase price of the Product, at In Focus’ sole option. To exercise the Purchaser’s
rights under the foregoing warranty, the Product must be returned at the Purchaser’s sole cost
and expense, to In Focus or to any authorized In Focus service center provided, however, that
the Product must be accompanied by a written letter explaining the problem and which
includes (i) proof of date of purchase; (ii) the dealer’s name; and (iii) the model and serial
number of the Product. A return authorization number, issued by the In Focus customer service
department, must also be clearly displayed on the outside of the shipping carton containing the
Product.
WARRANTY LIMITATION AND EXCLUSION
In Focus shall have no further obligation under the foregoing limited warranty if the Product
has been damaged due to abuse, misuse, neglect, accident, unusual physical or electrical stress,
unauthorized modifications, tampering, alterations, or service other than by In Focus or its
authorized agents, causes other than from ordinary use or failure to properly use the Product in
the application for which said Product is intended.
DISCLAIMER OR UNSTATED WARRANTIES
THE WARRANTY PRINTED ABOVE IS THE ONLY WARRANTY APPLICABLE TO THIS
PURCHASE. ALL OTHER WARRANTIES, EXPRESS OR IMPLIED, INCLUDING, BUT NOT
LIMITED TO, THE IMPLIED WARRANTIES OF MERCHANTABILITY AND FITNESS FOR A
PARTICULAR PURPOSE ARE DISCLAIMED. THERE ARE NO WARRANTIES THAT
EXTEND BEYOND THE FACE HEREOF AND THE FOREGOING WARRANTY SHALL NOT
BE EXTENDED, ALTERED OR VARIED EXCEPT BY WRITTEN INSTRUMENT SIGNED BY IN
FOCUS.
LIMITATION OF LIABILITY
IT IS UNDERSTOOD AND AGREED THAT IN FOCUS’ LIABILITY WHETHER IN
CONTRACT, IN TORT, UNDER ANY WARRANTY, IN NEGLIGENCE OR OTHERWISE
SHALL NOT EXCEED THE RETURN OF THE AMOUNT OF THE PURCHASE PRICE PAID
BY PURCHASER AND UNDER NO CIRCUMSTANCES SHALL IN FOCUS BE LIABLE FOR
SPECIAL, INDIRECT OR CONSEQUENTIAL DAMAGES. THE PRICE STATED FOR THE
PRODUCT IS A CONSIDERATION IN LIMITING IN FOCUS’ LIABILITY. NO ACTION,
REGARDLESS OF FORM, ARISING OUT OF THE AGREEMENT TO PURCHASE THE
PRODUCT MAY BE BROUGHT BY PURCHASER MORE THAN ONE YEAR AFTER THE
CAUSE OF ACTION HAS ACCRUED.
Page 63

Part Number 010-0086-00
 Loading...