

Page 1

TABLE OF CONTENTS
Safety Summary iii
Introduction 1
Image Resolution 1
Compatibility 2
Unpacking the Projector 2
Usage Guidelines 5
If You Need Assistance 5
Warranty 5
Setting up the Projector 7
Connecting the CableWizard™ to the Projector 8
Selecting Connectors on the CableWizard 8
Preparing to Connect Your Equipment to the Projector 10
Connecting an IBM-Compatible Laptop Computer 11
Connecting an IBM-Compatible Desktop Computer 13
Connecting an Apple PowerBook Computer 15
Connecting a Macintosh Desktop Computer 17
Connecting a Video Player 19
Connecting an External Speaker 21
Powering up the Projector and Adjusting the Image 21
Turning Off the Projector 22
Using the Projector 23
Basic Image Adjustment 23
Using the Remote Control 23
Adjusting the Projector 25
Using the Keypad Buttons 27
Using the On-Screen Menus 29
Display Menu Functions 31
Audio Menu Functions 33
Image Menu Functions 35
Controls Menu Functions 37
i
Page 2

Tab le of Co ntents
Maintenance & Troubleshooting 39
Cleaning the Lens 39
Cleaning the Fan Intake Filter 39
Replacing the Projection Lamp 41
Replacing the Batteries in the Remote Control 43
Using the Kensington Lock 43
Troubleshooting 44
Solutions to Common Problems 45
Appendix 49
Specifications 49
Accessories 51
Portable and Laptop Activation Chart 53
Using Video Mirroring with a PowerBook Computer 57
Projected Image Size 58
Index 61
ii
Page 3

SAFETY SUMMARY
Please read these instructions carefully before using your projector. Failure to comply with them could result in fire, electrical
shock, personal injury or damage to equipment.
These graphics are used throughout this manual to draw your
attention to important information about the projectors.
NOTE: Additional useful details or tips.
CAUTION: Steps to take to avoid damage to your equipment.
WARNING: Steps to take to avoid personal injury.
These graphics are used on the projector’s labels.
Attention
- Refer to this User’s Guide for important
safety information.
CAUTION- Hot Surfaces
- Avoid touching hot surfaces.
Do not touch until the projector has cooled.
Do Not Look Into The Lens!
Be extremely careful not to look into the projection lens when the
projector is turned on. The bright light may harm your eyes. Be
especially careful to keep children from looking into the lens.
Power So urce
Use only a three-wire grounding type power source. The power
source should not exceed 250 volts rms between the supply conductors or between either conductor and the ground.
Power Cord
Use only the power cord that was shipped with the projector.
Although other power cords might be similar in appearance, they
have not been safety-tested with the projector. Do not use a
power cord if it has become damaged or frayed. Contact your In
Focus dealer or call In Focus if you need to replace your power
cord.
iii
Page 4

Safety Summary
Grounding
The projector is grounded through the grounding conductor on
the power cord. To avoid electric shock, plug the power cord into
a properly wired receptacle. Do not defeat the purpose of the
grounding-type plug.
Lamp
To avoid overheating and unacceptable image quality, replace the
projection lamp with a lamp of the specified type. Refer to
page 49 for lamp specifications and to page 41 for instructions on
replacing the lamp.
Lamp Compartment
To avoid burns, do not open the lamp module door until the projector is turned off and the lamp has cooled for at least 2 minutes.
Follow the instructions in this manual for lamp replacement carefully.
Hot Surfaces
Allow the projector to cool at least 2 minutes before replacing a
lamp. When you open the lamp housing, be very careful not to
touch the hot surfaces inside.
NO TE: If you open the projector
case, you will void the warranty.
iv
Ventilation and Overheating
Openings in the projector case provide ventilation to protect it
from overhe ating. Keep loose papers and other ob jects well away
from the grills. Do not place the projector on top of or close to a
computer or other heat-producing equipment.
Liquid Spills
Do not set drinks on top of the projector. Spilled liquids can flow
inside and cause damage.
Do Not Disassemble
All projector service must be performed by an authorized In
Focus service center. The only user-serviceable part in the projector is the projection lamp, which you can replace by opening the
lamp cover on the bottom of the projector (see page 41). Do not
open any other part of the projector. If your projector needs
repair, call In Focus Technical Support as described on page 5.
Before you call Technical Support, you may want to refer to
“Troubleshooting” on page 44 to see if you can resolve the problem yourself.
Page 5

INTRODUCTION
The In Focus
®
LP™ 725 and 730 lightweight multimedia projectors combine powerful and sophisticated features with easy-touse, intuitive controls. Built-in multimedia features include
audio, a palette of 16.7 million colors and active matrix liquid
crystal display (LCD) technology. The 700 series projectors are
ideal for high-performance business, training and imaging applications that demand exceptional color quality. The 725 has SVGA
800x600 graphics, the 730 has XGA 1024x768 graphics. The user
interfaces of the two products are identical; information in this
User’s Guide applies to both products.
Image Resolution
LP 725
The SVGA resolution of the 725’s projected image is 800x600.
Screen resolutions between 800x600 and 1024x768 are co mpressed to 800x600. The 725 cannot compress screen resolutions
above 1024x768. If your computer’s screen resolution is higher
than 1024x768, reset it to a lower resolution before you connect
the 725
LP 730
.
The XGA resolution of the 730’s projected image is 1024x768.
Screen resolutions between 1024x768 and 1280x1024 are compressed to 1024x768. The 730 cannot compress screen resolutions
above 1280x1024. If your computer’s screen resolution is higher
than 1280x1024, reset it to a lower resolution before you connect
the 730
.
NO TE: The 725 automatically
expands 640x480 images to
800x600. You can display these
images at 640x480 by turning off
the Auto Resize feature. See “Auto
Resize” on page 35 for more information.
NOTE: The 730 automatically
expands 640x480 and 800x600
images to 1024x768. You can display these images at their original
resolutions by turning off the Auto
Resize feature. See “Auto Resize”
on page 35 for more information.
1
Page 6

Introduction
Compatibility
The projector is compatible with a wide variety of computers and
video devices, including:
•
IBM-compatible computers, including laptops, up to 1024x768
NOTE: Selected workstations are
also supported. Contact your In
Focus dealer for details.
resolution (LP 725) or 1280x1024 resolution (LP 730) at 75 Hz.
•
Apple Macintosh and PowerBook computers up to 1024x768
resolution (LP 725) or 1280x1024 resolution (LP 730).
•
Most standard VCRs, camcorders and laser disc players.
Unpacking the Projector
The projector comes with the items shown in Figure 1. Check to
make sure all are included. Contact your In Focus dealer immediately if anything is missing.
If you are experienced in setting up presentation systems, use the
LP 725/730 Quick Start
box. For complete details on connecting and operating the projector , r efer to this User’s Guide. User’s Guides are also available for
download from our website at www.infocus.com.
card that was included in the shipping
NOTE: The contents of your
shipping box may vary depending
on the configuration you’ve
ordered.
2
Page 7

2
3
1
6
8
7
9
1. LP 725 or 730 projector 6. CableWizard
2. LP 725/730 User’s Guide 7. CableWizard computer cable
3. power cord 8. CableWizard mouse cable
4. remote and batteries 9. CableWizard audio cable
5. RCA audio/video (A/V) cable
Not shown: Quick Start card, online user guide CD-ROM, lens cap
5
4
FIGURE 1
Shipping box contents
3
Page 8

Introduction
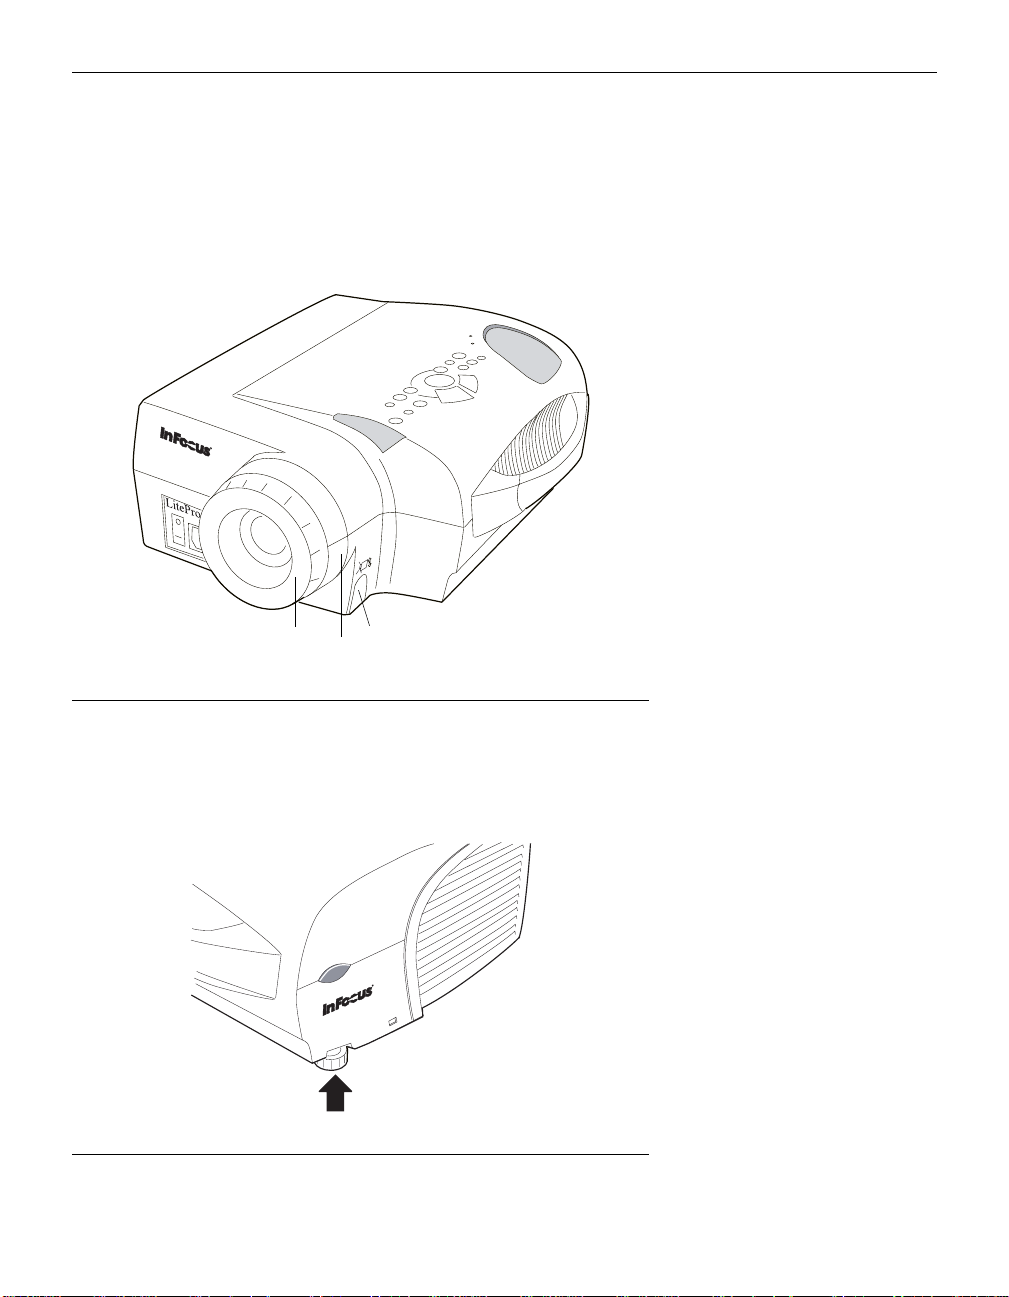
F
IGURE 2
Side view of projector
speaker
connector panel
elevator button
power
switch
F
IGURE 3
power
cord
connector
focus ring
zoom ring
remote control
receiver
Front view of projector
4
Page 9

Usage Guidel ines
•
Do not look directly into the projection lens when the projector
is turned on. The bright light may harm your eyes.
•
Do not block the grills on the projector. Restricting the air flow
can cause it to overheat and turn off.
•
Handle the projector as you would any product with glass
components. Be especially careful not to drop it.
•
Avoid leaving the projector in direct sunlight or extreme cold
for extended periods of time. If this happens, allow it to reach
room temperature before use.
•
This projector is not intended fo r use in a mainf ram e co mputer
room as defined in the Sta ndar d for th e Pr otection of Electr o nic
Computer/Data Processing Equipment, ANSI/NFPA 75.
•
Transport the projector in a vendor-appro ved h ard or soft case.
Part numbers for these cases are listed on page 52. Call your In
Focus dealer to order.
If You Need Assistance
The first place to look for help is in this manual. Be sure to check
the guidelines in “Troubleshooting” on page 44.
NOTE: If the projector overheats
and turns off, you must wait about
30 seconds before you attempt to
turn it back on.
If this manual doesn’t answer your question, call your In Focus
dealer. You can also call In Focus Customer Service directly at
1-800-799-9911
. Customer Service is free between 5 a.m. and
5 p.m. PST, Monday through Friday. Service is available in North
America after hours and on weekends for a fee.
In Europe, call In Focus in The Netherlands at
(31) 23-5540310
e-mail at
. In Singapore, call
techsupport@infocus.com
Our World Wide Web address is
(65) 740-6435
http://www.infocus.com.
. Or, send us an
Warranty
This product is backed by a limited one-year warranty. The
details of the warranty are printed at the back of this manual.
Longer term warranties can be purchased from your In Focus
dealer. Refer to page 52 for part numbers.
5
Page 10

SETTING UP THE PROJECTOR
Place the projector on a flat surface.
1
•
The projector must be within 10 feet (3 m) of your power
source and within 10 feet of your computer.
•
If you want to project from behind a translucent screen, set
up the projector behind your screen. See “Rear Projection”
on page 38 to reverse the image.
•
If you are installing the projector on the ceiling, refer to the
LP 700 Series Ceiling Mount Installation Guide
that comes
with the Ceiling Mount Kit for more information. To turn
the image upside down, see “Ceiling” on page 38. The Ceiling Mount Kit is sold separately; see page 52.
Position the projector the desired distance from the screen.
2
•
The distance from the lens of the projector to the screen
determines the size of the projected image. Figure 4 shows
three projected image sizes using the lens at minimum
focusing distance. For more information about image size,
see “Projected Image Size” on page 58.
NO TE: An optional extension
cable, sold separately, lets you
increase the distance between the
projector and your computer to
70 feet (21 m). See “Optional
Accessories” on page 52.
Make sure the projector and your computer are turned off.
3
2
5
f
t
.
5
f
t
2
.
5
.
f
t
.
3.3 ft.
6.5 ft.
32.5 ft.
Projected image size (minimum focusing distance)
FIGURE 4
7
Page 11

Setting up the Projector
Connecting the CableWizard™ to the Projector
The CableWizard simplifies the connection process by providing
CAUTION: Turn o ff the
computer, monitor and projector
whenever you connect or
disconnect cables.
a central hub for all the connections between the projector and
your computer. The connectors on the CableWizard are labeled
with icons.
Connect the end of the CableWizard cable to the
connector on the projector’s connector panel (Figure 5).
NOTE: The projectors are
optimized for use with
CableWizard II. If you have
CableWizards from other models
of In Focus projectors, we do not
recommend using them. Image
quality is reduced by using a
CableWizard other than Cable
Wizard II. The label on the bottom
reads CableWizard or
CableWizard II.
F
IGURE 5
Connecting the CableWizard to the projector
Selecting Connectors on the CableWizard
Turn the selector on the top of the CableWizard to reveal the
correct connectors for your computer.
NOTE: You must disconnect all
cables before turning the selector
on the CableWizard.
8
IGURE 6
F
Selecting connectors on the CableWizard
Page 12

•
If you’re connecting an
, turn the selector until the window displays “PC.”
puter
IBM-compatible desktop or laptop com-
computer
audio
•
If you’re connecting a
computer
, turn the selector until the window displays “Mac™.”
monitor
mouse
serial
F
IGURE 7
Selecting the IBM-compatible connectors on the CableWizard
Macintosh desktop o r an Apple PowerBoo k
monitor
mouse
computer
NO TE: The serial connector is
provided for use with a command
center for a fixed installation.
audio
FIGURE 8
Selecting the Macintosh connectors on the CableWizard
9
Page 13

Setting up the Projector
Preparing to Connect Your Equipment to the Projector
Now you’re ready to connect your equipment. Computers are
NO TE: Before you continue,
make sure the projector and your
equipment are turned off. If you’re
connecting a computer, make sure
the distance between it and the
projector is 10 feet or less and
you’ve selected the appropriate
connectors on the CableWizard.
connected to the CableWizard. Video players and other equipment, such as external speakers, are connected directly to the projector.
Steps for connecting the different types of equipment are given
on the pages listed below.
Equipment you want to connect Page
IBM-compatible laptop computer page 11
IBM-compatible desktop computer page 13
Apple PowerBook page 15
Macintosh desktop computer page 17
Video player page 19
External speaker page 21
NOTE: In some older computers,
the monitor connector does not
have a hole for Pin 9. If you have
trouble connecting the
CableWizard computer cable to
your computer, contact In Focus
Technical Support.
10
external
speaker
F
IGURE 9
Connector panel
s-video
composite
video
L/R audio in
wired remote
(optional
accessory)
CableWizard
Page 14

Connecting an IBM-Compatible Laptop Computer
Plug the end of the CableWizard computer cable into the
1
video connector on your computer.
Plug the end of the CableWizard computer cable into the
2
connector on the CableWizard.
computer cable
FIGURE 10
Connecting the CableWizard computer cable to an IBM-compatible laptop computer
Do you want to play your computer’s audio on the projector?
Plug either end of the CableWizard audio cable into the audio
1
connector on your computer.
Plug the other end of the audio cable into the connector
2
on the CableWizard.
NO TE: Many laptop computers
do not automatically turn on their
external video port when a secondary display device such as a
projector is connected. Refer to
your computer manual for the
command that activates the external video port. Activation commands for some laptop computers
are listed in the Appendix of this
manual on page 53.
NO TE: If you don’t w ant audio or
mouse control, you can use the
CableWizard Lite with your IBMcompatible computer. CableWizard Lite is ordered separately. See
“Optional Accessories” on
page 52.
11
Page 15

Setting up the Projector
Do you want to control the comput er’s mouse from the projector’s
remote or keypad?
Locate the mouse cable and unplug it from your computer.
1
Plug the end of the CableWizard mouse cable into the
2
NOTE: Most laptop computers
do not allow you to use the
computer’s pointing device and the
projector’s remote at the same
time.
mouse connector on your computer.
Plug the end of the CableWizard mouse cable into the
3
connector on the CableWizard.
mouse cable
computer cable
12
audio cable
FIGURE 11
Connecting the CableWizard audio and mouse cables to an IBM-compatible laptop
computer
Now you’re ready to power up the projector and your laptop.
Skip to “Powering up the Projector and Adjusting the Image” on
page 21.
Page 16

Connecting an IBM-Compatible Desktop Computer
Locate the cable that connects your monitor to your computer.
1
Unplug it from the computer.
Plug the end of the CableWizard computer cable into the
2
monitor connector on your computer.
Plug the end of the computer cable into the connector
3
on the CableWizard.
computer cable
FIGURE 12
Connecting the CableWizard computer cable to an IBM-compatible desktop computer
Do you want to display the image on your computer’s monitor as
well as on the projection screen?
Plug your monitor’s cable into the connector on the
1
CableWizard.
Do you want to play your computer’s audio on the projector?
Unplug the audio cable, if present, from your computer.
1
Plug either end of the CableWizard audio cable into the audio
2
connector on your computer.
Plug the other end of the audio cable into the connector
3
on the CableWizard.
13
Page 17

Setting up the Projector
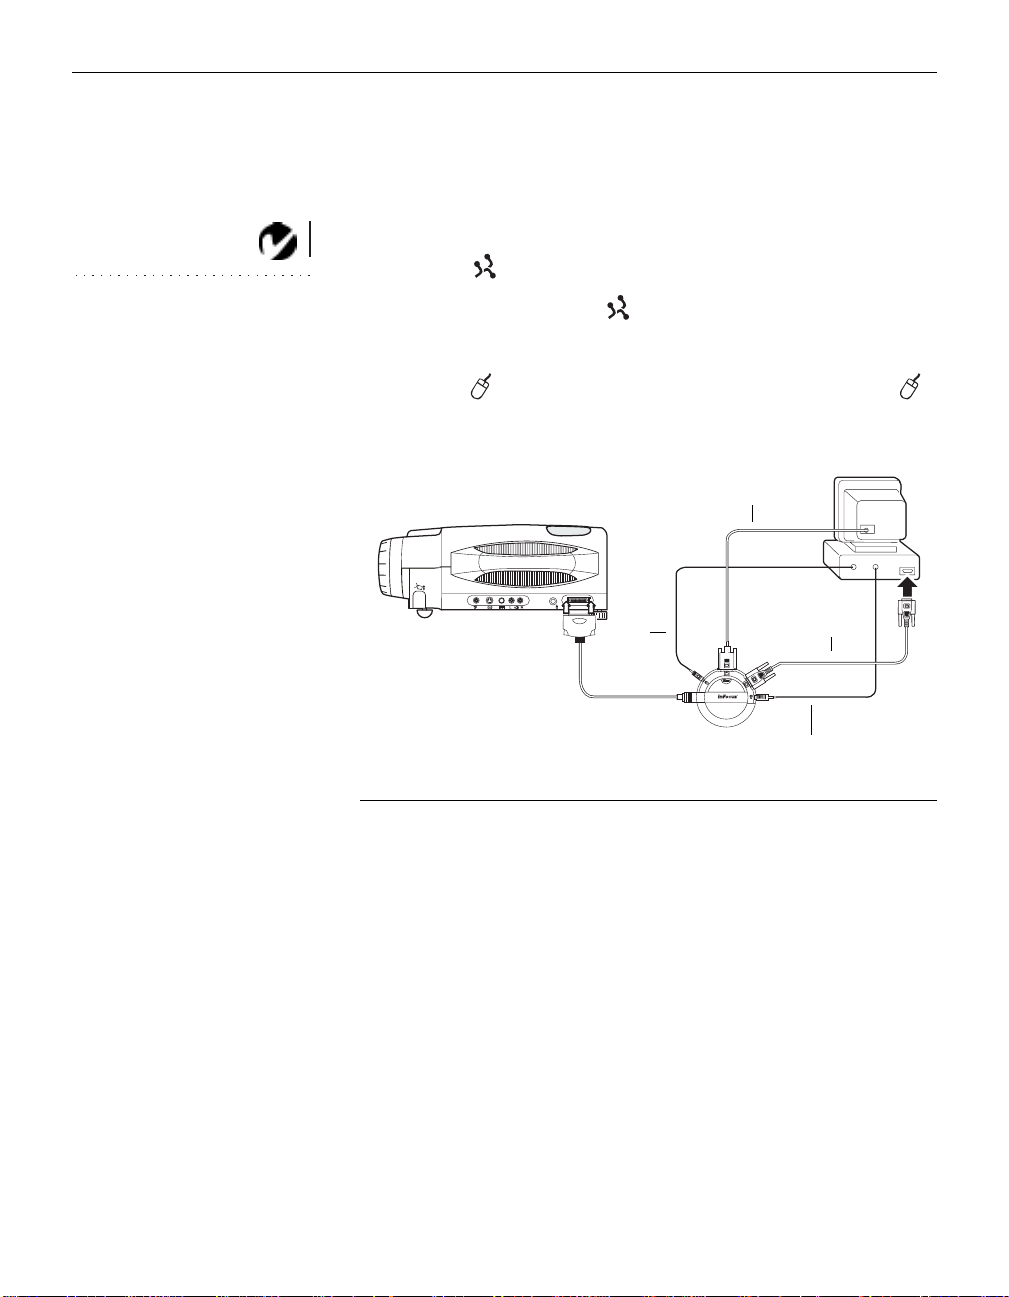
Do you want to control your computer’s mouse from the projector’s
remote or keypad?
Unplug the mouse cable from your computer.
1
Plug the end of the CableWizard mouse cable into the
2
NO TE: You cannot use your
computer’s mouse and the
projector’s remote at the same
time.
mouse connector on your computer.
Plug the end of the CableWizard mouse cable into the
3
connector on the CableWizard.
monitor cable
computer cable
audio cable
FIGURE 13
Connecting the CableWizard monitor, audio and mouse cables to an IBM-compatible
desktop computer
mouse cable
Now you’re ready to power up the projector and your computer.
Skip to “Powering up the Projector and Adjusting the Image” on
page 21.
14
Page 18

Connecting an Apple PowerBook Computer
Plug the end of the CableWizard computer cable into the
1
video connector on your PowerBook.
Plug the end of the CableWizard computer cable into the
2
connector on the CableWizard.
If you want the projector display to be the same as the Power-
3
Book’s screen display, turn on video mirroring. (See “Using
V ideo Mirr oring with a PowerBook Com puter” on page 57 for
additional information.)
PowerBook
computer cable
video-out cable
NO TE: Some PowerBooks require
the Apple-supplied video-out cable
for external video. Connect it
between the PowerBook and the
CableWizard computer cable as
shown in Figure 14.
FIGURE 14
Connecting the CableWizard computer cable to an Apple PowerBook
Do you want to play your computer’s audio on the projector?
Plug either end of the CableWizard audio cable into the audio
1
connector on your PowerBook.
Plug the other end of the audio cable into the connector
2
on the CableWizard.
15
Page 19

Setting up the Projector
Do you want to control the comput er’s mouse from the projector’s
remote or keypad?
Locate the mouse cable and unplug it from your PowerBook.
1
Plug the end of the CableWizard mouse cable into the
2
NOTE: Most laptop computers
do not allow you to use the
computer’s pointing device and the
projector’s remote at the same
time.
(ADB) connector on your PowerBook.
Plug the end of the CableWizard mouse cable into the
3
connector on the CableWizard.
mouse cable
computer cable
audio cable
PowerBook
video-out cable
16
FIGURE 15
Connecting the CableWizard audio and mouse cables to a PowerBook
Now you’re ready to power up the projector and your PowerBook. Skip to “Powering up the Projector and Adjusting the
Image” on page 21.
Page 20

Connecting a Macintosh Desktop Computer
Locate the cable that connects the monitor to your computer.
1
Unplug it from the computer.
Plug the end of the CableWizard computer cable into the
2
monitor connector on your computer.
Plug the end of the CableWizard computer cable into the
3
connector on the CableWizard.
computer cable
FIGURE 16
Connecting the CableWizard computer cable to a Macintosh desktop computer
Do you want to display the image on your computer’s monitor as
well as on the projection screen?
Plug the monitor’s cable into the connector on the
1
CableWizard.
Do you want to play your computer’s audio on the projector?
Unplug the audio cable, if present, from your computer.
1
Plug either end of the CableWizard audio cable into the audio
2
connector on your Macintosh.
Plug the other end of the audio cable into the connector
3
on the CableWizard.
17
Page 21
Setting up the Projector
Do you want to control the comput er’s mouse from the projector’s
remote or keypad?
Unplug the mouse from your Macintosh or locate an unused
1
ADB connector.
Plug the end of the CableWizard mouse cable into the
2
NO TE: You cannot use your
computer’s mouse and the
projector’s remote at the same
time.
mouse connector or the (ADB) connector on your
Macintosh.
Plug the end of the CableWizard mouse cable into the
3
connector on the CableWizard.
monitor cable
mouse
cable
FIGURE 17
Connecting the CableWizard monitor, audio and mouse cables to a Macintosh desktop
computer
computer cable
audio cable
.Now you’re ready to power up the projector and the Macintosh.
Skip to “Powering up the Projector and Adjusting the Image” on
page 21.
18
Page 22

Connecting a Video Player
If your video player uses a round, one-pr on g composite video
1
connector, you’ll need only the A/V cable that shipped with
the projector.
•
If your video player uses a round, four-prong S-video connector, you’ll need an S-video cable in addition to the A/V
cable. The S-video cable is sold separately. (See “Optional
Accessories” on page 52.)
Plug the A/V cable’s yellow connector into the “video-out”
2
port on your video player (Figure 18). This port may be
labeled “To Monitor.”
•
If you’re using an S-video cable, connect it to the “s-video
out” connector on the video player (Figure 19).
Plug the other yellow connector int o the composite connector
3
on the projector.
•
If you’re using S-video, plug the other end of the cable into
the “s-video” connector on the projector (Figure 19).
audio/video cable
FIGURE 18
Connecting the projector to a video player using the standard A/V cable (with composite
video connector)
19
Page 23

Setting up the Projector
S-video cable
A/V cable
F
IGURE 19
Connecting the projector to a video player using an S-video cable and the audio connectors on the standard A/V cable
Plug the A/V cable’s white connector into the left “audio out”
4
port on your video player. Plug the cable’s red connector into
the right “audio out” port on the video player (Figure 18 and
Figure 19).
CAUTION: Your video player
may also have a “Video Out” port
for a coaxial cable connection.
DO NOT use this to connect to the
projector.
20
•
If you’re using an S-video cable, the yellow connectors on
the A/V cable remain unused (Figure 19).
Plug the A/V cable’s other white and red connectors to the
5
left and right “audio in” ports on the projector.
The projector is compatible with these major broadcast video
standards: NTSC, NTSC 4.43, PAL, PAL-M, PAL-N, and SECAM.
It automatically adjusts to optimize its performance for the
incoming video. The input signals for SECAM, PAL-M, and
PAL-N video cannot be automatically detected, therefore they
must be chosen manually; see “Video Standard” on page 37.
Page 24

Connecting an External Speaker
To connect one or two external speakers, plug the speaker cable
into the (audio out) connector on the projector.
IGURE 20
F
Connecting an external speaker
Powering up the Pr ojector and Adjusting the Imag e
Remove the lens cap.
1
Plug the power cord into the front of the projector, then plug it
2
into your electrical outlet. A surge-protected power strip is
recommended if power surges are common in your area.
NO TE: The external speakers
must be amplified.
NO TE: Alw ays use the po w er cor d
that shipped with the projector.
Turn on the projector by pressing the “I” side of the power
3
switch on the front of the projector.
•
The In Focus startup screen displays and the Power LED
lights (Figure 25 on page 27).
If you connected a video player, turn it on.
4
•
Press the
button on the keypad to display the image
video
from your video player. (You can select a default source to
determine which source the projector examines first during
power-up for active video; see “Default Source” on
page 38.)
•
Use the
volume
buttons to adjust the volume.
CAUTION: If the lamp LED
remains solidly lit after the projector has powered on, the lamp
needs to be replaced. Refer to
“Replacing the Projection Lamp”
on page 41 for more information.
21
Page 25

Setting up the Projector
•
If you don’t want to hear the sound from your video player ,
press the
If you connected any external speakers, turn them on.
5
If you connected your monitor, turn it on.
6
Turn on your computer.
7
•
The computer image should display on the projection
mute
button.
screen. (If a video source is active, press the
ton to display your computer’s image.)
•
NO TE: With some computers,
the order in which you power up
the equipment is very impor tant.
Most computers should be turned
on last, after all other peripherals
have been turned on. Refer to your
computer’s documentation to
determine the correct order.
If necessary, use the
brightness
adjust the brightness. You can make further adjustments to
the image from the projector’s on-screen menus. To open
the menus, press the
menu
select the Display menu or the Image menu. For more information about the menus, see page 29.
•
If you don’t want to hear the sound from your computer or
video player, press the
mute
Turning Off the Projector
buttons on the keypad to
button on the keypad. Then
button.
If you want to turn off the projector for a short period of time,
press the
standby
button on the keypad. This blanks the screen for
15 minutes, but keeps the projector running. After 15 minutes, the
lamp goes out (the projector keeps running). To exit standby
mode, press the
standby
button again. (It takes several seconds for
the projection lamp to reach full power and project the image
again.)
computer
but-
CAUTION: When you
disconnect the projector after you
have switched it off, always
remove the power cord from the
electrical outlet first, then remove
it from the projector.
22
To completely power off the projector, press the “O” side of the
power switch on the front of the projector. If you want to turn the
projector back on immediately, you must allow about 30 seconds
for the lamp to cool. The lamp won’t light if it’s too hot.
Page 26

USING THE PROJECTOR
This section describes how to use and make adjustments to the
projector. It also provides a reference to the keypad buttons and
the options available from the on-screen menus.
Basic Image Adjustment
Make sure you have powered up your equipment in the right
1
order (page 21).
If the image doesn’t display completely, adjust the height and
2
tilt of the projector (page 25), zoom the image (page 25), or
center the image by adjusting its horizontal or vertical position (page 36).
If the image is out of focus, rotate the lens to focus it (page 25).
3
If the image appears to shimmer or if it has blurry vertical
4
bars after you have adjusted the focus, turn Auto Image
(page 35) off and then back on to reset the automatic sync and
tracking. If that doesn’t clear up the image, adjust the sync
(page 36) and/or the tracking (page 36) manually.
If the colors don’t look right, adjust the brightness (page 27)
5
and tint (page 31).
NO TE: In Focus has created a
software program called In Focus
Presents that automatically optimizes your computer’s display
when used with any In Focus projector. This free program is
included with every projector and
available for download from our
website at www.infocus.com.
Using the Remote Control
Point the remote control at the projection screen or at the front or
rear of the projector. The range for optimum operation is about
40 feet. If you point the remote at the projection screen, the distance to the screen and back to the projector must be less than or
equal to 40 feet. For best results, point the remote directly at the
front or the rear of the projector.
The projector ships with a two-button remote. (A full-feature
Smart Remote with all the same buttons as the keypa d is ava ilable separately; see “Optional Accessories” on page 52.) The
remote has a disk mouse and two mouse buttons, one on the top
of the remote and one on the bottom.
NO TE: If you can’t aim the
remote control at the projector so
that its signal is received — for
example, when using rear projec-
—
tion
purchase the optional
Smart Remote and connect it
directly to the projector with the
optional remote control cable. See
“Optional Accessories” on
page 52.
23
Page 27

Using the Projector
left mouse button
(on underside of remote)
F
IGURE 21
Remote control
disk mouse
right mouse button
NOTE: To control the computer’s
mouse from the projector’s remote
or keypad, you must connect the
mouse cable to the CableWizard.
See page 10 for details.
Press anywhere on the edge of the disk mouse to move the cursor
on the screen. You can move the cursor at any angle by pressing
the corresponding edge of the disk. The mouse button on the top
of the remote simulates your computer’s right mouse button; the
button on the bottom simulates your computer’s left mouse button.
If you are crea ting pr esentations in Microsoft® PowerPoint®, you
can use the remote’s mouse buttons to navigate through your
presentation while in Slide Show mode. To configure PowerPoint
for this, choose Options from the Tools menu, click the View Tab,
de-select the “Popup Menu on Right Mouse Click” option in the
Slide Show section, then click OK. Then, when you’re in PowerPoint’s Slide Show mode, a left click advances to the next slide
and a right click returns to the previous slide (other PowerPoint
modes are not affected).
24
Page 28
Adjusting the Projecto r
To focus the image, rotate the focus ring (Figure 22) until the
image is clear. To zoom the image, rotate the zoom ring. This
adjusts the image size without affecting focus.
focus ring
elevator button
zoom ring
FIGURE 22
Focus ring, zoom ring, and elevator button
The projector is equipped with a self-locking, qu ick-release elevator foot and button (Figure 24) and a leveling knob (Figure 23).
FIGURE 23
Leveling knob
25
Page 29

Using the Projector
To raise the projector:
Press and hold the elevator button (Figure 22).
1
Raise the projector to the height you want, then release the
2
button to lock the elevator foot into position.
If necessary, use the leveling knob (Figure 23) to adjust the
3
angle of the projected image.
26
FIGURE 24
Adjusting the height of the projector
To lower the projector:
Press the elevator button.
1
Lower the projector.
2
If necessary, use the leveling knob (Figure 23) to readjust the
3
angle of the projected image.
Page 30

Using the Keypad Buttons
This section provides an alphabetical refer ence to the keypad buttons.
lamp LED
power LED
FIGURE 25
Keypad
Brightness
Adjusting the brightness lightens or darkens the image.
•
To darken the image, press
•
To lighten the image, press
Computer
When you have more than one source (computer or LiteShow Pro
and video) connected to the projector, select between them by
pressing the button for the source you want.
Press
computer
to display your computer image or LiteShow Pro
presentation.
NOTE: LiteShow Pro is an
optional presentation player. Contact your In Focus dealer for more
information.
Freeze
The
button halts, or “freezes” the projected image. Use this
freeze
button to freeze a frame of video (the video continues to run but
the projected image is frozen). You can also freeze an image from
a computer source on the screen, allowing you to perform other
operations on the computer without the audience seeing them.
Press
Help
Press
again when you want the image to return to normal.
freeze
to display the on-screen help information.
help
27
Page 31

Using the Projector
Menu
Press
to open the on-screen menus. Press
menu
close the menus. When you close the menus, the projector saves
any changes you made. For more information about the onscreen menus, see page 29.
Mute
Pressing the
button silences the internal speaker. It also
mute
silences any external speakers that are connected.
menu
again to
To return the volume to its previous setting, press
press either
Scribble
The
scribble
Press the
1
Press the right disk mouse button (Figure 26 on page 30) to
2
volume
button activates on-screen annotation.
scribble
button.
button. The cursor changes to a pencil.
mute
again or
display the color selector. Use the disk mouse to position the
cursor on the desired color, then press the left mouse button.
Press the right button again to close the color selector.
Use the disk mouse to move the pencil to where you want to
3
start the annotation.
Press the left mouse button. The cursor changes to an upright
4
pencil.
Use the disk mouse to draw your annotation. Press the left
5
mouse button to complete the annotation.
To exit Scribble, press the
6
scribble
button. The annotation is
automatically deleted (it cannot be saved).
28
Page 32

Standby
When you press
standby
, the display and audio turn off and a
blank screen is displayed for 15 minutes. After 15 minutes, the
lamp goes out if you haven’t pressed
standby
again. You can
change the amount of time the projector stays in standby mode;
see “Standby TIme” on page 37 for details.
•
If you press
standby
again within 15 minutes, the projector
returns to normal operations imme diately.
•
If you press
standby
again after 15 minutes, there is about a
30 second delay before the lamp turns back on.
Video
When you have more than one source (computer or LiteShow Pro
and video) connected to the projector, select between them by
pressing the button for the source you want.
Press
Volume
•
To increase the volume, press
•
To decrease the volume, press
to display the image from your video player.
video
Volume adjustments are saved for each source you have connected.
Using the On-Screen Menus
The projector
has four on-screen menus that allow you to make
image adjustments and change a variety of settings. Most of these
adjustments aren’t available directly from the keypad.
To open the on-screen menus, press the
pad. Press
again when you want to close the menus and
menu
button on the key-
menu
save any changes.
To select a menu, use the disk mouse on the keypad or remote to
move the cursor to the tab for the menu you want, then click
either mouse button.
29
Page 33

Using the Projector
disk mouse
left mouse right mouse
button
F
IGURE 26
Disk mouse and mouse buttons on keypad
To change a menu setting, move the cursor to the setting you
want to change, then use one of the two mouse buttons to ma ke
changes. All changes are saved when you close the menus.
The status bar at the top of the menu display indicates the source
that is currently active (Computer or Video) and any peripherals
that are connected.
button
The status bar also contains a lamp hour counter that starts at
zero hours and counts each hour the lamp is in use. When the
counter reaches 2000 hours, the lamp monitor light turns on,
when it reaches 2050 hours, the lamp switches of f comple tely. See
“Replacing the Projection Lamp” on page 41 for details.
FIGURE 27
On-screen menu status bar
30
Page 34
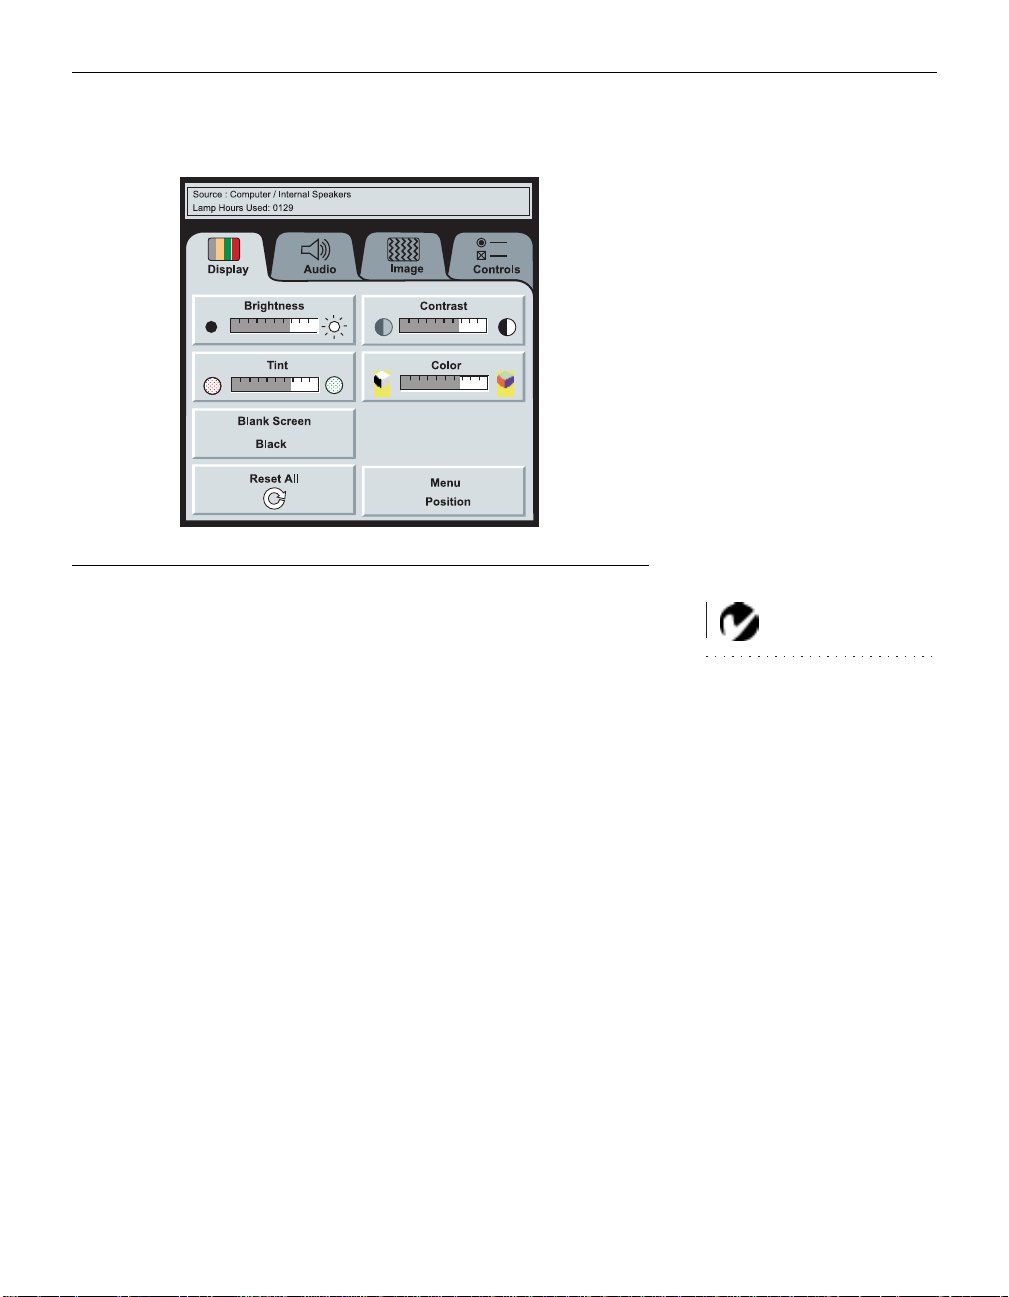
Display Menu Functions
FIGURE 28
Display menu
Brightness
Adjusting the brightness changes the intensity of the image.
•
Press the left mouse button to darken the image.
•
Press the right mouse button to lighten the image.
Contrast
The contrast controls the degree of differ ence between the lightest
and darkest parts of the picture. Adjusting the contrast changes
the amount of black and white in the image.
NO TE: Changing the brightness
using the menu is the same as
changing it using the keypad.
•
Press the left mouse button to decrease the contrast.
•
Press the right mouse button to increase the contrast, making
the blacks appear blacker and the whites appear whiter.
Tint
The tint adjusts the red-green color balance in the projected
image. Changing the Tint setting has no effect on PAL or SECAM
video sources.
•
Press the left mouse button to increase the amount of green in
the image.
•
Press the right mouse button to increase the amount of red in
the image.
31
Page 35

Using the Projector
Color
The color setting adjusts a video image from black and white to
fully saturated color.
•
Press the left mouse button to decrease the amount of color in
the image.
•
Press the right mouse button to increase the amount of color in
the image.
Blank Screen
Blank Screen determines what color is displayed when ther e is no
active source and when the projector is in standby. Click the button to toggle between the two options.
Reset All
Click either mouse button to reset all the options (except Language, Video Standard, Ceiling, and Rear Projection) in all the
menus to their original settings. This also returns Freeze and
Mute to their default (off) settings.
Menu Position
This lets you move the menu to various locations on the screen,
allowing you to view different parts of the image while making
adjustments. The default position is the center of the screen. Click
Menu Position to move the menu to the upper-left corner; click it
again to move it to upper-right, then lower right, then lower left,
then center again.
32
Page 36

Audio Menu Functions
FIGURE 29
Audio menu
Volume
•
Press the left mouse button to decrease the volume.
•
Press the right mouse button to increase the volume.
Volume adjustments you make are saved for each source.
Balance
The balance setting controls the balance between the left and
right external speakers. It appears gray and won’t highlight if
you haven’t connected external speakers. Balance
applies to all
sources you have connected.
NO TE: Changing the volume
from the menu is the same as
changing it using the keypad.
•
Press the left mouse button to increase the amount of sound
coming from the left external speaker.
•
Press the right mouse button to increase the amount of sound
coming from the right external speaker.
33
Page 37

Using the Projector
Fade
The fade setting controls the balance between the internal and
external speakers. The setting appears gray and won’t highlight if
external speakers aren’t connected.
•
Press the left mouse button to increase the amount of sound
coming from the internal speaker.
•
Press the right mouse button to increase the amount of sound
coming from the external speakers.
Treble
The treble setting controls the higher frequencies of your audio
source.
•
Press the left mouse button to decrease the treble.
NO TE: The Treble and Bass
settings apply only to the
projector’s internal speaker.
External speakers typically have
their own tone controls.
•
Press the right mouse button to increase the treble.
Bass
The bass setting controls the lower frequencies of your audio
source.
•
Press the left mouse button to decrease the bass.
34
•
Press the right mouse button to increase the bass.
Page 38

Image Menu Functions
FIGURE 30
Image menu
Auto Image
The projector automatically adjusts tracking, signal synchronization and vertical and horizontal position for most computers. If
you want to adjust these features manually, you must turn off
Auto Image
Auto Resize
Auto Resize
first by clicking it.
automatically resizes the image by scaling it up or
down.
When
Auto Resize
image to the screen. If you turn
is on, the projector makes the best fit of the
Auto Resize
off (by clicking it), the
image may be either cropped or too small for the screen.
NOTE: Some screen savers interfere with the operation of Auto
Image. If you’re experiencing problems, try turning your screen saver
off, then turning Auto Image off
and back on.
35
Page 39

Using the Projector
Manual Sync
The projector adjusts signal synchronization automatically for
most computers. But if the projected computer image looks fuzzy
or streaked, try turning
Auto Image
image still looks bad, try ad justing the signal synchronization
manually as described below.
off then back on again. If the
NOTE: The Manual Sync,
Manual Tracking, Horiz.
Position and Vert. Position
buttons are available only for
computer sources. The projector
sets these options automatically
for a video source.
Click the
1
Press the left or right mouse buttons repeatedly until the
2
Auto Image
button to turn Auto Image off.
image is sharp and free of streaks.
Manual Tracking
The tracking function adjusts the projector to match the video
signal from your computer. The projector usually adjusts the
tracking automatically when you connect your computer. However, if the display shows evenly spaced, fuzzy, vertical lines or if
the projected image is too wide or too narrow for the screen, try
turning
Auto Image
off then back on again. If the image is still
bad, try adjusting the tracking manually as described below.
Click the
1
Press the left or right mouse buttons repeatedly until the
2
Auto Image
button to turn Auto Image off.
fuzzy vertical bars are gone.
Horiz. Position
Follow these steps to manually adj ust the horizontal position.
Click the
1
Press the left mouse button to move the image right; press the
2
Auto Image
button to turn Auto Image off.
right mouse button to move the image le ft.
36
Positioning adjustments are saved when you power off the projector.
Vert. Position
Follow these steps to manually adj ust the vertical position.
Click the
1
Press the left mouse button to move the image down; press
2
Auto Image
button to turn Auto Image off.
the right mouse button to move the image up.
Positioning adjustments are saved when you power off the projector.
Page 40

Controls Menu Functions
FIGURE 31
Controls menu
Video Standard
When
is on, the projector attempts to pick the video stan-
Auto
dard (NTSC, NTSC 4.43, PAL, PAL-M, PAL-N, or SECAM) automatically based on the input signal it receives. (The video
standard options may vary depending on your region of the
world.) The input signals for SECAM, PAL-M, and PAL-N video
cannot be automatically detected, therefore they must be chosen
manually. If the projector is unable to detect the standard, the colors might not look right or the image might appear “torn.” If this
happens, manually select a standard by clicking the button and
cycling through the standards.
Standby TIme
This option lets you select how long the lamp stays on and the
blank screen is displayed when you enter standby mode before
the projector turns off. Select among 1, 5, 10, and 15 minutes by
clicking the button and cycling through the options.
NO TE: If you already know the
video standard used in your geographical area, it’s often best to
manually select it.
37
Page 41

Using the Projector
Language
You can display the on-screen menus in English, French, German,
and Spanish. The default is English.
•
Click the button for the language you want. The menus redraw
immediately.
Ceiling
•
Click either mouse button to turn the image upside down for
NO TE: To order the LP 700
Series Ceiling Mount, refer to
“Optional Accessories” on
page 52.
ceiling-mounted projection.
Rear Projection
When you select
Rear Proje c tion
so you can project from behind a translucent screen.
Default Source
Default Source toggles between Computer and Video. This determines which source the projector checks first for active video
during power-up. Click the button to toggle between the options.
Auto Source Select
This setting toggles between On and Off. When this feature is Off,
the projector defaults to the source selected in Default Source. To
display another source, you must manually select one by pressing the
computer
or
button on the keypad. When this fea-
video
ture is On, the projector automatically finds the active source,
checking the default source first. Click the button to toggle
between the options.
, the projector reverses the image
38
Page 42

MAINTENANCE & TROUBLESHOOTING
This section describes how to:
•
clean the lens
•
clean the fan intake filter
•
replace the projection lamp
•
replace the batteries in the remote control
•
use the Kensington lock feature
•
troubleshoot the projector
Cleaning the Lens
Follow these steps to clean the projection lens:
Apply a non-abrasive camera lens cleaner to a soft, dry cloth.
1
•
Avoid using an excessive amount of cleaner.
•
Abrasive cleaners, solvents or other harsh chemicals might
scratch the lens.
Lightly wipe the cleaning cloth over the lens.
2
If you don’t intend to use the projector immediately, replace
3
the lens cap.
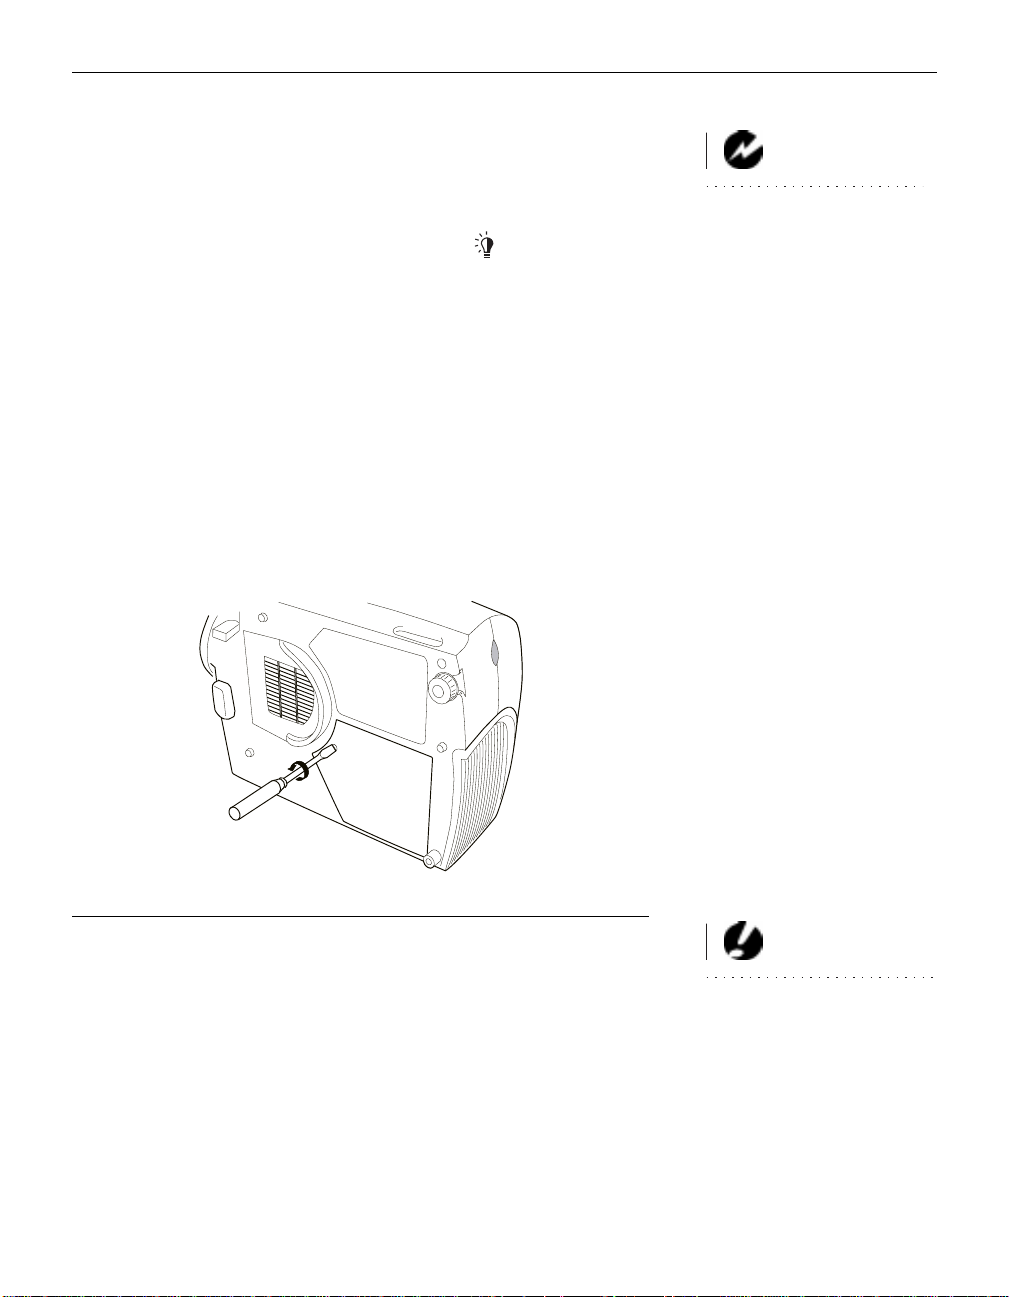
Cleaning the Fan Intake Filter
The fan intake filter on the bottom of the projector catches dust
and particles in the air. If the filter becomes clogged, the projector
does not cool properly and may malfunction. To prevent this,
clean the filter after every 100 hours of use.
Turn off the power and unplug the power cord.
1
Remove the filter door.
2
•
Carefully place a screwdriver against the indented part of
the filter door and lift out.
39
Page 43

Maintenance & Troubleshooting
FIGURE 32
Removing the filter door
Clean the filter.
3
40
•
Use a vacuum cleaner set on low power to remove the dust
and dirt.
FIGURE 33
Cleaning the air filter
Replace the filter.
4
•
First, insert the side with the tabs, then press the other end
in place.
Page 44
Replacing the Projection Lamp
The lamp hour counter on the status bar at the top of the menus
counts the number of hours the lamp has been in use. After 2000
hours of use, the lamp monitor LED, marked on the top of the
projector near the keypad, lights. After 2050 hours, the lamp
switches off completely and must be replaced. You can order new
lamp modules from your In Focus dealer. See “Accessories” on
page 51 for information.
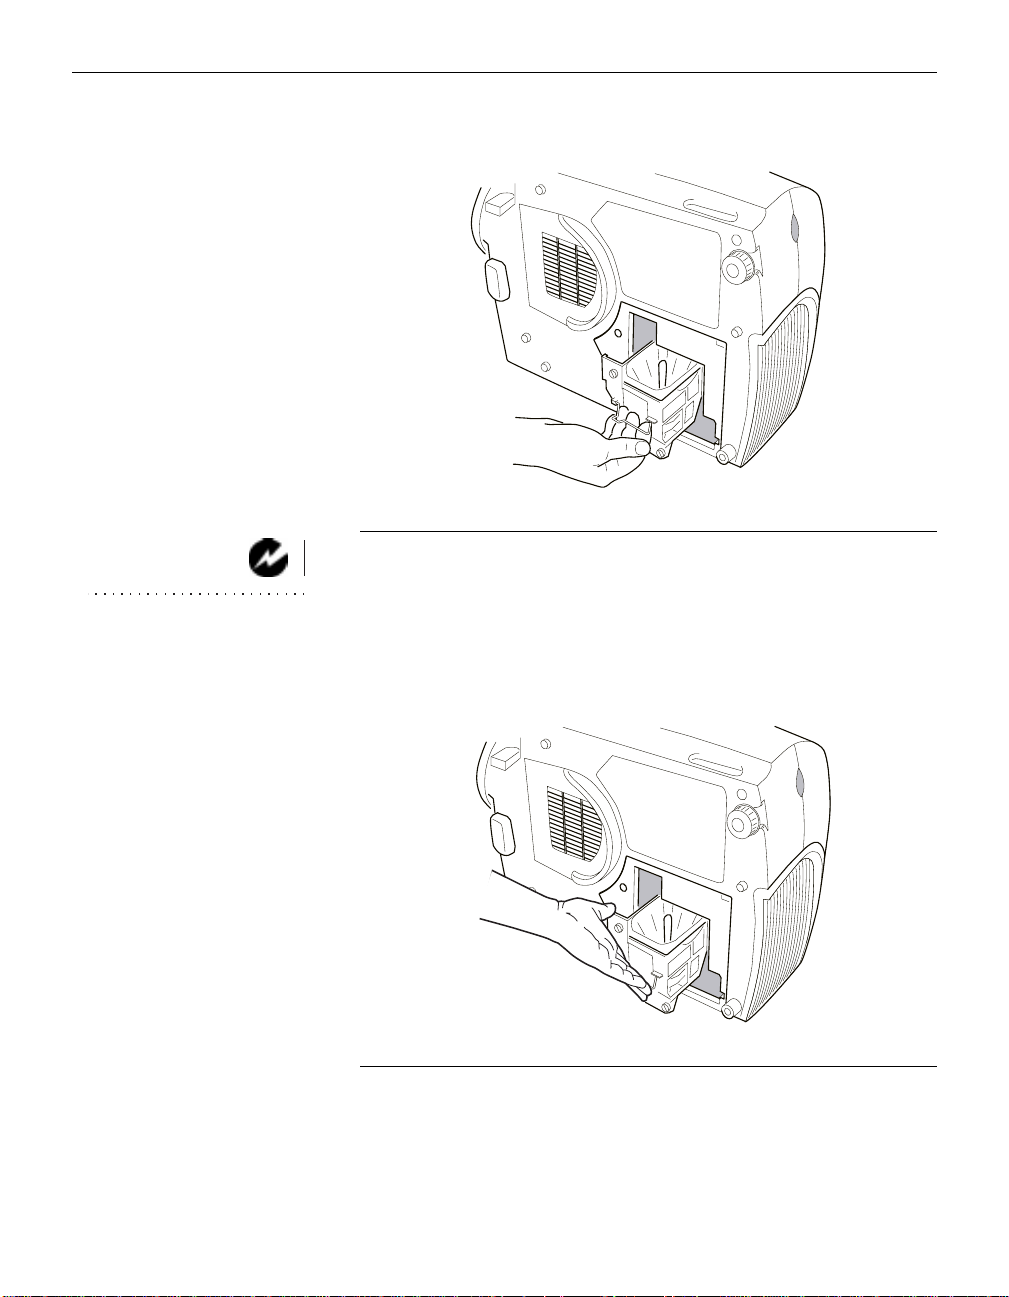
Follow these steps to replace the projection lamp:
Turn off the projector and unplug the power cord.
1
Wait 2 minutes to allow it to cool thoroughly.
2
Using a small, flat-blade screwdriver, remove the screw on the
3
outside of the lamp door (Figure 34).
Pull the lamp cover up and remove it.
4
WARNING: To avoid burns,
allow the projector to cool for at
least 2 minutes before you open
the lamp module door. Never
extract the lamp module while the
lamp is operating.
FIGURE 34
Removing the lamp module door
Loosen the two non-removable screws on the outside of the
5
module.
Remove the module (Figure 35).
6
CAUTION: Never operate the
projector with the lamp cover open
or removed. This disrupts the air
flow and causes the projector to
overheat.
41
Page 45
Maintenance & Troubleshooting
F
IGURE 35
Removing the lamp module
Align the new lamp module in the correct direction.
7
WARNIN G: Do not drop the
lamp module or touch the glass
bulb! The glass may shatter and
cause injury.
Gently push the module in as far as it goes (Figure 36).
8
Tighten the screws on the outside of the module.
9
42
FIGURE 36
Installing a new lamp module
Reposition the lamp cover.
10
Page 46

Replace the screw and tighten it.
11
Plug in the power cord and turn the projector back on. The
12
lamp monitor light and lamp hour counter in the Status bar on
the menus are automatically reset.
Replacing the Batteries in the Remote Control
The life of the batteries depends on how often and how long you
use the remote. Symptoms of low battery charge include erratic
responses when using the remote and a reduced range of operation.
Follow these steps to replace the batteries:
Turn the remote face down in your hand.
1
Slide the battery cover off the end of the remote by pressing
2
on it with the heel of your hand.
Remove the old batteries.
3
Install two new AAA alkaline batteries. Make sure you install
4
each in the correct direction.
Slide the battery cover back on the remote.
5
Using the Kensington Lock
The projector has a Kensington Security Standard connector for
use with a Kensington MicroSaver Security System (Figure 37).
Refer to the information that came with the Kensington System
for instructions on how to use it to secure the projector.
FIGURE 37
Installing the Kensington lock
43
Page 47

Maintenance & Troubleshooting
Troubleshooting
If you’re experiencing trouble with the projector, follow these
steps to make sure everything is properly connected before you
call Technical Support for assistance.
Check cable connections. Verify that all computer, CableWiz-
1
ard and power cables are properly connected.
Verify that all power is sw itched on.
2
Verify that the projector has not been switched off with the
3
standby
If the projector still doesn’t display an image, restart the com-
4
button on the keypad.
puter.
If the problem still exists, unplug the projector from the com-
5
NOTE: Macintosh computers
require a specific power-up
sequence: the projector must be
turned on before you turn on the
computer.
puter and check the computer monitor’s display. The maximum resolution that the 725 can display is 1024x768 pixels,
preferably 800x600; the maximum resolution that the 730 can
display is 1280x1024 pixels , preferabl y 1024x768 . The problem
might be with the graphics controller in your computer rather
than with the projector. When you reconnect the projector,
remember to turn the computer and monitor off before you
power up the projector. Power the equipment back up in this
order: projector, monitor, computer.
44
If you’re using a laptop computer and it is not displaying your
6
presentation, make sure you have activated the computer’s
external video output. Most laptop computers do not automatically turn on their external video port when a secondary
display device such as a projector is connected. Refer to
page 53 for more information.
If the problem still exists, read through the problems and solu-
7
tions in this chapter.
Page 48

Solutions to Common Problems
Problem: Nothing on projection screen
•
Make sure that the power cord is properly connected to a functional AC electrical outlet. Make sure that the power cord is
also properly connected to the projector.
•
If the projector is plugged into a power strip, make sure the
power strip is turned on.
•
Make sure you have removed the lens cap from the projection
lens at the front of the projector.
•
Make sure the projector is switched on.
•
Check the projector’s lamp to ensure that it is securely connected in the lamp module. See “Replacing the Projection
Lamp” on pa ge 41.
•
Make sure that the CableWizard and the cables do not have
any bent pins. Check the power cord for bent pins also.
Problem: Color or text not being projected
•
You might need to adjust the brightness up or down until the
text is visible. Refer to “Brightness” on page 27 for more information.
•
Verify that the appropriate input source is selected. See “Computer” on page 27 or “Video” on page 29.
Problem: The screen resolution is not right
•
Make sure the computer’s graphics card is set for a resolution
of no greater than 1024x768 for the 725, 1280x1024 for the 730.
Problem: Image isn’t centered on the screen
•
Reposition the image. Refer to “Horiz. Position” on page 36
and “Vert. Position” on page 36.
•
If you’re using an extension cable between the CableWizard
and the projector, make sure it’s In Focus-approved.
Problem: Only the start-up screen displays
•
Verify that the cables are connected correctly. Check to see that
the CableWizard computer cable is correctly connected to the
monitor connector on the computer (this is the connector
where your monitor cable usually goes.) See page 8 through
page 17 for connection procedures.
45
Page 49

Maintenance & Troubleshooting
•
Verify that the proper input source is connected. See “Computer” on page 27 or “Video” on page 29.
•
You might need to turn everything off and power up the equipment again. Make sure you power up in this order: projector,
computer monitor, computer. It is especially important that
you follow this sequence for Macintosh computers.
•
Make sure your computer’s graphics board is installed and
configured correctly.
If you’re using Windows 3.x:
In the Windows Program Manager, double-click the Win-
1
dows Setup icon in the Main program group.
Verify that the Display setting is 1024x768 or less for the
2
725, 1280x1024 or less for the 730.
If you’re using Windows 95:
Open “My Computer” icon, the Control Panel folder and
1
then the Display icon.
46
Click the Settings tab.
2
Verify that the Desktop area is set to 1024x768 or less for
3
the 725, 1280x1024 or less for the 730.
Also check the following:
•
Does your computer have a compatible graphics board? The
projector isn’t CGA or EGA compatible.
•
Is your computer’s graphics board turned on? This is especially true for laptop computers. See “Portable and Laptop
Activation Chart” on page 53.
Problem: Image is too wide or narrow for screen
•
You might need to manually adjust the tracking to reduce or
enlarge the projected image. Refer to “Manual Tracking” on
page 36.
•
Adjust the resolution of your monitor if it’s greater than
1024x768 pixels for the 725 or 1280x1024 for the 730. Only these
resolutions at 75 Hz or less will display on the projector.
Page 50

Problem: Image is out of focus
•
Turn the projection lens to focus the image.
•
Make sure the pr ojection scr een is at least 4 feet (1.2m) fr om the
projector.
•
Make sure the projector is turned off, then check the projection
lens to see if it needs cleaning.
Problem: Image and menus are reversed left to right
•
Rear projection mode is probably turned on. Switch back to forward projection from the Controls menu. The image should
immediately return to forward projection. See “Rear Projection” on page 38.
Problem: Image and menus are upside down
•
Ceiling mode is probably turned on. Turn off the mode from
the Controls menu. The image should immediately return to
forward projection. See “Ceiling” on page 38.
Problem: the projector displays vertical lines, “bleeding” or spots
•
Adjust the brightness. See “Brightness” on page 27.
•
Make sure the projector is turned off, then check the projection
lens to see if it needs cleaning.
Problem: no sound
•
Press the mute button.
•
Adjust volume.
•
Verify audio/input connections.
•
Adjust audio source.
Problem: Image is “noisy” or streaked
Try these steps in this order.
Deactivate the screen saver on your computer.
1
2
Turn
Auto Image
off and then back on again. See “Auto
Image” on page 35.
Adjust the synchronization and trac king manually to find an
3
optimal setting. See “Manual Sync” on page 36 and “Manual
47
Page 51

Maintenance & Troubleshooting
Tracking” on page 36.
•
If you’re using an extension cable between the CableWizard
and the projector, make sure it’s In Focus-approved.
•
The problem could be with your computer’s graphics board. If
possible, connect a different computer.
Problem: Projected colors don’t match the computer or video
player’s col ors
•
Adjust the brightness, tint and/or contrast from the Display
menu. Just as there are differences in the displays of different
monitors, there are often differences between the computer
image and the projected image. See “Brightness” on page 27,
“Tint” on page 31 and “Contrast” on page 31.
Problem: Lamp seems to be getting dimmer
•
The lamp begins to lose brightness when it has been in use for a
long time. Replace the lamp as described in “Replacing the Projection Lamp” on page 41.
Problem: Lamp shuts off
•
A minor power surge may cause the lamp to shut off. Turn the
projector off, wait at least 30 seconds, then turn it back on.
Problem: Remote not operating correctly
•
You might need to replace the batteries. See “Replacing the Batteries in the Remote Control” on page 43.
•
Make sure you’re pointing the remote either at the back or front
of the projector, or at the projection screen.
•
Make sure the remote is within its operating range of 40 feet.
Before calling your dealer or In Focus Technical Support for assistance, please have the following information available::
•
the projector’s serial number (located on the bottom label)
•
the resolution of your computer.
Call In Focus Technical Support at
1-800-799-9911.
Support is free
between 5 a.m. and 5 p.m. PST, Monday through Friday. Support
is available in North America after hours and on weekends for a
fee.
48
Page 52

APPENDIX
Specifications
The LP 725 and 730 must be operated and stored within the temperature and humidity ranges specified.
Tempe r atur e
Operating
Non-operating
Humidity
Operating and non-oper. 5% to 95% relative humidity, non-condensing
Dimensions
6.0 x 15.3 x 11.7 inches (15.3 x 38.8 x 2 9.8 cm)
Weight
12.2 lbs. (5.5 kg) unpacked
Altitude
Operating 0 to 10,000 feet (3048 meters)
Non-operating 0 to 40,000 feet (12,192 meters)
10 C to 40° C
-20 to 70
° C
Audio Output
Frequency Response 10 Hz - 20 KHz
Output Impedance 1.2 K ohm nominal
Output Voltage 2 Vrms maximum (open circuit)
Connector Type red and white RCA jacks
Optics
Focus Range 3.25 - 32.5 feet (1-10 m)
Lamp
Type 150-watt UHP
49
Page 53

Appendix
Remote Control
Battery Two (2) AAA alkaline cells
Input Power Requirements
100-120/220-2 40V, 5.0/3.0A, 50/60 Hz.
Video Audio Input
Input Impedance 5K ohm DC coupled
Maximum Input Voltage (LIN + RIN)
L
or RIN < 2.0 Vrms for THD ≤ 0.3%
IN
< 4.5 V for THD ≤ 0.3%
PEAK
Sensitivity 100 mV at 1 KHz for 88 dB SPL at 1 meter
Connector Type RCA jack
CableWizard Audio Input
Input Impedance 10K ohm nominal, AC coupled
Maximum Input Voltage (L
+ RIN)
IN
L
or RIN < 2.0 Vrms for THD ≤ 0.3%
IN
< 4.5 V for THD ≤ 0.3%
PEAK
Sensitivity 100 mV at 1 KHz for 88 dB SPL at 1 meter
Connector Type 3.5 mm (1/8 inch) stereo phone jack
50
Page 54

Accessories
Standard Accessories
(ship with the projector) Part Number
LP 725/730 Quick Start card 009-0342-xx
LP 725/730 User’s Guide 010-0151-xx
Shipping Box 110-0159- xx
CableWizard and Cables SP-CW2
CableWizard Audio Cable 210-0079-xx
CableWizard Computer Cable 210-0094-xx
CableWizard Mouse Cable 210-0078-xx
Projection Lamp Module SP-LAMP-LP7E
Lens Cap 505-0241-xx
Audio/Video Cable 210-0053-xx
Remote Control and 2 Batteries SP-EXREM
Online User’s Guide CD-ROM 010-0116-xx
Power Cords (one ships with projector, type depends on country)
North American Power Cord 210-0023-xx
Australian Power Cord 210-0027-xx
UK Power Cord 210-0028-xx
European Power Cord 210-0029-xx
Danish Power Cord 210-0030-xx
Swiss Power Cord 210-0031-xx
NO TE: Use only In Focusapproved accessories. Other products have not been tested with the
projector .
51
Page 55

Appendix
Optional Accessories
Easy Carry Case CA-C129
Soft Case CA-C122
European Hard Case CA-C130
Hard Travel Case CA-C123
Deluxe Travel Case CA-C128
ATA Shipping Case CA-C124
CableWizard Lite, 6.5 ft (2 m) SP-CW2LITE
Mac Adapter for CableWizard Lite 516-0003-xx
CableWizard Extension Cable, non-plenum
SP-CW2EXT
rated, 60.7 ft (18.5 m)
CableWizard Extension Cable, plenum-r ated,
SP-CW2EXTP
60.7 ft (18.5m)
Full-Feature Smart Remote Control HW-SMART
Remote Cable 210-0088-xx
LiteShow Pro Presentation Player HW-LSPRO
LiteShow Pro Soft Case CA-C131
32 MB Memory Upgrade HW-MEM-LSP
Kensington MicroSaver Security System SP-KEN LOC
SGI/SUN Workstation Cables SP-CABLE-WS
Rhapsody II Speakers SP-R2SPKR
JBL Subwoofer SP-JBLSUB
Portable Projector Stand SP-STND
S-Video Cable 515-0027-xx
LP 700 Series Ceiling Mount-LiteMount 7
SP-CEIL-LM7
LiteMount False Ceiling Plate SP-LTMT-PLT
LiteMount Pipe Tubing Extension SP-LTMT-EXT
CableWizard Wall Plate SP-CWWALL
nd
Year Advantage Service Plan
2
AS-LP7xx-12
(1 year extension)
rd
3
Year Advantage Service Plan
AS-LP7xx-24
(2 year extension)
52
Page 56

Portable and Laptop Activation Chart
Many laptop computers do not automatically turn on their external video port when a secondary display device such as a projector is connected. Activation commands for some laptop
computers are listed in the following table. (If your computer is
not listed or the given command does not work, refer to the computer’s documentation for the appropriate command.) On some
laptops, the activation function key is labeled with an icon, for
example or the text CRT/LCD.
K ey command to
Computer
Acer Ctrl-Alt-Esc (for setup) Ctrl-Alt-Esc (for setup)
AST* ** FN-D or Ctrl-D FN-D or Ctrl-D
Advanced Logic
Research
Altima Shift-Ctrl-Alt-C Shift-Ctrl-Alt-L
Ambra** FN-F12 FN-F12
Amrel* ** setup menu setup menu
Apple see Mac Portable and Mac PowerBook
Aspen automatic auto matic
BCC* automatic reboot computer
Bondwell LCD or CR T options after
Chaplet** setup screen setup screen
Commax Ctrl-Alt-#6 Ctrl-Alt-#5
activate port
Ctrl-FN-D Ctrl-FN-D
FN-F5 FN-F5
type from A:/IVGA/CRT type from A:/IVGA/CRT
FN-F12 FN-F12
Ctrl-Alt-V Ctrl-Alt-V
setup VGA/
Conf.Simulscan
FN-F5 FN-F5
F2/Choose Option/F5 F2/Choose Option/F5
Shift-Ctrl-D Shift-Ctrl-D
bootup
FN-F6 FN-F6
FN-F4 FN-F4
K ey command to
de-activate port
setup VGA/
Conf.Simulscan
reboot for LCD or CRT
options to appear
NO TE: Often, pressing the key
commands once activates the
external video port, pressing it
again activates both the external
and internal ports, and pressing it
a third time activates the internal
port. Refer to your computer’s documentation for details on your specific model.
53
Page 57

Appendix
K ey command to
Computer
Compaq* ** Ctrl-Alt-< Ctrl-Alt->
Compuadd* ** automatic automatic
Data General Ctrl-Alt-Command Ctrl-Alt-Command
Data General
Walkabout
Datavue Ctrl-Shift-M Ctrl-Shift-M
Dell** Ctrl-Alt-< Ctrl-Alt->
Digital* automatic reboot
Dolch dip switch to CRT dip switch to LCD
Epson dip switch to CRT dip switch to LCD
Everex* setup screen option setup screen option
For-A Ctrl-Alt-Shift-C Ctrl-Shift-Alt-L
Gateway FN-F1/FN-F1 again simul-
Grid* ** FN-F2, choose auto or
Hyundai setup screen option setup screen option
IBM 970* automatic warm reboot
activate port
FN-F4 FN-F4
automatic automatic
mode/? (for setup option) mode/? (for setup option)
Alt-F for screen setup
option
2 CRT/X at DOS prompt reboot
Ctrl-Alt-F10 Ctrl-Alt-F10
FN-F8 (CRT/LCD) FN-F8
FN-D FN-D
FN-F12 FN-F12
FN-F2 FN-F2
taneous
simultaneous
Ctrl-Alt-Tab Ctrl-Alt-Tab
K ey command to
de-activate port
Alt-F for screen setup
option
FN-F1
FN-F2
54
Page 58

K ey command to
Computer
IBM ThinkPad** reboot, enter setup menu FN-F2
Kaypro boot up, monitor plugged inunplug monitor
Kris Tech FN-F8 FN-F8
Mac Portable
100
Mac PowerBook
140, 145, 150,
170
160, 165, 180,
520, 540, 5300
210, 230, 250,
270, 280, 2300
Magitronic FN-F4 FN-F4
Mastersport FN-F2 FN-F1
Micro Express* automatic warm reboot
Microslate* automatic warm reboot
Mitsubishi SW2 On -O ff-Of f- Off SW2 Off-On-On-On
NCR setup screen option setup screen option
NEC* ** setup screen option setup screen option
Olivetti* automatic automatic
activate port
FN-F7, select choice from
setup menu
FN-F1, select choice
FN-F5, select choice
PS/2 SC select choice
(CRT, LCD, etc.)
no video port: not compatible
no video port: requires a 3rd-party interface
Control Panel folder,
Pow erBook Display
folder; Activate Video
Mirroring
requires Apple Docking Station or Mini Dock
CRT at the DOS prompt LCD at the DOS prompt
FN-F31 FN-F3
FN-O/* FN-O/*
FN- | | FN- | |
K ey command to
de-activate port
warm reboot
55
Page 59

Appendix
K ey command to
Computer
Packard Bell** FN-F2 FN-F2
Panasonic FN-F2 FN-F2
Samsung* setup screen option setup screen option
Sanyo setup screen option setup screen option
Sharp dip switch to CRT dip switch to LCD
Sun SPARC-
Dataview
Tandy** Ctrl-Alt-Insert Ctrl-Alt-Insert
Texas Instruments*
Top-Link* ** setup screen option setup screen option
Toshiba* ** Ctrl-Alt-End Ctrl-Alt-Home
Twinhead* FN-F7 FN-F7
WinBook Ctrl-Alt-F10 Ctrl-Alt-F10
Wyse software driven software driven
Zenith** FN-F10 FN-F10
activate port
Ctrl-Alt-< Ctrl-Alt->
Ctrl-Shift-M Ctrl-Shift-M
setup screen option setup screen option
setup screen option setup screen option
FN-F6 FN-F6
FN-End FN-Home
FN-F5 FN-F5
setup screen option setup screen option
FN-F5 FN-F5
Automatic Automatic
FN-F2 FN-F2
FN-F1 FN-F1
K ey command to
de-activate port
56
* These manufacturers have models that automatically send video
to the external CRT port when some type of display device is
attached.
** These manufacturers offer more than one key command depend-
ing on the computer model.
Page 60

Using Video Mirroring with a PowerBook Computer
When you turn video mirroring on (called SimulScan in newer
PowerBooks-see below), the projector displays the same information that appears on your PowerBook’s built-in screen. When
video mirroring is off, the projector acts like a separate display.
To turn on video mirroring for the first time:
Open the Monitors control panel; click on Monitor 2.
1
Set the number of colors you want.
2
Open the Control Strip; click on the monitor icon.
3
Select “Turn Video Mirroring On.”
4
Now you can turn video mirroring on and off from the Control
Strip without having to open the Monitors control panel again.
When using video mirroring and high color graphics such as
slide shows, the projected image occasionally might turn black
and white. If this happens, perform the following steps:
Turn off video mirroring.
1
Open the Monitors control panel.
2
Move the white menu bar to Monitor 2 to set the projector as
3
the primary monitor.
Restart the PowerBook.
4
Using SimulScan
Some newer PowerBooks display images on an external monitor
or projector differently than previous ones. When using
SimulScan, the projector displays the same information that
appears on your PowerBook
To select Sim ulScan:
Open the Control Panel, then double-click Monitors and
1
Sound.
In the Resolution list, choose the SimulScan mode, then click
2
OK.
If this changes your display settings, a dialog bo x appear s.
3
Click OK to confirm the change.
57
Page 61
Appendix
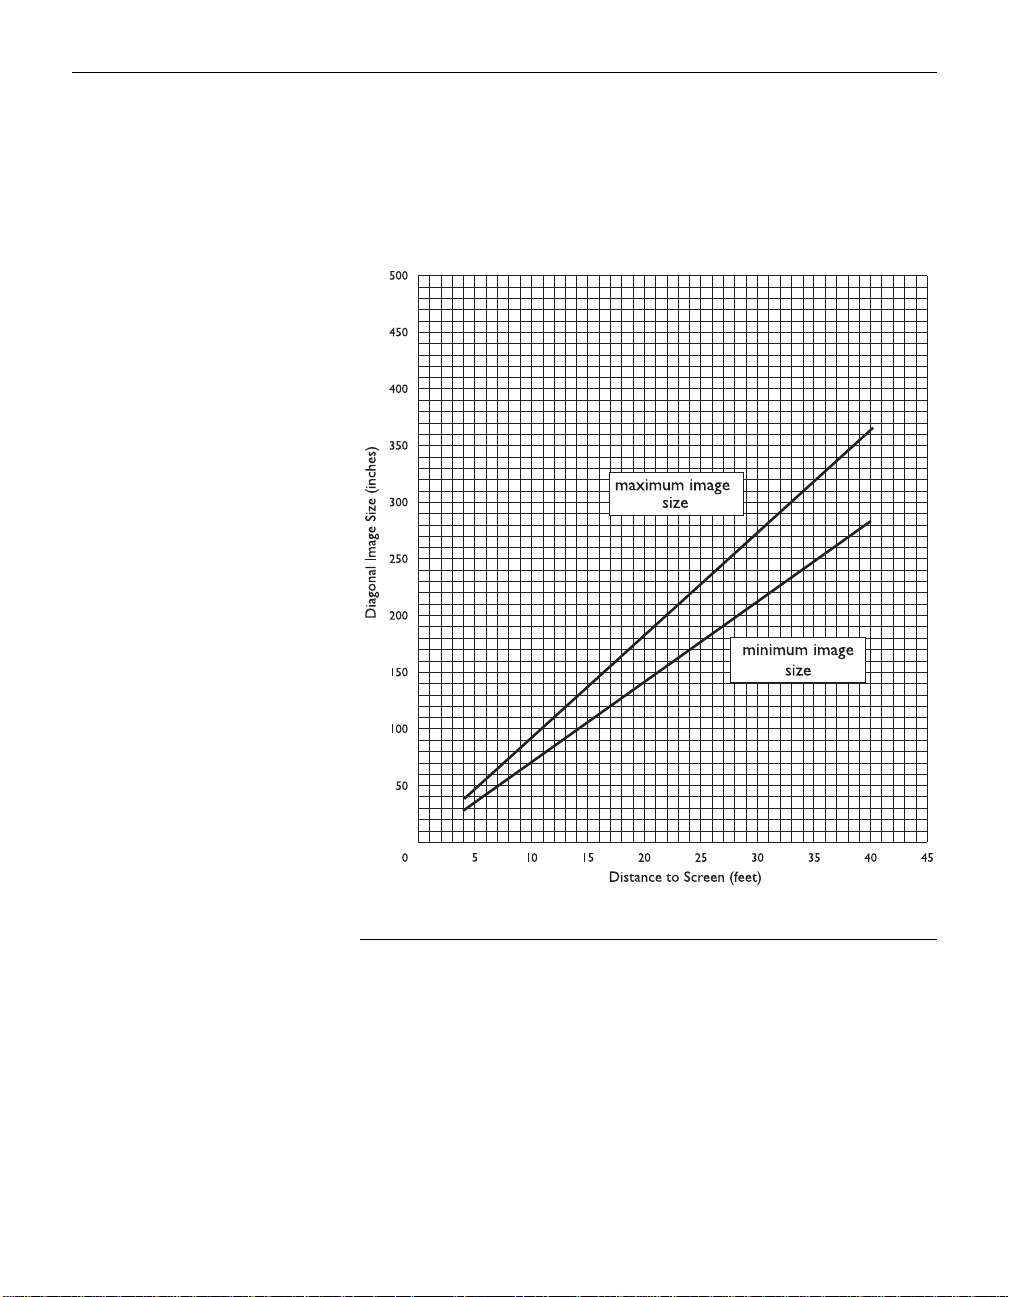
Projected Image Size
Use the chart below and the tables on the next page to help you
determine projected image sizes.
58
FIGURE 38
Projected image size
Page 62

Tabl e 1:
Image Size, W idt h and Height for Lens at Maximum
Image Size
Distance to
Screen (fee t)
4362922
10 91 73 55
15 137 110 82
20 182 146 109
25 228 182 137
30 274 219 164
35 319 255 191
40 365 292 219
Image Size, W idt h and He ight for Len s at
Distance to
Screen (fee t)
4 282217
10 71 57 43
15 106 85 64
20 142 114 85
25 177 142 106
30 212 170 127
35 248 198 149
40 283 226 170
Diagonal
(inches)
Minimum Image Size
Maximum
Diagonal
(inches)
Width
(inches)
Table 2:
Maximum
Width
(inches)
Height
(inches)
Maximum
Height
(inches)
59
Page 63

INDEX
A
accessories, ordering 51, 52
activation comm ands for laptop com-
puters 53
adjusting
balance 33
bass 34
brightness 27, 31
color 32
contrast 31
fade 34
Menu Position 32
tint 31
treble 34
volume 29, 33
adjusting the height of the projector 25
altitude limits 49
annotating 28
assistance. See Technical Support
Audio menu 33
Audio menu options
Balance 3 3
Bass 34
Fade 34
Treble 34
Volume 33
Auto Source Select 38
B
balance, adjusting 33
bass, adjusting 34
Blank Screen 32
Brightness buttons 27
brightness, adjusting 27, 31
buttons on k e y p ad
Brightness 27
Computer 27
Freeze 27
Help 27
Menu 28
Mute 28
Scribble 28
Standby 29
Video 29
Volume 29
C
cables
A/V 19, 51
CableWizard 3, 8–18, 51
CableWizard exten sion 52
composite video 19
extension 7, 52
ordering 51, 52
power iii, 51
remote contro l 52
S-video 19, 52
CableWizard
cables 3, 8–18, 51
connecting to equipment 10
connecting to the projector 8
extension cable 52
selecting connect or s 8
CableWizard L ite, ordering 52
cases, ordering 52
ceiling-moun ted p roj e ction 38, 52
cleaning the projection lens 39
color, adjusting 32
colors
don’t match monitor colors 48
not displayed 45
compatibility
IBM-compatible 2
Macintosh 2
composite video cable
connecting 19
ordering (A/V cable) 51
61
Page 64

Index
62
Computer button 27
computers, compatible 2
connecting
Apple PowerBook 15–16
external speakers 21
IBM-compatible desktop
computer 13–14
IBM-compatible laptop 11–12
Macintosh 17–18
power cord 21
video player 19–20
connector panel
audio out 10
contrast, adjusting 31
Controls menu 37
Controls menu options
Auto Source Select 38
Ceiling 38
Default Source 38
Language 37
Rear Projection 38
Video Standard 37
cords. See cables
D
Default Source 38
Display menu 31
Display menu optio n s
Blank Screen 32
Brightness 31
Color 32
Contrast 31
Menu Position 32
Reset All 32
Tint 31
displaying
on-screen help inform ation 27
on-screen menus 28
E
extension cable 7, 52
external speakers, connecting 21
F
f 23
fade, adjusting 34
filter, cleaning 39
Freeze button 27
freezing the display 27
fuzzy lines 23, 36
H
Help button 27
hot surfaces iv
I
IBM-compatible comp u ter s
compatibilit y 2
connecting 11–14
icons
on CableWizard 8–18
on projector labels i ii
on the projector 4, 10
image
adjusting 21, 23
centering 23, 36
colors don’t match comput er’s 48
focusing 25
fuzzy lines 23, 36
has lines or spots 47
not centered 45
not displayed 45
out of focus 47
quality 45–48
resolution 1
reversed 38, 47
size 7, 58
streaked 47
too dark or too light 27
too wide or too narrow 23, 46
Image menu 35
Image menu options
Auto Image 35
Auto Resize 35
Horiz. Position 36
Manual Sync 36
Manual Tracking 36
Vert. Position 36
intake filter, cleaning 39
Page 65

K
Kensington lock 43, 52
L
labels on projector iii
lamp
LED 41
ordering 51
overheating iv
replacing 41
safety iii–iv
turns off unexpectedly 48
lamp hour counter 30
language, selecting for menus 37
laptop computers
activation sequence to allow
secondary display 53
connecting IBM-compatible 11
connecting PowerBook 15
lens
cap 51
cleaning 39
safety iii
leveling the pro jector 25
LP 725/730
cases 52
ceiling mount e d 7, 38
hot surfaces iv
not working 44
project from behind the s cr een 3 8
setting up 7
specifications 49
turning off 22
turning on 21
ventilation and overheating iv
voiding the wa rranty iv
M
Macintosh computers
compatibilit y 2
connecting desktop models 17–
18
connecting PowerBooks 15–16
Menu 28
Menu button 28, 29
Menu Position 32
menus. See on-screen menus
monitor, projected colors don’t match
48
Mute button 28
N
NTSC video 37
O
on-screen menus
Audio menu 33
changing language of 37
Controls menu 37
Display menu 31
displaying 29
Image menu 35
making changes to menu
functions 30
removing from the screen 29
P
PAL video 31, 37
power cord
connecting 21
grounding iv
ordering 51
safety iii
power source, safety ii i
power strip 21
power switch 22
power up sequence 21, 46
PowerBook, conn e ct ing 15
project from behind the screen 38
63
Page 66

Index
R
rear projection 38
remote contro l
not working 48
ordering 51
replacing t h e batteries 43
specifications 50
using 23
repair. See Technical Support
replacing
projection lamp module 41
re-positioning the image on the screen
36
resetting adjustments 32
resolution 1
S
safety guidelines iii–iv
Scribble button 28
SECAM video 31, 37
security feature 43
service. See Technical Support
SimulScan, using with PowerBooks 57
speakers
external 21, 28, 52
internal 28
muting 28
specifications 49
Standby button 29
start-up screen 21, 45
S-video
connecting 19
ordering cable 52
T
Technical Support
in Europe 5
in Singapore 5
in USA 5
information to have on hand
before you call 48
things to try before you call 44
voiding the warra nty iv
temperature limits 49
text not visible 45
tint, adjusting 31
treble, adjusting 34
troubleshooting 44
turning off
projector 22
sound 28
turning on the projector 21
U
using the remote cont ro l 23
V
vertical lines displayed 36, 47
Video button 29
video mirroring on a PowerBook 15,
57
video standards 31, 37
volume
adjusting 29, 33
muting 28
Volume buttons 29
W
warranty iv, 5, 52
64
 Loading...