


Installation Guide
LP 425 Series
Ceiling Mount
Installation Guide
LP 425 Series
Installationhandbuch zur
Deckenbefestigung
English. . . . . . . . . . . . .1
Deutsch . . . . . . . . . .13

Copyright © 1998 by In Focus, Inc.
Wilsonville, Oregon. All right s reserv e d .
Copyright © 1998 by In Focus, Inc.
Wilsonville, Oregon, USA. Alle Rechte vorbehalten.
010-0186-00

CEILING MOUNT INSTALLATION GUIDE
The LP 425 LiteMount
TM
makes it easy to hang
your projector from the ceiling for fixed installation use in meeting, auditorium and training
room settings. A unique quick-release feature
allows you to take the projector down in seconds
to replace the lamp or move the projector to
another location.
You must determine the suitability of this product for your intended use and assume all risk
and liability in connection therewith. In Focus
recommends that a professional contractor or
other facilities professional assist you in mounting this device. Be sure to take precautions to
meet all local building codes.
Additional LiteMount Products
In Focus offers two additional LiteMount products that may make your ceiling mount installation easier.
WARNING: This installation must be performed in
compliance with your local
building code requirements. Local requirements take precedence
over any instructions given
in this guide.
•
The LiteMount False Ceiling Plate
SP-LTMT-PLT
(
) is designed for suspended ceilings wit h ac ou sti c t ile s. It moun ts in you r ce il ing in place of a ceiling tile. It is preassembled with threaded studs to install the
LiteMount brackets, and includes the necessary hardware to attach to the brackets.
•
The LiteMount Pipe Tubing Extension (
LTMT-EXT
) allows you to install the projector
in a room with a high ceiling. With the extension, you can place the projector from 24”
(61 cm) to 46” (117 cm) from the ceiling (12”
to 24” with cut).
Contact your In Focus dealer to order these
products.
SP-
1

Placing the Projector
Placing the Projector
Refer to the LP 425 Use r’s Guide for image distances and sizes to determine where to install the
ceiling mount to meet your projection needs.
Contents
The LP 425 Ceiling Mount package contains:
1 Installation Guide
NOTE: The maximum
load the ceiling mount can
support is 15 pounds.
2 ceiling mount base box
dimensions: 9.6” x 6.0” x 1.4”
(24.5 x 15.2 x 3.5 cm)
weight: 1.8 lbs (0.8 kg)
3 projector mounting bracket
dimensions: 10.2” x 9.9” x 1.5”
(25.9 x 25.2 x 3.8 cm)
weight: 2.6 lbs (1.2 kg)
4 hardware for installing the projector mount-
ing bracket on the projector:
•
two (2) 4x16 mm Phillips-head screws
•
two (2) 4 mm quick release sleeves
•
one (1) 4x8 mm knurled knob s crew
2
5 hardware for installing the projector (with
mounting plate) to the base box in the ceiling:
•
four (4) 6x12 mm knurled knob screws
•
two (2) 6 mm flat washers
•
two (2) 10 mm conical spacers

Install the Ceiling Mount Base Box on the
Ceiling
Instructions for installin g the ceiling mount on
the LiteMount False Ceiling Plate an d the LiteMount Pipe Tubing Extension are given in this
installation guide. If you ha ve not purchased
either of these products, consult a professional
contractor or other facilities professional to
ensure a safe installation.
WARNING: The ceiling
structure must be able to
support at least 5 times
the weight of the pr o jector
and mounting hardware. If
Please refer to the LiteMount False Ceiling Plate
and LiteMount Pipe Tubing Extension installation instructions for lists of included hardware.
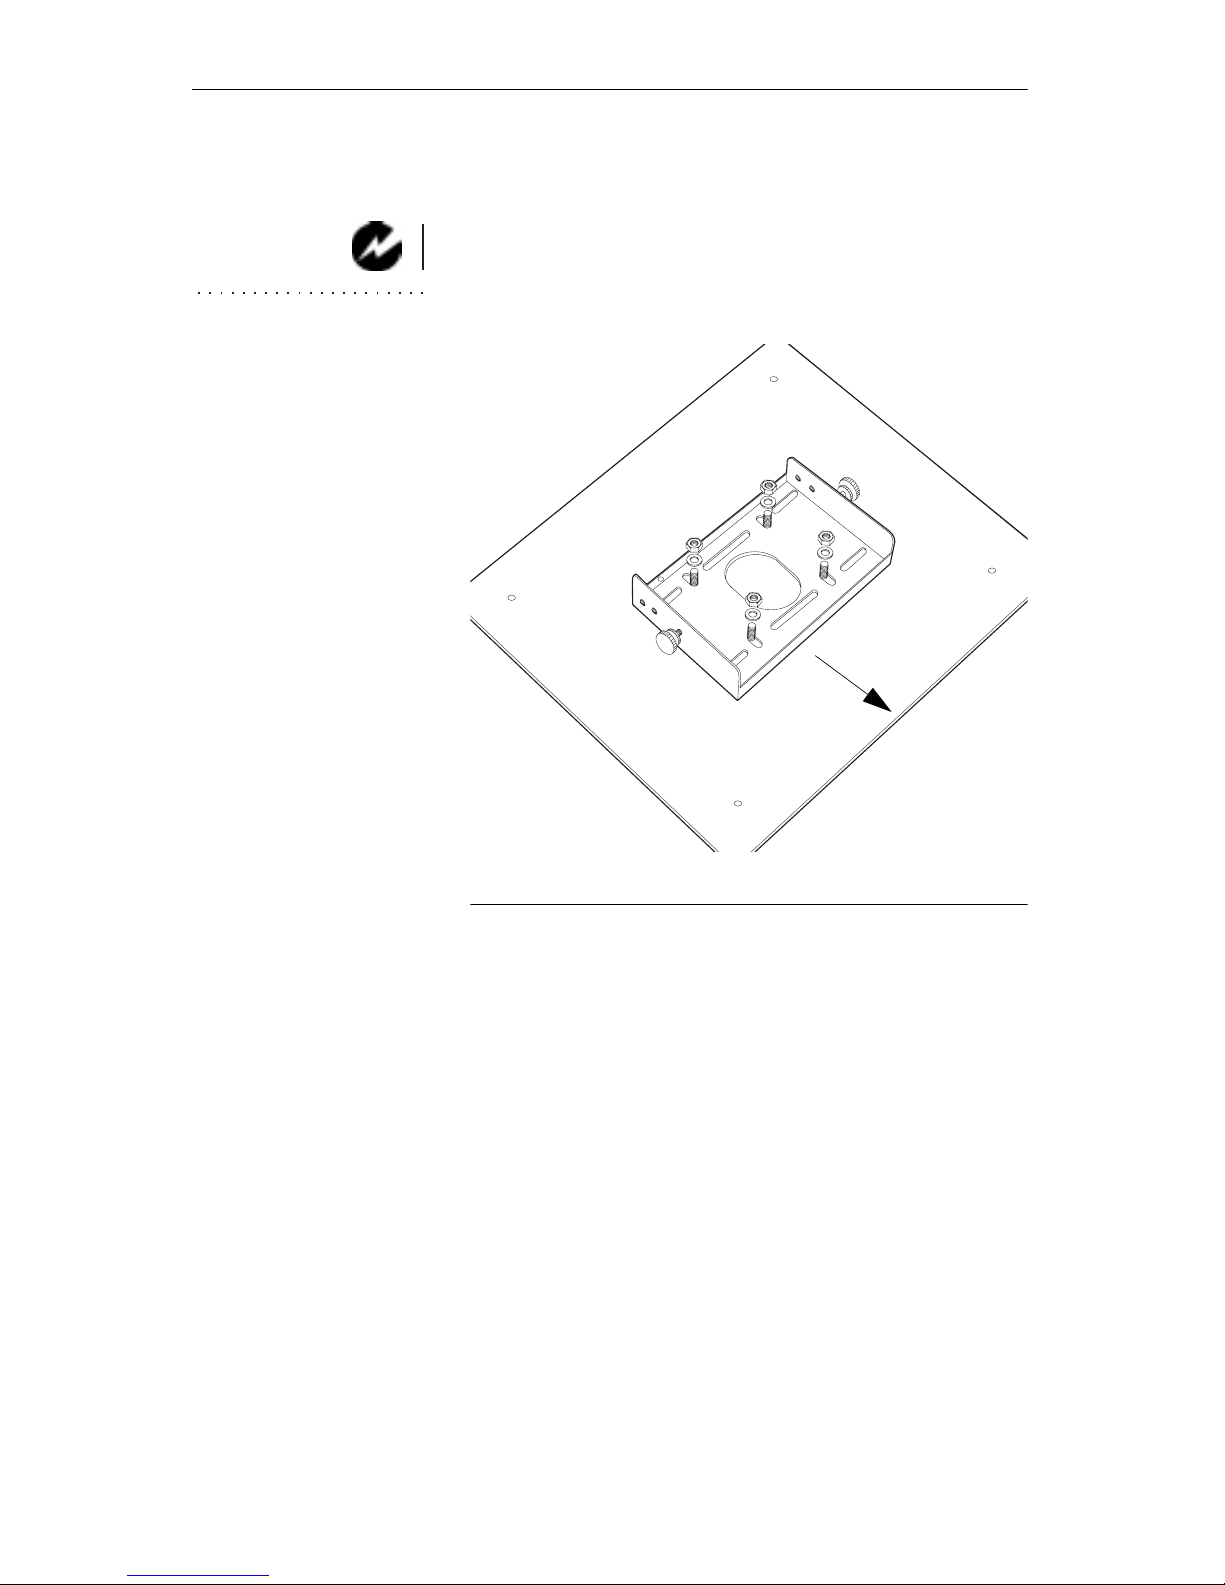
1 Center the ceiling mount base box on the ceil-
ing plate as shown in Figure 1. Make sure the
front of the base box faces forward toward
your projection screen. The front side of the
base box is the only surface without drilled
holes.
2a LiteMount False Ceiling Plate - Align the
holes in the base box with the threaded studs
on the plate. Install the 4 washers and nuts as
shown in Figure 1.
2b LiteMount Pipe Tubing Extension - Line up
the holes in the base box with the holes in the
plate at the end of the pipe extension. Install
the hardware as shown in Figure 2.
not, it must be reinforced
according to your local
building codes.
NO TE: Refer to the
Installation Instructions
that came with the Lite-
Mount False Ceiling Plate
and the LiteMount Pipe
Tubing Extension for
important additional information.
3
Install the Ceiling Mount Base Box on the Ceiling
3 Place the ceiling plate or pipe extension in the
ceiling so that the base box hangs down into
the room.
4 Route the projector’s cables through your
ceiling and out the hole in the ceilin g.
WARNING: If the
dropped ceiling is an air-
handling plenum, be sure
the cables are plenum-
rated, or install the cables
within conduit.
make sure this
surface faces front
F
IGURE
1
Install the base box to the LiteMount False Ceiling Plate
4
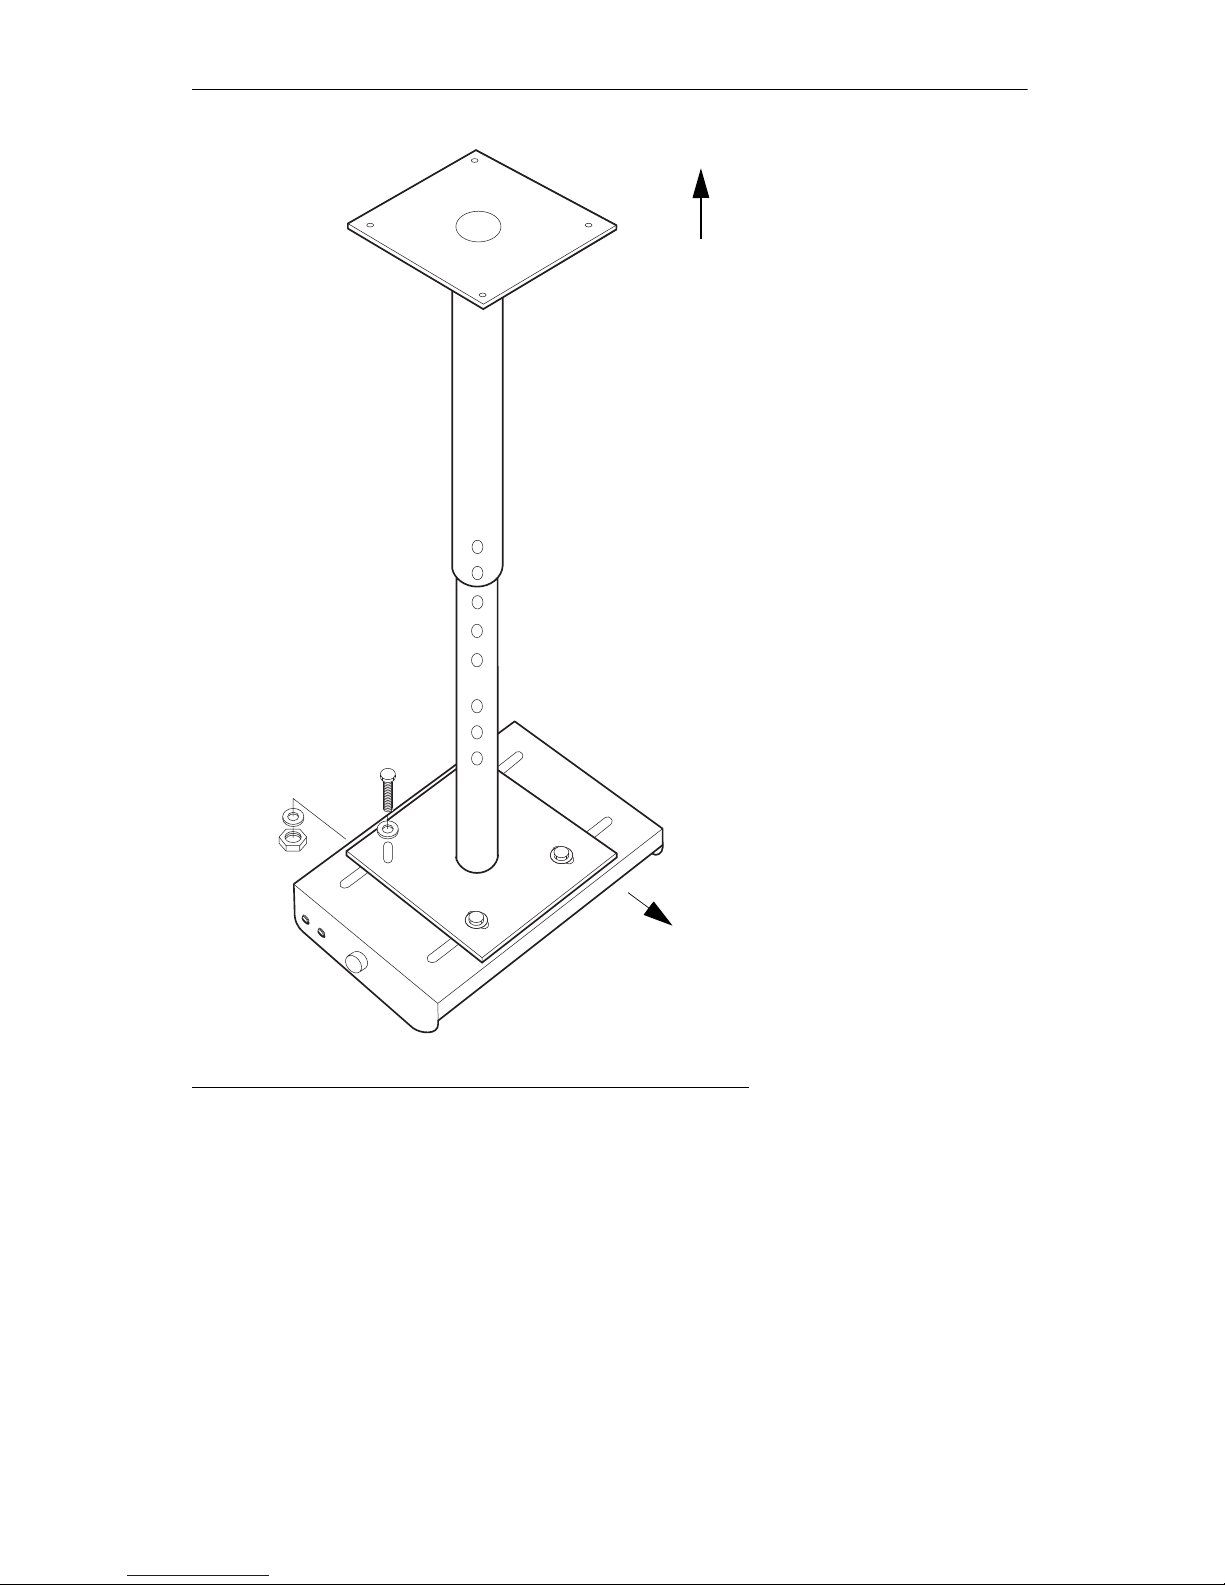
false ceiling plate
make sur e this
surface faces front
F
IGURE
2
Install the base box to the LiteMount Pipe Tubing Extension
5
Attach the Mounting Plate to the Projector
Attach the Mounting Plate to the Projector
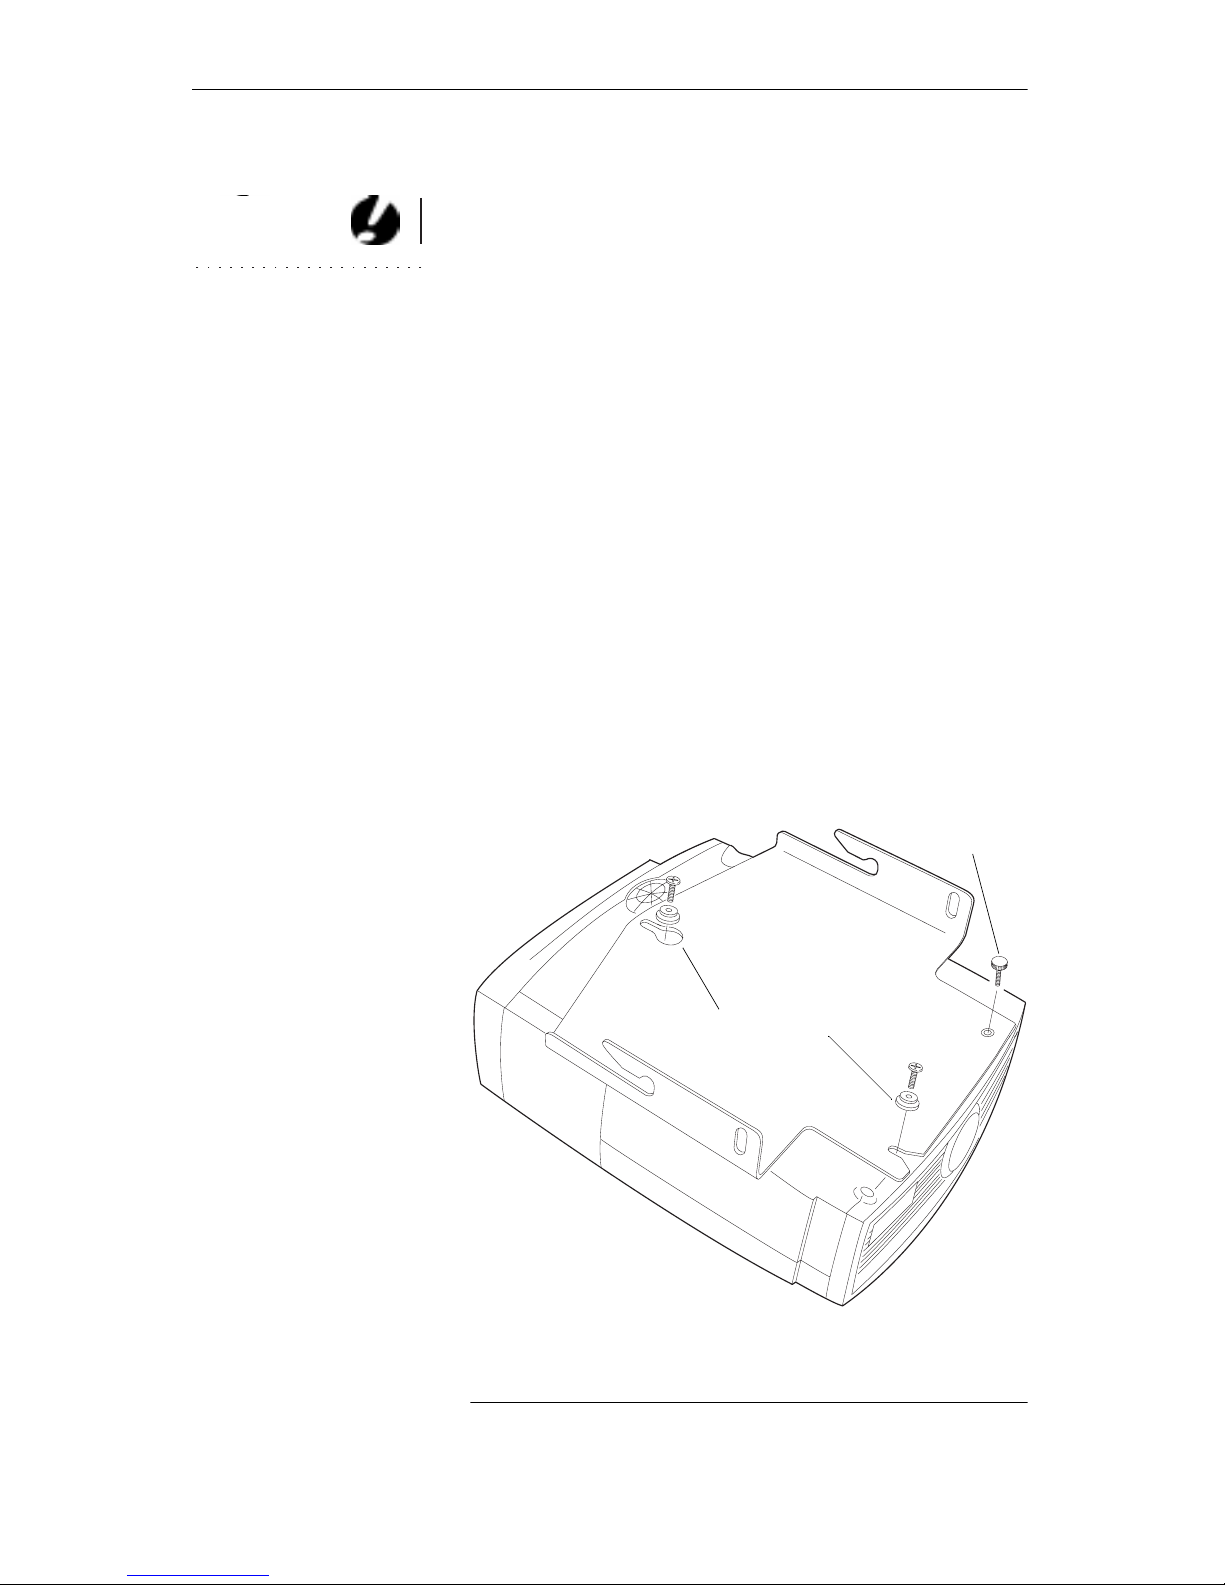
1 Set the projector on a table with the bottom
side up.
2 Insert the 2 screws into the 2 quick release
CAUTION: Use only the
sleeves.
hardware that is provided
with the LP 425 Ceiling
Mount. Using different
hardware may damage
your projector.
3 Loosely attach the screws and sleeves to the
holes in the projector as shown in Figure 3.
4 Align the keyholes in the mounting bracket
with the screws in the projector. Slide the
mounting bracket until the quick release
sleeves are at the top of the keyhole slot.
5 Attach the 8 mm knurled kno b to the projec-
tor in the location shown in Figure 3. Tighten
the two 8 mm screws and the 8 mm knurled
knob. Be careful not to over-tighten the
screws.
knurled knob
goes here
6
quick release sleeves
F
IGURE
Attach the mounting plate to the projector
3
 Loading...