

Page 1
User’s Guide
010-0643-01 *010-0643-00*
Page 2

Declaration of Conformity
Manufacturer: InFocus Corporation, 27500 SW Parkway Ave. Wilsonville, Oregon 97070 USA
European Office: Louis Armstrongweg 110, 1311 RL Almere, The Netherlands
We declare under our sole responsibility that the LiteShow wireless adapter conforms to the following directives and norms:
EMC Directive 89/336/EEC, Amended by 93/68/EEC
EMC: EN 55022
EN 55024
ETSI EN 300 328 V1.6.1:2004
EN 301 489-01 V1.5.1:2004
EN 301 489-03 V1.4.1:2002
EN 301 489-17 V1.2.1:2002
EN 61000-3-2
EN 61000-3-3
Low Voltage Directive 73/23/EEC, Amended by 93/68/EEC
Safety: EN 60950: 2000
The Agency/Regulatory Approval for the computer’s wireless adapter is solely the responsibility of the adapter manufacturer - not InFocus Corporation.
Trademarks
Apple, Macintosh, and PowerBook are trademarks or registered trademarks of Apple Computer, Inc. IBM and PS/2 are trademarks or registered trademarks of International Business Machines, Inc. Microsoft, PowerPoint,
and Windows are trademarks or registered trademarks of Microsoft Corporation. InFocus, LiteShow, ASK, and LP are trademarks or registered trademarks of InFocus Corporation.
User’s Guide Travel Restrictions
You must keep this User’s Guide with your LiteShow II adapter at all times when traveling in countries other than the United States of America.
FCC Warning
Note: This equipment has been tested and found to comply with the limits for a Class B digital device, pursuant to part 15 of the FCC Rules. These limits are designed to provide reasonable protection against harmful
interference in a residential installation. This equipment generates, uses and can radiate radio frequency energy and, if not installed and used in accordance with the instructions, may cause harmful interference to radio
communications. However, there is no guarantee that interference will not occur in a particular installation. If this equipment does cause harmful interference to radio or television reception, which can be determined by
turning the equipment off and on, the user is encouraged to try to correct the interference by one or more of the following measures:
--Reorient or relocate the receiving antenna.
--Increase the separation between the equipment and receiver.
--Connect the equipment into an outlet on a circuit different from that to which the receiver is connected.
--Consult the dealer or an experienced radio/TV technician for help.
CAUTION: The Part 15 radio device operates on a non-interference basis with other devices operating at its frequency. Any changes or modification to said product not expressly approved could void the user's authority to operate this device.
FCC CAUTION: Any changes or modifications not expressly approved by the party responsible for compliance could void the user's authority to operate this equipment. This device complies with Part 15 of the FCC
Rules. Operation is subject to the following two conditions: (1) This device may not cause harmful interference, and (2) this device must accept any interference received, including interference that may cause undesired
operation.The antenna(s) used for this transmitter must not be co-located or operating in conjunction with any other antenna or transmitter.
1
Page 3

IMPORTANT NOTE: FCC Radiation Exposure Statement:
This equipment complies with FCC radiation exposure limits set forth for an uncontrolled environment. This equipment should be installed and operated with a minimum distance of 2.5cm between the equipment and
your body. Proper operation of this radio according to the instructions found in this user's guide will result in user exposure that is substantially below the FCC recommended limits.
• Do not touch or move antenna while the unit is transmitting or receiving.
• Do not hold any component containing the radio such that the antenna is very close or touching any exposed parts of the body, especially the face or eyes, while transmitting.
• Do not operate a portable transmitter near unshielded blasting caps or in an explosive environment unless it is a type especially qualified for such use.
• Do not operate the radio or attempt to transmit data unless the antenna is connected: if not, the radio may be damaged.
Canada
This Class B digital apparatus complies with Canadian ICES-003.
Cet appareil numérique de la classe B est conforme à la norme NMB-003 du Canada.
This device complies with Class B Limits of Industry Canada. Operation is subject to the following conditions:
1 This device may not cause harmful interference, and
2 This device must accept any interference received, including interference that may cause undesired operation.
The device is certified to the requirements of RSS-139-1 and RSS-210 for 2.4-GHz spread spectrum devices. The use of this device in a system operating either partially or completely outdoors may require the user to
obtain a license for the system according to the Canadian regulations. For further information, contact your local Industry Canada office.
Agency Approvals
NOM, CE, FCC
Other specific Country Approvals may apply, see please product certification label.
WAR NI NG : This device is approved for indoor use only.
The unit is to be used only with the proper power supply, P/N:PSC11R-050.
WAR NI NG : DO not remove the plug and plug into the wall outlet by itself, always attach the plug to the power supply first before inserting the plug into the wall.
2
Page 4

Introduction 4
Included items 4
Key Features 4
Requirements 5
Connecting the LiteShow II Adapter 6
Required connections 6
Optional connections 7
Installing LiteShow II Manager Software on your Computer 8
Connecting to the Main network/Internet 8
Running LiteShow II Manager Software 9
Display modes 12
Options 13
Advanced settings 15
Password Setup 16
Adapter Options 16
Access Code 17
Auxiliary computer input priority 17
Private IP Address 17
Firmware Update 18
Restart Adapter 18
Factory Reset 19
Network Types 20
Wireless Security for Peer-to-Peer 21
Access Point + specific Advanced settings 22
Adapter connection to main network 22
Wireless Network and Security 23
IP Address 23
802.1x 24
Enterprise specific Advanced settings 25
Troubleshooting and Maintenance 27
Reset the LiteShow II adapter 27
Adapter Mounting Template 34
Mounting Instructions 34
Table of Contents
3
Page 5

Introduction
Congratulations. You have chosen to step into the future of wireless projection by using the InFocus LiteShow II cable-free digital projection system. The system consists of
the LiteShow II wireless adapter and the LiteShow Manager software. It is a powerful and secure wireless projection system which allows you to send sharp images from a
computer to any VGA compatible projector or display device. It is easy to set up and configure.
Included items
• LiteShow wireless adapter
•Power adapter
• Power cord
• VGA cable
• Audio cable
• Documentation and CD
Be sure to register your LiteShow II online at www.infocus.com/register to receive product updates, announcements, and registration incentives.
Key Fe atures
Easy to use setup software
VGA connections
Mirrors content of primary and extended monitor/desktop
Wireless and Ethernet connectivity device can act as an access point and simultaneously connects to the Internet
Project wired or wireless through your existing network using Enterprise mode.
Guest mode allows visitors the ability to project without compromising your internal network.
802.11b/g Wireless LAN compatibility
WEP 64 bit, WPA-personal, WPA2, and WPA2-Personal (PSK) with AES encryption security features
Upgrade software via the Internet
Supports video playback
Supports audio playback
4
Page 6

Requirements
Display device compatibility: Analog VESA, 640x480, 720x480, 720x576, 800x600, 1024x768, 1280x720, 24 and 32 bits per pixel, 60 and 75Hz refresh rates
Hardware
The minimum hardware requirements are:
CPU: Pentium 4 or M > 1.5GHz (Dual-Core Processor is recommended)
Memory: 512 MB
Available disk space: 10 MB
Software
The minimum software requirements are:
Operating System:
Windows XP Home/Professional Edition SP2
Windows Vista (1 GByte RAM recommended)
Wireless Utility software: Microsoft Wireless Zero Configuration (WZC)
Media Player: WinDVD, Media Player Classic or PowerDVD. Refer to "Recommended Media Players" for more information.
Wireless Protocols: 802.11b or 802.11g (802.11g is required for full-motion video)
5
Page 7

Connecting the LiteShow II Adapter
Required connections
Connect the included VGA cable from the VGA OUT port on the LiteShow II adapter to the VGA in port on your projector. Connect the AC Power adapter to a power
outlet, then connect it to the Power In connector on the adapter. The LED on the front of the adapter lights steady red while the adapter is booting up and steady green
when the adapter is initialized and ready. (The LED blinks green when the adapter is in use and it blinks red in the event of an error.)
5V 2A
V G A O UT AU X V G A I N AU D IO O U T
LAN
If you plan to mount the adapter adjacent to the projector, drill 2 holes 8 cm apart. A mounting template is included on page 34 to help you locate the holes.
Turn on your projector. The LiteShow Startup screen appears on your display. Note that this screen can change based on the adapter’s network type. Additional information, like adapter host name and adapter IP address may appear. See pages 20-26 for detail on network type and related settings.
this is the default adapter name, you can
customize it, see page 15
6
Page 8

Optional connections
If you want to be able to access the main network through the LiteShow II adapter, either connect an Ethernet cable from the LAN port on the LiteShow II adapter to the
main network, or connect the adapter to the main network wirelessly. See page 8 for details. If you are using Enterprise mode, you must connect the adapter to the main
network with an Ethernet cable.
Enterprise Network Configuration
Wireless
Wired
Projection network data
Other network data
Optional
Guest
Optional
Main Network
Peer-to-Peer Network Configuration
or
Wireless
Wired
Projection network data
Other network data
Access Point + Network Configuration
or
Main Network
Wireless
Wired
Projection network data
Other network data
Main Network
Auxiliary video
If your projector is already installed and connected to a wired VGA cable, you can continue using that cable when you aren't using the LiteShow II adapter. Disconnect that
cable from the projector, and connect it to the AUX VGA IN connector on the adapter instead. In this configuration, auxiliary video will be displayed unless the adapter is
in use.
Sound
To hear sound played from the adapter, connect the included audio cable from the AUDIO OUT port on the LiteShow II adapter to your projector. You can control sound
output using Adapter options, see page 17.
7
Page 9

Installing LiteShow II Manager Software on your Computer
You can install this application from the included LiteShow Manager CD or download it from the LiteShow II adapter or from our website. It is easier to install it directly
from the CD.
1 Insert the LiteShow II CD into your computer.
The install screen appears. Follow the instructions on the screen to install the necessary software and drivers on your computer. A reboot may be required at the completion of the installation.
Installer creates the following items:
InFocus > LiteShow II folder in Start > Programs with LiteShow II User's Guide, LiteShow Help, LiteShow Manager, and Uninstall LiteShow Manager.
It can also install a LiteShow II Manager desktop shortcut.
You only need to download and install once. After you have installed the software, to start projecting, double-click the LiteShow II Manager shortcut on your computer or
choose LiteShow Manager from the Start/All Programs/InFocus/LiteShow Manager.
To install from the adapter, follow the instructions on the Liteshow splash screen.
Connecting to the Main network/Internet
If you want to be able to access your main network/internet while also using the LiteShow II adapter, you must do one of the following:
1 If your computer has both a wireless and a wired connection, connect to the main network using the wired connection, and use the wireless connection to project to
the adapter.
2 If your computer has only one wireless network connection, you can configure the LiteShow II adapter to act as a wireless access point. In this mode, your computer
reaches the main network/internet through the wireless connection to the adapter. See page 20.
8
Page 10

Running LiteShow II Manager Software
On your computer, either choose LiteShow II Manager from the InFocus menu or double-click the LiteShow II Manager shortcut on your desktop. Adjust the angle of the
antenna on the back of the adapter to maximize the wireless signal strength.
The Main window appears.
NOTE: Many functions can be accessed either by clicking the appropriate button or by pressing the corresponding Alt-key equivalent. These are indicated in the software
by underline initial letters. For example, to start projecting, either click that button or press the Alt+S keys.
signal strength is gray bars when no wireless
network is connected, green bars when connected.
adjust the antenna angle on the back of the adapter to
to maximize wireless signal strength.
If you see "Not connected", you must connect to a projector or display device. Click Connect to Projector...
This window allows you to select which projector you want to use to display your desktop. The name of the projector at your location will be shown in the adapter's
splash screen under "adapter name". Select the desired one and click Connect.
If you experience problems wirelessly connecting to the LiteShow II adapter, or you experience dropped connections while projecting, you may be able to resolve (or
greatly improve) these problems by trying the following steps:
1. Search your computer manufacturer's support website for the latest driver software for your computer's wireless network adapter. This is the best option as it
increases the likelihood that the driver has been tested with your model of computer. If this option does not result in a suitable driver, then go to step 2.
2. Search for the driver on the wireless network adapter manufacturer's website. This may produce the most recent version of the driver, but this configuration may not have been tested with your specific model of computer.
3. Some antivirus products may close the wireless connection if they detect a virus pattern. The projection data sent by LiteShow may trigger a 'false positive' in this
case, even though no virus is present. Typically checking the Event Viewer in Windows can help to identify this issue.
For up-to-date support on this issue, visit http://www.infocus.com/support/liteshowII or check the Read Me file included with your LiteShow II software. For other assistance with issues, see the Troubleshooting section starting on page 27.
9
Page 11
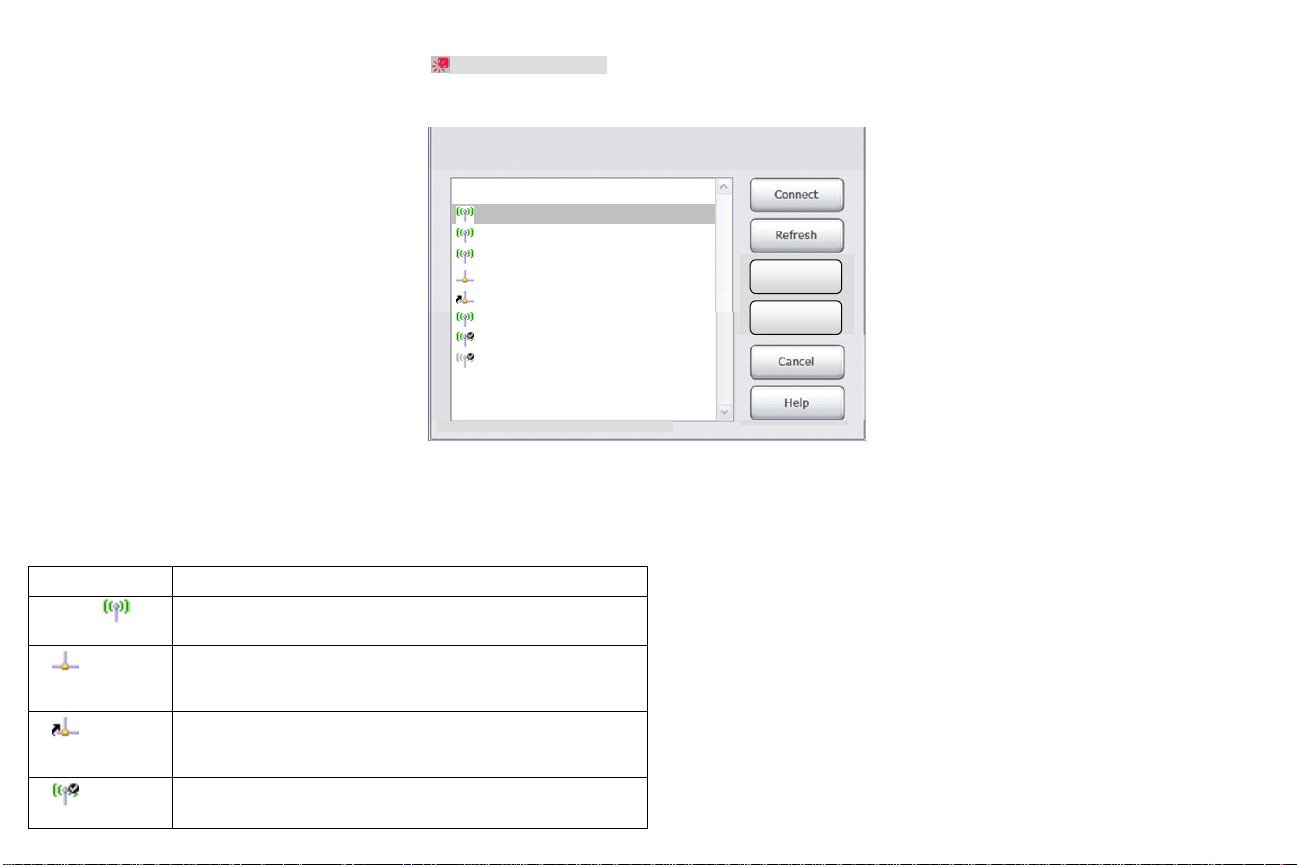
Connect to Projector
Select the projector, then click Connect:
Other projector not listed here
<xxx>
<xxx>
<xxx>
<xxx>
<xxx>
<xxx>
<xxx>
<xxx>
Set Default
Clear Default
If you have connected to a projector in the past, you can click the Start Projecting button to immediately start displaying your desktop to the projector. To make meetings
more collaborative, you do not have to exit the entire application to hand over access to the projector to another user, you can simply click Stop Projecting. Toggling this
button starts and stops projection of your desktop. Use Connect to Projector only if you want to change projectors.
Icons
Icon Meaning
Auto-detected wireless adapters. Text is full SSID.
Auto-detected wired adapters. Text is hostname or IP
address.
User-created shortcut to wired adapters. Text is hostname
entered on Other Projector dialog box. To delete, select it
and press Delete key.
A checkmark indicates the default projector.
10
Page 12

Connect to Other Projector
This dialog box allows you to connect to other projectors not listed in the Connect to Projector dialog. You can access this directly by holding down the Alt key while
clicking Connect to Projector. Host name shortcuts saved here appear in the Connect to Projector dialog. The 3rd radio button option will only be visible if your computer’s built in Wifi wasn’t detected.
11
Page 13

Display modes
You can select among three different display modes: Presenting/General Use (non-video, the default setting), Windowed Video, and Full Screen Video (this option will only
be active when a video is detected that can be displayed in full screen). You can also select Custom settings by selecting a resolution (640x480, 800x600, 1024x768,
1280x720, or 1280x800) and by specifying your Desktop appearance (Duplicated or Extended). The Color Depth (24 bit or 32 bit) is set automatically by the software and
cannot be changed. You can also choose Blank Screen to hide your desktop and show a blank screen instead. This allows you to keep using the screens on your computer
without projecting them. Choose Un-Blank Screen to resume projecting your data.
Custom: Projection resolution
Projection resolutions of 640x480, 800x600, 1024x768, 1280x720, and 1280x800 are supported
• 640x480 is typically used to display video while in Extended Mode (default extended mode resolution). This resolution provides the best Frame per Second performance and ensures a smooth video for computers with minimum CPU capability.
• 800x600 provides better video quality for computers with high performance CPUs (e.g., dual core systems)
• 1024x768 screen resolution is best used when displaying graphics such as Power Point or other presentation material that contains text and detailed graphics. Video
performance will suffer in this resolution due to the CPU and 802.11g wireless bandwidth limitations. Use "Extended Mode" and a lower resolution to improve video
quality.
• 1280x720 and 1280x800 have been added for those projectors that can project this widescreen aspect ratio.
Custom: Extended vs Duplicated Mode
Extended Mode is a feature in a computer that allows you to extend viewing capabilities by using two or more monitors at the same time. To connect more than one monitor to a computer, you must have a computer with more than one monitor port. LiteShow Manager “installs” a virtual monitor port to enable extended mode. Extended
mode allows you to display a single document or application across multiple monitors, or use each monitor to display a different document or application than is displayed
on your primary monitor. It also allows the monitors to have independent resolutions, color depth, and refresh rates. Extended mode is useful for presentations where the
user wishes to display one screen to the audience while reading notes from another (hidden) screen. It is also used to view spreadsheets across several monitors so that all
columns or rows can be seen without scrolling, in graphic and Web design to edit an HTML page on one monitor while viewing the rendered Web page on another, and in
gaming.
12
Page 14

While operating in Extended Mode, the LiteShow application captures the extended (virtual) monitor. This functionality permits the user to view MPEG and DivX files or
streaming Internet content via a media player (e.g., PowerDVD, WinDVD, etc.) on the extended desktop while continuing to use their primary desktop for other applications.
Duplicated Mode means that the screen capture is occurring from the normal desktop, or primary monitor.
NOTE: Not all versions of Windows support extended mode. Windows Vista does not support extended mode.
Options
There are 2 tabs in Options. Screen Resize allows you to control how LiteShow II manager adjusts the image if the projection resolution is lower than the computer’s resolution. You can choose to resize, to not resize, or to be asked the next time you start to project.
13
Page 15

The Performance tab controls how often the projected image is updated when the display mode is Presenting/General Use (this setting does not affect the speed of Video
Playback display modes). Higher speeds use more of your computer’s processing power, which may slow it down. For best results, choose the highest speed that doesn’t
impact the performance of Windows or other programs. This can be changed while you are projecting to immediately adjust the update rate.
14
Page 16

Advanced settings
Advanced settings are for adapters, are per-adapter, and are only accessible when you are connected to an adapter. The advanced settings button is disabled if you aren't
connected to an adapter. You can select password settings, network and security types, and access codes. You can set a password up to restrict access to advanced settings. You can also set an access code to ensure users project to the intended device. The bottom part of this window changes if you select Access Point +, see page 22 for
those options, and if you select Enterprise mode, see page page 25.
this is the default adapter name, you can customize
the name by adding text in the box, but the prefix IFSand the suffix remain the same.
15
Page 17

Password Setup
Click Settings Password to create or change the password, up to 32 characters. This password prevents unauthorized users from accessing Advanced settings. Users will
be prompted for the password when they click the Advanced Settings button on the Main window. The password is adapter-specific, so if you want to protect multiple
adapters, you must connect to each one individually and set the password.
Adapter Options
16
Page 18

Turn the following 3 options on by checking their checkboxes.
Access Code
This causes the adapter to display a 4-digit code on the projection screen that must be entered by the user before the desktop is displayed. Use this to prevent users from
using projectors that are not at their location (users must be in the same location as the projector to see the access code).
Local Audio
This sends sound to the computer's speakers instead of the adapter. Select this if the adapter's AUDIO OUT connector is not used.
Auxiliary computer input priority
By default, the adapter stops showing auxiliary video when a user begins to wirelessly project to the adapter. Select this to instead have the adapter always display auxiliary
video when it's available; in this mode, if you want to project to the adapter, the computer connected to auxiliary video first needs to be turned off or disconnected from
the auxiliary connector.
Private IP Address
This allows you to change the adapter’s wireless IP address. Only do this if the default conflicts with another device on your network.
17
Page 19

Firmware Update
Click to open a dialog box to access the InFocus website to download the latest firmware versions (you must be connected to the Internet). The current firmware version
appears in the lower-right corner of the Splash screen.
You may need to update the LiteShow Manager software before updating the firmware.
Restart Adapter
This disconnects you from the adapter.
18
Page 20

Factory Reset
Click this button to return all settings to factory default. You can also do this by holding down the adapter’s Reset button for 5 seconds.
Device name/SSID
The default name appears. You can modify this to help identify which projector the adapter is connected to by typing text in the box, but the prefix IFS- and the existing
suffix must remain.
Channel
If there is interference on your network, you can select a different channel. Remember that all wireless devices must be on the same channel in order to communicate.
19
Page 21

Network Types
There are three different network types, Peer-to-Peer (default), Access Point +, and Enterprise. All allow you to specify security settings when using wireless connections.
Pee r-to-Peer
This is the simplest mode. In this mode, one computer projects to the LiteShow II adapter at a time using a direct wireless connection. If you click Stop Projecting, another
computer can connect to that adapter. While the adapter is in use, the computer's wireless connection cannot be used to access the main network/Internet.
However, if you have an additional network connection on your computer (e.g. a wired connection, or a second wireless connection), then while you are projecting, you
can use the second network connection to access network features like email or Internet.
Enterprise Network Configuration
Wireless
Wired
Projection network data
Other network data
Optional
Guest
Optional
Main Network
Peer-to-Peer Network Configuration
or
Wireless
Wired
Projection network data
Other network data
Access Point + Network Configuration
or
Main Network
Wireless
Wired
Projection network data
Other network data
Main Network
Access Point +
In this mode, you can make the adapter act like a wireless access point by connecting it to your existing network either via a wired ethernet connection, or wirelessly. This
allows network users to use the adapter as a regular wireless access point, which means they can access the network and Internet, and use the adapter for projecting, at
the same time (but only one computer can project at a time). The adapter can connect to the Main network either wirelessly or wired. If it connects wirelessly, you can
specify security settings.
Enterprise
In this mode, you can connect the LiteShow adapter to the main network via an Ethernet cable as a trusted device, inside of the network. Then, registered users of the
main network can access corporate assets like the Internet or shared drives while they are projecting wirelessly. Any computer on the main network can project. The
security of the main network applies to the LiteShow adapter.
20
Page 22

Wireless Security for Peer-to-Peer
You can choose to encrypt your data using an open WEP key (64 or 128 bit) or a WPA-personal with TKIP encryption. The valid keys length/type are as follows:
WEP 64 - 5 letters/digits or 10 hexadecimal
WEP 128 - 13 letters/digits or 26 hexadecimal
WPA - Personal and WPA2-Personal (PSK) - 8-63 ASCII characters
Enter the key, then click OK. You must click “Save to Adapter and Close” in the next dialog box to save these settings.
21
Page 23

Access Point + specific Advanced settings
Adapter connection to main network
Choose Wired or Wireless. If Wireless, the Wireless Network & Security button becomes active.
22
Page 24

Wireless Network and Security
You can specify the type of security your network uses, and the adapter will use the same settings.
Enter the SSID and channel of your main network, or click Detect to show all detected networks on all channels. Select the Security type from among WEP 64 bit, WEP
128 bit, WPA-personal with TKIP encryption, and WPA2-Personal (PSK) then fill in the appropriate Key.
NOTE: The security level increases as you move down the pulldown list. The security type selected here must match the security type of the existing Main network.
IP Address
By default, IP addresses are assigned automatically. If you want to specify one, click IP Address and provide the applicable information.
23
Page 25

802.1x
This feature allows your LiteShow adapter to integrate into a secure wired corporate network. Contact your IT department if this feature is needed. If your network
requires 802.1x authentication, enter your information here.
24
Page 26

Enterprise specific Advanced settings
The Guest feature of Enterprise mode allows guests (people not registered on the main network) to project wirelessly to the LiteShow adapter without being granted
access to the main network.
25
Page 27

Guests
By default, Allow guests is checked, meaning guests are allowed. To prevent guests from projecting, uncheck this box.
Select what type of security applies to guests, if any.
26
Page 28

Troubleshooting and Maintenance
Reset the LiteShow II adapter
Soft Reset
A soft reset reboots the system with all user settings saved. Press the reset button for about one second. The LED turns off for two seconds, then the system reboots.
Hard Reset
A hard reset reboots the system with all factory default settings restored. Press the reset button for five seconds or more. The LED turns off for two seconds, then the
system reboots. This will remove all password protection you may have applied previously.
Category Issue Solution
Power LiteShow II has no power
LiteShow II Power LED is not lit
Connecting The LiteShow II device I want to con-
nect to is not showing up in my LiteShow Manager
Connecting “Connect to Projector” option is not
available while using Windows XP
Verify the power supply connector is plugged into LiteShow II and a working AC power outlet.
Perform a hard reset.
Try a new LiteShow II power cord.
Verify that the projector and the LiteShow II device are both turned on, and that the LiteShow II splash
screen is displaying.
Verify the wireless network strength on the LiteShow Manager software. Adjust the antenna angle on
the back of the adapter, if needed, to maximize the wireless network strength.
Installation requires Administrator privileges. The "Connect to Projector" option will not work without Administrator privileges. Manually select the Wireless Network through the operating system
after LiteShow Manager starts.
27
Page 29

Category Issue Solution
LED LiteShow II Power LED is solid red
LiteShow II Power LED is blinking red
Performance The computer is running slowly while
projecting
Performance My computer is running Vista In order for LiteShow Manager to take full advantage of your wireless adapter on Windows Vista, it is
Image The projector is not displaying the
LiteShow II default screen
Wait one minute. The device may simply be warming up.
Peer-to-Peer: If it still displays solid red after 2 minutes, perform a hard reset.
If it still displays solid red after a reset and 2 minutes have passed, the LiteShow II device will need to be
replaced.
Access Point: Contact your IT Department before performing a hard reset. (A reset will cause all setup information to be discarded.)
The LiteShow II device has encountered an error.
Peer-to-Peer: Perform a soft reset, then a hard reset if necessary. If the resets do not resolve the problem, the device will need to be replaced.
Access Point: Contact your IT Department before performing a hard reset. (A hard reset will cause all
set-up information to be discarded.)
Slow down the graphics/video update rate, which will free up more processing power for other tasks.
Choose Options… from the end of the Display Mode menu, click the Performance tab, then pick a
lower speed.
necessary to install the Microsoft Visual C++ 2005 Redistributable Package (vcredist_x86.exe). Under
normal circumstances this file will be installed automatically when performing a CD install. If you need
this file, it can be found on the LiteShow II CD or the InFocus Support site: www.infocus.com/support/
liteshowII
You can also download this file from Microsoft at:
http://www.microsoft.com/downloads/details.aspx?familyid=32bc1bee-a3f9-4c13-9c99-220b62a191ee
Verify the projector is turned on and displaying an image.
Verify the LiteShow II device has power (the Power LED should be green).
Verify the projector is set to the correct computer source input.
Verify proper HD15 connection between the projector and the LiteShow II device.
Try a different HD15 cable and/or check for bent/broken pins.
28
Page 30

Category Issue Solution
Image The projector is not displaying the
computer's image
Image The computer's image is split across
the computer monitor and the projected image
Image The computer image and the pro-
jected image are duplicated rather
than split
Image The projected image is not complete
and pans when I move my mouse
Verify the LiteShow Manager software has been installed and is displaying on the computer.
Click "Start Projecting" or "Connect to Projector" to select a different LiteShow II device. (The LiteShow Manager should display the same adapter name as the LiteShow II device.)
Verify that another user is not displaying through the desired LiteShow II device. Only one computer
can display at a time.
Verify the wireless network strength on the LiteShow Manager software. Adjust the antenna angle on
the back of the adapter, if needed to maximize the wireless network strength. Also make certain the
computer and LiteShow II device are within 100' (30.46m) of each other for the best possible communication.
Verify the computer meets or exceed basic LiteShow II requirements (See below.)
Verify the computer is plugged into AC power, rather than just batteries.
Peer-to-Peer:Try using a different channel (LiteShow Manager: Advanced Settings menu). (his will help
if the device is experiencing wireless interference.
Access Point: Check to see how many people are currently using the LiteShow II device as an access
point. The signal may become too weak to display the computer image through the projector because
of excess users.
In the LiteShow Manager, click the "Display Mode" button and choose "Custom" and then "Duplicated".
In the LiteShow Manager, click the "Display Mode" button and choose "Custom" and then "Extended".
This happens if the computer resolution is higher than the LiteShow II resolution in "Duplicated"
mode. Drop the computer resolution down to no higher than 1024 x 768.
Image Extended mode not available Extended mode may not be supported on all versions of Windows.
29
Page 31

Category Issue Solution
Image No full screen video on Vista The option "Best for Full Screen Video Playback" requires extended mode. Since extended mode is not
supported on Windows Vista, this option will not be available. However, it is possible to experience
full screen video on Windows Vista by doing the following:
1. In your computer's Display control panel, select 640x480 resolution. It may be necessary to choose
"Advanced" and "List All Modes..." to select 640x480.
2. Select "Best for Windowed Video Playback" in LiteShow Manager.
3. Start your DVD or video player software and switch it to full screen mode.
4. Do not move the mouse or use the keyboard for at least 3 seconds and the system will switch to
video half-line mode for a better video experience.
Image The LiteShow II image keeps freezing
The LiteShow II image is suffering from
extremely slow/poor performance
Image I have trouble connecting or my con-
nection drops while projecting
Image My video performance is jerky Change the resolution of the video down (LiteShow Manager: Display Mode>Custom>640 x 480).
Image My video window got smaller This is normal behavior. In order to obtain the smoothest video playback, the LiteShow Manager auto-
Video I cannot display full-motion video Verify that your wireless card is an 802.11G card.
Verify the computer meets or exceed basic LiteShow II requirements.
Slow down the graphics/video update rate, which will free up more processing power for other tasks.
Choose Options… from the end of the Display Mode menu, click the Performance tab, then pick a
lower speed.
1. Update the driver software of your wireless network adapter to the newest version available from
your computer manufacturer's website (although your current driver may be working fine for web and
email, correct handling of projection data is more demanding and more sensitive to driver issues).
2. If a newer driver isn't available from your computer manufacturer, check the wireless network
adapter manufacturer's website instead (but this driver may not have been tested with your specific
computer and software configuration).
3. It's also possible that your antivirus software is monitoring your network traffic and breaking the
wireless connection when it incorrectly identifies projection data as virus data. If you believe this is the
problem, you can try updating your antivirus software and/or changing its settings.
For up-to-date support on this issue, visit http://www.infocus.com/support/liteshowII or check the
Read Me file included with your LiteShow II software
matically adjusts video down to 800 x 600 resolution.
30
Page 32

Category Issue Solution
Video I can't get to full screen video mode Full Screen Video Playback" mode (800 x 600 resolution or less) is only available with select media
players (WinDVD 6 or Media Player Classic) and only when running the media player in Extended
mode. (From the Windows Task Bar, right click on the Media Player icon and select the "Move to Display" option.) For non-compatible video modes, "Full Screen Video" mode will be grayed out.
Audio I want to hear audio through my pro-
jector
Audio LiteShow audio driver used for other
devices
Audio I am hearing an echo/squealing The computer microphone is on. If audio is not desired at all, unplug the audio cable from the Lite-
Peer-to-Peer: Plug a 3.5mm mini-din audio cable into the projector's Audio In port and into the LiteShow II AUDIO OUT port. Note: Disable the computer microphone in order to avoid feedback.
Access Point: Plug an audio cable from the computer audio out port into the projector's audio in port.
Wireless audio is not available when using the LiteShow II as an access point.
LiteShow Manager installs an audio driver in your system that enables it to stream audio to the LiteShow II Adapter. This driver (PC2TV Audio) is enabled when projecting, and disabled when you stop
projecting. If a media player is started while the LiteShow Audio is activated, the media player will continue to use the LiteShow Audio driver even after exiting LiteShow. Simply exit and restart the media
player to allow it to use your default audio player.
In a few rare cases, LiteShow Manager might not change the audio driver to the desired setting. If this
happens, the audio device can be changed manually by doing the following:
1. In Control Panel open "Sound and Audio Devices".
2. Change "Sound Playback" and "Sound Recording" devices to the desired device.
* On Windows Vista, you may see the Audio Properties window flash open quickly and close. This is
normal behavior.
Show II device and the projector, or go into the LiteShow Manager and choose "Local Audio" from the
Device/Adapter Options. If audio is desired without the microphone, disable the computer microphone (XP: Control Panel>Sounds & Audio Devices Properties menu).
31
Page 33

Category Issue Solution
Internet/Email I can't access my local network any-
more for email or for the internet,
after I have disconnected from the
LiteShow Manager
Internet/Email I have the LiteShow Manager open, but
can't project my local network (email,
Internet etc.) using the LiteShow II and
my computer
Error Messages An error message keeps appearing say-
ing that I must upgrade my wireless
driver
Password The Advanced Properties window
requires a password
Password I can't set my password up Up to 21 alphanumeric characters can be used, including underscores, dashes, and blank spaces.
Password I forgot my password Perform a hard reset.
Peer-to-Peer: If you have disconnected from LiteShow II and are no longer presenting from your computer to the projector, close the LiteShow Manager.
If the LiteShow Manager closed unexpectedly and you are unable to access your email/internet, restart the LiteShow Manager and close normally. This should cause your Wireless Zero Configuration
setting to be turned back on automatically.
Otherwise, the Wireless Zero Configuration setting may need to be manually turned back on (XP:
Control Panel>Administration Services>Tools>Wireless Zero Services "enable").
Access Point: Check with your IT administrator to verify proper set-up of LiteShow II as an AP.
Peer-to-Peer: Activate a second wireless card on your computer or plug a standard network cable
from your computer into the closest network RJ45 connector.
Access Point: If you cannot access the network, contact your IT administrator to verify proper set-up
of LiteShow II as an access point.
If the network is accessible but cannot be displayed, refer to "The projector is not displaying the computer's image" scenario above.
The LiteShow Manager has determined that your embedded computer or 3rd-party wireless card does
not meet the LiteShow II requirements. Although you may obtain an image on the LiteShow device,
unexpected results or undesirable quality may result. If you cannot upgrade your wireless card on the
manufacturer's website, it is recommended you try a different wireless card or connect your computer
to the projector using a computer cable.
Your IT administrator has set a password up for this LiteShow II device. Check with your IT administrator for assistance. Note: The password is adapter specific.
Access Point: Contact your IT administrator for assistance.
Software I don't have the LiteShow Manager
software installed
There are three options to install the LiteShow Manager software:
1)Use the CD-ROM which came with the LiteShow II device.
2)If you have internet access, go to: www.infocus.com/support/LiteShowII
3)If the LiteShow II device is turned on, open Internet Explorer (or other browser utility) and type:
http://10.0.0.1, then click "Download Software".
32
Page 34

Category Issue Solution
Firmware I'm trying to upgrade my firmware, but
it is not working
Macintosh
Compatibility
Connection Host name feature not working; can’t
Connection Networked LiteShow adapters do not
Security WPA-2 not working on Windows XP This support is not natively installed on XP or part of automatic updates. An update needs to be
I can’t project my Macintosh
through LiteShow II
connect via host name
appear on “connect to projector” list
Perform a soft reset of the device and restart your computer. If the problem persists, perform a hard
reset. If the resets do not resolve the problem, contact Service.
At this time, the Macintosh Operating System is not supported.
Enterprise mode-specific troubleshooting
The DHCP server needs to be configured to deliver the WINS server IP address.
UDP packets may be blocked by the switch or router. If this feature can’t be enabled, use the “Connect
to Other Projector” dialog to connect to the adapter.
downloaded from Microsoft.
33
Page 35
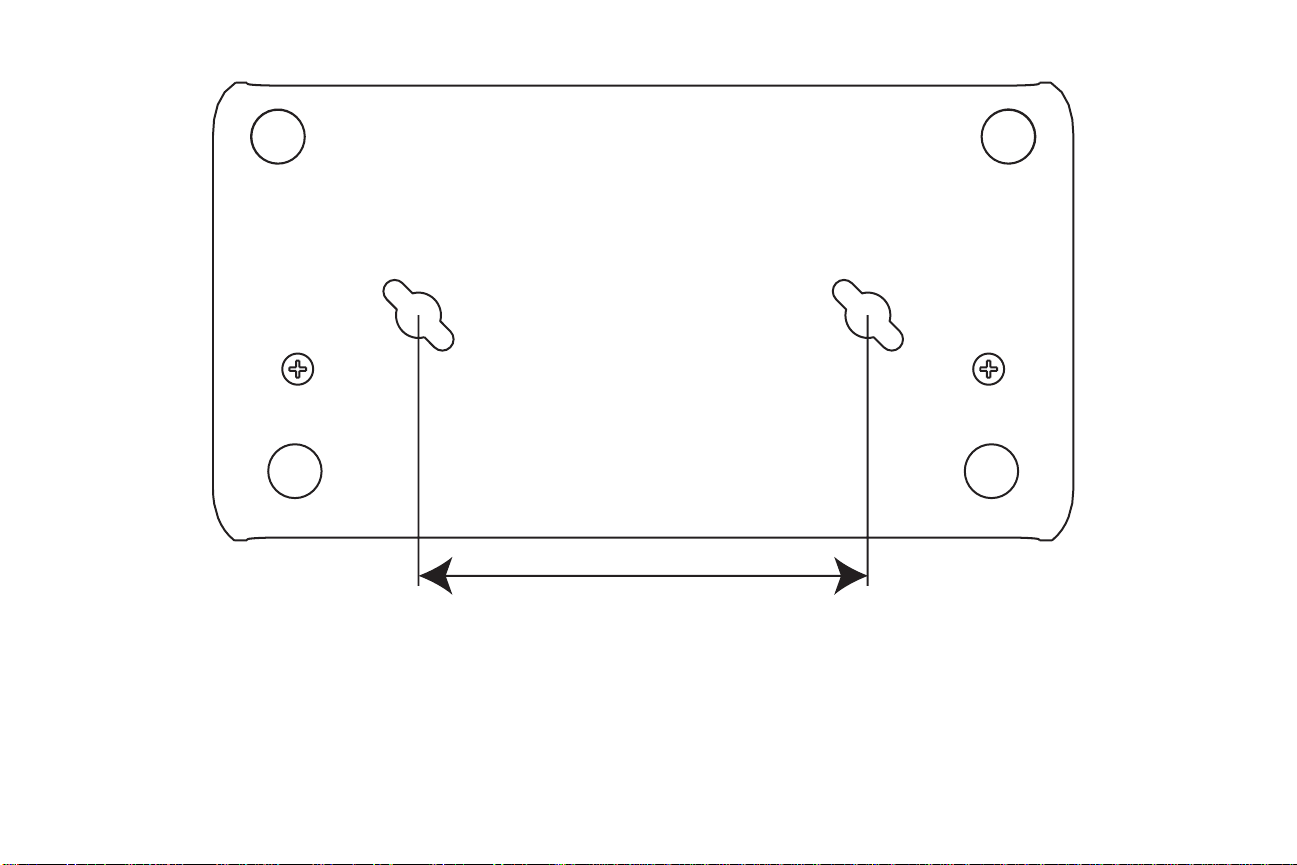
Adapter Mounting Template
If you want to mount the adapter, you can cut this template out to help you locate the holes to drill.
8 cm
Mounting Instructions
1. Drill two 5.5mm (7/32”) holes per the template.
2. Insert the two provided plastic mounts into the holes.
3. Install the two provided mounting screws into the plastic mounts. Do not screw these in tight. Leave a 1-2mm (.04-.08”) space between the screw heads and the plastic mounts.
4. Line up the mounting holes on the bottom of the LiteShow II with the screw heads and insert the screw heads into the bottom of the LiteShow II.
5. Slide the LiteShow II either to the front or the back, locking the screw heads into place.
34
Page 36

One-Year Warranty
Limited Warranty
Subject to the Limitations, Exclusions and Disclaimers hereof, InFocus Corporation (“InFocus”) warrants that the Projector, Lamps and Accessories (hereinafter collectively or individually referred to as “Product” as appropriate) purchased from InFocus, an InFocus distributor, or an InFocus reseller will conform to InFocus’ specifications
and be free from defects in material or workmanship for the respective Limited Warranty period provided below. InFocus does not warrant that the Product will meet the
specific requirements of the end-user customer.
If the Product, while subject to this Limited Warranty, is defective in material or workmanship during the warranty period, then InFocus, at its option, will REPAIR or
REPLACE the Product.
All exchanged parts and Products replaced under this Limited Warranty will become property of InFocus. InFocus' sole obligation is to supply (or pay for) all labor necessary to repair the Product found to be defective within the Limited Warranty period and to repair or replace defective parts with new parts or, at the option of InFocus,
serviceable used parts that are equivalent or superior to new parts performance. Limited Warranty periods are as follows:
Product Limited Warranty Period
WARRANTY LIMITATION AND EXCLUSION
THIS WARRANTY SETS FORTH INFOCUS’ MAXIMUM LIABILITY FOR ITS PRODUCT. THIS WARRANTY EXTENDS ONLY TO PRODUCTS PURCHASED FROM
INFOCUS OR AN INFOCUS AUTHORIZED RESELLER. InFocus shall have no further obligation under the foregoing Limited Warranty if the Product has been damaged
due to abuse, misuse, neglect, smoke exposure (cigarette or otherwise), accident, unusual physical or electrical stress, unauthorized modifications (including use of an
unauthorized mount), tampering, alterations, or service other than by InFocus or its authorized agents, causes other than from ordinary use or failure to properly use the
Product in the application for which said Product was intended.
This Limited Warranty excludes Product cleaning, repair, or replacement of plastics due to cosmetic damage and damage as a result of normal wear. Product repair outside
of the terms of the Limited Warranty will be on a time and materials basis. Prolonged Product "demonstration" causes unusual Product wear and is not considered normal
use under the terms of this Limited Warranty.
The Accessory Product Limited Warranty covers the accessory item only and excludes normal wear. The Lamp Product Limited Warranty excludes expected lamp degradation.
Remanufactured Products and Software Products are exempt from the foregoing Limited Warranty. Please refer to the appropriate Remanufactured Product Limited Warranty or Software Product Limited Warranty for applicable Warranty information.
DISCLAIMER OF UNSTATED WARRANTIES
THE WARRANTY PRINTED ABOVE IS THE ONLY WARRANTY APPLICABLE TO THIS PRODUCT. ALL OTHER WARRANTIES, EXPRESS OR IMPLIED, INCLUDING,
BUT NOT LIMITED TO, THE IMPLIED WARRANTIES OF MERCHANTABILITY AND FITNESS FOR PARTICULAR PURPOSE ARE DISCLAIMED. THERE ARE NO
WARRANTIES THAT EXTEND BEYOND THE DESCRIPTION ON THE FACE HEREOF AND THE FOREGOING WARRANTY SHALL NOT BE EXTENDED, ALTERED
OR VARIED EXCEPT BY WRITTEN INSTRUMENT SIGNED BY INFOCUS. SOME JURISDICTIONS DO NOT ALLOW LIMITATIONS ON HOW LONG AN IMPLIED
WARRANTY MAY LAST, SO SUCH LIMITATIONS MAY NOT APPLY TO YOU.
: One (1) year from date of purchase.
35
Page 37

Limited Warranty Period
The Limited Warranty periods hereof commence on the date of purchase by the end-user customer. These Limited Warranty provisions shall apply only to the end-user
purchaser (first person or entity that purchased a new Product for personal or business use and not for the purpose of distribution or resale). SOME JURISDICTIONS
MAY GRANT YOU CONSUMER RIGHTS WITH MINIMUM WARRANTY DURATION THAT DIFFER FROM THE DURATIONS PROVIDED HEREIN, AND INFOCUS
WILL HONOR ALL SUCH CONSUMER RIGHTS.
To Be Eligible For Limited Warranty Coverage
Any person exercising a claim under this Limited Warranty must establish to the satisfaction of InFocus both the date of purchase and that the Product was purchased new.
The sales receipt or invoice, showing the date of purchase of the Product is the proof of the date of purchase.
To Obtain Warranty Service
During the Limited Warranty period, to exercise this Limited Warranty, the purchaser must first contact 1) InFocus, 2) a service facility authorized by InFocus or 3) the
place of original purchase.
InFocus Customer Service – 1-503-685-8888 or visit www.infocus.com/service
For Warranty service, the purchaser will be advised to return or deliver the defective Product freight and all fees prepaid, to an InFocus Service Center or to a service
facility authorized by InFocus. When returning Product to InFocus, a Service Request Number (SR #) is required and must be clearly displayed on the outside of the shipping carton or a similar package affording an equal degree of protection. InFocus or the service facility authorized by InFocus will return the repaired/replaced Product
freight prepaid to the purchaser.
Products returned for Warranty service must be accompanied by a written letter that: (i) explains the problem; (ii) provides proof of date of purchase; (iii) provides the
dealer’s name; and (iv) provides the model and serial number of the Product. Upon request of InFocus Corporation or an authorized repair center for InFocus, proof of
legal import must accompany the warranty repair Product, otherwise the Product must be returned to the place of original purchase, to the manufacturer (Purchaser must
bear all tax, duty and freight), or the Purchaser must bear charges for the warranty repair.
No repair or replacement of Product or part thereof shall extend the Limited Warranty period as to the entire Product. Warranty on the repair part and workmanship
shall only be effective for a period of ninety (90) days following the repair or replacement of that part or the remaining period of the Product Limited Warranty whichever
is greater.
LIMITATION OF LIABILITY
IT IS UNDERSTOOD AND AGREED THAT INFOCUS’ LIABILITY WHETHER IN CONTRACT, IN TORT, UNDER ANY WARRANTY, IN NEGLIGENCE OR OTHERWISE SHALL NOT EXCEED THE RETURN OF THE AMOUNT OF THE PURCHASE PRICE PAID BY PURCHASER AND UNDER NO CIRCUMSTANCES SHALL
INFOCUS BE LIABLE FOR SPECIAL, INDIRECT, INCIDENTAL OR CONSEQUENTIAL DAMAGES OR LOST PROFITS, LOST REVENUES OR LOST SAVINGS. THE
PRICE STATED FOR THE PRODUCTS IS A CONSIDERATION IN LIMITING INFOCUS’ LIABILITY.
Limitation on Bringing Action - No action, regardless of form, arising out of the agreement to purchase the Product may be brought by purchaser more than one year after
the cause of action has accrued.
Governing Law - Any action, regardless of form, arising out of the agreement to purchase the Product is governed by Oregon law.
Mandatory Arbitration – Any action, regardless of form, arising out of the agreement to purchase the Product is subject to mandatory arbitration. SOME JURISDICTIONS
DO NOT ALLOW THE EXCLUSION OR LIMITATION OF INCIDENTAL OR CONSEQUENTIAL DAMAGES SO THE ABOVE LIMITATION OR EXCLUSION MAY
NOT APPLY TO YOU. THIS LIMITED WARRANTY GIVES YOU SPECIFIC LEGAL RIGHTS, AND YOU MAY ALSO HAVE OTHER RIGHTS, DEPENDING ON JURISDICTION.
36
Page 38

LiteShow II Wireless Products Software Warranty Statement
You agree that this SOFTWARE PRODUCT is provided by InFocus “AS IS” without any warranty of any kind. InFocus has no responsibility or liability for any bug or defect
fixes or service support. ACCORDINGLY, TO THE MAXIMUM EXTENT PERMITTED BY APPLICABLE LAW NO WARRANTIES ARE PROVIDED BY INFOCUS, AND
INFOCUS AND ITS SUPPLIERS DISCLAIM ALL WARRANTIES AND CONDITIONS, EITHER EXPRESS, IMPLIED OR STATUTORY, INCLUDING, BUT NOT LIMITED
TO, IMPLIED WARRANTIES OF MERCHANTABILITY, FITNESS FOR A PARTICULAR PURPOSE, TITLE, AND NON-INFRINGEMENT, WITH REGARD TO THE SOFTWARE PRODUCT AND THE PROVISION OF OR FAILURE TO PROVIDE SUPPORT SERVICES. THIS LIMITED WARRANTY GIVES YOU SPECIFIC LEGAL RIGHTS.
YOU MAY HAVE OTHERS, WHICH VARY FROM STATE/JURISDICTION TO STATE JURISDICTION. To the extent implied warranties may not be entirely disclaimed but
implied warranty limitations are allowed by applicable law, implied warranties on the SOFTWARE PRODUCT, if any, are limited to ninety (90) days.
LIMITED WARRANTY ON MEDIA
Notwithstanding the foregoing, InFocus warrants the media on which the InFocus Software is recorded and delivered by InFocus to be free from defects in materials and workmanship under
normal use for a period of ninety (90) days from the date of original purchase. Your exclusive remedy under this Section shall be, at InFocus’s option, a refund of the purchase price of the product containing the InFocus Software or replacement of the InFocus Software which is returned to InFocus or an InFocus authorized representative with a copy of the receipt. THIS LIMITED
WARRANTY AND ANY IMPLIED WARRANTIES ON THE MEDIA INCLUDING, BUT NOT LIMITED TO, THE IMPLIED WARRANTIES OF MERCHANTABILITY, OF SAT IS FAC TO RY
QUALITY, AND OF FITNESS FOR A PARTICULAR PURPOSE, ARE LIMITED IN DURATION TO NINETY (90) DAYS FROM THE DATE OF ORIGINAL PURCHASE. THE LIMITED WARRANTY SET FORTH HEREIN IS THE ONLY WARRANTY MADE TO YOU AND IS PROVIDED IN LIEU OF ANY OTHER WARRANTIES (IF ANY) CREATED BY ANY DOCUMENTATION
OR PACKAGING. THIS LIMITED WARRANTY GIVES YOU SPECIFIC LEGAL RIGHTS, AND YOU MAY ALSO HAVE OTHER RIGHTS WHICH VARY BY JURISDICTION. LIMITATION OF
LIABILITY. TO THE MAXIMUM EXTENT PERMITTED BY APPLICABLE LAW, IN NO EVENT SHALL INFOCUS OR ITS SUPPLIERS BE LIABLE FOR ANY SPECIAL, INCIDENTAL, INDIRECT, OR CONSEQUENTIAL DAMAGES WHATSOEVER (INCLUDING, WITHOUT LIMITATION, DAMAGES FOR LOSS OF BUSINESS PROFITS, BUSINESS INTERRUPTION, COMPUTER INTERRUPTION, LOSS OF BUSINESS INFORMATION, OR ANY OTHER PECUNIARY LOSS) ARISING OUT OF THE USE OF OR INABILITY TO USE THE SOFTWARE
PRODUCT OR THE PROVISION OF OR FAILURE TO PROVIDE SUPPORT SERVICES, EVEN IF INFOCUS HAS BEEN ADVISED OF THE POSSIBILITY OF SUCH DAMAGES. BEC AU SE
SOME STATES AND JURISDICTIONS DO NOT ALLOW THE EXCLUSION OR LIMITATION OF LIABILITY, THE ABOVE LIMITATION MAY NOT APPLY TO YOU.
37
 Loading...