

Top loading washing machine
Instructions for installation and use GB
Lave-linge Top
Mode d'installation et d'emploi F
Toplader-Waschvollautomat
Installations- und Bedienungsanleitungen D
Wasmachine bovenlader
Instructies voor de installatie en het gebruik NL
Pralka ³adowana z góry
Instrukcja instalacji i obs³ugi PL
Felsõ betöltésû mosógép
Beüzemelési és használati utasítás Hu
WT120
QuicQuic
Quic
QuicQuic
Here are the 12 topics explained in this manual. Read,
learn and have fun: you will discover many secret ways
to get a better wash, more easily and making your
washing machine last longer. And especially keeping
an eye on safety.
Installation and removal (p. 2) Installation and removal (p. 2)
1.
Installation and removal (p. 2)
Installation and removal (p. 2) Installation and removal (p. 2)
Installation, after delivery or transport, is the most important
operation for the correct functioning of your washing machine.
Always check:
1.1.
1. That the electric system complies with the law;
1.1.
2.2.
2. That the inlet and draining pipes are connected correctly;
2.2.
3.3.
3. That the washing machine is levelled properly: something
3.3.
worth checking for the life of your washing machine and the
quality of your wash;
4.4.
That the tub fastening screwsThat the tub fastening screws
4.
That the tub fastening screws (on the back of the appliance)
4.4.
That the tub fastening screwsThat the tub fastening screws
have been removedhave been removed
have been removed.
have been removedhave been removed
Safety for you and your children (p. 12)Safety for you and your children (p. 12)
2.
Safety for you and your children (p. 12)
Safety for you and your children (p. 12)Safety for you and your children (p. 12)
Here you will find the necessary guidelines for the safety of
your entire household. Because safety is very important indeed.
k Guidek Guide
k Guide
k Guidek Guide
Useful tips to avoid mistakes (p. 8)Useful tips to avoid mistakes (p. 8)
7.
Useful tips to avoid mistakes (p. 8)
Useful tips to avoid mistakes (p. 8)Useful tips to avoid mistakes (p. 8)
Years back, our grandmothers were the ones who gave us good
advice - and in those days synthetic fibres did not exist: washing
was easy. Today, your washing machine gives you helpful
advice.
How to close the drum (p. 9)How to close the drum (p. 9)
8.
How to close the drum (p. 9)
How to close the drum (p. 9)How to close the drum (p. 9)
Open and shut the doors fully for a safe wash cycle.
What goes in your washing machine andWhat goes in your washing machine and
3.
What goes in your washing machine and
What goes in your washing machine andWhat goes in your washing machine and
how to start it (p. 4)how to start it (p. 4)
how to start it (p. 4)
how to start it (p. 4)how to start it (p. 4)
A correct distribution of your laundry is vital both to the successful
outcome of the wash and to the life of your appliance. Learn all
the tips and secrets to dividing your linen: colour, type of fabric
and tendency of creating fuzz are the most important criteria.
Understanding the control panel (p. 5)Understanding the control panel (p. 5)
4.
Understanding the control panel (p. 5)
Understanding the control panel (p. 5)Understanding the control panel (p. 5)
The control panel is very simple. It has only a few essential
buttons to help you choose any type of wash cycle, ranging
from the most energetic, capable of cleaning a mechanic’s
overalls, to the most delicate for wool. Familiarising with it will
help you get the best out of your wash, while spending less and
helping your washing machine last longer. It’s easy.
Guide to the wash programmes (p. 6)Guide to the wash programmes (p. 6)
5.
Guide to the wash programmes (p. 6)
Guide to the wash programmes (p. 6)Guide to the wash programmes (p. 6)
Herein is an easy table to help you choose the right programme,
temperature, detergents and possible additives. Choose the
right programme and you will get better results with your wash
while saving time, water and energy, day after day.
Guide to understanding labels and symbols (p. 7-8) Guide to understanding labels and symbols (p. 7-8)
6.
Guide to understanding labels and symbols (p. 7-8)
Guide to understanding labels and symbols (p. 7-8) Guide to understanding labels and symbols (p. 7-8)
The detergent dispenser (p. 10)The detergent dispenser (p. 10)
9.
The detergent dispenser (p. 10)
The detergent dispenser (p. 10)The detergent dispenser (p. 10)
How to use the detergent dispenser.
PrPr
obob
10.
Before calling a technician, read these pages: immediate
solutions may be found for a number of problems. If the problem
persists, call Indesit customer services and any failure will be
repaired as soon as possible.
11 .
Your washing machine is a true friend: with just a bit of care, it
will repay you with loyalty and devotion.
With the necessary upkeep, it will wash for years and years to
come.
12.
Herein are the technical features of your washing machine:
model type number, electric and water specifications, size,
capacity, speed of the spin cycle and compliance with Italian
and European rules and regulations.
lems and solutions (p.lems and solutions (p.
Pr
ob
lems and solutions (p.
PrPr
obob
lems and solutions (p.lems and solutions (p.
Care and maintenance (p.Care and maintenance (p.
Care and maintenance (p.
Care and maintenance (p.Care and maintenance (p.
TT
ecec
T
ec
TT
ecec
hnical fhnical f
hnical f
hnical fhnical f
eatures (p.eatures (p.
eatures (p.
eatures (p.eatures (p.
14) 14)
14)
14) 14)
11 and 12) 11 and 12)
11 and 12)
11 and 12) 11 and 12)
13) 13)
13)
13) 13)
The international symbols on the labels of your garments are
easy to understand and equally important for the success of
your wash. The guide includes simple instructions to help you
choose the suitable wash programme, the right temperature,
wash cycles, ironing methods and specific Indesit symbols.
11
1 Instructions for installation and use
11
Installation and removal
When theWhen the
When the
When theWhen the
appliance arrivesappliance arrives
appliance arrives
appliance arrivesappliance arrives
Whether new or just transported to a new house, installation is extremely
important for the correct functioning of your washing machine.
After removing the appliance
from its packaging, check that
it is intact. If in doubt, contact a
qualified technician immedia-
The inside of the machineThe inside of the machine
tely.
The inside of the machine
The inside of the machineThe inside of the machine
is blocked, for transportation,is blocked, for transportation,
is blocked, for transportation,
is blocked, for transportation,is blocked, for transportation,
by four screws and rubberby four screws and rubber
by four screws and rubber
by four screws and rubberby four screws and rubber
washers on the back panel.washers on the back panel.
washers on the back panel.
washers on the back panel.washers on the back panel.
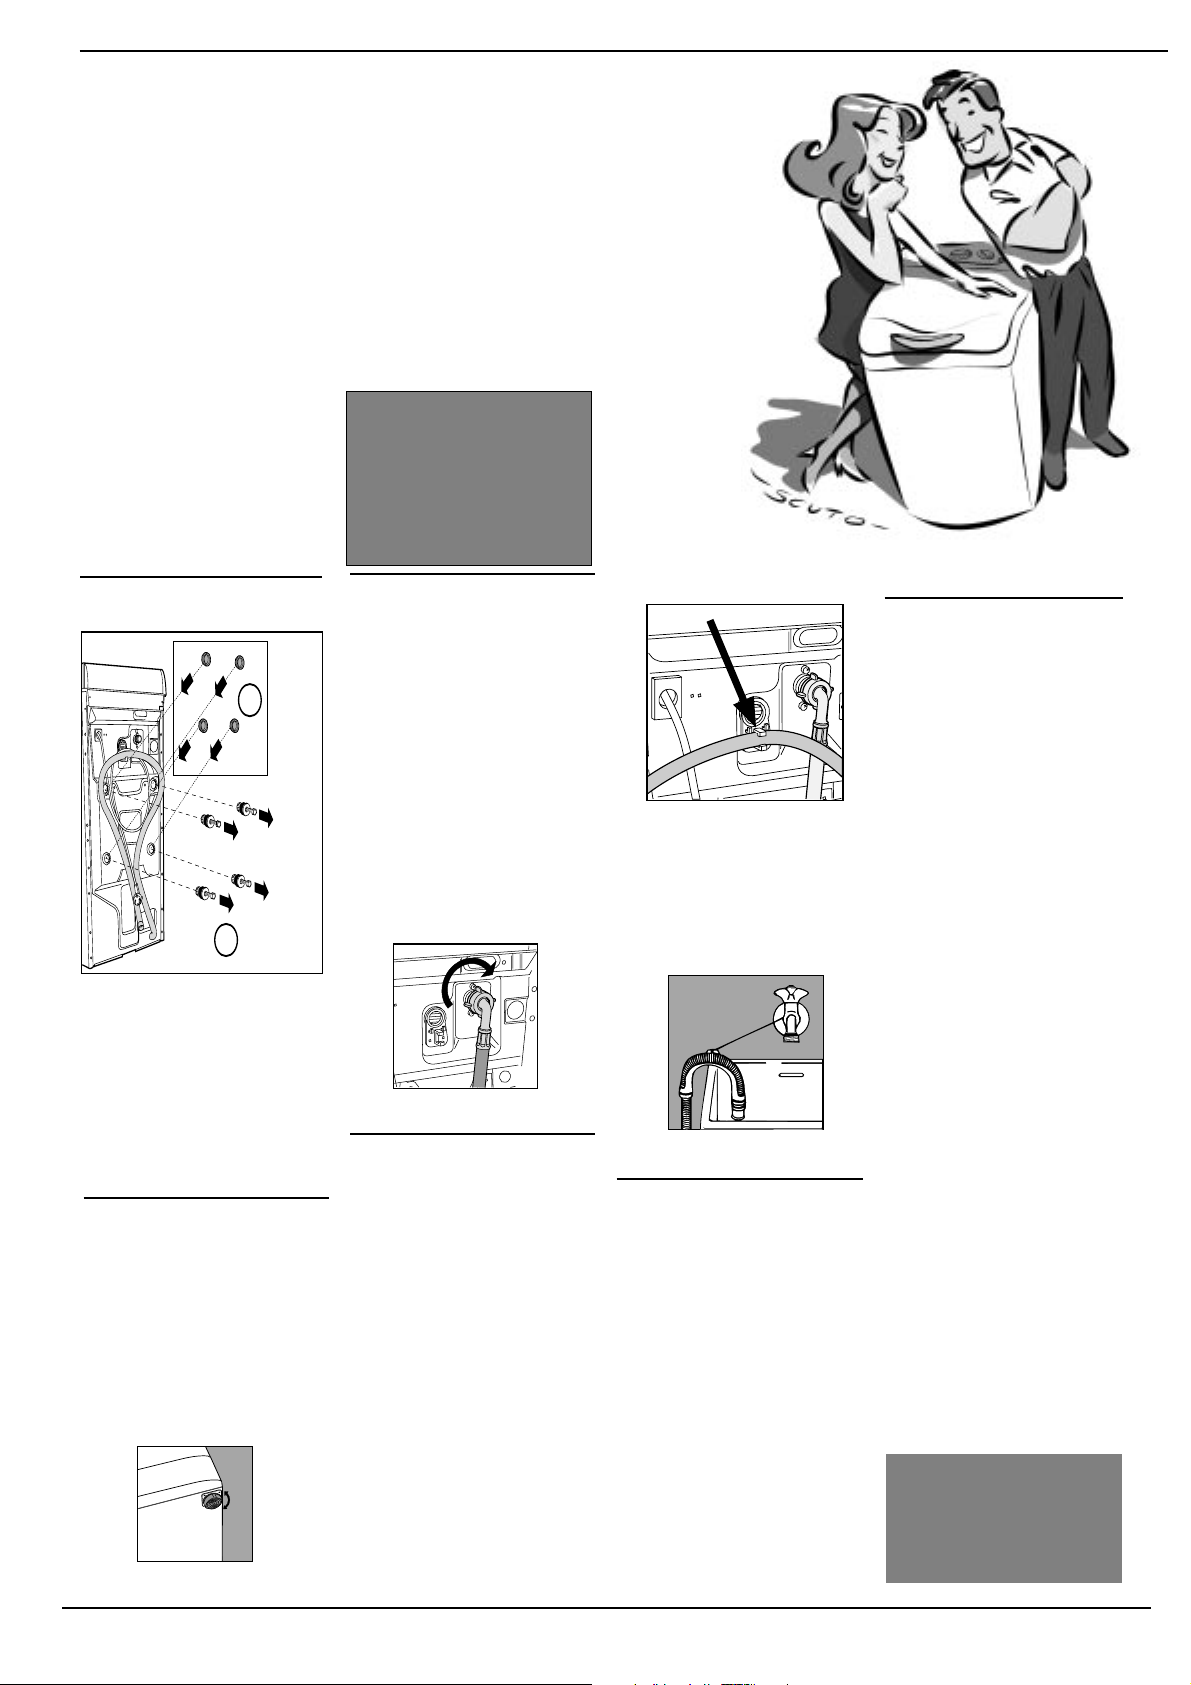
Unblocking: removeUnblocking: remove
Unblocking: remove
Unblocking: removeUnblocking: remove
the 4 screws!the 4 screws!
the 4 screws!
the 4 screws!the 4 screws!
2
1
Before using the washing
machine,
remove the rubber washers
with the aid of the special
spacer (keeping all the parts)
and use the plastic plugs
provided to fill in the holes.
Warning: should the screws be
re-used, make sure you fasten
the shorter ones at the top.
LevellingLevelling
Levelling
LevellingLevelling
The washing machine must be
levelled appropriately in order to
guarantee its correct functioning.
TT
o leo le
T
o le
TT
o leo le
must be adjustedmust be adjusted
must be adjusted; the angle of
must be adjustedmust be adjusted
inclination, measured according to
the worktop, must not exceed 2°.
When placed on fitted carpet,
make sure the ventilation is not
obstructed within its surroundings.
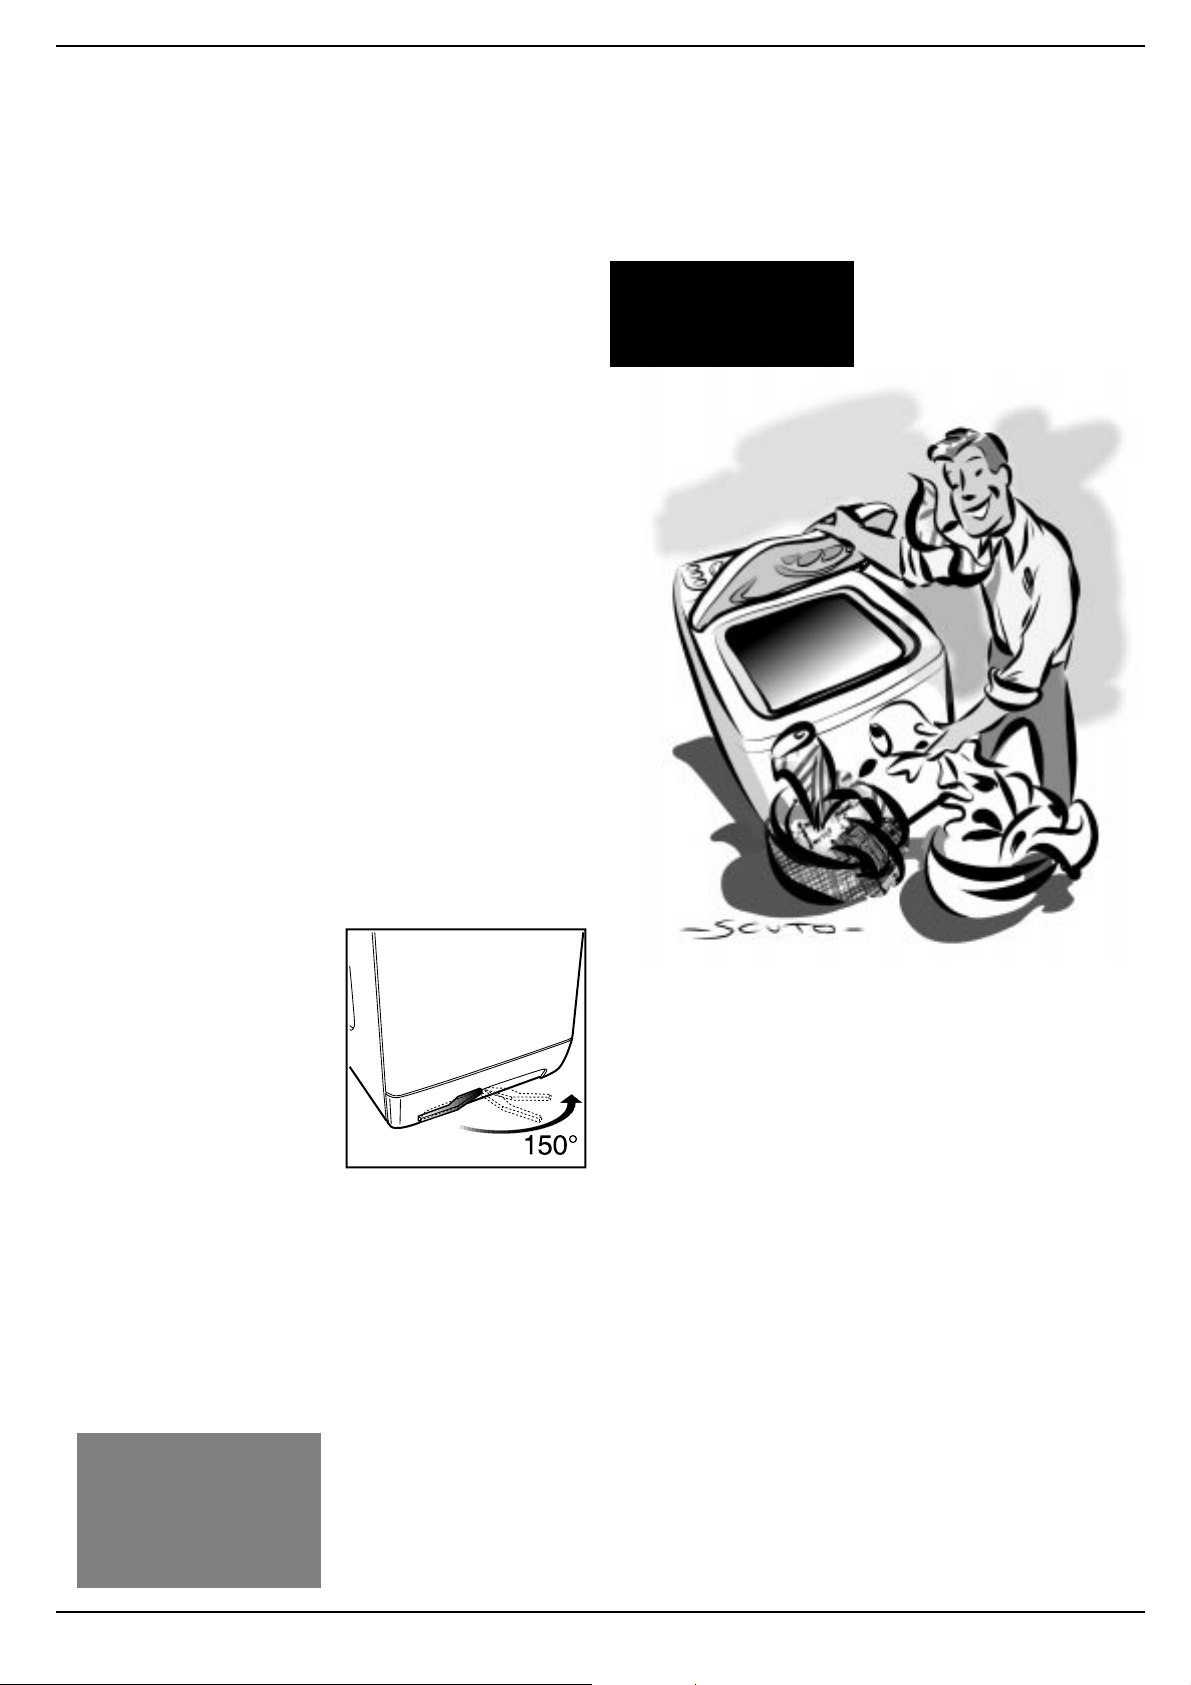
The feet are adjustable.
remove the screwsremove the screws
remove the screws,
remove the screwsremove the screws
vel the appliancevel the appliance
vel the appliance
vel the appliancevel the appliance
,,
the f the f
,
the f
,,
the f the f
eeteet
eet
eeteet
Do not throw the blocking
screws and the spacers
away. In the event of a
removal, they can be used
to block the components
inside the appliance again
and so protect it during
transport.
Connection to the waterConnection to the water
Connection to the water
Connection to the waterConnection to the water
mainsmains
mains
mainsmains
Water pressure must range
within the values indicated on
the data plate on the rear of
your washing machine.
Connect the inlet hose
(situated unassembled inside
the drum) to a cold water tap
with a 3/4 gas threaded mouth.
If the water pipes are new or
left unused, run the water until
it is clear and free of debris.
Attach the hose to the
appliance, in line with the
appropriate water pipe inlet at
the top right.
Water hose inlet to be fitted to
the top right.
Connecting the drain hoseConnecting the drain hose
Connecting the drain hose
Connecting the drain hoseConnecting the drain hose
On the back of the appliance,
towards the top, you will find a
hook onto which you should
fasten the drain hose if
necessary . Insert the other end
in a wall draining duct or place
it on the edge of a sink or tub
avoiding excessive kinks and
bending.
at a height ranging from 60 toat a height ranging from 60 to
at a height ranging from 60 to
at a height ranging from 60 toat a height ranging from 60 to
100 cm.100 cm.
100 cm.
100 cm.100 cm.
In case it is necessary to fix the
end of the hose at a height
below 60 cm from the ground,
it must be fixed in the
appropriate hook placed on
the back panel as mentioned
above.
It should be placedIt should be placed
It should be placed
It should be placedIt should be placed
The hook to be used in case the
drain hose ends at a height
below 60 cm.
If the hose drains into a tub or
sink, apply the plastic guide
and tie it to the tap.
The guide for draining into tubs
and sinks.
The hose must never remainThe hose must never remain
The hose must never remain
The hose must never remainThe hose must never remain
immerimmer
sed in watersed in water
immer
sed in water
immerimmer
sed in watersed in water
Extensions are inadvisable. In
case of absolute need, the
extension must have the same
diameter as the original hose
and must not exceed 150 cm
in length. In case of wall
draining pipes, their efficiency
must be checked by a qualified
technician. If the dwelling is on
one of the upper floors of a
building, there may be drain
trap problems causing the
washing machine to load and
unload water continuously.
In order to avoid such an
inconvenience, special antidrain trap valves are available
in shops.
..
.
..
Electric connectionElectric connection
Electric connection
Electric connectionElectric connection
Before connecting the
appliance to the electric
socket, be sure that:
1) the electric socket is able
to sustain the appliance's
maximum power load
indicated on the data plate
and in compliance with the
law;
2) the supply voltage is
included within the values
indicated on the data
plate;
3) the socket is compatible
with the appliance's plug.
If not, do not use adapters,
but replace either the
socket or the plug;
4) electric household appliances must be equipped
with an "earthing" system,
5) that the machine is not
placed on top of the power
supply cable once the
connection has been
made.
Warning!
Any modifications made to the
factory settings or an irregular electric connection, any
electrical, mechanical or hydraulic modification whatsoever to the appliance shall
render the guarantee invalid
and shall relieve the manufacturer and retailer of any and
all liability.
Plastic bags, polystyrene
foam, screws and other
packaging parts are not
children's toys, and are
potentially dangerous.
Instructions for installation and use
22
2
22
More and more important
YY
our safour saf
Y
our saf
YY
our safour saf
yy
our cour c
y
our c
yy
our cour c
hildrenhildren
hildren
hildrenhildren
ety and that ofety and that of
ety and that of
ety and that ofety and that of
Y our washing machine has been built in compliance
with the strictest international safety regulations.
T o protect you and all your family .
Read these indications and all
the information in this manual
carefully: they are an important
source, not only of numerous
useful tips, but also of vital
information on safety, use and
maintenance
.
1. In case of malfunctioning,1. In case of malfunctioning,
1. In case of malfunctioning,
1. In case of malfunctioning,1. In case of malfunctioning,
first unplug the appliancefirst unplug the appliance
first unplug the appliance
first unplug the appliancefirst unplug the appliance
from the wall socket andfrom the wall socket and
from the wall socket and
from the wall socket andfrom the wall socket and
turn off the water tapturn off the water tap
turn off the water tap; do
turn off the water tapturn off the water tap
not under any circumstances touch internal
parts in order to attempt
repairs. This will also
render the guarantee
invalid.
2.2.
The washing machineThe washing machine
2.
The washing machine
2.2.
The washing machineThe washing machine
should not be installed inshould not be installed in
should not be installed in
should not be installed inshould not be installed in
an outdoor environmentan outdoor environment
an outdoor environment,
an outdoor environmentan outdoor environment
not even when a roof
shelters the area, because
it may be very dangerous
to leave it exposed to rain
and thunderstorms.
3.3.
It must only be used byIt must only be used by
3.
It must only be used by
3.3.
It must only be used byIt must only be used by
adults adults
adults and exclusively for
adults adults
washing clothes following
the instructions provided in
this manual.
4.4.
4. Should it have to be
4.4.
moved, pull the white
lever, situated on the left
beneath the base, and the
retractable wheels will
appear, thus allowing for
easy movement.
5.5.
5. Before loading the
5.5.
washing machine,
sure the drum is emptysure the drum is empty
sure the drum is empty.
sure the drum is emptysure the drum is empty
6.6.
Never touch the washingNever touch the washing
6.
Never touch the washing
6.6.
Never touch the washingNever touch the washing
machine when barefootmachine when barefoot
machine when barefoot
machine when barefootmachine when barefoot
"I only want an authorised
specialised technician with
original Indesit spare
parts!"
makemake
make
makemake
with wet or damp handswith wet or damp hands
or
with wet or damp hands
with wet or damp handswith wet or damp hands
or feetor feet
or feet.
or feetor feet
7.7.
Never use extensions orNever use extensions or
7.
Never use extensions or
7.7.
Never use extensions orNever use extensions or
multiple plugsmultiple plugs
multiple plugs, which are
multiple plugsmultiple plugs
particularly dangerous in
humid environments. The
power supply cable must
never be bent or dangerously compressed.
8.8.
Do not remove the filterDo not remove the filter
8.
Do not remove the filter
8.8.
Do not remove the filterDo not remove the filter
while the appliance is on.while the appliance is on.
while the appliance is on.
while the appliance is on.while the appliance is on.
Do not use hand washDo not use hand wash
Do not use hand wash
Do not use hand washDo not use hand wash
detergentdetergent
detergent because the
detergentdetergent
abundance of foam could
come out from the lid and
cause damage.
9.9.
Never pull on the plugNever pull on the plug
9.
Never pull on the plug or
9.9.
Never pull on the plugNever pull on the plug
the washing machine to
disconnect it from the wall
socket: it is extremely
dangerous.
10.10.
10.While the appliance is
10.10.
functioning,
the drain waterthe drain water
the drain water as it could
the drain waterthe drain water
reach very high temperatures.
children’s reachchildren’s reach
children’s reach.
children’s reachchildren’s reach
force the washingforce the washing
force the washing
force the washingforce the washing
machine doormachine door
machine door because this
machine doormachine door
could damage the safety
block on the opening,
which serves to protect
from accidental openings.
11.11.
This appliance is intendedThis appliance is intended
11.
This appliance is intended
11.11.
This appliance is intendedThis appliance is intended
for domestic use.for domestic use.
for domestic use.
for domestic use.for domestic use.
Industrial use (in hotels,
restaurants and laundries)
compromises its original
manufacturing characteristics and invalidates the
guarantee.
do not touchdo not touch
do not touch
do not touchdo not touch
Keep it out ofKeep it out of
Keep it out of
Keep it out ofKeep it out of
NeverNever
Never
NeverNever
How to change the power supply cableHow to change the power supply cable
How to change the power supply cable
How to change the power supply cableHow to change the power supply cable
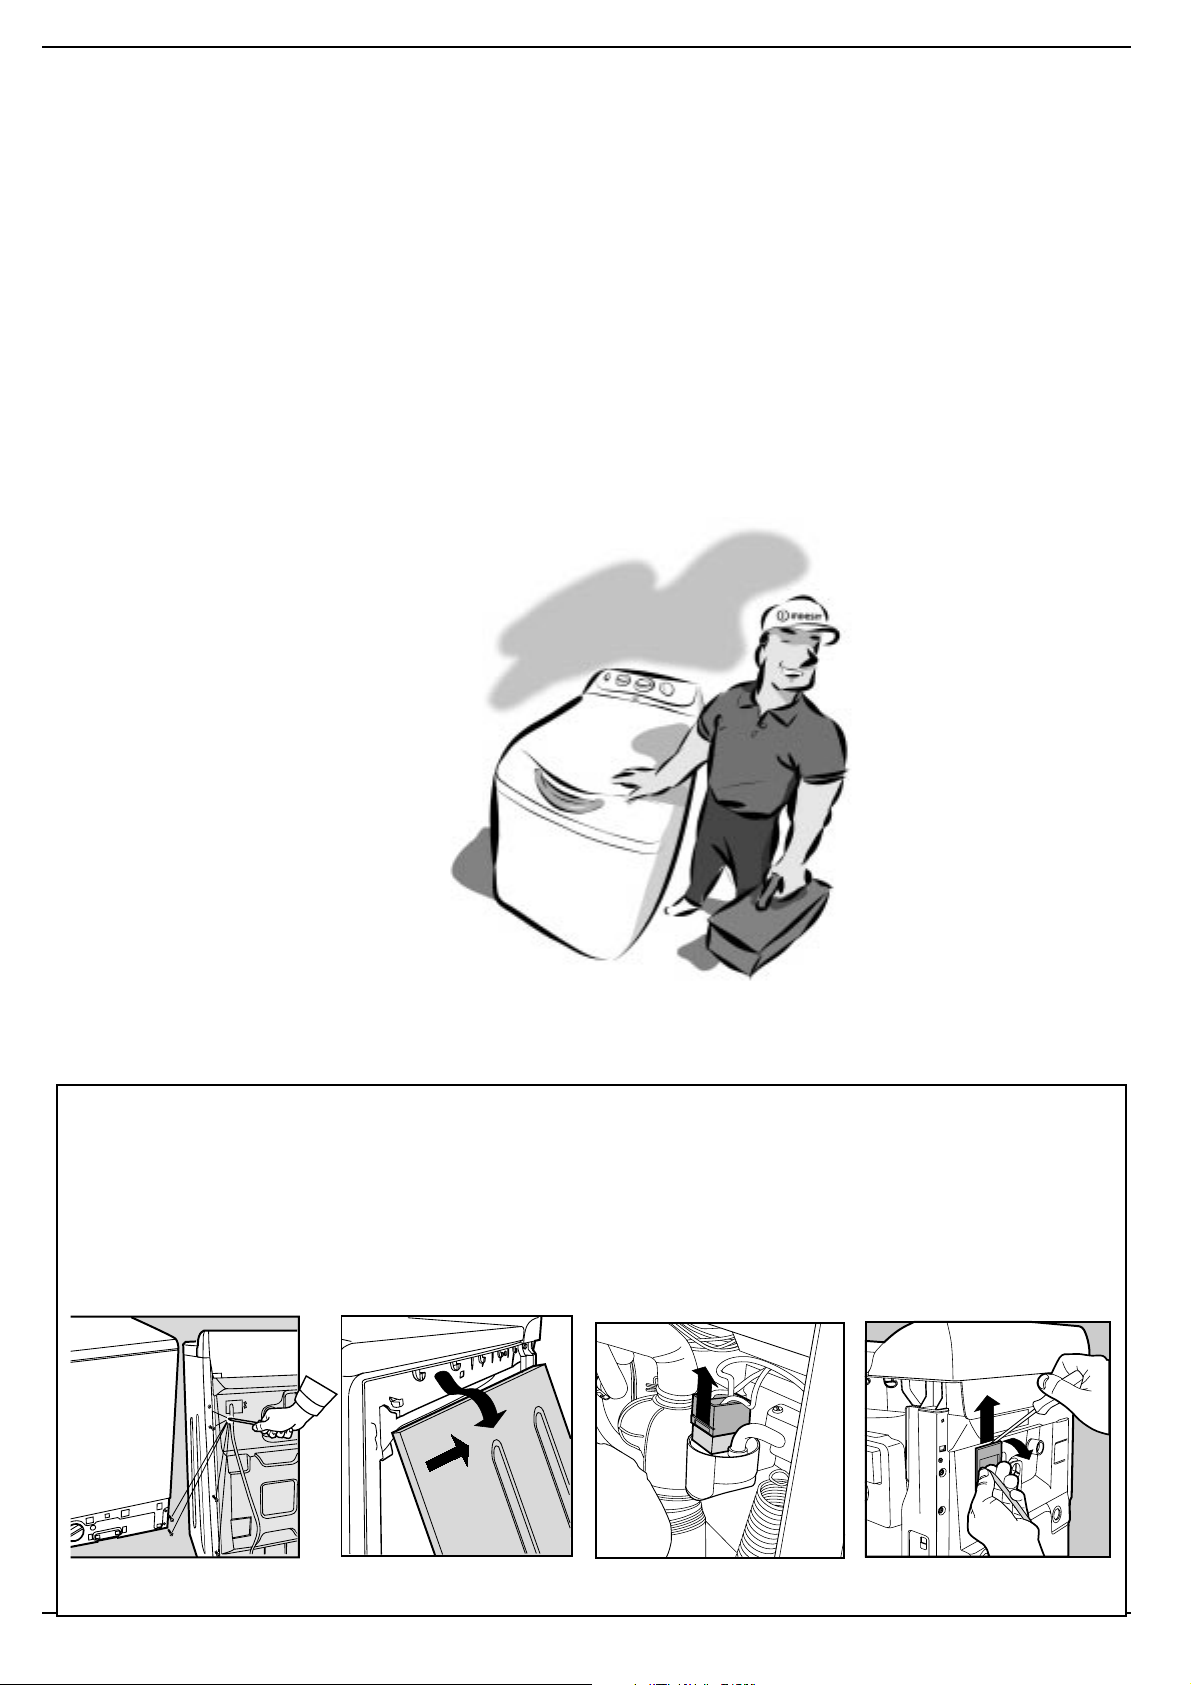
The power supply cable is special and can be purchased exclusively from authorised
T echnical Service Centres.
T o replace it, do as follows:
1. Make sure that the washing
machine is switched off and unplugged.
Fig. 1
2. Remove the appliance base
and unscrew the 2 screws on
the bottom right-hand side, then
unscrew the 6 rear screws, on
the left-hand side, and remove
the side panel by tipping it
slightly outwards and pulling it
out. (fig. 1 and 2).
Fig. 2
3. Disconnect the electricity sup-
ply to the radio interference suppresser by removing the connector (fig. 3).
4. Unscrew the 2 outer filter fastening screws and, with the help
of a screwdriver (see fig. 4), release it from the back panel by
pulling upwards.
Fig. 3 Fig. 4
5. Once you have positioned the
new power supply cable, reconnect the connector, making sure
the safety hook is securely in
place.
Y ou must contact a qualified professional to replace the power
supply cable. The same must respect the applicable norms in
force.
33
3 Instructions for installation and use
33
M
What goes in your washing machine?What goes in your washing machine?
What goes in your washing machine?
What goes in your washing machine?What goes in your washing machine?
Before washing, you can do a great deal for better results. Divide your garments according to fabric and colour.
Read the labels and follow their indications. Alternate small items with large ones.
Before washing.Before washing.
Before washing.
Before washing.Before washing.
Divide your washing according
to the type of fabric and colour
resistance: sturdy fabrics should
be separated from delicate
ones.
Light colours should be
separated from dark ones.
Empty all pockets (coins, paper,
money and small objects) and
check the buttons. Mend
immediately or remove loose
buttons as they could fall off
during the wash cycle.
The labels say it all.The labels say it all.
The labels say it all.
The labels say it all.The labels say it all.
Always look at the labels: they
tell you everything about your
garment and how to wash it in
the best way possible.
The table on page 7 shows you
all the secrets of the symbols
found on labels. Their
indications are a valuable guide
to a better wash and to longer
lasting clothes.
Alternate small itemsAlternate small items
Alternate small items
Alternate small itemsAlternate small items
with large ones.with large ones.
with large ones.
with large ones.with large ones.
Unfold all your washing. Place
it loose inside the drum and
follow the indications as to the
recommended load quantity for
the different wash programmes.
Your clothes will come out
cleaner and with fewer creases.
Garments treated withGarments treated with
Garments treated with
Garments treated withGarments treated with
petrpetr
ol-based stain remool-based stain remo
petr
ol-based stain remo
petrpetr
ol-based stain remool-based stain remo
Do not place garments in your
washing machine that have
been treated with petrol, pure
alcohol, trichlorethylene etc.
until these products have
evaporated completely.
verver
ver
verver
Dividing your garments
according to fabric and
colour is very important
for good results.
..
.
..
How to start the applianceHow to start the appliance
How to start the appliance
How to start the applianceHow to start the appliance
Putting your appliance
in place and moving it.
If your washing machine is
equipped with a special set of
retractable wheels you can
easy move it. To lower the
wheels and thus move the
appliance effortlessly, just pull
the lever, situated on the lefthand side beneath the base.
Once the appliance is in the
required position, put the lever
back in place. The washing
machine is now firmly in place.
See figure. (Just for equipped
models)
After installing your new washing machine, start a wash cycle (with the appliance empty) by setting programme
"1" at 60 degrees C.
Starting the washing machine
in the right way is important for
the quality of your wash, for
preventing problems and for
lengthening the life of your
appliance. After loading your
washing and pouring in the
detergent together with any
additives, always check that:
For delicate garments:
protect underwear, tights
and stockings, children's
socks and delicate items
by placing them in a
canvas pouch
1. The appliance doors are
firmly shut.
2. The plug is inserted in the
socket.
3. The water tap is turned on.
4. Button G is on the O position.
5. The set of retractable wheels
is stored away (i.e. the wheels
are not touching the floor).
Choose the desired programme
The programme is selected
according to the type of
garments that need to be
washed and how dirty these are.
To select the programme,
consult the table on page 6. Turn
knob A and set it to the number
corresponding to the desired
programme. Select the
temperature using knob B, in
the case turn the knob C
selecting the spin speed and, if
necessary, press the function
buttons (D-E-F); finally press the
ON-OFF button G (position I).
At the end of the wash cycle...
Wait for approximately two
minutes.
Then turn the washing machine
off by pressing ON-OFF button
G (O position). You can now
open the washing machine
doors safely. After having
removed the freshly cleaned
washing, leave the doors open
or ajar so that the humidity left
inside can evaporate.
Always turn the water tap off.
Remember that, in the event
of a power failure, or should
the washing machine switch
itself off, the programme
selected will start up again
from where it was interrupted.
Instructions for installation and use
44
4
44
Understanding the control panel
Here I'm in commandHere I'm in command
Here I'm in command
Here I'm in commandHere I'm in command
Making the right choice is important. And it's easy.
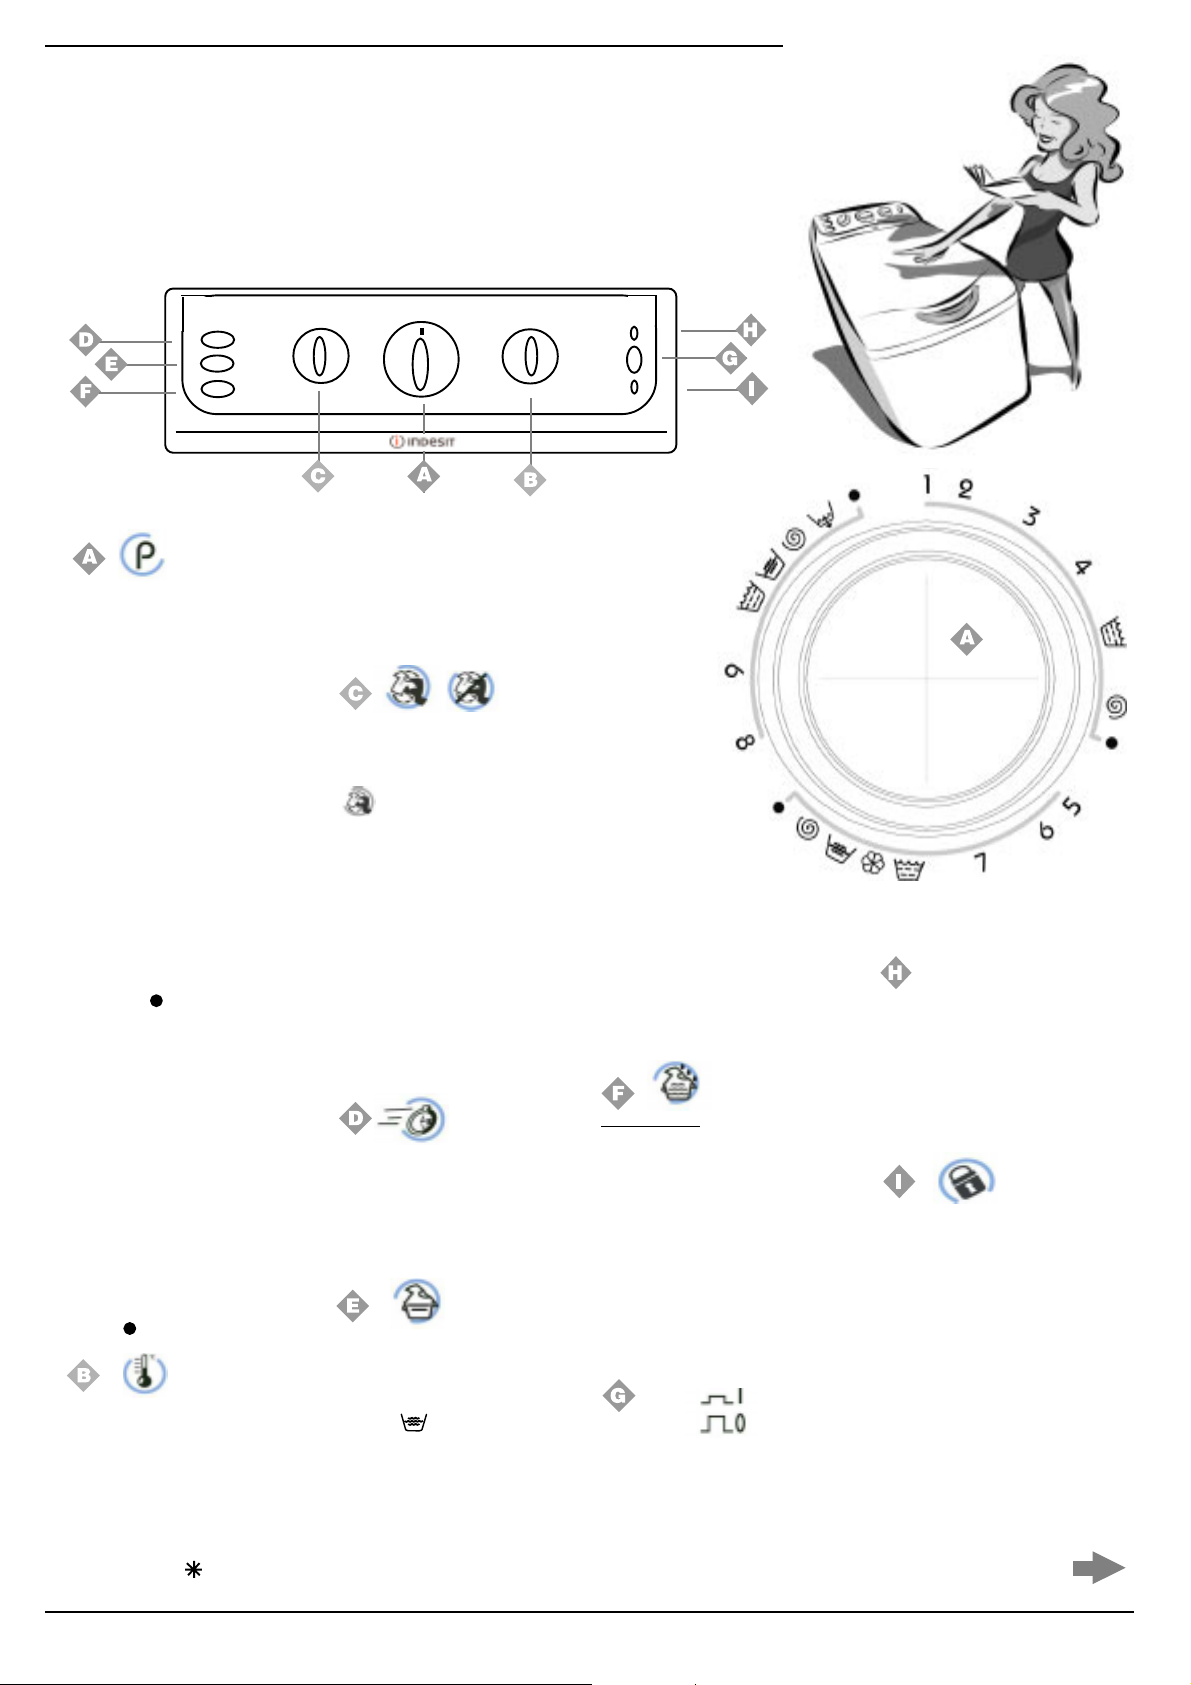
Programme selector knobProgramme selector knob
Programme selector knob
Programme selector knobProgramme selector knob
It is used to select the wash
programme.
TT
urn this knob curn this knob c
T
urn this knob c
TT
urn this knob curn this knob c
To select the programmes, the
mark situated on the knob must
be aligned with the symbol/
number that corresponds to the
desired programme.
Now press the
II
(
I position), and lamp
II
begin flashing. After 5 seconds,
the setting is accepted, lamp
stops flashing (staying lit) and
the wash cycle begins.
If you want to interrupt the
programme in progress or set a
new one, select one of the
symbols
wait 5 seconds: when the
cancellation has been
accepted, lamp
this point you can set the new
one or turn the appliance off.
Should you wish to add some
garments, by then waiting for
approximately 2 minutes before
opening the appliance doors.
After the wash cycle has been
set and accepted by the
washing machine, any
changes to the position of the
knob will be of no use (except
in the
TT
T
TT
It is used to set the wash
temperature indicated in the
programme table (on page 6).
It also allows you to reduce the
temperature recommended for
the selected programme, and
even to set a cold wash cycle
(snow symbol ).
Stop/Reset position).
emperature contremperature contr
emperature contr
emperature contremperature contr
locloc
kwise onlkwise onl
loc
kwise onl
locloc
kwise onlkwise onl
On/OffOn/Off
On/Off button
On/OffOn/Off
HH
H will
HH
(Stop/Reset) and
HH
H will flash, at
HH
ol knobol knob
ol knob
ol knobol knob
yy
..
y
.
yy
..
Spin exclusion KnobSpin exclusion Knob
Spin exclusion Knob
Spin exclusion KnobSpin exclusion Knob
It is used to exclude the spin
cycle (by choosing symbol
GG
G
GG
HH
H
HH
) and/or to reduce the
spin speed of the selected
programme. The maximum
speed for the four types of
fabric ar
FabricFabric
Fabric
FabricFabric
CottonCotton
Cotton max rpm
CottonCotton
SyntheticsSynthetics
Synthetics 800 rpm
SyntheticsSynthetics
WoolWool
Wool 600 rpm
WoolWool
SilkSilk
Silk none
SilkSilk
In any case, the appliance
distributes the load at low
speed.
Rapid washRapid wash
Rapid wash
Rapid washRapid wash
The function activated
reduces the length of wash
for about 30%. You cannot use
it for the Special Programmes,
Wool and Silk (see page 6).
Anti-creaseAnti-crease
Anti-crease
Anti-creaseAnti-crease
(Synthetics-delicates)(Synthetics-delicates)
(Synthetics-delicates)
(Synthetics-delicates)(Synthetics-delicates)
This button allows you to
interrupt a programme (on
symbol )
keeping the washing soaking in
water before the spin cycle. It is
a very useful button, because it
prevents delicate and synthetic
fabrics from creasing (for
example, when you cannot take
the washing out at the end of
SpeedSpeed
Speed
SpeedSpeed
the wash cycle, but only after a few
hours).
It can only be used in programmes for Synthetic fabrics
(Progr. 5-6-7-9).
WW
ARNING! ARNING!
W
ARNING! To conclude the wash
WW
ARNING! ARNING!
cycle and drain the water, press
EE
button
Extra RinseExtra Rinse
Extra Rinse
Extra RinseExtra Rinse
This function increase the
quantity of water during the rinse
cycles
Use of this function is
recommended to improve
rinsing results when washing full
loads and large quantities of
detergent are used.
Recommended in case of
detergent contact allergies.
Option available with programmes
ON-OFFON-OFF
ON-OFF
ON-OFFON-OFF
When button
washing machine is switched
on, when it is not the machine is
switched off.
TT
T
TT
not cancel the selectednot cancel the selected
not cancel the selected
not cancel the selectednot cancel the selected
programme.programme.
programme.
programme.programme.
E
again.
EE
for resistantfor resistant
for resistant
for resistantfor resistant
1-2-3-4-5-61-2-3-4-5-6
1-2-3-4-5-6
1-2-3-4-5-61-2-3-4-5-6
GG
G is pressed, the
GG
urning the macurning the mac
urning the mac
urning the macurning the mac
fabrics.fabrics.
fabrics.
fabrics.fabrics.
hine off doeshine off does
hine off does
hine off doeshine off does
The knobThe knob
The knob
The knobThe knob
with your washingwith your washing
with your washing
with your washingwith your washing
machine's washmachine's wash
machine's wash
machine's washmachine's wash
programmesprogrammes
programmes
programmesprogrammes
ON-OFF lampON-OFF lamp
ON-OFF lamp
ON-OFF lampON-OFF lamp
HH
Lamp
appliance is switched on and
awaiting a programme to be set.
A steady light means the
appliance has accepted the
selected programme.
Door blocked lampDoor blocked lamp
Door blocked lamp
Door blocked lampDoor blocked lamp
This lamp indicates that the
washing machine door is
blocked to prevent it from being
opened accidentally. To avoid
any damages, you must wait for
the lamp to switch itself off before
you open the door. You must
wait around two minutes.
The information contained in the
table is purely indicative. It could in
fact vary depending on the appliance
model, the quantity and type of
garments to wash, the hardness and
temperature of the mains water supply,
as well as the temperature of the
environment.
H
flashes when the
HH
55
5 Instructions for installation and use
55
What are you washing today?
A prA pr
A pr
A prA pr
Type of fabric and
degree of soil
COTTON
Exceptionally soiled whites (sheets,
tablecloths, etc.)
Heavily soiled whites (sheets,
tablecloths, etc.)
Heavily soiled rwhites and
resistant colours (sheets, tablecloths,
etc.)
Heavily soiled whites and fast colours
Rinse cycle s/Bleach
Spin cycle Draining and final spin cycle
Stop/Reset Interrupts/Cancels selected programme
SYNTHETICS
Heavily soiled fast colour synthetics
(baby linen, etc.)
ogramme fogramme f
ogramme f
ogramme fogramme f
Progr.
Knob
Temp.
Knob
Max
1
2
3
4
5
Max
60°C
40°C
60°C
Detergent
for p re wash
or all seasonsor all seasons
or all seasons
or all seasonsor all seasons
Detergent
for wash
u u u
Fabric
softener
u u
u u
u u
u
u u
Bleach Cycle
Delicate/Trad-
itional
Delicate/Trad-
itional
Delicate/Trad-
itional
Delicate/Trad-
itional
Delicate
length
(minutes)
Description o f wash
cycle
Pre-wash
150
rinses, intermediate and final spin cycles
Wash at high temperature, rinses,
130
intermediate and final spin cycles
Wash at 60°C, rinses, intermediate and
final spin cycles
130
Wash cycle at 40°C , rinse cycles,
intermediate and final spin cycles
115
Rinse cycle s, intermed iate and final spin
cycles
Wash at 60°C, rinses, anti-crease or
105
delicate spin cycle
, Wash at high temperature,
Delicate colour synthetics (all types of
slightly soiled garments)
Delicate colour synthetics (all types of
slightly soiled garments)
Rinse cycle s/Bleach
Fabric softener
Anti-crease - Rinse Hold Rinse hold for silk and especially delicate
Spin cycle Draining and delicate spin cycle
Stop/Reset Interrupts/Cancels selected programme
DELICATES
Wool
particularly delicate garments
Silk,
and fabrics (curtains, silk, viscose,
etc.)
Rinse cycle s
Anti-crease - Rinse Hold Rinse hold for silk and especially delicate
40°C
6
30°C
7
40°C
8
30°C
9
u u
u u
u
u
u u
u u
u
Delicate
Delicate
Wash cycle at 40°C , rinse cycles, anticrease or delicate spin cycle
75
Daily fast wash cycle a t 30°C, rinse cycles
and delicate spin cycle
30
Rinse cycle s, anti-crease or delicate spin
cycle
Rinse cycle s with automatic introduction of
softener, anti-crease or delicate spin cycle
garments
Wash cycle at 40°C , rinse cycles and
delicate spin cycle
55
Wash cycle at 30°C , rinse cycles, anticrease or draining
45
Rinse cycle s, anti-crease or draining
garments
Spin cycle Draining and delicate spin cycle (wool)
Draining Draining
Stop/Reset Interrupts/Cancels selected programme
Special programmeSpecial programme
Special programme
Special programmeSpecial programme
Important:Important:
Important:
Important:Important:
symbols (Stop/Reset) and wait for at least 5 seconds. symbols (Stop/Reset) and wait for at least 5 seconds.
symbols (Stop/Reset) and wait for at least 5 seconds.
symbols (Stop/Reset) and wait for at least 5 seconds. symbols (Stop/Reset) and wait for at least 5 seconds.
TT
o cancel the wash pro cancel the wash pr
T
o cancel the wash pr
TT
o cancel the wash pro cancel the wash pr
ogramme yogramme y
ogramme y
ogramme yogramme y
ou haou ha
ou ha
ou haou ha
ve just set,ve just set,
ve just set,
ve just set,ve just set,
select one of the select one of the
select one of the
select one of the select one of the
7 - Daily 30° wash for delicate Synthetics for 30’. Your washing machine has a programme designed to wash lightly soiled garments in
a short amount of time. By setting programme 7 at a temperature of 30°C, you can wash different fabrics together (except for woollen and
silk items), with a maximum load of 3 kg. This programme allows you to save on both time and energy as it only lasts approximately 30
minutes. We recommend you use liquid detergent and pour it into the wash compartment of the detergent dispenser.
Instructions for installation and use
66
6
66
UnderUnder
Under
UnderUnder
standing labels…standing labels…
standing labels…
standing labels…standing labels…
Learn the meaning of these symbols and you will get
better results, your garments will last longer and your
machine will repay you by washing better.
All over Europe, garment
labels contain messages
expressed in small yet
important symbols.
Understanding them is very
important if you want to get
better results and treat your
garments the way they
deserve to be treated.
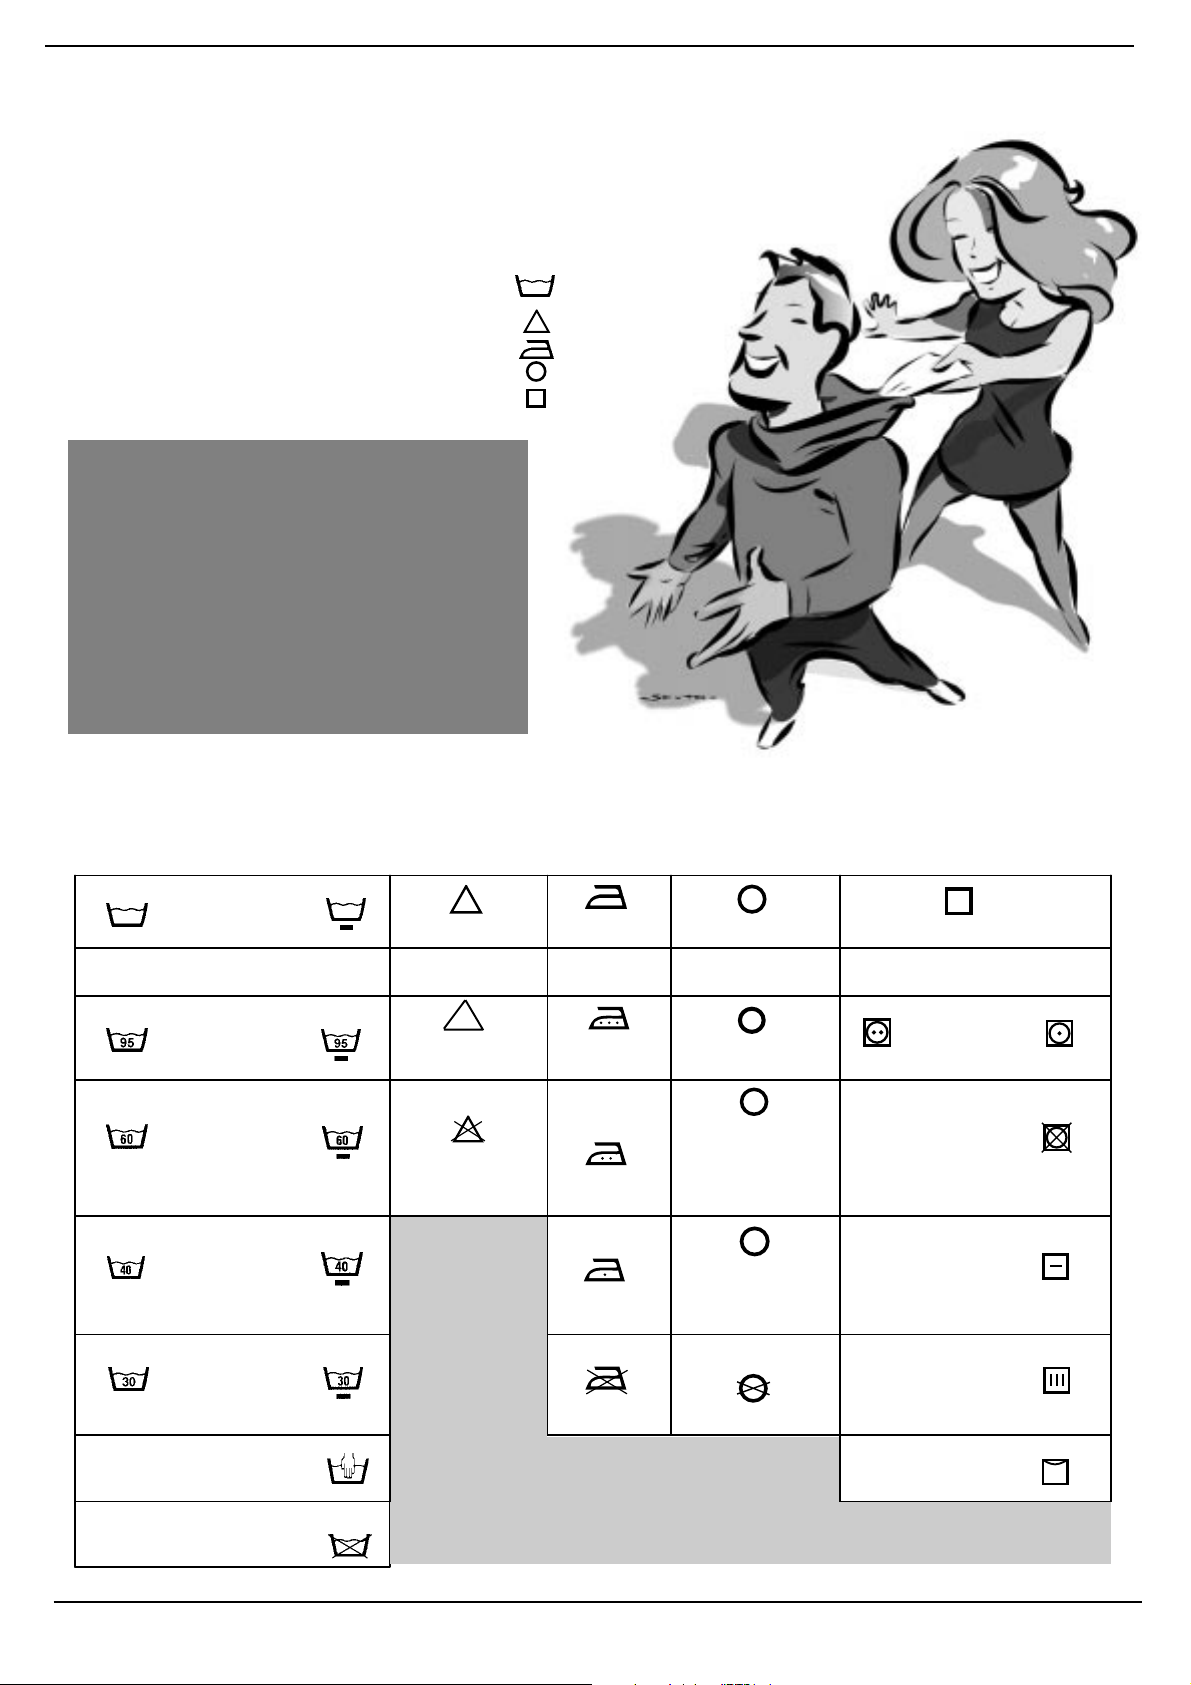
These symbols are divided in
five different categories and
shapes:
wash cyclewash cycle
wash cycle
wash cyclewash cycle
bleaching bleaching
bleaching
bleaching bleaching
ironing ironing
ironing
ironing ironing
dry cleaningdry cleaning
dry cleaning
dry cleaningdry cleaning
and dryingand drying
and drying
and dryingand drying
.
,
,
,
Useful tips
Turn shirts inside out to get better
results and make them last longer .
Always empty pockets of their
contents.
Look at the label: it will always give
you useful advice.
Consult and learn the symbols in this table: they will help youConsult and learn the symbols in this table: they will help you
Consult and learn the symbols in this table: they will help you
Consult and learn the symbols in this table: they will help youConsult and learn the symbols in this table: they will help you
obtain a better wash,obtain a better wash,
obtain a better wash,
obtain a better wash,obtain a better wash,
performance out of your washing machine.performance out of your washing machine.
performance out of your washing machine.
performance out of your washing machine.performance out of your washing machine.
treat y treat y
treat y
treat y treat y
our cour c
our c
our cour c
lothes prlothes pr
lothes pr
lothes prlothes pr
operloperl
operl
operloperl
yy
,,
and g and g
y
,
and g
yy
,,
and g and g
et a betteret a better
et a better
et a betteret a better
Make sure you
select the right
temperature
Strong
Movement
Wash
cycle Bleaching Ironing Dry cleaning Drying
Delicate
Movement
Wash cycle
95°C
Wash cycle
60°C Do not bleach
Wash cycle
40°C
Wash cycle
30°C
Delicate
hand wash
Do not
wash in
water
Can be bleached
in c old water
Cl
Hot iron max
200°C
Warm iron
max 150°C
Cool iron
max 110°C
Do not iron
pure alcohol, R111
A
Dry cleaning with
all solvents
P
Dry cleaning with
perchloride ,
aviation gasoline,
and R113
F
Dry cleaning with
aviation gasoline,
pure alcohol and
R113
Do not dry clean
High
tem p.
Can be
tumble -dried
Do not
tumble dry
Lay flat to
dry
Hang to dry
non-spin
garments
Dry on
hangers
Mild
Temp.
dried
77
7 Instructions for installation and use
77
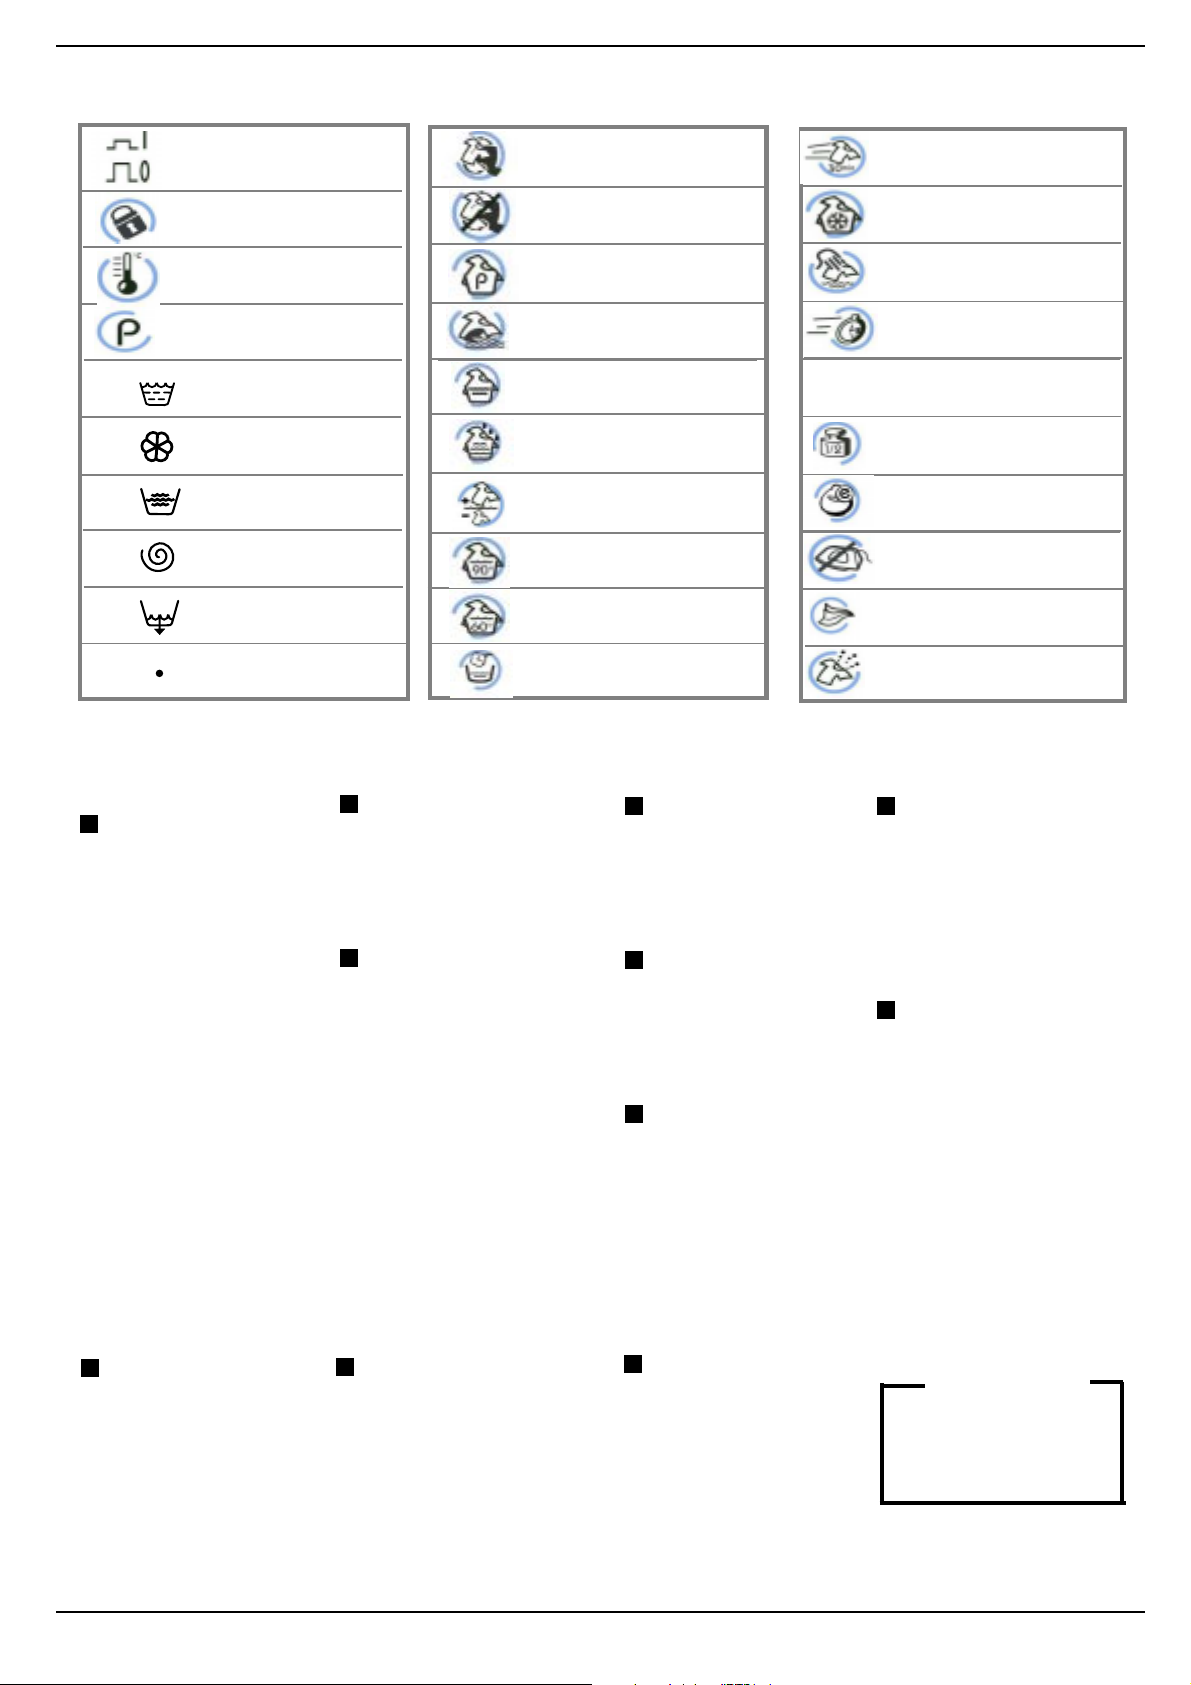
… and the symbols for the various Indesit models:… and the symbols for the various Indesit models:
… and the symbols for the various Indesit models:
… and the symbols for the various Indesit models:… and the symbols for the various Indesit models:
ON
OFF
Door lock
Temperature
Programmes:Programmes:
Programmes:
Programmes:Programmes:
Rinse cycles
F abric softener
Rinse hold
Spin cycle
Draining
Stop/Reset
Spin cycle variation
Spin cycle exclusion
Pre-wash
Stain removal
Anti-crease - rinse
hold
Extra Rinse
Wash cycle intensity
90° Wash
60° Wash
Delicate wash
Daily wash at 30° in
30'
Cold wash
Hand wash
Rapid wash
Half load
Extra economy wash
Extra economy wash
Easy iron
Silk and curtains
Garment hygiene
Useful tips to aUseful tips to a
Useful tips to a
Useful tips to aUseful tips to a
General Rules:General Rules:
General Rules:
General Rules:General Rules:
- Cotton - Linen- Cotton - Linen
- Cotton - Linen. Fill the
- Cotton - Linen- Cotton - Linen
drum but do not overload
it.
- Synthetics- Synthetics
- Synthetics. Do not fill more
- Synthetics- Synthetics
than half the drum.
- Delicates and - Delicates and
- Delicates and
- Delicates and - Delicates and
not fill the drum more than
a third.
- Heavily soiled garments:- Heavily soiled garments:
- Heavily soiled garments:
- Heavily soiled garments:- Heavily soiled garments:
reduce the quantity.
- Persistent or special- Persistent or special
- Persistent or special
- Persistent or special- Persistent or special
stains.stains.
stains. Treat these before
stains.stains.
washing by rubbing the
toughest stains with a
special detergent, with
detergent paste or
specific stain removers
(see the insert on treating
special stains with stain
removers on page 9)
HoHo
Ho
w to wash almost anw to wash almost an
w to wash almost an
HoHo
w to wash almost anw to wash almost an
WW
W
WW
ool.ool.
ool.
ool.ool.
Do
Never use your washingNever use your washing
Never use your washing
Never use your washingNever use your washing
machine to washmachine to wash
machine to wash... torn, fraying
machine to washmachine to wash
or non-hemmed linen. If it is
absolutely necessary , place it in
a bag for protection. Brightly
coloured linen with whites.
WW
atcatc
h the weight!h the weight!
W
atc
h the weight!
WW
atcatc
h the weight!h the weight!
For best results, do not exceed
the weight limits stated below
(figures show weight when dry):
--
Sturdy fabrics:Sturdy fabrics:
-
Sturdy fabrics:
--
Sturdy fabrics:Sturdy fabrics:
max 5 kg
--
Synthetic fabrics:Synthetic fabrics:
-
Synthetic fabrics:
--
Synthetic fabrics:Synthetic fabrics:
max 2.5 kg
--
Delicate fabrics:Delicate fabrics:
-
Delicate fabrics:
--
Delicate fabrics:Delicate fabrics:
max 2 kg
--
Pure virgin wool:Pure virgin wool:
-
Pure virgin wool:
--
Pure virgin wool:Pure virgin wool:
max 1 kg
TT
oo
wellingwelling
-
T
o
welling
TT
oo
wellingwelling
max 2.3 kg
vv
oid mistakesoid mistakes
v
oid mistakes
vv
oid mistakesoid mistakes
How much does it weigh?How much does it weigh?
How much does it weigh?
How much does it weigh?How much does it weigh?
1 sheet 400-500 gr.
1 pillow case 150-200 gr.
1 tablecloth 400-500 gr.
1 bathrobe 900-1,200 gr.
1 towel 150-500 gr.
Mix clothing of different Mix clothing of different
Mix clothing of different
Mix clothing of different Mix clothing of different
sizessizes
sizes with towelling:
sizessizes
bathrobes, towels, etc. This
way no “ball” will form during
the spin cycle and the
garments will stay balanced.
Coloured Coloured
Coloured
Coloured Coloured
ones and shirts last longer if
turned inside out before
washing.
Printed T-shirts and sweatshirts should always be ironed
inside out.
ythingything
ything
ythingything
TT
-shir-shir
T
-shir
TT
-shir-shir
tsts
ts, printed
tsts
Salopette alert. Salopette alert.
Salopette alert.
Salopette alert. Salopette alert.
Very popular “salopette” type
overalls have straps with hooks
that can damage the drum of
your washing machine or other
garments during the wash. By
placing the hooks in the bib
pocket and fastening them with
safety pins, all risks are avoided.
Holidays: unplug theHolidays: unplug the
Holidays: unplug the
Holidays: unplug theHolidays: unplug the
appliance.appliance.
appliance.
appliance.appliance.
When you go on holiday, we
recommend that you unplug
your washing machine,
shutting off the water inlet tap
and leaving the door opened or
ajar. This wa y , both the drum and
the gasket will remain nice and
dry and unpleasant odours will
not develop inside the washing
machine.
Curtains.Curtains.
Curtains.
Curtains.Curtains.
Curtains tend to crease a
great deal. Here is a tip to
reduce creasing: fold the
curtains and place them in a
pillow case or mesh bag. Do
not load anything else, so
that the overall weight does
not exceed the half load.
Quilted coats and wind-Quilted coats and wind-
Quilted coats and wind-
Quilted coats and wind-Quilted coats and wind-
cheaters.cheaters.
cheaters.
cheaters.cheaters.
You can wash quilted coats and
wind-cheaters, too, if they are
padded with goose or duck
down. Do not load more than 23 kg and never load 5 kg. Repeat
rinse once or twice using the
gentle spin.
TT
rainerrainer
rainer
rainerrainer
s.
s.s.
s.s.
T
TT
Once you have removed mud
and dirt from trainers, you
can wash them with jeans
and other tough garments.
Do not wash trainers with
whites.
WOOL CYCLE
For best results, use a
specific detergent, taking
care not to exceed a load
of 1 kg.
Instructions for installation and use
88
8
88
When detergents and water are not enough…
How to get rid of some special stainsHow to get rid of some special stains
How to get rid of some special stains
How to get rid of some special stainsHow to get rid of some special stains
- Red wine. Leave to soak with detergent, rinse and treat with acetic acid or citric acid, then rinse. Treat any residue with
bleach.
- Blood. Fresh stains should be treated immediately with cold water. In the event of dry blood stains, leave to soak overnight
with a special detergent and then rub with soapy water.
- Dry grease stains. Moisten with turpentine, dab the stains with your fingertips and a cotton cloth, after placing the
garment on a soft surface.
- Rust. Oxysalt (can be found in a chemists) hot molten, or a cold anti-rust product. Old stains may have already damaged
the fabric: risk of holes
- Mould stains Treat with bleach, rinse thoroughly (only white and coloured garments resistant to chlorine).
- Oil paint. Moisten with detergent petrol, dab the stains after placing the garment on top of a soft cloth, then treat
repeatedly with the detergent.
- Ink and biro. Dab with cotton soaked in methyl alcohol or alcohol at 90°.
- Tar. Dab with fresh butter, rub in turpentine then wash immediately.
- Wax. Scrape away, then run a hot iron between two sheets of absorbent paper. Then rub in cotton with turpentine or
methyl alcohol.
- Chewing gum. Rub in nail polish remover and wipe with a clean rag.
- Mould. Cotton and white linen should be placed in a solution of 5 parts water, one bleach and a spoon of vinegar, then
washed immediately. For other white fabrics, use hydrogen peroxide at 10 volumes and wash immediately.
- Lipstick. Dab with ether on wool or cotton. Use trichlorethylene for silk.
- Nail polish. Place a sheet of absorbent paper on the side of the stain, wet it with nail polish remover, shifting the garment
as the sheet gradually changes colour.
- Grass. Dab with a wad of cotton soaked in methyl alcohol.
For a safe wash cycle
How to open and shut the drumHow to open and shut the drum
How to open and shut the drum
How to open and shut the drumHow to open and shut the drum
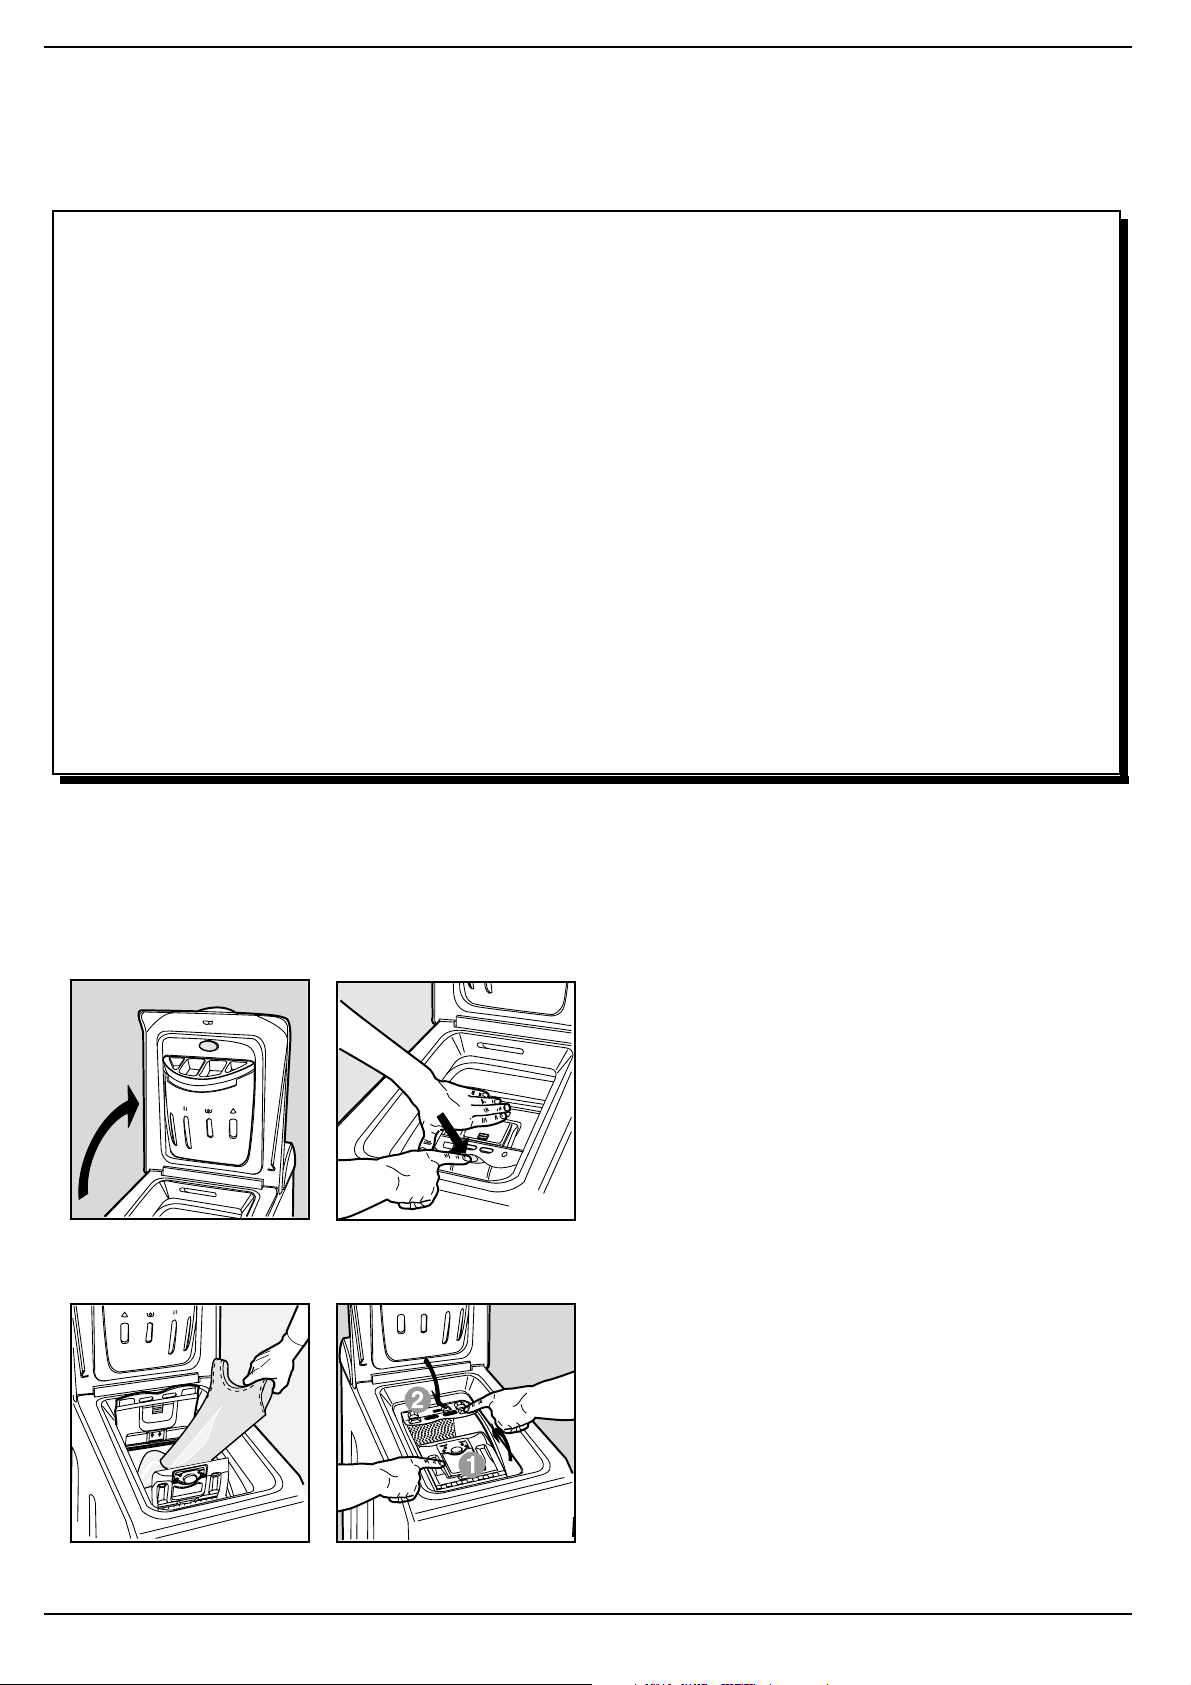
A) OPENING (Fig. 1).A) OPENING (Fig. 1).
A) OPENING (Fig. 1). Lift the external lid and open it completely.
A) OPENING (Fig. 1).A) OPENING (Fig. 1).
B) Then open the drum using both hands as shown in Fig. 2:B) Then open the drum using both hands as shown in Fig. 2:
B) Then open the drum using both hands as shown in Fig. 2:
B) Then open the drum using both hands as shown in Fig. 2:B) Then open the drum using both hands as shown in Fig. 2:
- press the button indicated by the arrow in Fig. 2 lightly downwards,
with one hand firmly resting on the doors to prevent them from
suddenly opening and hurting your fingers;- therefore follow the
appliance doors along as these unhook and open easily.
Fig. 1
Fig. 1
Fig. 3
Fig. 2
Fig. 2
Fig. 4
C) LOC) LO
ADING ADING
THE THE
WW
C) LO
ADING
C) LOC) LO
ADING ADING
D) SHUTTING. (Fig. 4).D) SHUTTING. (Fig. 4).
D) SHUTTING. (Fig. 4).
D) SHUTTING. (Fig. 4).D) SHUTTING. (Fig. 4).
- close the drum fully by first shutting the front door followed by the
rear one;
- then ensure the hooks on the front door are perfectly housed
within the seat of the rear door;
- after the hooks have clicked into position, press both doors lightly
downwards to make sure they do not come loose;
- finally shut the external lid.
THE
THE THE
ASHING MAASHING MA
W
ASHING MA
WW
ASHING MAASHING MA
CHINE.CHINE.
CHINE.
CHINE.CHINE.
(Fig. (Fig.
(Fig.
(Fig. (Fig.
3). 3).
3).
3). 3).
99
9 Instructions for installation and use
99

It's important for a good wash
The secrets of the deterThe secrets of the deter
The secrets of the deter
The secrets of the deterThe secrets of the deter
gg
ent dispenserent dispenser
g
ent dispenser
gg
ent dispenserent dispenser
The first secret: the detergent dispenser is in a handy position underneath the appliance door.
You should add detergent and
any additives following the
dosage recommended by the
manufacturers: generally, all
the indications you need are
on the box.
Doses vary Doses vary
Doses vary
Doses vary Doses vary
wash load, the waterwash load, the water
wash load, the water
wash load, the waterwash load, the water
hardness and how soiled thehardness and how soiled the
hardness and how soiled the
hardness and how soiled thehardness and how soiled the
washing is. Do not exceed.washing is. Do not exceed.
washing is. Do not exceed.
washing is. Do not exceed.washing is. Do not exceed.
More detergent does notMore detergent does not
More detergent does not
More detergent does notMore detergent does not
necessarily mean greaternecessarily mean greater
necessarily mean greater
necessarily mean greaternecessarily mean greater
wash efficiencwash efficienc
wash efficienc
wash efficiencwash efficienc
contrary…contrary…
contrary…
contrary…contrary…
Experience will help you select
the right dosage almost
automatically: it will become
your secret.
When pouring in the softener
in compartment
exceeding the “max” level
indicated.
The washing machine automatically adds the softener to
according toaccording to
according to
according toaccording to
yy
,,
on the on the
y
,
on the
yy
,,
on the on the
33
3, avoid
33
the wash in each pro-gramme.
Liquid detergent is to beLiquid detergent is to be
Liquid detergent is to be
Liquid detergent is to beLiquid detergent is to be
poured in just a few secondspoured in just a few seconds
poured in just a few seconds
poured in just a few secondspoured in just a few seconds
before starting the washbefore starting the wash
before starting the wash
before starting the washbefore starting the wash
cycle.cycle.
cycle.
cycle.cycle.
Remember that liquid de-Remember that liquid de-
Remember that liquid de-
Remember that liquid de-Remember that liquid detergent is particularly sui-tergent is particularly sui-
tergent is particularly sui-
tergent is particularly sui-tergent is particularly suitable for wash cycles of up totable for wash cycles of up to
table for wash cycles of up to
table for wash cycles of up totable for wash cycles of up to
60 degrees and those not60 degrees and those not
60 degrees and those not
60 degrees and those not60 degrees and those not
requiring pre-washing.requiring pre-washing.
requiring pre-washing.
requiring pre-washing.requiring pre-washing.
Liquid or powder detergents
are sold together with special
containers that are to be placed
directly inside the washing
machine drum, according to
the instructions found on the
detergent box.
Never use hand wash
detergent, because it may form
too much foam, which could
damage the washing machine.
One last secret: when washing
with cold water, always reduce
the amount of detergent you
use: it dissolves less easily in
cold water than in hot water, so
part of it would be wasted.
Pre-wash, bleach and fabricPre-wash, bleach and fabric
Pre-wash, bleach and fabric
Pre-wash, bleach and fabricPre-wash, bleach and fabric
softenersoftener
softener
softenersoftener
Should it be necessary to
bleach, set the special
programmes and pour the
bleach into compartment
of the detergent dispenser.
When you pour the bleach in,
take care not to exceed the
“max”“max”
“max” level indicated.
“max”“max”
The use of bleach excludesThe use of bleach excludes
The use of bleach excludes
The use of bleach excludesThe use of bleach excludes
the possibility of running athe possibility of running a
the possibility of running a
the possibility of running athe possibility of running a
pre-wash.pre-wash.
pre-wash.
pre-wash.pre-wash.
TT
raditional braditional b
T
raditional b
TT
raditional braditional b
be used on sturdy whitebe used on sturdy white
be used on sturdy white
be used on sturdy whitebe used on sturdy white
fabrics, whereas delicatefabrics, whereas delicate
fabrics, whereas delicate
fabrics, whereas delicatefabrics, whereas delicate
bleach can be used forbleach can be used for
bleach can be used for
bleach can be used forbleach can be used for
coloured fabrics andcoloured fabrics and
coloured fabrics and
coloured fabrics andcoloured fabrics and
synthetics.synthetics.
synthetics. You cannot
synthetics.synthetics.
bleach with the “Silk”
programme and with the
“Special Programmes” (see
leacleac
leac
leacleac
h can onlh can onl
h can onl
h can onlh can onl
page 6).
N.B.:N.B.:
N.B.:
N.B.:N.B.:
1) Concentrated bleach must1) Concentrated bleach must
1) Concentrated bleach must
1) Concentrated bleach must1) Concentrated bleach must
be diluted in all cases.be diluted in all cases.
be diluted in all cases.
be diluted in all cases.be diluted in all cases.
4 4
4
4 4
2) For concentrated2) For concentrated
2) For concentrated
2) For concentrated2) For concentrated
detergents (in powder ordetergents (in powder or
detergents (in powder or
detergents (in powder ordetergents (in powder or
liquid), use a programmeliquid), use a programme
liquid), use a programme
liquid), use a programmeliquid), use a programme
without pre-washing.without pre-washing.
without pre-washing.
without pre-washing.without pre-washing.
3) For detergents contained3) For detergents contained
3) For detergents contained
3) For detergents contained3) For detergents contained
in a ball or in tablets, do notin a ball or in tablets, do not
in a ball or in tablets, do not
in a ball or in tablets, do notin a ball or in tablets, do not
run a pre-wash.run a pre-wash.
run a pre-wash.
run a pre-wash.run a pre-wash.
yy
y
yy
Fabric Softener AdditionFabric Softener Addition
Fabric Softener Addition
Fabric Softener AdditionFabric Softener Addition
Fabric softener makes your
washing softer and decreases
the electrostatic load of synthetic
fibres.
Degrees of water hardness
Level -Feature German French
°dH °T.H
In compartment 1:
pre-wash (powder)pre-wash (powder)
pre-wash (powder)
pre-wash (powder)pre-wash (powder)
In compartment 2:
the wash cycle (powder and liquid)the wash cycle (powder and liquid)
the wash cycle (powder and liquid)
the wash cycle (powder and liquid)the wash cycle (powder and liquid)
In compartment 3:
In compartment 4:
Cutting costs efficiently
A guide to running your household appliances
cheaply while respecting the environment.
FULL LOAD
The best way to save on energy, water, detergent and time is to use your washing machine,
washing a full recommended load.
A full load instead of two half loads allows you to SAVE up to 50% of energy.
USE LESS DETERGENT IF: you are washing few garments, the washing is only soiled
lightly, foam forms during washing or the water is not very hard, or soft even (please see
small table above with the degrees of water hardness). To find out how hard the water in
your area is, contact your local Water Works.
IS PRE-W ASHING STRICTLY NECESSARY?
Only for extremely soiled garments.
Programming a wash WITHOUT pre-washing for lightly soiled or medium soiled garments
allows you to SAVE on detergent, time, water and between 5 and 15% of energy.
IS W ASHING WITH HOT WATER STRICTL Y NECESSAR Y?
Treating stains with a stain remover or soaking garments with dry stains in water before
washing can reduce the need to programme a wash using hot water.
Use a wash programme at 60° to SAVE up to 50% of energy.
Detergent forDetergent for
Detergent for
Detergent forDetergent for
Detergent forDetergent for
Detergent for
Detergent forDetergent for
Fabric softenerFabric softener
Fabric softener
Fabric softenerFabric softener
BleachBleach
Bleach
BleachBleach
1 - Soft
2 - Medium
3 - Hard
4 - Very hard
0- 7 0-15
8-14 16-25
15-21 26-37
more than
21
more than
the manufacturer's instructions.
The fabric softener is
automatically inserted into the
machine during the last rinse.
At the end of the wash
programme, some water will be
left in compartment 3. This is
used for the inlet of denser fabric
softeners into the machine, i.e.
to dilute the more concentrated
softeners.
Should more than a normal
amount of water remain in
compartment 3, this means the
emptying device is blocked,
thus interrupting the suction
effect of the device.
For cleaning instructions, see
page 13. Never pour fabric
softeners together with starch
into the dispenser, as the
overflow system could get
clogged.
37
Fabric softeners can be
used for towelling fabrics,
knitwear,
curtains, etc.
Pour the fabric
softener into
compartment 3
of the dispenser following
Instructions for installation and use
1010
10
1010
Troubleshooting
BefBef
Bef
BefBef
Your washing machine could fail to work. In most cases, the problems arising can be easily solved without having to
call for a technician. Before calling for assistance, always check these points.
The washing machineThe washing machine
The washing machine
The washing machineThe washing machine
fails to start.fails to start.
fails to start.
fails to start.fails to start.
Is the plug correctly Is the plug correctly
Is the plug correctly
Is the plug correctly Is the plug correctly
inserted in the socket?inserted in the socket?
inserted in the socket? It
inserted in the socket?inserted in the socket?
could have been moved
whilst cleaning.
Is there electricity in the Is there electricity in the
Is there electricity in the
Is there electricity in the Is there electricity in the
house?house?
house?
house?house?
A circuit breaker could have
gone off, perhaps because
too many appliances are on
at the same time. Or
perhaps because of a
general power failure in
your entire area.
Is the appliance door shutIs the appliance door shut
Is the appliance door shut
Is the appliance door shutIs the appliance door shut
properly?properly?
properly?
properly?properly?
For safety reasons, the
ore calling,ore calling,
ore calling,
ore calling,ore calling,
washing machine cannot
work if the door is open or
not shut properly.
Is the ON/OFF button Is the ON/OFF button
Is the ON/OFF button
Is the ON/OFF button Is the ON/OFF button
pressed?pressed?
pressed?
pressed?pressed?
If it is, then a programmed
start has been set.
Is the programmed startIs the programmed start
Is the programmed start
Is the programmed startIs the programmed start
knob, on those modelsknob, on those models
knob, on those models
knob, on those modelsknob, on those models
concerned, in the correctconcerned, in the correct
concerned, in the correct
concerned, in the correctconcerned, in the correct
position?position?
position?
position?position?
Is the water tap turned on? Is the water tap turned on?
Is the water tap turned on?
Is the water tap turned on? Is the water tap turned on?
For safety reasons, if the
washing machine does not
load water, it cannot start a
wash cycle.
read the f read the f
read the f
read the f read the f
olloollo
ollo
olloollo
wingwing
wing
wingwing
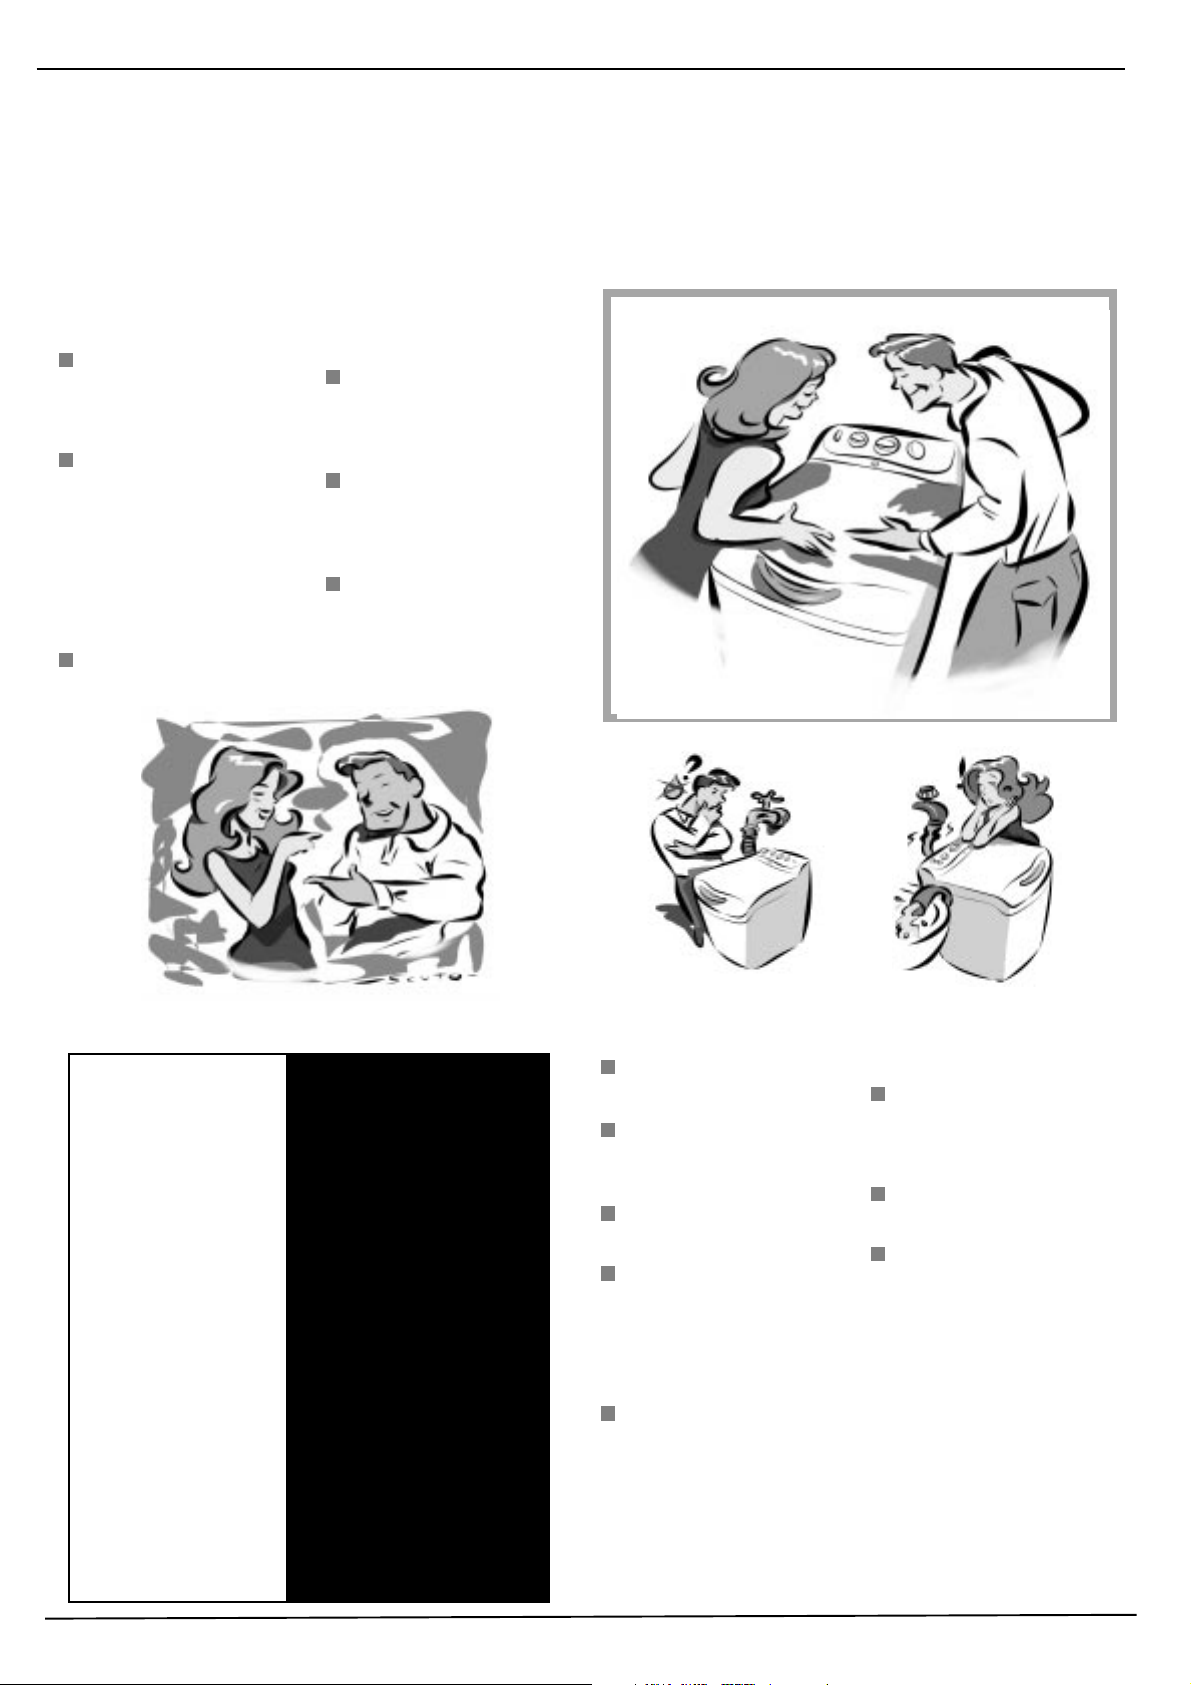
RIGHT RIGHT
RIGHT
RIGHT RIGHT
T urning off the water
tap after each wash
limits the use of the
washing machine's
hydraulic system and
eliminate leakage
risks when no-one is
at home.
T ry to only leave the
appliance in use
unattended if the place
where it is located is
equipped with a floor
drain.
Always leave all
appliance doors ajar .
This will avoid the
formation of bad
odours.
Clean the appliance's
exteriors delicately.
T o clean the exteriors
and the rubber parts of
the appliance, always
use a cloth dipped in
lukewarm soapy water .
WRONG
Leave the washing machine
plugged in while cleaning.
Even during maintenance,
the appliance should always
be unplugged.
Use solvents and aggressive abrasives.
Never use solvents or
abrasives to clean the
external and rubber parts
of the washing machine.
Neglect the detergent
dispenser .
It is removable and can
easily be cleaned by leaving
it under running water .
Go on holiday without
thinking about it.
Before leaving, always
make sure that the washing
machine is unplugged and
that the water tap is turned
off.
The washing machineThe washing machine
The washing machine
The washing machineThe washing machine
fails to load waterfails to load water
fails to load water
fails to load waterfails to load water
Is the tap correctly Is the tap correctly
Is the tap correctly
Is the tap correctly Is the tap correctly
attached to the pipe?attached to the pipe?
attached to the pipe?
attached to the pipe?attached to the pipe?
Is there a water shortage?Is there a water shortage?
Is there a water shortage?
Is there a water shortage?Is there a water shortage?
There could be work in
progress in your building or
street.
Is there enough pressure?Is there enough pressure?
Is there enough pressure?
Is there enough pressure?Is there enough pressure?
The autoclave may be
malfunctioning.
Is the tap filter clean?Is the tap filter clean?
Is the tap filter clean? If the
Is the tap filter clean?Is the tap filter clean?
water is very calcareous, or
if work has recently been
carried out on the water
piping, the tap filter could be
clogged with particles and
debris.
Is the rubber hose bent?Is the rubber hose bent?
Is the rubber hose bent?
Is the rubber hose bent?Is the rubber hose bent?
The tract of the rubber hose
bringing water to the
washing machine must be
as straight as possible.
Make sure it is not
squashed or bent.
..
.
..
The washing machineThe washing machine
The washing machine
The washing machineThe washing machine
continuously loadscontinuously loads
continuously loads
continuously loadscontinuously loads
and unloads waterand unloads water
and unloads water
and unloads waterand unloads water
Is the drain hoseIs the drain hose
Is the drain hose
Is the drain hoseIs the drain hose
positioned too low?positioned too low?
positioned too low? It must
positioned too low?positioned too low?
be installed at a height
ranging from 60 to 100 cm.
Is the hose’Is the hose’
Is the hose’
Is the hose’Is the hose’
immersed in water?immersed in water?
immersed in water?
immersed in water?immersed in water?
Does the wall drainageDoes the wall drainage
Does the wall drainage
Does the wall drainageDoes the wall drainage
system have a breathersystem have a breather
system have a breather
system have a breathersystem have a breather
pipe? pipe?
pipe? If the problem
pipe? pipe?
persists even after these
checks, turn off the water
tap, switch the appliance off
and call for assistance.
If you live on an upper floor
of your building, there may
be a problem with your
..
.
..
s mouths mouth
s mouth
s mouths mouth
11 11
11 Instructions for installation and use
11 11
The washing machineThe washing machine
The washing machine
The washing machineThe washing machine
does not drain or spin.does not drain or spin.
does not drain or spin.
does not drain or spin.does not drain or spin.
Does the selectedDoes the selected
Does the selected
Does the selectedDoes the selected
programme foresee waterprogramme foresee water
programme foresee water
programme foresee waterprogramme foresee water
draining?draining?
draining? Some wash
draining?draining?
cycles require enabling the
draining manually.
Has the Has the
Has the
Has the Has the
function - in thosefunction - in those
function - in those
function - in thosefunction - in those
appliances where it isappliances where it is
appliances where it is
appliances where it isappliances where it is
foreseen - been enabled?foreseen - been enabled?
foreseen - been enabled?
foreseen - been enabled?foreseen - been enabled?
This function requires
enabling the draining
manually.
Is the drain pump clogged?Is the drain pump clogged?
Is the drain pump clogged?
Is the drain pump clogged?Is the drain pump clogged?
To check it, turn off the tap,
unplug the washing
machine and follow the
instructions on page 12, or
call for technical assistance.
“Anti-crease”“Anti-crease”
“Anti-crease”
“Anti-crease”“Anti-crease”
Always get
assistance from
authorised
technicians and
always insist on
original spare parts
Is the rubber hose bent?Is the rubber hose bent?
Is the rubber hose bent?
Is the rubber hose bent?Is the rubber hose bent?
The tract of the drain hose
must be as straight as
possible. Make sure it is not
squashed or bent.
Is the washing macIs the washing mac
Is the washing mac
Is the washing macIs the washing mac
drain duct clogged? drain duct clogged?
drain duct clogged? Is
drain duct clogged? drain duct clogged?
there an extension on the
drain hose? If so, is it
positioned incorrectly,
blocking the water flow?
The washing machineThe washing machine
The washing machine
The washing machineThe washing machine
vibrates too muchvibrates too much
vibrates too much
vibrates too muchvibrates too much
during the spin cycle.during the spin cycle.
during the spin cycle.
during the spin cycle.during the spin cycle.
Has the internal floatingHas the internal floating
Has the internal floating
Has the internal floatingHas the internal floating
unit been correctlyunit been correctly
unit been correctly
unit been correctlyunit been correctly
unblocked duringunblocked during
unblocked during
unblocked duringunblocked during
installation? installation?
installation? See page 2
installation? installation?
on installation procedures.
Has the washing machineHas the washing machine
Has the washing machine
Has the washing machineHas the washing machine
been levelled correctly?been levelled correctly?
been levelled correctly?
been levelled correctly?been levelled correctly?
The levelling of the
appliance should be
checked periodically. In
time, the appliance could
move imperceptibly. Adjust
the feet and check them
with a level.
Has it got enough roomHas it got enough room
Has it got enough room
Has it got enough roomHas it got enough room
arar
ound it?ound it?
ar
ound it? The appliance
arar
ound it?ound it?
hine’hine’
hine’
hine’hine’
should not be leaning
against any sanitary fixtures
and must have some free
space around it. If it is
placed on a fitted carpet
floor, ensure that there is
enough room for air to
ss
s
ss
circulate between the
appliance feet and the
carpet.
The washing machineThe washing machine
The washing machine
The washing machineThe washing machine
leaks.leaks.
leaks.
leaks.leaks.
Is the metal ring of the inletIs the metal ring of the inlet
Is the metal ring of the inlet
Is the metal ring of the inletIs the metal ring of the inlet
hose properly attached?hose properly attached?
hose properly attached?
hose properly attached?hose properly attached?
Tur n off the tap, unplug the
appliance and try tightening
its attachment without
forcing it.
Is the detergent dispenserIs the detergent dispenser
Is the detergent dispenser
Is the detergent dispenserIs the detergent dispenser
obstructed? obstructed?
obstructed? Try extracting
obstructed? obstructed?
it and washing it under tap
water.
Is the drain hose wellIs the drain hose well
Is the drain hose well
Is the drain hose wellIs the drain hose well
attacattac
hed?hed?
attac
hed? Turn off the tap,
attacattac
hed?hed?
unplug the appliance and
try tightening its attachment.
TT
oo moo m
ucuc
h fh f
T
oo m
TT
oo moo m
Is the detergent suitableIs the detergent suitable
Is the detergent suitable
Is the detergent suitableIs the detergent suitable
for washing-machinefor washing-machine
for washing-machine
for washing-machinefor washing-machine
use?use?
use? Make sure that it
use?use?
bears the definition "for
washing-machines" or
"hand and machine wash",
or the like.
Is the correct amountIs the correct amount
Is the correct amount
Is the correct amountIs the correct amount
being used?being used?
being used? An excessive
being used?being used?
amount of detergent,
besides producing too
much foam, does not
guarantee a more effective
wash, and causes scaling
in the internal parts of the
appliance.
If, despite all checks, the
washing machine fails to
function and the problem
persists, call your nearest
authorised Customer Service
Centre, providing the following
information:
--
the type of malfunctioningthe type of malfunctioning
-
the type of malfunctioning
--
the type of malfunctioningthe type of malfunctioning
--
the model type no.(Mod. )the model type no.(Mod. )
-
the model type no.(Mod. )
--
the model type no.(Mod. )the model type no.(Mod. )
- the serial number (S/N …..)- the serial number (S/N …..)
- the serial number (S/N …..)
- the serial number (S/N …..)- the serial number (S/N …..)
These indications can be found
on the data plate situated on
the back of the washing
machine front base. (fig. 1)
uc
ucuc
h f
h fh f
oam.oam.
oam.
oam.oam.
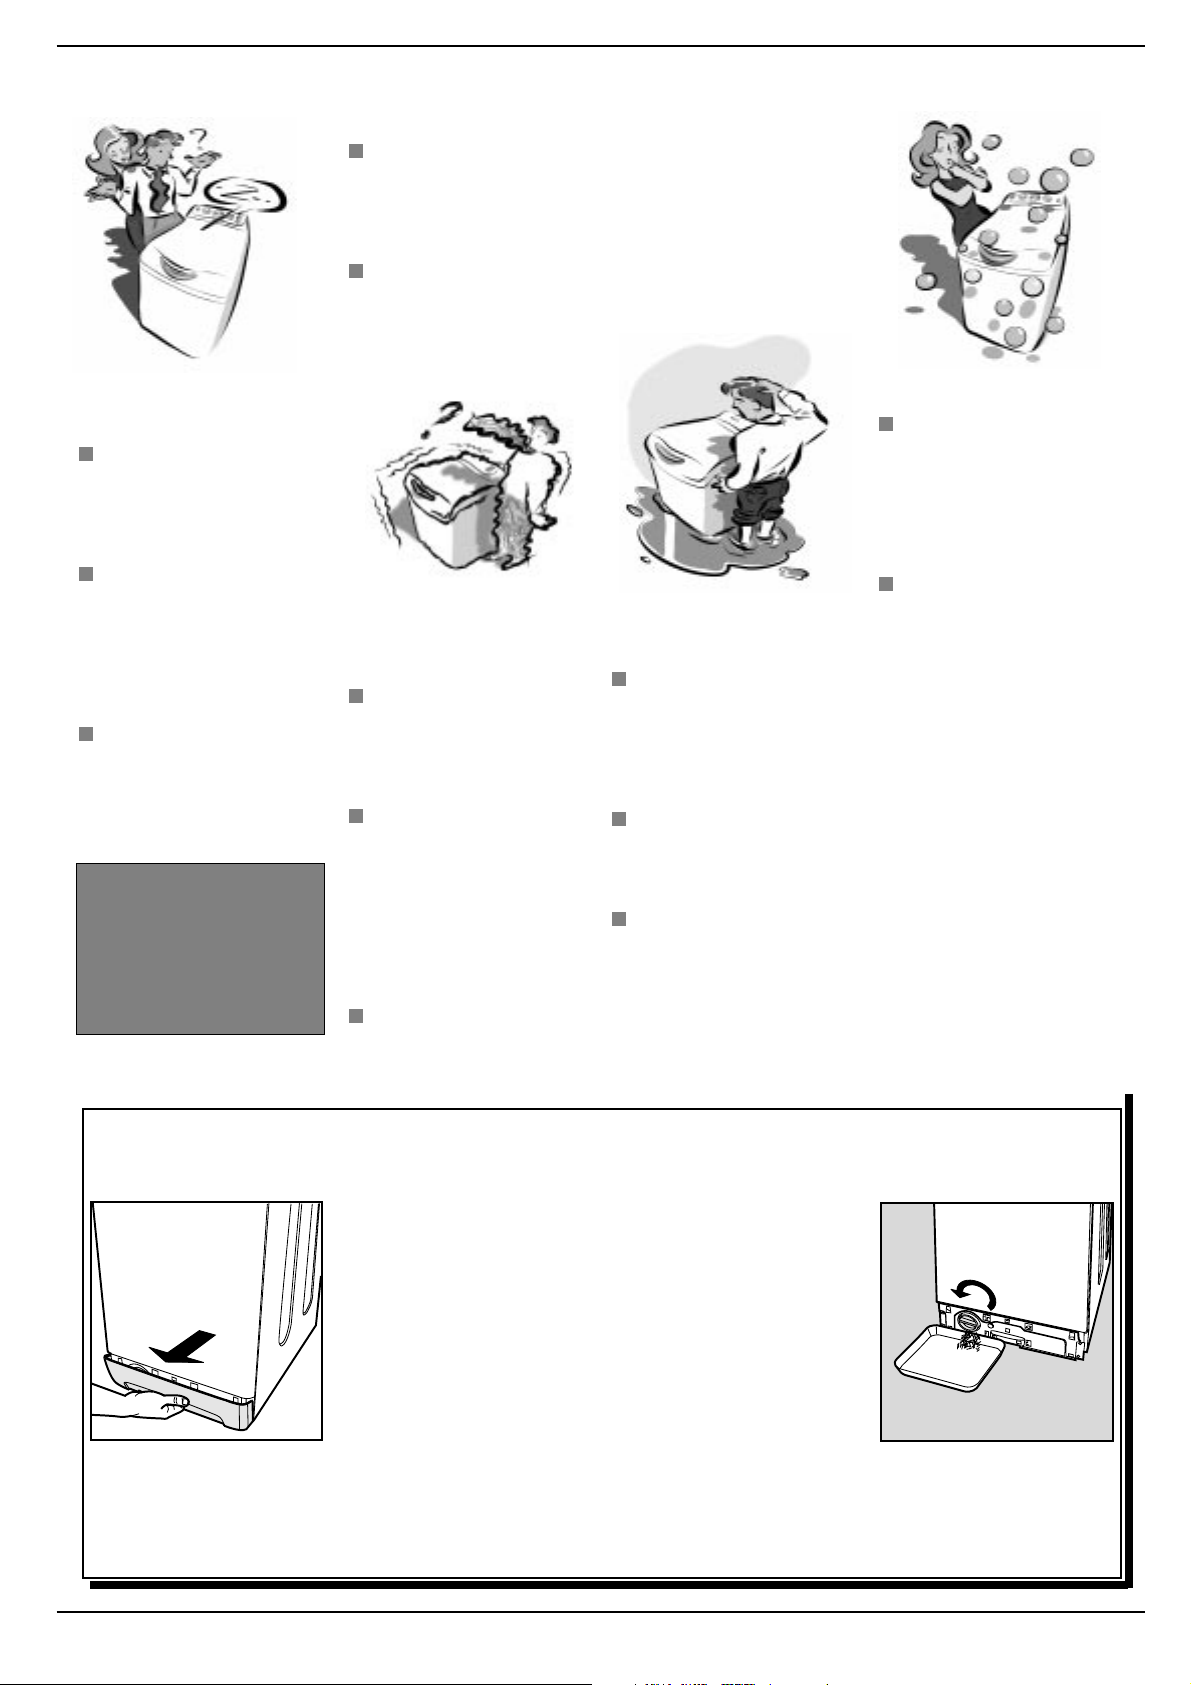
When in need, check the pump and the rubber hose.When in need, check the pump and the rubber hose.
When in need, check the pump and the rubber hose.
When in need, check the pump and the rubber hose.When in need, check the pump and the rubber hose.
The washing machine comes equipped with a self-cleaning pump that does not require any cleaning or maintenance. Small objects
may accidentally fall into the pump: coins, hair clips, loose buttons and other small items. T o avoid possible damage, they are
withheld in an accessible pre-chamber , situated at the lower end of the pump.
To access this pre-chamber, just remove the panel covering the
bottom of the washing machine (fig. 1); then lift the cover rotating it
anti-clockwise (fig. 2) and check its contents accurately.
The rubber hose
Check the rubber hose at least once a year. If you see any cracks,
replace it immediately. When you use your washing machine, water
pressure is very strong and a cracked hose could easily split open.
Fig. 1
Fig. 1
Fig. 2
Warning: make sure that the wash cycle has come to a full stop and unplug the appliance before removing the lid as well as before any
type of maintenance procedure. It is normal to find that a little water comes out after removing the lid. When replacing the panel, make
sure you insert the hooks situated at the bottom of the washing machine in the right slots before pushing it back against the appliance.
Instructions for installation and use
1212
12
1212
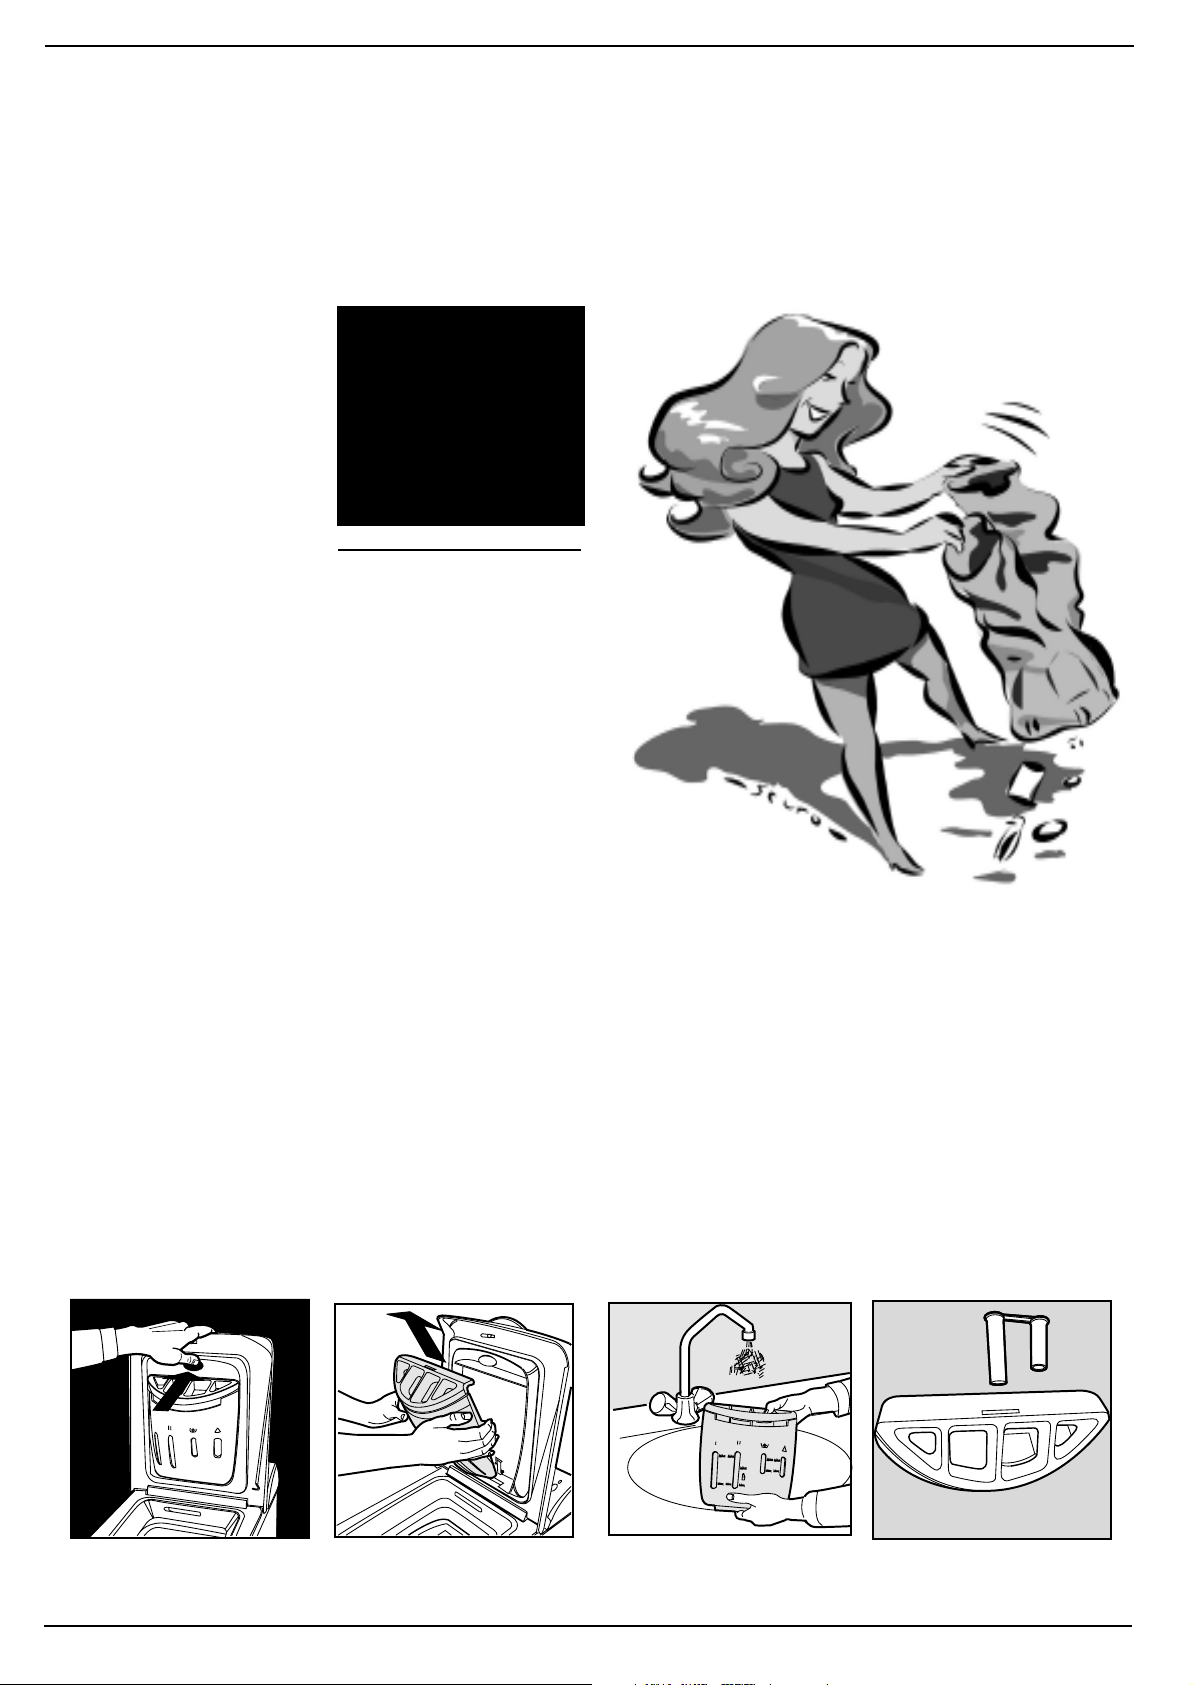
Easy Care and Maintenance
TT
reat it well and it'll be yreat it well and it'll be y
T
reat it well and it'll be y
TT
reat it well and it'll be yreat it well and it'll be y
Y our washing machine is a r eliable companion in life and on
friend ffriend f
friend f
friend ffriend f
oreore
ore
oreore
verver
ver
verver
the job. It is just as important for you to keep it in shape.
ourour
our
ourour
Your washing machine is
designed to last a lifetime
without any problems. A few
simple steps help keep it in
shape and last longer.
Firstly, you must turn off the
water tap after each wash:
the constant pressure of water
could warp a few of the
component parts.
In addition, by doing so, you
will avoid the risk of leaks when
no-one is at home.
If the water in your area is too
hard, use a deliming product
(water is hard if it often leaves
whitish stains around taps or
drains, especially of bath tubs.
For more accurate information
as to the type of water in your
system, call the local water
works or a local plumber).
Pockets must always be
emptied by removing even
coins, pins, badges and any
other hard object.
The washing machine exterior
should be cleaned with a cloth
dipped in lukewarm soapy
water.
It is important to wash
the detergent dispenser
regularly.
To prevent dried washing
powder from
accumulating, place the
dispenser under running
water for a few minutes.
Never exaggerate with
detergent doses.
Normal detergents already
contain deliming agents. Only
if the water is particularly hard,
that is, rich in lime content, do
we recommend the use of a
specific product at every wash.
A periodical wash cycle with a
dose of a deliming product,
without detergents or
washing, may prove useful.
Never use too much detergent
or additives because this
could cause an excess
amount of foam, scaling and
possible damage to the
component parts of your
washing machine.
Do not forget to empty all pockets:
small metallic objects can cause damage to your
washing machines drum during the spin cycle.
HoHo
Ho
HoHo
Fig. 1
1313
13 Instructions for installation and use
1313
w to cw to c
w to c
w to cw to c
Disassembly:Disassembly:
Disassembly:
Disassembly:Disassembly:
Press lightly on the large button on the front of the detergent
dispenser and pull it upwards
(fig. 1).
lean the deterlean the deter
lean the deter
lean the deterlean the deter
gg
ent dispenserent dispenser
g
ent dispenser
gg
ent dispenserent dispenser
Cleaning:Cleaning:
Cleaning:
Cleaning:Cleaning:
Then clean the dispenser under a tap (fig. 3) using an old toothbrush and, once the pair of siphons inserted in the top of compartments 1 and 2 (fig. 4) have been pulled out, check whether
the same are not clogged and then rinse them.
Fig. 2
Fig. 3
Reassembly:Reassembly:
Reassembly:
Reassembly:Reassembly:
Do not forget to reinsert the
pair of siphons into the special
housings and then to replace
the dispenser into its seat,
clicking it into place (fig. 4, 2
and 1).
Fig. 4
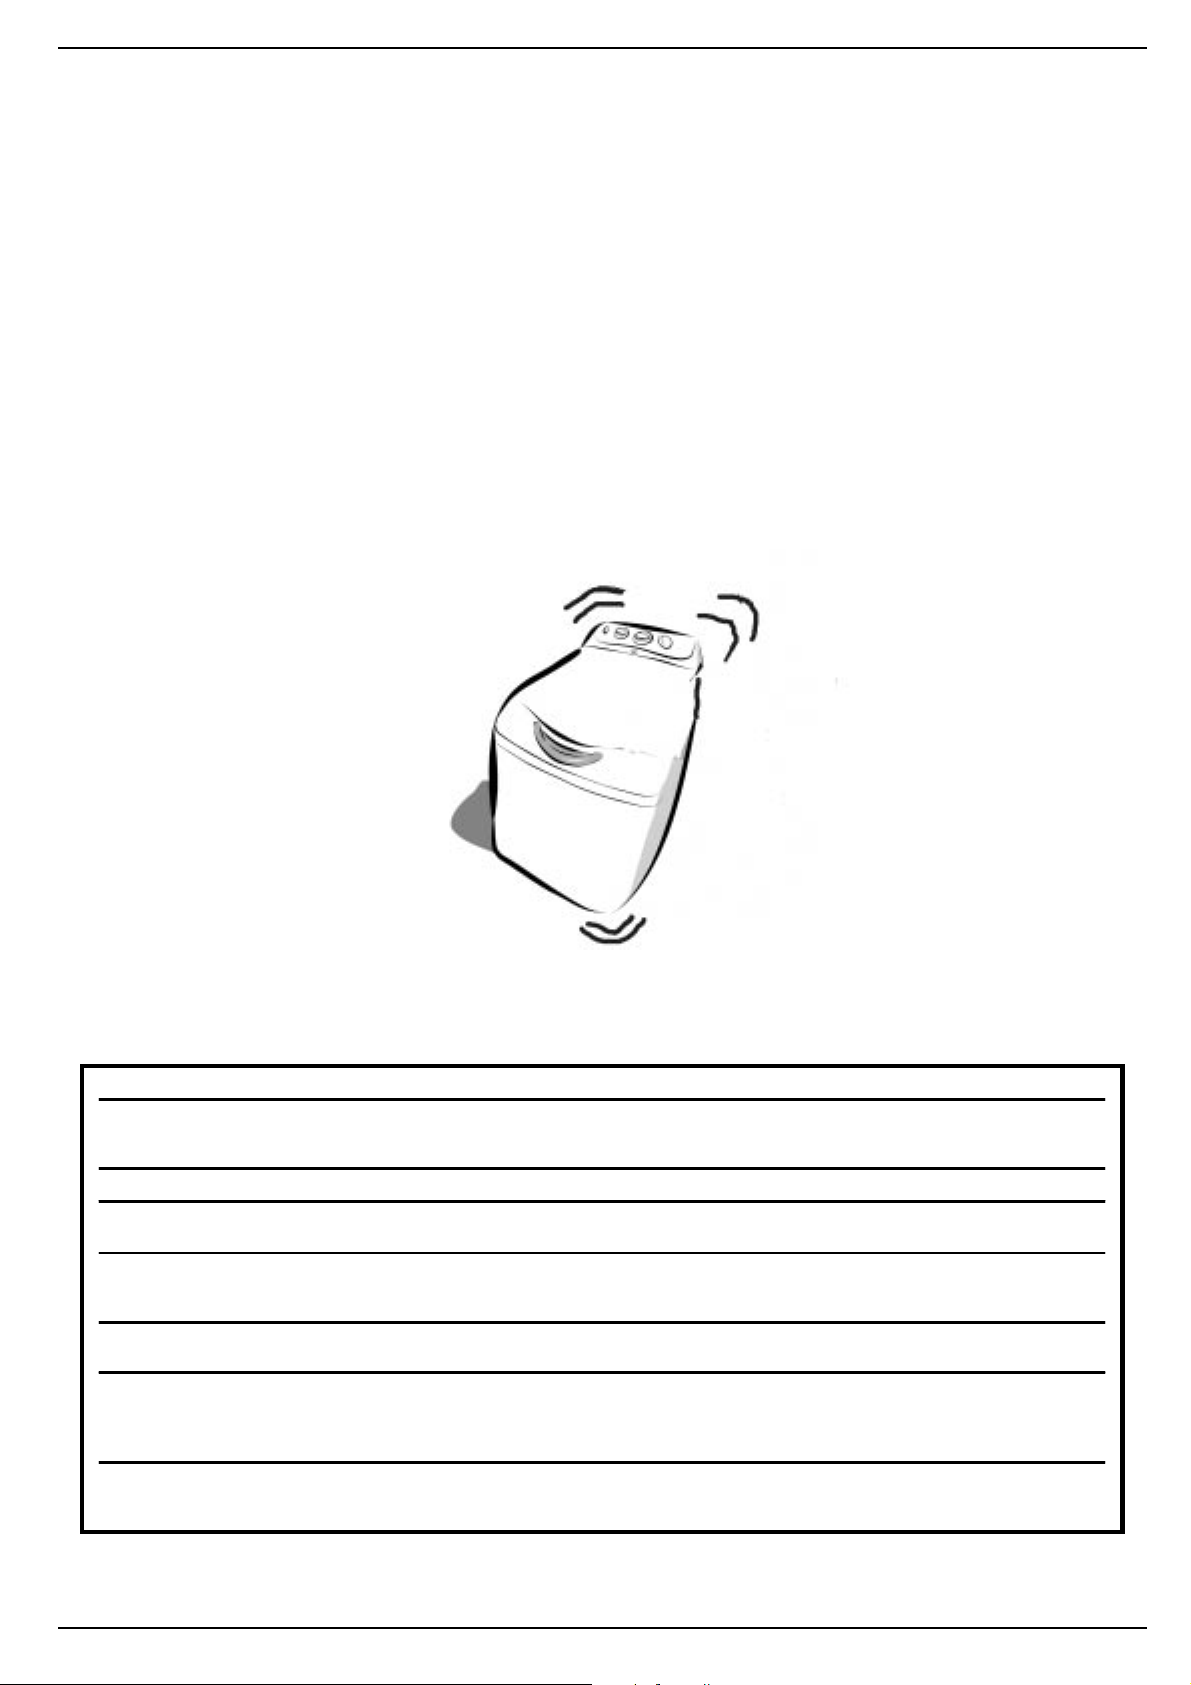
We take care of your loads
Electronic ABC balancing ofElectronic ABC balancing of
Electronic ABC balancing of
Electronic ABC balancing ofElectronic ABC balancing of
your spin cycleyour spin cycle
your spin cycle
your spin cycleyour spin cycle
Warning
This appliance is equipped
with an electronic autobalancing device (
Balance Control)
enables the spin cycle to be
run at high speed only with
well-distributed wash loads.
An unbalanced wash load
would in fact seriously
damage the appliance.
Before each spin cycle phase,
the ABC auto-balancing
system makes the drum
perform repeated revolutions,
both clockwise and anticlockwise, in order to distribute the
garments inside it uniformly
and then to start the spin cycle
off gently .
Auto
that
In special load conditions,
these revolutions may not be
sufficient to distribute the
weight inside the drum evenly
(if there are towel bathrobes,
blankets and sheets inside it
that have formed a “ball”, etc.).
In these conditions, two
different things may happen:
- the ABC system “accepts” the
imbalance, but reduces
the spin speed. In this
case, the clothes will come
out wetter than usual;
- the ABC system deems this
imbalance to be beyond the
acceptability threshold and
excludes the spin cycle. In
this case, take out the
washing, unroll the
garments and put them all
back into the appliance and
set the spin cycle
programme.
In both cases, it is not a matter
of poor appliance quality, but
raher one of the more
advanced features it has to
protet it from breakages,
vibrations, movements on the
floor or other inconveniences.
TT
ecec
T
TT
The manufacturer reserves the right to make any modifications whatsoever, at any time and without notice, to the appliance or any of its accessories that may be deemed necessary for technical or commercial requirements.
hnical fhnical f
ec
hnical f
ecec
hnical fhnical f
Model
Dimensions
Capacity
Electric
connections
Water connections
Spin speed/min
Controlling
programmes in
accordance with
IEC Norm 456
WT 120
width c m 4 0
height cm 85
dep th cm 60
from 1 to 5 kg
voltage 230 Volts 50Hz
maximum absorbed power 2100 W
max imum pressure 1 Mpa (10 bar)
minimum pressure 0.05 Mpa (0 .5 bar)
drum ca pa ci ty 42 litr es
up to 1200 r.p.m.
run with a load of 5.0 kg, programme 3, 60° C
This appliance conforms with the following European Community Directives:
- 73/23/EEC of 19/02/73 (Low Voltage) and subsequent modifications
- 89/336/EEC of 03/05/89 (Electromagnetic Compatibility) and subsequent modifications
eatureseatures
eatures
eatureseatures
Instructions for installation and use
14 14
14
14 14

Merloni Elettrodomestici
Viale Aristide Merloni 47
60044 Fabriano
Italy
Tel no. +39 0732 6611
Fax no. +39 0732 662501
www.merloni.com
We work, you play
01/2003- 195 034 985 02 - Export - Xerox Business Docutech
Lave-linge Top
Mode d'installation et d'emploi F
WT 120
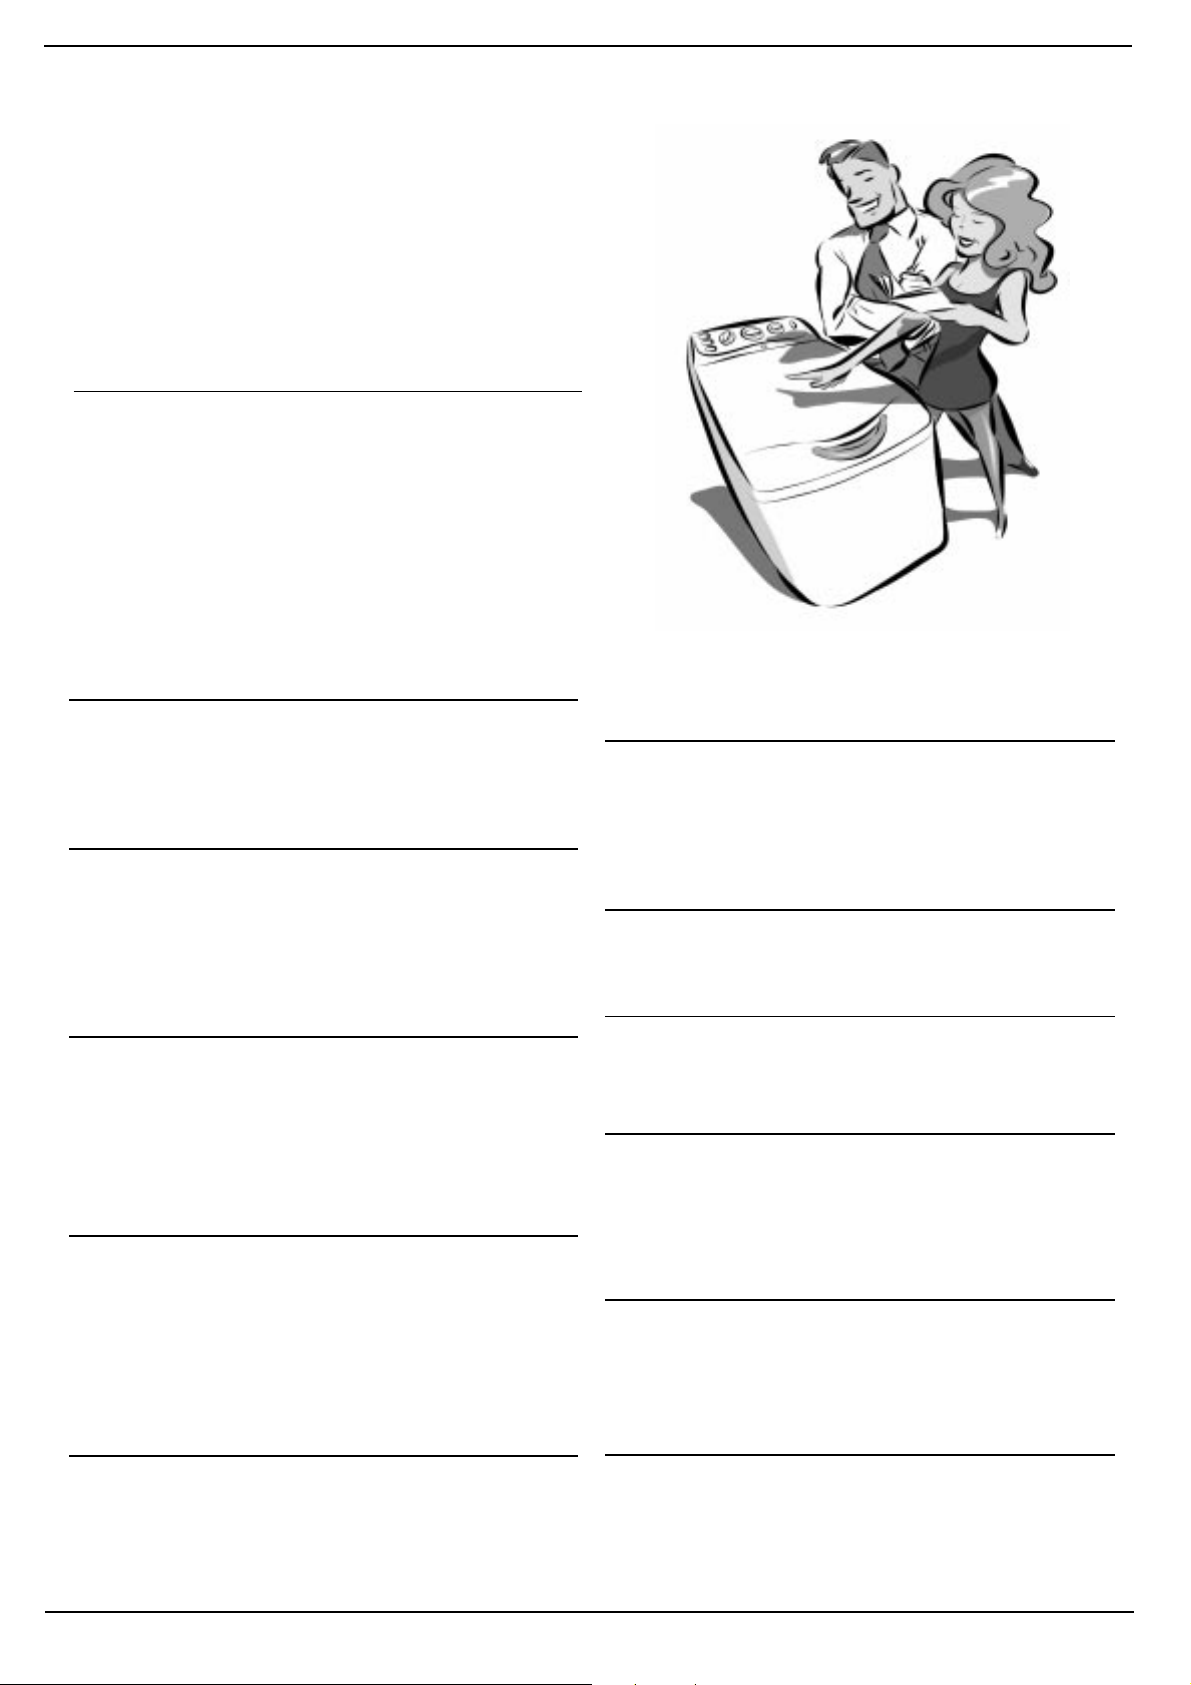
Guide rapideGuide rapide
Guide rapide
Guide rapideGuide rapide
Découvrez ci-dessous les 12 sujets qui seront développés dans les pages de ce manuel. Lisez, apprenez,
amusez-vous: vous découvrirez un tas de petits secrets
pour laver mieux, avec moins d'efforts tout en
augmentant la longévité de votre lave-linge. Et surtout,
en toute sécurité .
Installation et déménagement (page 2)Installation et déménagement (page 2)
1.
Installation et déménagement (page 2)
Installation et déménagement (page 2)Installation et déménagement (page 2)
Pour un bon fonctionnement du lave-linge, l'opération la plus
importante après sa livraison ou après un déménagement, est
sans aucun doute son installation. Vérifiez toujours:
1.1.
1. si l'installation électrique est conforme;
1.1.
2.2.
2. si les tuyaux d'arrivée et de vidange de l'eau sont bien raccordés
2.2.
correctement;
3.3.
3. si le lave-linge est bien nivelé. C'est important: pour la longévité
3.3.
de votre lave-linge et pour la qualité de votre lessive;
4.4.
si les vis de fixage de la cuvesi les vis de fixage de la cuve
4.
si les vis de fixage de la cuve qui se trouvent sur le panneau
4.4.
si les vis de fixage de la cuvesi les vis de fixage de la cuve
arrière
2.
ont bien été enlevées.ont bien été enlevées.
ont bien été enlevées.
ont bien été enlevées.ont bien été enlevées.
Sécurité pour vous et vos enfants (page 3)Sécurité pour vous et vos enfants (page 3)
Sécurité pour vous et vos enfants (page 3)
Sécurité pour vous et vos enfants (page 3)Sécurité pour vous et vos enfants (page 3)
Vous y trouverez tous les conseils indispensables à votre sécurité
et à celle de votre famille. C'est ce qu'il y a de plus important.
Comment charger votre lave-linge et le mettre enComment charger votre lave-linge et le mettre en
3.
Comment charger votre lave-linge et le mettre en
Comment charger votre lave-linge et le mettre enComment charger votre lave-linge et le mettre en
service (page 4)service (page 4)
service (page 4)
service (page 4)service (page 4)
Triez correctement v otre linge: c'est une opération importante dont
la réussite de votre lessive et la longévité de votre lave-linge
dépendent. Apprenez tous les trucs et tous les secrets pour trier
votre lessive: les couleurs, les textiles, la tendance à produire des
peluches, voilà quels sont les critères les plus importants.
Bien maîtriser le bandeau de commandes (page 5) Bien maîtriser le bandeau de commandes (page 5)
4.
Bien maîtriser le bandeau de commandes (page 5)
Bien maîtriser le bandeau de commandes (page 5) Bien maîtriser le bandeau de commandes (page 5)
Le bandeau de commandes est très simple. Quelques commandes
essentielles pour choisir les types de lavage, du plus énergique,
pour laver une combinaison de mécanicien, jusqu'au plus délicat
pour la laine. Apprenez à vous en servir, vous laverez mieux,
dépenserez moins et prolongerez la durée de vie de votre lavelinge. C'est facile.
Guide des programmes de lavage (page 6)Guide des programmes de lavage (page 6)
5.
Guide des programmes de lavage (page 6)
Guide des programmes de lavage (page 6)Guide des programmes de lavage (page 6)
Un tableau facile à consulter pour cerner d'un seul coup d'œil tous
les programmes, les températures, les produits lessiviels et
additionnels. Utilisez le bon et vous obtiendrez de meilleurs
résultats en économisant du temps, de l'eau et de l'électricité, jour
après jour.
Conseils utiles pour ne pas vous tromper (page 8)Conseils utiles pour ne pas vous tromper (page 8)
7.
Conseils utiles pour ne pas vous tromper (page 8)
Conseils utiles pour ne pas vous tromper (page 8)Conseils utiles pour ne pas vous tromper (page 8)
Autrefois, on suivait les bons conseils de grand-mère - et les
matières synthétiques n'existaient pas: il était donc facile de laver.
Désormais c'est votre lave-linge qui vous donne de nombreux
bons conseils.
Comment fermer le tambour (page 9)Comment fermer le tambour (page 9)
8.
Comment fermer le tambour (page 9)
Comment fermer le tambour (page 9)Comment fermer le tambour (page 9)
Pour un lavage en toute sécurité ouvrez et fermez bien le hublot.
Le tiroir à produits lessiviels (page 10)Le tiroir à produits lessiviels (page 10)
9.
Le tiroir à produits lessiviels (page 10)
Le tiroir à produits lessiviels (page 10)Le tiroir à produits lessiviels (page 10)
Comment utiliser le tiroir à produits lessiviels.
Problèmes et solutions (pages 11 et 12)Problèmes et solutions (pages 11 et 12)
10.
Problèmes et solutions (pages 11 et 12)
Problèmes et solutions (pages 11 et 12)Problèmes et solutions (pages 11 et 12)
Avant d'appeler un technicien, lisez ces pages: de nombreux
problèmes peuvent trouver une solution immédiate. Si vous
n'arrivez pas à les résoudre, appelez alors le numéro du SAV
Indesit et en un rien de temps la panne sera réparée.
Soin et entretien (paSoin et entretien (pa
11.
Soin et entretien (pa
Soin et entretien (paSoin et entretien (pa
Votre lave-linge est un ami: quelques petites attentions suffisent
pour qu'il vous rende la pareille en fidélité et dévotion.
Chouchoutez-le, il lavera pour vous pendant des années et des
années.
gg
es 12 et 13)es 12 et 13)
g
es 12 et 13)
gg
es 12 et 13)es 12 et 13)
Guide pour comprendre les étiquettes et lesGuide pour comprendre les étiquettes et les
6.
Guide pour comprendre les étiquettes et les
Guide pour comprendre les étiquettes et lesGuide pour comprendre les étiquettes et les
symboles (pages 7-8)symboles (pages 7-8)
symboles (pages 7-8)
symboles (pages 7-8)symboles (pages 7-8)
Les symboles internationaux reportés sur les étiquettes des
vêtements sont très faciles à comprendre et importants quant à la
réussite du lavage. Ce guide vous aidera à vous y retrouver parmi
les programmes, les températures conseillées, les types de lavage
et de repassage et les symboles spécifiques Indesit.
11
1 Mode d'installation et d'emploi
11
Caractéristiques techniques (page 14)Caractéristiques techniques (page 14)
12.
Caractéristiques techniques (page 14)
Caractéristiques techniques (page 14)Caractéristiques techniques (page 14)
Vous y trouverez les caractéristiques techniques de votre lavelinge: sigle du modèle, spécifications électriques et hydrauliques,
dimensions, capacité, vitesse d'essorage et conformité aux normes
et aux directives italiennes et européennes.
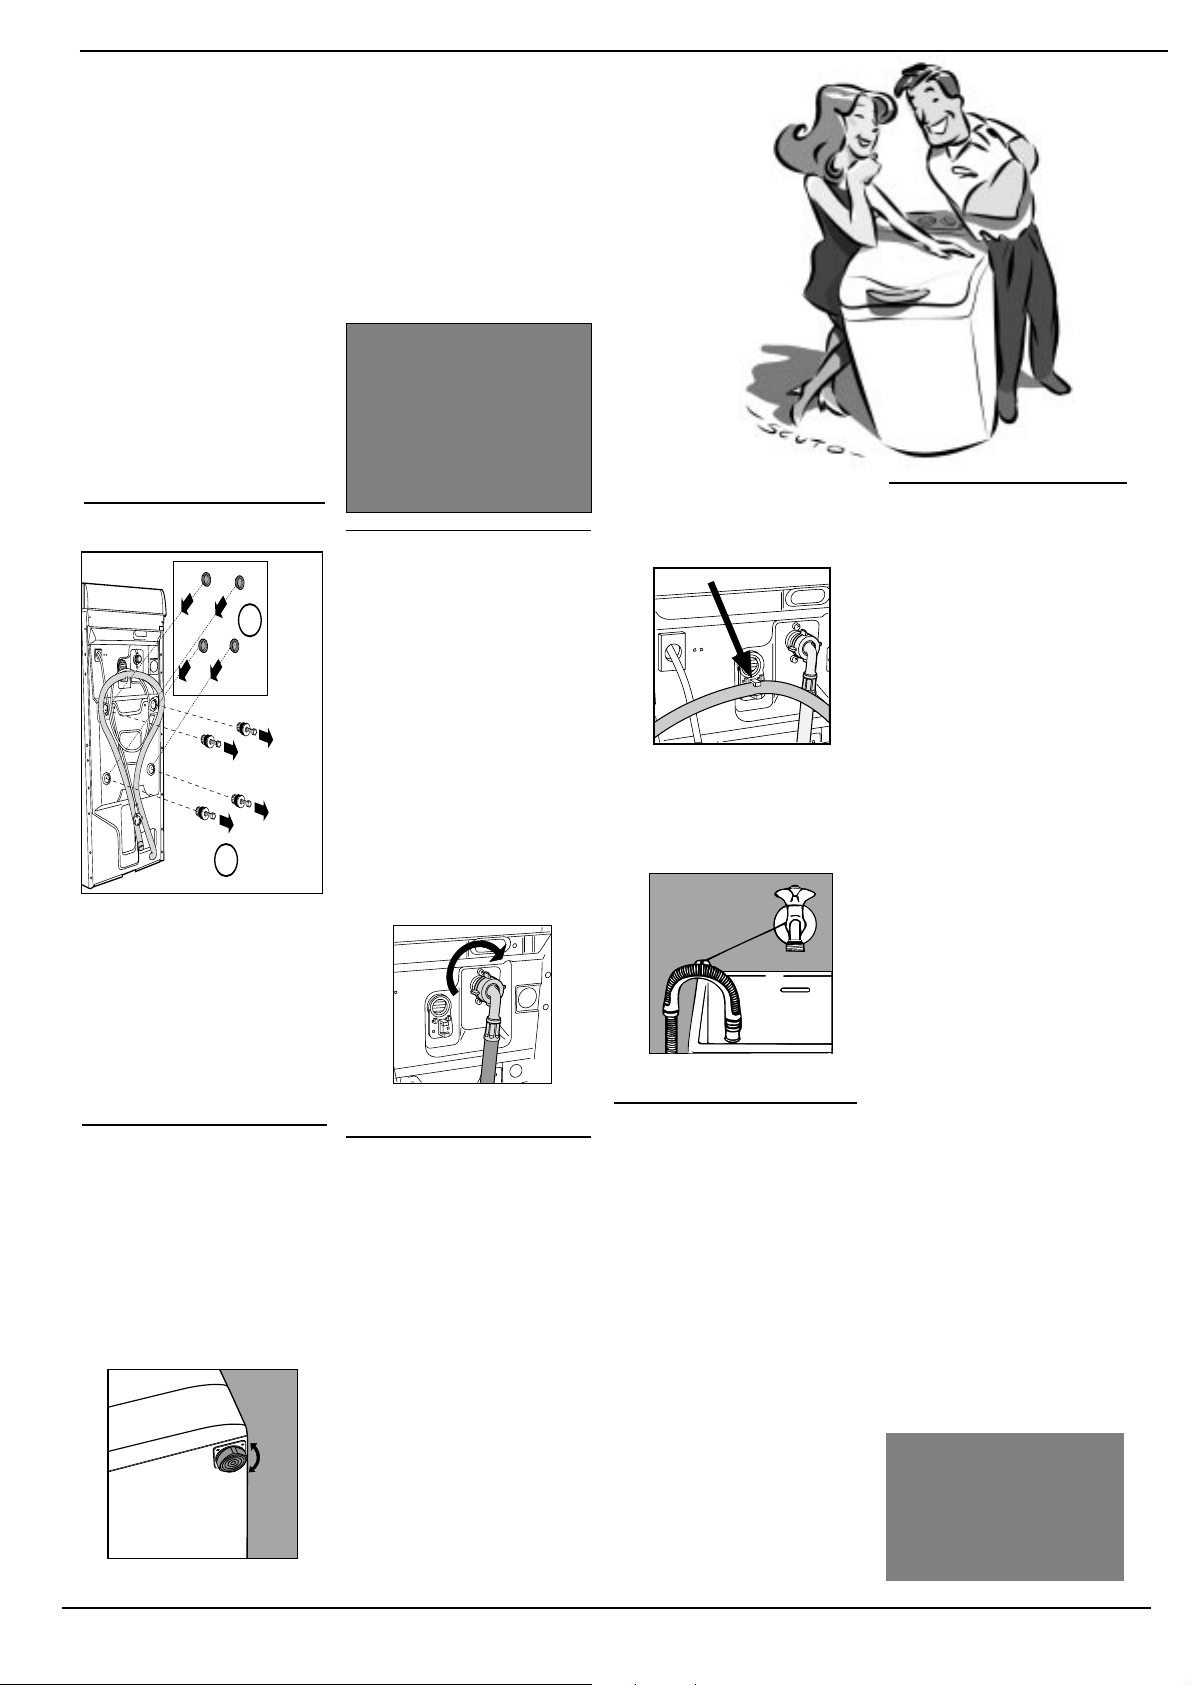
Installation et déménagement
Quand vQuand v
Quand v
Quand vQuand v
lala
ve-lingve-ling
la
ve-ling
lala
ve-lingve-ling
Que votre lave-linge soit neuf ou que vous veniez juste de déménager ,
son bon fonctionnement dépend en grande partie de son installation.
Après avoir déballé l'appareil,
vérifiez s'il est en bon état. En
cas de doute, faites appel à un
professionnel du secteur .
permettre son transport, l'in-permettre son transport, l'in-
permettre son transport, l'in-
permettre son transport, l'in-permettre son transport, l'intérieur du lave-linge a été blo-térieur du lave-linge a été blo-
térieur du lave-linge a été blo-
térieur du lave-linge a été blo-térieur du lave-linge a été bloqué à l'aide de quatre vis etqué à l'aide de quatre vis et
qué à l'aide de quatre vis et
qué à l'aide de quatre vis etqué à l'aide de quatre vis et
de caoutchoucs sur le pan-de caoutchoucs sur le pan-
de caoutchoucs sur le pan-
de caoutchoucs sur le pan-de caoutchoucs sur le panneau arrière de la machine.neau arrière de la machine.
neau arrière de la machine.
neau arrière de la machine.neau arrière de la machine.
Déblocage: enleverDéblocage: enlever
Déblocage: enlever
Déblocage: enleverDéblocage: enlever
les 4 vis!les 4 vis!
les 4 vis!
les 4 vis!les 4 vis!
PP
P
PP
ourour
our
ourour
2
1
Avant de brancher votre lavelinge, enlevez les vis, les
caoutchoucs et la cale
(conservez bien toutes ces
pièces) et bouchez les trous à
l'aide des cache-trous en
plastique fournis avec
l'appareil.
Attention : Attention :
Attention : en cas de
Attention : Attention :
réutilisation, les vis plus courtes
doivent être montées dessus.
Mise à niveauMise à niveau
Mise à niveau
Mise à niveauMise à niveau
Pour bien fonctionner, il est
important que votre lave-linge soit
bien posé à plat.
nivelerniveler
,,
il suffit d'a il suffit d'a
niveler
,
il suffit d'a
nivelerniveler
,,
il suffit d'a il suffit d'a
pieds;pieds;
pieds; son angle d'inclinaison ,
pieds;pieds;
mesuré sur le plan de travail, ne
doit pas dépasser 2°. Si vous avez
de la moquette, attention à ce que
la ventilation ne soit pas bouchée
au niveau de la zone d'appui.
Les pieds avant sont réglables
Pour bien lePour bien le
Pour bien le
Pour bien lePour bien le
gir sur sesgir sur ses
gir sur ses
gir sur sesgir sur ses
otreotre
otre
otreotre
e arrivee arrive
e arrive
e arrivee arrive
Conservez les vis de
blocage et les cales. En cas
de déménagement vous
pourrez vous en resservir
pour bloquer les pièces
internes du lave-linge et le
protéger ainsi contre les
chocs pendant son
transport.
Raccordement à la priseRaccordement à la prise
Raccordement à la prise
Raccordement à la priseRaccordement à la prise
d'eaud'eau
d'eau
d'eaud'eau
La pression de l'eau doit être
comprise entre les valeurs
indiquées sur la plaquette
fixée à l'arrière de l'appareil.
Raccordez le tuyau d'arrivée
que vous trouvez, démonté, à
l'intérieur du tambour à une
prise d'eau froide à embout
fileté 3/4 gaz.
Si les tuyauteries de l'eau sont
neuves ou inutilisées depuis
longtemps, faites couler l'eau
jusqu'à ce qu'elle soit limpide
et sans impuretés avant de
raccorder. Raccordez le tuyau
à la machine, au niveau de la
prise d'eau prévue en haut, à
droite.
Prise d'eau à monter en haut à
droite.
Raccordement du tuyau deRaccordement du tuyau de
Raccordement du tuyau de
Raccordement du tuyau deRaccordement du tuyau de
vidangevidange
vidange
vidangevidange
Un crochet situé à l'arrière de
la machine, en haut, vous
permet éventuellement de fixer
le tuyau de vidange.
Introduisez l'autre extrémité
dans un conduit d'évacuation
murale ou bien accrochez-le à
l'évier ou à la baignoire en
évitant de l'écraser ou de trop
le plier. Il faut absolument qu'il
débouche entre 60 et 100 cm
de haut.
Si vous êtes obligé de fixer
l'extrémité à moins de 60 cm
au-dessus du sol, il faut que
vous fixiez le tuyau au crochet
susmentionné prévu dans le
panneau arrière de la machine.
Le crochet à utiliser si le tuyau
débouche à moins de 60 cm de
haut.
Si le tuyau évacue dans la
baignoire ou dans le lavabo,
appliquez le support en
plastique et attachez-le au
robinet.
Le guide pour le vindange en
baignoire ou lavabo.
Ne le laissez jamais tremperNe le laissez jamais tremper
Ne le laissez jamais tremper
Ne le laissez jamais tremperNe le laissez jamais tremper
dans l'eau.dans l'eau.
dans l'eau.
dans l'eau.dans l'eau.
L'utilisation de rallonges est
absolument déconseillée. Si
vous ne pouvez vraiment pas
vous en passer, il faut qu'elle
ait le même diamètre que le
tuyau original et moins de 150
cm de long. En cas
d'évacuation murale, faites
vérifier son efficacité par un
professionnel agréé. Si vous
habitez en étage dans un
immeuble, il peut y avoir des
phénomènes de
siphonnement qui font que
votre lave-linge prend et
évacue l'eau continuellement.
Pour supprimer cet inconvénient , vous pouvez trouver
dans le commerce des valves
spéciales anti-siphonnement.
Branchement électriqueBranchement électrique
Branchement électrique
Branchement électriqueBranchement électrique
Avant de brancher la machine
à la prise de courant, contrôlez
que:
1) la prise de courant est conforme aux normes et que
sa charge électrique est
bien apte à supporter la
puissance maximum de la
machine figurant sur la
plaquette des caractéristiques;
2) la tension d'alimentation
est bien comprise entre les
valeurs figurant sur la
plaquette des caractéristiques;
3) la prise est bien compatible avec la fiche de la
machine. En cas
d'incompatibilité, n'utilisez
pas d'adaptateurs mais
remplacez la prise ou la
fiche;
4) votre installation électrique
dispose bien d'une "mise
à la terre".
5) une fois la machine
branchée, elle ne s'appuie
pas sur le câble
d'alimentation.
Attention !
Le constructeur et le vendeur
déclinent toute responsabilité et
aucune garantie ne sera due en
cas de modification apportée
au raccordement prévu par
l'usine, de mauvais raccordement électrique, de modification électrique, mécanique ou
hydraulique subis par la ma-
chine.
Ne laissez pas les enfants
jouer avec les sachets
plastique, le polystyrène
expansé, les vis et les
autres éléments
d'emballage, ils
pourraient être
dangereux.
Mode d'installation et d'emploi
2 2
2
2 2

Ce qui compte par dessus tout
VV
otre sécurité et celle deotre sécurité et celle de
V
otre sécurité et celle de
VV
otre sécurité et celle deotre sécurité et celle de
Votre lave-linge a été fabriqué selon les normes
vv
os os
v
os
vv
os os
enfantsenfants
enfants
enfantsenfants
internationales de sécurité les plus sévères. Pour
vous protéger ainsi que votre famille.
Lisez attentivement ces conseils
ainsi que toutes les informations contenues dans ce mode
d'emploi: ils vous fourniront
non seulement des renseignements utiles mais aussi des
conseils importants sur la
sécurité, l'utilisation et l'entretien.
1. En cas de panne, fermez1. En cas de panne, fermez
1. En cas de panne, fermez
1. En cas de panne, fermez1. En cas de panne, fermez
avant tout le robinet de l’eauavant tout le robinet de l’eau
avant tout le robinet de l’eau
avant tout le robinet de l’eauavant tout le robinet de l’eau
et débranchez la fiche deet débranchez la fiche de
et débranchez la fiche de
et débranchez la fiche deet débranchez la fiche de
la prise muralela prise murale
la prise murale; n’essayez
la prise muralela prise murale
en aucun cas d’accéder aux
mécanismes internes pour
la réparer. Votre garantie ne
sera alors plus valable.
2.2.
VV
otre laotre la
2.
V
otre la
2.2.
VV
otre laotre la
pas être installé dehorspas être installé dehors
pas être installé dehors,
pas être installé dehorspas être installé dehors
même à l’abri, car il est très
dangereux de le laisser
exposé à la pluie et aux
orages.
3.3.
Il ne doit être utilisé queIl ne doit être utilisé que
3.
Il ne doit être utilisé que
3.3.
Il ne doit être utilisé queIl ne doit être utilisé que
par des adultespar des adultes
par des adultes et
par des adultespar des adultes
exclusivement pour laver du
linge selon les instructions
reportées dans ce mode
d’emploi.
ve-lingve-ling
ve-ling
ve-lingve-ling
e ne doite ne doit
e ne doit
e ne doite ne doit
4.4.
4. Si vous devez le déplacer,
4.4.
tirez le levier blanc, en bas
à gauche sous la base, qui
fera descendre le chariot
des roues rétractiles et
permettra un déplacement
plus facile.
5.5.
5. Avant d’introduire votre
5.5.
linge,
tambour est bien videtambour est bien vide
tambour est bien vide.
tambour est bien videtambour est bien vide
6.6.
6.
6.6.
machine pieds nusmachine pieds nus
machine pieds nus ou
machine pieds nusmachine pieds nus
bien
pieds mouillés oupieds mouillés ou
pieds mouillés ou
pieds mouillés oupieds mouillés ou
humides.humides.
humides.
humides.humides.
"J'exige un professionnel
qualifié et agréé et des
pièces de rechange
originales garanties
Indesit!"
contrôlez si lecontrôlez si le
contrôlez si le
contrôlez si lecontrôlez si le
Ne touchez jamais laNe touchez jamais la
Ne touchez jamais la
Ne touchez jamais laNe touchez jamais la
les mains ou lesles mains ou les
les mains ou les
les mains ou lesles mains ou les
7. N’utilisez ni rallonges ni7. N’utilisez ni rallonges ni
7. N’utilisez ni rallonges ni
7. N’utilisez ni rallonges ni7. N’utilisez ni rallonges ni
prises multiplesprises multiples
prises multiples, dange-
prises multiplesprises multiples
reuses surtout dans des
endroits humides. Le câble
d’alimentation ne doit être ni
plié ni trop écrasé.
8.8.
Ne sortez jamais le filtreNe sortez jamais le filtre
8.
Ne sortez jamais le filtre
8.8.
Ne sortez jamais le filtreNe sortez jamais le filtre
si la machine est branchée.si la machine est branchée.
si la machine est branchée.
si la machine est branchée.si la machine est branchée.
N’utilisez jamais de lessiveN’utilisez jamais de lessive
N’utilisez jamais de lessive
N’utilisez jamais de lessiveN’utilisez jamais de lessive
pour lavage à la main, pour lavage à la main,
pour lavage à la main, leur
pour lavage à la main, pour lavage à la main,
excès de mousse risquerait
de s’échapper du couvercle
et d’endommager votre
lave-linge.
9.9.
Ne tirez jamais sur leNe tirez jamais sur le
9.
Ne tirez jamais sur le
9.9.
Ne tirez jamais sur leNe tirez jamais sur le
câblecâble
câble ni sur le lave-linge
câblecâble
pour débrancher la fiche de
la prise murale: c’est
extrêmement dangereux.
10.10.
10. En cours de fonctionne-
10.10.
, ne touchez pas à, ne touchez pas à
ment
, ne touchez pas à
, ne touchez pas à, ne touchez pas à
l’eau évacuéel’eau évacuée
l’eau évacuée, elle peut
l’eau évacuéel’eau évacuée
atteindre des températures
très élevées.
enfants à bonne distance.enfants à bonne distance.
enfants à bonne distance.
enfants à bonne distance.enfants à bonne distance.
Ne forcez jamais pourNe forcez jamais pour
Ne forcez jamais pour
Ne forcez jamais pourNe forcez jamais pour
ouvrir le hublotouvrir le hublot
ouvrir le hublot vous
ouvrir le hublotouvrir le hublot
risqueriez d’endommager le
mécanisme de sécurité
prévu pour prévenir les
ouvertures accidentelles.
11. Cet appareil est destiné à11. Cet appareil est destiné à
11. Cet appareil est destiné à
11. Cet appareil est destiné à11. Cet appareil est destiné à
un usage domestique.un usage domestique.
un usage domestique.
un usage domestique.un usage domestique.
Aucune garantie ne sera
due en cas d’usage
industriel (hôtels, restaurants, blanchisseries) qui en
compromet les caractéristiques de construction
d’origine.
Gardez vosGardez vos
Gardez vos
Gardez vosGardez vos
Comment changer le câble d'alimentationComment changer le câble d'alimentation
Comment changer le câble d'alimentation
Comment changer le câble d'alimentationComment changer le câble d'alimentation
Le câble d'alimentation est un
câble spécial qui n'est disponible qu'auprès des SA V autorisés.
Pour le remplacer, procédez comme
suit :
1. Contrôlez que le lave-linge est
bien éteint et que la fiche est bien
débranchée.
Fig. 1
33
3 Mode d'installation et d'emploi
33
2. Déposez la base, dévissez
d'abord les 2 vis de droite en
bas puis les 6 vis de gauche à
l'arrière, déposez le panneau
latéral en l'inclinant légèrement
vers vous pour le dégager. (fig.
1 et 2).
3. Sortez le connecteur pour
déconnectez le filtre antiparasite (fig. 3).
Fig. 2
4. Dévissez les 2 vis extérieures
qui fixent le filtre et, à l'aide d'un
tournevis (voir fig. 4), dégagezle du panneau arrière en le tirant
vers le haut.
5. Après avoir monté le nouveau
câble, raccordez le connecteur en
vérifiant que le crochet de sécurité tienne bien.
Fig. 3
Pour le remplacer, nous vous
conseillons de faire appel à un
spécialiste du secteur qui devra
respecter les normes applicables en l'espèce.
Fig. 4
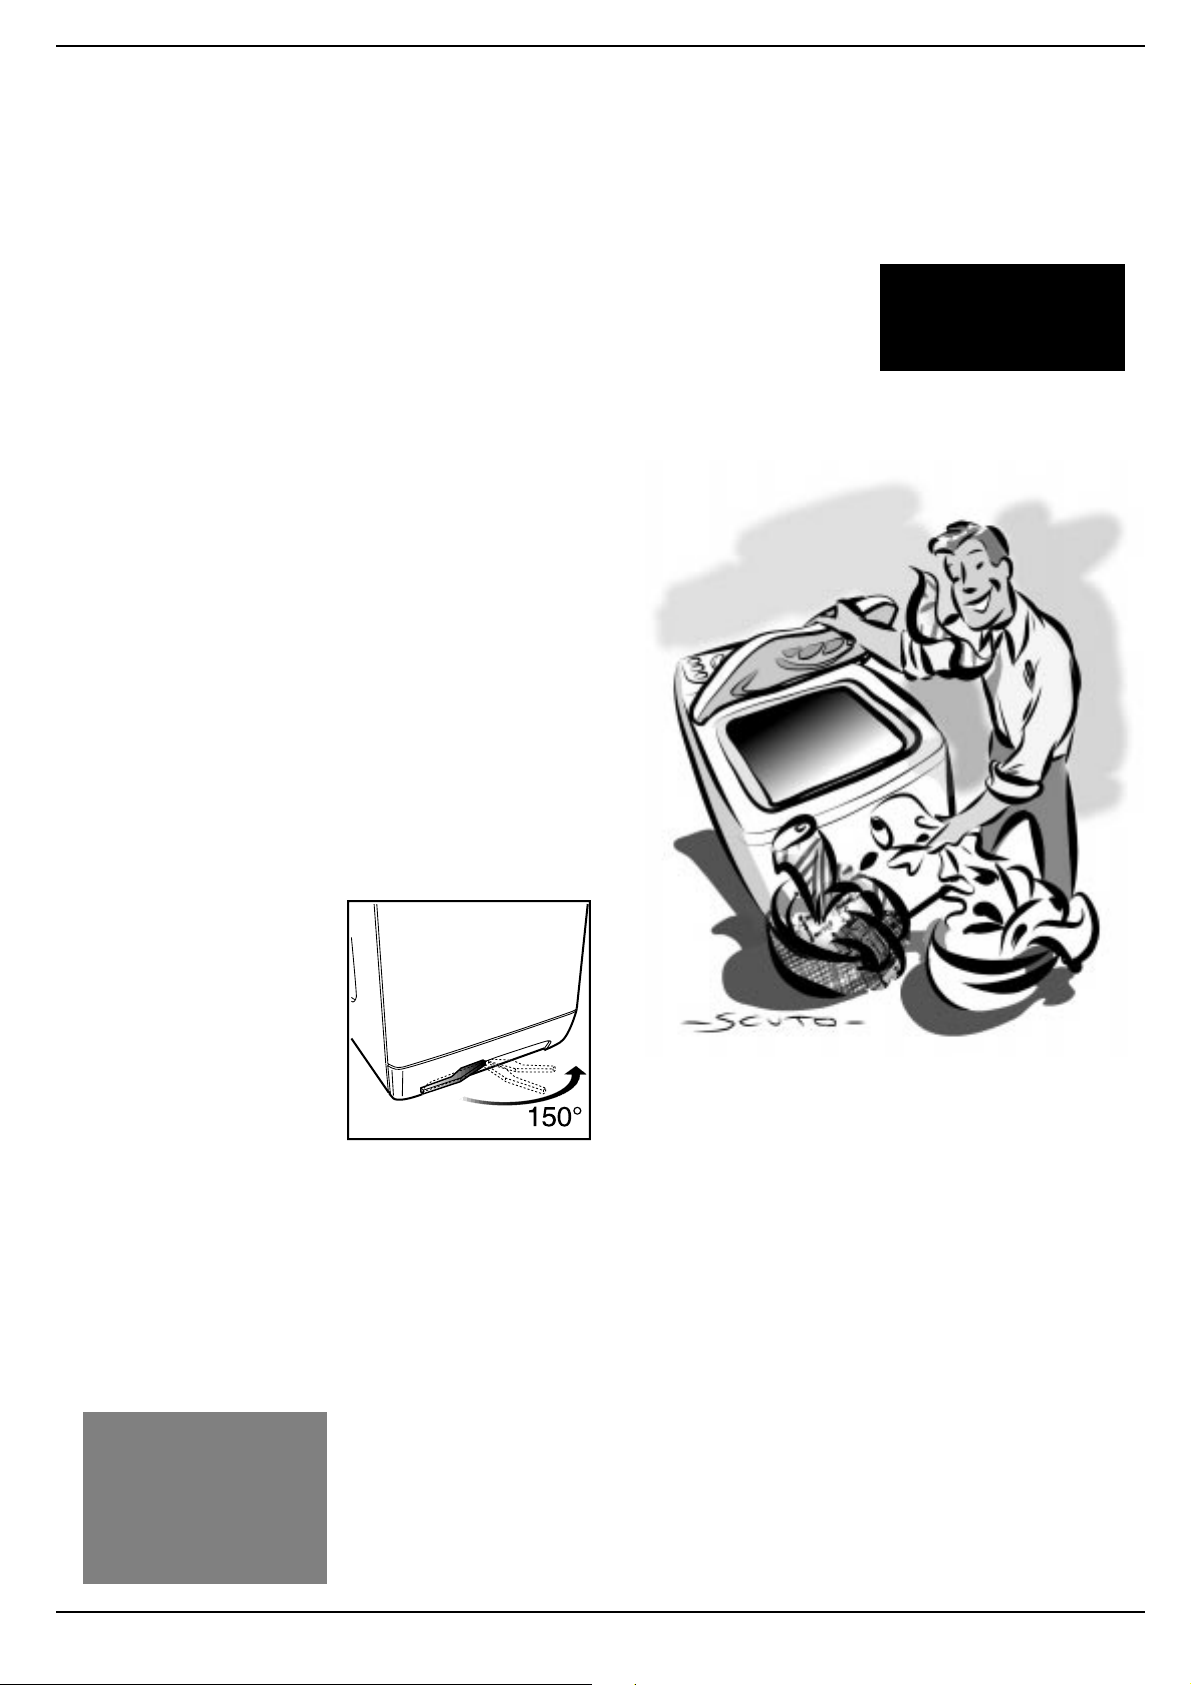
M
Que placer dans vQue placer dans v
Que placer dans v
Que placer dans vQue placer dans v
Quelques astuces pour mieux laver. Triez votre linge en tenant compte des textiles et des couleurs.
Attention aux étiquettes, suivez leurs indications. Alternez les petites et les grandes pièces.
AA
vv
ant de laant de la
A
v
ant de la
AA
vv
ant de laant de la
Triez votre linge selon le type
de tissu et la résistance des
couleurs: les tissus plus
résistants doivent être séparés
des délicats.
Séparez les couleurs claires
des couleurs foncées.
Videz toutes les poches
(pièces de monnaie, papier,
argent et petits objets) et
contrôlez les boutons.
Recousez tout de suite les
boutons ballants, vous éviterez
ainsi qu’ils ne se détachent en
cours de lavage.
Les étiquettes vousLes étiquettes vous
Les étiquettes vous
Les étiquettes vousLes étiquettes vous
disent tout ce qu’il faut.disent tout ce qu’il faut.
disent tout ce qu’il faut.
disent tout ce qu’il faut.disent tout ce qu’il faut.
Lisez toujours les étiquettes:
vous saurez tout sur vos
vêtements et sur leurs
meilleures conditions de
lavage.
verver
ver
verver
..
.
..
Page 7, nous vous dévoilerons
tous les secrets qui se cachent
derrière les symboles reportés
sur les étiquettes des
vêtements. Leurs indications
sont précieuses, elles vous
aideront à conserver la beauté
de vos vêtements.
Alternez les petites etAlternez les petites et
Alternez les petites et
Alternez les petites etAlternez les petites et
les grandes pièces.les grandes pièces.
les grandes pièces.
les grandes pièces.les grandes pièces.
Dépliez votre linge. Placez-le
dans le tambour sans le
presser et en suivant les
quantités de charge conseil-
otre laotre la
otre la
otre laotre la
lées pour les différents programmes. Vous obtiendrez un
linge plus propre et moins
froissé.
Vêtements détachés àVêtements détachés à
Vêtements détachés à
Vêtements détachés àVêtements détachés à
l’essence. l’essence.
l’essence. Ne mettez pas dans
l’essence. l’essence.
votre lave-linge de vêtements
détachés à l’essence, à
l’alcool, au trichloréthylène etc.
avant que ces substances ne
se soient évaporées.
ve-lingve-ling
ve-ling
ve-lingve-ling
e?e?
e?
e?e?
Triez votre linge par type
de tissu, couleur: vous
obtiendrez de meilleurs
résultats
Comment mettre enComment mettre en
Comment mettre en
Comment mettre enComment mettre en
serser
ser
serser
Mise en place, déplacementsMise en place, déplacements
Mise en place, déplacements.
Mise en place, déplacementsMise en place, déplacements
Votre lave-linge est muni d'un
chariot spécial avec roues
rétractiles pour en faciliter le
déplacement. Pour faire
descendre ce chariot et pouvoir
ainsi déplacer sans effort votre
lave-linge, vous devez tirer le
levier situé en bas à gauche,
sous la base. Une fois le lavelinge déplacé, remettez-le dans
la position initiale. Le lave-linge
est ainsi solidement mis en
place. Voir figure.
Dès son installation, démarrez un cycle de lavage à vide en sélectionnant le programme "1" à 60 degrés C.
Une bonne mise en service du
lave-linge est primordiale tant
pour la qualité du lavage que
pour éviter des problèmes et
augmenter sa longévité. Après
avoir chargé le linge et dosé
les produits lessiviels, contrôlez toujours si:
vice vvice v
vice v
vice vvice v
Chouchoutez votre linge:
placez vos pièces de
lingerie, vos bas, les
chaussettes de vos enfants
et vos vêtements délicats
dans un sachet en toile
pour les protéger
otre laotre la
otre la
otre laotre la
ve-lingve-ling
ve-ling
ve-lingve-ling
1.1.
1. Le couvercle et les portes
1.1.
sont bien fermées.
2.2.
2. La fiche est bien branchée
2.2.
dans la prise.
3.3.
3. Le robinet de l’eau est
3.3.
ouvert.
4.4.
4. la touche
4.4.
position O).
5. 5.
5. Le chariot des roues
5. 5.
rétractiles est dans la position
de repos (les roues ne sont pas
en contact avec le sol).
Choisissez un programmeChoisissez un programme
Choisissez un programme
Choisissez un programmeChoisissez un programme
Choisissez le programme en
fonction du type de linge à
laver et de son degré de
G G
G est dans la
G G
ee
e
ee
salissure. Pour choisir le
programme, consultez le
tableau page 6. Tournez le
Sélecteur
arrive sur le numéro du
programme désiré. Choisissez
la température à l’aide du
bouton
bouton
position désirée (sélection de
vitesse d’essorage); si
nécessaire, appuyez sur les
fonctions à touche (
enfin appuyez sur la touche
allumé/éteint
Une fois le lavage terminé...Une fois le lavage terminé...
Une fois le lavage terminé...
Une fois le lavage terminé...Une fois le lavage terminé...
Attendez deux minutes environ.
AA
A jusqu’à ce qu’il
AA
B B
B et vérifiez que le
B B
CC
C est bien dans la
CC
D-E-FD-E-F
D-E-F);
D-E-FD-E-F
GG
G (position I).
GG
Eteignez alors le lave-linge en
appuyant sur la touche allumé/
GG
éteint
G (position
GG
pouvez alors ouvrir la porte
couvercle en toute sécurité.
Après avoir sorti le linge,
laissez la porte couvercle
ouverte ou entrouverte pour
que l’humidité à l’intérieur
puisse évaporer.
Fermez toujours le robinet de
l’eau.
N’oubliez pas qu’en cas deN’oubliez pas qu’en cas de
N’oubliez pas qu’en cas de
N’oubliez pas qu’en cas deN’oubliez pas qu’en cas de
coupure de courant ou sicoupure de courant ou si
coupure de courant ou si
coupure de courant ou sicoupure de courant ou si
vous éteignez le lave-linge,vous éteignez le lave-linge,
vous éteignez le lave-linge,
vous éteignez le lave-linge,vous éteignez le lave-linge,
le programme sélectionnéle programme sélectionné
le programme sélectionné
le programme sélectionnéle programme sélectionné
reprendra là où il a étéreprendra là où il a été
reprendra là où il a été
reprendra là où il a étéreprendra là où il a été
interrompu.interrompu.
interrompu.
interrompu.interrompu.
OO
O). Vous
OO
Mode d'installation et d'emploi
4 4
4
4 4
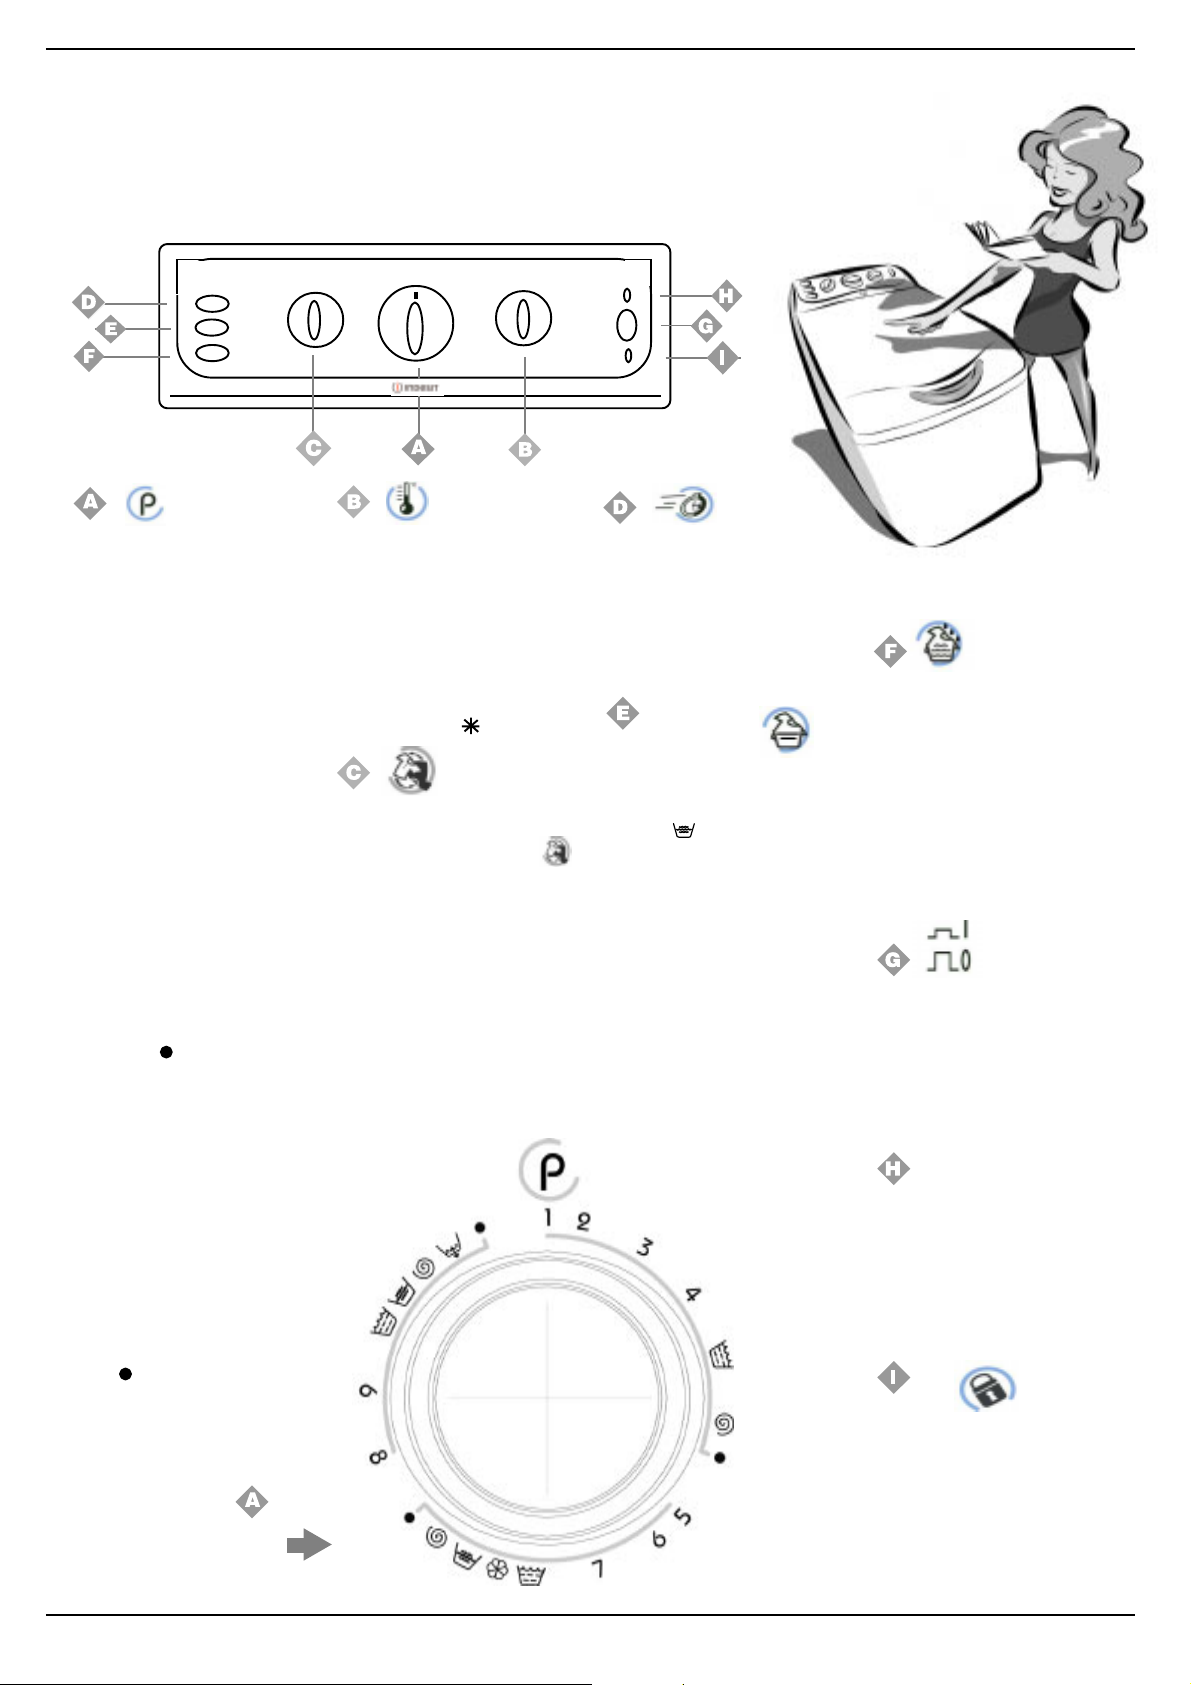
Maîtrise du panneau de commandes
C'est vous qui commandezC'est vous qui commandez
C'est vous qui commandez
C'est vous qui commandezC'est vous qui commandez
Choisissez les bons programmes: c'est important. Et c'est facile.
D
Sélecteur programmesSélecteur programmes
Sélecteur programmes
Sélecteur programmesSélecteur programmes
Il sert à sélectionner
le programme de lavage.
Ne tournez ce bouton queNe tournez ce bouton que
Ne tournez ce bouton que
Ne tournez ce bouton queNe tournez ce bouton que
dans le sens des aiguillesdans le sens des aiguilles
dans le sens des aiguilles
dans le sens des aiguillesdans le sens des aiguilles
d’une montre.d’une montre.
d’une montre.
d’une montre.d’une montre.
Pour sélectionner les programmes, amenez le symbole/
numéro du programme désiré
en face du repère situé sur le
bouton.
Appuyez à présent sur la
touche allumé/éteint
I I
tion
I), le voyant
I I
à clignoter. Au bout de 5”, la
sélection est acceptée, le
voyant
(mais reste allumé) et le cycle
de lavage commence.
Pour interrompre le programme en cours ou en programmer
un autre, sélectionnez l’un des
symboles
attendez 5”: dès que l’annulation est acceptée, le voyant
HH
H se met à clignoter; vous
HH
pouvez alors sélectionner le
nouveau programme ou
éteindre la machine. Si vous
voulez ajouter du linge,
attendez 2 minutes environ
avant d’ouvrir le hublot.
Aprés que le cycle de lavage à
été tracè et accepté par la lavelinge, le dèplacement du bouton n’exerce plus aucune
influence (sauf que dans la position Stop/Reset).
HH
H cesse de clignoter
HH
(Stop/Reset) et
Le SélecteurLe Sélecteur
Le Sélecteur
Le SélecteurLe Sélecteur
des programmes dedes programmes de
des programmes de
des programmes dedes programmes de
votre lave-lingevotre lave-linge
votre lave-linge
votre lave-lingevotre lave-linge
GG
G (posi-
GG
HH
H commence
HH
Sélecteur températureSélecteur température
Sélecteur température
Sélecteur températureSélecteur température
Il sert à sélectionner la
température de lavage indiquée dans le tableau des
programmes (voir page 6). Il
vous permet aussi de réduire
la température conseillée pour
le programme sélectionné,
jusqu’au lavage à froid
(symbole neige ).
Sélecteur essorageSélecteur essorage
Sélecteur essorage
Sélecteur essorageSélecteur essorage
Il sert à supprimer l’essorage
(sélectionnez le symbole
et à réduire la vitesse
d’essorage du programme
sélectionné. Les vitesses
maximum prévues pour les 4
types de tissu sont:
Tissu Tissu
Tissu
Tissu Tissu
- Coton tours minute max.
- Synthétiques 800 tours minute
- Laine 600 tours minute
- Soie non
De toute manière, la machine
procède à une distribution de
la charge à faible
vitesse.
VitesseVitesse
Vitesse
VitesseVitesse
Lavage expressLavage express
Lavage express
Lavage expressLavage express
Cette touche permet de reduire
la durée du programme de
lavage du 30% environ. Il ne
peut pas ètre utilisé avec les
programmes éspéciaux (voire
page 6) et cels-ci pour la laine
et la soie.
Anti-froissementAnti-froissement
Anti-froissement
Anti-froissementAnti-froissement
(Synthétiques délicats)(Synthétiques délicats)
(Synthétiques délicats)
(Synthétiques délicats)(Synthétiques délicats)
Cette touche permet d’interrompre le programme (sur le
symbole ) en laissant le linge
)
tremper avant l’essorage. C’est
une touche précieuse car elle
permet d’éviter que les textiles
délicats et synthétiques ne se
froissent (par exemple, quand
vous ne pouvez pas sortir votre
linge dès la fin du lavage, mais
seulement au bout de quelques
heures).
Ne l’utilisez que pour les
programmes spéciaux textiles
Synthétiques et Soie (Progr. 56-7-9).
AA
TTENTION !TTENTION !
A
TTENTION ! Pour terminer
AA
TTENTION !TTENTION !
le programme en faisant une
vidange, appuyez à nouveau
sur la touche
Super RinçageSuper Rinçage
Super Rinçage
Super RinçageSuper Rinçage
Elle vous permet d’augmenter
le nombre de rinçages pour
vos programmes spéciaux
textiles
conseillons de l’utiliser pour
améliorer le rinçage de votre
linge en cas de pleine charge
et d’hypersensibilité aux
produits lessiviels (allergies
de contact).Programmes
3-4-5-6)3-4-5-6)
3-4-5-6)
3-4-5-6)3-4-5-6)
Allumé/éteint (On-Off)Allumé/éteint (On-Off)
Allumé/éteint (On-Off)
Allumé/éteint (On-Off)Allumé/éteint (On-Off)
Appuyez sur la touche
allumer votre lave-linge,
relâchez-la pour l’éteindre.
Si vous éteignez le lave-lingeSi vous éteignez le lave-linge
Si vous éteignez le lave-linge
Si vous éteignez le lave-lingeSi vous éteignez le lave-linge
le programme sélectionnéle programme sélectionné
le programme sélectionné
le programme sélectionnéle programme sélectionné
reste mémorisé.reste mémorisé.
reste mémorisé.
reste mémorisé.reste mémorisé.
E.E.
E.
E.E.
oo
yy
ant de fant de f
VV
V
o
y
ant de f
VV
oo
yy
ant de fant de f
allumé/éteintallumé/éteint
allumé/éteint
allumé/éteintallumé/éteint
Le voyant
signaler que la machine est
allumée et attend d’être
programmée. Sa lumière fixe
indique que le programme
sélectionné est accepté.
VV
oo
yy
antant
V
o
y
ant
VV
oo
yy
antant
couvercle verrouillécouvercle verrouillé
couvercle verrouillé
couvercle verrouillécouvercle verrouillé
L’allumage du voyant indique
que la porte couvercle est
bloquée pour empêcher toute
ouverture accidentelle.
Attendez que le voyant
s’éteigne avant de l’ouvrir.
L’attente est d’environ deux
minutes.
résistantsrésistants
résistants. Nous vous
résistantsrésistants
1-2-1-2-
1-2-
1-2-1-2-
GG
G pour
GG
onctionnementonctionnement
onctionnement
onctionnementonctionnement
HH
H clignote pour
HH
5 5
5 Mode d'installation et d'emploi
5 5
g
ç
ç
ç
ç
Que laver, aujourd'hui?
Des prDes pr
Des pr
Des prDes pr
Nature des tissus et
degré de salissure
ogrammes pour toutes les saisonsogrammes pour toutes les saisons
ogrammes pour toutes les saisons
ogrammes pour toutes les saisonsogrammes pour toutes les saisons
Bouton
program.
Bouton
températ.
Lessive
prélavage
Lessive
lavage
Assoupl. Tache Javel Durée du
cycle
(minutes)
Description du cycle de
lavage
COTON
Blancs extrêmement sales
(draps, nappes, etc.)
Blancs très sales (draps,
nappes, etc.)
Blancs et coule urs résistantes
trè s s a les
Blancs peu sales et
couleursdelicats (chemises
maille s, ecc.)
Rinçages/Javel
Essorage Vidange et essorage final
Stop/Reset Interrompt/Annule le programme
1Max
2Max
3 60°C
4 40°C
uuu
uu
uu
uu
u
Délicate/T ra-
ditionnelle
Délicate /Tra-
ditionnelle
Délicate/T ra-
ditionnelle
Délicate/T ra-
ditionnelle
150
Prélava
températures, rin
intermédia ires et finaux
130 Lavage à hautes températures,
rinçages, essorages intermédiaires et
finaux
130 Lavage à 60°C, rinçages, essorages
intermédia ires et finaux
115 L avage à 40°C, rinçages, essorages
intermédia ires et finaux
Rinçages, essorages intermédiaires et
finaux
sélectionné
, Lavage à hautes
e
ages, essorages
SYNTHETIQUES
Synthétiques couleurs
résistantes très sales (linge
de bébé, etc.)
5 60°C
uu
Délicate
105
Lavage à 60° C, rin
froissement ou essorage délicat
ages, anti-
Synthétiques couleurs
délicates(linge en tout genre
légè rem e nt sale )
Synthétiques couleurs
délicates(linge en tout genre
légè rem e nt sale )
Rinçages/Javel
Assoup lissant
Anti-froisseme nt - Arrêt cuve
pleine
Essorage
Stop/R eset
TISSUS DELICATS
Laine
S o i e, vê te me nts e t ti s s u s
particulièrem e nt délicats
(rideaux, soie, viscose, etc.)
Rinçages
A nti-fro i s se ment - Arrê t cuve
pleine
6 40°C
7 30°C
8 40°C
9 30°C
uu
uu
u
u
uu
uu
u
Dé lica te
Dé lica te
75
Lavage à 40°C, rin
froissement ou essorage délicat
30
Lavage à 30°C, rin
délicat
Rinçages, anti-froissement ou
essorage délicat
Rinçages avec prélèvement de
l'a ssouplissant, a nti-froissement ou
essorage délicat
Arrêt cuve pleine pour linge
particulièrem e nt délicat
Vidange et essorage délicat
Interrompt/Annule le programme
sélectionné
55 L avage à 40°C, rinçages et essorage
délicat
45 Lavage à 30°C, rinçages, anti-
froissement ou vidange
Rinçages, anti-froissement ou vidange
Arrêt cuve pleine pour soie et linge
particulièrem e nt délicat
ages, anti-
ages et essorage
Essorage Vidange et essorage délicat (laine)
Vidange Vidange
Stop/Reset Interrompt/Annule le programme
II
mportant:mportant:
I
mportant:
mportant:mportant:
II
Pour annuler le programme de lavage que vous venez de lancer, sélectionnez l'un des symboles (Stop/Reset) et attendez au moins 5 secondes.
Programmes SpéciauxProgrammes Spéciaux
Programmes Spéciaux
Programmes SpéciauxProgrammes Spéciaux
Les données reportées dans le tableau sont à titre indicatif. Elles peuvent varier selon la quantité et le
type de linge, la température de l'eau du réseau, mais aussi de la température de l'environnement.
sélectionné
7 - Lavage quotidien Synthétiques délicats à 30° de 30 minutes. Votre lave-linge dispose d’un programme spécial permettant de laver des vêtements
peu sales en un rien de temps. En choisissant le programme 7 à 30°C, vous pouvez laver ensemble des tissus différents (sauf laine et soie), avec une
capacité maximum de 3 kg. Ce programme permet de faire des économies de temps et d’électricité, parce qu’il ne dure que 30 minutes. Nous vous
conseillons d’utiliser de la lessive liquide que vous verserez dans le compartiment lavage du tiroir à produits lessiviels.
Mode d'installation et d'emploi
6 6
6
6 6
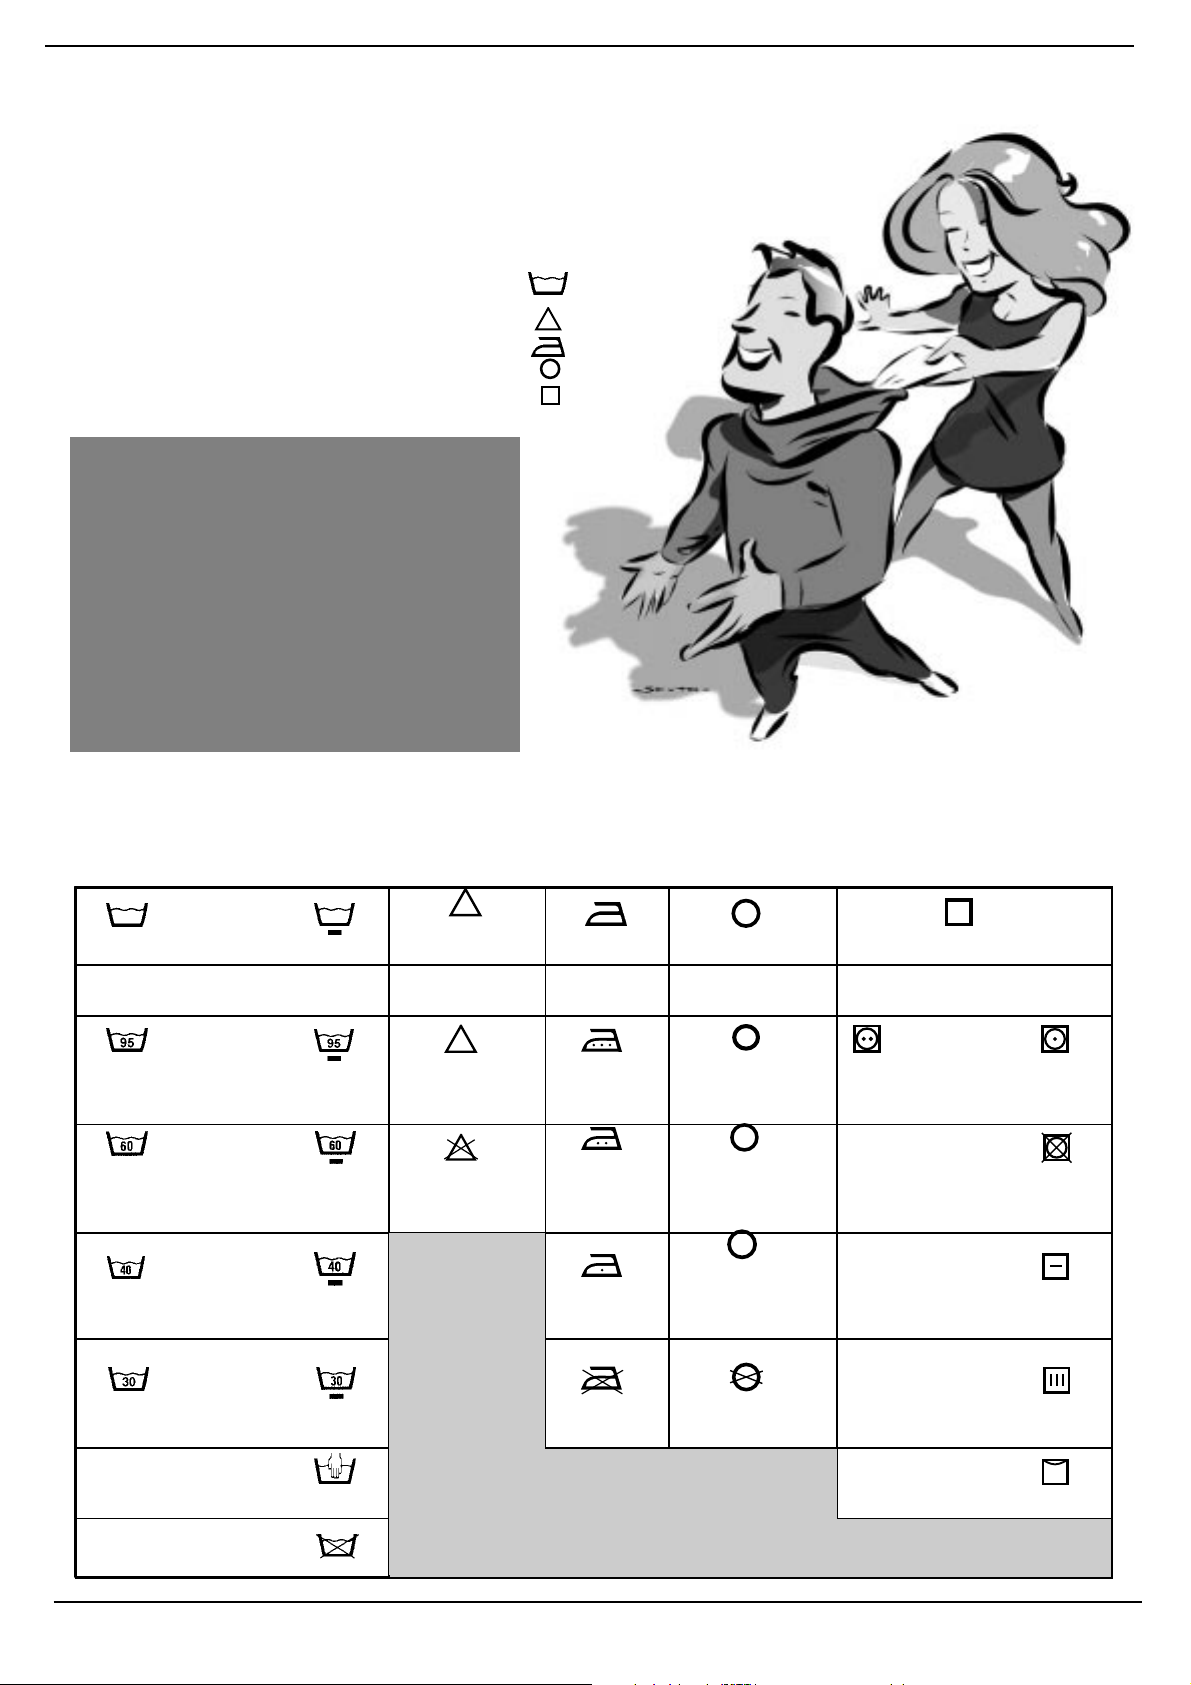
Sachez lire les étiquettes…Sachez lire les étiquettes…
Sachez lire les étiquettes…
Sachez lire les étiquettes…Sachez lire les étiquettes…
Apprenez à lire ces symboles, vous laverez mieux, votre
linge durera plus longtemps et votre lave-linge ne vous
en servira que mieux.
Partout en Europe, les
étiquettes contiennent des
messages sous forme de
petits mais très importants
symboles. Il est primordial
d'apprendre à les comprendre
pour mieux laver et traiter vos
vêtements.
On compte cinq catégories de
sigles différents:
lavage lavage
lavage
lavage lavage
Javel Javel
Javel
Javel Javel
repassage repassage
repassage
repassage repassage
nettoyage à sec nettoyage à sec
nettoyage à sec
nettoyage à sec nettoyage à sec
séchage séchage
séchage
séchage séchage
,,
,
,,
, ,
,
, ,
,,
,
,,
,,
,
,,
..
.
..
Conseils Utiles
Retournez les chemises, elles seront
mieux lavées et dureront plus
longtemps.
Videz bien les poches.
Lisez toujours les étiquettes: leurs
conseils sont précieux et utiles.
Dans le tambour, alternez grandes et
petites pièces de linge.
Lisez et mémorisez les symboles de ce tableau: vous apprendrezLisez et mémorisez les symboles de ce tableau: vous apprendrez
Lisez et mémorisez les symboles de ce tableau: vous apprendrez
Lisez et mémorisez les symboles de ce tableau: vous apprendrezLisez et mémorisez les symboles de ce tableau: vous apprendrez
à mieux laver et traiter votre linge et à augmenter lesà mieux laver et traiter votre linge et à augmenter les
à mieux laver et traiter votre linge et à augmenter les
à mieux laver et traiter votre linge et à augmenter lesà mieux laver et traiter votre linge et à augmenter les
performances de votre lave-linge.performances de votre lave-linge.
performances de votre lave-linge.
performances de votre lave-linge.performances de votre lave-linge.
Attention à ne pas
vous tromper de
température....
Action forte
Lavage
Lavage à
95°C
Lavage à
60°C
Lavage à
40°C
Lavage à
30°C
Lavage à
la ma in
Action
délicate
Traitement
Javel Repas sa ge Nettoyage à sec Séchage
Temp.
élevée
c
l
Traitement
autorisé en eau
froide
Traitement
interdit
Repassage
fort max
200°C
Repassage
moyen max
150°C
A
Nettoyage à sec
tous ty pes d e
solvants
P
Nettoyage à sec au
perch lor., essence
d'aviation, alcool
pur, R111 et R113
F
Nettoyage à sec à
Repassage
max 110°C
Repassage
interdit
l'essence
d'aviation, alcool
pur et R113
Nettoyage à sec
interdit
Séchage sur
Temp.
modérée
Séchage
autorisé en
sèche-linge
Séchage
interdit en
sèche-linge
Séchage à
plat
Séchage
suspen du
pour
vêtement
non essoré
cintre
Lavage
interdit
7 7
7 Mode d'installation et d'emploi
7 7

… et les symboles des différents modèles Indesit:… et les symboles des différents modèles Indesit:
… et les symboles des différents modèles Indesit:
… et les symboles des différents modèles Indesit:… et les symboles des différents modèles Indesit:
On - Allumage
Off - Coupure
Blocage hublot
T empér ature
Programmes :Programmes :
Programmes :
Programmes :Programmes :
Rinçages
Assouplissant
Arrêt cuve pleine
Essorage
Vidange
Stop/Reset
Variation essorage
Suppression essorage
Prélavage
Spécial taches
Super rinçage
Anti-froissement arrêt cuve pleine
Intensité Lavage
Lavage 90°
Lavage 60°
Lavage délicat
Lavage quotidien de
30’ à 30°
Lavage à froid
Lavage à la main
Lavage express
1/2 charge
Lavage super économ.
Repassage facile
Soie et rideaux
Hygiène du linge
Quelques conseils pour ne pas vQuelques conseils pour ne pas v
Quelques conseils pour ne pas v
Quelques conseils pour ne pas vQuelques conseils pour ne pas v
Ne lavez jamais à la ma- Ne lavez jamais à la ma-
Ne lavez jamais à la ma-
Règles Générales:Règles Générales:
Règles Générales:
Règles Générales:Règles Générales:
- Coton-Lin. - Coton-Lin.
- Coton-Lin. Remplissez le
- Coton-Lin. - Coton-Lin.
tambour mais ne le surchar gez pas.
- Synthétiques. - Synthétiques.
- Synthétiques. Ne remplis-
- Synthétiques. - Synthétiques.
sez pas à plus de la moitié
du tambour.
- Délicats et Laine. - Délicats et Laine.
- Délicats et Laine. Ne
- Délicats et Laine. - Délicats et Laine.
remplissez pas à plus d’un
tiers du tambour.
- Linge très sale:- Linge très sale:
- Linge très sale: réduisez les
- Linge très sale:- Linge très sale:
quantités.
- -
TT
acac
hes résistantes ouhes résistantes ou
-
T
ac
hes résistantes ou
- -
TT
acac
hes résistantes ouhes résistantes ou
spéciales.spéciales.
spéciales.
spéciales.spéciales.
Avant le lavage, traitez les
taches et frottez les points
particulièrement sales avec
une lessive spéciale, un
produit déter- gent ou des
détachants spéciaux (voir
tableau sur le lavage des
taches spéciales avec détachants page 9)
Ne lavez jamais à la ma- Ne lavez jamais à la ma-
chine...chine...
chine... du linge non ourlé,
chine...chine...
effiloché ou déchiré. Si vous
devez absolument le laver,
enfermez-le dans un sac. Du
linge aux couleurs vives avec du
linge blanc.
Attention au poids!Attention au poids!
Attention au poids!
Attention au poids!Attention au poids!
Pour obtenir d’excellents résultats, ne dépassez jamais les poids
indiqués, se référant à la capacité
maximum de linge sec:
--
Tissus résistants:Tissus résistants:
-
Tissus résistants:
--
Tissus résistants:Tissus résistants:
max. 5 kg
--
TT
ee
xtiles synthétiques:xtiles synthétiques:
-
T
e
xtiles synthétiques:
--
TT
ee
xtiles synthétiques:xtiles synthétiques:
max. 2,5 kg
--
TT
ee
xtiles délicats:xtiles délicats:
-
T
e
xtiles délicats:
--
TT
ee
xtiles délicats:xtiles délicats:
max. 2 kg
--
Pure laine vierge:Pure laine vierge:
-
Pure laine vierge:
--
Pure laine vierge:Pure laine vierge:
max. 1 kg
--
Tissu en épongeTissu en éponge
-
Tissu en éponge
--
Tissu en épongeTissu en éponge
max. 2,3 kg
Mais combien pèsent-ils? Mais combien pèsent-ils?
Mais combien pèsent-ils?
Mais combien pèsent-ils? Mais combien pèsent-ils?
1 drap 400-500 g
1 taie d’oreiller 150-200 g
1 nappe 400-500 g
1 peignoir 900-1.200 g
1 serviette éponge150-500 g
Mélangez du linge de Mélangez du linge de
Mélangez du linge de
Mélangez du linge de Mélangez du linge de
plusieurs dimensions plusieurs dimensions
plusieurs dimensions avec
plusieurs dimensions plusieurs dimensions
des tissus en éponge:
peignoirs, serviettes, etc. Vous
éviterez ainsi la formation de
la “boule” à l’essorage et le
déséquilibre.
Les Les
TT
ee-shiree-shir
ee-shir
ee-shiree-shir
ts couleurts couleur
ts couleur, les
ts couleurts couleur
Les
T
Les Les
TT
imprimés et les chemises
durent plus longtemps si vous
les lavez à l’envers.
Repassez toujours vos Teeshirts et vos sweats imprimés
sur l’envers.
ous trous tr
ous tr
ous trous tr
Alarme salopettes.Alarme salopettes.
Alarme salopettes.
Alarme salopettes.Alarme salopettes.
Elles ont du succès ces
combinaisons genre “salopette” mais leurs bretelles ont des
crochets qui peuvent endommager le tambour ou les autres
vêtements. Pourquoi ne pas les
enfiler dans la poche de la
bavette et les fixer avec des
épingles à nourrice pour
supprimer tout danger!
VV
acances:acances:
V
acances:
VV
acances:acances:
fiche.fiche.
fiche.
fiche.fiche.
Quand vous partez en vacances, mieux vaut débrancher la
fiche, fermer le robinet d’arrivée de l’eau et laisser le
hublot entrouvert ou ouvert.
Ainsi, le tambour et le joint
resteront bien secs et vous
éviterez la formation de mauvaises odeurs.
omperomper
omper
omperomper
débranc débranc
débranc
débranc débranc
hez lahez la
hez la
hez lahez la
CYCLE LAINE
P
our obtenir d'excellents résultats utilisez
un produit lessiviel
spécial et ne dépassez
pas un charge de
1 kg.
Comment laver presque toutComment laver presque tout
Comment laver presque tout
Comment laver presque toutComment laver presque tout
Doudounes et anoraksDoudounes et anoraks
Les rideaux.Les rideaux.
Les rideaux.
Les rideaux.Les rideaux.
Ils ont tendance à beaucoup se
froisser. Nous vous conseillons:
de bien les plier et de les glisser
dans une taie d’oreiller ou dans
un sac genre filet. Lavez-les
seuls de manière à ce que leur
poids total ne dépasse pas une
demi-charge.
Doudounes et anoraks
Doudounes et anoraksDoudounes et anoraks
Les doudounes et les anoraks
aussi peuvent être lavés à la
machine s’ils sont en duvet d’oie
ou de canard. Ce qui compte c’est
de ne pas dépasser une charge
de 2-3 Kg maximum, de faire faire
deux ou trois rinçages de suite et
un essorage léger.
. .
.
. .
Chaussures de tennis.Chaussures de tennis.
Chaussures de tennis.
Chaussures de tennis.Chaussures de tennis.
Débarrassez les chaussures de
tennis de la boue et lavez-les avec
les jeans et les vêtements plus
résistants. Ne les lavez pas avec
du linge blanc.
Mode d'installation et d'emploi
8 8
8
8 8

Les produits lessiviels et l'eau ne suffisent pas...
Comment enlever certaines taches spécialesComment enlever certaines taches spéciales
Comment enlever certaines taches spéciales
Comment enlever certaines taches spécialesComment enlever certaines taches spéciales
-Vin rouge. Laissez tremper avec le produit lessiviel, rincez et traitez avec de l’acide acétique ou de l’acide
citrique, rincez à nouveau. Traitez les éventuels résidus à l’eau de Javel.
- Sang. Traitez les taches encore fraîches avec de l’eau froide. Si les taches sont sèches, laissez tremper toute une
nuit avec un produit lessiviel puis frottez avec de l’eau et du savon.
- Taches de graisse sèches. Posez le vêtement sur du mou, mouillez-le avec de la térébenthine, tamponnez les
taches avec la pointe des doigts et un chiffon en coton.
- Rouille. A vec de l’acide oxalique (trouvable en droguerie) dissous à chaud ou un produit antirouille à froid. Les
vieilles taches peuvent avoir déjà attaqué le tissu: risque de trous...
- Taches de moisissure. Traitez-les avec de l’eau de Javel, rincez bien (seulement pour linge blanc et couleurs
résistant au chlore).
- Couleurs à huile. Mouillez avec de l’essence détergente, tamponnez les taches après avoir disposé le vêtement
sur un chiffon mou, et traitez-les plusieurs fois avec le détergent.
- Encre et stylo à bille. Tamponnez avec du coton imbibé d’alcool méthylique ou d’alcool à 90°.
- Goudron. Tamponnez avec du beurre frais, passez de la térébenthine puis lavez immédiatement.
- Cire. Raclez puis repassez avec un fer bien chaud entre deux feuilles de papier buvard. Passez ensuite du coton
imbibé d’essence de térébenthine ou d’alcool méthylique.
- Chewing gum. Passez du solvant pour vernis à ongles puis un chiffon propre.
- Moisissure. Plongez le coton et le lin blanc dans une solution formée de 5 parties d’eau, une d’eau de Javel et
une cuillère à soupe de vinaigre, lavez aussitôt. Pour les autres tissus blancs, utilisez de l’eau oxygénée à 10
volumes puis lavez aussitôt.
- Rouge à lèvres. Tamponnez à l’éther les tissus de laine ou de coton. Pour la soie, utilisez du trichloréthylène.
- Vernis à ongles. Posez le tissu du côté de la tache contre une feuille de papier buvard, mouillez de solvant, en
déplaçant le vêtement au fur et à mesure que la feuille se colore.
- Herbe. T amponnez avec du coton imbibé d’alcool méthylique.
Pour un lavage en toute sécurité
Comment ouvrir et fComment ouvrir et f
Comment ouvrir et f
Comment ouvrir et fComment ouvrir et f
Fig. 1 Fig. 2
Fig. 3 Fig. 4
99
9 Mode d'installation et d'emploi
99
ermer le tambourermer le tambour
ermer le tambour
ermer le tambourermer le tambour
A) OUVREZ. (Fig. 1).A) OUVREZ. (Fig. 1).
A) OUVREZ. (Fig. 1). Soulevez le
A) OUVREZ. (Fig. 1).A) OUVREZ. (Fig. 1).
complètement
B) Ouvrez ensuite les Portes du tambour à l’aide de vos deuxB) Ouvrez ensuite les Portes du tambour à l’aide de vos deux
B) Ouvrez ensuite les Portes du tambour à l’aide de vos deux
B) Ouvrez ensuite les Portes du tambour à l’aide de vos deuxB) Ouvrez ensuite les Portes du tambour à l’aide de vos deux
mains comme indiqué sur la Fig. 2):mains comme indiqué sur la Fig. 2):
mains comme indiqué sur la Fig. 2):
mains comme indiqué sur la Fig. 2):mains comme indiqué sur la Fig. 2):
--
- appuyez sur la touche indiquée par la flèche sur la Fig. 2) et
--
tout en appuyant légèrement vers le bas posez une main
pour éviter que les portes ne vous fassent mal aux doigts en
s’ouvrant soudainement;
- -
- accompagnez dans leur mouvements les portes qui se
- -
décrocheront et s’ouvriront facilement.
C) C)
INTRODUISEZ LE LINGE. (Fig. 3).INTRODUISEZ LE LINGE. (Fig. 3).
C)
INTRODUISEZ LE LINGE. (Fig. 3).
C) C)
INTRODUISEZ LE LINGE. (Fig. 3).INTRODUISEZ LE LINGE. (Fig. 3).
D) FERMEZ. (Fig. 4).D) FERMEZ. (Fig. 4).
D) FERMEZ. (Fig. 4).
D) FERMEZ. (Fig. 4).D) FERMEZ. (Fig. 4).
- -
- refermez bien le tambour en baissant d’abord la porte
- -
antérieure et posez ensuite la porte postérieure;
--
- faites attention à parfaitement positionner les crochets de la
--
porte antérieure dans leur siège dans la porte postérieure;
--
- vous entendrez un “
--
appuyez alors légèrement vers le bas sur les deux
portes qui ne doivent pas se décrocher;
- -
- fermez enfin le couvercle externe.
- -
clac
Couvercle externeCouvercle externe
Couvercle externe et ouvrez-le
Couvercle externeCouvercle externe
” qui confirmera la bonne fixation;

Important pour mieux laver
Le secret du tirLe secret du tir
Le secret du tir
Le secret du tirLe secret du tir
oir à proir à pr
oir à pr
oir à proir à pr
oduits lessivielsoduits lessiviels
oduits lessiviels
oduits lessivielsoduits lessiviels
Son premier secret: c'est facile, il se trouve sous le couvercle.
VV
erer
Versez les produits lessiviels
et l’additif éventuel en ne
dépassant pas les doses
conseillées par le fabricant:
lisez les informations indiquées sur les paquets.
Les doses varient en fonctionLes doses varient en fonction
Les doses varient en fonction
Les doses varient en fonctionLes doses varient en fonction
de la charge, de la dureté dede la charge, de la dureté de
de la charge, de la dureté de
de la charge, de la dureté dede la charge, de la dureté de
l’eau et du degré de salissure.l’eau et du degré de salissure.
l’eau et du degré de salissure.
l’eau et du degré de salissure.l’eau et du degré de salissure.
N’ayez pas la main lourde.N’ayez pas la main lourde.
N’ayez pas la main lourde.
N’ayez pas la main lourde.N’ayez pas la main lourde.
excès de lessive ne signifieexcès de lessive ne signifie
excès de lessive ne signifie
excès de lessive ne signifieexcès de lessive ne signifie
pas un meilleur lavage, aupas un meilleur lavage, au
pas un meilleur lavage, au
pas un meilleur lavage, aupas un meilleur lavage, au
contraire...contraire...
contraire...
contraire...contraire...
L’expérience aidant, vous
apprendrez à doser les
quantités presque automatique ment: ce sera votre secret.
Quand vous versez l’assouplissant dans le bac
à ce qu’il ne dépasse pas le
niveau “max.” indiqué.
Le lave-linge prélève automatiquement l’assouplissant lors
de chaque programme de lavage.
3,3,
3, attention
3,3,
UnUn
Un
UnUn
sez la lessive liquide quel-sez la lessive liquide quel-
V
er
sez la lessive liquide quel-
VV
erer
sez la lessive liquide quel-sez la lessive liquide quel-
ques instants avant deques instants avant de
ques instants avant de
ques instants avant deques instants avant de
brancher votre machine.brancher votre machine.
brancher votre machine.
brancher votre machine.brancher votre machine.
N’oubliez pas que la lessiveN’oubliez pas que la lessive
N’oubliez pas que la lessive
N’oubliez pas que la lessiveN’oubliez pas que la lessive
liquide est particulièrementliquide est particulièrement
liquide est particulièrement
liquide est particulièrementliquide est particulièrement
indiquée pour des lavages àindiquée pour des lavages à
indiquée pour des lavages à
indiquée pour des lavages àindiquée pour des lavages à
des températures allantdes températures allant
des températures allant
des températures allantdes températures allant
jusqu’à 60 degrés et pour lesjusqu’à 60 degrés et pour les
jusqu’à 60 degrés et pour les
jusqu’à 60 degrés et pour lesjusqu’à 60 degrés et pour les
programmes de lavage qui neprogrammes de lavage qui ne
programmes de lavage qui ne
programmes de lavage qui neprogrammes de lavage qui ne
prévoient pas de prélavage.prévoient pas de prélavage.
prévoient pas de prélavage.
prévoient pas de prélavage.prévoient pas de prélavage.
Vous trouverez dans le commerce
des lessives liquides ou en poudre
avec boule doseuse à placer
directement dans le tambour, leur
mode d’emploi est indiqué sur le
paquet.
N’utilisez jamais de lessive pour
lavage à la main, leur excès de
mousse risquerait d’endommager
votre lave-linge.
Encore un petit secret: quand vous
lavez à l’eau froide, réduisez la
quantité de lessive: cette dernière
s’y dissout moins bien que dans
l’eau chaude et serait en partie
gaspillée.
Prélavage, Javel, assouplissantPrélavage, Javel, assouplissant
Prélavage, Javel, assouplissant
Prélavage, Javel, assouplissantPrélavage, Javel, assouplissant
Si vous voulez blanchir votre
linge sélectionnez les programmes correspondants et versez le
produit de blanchissage dans le
44
bac
4 du tiroir à produits lessi-
44
viels.
Quand vous versez le produit
de blanchissage, attention à
ne pas dépasser le niveau
“max.”“max.”
“max.” indiqué.
“max.”“max.”
LL
’utilisation de l’eau de Ja’utilisation de l’eau de Ja
L
’utilisation de l’eau de Ja
LL
’utilisation de l’eau de Ja’utilisation de l’eau de Ja
exclut la possibilité d’ef-exclut la possibilité d’ef-
exclut la possibilité d’ef-
exclut la possibilité d’ef-exclut la possibilité d’effectuer un prélavage.fectuer un prélavage.
fectuer un prélavage.
fectuer un prélavage.fectuer un prélavage.
N’utilisez de l’eau de JavelN’utilisez de l’eau de Javel
N’utilisez de l’eau de Javel
N’utilisez de l’eau de JavelN’utilisez de l’eau de Javel
que pour les tissus blancsque pour les tissus blancs
que pour les tissus blancs
que pour les tissus blancsque pour les tissus blancs
résistants et des détachantsrésistants et des détachants
résistants et des détachants
résistants et des détachantsrésistants et des détachants
délicats pour les couleurs etdélicats pour les couleurs et
délicats pour les couleurs et
délicats pour les couleurs etdélicats pour les couleurs et
synthétiques.synthétiques.
lesles
synthétiques.
les
synthétiques.synthétiques.
lesles
Supprimez le blanchissage
Degrés de dureté de l'eau
Niv .-Caractéristique Allemands Français
Bac 1:Bac 1:
Bac 1:
Bac 1:Bac 1:
Bac 2:Bac 2:
Bac 2:
Bac 2:Bac 2:
Bac 3:Bac 3:
Bac 3:
Bac 3:Bac 3:
Bac 4: JavelBac 4: Javel
Bac 4: Javel
Bac 4: JavelBac 4: Javel
Des économies sur toute la ligne
CHARGE MAXIMUM
La meilleure façon d’éviter des gaspillages d’électricité, d’eau, de lessive et de temps, c’est d’utiliser
votre lave-linge au maximum de la charge conseillée.
Mieux vaut une pleine charge que deux demies, vous pourrez ECONOMISER jusqu’à 50%
d’électricité.
UTILISEZ MOINS DE LESSIVE SI : vous lavez peu de linge, le linge n’est pas très sale, si de la
mousse se forme durant le lavage ou le degré de dureté de l’eau varie de dur à doux (voir tableau cidessus). Si vous voulez connaître la dureté de votre eau, informez-vous auprès du Service des Eaux
de votre Commune.
UN PRELA VAGE EST-IL VRAIMENT NECESSAIRE?
Uniquement en cas de linge vraiment sale.
Programmer un lavage SANS prélavage pour du linge peu sale ou moyennement sale permet
d’ECONOMISER sur la lessive, le temps, l’eau et de 5 à 15% d’électricité.
UN LA VAGE A L’EAU CHAUDE EST-IL VRAIMENT NECESSAIRE?
Avant le lavage, traitez les taches avec un détacheur ou mettez à tremper le linge taché dans l’eau,
vous pourrez sélectionner un programme de lavage à l’eau chaude à une température moins élevée.
Choisissez un programme de lavage à 60° pour ECONOMISER jusqu’à 50% d’électricité.
Lessive prélavage (enLessive prélavage (en
Lessive prélavage (en
Lessive prélavage (enLessive prélavage (en
poudre)poudre)
poudre)
poudre)poudre)
Lessive lavage (enLessive lavage (en
Lessive lavage (en
Lessive lavage (enLessive lavage (en
poudre ou liquide)poudre ou liquide)
poudre ou liquide)
poudre ou liquide)poudre ou liquide)
AssouplissantAssouplissant
Assouplissant
AssouplissantAssouplissant
1 - Douce
2 - Moyenne
3 - Dure
4 - Très dure
Guide pour un emploi
économique et écologique des
électroménagers
pour le pro- gramme “Soie” et
les “Programmes Spéciaux”
(voir page 6).
NB:NB:
NB:
NB:NB:
1) Diluez l’eau de Javel1) Diluez l’eau de Javel
1) Diluez l’eau de Javel
1) Diluez l’eau de Javel1) Diluez l’eau de Javel
concentrée. concentrée.
concentrée.
concentrée. concentrée.
2) Pour les lessives con-2) Pour les lessives con-
2) Pour les lessives con-
2) Pour les lessives con-2) Pour les lessives concentrées (en poudre ou li-centrées (en poudre ou li-
centrées (en poudre ou li-
centrées (en poudre ou li-centrées (en poudre ou liquides) utilisez un program-quides) utilisez un program-
quides) utilisez un program-
quides) utilisez un program-quides) utilisez un programme sans prélavage.me sans prélavage.
me sans prélavage.
me sans prélavage.me sans prélavage.
velvel
vel
velvel
3) Pour les lessives3) Pour les lessives
3) Pour les lessives
3) Pour les lessives3) Pour les lessives
contenues dans des boulescontenues dans des boules
contenues dans des boules
contenues dans des boulescontenues dans des boules
ou des tablettes n’utilisezou des tablettes n’utilisez
ou des tablettes n’utilisez
ou des tablettes n’utilisezou des tablettes n’utilisez
pas le prélavagepas le prélavage
pas le prélavage
pas le prélavagepas le prélavage
AA
jout d’Assouplissantjout d’Assouplissant
A
jout d’Assouplissant
AA
jout d’Assouplissantjout d’Assouplissant
L’assouplissant rend votre
linge plus souple et diminue
°dH °T.H
0- 7 0-15
8-14 16-25
15-21 26-37
plus de 21 plus de 37
Versez l’as- souplissant dans
le bac
lessiviels selon les indications
du fabricant.
Le lave-linge prélève automatiquement l’assouplissant lors
du dernier rinçage. A la fin du
programme de lavage il reste
dans le bac 3 un résidu d’eau.
Cette eau sert au prélèvement
des assouplissants très
denses ou à dissoudre les
assou- plissants concentrés.
Si dans le bac 3 il reste un peu
plus d’eau que d’habitude,
cela signifie que le dispositif
de vidange est bouché et
empêche l’effet aspirant du
dispositif.
Pour le nettoyer voir page 13.
Ne versez jamais dans le bac
assouplissant et amidon en
même temps, le système
antidébordement pourrait se
boucher.
3 3
3
du tiroir à produits
3 3
la charge
électrostatique
des fibres
thétiques.
Vous pouvez
utiliser les assouplissants
pour les tissus
en éponge,
les tricots, les
ri-deaux, etc.
syn-
Mode d'installation et d'emploi
10 10
10
10 10

Problèmes et solutions
AA
vv
A
AA
Il peut arriver que le lave-linge ne fonctionne pas bien. Il s'agit très souvent de problèmes faciles à résoudre
sans l'aide d'un technicien. Avant d'appeler le SAV, effectuez les contrôles suivants.
ant de téléphonerant de téléphoner
v
ant de téléphoner
vv
ant de téléphonerant de téléphoner
,,
lisez ce qui suit lisez ce qui suit
,
lisez ce qui suit
,,
lisez ce qui suit lisez ce qui suit
Le lave-linge neLe lave-linge ne
Le lave-linge ne
Le lave-linge neLe lave-linge ne
démarre pasdémarre pas
démarre pas
démarre pasdémarre pas
La fiche est-elle bien bran-La fiche est-elle bien bran-
La fiche est-elle bien bran-
La fiche est-elle bien bran-La fiche est-elle bien bran-
chée dans la prise?chée dans la prise?
chée dans la prise? Elle
chée dans la prise?chée dans la prise?
pourrait avoir été déplacée
en faisant le ménage.
Y a-t-il du courant?Y a-t-il du courant?
Y a-t-il du courant?
Y a-t-il du courant?Y a-t-il du courant?
Le disjoncteur pourrait s’être
déclenché parce qu’il y a trop
d’électroménagers branchés
en même temps. Ou bien il
peut y avoir une panne de
courant dans votre quartier.
La porte du tambour est-elle La porte du tambour est-elle
La porte du tambour est-elle
La porte du tambour est-elle La porte du tambour est-elle
bien fermée?bien fermée?
bien fermée?
bien fermée?bien fermée?
Par sécurité, le lave-linge ne
fonctionne pas si la porte du
..
.
..
tambour est ouverte ou mal
fermée.
La touche Allumé/Eteint est-La touche Allumé/Eteint est-
La touche Allumé/Eteint est-
La touche Allumé/Eteint est-La touche Allumé/Eteint est-
elle enfoncée?elle enfoncée?
elle enfoncée?
elle enfoncée?elle enfoncée?
Dans ce cas, un départ différé
a été programmé.
Le bouton de départLe bouton de départ
Le bouton de départ
Le bouton de départLe bouton de départ
programmé, sur les modèlesprogrammé, sur les modèles
programmé, sur les modèles
programmé, sur les modèlesprogrammé, sur les modèles
qui en prévoit un, est-il dansqui en prévoit un, est-il dans
qui en prévoit un, est-il dans
qui en prévoit un, est-il dansqui en prévoit un, est-il dans
une position correcte?une position correcte?
une position correcte?
une position correcte?une position correcte?
Le robinet de l’eau est-ilLe robinet de l’eau est-il
Le robinet de l’eau est-il
Le robinet de l’eau est-ilLe robinet de l’eau est-il
ouvert?ouvert?
ouvert? Par sécurité, s’il n’y
ouvert?ouvert?
a pas d’arrivée d’eau, le
lavage ne démarre pas.
Il n’y a pas d’arrivéeIl n’y a pas d’arrivée
Il n’y a pas d’arrivée
Il n’y a pas d’arrivéeIl n’y a pas d’arrivée
d’eau.d’eau.
d’eau.
d’eau.d’eau.
A FA F
AIREAIRE
A F
AIRE
A FA F
AIREAIRE
Fermez le robinet
après chaque lavage,
cela réduit l'usure de
l'installation
hydraulique du lavelinge et évite le danger
de fuites quand il n'y a
personne à la maison.
Dans la mesure du
possible, n'utilisez
votre lave-linge sans
surveillance que s'il
se trouve dans un lieu
où il y a évacuation au
sol (puisard).
Laissez toujours la
porte du tambour
entrebâillée.
V ous éviterez ainsi la
formation de
mauvaises odeurs.
Nettoyez l'extérieur
avec soin.
Pour nettoyer
l'extérieur et les
parties en caoutchouc,
utilisez toujours un
chiffon imbibé d'eau et
de savon.
A NE PAS FAIRE
Ne laissez jamais la fiche
branchée pendant le
nettoyage du lave-linge.
Même pendant les travaux
d'entretien, il faut toujours
débrancher la fiche.
N'utilisez pas de solvants et
de produits abrasifs
agressifs.
N'utilisez jamais de
produits solvants ou
abrasifs pour nettoyer
l'extérieur et les parties en
caoutchouc.
Ne négligez pas le tiroir à
produits lessiviels.
Il est amovible, pour le
laver il suffit de le laisser
un peu sous un jet d'eau
courante.
Ne partez pas en vacances
sans vous soucier de lui.
A vant de partir , il faut
toujours contrôler si la
fiche est bien débranchée et
le robinet de l'eau fermé.
Le tuyau est-il bienLe tuyau est-il bien
Le tuyau est-il bien
Le tuyau est-il bienLe tuyau est-il bien
raccordé au robinet?raccordé au robinet?
raccordé au robinet?
raccordé au robinet?raccordé au robinet?
Panne d’eau? Panne d’eau?
Panne d’eau? N’y a-t-il pas
Panne d’eau? Panne d’eau?
des travaux en cours dans
votre immeuble ou dans la
rue?
La pression est-elleLa pression est-elle
La pression est-elle
La pression est-elleLa pression est-elle
suffisante?suffisante?
suffisante? L’autoclave
suffisante?suffisante?
pourrait être en panne.
Le filtre du robinet est-ilLe filtre du robinet est-il
Le filtre du robinet est-il
Le filtre du robinet est-ilLe filtre du robinet est-il
propre?propre?
propre? Si l’eau est très
propre?propre?
calcaire, ou suite à des
travaux récents sur la
canalisation d’eau, le filtre
pourrait être bouché par des
détritus.
Le tuyau en caoutchoucLe tuyau en caoutchouc
Le tuyau en caoutchouc
Le tuyau en caoutchoucLe tuyau en caoutchouc
n’est-il pas plié?n’est-il pas plié?
n’est-il pas plié? Le
n’est-il pas plié?n’est-il pas plié?
parcours du tuyau en
caoutchouc qui amène l’eau
au lave-linge doit être le plus
rectiligne possible. Contrô-
lez s’il n’est pas écrasé ou
plié.
Le lave-linge prendLe lave-linge prend
Le lave-linge prend
Le lave-linge prendLe lave-linge prend
l’eau et vidange conti-l’eau et vidange conti-
l’eau et vidange conti-
l’eau et vidange conti-l’eau et vidange continuellement.nuellement.
nuellement.
nuellement.nuellement.
Le tuyau est-il placé tropLe tuyau est-il placé trop
Le tuyau est-il placé trop
Le tuyau est-il placé tropLe tuyau est-il placé trop
bas?bas?
bas? Il faut l’installer entre
bas?bas?
60 et 100 cm de haut.
LL
’embouc’embouc
L
’embouc
LL
’embouc’embouc
elle plongée dans l’eau?elle plongée dans l’eau?
elle plongée dans l’eau?
elle plongée dans l’eau?elle plongée dans l’eau?
LL
’év’év
L
’év
LL
’év’év
un évent?un évent?
un évent? Si après ces
un évent?un évent?
vérifications, le problème
persiste, fermez le robinet de
l’eau, éteignez la machine et
appelez le SAV.
Si vous habitez en étage, il
pourrait y avoir des phénomènes de siphonnement.
Pour les résoudre, il faut
monter une soupape spéciale.
hure du tuyhure du tuy
hure du tuy
hure du tuyhure du tuy
acuation macuation m
acuation m
acuation macuation m
au est-au est-
au est-
au est-au est-
urale a-t-elleurale a-t-elle
urale a-t-elle
urale a-t-elleurale a-t-elle
11 11
11 Mode d'installation et d'emploi
11 11
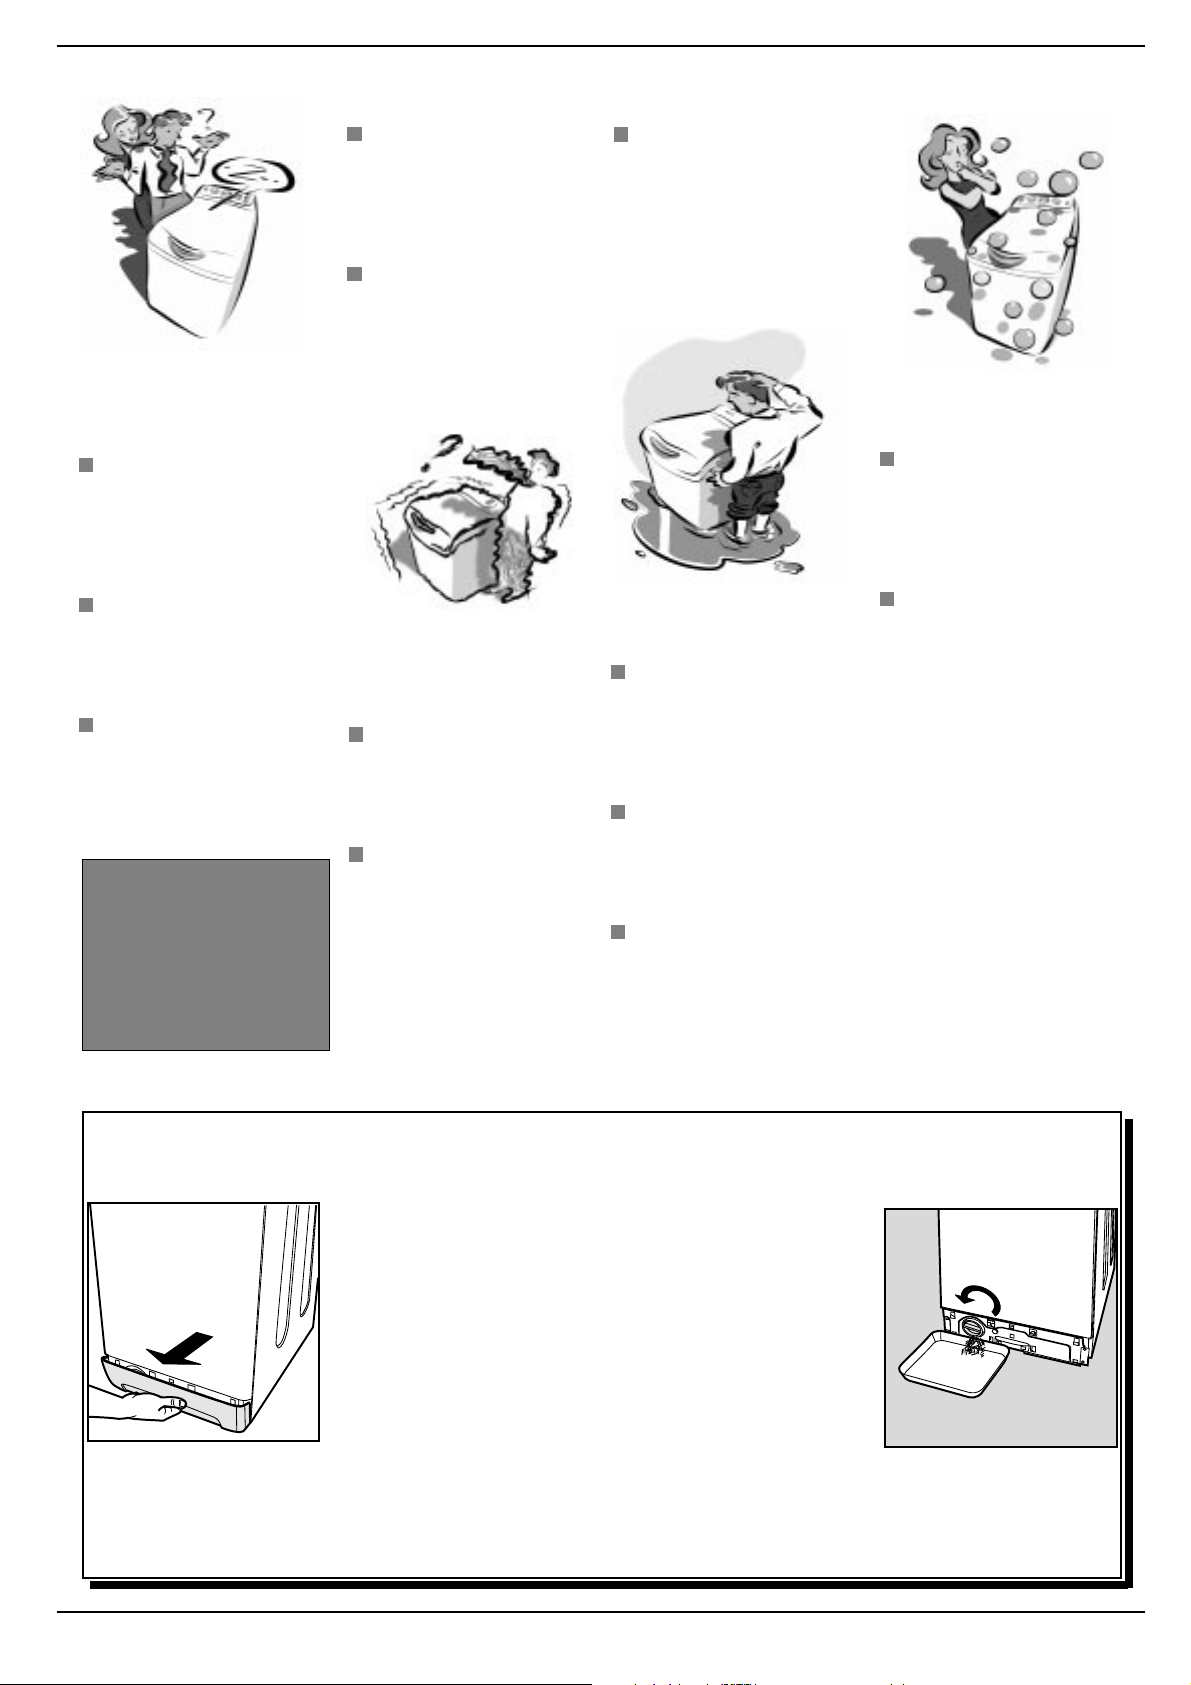
VV
otre laotre la
V
otre la
VV
otre laotre la
vidange pas et n’es-vidange pas et n’es-
vidange pas et n’es-
vidange pas et n’es-vidange pas et n’essore pas.sore pas.
sore pas.
sore pas.sore pas.
Est-ce que le programmeEst-ce que le programme
Est-ce que le programme
Est-ce que le programmeEst-ce que le programme
choisi prévoit la vidangechoisi prévoit la vidange
choisi prévoit la vidange
choisi prévoit la vidangechoisi prévoit la vidange
de l’eau?de l’eau?
de l’eau? Pour certains
de l’eau?de l’eau?
programmes de lavage il
faut intervenir pour lancer la
vidange.
Est-ce que la fonctionEst-ce que la fonction
Est-ce que la fonction
Est-ce que la fonctionEst-ce que la fonction
“Anti-froissement” - si elle“Anti-froissement” - si elle
“Anti-froissement” - si elle
“Anti-froissement” - si elle“Anti-froissement” - si elle
est prévue - est activée?est prévue - est activée?
est prévue - est activée? Il
est prévue - est activée?est prévue - est activée?
faut là aussi intervenir pour
actionner la vidange.
Est-ce que la pompeEst-ce que la pompe
Est-ce que la pompe
Est-ce que la pompeEst-ce que la pompe
d’évacuation est bou-d’évacuation est bou-
d’évacuation est bou-
d’évacuation est bou-d’évacuation est bouchée?chée?
chée? Pour l’inspecter,
chée?chée?
fermez le robinet, débranchez la fiche et suivez les
instructions fournies page
12 ou bien appelez le SAV.
ve-lingve-ling
ve-ling
ve-lingve-ling
e nee ne
e ne
e nee ne
Ne vous adressez
jamais à des
techniciens non
agréés et exigez
toujours l'emploi de
pièces détachées
originales
Est-ce que le tuyau d’éva-Est-ce que le tuyau d’éva-
Est-ce que le tuyau d’éva-
Est-ce que le tuyau d’éva-Est-ce que le tuyau d’éva-
cuation est plié? cuation est plié?
cuation est plié? Le
cuation est plié? cuation est plié?
parcours du tuyau doit être
le plus rectiligne possible.
Contrôlez s’il n’est pas
écrasé ou plié.
Est-ce que la conduite deEst-ce que la conduite de
Est-ce que la conduite de
Est-ce que la conduite deEst-ce que la conduite de
l’installation de vidangel’installation de vidange
l’installation de vidange
l’installation de vidangel’installation de vidange
est bouchée? est bouchée?
est bouchée? S’il y a une
est bouchée? est bouchée?
rallonge, est-ce qu’elle est
bien montée ou empêchet-elle l’eau de passer?
VV
otre laotre la
V
otre la
VV
otre laotre la
beaucoup en phasebeaucoup en phase
beaucoup en phase
beaucoup en phasebeaucoup en phase
d’essorage.d’essorage.
d’essorage.
d’essorage.d’essorage.
Est-ce que le groupeEst-ce que le groupe
Est-ce que le groupe
Est-ce que le groupeEst-ce que le groupe
oscillant interne a bien étéoscillant interne a bien été
oscillant interne a bien été
oscillant interne a bien étéoscillant interne a bien été
débloqué lors de l’installa-débloqué lors de l’installa-
débloqué lors de l’installa-
débloqué lors de l’installa-débloqué lors de l’installation? tion?
tion? La page 2 est
tion? tion?
consacrée à l’installation.
Est-ce que le lave-linge estEst-ce que le lave-linge est
Est-ce que le lave-linge est
Est-ce que le lave-linge estEst-ce que le lave-linge est
bien nivelé?bien nivelé?
bien nivelé? Contrôlez
bien nivelé?bien nivelé?
régulièrement sa mise à
niveau. A la longue, le
lave-linge pourrait s’être
légèrement déplacé.
Agissez sur les pieds et
contrôlez à l’aide d’un
niveau.
ve-lingve-ling
ve-ling
ve-lingve-ling
e vibree vibre
e vibre
e vibree vibre
A-t-il assez de place toutA-t-il assez de place tout
A-t-il assez de place tout
A-t-il assez de place toutA-t-il assez de place tout
autour? autour?
autour? N’appuyez pas
autour? autour?
votre lave-linge contre les
sanitaires et laissez de la
place tout autour. S’il est
posé sur de la moquette,
attention à ce que la
ventilation ne soit pas
bouchée au niveau de la
zone d’appui.
Le lave-linge a desLe lave-linge a des
Le lave-linge a des
Le lave-linge a desLe lave-linge a des
fuites.fuites.
fuites.
fuites.fuites.
Est-ce que la bague du Est-ce que la bague du
Est-ce que la bague du
Est-ce que la bague du Est-ce que la bague du
tuyau d’arrivée de l’eau esttuyau d’arrivée de l’eau est
tuyau d’arrivée de l’eau est
tuyau d’arrivée de l’eau esttuyau d’arrivée de l’eau est
bien vissée? bien vissée?
bien vissée? Fermez le
bien vissée? bien vissée?
robinet, débranchez la fiche
et essayez de la serrer sans
forcer .
Est-ce que le tiroir àEst-ce que le tiroir à
Est-ce que le tiroir à
Est-ce que le tiroir àEst-ce que le tiroir à
produits lessiviels estproduits lessiviels est
produits lessiviels est
produits lessiviels estproduits lessiviels est
engorgé? engorgé?
engorgé? Essayez de le
engorgé? engorgé?
sortir et de le laver à l’eau
courante.
Est-ce que le tuyau deEst-ce que le tuyau de
Est-ce que le tuyau de
Est-ce que le tuyau deEst-ce que le tuyau de
vidange n’est pas bienvidange n’est pas bien
vidange n’est pas bien
vidange n’est pas bienvidange n’est pas bien
fixé?fixé?
fixé? Fermez le robinet,
fixé?fixé?
débranchez la fiche et
essayez de mieux le fixer.
Il y a un excès deIl y a un excès de
Il y a un excès de
Il y a un excès deIl y a un excès de
mousse.mousse.
mousse.
mousse.mousse.
Est-ce que vous utilisezEst-ce que vous utilisez
Est-ce que vous utilisez
Est-ce que vous utilisezEst-ce que vous utilisez
bien une lessive machine?bien une lessive machine?
bien une lessive machine?
bien une lessive machine?bien une lessive machine?
Vérifiez qu’il y ait bien
l’inscription: “pour lavelinge” ou bien “main et
machine”.
Est-ce que la quantité estEst-ce que la quantité est
Est-ce que la quantité est
Est-ce que la quantité estEst-ce que la quantité est
correcte? correcte?
correcte? Un excès de
correcte? correcte?
lessive produit plus de
mousse mais ne lave pas
mieux tout en produisant
des incrustations à
l’intérieur du lave-linge.
Si malgré tous ces contrôles,
votre lave-linge ne fonctionne
pas et l’inconvénient persiste,
appelez le SAV le plus proche
de votre domicile en précisant:
- le type de panne
- le sigle (Modèle ………. )
- le numéro de série (S/N .....)
Vous trouverez tous ces
renseignements sur la plaquette signalétique située à
l’intérieur du socle de votre
lave-linge. (fig. 1).
En cas de besoin, inspectez la pompe et le tuyau en caoutchouc.En cas de besoin, inspectez la pompe et le tuyau en caoutchouc.
En cas de besoin, inspectez la pompe et le tuyau en caoutchouc.
En cas de besoin, inspectez la pompe et le tuyau en caoutchouc.En cas de besoin, inspectez la pompe et le tuyau en caoutchouc.
Le lave-linge est équipé d'une pompe autonettoyante qui n'exige aucune opération de nettoyage et d'entretien. Il peut toutefois
arriver que de menus objets tombent par mégarde dans la pompe: des pièces de monnaie, des barrettes, des boutons etc. Pour éviter
qu'ils n'endommagent la machine, ils sont bloqués dans une préchambre accessible, située en bas de la pompe.
Pour accéder à cette préchambre, il suffit de démonter le panneau
situé en bas du lave-linge (fig. 1); enlevez ensuite le couvercle en le
faisant tourner dans le sens inverse des aiguilles d'une montre (fig.
2) et inspectez soigneusement l'intérieur.
Le tuyau en caoutchouc
Contrôlez le tuyau en caoutchouc au moins une fois par an.
Remplacez-le dès que vous remarquez des craquèlements et des
fissures qui pourraient entraîner des cassures.
Fig. 1
Fig. 2
Attention: contrôlez que le cycle de lavage est bien terminé et débranchez la fiche avant d'enlever le couvercle et avant toute opération
d'entretien. Il est normal qu'un peu d'eau s'échappe quand vous enlevez le couvercle. Lorsque vous remontez le panneau extérieur,
attention à bien enfiler les crochets du bas dans les fentes avant de le pousser contre la machine.
Mode d'installation et d'emploi
12 12
12
12 12

Soins et entretien facile
ChoucChouc
Chouc
ChoucChouc
toujourtoujour
toujour
toujourtoujour
Votre lave-linge est conçu pour
durer longtemps sans causer de
problèmes. Quelques astuces
vous permettront de le garder
toujours en forme et d’augmenter sa longévité.
mier lieu, fermez toujours lemier lieu, fermez toujours le
mier lieu, fermez toujours le
mier lieu, fermez toujours lemier lieu, fermez toujours le
robinet de l’eau après chaquerobinet de l’eau après chaque
robinet de l’eau après chaque
robinet de l’eau après chaquerobinet de l’eau après chaque
lavage:lavage:
lavage: la pression continue de
lavage:lavage:
l’eau peut provoquer l’usure de
certains composants.
Vous éliminerez aussi tout
danger de fuites en votre
absence.
Si votre eau est trop dure,Si votre eau est trop dure,
Si votre eau est trop dure,
Si votre eau est trop dure,Si votre eau est trop dure,
utilisez un produit anticalcaireutilisez un produit anticalcaire
utilisez un produit anticalcaire
utilisez un produit anticalcaireutilisez un produit anticalcaire
(une eau dure laisse des traces
blanchâtres autour des robinets
ou bien au niveau des bondes,
notamment dans la baignoire).
Si vous désirez avoir des
renseignements plus précis à
propos de l’eau de votre
installation, adressez-vous au
Service des Eaux de votre
Commune ou bien à un
plombier du coin.
Il faut toujours vider les poches
et enlever les objets durs, les
pièces de monnaie, les broches
ou les pin’s par exemple.
Lavez l’extérieur du lave-linge
avec un chiffon, de l’eau tiède
et du savon.
houtez-le et il vhoutez-le et il v
houtez-le et il v
houtez-le et il vhoutez-le et il v
En pre-En pre-
En pre-
En pre-En pre-
s fidèles fidèle
s fidèle
s fidèles fidèle
Le tiroir à produits
lessiviels est amovible;
il est important de le
laver régulièrement.
Pour éviter les
incrustations il suffit
de le laisser un peu
sous un jet d’eau
courante.
N’ayez pas la main lourdeN’ayez pas la main lourde
N’ayez pas la main lourde
N’ayez pas la main lourdeN’ayez pas la main lourde
avec la lessive.avec la lessive.
avec la lessive.
avec la lessive.avec la lessive.
Les lessives normales contiennent déjà des produits anticalcaires. Donc, n’ajoutez à votre
lavage un produit spécifique
que si votre eau est particulièrement dure, c’est à dire
très riche en calcaire.
Il peut être utile, de temps en
temps, d’effectuer un cycle de
lavage avec une dose de
produit anticalcaire, sans
lessive et sans linge.
N’ayez pas la main lourde avec
les produits lessiviels, l’excès
de mousse pourrait causer des
incrustations et abîmer les
composants de votre machine.
ous seraous sera
ous sera
ous seraous sera
V otr e lave-linge est un vrai compagnon de vie et de
travail. Le garder en forme, c'est important.
Pour vous aussi.
Videz toujours les poches:
lors de l'essorage les petits objets métalliques peuvent
gravement endommager le tambour de votre machine !
Comment nettoComment netto
Comment netto
Comment nettoComment netto
Nettoyage:Nettoyage:
Nettoyage:
Démontage:Démontage:
Démontage:
Démontage:Démontage:
Appuyez légèrement sur la
grosse touche située sur la
partie antérieure du tiroir à
produits lessiviels et tirez vers
le haut (fig. 1).
Fig. 1
13 13
13 Mode d'installation et d'emploi
13 13
Nettoyage:Nettoyage:
Nettoyez le tiroir sous le robinet (fig. 3) à l'aide par exemple d'une
vieille brosse à dents; tirez sur les deux petits siphons placés
dans la partie supérieure des bacs 1 et 2 (fig. 4), contrôlez qu'ils
ne soient pas bouchés et rincez-les.
Fig. 2
yy
er le tirer le tir
y
er le tir
yy
er le tirer le tir
oir à proir à pr
oir à pr
oir à proir à pr
Fig. 3
oduits lessivielsoduits lessiviels
oduits lessiviels
oduits lessivielsoduits lessiviels
Remontage:Remontage:
Remontage:
Remontage:Remontage:
N'oubliez pas de replacez les
deux petits siphons dans leurs
emplacements spéciaux et
remettez enfin le tiroir dans son
siège en le fixant (fig. 4, 2, 1).
Fig. 4

Nous prenons soin de vos charges
EquilibraEquilibra
Equilibra
EquilibraEquilibra
vv
otre essoraotre essora
v
otre essora
vv
otre essoraotre essora
gg
g
gg
Attention
Cette machine est équipéeCette machine est équipée
Cette machine est équipée
Cette machine est équipéeCette machine est équipée
d’un dispositif électroniqued’un dispositif électronique
d’un dispositif électronique
d’un dispositif électroniqued’un dispositif électronique
auto-équilibrant auto-équilibrant
auto-équilibrant
auto-équilibrant auto-équilibrant
Control)Control)
Control)
Control)Control)
à vitesse élevée uniquementà vitesse élevée uniquement
à vitesse élevée uniquement
à vitesse élevée uniquementà vitesse élevée uniquement
si les charges de linge sontsi les charges de linge sont
si les charges de linge sont
si les charges de linge sontsi les charges de linge sont
bien distribuéesbien distribuées
bien distribuées
bien distribuéesbien distribuées
Un déséquilibre dans laUn déséquilibre dans la
Un déséquilibre dans la
Un déséquilibre dans laUn déséquilibre dans la
charge pourrait en effetcharge pourrait en effet
charge pourrait en effet
charge pourrait en effetcharge pourrait en effet
endommager votre machine.endommager votre machine.
endommager votre machine.
endommager votre machine.endommager votre machine.
Avant chaque phase d’essorage, le système auto-équilibrant ABC imprime au tambour de plus nombreuses
rotations, dans le sens des
aiguilles d’une montre et dans
le sens inverse, jusqu’à
distribuer de façon uniforme le
linge à l’intérieur et ensuite faire
démarrer doucement l’essorage.
qui permet l’essorage qui permet l’essorage
qui permet l’essorage
qui permet l’essorage qui permet l’essorage
(Auto balance(Auto balance
(Auto balance
(Auto balance(Auto balance
Dans certaines conditions de
charge il peut arriver que les
rotations ne suffisent pas à
distribuer le poids à l’intérieur
du tambour (s’il y a par exemple
des peignoirs en éponges, des
couvertures, des draps qui
forment une “boule”, etc.)
Deux cas de figure peuvent
alors se vérifier:
e électre électr
e électr
e électre électr
gg
ee
g
e
gg
ee
- -
- le système ABC “accepte” le
- -
déséquilibre,
vitesse d’essoragevitesse d’essorage
vitesse d’essorage . Dans ce
vitesse d’essoragevitesse d’essorage
cas le linge sera plus humide
que d’habitude;
--
- Le système ABC estime que le
--
déséquilibre est supérieur au
seuil d’acceptabilité et
l’essoragel’essorage
l’essorage. Dans ce cas sortez
l’essoragel’essorage
le linge de la machine, déroulez-le avant de le remettre dans
la machine et de sélectionner le
programme essorage.
mais réduit lamais réduit la
mais réduit la
mais réduit lamais réduit la
onique ABC deonique ABC de
onique ABC de
onique ABC deonique ABC de
exclut exclut
exclut
exclut exclut
Dans les deux cas, il ne s’agit
pas d’un défaut de la machine
mais bien d’une de ses caractéristiques les plus avancées
qui la protègent d’éventuels
cassures, vibrations, déplacements sur le sol et autres
inconvénients sérieux.
Caractéristiques techniquesCaractéristiques techniques
Caractéristiques techniques
Caractéristiques techniquesCaractéristiques techniques
Modèle
Dimensions
Capacité
Connexions
électrique s
Connexions
hydrauliques
Vitesse d'essorage
Programmes de
contrôle suivant
norme IEC 456
Le constructeur se réserve le droit d'apporter, à tout moment et sans aucun préavis, toutes les modifications, à la machine ou aux accessoires de
ses modèles, jugées nécessaires pour des exigences techniques et commerciales.
WT120
la rg eur c m 4 0
hauteur c m 8 5
profondeur cm 60
de 1 à 5 kg
tension à 230 Volt 50 Hz
puissance max. absorbée 2100 W
pres sion ma ximu m 1 MP a (10 ba r)
pres sion mini mum 0,05 MP a (0 ,5 bar)
ca pac ité d u tambou r 4 2 litres
tours/minute 1200
effectué pour une charge de 5,0 kg, programme 3 à 60° C
Cet appareil est conforme aux Directives Communautaires suivantes:
- 73/23/CEE du 19/02/73 (Basse Tension) et modifications successives
- 89/336/CEE du 03/05/89 (Compatibilité électromagnétique) et modifications successives
Mode d'installation et d'emploi
14 14
14
14 14

Merloni Elettrodomestici
Viale Aristide Merloni 47
60044 Fabriano
Italie
Tel +39 0732 6611
Fax +39 0732 662501
www.merloni.com
01/2003- 195 034 985 02 - Xerox Business Services - Docutech.

TopladerWaschvollautomat
Installations- und Bedienungsanleitungen
WT 120

KK
urzanleitungurzanleitung
K
urzanleitung
KK
urzanleitungurzanleitung
Erkunden Sie hier die 12 Argumente, die auf nachfolgenden
Seiten dieses Handbuches näher erklärt werden. Lesen Sie
diese, merken Sie sich diese, haben Sie viel Spaß daran: Sie
werden viele kleine Geheimnisse entdecken, die Ihnen dazu
verhelfen, besser und müheloser zu waschen, und Ihr Gerät
länger zu erhalten. Alles unter dem Motto: Sicherheit.
Installation und Umzug (Seite 2)Installation und Umzug (Seite 2)
1.
Installation und Umzug (Seite 2)
Installation und Umzug (Seite 2)Installation und Umzug (Seite 2)
Nach der Lieferung Ihres neuen Waschvollautomaten oder
nach einem Umzug ist es von grundlegender Bedeutung,
dass das Gerät korrekt angeschlossen wird, damit Ihr Gerät
einwandfrei funktioniert. K ontrollieren Sie daher stets folgende Punkte:
1.1.
1. dass die Elektroanlage den einschlägigen Vorschriften
1.1.
entspricht;
2.2.
2. dass Versorgungs- und Ablaufschläuche vorschriftsmä
2.2.
ßigangeschlossen wurden;
3.3.
3. dass der Waschvollautomat eben aufgestellt wurde. Es
3.3.
zahlt sich aus: durch längere Lebensdauer und beste
Waschwirkung;
4.4.
4. dass die Befestigungsschrauben des Laugenbehälters
4.4.
(auf der Rückwand des Waschvollautomaten) entfernt
wurden.
Ihre Sicherheit und die Ihrer Kinder (Seite 3)Ihre Sicherheit und die Ihrer Kinder (Seite 3)
2.
Ihre Sicherheit und die Ihrer Kinder (Seite 3)
Ihre Sicherheit und die Ihrer Kinder (Seite 3)Ihre Sicherheit und die Ihrer Kinder (Seite 3)
Hier finden Sie unentbehrliche Ratschläge für Ihre Sicherheit und die Ihrer Familie. Was ja das allerwichtigste ist!
WW
as kann im as kann im
3.
W
as kann im
WW
as kann im as kann im
werden und wie wird er in Betrieb gesetzt? werden und wie wird er in Betrieb gesetzt?
werden und wie wird er in Betrieb gesetzt?
werden und wie wird er in Betrieb gesetzt? werden und wie wird er in Betrieb gesetzt?
(Seite 4) (Seite 4)
(Seite 4)
(Seite 4) (Seite 4)
WW
W
WW
ascasc
hvhv
ollautomaten gollautomaten g
asc
hv
ollautomaten g
ascasc
hvhv
ollautomaten gollautomaten g
ee
wascwasc
e
wasc
ee
wascwasc
henhen
hen
henhen
Praktische Ratschläge um Fehler zu Praktische Ratschläge um Fehler zu
7.
Praktische Ratschläge um Fehler zu
Praktische Ratschläge um Fehler zu Praktische Ratschläge um Fehler zu
vermeiden (Seite 8) vermeiden (Seite 8)
vermeiden (Seite 8)
vermeiden (Seite 8) vermeiden (Seite 8)
Einmal waren es unsere Großmütter, die uns mit guten Ratschlägen zur Seite standen, außerdem gab es damals noch
keine Kunstf asern: K ein Wunder , dass W aschen einf acher war!
Heute ist es Ihr Waschvollautomat, der Ihnen mit Rat und Tat
zur Seite steht.
Ein korrektes Sortieren Ihrer Wäsche ist nicht nur für ein optimales Waschergebnis von äußerster Wichtigkeit, sondern
auch für die Lebensdauer des Gerätes. Lernen Sie die wichtigen Kniffe und Geheimnisse, die beim Wäschesortieren zu
beachten sind: Farben, Gewebeart, Neigung zu
Flusenbildung sind die wichtigsten Kriterien.
Machen Sie sich mit der BedienungsblendeMachen Sie sich mit der Bedienungsblende
4.
Machen Sie sich mit der Bedienungsblende
Machen Sie sich mit der BedienungsblendeMachen Sie sich mit der Bedienungsblende
vertraut (Seite 5) vertraut (Seite 5)
vertraut (Seite 5)
vertraut (Seite 5) vertraut (Seite 5)
Die Bedienungsblende ist einfach und übersichtlich. Rasch
übersehen Sie, welches Programm zu wählen ist. Jedes Programm kann mit nur wenigen Einstellungen leicht abgerufen
werden, vom energischsten V o llwaschprogr amm bis hin zum
Schonprogramm für Wolle. Sie werden sehen, es wird ganz
leicht sein.
Anleitung zur Wahl der Programme (Seite 6)Anleitung zur Wahl der Programme (Seite 6)
5.
Anleitung zur Wahl der Programme (Seite 6)
Anleitung zur Wahl der Programme (Seite 6)Anleitung zur Wahl der Programme (Seite 6)
Eine einfache, praktische, übersichtliche Tabelle hilft Ihnen
bei der Wahl der Temperaturen, des geeigneten Reinigers
und eventueller Zusätze. Eine korrekte Wahl dieser Komponenten, eine angemessene Dosierung des Reinigers sind
eine Garantie für optimale W aschergebnisse. Sie sparen Zeit,
Wasser und Strom, Tag für Tag.
Leitfaden zur Leitfaden zur
6.
Leitfaden zur
Leitfaden zur Leitfaden zur
der Symbole (Seite 7-8) der Symbole (Seite 7-8)
der Symbole (Seite 7-8)
der Symbole (Seite 7-8) der Symbole (Seite 7-8)
VV
erer
V
er
VV
erer
deutlicdeutlic
deutlic
deutlicdeutlic
hung der Etiketten undhung der Etiketten und
hung der Etiketten und
hung der Etiketten undhung der Etiketten und
ScSc
8.
Sicheres Waschen durch vorschriftsmäßiges Öffnen bzw.
Schließen der Gerätetüren.
9.
Anleitung zum Einsatz der Reinigerkammern.
10.
Bevor Sie den Techniker rufen, schauen Sie sich doch diese
Seite an: für viele Probleme findet sich die Lösung von selbst.
Sollten Sie jedoch keine geeignete Lösung finden, dann fordern Sie den Indesit-Kundendienst an, der für eine sofortige
Behebung einer jeden Betriebsstörung sorgen wird.
11.
In Ihrer Waschmaschine finden Sie eine treue Freundin: Sie
verlangt nur einige kleine Aufmerksamkeiten und dankt Ihnen dafür mit Treue und Zuverlässigkeit.
Pflegen Sie sie, und Sie werden noch lange Freude an Ihrer
Maschine haben.
hließen der hließen der
Sc
hließen der
ScSc
hließen der hließen der
Die Reinigerkammer (Seite 10)Die Reinigerkammer (Seite 10)
Die Reinigerkammer (Seite 10)
Die Reinigerkammer (Seite 10)Die Reinigerkammer (Seite 10)
Probleme und Lösungen (Seite 11 und 12)Probleme und Lösungen (Seite 11 und 12)
Probleme und Lösungen (Seite 11 und 12)
Probleme und Lösungen (Seite 11 und 12)Probleme und Lösungen (Seite 11 und 12)
Reinigung und Pfleg Reinigung und Pfleg
Reinigung und Pfleg
Reinigung und Pfleg Reinigung und Pfleg
WW
W
WW
ascasc
htrhtr
ommel (Seite 9)ommel (Seite 9)
asc
htr
ommel (Seite 9)
ascasc
htrhtr
ommel (Seite 9)ommel (Seite 9)
e (Seite 13)e (Seite 13)
e (Seite 13)
e (Seite 13)e (Seite 13)
Die auf den in jedem Kleidungs- bzw. Wäschestück befindlichen Etiketten abgebildeten internationalen Symbole sind
leicht verständlich und maßgebend für ein optimales Waschergebnis. In diesem Abschnitt erhalten Sie einige praktische
Hinweise zu den Programmen, den empfohlenen Temperaturen, der Art der Behandlung, der Bügelweise und den entsprechenden Indesit-Symbolen.
11
1 Installations- und Bedienungsanleitungen
11
TT
ecec
hnischnisc
12.
Hier finden Sie die technischen Daten Ihres Vollwaschautomaten: Modellkennzeichen, Daten zum Elektround W asseranschluss , Abmessungen, Kapazität, Schleudertouren und Übereinstimmungserklärung mit den italienischen
und europäischen Richtlinien und Vorschriften.
T
ec
TT
ecec
hnisc
hnischnisc
he Eighe Eig
he Eig
he Eighe Eig
enscensc
haften (Seite 14)haften (Seite 14)
ensc
haften (Seite 14)
enscensc
haften (Seite 14)haften (Seite 14)

Installation und Umzug
Der neue Der neue
Der neue
Der neue Der neue
zieht in Ihr Haus einzieht in Ihr Haus ein
zieht in Ihr Haus ein
zieht in Ihr Haus einzieht in Ihr Haus ein
WW
W
WW
ascasc
asc
ascasc
hvhv
hv
hvhv
ollautomatollautomat
ollautomat
ollautomatollautomat
Egal, ob Sie Ihren Waschvollautomaten neu kaufen oder ob Sie ihn
aufgrund eines Umzugs neu anschließen müssen, die Installation ist
ein überaus wichtiger Vorgang für seine einwandfreie Betriebsweise.
Nach Abnahme der Verpakkung vergewissern Sie sich in
erster Linie, dass das Gerät
keinen Schaden erlitten hat.
Wenden Sie sich im Falle
irgendwelcher Zweifel diesbezüglich an einen Fach-
Für den Für den
mann.
Für den
Für den Für den
die Wäschetrommel durchdie Wäschetrommel durch
die Wäschetrommel durch
die Wäschetrommel durchdie Wäschetrommel durch
vier Schrauben und Gummi-vier Schrauben und Gummi-
vier Schrauben und Gummi-
vier Schrauben und Gummi-vier Schrauben und Gummiteile an der Geräterückwandteile an der Geräterückwand
teile an der Geräterückwand
teile an der Geräterückwandteile an der Geräterückwand
befestigt.befestigt.
befestigt.
befestigt.befestigt.
Abnahme dieser Befe-Abnahme dieser Befe-
Abnahme dieser Befe-
Abnahme dieser Befe-Abnahme dieser Befestigung: die 4 Schrau-stigung: die 4 Schrau-
stigung: die 4 Schrau-
stigung: die 4 Schrau-stigung: die 4 Schrauben ausschrauben !ben ausschrauben !
ben ausschrauben !
ben ausschrauben !ben ausschrauben !
TT
ransporranspor
T
ranspor
TT
ransporranspor
t wirt wir
t wir
t wirt wir
2
1
Bevor Sie den ersten Waschgang starten,
Schrauben Schrauben
Schrauben und auch die
Schrauben Schrauben
Gummiteile, sowie das
Distanzstück ab (bewahren
Sie alles gut auf) und verschließen Sie die Löcher mit
den mitgelieferten Plastik-
stöpseln.
Zur Beachtung: Im Falle einer
Wiederverwendung sind die
kürzeren Schrauben oben
einzusetzen.
NivellierungNivellierung
Nivellierung
NivellierungNivellierung
Eine optimale Betriebsweise
setzt eine vollkommen ebene
Aufstellung voraus.
Gerät einen perfekten StandGerät einen perfekten Stand
Gerät einen perfekten Stand
Gerät einen perfekten StandGerät einen perfekten Stand
zu verleihen,zu verleihen,
zu verleihen, müssen die Stell-
zu verleihen,zu verleihen,
füße entsprechend eingestellt
werden; der auf der Arbeitsflä-
che der Waschmaschine zu er-
mittelnde Neigungswinkel darf
2° nicht überschreiten. Falls
Sie als Unterlage einen Tep-
pichboden haben, vergewis-
nehmen Sie dienehmen Sie die
nehmen Sie die
nehmen Sie dienehmen Sie die
Um demUm dem
Um dem
Um demUm dem
Bewahren Sie die
Arretierschrauben und die
Distanzstücke auf. Sie könnten
sie zur Befestigung der
Innenteile anl. eines evtl.
Umzuges erneut einsetzen,
um sie vor Transportschäden
dd
d
dd
sern Sie sich, dass die Belüftung auf der Standfläche nicht
beeinträchtigt wird.
Die Stellfüße sind regulierbar.
WasseranschlussWasseranschluss
Wasseranschluss
WasseranschlussWasseranschluss
Der Wasserdruck muss den
Werten entsprechen, die auf
dem Typenschild auf dem
Rückteil des Waschvollautomaten angegeben sind.
Schließen Sie den Zufuhrschlauch (er befindet sich lose
im Trommelinnern) an einen
mit einem 3/4GAS-Gewinde
versehenen Kaltwasserhahn
an. Handelt es sich um neu angelegte Wasserleitungen, oder
wurden diese längere Zeit nicht
benutzt, lassen Sie das Wasser so lange laufen, bis es klar
und frei von allen Verunreinigungen ist, bevor Sie den
Schlauch an den an der
Geräterückseite (oben rechts)
befindlichen Wassereingang
anschließen.
Versorgungsschlauch oben
rechts anbringen.
Anschluss desAnschluss des
Anschluss des
Anschluss desAnschluss des
AblaufschlauchesAblaufschlauches
Ablaufschlauches
AblaufschlauchesAblaufschlauches
Am oberen Teil der Geräterückwand befindet sich ein Haken, an dem der Ablaufschlauch
ggf. befestigt werden kann. Führen Sie das andere Ende in eine
an der Wand angelegte Abwasserleitung ein oder hängen
Sie es in ein Waschbecken
oder eine Badewanne;
zu schützen.
Drosselstellen oder zu starke
Krümmungen sind hierbei zu
vermeiden.
dass der Schlauch auf einerdass der Schlauch auf einer
dass der Schlauch auf einer
dass der Schlauch auf einerdass der Schlauch auf einer
Höhe von 60 bis 100 cm en-Höhe von 60 bis 100 cm en-
Höhe von 60 bis 100 cm en-
Höhe von 60 bis 100 cm en-Höhe von 60 bis 100 cm endet.det.
det.
det.det.
Falls es unumgänglich ist, den
Schlauch in einer Höhe von
weniger als 60 cm vom Boden
anzuschließen, ist er in den auf
der Geräterückseite befindlichen Haken einzuhängen.
Haken zum Einhängen des
Ablaufschlauches, wenn er in
einer Höhe von weniger als 60
cm vom Boden endet.
Wird der Ablaufschlauch in
eine Wanne oder ein Waschbecken geführt, dann bringen
Sie die Kunststoffführung an
und binden den Schlauch am
Wasserhahn fest.
Führung für den Wasserablauf in
Wannen oder Waschbecken.
Der Schlauch darf nie im Was-Der Schlauch darf nie im Was-
Der Schlauch darf nie im Was-
Der Schlauch darf nie im Was-Der Schlauch darf nie im Wasser liegen.ser liegen.
ser liegen.
ser liegen.ser liegen.
Es sollten keine V erlängerungsschläuche verwendet werden.
Falls dies absolut un vermeidlich
ist, sollte die Verlängerung denselben Durchmesser haben, wie
der Originalschlauch. Er darf in
keinem Fall länger als 150 cm
sein. Falls Sie über einen Wandablauf verfügen, lassen Sie bitte von einem F achmann kontrollieren, ob dieser auch geeignet
ist. Befindet sich Ihre W ohnung
in einer der obersten Etagen,
könnten sich ggf. Vakuumstellen im Siphon bilden, weshalb der W aschvollautomat ständig Wasser ansaugt und wieder abpumpt.
Wichtig ist jedoch,Wichtig ist jedoch,
Wichtig ist jedoch,
Wichtig ist jedoch,Wichtig ist jedoch,
Für Abhilfe sorgen in diesen
Fällen entsprechende im
Handel befindliche SpezialSiphonventile.
StromanschlussStromanschluss
Stromanschluss
StromanschlussStromanschluss
Bevor Sie den
Waschvollautomaten ans
Stromnetz anschließen,
vergewissern Sie sich, dass:
1) die Steckdose für die auf
dem Typenschild
angegebene Höchstlast
geeignet ist und den
gesetzlichen
Sicherheitsvorschriften
entspricht;
2)die
Versorgungsspannung
den auf dem Typenschild
vermerkten Werten
entspricht;
3) der Stecker mit der
Steckdose übereinstimmt.
Falls dies nicht der Fall ist,
verwenden Sie keine
Zwischenstecker,
sondern lassen den
Stecker oder die
Steckdose austauschen;
4) die Elektroanlage Ihrer
Wohnung mit einer
Erdung ausgestattet ist;
5) das installierte Gerät nicht
auf dem Kabel steht;
6) das Gerät so aufgestellt
wurde, dass der Stecker
gut zugänglich ist.
Hinweis!Hinweis!
Hinweis!
Jede Änderung an demJede Änderung an dem
Jede Änderung an dem
Jede Änderung an demJede Änderung an dem
werkseitig eingerichtetenwerkseitig eingerichteten
werkseitig eingerichteten
werkseitig eingerichtetenwerkseitig eingerichteten
Anschluss oder einAnschluss oder ein
Anschluss oder ein
Anschluss oder einAnschluss oder ein
vorschriftswidriger Elektro-vorschriftswidriger Elektro-
vorschriftswidriger Elektro-
vorschriftswidriger Elektro-vorschriftswidriger Elektroanschluss, eine elektrische,anschluss, eine elektrische,
anschluss, eine elektrische,
anschluss, eine elektrische,anschluss, eine elektrische,
mechanische oder hydrau-mechanische oder hydrau-
mechanische oder hydrau-
mechanische oder hydrau-mechanische oder hydraulische Änderung jeder Artlische Änderung jeder Art
lische Änderung jeder Art
lische Änderung jeder Artlische Änderung jeder Art
des Gerätes bewirkt dendes Gerätes bewirkt den
des Gerätes bewirkt den
des Gerätes bewirkt dendes Gerätes bewirkt den
VV
erlust sämtlicerlust sämtlic
V
erlust sämtlic
VV
erlust sämtlicerlust sämtlic
che auf Garantie und ent-che auf Garantie und ent-
che auf Garantie und ent-
che auf Garantie und ent-che auf Garantie und entbindet den Hersteller undbindet den Hersteller und
bindet den Hersteller und
bindet den Hersteller undbindet den Hersteller und
den Händler von etwaigerden Händler von etwaiger
den Händler von etwaiger
den Händler von etwaigerden Händler von etwaiger
Haftung.Haftung.
Haftung.
Haftung.Haftung.
Schaumgummi, Schrauben
Hinweis!Hinweis!
her Ansprü-her Ansprü-
her Ansprü-
her Ansprü-her Ansprü-
Plastikbeutel,
und andere
Verpackungsmaterialien
sind kein Spielzeug für
Kinder: sie können eine
ernsthafte Gefahr
darstellen.
Installations- und Bedienungsanleitungen
22
2
22

Absolut vorrangig
Ihre SicIhre Sic
Ihre Sic
Ihre SicIhre Sic
Ihrer KinderIhrer Kinder
Ihrer Kinder
Ihrer KinderIhrer Kinder
Lesen Sie bitte aufmerksam
die nachstehenden Hinweise,
sowie die des gesamten Handbuches: sie liefern nicht nur
zahlreiche praktische Hinweise, sondern wichtige Informationen hinsichtlich der Sicherheit, dem Gebrauch und der
Wartung.
1. Ziehen Sie im Falle einer 1. Ziehen Sie im Falle einer
1. Ziehen Sie im Falle einer
1. Ziehen Sie im Falle einer 1. Ziehen Sie im Falle einer
Betriebsstörung zuerstBetriebsstörung zuerst
Betriebsstörung zuerst
Betriebsstörung zuerstBetriebsstörung zuerst
den Stecker aus derden Stecker aus der
den Stecker aus der
den Stecker aus derden Stecker aus der
Steckdose und drehen SieSteckdose und drehen Sie
Steckdose und drehen Sie
Steckdose und drehen SieSteckdose und drehen Sie
den den
WW
asserhahn ab;asserhahn ab;
den
W
asserhahn ab;
den den
WW
asserhahn ab;asserhahn ab;
chen Sie auf keinen Fall.
Schäden an inneren Maschinenteilen selbst zu beheben. Hierdurch würden
Sie jeglichen Anspruch auf
Garantie verlieren.
22
..
Der Der
WW
ascasc
2
.
Der
22
..
Der Der
darf nicht im Freien instal-darf nicht im Freien instal-
darf nicht im Freien instal-
darf nicht im Freien instal-darf nicht im Freien installiert werden,liert werden,
liert werden, auch nicht,
liert werden,liert werden,
wenn es sich um einen geschützten und überdachten
Platz handeln sollte. Es ist
gefährlich, das Gerät Gewittern und Unwettern auszusetzen.
3.3.
Ihr Ihr
WW
3.
Ihr
W
3.3.
Ihr Ihr
WW
nur von Erwachsenen zunur von Erwachsenen zu
nur von Erwachsenen zu
nur von Erwachsenen zunur von Erwachsenen zu
bedienenbedienen
bedienen
bedienenbedienen
hvhv
W
asc
hv
WW
ascasc
hvhv
ascasc
hvhv
ollautomat istollautomat ist
asc
hv
ollautomat ist
ascasc
hvhv
ollautomat istollautomat ist
und ausschließ-
versu-
ollautomatollautomat
ollautomat
ollautomatollautomat
herheit und dieherheit und die
herheit und die
herheit und dieherheit und die
lich zum Waschen gemäß
den in diesem Handbuch
enthaltenen Anweisungen
bestimmt.
4.4.
4. Sollte das Gerät versetzt
4.4.
werden müssen, ziehen Sie
bitte den weißen Hebel (unter dem Sockel), um das
Gestell der einziehbaren
Räder herabzulassen, was
ein Versetzen des Gerätes
erleichtert.
5.5.
5. Bevor Sie die Wäsche ein-
5.5.
stellen Sie bitte si-stellen Sie bitte si-
füllen,
stellen Sie bitte si-
stellen Sie bitte si-stellen Sie bitte si-
cc
herher
,,
dass die dass die
c
her
,
dass die
cc
herher
,,
dass die dass die
rer rer
WW
ascasc
rer
W
asc
rer rer
WW
ascasc
ist.ist.
ist.
ist.ist.
"Ich möchte anerkanntes
Fachpersonal und
ausschließlich
garantierte IndesitOriginal-Ersatzteile!"
TT
T
TT
hmaschmasc
hmasc
hmaschmasc
rr
ommel Ih-ommel Ih-
r
ommel Ih-
rr
ommel Ih-ommel Ih-
hine leerhine leer
hine leer
hine leerhine leer
Ihr Waschvollautomat wurde gemäß den str engsten
internationalen Sicherheitsvorschriften gebaut, um Sie
und Ihre Familie zu schützen.
det.det.
VV
6.6.
Bedienen Sie die Maschi-Bedienen Sie die Maschi-
6.
Bedienen Sie die Maschi-
6.6.
Bedienen Sie die Maschi-Bedienen Sie die Maschine nicht barfuß, nicht mitne nicht barfuß, nicht mit
ne nicht barfuß, nicht mit
ne nicht barfuß, nicht mitne nicht barfuß, nicht mit
nassen bzw. feuchten Hän-nassen bzw. feuchten Hän-
nassen bzw. feuchten Hän-
nassen bzw. feuchten Hän-nassen bzw. feuchten Händen oder Füßen.den oder Füßen.
den oder Füßen.
den oder Füßen.den oder Füßen.
7.7.
VV
erwenden Sie keine erwenden Sie keine
7.
V
erwenden Sie keine
7.7.
VV
erwenden Sie keine erwenden Sie keine
längerungen und Mehrlängerungen und Mehr
längerungen und Mehr
längerungen und Mehrlängerungen und Mehr
facfac
hstechstec
kerker
,,
fac
hstec
facfac
hstechstec
feuchten Räumlichkeiten ist
dies gefährlich. Das
V ersorgungskabel darf weder
geknickt noch gefährlich eingeklemmt werden.
8.8.
Ziehen Sie das FlusensiebZiehen Sie das Flusensieb
8.
Ziehen Sie das Flusensieb
8.8.
Ziehen Sie das FlusensiebZiehen Sie das Flusensieb
nicht heraus, wenn sichnicht heraus, wenn sich
nicht heraus, wenn sich
nicht heraus, wenn sichnicht heraus, wenn sich
das Gerät in Betrieb befin-das Gerät in Betrieb befin-
das Gerät in Betrieb befin-
das Gerät in Betrieb befin-das Gerät in Betrieb befin-
ker
,
besonders in
kerker
,,
VV
erer
--
V
er
-
VV
erer
--
--
-
--
9.9.
9.
9.9.
10.10.
10. Das Ablaufwasser kann äu-
10.10.
11
11
1
1
11
11
erwenden Sie keinerwenden Sie kein
det.
V
erwenden Sie kein
det.det.
VV
erwenden Sie keinerwenden Sie kein
WW
ascasc
hmittel,hmittel,
W
asc
hmittel,
WW
ascasc
hmittel,hmittel,
Handwäsche bestimmt ist,Handwäsche bestimmt ist,
Handwäsche bestimmt ist,
Handwäsche bestimmt ist,Handwäsche bestimmt ist,
der zu starke Schaum könnte aus der Rückwand austreten und Schäden verursachen.
Ziehen Sie niemals Ziehen Sie niemals
Ziehen Sie niemals den
Ziehen Sie niemals Ziehen Sie niemals
Stecker
kabel, kabel,
kabel, oder am Gerät selbst
kabel, kabel,
aus der Steckdose: das ist
äußerst gefährlich.
ßerst heiß werden,
Sie dieses demnach nicht.Sie dieses demnach nicht.
Sie dieses demnach nicht.
Sie dieses demnach nicht.Sie dieses demnach nicht.
Halten Sie Kinder fHalten Sie Kinder f
Halten Sie Kinder f
Halten Sie Kinder fHalten Sie Kinder f
suchen Sie niemals,
Gerätetür mit Kraft zu öff-Gerätetür mit Kraft zu öff-
Gerätetür mit Kraft zu öff-
Gerätetür mit Kraft zu öff-Gerätetür mit Kraft zu öffnen,nen,
nen, dies könnte den Sicher-
nen,nen,
heitsmechanismus beschädigen, der vor unabsichtlichem Öffnen der Tür bei laufender Maschine schützt.
. .
Dieses Gerät ist für denDieses Gerät ist für den
.
Dieses Gerät ist für den
. .
Dieses Gerät ist für denDieses Gerät ist für den
Einsatz im privaten Haus-Einsatz im privaten Haus-
Einsatz im privaten Haus-
Einsatz im privaten Haus-Einsatz im privaten Haushalt bestimmt. halt bestimmt.
halt bestimmt. Ein industri-
halt bestimmt. halt bestimmt.
eller Einsatz (Hotels, Restaurants, Wäschereien)
beeinträchtigt die ursprünglichen Baueigenschaften
des Gerätes, wodurch Garantieansprüche verloren
gehen.
am am
am
am am
das für das für
das für
das für das für
VV
erer
sorsor
V
er
sor
VV
erer
sorsor
berührenberühren
berühren
berührenberühren
ern.ern.
ern. V er-
ern.ern.
gungs-gungs-
gungs-
gungs-gungs-
diedie
die
diedie
AA
ustauscustausc
A
ustausc
AA
ustauscustausc
Bei diesem Kabel handelt es
sich um ein Spezialkabel, das
nur bei den zugelassenen Kundendienstzentren erhältlich ist.
Und so wird es ausgetauscht:
1. Vergewissern Sie sich, dass
Ihr Waschvollautomat ausgeschaltet und der Stecker herausgezogen ist.
Abb. 1
33
3 IInstallations- und Bedienungsanleitungen
33
h des h des
h des
h des h des
VV
erer
sorsor
V
er
sor
VV
erer
sorsor
2. Nehmen Sie den Sockel ab und
schrauben Sie die beiden unteren Schrauben (rechts von Ihnen) aus; Schrauben Sie nun die
6 hinteren Schrauben (dieses
Mal links von Ihnen) aus und
nehmen Sie das Seitenteil (leicht
schräg nach außen herausziehend) ab. (Abb. 1 und 2).
Abb. 2
gungskabelsgungskabels
gungskabels
gungskabelsgungskabels
3. Unterbrechen Sie die Stromversorgung des Entstörers, indem
Sie den Verbinder abnehmen
(Abb. 3).
4. Schrauben Sie die beiden Befestigungsschrauben des Filters
mit Hilfe eines Schraubenziehers
ab (siehe Abb. 4) und haken Sie
diesen aus der Rückwand aus,
indem Sie ihn nach oben ziehen.
Abb. 3
5. Schließen Sie nach dem W ech-
sel des Kabels den V erbinder erneut an. Vergewissern Sie sich
dabei, dass der Sicherheitshaken
tatsächlich hält.
Dieser Wechsel ist nur von dazu
qualifiziertem Personal unter
Einhaltung der einschlägigen
Normen durchzuführen.
Abb. 4

WW
W
WW
as darf in die as darf in die
as darf in die
as darf in die as darf in die
WW
W
WW
ascasc
asc
ascasc
hmaschmasc
hmasc
hmaschmasc
hine?hine?
hine?
hine?hine?
Sie können viel dazu beitragen, dass Ihre Wäsche besonders rein wird, noch bevor der Waschvorgang
beginnt. Trennen Sie die Wäsche nach Farben und Material. Kontrollieren Sie die Wäscheetiketten und
befolgen Sie die dort aufgezeichneten Waschanleitungen. Geben Sie abwechselnd kleine und große
Wäschestücke in die Wäschetrommel.
VV
or dem or dem
V
or dem
VV
or dem or dem
Trennen Sie die Wäsche nach
Material und nach
Farbf estigkeit: strapazierfähige
Gewebe sollten nicht gemeinsam mit Feinwäsche gewaschen werden.
Helle Farben müssen stets v on
dunklen getrennt gewaschen
werden.
Entleeren Sie alle Taschen
(Kleingeld, Papier , Geldscheine
und Kleingegenstände) und kontrollieren Sie auch die Knöpfe.
Wenn ein Knopf lose ist, nehmen Sie ihn ab oder nähen Sie
ihn fest, denn er könnte beim
Waschen abspringen.
Die Die
WäscWäsc
Die
Wäsc
Die Die
WäscWäsc
verraten Ihnen allesverraten Ihnen alles
verraten Ihnen alles
verraten Ihnen allesverraten Ihnen alles
Kontrollieren Sie diese stets:
hieraus gehen alle Informationen
WW
ascasc
hen.hen.
W
asc
hen.
WW
ascasc
hen.hen.
heetikettenheetiketten
heetiketten
heetikettenheetiketten
zum Wäsche- oder Kleidungsstück hervor, auch wie
es am besten gewaschen
werden sollte.
Auf Seite 7 wird die "Geheimsprache" aller Wäscheetik etten
entschlüsselt. Die Angaben, die
Sie dort finden, sind überaus
nützlich, um Ihre Wäsche materialgerecht zu waschen und
lange Ihre Freude daran zu haben.
Geben Sie abwechselndGeben Sie abwechselnd
Geben Sie abwechselnd
Geben Sie abwechselndGeben Sie abwechselnd
kleine und grkleine und gr
kleine und gr
kleine und grkleine und gr
stücstüc
ke in die ke in die
stüc
ke in die
stücstüc
ke in die ke in die
trtr
ommel.ommel.
tr
ommel.
trtr
ommel.ommel.
sche auseinander. Laden Sie diese locker in die Wäschetrommel,
..
.
..
ohne die für die verschiedenen
Programme angegebenen Mengen zu überschreiten. Ihre Wä-
oße oße
WäscWäsc
oße
Wäsc
oße oße
WäscWäsc
WäscWäsc
Wäsc
WäscWäsc
Falten Sie die Wä-
sche wird so sauberer und nicht
so sehr zerknittert.
Mit Benzin entflecMit Benzin entflec
Mit Benzin entflec
Mit Benzin entflecMit Benzin entflec
Laden Sie keine mit Benzin, Alkohol, Trielin usw. behandelten
Kleidungsstücke in die Waschmaschine, bevor diese Produkte nicht verflogen sind.
he-he-
he-
he-he-
he-he-
he-
he-he-
kte kte
kte
kte kte
TT
T
TT
eileeile
eile
eileeile
Das Trennen der
Wäschestücke nach
Gewebe und Farbe ist ein
..
.
..
wichtiger Schritt zur
Gewährleistung
optimaler
Waschergebnisse.
So starSo star
So star
So starSo star
AA
ufstellen,ufstellen,
A
ufstellen,
AA
ufstellen,ufstellen,
Sollte Ihr Geraet mit einem
Spezialgestell mit einziehbaren Raedern ausgestattet
sein, kann das Geraet
muehelos verschoben werden. Um dieses Gestell
herunter zu lassen, ziehen
Sie den links unter dem
Sockel befindlichen Hebel,
und versetzen dann die
Waschmaschine. Bringen Sie
das Radgestell anschließend
wieder in die ursprüngliche
Stellung zurück. Das Gerät
Lassen Sie bitte nach der Installation einen Waschgang (Progr.1 bei 60°C) bei leerer
Maschine durchlaufen.
Eine ordnungsgemäße Inbetriebnahme Ihres Waschvollautomaten ist äußerst wichtig,
und zwar nicht nur , um eine gute
Waschqualität zu garantieren,
sondern auch um Störungen am
Gerät zu vermeiden und somit
seine Lebensdauer zu verlängern. Nachdem Sie die Wäsche ,
das W aschmittel und e ventuel-
Für empfindliche Feinwäsche:
Geben Sie Ihre Unterwäsche,
Damen- und Kinderstrümpfe
und andere Feinwäsche in ein
Stoffsäckchen, um sie zu
ten Sie Ihre ten Sie Ihre
ten Sie Ihre
ten Sie Ihre ten Sie Ihre
VV
erer
setzsetz
setz
setzsetz
en.en.
en.
en.en.
V
er
VV
erer
schützen.
WW
ascasc
W
asc
WW
ascasc
steht so fest und sicher auf
dem Boden. Siehe Abbildung.
(Nur fuehr die Modelle , die
ein solches Gestell vorseher)
le Zusätze in den Waschvollautomaten gegeben haben, vergewissern Sie sich, dass:
11
der der
TT
rr
1.
der
11
der der
sowie der Gerätedeckelsowie der Gerätedeckel
sowie der Gerätedeckel
sowie der Gerätedeckelsowie der Gerätedeckel
vorschriftsmäßig ge-vorschriftsmäßig ge-
vorschriftsmäßig ge-
vorschriftsmäßig ge-vorschriftsmäßig geschlossen wurde.schlossen wurde.
schlossen wurde.(Seite 9
schlossen wurde.schlossen wurde.
2.2.
2. der Stecker in der Steckdo-
2.2.
se ist;
3.3.
3. der Wasserhahn auf ist;
3.3.
4.4.
4. die Taste
4.4.
gebracht wurde;
5.5.
5. sich das Gestell der einzieh-
5.5.
baren Räder in Ruhestellung
befindet (die Räder dürfen
den Boden nicht berühren).
ommelverommelver
T
r
ommelver
TT
rr
ommelverommelver
GG
G auf Position
GG
hmaschmasc
hmasc
hmaschmasc
scsc
hlusshluss
sc
hluss
scsc
hlusshluss
hinehine
hine
hinehine
Das Programm auswählenDas Programm auswählen
Das Programm auswählen
Das Programm auswählenDas Programm auswählen
Das Programm ist je nach Art
des Wäschestücks und
Verschmutzungsgrades auszuwählen. Zur Wahl des Programms verweisen wir auf die
Tabelle der Seite 6.
);
Drehen Sie den Schalterknopf
AA
A auf die Nummer des ge-
AA
wünschten Programms.
O)O)
O)
O)O)
Wählen Sie die Temperatur
mittels des Schalterknopfes
Gegebenenfalls koennen Sie
ueber den Drehschalter
auch die Schleudertouren einstellen.
Installations- und Bedienungsanleitungen
Drücken Sie ggf. die Tastenfunktionen (
abschließend die
GG
ste
G (Position
GG
Am Ende des WaschgangesAm Ende des Waschganges
Am Ende des Waschganges
Am Ende des WaschgangesAm Ende des Waschganges
Warten Sie ca. zwei Minuten.
Dann schalten Sie Ihren
Waschvollautomaten durch
Drücken der EIN/AUS-Taste
(Position
Sie die Türen ohne Gefahr öffnen. Lassen Sie die Türen immer einen Spalt weit offen stehen, nachdem Sie die Wäsche
herausgenommen haben, damit die Feuchtigkeit, die sich
angesammelt hat, verdunsten
kann. Schließen Sie stets den
Wasserhahn.
Hinweis: Falls es zu einemHinweis: Falls es zu einem
Hinweis: Falls es zu einem
Hinweis: Falls es zu einemHinweis: Falls es zu einem
Stromausfall kommt oder dieStromausfall kommt oder die
Stromausfall kommt oder die
Stromausfall kommt oder dieStromausfall kommt oder die
WW
ascasc
W
asc
WW
ascasc
WW
ascasc
W
asc
WW
ascasc
wird, läuft das Programmwird, läuft das Programm
wird, läuft das Programm
wird, läuft das Programmwird, läuft das Programm
B.B.
B.
B.B.
nacnac
nac
nacnac
StrStr
oms bzwoms bzw
Str
oms bzw
StrStr
CC
C
CC
oms bzwoms bzw
schalten des Gerätes dortschalten des Gerätes dort
schalten des Gerätes dort
schalten des Gerätes dortschalten des Gerätes dort
weiterweiter
weiter
weiterweiter
wurde.wurde.
wurde.
wurde.wurde.
D-E-FD-E-F
D-E-F), drücken Sie
D-E-FD-E-F
II
I).
II
OO
O) aus. Nun können
OO
hmaschmasc
hine während deshine während des
hmasc
hine während des
hmaschmasc
hine während deshine während des
hganghgang
es abges abg
hgang
es abg
hganghgang
es abges abg
h h
WiederherWiederher
h
Wiederher
h h
WiederherWiederher
..
.
..
,,
w w
o es unterbro es unterbr
,
w
o es unterbr
,,
w w
o es unterbro es unterbr
EIN/AUSEIN/AUS
EIN/AUS-Ta-
EIN/AUSEIN/AUS
escesc
haltethaltet
esc
haltet
escesc
haltethaltet
stellen desstellen des
stellen des
stellen desstellen des
Wiederein-Wiederein-
Wiederein-
Wiederein-Wiederein-
ococ
henhen
oc
hen
ococ
henhen
GG
G
GG
44
4
44

Machen Sie sich mit der Bedienungsblende vertraut
Hier bestimmen SieHier bestimmen Sie
Hier bestimmen Sie
Hier bestimmen SieHier bestimmen Sie
Die Wahl des geeigneten Programms ist absolut wichtig - und leicht.
Programmwähler A
ProgrammwählerProgrammwähler
Programmwähler
ProgrammwählerProgrammwähler
Mit diesem Schalterknopf wählen Sie das gewünschte W aschprogramm.
Drehen Sie diesen aus-Drehen Sie diesen aus-
Drehen Sie diesen aus-
Drehen Sie diesen aus-Drehen Sie diesen ausschließlich im Uhrzeigersinn.schließlich im Uhrzeigersinn.
schließlich im Uhrzeigersinn.
schließlich im Uhrzeigersinn.schließlich im Uhrzeigersinn.
Bei der Wahl eines Waschprogramms muss die Bezugsanzeige auf dem Schalterknopf
mit dem Symbol bzw. der Zahl
des gewünschten Waschprogramms übereinstimmen.
Drücken Sie daraufhin die EIN/
AUS-Taste
Anzeigeleuchte
Nach 5 Sekunden wird die Einstellung akzeptiert, die Anzeigeleuchte
bleibt jedoch eingeschaltet), der
Waschgang startet.
Möchten Sie das laufende Programm unterbrechen, oder ein
neues einstellen, dann wählen
Sie eines der Symbole
Reset) und warten Sie 5 Sekunden. Die Anzeigeleuchte H blinkt
nun, als Zeichen dafür, dass die
Programmannullierung akzeptiert wurde. Jetzt kann ein neues Programm eingestellt, oder
das Gerät ausgeschaltet werden, um gegebenenfalls weitere Wäscheteile hinzuzufügen.
Warten Sie 2 Minuten, um die
Türen zu öffnen.
Nach Einstellung des Waschprogramms und entsprechender
Annahme seitens des Waschvollautomaten, hat ein Verstellen des Schalterknopfes keinen
Einfluss mehr auf das Gerät (mit
Ausnahme der Einstellung von
Stop/Reset).
GG
G (Position
GG
HH
H blinkt nicht mehr (sie
HH
I I
I), die
I I
HH
H blinkt nun.
HH
(Stop/
TT
emperaturregleremperaturregler
T
emperaturregler
TT
emperaturregleremperaturregler
Dieser dient zur Einstellung
der in der Programmtabelle
angegebenen Waschtemperatur (siehe Seite 6). Er
ermöglicht ebenfalls ein Herabsetzen der für das jeweilige
Programm vorgegebenen
Waschtemperatur, bis hin zur
Kaltwäsche ( ).
SchleuderwahlSchleuderwahl
Schleuderwahl
SchleuderwahlSchleuderwahl
Mit diesem Schalterknopf kann
der Schleudergang ausgeschlossen (auf Einstellung ),
sowie die Schleudergeschwindigkeit des gewählten
Waschprogramms herabgesetzt werden.
Die für die 4 Gewebearten vorgesehenen Spitzenschleudertouren sind folgende:
Gewebe Schleudertouren
Baumwolle max. U/min.
Kunstfasern 800 U/min.
Wolle 600 U/min.
Seide nicht Schleudern
Ein Sanftanlauf sorgt dafür,
dass die Wäsche gleichmäßig
verteilt wird.
KurzwäscheKurzwäsche
Kurzwäsche
KurzwäscheKurzwäsche
Diese ermöglicht Ihnen, für die
kurze Wäsche zwischendurch,
die Dauer des Waschprogramms um 30% zu kürzen.
Dies gilt nicht für die Spezialprogramme (siehe Seite 6) und
die für Wolle und Seide.
KnitterKnitter
Knitter
KnitterKnitter
Kunstfasern)Kunstfasern)
Kunstfasern)
Kunstfasern)Kunstfasern)
Mittels dieser Taste kann das
Programm angehalten werden,
die Wäsche bleibt so im Wasser
liegen ) , bevor die Schleuder
zum Endschleudern aktiviert
wird. Dies erweist sich als äußerst praktisch, da ein Knittern
bei Feingeweben und
Kunstfasergeweben vermieden
wird (besonders dann, wenn die
Wäsche nicht sofort nach dem
Waschen, sondern erst einige
Stunden später aus der Maschine genommen werden kann).
Der Knitterschutz ist jedoch nur
bei den für Kunstfasern und Seide bestimmten Programmen
(Progr. 5-6-7) zuzuschalten.
ACHTUNG!ACHTUNG!
ACHTUNG! Um das Wasch-
ACHTUNG!ACHTUNG!
programm abzuschließen bzw.
das Wasser ablaufen zu lassen, drücken Sie erneut die
Knitterschutz-Taste.
ExtraspülgangExtraspülgang
Extraspülgang
ExtraspülgangExtraspülgang
Mit dieser Taste kann, bei den
für
be bestimmten Programmen,
die Anzahl der Spülgänge erhöht werden. Empfehlenswert
um noch besser zu spülen,
besonders bei maximaler
Wäscheladung oder im Falle
einer Überempfindlichkeit gegen Waschmittel (Kontaktallergien).
scsc
hutz-Thutz-T
hutz-T
hutz-Thutz-T
aste (Zaraste (Zar
aste (Zar
aste (Zaraste (Zar
sc
scsc
widerstandsfähige widerstandsfähige
widerstandsfähige Gewe-
widerstandsfähige widerstandsfähige
(Program. 1-2-3-4-5-6)
tete
te
tete
..
.
..
EIN/AUS (On/Off)EIN/AUS (On/Off)
EIN/AUS (On/Off)
EIN/AUS (On/Off)EIN/AUS (On/Off)
Befindet sich die Taste G gedrückt, ist Ihr Waschvollautomat eingeschaltet, ist diese nicht gedrückt, ist Ihr
Waschvollautomat ausgeschaltet.
Ein Ausschalten des GerätsEin Ausschalten des Geräts
Ein Ausschalten des Geräts
Ein Ausschalten des GerätsEin Ausschalten des Geräts
bewirkt kein Löschen desbewirkt kein Löschen des
bewirkt kein Löschen des
bewirkt kein Löschen desbewirkt kein Löschen des
gewählten Programms.gewählten Programms.
gewählten Programms.
gewählten Programms.gewählten Programms.
BetriebsanzeigeleuchteBetriebsanzeigeleuchte
Betriebsanzeigeleuchte
BetriebsanzeigeleuchteBetriebsanzeigeleuchte
Bei eingeschaltetem Gerät
blinkt die Anzeigeleuchte H,
und wartet auf Eingabe eines
Programmes. Ein Umschalten auf feststehendes Licht
bedeutet, dass das eingegebene Programm akzeptiert
wurde.
Türsperre-AnzeigeTürsperre-Anzeige
Türsperre-Anzeige
Türsperre-AnzeigeTürsperre-Anzeige
Durch Leuchten dieser LedAnzeige meldet das Gerät,
dass die Gerätetür gesperrt
ist, um ein versehentliches
Öffnen zu verhindern. Um
Schäden an Ihrem Gerät zu
vermeiden, warten Sie bitte,
bis diese Anzeigeleuchte erlischt, bevor Sie die Tür Ihres
Waschvollautomaten öffnen
(ca. 2 Minuten).
55
5 Installations- und Bedienungsanleitungen
55

W as soll heute gewaschen werden?
WW
ascasc
W
asc
WW
ascasc
Gewebeart und
Verschmutzungsgrad
BAUMWOLLE
hprhpr
hpr
hprhpr
ogramme für jede Jahreszogramme für jede Jahresz
ogramme für jede Jahresz
ogramme für jede Jahreszogramme für jede Jahresz
Programm
Wähler
Temperatur
Regler
Wasch
mittel
Hauptwasch
gang
Weich
spüler
Normales
oder mildes
Bleichmittel
Waschdauer
(Minuten)
Beschreibung des
Waschprogramms
eiteit
eit
eiteit
Kochwäsche (Bettücher, Tischdecken
usw.)
Widerstandsfähige, stark verschmutzte
Weiß- und Buntwäsche
Stark verschmutzte Weißwäsche und
empfindliche Buntwäsche
(Oberhemden, T-Shirts usw.)
Leichtverschmutzte Weißwä sche und
empfindliche Buntwäsche
(Oberhemden, T-Shirts usw.)
Spülgänge/Bleichmittel
Schleuder Ablauf und Endschleudern
Stop/Reset Unterbricht/Löscht das eingeste llte
KUNSTFASERN
Stark verschmutzte, farbechte
Kunstfasergewebe (Babywäsche usw.)
Zarte bunte Kunstfasergewebe (leicht
verschmutzte Feinwäsche jeglich er Art)
Zarte bunte Kunstfasergewebe (leicht
verschmutzte Feinwäsche jeglich er Art)
Spülgänge/Bleichmittel
Weichspüler
Spülstop Die Wäsche bleibt im Wasser liegen (für
Schleuder Ablauf und sanftes Schleudern
Stop/Reset Unterbricht/Löscht das eingeste llte
FEINWÄSCHE
1
2
3
4
5
6
7
Max°C
Max°C
60°C
40°C
60°C
40°C
30°C
uuu
u
u
u
Mildes/ N ormales
Mildes/ N ormales
Mildes/ N ormales
Mildes/ N ormales
uu
uu
uu
uu
uu
uu
Mildes
Mildes
Mildes
Vorwaesche. Hauptwäsche be i
150
hohen Temperaturen
Zwisc hen- und Endschleudern
Waschen bei 60°C, Spülgänge ,
130
Zwischen- und Endschleudern
Waschen bei 60°C, Spülgänge ,
130
Zwischen- und Endschleudern
Waschen bei 40°C, Spülgänge ,
115
Zwischen- und Endschleudern
Spülgänge, Zwischen- und Endschleudern
Programm
Intensives W aschen bei 60°C,
105
Spülgänge, Knittersch utz oder sanftes
Schleudern
Normales Waschen bei 40°C, Spülgänge,
75
Knitterschutz oder sanf tes Schleudern
Schonwäsche bei 30°C, Spülgänge und
30
sanftes Schleudern
Spülgänge, Knitt erschutz oder sanftes
Schleudern
Spülgänge mit Einspülung des
Weichspülers, Knitterschutz oder sanftes
Schleudern
besonders empfindliche Gewebe)
Programm
, Spülgä nge,
Wolle/Handwäsche
Seide.
Sehr zarte Feinwaesche
(Gardinen, Seide, Viskose, usw.)
Spülgänge
Spülstop Die Wäsche bleibt im Wasser liegen (für
Schleuder Ablauf und sanftes Schleudern
Ablauf Ablauf
Stop/Reset Unterbricht/Löscht das eingeste llte
Wichtig: Wichtig:
Wichtig:
Wichtig: Wichtig:
Sie mindestens 5 Sekunden. Sie mindestens 5 Sekunden.
Sie mindestens 5 Sekunden.
Sie mindestens 5 Sekunden. Sie mindestens 5 Sekunden.
Bei den in der Tabelle angegebenen Daten handelt es sich um Richtwerte. Sie variieren je nach Waschmaschinenmodell, Menge und Art der Wäsche, Wasserhärte,
W asserzufuhrtemperatur und Raumtemperatur.
SpezialprogrammeSpezialprogramme
Spezialprogramme
SpezialprogrammeSpezialprogramme
7 - Schnelle Wäsche bei 30°C in 30 Min. Ihr Waschvollautomat stellt Ihnen außerdem ein Programm zur Verfügung, das es Ihnen ermöglicht, nur
leicht verschmutzte Wäsche in kurzer Zeit wirtschaftlich zu waschen. Wählen Sie das Programm 7 und eine Temperatur von 30°C. Auch Gewebe
unterschiedlicher Art (mit Ausnahme von Wolle und Seide) können bei maximaler Lademenge von 3 kg zusammen gewaschen werden. Mit diesem
Programm sparen Sie Zeit und Energie, denn die Waschzeit beträgt nur ca. 30 Minuten. Wir raten zu einem Flüssigwaschmittel, das in die
Waschmittelkammer einzufüllen ist.
Um ein soeben eingegebenes Programm zu löschen, wählen Sie bitte eines der Symbole (Stop/Reset) und warten Um ein soeben eingegebenes Programm zu löschen, wählen Sie bitte eines der Symbole (Stop/Reset) und warten
Um ein soeben eingegebenes Programm zu löschen, wählen Sie bitte eines der Symbole (Stop/Reset) und warten
Um ein soeben eingegebenes Programm zu löschen, wählen Sie bitte eines der Symbole (Stop/Reset) und warten Um ein soeben eingegebenes Programm zu löschen, wählen Sie bitte eines der Symbole (Stop/Reset) und warten
8
9
40°C
30° C
uu
u
Waschen bei 40°C,
55
sanftes Schleudern
Waschen bei 30°C,
45
Knitterschutz oder Ablauf
Spülgänge, Knitt erschutz oder Ablauf
besonders empfindliche Gewebe)
Programm
Installations- und Bedienungsanleitungen
Spülgänge und
Spülgänge,
66
6
66

Leitfaden zur Leitfaden zur
Leitfaden zur
Leitfaden zur Leitfaden zur
Prägen Sie sich diese wenigen Symbole ein. Ihre Wäsche wird es
Ihnen danken, sie wird sauberer, hält länger, bleibt formschön und
auch Ihr Waschvollautomat wird sein Bestes geben.
VV
V
VV
erer
deutlicdeutlic
er
deutlic
erer
deutlicdeutlic
hung der Etikettenhung der Etiketten
hung der Etiketten
hung der Etikettenhung der Etiketten
Innerhalb Europas sprechen die
auf den Etiketten abgebildeten
Symbole "dieselbe Sprache".
Versuchen Sie, diese zu
verstehen und sich diese zu
eigen zu machen, sie werden
Ihnen eine wertvolle Stütze sein
bei der korrekten Behandlung
Ihrer Kleider und Wäscheteile.
Sie werden in fünf Kategorien
unterschiedlicher Formen
unterteilt, und beziehen sich auf:
WW
ascasc
hen hen
W
asc
hen
WW
ascasc
hen hen
Bleichen Bleichen
Bleichen
Bleichen Bleichen
BügelnBügeln
Bügeln
BügelnBügeln
Chem. ReinigenChem. Reinigen
Chem. Reinigen
Chem. ReinigenChem. Reinigen
TT
rr
ococ
knen knen
T
r
oc
TT
rr
ococ
knen
knen knen
Praktische Ratschläge
Ziehen Sie Oberhemden und
Blusen auf links.
Entleeren Sie alle Taschen.
Kontrollieren Sie die Etiketten:
sie geben wertvolle Hinweise.
Füllen Sie große und kleine
Wäscheteile abwechselnd in die
Wäschetrommel.
VV
erer
gleicgleic
V
er
VV
erer
WäscWäsc
Wäsc
WäscWäsc
ff
ormscormsc
f
ormsc
ff
ormscormsc
geben.geben.
geben.
geben.geben.
hen Sie die Etiketten mit den Symbolen dieser hen Sie die Etiketten mit den Symbolen dieser
gleic
hen Sie die Etiketten mit den Symbolen dieser
gleicgleic
hen Sie die Etiketten mit den Symbolen dieser hen Sie die Etiketten mit den Symbolen dieser
he wirhe wir
d es Ihnen danken,d es Ihnen danken,
he wir
d es Ihnen danken,
he wirhe wir
d es Ihnen danken,d es Ihnen danken,
hön und auchön und auc
hön und auc
hön und auchön und auc
h Ihr Indesit - h Ihr Indesit -
h Ihr Indesit -
h Ihr Indesit - h Ihr Indesit -
sie wir sie wir
sie wir
sie wir sie wir
WW
ascasc
W
asc
WW
ascasc
d saubererd sauberer
d sauberer
d saubererd sauberer
hvhv
ollautomat wirollautomat wir
hv
ollautomat wir
hvhv
ollautomat wirollautomat wir
TT
T
TT
,,
hält läng hält läng
,
hält läng
,,
hält läng hält läng
d sein Bestesd sein Bestes
d sein Bestes
d sein Bestesd sein Bestes
abelle:abelle:
abelle:
abelle:abelle:
erer
,,
b b
er
,
b
erer
,,
b b
Ihre Ihre
Ihre
Ihre Ihre
leibtleibt
leibt
leibtleibt
Wählen Sie die
richtigen
Temperaturen
Waschen Bleichen Bügeln Chem.Reinigen Trocknen
Intensiv Leicht
Max.
Waschtemp
95°C
Max.
Waschtemp
60°C
Max.
Waschtemp
40°C
Max.
Waschtemp
30°C
Leicht
von Hand
waschen
c
l
Bleichen in
kaltem Wasser
gestattet
Nicht Bleichen
Max.
Bügeltemp.
200°C
Leicht Bügeln
bei max.
150°C
Max.
Bügeltemp.
110°C
Nicht Bügeln
Hohe
Temp.
A
A
Chem. Reinigen mit
allen Lösemitteln
P
Chem. Reinigen mit
Perchloräthylen,
Fliegerbenzin,
Reinalkohol, R111
und R113
F
Chem. Reinigen
mit Fliegerbenzin,
Reinalkohol und
R113 Liegend Trocknen
Nicht chemisch
Reinigen
Wäschetrockner
getrocknet werden
Wäschetrockner
Auf Kleiderbügel
Niedrige
Temp.
Kann im
Nicht im
Trocknen
Nicht
geschleuderte
Teile hängend
Trocknen
Trocknen
Nicht
waschen
77
7 Installations- und Bedienungsanleitungen
77

…und Symbole der verschiedenen Indesit-Modelle:…und Symbole der verschiedenen Indesit-Modelle:
…und Symbole der verschiedenen Indesit-Modelle:
…und Symbole der verschiedenen Indesit-Modelle:…und Symbole der verschiedenen Indesit-Modelle:
Ein = Einschalten
Aus =A usschalten
Türsperre
Temperatur
WW
ascasc
hprhpr
W
WW
asc
ascasc
ogramme:ogramme:
hpr
ogramme:
hprhpr
ogramme:ogramme:
Spülgänge
Weichspüler
Spülstop
Schleuder
Ablauf
Stop/Reset
Schleuderwahl
Schleuderausschluss
V orwäsche
Flecken
Extraspülgang
Knitterschutz Spülstop
Waschintensität
90°-Waschgang
60°-Waschgang
Schonwaschgang
Schnelle Wäsche bei
30° in 30 Min.
Kaltwäsche
Wolle/Handwäsche
Kurzwäsche
1/2 Füllung
Spar-Waschgang
Bügelleicht
Seide und Gardinen
Hygiene der Wäsche
Praktische Ratschläge um Fehler zu vermeidenPraktische Ratschläge um Fehler zu vermeiden
Praktische Ratschläge um Fehler zu vermeiden
Praktische Ratschläge um Fehler zu vermeidenPraktische Ratschläge um Fehler zu vermeiden
Allgemeine Regeln: Allgemeine Regeln:
Allgemeine Regeln:
Allgemeine Regeln: Allgemeine Regeln:
- Baumwolle, Leinen: - Baumwolle, Leinen:
- Baumwolle, Leinen: Füllen
- Baumwolle, Leinen: - Baumwolle, Leinen:
Sie die Wäschetrommel, überladen Sie diese jedoch nicht.
- Kunstfasern: - Kunstfasern:
- Kunstfasern: Füllen Sie die
- Kunstfasern: - Kunstfasern:
Wäschetrommel nur zur Hälfte.
- Feinwäsc- Feinwäsc
- Feinwäsc
- Feinwäsc- Feinwäsc
len Sie die Wäschetrommel nur
zu einem Drittel.
- Sehr ver- Sehr ver
- Sehr ver
- Sehr ver- Sehr ver
Wäschemenge reduzieren
- Hartnäckige Flecken:- Hartnäckige Flecken:
- Hartnäckige Flecken:
- Hartnäckige Flecken:- Hartnäckige Flecken:
Behandeln Sie diese Flecken
vor dem Waschen, reiben Sie die
verschmutzten Stellen mit einem
Spezialreiniger, mit Reinigungscreme oder einem speziellen
Fleckenmittel ein. (Ziehen Sie
hierzu den Abschnitt hinsichtlich
der Spezialbehandlung mit
Fleckenmitteln der Seite 9 zu
Rate.)
WW
W
WW
ne keine ne keine
ne keine
ne keine ne keine
he und he und
WW
olle:olle:
he und
he und he und
scsc
hmhm
utzte utzte
sc
hm
utzte
scsc
hmhm
utzte utzte
ascasc
hen Sie in der Maschen Sie in der Masc
asc
hen Sie in der Masc
ascasc
hen Sie in der Maschen Sie in der Masc
WäscWäsc
hehe
Wäsc
he
WäscWäsc
hehe
Skijacken und AnoraksSkijacken und Anoraks
Skijacken und Anoraks
Skijacken und AnoraksSkijacken und Anoraks
Auch Skijacken und Anoraks können
in der Maschine gewaschen werden,
wenn es sich um Gänse- oder
Entenfedern handelt. Wichtig ist, dass
das Gerät nicht mit einem Gewicht von
5 kg beladen wird, sondern höchstens
2-3 kg, und dass der Spülgang ein
oder zweimal wiederholt wird, und ein
sanfter Schleudergang eingelegt wird.
W
olle:
Fül-
WW
olle:olle:
WäscWäsc
he:he:
Wäsc
he:
WäscWäsc
he:he:
hi-hi-
hi-
,,
, die unge-
,,
hi-hi-
säumt, ausgefranst oder zerrissen
ist. Gegebenenfalls sind solche
T eile in einem Kissenbezug zu waschen. Waschen Sie Buntwäsche
nicht mit Weißwäsche zusammen.
Achten Sie auf das Gewicht!Achten Sie auf das Gewicht!
Achten Sie auf das Gewicht!
Achten Sie auf das Gewicht!Achten Sie auf das Gewicht!
Das angegebene Gewicht, das
sich auf die maximale Ladung an
Trockenwäsche bezieht, sollte
nicht überschritten werden
- Widerstandsfähige Gewe be:
höchstens 5 kg
- Kunstfasergewebe:
höchstens 2,5 kg
- Feinwäsche:
höchstens 2 kg
- Reine Wolle:
höchstens 1 kg
- Frottee
höchstens 2,3 kg
Wie scWie sc
hwer ist hwer ist
Wie sc
hwer ist
Wie scWie sc
1 Bettuch 400-500 gr
hwer ist hwer ist
WäscWäsc
he?he?
Wäsc
he?
WäscWäsc
he?he?
Wie wasche ichWie wasche ich
Wie wasche ich
Wie wasche ichWie wasche ich
GardinenGardinen
Gardinen
GardinenGardinen
Gardinen zerknittern sehr leicht. Um
dies zu vermeiden, sollten sie
zusammengefaltet in einem
Kissenbezug oder in einem netzartigen
Beutel gewaschen werden. Waschen
Sie sie allein und achten Sie darauf,
dass das Gesamtgewicht die Hälfte der
maximalen Lademenge nicht
übersteigt.
1 Kissenbezug 150-200 gr
1 Tischdecke 400-500 gr
1 Bademantel 900-1.200 gr
1 Handtuch 150-500 gr
VV
ermiscermisc
ermisc
ermiscermisc
arbigarbig
e e
TT
arbig
e
T
arbigarbig
e e
TT
oror
sicsic
ht bei Overallsht bei Overalls
or
sic
ht bei Overalls
oror
sicsic
ht bei Overallsht bei Overalls
hen Sie hen Sie
hen Sie
hen Sie hen Sie
-Shir-Shir
-Shir
-Shir-Shir
V
VV
stücke unterschiedlicherstücke unterschiedlicher
stücke unterschiedlicher
stücke unterschiedlicherstücke unterschiedlicher
Abmessungen mit Frottiergeweben: Bademäntel,
Frotteetücher us w . Sie v ermeiden hierdurch, dass beim
Schleudern keine sogenannten
Knäuel gebildet, oder falsche
Gewichtsverlagerungen
verursacht werden.
FF
F
FF
T-Shirts und auch Oberhemden
und Blusen bleiben länger schön,
wenn sie vor dem Waschen auf
links gezogen werden.
T-Shirts und Sw eatshirts sollten
stets von links gebügelt werden.
VV
V
VV
Die weit verbreiteten und gern
getragenen Overalls des Typs
WäscWäsc
Wäsc
WäscWäsc
ts,ts,
ts, bedruckte
ts,ts,
Entfernen Sie eventuelle
Schlammreste. Tennisschuhe
können zusammen mit Jeans und
ähnlichen, widerstandsfähigen
Wäschestücken gewaschen
werden. Zusammen mit
Weißwäsche sollten sie jedoch nicht
gewaschen werden.
"Arbeiteranzug" haben Träger mit
Schnallen und Haken, die nicht
nur die Wäschetrommel, sondern
auch die anderen Wäschestücke
beschädigen könnten. Stecken
he-he-
he-
he-he-
Sie diese vor dem Waschen in die
Brusttasche und befestigen Sie sie
mit Sicherheitsnadeln, um jegliches
Risiko auszuschließen.
Urlaub: Stecker herauszie-Urlaub: Stecker herauszie-
Urlaub: Stecker herauszie-
Urlaub: Stecker herauszie-Urlaub: Stecker herauszie-
hen!hen!
hen!
hen!hen!
Bevor Sie in Urlaub fahren, empfiehlt es sich, den Stecker aus der
Steckdose zu ziehen, den W asserhahn abzudrehen und die Gerätetür zu öffnen, oder zumindest etwas
vorstehen zu lassen. Hierdurch
bleiben T rommel und Dichtung trocken, wodurch die Bildung unangenehmer Gerüche vermieden wird.
WOLLE
PROGRAMM
Verwenden Sie hierfür ein
Spezialwaschmittel, und achten
Sie darauf, die maximale
Lademenge von 1 kg nicht zu
überschreiten.
TT
ennisscennissc
T
ennissc
TT
ennisscennissc
huhehuhe
huhe
huhehuhe
Installations- und Bedienungsanleitungen
88
8
88

W enn W aschmittel und Wasser allein nicht ausreichen…
So können harSo können har
So können har
So können harSo können har
- Rotwein. Mit etwas Waschmittel einweichen lassen, nachspülen und mit Essig- oder Zitronensäure betupfen, anschließend
gründlich nachspülen. Eventuelle Rückstände mit Bleichmittel nachbehandeln.
- Blutflecken. Noch frische Flecken kalt auswaschen. Bereits eingetrocknete Flecken mit etwas Spezial-Waschmittel einreiben und
für eine Nacht einweichen lassen, anschließend in Lauge auswaschen.
- Eingetrocknete Fettflecken. Mit Terpentin anfeuchten, das Wäscheteil auf eine weiche Unterlage legen und die Flecken mit den
Fingerspitzen und einem Baumwolltuch leicht reiben.
- Rostflecken. Mit einer heißen Lösung aus Fleckensalz (aus der Drogerie) behandeln, oder mit einem Rostmittel (kalt) behandeln.
Bei ihrer Anwendung ist Vorsicht geboten. Sie könnten dem Stoff schaden.
- Schimmelflecken. Mit Bleichmittel behandeln, gründlich nachspülen (nur Weißwäsche und Chlorfeste Buntwäsche).
- Ölfarben. Den Fleck mit Waschbenzin betupfen. Legen Sie das Wäscheteil hierzu auf ein weiches Tuch. Anschließend mehrmals
mit Waschmittel behandeln.
- Tinte und Kugelschreiber. Den Fleck mit einem mit Methylalkohol oder 90°igem Alkohol getränkten Wattebausch betupfen.
- Teer. Den Fleck mit frischer Butter betupfen, anschließend mit Terpentin behandeln und alles sofort gründlich auswaschen.
- Wachs. Das feste Wachs zuerst abschaben, den Fleck zwischen zwei Löschblätter legen: nun mit heißen Bügeleisen darüber bügeln.
Abschließend mit einem mit Farblösungsmittel oder einem mit Methylalkohol getränkten Wattebausch vorsichtig abreiben.
- Kaugummi. Den Kaugummi mit Nagellackentferner abreiben und das Ganze dann mit einem sauberen Tuch nachreiben.
- Stockflecken. Baumwolle- und weißes Leinengewebe in eine W asser/Bleichmittellösung (5 :1, 5 Teile Wasser und 1 Teil Bleichmittel)
und 1 Esslöffel Essig stecken, danach sofort auswaschen. Für alle übrigen weißen Gewebe verwenden Sie Wasserstoffsuperoxyd
(1:10) und waschen daraufhin sofort das Gewebe aus.
- Lippenstift. Den Fleck mit Äther abreiben, wenn es sich um Wolle oder Baumwolle handelt. Bei Seide verwenden Sie Trielin.
- Nagellack. Das Wäscheteil mit dem Fleck nach unten auf ein Löschblatt legen, das Ganze mit Nagellackentferner tränken. Sobald
sich das Löschpapier verfärbt, auf eine saubere Stelle des Papiers verschieben.
- Gras. Den Fleck mit einem mit Methylalkohol getränkten Wattebausch betupfen.
tnäctnäc
tnäc
tnäctnäc
kigkig
kig
kigkig
e Flece Flec
e Flec
e Flece Flec
ken entfken entf
ken entf
ken entfken entf
ernt werernt wer
ernt wer
ernt werernt wer
denden
den
denden
Sicheres W aschen
So öffnen und schließen Sie dieSo öffnen und schließen Sie die
So öffnen und schließen Sie die
So öffnen und schließen Sie dieSo öffnen und schließen Sie die
WäschetrommelWäschetrommel
Wäschetrommel
WäschetrommelWäschetrommel
A) Öffnen (Abb. 1) A) Öffnen (Abb. 1)
A) Öffnen (Abb. 1) Öffnen Sie den äußeren Deckel ganz.
A) Öffnen (Abb. 1) A) Öffnen (Abb. 1)
Abb. 1
Abb. 3 Abb. 4
99
9 Installations- und Bedienungsanleitungen
99
Abb. 2
B) Öffnen Sie dann (mit beiden Händen) die B) Öffnen Sie dann (mit beiden Händen) die
B) Öffnen Sie dann (mit beiden Händen) die
B) Öffnen Sie dann (mit beiden Händen) die B) Öffnen Sie dann (mit beiden Händen) die
so wie auf der Abbildung veranschaulicht. so wie auf der Abbildung veranschaulicht.
so wie auf der Abbildung veranschaulicht.
so wie auf der Abbildung veranschaulicht. so wie auf der Abbildung veranschaulicht.
- Drücken Sie die durch den Zeiger bezeichnete Taste (Abb. 2)
leicht nach unten, und halten Sie mit der anderen Hand die
Trommeltüren noch geschlossen, um zu vermeiden, sich
durch plötzliches Öffnen der Türen die Finger zu
verletzen.
- Begleiten Sie die nun aufspringenden Türen mit der Hand.
C) EINFÜLLEN DER WÄSCHE (Abb. 3)
D) SCHLIESSEN (Abb. 4) D) SCHLIESSEN (Abb. 4)
D) SCHLIESSEN (Abb. 4)
D) SCHLIESSEN (Abb. 4) D) SCHLIESSEN (Abb. 4)
- Schließen Sie sorgfältig die Wäschetrommel. Schließen
Sie zuerst den vorderen Flügel und drücken Sie
anschließend den hinteren Flügel auf.
- Stellen Sie sicher, dass sich die Hak en des v orderen
Flügels ordnungsgemäß in den entsprechenden Sitzen
der hinteren Flügel befinden.
- Nach hörbarem Einrasten der Haken drücken Sie leicht
auf beide Türen; sie dürf en nicht aufspringen.
- Schließen Sie abschließend den äußeren Deckel.
WäscWäsc
Wäsc
WäscWäsc
hetrhetr
hetr
hetrhetr
ommelommel
ommel
ommelommel

Wichtige Regeln für ein besseres W aschergebnis
Das Geheimnis der Das Geheimnis der
Das Geheimnis der
Das Geheimnis der Das Geheimnis der
WW
W
WW
ascasc
asc
ascasc
hmittelschmittelsc
hmittelsc
hmittelschmittelsc
Erstes Geheimnis: Die Waschmittelschublade liegt ganz bequem unter der Gerätetür.
Geben Sie das W aschmittel und
eventuelle Zusätze gemäß den
Mengenangaben des Herstellers
in die entsprechende Kammer:
Lesen Sie alle Informationen auf
der Verpackung.
WW
ascasc
hmittelmenghmittelmeng
W
asc
hmittelmeng
WW
ascasc
hmittelmenghmittelmeng
je nacje nac
h h
je nac
je nacje nac
grad des grad des
grad des
grad des grad des
scsc
sc
scsc
brauchen Sie nie zu viel. Zu vielbrauchen Sie nie zu viel. Zu viel
brauchen Sie nie zu viel. Zu viel
brauchen Sie nie zu viel. Zu vielbrauchen Sie nie zu viel. Zu viel
WW
W
WW
unbedingt stärkere unbedingt stärkere
unbedingt stärkere
unbedingt stärkere unbedingt stärkere
im Gegenteil…im Gegenteil…
im Gegenteil…
im Gegenteil…im Gegenteil…
Mit ein bißchen Erfahrung werden
Sie lernen, die Mengen fast automatisch zu dosieren: damit werden auch Sie Ihren Geheimtipp
haben.
Achten Sie bei Einfüllen des
Weichspülers in Kammer 3 darauf, die angegebene "max."
Höchstmenge nicht zu überschreiten.
Der Waschvollautomat entnimmt
WäscWäsc
h
Wäsc
h h
WäscWäsc
hmhm
utzung der Kleiderutzung der Kleider
hm
utzung der Kleider
hmhm
utzung der Kleiderutzung der Kleider
ascasc
hmittel bedeutet nichmittel bedeutet nic
asc
hmittel bedeutet nic
ascasc
hmittel bedeutet nichmittel bedeutet nic
hemenghemeng
hemeng
hemenghemeng
WW
asserasser
W
asser
WW
asserasser
e ändere änder
e änder
e ändere änder
ee
,,
Här Här
e
,
Här
ee
,,
Här Här
s und s und
s und
s und s und
WW
ascasc
W
asc
WW
ascasc
t sict sic
t sic
t sict sic
..
.
..
hkraft,hkraft,
hkraft,
hkraft,hkraft,
Sparsam und vernünftig waschen
WÄSCHEKAPAZITÄT VOLL NUTZEN
Die beste Weise, um weder Strom, Wasser, W aschmittel noch Zeit zu verschwenden, besteht darin,
die W aschmaschine nur mit der empfohlenen Höchstwäschemenge einzusetzen.
Bei einer vollen Auslastung Ihres Waschvollautomaten können Sie ver glichen mit zwei halben
Auslastungen bis zu 50% Energie SP AREN.
REDUZIEREN SIE DIE WASCHMITTELMENGE, WENN: Sie nur wenig Wäsche zu
waschen haben; die Wäsche nur leicht verschmutzt ist; oder das Wasser weich ist (siehe obige
W asserhärte-T abelle). Erfragen Sie bei der zuständigen Gemeindeverwaltung den Härtebereich Ihres
W ohnortes.
IST DIE VORWÄSCHE TATSÄCHLICH ERFORDERLICH ?
Nur wenn die Wäsche wirklich sehr schmutzig ist.
Wählen Sie für nur leicht oder mittelmäßig verschmutze Wäsche einen W aschgang OHNE V orwäsche:
Auf diese W eise SP AREN Sie W aschmittel, Zeit, W asser und zwischen 5 und 15% Ener gie.
IST ES WIRKLICH ERFORDERLICH, BEI HEISSEN TEMPERATUREN ZU
WASCHEN?
W enn Sie die Flecken vorab mit einem Fleckenlöser behandeln oder die angetrockneten Flecken
vor der Wäsche einweichen, können Sie in vielen Fällen auf den Heißwaschgang verzichten.
Mit einem 60°-Waschprogramm SPAREN Sie bis zu 50% Energie.
den Weichspüler bei jedem
Waschprogramm automatisch.
Flüssigwaschmittel werdenFlüssigwaschmittel werden
Flüssigwaschmittel werden
Flüssigwaschmittel werdenFlüssigwaschmittel werden
erer
st kurz vst kurz v
er
st kurz v
erer
st kurz vst kurz v
vollautomaten eingefüllt.vollautomaten eingefüllt.
vollautomaten eingefüllt.
vollautomaten eingefüllt.vollautomaten eingefüllt.
DieDie
Die
DieDie
VV
erer
V
er
VV
erer
hh
h
hh
Flüssigwaschmittel besondersFlüssigwaschmittel besonders
Flüssigwaschmittel besonders
Flüssigwaschmittel besondersFlüssigwaschmittel besonders
te-te-
te-
te-te-
gg
eeignet sind für eeignet sind für
g
eeignet sind für
gg
VV
V
VV
Ge- Ge-
Ge-
Ge- Ge-
eeignet sind für eeignet sind für
erer
--
er
-
erer
--
programme bis zu 60 Grad undprogramme bis zu 60 Grad und
programme bis zu 60 Grad und
programme bis zu 60 Grad undprogramme bis zu 60 Grad und
für all jene Programme, die kei-für all jene Programme, die kei-
für all jene Programme, die kei-
für all jene Programme, die kei-für all jene Programme, die keine ne
VV
ne
V
ne ne
htht
ht
htht
VV
Sie finden sowohl Flüssigwaschmittel als auch W aschpulver mit speziellen Dosierbechern
im Handel, die direkt in die
Wäschetrommel gegeben werden, so wie auf der Packung beschrieben.
V erwenden Sie nie Waschmittel,
die für Handwäsche bestimmt
sind; diese schäumen zu stark,
was dem Waschvollautomaten
schaden könnte.
Und nun noch ein letzter Geheimtipp: Wenn Sie mit kaltem Wasser waschen, dann reduzieren
Sie stets die W aschmittelmenge;
im kalten Wasser löst es sich
nämlich schlechter auf als im war-
In Kammer 1:
WW
ascasc
W
asc
WW
ascasc
(kein Flüssigwaschmittel)(kein Flüssigwaschmittel)
(kein Flüssigwaschmittel)
(kein Flüssigwaschmittel)(kein Flüssigwaschmittel)
In Kammer 2:
Waschmittel für die HauptwäscheWaschmittel für die Hauptwäsche
Waschmittel für die Hauptwäsche
Waschmittel für die HauptwäscheWaschmittel für die Hauptwäsche
(Waschpulver oder(Waschpulver oder
(Waschpulver oder
(Waschpulver oder(Waschpulver oder
Flüssigwaschmittel)Flüssigwaschmittel)
Flüssigwaschmittel)
Flüssigwaschmittel)Flüssigwaschmittel)
In Kammer 3:
WW
eiceic
W
eic
WW
eiceic
In Kammer 4:
BleichmittelBleichmittel
Bleichmittel
BleichmittelBleichmittel
or Staror Star
or Star
or Staror Star
gg
essen Sie nicessen Sie nic
g
essen Sie nic
gg
essen Sie nicessen Sie nic
orwäscorwäsc
orwäsc
orwäscorwäsc
he vhe v
he v
he vhe v
hpulver für die hpulver für die
hpulver für die
hpulver für die hpulver für die
hspülerhspüler
hspüler
hspülerhspüler
oror
or
oror
t des t des
t des
t des t des
ht,ht,
ht,
ht,ht,
WW
W
WW
sehen.sehen.
sehen.
sehen.sehen.
VV
orwäscorwäsc
V
orwäsc
VV
orwäscorwäsc
WW
ascasc
W
asc
WW
ascasc
dass dass
dass
dass dass
ascasc
asc
ascasc
hehe
he
hehe
VV
orwascorwasc
V
orwasc
VV
orwascorwasc
WW
eiceic
W
WW
h-h-
h-
h-h-
men, daher wäre ein Teil
verschwendet.Sollte ein Bleichen erforderlich sein, dann wählen Sie die entsprechenden
Waschprogr amme und füllen Sie
h-h-
h-
h-h-
das Bleichmittel in Kammer 4 der
Waschmittelschublade ein.
Achten Sie bei Einfüllen des
Bleichmittels darauf, die mit
"max" bezeichnete Höchstmenge nicht zu überschreiten.
Der Einsatz eines Bleichmit-Der Einsatz eines Bleichmit-
Der Einsatz eines Bleichmit-
Der Einsatz eines Bleichmit-Der Einsatz eines Bleichmittels schließt die Möglichkeittels schließt die Möglichkeit
tels schließt die Möglichkeit
tels schließt die Möglichkeittels schließt die Möglichkeit
einer einer
einer
einer einer
Herkömmliche BleichmittelHerkömmliche Bleichmittel
Herkömmliche Bleichmittel
Herkömmliche BleichmittelHerkömmliche Bleichmittel
sind nur für strapazierfähigesind nur für strapazierfähige
sind nur für strapazierfähige
sind nur für strapazierfähigesind nur für strapazierfähige
WW
W
WW
während schonende Bleich-während schonende Bleich-
während schonende Bleich-
während schonende Bleich-während schonende Bleichmittel aucmittel auc
mittel auc
mittel aucmittel auc
sche und Kunstfasern einge-sche und Kunstfasern einge-
sche und Kunstfasern einge-
sche und Kunstfasern einge-sche und Kunstfasern eingesetzt wersetzt wer
setzt wer
setzt wersetzt wer
hspülerhspüler
eic
hspüler
eiceic
hspülerhspüler
VV
orwäscorwäsc
V
orwäsc
VV
orwäscorwäsc
eißwäsceißwäsc
eißwäsc
eißwäsceißwäsc
den können.den können.
den können.
den können.den können.
he aus.he aus.
he aus.
he aus.he aus.
he zu verwenden,he zu verwenden,
he zu verwenden,
he zu verwenden,he zu verwenden,
h für farbigh für farbig
h für farbig
h für farbigh für farbig
Härtegrad des W assers
Ber. Eigenschaft
1 - W eich
2 - Mittelhart
3 - Hart
4 - Sehr hart
Für einen sparsamen und
umweltfreundlichen
EInsatz von Hausgeräten.
hen,Bleichen,Bleic
hen,Bleic
hen,Bleichen,Bleic
Sie das Programm für "Seide",
oder irgend ein anderes
"Spezialprogramm", dann
können Sie nicht bleichen (siehe Seite 6).
N.B.:N.B.:
N.B.:
N.B.:N.B.:
1) Konzentrierte Bleichmittel1) Konzentrierte Bleichmittel
1) Konzentrierte Bleichmittel
1) Konzentrierte Bleichmittel1) Konzentrierte Bleichmittel
müssen unbedingt verdünntmüssen unbedingt verdünnt
müssen unbedingt verdünnt
müssen unbedingt verdünntmüssen unbedingt verdünnt
werden.werden.
werden.
werden.werden.
2) Bei k2) Bei k
2) Bei k
2) Bei k2) Bei k
mitteln (flüssig oder inmitteln (flüssig oder in
mitteln (flüssig oder in
mitteln (flüssig oder inmitteln (flüssig oder in
Pulverform) ist ein ProgrammPulverform) ist ein Programm
Pulverform) ist ein Programm
Pulverform) ist ein ProgrammPulverform) ist ein Programm
ohne ohne
ohne
ohne ohne
den.den.
den.
den.den.
3) Bei 3) Bei
3) Bei
3) Bei 3) Bei
Dosierkugeln oder inDosierkugeln oder in
Dosierkugeln oder in
Dosierkugeln oder inDosierkugeln oder in
TT
T
TT
gramm ohne gramm ohne
gramm ohne
gramm ohne gramm ohne
zustellen.zustellen.
zustellen.
zustellen.zustellen.
e e
Wä-Wä-
e
Wä-
e e
Wä-Wä-
Weichspüler-ZusatzWeichspüler-Zusatz
Weichspüler-Zusatz
Wählen
Weichspüler-ZusatzWeichspüler-Zusatz
Weichspüler machen Ihre Wä-
deutsche französ.
°dH °f.H
0- 7 0-15
8-14 16-25
15-21 26-37
mehr als 21 mehr als 37
Weichspüler gemäß den Anweisungen des Herstellers in
die Kammer 3 der Waschmittelschublade.
Der W eichspüler wird beim letzten Spülgang automatisch in die
Wäschetrommel eingespült.
Nach Abschluss des Waschprogramms bleibt in Kammer 3
ein kleiner Rückstand an W asser.
Dieser ist zur Einspülung sehr
dickflüssiger, bzw. zur Verdünnung konzentrierter Weichspüler
erforderlich.
Sollte in Kammer 3 doch mehr
Wasser als üblich zurückb leiben,
dann ist das ein Zeichen dafür,
dass die Entnahmevorrichtung
verstopft ist, und das Einspülen
somit unterbrochen wird.
Zur Reinigung derselben verweisen wir auf Seite 13.Füllen Sie in
die Zusatzkammer niemals
Weichspüler und Stärke zusammen ein, das Überlaufsystem
könnte hierdurch verstopfen.
hubhub
hub
hubhub
VV
orwäscorwäsc
V
orwäsc
VV
orwäscorwäsc
abab
lettenflettenf
ab
lettenf
abab
lettenflettenf
ladelade
lade
ladelade
hmittel,hmittel,
hmittel,
hmittel,hmittel,
onzonz
entrierentrier
onz
onzonz
WW
W
WW
ten ten
entrier
ten
entrierentrier
ten ten
he zu verwen-he zu verwen-
he zu verwen-
he zu verwen-he zu verwen-
ascasc
hmitteln inhmitteln in
asc
hmitteln in
ascasc
hmitteln inhmitteln in
orm ist ein Prorm ist ein Pr
orm ist ein Pr
orm ist ein Prorm ist ein Pr
VV
orwäscorwäsc
V
orwäsc
VV
orwäscorwäsc
sche weich und
mindern die statische Ladung
der Kunstfasern.
Verwenden Sie
Weichspüler für
Frottee, Maschenware,
Gardinen usw .
Füllen Sie den
WW
ascasc
W
asc
WW
ascasc
he ein-he ein-
he ein-
he ein-he ein-
h-h-
h-
h-h-
o-o-
o-
o-o-
Installations- und Bedienungsanleitungen
1010
10
1010

Probleme und Lösungen
BeBe
Be
BeBe
Sie bitte FolgSie bitte Folg
Sie bitte Folg
Sie bitte FolgSie bitte Folg
Es kann sicherlich einmal vorkommen, dass Ihr Waschvollautomat nicht oder nicht ordnungsgemäß funktioniert.
In vielen Fällen handelt es sich dabei um Probleme, die ohne weiteres gelöst werden können, ohne den Techniker
anzufordern. Überprüfen Sie demnach zuerst die folgenden Punkte.
Der Der
Der
Der Der
startet nicht.startet nicht.
startet nicht.
startet nicht.startet nicht.
WW
W
WW
nungsgemäß in die Steck-nungsgemäß in die Steck-
nungsgemäß in die Steck-
nungsgemäß in die Steck-nungsgemäß in die Steckdose gesteckt? dose gesteckt?
dose gesteckt? Bei
dose gesteckt? dose gesteckt?
Reinigungsarbeiten könnte
dieser eventuell herausgerutscht sein.
Besteht ein Stromausfall inBesteht ein Stromausfall in
Besteht ein Stromausfall in
Besteht ein Stromausfall inBesteht ein Stromausfall in
Ihrer Ihrer
Ihrer
Ihrer Ihrer
Die Sicherung könnte herausgesprungen sein, weil der
Stromkreis durch Einschalten
zu vieler Hausgeräte eventuell überlastet wurde. Oder es
besteht ein Stromausfall in Ihrem gesamten W ohnviertel.
vv
v
vv
WW
ascasc
hvhv
W
asc
hv
WW
ascasc
hvhv
urur
de der Stecde der Stec
ur
de der Stec
urur
de der Stecde der Stec
WW
ohnohn
ung?ung?
W
ohn
ung?
WW
ohnohn
ung?ung?
or Sie telefor Sie telef
or Sie telef
or Sie telefor Sie telef
endesendes
endes
endesendes
WW
urur
de die Gerätetür gut gde die Gerätetür gut g
W
ur
de die Gerätetür gut g
WW
urur
ollautomatollautomat
ollautomat
ollautomatollautomat
ker orker or
ker or
ker orker or
d-d-
d-
d-d-
de die Gerätetür gut gde die Gerätetür gut g
schlossen?schlossen?
schlossen?
schlossen?schlossen?
Aus Sicherheitsgründen wird
ein Start der Maschine ausgeschlossen, wenn die Gerätetür
offenbleibt oder nicht richtig
geschlossen wird.
WW
urur
de der EIN/Ade der EIN/A
W
ur
de der EIN/A
WW
urur
de der EIN/Ade der EIN/A
gedrückt?gedrückt?
gedrückt?
gedrückt?gedrückt?
Wenn ja, wurde vielleicht ein
Programm mit Startvorwahl
gespeichert?
Befindet sich der Startvor-Befindet sich der Startvor-
Befindet sich der Startvor-
Befindet sich der Startvor-Befindet sich der Startvorwahl-Knopf, bei den Model-wahl-Knopf, bei den Model-
wahl-Knopf, bei den Model-
wahl-Knopf, bei den Model-wahl-Knopf, bei den Modellen, die einen solchen vorse-len, die einen solchen vorse-
len, die einen solchen vorse-
len, die einen solchen vorse-len, die einen solchen vorsehen, auf der richtigen Ein-hen, auf der richtigen Ein-
hen, auf der richtigen Ein-
hen, auf der richtigen Ein-hen, auf der richtigen Einstellung?stellung?
stellung?
stellung?stellung?
US-KnopfUS-Knopf
US-Knopf
US-KnopfUS-Knopf
onieren,onieren,
onieren,
onieren,onieren,
e-e-
e-
e-e-
lesen lesen
lesen
lesen lesen
RICHTIG RICHTIG
RICHTIG
RICHTIG RICHTIG
Durch Abdrehen des
Wasserhahns nach jedem
Waschgang kann ein rascher
Verschleiß der GeräteHydraulikanlage verhindert
und die Gefahr von
Wasserverlusten während
Ihrer Abwesenheit
verhindert werden.
Setzen Sie Ihren
Waschvollautomaten
möglichst nur dann
unbeaufsichtigt in Betrieb,
wenn der Aufstellungsort
mit einem Bodenablauf
versehen ist.
Lassen Sie die Gerätetür
stets leicht auf,
um Geruchbildung zu
vermeiden.
Die Außenflächen sanft
reinigen.
Die äußeren Teile sowie die
Teile aus Gummi sind mit
einem mit lauwarmer , milder
Spüllauge angefeuchteten
Tuch zu reinigen.
FALSCH
Den Stecker nicht
herauszuziehen, wenn die
Maschine gereinigt wird.
Auch während der
Wartungsarbeiten muss der
Stecker herausgezogen
werden.
Der Einsatz von Löse- und
Scheuermitteln.
Diese dürfen zur Reinigung
der äußeren Teile und der
Teile aus Gummi nicht
eingesetzt werden.
Den Reinigerbehälter zu
vernachlässigen.
Er kann herausgezogen
werden, und kann demnach
unter laufendem Wasser
ausgespült werden.
Sich in Urlaub zu begeben,
ohne sich um die Maschine
zu kümmern.
Bevor Sie in Urlaub fahren
ist sicherzustellen, dass der
Stecker gezogen und der
Wasserhahn abgedreht
wurde.
Ist der Ist der
WW
Ist der
Ist der Ist der
Sicherheitsgründen wird der
Start des Gerätes verhindert,
wenn es kein W asser lädt.
Der Der
Der
Der Der
lädt kein lädt kein
lädt kein
lädt kein lädt kein
Ist der Schlauch korrektIst der Schlauch korrekt
Ist der Schlauch korrekt
Ist der Schlauch korrektIst der Schlauch korrekt
am am
am
am am
schlossen?schlossen?
schlossen?
schlossen?schlossen?
Fehlt das Fehlt das
Fehlt das
Fehlt das Fehlt das
wurde die W asserzufuhr aufgrund eventueller Arbeiten in
Ihrem Wohnviertel kurzfristig
unterbrochen.
Ist der Druck ausreichend?Ist der Druck ausreichend?
Ist der Druck ausreichend?
Ist der Druck ausreichend?Ist der Druck ausreichend?
Vielleicht besteht eine Störung
an der Druckpumpe.
Ist der Ist der
Ist der
Ist der Ist der
Durch sehr kalkhaltiges W asser, oder auch nach Arbeiten
an der Leitung könnte das
Sieb des W asserhahns durch
eventuelle Rückstände verstopft worden sein.
Ist der Schlauch einge-Ist der Schlauch einge-
Ist der Schlauch einge-
Ist der Schlauch einge-Ist der Schlauch eingeklemmt oder geknickt? klemmt oder geknickt?
klemmt oder geknickt? Der
klemmt oder geknickt? klemmt oder geknickt?
Wasserzulaufschlauch muss
asserhahn auf?asserhahn auf?
W
asserhahn auf? Aus
WW
asserhahn auf?asserhahn auf?
WW
ascasc
hvhv
W
WW
WW
W
WW
ollautomatollautomat
asc
hv
ollautomat
ascasc
hvhv
ollautomatollautomat
WW
asserasser
W
asser
WW
asserasser
asserhahn angasserhahn ang
asserhahn ang
asserhahn angasserhahn ang
WW
asser? asser?
W
asser? Vielleicht
WW
asser? asser?
WW
asserfilter sauber?asserfilter sauber?
W
asserfilter sauber?
WW
asserfilter sauber?asserfilter sauber?
..
.
..
e-e-
e-
e-e-
möglichst gerade verlegt werden. Stellen Sie sicher, dass
er weder eingeklemmt noch
geknickt wurde.
Der Der
WW
ascasc
hvhv
Der
W
Der Der
WW
lädt lauflädt lauf
lädt lauf
lädt lauflädt lauf
pumpt es laufend ab.pumpt es laufend ab.
pumpt es laufend ab.
pumpt es laufend ab.pumpt es laufend ab.
Liegt der Schlauch zu tief?Liegt der Schlauch zu tief?
Liegt der Schlauch zu tief?
Liegt der Schlauch zu tief?Liegt der Schlauch zu tief?
Er muss in einer Höhe von 60
bis 100 cm installiert werden.
Liegt das SchlauchendeLiegt das Schlauchende
Liegt das Schlauchende
Liegt das SchlauchendeLiegt das Schlauchende
vielleic vielleic
vielleic
vielleic vielleic
WW
urur
W
ur
WW
urur
einer Entlüftungsöffnungeiner Entlüftungsöffnung
einer Entlüftungsöffnung
einer Entlüftungsöffnungeiner Entlüftungsöffnung
versehen?versehen?
versehen?Sollte die Betriebs-
versehen?versehen?
störung nach diesen Kontrollen weiterhin bestehen, drehen Sie bitte den W asserhahn
ab, schalten die Maschine aus
und fordern den Kundendienst
an.Wohnen Sie sehr hoch (auf
den letzten Etagen) könnte es
sich auch um einen Saugeffekt handeln.
In diesem Fall ist ein entsprechendes V entil zu installieren.
ollautomatollautomat
asc
hv
ollautomat
ascasc
hvhv
ollautomatollautomat
end end
WW
asser undasser und
end
W
asser und
end end
WW
asser undasser und
ht unter ht unter
ht unter
ht unter ht unter
de der Mauerabde der Mauerab
de der Mauerab
de der Mauerabde der Mauerab
WW
asser?asser?
W
asser?
WW
asser?asser?
lauf mitlauf mit
lauf mit
lauf mitlauf mit
11 11
11 Installations- und Bedienungsanleitungen
11 11

Der Der
WW
ascasc
hvhv
asc
ascasc
ollautomatollautomat
hv
ollautomat
hvhv
ollautomatollautomat
WW
asserabasserab
W
asserab
WW
asserabasserab
..
.
..
scsc
hutz"-hutz"-
sc
hutz"-
scsc
hutz"-hutz"-
Der
W
Der Der
WW
pumpt nicht ab undpumpt nicht ab und
pumpt nicht ab und
pumpt nicht ab undpumpt nicht ab und
schleudert nichtschleudert nicht
schleudert nicht
schleudert nichtschleudert nicht
Sieht das eingestellte Pro- Sieht das eingestellte Pro-
Sieht das eingestellte Pro-
Sieht das eingestellte Pro- Sieht das eingestellte Pro-
gramm den gramm den
gramm den
gramm den gramm den
vor?vor?
vor? Bei einigen Programm
vor?vor?
muss der Ablauf manuell gestartet werden.
WW
urur
de die "Knitterde die "Knitter
W
ur
de die "Knitter
WW
urur
de die "Knitterde die "Knitter
Funktion bei den Geräten,Funktion bei den Geräten,
Funktion bei den Geräten,
Funktion bei den Geräten,Funktion bei den Geräten,
die eine solche vorsehen,die eine solche vorsehen,
die eine solche vorsehen,
die eine solche vorsehen,die eine solche vorsehen,
aktiviert? aktiviert?
aktiviert? Diese Funktion er-
aktiviert? aktiviert?
fordert ein manuelles Aktivieren des Schleudergangs.
Ist die Ablaufpumpe ver-Ist die Ablaufpumpe ver-
Ist die Ablaufpumpe ver-
Ist die Ablaufpumpe ver-Ist die Ablaufpumpe verstopft?stopft?
stopft? Um dies zu überprü-
stopft?stopft?
fen drehen Sie bitte den W asserhahn ab, ziehen den Stekker heraus und folgen Sie den
Anleitungen auf Seite 12,
oder fordern Sie den Kundendienst an.
Wenden Sie sich
ausschließlich an
autorisierte
Fachkräfte und
verlangen Sie den
Einsatz von
Original-
Ersatzteilen.
Ist der Ablaufschlauch ge-Ist der Ablaufschlauch ge-
Ist der Ablaufschlauch ge-
Ist der Ablaufschlauch ge-Ist der Ablaufschlauch geknickt? knickt?
knickt? Der Ablaufschlauch
knickt? knickt?
muss so gerade wie möglich
verlegt werden. Stellen Sie
sicher, dass er weder eingeklemmt noch geknickt wurde.
Ist die Ablaufleitung ver-Ist die Ablaufleitung ver-
Ist die Ablaufleitung ver-
Ist die Ablaufleitung ver-Ist die Ablaufleitung verstopft? stopft?
stopft? Wurde der Ablauf-
stopft? stopft?
schlauch mit einer nicht ordnungsgemäßen Verlängerung, die den Ablauf verhindert, versehen?
lauflauf
lauf
lauflauf
Der WaschvollautomatDer Waschvollautomat
Der Waschvollautomat
Der WaschvollautomatDer Waschvollautomat
vibriert zu stark währendvibriert zu stark während
vibriert zu stark während
vibriert zu stark währendvibriert zu stark während
des Schleudernsdes Schleuderns
des Schleuderns
des Schleudernsdes Schleuderns
WW
urur
de bei der Installationde bei der Installation
W
ur
de bei der Installation
WW
urur
de bei der Installationde bei der Installation
die innere Schwinger-die innere Schwinger-
die innere Schwinger-
die innere Schwinger-die innere Schwingergruppe korrekt befreit? gruppe korrekt befreit?
gruppe korrekt befreit? Zie-
gruppe korrekt befreit? gruppe korrekt befreit?
hen Sie die der Installation
gewidmeten Seite 2 zu Rate.
Wurde der Waschvoll-Wurde der Waschvoll-
Wurde der Waschvoll-
Wurde der Waschvoll-Wurde der Waschvollautomat eben aufgestellt ?automat eben aufgestellt ?
automat eben aufgestellt ?
automat eben aufgestellt ?automat eben aufgestellt ?
Kontrollieren Sie dies regelmäßig. Der Waschvollautomat könnte im Laufe der
Zeit unmerklich verrückt sein.
Regulieren Sie die Stellfüße
unter Zuhilfenahme einer
Wasserwaage.
Ist der umliegende Frei-Ist der umliegende Frei-
Ist der umliegende Frei-
Ist der umliegende Frei-Ist der umliegende Freiraum ausreichend?raum ausreichend?
raum ausreichend?Das
raum ausreichend?raum ausreichend?
Gerät sollte nicht an die sa-
nitären Anlagen anstoßen;
der Freiraum um das Gerät
herum ist sicherzustellen.
Sollte das Gerät auf einem
Teppichboden stehen, dann
vergewissern Sie sich, dass
die Luft zwischen den Stellfüßen und dem Fußboden
frei zirkulieren kann.
Der Der
WW
ascasc
hvhv
Der
W
Der Der
WW
undicht.undicht.
undicht.
undicht.undicht.
WW
urur
W
ur
WW
urur
fest aufgeschraubt? fest aufgeschraubt?
fest aufgeschraubt? Drehen
..
.
..
fest aufgeschraubt? fest aufgeschraubt?
Sie den W asserhahn ab, ziehen Sie den Stecker aus der
Steckdose und versuchen
Sie, die Nutmutter etwas mehr
anzudrehen (nicht zu fest).
Ist der Waschmittel-Ist der Waschmittel-
Ist der Waschmittel-
Ist der Waschmittel-Ist der Waschmittelbehälter verstopft? behälter verstopft?
behälter verstopft? Versu-
behälter verstopft? behälter verstopft?
chen Sie, diesen herauszunehmen und unter fließendem Wasser zu reinigen.
WW
urur
W
ur
WW
urur
gut aufgedreht?gut aufgedreht?
gut aufgedreht? Drehen Sie
gut aufgedreht?gut aufgedreht?
den Wasserhahn ab, ziehen
Sie den Stecker aus der
Steckdose und versuchen
Sie, ihn etwas besser aufzudrehen.
ollautomat istollautomat ist
asc
hv
ollautomat ist
ascasc
hvhv
ollautomat istollautomat ist
de der Zulaufscde der Zulaufsc
de der Zulaufsc
de der Zulaufscde der Zulaufsc
de der Abde der Ab
de der Ab
de der Abde der Ab
laufsclaufsc
laufsc
laufsclaufsc
hlauchlauc
hlauc
hlauchlauc
hlauchlauc
hlauc
hlauchlauc
Es bildet sich zu vielEs bildet sich zu viel
Es bildet sich zu viel
Es bildet sich zu vielEs bildet sich zu viel
Schaum.Schaum.
Schaum.
Schaum.Schaum.
Wurde ein Wurde ein
Wurde ein
Wurde ein Wurde ein
maschinengeeignetesmaschinengeeignetes
maschinengeeignetes
maschinengeeignetesmaschinengeeignetes
WW
ascasc
hmittel einghmittel eing
W
asc
hmittel eing
WW
ascasc
hmittel einghmittel eing
Kontrollieren Sie, was auf der
V erpackung aufgedruckt ist:
"Für Waschmaschinen" oder
"Für Handwäsche" oder
Ähnliches.
WW
urur
de mit zuviel de mit zuviel
W
ur
de mit zuviel
WW
urur
de mit zuviel de mit zuviel
tel gewaschen? tel gewaschen?
tel gewaschen? Durch eine zu
tel gewaschen? tel gewaschen?
hohe Reinigermenge, die außerdem zuviel Schaum erzeugen würde, wird der
hh
h
hh
Reinigungseffekt nicht erhöht,
sondern verursacht nur
Verkrustungen im Innern des
Waschvollautomaten.
Sollte trotz all dieser Kontrollen
die Betriebsstörung an Ihrem
Waschvollautomaten weiter bestehen bleiben, dann wenden
Sie sich an die nächstgelegene
autorisierte Kundendienststelle
und geben Sie hierbei folgende
Daten an:
--
Art der StörungArt der Störung
-
Art der Störung
--
Art der StörungArt der Störung
hh
h
hh
--
das Kennzeichen (Modell … )das Kennzeichen (Modell … )
-
das Kennzeichen (Modell … )
--
das Kennzeichen (Modell … )das Kennzeichen (Modell … )
- -
die Seriennummer (S/N ....)die Seriennummer (S/N ....)
-
die Seriennummer (S/N ....)
- -
die Seriennummer (S/N ....)die Seriennummer (S/N ....)
Diese Daten entnehmen Sie bitte
dem auf dem unteren Teil des Sockels befindlichen Typenschild.
(Abb. 1)
WW
W
WW
esetzt?esetzt?
esetzt?
esetzt?esetzt?
ascasc
hmit-hmit-
asc
hmit-
ascasc
hmit-hmit-
Bei Bedarf kBei Bedarf k
Bei Bedarf k
Bei Bedarf kBei Bedarf k
ontrontr
ollieren Sie die Pumpe und den Gummiscollieren Sie die Pumpe und den Gummisc
ontr
ollieren Sie die Pumpe und den Gummisc
ontrontr
ollieren Sie die Pumpe und den Gummiscollieren Sie die Pumpe und den Gummisc
hlauchlauc
hlauc
hlauchlauc
h.h.
h.
h.h.
Der Waschvollautomat verfügt über eine selbstreinigende Pumpe, die keinerlei Reinigung oder Wartung
erfordert. Es kann jedoch geschehen, dass versehentlich kleine Gegenstände (Kleingeld, Sicherheitsnadeln,
Haarspangen, abgesprungene Knöpfe und ähnliches) in die Pumpe fallen. Um Schäden zu vermeiden, bleiben
diese Gegenstände in einem Vorraum liegen, der sich auf der Unterseite der Pumpe befindet und zugänglich
ist.
Um Zugang zu diesem Vorraum zu erhalten, nehmen Sie zuerst das
Abdeckpaneel ab, das sich im unteren Teil der Waschmaschine
befindet (Abb. 1), und dann den Deckel (gegen den Uhrzeigersinn
drehen) (Abb. 2). Sie können so den Innenraum sorgfältig
kontrollieren.
Der Gummischlauch
Kontrollieren Sie den Gummischlauch mindestens einmal im Jahr.
Wenn er Risse oder Verschleißstellen aufweist, muss er unmittelbar
ausgetauscht werden, denn während der Wäsche wird er einem starken
Fig. 1
Abb. 1
Druck ausgesetzt, der ein plötzliches Reißen zur Folge haben könnte.
Abb. 2
Achtung: Vergewissern Sie sich stets, dass der Waschgang beendet ist und ziehen Sie den Stecker aus der Steckdose, bevor
Sie den Deckel abnehmen oder Wartungsarbeiten vornehmen. Es ist normal, dass nach Abnahme des Deckels etwas Wasser
herausfließt. W enn Sie das Abdeckpaneel wieder einsetzen, kontrollieren Sie, dass die Haken im unteren T eil in die Halterungen
einrasten, bevor Sie das Paneel gegen das Gerät drücken.
Installations- und Bedienungsanleitungen
1212
12
1212

Leichte Pflege und Wartung
Behandeln Sie Ihre Behandeln Sie Ihre
Behandeln Sie Ihre
Behandeln Sie Ihre Behandeln Sie Ihre
gut und Sie wergut und Sie wer
gut und Sie wer
gut und Sie wergut und Sie wer
Freundin habenFreundin haben
Freundin haben
Freundin habenFreundin haben
Ihre Waschmachine ist so gebaut worden, dass Sie problemlos viele Jahre lang Ihre Freude
daran haben können. Einige einfache V orkehrungen aber helfen
Ihnen, Ihr Gerät stets fit zu halten und seine Lebensdauer zusätzlich zu verlängern.
Linie mLinie m
Linie m
Linie mLinie m
immer der immer der
immer der
immer der immer der
schlossen werdenschlossen werden
schlossen werden: der ständi-
schlossen werdenschlossen werden
ge Wasserdruck kann einigen
Bestandteilen schaden.
Außerdem vermeiden Sie auf
diese Weise eventuelle W asseraustritte, wenn niemand im Hause ist.
Sollte das Sollte das
Sollte das
Sollte das Sollte das
gend allzu hart sein, dann ver-gend allzu hart sein, dann ver-
gend allzu hart sein, dann ver-
gend allzu hart sein, dann ver-gend allzu hart sein, dann verwenden Sie einwenden Sie ein
wenden Sie ein
wenden Sie einwenden Sie ein
EntkalkungsmittelEntkalkungsmittel
Entkalkungsmittel (das Was-
EntkalkungsmittelEntkalkungsmittel
ser ist hart, wenn es um den
Wasserhahn oder den Ablauf
herum leicht weiße Spuren
hinterlässt, was Sie vor allem in
der Badewanne feststellen können.
Genauere Informationen zum
Wassertyp Ihrer Anlage erfragen Sie bitte beim Wasseramt
Ihrer Gemeinde oder Ihrem
Klempner.
Leeren Sie stets alle Taschen,
nehmen Sie auch Münzen, Broschen, Abzeichen und alle übrigen harten Gegenstände ab.
uß nacuß nac
uß nac
uß nacuß nac
WW
W
WW
WW
asser in Ihrer Ge-asser in Ihrer Ge-
W
asser in Ihrer Ge-
WW
asser in Ihrer Ge-asser in Ihrer Ge-
In ersterIn erster
In erster
In ersterIn erster
h jeder h jeder
h jeder
h jeder h jeder
asserhahn gasserhahn g
asserhahn g
asserhahn gasserhahn g
WäscWäsc
Wäsc
WäscWäsc
Die Außenwände des Waschvollautomaten werden mit einem
weichen Tuch und einer lauwarmem Seifenlauge gereinigt.
Es ist wichtig, die
ausziehbare
Waschmittelschublade
hehe
he
hehe
regelmäßig zu reinigen.
e-e-
e-
e-e-
Um Ablagerungen
entgegenzuwirken,
spülen Sie diese
regelmäßig unter
fließendem Wasser aus.
Nie mit der Nie mit der
Nie mit der
Nie mit der Nie mit der
übertreiben.übertreiben.
übertreiben.
übertreiben.übertreiben.
Normale Waschmittel enthalten
bereits einen Kalklöser. Nur
wenn das Wasser ganz besonders hart ist, das heißt, wenn es
besonders kalkreich ist, empfehlen wir Ihnen, bei jeder Wäsche
ein Spezialprodukt zu verwenden.
Gelegentlich sollte auch ein
Waschgang mit einem Kalklöser
durchgeführt werden, ohne
Waschmittel und ohne Wäsche.
Verwenden Sie nie allzu große
Mengen W aschmittel oder Zusätze, denn dies könnte zu starker
Schaumbildung führen, was Ablagerungen und Schaden an einigen Bestandteilen der W aschmaschine zur Folge haben kann.
WW
W
WW
ascasc
asc
ascasc
den in ihr eine treueden in ihr eine treue
den in ihr eine treue
den in ihr eine treueden in ihr eine treue
Ihre W aschmaschine ist ein verlässlicher Lebensund Arbeitspartner . Es ist daher wichtig, sie fit zu
halten. Auch für Sie.
hmittelmenghmittelmeng
hmittelmeng
hmittelmenghmittelmeng
ee
e
ee
Leeren Sie stets alle Taschen:
Auch die kleinsten Metallgegenstände in der Schleuder
können die Trommel Ihrer Maschine ernsthaft
beschädigen.
WW
W
WW
ascasc
asc
ascasc
hmaschmasc
hmasc
hmaschmasc
hinehine
hine
hinehine
So kann der So kann der
So kann der
So kann der So kann der
Abnehmen:Abnehmen:
Abnehmen:
Abnehmen:Abnehmen:
Drücken Sie leicht auf den
vorne im Behälter befindlichen
Knopf und ziehen Sie den
Behälter dann nach oben heraus
(Abb. 1 + Abb. 2).
Abb. 1
1313
13 Installations- und Bedienungsanleitungen
1313
WW
ascasc
W
asc
WW
ascasc
Reinigen:Reinigen:
Reinigen:
Reinigen:Reinigen:
Reinigen Sie ihn unter fließendem W asser (Abb.3) , e ventuell unter
Zuhilfenahme einer alten Zahnbürste, ziehen Sie das im oberen Teil
der Kammern 1 und 2 befindliche Siphonpaar heraus (Abb. 4) und
kontrollieren Sie, ob dieses verstopft ist. Spülen Sie es eventuell
gründlich aus.
Abb. 2
hmittelbehälter ghmittelbehälter g
hmittelbehälter g
hmittelbehälter ghmittelbehälter g
Abb. 3
ereinigt werereinigt wer
ereinigt wer
ereinigt werereinigt wer
Anbringen:Anbringen:
Anbringen:
Anbringen:Anbringen:
Vergessen Sie nicht, auch das
Siphonpaar wieder
einzusetzen, bevor Sie den
Waschmittelbehälter wieder
einhängen. (Abb. 4, dann 2, 1).
Abb. 4
denden
den
denden

Schleudern ohne Risiko
ABC-System zur elektrABC-System zur elektr
ABC-System zur elektr
ABC-System zur elektrABC-System zur elektr
AA
A
AA
usus
us
usus
wucwuc
wuc
wucwuc
htung Ihrer Schtung Ihrer Sc
htung Ihrer Sc
htung Ihrer Schtung Ihrer Sc
Hinweis
Ihr Waschvollautomat ist mitIhr Waschvollautomat ist mit
Ihr Waschvollautomat ist mit
Ihr Waschvollautomat ist mitIhr Waschvollautomat ist mit
einem elektronischeneinem elektronischen
einem elektronischen
einem elektronischeneinem elektronischen
Selbstauswuchtungs-Über-Selbstauswuchtungs-Über-
Selbstauswuchtungs-Über-
Selbstauswuchtungs-Über-Selbstauswuchtungs-Überwachungssystem (Auto Ba-wachungssystem (Auto Ba-
wachungssystem (Auto Ba-
wachungssystem (Auto Ba-wachungssystem (Auto Balance Control) ausgestattet,lance Control) ausgestattet,
lance Control) ausgestattet,
lance Control) ausgestattet,lance Control) ausgestattet,
das ein Schleudern bei hoherdas ein Schleudern bei hoher
das ein Schleudern bei hoher
das ein Schleudern bei hoherdas ein Schleudern bei hoher
Geschwindigkeit nur dannGeschwindigkeit nur dann
Geschwindigkeit nur dann
Geschwindigkeit nur dannGeschwindigkeit nur dann
erlaubt, wenn die Maschineerlaubt, wenn die Maschine
erlaubt, wenn die Maschine
erlaubt, wenn die Maschineerlaubt, wenn die Maschine
gleichmäßig beladen wurde.gleichmäßig beladen wurde.
gleichmäßig beladen wurde.
gleichmäßig beladen wurde.gleichmäßig beladen wurde.
Eine ungleichmäßig verteilte
Ladung könnte nämlich Ihr Gerät ernsthaft beschädigen.
Dieses ABC-System steuert
die Trommel vor jedem Schleudern so, dass zuerst mehrere
Rechts- und Links-Umdrehungen vorgenommen werden, um
die Ladung erst einmal gleichmäßig zu verteilen, um dann
auf ein sanftes Schleudern umzuschalten.
Es ist möglich, dass diese Umdrehungen im Falle einer außergewöhnlichen
Beschickungsart (bei Anwesenheit von Bademänteln,
Decken, Bettüchern, die even-
tuell ein Knäuel gebildet haben usw.) nicht dazu ausreichen, das Gewicht gleichmäßig im Trommelinnern zu verteilen.
Dies kann zwei Möglichkeiten
zur Folge haben:
- -
- Das ABC-System "akzeptiert"
- -
diesen ungenauen Ausgleich,
reduziert jedoch diereduziert jedoch die
reduziert jedoch die
reduziert jedoch diereduziert jedoch die
Schleudergeschwindigkeit.Schleudergeschwindigkeit.
Schleudergeschwindigkeit.
Schleudergeschwindigkeit.Schleudergeschwindigkeit.
Die Wäsche bleibt demnach
etwas feuchter als normal.
--
- Das ABC-System hält diesen
--
ungenauen Ausgleich als zu
hoch, und demnach als nicht
akzeptabel und
Schleuder ganz aus.Schleuder ganz aus.
Schleuder ganz aus.
Schleuder ganz aus.Schleuder ganz aus.
Nehmen Sie in diesem Fall die
Wäsche wieder aus der
Trommel, sortieren Sie diese
dann gleichmäßiger wieder ein
und stellen Sie den
Schleudergang ein.
schließt dieschließt die
schließt die
schließt dieschließt die
Es handelt sich in beiden
Fällen nicht um eine
Betriebsstörung, sondern um
eine der fortschrittlichsten
Eigenschaften, die vor
Brüchen, Vibrieren,
Verrücken der Maschine auf
dem Fußboden oder anderen
ernsthaften Zwischenfällen
schützen.
onisconisc
onisc
onisconisc
hleuderhleuder
hleuder
hleuderhleuder
henhen
hen
henhen
TT
ecec
T
TT
Modell
Abmessungen
Fassungsvermögen
Elektro-Anschlüsse
Wasser- Anschlüsse
Sch leu derto uren
Prüfprogramme
gemäß IEC456
hnischnisc
ec
hnisc
ecec
hnischnisc
he Datenhe Daten
he Daten
he Datenhe Daten
WT 12 0
Breite 40 cm
Höh e 85 cm
Tiefe 6 0 cm
von 1 bis 5 kg
Spannung 230 Volt 50 Hz
max. Leistungsaufnahme 2100 W
max. Druck 1 MPa (10 bar)
min. Druck 0,05 MPa (0,5 bar)
Fassungsvermögen des Laugenbehälters 42 Liter
bis zu 1200 U/min.
bei einer Wäscheladung von 5,0 kg. Programm 3, 60° C
Dieses Gerät entspricht den folgenden EG-Richtlinien:
- 73/23/EWG vom 19.02.73 (Niederspannung) und nachfolgenden Änderungen
- 89/336/EWG vom 03.05.89 (elektromagnetische Verträglichkeit) und nachfolgenden
Änderungen
Der Hersteller behält sich das Recht vor, jederzeit und ohne V orankündigung Änderungen jeglicher Art an dem Gerät oder den Zubehörteilen seiner Modelle,
die er aus technischen oder wirtschaftlichen Gründen für erforderlich hält, vorzunehmen.
Installations- und Bedienungsanleitungen
14 14
14
14 14

Merloni Elettrodomestici
Viale Aristide Merloni 47
60044 Fabriano
Italy
Tel +39 0732 6611
Fax +39 0732 662501
www.merloni.com
We work, you play
01/2003 - 195 034 985 02 - Xerox Services Docutech

Wasmachine bovenlader
Instructies voor de installatie en het gebruik NL
WT 120

BeknopteBeknopte
Beknopte
BeknopteBeknopte
instructiesinstructies
instructies
instructiesinstructies
Hier volgen de 13 punten die worden uitgelegd in
deze gebruiksaanwijzing. Lees, leer en geniet van de
machine: hier worden veel kleine geheimpjes onthuld
voor beter wassen met minder moeite en voor de
duurzaamheid van uw machine. Er wordt hierbij vooral
gelet op de veiligheid.
Het installeren en verhuizen (blz.2)Het installeren en verhuizen (blz.2)
1.
Het installeren en verhuizen (blz.2)
Het installeren en verhuizen (blz.2)Het installeren en verhuizen (blz.2)
Na het thuis bezorgen van de machine, of na een verhuizing, is
het installeren het belangrijkste moment voor het goed functioneren van uw wasmachine. Controleer altijd of:
1.1.
1. uw lichtnet aan de geldende normen voldoet;
1.1.
2.2.
2. de aan- en afvoerbuizen van het water op de juiste wijze zijn
2.2.
aangesloten;
3.3.
3. de wasmachine waterpas staat. Deze controle verhoogt zowel
3.3.
de duurzaamheid van uw wasmachine als de kwaliteit van uw
wasgoed;
44
4. aan de achterkant van de wasmachine
44
kuip blokkeren verwijderd zijn.kuip blokkeren verwijderd zijn.
kuip blokkeren verwijderd zijn.
kuip blokkeren verwijderd zijn.kuip blokkeren verwijderd zijn.
de schroeven die dede schroeven die de
de schroeven die de
de schroeven die dede schroeven die de
7.
(blz.8) (blz.8)
(blz.8)
(blz.8) (blz.8)
Vroeger waren het de oma's die goede raad gaven - en synthetische stoffen bestonden toen nog niet: geen wonder dat wassen
een koud kunstje was. V andaag de dag is het uw w asmachine die
u goede raad geeft.
Handige adviezen om u niet te vergissenHandige adviezen om u niet te vergissen
Handige adviezen om u niet te vergissen
Handige adviezen om u niet te vergissenHandige adviezen om u niet te vergissen
PP
erer
2.
Hier vindt u nuttige tips voor uw eigen veiligheid en die van uw
hele gezin. W ant dat is het belangrijkste wat er bestaat.
3.
Het op de juiste wijze scheiden van het wasgoed is belangrijk zowel voor het resultaat van de was als voor de duurzaamheid van
de machine. Leer alle trucjes en geheimen voor het scheiden van
uw wasgoed: kleuren, soort stof en neiging tot pluizen zijn de
belangrijkste criteria.
4.
Het bedieningspaneel zit heel eenvoudig in elkaar . Met enkele essentiële bedieningsknoppen kiest u ieder soort wasprogramma,
van het meest energieke, in staat zelfs de overall van een monteur schoon te krijgen, tot de delicate wascyclus voor wol. U zult
er snel aan wennen en beter wassen, geld besparen en langer
van uw wasmachine genieten. Het is gemakkelijk.
5.
Een eenvoudige tabel zodat u in één oogopslag het programma,
de temperatuur, het w asmiddel en eventuele toe voegingen bepaalt.
Met het juiste programma bereikt u het beste resultaat en bespaart
u iedere dag opnieuw tijd, water en energie.
6.
symbolen (blz. 7-8) symbolen (blz. 7-8)
symbolen (blz. 7-8)
symbolen (blz. 7-8) symbolen (blz. 7-8)
De internationale symbolen op de etiketten in de kledingstukken
zijn gemakkelijk te begrijpen en belangrijk voor het slagen van uw
was. Dit is een aanwijzing om uw weg te vinden tussen de aanbevolen programma's en temperaturen, de v erschillende soorten behandelingen, de wijzen van strijken en de specifieke INDESIT
symbolen.
soonlijke veiligheid vsoonlijke veiligheid v
P
er
soonlijke veiligheid v
PP
erer
soonlijke veiligheid vsoonlijke veiligheid v
WW
at gaat er in de wasmacat gaat er in de wasmac
W
at gaat er in de wasmac
WW
at gaat er in de wasmacat gaat er in de wasmac
machine aan (blz. 4)machine aan (blz. 4)
machine aan (blz. 4)
machine aan (blz. 4)machine aan (blz. 4)
Het bedieningspaneel (blz.5)Het bedieningspaneel (blz.5)
Het bedieningspaneel (blz.5)
Het bedieningspaneel (blz.5)Het bedieningspaneel (blz.5)
Instructies bij de wasprogramma's (blz. 6)Instructies bij de wasprogramma's (blz. 6)
Instructies bij de wasprogramma's (blz. 6)
Instructies bij de wasprogramma's (blz. 6)Instructies bij de wasprogramma's (blz. 6)
Instructies vInstructies v
Instructies v
Instructies vInstructies v
oor het begrijpen voor het begrijpen v
oor het begrijpen v
oor het begrijpen voor het begrijpen v
oor u en uw goor u en uw g
oor u en uw g
oor u en uw goor u en uw g
hine en hoe zhine en hoe z
hine en hoe z
hine en hoe zhine en hoe z
an etiketten enan etiketten en
an etiketten en
an etiketten enan etiketten en
ezin (bezin (b
ezin (b
ezin (bezin (b
et u deet u de
et u de
et u deet u de
lz.3)lz.3)
lz.3)
lz.3)lz.3)
Hoe sluit u de trommel (blz. 9)Hoe sluit u de trommel (blz. 9)
8.
Hoe sluit u de trommel (blz. 9)
Hoe sluit u de trommel (blz. 9)Hoe sluit u de trommel (blz. 9)
Open en sluit de kleppen goed, dan wast u veiliger .
9.
Hoe gebruikt u het wasmiddellaatje.
10.
V oordat u technische hulp inroept, leest u eerst hoofdstuk 10: heel
veel problemen kunnen onmiddellijk door u worden opgelost. Als
het u daarna nog niet lukt het probleem op te lossen, bel dan de
installateur. Deze zal ervoor z orgen dat het defect zo snel mogelijk
gerepareerd wordt.
11.
Uw wasmachine is een vriendin: kleine attenties worden beloond
met trouw en toewijding. Behandel haar met zorg en zij zal jarenlang voor u wassen.
12.
Hier vindt u de technische kenmerken van uw wasmachine: modelnummer, elektrische en hydr aulische kenmerken, afmetingen, capaciteit, snelheid van de centrifuge en conformiteit aan de normen
en richtlijnen van de E.U.
Het wasmiddellaatje (blz. 10)Het wasmiddellaatje (blz. 10)
Het wasmiddellaatje (blz. 10)
Het wasmiddellaatje (blz. 10)Het wasmiddellaatje (blz. 10)
Problemen en oplossingen (blz. 11 en 12)Problemen en oplossingen (blz. 11 en 12)
Problemen en oplossingen (blz. 11 en 12)
Problemen en oplossingen (blz. 11 en 12)Problemen en oplossingen (blz. 11 en 12)
Onderhoud (bOnderhoud (b
Onderhoud (b
Onderhoud (bOnderhoud (b
TT
ecec
hnischnisc
T
ec
hnisc
TT
ecec
hnischnisc
13.
steek (blz. 15) steek (blz. 15)
steek (blz. 15)
steek (blz. 15) steek (blz. 15)
Indesit staat ook na de aankoop achter haar producten met
speciale service, professionele assistentie en kwaliteitsonderdelen en -accessoires.
Indesit laat u ook na de aankoop niet in deIndesit laat u ook na de aankoop niet in de
Indesit laat u ook na de aankoop niet in de
Indesit laat u ook na de aankoop niet in deIndesit laat u ook na de aankoop niet in de
lz.13)lz.13)
lz.13)
lz.13)lz.13)
he kenmerken (bhe kenmerken (b
he kenmerken (b
he kenmerken (bhe kenmerken (b
lz.14)lz.14)
lz.14)
lz.14)lz.14)
11
1 Instructies voor de installatie en het gebruik
11

Eerste installatie en verhuizen
WW
anneer deanneer de
W
anneer de
WW
anneer deanneer de
wasmacwasmac
wasmac
wasmacwasmac
ww
oror
or
oror
dtdt
dt
dtdt
De binnenkantDe binnenkant
De binnenkant
De binnenkantDe binnenkant
w
ww
Nieuw gearriveerd of net verhuisd, het installeren is een belangrijk
moment voor het goed functioneren van de wasmachine.
Nadat u de verpakking heeft
verwijderd, controleert u goed
of er geen beschadigingen
zijn. In geval van twijfel haalt
u er meteen een bevoegde
installateur bij.
van de machine is voor hetvan de machine is voor het
van de machine is voor het
van de machine is voor hetvan de machine is voor het
vervoer geblokkeerd metvervoer geblokkeerd met
vervoer geblokkeerd met
vervoer geblokkeerd metvervoer geblokkeerd met
vier schroeven en rubberenvier schroeven en rubberen
vier schroeven en rubberen
vier schroeven en rubberenvier schroeven en rubberen
bescherming aan de achter-bescherming aan de achter-
bescherming aan de achter-
bescherming aan de achter-bescherming aan de achterkant.kant.
kant.
kant.kant.
Deblokkeren: verwijderDeblokkeren: verwijder
Deblokkeren: verwijder
Deblokkeren: verwijderDeblokkeren: verwijder
de 4 schroeven!de 4 schroeven!
de 4 schroeven!
de 4 schroeven!de 4 schroeven!
hine ghine g
hine g
hine ghine g
2
eleele
ele
eleele
blokkeerschroeven en de
afstandbuisjes. Mocht u
ooit verhuizen dan komen
ze weer van pas voor het
blokkeren van de interne
Aansluiting op de waterlei-Aansluiting op de waterlei-
Aansluiting op de waterlei-
Aansluiting op de waterlei-Aansluiting op de waterleidingding
ding
dingding
De waterdruk moet zich bevinden tussen de waarden die zijn
aangegeven in de tabel ‘technische gegevens’ op blz 14.
Sluit de toevoerslang (deze ligt
los in de trommel) aan op een
koudwaterkraan met een koppeling met 3/4" gasdraad.
Als de waterleidingbuizen
nieuw of lange tijd niet gebruikt
zijn, moet u, voordat u de slang
aansluit, het water laten stromen totdat het water helder is.
Sluit de slang rechtsboven op
het watertoevoergat van de
machine aan.
Bewaar de
onderdelen en het
beschermen van de
wasmachine tijdens het
vervoer.
verver
ver
verver
dd
d
dd
Haak voor een afvoerbuis die op
een hoogte van minder dan 60
cm eindigt
Als de afvoerbuis in het bad of
in de wasbak eindigt, breng
dan de plastic steun aan en
maak hem vast aan de kraan.
1
VV
erwijder de scerwijder de sc
V
erwijder de sc
VV
erwijder de scerwijder de sc
voordat u de wasmachine
gaat gebruiken, verwijder het
rubber met de bijhorende
afstandleider (bewaar deze
stukken) en sluit de gaten met
de bijgeleverde plastic
doppen.
Belangrijk:Belangrijk:
Belangrijk: bij hergebruik
Belangrijk:Belangrijk:
moeten de kortere schroeven
aan de bovenkant worden
gemonteerd.
Waterpas zettenWaterpas zetten
Waterpas zetten
Waterpas zettenWaterpas zetten
Het is belangrijk dat de machine
goed recht staat. V
pas zetten draait u aan de stel-pas zetten draait u aan de stel-
pas zetten draait u aan de stel-
pas zetten draait u aan de stel-pas zetten draait u aan de stelschroeven;schroeven;
schroeven; het bovenvlak van de
schroeven;schroeven;
machine mag niet meer dan 2° hellen. Als u vloerbedekking of vast
tapijt heeft, moet u opletten dat de
ventilatie aan de onderkant niet belemmerd wordt.
De stelschroeven zijn regelbaar.
hrhr
oeoe
venven
hr
oe
ven
hrhr
oeoe
venven
oor het wateroor het water
oor het water
oor het wateroor het water
Te installeren watertoevoergat
rechtsboven.
Aansluiting van de afvoerbuisAansluiting van de afvoerbuis
Aansluiting van de afvoerbuis
Aansluiting van de afvoerbuisAansluiting van de afvoerbuis
Aan de achterkant van de wasmachine bevindt zich bovenaan
een haak waar u de afvoerbuis
eventueel aan kunt bevestigen.
Sluit het andere uiteinde aan op
een afvoerleiding in de muur of
--
-
--
laat hem in een wasbak of in een
bad hangen zonder dat hij gekneld of teveel gebogen ligt.
is belangrijk dat het uiteinde opis belangrijk dat het uiteinde op
is belangrijk dat het uiteinde op
is belangrijk dat het uiteinde opis belangrijk dat het uiteinde op
een hoogte van 60 tot 100 cmeen hoogte van 60 tot 100 cm
een hoogte van 60 tot 100 cm
een hoogte van 60 tot 100 cmeen hoogte van 60 tot 100 cm
ligt.ligt.
ligt.
ligt.ligt.
Als het noodzakelijk is het uiteinde
van de buis op een lagere hoogte
dan 60 cm vanaf de vloer te plaatsen, dan moet de buis worden
vastgemaakt aan de haak bovenaan aan de achterkant van
de machine.
Plastic steun voor afvoer in bad
of wasbak.
De afvoerbuis mag nooit on-De afvoerbuis mag nooit on-
De afvoerbuis mag nooit on-
De afvoerbuis mag nooit on-De afvoerbuis mag nooit onder water liggen.der water liggen.
der water liggen.
der water liggen.der water liggen.
Bevestig geen verlengstukken
aan de buis. Mocht dit absoluut noodzakelijk zijn dan moet
het verlengstuk dezelfde diameter hebben als de buis zelf
en mag hij niet langer zijn dan
150 cm. Bij afvoer in een
afvoerleiding in de muur moet
een installateur controleren of
deze voldoet aan de normen.
Als u op één van de hoogste
HetHet
Het
HetHet
verdiepingen van een flatgebouw woont kan zich een probleem met de hevelwerking
voordoen, waarbij de machine
voortdurend water aan- en afvoert.
Om deze storing te verhelpen
bestaan er speciale in de handel verkrijgbare anti-hevelkleppen.
Elektrische aansluitingElektrische aansluiting
Elektrische aansluiting
Elektrische aansluitingElektrische aansluiting
Voordat u de elektriciteit gaat
aansluiten moet u eerst controleren of:
1) Het stopcontact geschikt is
voor het maximum vermogen van de machine aangegeven op het typeplaatje
en of het voldoet aan de
geldende normen.
2) Het voltage van de stroomvoorziening overeenkomt
met wat is aangegeven op
het typeplaatje.
3) De stekker van de machine
geschikt is voor het stopcontact. Indien dit niet het
geval is moet u geen
adapters gebruiken maar
het stopcontact of de stekker vervangen.
4) Elektrische huishoudapparaten moeten geaard
zijn.
5) Na het aansluiten de machine niet op de voedingskabel staat;
6) De machine moet zo staan
dat u gemakkelijk bij de
stekker kunt.
Waarschuwing !
Veranderingen aan de door
de fabriek aangebrachte aansluiting, foutieve aansluiting
op het lichtnet, veranderingen aan het elektrische, mechanische of hydraulische
gedeelte van de machine zorgen ervoor dat de garantie
vervalt en de fabrikant en de
verkoper niet meer verantwoordelijk gesteld kunnen
worden.
Plastic zakjes, piepschuim ,
schroeven en ander
verpakkingsmateriaal zijn
geen speelgoed en kunnen
gevaar opleveren voor
kinderen.
Instructies voor de installatie en het gebruik
22
2
22

Het belangrijkste is nog altijd
De persoonlijke veiligheid vanDe persoonlijke veiligheid van
De persoonlijke veiligheid van
De persoonlijke veiligheid vanDe persoonlijke veiligheid van
Uw wasmachine is geconstrueerd in overeenstemming
met de meest rigoureuze internationale veiligheidsnor-
u en uw gezinu en uw gezin
u en uw gezin
u en uw gezinu en uw gezin
men. Om u en uw gezin te beschermen.
Lees voor het gebruik eerst de
volgende waarschuwingen en
de overige informatie in dit
boekje: dit is van groot belang,
omdat het naast vele handige
tips, ook belangrijke informatie
over veiligheid, gebruik en onderhoud bevat.
1.1.
In geval van storingenIn geval van storingen
1.
In geval van storingen
1.1.
In geval van storingenIn geval van storingen
haalt u eerst de stekker uithaalt u eerst de stekker uit
haalt u eerst de stekker uit
haalt u eerst de stekker uithaalt u eerst de stekker uit
het stopcontact en doet uhet stopcontact en doet u
het stopcontact en doet u
het stopcontact en doet uhet stopcontact en doet u
de waterkraan dicht; de waterkraan dicht;
de waterkraan dicht; pro-
de waterkraan dicht; de waterkraan dicht;
beer nooit de machine op
eigen houtje te repareren.
Het gevolg is dan namelijk
dat de garantie vervalt.
22
..
De wasmachine mag nietDe wasmachine mag niet
2
.
De wasmachine mag niet
22
..
De wasmachine mag nietDe wasmachine mag niet
buiten worden geïnstal-buiten worden geïnstal-
buiten worden geïnstal-
buiten worden geïnstal-buiten worden geïnstalleerd, leerd,
leerd, zelfs niet onder een
leerd, leerd,
afdak, aangezien het gevaarlijk is hem bloot te stellen aan regen en onweer.
3. Hij mag alleen door vol-3. Hij mag alleen door vol-
3. Hij mag alleen door vol-
3. Hij mag alleen door vol-3. Hij mag alleen door volwassenen worden ge-wassenen worden ge-
wassenen worden ge-
wassenen worden ge-wassenen worden gebruikt, bruikt,
bruikt, en altijd alleen voor
bruikt, bruikt,
het wassen van wasgoed
volgens de instructies in
deze gebruiksaanwijzing.
4.4.
Als hij verplaatst moetAls hij verplaatst moet
4.
Als hij verplaatst moet
4.4.
Als hij verplaatst moetAls hij verplaatst moet
worden, worden,
worden, trek dan aan de
worden, worden,
witte hendel linksonder
onder de plint, zodat het
intrekbare onderstel met
wielen tevoorschijn komt
en u de wasmachine gemakkelijk kunt verplaatsen.
5. Controleer 5. Controleer
5. Controleer voordat u het
5. Controleer 5. Controleer
wasgoed in de machine
of de trommel leegof de trommel leeg
doet
of de trommel leeg
of de trommel leegof de trommel leeg
is.is.
is.
is.is.
6. Raak de machine niet aan6. Raak de machine niet aan
6. Raak de machine niet aan
6. Raak de machine niet aan6. Raak de machine niet aan
als u op blote voetenals u op blote voeten
als u op blote voeten
als u op blote voetenals u op blote voeten
"Wendt u zich uitsluitend
tot bevoegd personeel en
eis altijd originele
Indesitonderdelen!"
loopt of natte, vochtigeloopt of natte, vochtige
loopt of natte, vochtige
loopt of natte, vochtigeloopt of natte, vochtige
handen of voeten hebt.handen of voeten hebt.
handen of voeten hebt.
handen of voeten hebt.handen of voeten hebt.
7. Gebruik geen verleng-7. Gebruik geen verleng-
7. Gebruik geen verleng-
7. Gebruik geen verleng-7. Gebruik geen verlengsnoeren of dubbel-snoeren of dubbel-
snoeren of dubbel-
snoeren of dubbel-snoeren of dubbelstekkers. stekkers.
stekkers. Die zijn vooral in
stekkers. stekkers.
een vochtige omgeving erg
gevaarlijk. De voedingskabel
mag niet gebogen of gekneld
liggen.
8.8.
Haal de filter niet los wan-Haal de filter niet los wan-
8.
Haal de filter niet los wan-
8.8.
Haal de filter niet los wan-Haal de filter niet los wanneer de machine in wer-neer de machine in wer-
neer de machine in wer-
neer de machine in wer-neer de machine in wer-
king is.king is.
king is.
king is.king is.
Gebruik geen hand-Gebruik geen hand-
Gebruik geen hand-
Gebruik geen hand-Gebruik geen handwasmiddel.wasmiddel.
wasmiddel. Het overvloe-
wasmiddel.wasmiddel.
dige schuim zou uit het deksel naar buiten kunnen komen en op die manier
schade kunnen veroorzaken.
9.9.
TT
rek nooit aan het snoerrek nooit aan het snoer
9.
T
rek nooit aan het snoer
9.9.
TT
rek nooit aan het snoerrek nooit aan het snoer
of aan de machine om de
stekker uit het stopcontact
te halen: dat is erg gevaarlijk.
10. Raak het afvoerwater niet10. Raak het afvoerwater niet
10. Raak het afvoerwater niet
10. Raak het afvoerwater niet10. Raak het afvoerwater niet
aan aan
aan terwijl de machine in
aan aan
werking is, het kan heet zijn.
Buiten bereik van kinderenBuiten bereik van kinderen
Buiten bereik van kinderen
Buiten bereik van kinderenBuiten bereik van kinderen
houden. Forceer de klephouden. Forceer de klep
houden. Forceer de klep
houden. Forceer de klephouden. Forceer de klep
nietniet
niet aangezien dit het
nietniet
veiligheidssysteem, dat openen onmogelijk maakt, kan
beschadigen.
11. Deze wasmachine is be-11. Deze wasmachine is be-
11. Deze wasmachine is be-
11. Deze wasmachine is be-11. Deze wasmachine is bestemd voor huishoudelijkstemd voor huishoudelijk
stemd voor huishoudelijk
stemd voor huishoudelijkstemd voor huishoudelijk
gebruik. gebruik.
gebruik. Industrieel gebruik
gebruik. gebruik.
(hotels, restaurants, wasserettes) is gezien de oorspronkelijk kenmerken van
de machine ten zeerste af te
raden en leidt tot het vervallen van de garantie.
Het vervangen van de voedingskabelHet vervangen van de voedingskabel
Het vervangen van de voedingskabel
Het vervangen van de voedingskabelHet vervangen van de voedingskabel
De voedingskabel is speciaal
en kan uitsluitend bij bevoegde
Service Centers worden gekocht.
V oor het vervangen gaat u als volgt
te werk:
1. Wees er zeker van dat de wasmachine uit is en de stroom afgesloten.
Afb. 1
2. V erwijder de plint en draai de
2 schroeven rechtsbeneden los.
Draai vervolgens de 6 achterste
schroeven aan uw linkerkant los
en verwijder het zijpaneel door
het enigszins naar buiten te richten en los te schuiven. (afb. 1
en 2).
Afb. 2
3. Sluit de stroom van de anti-
storingsfilter af door de aansluiting eruit te trekken (afb. 3).
4. Schroef de 2 buitenste schroeven van de filter los en haak de
filter met behulp van een
schroevendraaier (zie afb. 4) van
de achterkant af door hem naar
boven toe te trekken.
Afb. 3
5. Als de nieuwe voedingskabel
is aangebracht verbindt u de aansluiting weer en let u erop dat de
haak goed vast zit.
V oor het vervangen moet u zich
in ieder geval tot een bevoegde
installateur wenden die zich aan
de geldende normen houdt.
Afb. 4
33
3 Instructies voor de installatie en het gebruik
33

M
WW
W
WW
Voordat u gaat wassen kunt u veel doen voor een beter wasresultaat. Sorteer het wasgoed naar het
soort stof en kleur.Kijk op de etiketten en volg de aanwijzingen. Wissel grote en kleine kledingstukken
at gaat er in de wasmacat gaat er in de wasmac
at gaat er in de wasmac
at gaat er in de wasmacat gaat er in de wasmac
VV
ooroor
dat u gaat wassen.dat u gaat wassen.
V
oor
dat u gaat wassen.
VV
ooroor
dat u gaat wassen.dat u gaat wassen.
Sorteert u het w asgoed op het
soort stof en op kleurv astheid.
Stevige stoffen en fijne stoffen
worden gescheiden.
Licht gekleurde stoffen worden
gescheiden van donkere gekleurde stoffen.
Leeg alle zakken (geldstukken,
papiertjes, kleine voorwerpen
enz.) en controleer de knopen.
Naai knopen die niet goed vast
zitten meteen vast, aangezien
ze gedurende de wasbeurt los
kunnen raken.
De etiketten zeggen allesDe etiketten zeggen alles
De etiketten zeggen alles
De etiketten zeggen allesDe etiketten zeggen alles
Kijk altijd naar de etiketten: zij
vertellen u alles over het kledingstuk en hoe dit gewassen
dient te worden.
Op bladzijde 7 vindt u de uitleg
bij de symbolen die u op de etiketten van de kledingstukken
tegenkomt. Deze aanwijzingen
zijn bijzonder belangrijk voor
een optimale was en het behoud van uw kleding.
Wissel grote en kleine kle-Wissel grote en kleine kle-
Wissel grote en kleine kle-
Wissel grote en kleine kle-Wissel grote en kleine kledingstukken af.dingstukken af.
dingstukken af.
dingstukken af.dingstukken af.
dingstukken niet op een prop zitten. Laad de trommel niet te vol.
V olg bij ieder progr amma de instructies m.b.t. de aanbevolen
laadhoeveelheid. Uw wasgoed
zal schoner en minder gekreukt
zijn.
Kledingstukken met benzine-Kledingstukken met benzine-
Kledingstukken met benzine-
Kledingstukken met benzine-Kledingstukken met benzinevlekken. vlekken.
vlekken. Stop kledingstukken
vlekken. vlekken.
met benzine-, alcohol- of
trichloorethyleenvlekken (enz.)
niet meteen in de wasmachine.
Wacht eerst tot dergelijke
producten vervlogen zijn.
Laat de kle-
Sorteer de
kledingstukken op soort
stof en kleur. Dit is
belangrijk voor een
optimaal wasresultaat.
hine?hine?
hine?
hine?hine?
Het aanzHet aanz
Het aanz
Het aanzHet aanz
machinemachine
machine
machinemachine
Plaatsen, verplaatsen.Plaatsen, verplaatsen.
Plaatsen, verplaatsen.
Plaatsen, verplaatsen.Plaatsen, verplaatsen.
Als uw wasmachine is
uitgerust met speciale in-en
uitklapbare wielen, kunt u de
wasmachine makkelijk verpla
atsen. Om dit onderstel
tevoorschijn te halen en de
machine zonder moeite te
kunnen verplaatsen, trekt u
aan de hendel linksonder
onder de plint. Zodra u de
machine verplaatst heeft,
moet u hem weer waterpas
zetten. Daarna staat de
machine stevig op zijn plaats.
etten vetten v
etten v
etten vetten v
Zie afbeelding. (Alleen voor
modellen met deze uitrusting.)
an dean de
an de
an dean de
Als de machine net geïnstalleerd is laat u programma "1" bij 60°C draaien
Het is belangrijk de wasmachine op de juiste wijze aan te
zetten, zowel voor de kwaliteit
van de was als voor het voorkomen van problemen en de
duurzaamheid van de machine.
Als het wasgoed in de machine
Tip voor de fijne was:
sluit fijn ondergoed,
dameskousen,
kindersokjes en ander
fijn wasgoed in een
katoenen zak ter
bescherming.
zit en het wasmiddel en eventuele toevoegingsmiddelen zijn
toegevoegd,
of:of:
of:
of:of:
1.1.
De klep goed dicht zijn.De klep goed dicht zijn.
1.
De klep goed dicht zijn.
1.1.
De klep goed dicht zijn.De klep goed dicht zijn.
2.2.
2. De stekker goed in het stop-
2.2.
contact zit.
3.3.
3. De waterkraan open is.
3.3.
4.4.
4. Knop
4.4.
5.5.
5. Het intrekbare onderstel in de
5.5.
ruststand staat (wielen niet
in contact met de vloer).
controleer altijdcontroleer altijd
controleer altijd
controleer altijdcontroleer altijd
GG
O O
G op
O) staat.
GG
O O
Het kiezen van het pro-Het kiezen van het pro-
Het kiezen van het pro-
Het kiezen van het pro-Het kiezen van het programmagramma
gramma
grammagramma
De keuze van het programma
hangt af van het soort kledingstuk en of de was erg vuil is of
niet. Raadpleeg voor de keuze
van het programma de tabel op
bladzijde 6. Draai knop
deze op het nummer van het
programma van uw keuze
staat. Kies de temperatuur met
BB
knop
B en druk zonodig. Stel,
BB
als u wenst, de centrifuge snelheid in e met draaiknop
de functieknopjes (
tenslotte op de
(positie
II
I).
II
D-E-FD-E-F
D-E-F); druk
D-E-FD-E-F
aan-uitknopaan-uitknop
aan-uitknop
aan-uitknopaan-uitknop
Aan het einde van het was-Aan het einde van het was-
Aan het einde van het was-
Aan het einde van het was-Aan het einde van het wasprogramma…programma…
programma…
programma…programma…
Wacht u ongeveer 2 minuten.
Vervolgens zet u de wasmachine uit door op de aan-uitknop
GG
G te drukken (positie
GG
de kleppen van de machine nu
veilig open maken. Laat de kleppen na het verwijderen van het
wasgoed open of op een kier
staan, zodat het vocht dat ach-
AA
A tot
AA
terblijft kan verdampen.
Sluit altijd de waterkraan.
Denk eraan dat, mocht deDenk eraan dat, mocht de
Denk eraan dat, mocht de
Denk eraan dat, mocht deDenk eraan dat, mocht de
stroom uitvallen of destroom uitvallen of de
stroom uitvallen of de
stroom uitvallen of destroom uitvallen of de
machine uitgeschakeldmachine uitgeschakeld
machine uitgeschakeld
machine uitgeschakeldmachine uitgeschakeld
worden, het gekozen pro-worden, het gekozen pro-
worden, het gekozen pro-
worden, het gekozen pro-worden, het gekozen pro-
CC
C op
CC
gramma daarna verder zalgramma daarna verder zal
gramma daarna verder zal
gramma daarna verder zalgramma daarna verder zal
gaan op het punt waar hijgaan op het punt waar hij
gaan op het punt waar hij
gaan op het punt waar hijgaan op het punt waar hij
GG
G
eerder onderbroken werd.eerder onderbroken werd.
GG
eerder onderbroken werd.
eerder onderbroken werd.eerder onderbroken werd.
Instructies voor de installatie en het gebruik
OO
O). U kunt
OO
44
4
44

Het bedieningspaneel
Hier bent u de baasHier bent u de baas
Hier bent u de baas
Hier bent u de baasHier bent u de baas
Het kiezen van het juiste programma is belangrijk. En gemakkelijk.
D
CentrifugeknopCentrifugeknop
Centrifugeknop
ProgrammeerknopProgrammeerknop
Programmeerknop
ProgrammeerknopProgrammeerknop
Hiermee kiest u het wasprogramma. Draai deze knop
alleen met de klok mee.
Voor het kiezen van de programma's moet het wijzertje op
de knop samenvallen met het
symbool/nummer van het gewenste programma.
Daarna drukt u op de aan-uit-
GG
knop
G (positie
GG
lampje
Na 5 seconden wordt deze instelling geaccepteerd en houdt
het controlelampje
knipperen (blijft wel aan); de
wascyclus begint.
Als u een programma wilt onderbreken of een nieuw programma wilt instellen, selecteer dan één van de symbolen
seconden: als het controlelampje
programmaonderbreking geaccepteerd. Op dat moment
kunt u een nieuw programma
instellen of de machine uitzetten. Mocht u wasgoed willen
toevoegen, wacht dan ongeveer 2 minuten totdat de klep
ontgrendeld wordt.
Nadat de wascyclus ingesteld
en door de machine geaccepteerd is, heeft het draaien van
de knop geen enkele invloed
meer (behalve in de Stop/
Reset positie ).
TT
T
TT
Deze knop stelt de wastemperatuur in zoals aangegeven in de programmatabel
(zie blz.6). U kunt hiermee ook
de aangeraden temperatuur
verlagen tot aan koude was
(Sneeuw Symbol ).
HH
H begint te knipperen.
HH
(Stop/Reset) en wacht 5
emperatuurknopemperatuurknop
emperatuurknop
emperatuurknopemperatuurknop
II
I), het controle-
II
HH
H op met
HH
HH
H knippert, is de
HH
CentrifugeknopCentrifugeknop
Deze dient voor het uitschakelen van de centrifuge (kies symbool ) en voor het verminderen van de centrifugesnel-heid
van het gekozen programma.
De maximumsnelheden voor de
4 soorten stof zijn:
Stof Snelheid
KatonKaton
Katon max. aantal toe-
KatonKaton
. ren per minuut
SynthetischSynthetisch
Synthetisch 800 toeren per
SynthetischSynthetisch
minuut
WolWol
Wol 600 toeren per
WolWol
minuut
Zijde Zijde
Zijde nee
Zijde Zijde
In ieder geval verdeelt de machine de lading eerst bij een
lage snelheid.
Snelle wasSnelle was
Snelle was
Snelle wasSnelle was
Deze knop verkort de duur van
het programma met ongeveer
30%. Hij kan niet worden gebruikt
met de speciale programma's
(zie blz.. 6) of de programma's
voor wol en zijde.
Kreukvrij (Synthetisch-fijn)
Deze knop onderbreekt het programma en houdt het wasgoed
in de week , vóór de centrifuge.
Deze functie vermijdt kreuken
van fijne en synthetische stoffen
(b.v. als u het wasgoed niet meteen uit de machine kunt halen).
Dit wordt uitsluitend gebruikt bij
de programma's voor synthetische stoffen (Progr. 5-6-7-9).
BELANGRIJK!BELANGRIJK!
BELANGRIJK! Om het pro-
BELANGRIJK!BELANGRIJK!
gramma te beëindigen met het
afvoeren van het water, drukt
u opnieuw op knop
..
.
..
Draaiknop A met deDraaiknop A met de
Draaiknop A met de
Draaiknop A met deDraaiknop A met de
programma's van uwprogramma's van uw
programma's van uw
programma's van uwprogramma's van uw
wasmachine.wasmachine.
wasmachine.
wasmachine.wasmachine.
Extra SpoelingExtra Spoeling
Extra Spoeling
Extra SpoelingExtra Spoeling
Deze dient voor extra spoelingen bij de programma's voor
stevige stevige
stevige stoffen. Wij raden u
stevige stevige
aan deze functie te gebruiken
om het spoelresultaat te verbeteren bij een volle wasmachine of bij overgevoeligheid
voor wasmiddelen (allergie).
Aan-uit (On-Off)Aan-uit (On-Off)
Aan-uit (On-Off)
Aan-uit (On-Off)Aan-uit (On-Off)
Als knop
machine aan; als hij niet ingedrukt is, is de machine uit.
Het uitschakelen van de ma-Het uitschakelen van de ma-
Het uitschakelen van de ma-
Het uitschakelen van de ma-Het uitschakelen van de machine annuleert het gekozenchine annuleert het gekozen
chine annuleert het gekozen
chine annuleert het gekozenchine annuleert het gekozen
programma niet.programma niet.
programma niet.
programma niet.programma niet.
GG
G ingedrukt is, is de
GG
Controlelampje werkingControlelampje werking
Controlelampje werking
Controlelampje werkingControlelampje werking
aan-uitaan-uit
aan-uit
aan-uitaan-uit
Het controlelampje
als de machine aan is en het
instellen van een programma
afwacht. Als het lampje blijft
branden, betekent dit dat het
programma is ingesteld.
Controlelampje klep ge-Controlelampje klep ge-
Controlelampje klep ge-
Controlelampje klep ge-Controlelampje klep geblokkeerdblokkeerd
blokkeerd
blokkeerdblokkeerd
Als dit lampje aan is, betekent
het dat de klep van de machine geblokkeerd is om per
ongeluk openen te verhinderen. Om schade te voorkomen
dient u te wachten tot het
lampje uit is voordat u de klep
open doet. Dit duurt ongeveer
twee minuten.
HH
H knippert
HH
55
5 Instructies voor de installatie en het gebruik
55

W at zit er vandaag in de was?
PrPr
Pr
PrPr
Soort stof en vuil
KATOEN
Zeer vuile witte was (laken s,
tafellakens enz.)
Zeer vuile witte was (laken s,
tafellakens enz.)
Zeer vuile witte was (laken s,
tafellakens enz.)
Vuil, stevig, wi t en bont wa sgoed
Spoelen/ bleekmiddel
Centrifuge Waterafvoer en centrifuge
Stop/Reset Onderbreekt/Annuleert gekozen programma
SYNTHETISCH
Zeer vuile kl eurvaste synthetische
stoffen (babygoed enz.)
Licht gekleurde synthetische
stoffen (ieder soort weinig vuil
wasgoed)
Licht gekleurde synthetische
stoffen (ieder soort weinig vuil
wasgoed)
Spoelen/ bleekmiddel
Wasverzachter
ogramma's vogramma's v
ogramma's v
ogramma's vogramma's v
Programmaknop Temperatuurknop Wasmiddel
1 Max. °C
2 Max. °C
3 60° C
4 40 °C
5 60° C
6 50 °C
7 30 °C
oor alle seizoenen.oor alle seizoenen.
oor alle seizoenen.
oor alle seizoenen.oor alle seizoenen.
voorwas
u
Wasmiddel
was
Wasverzachter Bleekmiddel
uu
uu
uu
uu
u
uu
uu
uu
u
u
traditioneel
of delicaat
traditioneel
traditioneel
traditioneel
traditionee
traditioneel
Delicaat/
Delicaat/
Delicaat/
Delicaat/
Delicaat/
Delicaat
Delicaat
Delicaat
Duur
cyclus
(minuten)
150
130
130
115
105
75
30
Beschrijving was cyclus
Voorwassen, was op h o ge
temperatuur, spoelingen,
tussentijdse en eindcentrifuge
Was op hoge temperatuur,
spoelingen, tussentijdse en
eindcentrifuge
Energetische wascycli op 60° C
temperatuur, spoelingen, tussentijdse en
eindcentrifuge
Normale was op 40°C, spoelingen,
tussentijdse en eindcentrifuge
Spoelingen, tussentijdse en eindcentrifuge
Energetische was op 60°C, spo elingen,
kreukvrij of delicate centrifuge
Normale was op 50°C, spoelingen,
kreukvrij of delicate centrifuge
Fijne was op 30°C, spoelingen en
delicate centrifuge
Spoelen, kreukvrij of del icate centrifuge
Spoeli nge n met wasverzachter, kreukvrij of
delicate centrifuge
Waterstop Waterstop voor zeer delicate
Centrifuge Waterafvoer en delicate centrifuge
Stop/Reset Onderbreekt/Annuleert gekozen programma
DELICATE STOFFEN
Wol
Ziijde
, Specifieke stoffen, delicaat
(gordijnen, zijde etc.)
Spoelen
Waterstop Waterstop voor zeer delicate
Centrifuge Waterafvoer en delicate centrifuge
Waterafvoer Waterafvoer
Stop/Reset Onderbreekt/Annuleert gekozen programma
Belangrijk :Belangrijk :
Belangrijk :
Belangrijk :Belangrijk :
(Stop/Reset) en wacht u 5 sec. (Stop/Reset) en wacht u 5 sec.
(Stop/Reset) en wacht u 5 sec.
(Stop/Reset) en wacht u 5 sec. (Stop/Reset) en wacht u 5 sec.
Speciale programma'sSpeciale programma's
Speciale programma's
Speciale programma'sSpeciale programma's
VV
oor het annoor het ann
V
oor het ann
VV
oor het annoor het ann
8 40 °C
9 30° C
uleren vuleren v
uleren v
uleren vuleren v
an een reeds ingan een reeds ing
an een reeds ing
an een reeds ingan een reeds ing
De waarden uit de tabel dienen slechts als indicatie. Deze kunnen dan ook variëren naar gelang het
model wasmachine, de hoeveelheid en het soort wasgoed, de hardheid en de temperatuur van het
leidingwater en de temperatuur van de omgeving.
uu
uu
esteld presteld pr
esteld pr
esteld presteld pr
ogramma kiest u één vogramma kiest u één v
ogramma kiest u één v
ogramma kiest u één vogramma kiest u één v
u
kledingstukken
Was op 40°C, spoelingen en delicate
55
centrifuge
Was 30°, spoelen , kreukvrij /watererafvoer
45
Spoeli nge n, kreukvrij of w aterafvoer
kledingstukken
an de symbolenan de symbolen
an de symbolen
an de symbolenan de symbolen
7- Dagelijkse was Delicate Synthetische stoffen op 30° gedurende 30 minuten.Uw wasmachine beschikt over een programma dat
speciaal ontworpen is om weinig vuile kleren snel te wassen. Met programma 7 op 30°C kunt u verschillende soorten stoffen tegelijk wassen
(behalve wol en zijde) met een lading van max. 3 kg. Met dit programma bespaart u tijd en energie aangezien de cyclus slechts ongeveer 30
minuten duurt. Wij raden u aan vloeibaar wasmiddel te gebruiken in het wasgedeelte van het wasmiddellaatje.
Instructies voor de installatie en het gebruik
66
6
66

De etiketten...De etiketten...
F
De etiketten...
De etiketten...De etiketten...
Kent u de betekenis van deze symbolen, dan wast u beter
en gaat uw kleding langer mee.
Ze zijn verdeeld in vijf catego-
IIn Europa bevat ieder etiket een
boodschap die wordt overgebracht door kleine maar belangrijke symbolen. Het begrijpen
van hun betekenis is belangrijk
voor een betere was en mooiere
kleren.
rieën, die elk door een ander figuur verbeeld worden:
wassen wassen
wassen
wassen wassen
bleken bleken
bleken
bleken bleken
strijken strijken
strijken
strijken strijken
Stomen Stomen
Stomen
Stomen Stomen
drogen drogen
drogen
drogen drogen
,,
,
,,
,,
,
,,
,
,,
,
,,
..
.
..
Handige tips
Draai overhemden binnenstebuiten zodat
ze schoner worden en langer meegaan.
V erwijder altijd alle voorwerpen uit de zakken.
Bekijk de etiketten: zij bevatten handige
en waardevolle aanwijzingen.
Stop afwisselend grote en kleinere
kledingstukken in de trommel.
Bekijk en leer de symbolen uit de vBekijk en leer de symbolen uit de v
Bekijk en leer de symbolen uit de v
Bekijk en leer de symbolen uit de vBekijk en leer de symbolen uit de v
bijdragen dat u beter wast, u uw kleding beter behandelt en uwbijdragen dat u beter wast, u uw kleding beter behandelt en uw
bijdragen dat u beter wast, u uw kleding beter behandelt en uw
bijdragen dat u beter wast, u uw kleding beter behandelt en uwbijdragen dat u beter wast, u uw kleding beter behandelt en uw
wasmachine beter presteert.wasmachine beter presteert.
wasmachine beter presteert.
wasmachine beter presteert.wasmachine beter presteert.
Wa s Bleken Strijken Stomen Drogen
Forse
werking
Was bij
95°C
Was bij
60°C
Was bij
40°C
Delicat e
werking
In koud water
Niet bleken
c
l
bleken
olgolg
ende tabel:ende tabel:
olg
ende tabel:
olgolg
ende tabel:ende tabel:
strijken max
strijken bij
max 150°C
Strijken max
Flink
200°C
Matig
110°C
z z
e zullen ere zullen er
z
e zullen er
z z
e zullen ere zullen er
Stomen met alle
mogelijke
middelen
Stomen met con
percloro, benz ina
avio, alcohol puur,
R111 en R113
Stomen met
benzina avio,
alcohol puurr en
R113
A
P
toetoe
toe
toetoe
Hoge
tempe ratuur
Let op de juiste
temperatuur
Matige
tempe ratuur
Kan in
droogmachine
gedroogd worden
Kan niet in
droogmachine
gedroogd worden
Plat drogen
Was bij
30 °C Niet strijke n
Met de
hand
wasse n
Niet in
water
wasse n
77
7 Instructies voor de installatie en het gebruik
77
Niet stomen
Niet gecentri-
fugeerd ophangen
Drogen aan
klerenhanger

...en de symbolen van de verschillende Indesit...en de symbolen van de verschillende Indesit
...en de symbolen van de verschillende Indesit
...en de symbolen van de verschillende Indesit...en de symbolen van de verschillende Indesit
modellen:modellen:
modellen:
modellen:modellen:
On - Aan
Off - Uit
Deurbeveiliging
Temperatuur
Programma's:Programma's:
Programma's:
Programma's:Programma's:
Spoelen
Wasverzachter
Waterstop
Centrifuge
Waterafvoer
Stop/Reset
Aanpassen centrifuge
Uitschakelen centrifuge
Voorwassen
Ontvlekken
Extra Spoeling
Kreukvrij Waterstop
Intensiteit wascyclus
Wascyclus op 90°
Wascyclus op 60°
Fijne was
Dagelijkse was op
30° in 30 minuten
Koud wassen
Wol/Hand wash/A la
main
Snelle was
1/2 lading
Extra zuinig wassen.
Minder strijken
Zijde en gordijnen
Hygiëne van de
kledingstukken
Tips om gTips om g
Tips om g
Tips om gTips om g
Algemene spelregels: Algemene spelregels:
Algemene spelregels:
Algemene spelregels: Algemene spelregels:
- Katoen-Linnen- Katoen-Linnen
- Katoen-Linnen V ul de trom-
- Katoen-Linnen- Katoen-Linnen
mel maar laad hem niet te
vol.
- Synthetisch. - Synthetisch.
- Synthetisch. Doe de trom-
- Synthetisch. - Synthetisch.
mel niet verder dan voor de
helft vol.
- Delicate stoffen en wol.- Delicate stoffen en wol.
- Delicate stoffen en wol.
- Delicate stoffen en wol.- Delicate stoffen en wol.
Doe de trommel niet verder
dan voor een derde vol.
- Erg vuile was:- Erg vuile was:
- Erg vuile was:
- Erg vuile was:- Erg vuile was:
verminder de hoeveelheid
- Hardnekkige of speciale- Hardnekkige of speciale
- Hardnekkige of speciale
- Hardnekkige of speciale- Hardnekkige of speciale
vlekken.vlekken.
vlekken.
vlekken.vlekken.
Behandel de vuile plekken
voor het wassen met speciaal
wasmiddel of met een speciaal
vlekkenmiddel (zie gedeelte
over de behandeling van speciale vlekken met vlekkenmiddel op blz.9).
GordijnenGordijnen
Gordijnen
GordijnenGordijnen
Gordijnen hebben de neiging
erg te kreuken. Om het kreuken
te beperken volgt hier een tip:
vouw ze netjes op en stop ze in
een sloop of een waszak. Was
ze apart en zorg ervoor dat u
het gewicht van een halve
maximale lading aanhoudt.
een feen f
een f
een feen f
WW
as nooit in de macas nooit in de mac
W
as nooit in de mac
WW
as nooit in de macas nooit in de mac
wasgoed dat ongezoomd, gerafeld of gescheurd is. Als het
gewassen moet worden doe het
dan in een zak. Donker wasgoed samen met wit.
Let op het gewicht! Let op het gewicht!
Let op het gewicht!
Let op het gewicht! Let op het gewicht!
Voor een optimaal resultaat
moeten de aangegeven gewichten van de maximum lading
droog wasgoed niet overschreden worden:
- stevige stoffen:
maximaal 5 kg.
- synthetische stoffen
maximaal 2,5 kg.
- Fijne stoffen
maximaal 2 kg.
- Pure wol
maximaal 1 kg.
- Badstof
maximaal 2,3 kg.
Hoe bijna alles te wassenHoe bijna alles te wassen
Hoe bijna alles te wassen
Hoe bijna alles te wassenHoe bijna alles te wassen
Donzen dekbedden en metDonzen dekbedden en met
Donzen dekbedden en met
Donzen dekbedden en metDonzen dekbedden en met
dons gevulde windjacks.dons gevulde windjacks.
dons gevulde windjacks.
dons gevulde windjacks.dons gevulde windjacks.
Ook donzen dekbedden en met
dons gevulde windjacks kunnen
in de machine gewassen worden
als de vulling van ganzen- of
eendendons is. Belangrijk is echter wel dat u geen 5 kg. maar max.
2-3 kg. in de wasmachine doet,
één of twee keer extra spoelt en
de delicate centrifuge gebruikt.
outen te makenouten te maken
outen te maken
outen te makenouten te maken
Gemiddeld gewichtGemiddeld gewicht
Gemiddeld gewicht
hine:hine:
hine:
hine:hine:
Gemiddeld gewichtGemiddeld gewicht
1 laken 400-500 gr .
1 sloop 150-200 gr.
1 tafellak en 400-500 gr.
1 badjas 900-1200 gr.
1 handdoek 150-500 gr.
Wissel kledingstukkenWissel kledingstukken
Wissel kledingstukken
Wissel kledingstukkenWissel kledingstukken
van verschillende groottes afvan verschillende groottes af
van verschillende groottes af
van verschillende groottes afvan verschillende groottes af
met badstof:met badstof:
met badstof:
met badstof:met badstof:
badjassen, handdoeken, enz.
Zo voorkomt u dat de kledingstukken tijdens het centrifuge
ren op een "prop" gaan zitten
en de centrifuge uit balans
brengen.
Gekleurde T-shirtsGekleurde T-shirts
Gekleurde T-shirts met op-
Gekleurde T-shirtsGekleurde T-shirts
druk en overhemden blijven
mooier als u ze binnenstebuiten
wast.
T-shirts en truien met opdruk worden altijd binnenstebuiten gestreken.
TT
ennisscennissc
T
ennissc
TT
ennisscennissc
Tennisschoenen moeten eerst
van modder en vuil worden
ontdaan, daarna kunnen ze
samen met spijkerbroeken en
andere stevige stoffen
gewassen worden. Was ze niet
samen met witte was.
Instructies voor de installatie en het gebruik
hoenenhoenen
hoenen
hoenenhoenen
Let op met hansoppenLet op met hansoppen
Let op met hansoppen
Let op met hansoppenLet op met hansoppen
Kinderkleding van het type
'hansop' met bretels en haken
kunnen de trommel of de andere
kledingstukken beschadigen tijdens het wassen. Steek de haken in de zak en doe deze dicht
met een veiligheidsspeld.
VV
akantie:akantie:
V
akantie:
VV
akantie:akantie:
Als u met vakantie gaat is het
verstandig de stekker uit het stopcontact te halen, de waterkraan
dicht te doen en de klep van de
machine open of op een kier te
laten staan. Zo blijven trommel en
dichtingen droog en ontstaat er
geen muffe geur in de machine.
de stekker eruit de stekker eruit
de stekker eruit
de stekker eruit de stekker eruit
WOLCYCLUS
Om een optimaal resultaat te
behalen gebruikt u een speciaal
wasmiddel en doet u niet meer
dan 1 kg. wasgoed tegelijk in
de trommel.
88
8
88

W anneer wasmiddel en water niet volstaan...
Hoe verwijdert u speciale vlekkenHoe verwijdert u speciale vlekken
Hoe verwijdert u speciale vlekken
Hoe verwijdert u speciale vlekkenHoe verwijdert u speciale vlekken
- Rode wijn. Zet het kledingstuk in de week (sopje), spoel het uit en behandel het met azijn- of citroenzuur, spoel het
daarna opnieuw uit. Behandel eventuele achtergebleven plekken met bleekmiddel.
- Bloed. Natte vlekken moeten met koud water behandeld worden. Kledingstukken met opgedroogde bloedvlekken
legt u een nacht over in de week met een speciaal wasmiddel. Daarna wast u ze nog eens met water en zeep.
- Opgedroogde vetvlekken. Bevochtig met terpentijn. Leg het kledingstuk op een zachte ondergrond en dep de
vlekken met de punt van uw vingers en een katoenen doek met terpentijn.
- Roest. Kaliumoxalaat (verkrijgbaar bij uw drogist) opgelost in warm water, of koud met een anti-roestmiddel. Oude
vlekken kunnen de stof al aangetast hebben: gaten in de stof.
- Schimmelvlekken. Behandel deze vlekken met bleekmiddel, spoel goed uit (alleen witte kleding en gekleurde
stoffen die chloorbestendig zijn).
- Olieverf. Leg het kledingstuk op een zachte ondergrond en dep de vlekken met wasbenzine. Behandel ze daarna
een paar keer met wasmiddel.
- Inkt en balpen. Dep met een katoenen doek met methylalcohol of alcohol van 90°.
- Teer. Dep met verse boter, giet er terpentijn overheen en was onmiddellijk.
- Kaarsvet. Schraap het kaarsvet eraf en strijk het kledingstuk daarna met een heet ijzer tussen twee vellen
vloeipapier. Wrijf daarna in met een katoenen doek met terpentijn of methylalcohol.
- Kauwgum. Giet er aceton overheen en wrijf daarna goed met een schone doek.
- Schimmel. Katoen en wit linnen waar het weer in zit worden in een oplossing gelegd van 5 delen water, één deel
bleekmiddel en een lepel azijn, en vervolgens meteen gewassen. Voor andere witte stoffen waterstofperoxide, 10
hoeveelheden, gebruiken en daarna meteen wassen.
- Lippenstift. Wol of katoen deppen met ether. Voor zijde gebruikt u trichloorethyleen.
- Nagellak. Leg de kant met de vlek op vloeipapier, giet er aceton overheen terwijl u de stof verschuift naarmate het
vloeipapier verzadigd raakt.
- Gras. Dep met watten die bevochtigd zijn met methylalcohol.
Voor een veilige was
Openen en sluiten vOpenen en sluiten v
Openen en sluiten v
Openen en sluiten vOpenen en sluiten v
Afb. 1
Afb. 3 Afb. 4
99
9 Instructies voor de installatie en het gebruik
99
Afb. 2
an de tran de tr
an de tr
an de tran de tr
A) OPENEN. (Afb. 1). A) OPENEN. (Afb. 1).
A) OPENEN. (Afb. 1). Licht het deksel van de wasmachine op en
A) OPENEN. (Afb. 1). A) OPENEN. (Afb. 1).
zet het helemaal open
B) Open daarna met twee handen de trommel zoals op Afb. B) Open daarna met twee handen de trommel zoals op Afb.
B) Open daarna met twee handen de trommel zoals op Afb.
B) Open daarna met twee handen de trommel zoals op Afb. B) Open daarna met twee handen de trommel zoals op Afb.
2) te zien is: 2) te zien is:
2) te zien is:
2) te zien is: 2) te zien is:
- druk op de knop die in Afb. 2 met de pijl wordt aangegeven.
T erwijl u de knop langzaam naar beneden drukt, houdt u met uw
andere hand de kleppen tegen, zodat u uw vingers niet bezeert
als de kleppen onverwachts opengaan;
- houd de kleppen tegen wanneer deze moeiteloos loskomen
en opengaan.
C) STOP HET WASGOED IN DE TROMMEL. (Afb. 3)
D) SLUITEN. (Afb. 4) D) SLUITEN. (Afb. 4)
D) SLUITEN. (Afb. 4)
D) SLUITEN. (Afb. 4) D) SLUITEN. (Afb. 4)
- sluit de trommel goed af door eerst de voorste en daarna de
achterste klep naar beneden te brengen;
- zorg ervoor dat de sluitingen van de voorste klep goed in de
daarvoor bestemde ruimtes van de achterste klep vallen;
- controleer, nadat u de "klik" van de sluiting hebt gehoord, of de
twee kleppen niet losschieten wanneer u er lichtjes op drukt;
- sluit uiteindelijk ook het deksel van de wasmachine .
ommelommel
ommel
ommelommel
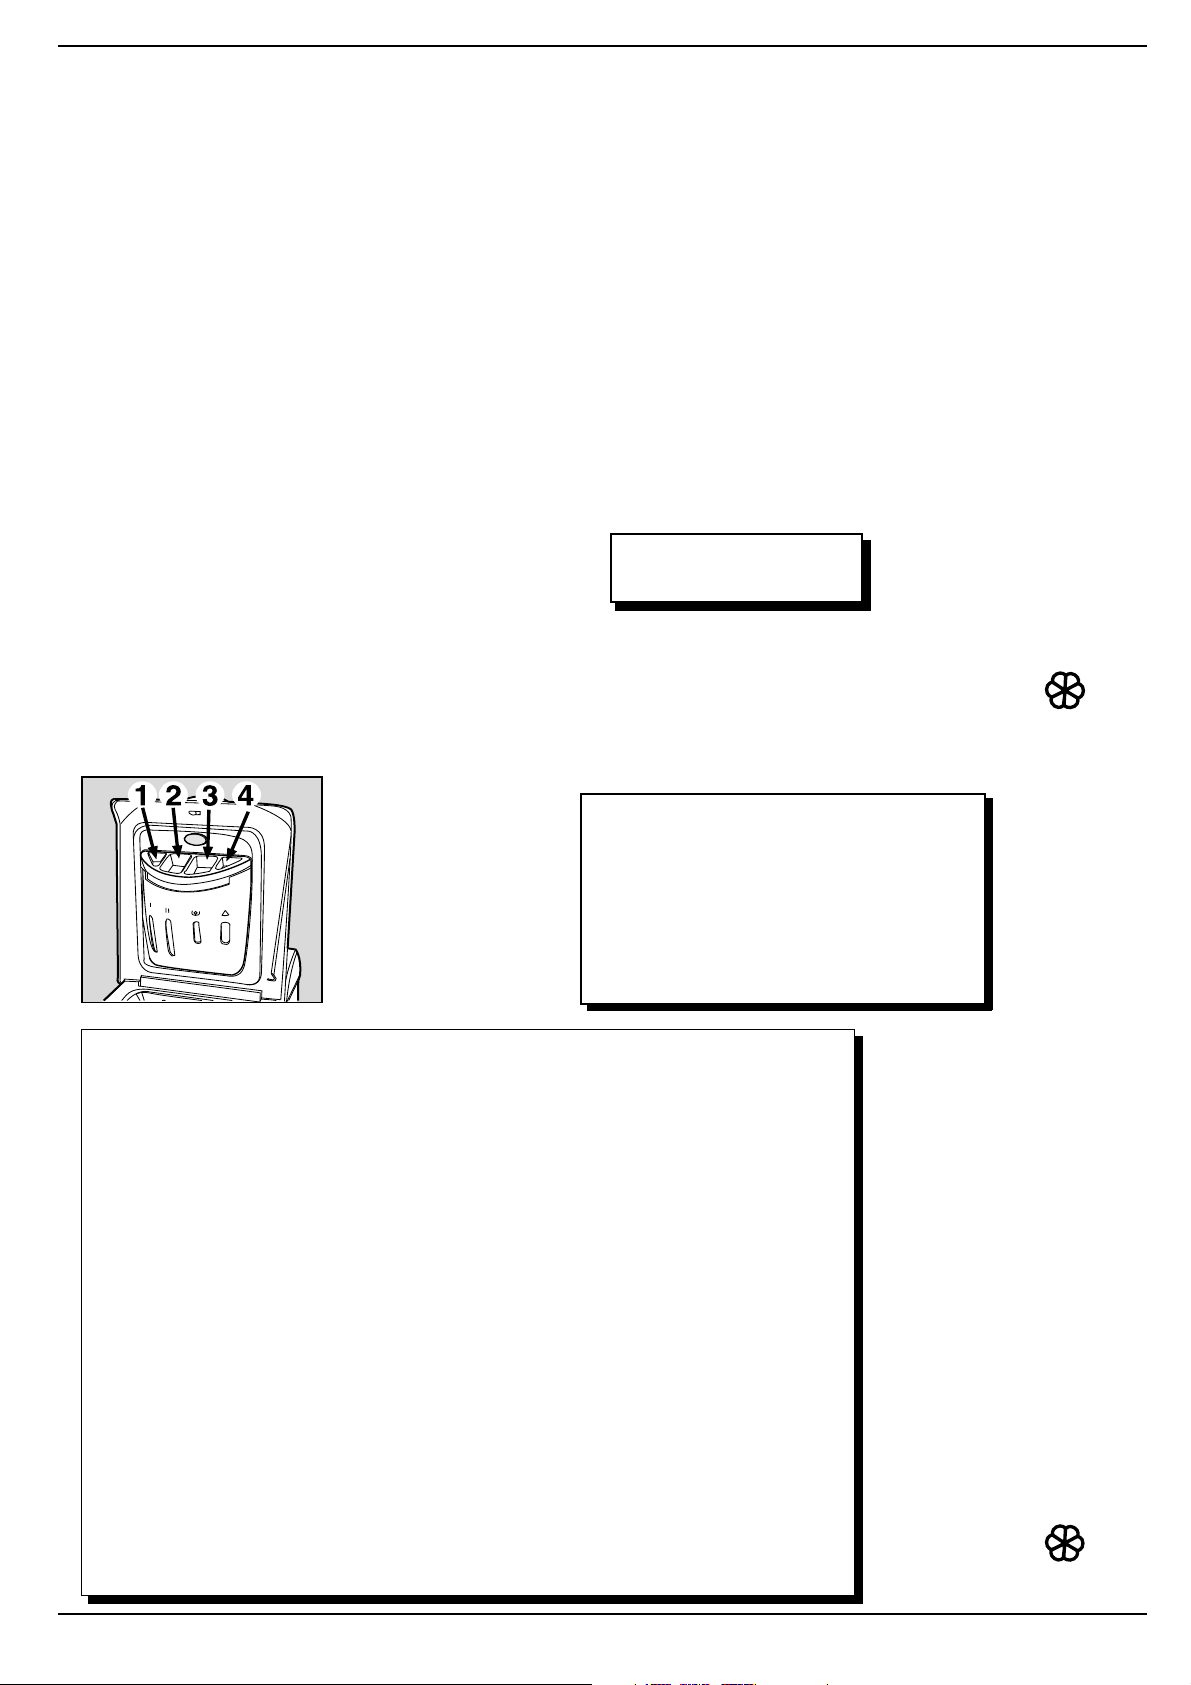
Belangrijk voor een beter wasresultaat
Uitleg wasmiddellaatjeUitleg wasmiddellaatje
Uitleg wasmiddellaatje
Uitleg wasmiddellaatjeUitleg wasmiddellaatje
Het eerste geheim: het wasmiddellaatje bevindt zich op een makkelijke plaats onder het deksel.
V oeg het wasmiddel en de ev entuele toevoegmiddelen toe volgens de aangegeven dosis, die
u meestal op de verpakking
vindt.
De doses variëren naar ge-De doses variëren naar ge-
De doses variëren naar ge-
De doses variëren naar ge-De doses variëren naar gelang de hoeveelheid was-lang de hoeveelheid was-
lang de hoeveelheid was-
lang de hoeveelheid was-lang de hoeveelheid wasgoed, de hardheid van hetgoed, de hardheid van het
goed, de hardheid van het
goed, de hardheid van hetgoed, de hardheid van het
water en de vuilheidsgraad.water en de vuilheidsgraad.
water en de vuilheidsgraad.
water en de vuilheidsgraad.water en de vuilheidsgraad.
Overdrijf niet. Meer wasmid-Overdrijf niet. Meer wasmid-
Overdrijf niet. Meer wasmid-
Overdrijf niet. Meer wasmid-Overdrijf niet. Meer wasmiddel wil niet zeggen dat u be-del wil niet zeggen dat u be-
del wil niet zeggen dat u be-
del wil niet zeggen dat u be-del wil niet zeggen dat u beter wast!ter wast!
ter wast!
ter wast!ter wast!
Al doende leert u en wordt het
doseren een routine.
Wanneer u de wasv erzachter in
vakje 3 giet, let er dan op dat u
niveau "max" niet overschrijdt.
De wasverzachter wordt automatisch door de machine opgenomen bij ieder programma.
Vloeibaar wasmiddel moet uVloeibaar wasmiddel moet u
Vloeibaar wasmiddel moet u
Vloeibaar wasmiddel moet uVloeibaar wasmiddel moet u
net voordat u de machine aan-net voordat u de machine aan-
net voordat u de machine aan-
net voordat u de machine aan-net voordat u de machine aanzet toevoegen.zet toevoegen.
zet toevoegen.
zet toevoegen.zet toevoegen.
Vloeibaar wasmiddel is vooralVloeibaar wasmiddel is vooral
Vloeibaar wasmiddel is vooral
Vloeibaar wasmiddel is vooralVloeibaar wasmiddel is vooral
geschikt voor wassen bij tem-geschikt voor wassen bij tem-
geschikt voor wassen bij tem-
geschikt voor wassen bij tem-geschikt voor wassen bij temperaturen tot 60°C en voor pro-peraturen tot 60°C en voor pro-
peraturen tot 60°C en voor pro-
peraturen tot 60°C en voor pro-peraturen tot 60°C en voor programma's zonder voorwas.gramma's zonder voorwas.
gramma's zonder voorwas.
gramma's zonder voorwas.gramma's zonder voorwas.
Er bestaan ook wasmiddelen,
vloeibaar en poeder, met een speciale doseerder die rechtstreeks
in de trommel gedaan wordt. Lees
daarvoor de aanwijzingen op de
verpakking.
Gebruik nooit middelen die voor
handwas bestemd zijn. Zij schuimen teveel en dat is niet goed voor
de machine.
Een laatste geheim: Als u met koud
water wast moet u altijd minder
wasmiddel gebruiken. In koud
water lost het slechter op en verspilt u dus een gedeelte ervan.
VV
oorwas,oorwas,
V
oorwas,
VV
oorwas,oorwas,
zachterzachter
zachter
zachterzachter
Wanneer u de was wilt bleken,
stelt u de betreffende programma's in en giet u het bleekmiddel
in vakje 4 van het wasmiddellaatje.
Wanneer u het bleekmiddel in
het laatje giet, let er dan op dat
u niveau "
schrijdt.
Wanneer u bleekmiddel ge-Wanneer u bleekmiddel ge-
Wanneer u bleekmiddel ge-
Wanneer u bleekmiddel ge-Wanneer u bleekmiddel gebruikt, kunt u niet voor-bruikt, kunt u niet voor-
bruikt, kunt u niet voor-
bruikt, kunt u niet voor-bruikt, kunt u niet voorwassen.wassen.
wassen.
wassen.wassen.
Het traditionele bleekmiddelHet traditionele bleekmiddel
Het traditionele bleekmiddel
Het traditionele bleekmiddelHet traditionele bleekmiddel
kan alleen voor stevig witkan alleen voor stevig wit
kan alleen voor stevig wit
kan alleen voor stevig witkan alleen voor stevig wit
wasgoed gebruikt worden,wasgoed gebruikt worden,
wasgoed gebruikt worden,
wasgoed gebruikt worden,wasgoed gebruikt worden,
terwijl het zachte bleekmiddelterwijl het zachte bleekmiddel
terwijl het zachte bleekmiddel
terwijl het zachte bleekmiddelterwijl het zachte bleekmiddel
geschikt is voor gekleurdegeschikt is voor gekleurde
geschikt is voor gekleurde
geschikt is voor gekleurdegeschikt is voor gekleurde
stoffen en synthetische stof-stoffen en synthetische stof-
stoffen en synthetische stof-
stoffen en synthetische stof-stoffen en synthetische stoffen. fen.
fen.
fen. fen.
maxmax
max" niet over-
maxmax
Bleken is niet mogelijk bij
Hardheid van het water
In vakje 1:
voorwasmiddel (poeder)voorwasmiddel (poeder)
voorwasmiddel (poeder)
voorwasmiddel (poeder)voorwasmiddel (poeder)
In vakje 2:
wasmiddelwasmiddel
wasmiddel
wasmiddelwasmiddel
(poeder of vloeibaar)(poeder of vloeibaar)
(poeder of vloeibaar)
(poeder of vloeibaar)(poeder of vloeibaar)
In vakje 3:
WasverzachterWasverzachter
Wasverzachter
WasverzachterWasverzachter
In vakje 4:
BleekmiddelBleekmiddel
Bleekmiddel
BleekmiddelBleekmiddel
Niv . Kenmerken
1 - Zacht
2 - Gemiddeld
3 - Hard
4 - Zeer hard
Energiebesparing
Een aanwijzing voor zuinig en ecologisch gebruik van huishoudapparaten
MAXIMUM LADING
De machine zo vol mogelijk laden is de beste manier om energie, water, wasmiddel en tijd
te besparen.
U spaart 50% energie met een volle lading i.p.v. twee halfvolle ladingen.
GEBRUIK MINDER WASMIDDEL ALS: u weinig was heeft, de was niet erg vuil is,
er tijdens het wassen veel schuim ontstaat of het water niet hard tot zacht is (zie de tabel
hierboven met de verschillende hardheden van het water). Om er achter te komen hoe hard
het water is, neemt u contact op met het waterleidingbedrijf in uw gemeente.
IS VOORWASSEN WERKELIJK NODIG?
Alleen voor echt vuile was.
Een programma ZONDER voorwassen voor niet erg vuil wasgoed BESP AART u
wasmiddel, tijd, water en 5 à 15% energie.
IS WASSEN MET WARM WATER WERKELIJK NODIG?
Als u het wasgoed eerst met vlekkenmiddel behandelt of de vlekken in water weekt voordat
u gaat wassen, is het minder noodzakelijk een programma met warm water te kiezen.
Gebruik een programma op 60°C voor het BESPAREN van energie tot 50%.
b b
leekmidleekmid
b
leekmid
b b
leekmidleekmid
del,del,
del,
del,del,
het programma "Zijde" en de
"Speciale Programma's" (zie
blz.6).
N.B.:N.B.:
N.B.:
N.B.:N.B.:
1) Geconcentreerd bleek-1) Geconcentreerd bleek-
1) Geconcentreerd bleek-
1) Geconcentreerd bleek-1) Geconcentreerd bleekmiddel moet altijd aange-middel moet altijd aange-
middel moet altijd aange-
middel moet altijd aange-middel moet altijd aangelengd worden.lengd worden.
lengd worden.
lengd worden.lengd worden.
2) Kies bij geconcentreerde2) Kies bij geconcentreerde
2) Kies bij geconcentreerde
2) Kies bij geconcentreerde2) Kies bij geconcentreerde
wasmiddelen (poeder ofwasmiddelen (poeder of
wasmiddelen (poeder of
wasmiddelen (poeder ofwasmiddelen (poeder of
vloeibaar) een programmavloeibaar) een programma
vloeibaar) een programma
vloeibaar) een programmavloeibaar) een programma
zonder voorwas.zonder voorwas.
zonder voorwas.
zonder voorwas.zonder voorwas.
3) Bij wasmiddelen in een bal-3) Bij wasmiddelen in een bal-
3) Bij wasmiddelen in een bal-
3) Bij wasmiddelen in een bal-3) Bij wasmiddelen in een balletje of tablets niet voor-letje of tablets niet voor-
letje of tablets niet voor-
letje of tablets niet voor-letje of tablets niet voorwassenwassen
wassen
wassenwassen
WW
asverzacasverzac
W
asverzac
WW
asverzacasverzac
Wasverzachter maakt u was
heerlijk zacht en verlaagt de statische geladenheid van
Duits Frans
°dH °T.H
0- 7 0-15
8-14 16-25
15-21 26-37
meer dan 21 meer dan37
volgens de aanwijzingen van de
producent.
De wasverzachter wordt automatisch opgenomen door de machine bij de laatste keer spoelen.
Aan het einde van het programma
blijft er in vakje 3 een laagje water staan. Dit water dient voor het
gebruik van erg dikke
wasverzachters, oftewel voor het
verdunnen van geconcentreerde
wasverzachters.
Als er teveel water achterblijft in
vakje 3 betekent dit dat het
afvoersysteem verstopt zit en het
water niet meer goed afgevoerd
wordt.
Schoonmaken van de machine
zie blz.13. Giet nooit wasverzachter en stijfsel in hetzelfde
vakje. Dit kan leiden tot een verstopping van het overloopsysteem.
wasver wasver
wasver
wasver wasver
hterhter
hter
hterhter
synthetische
stoffen.
Wasverzachter
kunt u gebruiken voor badstof, gebreide
textiel, gordijnen, enz.
Giet de
wasverzachter in
vakje 3 en doseer
--
-
--
Instructies voor de installatie en het gebruik
1010
10
1010

Problemen en oplossingen
VV
ooroor
V
oor
VV
ooroor
Het kan gebeuren dat de wasmachine niet werkt. In veel gevallen gaat het om
gemakkelijk oplosbare problemen en hoeft er geen installateur aan te pas te
komen. Controleer eerst deze zeven punten.
dat u hulp inrdat u hulp inr
dat u hulp inr
dat u hulp inrdat u hulp inr
oept,oept,
oept,
oept,oept,
lees dit… lees dit…
lees dit…
lees dit… lees dit…
De wasmachine startDe wasmachine start
De wasmachine start
De wasmachine startDe wasmachine start
nietniet
niet
nietniet
Zit de stekker goed in het Zit de stekker goed in het
Zit de stekker goed in het
Zit de stekker goed in het Zit de stekker goed in het
stopcontact?stopcontact?
stopcontact? Bij het
stopcontact?stopcontact?
schoonmaken kan de stekker bewogen zijn.
Is de stroom soms uitge-Is de stroom soms uitge-
Is de stroom soms uitge-
Is de stroom soms uitge-Is de stroom soms uitgevallen?vallen?
vallen?
vallen?vallen?
De hoofdzekering kan zijn
doorgeslagen b.v. omdat er
teveel apparaten tegelijk aan
zijn. Of is de stroom in de
hele regio misschien uitgevallen?
Is het deksel goed dicht? Is het deksel goed dicht?
Is het deksel goed dicht?
Is het deksel goed dicht? Is het deksel goed dicht?
Om veiligheidsredenen func-
tioneert de wasmachine niet
als het deksel open of niet
goed dicht is.
Is de aan-uitknop ingedrukt? Is de aan-uitknop ingedrukt?
Is de aan-uitknop ingedrukt?
Is de aan-uitknop ingedrukt? Is de aan-uitknop ingedrukt?
Als dit het geval is, dan is er
een uitgestelde start ingesteld.
Staat de knop voor de uitge-Staat de knop voor de uitge-
Staat de knop voor de uitge-
Staat de knop voor de uitge-Staat de knop voor de uitge-
stelde start (indien aanwe-stelde start (indien aanwe-
stelde start (indien aanwe-
stelde start (indien aanwe-stelde start (indien aanwezig) in de juiste stand?zig) in de juiste stand?
zig) in de juiste stand?
zig) in de juiste stand?zig) in de juiste stand?
Is de waterkraan open? Is de waterkraan open?
Is de waterkraan open? Om
Is de waterkraan open? Is de waterkraan open?
veiligheidsredenen start de
wasmachine niet als deze
geen water neemt.
ZO HOORZO HOOR
ZO HOOR
ZO HOORZO HOOR
Het sluiten van de
kraan na iedere wasbeurt spaart het watersysteem van de machine en voorkomt
lekkagegevaar wanneer er niemand thuis
is.
Laat de wasmachine zo
mogelijk alleen onbeheerd draaien wanneer
de ruimte waarin hij
staat voorzien is van
een afvoerputje in de
vloer.
Laat de kleppen altijd
op een kier staan.
Op die manier ontstaan
er geen muffe luchtjes.
Maak de buitenkant van
de machine voorzichtig
schoon.
Gebruik voor het
schoonmaken van de
buitenkant en de rubber
afdichting een doek en
lauw sop.
T HETT HET
T HET
T HETT HET
DIT IS DIT IS
DIT IS
DIT IS DIT IS
De stekker in het contact
laten zitten terwijl u de machine schoonmaakt.
Ook tijdens onderhoud moet
de stekker altijd uit het stopcontact gehaald worden.
Agressieve oplosmiddelen en
schuurmiddelen gebruiken.
Gebruik nooit oplos- of
schuurmiddelen voor het
schoonmaken van de buitenkant en de rubber afdichting
van de machine.
Het wasmiddellaatje verwaarlozen
Het is uittrekbaar en om het
te reinigen is het voldoende
het even onder de kraan te
houden.
Op vakantie gaan zonder aan
de wasmachine te denken.
Voordat u op vakantie gaat
moet u altijd controleren of
de stekker uit het stopcontact is gehaald en of de waterkraan dicht is.
VERKEERDVERKEERD
VERKEERD
VERKEERDVERKEERD
Neemt de wasma-Neemt de wasma-
Neemt de wasma-
Neemt de wasma-Neemt de wasmachine geen water?chine geen water?
chine geen water?
chine geen water?chine geen water?
s de slang wel goeds de slang wel goed
I
s de slang wel goed
s de slang wel goeds de slang wel goed
aangesloten op de kraan?aangesloten op de kraan?
aangesloten op de kraan?
aangesloten op de kraan?aangesloten op de kraan?
Is er wel water?Is er wel water?
Is er wel water? Het kan ge-
Is er wel water?Is er wel water?
beuren dat het water wegens
werkzaamheden in huis of op
straat afgesloten is.
Staat er genoeg druk op deStaat er genoeg druk op de
Staat er genoeg druk op de
Staat er genoeg druk op deStaat er genoeg druk op de
kraan? kraan?
kraan? Het kan zijn dat er
kraan? kraan?
problemen met de waterdruk
zijn.
Is de filter van de kraanIs de filter van de kraan
Is de filter van de kraan
Is de filter van de kraanIs de filter van de kraan
schoon?schoon?
schoon? Als er veel kalk in
schoon?schoon?
het water zit of als er onlangs
werkzaamheden zijn verricht
aan de waterleiding, kan de filter van de kraan verstopt zijn
geraakt.
Zit er een knik in de rubberZit er een knik in de rubber
Zit er een knik in de rubber
Zit er een knik in de rubberZit er een knik in de rubber
slang?slang?
slang? De rubber slang
slang?slang?
waardoor het water de wasmachine instroomt moet zo
recht mogelijk liggen. Controleer of hij niet gekneld of omgebogen ligt.
De wasmachine blijftDe wasmachine blijft
De wasmachine blijft
De wasmachine blijftDe wasmachine blijft
water aan- en afvwater aan- en afv
water aan- en afv
water aan- en afvwater aan- en afv
renren
ren
renren
Is de slang te laag beves-Is de slang te laag beves-
Is de slang te laag beves-
Is de slang te laag beves-Is de slang te laag bevestigd? tigd?
tigd? Hij moet op een hoogte
tigd? tigd?
tussen de 60 en 100 cm.
geïnstalleerd zijn.
Ligt het uiteinde van deLigt het uiteinde van de
Ligt het uiteinde van de
Ligt het uiteinde van deLigt het uiteinde van de
slang onder water?slang onder water?
slang onder water?
slang onder water?slang onder water?
Heeft de afvoer in de muur Heeft de afvoer in de muur
Heeft de afvoer in de muur
Heeft de afvoer in de muur Heeft de afvoer in de muur
een ontluchter?een ontluchter?
een ontluchter? Als u er na
een ontluchter?een ontluchter?
deze controles niet in geslaagd bent het probleem op
te lossen, draait u de waterkraan dicht, zet u de wasmachine uit en belt u een
installateur.
Als u op één van de boven-
ste verdiepingen van een flatgebouw woont kunnen zich
problemen met de hevelwerking voordoen.
Om dit te verhelpen brengt u
een in de handel verkrijgbaar
ventiel aan.
oe-oe-
oe-
oe-oe-
11 11
11 Instructies voor de installatie en het gebruik
11 11

De wasmachineDe wasmachine
De wasmachine
De wasmachineDe wasmachine
vv
oeroer
t het water niett het water niet
v
oer
t het water niet
vv
oeroer
t het water niett het water niet
af en centrifugeertaf en centrifugeert
af en centrifugeert
af en centrifugeertaf en centrifugeert
niet.niet.
niet.
niet.niet.
Maakt het afvoeren van het Maakt het afvoeren van het
Maakt het afvoeren van het
Maakt het afvoeren van het Maakt het afvoeren van het
water deel uit van het ge-water deel uit van het ge-
water deel uit van het ge-
water deel uit van het ge-water deel uit van het gekozen programma? kozen programma?
kozen programma? Bij be-
kozen programma? kozen programma?
paalde wasprogramma's
moet het afvoeren van het
water manueel ingesteld worden.
Is de "Kreukvrij"-functie Is de "Kreukvrij"-functie
Is de "Kreukvrij"-functie
Is de "Kreukvrij"-functie Is de "Kreukvrij"-functie
(indien aanwezig) geacti-(indien aanwezig) geacti-
(indien aanwezig) geacti-
(indien aanwezig) geacti-(indien aanwezig) geactiveerd?veerd?
veerd? Bij deze functie moet
veerd?veerd?
het afvoeren van het water
manueel worden ingesteld.
Zit de afvoerpomp ver- Zit de afvoerpomp ver-
Zit de afvoerpomp ver-
Zit de afvoerpomp ver- Zit de afvoerpomp ver-
stopt?stopt?
stopt? Om dit te controleren,
stopt?stopt?
sluit u de waterkraan, haalt u
de stekker uit het stopcontact en volgt u de instructies
Roep er altijd een
bevoegde
installateur bij en
accepteer alleen
originele
onderdelen.
op blz. 12 of belt een
installateur.
Zit er een knik in de afvoer-Zit er een knik in de afvoer-
Zit er een knik in de afvoer-
Zit er een knik in de afvoer-Zit er een knik in de afvoer-
slang?slang?
slang? De afvoerslang moet
slang?slang?
zo recht mogelijk liggen. Controleer of hij niet gekneld of
omgebogen ligt.
Zit de leiding van hetZit de leiding van het
Zit de leiding van het
Zit de leiding van hetZit de leiding van het
afvoersysteem verstopt?afvoersysteem verstopt?
afvoersysteem verstopt? Is
afvoersysteem verstopt?afvoersysteem verstopt?
het verlengstuk van de
afvoerslang (indien aanwezig) onregelmatig en blokkeert het de doorstroming
van het water?
De machine trilt ergDe machine trilt erg
De machine trilt erg
De machine trilt ergDe machine trilt erg
tijdens hettijdens het
tijdens het
tijdens hettijdens het
centrifugeren.centrifugeren.
centrifugeren.
centrifugeren.centrifugeren.
Is de interne trilgroep op Is de interne trilgroep op
Is de interne trilgroep op
Is de interne trilgroep op Is de interne trilgroep op
het moment van de instal-het moment van de instal-
het moment van de instal-
het moment van de instal-het moment van de installatie op de juiste manierlatie op de juiste manier
latie op de juiste manier
latie op de juiste manierlatie op de juiste manier
gedeblokkeerd?gedeblokkeerd?
gedeblokkeerd? Zie blz. 2
gedeblokkeerd?gedeblokkeerd?
voor informatie over de installatie.
Staat de wasmachine goedStaat de wasmachine goed
Staat de wasmachine goed
Staat de wasmachine goedStaat de wasmachine goed
waterpas?waterpas?
waterpas? Periodiek moet er
waterpas?waterpas?
gecontroleerd worden of de
wasmachine nog waterpas
staat. In de tussentijd is de
wasmachine misschien iets
verplaatst zonder dat u er erg
in gehad heeft. Draai aan de
stelschroeven en controleer met een waterpas.
Is er ruimte om de was-Is er ruimte om de was-
Is er ruimte om de was-
Is er ruimte om de was-Is er ruimte om de was-
machine heen?machine heen?
machine heen? De wasma-
machine heen?machine heen?
chine moet niet tegen het
sanitair aanstaan. Om de
machine heen moet ruimte
vrij zijn. Als de machine op
vast tapijt staat, verzekert u
zich er dan van dat er lucht
tussen de pootjes en de vloer
kan komen.
De wasmachine lekt.De wasmachine lekt.
De wasmachine lekt.
De wasmachine lekt.De wasmachine lekt.
Is de metalen ring van de Is de metalen ring van de
Is de metalen ring van de
Is de metalen ring van de Is de metalen ring van de
watertoevoer goed aan-watertoevoer goed aan-
watertoevoer goed aan-
watertoevoer goed aan-watertoevoer goed aangedraaid?gedraaid?
gedraaid? Sluit de kraan,
gedraaid?gedraaid?
haal de stekker uit het stopcontact en probeer of u de
ring verder aan kunt draaien
zonder te forceren.
Zit het wasmiddellaatje ver-Zit het wasmiddellaatje ver-
Zit het wasmiddellaatje ver-
Zit het wasmiddellaatje ver-Zit het wasmiddellaatje ver-
stopt?stopt?
stopt? Haal het laatje uit de
stopt?stopt?
machine en houd het onder
de kraan.
Zit de afvoerslang niet Zit de afvoerslang niet
Zit de afvoerslang niet
Zit de afvoerslang niet Zit de afvoerslang niet
goed vast?goed vast?
goed vast? Sluit de kraan,
goed vast?goed vast?
haal de stekker uit het stopcontact en probeer of u de
slang beter vast kunt maken.
Er ontstaat teveelEr ontstaat teveel
Er ontstaat teveel
Er ontstaat teveelEr ontstaat teveel
schuimschuim
schuim
schuimschuim
Is het wasmiddel geschiktIs het wasmiddel geschikt
Is het wasmiddel geschikt
Is het wasmiddel geschiktIs het wasmiddel geschikt
voor de wasmachine?voor de wasmachine?
voor de wasmachine? Con-
voor de wasmachine?voor de wasmachine?
troleer of er "voor de wasmachine" of "op de hand en in
de wasmachine" of iets dergelijks op de verpakking
staat.
Gebruikt u de juiste hoe-Gebruikt u de juiste hoe-
Gebruikt u de juiste hoe-
Gebruikt u de juiste hoe-Gebruikt u de juiste hoe-
veelheid wasmiddel?veelheid wasmiddel?
veelheid wasmiddel? Een
veelheid wasmiddel?veelheid wasmiddel?
te grote hoeveelheid wasmiddel produceert teveel
schuim, wast niet beter en
werkt eraan mee afzettingen
in de machine te veroorza-
ken.
Als ondanks alle controles de
machine nog niet functioneert
en de storing blijft bestaan,
wendt u zich dan tot een bevoegd Service Center met de
volgende informatie:
- het soort storing
- het codenummer (Mod….)
- het serienummer (S/N…..)
U vindt deze informatie op het
typeplaatje dat zich aan de
achterkant van het voetstuk
bevindt (afb.1)
WW
anneer het nodig is,anneer het nodig is,
W
anneer het nodig is,
WW
anneer het nodig is,anneer het nodig is,
Uw wasmachine is voorzien van een zelfreinigende pomp die geen onderhoud nodig heeft. Het kan echter gebeuren
dat kleine voorwerpen per ongeluk in de pomp terechtkomen: munten, speldjes, knopen enz. Om schade te
voorkomen worden deze kleine voorwerpen tegengehouden in een toegankelijke filterruimte die zich onderaan
de pomp bevindt.
Afb. 1
Belangrijk: Controleer altijd of de machine nog in werking is en haal de stekker uit het stopcontact voordat u de klep omhoog
doet of voordat u tot onderhoud of reparatie overgaat. Het is normaal dat er na het verwijderen van de deksel een beetje water naar
buiten komt. Let er bij het weer aanbrengen van het paneeltje op dat de haakjes aan de onderkant in de gaatjes komen te zitten
voordat u het paneeltje aandrukt.
moeten de pomp en de rubber slang g moeten de pomp en de rubber slang g
moeten de pomp en de rubber slang g
moeten de pomp en de rubber slang g moeten de pomp en de rubber slang g
Om deze filterruimte te bereiken verwijdert u het paneeltje
onderaan de machine (afb.1); daarna verwijdert u het deksel door
hem tegen de klok in te draaien (afb.2) en inspecteert u de
binnenkant nauwkeurig.
De rubber slang
Controleer de rubber slang ten minste één keer per jaar. De slang
moet onmiddellijk vervangen worden zodra deze barsten of scheurtjes
vertoont. Tijdens het wassen komt er een hoge druk op de slang te
staan en zou hij plotseling kunnen scheuren.
econtrecontr
econtr
econtrecontr
oleeroleer
oleer
oleeroleer
d wd w
d w
d wd w
Instructies voor de installatie en het gebruik
oror
denden
or
den
oror
denden
Afb. 2
12 12
12
12 12

Dagelijks onderhoud
Behandel uw macBehandel uw mac
Behandel uw mac
Behandel uw macBehandel uw mac
hine met zorhine met zor
hine met zor
hine met zorhine met zor
Uw wasmachine is een betrouwbare levens- en werkgezel. Het
is dan ook belangrijk dat hij in vorm blijft. Ook voor u.
Uw wasmachine is ontworpen
om zonder problemen jarenlang
mee te gaan. Een beetje goede
zorg houdt hem in conditie en
zorgt ervoor dat hij langer mee-
Om te beginnen moet uOm te beginnen moet u
gaat.
Om te beginnen moet u
Om te beginnen moet uOm te beginnen moet u
altijd na iedere wasbeurt dealtijd na iedere wasbeurt de
altijd na iedere wasbeurt de
altijd na iedere wasbeurt dealtijd na iedere wasbeurt de
waterkraan dichtdoen: waterkraan dichtdoen:
waterkraan dichtdoen: de con-
waterkraan dichtdoen: waterkraan dichtdoen:
stante druk van het water kan
slijtage veroorzaken aan de onderdelen.
Bovendien sluit het de mogelijkheid tot lekken uit.
Als het water in uw regio teAls het water in uw regio te
Als het water in uw regio te
Als het water in uw regio teAls het water in uw regio te
hard is, gebruik dan eenhard is, gebruik dan een
hard is, gebruik dan een
hard is, gebruik dan eenhard is, gebruik dan een
ontkalkingsmiddel:ontkalkingsmiddel:
ontkalkingsmiddel: het water is
ontkalkingsmiddel:ontkalkingsmiddel:
hard als het snel witte sporen
achterlaat op de kranen of om
de afvoer (en dan vooral die van
de badkuip) heen.
Voor uitgebreidere informatie
over het water in uw huis kunt u
contact opnemen met het plaatselijke waterleidingbedrijf of met
een loodgieter in uw buurt.
Leeg altijd de zakken van de
kledingstukken en verwijder
muntstukken, speldjes en andere harde voorwerpen.
De buitenkant van de wasmachine reinigt u met een doek en
een lauw sopje.
Het is belangrijk dat u
regelmatig het
uittrekbare
wasmiddellaatje
schoonspoelt.
Om afzettingen te
verwijderen houdt u het
laatje gewoon een tijdje
onder stromend water.
Overdrijf niet bij hetOverdrijf niet bij het
Overdrijf niet bij het
Overdrijf niet bij hetOverdrijf niet bij het
doseren van het wasmid-doseren van het wasmid-
doseren van het wasmid-
doseren van het wasmid-doseren van het wasmiddel.del.
del.
del.del.
Normaal wasmiddel bevat reeds
ontkalkingsmiddelen. Alleen als
het water buitengewoon hard is,
d.w.z. erg rijk aan kalk, raden wij
u aan bij iedere was een speciaal
product te gebruiken.
Het kan ook nuttig zijn de machine af en toe zonder wasmiddel of wasgoed met een
ontkalkingsmiddel te laten
draaien.
Gebruik altijd de juiste dosis en
overdrijf nooit met de hoeveelheid wasmiddel. Dit kan leiden tot
een buitensporige schuimontwikkeling, die afzettingen en
eventuele schade aan de machine tot gevolg heeft.
Leeg altijd de zakken van de
kledingstukken:ook kleine metalen voorwerpen
in de centrifuge kunnen de trommel van uw
wasmachine ernstig beschadigen !
gg
g
gg
Hoe reinigt u het wasmiddellaatjeHoe reinigt u het wasmiddellaatje
Hoe reinigt u het wasmiddellaatje
Hoe reinigt u het wasmiddellaatjeHoe reinigt u het wasmiddellaatje
Reinigen:Reinigen:
Reinigen:
Demonteren:Demonteren:
Demonteren:
Demonteren:Demonteren:
Druk licht op de grote knop aan
de voorkant van het wasmiddellaatje en trek hem naar boven
(afb. 1).
Afb. 1
1313
13 Instructies voor de installatie en het gebruik
1313
Reinigen:Reinigen:
Reinig het laatje onder de kraan (afb.3) met een oude tandenborstel. Haal de beide sifonnetjes uit het bovenste gedeelte van vakje
1 en 2 (afb. 4) los, controleer of deze niet verstopt zijn en spoel ze
schoon.
Afb. 2
Afb. 3
Hermonteren:Hermonteren:
Hermonteren:
Hermonteren:Hermonteren:
V ergeet niet de sifonnetjes weer
op de juiste plaats terug te doen
en haak het laatje uiteindelijk
terug in de wasmachine (afb. 4,
2, 1).
Afb. 4

Wij letten op hoe u laadt
ElektrElektr
Elektr
ElektrElektr
vv
oor uw centrifugoor uw centrifug
v
oor uw centrifug
vv
oor uw centrifugoor uw centrifug
onisconisc
onisc
onisconisc
he balanscontrhe balanscontr
he balanscontr
he balanscontrhe balanscontr
Belangrijk!
Deze machine is voorzienDeze machine is voorzien
Deze machine is voorzien
Deze machine is voorzienDeze machine is voorzien
van een elektronischevan een elektronische
van een elektronische
van een elektronischevan een elektronische
balanscontrole (Autobalanscontrole (Auto
balanscontrole (Auto
balanscontrole (Autobalanscontrole (Auto
Balance Control) die ervoorBalance Control) die ervoor
Balance Control) die ervoor
Balance Control) die ervoorBalance Control) die ervoor
zorgt dat u alleen op hogezorgt dat u alleen op hoge
zorgt dat u alleen op hoge
zorgt dat u alleen op hogezorgt dat u alleen op hoge
snelheid kunt centrifugerensnelheid kunt centrifugeren
snelheid kunt centrifugeren
snelheid kunt centrifugerensnelheid kunt centrifugeren
als de lading in uw wasma-als de lading in uw wasma-
als de lading in uw wasma-
als de lading in uw wasma-als de lading in uw wasmachine goed verdeeld is.chine goed verdeeld is.
chine goed verdeeld is.
chine goed verdeeld is.chine goed verdeeld is.
Een slecht verdeelde ladingEen slecht verdeelde lading
Een slecht verdeelde lading
Een slecht verdeelde ladingEen slecht verdeelde lading
zou u machine ernstig be-zou u machine ernstig be-
zou u machine ernstig be-
zou u machine ernstig be-zou u machine ernstig beschadigen.schadigen.
schadigen.
schadigen.schadigen.
Dankzij de automatische
balanscontrole ABC draait de
trommel vóór iedere
centrifugebeurt een aantal keren met de klok mee en tegen
de klok in, zodat de kleding
evenredig verdeeld wordt en
de centrifuge rustig aan zijn
taak kan beginnen.
Het kan in bepaalde gevallen
voorkomen dat het aantal rotaties niet volstaat om het gewicht in de trommel evenredig
te verdelen (aanwezigheid
van badjassen, dekens of lakens die op een prop zijn komen te zitten, enz.).
Er kunnen zich dan twee gevallen voordoen:
- het ABC-systeem "accepteert" de onevenwichtige
verdeling van de lading,
maar reduceert de
centrifugesnelheid.
In dit geval zullen de kledingstukken vochtiger aanvoelen dan anders;
- Het ABC-systeem accepteert de verdeling niet omdat de lading te onevenwichtig is verdeeld en blokkeert de centrifuge.
In beide gevallen gaat het niet
om een defect aan de
machine, maar om één van de
geavanceerdere functies die
de machine beschermen
tegen schade, trillingen,
verplaatsing over de vloer en
andere belangrijke
ongemakken.
ee
e
ee
ole ABCole ABC
ole ABC
ole ABCole ABC
TT
ecec
T
TT
Model
Afmetingen
Vermogen
Elektri sche
aansluitingen
Aan sluiting
waterleiding
Snelheid centrifuge
Controleprogramma's volgens
de norm IEC45 6
De fabrikant behoudt zich het recht voor op ieder moment en zonder aankondiging aan het publiek veranderingen aan te brengen aan de machine of de
accessoires van zijn eigen modellen wanneer hij dit om technische en commerciële redenen nodig acht.
hnischnisc
ec
hnisc
ecec
hnischnisc
he ghe g
he g
he ghe g
WT 120
Breedte cm 40
hoogte cm 85
d ie pt e cm 60
Van 1 tot 5 Kg
Spanning 230 Volt 50 Hz
max. opnemingsvermogen 2100 W
Max . d ru k 1 M Pa ( 10 b ar )
Min . d ruk 0 ,0 5 MP a (0 ,5 bar )
Inhoud kuip 42 litri
Tot 1000 toeren per minuut
Uitgevoerd met 5,0 Kg lading, programma 3, 60° C
Deze apparatuur voldoet aan de volgende EEC voorschriften:
- 73/23/EEC van 19/02/73 (Laagspanning) en successievelijke modificaties
- 89/33 6/EEC van 03 /05/89 (Elektromagnetische compatiabiliteit) en successievelijke modificatie s
egeg
eg
egeg
ee
vensvens
e
vens
ee
vensvens
Instructies voor de installatie en het gebruik
14 14
14
14 14

Merloni Elettrodomestici
Viale Aristide Merloni 47
60044 Fabriano
Italy
Tel +39 0732 6611
Fax +39 0732 662501
www.merloni.com
Indesit: ook de service staat voor
kwaliteit
In deze handleiding staan een aantal tips om eenvoudige
storingen zelf te verhelpen. Mocht u niet in staat zijn de storing
te verhelpen,dan kunt u gebruik maken van de fabrieksservice
van Merloni Huishoudapparaten b.v.
Merloni huishoudapparaten b.v.heeft Nederland opgedeeld in
verschillende service regio's. Elke regio is postcodegebonden.
Binnen elke regio is een Merloni Service Partner verantwoordelijk
voor de fabrieksservice. Elke Merloni Service Partner voldoet
aan strenge kwaliteitseisen; ze zijn in staat om een storing snel,
vakkundig en goedkoop voor u op te lossen.
VOOR SERVICE BEL 0900-2025254
Bij opgave van de storing verzoeken wij u onderstaande gegevens te willen verschaffen:
- Aard van de storing
- Model
- Serienummer S/N
- Aankoopdatum en naam leverancier
MERLONI EEN ORGANISATIE DIE OPTIMALE SERVICE GARANDEERT
We work, you play
01/2003- 195 034 985 02 - Xerox Services Docutech

Pralka ³adowana z góry
Instrukcja instalacji i obs³ugi PL
WT120

Instalacja i przeprowadzka
Gdy w domu
pojawia siê pralka
Czy pralka jest nowa, czy te¿ przeniesiona z jednego
do drugiego mieszkania, instalacja stanowi czynnoæ
bardzo wa¿n¹ dla dobrego funkcjonowania pralki.
Po rozpakowaniu pralki
sprawdz, czy jest ona w
nienaruszonym stanie. W
razie watpliwosci wezwij
niezwlocznie
wykwalifikowanego technika.
Ze wzgledu na wymogiZe wzgledu na wymogi
Ze wzgledu na wymogi
Ze wzgledu na wymogiZe wzgledu na wymogi
transportu wnetrze pralkitransportu wnetrze pralki
transportu wnetrze pralki
transportu wnetrze pralkitransportu wnetrze pralki
jest zablokowane od tylujest zablokowane od tylu
jest zablokowane od tylu
jest zablokowane od tylujest zablokowane od tylu
czterema srubamiczterema srubami
czterema srubami
czterema srubamiczterema srubami
gumowymi nakladkamigumowymi nakladkami
gumowymi nakladkami
gumowymi nakladkamigumowymi nakladkami
umieszczonymi z tylu pralki.umieszczonymi z tylu pralki.
umieszczonymi z tylu pralki.
umieszczonymi z tylu pralki.umieszczonymi z tylu pralki.
Odblokowanie: wyjac 4Odblokowanie: wyjac 4
Odblokowanie: wyjac 4
Odblokowanie: wyjac 4Odblokowanie: wyjac 4
sruby!sruby!
sruby!
sruby!sruby!
2
1
Przed uruchomieniem pralki
usun te sruby, wyjmij gumowe
nakladki oraz odpowiednia
podkladke (zachowaj
wszystkie te czesci) i zatkaj
otwory dostarczonymi wraz z
pralka plastykowymi
zatyczkami.
Uwaga: w razie ponownego
uzycia krótsze srubki powinny
byc przymocowane u góry.
Wypoziomowanie
Dla dobrego funkcjonowania pralki
niezbêdne jest jej ustawienie
dok³adnie w poziomie. Pralkê
poziomuje siê przy pomocy
nó¿ek; k¹t pochylenia pralki,
zmierzony na górnym blacie, nie
powinien przekraczaæ 2°. Jeli pralka
stoi na wykladzinie dywanowej,
nale¿y sprawdziæ, czy wyk³adzina nie
utrudnia wentylacji w strefie oparcia
pralki.
Zachowaj ruby blokuj¹ce
oraz podk³adki. W razie
przeprowadzki mog¹ siê
one przydaæ, aby ponownie
zablokowaæ wewnêtrzne
czêci pralki, chroni¹c j¹ w
ten sposób przed
ewentualnymi
uszkodzeniami w czasie
transportu.
Nó¿ki mo¿na regulowaæ.
Pod³¹czenie rury pobierania
wody
Cinienie wody w sieci powinno
odpowiadaæ wielkociom wskazanym
na umieszczonej z ty³u pralki
tabliczce. Pod³¹czyæ rurê
pobierania wody (znajdziesz j¹
od³¹czon¹ w bêbnie pralki) do kurka
zimnej wody o otworze gwintowanym
drobnozwojnym 3/4.
Jeli rury sieci wodnej s¹ nowe lub
pozostawa³y przez d³u¿szy czas
nieu¿ywane, przed pod³¹czeniem
pralki nale¿y na pewien czas odkr
ciæ wodê i spuszczaæ j¹, a¿ bêdzie
zupe³nie czysta i wolna od wszelkich
nieczystoci. Pod³¹czyæ rurê do
ujêcia wody z prawej strony u góry
pralki.
Ujêcie wody, które ma byæ
pod³¹czone z
Pod³¹czenie rury usuwania wody
Na górze z ty³u pralki znajduje siê
zaczep, do którego nale¿y
przymocowaæ ewentualn¹ rurê
usuwania wody. Drugi koniec rury
nale¿y wprowadziæ do przewodu
wodoci¹gowego lub oprzeæ na
prawej strony u góry.
Ustawienie,
przemieszczenie.
Jesli posiadana przez Ciebie
pralka wyposazona jest w
specjalne podwozie z wysuwanymi kólkami, latwiej bedzie
ci ja przemiescic.
Aby wysun¹æ kó³ka i móc dziêki
temu przesun¹æ pralkê bez
wysi³ku, nale¿y poci¹gn¹æ
dwigniê, znajduj¹c¹ siê na
dole z lewej strony pod coko³em.
Po przesuniêciu pralki nale¿y z
powrotem ustawiæ dwigniê w
pierwotnej pozycji. Urz¹dzenie
stoi teraz pewnie na pod³odze.
umywalce lub na wannie, unikaj¹c
nadmiernych zgiêæ i zwê¿eñ.
Wa¿ne jest, by koniec rury
znajdowa³ siê na wysokoci
miêdzy 60 a 100 cm. i nie byl
zanurzony w wodzie.
Jeli konieczne jest przymocowanie
koñca rury na wysokoci mniejszej
ni¿ 60 cm od pod³ogi, rura musi
zostaæ przymocowana do
odpowiedniego zaczepu,
znajduj¹cego we wspomnianych
plecach pralki.
Zaczep, którego u¿ywa siê, jeli
koñcówka rury usuwania wody
znajduje siê na wysokoci
mniejszej ni¿ 60 cm.
Jeli rura usuwa wodê do wanny lub
umywalki, nale¿y u¿yæ plastykowej
podpórki i przymocowaæ j¹ do kranu.
ê
Podpórka do usuwania wody do
wanien i umywalek.
Rura nie powinna nigdy
pozostawaæ zanurzona w wodzie.
Odradza siê stosowanie rur
przed³u¿aj¹cych. Jeli s¹ one
niezbêdnie konieczne, rura
przed³u¿aj¹ca powinna mieæ tê
sam¹ rednicê, co rura oryginalna i
nie powinna przekraczaæ 150 cm
d³ugoci. W przypadku usuwania
wody bezporednio do cieku w
cianie, nale¿y sprawdziæ jego
dzia³anie przez wykwalifikowanego
technika. Jeli mieszkanie znajduje
siê na najwy¿szych piêtrach
(Tylko w niektórych modelach
pralek)
budynku, mo¿e zaistnieæ efekt
syfonu, w wyniku którego pralka
nieustannie pobiera i usuwa wodê.
W celu wyeliminowania tej
niedogodnoci w handlu dostêpne
s¹ specjalne zawory.
Pod³¹czenia elektryczne
Przed pod³¹czeniem pralki do
sieci elektrycznej nale¿y upewniæ
siê, czy:
1) gniazdko elektryczne jest w
stanie wytrzymaæ maksymaln¹
moc urz¹dzenia podan¹ na
tabliczce danych
technicznych i czy odpowiada
ono obowi¹zuj¹cym
przepisom;
2) napiêcie elektryczne w sieci
odpowiada wartociom
podanym na tabliczce danych
technicznych;
3 ) gniazdko odpowiada wtyczce
pralki. W przeciwnym razie nie
nale¿y u¿ywaæ adapterów, lecz
wymieniæ gniazdko albo
wtyczkê;
4) domowe instalacje elektryczne
powinny byæ wyposa¿one w
uziemnienie.
5) urz¹dzenie po pod³¹czeniu
nie stoi na przewodzie
elektrycznym;
6) urz¹dzenie jest tak ustawione,
¿eby wtyczka by³a ³atwo
dostêpna.
Ostrze¿enie !
Wszelkie zmiany wykonanych
fabrycznie pod³¹czeñ elektrycznych pralki lub niew³aciwe
pod³¹czenie do sieci pr¹du
elektrycznego, wszelkie zmiany
w instalacji elektrycznej,
hydraulicznej i mechanicznej
pralki uniewa¿niaj¹ gwarancjê
urz¹dzenia i zwalniaj¹ producenta i sprzedawcê od wszelkiej
odpowiedzialnoci.
Worki plastykowe,
styropian, gwodzie oraz
inne elementy opakowania
pralki nie nadaj¹ siê do
zabawy dla dzieci i s¹ dla
nich potencjalnym ród³em
niebezpieczeñstwa.
Instrukcja instalacji i obs³ugi
11
1
11

Najwa¿niejsze jest zawsze
Bezpieczeñstwo Twoje i
Pralka zosta³a skonstruowana wed³ug najostrzejszych
Twoich dzieci
Przeczytaj uwa¿nie
ostrze¿enia i wszystkie
informacje zawarte w niniejszej
ksi¹¿eczce: jest to wa¿ne, gdy¿
obok licznych u¿ytecznych
porad zawiera ona wa¿ne
informacje dotycz¹ce
bezpieczeñstwa, u¿ytkowania
i konserwacji.
11
..
1
. W razie awarii przede
11
..
wszystkim zamknij kurek
dop³ywu wody i wyjmij
wtyczkê z kontaktu; w
¿adnym wypadku nie próbuj
samemu reperowaæ
wewnêtrznych
mechanizmów pralki.
Uniewa¿ni³oby to równie¿
gwarancjê.
2. Nie nale¿y instalowaæ pralki
na zewn¹trz nawet jeli
miejsce to jest chronione
daszkiem, gdy¿
wystawienie pralki na
dzia³anie deszczu i burz, jest
bardzo niebezpieczne.
3. Pralka powinna byæ
u¿ywana wy³¹cznie przez
doros³ych i wy³¹cznie w celu
prania bielizny wed³ug
zawartych w niniejszej
ksi¹¿eczce instrukcji.
4. Jeli chcesz przesun¹æ
pralkê, poci¹gnij za bia³¹
r¹czkê na dole z lewej
strony pod coko³em, dziêki
czemu wysun¹ siê
schowane kó³ka,
umo¿liwiaj¹c ³atwe
przesuwanie pralki.
5. Przed w³o¿eniem bielizny
sprawd, czy bêben jest
pusty.
6. Nie dotykaj pralki, stoj¹c
przy niej boso lub maj¹c
rêce czy stopy mokre czy
wilgotne.
7. Nie u¿ywaj przed³u¿aczy
elektrycznych ani
wtyczek wielokrotnych,
niebezpiecznych
zw³aszcza w
rodowiskach wilgotnych.
Przewód zasilania
elektrycznego nie powinien
mieæ zgiêæ ani
niebezpiecznych zgnieceñ.
8. Nie wyjmuj filtru w trakcie
pracy pralki.
Nie u¿ywaj rodka
pior¹cego do prania
rêcznego, gdy¿ tworzona
przez niego w du¿ych
ilociach piana mog³aby
wyjæ poza pokrywê i
uszkodziæ pralkê.
9. Nigdy nie ci¹gnij za
przewód elektryczny ani
za pralkê, aby wyj¹æ
wtyczkê z kontaktu w
cianie: jest to bardzo
niebezpieczne.
10. W trakcie pracy pralki nigdy
nie dotykaj usuwanej
wody, gdy¿ mo¿e ona
osi¹gaæ wysokie
temperatury. Trzymaj
dzieci z dala od pralki
Nigdy nie otwieraj
miêdzynarodowych przepisów bezpieczeñstwa. Maj¹c
na wzglêdzie bezpieczeñstwo Twoje i Twojej rodziny.
drzwiczek pralki na si³ê,
poniewa¿ mog³oby to
uszkodziæ mechanizm
zabezpieczaj¹cy
zamkniêcie, chroni¹cy przed
przed przypadkowym
otwarciem drzwiczek.
11.Urz¹dzenie to przeznaczone
jest do u¿ytku domowego.
U¿ytkowanie przemys³owe
(hotele, restauracje, pralnie)
jest sprzeczne z
zasadniczymi za³o¿eniami
konstrukcyjnymi pralki i
uniewa¿nia gwarancjê.
NALE¯Y NIE NALE¯Y
Zamkn¹æ kurek dop³ywu
wody po ka¿dym praniu.
Zapobiega to zu¿ywaniu
siê instalacji
hydraulicznej pralki oraz
niebezpieczeñstwu zalania
mieszkania, gdy w domu
nikogo nie ma.
Pralkê mo¿na zostawiæ
pracuj¹c¹ bez nadzoru
tylko wówczas, gdy
pomieszczenie, w którym
siê ona znajduje,
wyposa¿one jest w
odprowadzanie wody w
pod³odze (studzienkê).
Zostawiaæ zawsze
drzwiczki przymkniête.
Zapobiega to tworzeniu siê
nieprzyjemnych zapachów.
Delikatnie myæ obudowê
pralki.
Do czyszczenia obudowy
oraz czêci gumowych
pralki u¿ywaj zawsze
ciereczki zmoczonej w
letniej wodzie z myd³em.
Myæ pralki gdy wtyczka jest
w³¹czona do kontaktu.
Wtyczkê nale¿y wyj¹æ z
kontaktu tak¿e i w trakcie
czynnoci konserwacyjnych.
U¿ywaæ rozpuszczalników i
silnych rodków cieraj¹cych.
Nigdy nie nale¿y u¿ywaæ
rozpuszczalników ani silnych
rodków cieraj¹cych do
czyszczenia obudowy i
gumowych czêci pralki.
Zaniedbywaæ szufladki
rodków pior¹cych.
Szufladka ta jest wyjmowalna
i aby j¹ umyæ, wystarczy
pozostawiæ j¹ na pewien czas
pod bie¿¹c¹ wod¹.
Wyjechaæ na wakacje,
zapomniawszy o pralce.
Przed wyjazdem na wakacje
sprawd zawsze, czy wtyczka
pralki jest wy³¹czona z
kontaktu i czy kurek dop³ywu
wody jest zamkniêty.
Jak wymieniæ przewód zasilania elektrycznego
Kabel elektryczny pralki
jest kablem specjalnym i
mo¿na go zakupiæ
wy³¹cznie w sklepach
upowa¿nionego Serwisu
Technicznego.
Aby go wymieniæ, nale¿y
postêpowaæ w nastêpuj¹cy
sposób:
1. Upewnij siê, czy pralka
jest wy³¹czona i czy
Rys. 1
22
2
Instrukcja instalacji i obs³ugi
22
wtyczka jest wyjêta z
kontaktu.
2. Zdejmij cokó³ i odkrêæ 2
ruby znajduj¹ce siê na dole
po twojej prawej stronie, a
nastêpnie odkrêæ 6 tylnych
rub, tym razem po twej lewej
stronie i zdejmij boczny
panel pochylaj¹c go lekko na
zewn¹trz i wysuwaj¹c go.
(Rys. 1 i 2).
Rys. 2
3. Od³¹cz od elektrycznoci
filtr antyzak³óceniowy,
zsuwaj¹c z³¹czkê (Rys. 3).
4. Odkrêæ 2 zewnêtrzne ruby
mocuj¹ce filtr i, pomagaj¹c
sobie rubokrêtem (por. rys.
4), odczep go od pleców
pralki, poci¹gaj¹c do góry.
5. Wymieñ przewód na nowy,
ponownie pod³¹cz z³¹czkê,
Rys. 3
sprawdzaj¹c, czy zaczep
bezpieczeñstwa jest dobrze
zamocowany.
W ka¿dym razie w celu
wymiany przewodu nale¿y
zwróciæ siê do
wyspecjalizowanego
technika, który musi
przestrzegaæ
obowi¹zuj¹cych
przepisów.
Rys. 4

Jak uruchomiæ pralkê
Zaraz po zainstalowaniu pralki wykonaj jeden cykl
prania, nastawiaj¹c program 1 na 60 stopni
Zobacz rysunek.
W³aciwe uruchomienie pralki
jest wa¿ne zarówno ze wzglêdu
na jakoæ prania, jak i w celu
zapobie¿enia awariom i
zapewnienia wieloletniego
u¿ytkowania pralki. Po
za³adowaniu bielizny, w³o¿eniu
rodka pior¹cego i
ewentualnych rodków
dodatkowych sprawd zawsze,
czy:
1. Drzwiczki s¹ dobrze
zamkniête.
2. Wtyczka w³o¿ona jest do
kontaktu.
3. Kurek dop³ywu wody jest
otwarty.
4. Przycisk G znajduje siê w
pozycji O).
5. Kó³ka pralki znajduj¹ siê w
pozycji spoczynku (kó³ka nie
dotykaj¹ pod³ogi).
Wybór programu
Program prania nale¿y wybraæ
w zale¿noci od rodzaju ubrañ
do prania i stopnia ich
zabrudzenia. Aby wybraæ
program, zapoznaj siê z tabel¹
na stronie 6. Przekrêcaj pokrêt³o
A, a¿ wska¿e ono po¿¹dany
numer programu. Wybierz
po¿¹dan¹ temperaturê prania
przy pomocy pokrêt³a B, wybierz
po¿¹dan¹ wirowania prania przy
pomocy pokrêt³a C i w razie
potrzeby przycinij przyciski
funkcyjne (D-E-F); wreszcie
przycinij przycisk w³¹czaniawy³¹czania /On-Off G (pozycja I).
Po zakoñczeniu prania...
Odczekaj oko³o dwóch minut.
Nastêpnie wy³¹cz pralkê,
M
przyciskaj¹c przycisk w³¹czaniawy³¹czania G (pozycja O).
Mo¿esz teraz bezpiecznie
otworzyæ drzwiczki pralki. Po
wyjêciu wie¿o upranej bielizny
zostaw zawsze drzwiczki
otwarte lub uchylone, by mog³a
wyparowaæ pozosta³a w pralce
wilgoæ.
Po zakoñczeniu prania zawsze
zakrêæ kurek dop³ywu wody.
Pamiêtaj, ¿e w razie przerwania dop³ywu pr¹du lub
wy³¹czenia pralki, wybrany
program ponownie podejmie
pracê od momentu, w którym
zosta³ przerwany.
Bieliznê szczególnie delikatn¹, jak bielizna osobista, poñczochy, dziecinne skarpetki i inne bardzo delikatne
ubrania, pierz w³o¿one do p³óciennego woreczka.
UWUW
AA
GA! GA!
UW
A
GA! Aby zakonczyc
UWUW
AA
Zrozumieæ tablicê przycisków
Tutaj polecenia
wydajesz Ty
Wybranie w³aciwego programu jest wa¿ne. I
wcale nietrudne.
Pokrêt³o
z programami pralki.
S³u¿y do wybrania programu
prania.
Pokrêt³o to obracaæ nale¿y
wy³¹cznie w kierunku
zgodnym z ruchem wskazówek zegara.
Aby wybraæ program, wskanik
na pokrêtle musi wskazaæ
symbol/numer po¿¹danego
programu.
Przycinij teraz przycisk
w³¹czania-wy³¹czaniao G
(pozycja I); wskanik H zacznie
wówczas migotaæ. Po 5
sekundach, zaprogramowanie
zostaje zapami tane, wiate³ko
H przestaje migotaæ (pozostaje
stale zapalone) i zaczyna siê
cykl prania.
Jeli chcesz przerwaæ program
w toku lub nastawiæ inny, wybierz
jeden z symboli
i odczekaj 5 sekund: gdy
program zostanie anulowany ,
wskanik H zacznie migotaæ;
mo¿esz wówczas nastawiæ
(Stop/Reset)
nowy program lub wy³¹czyæ
pralkê, gdyby chcia³a do³o¿yæ
inn¹ bieliznê do praniaodczekaj wówczas oko³o
dwóch minut przed
otworzeniem drzwiczek.
Po nastawieniu i zapamietaniu
przez pralkê cyklu prania dalsze
przekrêcanie pokrêt³a nie ma ju¿
¿adnego wp³ywu na dzia³anie
pralki (z wyj¹tkiem pozycji
Stop/Reset).
Pokrêt³o temperatur
S³u¿y do nastawienia
temperatury prania wskazanej w
tabeli programów (por. str.6).
Pozwala Ci ono równie¿, jeli
chcesz, obni¿yæ zalecan¹ dla
wybranego programu
temperaturê, a¿ do prania w
zimnej wodzie w³¹cznie ( ).
Pokrêt³o wirowania
S³u¿y do wy³¹czania
odwirowywania (przez wybranie
symbolu ) oraz do
zredukowania szybkoci
odwirowywania przewidzianego
przez wybrany program.
Maksymalne szybkoci
wirowania dla czterech
podstawowych typów tkanin s¹
nastêpuj¹ce:
Szybkoæ
Tkanina
Bawe³na maksymalna
Tkaniny
syntetyczne 800 obrotów na
We³na 600 obrotów na
Jedwab bez wirowania
W ka¿dym przypadku pralka
dokonuje roz³o¿enia ³adunku
przy ma³ej szybkoci.
Pranie szybkiePranie szybkie
Pranie szybkie
Pranie szybkiePranie szybkie
Przycisk ten skraca program
prania o okolo 30%. Nie mozna
go uzywac przy programach
specjalnych (zob. str. 6) oraz
programach do welny i jedwabiu.
Przycisk zapobieganiaPrzycisk zapobiegania
Przycisk zapobiegania
Przycisk zapobieganiaPrzycisk zapobiegania
gnieceniu sie (do tkaningnieceniu sie (do tkanin
gnieceniu sie (do tkanin
gnieceniu sie (do tkaningnieceniu sie (do tkanin
syntetycznychsyntetycznych
syntetycznych
syntetycznychsyntetycznych
i delikatnych )i delikatnych )
i delikatnych )
i delikatnych )i delikatnych )
Przycisk ten pozwala na
przerwanie programu prania,
pozostawiajac bielizne namo
czona w wodzie przed ostatnim
odwirowaniem . Jest to
funkcja bardzo przydatna, gdyz
zapobiega gnieceniu sie tkanin
delikatnych i syntetycznych (na
przyklad, gdy nie mozesz
wyladowac pralki od razu po
zakonczeniu prania, lecz
dopiero po kilku godzinach).
Uzywa sie go wylacznie przy
programach do tkanin
syntetycznych (Progr. 5-6-7-9).
wirowania
iloæ
obrotów na
minutê
minutê
minutê
GA! GA!
program i usunac wode,
ponownie przycisnij przycisk
.
Dodatkowe plukanieDodatkowe plukanie
Dodatkowe plukanie
Dodatkowe plukanieDodatkowe plukanie
Sluzy do zwiekszenia ilosci
plukan przy programach do
tkanin
Zalecamy je w celu
poprawienia jakosci plukania,
gdy pralka jest zaladowana
do pelna i w przypadku skóry
szczególnie wrazliwej na
srodki piorace (uczulenia i
alergie).
wytrzymalych.wytrzymalych.
wytrzymalych.
wytrzymalych.wytrzymalych.
W³¹czanie- Wy³¹czanie
(On-Off)
Gdy przycisk G jest wciniêty,
pralka jest w³¹czona, gdy za
nie jest wciniêty - pralka jest
wy³¹czona.
Wy³¹czenie pralki nie anuluje
wybranego programu.
wiate³ko wskazuj¹ce
w³¹czenie-wy³¹czenie
pralki
wiate³ko H migocze, gdy
pralka jest w³¹czona i czeka na
nastawienie programu. Gdy
pozostaje ono stale zapalone,
oznacza to, ¿e pralka zapami
ta³a nastawiony program
prania.
Wskanik wietlny
blokady drzwiczek
Zapalone wiate³ko oznacza, ¿e
okr¹g³e drzwiczki pralki s¹
zablokowane, uniemo¿liwiaj¹c
ich przypadkowe otworzenie.
Aby nie uszkodziæ tego
mechanizmu, nale¿y odczekaæ,
a¿ to wiate³ko zganie przed
otworzeniem drzwiczek. Czas
oczekiwania wynosi oko³o
dwóch minut.
ê
Instrukcja instalacji i obs³ugi
33
3
33

Co chcesz dzisiaj praæ?
Programy na ka¿d¹ porê roku
Rodzaj tkaniny oraz
stopieñ zabrudzenia
BAWE£NA
Bielizna bia³a silnie zabrudzona (pociel,
obrusy itp.)
Pokrêt³o
programów
1
Pokrêt³o
tem peratu r
Max°C
rodek do
prania
wstêpnego
rodek do
prania
w³aciwego
uu u
rodek
zmiêkczaj¹cy
Wybielacz
tradycyjny
lub delikatny
Czas
trw ania
cyklu (w
minutach)
150
Opis cyklu prania
Pranie wstêpne. Pranie w³a
ciwe w wysokiej temperaturze,
p³ukania, odwirowania porednie i koñcowe
Bielizna bia³a silnie zabrudzona (pociel,
obrusy itp.)
Bielizna bia³a i kolorowa, wytrzyma³a,
mocno zabrudzona
Bielizna bia³a, s³abo zabrudzona oraz
kolorowa delikatna (koszule, bluzki itp.)
P³ukania i wybielanie
Odwirowanie Usuniêcie wody oraz odwirowanie koñcowe
Stop/Reset Przerywa/ anuluje wybrany program
Max°C
2
60°C
3
4
40°C
uu
uu
uu
u
D elikatn y/
Tradycyjny
D elikatn y/
Tradycyjny
D elikatn e/
Tradycyjne
D elikatn y/
Tradycyjny
Pranie w³aciwe w wysokiej
temperaturze,
130
rednie i koñcowe
Pranie normalne w temp.60
130
p³ukania, odwirowania porednie i koñcowe
Delikatne pranie w temp. 40
p³ukania, odwirowania porednie i koñcowe
115
P³ukania, odwirowania porednie i koñcowe
p³ukania, odwirowania po
,
°C
,
°C
TKANINY
SYNTETYCZNE
Tkaniny syntetyczne o wytrzyma³ych
kolorach, silnie zabrudzone (bielizna dla
nie m ow l¹ t itp.)
Tkaniny syntetyczne o delikatnych
kolorach (wszystkie rodzaje bielizny, lekko
zabrudzonej)
Tkaniny syntetyczne o delikatnych
kolorach (wszystkie rodzaje bielizny, lekko
zabrudzonej)
P³ukania i wybielanie
rodek zmiêkczaj¹cy
Zatrzymanie z wod¹ Zatrzymanie w w odzie do ubrañ i bielizny
Odwirowanie Opró¿nienie z wody i delikatne odwirowanie
Stop/Reset Przerywa/ anuluje wybrany program
TKANINY DELIKATNE
60°C
5
40°C
6
30°C
7
uu
uu
uu
u
u
D elikatny
D elikatny
Delikatny P³ukania, funkcja przeciw gnieceniu lub
Pranie energiczne w temp.60
p³ukania, funkcja przeciw gnieceniu lub
105
delikatne odwirowanie
Pranie normalne w temp.40°C,
p³ukania, funkcja przeciw gnieceniu lub
75
delikatne odwirowanie
Pranie delikatne w temp.30
p³ukania i delikatne odwirowanie
30
delikatne odwirowanie
P³ukania z pobraniem rodka zmiêkczaj¹cego,
funkcja przeciw gnieceniu lub delikatne
odwirowanie
szczególnie delikatnej
°C
°C
,
,
We³na
Ubrania
delikatne (firanki, jedwab, wiskoza itp.)
P³ukania
Zatrzymanie z zanurzeniem w w odzie Zatrzymanie z zanurzeniem w w odzie do
Odwirowanie Opró¿nienie z wody i delikatne odwirowanie
Opró¿nienie z wody O pró¿nienie z wody
Stop/Reset Przerywa/ anuluje wybrany program
i tkaniny szczególnie
40°C
8
30° C
9
uu
uu
u
Pranie w temp.40°C,
55
odwirowanie
Pranie w temp.
45
przeciw gnieceniu lub usuniêcie wody
P³ukania, funkcja przeciw gnieceniu lub
opró¿nienie z wody
szczególnie delikatnych tkanin
p³ukania i delikatne
,
p³ukania, funkcja
30°C
Wa¿ne: Aby anulowaæ nastawiony program prania, nale¿y wybraæ jeden z symbolów ) (Stop/Reset) i odczekaæ conajmniej
5 sekund.
Programy Specjalne
Podane w tabeli dane maj¹ charakter orientacyjny. Mog¹ siê bowiem ró¿niæ w zale¿noci od modelu pralki,
iloci i rodzaju bielizny, twardoci i temperatury wody w sieci oraz temperatury otoczenia.
7- Pranie codzienne do delikatnych tkanin syntetycznych w temp. 30° przez 30 minut. Pralka wyposa¿ona jest w specjalny program
przeznaczony do prania ma³o zabrudzonej bielizny w krótkim czasie. Nastawiaj¹c program 7 na temperaturê 30°C mo¿na razem wypraæ
ró¿nego rodzaju tkaniny (z wyj¹tkiem we³ny i jedwabiu), przy maksymalnym za³adunku do 3 kg. Program ten pozwala na zaoszczêdzenie
czasu i energii, poniewa¿ trwa zaledwie oko³o 30 minut. Zalecamy u¿ycie p³ynnego rodka pior¹cego, który wlewa siê do przegródki prania
w³aciwego w szufladce rodków pior¹cych.
44
4
44
Instrukcja instalacji i obs³ugi

Aby bezpiecznie praæ
Jak otwieraæ i zamykaæ kosz
A) OTWIERANIE. (Rys.1). Podnieæ zewnêtrzn¹ pokrywê i
ca³kowicie j¹ otworzyæ.
B) Nastêpnie otworzyæ bêben, pomagaj¹c sobie obiema
rêkami, jak pokazano na Rys. 2):
- przycisn¹æ wskazany strza³k¹ na Rys. 2 przycisk i
lekko docisn¹æ w dó³, trzymaj¹c opart¹ jedn¹ d³oñ, aby
drzwiczki otwieraj¹c siê nie zrani³y palców;
- powoli poluzowaæ drzwiczki, które siê zwolni¹ i ³atwo
Rys. 1 Rys. 2
Rys. 3
Rys. 4
otworz¹.
C) WK£ADANIE BIELIZNY. (Rys.3)
D) ZAMKNIÊCIE. (Rys.4)
- dobrze zamkn¹æ drzwiczki, opuszczaj¹c najpierw
drzwiczki przednie i opieraj¹c na nich drzwiczki tylne;
- upewniæ siê, czy zaczepy przednich drzwiczek dobrze
wesz³y na swoje miejsce w tylnych drzwiczkach;
- po us³yszeniu charakterystycznego clac, co wiadczy
o zaskoczeniu zaczepów, lekko docisn¹æ oboje
drzwiczek, które nie powinny siê rozczepiæ.;
- na zakoñczenie zamkn¹æ klapê zewnêtrzn¹.
Jak czyciæ szufladkê rodków pior¹cych
Wymontowanie:
Lekko przycisn¹æ du¿y przycisk
w przedniej czêci szufladki
rodków pior¹cych i
poci¹gn¹æ j¹ do góry (Rys.1).
Rys. 1
Czyszczenie:
Wymyæ szufladkê pod bie¿¹c¹ wod¹ (Rys.3), pomagaj¹c sobie
star¹ szczoteczk¹ do zêbów i po wyjêciu pary syfonków
znajduj¹cych siê w górnej czêci przegródek 1 i 2 (Rys.4),
sprawdziæ, czy nie s¹ one zatkane i wyp³ukaæ je.
Rys. 2
Rys. 3
Kiedy trzeba skontrolowaæ pompê i rurê gumow¹.
Pralka wyposa¿ona jest w pompê samooczyszczaj¹c¹, która nie wymaga czyszczenia i konserwacji. Mo¿e siê jednak zdarzyæ, ¿e drobne
przedmioty, jak monety, spinki, oderwane guziki i inne drobiazgi, dostan¹ siê przypadkowo do pompy. Aby zapobiec uszkodzeniom,
przedmioty te zatrzymywane s¹ w specjalnej, usytuowanej w dolnej czêci pompy komorze wstêpnej, któr¹ ³atwo jest skontrolowaæ.
Ponowne
zamontowanie:
Po w³o¿eniu pary syfonków,
wstaw szufladkê na swoje miejsce,
zaczepiaj¹c j¹ (Rys.4, 2, 1).
Rys. 4
Aby dostaæ siê do tej komory, wystarczy zdj¹æ przykrywaj¹cy panel
zewnêtrzny w dolnej czêci pralki (Rys.1); a nastêpnie zdj¹æ przykrywkê,
obracaj¹c j¹ w kierunku przeciwnym do ruchu wskazówek zegara (Rys.2) i
dok³adnie skontrolowaæ wnêtrze.
Rura gumowa
Przynajmniej raz do roku skontroluj rurê gumow¹. Jeli widoczne s¹ na niej
pêkniêcia i rysy, nale¿y j¹ natychmiast wymieniæ, poniewa¿ w trakcie prania
poddana jest ona wysokim cinieniom, które mog³yby spowodowaæ jej
nag³e rozerwanie.
Rys. 1
Uwaga: przed zdjêciem przykrywki, jak te¿ i przed zaczêciem jakiejkolwiek czynnoci konserwacji, sprawd, czy cykl prania dobieg³ koñca i
wyjmij wtyczkê z kontaktu. Fakt, ¿e po zdjêciu przykrywki wyp³ynie niewielka iloæ wody, jest zjawiskiem normalnym. Montuj¹c ponownie
panel przykrywaj¹cy, sprawd, by znajduj¹ce siê w dolnej czêci zaczepy wesz³y do odpowiednich otworów, zanim dociniesz panel.
Instrukcja instalacji i obs³ugi
Rys. 2
55
5
55

Aby lepiej praæ
Sekrety szufladki rodków pior¹cych
Pierwszy sekret: szufladka na rodki pior¹ce znajduje siê w wygodnym miejscu pod klap¹.
Wsypuj rodki pior¹ce oraz
ewentualne rodki dodatkowe,
stosuj¹c siê do zaleceñ
producenta: zazwyczaj
informacje te znajduj¹ siê na
opakowaniu. Dozowanie
rodka pior¹cego zale¿y od
iloci za³adowanej bielizny, od
twardoci wody oraz od
stopnia zabrudzenia.
przesadzaj.
wcale nie oznacza lepszego
prania; wrêcz przeciwnie...
Z czasem nauczysz siê
dozowaæ rodki pior¹ce w
sposób niemal automatyczny:
stanie siê to Twoim sekretem.
Gdy wlewasz rodek
zmiêkczaj¹cy do przegródki 3,
uwa¿aj, by nie przekroczyæ
wskazanego poziomu
maksymalnego (max).
Pralka pobiera automatycznie
rodek zmiêkczaj¹cy przy
ka¿dym programie prania.
Wiêcej proszku
Nie
Oszczêdnoæ inteligentna
MAKSYMALNE ZA£ADOWANIE
Najlepszym sposobem, by nie trwoniæ wody, energii, rodka pior¹cego oraz czasu, jest u¿ywanie pralki z
pe³nym zalecanym ³adunkiem maksymalnym.
Jedno za³adowane do pe³na pranie, zamiast dwóch za³adowanych do po³owy, pozwala na
ZAOSZCZÊDZENIE a¿ do 50% energii.
U¯YWAJ MNIEJ RODKA PIOR¥CEGO GDY : pierzesz niewielk¹ iloæ bielizny, bielizna jest ma³o
zabrudzona, w czasie prania tworzy siê piana lub woda jest ma³o twarda albo miêkka (zobacz powy¿sz¹
tabelê ze stopniami twardoci wody). O twardoci wody mo¿esz siê dowiedzie poinformowaæ w
Urzêdzie Wodoci¹gowym w Twojej gminie.
PRANIE WSTÊPNE JEST NAPRAWDÊ KONIECZNE?
Tylko wówczas, gdy bielizna jest naprawdê bardzo brudna.
Zaprogramowanie prania BEZ prania wstêpnego w przypadku bielizny ma³o lub rednio zabrudzonej
pozwala na ZAOSZCZÊDZENIE rodka pior¹cego, czasu, wody oraz od 5 do 15% energii.
PRANIE W GOR¥CEJ WODZIE JEST NAPRAWDÊ KONIECZNE?
Usuniêcie plam odplamiaczem lub namoczenie suchych plam w wodzie przed praniem pozwala na
zmniejszenie temperatury prania.
Stosowanie programu prania o temp.60° pozwala na ZAOSZCZÊDZENIE a¿ do 50% energii.
P³ynny rodek pior¹cy wlewa
siê tu¿ przed uruchomieniem
ki.
pral
Pamiêtaj, ¿e p³ynne rodki
pior¹ce nadaj¹ siê zw³aszcza
do prania w temperaturze do
60 stopni oraz do programów
prania, które nie przewiduj¹
prania wstêpnego.
W handlu istniej¹ równie¿ rodki
pior¹ce p³ynne i w proszku
sprzedawane wraz ze
specjalnymi pojemnikami, które
wk³ada siê bezporednio do
bêbna, wed³ug podanych na
opakowaniu instrukcji.
Nigdy nie u¿ywaj do pralki
rodków pior¹cych
przeznaczonych do prania
rêcznego, gdy¿ tworz¹ one zbyt
wiele piany, która mo¿e
uszkodziæ pralkê.
Ostatni sekret: gdy pierzesz w
zimnej wodzie, zawsze zmniejsz
iloæ rodka pior¹cego; w
zimnej wodzie rozpuszcza siê on
bowiem gorzej ni¿ w ciep³ej, a
wiêc jego nadmiar zmarnowa³by
siê.
Przegródka 1: rodek pior¹cy
do prania wstêpnego (w
proszku)
Przegródka 2: rodek pior¹cy
do prania w³aciwego (w
proszku lub w p³ynie)
Przegródka 3: rodek
zmiêkczaj¹cy
Przegródka 4: Wybielacz
Pranie wstêpne, wybielanie,
rodek zmiêkczaj¹cy
Gdy konieczne jest wybielanie,
nastaw odpowiednie programy
i wlej wybielacz do przegródki
4 szufladki rodków pior¹cych.
Gdy wlewasz wybielacz,
uwa¿aj, by nie przekroczyæ
wskazanego maksymalnego
poziomu “max”.
Stosowanie wybielacza
wyklucza mo¿liwoæ wykonania prania wstêpnego.
Wybielacz t
siê wy³¹cznie do
wytrzyma³ych tkanin bia³ych,
za wybielacz delikatny
stosuje siê do tkanin
kolorowych i syntetycznych.
Nie mo¿na dokonaæ
wybielania przy programie
Jedwab oraz przy
Programach Specjalnych
(zobacz str.6).
Stopnie twardoci wody
Poziom Cecha
1 Miêkka
2 rednia
3 – Twarda
4 – Bardzo twarda
Wskazówki dla oszczêdnego
i ekologicznego korzystania
ze sprzêtu domowego u¿ytku
æ
radycyjny stosuje
Niemieckie Francuskie
N.B.:
ybielacz
1)W
skoncentrowany nale¿y
koniecznie rozcieñczyæ.
2) W przypadku
skoncentrowanych rodków
pior¹cych (w proszku i w
p³ynie) nale¿y stosowaæ
programy prania bez prania
wstêpnego.
3) W przyupadku rodków
pior¹cych w postaci kulki lub
tabletki nie nale¿y stosowaæ
prania wstêpnego.
Dodanie rodka
zmiêkczaj¹cego
rodek zmiêkczaj¹cy sprawia,
¿e bielizna staje siê miêkka i
zmniejsza elektryzowanie siê
tkanin syntetycznych.
°dH °T .H
0 - 7 0 -15
8-14 16-25
15-21 26-37
+ ponad 21 + ponad 37
szufladki na rodki pior¹ce,
stosuj¹c siê do zaleceñ
producenta.
Pralka pobierze automatycznie
rodek zmiêkczaj¹cy w trakcie
ostatniego p³ukania. Po
zakoñczeniu programu prania
na dnie przegródki 3 pozostanie
trochê wody. S³u¿y ona do
rozwodnienia rodków
zmiêkczaj¹cych bardzo gêstych
i do rozcieñczenia
skoncentrowanych.
Jeli w przegródce 3
pozosta³oby wiêcej wody, ni¿
normalnie, oznacza to, ¿e
urz¹dzenie opró¿niaj¹ce
przegródkê jest zatkane, co
utrudnia zasysanie rodka.
O czyszczeniu przegródki
zobacz str. 13. Nigdy nie wlewaj
razem do przegródki rodka
zmiêkczaj¹cego i krochmalu,
gdy¿ mog³oby dojæ do zatkania
systemu przelewu.
rodki
zmiêkczaj¹ce
mo¿na
stosowaæ do
tkanin
frotté, dzianiny,
firanek itp.
Wlej rodek
zmêkczaj¹cy
do przegródki 3
6 6
6
Instrukcja instalacji i obs³ugi
6 6

Problemy i ich rozwi¹zanie
Zanim wezwiesz technika, przeczytaj to
Mo¿e siê zdarzyæ, ¿e pralka nie dzia³a. W wielu przypadkach s¹ to problemy, które ³atwo rozwi¹zaæ, bez
wzywania technika. Zanim wezwiesz serwis techniczny, sprawd zawsze, co nastêpuje:
Pralka nie uruchamia siê.
Czy wtyczka jest dobrze
w³o¿ona do kontaktu? Przy
okazji sprz¹tania mog³a siê
wysun¹æ.
Czy w domu jest dop³yw
pr¹du?
Móg³ zadzia³aæ bezpiecznik, na
przyk³ad poniewa¿ w³¹czy³a
za du¿o sprzêtu elektrycznego
jednoczenie. Albo móg³
zostaæ chwilowo wy³¹czony
pr¹d w budynku lub w ca³ej
dzielnicy.
Czy drzwiczki s¹ dobrze
zamkniête?
Ze wzglêdów bezpieczeñstwa
pralka nie dzia³a, jeli
drzwiczki s¹ otwarte lub le
zamkniête.
Przycisk w³¹czania/
wy³¹czania jest wciniêty?
Jeli tak, czy zosta³o
nastawione opónione
uruchomienie pralki?
Czy pokrêt³o opónionego
uruchomienia, w modelach
pralek, gdzie jest ono
przewidziane, ustawione
jest we w³aciwej pozycji?
Czy kurek dop³ywu wody
jest otwarty? Ze wzglêdów
bezpieczeñstwa pralka nie
rozpoczyna prania, jeli nie
mo¿e pobraæ wody.
Pralka nie pobiera wody.
Czy rura dop³ywu wody
jest dobrze pod³¹czona do
kurka ?
Czy w sieci wodoci¹gowej
nie brak wody? Mo¿e
w³anie prowadzone s¹
prace hydrauliczne w
budynku lub na ulicy.
Czy cinienie wody jest
wystarczaj¹ce? Mo¿e jest
defekt autoklawu.
Czy filtr kurka jest czysty?
Jeli woda zawiera du¿o
wapnia lub jeli niedawno
prowadzone by³y roboty
wodoci¹gowe, ró¿ne
nieczystoci mog³y zatkaæ filtr
kurka dop³ywu wody.
Czy rura gumowa jest
zgiêta? Przebieg rury
gumowej, która doprowadza
wodê do pralki, powinien byæ
mo¿liwie najprostszy.
Sprawd, czy rura nie jest
zgiêta czy ciniêta.
Pralka pobiera i usuwa
wodê bez ustanku.
Rura znajduje siê za nisko?
Rura ma byæ pod³¹czona na
wysokoci od 60 do 100 cm.
Wylot rury usuwania
zanurzony jest w wodzie?
Czy kurek usuwania w
cianie wyposa¿ony jest w
odpowietrznik? Jeli po
skontrolowaniu tych
elementów problem nadal
siê utrzymuje, zamknij kurek
dop³ywu wody, wy³¹cz pralkê i
wezwij serwis techniczny.
Jeli mieszkasz na wysokim
piêtrze, mo¿e zaistnieæ efekt
syfonu”.
Aby mu zapobiec, nale¿y
zainstalowaæ odpowiedni
zawór.
Pralka nie usuwa wody i
nie odwirowuje.
Wybrany program
przewiduje usuwanie wody?
Przy niektórych programach
prania nale¿y manualnie
uruchomiæ opró¿nienie z
wody.
Zosta³a nastawiona funkcja
Przeciw gnieceniu tkanin
w pralkach, gdzie jest ona
przewidziana ? Funkcja ta
przewiduje manualne
uruchomienie opró¿nienia
pralki z wody.
Zatkana jest pompa
usuwania wody? W celu
skontrolowania pompy nale¿y
zamkn¹æ kurek dop³ywu
wody, wy³¹czyæ wtyczkê i
postêpowaæ wed³ug instrukcji
zawartych na stronie 12 lub
wezwaæ serwis techniczny.
Rura usuwania wody jest
zgiêta? Przebieg rury
powinien byæ mo¿liwie
najprostszy. Sprawd, czy rura
nie jest zgiêta lub zgnieciona.
Czy przewód usuwania
wody nie jest zatkany? Czy
ewentualne przed³u¿enie
rury usuwania wody nie jest
nieregularne i nie utrudnia
swobodnego przep³ywu
wody?
Pralka mocno wibruje w
fazie odwirowywania.
Czy wewnêtrzna grupa
oscyluj¹ca zosta³a
w³aciwie odblokowana w
czasie instalacji? Zobacz
str.2, powiêcona instalacji.
Czy pralka ustawiona jest
dok³adnie w poziomie?
Powinno siê okresowo
kontrolowaæ
wypoziomowanie
urz¹dzenia. Z czasem pralka
mo¿e siê bowiem
nieznacznie przesun¹æ.
Wyregulowaæ
wypoziomowanie przy
pomocy nó¿ek, kontroluj¹c
poziomnic¹.
Czy wokó³ pralki jest
trochê miejsca? Zaleca siê,
by pralka nie dotyka³a
urz¹dzeñ sanitarnych i by
mia³a wokó³ siebie trochê
wolnego miejsca. Jeli
ustawiona jest ona na
wyk³adzinie dywanowej,
upewnij siê, czy miêdzy
nó¿kami a pod³og¹ istnieje
swobodny przep³yw
powietrza.
Z pralki przecieka woda.
Nasadka rury pobierania
wody jest dobrze
dokrêcona? Zamknij kurek,
wy³¹cz wtyczkê i spróbuj
dokrêciæ j¹ bez forsowania.
Szufladka rodków
pior¹cych jest zatkana?
Spróbuj j¹ wyj¹æ i umyæ pod
bie¿¹c¹ wod¹.
Rura usuwania wody jest le
przymocowana? Zamknij
kurek, wy³¹cz wtyczkê i
spróbuj j¹ lepiej
przymocowaæ.
We work, you play
Tworzy siê zbyt wiele
piany.
Czy rodek pior¹cy
przeznaczony jest do pralek
automatycznych? Sprawd,
czy na opakowaniu znajduje
siê napis do pralek lub do
prania rêcznego oraz pralek”,
lub podobny.
Czy iloæ rodka pior¹cego
jest w³aciwa? Nadmiar
rodka tworzy zbyt wiele piany,
a ponadto le pierze i prowadzi
do tworzenia sie nalotów na
wewnêtrznych czêciach
pralki.
Jeli, mimo skontrolowania
wszystkiego, pralka nadal nie
pracuje i nadal zachodzi
zauwa¿ona nieprawid³owoæ,
wezwij najbli¿szy upowa¿niony
serwis techniczny i podaj mu
nastêpuj¹ce dane:
- rodzaj defektu
- znak modelu (Mod…. )
- numer seryjny (S/N ....)
Informacjê tê znajdziesz na
tabliczce znajduj¹cej siê w
tylnej czêci coko³u.
(Rys. 1)
Zwracaj siê wy³¹cznie do
upowa¿nionych
techników i zawsze
domagaj siê
zainstalowania
oryginalnych czêci
zamiennych.
01/2003 - 195 034 985 02 - Xerox Services Docutech
77
7
Instrukcja instalacji i obs³ugi
77

Felsõ betöltésû
mosógép
Beüzemelési és használati utasítás Hu
WT 120

Beüzemelés és áthelyezés
Amikor a mosógép megérkezik
Felállítás, áthelyezések
A beüzemelés nagyon fontos pillanat a mosógép
jó mûködéséhez, az akár új, akár át lett költöztetve
az egyik lakhelyrõl a másikra.
A csomagolás lebontása
után gyõzõdj meg a készülék
épségérõl. Kétség esetén hívj
fel azonnal egy szakképzett
szerelõt. A mosógép belsejét
a szállításhoz négy csavarral
és dugóval a hátlaphoz
rögzítik.
távolságtartót. Áthelyezés
esetén hasznosak lesznek a
ismételt rögzítéséhez, mely
õrizd meg a
õcsavarokat és a
rögzít
mosógép belsõ részeinek
ezáltal védelmet élvez az
Kibontás: vedd le a 4
ütõdésektõl.
csavart!
Csatlakoztatás a
2
1
A mosógép muködésbe
helyezése elõtt távolítsd el a
csavarokat, (õrizz meg
minden darabot) és tömd be
a lyukakat a mellékelt
muanyag dugókkal.
Figyelem: újbóli használat
esetén a rövidebb csavarokat
felülre kell szerelni.
Vízszintezés
A mosógép jó üzemeléséhez
fontos, hogy teljesen vízszintben
legyen. A vízszintezés
végrehajtásához elegendõ az
elsõ lábak elmozdítása: a munka
síkján mért dõlésszög nem
haladhatja meg a 2°-ot.
Padlószõnyeg esetén
bizonyosodjunk meg arról, hogy
nem záródik el a szellõzés a
támaszpontnál.
A lábak szabályozhatók.
vízbevezetéshez
A víznyomásnak a hátulján
elhelyezett táblán feltüntetett
értékeknek kell megfelelnie.
Kössük a betöltõcsövet ( a
forgódob belsejében
szétbontva található) egy
hidegvíz bevezetõhöz egy 3/4
gas méretû menetes gyûrûvel.
Ha a vízvezeték új vagy
használaton kívül volt, a
bekötés elõtt folyassuk ki a
vizet, amíg áttetszõ és
szennyezõdéstõl mentes nem
lesz. A csövet kössük a géphez
a jobb felsõ részen lévõ
megfelelõ vízbevezetõbe.
Vízbevezetõ a jobb felsõ
részén.
A leeresztõcsõ
csatlakoztatása
A gép hátulján, felül van egy
kampó, amelyhez rögzíthetõ a
leeresztõcsõ. A másik
végzõdését egy fali
elvezetõcsõbe kötjük illetve a
mosdóhoz vagy a kádhoz
támasztjuk, elkerülve az
összenyomását és a túlzott
görbületeket. Fontos, hogy egy
60 és 100 cm közötti magasságban végzõdjön.
Abban az esetben, amikor
nélkülözhetetlen a csõ
végzõdésének rögzítése a
padlótól mért 60 cm-nél
alacsonyabb magasságban,
szükséges, hogy a csövet a fent
említett, a hátlap felsõ részén
erre a célra elhelyezett
kampóra erõsítsük.
Ezen kocsi leengedéséhez és
így a gép erõfeszítés nélküli
elmozdításához alul a zárócsík
alatt, bal oldalon elhelyezett kart
kell meghúzni. Az áthelyezés
befejeztével a kiindulási
állapotba tegyük a gépet. Ezen
a ponton a gép biztonságosan
fel van állítva. Lásd ábra.
(Csak az eloirányzott modelleknél)
Kampó arra a célra, ha a
leeresztõcsõ 60 cm-nél
alacsonyabb magasságban
végzõdik.
Ha a csõ a kádba vagy a
mosdóba ereszti le a vizet, a
muanyag vezetéket
alkalmazzuk és kössük a
vízcsaphoz.
Vezeték a kádba és a mosdóba
történõ leeresztéshez.
A csõnek soha nem szabad a
vízbe merûlve maradnia.
A hosszabítócsövek nem
javasoltak. Amennyiben
feltétlenül nélkülözhetetlen, a
hosszabbítócsõnek az eredeti
csõ átmérõjével meg kell
egyeznie és nem haladhatja
meg a 150 cm-es
hosszúságot. Falon keresztüli
leeresztés esetében
szakképzett szerelõvel
ellenõriztessük az
alkalmasságát. Ha a lakhely
egy épület legfelsõbb
emeleteinek egyikén található,
lehetséges, hogy a
közlekedõedény jelensége lép
fel, ezért a mosógép
folytonosan szívja és leereszti
a vizet.
Ezen kellemetlenség
elkerüléséhez a kereskedelmi
forgalomban rendelkezésre
állnak a közlekedõedény
jelenség elleni szelepek.
Elektromos bekötés
A gépnek az elektromos
csatlakozáshoz történõ
bekötése elõtt
bizonyosodjunk meg, hogy:
1) az elektromos csatlakozás el tudja viselni a
gépnek a tulajdonságokat
ismertetõ tábláján jelölt
maximális teljesítményét
és hogy a törvény által
elõírt szabványoknak
megfeleljen.
2) Az áramellátás
feszültsége a
tulajdonságokat ismertetõ
táblán jelölt értékekkel
megegyezzen.
3) Az aljzat kompatibilis
legyen a gép
csatlakozódugójával.
Ellenkezõ esetben ne
használjunk illesztõ
egységet, hanem az aljzat
vagy a csatlakozódugó
cseréjével járjunk el.
4) Az elektromos háztartási
gépeknek "földeléssel"
kell rendelkezniük.
5) a bekötést követõen a gép
ne álljon a villamossági
kábelen;
6) a készüléket úgy kell
elhelyezni, hogy a
csatlakozódugó elérhetõ
legyen.
Figyelmeztetés!
A gyár által készített
csatlakozáson végzett
bármilyen módosítás vagy egy
szabálytalan elektromos
bekötés, a gép bármiféle
elektromos, mûszaki vagy
vízrendszeri módosítása a
garancia érvényének
vesztését eredményezi és a
gyártót illetve az eladót az
esetleges felelõsség alól
mentesíti.
Mûanyag zacskók,
expandált polisztirol,
szegek és egyéb
csomagolóanyagok nem
játékszerek gyermekek
számára, hanem komoly
veszélyforrások.
11
1
Beüzemelési és használati utasítás
11

Mindig a legfontosabb
A biztonság számodra és a
gyermekeid részére
Olvasd el figyelmesen az alábbi
utasításokat és minden
információt, melyeket ez a
könyvecske tartalmaz: fontos,
mert számos hasznos ismereten
kívül lényeges információkat
nyújtanak a biztonságra, a
felhasználásra és a karbantartásra vonatkozóan.
1.Meghibásodás esetén
mindenekelõtt húzd ki a
csatlakozódugót a fali
aljzatból és zárd el a
vízcsapot, semmilyen
esetben se nyúlj a belsõ
mechanizmusokhoz a
javítás szándékával. Ez a
garanciafeltételek
érvényének vesztését is
eredményezi.
2. A mosógép nem
helyezhetõ üzembe nyílt
térben, még akkor sem, ha
a tér tetõvel van fedve, mert
nagyon veszélyes esõnek
és zivataroknak kitéve
hagyni.
3. Csak felnõttek
használhatják és
kizárólag ruhanem
mosására a jelen
kézikönyvben leírt
utasítások szerint.
4. Elmozdítása esetén a bal
oldalon alul, a lábazat alatt
levõ fehér kart kell
û
meghúzni, amely
leengedi a behúzható
kerekek kocsiját és így
lehetõvé teszi a könny
mozgatást.
5. A ruhanem
elõtt ellenõrizd, hogy a
forgódob üres legyen.
6. Ne érj a géphez mezítláb
illetve vizes vagy nedves
kézzel vagy lábbal.
7. Ne használj hosszabbítókat és elosztókat,
melyek leginkább nedves
környezetben
veszélyesek. A
villamossági kábelt
veszélyes hajlításoknak
vagy összenyomásnak
nem szabad kitenni.
8. Ne húzd ki a szûrõt,
amikor a gép mûkõdik.
Ne használj kézi
mosószert, mert a sok
habja kiáramolhat a
fedéllapon és károkat
okozhat.
9. Soha ne húzd a kábelt,
sem a mosógépet a
csatlakozódugónak a fali
aljzatból történõ
kihúzásához: nagyon
veszélyes.
10.A mosógép m
alatt ne érintsd meg a
lefolyó vizet, mert magas
hõmérséklet
û berakása
ûködése
û lehet.
û
A mosógéped a legszigorúbb nemzet-közi biztonsági
szabványok szerint készült. A Te és a családod védelmére.
Tartsd távol a
gyermekeket. Soha ne
erõltesd az ajtó nyitását,
mert az megkárosíthatja a
nyílásba szerelt biztonsági
mechanizmust, melynek
feladata a véletlen
kinyílásoktól való védelem.
HELYES
A vízcsap elzárása minden
mosás után korlátozza a
mosógép vízrendszeri
berendezésének
elhasználódását és kiküszöböli
az elfolyás veszélyét, amikor
nincs otthon senki.
Felügyelet nélkül lehetõleg
csak akkor használd a
mosógépet, ha a helyiség, ahol
el van helyezve, kövezeti
lefolyóval el van látva
(levezetõ).
Mindig hagyd félig nyitva az
ajtókat.
Ilyen módon nem alakulnak ki
kellemetlen szagok.
Kíméletesen tisztítsd a
külsejét.
A mosógép külsejének és
gumirészeinek tisztításához
mindig szappanos, langyos
vízzel átitatott törlõrongyot
használj.
11.Ez a gép háztartási
felhasználásra készült.
Ipari felhasználása
(szállodák, éttermek,
mosodák) rontja az erdeti
gyári tulajdonságait és a
garancia érvényének
vesztését eredményezi.
TÉVES
A csatlakozódugót bekötve
hagyni amikor a mosógépet
tisztítod.
A karbantartási munkák
során is a csatlakozódugót
mindig ki kell húzni.
Erõs oldószereket és
csiszolóanyagokat használni.
Soha ne használj
oldószereket vagy
csiszolóanyagokat a mosógép
külsejének és gumirészeinek
tisztításához.
A mosószertartót
elhanyagolni.
Kihúzható és a kimosásához
elegendõ egy rövid ideig
folyóvíz alatt hagyni.
Vakációra menni anélkül,
hogy eszünkbe ne jutna.
Vakációra menet elõtt mindig
ellenõrizd, hogy a
csatlakozódugó ki legyen
húzva és a vízcsap zárva
legyen.
A hálózati kábel cseréje
1. Gyõzõdj meg arról,
hogy a mosógép ki legyen
kapcsolva és a
!
A speciális hálózati kábel
kizárólag az
Szervízszolgálatoknál
vásárolható meg.
A cseréjekor az alábbiak
szerint kell eljárni:
1. ábra
csatlakozódugó ki legyen
húzva.
2. Távolítsd el a mosógép
lábazati takarólemezét, és
csavarozd ki a jobb oldalon
alul található két csavart,
majd csavarozd ki a tõled
balra esõ hátsó hat csavart,
2. ábra
és az oldallapot kissé kifelé
döntve húzd ki, majd távolítsd
el. (1. és 2. ábra).
3. A csatlakozót széthúzva
kösd ki a zavarszûrõt (3.
ábra).
4. Csavarozd ki a szûrõ két
külsõ rögzítõcsavarját, és egy
csavarhúzó segítségével (lásd
4. ábra) felfelé húzva akaszd
le a hátlapról.
3. ábra
Beüzemelési és használati utasítás 2
5. Miután a kábelt kicserélted,
told egymásba a
csatlakozókat, és ellenõrizd,
hogy a rögzítõfül a helyére
ugrott, tehát a csatlakozó nem
fog szétcsúszni.
A hálózati kábel cseréjét
mindenképpen
szakembernek kell
végeznie, aki be kell, hogy
tartsa a vonatkozó törvény
elõírásait.
4. ábra

A mosógép beindítása
M
Üzembehelyezés után kezdj egy mosási ciklust az "1"-es program bekapcsolásával 60 fokon.
A mosógép helyes módon
történõ beindítása fontos úgy
a mosás minõsége, mint a
problémák megelõzése és a
mosógép élettartamának
növelése szempontjából. A
ruhanemû behelyezése, a
mosószer és esetleges
A kényesebb
ruhadarabok számára:
fehérnem
ût, nõi
harisnyákat és
kényesebb
ruhadarabokat kösd egy
vászonzsákba, hogy
megkíméld õket.
adalékanyagok betöltése után
mindig ellenõrizd, hogy:
1. Az ajtók jól be legyenek zárva
2. A csatlakozódugó be
legyen vezetve az aljzatba.
3. A vízcsap ki legyen nyitva.
4. A G nyomógomb az O)
pozícióban álljon.
5. A behúzható kerekek
kocsija üzemen kívüli
pozícióban legyen (a kövezettel
nem érintkezõ kerekek).
A program kiválasztása
A programot a kimosandó
ruhák típusa és a
szennyezõdés mértéke
alapján kell kiválasztani. A
program kiválasztásához a 4.
oldalon levõ táblázatot
tanulmányozd. Csavard el az A
szabályozógombot a kívánt
programszám eléréséig.
Válaszd ki a hõmérsékletet a B
szabályozógombbal és ha
szükséges, centrifuga
valtozatok C,kapcsold be a
nyomógombos m
(D, E, F), végül nyomd be a G
be-ki nyomógombot (I pozíció).
A mosás végén
Várj körülbelül két percet.
Ezután kapcsold ki a
ûködéseket
mosógépet a G be/ki
nyomógomb benyomásával (O
pozíció). Ekkor biztonsággal
kinyithatod az ajtókat. A kimosott
ruhanemû kivétele után hagyd
mindig teljesen vagy félig nyitva
az ajtókat oly módon, hogy a
belsejében maradt nedvesség
elpárologhasson.
Mindig zárd el a vízcsapot.
Emlékezz arra, hogy
áramszünet vagy a mosógép
kikapcsolása esetén a
kiválasztott program
újraindul attól a ponttól
kezdve, ahol az megszakadt.
Itt Te irányítasz
A helyes programok kiválasztása fontos. Valamint könnyû is.
Anyag Sebesség
Programok
szabályozógombja
A mosási program kiválasztá
sára szolgál.
Ez a szabályozógomb
kizárólag az óra járásával
egyirányban csavarható el.
A programok kiválasztásához
a szabályozógombon levõ
jelzésnek egybe kell esnie a
kívánt programnak megfelelõ
jellel/számmal.
Ekkor nyomd be a G be/ki
nyomógombot (I pozíció), az H
jelzõlámpa elkezd villogni. 5
után a beállítást elfogadja, a
H jelzõlámpa abbahagyja a
villogást (bekapcsolva marad)
és megkezdõdik a mosási
ciklus.
Ha a folyamatban levõ
programot meg akarod
szakítani vagy egy újat
beállítani, a (Stop/Reset) jelt
válaszd ki és várj 5-t. Amint a
törlést elfogadta, a H
jelzõlámpa villog, ezen a
ponton beállíthatod az új
programot vagy
kikapcsolhatod a gépet abban
az esetben, ha hozzá kívánsz
adni ruhanemût, 2 percet várva
az ajtók kinyitása elõtt.
Miután a mosógép beállította
és elfogadta a mosási ciklust,
a szabályozógomb elfordítása
nem vált ki semmilyen hatást
(hacsaknem a Stop/Reset
pozícióban).
Hõmérséklet szabályozógomb
A programtáblázatban
feltüntetett mosási
hõmérséklet beállítására
szolgál (lásd 4.old.). Ezenkívül
lehetõvé teszi számodra, ha
akarod, a kiválasztott
programhoz javasolt
hõmérséklet lecsökkentését
egészen a hideg vizes
mosásig ( ).
Centrifuga szabályozógomb
A centrifuga kizárására (a
jel kiválasztásával) és a
kiválasztott program
centrifuga sebességének
lecsökkentésére szolgál. Az
elõirányzott maximális
sebességek a 4 anyagtípusra
vonatkozóan az alábbiak:
- Pamut
fordulat percenként
- Szintetikusok 800
fordulat percenként
- Gyapjú 600
fordulat percenként
Selyem nem
Minden esetben a gép kis
sebességnél súlyelosztást
hajt végre.
Gyors mosásGyors mosás
Gyors mosás
Gyors mosásGyors mosás
Ezzel a nyomógombbal
lecsökkentheted körülbelül 30
%-kal a mosási program
idotartamát. Nem használható
a speciális programokkal (lásd
4. old) valamint a gyapjú és a
selyem programokkal.
GyurodésgátlóGyurodésgátló
Gyurodésgátló
GyurodésgátlóGyurodésgátló
nyomógomb - Vízfelvételnyomógomb - Vízfelvétel
nyomógomb - Vízfelvétel
nyomógomb - Vízfelvételnyomógomb - Vízfelvétel
után stop (Szintetikusok -után stop (Szintetikusok -
után stop (Szintetikusok -
után stop (Szintetikusok -után stop (Szintetikusok kényesek)kényesek)
kényesek)
kényesek)kényesek)
Ez a gomb lehetové teszi a
program megszakítását, a
vízben hagyva a ruhanemut az
utolsó centrifugálás elott.
Nagyon fontos gomb, minekután
kiküszöböli, hogy a kényes és a
szintetikus anyagok
összegyurodjenek (például
amikor nem veheted ki a
ruhanemut a mosás végén,
hanem csak néhány órával
késobb).
Kizárólag a szintetikus
anyagoknak eloírt programoknál
lehet használni (5-6-7-9 progr.)
Figyelem! A program
befejezéséhez a víz leeresztésével a E nyomógombot újra be
kell nyomni.
max
EXTRA ÖBLíTÉS
Az öblítések számának
növelésére szolgál az ellenálló
anyagok programjainál.
Használatát javasoljuk az
öblítés javításához a mosógép
teljes telítettsége vagy a
mosószerekkel szembeni
túlérzékenység esetén (érintés
utáni allergia). Progr. 1-2-4-5-6.
Be/Ki (On-Off)
Amikor a E nyomógomb be van
nyomva, a mosógép
bekapcsolt, amikor nincs
benyomva, akkor kikapcsolt
állapotban van.
A gép kikapcsolása nem törli
a kiválasztott programot.
Be-ki mûködési
jelzõlámpa
A H jelzõlámpa villog, amikor
a gép be van kapcsolva és
várja egy program beállítását.
Az állandó fényjelzés a
beállított program elfogadását
jelenti.
Reteszelt ajtó jelzõlámpa
A világító jelzõlámpa jelöli,
hogy az ajtó reteszelve van a
véletlen kinyílás
megakadályozása céljából. A
rongálódások elkerülése
végett meg kell várni, hogy a
jelzõlámpa kialudjon az ajtó
kinyitása elõtt. A várakozás
ideje körülbelül két perc.
3 Beüzemelési és használati utasítás

Mit szeretnél mosni ma?
A programok minden idõszakra
Az anyagok és a
szennyezõdés jellege
Program
szabályozógomb
Hõmérséklet
szabályozógomb
Mosószer
az
elõmosáshoz
Mosószer
mosáshoz
Öblítõfolyadék
Fehérítõszer
A ciklus
idõtartama
(perc)
A mosási ciklus leírása
PAMUT
Rendkívül piszkos fehérek
(ágynemûk, asztalterítõk, stb.)
Rendkívül piszkos fehérek
(ágynemûk, asztalterítõk, stb.)
Rendkívül piszkos fehérek
(ágynemûk, asztalterítõk, stb.)
Nagyon piszkos fehérek és
ellenálló színesek
Öblítések/Fehérítés
Centrifugálás Vízleeresztés és befejezõ centrifugálás
Stop/Reset A kiválasztott program megszakítása/törlése
2
3 60°C
4 40°C
Max°C
1
Max°C
u u u
u u
u u
u u
u
Kímé lõ/H agyo m.
Kímé lõ/H agyo m.
Kímé lõ/H agyo m.
Kímélõ/Hagyom. Öblítések, köztes és befejezõ
Elõmosás, Mosás magas
150
hõmérsékleten, öblítések, köztes és
befejezõ centrifugálások
Mosás magas hõmérsékleten, öblítések,
130
köztes és befejezõ centrifugálások
Mosás
130
befejezõ centrifugálások
Kímélõ mosás
115
és befejezõ centrifugálások
centrifugálások
on, öblítések, köztes és
60°C-
-on, öblítések, köztes
40°C
SZINTETIKUSOK
Nagyon piszkos, ellenálló színû
szintetikusok (ruhanemû
újszülötteknek, stb.)
Kényes színû szintetikusok
(minden típusú, enyhén piszkos
ruhanemû)
Kényes színû szintetikusok
(minden típusú, enyhén piszkos
ruhanemû)
Öblítések/Fehérítés
Öblítõfolyadék
Gyûrõdésgátló - Vízfelvétel stop Vízfelvétel stop a különösen kényes
Centrifugálás Vízleeresztés és kímélõ centrifugálás
Stop/Reset A kiválasztott program megszakítása/törlése
5 60°C
6 40°C
7 30°C
u u
u u
u u
u
u
Kímélõ
Kímélõ
Kímélõ Öblítések, gyûrõdésgátló vagy kímélõ
Nagy hatóerejû mosás
105
öblítések, gyûrõdésgátló vagy kímélõ
centrifugálás
Mosás
75
vagy kímélõ centrifugálás
Mosás
30
centrifugálás
centrifugálás
Öblítések öblítõfolyadék felvételével,
gyûrõdésgátló vagy kímélõ centrifugálás
ruhadaraboknál
, öblítések, gyûrõdésgátló
40°C-on
, öblítések és kímélõ
30°C-on
60°C-on
,
KÉNYESEK
Gyapjú
Rendkívül kényes selyem,
ruhanemûk és anyagok (függöny,
selyem, viszkóz, stb.)
Öblítések
Gyûrõdésgátló - Vízfelvétel stop Vízfelvétel stop a különösen kényes
Centrifugálás Vízleeresztés és kímélõ centrifugálás
Vízleeresztés Vízleeresztés
Stop/Reset A kiválasztott program megszakítása/törlése
8 40°C
9 30°C
Fontos: Az éppen beállított mosási program törléséhez válaszd ki a (
u u
u u
u
Stop/Reset
Mosás
55
centrifugálás
Mosás
45
vagy vízleeresztés
Öblítések, gyûrõdésgátló vagy
vízleeresztés
ruhadaraboknál
(gyapjú)
) jelek egyikét és várj legalább 5
,
öblítések és kímélõ
40°C-on
,
öblítések, gyûrõdésgátló
30°C-on
másodpercet.
A táblázatban feltüntetett adatok megközelítõ értékûek. Valóban változhatnak a gépmodell, a ruhanemû mennyisége és
típusa, a vezetékes víz hõmérséklete és keménysége, valamint a levegõ hõmérséklete függvényében.
Speciális programok
7-Kényes szintetikusok napi mosása 30°C-on 30 percig. A mosógéped rendelkezik egy kevéssé piszkos ruházatok rövid idõ alatt
végbemenõ mosására kidolgozott programmal. A 7-es programot 30ºC hõmérsékletre beállítva ki lehet mosni együttesen különbözõ jellegû
anyagokat (kivéve gyapjú és selyem), maximum 3 kg-os terheléssel. Ez a program idõ és energia megtakarítását lehetõvé teszi, mivel csak
körülbelül 30 percig tart. Folyékony mosószer használatát javasoljuk, melyet a mosószertartó mosószernek kijelölt rekeszébe kell betölteni.
Beüzemelési és használati utasítás 4

A forgódob kinyitása és bezárása
A) KINYITÁS (1. ábra) Felemelni a külsõ fedõlapot
B) Ezután mindkét kézzel kinyitni a
forgódobot, mint azt a 2) ábra jelzi:
megnyomni és enyhe nyomást gyakorolva
az ujjak megsérüljenek.
1. ábra
3. ábra
3. ábra
2. ábra
4. ábra
könnyen kinyílnak.
C) RUHANEMÛ BEHELYEZÉSE. (3. ábra)
D) BEZÁRÁS. (4. ábra)
ráhajtva jól bezárni a forgódobot.
tökéletesen illeszkednek-e a hátsó ajtóban
enyhe nyomást gyakorolni lefelé, melyeknek
nem szabad kikattanni.
és teljesen kinyitni.
- a 2. ábrán nyíllal jelölt nyomógombot
lefelé az egyik kezet rátámasztani, amivel
elkerülhetõ, hogy az ajtók hirtelen kinyílásával
- végül kézzel vezetve az ajtók kikattannak és
- elõször az elülsõ ajtót leeresztve majd a hátsót
- ellenõrizni, hogy az elülsõ ajtó kampói
levõ helyükre.
- a kattanás klak észlelése után mindkét ajtóra
- végül a külsõ fedõlapot bezárni.
A mosószertartó tisztítása
Kivétel:
Enyhe nyomást gyakorolni a
mosószertartó elülsõ részén levõ
nagy nyomógombra és felfelé
kihúzni (1. ábra).
ábra.1
Tisztítás:
Ezután kitisztítani vízcsap alatt a tartót (3. ábra) egy régi fogkefe
segítségével és az 1-es és 2-es rekeszek felsõ részébe illesztett két
szivornyát kihúzva (4. ábra) megvizsgálni, hogy azok ne legyenek
eltömõdve majd leöblíteni.
2. ábra
3. ábra
Visszahelyezés:
Ne felejtsd el visszailleszteni a két
szivornyát a megfelelõ helyére
és végül a tokjába beakasztva
visszatenni a tartót.
4. ábra
Szükség esetén a szivattyú és a gumicsõ vizsgálata
A mosógép egy öntisztító szivattyúval van felszerelve, melynek nincs szüksége tisztítási és karbantartási mûveletekre.
Megtörténhet azonban, hogy kis tárgyak véletlenül a szivattyúba esnek: pénzérmék, csattok, leszakadó gombok és
egyéb apró dolgok. A károsodások elkerülése végett ezeket megállítja egy hozzáférhetõ elõkamrában, amely a
szivattyú alsó részében található.
.
Ezen elõkamra eléréséhez elegendõ a mosógép alsó részén
elhelyezett fedõlemez eltávolítása (1. ábra), majd a fedél levétele
az óra járásával ellenkezõ irányban csavarva (2. ábra) és a belsõ rész
gondos megvizsgálása.
A gumicsõ
Ellenõrizd a gumicsövet évente legalább egyszer. Azonnal ki kell
cserélni, ha repedések és hasadások mutatkoznak rajta, minekután a
1. ábra
Figyelem: bizonyosodj meg arról, hogy a mosási ciklus befejezõdött és a fedél levétele, vagy bármely karbantartási mûvelet elõtt húzd ki
a csatlakozódugót. Érthetõ, hogy a fedél levétele után egy kis mennyiségû víz kifolyik. A fedõlemez visszaszerelésekor gyõzõdj meg arról,
hogy az alsó részben a megfelelõ lyukakba behelyezted a kampókat mielõtt azt a géphez nyomnád.
55
5
Beüzemelési és használati utasítás
55
mosások során erõs nyomást kell elviselnie, mely töréseket idézhet
elõ.
2. ábra

A mosószertartó titka
A mosószereket és az
esetleges adalékanyagokat a
gyártó által elõírt adagok
figyelembe vételével kell
betöltened: az információkat
olvasd el a csomagoláson.
Az adagok a ruhanemû
súlyának, a víz
keménységének és a
szennyezõdés mértékének
függvényében változnak.
Non eccedere.Ne túlozz!
Több mosószer nem javítja a
mosás hatékonyságát,
ellenkezõleg
A folyékony mosószert csak
néhány pillanattal a gép
beindítása elõtt kell betölteni.
Emlékezz arra, hogy a
folyékony mosószer különösen alkalmas a max. 60 fok
hõmérsékleten történõ
mosásoknál és azon mosási
programoknál, melyek nem
tartalmazzák az elõmosás
fázisát.
A kereskedelemben
megvásárolhatók a folyékony
vagy por formájú mosószerek
olyan speciális tartókkal,
melyeket közvetlenül a
A tapasztalat kialakulásával el
fogod sajátítani a
mennyiségek adagolását
szinte automatikus módon: a
titkaiddá válnak.
Amikor az öblítõszert töltöd a
3-as rekeszbe, vigyázz arra,
hogy ne haladd meg a kijelölt
max szintet.
A mosógép automatikusan fel
tudja használni az
öblítõfolyadékot minden
mosási programban.
forgódobba kell helyezni a
csomagoláson elõírt
utasítások szerint.
Soha ne használj kézi
mosáshoz készült mosószereket, mert túlságosan
habzanak és ez potenciálisan
káros a mosógép számára.
Egy utolsó titok: amikor hideg
vízzel mosol, mindig csökkentsd le a mosószer mennyiségét: a hideg vízben kevésbé
oldódik fel, mint a meleg vízben, tehát részben kárba
veszne.
Az 1-es rekeszbe:
Mosószer elõmosáshoz (por)
A 2-es rekeszbe:
Mosószer mosáshoz (por
és folyékony)
A 3-es rekeszbe:
Öblítõfolyadék
A 4-es rekeszbe:
Fehérítõszer
Elõmosás, fehérítés, öblítés
Amikor fehérítés szükséges, a
megfelelõ programokat be kell
állítani és betölteni a
fehérítõszert a mosószertartó
4-es rekeszébe.
Amikor a fehérítõszert töltöd,
vigyázz arra, hogy ne haladd
meg a kijelölt max szintet.
A fehérítõszer használata
kizárja az elõmosás
végrehajtásának
lehetõségét.
Fontos megj.:
1) A koncentrált fehérítõszert
feltétlenül higítani kell.
2) Koncentrált (por vagy
folyékony) mosószerekhez
elõmosás nélküli programot
kell alkalmazni.
3) Pasztillás vagy tablettás
mosószerekkel ne alkalmazz
elõmosást.
Öblítõflyadék hozzáadása
Az öblítszer puhává teszi a ruhanemût és lecsökkenti a
szintetikus szálak elektrosztatikus töltését.
Az öblítõszerek felhasználha-tóak frottír, kötött, vászon stb.
anyagokhoz
Töltsd az öblítõfolyadékot a tartó 3-as rekeszébe a gyártók
elõírásai szerint.
A z öblítõfolya-dék
automatikusan a gépbe kerül az utolsó öblítés során. A mosási
program végén a 3-as rekeszben víz marad vissza. Ez a nagyon
sûrû öblítõfolyadékok beviteléhez illetve a koncentráltak
hígításához szolgál.
Ha a 3-as rekeszben a normálisnál több víz maradna, az azt
jelentené, hogy az ürítõ berendezés eltömõdött, megszakítva a
berendezés szívó hatását.
A tisztításhoz lásd 5. old. Soha ne tölts a rekeszbe
öblítõfolyadékot és keményítõt együtt, mert a túlfolyó rendszer
eltömõdése mehet végbe.
Vevõtájékoztató adatlap, megfelelõségi nyilatkozat
Típus WT 120
Méretek Szélesség: 40 cm
Elektromos csatlakoztatás Feszültség 230 Volt 50 Hz
Vízcsatlakoztatás Maximális nyomás: 1 Mpa (10 bar)
Ellenõrzõ programok az IEC456 norma
szerint
Energia hatékonysági osztály:
(A hatékonyabb - B kevésbé hatékony)
Energia fogyaszt ás :
(60 º C-os pamut programnak megfelelõ
szabványos vizsgálat alapján) A tényleges
energia fogyasztás függ a készülék
használatától)
Mosási teljesítmény:
(A nagyobb - G kisebb)
Centrifugálási hatékonyság:
A-tól (jobb) G-ig (rosszabb)
Centrifugálási hatékonyság a szabványos
vizsgálati elõírásoknak megfelelõen, normál
60 º C pamut programnál:
Legnagyobb centrifugálási fordulat szám: 1200
A készülék kapacitása (60 ° C pamut
programnál) :
Ciklusonkénti vízfogyasztás:
(60 °C pamut programnál)
Programidõ normál 60°C pamut
programnál a vonatkozó szabványok
szerint:
Az átlagos évi energia és vízfogyasztás:
(200 ciklusra 60°C pamut programnál)
Zajteljesítményszint
mosásnál:
centrifugálásnál:
Ha mosás után kül ön szárítóg épet hasz nál és G osztál yú centrifugá s mosógép helyett A osztályú ce ntrifugá s mosógép et
választ, a szárítógép üzemköltsége felére csökken. A ruhák szárítógépben történõ szárítása rendszerint több energiát
fogyaszt, mint a kimosásuk.
A forgalombahozó a 79/1977 (XII.31) IKIM és a 77/1999 (XII.22) GM rendelet alapján tanúsítja, hogy a fenti típusú
mosógép megfelel az elõíráso knak.
MERLONI Elettrodomestici SpA.
Viale Aristide Merloni, 47 Magyarországi Közv.Ker.Képv.
60044 Fabriano (AN) - ITALY
Magasság: 85 cm
Mélysége: .60 cm
Maximális teljesítmény: 2 100 W
Minimális nyomás: 0,05 Mpa (0,5 bar)
Dob kapacitás: 42 liter
5 kg terheléssel végrehajtva
A
0,95 kWh
B
B
52%
5 Kg
49 liter
135 perc
190 kWh
9800 liter
60 dB/A
75 dB/A
Ez a készülék az alábbi Közösségi Irányelveknek felel meg:
73/02/19-i 73/23 CEE (Alacsony feszültség) és vonatkozó módosításai
89/05/03-i 89/336 CEE (Elektromágneses kompatibilitás) és vonatkozó
módosítása i
MERLONI Elettrodomestici SpA
1072. Budapest, Nyár u.32
Tel: 352-8556
.
A hagyományos fehérítõszer
kizárólag fehér, ellenálló
anyagokhoz használatos, míg
a kímélõ fehérítõszer a
színes, szintetikus
anyagokhoz és a gyapjúhoz
alkalmazható.
Nem végezhetsz fehérítést a
“Selyem” programmal és a
“Speciális programok”-kal (lásd
4.old.).
A víz keménységi fokai
Karakterisztikai szint
1 - Lágy
2 - Közepes
3 - Kemény
4 - Nagyon
kemény
Német Franc
°dH °T.H
0- 7 0-15
8-14 16-25
15-21 26-37
21-nél több 37-nél több
A gyártó fenntartja magának azt a jogot, hogy
bármikor és elõzetes nyilvánosságra hozatal nélkül,
a mûszaki és kereskedelmi elvárásoknak
megfelelõen szükségesnek bizonyuló, bármilyen
módosítást végezzen a gépen vagy a saját modelljei
alkatrészein.
Beüzemelési és használati utasítás
66
6
66

Problémák és megoldások
Mielõtt telefonálnál, olvasd el a következõt
Megtörténhet, hogy a mosógép nem mûködik. Sok esetben könnyen megoldható problémákról van
szó, amikor nincs szükség a szerelõ kihívására. Mielõtt telefonálnál a szervízszolgálatnak, mindig
ellenõrizd az alábbi pontokat.
A mosógép nem
indul be
A csatlakozódugó jól be
van helyezve az
aljzatba?Takarítás közben
kilazulhatott.
Van áram a lakásban?
Levághatta a biztosítékot,
mert esetleg sok elektromos
háztartási gép van
bekapcsolva. Vagy egy
általános áramszünet
következett be a környéken.
Az ajtó jól be van zárva?
Biztonsági okokból a
mosógép nem mûködhet, ha
az ajtó nyitva van vagy
rosszul van bezárva.
A Be/Ki nyomógomb be van
nyomva?
Ha igen, akkor egy
beprogramozott indítás be
volt állítva.
A programozott indítás
szabályozógombja az azzal
felszerelt modelleknél a
helyes pozícióban áll?
A vízcsap nyitva van?
Biztonsági okokból ha a
mosógép nem szívja a vizet,
akkor nem indulhat be a
mosás.
A mosógép nem
szívja a vizet
A csõ jól be van
csatlakoztatva a csaphoz?
Nincs víz? Lehet, hogy
munkálatok folynak az
épületben vagy az utcában.
Van elegendõ nyomás?
Az autokláv meghibásodhatott.
A csap szûrõje tiszta? Ha a
víznek nagyon magas a
kálcium-karbonát tartalma
vagy a közelmúltban
javításokat végeztek a
vízvezetékeknél, a csap
szûrõje eltömõdhetett
darabkákkal vagy
törmelékekkel.
A gumicsõ meghajlott? A
vizet a mosógépbe vezetõ
gumicsõ teljes hosszának a
lehetõ legegyenesebbnek
kell lennie. Ellenõrizd, hogy
ne legyen összelapulva vagy
meghajolva.
?
A mosógép
folytonosan szívja és
lereszti a vizet.
A csõ túlságosan
alacsonyra van helyezve?
Egy 60 és 100 cm között
ingadozó magasságra kell
beszerelni.
A csõ nyílása a vízbe merül?
A fali elvezetõnek van
szellõzése? Ha ezen
vizsgálatok után a probléma
nem oldódik meg, zárd el a
vízcsapot, kapcsold ki a
mosógépet és hívd ki a
szervízszolgálatot.
Ha egy felsõbb emeleten
laksz, a közlekedõedény
jelensége léphetett fel.
Megoldásához egy megfelelõ
szelep beépítése szükséges.
A mosógép nem
ereszti le a vizet vagy
nem centrifugál.
A kiválasztott program
tartalmazza a
vízleeresztést? Néhány
mosási programnál
manuálisan kell a leeresztést
mûködésbe hozni.
AGyûrõdésgátló
mûködés azon
mosógépeknél, melyek azt
tartalmazzák aktív? Ez a
mûködés manuális
leeresztés mûködésbe
hozását igényli.
A leresztõ szivattyú
eltömõdött? A
megvizsgálásához zárd el a
csapot, húzd ki az
elektromos dugót és kövesd
a 5. oldal utasításait vagy
hívd ki a mûszaki
szervízszolgálatot.
A mosógép nagyon
rázkódik a centrifuga
fázisa során.
A mosógépbõl folyik
a víz.
A leresztõcsõ meg van
hajolva? A leeresztõcsõ
teljes hosszának a lehetõ
legegyenesebbnek kell lennie.
Ellenõrizd, hogy ne legyen
összelapulva vagy
meghajolva.
A leresztõ berendezés
vezetéke elzáródott? A
leeresztõcsõ esetleges
hosszabbítója rendellenes és
a víz áthaladását gátolja?
Az üzembehelyezés
pillanatában a belsõ mozgó
rész rögzítése helyesen ki
lett oldva? Lásd az
üzembehelyezésre
vonatkozó 1. oldalt.
A mosógép jól szintbe van
helyezve? A készülék
szintbehelyezését
rendszeresen ellenõrizni kell.
Idõvel a mosógép
észrevehetetlen módon
elmozdulhatott. Egy
szintezõvel a lábaknál kell
végrehajtani az ellenõrzést.
Van körülötte üres tér?
Fontos, hogy a gép ne
támaszkodjon a fürdõszobai
berendezésekhez és legyen
körülötte egy kis üres tér. Ha
padlószõnyegre van
elhelyezve, gyõzõdjünk meg
arról, hogy a tartólábak és a
szõnyeg között van-e
légmozgás.
A bevezetõcsõ gyûrûje jól
be van csavarva? Zárd el a
csapot, húzd ki a
csatlakozódugót és próbáld
megszorítani erõltetés nélkül.
A mosószertartó
eltömõdött? Próbáld kihúzni
és folyóvíz alatt kimosni.
A leeresztõcsõ nincs jól
rögzítve? Zárd el a csapot,
húzd ki a csatlakozódugót és
próbáld azt jobban rögzíteni.
Sok hab képzõdik.
A mosószer alkalmas
mosógépi mosásra?
Ellenõrizd, hogy
tartalmazza-e a gépi
mosáshoz vagy kézi és
gépi mosáshoz vagy
hasonló meghatározást.
A mennyiség helyes? A
mosószertöbblet azontúl,
hogy sok habot termel, nem
mos hatékonyabb módon és
a mosógép belsõ részeiben
a vízkõ képzõdéséhez
hozzájárul.
Amennyiben minden
ellenõrzés ellenére a
mosógép nem mûködik és az
észlelt rendellenesség
továbbra is fennáll, hívd ki a
legközelebbi Szervízszolgálati
Központot közölve az alábbi
információkat:
- a meghibásodás jellege
- a jelzés (Mod.. )
- a sorozatszám (Sorsz.)
Ezen információkat megtalálod
az alsó zárócsík hátsó részére
felerõsített táblán.
Soha ne fordulj nem
megbízott szerelokhöz és
mindig utasítsd vissza a nem
eredeti alkatrészek
beszerelését.
01-2003/
195 034 985 02
We work, you play
Beüzemelési és használati utasítás
77
7
77
 Loading...