

Page 1

Instructions for use
WASHING MACHINE
GB
English,1
RO
Românã,37
WISL 125 X
DE
Deutsch,13
HU
Magyar,49
CZ
Èeský,25
I
Italiano,61
Contents
GB
Installation, 2-3
Unpacking and levelling, 2
Electric and water connections, 2-3
The first wash cycle, 3
Technical details, 3
Washing machine description, 4-5
Control panel, 4
Leds, 5
Starting and Programmes, 6
Briefly: how to start a programme, 6
Programme table, 6
Personalisations, 7
Setting the temperature, 7
Setting the spin speed, 7
Functions, 7
Detergents and laundry, 8
Detergent dispenser, 8
Bleach cycle, 8
Preparing your laundry, 8
Special items, 8
Precautions and advice, 9
General safety, 9
Disposal, 9
Saving energy and respecting the environment, 9
Care and maintenance, 10
Cutting off the water or electricity supply, 10
Cleaning your appliance, 10
Cleaning the detergent dispenser, 10
Caring for your appliance door and drum, 10
Cleaning the pump, 10
Checking the water inlet hose, 10
Troubleshooting, 11
Service, 12
Before calling for Assistance, 12
1
Page 2
Installation
GB
Keep this instruction manual in a safe place for
future reference. Should the appliance be sold,
transferred or moved, make sure the instruction
manual accompanies the washing machine to inform
the new owner as to its operation and features.
Read these instructions carefully: they contain vital
information on installation, use and safety.
Unpacking and levelling
Unpacking
1. Unpack the washing machine.
2. Check whether the washing machine has been
damaged during transport. If this is the case, do not
install it and contact your retailer.
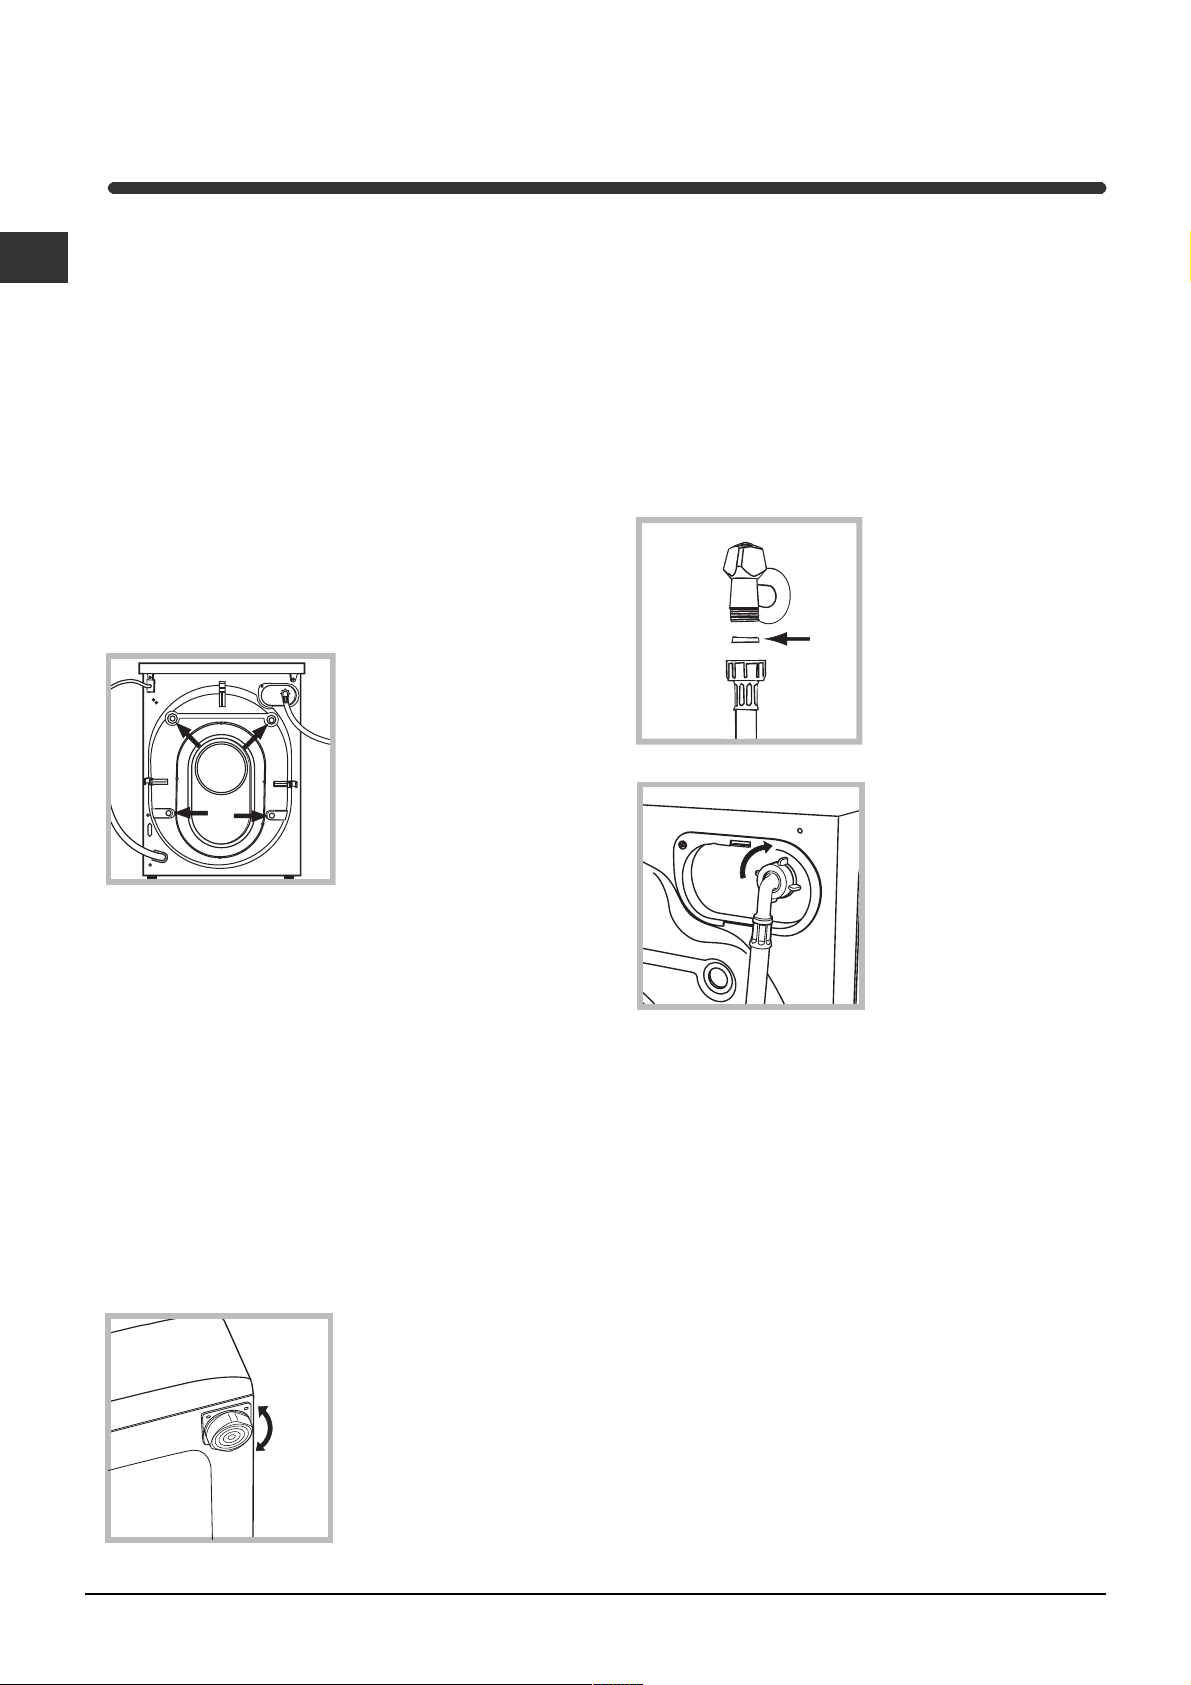
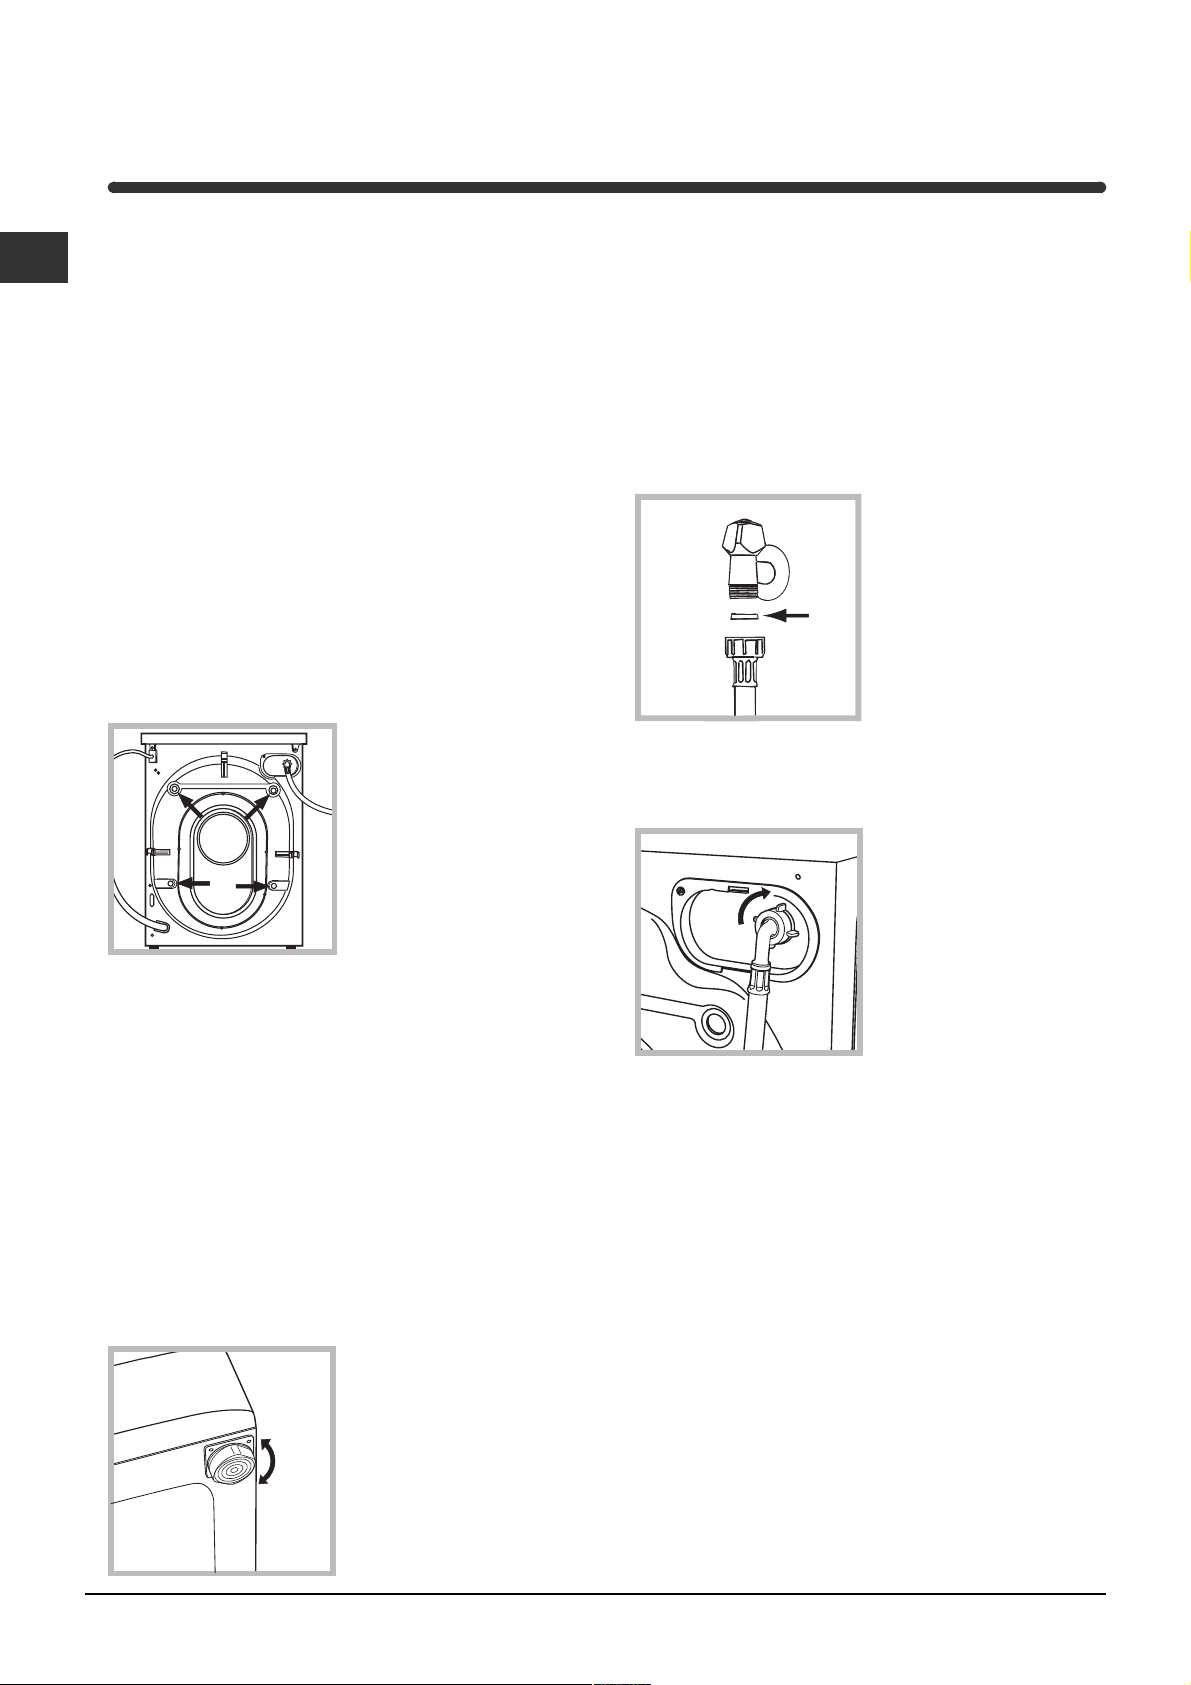
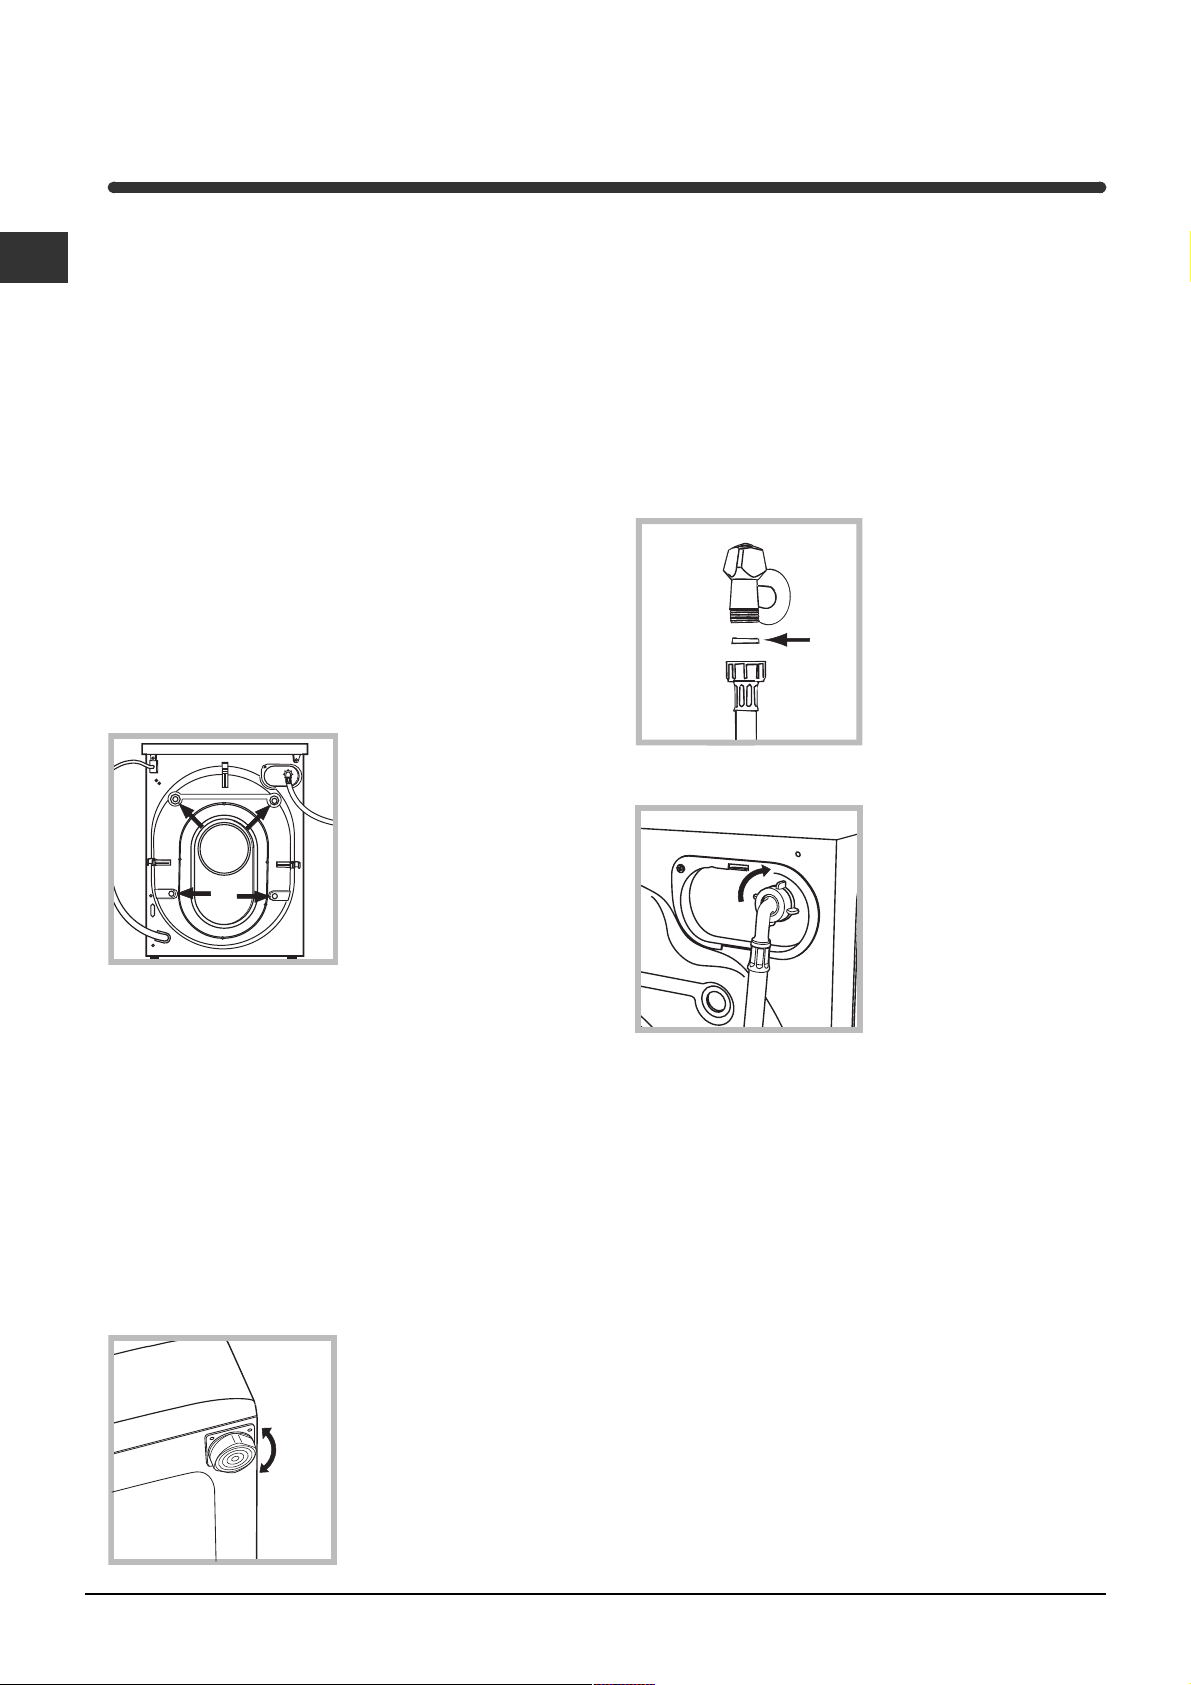
3. Remove the 4
protective screws and
the rubber washer with
the respective spacer,
situated on the rear of
the appliance (see
figure).
4. Seal the gaps using the plastic plugs provided.
5. Use the plug provided to seal the three holes
where the plug was housed, situated on the lower
right-hand side on the rear of your appliance.
6. Keep all the parts: you will need them again if the
washing machine needs to be moved to another
location.
Packaging materials are not children's toys.
Levelling
1. Install the washing machine on a flat sturdy floor,
without resting it up against walls, furniture cabinets
or other.
2. If the floor is not
perfectly level, compensate for any unevenness
by tightening or
loosening the adjustable
front feet (see figure);
the angle of inclination,
measured according to
the worktop, must not
exceed 2°.
Levelling your appliance correctly will provide it with
stability and avoid any vibrations, noise and shifting
during operation. If it is placed on a fitted or loose
carpet, adjust the feet in such a way as to allow
enough room for ventilation beneath the washing
machine.
Electric and water connections
Connecting the water inlet hose
1. Insert seal A into the
end of the inlet hose
and screw the latter
onto a cold water tap
A
3. Make sure there are no kinks or bends in the
hose.
The water pressure at the tap must be within the
values indicated in the Technical details table
(on the next page).
If the water inlet hose is not long enough, contact
a specialist store or an authorised serviceman.
with a 3/4 gas threaded
mouth (see figure).
Before making the
connection, allow the
water to run freely until
it is perfectly clear.
2. Connect the other end
of the water inlet hose to
the washing machine,
screwing it onto the
appliance's cold water
inlet, situated on the top
right-hand side on the
rear of the appliance
(see figure).
2
Page 3
Connecting the drain hose
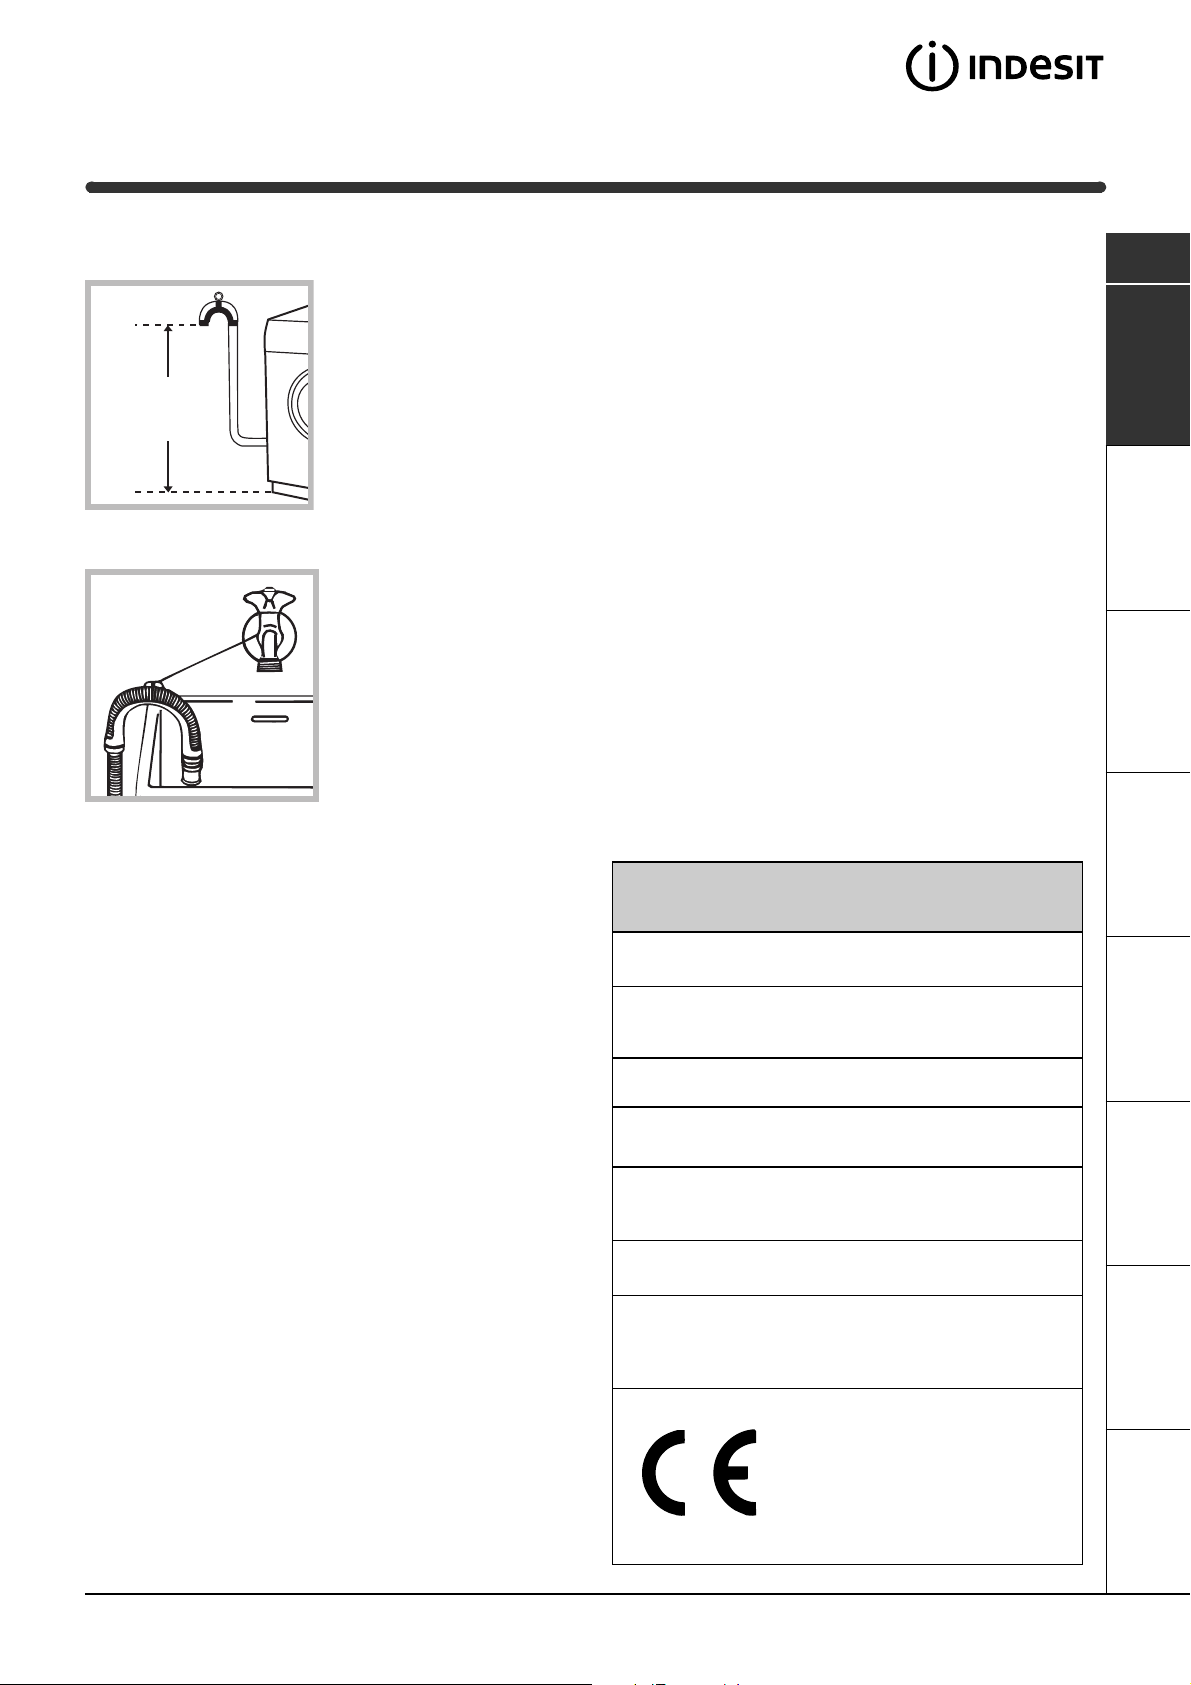
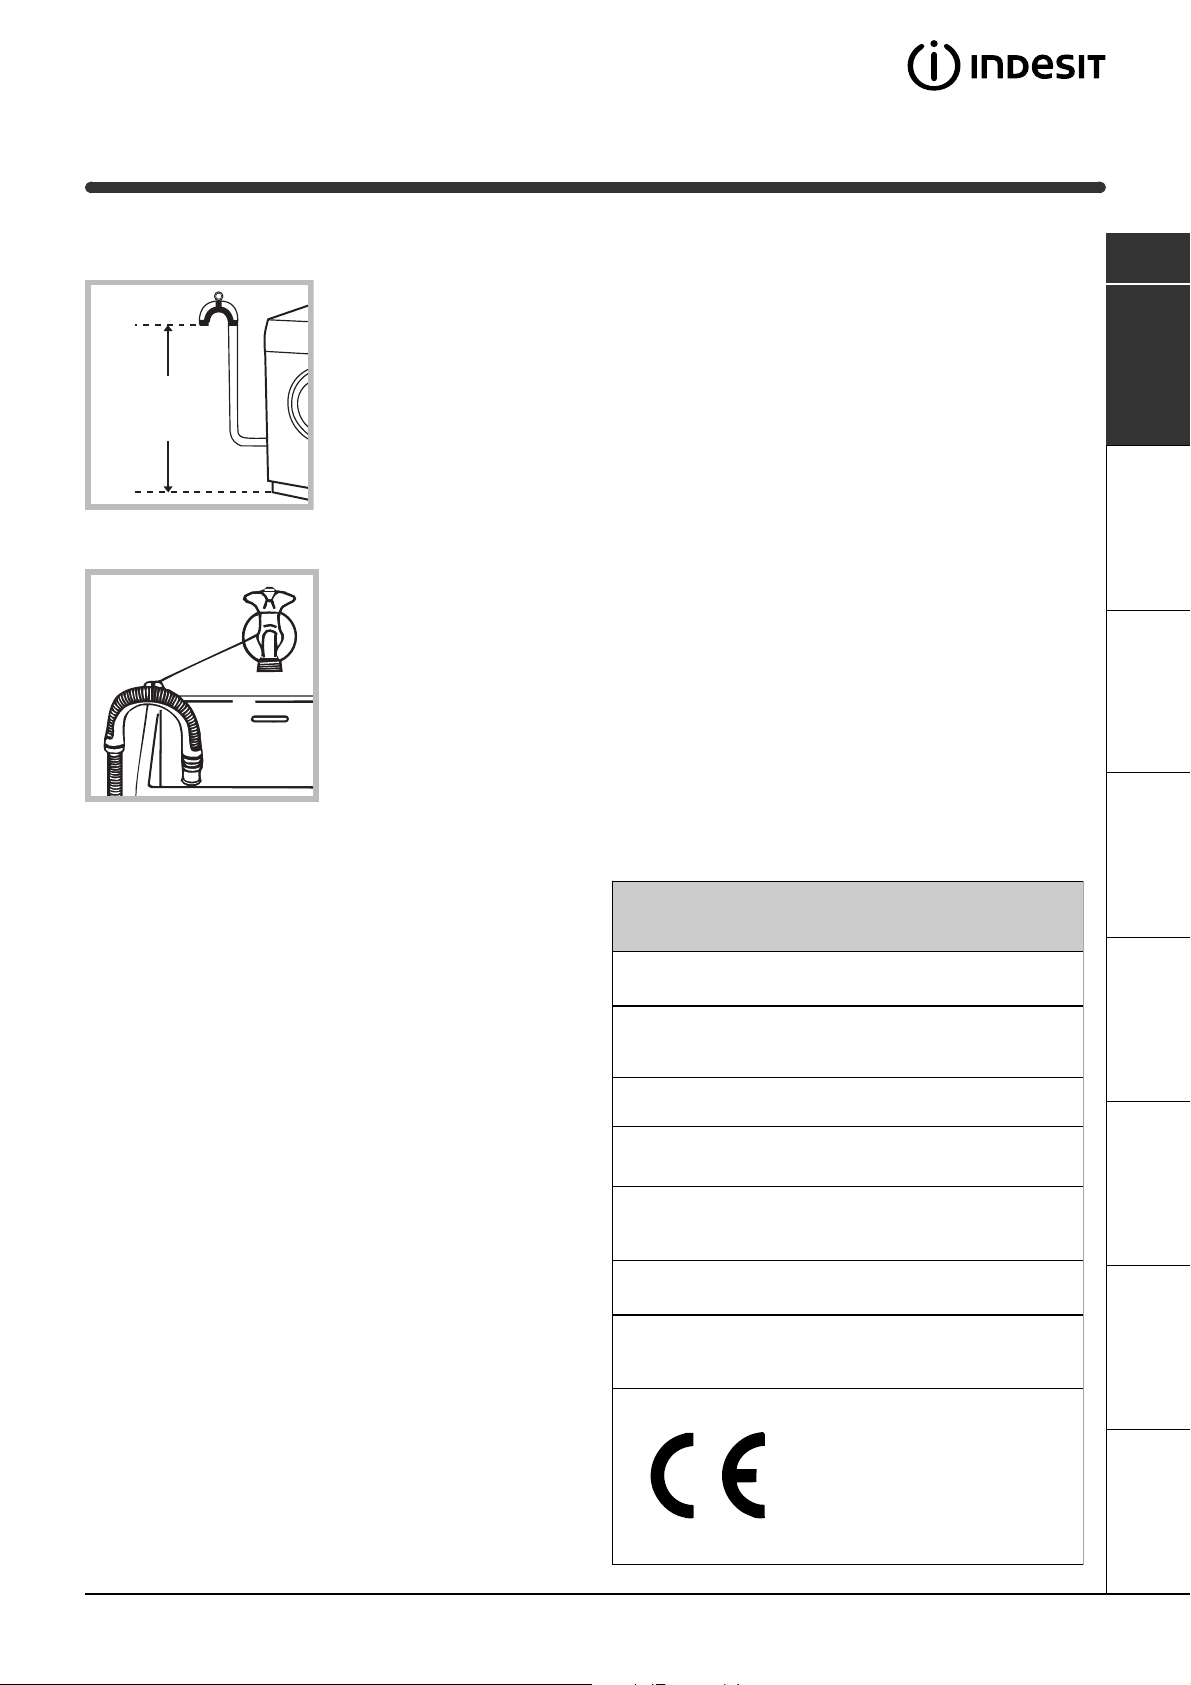
65 - 100 cm
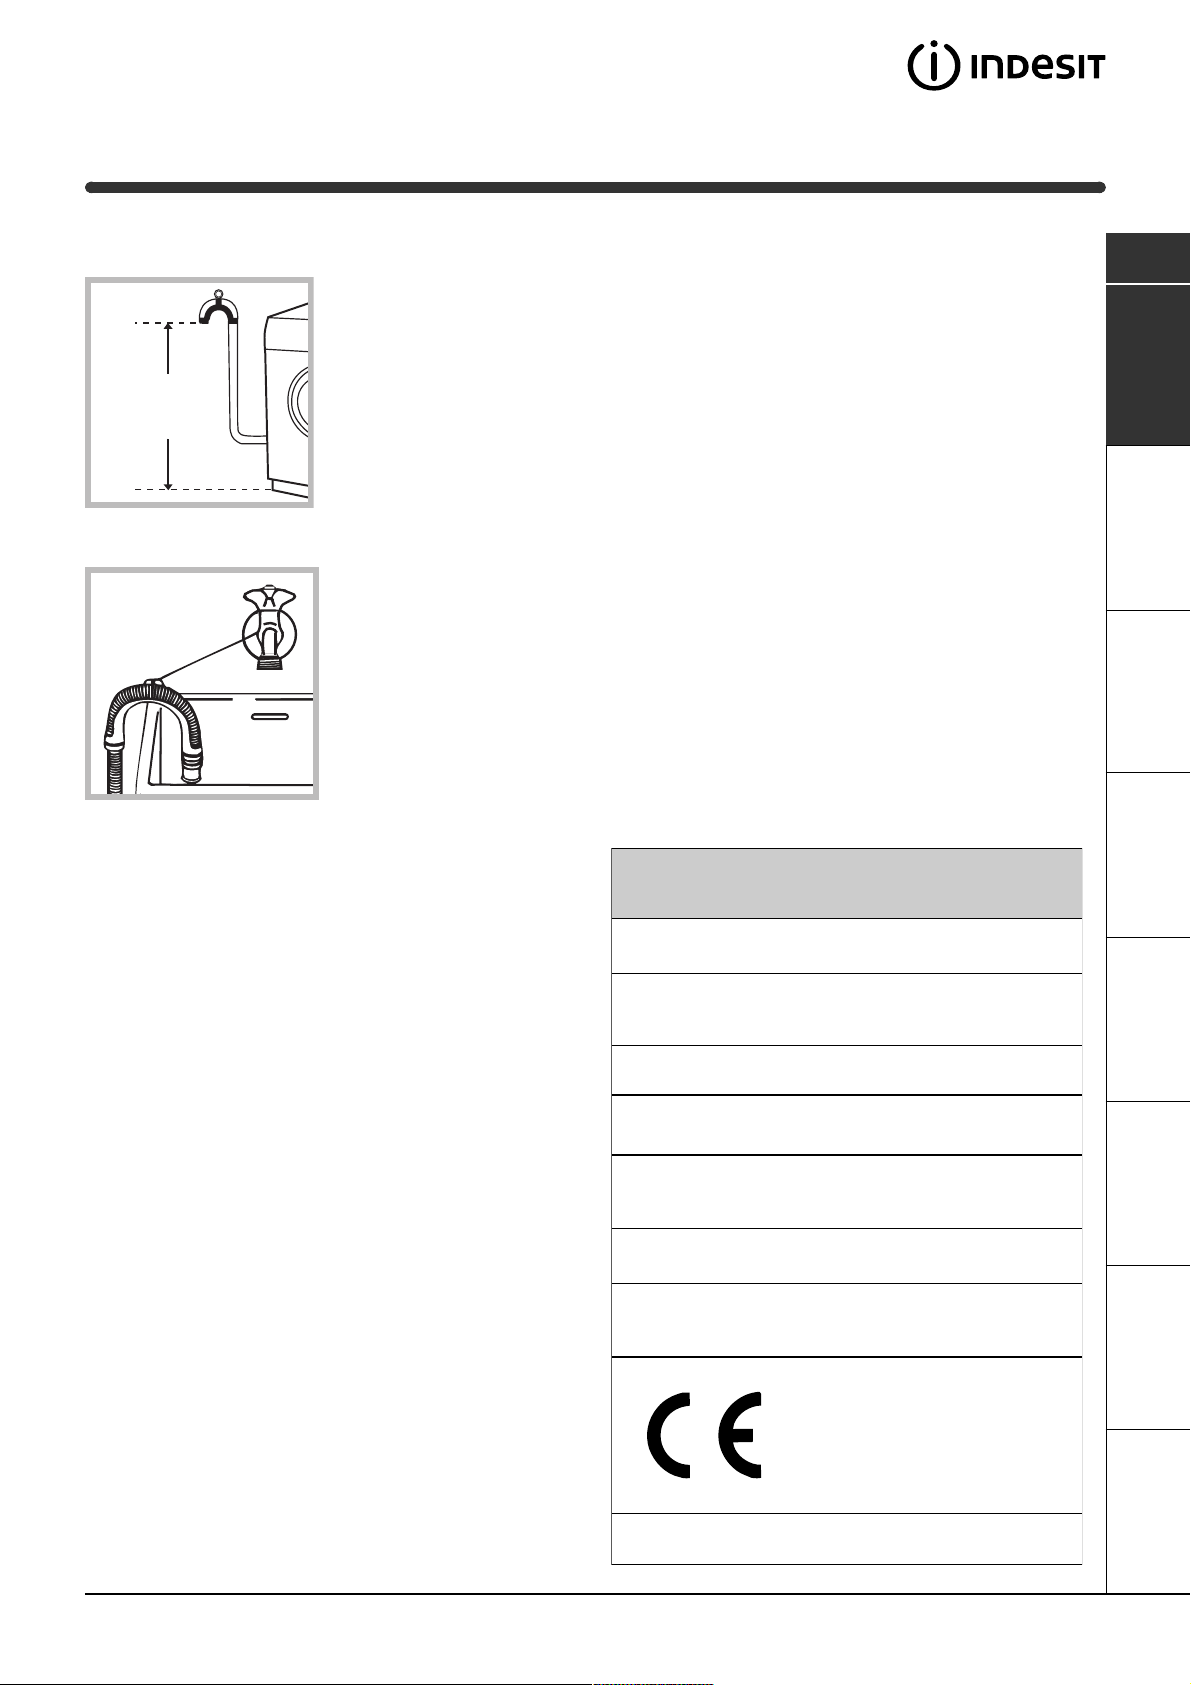
Connect the drain hose,
without bending it, to a
draining duct or a wall
drain situated between
65 and 100 cm from
the floor;
Do not use extensions or multiple sockets.
GB
The power supply cable must never be bent or
dangerously compressed.
The power supply cable must only be replaced by
an authorised serviceman.
Warning! The company denies all liability if and when
these norms are not respected.
The first wash cycle
alternatively, place it
over the edge of a
basin, sink or tub,
fastening the duct
supplied to the tap (see
figure). The free end of
the hose should not be
underwater.
We advise against the use of hose extensions; in
case of absolute need, the extension must have the
same diameter as the original hose and must not
exceed 150 cm in length.
Electric connection
Before plugging the appliance into the mains
socket, make sure that:
the socket is earthed and in compliance with the
applicable law;
the socket is able to sustain the appliance's
maximum power load indicated in the Technical
details table (on the right);
the supply voltage is included within the values i
ndicated on the Technical details table
(on the right);
Once the appliance has been installed, and before
you use it for the first time, run a wash cycle with
detergent and no laundry, setting the 90°C
programme without a pre-wash cycle.
Technical details
Model
Dimensions
Capacity
Electric
connections
Wat er
connections
Spin speed
WISL 125 X
59.5 cm wide
85 cm high
40 cm deep
from 1 to 4,5 kg
voltage 220/230 Volts 50 Hz
maximum absorbed power 1850 W
maximum pressure 1 MPa (10 bar)
minimum pressure 0.05 MPa (0.5 bar)
drum capacity 40 litres
up to 1200 rpm
the socket is compatible with the washing
machine's plug. If this is not the case, replace
the socket or the plug.
The washing machine should not be installed in an
outdoor environment, not even when the area is
sheltered, because it may be very dangerous to
leave it exposed to rain and thunderstorms.
When the washing machine is installed, the mains
socket must be within easy reach.
Control
programmes
according to
IEC456 directive
programme 2; temperature 60°C;
run with a load of 4,5 kg.
This appliance is compliant with the
following European Community
Directives:
- 73/23/CEE of 19/02/73 (Low
Voltage) and subsequent amendments
- 89/336/CEE of 03/05/89
(Electromagnetic Compatibility) and
subsequent amendments
ServiceTroubleshootingPrecautions CareProgrammes DetergentsInstallation Description
3
Page 4
Washing machine description
GB
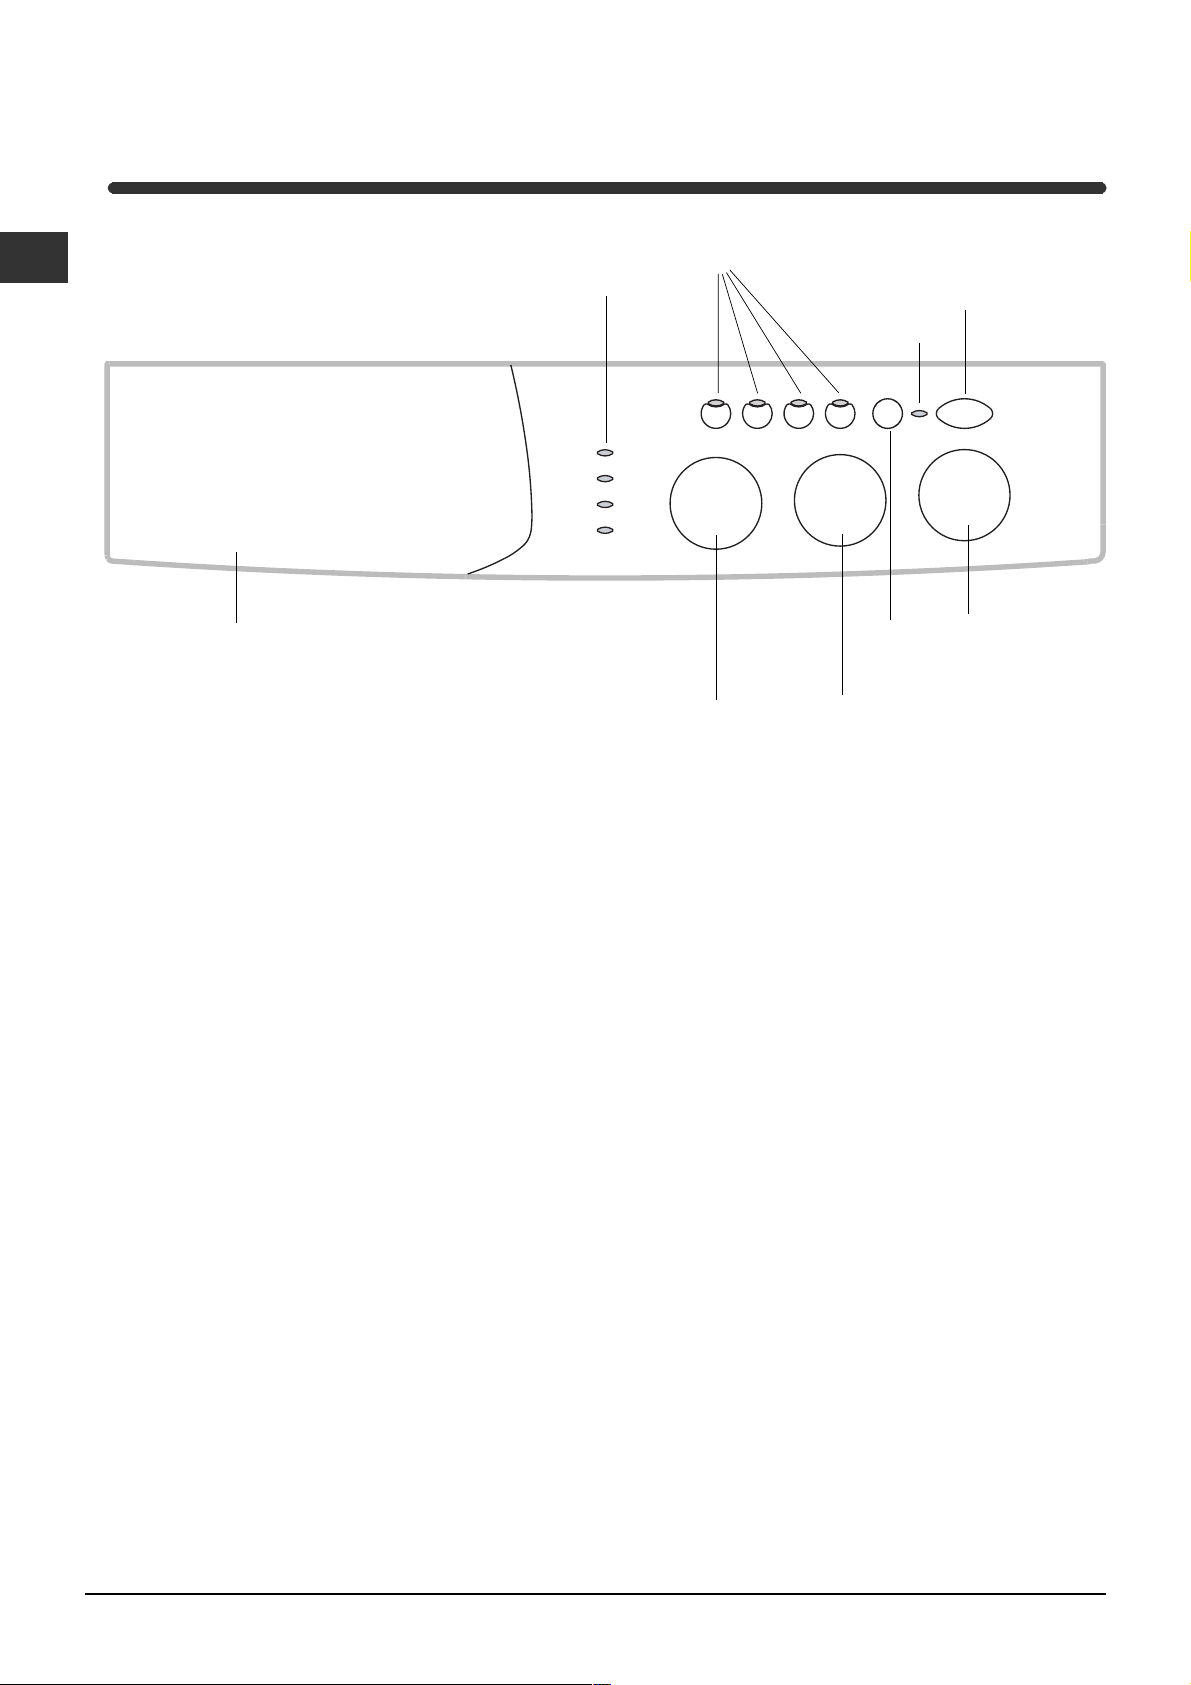
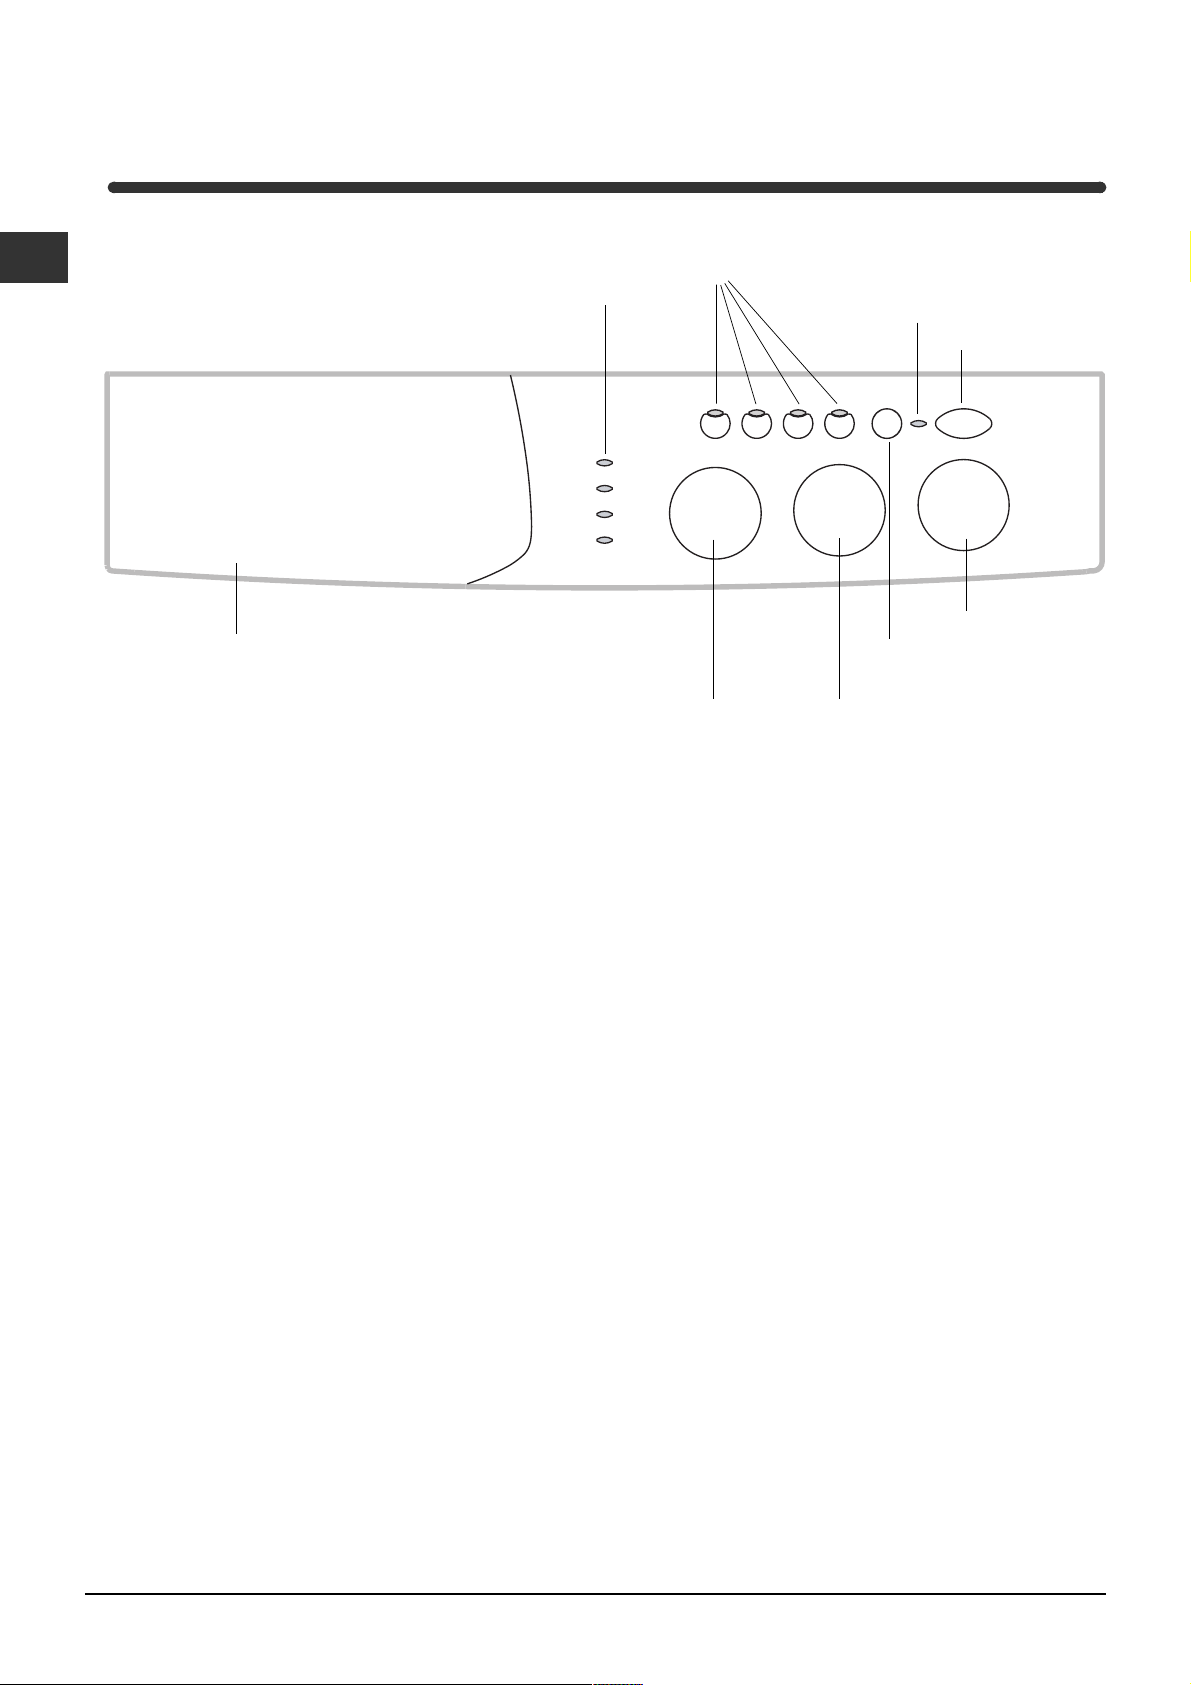
Control panel
Detergent dispenser
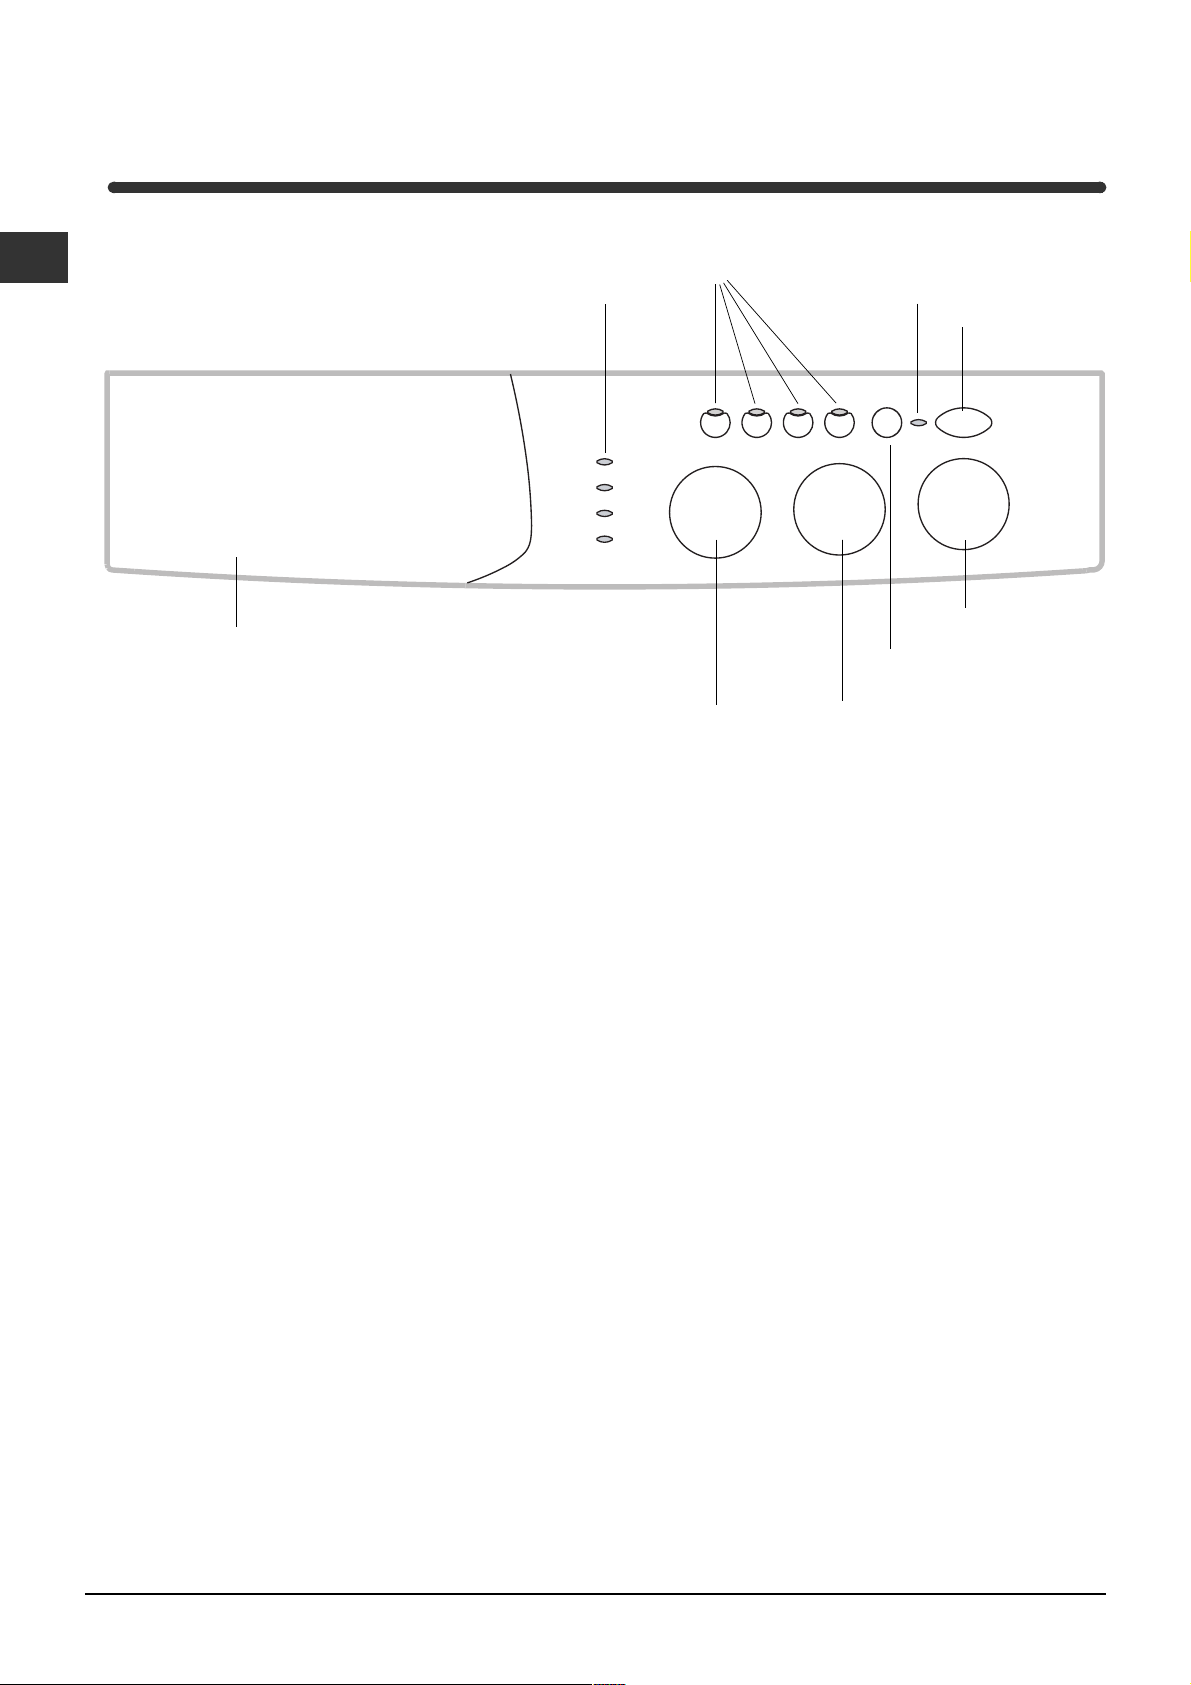
Detergent dispenser: to add detergent and fabric
softener (see page 8).
FUNCTION
Buttons
Leds
SPIN SPEED
Knob
TEMPERATURE knob: to set the temperature or
the cold wash cycle (see page 7).
ON-OFF/
DOOR
LOCK
Led
START/RESET
Button
TEMPERATURE
Knob
ON-OFF
Button
PROGRAMME
Knob
LEDS: to find out which wash cycle phase is under
way.
If the Delay Timer function has been set, the time
left until the programme starts will be indicated (see
page 5).
SPIN SPEED knob: to set the spin speed or exclude
the spin cycle completely (see page 7).
FUNCTION buttons: to select the functions
available. The button corresponding to the function
selected will remain on.
START/RESET button: to start the programmes or
cancel any incorrect settings.
ON-OFF/DOOR LOCK Led: to find out whether the
washing machine is on and if the appliance door can
be opened (see page 5).
ON/OFF button: to turn the washing machine on
and off.
PROGRAMME knob: to select the wash
programmes. The knob stays still during the cycle.
4
Page 5
Leds
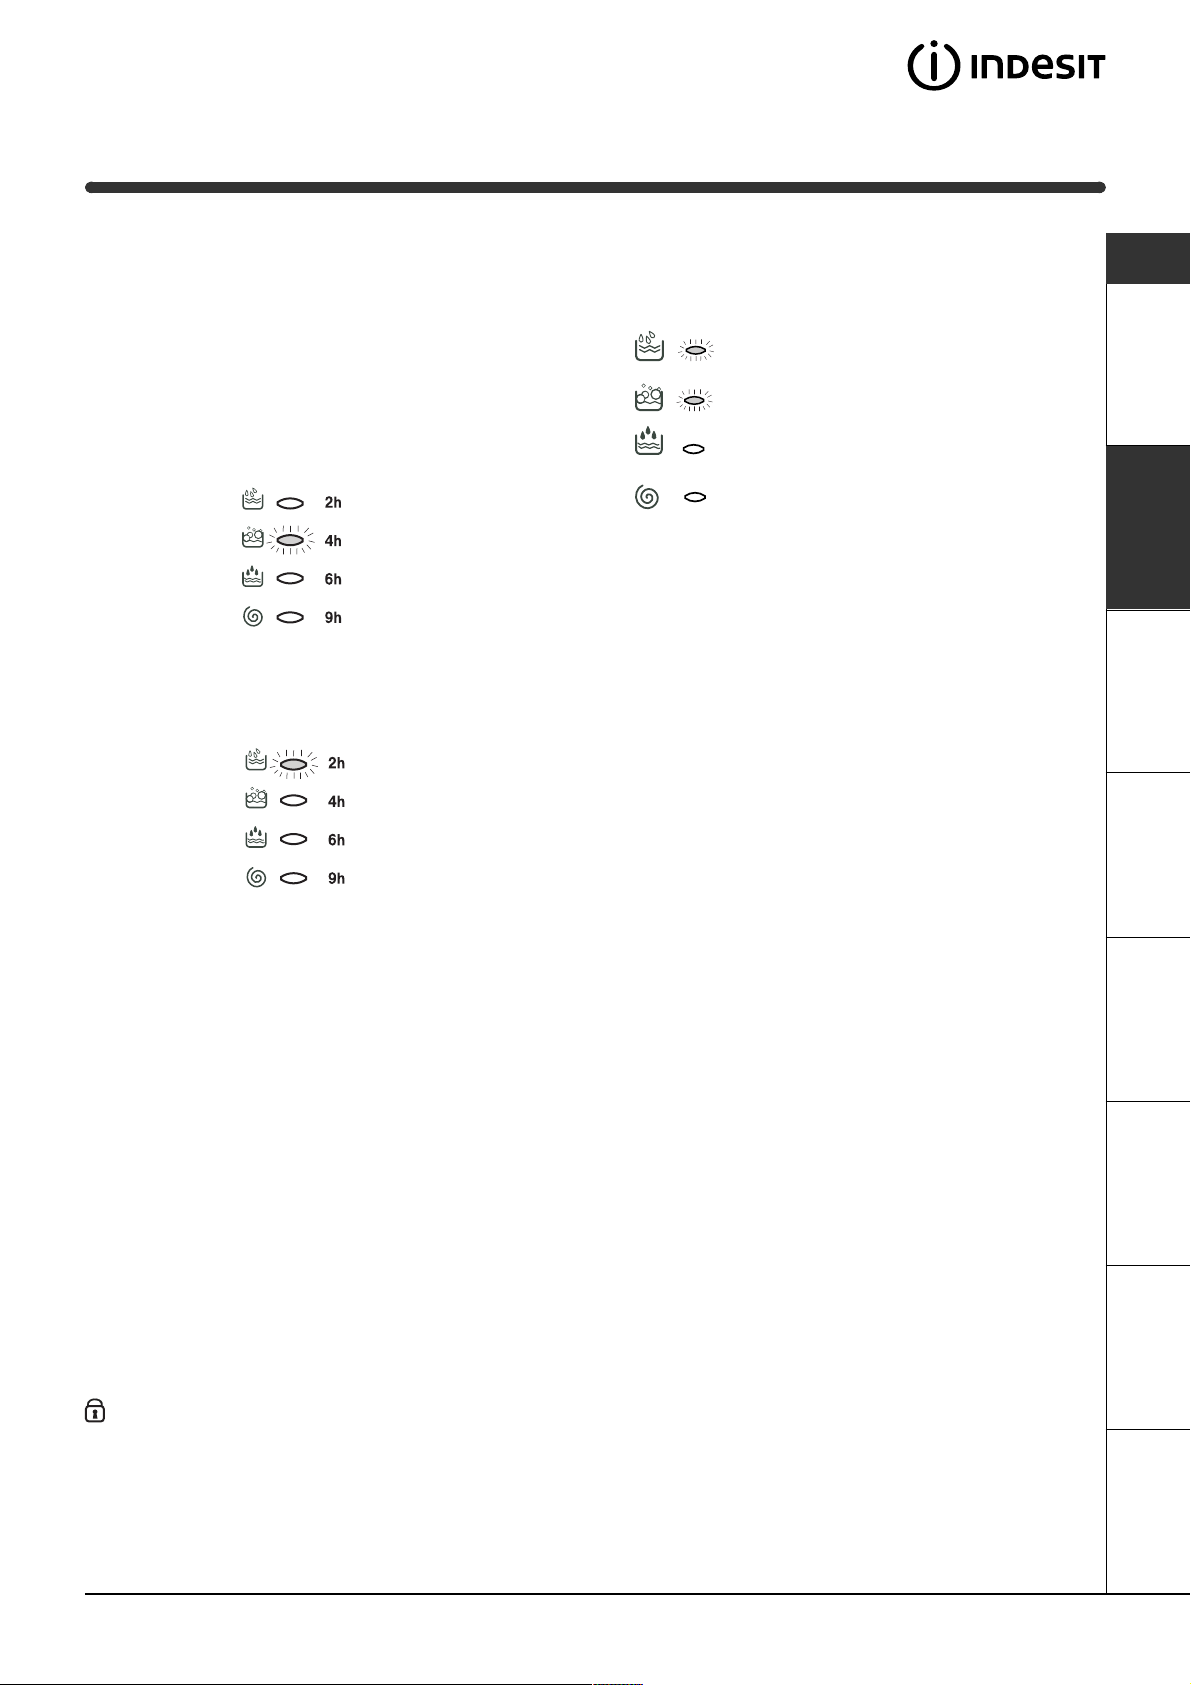
The LEDS provide important information.
This is what they can tell you:
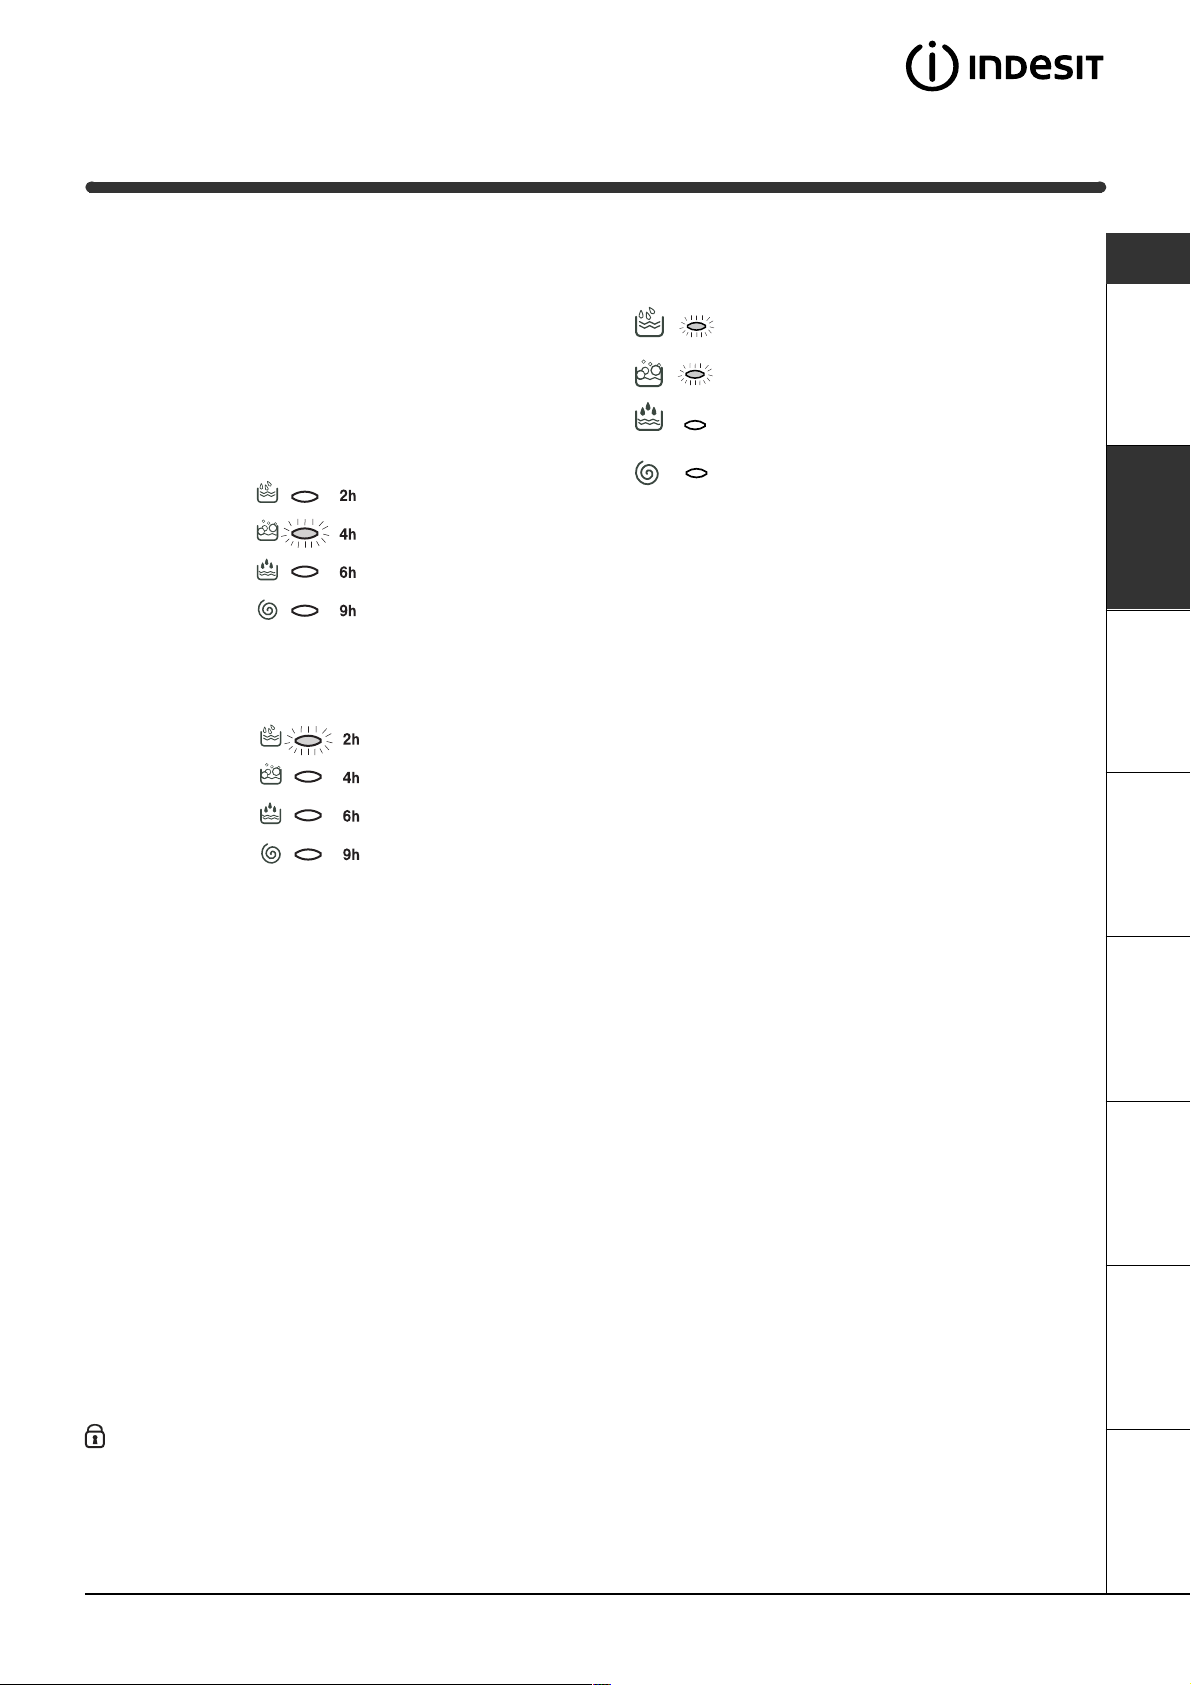
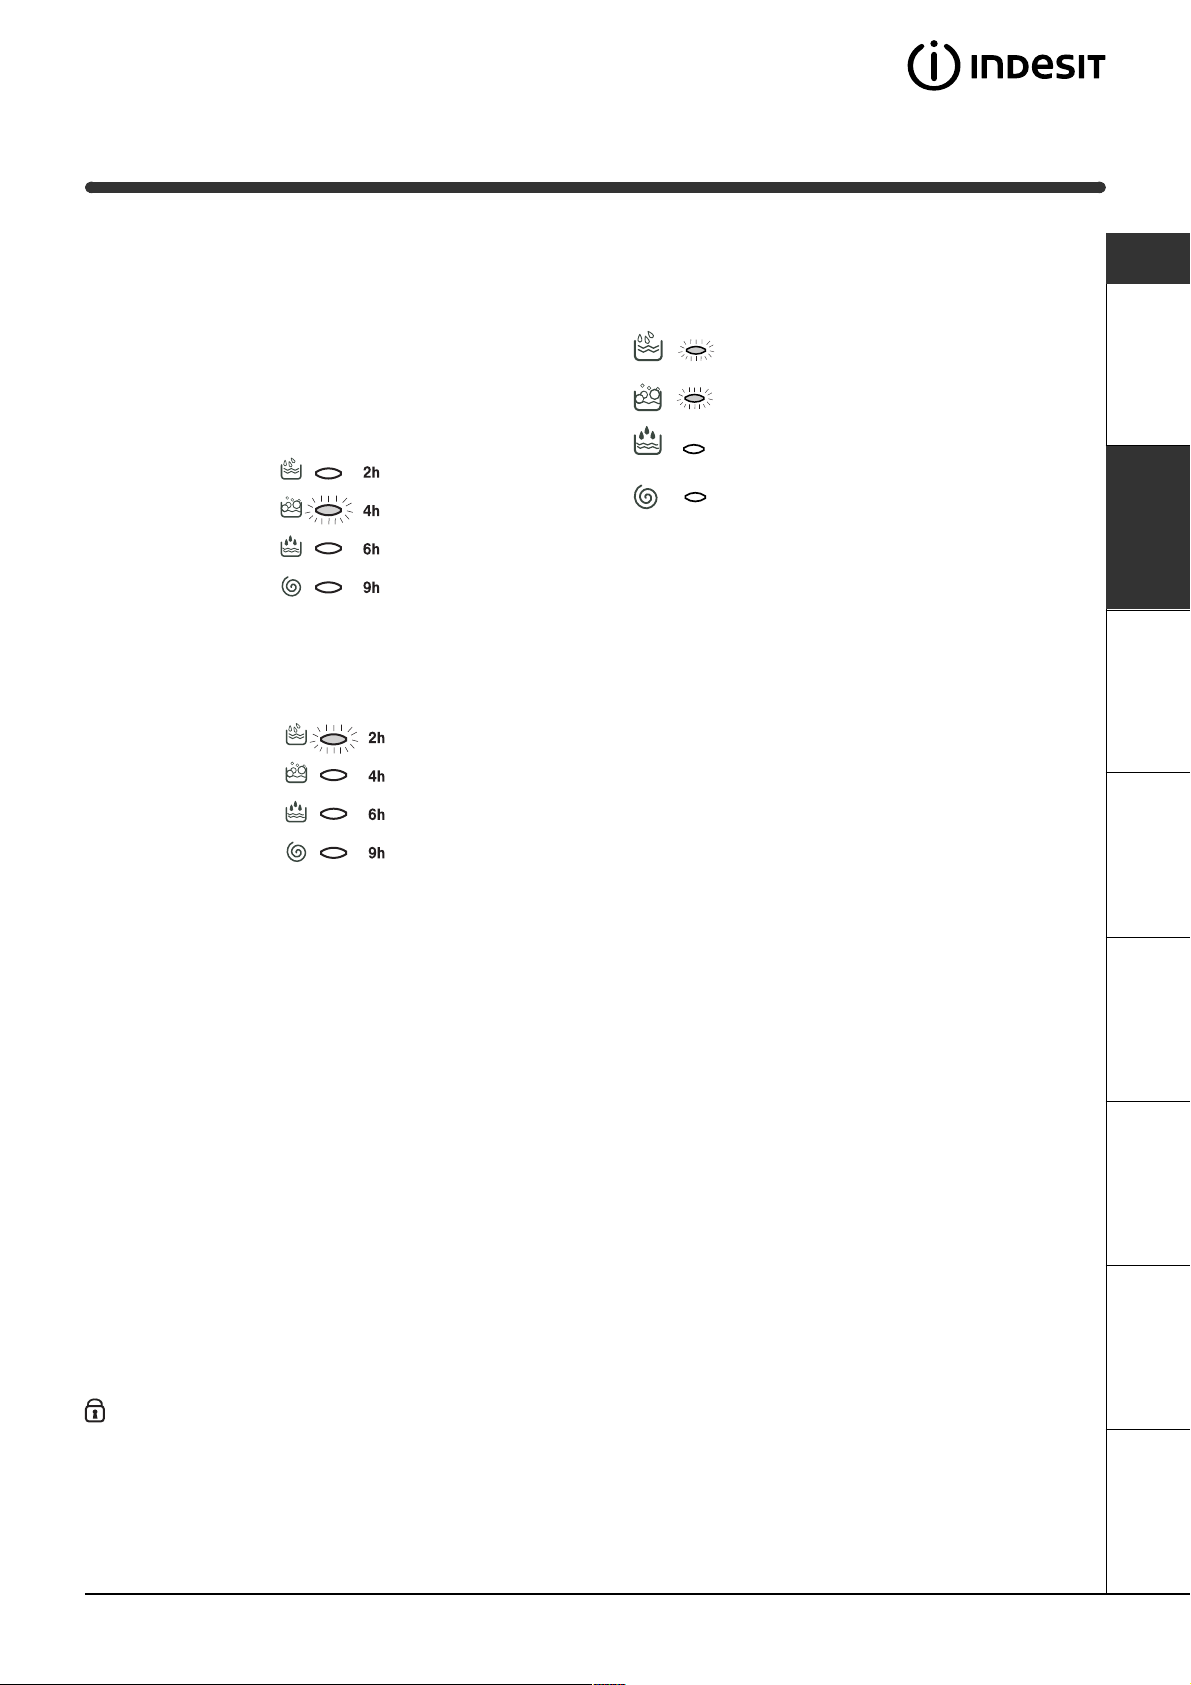
Delay set:
If the Delay Timer function has been enabled (see
page. 7), once you have started the programme,
the LED corresponding to the delay set will begin to
flash:
As time passes, the remaining delay will be
displayed, and the corresponding LED will flash:
Cycle phase under way:
During the wash cycle, the LEDs gradually illuminate
on to indicate the cycle phase under way:
Prewash
Wash
Rinse
Spin cycle
Note: during draining, the LED corresponding to the
Spin cycle phase will be turned on.
Function buttons
The FUNCTION BUTTONS also act like LEDS.
When a function is selected, the corresponding
button is illuminated.
If the function selected is incompatible with the
programme set, the button will flash and the
function will not be enabled.
If you set a function that is incompatible with
another function you selected previously, only the
last one selected will be enabled.
GB
Once the set delay is complete, the flashing LED will
turn off and the programme set will start.
ON-OFF/DOOR LOCK led:
If this LED is on, the appliance door is locked to prevent it from being opened accidentally; to avoid any damages,
wait for the LED to flash before you open the appliance door.
ServiceTroubleshootingPrecautions CareProgrammes DetergentsInstallation Description
The rapid flashing of the ON-OFF/DOOR LOCK Led together with the flashing of at least one other LED indicates
there is an abnormality. Call for Technical Assistance.
5
Page 6
Starting and Programmes
GB
Briefly: starting a programme
1. Switch the washing machine on by pressing button .
All the LEDS will light up for a few seconds and
the ON-OFF/DOOR LOCK Led will begin to flash.
2. Load your laundry into the washing machine and
shut the appliance door.
3. Set the PROGRAMME knob to the programme
required.
4. Set the wash temperature (see page 7).
5. Set the spin speed (see page 7).
6. Add the detergent and any fabric softener
(see page 8).
7. Start he programme by pressing the START/RESET
button.
To cancel it, keep the START/RESET button pressed
for at least 2 seconds.
8. When the programme is finished, the ON-OFF/
DOOR LOCK Led will flash to indicate that the
appliance door can be opened. Take out your
laundry and leave the appliance door ajar to allow
the drum to dry thoroughly. Turn the washing
machine off by pressing button
.
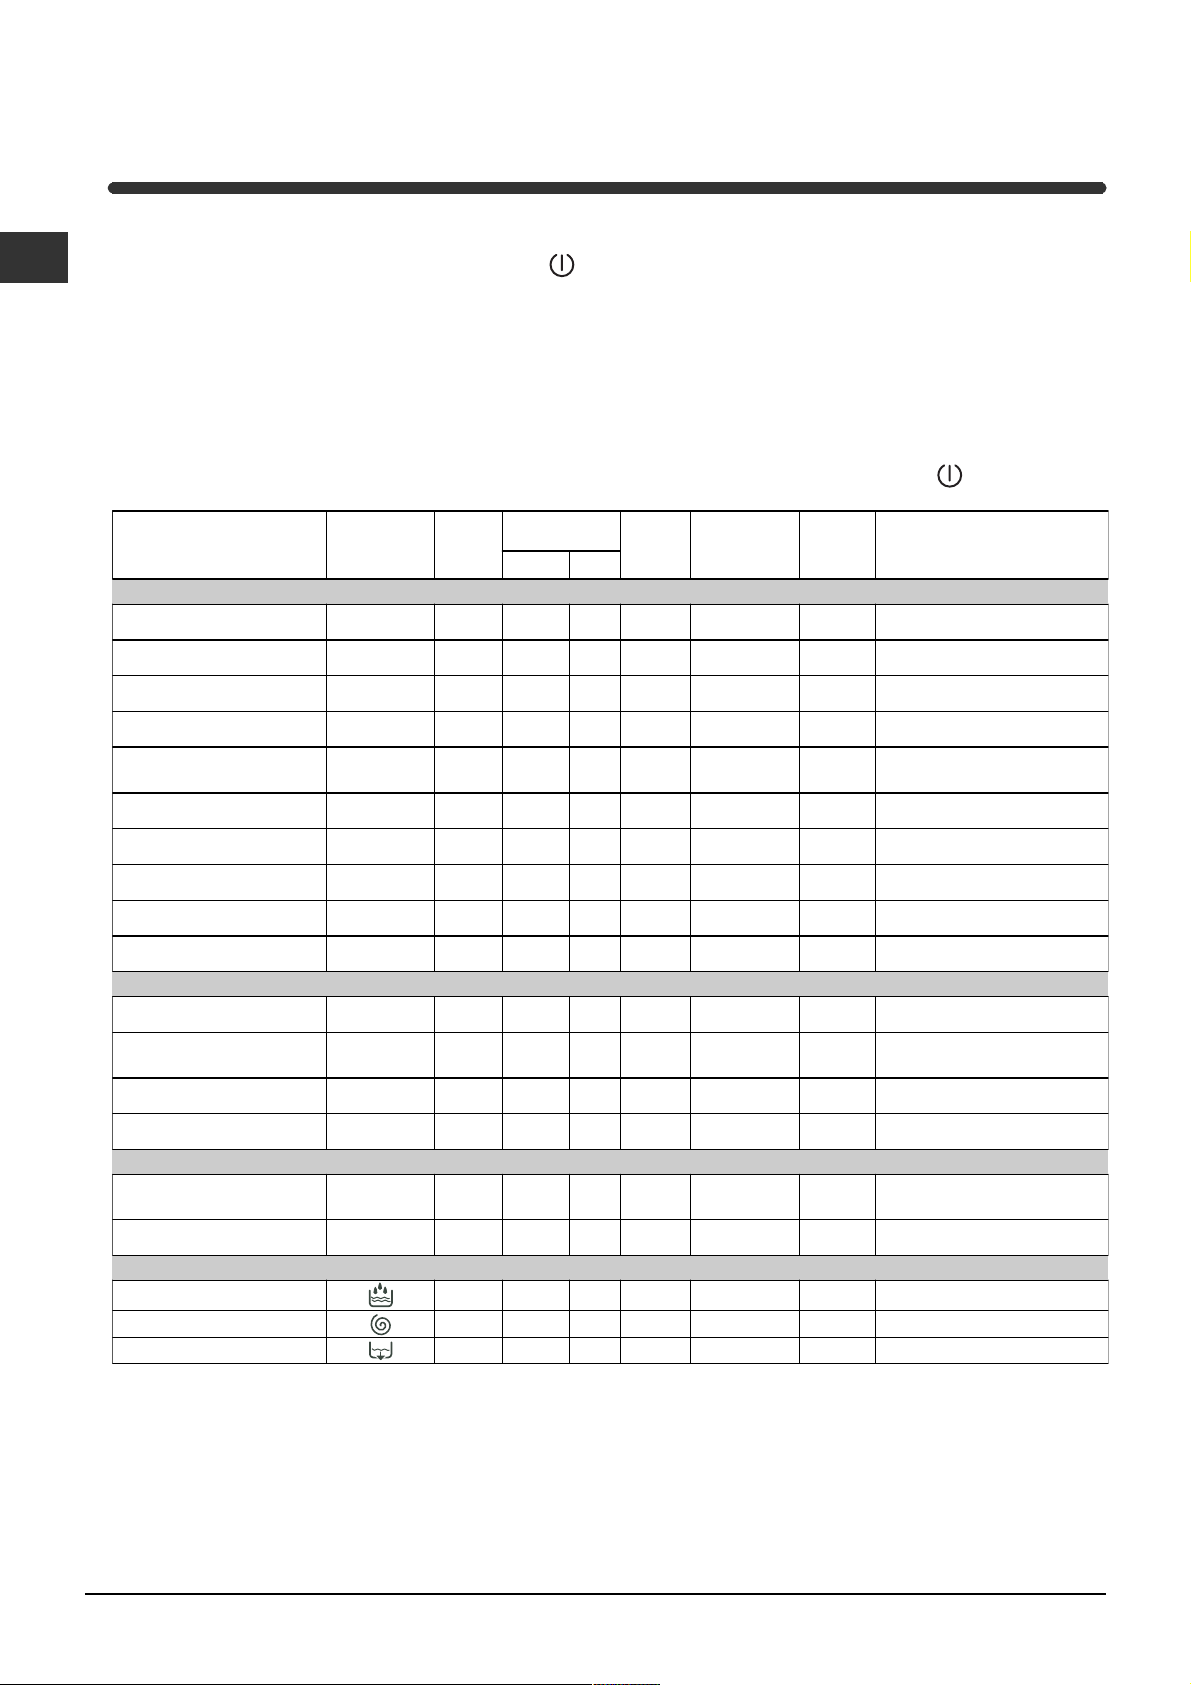
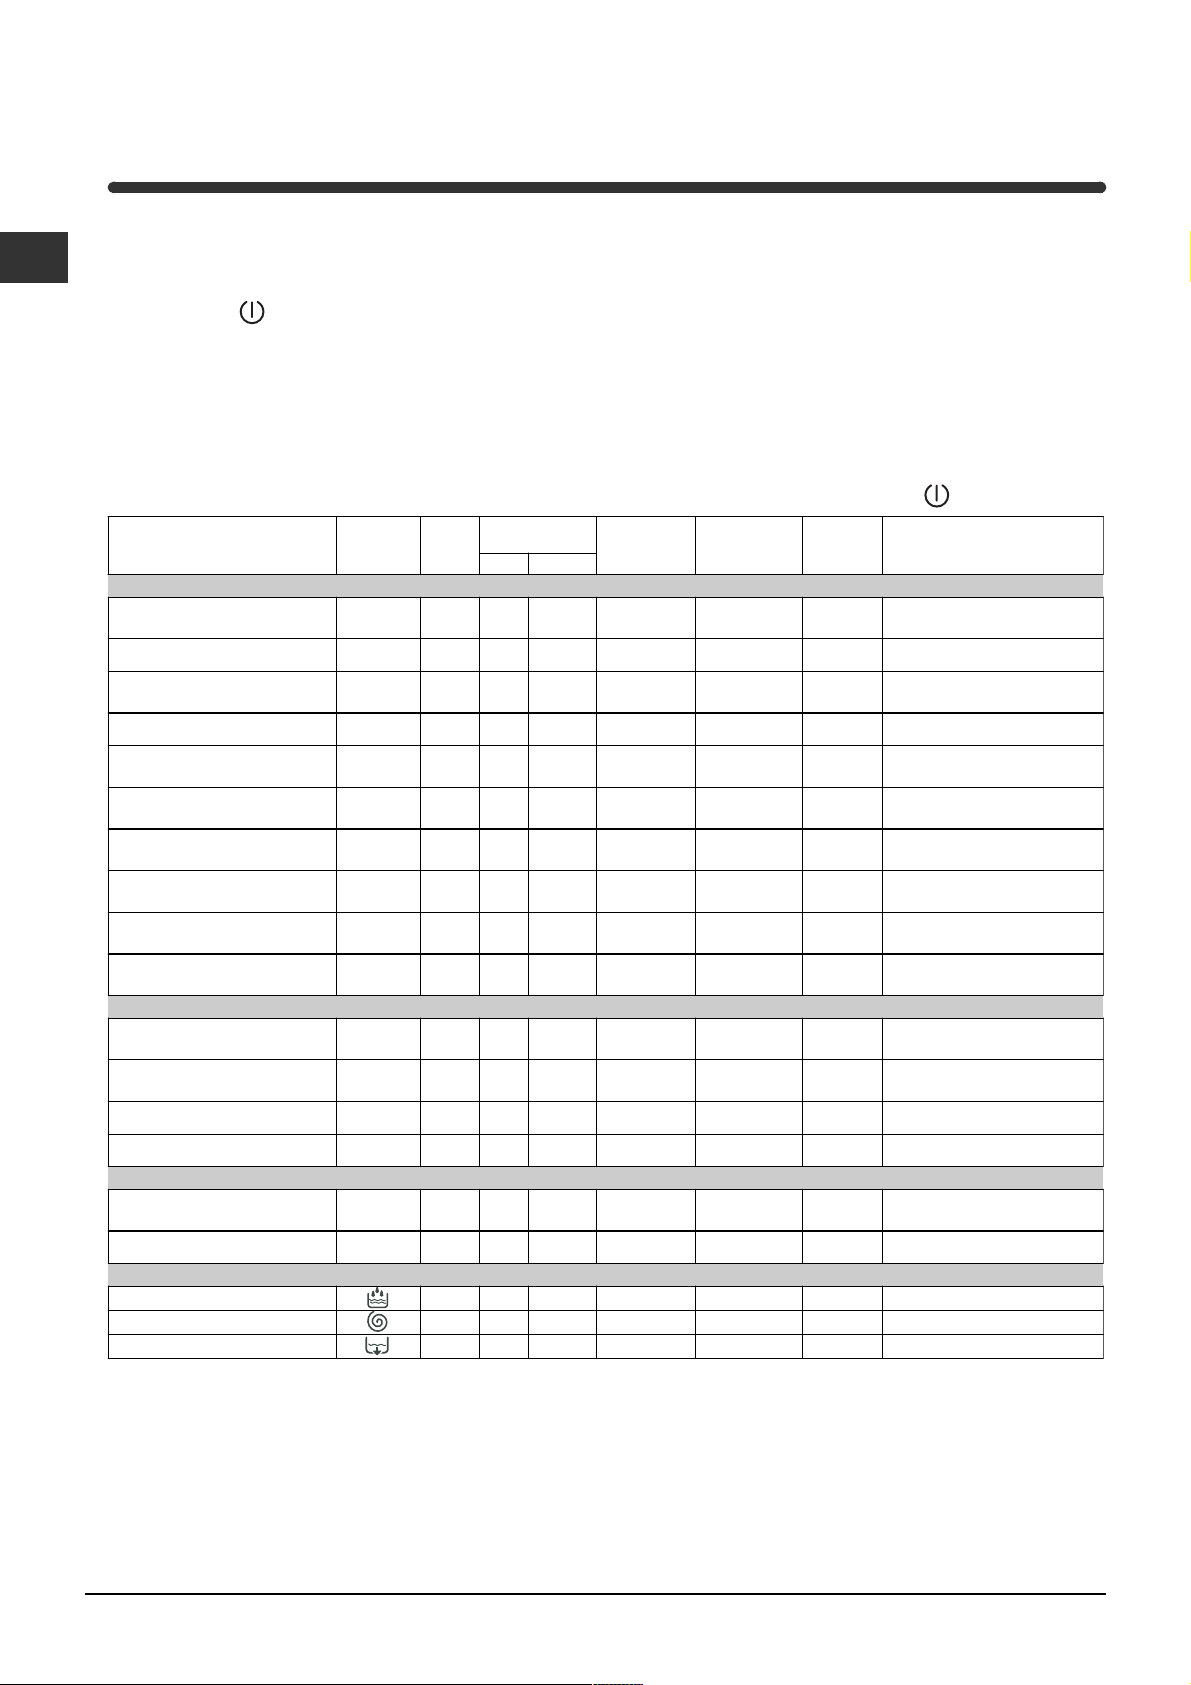
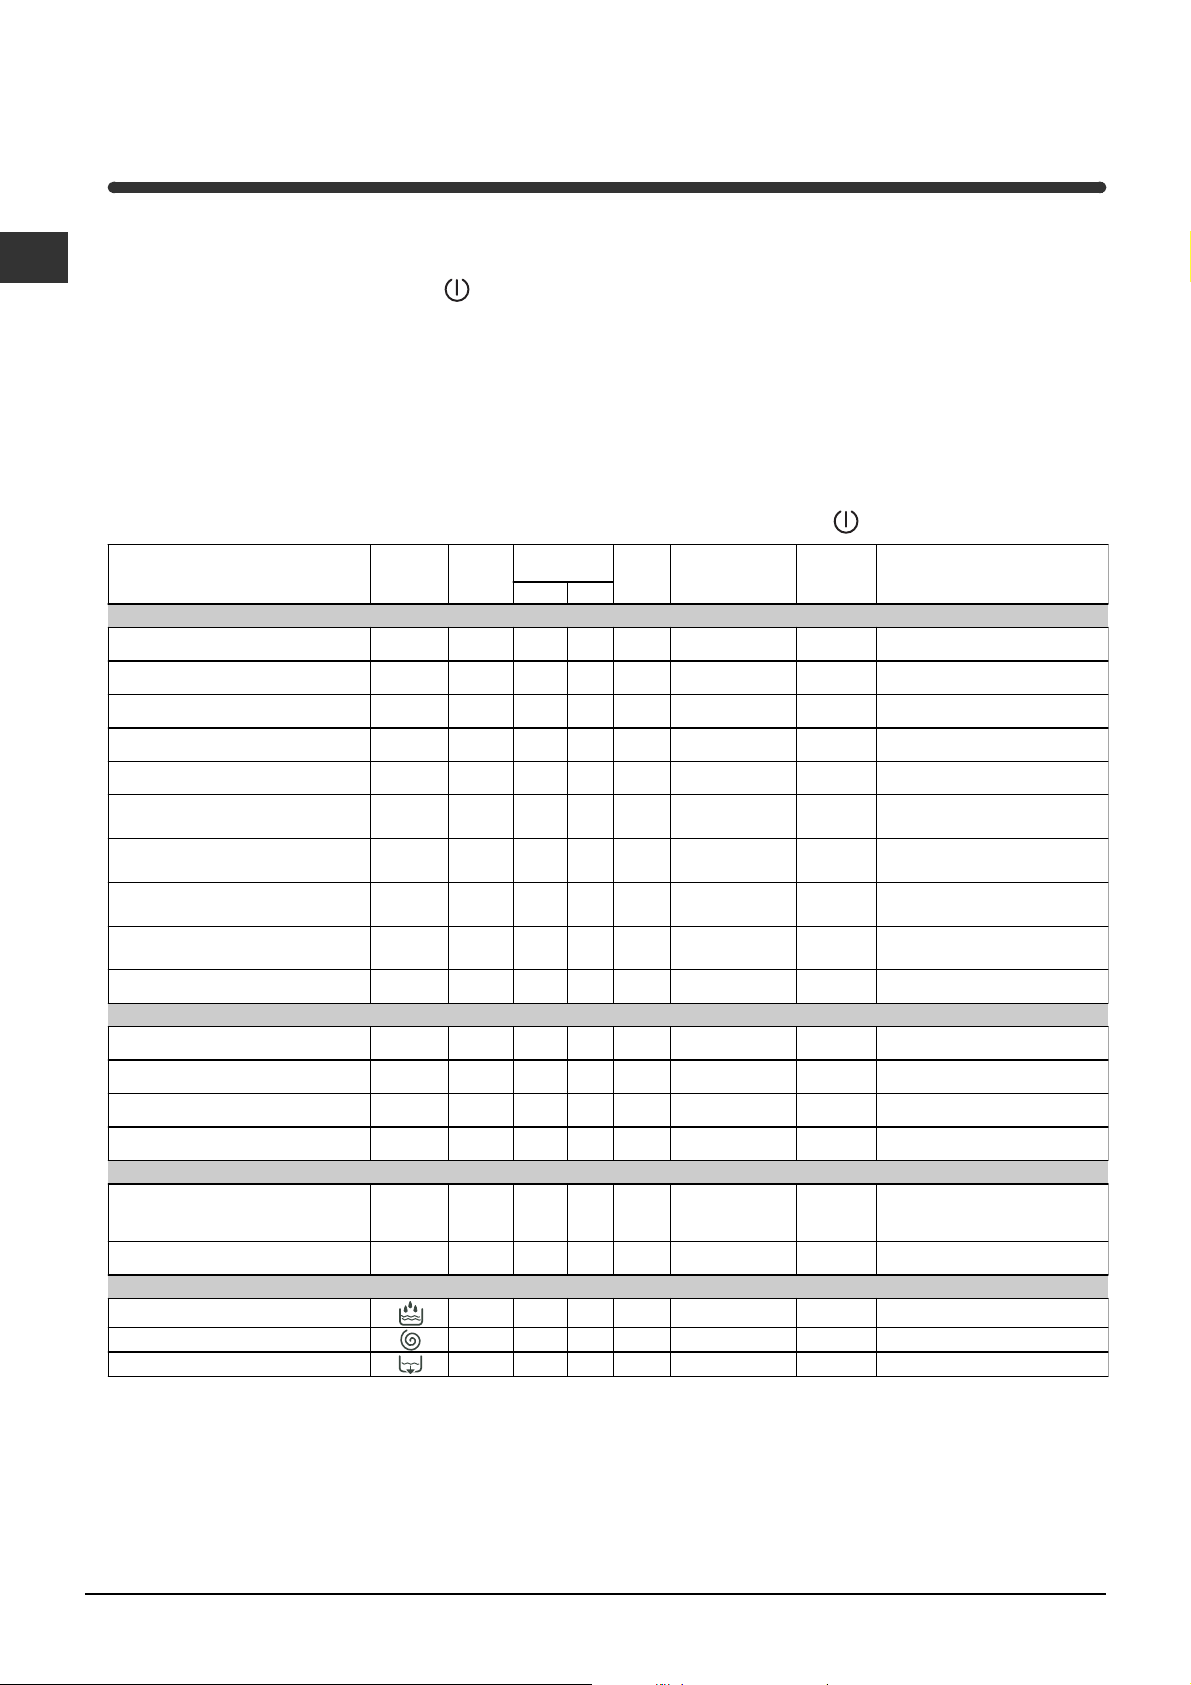
Programme table
Cycle
length
(m in ute s)
135
125
110
105
70
75
60
60
50
45
65
55
45
Description of wash cycle
Pre-wash, wash cycle, rinse cycles,
intermediate and final spin cycles
Wash cycle, rinse cycles,
intermediate and final spin cycles
Wash cycle, rinse cycles,
intermediate and final spin cycles
Wash cycle, rinse cycles,
intermediate and final spin cycles
Wash cycle, rinse cycles,
intermediate and final spin cycles
Wash cycle, rinse cycles, anticrease or delicate spin cycle
Wash cycle, rinse cycles, anticrease or delicate spin cycle
Wash cycle, rinse cycles, anticrease or delicate spin cycle
Wash cycle, rinse cycles, anticrease and delicate spin cycle
Wash cycle, rinse cycles, anticrease or draining cycle
Wash cycle, rinse cycles,
intermediate and final spin cycles
Wash cycle, rinse cycles,
intermediate and final spin cycles
Wash cycle, rinse cycles,
delicate spin cycle
Wash cycle, rinse cycles and
delicate spin cycle
Cold wash (without detergents),
wash cycle, rinse cycles, and
delicate spin cycle
Wash cycle, rinse cycles,
intermediate and final spin cycles
Rinse cycles and spin cycle
°C
°C
Detergent
pre-
wash
Fabric
softener
wash
50
Stain removal
option/bleach
Delicate/
Traditional
Delicate/
Traditional
Delicate/
Traditional
Delicate/
Traditional
Delicate/
Traditional
Type of fab ric and
degree of soil
Standard
Extremely soiled whites
(sheets, tablecloths, etc.)
Extremely soiled whites
(sheets, tablecloths, etc.)
Heavily soiled w h ites and fast
colours
Heavily soiled w h ites and
delicate colours
Slightly s oiled whites and
delicate colou rs (sh irts,
jum pers, etc.)
Heavily soiled fast colours
(baby linen, etc.)
Heavily soiled fast colours
(baby linen, etc.)
Delicate colours (all types of
sligh tly soiled garm ents)
Wool
Very delicate fabrics
(curtain s, silk, viscos e, etc.)
Tim e 4 y ou
Heavily soiled w h ites and fast
colours
Slightly s oiled whites and
delicate colou rs (sh irts,
jum pers, etc.)
Delicate colours (all types of
sligh tly soiled garm ents)
Delicate colours (all types of
sligh tly soiled garm ents)
Sports
Sports shoes
Fabrics for sportswear
(Tracksuits, shorts, etc.)
PARTIAL PROGRAMMES
Rinse
Spin cycle Draining and spin cycle
Drain Draining
(MAX. 2 pairs)
Program mes
1
2
2
2
3
4
4
5
6
7
8
9
10
11
12
13
Te m p e rature
90°C
90°C
60°C
40°C
40°C
60°C D elicate
40°C Delicate
40°C Delicate
40°C
30°C
60°C
40°C
40
30°C 30
30
30°C 60
Notes
-For programmes 8 and 9, we advise against exceeding a wash load of 3.5 kg.
-For programme 13 we advise against exceeding a wash load of 2 kg.
-For the anti-crease function: see Easy iron, opposite page. The information contained in the table is purely indicative.
Special programme
Daily (programme 11 for Synthetics) is designed to wash lightly soiled garments in a short amount of time: it only lasts
30 minutes and allows you to save on both time and energy. By setting this programme (11 at 30°C), you can wash
different fabrics together (except for woollen and silk items), with a maximum load of 3 kg.
We recommend the use of liquid detergent.
6
Page 7
Personalisations
Setting the temperature
Turn the TEMPERATURE knob to set the wash temperature (see Programme table on page 6).
The temperature can be lowered, or even set to a cold wash (
Setting the spin speed
Turn the SPIN SPEED knob to set the spin speed for the programme selected.
The maximum spin speeds for each programme are as follows:
Programmes Maximum spin speed
Cottone 1200 rpm
Synthetics 800 rpm
Wool 600 rpm
Silk no
).
GB
The spin speed can be lowered, or the spin cycle can be excluded altogether by selecting symbol
.
The washing machine will automatically prevent you from selecting a spin speed higher than the maximum
speed for each programme.
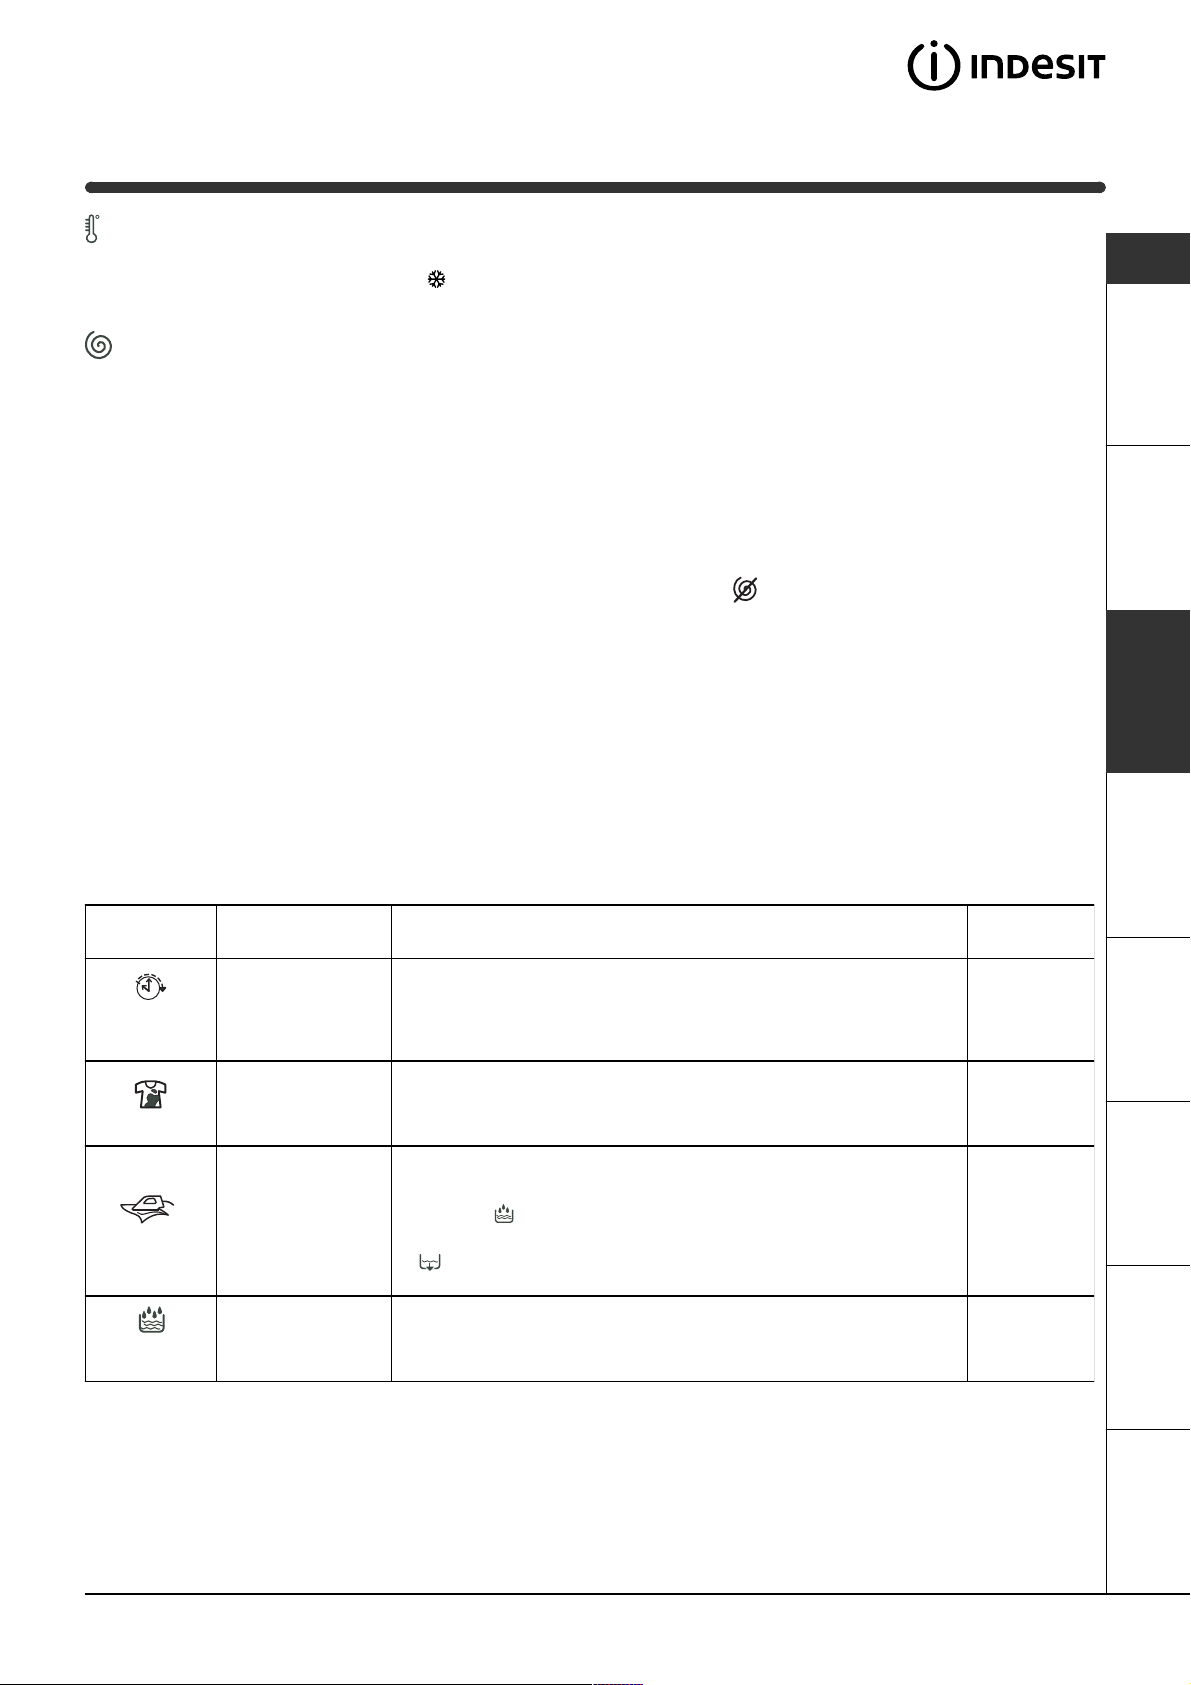
Functions
To enable a function:
1. press the button corresponding to the desired function, according to the table below;
2. the function is enabled when the corresponding button is illuminated.
Note: The rapid flashing of the button indicates that the corresponding function cannot be selected for the
programme set.
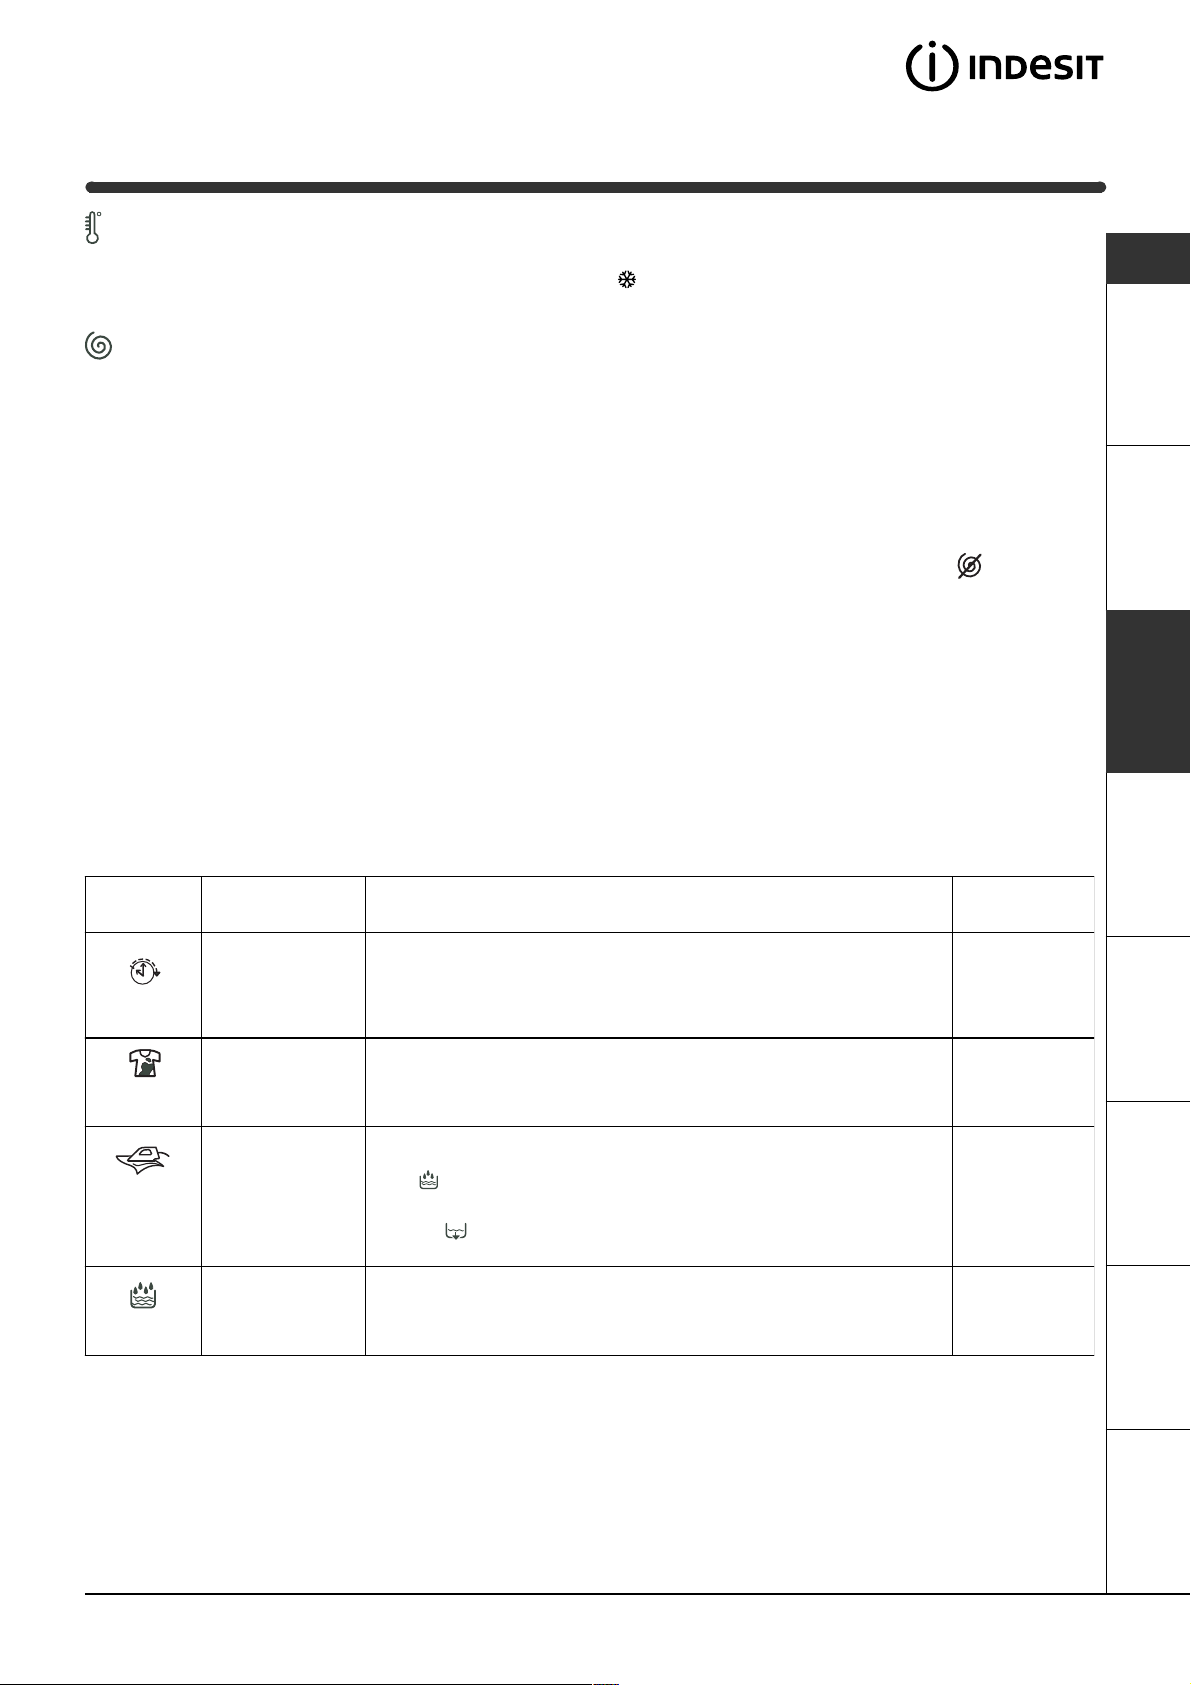
Function Effect Comments
Press the button repeatedly until the LED corresponding to the
desired delay is turned on.
The fifth time the button is pressed, the function will be disabled.
N.B.: Once you have pressed the Start/Reset button, the delay
can only be decreased if you wish to modify it.
Please remember to pour the bleach into extra compartment 4
(se
e page 8)
This function is incompatible with the EASY IRON function.
When this function is set, programmes 4, 5, 6, 7 will end with the
laundry left to soak (Anti-crease) and the Rinse cycle phase
LED will flash.
- to conclude the cycle, press the START/RESET button;
- to run the draining cycle alone, set the knob to the relative
symbol and press the START/RESET button.
This function is incompatible with the STAIN REMOVAL function.
Delay Timer
Stain
removal
Easy iron
Delays the start
of the wash by
up to 9 hours.
Bleaching cycle
designed to
remove the
toughest stains.
This option
reduces the
amount of
creasing on
fabrics, making
them easier to
iron.
.
Enabled with
programmes:
All
2, 3, 4, 5,
Rinse cycle.
3, 4, 5, 6, 7,
8, 9, 10,
Rinse cycle.
Extra Rinse
Increases the
efficiency of the
rinse.
Recommended when the appliance has a full load or with large
quantities of detergent.
1, 2, 3, 4, 5,
8, 9, 10, 12,
13, Rinse
cycle.
ServiceTroubleshootingPrecautions CareProgrammes DetergentsInstallation Description
7
Page 8
Detergents and laundry
GB
Detergent dispenser
Good washing results also depend on the correct
dose of detergent: adding too much detergent won't
necessarily make for a more efficient wash, and may
in fact cause build up on the interior of your
appliance and even pollute the environment.
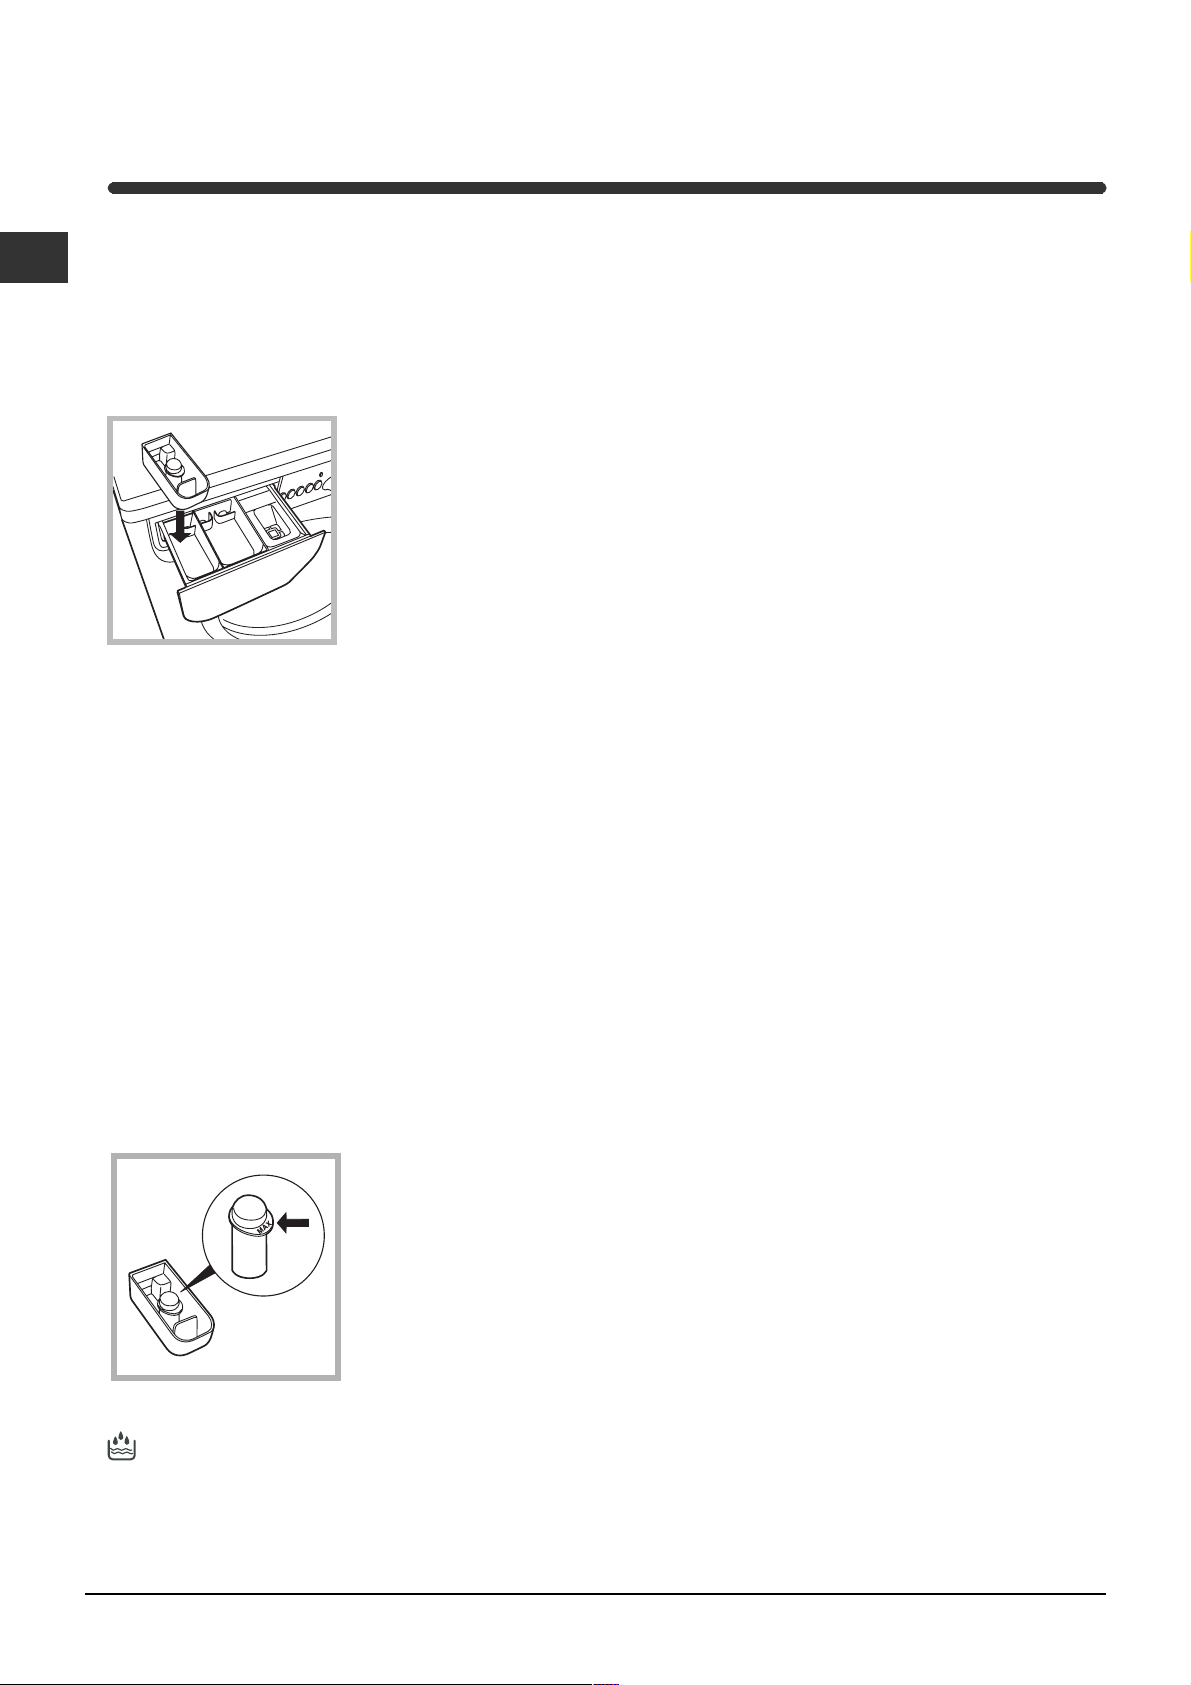
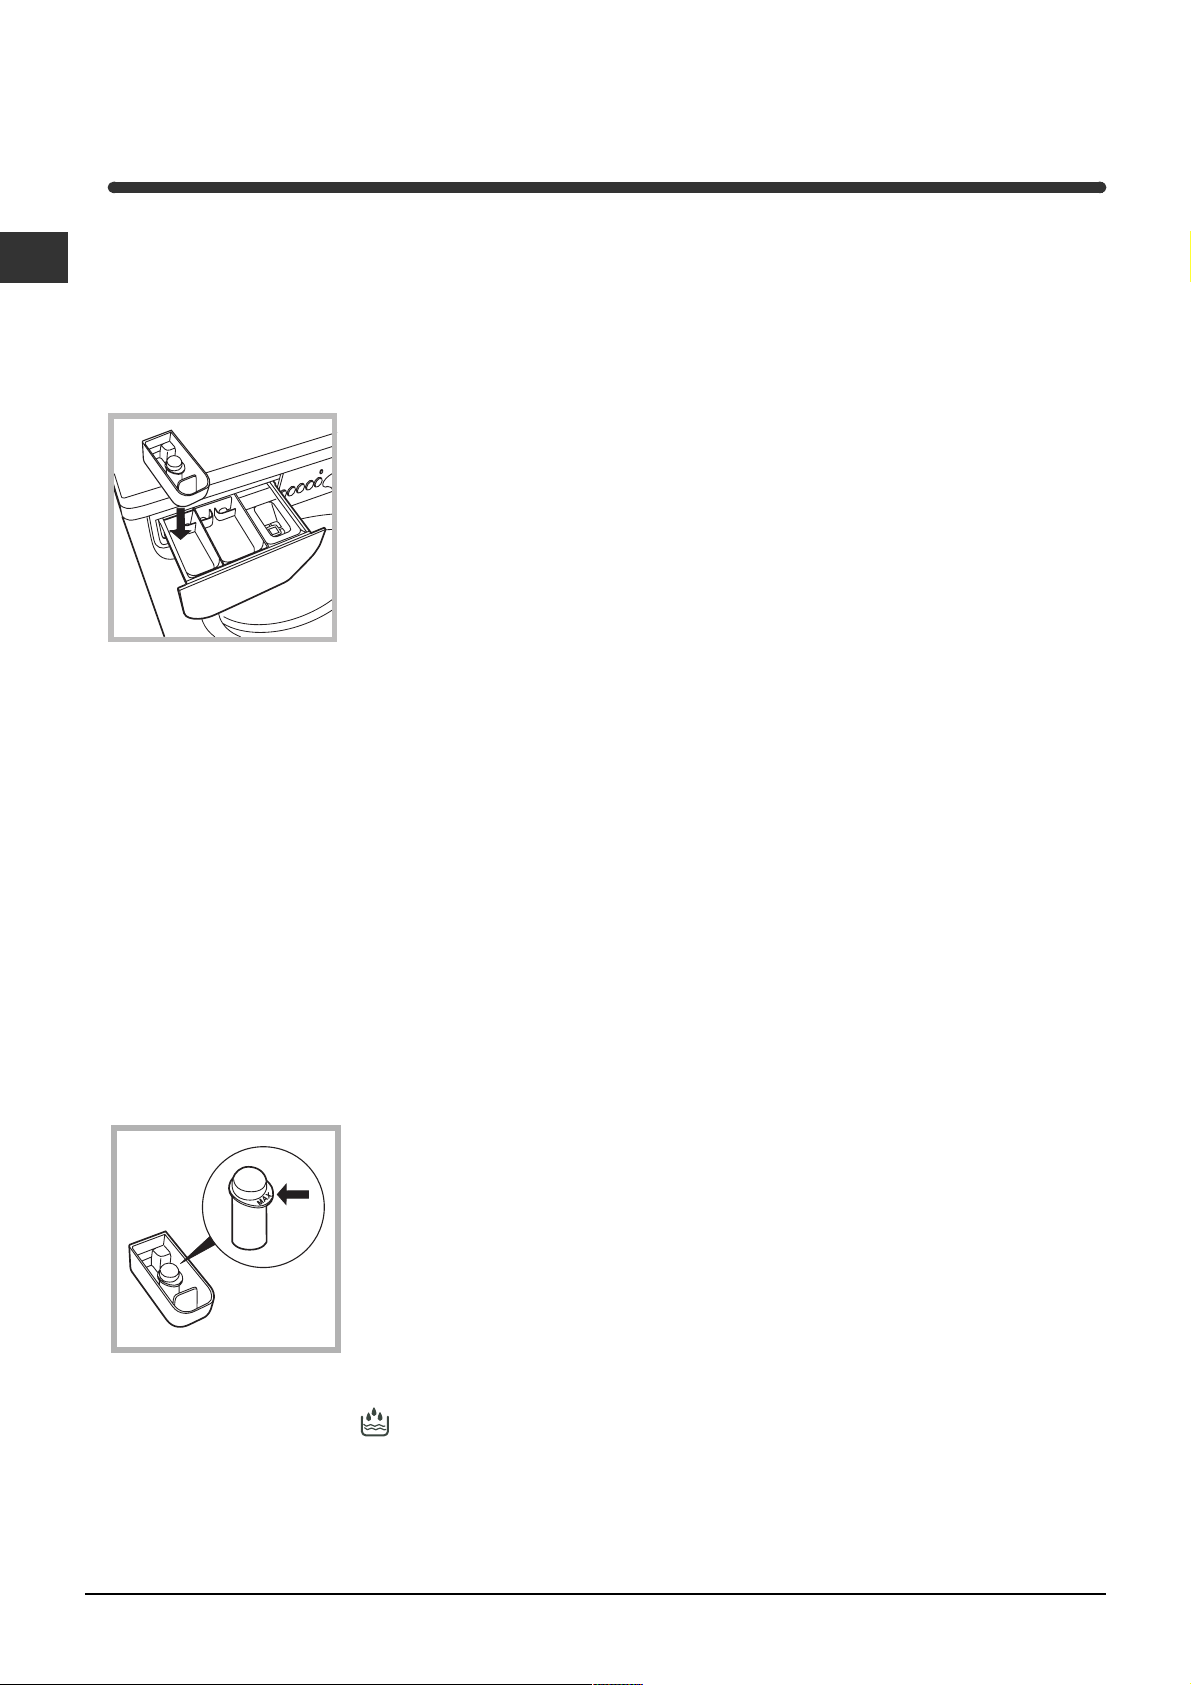
Open up the detergent
4
dispenser and pour in
the detergent and fabric
softener, as follows.
3
2
1
compartment 1: Detergent for pre-wash
(powder)
Before pouring in the detergent, make sure that
extra compartment 4 has been removed.
compartment 2: Detergent for the wash cycle
(powder or liquid)
Liquid detergent should only be poured in
immediately prior to the wash cycle start.
compartment 3: Additives (fabric softeners, etc.)
The fabric softener should not overflow from the grid.
extra compartment 4: Bleach
Do not use hand wash detergent because it may
form too much foam.
Bleach cycle
Preparing your laundry
Divide your laundry according to:
- the type of fabric/the symbol on the label.
- the colours: separate coloured garments from
whites.
Empty all pockets and check for loose buttons.
Do not exceed the weight limits stated below,
which refer to the weight when dry:
Sturdy fabrics: max 4,5 kg
Synthetic fabrics: max 2.5 kg
Delicate fabrics: max 2 kg
Wool: max 1 kg
How much does your laundry weigh?
1 sheet 400-500 g
1 pillow case 150-200 g
1 tablecloth 400-500 g
1 bathrobe 900-1,200 g
1 towel 150-250 g
Special items
Curtains: fold curtains and place them in a pillow
case or mesh bag. Wash them separately without
exceeding half the appliance load. Use programme 7
which excludes the spin cycle automatically.
Quilted coats and windbreakers: if they are
padded with goose or duck down, they can be
machine-washed. Turn the garments inside out and
load a maximum of 2-3 kg, repeating the rinse cycle
once or twice and using the delicate spin cycle.
Wool: for best results, use a specific detergent,
taking care not to exceed a load of 1 kg.
Traditional bleach should be used on sturdy
white fabrics, and delicate bleach for coloured
fabrics, synthetics and for wool.
Place extra
compartment 4,
provided, into
compartment 1.
When pouring in the
bleach, be careful not to
exceed the "max" level
indicated on the central
pivot (see figure).
To run the bleach cycle alone, pour the bleach into
extra compartment 4 and set the Rinse programme
. To bleach during a wash cycle, pour in the
detergent and fabric softener, set the desired
programme and enable the Stain removal option
(see page 7).
The use of extra compartment 4 excludes the
possibility of using the pre-wash cycle.
8
Page 9
Precautions and advice
The washing machine was designed and built in
compliance with the applicable international safety
regulations. The following information is provided for
your safety and should consequently be read
carefully.
General safety
This appliance has been designed for non-
professional, household use and its functions must
not be changed.
This washing machine should only be used by
adults and in accordance with the instructions
provided in this manual.
Never touch the washing machine when barefoot
or with wet or damp hands or feet.
Do not pull on the power supply cable to unplug
the appliance from the electricity socket. Pull the
plug out yourself.
Do not open the detergent dispenser while the
appliance is in operation.
Do not touch the drain water as it could reach
very high temperatures.
Never force the washing machine door: this could
damage the safety lock mechanism designed to
prevent any accidental openings.
In the event of a malfunction, do not under any
circumstances touch internal parts in order to
attempt repairs.
Always keep children well away from the
appliance while in operation.
The appliance door tends to get quite hot during
the wash cycle.
Disposing of an old washing machine:
before scrapping your appliance, cut the power
supply cable and remove the appliance door.
Saving energy and respecting the
environment
Environmentally-friendly technology
If you only see a little water through your appliance
door, this is because thanks to the latest Indesit
technology, your washing machine only needs less
than half the amount of water to get the best
results: an objective reached to respect the
environment.
Saving on detergent, water,
energy and time
To avoid wasting resources, the washing machine
should be used with a full load. A full load instead
of two half loads allows you to save up to 50% on
energy.
The pre-wash cycle is only necessary on
extremely soiled garments. Avoiding it will save on
detergent, time, water and between 5 and 15%
energy.
Treating stains with a stain remover or leaving
them to soak before washing will cut down the
need to wash them at high temperatures. A
programme at 60°C instead of 90°C or one at
40°C instead of 60°C will save up to 50% on
energy.
Use the correct quantity of detergent depending
on the water hardness, how soiled the garments
are and the amount of laundry you have, to avoid
wastage and to protect the environment: despite
being biodegradable, detergents do contain
ingredients that alter the natural balance of the
environment. In addition, avoid using fabric
softener as much as possible.
GB
Should it have to be moved, proceed with the
help of two or three people and handle it with the
utmost care. Never try to do this alone, because
the appliance is very heavy.
Before loading your laundry into the washing
machine, make sure the drum is empty.
Disposal
Disposing of the packaging material:
observe local regulations, so the packaging can
be re-used.
If you use your washing machine from late in the
afternoon until the early hours of the morning, you
will help reduce the electricity board's peak load.
The Delay Timer option (see page 7) helps to
organise your wash cycles accordingly.
If your laundry has to be dried in a tumble dryer,
select a high spin speed. Having the least water
possible in your laundry will save you time and
energy in the drying process.
ServiceTroubleshootingPrecautions CareProgrammes DetergentsInstallation Description
9
Page 10
Care and maintenance
GB
Cutting off the water or electricity
supply
Turn off the water tap after every wash. This will
limit the wear of your appliance's water system
and also prevent leaks.
Unplug your appliance when cleaning it and
during all maintenance operations.
Cleaning your appliance
The exterior and rubber parts of your appliance can
be cleaned with a soft cloth soaked in lukewarm
soapy water. Do not use solvents or abrasives.
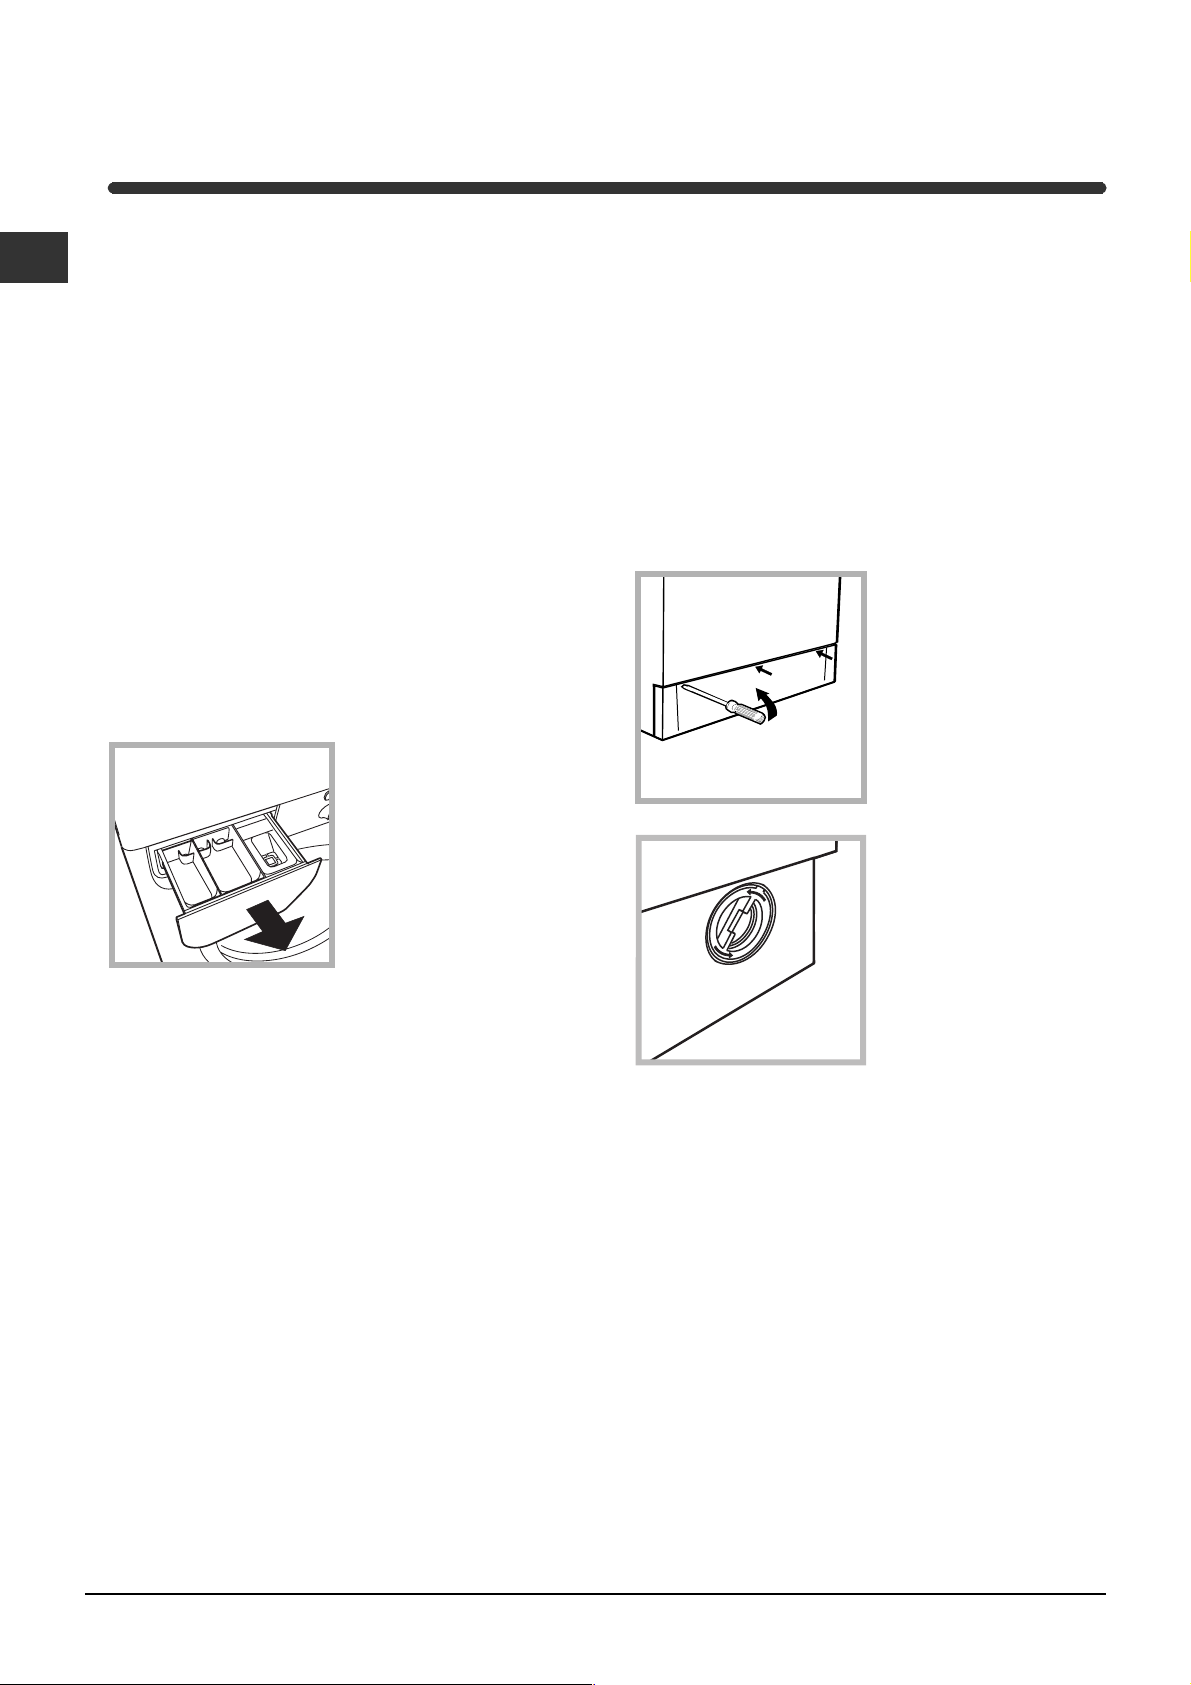
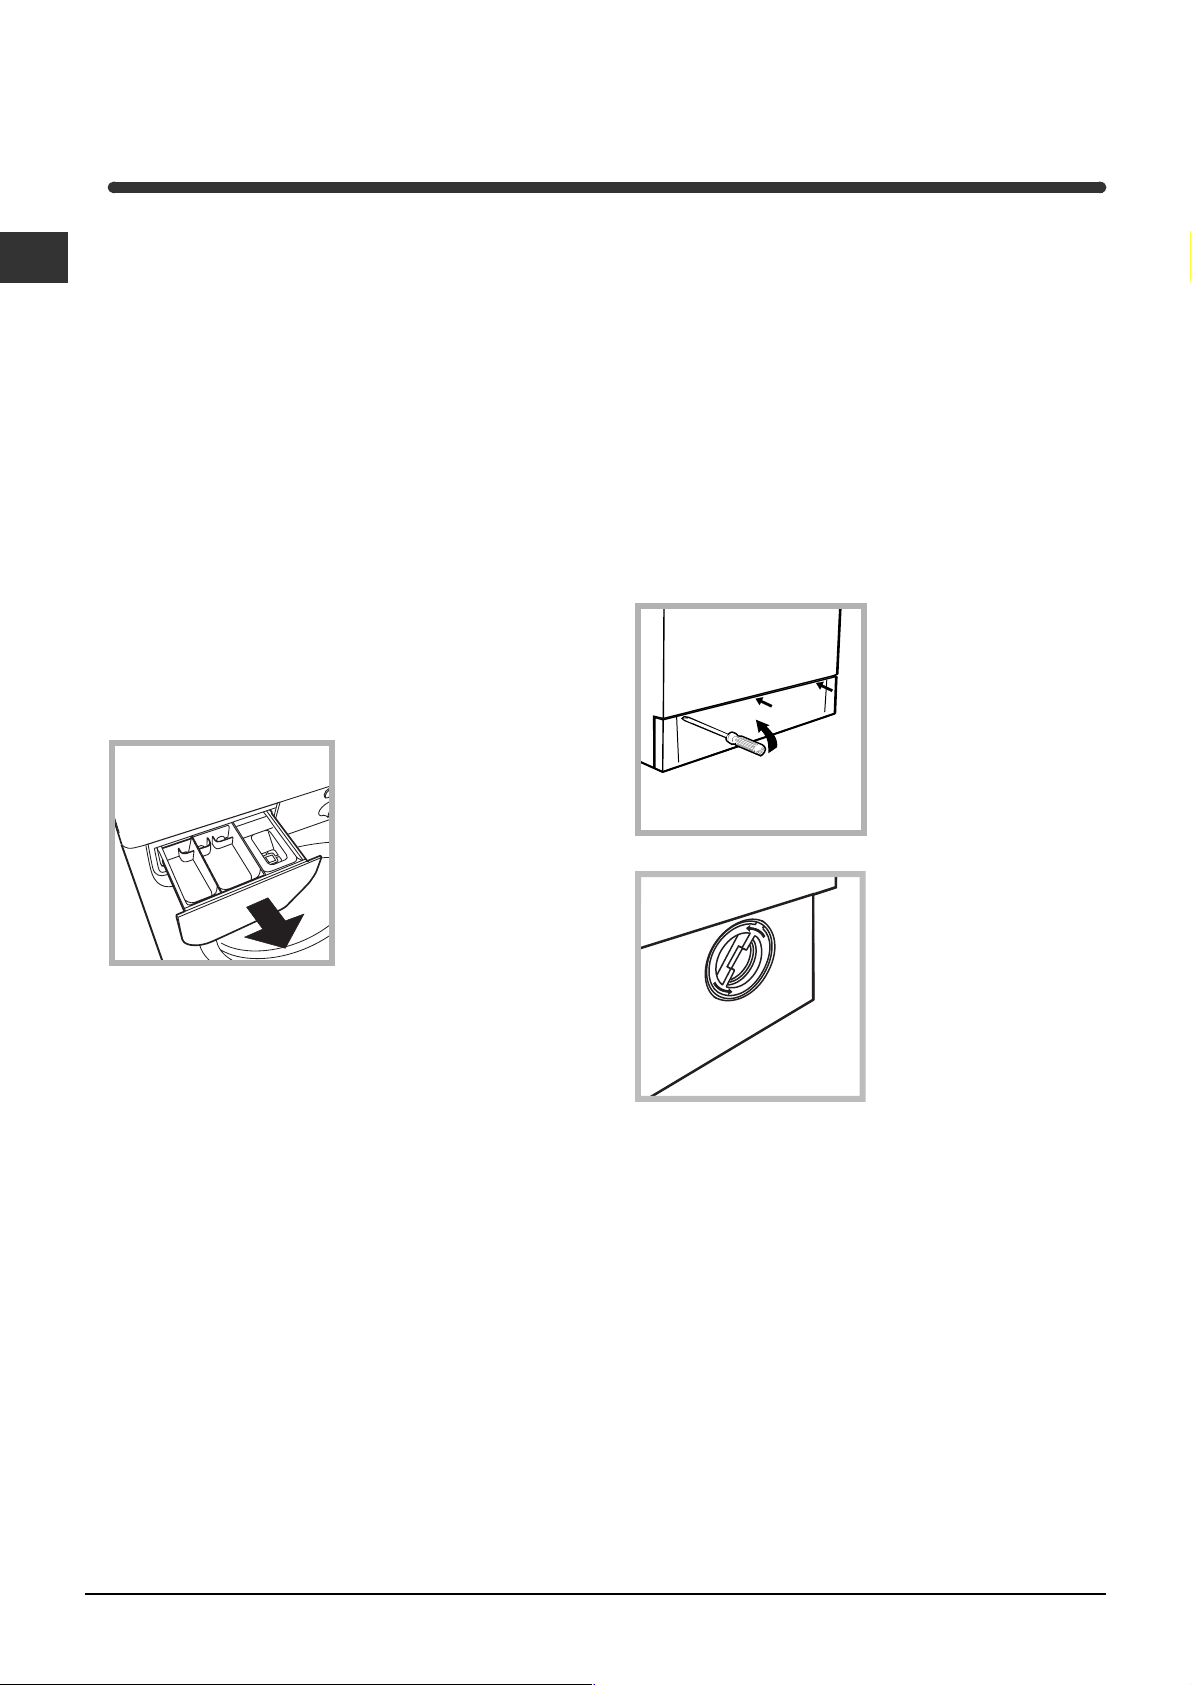
Cleaning the detergent dispenser
Remove the dispenser
by pulling it out (see
figure).
Wash it under running
water; this operation
should be repeated
frequently.
Cleaning the pump
The washing machine is fitted with a self-cleaning
pump that does not require any maintenance.
Sometimes, small items (such as coins or buttons)
may fall into the pre-chamber that protects the
pump, situated in the lower part of the same.
Make sure the wash cycle has ended and unplug
the appliance.
To access the pre-chamber:
1. using a screwdriver,
remove the cover panel
on the lower front of the
washing machine (see
figure);
2. unscrew the lid
rotating it anticlockwise (see figure): a
little water may trickle
out. This is perfectly
normal;
Caring for your appliance door and
drum
Always leave the appliance door ajar to prevent
unpleasant odours from forming.
3. clean the interior thoroughly;
4. screw the lid back on;
5. reposition the panel, making sure the hooks are
securely in place before you push it onto the
appliance.
Checking the water inlet hose
Check the water inlet hose at least once a year. If
you see any cracks, replace it immediately: during
the wash cycles, water pressure is very strong and
a cracked hose could easily split open.
Never use hoses that have already been used.
10
Page 11

Troubleshooting
Your washing machine could fail to work. Before calling for Assistance (see page 12), make sure the problem
can't easily be solved by consulting the following list.
Problem
The washing machine won't
start.
The wash cycle won't start.
The washing machine fails to
load water.
The washing machine
continuously loads and unloads
water.
Possible causes/Solution:
The appliance is not plugged into the socket, or not enough to
make contact.
There has been a power failure.
The appliance door is not shut properly.
The
The START/RESET button has not been pressed.
The water tap is not turned on.
A delayed start has been set (using the Delay Timer, see page 7).
The water inlet hose is not connected to the tap.
The hose is bent.
The water tap is not turned on.
There is a water shortage.
The water pressure is insufficient.
The START/RESET button has not been pressed.
The drain hose is not fitted between 65 and 100 cm from the floor
(see page 3).
The free end of the hose is underwater (see page 3).
The wall drainage system doesn't have a breather pipe.
If the problem persists even after these checks, turn off the water tap,
switch the appliance off and call for Assistance. If the dwelling is on one of
the upper floors of a building, there may be drain trap problems causing the
washing machine to load and unload water continuously. In order to avoid
such an inconvenience, special anti-drain trap valves are available in shops.
button has not been pressed.
GB
The washing machine does not
drain or spin.
The washing machine vibrates
too much during the spin cycle.
The washing machine leaks.
The ON-OFF/DOOR LOCK Led
flashes rapidly at the same
time as at least one other LED.
There is too much foam.
The programme does not foresee the draining: some programmes
require enabling the draining manually (see page 6).
The Easy iron option is enabled: to complete the programme, press
the START/RESET button (see page 7).
The drain hose is bent (see page 3).
The drain duct is clogged.
The drum was not unblocked correctly during installation (see page 2).
The washing machine is not level (see page 2).
The washing machine is closed in between furniture cabinets and
the wall (see page 2).
The water inlet hose is not screwed on correctly (see page 2).
The detergent dispenser is obstructed (to clean it, see page 10).
The drain hose is not secured properly (see page 3).
Call for Assistance because this means there is an abnormality.
The detergent is not suitable for machine washing (it should bear
the definition "for washing machines" or "hand and machine wash",
or the like).
You used too much detergent.
ServiceTroubleshootingPrecautions CareProgrammes DetergentsInstallation Description
11
Page 12
Service
GB
Before calling for Assistance:
Check whether you can solve the problem on your own (see page 11);
Restart the programme to check whether the problem has been solved;
If this is not the case, contact an authorised Technical Service Centre on the telephone number
provided on the guarantee certificate.
Always request the assistance of authorised servicemen.
Notify the operator of:
the type of problem;
the appliance model (Mod.);
the serial number (S/N).
This information can be found on the data plate situated on the rear of the washing machine.
Service
12
Page 13

Bedienungsanleitungen
WASCHVOLLAUTOMAT
DE
Deutsch
WISL 125 X
INHALTSVERZEICHNIS
DE
Installation, 14-15
Auspacken und Aufstellen, 14
Wasser- und Elektroanschlüsse, 14-15
Erster Waschgang, 15
Technische Daten, 15
Beschreibung des
Waschvollautomaten, 16-17
Schalterblende, 16
Kontrollleuchten, 17
Inbetriebnahme und Programme, 18
Kurz zusammengefasst: Waschprogramm starten, 18
Programmtabelle, 18
Individualisierungen, 19
Einstellen der Temperatur, 19
Einstellen der Schleuder, 19
Funktionen, 19
Waschmittel und Wäsche, 20
Waschmittelschublade, 20
Bleichen, 20
Vorsortieren der Wäsche, 20
Besondere Wäscheteile, 20
Vorsichtsmaßregeln und Hinweise, 21
Allgemeine Sicherheit, 21
Entsorgung, 21
Energie sparen und Umwelt schonen, 21
Reinigung und Pflege, 22
Wasser- und Stromversorgung abstellen, 22
Reinigung des Gerätes, 22
Reinigung der Waschmittelschublade, 22
Pflege der Gerätetür und Trommel, 22
Reinigung der Pumpe, 22
Kontrolle des Wasserzulaufschlauchs, 22
Störungen und Abhilfe, 23
Kundendienst, 24
Bevor Sie sich an den Kundendienst wenden, 24
13
Page 14
Installation
DE
Es ist äußerst wichtig, diese Bedienungsanleitung
sorgfältig aufzubewahren, um sie jederzeit zu Rate ziehen
zu können. Sorgen Sie dafür, dass sie im Falle eines
Umzugs oder Übergabe an einen anderen Benutzer das
Gerät stets begleitet, damit auch der neue Inhaber die
Möglichkeit hat, diese zu Rate zu ziehen.
Lesen Sie bitte folgende Hinweise aufmerksam durch,
sie liefern wichtige Informationen hinsichtlich der Installation, dem Gebrauch und der Sicherheit.
Auspacken und Aufstellen
Auspacken
1. Gerät auspacken.
2. Sicherstellen, dass der Waschvollautomat keine Transportschäden erlitten hat. Im Falle einer Beschädigung Gerät bitte
nicht anschließen, sondern den Kundendienst anfordern.
3. Die 4 Transportschutzschrauben ausschrauben
und das an der Rückwand befindliche Gummiteil nebst entsprechendem Distanzstück
abnehmen (siehe Abbil-
dung).
4. Die Löcher mittels der mitgelieferten Kunststoffstöpsel
schließen.
5. Die drei Löcher, die zur Lagerung des Steckers verwendet worden sind (an der Rückwand unten rechts), durch
den entsprechenden Stöpsel schließen.
6. Sämtliche Teile aufbewahren: Sollte der Waschvollautomat erneut transportiert werden müssen, müssen
diese Teile wieder eingesetzt werden.
Verpackungsmaterial ist kein Spielzeug für Kinder
Standfläche
1. Der Waschvollautomat muss auf einem ebenen, festen
Untergrund aufgestellt werden, ohne ihn an Wände, Möbelteile
oder ähnliches anzulehnen.
2. Sollte der Boden nicht
perfekt eben sein, müssen
die Unebenheiten durch
An- bzw. Ausdrehen der
vorderen Stellfüße ausgeglichen werden (siehe
Abbildung), der auf der
Arbeitsfläche zu ermittelnde Neigungsgrad darf 2°
nicht überschreiten.
Eine präzise Nivellierung verleiht dem Gerät die erforderliche
Stabilität, durch die Vibrationen, Betriebsgeräusche und ein
Verrücken des Gerätes vermieden werden. Bei Teppichböden müssen die Stellfüße so reguliert werden, dass ein
ausreichender Freiraum zur Belüftung unter dem Waschvollautomaten gewährleistet ist.
Wasser- und Elektroanschlüsse
Anschluss des Zulaufschlauches
1. Legen Sie die Gummidichtung A in das
Anschlussstück des
Zulaufschlauches ein und
A
vor dem Anschluss so lange auslaufen, bis klares
Wasser austritt.
3. Der Schlauch darf hierbei nicht eingeklemmt oder
abgeknickt werden.
Der Wasserdruck muss innerhalb der Werte liegen,
die in der Tabelle der Technischen Daten angegebenen
sind (siehe nebenstehende Seite).
Sollte der Zulaufschlauch nicht lang genug sein, dann
wenden Sie sich bitte an einen Fachhändler oder an
einen autorisierten Fachmann.
drehen Sie dieses an
einen mit
Gewindeanschluss von ¾
G versehenen Kaltwasserhahn (siehe Abbildung).
Lassen Sie das Wasser
2. Schließen Sie das
andere Ende des Schlauches an den oben rechts
am Rückteil des Waschvollautomaten befindlichen Wasseranschluss
an (siehe Abbildung).
14
Page 15
Anschluss des Ablaufschlauches
Schließen Sie den Ablaufschlauch, ohne ihn dabei
zu krümmen, an eine
Ablaufleitung, oder an
einen in der Wand in einer
65 - 100 cm
Mindesthöhe von 65 - 100
cm angelegten Ablauf an;
Verwenden Sie bitte keine Verlängerungen oder
Mehrfachstecker.
Das Kabel darf nicht gebogen bzw. eingeklemmt
werden.
Das Versorgungskabel darf nur durch autorisierte
Fachkräfte ausgetauscht werden.
Achtung! Der Hersteller weist jede Haftung zurück, falls
diese Vorschriften nicht eingehalten werden sollten.
DE
oder hängen Sie ihn in ein
Becken oder eine Wanne
ein; befestigen Sie ihn in
diesem Falle mittels der
mitgelieferten Führung an
dem Wasserhahn (siehe
Abbildung). Das freie
Ablaufschlauchende darf
nicht unter Wasser
bleiben.
Verlängerungsschläuche sollten nicht eingesetzt
werden, sollte dies jedoch absolut unvermeidlich sein,
muss die Verlängerung denselben Durchmesser des
Originalschlauchs aufweisen und 150 cm nicht überschreiten.
Elektronschluss
Vor Einfügen des Steckers in die Steckdose ist sicherzustellen, dass:
die Steckdose über eine normgerechte Erdung
verfügt;
die Steckdose die in nebenstehender Datentabelle
angegebene Höchstlast des Gerätes trägt;
Erster Waschgang
Lassen Sie nach der Installation bzw. vor erstmaligem
Gebrauch erst einen Waschgang (mit Waschmittel) ohne
Wäsche durchlaufen. Stellen Sie hierzu das 90°CWaschprogramm ohne Vorwäsche ein.
Technische Daten
Modell
Abmessungen
Fassungsvermögen
Elektroanschlüsse
WISL 125 X
Breite 59,5 cm
Höhe 85 cm
Tiefe 40 cm
1 bis 4,5 kg
Spannung 220/230 Volt 50 Hz
max. Leistungsaufnahme 1850 W
Waschprogramme WaschmittelInstallation Beschreibung
Wartung und
Pflege
die Stromspannung den in nebenstehender Daten-
tabelle aufgeführten Werten entspricht;
der Stecker in die Steckdose passt. Andernfalls muss
der Stecker (oder die Steckdose) ersetzt werden.
Der Waschvollautomat darf nicht im Freien installiert
werden, auch nicht, wenn es sich um einen geschützten
Platz handelt. Es ist gefährlich, Ihren Vollwaschautomaten
Gewittern und Unwettern auszusetzen.
Die Steckdose sollte nach installiertem Gerät leicht
zugänglich sein.
Wasseranschlüsse
Schleudertouren
Prüfprogramme
gemäß IEC456
Höchstdruck 1 MPa (10 bar)
Mindestdruck 0,05 MPa (0,5 bar)
Trommelvolumen 40 Liter
bis zu 1200 U/min.
Programm 2; Temperatur 60°C;
bei einer Lademenge von 4,5 kg.
Dieses Gerät entspricht den
folgenden EG-Richtlinien:
- 73/23/EWG vom 19.02.73
(Niederspannung)
und nachfolgenden Änderungen
- 89/336/EWG vom 03.05.89
(elektromagnetische Verträglichkeit)
und nachfolgenden Änderungen
KundendienstStörungenVorsichtsmaßregeln
15
Page 16
Beschreibung des
Waschvollautomaten
DE
Schalterblende
Waschmittelschublade
Waschmittelschublade: für Waschmittel und
Zusätze (siehe Seite 20).
Kontrollleuchten
Wahlschalter TEMPERATUR: Zur Einstellung der
Waschtemperatur oder der Kaltwäsche (siehe Seite 19).
Taste
FUNKTIONEN
Wahlschalter
SCHLEUDER
Kontrollleuchte
ON/FÜLLFENSTER
GESPERRT
Taste
EIN/AUS
Wahlschalter
Taste
START/RESET
Wahlschalter
TEMPERATUR
PROGRAMME
Kontrollleuchten: Zur Kontrolle des Wasch-
programmablaufs.
Wurde die Funktion Delay Timer eingestellt, wird die
bis zum Start noch verbleibende Zeit
Angezeigt (siehe Seite 17).
Wahlschalter SCHLEUDER: Zur Einstellung oder zum
völligen Ausschalten der Schleuder (siehe Seite 19).
Tasten FUNKTIONEN: Zur Einstellung der verfügbaren
Funktionen. Die gewählte Einstellung der entsprechenden Funktionstaste bleibt eingeschaltet. (sie leuchtet.
Taste "START/RESET": um die Programme zu
starten bzw. zu löschen, falls unkorrekt eingestellt.
Kontrollleuchte ON/FÜLLFENSTER GESPERRT: Um
Erkennen zu können, ob die Maschine eingeschaltet
ist und demnach das Füllfenster nicht geöffnet werden
kann (siehe Seite 17).
Taste "EIN/AUS": zur Ein- und Ausschaltung des
Waschvollautomaten
Wahlschalter PROGRAMME: zur Programmwahl.
Während des Programmablaufs bleibt der Schalter
feststehend.
16
Page 17
Kontrollleuchten
Die Kontrollleuchten liefern wichtige Hinweise.
Sie signalisieren:
Laufende Programmphase:
Während des Waschprogrammablaufs leuchten die
Kontrollleuchten nach und nach auf und zeigen so
den jeweiligen Stand an.
DE
Startvorwahl erfolgt:
Wurde die Startvorwahl-Funktion Delay Timer (siehe
Seite 19) aktiviert, und das Programm in Gang gesetzt,
schaltet die Kontrollleuchte, die der eingestellten
Zeitverschiebeung entspricht, auf Blinklicht:
Nach und nach wird die bis zum effektiven Start
noch verbleibende Zeit eingeblendet, die entsprechende Kontrollleuchte blinkt:
Nach Ablauf der vorgewählten Zeit erlischt die
Kontrollleuchte und das gewählte Waschprogramm
startet.
Vorwäsche
Hauptwäsche
Spülen
Schleudern
Anmerkung: Während des Abpumpens leuchtet die
entsprechende Kontrollleuchte für die Schleuder auf.
Tasten FUNKTIONEN
Die Funktionstasten fungieren auch als
Kontrollleuchten.
Bei Wahl einer Funktion leuchtet die entsprechende
Taste auf.
Ist die gewählte Funktion nicht vereinbar mit dem
eingestellten Programm, schaltet die Taste auf
Blinklicht und die Funktion wird nicht aktiviert.
Wird eine Funktion eingestellt, die zu der bereits
eingestellten nicht zugeschaltet werden kann, bleibt
nur die zuletzt gewählte aktiv.
Waschprogramme WaschmittelInstallation Beschreibung
Kontrollleuchte ON/FÜLLFENSTER GESPERRT:
Ist diese Kontrollleuchte eingeschaltet, bedeutet dies, dass das Füllfenster gesperrt ist. Um ungewolltes Öffnen zu
vermeiden, warten Sie, bis die Leuchte auf Blinklicht umschaltet, bevor Sie das Fenster öffnen, um Schäden zu
vermeiden.
Ein gleichzeitiges, rasches Blinken der Kontrollleuchte ON/FÜLLFENSTER GESPERRT mit einer beliebigen anderen
Kontrollleuchte signalisiert einen Fehler. Fordern Sie den Kundendienst an.
Wartung und
Pflege
KundendienstStörungenVorsichtsmaßregeln
17
Page 18
Inbetriebnahme und
Programme
DE
Kurz zusammengefasst:
Waschprogramm starten
1. Schalten Sie den Waschvollautomaten durch Druck
auf die Taste
ein. Alle Kontrollleuchten leuchten für
einige Sekunden auf, und erlöschen kurz darauf
wieder. Die Kontrollleuchte ON/FÜLLFENSTER
GESPERRT schaltet auf Blinklicht.
2. Wäsche einfüllen und Füllfenster schließen.
3. Stellen Sie das gewünschte Programm mittels des
Wahlschalters PROGRAMME ein.
4. Einstellen der Waschtemperatur (siehe Seite 19).
Programmtabelle
Gewebeart und
Verschm utzungsgrad
Standard
Stark verschmutzte Kochwäsche
(Bettücher, Tischdecken usw.)
Stark verschmutzte Kochwäsche
(Bettücher, Tischdecken usw.)
Weißwäsche und
widerstandsfähige, stark
verschmutzte Buntwäsch e
Weißwäsche und empfindliche,
stark verschmu tzte Bu n tw äsche
Leicht verschmutzte Weißwäsche
un d em pfindliche Buntw äsche
(Oberhem den , Maschenware usw.)
Stark verschm utzte, farbechte
Buntwäsche (Babywäsche
usw.)
Stark verschm utzte, farbechte
Buntwäsche (Babywäsche
usw.)
Empfindliche Buntwäsche
(leicht verschmutzte Wäsche
aller Art).
W olle
Sehr empfindliche Stoffe
(Gardinen, Seide, Viskose, usw.)
Time 4 you
Weißwäsche und
widerstandsfähige, stark
verschmutzte Buntwäsch e
Leicht verschmutzte Weißwäsche
un d em pfindliche Buntw äsche
(Oberhem den , Maschenware usw.)
Empfindliche Buntwäsche (leicht
verschmutzte Wäsche aller Art).
Empfindliche Buntwäsche (leicht
verschmutzte Wäsche aller Art).
Sport
Sportschuhe (MA X. 2 P aar.
Stoffe für Sportbekleidung
(Trainingsan züg e, S porthos en us w.)
TEILPROGR AMME
Spülen M ild/No rm al Sp ü len und Sch leudern
Schleudern Ablauf und Schleudern
Ablauf Ablauf
)
Waschpr-
ogramme
1
2
2
2
3
4
4
5
6
7
8
9
10
11
12
13
Te m p eratur
Was ch m itte l
Vorw. Hau ptw .
90°C
90 °C M ild/No rm al
60 °C M ild/N orm al
40 °C Mild/N o rm al
40 °C Mild/N o rm al
60 °C Mild
40 °C M ild
40 °C M ild
40°C
30°C
60°C
40°C
°C
40
30°C 30
°C
30
30°C 60
50
5. Einstellen der Schleudergeschwindigkeit (siehe Seite 19).
6. Waschmittel und Zusätze einfüllen (siehe Seite 20).
7. Programm durch Druck auf die Taste START/RESET
in Gang setzen.
Um dieses zu löschen, Taste START/RESET für
mindestens 2 Sekunden gedrückt halten.
8. Ist das Waschprogramm abgelaufen schaltet die
Kontrollleuchte ON/FÜLLFENSTER GESPERRT auf
Blinklicht, was anzeigt, dass das Fenster geöffnet
werden kann. Nehmen Sie die Wäsche heraus und
lassen Sie das Füllfenster leicht offen stehen, damit
die Trommel trocknen kann. Die Waschmaschine
nun durch Druck auf die Taste
Weichspüler
Funktion
Flecken/
B leichm ittel
Programmdauer
(M in.)
135
125
110
105
70
75
60
60
50
45
65
55
45
Beschreibung des
Waschprogramm s
Vorwäsche, Hauptwäsche,
Spülen, Zwischen- und
Endschleudern
Hauptwäsche, Spülen,
Zwischen- un d Endschleudern
Hauptwäsche, Spülen,
Zwischen- un d Endschleudern
Hauptwäsche, Spülen,
Zwischen- un d Endschleudern
Hauptwäsche, Spülen,
Zwischen- un d Endschleudern
Hauptwäsch e, Spülen,
Knitterschutz oder sanftes
Schleudern
Hauptwäsch e, Spülen,
Knitterschutz oder sanftes
Schleudern
Hauptwäsch e, Spülen,
Knitterschutz oder sanftes
Schleudern
Hauptwäsche, Spülen
Kn itterschu tz und sanftes
Schleudern
Hauptwäsche, Spülen,
Knitterschutz oder
Wasserablauf
Hauptwäsche, Spülen,
Zwischen- un d Endschleudern
Hauptwäsche, Spülen,
Zwischen- un d Endschleudern
Hauptwäsche, Spülen und
sanftes Schleudern
Hauptwäsche, Spülen und
sanftes Schleudern
Kaltw äs che (o h n e W asch mittel),
Hauptwäsche, Spülen und
sanftes Schleudern
Hauptwäsch e, Spülen,
Zwischen- und Endschleudern
ausschalten.
,
Anmerkungen
-Bei den Programmen 8 - 9 sollte eine Beladungsmenge von 3,5 kg nicht überschritten werden.
-Bei dem Programm 13 sollte eine Beladungsmenge von 2 kg nicht überschritten werden.
-Zum Knitterschutz: siehe "Bügelleicht", auf nebenstehender Seite. Bei den in der Tabelle aufgeführten Daten handelt
es sich um Richtwerte.
Spezialprogramm
Kurzprogramm 30' (Programm 11 für Kunstfasern) Kurzprogramm für die tägliche Wäsche leicht verschmutzter Teile: in
nur 30 Minuten, zur Einsparung von Zeit und Energie. Stellen Sie dieses Waschprogramm (11 bei 30°C) ein, dann
können, bei einer maximalen Lademenge von 3 kg, Gewebe unterschiedlicher Art (mit Ausnahme von Wolle und
Seide) zusammen gewaschen werden. Es ist ratsam, flüssige Waschmittel einzusetzen.
18
Page 19
Individualisierungen
C
Einstellen der Temperatur
Durch Drehen des Wahlschalters TEMPERATUR wird die Waschtemperatur eingestellt. (siehe Programmtabelle auf Seite 18).
Die Temperatur kann bis auf Kaltwäsche (
Einstellen der Schleuder
Durch Drehen des Wahlschalters SCHLEUDER wird die Schleudergeschwindigkeit des gewählten Waschprogramms
eingestellt.
Folgende Höchstgeschwindigkeiten sind für die einzelnen Programme vorgesehen:
Waschprogramme Höchstgeschwindigkeit
Baumwolle 1200 U/min
Kunstfasern 800 U/min
Wolle 600 U/min
Seide no
) herabgesetzt werden.
DE
Die Schleudergeschwindigkeit kann herabgesetzt; durch Wahl des Symbols
kann die Schleuder gänzlich ausgeschlossen werden.
Der Waschvollautomat verhindert automatisch ein höheres Schleudern, falls die für das entsprechende Programm
vorgeschriebene Schleuderdrehzahl überstiegen wird.
Funktionen
Die verschiedenen Waschfunktionen, die Ihnen Ihr Waschvollautomat bietet, ermöglichen es Ihnen, hygienisch saubere und weiße Wäsche zu erhalten, die Ihren Wünschen entsprechen. Aktivierung der Funktionen:
1. Die Taste der gewünschten Funktion gemäss untenstehender Tabelle drücken;
2. Das Einschalten bzw. Aufleuchten der entsprechenden Taste zeigt an, dass die Funktion aktiviert wurde.
Anmerkung: Sollte die Taste jedoch auf Blinklicht schalten, bedeutet dies, dass die Funktion zu dem eingestellten
Programm nicht zugeschaltet werden kann.
Funktionen Wirkung Anleitungen zur Anwendung
Drücken Sie die Taste so oft, bis die Kontrollleuchte der
gewünschten Zeitverschiebung aufleuchtet.
Ein fünfter Tastendruck deaktiviert die Funktion.
NB: Ist die Taste START/RESET einmal gedrückt, kann der
gewählte Zeitverschiebungswert nur noch herabgesetzt werden.
Vergessen Sie nicht, dass das Bleichmittel in die Zusatzkammer 4
eingegeben werden muss (
Nicht mit der Funktion BÜGELLEICHT zu kombinieren.
Wurde diese Funktion eingestellt, werden die Programme 4, 5, 6, 7
unterbrochen, das Wasser wird nicht abgepumpt, die Wäsche
bleibt im Wasser liegen (Knitterschutz), und die Kontrollleuchte der
Spülphase schaltet auf Blinklicht:
- um den Waschgang zu beenden, Taste START/RESET drücken;
- nur das Wasser abpumpen: Knopf auf das entsprechende Symbol
drehen und die Taste START/RESET drücken.
Nicht mit der Funktion FLEKEN zu kombinieren.
siehe Seite 20
Delay Timer
(Startvorwahl)
Fleken
Bügelleicht
Start kann bis zu 9
Std. verschoben
werden.
Bleichzyklus, zur
Entfernung auch
hartnäckigster
Flecken.
Reduziert die
Knitterbildung und
erleichtert so das
Bügeln.
).
Aktiv mit den
Programmen:
Alle
2, 3, 4, 5,
Spülen.
3, 4, 5, 6, 7,
8, 9, 10,
Spülen.
Waschprogramme WaschmittelInstallation Beschreibung
Wartung und
Pflege
Erhöht die
Extra
spülen
Wirksamkeit des
Spülgangs.
Empfehlenswert bei voller Gerätebeladung und hoher
Waschmitteldosierung.
1, 2, 3, 4,
5, 8, 9, 10,
12, 13
Spülen.
KundendienstStörungenVorsichtsmaßregeln
19
Page 20
Waschmittel und Wäsche
DE
Waschmittelschublade
Ein gutes Waschergebnis hängt auch von einer korrekten
Waschmitteldosierung ab: Eine zu hohe Dosierung
bedeutet nicht unbedingt reinere Wäsche, sie trägt nur
dazu bei, die Maschineninnenteile zu verkrusten und die
Umwelt zu belasten.
Schublade herausziehen
4
und Waschmittel oder
Zusätze wie folgt einfüllen:
3
2
1
In Kammer 1: Waschpulver für die Vorwäsche
(kein Flüssigwaschmittel)
Vergewissern Sie sich vor Einfüllen des Waschmittels,
dass die Zusatzkammer 4 nicht eingesetzt wurde.
In Kammer 2: Waschmittel für die Hauptwäsche
(Waschpulver oder Flüssigwaschmittel)
Flüssigwaschmittel nur kurz vor dem Start einfüllen.
In Kammer 3: Zusätze (Weichspüler usw.)
Der Weichspüler darf das Gitter nicht übersteigen.
Zusätzliche Kammer 4: Bleichmittel
Verwenden Sie keine Handwaschmittel, sie verursa-
chen eine zu hohe Schaumbildung.
Bleichen
Normale Bleichmittel sind für strapazierfähige
Weißwäsche zu verwenden, milde Bleichmittel
dagegen für Buntwäsche, Feinwäsche und Wolle.
Vorsortieren der Wäsche
Sortieren Sie die Wäsche nach:
- Gewebeart / Waschetikettensymbol
- und Farben: Buntwäsche von Weißwäsche
trennen.
Entleeren Sie alle Taschen.
Das angegebene Gewicht, das sich auf die maxima-
le Ladung an Trockenwäsche bezieht, sollte nicht
überschritten werden:
Widerstandsfähige Gewebe: max 4,5 kg
Kunstfasergewebe: max 2,5 kg
Feinwäsche: max 2 kg
Wolle: max 1 kg
Wie schwer ist Wäsche?
1 Bettuch 400-500 gr
1 Kissenbezug 150-200 gr
1 Tischdecke 400-500 gr
1 Bademantel 900-1.200 gr
1 Handtuch 150-250 gr
Besondere Wäscheteile
Gardinen:Gardinen zusammengefaltet in einem
Kissenbezug oder in einem netzartigen Beutel waschen. Waschen Sie diese allein, ohne das Gesamtgewicht für halbe Füllung zu übersteigen. Stellen Sie das
Programm 7 ein, das ein automatisches Ausschließen
der Schleuder vorsieht.
Skijacken und Anoraks: Sind diese mit Gänseoder Daunenfedern gefüttert, können sie im Waschvollautomaten gewaschen werden. Ziehen Sie die Teile
auf links, achten Sie auf eine maximale Beladung von
2/3 kg, wiederholen Sie 2/3 Spülgänge und stellen Sie
die Schleuder auf Schonschleudern ein.
Wolle: Verwenden Sie Spezialwaschmittel; Lademenge von 1 kg bitte nicht überziehen.
Mitgelieferte, zusätzliche
Kammer 4 in Kammer 1
einsetzen. Bei der Dosierung des Bleichmittels darf
der auf dem Zentralstift mit
"max" gekennzeichnete
Höchststand (siehe Abbil-
dung) nicht überschritten
werden.
Soll nur ein Bleichzyklus allein durchgeführt werden, dann
geben Sie das Bleichmittel in die zusätzliche Kammer 4 und
stellen Sie die Funktion Spülen
Um während des Waschgangs zu bleichen, geben Sie
das Waschmittel und die Zusätze ein; wählen das
gewünschte Programm und schalten die Funktion
Flecken hinzu (siehe Seite 19).
Die Verwendung der zusätzlichen Kammer 4 schließt
die Vorwäsche aus.
20
.
Page 21
Vorsichtsmaßregeln
und Hinweise
Der Waschvollautomat wurde nach den strengsten
internationalen Sicherheitsvorschriften entworfen und
gebaut. Nachstehende Hinweise werden aus Sicherheitsgründen geliefert und sollten aufmerksam gelesen werden.
Allgemeine Sicherheit
Dieses Gerät wurde für den nicht professionellen Einsatz
im privaten Haushalt konzipiert und seine Funktionen
dürfen nicht verändert werden.
Der Waschvollautomat darf nur von Erwachsenen und
gemäß den Anleitungen dieses Handbuchs bedient
werden.
Berühren Sie das Gerät nicht, wenn Sie barfuß sind, und
auch nicht mit nassen oder feuchten Händen oder Füßen.
Ziehen Sie den Gerätestecker nicht am Kabel aus der
Steckdose, sondern nur am Stecker selbst.
Öffnen Sie die Waschmittelschublade nicht, wenn das
Gerät in Betrieb ist.
Berühren Sie nicht das Ablaufwasser, es kann sehr heiß
sein.
Öffnen Sie das Füllfenster nicht mit Gewalt: Der Sicherheits-
Schließmechanismus könnte hierdurch beschädigt werden.
Bei etwaigen Störungen versuchen Sie bitte nicht, Innentei-
le selbst zu reparieren.
Entsorgung des Altgerätes:
Machen Sie das Gerät vor der Entsorgung unbrauchbar. Schneiden Sie das Kabel ab und nehmen Sie das Füllfenster ab.
Energie sparen und Umwelt schonen
Technologie im Dienste der Umwelt
Glauben Sie, durch das Füllfenster hindurch wenig Wasser
zu sehen? Dank der neuen Indesit-Technik genügt die
halbe Wassermenge für eine maximale Sauberkeit: eine
Maßnahme die zum Schutze der Umwelt angestrebt
wurde.
Waschmittel, Wasser, Energie und Zeit sparen
Verschwendung von Strom, Wasser, Waschmittel und Zeit
kann man vermeiden, indem man die Waschmaschine mit
der empfohlenen Höchstwäschemenge benutzt. Bei einer
vollen Auslastung Ihres Waschvollautomaten können Sie
bis zu 50% Energie sparen.
Vorwäsche ist nur bei stark verschmutzter Wäsche
erforderlich. Durch Vermeidung einer solchen kann
Waschmittel, Zeit, Wasser und 5-15% Energie gespart
werden.
Flecken sollten mit einem Fleckenmittel vorbehandelt
werden, oder weichen Sie die Wäsche vor der Wäsche
ein. Hierdurch können hohe Waschtemperaturen vermieden werden. Ein 60°C-Programm anstelle eines 90°CProgramms, oder ein 40°C-Programm anstelle eines
60°C-Programms hilft bis zu 50% Energie zu sparen.
DE
Waschprogramme WaschmittelInstallation Beschreibung
Halten Sie Kinder stets von dem in Betrieb befindlichen
Gerät fern.
Während des Waschgangs kann das Füllfenster sehr heiß
werden.
Muss der Waschvollautomat versetzt werden, sollten hierfür
mindestens 2/3 Personen verfügbar sein. (Vorsichtig
vorgehen). Versuchen Sie es niemals allein, das Gerät ist
äußerst schwer.
Vergewissern Sie sich, dass die Trommel völlig leer ist,
bevor Sie die Wäsche einfüllen.
Entsorgung
Entsorgung des Verpackungsmaterials:
Befolgen Sie die lokalen Vorschriften, Verpackungsmaterial kann wiederverwertet werden.
Dosieren Sie Waschmittel sparsam je nach Wasserhärte,
Verschmutzungsgrad und Wäschemenge, um die Umwelt
nicht über Gebühr zu belasten: obwohl sie biologisch
abbaubar sind, beinhalten Sie dennoch Stoffe, die die
Umwelt belasten. Auch Weichmacher sollten höchst
sparsam eingesetzt werden.
Waschen Sie am späten Nachmittag oder in den ersten
Morgenstunden, hierdurch tragen sie dazu bei, die
Belastung der Elektrizitätswerke zu mindern.
Die Option Delay Timer' (siehe Seite 19) hilft Ihnen in
dieser Hinsicht außerordentlich.
Soll die Wäsche in einem Wäschetrockner getrocknet
werden, dann stellen Sie eine hohe Schleudergeschwindigkeit ein. Je trockener die Wäsche geschleudert wird, desto niedriger ist der zum Trocknen
erforderliche Energieverbrauch.
Wartung und
Pflege
KundendienstStörungenVorsichtsmaßregeln
21
Page 22
Reinigung und Pflege
DE
Wasser- und Stromversorgung abstellen
Wasserhahn nach jedem Waschvorgang zudrehen.
Hierdurch wird der Verschleiß der Wasseranlage
verringert und Wasserlecks vorgebeugt.
Ziehen Sie den Stecker aus der Steckdose, bevor Sie
Ihren Waschvollautomaten reinigen.
Reinigung des Gerätes
Die Gehäuseteile und die Teile aus Gummi können mit
einem mit warmer Spülmittellauge angefeuchteten Tuch
gereinigt werden. Vermeiden Sie Löse- und Scheuermittel.
Reinigung der Waschmittelschublade
Heben Sie die Schublade
leicht an und ziehen Sie
sie nach vorne hin heraus
(siehe Abbildung).
Spülen Sie diese regelmäßig unter fließendem
Wasser gründlich aus.
Reinigung der Pumpe
Ihr Gerät ist mit einer selbstreinigenden Pumpe ausgerüstet, eine Wartung ist demnach nicht erforderlich. Es
könnte doch einmal vorkommen, dass kleine Gegenstände (Münzen, Knöpfe) in die zum Schutz der Pumpe
dienende Vorkammer (befindlich unter der Pumpe) fallen.
! Vergewissern Sie sich, dass der Waschgang abgeschlossen ist und ziehen Sie den Stecker heraus.
Vergewissern Sie sich, dass der Waschgang abge-
schlossen ist und ziehen Sie den Stecker heraus.
Zugang zur Vorkammer:
1. Die Abdeckung (befindlich an der Gerätefront)
mit Hilfe eines Schraubenziehers abnehmen (siehe
Abbildung);
2.den Deckel gegen den
Uhrzeigersinn abdrehen
(siehe Abbildung): es ist
ganz normal, wenn
etwas Wasser austritt;
Pflege der Gerätetür und Trommel
Lassen Sie die Füllfenstertür stets leicht offen stehen,
um die Bildung unangenehmer Gerüche zu vermeiden.
3. das Innere gründlich reinigen;
4. den Deckel wieder aufschrauben;
5. die Abdeckung wieder anbringen. Stellen Sie hierbei
sicher, dass die Haken in die Schlitze eingreifen, bevor
Sie die Abdeckung fest andrücken.
Kontrolle des Wasserzulaufschlauchs
Kontrollieren Sie den Zulaufschlauch mindestens einmal
im Jahr. Weist er Risse bzw. Brüche auf, muss er
ausgetauscht werden. Der starke Druck während des
Waschprogramms könnte zu plötzlichem Platzen führen.
Verwenden Sie niemals bereits gebrauchte Schläu-
che.
22
Page 23
Störungen und Abhilfe
Es kann immer einmal vorkommen, dass Ihr Waschvollautomat nicht funktioniert. Bevor Sie sich an den Technischen Kundendienst wenden (siehe Seite 24), vergewissern Sie sich zuerst, ob es sich nicht um eine Kleinigkeit handelt, die Sie selbst beheben
können. Ziehen Sie hierzu nachstehendes Verzeichnis zu Rate.
DE
Störungen:
Der Waschvollautomat schaltet
sich nicht ein.
Der Waschgang startet nicht.
Der Waschvollautomat lädt kein
Wasser.
Der Waschvollautomat lädt
laufend Wasser und pumpt es
laufend ab.
Mögliche Ursachen / Lösungen:
Der Stecker steckt nicht in der Steckdose, oder nicht so, dass der Kontakt
hergestellt wird.
Der Strom ist ausgefallen.
Das Füllfenster ist nicht richtig geschlossen.
Die Taste wurde nicht gedrückt.
Die Taste STARTRESET wurde nicht gedrückt.
Der Wasserhahn ist nicht auf.
Es wurde ein verzögerter Start gewählt (Delay Timer, siehe Seite 19).
Der Zufuhrschlauch ist nicht am Wasserhahn angeschlossen.
Der Schlauch ist geknickt.
Der Wasserhahn ist nicht auf.
Es ist kein Wasser da.
Der Druck ist unzureichend.
Die Taste START/RESET wurde nicht gedrückt.
Der Ablaufschlauch befindet sich nicht auf der vorgeschriebenen Höhe, d.h.
65 - 100 cm vom Boden (siehe Seite 15).
Das Schlauchende liegt unter Wasser (siehe Seite 15).
Der Mauerablauf wurde nicht mit einer Entlüftungsöffnung versehen.
Konnte die Störung durch diese Kontrollen nicht behoben werden, dann drehen
Sie den Wasserhahn zu, schalten das Gerät aus und fordern den Kundendienst
an. Falls Sie in einer der obersten Etagen eines Gebäudes wohnen, kann es
vorkommen, dass sich im Syphon ein Vakuum bildet, und der Waschvollautomat
ständig Wasser ansaugt und wieder abpumpt. Zur Lösung dieser Probleme
bietet der Handel spezielle Syphonventile.
Waschprogramme WaschmittelInstallation Beschreibung
Der Waschvollautomat pumpt
nicht ab und schleudert nicht.
Der Waschvollautomat vibriert
zu stark während des Schleuderns.
Der Waschvollautomat ist undicht.
Die Kontrollleuchte ON/FÜLLFENSTER GESPERRT und mindestens eine weitere Kontrollleuchte
blinken in raschen Abständen.
Es bildet sich zu viel Schaum.
Das Programm siehe kein Abpumpen vor: bei einigen Programmen muss
diese Funktion manuell gestartet werden (siehe Seite 18).
Die Option Bügelleicht' wurde eingestellt: zur Beendung des Programms
Taste START/RESET drücken (siehe Seite 19).
Der Ablaufschlauch ist geknickt (siehe Seite 15).
Die Ablaufleitung ist verstopft.
Die Trommel wurde bei der Installation nicht korrekt befreit (siehe Seite 14).
Der Waschvollautomat steht nicht eben (siehe Seite 14).
Der Waschvollautomat steht zu eng zwischen der Wand und einem Möbel
(siehe Seite 14).
Der Zulaufschlauch wurde nicht ordnungsgemäß aufgeschraubt (siehe Seite 14).
Die Waschmittelschublade ist verstopft (zur Reinigung siehe Seite 22).
Der Ablaufschlauch wurde nicht ordnungsgemäß befestigt (siehe Seite 15).
Fordern Sie den Kundendienst an, denn das Gerät signalisiert einen Fehler.
Das Waschmittel ist für Waschmaschinen nicht geeignet (es muss mit der
Aufschrift "Für Waschmaschinen", "Für Handwäsche und Waschmaschinen"
usw. versehen sein.
Es wurde zu hoch dosiert.
Wartung und
Pflege
KundendienstStörungenVorsichtsmaßregeln
23
Page 24
Kundendienst
DE
Bevor Sie sich an den Kundendienst wenden:
Kontrollieren Sie zuerst, ob das Problem nicht allein gelöst werden kann (siehe Seite 23);
Starten Sie das Programm erneut, um sicherzustellen, dass die Störung auch wirklich behoben wurde;
Ist dies nicht der Fall, dann kontaktieren Sie den autorisierten Kundendienst unter der auf dem Garantie-
schein aufgedruckten Telefonnummer.
Wenden Sie sich auf keinen Fall an nicht autorisierte Techniker.
Geben Sie bitte Folgendes an:
die Art der Störung;
das Maschinenmodell (Mod.);
die Seriennummer (S/N).
Diese Daten entnehmen Sie bitte dem auf der Rückseite der Maschine befindlichen Typenschild.
Kundendienst
24
Page 25

Návod k pouití
PRAÈKA
CZ
Èeský,1
WISL 125 X
Obsah
CZ
Instalace, 26-27
Rozbalení a vyrovnání do vodorovné polohy, 26
Pøipojení kelektrické síti a krozvodu vody, 26-27
První prací cyklus, 27
Technické údaje, 27
Popis praèky, 28-29
Ovládací panel, 28
Kontrolky, 29
Uvedení do chodu a programy, 30
Vezkratce: uvedení pracího programu do chodu, 30
Tabulka programù, 30
Nastavení èinnosti dle potøeb uivatele, 31
Nastavení teploty, 31
Nastavení rychlosti odstøeïování, 31
Funkce, 31
Prací prostøedky a prádlo, 32
Dávkovaè pracích prostøedkù, 32
Cyklus bìlení, 32
Pøíprava prádla, 32
Odìvy vyadující zvlátní péèi, 32
Opatøení a rady, 33
Základní bezpeènostní pokyny, 33
Likvidace, 33
Jak uetøit a brát ohled na ivotní prostøedí, 33
Údrba a péèe, 34
Uzavøení pøívodu vody a
vypnutí elektrického napájení, 34
Èitìní praèky, 34
Èitìní dávkovaèe pracích prostøedkù, 34
Péèe o dvíøka a buben, 34
Èitìní èerpadla, 34
Kontrola pøítokové hadice, 34
Poruchy a zpùsob jejich odstranìní, 35
Servisní sluba, 36
Pøed pøivoláním servisní sluby, 36
25
Page 26
Instalace
CZ
Je velmi dùleité uschovat tento návod za úèelem
jeho dalí konzultace. Vpøípadì prodeje, darování
anebo pøestìhování praèky se ujistìte, e zùstane
uloen vblízkosti praèky, aby mohl poslouit novému
majiteli pøi seznámení se sèinností a spøíslunými
upozornìními.
Pozornì si pøeètìte uvedené pokyny: obsahují
dùleité informace týkající se instalace, pouití a
bezpeènosti pøi práci.
Rozbalení a vyrovnání do vodorovné polohy
Rozbalení
1. Rozbalte praèku.
2. Zkontrolujte, zda bìhem pøepravy nedolo
kjejímu pokození. Vpøípadì, e je pokozena,
nezapojujte ji a obrate se na prodejce.
3. Odstraòte ètyøi
rouby s gumovou
podlokou as
pøíslunou rozpìrkou,
nacházející se vzadní
èásti (viz obrázek),
slouící na ochranu
bìhem pøepravy.
Dokonalé vyrovnání do vodorovné polohy zabezpeèí
stabilitu zaøízení a zamezí vzniku vibrací a hluku
bìhem èinnosti. Vpøípadì instalace na podlahovou
krytinu anebo na koberec, nastavte noièky tak,
aby pod praèkou zùstal dostateèný volný prostor
pro ventilaci.
Pøipojení kelektrické síti a krozvodu vody
Pøipojení pøítokové hadice
1. Vlote tìsnìní A do
koncové èásti pøítokové
hadice a pøipevnìte ji
kuzávìru studené vody
A
se závitem 3/4 (viz
obrázek).
Pøed pøipojením hadice
nechte vodu odtéci,
dokud nebude
prùzraèná.
2. Pøipojte pøítokovou
hadici kpraèce
prostøednictvím
pøísluného vstupního
hrdla, umístìného
vpravo nahoøe (viz
obrázek).
4. Uzavøete otvory po roubech plastikovými krytkami.
5. Uzavøete prostøednictvím uzávìru, který je
souèástí pøísluenství, tøi otvory, ve kterých se
nacházel kolík, umístìný v zadní èásti, vpravo dole.
6. Uschovejte vechny díly: vpøípadì opìtovné
pøepravy praèky je bude tøeba namontovat zpátky.
Obaly nejsou hraèky pro dìti
Vyrovnání do vodorovné polohy
1. Praèku je tøeba umístit na rovnou a pevnou podlahu, bez
toho, aby byla opøená o stìnu, nábytek anebo nìco jiného.
2. Vpøípadì, kdy
podlaha není dokonale
vodorovná, mohou být
pøípadné rozdíly
vykompenzovány
roubovaním pøedních
noek (viz obrázek).
Úhel sklonu, namìøen
na pracovní ploe,
nesmí pøesáhnout 2°.
3. Dbejte na to, aby hadice nebyla pøíli ohnuta
anebo stlaèena.
Tlak v rozvodu vody se musí pohybovat v rozmezí
hodnot uvedených v tabulce s technickými údaji
(viz vedlejí strana).
Vpøípadì, e délka pøítokové hadice nebude
dostateèná, obrate se na specializovanou prodejnu
anebo na autorizovaný technický personál.
26
Page 27
Pøipojení odtokové hadice
65 - 100 cm
Pøipojte vypoutìcí hadici,
kodpadovému potrubí
anebo kodpadu ve stìnì,
nacházejícímu se od 65
do 100 cm nad zemí;
zamezte jejímu ohybu;
Nepouívejte prodluovaní kabely a rozvodky.
CZ
Kabel nesmí být ohnut anebo stlaèen.
Výmìna kabelu musí být svìøena výhradnì
autorizovanému technickému personálu.
Upozornìní! Výrobce neponese ádnou odpovìdnost
za následky nerespektování uvedených pøedpisù.
První prací cyklus
anebo ji zachyte na
okraj umývadla èi vany, a
pøipevnìte ji ke kohoutku
prostøednictvím dráku
zpøísluenství (viz
obrázek). Volný konec
vypoutìcí hadice nesmí
zùstat ponoøen do vody.
Pouití prodluovacích hadic se nedoporuèuje; je-li vak
nezbytné, prodluovaní hadice musí mít stejný prùmìr jako
originální hadice a její délka nesmí pøesáhnout 150 cm.
Pøipojení kelektrické síti
Pøed zasunutím zástrèky do zásuvky se ujistìte, e:
zásuvka je uzemnìna a e vyhovuje normám;
zásuvka je schopna snést maximální zátì
odpovídající jmenovitému pøíkonu zaøízení,
uvedenému vtabulce technickými údaji (viz
vedle);
hodnota napájecího napìtí odpovídá údajùm
uvedeným vtabulce stechnickými údaji (viz
vedle);
zásuvka je kompatibilní se zástrèkou praèky.
Vopaèném pøípadì je tøeba vymìnit zástrèku.
Praèka nesmí být umístìna venku pod irým
nebem, a to ani vpøípadì, kdyby se jednalo o místo
chránìné pøed nepøízní poèasí, protoe je velmi
nebezpeèné vystavit ji pùsobení detì a bouøí.
Po definitivním umístìní praèky musí zásuvka
zùstat lehce pøístupná.
Po nastavení praèky, pøed jejím pouitím na praní
prádla, je tøeba provést jeden zkuební cyklus, spracím
prostøedkem a bez náplnì prádla, pøi teplotì 90°C, bez
pøedpírání.
Technické údaje
Model
Rozmìry
Kapacita
Napájení
Pøipojení k
rozvodu vody
Rychlost
odstøeïování
Kontrolní program
podle normy IEC456
Hluènost
(dB(A) re 1 pW)
WISL 125 X
íøka 59,5 cm
výka 85 cm
hloubka 40 cm
od 1 do 4,5 kg
napìtí 220/230 V 50 Hz
maximální pøíkon 1850 W
maximální tlak 1 MPa (10 bar)
minimální tlak 0.05 MPa (0.5 bar)
kapacita bubnu 40 litrù
a
z do 1200 otáèek za minutu
¡
program 2; teplota 60°C;
náplò 4,5 kg prádla.
Toto zaøízení odpovídá následujícím
normám Evropské unie:
- 73/23/EHS z 19/02/73 (Nízké napìtí)
v platném znìní
- 89/336/EHS z 03/05/89
(Elektromagnetická kompatibilita)
v platném znìní
Praní: 63
Odstøeïování: 78
Servisní slubaPoruchyOpatøení ÚdrbaPrací programy Prací prostøedkyInstalace Popis
27
Page 28
CZ
Popis praèky
Ovládací panel
Dávkovaè pracích prostøedkù
Kontrolky
FUNKÈNÍ tlaèítka
Kontrolka ZAPNUTO/
ZABLOKOVANÁ DVÍØKA
Tlaèítko
ZAPNOUT/VYPNOUT
Voliè
PROGRAMÙ
Tlaèítko
START/VYNULOVÁNÍ
Dávkovaè pracích prostøedkù slouí k dávkování
pracích prostøedkù a pøídavných prostøedkù (viz str. 32).
Kontrolky: slouí ke kontrole prùbìhu pracího
programu.
Vpøípadì, e byla nastavena funkce odloený
start, budou informovat o èase zbývajícím do startu
pracího programu (viz str. 29).
Voliè RYCHLOSTI ODSTØEÏOVÁNÍ: slouí
knastavení rychlosti odstøeïování anebo kjeho
vylouèení (viz str. 31).
FUNKÈNÍ tlaèítka: slouí kvolbì jednotlivých
nabízených funkcí. Po uskuteènìní volby jednotlivé
funkce zùstane pøísluné tlaèítko podsvìtleno.
Voliè TEPLOTY: slouí knastavení teploty praní
anebo praní ve studené vodì (viz str. 31).
Voliè
Voliè
RYCHLOSTI
ODSTØEÏOVÁNÍ
Tlaèítko START/VYNULOVÁNÍ slouí k uvedení
pracích programù do chodu nebo k vynulování
chybného nastavení.
Kontrolka ZAPNUTO/ZABLOKOVANÁ DVÍØKA:
informuje o tom, zda je praèka zapnuta a zda jsou
zablokovaná dvíøka (viz str. 29).
Tlaèítko ZAPNOUT/VYPNOUT slouí k zapnutí a
vypnutí praèky.
Voliè PROGRAMÙ: slouí k volbì pracích
programù.
Bìhem pracího programu zùstane stát ve stejné
poloze.
TEPLOTY
28
Page 29
Kontrolky
Kontrolky jsou zdrojem dùleitých informací.
Informují nás o následujících skuteènostech:
Aktuální fáze pracího programu:
Bìhem pracího cyklu dojde postupnì krozsvícení
jednotlivých kontrolek za úèelem indikace prùbìhu
praní:
CZ
Nastavený èas:
Vpøípadì, e byla nastavena funkce odloený start
(viz str. 31), po zapnutí pracího programu zaène
blikat kontrolka odpovídající nastavenému èasu:
Bude zobrazován èas zbývající do startu, a
zobrazování bude provázeno blikáním pøísluné
kontrolky:
Po uplynutí zvoleného èasu dojde kzhasnutí
kontrolky odloeného startu a kzahájení
nastaveného pracího programu.
Pøedpírání
Praní
Máchání
Odstøeïování
Poznámka: Bìhem odèerpání vody se rozsvítí
kontrolka signalizující fázi odstøeïování.
Funkèní tlaèítka
FUNKÈNÍ TLAÈÍTKA slouí také jako kontrolky.
Po zvolení jednotlivé funkce dojde kpodsvìtlení
pøísluného tlaèítka.
Vpøípadì, e zvolená funkce není kompatibilní
snastaveným pracím programem, pøísluné
tlaèítko zaène blikat a funkce nebude aktivována.
Vpøípadì, e bude zvolena funkce, která není
kompatibilní snìkterou z pøedem zvolených
funkcí, aktivována zùstane pouze poslední zvolená
funkce.
Kontrolka ZAPNUTO/ZABLOKOVANÁ DVÍØKA:
Rozsvícení této kontrolky poukazuje na to, e dvíøka jsou zablokována kvùli zamezení náhodnému otevøení;
aby se zabránilo pokození dvíøek, pøed jejich otevøením je tøeba vyèkat, dokud uvedená kontrolka nezaène
blikat.
Rychlé blikání kontrolky ZAPNUTO/ZABLOKOVANÁ DVÍØKA spolu salespoò jednou dalí kontrolkou
upozoròuje na pøítomnost poruchy. Pøivolejte servisní slubu.
Servisní slubaPoruchyOpatøení ÚdrbaPrací programy Prací prostøedkyInstalace Popis
29
Page 30
Uvedení do chodu a programy
CZ
Vezkratce: uvedení pracího
programu do chodu
1. Zapnìte praèku stisknutím tlaèítka . Na
nìkolik vteøin se rozsvítí vechny kontrolky,
následnì dojde kjejich zhasnutí a zaène blikat
kontrolka ZAPNUTO/ZABLOKOVANÁ DVÍØKA.
2. Naplòte praèku a zavøete dvíøka.
3. Volièem PROGRAMÙ nastavte poadovaný
prací program.
4. Nastavte teplotu praní (viz str. 31).
5. Nastavte rychlost odstøeïování (viz str. 31).
Tabulka programù
Druh tkaniny a stupeò jejího zneèi
tìní
Standardní
Extrémnì zneèitìné bílé prádlo
(pro stìradla, ub rusy, atd.)
Extrémnì zneèitìné bílé prádlo
(pro stìradla, ub rusy, atd.)
Silnì zneèitìné bílé a barevné prádlo z
odolných tkanin
Siln ì zn eè itì né bílé a b are vné
choulostivé prádlo
Èásteènì zneèitìné bílé a barevné
choulostivé prádlo (koile, trièka, atd.)
S iln ì zn e èitì n é prádlo z o d o ln ý c h
barevných tkanin (kojenecké prádlo,
atd.)
S iln ì zn e èitì n é prádlo z o d o ln ý c h
barevných tkanin (kojenecké prádlo,
atd.)
C h o u lo stivé b a re v n é prád lo (leh c e
zneèitìné prádlo veho druhu)
Vlna
Prádlo z velic e ch oulosti-v ý ch tk a nin
(záclony, hedvábí, viskóza, atd.)
Time 4 you
Silnì zneèitìné bílé a barevné prádlo z
odolných tkanin
Èásteènì zneèitìné bílé a barevné
choulostivé prádlo (koile, trièka, atd.)
C h o u lo stivé b a re v n é prád lo (leh c e
zneèitìné prádlo veho druhu)
C h o u lo stivé b a re v n é prád lo (leh c e
zneèitìné prádlo veho druhu)
Sport
Sportovní obuv (MA X. 2 páry.)
Tkaniny pro sportovní odìv
(teplákové soupravy, pono
DÍLÈÍ PROGRA-MY
Máchání
Odstøeïování Vypoutìní vody a odstøeïování
Vypoutìní vody Vypoutìní vody
ky, atd.)
¡z
Prací
programy
1
2
2
2
3
4
4
5
6
7
8
9
10
11
12
13
Teplota
90°C
90°C
60°C
40°C
40°C
60°C
40°C
40°C
40°C
30°C
60°C
40°C
40
°C
30°C
30
°C
30°C
Prací
prostøedek
pøedp. praní
6. Naplòte dávkovaè pracími a pøípadnì také
pøídavnými prostøedky (viz str. 32).
7. Uveïte nastavený prací program do chodu
stisknutím tlaèítka START/VYNULOVÁNÍ.
Vynulování nastaveného programu se vykonává
stisknutím tlaèítka START/VYNULOVÁNÍ na
dobu nejménì 2 vteøin.
8. Po ukonèení pracího programu bude kontrolka
ZAPNUTO/ZABLOKOVANÁ DVÍØKA blikat,
poukazujíce na monost otevøení dvíøek.
Vyndejte prádlo a nechte dvíøka pootevøená, aby
mohlo dojít kvysuení bubnu. Vypnìte praèku
Doba
cyklu (v
minutách)
135
125
110
105
70
50
45
65
55
45
.
Popis pracího cyklu
Pøedp írka, praní, máchání, prùbì¡zné
a závìreèné odstøeïování
Praní, máchání, prùbì¡zné a
závìreèné odstøeïování
Praní, máchání, prùbì¡zné a
závìreèné odstøeïování
Praní, máchání, prùbì¡zné a
závìreèné odstøeïování
Praní, máchání, prùbì¡zné a
závìreèné odstøeïování
Praní, máchání, ochrana pøed
zmaèkáním odstøeïování pro
ch o ulostivé p rá d lo
Praní, máchání, ochrana pøed
zmaèkáním odstøeïování pro
ch o ulostivé p rá d lo
Praní, máchání, ochrana pøed
zmaèkáním odstøeïování pro
ch o ulostivé p rá d lo
Praní, máchání, ochrana pøed
zmaèkáním a odstøeïování pro
ch o ulostivé p rá d lo
Praní, máchání, ochrana pøed
zmaèkáním vypoutìní vody
Praní, máchání, prùbì¡zné a
závìreèné odstøeïování
Praní, máchání, prùbì¡zné a
závìreèné odstøeïování
Praní, máchání, odstøeïování
pro choulostivé prádlo
Praní, máchání, odstøeïování
pro choulostivé prádlo
Praní ve studené vodì
(bez pracího prostøedku), pran í,
máchání a odstøeïování pro
choulostivé prádlo
Praní, máchání, prùbì¡zné a
závìreèné odstøeïování
Máchání a odstøeïování
stisknutím tlaèítka
V o litelná fu n k ce
Avivá¡z
30
50
60
Odstranìní
sk vrn / B ìlící
prostøedek
Na choul. prádlo/
Tradièní
Na choul. prádlo/
Tradièní
Na choul. prádlo/
Tradièní
Na choul. prádlo/
Tradièní
Na choul. prádlo 75
Na choul. prádlo 60
Na choul. prádlo 60
Na choul. prádlo/
Tradièní
Poznámky
-Pøi programech 8 - 9 se doporuèuje nepøekroèit náplò praèky 3,5 kg.
-Pøi programu 13 se doporuèuje nepøekroèit náplò praèky 2 kg.
-Popis ochrana pøed zmaèkáním: viz Snadné ehlení, na vedlejí stranì. Údaje uvedené vtabulce mají pouze
informativní charakter.
Speciální program
Kadodenní praní 30' (program 11 pro syntetiku) je navren speciálnì pro praní lehce zneèitìného prádla bìhem krátké
doby: trvá pouze 30 minut a etøí tak energii a èas. Nastavením programu (11 pøi 30°C) je moné prát spolu prádlo
rùzného druhu (s výjimkou vlny a hedvábí) snáplní nepøesahující 3 kg. Doporuèuje se pouití tekutého pracího prostøedku.
30
Page 31
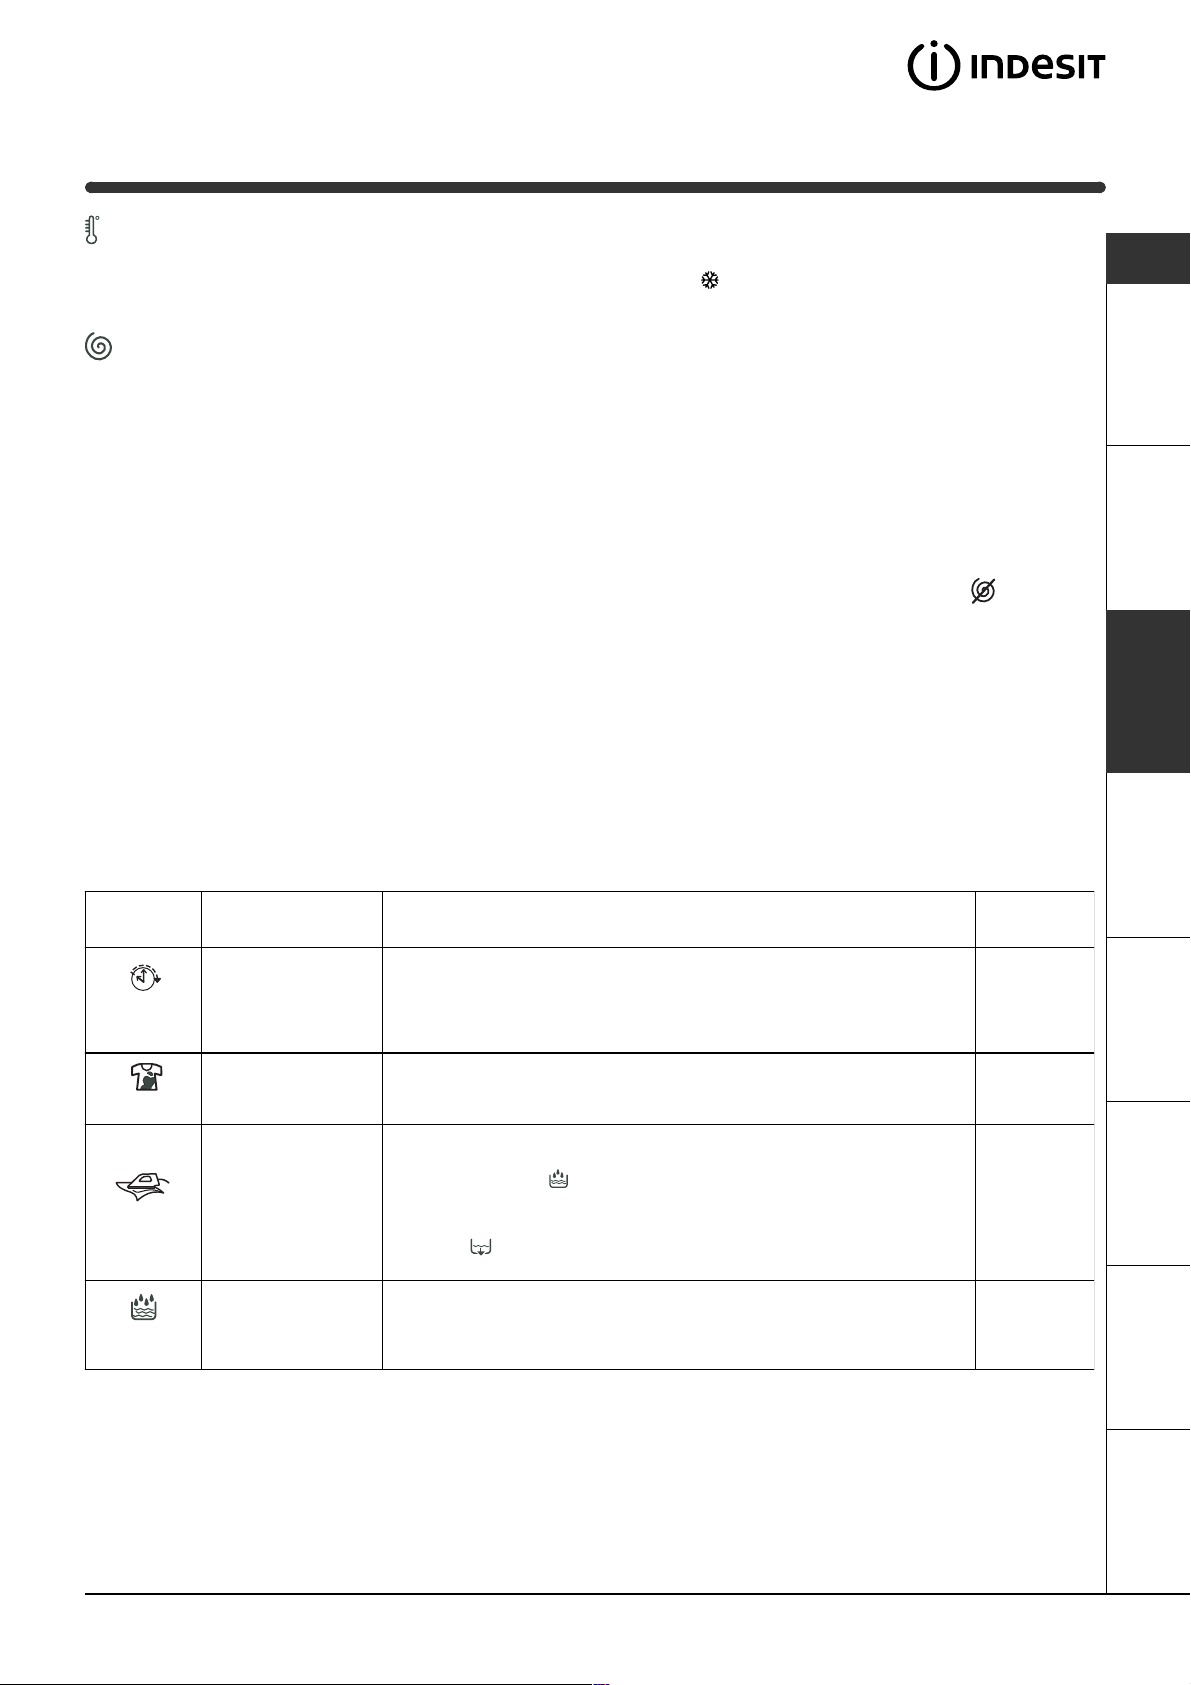
Nastavení èinnosti
C
dle potøeb uivatele
Nastavení teploty
Otáèením volièe TEPLOTY dojde knastavení teploty praní (viz Tabulka programù na str. 30).
Teplota mùe být postupnì sniována a po praní ve studené vodì (
Nastavení rychlosti odstøeïování
Otáèením volièe RYCHLOSTI ODSTØEÏOVÁNÍ se nastavuje rychlost odstøeïování zvoleného pracího
programu.
Maximální hodnoty rychlosti pro jednotlivé prací programy jsou:
Prací programy Maximální rychlost
Bavlna 1200 otáèek za minutu
Syntetika 800 otáèek za minutu
Vlna 600 otáèek za minutu
Hedvábí ne
).
CZ
Rychlost odstøeïování mùe být sníena nebo odstøeïování mùe být vylouèeno volbou symbolu
Zaøízení automaticky zabrání odstøeïování vyí rychlostí ne je maximální hodnota rychlosti pro kadý prací
program.
.
Funkce
Jednotlivé funkce, kterými praèka disponuje umoòují dosáhnout poadovaný stupeò èistoty a bìlosti praného
prádla. Zpùsob aktivace jednotlivých funkcí:
1. stisknìte tlaèítko pøísluné poadované funkce podle níe uvedené tabulky;
2. podsvìtlení pøísluného tlaèítka signalizuje, e dolo kaktivaci zvolené funkce.
Poznámka: Rychlé blikání tlaèítka poukazuje na to, e pøísluná funkce je nepouitelná bìhem nastaveného
pracího programu.
Funkce Efekt Poznámky k pou±zití
Opakovanì stisknìte tlaèítko az do rozsvícení kontrolky oznaèující
pozadovaný èas.
Po pátém stisknutí tlaèítka dojde kvylouèení uvedené funkce.
POZN.: Po stisknutí tlaèítka Start/Vynulování je mozné zmìnit hodnotu
èasu pouze jeho snízením.
Nezapomeòte na vlo±zení bìlícího prostøedku do pøídavné pøihrádky 4
(viz str. 32)
Není kompatibilní s pou±zitím volitelné funkcí SNADNÉ ZEHLENÍ.
Po nastavení této funkce dojde kpøeruení programù 4, 5, 6, 7
sprádlem ve vodì (ochrana pøed zmaèkáním), provázenému blikáním
kontrolky Máchání :
- dokonèení pracího cyklu je mo±zné po stisknutí tlaèítka
START/VYNULOVÁNÍ;
- pøejete-li si pouze vypustit vodu, nastavte otoèný voliè do polohy
oznaèené a stisknìte tlaèítko START/VYNULOVÁNÍ.
Není kompatibilní s pou±zitím volitelné funkcí BÌLENÍ.
.
Odlo±zený
start
Bìlení
Snadné
±zehlení
Slou±zí k ²odlo±zení
startu pracího cyklu
a±z o 9 hodin.
Bìlící cyklus vhodný
na odstranìní
nejodolnìjích skvrn.
Slou±zí ke sní±zení
poètu záhybù na
tkaninách, ulehèujíc
následné ±zehlení.
Aktivní pøi
programech:
Vech
2, 3, 4, 5,
máchání.
3, 4, 5, 6, 7,
8, 9, 10,
máchání.
1, 2, 3, 4,
Intenzivní
máchání
Slou±zí ke zvýení
úèinnosti máchání.
Její pou±zití se doporuèuje pøi zcela naplnìné praèce anebo pøi pou±zití
velkého mno±zství pracího prostøedku.
5, 8, 9, 10,
12, 13,
máchání.
Servisní slubaPoruchyOpatøení ÚdrbaPrací programy Prací prostøedkyInstalace Popis
31
Page 32
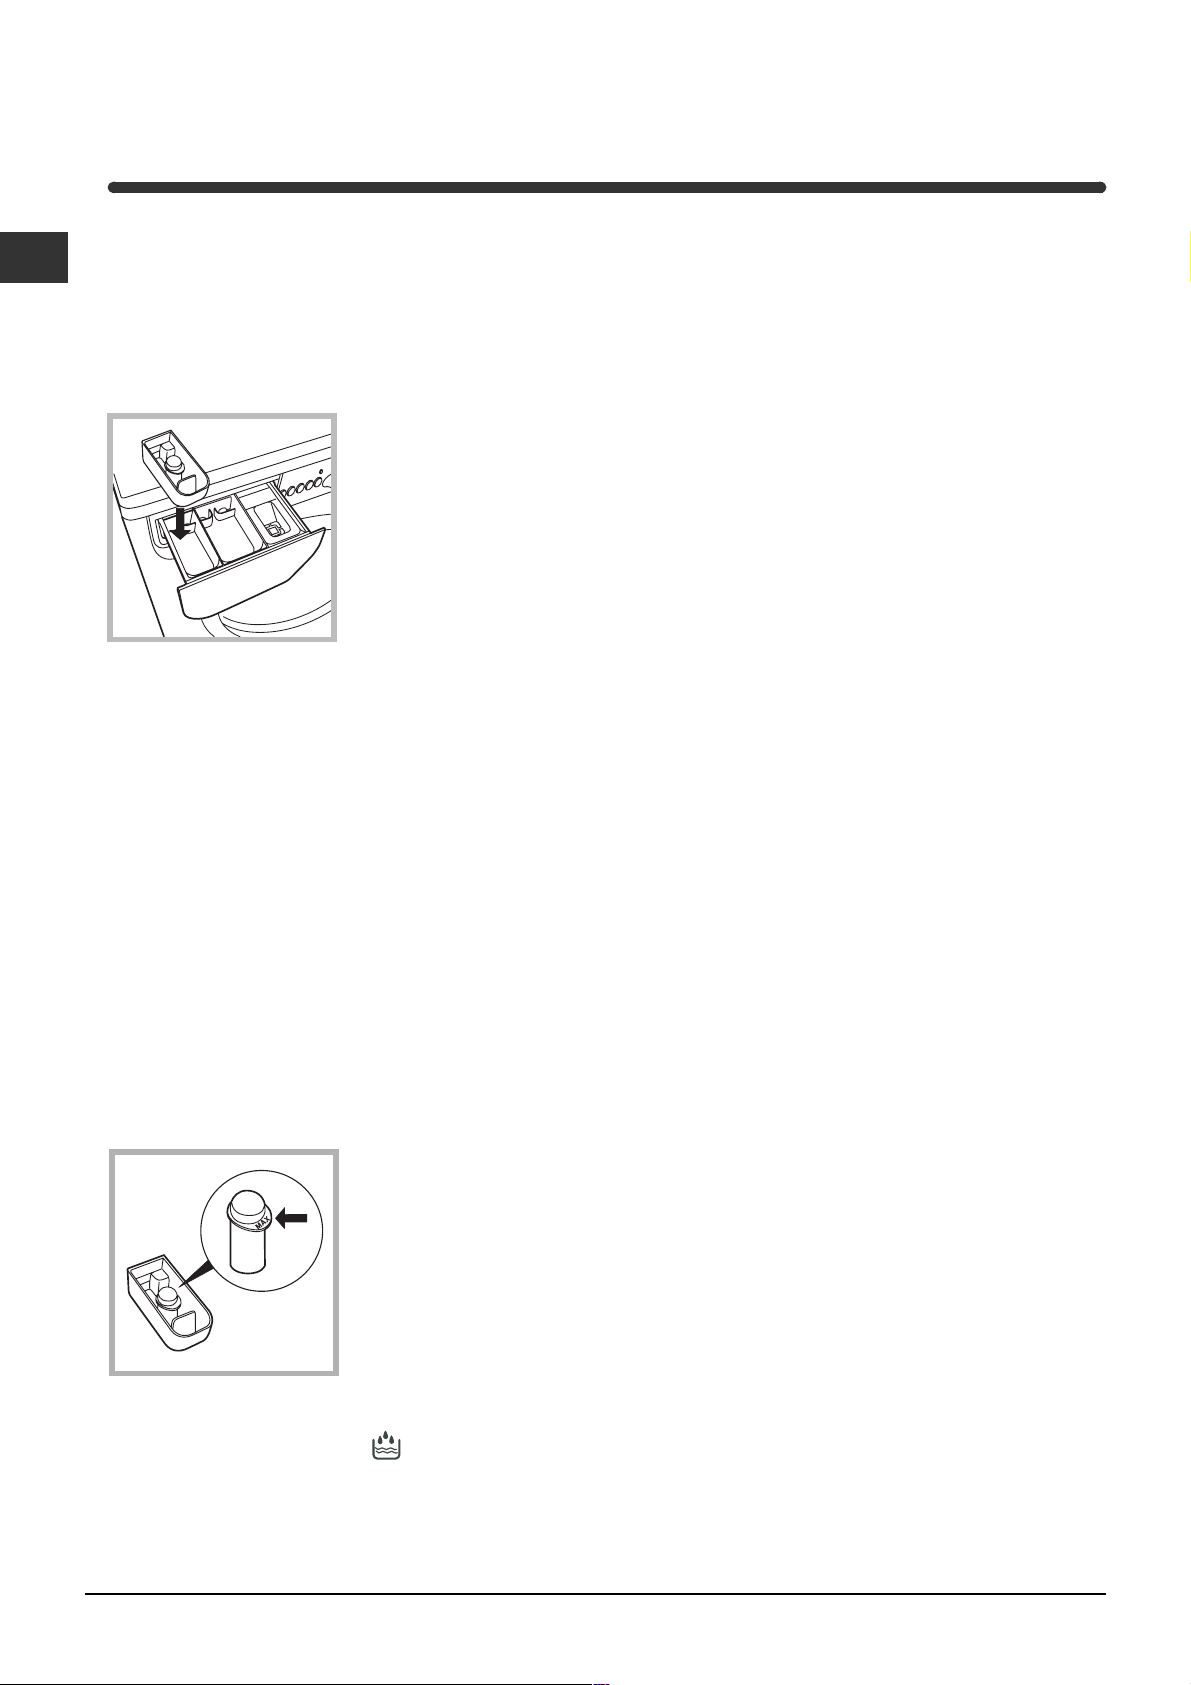
Prací prostøedky a prádlo
CZ
Dávkovaè pracích prostøedkù
Dobrý výsledek praní závisí také na správném
dávkování pracích prostøedkù: pouití jejich
nadmìrného mnoství sniuje efektivitu praní a
napomáhá tvorbì vodního kamene na vnitøních
èástech praèky a zneèitìní ivotního prostøedí.
Pøi vytahování dávkovaèe
4
3
pracích prostøedkù a pøi
jeho plnìní pracími anebo
pøídavnými prostøedky
postupujte následovnì:
2
1
pøihrádka 1: Prací prostøedek (prákový) pro
pøedpírání
Pøed naplnìním pøihrádky pracím prostøedkem se ujistìte,
e se vdávkovaèi nenachází pøídavná pøihrádka 4.
pøihrádka 2: Prací prostøedek (prákový anebo
tekutý) pro praní
Tekutý prací prostøedek se nalévá pouze tìsnì pøed
uvedením do chodu.
pøihrádka 3: Pøídavné prostøedky (avivá, atd.)
Avivá nesmí vytékat zmøíky.
pøídavná pøihrádka 4: Bìlící prostøedek
Nepouívejte prací prostøedky urèené na ruèní praní,
protoe zpùsobují tvorbu nadmìrného mnostva pìny.
Cyklus bìlìní
Tradièní bìlící prostøedek se pouívá pøi bìlení bílého
prádla zodolných tkanin, zatímco bìlící prostøedek na
choulostivé prádlo se pouívá pøi bìlení barevného
prádla, prádla ze syntetických tkanin a zvlny.
Pøíprava prádla
Roztøiïte prádlo podle:
- druhu tkaniny / symbolu na visaèce.
- barvy: oddìlte barevné prádlo od bílého.
Vyprázdnìte kapsy a zkontrolujte knoflíky.
Nepøekraèujte povolenou náplò, vztahující se na
hmotnost suchého prádla:
Odolné tkaniny: max. 4,5 kg
Syntetické tkaniny: max. 2.5 kg
Jemné tkaniny: max. 2 kg
Vlna: max. 1 kg
Kolik váí prádlo?
1 prostìradlo 400-500 g
1 povlak na poltáø 150-500 g
1 ubrus 400-500 g
1 upan 900-1.200 g
1 ruèník 150-250 g
Odìvy vyadující zvlátní péèi
Záclony: pøehnout je a uloit dovnitø povlaku na
poltáø anebo do sáèku ze síoviny. Je tøeba je prát
samotné a nepøekroèit pøitom polovièní náplò. Na
praní záclon pouijte program 7, který automaticky
vylouèí odstøeïování.
Proívané kabáty a vìtrovky: je moné je prát
vpraèce vpøípadì, e jsou plnìny husím anebo
kachním prachovým peøím. Jednotlivé kusy odìvu
obrate naruby, naplòte praèku náplní shmotností
nepøesahující 2-3 kg, zopakujte jeden anebo víckrát
máchání a pouijte jemné odstøeïování.
Vlna: abyste dosáhli nejlepích výsledkù, je tøeba
pouít specifický prací prostøedek na praní vlny a
nepøekroèit 1 kg náplnì.
Vlote pøídavnou
pøihrádku 4,
zpøísluenství, do
pøihrádky 1. Pøi dávkování
bìlícího prostøedku
nepøekroète hladinu
max, vyznaèenou na
støedovém kolíku (viz
obrázek).
Kdy si pøejete vykonat pouze bìlící cyklus,
naplòte pøídavnou pøihrádku 4 bìlícím prostøedkem
a nastavte program máchání
Pøi bìlení bìhem pracího cyklu naplòte dávkovaè
pracím prostøedkem a pøídavnými prostøedky,
nastavte poadovaný prací cyklus a aktivujte
volitelnou funkci bìlení (viz str. 31).
Pouití pøídavné pøihrádky 4 vyluèuje monost pøedpírání.
32
.
Page 33
Opatøení a rady
Praèka byla navrena a vyrobena vsouladu
splatnými mezinárodními bezpeènostním pøedpisy.
Tato upozornìní jsou uvádìna zbezpeènostních
dùvodù a je tøeba si je pozornì pøeèíst.
Základní bezpeènostní pokyny
Tento spotøebiè byl navrhnut pro domácí,
neprofesionální pouití, a jeho funkce nesmí být
mìnìny.
Praèku mohou pouívat pouze dospìlé osoby,
podle pokynù uvedených vtomto návodì.
Nedotýkejte se zaøízení bosí, anebo vpøípadì,
kdy máte mokré ruce anebo nohy.
Nevytahujte zástrèku ze zásuvky tahem za kabel,
ale uchopením za zástrèku.
Neotvírejte dávkovaè pracích prostøedkù bìhem
èinnosti zaøízení.
Nedotýkejte se vyèerpávané vody, protoe mùe
mít velmi vysokou teplotu.
Nepokouejte se o násilné otevøení dvíøek: mohlo
by dojít kpokození bezpeènostního uzávìru, který
zabraòuje náhodnému otevøení.
Pøi výskytu poruchy se vádné pøípadì
nepokouejte o opravu vnitøních èástí zaøízení.
Vdy mìjte pod kontrolou dìti a zabraòte jejich
pøiblíení se kpraèce bìhem pracího cyklu.
Bìhem pracího cyklu mají dvíøka tendenci ohøát se.
Vpøípadì potøeby pøemísujte praèku ve dvou
nebo ve tøech, a vìnujte celé operaci zvlátní
pozornost. Nikdy se nepokouejte praèku
pøemísovat sami, je toti velmi tìká.
Pøed zahájením vkládání prádla zkontrolujte, zda je
buben prázdný.
Likvidace staré praèky:
pøed její likvidací se postarejte o její
znehodnocení, odstøihnutím pøívodního kabelu a
oddìlením dvíøek.
Jak uetøit a brát ohled na ivotní prostøedí
Technika ve slubách ivotního prostøedí
Vysvìtlením toho, e uvnitø praèky je vidìt málo vody, je
skuteènost, e nový zpùsob praní Indesit umoòuje
dokonale vyprat prádlo spouitím ménì ne polovièního
mnoství vody: jedná se o dosaení vytýèeného cíle
sohledem na ivotné prostøedí.
etøení pracími prostøedky, vodou, energií a
èasem
Aby nedocházelo kplýtvání, je tøeba pouívat
praèku splnou náplní. Jedna plná náplò, ve
srovnání se dvìmi polovièními, umoòuje uetøit
a 50% energie.
Pøedpírání je potøebné pouze pøi praní silnì
zneèitìného prádla. Prací program bez
pøedpírání umoòuje uetøit od 5 do 15% energie.
Pøi aplikaci pøísluného prostøedku proti skvrnám
anebo jejich namoèením pøed zahájením praní, je
moné vyhnout se praní pøi vysokých teplotách.
Pouití stejného pracího programu pøi teplotì
60°C namísto 90°C anebo 40°C namísto 60°C,
umoòuje uetøit a 50% energie.
Správné dávkování pracího prostøedku, sohledem
na tvrdost vody, stupeò zneèitìní a mnoství
praného prádla zabraòuje plýtvání a chrání ivotní
prostøedí: i kdy se jedná o biodegradabilní látky,
prací prostøedky naruují pøirozenou rovnováhu
vpøírodì. Dále se je tøeba, dle moností, vyhnout
pouití aviváe.
Praní vpodveèer nebo brzy ráno napomáhá nií
zátìi firem, zabývajících se výrobou energie.
Volitelná funkce odloený start (viz str. 31)
znaènì napomáhá organizaci praní právì na
základì uvedených pravidel.
CZ
Likvidace
Likvidace obalových materiálù:
pøi jejich odstranìní postupujte vsouladu
smístním pøedpisy a dbejte na monou recyklaci.
Vpøípadì, e prádlo má být vysueno vsuièce,
zvolte vysokou rychlost odstøeïování. Malé
mnoství vody umoòuje etøit èas a energii
bìhem suícího programu.
Servisní slubaPoruchyOpatøení ÚdrbaPrací programy Prací prostøedkyInstalace Popis
33
Page 34
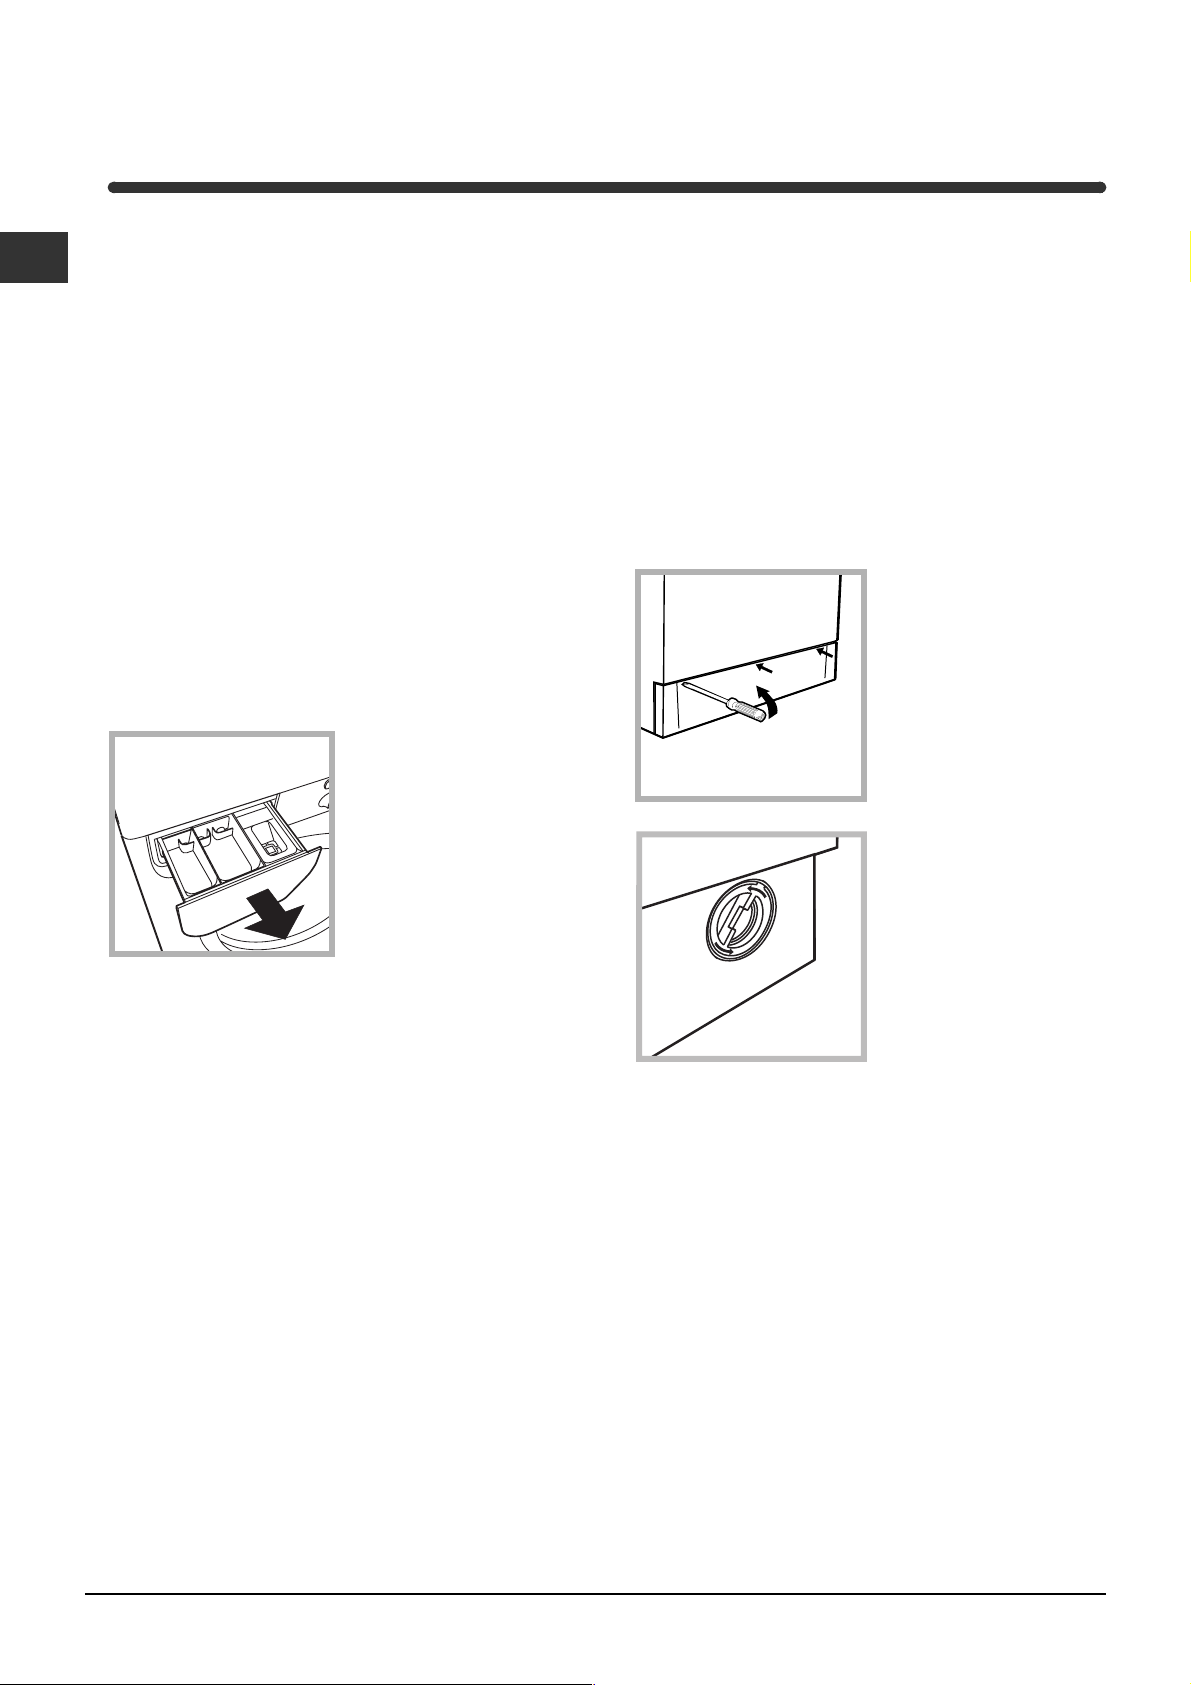
Údrba a péèe
CZ
Uzavøení pøívodu vody a vypnutí
elektrického napájení
Po kadém praní uzavøete pøívod vody. Tímto
zpùsobem dochází komezení opotøebení praèky
a ke sníení nebezpeèí úniku vody.
Pøed zahájením èitìní praèky a bìhem operací
údrby je tøeba vytáhnout zástrèku pøívodního
kabelu ze zásuvky.
Èitìní praèky
Vnìjí èásti a èásti z gumy mohou být èitìny
hadrem navlhèeným ve vlané vodì a saponátu.
Nepouívejte rozpoutìdla anebo brusné prostøedky.
Èitìní dávkovaèe pracích prostøedkù
Vytáhnìte dávkovaè
jeho nadzvednutím a
vytáhnutím smìrem ven
(viz obrázek).
Umyjte ho pod proudem
vody; tento druh
vyèitìní je tøeba
vykonávat pravidelnì.
Èitìní èerpadla
Souèástí praèky je samoèisticí èerpadlo, která
nevyaduje zvlátní péèi. Mùe se vak stát, e se
vjeho vstupní èásti, urèené na jeho ochranu, a
nacházející se vjeho spodní èásti, zachytí drobné
pøedmìty (mince, knoflíky).
Ujistìte se, e prací cyklus byl ukonèen a
vytáhnìte zástrèku ze zásuvky.
Pøístup ke vstupní èásti èerpadla:
1. pomocí roubováku
odstraòte krycí panel
nacházející se ve
pøední èásti praèky (viz
obrázek);
2. odroubujte vrchní
kryt otáèením proti
smìru hodinových
ruèièek (viz obrázek):
vyteèení malého
mnoství vody je zcela
bìným jevem;
Péèe o dvíøka a buben
Dvíøka ponechte po kadé pootevøeny, aby se
zabránilo tvorbì nepøíjemných zápachù.
3.dokonale vyèistìte vnitøek vstupní èásti èerpadla;
4.nasaïte zpátky vrchní kryt;
5.namontujte zpátky krycí panel, pøièem se, pøed
jeho pøisunutím kpraèce ujistìte, e dolo
ksprávnému zachycení háèkù do pøísluných otvorù.
Kontrola pøítokové hadice
Stav pøítokové hadice je tøeba zkontrolovat alespoò
jednou roènì. Jsou-li na ní viditelné praskliny anebo
trhliny, je tøeba ji vymìnit: silný tlak pùsobící na
hadici bìhem pracího cyklu by mohl zpùsobit její
náhlé roztrhnutí.
Nikdy nepouívejte ji pouité hadice.
34
Page 35

Poruchy a zpùsob jejich
odstranìní
Mùe se stát, e praèka nebude fungovat. Pøed telefonickým kontaktováním servisní sluby (viz str. 36),
zkontrolujte prostøednictvím následujícího seznamu, zda se nejedná o jednodue odstranitelný problém.
Poruchy:
Praèku nelze zapnout.
Nedochází kzahájení pracího
cyklu.
Nedochází knapoutìní vody do
praèky.
Dochází knepøetritému
napoutìní a vyèerpávání vody.
Moné pøíèiny / Zpùsob jejich odstranìní:
Zástrèka není zasunuta vzásuvce, anebo ne natolik, aby dolo ke
spojení kontaktù.
Vcelém domì je vypnut proud.
Dvíøka nejsou správnì zavøena.
Nebylo stisknuto tlaèítko
Nebylo stisknuto tlaèítko START/VYNULOVÁNÍ.
Nebyl otevøen kohoutek pøívodu vody.
Byl nastaven odloený start (Odloený start, viz str. 31).
Pøívodní hadice není pøipojena kvodovodnímu kohoutku.
Pøívodní hadice je pøíli ohnuta.
Nebyl otevøen kohoutek pøívodu vody.
Vcelém domì je uzavøen pøívod vody.
Vrozvodu vody není dostateèný tlak.
Nebylo stisknuto tlaèítko START/VYNULOVÁNÍ.
Ústí vypoutìcí hadice se nachází mimo urèené rozmezí od 65 do
100 cm nad zemí (viz str. 27).
Koncová èást vypoutìcí hadice je ponoøena ve vodì (viz str. 27).
Odpad ve stìnì není vybaven odvzduòovacím otvorem.
Kdy ani po uvedených kontrolách nedojde kodstranìní problému,
uzavøete pøívod vody, vypnìte praèku a pøivolejte servisní slubu.
Vpøípadì, e se byt nachází na jednom znejvyích poschodí, je
moné, e dochází ksifonovému efektu, jeho následkem praèka
nepøetritì napoutí a odèerpává vodu. Na odstranìní uvedeného
efektu jsou vprodeji bìnì dostupné speciální protisifónové ventily.
.
CZ
Nedochází kvyèerpání vody
anebo kodstøeïování.
Bìhem odstøeïování je moné
pozorovat silné vibrace.
Dochází kúniku vody zpraèky.
Kontrolka ZAPNUTO/ZABLOKOVANÁ
DVÍØKA bliká rychle spolu salespoò
jednou dalí kontrolkou.:
Dochází ktvorbì nadmìrného
mnoství pìny.
Odèerpání vody netvoøí souèást nastaveného programu: u nìkterých
programù je potøebné jeho manuální uvedené do èinnosti (viz str. 30).
Byla aktivována volitelná funkce Snadné ehlení: dokonèení pracího
cyklu je moné po stisknutí tlaèítka START/VYNULOVÁNÍ (viz str. 31).
Vypoutìcí hadice je pøíli ohnuta (viz str. 27).
Odpadové potrubí je ucpáno.
Bìhem instalace nebyl buben odjitìn pøedepsaným zpùsobem (viz str. 26).
Praèka není vyrovnána do vodorovné polohy (viz str. 26).
Praèka je namáèknuta mezi nábytkem a stìnou (viz str. 26).
Pøívodní hadice není správnì pøipojena (viz str. 26).
Dávkovaè pracích prostøedkù je ucpán (zpùsob jeho vyèitìní viz str. 34).
Vypoutìcí hadice není upevnìna pøedepsaným zpùsobem (viz str. 27).
Zavolejte servisní slubu, protoe praèka hlásí poruchu.
Servisní slubaPoruchyOpatøení ÚdrbaPrací programy Prací prostøedkyInstalace Popis
Pouitý prací prostøedek není vhodný pro pouití vautomatické
praèce (musí obsahovat oznaèení pro praní vpraèce, pro praní
vrukou nebo vpraèce anebo podobné oznaèení).
Bylo pouito nadmìrné mnoství pracích prostøedkù.
35
Page 36
Servisní sluba
CZ
Pøed pøivoláním servisní sluby:
Zkontrolujte, zda nejste schopni poruchu odstranit sami (viz str. 35);
Opìtovnì uveïte do chodu prací program, scílem ovìøit, zda byla porucha odstranìna;
Vopaèném pøípadì se obrate na autorizované centrum servisní sluby, na telefonním èísle
uvedeném na záruèním listì.
Nikdy se neobracejte se ádostí o pomoc na techniky, kteøí nejsou na vykonávání této èinnost
oprávnìni.
Pøi hláení poruchy uveïte:
druh poruchy;
model praèky (Mod.);
výrobní èíslo (S/N).
tyto informace jsou uvedeny na typovém títku, nacházejícím se na zadní stranì praèky.
Servisní sluba
36
Page 37

INSTRUCÞIUNI DE FOLOSIRE
MAªINÃ DE SPÃLAT RUFE
RO
Românã
WISL 125 X
Sumar
RO
Instalare, 38-39
Scoaterea din ambalaj ºi nivelarea, 38
Legãturi hidraulice ºi electrice, 38-39
Primul ciclu de spãlare, 39
Date tehnice, 39
Descrierea maºinii de spãlat, 40-41
Panoul de control, 40
Indicatoare luminoase, 41
Pornire ºi Programe, 42
Pe scurt: pornirea unui program, 42
Tabel de programe, 42
Personalizãri, 43
Stabilirea temperaturii de spãlare, 43
Fixarea vitezei de centrifugare, 43
Funcþii, 43
Detergenþi ºi rufe albe, 44
Sertarul detergenþilor, 44
Ciclu de albire, 44
Prepararea rufelor, 44
Rufe deosebite, 44
Precauþii ºi sfaturi, 45
Protecþie generalã, 45
Aruncarea reziduurilor, 45
Protecþia ºi respectarea mediului înconjurãtor, 45
Întreþinere ºi îngrijire, 46
Oprirea apei ºi a curentului electric, 46
Curãþarea maºinii de spãlat, 46
Curãþarea sertarului pentru detergenþi, 46
Îngrijirea hubloului ºi a coºului, 46
Curãþarea pompei, 46
Controlarea tubului de alimentare cu apã, 46
Anomalii ºi remedii, 47
Asistenþã, 48
Înainte de a lua legãtura cu Asistenþa, 48
37
Page 38
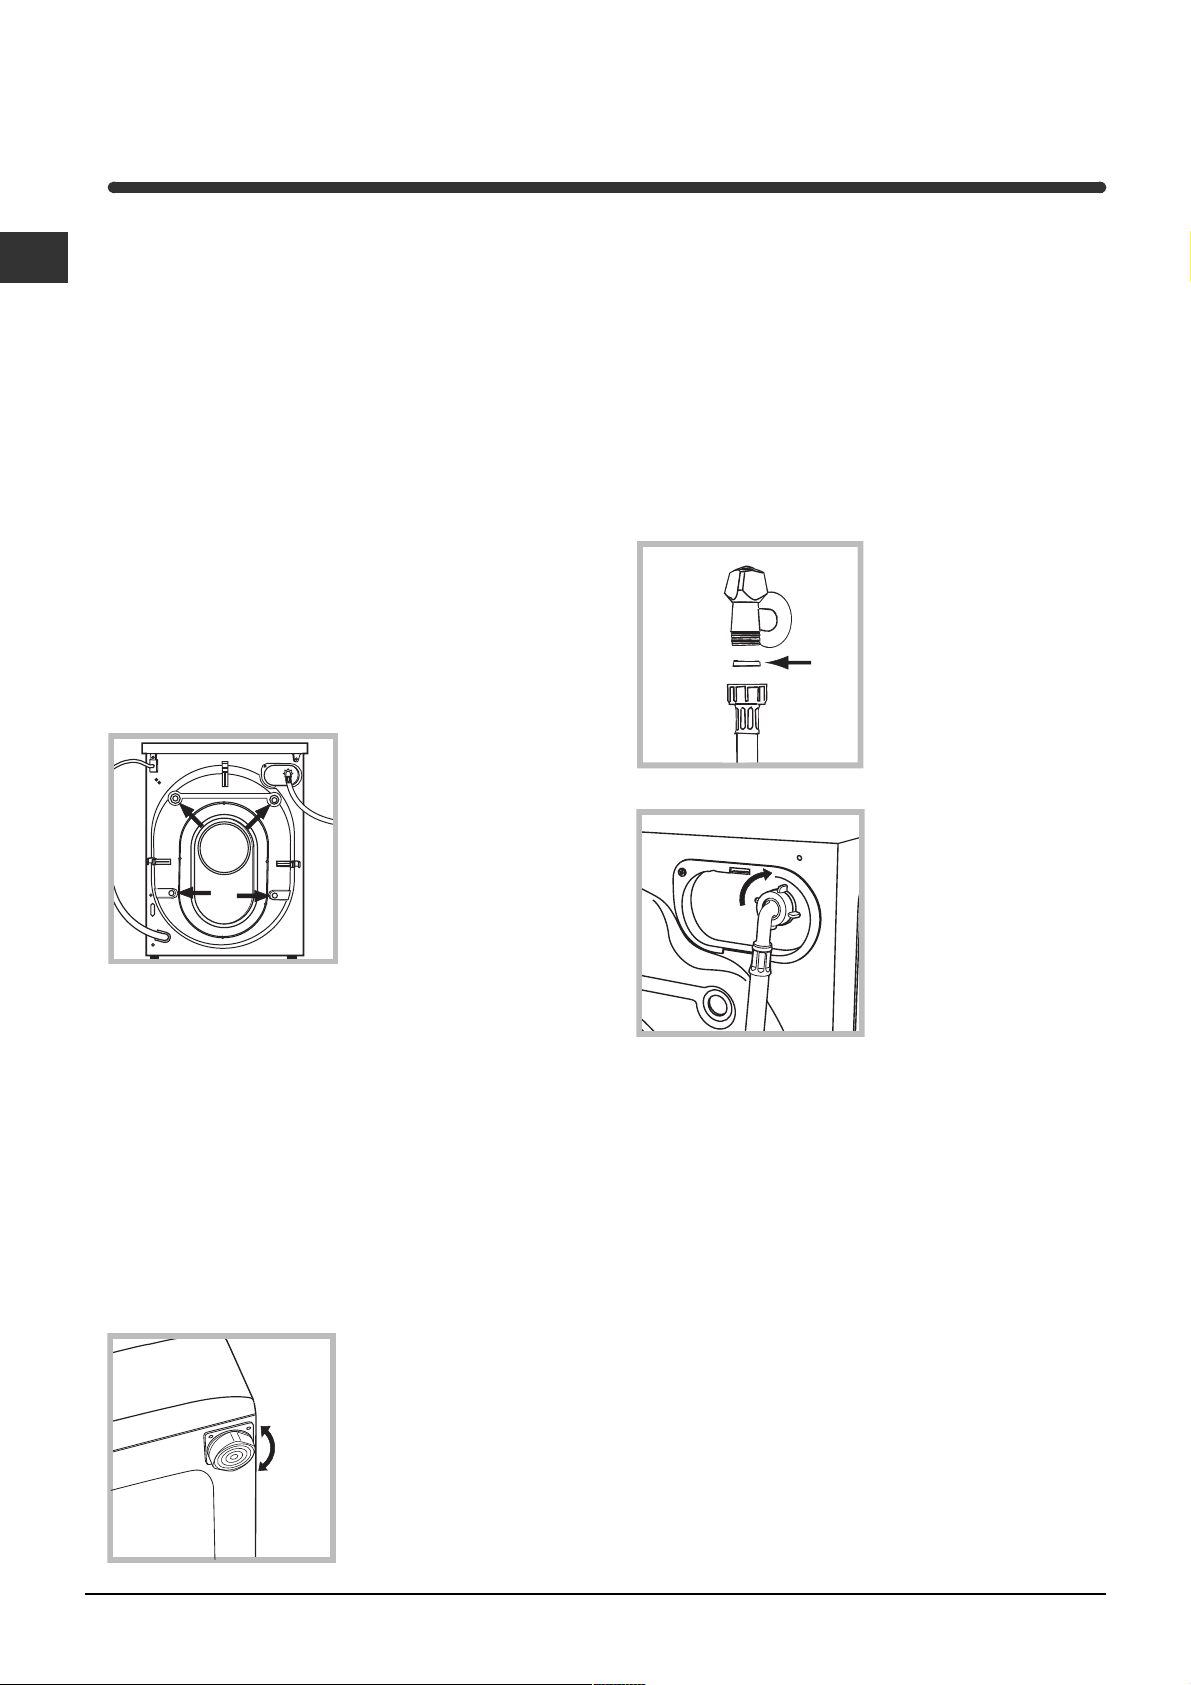
Instalare
RO
Este important sã se pãstreze acest manual
pentru a-l putea consulta în orice moment. În caz
de vânzare, de cesiune sau de schimbare a
locuinþei, acesta trebuie sã rãmânã împreunã cu
maºina de spãlat pentru a informa noul proprietar
cu privire la funcþionare ºi la respectivele
avertismente.
Citiþi cu atenþie instrucþiunile: veþi gãsi informaþii
importante cu privire la instalare, la folosire ºi la
siguranþã.
Scoaterea din ambalaj ºi nivelarea
Scoaterea din ambalaj
1. Scoaterea din ambalaj a maºinii de spãlat.
2. Controlaþi ca maºina de spãlat sã nu fi fost
deterioratã în timpul transportului. Dacã este deterioratã
nu o conectaþi ºi luaþi legãtura cu cine v-a vândut-o.
3. Scoateþi cele 4
ºuruburi de protecþie
pentru transport ºi
cauciucul cu respectivul
distanþator, situate în
partea posterioarã (vezi
figura).
4. Închideþi orificiile cu dopurile din plastic aflat în dotare.
5. Închideþi cu dopul aflat în dotare cele trei orificii în care
se afla fiºa, situate în partea posterioarã, jos în dreapta.
6. Pãstraþi toate piesele: pentru cazul în care maºina de
spãlat va trebui sã fie transportatã, piesele vor trebui
montante din nou.
Ambalajele nu constituie jucãrii pentru copii
O nivelare precisã conferã stabilitate maºinii ºi
evitã vibraþii, zgomote ºi deplasãri pe timpul
funcþionãrii. În cazul mochetelor sau a unui covor,
reglaþi picioruºele astfel încât sã menþineþi sub
maºina de spãlat un spaþiu suficient pentru
ventilare.
Legãturi hidraulice ºi electrice
Conectarea tubului de alimentare cu apã
1. Introduceþi garnitura
A în extremitatea
tubului de alimentare ºi
înºurubaþi-l la un robinet
A
3. Fiþi atenþi ca tubul sã nu fie nici curbat nici
îndoit.
Presiunea apei trebuie sã fie cuprinsã în valorile
tabelului Date tehnice (vezi pagina alãturatã).
de apã rece cu gura
filetatã de ¾ gaz (vezi
figura).
Înainte de conectare,
lãsaþi apa sã curgã
pentru a se limpezi.
2. Conectaþi tubul de
alimentare la maºina
de spãlat,
înºurubându-l la
respectiva prizã de
apã, în partea
posterioarã, sus în
dreapta (vezi figura).
Nivelare
1. Instalaþi maºina de spãlat pe un paviment plan ºi
rigid, fãrã a o sprijini de ziduri, mobilã sau altceva.
2. Dacã podeaua nu este
perfect orizontalã,
compensaþi neregularitãþile
deºurubând sau
înºurubând picioruºele
anterioare (vezi figura);
unghiul de înclinare,
mãsurat pe planul de
lucru, nu trebuie sã
depãºeascã 2°.
38
Dacã lungimea tubului de alimentare nu este
suficientã, adresaþi-vã unui magazin specializat sau
unui tehnician autorizat.
Page 39
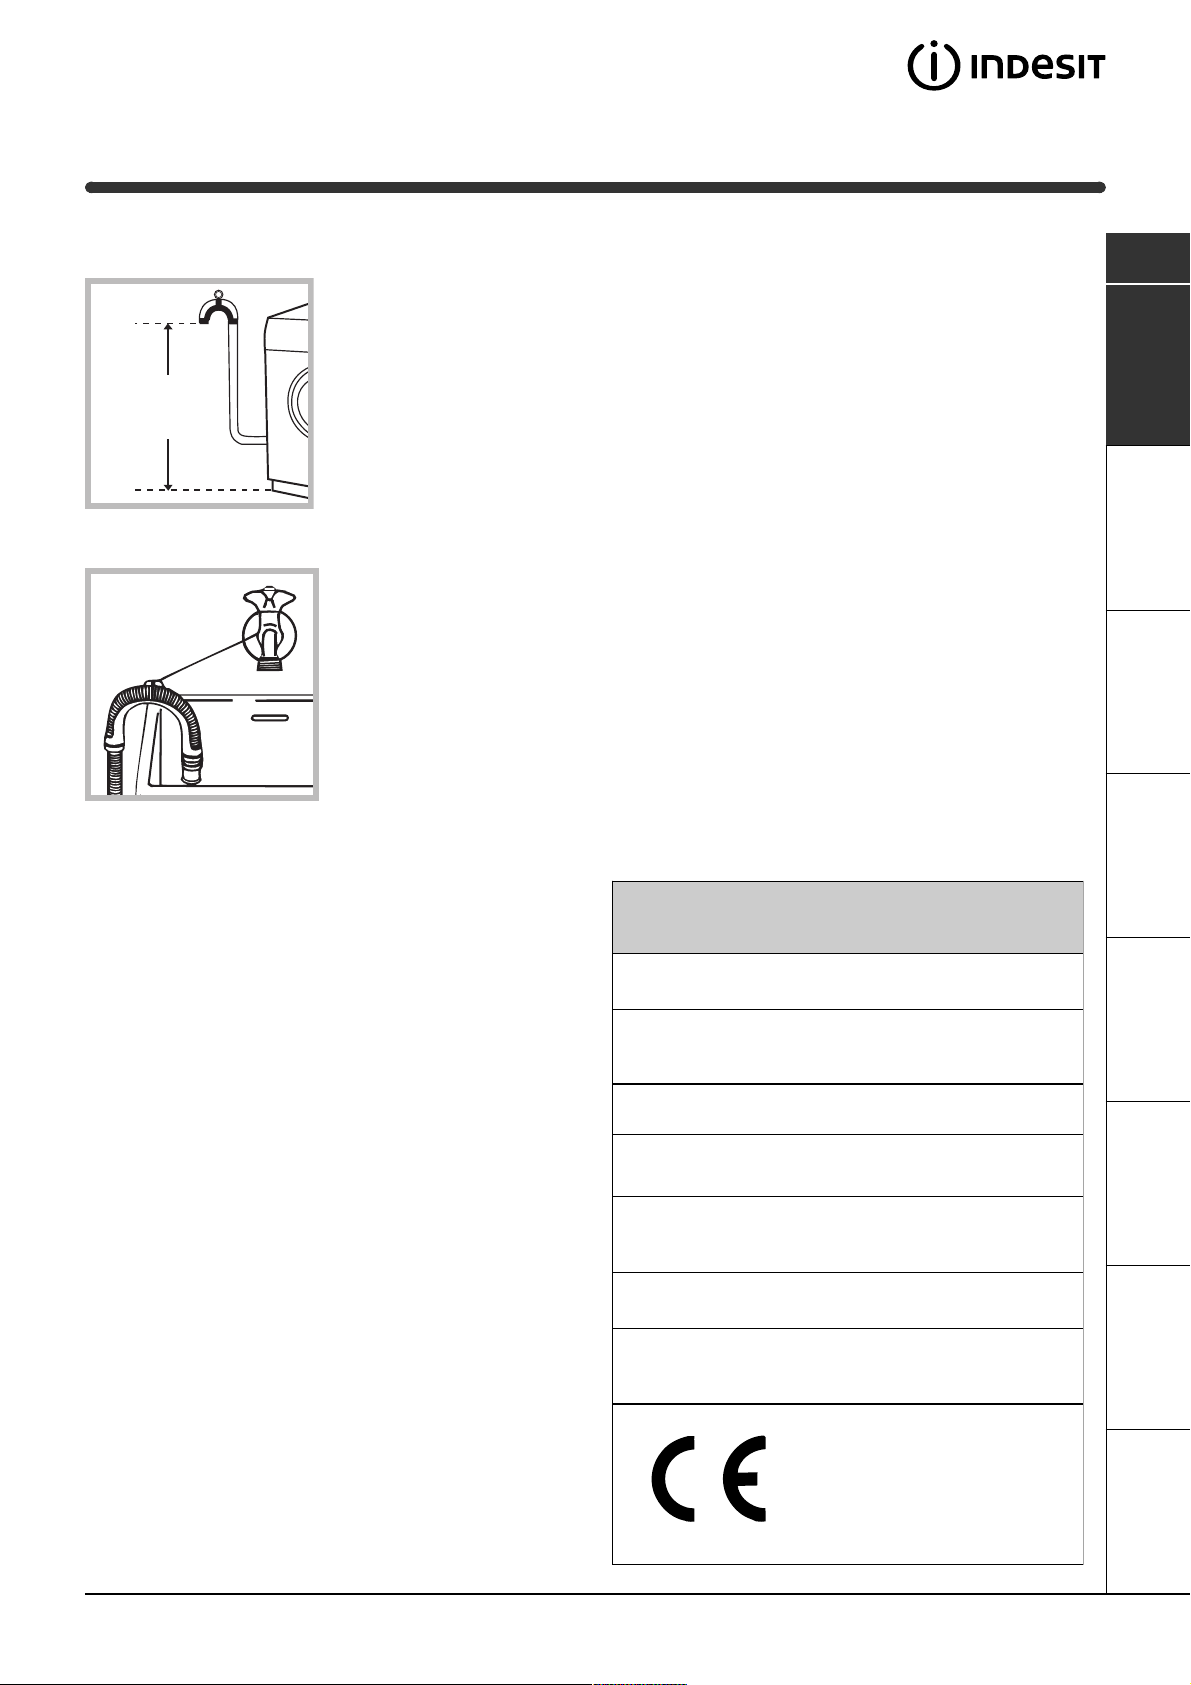
Conectarea tubului de evacuare
Conectaþi tubul de
evacuare, fãrã a-l îndoi,
la o conductã de
evacuare sau la o gurã
de evacuare în zid,
65 - 100 cm
situate între 65 ºi 100
cm de pãmânt;
Nu folosiþi prelungitoare ºi prize multiple.
RO
Cablul nu trebuie sã fie îndoit sau comprimat.
Cablul de alimentare trebuie sã fie înlocuit doar
de tehnicieni autorizaþi.
Atenþie! Producãtorul îºi declinã orice
responsabilitate pentru cazul în care aceste norme
nu se respectã.
Primul ciclu de spãlare
sau sprijiniþi-l pe
marginea unei chiuvete
sau a unei cãzi, legând
ghidul aflat în dotare,
de robinet (vezi figura).
Extremitatea liberã a
tubului de evacuare nu
trebuie sã rãmânã
cufundatã în apã.
Nu este recomandabilã folosirea tuburilor de
prelungire; dacã este indispensabil, tubul de
prelungire trebuie sã aibã acelaºi diametru cu tubul
original ºi nu trebuie sã depãºeascã 150 cm.
Legãtura electricã
Înainte de a introduce fiºa în priza de curent,
asiguraþi-vã ca:
priza sã fie cu împãmântare ºi conform
prevederilor de lege;
priza sã poatã suporta sarcina maximã de
putere a maºinii, indicatã în tabelul cu Date
tehnice (vezi alãturi);
tensiunea de alimentare sã fie cuprinsã în valorile
indicate în tabelul cu Date tehnice (vezi alãturi);
Dupã instalare, înainte de folosire, efectuaþi un ciclu
de spãlare cu detergent ºi fãrã rufe, selectând
programul la 90°C fãrã prespãlare.
Date tehnice
Model
Dimensiuni
Capacitate
Legãturi electrice
Legãturi hidrice
Viteza de centrifugare
WISL 125 X
lãrgime 59,5 cm
înãlþime 85 cm
profunzime 40 cm
de la 1 la 4,5 kg
tensiune 220/230 Volþi 50 Hz
putere maximã absorbitã 1850 W
presiune maximã 1 MPa (10 bari)
presiune minimã 0,05 MPa (0,5 bari)
capacitatea cuvei 40 litri
pânã la 1200 de rotaþii pe minut
priza sã fie compatibilã cu fiºa maºinii de spãlat.
În caz contrar înlocuiþi priza sau fiºa.
Maºina de spãlat nu trebuie instalatã afarã, nici chiar
în cazul în care spaþiul este adãpostit, deoarece este
foarte periculoasã expunerea maºinii la ploi ºi furtuni.
Dupã instalarea maºinii de spãlat, priza de curent
trebuie sã fie uºor accesibilã.
Programe de control
pe baza normei
IEC456
programul 2; temperatura 60°C;
efectuatã cu 4,5 kg de rufe.
Acest aparat este conform cu
urmãtoarele Directive Comunitare:
- 73/23/CEE din data de 19/02/73
(Tensiuni Joase) ºi modificãri succesive
- 89/336/CEE din data de 03/05/89
(Compatibilitate Electromagneticã) ºi
modificãri succesive
AsistenþãAnomaliiPrecauþii ÎntreþinerePrograme DetergenþiInstalare Descriere
39
Page 40
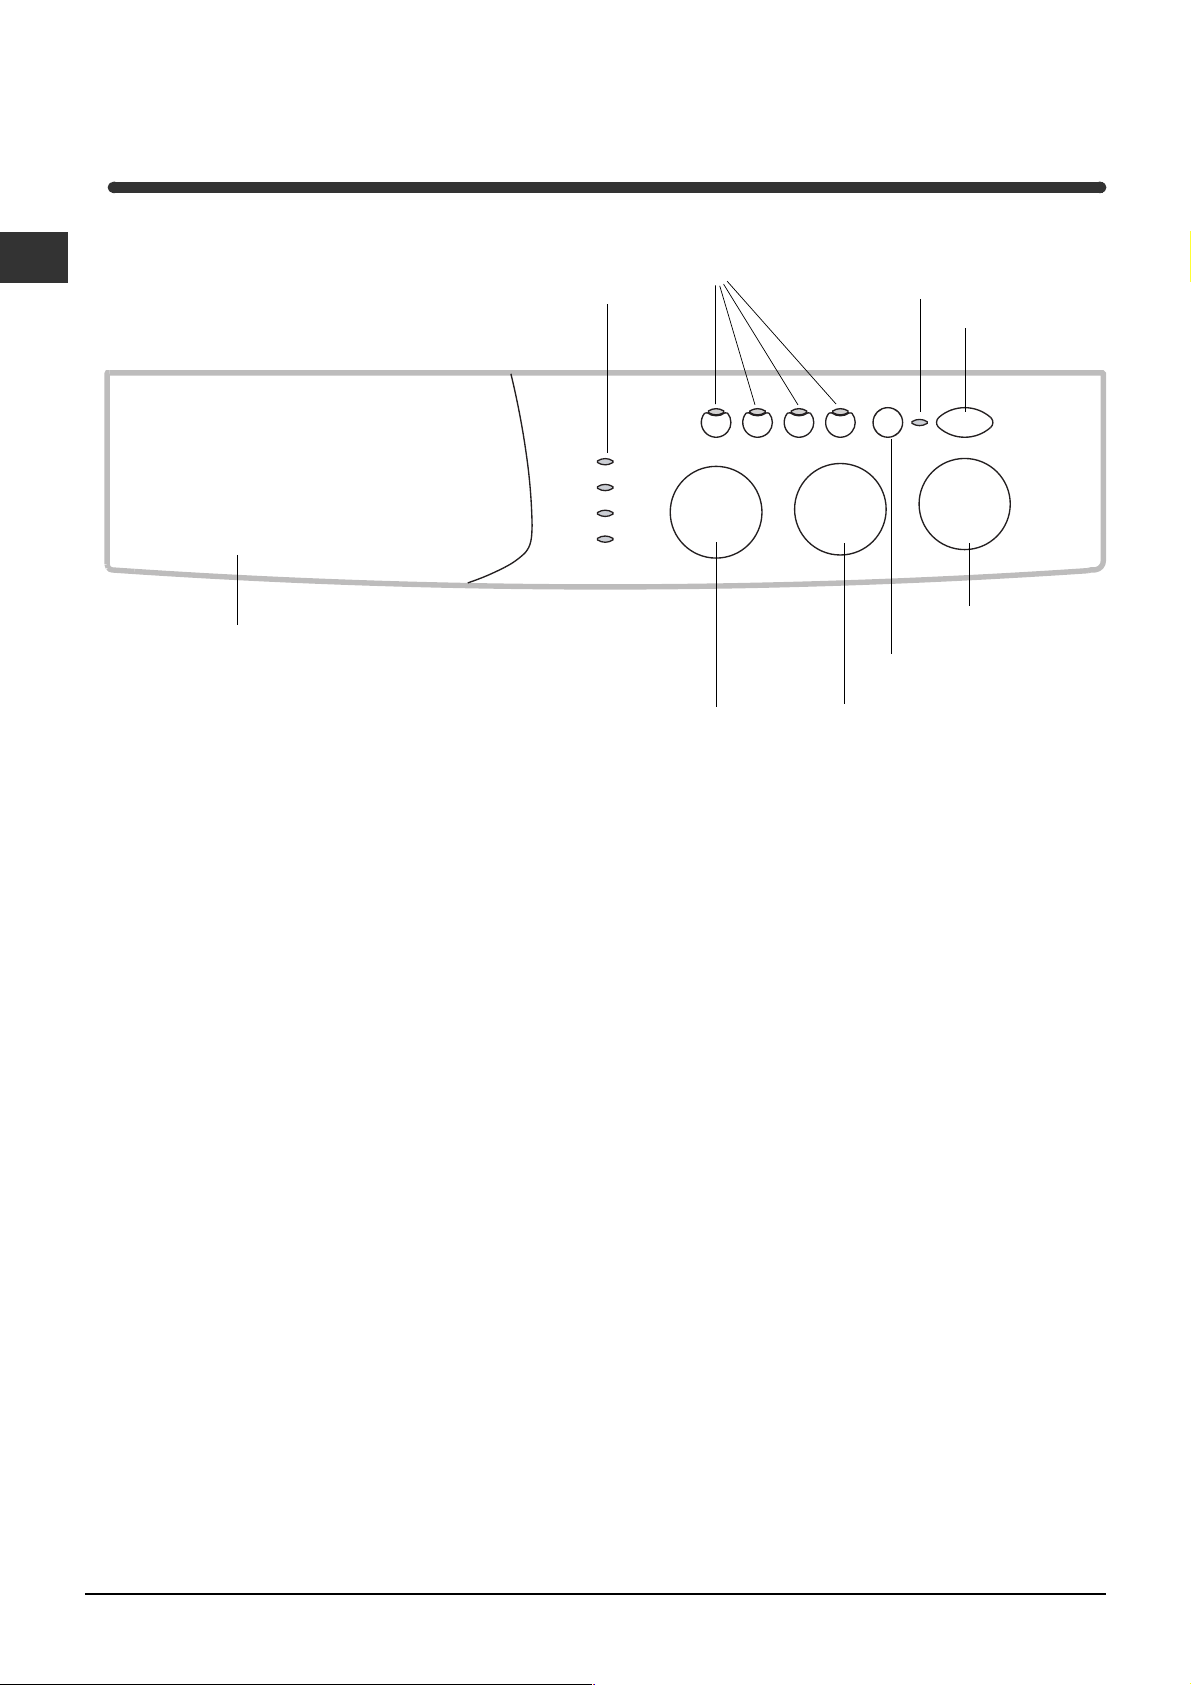
Descrierea maºinii de spãlat
RO
Panoul de control
Indicatoare
luminoase
Sertarul detergenþilor
Sertarul detergenþilor: pentru a încãrca detergenþi
ºi aditivi (vezi pag. 44).
Indicatoare luminoase: pentru a putea urmãri
derularea programului de spãlare ales
O datã selectatã funcþia Delay Timer, momentul de
aºteptare va fi cronometrat astfel încât dvs. sã
puteþi afla timpul reziduual pânã la iniþierea
programului de spãlare (a se vedea pag. 41).
Selector CENTRIFUGÃ: este folosit pentru a selecta/
exclude programul de stoarcere (a se vedea pag. 43).
Taste FUNCÞIONARE: pentru a selecta funcþiile
disponibile. Butonul corespunzãtor funcþiei
selectate va rãmâne aprins.
Taste/butoane de
FUNCÞIONARE
Selector
VITEZÃ DE
CENTRIFUGARE
Butonul START/RESET: pentru pornirea
programelor sau anularea a ceea a fost selectat
greºit.
Indicator PORNIRE/HUBLOU BLOCAT: vã indicã
faptul cã maºina de spãlat este în funcþiune ºi
posibilitatea de a deschide hubloul (a se vedea
pag. 41).
Butonul PORNIRE/OPRIRE: pentru pornirea ºi
stingerea maºinii de spãlat.
Selector PROGRAME: pentru alegerea
programelor.
Pe durata programului selectorul rãmâne ferm.
Indicator
HUBLOU BLOCAT
Selector
TEMPERATURÃ
PORNIRE/
Butonul
PORNIRE/OPRIRE
Selector
PROGRAME
Butonul
START/RESET
Selector TEMPERATURÃ: pentru a selecta
temperatura sau programul de spãlare la rece
(a se vedea pag. 43).
40
Page 41
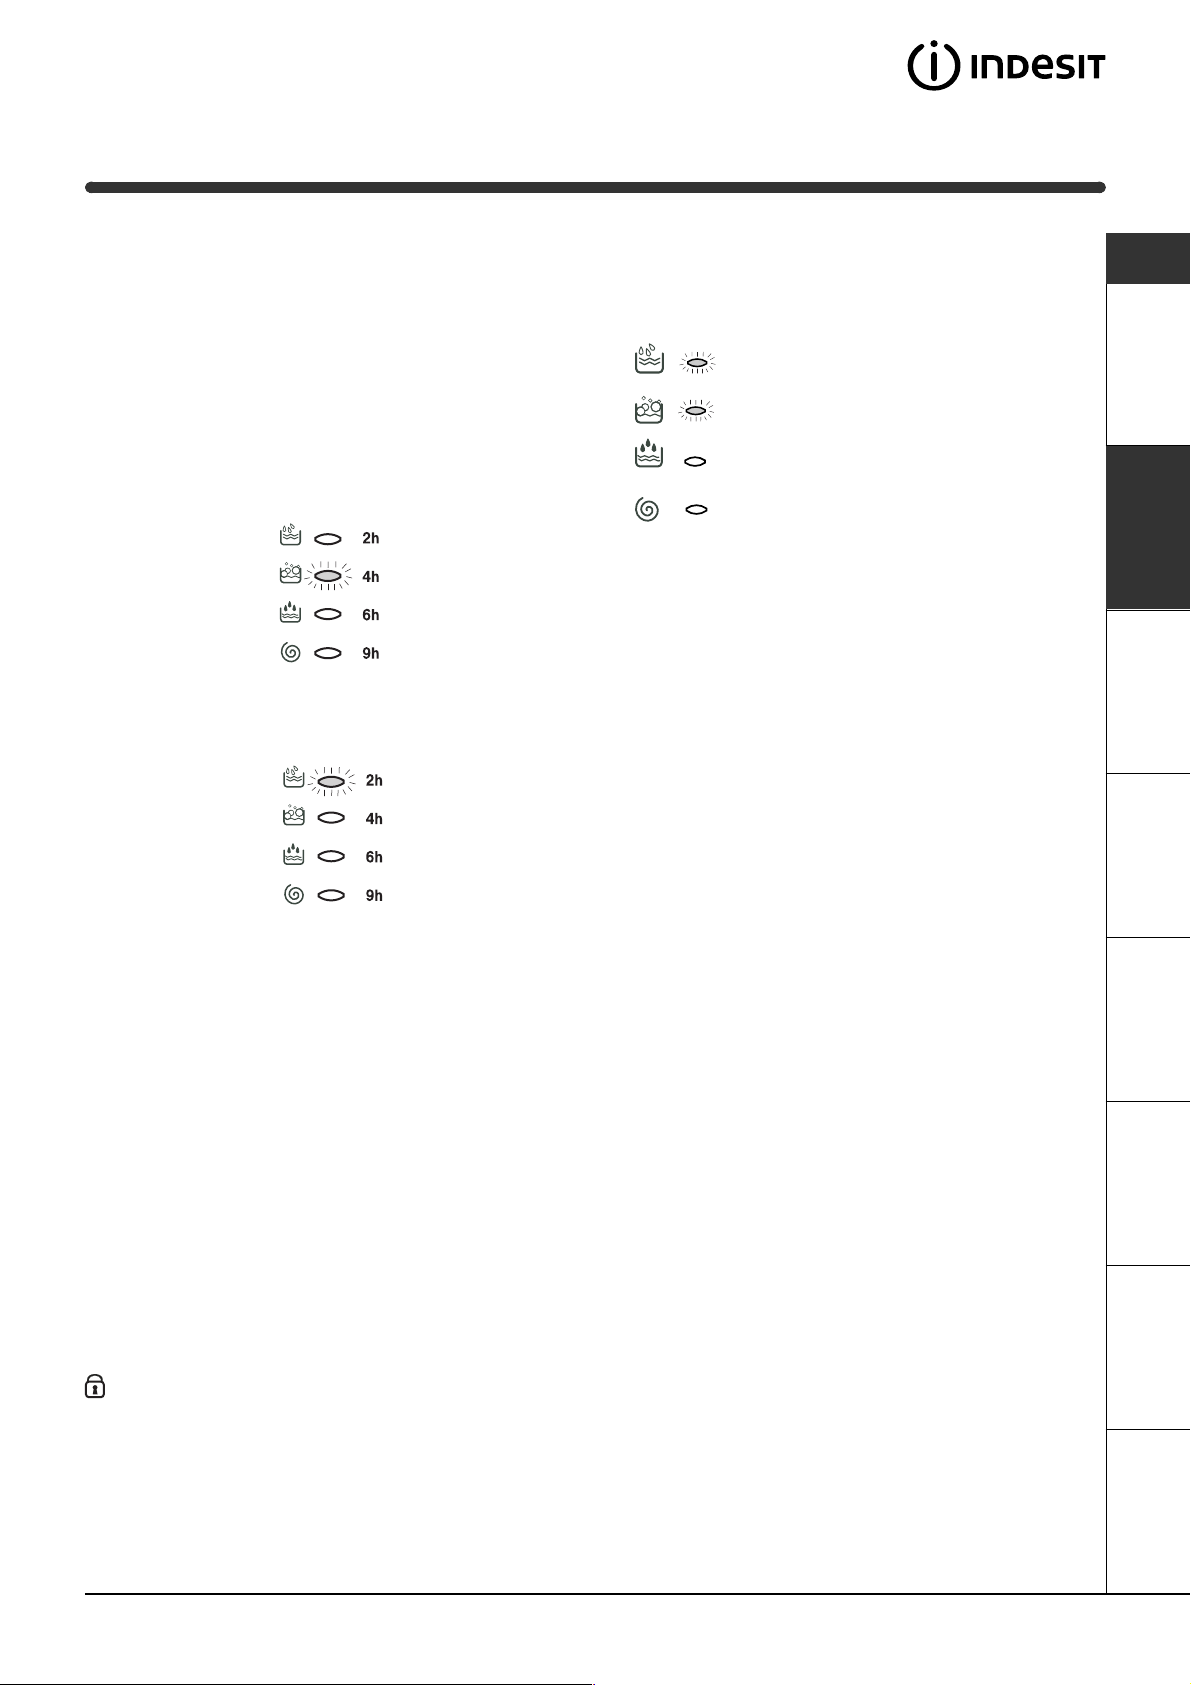
Indicatoare luminoase
Indicatoarele luminoase furnizeazã informaþii
importante, dupã cum urmeazã:
Fazã în curs:
Pe durata ciclului de spãlare, indicatoarele
luminoase se vor aprinde în mod progresiv pentru
a indica starea de avansare:
RO
Programarea momentului de pornire dupã un
anumit interval de timp:
Dacã a fost activatã funcþia Delay Timer (a se
vedea pag. 43), dupã ce programul ales a fost
iniþiat, va începe sã semnalizeze indicatorul
luminos corespunzãtor întârzierii selectate:
Durata de aºteptare va fi cronometratã ºi
semnalatã prin aprinderea indicatorului respectiv:
Dupã trecerea întârzierii selecþionate, indicatorul
luminos se va stinge ºi va porni programul selectat.
Prespãlare
Spãlare
Clãtire
Centrifugare
Notã: pe durata evacuãrii, indicatorul luminos
aferent programului de stoarcere se va aprinde.
Taste funcþionare
TASTELE DE FUNCÞIONARE îndeplinesc ºi rolul
de indicatoare luminoase.
Activând o anumitã funcþie, butonul aferent
acesteia se va aprinde.
Dacã funcþia selectatã nu este compatibilã cu
programul ales, butonul va lumina intermitent, iar
funcþia aferentã nu va putea fi activatã.
În cazul în care va fi selectatã o funcþie
incompatibilã cu cea selectatã mai înainte, doar
ultima aleasã va rãmâne activã.
Indicator PORNIRE/HUBLOU BLOCAT:
Aprinderea Indicatorului luminos indicã faptul cã hubloul a fost blocat în scopul evitãrii deschiderilor
accidentale; pentru a evita daune, este necesar sã se aºtepte ca indicatorul luminos sã se aprindã înainte de
a deschide hubloul.
Intermitenþa rapidã a indicatorului luminos PORNIRE/HUBLOU BLOCAT în acelaºi timp cu acela al unuia sau
mai multor indicatoare luminoase indicã o anomalie. În acest caz vã recomandãm sã apelaþi la Unitatea de
Service.
AsistenþãAnomaliiPrecauþii ÎntreþinerePrograme DetergenþiInstalare Descriere
41
Page 42
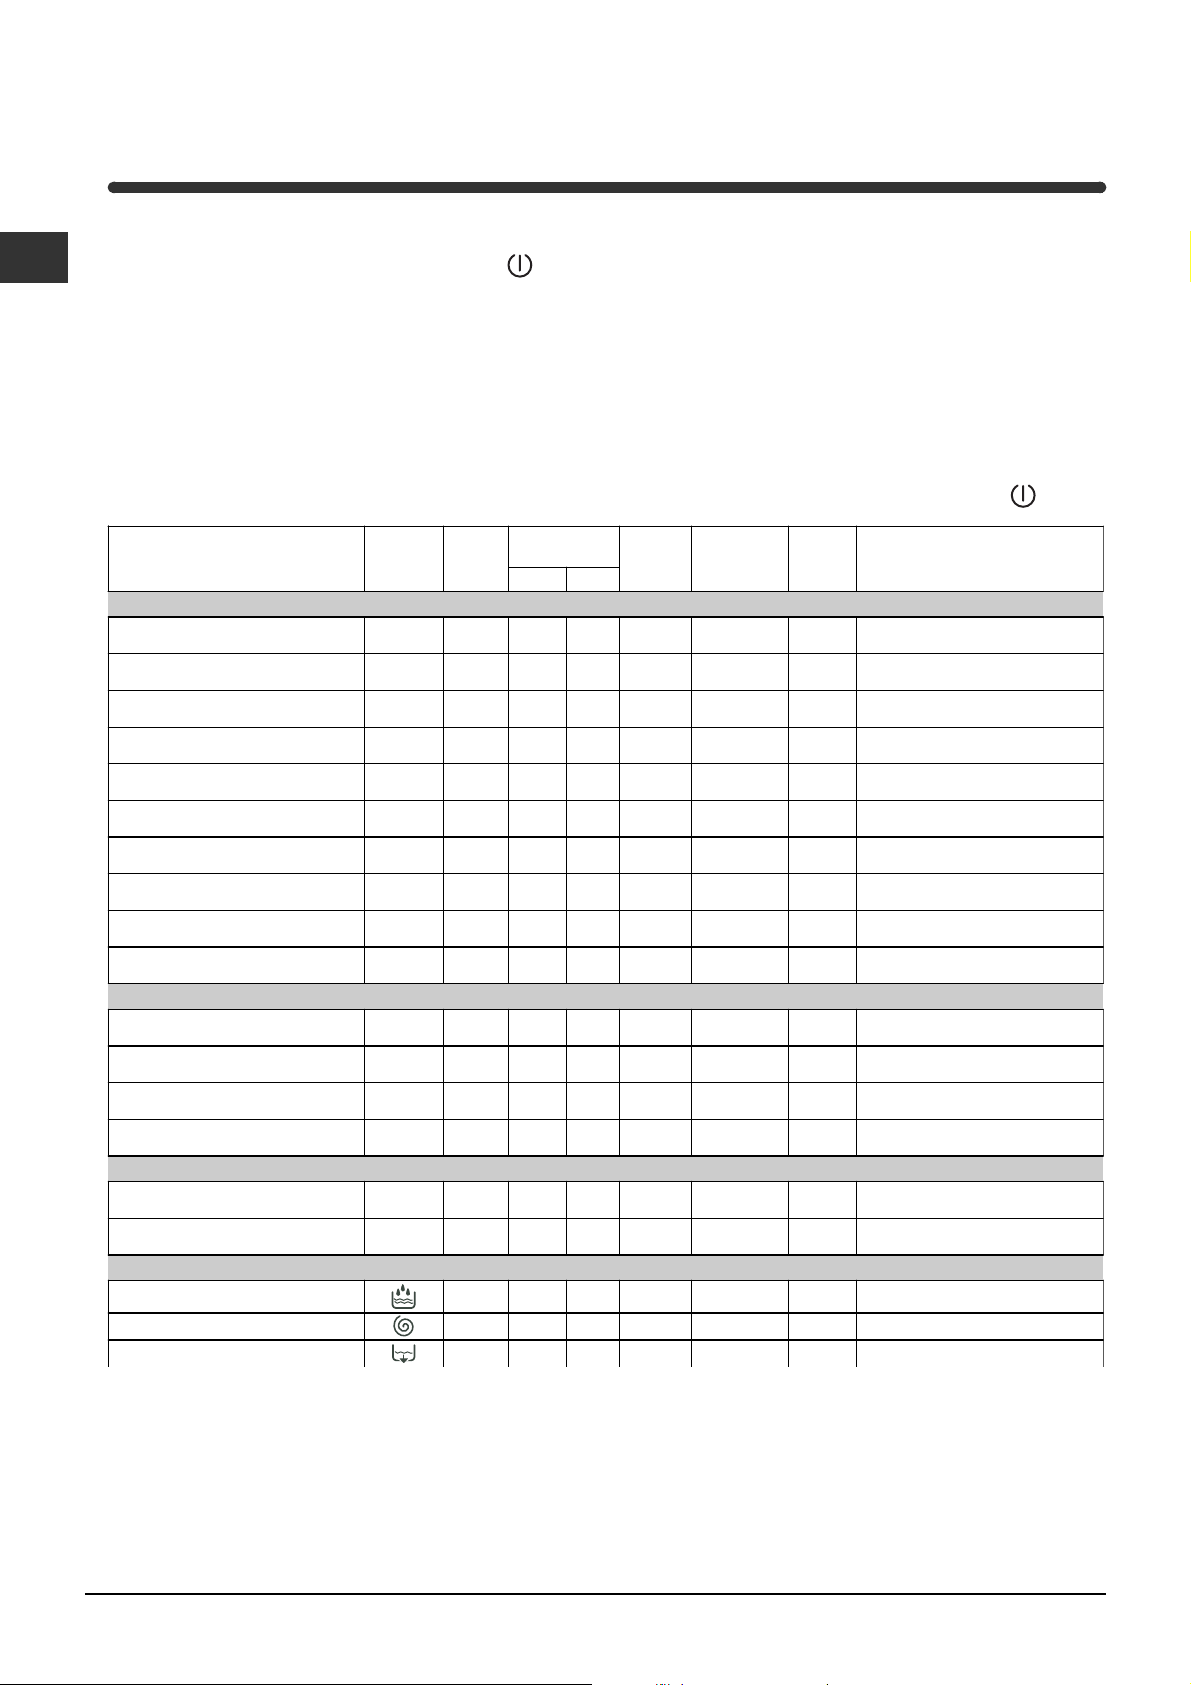
Pornire ºi Programe
RO
Pe scurt: pornirea unui program
1. Porniþi maºina de spãlat apãsând butonul .
Toate indicatoarele luminoase se vor aprinde timp
de câteva secunde, dupã care se vor stinge, iar
indicatorul PORNIRE/HUBLOU BLOCAT va
lumina intermitent.
2. Introduceþi rufele ºi închideþi hubloul.
3. Selectaþi programul dorit cu ajutorul selectorului
PROGRAME.
4. Stabiliþi temperatura de spãlare (a se vedea pag. 43).
Tabel de programe
Tipul de þesãturã ºi de murdãrie Programe
Temperaturã
Detergent
presp. Spãl.
5. Selectaþi viteza de centrifugare (a se vedea pag. 43).
6. Vãrsaþi detergenþi ºi aditivi (vezi pag. 44).
7. Porniþi programul apãsând butonul START/
RESET.
Pentru a anula þineþi apãsat butonul START/
RESET timp de cel puþin 2 secunde.
8. La sfârºitul programului ales, indicatorul luminos
PORNIRE/HUBLOU BLOCAT se va aprinde,
indicând faptul cã hubloul poate fi deschis.
Scoateþi rufele ºi lãsaþi hubloul întredeschis pentru
a evita formarea mirosurilor nepãcute în interiorul
cuvei. Închideþi hubloul apãsând butonul
A ditiv
înmuiere
Opþiune
Antipatã /
Deco lorant
Durata
ciclului
(min ute)
Descrierea ciclului de spãlare
.
Standard
Albe extrem de murdare
(cearceafuri, feþe de masã, etc.)
Albe extrem de murdare
(cearceafuri, feþe de masã, etc.)
Albe ºi co lorate rezistente foarte
murdare
Albe ºi co lorate delicate foarte
murdare
Albe puþin murdare ºi culori
delicate (cãmãºi, bluze, etc.)
Culori rezistente foarte murdare
(scutece pentru n oi nãscuþi, etc.)
Culori rezistente foarte murdare
(scutece pentru n oi nãscuþi, etc.)
Culo ri delicate (rufe de toate
tipurile pu þin murdare )
Lânã
Þesãturi foarte delicate
(perdele, mãtase, vâscozã, etc.)
1
90°C
2
90°C
2
60°C
2
40°C
3
40°C
4
60°C
4
40°C
5
40°C
6
40°C
7
30°C
Delicatã
Delicatã
Delicatã
Delicatã /
Tradiþionale
Delicatã /
Tradiþionale
Delicatã /
Tradiþionale
Delicatã /
Tradiþionale
Prespãlare, spãlare, clãtiri,
135
centrifugi intermediare ºi finale
Sp ãlare, clãtiri, centrifugi
125
intermediare ºi finale
Sp ãlare, clãtiri, centrifugi
110
intermediare ºi finale
Sp ãlare, clãtiri, centrifugi
105
intermediare ºi finale
Sp ãlare, clãtiri, centrifugi
70
intermediare ºi finale
Sp ãlare, clãtiri, antiºifonare sau
75
centrifugare delicatã
Sp ãlare, clãtiri, antiºifonare sau
60
centrifugare delicatã
Sp ãlare, clãtiri, antiºifonare sau
60
centrifugare delicatã
Sp ãlare, clãtiri, antiºifonare ºi
50
centrifugare delicatã
Sp ãlare, clãtiri, antiºifonare sau
45
scurgere
T imp p entru tin e
Albe ºi co lorate rezistente foarte
murdare
Albe puþin murdare ºi culori
delicate (cãmãºi, bluze, etc.)
Culo ri delicate (rufe de toate
tipurile pu þin murdare )
Culo ri delicate (rufe de toate
tipurile pu þin murdare )
8
60°C
9
40°C
10
11
40
°C
30°C
30
Sp ãlare, clãtiri, centrifugi
65
intermediare ºi finale
Sp ãlare, clãtiri, centrifugi
55
intermediare ºi finale
Sp ãlare, clãtiri ºi ce ntrifug are
45
delicatã
Sp ãlare, clãtiri ºi ce ntrifug are
delicatã
Sport
Încãlþãmin te sportiv ã
MAX 2 perechi.
(
Þesãtu ri pen tru îmbrãcãm inte spo rtivã
(Treninguri, chiloþi de gimnasticã, etc.
PROGRAM E PARÞIALE
Clãtire
Centrifugare Descãrcare apã ºi centrifugare
Descãrcare Descãrcare
)
12
13
°C
30
30°C
50
60
Delicatã /
Tradiþionale
Spãlare la rece (fãrã detergent),
spãlare, clãtiri ºi centrifugã de licatã
Sp ãlare, clãtiri, centrifugi
intermediare ºi finale
Clãtiri ºi centrifugare
Note
-Pentru programele 8 - 9 este recomandabil sã nu se depãºeascã o cantitate de rufe de 3,5 kg.
-Pentru programul 13 este recomandabil sã nu se depãºeascã o cantitate de rufe de 2 kg.
-Antiºifonare-vezi calcã mai uºor, pagina alãturatã. Datele specificate în tabel au valoare indicativã.
Program special
Zilnic 30 (programul 11 pentru materiale sintetice) este studiat pentru a spãla rufe puþin murdare într-un
interval scurt de timp: dureazã doar 30 de minute economisindu-se energie ºi timp. Selectând programul
(11 la 30°C) este posibilã spãlarea împreunã a þesãturilor de diverse tipuri (excluse lâna ºi mãtasea) cu o
încãrcãturã maximã de 3 kg. Se recomandã folosirea detergentului lichid.
42
Page 43
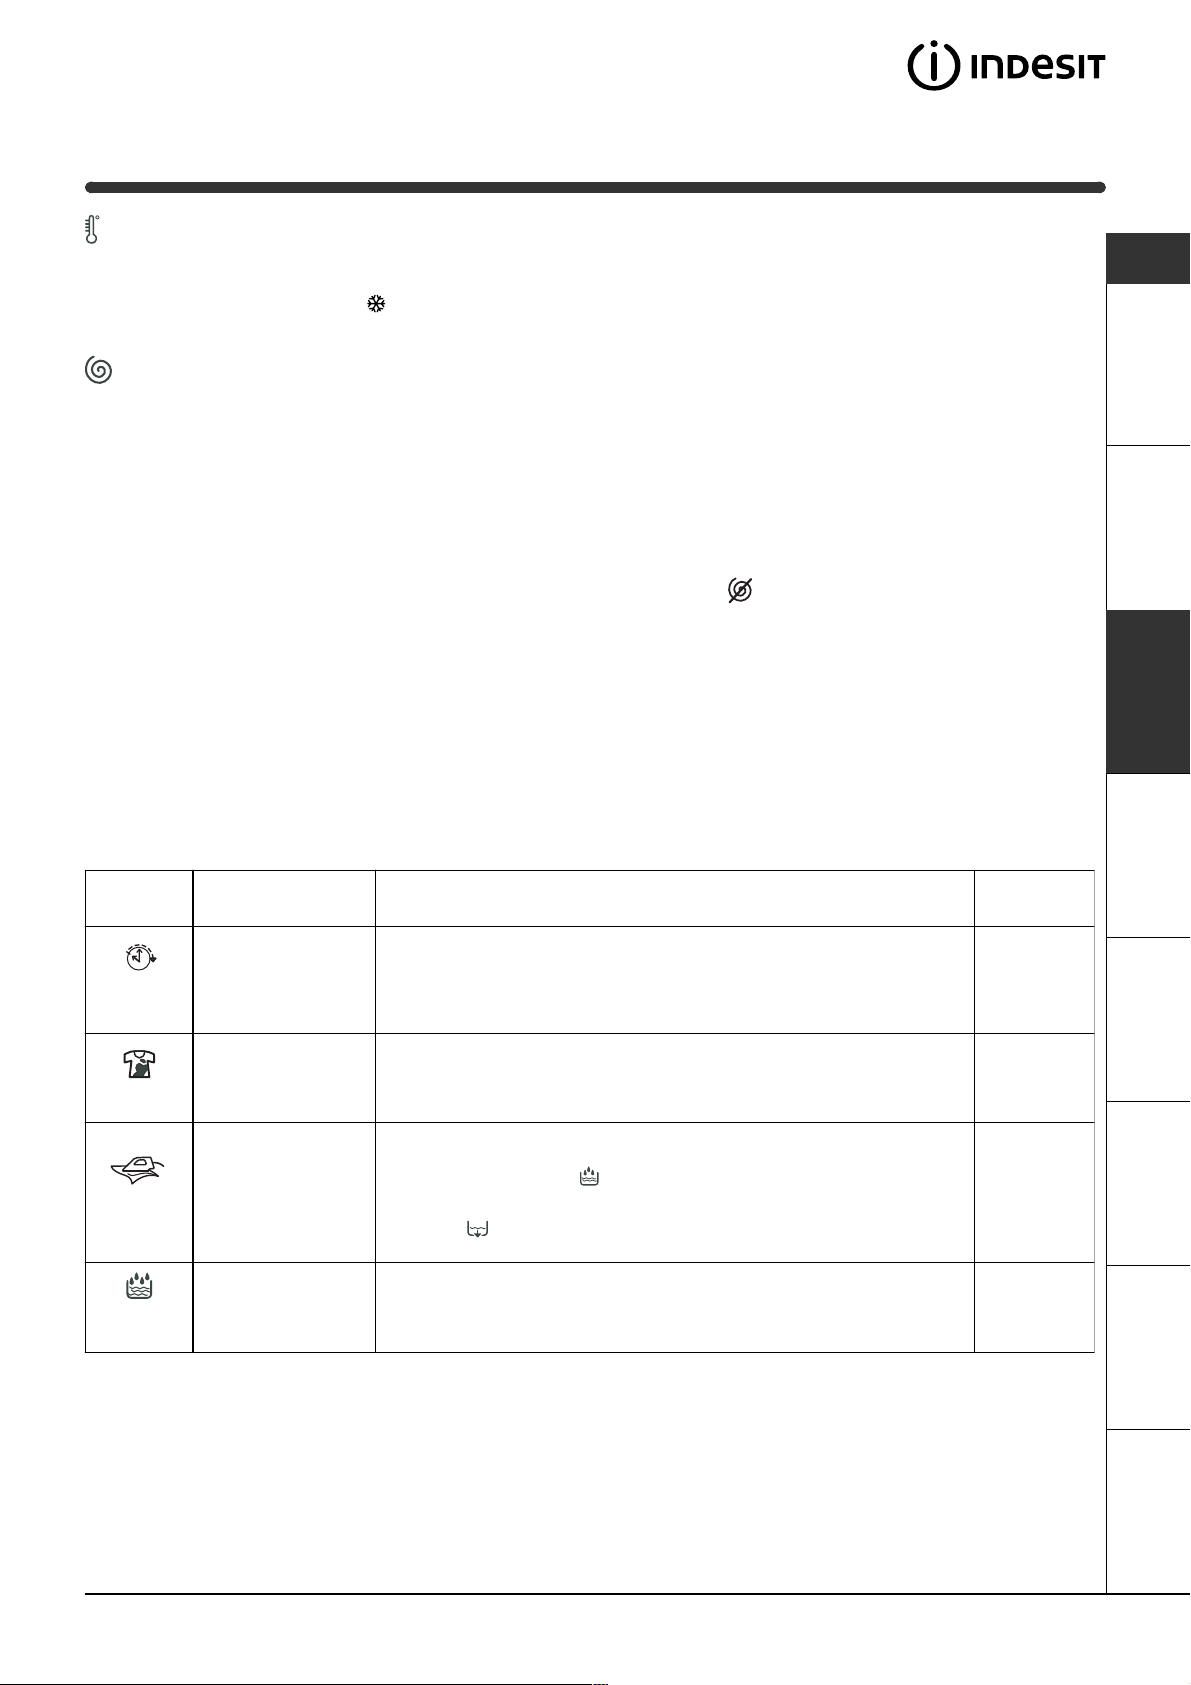
Personalizãri
C
Stabilirea temperaturii de spãlare
Temperatura de spãlare se obþine prin rotirea selectorului TEMPERATURÃ pânã ajungeþi în dreptul valorilor dorite.
(a se vedea Tabelul de programe de la pag. 42).
Puteþi folosi ºi spãlarea la rece (
Fixarea vitezei de centrifugare
Viteza de centrifugare se obþine prin rotirea selectorului CENTRIFUGÃ pânã ajungeþi în dreptul valorilor dorite.
Vitezele maxime prevãzute pentru programe sunt:
Programe Vitezã maximã
Bumbac 1200 rotaþii pe minut
Sintetice 800 rotaþii pe minut
Lânã 600 rotaþii pe minut
Mãtase nu
).
RO
Viteza de centrifugare poate fi redusã sau exclusã selectând simbolul
.
Maºina va împiedica în mod automat efectuarea unei stoarceri la valori excesive în raport cu cele maxime
prevãzute pentru fiecare program.
Funcþii
Diferitele funcþii de spãlare prevãzute pentru maºina de spãlat permit obþinerea unor rezultate excepþionale (o
calitate îmbunãtãþitã a spãlãrii-rufe curate, etc.). Pentru a activa aceste funcþii, procedaþi astfel:
1. apãsaþi butonul aferent funcþiei dorite, þinând cont de informaþiile conþinute în tabelul de mai jos;
2. aprinderea butonului respectiv indicã faptul cã funcþia respectivã a fost activatã.
Notã: Intermitenþa rapidã a butonului indicã faptul cã funcþia respectivã nu este selecþionabilã pentru programul ales.
Funcþii Efect Note pentru folosire
Apãsaþi de mai multe ori pânã la aprinderea butonului aferent
programãrii momentului de pornire dupã un anumit interval de timp.
La a cincia apãsare a butonului, funcþia se va dezactiva.
Notã: Dupã apãsarea butonului Start/Reset, puteþi modifica intervalul
stabilit pentru iniþierea momentului de pornire doar prin diminuare.
A se vãrsa decolorantul în sertarul adiþional 4
În acest moment nu puteþi utiliza funcþia CALCÃ MAI UªOR.
O datã stabilitã aceastã funcþie, programele 4, 5, 6, 7 vor fi întrerupte,
rufele rãmânând imersate în apã (antiºifonare), iar indicatorul luminos
aferent fazei de Clãtire se va aprinde:
- pentru a completa ciclul apãsaþi pe butonul START/RESET;
- pentru a efectua doar descãrcarea poziþionaþi selectorul pe simbolul
respectiv ºi apãsaþi pe butonul START/RESET.
În acest moment nu puteþi utiliza funcþia ANTIPATÃ.
Delay
Timer
Antipatã
Calcã mai
uºor
Întârzie pornirea
maºinii pânã la 9 de
ore.
Ciclu de decolorare
adecvat pentru
eliminarea petelor
mai rezistente.
Reduce pliurile la
þesãturi facilitând
cãlcarea.
(a se vedea pag. 44
)
Activã cu
programele:
Toate
2, 3, 4, 5,
Clãtiri.
3, 4, 5, 6, 7,
8, 9, 10,
Clãtiri.
1, 2, 3, 4,
Extra
Clãtire
Mãreºte eficacitatea
clãtirii.
Se recomandã cu maºina plinã sau cu doze elevate de detergent.
5, 8, 9, 10,
12, 13,
Clãtiri.
AsistenþãAnomaliiPrecauþii ÎntreþinerePrograme DetergenþiInstalare Descriere
43
Page 44
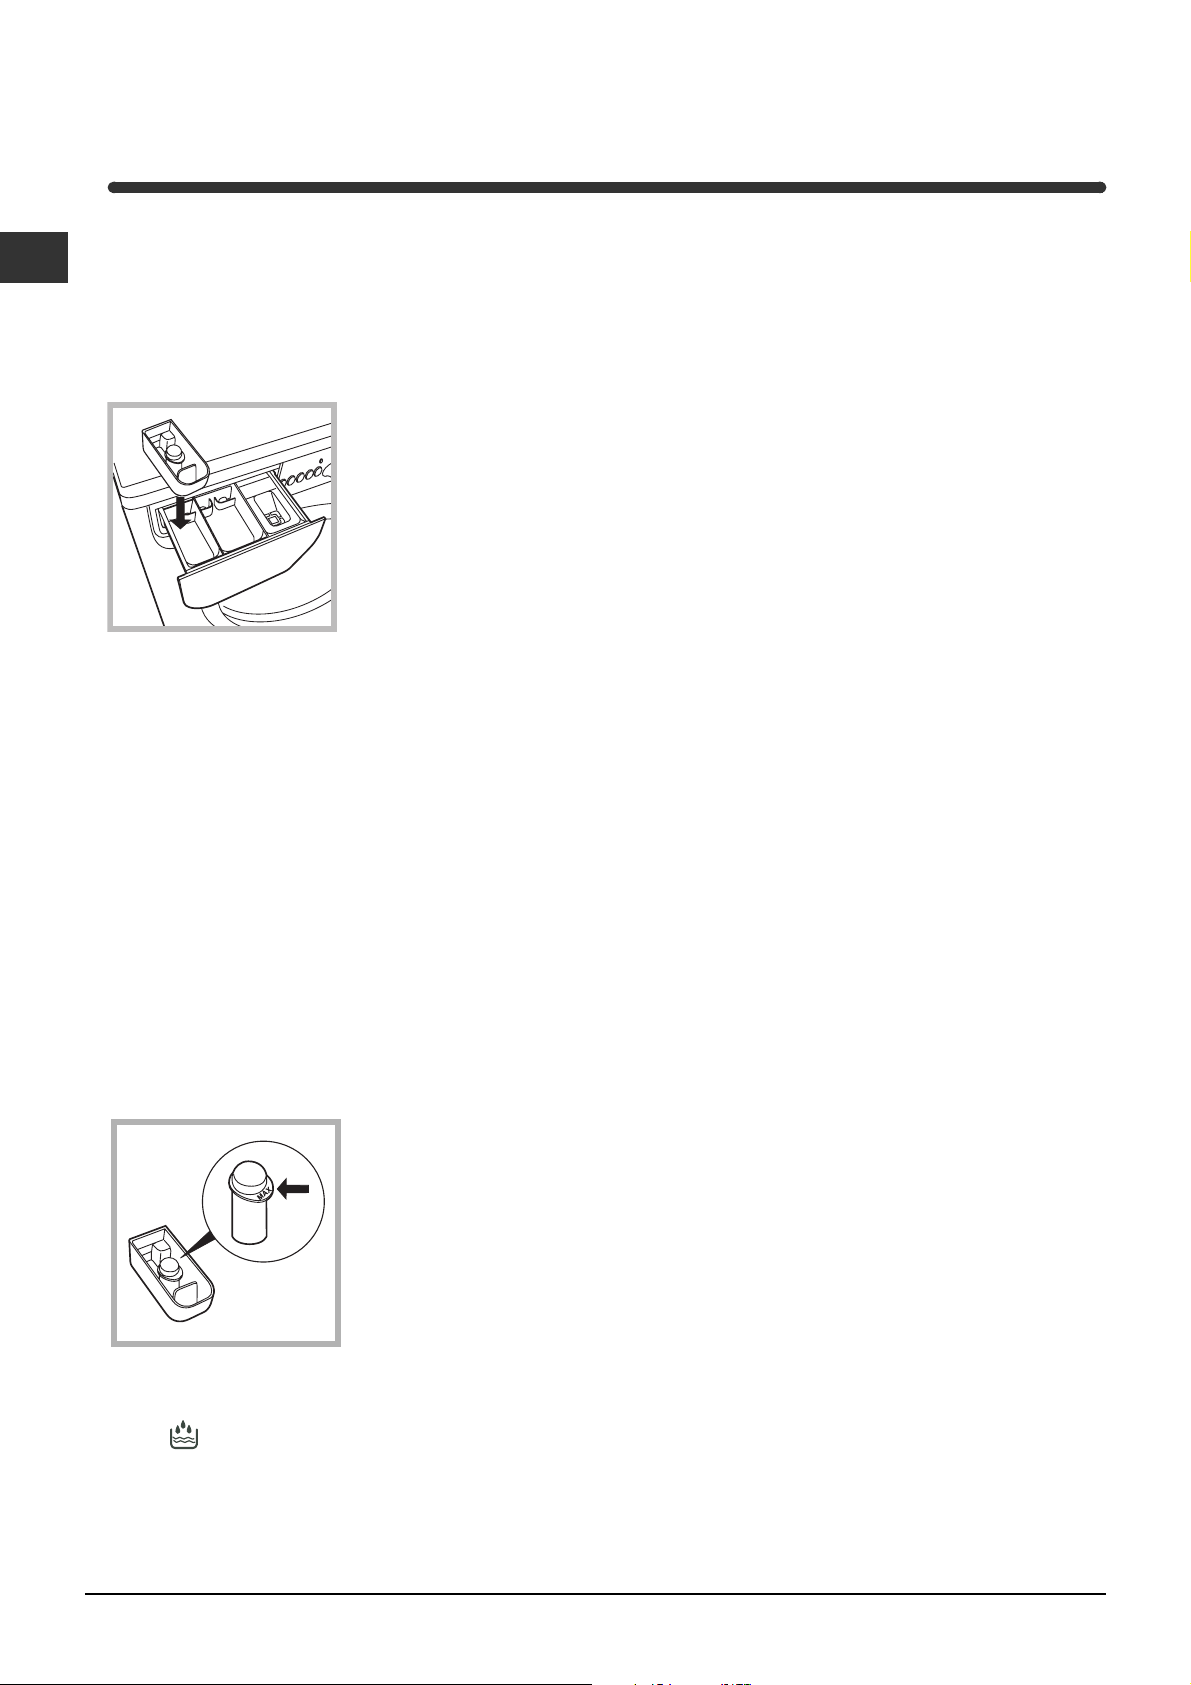
Detergenþi ºi rufe albe
RO
Sertarul detergenþilor
Un rezultat bun la spãlare depinde ºi de dozarea
corectã a detergentului: cu un exces de detergent
nu se spalã în mod mai eficace ºi se contribuie la
încrustarea pãrþilor interne ale maºinii de spãlat ºi
poluarea mediului înconjurãtor.
Extrageþi sertarul pentru
4
detergenþi ºi introduceþi
detergentul sau aditivul
dupã cum urmeazã:
3
2
1
sertarul 1: Detergent pentru prespãlare
(sub formã de praf)
Înainte de a vãrsa detergentul verificaþi ca sertarul
adiþional 4 sã nu fie introdus.
sertarul 2: Detergent pentru spãlare
(sub formã de praf sau lichid)
Detergentul lichid trebuie vãrsat doar înainte de pornire.
sertarul 3: Aditivi (soluþie de înmuiat, etc.)
Soluþia de înmuiat nu trebuie sã iasã deasupra grãtarului.
sertar adiþional 4: Decolorant
Nu folosiþi detergenþi pentru spãlare manualã,
deoarece formeazã prea multã spumã.
Ciclu de albire
Decolorantul tradiþional se foloseºte pentru
þesãturi rezistente albe, cel delicat pentru þesãturi
colorate, sintetice ºi pentru lânã.
Prepararea rufelor
Subdivizaþi rufele în funcþie de:
- tipul de þesãturã / simbolul de pe etichetã.
- culori: separaþi rufele colorate de cele albe.
Goliþi buzunarele ºi controlaþi nasturii.
Nu depãºiþi valorile indicate, referitoare la
greutatea rufelor uscate:
Þesãturi rezistente: max 4,5 kg
Þesãturi sintetice: max 2,5 kg
Þesãturi delicate: max 2 kg
Lânã: max 1 kg
Cât cântãresc rufele?
1 cearceaf: 400-500 g.
1 faþã de pernã: 150-200 g.
1 faþã de masã: 400-500 g.
1 halat de baie: 900-1.200 g.
1 prosop: 150-250 g.
Rufe deosebite
Perdele: împãturiþi-le ºi aºezaþi-le într-o faþã de
pernã sau într-un sac de tip plasã Spãlaþi-le
singure fãrã a depãºi o jumãtate din încãrcãturã.
Folosiþi programul 7 care exclude centrifugarea.
Plãpumi ºi haine de vânt: dacã cãptuºeala este
din fulgi de gâscã sau de raþã se pot spãla în
maºina de spãlat. Întoarceþi lucrurile pe dos ºi
formaþi o încãrcãturã maximã de 2-3 kg, repetând
clãtirea o datã sau de douã ori ºi utilizând
centrifuga delicatã.
Lânã: pentru a obþine cele mai bune rezultate,
folosiþi un detergent specific ºi nu depãºiþi 1 kg de
rufe.
Introduceþi sertarul
adiþional 4, aflat în
dotare, în sertarul 1.
Când dozaþi
decolorantul nu depãºiþi
nivelul max indicat pe
pivotul central (vezi
figura).
Pentru efectuarea doar a decolorãrii, vãrsaþi
decolorantul în sertarul adiþional 4 ºi selectaþi programul
Clãtire
Pentru albirea în timpul spãlãrii, vãrsaþi detergentul
ºi aditivii, selectaþi programul dorit ºi activaþi
opþiunea Antipatã (vezi pag. 43).
Folosirea sertarului adiþional 4 exclude
prespãlarea.
44
.
Page 45

Precauþii ºi sfaturi
Maºina de spãlat a fost proiectatã ºi construitã
conform normelor internaþionale de protecþie. Aceste
avertizãri sunt furnizate din motive de siguranþã ºi
trebuie sã fie citite cu atenþie.
Protecþie generalã
Acest aparat a fost conceput pentru o folosire de
uz casnic, nu profesionalã, iar funcþiunile sale nu
trebuie alterate.
Maºina de spãlat trebuie sã fie folositã doar de
persoane adulte ºi respectând instrucþiunile din
acest manual.
Nu atingeþi maºina când sunteþi desculþi sau cu
mâinile sau picioarele ude sau umede.
Nu scoateþi fiºa din priza de curent trãgând de
cablu, ci trãgând de fiºã.
Nu deschideþi sertarul detergenþilor în timp ce
maºina se aflã în funcþiune.
Nu atingeþi apa de evacuare, care poate atinge
temperaturi elevate.
Nu forþaþi în nici un caz hubloul: s-ar putea
deteriora mecanismul de siguranþã care
protejeazã deschiderile accidentale.
În caz de defecþiune, nu umblaþi în nici un caz la
mecanismele interne pentru a pentru a încerca
sã reparaþi maºina de spãlat.
Controlaþi mereu ca în apropierea maºinii aflate
în funcþiune, sã nu se afle copii.
Pe durata spãlãrii hubloul are tendinþa de a se
încãlzi.
Dacã trebuie sã fie deplasatã, faceþi acest lucru
în douã sau trei persoane, cu maximã atenþie.
Niciodatã nu deplasaþi maºina singuri deoarece
aceasta este foarte grea.
Înainte de a introduce rufele, controlaþi ca în
interior sã fie goalã.
Aruncarea maºinii de spãlat vechi:
înainte de a o arunca, faceþi-o inutilizabilã
tãindu-i cablul de alimentare electricã ºi
scoþându-i hubloul.
Protecþia ºi respectarea mediului
înconjurãtor
Tehnologia la dispoziþia mediului înconjurãtor
Dacã prin hublou se vede puþinã apã este pentru cã
datoritã noii tehnologii Indesit, este suficientã mai
puþin de jumãtate din apã pentru a obþine o curãþare
maximã: un scop atins pentru respectarea mediului
înconjurãtor.
Economisirea de detergent, apã, energie ºi timp
Pentru a economisi detergent, apã, timp folosiþi
încãrcãtura maximã.
O încãrcare totalã în locul a douã jumãtãþi,
permite economisirea de pânã la 50% din
energie.
Prespãlarea este necesarã doar pentru rufele
foarte murdare. Evitarea acesteia permite
economisirea de detergent, timp, apã ºi între 5
ºi 15% din energie.
Tratând petele cu o substanþã pentru
îndepãrtarea acestora ºi lãsându-le la înmuiat
înainte se spãlare, reduce necesitatea de a
spãla la temperaturi mari. Un program la 60°C în
locul unuia la 90°C sau unul la 40°C în locul
unuia la 60°C, permit economisirea unui procent
de pânã la 50% de energie.
Dozaþi bine detergentul în funcþie de duritatea
apei, de gradul de murdãrie ºi de cantitatea de
rufe, pentru a evita risipe ºi pentru a proteja
mediul înconjurãtor: deºi sunt biodegradabili,
detergenþii conþin elemente care altereazã
echilibrul naturii. În afarã de aceasta evitaþi
pe cât posibil aditivul de înmuiere.
Efectuând spãlãri începând de seara ºi pânã la
primele ore ale dimineþii, se colaboreazã pentru
reducerea sarcinii de absorbire a întreprinderilor
electrice. Opþiunea Delay Timer (vezi pag. 43)
ajutã mult la organizarea spãlãrilor în acest
sens.
RO
Aruncarea reziduurilor
Aruncarea materialelor de ambalare:
respectaþi normele locale, în acest fel ambalajele
vor putea fi reutilizate.
Dacã rufele trebuie uscate într-un uscãtor,
selectaþi o vitezã mare pentru centrifugã.
Cantitatea redusã de apã permite economisirea
de timp ºi energie electricã la programul de
uscare.
AsistenþãAnomaliiPrecauþii ÎntreþinerePrograme DetergenþiInstalare Descriere
45
Page 46
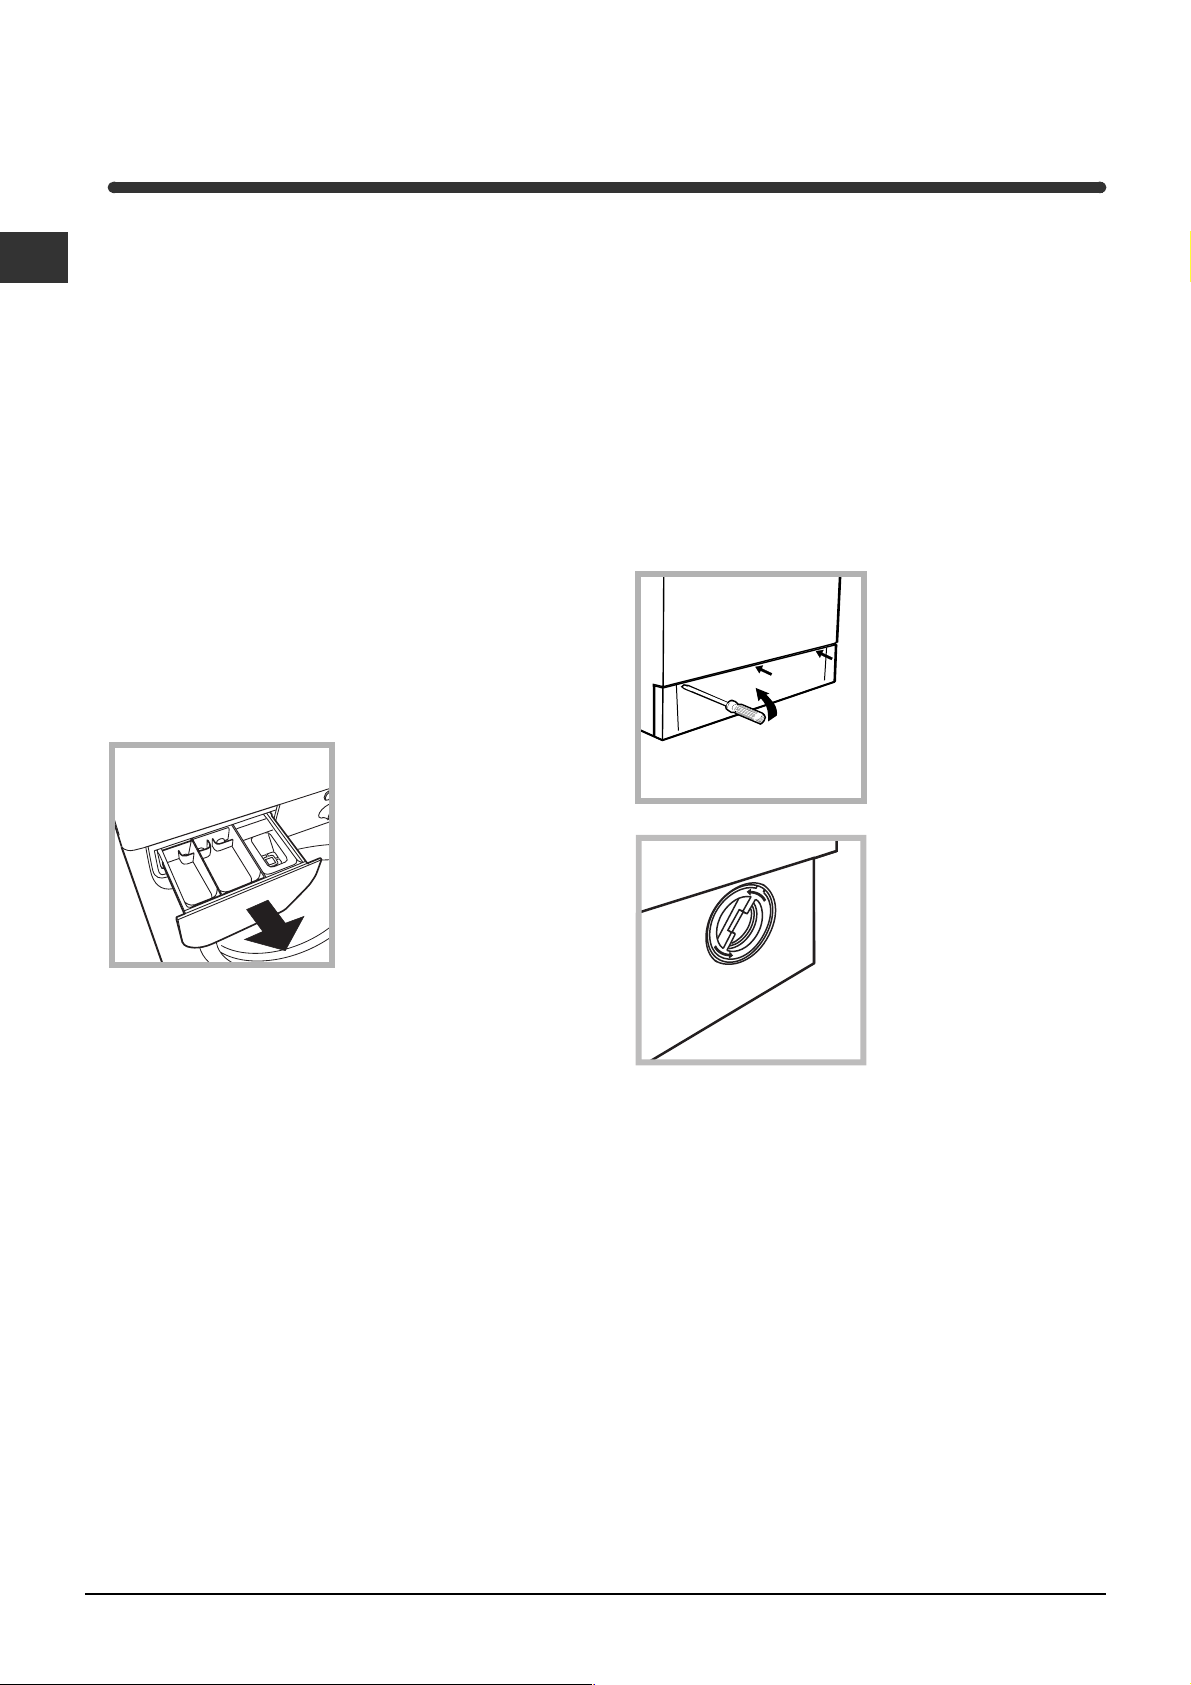
Întreþinere ºi îngrijire
RO
Oprirea apei ºi a curentului electric
Închideþi robinetul de apã dupã fiecare spãlare.
Se limiteazã astfel uzare instalaþiei hidraulice a
maºinii de spãlat ºi se eliminã pericolul
scurgerilor.
Scoateþi fiºa din priza de curent atunci când
curãþaþi maºina de spãlat ºi când se efectueazã
lucrãri de întreþinere.
Curãþarea maºinii de spãlat
Partea externã ºi pãrþile din cauciuc pot fi curãþate
cu o cârpã înmuiatã în apã cãlduþã ºi sãpun. Nu
folosiþi solvenþi sau substanþe abrazive.
Curãþarea sertarului pentru detergenþi
Scoateþi sertarul
ridicându-l ºi trãgându-l
spre exterior (vezi
figura):
Spãlaþi-l cu apã;
aceastã curãþare
trebuie efectuatã
frecvent.
Curãþarea pompei
Maºina de spãlat este echipatã cu o pompã
autocurãþãtoare care nu are nevoie de întreþinere.
Se poate întâmpla însã ca obiecte mici (monede,
nasturi) sã cadã în precamera care protejeazã
pompa, situatã în partea inferioarã a acesteia.
Verificaþi ca ciclul de spãlare sã fie terminat ºi
scoateþi din prizã.
Pentru a avea acces la precamerã:
1. scoateþi panoul de
acoperire de pe latura
anterioarã a maºinii de
spãlat folosindu-vã de o
ºurubelniþã (vezi figura):
2. deºurubaþi capacul
rotindu-l în sens invers
(vezi figura): este
normal sã iasã puþinã
apã;
Îngrijirea hublouului ºi a coºului
Lãsaþi mereu hubloului întredeschis pentru a
evita formarea de mirosuri urâte.
3.curãþaþi cu grijã interiorul;
4.montaþi din nou capacul;
5.montaþi din nou panoul verificând, înainte de a-l
împinge spre maºinã, de a fi introdus cârligele în
orificiile respective.
Controlarea tubului de alimentare cu apã
Controlaþi tubul de alimentare cel puþin o datã pe an.
Dacã prezintã crãpãturi sau fisuri trebuie înlocuit:
pe parcursul spãlãrilor, presiunile puternice ar putea
provoca crãpãturi neaºteptate.
Nu folosiþi tuburi deja folosite.
46
Page 47

Anomalii ºi remedii
Se poate întâmpla ca maºina de spãlat sã nu funcþioneze. Îaninte de a telefona la Asistenþã (vezi pag. 48),
verificaþi dacã aceastã problemã nu poate fi remediatã de dvs., astfel:
Anomalii:
Maºina de spãlat nu se aprinde.
Ciclul de spãlare nu porneºte.
Maºina de spãlat nu încarcã apã.
Maºina de spãlat încarcã ºi
evacueazã apã continuu.
Cauze posibile / Rezolvare:
Fiºa nu este introdusã sau nu a fost suficient introdusã în priza de
curent astfel încât sã existe conexiune electricã.
În casã nu este curent electric.
Hubloul nu este bine închis.
Butonul
Butonul START/RESET nu a fost apãsat.
Robinetul de apã nu este deschis
A fost fixatã o întârziere de pornire (Delay Timer, vezi pag. 43).
Tubul de alimentare cu apã nu este conectat la robinet.
Tubul este îndoit.
Robinetul de apã nu este deschis
În casã lipseºte apa.
Nu este presiune suficientã.
Butonul START/RESET nu a fost apãsat.
Tubul de evacuare nu a fost instalat la o distanþã cuprinsã între 65
ºi 100 cm de pãmânt (vezi pag. 39).
Extremitatea tubului de evacuare este cufundatã în apã (vezi pag. 39).
Evacuarea din perete nu are rãsuflare pentru aer.
Dacã dupã aceste verificãri problema nu se rezolvã, închideþi
robinetul de apã, opriþi maºina de spãlat ºi chemaþi Asistenþa. Dacã
locuinþa se aflã la ultimele etaje ale unui edificiu, este posibil sã aibã
loc fenomene de sifonare, motiv pentru care maºina de spãlat
încarcã ºi evacueazã apã încontinuu. Pentru a elimina acest
inconvenient, se gãsesc în comerþ supape anti-sifonare.
nu a fost apãsat.
RO
Maºina de spãlat nu evacueazã
sau nu centrifugheazã.
Maºina de spãlat vibreazã foarte
mult pe timpul centrifugãrii.
Maºina de spãlat pierde apã.
Butonul PORNIRE/HUBLOU
BLOCAT se aprinde în mod rapid
ºi în acelaºi timp cu cel puþin un
alt indicator.
Se formeazã prea multã spumã.
Programul nu prevede evacuarea apei: cu unele programe este
necesar sã se porneascã manual (vezi pag. 42).
Este activã opþiunea Calcã mai puþin: pentru a completa programul
apãsaþi pe butonul START/RESET (vezi pag. 43).
Tubul de evacuare este îndoit (vezi pag. 39).
Conducta de evacuare este înfundatã.
Coºul, în momentul instalãrii, nu a fost deblocat în mod corect (vezi pag. 3 8 ).
Maºina de spãlat nu se aflã în plan orizontal (vezi pag. 38).
Maºina de spãlat este fixatã foarte puternic între mobilã ºi zid (vezi pag. 38 ).
Tubul de alimentare cu apã nu este bine înºurubat (vezi pag. 38).
Sertarul detergenþilor este înfundat (pentru a-l curãþa vezi pag. 46).
Tubul de evacuare nu este fixat bine (vezi pag. 39).
Chemaþi asistenþa deoarece se semnalizeazã o anomalie.
AsistenþãAnomaliiPrecauþii ÎntreþinerePrograme DetergenþiInstalare Descriere
Detergentul nu este specific pentru maºina de spãlat (trebuie sã
fie scris pentru maºina de spãlat, de mânã sau în maºina de
spãlat, sau ceva asemãnãtor).
Dozajul a fost excesiv.
47
Page 48
Asistenþã
RO
Înainte de a lua legãtura cu Asistenþa:
Verificaþi dacã anomalia poate fi rezolvatã de dvs. (vezi pag. 47);
Porniþi din nou programul pentru a controla dacã inconvenientul a fost eliminat;
În caz contrar, vã recomandãm sã apelaþi la Unitatea de Service.
Nu apelaþi niciodatã la tehnicieni neautorizaþi.
Comunicaþi:
tipul de anomalie;
modelul maºinii (Mod.);
numãrul de serie (S/N).
Aceste informaþii se aflã pe tãbliþa aplicatã în partea posterioarã a maºinii de spãlat.
Asistenþã
48
Page 49

Használati utasítás
MOSÓGÉP
HU
Magyar
WISL 125 X
Összefoglalás
HU
Üzembehelyezés, 50-51
Kicsomagolás és vízszintbe állítás, 50
Víz és elektromos csatlakozás, 50-51
Elsõ mosási ciklus, 51
Mûszaki adatok, 51
Mosógép leírása, 52-53
Vezérlõpanel, 52
Visszajelzõ lámpák, 53
Indítás és Programok, 54
Röviden: egy program elindítása, 54
Programtáblázat, 54
Program módosítások, 55
Hõmérséklet beállítása, 55
Centrifugálás beállítása, 55
Funkciók, 55
Mosószerek és mosandók, 56
Mosószeradagoló fiók, 56
Fehérítõ ciklus, 56
Mosandó ruhák elõkészítése, 56
Különleges bánásmódot igénylõ darabok, 56
Óvintézkedések és tanácsok, 57
Általános biztonság, 57
Hulladékelhelyezés, 57
Környezetvédelem, 57
Karbantartás és törõdés, 58
A víz elzárása és az elektromos áram
kikapcsolása, 58
A mosógép tisztítása, 58
A mosószertartó tisztítása, 58
Az ajtó és a forgódob gondozása, 58
A szivattyú tisztítása, 58
A vízbevezetõ csõ ellenõrzése, 58
Rendellenességek és elhárításuk, 59
Szerviz, 60
Mielõtt a Szervizhez fordulna, 60
49
Page 50
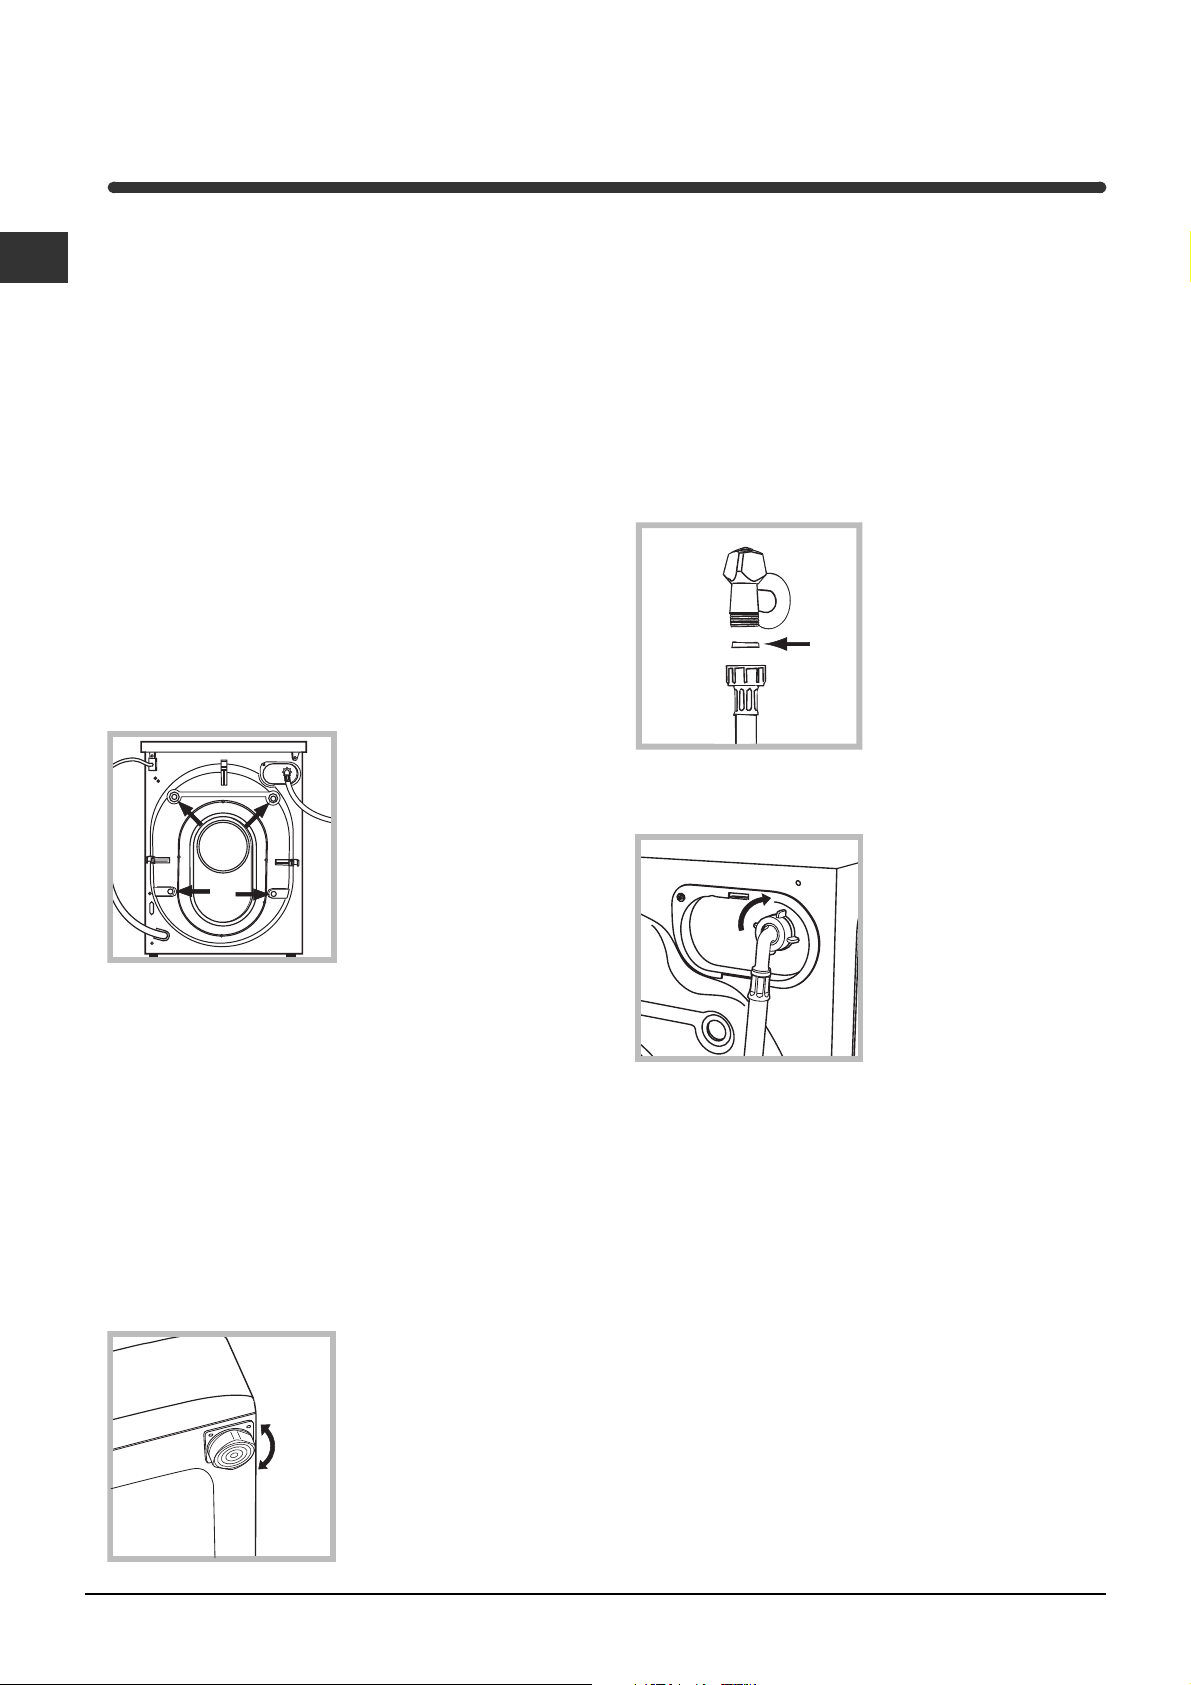
Üzembehelyezés
HU
E kézikönyv megõrzése azért fontos, hogy bármikor
elõvehesse, és megnézhesse. Ha a mosógépet eladná,
átadná vagy másnál helyezné el, gondoskodjon arról,
hogy e használati utasítás a géppel együtt maradjon,
hogy az új tulajdonos is megismerhesse a mosógép
funkcióit és az ezekre vonatkozó figyelmeztetéseket.
Figyelmesen olvassa el az utasításokat: fontos
információkat tartalmaznak az üzembehelyezésrõl, a
használatról és a biztonságról.
Kicsomagolás és vízszintbe állítás
Kicsomagolás
1. Csomagolja ki a mosógépet.
2. Ellenõrizze, hogy a mosógép nem sérült-e meg a
szállítás során. Ha a gépen sérülést talál, ne
csatlakoztassa, és forduljon a készülék eladójához.
3. Távolítsa el a
hátoldalon található, a
szállításhoz felszerelt 4
védõcsavart, valamint a
gumit a hozzá tartozó
távtartóval (lásd ábra).
4. A furatokat zárja le a tartozékként kapott
mûanyag dugókkal.
5. A hátul jobboldalon lent, a villásdugó helyén lévõ
három furatot is zárja le a tartozék dugóval.
6. Minden darabot õrizzen meg: ha a mosógépet
szállítani kell, elõtte ezeket vissza kell szerelni.
A pontos vízszintezés biztosítja a gép stabilitását,
így az a mûködés során nem fog vibrálni, zajt
okozni vagy elmozdulni. Szõnyegpadló vagy
szõnyeg esetén a lábakat úgy állítsa be, hogy a
mosógép alatt elegendõ hely maradjon a
szellõzésre.
Víz és elektromos csatlakozás
Vízbevezetõ csõ csatlakoztatása
1. Illessze az A
tömítést a vízbevezetõ
csõ végére és
csavarozza fel a 3/4-os
külsõ menettel
A
3. Ügyeljen arra, hogy a csövön ne legyen törés
vagy szûkület.
rendelkezõ hidegvíz
csapra (lásd ábra).
A csatlakoztatás elõtt
eresszen ki a csapból
vizet addig, amíg a víz
teljesen átlátszóvá nem
válik.
2. Csatlakoztassa a
vízbevezetõ csövet a
mosógéphez úgy, hogy
azt a hátul jobboldalon
fent lévõ vízbemeneti
csonkra csavarozza
(lásd ábra).
A csomagolóanyag nem gyermekjáték
Vízszintezés
1. A mosógépet sík és kemény padlóra állítsa,
úgy, hogy ne érjen falhoz, bútorhoz vagy máshoz.
2. Ha a padló nem
tökéletese vízszintes,
az elsõ lábak be-,
illetve kicsavarásával
kompenzálhatja azt
(lásd ábra). A dõlés a
gép felsõ burkolatán
mérve nem lehet több,
mint 2°.
50
A csapnál a víznyomásnak a Mûszaki adatok
táblázatban szereplõ határértékek között kell lennie
(lásd a szemben lévõ oldalt).
Amennyiben a vízbevezetõ csõ nem elég hosszú,
forduljon szaküzlethez vagy megbízott
szakemberhez.
Page 51
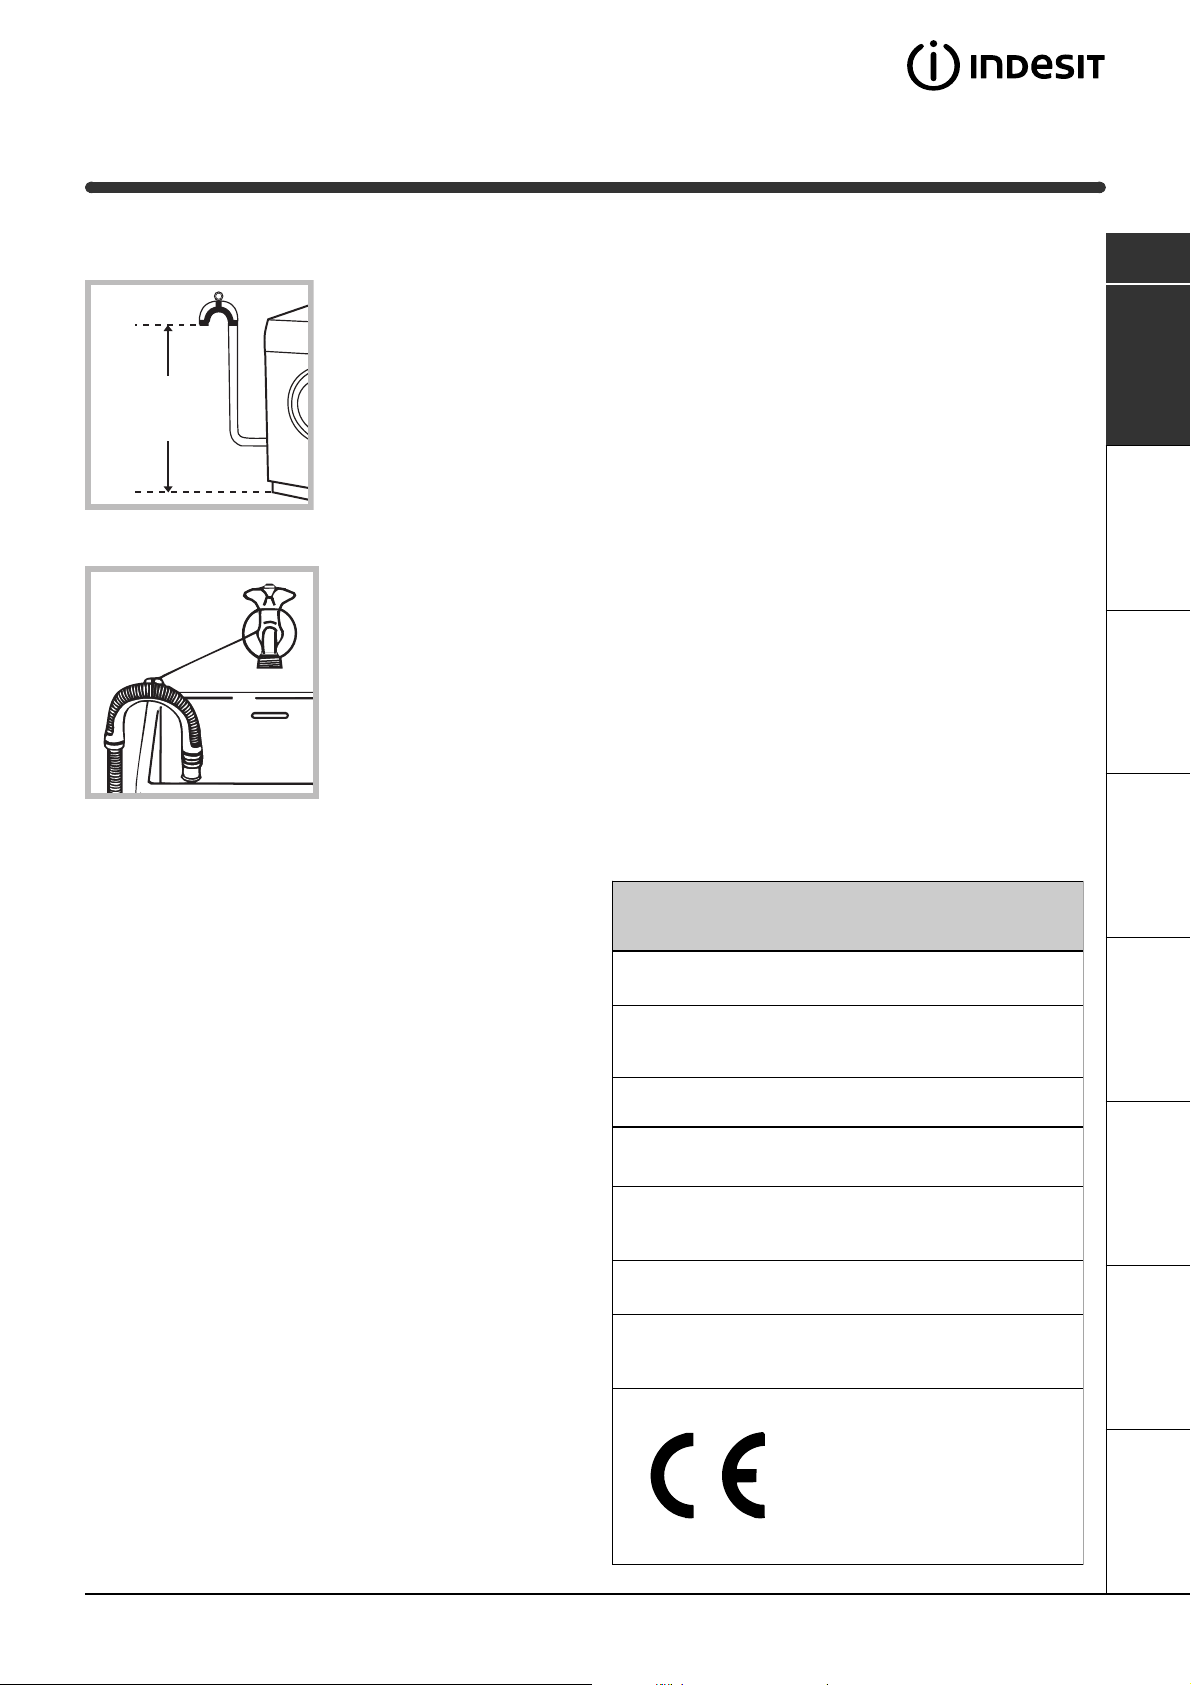
A leeresztõcsõ csatlakoztatása
A leeresztõcsövet
csatlakoztassa
lefolyóhoz vagy a
padlótól 65 és 100 cm
közötti magasságban
65 - 100 cm
lévõ fali lefolyószifonhoz
anélkül, hogy megtörné,
Ne használjon hosszabbítót vagy elosztót.
Ne legyen a kábel megtörve vagy összenyomva.
A hálózati kábelt csak megbízott szakember
cserélheti.
Figyelem! A gyártó minden felelõsséget elhárít,
amennyiben a fenti elõírásokat figyelmen kívül
hagyják.
Elsõ mosási ciklus
HU
Üzembehelyezés
Leírás
vagy akassza a mosdó
vagy a kád szélére
úgy, hogy a tartozékok
között lévõ vezetõt a
csaphoz erõsíti (lásd
ábra). A leeresztõcsõ
szabad végének nem
szabad vízbe merülnie.
Toldások használata nem javasolt. Amennyiben
feltétlenül szükséges, a toldás átmérõje egyezzen
meg az eredeti csõével, és semmiképpen se
legyen 150 cm-nél hosszabb.
Elektromos bekötés
Mielõtt a csatlakozódugót az aljzatba dugná,
bizonyosodjon meg arról, hogy:
az aljzat földelése megfelel a törvény által elõírtnak;
az aljzat képes elviselni a gép Mûszaki adatait
tartalmazó táblázatban megadott maximális
teljesítményfelvételt (lásd szemben);
a hálózat feszültsége a Mûszaki adatokat
tartalmazó táblázatban szereplõ értékek közé esik
(lásd szemben);
Az aljzat legyen kompatibilis a gép
csatlakozódugójával. Ellenkezõ esetben cserélje
ki az aljzatot vagy a csatlakozódugót.
A mosógép nem állítható fel nyílt téren, még akkor
sem, ha a tér tetõvel van fedve, mert nagyon veszélyes,
ha a gép esõnek vagy zivataroknak van kitéve.
A csatlakozódugónak könnyen elérhetõ helyen kell
lennie akkor is, amikor a gép már a helyén áll.
Üzembehelyezés után, mielõtt a mosógépet
használni kezdené, végezzen egy 90°-os elõmosás
nélküli mosást mosóporral de mosandó ruha nélkül.
Mûszaki adatok
Modell
Méretek
Ruhatöltet:
Elektromos
csatlakozás
Vízcsatlakozások
Centrifuga
fordulatszám
IEC456 szabvány
Szerinti
vezérlõprogramok
WISL 125 X
szélesség 59,5 cm
magasság 85 cm
mélység 40 cm
1-tõl 4,5 kg-ig
feszültség 220/230 Volt 50 Hz
maximális felvett teljesítmény 1850 W
maximális nyomás 1 MPa (10 bar)
minimális nyomás 0,05 MPa (0,5 bar)
dob ûrtartalma 40 liter
1200 fordulat/perc-ig
2-as program; hõmérséklet 60
4,5 kg ruhatöltettel végezve.
Ez a berendezés megfelel a következõ
Uniós Elõírásoknak:
- 73/02/19-i 73/23/CEE elõírás
(Alacsony feszültség) és annak
módosításai
- 89/05/03-i 89/336/CEE elõírás
(Elektromágneses összeférhetõség) és
annak módosításai
°
C;
SzervizRendellenességekÓvintézkedések KarbantartásProgramok Mosószerek
51
Page 52
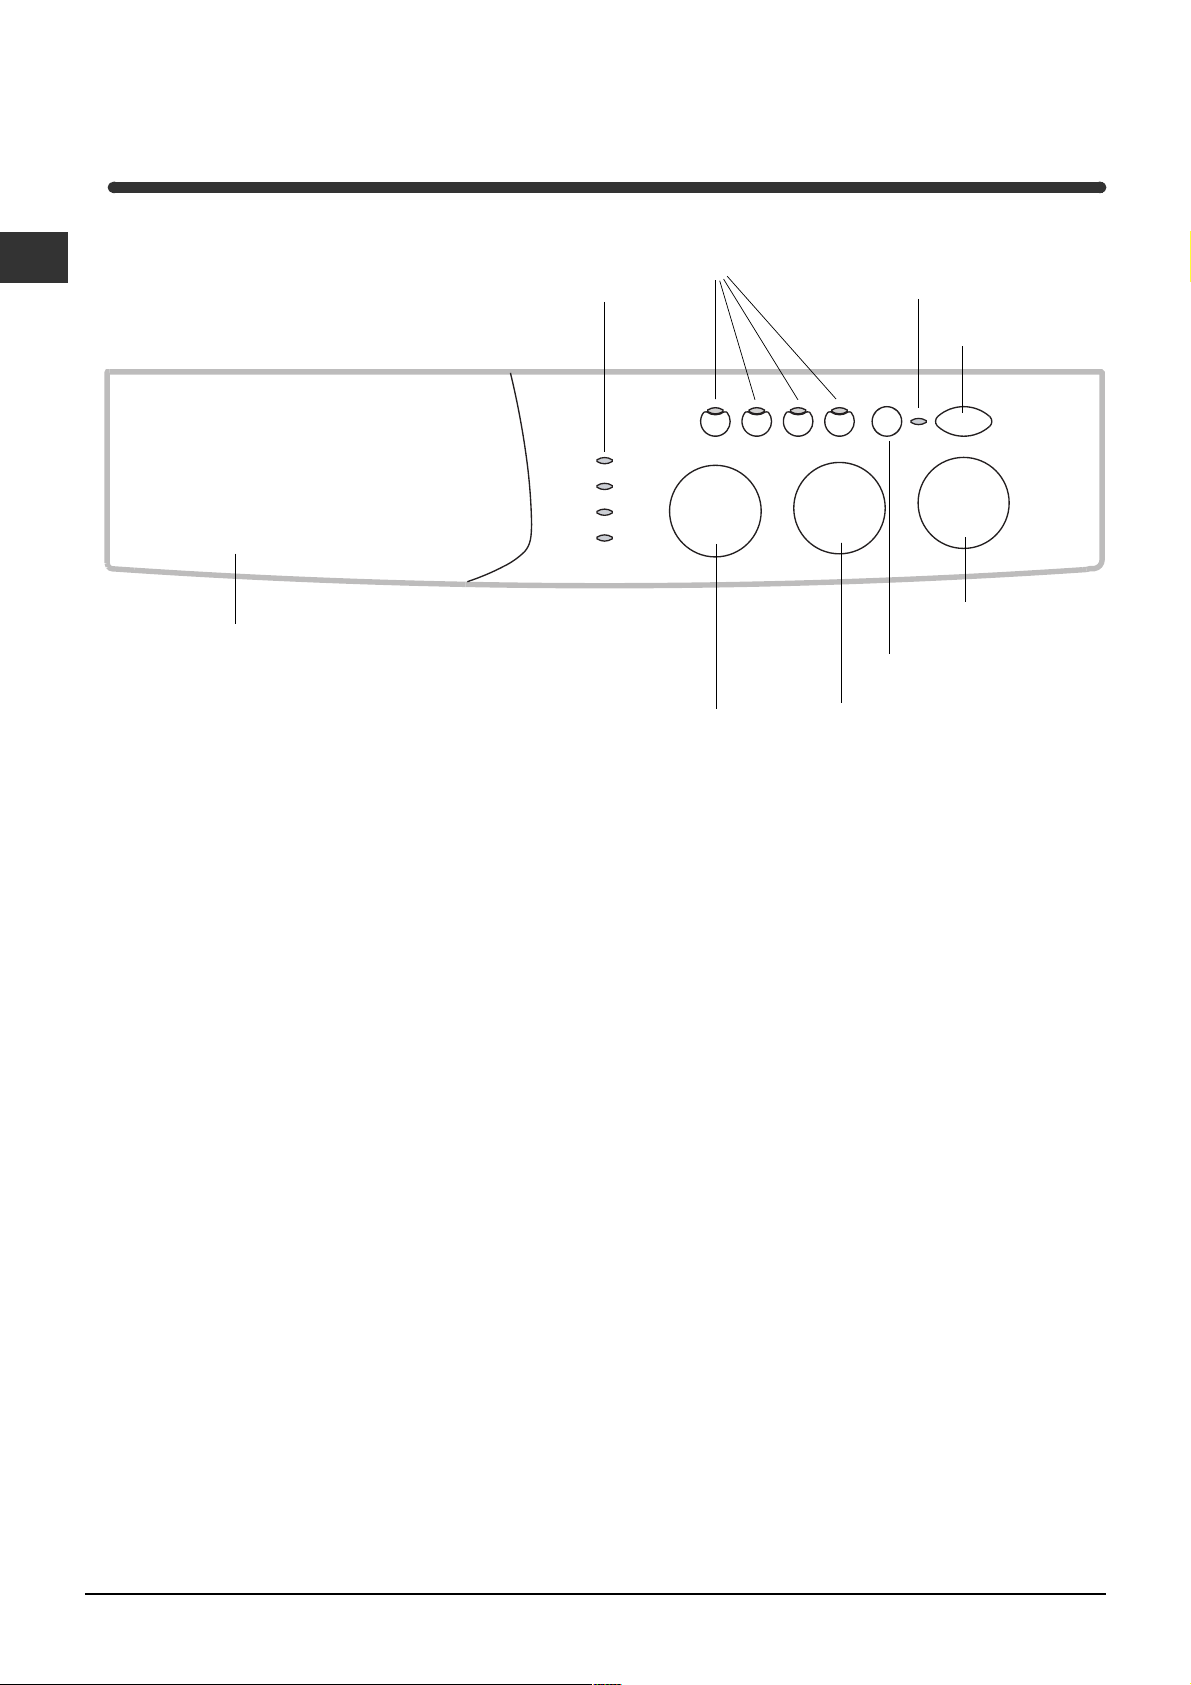
A mosógép leírása
HU
Vezérlõpanel
Mosószeradagoló fiók
Mosószeradagoló fiók a mosószerek és
adalékszerek betöltésére (lásd 56. oldal).
Visszajelzõ
lámpák
CENTRIFUGÁLÁS
beállító tárcsa
START/RESET: billentyû a program elindítására
vagy a hibás beállítás törlésére.
FUNKCIÓ
billentyûk
BEKAPCSOLVA/AJTÓZÁR
visszajelzõ lámpa
BEKAPCSOLÁS/
KIKAPCSOLÁS
billentyû
PROGRAM
beállító tárcsa
START/RESET
billentyû
HÕMÉRSÉKLET
beállító tárcsa
Visszajelzõ lámpák: a mosóprogram állapotának
követésére.
Ha a Késleltetés Idõzítõ funkció be lett állítva, a
program indításáig hátra lévõ idõt jelzik (lásd 53.
oldal).
CENTRIFUGÁLÁS beállító tárcsa: a centrifugálás
beállítására illetve kikapcsolására (lásd 55. oldal).
FUNKCIÓ billentyûk: a lehetséges funkciók
kiválasztására. A kiválasztott funkció billentyûje
világít.
HÕMÉRSÉKLET beállító tárcsa: a hõmérséklet
vagy a hideg vizes mosás beállítására (lásd 55.
oldal).
BEKAPCSOLVA/AJTÓZÁR visszajelzõ lámpa:
hogy tudjuk, a mosógép be van-e kapcsolva illetve
az ajtót ki lehet-e nyitni (lásd 53. oldal).
BEKAPCSOLÁS/KIKAPCSOLÁS: billentyû a
mosógép be- illetve kikapcsolására.
PROGRAM beállító tárcsa: a programok
kiválasztására.
A program során a tárcsa nem mozog.
52
Page 53
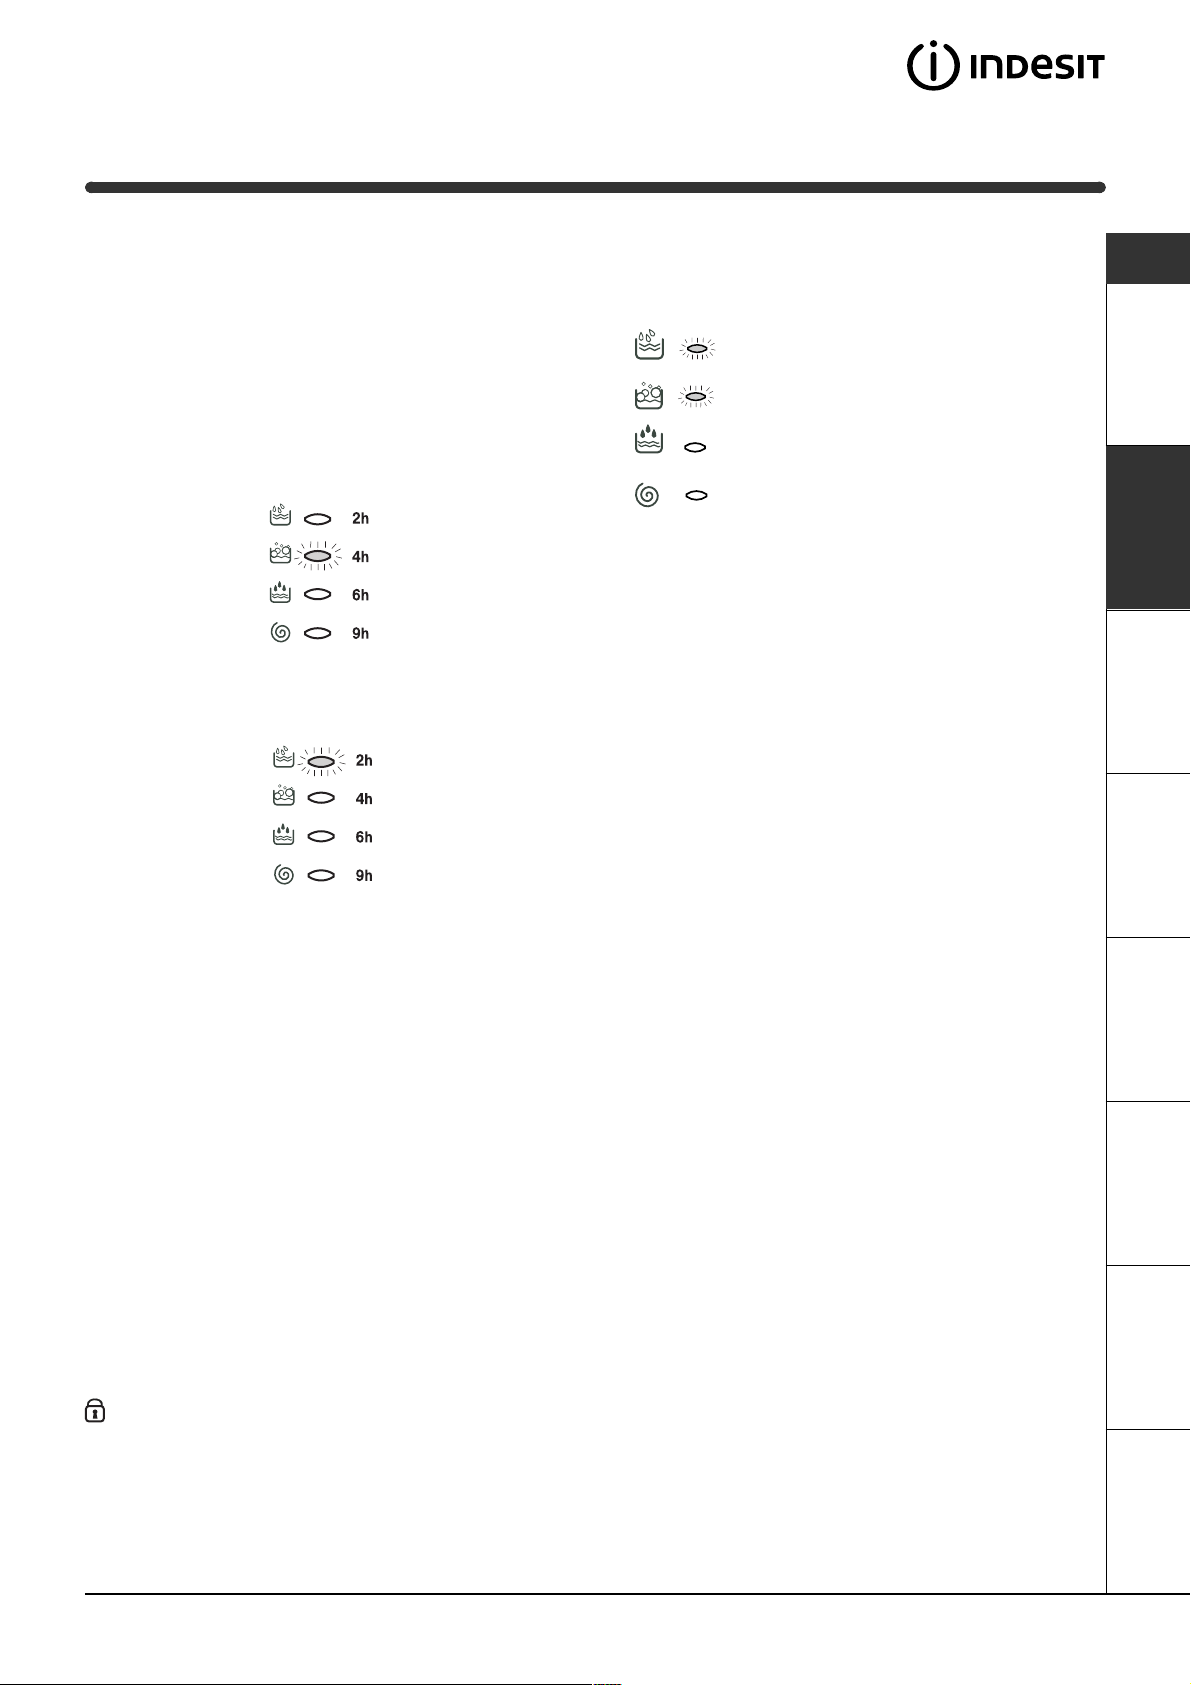
Visszajelzõ lámpák
A visszajelzõ lámpák fontos információkkal
szolgálnak.
A következõk olvashatók le róluk:
Beállított késleltetés:
Hogy a Késleltetõ Idõzítõ funkció be van-e
kapcsolva (lásd 55. oldal): a program elindítása
után a kiválasztott késleltetéshez tartozó
visszajelzõ elkezd villogni:
Az idõ múlásával a hozzá tartozó visszajelzõ
villogásával mindig a hátralévõ késleltetési idõt jelzi ki:
Folyamatban lévõ mosási fázis:
A mosás során a visszajelzõk egymás után
gyulladnak meg, ezzel jelezve a program
elõrehaladását:
Elõmosás
Mosás
Öblítés
Centrifugálás
Megjegyzés: a vízürítés (szivattyúzás) során a
centrifugálási fázishoz tartozó visszajelzõ világít.
Funkció billentyûk
A FUNKCIÓ billentyûk visszajelzõ lámpaként is
mûködnek.
A funkció bekapcsolásakor a hozzá tartozó
billentyû világítani kezd.
Ha a kiválasztott funkció a beállított programmal
nem fér össze, a billentyû villog, és a funkció nem
lesz bekapcsolva.
Abban az esetben, ha egy másik, korábban
kiválasztottal össze nem férõ funkciót kapcsol be,
csak az utolsóként választott marad bekapcsolva.
HU
Üzembehelyezés
Leírás
A kiválasztott késleltetés elteltével a villogó
visszajelzõ elalszik, és elkezdõdik a beállított
program végrehajtása.
BEKAPCSOLVA/AJTÓZÁR visszajelzõ lámpa:
A világító visszajelzõ lámpa azt jelzi, hogy a véletlen nyitás megakadályozására a mosógépajtó be van zárva.
A károsodások elkerülése érdekében meg kell várni, hogy a visszajelzõ villogni kezdjen: az ajtót csak ez után
próbálja meg kinyitni.
SzervizRendellenességekÓvintézkedések KarbantartásProgramok Mosószerek
A BEKAPCSOLVA/AJTÓZÁR visszajelzõ és legalább egy másik visszajelzõ egyidejû gyors villogása
rendellenes mûködést jelez. Hívja a Szervizt.
53
Page 54
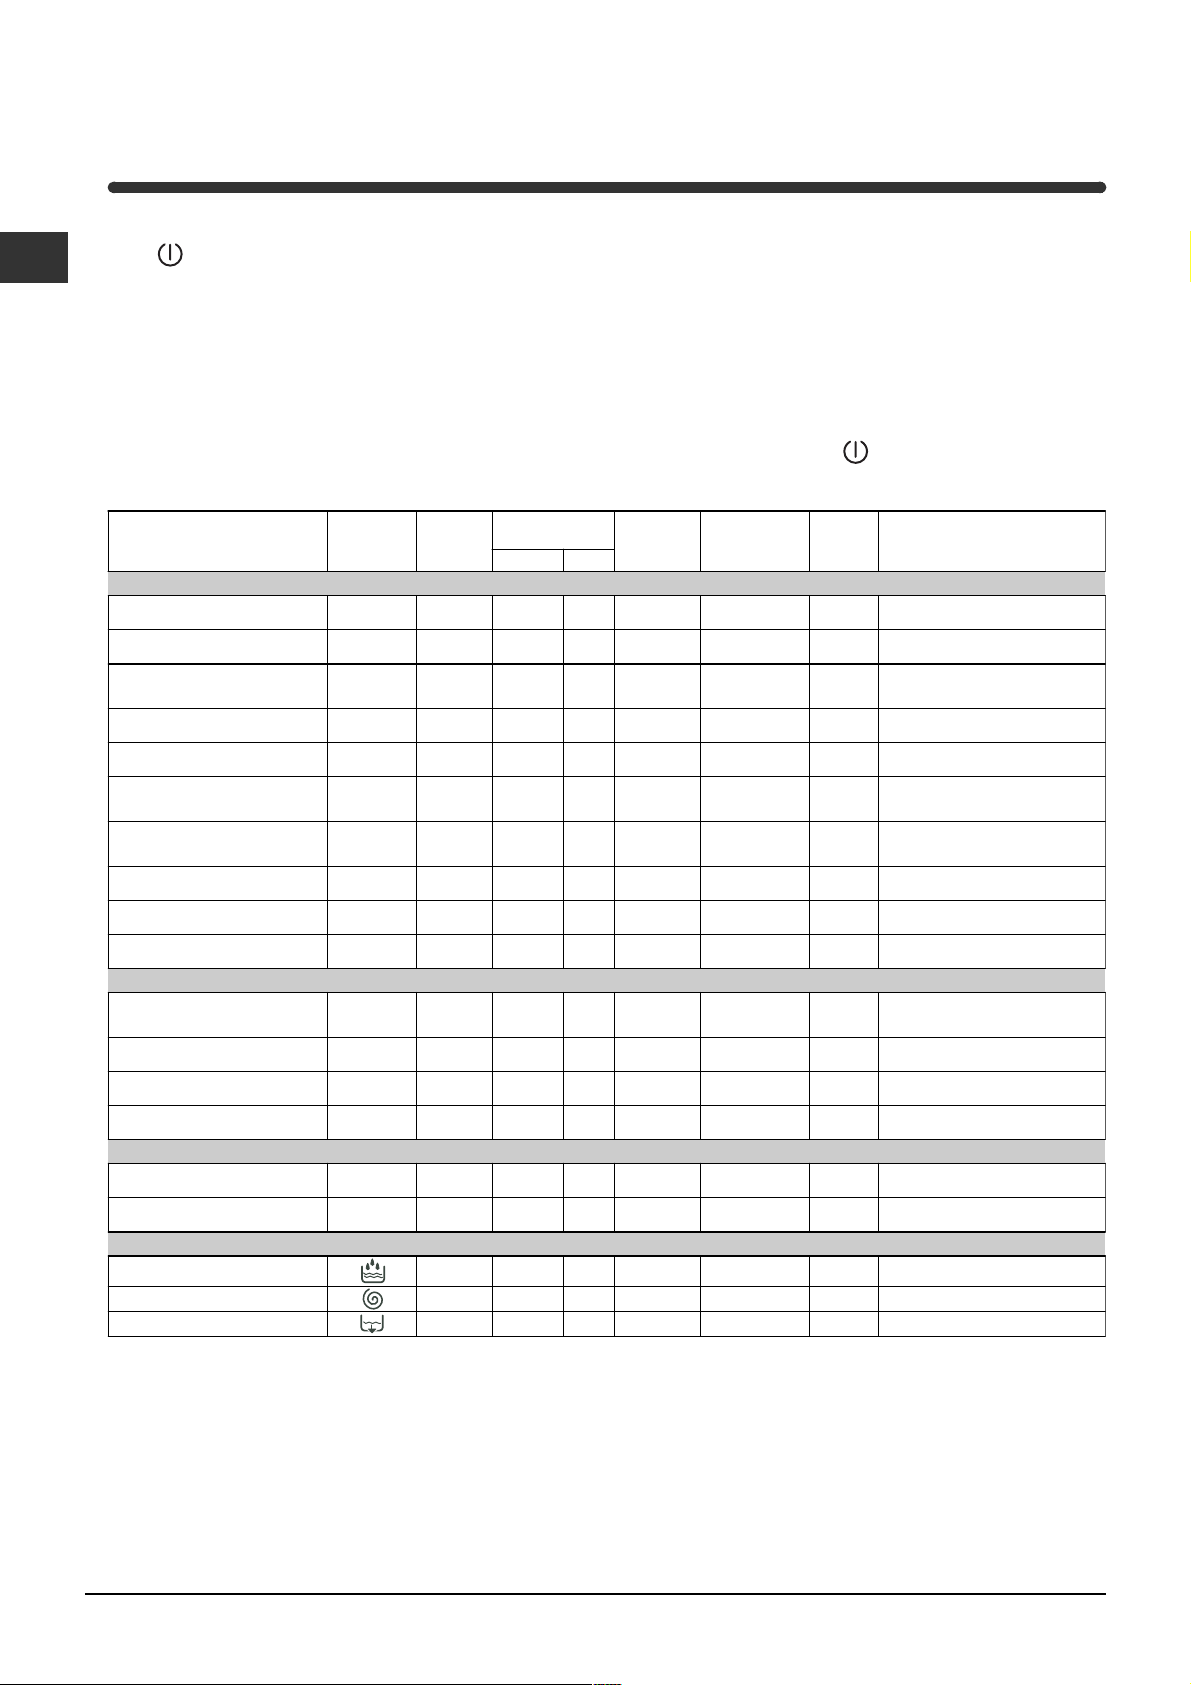
Indítás és Programok
HU
Röviden: egy program elindítása
1. Az billentyû megnyomásával kapcsolja be a
mosógépet. Néhány másodpercre az összes
visszajelzõ felgyullad, majd elalszik, és a
BEKAPCSOLVA/AJTÓZÁR visszajelzõ kezd villogni.
2. Rakja be a mosandó ruhát, és csukja be az ajtót.
3. A PROGRAMOK tárcsával állítsa be a kívánt
mosóprogramot.
4. Állítsa be a mosási hõmérsékletet (lásd 55. oldal).
5. Állítsa be a centrifugálási fordulatszámot (lásd 5 5 . oldal).
6. Töltse be a mosószert és az adalékokat (lásd 5 6 . oldal).
7. A START/RESET billentyû megnyomásával
indítsa el a programot.
A törléshez tartsa nyomva a START/RESET
billentyût legalább 2 másodpercen keresztül.
8. A program végeztével a BEKAPCSOLVA/
AJTÓZÁR visszajelzõ villog, azt jelezve, hogy az
ajtót ki lehet nyitni. Vegye ki a mosott ruhát, és
az ajtót hagyja kicsit nyitva, hogy a dob
kiszáradhasson. Az
billentyûvel kapcsolja ki
a mosógépet.
Programtáblázat
Az anyag és a piszok
term észete
Szokásos
Erõsen szennyezett fehér ruhák
(lepedõ, abrosz, stb.)
Erõsen szennyezett fehér ruhák
(lepedõ, abrosz, stb.)
Erõsen szennyezett fehér és
magasabb hõmérsékleten
mosható színes ruhák
Erõsen szennyezett finom fehér
és színes ruhák
Enyhén szennyezett fehér és finom
színes ruhák (ingek, blúzok, stb.)
Erõsen szennyezett magasabb
hõmérsékleten mosható színes
ruhák (baba fehérnemû, stb.)
Erõsen szennyezett magasabb
hõmérsékleten mosható színes
ruhák (baba fehérnemû, stb.)
Finom színes ruhák (bármilyen
enyhén szennyezett fehérnemû)
Gyapjú
Nagyon finom szövetek
(függönyök, selyem, viszkóz, stb.)
Idõ Ön nek
Erõsen szennyezett fehér és
magasabb hõmérsékleten
mosható színes ruhák
Enyhén szennyezett fehér és finom
színes ruhák (ingek, blúzok, stb.)
Finom színes ruhák (bármilyen
enyhén szennyezett fehérnemû)
Finom színes ruhák (bármilyen
enyhén szennyezett fehérnemû)
Sport
Sportcipõ k (MA X . 2 pár.
Sportruhák (tréningruhák,
rövidnadrágok, stb.)
RéSZLEGES PROGRAMOK
Ö b lítés
Cen trifugá lás Ü rítés és c en trifu gálá s
Ü rítés Ü rítés
Programok
)
Hõmérséklet
1
2
2
2
3
4
4
5
6
7
8
9
10
11
12
13
90°C
90°C
60°C
40°C
40°C
60°C
40°C
40°C
40°C
30°C
60°C
40°C
40
°C
30°C
30
°C
30°C
Mosószer
elõmosás m osás
Lágyítószer
Finom
Finom
Finom
30
50
60
Folteltávolító/
Fehérító opció
Finom /
Hagyományos
Finom /
Hagyományos
Finom /
Hagyományos
Finom /
Hagyományos
Finom /
Hagyományos
Ciklusidõ
(perc)
135
125
110
105
70
75
60
60
50
45
65
55
45
A m osási c iklus leír ása
Elõmosás, m osás, öblítés, középsõ
és végsõ centrifugálás
Mosás, öblítés, középsõ és végsõ
cen trifugá lás
Mosás, öblítés, középsõ és végsõ
cen trifugá lás
Mosás, öblítés, középsõ és végsõ
cen trifugá lás
Mosás, öblítés, középsõ és végsõ
cen trifugá lás
Mosás, öblítés, gyûrõdésgátlás
vagy finom centrifugálás
Mosás, öblítés, gyûrõdésgátlás
vagy finom centrifugálás
Mosás, öblítés, gyûrõdésgátlás
vagy finom centrifugálás
Mosás, öblítés, gyûrõdésgátlás
és finom centrifugálás
vagy
Mosás, öblítés, gyûrõdésgátlás
vagy ürítés
Mosás, öblítés, középsõ és végsõ
cen trifugá lás
Mosás, öblítés, középsõ és végsõ
cen trifugá lás
Mosás, öblítés és finom
centrifugálás
Mosás, öblítés és finom
centrifugálás
Hidegmosás (mosópor nélkül),
m osá s, ö blíté s é s fin om c entrifugá lás
Mosás, öblítés, középsõ és
végsõ centrifugálás
Ö b lítés é s ce ntrifugálás
Megjegyzések
-A 8 - 9 programok esetén nem ajánlatos 3,5 kg ruhánál többet betenni.
-A 13 program esetén nem ajánlatos 2 kg ruhánál többet betenni.
-A gyûrõdésgátlás leírásához: lásd Vasalj kevesebbet, szemben lévõ oldal. A táblázatban szereplõ értékek
tájékoztató jellegûek.
Speciális program
Napközbeni 30' (11-es program szintetikus anyagokhoz) programot kevéssé szennyezett ruhák gyors
mosására fejlesztettük ki: mindössze 30 percig tart, így energiát és idõt takarít meg. A 11-es programot
30°C hõmérsékletre beállítva különbözõ jellegû anyagokat együttesen lehet mosni (kivéve gyapjú és selyem),
maximum 3 kg-os töltéssel. Folyékony mosószer használatát javasoljuk.
54
Page 55
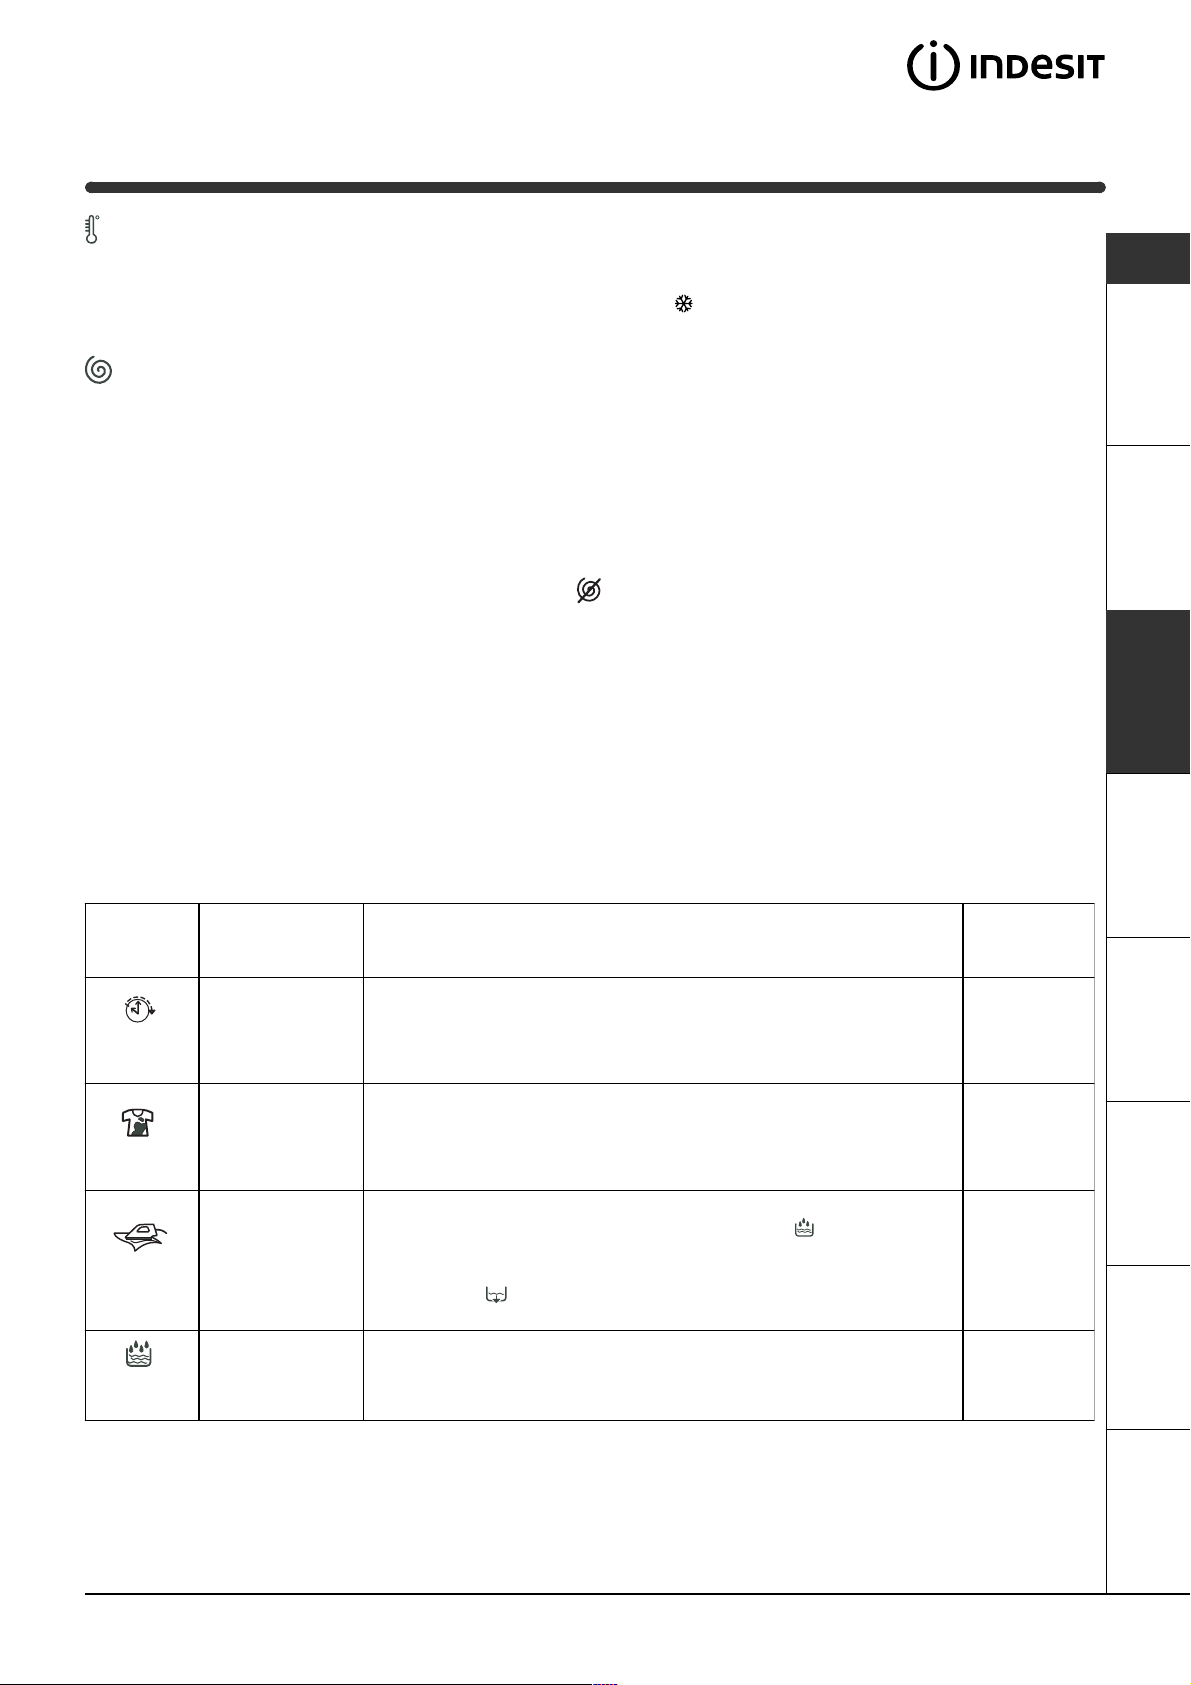
Program módosítások
C
Hõmérséklet beállítása
A mosási hõmérsékletet a HÕMÉRSÉKLET tárcsa elforgatásával lehet beállítani (lásd a Programtáblázatot a 54.
oldalon).
A hõmérsékletet a hideg vízzel történõ mosásig lehet csökkenteni (
Centrifugálás beállítása
A kiválasztott programhoz a centrifugálás fordulatszámát a CENTRIFUGA tárcsa elforgatásával lehet beállítani.
A különféle programokhoz beállítható maximális fordulatszámok a következõk:
Program Maximális fordulatszám
Pamut 1200 fordulat percenként
Szintetikus anyagok 800 fordulat percenként
Gyapjú 600 fordulat percenként
Selyem nem
).
HU
Üzembehelyezés
Leírás
A centrifugálás fordulatszáma csökkenthetõ, vagy az
jelre állítással teljesen kikapcsolható.
A gép automatikusan megakadályozza, hogy az egyes programokhoz maximálisan beállítható
fordulatszámnál magasabbon centrifugáljon.
Funkciók
A mosógép különféle mosófunkciói lehetõvé teszik a kívánt tisztítás és fehérség elérését. A funkciók
bekapcsolásához:
1. nyomja meg a kívánt funkcióhoz tartozó billentyût, az alábbi táblázat szerint;
2. a billentyû világítása azt jelzi, hogy a hozzá tartozó funkció be van kapcsolva.
Megjegyzés: A gyors villogás azt jelenti, hogy a beállított programhoz a billentyûhöz tartozó funkció nem
kapcsolható be.
Funkciók Hatás Megjegyzések a használathoz
A késleltetés beállításához annyiszor nyomja meg a billentyût, hogy a
kívánt értékhez tartozó visszajelzõ világítson.
A billentyû ötödik megnyomására a funkció kikapcsol.
Megjegyzendõ: Ha a Start/Reset billentyût megnyomta, a késleltetés
értékét csak csökkenteni lehet.
Ne felejtse al a fehérítõszert a 4-es berakható tar
sd 56. oldal).
(lá
Ez a VASALJ KEVESEBBET funkcióval nem fér össze.
Késleltetõ
idõzítõ
Fehérítés
Késlelteti a gép
indítását max. 9
órát.
A fehérítés ciklus
a legmakacsabb
foltok
eltávolítására
alkalmas.
tályba tölteni
A következõ
programokkal mûködik:
Mindegyik
2, 3, 4, 5,
Öblítések.
Ezt a funkciót bekapcsolva a 4, 5, 6, 7 programok leáll úgy, hogy a
Csökkenti az
anyagok gyûrését,
ezzel könnyítve a
Vasalj
kevesebbet
Extra
Öblítés
vasalást.
Növeli az öblítés
hatékonyságát.
mosott ruha a vízben marad (Gyûrõdésgátlás), és az öblítés fázisának
visszajelzõje villog:
- a ciklus befejezéséhez nyomja meg a START/RESET billentyût;
- ha csak le akarja szivattyúzni a vizet, a tárcsát állítsa a szivattyúzás
szimbólumára , és nyomja meg a START/RESET billentyût.
Ez a FEHÉRÍTÉS funkcióval nem fér össze.
A mosógép teljes töltése esetén vagy nagymennyiségû
mosószeradagolás esetén javasolt.
3, 4, 5, 6, 7,
8, 9, 10,
Öblítések.
1, 2, 3, 4,
5, 8, 9, 10,
12, 13,
Öblítések.
SzervizRendellenességekÓvintézkedések KarbantartásProgramok Mosószerek
55
Page 56
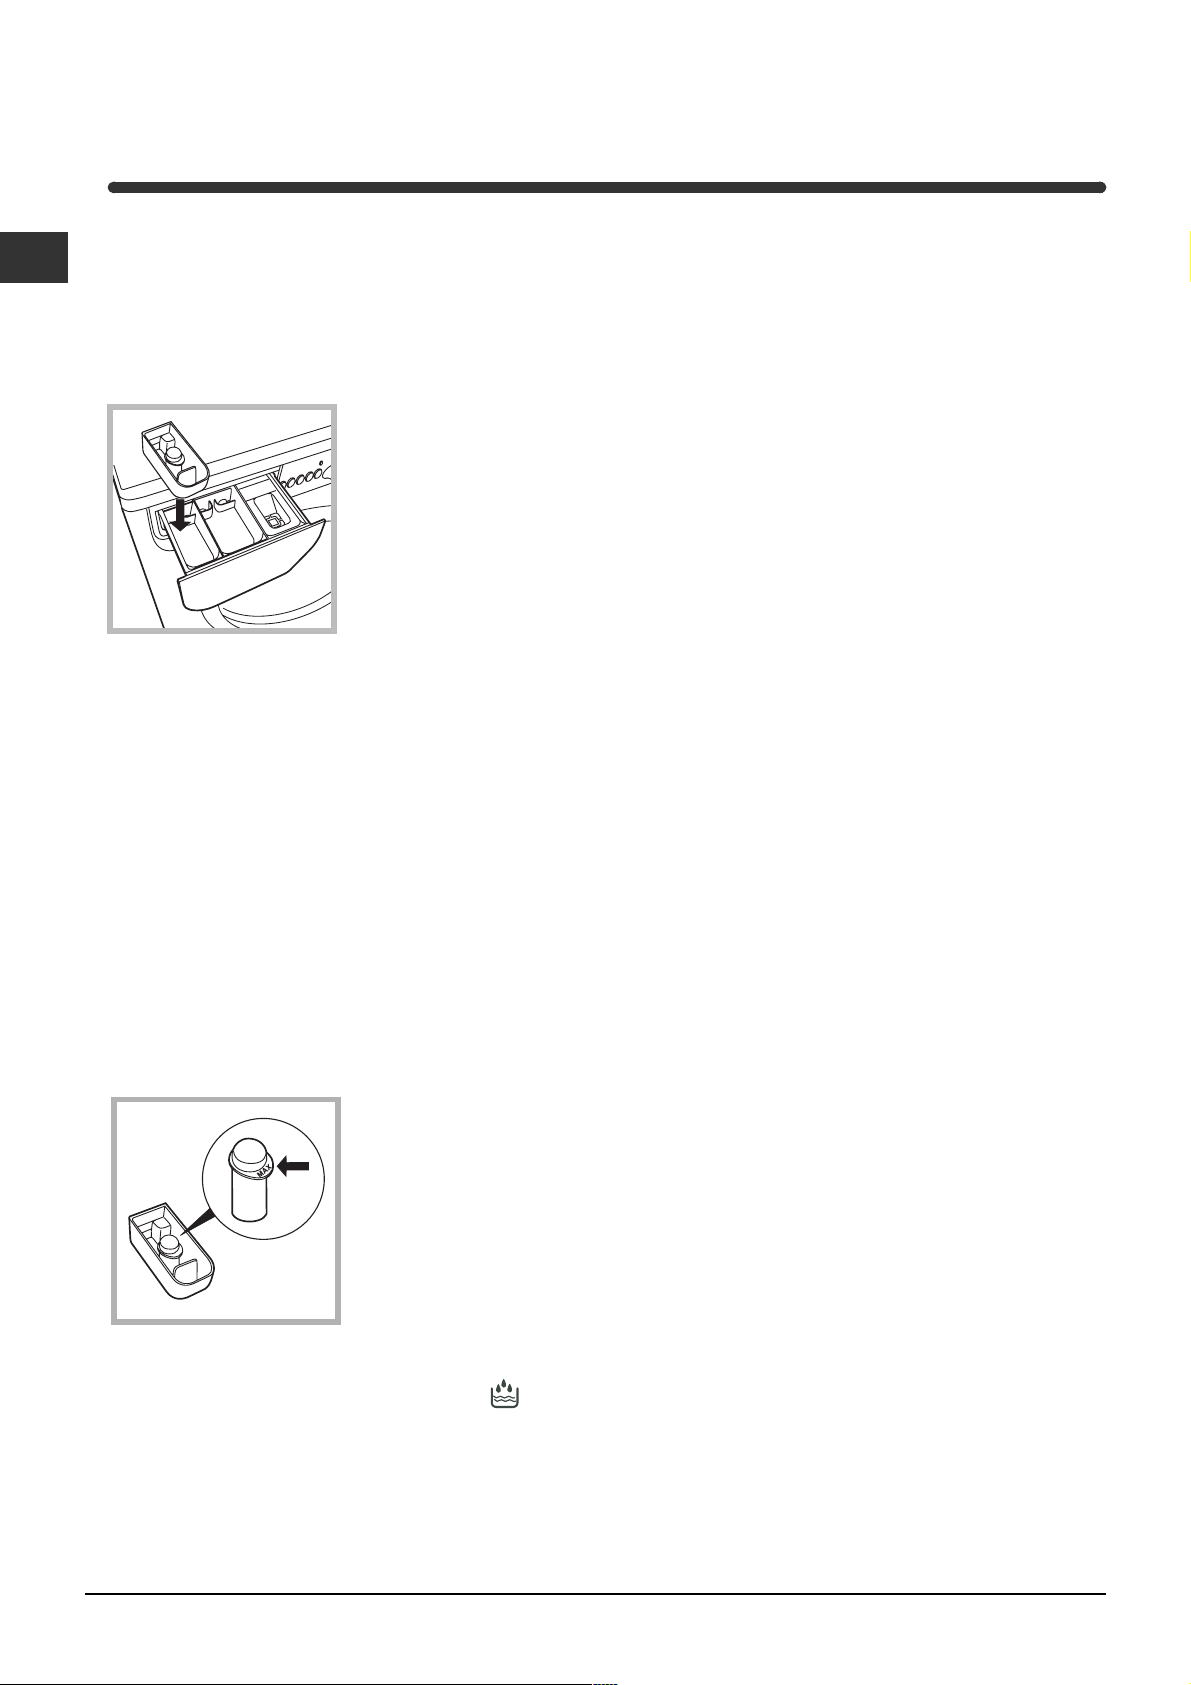
Mosószerek és mosandók
HU
Mosószeradagoló fiók
A mosás eredményessége függ a mosószer helyes
adagolásától is: ha túl sokat adagol belõle, a mosás
nem lesz hatékonyabb, de hozzájárul ahhoz, hogy
lerakódás képzõdjön a mosógépben, valamint a
környezetet is jobban szennyezi.
Húzza ki a
4
3
mosószeradagoló fiókot,
és a következõképpen
tegye bele a mosószret
vagy az adalékot.
2
1
1-es tartály: Mosószer elõmosáshoz (por)
A mosószer betöltése elõtt gyõzõdjön meg arról,
hogy a 4-es berakható tartály nincs fiókban.
2-es tartály: Mosószer mosáshoz
(por vagy folyadék)
A folyékony mosószert csak az indítás elõtt lehet betölteni.
3-as tartály: Adalékok
(öblítõszerek, illatosítók, stb.)
Az öblítõszer ne érjen a rács fölé.
4-es berakható tartály: Fehérítõszer
Ne használjon kézimosószert, mert túlzottan sok
hab képzõdik.
Fehérítõ ciklus
A hagyományos fehérítést tartós fehér ruhákhoz,
a kíméletest pedig színes, szintetikus vagy gyapjú
anyagokhoz használjuk.
Mosandó ruhák elõkészítése
Osztályozza a mosandókat a következõk
szerint:
- kelme típusa / címkén lévõ szimbólum.
- színek: válogassa külön a színes ruhákat a
fehérektõl.
Ürítse ki a zsebeket, és vizsgálja meg a
gombokat.
Ne lépje túl a mosandók száraz súlyára
vonatkozóan megadott értékeket:
Tartós anyagok: max. 4,5 kg
Szintetikus anyagok: max. 2,5 kg
Kényes anyagok: max. 2 kg
Gyapjú: max. 1 kg
Milyen nehezek a mosandó ruhák?
1 lepedõ 400-500 g.
1 párnahuzat 150-200 g.
1 asztalterítõ 400-500 g.
1 fürdõköpeny 900-1200 g.
1 törülközõ 150-250 g.
Különleges bánásmódot igénylõ darabok
Függönyök: hajtogatva tegye párnahuzatba
(vászonzsákba) vagy hálós zacskóba. Külön mossa
õket, és ne lépje túl a fél töltésnyi mennyiséget.
használja a 7-es programot, amelyik
automatikusan kikapcsolja a centrifugálást.
Toll/pehely ágynemûk és tollkabátok: ha a benne
lévõ liba vagy kacsatoll mosógépben mosható. Fordítsa
ki a darabokat, és egyszerre legfeljebb 2-3 kg-nyit
mosson úgy, hogy egyszer vagy kétszer megismétli az
öblítést, és kíméletes centrifugálást használ.
Gyapjú: a legjobb eredmény elérése érdekében
használjon speciális mosószert (gyapjúmosószert),
és ne lépje túl az 1 kg ruhatöltetet.
Tegye be a 4-es
berakható tartályt az 1es rekeszbe.
A fehérítõszer betöltése
közben vigyázzon arra,
hogy az a központi
csapon jelzett max
szintet ne haladja meg
(lásd ábra).
Ha csak fehérítést akar végezni, öntse a fehérítõszert
a 4-es berakható tartályba, és állítsa be az
Öblítés programot.
Ha a mosás során akar fehéríteni, töltse be a
mosószert és az adalékokat, állítsa be a kívánt
programot, és kapcsolja be a Fehérítés opciót (lásd
55. oldal).
A 4-es berakható tartály használata kizárja az
elõmosást.
56
Page 57
Óvintézkedések és
tanácsok
A mosógépet a nemzetközi biztonsági
szabványoknak megfelelõen tervezték és gyártották.
Ezeket a figyelmeztetéseket biztonsági okokból írjuk
le, és figyelmesen el kell olvasni õket.
Általános biztonság
Ezt a készüléket egyfajta háztartási és nem
professzionális használatra tervezték, és a
funkcióit megváltoztatni nem szabad.
A mosógépet csak felnõtt használhatja, és csak
az e használati utasításban megadott utasítások
szerint.
Ne érjen a géphez mezítláb, illetve vizes vagy
nedves kézzel vagy lábbal.
A csatlakozódugót az aljzatból ne a kábelt, hanem
a csatlakozót fogva húzza ki.
Ne nyissa ki a mosószeradagoló fiókot, ha a
mosógép mûködik.
Ne nyúljon a leeresztett vízbe, mert forró lehet.
Semmiképpen ne feszegesse az ajtót:
megsérülhet a véletlen nyitást akadályozó
biztonsági retesz.
Hiba esetén semmiképpen se nyúljon a gép belsõ
részeihez, és ne próbálja megjavítani.
Mindig ügyeljen arra, hogy gyerekek ne
mehessenek a mûködõ gép közelébe.
A mosás során az ajtó meleg lehet.
Amennyiben a gépet át kell helyezni, két vagy
három személy végezze, maximális figyelemmel.
Soha sem egyedül, mert a gép nagyon súlyos.
A mosandó berakása elõtt ellenõrizze, hogy a
forgódob üres legyen.
Hulladékelhelyezés
Csomagolóanyag megsemmisítése:
tartsa be a helyi elõírásokat, így a csomagolás
újrahasznosítható.
Öreg mosógép kidobása:
mielõtt a hulladékok közé helyezné, tegye
használhatatlanná úgy, hogy elvágja a hálózati
kábelt, és letépi az ajtót.
Környezetvédelem
Környezetvédelmet szolgáló technológia
Ha az ajtó üvegén keresztül kevés víz látszik, az
azért van, mert az új technológiának köszönhetõen
az Indesit ak a felénél kevesebb víz is elég ahhoz,
hogy maximális tisztítóhatást érjen el: egy olyan
cél, amelyet a környezet megóvása érdekében
tûztünk ki.
Takarítson meg mosószert, vizet, energiát és idõt
Annak érdekében, hogy ne pazaroljunk az
erõforrásokkal, a mosógépet teljes ruhatöltettel
kell használni. Egy teljes ruhatöltettel való mosás
két féltöltet helyett, akár 50% energia
megtakarítást is lehetõvé tehet.
Az elõmosás csak nagyon szennyezett ruhák
esetén szükséges. Ha nem használja, azzal
mosószert, idõt és 5-15% energiát takarít meg.
Ha a foltokat a mosás elõtt folttisztítóval kezeli,
és beáztatja, kevesebb szükség lesz a magas
hõmérsékletû mosásra. A 60°C-on történõ mosás
a 90°C helyett, vagy 40°C-on 60°C helyett akár
50% energiamegtakarításhoz is vezethet.
Ha a mosószert a víz keménysége, a
szennyezettség mértéke és a ruha mennyisége
alapján helyesen adagolja, elkerüli a pazarlást
és nem terheli feleslegesen a környezetet: még,
ha biológiailag lebomló fajtájúak is, a
mosószerek olyan összetevõket tartalmaznak,
amelyek megváltoztatják a természet
egyensúlyát. Ezen kívül, kerülje az öblítõszerek
használatát, amennyire csak lehet.
Ha a késõ délután és a kora hajnal közötti
idõszakban mos, akkor hozzájárul ahhoz, hogy
csökkentse az áramszolgáltató vállalatok
terhelését.
A Késleltetõ idõzítõ (lásd 55. oldal) nagyon
hasznos a mosás idõzítése szempontjából.
Ha a mosott ruhákat utána szárítógépben
szárítja, magas fordulatszámú centrifugálást
válasszon. Ha a mosott ruhában kevés a víz, idõt
és energiát takarít meg a szárítóprogramnál.
HU
Üzembehelyezés
Leírás
SzervizRendellenességekÓvintézkedések KarbantartásProgramok Mosószerek
57
Page 58
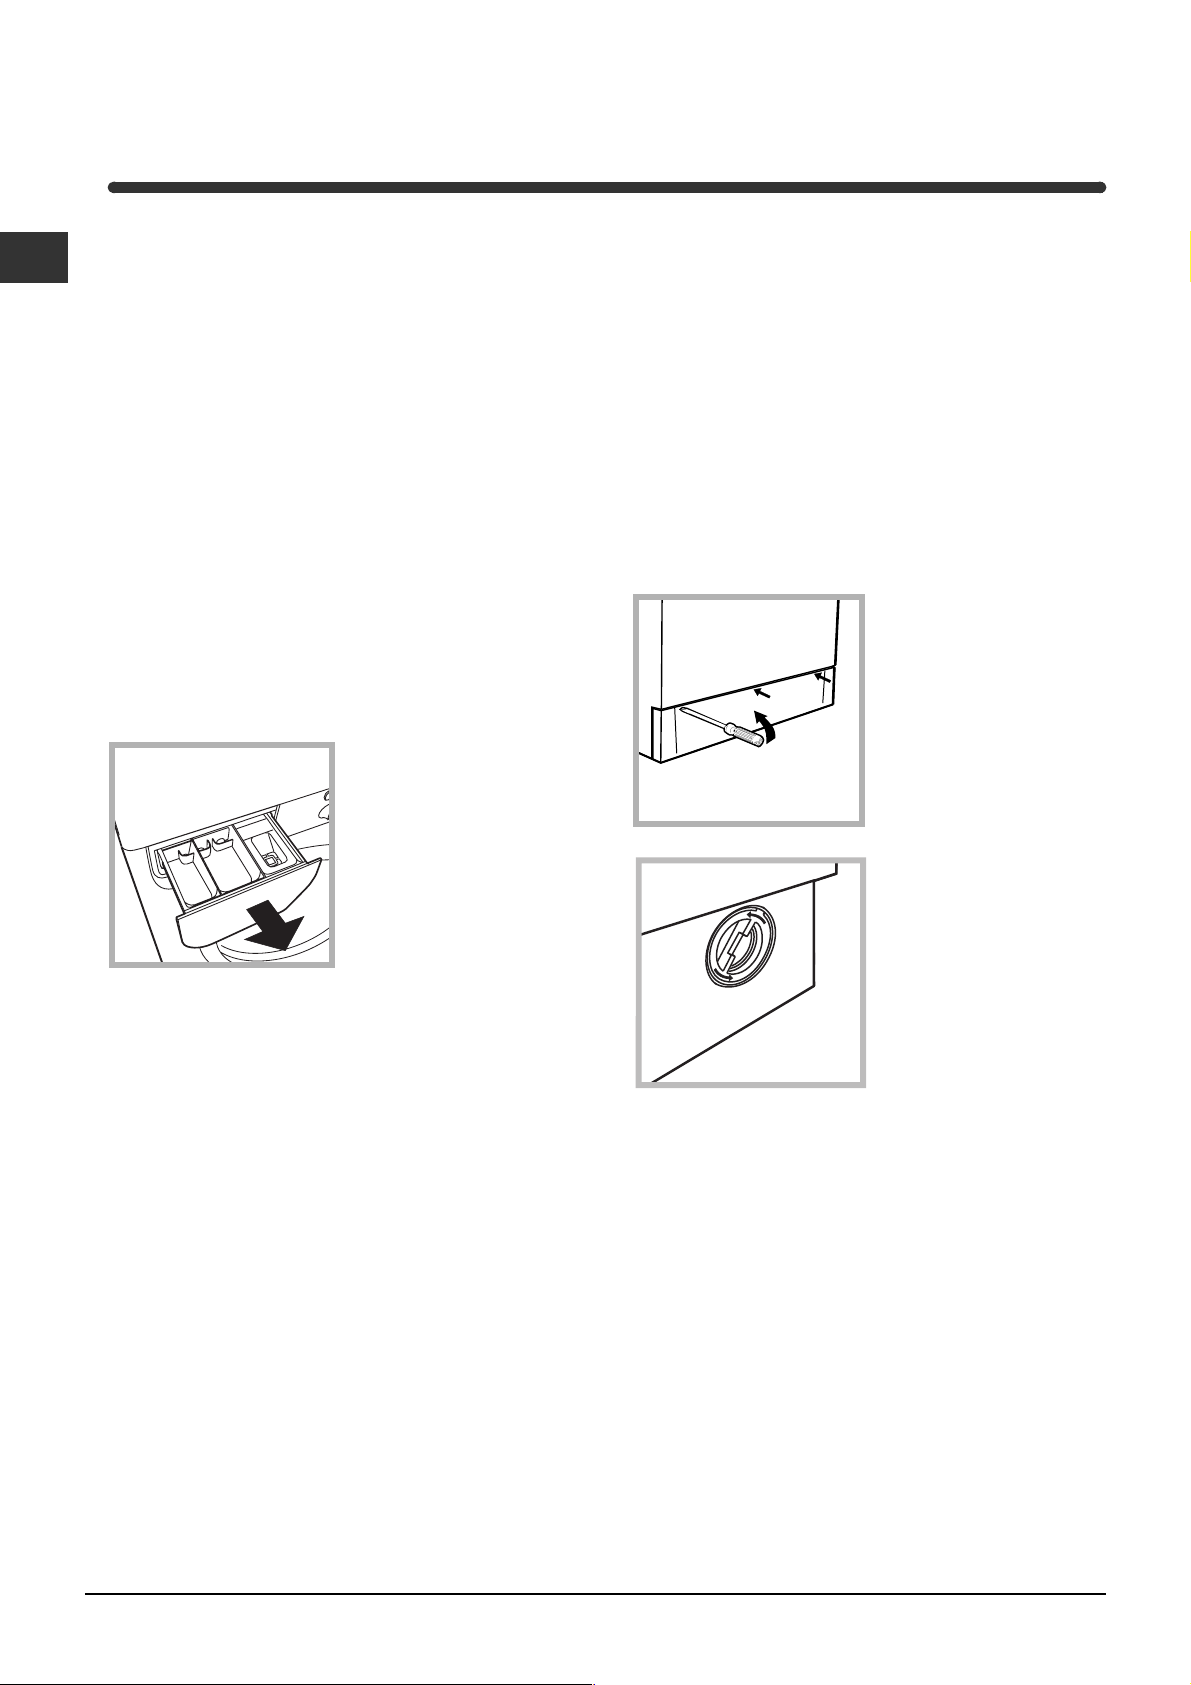
Karbantartás és törõdés
HU
A víz elzárása és az elektromos áram
kikapcsolása
Minden mosás után zárja el a vízcsapot. Így
kíméli a mosógép vízrendszerét, és megszünteti a
vízszivárgás kockázatát.
Húzza ki a hálózati csatlakozódugót az aljzatból,
amikor a mosógépet tisztítja vagy karbantartást
végez.
A mosógép tisztítása
A külsõ részeket és a gumi részeket langyos
szappanos vizes ronggyal tisztíthatja. Ne használjon
oldószert vagy súrolószert.
A mosószeradagoló fiók tisztítása
Vegye ki a fiókot úgy,
hogy felemeli és kifelé
húzza (lásd ábra).
Folyóvíz alatt mossa ki.
Ezt a tisztítást gyakran
el kell végezni.
Az ajtó és a forgódob gondozása
A szivattyú tisztítása
A mosógép öntisztító szivattyúval van felszerelve,
melynek nincs szüksége tisztítási és karbantartási
mûveletekre. Az azonban megtörténhet, hogy kis
tárgyak kerülnek (aprópénz, gomb) a szivattyút
védõ elõkamrába, ami a szivattyú alsó részén
található.
Gyõzõdjön meg róla, hogy a mosóprogram véget
ért, és húzza ki a hálózati csatlakozót.
Hogy hozzáférjen az elõkamrához:
1. egy csavarhúzó
segítségével távolítsa el
a burkolópanelt a
mosógép elejérõl (lásd
ábra);
2. az óra járásával
ellentétes irányban
forgatva csavarja le a
fedelet (lásd ábra):
természetes, hogy egy
kevés víz kifolyik;
Az ajtót hagyja mindig résre nyitva, nehogy
rossz szagok keletkezzenek.
58
3. gondosan tisztítsa ki a belsejét;
4. csavarja vissza a fedelet;
5. szerelje vissza a panelt úgy, hogy mielõtt azt a
gép felé nyomná, meggyõzõdik arról, hogy a horgok
a hozzájuk tartozó furatokba illeszkednek.
A vízbevezetõ csõ ellenõrzése
Évente legalább egyszer ellenõrizze a gumicsövet.
Ki kell cserélni, ha repedezett vagy hasadozott: a
mosás során a nagy nyomás hirtelen szakadást
okozhat.
Soha ne alkalmazzon már használt csöveket.
Page 59

Rendellenességek
és elhárírásuk
Megtörténhet, hogy a mosógép nem mûködik. Mielõtt felhívná a Szervizt (lásd 60. oldal) ellenõrizze, hogy
nem olyan problémáról van szó, amely a következõ lista segítségével egyszerûen megoldható.
Rendellenességek:
A mosógép nem kapcsol be.
A mosási ciklus nem indul el.
A mosógép nem vesz fel vizet .
A mosógép folytonosan szívja és
lereszti a vizet.
Lehetséges okok / Megoldás:
A hálózati csatlakozódugó nincs bedugva az aljzatba, vagy nem
eléggé ahhoz, hogy jól érintkezzen.
Nincs áram a lakásban.
Az ajtó nincs jól becsukva.
Nem nyomta meg az
Nem nyomta meg a START/RESET billentyût.
A vízcsap nincs nyitva.
Az indítás késletetése van beállítva (Késleltetõ idõzítõ, lásd 55. oldal).
A vízbevezetõ csõ nincs csatlakoztatva a csaphoz.
A csõ meg van törve.
A vízcsap nincs nyitva.
A lakásban nincs víz.
Nincs elegendõ nyomás.
Nem nyomta meg a START/RESET billentyût.
A leeresztõcsõ nem a padlószinttõl 65 és 100 cm közötti
magasságban van felszerelve (lásd 51. oldal).
A leeresztõcsõ vége vízbe merül (lásd 51. oldal).
A fali szifonnak nincs szellõzése.
Ha ezen vizsgálatok után a probléma nem oldódik meg, zárja el a
vízcsapot, kapcsolja ki a mosógépet és hívja ki a szervizszolgálatot.
Ha a lakás egy épület legfelsõbb emeleteinek egyikén található,
lehetséges, hogy a csatorna-szellõzõ eltömõdésének jelensége
(szivornyahatás) lépett fel, ezért a mosógép folytonosan szívja és
leereszti a vizet. Ezen kellemetlenség elkerülésére a kereskedelmi
forgalomban rendelkezésre állnak csatorna-szellõzõ szelepek.
billentyût.
HU
Üzembehelyezés
Leírás
A mosógép nem ereszti le a
vizet, vagy nem centrifugál.
A mosógép nagyon rázkódik a
centrifugálás alatt.
A mosógépbõl elfolyik a víz.
A BEKAPCSOLVA/AJTÓZÁR
visszajelzõ gyorsan villog legalább
egy másik visszajelzõvel együtt.
Sok hab képzõdik.
A program nem ereszti le a vizet: némelyik programnál manuálisan
kell elindítani (lásd 54. oldal).
Be van kapcsolva a Vasalj kevesebbet opció: a program befejezéséhez
nyomja meg a START/RESET billentyût (lásd 55. oldal).
A leeresztõcsõ meg van törve (lásd 51. oldal).
A lefolyó el van dugulva.
Az üzembehelyezéskor nem távolították el a forgódob rögzítését
(lásd 50. oldal).
A mosógép nem áll vízszintben (lásd 50. oldal).
A mosógép a bútor és a fal köté van szorítva (lásd 50. oldal).
A vízbevezetõ csõ nincs jól felcsavarva (lásd 50. oldal).
A mosószeradagoló fiók eltömõdött (a tisztítást lásd a 58. oldalon).
A leeresztõcsõ nincs jól rögzítve (lásd 51. oldal).
Hívja a Szervizt, mert rendellenességet jelez.
SzervizRendellenességekÓvintézkedések KarbantartásProgramok Mosószerek
A mosószer nem mosógépekhez való (kell, hogy szerepeljen rajta,
hogy gépi, kézi vagy gépi mosáshoz, vagy hasonló).
Túl sok mosószert használt.
59
Page 60
Szerviz
HU
Mielõtt a Szervizhez fordulna:
Gyõzõdjön meg arról, hogy a hibát nem tudja maga is elhárítani (lásd 59. oldal);
Újból indítsa el a programot, hogy lássa, elhárította-e a hibát;
Ellenkezõ esetben forduljon a megbízott Szakszervizhez: a telefonszámot a garanciajegyen találja.
Soha ne forduljon nem megbízott szerelõhöz.
Közölje:
a meghibásodás jellegét;
a mosógép modelljét (Mod.);
a gyártási számot (Sorsz.).
Ezen információk a mosógép hátsó részére felerõsített táblán találhatók.
Szerviz
60
Page 61

Istruzioni per luso
LAVABIANCHERIA
I
Italiano
WISL 125 X
Sommario
I
Installazione, 62-63
Disimballo e livellamento, 62
Collegamenti idraulici ed elettrici, 62-63
Primo ciclo di lavaggio, 63
Dati tecnici, 63
Descrizione della lavabiancheria, 64-65
Pannello di controllo, 64
Spie, 65
Avvio e Programmi, 66
In breve: avviare un programma, 66
Tabella dei programmi, 66
Personalizzazioni, 67
Impostare la temperatura, 67
Impostare la centrifuga, 67
Funzioni, 67
Detersivi e biancheria, 68
Cassetto dei detersivi, 68
Ciclo candeggio, 68
Preparare la biancheria, 68
Capi particolari, 68
Precauzioni e consigli, 69
Sicurezza generale, 69
Smaltimento, 69
Risparmiare e rispettare lambiente, 69
Manutenzione e cura, 70
Escludere acqua e corrente elettrica, 70
Pulire la lavabiancheria, 70
Pulire il cassetto dei detersivi, 70
Curare oblò e cestello, 70
Pulire la pompa, 70
Controllare il tubo di alimentazione dellacqua, 70
Anomalie e rimedi, 71
Assistenza, 72
61
Page 62
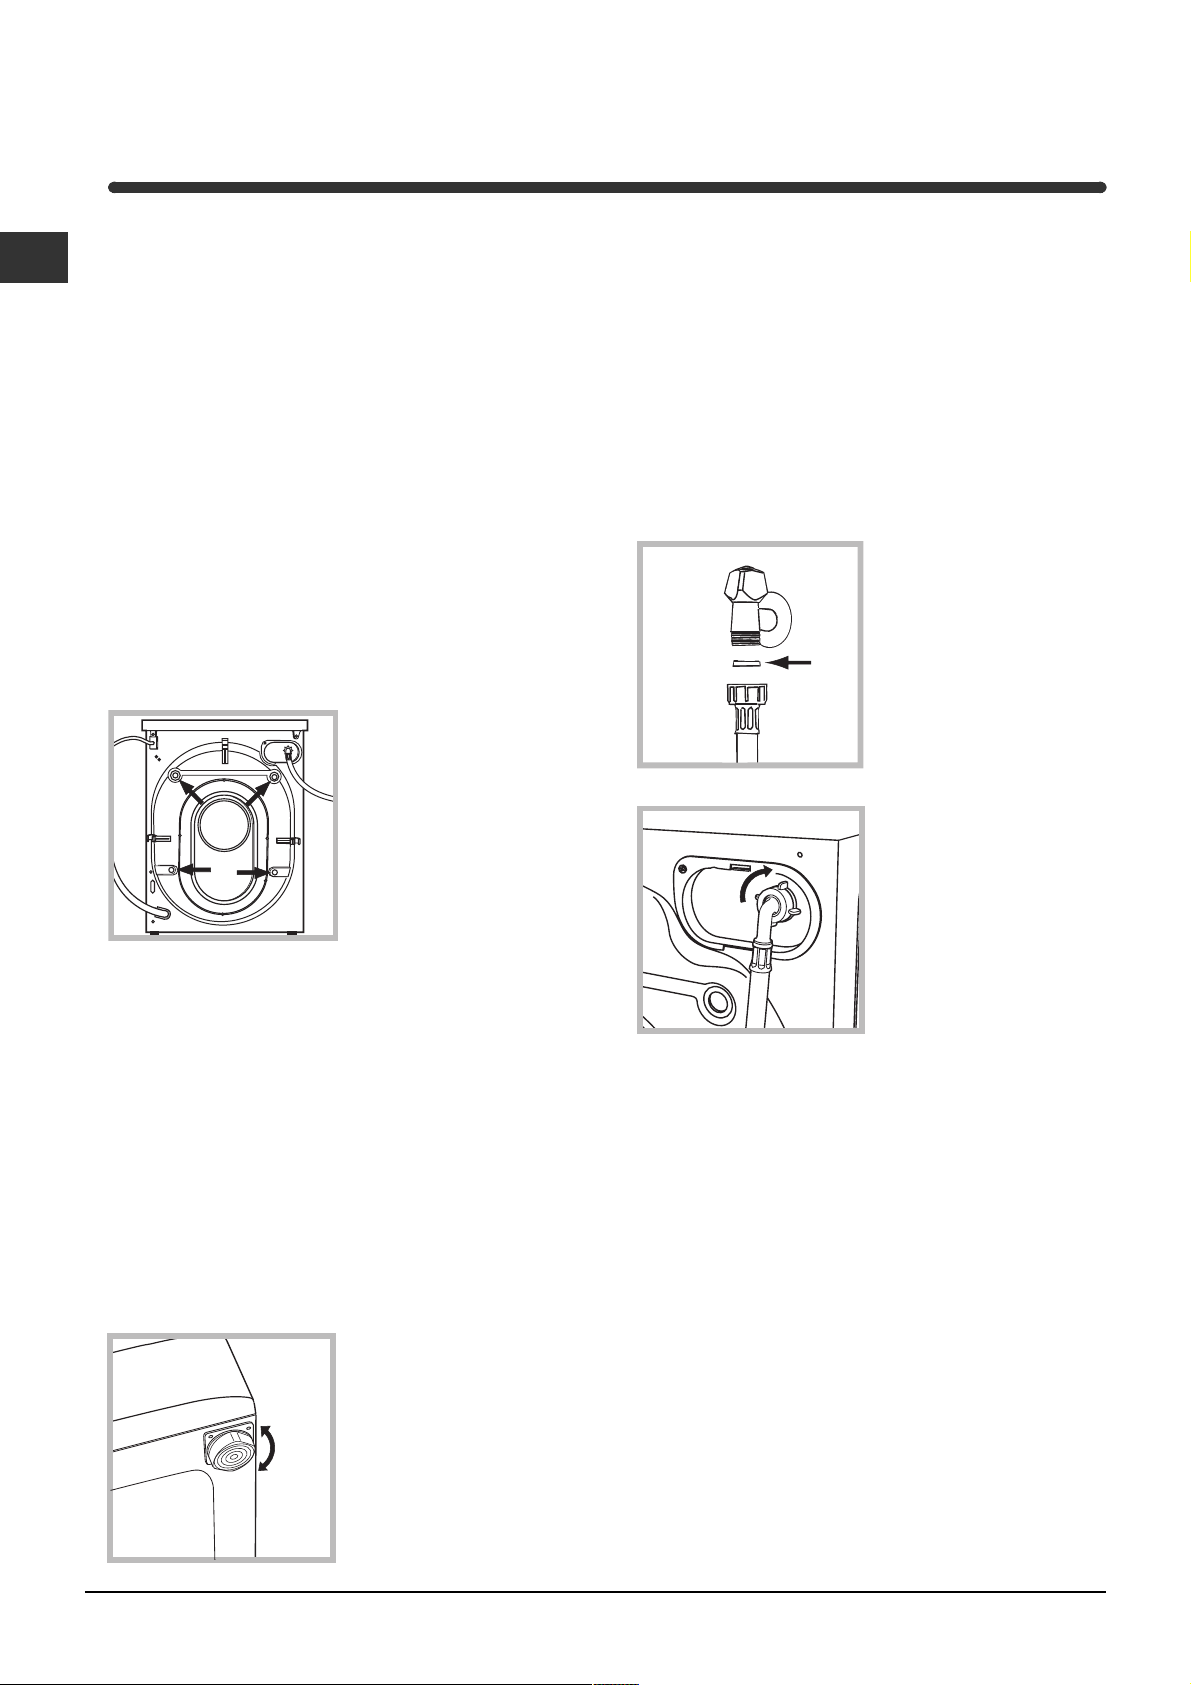
Installazione
È importante conservare questo libretto per poterlo
I
consultare in ogni momento. In caso di vendita, di
cessione o di trasloco, assicurarsi che resti insieme
alla lavabiancheria per informare il nuovo proprietario
sul funzionamento e sui relativi avvertimenti.
Leggere attentamente le istruzioni: ci sono
importanti informazioni sullinstallazione, sulluso
e sulla sicurezza.
Disimballo e livellamento
Disimballo
1. Disimballare la lavabiancheria.
2. Controllare che la lavabiancheria non abbia
subìto danni nel trasporto. Se fosse danneggiata
non collegarla e contattare il rivenditore.
3. Rimuovere le quattro
viti di protezione per il
trasporto e il gommino
con il relativo distanziale, posti nella parte
posteriore (vedi figura).
4. Chiudere i fori con i tappi di plastica in dotazione.
5. Chiudere con il tappo in dotazione i tre fori dove
alloggiava la spina, situati nella parte posteriore in
basso a destra.
6. Conservare tutti i pezzi: qualora la lavabiancheria
debba essere trasportata, dovranno essere
rimontati.
Gli imballaggi non sono giocattoli per bambini.
Livellamento
1. Installare la lavabiancheria su un pavimento piano
e rigido, senza appoggiarla a muri, mobili o altro.
Un accurato livellamento dà stabilità alla macchina
ed evita vibrazioni, rumori e spostamenti durante il
funzionamento. In caso di moquette o di un tappeto,
regolare i piedini in modo da conservare sotto la
lavabiancheria uno spazio sufficiente per la ventilazione.
Collegamenti idraulici ed elettrici
Collegamento del tubo di alimentazione
dellacqua
1. Inserire la guarnizione
A nellestremità del tubo
di alimentazione e
avvitarlo a un rubinetto
A
3. Fare attenzione che nel tubo non ci siano né
pieghe né strozzature.
La pressione idrica del rubinetto deve essere
compresa nei valori della tabella Dati tecnici
(vedi pagina a fianco).
Se la lunghezza del tubo di alimentazione non
fosse sufficiente, rivolgersi a un negozio specializzato
o a un tecnico autorizzato.
dacqua fredda con
bocca filettata da 3/4
gas (vedi figura).
Prima di allacciare, far
scorrere lacqua finché
non sia limpida.
2. Collegare il tubo di
alimentazione alla
lavabiancheria
avvitandolo allapposita
presa dacqua, nella
parte posteriore in alto a
destra (vedi figura).
62
2. Se il pavimento non
fosse perfettamente
orizzontale, compensare
le irregolarità svitando o
avvitando i piedini
anteriori (vedi figura);
langolo di inclinazione,
misurato sul piano di
lavoro, non deve superare i 2°.
Page 63
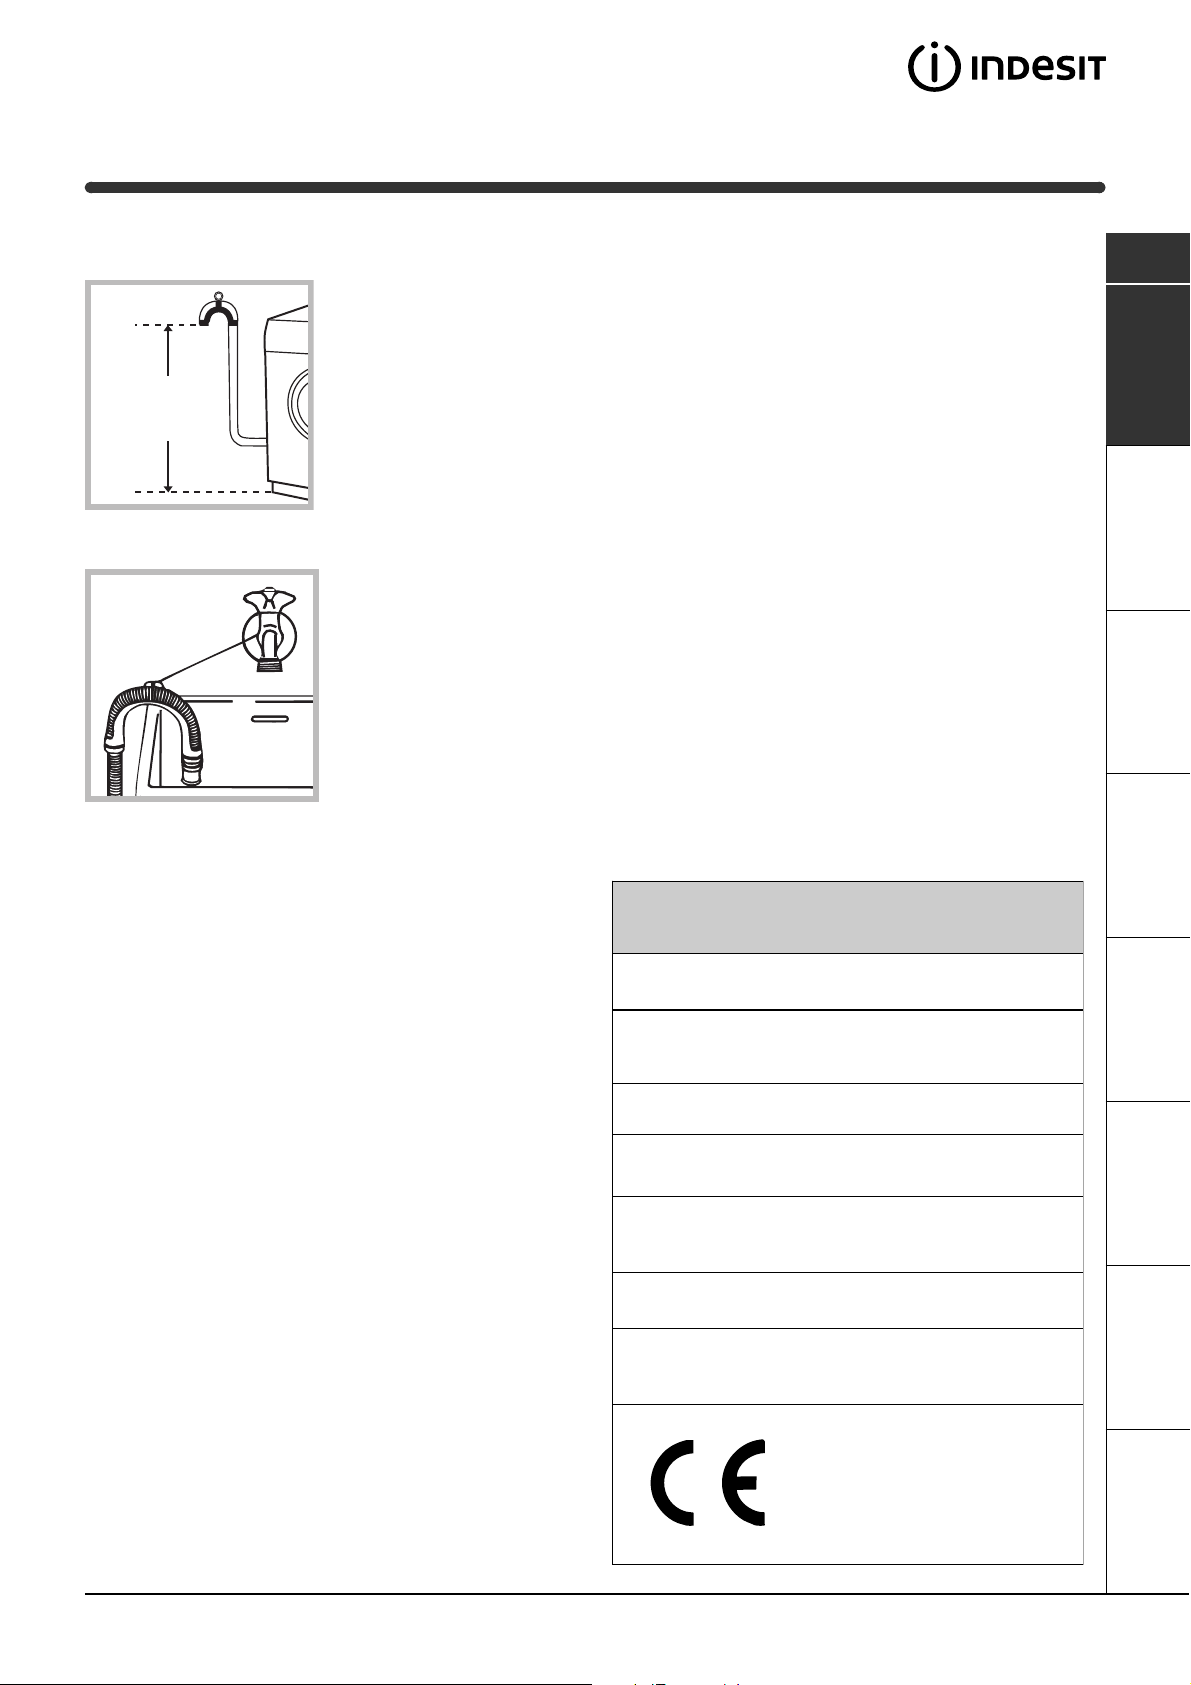
Collegamento del tubo di scarico
Collegare il tubo di
scarico, senza piegarlo,
a una conduttura di
scarico o a uno scarico
a muro posti tra 65 e
65 - 100 cm
100 cm da terra;
Non usare prolunghe e multiple.
I
Il cavo non deve subire piegature o compressioni.
Il cavo di alimentazione deve essere sostituito solo
da tecnici autorizzati.
Attenzione! Lazienda declina ogni responsabilità
qualora queste norme non vengano rispettate.
Primo ciclo di lavaggio
oppure appoggiarlo al
bordo di un lavandino o
di una vasca, legando
la guida in dotazione al
rubinetto (vedi figura).
Lestremità libera del
tubo di scarico non
deve rimanere immersa
nellacqua.
È sconsigliato usare tubi di prolunga; se indispen-
sabile, la prolunga deve avere lo stesso diametro del
tubo originale e non superare i 150 cm.
Collegamento elettrico
Prima di inserire la spina nella presa della corrente,
accertarsi che:
la presa abbia la messa a terra e sia a norma
di legge;
Dopo linstallazione, prima delluso, effettuare un
ciclo di lavaggio con detersivo e senza biancheria
impostando il programma a 90°C senza prelavaggio.
Dati tecnici
Modello
Dimensioni
Capacità
WISL 125 X
larghezza cm 59,5
altezza cm 85
profondità cm 40
da 1 a 4,5 kg
la presa sia in grado di sopportare il carico
massimo di potenza della macchina, indicato nella
tabella Dati tecnici (vedi a fianco);
la tensione di alimentazione sia compresa nei
valori indicati nella tabella Dati tecnici (vedi a
fianco);
la presa sia compatibile con la spina della
lavabiancheria. In caso contrario sostituire la
presa o la spina.
La lavabiancheria non va installata allaperto,
nemmeno se lo spazio è riparato, perché è molto
pericoloso lasciarla esposta a pioggia e temporali.
A lavabiancheria installata, la presa della corrente
deve essere facilmente raggiungibile.
Collegamenti
elettrici
Collegamenti
idrici
Vel ocità di
centrifuga
Programmi di
controllo secondo
la norma IEC456
tensione a 220/230 Volt 50 Hz
potenza massima assorbita 1850 W
pressione massima 1 MPa (10 bar)
pressione minima 0,05 MPa (0,5 bar)
capacità del cesto 40 litri
sino a 1200 giri al minuto
programma 2; temperatura 60°C;
effettuato con 4,5 kg di carico.
Questa apparecchiatura è conforme
alle seguenti Direttive Comunitarie:
- 73/23/CEE del 19/02/73 (Bassa
Tens ione) e su ccessive modifi cazioni
- 89/336/CEE del 03/05/89
(Compatibilità Elettromagnetica) e
successive modificazioni
AssistenzaAnomaliePrecauzioni ManutenzioneProgrammi DetersiviInstallazione Descrizione
63
Page 64
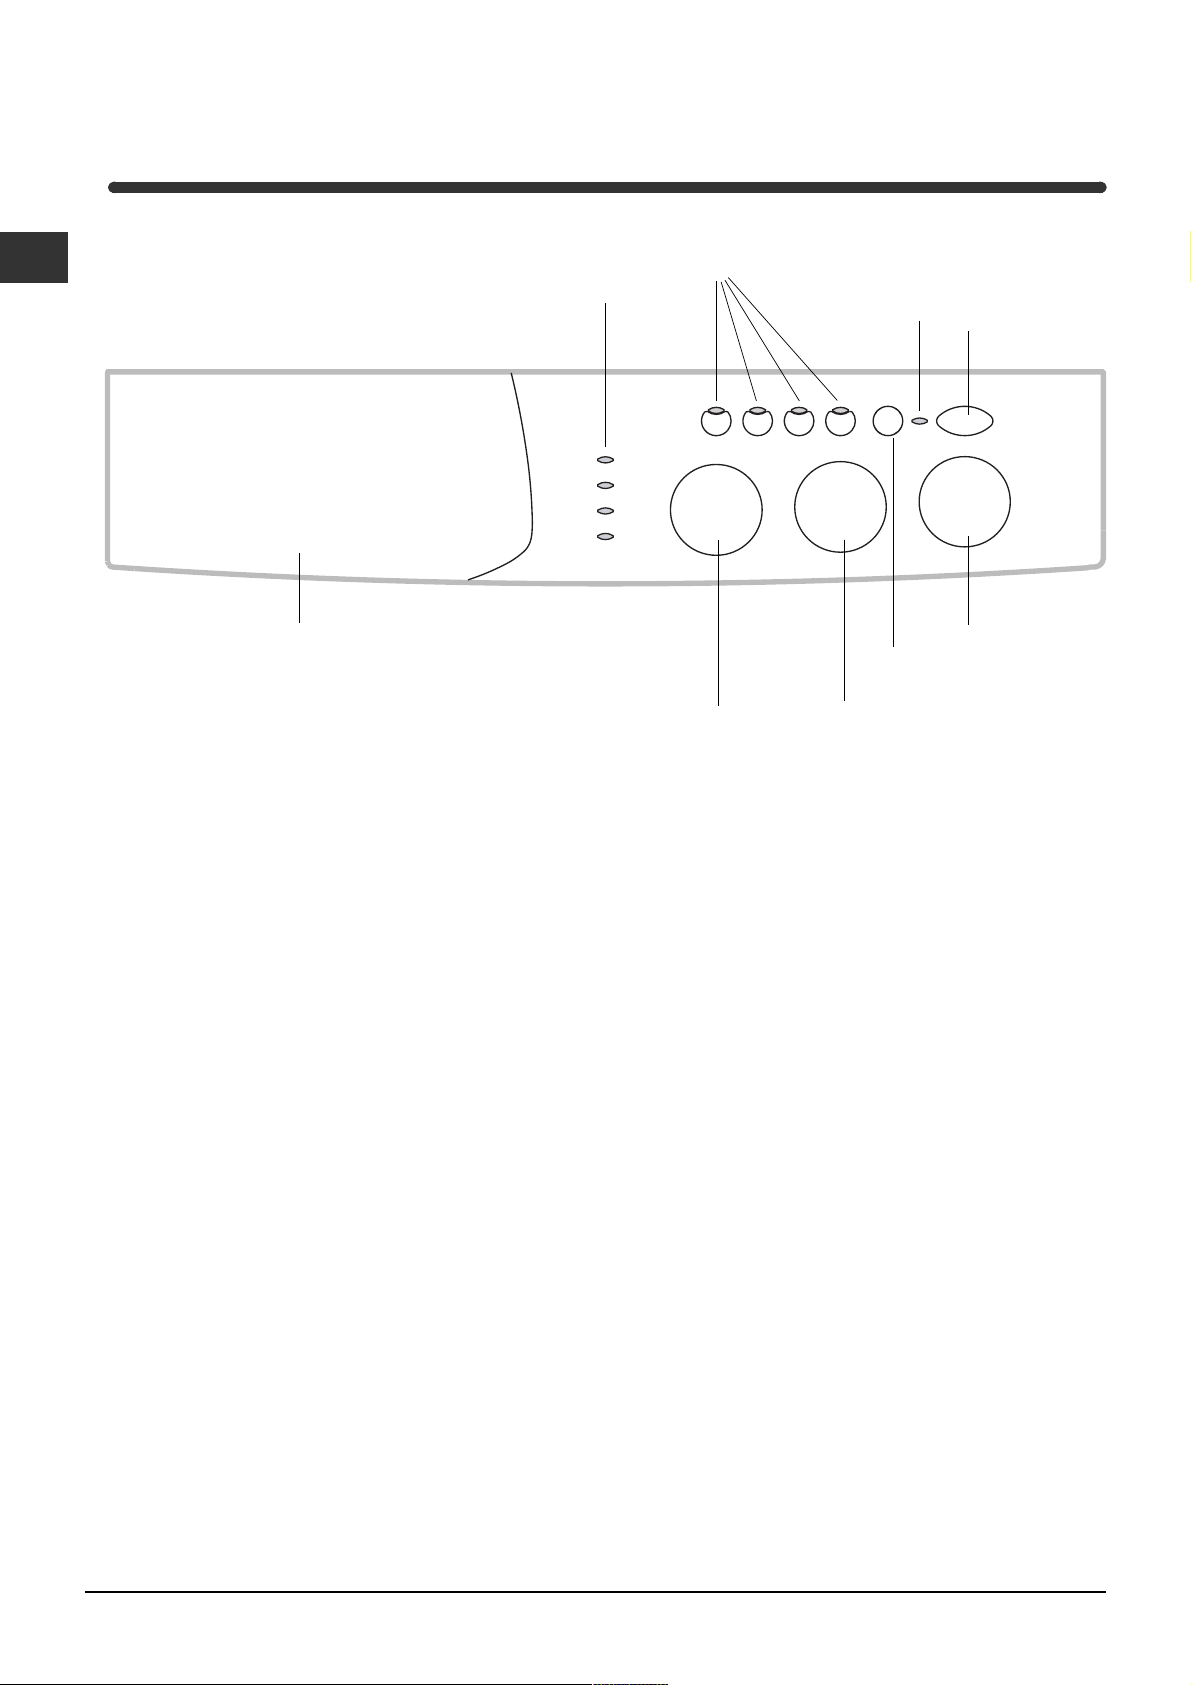
Descrizione
della lavabiancheria
Pannello di controllo
I
Cassetto dei detersivi
Cassetto dei detersivi per caricare detersivi e
additivi (vedi pag. 68).
Tasti
FUNZIONE
Spia
Spie
Manopola
CENTRIFUGA
Tasto START/RESET per avviare i programmi o
annullare quanto erroneamente impostato.
ACCENSIONE/
OBLÒ BLOCCATO
Tasto
START/RESET
Manopola
TEMPERATURA
Tasto
ACCENSIONE/
SPEGNIMENTO
Manopola
PROGRAMMI
Spie per seguire lo stato di avanzamento del programma di lavaggio.
Se è stata impostata la funzione Delay Timer, indicheranno il tempo mancante allavvio del programma (vedi pag. 65).
Manopola CENTRIFUGA per impostare la centrifuga
o escluderla (vedi pag. 67).
Tasti FUNZIONE per selezionare le funzioni disponi-
bili. Il tasto relativo alla funzione selezionata rimarrà
acceso.
Manopola TEMPERATURA per impostare la temperatura o il lavaggio a freddo (vedi pag. 67).
Spia ACCENSIONE/OBLÒ BLOCCATO per capire
se la lavabiancheria è accesa e se loblò è apribile
(vedi pag. 65).
Tasto ACCENSIONE/SPEGNIMENTO per accen-
dere e spegnere la lavabiancheria.
Manopola PROGRAMMI per impostare i programmi
(vedi pag. 66).
Durante il programma la manopola resta ferma.
64
Page 65
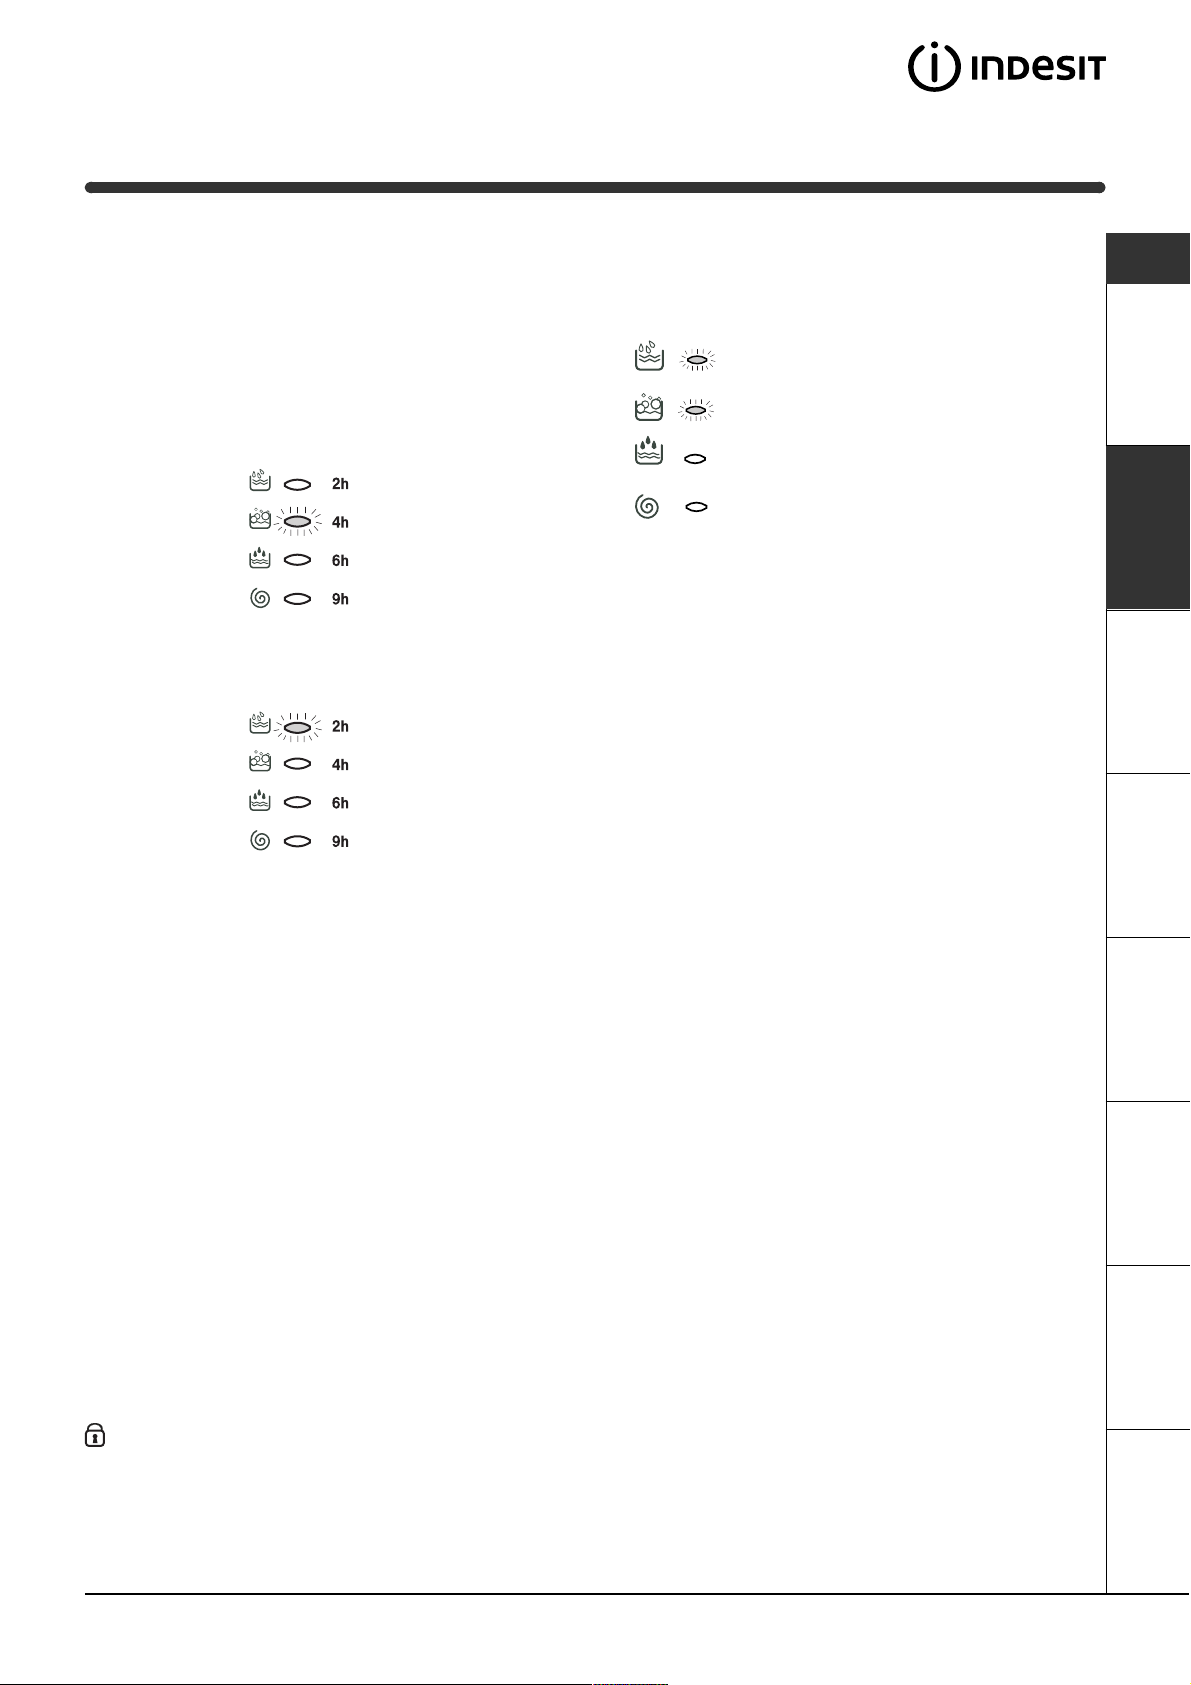
Spie
Le spie forniscono informazioni importanti.
Ecco che cosa dicono:
Fase in corso:
Durante il ciclo di lavaggio le spie si accenderanno
progressivamente per indicarne lo stato di avanzamento:
I
Ritardo impostato:
Se è stata attivata la funzione Delay Timer (vedi pag.
67), dopo avere avviato il programma, inizierà a lampeg-
giare la spia relativa al ritardo selezionato:
Col trascorrere del tempo verrà visualizzato il ritardo
residuo con il lampeggio della spia relativa:
Trascorso il ritardo selezionato la spia lampeggiante
si spengnerà e avrà inizio il programma impostato.
Prelavaggio
Lavaggio
Risciacquo
Centrifuga
Nota: durante la fase di scarico si illuminerà
la spia relativa alla fase Centrifuga.
Tasti funzione
I TASTI FUNZIONE fungono anche da spie.
Selezionando una funzione il relativo tasto si illuminerà.
Se la funzione selezionata non è compatibile con il
programma impostato il tasto lampeggerà e la
funzione non verrà attivata.
Nel caso venga impostata una funzione incompatibile con unaltra precedentemente selezionata rimarrà
attiva solo lultima scelta.
Spia ACCENSIONE/OBLÒ BLOCCATO:
La spia accesa indica che loblò è bloccato per impedire aperture accidentali; per evitare danni è necessario
attendere che la spia lampeggi prima di aprire loblò.
Il lampeggio veloce della spia ACCENSIONE/OBLÒ BLOCCATO contemporaneo a quello di almeno unaltra
spia segnala unanomalia. Chiamare lAssistenza Tecnica.
AssistenzaAnomaliePrecauzioni ManutenzioneProgrammi DetersiviInstallazione Descrizione
65
Page 66
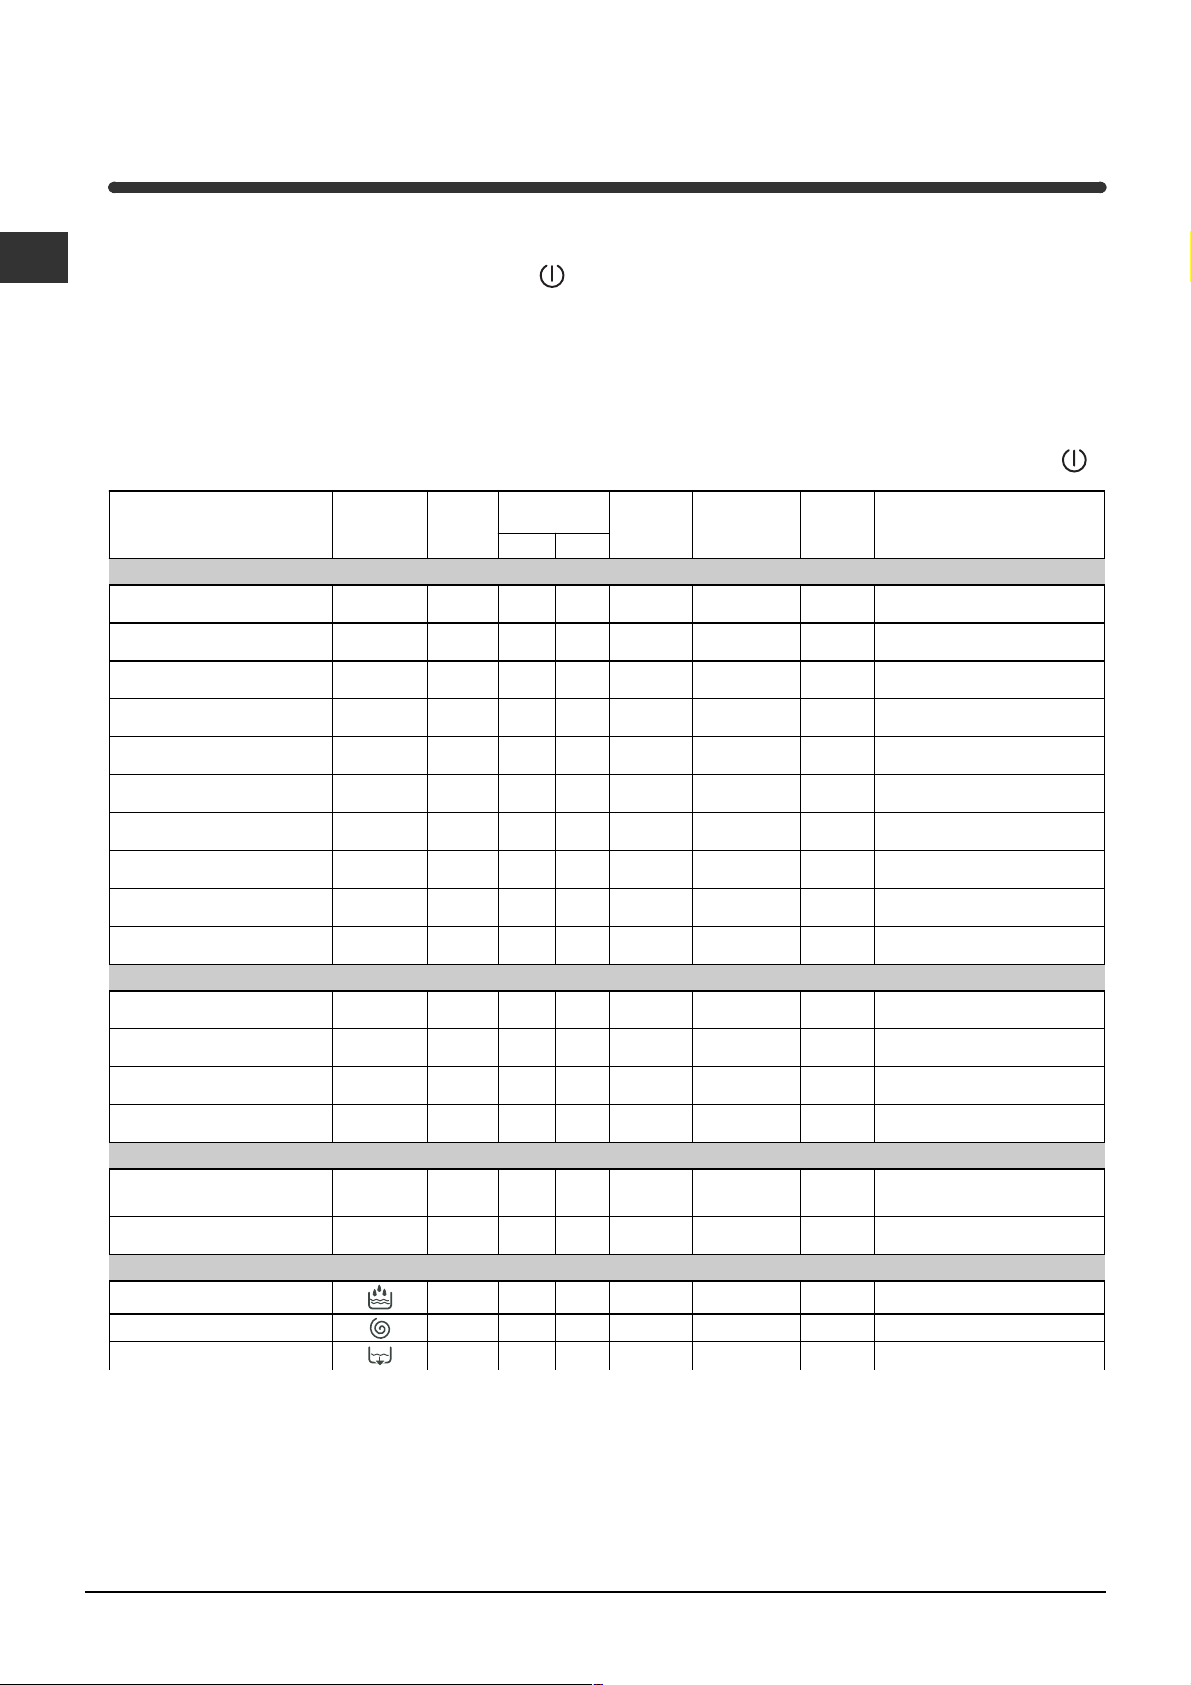
Avvio e Programmi
In breve: avviare un programma
I
1. Accendere la lavabiancheria premendo il tasto .
Tutte le spie si accenderanno per qualche
secondo, poi si spengono e la spia ACCENSIONE/
OBLÒ BLOCCATO inizierà a lampeggiare.
2. Caricare la biancheria e chiudere loblò.
3. Impostare con la manopola PROGRAMMI il
programma desiderato.
4. Impostare la temperatura di lavaggio (vedi pag. 67).
Tabella dei programmi
Natura dei tessuti
e dello sporco
Programmi
Te m p e ratura
Detersivo
prelav. lavag.
5. Impostare la velocità di centrifuga (vedi pag. 67).
6. Versare detersivo e additivi (vedi pag. 68).
7. Avviare il programma premendo il tasto
START/RESET.
Per annullare il ciclo impostato premere il tasto
START/RESET per 2 secondi.
8. Al termine del programma la spia ACCENSIONE/
OBLÒ BLOCCATO lampeggerà indicando che
loblò è apribile. Estrarre la biancheria e lasciare
loblò socchiuso per far asciugare il cestello.
Spegnere la lavabiancheria premendo il tasto
Ammorbi-
dente
Opzione
Antimacchia /
Candeggina
Durata
del ciclo
(minuti)
Descrizione del ciclo di
lavaggio
Standard
Bian chi estremamen te sporch i
(lenzuola, tovaglie, ecc.)
Bian chi estremamen te sporch i
(lenzuola, tovaglie, ecc.)
Bian chi e colorati resistenti
molto sporchi
Bian chi e colorati delicati
molto sporchi
Bianchi poco sporchi e colori
delicati (camice, maglie, ecc.)
Colori resistenti molto sporchi
(biancheria per neonati, ecc.)
Colori resistenti molto sporchi
(biancheria per neonati, ecc.)
Colori delicati (bianch eria di
tutti i tipi leggermente sporca)
Lana
Tessuti molto delicati (tende,
seta, viscosa, ecc.)
1
2
2
2
3
4
4
5
6
7
90°C
90°C
60°C
40°C
40°C
60°C Delicata
40°C Delicata
40°C Delicata
40°C
30°C
Delicata /
Tradizionale
Delicata /
Tradizionale
Delicata /
Tradizionale
Delicata /
Tradizionale
Prelavaggio, lavaggio, risciacqui,
135
centrifughe intermedie e finale
Lavaggio, risciacqui,
125
centrifughe intermedie e finale
Lavaggio, risciacqui,
110
centrifughe intermedie e finale
Lavaggio, risciacqui,
105
centrifughe intermedie e finale
Lavaggio, risciacqui,
70
centrifughe intermedie e finale
Lavaggio, risciacqui,
75
antipiega o centrifuga delicata
Lavaggio, risciacqui,
60
antipiega o centrifuga delicata
Lavaggio, risciacqui,
60
antipiega o centrifuga delicata
Lavaggio, risciacqui,
50
antipiega o centrifuga delicata
Lavaggio, risciacqui,
45
antipiega o scarico
Time 4 you
Bian chi e colorati resistenti
molto sporchi
Bianchi poco sporchi e colori
delicati (camice, maglie, ecc.)
Colori delicati (bianch eria di
tutti i tipi leggermente sporca)
Colori delicati (bianch eria di
tutti i tipi leggermente sporca)
10
11
8
9
60°C
40°C
°C
40
30°C 30
Lavaggio, risciacqui,
65
centrifughe intermedie e finale
Lavaggio, risciacqui,
55
centrifughe intermedie e finale
Lavaggio, risciacqui,
45
centrifuga delicata
Lavaggio, risciacqui,
e cen trifuga delicata
Sport
Scarpe sportive
Tessu ti per abb igliament o
sportivo (Tute, calzoncini, ecc.)
PROGRAMMI PARZIALI
Risciacquo
Centrifuga Scarico e centrifuga
Scarico Scarico
(MAX. 2 paia)
12
13
°C
30
30°C 60
50
Delicata /
Tradizionale
Lavaggio a fredd
detersivo), lavaggio, risciacqui,
e centrifuga delicata
Lavaggio, risciacqui,
centrifughe intermedie e finale
Risciacqui e centrifuga
.
o (senza
Note
-Per i programmi 8 e 9 è consigliabile non superare un carico di biancheria di 3,5 kg.
-Per il programma 13 è consigliabile non superare un carico di biancheria di 2 kg.
-Per la descrizione dellantipiega:
vedi Stira meno, pagina a fianco. I dati riportati nella tabella hanno valore indicativo.
Programma speciale
4ABHAID(programma 11 per Sintetici) è studiato per lavare capi leggermente sporchi in poco tempo: dura solo 30
minuti e fa così risparmiare energia e tempo. Impostando il programma (11 a 30°C) è possibile lavare insieme tessuti di
diversa natura (esclusi lana e seta) con un carico massimo di 3 kg. Si consiglia l'uso di detersivo liquido.
66
Page 67
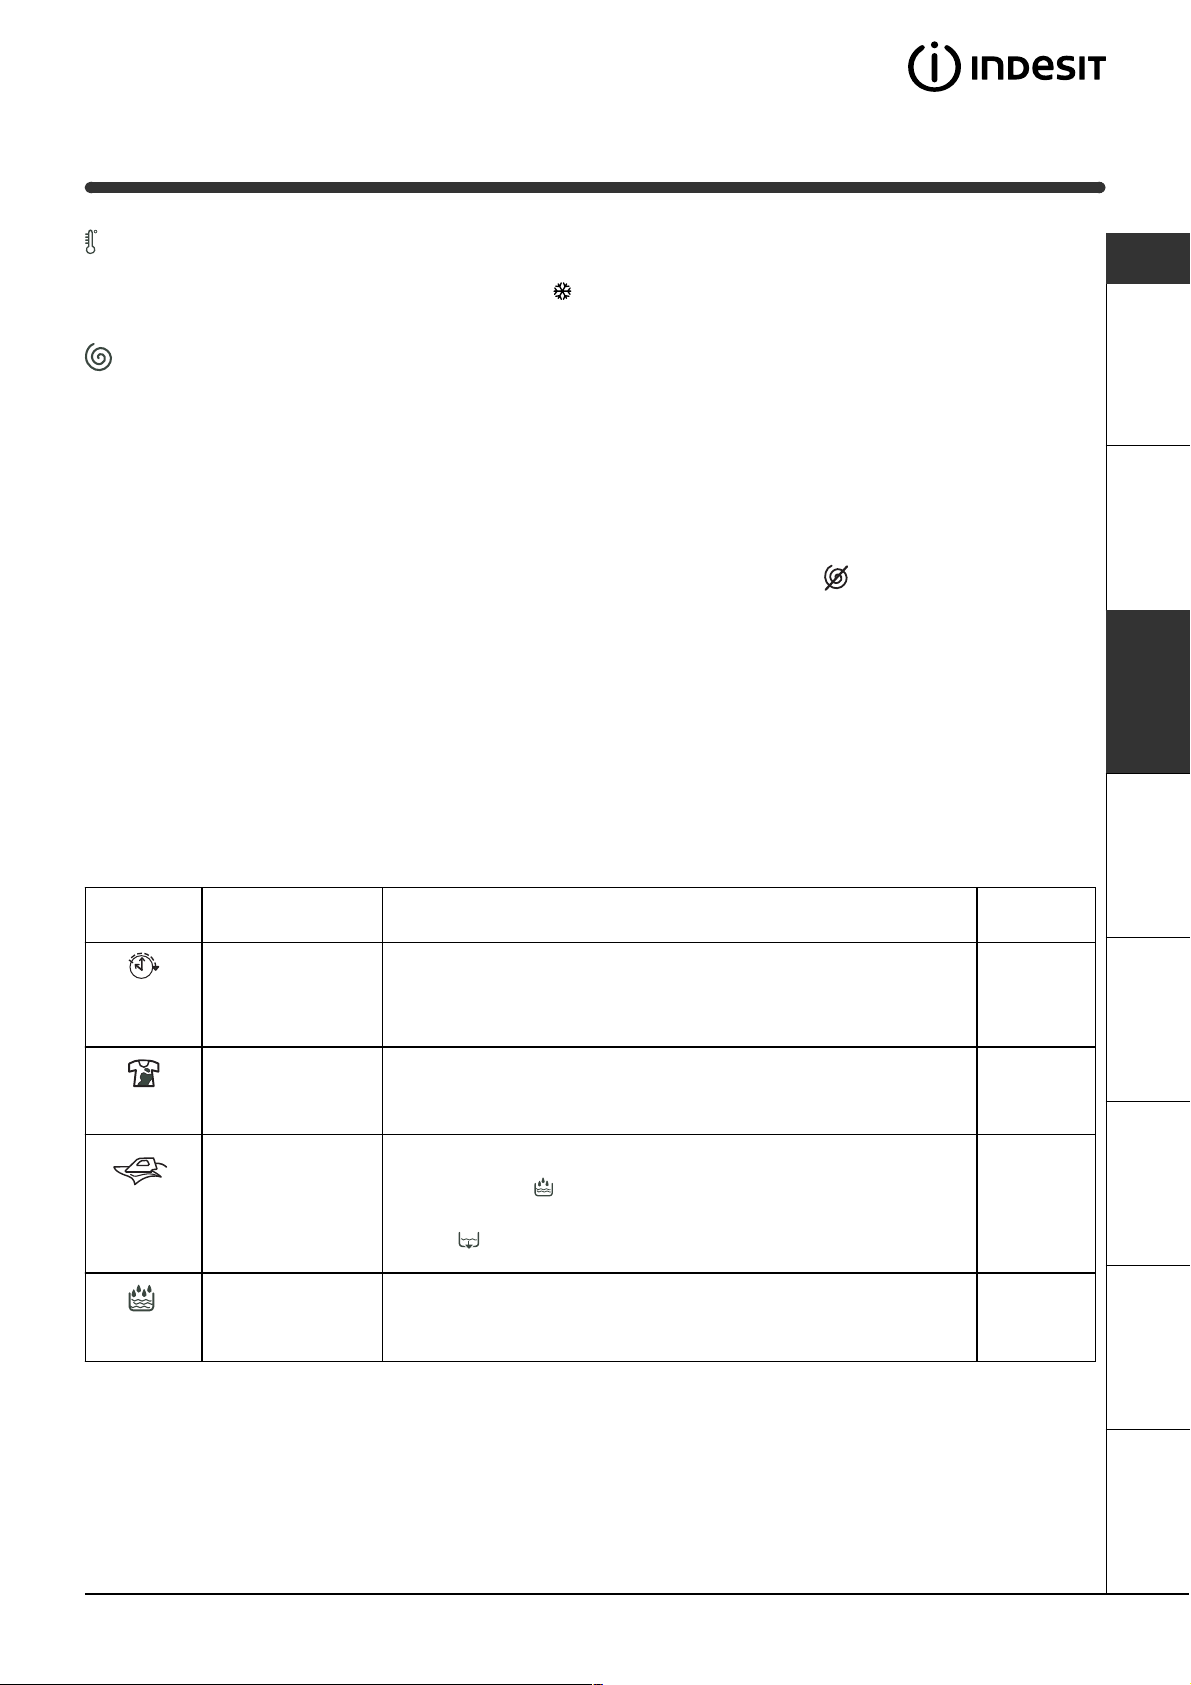
Personalizzazioni
C
Impostare la temperatura
Ruotando la manopola TEMPERATURA si imposta la temperatura di lavaggio (vedi Tabella dei programmi a pag. 66).
La temperatura si può ridurre sino al lavaggio a freddo (
).
Impostare la centrifuga
Ruotando la manopola CENTRIFUGA si imposta la velocità di centrifuga del programma selezionato.
Le velocità massime previste per i programmi sono:
Programmi Velocità massima
Cotone 1200 giri al minuto
Sintetici 800 giri al minuto
Lana 600 giri al minuto
Seta no
La velocità di centrifuga può essere ridotta, oppure esclusa selezionando il simbolo
.
La macchina impedirà automaticamente di effettuare una centrifuga maggiore a quella massima prevista per
ogni programma.
Funzioni
Le varie funzioni di lavaggio previste dalla lavabiancheria permettono di ottenere la pulizia e il bianco desiderati.
Per attivare le funzioni:
1. premere il tasto relativo alla funzione desiderata, secondo la tabella sottostante;
2. laccensione del tasto relativo segnala che la funzione è attiva.
Nota: Il lampeggio veloce del tasto indica che la funzione relativa non è selezionabile per il programma impostato.
I
Funzioni Effetto Note per l'uso
Premere più volt e il tas t o fino a far acccendere la spia relativa al ritardo
desiderato.
Alla quinta pressione del tasto la funzione si disattiverà.
N.B.: Una volta premuto il tasto Start/Reset, si può modificare il
valore del ritardo solo diminuendolo.
Ricordarsi di versare la candeggina nella vaschetta aggiuntiva 4
(
vedi pag. 68
Non è compatibile con l'opzione STIRA MENO.
Impostando questa funzione, i programmi 4, 5, 6, 7 si
interromperanno con il bucato in ammollo (Antipiega) e la spia della
fase Risciacquo lampeggerà:
- per completare il ciclo premere il tasto START/RESET;
- per effettuare solo lo scarico posizionare la manopola sul simbolo
relativo e premere il tasto START/RESET.
Non è compatibile con l'opzione ANTIMACCHIA.
E' consigliata con lavabiancheria a pieno carico o con dosi elevate
di detersivo.
).
Delay Ti mer
An timacchia
Stira meno
Extra
Ri sciacqu o
Ritarda l'avvio
della macchina
sino a 9 ore.
Ciclo di candeggio
adatto a eliminare
le macchie più
resistenti.
Riduce le pieghe
sui tessuti,
agevolando
la stiratura.
Aumenta l'efficacia
del risciacquo.
Attiva con i
programmi:
Tutt i
2, 3, 4, 5,
Risciacquo.
3, 4, 5, 6, 7,
8, 9, 10,
Risciacquo.
1, 2, 3, 4,
5, 8, 9,
10,12, 13
Risciacquo.
AssistenzaAnomaliePrecauzioni ManutenzioneProgrammi DetersiviInstallazione Descrizione
67
Page 68
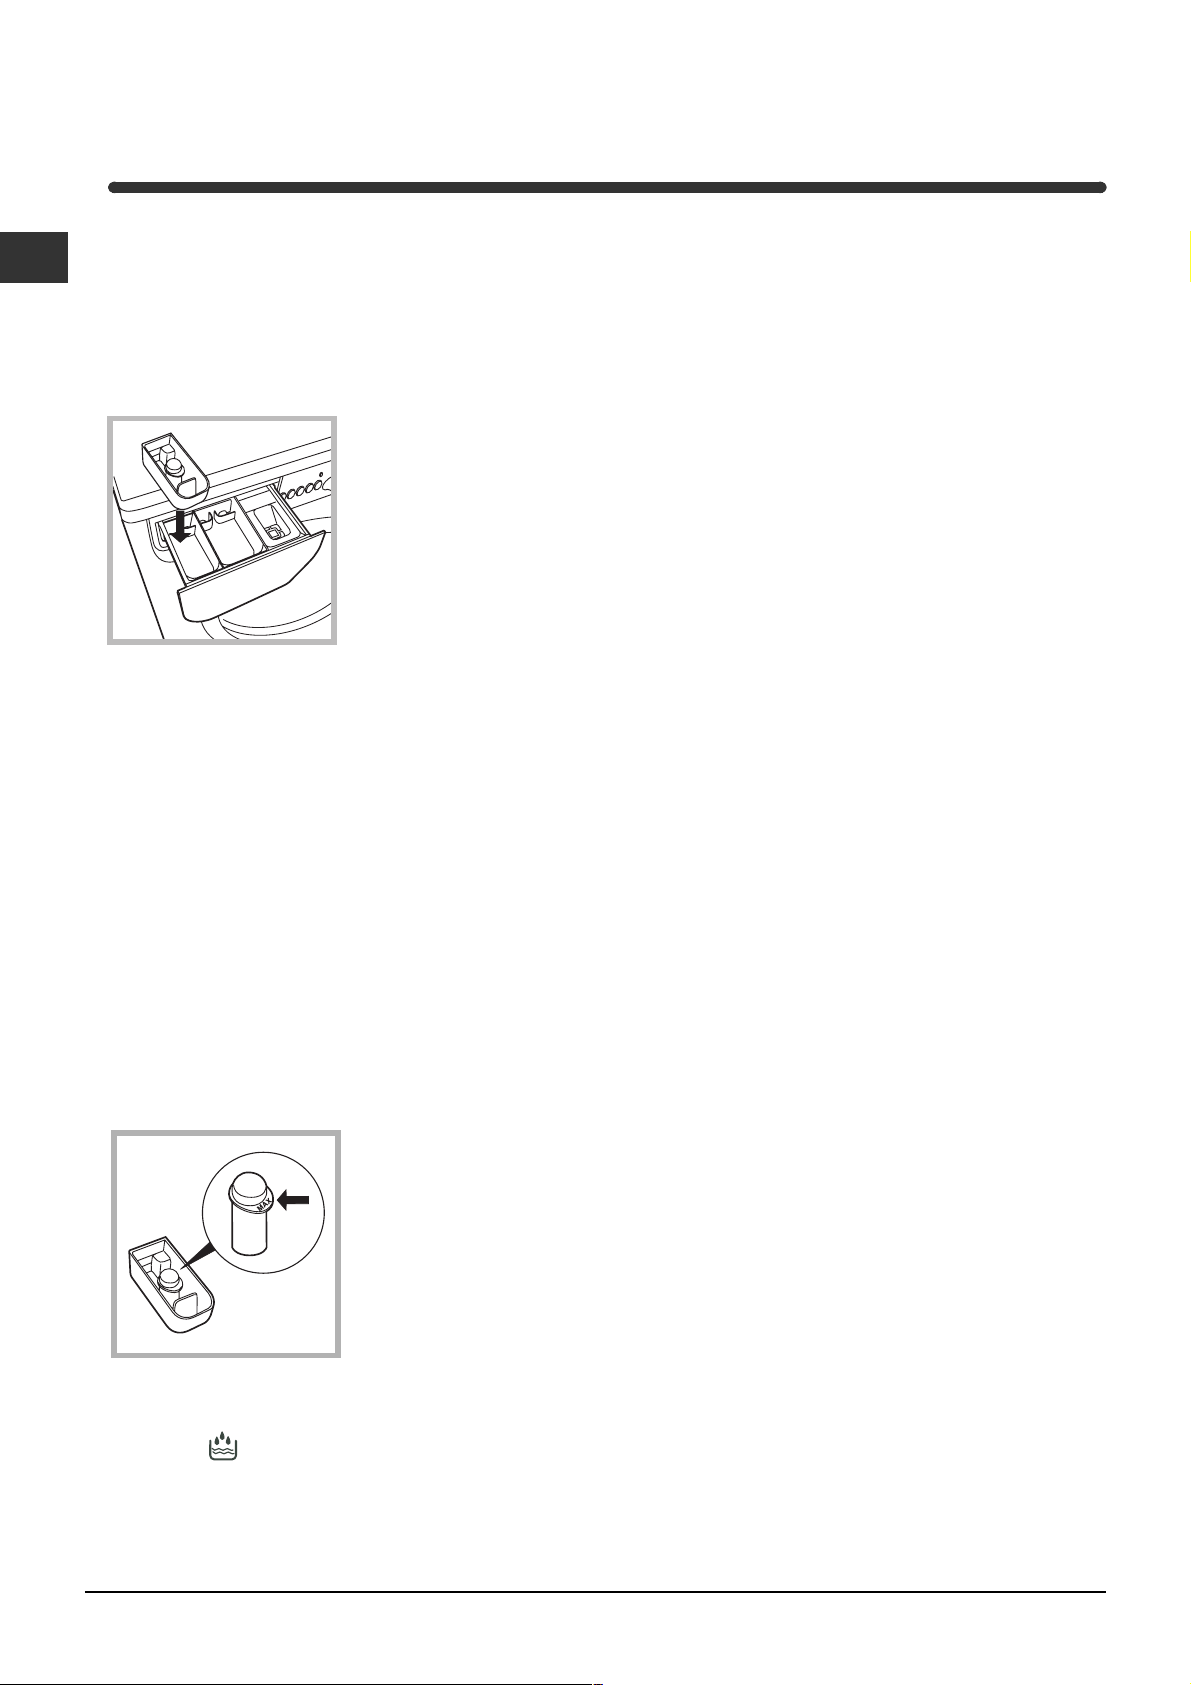
Detersivi e biancheria
Cassetto dei detersivi
I
Il buon risultato del lavaggio dipende anche dal
corretto dosaggio del detersivo: eccedendo non si
lava in modo più efficace e si contribuisce a incrostare le parti interne della lavabiancheria e a inquinare lambiente.
Estrarre il cassetto dei
4
detersivi e inserire il
detersivo o ladditivo
come segue.
3
2
1
vaschetta 1: Detersivo per prelavaggio
(in polvere)
Prima di versare il detersivo verificare che non sia
inserita la vaschetta aggiuntiva 4.
vaschetta 2: Detersivo per lavaggio
(in polvere o liquido)
Il detersivo liquido va versato solo prima dellavvio.
vaschetta 3: Additivi (ammorbidente, ecc.)
Lammorbidente non deve fuoriuscire dalla griglia.
vaschetta aggiuntiva 4: Candeggina
Non usare detersivi per il lavaggio a mano, perché
formano troppa schiuma.
Ciclo candeggio
Preparare la biancheria
Suddividere la biancheria secondo:
- il tipo di tessuto / il simbolo sulletichetta.
- i colori: separare i capi colorati da quelli bianchi.
Vuotare le tasche e controllare i bottoni.
Non superare i valori indicati, riferiti al peso della
biancheria asciutta:
Tessuti resistenti: max 4,5 kg
Tessuti sintetici: max 2,5 kg
Tessuti delicati: max 2 kg
Lana: max 1 kg
Quanto pesa la biancheria?
1 lenzuolo 400-500 gr.
1 federa 150-200 gr.
1 tovaglia 400-500 gr.
1 accappatoio 900-1.200 gr.
1 asciugamano 150-250 gr.
Capi particolari
Tende: piegarle e sistemarle dentro una federa o un
sacchetto a rete. Lavarle da sole senza superare il
mezzo carico. Utilizzare il programma 7 che esclude
in automatico la centrifuga.
Piumini e giacche a vento: se limbottitura è
doca o danatra si possono lavare nella
lavabiancheria. Rivoltare i capi e fare un carico
massimo di 2-3 kg, ripetendo il risciacquo una o due
volte e utilizzando la centrifuga delicata.
Lana: per ottenere i migliori risultati utilizzare un
detersivo specifico e non superare 1kg di carico.
La candeggina tradizionale si usa per i tessuti
resistenti bianchi, quella delicata per i tessuti
colorati, i sintetici e per la lana.
Inserire la vaschetta
aggiuntiva 4, in dotazione, nella vaschetta 1.
Nel dosare la
candeggina non superare il livello max
indicato sul perno
centrale (vedi figura).
Per effettuare solo il candeggio versare la candeggina
nella vaschetta aggiuntiva 4 e impostare il programma
Risciacquo
Per candeggiare durante il lavaggio versare il detersivo e gli additivi, impostare il programma desiderato
e attivare la funzione Antimacchia (vedi pag. 67).
Lutilizzo della vaschetta aggiuntiva 4 esclude il
prelavaggio.
.
68
Page 69

Precauzioni e consigli
La lavabiancheria è stata progettata e costruita in
conformità alle norme internazionali di sicurezza.
Queste avvertenze sono fornite per ragioni di
sicurezza e devono essere lette attentamente.
Sicurezza generale
Questo apparecchio è stato concepito esclusiva-
mente per un uso di tipo domestico.
La lavabiancheria deve essere usata solo da
persone adulte e secondo le istruzioni riportate
in questo libretto.
Non toccare la macchina a piedi nudi o con le
mani o i piedi bagnati o umidi.
Non staccare la spina dalla presa della corrente
tirando il cavo, bensì afferrando la spina.
Non aprire il cassetto dei detersivi mentre la
macchina è in funzione.
Non toccare lacqua di scarico, che può
raggiungere temperature elevate.
Non forzare in nessun caso loblò: potrebbe
danneggiarsi il meccanismo di sicurezza che
protegge da aperture accidentali.
In caso di guasto, in nessun caso accedere ai
meccanismi interni per tentare una riparazione.
Controllare sempre che i bambini non si avvicinino
alla macchina in funzione.
Durante il lavaggio loblò tende a scaldarsi.
Risparmiare e rispettare lambiente
I
Tecnologia a servizio dellambiente
Se nelloblò si vede poca acqua è perché con la
nuova tecnologia Indesit basta meno della metà
dellacqua per raggiungere il massimo pulito: uno
scopo raggiunto per rispettare lambiente.
Risparmiare detersivo, acqua,
energia e tempo
Per non sprecare risorse bisogna utilizzare la
lavabiancheria con il massimo carico. Un carico
pieno al posto di due mezzi fa risparmiare fino al
50% di energia.
Il prelavaggio è necessario solo per biancheria
molto sporca. Evitarlo fa risparmiare detersivo,
tempo, acqua e tra il 5 e il 15% di energia.
Trattando le macchie con uno scioglimacchia o
lasciandole in ammollo prima del lavaggio, si
riduce la necessità di lavare ad alte temperature.
Un programma a 60°C invece di 90°C o uno a
40°C invece di 60°C, fa risparmiare fino al 50% di
energia.
Dosare bene il detersivo in base alla durezza
dellacqua, al grado di sporco e alla quantità di
biancheria evita sprechi e protegge lambiente:
pur biodegradabili, i detersivi contengono elementi
che alterano lequilibrio della natura. Inoltre evitare
il più possibile lammorbidente.
Effettuando i lavaggi dal tardo pomeriggio fino alle
prime ore del mattino si collabora a ridurre il
carico di assorbimento delle aziende elettriche.
La funzione Delay Timer (vedi pag. 67) aiuta molto
a organizzare i lavaggi in tal senso.
Se devessere spostata, lavorare in due o tre
persone con la massima attenzione. Mai da soli
perché la macchina è molto pesante.
Prima di introdurre la biancheria controlla che il
cestello sia vuoto.
Smaltimento
Smaltimento del materiale di imballaggio:
attenersi alle norme locali, così gli imballaggi
potranno essere riutilizzati.
Smaltimento della vecchia lavabiancheria:
prima di rottamarla, renderla inutilizzabile tagliando
il cavo di alimentazione elettrica e staccando
loblò.
Se il bucato deve essere asciugato in un
asciugatore, selezionare unalta velocità di
centrifuga. Poca acqua nel bucato fa rispamiare
tempo ed energia nel programma di asciugatura.
AssistenzaAnomaliePrecauzioni ManutenzioneProgrammi DetersiviInstallazione Descrizione
69
Page 70
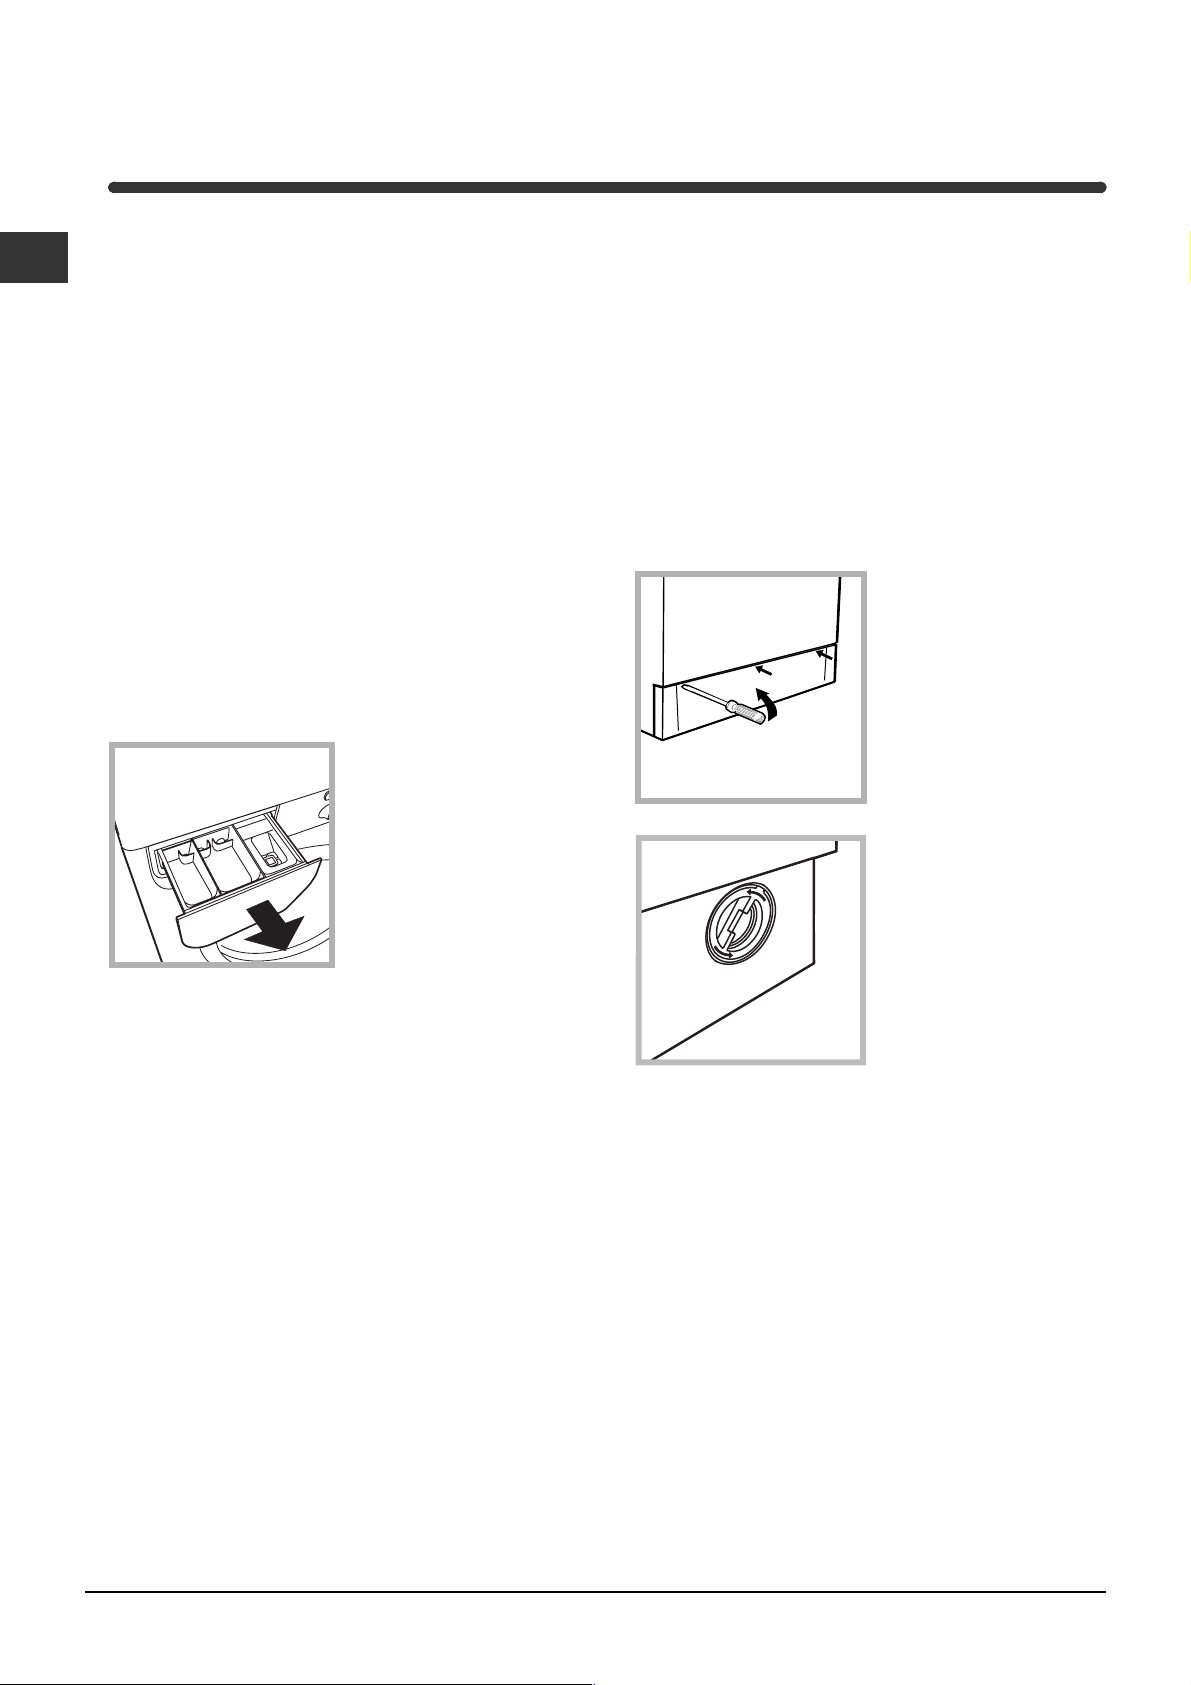
Manutenzione e cura
Escludere acqua e corrente elettrica
I
Chiudere il rubinetto dellacqua dopo ogni
lavaggio. Si limita così lusura dellimpianto
idraulico della lavabiancheria e si elimina il pericolo
di perdite.
Staccare la spina della corrente quando si
pulisce la lavabiancheria e durante i lavori di
manutenzione.
Pulire la lavabiancheria
La parte esterna e le parti in gomma possono
essere puliti con un panno imbevuto di acqua tiepida
e sapone. Non usare solventi o abrasivi.
Pulire il cassetto dei detersivi
Sfilare il cassetto sollevandolo e tirandolo
verso lesterno (vedi
figura).
Lavarlo sotto lacqua
corrente; questa pulizia
va effettuata
frequentemente.
Pulire la pompa
La lavabiancheria è dotata di una pompa
autopulente che non ha bisogno di manutenzione.
Può però succedere che piccoli oggetti (monete,
bottoni) cadano nella precamera che protegge la
pompa, situata nella parte inferiore di essa.
Assicurarsi che il ciclo di lavaggio sia terminato e
staccare la spina.
Per accedere alla precamera:
1. rimuovere il pannello
di copertura sul lato
anteriore della
lavabiancheria con
lausilio di un giravite
(vedi figura);
2. svitare il coperchio
ruotandolo in senso
antiorario (vedi figura): è
normale che fuoriesca
un po dacqua;
Curare oblò e cestello
Lasciare sempre socchiuso loblò per evitare che
si formino cattivi odori.
3. pulire accuratamente linterno;
4. riavvitare il coperchio;
5. rimontare il pannello assicurandosi, prima di
spingerlo verso la macchina, di aver inserito i ganci
nelle apposite asole.
Controllare il tubo di alimentazione
dellacqua
Controllare il tubo di alimentazione almeno una volta
allanno. Se presenta screpolature e fessure va
sostituito: durante i lavaggi le forti pressioni potrebbero provocare improvvise spaccature.
Non utilizzare mai tubi già usati.
70
Page 71

Anomalie e rimedi
Può accadere che la lavabiancheria non funzioni. Prima di telefonare allAssistenza (vedi pag. 72), controllare che
non si tratti di un problema facilmente risolvibile aiutandosi con il seguente elenco.
Anomalie:
La lavabiancheria
non si accende.
Il ciclo di lavaggio
non inizia.
La lavabiancheria non carica
acqua.
La lavabiancheria carica e
scarica acqua di continuo.
Possibili cause / Soluzione:
La spina non è inserita nella presa della corrente, o non abbastanza
da fare contatto.
In casa non cè corrente.
Loblò non è ben chiuso
Il tasto
Il tasto START/RESET non è stato premuto.
Il rubinetto dellacqua non è aperto.
Si è impostato un ritardo sullora di avvio (Delay Timer, vedi pag. 67).
Il tubo di alimentazione dellacqua non è collegato al rubinetto.
Il tubo è piegato.
Il rubinetto dellacqua non è aperto.
In casa manca lacqua.
Non cè sufficiente pressione.
Il tasto START/RESET non è stato premuto.
Il tubo di scarico non è installato fra 65 e 100 cm da terra (vedi pag. 63).
Lestremità del tubo di scarico è immersa nellacqua (vedi pag. 63).
Lo scarico a muro non ha lo sfiato daria.
Se dopo queste verifiche il problema non si risolve, chiudere il rubinetto
dellacqua, spegnere la lavabiancheria e chiamare lAssistenza. Se
labitazione si trova agli ultimi piani di un edificio, è possibile che si
verifichino fenomeni di sifonaggio, per cui la lavabiancheria carica e
scarica acqua di continuo. Per eliminare linconveniente sono disponibili
in commercio apposite valvole anti-sifonaggio.
non è stato premuto.
I
La lavabiancheria non scarica
o non centrifuga.
La lavabiancheria vibra
molto durante la centrifuga.
La lavabiancheria perde acqua.
La spia ACCENSIONE/OBLÒ
BLOCCATO lampeggia in modo
veloce contemporaneamente
ad almeno unaltra spia.
Si forma troppa schiuma.
Il programma non prevede lo scarico: con alcuni programmi occorre
avviarlo manualmente (vedi pag. 66).
È attiva la funzione Stira meno: per completare il programma
premere il tasto START/RESET (vedi pag. 67).
Il tubo di scarico è piegato (vedi pag. 63).
La conduttura di scarico è ostruita.
Il cestello, al momento dellinstallazione, non è stato sbloccato
correttamente (vedi pag. 62).
La lavabiancheria non è in piano (vedi pag. 62).
La lavabiancheria è stretta tra mobili e muro (vedi pag. 62).
Il tubo di alimentazione dellacqua non è ben avvitato (vedi pag. 62).
Il cassetto dei detersivi è intasato (per pulirlo vedi pag. 70).
Il tubo di scarico non è fissato bene (vedi pag. 63).
Chiamare lAssistenza perché sta segnalando unanomalia.
AssistenzaAnomaliePrecauzioni ManutenzioneProgrammi DetersiviInstallazione Descrizione
Il detersivo non è specifico per lavabiancheria (deve esserci la
dicitura per lavatrice, a mano e in lavatrice, o simili).
Il dosaggio è stato eccessivo.
71
Page 72
Assistenza
195042664.01
03 /2004 - Xerox Business Services
I
Prima di contattare lAssistenza:
Verificare se lanomalia può essere risolta da soli (vedi pag. 71);
Riavviare il programma per controllare se linconveniente è stato ovviato;
In caso negativo, contattare l'Assistenza tecnica autorizzata al numero telefonico indicato sul
certificato di garanzia.;
Non ricorrere mai a tecnici non autorizzati.
Comunicare:
il tipo di anomalia;
il modello della macchina (Mod.);
il numero di serie (S/N);
Queste informazioni si trovano sulla targhetta applicata nella parte posteriore della lavabiancheria.
Assistenza
72
 Loading...