

Page 1

Instructions for use
WASHING MACHINE
GB
English,1
Français,13
PL
Polski,37
Românã,49
WIL 1200 OT
F
RO
NL
Nederlands,25
Contents
GB
Installation, 2-3
Unpacking and levelling
Electric and water connections
Technical details
Washing machine description, 4-5
Detergent dispenser
Control panel
Running a wash cycle, 6
Programme table, 7
Detergents and laundry, 8
Preparing your laundry
Special items
Load-balancing system
Precautions and advice, 9
General safety
Disposal
Saving energy and respecting the environment
Care and maintenance, 10
Cutting off the water or electricity supply
Cleaning your appliance
Cleaning the detergent dispenser
Caring for your appliance door and drum
Cleaning the pump
Checking the water inlet hose
Troubleshooting, 11
Service, 12
Before calling for Assistance
1
Page 2
Installation
GB
Keep this instruction manual in a safe place for
future reference. Should the appliance be sold,
transferred or moved, make sure the instruction
manual accompanies the washing machine to inform
the new owner as to its operation and features.
Read these instructions carefully: they contain vital
information on installation, use and safety.
Unpacking and levelling
Unpacking
1. Unpack the washing machine.
2. Check whether the washing machine has been
damaged during transport. If this is the case, do not
install it and contact your retailer.
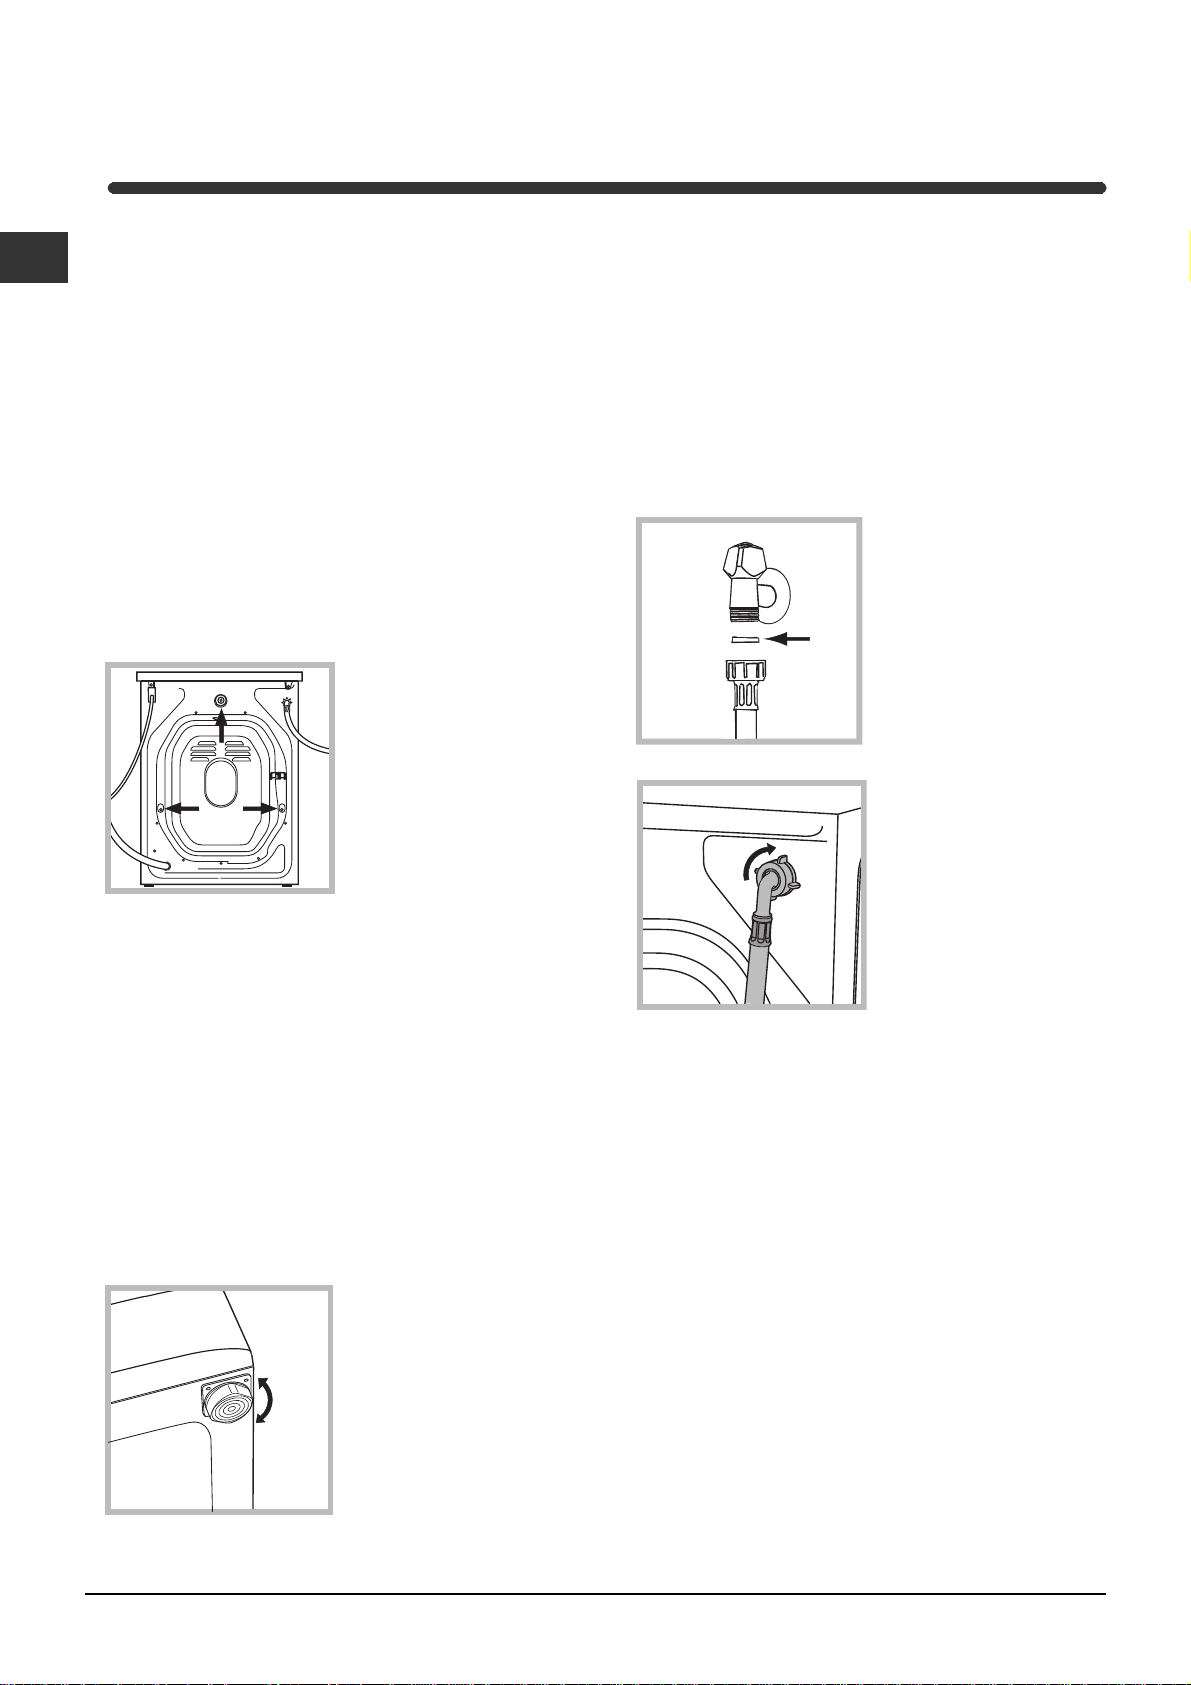
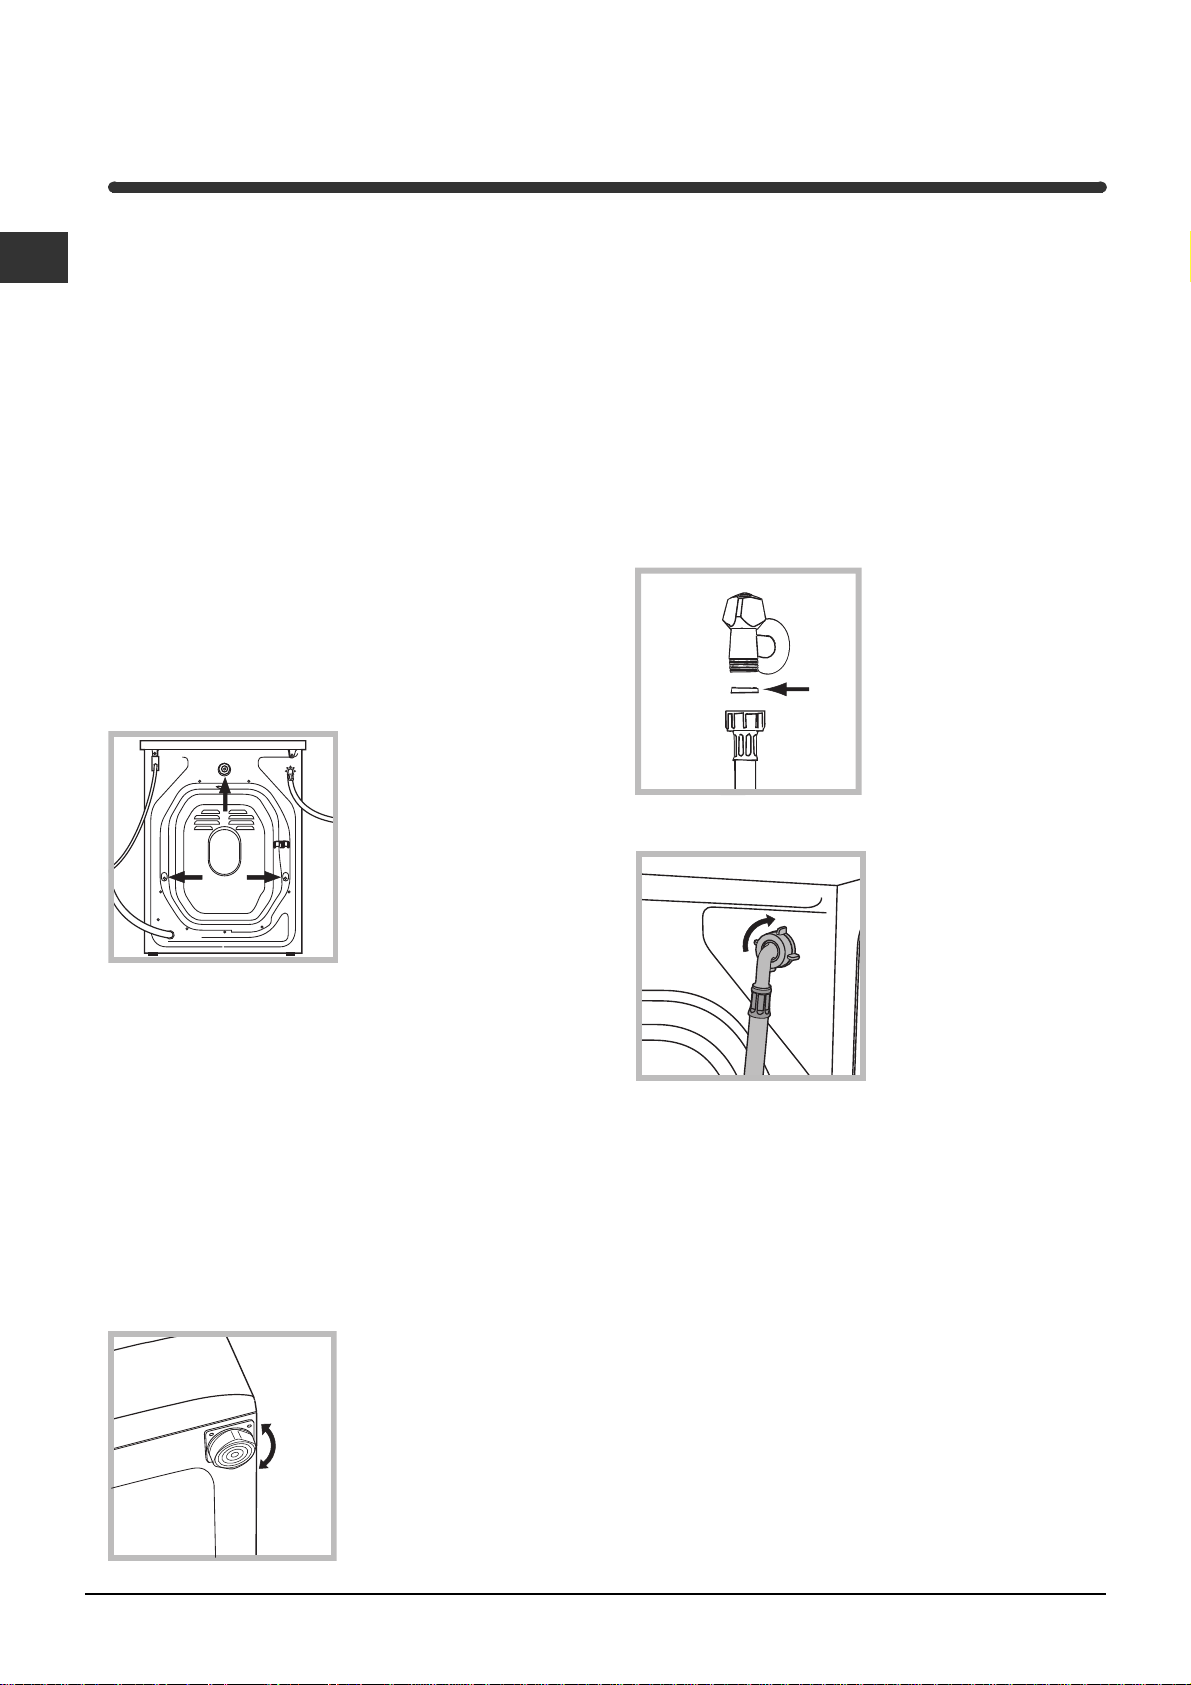
3. Remove the 3
protective screws and
the rubber washer with
the respective spacer,
situated on the rear of
the appliance (see
figure).
4. Seal the gaps using the plastic plugs provided.
5. Keep all the parts: you will need them again if the
washing machine needs to be moved to another
location.
Levelling your appliance correctly will provide it with
stability and avoid any vibrations, noise and shifting
during operation. If it is placed on a fitted or loose
carpet, adjust the feet in such a way as to allow
enough room for ventilation beneath the washing
machine.
Electric and water connections
Connecting the water inlet hose
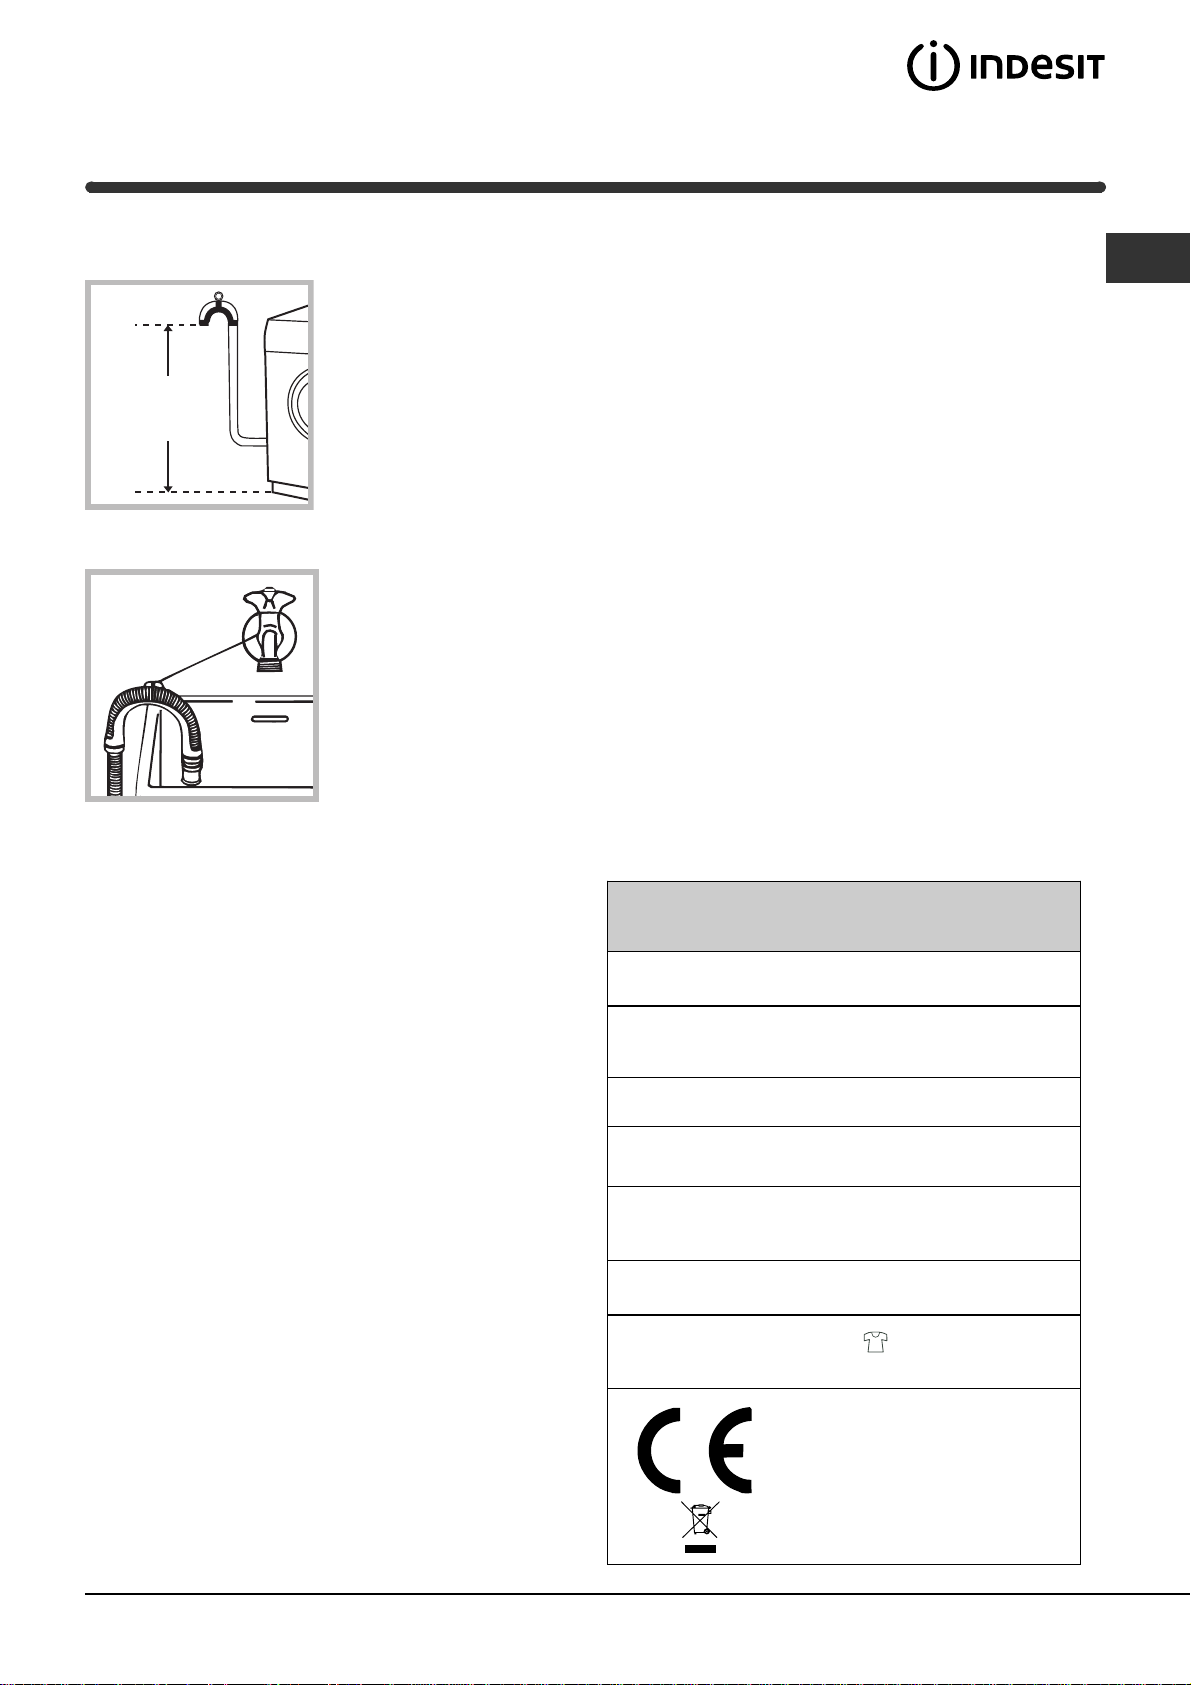
1. Insert seal A into the
end of the inlet hose
and screw the latter
onto a cold water tap
A
with a 3/4 gas threaded
mouth (see figure).
Before making the
connection, allow the
water to run freely until
it is perfectly clear.
2. Connect the other end
of the water inlet hose to
the washing machine,
screwing it onto the
appliance's cold water
inlet, situated on the top
right-hand side on the
rear of the appliance
(see figure).
Packaging materials are not children's toys.
Levelling
Your machine may make a considerable amount of
noise if the two front feet have not been adjusted
correctly.
1. Install the washing machine on a flat sturdy floor,
without resting it up against walls, furniture cabinets
or other.
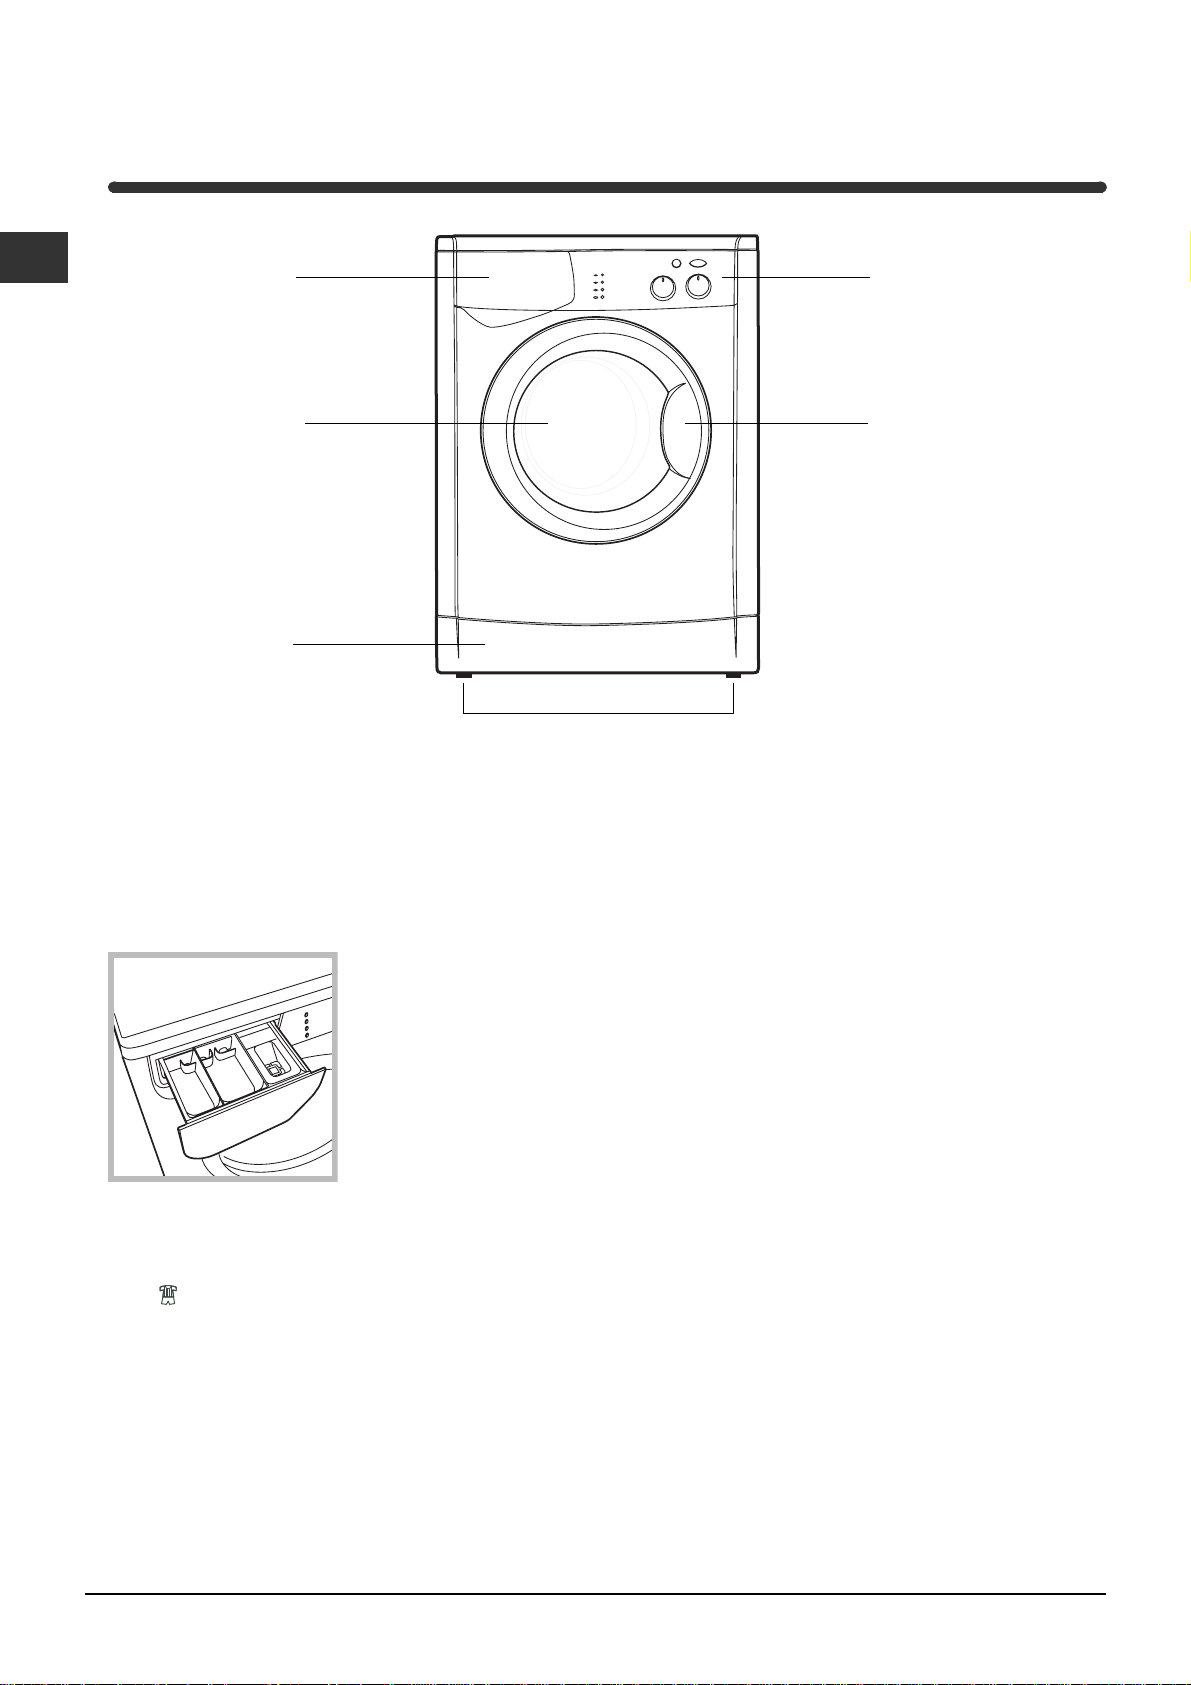
2. If the floor is not
perfectly level, compensate for any unevenness
by tightening or
loosening the adjustable
front feet (see figure);
the angle of inclination,
measured according to
the worktop, must not
exceed 2°.
2
3. Make sure there are no kinks or bends in the hose.
The water pressure at the tap must be within the
values indicated in the Technical details table
(on the next page).
If the water inlet hose is not long enough, contact
a specialist store or an authorised serviceman.
Page 3
Connecting the drain hose
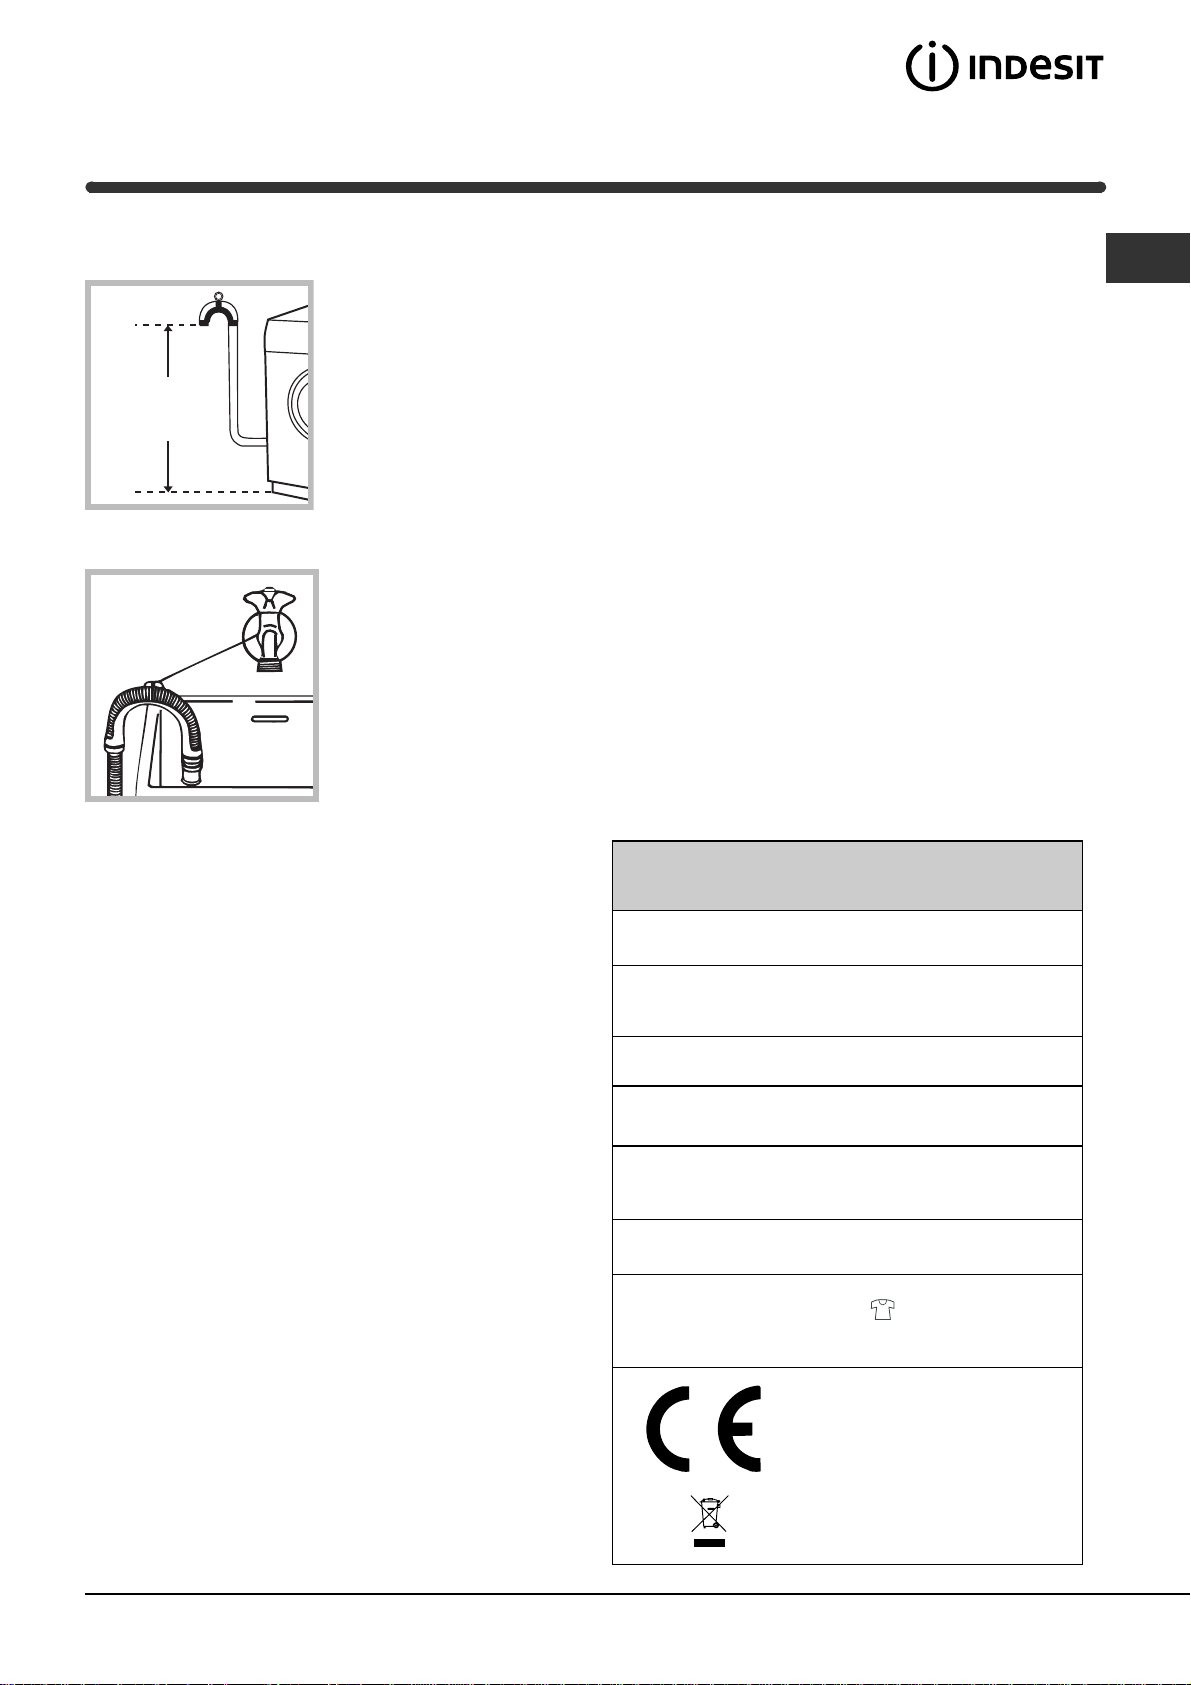
65 - 100 cm
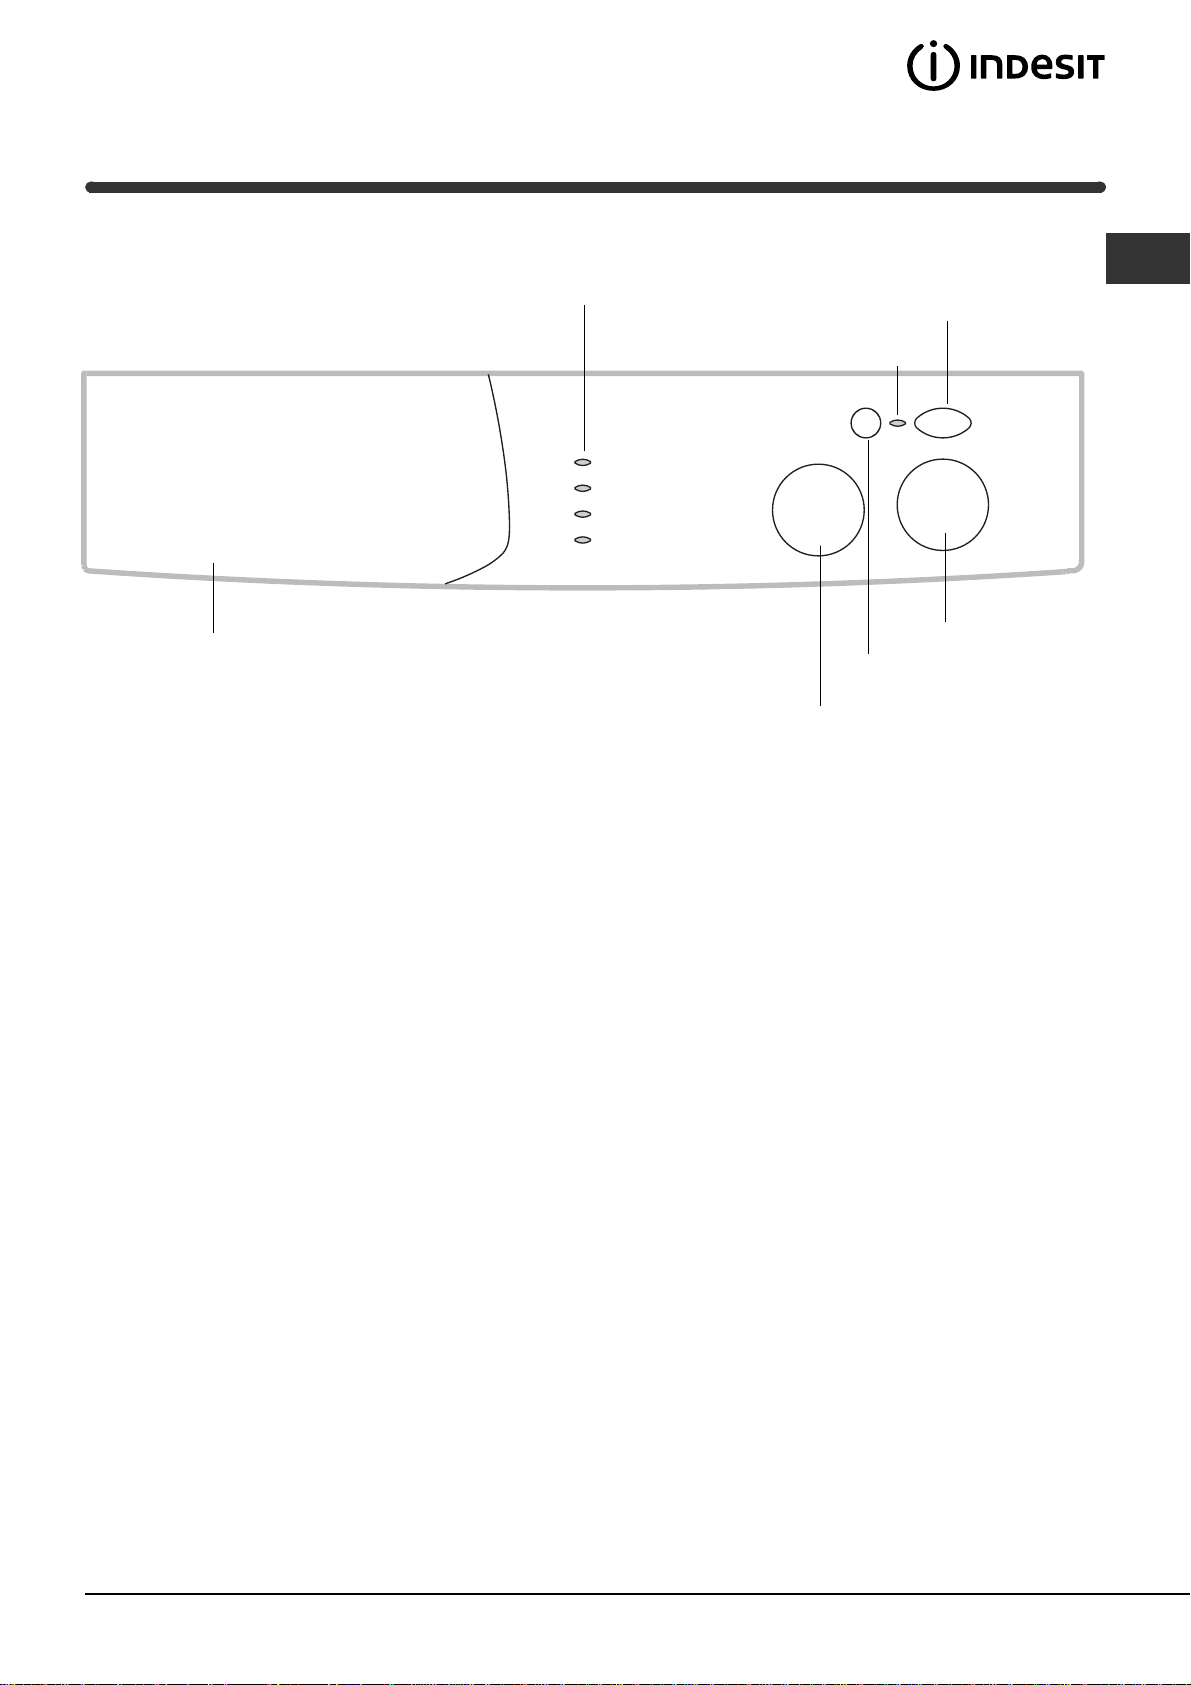
Connect the drain hose,
without bending it, to a
draining duct or a wall
drain situated between
65 and 100 cm from
the floor;
alternatively, place it
over the edge of a
basin, sink or tub,
fastening the duct
supplied to the tap (see
figure). The free end of
the hose should not be
underwater.
Do not use extensions or multiple sockets.
GB
The power supply cable must never be bent or
dangerously compressed.
The power supply cable must only be replaced by
an authorised serviceman.
Warning! The company denies all liability if and when
these norms are not respected.
We advise against the use of hose extensions; in
case of absolute need, the extension must have the
same diameter as the original hose and must not
exceed 150 cm in length.
Electric connection
Before plugging the appliance into the mains
socket, make sure that:
the socket is earthed and in compliance with the
applicable law;
the socket is able to sustain the appliance's
maximum power load indicated in the Technical
details table (on the right);
the supply voltage is included within the values i
ndicated on the Technical details table
(on the right);
the socket is compatible with the washing
machine's plug. If this is not the case, replace
the socket or the plug.
The washing machine should not be installed in an
outdoor environment, not even when the area is
sheltered, because it may be very dangerous to
leave it exposed to rain and thunderstorms.
When the washing machine is installed, the mains
socket must be within easy reach.
Technical details
Model
Dimensions
Capacity
Electric
connections
Wat er
connections
Spin speed
Control
programmes
according to
IEC456 directive
WIL 1200 OT
59.5 cm wide
85 cm high
52.5 cm deep
from 1 to 5 kg
voltage 220/230 Volts 50 Hz
maximum absorbed power 1850 W
maximum pressure 1 MPa (10 bar)
minimum pressure 0.05 MPa (0.5 bar)
drum capacity 46 litres
up to 1200 rpm
programme ; TIMER knob "auto";
run with a load of 5 kg.
This appliance is compliant with the
following European Community
Directives:
- 73/23/CEE of 19/02/73 (Low
Voltage) and subsequent amendments
- 89/336/CEE of 03/05/89
(Electromagnetic Compatibility) and
subsequent amendments
- 2002/96/CE
3
Page 4
Washing machine description
GB
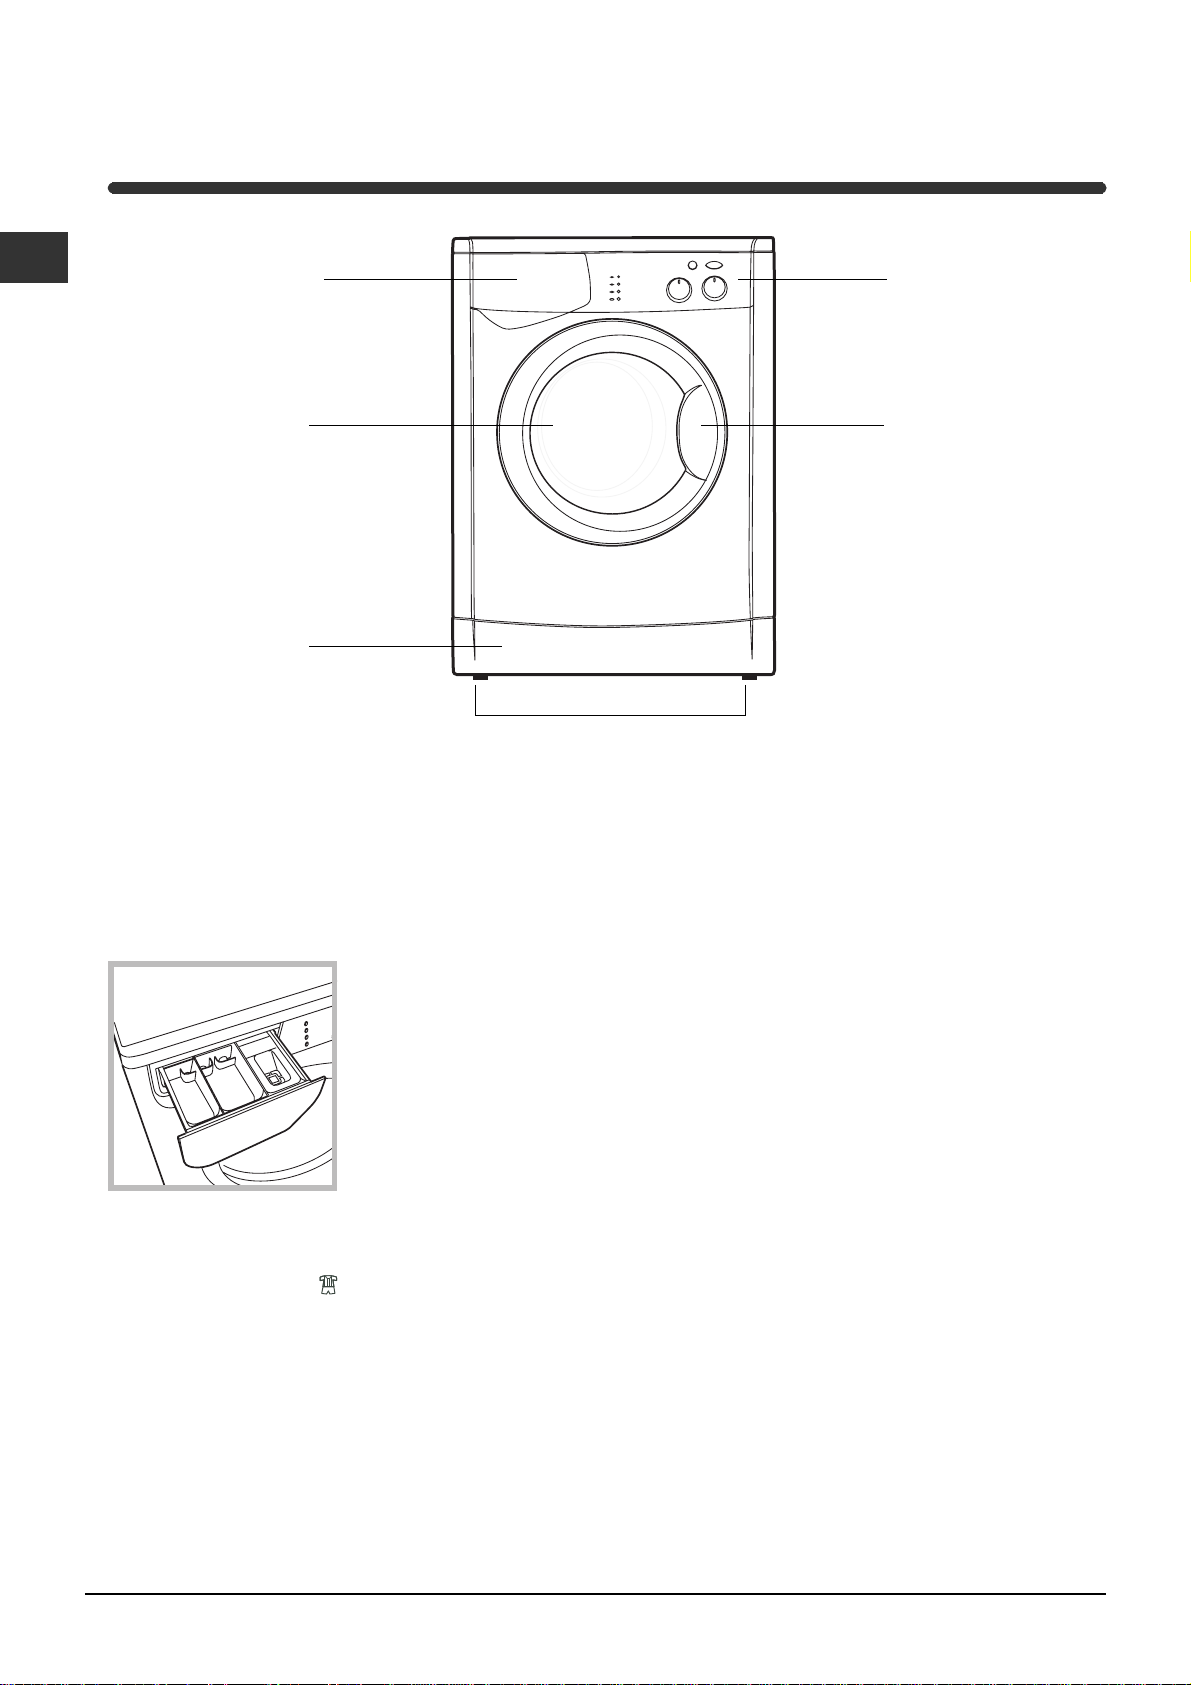
DETERGENT
DISPENSER
DOOR
KICKSTRIP
ADJUSTABLE FEET
Detergent dispenser
Good washing results also depend on the correct
dose of detergent: adding too much detergent
won't necessarily make for a more efficient wash,
and may in fact cause build up on the interior of
your appliance and even pollute the environment.
CONTROL
PANEL
DOOR
HANDLE
Open up the detergent
dispenser and pour in
the detergent and fabric
softener, as follows.
3
2
1
compartment 1: Detergent for pre-wash
(powder)
Pre-wash detergent should only be used with the
sportswear programme
knob to the "auto" position or to one of the "3h" to
"24h" positions (see Detergents and laundry).
compartment 2: Detergent for the wash
cycle (powder or liquid)
Liquid detergent should only be poured in
immediately prior to the wash cycle start.
compartment 3: Additives (fabric softeners, etc.)
The fabric softener should not overflow from the grid.
Do not use hand wash detergent because it may
form too much foam.
, while setting the timer
4
Page 5
Control panel
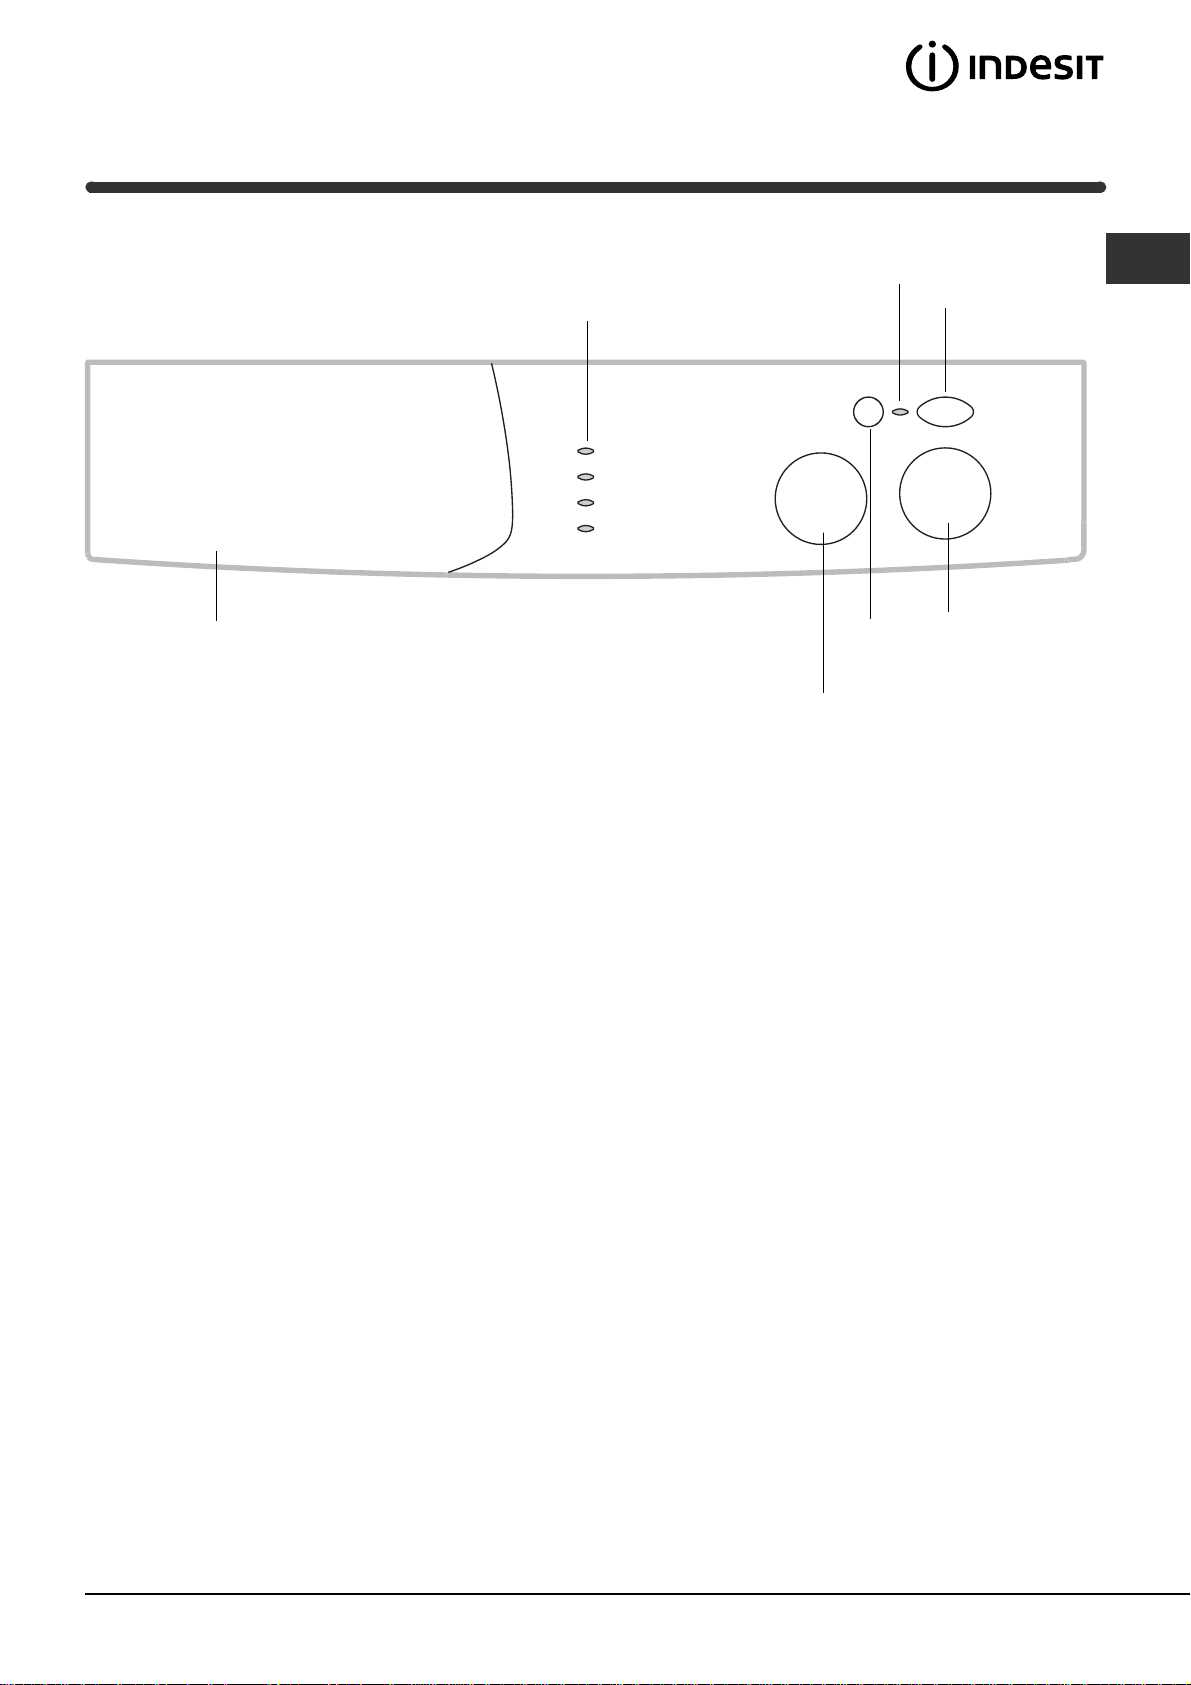
Detergent dispenser
Indicator
lights
ON-OFF/
DOOR
LOCK
indicator light
START/CANCEL
Button
PROGRAMMES
Knob
GB
ON-OFF
Button
TIMER
Knob
Detergent dispenser: to add detergent and fabric
softener (see Washing machine description).
Indicator lights: show that the programme has
started and give an indication of the time remaining
until the end of the programme (see Running a
wash cycle).
PROGRAMME knob: to select the wash
programmes. The knob stays still during the cycle.
START/CANCEL button: starts the cycle after the
programme and required time have been set.
To cancel the programme and set a different one,
press and hold the button for at least 3 seconds.
ON-OFF/DOOR LOCK indicator light:
If the indicator light is switched on, this shows that
the door has been locked in order to prevent it being
opened accidentally; to avoid damaging the
machine, wait until the indicator light begins to flash
after the cycle has finished before opening the door.
The waiting time is approximately 2 minutes.
If the ON-OFF/DOOR LOCK indicator light flashes
extremely rapidly it has experienced a problem (see
Troubleshooting).
ON/OFF button: to turn the washing machine on
and off.
TIMER knob: sets the required duration of the
programme.
In the "auto" position the duration is controlled
automatically by the machine.
5
Page 6
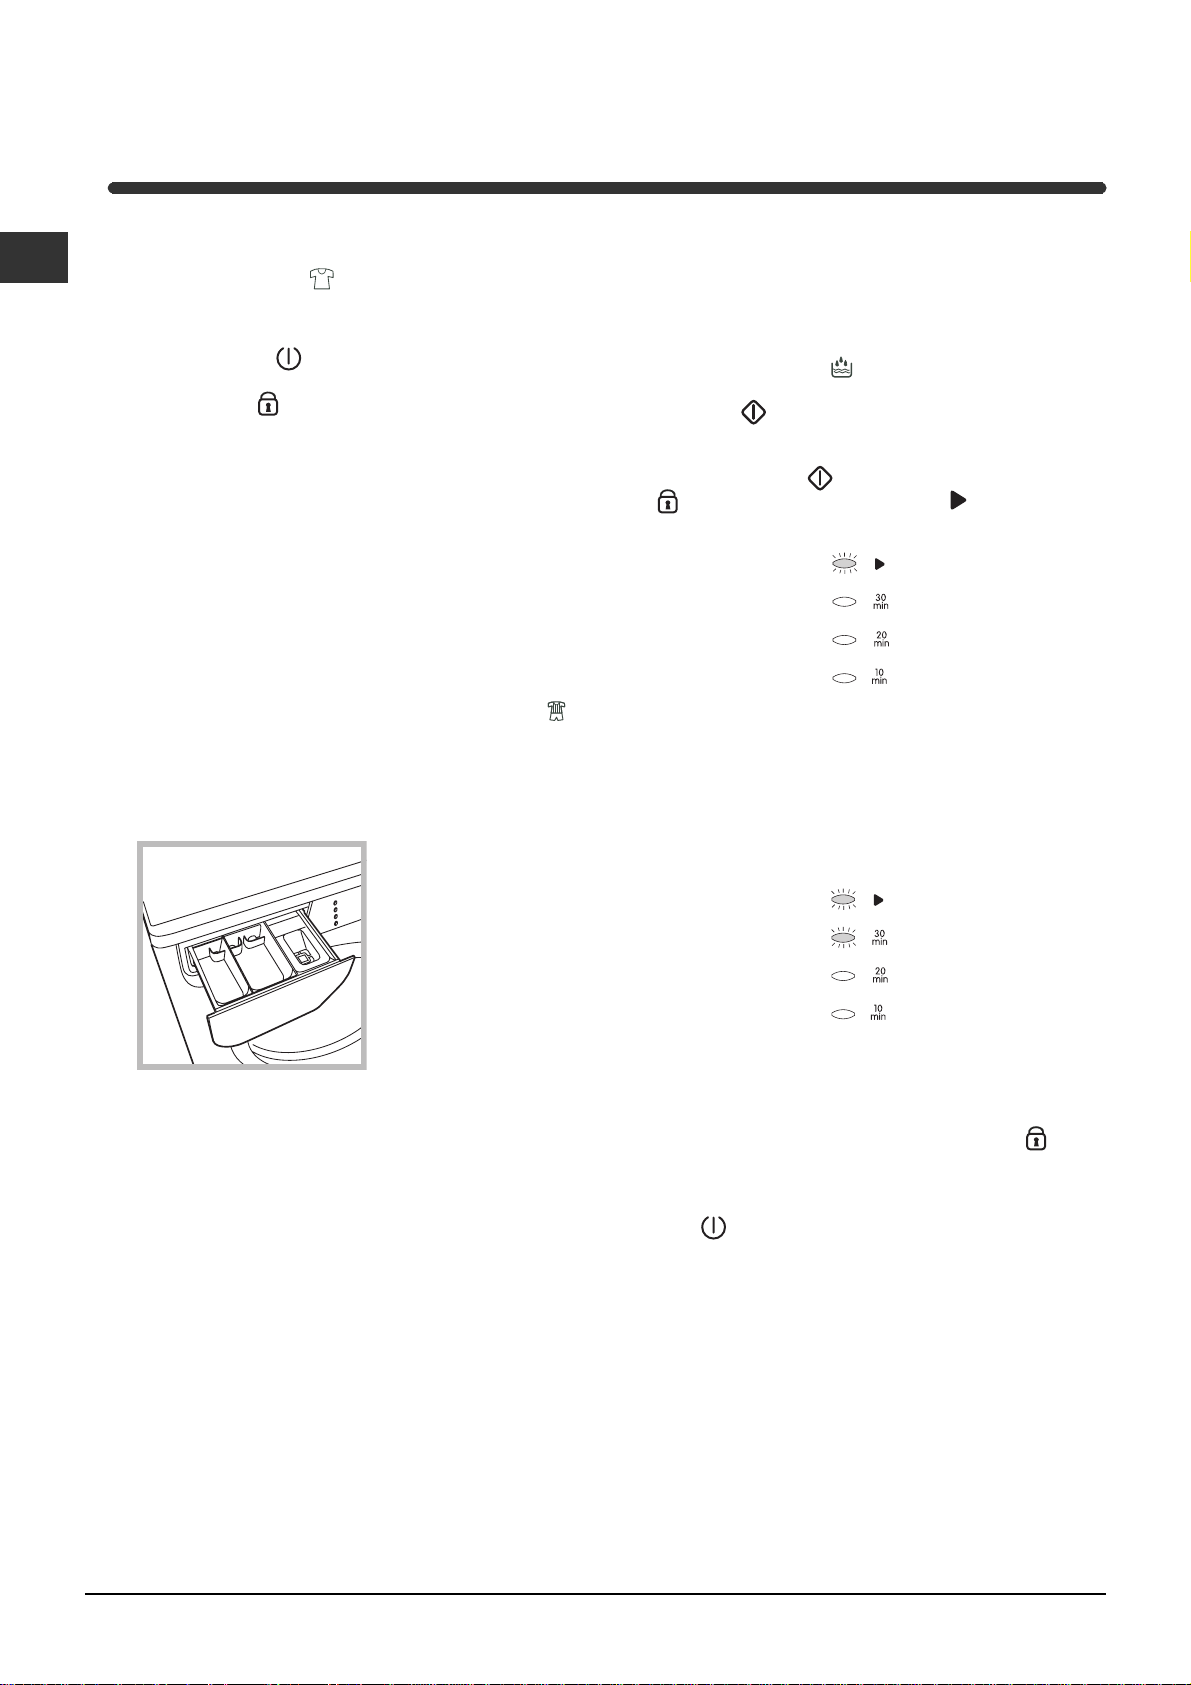
Running a wash cycle
GB
Note: After installing the machine and before using
it for the first time, run an empty wash cycle using
detergent, setting the
the timer knob is in the "auto" position.
1. Switch the washing machine on by pressing
ON/OFF button
few seconds and the ON-OFF/DOOR LOCK
indicator light
2. LOADING LAUNDRY. Open the door. Load the
laundry, making sure that the maximum load
quantity indicated in the table of programmes
(below) is not exceeded.
3. MEASURING OUT DETERGENT/WASHING ADDITIVES
Remove the drawer completely and pour the
detergent into the compartment marked with the
number 2. If required, pour fabric softener and
other additives into the compartment marked with
the number 3. The softener must not rise above
the level of the grille. If you wish to run the
washing programme especially for sportswear
(by setting the timer knob to "auto" or to one of
the positions between "3h and 24h" - see
Detergents and laundry), it is also possible to
use powder detergent in compartment 1 for the
pre-wash phase.
programme and ensuring
. All the LEDS will light up for a
will begin to flash.
- Whenever it is not necessary to set a specific
time for washing to end, select the "AUTO"
position: the machine automatically controls the
duration of the programme, based on the fabric
selected (see table of programmes below).
Regardless of the position selected for the TIMER
KNOB, the "Rinse"
minutes and begins as soon as the START/
CANCEL
7. START THE PROGRAMME by pressing the
START/CANCEL
and "programme in progress" indicator lights
will illuminate and remain lit constantly.
During the cycle, the indicator lights provide
information relating to the amount of time
remaining until the end of the programme.
When there are 30, 20 and 10 minutes
respectively remaining until the end of the
programme, the corresponding indicator lights will
illuminate.
button is pressed.
programme lasts 30
button. The "on-off/door lock"
3
2
1
4. CLOSE THE DOOR.
5. SELECT THE WASH FABRIC by turning the
PROGRAMME KNOB right or left until the correct
fabric or the "Rinse" programme is selected.
6. SET THE WASHING END TIME by turning the
TIMER KNOB right or left.
The following settings may be used:
- Positions "30 min - 45 min - 60 min": by
selecting one of these times, the duration of the
programme is set.
- Positions between "3h" and "24h": by selecting
one of these times the user selects the number of
hours after which the programme should finish.
The effective duration of the wash is equivalent to
the "auto" cycle duration (see table of
programmes below), but the machine will delay
the start of the cycle automatically to ensure it
ends within the set time period.
8. PROGRAMME END
At the end of the wash programme, all the
indicator lights will switch off. Wait for the door to
become unlocked (the "on-off/door lock"
indicator light flashes), remove the laundry and
leave the door ajar in order to let the drum dry
out. Switch off the machine by pressing the ON/
OFF
button.
6
Page 7
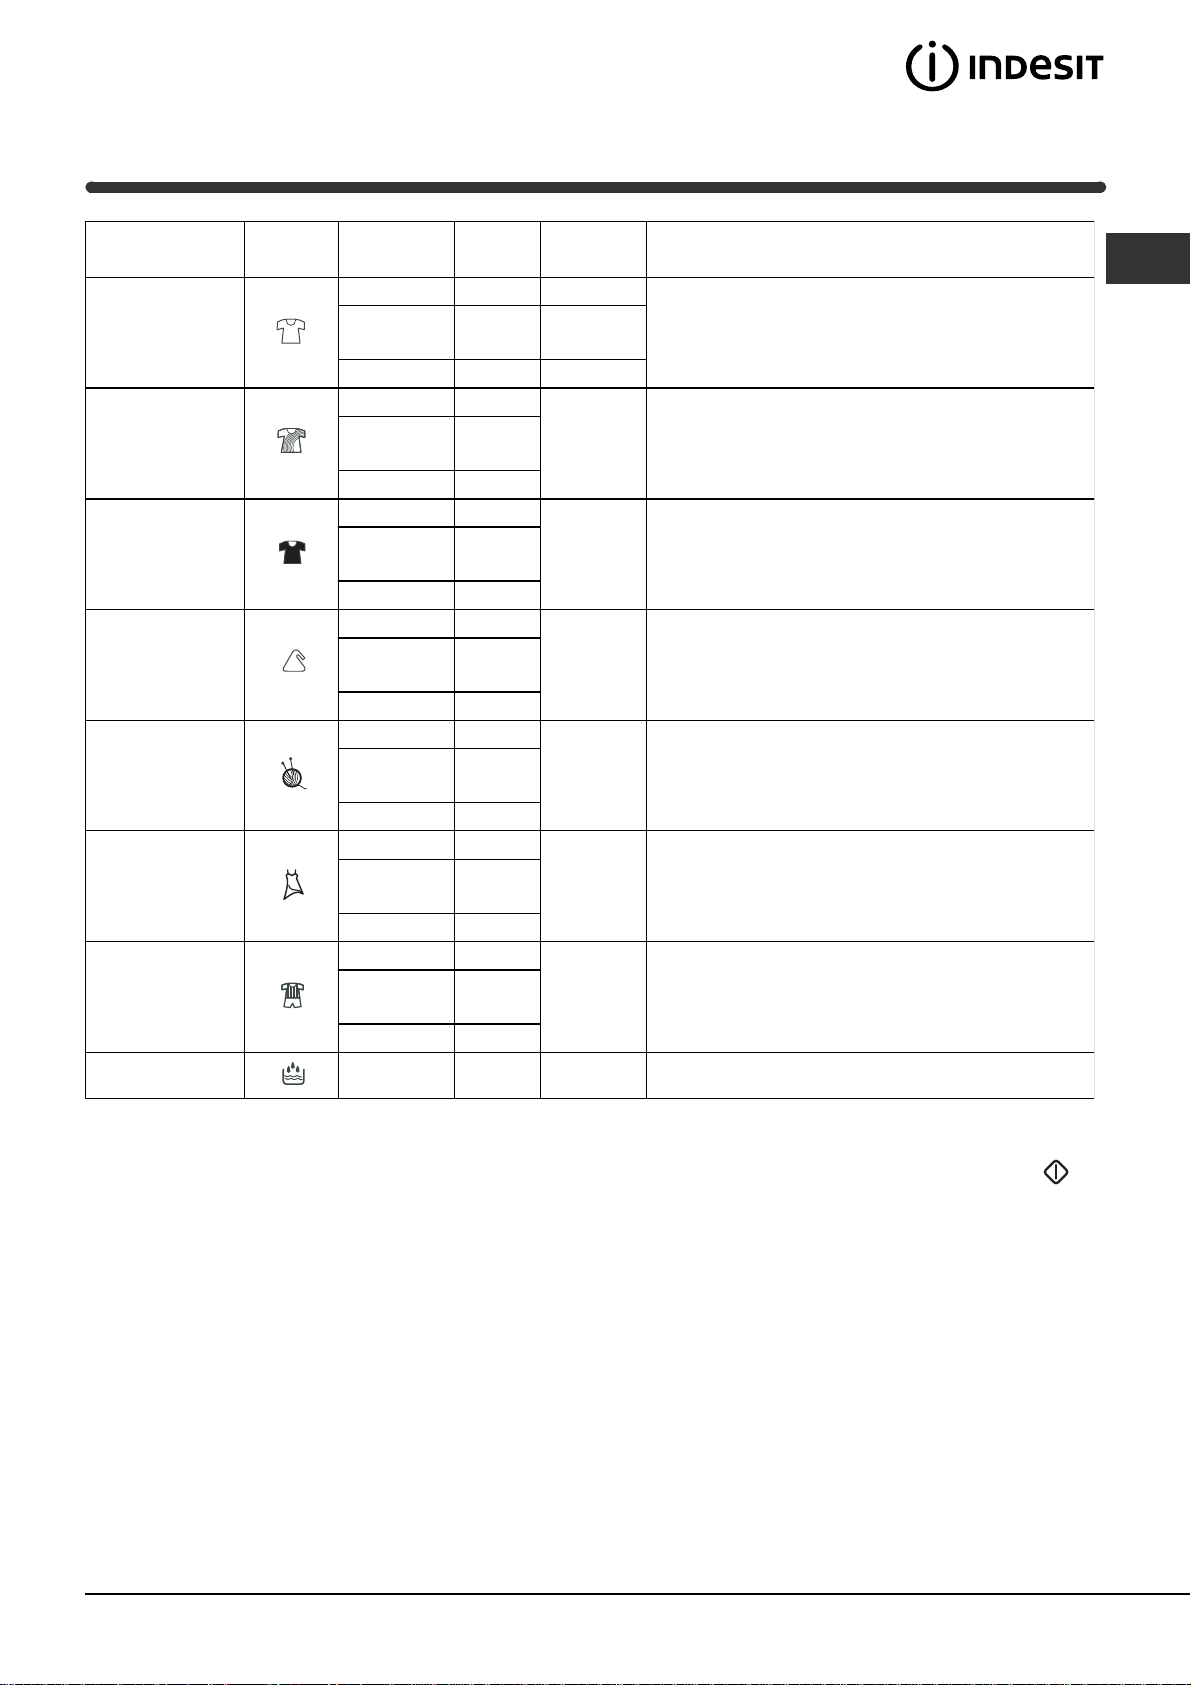
Programme table
Nature of fabrics
and soiling
White cotton
Coloured cotton
Dark/delicate cotton
Synthetics
Wool
Delicates
Special Sport
Programmes
Times
auto (125 min.) 5 60°
30 min.
45 min.
60 min.
3h - 24h 5 60°
auto (70 min.) 5
30 min.
45 min.
60 min.
3h - 24h 5
auto (60 min.) 5
30 min.
45 min.
60 min.
3h - 24h 5
auto (60 min.) 2,5
30 min.
45 min.
60 min.
3h - 24h 2,5
auto (60 min.) 1
30 min.
45 min.
60 min.
3h - 24h 1
auto (60 min.) 1
30 min.
45 min.
60 min.
3h - 24h 1
auto (60 min.) 1,5
30 min.
45 min.
60 min.
3h - 24h 1,5
Maximum
Load (kg)
3
3
3
3
3
3
3
3
3
1,5
2,5
2,5
1
1
1
1
1
1
1,5
1,5
1,5
Maximum
temperature
40°
60°
60°
40° Wash, rinse, intermediate and final spins
30° Wash, rinse, intermediate and final spins
40° Wash, rinse, gentle spin
40° Wash, rinse, gentle spin
30° Wash, rinse, drain
30° Prewash, wash, rinse, intermediate and final spins
Wash cycle description
Wash, rinse, intermediate and final spins
GB
Rinse
*
2,5 Rinse and spin
* Note: regardless of the position of the "TIMER knob", the Rinse cycle begins immediately after the ON/CANCEL
button is pressed, and lasts for 30 minutes.
Important:
- the quick wash programmes "30 min" and "45 min" (regardless of the type of fabric) are recommended for
refreshing lightly soiled garments in a short time.
- the "60 min" programmes (regardless of the type of fabric) are recommended for washing lightly soiled garments.
- Wash times do not include the 2 minutes at the end of the cycle when the user must wait for the door to unlock.
7
Page 8

Detergents and laundry
GB
Preparing your laundry
Divide your laundry according to:
- the type of fabric/the symbol on the label.
- the colours: separate coloured garments from
whites.
Empty all pockets and check for loose buttons.
Do not exceed the maximum load values shown
in the "Programme table".
How much does your laundry weigh?
1 sheet 400-500 g
1 pillow case 150-200 g
1 tablecloth 400-500 g
1 bathrobe 900-1200 g
1 towel 150-250 g
Special items
Curtains: fold curtains and place them in a pillow
case or mesh bag. Wash them separately without
exceeding half the appliance load. Use programme
which excludes the spin cycle automatically.
Quilted coats and windbreakers: if they are
padded with goose or duck down, they can be
machine-washed. Turn the garments inside out and
load a maximum of 3 kg, repeating the rinse cycle
once or twice.
Wool: for best results, use a specific detergent,
taking care not to exceed a load of 1 kg.
Sportswear: use the "Special Sport"
programme. It is possible to run an initial pre-wash
phase, which is useful for removing soil or mud
residues from the garments. To use this phase, pour
powder detergent into compartment 1 of the
detergent drawer (see Washing machine
description).
The pre-wash phase will not run if the timer knob is
set to a duration between 30 minutes and 1 hour
(inclusive).
Load-balancing system
To avoid excessive vibrations, before every spin
cycle the machine distributes the load in a uniform
manner by continuously rotating the drum at a
speed which is slightly faster than the normal
washing speed.
When, despite repeated attempts, the load is still
not evenly distributed, the machine spins at a lower
speed than the set frequency.
If the load is excessively unbalanced, the machine
attempts to distribute it instead of spinning.
The balancing attempts may extend the total duration
of the cycle, up to a maximum of 10 minutes.
8
Page 9

Precautions and advice
The washing machine was designed and built in
compliance with the applicable international safety
regulations. The following information is provided for
your safety and should consequently be read carefully.
General safety
This appliance has been designed for non-
professional, household use and its functions must
not be changed.
This washing machine should only be used by
adults and in accordance with the instructions
provided in this manual.
Never touch the washing machine when barefoot
or with wet or damp hands or feet.
Do not pull on the power supply cable to unplug
the appliance from the electricity socket. Pull the
plug out yourself.
Do not open the detergent dispenser while the
appliance is in operation.
Do not touch the drain water as it could reach
very high temperatures.
Never force the washing machine door: this could
damage the safety lock mechanism designed to
prevent any accidental openings.
In the event of a malfunction, do not under any
circumstances touch internal parts in order to
attempt repairs.
Always keep children well away from the
appliance while in operation.
The appliance door tends to get quite hot during
the wash cycle.
Should it have to be moved, proceed with the
help of two or three people and handle it with the
utmost care. Never try to do this alone, because
the appliance is very heavy.
the impact on human health and the environment.
The crossed out "wheeled bin" symbol on the
product reminds you of your obligation, that when
you dispose of the appliance it must be separately
collected.
Consumers should contact their local authority or
retailer for information concerning the correct
disposal of their old appliance.
Saving energy and respecting the
environment
Environmentally-friendly technology
If you only see a little water through your appliance
door, this is because thanks to the latest Indesit
technology, your washing machine only needs less
than half the amount of water to get the best results:
an objective reached to respect the environment.
Saving on detergent, water, energy and time
To avoid wasting resources, the washing machine
should be used with a full load. A full load instead of
two half loads allows you to save up to 50% on energy.
Treating stains with a stain remover or leaving them
to soak before washing will cut down the need to
wash them at high temperatures.
Use the correct quantity of detergent depending
on the water hardness, how soiled the garments
are and the amount of laundry you have, to avoid
wastage and to protect the environment: despite
being biodegradable, detergents do contain
ingredients that alter the natural balance of the
environment. In addition, avoid using fabric
softener as much as possible.
If you use your washing machine from late in the
afternoon until the early hours of the morning, you
will help reduce the electricity board's peak load.
GB
Before loading your laundry into the washing
machine, make sure the drum is empty.
Disposal
Disposing of the packaging material:
observe local regulations, so the packaging can
be re-used.
The European Directive 2002/96/EC on Waste
Electrical and Electronic Equipment, requires that
old household electrical appliances must not be
disposed of in the normal unsorted municipal waste
stream. Old appliances must be collected
separately in order to optimise the recovery and
recycling of the materials they contain and reduce
9
Page 10
Care and maintenance
GB
Cutting off the water or electricity
supply
Turn off the water tap after every wash. This will
limit the wear of your appliance's water system
and also prevent leaks.
Unplug your appliance when cleaning it and
during all maintenance operations.
Cleaning your appliance
The exterior and rubber parts of your appliance can
be cleaned with a soft cloth soaked in lukewarm
soapy water. Do not use solvents or abrasives.
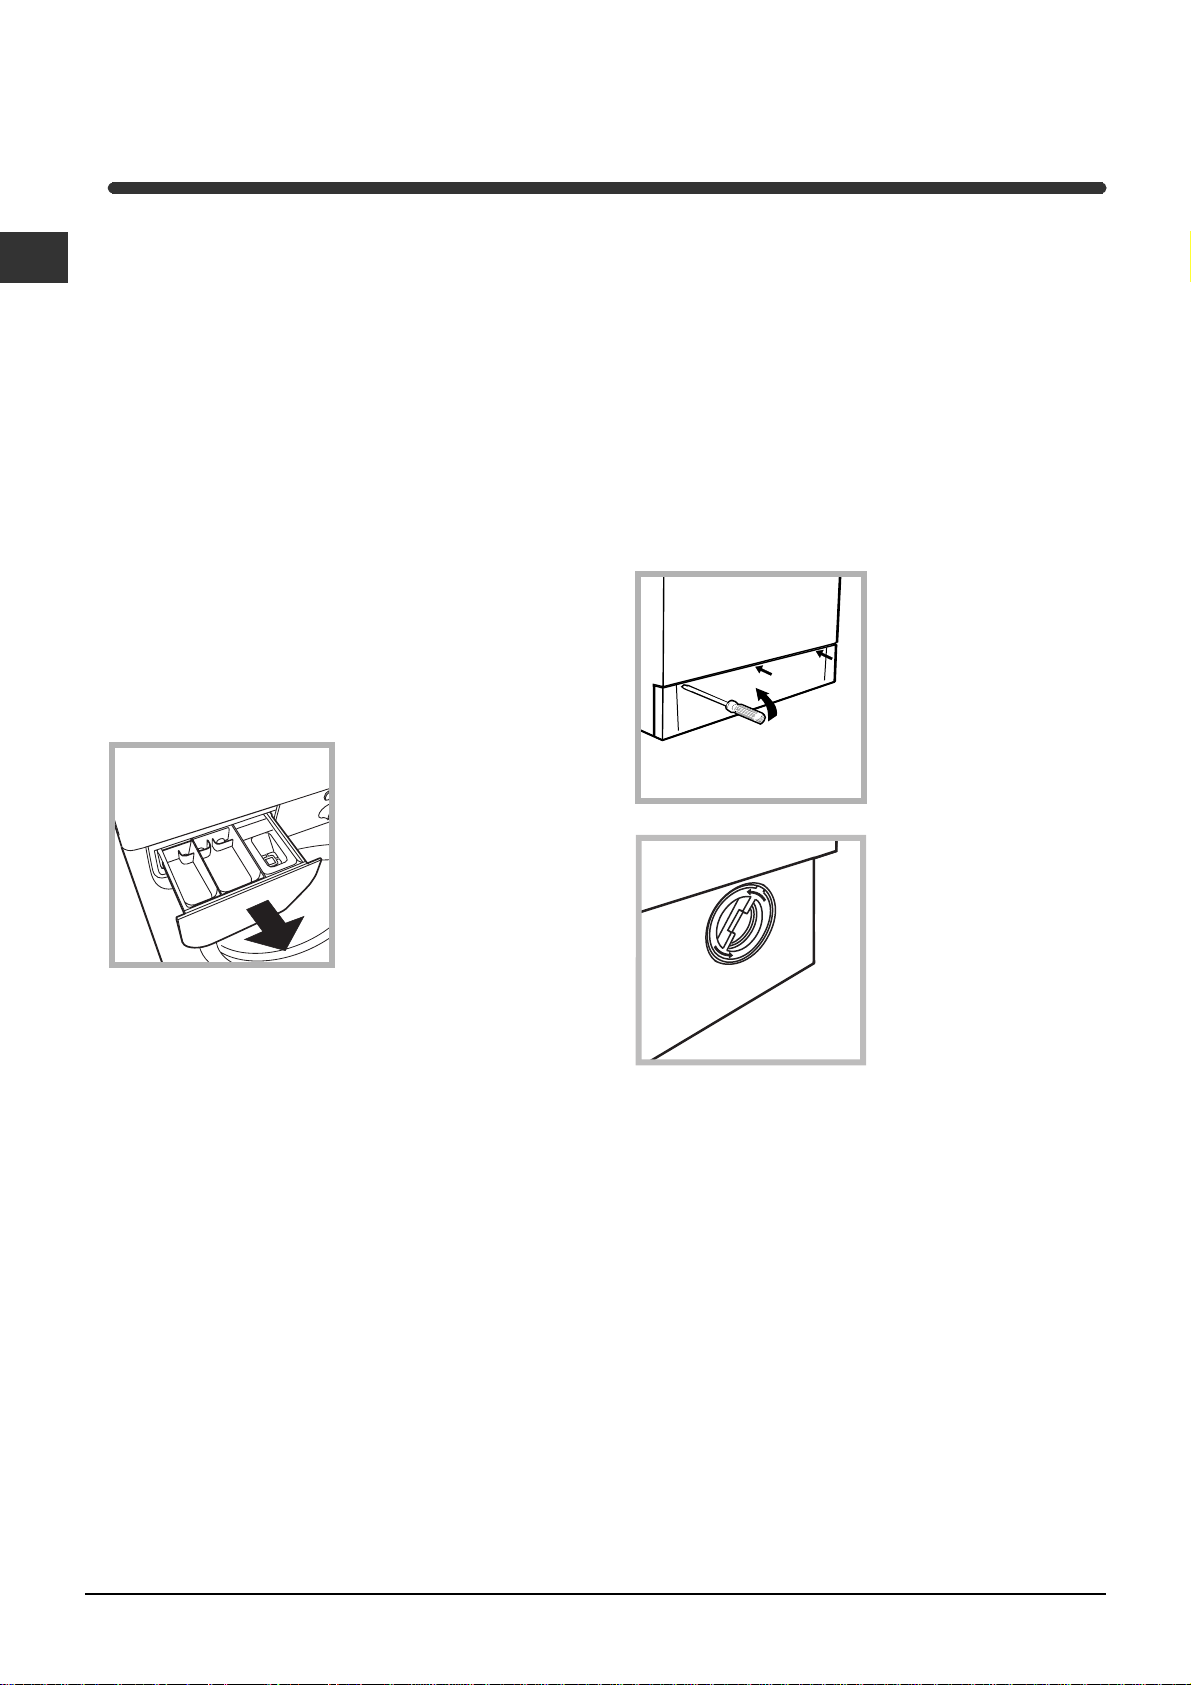
Cleaning the detergent dispenser
Remove the dispenser
by pulling it out (see
figure).
Wash it under running
water; this operation
should be repeated
frequently.
Cleaning the pump
The washing machine is fitted with a self-cleaning
pump that does not require any maintenance.
Sometimes, small items (such as coins or buttons)
may fall into the pre-chamber that protects the
pump, situated in the lower part of the same.
Make sure the wash cycle has ended and unplug
the appliance.
To access the pre-chamber:
1. using a screwdriver,
remove the cover panel
on the lower front of the
washing machine (see
figure);
2. unscrew the lid
rotating it anticlockwise (see figure): a
little water may trickle
out. This is perfectly
normal;
Caring for your appliance door and
drum
Always leave the appliance door ajar to prevent
unpleasant odours from forming.
3. clean the interior thoroughly;
4. screw the lid back on;
5. reposition the panel, making sure the hooks are
securely in place before you push it onto the
appliance.
Checking the water inlet hose
Check the water inlet hose at least once a year. If
you see any cracks, replace it immediately: during
the wash cycles, water pressure is very strong and
a cracked hose could easily split open.
Never use hoses that have already been used.
10
Page 11
Troubleshooting
Your washing machine could fail to work. Before calling for Assistance (see Service), make sure the problem
can't easily be solved by consulting the following list.
Problem
The washing machine won't
start.
The wash cycle won't start.
The washing machine fails to
load water.
The washing machine
continuously loads and unloads
water.
Possible causes/Solution:
The appliance is not plugged into the socket, or not enough to make contact.
There has been a power failure.
The appliance door is not shut properly.
The ON/OFF button
The START/CANCEL button
The water tap is not turned on.
A washing end time between "3h" and "24h" has been set
(see Running a wash cycle).
The water inlet hose is not connected to the tap.
The hose is bent.
The water tap is not turned on.
There is a water shortage.
The water pressure is insufficient.
The START/CANCEL button
The drain hose is not fitted between 65 and 100 cm from the floor (see Installation).
The free end of the hose is underwater (see Installation).
The wall drainage system doesn't have a breather pipe.
If the problem persists even after these checks, turn off the water tap,
switch the appliance off and call for Assistance. If the dwelling is on one of
the upper floors of a building, there may be drain trap problems causing the
washing machine to load and unload water continuously. In order to avoid
such an inconvenience, special anti-drain trap valves are available in shops.
has not been pressed.
has not been pressed.
has not been pressed.
GB
The washing machine does not
drain or spin.
The washing machine vibrates
too much during the spin cycle.
The washing machine leaks.
The ON-OFF/DOOR LOCK
indicator light flashes
extremely rapidly.
There is too much foam.
The drain hose is bent (see Installation).
The drain duct is clogged.
When the machine is installed, the locking screws for the oscillating
assembly are still in place. Remove the screws (see Installation).
The washing machine is not level (see Installation).
The washing machine is closed in between furniture cabinets and
the wall (see Installation).
The water inlet hose is not screwed on correctly (see Installation).
The detergent dispenser is obstructed (to clean it, see Care and maintenance).
The drain hose is not secured properly (see Installation).
This means there is a problem with the machine. Before calling
Assistance, please follow the set of instructions below:
1. Switch off the machine by pressing the
2. Remove the plug connecting the appliance to the mains supply
and wait for at least 40 seconds;
3. Place the plug back into the socket;
4. Switch on the machine by pressing the
5. If the problem is still evident after this process has been carried
out, contact Assistance.
The detergent is not suitable for machine washing (it should bear the
definition "for washing machines" or "hand and machine wash", or the like).
You used too much detergent.
button;
button again;
11
Page 12

Service
GB
Before calling for Assistance:
Check whether you can solve the problem on your own (see Troubleshooting);
Restart the programme to check whether the problem has been solved;
If this is not the case, contact an authorised Technical Service Centre on the telephone number
provided on the guarantee certificate.
If the machine has been installed or used incorrectly, you may be charged for the maintenance callout service.
Always request the assistance of authorised servicemen.
Notify the operator of:
the type of problem;
the appliance model (Mod.);
the serial number (S/N).
This information can be found on the data plate situated on the rear of the washing machine.
12
Page 13

Mode d'emploi
LAVE-LINGE
F
Français
WIL 1200 OT
Sommaire
F
Installation, 14-15
Déballage et mise à niveau
Raccordements hydrauliques et électriques
Caractéristiques techniques
Description du lave-linge, 16-17
Tiroir à produits lessiviels
Bandeau de commandes
Comment effectuer un cycle de lavage, 18
Tableau des programmes, 19
Produits lessiviels et linge, 20
Triage du linge
Pièces de linge particulières
Système d'équilibrage du chargement
Précautions et conseils, 21
Sécurité générale
Mise au rebut
Economies et respect de l'environnement
Entretien et soin, 22
Coupure de l'arrivée d'eau et de courant
Nettoyage du lave-linge
Nettoyage du tiroir à produits lessiviels
Entretien du hublot et du tambour
Nettoyage de la pompe
Contrôle du tuyau d'arrivée de l'eau
Anomalies et remèdes, 23
Assistance, 24
Consultation à tout moment
13
Page 14
Installation
Conservez ce mode d'emploi pour pouvoir le
F
consulter à tout moment. En cas de vente, de cession
ou de déménagement, veillez à ce qu'il suive toujours
le lave-linge pour que son nouveau propriétaire soit
informé sur son mode de fonctionnement et puisse
profiter des conseils correspondants.
Lisez attentivement les instructions: elles fournissent
d'importantes informations sur l'installation, l'utilisation
et la sécurité.
Déballage et mise à niveau
Déballage
1. Déballez le lave-linge.
2. Contrôlez que le lave-linge n'a pas été endommagé
pendant le transport. S'il est abîmé, ne le raccordez
pas et contactez votre revendeur.
3. Enlevez les 3 vis de
protection pour le
transport, le
caoutchouc et la cale,
placés dans la partie
arrière (voir figure).
4. Bouchez les trous à l'aide des bouchons plastique
fournis.
5. Conservez bien toutes ces pièces: il faudra les
remonter en cas de transport du lave-linge.
Une bonne mise à niveau garantit la stabilité de la
machine et évite qu'il y ait des vibrations, du bruit et
des déplacements en cours de fonctionnement. Si la
machine est posée sur de la moquette ou un tapis,
réglez les petits pieds de manière à ce qu'il y ait
suffisamment d'espace pour assurer une bonne
ventilation.
Raccordements hydrauliques et
électriques
Raccordement du tuyau d'arrivée de l'eau
1. Montez le joint A sur
l'extrémité du tuyau
d'alimentation et vissezle à un robinet d'eau
A
froide à embout fileté 3/4
gaz (voir figure).
Faites couler l'eau
jusqu'à ce qu'elle soit
limpide et sans
impuretés avant de
raccorder.
2. Raccordez le tuyau
d'alimentation au lavelinge en le vissant à la
prise d'eau prévue, dans
la partie arrière en haut
à droite (voir figure).
Les emballages ne sont pas des jouets pour enfants.
Mise à niveau
Votre appareil peut s'avérer bruyant si vous n'avez
pas bien réglé ses deux pieds avant.
1. Installez le lave-linge sur un sol plat et rigide, sans
l'appuyer contre des murs, des meubles ou autre.
2. Si le sol n'est pas
parfaitement horizontal,
vissez ou dévissez les
petits pieds avant (voir
figure) pour niveler
l'appareil; son angle
d'inclinaison, mesuré
sur le plan de travail, ne
doit pas dépasser 2°.
14
3. Faites attention à ce que le tuyau ne soit ni plié ni
écrasé.
La pression de l'eau doit être comprise entre les
valeurs indiquées dans le tableau des
Caractéristiques techniques (voir page ci-contre).
Si la longueur du tuyau d'alimentation ne suffit pas,
adressez-vous à un magasin spécialisé ou à un
technicien agréé.
Page 15
Raccordement du tuyau de vidange
Raccordez le tuyau
d'évacuation, sans le
plier, à un conduit
d'évacuation ou à une
évacuation murale
65 - 100 cm
placés à une distance
du sol comprise entre
65 et 100 cm (voir figure);
ou bien accrochez-le à
un évier ou à une
baignoire, dans ce cas,
fixez le support en
plastique fourni avec
l'appareil au robinet
(voir figure). L'extrémité
libre du tuyau
d'évacuation ne doit
pas être plongée dans
l'eau.
N'utilisez ni rallonges ni prises multiples.
F
Le câble ne doit être ni plié ni écrasé.
Le câble d'alimentation ne doit être remplacé que
par des techniciens agréés.
Attention! Nous déclinons toute responsabilité en cas
de non respect des normes énumérées ci-dessus.
L'utilisation de tuyaux de rallonge est absolument
déconseillée, si vous ne pouvez vraiment pas faire
autrement vous devrez utiliser un tuyau de même
diamètre et de longueur maximum de 150 cm.
Branchement électrique
Avant de brancher la fiche dans la prise de courant,
contrôlez que:
la prise dispose de mise à la terre et est conforme
aux normes;
la prise est bien apte à supporter la puissance
maximale de la machine indiquée dans le tableau
des Carcatéristiques techniques (voir ci-contre);
la tension d'alimentation est bien comprise entre les
valeurs figurant dans le tableau des
Caractéristiques techniques (voir ci-contre);
la prise est bien compatible avec la fiche du lave-
linge. Autrement, remplacez la prise ou la fiche.
Votre lave-linge ne doit pas être installé dehors,
même à l'abri, car il est très dangereux de le laisser
exposé à la pluie et aux orages.
Après installation du lave-linge, la prise de courant
doit être facilement accessible.
Caractéristiques techniques
Modèle
Dimensions
Capacité
Raccordements
électriques
Raccordements
hydrauliques
Vitesse
d'essorage
Programmes de
contrôle selon la
norme IEC456
WIL 1200 OT
largeur 59,5 cm
hauteur 85 cm
profondeur 52,5 cm
de 1 à 5 kg
tension 220-230 Volt 50 Hz
puissance maximale absorbée 1850 W
pression maximale 1 MPa (10 bar)
pression minimale 0,05 MPa (0,5 bar)
capacité du tambour 46 litres
jusqu'à 1200 tours minute
Programme ; Bouton DUREE "auto";
effectué avec une charge de 5 kg.
Cet appareil est conforme aux
Directives Communautaires suivantes:
- 73/23/CEE du 19/02/73 (Basse
Tension) et modifications suivantes
- 89/336/CEE du 03/05/89
(Compatibilité électromagnétique) et
modifications suivantes
- 2002/96/CE
15
Page 16
Description du lave-linge
F
TIROIR À PRODUITS
LESSIVIELS
HUBLOT
PLINTHE
Tiroir à produits lessiviels
Un bon résultat de lavage dépend aussi d'un bon
dosage de produit lessiviel: un excès de lessive ne
lave pas mieux, il incruste l'intérieur de votre lavelinge et pollue l'environnement.
TABLEAU DE
COMMANDE
POIGNÉE
HUBLOT
PIEDS RÉGLABLES
Sortez le tiroir à produits
lessiviels et versez la
lessive ou l'additif
comme suit.
3
2
1
bac 1: Lessive prélavage (en poudre)
N'utilisez le produit lessiviel de prélavage qu'en cas
de sélection du programme dédié aux vêtements de
sport
"auto" ou sur une des positions de "3h à 24h"
(voir «Produits lessiviels et linge»).
bac 2: Lessive lavage
(en poudre ou liquide)
Versez la lessive liquide juste avant la mise en marche.
bac 3: Additifs (adoucissant, etc.)
L'assouplissant ne doit pas déborder de la grille.
N'utilisez pas de lessives pour lavage à la main,
elles génèrent trop de mousse.
, amenez le bouton durée sur la position
16
Page 17
Bandeau de commandes
Voyants
Voyant
ALLUMAGE/
HUBLOT
VERROUILLE
F
Touche
MISE EN
MARCHE/ARRET
Tiroir à produits lessiviels
Tiroir à produits lessiviels: chargement des
produits lessiviels et additifs (voir Description du
lave-linge).
Voyants: ils indiquent le début du programme et le
temps restant (voir Comment effectuer un cycle de
lavage).
Bouton PROGRAMMES: choix des programmes
(voir page 7).
En cours de lavage, le bouton ne bouge pas.
Touche MARCHE / PAUSE: pour démarrer le cycle
après avoir sélectionné le programme et la durée
voulue.
Pour annuler le programme et en sélectionner un
autre, appuyez au moins 3 secondes de suite sur la
touche.
Bouton
DUREE
Touche
MARCHE / PAUSE
Bouton
PROGRAMMES
Touche MISE EN MARCHE/ARRET: mise en
marche ou arrêt du lave-linge.
Bouton DUREE: pour sélectionner l'heure de fin de
programme.
En position "auto" la durée du programme est gérée
automatiquement par l'appareil.
Voyant ALLUMAGE/HUBLOT VERROUILLE
:
Le voyant allumé indique que le hublot est verrouillé
pour empêcher toute ouverture accidentelle ;
attendez que le voyant cesse de clignoter avant
d'ouvrir le hublot, vous risqueriez autrement
d'endommager l'appareil.
Le délai d'attente est d'environ 2 minutes.
Un clignotement très rapide du voyant
ALLUMAGE/HUBLOT VERROUILLE signale une
anomalie (voir Anomalies et remèdes).
17
Page 18
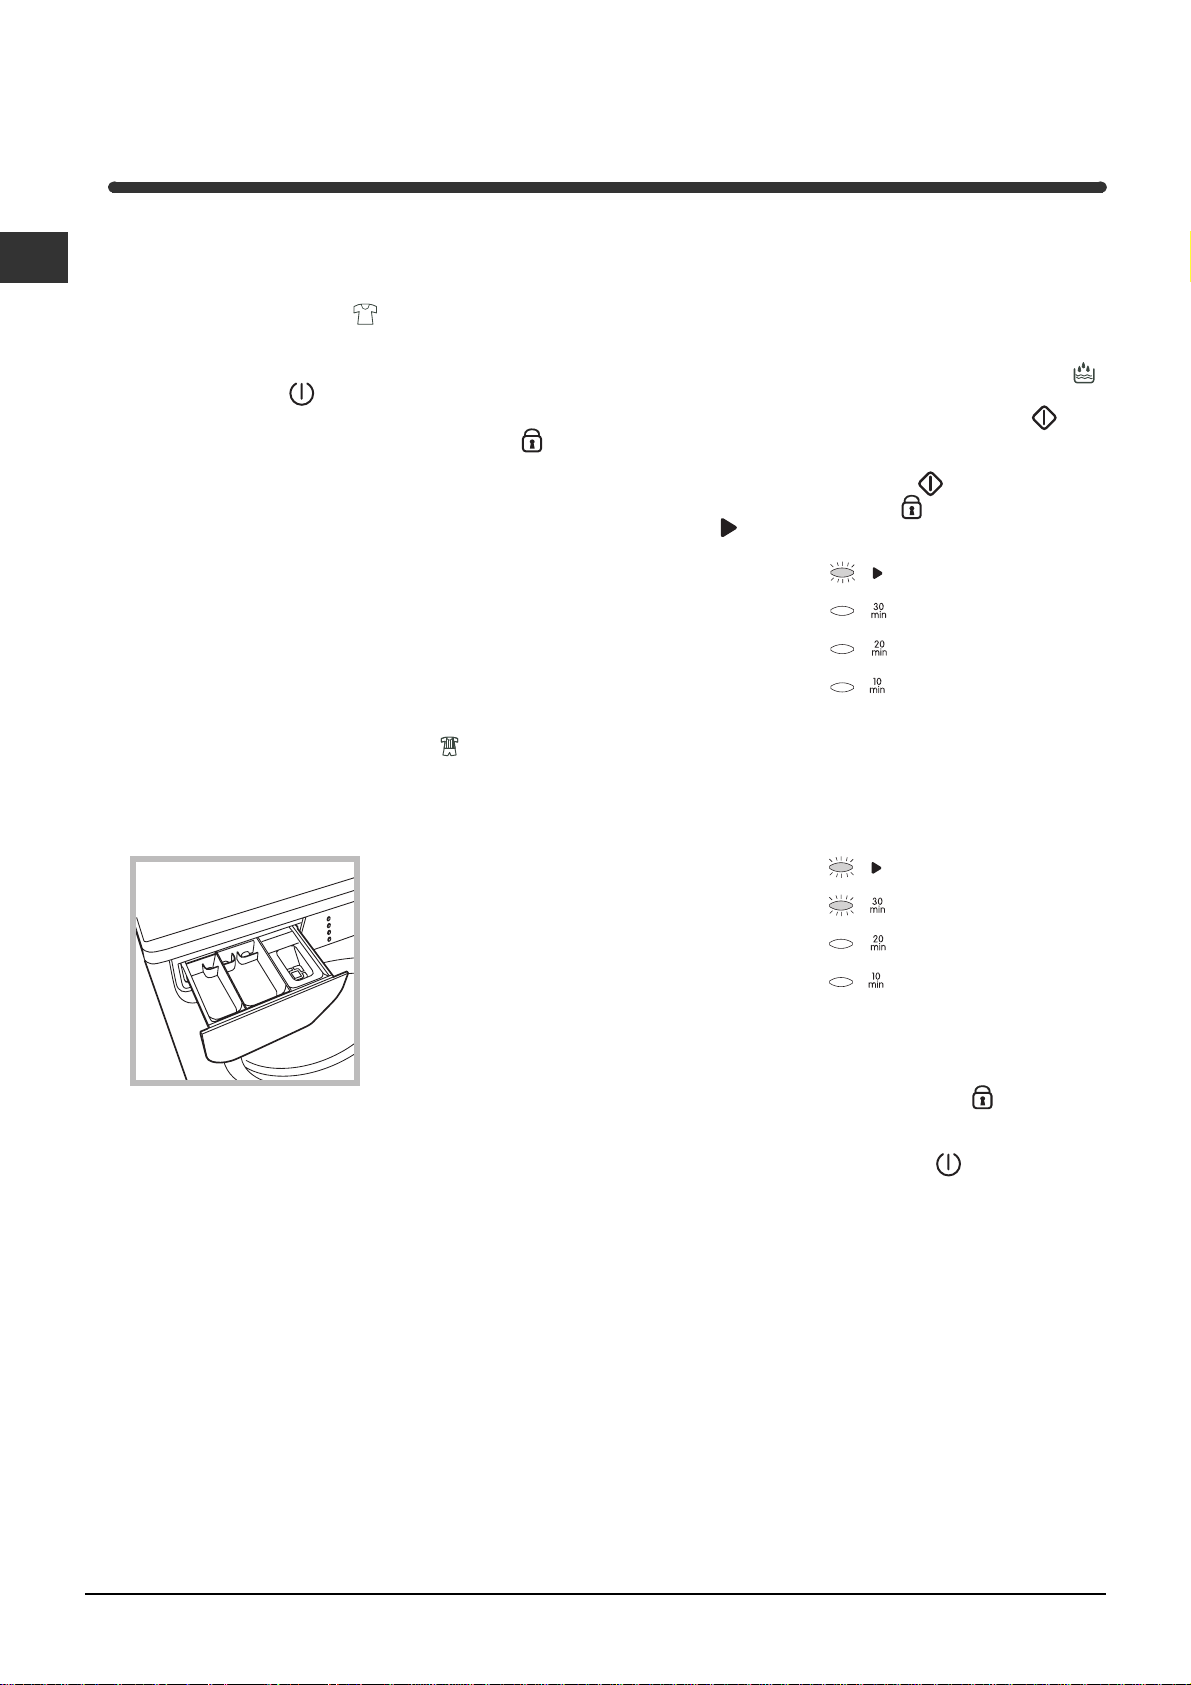
Comment effectuer un cycle de
lavage
Remarque: Après avoir installé l'appareil et
F
avant sa première utilisation, effectuez un cycle de
lavage à vide avec un produit lessiviel et
sélectionnez le programme
bouton Durée en position "auto".
1. Pour allumer le lave-linge appuyez sur la touche
MARCHE/ARRET
pendant quelques secondes puis s'éteignent et le
voyant ALLUMAGE/HUBLOT VERROUILLE
commence à clignoter.
2. CHARGER LE LINGE. Ouvrez le hublot. Chargez
le linge en faisant attention à ne pas dépasser la
charge maximale indiquée dans le tableau des
programmes à la page suivante.
3. DOSER LE PRODUIT LESSIVIEL/ADDITIFS
Sortez complètement le tiroir et versez le produit
lessiviel dans le bac n° 2. Versez l'assouplissant et
autres additifs éventuels dans le bac n° 3.
L'assouplissant ne doit pas déborder de la grille.
Si vous souhaitez effectuer un programme de
lavage spécial vêtements de sport
bouton Durée sur la position "auto" ou sur une
des positions comprises entre "3h et 24h" (voir
Produits lessiviels et linge) et introduisez de la
lessive en poudre pour prélavage dans le bac n°1.
. Tous les voyants s'allument
en amenant le
, amenez le
- Si la sélection d'une durée spéciale de lavage
n'est pas nécessaire, sélectionnez la position
"AUTO": l'appareil gèrera automatiquement la
durée du programme selon le textile sélectionné
(voir tableau programmes page suivante).
Indépendamment de la position sélectionnée sur
le BOUTON DUREE, le programme "Rinçage"
dure 30 minutes et démarre immédiatement dès
pression sur la touche MARCHE / PAUSE
7. Pour DEMARRER LE PROGRAMME, appuyez sur
la touche MARCHE / PAUSE
"allumage/hublot verrouillé"
cours"
Pendant le cycle, les voyants indiquent le temps
restant.
Quand il manque respectivement 30, 20 et 10
minutes à la fin du programme, les voyants
correspondants s'allument.
s'allument.
. Les voyants
et "programme en
.
3
2
1
4. FERMER LE HUBLOT.
5. Pour SELECTIONNER LE TEXTILE, tournez le
BOUTON PROGRAMMES à droite ou à gauche
jusqu'à ce que vous ayez sélectionné le textile
désiré ou le programme "Rinçage".
6. Pour SELECTIONNER LA FIN DE LAVAGE,
tournez le BOUTON DUREE à droite ou à gauche.
Sélections possibles:
- Positions "30 min - 45 min - 60 min": la
sélection d'une de ces positions détermine la
durée du programme sélectionné.
- Positions de "3h" à "24h": la sélection d'une de
ces positions détermine le nombre d'heures au
bout desquelles le programme de lavage prend
fin. La durée effective du lavage est égale à celle
du cycle "auto" (voir tableau programmes page
suivante) mais l'appareil diffèrera
automatiquement le démarrage du cycle pour
assurer sa conclusion dans le délai fixé.
8. FIN DU PROGRAMME
A la fin du programme de lavage, tous les voyants
s'éteignent. Attendez le déverrouillage du hublot
(voyant "allumage/hublot verrouillé"
sortez le linge et laissez le hublot entrouvert pour
faire sécher le tambour. Eteignez l'appareil à l'aide
de la touche MARCHE/ARRET
clignotant),
.
18
Page 19
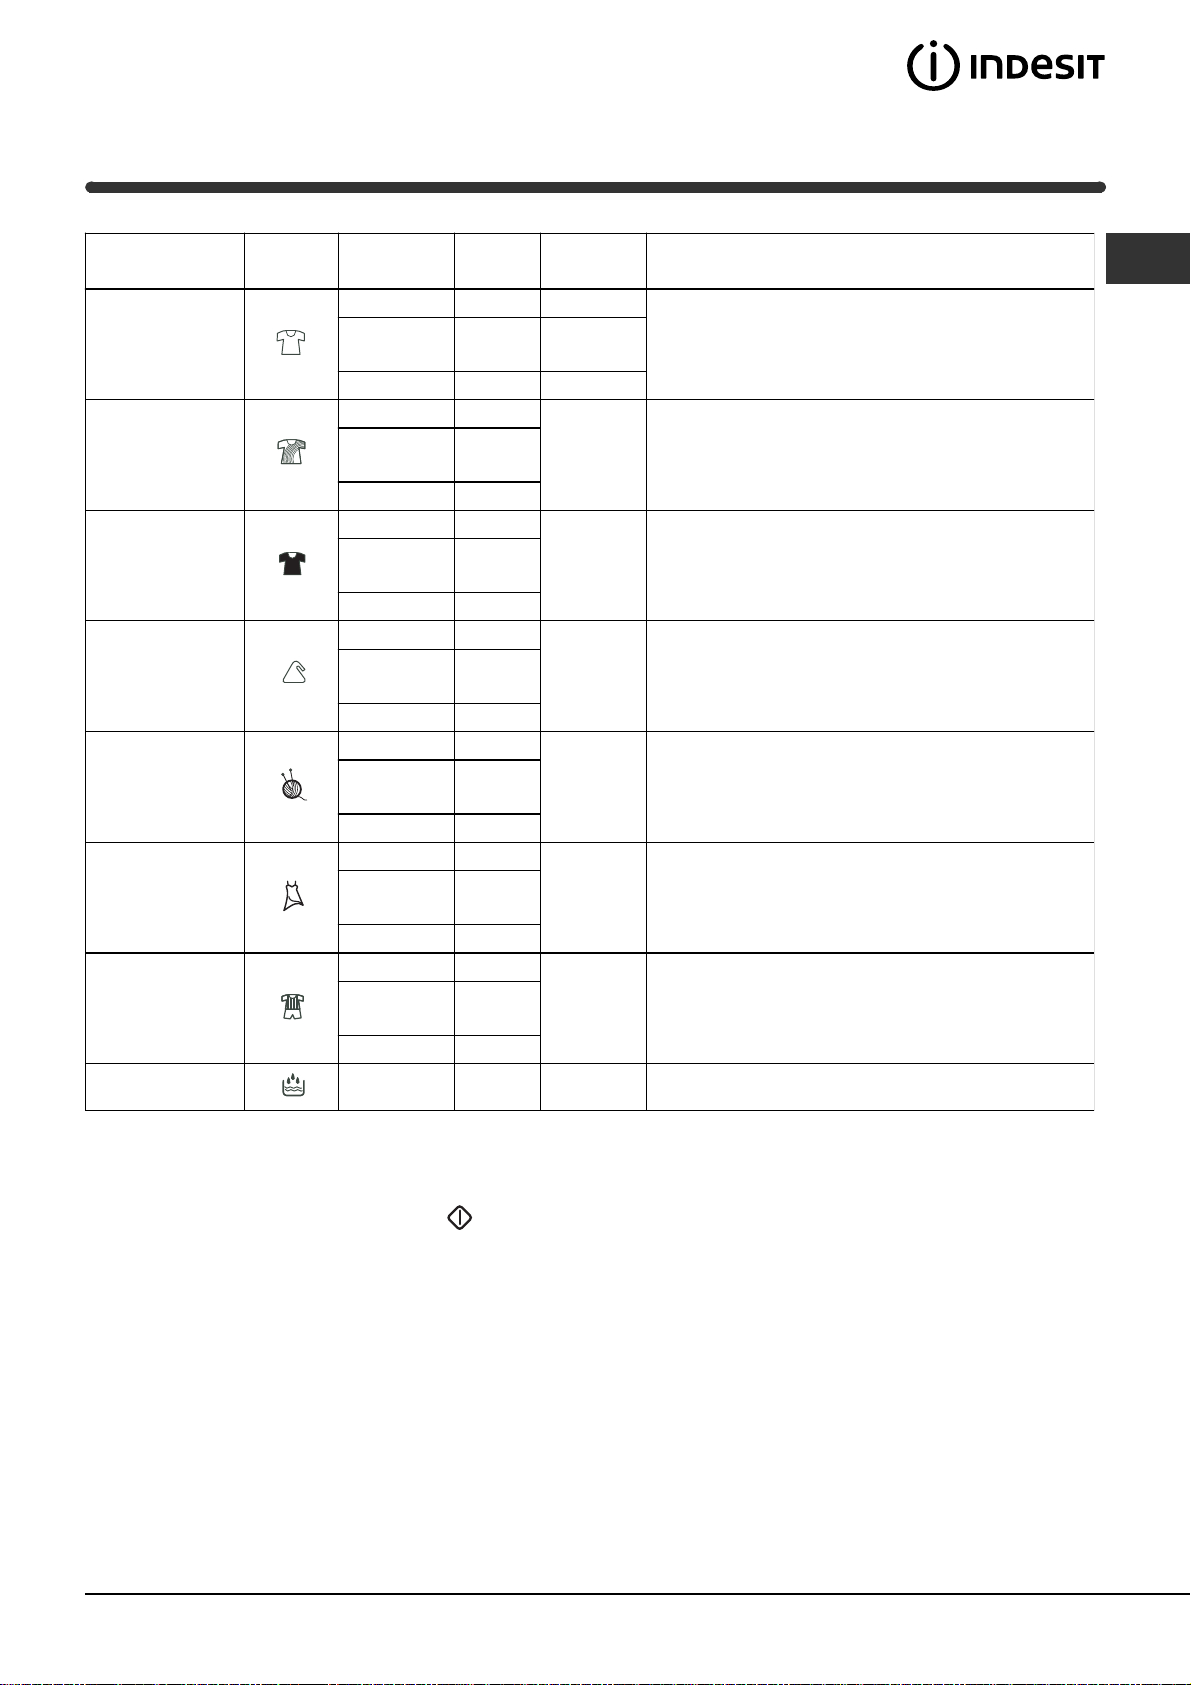
Tableau des programmes
Nature des textiles
et degré de
salissure
Coton blancs
Coton couleursi
Coton
foncés/délicats
Synthétiques
Laine
Délicats
Spécial Sport
Programmes
Durée
auto (125 min.) 5 60°
30 min.
45 min.
60 min.
3h - 24h 5 60°
auto (70 min.) 5
30 min.
45 min.
60 min.
3h - 24h 5
auto (60 min.) 5
30 min.
45 min.
60 min.
3h - 24h 5
auto (60 min.) 2,5
30 min.
45 min.
60 min.
3h - 24h 2,5
auto (60 min.) 1
30 min.
45 min.
60 min.
3h - 24h 1
auto (60 min.) 1
30 min.
45 min.
60 min.
3h - 24h 1
auto (60 min.) 1,5
30 min.
45 min.
60 min.
3h - 24h 1,5
Charge
maxi. (kg)
1,5
2,5
2,5
1,5
1,5
1,5
3
3
3
3
3
3
3
3
3
1
1
1
1
1
1
Te m p é r a t u r e
maxi.
40°
60°
60°
40° Lavage, rinçages, essorages intermédiaires et essorage final
30° Lavage, rinçages, essorages intermédiaires et essorage final
40° Lavage, rinçages et essorage délicat
40° Lavage, rinçages et essorage délicat
30° Lavage, rinçages et essorage
30°
Description du cycle de lavage
Lavage, rinçages, essorages intermédiaires et essorage final
Prélavage, lavage, rinçages, essorages intermédiaires et
essorage final
F
Rinçage
*
2,5 Rinçages et essorage
* Remarque: indépendamment de la position du "bouton DUREE", le Rinçage démarrera immédiatement dès
pression sur la touche MARCHE/ARRET et durera 30 minutes.
Important:
- les programmes rapides "30 min" et "45 min" (indépendamment du type de textile) sont conseillés pour
rafraîchir du linge peu sale en peu de temps.
- les programmes "60 min" (indépendamment du type de textile) sont conseillés pour laver du linge peu sale.
- les 2 minutes d'attente nécessaires au déverrouillage du hublot ne sont pas comprises dans les temps
indiqués.
19
Page 20

Produits lessiviels et linge
Triage du linge
F
Triez correctement votre linge d'après:
- le type de textile / le symbole sur l'étiquette.
- les couleurs: séparez le linge coloré du blanc.
Videz les poches et contrôlez les boutons.
Ne dépassez pas la charge maximale indiquée
dans le "Tableau des programmes".
Combien pèse le linge ?
1 drap 400-500 g
1 taie d'oreiller 150-200 g
1 nappe 400-500 g
1 peignoir 900-1.200 g
1 serviette éponge 150-250 g
Pièces de linge particulières
Rideaux: pliez-les bien et glissez-les dans une taie
d'oreiller ou dans un sac genre filet. Lavez-les seuls
sans dépasser la demi-charge. Sélectionnez le programme
Doudounes et anoraks: s'ils sont en duvet d'oie ou
de canard, ils peuvent être lavés à la machine. Lavez
les vêtements sur lenvers. La charge ne doit pas
excéder
2-3 kg. Prévoyez 2, voire 3 rinçages.
Laine: pour obtenir d'excellents résultats utilisez un
produit lessiviel spécial et ne dépassez pas une
charge de 1kg.
Vêtements de sport: utilisez le programme "Spécial Sport"
ner les résidus de terre et de boue sur les vêtements. Dans ce cas, introduisez de la lessive en
poudre dans le bac n° 1 du tiroir à produits lessiviels
(voir «Description du lave-linge»).
La phase de prélavage n'aura pas lieu si la sélection
effectuée à l'aide du bouton Durée est comprise
entre 30 min et 1h.
qui supprime automatiquement l'essorage.
. Un prélavage est possible pour élimi-
Système d'équilibrage du chargement
Pour éviter des vibrations excessives, avant toute
phase d'essorage, l'appareil imprime au tambour
une série de rotations continues à une vitesse
légèrement supérieure à la vitesse de lavage pour
distribuer le linge de façon uniforme.
Si, malgré plusieurs tentatives, le linge n'est pas
parfaitement réparti, l'appareil effectue l'essorage à
une vitesse inférieure à la vitesse prévue.
En cas de déséquilibre excessif, l'appareil procède à
la répartition du linge au lieu de l'essorage.
Les tentatives éventuelles d'équilibrage peuvent
prolonger la durée totale du cycle de 10 minutes
maximum.
20
Page 21

Précautions et conseils
Ce lave-linge a été conçu et fabriqué conformé-
ment aux normes internationales de sécurité. Ces
avertissements sont fournis pour des raisons de
sécurité, lisez-les attentivement.
Sécurité générale
Cet appareil a été conçu pour une utilisation
domestique, non professionnelle et ses fonctions
ne doivent pas être altérées.
Ce lave-linge ne doit être utilisé que par des
adultes en suivant les instructions reportées dans
ce mode d'emploi.
Nutilisez pas lappareil si vous êtes pieds nus.
ne touchez jamais lappareil si vous avez les pieds
ou les mains humides.
Ne tirez jamais sur le câble pour débrancher la
fiche de la prise de courant.
N'ouvrez pas le tiroir à produits lessiviels si la
machine est en marche.
Ne touchez pas à l'eau de vidange, elle peut
atteindre des températures très élevées.
Ne forcez pas pour ouvrir le hublot: le verrouillage
de sécurité qui protège contre les ouvertures
accidentelles pourrait s'endommager.
En cas de panne, n'essayez en aucun cas
d'accéder aux mécanismes internes pour tenter
de la réparer.
Veillez à ce que les enfants ne s'approchent pas
de la machine pendant son fonctionnement.
Pendant le lavage, le hublot a tendance à se
réchauffer.
Deux ou trois personnes sont nécessaires pour la
déplacer en faisant très attention. Ne jamais la
déplacer seul car la machine est très lourde.
Avant d'introduire votre linge, contrôlez si le
tambour est bien vide.
produits pour rappeler les obligations de collecte
séparée.
Les consommateurs devront contacter les
autorités locales ou leur revendeur concernant la
démarche à suivre pour l'enlèvement de leur vieil
appareil.
Economies et respect de l'environnement
La technologie au service de l'environnement
Si vous voyez peu d'eau à travers le hublot c'est
parce que grâce à la nouvelle technologie Indesit, il
suffit de moins de la moitié d'eau pour obtenir une
propreté impeccable: un but atteint pour protéger
l'environnement.
Economie de produit lessiviel, d'eau, d'électricité et de temps
Pour ne pas gaspiller de ressources, utilisez le
lave-linge à sa charge maximale. Mieux vaut une
pleine charge que deux demies, vous économiserez jusqu'à 50% d'électricité.
Si vous traitez les taches avec un produit déta-
chant ou si vous les laissez tremper avant de les
laver, vous éviterez d'avoir à laver à de hautes
températures.
Bien doser la quantité de produit lessiviel en
fonction de la dureté de l'eau, du degré de
salissure et de la quantité de linge à laver évite les
gaspillages et protège l'environnement: bien que
biodégradables, les produits lessiviels contiennent
des éléments qui altèrent l'équilibre de la nature.
Evitez le plus possible l'utilisation d'assouplissant.
Effectuer ses lavages tard dans l'après-midi et
jusqu'aux premières heures du matin permet de
réduire la charge d'absorption des opérateurs
énergétiques.
F
Mise au rebut
Mise au rebut du matériel d'emballage:
se conformer aux réglementations locales de manière
à ce que les emballages puissent être recyclés.
La Directive Européenne 2002/96/EC sur les
Déchets des Equipements Electriques et Electroniques, exige que les appareils ménagers usagés
ne soient pas jetés dans le flux normal des déchets municipaux. Les appareils usagés doivent
être collectés séparément afin d'optimiser le taux
de récupération et le recyclage des matériaux qui
les composent et réduire l'impact sur la santé
humaine et l'environnement. Le symbole de la
''poubelle barrée'' est apposée sur tous les
21
Page 22
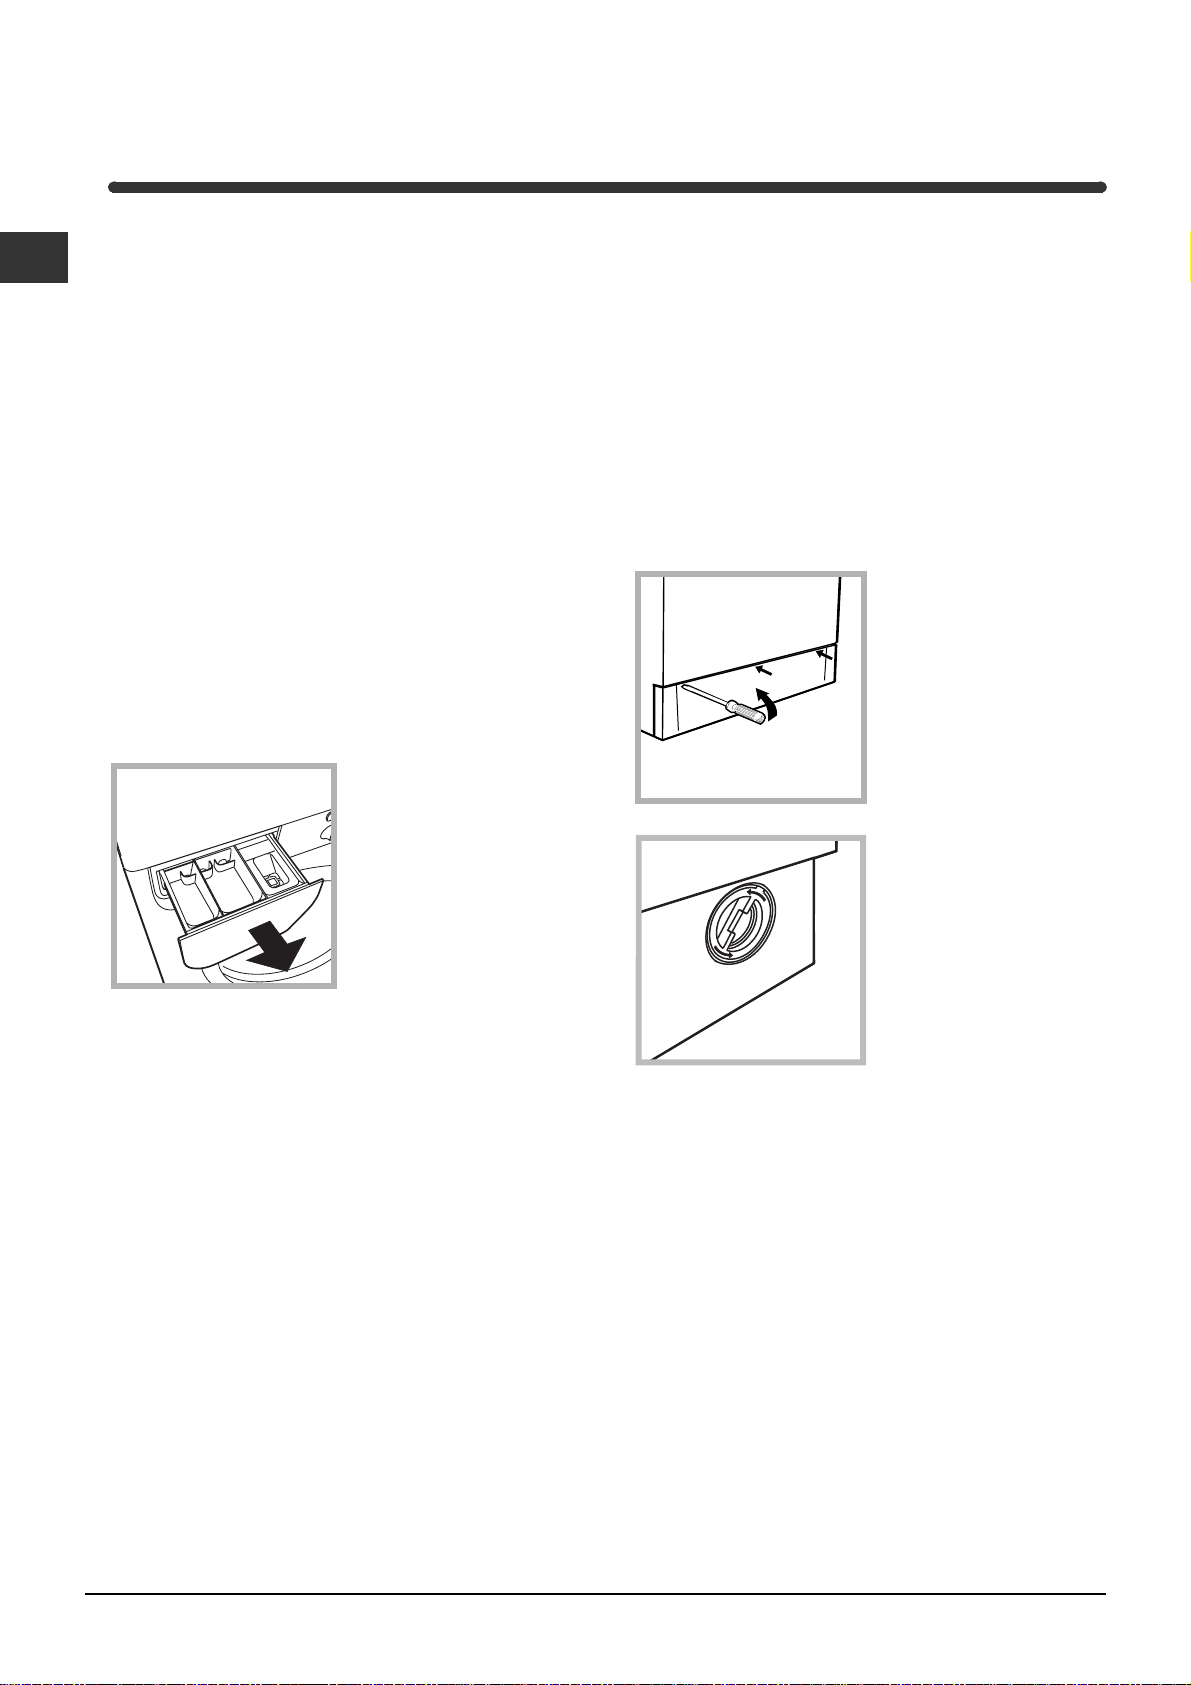
Entretien et soin
Coupure de l'arrivée d'eau et de courant
F
Fermez le robinet de l'eau après chaque
lavage: vous limiterez ainsi l'usure de l'installation
hydraulique de votre lave-linge et éliminerez le
danger de fuites.
Débranchez la fiche de la prise de courant quand
vous nettoyez votre lave-linge et pendant tous vos
travaux d'entretien.
Nettoyage du lave-linge
Pour nettoyer l'extérieur et les parties en caoutchouc,
utilisez un chiffon imbibé d'eau tiède et de savon.
N'utilisez ni solvants ni abrasifs.
Nettoyage du tiroir à produits
lessiviels
Pour sortir le tiroir,
soulevez-le et tirez-le
vers vous (voir figure).
Lavez-le à l'eau
courante, effectuez
cette opération assez
souvent.
Nettoyage de la pompe
Le lave-linge est équipé d'une pompe autonettoyante
qui n'exige aucune opération d'entretien. Il peut
toutefois arriver que de menus objets (pièces de
monnaie, boutons) tombent dans la préchambre qui
protège la pompe, placée en bas de cette dernière.
Contrôlez que le cycle de lavage est bien terminé
et débranchez la fiche.
Pour accéder à cette préchambre:
1. démontez le panneau
situé à l'avant du lavelinge à l'aide d'un
tournevis (voir figure);
2. dévissez le couvercle
en le faisant tourner dans
le sens inverse des
aiguilles d'une montre (voir
figure): il est normal qu'un
peu d'eau s'écoule;
Entretien du hublot et du tambour
Quand vous nutilisez pas votre lave-linge, laissez
toujours le hublot entrouvert pour éviter la
formation de mauvaises odeurs.
22
3. nettoyez soigneusement à l'intérieur;
4. revissez le couvercle;
5. remontez le panneau en veillant à bien enfiler les
crochets dans les fentes prévues avant de le pousser
contre la machine.
Contrôle du tuyau d'arrivée de l'eau
Contrôlez le tuyau d'alimentation au moins une fois
par an. Remplacez-le dès que vous remarquez des
craquèlements et des fissures: les fortes pressions
subies pendant le lavage pourraient provoquer des
cassures.
N'utilisez jamais de tuyaux usés.
Page 23
Anomalies et remèdes
Il peut arriver que le lave-linge ne fonctionne pas bien. Avant de appelez le Service après-vente (voir Assistance),
contrôlez s'il ne s'agit pas d'un problème facile à résoudre grâce à la liste suivante.
Anomalies:
Le lave-linge ne s'allume pas.
Le cycle de lavage ne démarre
pas.
Il n'y a pas d'arrivée d'eau.
Le lave-linge prend l'eau et
vidange continuellement.
Causes / Solutions possibles:
La fiche n'est pas branchée dans la prise de courant ou mal branchée.
Il y a une panne de courant.
Le hublot n'est pas bien fermé.
La touche MARCHE/ARRET
La touche MARCHE / PAUSE
Le robinet de l'eau n'est pas ouvert.
Sélection d'une fin de cycle de "3h" à "24h" (voir Comment
effectuer un cycle de lavage).
Le tuyau d'arrivée de l'eau n'est pas raccordé au robinet.
Le tuyau est plié.
Le robinet de l'eau n'est pas ouvert.
Il y a une coupure d'eau.
La pression n'est pas suffisante.
La touche MARCHE / PAUSE
le tuyau de vidange n'est pas installé à une distance du sol
comprise entre 65 et 100 cm (voir Installation).
L'extrémité du tuyau de vidange est plongée dans l'eau (voir Installation).
L'évacuation murale n'a pas d'évent.
Si après ces vérifications, le problème persiste, fermez le robinet de l'eau, éteignez
la machine et appelez le service Assistance. Si vous habitez en étage dans un
immeuble, il peut y avoir des phénomènes de siphonnement qui font que votre
lave-linge prend et évacue l'eau continuellement. Pour supprimer cet inconvénient,
vous pouvez trouver dans le commerce des valves spéciales anti-siphonnement.
n'a pas été actionnée.
n'a pas été actionnée.
n'a pas été actionnée.
F
Votre lave-linge ne vidange pas
et n'essore pas.
Votre lave-linge vibre beaucoup
pendant l'essorage.
Le lave-linge a des fuites.
Le voyant ALLUMAGE/HUBLOT
VERROUILLE clignote très
rapidement.
Il y a un excès de mousse.
Le tuyau de vidange est plié (voir Installation).
La conduite de l'installation de vidage est bouchée.
Les vis de fixation du groupe oscillant n'ont pas été enlevées lors de
l'installation de l'appareil. Enlevez les vis (voir Installation).
Le lave-linge n'est pas posé à plat (voir Installation).
Le lave-linge est coincé entre des meubles et le mur (voir Installation).
Le tuyau d'arrivée de l'eau n'est pas bien vissé (voir Installation).
Le tiroir à produits lessiviels est bouché (pour le nettoyer voir Entretien et soin).
Le tuyau de vidange n'est pas bien fixé (voir Installation).
Il vous signale une anomalie. Avant d'appeler le service de
dépannage, nous vous prions de bien vouloir procéder comme suit:
1. Eteignez l'appareil en appuyant sur la touche
2. Débranchez la fiche d'alimentation et attendez au moins 40 s;
3. Rebranchez la fiche dans la prise de courant;
4. Allumez l'appareil en appuyant à nouveau sur la touche
5. Si le défaut persiste, appelez le service d'assistance.
Le produit de lavage utilisé n'est pas une lessive spéciale machine
(il faut qu'il y ait l'inscription "pour lave-linge", "main et machine", ou
autre semblable).
La quantité utilisée est excessive.
;
;
23
Page 24

Assistance
F
Avant d'appeler le service après-vente:
Vérifiez si vous ne pouvez pas résoudre vous-même le problème (voir Anomalies et remèdes);
Remettez le programme en marche pour contrôler si dysfonctionnement a disparu;
Autrement, appelez le Service après-vente de votre revendeur;
En cas d'installation erronée ou d'utilisation incorrecte, vous pouvez être appelé à payer l'intervention.
Ne vous adressez jamais à des techniciens non agréés.
Communiquez:
le type de panne;
le modèle de la machine (Référence);
le numéro de série (S/N).
Vous trouverez tous ces renseignements sur la plaquette signalétique située sur le panneau arrière de
votre lave-linge.
Consultation à tout moment
Pour toute demande concernant nos produits, nhésitez pas à contacter notre Service Consommateurs
0.825.05.44.44.
24
Page 25

Instructies voor het gebruik
WASMACHINE
NL
Nederlands
WIL 1200 OT
Inhoud
NL
Installatie, 26-27
Uitpakken en waterpas zetten
Water- en elektrische aansluiting
Technische gegevens
Beschrijving van de wasmachine, 28-29
Wasmiddellaatje
Bedieningspaneel
Het uitvoeren van een wascyclus, 30
Tabel van de programma's, 31
Wasmiddel en wasgoed, 32
Prepareren van het wasgoed
Speciale stukken
Balanceersysteem van de lading
Voorzorgsmaatregelen en raadgevingen, 33
Algemene veiligheid
Het afvoeren
Bezuiniging en bescherming van het milieu
Onderhoud, 34
Afsluiten van water en stroom
Schoonmaken van de wasmachine
Het wasmiddellaatje schoonmaken
Reinigen van deur en trommel
Reinigen van de pomp
Controleer de slang van de watertoevoer
Storingen en oplossingen, 35
Service, 36
Voordat u er de installateur bijhaalt
25
Page 26
Installatie
NL
Het is belangrijk dit boekje te bewaren zodat u het
kunt raadplegen wanneer u maar wilt. In het geval dat u
de machine verkoopt, of u verhuist, moet het boekje bij
de machine blijven zodat de nieuwe gebruiker de
functies en betreffende raadgevingen kan leren kennen.
Lees de instructies met aandacht: u vindt er belang-
rijke informatie betreffende het installeren, gebruik en
veiligheid.
Uitpakken en waterpas zetten
Uitpakken
1. Pak de wasmachine uit.
2. Controleer of de wasmachine geen schade heeft
geleden gedurende het vervoer. Indien dit wel het
geval is moet hij niet worden aangesloten en moet u
contact opnemen met de handelaar.
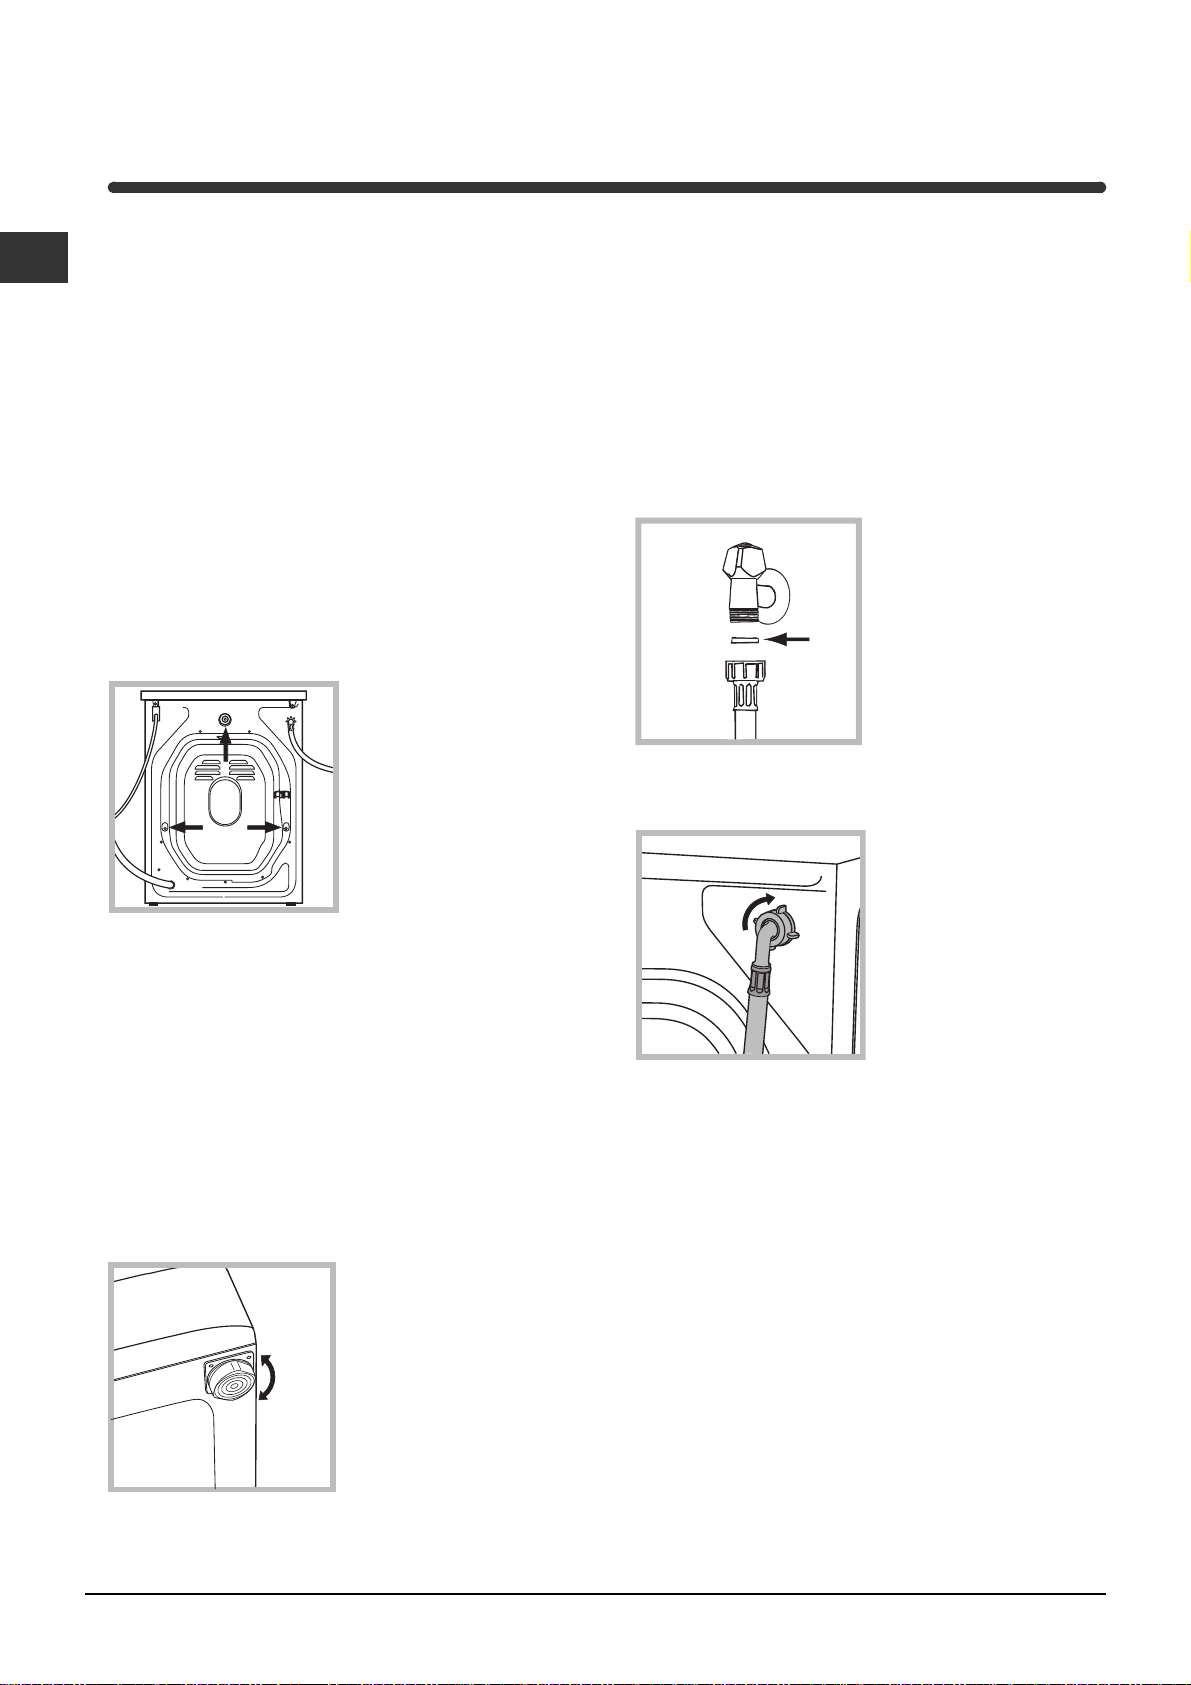
3. Verwijder de 3
transportbouten met de
rubberen ring en bijbehorende afstandstukken
die zich aan de achterkant bevinden (zie
afbeelding).
4. Sluit de gaten af met de bijgeleverde plastic doppen.
5. Bewaar alle stukken: mocht de wasmachine ooit
worden vervoerd, dan moeten deze weer worden
aangebracht.
Een correcte waterpas geeft de machine stabiliteit
en vermijdt trillingen, lawaai en het zich verplaatsen
gedurende het functioneren van de machine. In het
geval van vaste vloerbedekking of een tapijt regelt u
de stelvoetjes zodanig dat onder de wasmachine
genoeg plaats is voor ventilatie.
Water- en elektrische aansluiting
Aansluiting van de watertoevoerslang
1. Plaats de pakking A
op het uiteinde van de
waterslang en schroef
hem op een koud-
A
waterkraan met een
mondstuk met schroefdraad van 3/4 gas (zie
afbeelding).
Voordat u hem aansluit
moet u het water laten
lopen totdat het helder is.
2. Verbind de slang aan
de wasmachine door
hem op de betreffende
watertoevoer aan te
schroeven, rechtsboven
aan de achterkant (zie
afbeelding).
Het verpakkingsmateriaal is geen speelgoed voor
kinderen.
Waterpassen
1. Installeer de wasmachine op een rechte en stevige
vloer en laat hem niet leunen tegen een muur, meubel
of dergelijken.
2. Als de vloer niet perfect
horizontaal is kunt u de
onregelmatigheid opheffen
door de stelvoetjes aan de
voorkant in- of uit te
schroeven (zie afbeelding);
de hoek, gemeten ten
opzichte van de aanrecht,
mag de 2° niet overschrijden.
26
3. Let erop dat er geen knellingen of kronkels in de
slang zijn.
De waterdruk van de kraan moet binnen de
waarden van de tabel Technische Gegevens liggen
(zie bladzijde hiernaast).
Als de slang niet lang genoeg is moet u zich wenden
tot een gespecialiseerde handelaar of een bevoegde
installateur.
Page 27
Aansluiting van de afvoerbuis
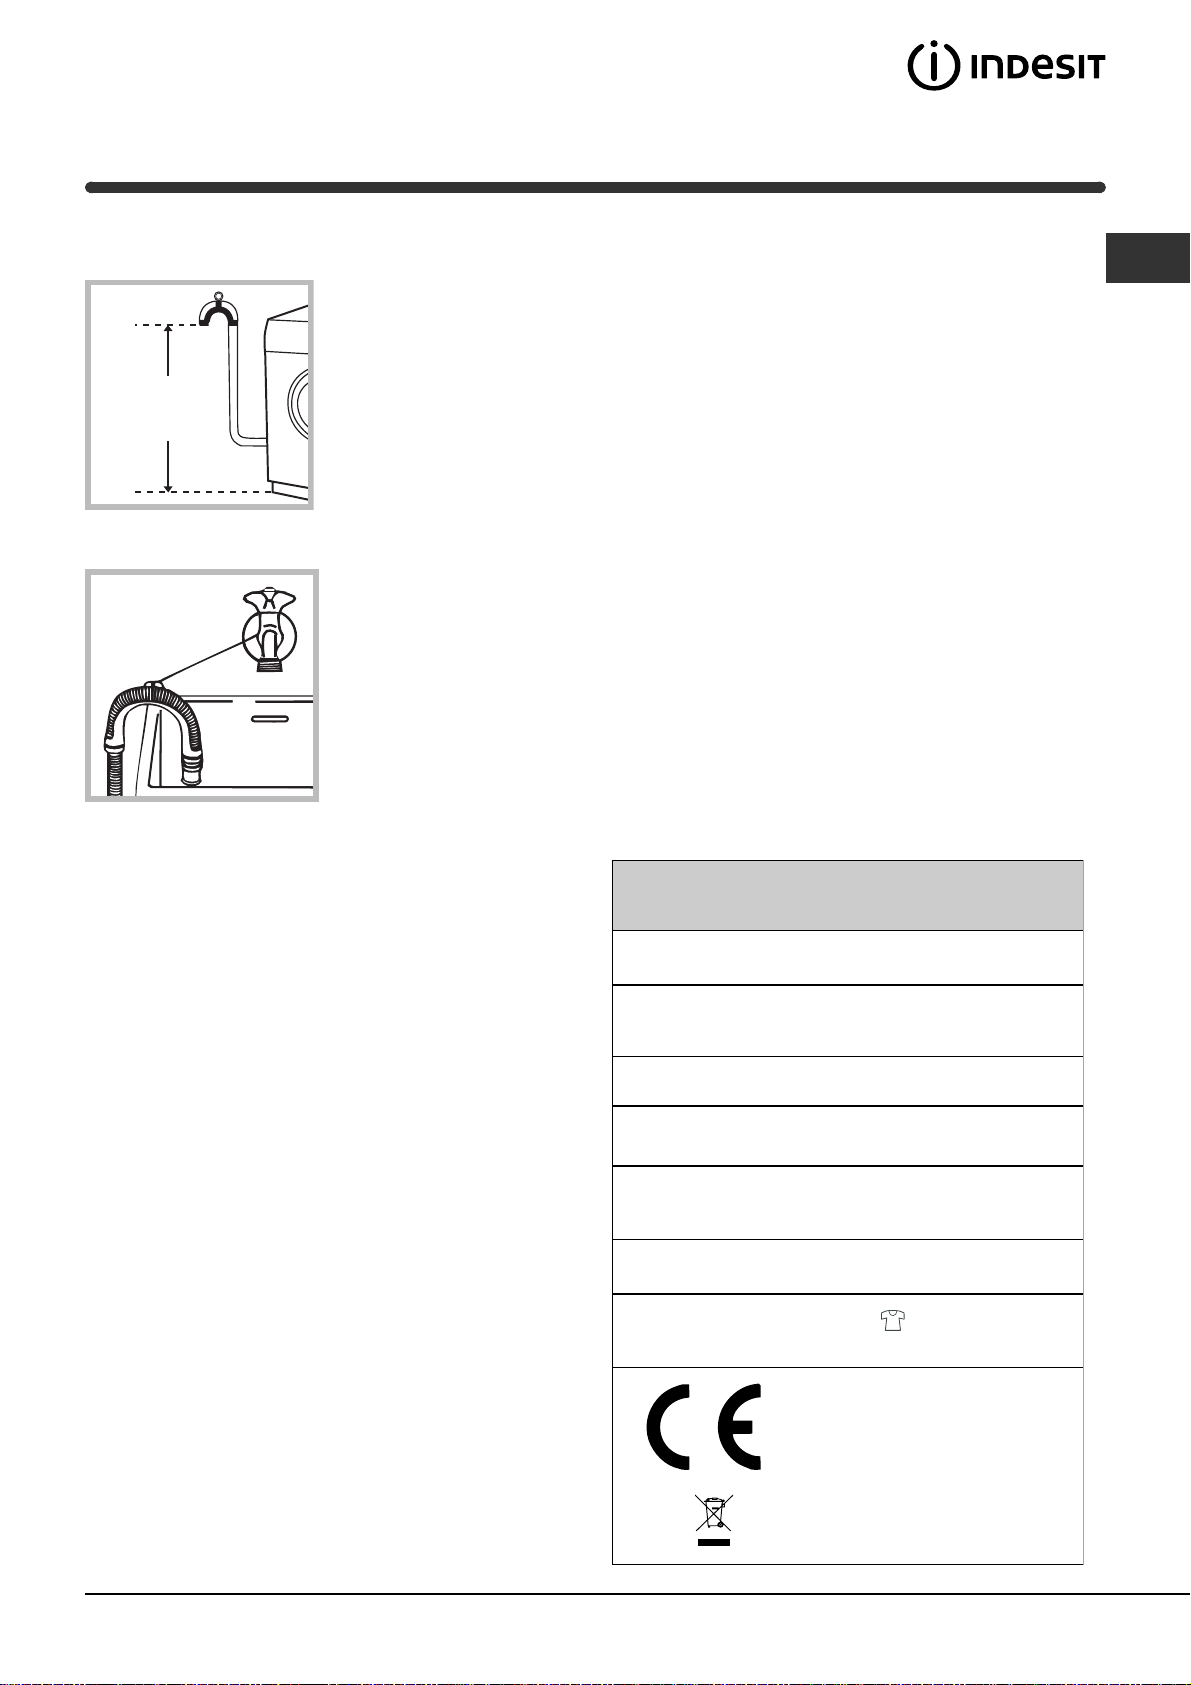
Verbind de buis, zonder
hem te buigen, aan een
afvoerleiding of aan een
afvoer in de muur tussen
65 en 100 cm van de
65 - 100 cm
grond af;
of hang hem op de rand
van een wasbak of bad,
en bind de bijgeleverde
leiding aan de kraan
(zie afbeelding). Het
uiteinde van de afvoerslang mag niet onder
water hangen.
Gebruik geen verlengsnoeren of dubbelstekkers.
NL
Het snoer mag niet in bochten of geknikt liggen.
De voedingskabel mag alleen door een bevoegde
installateur worden vervangen.
Belangrijk! De fabrikant is niet aansprakelijk wanneer
deze normen niet gerespecteerd zijn.
Gebruik geen verlengstuk voor de slang ; indien dit
niet te vermijden is moet het verlengstuk dezelfde
doorsnee hebben als de originele slang en hij mag niet
langer zijn dan 150 cm.
Elektrische aansluiting
Voordat u de stekker in het stopcontact steekt moet u
zich ervan verzekeren dat:
het stopcontact geaard is en voldoet aan de gel-
dende normen;
het stopcontact het maximum vermogen van de
machine kan verdragen, zoals aangegeven in de
tabel Technische Gegevens (zie hiernaast);
het voltage correspondeert met de waarden die zijn
aangegeven in de tabel Technische Gegevens (zie
hiernaast);
het stopcontact geschikt is voor de stekker van de
machine. Indien dit niet zo is moet de stekker of het
stopcontact vervangen worden.
De wasmachine mag niet buiten worden geinstalleerd,
ook niet op een plaats die beschut is, aangezien het
gevaarlijk is hem aan regen en onweer bloot te stellen.
Als de wasmachine is geinstalleerd moet het stop-
contact gemakkelijk te bereiken zijn.
Technische gegevens
Model
Afmetingen
Vermog en
Elektrische
aansluitingen
Aansluiting
waterleiding
Snelheid
centrifuge
Controle-programma's volgens de
norm IEC456
WIL 1200 OT
breedte cm 59,5
hoogte cm 85
diepte cm 52,5
van 1 tot 5 kg
spanning 220/230 Volt 50 Hz
max. aansluitwaarde 1850 W
max. druk 1 MPa (10 bar)
min. druk 0,05 MPa (0,5 bar)
Inhoud trommel 46 liters
tot 1200 toeren per minuut
Programma ; Timerknop "auto";
uitgevoerd met 5 kg lading.
Deze apparatuur voldoet aan de
volgende EEC voorschriften:
-73/23/EEC van 19/02/73
(Laagspanning) en successievelijke
modificaties
-89/336/EEC van 03/05/89
(Elektromagnetische compatiabiliteit)
en successievelijke modificaties
- 2002/96/CE
27
Page 28
Beschrijving van de wasmachine
NL
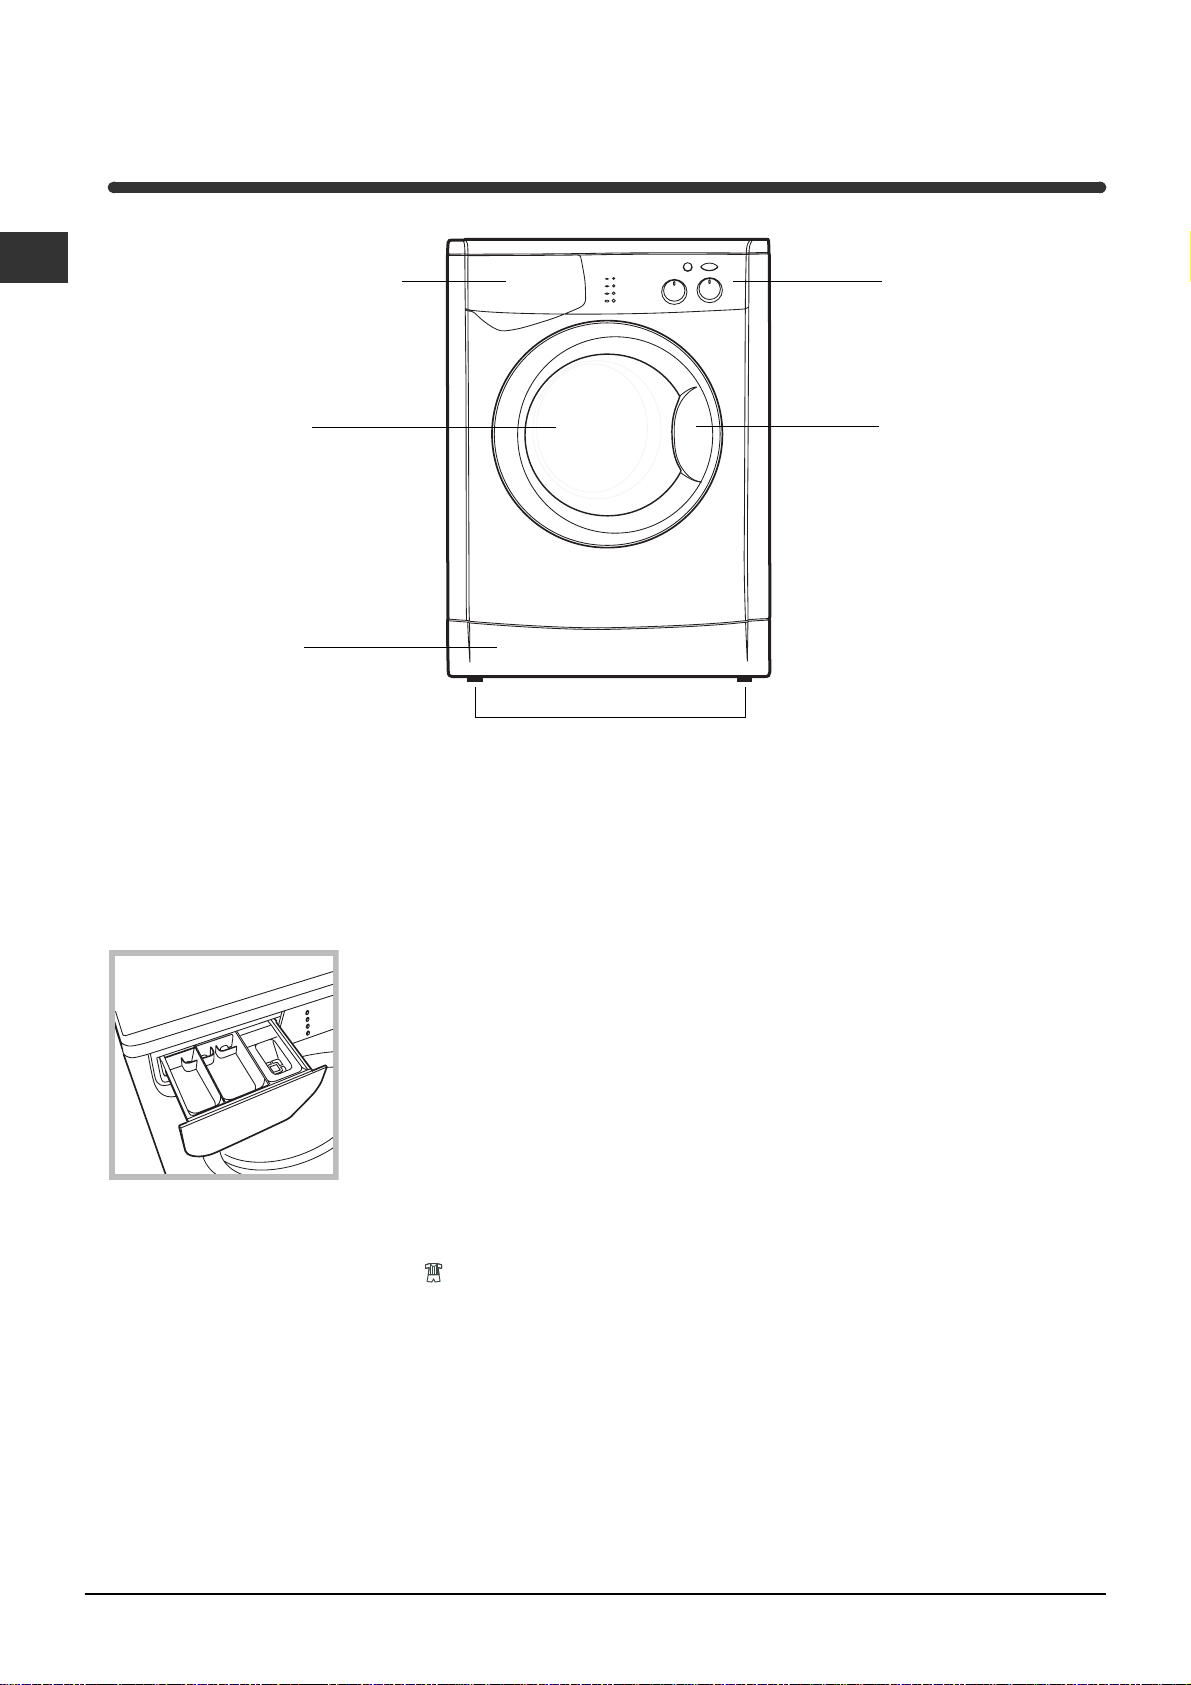
WASMIDDELLAATJE
DEUR
VOETSTUK
Wasmiddellaatje
BEDIENINGSPANEEL
HANDVAT
DEUR
STELVOETEN
Een goed resultaat van de was hangt ook af van een
juiste dosis wasmiddel: te veel maakt het wassen niet
beter en blijft in het wasgoed hangen terwijl het slecht
is voor het milieu.
Trek het laatje naar voren
en giet het wasmiddel en/
of de verdere toevoegingen erin als volgt.
3
2
1
bakje 1: voorwasmiddel (poeder)
Het wasmiddel voor de voorwas kan alleen worden
toegevoegd bij het sportprogramma
timerknop op de stand "auto" of op een van de standen van "3hr tot 24hr" (zie Wasmiddel en wasgoed).
bakje 2: wasmiddel (poeder of vloeibaar)
Het vloeibare wasmiddel wordt erin gegoten vlak voor
de start.
bakje 3: toevoegingen (wasverzachter enz.)
De wasverzachter mag niet boven het roostertje
uitkomen.
Gebruik nooit middelen voor handwas aangezien die
te veel schuim vormen.
. Zet de
28
Page 29
Bedieningspaneel
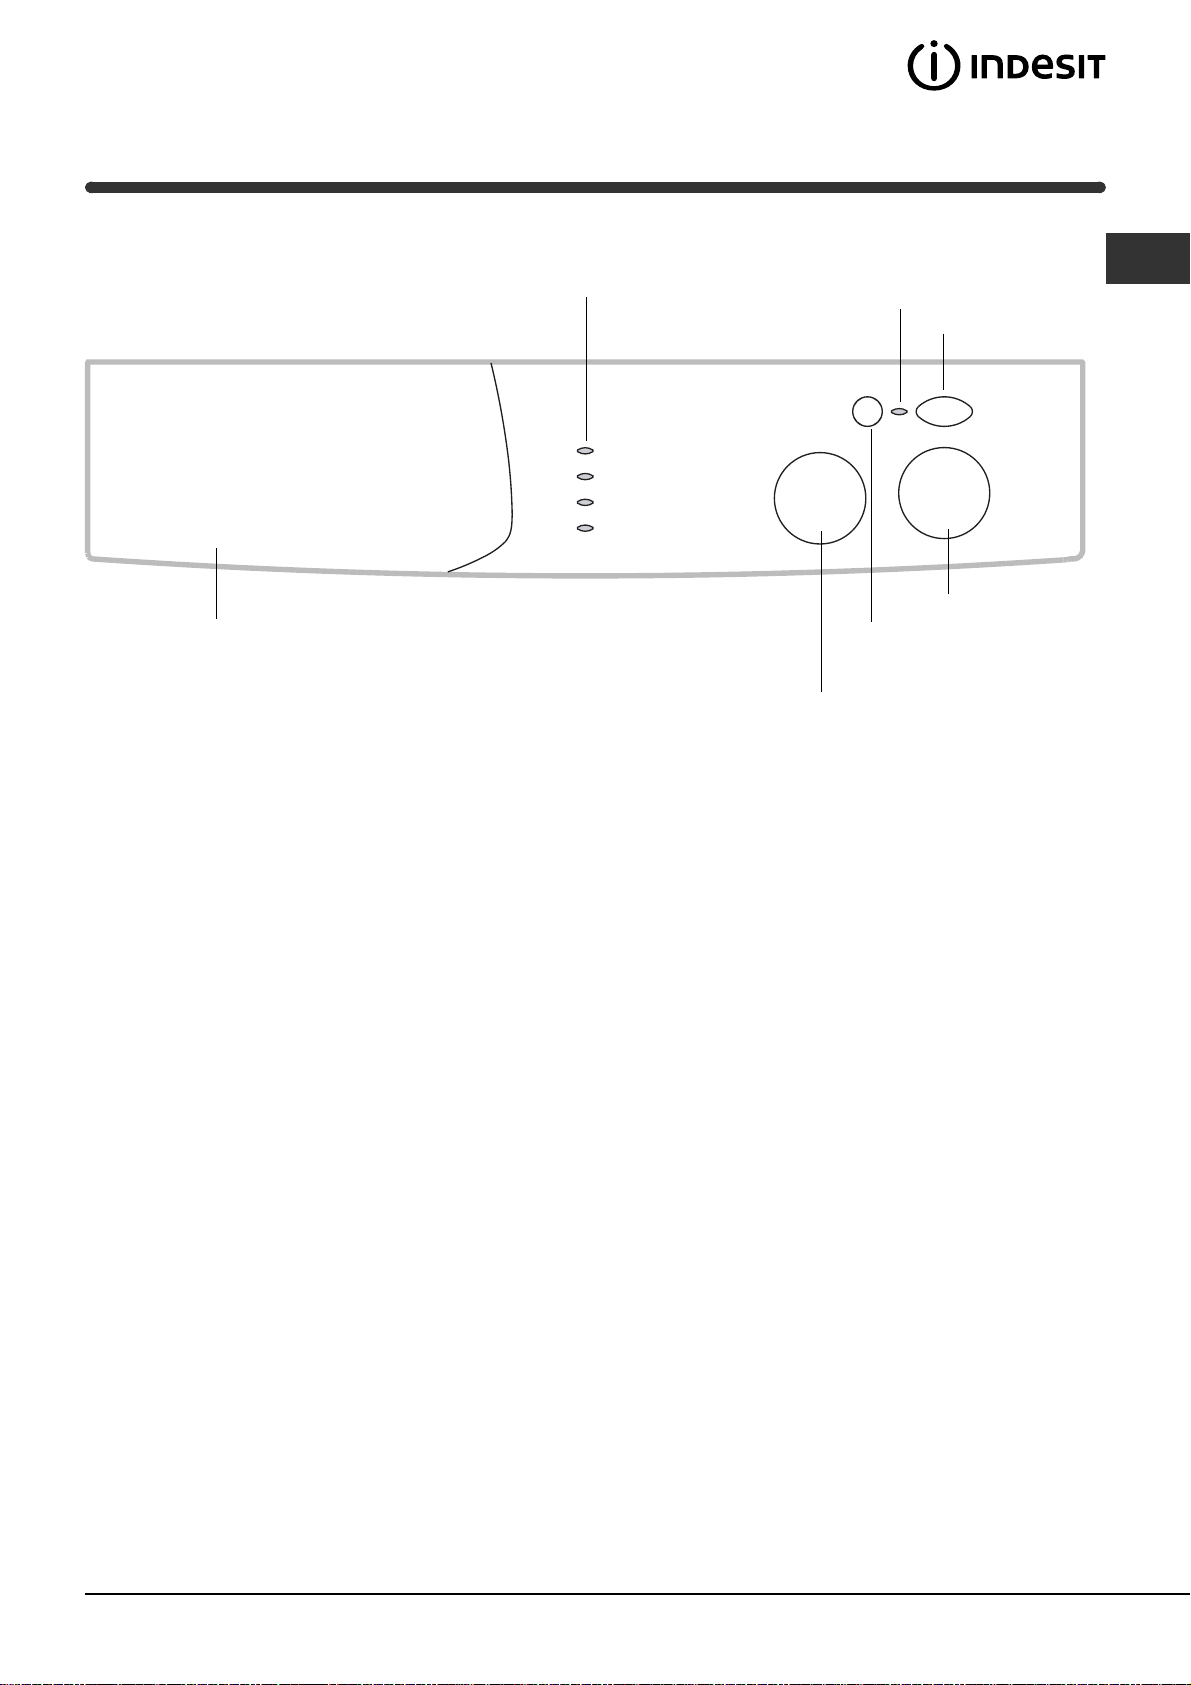
Wasmiddellaatje
Controlelampjes
Controlelampje
GEBLOKKEERD
START/ANNULEER
knop
PROGRAMMA
knop
AAN/DEUR
AAN/UIT
knop
TIMERKNOP
NL
Wasmiddellaatje: voor wasmiddel en verdere
toevoegingen (zie Beschrijving van de wasmachine).
Controlelampjes: geven het begin van het programma aan en de tijd die nog resteert tot aan het
einde van het programma (zie Het uitvoeren van
een wascyclus).
PROGRAMMA knop: voor het kiezen van de
programma's. Gedurende het programma blijft de
knop stilstaan.
START/ANNULEER: om de cyclus te starten
nadat u het gewenste programma en de gewenste
tijd heeft ingesteld.
Om het programma te annuleren en een ander
programma in te stellen houdt u deze knop minstens 3 seconden lang ingedrukt.
Controlelampje AAN/DEUR GEBLOKKEERD
:
Als het controlelampje aan is betekent het dat de
deur is geblokkeerd om te verhinderen dat de
wasmachine per ongeluk aangezet wordt. Om
beschadigingen te voorkomen moet u aan het einde
van de wascyclus voor u de deur opendoet wachten tot het controlelampje gaat knipperen.
De wachttijd is ongeveer 2 minuten.
AAN/UIT knop: voor het in- en uitschakelen van
de wasmachine.
TIMERKNOP: om in te stellen na hoeveel tijd het
programma moet eindigen.
In de stand "auto" zal de tijdsduur van het programma automatisch door de wasautomaat worden
beheerd.
Als het controlelampje AAN/DEUR GEBLOKKEERD
snel knippert betekent dit dat er een storing is
(zie Storingen en oplossingen).
29
Page 30
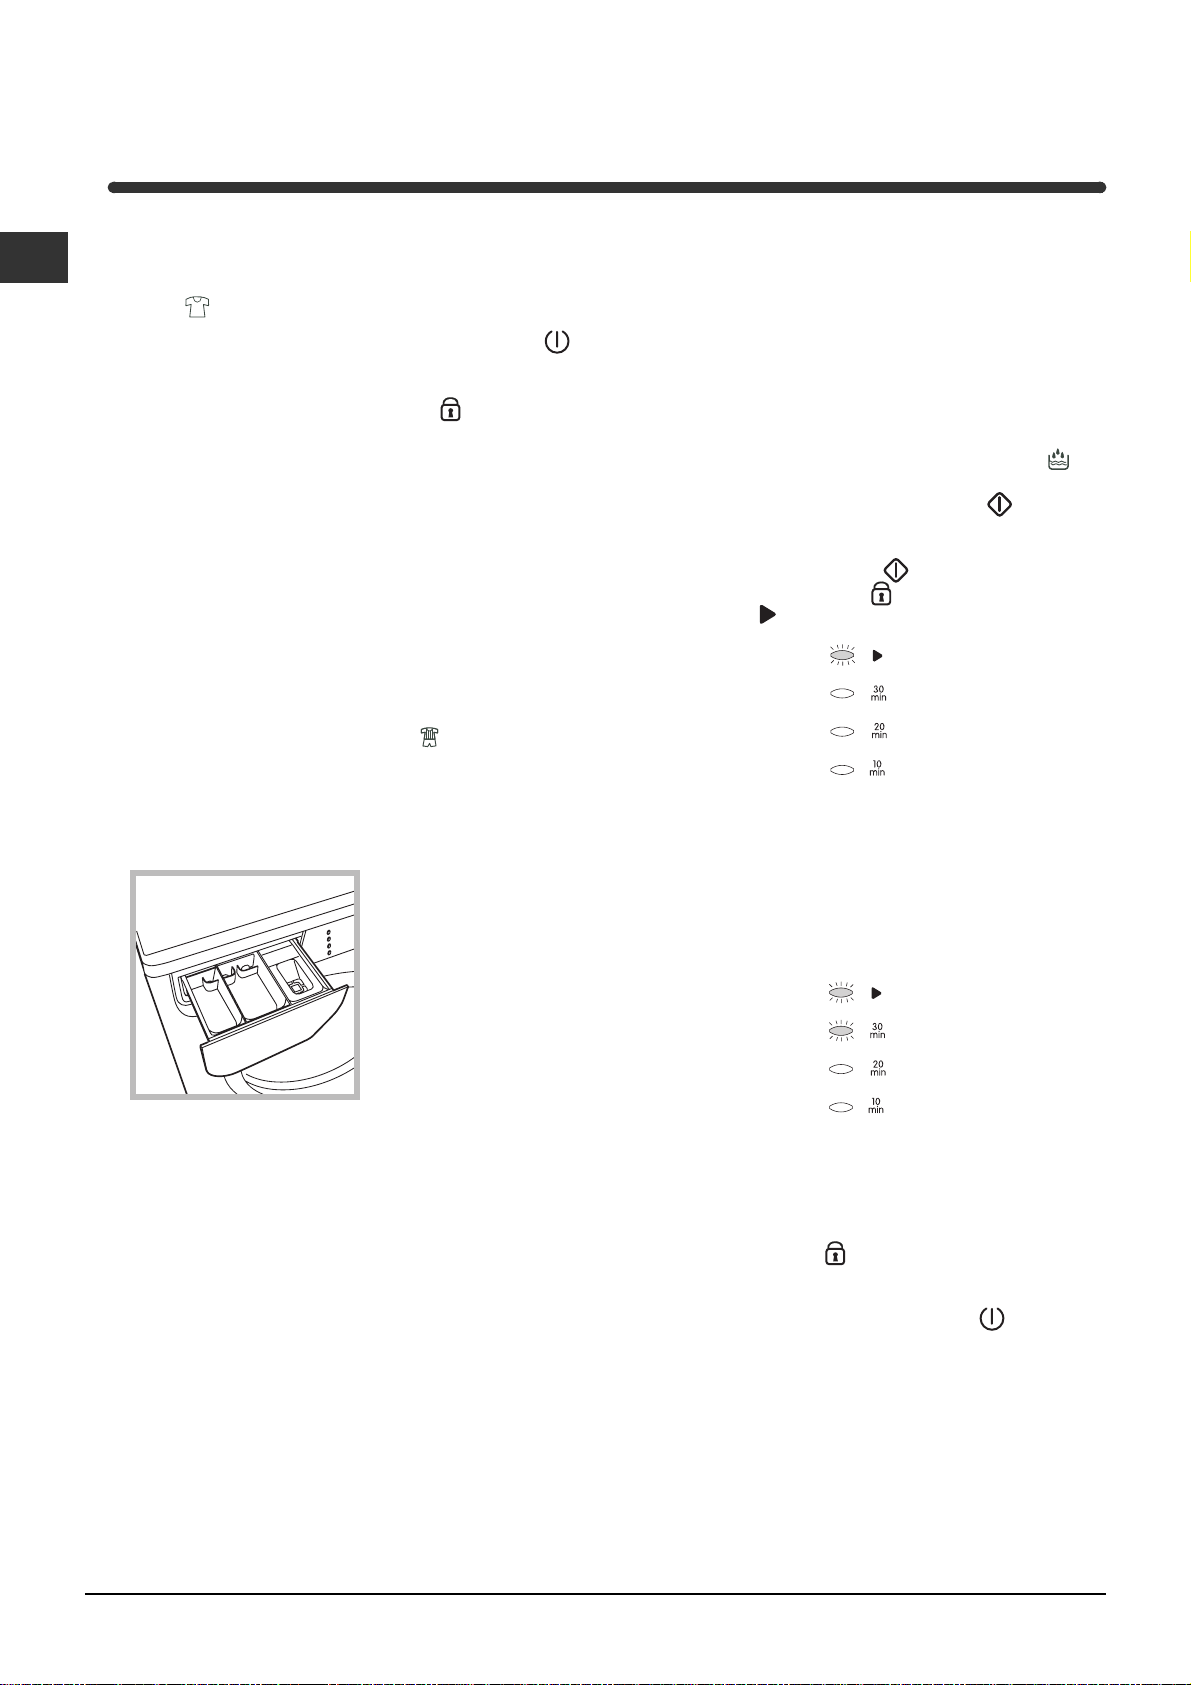
Het uitvoeren van een
wascyclus
NL
N.B.: Na de installatie en voor u de wasautomaat in
gebruik neemt, dient u een wascyclus uit te voeren
mèt wasmiddel maar zonder wasgoed, op het programma
1. Schakel de wasmachine in met de AAN/UIT knop
Alle controlelampjes branden gedurende enkele
secon den, gaan vervolgens uit en het controlelampje AAN/DEUR GEBLOKKEERD
ren.
2. HET WASGOED INLADEN. Open de deur. Laad
het wasgoed in en zorg ervoor nooit de laadhoeveelheid te overschrijden die wordt aangegeven in de programmatabel op de volgende blad
zijde.
3. WASMIDDEL/ANDERE PRODUCTEN DOSEREN
Haal het wasmiddelbakje helemaal naar voren toe
en doe het hoofdwasmiddel in het bakje met
nummer 2. Indien gewenst kunt u wasverzachter
en andere wasmiddelen in vakje 3 doen. De
wasverzachter mag niet boven het rooster uitkomen. Als u het sportprogramma
zet u de timerknop op de stand "auto" of op
een van de standen tussen "3h tot 24h" (zie
Wasmiddel en wasgoed). In dit geval is het
bovendien mogelijk waspoeder voor de voorwas
toe te voegen in het vakje 1.
met de timerknop in de stand "auto".
gaat knippe-
wilt uitvoeren,
3
2
1
van het wasprogramma automatisch net zolang
uitstellen tot de cyclus op de vastgestelde tijd zal
eindigen.
- Indien het niet nodig is een specifieke eindtijd in
.
te stellen, selecteert u de stand "AUTO": de
wasautomaat zal automatisch de lengte van het
programma instellen op basis van de geselecteerde stof (zie programmatabel op de volgende
bladzijde).
Onafhankelijk van de geselecteerde stand op de
TIMERKNOP, zal het programma "Spoelen"
ongeveer 30 minuten duren, en zal direct na de
druk op de knop START/ANNULEER
7. START HET PROGRAMMA door te drukken op de
knop START/ANNULEER
"aan/deur geblokkeerd"
voortgang"
Tijdens de cyclus geven de controlelampjes aan
hoeveel tijd nog resteert tot het einde van het
programma.
Als er respectievelijk nog 30, 20 en 10 minuten te
gaan zijn voor het einde van het programma,
zullen de corresponderende controlelampjes
aangaan.
zullen aangaan.
. De controlelampjes
en "programma in
beginnen.
4. DE DEUR SLUITEN.
5. KIES DE TE WASSEN STOF door de
PROGRAMMAKNOP naar rechts of naar links te
draaien, totdat u de gewenste stof of het programma "Spoelen" heeft geselecteerd.
6. STEL DE EINDTIJD VAN HET PROGRAMMA IN
door de TIMERKNOP naar links of naar rechts te
draaien.
U kunt de volgende standen instellen:
- Standen "30 min - 45 min - 60 min": door één
van deze tijden in te stellen regelt u de duur van
het geselecteerde programma.
- Standen van "3h" tot "24h": door een van deze
tijden in te stellen kunt u bepalen na hoeveel uur
het wasprogramma moet stoppen. De effectieve
tijdsduur van de wascyclus is die van de cyclus
"auto" (zie programmatabel op de volgende
bladzijde), maar de wasautomaat zal het starten
30
8. EINDE VAN HET PROGRAMMA
Aan het einde van de wascyclus zullen alle
controlelampjes uitgaan. Wacht op de
deblokkering van de deur (controlelampje "aan/
deur geblokkeerd"
uit de automaat en laat de deur op een kier
staan zodat de trommel kan opdrogen. Schakel
de machine uit door op de AAN/UIT
drukken.
knippert), haal het wasgoed
knop te
Page 31
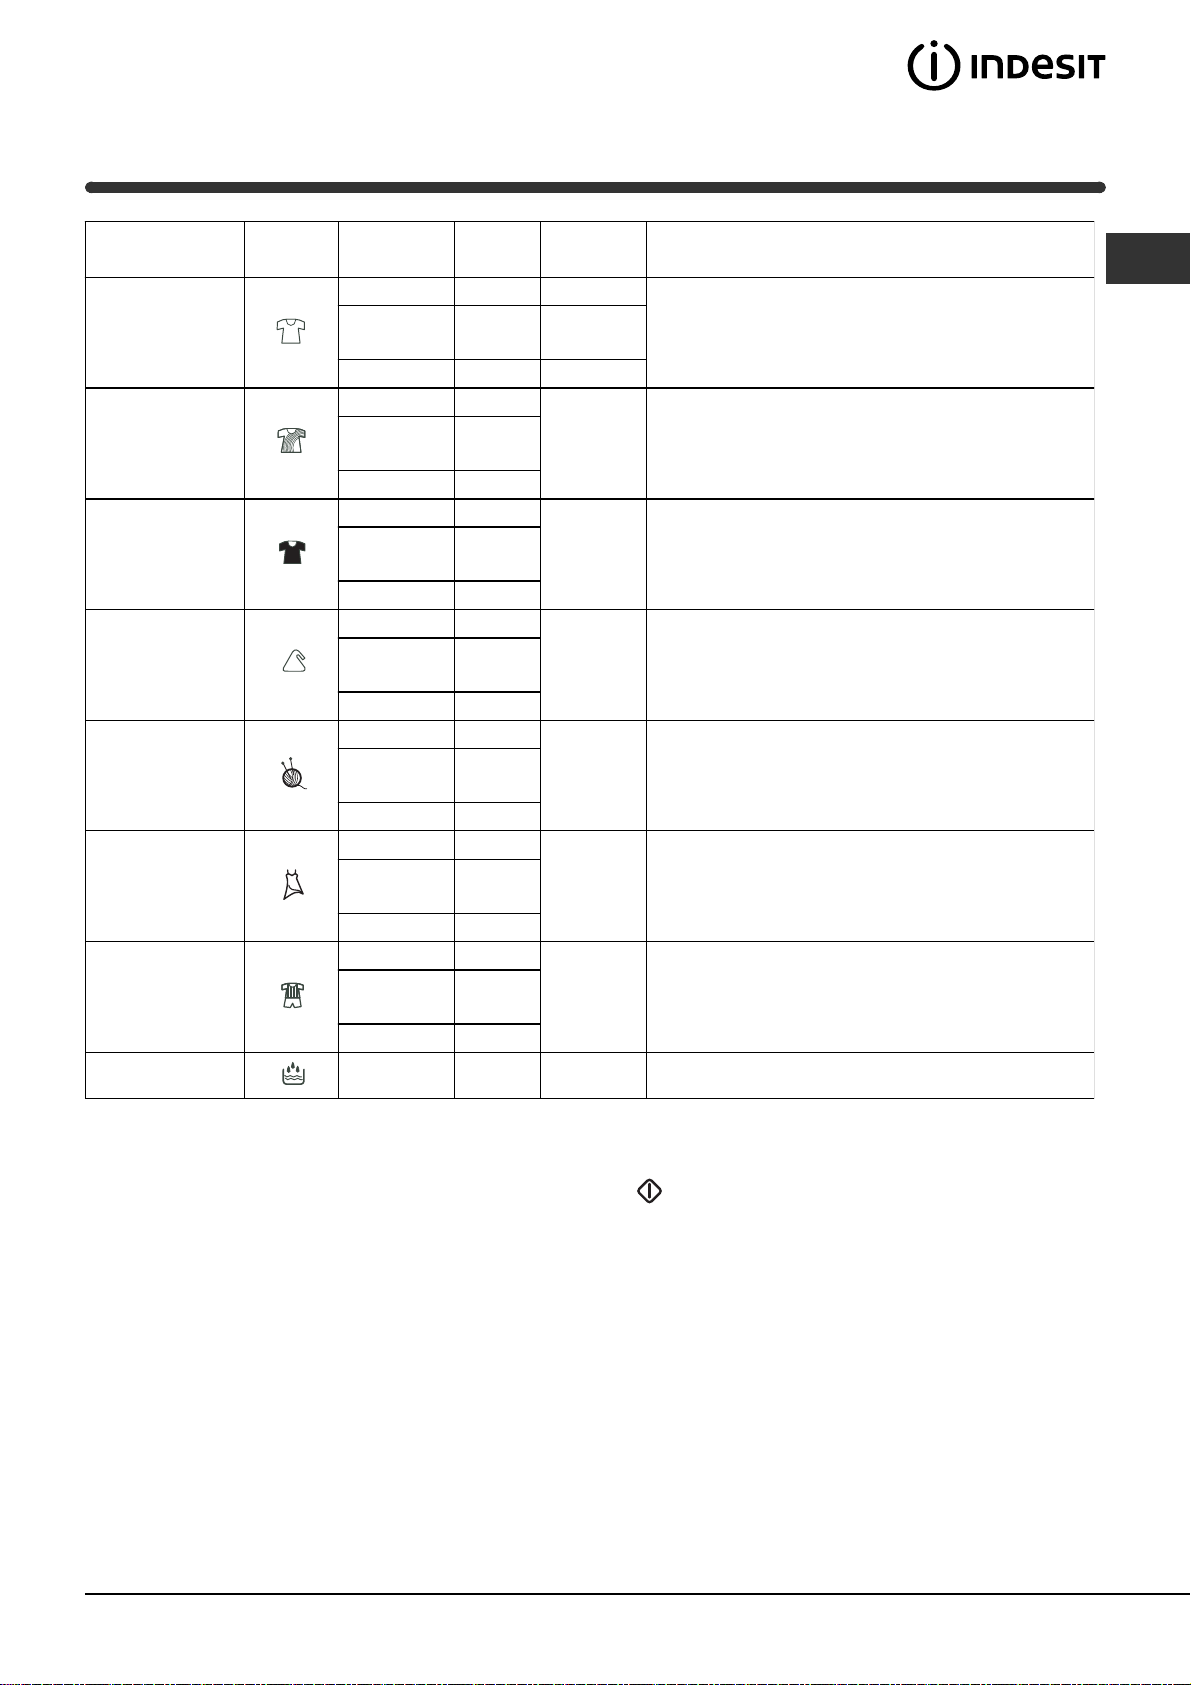
Tabel van de programma's
Soort stof en soort
vuil
Wit katoen
Bont katoen
Katoen donker/fijn
Synthetisch
Wol
Fijne was
Special Sport
Programma's
Tijden
auto (125 min.) 5 60°
30 min.
45 min.
60 min.
3h - 24h 5 60°
auto (70 min.) 5
30 min.
45 min.
60 min.
3h - 24h 5
auto (60 min.) 5
30 min.
45 min.
60 min.
3h - 24h 5
auto (60 min.) 2,5
30 min.
45 min.
60 min.
3h - 24h 2,5
auto (60 min.) 1
30 min.
45 min.
60 min.
3h - 24h 1
auto (60 min.) 1
30 min.
45 min.
60 min.
3h - 24h 1
auto (60 min.) 1,5
30 min.
45 min.
60 min.
3h - 24h 1,5
Max.
Lading
(kg)
3
3
3
3
3
3
3
3
3
1,5
2,5
2,5
1
1
1
1
1
1
1,5
1,5
1,5
Max.
Te m p e r a t u u r
40°
60°
60°
40° Wassen, spoelen, centrifuge halverwege en op het einde
30° Wassen, spoelen, centrifuge halverwege en op het einde
40° Wassen, spoelen en lichte centrifuge
40° Wassen, spoelen en lichte centrifuge
30° Wassen, spoelen en water afvoeren
30°
Beschrijving van de wascyclus
Wassen, spoelen, centrifuge halverwege en op het einde
Voorwas, Wassen, spoelen, centrifuge halverwege en op het
einde
NL
Spoelen
*
2,5 Spoelen en centrifuge
* N.B: onafhankelijk van de stand van de "TIMERKNOP", zal het programma Spoelen, dat 30 minuten duurt,
direct van start gaan nadat u op de knop START/ANNULEER heeft gedrukt.
Belangrijk:
- de snelle programma's "30 min." en "45 min." (onafhankelijk van het soort stof) zijn speciaal ontwikkeld voor
het snel opfrissen van niet zo vuil wasgoed.
- de programma's "60 min." (onafhankelijk van het soort stof) zijn speciaal ontwikkeld voor het wassen van niet
zo vuil wasgoed.
- de aangegeven tijden zijn exclusief de 2 minuten wachttijd aan het einde van de cyclus voor het deblokkeren
van de deur.
31
Page 32

Wasmiddel en wasgoed
NL
Prepareren van het wasgoed
Verdeel het wasgoed volgens:
- het soort stof / het symbool op het etiket.
- de kleuren: scheid gekleurd goed van de witte was.
Maak de zakken leeg en controleer de knopen.
Overschrijd nooit de waarden van maximale lading die
zijn aangegeven in de "Tabel van de programma's".
Hoeveel weegt het wasgoed?
1 laken 400-500 gr.
1 sloop 150-200 gr.
1 tafelkleed 400-500 gr.
1 badjas 900-1200 gr.
1 handdoek 150-200 gr.
Speciale stukken
Gordijnen: vouw de gordijnen nauwkeurig en doe
ze in een kussensloop of net. Was ze apart zonder
ooit de halve lading te overschrijden. Gebruik programma
Donzen dekbedden en met dons gevulde
windjacks: als de vulling uit ganzenveren of eenden-
dons bestaat kunt u ze wassen in de wasmachine.
Keer de stukken binnenste buiten en ga niet boven
een max. lading van 2-3 kg; herhaal de spoeling een
of twee keer en gebruik de delicate centrifuge.
Wol: Gebruik voor de beste resultaten een wasmiddel dat speciaal voor wol is bestemd en laad niet
meer dan 1kg wollen goed in de machine.
Sportkleding: gebruik het programma "Special
Sport"
die vooral nuttig is voor het verwijderen van aarde of
modder op de kleding. Voor de voorwas dient u
waspoeder in het vakje 1 van het wasmiddelbakje te
doen (zie Beschrijving van de wasmachine).
Het voorwassen wordt niet uitgevoerd als de
timerknop op een tijd is ingesteld van tussen de 30
min en 1 hr.
dat automatisch de centrifuge uitsluit.
. Het is mogelijk een voorwas in te stellen
Balanceersysteem van de lading
Om overmatige trillingen te vermijden verdeelt de
automaat de lading voor het centrifugeren op een
gelijkmatige manier. Dit gebeurt door de trommel
voortdurend te laten draaien op een snelheid die iets
hoger ligt dan de wassnelheid.
Als na herhaaldelijke pogingen, de lading nog steeds
niet goed is gebalanceerd, dan zal de wasautomaat
de centrifuge op een lagere snelheid uitvoeren dan
was voorzien.
Als de lading zeer uit balans is, zal de wasautomaat
een verdeling uitvoeren in plaats van een centrifuge.
De herhaaldelijke balanceerpogingen kunnen de
totale duur van de cyclus verlengen tot aan maximaal 10 minuten.
32
Page 33

Voorzorgsmaatregelen en
raadgevingen
De wasmachine is ontworpen en geproduceerd
volgens de internationale veiligheidsnormen. Deze
aanwijzingen worden voor uw eigen veiligheid gegeven en zij moeten met aandacht worden gelezen.
Algemene veiligheid
Dit apparaat is gemaakt voor huishoudelijk ge-
bruik, niet-professioneel, en zijn functies mogen
niet veranderd worden.
De wasmachine mag alleen door volwassen
personen en volgens de instructies in dit boekje
worden gebruikt.
Raak de machine niet aan als u blootsvoets bent
of met natte of vochtige handen of voeten.
Trek de stekker nooit aan het snoer uit het stopcon-
tact, maar altijd door de stekker aan te pakken.
Open het wasmiddellaatje niet terwijl de machine
in werking is.
Raak het afvoerwater niet aan aangezien het
nogal warm kan zijn.
Forceer nooit de deur: het veiligheidsmechanisme,
dat tegen per ongeluk openen beschermt, kan
beschadigd worden.
Probeer in geval van storingen nooit zelf interne
mechanismen van de machine te repareren.
Zorg ervoor dat kleine kinderen niet te dicht bij de
machine komen als deze in werking is.
De glazen deur kan heet worden.
Als de machine verplaatst moet worden doe dit dan
met twee of drie personen en met grote voorzichtigheid. Nooit alleen want de machine is zwaar.
Voordat u het wasgoed in de machine laadt,
controleer dat hij leeg is.
wanneer u het apparaat vernietigt, het apparaat
apart moet worden ingezameld.
Consumenten moeten contact opnemen met de
locale autoriteiten voor informatie over de juiste
wijze van vernietiging van hun oude apparaat.
Bezuiniging en bescherming van het milieu
Maximale reiniging
Als er weinig water door de glazen deur te zien is
komt dat doordat met de nieuwe Indesit technologie
minder dan de helft water voldoende is voor maximum reinheid van de was: een doel dat is bereikt
ten gunste van de milieu-bescherming.
Bezuinigen op wasmiddel, water, energie en tijd
Teneinde geen energiebronnen te verkwisten
moet de machine altijd met maximum lading
worden gebruikt. U spaart 50% energie met een
volle lading i.p.v. twee half volle ladingen.
Door vlekken met een ontvlekkingsmiddel te
behandelen of in de week te zetten kunt u met
minder hoge temperaturen wassen.
Doseer het wasmiddel op basis van de hardheid
van het water, de vuilheidsgraad en de hoeveelheid wasgoed, zo vermijd u onnodig energieverbruik en beschermt u het milieu. ook al zijn de
wasmiddelen biologisch afbreekbaar, toch bevatten ze elementen die het evenwicht in de natuur
verstoren. Bovendien moet u zoveel mogelijk
wasverzachters vermijden.
Door zoveel mogelijk te wassen met goedkope
stroomtarieven (s´nachts) werkt u mee aan het
reduceren van de belasting van de elektrische
centrale.
NL
Het afvoeren
Het afvoeren van het verpakkingsmateriaal:
houd u zich aan de plaatselijke normen zodat het
materiaal gerecycled kan worden.
De Europese Richtlijn 2002/96/EC over Vernieti
ging van Electrische en Electronische Apparatuur,
vereist dat oude huishoudelijke electrische appa
raten niet mogen vernietigd via de normale
ongesorteerde afvalstroom. Oude apparaten
moeten apart worden ingezameld om zo het
hergebruik van de gebruikte materialen te optima
liseren en de negatieve invloed op de gezondheid
en het milieu te reduceren. Het symbool op het
product van de "afvalcontainer met een kruis
erdoor" herinnert u aan uw verplichting, dat
33
Page 34
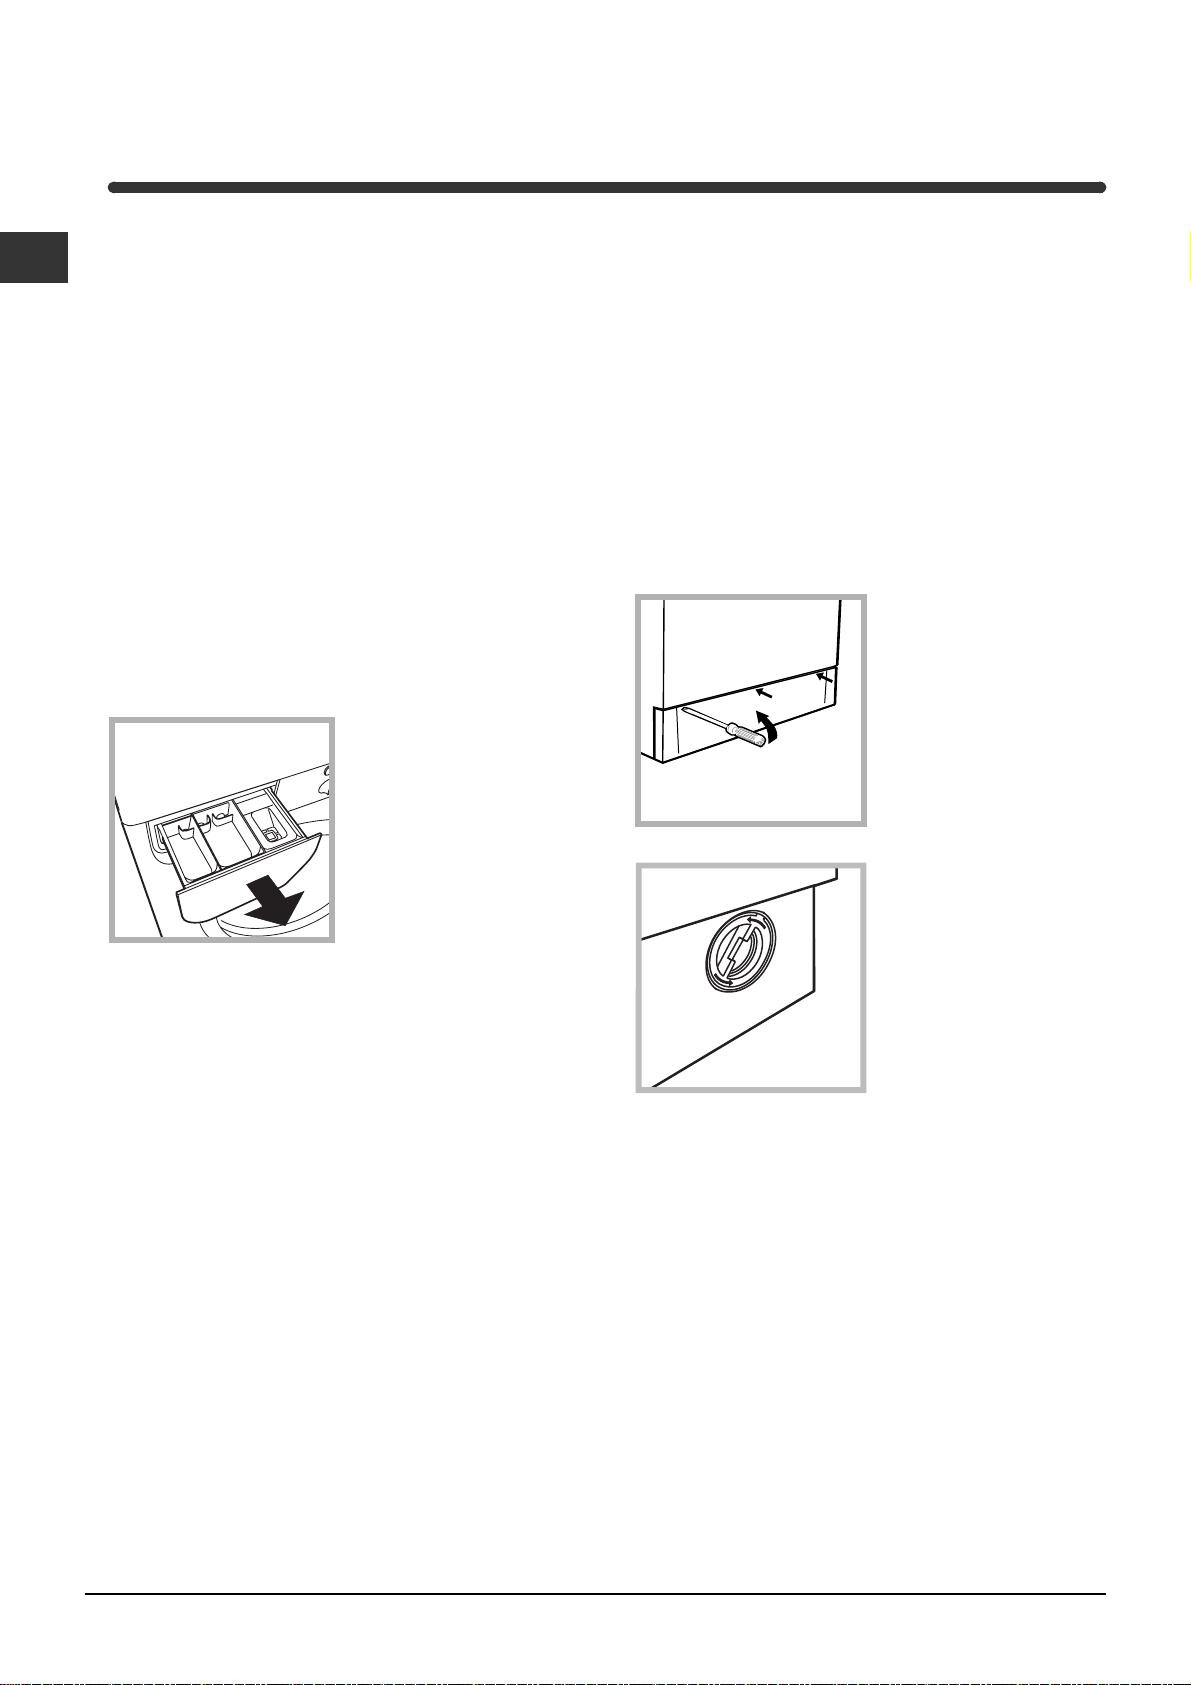
Onderhoud
NL
Afsluiten van water en stroom
Doe de kraan dicht na iedere wasbeurt. Hiermee
reduceert u de kans op lekkage.
Sluit altijd eerst de stroom af voordat u de wasma-
chine gaat schoonmaken en gedurende
onderhoudswerkzaamheden.
Schoonmaken van de wasmachine
De buitenkant en de rubber onderdelen kunnen met
een spons en lauw sopje worden schoongemaakt.
Nooit schuurmiddelen of oplosmiddelen gebruiken!
Het wasmiddellaatje schoonmaken
Verwijder het laatje door
het op te lichten en naar
voren te trekken
(zie afbeelding).
Was het onder stromend water: dit moet u
regelmatig doen.
Reinigen van de pomp
De wasmachine is voorzien van een zelfreinigende
pomp en hoeft dus niet te worden schoongemaakt.
Het kan echter gebeuren dat kleine voorwerpen
(geldstukken, knopen) in het voorvakje terecht komen
dat de pomp beschermt en zich aan de onderkant
bevindt.
Verzeker u ervan dat het wasprogramma klaar is
en trek de stekker uit het stopcontact.
Toegang tot het paneel:
1. verwijder het paneeltje aan de voorkant van
de wasmachine met
behulp van een
schroevendraaier
(zie afbeelding);
2. draai de deksel eraf,
tegen de klok in
draaiend (zie afbeelding):
het is normaal dat er een
beetje water uit komt;
Reinigen van deur en trommel
Laat de deur altijd op een kier staan om muffe lucht
te vermijden.
3. maak de binnenkant goed schoon;
4. schroef de deksel er weer op;
5. monteer het paneeltje weer, met de haakjes in de
betreffende openingen voordat u het paneeltje
tegen de machine aan drukt.
Controleer de slang van de
watertoevoer
Controleer minstens eens per jaar de slang van de
watertoevoer. Als er barstjes in zitten moet hij vervangen worden: gedurende het wassen kan de hoge
waterdruk onverwachts scheurtjes veroorzaken.
Nooit reeds eerder gebruikte slangen gebruiken.
34
Page 35
Storingen en oplossingen
Het kan gebeuren dat de machine niet werkt. Voordat u de installateur opbelt (zie Service), controleert u of het
een storing betreft die gemakkelijk te verhelpen is met behulp van de volgende lijst.
NL
Storingen:
De wasmachine
gaat niet aan.
Het wasprogramma
start niet.
De wasmachine neemt geen
water.
De wasmachine blijft water
aan- en afvoeren.
Mogelijke oorzaken / Oplossing:
De stekker is niet in het stopcontact of niet ver genoeg ingestoken
om contact te maken.
Er is geen stroom.
De deur is niet goed dicht.
De AAN/UIT knop
De START/ANNULEER knop
De waterkraan is niet open.
U heeft een eindtijd ingesteld tussen de "3h" en "24h"
(zie Het uitvoeren van een wascyclus).
De watertoevoerslang is niet aangesloten aan de kraan.
De slang ligt gekneld.
De kraan is niet open.
In huis mankeert het water.
Er is geen voldoende druk.
De START/ANNULEER knop
De afvoerslang is niet geinstalleerd op 65 tot 100 cm afstand van de
grond (zie Installatie).
Het uiteinde van de afvoerslang ligt onder water (zie Installatie).
De afvoer in de muur heeft geen ontluchting.
Als na deze controle het probleem niet is opgelost, doet u de waterkraan dicht, de machine uit en belt u de installateur. Als u op een van
de hoogste verdiepingen van een flatgebouw woont kan zich een
probleem met het hevelen voordoen, waarbij de machine voortdurend
water aan- en afvoert. Om deze storing te verhelpen bestaan er speciale in de handel verkrijgbare ventielen.
is niet ingedrukt.
is niet ingedrukt.
is niet ingedrukt.
De wasmachine pompt het water
niet af of centrifugeert niet.
De machine trilt erg tijdens het
centirfugeren.
De wasmachine lekt.
Het controlelampje AAN/DEUR
GEBLOKKEERD knippert zeer
snel.
Er ontstaat teveel schuim.
De afvoerslang ligt gekneld (zie Installatie).
De afvoerleiding is verstopt.
De transportbeveiliging zijn niet verwijderd tijdens het installeren.
Verwijder de schroeven (zie Installatie).
De wasmachine staat niet recht (zie Installatie).
De wasmachine staat te nauw tussen meubel en muur (zie Installatie).
De slang van de watertoevoer is niet goed aangeschroefd (zie Installatie).
Het wasmiddellaatje is verstopt (voor schoonmaken zie Onderhoud).
De afvoerslang is niet goed bevestigd (zie Installatie).
Er is een storing. Voordat u de servicedienst inschakelt vragen wij u
eerst de volgende instructies op te volgen:
1. Schakel de wasautomaat uit met de knop
2. Haal de stekker uit het stopcontact en wacht minstens 40 seconden;
3. Doe de stekker weer in het stopcontact;
4. Schakel de wasautomaat in door weer op de knop
5. Als na deze handeling de storing blijft bestaan dient u de Servicedienst in te schakelen.
Het wasmiddel is niet bedoeld voor wasmachines (er moet "voor
wasmachine", "handwas en wasmachine", of dergelijke op staan).
De dosering is te veel.
;
te drukken;
35
Page 36

Service
NL
Voordat u er de installateur bijhaalt:
Kijk eerst even of u het probleem zelf kunt oplossen (zie Storingen en oplossingen);
Start het programma om te controleren of de storing is verholpen;
Is dit niet het geval dan neemt u contact op met de bevoegde dichtsbijzijnde Technische Dienst via
het telefoonnummer dat op het garantiebewijs/gebruiksaanwijzing staat.
In het geval de automaat verkeerd is geïnstalleerd of u hem niet correct gebruikt zal u gevraagd
worden de reparatiekosten te betalen.
Nooit een niet-bevoegde installateur erbij halen.
Vermeld:
het soort storing;
het model van de machine (Mod.);
het serienummer (S/N).
Deze informatie vindt u op het typeplaatje aan de achterkant van de wasmachine.
36
Page 37

Instrukcja obs³ugi
PRALKA
PL
Polski
WIL 1200 OT
Spis treci
PL
Instalacja, 38-39
Rozpakowanie i wypoziomowanie
Pod³¹czenie do sieci wodnej i elektrycznej
Dane techniczne
Opis pralki, 40-41
Szufladka na rodki pior¹ce
Pulpit sterowania
W jaki sposób wykonaæ cykl prania, 42
Tabela programów, 43
rodki pior¹ce i bielizna, 44
Przygotowanie bielizny
Tkaniny wymagaj¹ce szczególnej dba³oci
System równowa¿enia ³adunku
Zalecenia i rodki ostro¿noci, 45
Ogólne zasady bezpieczeñstwa
Usuwanie odpadów
Oszczêdnoæ i ochrona rodowiska
Konserwacja, 46
Wy³¹czenie wody i pr¹du elektrycznego
Czyszczenie pralki
Czyszczenie szufladki na rodki pior¹ce
Czyszczenie drzwiczek i bêbna
Czyszczenie pompy
Kontrola rury doprowadzania wody
Anomalie i rodki zaradcze, 47
Serwis Techniczny, 48
Przed zwróceniem siê do Serwisu Technicznego
37
Page 38
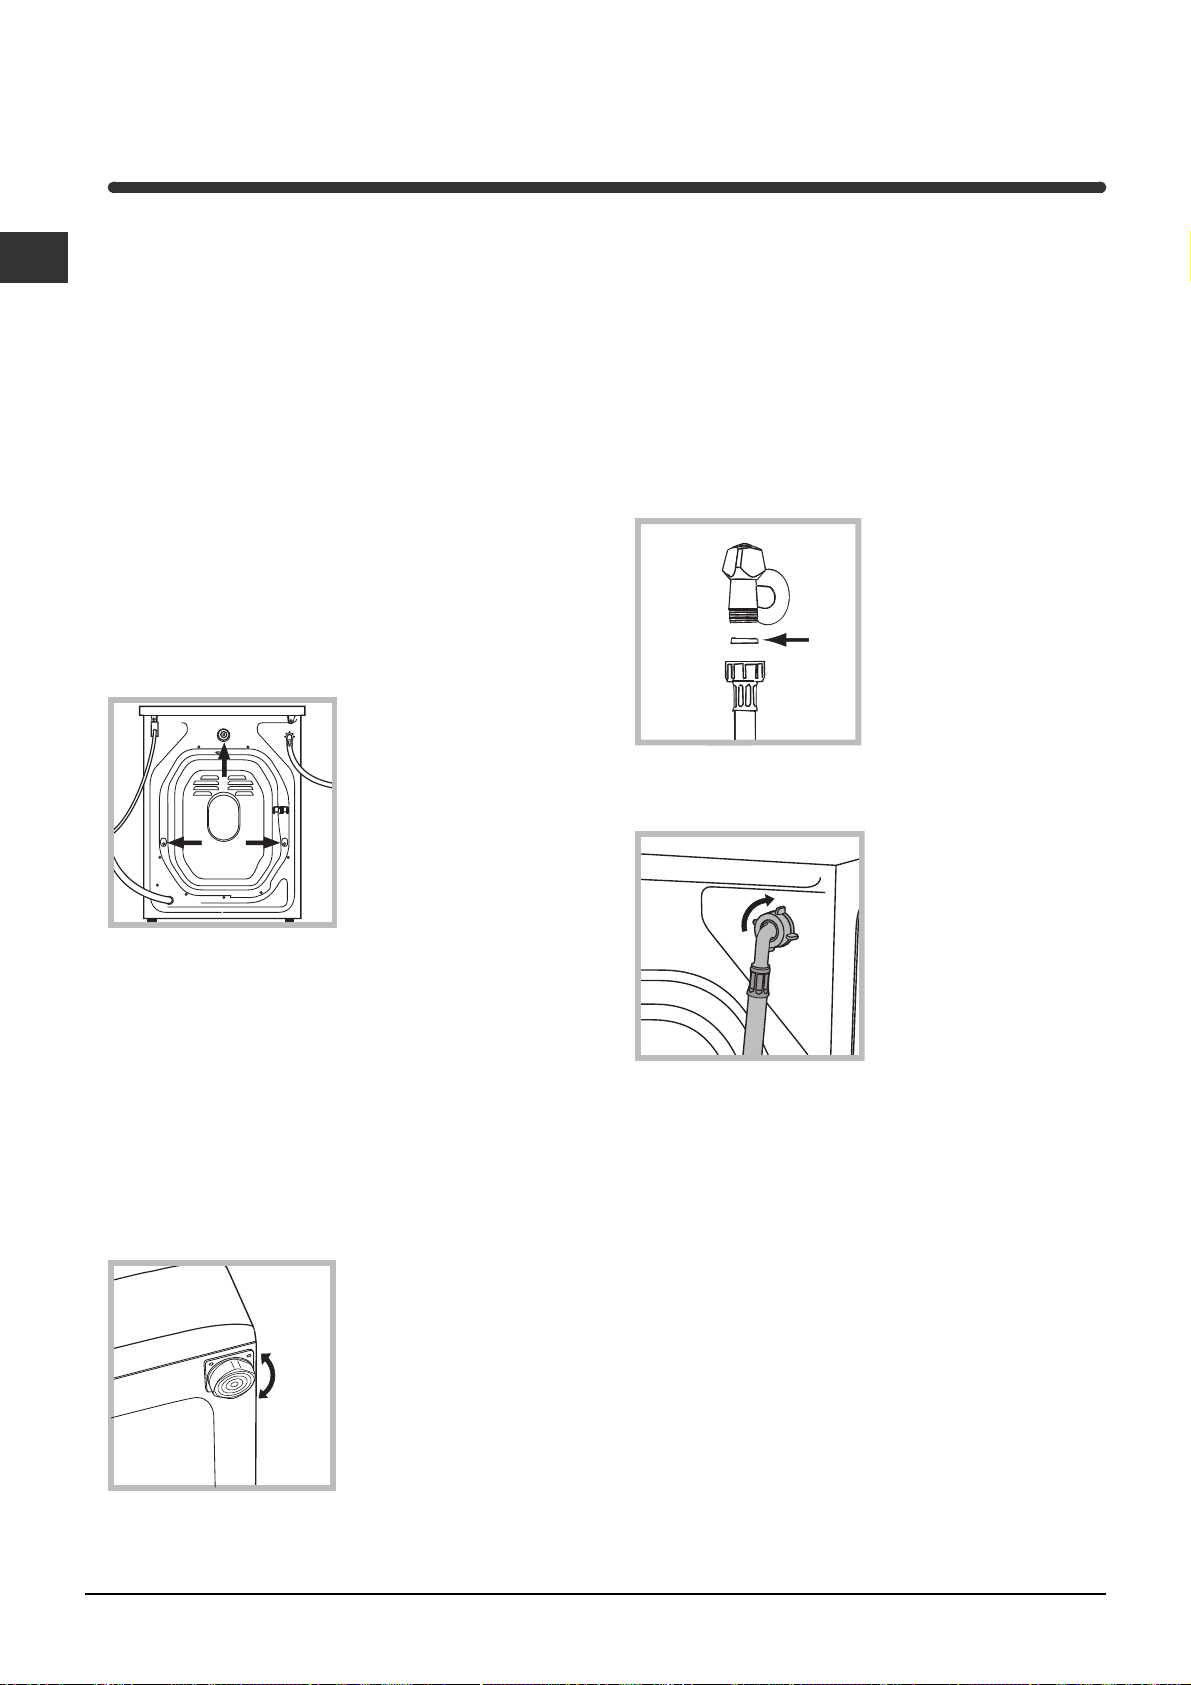
Instalacja
PL
Nale¿y zachowaæ niniejsz¹ ksi¹¿eczkê instrukcji dla
przysz³ych konsultacji. W razie sprzeda¿y, oddania,
czy przeniesienia pralki w inne miejsce nale¿y
upewniæ siê, by przekazana zosta³a ona razem z
instrukcj¹, aby nowy w³aciciel zapoznaæ siê móg³ z
dzia³aniem urz¹dzenia i odpowiednimi informacjami.
Nale¿y uwa¿nie przeczytaæ instrukcjê obs³ugi, gdy¿
zawiera ona wa¿ne informacje dotycz¹ce instalacji
oraz w³aciwego i bezpiecznego u¿ytkowania pralki.
Rozpakowanie i wypoziomowanie
Rozpakowanie
1. Rozpakowaæ pralkê.
2. Sprawdziæ, czy nie dozna³a ona uszkodzeñ w
czasie transportu. Jeli by³aby ona uszkodzona, nie
pod³¹czaæ jej i powiadomiæ sprzedawcê.
3. Odkrêciæ 3 ruby
ochronne, zamocowane
na czas transportu, oraz
zdj¹æ gumow¹ podk³adkê
z odpowiedni¹ rozpórk¹,
znajduj¹ce siê w tylnej
cianie i (zobacz rysunek).
4. Zatkaæ otwory przy pomocy za³¹czonych do pralki
plastykowych zalepkek.
5. Zachowaæ wszystkie te czêci: gdyby okaza³o siê
konieczne przewiezienie pralki w inne miejsce,
powinny one zostaæ ponownie zamontowane.
Staranne wypoziomowanie pralki zapewnia jej
stabilnoæ i zapobiega wibrowaniu, ha³asom i
przesuwaniu siê urz¹dzenia w czasie pracy. W
razie ustawienia na dywanie lub wyk³adzinie
dywanowej nale¿y tak wyregulowaæ nó¿ki, aby pod
pralk¹ pozostawa³a wolna przestrzeñ niezbêdna dla
wentylacji.
Pod³¹czenie do sieci wodnej i elektrycznej
Pod³¹czenie rury pobierania wody
1. Wsun¹æ uszczelkê A
do koñcówki rury
pobierania wody i
przykrêciæ j¹ do kurka
A
zimnej wody o
gwintowanym otworze
3/4'' (zobacz rysunek).
Przed pod³¹czeniem
upuciæ wodê, a¿
bêdzie zupe³nie czysta
i przeroczysta.
2. Pod³¹czyæ rurê
pobierania wody do
pralki, przykrêcaj¹c j¹
do odpowiedniego
otworu pobierania wody,
znajduj¹cego siê w
tylnej cianie pralki, z
prawej strony u góry
(zobacz rysunek).
Czêci opakowania nie nadaj¹ siê do zabawy dla dzieci
Wypoziomowanie
1. Ustawiæ pralkê na p³askiej i twardej pod³odze;
nie opieraæ jej o ciany, meble itp.
2. Jeli pod³oga nie jest
dok³adnie pozioma,
nale¿y wypoziomowaæ
pralkê, dokrêcaj¹c lub
odkrêcaj¹c przednie
nó¿ki (zobacz rysunek).
K¹t nachylenia,
zmierzony na górnym
blacie pralki, nie
powinien przekraczaæ 2°.
38
3. Zwróciæ uwagê, by na rurze nie by³o zgiêæ ani
ciniêæ.
Cinienie hydrauliczne kurka powinno mieciæ siê
w przedziale podanym w tabeli Danych
technicznych (zobacz na s¹siedniej stronie).
Jeli rura doprowadzania wody okaza³aby siê za
krótka, nale¿y zwróciæ siê do wyspecjalizowanego
sklepu lub do upowa¿nionego fachowca.
Page 39
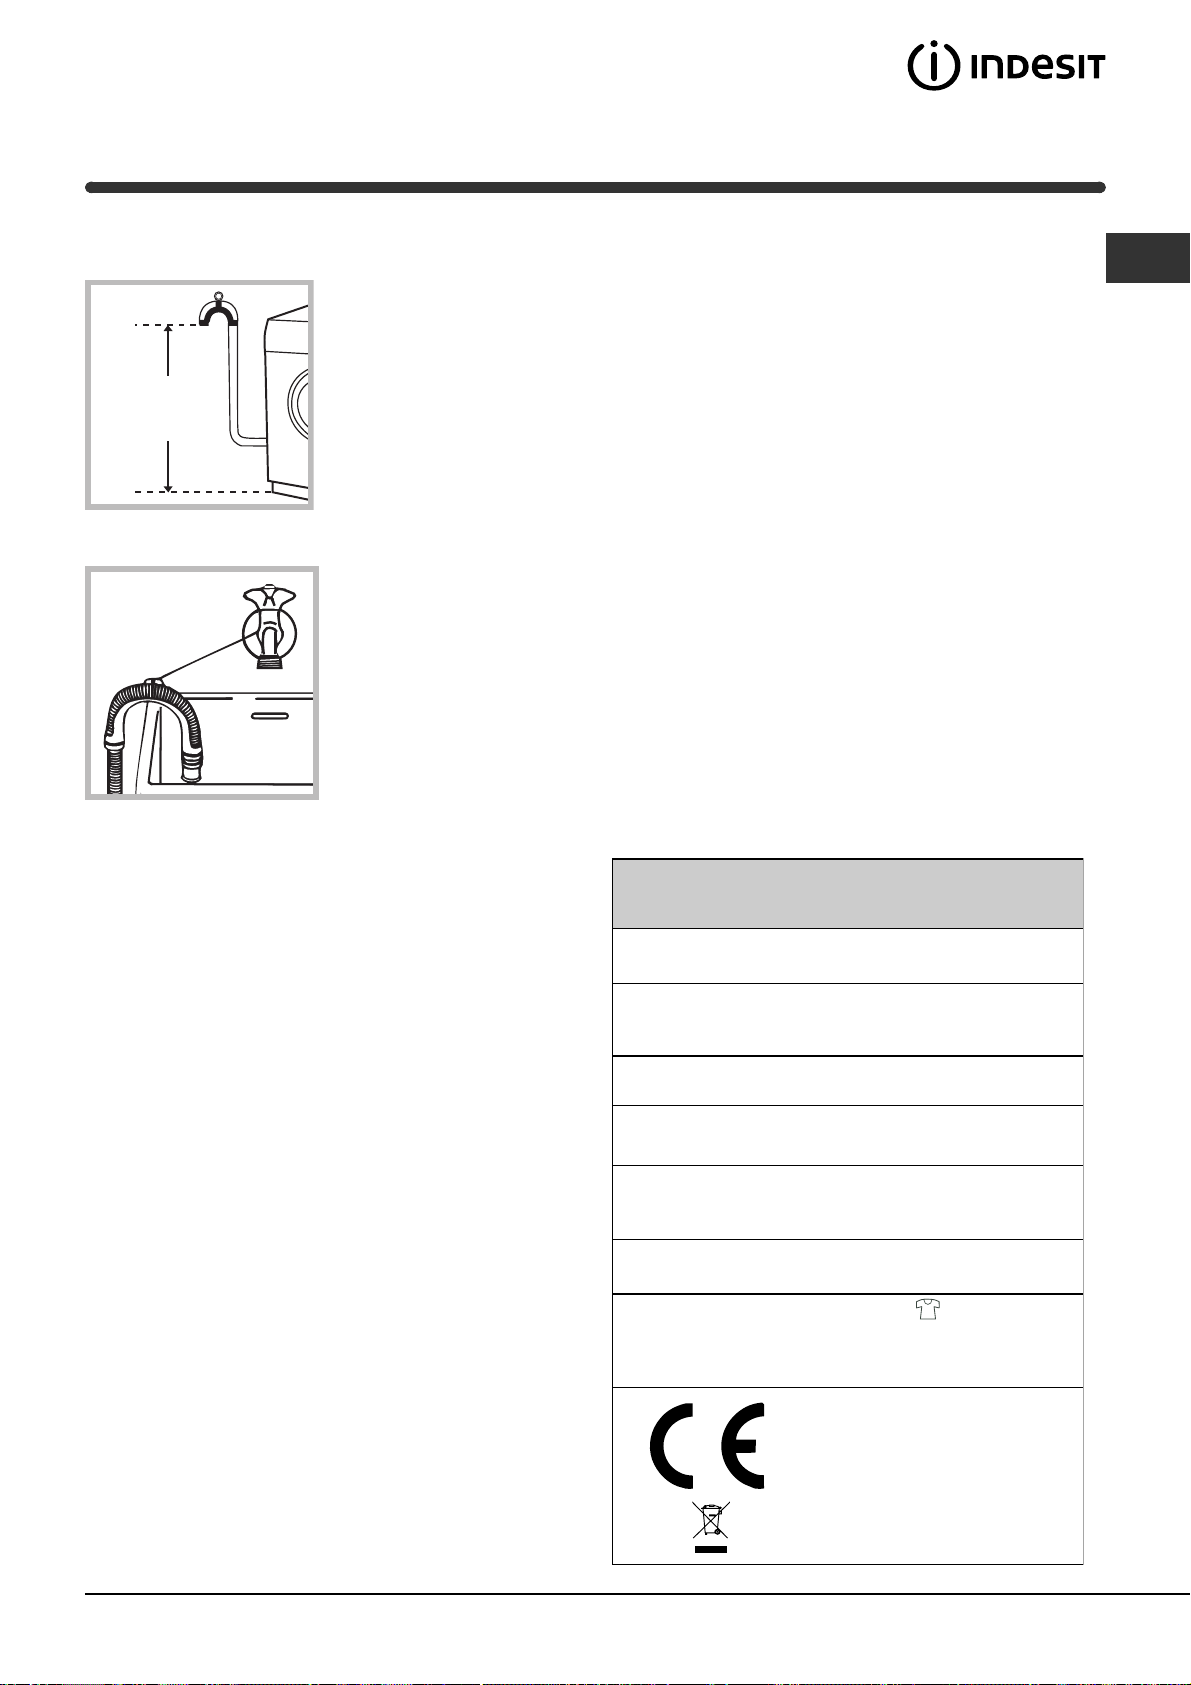
Pod³¹czenie rury usuwania wody
Pod³¹czyæ rurê usuwania
wody, bez zginania jej,
do przewodu ciekowego
lub do cieku w cianie,
które powinny znajdowaæ
65 - 100 cm
siê na wysokoci od 65
do 100 cm od pod³ogi;
lub oprzeæ j¹ na brzegu
zlewu lub wanny,
przymocowuj¹c do kranu
za³¹czony do pralki
prowadnik (zobacz
rysunek). Wolny koniec
rury usuwania wody nie
powinien pozostawaæ
zanurzony w wodzie.
Nie u¿ywaæ przed³u¿aczy ani wtyczek
wielokrotnych.
Kabel nie powinien mieæ zgiêæ ani nie powinien byæ
zgnieciony.
Kabel zasilania elektrycznego mo¿e byæ wymieniony
wy³¹cznie przez upowa¿nionego technika specialistê.
Uwaga! Producent uchyla siê od wszelkiej
odpowiedzialnoci, jeli nie przestrzega siê
powy¿szych zasad.
PL
Odradza siê u¿ywanie rur-przed³u¿aczy; jeli
przed³u¿acz jest jednak konieczny, powinien mieæ on
ten sam przekrój, co rura oryginalna, i nie powinien
przekraczaæ 150 cm d³ugoci.
Pod³¹czenia elektryczne
Przed wprowadzeniem wtyczki do gniazdka nale¿y
upewniæ siê, czy:
gniazdko ma odpowiednie uziemnienie i czy
odpowiada obowi¹zuj¹cym przepisom;
gniazdko jest w stanie wytrzymaæ obci¹¿enie
maksymalnej mocy urz¹dzenia, podanej w tabeli
Danych Technicznych (zobacz obok);
napiêcie pr¹du elektrycznego w sieci zgodne jest
z danymi podanymi w tabeli Danych Technicznych
(zobacz obok);
gniazdko odpowiada wtyczce pralki. W
przeciwnym razie nale¿y wymieniæ gniazdko lub
wtyczkê.
Nie nale¿y instalowaæ pralki na otwartym
powietrzu, nawet jeli miejsce to jest chronione
daszkiem, gdy¿ wystawienie urz¹dzenia na dzia³anie
deszczu i burz, jest bardzo niebezpieczne.
Po zainstalowaniu pralki gniazdko elektryczne
powinno byæ ³atwo dostêpne.
Dane techniczne
Model
Wymiary
Pojemnoæ
Dane pr¹du
elektrycznego
Dane sieci
wodoci¹gowej
Szybkoæ wirowania
Programy kontrolne
zgodnie z przepisami
IEC456
WIL 1200 OT
szerokoæ cm 59,5
wysokoæ cm 85
g³êbokoæ cm 52,5
od 1 do 5 kg
Napiêcie 220/230 Volt 50 Hz
maksymalna moc pobierana 1850 W
Maksymalne cinienie 1 MPa (10 barów)
cinienie minimalne 0,05 MPa (0,5 barów)
pojemnoæ bêbna 46 litrów
do 1200 obrotów na minutê
PROGRAMÓW ; Pokrêt³o
CZASY "auto";
wykonane przy 5 kg za³adowanej
bielizny.
Urz¹dzenie to zosta³o wyprodukowane
zgodnie z nastêpuj¹cymi przepisami EWG:
- 73/23/CEE z dn. 19/02/73 (o Niskim
Napiêciu) wraz z kolejnymi zmianami
- 89/336/CEE z dn. 03/05/89
(o Kompatybilnoci Elektromagnetycznej)
wraz z kolejnymi zmianami
- 2002/96/CE
39
Page 40
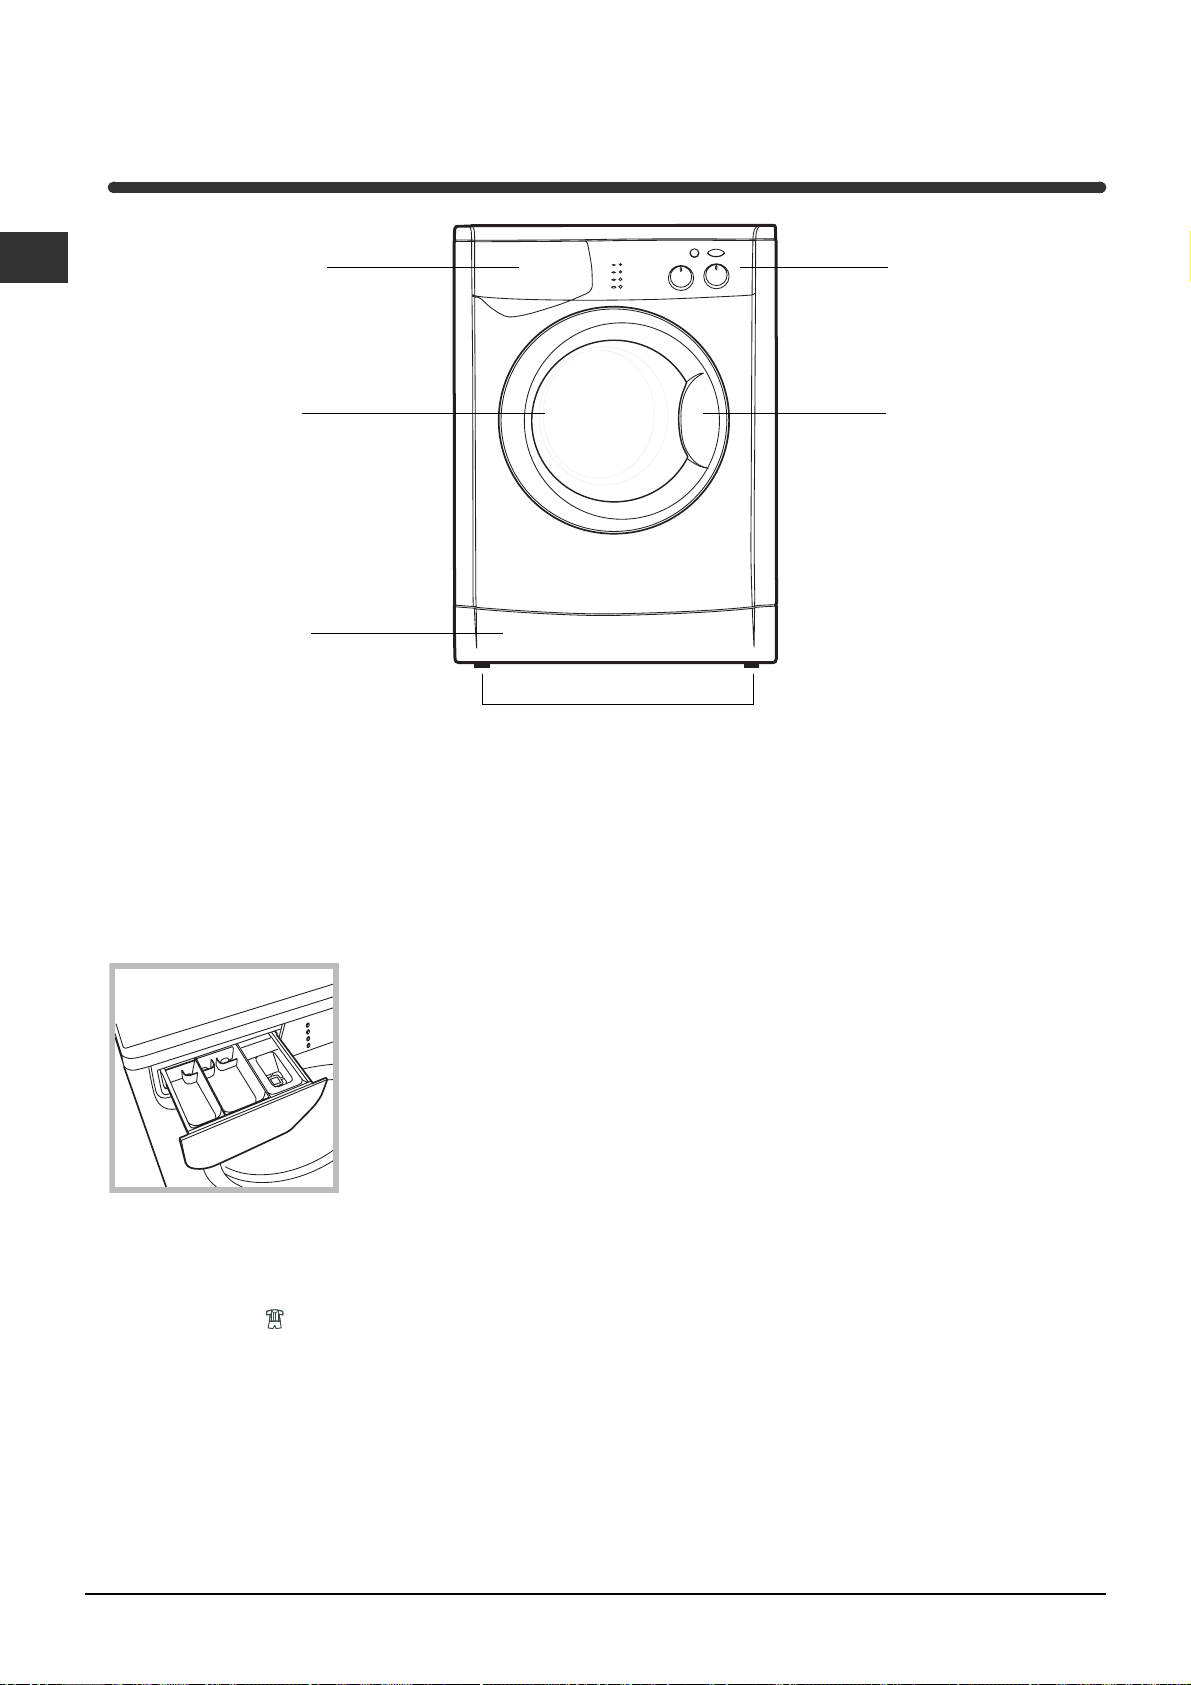
Opis pralki
PL
Szufladka rodków
pior¹cych
Drzwiczki
Cokó³
Regulowane nó¿ki
Szufladka na rodki pior¹ce
Dobre rezultaty prania zale¿¹ równie¿ od
w³aciwego dozowania rodka pior¹cego: wsypuj¹c
go za du¿o, wcale nie poprawia siê wydajnoci
prania, lecz przyczynia siê do odk³adania siê
nalotów na wewnêtrznych czeciach pralki i do
zanieczyszczania rodowiska.
Pulpit sterowania
Uchwyt drzwiczek
Wysun¹æ szufladkê i
wsypaæ do niej rodki
pior¹ce i dodatkowe w
nastêpuj¹cy sposób
3
2
1
przegródka 1: rodek pior¹cy do prania
wstêpnego (w proszku)
Proszek do prania wstêpnego stosowany jest
wy³¹cznie wraz z programem przeznaczonym dla
odzie¿y sportowej
w po³o¿eniu auto lub w jednym z po³o¿eñ pomiêdzy
3godz a 24godz (zobacz rodki pior¹ce i bielizna).
przegródka 2: rodek pior¹cy do prania
w³aciwego (w proszku lub w p³ynie)
P³ynny rodek do prania wlewa siê tu¿ przed
uruchomieniem.
przegródka 3: rodki dodatkowe (zmiêkczaj¹ce, itp.)
rodek zmiêkczaj¹cy nie powinien wyp³ywaæ poza kratkê.
Nie u¿ywaæ rodków do prania rêcznego,
poniewa¿ tworz¹ za du¿o piany.
, przez ustawienie pokrêt³a czasu
40
Page 41
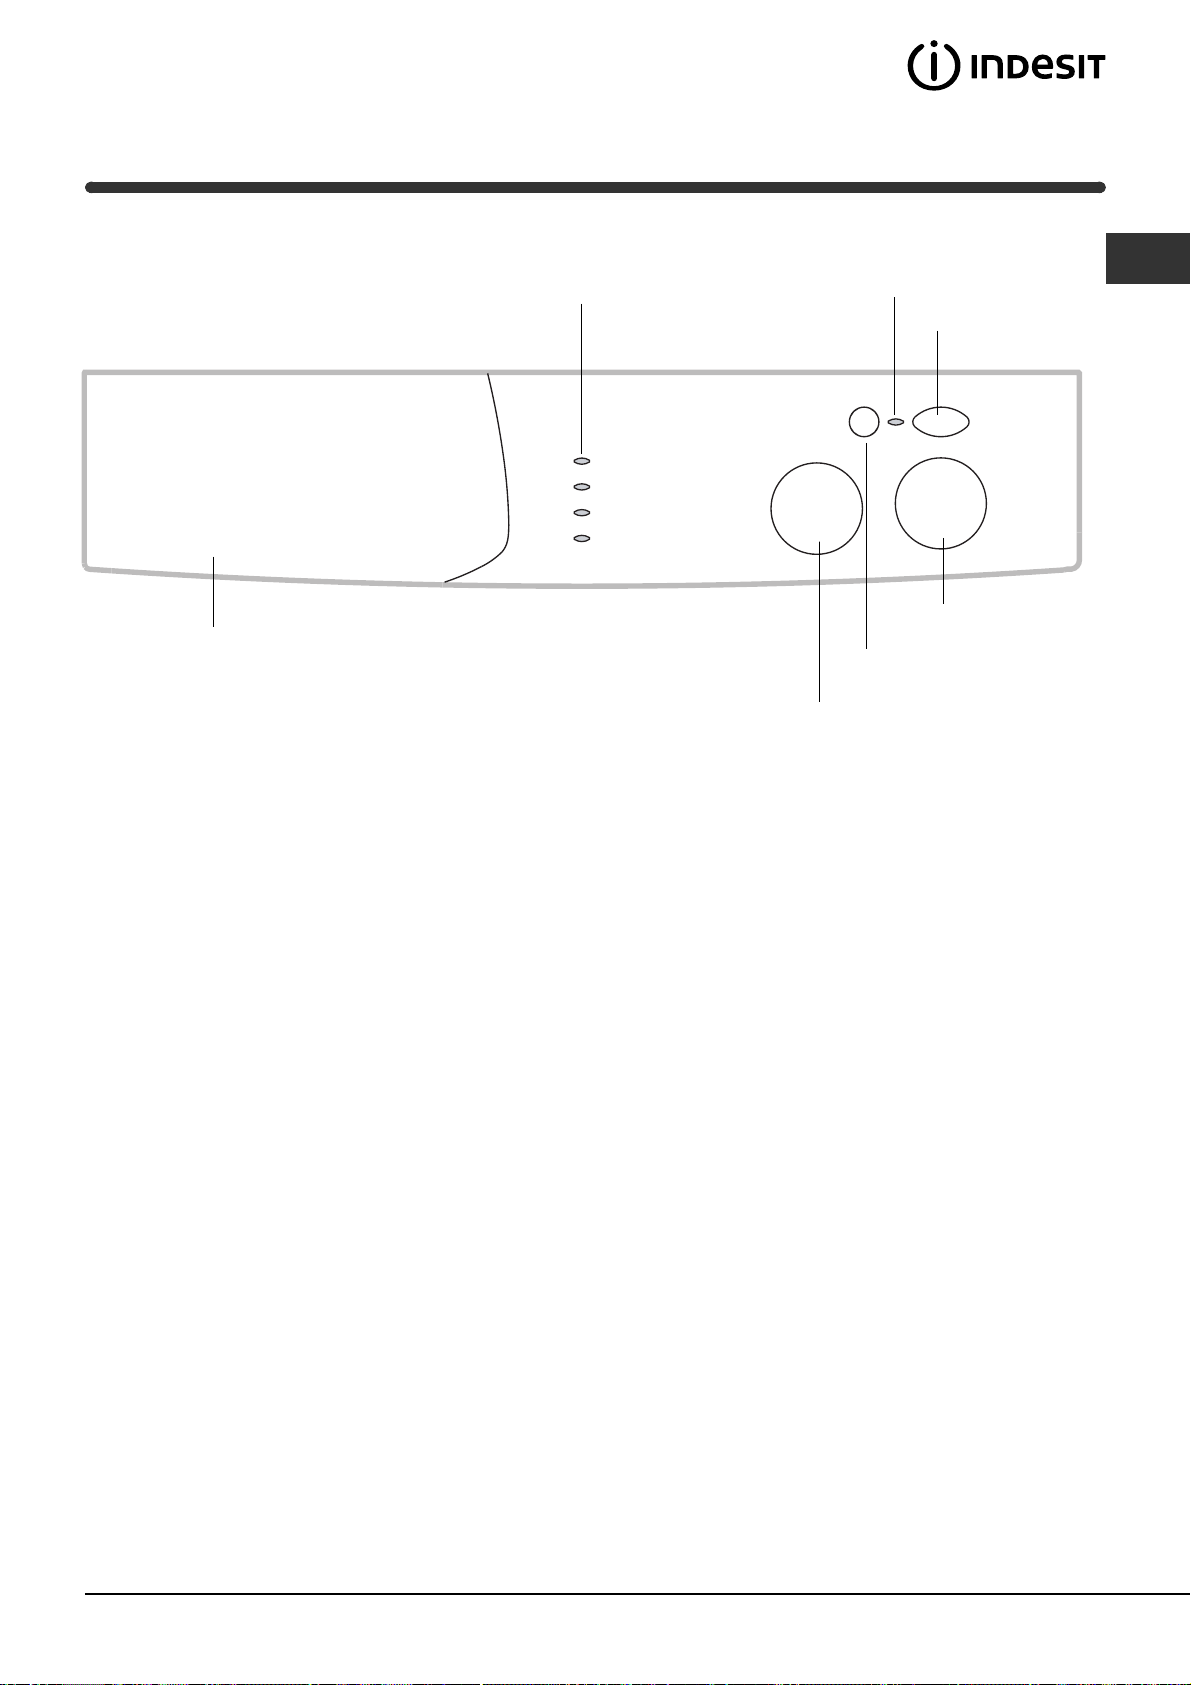
Pulpit sterowania
Szufladka rodków pior¹cych
Kontrolki
Kontrolka
W£¥CZENIE/
ZABLOKOWANE DRZWICZKI
Przycisk
W£¥CZENIE/
WY£¥CZENIE
Pokrêt³o
CZASY
Przycisk
URUCHOM / ANULUJ
Pokrêt³o
PROGRAMÓW
PL
Szufladka na rodki pior¹ce: S³u¿y do wsypania
rodków pior¹cych i dodatkowych (zobacz Opis
pralki).
Kontrolki: wskazuj¹ rozpoczêcie programu oraz
czas pozostaj¹cy do koñca (patrz W jaki sposób
wykonaæ cykl prania).
Pokrêt³o
PROGRAMÓW:
s³u¿y do wybierania
programów.
W czasie trwania programu pokrêt³o pozostaje
nieruchome.
Przycisk URUCHOM / ANULUJ: w celu
uruchomienia cyklu po dokonaniu wyboru programu
i ¿¹danego czasu.
W celu anulowania programu i dokonania wyboru
innego przytrzymaæ wciniêty przycisk przez
przynajmniej 3 sekundy.
Kontrolka W£¥CZENIE/ZABLOKOWANE
DRZWICZKI:
Zapalona kontrolka wskazuje, ¿e drzwiczki pralki
s¹ zablokowane, aby zapobiec przypadkowemu ich
otwarciu; aby unikn¹æ ich uszkodzenia po
zakoñczeniu cyklu odczekaæ z otwarciem
drzwiczek, a¿ kontrolka zacznie pulsowaæ.
Czas oczekiwania wynosi oko³o 2 minuty.
Przycisk W£¥CZANIE/WY£¥CZANIE: s³u¿y do
w³¹czania i wy³¹czania pralki.
Pokrêt³o CZASY: w celu ustalenia, po jakim czasie
program powinien siê zakoñczyæ.
W po³o¿eniu auto czas trwania programu
sterowany jest automatycznie przez maszynê.
! Szybkie pulsowanie kontrolki W£¥CZENIE /
ZABLOKOWANE DRZWICZKI sygnalizuje wyst¹pienie
anomalii (zobacz Anomalie i rodki zaradcze).
41
Page 42
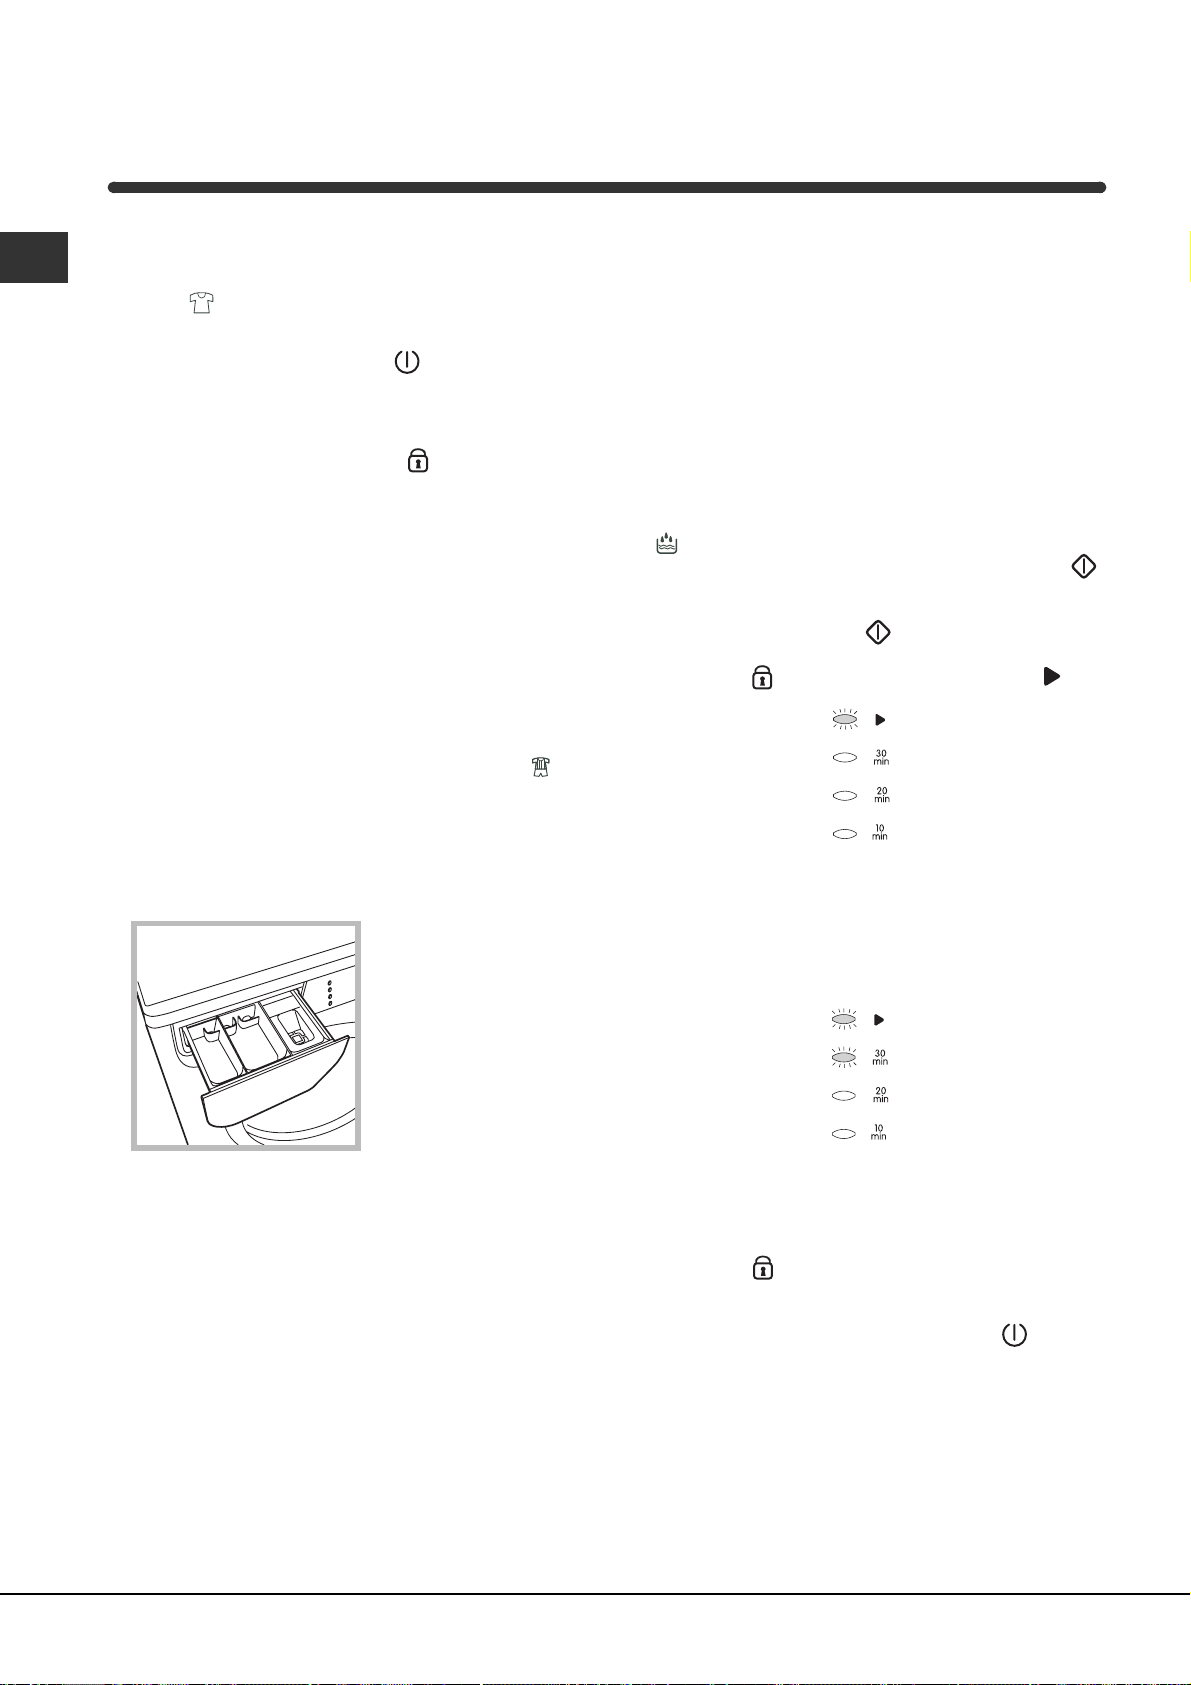
W jaki sposób wykonaæ cykl prania
PL
Uwaga: Po zainstalowaniu, a jeszcze przed
u¿yciem pralki, nale¿y wykonaæ jeden cykl prania
z u¿yciem detergentu i bez bielizny, nastawiaj¹c
program
1. W³¹czyæ pralkê, przyciskaj¹c przycisk
W£¥CZENIE/WY£¥CZENIE . Wszystkie
wiate³ka sygnalizacyjne zapal¹ siê na kilka
sekund, a nastêpnie zgasn¹, po czym zacznie
migotaæ wiate³ko sygnalizacyjne W£¥CZENIE/
ZABLOKOWANE DRZWICZKI
2. ZA£ADUNEK BIELIZNY. Otworzyæ drzwiczki.
W³o¿yæ bieliznê uwa¿aj¹c, aby nie przekroczyæ
wielkoci ³adunku wskazanej w tabeli programów
z nastêpnej strony.
3. DOZOWANIE DETERGENTU / DODATKÓW
Wysun¹æ ca³kowicie szufladkê i wlaæ detergent
do pojemnika oznaczonego liczb¹ 2. Jeli jest
taka potrzeba, rodek zmiêkczaj¹cy oraz
pozosta³e dodatki wlaæ do przegródki 3. rodek
zmiêkczaj¹cy nie powinien wyp³ywaæ przez
kratkê. Jeli zamierza siê wykonaæ program
prania przeznaczony dla odzie¿y sportowej
poprzez ustawienie pokrêt³a czasów w po³o¿eniu
auto lub w jednym z po³o¿eñ zawartych
pomiêdzy 3godz a 24godz (patrz rodki
pior¹ce i bielizna) mo¿liwe jest tak¿e podanie
detergentu w proszku do prania wstêpnego do
przegródki 1.
z pokrêt³em w po³o¿eniu auto.
.
jest czasowi trwania cyklu auto (patrz tabela
programów na nastêpnej stronie), lecz maszyna
automatycznie opóni rozpoczêcie cyklu w celu
zapewnienia jego zakoñczenia w ustalonym
czasie.
- W sytuacji, gdy nie jest koniecznym
ustawianie okrelonej pory zakoñczenia prania,
wybieraæ po³o¿enie AUTO: maszyna
automatycznie sterowaæ bêdzie czasem trwania
programu podstawowego w zale¿noci od
rodzaju wybranej tkaniny (patrz tabela
programów na nastêpnej stronie).
Niezale¿nie od wybranego po³o¿enia przy
pomocy POKRÊT£A CZASU, program P³ukanie
trwa 30 minut i rozpoczyna siê niezw³ocznie
po naciniêciu przycisku URUCHOM / ANULUJ
7. URUCHOMIÆ PROGRAM naciskaj¹c przycisk
URUCHOM / ANULUJ
ci¹g³ym kontrolki w³¹czenie/zablokowane
drzwiczki
,
Podczas trwania cyklu kontrolki dostarczaja
wskazania czasu brakujacego do zakonczenia.
Kiedy do zakonczenia programu brakowac
bedzie odpowiednio 30, 20 oraz 10 minut,
wlaczac sie beda odpowiednie kontrolki.
oraz program uruchomiony .
. W³¹cz¹ siê wiat³em
.
3
2
1
4. ZAMKN¥Æ DRZWICZKI.
5. WYBRAÆ RODZAJ PRANEJ TKANINY poprzez
obrót POKRÊT£EM PROGRAMATORA w
kierunku w prawo lub w lewo, do chwili wybrania
¿¹danej tkaniny lub programu P³ukania.
6. WYBRAÆ CZAS ZAKOÑCZENIA PRANIA
obracaj¹c POKRÊT£EM CZASU w kierunku w
prawo lub w lewo.
Mo¿liwe s¹ nastêpuj¹ce ustawienia:
- Po³o¿enia 30 min 45 min 60 min:
wybieraj¹c jeden z tych czasów okrela siê
czas trwania wybranego programu.
- Po³o¿enia od 3godz do 24godz:
wybieraj¹c jeden z tych czasów okrela siê po
ilu godzinach program prania powinien zostaæ
zakoñczony. Rzeczywisty czas prania równy
8. KONIEC PROGRAMU
Po zakoñczeniu programu prania wy³¹czaj¹ siê
wszystkie kontrolki. Odczekaæ na odblokowanie
drzwiczek (kontrolka w³¹czenie/zablokowane
drzwiczki
pozostawiæ drzwiczki przymkniête w celu
osuszenia kosza. Wy³¹czyæ pralkê naciskaj¹c
przycisk W£¥CZANIE/WY£¥CZANIE
pulsuj¹ca), wyj¹æ bieliznê i
.
42
Page 43
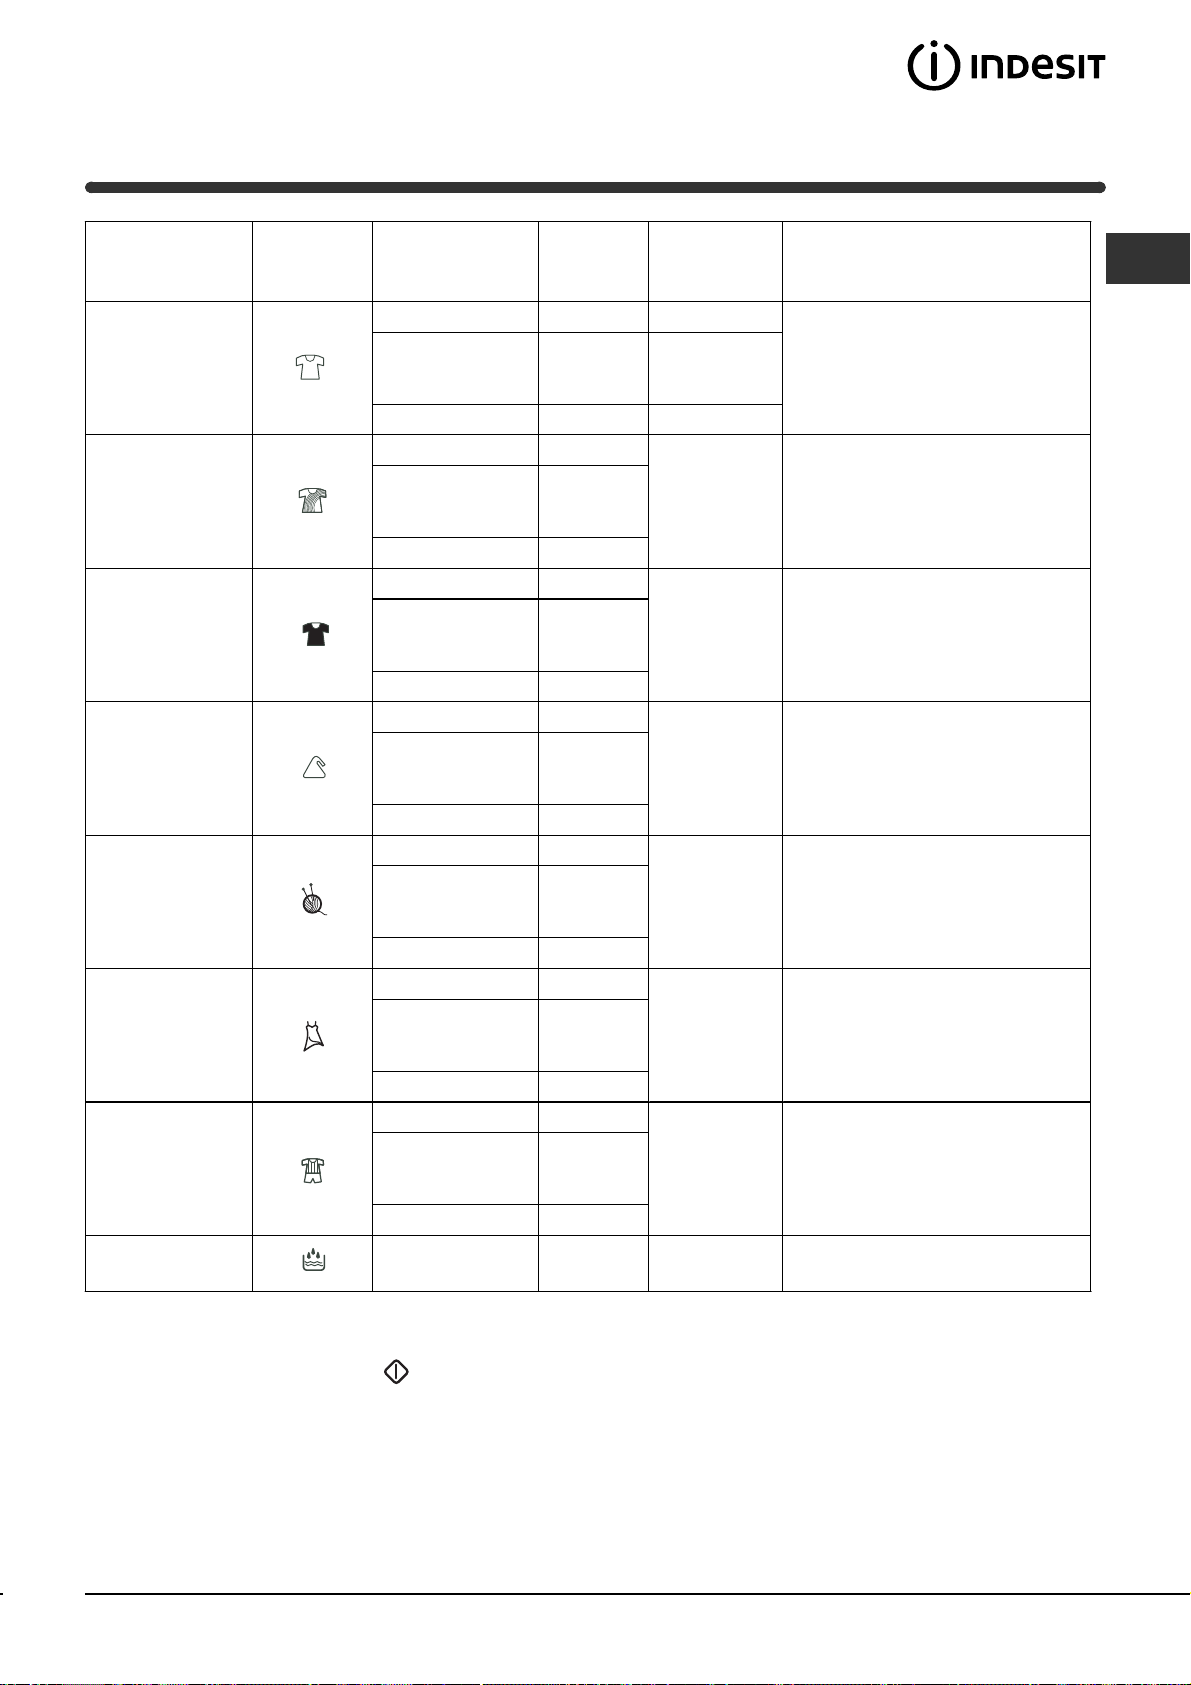
Tabela programów
Rodzaj tkaniny
oraz stopieñ
zabrudzenia
Bawe³na bia³a
Bawe³na
kolorowa
Bawe³na
ciemna/delikatna
Tkaniny
syntetyczne
We³na
Kryszta³y
Special Sport
Programy Czas
Auto (125 min.)
30 min.
45 min.
60 min.
3godz – 24godz
auto (70 min.)
30 min.
45 min.
60 min.
3godz – 24godz
auto (60 min.)
30 min.
45 min.
60 min.
3godz – 24godz
auto (60 min.)
30 min.
45 min.
60 min.
3godz – 24godz
auto (60 min.)
30 min.
45 min.
60 min.
3godz – 24godz
auto (60 min.)
30 min.
45 min.
60 min.
3godz – 24godz
auto (60 min.)
30 min.
45 min.
60 min.
3godz – 24godz
£adunek
MAKS.
(Kg)
5 60°
3
3
3
5 60°
5
3
3
3
5
5
3
3
3
5
2,5
1,5
2,5
2,5
2,5
1
1
1
1
1
1
1
1
1
1
1,5
1,5
1,5
1,5
1,5
Temperatura
maks.
40°
60°
60°
40°
30°
40°
40°
30°
30°
Opis cyklu prania
Pranie, p³ukania, odwirowania
porednie i koñcowe
Pranie, p³ukania, odwirowania
porednie i koñcowe
Pranie, p³ukania, odwirowania
porednie i koñcowe
Pranie, p³ukania i delikatne
odwirowanie
Pranie, p³ukania i delikatne
odwirowanie
Pranie, p³ukania i opró¿nienie z
wody
Pranie wstêpne, Pranie, p³ukania,
odwirowania porednie i koñcowe
PL
P³ukanie
*
2,5 P³ukania i odwirowanie
* Uwaga: Niezale¿nie od po³o¿enia pokrêt³a CZASY, P³ukanie rozpoczyna siê niezw³ocznie po naciniêciu
przycisku URUCHOM / ANULUJ i trwaæ bêdzie 30 minut.
Wa¿ne:
- programy krótkie 30 min. oraz 45 min. (niezale¿nie od rodzaju tkaniny) zalecane s¹ do odwie¿ania
tkanin niezbyt zabrudzonych w krótkim czasie.
- programy 60 min. (niezale¿nie od rodzaju tkaniny) zalecane s¹ do prania tkanin niezbyt zabrudzonych.
- czasy s¹ wartociami orientacyjnymi i nie zawieraj¹ 2 minut oczekiwania na odblokowanie drzwiczek po
zakoñczeniu cyklu.
43
Page 44

rodki pior¹ce i bielizna
PL
Przygotowanie bielizny
Podzieliæ bieliznê do prania wed³ug:
- rodzaju tkaniny / symbolu na etykietce.
- kolorów: oddzieliæ bieliznê kolorow¹ od bia³ej.
Opró¿niæ kieszenie i sprawdziæ guziki.
Nie przekraczaæ wartoci maksymalnego
³adunku wskazanego w Tabela programów.
Ile wa¿y bielizna?
1 przecierad³o 400-500 gr.
1 pow³oczka na poduszkê 150-200 gr.
1 obrus 400-500 gr.
1 szlafrok 900-1.200 gr.
1 rêcznik 150-250 gr.
Tkaniny wymagaj¹ce szczególnej dba³oci
Firanki: w³o¿yæ je z³o¿one do poszewki lub do
siatkowatego worka. Praæ same, nie przekraczaj¹c
po³owy za³adunku. Stosowaæ program
automatycznie wyklucza wirowanie.
Poduszki i kurtki: Jeli wype³nione s¹ one pierzem
gêsim lub kaczym, mo¿na je praæ w pralce.
Wywróciæ na lew¹ stronê i za³adowaæ nie wiêcej ni¿
2-3 kg; powtórzyæ p³ukania jeden lub dwa razy i
stosowaæ delikatne odwirowanie.
We³na: Aby uzyskaæ dobre rezultaty prania, nale¿y
stosowaæ specjalny rodek pior¹cy i nie przekraczaæ
1 kg za³adunku.
Odzie¿ sportowa: stosowaæ program Special Sport
. Mo¿liwe jest wykonanie pocz¹tkowej fazy prania
wstêpnego, przydatnej zw³aszcza w celu usuniêcia z
ubrañ resztek ziemi lub b³ota. W celu wykonania go
umieciæ detergent w proszku w komorze 1 szuflady
na rodki pior¹ce (patrz Opis pralki).
Faza prania wstêpnego nie bêdzie wykonana, jeli
pokrêt³o czasów ustawione bêdzie na czasie trwania
zawartym w przedziale pomiêdzy 30 min a 1godz.
, który
System równowa¿enia ³adunku
W celu unikniêcia nadmiernych wibracji przed
ka¿dym odwirowaniem pralka rozk³ada ciê¿ar
wsadu w sposób jednolity, nastêpuje to poprzez
wykonywanie sta³ych obrotów kosza z prêdkoci¹
nieco wy¿sz¹ od obrotów podczas prania.
Kiedy jednak, niezale¿nie od powtarzanych prób,
wsad nie zostanie roz³o¿ony równomiernie,
maszyna wykona wirowanie z prêdkoci¹ ni¿sz¹
od zaprogramowanej.
W przypadku pojawienia siê nadmiernego
niezrównowa¿enia maszyna bêdzie próbowa³a
roz³o¿yæ wsad zamiast odwirowywaæ.
Ewentualne próby zrównowa¿enia wsadu mog¹
wyd³u¿yæ ³¹czny czas trwania cyklu o maksimum
10 minut.
44
Page 45

Zalecenia i rodki
ostro¿noci
Pralka zosta³a zaprojektowana i wyprodukowana
zgodnie z miêdzynarodowymi przepisami
bezpieczeñstwa. Podajemy Wam poni¿sze zalecenia,
maj¹c na wzglêdzie Wasze bezpieczeñstwo, i
powinniecie je uwa¿nie przeczytaæ.
Ogólne zasady bezpieczeñstwa
Niniejsze urz¹dzenie zaprojektowane zosta³o do
u¿ytku domowego, a nie zawodowego i nie
nale¿y zmieniaæ jego przeznaczenia ani funkcji.
Pralki powinny u¿ywaæ wy³¹cznie osoby doros³e
i w sposób zgodny z podanymi w niniejszej
ksi¹¿eczce instrukcjami.
Nie dotykaæ pralki, stoj¹c przy niej boso lub
maj¹c rêce czy stopy mokre lub wilgotne.
Nie wyjmowaæ wtyczki z gniazdka, ci¹gn¹c za
kabel, lecz trzymaj¹c za wtyczkê.
Nie otwieraæ szufladki na rodki pior¹ce w
trakcie prania.
Nie dotykaæ usuwanej wody, gdy¿ mo¿e byæ ona
bardzo gor¹ca.
W ¿adnym wypadku nie otwieraæ drzwiczek
pralki na si³ê: móg³by bowiem ulec uszkodzeniu
mechanizm zabezpieczaj¹cy drzwiczki przed
przypadkowym otworzeniem.
W razie usterek nie nale¿y w ¿adnym wypadku
próbowaæ dostaæ siê do wewnêtrznych czêci
pralki, próbuj¹c samemu j¹ naprawiaæ.
Skontrolowaæ zawsze, by dzieci nie zbli¿a³y siê
do pracuj¹cej pralki.
W czasie prania okr¹g³e drzwiczki pralki
rozgrzewaj¹ siê.
Jeli trzeba przenieæ pralkê w inne miejsce,
nale¿y to robiæ bardzo ostro¿nie w kilka osób.
Nigdy nie nale¿y tego robiæ samemu, gdy¿
pralka jest bardzo ciê¿ka.
Przed w³o¿eniem bielizny sprawdziæ, czy bêben
jest pusty.
Usuwanie odpadów
oraz ponownego przetworzenia pewnych
komponentów i materia³ów. Pozwala to
ograniczyæ zanieczyszczenie rodowiska i
pozytywnie wp³ywa na ludzkie zdrowie.
Przekrelony symbol kosza umieszczony na
produkcie przypomina klientowi o obowi¹zku
specjalnego sortowania.
Konsumenci powinni kontaktowaæ siê z
w³adzami lokalnymi lub sprzedawc¹ w celu
uzyskania informacji dotycz¹cych postêpowania
z ich zu¿ytymi urz¹dzeniami gospodarstwa
domowego.
Oszczêdnoæ i ochrona rodowiska
Technologia w s³u¿bie rodowiska
Jeli przez okr¹g³e drzwiczki pralki widaæ w czasie
prania ma³o wody, to dlatego, ¿e przy nowej technologii
Indesit wystarcza mniej ni¿ po³owa wody do uzyskania
maksymalnych rezultatów prania: zosta³ w ten sposób
osi¹gniêty jeden z celów ochrony rodowiska.
Oszczêdnoæ rodka pior¹cego, wody, energii i czasu
Aby nie trwoniæ zasobów, nale¿y u¿ywaæ pralki
za³adowanej do pe³na. Jedno za³adowane do pe³na
pranie, zamiast dwóch za³adowanych do po³owy,
pozwala na zaoszczêdzenie a¿ do 50% energii.
Wywabiaj¹c plamy odplamiaczem i
pozostawiaj¹c bieliznê namoczon¹ w wodzie
przed praniem, mo¿na zredukowaæ temperaturê
prania.
Dok³adne dozowanie rodka pior¹cego w
zale¿noci od twardoci wody, stopnia zabrudzenia
i iloci bielizny pozwala unikn¹æ jego trwonienia i
wychodzi na korzyæ rodowisku: rodki pior¹ce,
mimo ¿e ulegaj¹ biodegradacji, zawsze zawieraj¹
jednak sk³adniki, które zak³ócaj¹ rodowisko
naturalne. Nale¿y równie¿ unikaæ, gdy jest to
mo¿liwe, rodka zmiêkczaj¹cego.
Dokonuj¹c prania pónym popo³udniem i wieczorem,
a¿ do wczesnych godzin rannych, przyczynia siê do
zmniejszenia obci¹¿enia energetycznego elektrowni.
PL
Pozbycie siê materia³ów opakowania:
stosowaæ siê do lokalnych przepisów; w ten
sposób opakowanie bêdzie mog³o zostaæ
ponownie wykorzystane.
Europejska Dyrektywa 2002/96/EC dotycz¹ca
Zu¿ytych Elektrycznych i Elektronicznych
Urz¹dzeñ zak³ada zakaz pozbywania siê starych
urz¹dzeñ domowego u¿ytku jako
nieposortowanych mieci komunalnych. Zu¿yte
urz¹dzenia musz¹ byæ osobno zbierane i
sortowane w celu zoptymalizowania odzyskania
45
Page 46
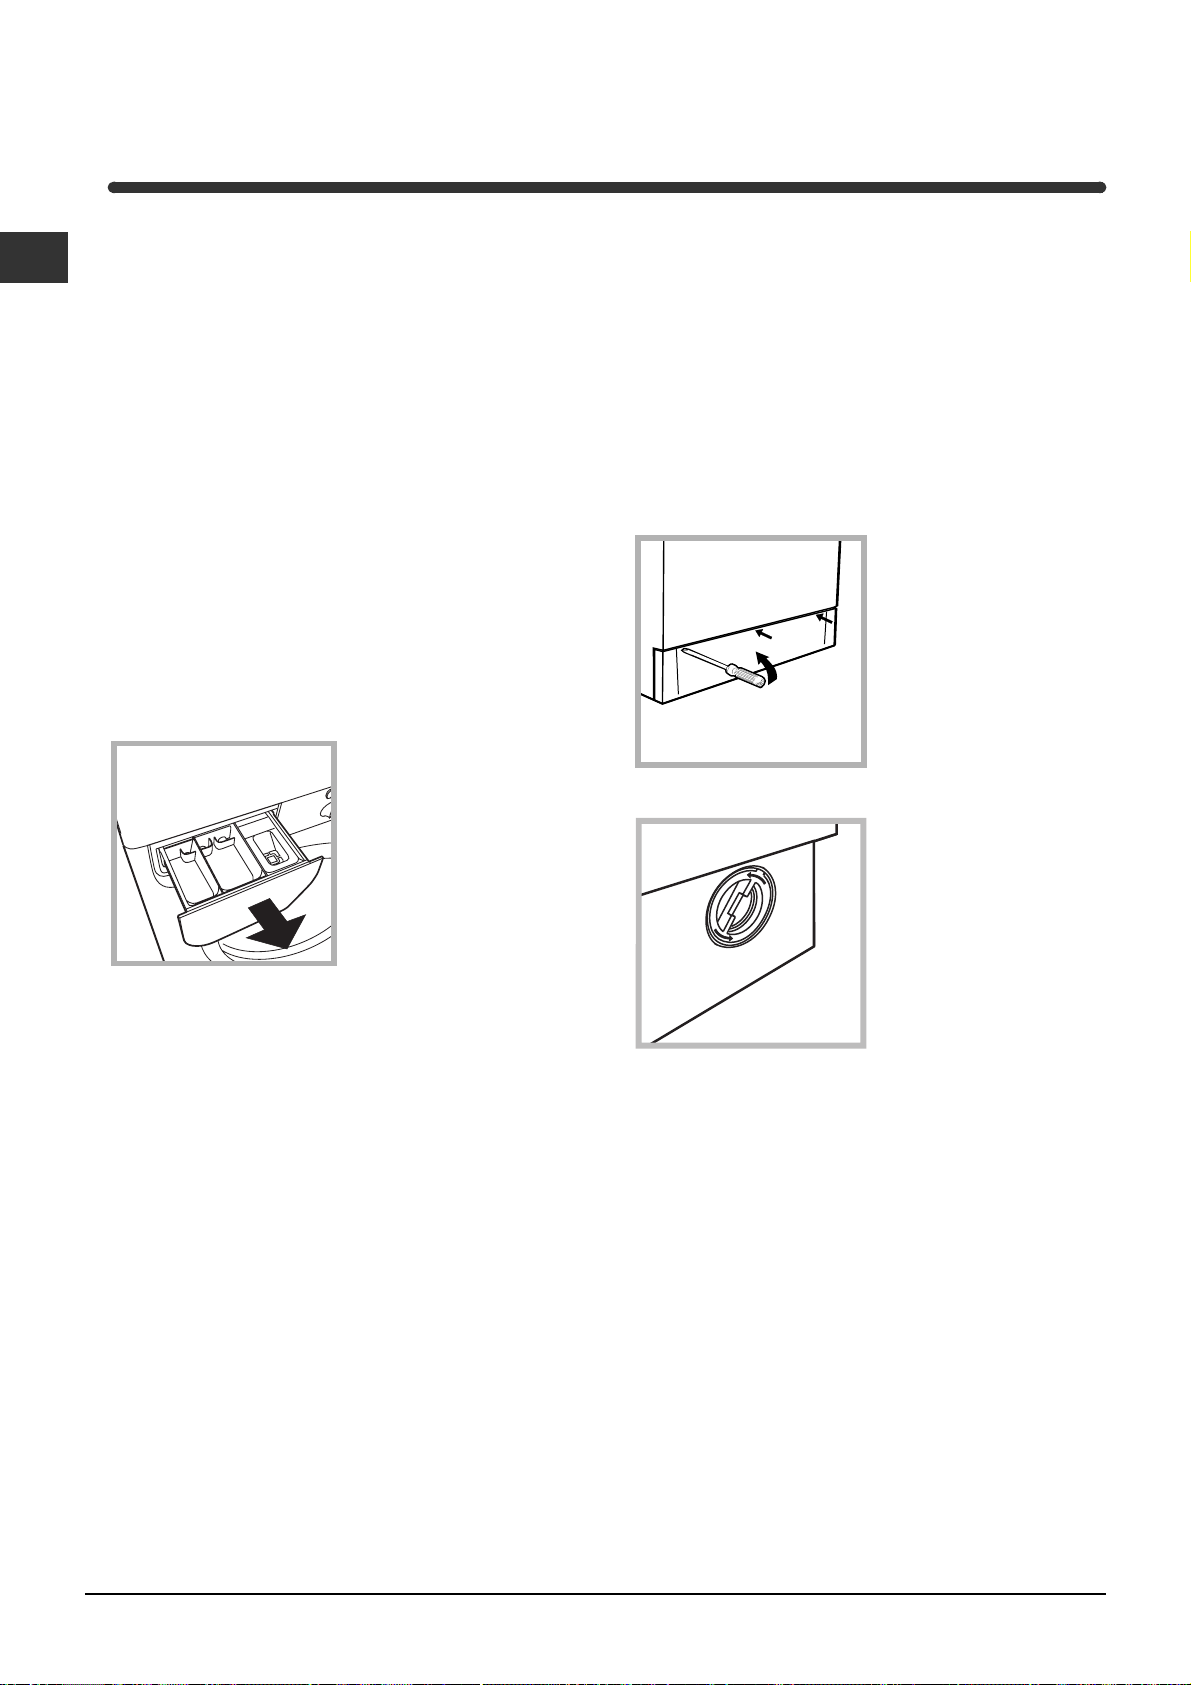
Konserwacja
PL
Wy³¹czenie wody i pr¹du elektrycznego
Zamkn¹æ kurek dop³ywu wody po ka¿dym praniu.
Zmniejsza siê w ten sposób zu¿ycie instalacji
hydraulicznej pralki oraz niebezpieczeñstwo
przecieków.
Wyj¹æ wtyczkê z kontaktu przed przyst¹pieniem
do czyszczenia pralki oraz czynnoci
konserwacyjnych.
Czyszczenie pralki
Obudowê zewnêtrzn¹ i gumowe czêci pralki nale¿y
myæ wilgotn¹ ciereczk¹ zmoczon¹ w wodzie z
myd³em. Nie stosowaæ rozpuszczalników ani ostrych
i ciernych rodków czyszcz¹cych.
Czyszczenie szufladki na rodki pior¹ce
Wysun¹æ szufladkê,
unosz¹c j¹ lekko ku
górze i wyci¹gaj¹c na
zewn¹trz (zobacz
rysunek).
Wyp³ukaæ j¹ pod bie¿¹c¹
wod¹. Czynnoæ tê
nale¿y powtarzaæ
stosunkowo czêsto.
Czyszczenie pompy
Pralka wyposa¿ona jest w pompê samooczyszczaj¹c¹,
która nie wymaga zabiegów konserwacyjnych. Mo¿e
siê jednak zdarzyæ, ¿e ma³e przedmioty (monety,
guziki) wpadn¹ do przedsionka ochronnego pompy,
znajduj¹cego siê w jej dolnej czêci.
Upewniæ siê, by cykl prania by³ zakoñczony i by
wtyczka by³a wyjêta z gniazdka.
Aby dostaæ siê do przedsionka pompy:
1. przy pomocy
rubokrêtu odj¹æ panel
przykrywaj¹cy,
znajduj¹cy siê w
przedniej czêci pralki
(zobacz rysunek);
2. odkrêciæ
przykrywkê, obracaj¹c
j¹ w kierunku
przeciwnym do ruchu
wskazówek zegara
(zobacz rysunek): fakt,
¿e wyp³ynie trochê
wody, jest zjawiskiem
normalnym;
Czyszczenie drzwiczek i bêbna
Nale¿y zawsze pozostawiaæ uchylone drzwiczki
pralki, aby zapobiec tworzeniu siê przykrych
zapachów.
46
3. dok³adnie wyczyciæ wnêtrze;
4. ponownie przykrêciæ przykrywkê;
5. ponownie przymocowaæ panel, pamiêtaj¹c o
wsuniêciu zaczepów w odpowiednie otwory przed
dopchniêciem go do urz¹dzenia.
Kontrola rury doprowadzania wody
Przynajmniej raz do roku nale¿y skontrolowaæ rurê
doprowadzania wody. Jeli widoczne s¹ na niej rysy
i pêkniêcia, nale¿y j¹ wymieniæ: w trakcie prania
du¿e cinienie mo¿e bowiem spowodowaæ jej nag³e
rozerwanie siê.
Nigdy nie instalowaæ rur u¿ywanych.
Page 47
Anomalie i rodki zaradcze
Mo¿e siê zdarzyæ, ¿e pralka nie dzia³a. Zanim wezwie siê Serwis Techniczny (zobacz Serwis Techniczny) nale¿y
sprawdziæ, czy problemu tego nie da siê ³atwo rozwi¹zaæ samemu, pomagaj¹c sobie poni¿szym wykazem.
PL
Nieprawid³owoci w dzia³aniu:
Pralka siê nie w³¹cza.
Cykl prania nie zaczyna siê.
Pralka nie pobiera wody.
Pralka pobiera i usuwa wodê
bez przerwy.
Mo¿liwe przyczyny/Porady:
Wtyczka nie jest w³¹czona do gniazdka, lub jest wsuniêta
niedostatecznie, tak ¿e nie ma kontaktu.
W domu brak jest pr¹du.
Drzwiczki nie s¹ dobrze zamkniête.
Nie zosta³ przyciniêty przycisk W£¥CZENIE/WY£¥CZENIE
Nie zosta³ przyciniêty przycisk URUCHOM / ANULUJ
Kurek dop³ywu wody jest zamkniêty.
Dokonano wyboru czasu zakoñczenia cyklu od 3godz do
24godz (patrz W jaki sposób wykonaæ cykl prania).
Rura pobierania wody nie jest pod³¹czona do kurka.
Rura jest zgiêta.
Kurek dop³ywu wody jest zamkniêty.
W domu brak jest wody.
Cinienie wody nie jest wystarczaj¹ce.
Nie zosta³ przyciniêty przycisk URUCHOM / ANULUJ .
Rura usuwania wody nie zosta³a zainstalowana na wysokoci od 65 do
100 cm od pod³ogi (zobacz Instalacja).
Koñcówka rury usuwania wody jest zanurzona w wodzie (zobacz Instalacja).
Usuwanie wody bezporednio w cianie nie posiada odpowietrznika.
Jeli po skontrolowaniu tych pozycji nieprawid³owoæ nadal siê utrzymuje,
nale¿y zamkn¹æ kurek dop³ywu wody, wy³¹czyæ pralkê i wezwaæ Serwis
Techniczny. Jeli mieszkanie znajduje siê na najwy¿szych piêtrach
budynku, mo¿e zaistnieæ efekt syfonu, w wyniku czego pralka nieustannie
pobiera i usuwa wodê. W celu wyeliminowania tej niedogodnoci w
handlu dostêpne s¹ specjalne zawory.
.
.
Pralka nie usuwa wody i nie
odwirowuje.
Pralka mocno wibruje w fazie
odwirowywania.
Z pralki wycieka woda.
Kontrolka W£¥CZENIE /
ZABLOKOWANE DRZWICZKI
pulsuje w sposób bardzo szybki.
Tworzy siê zbyt wiele piany.
Rura usuwania wody jest zgiêta (zobacz Instalacja).
Rura usuwania wody jest zatkana.
ruby zabezpieczaj¹ce podczas transportu nie zosta³y zdjête w chwili
dokonywania instalacji. Zdj¹æ ruby (zobacz Instalacja).
Pralka nie jest ustawiona dok³adnie w poziomie (zobacz Instalacja).
Pralka jest wciniêta miêdzy meble i cianê (zobacz Instalacja).
Rura doprowadzania wody nie jest dobrze przykrêcona (zobacz Instalacja).
Szufladka na rodki pior¹ce jest zatkana (aby j¹ oczyciæ, zobacz Konserwacja).
Rura usuwania wody nie jest dobrze przymocowana (zobacz Instalacja).
Sygnalizuje pojawienie siê anomalii. Przed wezwaniem pomocy
technicznej prosimy o wykonanie nastêpuj¹cych czynnoci:
1. Wy³¹czyæ maszynê naciskaj¹c przycisk
2. Wyj¹æ wtyczkê zasilaj¹c¹ i odczekaæ przynajmniej 40 sekund.;
3. Ponownie w³o¿yæ do gniazdka wtyczkê zasilaj¹c¹;
4. Wy³¹czyæ maszynê naciskaj¹c ponownie przycisk
5. Jeli po tej czynnoci defekt utrzymuje siê, wezwaæ pomoc techniczn¹.
rodek pior¹cy nie jest odpowiedni do pralek automatycznych (na
opakowaniu musi byæ napisane: do pralek, do prania rêcznego i
pralek lub podobne).
U¿yto za du¿o rodka pior¹cego.
;
;
47
Page 48

Serwis Techniczny
PL
Przed zwróceniem siê do Serwisu Technicznego:
Sprawdziæ, czy problemu nie mo¿na rozwi¹zaæ samemu (zobacz Anomalie i rodki zaradcze);
Ponownie nastawiæ program i sprawdziæ, czy problem zosta³ rozwi¹zany;
W przypadku negatywnym skontaktowaæ siê z upowa¿nionym orodkiem Serwisu Technicznego
pod numerem podanym na karcie gwarancyjnej.
W przypadku niew³aciwej instalacji lub niew³aciwego u¿ycia mo¿ecie zostaæ obci¹¿eni kosztem
interwencji.
Nigdy nie zwracaæ siê do nieupowa¿nionych techników.
Nale¿y podaæ:
rodzaj defektu;
model urz¹dzenia (Mod.);
numer seryjny (S/N).
Informacje te znajduj¹ siê na przymocowanej z ty³u pralki tabliczce znamionowej.
48
Page 49

INSTRUCÞIUNI DE FOLOSIRE
MAªINÃ DE SPÃLAT RUFE
RO
Românã
WIL 1200 OT
Sumar
RO
Instalare, 50-51
Scoaterea din ambalaj ºi nivelarea
Legãturi hidraulice ºi electrice
Date tehnice
Descrierea maºinii de spãlat, 52-53
Sertarul detergenþilor
Panou de comandã
Cum se desfãºoarã un program de
spãlare, 54
Tabelul de programe, 55
Detergenþi ºi rufe albe, 56
Sortarea rufelor
Rufe deosebite
Sistem de echilibrare a încãrcãturii
Precauþii ºi sfaturi, 57
Protecþie generalã
Aruncarea reziduurilor
Protecþia ºi respectarea mediului înconjurãtor
Întreþinere ºi îngrijire, 58
Oprirea apei ºi a curentului electric
Curãþarea maºinii de spãlat
Curãþarea sertarului pentru detergenþi
Îngrijirea hubloului ºi a cuvei
Curãþarea pompei
Controlarea furtunului de alimentare cu apã
Anomalii ºi remedii, 59
Asistenþã, 60
Înainte de a lua legãtura cu Asistenþa
49
Page 50
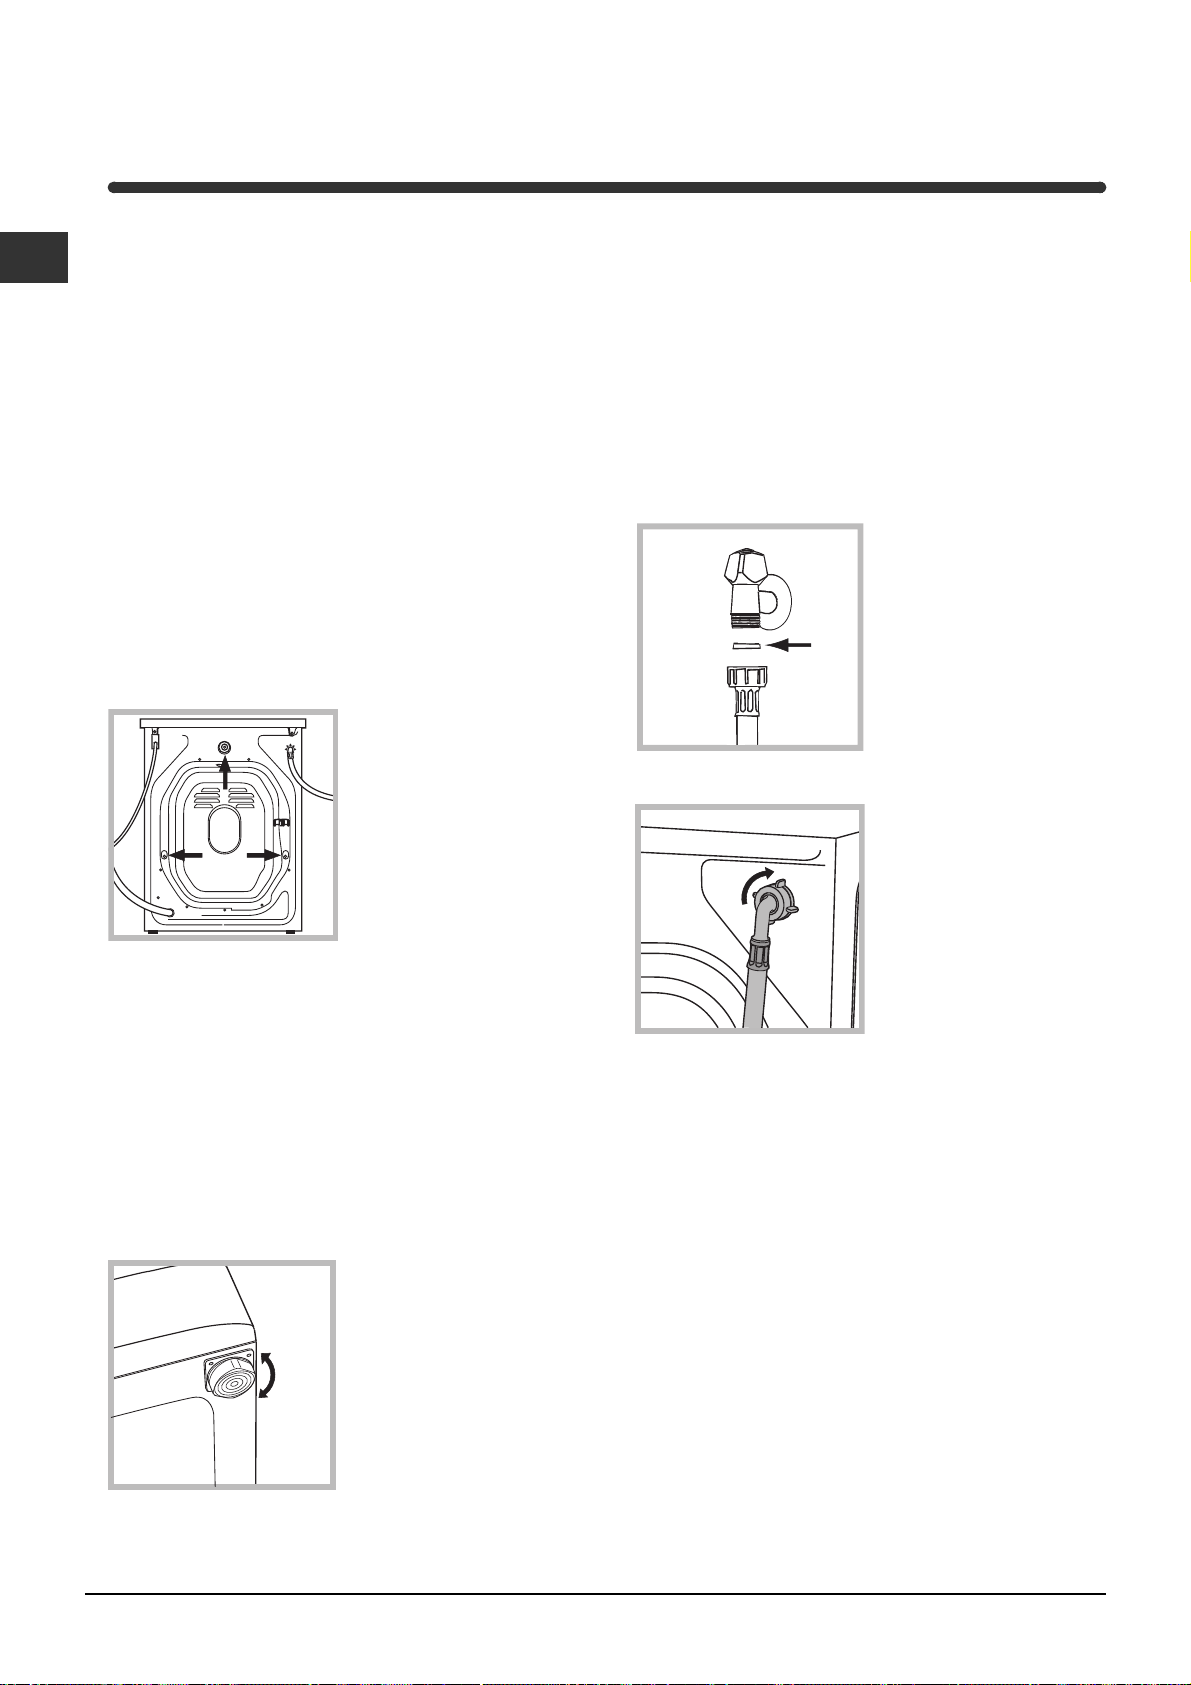
Instalare
RO
Este important sã se pãstreze acest manual
pentru a-l putea consulta în orice moment. În caz
de vânzare, cesiune sau schimbare a locuinþei,
acesta trebuie pãstrat împreunã cu maºina de
spãlat pentru a informa noul proprietar cu privire la
funcþionare ºi la respectivele avertismente.
Citiþi cu atenþie instrucþiunile: veþi gãsi informaþii
importante cu privire la instalare, folosire ºi
siguranþã.
Scoaterea din ambalaj ºi nivelarea
Scoaterea din ambalaj
1. Scoateþi din ambalaj maºina de spãlat.
2. Controlaþi ca maºina sã nu fii fost deterioratã pe
durata transportului. Dacã este deterioratã, nu o
conectaþi ºi luaþi legãtura cu cine v-a vândut-o.
3. Scoateþi cele 3
ºuruburi de protecþie
pentru transport ºi
cauciucul cu
respectivul distanþator,
situate în partea
posterioarã (a se vedea
figura).
4. Închideþi orificiile cu dopurile de plastic din dotare.
5. Pãstraþi toate piesele: pentru cazul în care maºina de
spãlat va trebui sã fie transportatã, piesele vor trebui
montante din nou.
Ambalajele nu constituie jucãrii pentru copii.
O nivelare precisã conferã stabilitate maºinii ºi
evitã vibraþii, zgomote ºi deplasãri pe durata
funcþionãrii. În cazul mochetelor sau a unui covor,
reglaþi picioruºele astfel încât sã menþineþi sub
maºina de spãlat un spaþiu suficient pentru
ventilare.
Legãturi hidraulice ºi electrice
Conectarea furtunului de alimentare cu apã
1. Introduceþi garnitura
A în extremitatea
furtunului de alimentare
ºi nºurubaþi-l la un
robinet filetat de apã
A
3. Fiþi atenþi ca furtunul sã nu fie nici curbat, nici
îndoit.
rece (a se vedea
figura).
Înainte de conectare,
lãsaþi apa sã curgã
pentru a se limpezi.
2. Conectaþi furtunul de
alimentare la maºina de
spãlat, înºurubându-l la
respectiva prizã de apã,
în partea posterioarã,
sus, în dreapta (a se
vedea figura).
Nivelare
1. Instalaþi maºina de spãlat pe un plan rigid, fãrã a
o sprijini de ziduri, mobilã sau altceva.
2. Dacã podeaua nu este
perfect orizontalã,
compensaþi neregularitãþile
deºurubând sau
înºurubând picioruºele
anterioare (a se vedea
figura); unghiul de
înclinare, mãsurat pe
planul de lucru, nu trebuie
sã depãºeascã 2°.
50
Presiunea apei trebuie sã fie cuprinsã în valorile
tabelului Date tehnice (a se vedea pagina
alãturatã).
Dacã lungimea furtunului de alimentare nu este
suficientã, adresaþi-vã unui magazin specializat sau
unui tehnician autorizat.
Page 51
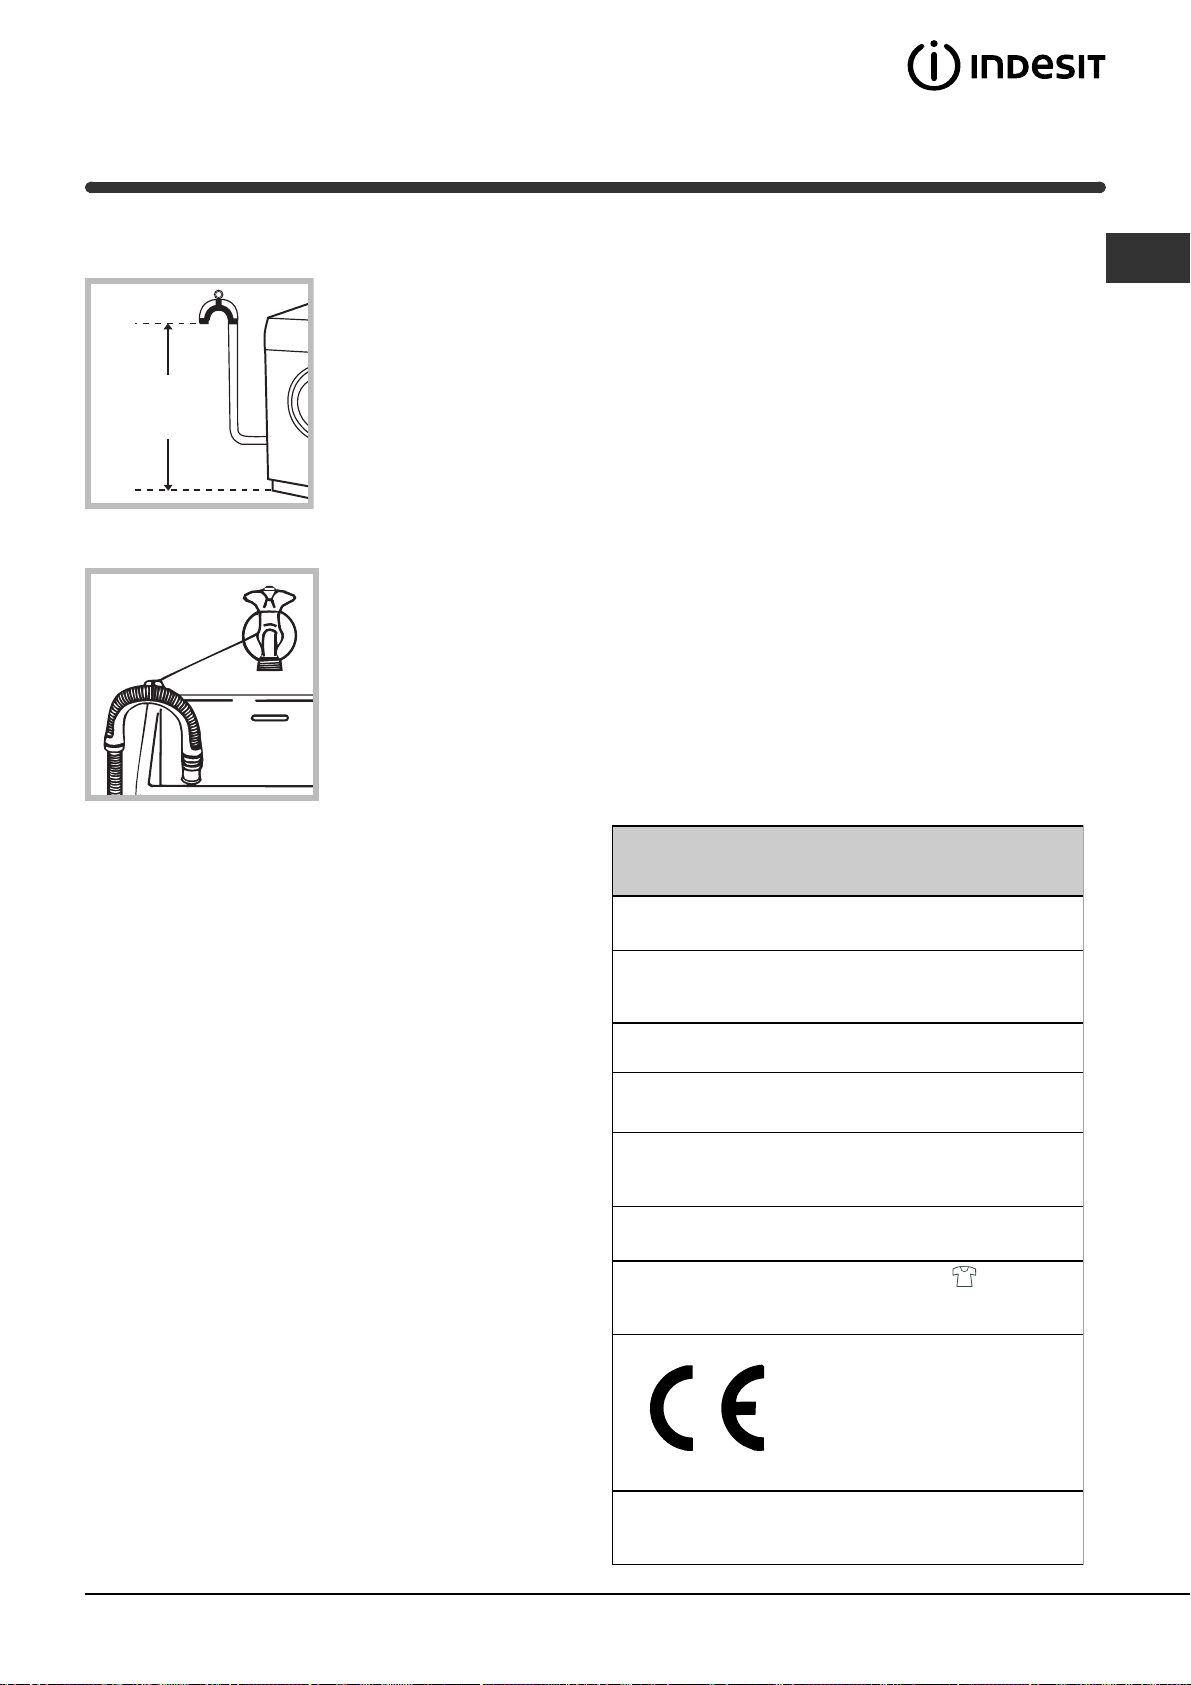
Conectarea furtunului de evacuare
Conectaþi furtunul de
evacuare, fãrã a-l îndoi,
la o conductã de
evacuare sau la o gurã
de evacuare a apei,
65 - 100 cm
situate între 65 ºi 100
cm de pãmânt;
sau sprijiniþi-l pe
marginea unei chiuvete
sau a unei cãzi, legând
ghidajul aflat în dotare,
de robinet (a se vedea
figura). Extremitatea
liberã a furtunului de
evacuare nu trebuie sã
rãmânã cufundatã în
apã.
Nu folosiþi prelungitoare ºi prize multiple.
RO
Maºina nu funcþioneazã la temperaturi mai mici
de 16 grade.
Cablul nu trebuie sã fie îndoit sau comprimat.
Cablul de alimentare trebuie sã fie înlocuit doar
de tehnicieni autorizaþi.
Atenþie! Producãtorul îºi declinã orice
responsabilitate pentru cazul în care aceste norme
nu se respectã.
Nu este recomandabilã folosirea furtunurilor de
prelungire; dacã este indispensabil, furtunul de
prelungire trebuie sã aibã acelaºi diametru cu furtunul
original ºi nu trebuie sã depãºeascã 150 cm.
Legãtura electricã
Înainte de a introduce ºtecherul în priza de curent,
asiguraþi-vã ca:
priza sã fie cu împãmântare ºi conform
prevederilor legale;
priza sã poatã suporta sarcina maximã de
putere a maºinii, indicatã în tabelul cu date
tehnice (a se vedea alãturi);
tensiunea de alimentare sã fie cuprinsã în
valorile indicate în tabelul cu date tehnice (a se
vedea alãturi);
priza sã fie compatibilã cu ºtecherul maºinii de
spãlat. În caz contrar, înlocuiþi priza sau
ºtecherul.
Maºina de spãlat nu trebuie instalatã afarã, nici
chiar în cazul în care spaþiul este adãpostit, deoarece
este foarte periculoasã expunerea maºinii la ploi ºi
furtuni.
Dupã instalarea maºinii de spãlat, priza de curent
trebuie sã fie uºor accesibilã.
Date tehnice
Model
Dimensiuni
Capacitate
Legãturi electrice
Legãturi hidrice
Turaþia de
centrifugare
Programe de control
în baza normei
IEC456
Zgomot
(dB(A) re 1 pW)
WIL 1200 OT
lãrgime: 59,5 cm
înãlþime: 85 cm
profunzime: 52,5 cm
de la 1 la 5 kg
tensiune: 220/230 Volþi 50 Hz
putere maximã absorbitã: 1850 W
presiune maximã: 1 MPa (10 bari)
presiune minimã: 0,05 MPa (0,5 bari)
capacitatea cuvei: 46 litri
pânã la 1200 de rotaþii pe minut
Selector PROGRAME ; Selector
DURATÃ "auto"; efectuatã cu 5 kg de
rufe.
Acest aparat este conform cu
urmãtoarele Directive Comunitare:
- 73/23/CEE din data de 19/02/73
(Tensiuni Joase) ºi modificãri succesive
- 89/336/CEE din data de 03/05/89
(Compatibilitate Electromagneticã) ºi
modificãri succesive
Spãlare: 66
Turaþie de centrifugare: 76
51
Page 52
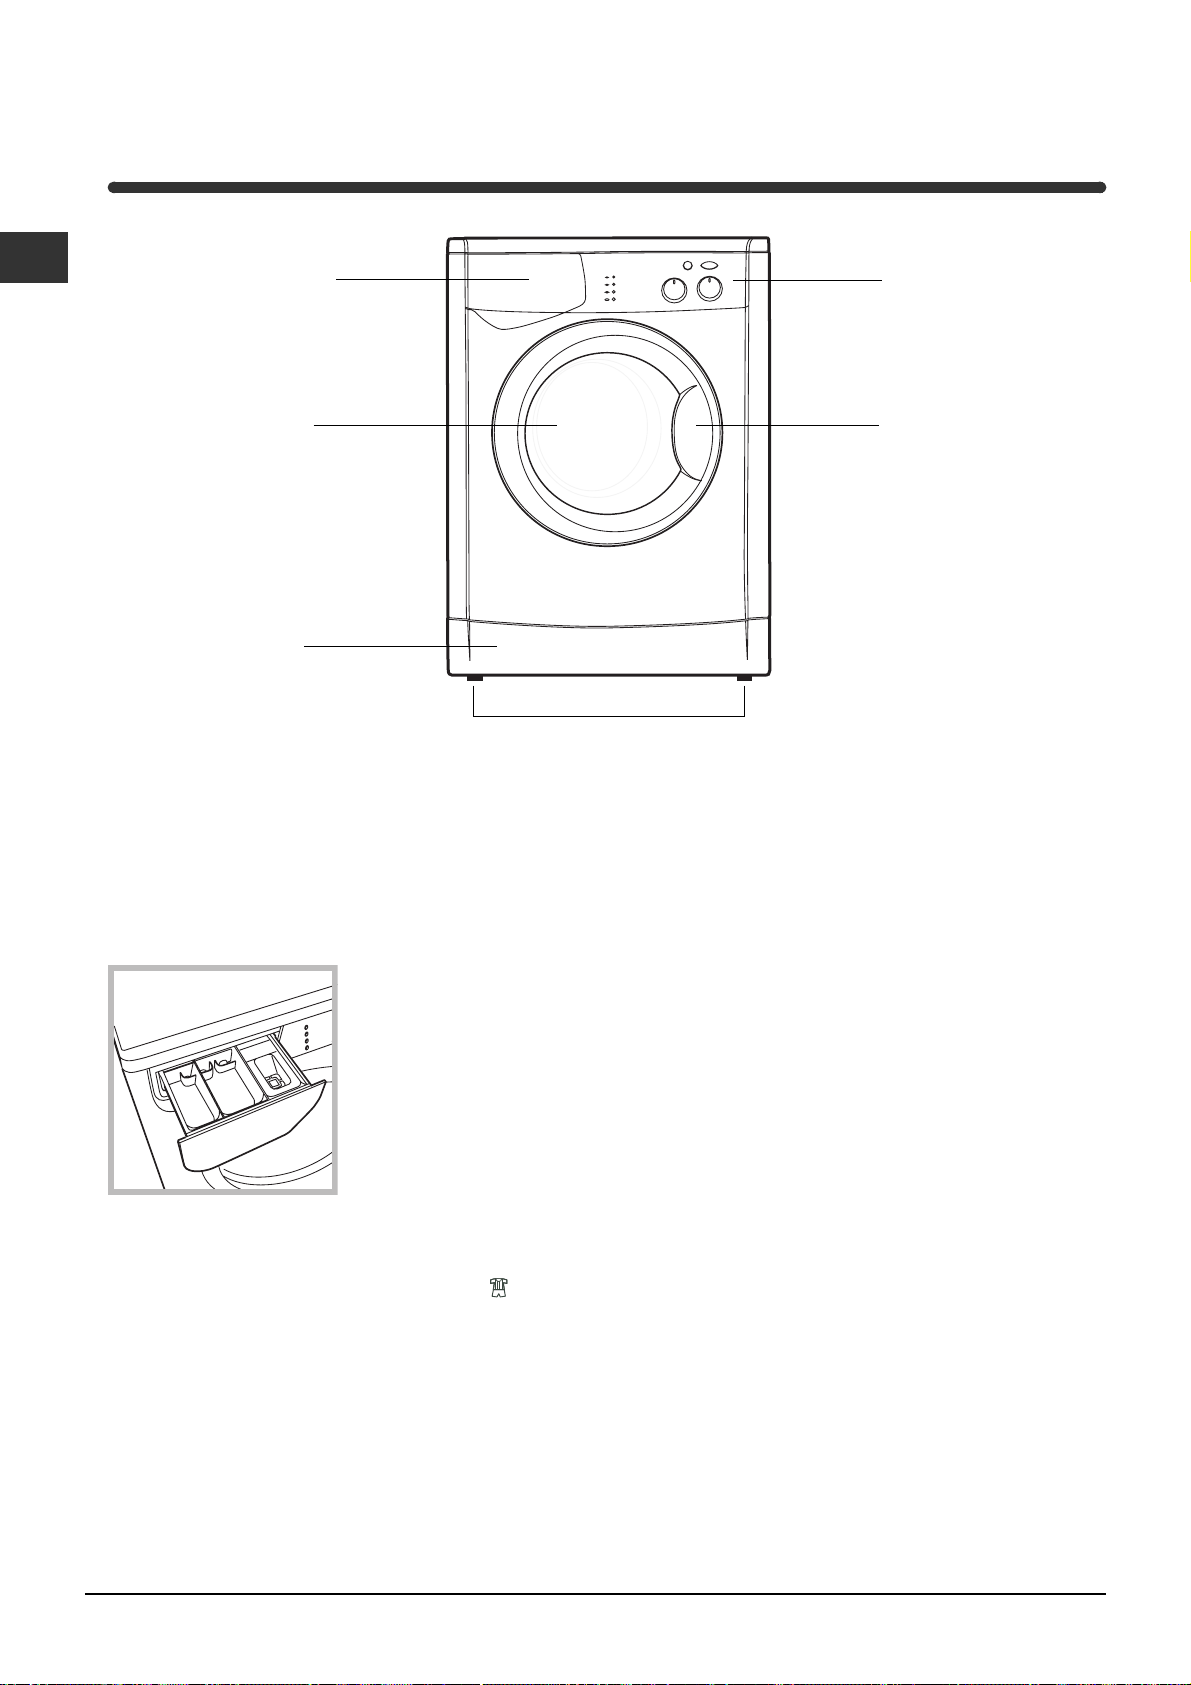
Descrierea maºinii de spãlat
RO
Sertarul
detergenþilor
Uºã
Plintã
Picioare reglabile
Sertarul detergenþilor
Un rezultat bun la spãlare depinde ºi de dozarea
corectã a detergentului: cu un exces de detergent
nu se spalã mai eficient, ci se contribuie la
încrustarea pãrþilor interne ale maºinii de spãlat ºi
la poluarea mediului înconjurãtor.
Panou de
comandã
Mâner uºã
Extrageþi sertarul
pentru detergenþi ºi
introduceþi detergentul
sau aditivul, dupã cum
3
urmeazã:
2
1
sertarul 1: Detergent pentru prespãlare
(sub formã de praf)
Detergentul pentru prespãlare se va utiliza exclusiv
cu programul pentru echipamentul sportiv
selectorul în dreptul poziþiei auto sau în dreptul
uneia dintre poziþiile de la 3h la 24h(a se vedea
Detergenþi ºi rufe albe).
sertarul 2: Detergent pentru spãlare
(sub formã de praf sau lichid)
Detergentul lichid trebuie vãrsat doar înainte de pornire.
sertarul 3: Aditivi (soluþie de înmuiat, etc.)
Soluþia de înmuiat nu trebuie sã depãºeascã nivelul
grãtarului.
Nu folosiþi detergenþi pentru spãlare manualã,
deoarece formeazã prea multã spumã.
, rotind
52
Page 53
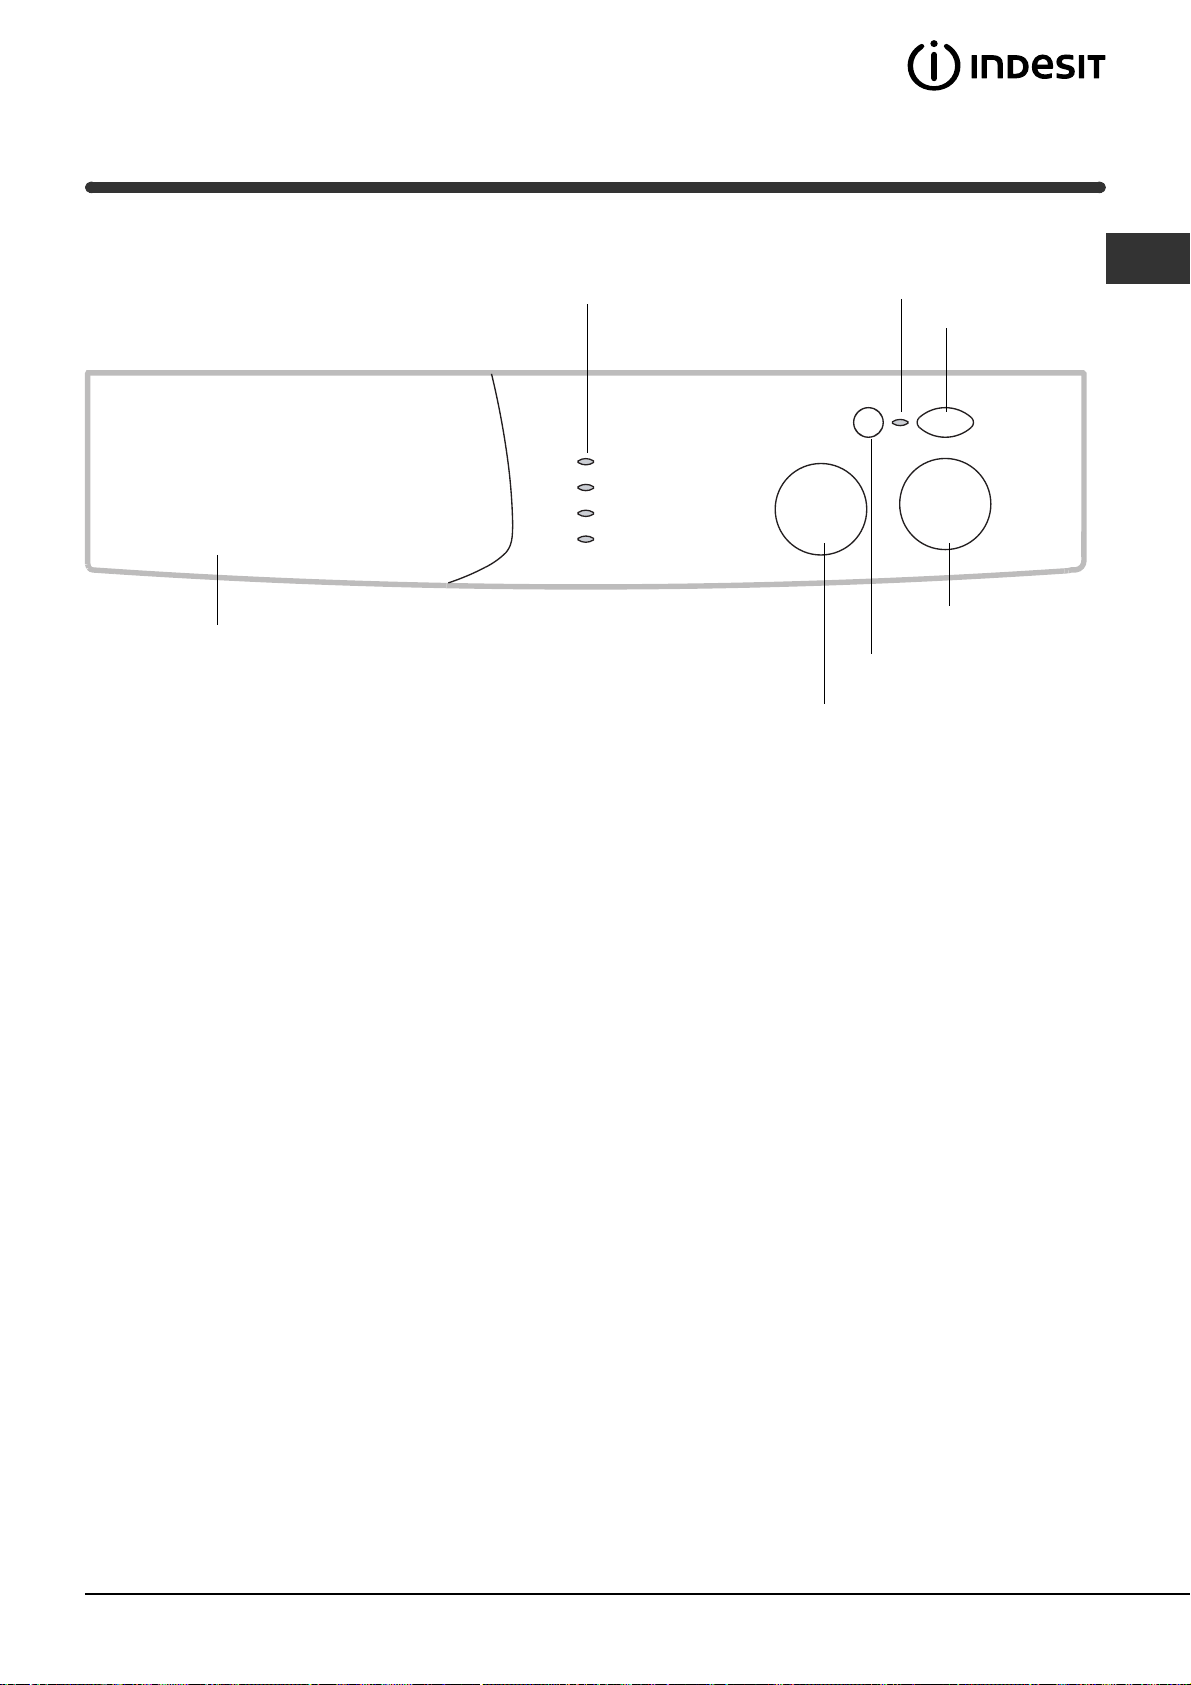
Panou de comandã
Sertarul detergenþilor
Indicatoare
luminoase
Indicator
UªÃ BLOCATÃ
Selector
PROGRAME
PORNIRE/
Butonul
PORNIRE/
OPRIRE
Selector
DURATÃ
Butonul de
ACTIVARE/ANULARE
RO
Sertarul detergenþilor: este folosit pentru a
încãrca detergenþi ºi aditivi (a se vedea Descrierea
maºinii de spãlat).
Indicatoare luminoase: indicã iniþierea programului
ºi durata rãmasã pânã la încheierea acestuia (a se
vedea Cum se desfãºoarã un program de spãlare).
Selector PROGRAME: este folosit pentru alegerea
programelor.
Pe durata programului, selectorul rãmâne ferm.
Butonul de ACTIVARE/ANULARE: pentru a activa
un anumit program o datã stabilitã durata de
spãlare doritã.
Pentru a anula un program ºi pentru a alege un
altul, þineþi apãsat butonul duratã cel puþin 3
secunde.
Indicator PORNIRE/UªÃ BLOCATÃ
:
Indicatorul aprins indicã faptul cã uºa este blocatã
pentru a evita deschiderea accidentalã a acesteia;
pentru a evita eventuale daune, la încheierea
programului este necesar sã aºteptaþi ca
indicatorul sã lumineze intermitent înainte de a
deschide uºa.
Durata de aºteptare este de aproximativ 2 minute.
Butonul PORNIRE/OPRIRE: este folosit pentru
pornirea ºi oprirea maºinii de spãlat.
Selector DURATÃ: este folosit pentru a regla durata
de spãlare sau, altfel spus, durata rãmasã pânã la
încheierea unui program.
În poziþia auto, durata desfãºurãrii programului este
reglatã automat de maºinã.
! Dacã indicatorul PORNIRE/UªÃ BLOCATÃ
lumineazã intermitent, cu frecvenþã rapidã, înseamnã
cã s-a produs o anomalie (a se vedea Anomalii ºi
remedii).
53
Page 54
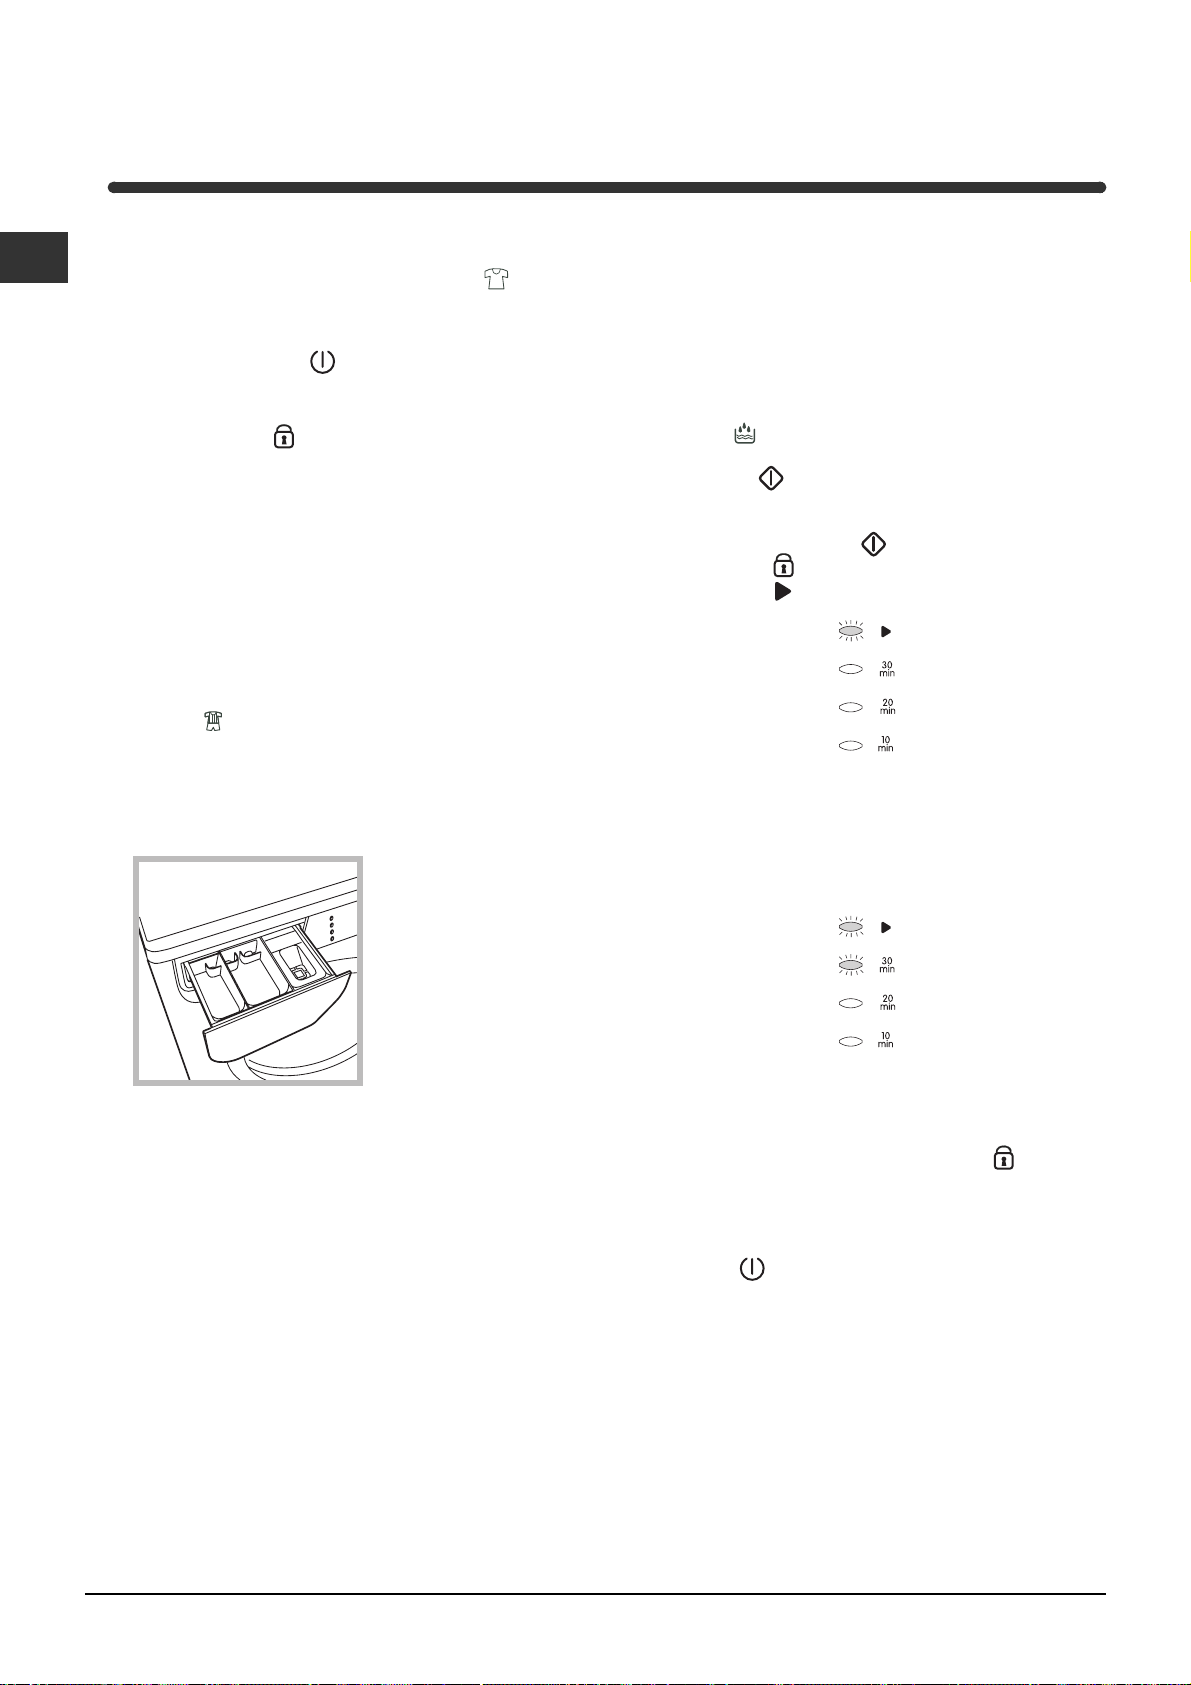
Cum se desfãºoarã un program de
spãlare
RO
Notã: Dupã instalare, dar înainte de prima
folosire, efectuaþi un program de spãlare, cu
detergent ºi fãrã rufe, alegând programul
poziþionând selectorul duratã spãlare pe auto.
1. Porniþi maºina de spãlat apãsând butonul
PORNIRE/OPRIRE
luminoase se vor aprinde timp de câteva secunde,
dupã care se vor stinge, iar indicatorul PORNIRE/
UªÃ BLOCATÃ
2. INTRODUCEREA RUFELOR. Deschideþi uºa.
Introduceþi rufele în maºinã, fiind atenþi sã nu
depãºiþi cantitatea indicatã în tabelul de
programe (a se vedea pagina urmãtoare).
3. DOZAREA DETERGENTULUI/ADITIVILOR
Extrageþi sertarul ºi umpleþi cu detergent al 2-lea
compartiment. Dacã doriþi, umpleþi al 3-lea
compartiment cu balsam de rufe sau cu alþi
aditivi. Aditivii nu trebuie sã depãºeascã nivelul
indicat. Dacã doriþi sã efectuaþi programul de
spãlare
reglând selectorul duratei în dreptul poziþiei
auto sau în dreptul uneia dintre poziþiile de la
3 la 24h (a se vedea Detergenþi ºi rufe albe),
aveþi posibilitatea de a umple primul compartiment
cu detergent praf (pentru prespãlare).
dedicat echipamentului sportiv,
. Toate indicatoarele
va lumina intermitent.
ºi
încheierea programului de spãlare la momentul
de dinainte stabilit.
- Dacã nu este necesar sã programaþi încheierea
programului de spãlare, selectaþi poziþia AUTO:
maºina va gestiona automat durata programului
în baza tipului de þesãturã selectat (a se vedea
tabelul de programe de la pagina urmãtoare).
Independent de poziþia pe care aþi reglat
SELECTORUL DURATÃ SPÃLARE, programul
Clãtire
imediat dupã apãsarea butonului de ACTIVARE/
ANULARE
7. ACTIVAÞI PROGRAMUL apãsând butonul de
ACTIVARE/ANULARE
uºã blocatã
desfãºurare
Pe parcursul desfãºurãrii programului de spãlare,
indicatoarele vã vor indica durata rãmasã pânã la
încheierea acestuia.
Acestea se vor aprinde la 30, 20 ºi respectiv 10
minute pânã la încheierea programului.
va dura 30 minute ºi va începe
.
. Indicatoarele pornire/
ºi program în curs de
se vor aprinde.
3
2
1
4. ÎNCHIDEÞI UªA.
5. ALEGEÞI TIPUL DE MATERIAL rotind
SELECTORUL DE PROGRAME spre dreapta
sau spre stânga pânã ajunge în dreptul þesãturii
dorite sau în dreptul programului de Clãtire.
6. ALEGEÞI DURATA DE ÎNCHEIERE A
PROGRAMULUI rotind SELECTORUL DURATÃ
SPÃLARE spre dreapta sau spre stânga.
Este posibil sã alegeþi urmãtoarele poziþii:
- 30 min 45 min 60 min: selectând una din
aceste opþiuni, alegeþi durata de desfãºurare a
programului dorit.
- de la 3h la 24h: alegând una din aceste
opþiuni, programaþi încheierea programului de
spãlare. Durata programului de spãlare va fi
aceeaºi ca ºi în modalitatea auto (a se vedea
tabelul de programe de la pagina urmãtoare),
dar, în acest caz, maºina va întârzia începerea
programului, în mod automat, pentru a garanta
8. ÎNCHEIEREA PROGRAMULUI
La încheierea programului de spãlare, toate
indicatoarele se vor stinge. Aºteptaþi deblocarea
uºii (indicatorul pornire/uºã blocatã
lumina intermitent), dupã care scoateþi rufele din
maºinã ºi lãsaþi uºa întredeschisã, pentru ca apa
rãmasã eventual în cuvã sã se evapore. Opriþi
maºina de spãlat apãsând butonul PORNIRE/
OPRIRE
.
va
54
Page 55
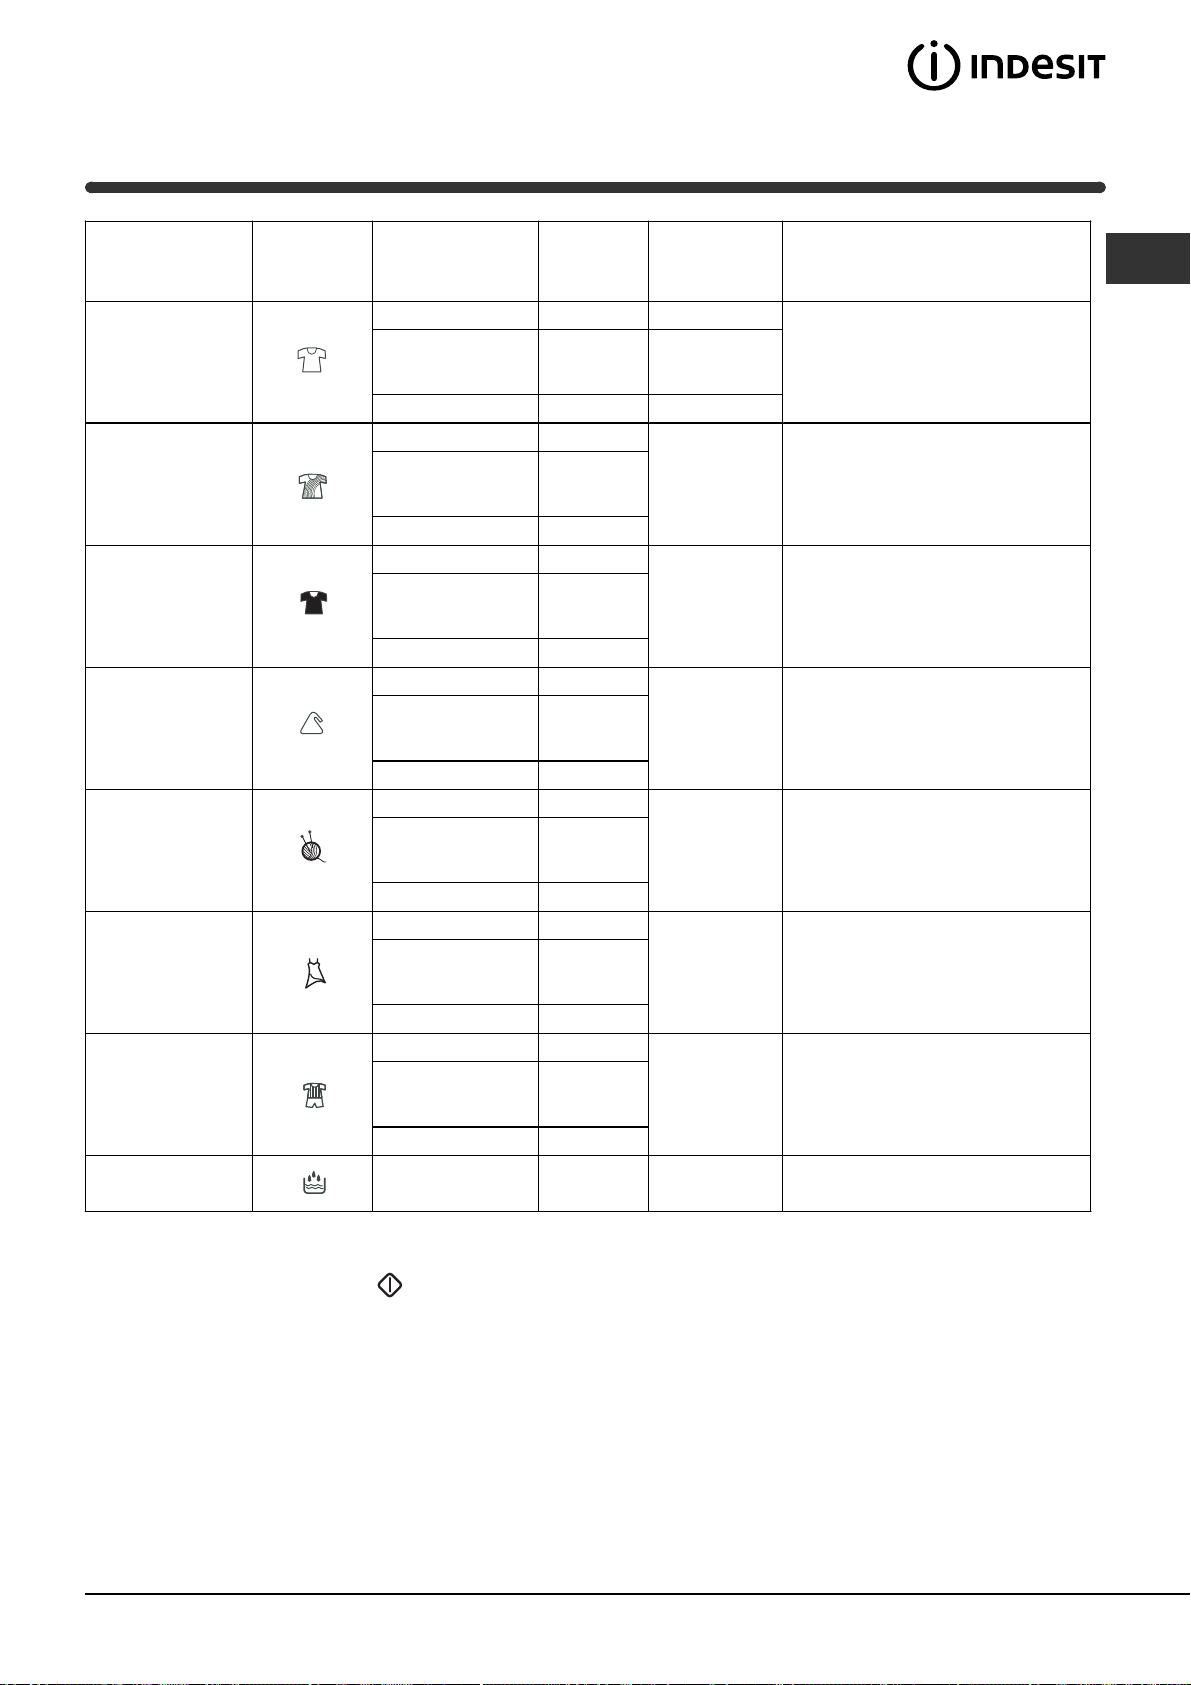
Tabelul de programe
Tipul de þesãturã
ºi gradul de
murdãrie
Bumbac – rufe albe
Bumbac – rufe
colorate
Bumbac – rufe
închise la culoare
sau delicate
Sintetice
Lânã
Delicate
Special Sport
Programe Duratã
Încãrcãturã
max. (Kg)
auto (125 min.) 5 60°
30 min.
45 min.
60 min.
3h - 24h 5 60°
auto (70 min.) 5
30 min.
45 min.
60 min.
3h - 24h 5
auto (60 min.) 5
30 min.
45 min.
60 min.
3h - 24h 5
auto (60 min.) 2,5
30 min.
45 min.
60 min.
3h - 24h 2,5
auto (60 min.) 1
30 min.
45 min.
60 min.
3h - 24h 1
auto (60 min.) 1
30 min.
45 min.
60 min.
3h - 24h 1
auto (60 min.) 1,5
30 min.
45 min.
60 min.
3h - 24h 1,5
3
3
3
3
3
3
3
3
3
1,5
2,5
2,5
1
1
1
1
1
1
1,5
1,5
1,5
Temperatura
max.
40°
60°
60°
40°
30°
40° Spãlare, clãtiri ºi stoarcere delicatã
40° Spãlare, clãtiri ºi stoarcere delicatã
30° Spãlare, clãtiri, evacuare apã
30°
Descrierea programului de spãlare
Spãlare, clãtiri, stoarcere intermediarã
ºi finalã
Spãlare, clãtiri, stoarcere intermediarã
ºi finalã
Spãlare, clãtiri, stoarcere intermediarã
ºi finalã
Prespãlare, spãlare, clãtiri, stoarcere
intermediarã ºi finalã
RO
Clãtire
*
2,5 Clãtire ºi stoarcere
* Notã: independent de poziþia selectorului DURATÃ SPÃLARE, Clãtirea va începe imediat dupã apãsarea
butonului ACTIVARE/ANULARE ºi va dura 30 minute.
Important:
- programele rapide 30 min ºi 45 min (independent de tipul de material) sunt recomandate pentru a spãla
rufele puþin murdare, într-un timp scurt.
- programele 60 min (independent de tipul de material) sunt recomandate pentru a spãla rufele puþin murdare.
- durata de spãlare indicatã nu cuprinde cele 2 minute de aºteptare pânã la deblocarea uºii.
55
Page 56

Detergenþi ºi rufe albe
RO
Sortarea rufelor
Subdivizaþi rufele în funcþie de:
- tipul de þesãturã / simbolul de pe etichetã.
- culori: separaþi rufele colorate de cele albe.
Goliþi buzunarele ºi controlaþi nasturii.
Nu depãºiþi cantitatea maximã de rufe, indicatã
în Tabelul de programe.
Cât cântãresc rufele?
1 cearceaf: 400-500 g.
1 faþã de pernã: 150-200 g.
1 faþã de masã: 400-500 g.
1 halat de baie: 900-1.200 g.
1 prosop: 150-250 g.
Rufe deosebite
Perdele: împãturiþi-le ºi aºezaþi-le într-o faþã de
pernã sau într-un sac de tip plasã. Spãlaþi-le
singure fãrã a depãºi o jumãtate de încãrcãturã.
Folosiþi programul
centrifugare.
Plãpumi ºi haine de vânt: dacã cãptuºeala este
din fulgi de gâscã sau de raþã, se poate spãla în
maºina de spãlat doar câte un articol care sã nu
depãºeascã o încãrcãturã maximã de 2-3 kg,
repetând programul de clãtire o datã sau de douã ori
ºi utilizând o turaþie de centrifugare delicatã.
Lânã: pentru a obþine cele mai bune rezultate, folosiþi
un detergent specific ºi nu depãºiþi 1 kg de rufe.
Echipament sportiv: utilizaþi programul Special
Sport
sau noroi de pe rufe, puteþi efectua o prespãlare.
Pentru aceasta, umpleþi cu detergent praf
compartimentul 1 al sertarului pentru detergenþi
(a se vedea Descrierea maºinii de spãlat).
Prespãlarea nu poate fi efectuatã dacã selectorul
duratei este poziþionat în dreptul unui program a
cãrui duratã este cuprinsã între 30 min ºi 1 orã.
. Pentru a elimina reziduurile de pãmânt
care exclude turaþia de
Sistem de echilibrare a încãrcãturii
Pentru a evita vibrarea excesivã, înainte de
stoarcere, maºina va distribui cantitatea de rufe în
mod uniform, efectuând câteva rotaþii complete la o
turaþie mai mare în raport cu turaþia de spãlare.
Dacã, dupã numeroase încercãri, maºina nu
reuºeºte sã echilibreze încãrcãtura, stoarcerea
rufelor se va face la o turaþie mai micã decât cea
prevãzutã de program.
Dacã dezechilibrul este prea mare (în cazul
încãrcãrilor excesive), maºina va încerca sã
redistribuie încãrcãtura înainte de a efectua
stoarcerea.
Aceste încercãri pot prelungi durata totalã a unui
program cu maxim 10 minute.
56
Page 57

Precauþii ºi sfaturi
Maºina de spãlat a fost proiectatã ºi construitã
conform normelor internaþionale de protecþie.
Aceste avertizãri sunt furnizate din motive de
siguranþã ºi trebuie sã fie citite cu atenþie.
Protecþie generalã
Acest aparat a fost conceput pentru o folosire de
uz casnic, nu profesionalã, iar funcþiile sale nu
trebuie alterate.
Maºina de spãlat trebuie sã fie folositã doar de
persoane adulte ºi respectând instrucþiunile din
acest manual.
Nu atingeþi maºina când sunteþi desculþi sau cu
mâinile sau picioarele ude sau umede.
Nu scoateþi ºtecherul din priza de curent trãgând
de cablu, ci trãgând de ºtecher.
Nu deschideþi sertarul detergenþilor în timp ce
maºina se aflã în funcþiune.
Nu atingeþi apa provenitã din evacuare, care
poate atinge temperaturi ridicate.
Aruncarea maºinii vechi de spãlat:
înainte de a o arunca, fãceþi-o inutilizabilã
tãindu-i cablul de alimentare electricã ºi
scoþându-i hubloul.
Protecþia ºi respectarea mediului
înconjurãtor
Tehnologia la dispoziþia mediului înconjurãtor
Dacã prin hublou se vede puþinã apã este pentru
cã, datoritã noii tehnologii Indesit, este suficientã
mai puþin de jumãtate din apã pentru a obþine o
curãþare maximã: un scop atins pentru respectarea
mediului înconjurãtor.
Economisirea de detergent, apã, energie ºi timp
Pentru a economisi detergent, apã, timp folosiþi
încãrcãtura maximã.
O încãrcare totalã în locul a douã jumãtãþi,
permite economisirea de pânã la 50% energie
electricã.
Tratând petele cu o substanþã (recomandatã a fi
utilizatã în maºina de spãlat rufe automatã)
pentru îndepãrtarea acestora ºi lãsându-le la
înmuiat înainte se spãlare, se reduce
necesitatea de a spãla la temperaturi mari.
RO
Nu forþaþi în nici un caz hubloul: s-ar putea
deteriora mecanismul de siguranþã care
împiedicã deschiderile accidentale.
În cazul defecþiunilor, nu interverniþi în nici un caz
în mecanismele interne pentru a încerca sã
reparaþi maºina de spãlat.
Controlaþi mereu ca în apropierea maºinii aflate
în funcþiune sã nu se afle copii.
Pe durata spãlãrii hubloul are tendinþa de a se
încãlzi.
Dacã maºina trebuie sã fie deplasatã, faceþi
acest lucru în douã sau trei persoane, cu
maximã atenþie. Niciodatã nu deplasaþi maºina
singuri deoarece aceasta este foarte grea.
Înainte de a introduce rufele, controlaþi ca în
interior sã fie goalã.
Aruncarea reziduurilor
Aruncarea materialelor de ambalare:
respectaþi normele locale, în acest fel ambalajele
vor putea fi reutilizate.
Dozaþi bine detergentul în funcþie de duritatea
apei, de gradul de murdãrie ºi de cantitatea de
rufe, pentru a evita risipe ºi pentru a proteja
mediul înconjurãtor: deºi sunt biodegradabili,
detergenþii conþin elemente care altereazã
echilibrul naturii. Mai mult, evitaþi pe cât posibil
aditivul de înmuiere.
Efectuând spãlãri începând de seara ºi pânã la
primele ore ale dimineþii, se colaboreazã pentru
reducerea sarcinii de absorbire a întreprinderilor
electrice.
57
Page 58
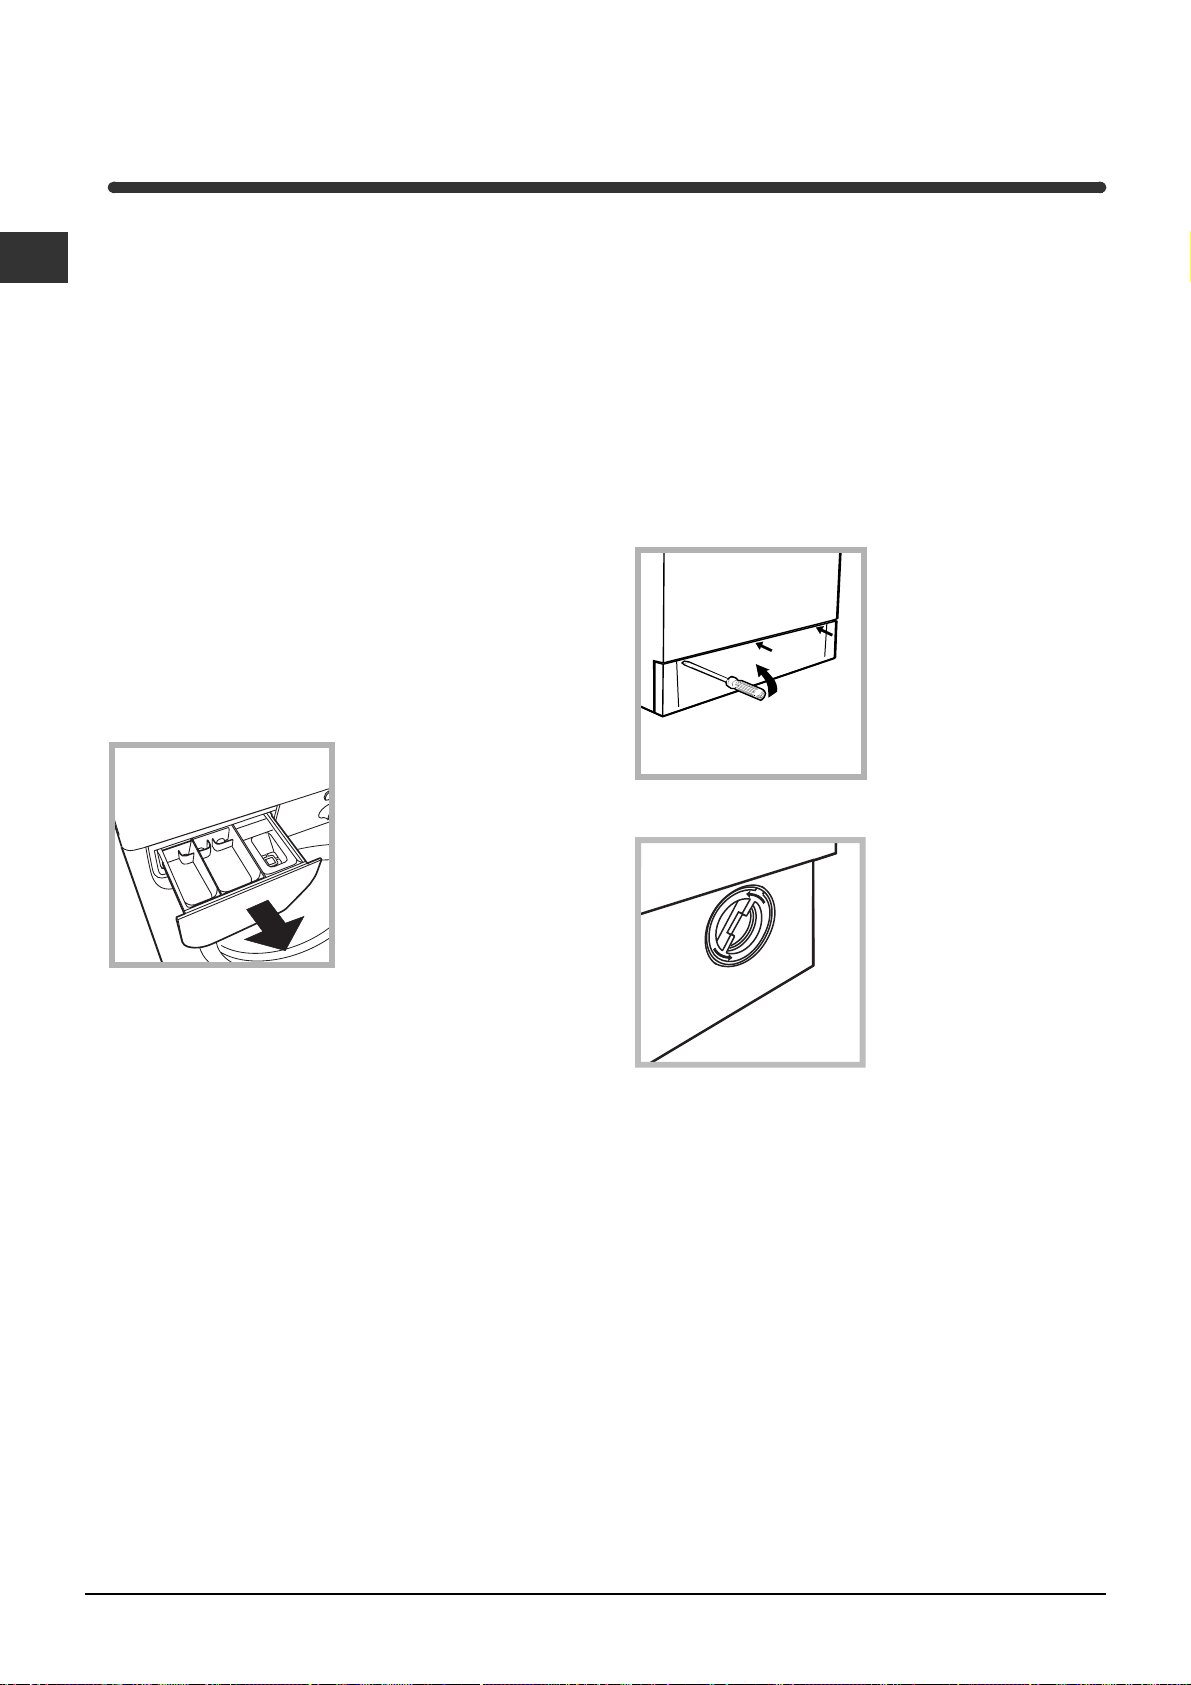
Întreþinere ºi îngrijire
RO
Oprirea apei ºi a curentului electric
Închideþi robinetul de apã dupã fiecare spãlare.
Se limiteazã astfel uzarea instalaþiei hidraulice a
maºinii de spãlat ºi se eliminã pericolul
scurgerilor.
Scoateþi ºtecherul din priza de curent atunci
când curãþaþi maºina de spãlat ºi când se
efectueazã lucrãri de întreþinere.
Curãþarea maºinii de spãlat
Partea externã ºi pãrþile din cauciuc pot fi curãþate
cu o cârpã înmuiatã în apã cãlduþã ºi sãpun. Nu
folosiþi solvenþi sau substanþe abrazive.
Curãþarea sertarului pentru detergenþi
Scoateþi sertarul
ridicându-l ºi trãgându-l
spre exterior (a se
vedea):
Spãlaþi-l cu apã;
aceastã curãþare
trebuie efectuatã
frecvent.
Curãþarea pompei
Maºina de spãlat este echipatã cu o pompã
autocurãþãtoare care nu necesitã întreþinere. Se
poate întâmpla însã ca obiecte mici (monede,
nasturi) sã cadã în precamera care protejeazã
pompa, situatã în partea inferioarã a acesteia.
Verificaþi ca programul de spãlare sã se fii
încheiat ºi scoateþi din prizã.
Pentru a avea acces la precamerã,procedaþi astfel:
1.scoateþi panoul de
acoperire de pe latura
anterioarã a maºinii de
spãlat folosindu-vã de o
ºurubelniþã (a se vedea
figura):
2. deºurubaþi capacul
rotindu-l în sens invers
(a se vedea figura):
este normal sã curgã
puþinã apã;
Îngrijirea hubloului ºi a cuvei
Lãsaþi mereu hubloul întredeschis pentru a
evita formarea mirosurilor neplãcute.
3.curãþaþi cu grijã interiorul;
4.montaþi din nou capacul;
5.montaþi din nou panoul verificând, înainte de a-l
împinge spre maºinã, de a fi introdus cârligele în
orificiile respective.
Controlarea furtunului de alimentare cu
apã
Controlaþi furtunul de alimentare cel puþin o datã pe
an. Dacã prezintã crãpãturi sau fisuri trebuie
înlocuit: pe parcursul spãlãrilor, presiunile puternice
ar putea provoca crãpãturi neaºteptate.
Nu folosiþi furtunuri deja folosite.
58
Page 59
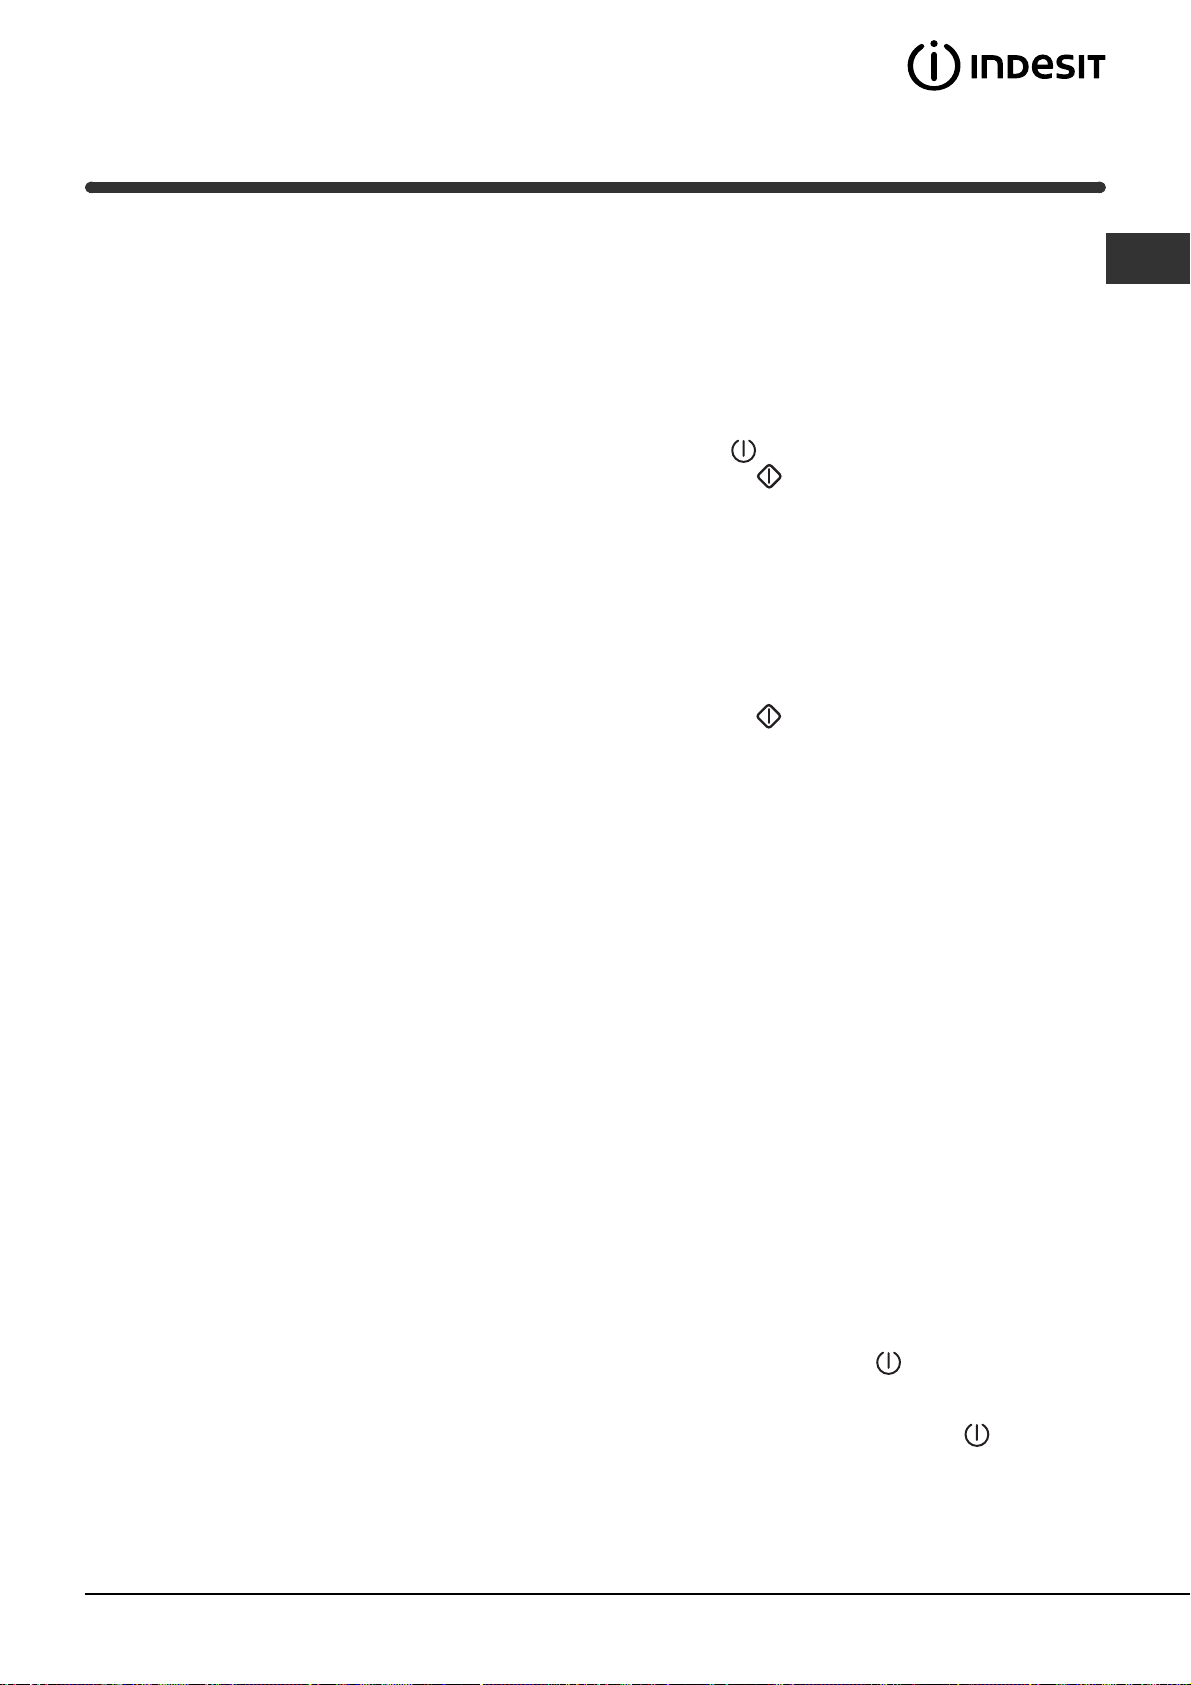
Anomalii ºi remedii
Se poate întâmpla ca maºina de spãlat sã nu funcþioneze. Înainte de a telefona la Asistenþã (a se vedea
Asistenþã), verificaþi dacã aceastã problemã nu poate fi remediatã de dvs., astfel:
Anomalii:
Maºina de spãlat nu porneºte.
Programul de spãlare nu poate
fi activat.
Maºina de spãlat nu încarcã apã.
Maºina de spãlat încarcã ºi
evacueazã apã încontinuu.
Cauze posibile / Rezolvare:
ªtecherul nu este introdus sau nu a fost suficient introdus în priza
de curent astfel încât sã existe conexiune electricã.
În casã nu este curent electric.
Hubloul nu este bine închis.
Butonul PORNIRE/OPRIRE
Butonul ACTIVARE/ANULARE
Robinetul de apã nu este deschis
A fost selectatã o duratã de spãlare de la 3h la 24 de ore (a se
vedea Cum se desfãºoarã un program de spãlare).
Furtunul de alimentare cu apã nu este conectat la robinet.
Furtunul este îndoit.
Robinetul de apã nu este deschis.
În casã lipseºte apa.
Nu este presiune suficientã.
Butonul ACTIVARE/ANULARE
Furtunul de evacuare nu a fost instalat la o distanþã cuprinsã între
65 ºi 100 cm de pãmânt (a se vedea Instalare).
Extremitatea furtunului de evacuare este cufundatã în apã (a se vedea Instalare).
Dacã dupã aceste verificãri problema nu se rezolvã, închideþi robinetul
de apã, opriþi maºina de spãlat ºi chemaþi Asistenþa. Dacã locuinþa se
aflã la ultimele etaje ale unui edificiu, este posibil sã aibã loc
fenomene de sifonare, motiv pentru care maºina de spãlat încarcã ºi
evacueazã apã încontinuu. Pentru a elimina acest inconvenient, se
gãsesc în comerþ supape anti-sifonare.
nu a fost apãsat.
nu a fost apãsat.
nu a fost apãsat.
RO
Maºina de spãlat nu evacueazã
sau nu stoarce.
Maºina de spãlat vibreazã foarte
mult pe parcursul turaþiei de
centrifugare.
Maºina de spãlat pierde apã.
Indicatorul PORNIRE/UªÃ
BLOCATÃ lumineazã intermitent,
cu frecvenþã rapidã.
Se formeazã prea multã spumã.
Furtunul de evacuare este îndoit (a se vedea Instalare).
Conducta de evacuare este înfundatã.
ªuruburile de protecþie pe durata transportului nu au fost îndepãrtate
în momentul instalãrii. Scoateþi ºuruburile (a se vedea Instalare).
Maºina de spãlat nu este poziþionatã orizontal (a se vedea Instalare).
Maºina de spãlat este fixatã foarte puternic între mobilã ºi zid
(a se vedea Instalare).
Furtunul de alimentare cu apã nu este bine înºurubat (a se vedea Instalare).
Sertarul detergenþilor este înfundat (pentru a-l curãþa, a se vedea Întreþinere ºi îngrijire).
Furtunul de evacuare nu este bine fixat (a se vedea Instalare).
S-a depistat o anomalie. Înainte de a apela serviceul autorizat, vã
rugãm sã efectuaþi urmãtoarele operaþii:
1. Opriþi maºina de spãlat apãsând butonul
2. Scoateþi ºtecherul maºinii din prizã ºi aºteptaþi cel puþin 40 de secunde;
3. Introduceþi ºtecherul în prizã;
4. Porniþi maºina de spãlat apãsând din nou butonul
5. Dacã ºi dupã aceste operaþii defecþiunea persistã, apelaþi serviceul autorizat.
Detergentul nu este specific pentru maºina de spãlat (trebuie sã fie
scris pentru maºina de spãlat, de mânã sau în maºina de spãlat,
sau ceva asemãnãtor).
Dozajul a fost excesiv.
;
;
59
Page 60

Asistenþã
195052487.02
07/2005 - Xerox Business Services
RO
Înainte de a lua legãtura cu Asistenþa:
Verificaþi dacã anomalia poate fi remediatã de dvs. (a se vedeaAnomalii ºi remedii);
Porniþi din nou programul pentru a controla dacã inconvenientul a fost eliminat;
În caz contrar, vã recomandãm sã apelaþi la Unitatea de Service.
Dacã instalarea nu a fost fãcutã în mod corespunzãtor sau dacã aþi utilizat maºina în mod incorect,
este posibil ca plata intervenþiei sã fie suportatã de dvs.
Nu apelaþi niciodatã la tehnicieni neautorizaþi.
Comunicaþi:
tipul de anomalie;
modelul maºinii (Mod.);
numãrul de serie (S/N).
Aceste informaþii se aflã pe eticheta autocolantã aplicatã în partea din spate a maºinii de spãlat.
60
 Loading...