

Page 1

Mode d’emploi
CUISINIERE
FR
K3C11/FR
KN3C11/FR
GB
Sommaire
Installation, 2-3
English, 11Français, 1
Positionnement et nivellement
Raccordement électrique
Caractéristiques techniques
Description de l’appareil, 4
Vue d’ensemble
Tableau de bord
Utilisation du four, 5-7
Mise en marche du four
Programmes de cuisson
Tableau de cuisson
Utilisation du plan vitrocéramique, 8
Allumer et éteindre les foyers
Les foyers
Précautions et conseils, 9
Sécurité générale
Mise au rebut
Economies et respect de l’environnement
Nettoyage et entretien, 10
Mise hors tension
Nettoyage du four
Remplacement de l’ampoule d’éclairage du four
Nettoyage du plan de cuisson vitrocéramique
Assistance
Page 2
Installation
H05RR-F 3x4 CEI-UNEL 35363
H05VV-F 3x4 CEI-UNEL 35746
H05VV-F 4x4 CEI-UNEL 35746
H05VV-F 5x2.5 CEI-UNEL 35746
FR
! Conservez ce mode d’emploi pour pouvoir le consulter
à tout moment. En cas de vente, de cession ou de
déménagement, veillez à ce qu’il suive l’appareil.
! Lisez attentivement les instructions : elles
contiennent des conseils importants sur l’installation,
l’utilisation et la sécurité de votre appareil
! L’installation de l’appareil doit être effectuée par un
professionnel du secteur conformément aux
instructions du fabricant.
! N’importe quelle opération de réglage ou
d’entretien doit être effectuée après avoir débranché
la prise de l’appareil.
Positionnement et nivellement
! L’appareil peut être installé à côté de meubles dont
la hauteur ne dépasse pas celle du plan de cuisson.
! Assurez-vous que le mur en contact avec la paroi
arrière de l’appareil est réalisé en matériel ignifuge
résistant à la chaleur (T 90°C).
Montage des pieds* fournis
avec l’appareil par
encastrement sous la base.
Raccordement électrique
Montage du câble d’alimentation
Le cordon doit être dimensionné en fonction du type
de raccordement électrique utilisé selon le schéma
de connexion suivant:
H05RR-F 5x2.5 CEI-UNEL 35363
400 3N
400V 2N
H05RR-F 4x4 CEI-UNEL 35363
230V
1 2
S
R
12345
R
1
2
R
4
3
T
S
4
3
5
N
N
5
N
Pour une installation correcte :
• installez cet appareil dans une cuisine, une salle à
manger ou un studio (jamais dans une salle de bains);
• si le plan de cuisson de la cuisinière dépasse le
plan de travail des meubles, ces derniers doivent
être placés à au moins 200 mm de l’appareil.
• si la cuisinière est
installée sous un élément
suspendu, il faut que ce
dernier soit placé à au
moins 420 mm de
mm. with hood
mm. without hood
distance du plan.
650
700
Il faut prévoir une distance
min.
min.
mm.
420
Min.
HOOD
Min. mm.
600
420
Min. mm.
de 700 mm si les
éléments suspendus sont
inflammables (
voir figure
• ne placez pas de rideaux derrière ou sur les côtés
de la cuisinière à moins de 200 mm de distance.
• pour l’installation de hottes, conformez-vous aux
instructions de leur notice d’emploi.
Nivellement
Pour mettre l’appareil bien à
plat, vissez les pieds de
réglage fournis aux
emplacements prévus aux
coins à la base de la
cuisinière (
voir figure
).
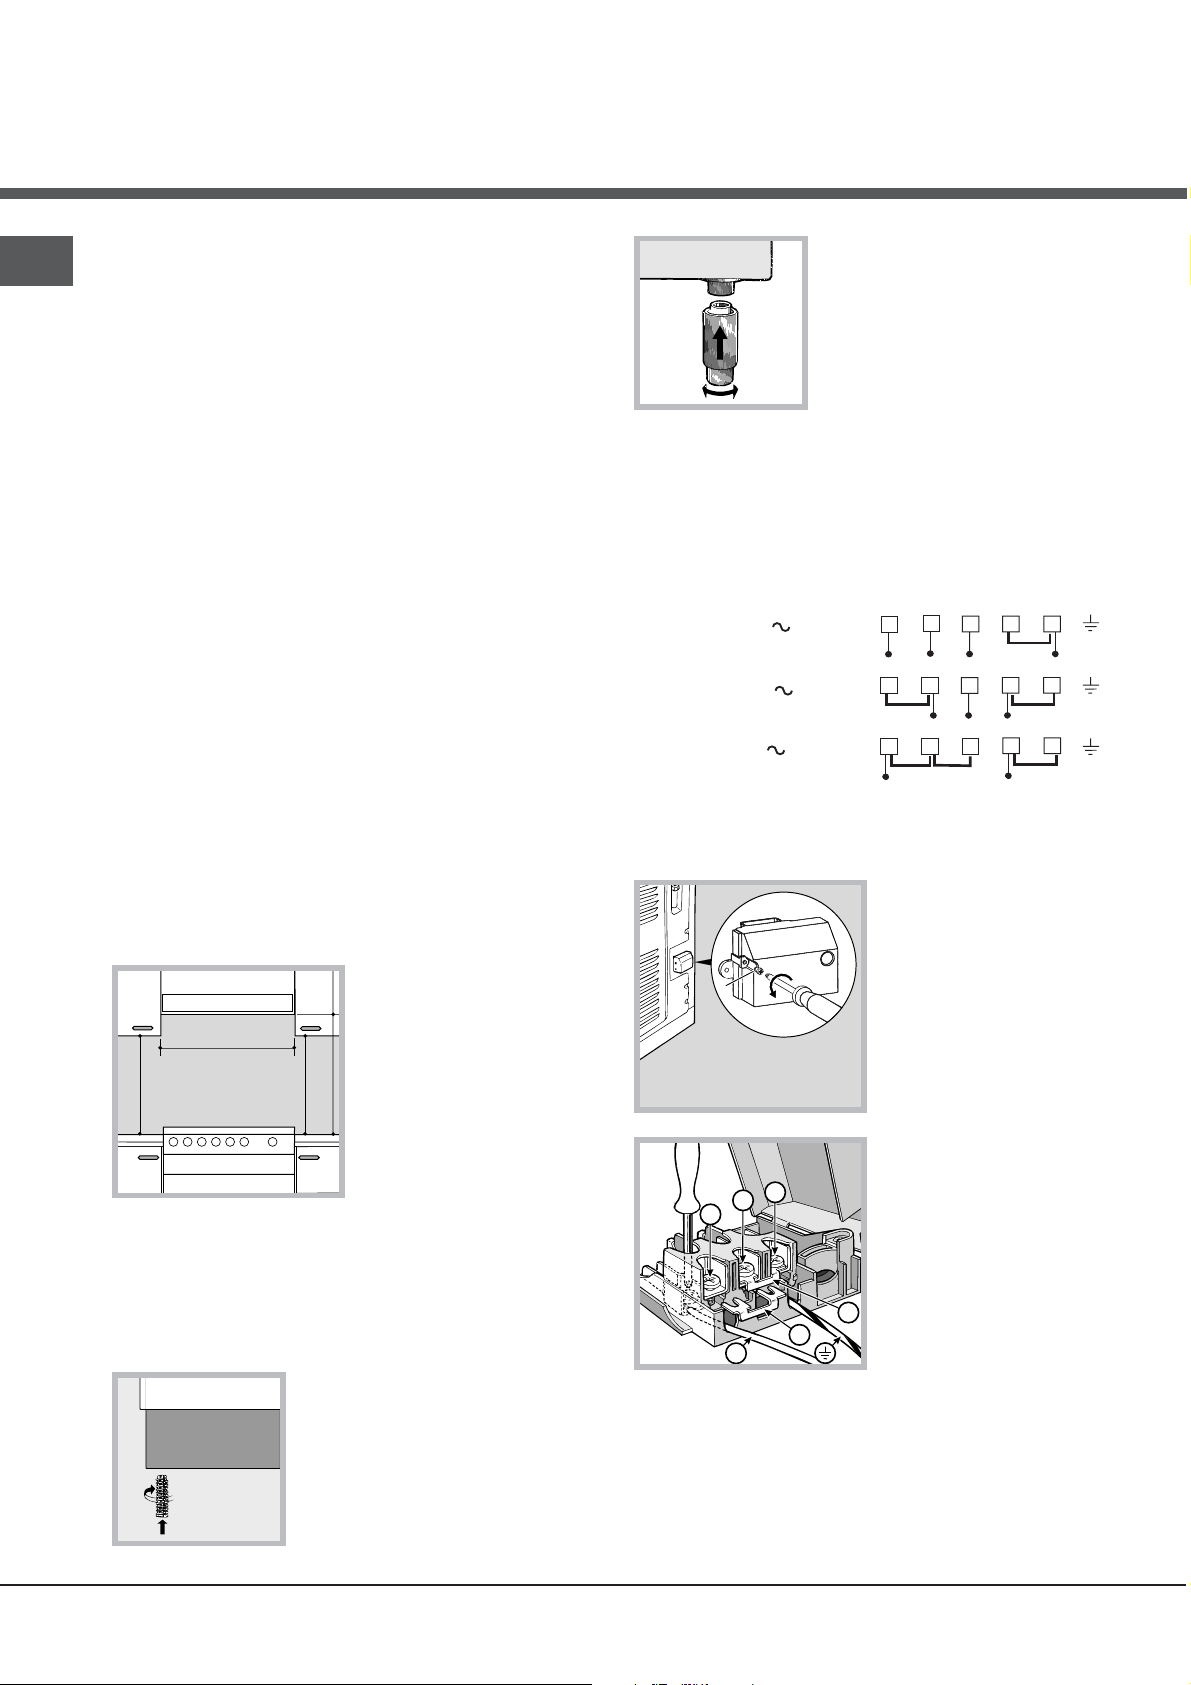
Pour monter le câble d’alimentation :
1. Dévissez la vis V du
bornier et tirez le
couvercle pour l’ouvrir
(
V
voir figure
).
2. positionnez le
);
1
3
2
cavalier de
raccordement A (
figure
) selon le schéma
voir
de connexion illustré
plus haut. Le bornier
est prévu pour
B
N
A
raccordement
monophasé 230 V : les
bornes 1, 2 et 3 sont
reliées les unes aux autres; le pont 4-5 se trouve
dans la partie inférieure du bornier.
3. positionnez les fils N et
dessin (
voir figure
) et effectuez le raccordement en
66
conformément au
6
66
serrant à fond les vis des bornes.
4. positionnez les fils restants sur les bornes 1-2-3
et serrez les vis.
2
Page 3
5. fixez le câble d’alimentation dans le serre-câble
prévu.
6. fermez le couvercle du bornier et vissez la vis V.
Branchement du câble d’alimentation au réseau
électrique
Montez sur le câble une fiche normalisée adaptée à
la charge indiquée sur l’étiquette des
caractéristiques collée sur l’appareil.
En cas de raccordement direct au réseau, intercalez
entre l’appareil et le réseau un interrupteur à coupure
omnipolaire ayant au moins 3 mm d’écartement
entre les contacts, dimensionné à la charge et
conforme aux normes en vigueur (le fil de terre ne
doit pas être interrompu par l’interrupteur). Le câble
d’alimentation ne doit atteindre, en aucun point, une
température dépassant de 50°C la température
ambiante.
Avant de procéder au branchement, assurez-vous
que :
• la prise est bien munie d’une terre conforme à la loi;
• la prise est bien apte à supporter la puissance
maximale de l’appareil, indiquée sur la plaquette
signalétique;
• la tension d’alimentation est bien comprise entre
les valeurs indiquées sur la plaquette
signalétique;
• la prise est bien compatible avec la fiche de
l’appareil. Si ce n’est pas le cas, remplacez la
prise ou la fiche, n’utilisez ni rallonges ni prises
multiples.
! Après installation de l’appareil, le câble électrique
et la prise de courant doivent être facilement
accessibles
CARACTERISTIQUES TECHNIQUES
Dimensions du
four HxLxP
Volume
Dimensions
utiles du tiroir
chauffe-plats
Tension et
fréquence
d'alimentation :
Plan de cuisson
vitrocéramique
Avant gauche
Arrière gauche
Arrière droit
Avant droit
Absorption Max.
plan de cuisson
vitrocéramique
ETIQUETTE
ENERGIE
34x38x44 cm
l 58
largeur 42 cm
profondeur 44 cm
hauteur 18 cm
voir plaquette signalétique
1200 W
1700 W
1200 W
1700 W
5800W
Directive 2004/40/CE sur
l'étiquette des fours électriques
Norme EN 50304
- Consommation énergie
convection naturelle.
Fonction four : Statique
Directives Communautaires:
06/95/EC du 12/12/06 (Basse
Tension) et modifications
successives
-04/108/EC du 15/12/04
(Compatibilité électromagnétique)
et modifications successives
-93/68/EEC du 22/07/93 et
modifications successives2002/96/EC
1275/2008 Stand-by/ Off mode
FR
! Le câble ne doit être ni plié ni excessivement
écrasé.
! Le câble doit être contrôlé périodiquement et ne
peut être remplacé que par un technicien agréé.
! Nous déclinons toute responsabilité en cas de
non respect des normes énumérées ci-dessus.
Il est recommandé de nettoyer le four avant sa
première utilisation, en suivant les instructions
mentionnées au paragraphe " Entretien et soin ".
N’existe que sur certains modèles
*
3
Page 4
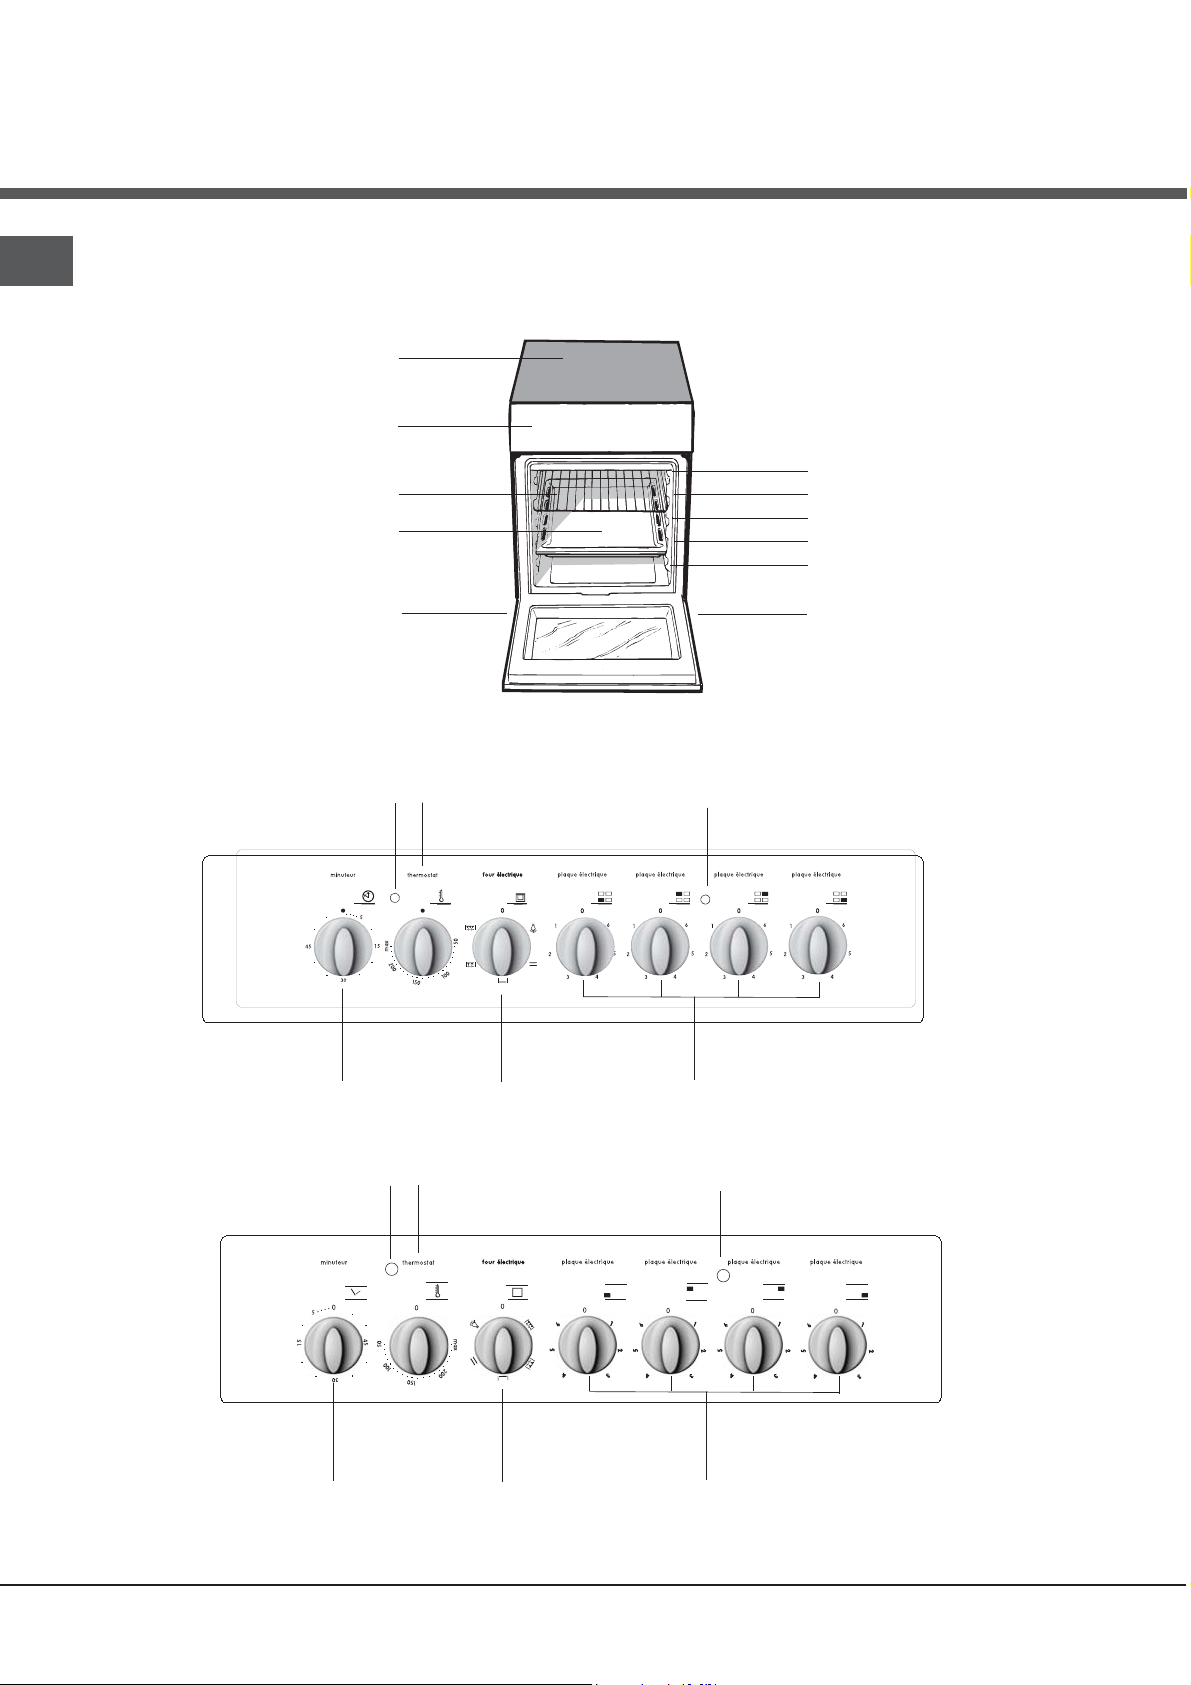
Description de
l’appareil
FR
Vue d’ensemble
Plan de cuisson
vitrocéramique
Tableau de bord
Support GRILLE
Support LECHEFRITE
Pied de réglage
Tableau de bord
THERMOSTAT
Voyant
Bouton
THERMOSTAT
GLISSIERES
de coulissement
niveau 5
niveau 4
niveau 3
niveau 2
niveau 1
Pied de réglage
Voyant FONCTIONNEMENT
PLAQUE ELECTRIQUE
Bouton
MINUTEUR
Voyant
THERMOSTAT
Bouton
MINUTEUR
Bouton
PROGRAMMES
Bouton
THERMOSTAT
Bouton
PROGRAMMES
Bouton foyer
PLAQUE ELECTRIQUE
Voyant FONCTIONNEMENT
PLAQUE ELECTRIQUE
Bouton foyer
PLAQUE ELECTRIQUE
4
Page 5

Utilisation du four
! Pour les modèles équipés d’une grille de
réduction, n’utiliser cette dernière que pour le
brûleur auxiliaire, en cas d’utilisation de casseroles
ayant moins de 12 cm de diamètre.
Utilisation du four
! Lors de son premier allumage, faire fonctionner le
four à vide, porte fermée, pendant au moins une
heure en réglant la température à son maximum.
Puis éteindre le four, ouvrir la porte et aérer la pièce.
L’odeur qui se dégage est due à l’évaporation des
produits utilisés pour protéger le four.
! Avant toute utilisation, enlever les pellicules
plastiques sur les côtés de l’appareil
! Ne jamais poser d’objets à même la sole du four,
l’émail risque de s’abîmer.
1. Pour sélectionner le programme de cuisson
souhaité, tourner le bouton PROGRAMMES.
2. Choisir la température conseillée pour ce
programme ou celle qu’on préfère à l’aide du bouton
THERMOSTAT.
Un tableau de cuisson sert de guide et indique
notamment les températures conseillées pour
plusieurs préparations culinaires (
cuisson au four
).
voir tableau
FR
En cours de cuisson, il est possible à tout moment
de :
• modifier le programme de cuisson à l’aide du
bouton PROGRAMMES;
• modifier la température à l’aide du bouton
THERMOSTAT;
• interrompre la cuisson en ramenant le bouton
PROGRAMMES sur “0”.
! Il faut toujours enfourner les plats sur la grille
fournie avec l’appareil.
Voyant THERMOSTAT
Allumé, il signale la montée en chaleur du four. Il
s’éteint dès que la température sélectionnée est
atteinte. Le voyant s’allume et s’éteint tour à tour
pour indiquer que le thermostat fonctionne et
maintient la température au degré près.
Eclairage du four
Pour l’allumer, amenez le bouton PROGRAMMES
sur une position autre que la position “0”. Il reste
allumé tant que le four est en marche. Si vous
amenez le bouton sur
activer aucune résistance.
, la lampe s’allume sans
88
8
88
5
Page 6
FR
Programmes de cuisson
! Pour tous les programmes il est possible de
sélectionner une température comprise entre 60°C et
MAX., sauf pour le programme GRIL, pour lequel il
est préconisé de sélectionner MAX.
Programme FOUR STATIQUE
Mise en marche des résistances de voûte et de
sole. Pour cette cuisson traditionnelle mieux vaut
cuire sur un seul niveau : la cuisson sur plusieurs
niveaux entraînerait une mauvaise distribution de la
chaleur.
Programme
PâtisseriePâtisserie
Pâtisserie
PâtisseriePâtisserie
Conseils de cuisson
! En cas de cuisson en mode GRIL, placer la
lèchefrite au gradin 1 pour récupérer les jus de
cuisson.
GRIL
• Placer la grille au gradin 3 ou 4, enfourner les plats
au milieu de la grille.
• Nous conseillons de sélectionner le niveau
d’énergie maximum. Ne pas s’inquiéter si la
résistance de voûte n’est pas allumée en
permanence: son fonctionnement est contrôlé par
un thermostat.
L’élément chauffant inférieur est branché. Cette
position est conseillée pour parfaire la cuisson
d’aliments (placés dans des plats à rôti) qui sont
déjà bien cuits à la surface mais encore mous à
l’intérieur ou pour des gâteaux garnis de fruits ou de
confiture qui ont besoin de se colorer modérément à
leur surface. A remarquer que cette fonction ne
permet pas d’atteindre une température maximum à
l’intérieur du four (250°C), il est par conséquent
déconseillé de cuire en maintenant longuement le
four dans cette position à moins qu’il ne s’agisse de
gâteaux qui exigent des températures inférieures ou
égales à 180°C.
Programme
Mise en marche de la résistance de voûte. La
température plutôt élevée et directe du gril permet
de saisir immédiatement les viandes évitant ainsi
qu’elles ne durcissent en perdant leur jus.
Programme
Mise en marche de la résistance de voûte et du
tournebroche. La cuisson au gril est particulièrement
recommandée pour les plats qui exigent une
température élevée à leur surface : côtes de veau et
de bœuf, entrecôtes, filet, hamburgers, etc...
Résistance de voûteRésistance de voûte
Résistance de voûte
Résistance de voûteRésistance de voûte
GRILGRIL
GRIL
GRILGRIL
PIZZA
• Utiliser un plat en aluminium léger et l’enfourner
sur la grille du four.
En cas d’utilisation du plateau émaillé, le temps
de cuisson sera plus long et la pizza beaucoup
moins croustillante.
• Si les pizzas sont bien garnies, n’ajouter la
mozzarelle qu’à mi-cuisson.
Minuteur*
Pour actionner le Minuteur procéder comme suit :
1. tourner le bouton MINUTEUR et faire un tour
presque complet dans le sens des aiguilles d’une
montre 4 pour remonter la sonnerie;
2. tourner le bouton MINUTEUR dans les sens
inverse des aiguilles d’une montre 5 pour
sélectionner la durée désirée.
! Les cuissons GRIL doivent avoir lieu porte fermée.
6
N’existe que sur certains modèles
*
Page 7

Tournebroche*
Pour actionner le
tournebroche, procédez
comme suit :
1. placez la lèchefrite au
gradin 1;
2. placez le berceau au
gradin 4 et encastrez le
bout arrière de la broche
dans le trou situé au
fond de l’enceinte (
figure
);
3. pour actionner le tournebroche, sélectionnez
l’aide du bouton PROGRAMMES.
Tableau de cuisson
Position
sélecteur
Aliments à cuire Poids
(Kg)
voir
à
gradins en
partant du
Position
bas
Niche inférieure*
Une niche ménagée audessous du four peut
être utilisée pour
entreposer des
accessoires ou des
casseroles. Pour ouvrir
le volet, faites-le pivoter
vers le bas (
voir figure
! Ne pas stocker de matériel inflammable dans la
niche du bas.
! Les surfaces intérieures du tiroir (s'il y en a un)
peuvent devenir chaudes.
Temps de
préchauffage
(minutes)
Position
sélecteur de
températures
Temps de
cuisson
(minutes)
FR
).
1 Statique Traditionnel
2 Four
Pâtisserie
3 Résistance
de voûte
4 Gril
N.B. : les temps de cuisson sont purement indicatifs et peuvent être modifiés selon les goûts de chacun. En cas de
cuisson au gril, placez toujours l a lèchefrite sur le 1er gradin en par tant du bas.
N’existe que sur certains modèles
*
Canard
Rôti de veau ou de buf
Rôti de porc
Biscuits (pâte brisée)
Ta r t e s
Lasagnes
Agneau
Maquereau
Plum-cake
Choux
Génoise
Quiches
Gâteaux levés
Ta r t e s
Gâteaux aux fruits
Brioches
Pour parfaire la cuisson - 3/4 15 220 -
Soles et seiches
Brochettes de calmars et
crevettes
Tranches de colin
Légumes grillés
Côte de veau
Côtelettes
Hamburgers
Maquereaux
Croque-monsieur
Avec tournebroche (sur
certains modèles)
Veau à la broche
Poulet à la broche
Agneau à la broche
1
1
1
1
1
1
1
1
0.3
0.5
1.5
0,5
1
1
0,5
1
1
1
1
1
1
1
1
n.° 4
1.0
1.5
1.0
3
3
3
3
3
3
2
2
2
3
3
3
3
3
3
3
4
4
4
3/4
4
4
4
4
4
15
15
15
15
15
10
10
10
10
10
10
15
15
15
15
15
5
5
5
5
5
5
5
5
5
-
-
-
5
5
5
200
200
200
180
180
190
180
180
170
180
170
200
160
180
180
160
Max
Max
Max
Max
Max
Max
Max
Max
Max
Max
Max
Max
65-75
70-75
70-80
15-20
30-35
35-40
50-60
30-35
40-50
30-35
20-25
30-35
30-40
35-40
50-60
25-30
8-10
6-8
10
10-15
15-20
15-20
7-10
15-20
2-3
80-90
70-80
70-80
7
Page 8

Utilisation du plan de
cuisson vitrocéramique
FR
! La colle utilisée pour les joints laisse des traces de
graisse sur le verre. Nous conseillons de les éliminer
avant d’utiliser l’appareil à l’aide d’un produit
d’entretien non abrasif. Une odeur de caoutchouc
peut se dégager au cours des premières heures
d’utilisation, elle disparaîtra très vite.
Allumer et éteindre les foyers
Pour allumer un foyer, tourner le bouton
correspondant dans le sens des aiguilles d’une
montre.
Pour l’éteindre, tourner le bouton dans le sens
inverse des aiguilles d’une montre jusqu’à “0”.
L’allumage du voyant FONCTIONNEMENT FOYERS
signale qu’au moins un foyer du plan de cuisson est
allumé.
Les foyers
Le plan de cuisson est équipé d’éléments
chauffants électriques radiants. Ils deviennent
rouges pendant leur fonctionnement :
A. Foyers radiants
A
A
B
dernier.
B. Voyant de chaleur
A
résiduelle : il signale une
température supérieure à 60°C
A
du foyer correspondant et ce
même après extinction de ce
Conseils d’utilisation du plan de cuisson
• Utiliser des casseroles à fond plat et de forte
épaisseur pour qu’elles adhèrent parfaitement à la
zone de chauffe ;
• utiliser des casseroles dont le diamètre couvre
complètement la zone de chauffe de façon à
exploiter au mieux toute la chaleur disponible ;
• s’assurer que le fond des casseroles est
parfaitement sec et propre : l’adhérence aux
foyers sera ainsi optimale et tant les casseroles
que le plan de cuisson dureront plus longtemps ;
• éviter d’utiliser des casseroles qui sont aussi
utilisées sur les brûleurs à gaz : la concentration
de chaleur des brûleurs à gaz peut déformer le
fond de la casserole qui perd son adhérence ;
• ne jamais laisser un foyer allumé sans casserole,
il risque de s’endommager.
Foyers radiants
Les résistances circulaires des foyers radiants
deviennent rouges 10-20 secondes à peine après
allumage.
Pos. Piastra normale o rapida
Spento
0
Cottura di verdure, pesci
1
Cottura di patate (a vapore) minestre, ceci,
2
fagioli
Proseguimento di cottura di grandi quantità di
3
cibi, minestroni
4 Arrostire (medio)
5 Arrostire (forte)
Rosolare o raggiungere bollitura in poco tempo
6
8
Page 9

Précautions et conseils
! Cet appareil a été conçu et fabriqué conformément aux
normes internationales de sécurité.
Ces conseils sont fournis pour des raisons de sécurité et
doivent être lus attentivement.
Sécurité générale
• Le plan de cuisson vitrocéramique résiste aux sautes
de température et aux chocs. N'oubliez toutefois pas
que des lames ou des ustensiles de cuisine pointus
peuvent casser la surface du plan de cuisson. En cas
de cassure, débranchez immédiatement l'appareil du
secteur, faites appel à un service après-vente agréé et
exigez l'utilisation de pièces détachées d'origine. Le
non respect de ces indications peut compromettre la
sécurité de l'appareil.
• Si la surface de la table est fêlée, éteindre l'appareil
pour éviter tout risque d'électrocution.
• Cet appareil a été conçu pour un usage familial, de
type non professionnel.
• Cet appareil ne doit pas être installé en extérieur,
même dans un endroit abrité, il est en effet très
dangereux de le laisser exposé à la pluie et aux
orages.
• Ne touchez pas à l’appareil si vous êtes pieds nus ou
si vous avez les mains ou les pieds mouillés ou
humides.
•Cet appareil qui sert à cuire des aliments ne doit être
utilisé que par des adultes conformément aux
instructions du mode d'emploi. Toute autre
utilisation (comme par exemple le chauffage d'une
pièce) est impropre et donc dangereux. Le fabricant
décline toute responsabilité en cas de dommages
provoqués par un usage impropre ou erroné.
• Cette notice concerne un appareil classe 1 (libre pose)
ou classe 2 - sous-classe 1 (encastré entre deux
meubles).
• Ne stockez pas de matériel inflammable dans la niche
de rangement du bas ou dans le four : si l’appareil était
par inadvertance mis en marche, il pourrait prendre feu.
• Les surfaces intérieures du tiroir (s'il y en a un) peuvent
devenir chaudes.
• Quand l’appareil n’est pas utilisé, assurez-vous toujours
que les boutons sont bien sur la position
• Ne tirez surtout pas sur le câble pour débrancher la
fiche de la prise de courant.
• N’effectuez aucune opération de nettoyage ou
d’entretien sans avoir auparavant débranché la fiche de
la prise de courant.
• En cas de panne, n’essayez en aucun cas d’accéder
aux mécanismes internes pour tenter de réparer
l’appareil. Faites appel au service d’assistance.
• Ne posez pas d’objets lourds sur la porte du four
ouverte.
•.
Mise au rebut
• Mise au rebut du matériel d’emballage : conformezvous aux réglementations locales, les emballages
pourront ainsi être recyclés.
• La Directive Européenne 2002/96/EC sur les Déchets des
Equipements Electriques et Electroniques (DEEE), exige
que les appareils ménagers usagés ne soient pas jetés
dans le flux normal des déchets municipaux. Les
appareils usagés doivent être collectés séparément afin
d’optimiser le taux de récupération et le recyclage des
matériaux qui les composent et réduire l’impact sur la
santé humaine et l’environnement. Le symbole de la
“poubelle barrée” est apposé sur tous les produits pour
rappeler les obligations de collecte séparée. Les
consommateurs devront contacter les autorités locales ou
leur revendeur concernant la démarche à suivre pour
l’enlèvement de leur vieil appareil.
FR
• En cours de fonctionnement, les éléments
chauffants et certaines parties du four deviennent
très chaudes. Attention à ne pas les toucher et à
garder les enfants à distance.
• Evitez que le cordon d’alimentation d’autres petits
électroménagers touche à des parties chaudes de
l’appareil.
• Les orifices ou les fentes d’aération ou d’évacuation de la
chaleur ne doivent pas être bouchés
• Utilisez toujours des gants de protection pour enfourner
ou sortir des plats du four.
• N’utilisez pas de solutions inflammables (alcool,
essence..) à proximité de l’appareil lorsqu’il est en
marche.
Economies et respect de l’environnement
• Pour faire des économies d’électricité, utilisez autant
que possible votre four pendant les heures creuses.
• Pour vos cuissons au GRIL, DOUBLE GRIL et
DOUBLE GRIL VENTILE nous vous conseillons de
garder la porte du four fermée: vous obtiendrez de
meilleurs résultats tout en faisant de sensibles
économies d’énergie (10% environ).
• Gardez toujours les joints propres et en bon état pour
qu’ils adhèrent bien à la porte et ne causent pas de
déperdition de chaleur.
9
Page 10

Nettoyage et entretien
FR
Mise hors tension
Avant toute opération de nettoyage ou d’entretien coupez l’alimentation
électrique de l’appareil.
! Ne nettoyez jamais l’appareil avec des nettoyeurs vapeur ou haute
pression.
Nettoyage du four
• Nettoyez l’extérieur émaillé ou inox et les joints en caoutchouc à l’aide
d’une éponge imbibée d’eau tiède additionnée de savon neutre. Si les
taches sont difficiles à enlever, utilisez des produits spéciaux. Il est
conseillé de rincer abondamment et d’essuyer après le nettoyage.
N’utilisez ni poudres abrasives ni produits corrosifs.
• Nettoyez l’enceinte après toute utilisation, quand le four est encore tiède.
Utilisez de l’eau chaude et du détergent, rincez et séchez avec un chiffon
doux. Evitez tout produit abrasif.
• Nettoyer la vitre de la porte avec des produits non abrasifs et des
éponges non grattantes, essuyer ensuite avec un chiffon doux. Ne pas
utiliser de matériaux abrasifs ou de racloirs métalliques aiguisés qui
risquent de rayer la surface et de briser le verre.
• Les accessoires peuvent être lavés comme de la vaisselle courante y
compris en lave-vaisselle.
• Pour éliminer la graisse et la saleté du tableau de bord, nettoyez-le avec
une éponge non abrasive ou avec un chiffon doux.
Contrôler les joints du four
Contrôlez périodiquement l’état du joint autour de la porte du four. S’il est
abîmé, adressez-vous au service après-vente le plus proche de votre
domicile. Mieux vaut ne pas utiliser le four tant qu’il n’est pas réparé.
Remplacement de l’ampoule d’éclairage
du four
1. Débranchez le four, enlevez le couvercle en
voir figure
verre du logement de la lampe (
2. Dévissez l’ampoule et remplacez-la par une autre
de même type : tension 230 V, puissance 25 W,
culot E 14.
3. Remontez le couvercle et rebranchez le four au
réseau électrique.
).
• Tout objet, matière plastique ou sucre ayant accidentellement
fondu sur la table de cuisson doit être aussitôt enlevé à l’aide du
grattoir tant que la surface est encore chaude.
• Une fois que la table est propre, vous pouvez appliquer un produit
d’entretien et de protection spécial : celui-ci forme un film invisible
qui protège la surface en cas de débordement accidentel.
Opérez de préférence quand l’appareil est tiède ou froid.
• Prenez soin de toujours bien rincer à l’eau claire et de sécher la table :
les résidus des produits pourraient en effet s’incruster lors d’une
prochaine cuisson.
Produits de nettoyage
spéciaux pour vitrocéramique
Raclette à lames et lames de
rechange
Stahl-Fix
SWISSCLEANER
WK TOP
Autres produits pour
vitrocéramique
Nettoyage de l’acier inox
Des taches peuvent se former sur l’acier inox si ce dernier reste trop
longtemps au contact d’une eau très calcaire ou de détergents agressifs
contenant du phosphore. Nous vous conseillons de rincer abondamment et de
bien essuyer.
Où les acheter
Bricolage et
quincaillerie
Articles ménagers
Bricolage
Quincaillerie
Supermarchés
Assistance
Indiquez-lui :
• le modèle de votre appareil (Mod.)
• son numéro de série (S/N)
Ces informations figurent sur la plaquette signalétique apposée sur
votre appareil et/ou sur son emballage.
Nettoyage du plan de cuissonNettoyage du plan de cuisson
Nettoyage du plan de cuisson
Nettoyage du plan de cuissonNettoyage du plan de cuisson
vitrocéramiquevitrocéramique
vitrocéramique
vitrocéramiquevitrocéramique
! N’utilisez jamais de détergents abrasifs ou corrosifs, tels que des bombes
aérosols pour grilloirs et fours, des détacheurs et dérouilleurs, des poudres à
récurer ou des éponges à surface abrasive : ils risquent de rayer
irrémédiablement la surface.
• Pour un entretien courant, passez une éponge humide sur la
surface de la table et séchez avec du papier essuie-tout.
• Si la table est sale, frottez avec un produit d’entretien adapté au
verre vitrocéramique, rincez et essuyez.
• Pour enlever les salissures en relief, utilisez un grattoir spécial (pas fourni
avec l’appareil). Intervenez dès que possible, n’attendez pas que
l’appareil ait refroidi afin d’éviter toute incrustation des salissures.
L’utilisation d’une éponge en fil d’acier inoxydable, spéciale verre
vitrocéramique, imprégnée d’eau savonneuse donne d’excellents
résultats.
10
Nettoyage automatique du four par catalyse*
Dans certains modèles de four, les parois verticales intérieures sont revêtues
d’un émail poreux dit émail catalytique. Il a pour propriété de détruire les corps
gras sous l’effet de la chaleur. Ceci est possible quand la température des
parois dépasse 170°C.
En fin de cuisson, s’il y a encore des traces de graisse sur les parois
catalytiques, continuez à faire fonctionner le four, à vide, porte fermée, en
amenant le bouton FOUR sur la position MAX, pendant un laps de temps
compris entre 60 et 90 minutes selon le degré de salissure. Vous pouvez
accélérer le dégraissage en nettoyant les projections alimentaires plus
importantes avec un peu d’eau chaude et une brosse souple.
! L’émail catalytique est résistant mais il faut éviter :
de gratter l’émail avec des objets tranchants (couteaux …)
et d’utiliser des détergents ou des produits de nettoyage abrasifs, les propriétés
autonettoyantes de l’émail risqueraient autrement d’être détruites
irrémédiablement.
N’existe que sur certains modèles
*
Page 11

Operating Instructions
COOKER AND OVEN
FR
Français, 1
K3C11/FR
KN3C11/FR
GB
English, 11
Contents
Installation, 12-13
Positioning and levelling
Electrical connections
Technical data
Description of the appliance, 14
Overall view
Control panel
Start-up and use, 15-17
Starting the oven
Cooking modes
Oven cooking advice table
Using the glass ceramic hob, 18
Switching the cooking zones on and off
Cooking zones
Precautions and tips, 19
General safety
Disposal
Respecting and conserving the environment
Care and maintenance, 20
Switching the appliance off
Cleaning the oven
Replacing the oven light bulb
Cleaning the glass ceramic hob
Assistance
Page 12

Installation
H05RR-F 3x4 CEI-UNEL 35363
H05VV-F 3x4 CEI-UNEL 35746
H05VV-F 4x4 CEI-UNEL 35746
H05VV-F 5x2.5 CEI-UNEL 35746
GB
! Before operating your new appliance please read
this instruction booklet carefully. It contains
important information concerning the safe installation
and operation of the appliance.
! Please keep these operating instructions for future
reference. Make sure that the instructions are kept
with the appliance if it is sold, given away or moved.
! The appliance must be installed by a qualified
professional according to the instructions provided.
! Any necessary adjustment or maintenance must be
performed after the appliance has been
disconnected from the electricity supply.
Positioning and levelling
! It is possible to install the appliance alongside
cupboards whose height does not exceed that of the
hob surface.
! Make sure that the wall in contact with the back of
the appliance is made from a non-flammable, heatresistant material (T 90°C).
To install the appliance correctly:
• Place it in the kitchen, the dining room or the bedsit (not in the bathroom).
• If the top of the hob is higher than the cupboards,
the appliance must be installed at least 200 mm
away from them.
• If the cooker is
HOOD
Min. mm.
600
mm.
420
Min.
420
Min. mm.
• Do not position blinds behind the cooker or less
than 200 mm away from its sides.
• Any hoods must be installed according to the
instructions listed in the relevant operating manual.
Levelling
installed underneath a wall
cabinet, there must be a
minimum distance of 420
mm between this cabinet
mm. with hood
and the top of the hob.
mm. without hood
650
700
This distance should be
min.
min.
increased to 700 mm if
the wall cabinets are
flammable (
see figure
If it is necessary to level the
appliance, screw the
adjustable feet* into the
places provided on each
corner of the base of the
cooker (
see figure
).
).
The legs* provided with the
appliance fit into the slots on
the underside of the base of
the cooker.
Electrical connections
Fitting the power supply cable
The cable should be suited to the type of electrical
connection used, according to the following
connection diagram:
H05RR-F 5x2.5 CEI-UNEL 35363
400 3N
400V 2N
H05RR-F 4x4 CEI-UNEL 35363
230V
1 2
R
12345
1
R
To install the power supply cable correctly:
1. Loosen the screw V
in the terminal board
and pull the cover to
open it (
V
2. Position the connection
3
2
1
support A (
according to the
connection diagram shown
above. The terminal board
is designed for singlephase 230 V connection:
B
N
A
terminals 1, 2 and 3 are
connected to each other;
jumper 4-5 is located in the
lower area of the terminal board.
3. Position wires N and
(
see figure
) and perform the connection by
66
according to the diagram
6
66
tightening the terminal board screws as much as
possible.
4. Position the remaining wires on terminals 1-2-3
and tighten the screws.
S
2
3
T
R
S
3
see figure
see figure
4
5
N
N
4
5
N
).
)
12
Page 13

5. Fix the power supply cable in place by fastening
the cable clamp screw.
6. Close the terminal board cover by tightening the
screws V.
Connecting the supply cable to the mains
Install a standardised plug corresponding to the
load indicated on the data plate located on the
appliance.
The appliance must be directly connected to the
mains using an omnipolar circuit-breaker with a
minimum contact opening of 3 mm installed between
the appliance and the mains. The circuit-breaker
must be suitable for the charge indicated and must
comply with current electrical regulations (the
earthing wire must not be interrupted by the circuitbreaker). The supply cable must be positioned so
that it does not come into contact with temperatures
higher than 50°C at any point.
Before connecting the appliance to the power
supply, make sure that:
• The appliance is earthed and the plug is compliant
with the law.
• The socket can withstand the maximum power of
the appliance, which is indicated by the data
plate.
• The voltage is in the range between the values
indicated on the data plate.
• The socket is compatible with the plug of the
appliance. If the socket is incompatible with the
plug, ask an authorised technician to replace it.
Do not use extension cords or multiple sockets.
TECHNICAL DATA
Oven dimensions
(HxWxD)
Volume
Useful
measurements
relating to the oven
compartment
Power supply
voltage and
frequency
Ceramic hob
Front Left
Back Left
Back Right
Front Right
Max. ceramic hob
consumption
ENERGY LABEL
34x38x44 cm
58 l
width 42 cm
depth 44 cm
height 18 cm
see data plate
1200 W
1700 W
1200 W
1700 W
5800W
Directive 2002/40/EC on the label of
electric ovens. Standard EN 50304
Energy consumption for Natural
convection – heating mode:
EC Directives: 06/95/EC dated 12/12/06
(Low Voltage) and subsequent
amendments –
04/108/EC dated 15/12/04
(Electromagnetic Compatibility) and
subsequent amendments –
93/68/EEC dated 22/07/93 and
subsequent amendments –
2002/96/EC.
1275/2008 Stand-by/ Off mode
Static;
GB
! Once the appliance has been installed, the power
supply cable and the electrical socket must be
easily accessible.
! The cable must not be bent or compressed.
! The cable must be checked regularly and replaced
by authorised technicians only.
! The manufacturer declines any liability should
these safety measures not be observed.
Only available in certain models.
*
13
Page 14

Description of the
appliance
GB
Overall view
Control panel
DRIPPING PAN
Adjustable foot
Control panel
Glass
ceramic hob
GRILL rack
GUIDE RAILS
for the sliding racks
position 5
position 4
position 3
position 2
position 1
Adjustable foot
THERMOSTAT
indicator light
TIMER
knob
THERMOSTAT
indicator light
THERMOSTAT
knob
PROGRAMMER
knob
THERMOSTAT
knob
ACTIVE HOTPLATE
indicator light
ACTIVE HOTPLATE
knobs
ACTIVE HOTPLATE
indicator light
14
TIMER
knob
PROGRAMMER
knob
ACTIVE HOTPLATE
knobs
Page 15

Start-up and use
! The first time you use your appliance, heat the
empty oven with its door closed at its maximum
temperature for at least half an hour. Ensure that the
room is well ventilated before switching the oven off
and opening the oven door. The appliance may emit
a slightly unpleasant odour caused by protective
substances used during the manufacturing process
burning away.
! Before operating the product, remove all plastic
film from the sides of the appliance.
Starting the oven
1. Select the desired cooking mode by turning the
SELECTOR knob.
2. Select the recommended temperature for the
cooking mode or the desired temperature by turning
the THERMOSTAT knob.
A list detailing cooking modes and suggested
cooking temperatures can be found in the relevant
table (
see Oven cooking advice table
).
GB
During cooking it is always possible to:
• Change the cooking mode by turning the
SELECTOR knob.
• Change the temperature by turning the
THERMOSTAT knob.
• Set the total cooking time and the cooking end
time (
see below
• Stop cooking by turning the SELECTOR knob to
the “0” position.
! Never put objects directly on the bottom of the
oven; this will avoid the enamel coating being
damaged. Only use position 1 in the oven when
cooking with the rotisserie spit.
! Always place cookware on the rack(s) provided.
THERMOSTAT indicator light
When this is illuminated, the oven is generating
heat. It switches off when the inside of the oven
reaches the selected temperature. At this point the
light illuminates and switches off alternately,
indicating that the thermostat is working and is
maintaining the temperature at a constant level.
).
Oven light
This is switched on by turning the SELECTOR knob
to any position other than “0”. It remains lit as long
as the oven is operating. By selecting
knob, the light is switched on without any of the
heating elements being activated.
, with the
88
8
88
15
Page 16

GB
Cooking modes
! A temperature value can be set for all cooking
modes between 50°C and MAX, except for the
GRILL programme, for which only the MAX power
level is recommended.
STATIC OVEN mode
Both the top and bottom heating elements will come
on. When using this traditional cooking mode, it is
best to use one cooking rack only. if more than one
rack is used, the heat will be distributed unevenly.
When utilizing the grill, place the rack at the lower
levels (see cooking table). To catch grease or fat and
prevent smoke, place a dripping-pan at the bottom
rack level.
Timer*
To activate the Timer proceed as follows:
1. Turn the TIMER knob in a clockwise direction 4
for almost one complete revolution to set the buzzer.
2. Turn the TIMER knob in an anticlockwise direction
5 to set the desired length of time.
OVEN BOVEN B
OVEN B
OVEN BOVEN B
The lower heating element is activated. This position
is recommended for perfecting the cooking of
dishes (in baking trays) which are already cooked on
the surface but require further cooking in the centre,
or for desserts with a covering of fruit or jam, which
only require moderate colouring on the surface. It
should be noted that this function does not allow the
maximum temperature to be reached inside the oven
(250°C) and it is therefore not recommended that
foods are cooked using only this setting, unless you
are baking cakes (which should be baked at a
temperature of 180°C or lower).
OVEN TOPOVEN TOP
OVEN TOP mode
OVEN TOPOVEN TOP
Temperature: between
The oven light turns on and so does the infra-red ray
grill, and the motor starts turning the spit. The rather
high and direct temperature of the grill permits
browning the outside of meats immediately thus
keeping in the juices and assuring tenderness.
GRILLGRILL
GRILL mode
GRILLGRILL
Temperature: between
The oven light turns on and so does the double
heating element of the grill and the motor starts
turning the spit. This grill is larger than the average
and has a completely new design: cooking
performance is increased 50%. The double grill
makes sure that even the corners are touched by
heat.
! !
! When using the grill, keep the oven door closed to
! !
obtain the best results and
10%).
OTTOMOTTOM
OTTOM mode
OTTOMOTTOM
5050
50°C and
5050
5050
50°C and
5050
MaxMax
Max
MaxMax
MaxMax
Max
MaxMax
save energy save energy
save energy (about
save energy save energy
Practical cooking advice
! In the GRILL cooking mode, place the dripping pan
in position 1 to collect cooking residues (fat and/or
grease).
GRILL
• Insert the rack in position 3 or 4. Place the food in
the centre of the rack.
• We recommend that the power level is set to
maximum. The top heating element is regulated
by a thermostat and may not always operate
constantly.
PIZZA
• Use a light aluminium pizza pan. Place it on the
rack provided.
For a crispy crust, do not use the dripping pan as
it prevents the crust from forming by extending
the total cooking time.
• If the pizza has a lot of toppings, we recommend
adding the mozzarella cheese on top of the pizza
halfway through the cooking process.
16
Only available in certain models.
*
Page 17

Rotisserie
To operate the
rotisserie (
proceed as follows:
1. Place the dripping
pan in position 1.
2. Place the rotisserie
support in position 4
and insert the spit in
the hole provided on
the back panel of the
oven.
3. Activate the rotisserie by selecting
SELECTOR knob.
Oven cooking advice table
see diagram
with the
Lower compartment*
GB
There is a compartment
)
underneath the oven
that may be used to
store oven accessories
or deep dishes. To open
the door pull it
downwards (
figure
).
see
! Do not place flammable materials in the lower oven
compartment.
! The internal surfaces of the compartment (where
present) may become hot.
Selector knob
setting
1 Convection
2 Pastry Mode
3 Top Oven
4 Grill
NB: cooking times are approximate and may vary according to personal taste. When cooking using the grill, the
dripping pan must always be placed on the 1st oven rack from the bottom.
Food to be cooked Weight
(in kg)
Duck
Roast veal or beef
Pork roast
Biscuits (short pastry)
Tar ts
Lasagne
Lamb
Mackerel
Plum-cake
Cream puffs
Sponge-cake
Savoury pies
Raised Cakes
Tar ts
Fruit cakes
Brioches
Browning food to
perfect cooking
Soles and cuttlefish
Squid and prawn
kebabs
Cod filet
Grilled vegetables
Veal steak
Cutlets
Hamburgers
Mackerels
Toasted sandwiches
With rotisserie (where
present)
Veal on the spit
Chicken on the spit
Lamb on the spit
1
1
1
1
1
1
1
1
0.3
0.5
1.5
0,5
1
1
0,5
- 3/4 15 220 -
1
1
1
1
1
1
1
1
n.° 4
1.0
1.5
1.0
Cooking rack
position from
bottom
3
3
3
3
3
3
2
2
2
3
3
3
3
3
3
3
4
4
4
3/4
4
4
4
4
4
-
-
-
Preheating time
(minutes)
15
15
15
15
15
10
10
10
10
10
10
15
15
15
15
15
5
5
5
5
5
5
5
5
5
5
5
5
Thermostat
knob
setting
200
200
200
180
180
190
180
180
170
180
170
200
160
180
180
160
Max
Max
Max
Max
Max
Max
Max
Max
Max
Max
Max
Max
Cooking
time
(minutes)
65-75
70-75
70-80
15-20
30-35
35-40
50-60
30-35
40-50
30-35
20-25
30-35
30-40
35-40
50-60
25-30
8-10
10-15
15-20
15-20
7-10
15-20
80-90
70-80
70-80
6-8
10
2-3
* Only available in certain models.
17
Page 18

Using the glass ceramic hob
GB
! The glue applied on the gaskets leaves traces of
grease on the glass. Before using the appliance, we
recommend you remove these with a special nonabrasive cleaning product. During the first few hours
of use there may be a smell of rubber which will
disappear very quickly.
Switching the cooking zones on and off
To switch on a cooking zone, turn the corresponding
knob in a clockwise direction.
To switch it off again, turn the knob in an
anticlockwise direction until it is in the “0” position.
If the ELECTRIC HOTPLATE ON indicator light is lit,
this shows that at least one hotplate on the hob is
switched on.
Cooking zones
The hob is equipped with electric radiant heating
elements. When they are in use the following items
on the hob become red.
A. The cooking zone.
A
A
B
been switched off but is still hot.
Cooking zones with radiant heating elements
They have similar properties to gas burners: they are
easy to control and reach set temperatures quickly,
allowing you to actually see the power they are
providing.
Turn the corresponding knob in a clockwise
direction, to a position between 1 and 6.
B. The residual heat indicator
A
light: this indicates that the
temperature of the
A
corresponding cooking zone
is greater than 60°C, even
when the heating element has
Setting Normal or Fast Plate
0 Off
1 Cooking vegetables, fish
Cooking potatoes (using steam) soups,
2
chickpeas, beans.
Continuing the cooking of large quantities
3
of food, minestrone
4 For roasting (average)
5 For roasting (above average)
For browning and reaching a boil in a
6
short time.
Practical advice on using the hob
• Use pans with a thick, flat base to ensure that
they adhere perfectly to the cooking zone.
• Always use pans with a diameter that is large
enough to cover the hotplate fully, in order to use
all the heat produced.
• Always make sure that the base of the pan is
completely clean and dry: this ensures that the
pans adhere perfectly to the cooking zones and
that both the pans and the hob last for a longer
period of time.
• Avoid using the same cookware that is used on
gas burners: the heat concentration on gas
burners may have warped the base of the pan,
causing it not to adhere to the surface correctly.
• Never leave a cooking zone switched on without a
pan on top of it, as doing so may cause the zone
to become damaged.
18
Page 19

Precautions and tips
! This appliance has been designed and
manufactured in compliance with international safety
standards.
The following warnings are provided for safety
reasons and must be read carefully.
General safety
• The glass ceramic hob is resistant to temperature
fluctuations and shocks. It is, however, wise to
remember that blades or cooking utensils may
ruin the surface of the hob. If this happens,
remove the plug of the cooker from the electricity
socket and contact an authorised Technical
Assistance Centre in order to request original
spare parts. Failure to comply with the above may
compromise the safety of the appliance.
• If the surface of the hob is cracked, switch off the
appliance to prevent electric shocks from
occurring.
• The appliance was designed for domestic use
inside the home and is not intended for
commercial or industrial use.
• The appliance must not be installed outdoors, even
in covered areas. It is extremely dangerous to
leave the appliance exposed to rain and storms.
• Do not touch the appliance with bare feet or with
wet or damp hands and feet.
• The appliance must be used by adults only for
the preparation of food, in accordance with the
instructions outlined in this booklet. Any other
use of the appliance (e.g. for heating the room)
constitutes improper use and is dangerous.
The manufacturer may not be held liable for
any damage resulting from improper, incorrect
and unreasonable use of the appliance.
• The instruction booklet accompanies a class 1
(insulated) or class 2 - subclass 1 (recessed
between 2 cupboards) appliance.
• When the appliance is in use, the heating
elements and some parts of the oven door
become extremely hot. Make sure you don't
touch them and keep children well away.
• Make sure that the power supply cables of other
electrical appliances do not come into contact
with the hot parts of the oven.
• The openings used for the ventilation and
dispersion of heat must never be covered.
• Always use oven gloves when placing cookware
in the oven or when removing it.
• Do not use flammable liquids (alcohol, petrol,
etc...) near the appliance while it is in use.
• Do not place flammable material in the lower
storage compartment or in the oven itself. If the
appliance is switched on accidentally, it could
catch fire.
• Always make sure the knobs are in the
• position
when the appliance is not in use.
• When unplugging the appliance, always pull the
plug from the mains socket; do not pull on the
cable.
• Never perform any cleaning or maintenance work
without having disconnected the appliance from
the electricity mains.
• If the appliance breaks down, under no
circumstances should you attempt to repair the
appliance yourself. Repairs carried out by
inexperienced persons may cause injury or further
malfunctioning of the appliance. Contact
Assistance.
• Do not rest heavy objects on the open oven door.
Disposal
• When disposing of packaging material: observe
local legislation so that the packaging may be
reused.
• The European Directive 2002/96/EC relating to
Waste Electrical and Electronic Equipment
(WEEE) states that household appliances should
not be disposed of using the normal solid urban
waste cycle. Exhausted appliances should be
collected separately in order to optimise the cost
of re-using and recycling the materials inside the
machine, while preventing potential damage to
the atmosphere and to public health. The
crossed-out dustbin is marked on all products to
remind the owner of their obligations regarding
separated waste collection.
Exhausted appliances may be collected by the
public waste collection service, taken to suitable
collection areas in the area or, if permitted by
current national legislation, they may be returned
to the dealers as part of an exchange deal for a
new equivalent product.
All major manufacturers of household appliances
participate in the creation and organisation of
systems for the collection and disposal of old and
disused appliances.
Respecting and conserving the
environment
• You can help to reduce the peak load of the
electricity supply network companies by using the
oven in the hours between late afternoon and the
early hours of the morning.
• Always keep the oven door closed when using the
GRILL, DOUBLE GRILL and FAN-ASSISTED
DOUBLE GRILL modes: This will achieve better
results while saving energy (approximately 10%).
• Check the door seals regularly and wipe them
clean to ensure they are free of debris so that
they adhere properly to the door, thus avoiding
heat dispersion.
GB
19
Page 20

Care and maintenance
XEROX FABRIANO
05/2011 - 195047220.03
GB
Switching the appliance off
Disconnect your appliance from the electricity supply before carrying out any
work on it.
! Never use steam cleaners or pressure cleaners on the appliance.
Cleaning the oven
• The stainless steel or enamel-coated external parts and the rubber seals
may be cleaned using a sponge that has been soaked in lukewarm water
and neutral soap. Use specialised products for the removal of stubborn
stains. After cleaning, rinse and dry thoroughly. Do not use abrasive
powders or corrosive substances.
• The inside of the oven should ideally be cleaned after each use, while it is
still lukewarm. Use hot water and detergent, then rinse well and dry with a
soft cloth. Do not use abrasive products.
Clean the glass part of the oven door using a sponge and a non-abrasive
•
cleaning product, then dry thoroughly with a soft cloth. Do not use rough
abrasive material or sharp metal scrapers as these could scratch the
surface and cause the glass to crack.
• The accessories can be washed like everyday crockery, and are even
dishwasher safe.
• Dirt and grease should be removed from the control panel using a nonabrasive sponge or a soft cloth.
Inspecting the oven seals
Check the door seals around the oven regularly. If the seals are damaged,
please contact your nearest After-sales Service Centre. We recommend that
the oven is not used until the seals have been replaced.
Replacing the oven light bulb
1. After disconnecting the oven from the electricity
mains, remove the glass lid covering the lamp socket
(
see figure
).
2. Remove the light bulb and replace it with a
similar one: voltage 230 V, wattage 25 W, cap E
14.
3. Replace the lid and reconnect the oven to the
electricity supply.
Cleaning the glass ceramic hobCleaning the glass ceramic hob
Cleaning the glass ceramic hob
Cleaning the glass ceramic hobCleaning the glass ceramic hob
! Do not use abrasive or corrosive detergents (for example, products in spray
cans for cleaning barbecues and ovens), stain removers, anti-rust products,
powder detergents or sponges with abrasive surfaces: these may scratch the
surface beyond repair.
• It is usually sufficient simply to wash the hob using a damp sponge and
dry it with absorbent kitchen roll.
• If the hob is particularly dirty, rub it with a special glass ceramic cleaning
product, then rinse well and dry thoroughly.
• To remove more stubborn dirt, use a suitable scraper (this is not supplied
with the appliance). Remove spills as soon as possible, without waiting for
the appliance to cool, to avoid residues forming crusty deposits. You can
obtain excellent results by using a rustproof steel wire sponge specifically designed for glass ceramic surfaces - soaked in soapy water.
• If plastic or sugary substances have accidentally been melted on the hob,
remove them immediately with the scraper, while the surface is still hot.
• Once it is clean, the hob may be treated with a special protective
maintenance product: the invisible film left by this product protects the
surface from drips during cooking. This maintenance should be carried out
while the appliance is warm (not hot) or cold.
• Always remember to rinse the appliance well with clean water and dry it
thoroughly: residues can become encrusted during subsequent cooking
processes.
Glass ceramic hob cleaners Available from
Window scraper Razor blade
scrapers
Replacement blades DIY Stores,
COLLO luneta
HOB BRITE
Hob Clean
SWISSCLEANER
DIY Stores
supermarkets,
chemists
Boots, Co-op stores,
department stores, Regional
Electricity Company shops,
supermarkets
Cleaning stainless steel
Stainless steel can be marked by hard water that has been left on the surface
for a long time, or by aggressive detergents that contain phosphorus. We
recommend that the steel surfaces are rinsed well then dried thoroughly.
Assistance
Please have the following information handy:
• The appliance model (Mod.).
• The serial number (S/N).
This information can be found on the data plate located on the
appliance and/or on the packaging.
Catalitic Cleaning*
In some models, the most exposed internal vertical sides of the oven
are coated with porous enamel, which is called catalytic enamel.
When heated, this enamel destroys fat particles given off by the food.
This "oxidation" of the fat particles occurs when the temperature of
the sides exceeds 170°C. The porous quality of the catalytic enamel
increases the surface area where the exchange vital to the oxidation
of the fats takes place.
If there is still grime on the catalytic surfaces after the cooking
programme has ended, leave the empty oven on with the door shut,
turning the temperature adjustment knob to its maximum setting.
Leave the oven like this for a period of time between 60 and 90
minutes, according to how much dirt was left inside. The cleaning
process for more stubborn food residues may be quickened by using
hot water and a soft brush.
20
* Only available in certain models.
 Loading...