

Page 1

Instructions for use
WASHING MACHINE
GB
English,1
IWME 147
Contents
Installation, 2-3-4-5-6-7
Unpacking and levelling
Electric and water connections
The first wash cycle
Technical details
Instructions for the fitter
Washing machine description, 8-9
Control panel
Leds
Starting and Programmes, 10
Briefly: how to start a programme
Programme table
Personalisations, 11
Setting the temperature
Setting the spin speed
Functions
Detergents and laundry, 12
Detergent dispenser
Bleach cycle
Preparing your laundry
Special items
GB
Precautions and advice, 13
General safety
Disposal
Saving energy and respecting the environment
Care and maintenance, 14
Cutting off the water or electricity supply
Cleaning your appliance
Cleaning the detergent dispenser
Caring for your appliance door and drum
Cleaning the pump
Checking the water inlet hose
Troubleshooting, 15-16
Assistance, 17-18
1
Page 2
Installation
GB
! Keep this instruction manual in a safe place for future
reference. Should the appliance be sold, transferred or
moved, make sure the instruction manual accompanies
the washing machine to inform the new owner as to its
operation and features.
! Read these instructions carefully: they contain vital infor-
mation on installation, use and safety.
Unpacking and levelling
Unpacking
1. Unpack the washing machine.
2. Check whether the washing machine has been damaged during transport. If this is the case, do not install it
and contact your retailer.
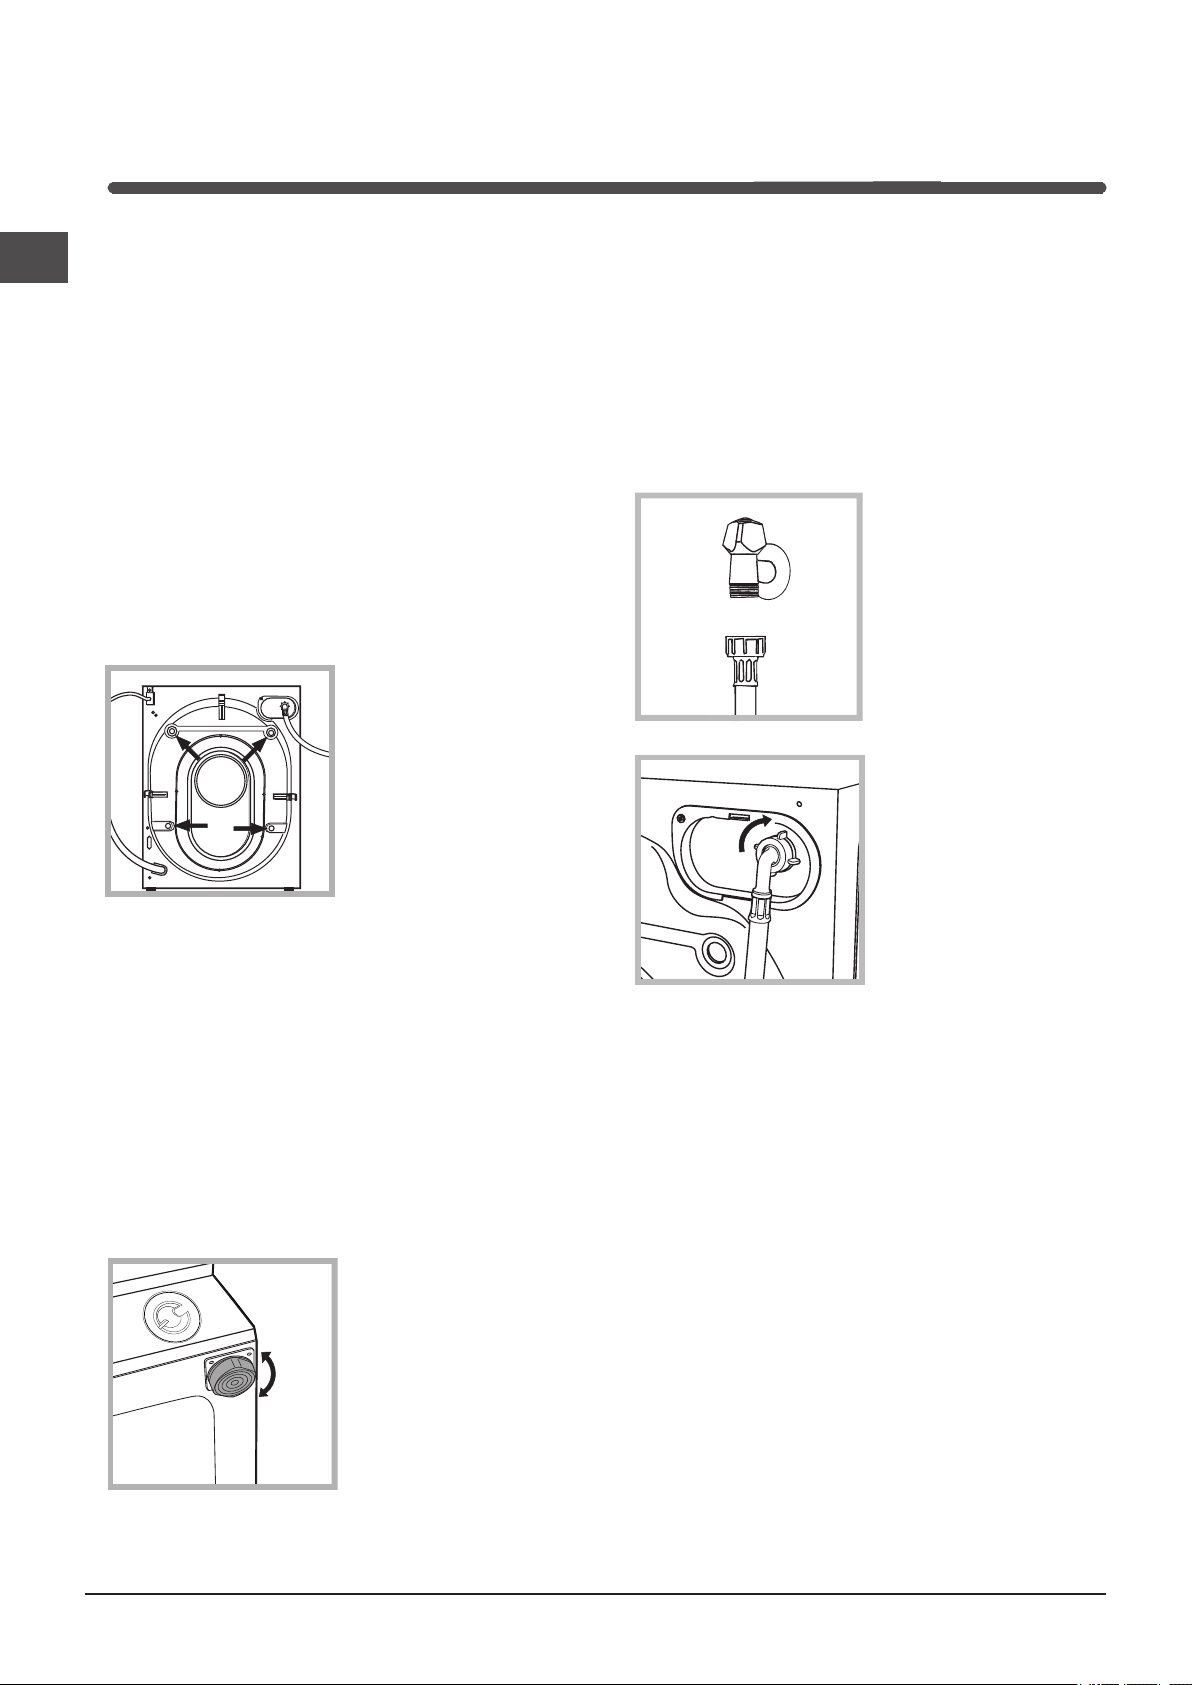
3. Remove the 4 protective
screws and the rubber bush
with the respective spacer,
situated on the rear of the
appliance (see also the
installation leaflet).
NB:The plastic spacers
may fall down inside the
machine once the bolt has
been removed, and will not
interfere with the operation
of the machine.
4. Seal the gaps using the plastic plugs provided.
5. Keep all the parts: you will need them again if the washing machine needs to be moved to another location.
! Packaging materials are not children’s toys.
Levelling
Your machine may make a considerable amount of noise if the
two front feet have not been adjusted correctly.
1. Install the washing machine on a flat sturdy floor,
without resting it up against walls, furniture cabinets or
other.
2. If the floor is not perfectly level, compensate
for any unevenness by
tightening or loosening
the adjustable front feet
(see figure); the angle
of inclination, measured
according to the worktop,
must not exceed 2°.
Levelling your appliance correctly will provide it with stability and avoid any vibrations, noise and shifting during
operation. If it is placed on a fitted or loose carpet, adjust
the feet in such a way as to allow enough room for ventilation beneath the washing machine.
Electric and water connections
Connecting the water inlet hose
1. Connect the supply
pipe by screwing it to a
cold water tap using a ¾
gas threaded connection
(see figure).
Before performing the
connection, allow the
water to run freely until it is
perfectly clear.
2. Connect the other end of
the water inlet hose to the
washing machine,
screwing it onto the appliance’s cold water inlet,
situated on the top righthand side on the rear of the
appliance (see figure).
3. Make sure there are no kinks or bends in the hose.
! The water pressure at the tap must be within the values
indicated in the Technical details table
(on the page 5).
! If the water inlet hose is not long enough, contact a
specialist store or an authorised serviceman.
! Ensure that the supply taps are allowing water throu-
gh. Old taps may seize in the closed position and thus
prevent water reaching the machine.
2
Page 3
Connecting the drain hose
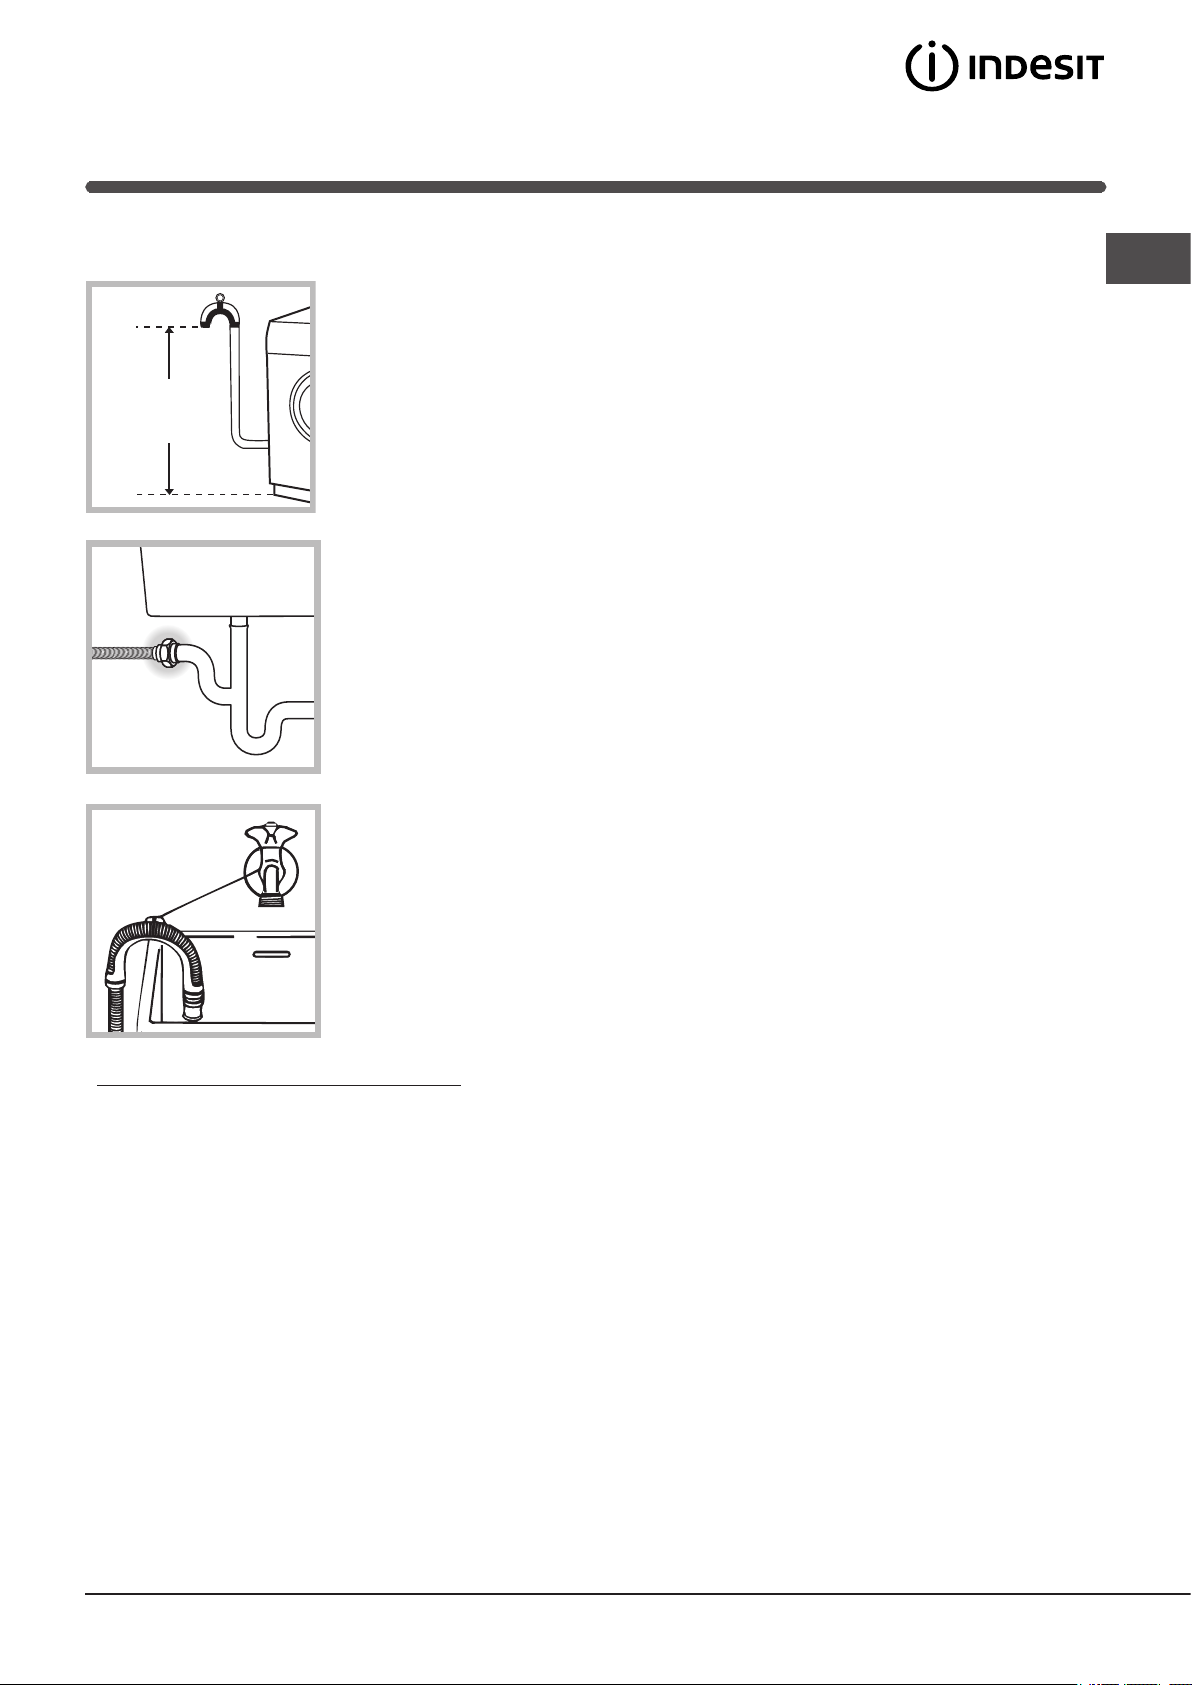
65 - 100 cm
Where it connects to
the waste water pipe
cut end off spigot or
remove the blanking cap
Connect the drain hose,
without bending it, to a
draining duct or a wall drain
situated between 65 and
100 cm from the floor;
The drain hose may be
connected to an under-sink
trap. Before connecting the
drain hose from the machine
ensure that any blanks or
removable ends have been
taken off the spigot.
If it is placed over the edge
of a basin or sink be sure
the free end of the hose
should not be underwater.
! We advise against the use of hose extensions; in case of
absolute need, the extension must have the same diameter
as the original hose and must not exceed 150 cm in length.
Ensure that if the drain hose is pushed into a standpipe, that
the end does not go down more than 15cms (6 inches). If
the hose is pushed down too far, this may cause the machine to self -syphon ie. continuously empty as it is filling.
Electric connection
Before plugging the appliance into the mains socket, make
sure that:
• the socket is earthed and in compliance with the applicable law;
• the supply voltage is included within the values indica ted on the Technical Data Plate fixed on the machine.
• the socket is compatible with the washing machine’s
plug. If this is not the case, replace the socket or the
plug.
Your appliance is now supplied with a 13 amp fused plug
it can be plugged into a 13 amp socket for immediate use.
Before using the appliance please read the instructions below.
WARNING - THIS APPLIANCE MUST BE EARTHED.
THE FOLLOWING OPERATIONS SHOULD BE CARRIED
OUT BY A QUALIFIED ELECTRICIAN.
Replacing the fuse:
When replacing a faulty fuse, a 13 amp ASTA approved
fuse to BS 1362 should always be used, and the fuse
cover re-fitted. If the fuse cover is lost, the plug must not
be used until a replacement is obtained.
Replacement fuse covers:
If a replacement fuse cover is fitted, it must be of the
correct colour as indicated by the coloured marking or the
colour that is embossed in words on the base of the plug.
Replacements can be obtained directly from your nearest
Service Depot.
Removing the plug:
If your appliance has a non-rewireable moulded plug and
you should wish to re-route the mains cable through partitions, units etc., please ensure that either:
the plug is replaced by a fused 13 ampere rewireable plug
bearing the BSI mark of approval.
or:
the mains cable is wired directly into a 13 amp cable outlet, controlled by a switch, (in compliance with BS 5733)
which is accessible without moving the appliance.
Disposing of the plug:
Ensure that before disposing of the plug itself, you make
the pins unusable so that it cannot be accidentally inserted
into a socket.
Instructions for connecting cable to an alternative plug:
Important: the wires in the mains lead are coloured in
accordance with the following code:
Green & Yellow Earth
Blue Neutral
Brown Live
GB
• the socket is able to sustain the appliance’s maximum
power load indicated in the Technical details table (see
page 5);
3
Page 4
GB
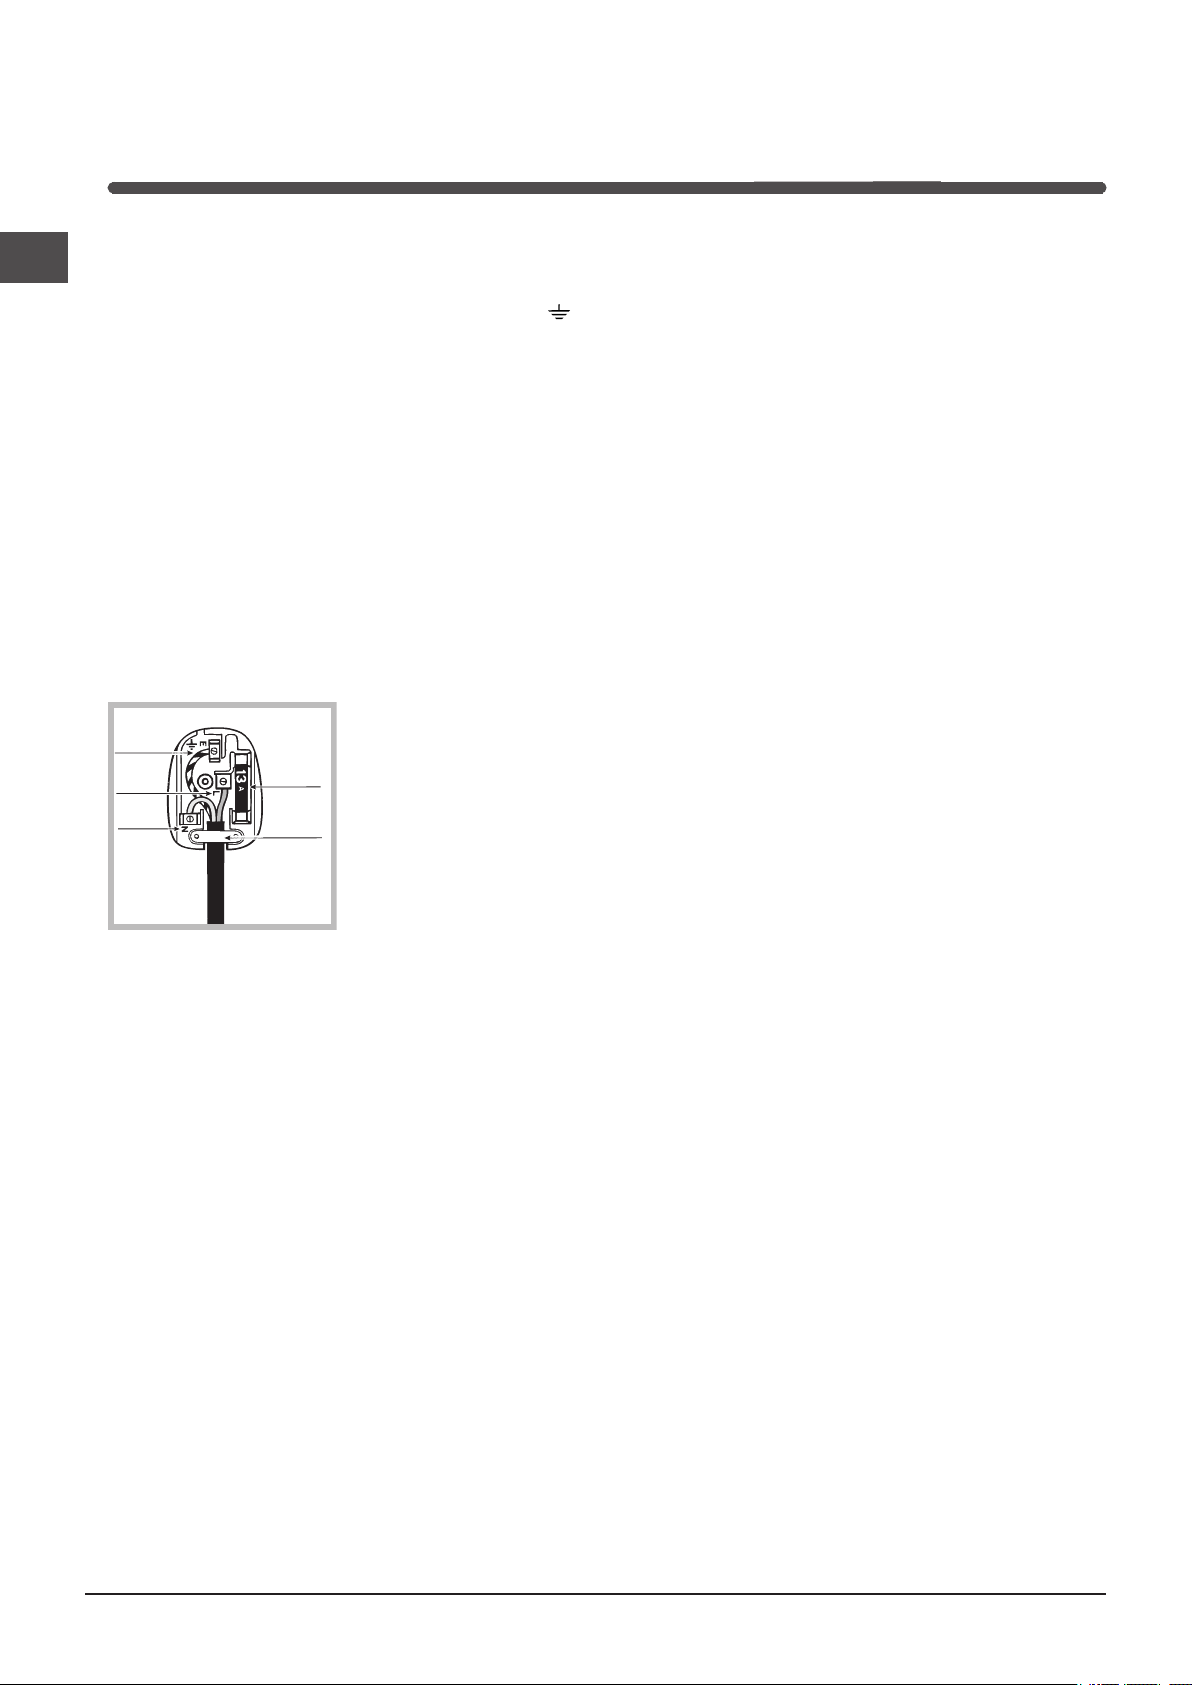
GREEN &
YELLOW
BROWN
BLUE
13 ampere fuse
CROSS-BAR
CORD GRIP
As the colours of the wires in the lead may not correspond
with the coloured markings identifying the terminals in your
plug, proceed as follows:
Connect Green & Yellow wire to terminal marked E or
or coloured Green or Green & Yellow.
Connect Brown wire to terminal marked L or coloured
Red.
Connect Blue wire to terminal marked N or coloured Black.
If a 13 amp plug (BS 1363) is used it must be fitted with a
13 amp fuse, either in the plug or adaptor or at the distribution board.
If you are in any doubt regarding the electrical supply to
your machine, consult a qualified electrician before use.
How to connect an alternative plug:
The wires in this mains lead are coloured in accordance
with the following code:
BLUE NEUTRAL (N)
BROWN LIVE (L)
GREEN & YELLOW EARTH (E)
The first wash cycle
Once the appliance has been installed, and before you
use it for the first time, run a wash cycle with detergent
and no laundry, setting the 90°C programme without a
pre-wash cycle.
Disposing of the appliance:
When disposing of the appliance please remove the plug by
cutting the mains cable as close as possible to the plug body
and dispose of it as described above.
! The washing machine should not be installed in an ou-
tdoor environment, not even where the area is sheltered,
because it may be very dangerous to leave it exposed to
damp, rain and thunderstorms.
! When the washing machine is installed, the mains socket
must be within easy reach.
! Do not use extensions or multiple sockets.
! The power supply cable must never be bent or dange-
rously compressed.
! The power supply cable must only be replaced by an
authorised serviceman.
Warning! The company denies all liability if and when these
norms are not respected.
4
Page 5
Technical data
GB
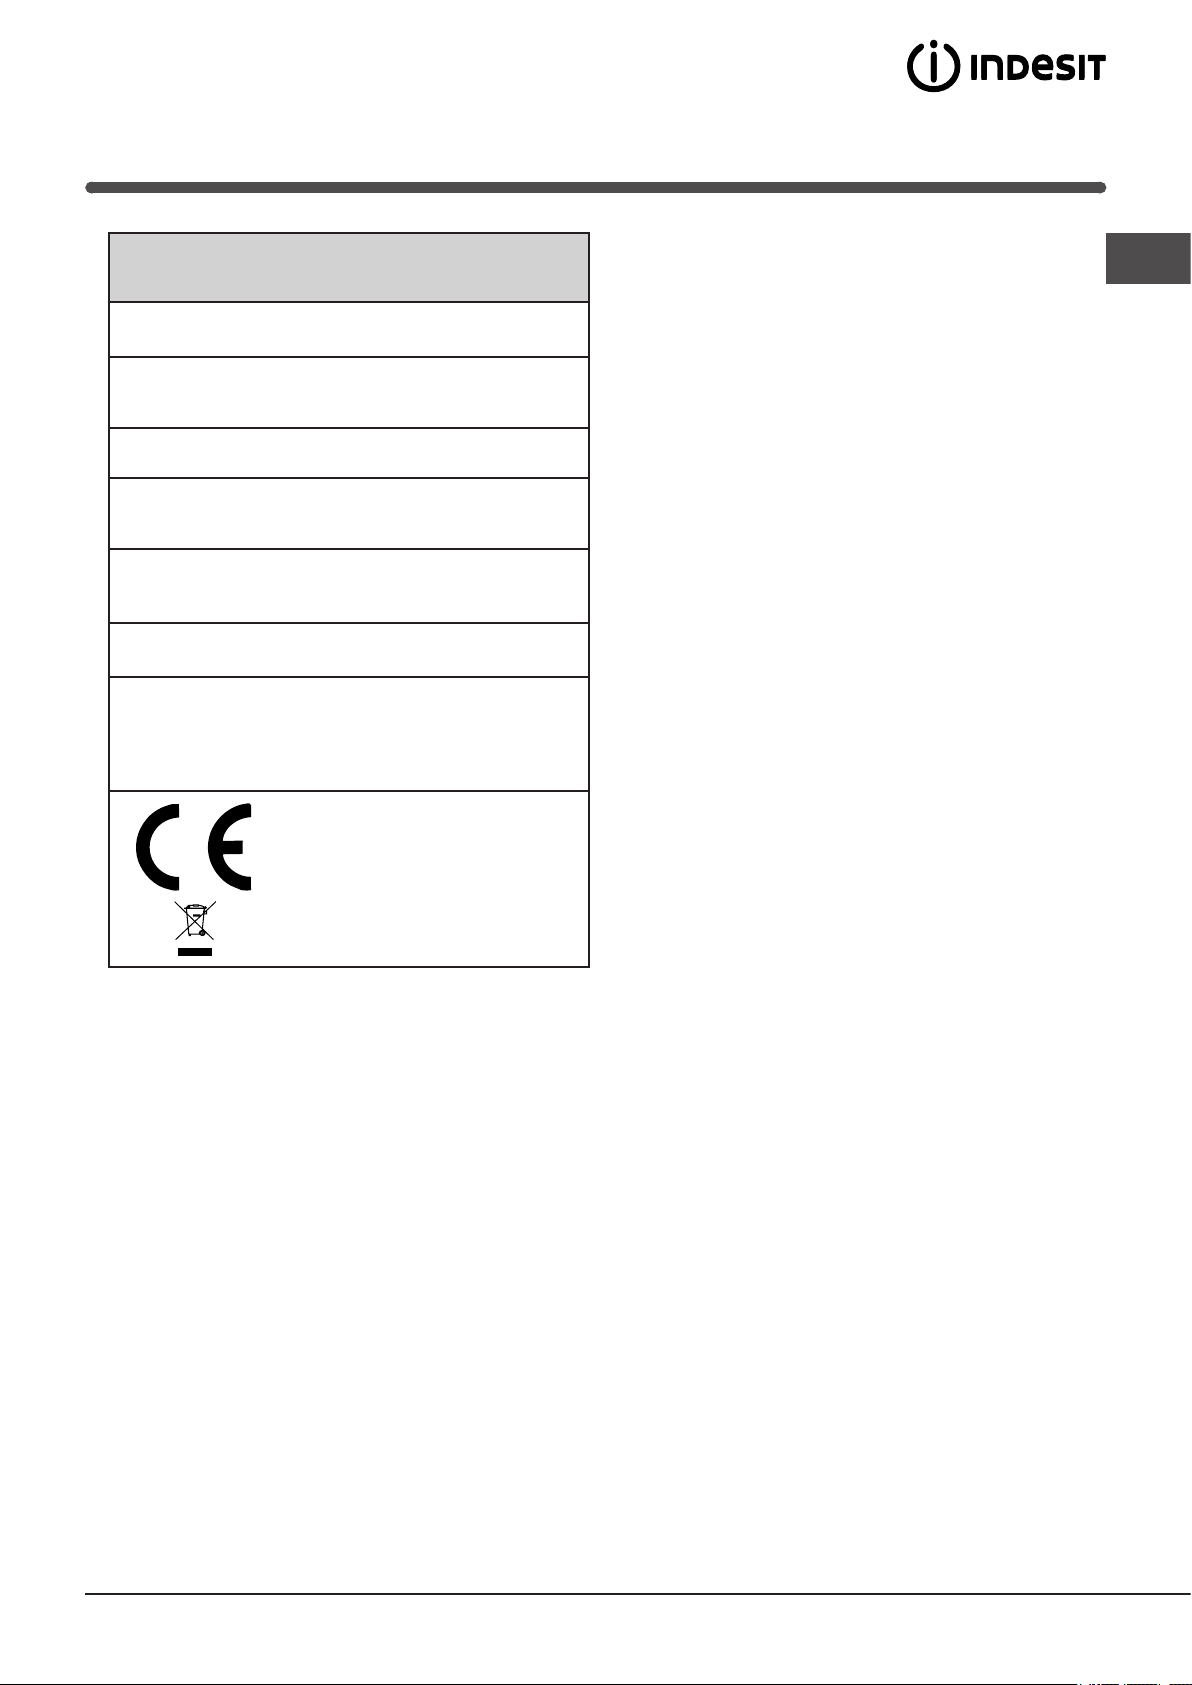
Model
Dimensions
Capacity
Electrical
connections
Water connections
Spin speed
Test wash cycles
in accordance
with directive
1061/2010
IWME 147
width 59.5 cm
height 81.5 cm
depth 54.5 cm
from 1 to 7 kg
please refer to the technical data plate
fixed to the machine
maximum pressure 1 MPa (10 bar)
minimum pressure 0.05 MPa (0.5 bar)
drum capacity 52 litres
up to 1400 rotations per minute
programme 2; temperature 60°C and 40°C.
This appliance conforms to the following
EC Directives:
- 2004/108/EC (Electromagnetic Compatibility)
- 2006/95/EC (Low Voltage)
- 2002/96/EC
5
Page 6
GB
Tur seite
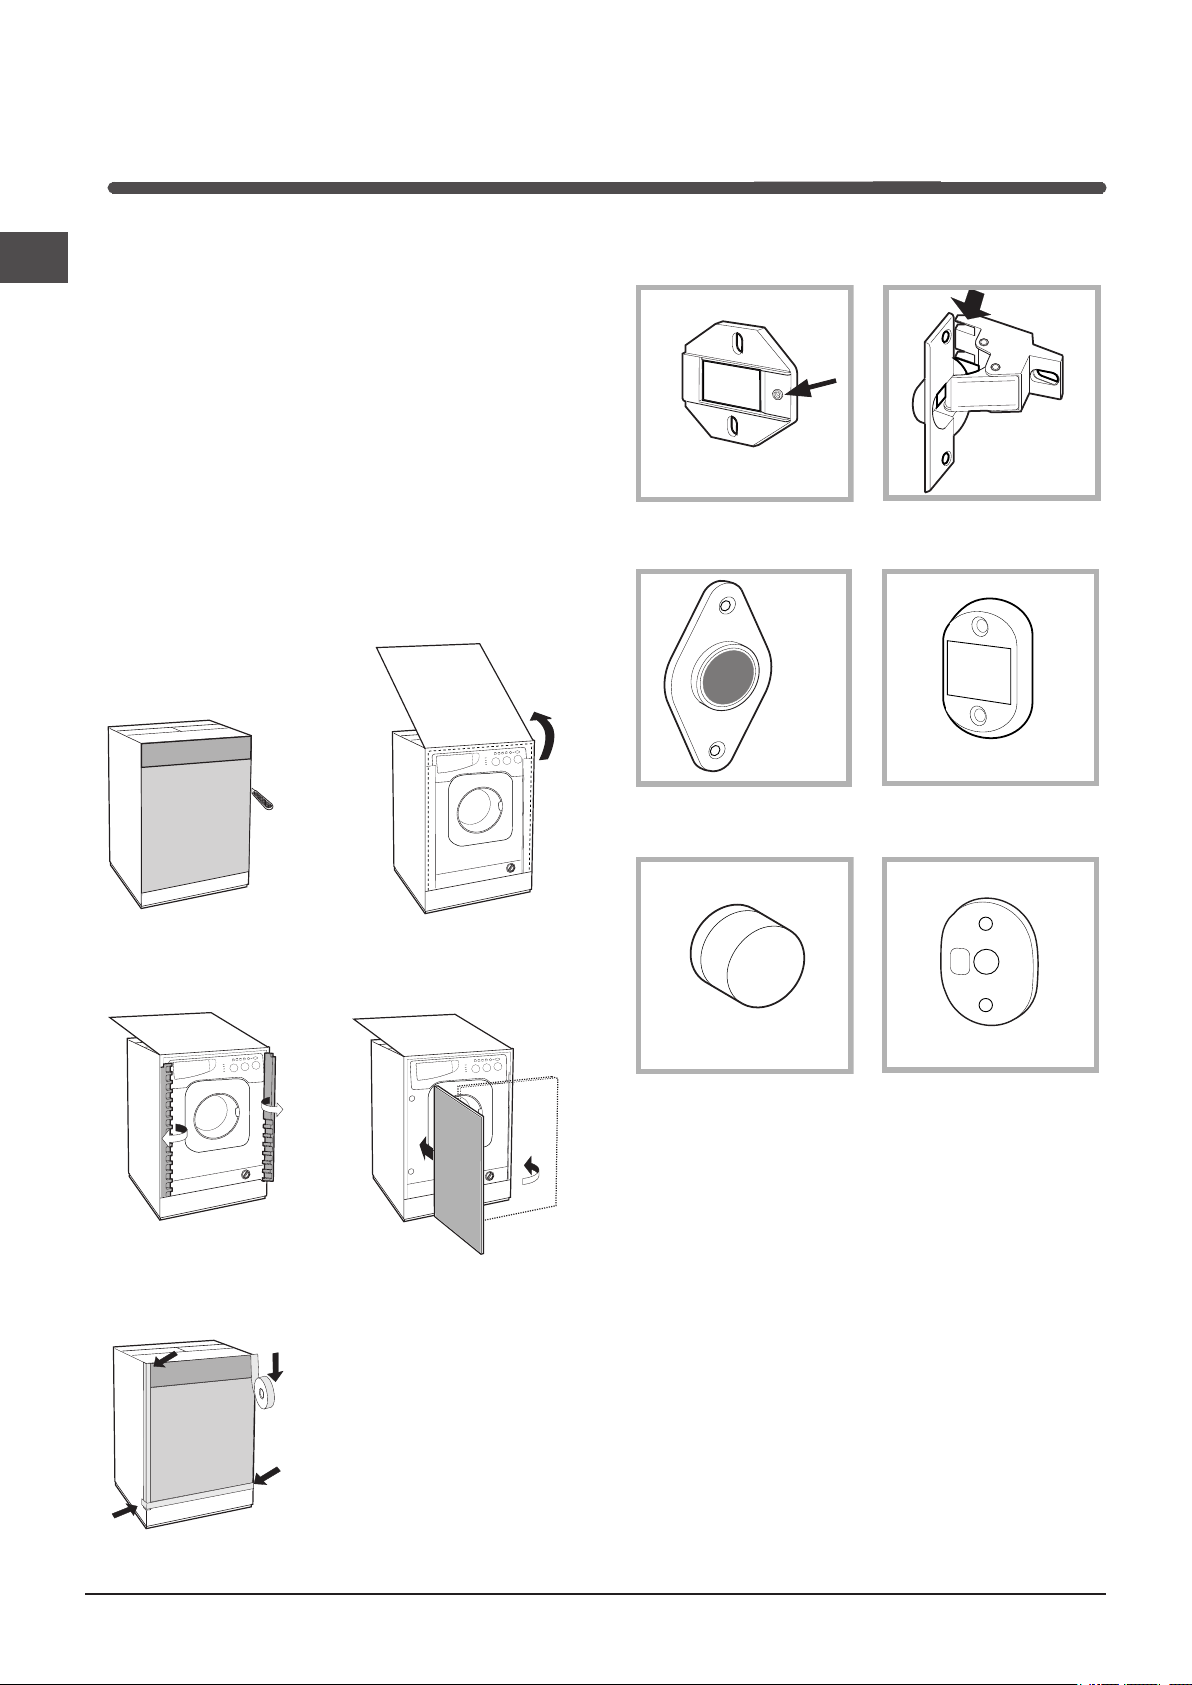
Instructions for the fitter
Mounting the wooden panel onto the door and inserting the machine into cabinets:
In the case where the machine must be shipped for final
installation after the wooden panel has been mounted, we
suggest leaving it in its original packaging. The packaging
was designed to make it possible to mount the wooden
panel onto the machine without removing it completely (see
figures below).
The wooden panel that covers the face of the machine must
not be less than 18 mm in thickness and can be hinged on
either the right or left. For the sake of practicality when using
the machine, we recommend that the panel be hinged on
the same side as the door for the machine itself - the left.
Door Mounting Accessories (Fig. 1-2-3-4-5).
N° 2 Hinge Supports
Fig. 1
N° 1 Magnet N° 1 Magnet plate
Fig. 3 Fig. 4
Fig. 2
N° 2 Hinges
A
C
E
B
D
N° 1 Rubber plug
Fig. 5
- No. 6 type A self-threading screws, l =13 mm.
- No. 2 type B metric, countersunk screws, l =25; for fastening the magnet plate to the cabinet.
- No. 4 type C metric screws, l =15 mm; for mounting the
hinge supports to the cabinet.
- No. 4 type D metric screws, l =7 mm; for mounting the
hinges on the supports.
Mounting the Parts onto the Face of the Machine.
- Fit the hinge supports to the appliance front panel, positioning the hole marked with an arrow in fig. 1 so that it is on the
inner side of the front panel. Fit a spacer (fig. 4/B) between
the surfaces using type C screws.
- Fit the magnet plate at the top of the opposite side, using
type B screws to fix two spacers (fig. 4/B) between the plate
and the surface.
Fig. 4/B
N° 4 Spacers
6
Page 7
Using the Drilling Template.
L
I
H
G
570
min
815
540
595
820 ÷ 900
600 min
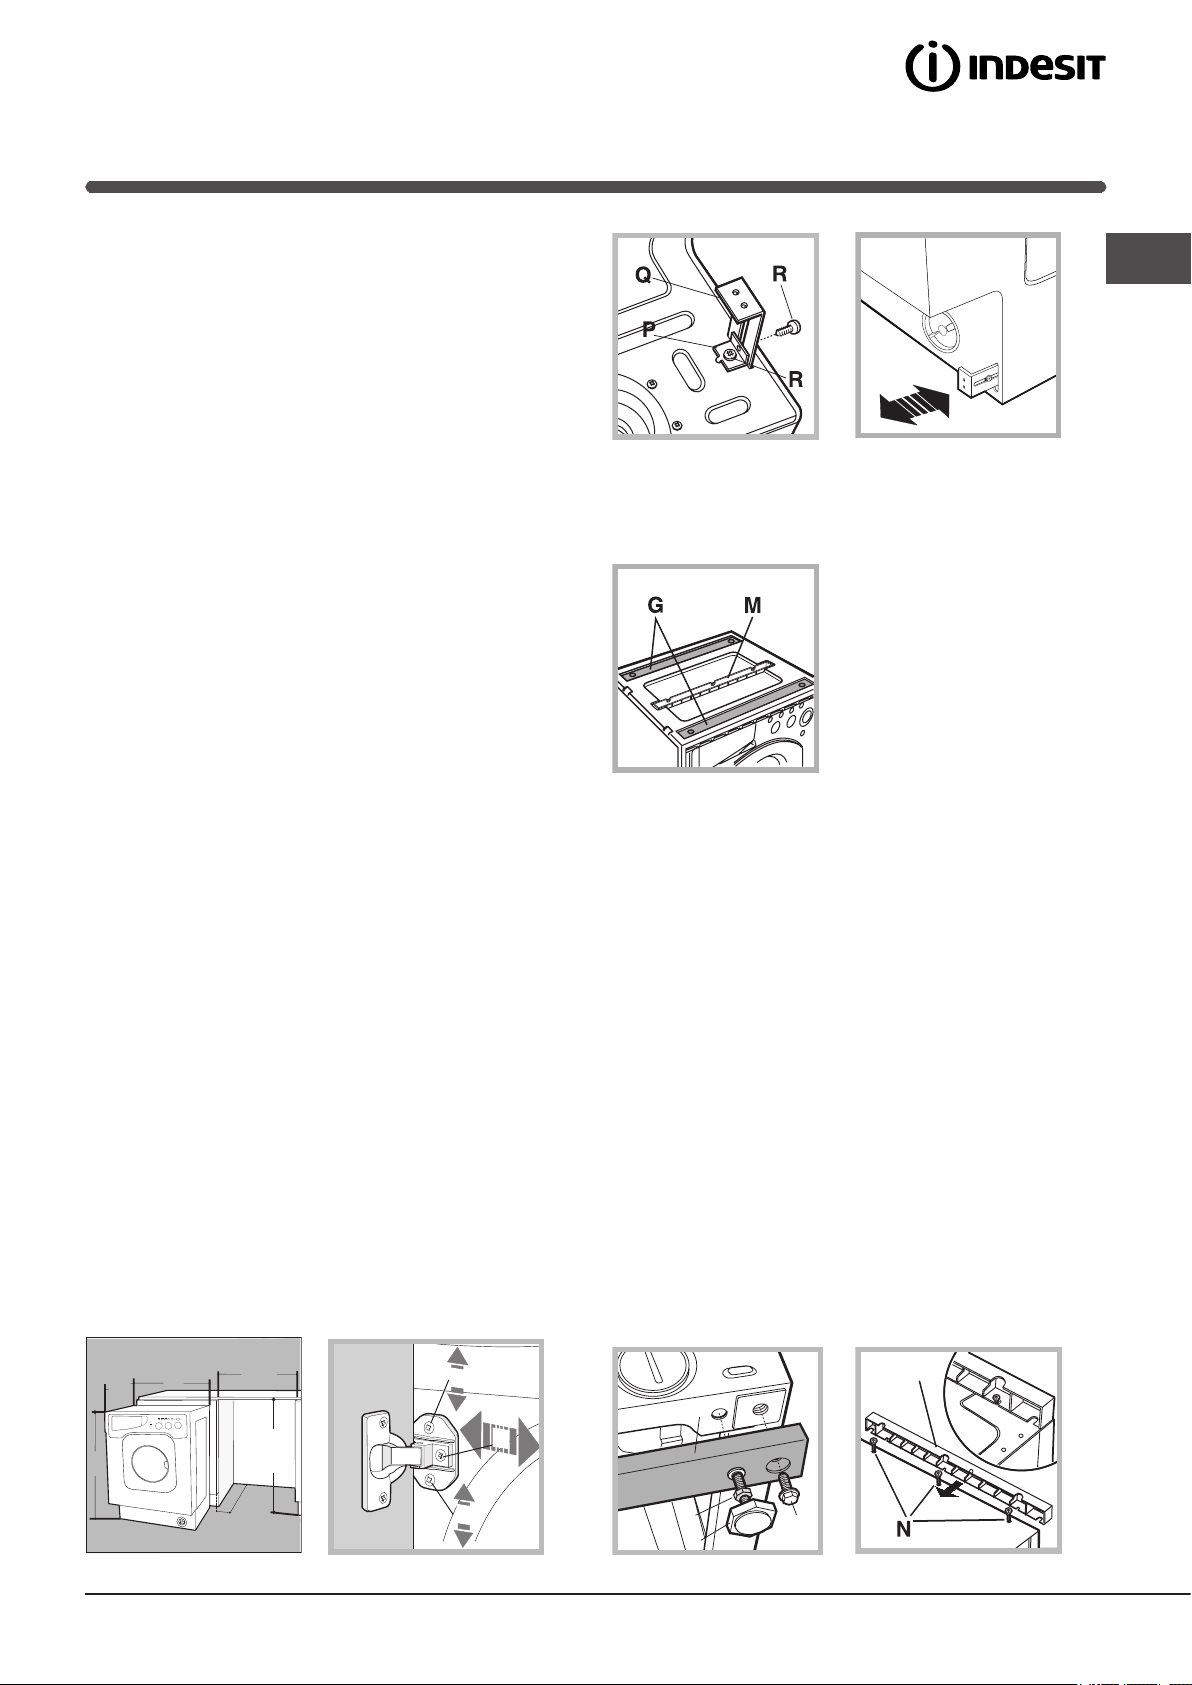
- To trace the positions of the holes on the left-hand side of
the panel, align the drilling template to the top left side of the
panel using the lines traced on the extremities as a reference.
- To trace the positions of the holes on the right-hand side of
the panel, align the drilling template to the top right side of
the panel.
- Use an appropriately sized router to mill the holes for the
two hinges, the rubber plug and the magnet.
Mounding the Parts onto the Wooden Panel (Door).
- Insert the hinges into the holes (the movable part of the
hinge must be positioned facing away from the panel) and
fasten them with the 4 type A screws.
- Insert the magnet into the top hole on the opposite side of
the hinges and fasten it with the two type B screws.
- Insert the rubber plug into the bottom hole.
The panel is now ready to be mounted onto the machine.
Mounting the Panel into the machine.
Insert the nib of the hinge (indicated by the arrow in fig. 2)
into the hole for the hinge and push the panel towards the
front of the machine. Fasten the two hinges with the type D
screws.
Fastening the plinth guide.
If the machine is installed at the end of a set of modular cabinets, mount either one or both of the guides for the base
molding (as shown in fig. 8). Adjust them for depth based on
the position of the base molding, and, if necessary, fasten
the base to the guides (fig. 9).
This is how to assemble the plinth guide (fig. 8):
Fasten angle P using screw R, insert plinth guide Q into the
special slot and once it is in the desired position, lock it in
place using angle P and screw R.
Inserting the machine into the Cabinet.
- Push the machine into the opening, aligning it with the
cabinets (fig. 6).
- Regulate the adjustable feet to raise the machine to the
appropriate height.
- To adjust the position of the wooden panel in both the
vertical and horizontal directions, use the C and D screws,
as shown in fig. 7.
Important: close the lower part of the appliance front by
ensuring that the plinth rests against the floor.
GB
Fig. 8 Fig. 9
Accessories provided for the height adjustment.
The following can be found inside the polystyrene lid (fig. 10): 2
crossbars (G), 1 strip (M)
the following can be found inside
the appliance drum:
4 additional feet (H),
4 screws (I),
4 screws (R),
4 nuts (L),
2 plinth guides (Q)
Fig. 10
Adjusting the appliance height.
The height of the appliance can be adjusted (from 815 mm to
835 mm), by turning the 4 feet.
Should you require the appliance to be placed higher than the
above height, you need to use the following accessories to
raise it to up to 870 mm:
the two crossbars (G); the 4 feet (H); the 4 screws (I); the 4
nuts (L) then perform the following operations (fig. 11):
remove the 4 original feet, place a crossbar G at the front of the
appliance, fastening it in place using screws I (screwing them in
where the original feet were) then insert the new feet H.
Repeat the same operation at the back of the appliance.
Now adjust feet H to raise or lower the appliance from 835 mm
to 870 mm.
Once you have reached the desired height, lock nuts L onto
crossbar G.
To adjust the appliance to a height between 870 mm and 900
mm, you need to mount strip M, adjusting feet H to the required height.
Insert the strip as follows:
loosen the three screws N situated at the front of the Top cover
of the appliance, insert strip M as shown in fig. 12, then fasten
screws N.
C
M
D
C
Fig. 6 Fig. 7
Fig. 11 Fig. 12
7
Page 8
Washing machine description
GB
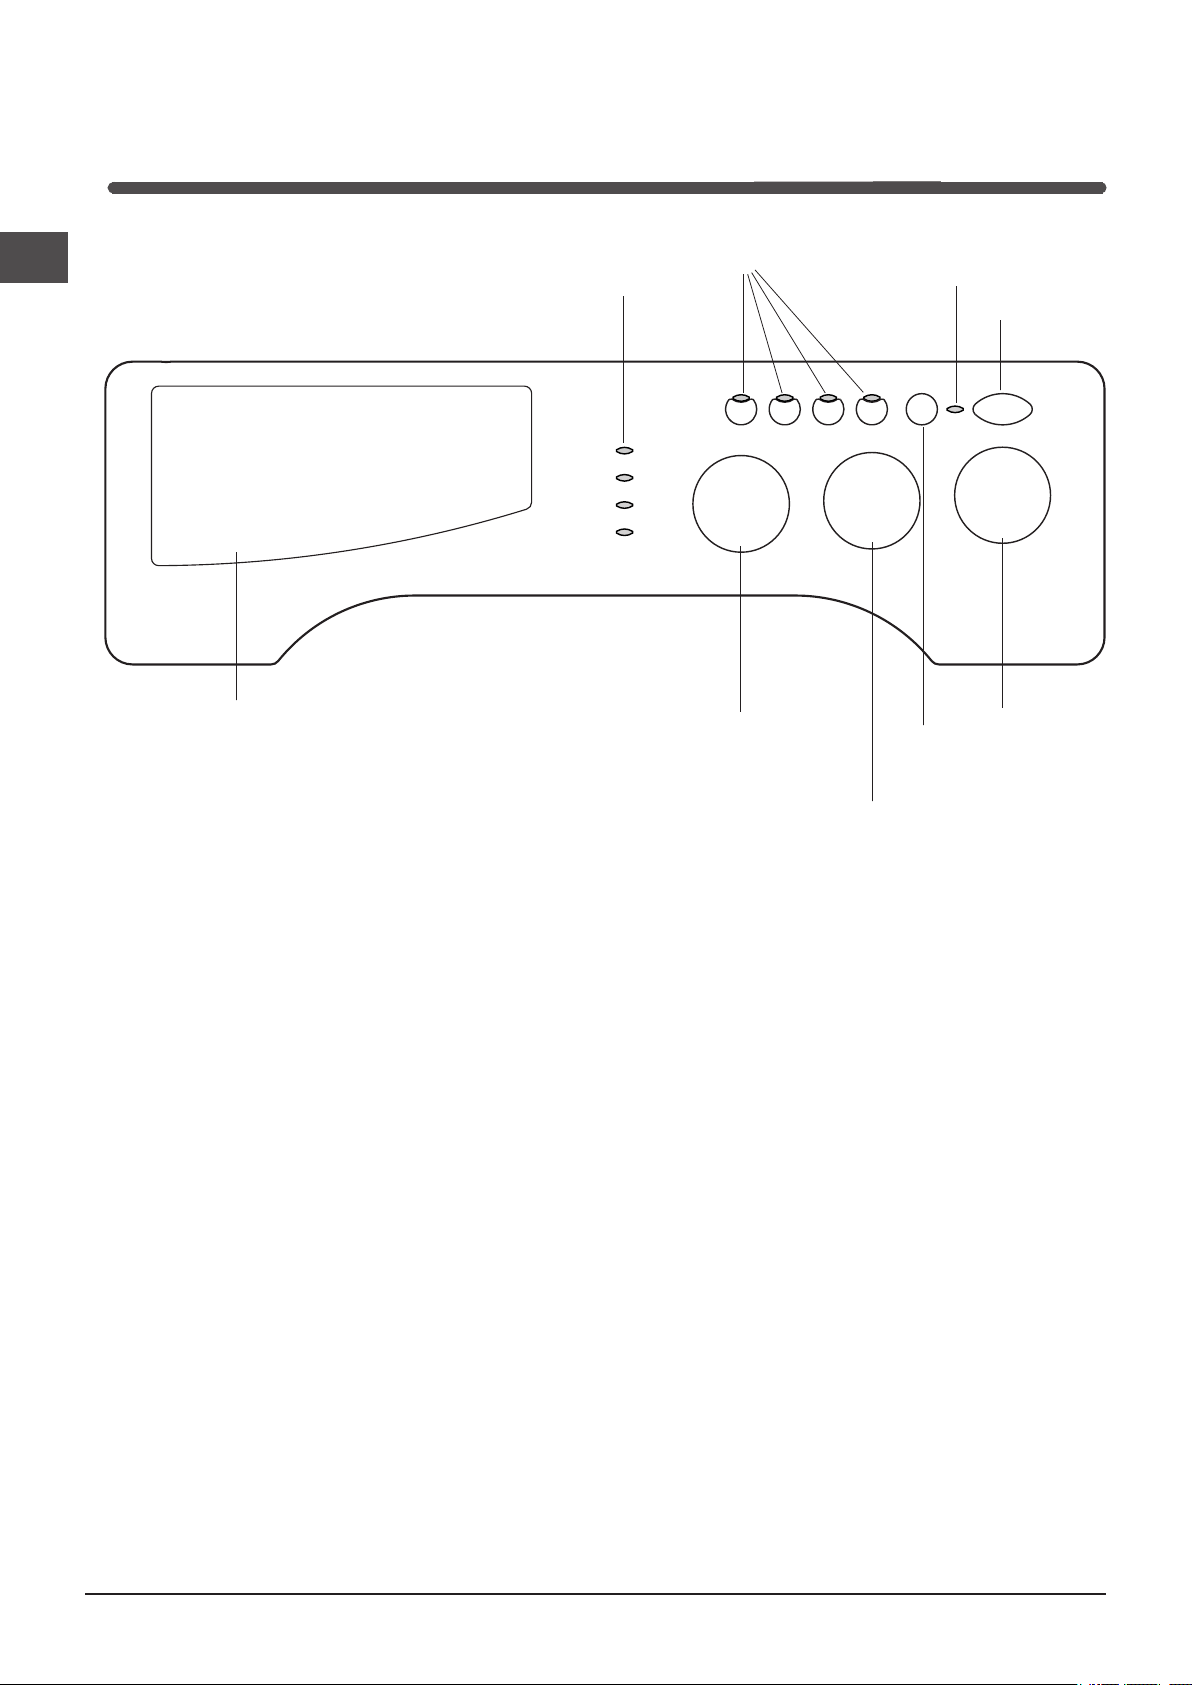
Control panel
Detergent dispenser
Leds
FUNCTION
Buttons
SPIN SPEED
Knob
ON-OFF/DOOR
LOCK Led
ON-OFF
Button
PROGRAMME
Knob
START/RESET
Button
Detergent dispenser: to add detergent and fabric
softener (see page 12).
LEDS: to find out which wash cycle phase is under way.
If the Delay Timer function has been set, the time left until
the programme starts will be indicated (see page 9).
SPIN SPEED knob: to set the spin speed or exclude the
spin cycle completely (see page 11).
FUNCTION buttons: to select the functions available.
The button corresponding to the function selected will
remain on.
TEMPERATURE knob: to set the temperature or the
cold wash cycle (see page 11).
START/RESET button: to start the programmes or
cancel any incorrect settings.
TEMPERATURE
Knob
PROGRAMME knob: to select the wash programmes.
The knob stays still during the cycle.
Standby mode
This washing machine, in compliance with new energy
saving regulations, is fitted with an automatic standby
system which is enabled after about 30 minutes if no activity is detected. Press the ON-OFF button briefly and wait
for the machine to start up again.
ON-OFF/DOOR LOCK Led: to find out whether the
washing machine is on and if the appliance door can be
opened (see page 9).
ON/OFF button: to turn the washing machine on and off.
8
Page 9
Leds
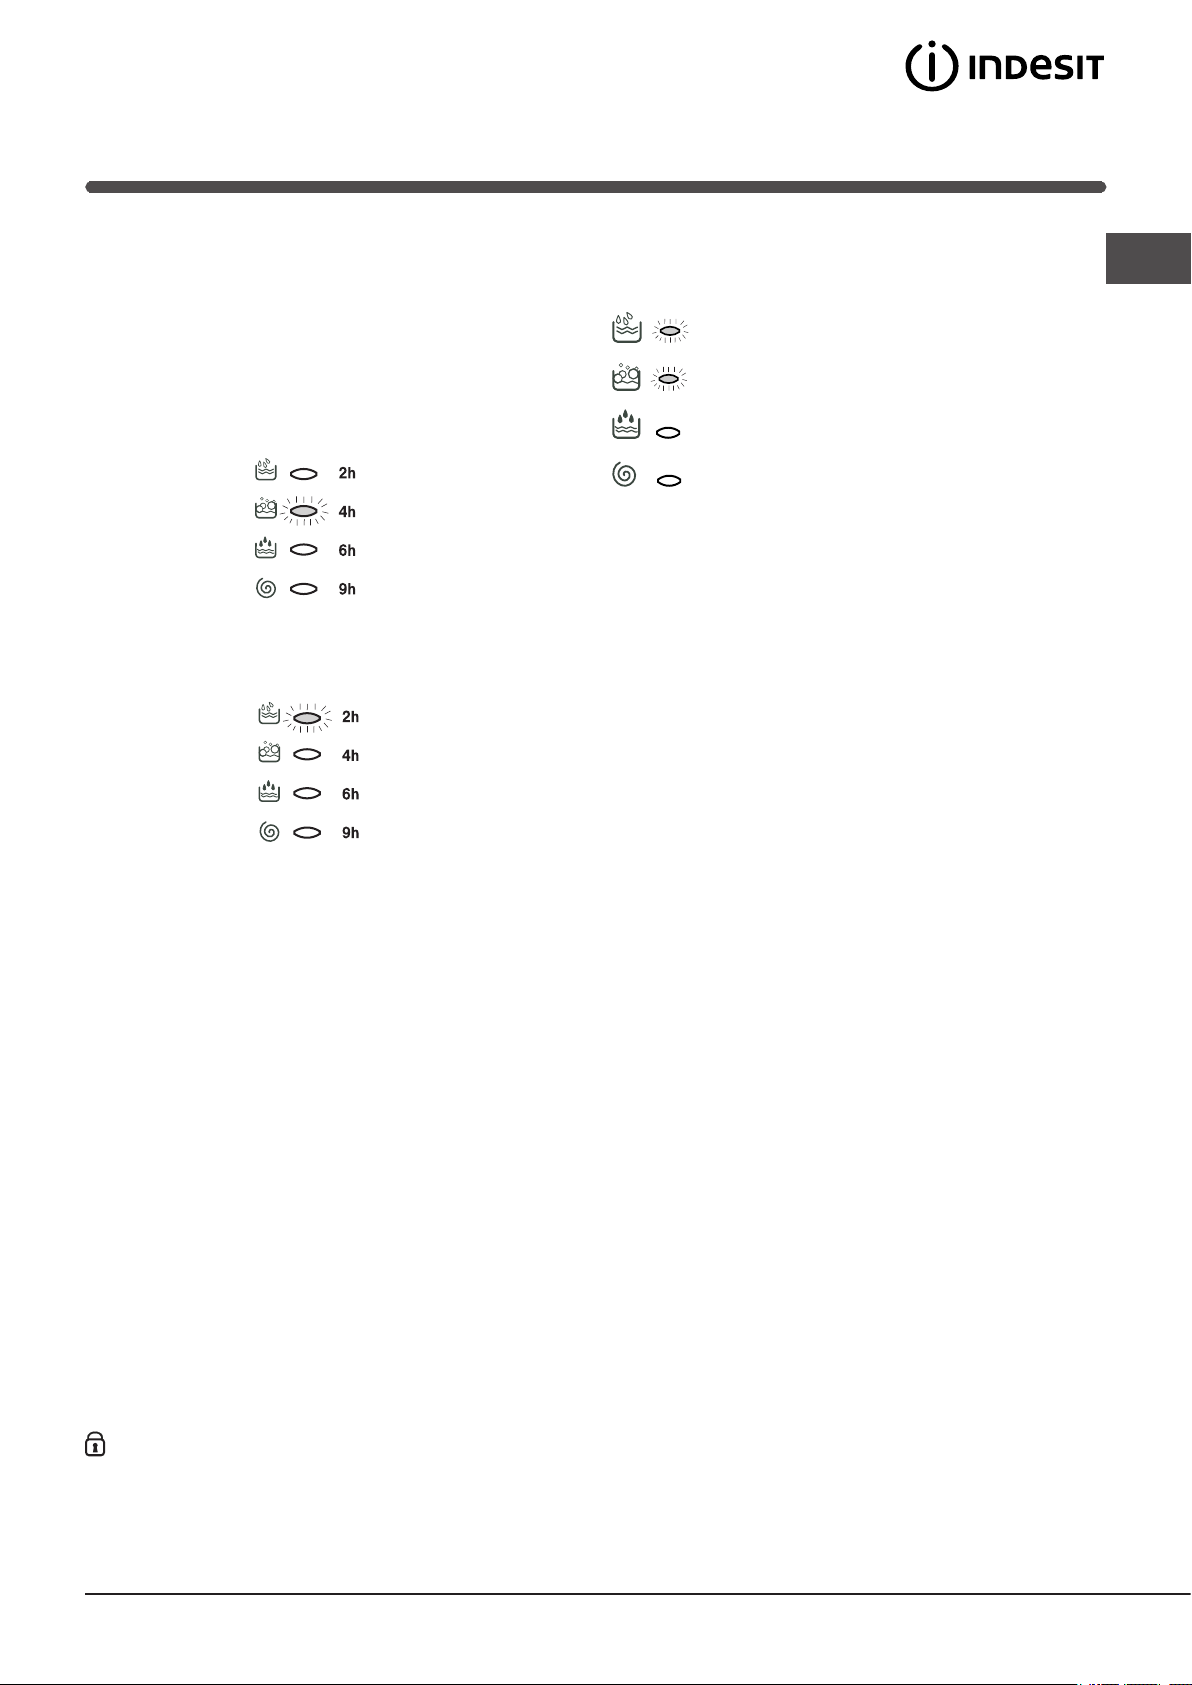
The LEDS provide important information.
This is what they can tell you:
Delay set:
If the Delay Timer function has been enabled (see page.
11), once you have started the programme, the LED
corresponding to the delay set will begin to flash:
As time passes, the remaining delay will be displayed,
and the corresponding LED will flash:
Cycle phase under way:
During the wash cycle, the LEDs gradually illuminate on to
indicate the cycle phase under way:
Prewash
Wash
Rinse
Spin cycle
Note: during draining, the LED corresponding to the Spin
cycle phase will be turned on.
Function buttons
The FUNCTION BUTTONS also act like LEDS.
When a function is selected, the corresponding button is
illuminated.
If the function selected is incompatible with the programme set, the button will flash and the function will not be
enabled.
If you set a function that is incompatible with another function you selected previously, only the last one selected
will be enabled.
GB
Once the set delay is complete, the flashing LED will
turn off and the programme set will start.
ON-OFF/DOOR LOCK led:
If this LED is on, the appliance door is locked to prevent it from being opened accidentally; to avoid any damages, wait for
the LED to flash before you open the appliance door.
! The rapid flashing of the ON-OFF/DOOR LOCK Led together with the flashing of at least one other LED indicates there is
an abnormality (see page 15).
9
Page 10
Starting and Programmes
cycle, rinse cycles, and delicate spin cycle
6. Add the detergent and any fabric softener (see page 12).
7. Start he programme by pressing the START/RESET
button. To cancel it, keep the START/RESET button
pressed for at least 2 seconds.
8. When the programme is finished, the ON-OFF/
DOOR LOCK Led will flash to indicate that the
appliance door can be opened. Take out your
laundry and leave the appliance door ajar to allow
the drum to dry thoroughly. Turn the washing
machine off by pressing button .
GB
Briefly: starting a programme
1. Switch the washing machine on by pressing button .
All the LEDS will light up for a few seconds and
the ON-OFF/DOOR LOCK Led will begin to flash.
2. Load your laundry into the washing machine and
shut the appliance door.
3. Set the PROGRAMME knob to the programme required.
4. Set the wash temperature (see page 11).
5. Set the spin speed (see page 11).
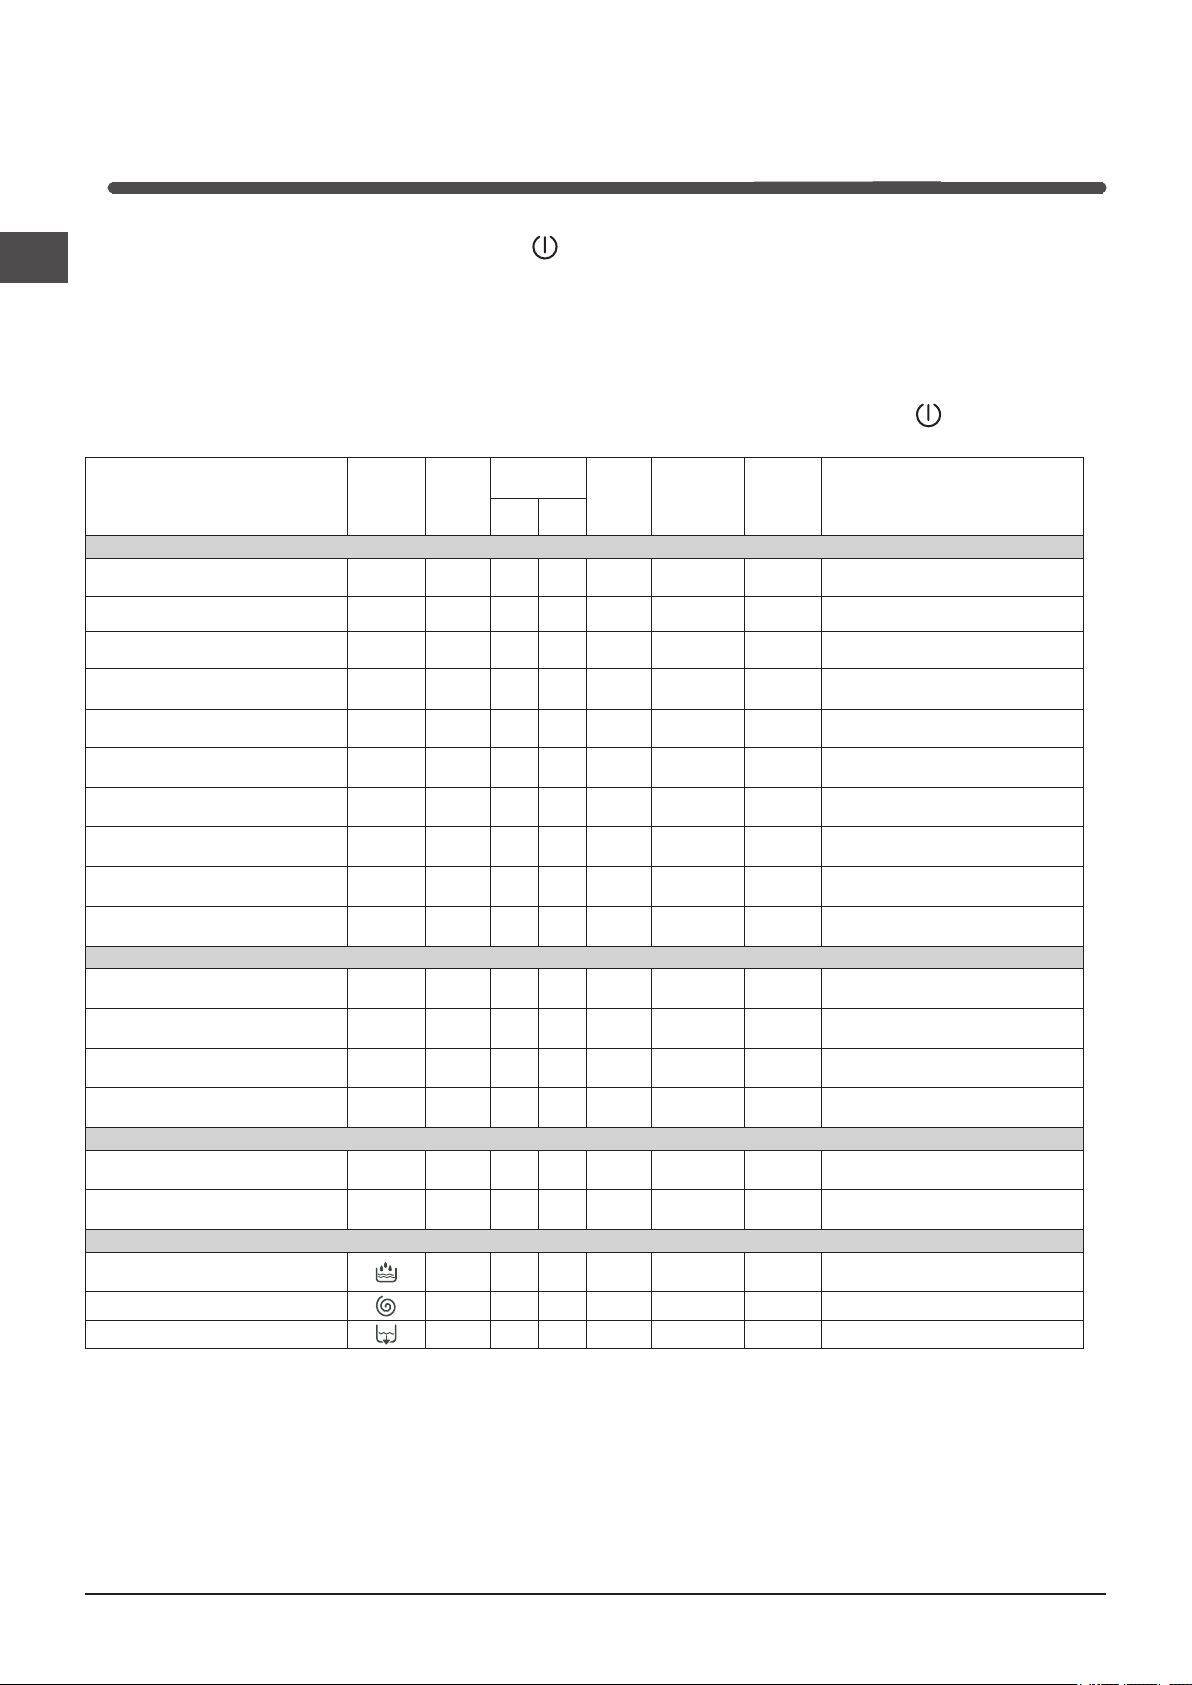
Programme table
Type of fabric and
degree of soil
Program-
mes
Tempe-
rature
Detergent
Pre-
wash
Standard
White prewash: Extremely soiled
whites (sheets, tablecloths, etc.)
White Cotton: Extremely soiled
whites (sheets, tablecloths, etc.)
White Cotton: Heavily soiled whites
and fast colours
White Cotton: Heavily soiled whites
and delicate colours
Colour Cotton: Slightly soiled whites and
delicate colours (shirts, jumpers, etc.)
Easy care: Heavily soiled fast colours (baby linen, etc.)
Easy care: Heavily soiled fast colours (baby linen, etc.)
Delicates: Delicate colours
(all types of slightly soiled garments)
Wool
Silk: Very delicate fabrics
(curtains, silk, viscose, etc.)
1
90°C
2
90°C
2
60°C
2
40°C
3
40°C
4
50°C
4
40°C
5
40°C
6
40°C
7
30°C
• • •
Time 4 you
Flesh Clean: Heavily soiled whites
and fast colours
Flesh Colours: Slightly soiled whites
and delicate colours
Flesh Nylon: Delicate colours
(all types of slightly soiled garments)
Daily: Delicate colours
(all types of slightly soiled garments)
10
11
8
60°C
9
40°C
40°C
30°C
Sport
Sports Shoes (MAX. 2 pairs)
Special Sport: Fabrics for sportswe-
ar (Tracksuits, shorts, etc.)
12
13
30°C
30°C
PARTIAL PROGRAMMES
Rinse
Spin
Drain
The length of cycle shown on the display or in this booklet is an estimation only and is calculated assuming standard working conditions. The actual duration can vary according to factors such as water temperature and pressure, the amount of detergent used, the amount and type of load inserted, load balancing and any wash options selected.
Notes
-For programmes 8 and 9, we advise against exceeding a wash load of 3.5 kg.
-For programme 13 we advise against exceeding a wash load of 2 kg.
-For the anti-crease function: see Easy iron, opposite page. The information contained in the table is purely indicative
Special programme
Daily (programme 11 for Synthetics) is designed to wash lightly soiled garments in a short amount of time: it only lasts
30 minutes and allows you to save on both time and energy. By setting this programme (11 at 30°C), you can wash
different fabrics together (except for woollen and silk items), with a maximum load of 3 kg.
We recommend the use of liquid detergent.
Wash
• •
• •
• •
• •
• •
• •
• •
• •
• •
• •
• •
• •
• •
• •
• •
Fabric
softe-
ner
•
Stain remo-
val option/
bleach
Delicate/
Traditional
Delicate/
Traditional
Delicate/
Traditional
Delicate/
Traditional
Delicate 105
Delicate 95
Delicate 70
Delicate/
Traditional
(minutes)
Cycle
length
Pre-wash, wash cycle, rinse cycles,
145
intermediate and final spin cycles
Wash cycle, rinse cycles, intermediate
125
and final spin cycles
Wash cycle, rinse cycles, intermediate
190
and final spin cycles
Wash cycle, rinse cycles, intermediate
185
and final spin cycles
Wash cycle, rinse cycles, intermediate
85
and final spin cycles
Wash cycle, rinse cycles, anti-crease
or delicate spin cycle
Wash cycle, rinse cycles, anti-crease
or delicate spin cycle
Wash cycle, rinse cycles, anti-crease
or delicate spin cycle
Wash cycle, rinse cycles and delicate
70
spin cycle
Wash cycle, rinse cycles, anti-crease
55
or draining cycle
Wash cycle, rinse cycles, intermediate
60
and final spin cycles
Wash cycle, rinse cycles, intermediate
50
and final spin cycles
Wash cycle, rinse cycles, delicate
40
spin cycle
Wash cycle, rinse cycles and delicate
30
spin cycle
Cold wash (without detergents), wash
60
Wash cycle, rinse cycles, intermediate
60
and final spin cycles
35 Rinse cycles and spin cycle
15 Draining and spin cycle
2 Draining
Description of
wash cycle
10
Page 11
Personalisations
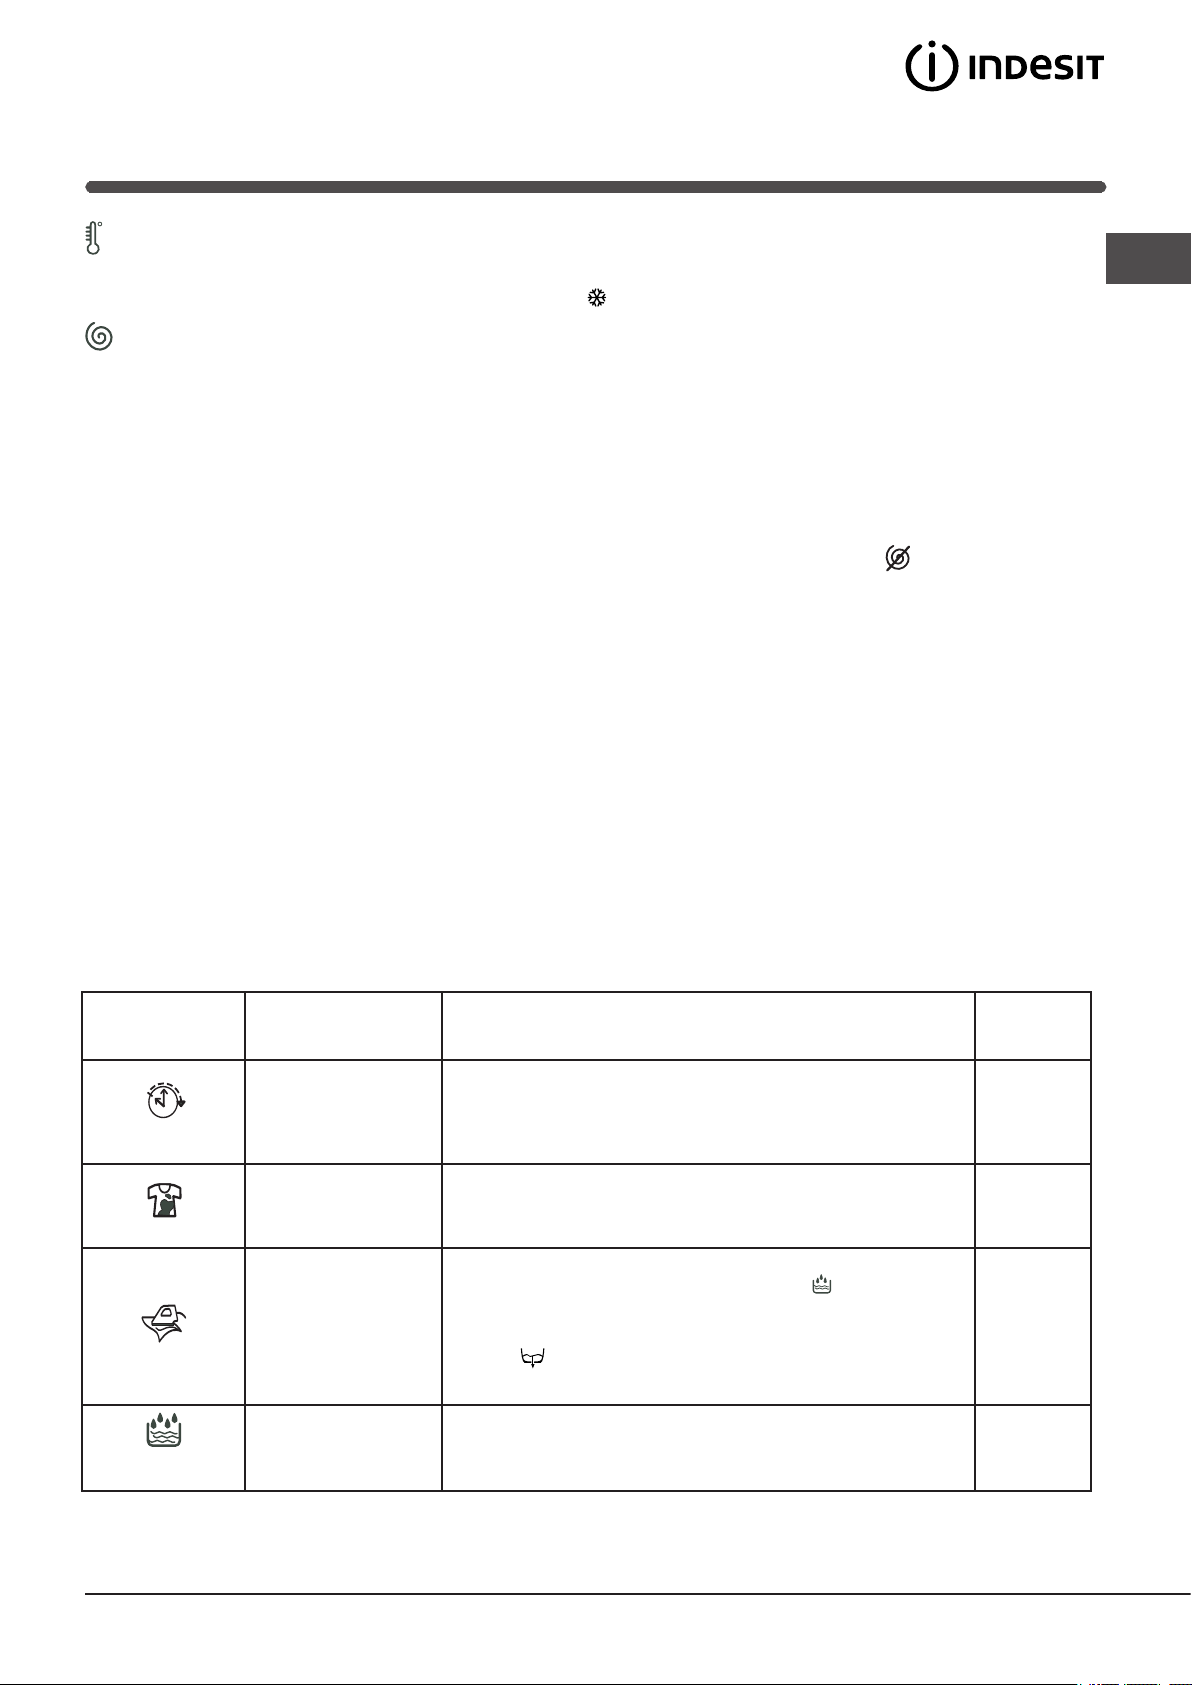
Setting the temperature
Turn the TEMPERATURE knob to set the wash temperature (see Programme table on page 10).
The temperature can be lowered, or even set to a cold wash ( ).
Setting the spin speed
Turn the SPIN SPEED knob to set the spin speed for the programme selected.
The maximum spin speeds for each programme are as follows:
Programmes Maximum spin speed
Cottone 1400 rpm
Synthetics 800 rpm
Wool 800 rpm
Silk no
The spin speed can be lowered, or the spin cycle can be excluded altogether by selecting symbol .
The washing machine will automatically prevent you from selecting a spin speed higher than the maximum speed for each
programme.
Note: to avoid excessive vibrations, before every spin cycle the machine distributes the load in a uniform manner by continuously rotating the drum at a speed which is slightly faster than the normal washing speed.
When, despite repeated attempts, the load is still not evenly distributed, the machine spins at a lower speed than the set
frequency.
If the load is excessively unbalanced, the machine attempts to distribute it instead of spinning.
The balancing attempts may extend the total duration of the cycle, up to a maximum of 10 minutes.
Functions
To enable a function:
1. press the button corresponding to the desired function, according to the table below;
2. the function is enabled when the corresponding button is illuminated.
GB
Note: The rapid flashing of the button indicates that the corresponding function cannot be selected for the programme set.
Option Effect Comments Enabled
Delays the start of the
wash by up to 9 hours.
Delay Timer
Bleaching cycle designed to remove the
toughest stains.
Stain removal
This option reduces
the amount of creasing
on fabrics, making
them easier to iron.
Easy iron
Increases the efficiency
of the rinse.
Extra Rinse
Pess the button repeatedly until the LED corresponding to the
desired delay is turned on. The fifth time the button is pressed, the
function will be disabled.
N.B.: Once you have pressed the Start/Reset button, the delay
can only be decreased if you wish to modify it.
Please remember to pour the bleach into extra compartment 4
(see page 12).
This option is incompatible with the EASY IRON option.
If you set this option, programmes 4, 5, 7 will be suspended, leaving the laundry to soak (Anti-crease) and icon will flash:
- to conclude the cycle, press the START/RESET button;
- to run the draining cycle alone, set the knob to the relative
symbol and press the START/RESET button.
This option is incompatible with the STAIN REMOVAL option.
Recommended when the appliance has a full load or with large
quantities of detergent.
with programmes:
All
2, 3, 4, 5,
Rinse
cycle.
3, 4, 5, 7,
8, 9, 10
and Rinse
cycle.
1, 2, 3, 4, 5,
8, 9, 10, 12,
13 and Rinse cycle.
11
Page 12
Detergents and laundry
M
AX
1
2
4
3
MAX
MAX
GB
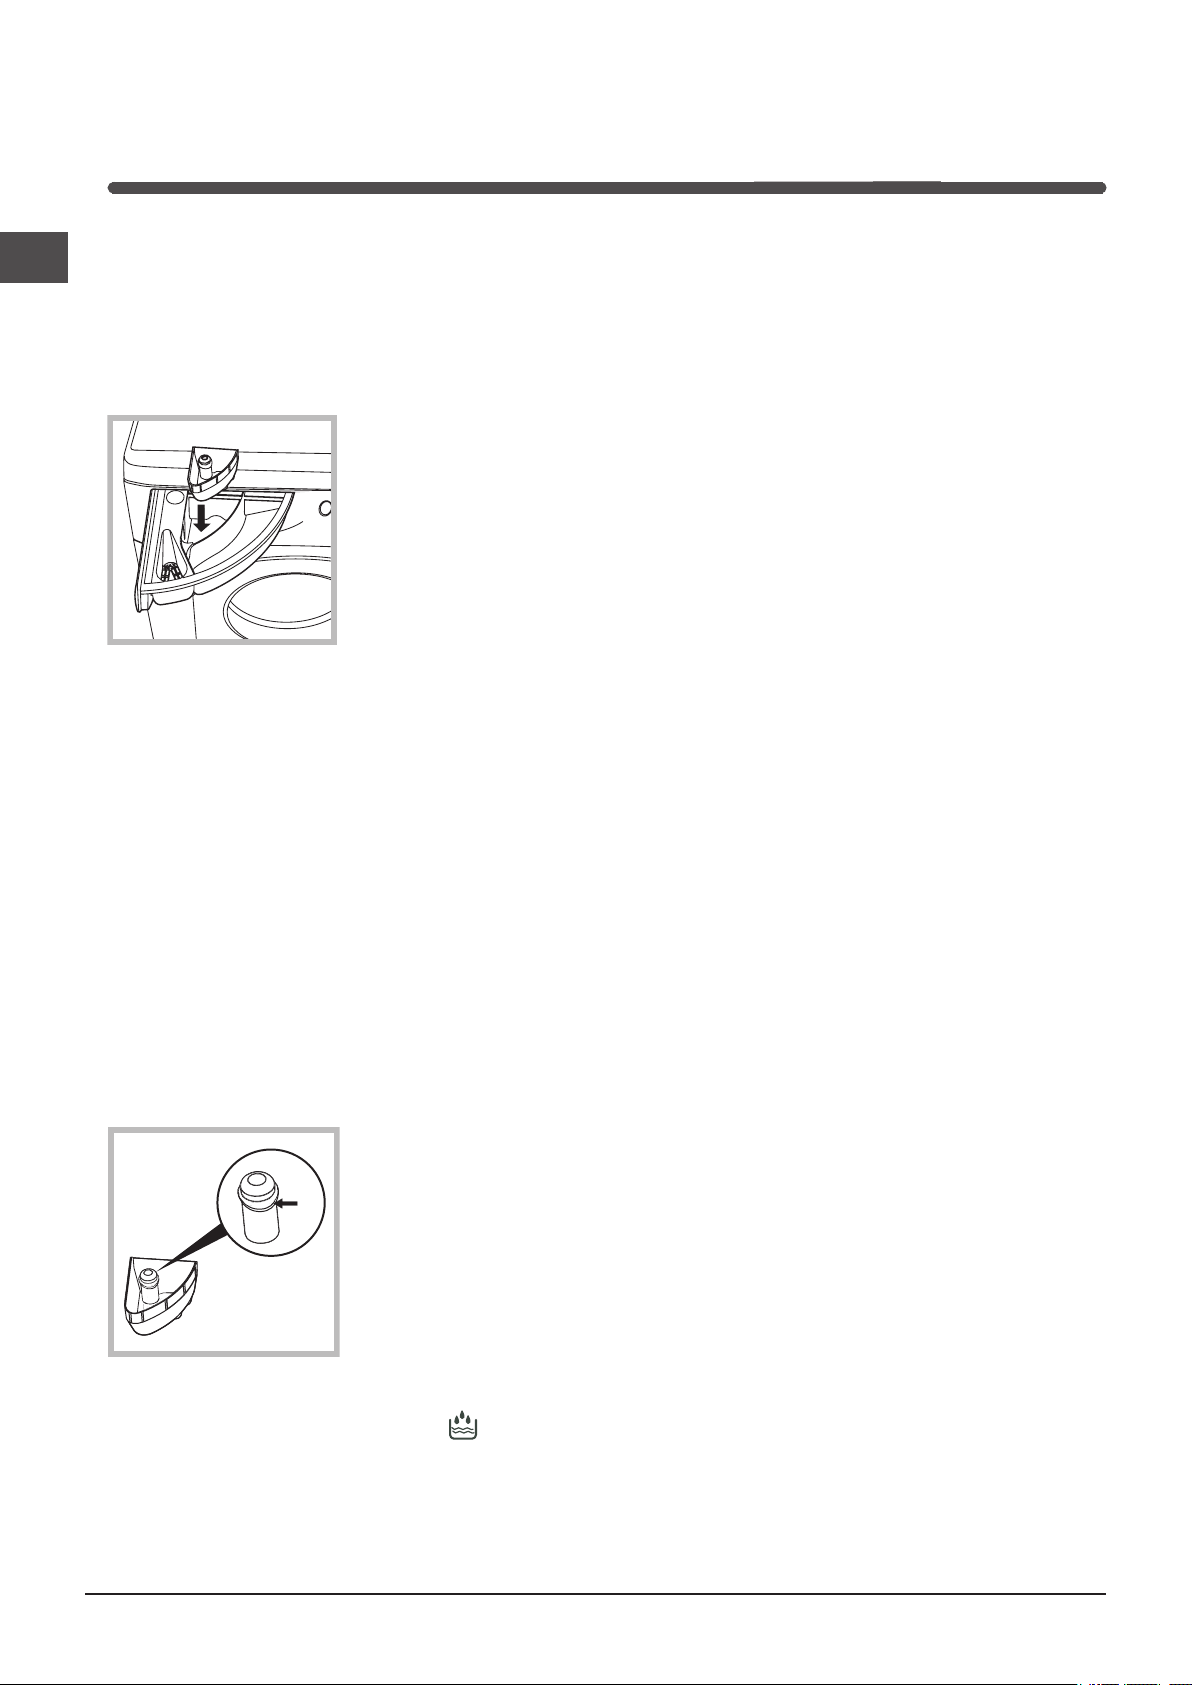
Detergent dispenser
Good washing results also depend on the correct dose of
detergent: adding too much detergent won’t necessarily
make for a more efficient wash, and may in fact cause
build up on the interior of your appliance and even pollute
the environment.
Open up the detergent
dispenser and pour in
the detergent and fabric
softener, as follows.
compartment 1: Detergent for pre-wash (powder)
Before pouring in the detergent, make sure that extra
compartment 4 has been removed.
compartment 2: Detergent for the wash cycle
(powder or liquid)
Liquid detergent should only be poured in immediately
prior to the wash cycle start.
compartment 3: Additives (fabric softeners, etc.)
The fabric softener should not overflow from the grid.
extra compartment 4: Bleach
! Do not use hand wash detergent because it may form
too much foam.
Bleach cycle
! Traditional bleach should be used on sturdy white
fabrics, and delicate bleach for coloured fabrics, synthetics and for wool.
Preparing your laundry
• Divide your laundry according to:
- the type of fabric/the symbol on the label.
- the colours: separate coloured garments from
whites.
• Empty all pockets and check for loose buttons.
• Do not exceed the weight limits stated below,
which refer to the weight when dry:
Sturdy fabrics: max 7 kg
Synthetic fabrics: max 3 kg
Delicate fabrics: max 2 kg
Wool: max 1,5 kg
How much does your laundry weigh?
1 sheet 400-500 g
1 pillow case 150-200 g
1 tablecloth 400-500 g
1 bathrobe 900-1,200 g
1 towel 150-250 g
Special items
Curtains: fold curtains and place them in a pillow case
or mesh bag. Wash them separately without exceeding
half the appliance load. Use programme 7 which excludes the spin cycle automatically.
Quilted coats and windbreakers: if they are padded
with goose or duck down, they can be machine-washed.
Turn the garments inside out and load a maximum of 2-3
kg, repeating the rinse cycle once or twice and using the
delicate spin cycle.
Wool: for best results, use a specific detergent, taking
care not to exceed a load of 1,5 kg.
Place extra compartment
4, provided, into compartment 1.
When pouring in the
bleach, be careful not to
exceed the “max” level indicated on the central pivot
(see figure).
To run the bleach cycle alone, pour the bleach into extra
compartment 4, set the Rinse programme and enable
the Stain removal option (see page 11). To bleach during
a wash cycle, pour in the detergent and fabric softener,
set the desired programme and enable the Stain removal
option (see page 11).
The use of extra compartment 4 excludes the possibility
of using the pre-wash cycle.
12
Page 13

Precautions and advice
! The washing machine was designed and built in complian-
ce with the applicable international safety regulations. The
following information is provided for your safety and should
consequently be read carefully.
General safety
• This appliance has been designed for non-
professional, household use and its functions must
not be changed.
• This appliance is not intended for use by persons
(including children) with reduced physical, sensory or
mental capabilities, or lack of experience and knowledge, unless they have been given supervision or
instruction concerning use of the appliance by a person
responsible for their safety. Children should be supervised to ensure that they do not play with the appliance.
• Never touch the washing machine when barefoot
or with wet or damp hands or feet.
• Do not pull on the power supply cable to unplug
the appliance from the electricity socket. Pull the
plug out yourself.
• Do not open the detergent dispenser while the
appliance is in operation.
• Do not touch the drain water as it could reach
very high temperatures.
• Never force the washing machine door: this could
damage the safety lock mechanism designed to
prevent any accidental openings.
• In the event of a malfunction, do not under any
circumstances touch internal parts in order to
attempt repairs.
• Always keep children well away from the
appliance while in operation.
• The appliance door tends to get quite hot during
the wash cycle.
• Should it have to be moved, proceed with the
help of two or three people and handle it with the
utmost care. Never try to do this alone, because
the appliance is very heavy.
• Before loading your laundry into the washing
machine, make sure the drum is empty.
Disposal
• Disposing of the packaging material:
observe local regulations, so the packaging can
be re-used.
• The European Directive 2002/96/EC on Waste
Electrical and Electronic Equipment, requires that
old household electrical appliances must not be
disposed of in the normal unsorted municipal waste
stream. Old appliances must be collected
separately in order to optimise the recovery and
recycling of the materials they contain and reduce
the impact on human health and the environment.
The crossed out “wheeled bin” symbol on the
product reminds you of your obligation, that when
you dispose of the appliance it must be separately
collected.
Consumers should contact their local authority or
retailer for information concerning the correct
disposal of their old appliance.
Saving energy and respecting the environment
Environmentally-friendly technology
If you only see a little water through your appliance door,
this is because thanks to the latest Indesit technology, your
washing machine only needs less than half the amount
of water to get the best results: an objective reached to
respect the environment.
Saving on detergent, water, energy and time
• To avoid wasting resources, the washing machine
should be used with a full load. A full load instead
of two half loads allows you to save up to 50% on
energy.
• The pre-wash cycle is only necessary on
extremely soiled garments. Avoiding it will save on
detergent, time, water and between 5 and 15%
energy.
• Treating stains with a stain remover or leaving them
to soak before washing will cut down the need to
wash them at high temperatures. A programme at
60°C instead of 90°C or one at 40°C instead of
60°C will save up to 50% on energy.
• Use the correct quantity of detergent depending
on the water hardness, how soiled the garments
are and the amount of laundry you have, to avoid
wastage and to protect the environment: despite
being biodegradable, detergents do contain
ingredients that alter the natural balance of the
environment. In addition, avoid using fabric
softener as much as possible.
• If you use your washing machine from late in the
afternoon until the early hours of the morning, you
will help reduce the electricity board’s peak load.
The Delay Timer option (see page 11) helps to
organise your wash cycles accordingly.
• If your laundry has to be dried in a tumble dryer,
select a high spin speed. Having the least water
possible in your laundry will save you time and
energy in the drying process.
GB
13
Page 14
Care and maintenance
1
2
GB
Cutting off the water or electricity
supply
• Turn off the water tap after every wash. This will limit
the wear of your appliance’s water system and also
prevent leaks.
• Unplug your appliance when cleaning it and during all
maintenance operations.
Cleaning your appliance
The exterior and rubber parts of your appliance can be
cleaned with a soft cloth soaked in lukewarm soapy water. Do not use solvents or abrasives.
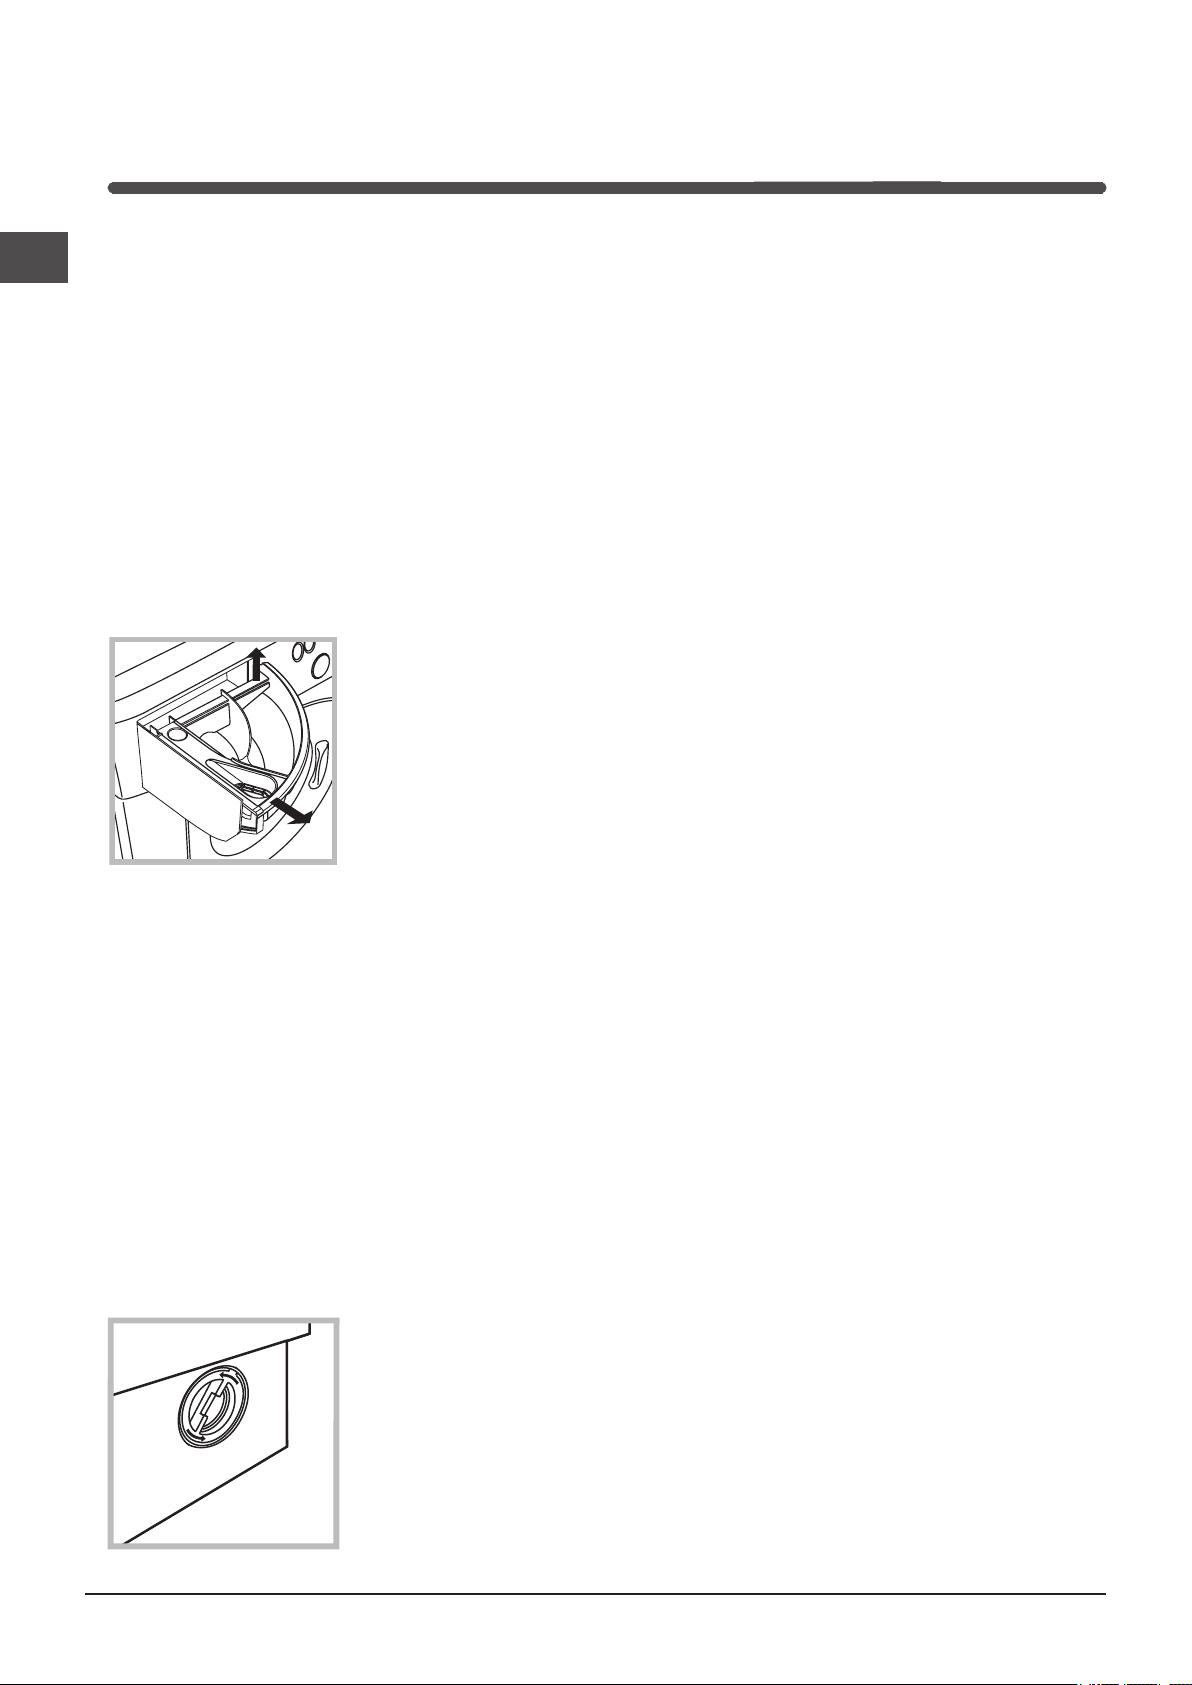
Cleaning the detergent dispenser
Remove the dispenser by
pulling it out (see figure).
Wash it under running water; this operation should
be repeated
frequently.
2. clean the interior thoroughly;
3. screw the lid back on.
Checking the water inlet hose
Check the water inlet hose at least once a year. If you
see any cracks, replace it immediately: during the wash
cycles, water pressure is very strong and a cracked hose
could easily split open.
! Never use hoses that have already been used.
Caring for your appliance door and drum
• Always leave the appliance door ajar to prevent unpleasant odours from forming.
Cleaning the pump
The washing machine is fitted with a self-cleaning pump
that does not require any maintenance. Sometimes, small
items (such as coins or buttons) may fall into the prechamber that protects the pump, situated in the lower
part of the same.
! Make sure the wash cycle has ended and unplug the
appliance.
To access the pre-chamber:
1. unscrew the lid rotating it anti-clockwise (see
figure): a little water may
trickle out. This is perfectly
normal;
14
Page 15

Troubleshooting
Your washing machine could fail to work. Before calling for Assistance (see page 16), make sure the problem can’t easily be
solved by consulting the following list.
GB
Problem
The machine does not switch on.
The wash cycle does not start.
The machine does not fill with
water.
The machine continuously fills
with water and continually drains
away or Water left in the dru or
Stuck on wash.
Possible causes/Solution:
• The appliance is not plugged into the socket fully, or not enough to make contact.
• There is no power to the socket, or the fuse has blown in the mains plug.
• The door is not closed properly.
• The ‘ON/OFF’ button has not been pressed.
• The ‘START/RESET’ button has not been pressed.
• The water tap has not been turned on to allow water to flow into the machine.
• A delayed start has been set.
• The water inlet hose is kinked.
• The water inlet hose is not connected to the water supply.
• The water pressure is too low.
• The water tap has not been turned on to allow water to flow into the machine.
• There is no water supply to the house.
• The inlet valve filter is blocked.
• The ‘START/RESET’ button has not been pressed.
• The top of the drain hose is too low - It must be fitted at a height
between 65 and 100 cm from the floor.
• The drain hose is connected incorrectly to the sink trap allowing water to
run into the machine, the drain hose must be positioned higher than the
bottom of the sink to prevent water flowing down the drain hose.
• The end of the drain hose has been pushed too far down the standpipe, the
‘U’ bracket should be fitted 100 mm from the end of the drain hose.
The machine does not drain or
spin.
The machine does not heat or
poor wash results.
The programme takes too long.
The machine vibrates a lot during
the spin cycle.
• The Pump filter is blocked.
• The “Easy iron” function is enabled: to complete the programme,
press the START/RESET button (see page 11).
• The drain hose is kinked.
• New Installation - The blanking cap or spigot has not been removed
if connected under a sink.
• The drain hose or sink trap is blocked.
• The wash cycle does not include draining, some wash cycles require
the drain phase to be started manually.
• The ‘Spin Speed’ selector knob is in the position.
• The ‘Temperature’ selector knob is in the position.
• Programme times will vary due to water pressure, the incoming water
temperature and if the wash load goes out of balance. This will increase the
programme times accordingly (see ‘ The machine wont spin properly’ below).
• The feet have not been adjusted, enabling the machine to rock.
• New Installation - Either the Transit Bolts including the plastic spacers,
or the Polystyrene Packaging have not been removed when installing the
machine.
• The machine is trapped between cabinets and/or walls.
• The load is in a slight out of balance condition and machine is spinning, but
at a lower speed.
15
Page 16

The machine is noisy.
GB
The machine wont spin properly.
• There will always be some motor, pump and drum noise during spin.
• Out of Balance detected when attempting to go into a spin cycle - If this happens
the machine will continue to try to repeat the distribution of the load required
before the machine will go into higher spin speeds - This will increase
the programme time accordingly. This is a safety feature to prevent damage.
Out of Balance can be caused by washing a single heavy item (eg duvet,
quilt, etc). - Try the programme again using a different load.
The machine leaks from the dispenser.
The machine leaks (other than
dispenser).
The indicator lights on the console are flashing rapidly.
The machine smells.
The machine door cannot be
opened.
Door Seal damaged at the bottom.
There is too much foam.
After completing the programme,
or before starting a programme,
the machine has turned itself off
(no lights).
• The dispenser drawer is blocked with detergent and requires cleaning.
• The water pressure is too high and requires turning down - turn down
the tap on the water supply pipe slightly and try again.
• The machine is tilting forwards - It must be level when in its final position.
• The fill hose is loose, check both the cabinet and tap ends.
• The fill hose is tight but still leaks, if so replace the rubber washers, or
the fill hose is missing the rubber washer.
• The drain hose is not fixed in properly.
• Switch off the machine and unplug it, wait for approximately 1 minute
and then switch it back on again If the problem persists contact the
Technical Assistance Service.
• The machine requires a service wash. Run a 90 degree wash cycle with
detergent and no laundry.
• The door will not open until the door lock indicator light goes out
shortly after the program has finished.
• The door seal has drainage holes at the bottom - This is normal.
• The detergent is not suitable for machine washing (it should display the
text ‘for washing machines’ or ‘hand and machine wash’ or the like).
• To comply with new energy saving regulations the machine is fitted with an
automatic standby system. Press ‘ON/OFF’ button for 3 seconds to activate
the machine, it can then either be switched off or a new programme selected.
General.
Remember, you will be charged for a service call for problems caused by incorrect installation,
as listed above.
Not emptying contents from pockets may cause pump or drain blockages, or may damage the machine.
Do not wash items which do not have a wash label, or wash items that are not intended as machine washable.
16
• Your washing machine contains sensors that monitor progress during
the wash cycle (eg: Water Levels, Temperatures, Out of Balance
loads, Wash time/progress). Normally, if your machine successfully
completes the cycle, there is unlikely to be anything wrong!
Page 17

Assistance
12 Months Parts and Labour Guarantee
Your appliance has the benefit of our manufacturer’s guarantee, which covers the cost of breakdown repairs for twelve
months from the date of purchase.
This gives you the reassurance that if, within that time, your appliance is proven to be defective because of either
workmanship or materials, we will, at our discretion, either repair or replace the appliance at no cost to you.
This guarantee is subject to the following conditions:
- The appliance has been installed and operated correctly and in accordance with our operating and
maintenance instructions.
- The appliance is used only on the electricity or gas supply printed on the rating plate.
- The appliance has been used for normal domestic purposes only.
- The appliance has not been altered, serviced, maintained, dismantled, or otherwise interfered with by any
person not authorised by us.
- Any repair work must be undertaken by us or our appointed agent.
- Any parts removed during repair work or any appliance that is replaced become our property.
- The appliance is used in the United Kingdom or Republic of Ireland.
The guarantee does not cover:
GB
- Damage resulting from transportation, improper use, neglect or interference or as a result of improper installation.
- Replacement of any consumable item or accessory . These include but are not limited to:
plugs, cables, batteries, light bulbs, fluorescent tubes and starters, covers and filters.
- Replacement of any removable parts made of glass or plastic.
THIS GUARANTEE WILL NOT APPLY IF THE APPLIANCE HAS BEEN USED IN COMMERCIAL OR
NON-DOMESTIC PREMISES.
5 Year Parts Guarantee
Indesit also offers you a free 5 year parts guarantee. This additional guarantee is conditional on you registering your appliance
with us and the parts being fitted by one of our authorised engineers. There will be a charge for our engineer’s time. To
activate the extra parts warranty on your appliance, simply call our registration line on 08448 24 24 24 (Republic of
Ireland 01 230 0800).
Extended Guarantees
We offer a selection of repair protection plans that enable you to fully cover yourself against the expense of repair bills for the
life of your policy. To find the ideal plan for you please call our advice line on
08448 226 226 (Republic of Ireland 01 230 0233).
Free Helpdesk Service
We have a dedicated team who can provide free advice and assistance with your appliance if you experience any technical
difficulties within the first 90 days of ownership. Simply call our Indesit Service Hotline on 08448 224 224 (Republic of
Ireland 0818 313 413) for telephone assistance, or, where necessary, to arrange for an engineer to call.
17
Page 18
GB
After Sales Service
No one is better placed to care for your Indesit appliance during the course of its working life than us - the manufacturer.
Essential Contact Information
Indesit Service
We are the largest service team in Europe offering you access to 400 skilled telephone advisors and 1100 fully qualified
engineers on call to ensure you receive fast, reliable, local service.
UK: 08448 224 224
Republic of Ireland: 0818 313 413
www.indesitservice.co.uk
Please note: Our advisors will require the following information:
Model number:
Serial number:
Parts and Accessories
We supply a full range of genuine replacement parts as well as accessory products that protect and hygienically clean your
appliance to keep it looking good and functioning efficiently throughout its life.
UK: 08448 225 225
Republic of Ireland: 0818 313 413
www.indesitservice.co.uk
Appliance Registration
We want to give you additional benefits of Indesit ownership. To activate your free 5 year parts guarantee you must register
your appliance with us.
UK: 08448 24 24 24
Republic of Ireland: 01 230 0800
www.indesitservice.co.uk
Indesit Company UK Ltd. Morley Way, Peterborough, PE2 9JB
Indesit Company Unit 49 Airways Industrial Estate, Dublin 17
Recycling & Disposal Information
As part of Indesit’s continued commitment to helping the environment, Indesit reserves the right to use quality, recycled
components to keep down customer costs and minimise material wastage.
Please dispose of packaging and old appliances carefully. To minimise the risk of injury to children, remove the door, plug and
cut the mains cable off flush with the appliance. Dispose of these parts separately to ensure that the appliance can no longer
be plugged into a mains socket, and the door cannot be locked shut.
18
Page 19

GB
19
Page 20

GB
195097120.00
10/2011 - Xerox Fabriano
20
 Loading...