

Page 1
Instructions for use
WASHING MACHINE
GB
English,1
IWE 7125 S
PT
Português,13
Contents
GB
Installation, 2-3
Unpacking and levelling
Connecting the electricity and water supplies
The first wash cycle
Technical data
Description of the washing machine, 4-5
Control panel
Display
Running a wash cycle, 6
Wash cycles and options, 7
Table of wash cycles
Wash options
Detergents and laundry, 8
Detergent dispenser drawer
Preparing the laundry
Special wash cycles
Load balancing system
Precautions and tips, 9
General safety
Disposal
Opening the porthole door manually
Care and maintenance, 10
Cutting off the water or electricity supply
Cleaning the washing machine
Cleaning the detergent dispenser drawer
Caring for the door and drum of your appliance
Cleaning the pump
Checking the water inlet hose
Troubleshooting, 11
Service, 12
1
Page 2
Installation
GB
! This instruction manual should be kept in a safe
place for future reference. If the washing machine is
sold, transferred or moved, make sure that the
instruction manual remains with the machine so that
the new owner is able to familiarise himself/herself
with its operation and features.
!
Read these instructions carefully: they contain vital
information relating to the safe installation and
operation of the appliance.
Unpacking and levelling
Unpacking
1. Remove the washing machine from its packaging.
2. Make sure that the washing machine has not been
damaged during the transportation process. If it has
been damaged, contact the retailer and do not
proceed any further with the installation process.
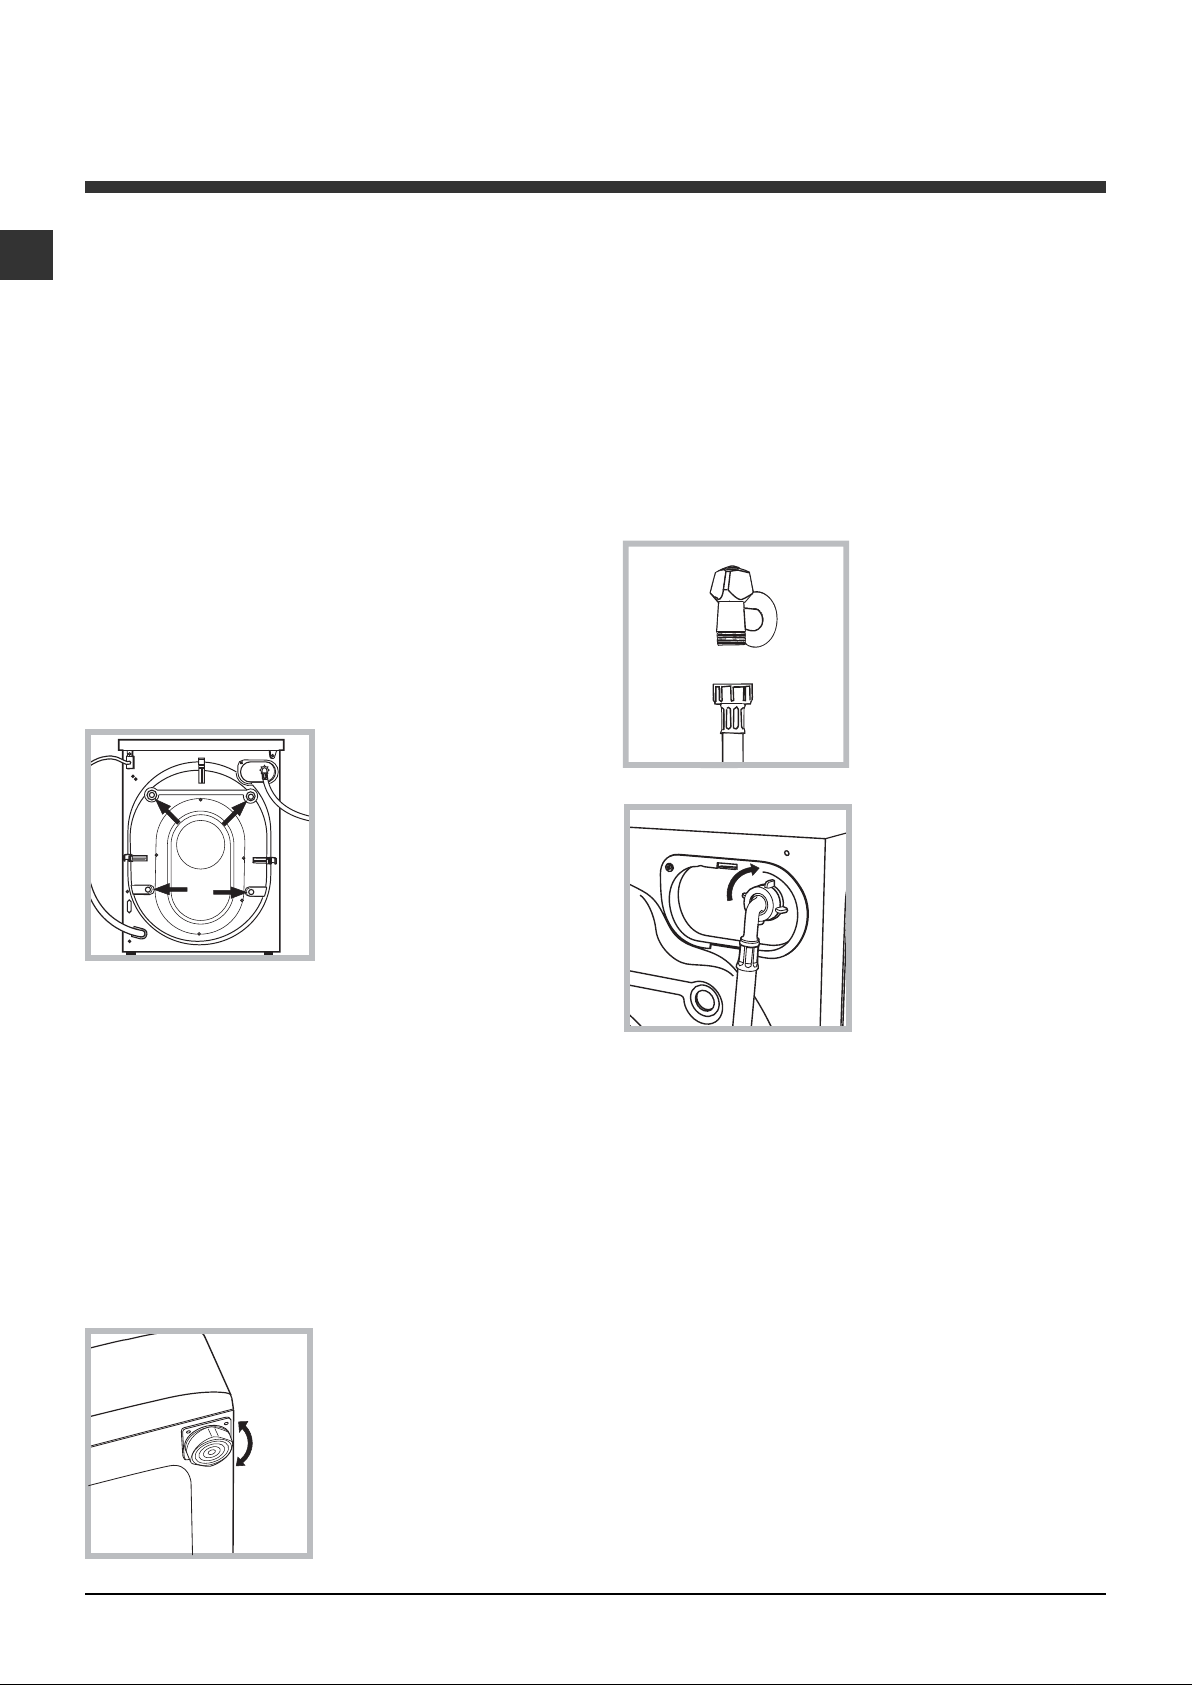
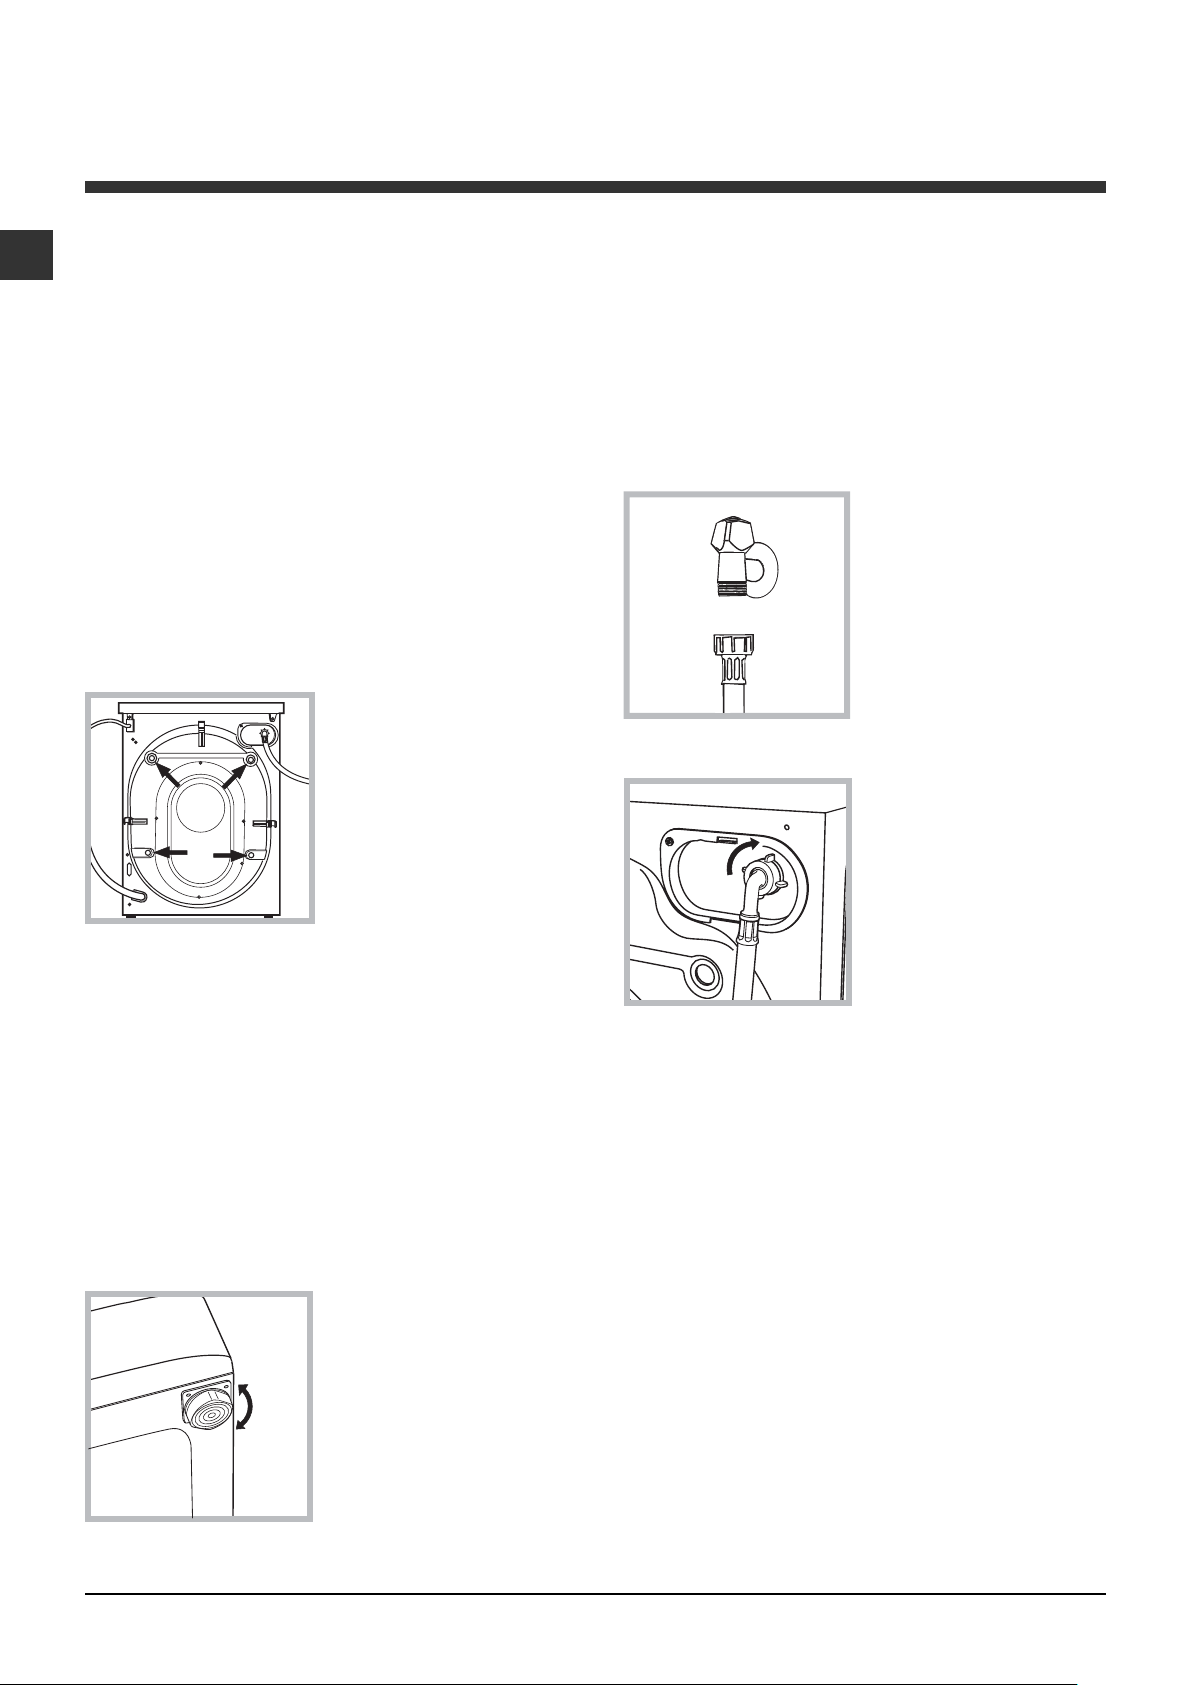
3. Remove the 4
protective screws (used
during transportation) and
the rubber washer with
the corresponding
spacer, located on the
rear part of the appliance
(see figure).
4. Close off the holes using the plastic plugs provided.
5. Keep all the parts in a safe place: you will need
them again if the washing machine needs to be
moved to another location.
Levelling the machine correctly will provide it with
stability, help to avoid vibrations and excessive noise
and prevent it from shifting while it is operating. If it is
placed on carpet or a rug, adjust the feet in such a
way as to allow a sufficient ventilation space
underneath the washing machine.
Connecting the electricity and water
supplies
Connecting the water inlet hose
1. Connect the supply
pipe by screwing it to a
cold water tab using a 3/4
gas threaded connection
(see figure).
Before performing the
connection, allow the
water to run freely until it
is perfectly clear.
2. Connect the inlet hose
to the washing machine
by screwing it onto the
corresponding water inlet
of the appliance, which is
situated on the top righthand side of the rear part
of the appliance (see
figure).
3. Make sure that the hose is not folded over or bent.
! Packaging materials should not be used as toys for
children.
Levelling
1. Install the washing machine on a flat sturdy floor,
without resting it up against walls, furniture cabinets
or anything else.
2. If the floor is not
perfectly level, compensate for any unevenness
by tightening or loosening
the adjustable front feet
(see figure); the angle of
inclination, measured in
relation to the worktop,
must not exceed 2°.
2
! The water pressure at the tap must fall within the
values indicated in the Technical details table (see
next page).
! If the inlet hose is not long enough, contact a
specialised shop or an authorised technician.
!!
!
Never use second-hand hoses.
!!
!!
!
Use the ones supplied with the machine.
!!
Page 3
Connecting the drain hose
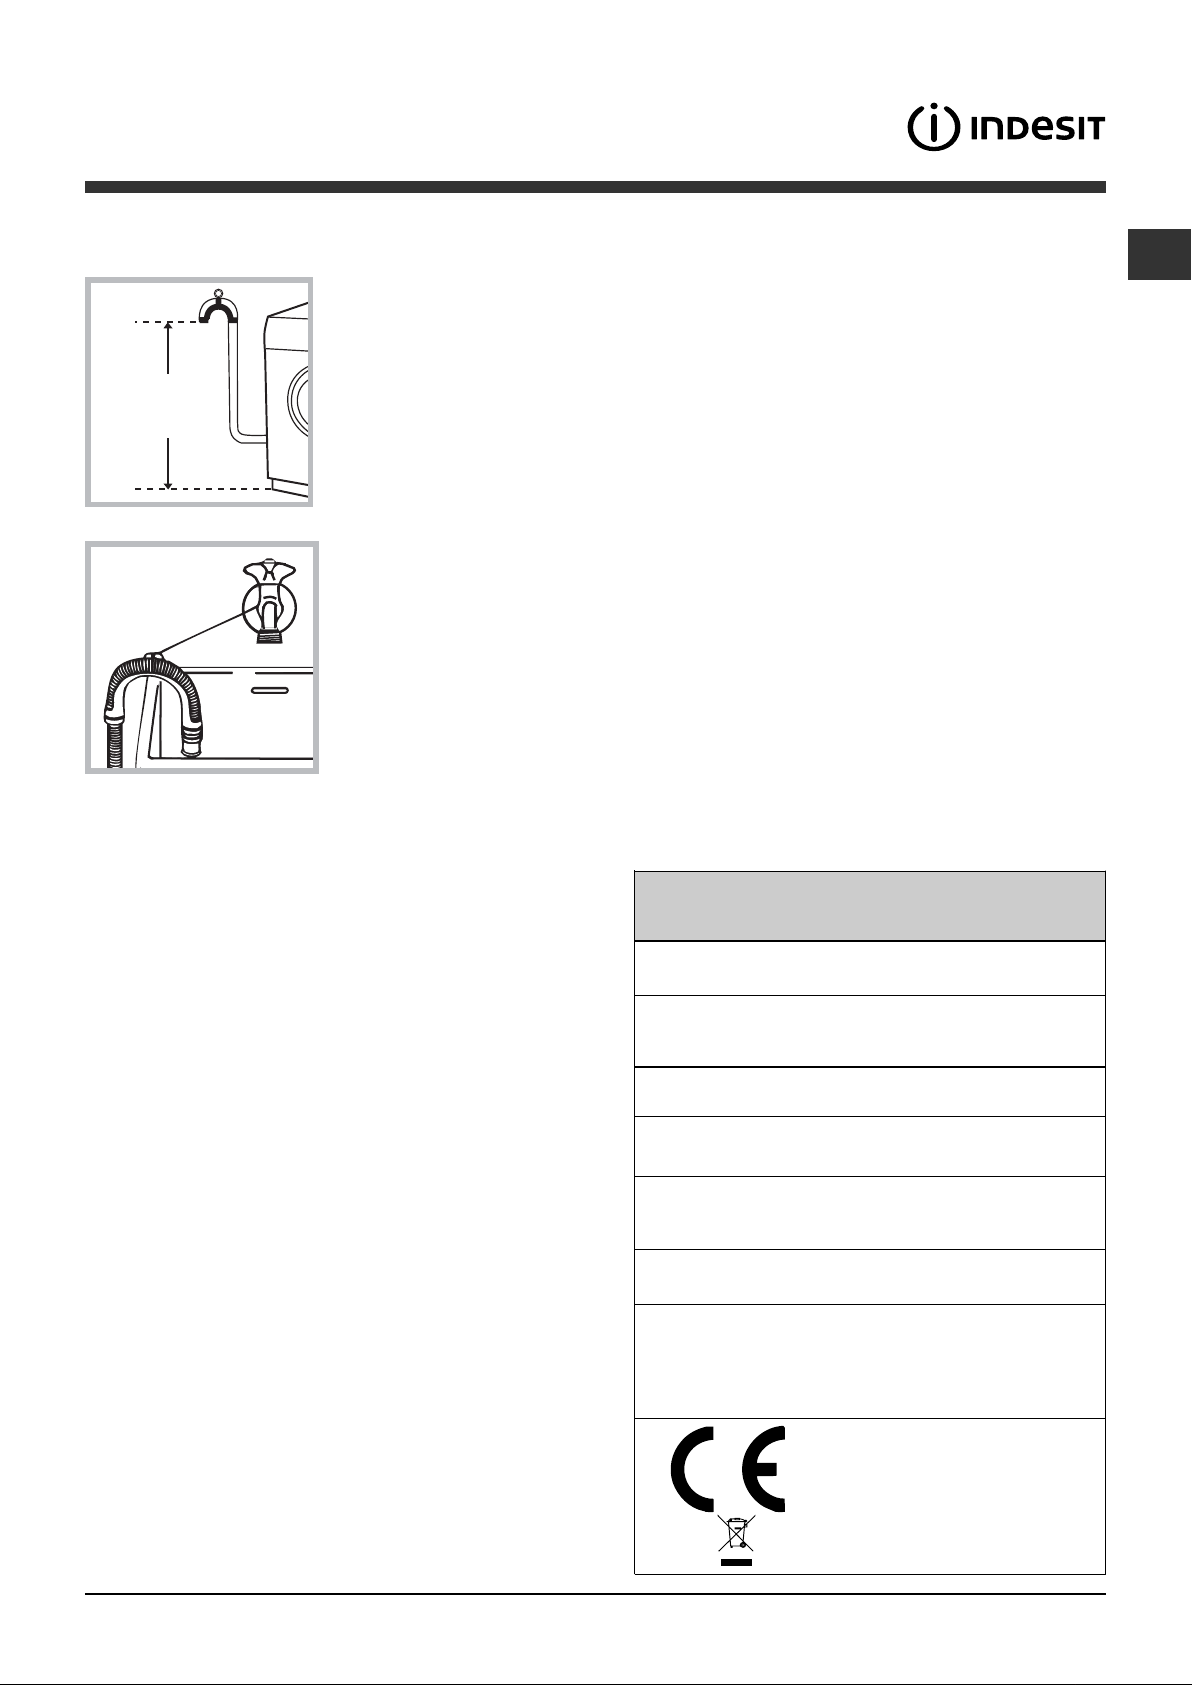
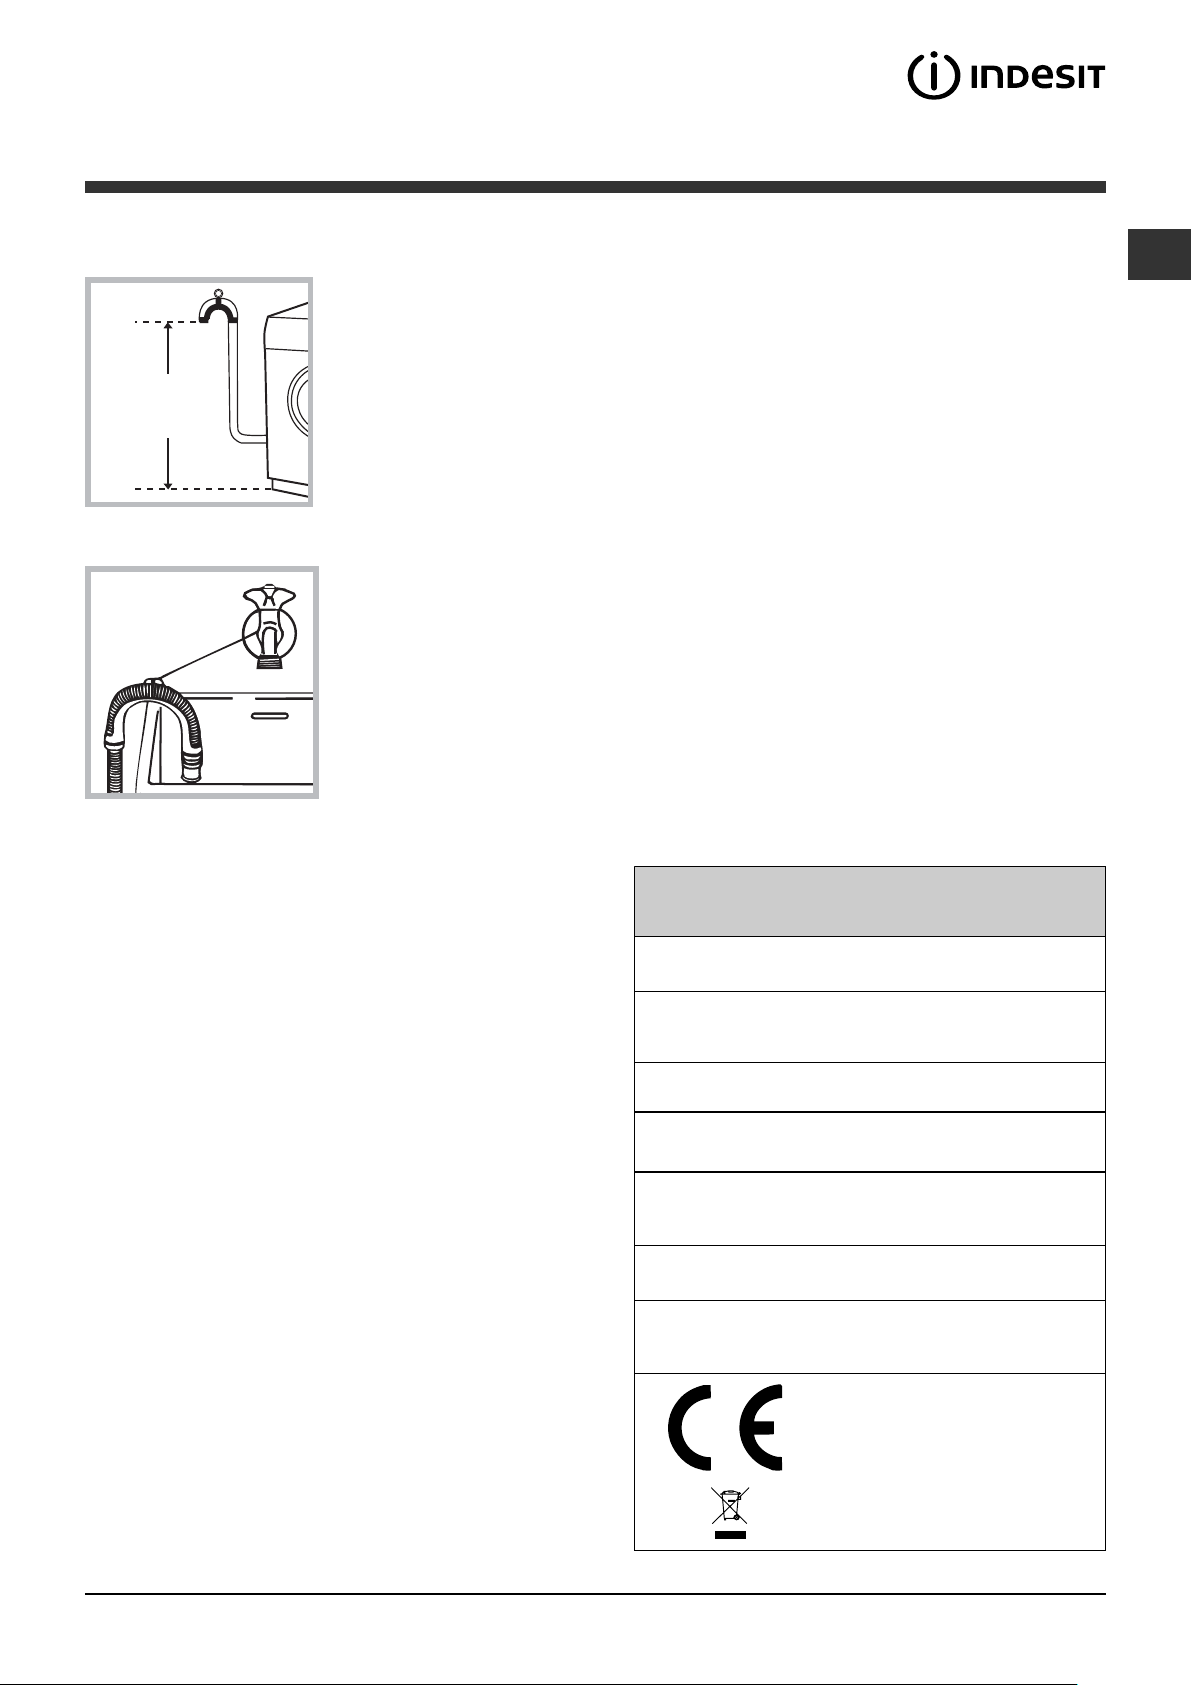
65 - 100 cm
Connect the drain hose,
without bending it, to a
drainage duct or a wall
drain located at a height
between 65 and 100 cm
from the floor;
! Do not use extension cords or multiple sockets.
GB
! The cable should not be bent or compressed.
! The power supply cable must only be replaced by
authorised technicians.
Warning! The company shall not be held responsible
in the event that these regulations are not respected.
The first wash cycle
alternatively, rest it on
the side of a washbasin
or bathtub, fastening the
duct supplied to the tap
(see figure). The free end
of the hose should not
be underwater.
! We advise against the use of hose extensions; if it is
absolutely necessary, the extension must have the
same diameter as the original hose and must not
exceed 150 cm in length.
Electrical connections
Before plugging the appliance into the electricity
socket, make sure that:
• the socket is earthed and complies with all
applicable laws;
• the socket is able to withstand the maximum power
load of the appliance as indicated in the Technical
data table (see opposite);
• the power supply voltage falls within the values
indicated in the Technical data table (see opposite);
Once the appliance has been installed, and before
you use it for the first time, run a wash cycle with
detergent and no laundry, using the wash cycle 2.
Technical data
Model
Dimensions
Capacity
Electrical
connections
Wa ter connections
Spin sp e ed
IWE 7125 S
width 59.5 cm
height 85 cm
depth 53 ,5 cm
from 1 to 7 kg
please refer to th e t ech ni cal dat a
plate fix ed t o t h e mach in e
maximu m pres su re 1 MPa (1 0 bar)
mini mu m pr es s u r e 0.0 5 MPa ( 0 .5 bar )
drum capacity 52 litres
up to 1200 rotations per minute
• the socket is compatible with the plug of the
washing machine. If this is not the case, replace
the socket or the plug.
! The washing machine must not be installed
outdoors, even in covered areas. It is extremely
dangerous to leave the appliance exposed to rain,
storms and other weather conditions.
! When the washing machine has been installed, the
electricity socket must be within easy reach.
Energy rated
programmes
according to
regulation
EN 60456
programme 2; temperature 60°C;
using a load of 7 kg.
Thi s app lian ce co nfo rms t o t he
following EC Directives:
- 89/336/EEC dated 03/05/89
(Electromagnetic Compatibility) and
subsequent modifications
- 2002/96/EC
- 2006/95/EC (Low Voltage)
3
Page 4
Description of the washing
machine
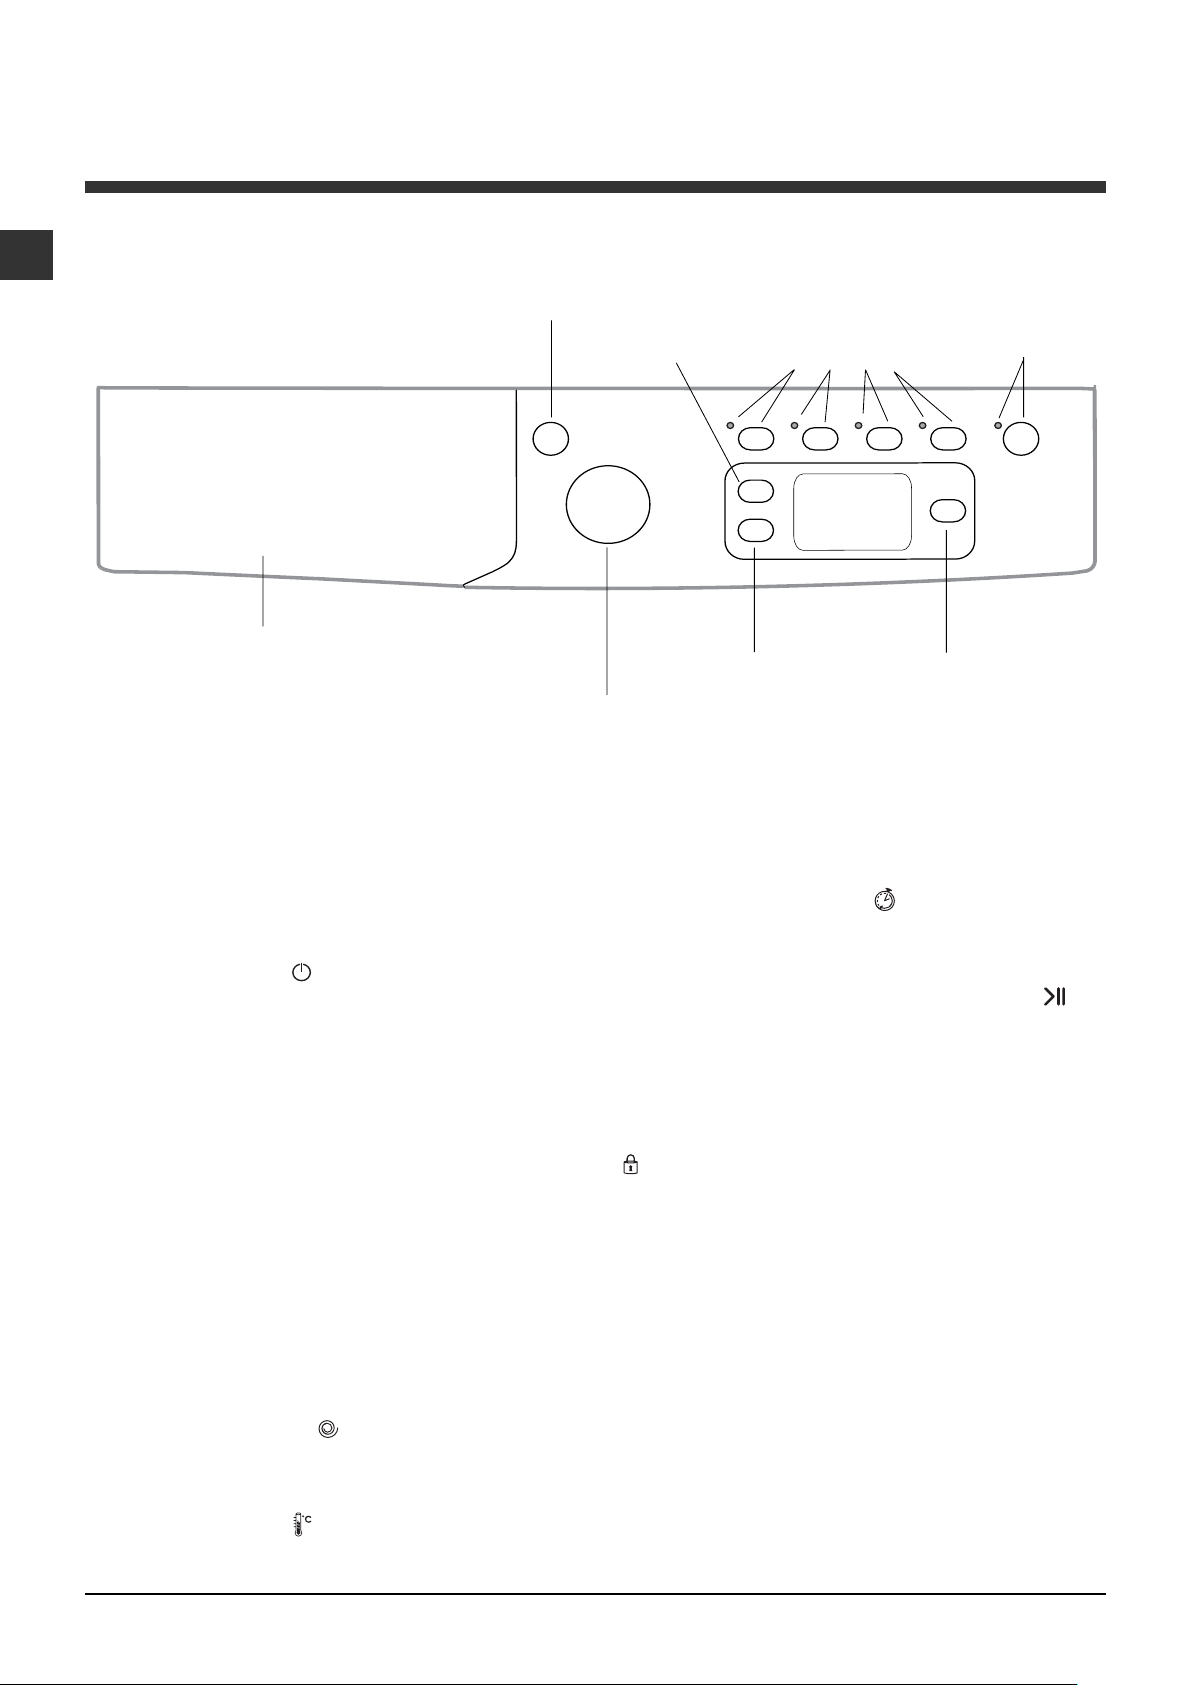
GB
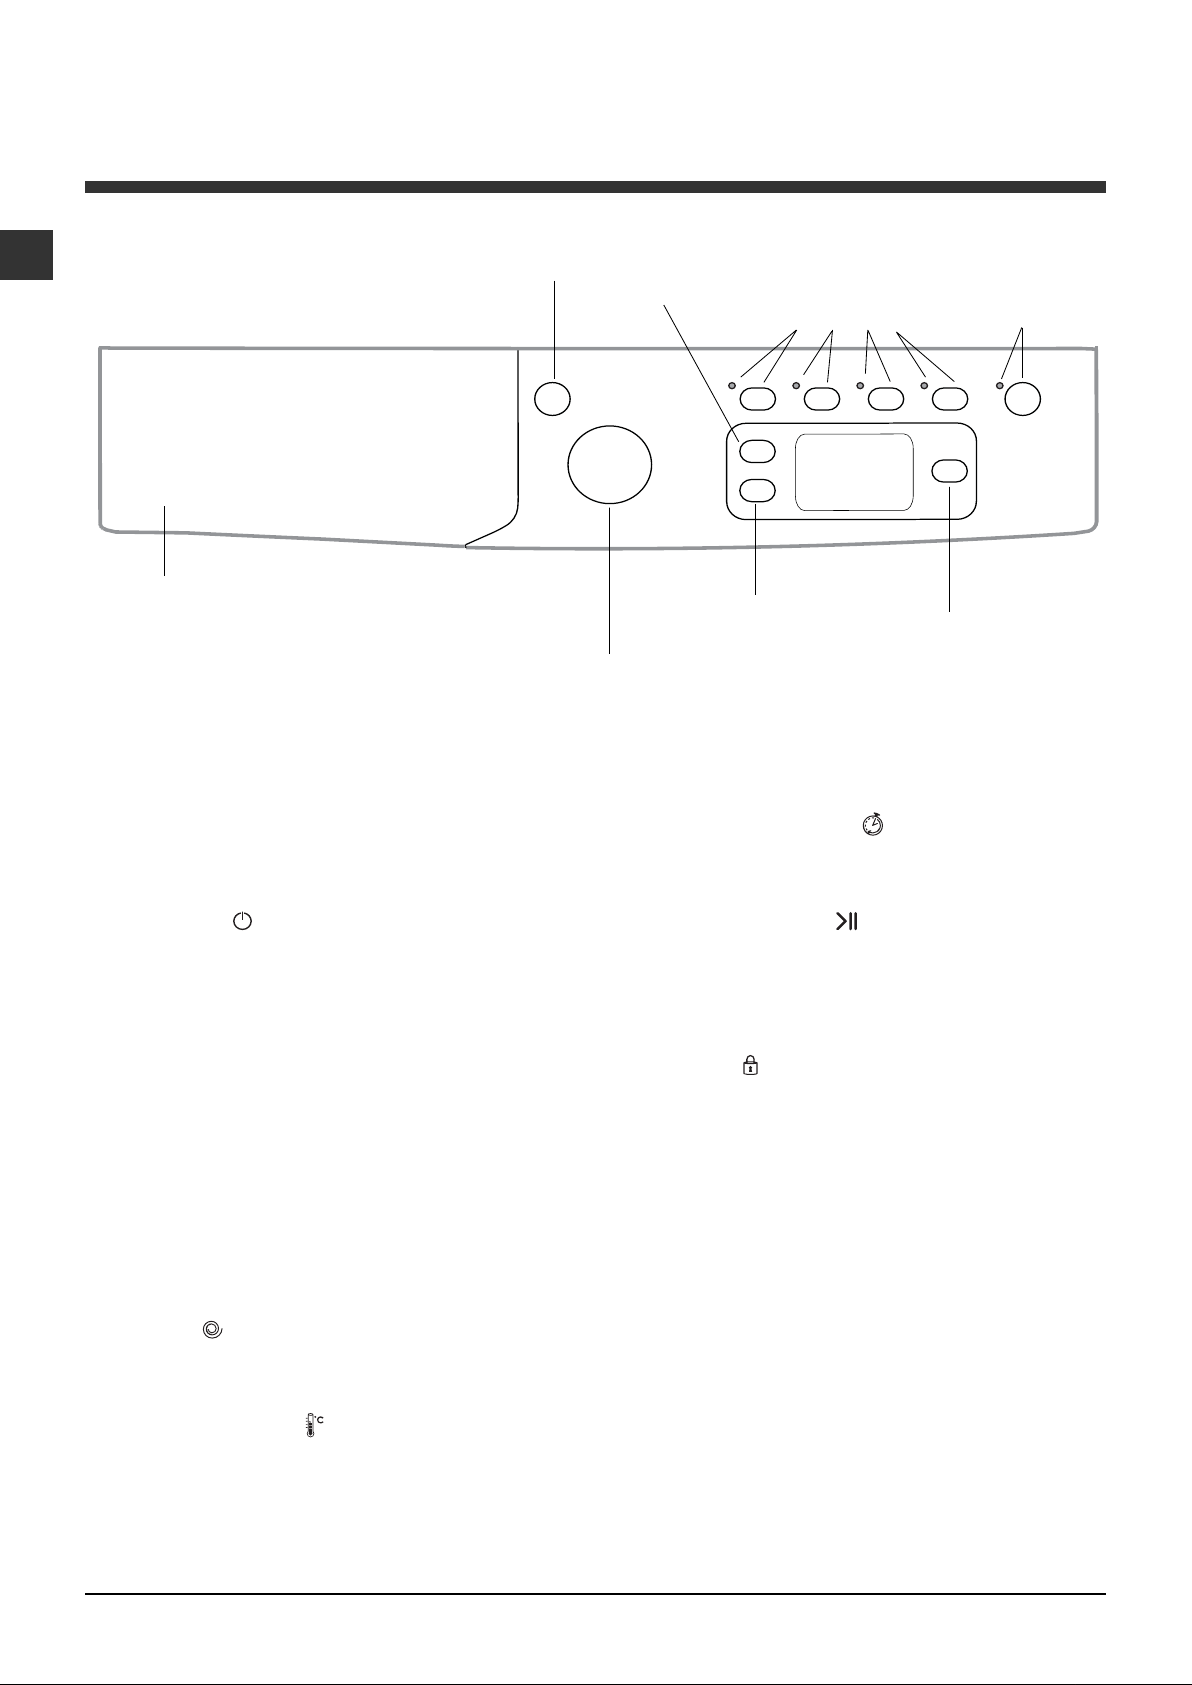
Control panel
Detergent dispenser drawer
ON/OFF
button
WASH CYCLE
knob
TEMPERATURE
Button
SPIN SPEED
Button
OPTION
buttons with
indicator lights
DISPLAY
START/PAUSE
button with indicator light
DELAYED
START
Button
Detergent dispenser drawer: used to dispense
detergents and washing additives (see “Detergents
and laundry”).
ON/OFF button
machine on or off. The START/PAUSE indicator light,
which flashes slowly in a green colour shows that the
machine is switched on. To switch off the washing
machine during the wash cycle, press and hold the
button for approximately 3 seconds; if the button is
pressed briefly or accidentally the machine will not
switch off. If the machine is switched off during a
wash cycle, this wash cycle will be cancelled.
WASH CYCLE knob: used to set the desired wash
cycle (see "Table of wash cycles").
OPTION buttons with indicator light: used to select
the available options. The indicator light corresponding
to the selected option will remain lit.
SPIN button
exclude the spin cycle - the value is indicated on the
display.
: press this briefly to switch the
: press to reduce or completely
DELAYED START button
start time for the selected wash cycle. The delay time
will be shown on the display.
START/PAUSE button
the green indicator light flashes slowly, press the
button to start a wash cycle. Once the cycle has
begun the indicator light will remain lit in a fixed
manner. To pause the wash cycle, press the button
again; the indicator light will flash in an orange colour.
If the symbol
opened. To start the wash cycle from the point at
which it was interrupted, press the button again.
Standby mode
This washing machine, in compliance with new
energy saving regulations, is fitted with an automatic
standby system which is enabled after a few minutes
if no activity is detected. Press the ON-OFF button
briefly and wait for the machine to start up again.
is not illuminated, the door may be
: press to set a delayed
with indicator light: when
TEMPERATURE button
completely exclude the temperature: the value will be
shown on the display.
4
: press to decrease or
Page 5
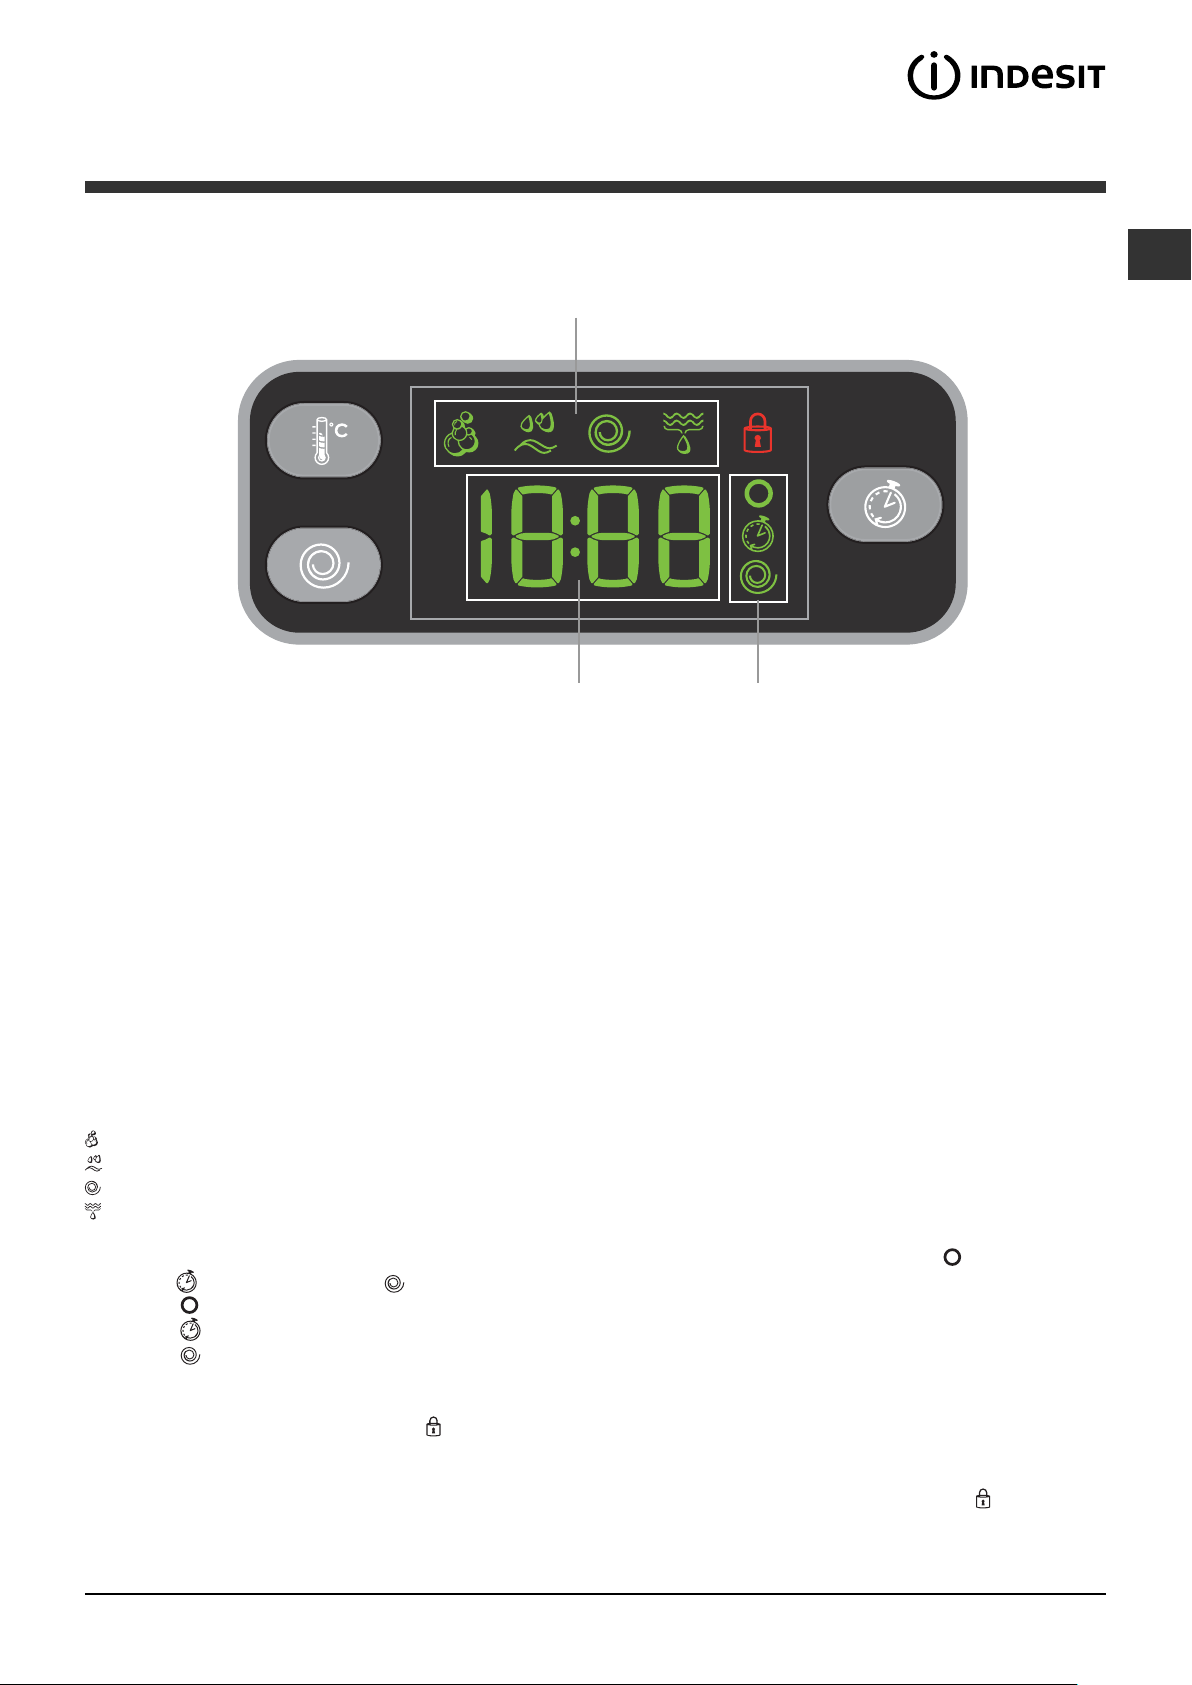
Display
GB
B
A
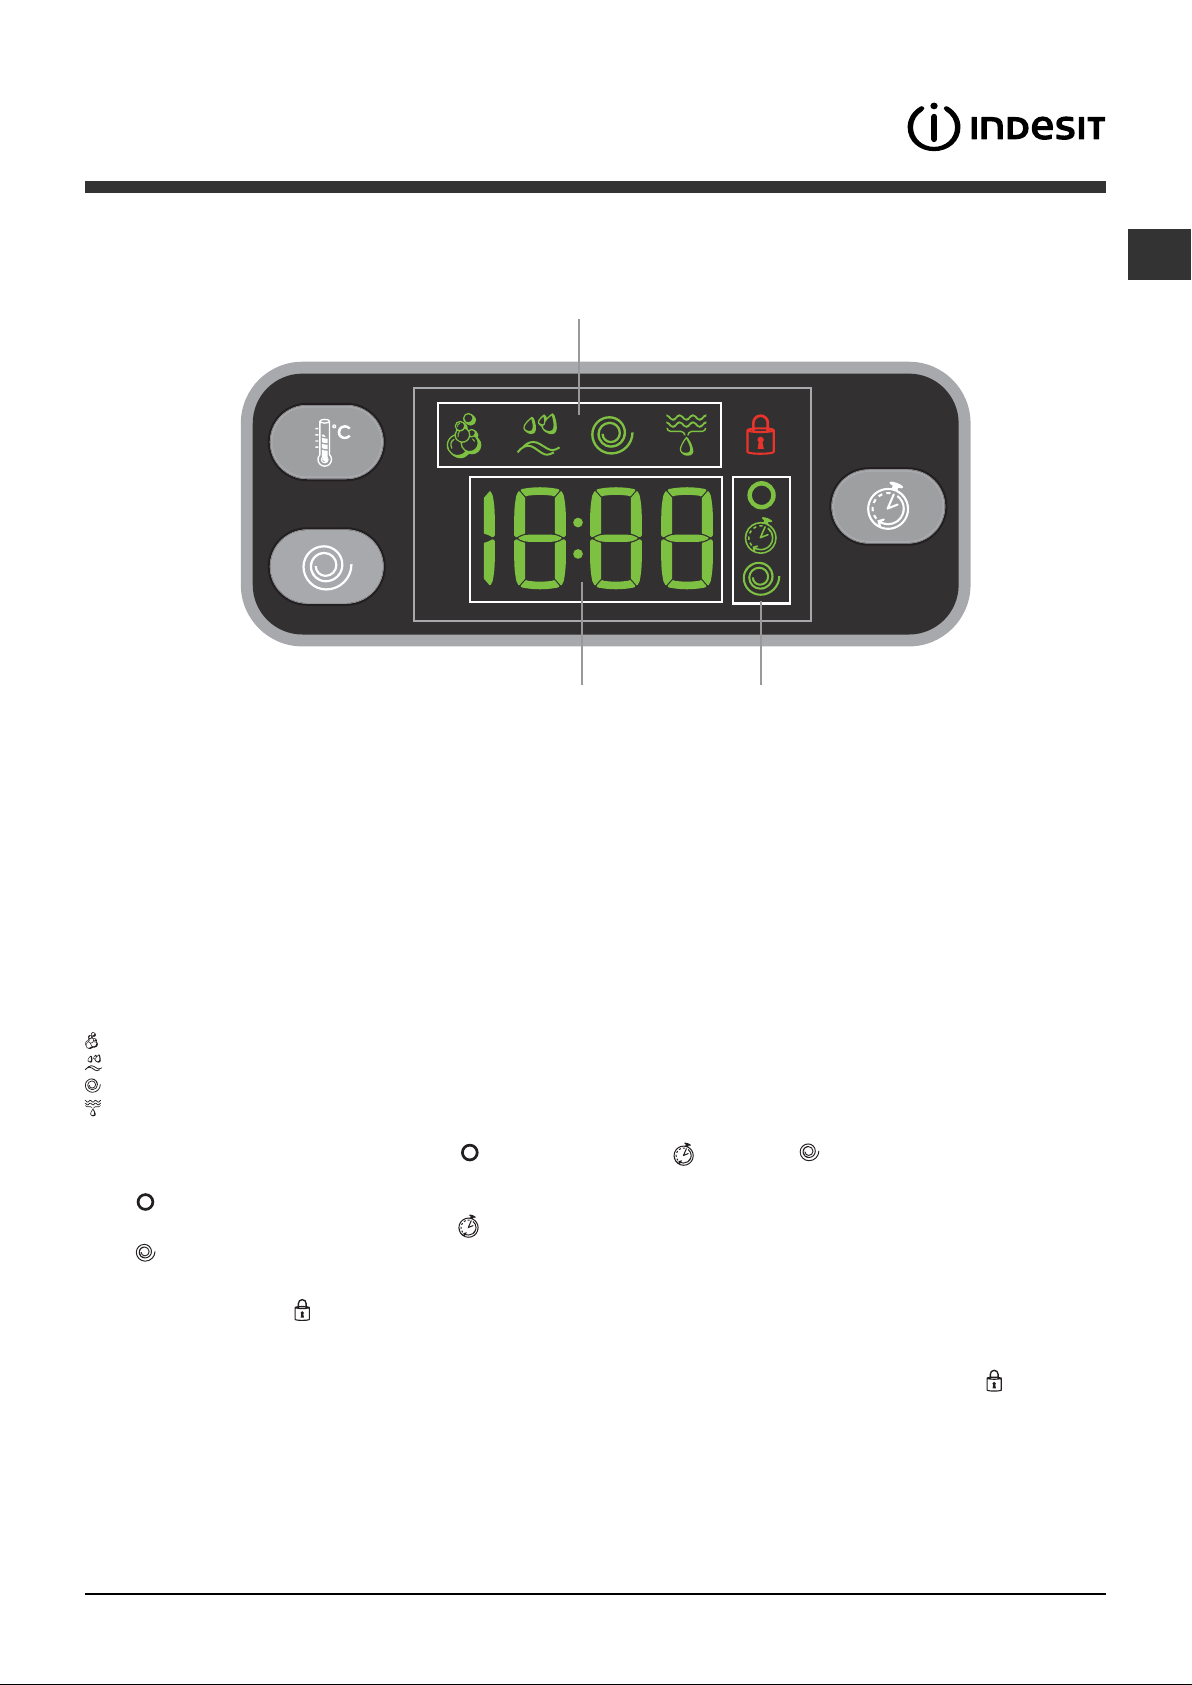
The display is useful when programming the machine and provides a great deal of information.
The duration of the available programmes and the remaining time of a running cycle appear in section A; if the
DELAY START option has been set, the countdown to the start of the selected programme will appear. Pressing
the relative button, the machine automatically displays the maximum temperature and spin speed values set for
the selected cycle, or the most recently-used settings if they are compatible with the selected cycle.
The "programme phases" relative to the selected programme and the "programme phase" of the running
programme appear in section B:
Wash
Rinse
Spin
Drain
The icons corresponding to "temperature"
to bottom:
If the
When a “delayed start” has been set, the
If the
symbol lights up, the display will visualise the set "temperature" value.
symbol lights up, the display will visualise the set "spin" value.
, "Programmed start" and "spin" appear in section C from top
symbol lights up.
C
Door locked symbol
The lit symbol indicates that the door is locked. To prevent any damage, wait until the symbol turns off before
opening the door.
To open the door while a cycle is in progress, press the STAR T/PAUSE button; if the DOOR LOCKED
switched off the door may be opened.
symbol is
5
Page 6
Running a wash cycle
GB
1. SWITCH THE MACHINE ON. Press the
button; the START/PAUSE indicator light will flash
slowly in a green colour.
2. LOAD THE LAUNDRY. Open the porthole door.
Load the laundry, making sure you do not exceed
the maximum load value indicated in the table of
programmes on the following page.
3. MEASURE OUT THE DETERGENT. Pull out the
detergent dispenser drawer and pour the detergent
into the relevant compartments as described in
"Detergents and laundry".
4. CLOSE THE DOOR.
5. SELECT THE WASH CYCLE. Set the WASH
CYCLE knob to the desired programme; a
temperature and spin speed is set for each wash
cycle; these may be adjusted. The duration of the
cycle will appear on the display.
6. CUSTOMISE THE WASH CYCLE. Use the
relevant buttons:
Modifying the temperature and/or spin
speed. The machine automatically displays the
maximum temperature and spin speed values set
for the selected cycle, or the most recently-used
settings if they are compatible with the selected
cycle. The temperature can be decreased by
pressing the
setting is reached. The spin speed may be
progressively reduced by pressing the
until it is completely excluded (the "OFF" setting). If
these buttons are pressed again, the maximum
values are restored.
button, until the cold wash "OFF"
button,
the indicator light corresponding to the first option
selected will flash and only the second option will be
activated; the indicator light corresponding to the
enabled option will remain lit.
! The options may affect the recommended load
value and/or the duration of the cycle.
7. START THE PROGRAMME. Press the START/
PAUSE button. The corresponding indicator light will
become green, remaining lit in a fixed manner, and
the door will be locked (the DOOR LOCKED
symbol
it is in progress, pause the washing machine using
the START/PAUSE button (the START/PAUSE
indicator light will flash slowly in an orange colour);
then select the desired cycle and press the START/
PAUSE button again.
To open the door while a cycle is in progress, press
the START/PAUSE button; if the DOOR LOCKED
symbol is switched off the door may be opened.
Press the START/PAUSE button again to restart the
wash cycle from the point at which it was
interrupted.
8. THE END OF THE WASH CYCLE. This will be
indicated by the text "END" on the display; when
the DOOR LOCKED
may be opened. Open the door, unload the laundry
and switch off the machine.
will be on). To change a wash cycle while
symbol switches off the door
! If you wish to cancel a cycle which has already
begun, press and hold the button. The cycle will be
stopped and the machine will switch off.
Setting a delayed start.
To set a delayed start for the selected programme,
press the corresponding button repeatedly until the
required delay period has been reached. When this
option is enabled, the
display. To remove the delayed start option press
the button until the text "OFF" appears on the
display.
Modifying the cycle
settings.
• Press the button to enable the option; the
indicator light corresponding to the button will
switch on.
• Press the button again to disable the option; the
indicator light will switch off.
symbol lights up on the
! If the selected option is not compatible with the
programmed wash cycle, the indicator light will
flash and the option will not be activated.
! If the selected option is not compatible with
another option which has been selected previously,
6
Page 7
Wash cycles and options
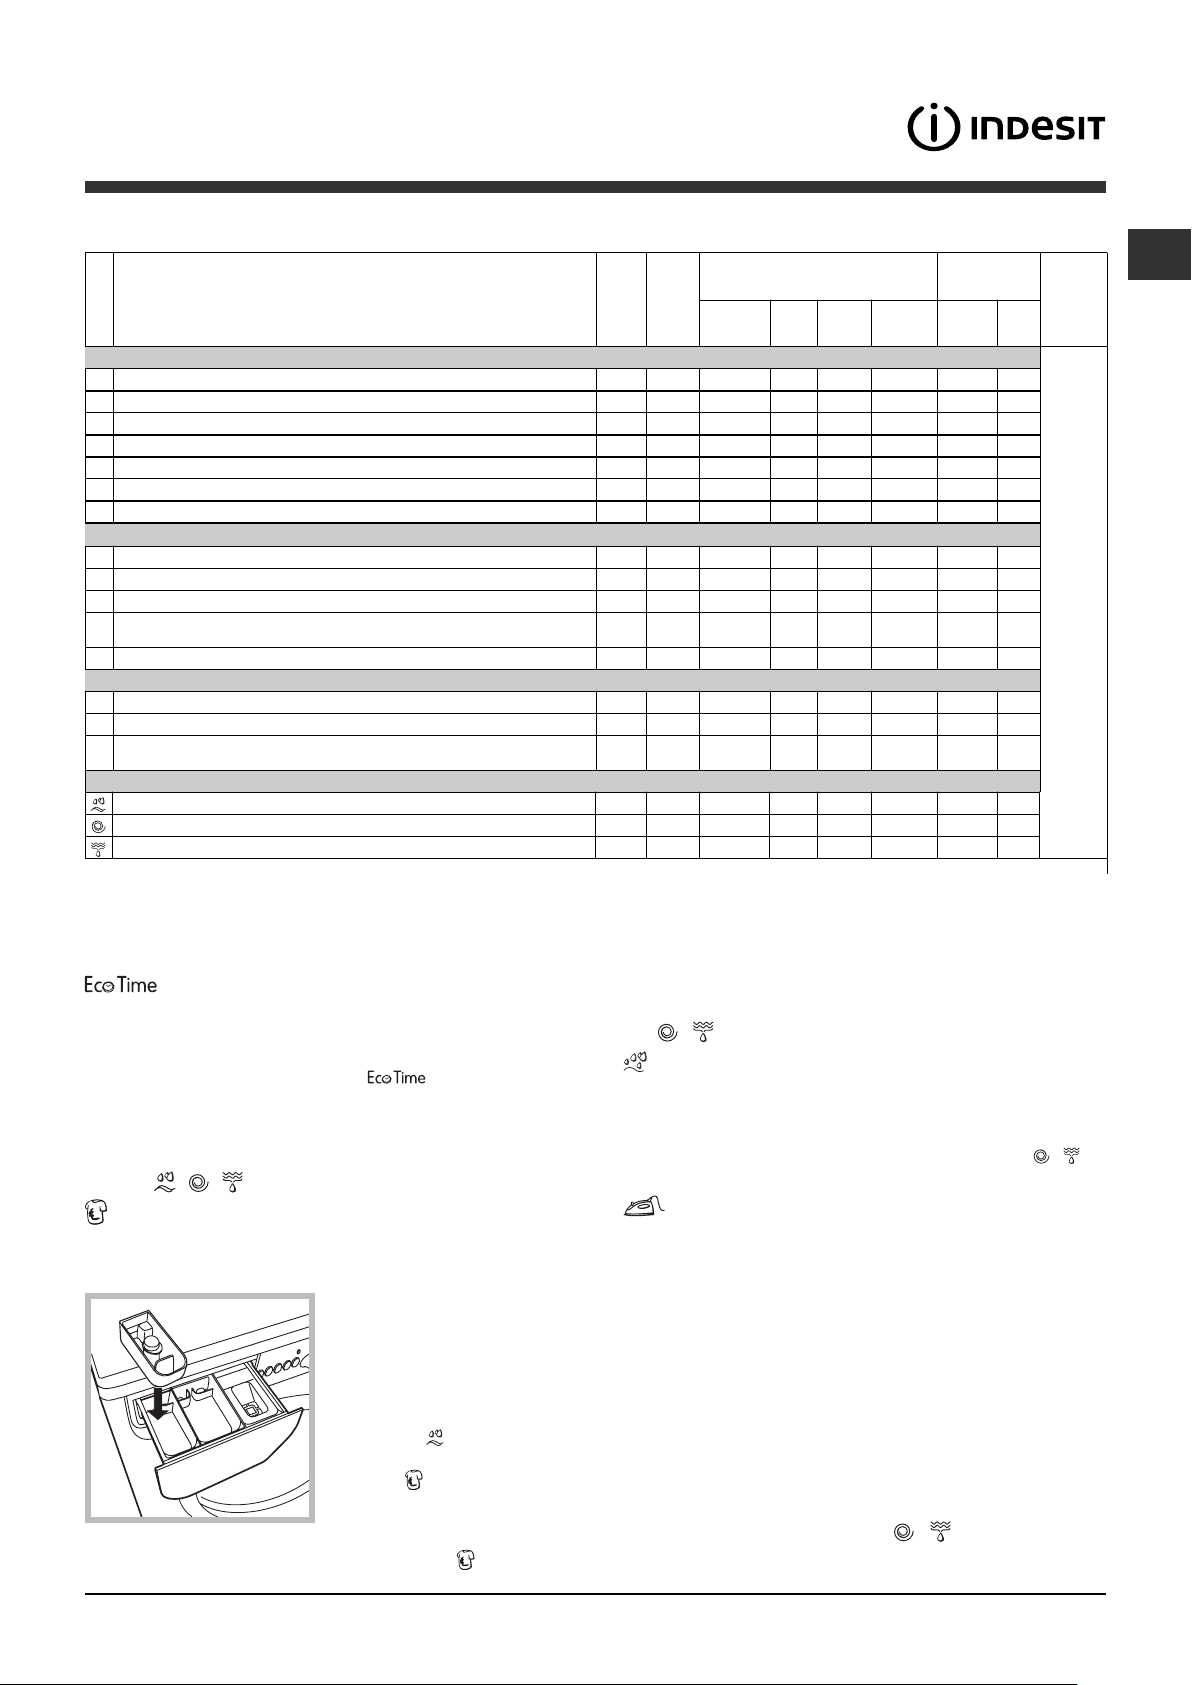
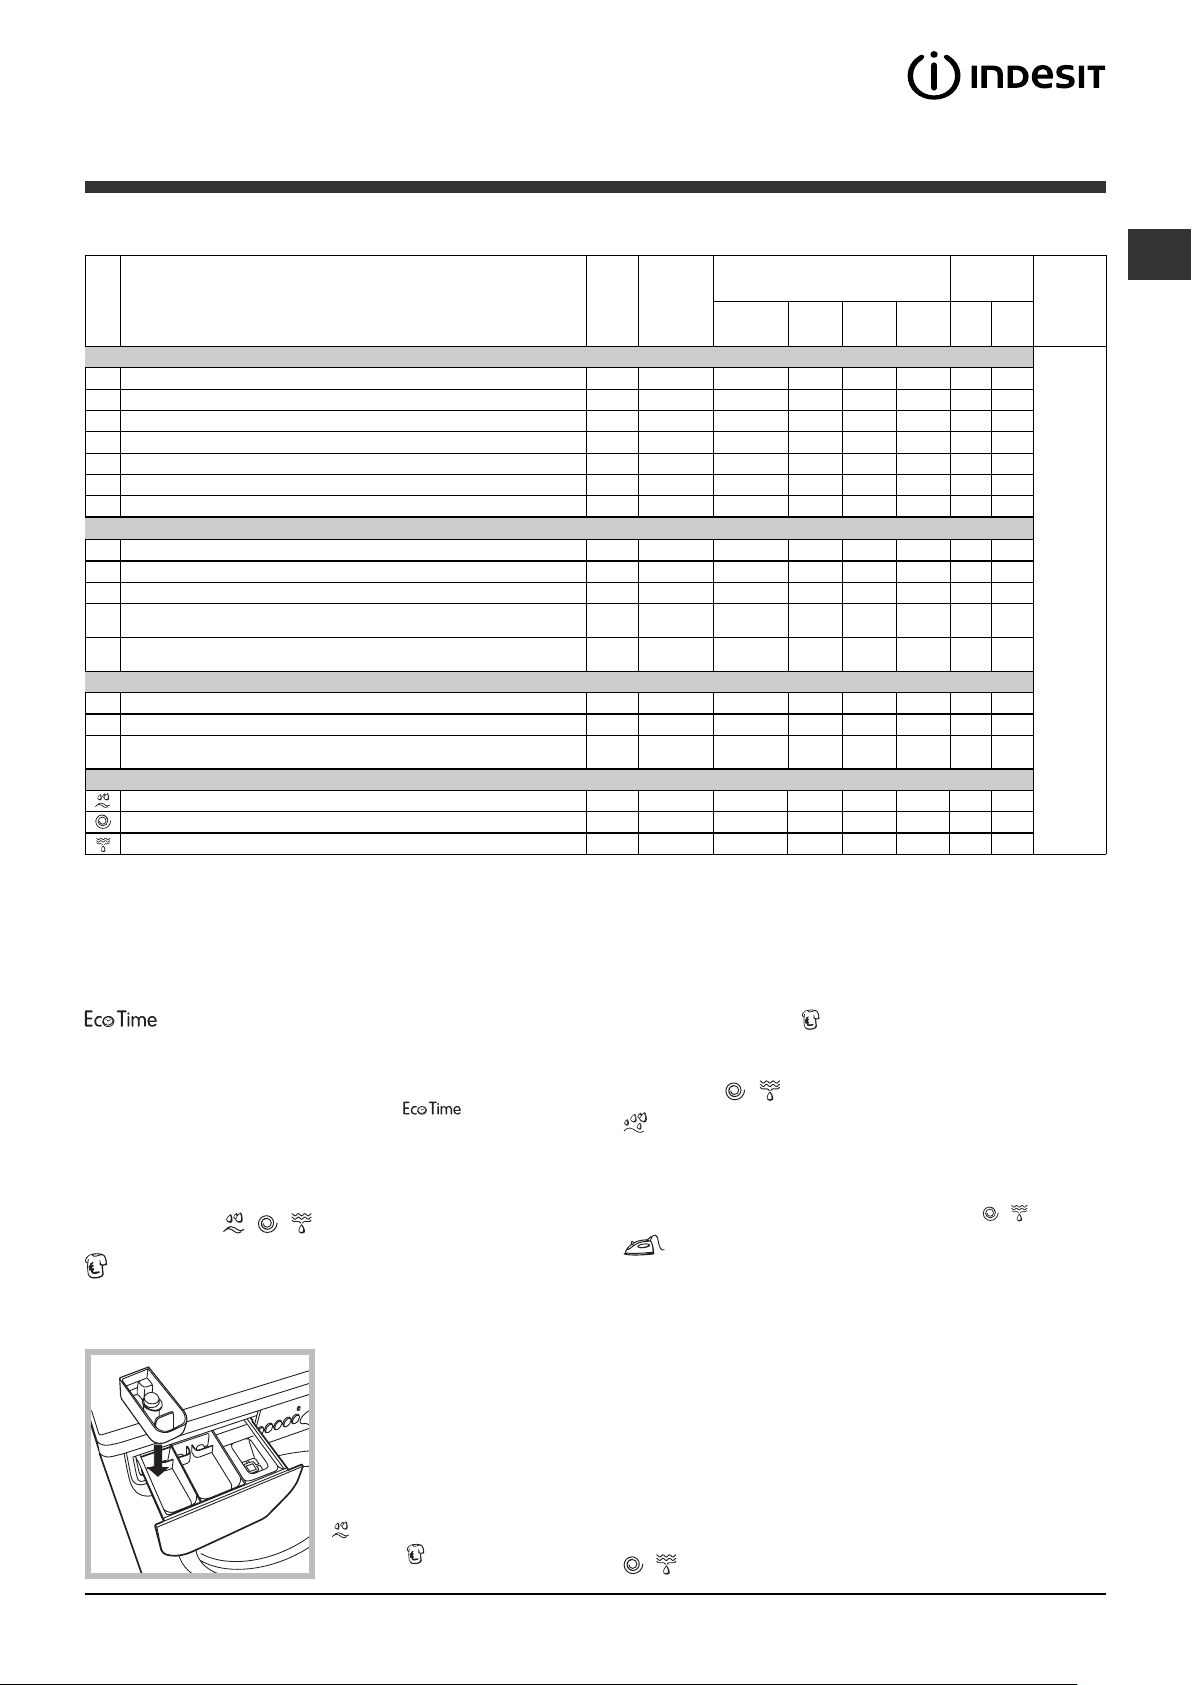
Table of wash cycles
.
Max
Description of the wash cycle
Wash cycles
Daily
1
Cotton with prewash: extremely so iled w h it es.
2
Cotton: extremely soiled w hites .
2
Co tton (1 ): heavily soiled wh it es an d res is tan t colours.
2
Co tton (2 ): heavily soiled whites an d delicate colou rs .
3
Cotton: heavily soiled w h ites an d resis t ant colo u rs .
4
Coloured C ottons (3): lightly soiled wh it es an d delicate colou rs .
5
Synthetics: light ly so iled resis tan t colou r s.
Special
6
Wool: for wo o l, cas h m ere, etc.
7
Silk/Curtains: for garments in silk an d visco se, ling erie.
8
Jeans
Express: to refresh light ly s oiled garmen ts qu ickly (n ot s u it able for
9
wool, silk an d cloth es w h ich requ ire was h in g by h an d).
10
Outwear
Sport
11
Sport Intensive
12
Spor t L i gh t
13
Spor t S h oe s
Partial wash cycles
Rinse - 1200
Spin - 1200
Drain - 0
For all T est Institutes:
1) T est wash cycle in compliance with regulation EN 60456: set wash cycle 2 with a temperature of 60°C.
2) Long wash cycle for cottons: set wash cycle 2 with a temperature of 40°C.
3) Short wash cycle for cottons: set wash cycle 4 with a temperature of 40°C.
Wash options
Selecting this option enables you to suitably adjust
drum rotation, temperature and water to a reduced
load of lightly soiled cotton and synthetic fabrics (refer
to the "Table of wash cycles"). “
to wash in less time thereby saving water and
electricity. We suggest using a liquid detergent
suitably measured out to the load quantity.
! It cannot be used with the 1, 2, 6, 7, 8, 9, 10, 11,
12, 13,
Stain removal
This option is particularly useful for the removal of
stubborn stains. Place extra compartment 4 (supplied)
into compartment 1.
and any fabric softener you wish to use, set the desired
wash cycle and enable the "Stain removal"
, , programmes.
4
3
2
1
When pouring in the bleach,
be careful not to exceed the
"max" level marked on the
central pivot (see figure).To
run the bleach cycle on its
own, pour the bleach into
extra compartment 4, set
the "Rinse"
and activate the "Stain
removal"
To bleach during a wash
cycle, pour in the detergent
” enables you
programme
option.
option.
Max.
temp.
speed
(°C)
(rpm)
Prewash Wash Bleach
90° 1200
90° 1200
60° 1200
40° 1200
60° 1200
40° 1200
60° 800
40° 600
30° 0
40° 800
30° 800
30° 400
30° 600
30° 600
30° 600
zz
-
-
-
-
-
-
-
-
-
-
-
-
-
-
--
----
----
The information contained in the table is intended as a guide only.
The use of extra compartment 4 excludes the “Prewash” option.
! It cannot be used with the 1, 6, 7, 8, 9, 10, 11, 12,
13,
, programmes.
Extra rinse
By selecting this option, the efficiency of the rinse is
increased and optimal detergent removal is
guaranteed. It is particularly useful for sensitive skin.
! It cannot be used in conjunction with the 9, ,
programmes.
Easy iron
By selecting this function, the wash and spin cycles
will be modified in order to reduce the formation of
creases. At the end of the cycle the washing machine
will perform slow rotations of the drum; the indicator
lights for the EASY IRON and START/PAUSE options
will flash (the first one green, the second orange). To
end the cycle, press the START/PAUSE button or the
EASY IRON button. For the 7-10 wash cycles, the
machine will end the cycle while the laundry is
soaking and the EASY IRON and START/PAUSE
indicator lights will flash and the RINSE phase will
remain lit in a fixed manner. To drain the water so that
the laundry may be removed, press the START/
PAUSE button or the EASY IRON button.
!
This function may not be used in conjunction with
wash cycles 6, 9, 11, 12, 13,
Detergents
Fabric
softener
z
-
zz z
zz z
zz z
zz z
zz z
zz z
z
z
z
z
z
z
z
z
z
-
z
-
z
-
z
-
--
z
-
z
-
z
-
zz
, .
Max. load
(kg)
Normal
Eco
Time
7
7
7
7
73,5
73,5
32
1,5
1
3
1,5
2
3 3 -
Max. 2
pairs
7
7
7
-
-
-
-
-
-
-
-
-
-
-
-
-
GB
Cycle
duration
The duration of the wash cycles can be checked
on the display.
7
Page 8
Detergents and laundry
GB
Detergent dispenser drawer
Good washing results also depend on the correct
dose of detergent: adding too much detergent will not
necessarily result in a more efficient wash, and may in
fact cause build up on the inside of your appliance
and contribute to environmental pollution.
! Do not use hand washing detergents because these
create too much foam.
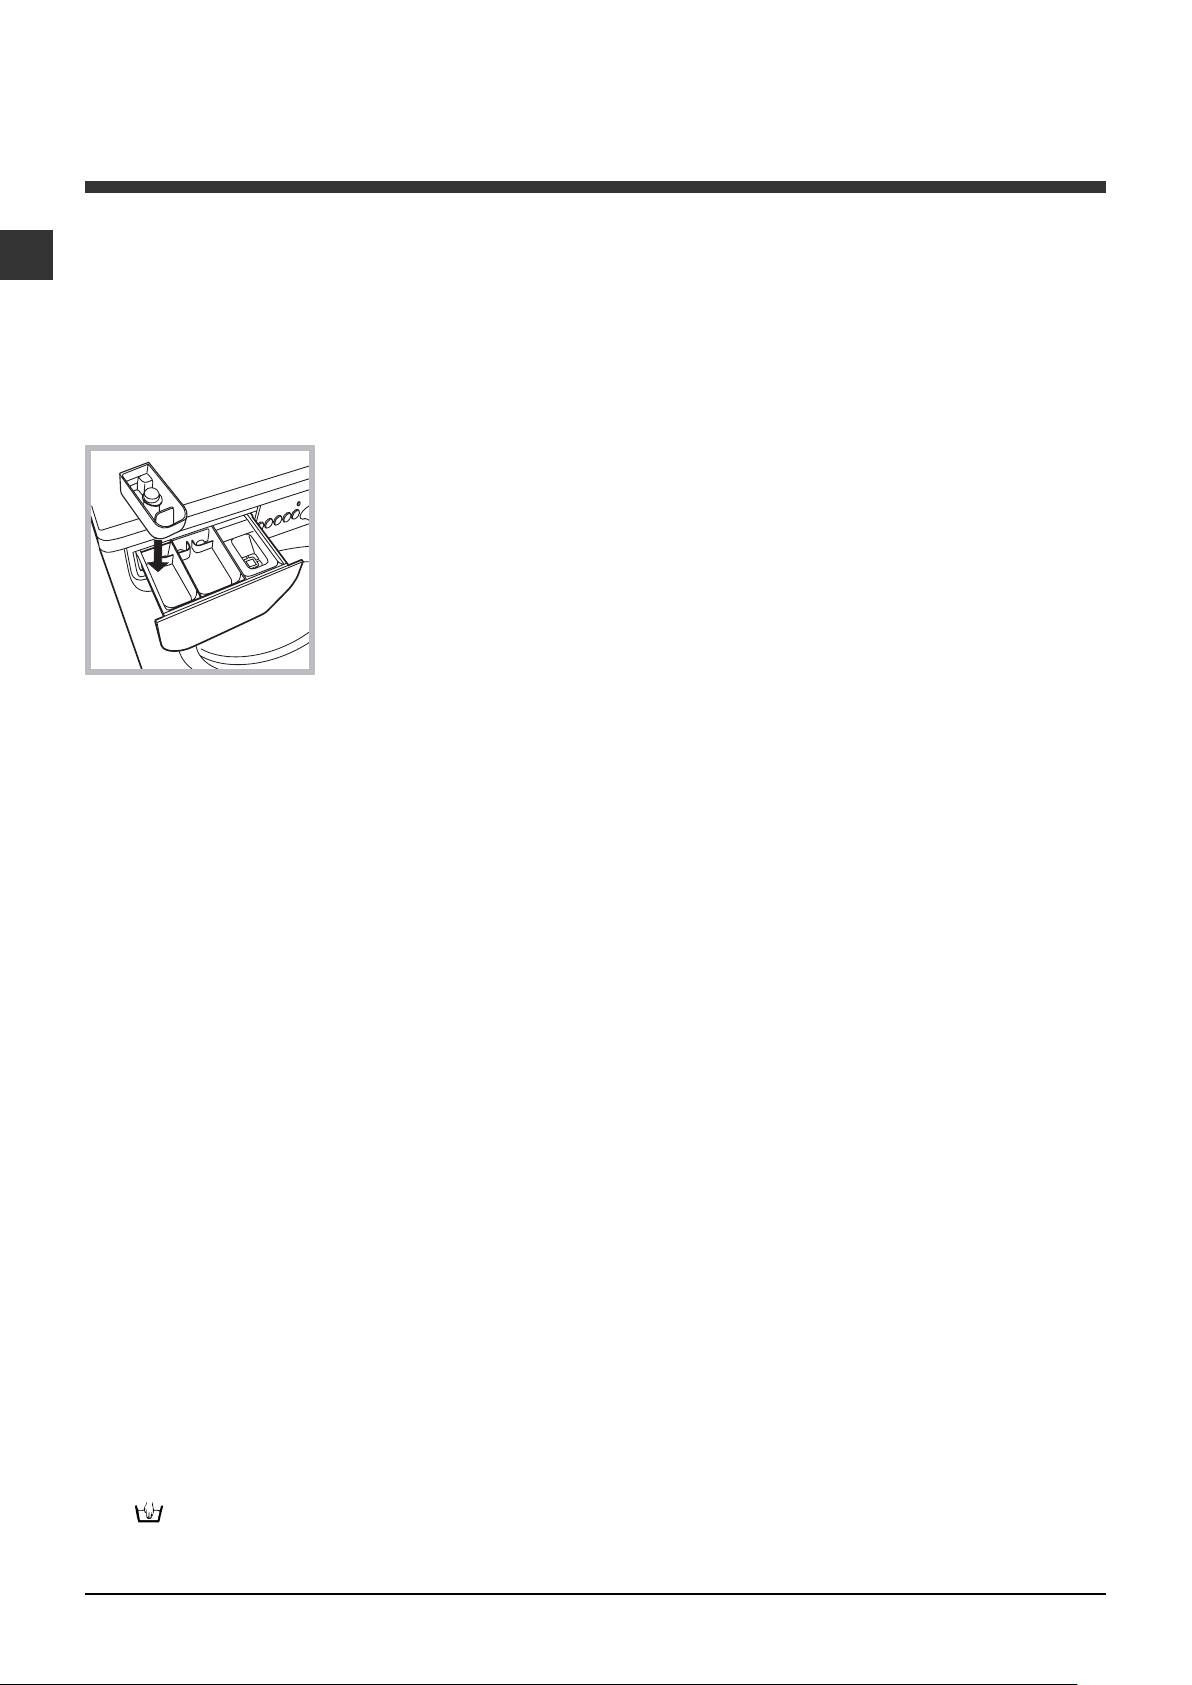
Open the detergent
4
3
dispenser drawer and
pour in the detergent or
washing additive, as
follows.
2
1
compartment 1: Pre-wash detergent (powder)
Before pouring in the detergent, make sure that extra
compartment 4 has been removed.
compartment 2: Detergent for the wash cycle
(powder or liquid)
Liquid detergent should only be poured in immediately
prior to the start of the wash cycle.
compartment 3: Additives (fabric softeners, etc.)
The fabric softener should not overflow the grid.
extra compartment 4: Bleach
Preparing the laundry
• Divide the laundry according to:
- the type of fabric/the symbol on the label
- the colours: separate coloured garments from whites.
• Empty all garment pockets and check the buttons.
• Do not exceed the listed values, which refer to the
weight of the laundry when dry:
Durable fabrics: max. 7 kg
Synthetic fabrics: max. 3 kg
Delicate fabrics: max. 2 kg
Wool: max. 1,5 kg
Silk: max. 1 kg
How much does your laundry weigh?
1 sheet 400-500 g
1 pillow case 150-200 g
1 tablecloth 400-500 g
1 bathrobe 900-1200 g
1 towel 150-250 g
Silk: use special wash cycle 7 to wash all silk
garments. We recommend the use of special
detergent which has been designed to wash delicate
clothes.
Curtains:
case or mesh bag. Use wash cycle 7.
Jeans: Turn garments inside-out before washing and
use a liquid detergent. Use programme 8.
Express: this wash cycle was designed to wash
lightly soiled garments quickly: it lasts just 15 minutes
and therefore saves both energy and time. By
selecting this wash cycle (
wash different fabrics together (except for wool and
silk items), with a maximum load of 1.5 kg.
Outwear
water-r epellent fabrics and winter jackets (e.g. Gor eT ex, polyester, nylon); for best results, use a liquid
detergent and dosage suitable for a half-load; pretreat necks, cuffs and stains if necessary; do not use
softeners or detergents containing softeners. Stuffed
duvets cannot be washed with this programme.
Sport Intensive (
heavily soiled sports clothing fabrics (tracksuits,
shorts, etc.); for best results, we recommend not
exceeding the maximum load indicated in the "Table
of wash cycles".
Sport Light (
soiled sports clothing fabrics (tracksuits, shorts, etc.);
for best results, we recommend not exceeding the
maximum load indicated in the "T able of wash
cycles". We recommend using a liquid detergent and
dosage suitable for a half-load.
Sport Shoes (
shoes; for best results, do not wash more than 2 pairs
simultaneously.
fold curtains and place them in a pillow
9
at 30°C), it is possible to
(
wash cycle
10): is studied for washing
wash cycle
wash cycle
wash cycle
11): is for washing
12): is for washing lightly
13): is for washing sports
Load balancing system
Before every spin cycle, to avoid excessive vibrations
and to distribute the load in a uniform manner, the
drum rotates continuously at a speed which is slightly
greater than the washing rotation speed. If, after
several attempts, the load is not balanced correctly,
the machine spins at a reduced spin speed. If the
load is excessively unbalanced, the washing machine
performs the distribution process instead of spinning.
To encourage improved load distribution and balance,
we recommend small and large garments are mixed
in the load.
Special wash cycles
Wool: All wool garments can be washed using
programme 6, even those carrying the "hand-wash
only"
detergents and do not exceed 1,5 kg of laundry.
8
label. For best results, use special
Page 9
Precautions and tips
20
! This washing machine was designed and
constructed in accordance with international safety
regulations. The following information is provided for
safety reasons and must therefore be read carefully.
General safety
• This appliance was designed for domestic use only.
• The washing machine must only be used by adults, in
accordance with the instructions provided in this manual.
• Do not touch the machine when barefoot or with
wet or damp hands or feet.
• Do not pull on the power supply cable when
unplugging the appliance from the electricity
socket. Hold the plug and pull.
• Do not open the detergent dispenser drawer while
the machine is in operation.
• Do not touch the drained water as it may reach
extremely high temperatures.
• Never force the porthole door. This could damage
the safety lock mechanism designed to prevent
accidental opening.
• If the appliance breaks down, do not under any
circumstances access the internal mechanisms in
an attempt to repair it yourself.
• Always keep children well away from the appliance
while it is operating.
• The door can become quite hot during the wash cycle.
• If the appliance has to be moved, work in a group
of two or three people and handle it with the utmost
care. Never try to do this alone, because the
appliance is very heavy.
• Before loading laundry into the washing machine,
make sure the drum is empty.
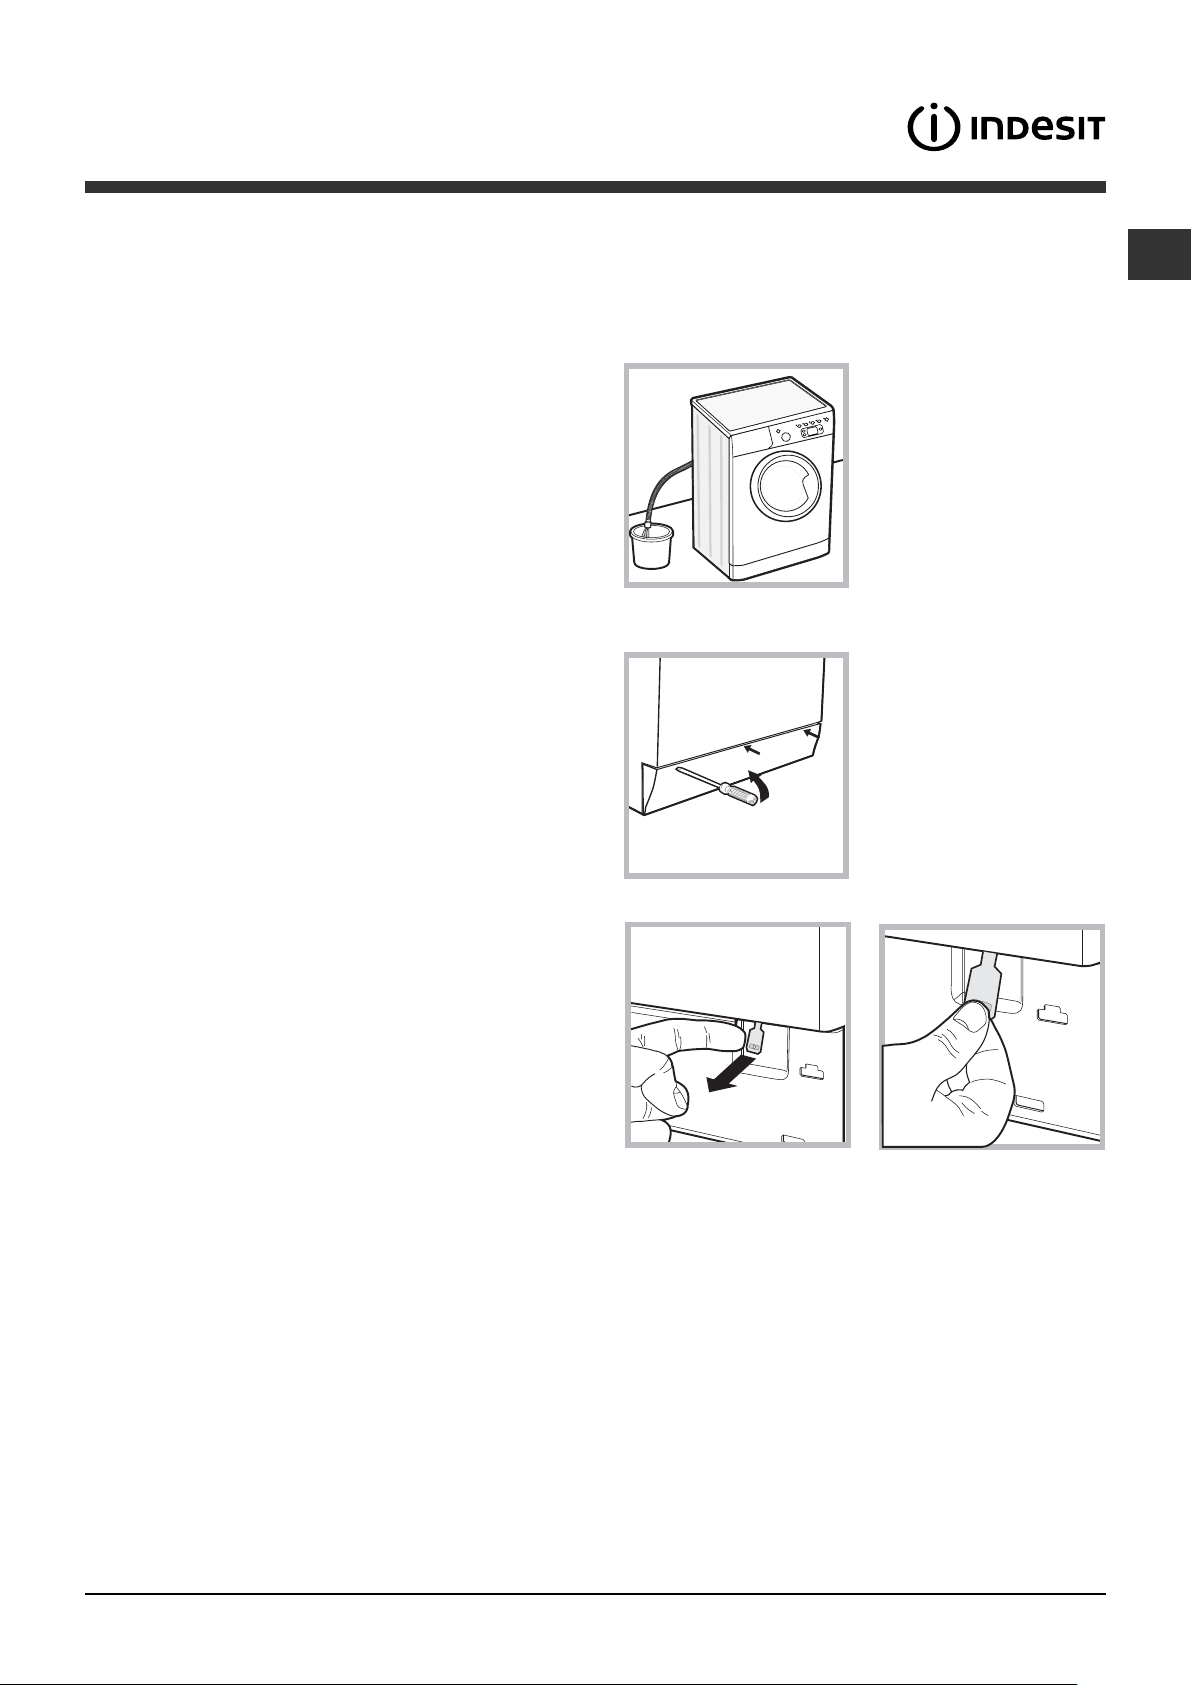
Opening the porthole door manually
In the event that it is not possible to open the
porthole door due to a powercut, and if you wish to
remove the laundry, proceed as follows:
1. remove the plug from
the electrical socket
2. make sure the water
level inside the machine is
lower than the door
opening; if it is not, remove
excess water using the
drain hose, collecting it in a
bucket as indicated in the
figure.
3. using a screwdriver,
remove the cover panel on
the lower front part of the
washing machine (see
.
figure)
.
GB
Disposal
• Disposing of the packaging materials: observe local
regulations so that the packaging may be re-used.
• The European Directive 2002/96/EC on Waste
Electrical and Electronic Equipment, requires that
old household electrical appliances must not be
disposed of in the normal unsorted municipal waste
stream. Old appliances must be collected
separately in order to optimise the recovery and
recycling of the materials they contain and reduce
the impact on human health and the environment.
The crossed out "wheeled bin" symbol on the
product reminds you of your obligation, that when
you dispose of the appliance it must be separately
collected.
Consumers should contact their local authority or
retailer for information concerning the correct
disposal of their old appliance.
4. pull outwards using the tab as indicated in the
figure, until the plastic tie-rod is freed from its stop
position; pull downwards and open the door at the
same time.
5. reposition the panel, making sure the hooks are
securely in place before you push it onto the
appliance.
9
Page 10
Care and maintenance
GB
Cutting off the water and electricity
supplies
• Turn off the water tap after every wash cycle. This
will limit wear on the hydraulic system inside the
washing machine and help to prevent leaks.
• Unplug the washing machine when cleaning it and
during all maintenance work.
Cleaning the washing machine
The outer parts and rubber components of the
appliance can be cleaned using a soft cloth soaked
in lukewarm soapy water. Do not use solvents or
abrasives.
Cleaning the detergent dispenser
drawer
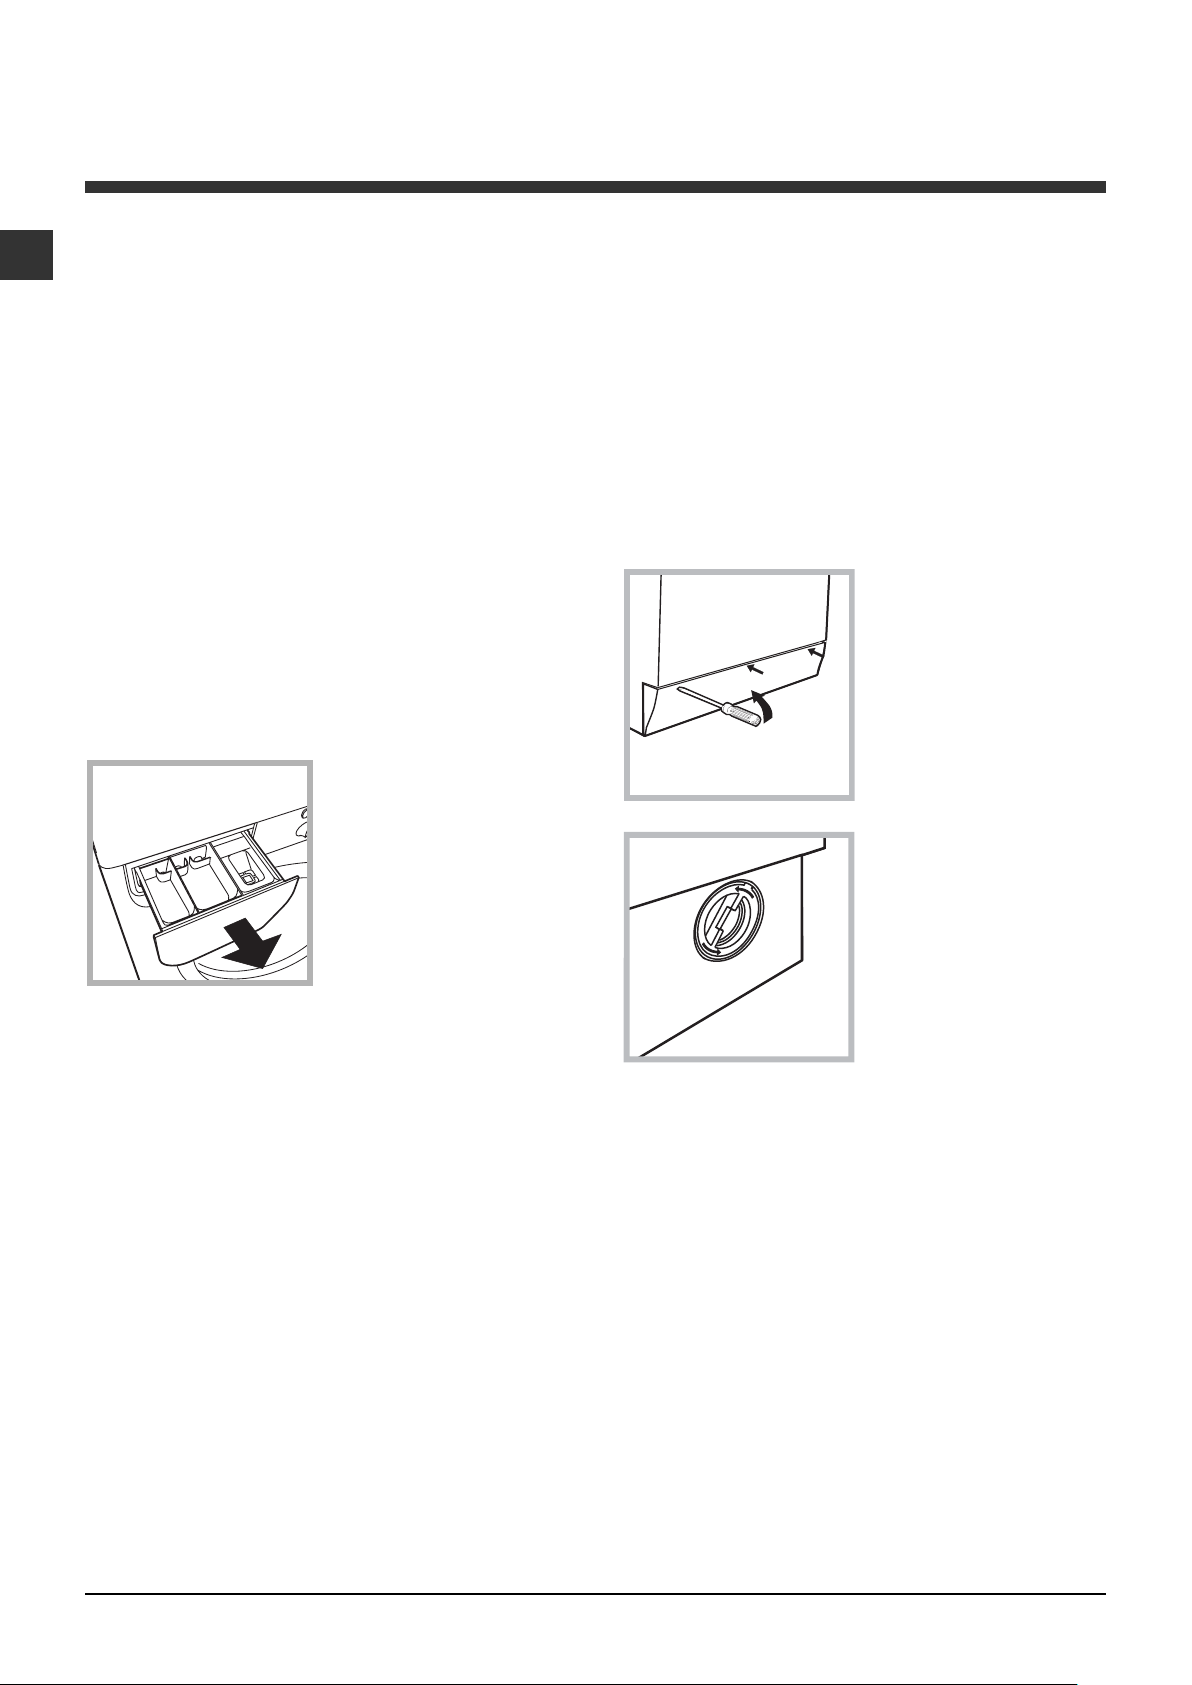
Remove the dispenser
by raising it and pulling it
out (see figure).
Wash it under running
water; this operation
should be repeated
frequently.
Cleaning the pump
The washing machine is fitted with a self-cleaning
pump which does not require any maintenance.
Sometimes, small items (such as coins or buttons)
may fall into the pre-chamber which protects the
pump, situated in its bottom part.
! Make sure the wash cycle has finished and unplug
the appliance.
To access the pre-chamber:
1. using a screwdriver,
remove the cover panel
on the lower front part of
the washing machine
(see figure);
2. unscrew the lid by
rotating it anti-clockwise
(see figure): a little water
may trickle out. This is
perfectly normal;
Caring for the door and drum of your
appliance
• Always leave the porthole door ajar in order to
prevent unpleasant odours from forming.
3. clean the inside thoroughly;
4. screw the lid back on;
5. reposition the panel, making sure the hooks are
securely in place before you push it onto the
appliance.
Checking the water inlet hose
Check the inlet hose at least once a year. If there are
any cracks, it should be replaced immediately: during
the wash cycles, water pressure is very strong and a
cracked hose could easily split open.
!!
!
Never use second-hand hoses.
!!
10
Page 11

Troubleshooting
Your washing machine could fail to work. Before contacting the Technical Assistance Centre (see “Assistance”),
make sure that the problem cannot be not solved easily using the following list.
Problem:
The washing machine does not
switch on.
The wash cycle does not start.
The washing machine does not
take in water ("H2O" will flash
on the display).
The washing machine
continuously takes in and
drains water.
Possible causes / Solutions:
• The appliance is not plugged into the socket fully, or is not making contact.
• There is no power in the house.
• The washing machine door is not closed properly.
• The ON/OFF button has not been pressed.
• The START/PAUSE button has not been pressed.
• The water tap has not been opened.
• A delayed start has been set (see “Running a wash cycle”).
• The water inlet hose is not connected to the tap.
• The hose is bent.
• The water tap has not been opened.
• There is no water supply in the house.
• The pressure is too low.
• The START/PAUSE button has not been pressed.
• The drain hose is not fitted at a height between 65 and 100 cm from
the floor (see “Installation”).
• The free end of the hose is under water (see “Installation”).
• The wall drainage system is not fitted with a breather pipe.
If the problem persists even after these checks, turn off the water tap,
switch the appliance off and contact the Assistance Service. If the
dwelling is on one of the upper floors of a building, there may be problems
relating to water drainage, causing the washing machine to fill with water
and drain continuously. Special anti-draining valves are available in shops
and help to avoid this inconvenience.
GB
The washing machine does not
drain or spin.
The washing machine vibrates a
lot during the spin cycle.
The washing machine leaks.
The "option" indicator lights and the
"start/pause" indicator light flash
and an error code appears on the
display (e.g.: F-01, F-..).
There is too much foam.
• The wash cycle does not include draining: some wash cycles require the
drain phase to be started manually.
• The “Easy iron ” option has been activated: To complete the wash cycle,
press the START/PAUSE button (see “Wash cycles and options”).
• The drain hose is bent (see “Installation”).
• The drainage duct is clogged.
• The drum was not unlocked correctly during installation (see “Installation”).
• The washing machine is not level (see “Installation”).
• The washing machine is trapped between cabinets and walls (see “Installation”).
• The water inlet hose is not screwed on properly (see “Installation”).
• The detergent dispenser drawer is blocked (for cleaning instructions, see “Care
and maintenance”).
• The drain hose is not fixed properly (see “Installation”).
• Switch off the machine and unplug it, wait for approximately 1 minute
and then switch it back on again.
If the problem persists, contact the Technical Assistance Service.
• The detergent is not suitable for machine washing (it should display the
text “for washing machines” or “hand and machine wash”, or the like).
• Too much detergent was used.
11
Page 12

Service
GB
Before calling for Assistance:
• Check whether you can solve the problem alone (see “Troubleshooting”);
• Restart the programme to check whether the problem has been solved;
• If this is not the case, contact an authorised Technical Assistance Centre using the telephone number
provided on the guarantee certificate.
! Always request the assistance of authorised technicians.
Have the following information to hand:
• the type of problem;
• the appliance model (Mod.);
• the serial number (S/N).
This information can be found on the data plate applied to the rear of the washing machine, and can also
be found on the front of the appliance by opening the door.
12
Page 13

Instruções para utilização
MÁQUINA DE LAVAR ROUPA
PT
Português
IWE 7125 S
Sumário
PT
Instalação, 14-15
Desembalar e nivelar
Ligações hidráulicas e eléctricas
Primeiro ciclo de lavagem
Dados técnicos
Descrição da máquina de lavar roupa, 16-17
Painel de comandos
Visor
Como efectuar um ciclo de lavagem, 18
Programas e funções, 19
Tabela dos programas
Funções de lavagem
Detergentes e roupa, 20
Gaveta dos detergentes
Preparar a roupa
Programas especiais
Sistema de balanceamento da carga
Precauções e conselhos, 21
Segurança geral
Eliminação
Abertura manual da porta de vidro
Manutenção e cuidados, 22
Interromper a alimentação de água e de corrente eléctrica
Limpar a máquina de lavar roupa
Limpar a gaveta dos detergentes
Cuidados com a porta de vidro e o tambor
Limpar a bomba
Verificar o tubo de alimentação de água
Anomalias e soluções,23
Assistência, 24
13
Page 14
Instalação
PT
! É importante guardar este manual para poder
consultá-lo a qualquer momento. Se a máquina for
vendida, cedida ou transferida, certifique-se que este
manual permaneça com a máquina para informar o
novo proprietário acerca do seu funcionamento e das
respectivas advertências.
!
Leia com atenção estas instruções: há importantes
informações acerca da instalação, da utilização e da
segurança.
Desembalar e nivelar
Desembalar
1. Tire a máquina de lavar roupa da embalagem.
2. Verifique se a máquina de lavar roupa sofreu danos
no transporte. Se estiver danificada não efectue a
sua ligação e contacte o revendedor.
3. Tire os 4 parafusos de
protecção para o
transporte e a
borrachinha com o
respectivo calço,
situados na parte traseira
(veja a figura).
4. Tampe os furos com as tampas em plástico
fornecidas.
5. Guarde todas as peças: se for necessário
transportar a máquina de lavar roupa, terão de ser
montadas outra vez.
Um cuidadoso nivelamento dá estabilidade à máquina
e evita vibrações, ruídos e deslocamentos durante o
funcionamento. Se houver tapete ou alcatifa, regule
os pés em modo que embaixo da máquina de lavar
roupa deixe um espaço suficiente para ventilação.
Ligações hidráulicas e eléctricas
Ligação do tubo de alimentação da água
1. Realize a ligação do
tubo de alimentação
parafusando-o a uma
torneira de água fria com
bocal de rosca 3/4 gás
(veja a figura).
Antes de realizar esta
ligação, deixe a água
escorrer até estar
límpida.
2. Ligue o tubo de
alimentação na máquina
de lavar roupa
atarraxando-o no
apropriado fornecimento
da água, na parte
traseira, em cima à
direita (veja a figura).
3. Tome cuidado para o tubo não ser dobrado nem
esmagado.
! Embalagens não são brinquedos para as crianças!
Nivelamento
1. Instale a máquina de lavar roupa sobre um pavimento plano e rígido, sem encostá-la em paredes,
móveis nem outro.
2. Se o pavimento não
for perfeitamente
horizontal, para compensar qualquer
irregularidade,
desatarraxe ou atarraxe
os pés dianteiros (veja a
figura); o ângulo de
inclinação, medido no
plano de trabalho, não
deve ultrapassar 2°.
14
! A pressão hídrica da torneira deve ser entre os
valores da tabela dos Dados técnicos (veja a página
ao lado).
! Se o comprimento do tubo de alimentação não for
suficiente, contacte uma oficina especializada ou um
técnico autorizado.
!!
!
Nunca utilize tubos já usados.
!!
!!
!
Utilize aqueles fornecidos com a máquina.
!!
Page 15
Ligação do tubo de descarga
65 - 100 cm
Ligue o tubo de
descarga, sem dobrá-lo,
a um conduto de
descarga ou a uma
descarga de parede
colocados entre 65 e 100
cm do chão;
! Não empregue extensões nem fichas múltiplas.
PT
! O cabo não deve ser dobrado nem apertado.
! O cabo de alimentação deve ser substituído
somente por técnicos autorizados.
Atenção! O fabricante declina toda a responsabilidade
se estas regras não forem respeitadas.
Primeiro ciclo de lavagem
em alternativa, coloque
na beira de um lavabo
ou de uma banheira,
prendendo na torneira a
guia fornecida (veja a
figura). A ponta solta do
tubo de descarga não
deve permanecer
emergida na água.
! É desaconselhado empregar tubos de extensão;
mas se for indispensável, a extensão deve ter o
mesmo diâmetro do tubo original e não medir mais de
150 cm de comprimento.
Ligação eléctrica
Antes de ligar a ficha na tomada eléctrica, certifiquese que:
• a tomada tenha uma ligação à terra e seja nos
termos da legislação;
• a tomada tenha a capacidade para suportar a
carga máxima de potência da máquina, indicada na
tabela dos Dados técnicos (veja ao lado);
• a tensão de alimentação seja entre os valores
indicados na tabela dos Dados técnicos (veja ao
lado);
• a tomada seja compatível com a ficha da máquina
de lavar roupa. Se não for, substitua a tomada ou a
ficha.
! Esta máquina de lavar roupa não deve ser instalada
ao aberto, nem mesmo abrigada, porque é muito
perigoso deixá-la exposta à chuva e às tempestades.
! Depois de ter instalado a máquina de lavar roupa, o
acesso à tomada eléctrica deve ser fácil.
Depois da instalação, antes de usar, efectue um ciclo
de lavagem com detergente mas sem roupa, defina o
programa 2.
Dados técnicos
Modelo
Medidas
Capacidade
Ligações
eléctricas
Ligações hídricas
Velocidade da
centrifugação
Programas de
controlo segundo
a norma EN 60456
IWE 7125 S
largura 59,5 cm.
altu ra 8 5 cm.
profundidade 53,5 cm.
de 1 a 7 kg.
veja a placa das caracter ís t icas
técni cas co lo cada n a máqu in a
pressão máxima 1 MPa (10 bars)
press ão mí n ima 0 ,05 MPa (0 ,5 b ar)
capacidade do tambor 5 2 lit ro s
até 1200 rotações por minuto
programa 2 ; temperat u ra 60°C;
realizado co m carga d e 7 k g.
Esta a parel h agem é em
conformidade com as seguintes
Directi vas Co mu ni tár ias :
- 89/336/CEE dl 03/05/89
(Compatibil idade Electro magn ética) e
post eri ores mod ifi cações .
- 2002/96/CE
- 2006/95/CE (Baixa Tensão)
15
Page 16
Descrição da máquina de lavar
roupa
PT
Painel de comandos
Gaveta dos detergentes
T ecla de
DESLIGA
PROGRAMAS
LIGA/
Selector de
Tecla
TEMPERATURA
Tecla
CENTRIFUGAÇÃO
Teclas com indicadores
luminosos de
FUNÇÕES
VISOR
T ecla c o m i n d i ca d o r
luminoso
PAUSA
Tecla
INÍCIO POSTERIOR
INÍCIO/
Gaveta dos detergentes: para colocar detergentes
e aditivos (veja “Detergentes e roupa”).
Tecla LIGA/DESLIGA
tecla para ligar ou desligar a máquina. O indicador
luminoso INÍCIO/PAUSA que pisca lentamente com a
cor verde, indica que a máquina está ligada. Para
desligar a máquina de lavar roupa durante a lavagem,
é necessário manter pressionado a tecla por mais
tempo, aproximadamente 2 segundos; uma pressão
breve ou acidental não anulará o funcionamento da
máquina. O desligar a máquina durante uma lavagem
em curso anula a própria lavagem.
Selector de PROGRAMAS: para seleccionar o
programa desejado (veja a "Tabela dos programas").
Teclas com indicadores luminosos de FUNÇÕES:
para seleccionar as funções disponíveis. O indicador
luminoso correspondente à função seleccionada
permanecerá aceso.
Tecla CENTRIFUGAÇÃO
ou excluir completamente a centrifugação - o valor é
indicado no visor.
: carregue brevemente na
: pressionar para reduzir
Tecla INÍCIO POSTERIOR
programar um início atrasado do programa escolhido.
O atraso é indicado no visor.
Tasto com indicador luminoso INÍCIO/PAUSA
quando o indicador luminoso verde, acender
intermitentemente, carregue na tecla para iniciar uma
lavagem. Quando o ciclo iniciar, o indicador
permanecerá aceso fixo. Para colocar em pausa a
lavagem, carregar novamente no botão; o indicador
ficará intermitente com uma luz laranja. Se o símbolo
não estiver iluminado, será possível abrir a porta de
vidro. Para fazer iniciar a lavagem do ponto em que
foi interrompida, carregar novamente na tecla.
Modalidade de Stand by
Esta máquina de lavar roupa, em conformidade com
as novas normas sobre a economia energética,
dispõe de um sistema de desligação automática
(stand by) que entra em função alguns minutos
depois, no caso de inutilização. Carregue brevemente
no botão LIGA/DESLIGA e aguarde até a reactivação
da máquina.
: pressionar para
:
Tecla TEMPERATURA
excluir a temperatura; o valor é indicado no visor.
16
: pressionar para reduzir ou
Page 17
Visor
PT
B
A
O visor é útil para programar a máquina e fornece muitas informações.
Na secção A é visualizada a duração dos vários programas à disposição e com o ciclo iniciado o tempo faltante
para o fim do mesmo; no caso em que tenha sido programado um INÍCIO POSTERIOR, será visualizado o tempo
faltante ao início do programa seleccionado. Além disto, ao carregar na respectiva tecla, a máquina visualiza
automaticamente a temperatura e a centrifugação máximas para o programa seleccionado ou as últimas
seleccionadas se compatíveis com o programa escolhido.
Na secção B são visualizadas as "fases de lavagem" previstas para o ciclo seleccionado e com o programa
iniciado a "fase de lavagem" em curso.
Lavagem
Enxaguamento
Centrifugação
Descarga
Na secção C estão presentes, partindo de cima para baixo, os ícones relativos à "temperatura"
posterior"
O símbolo
O símbolo
O símbolo
e à "Centrifugação" :
iluminado indica que no visor é visualizado o valor da "temperatura" configurado.
iluminado indica que foi configurado um "Início posterior".
iluminado indica que no visor é visualizado o valor da "centrifugação" configurado.
C
, ao "Início
Simbolo Porta de vidro bloqueada
O símbolo aceso indica que a porta está bloqueada. Para evitar danos é necessário aguardar que o símbolo
apague-se antes de abrir a porta de vidro.
Para abrir a porta durante a realização de um ciclo, carregar no botão INÍCIO/PAUSA; se o símbolo
VIDRO BLOQUEADA estiver apagado será possível abrir a porta.
PORTA DE
17
Page 18
Como efectuar um ciclo de
lavagem
PT
1. LIGAR A MÁQUINA. Carregue no botão ; o
indicador luminoso INÍCIO/PAUSA irá piscar
lentamente com a cor verde.
2. COLOCAR A ROUPA. Abrir a porta de vidro.
Coloque a roupa dentro da máquina prestando
atenção para não superar a carga máxima indicada
na tabela dos programas na página seguinte.
3. DOSAGEM DO DETERGENTE. Extrair a gaveta
e deitar o detergente nos específicos recipientes
como explicado no parágrafo "Detergentes e
roupa".
4. FECHAR A PORTA DE VIDRO.
5. ESCOLHA DE PROGRAMA. Seleccione mediante
o selector de PROGRAMAS o programa que
desejar; será associada uma temperatura e uma
velocidade de centrifugação que podem ser
modificadas. No visor aparecerá a duração do
ciclo.
6. PERSONALIZAR O CICLO DE LAVAGEM.
Utilizar as específicas teclas:
Modificar a temperatura e/ou a
centrifugação. A máquina visualiza
automaticamente a temperatura e a centrifugação
máximas para o programa seleccionado ou as
últimas seleccionadas se compatíveis com o
programa escolhido. Carregando no botão
pode-se reduzir a temperatura progressivamente
até a lavagem a frio "OFF". Carregando no botão
pode-se reduzir a centrifugação
progressivamente até a sua exclusão "OFF". Uma
nova pressão dos botões colocará os valores
novamente nos máximos previstos.
Programar um início posterior.
Para programar o início atrasado do programa
escolhido, carregue no botão respectivo até
alcançar o tempo de atraso desejado. Quando
esta opção estiver activa, no visor aparecerá o
símbolo
carregue no botão até que no visor apareça a
escrita OFF.
. Para cancelar o início posterior,
! Se a função seleccionada não for compatível com
o programa definido, o indicador luminoso ficará
intermitente e a função não será activada.
! Se a fu nção seleccionada não for compatível com
uma outra programada anteriormente, o indicador
luminoso relativo à primeira função seleccionada irá
piscar e será activada somente a segunda, o
indicador luminoso da função activada acender-se-á.
! As funções podem variar a carga recomendada e/
ou a duração do ciclo.
7. INICIAR O PROGRAMA. Carregar no botão
INÍCIO/PAUSA. O respectivo indicador luminoso
ficará verde e a porta de vidro irá bloquear-se
(símbolo PORTA DE VIDRO BLOQUEADA
aceso). Para modificar um programa durante a
realização de um ciclo, colocar a máquina de lavar
roupa em pausa carregando na tecla INÍCIO/
PAUSA (o indicador luminoso INÍCIO/PAUSA irá
piscar lentamente com a cor laranja); seleccionar
então o ciclo desejado e carregar novamente no
botão INÍCIO/PAUSA.
Para abrir a porta durante a realização de um ciclo,
carregar no botão INÍCIO/PAUSA; se o símbolo
PORTA DE VIDRO BLOQUEADA
será possível abrir a porta. Carregar novamente no
botão INÍCIO/PAUSA para fazer iniciar o programa
do ponto em que foi interrompido.
8. FIM DO PROGRAMA. É indicado pela escrita
"END" no visor, quando o símbolo PORTA
BLOQUEADA
Abrir a porta, retirar a roupa e desligar a máquina.
apagar será possível abrir a porta.
estiver apagado
! Se desejar anular um ciclo já iniciado, carregue por
alguns segundos na tecla
interrompido e a máquina desligar-se-á.
. O ciclo será
Modificar as
características do ciclo.
• Pressionar o botão para activar a função; o
indicador luminoso correspondente ao botão irá
acender-se.
• Pressionar novamente o botão para desactivar a
função; o indicador luminoso apagar-se-á.
18
Page 19
Programas e funções
Tabela dos programas
Velocità
Descrição do Programa
Programas
Quotidiano
1 Algod ã o P r é -la va ge m 90 °C: peças brancas ex t r em amente sujas.
2 Algodão: brancos e coloridos resistentes muito sujos.
2 Al g od ão (1 ): brancos e coloridos resistentes muito sujos.
2 Al g od ão (2 ): b ran cos e co lo rido s delicado s m u it o s u jo s .
3 Algodão: brancos e coloridos resistentes muito sujos.
4 A lgod ã o C ol ori d os (3): brancos pouco sujos e cores delicadas.
5 Sintétic os: coloridos resistentes muito sujos.
Programas Especiais
6 Lã: para lã, cashm ere, etc.
7 Seda / Cortinas: para roupas de seda, viscosa, lingerie.
8 Jeans
Express: para refrescar rapidamente ro upas levem ente sujas (não é
9
indicado para lã, seda e rou pas que deve ser lavadas à mão).
10 Outwear
Sport
11 Sport Inte n si ve
12 Sp ort Ligh t
13 Sp ort Shoe s
Programas Parciais
Enxag uamen t os - 1200 -Centrifugação - 1200 ----7
Descarga - 0 ----7
Para todos T est Institutes:
1) Programa de controlo segundo a norma EN 60456: configurar o programa 2 com uma temperatura de 60ºC.
2) Programa longo para algodão: configurar o programa 2 com uma temperatura de 40ºC.
3) Programa curto para algodão: configurar o programa 4 com uma temperatura de 40ºC.
Tem p .
max.
max.
(rotações
(°C)
90° 1200
90° 1200 60° 1200 40° 1200 60° 1200 40° 1200 60° 800 -
40° 600 30° 0 40° 800 -
30° 800 30° 400
30° 600 30° 600 -
30° 600 -
por
minuto)
lavagem
Detergentes
Pré-
Lava-
gem
zz
zzz
zzz
zzz
zzz
zzz
zzz
z
z
z
z
-
z
z
z
z
Lixívia
-
-
-
-
-
--2-
-
-
-
zz
Ama-
ciador
z
z
z
z
z
z
z
z
Carga
max. (Kg)
Nor-
Eco
mal
Time
7
-
7
-
7
-
7
-
73,5
73,5
32
1,5
-
1
-
3
-
1,5
-
3 3 -
Max.
-
2 paia
7
-
-
-
PT
Duração
ciclo
É possível visualizar a duração do programa de
lavagem no visor.
Funções de lavagem
Ao seleccionar esta opção, a movimentação mecânica, a
temperatura e a água serão optimizados para uma carga
reduzida de tecidos de algodão e sintéticos pouco sujos
(veja a "T abela dos programas"). Com “
lavar em pouco tempo, economizando água e energia
eléctrica. Aconselha-se usar uma dose de detergente
líquido adequada para a quantidade de carga.
! Não pode ser activada nos programas
10, 11, 12, 13,
, , .
Anti-mancha
Esta função é útil para eliminar as manchas mais
resistentes. Coloque a gaveta adicional 4, fornecida, na
gaveta 1.
Quando deitar a lixívia, não
4
ultrapasse o nível "máx"
indicado no pino central (veja
a figura). Para efectuar
3
2
1
somente o branqueamento
deitar a lixívia na gaveta
adicional 4, estabelecer o
programa “Enxaguamento"
e activar a função "Anti-
mancha" .
” é possível
1, 2, 6, 7, 8, 9,
Para branquear durante a lavagem deite o detergente e os
aditivos, configure o programa que desejar e seleccione a
função "Anti-mancha"
.
Se utilizar a gaveta adicional 4 exclui-se a pré-lavagem.
! Não pode ser activada nos programas 1, 6, 7, 8, 9, 10,
11, 12, 13,
Enxaguamento Extra
Seleccionando esta opção aumenta-se a eficácia do
enxaguamento, e garante-se a máxima remoção do detergente.
É útil para quem tem a pele particularmente sensível.
, .
! Não pode ser activada nos programas 9, , .
Engomar fácil
Seleccionando esta função, a lavagem e a centrifugação serão
oportunamente modificadas para reduzir a formação de rugas.
No fim do ciclo, a máquina de lavar roupa efectuará lentas
rotações do tambor; o indicador luminoso da opção ENGOMAR
FÁCIL e aquele de INÍCIO/PAUSA piscam (o primeir o é verde, o
segundo laranja). Para terminar o ciclo, carregar no botão INÍCIO/
PAUSA ou na tecla “ENGOMAR FÁCIL”. No programa 7-10 a
máquina terminará o ciclo com a roupa de molho e o
indicador luminoso da função ENGOMAR FÁCIL e aquele
de INÍCIO/PAUSA ficarão intermitentes. Para descarregar
a água e poder retirar a roupa é necessário carregar na
tecla INÍCIO/PAUSA ou na tecla ENGOMAR FÁCIL.
Não pode ser activada nos programas 6, 9, 11, 12, 13,
!
, .
19
Page 20
Detergentes e roupa
PT
Gaveta dos detergentes
O bom resultado da lavagem depende também do
emprego da dose certa de detergente: com excessos
não se lava de maneira mais eficaz, mas contribui-se
para formar crostas nas peças internas da máquina
de lavar roupa e poluir o meio ambiente.
! Não use detergentes para lavagem à mão, porque
formam espuma demais.
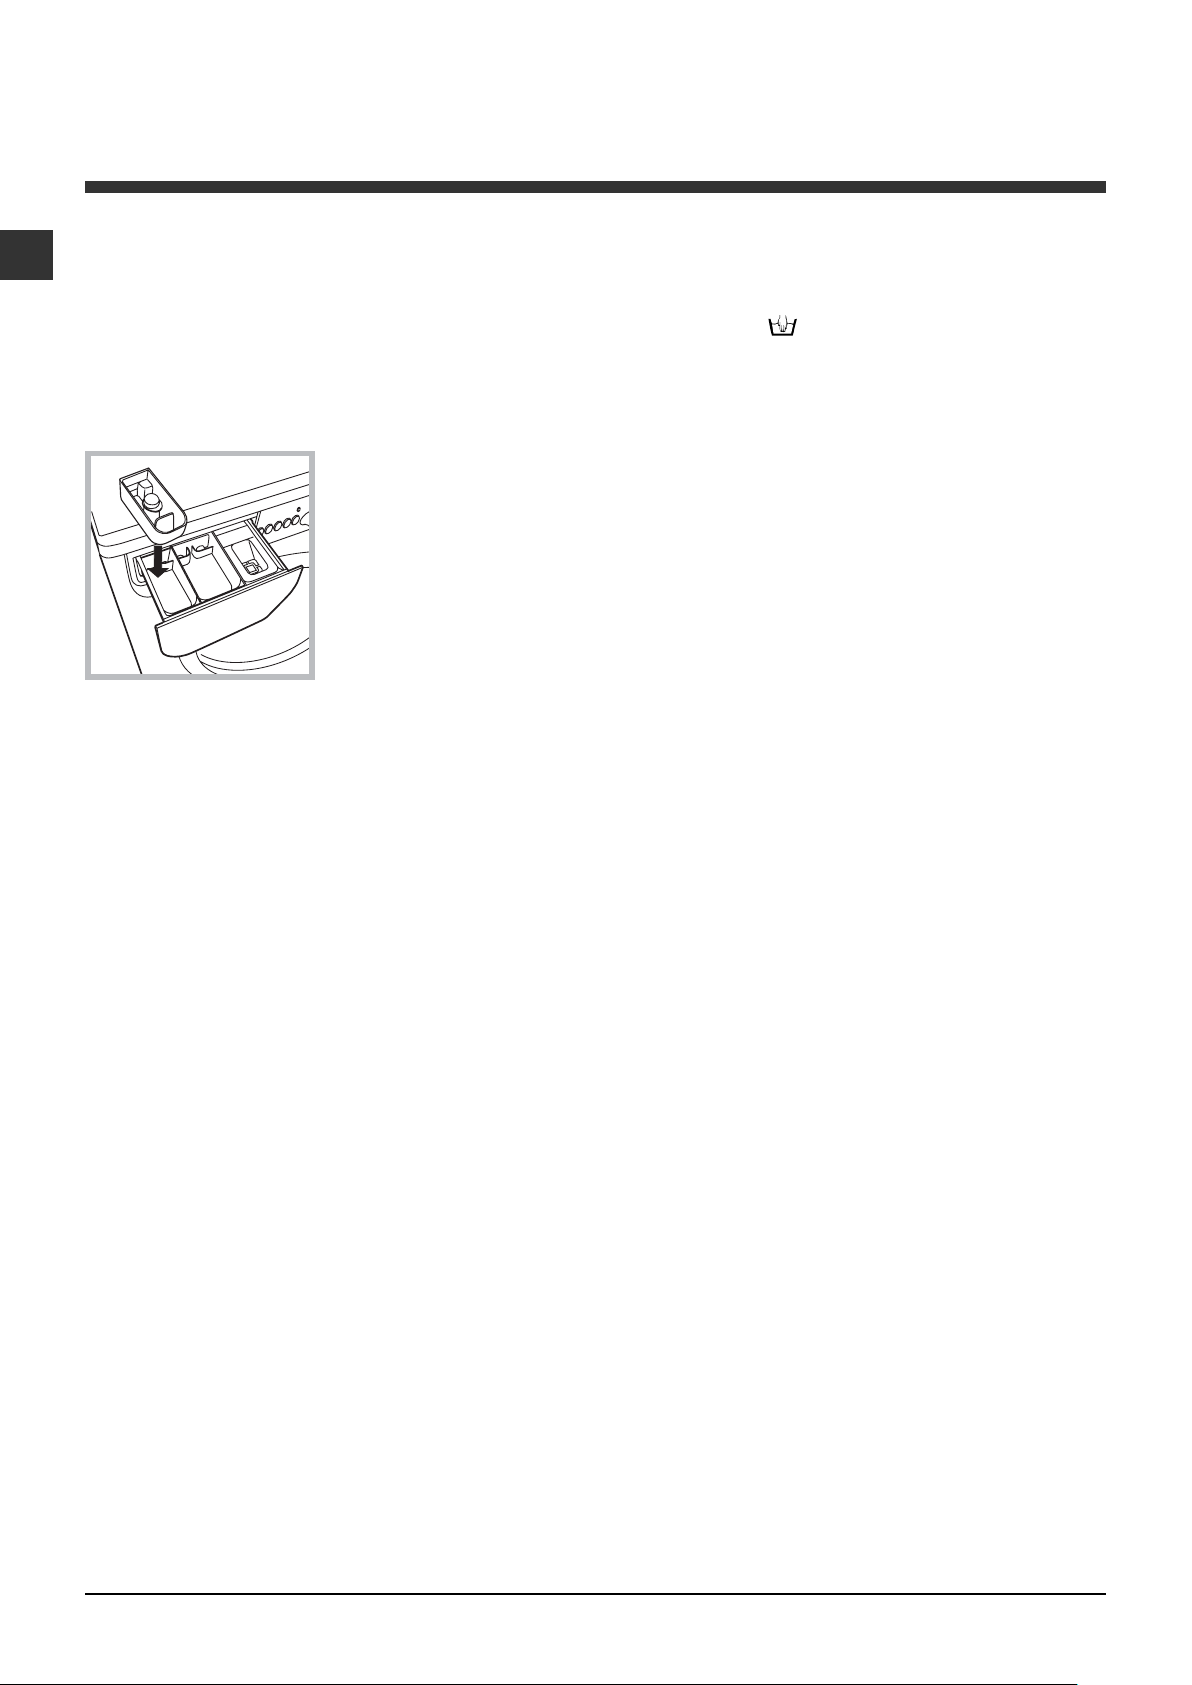
Tire a gaveta dos
4
detergentes e deite o
detergente ou o aditivo da
seguinte maneira:
3
2
1
gaveta 1: Detergente para pré-lavagem (em pó)
Antes de deitar detergente verifique se há dentro a
gaveta adicional 4.
gaveta 2: Detergente para lavagem (em pó ou
líquido)
O detergente líquido deve ser deitado somente depois
da máquina ter arrancado.
gaveta 3: Aditivos (amaciador etc.)
O aditivo amaciador não deve ultrapassar a grade.
gaveta adicional 4: Água de Javel
Preparar a roupa
• Divida a roupa em função:
- do tipo de tecido / do símbolo na etiqueta.
- das cores: separe as peças coloridas das
brancas.
• Esvazie as algibeiras e verifique se há botões soltos.
• Não ultrapasse os valores indicados que se referem
ao peso da roupa enxuta:
Tecidos resistentes: máx. 7 kg.
Tecidos sintéticos: máx. 3 kg.
Tecidos delicados: máx. 2 kg.
Lã: máx. 1,5 kg.
Seda: máx. 1 kg
Quanto pesa a roupa?
1 lençol 400 - 500 g.
1 fronha 150 - 200 g.
1 toalha de mesa 400 - 500 g.
1 roupão 900 - 1200 g.
1 toalha de rosto 150 - 250 g.
Programas especiais
Lã: com o programa 6 é possível lavar na máquina todas
as roupas de lã, mesmo aquelas com a etiqueta "lavar
somente à mão"
use um detergente específico e não supere 1,5 kg de
peso.
Seda: utilize o programa específico 7 para lavar todas as
roupas de seda. Aconselha-se o uso de um detergente
específico para tecidos delicados.
Cortinas:
fronha ou de um saquinho de rede. Utilize o programa 7.
Jeans: vire do avesso as roupas antes de lavar e use
um detergente líquido. Utilize o programa 8.
Express foi estudado para lavar peças levemente sujas
em pouco tempo: leva apenas 15 minutos e, desta
maneira, economiza energia e tempo. Se regular o
programa (9 a 30°C) será possível lavar juntos tecidos de
natureza diferente (excepto lã e seda), com uma carga
máxima de 1,5 Kg.
Outwear (programa 10) foi estudado par lavar tecidos
hidrorepelentes e anoraques (por ex. Goretex, poliéster,
nylon); para obter os melhores resultados, utilize detergente líquido e use uma dose adequada para a meia
carga; pré-tratar os punhos, colarinhos e manchas; não
use amaciador ou detergente com amaciador. Com este
programa não se podem lavar os edredões embutidos.
Sport Intensive (programa 11) foi estudado para lavar
tecidos para vestuário desportivo (fatos de treino,
calções, etc.) muito sujos; para obter os melhores
resultados, recomenda-se não superar a carga máxima
indicada na "Tabela dos programas".
Sport Light (programa 12) foi estudado para lavar
tecidos para vestuário desportivo (fatos de treino,
calções, etc.) pouco sujos; para obter os melhores
resultados, recomenda-se não superar a carga máxima
indicada na "Tabela dos programas". Recomenda-se o
uso de detergente líquido, na dose adequada para a
meia carga.
Sport Shoes (programa 13) foi estudado para lavar
calçados desportivos; para obter os melhores resultados
não lave mais de 2 pares por ciclo.
dobre-as bem e coloque-as dentro de uma
. Para obter os melhores resultados,
Sistema de balanceamento da carga
Antes de cada centrigfugação, para evitar vibrações
excessivas e para distribuir a carga em modo
uniforme, o tambor efectua algumas rotações a uma
velocidade levemente superior àquela de lavagem. Se
no fim de repetidas tentativas a carga ainda não
estiver correctamente balanceada, a máquina
efectuará a centrifugação com uma velocidade
inferior àquela prevista. No caso de um excessivo
desbalanceamento, a máquina de lavar roupa
efectuará a distribuição ao invés da centrifugação.
Para favorecer uma melhor distribuição da carga e o
seu correcto balanceamento, aconselha-se misturar
peças grandes com peças pequenas.
20
Page 21
Precauções e conselhos
20
! Esta máquina de lavar roupa foi projectada e fabricada
em conformidade com os regulamentos internacionais
de segurança. Estas advertências são fornecidas por
razões de segurança e devem ser lidas com atenção.
Segurança geral
• Este aparelho foi projectado exclusivamente para
um uso doméstico.
• Esta máquina de lavar roupa deve ser utilizada
somente por pessoas adultas e conforme as
instruções apresentadas neste manual.
• Não toque na máquina com os pés descalços nem
com as mãos ou os pés molhados ou húmidos.
• Não puxe o cabo eléctrico para tirar a ficha da
tomada, pegue a ficha mesmo.
• Não abra a gaveta dos detergentes enquanto a
máquina estiver a funcionar.
• Não toque a água de descarga, que poderá chegar
a temperaturas altas.
• Em nenhum caso force a porta para abri-la: poderá
danificar o mecanismo de segurança que a protege
contra aberturas acidentais.
• Se houver avarias, em nenhum caso mexa nos
mecanismos internos para tentar reparar.
• Verifique sempre que criança não se aproximem da
máquina a funcionar.
• Durante a lavagem a porta de vidro tende a aquecer-se.
• Se for preciso deslocá-la, são precisas pelo menos
duas ou três pessoas, com a máxima atenção.
Nunca sozinho porque a máquina é muito pesada.
• Antes de colocar a roupa verifique que o tambor
esteja vazio.
Abertura manual da porta de vidro
Caso não seja possível abrir a porta de vidro por falta
de energia eléctrica e quiser pendurar a roupa lavada,
proceda da seguinte maneira:
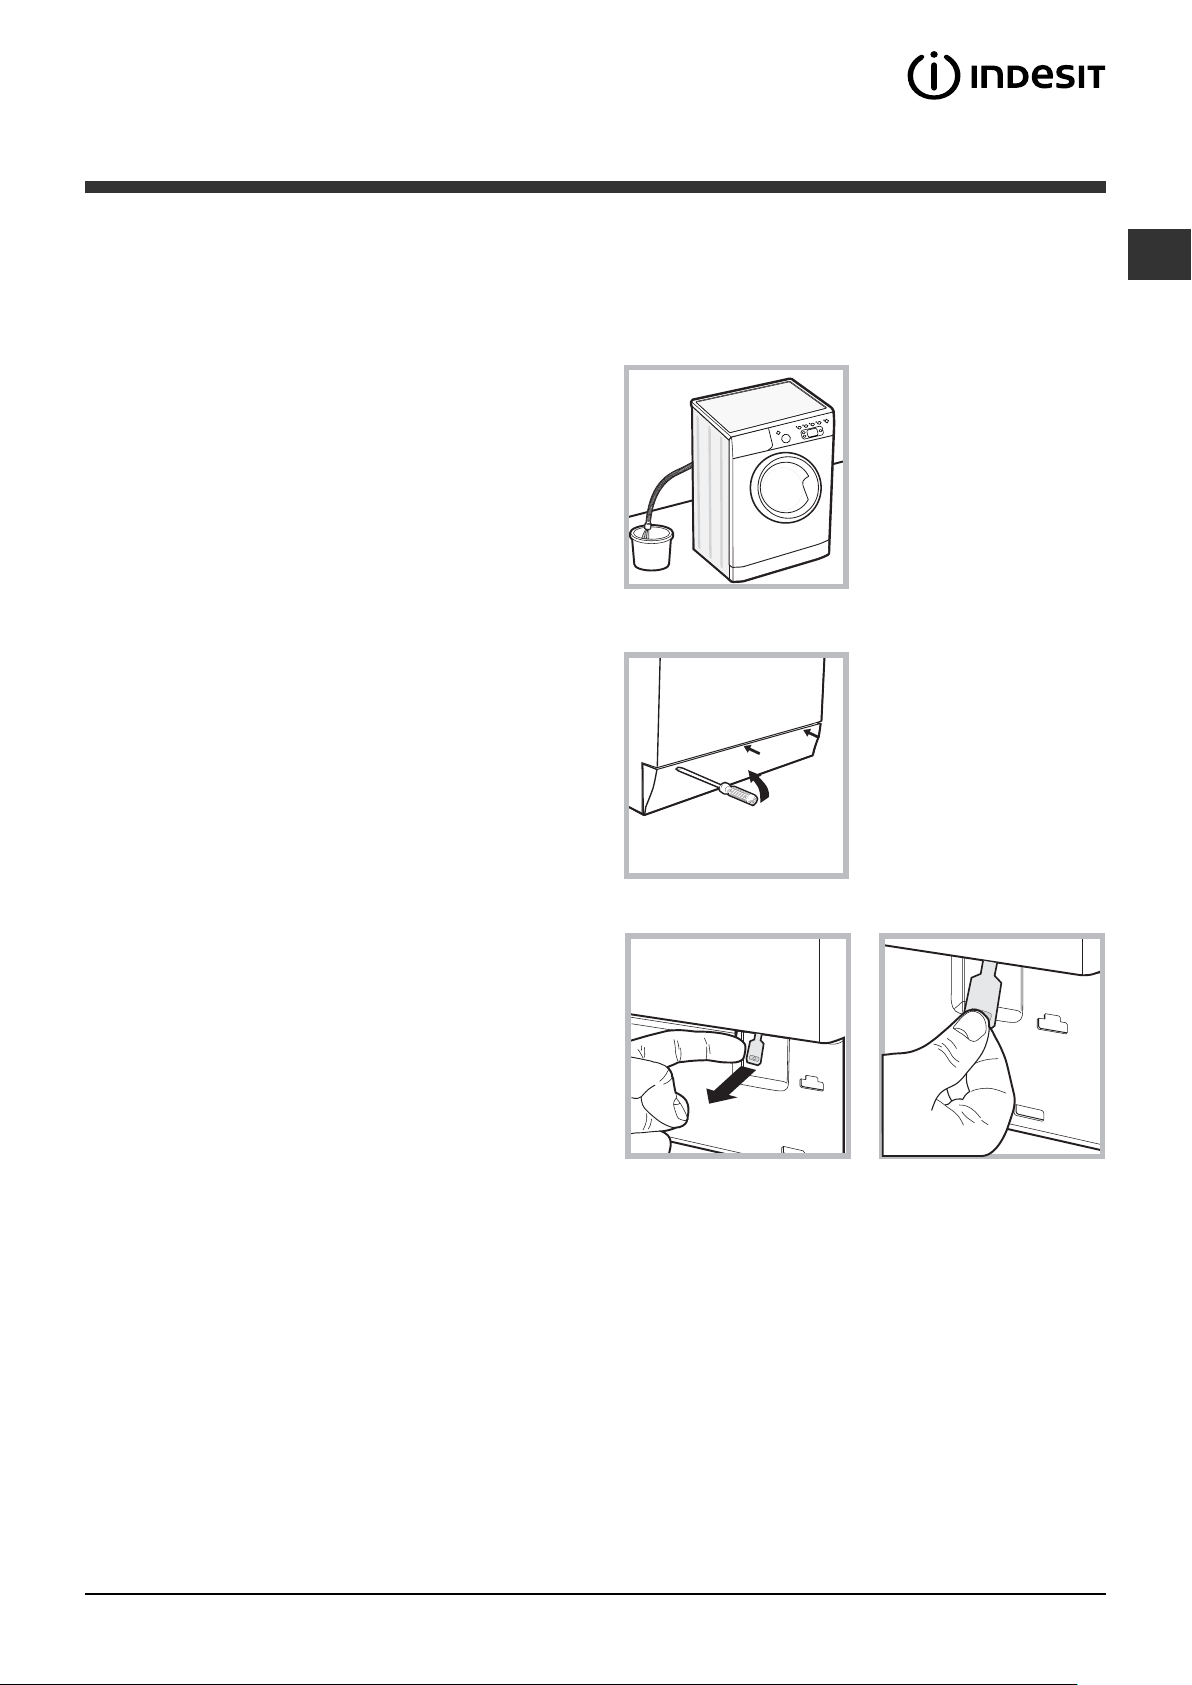
1. tire a ficha da tomada
de corrente
2. verifique que o nível de
água no interior da máquina
seja inferior respeito à
abertura da porta de vidro;
caso contrário, tirar a água
em excesso através do
tubo de descarga
recolhendo-a num balde
como indicado na figura.
3. tire o painel de
cobertura da parte
dianteira da máquina de
lavar roupa com ajuda de
uma chave de fendas(veja
a figura)
.
.
PT
Eliminação
• Eliminação do material de embalagem: obedeça os
regulamentos locais, de maneira que as
embalagens possam ser reutilizadas.
• A directiva Europeia 2002/96/CE referente à gestão
de resíduos de aparelhos eléctricos e electrónicos,
prevê que os electrodomésticos não devem ser
escoados no fluxo normal dos resíduos sólidos
urbanos. Os aparelhos desactualizados devem ser
recolhidos separadamente para optimizar a taxa de
recuperação e reciclagem dos materiais que os
compõem e impedir potenciais danos para a saúde
humana e para o ambiente. O símbolo constituído
por um contentor de lixo barrado com uma cruz
deve ser colocado em todos os produtos por forma
a recordar a obrigatoriedade de recolha separada.
Os consumidores devem contactar as autoridades
locais ou os pontos de venda para solicitar informação referente ao local apropriado onde devem
depositar os electrodomésticos velhos.
4. utilizando a lingueta indicada na figura, puxe para o
exterior até liberar o tirante de plástico do fecho;
puxá-lo sucessivamente para baixo e contemporaneamente abrir a porta.
5. monte outra vez o painel, certifique-se, antes de
empurrá-la na máquina, que os ganchos foram
colocados nas respectivas ranhuras.
21
Page 22
Manutenção e cuidados
PT
Interromper a alimentação de água e
de corrente eléctrica
• Feche a torneira da água depois de cada
lavagem. Desta maneira diminuiu-se o desgaste
do sistema hidráulico da máquina de lavar roupa e
elimina-se o risco de inundação.
• Tire a ficha da tomada eléctrica quando for limpar
a máquina de lavar roupa e durante os trabalhos
de manutenção.
Limpar a máquina de lavar roupa
A parte externa e as peças em borracha podem ser
limpas com um pano molhado com água morna e
sabão. Não empregue solventes nem abrasivos.
Limpar a gaveta dos detergentes
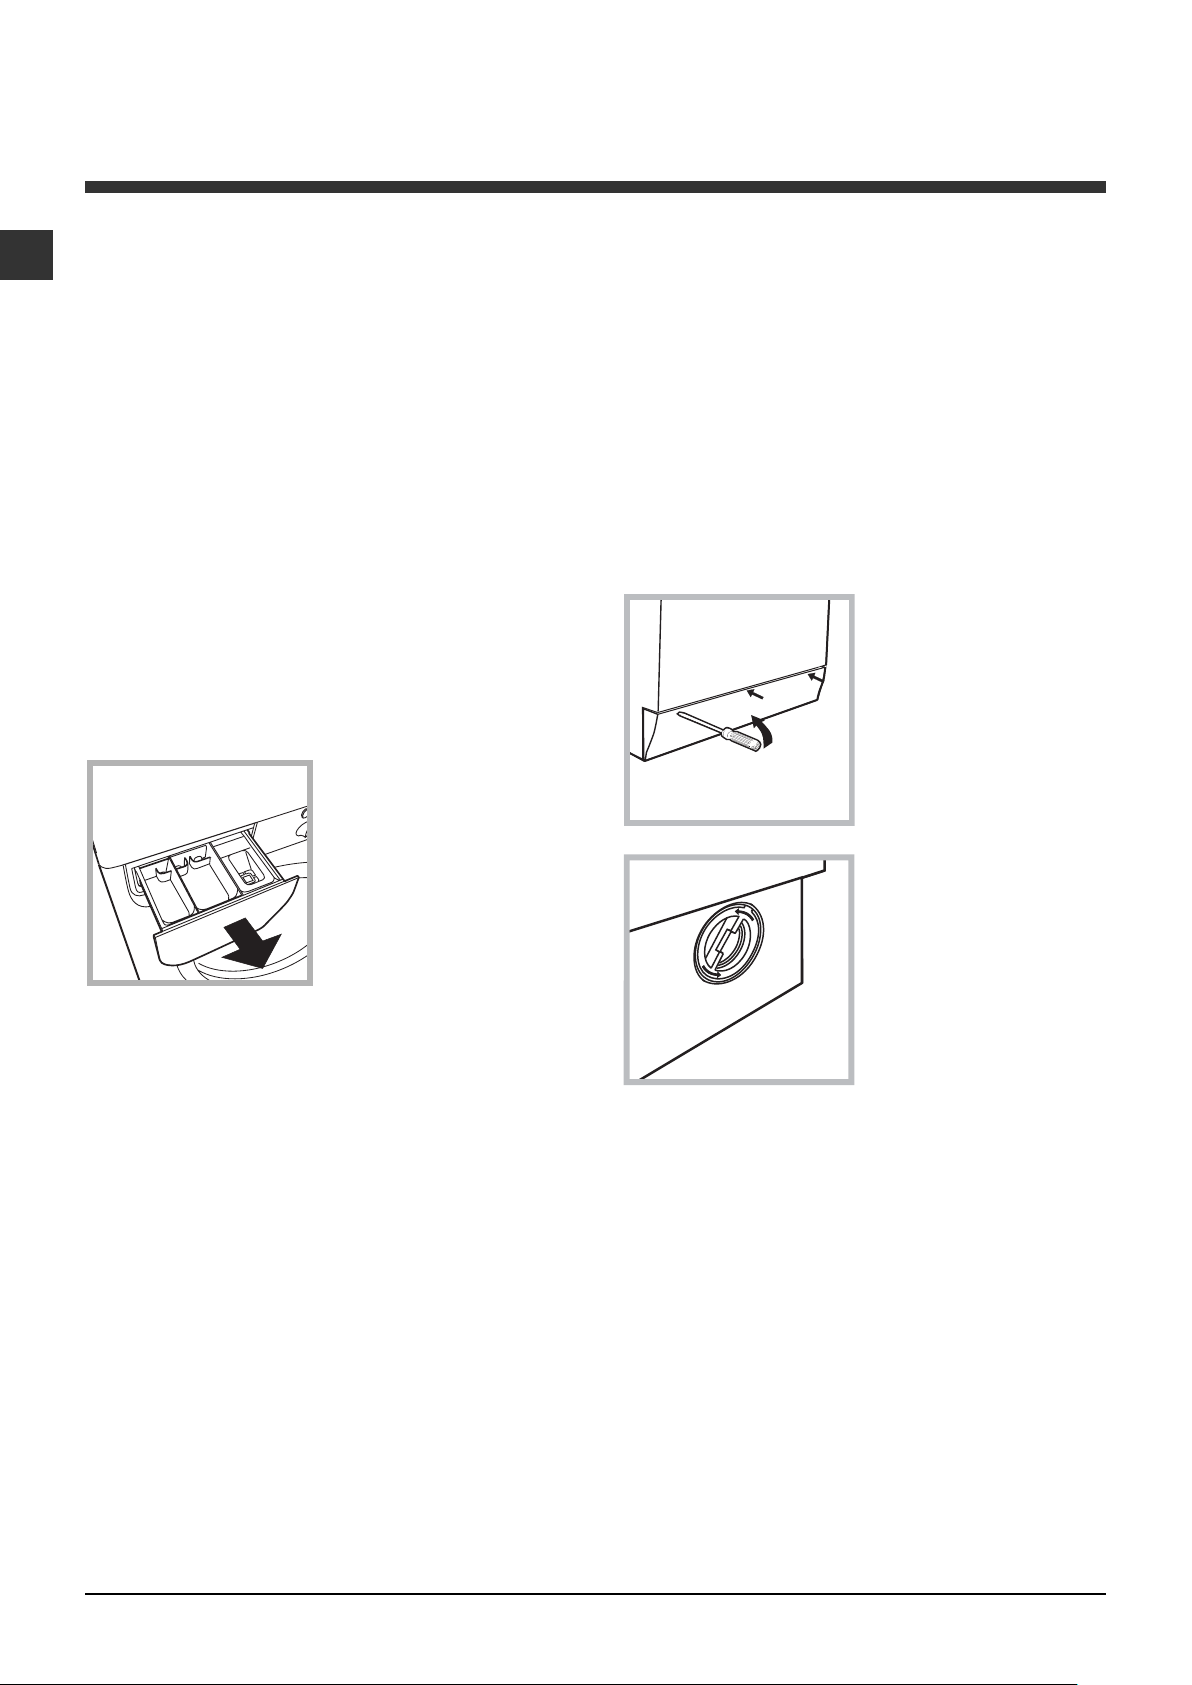
Para tirar a gaveta,
erga-a e puxe-a para
fora (veja a figura).
Lave-a com água
corrente; esta limpeza
deve ser efectuada
frequentemente.
Limpar a bomba
Esta máquina de lavar roupa é equipada com uma
bomba com limpeza automática que não precisa de
operações de manutenção. Entretanto pode
acontecer que pequenos objectos (moedinhas,
botões) caiam na pré-câmara que protege a bomba,
situada na parte inferior da mesma.
! Certifique-se que o ciclo de lavagem tenha
terminado e tire a ficha da tomada.
Para obter acesso à pré-câmara:
1. tire o painel de
cobertura da parte
dianteira da máquina de
lavar roupa com ajuda de
uma chave de fendas
(veja a figura);
2. desenrosque a tampa
girando-a no sentido
anti-horário (veja a
figura). é normal que
perca um pouco de
água;
Cuidados com a porta de vidro e o
tambor
• Deixe a porta sempre entreaberta para evitar que
se formem odores desagradáveis.
3. limpe o interior com cuidado;
4. enrosque outra vez a tampa;
5. monte outra vez o painel, certifique-se, antes de
empurrá-la na máquina, que os ganchos foram
colocados nas respectivas ranhuras.
Verificar o tubo de alimentação de
água
Verifique o tubo de alimentação pelo menos uma vez
por ano. Se houver rachaduras ou fendas, será
necessário substitui-lo: durante as lavagens as fortes
pressões podem provocar repentinas quebras.
!!
!
Nunca utilize tubos já usados.
!!
22
Page 23

Anomalias e soluções
Pode acontecer que a máquina de lavar roupa não funcione. Antes de telefonar para a Assistência Técnica
(veja “Assistência”), verifique se não se trata de um problema fácil de resolver com ajuda da seguinte lista.
Anomalias:
A máquina de lavar roupa não
liga.
O ciclo de lavagem não inicia.
A máquina de lavar roupa não
carrega a água (no visor será
mostrada a escrita "H2O"
intermitente).
A máquina de lavar roupa
carrega e descarrega água
continuamente.
Possíveis causas / Solução:
• A ficha não está colocada na tomada eléctrica, ou não o suficiente
para haver contacto.
• Em casa não há corrente.
• A porta de vidro não está bem fechada.
• O botão LIGA/DESLIGA não foi pressionado.
• O botão INÍCIO/PAUSA não foi pressionado.
• A torneira da água não está aberta.
• Foi programado um início posterior (veja as “Como efectuar um ciclo de
lavagem”).
• O tubo de alimentação de água não está ligado na torneira.
• O tubo está dobrado.
• A torneira da água não está aberta.
• Está a faltar água em casa.
• Não há suficiente pressão.
• O botão INÍCIO/PAUSA não foi pressionado.
• O tubo de descarga não está instalado entre 65 e 100 cm de altura do chão
(veja “Instalação”).
• A ponta do tubo de descarga está imersa na água (veja “Instalação”).
• Da descarga na parede não foi sangrado o ar.
Se depois destas verificações o problema não for resolvido, feche a torneira da
água, desligue a máquina de lavar roupa e chame a assistência técnica. Se a
morada encontrar-se nos últimos andares de um edifício, é possível que
aconteçam fenómenos de sifão por causa dos quais a máquina de lavar roupa
carrega e descarrega água continuamente. Para eliminar este inconveniente,
há a disposição no comércio apropriadas válvulas contra o efeito sifão.
PT
A máquina de lavar roupa não
descarrega ou nem realiza
centrifugação.
A máquina de lavar roupa vibra
muito durante a centrifugação.
Da máquina de lavar roupa está
a perder água.
Irão piscar os indicadores
luminosos das "funções" e o
indicador de "início/pausa" e o
visor irá indicar um código de
anomalia (por ex.: F-01, F-..).
Está a formar-se demasiada
espuma.
• No programa não há descarga: com alguns programas será necessário
iniciar a descarga manualmente.
• Está activa a função ENGOMAR FÁCIL: para completar o programa
mete na tecla INÍCIO/PAUSA (veja as “Programas e funções”).
• O tubo de descarga está dobrado (veja “Instalação”).
• A conduta de descarga está entupida.
• O tambor, no momento da instalação, não foi liberado correctamente
(veja “Instalação”).
• A máquina não está nivelada (veja “Instalação”).
• A máquina está apertada entre móveis e parede (veja “Instalação”).
• O tubo de alimentação da água não está bem enroscado (veja “Instalação”).
• O gaveta dos detergentes está entupida (para limpá-la veja
“Manutenção e cuidados”).
• O tubo de descarga não está fixado correctamente (veja “Instalação”).
• Desligue a máquina e tire a ficha da tomada, aguarde
aproximadamente 1 minuto e volte a ligá-la.
Se a anomalia persistir, contacte a Assistência Técnica.
• O detergente não é específico para máquina de lavar roupa (deve haver a
escrita “para máquina de lavar”, “à mão e para máquina de lavar” ou similares).
• A dose foi excessiva.
23
Page 24

Assistência
195076778.00
03/2009 - Xerox Fabriano
PT
Antes de contactar a Assistência Técnica:
• Verifique se consegue resolver a anomalia sozinho (veja “Anomalias e soluções”);
• Reinicie o programa para verificar se o inconveniente foi resolvido;
• Em caso negativo, contacte a o Centro de Assistência técnica autorizada no número de telefone indicado no
certificado de garantia.
! Nunca recorra a técnicos não autorizados.
Comunique:
• o tipo de anomalia;
• o modelo da máquina (Mod.);
• o número de série (S/N).
Estas informações encontram-se na placa colocada na parte traseira da máquina de lavar roupa e na parte
anterior abrindo a porta de vidro.
24
 Loading...