

Page 1

Instructions for use
WASHER-DRYER
GB
English,1
UCR
Укра¿нська,37
IWDE 7105
PL
Polski,13
HU
Magyar,25
Contents
GB
Installation, 2-3
Unpacking and levelling
Connecting the electricity and water supplies
The first wash cycle
Technical data
Description of the Washer-dryer, 4-5
Control panel
Display
How to run a wash cycle or a drying cycle, 6
Wash cycles and options, 7
Table of wash cycles
Wash options
Detergents and laundry, 8
Detergent dispenser drawer
Preparing the laundry
Special wash cycles
Load balancing system
Precautions and tips, 9
General safety
Disposal
Opening the porthole door manually
Care and maintenance, 10
Cutting off the water or electricity supply
Cleaning the Washer-dryer
Cleaning the detergent dispenser drawer
Caring for the door and drum of your appliance
Cleaning the pump
Checking the water inlet hose
Troubleshooting, 11
Service, 12
1
Page 2

Installation
GB
This instruction manual should be kept in a safe
place for future reference. If the Washer-dryer is sold,
transferred or moved, make sure that the instruction
manual remains with the machine so that the new
owner is able to familiarise himself/herself with its
operation and features.
Read these instructions carefully: they contain vital
information relating to the safe installation and
operation of the appliance.
Unpacking and levelling
Unpacking
1. Remove the Washer-dryer from its packaging.
2. Make sure that the Washer-dryer has not been
damaged during the transportation process. If it has
been damaged, contact the retailer and do not
proceed any further with the installation process.
3. Remove the 4
protective screws (used
during transportation) and
the rubber washer with
the corresponding
spacer, located on the
rear part of the appliance
(see figure).
4. Close off the holes using the plastic plugs provided.
5. Keep all the parts in a safe place: you will need
them again if the Washer-dryer needs to be moved to
another location.
Levelling the machine correctly will provide it with
stability, help to avoid vibrations and excessive noise
and prevent it from shifting while it is operating. If it is
placed on carpet or a rug, adjust the feet in such a
way as to allow a sufficient ventilation space
underneath the Washer-dryer.
Connecting the electricity and water
supplies
Connecting the water inlet hose
1. Connect the supply
pipe by screwing it to a
cold water tab using a ¾
gas threaded connection
(see figure).
Before performing the
connection, allow the
water to run freely until it
is perfectly clear.
2. Connect the inlet hose
to the Washer-dryer by
screwing it onto the
corresponding water inlet
of the appliance, which is
situated on the top righthand side of the rear part
of the appliance (see
figure).
3. Make sure that the hose is not folded over or bent.
Packaging materials should not be used as toys for
children.
Levelling
1. Install the Washer-dryer on a flat sturdy floor,
without resting it up against walls, furniture cabinets
or anything else.
2. If the floor is not
perfectly level, compensate for any unevenness
by tightening or loosening
the adjustable front feet
(see figure); the angle of
inclination, measured in
relation to the worktop,
must not exceed 2°.
2
The water pressure at the tap must fall within the
values indicated in the Technical details table (see
next page).
If the inlet hose is not long enough, contact a
specialised shop or an authorised technician.
Never use second-hand hoses.
Use the ones supplied with the machine.
Page 3

Connecting the drain hose
65 - 100 cm
Connect the drain hose,
without bending it, to a
drainage duct or a wall
drain located at a height
between 65 and 100 cm
from the floor;
Do not use extension cords or multiple sockets.
GB
The cable should not be bent or compressed.
The power supply cable must only be replaced by
authorised technicians.
Warning! The company shall not be held responsible
in the event that these regulations are not respected.
The first wash cycle
alternatively, rest it on
the side of a washbasin
or bathtub, fastening the
duct supplied to the tap
(see figure). The free end
of the hose should not
be underwater.
We advise against the use of hose extensions; if it is
absolutely necessary, the extension must have the
same diameter as the original hose and must not
exceed 150 cm in length.
Electrical connections
Before plugging the appliance into the electricity
socket, make sure that:
the socket is earthed and complies with all
applicable laws;
the socket is able to withstand the maximum power
load of the appliance as indicated in the Technical
data table (see opposite);
Once the appliance has been installed, and before
you use it for the first time, run a wash cycle with
detergent and no laundry, using the wash cycle 3.
Technical data
Model
Dimensions
Capacity
Electrical
connections
Wat er
connections
IWDE 7105
width 59.5 cm
height 85 cm
depth 53,5 cm
from 1 to 7 kg for the wash programme;
from 1 to 5 kg for the drying programme
please refer to the technical data plate
fixed to the machine
maximum pressure 1 MPa (10 bar)
minimum pressure 0.05 MPa (0.5 bar)
drum capacity 52 litres
the power supply voltage falls within the values
indicated in the Technical data table (see opposite);
the socket is compatible with the plug of the
Washer-dryer. If this is not the case, replace the
socket or the plug.
The Washer-dryer must not be installed outdoors,
even in covered areas. It is extremely dangerous to
leave the appliance exposed to rain, storms and other
weather conditions.
When the Washer-dryer has been installed, the
electricity socket must be within easy reach.
Spin speed
Energy rated
programmes
according to
regulation
EN 50229
up to 1000 rotations per minute
Wash: programme 2; temperature 60°C;
using a load of 7 kg.
Drying: first drying cycle performed with
a 2 kg load, selecting drying level "A1"
(IRON DRY); second drying cycle
performed with a 5 kg load, selecting
drying level "A4" (EXTRA DRY).
This appliance conforms to the following
EC Directives:
- 89/336/EEC dated 03/05/89
(Electromagnetic Compatibility) and
subsequent modifications
- 2002/96/EC
- 2006/95/EC (Low Voltage)
3
Page 4

Description of the Washer-dryer
GB
Control panel
Detergent dispenser drawer
ON/OFF
button
WASH CYCLE
knob
TEMPERATURE
Button
SPIN SPEED
Button
OPTION
buttons with
indicator lights
DISPLAY
START/PAUSE
button with indicator light
DRYING
Button
Detergent dispenser drawer: used to dispense
detergents and washing additives (see Detergents
and laundry).
ON/OFF button
machine on or off. The START/PAUSE indicator light,
which flashes slowly in a green colour shows that the
machine is switched on. To switch off the Washerdryer during the wash cycle, press and hold the
button for approximately 2 seconds; if the button is
pressed briefly or accidentally the machine will not
switch off. If the machine is switched off during a
wash cycle, this wash cycle will be cancelled.
WASH CYCLE knob: used to set the desired wash
cycle (see "Table of wash cycles").
OPTION buttons with indicator light: used to select
the available options. The indicator light corresponding
to the selected option will remain lit.
SPIN button
exclude the spin cycle - the value is indicated on the
display.
: press this briefly to switch the
: press to reduce or completely
DRYING button
drying; the selected drying level or time will appear on
the display (see "How to run a wash cycle or a drying
cycle").
START/PAUSE button
the green indicator light flashes slowly, press the
button to start a wash cycle. Once the cycle has
begun the indicator light will remain lit in a fixed
manner. To pause the wash cycle, press the button
again; the indicator light will flash in an orange colour.
If the symbol
opened. To start the wash cycle from the point at
which it was interrupted, press the button again.
Standby mode
This washing machine, in compliance with new
energy saving regulations, is fitted with an automatic
standby system which is enabled after a few minutes
if no activity is detected. Press the ON-OFF button
briefly and wait for the machine to start up again.
: press to decrease or exclude
with indicator light: when
is not illuminated, the door may be
TEMPERATURE button
completely exclude the temperature: the value will be
shown on the display.
4
: press to decrease or
Page 5
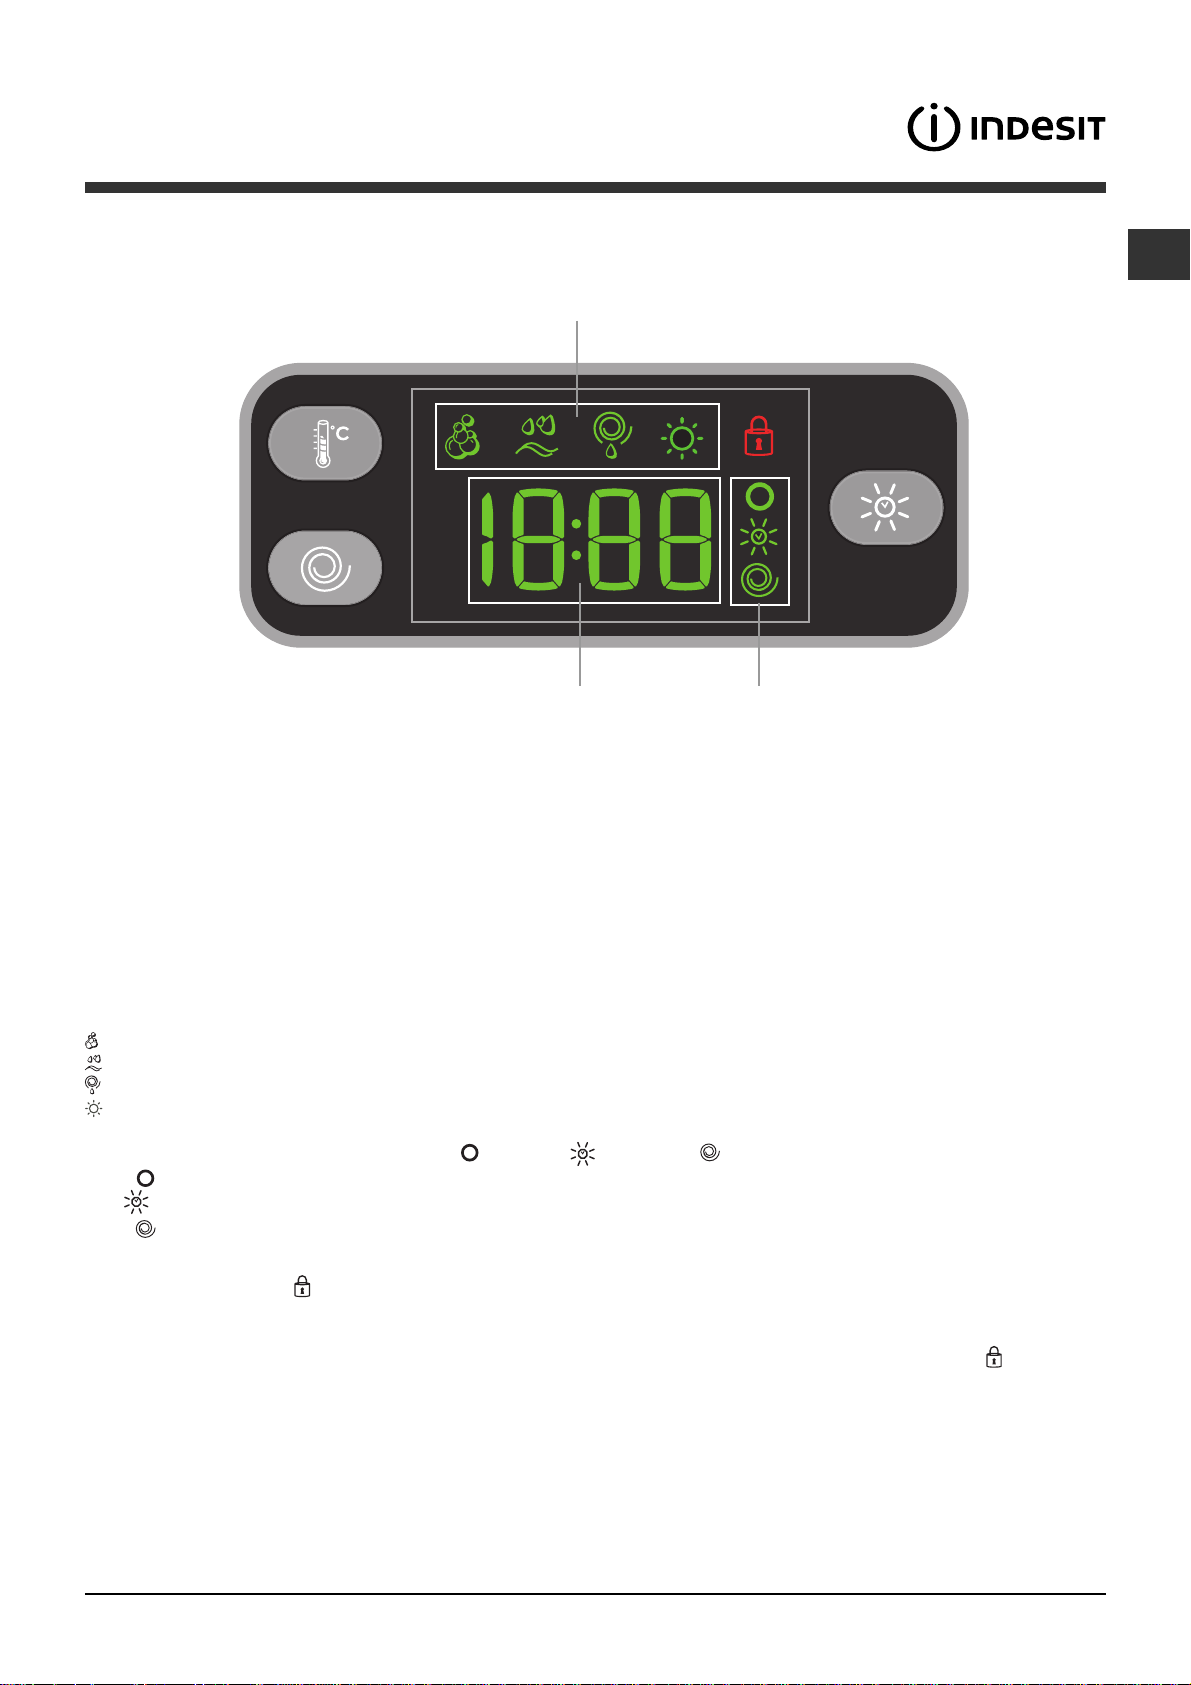
Display
GB
B
A
The display is useful when programming the machine and provides a great deal of information.
The duration of the available programmes and the remaining time of a running cycle appear in section A; if the
DELAY START option has been set, the countdown to the start of the selected programme will appear.
Furthermore, pressing the corresponding button allows you to view the maximum temperature, spin speed and
drying level or time values attained by the machine during the selected cycle.
The phases scheduled for the selected cycle and, once the cycle has begun, the current phase of the wash cycle
(and drying cycle, if applicable) appear in section B.
Wash
Rinse
Spin / Drain
Drying
The icons corresponding to "temperature"
If the
The
If the
Door locked symbol
The lit symbol indicates that the door is locked. To prevent any damage, wait until the symbol turns off before
opening the door.
To open the door while a cycle is in progress, press the START/PAUSE button; if the DOOR LOCKED
switched off the door may be opened.
symbol lights up, the display will visualise the set "temperature" value.
symbol lights up while the drying settings are being adjusted.
symbol lights up, the display will visualise the set "spin" value.
, "Drying" and "spin" appear in section C from top to bottom:
C
symbol is
5
Page 6

How to run a wash cycle or a
drying cycle
GB
1. SWITCH THE MACHINE ON. Press the
button; the START/PAUSE indicator light will flash
slowly in a green colour.
2. LOAD THE LAUNDRY. Open the porthole door.
Load the laundry, making sure you do not exceed
the maximum load value indicated in the table of
programmes on the following page.
3. MEASURE OUT THE DETERGENT. Pull out the
detergent dispenser drawer and pour the detergent
into the relevant compartments as described in
"Detergents and laundry".
4. CLOSE THE DOOR.
5. SELECT THE WASH CYCLE. Set the WASH
CYCLE knob to the desired programme; a
temperature and spin speed is set for each wash
cycle; these may be adjusted. The duration of the
cycle will appear on the display.
6. CUSTOMISE THE WASH CYCLE. Use the
relevant buttons:
Modifying the temperature and/or spin
speed. The machine automatically displays the
maximum temperature and spin speed values set
for the selected cycle, or the most recently-used
settings if they are compatible with the selected
cycle. The temperature can be decreased by
pressing the
setting is reached. The spin speed may be
progressively reduced by pressing the
until it is completely excluded (the "OFF" setting). If
these buttons are pressed again, the maximum
values are restored.
Setting the drying cycle
The first time the button is pressed, the machine
will automatically select the maximum drying cycle
which is compatible with the selected wash cycle.
Subsequent presses will decrease the drying level
and then the drying time, until the cycle is excluded
completely ("OFF").
Drying may be set as follows:
A- Based on the desired laundry dryness level:
Iron dry: suitable for clothes which will need
ironing afterwards. the remaining dampness softens
creases, making them easier to remove; "A1"
appears on the display.
Hanger dry: ideal for clothes which do not need to
be dried fully; "A2" appears on the display.
Cupboard dry: suitable for laundry which can be
put back in a cupboard without being ironed; "A3"
appears on the display.
Extra dry: suitable for garments which need to be
dried completely, such as sponges and bathrobes
"A4"; appears on the display.
B - Based on a set time period: between 30 and
180 minutes.
button, until the cold wash "OFF"
button,
If your laundry load to be washed and dried is
much greater than the maximum stated load (see
adjacent table), perform the wash cycle, and when
the cycle is complete, divide the garments into
groups and put some of them back in the drum. At
this point, follow the instructions provided for a
"Drying only" cycle. Repeat this procedure for the
remainder of the load.
N.B: a cooling-down period is always added to the
end of each drying cycle.
Drying only
Use the cycle selector knob to select a drying cycle
(11-12-13) in accordance with the type of fabric.
The desired drying level or time may also be set
using the DRYING button
Modifying the cycle settings.
Press the button to enable the option; the
indicator light corresponding to the button will
switch on.
Press the button again to disable the option; the
indicator light will switch off.
.
If the selected option is not compatible with the
programmed wash cycle, the indicator light will
flash and the option will not be activated.
If the selected option is not compatible with
another option which has been selected previously,
the indicator light corresponding to the first option
selected will flash and only the second option will be
activated; the indicator light corresponding to the
enabled option will remain lit.
The options may affect the recommended load
value and/or the duration of the cycle.
7. START THE PROGRAMME. Press the START/
PAUSE button. The corresponding indicator light will
become green, remaining lit in a fixed manner, and
the door will be locked (the DOOR LOCKED
symbol
it is in progress, pause the Washer-dryer using the
START/PAUSE button (the START/PAUSE indicator
light will flash slowly in an orange colour); then
select the desired cycle and press the START/
PAUSE button again. To open the door while a
cycle is in progress, press the START/PAUSE
button; if the DOOR LOCKED
off the door may be opened. Press the START/
PAUSE button again to restart the wash cycle from
the point at which it was interrupted.
8. THE END OF THE WASH CYCLE. This will be
indicated by the text "End" on the display; when
the DOOR LOCKED
may be opened. Open the door, unload the laundry
and switch off the machine.
will be on). To change a wash cycle while
symbol is switched
symbol switches off the door
If you wish to cancel a cycle which has already
begun, press and hold the
stopped and the machine will switch off.
button. The cycle will be
6
Page 7
Wash cycles and options
Table of wash cycles
.
Max
Description of the wash cycle
Wash cycles
Daily
1
Cotton with prewash:
2
Cotton:
extremely soiled whites.
2
Cotton (1):
2
Cotton (2):
3
Cotton:
4
Coloured Cottons (3):
5
Synthetics:
Special
6
Wool:
7
Silk/Cur tai ns:
8
Jeans
9
Sport Light
10
Sport Shoes
Drying
11
Cotton dry
12
Synthetics dry
13
Express Wash & Dry
Partial wash cycles
Rinse
Spin
Drain
For all Test Institutes:
1) Test wash cycle in compliance with regulation EN 50229: set wash cycle 2 with a temperature of 60°C.
2) Long wash cycle for cottons: set wash cycle 2 with a temperature of 40°C.
3) Short wash cycle for cottons: set wash cycle 4 with a temperature of 40°C.
heavily soiled whites and resistant colours.
heavily soiled whites and delicate colours.
heavily soiled whites and resistant colours.
lightly soiled resistant colours.
for wool, cashmere, etc.
for garments in silk and viscose, lingerie.
extremely soiled whites.
lightly soiled whites and delicate colours.
Max.
temp.
speed
(°C)
(rpm)
90° 1000
90° 1000
60° 1000
40° 1000
60° 1000
40° 1000
60° 800
40° 800
30° 0
40° 800
30° 600
30° 600
- -
- -
30° 1000
1000
-
1000
-
-
Drying
Pre-
wash
lll
l
-
l
-
l
-
l
-
l
-
l
-
- -
- -
l
-
- -
- -
l
- - - -
l
- - - -
l
-
l
- -
l
- - - -
0
- - - - -
The information contained in the table is intended as a guide only.
Detergents Max. load (kg)
Was h Blea ch
ll l
ll l
ll l
ll l
ll l
ll l
l
l
l
l
l
l
Fabr ic
softener
-
-
-
-
-
-
-
Normal
l
l
l
l
l
l
l
ll
7
7
7
7
73,5
73,5
32
1,5
1
3
3
Max. 2
pairs
5
3
0,5
7
7
7
Eco
Time
-
-
-
-
-
-
-
-
-
-
-
-
-
-
-
GB
Cycle
duration
The duration of the wash cycles can be checked
on the display.
Wash options
Selecting this option enables you to suitably adjust
drum rotation, temperature and water to a reduced
load of lightly soiled cotton and synthetic fabrics (refer
to the
"Table of wash cycles"
to wash in less time thereby saving water and
electricity. We suggest using a liquid detergent
suitably measured out to the load quantity.
This function may not be used in conjunction with
wash cycles 1, 2, 6, 7, 8, 9, 10, 11, 12, 13,
Stain removal
4
3
2
1
into extra compartment 4, set the "Rinse"
programme and activate the "Stain removal" option.
). enables you
, , .
This option is particularly
useful for the removal of
stubborn stains. Place extra
compartment 4 (supplied)
into compartment 1.
When pouring in the bleach,
be careful not to exceed
the "max" level marked on
the central pivot (see figure).
To run the bleach cycle on
its own, pour the bleach
To bleach during a wash cycle, pour in the detergent
and any fabric softener you wish to use, set the desired
wash cycle and enable the "Stain removal"
option.
The use of extra compartment 4 excludes the Prewash option.
It cannot be used with the 1, 6, 7, 8, 9, 10, 11, 12,
, programmes.
13,
Extra rinse
By selecting this option, the efficiency of the rinse is
increased and optimal detergent removal is
guaranteed. It is particularly useful for sensitive skin.
This function may not be used in conjunction with
wash cycles 11,12, 13,
Delay start
To set a delayed start for the selected cycle, press
the corresponding button repeatedly until the required
delay period has been reached. When this option is
enabled, the corresponding indicator light will remain
lit. To remove the delayed start setting, press the
button until the text "OFF" appears on the display.
This option can be used in conjunction with all
cycles.
, .
7
Page 8

Detergents and laundry
GB
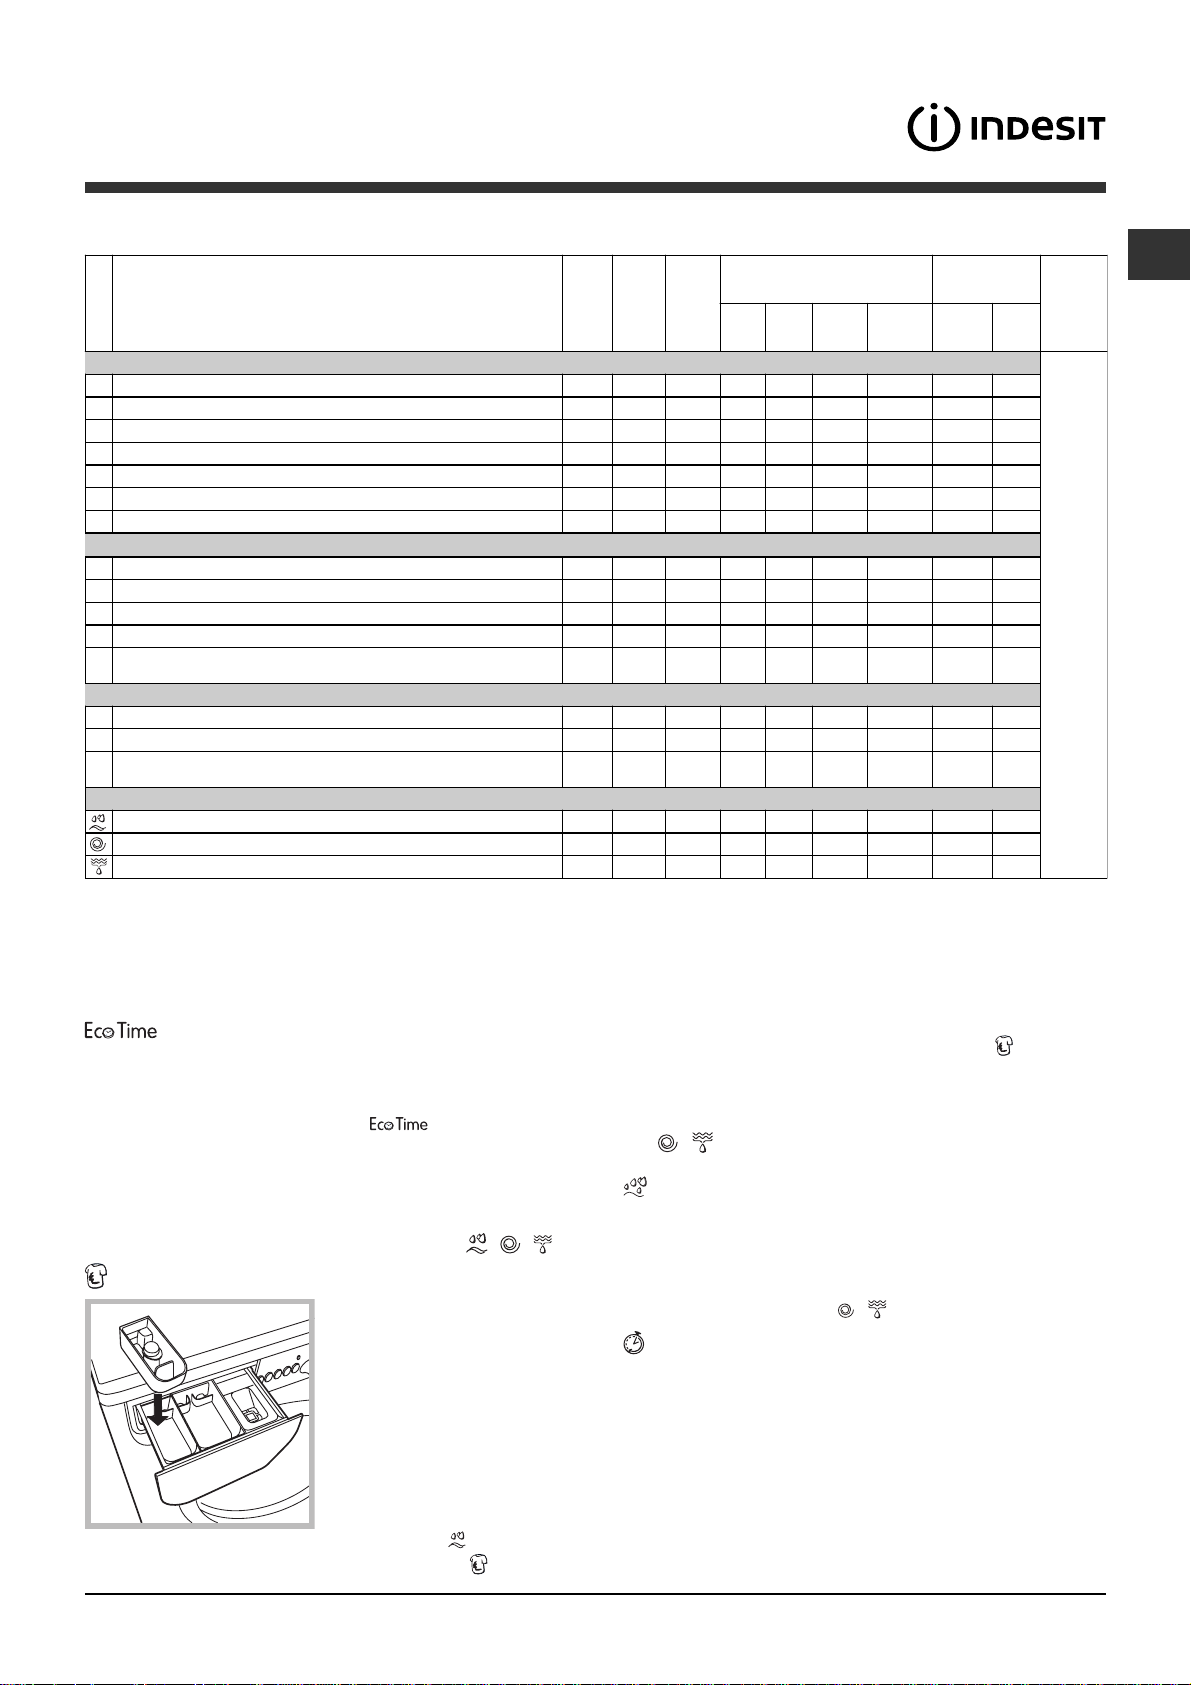
Detergent dispenser drawer
Good washing results also depend on the correct
dose of detergent: adding too much detergent will not
necessarily result in a more efficient wash, and may in
fact cause build up on the inside of your appliance
and contribute to environmental pollution.
Do not use hand washing detergents because these
create too much foam.
Open the detergent
4
3
dispenser drawer and
pour in the detergent or
washing additive, as
follows.
2
1
compartment 1: Pre-wash detergent (powder)
Before pouring in the detergent, make sure that extra
compartment 4 has been removed.
compartment 2: Detergent for the wash cycle
(powder or liquid)
Liquid detergent should only be poured in immediately
prior to the start of the wash cycle.
compartment 3: Additives (fabric softeners, etc.)
The fabric softener should not overflow the grid.
extra compartment 4: Bleach
Preparing the laundry
Divide the laundry according to:
- the type of fabric/the symbol on the label
- the colours: separate coloured garments from whites.
Empty all garment pockets and check the buttons.
Do not exceed the listed values, which refer to the
weight of the laundry when dry:
Durable fabrics: max. 7 kg
Synthetic fabrics: max. 3 kg
Delicate fabrics: max. 2 kg
Wool: max. 1,5 kg
Silk: max. 1 kg
How much does your laundry weigh?
1 sheet 400-500 g
1 pillow case 150-200 g
1 tablecloth 400-500 g
1 bathrobe 900-1200 g
1 towel 150-250 g
Silk: use special wash cycle 7 to wash all silk
garments. We recommend the use of special
detergent which has been designed to wash delicate
clothes.
Curtains: fold curtains and place them in a pillow
case or mesh bag. Use wash cycle 7.
Jeans: Turn garments inside-out before washing and
use a liquid detergent. Use programme 8.
Sport Light (wash cycle 9): is for washing lightly
soiled sports clothing fabrics (tracksuits, shorts, etc.);
for best results, we recommend not exceeding the
maximum load indicated in the "Table of wash
cycles". We recommend using a liquid detergent and
dosage suitable for a half-load.
Sport Shoes (wash cycle 10): is for washing sports
shoes; for best results, do not wash more than 2
pairs simultaneously.
Express Wash & Dry (wash cycle 13) was designed
to wash and dry lightly soiled garments quickly. This
cycle may be used to wash and dry a laundry load of
up to 0.5 kg in just 40 minutes.
To achieve optimum results, use liquid detergent and
pre-treat cuffs, collars and stains.
Load balancing system
Before every spin cycle, to avoid excessive vibrations
and to distribute the load in a uniform manner, the
drum rotates continuously at a speed which is slightly
greater than the washing rotation speed. If, after
several attempts, the load is not balanced correctly,
the machine spins at a reduced spin speed. If the
load is excessively unbalanced, the Washer-dryer
performs the distribution process instead of spinning.
To encourage improved load distribution and balance,
we recommend small and large garments are mixed
in the load.
Special wash cycles
Wool: all wool garments can be washed using
programme 6, even those carrying the "hand-wash
only"
detergents and do not exceed 1,5 kg of laundry.
8
label. For best results, use special
Page 9
Precautions and tips
This Washer-dryer was designed and constructed in
accordance with international safety regulations. The
following information is provided for safety reasons
and must therefore be read carefully.
General safety
This appliance was designed for domestic use only.
The Washer-dryer must only be used by adults, in
accordance with the instructions provided in this manual.
Do not touch the machine when barefoot or with
wet or damp hands or feet.
Do not pull on the power supply cable when
unplugging the appliance from the electricity
socket. Hold the plug and pull.
Do not open the detergent dispenser drawer while
the machine is in operation.
Do not touch the drained water as it may reach
extremely high temperatures.
Never force the porthole door. This could damage
the safety lock mechanism designed to prevent
accidental opening.
If the appliance breaks down, do not under any
circumstances access the internal mechanisms in
an attempt to repair it yourself.
Always keep children well away from the appliance
while it is operating.
The door can become quite hot during the wash cycle.
If the appliance has to be moved, work in a group
of two or three people and handle it with the utmost
care. Never try to do this alone, because the
appliance is very heavy.
Before loading laundry into the Washer-dryer, make
sure the drum is empty.
separately in order to optimise the recovery and
recycling of the materials they contain and reduce
the impact on human health and the environment.
The crossed out "wheeled bin" symbol on the
product reminds you of your obligation, that when
you dispose of the appliance it must be separately
collected.
Consumers should contact their local authority or
retailer for information concerning the correct
disposal of their old appliance.
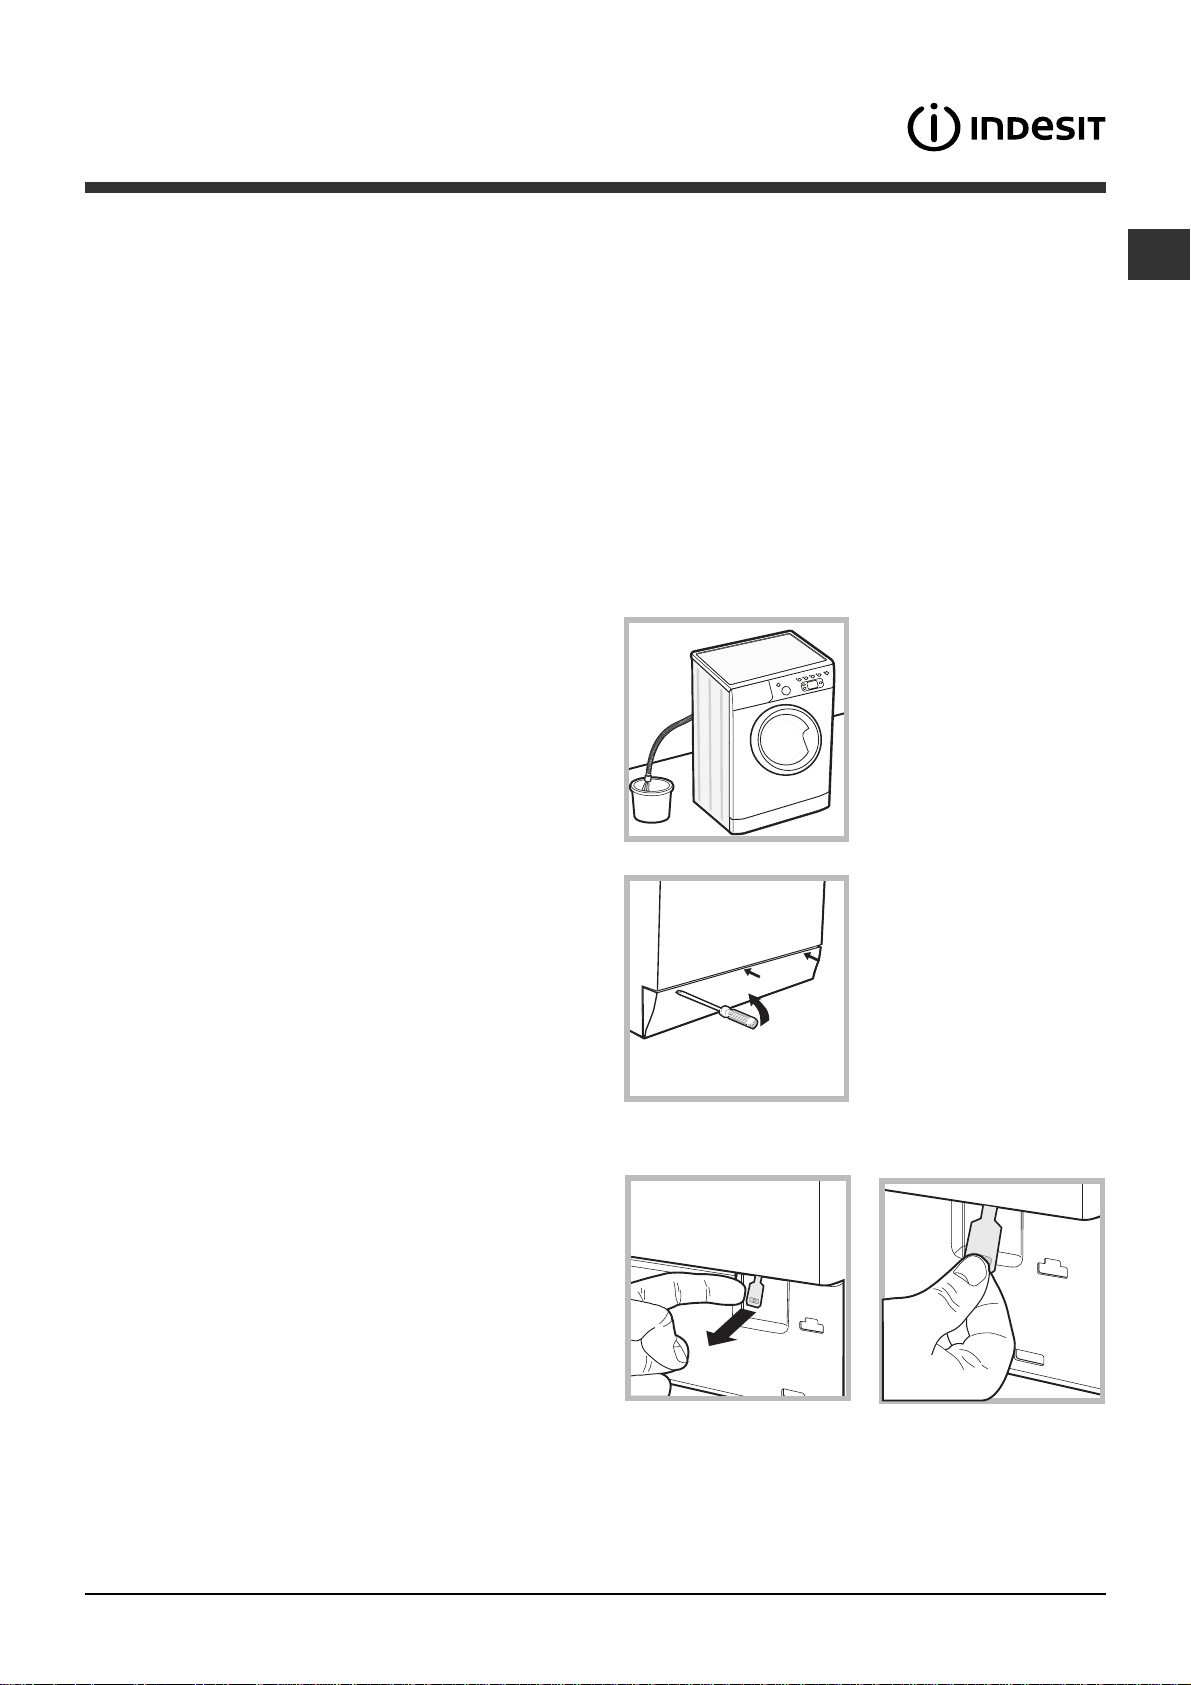
Opening the porthole door manually
In the event that it is not possible to open the
porthole door due to a powercut, and if you wish to
remove the laundry, proceed as follows:
1. remove the plug from
the electrical socket.
2. make sure the water
level inside the machine is
20
lower than the door
opening; if it is not, remove
excess water using the
drain hose, collecting it in a
bucket as indicated in the
figure.
3. using a screwdriver,
remove the cover panel on
the lower front part of the
Washer-dryer (see figure).
GB
During the drying phase, the door tends to get
quite hot.
Do not use the appliance to dry clothes that have
been washed with flammable solvents (e.g.
trichlorethylene).
Do not use the appliance to dry foam rubber or
similar elastomers.
Make sure that the water tap is turned on during
the drying cycles.
Disposal
Disposing of the packaging materials: observe local
regulations so that the packaging may be re-used.
The European Directive 2002/96/EC on Waste
Electrical and Electronic Equipment, requires that
old household electrical appliances must not be
disposed of in the normal unsorted municipal waste
stream. Old appliances must be collected
4. pull outwards using the tab as indicated in the
figure, until the plastic tie-rod is freed from its stop
position; pull downwards and open the door at the
same time.
5. reposition the panel, making sure the hooks are
securely in place before you push it onto the
appliance.
9
Page 10

Care and maintenance
GB
Cutting off the water and electricity
supplies
Turn off the water tap after every wash cycle. This
will limit wear on the hydraulic system inside the
Washer-dryer and help to prevent leaks.
Unplug the Washer-dryer when cleaning it and
during all maintenance work.
Cleaning the Washer-dryer
The outer parts and rubber components of the
appliance can be cleaned using a soft cloth soaked
in lukewarm soapy water. Do not use solvents or
abrasives.
Cleaning the detergent dispenser
drawer
Remove the dispenser
by raising it and pulling it
out (see figure).
Wash it under running
water; this operation
should be repeated
frequently.
Cleaning the pump
The Washer-dryer is fitted with a self-cleaning pump
which does not require any maintenance. Sometimes,
small items (such as coins or buttons) may fall into the
pre-chamber which protects the pump, situated in its
bottom part.
Make sure the wash cycle has finished and unplug
the appliance.
To access the pre-chamber:
1. using a screwdriver,
remove the cover panel
on the lower front part of
the Washer-dryer (see
figure);
2. unscrew the lid by
rotating it anti-clockwise
(see figure): a little water
may trickle out. This is
perfectly normal;
Caring for the door and drum of your
appliance
Always leave the porthole door ajar in order to
prevent unpleasant odours from forming.
3. clean the inside thoroughly;
4. screw the lid back on;
5. reposition the panel, making sure the hooks are
securely in place before you push it onto the
appliance.
Checking the water inlet hose
Check the inlet hose at least once a year. If there are
any cracks, it should be replaced immediately: during
the wash cycles, water pressure is very strong and a
cracked hose could easily split open.
Never use second-hand hoses.
10
Page 11

Troubleshooting
Your Washer-dryer could fail to work. Before contacting the Technical Assistance Centre (see Assistance), make
sure that the problem cannot be not solved easily using the following list.
Problem:
The Washer-dryer does not
switch on.
The wash cycle does not start.
The Washer-dryer does not take
in water ("H2O" will flash on the
display).
The Washer-dryer continuously
takes in and
drains water.
Possible causes / Solutions:
The appliance is not plugged into the socket fully, or is not making contact.
There is no power in the house.
The Washer-dryer door is not closed properly.
The ON/OFF button has not been pressed.
The START/PAUSE button has not been pressed.
The water tap has not been opened.
A delayed start has been set.
The water inlet hose is not connected to the tap.
The hose is bent.
The water tap has not been opened.
There is no water supply in the house.
The pressure is too low.
The START/PAUSE button has not been pressed.
The drain hose is not fitted at a height between 65 and 100 cm from
the floor (see Installation).
The free end of the hose is under water (see Installation).
The wall drainage system is not fitted with a breather pipe.
If the problem persists even after these checks, turn off the water tap,
switch the appliance off and contact the Assistance Service. If the
dwelling is on one of the upper floors of a building, there may be problems
relating to water drainage, causing the Washer-dryer to fill with water and
drain continuously. Special anti-draining valves are available in shops and
help to avoid this inconvenience.
GB
The Washer-dryer does not drain
or spin.
The Washer-dryer vibrates a lot
during the spin cycle.
The Washer-dryer leaks.
The "option" indicator lights and
the "start/pause" indicator light
flash and an error code appears
on the display (e.g.: F-01, F-..).
There is too much foam.
The washer-dryer does not dry.
The wash cycle does not include draining: some wash cycles require the
drain phase to be started manually.
The drain hose is bent (see Installation).
The drainage duct is clogged.
The drum was not unlocked correctly during installation (see Installation).
The Washer-dryer is not level (see Installation).
The Washer-dryer is trapped between cabinets and walls (see Installation).
The water inlet hose is not screwed on properly (see Installation).
The detergent dispenser drawer is blocked (for cleaning instructions, see Care
and maintenance).
The drain hose is not fixed properly (see Installation).
Switch off the machine and unplug it, wait for approximately 1 minute
and then switch it back on again.
If the problem persists, contact the Technical Assistance Service.
The detergent is not suitable for machine washing (it should display the
text for Washer-dryers or hand and machine wash, or the like).
Too much detergent was used.
The appliance is not plugged into the socket, or not enough to make contact.
There has been a power failure.
The appliance door is not shut properly.
A delayed start has been set.
DRYING is in the OFF position.
11
Page 12

Service
GB
Before calling for Assistance:
Check whether you can solve the problem alone (see Troubleshooting);
Restart the programme to check whether the problem has been solved;
If this is not the case, contact an authorised Technical Assistance Centre using the telephone number
provided on the guarantee certificate.
Always request the assistance of authorised technicians.
Have the following information to hand:
the type of problem;
the appliance model (Mod.);
the serial number (S/N).
This information can be found on the data plate applied to the rear of the Washer-dryer, and can also be
found on the front of the appliance by opening the door.
12
Page 13

Instrukcja obs³ugi
PRALKA
PL
Polski
IWDE 7105
Spis treci
PL
Instalacja, 14-15
Rozpakowanie i wypoziomowanie
Pod³¹czenia hydrauliczne i elektryczne
Pierwszy cykl prania
Dane techniczne
Opis pralki, 16-17
Panel sterowania
Wywietlacz
Jak wykonaæ cykl prania lub suszenie, 18
Programy i funkcje, 19
Tabela programów
Funkcje prania
rodki pior¹ce i bielizna, 20
Szufladka na rodki pior¹ce
Przygotowanie bielizny
Programy specjalne
System równowa¿enia ³adunku
Zalecenia i rodki ostro¿noci, 21
Ogólne zasady bezpieczeñstwa
Utylizacja
Rêczne otwieranie okr¹g³ych drzwiczek
Utrzymanie i konserwacja, 22
Od³¹czenie wody i pr¹du elektrycznego
Czyszczenie pralki
Czyszczenie szufladki na rodki pior¹ce
Konserwacja okr¹g³ych drzwiczek i bêbna
Czyszczenie pompy
Kontrola przewodu doprowadzaj¹cego wodê
Nieprawid³owoci w dzia³aniu i sposoby
ich usuwania, 23
Serwis Techniczny, 24
13
Page 14

Instalacja
PL
Nale¿y zachowaæ niniejsz¹ ksi¹¿eczkê, aby móc z
niej skorzystaæ w ka¿dej chwili. W przypadku
sprzeda¿y, odst¹pienia lub przeniesienia pralki w inne
miejsce nale¿y zadbaæ o przekazanie instrukcji wraz z
maszyn¹, aby nowy w³aciciel móg³ zapoznaæ siê z
dzia³aniem urz¹dzenia i z dotycz¹cymi go
ostrze¿eniami.
Nale¿y uwa¿nie przeczytaæ instrukcjê obs³ugi:
zawiera ona wa¿ne informacje dotycz¹ce instalacji oraz
w³aciwego i bezpiecznego u¿ytkowania pralki.
Rozpakowanie i wypoziomowanie
Rozpakowanie
1. Rozpakowaæ pralkê.
2. Sprawdziæ, czy nie dozna³a ona uszkodzeñ w czasie
transportu. W przypadku stwierdzenia uszkodzeñ nie
pod³¹czaæ jej i skontaktowaæ siê ze sprzedawc¹.
3. Odkrêciæ 4 ruby
zabezpieczaj¹ce
maszynê na czas
transportu oraz zdj¹æ
gumowy element z
podk³adk¹, znajduj¹cy siê
w tylnej czêci pralki
(patrz rysunek).
4. Zatkaæ otwory przy pomocy plastikowych zalepek,
znajduj¹cych siê w wyposa¿eniu maszyny.
5. Zachowaæ wszystkie czêci: w razie koniecznoci
przewiezienia pralki w inne miejsce, powinny one
zostaæ ponownie zamontowane.
Staranne wypoziomowanie pralki zapewnia jej
stabilnoæ i zapobiega wibracjom, ha³asowi oraz
przesuwaniu siê maszyny w czasie pracy. W razie
ustawienia na dywanie lub wyk³adzinie dywanowej
nale¿y tak wyregulowaæ nó¿ki, aby pod pralk¹
pozostawa³a wolna przestrzeñ niezbêdna dla
wentylacji.
Pod³¹czenia hydrauliczne i elektryczne
Pod³¹czenie przewodu doprowadzaj¹cego wodê
1. Podùàczyã przewód
zasilajàcy poprzez
przykræcenie do zaworu
wody zimnej z koñcówkà
gwintowanà ¾ gas (patrz
rysunek).
Przed pod³¹czeniem
spuszczaæ wodê do
momentu, a¿ stanie siê
ona ca³kowicie
przezroczysta.
2. Pod³¹czyæ do maszyny
przewód doprowadzaj¹cy
wodê, przykrêcaj¹c go do
odpowiedniego otworu
dop³ywowego,
znajduj¹cego siê w tylnej
czêci pralki, z prawej
strony u góry
(patrz rysunek).
3. Zwróciæ uwagê, aby na przewodzie nie by³o zagiêæ
ani zwê¿eñ.
Czêci opakowania nie s¹ zabawkami dla dzieci.
Poziomowanie
1. Ustawiæ pralkê na p³askiej i twardej pod³odze, nie
opieraj¹c jej o ciany, meble itp.
2. Jeli pod³oga nie jest
idealnie pozioma, nale¿y
skompensowaæ
nierównoci, odkrêcaj¹c
lub dokrêcaj¹c przednie
nó¿ki (patrz rysunek); k¹t
nachylenia, zmierzony na
górnym blacie pralki nie
powinien przekraczaæ 2°.
14
Cinienie wody w kurku powinno mieciæ siê w
przedziale podanym w tabeli Danych technicznych
(patrz strona obok).
Jeli d³ugoæ przewodu doprowadzaj¹cego wodê jest
niewystarczaj¹ca, nale¿y zwróciæ siê do
specjalistycznego sklepu lub do autoryzowanego
technika.
Nigdy nie instalowaæ ju¿ u¿ywanych przewodów.
Stosowaæ przewody znajduj¹ce siê w wyposa¿eniu
maszyny.
Page 15

Pod³¹czenie przewodu odp³ywowego
Pod³¹czyæ przewód
odp³ywowy, nie zginaj¹c
go, do rury ciekowej lub
do otworu odp³ywowego w
cianie, które powinny
65 - 100 cm
znajdowaæ siê na
wysokoci od 65 do 100
cm od pod³ogi;
Nie u¿ywaæ przed³u¿aczy ani rozga³êników.
PL
Przewód nie powinien byæ pozginany ani
przygnieciony.
Przewód zasilania elektrycznego mo¿e byæ
wymieniany wy³¹cznie przez autoryzowanych
techników.
Uwaga! Producent nie ponosi ¿adnej odpowiedzialnoci
w przypadku nieprzestrzegania powy¿szych zasad.
ewentualnie oprzeæ go na
brzegu zlewu lub wanny,
przymocowuj¹c do kranu
prowadnik, znajduj¹cy siê
w wyposa¿eniu (patrz
rysunek). Wolny koniec
przewodu odp³ywowego
nie powinien byæ
zanurzony w wodzie.
Odradza siê stosowanie przewodów przed³u¿aj¹cych;
jeli to konieczne, przewód przed³u¿aj¹cy powinien
mieæ tak¹ sam¹ rednicê jak oryginalny, a jego d³ugoæ
nie mo¿e przekraczaæ 150 cm.
Pod³¹czenie elektryczne
Przed w³o¿eniem wtyczki do gniazdka elektrycznego
nale¿y siê upewniæ, czy:
gniazdko posiada uziemienie i jest zgodne z
obowi¹zuj¹cymi przepisami;
gniazdko jest w stanie wytrzymaæ maksymalne
obci¹¿enie mocy maszyny, wskazane w tabeli
Danych technicznych (patrz obok);
Pierwszy cykl prania
Po zainstalowaniu pralki, przed przyst¹pieniem do jej
u¿ytkowania, nale¿y wykonaæ jeden cykl prania ze
rodkiem pior¹cym, ale bez wsadu, nastawiaj¹c
program 3.
Dane techniczne
Model
Wymiary
Pojemnoæ
Dane pr¹du
elektrycznego
Dane sieci
wodoci¹gowej
Szybkoæ wirowania
IWDE 7105
szerokoæ cm 59,5
wysokoæ cm 85
g³êbokoæ cm 53,5
od 1 do 7 kg dla prania
od 1 do 5 kg dla suszenia
dane techniczne umieszczone s¹ na
tabliczce na maszynie
Maksymalne cinienie 1 MPa (10 barów)
cinienie minimalne 0,05 MPa (0,5 barów)
pojemnoæ bêbna 52 litrów
do 1200 obrotów na minutê
napiêcie zasilania mieci siê w wartociach
wskazanych w tabeli Danych technicznych
(patrz obok);
gniazdko pasuje do wtyczki pralki. W przeciwnym
razie nale¿y wymieniæ gniazdko lub wtyczkê.
Nie nale¿y instalowaæ pralki na otwartym powietrzu,
nawet w os³oniêtym miejscu, gdy¿ wystawienie
urz¹dzenia na dzia³anie deszczu i burz jest bardzo
niebezpieczne.
Po zainstalowaniu pralki gniazdko elektryczne
powinno byæ ³atwo dostêpne.
Programy kontrolne
zgodnie z przepisami
EN 50229
program 2; temperatura 60°C;
pranie:
wykonane przy 7 kg za³adowanej bielizny.
pierwsze suszenie wykonane przy
uszenie:
ladunku 2 kg z ustawieniem poziomu
suszenia "A1" (PRASOWANIE);
drugie suszenie wykonane przy ladunku
kg z ustawieniem poziomu suszenia
5
"A4" (EXTRA).
Urz¹dzenie to zosta³o wyprodukowane
zgodnie z nastêpuj¹cymi przepisami EWG:
- 89/336/CEE z dn. 03/05/89
(o Kompatybilnoci Elektromagnetycznej)
wraz z kolejnymi zmianami
- 2002/96/CE
- 2006/95/CE (o Niskim Napiêciu)
15
Page 16

Opis pralki
PL
Panel sterowania
Przycisk
W£¥CZANIA/
WY£¥CZANIA
Szufladka na rodki pior¹ce
Szufladka na rodki pior¹ce: do dozowania
rodków pior¹cych i dodatków (patrz rodki pior¹ce
i bielizna).
Przycisk W£¥CZANIA/WY£¥CZANIA
krótko przycisk w celu w³¹czenia lub wy³¹czenia
maszyny. Kontrolka START/PAUZA, która pulsuje
powoli w kolorze zielonym wskazuje, ¿e maszyna
jest w³¹czona. W celu wy³¹czenia pralki podczas
prania konieczne jest d³u¿sze przytrzymanie
naciniêtego przycisku, przez oko³o 2 sek.; krótkie
lub przypadkowe naciniêcie wystarczy do
wy³¹czenia maszyny. Wy³¹czenie maszyny podczas
trwaj¹cego prania anuluje program prania.
Pokrêt³o PROGRAMÓW: do ustawiania programów.
W czasie trwania programu pokrêt³o pozostaje
nieruchome.
Przyciski z kontrolkami FUNKCJI: do wyboru
dostêpnych funkcji. Kontrolka wybranej funkcji
pozostaje zawiecona.
Przycisk WIROWANIA
zmniejszenia lub ca³kowitego wy³¹czenia wirówki
wartoæ ukazana zostanie na wywietlaczu.
: nacisn¹æ w celu
Pokrêt³o
PROGRAMÓW
: nacisn¹æ
Przycisk
TEMPERATURY
Przycisk
WIROWANIA
Przycisk SUSZENIE
zmniejszyæ lub wy³¹czyæ suszenie; poziom lub czas
wybranego suszenia zostanie wywietlony na
wywietlaczu (patrz Jak wykonaæ cykl prania lub
suszenie).
Przycisk z kontrolk¹ START/PAUZA
zielona kontrolka pulsuje powoli, nacisn¹æ przycisk
w celu uruchomienia prania. Po uruchomieniu cyklu
kontrolka wieci w sposób ci¹g³y. W celu wybrania
pauzy w praniu nale¿y nacisn¹æ ponownie przycisk,
kontrolka zacznie pulsowaæ w kolorze
pomarañczowym. Jeli symbol
mo¿na otworzyæ drzwiczki. W celu ponownego
uruchomienia prania od miejsca, w którym zosta³o
przerwane, nale¿y ponownie nacisn¹æ przycisk.
Funkcja stand by
Pralka ta, w myl nowych norm europejskich
zwi¹zanych z oszczêdnoci¹ elektryczn¹, posiada
system auto wy³¹czenia (stand by), który w³¹cza siê
po kilku minutach nie u¿ytkowania. Ponownie lekko
wcisn¹æ przycisk W£¥CZANIA/WY£¥CZANIA i
poczekaæ, a¿ pralka ponownie w³¹czy siê.
Przyciski z
kontrolkami
FUNKCJI
Wywietlacz
: nale¿y przycisn¹æ, aby
Przycisk z
kontrolk¹
START/PAUZA
Przycisk
SUSZENIE
: kiedy
nie wieci siê,
Przycisk TEMPERATURY
zmniejszenia lub ca³kowitego wy³¹czenia
temperatury; wartoæ zostanie wskazana na
wywietlaczu.
16
: nacisn¹æ w celu
Page 17

Wywietlacz
PL
B
A
Wywietlacz potrzebny jest w celu programowania maszyny i dostarcza wielu informacji.
W sekcji A wywietlany jest czas trwania dostêpnych programów oraz - w przypadku uruchomionego cyklu czas pozosta³y do jego zakoñczenia; jeli zosta³ ustawiony URUCHOMIENIE OPÓNIONE, zostanie
wywietlony czas brakuj¹cy do w³¹czenia wybranego programu. Równie¿, poprzez przyciniêcie w³aciwego
przycisku, wywietlone zostan¹ maksymalne wartoci temperatury, prêdkoæ wirowania i poziom lub czas
suszenia, jakie maszyn¹ mo¿e wykonaæ wed³ug ustawionego programu.
W sekcji B wywietlane s¹ przewidziane fazy dla wybranego cyklu i po w³¹czeniu programu, fazy mycia i
ewentualnie suszenie w trakcie:
Pranie
P³ukanie
Wirowanie/Wydalanie wody
Suszenie
W sekcji C umieszczone s¹, w kolejnoci od góry do do³u, ikony odnosz¹ce siê do temperatury
Suszenie
Podwietlony symbol
Symbol
Podwietlony symbol
i do wirowania :
sygnalizuje, ¿e na wywietlaczu wskazana jest ustawiona wartoæ temperatury.
zostaje podwietlony podczas regulacji suszenia.
sygnalizuje, ¿e na wywietlaczu wskazana jest ustawiona wartoæ wirowania.
C
, do
Symbol zablokowanych drzwiczek
Wlaczony symbol sygnalizuje, ze drzwiczki sa zablokowane. Aby uniknac uszkodzenia pralki, przed
przystapieniem do otwierania drzwiczek pralki nalezy odczekac, az ten symbol zgasnie.
W celu otwarcia drzwiczek w trakcie wykonywania cyklu nale¿y nacisn¹æ przycisk START/PAUZA; jeli symbol
ZABLOKOWANYCH DRZWICZEK
jest wy³¹czony mo¿liwe bêdzie otwarcie drzwiczek.
17
Page 18

Jak wykonaæ cykl prania lub
suszenie
PL
1. W£¥CZENIE MASZYNY. Nacisn¹æ przycisk ,
kontrolka START/PAUZA zacznie powoli pulsowaæ
w kolorze zielonym.
2. WK£ADANIE BIELIZNY. Otworzyæ szklane
drzwiczki. W³o¿yæ bieliznê uwa¿aj¹c, aby nie
przekroczyæ wielkoci wsadu wskazanej w tabeli
programów na nastêpnej stronie.
3. DOZOWANIE RODKA PIOR¥CEGO. Wysun¹æ
szufladkê i wsypaæ detergent do odpowiednich
komór w sposób wyjaniony w rodki pior¹ce i
bielizna.
4. ZAMKN¥Æ DRZWICZKI.
5. WYBÓR PROGRAMU. Ustawiæ ¿¹dany program
przy pomocy pokrêt³a PROGRAMÓW; z nim
powi¹zana jest temperatura oraz prêdkoæ
wirowania, które mog¹ zostaæ zmienione. Na
wywietlaczu pojawi siê czas trwania cyklu.
6. PERSONALIZACJA CYKLU PRANIA.
Przy pomocy odpowiednich przycisków:
Zmieniæ temperaturê i/lub wirówkê.
Maszyna automatycznie wywietla temperaturê i
przewidziane maksymalne wartoci dla
ustawionego programu lub ostatnie wartoci, jeli
s¹ zgodne z wybranym programem. Poprzez
naciskanie przycisku
temperaturê a¿ do prania w zimnej wodzie OFF.
Naciskaj¹c przycisk
wirówkê a¿ do jej wy³¹czenia OFF. Dodatkowe
naciniêcie przycisków przywróci maksymalne
wartoci przewidywane.
Ustawianie suszenia
Po przyciniêciu przycisku maszyna automatycznie
wybiera maksymalny poziom suszenia odpowiednio
do wybranego programu. Nastêpne przyciniêcia
zmniejszaj¹ poziom i nastêpnie czas suszenia a¿
do jego wy³¹czenia OFF.
Mo¿liwe jest ustawienie suszenia:
A- Na podstawie poziomu ¿¹danego suszenia:
Prasowanie: wskazany dla bielizny, która bêdzie
prasowana. Poziom pozosta³ej wilgotnoci
zmiêkcza zgiêcia i u³atwia ich usuniêcie.
Wywietlacz pokazuje A1.
Wieszak: Idealny dla tej bielizny, która wymaga
kompletnego prasowania. Wywietlacz pokazuje A2.
Szafa: Odpowiedni dla bielizny, która ma byæ
u³o¿ona w szafie bez jej prasowania.
Wywietlacz pokazuje A3.
Extra: Odpowiedni dla bielizny, które wymagaj¹
ca³kowitego wysuszenia, czyli taka jak g¹bki czy
szlafroki. Wywietlacz pokazuje A4.
B - Zale¿nie od czasu: od 30 do 180 minut.
Jeli wyj¹tkowo iloæ bielizny do prania i suszenia
przewy¿sza maksymalny przewidziany ³adunek (patrz
tabela obok), nale¿y wykonaæ pranie, a po
zakoñczeniu programu podzieliæ ³adunek i w³o¿yæ do
stopniowo zmniejsza siê
stopniowo zmniejsza siê
bêbna tylko jego czêæ. Dalej postêpowaæ wed³ug
instrukcji dotycz¹cych opcji Tylko suszenie.
Powtórzyæ te same czynnoci dla pozosta³ej czêci
bielizny.
N.B: zawsze po zakoñczeniu suszenia wykonywane
jest krótkie ch³odzenie bielizny.
Tylko suszenie
Wybraæ za pomoc¹ prze³¹cznika PROGRAMY
suszenie
nastêpnie ustawiæ rodzaj ¿¹danego suszenia
przyciskiem SUSZENIE
Naciskaæ przycisk w celu uruchomienia funkcji;
Nacisn¹æ ponownie przycisk w celu wy³¹czenia
(11-12-13) w zale¿noci od rodzaju tkaniny,
.
Zmiana charakterystyki cyklu.
zawieci siê kontrolka odpowiadaj¹ca
przyciskowi.
funkcji, kontrolka zganie.
Jeli wybrana funkcja nie jest zgodna z
wybranym programem, kontrolka bêdzie
pulsowaæ, a funkcja nie zostanie uruchomiona.
Jeli wybrana funkcja nie jest zgodna z inn¹,
ustawion¹ uprzednio, kontrolka odpowiadaj¹ca
pierwszej funkcji bêdzie pulsowa³a i uruchomiona
zostanie jedynie druga funkcja a kontrolka
uruchomionej funkcji zawieci siê.
Funkcje mog¹ zmieniaæ zalecane obci¹¿enie i/
lub czas trwania cyklu.
7. URUCHOMIENIE PROGRAMU. Nacisn¹æ
przycisk START/PAUZA. Odpowiednia kontrolka
zawieci siê kolorem zielonym i drzwiczki
zostan¹ zablokowane (symbol
ZABLOKOWANYCH DRZWICZEK
W celu zmiany programu w czasie trwania cyklu
nale¿y ustawiæ pralkê w pauzie naciskaj¹c
przycisk START/PAUZA (kontrolka START/PAUZA
zacznie powoli pulsowaæ w kolorze
pomarañczowym); nastêpnie wybraæ potrzebny
cykl i ponownie nacisn¹æ przycisk START/
PAUZA. W celu otwarcia drzwiczek w trakcie
wykonywania cyklu nale¿y nacisn¹æ przycisk
START/PAUZA; jeli symbol ZABLOKOWANYCH
DRZWICZEK
otwarcie drzwiczek Nacisn¹æ ponownie przycisk
START/PAUZA, aby uruchomiæ program od
punktu, w którym zosta³ przerwany.
8. KONIEC PROGRAMU. Wskazywany jest napisem
END na wywietlaczu, kiedy symbol
ZABLOKOWANYCH DRZWICZEK
mo¿liwe bêdzie otwarcie drzwiczek. Otworzyæ
drzwiczki, wyj¹æ bieliznê i wy³¹czyæ maszynê.
jest wy³¹czony mo¿liwe bêdzie
wieci siê).
wy³¹czy siê,
Jeli zamierza siê anulowaæ uruchomiony juz cykl,
przytrzymaæ d³u¿ej naciniêty przycisk
zostanie przerwany i maszyna wy³¹czy siê.
. Cykl
18
Page 19

Programy i funkcje
Tabela programów
Predkosc
Opis programu
Programy
Programy codzienne (Daily)
£
BAWELNA PRANIE WSTEPNE:
1
zabrudzona.
£
2BAWELNA
BAWELNA (1):
2
zabrudzone.
BAWELNA (2):
2
zabrudzone.
BAWELNA:
3
zabrudzone.
BAWELNA KOLOROWE (3):
4
zabrudzone i delikatne kolorowe.
5 SYNTETYCZNE:
Programy specjalne (Special)
6WELNA:
7 JEDWAB/FIRANY:
8JEANS
9 Sport Light
10 Sport Shoes
Programy Suszenie
11 Suszenie bawelna
12 Suszenie syntetyczne
-NFHAII9=ID,HO
13
Programy czesciowe
³
Plukani e
Wirowanie
Wydalanie wody
Dla wszystkich Instytucji homologacyjnych:
1) Program kontrolny zgodny z norm¹ EN 50229: ustawiæ program 2, wybieraj¹c temperaturê 60°C.
2) Program bawe³na, d³ugi: ustawiæ program 2, wybieraj¹c temperaturê 40°C.
3) Program bawe³na, krótki: ustawiæ program 4, wybieraj¹c temperaturê 40°C.
: bielizna biala silnie zabrudzona.
£
£
£
tkaniny biale i kolorowe, wytrzymale, mocno
£
do welny, kaszmiru, itp.
³
tkaniny biale i kolorowe, wytrzymale, mocno
tkaniny biale i kolorowe, delikatne, mocno
³
tkaniny kolorowe, wytrzymale, mocno zabrudzone.
do jedwabiu, wiskozy, bielizny.
³
bielizna biala silnie
³
³
tkaniny biale lekko
³
³
³
³
³
Temp.
max
(°C)
90° 1000
90° 1000
60° 1000
40° 1000
60° 1000
40° 1000
60° 800
40° 800 - -
30° 0 - -
40° 800
30° 600 - -
30° 600 - -
30° 1000
Funkcje prania
W przypadku wyboru tej opcji ruchy bêbna, temperatura
i woda s¹ dostosowywane do niedu¿ego wsadu tkanin
bawe³nianych i syntetycznych, o niewielkim stopniu
zabrudzenia (patrz Tabela programów).
mo¿esz praæ szybciej, oszczêdzaj¹c wodê i energiê.
Zaleca siê stosowaæ p³ynny rodek do prania,
dostosowuj¹c jego iloæ do iloci wsadu.
Funkcji tej nie mo¿na w³¹czyæ w programach 1, 2, 6, 7,
8, 9, 10, 11, 12, 13,
, , .
Odplamianie
Funkcja ta przydatna jest w
4
celu usuwania bardziej
opornych plam.
Wstawiæ dodatkowy
pojemniczek 4, na
3
2
1
wyposa¿eniu, do przegródki 1.
Przy dozowaniu wybielacza
nie przekroczyæ poziomu
max wskazanego na
rodkowej oce (patrz
rysunek).
Aby wykonaæ tylko wybielanie,
nale¿y wlaæ wybielacz do dodatkowego pojemnika 4 i
nastawiæ program P³ukanie
i uruchomiæ funkcjê
max
(obrotów
minute)
- -
- -
- 1000
- 1000
- 0 - - - - - 7-
Suszenie
na
ê
lll-l
l
l
l
l
l
l
l
l
l
l
l
l
Odplamianie
prania, nale¿y wlaæ i wsypaæ odpowiednie rodki pior¹ce i
dodatkowe, nastawiæ ¿¹dany program i uruchomiæ funkcjê
Odplamianie
wyklucza pranie wstêpne.
Funkcji tej nie mo¿na w³¹czyæ w programach 1, 6, 7, 8,
9, 10, 11, 12, 13,
P³ukanie dodatkowe
Wybieraj¹c tê opcjê zwiêksza siê skutecznoæ p³ukania i
zapewnia siê maksymalne usuwanie rodka pior¹cego.
Jest przydatne dla w³ókien szczególnie wra¿liwych.
Nie mo¿na jej uruchomiæ w programach 11,12, 13,
Opónienie startu
W celu ustawienia opónionego rozpoczêcia wybranego
programu nale¿y naciskaæ odpowiedni przycisk a¿ do
osi¹gniêcia ¿¹danego czasu opónienia. Jeeli tak
aopcja jest aktywna, wówczas lampka kontrolna bêdzie
wieci³a siê ca³y czas. Wby wy³¹czyæ opónienie nale¿y
utrzymaæ pod naciskiem przycisk do momentu, kiedy na
wywietlaczu pojawi siê napis OFF.
Mo¿na go w³¹czyæ dla wszystkich programów.
£ê
Srodki piorace
Pranie
Wstepne
Pranie
-
-
-
-
-
-
-
- - - - 5 -
- - - - 3 -
-
- -
- - - - 7-
¹
Srodek
Wybi-
zmiekc-
elacz
zajacy
ll l
ll l
ll l
ll l
ll l
ll l
l
-
l
-
l
-
l
-
l
-
l
-
ll
Ladunek
max (kg)
Norma-
ê
lny
¹
7 -
7 -
7 -
7-
73,5
73,5
32
l
1,5 -
l
l
l
l
l
1-
3-
3 -
Maks. 2
pary.
0,5
7-
. Aby przeprowadziæ wybielanie w trakcie
. U¿ycie pojemniczka dodatkowego 4
, .
Eco
Time
-
-
PL
Czas
trwania
cyklu
Mo¿liwa jest kontrola czasu trwania programów
na wywietlaczu.
, .
'
Page 20

rodki pior¹ce i bielizna
PL
Szufladka na rodki pior¹ce
Dobry rezultat prania zale¿y równie¿ od prawid³owego
dozowania rodka pior¹cego: u¿ycie jego nadmiernej
iloci nie poprawia skutecznoci prania, lecz przyczynia
siê do powstawania nalotów na wewnêtrznych czêciach
pralki i do zanieczyszczania rodowiska.
Nie stosowaæ rodków do prania rêcznego, poniewa¿
tworz¹ one za du¿o piany.
Wysun¹æ szufladkê i
4
umieciæ w niej rodek
pior¹cy lub dodatkowy w
nastêpuj¹cy sposób.
3
2
1
czy nie jest w³o¿ona dodatkowa przegródka 4.
przegródka 2: rodek pior¹cy do prania
w³aciwego (w proszku lub w p³ynie)
P³ynny rodek do prania nale¿y wlaæ dopiero przed
samym uruchomieniem programu.
przegródka 3: rodki dodatkowe
(zmiêkczaj¹ce, itp.)
rodek zmiêkczaj¹cy nie powinien wyp³ywaæ poza kratkê.
dodatkowa przegródka 4: Wybielacz
Przygotowanie bielizny
Podzieliæ bieliznê do prania wed³ug:
- rodzaju tkaniny / symbolu na etykietce.
- kolorów: oddzieliæ tkaniny kolorowe od bia³ych.
Opró¿niæ kieszenie i sprawdziæ guziki.
Nie przekraczaæ wskazanego ciê¿aru suchej
bielizny:
Tkaniny wytrzyma³e: max 7 kg
Tkaniny syntetyczne: max 3 kg
Tkaniny delikatne: max 2 kg
We³na: max 1,5 kg
Jedwab: max 1 kg
Ile wa¿y bielizna?
przegródka 1: rodek
pior¹cy do prania
wstêpnego (w proszku)
Przed wsypaniem rodka
pior¹cego nale¿y sprawdziæ,
Jedwab: stosowaæ odpowiedni program 7 do prania
wszelkiego rodzaju wyrobów z jedwabiu. Zaleca siê
stosowanie specjalnego rodka pior¹cego do tkanin
delikatnych.
Firany: w³o¿yæ je z³o¿one do poszewki lub do
siatkowatego worka. Stosowaæ program 7.
Jeans: przed praniem odwrócic odziez na lewa
strone, stosowac plynny srodek do prania. Uzywac
programu 8.
Sport Light (program 9): zosta³ opracowany do
prania tkanin u¿ywanych do produkcji odzie¿y
sportowej (dresów, krótkich spodenek itp.) o
niewielkim stopniu zabrudzenia; dla uzyskania
najlepszych rezultatów prania zaleca siê nie
przekraczaæ maksymalnego wsadu okrelonego w
Tabela programów. Zaleca siê stosowanie p³ynnych
rodków do prania, w iloci jak dla po³owy wsadu.
Sport Shoes (program 10): zosta³ opracowany do
prania obuwia sportowego; dla uzyskania
najlepszych rezultatów nie nale¿y praæ jednoczenie
wiêcej ni¿ 2 par obuwia.
Express Wash & Dry (program 13) zosta³
opracowany do prania i suszenia bielizny lekko
zabrudzonej w krótkim czasie. Po wybraniu tego
cyklu mo¿na praæ i suszyæ do 0,5 kg bielizny w
ci¹gu 40 minut. Aby otrzymaæ jak najlepsze wyniki
prania nale¿y stosowaæ p³ynny rodek pior¹cy;
wczeniej wypraæ ko³niesze, mankiety i plamy.
System równowa¿enia ³adunku
Przed ka¿dym wirowaniem, aby unikn¹æ
nadmiernych drgañ oraz jednorodnie roz³o¿yæ wsad,
bêben wykonuje obroty z prêdkoci¹ nieco wiêksz¹
ni¿ podczas prania. Jeli pomimo kolejnych prób
wsad nie zostanie równomiernie roz³o¿ony, maszyna
wykona wirowanie z prêdkoci¹ mniejsz¹ od
przewidzianej. W przypadku nadmiernego
niezrównowa¿enia pralka wykona roz³o¿enie wsadu
zamiast wirowania. Aby zapewniæ lepsze roz³o¿enie
wsadu oraz jego w³aciwe zrównowa¿enie, zaleca
siê wymieszanie du¿ych i ma³ych sztuk bielizny.
1 przecierad³o 400-500 gr.
1 poszewka 150-200 gr.
1 obrus 400-500 gr.
1 szlafrok 900-1.200 gr.
1 rêcznik 150-250 gr.
Programy specjalne
We³na: za pomoc¹ programu 6 mo¿na praæ w
pralce tak¿e odzie¿ we³nian¹, równie¿ tê opatrzon¹
etykiet¹ tylko pranie rêczne
najlepsze rezultaty, nale¿y stosowaæ specjalny
rodek do prania i nie przekraczaæ wsadu 1,5 kg.
20
. Aby uzyskaæ jak
Page 21

Zalecenia i rodki
ostro¿noci
Pralka zosta³a zaprojektowana i wyprodukowana zgodnie
z miêdzynarodowymi normami bezpieczeñstwa. Niniejsze
ostrze¿enia zosta³y tu zamieszczone ze wzglêdów
bezpieczeñstwa i nale¿y je uwa¿nie przeczytaæ.
Ogólne zasady bezpieczeñstwa
Urz¹dzenie to zosta³o zaprojektowane wy³¹cznie do
u¿ytkowania w warunkach domowych.
Pralki powinny u¿ywaæ wy³¹cznie osoby doros³e i w
sposób zgodny z instrukcjami podanymi w niniejszej
ksi¹¿eczce.
Nie dotykaæ pralki, stoj¹c przy niej boso lub maj¹c
mokre lub wilgotne rêce albo stopy.
Nie wyjmowaæ wtyczki z gniazdka, ci¹gn¹c za kabel,
lecz trzymaj¹c za wtyczkê.
W trakcie pracy maszyny nie otwieraæ szufladki na
rodki pior¹ce.
Nie dotykaæ odprowadzanej wody, gdy¿ mo¿e ona
osi¹gaæ wysokie temperatury.
W ¿adnym wypadku nie otwieraæ okr¹g³ych
drzwiczek pralki na si³ê: grozi to uszkodzeniem
mechanizmu zabezpieczaj¹cego drzwiczki przed
przypadkowym otwarciem.
W razie wyst¹pienia usterki nie nale¿y w ¿adnym
wypadku próbowaæ dostaæ siê do wewnêtrznych
czêci pralki z zamiarem samodzielnego dokonania
naprawy.
Zawsze uwa¿aæ, aby dzieci nie zbli¿a³y siê do
pracuj¹cej pralki.
W czasie prania okr¹g³e drzwiczki pralki nagrzewaj¹ siê.
Jeli trzeba przenieæ pralkê w inne miejsce, nale¿y
to robiæ bardzo ostro¿nie, w dwie lub trzy osoby.
Nigdy nie przenosiæ pralki samodzielnie, gdy¿ jest
ona bardzo ciê¿ka.
Przed w³o¿eniem bielizny sprawdziæ, czy bêben jest pusty.
W trakcie suszenia drzwiczki nagrzewaj¹ siê.
Nie suszyæ bielizny czyszczonej przy pomocy
³atwopalnych rozpuszczalników (np.trichloroetylen).
Nie suszyæ gumy g¹bczastej ani podobnych
elastomerów.
Upewniæ siê, by w trakcie suszenia kurek wody by³
odkrêcony.
zanieczyszczenie rodowiska i pozytywnie wp³ywa
na ludzkie zdrowie. Przekrelony symbol kosza
umieszczony na produkcie przypomina klientowi o
obowi¹zku specjalnego sortowania.
Konsumenci powinni kontaktowaæ siê z w³adzami
lokalnymi lub sprzedawc¹ w celu uzyskania
informacji dotycz¹cych postêpowania z ich
zu¿ytymi urz¹dzeniami gospodarstwa domowego.
Rêczne otwieranie okr¹g³ych drzwiczek
Jeli z powodu przerwy w dostawie energii elektrycznej
nie jest mo¿liwe otwarcie okr¹g³ych drzwiczek, w celu
wyjêcia i rozwieszenia prania nale¿y wykonaæ
nastêpuj¹ce czynnoci:
1. wyj¹æ wtyczkê z
gniazdka elektrycznego.
2. sprawdziæ, czy poziom
wody wewn¹trz maszyny
20
znajduje siê poni¿ej poziomu
otwarcia drzwiczek; w
przeciwnym wypadku usun¹æ
nadmiar wody przez przewód
odp³ywowy, zbieraj¹c j¹ do
wiaderka w sposób wskazany
na rysunku.
3. zdj¹æ panel pokrywy z
przedniej strony pralki przy
pomocy rubokrêtu (patrz
rysunek).
PL
Utylizacja
Utylizacja opakowania: stosowaæ siê do lokalnych
przepisów, dziêki temu opakowanie bêdzie mog³o
zostaæ ponownie wykorzystane.
Europejska Dyrektywa 2002/96/EC dotycz¹ca
Zu¿ytych Elektrycznych i Elektronicznych Urz¹dzeñ
zak³ada zakaz pozbywania siê starych urz¹dzeñ
domowego u¿ytku jako nieposortowanych mieci
komunalnych. Zu¿yte urz¹dzenia musz¹ byæ osobno
zbierane i sortowane w celu zoptymalizowania
odzyskania oraz ponownego przetworzenia pewnych
komponentów i materia³ów. Pozwala to ograniczyæ
4. poci¹gn¹æ na zewn¹trz klapkê wskazan¹ na
rysunku, a¿ do wyzwolenia siê z zacisku
plastikowego zaczepu; nastêpnie poci¹gn¹æ go w
dó³ i równoczenie otworzyæ drzwiczki.
5. ponownie za³o¿yæ panel upewniwszy siê, przed
dociniêciem go do maszyny, czy zatrzaski zosta³y
umieszczone w odpowiednich otworach.
21
Page 22

Utrzymanie i konserwacja
PL
Od³¹czenie wody i pr¹du
elektrycznego
Zamkn¹æ kurek dop³ywu wody po ka¿dym praniu.
W ten sposób zmniejsza siê zu¿ycie instalacji
hydraulicznej pralki oraz eliminuje siê
niebezpieczeñstwo wycieków.
Przed przyst¹pieniem do czyszczenia pralki oraz
do czynnoci konserwacyjnych wyj¹æ wtyczkê z
gniazdka.
Czyszczenie pralki
Obudowê zewnêtrzn¹ i gumowe czêci pralki mo¿na
myæ ciereczk¹ zmoczon¹ w letniej wodzie z
myd³em. Nie stosowaæ rozpuszczalników ani
ciernych rodków czyszcz¹cych.
Czyszczenie szufladki na rodki pior¹ce
Wysun¹æ szufladkê,
unosz¹c j¹ lekko ku
górze i wyci¹gaj¹c na
zewn¹trz (patrz
rysunek).
Wyp³ukaæ szufladkê pod
bie¿¹c¹ wod¹.
Czynnoæ tê nale¿y
wykonywaæ stosunkowo
czêsto.
Czyszczenie pompy
Pralka wyposa¿ona jest w pompê samoczyszcz¹c¹,
która nie wymaga zabiegów konserwacyjnych. Mo¿e
siê jednak zdarzyæ, ¿e drobne przedmioty (monety,
guziki) wpadn¹ do komory wstêpnej zabezpieczaj¹cej
pompê, która znajduje siê w jej dolnej czêci.
Nale¿y siê upewniæ, ¿e cykl prania zosta³
zakoñczony i wyj¹æ wtyczkê z gniazdka.
Aby dostaæ siê do komory wstêpnej:
1. zdj¹æ panel pokrywy z
przedniej strony pralki
przy pomocy rubokrêtu
(patrz rysunek);
2. odkrêciæ pokrywê,
obracaj¹c j¹ w kierunku
przeciwnym do ruchu
wskazówek zegara (patrz
rysunek): wyp³yniêcie
niewielkiej iloci wody
jest normalnym
zjawiskiem;
Konserwacja okr¹g³ych drzwiczek i
bêbna
Drzwiczki pralki nale¿y zawsze pozostawiaæ
uchylone, aby zapobiec tworzeniu siê
nieprzyjemnych zapachów.
22
3. dok³adnie wyczyciæ wnêtrze;
4. ponownie przykrêciæ pokrywê;
5. ponownie za³o¿yæ panel upewniwszy siê, przed
dociniêciem go do maszyny, czy zatrzaski zosta³y
umieszczone w odpowiednich otworach.
Kontrola przewodu doprowadzaj¹cego
wodê
Przynajmniej raz w roku nale¿y sprawdziæ przewód
doprowadzaj¹cy wodê. Jeli widoczne s¹ na nim
pêkniêcia i rysy, nale¿y go wymieniæ: w trakcie prania
du¿e cinienie mo¿e bowiem spowodowaæ jego nag³e
rozerwanie.
Nigdy nie instalowaæ ju¿ u¿ywanych przewodów.
Page 23

Nieprawid³owoci w dzia³aniu
i sposoby ich usuwania
Mo¿e siê zdarzyæ, ¿e pralka nie dzia³a. Przed wezwaniem Serwisu Technicznego (patrz Serwis Techniczny)
nale¿y sprawdziæ, czy problemu nie da siê ³atwo rozwi¹zaæ przy pomocy poni¿szego wykazu.
Nieprawid³owoci w dzia³aniu:
Pralka nie w³¹cza siê.
Cykl prania nie rozpoczyna siê.
Pralka nie pobiera wody (Na
wywietlaczu pojawi siê
pulsuj¹cy napis H2O).
Pralka ca³y czas pobiera i
odprowadza wodê.
Mo¿liwe przyczyny / Rozwi¹zania:
Wtyczka nie jest w³¹czona do gniazdka lub jest wsuniêta za s³abo, tak ¿e
nie ma styku.
W domu nast¹pi³a przerwa w dostawie pr¹du.
Drzwiczki pralki nie s¹ dobrze zamkniête.
Nie zosta³ wciniêty przycisk W£¥CZANIA/WY£¥CZANIA.
Nie zosta³ wciniêty przycisk START/PAUZA.
Kurek dop³ywu wody jest zamkniêty.
Zosta³o nastawione opónienie startu.
Przewód doprowadzaj¹cy wodê nie jest pod³¹czony do kurka.
Przewód jest zgiêty.
Kurek dop³ywu wody jest zamkniêty.
W domu nast¹pi³a przerwa w dostawie wody.
Cinienie wody nie jest wystarczaj¹ce.
Nie zosta³ wciniêty przycisk START/PAUZA.
Przewód odp³ywowy nie zosta³ zainstalowany na wysokoci miêdzy 65 a
100 cm od pod³ogi (patrz Instalacja).
Koñcówka przewodu odp³ywowego jest zanurzona w wodzie (patrz Instalacja).
Otwór odp³ywowy w cianie nie posiada odpowietrznika.
Jeli po sprawdzeniu tych mo¿liwoci problem nie zostanie rozwi¹zany,
nale¿y zamkn¹æ kurek dop³ywu wody, wy³¹czyæ pralkê i wezwaæ Serwis
Techniczny. Jeli mieszkanie znajduje siê na najwy¿szych piêtrach
budynku, mo¿e wyst¹piæ efekt syfonu, w wyniku którego pralka ca³y czas
pobiera i odprowadza wodê. W celu wyeliminowania tej niedogodnoci
nale¿y zakupiæ specjalny zawór, zapobiegaj¹cy powstawaniu efektu syfonu.
PL
Pralka nie odprowadza wody i nie
odwirowuje prania.
Pralka mocno wibruje w fazie
wirowania.
Z pralki wycieka woda.
Kontrolki opcje i kontrolka start/
pauza miga i wywietlacz pokazuje
kod anomalii (np.: F-01, F-..).
Tworzy siê zbyt du¿a iloæ piany.
Pralka nie suszy.
Program nie przewiduje odprowadzania wody: w przypadku niektórych
programów nale¿y uruchomiæ je rêcznie.
Przewód odp³ywowy jest zgiêty (patrz Instalacja).
Instalacja odp³ywowa jest zatkana.
Podczas instalacji pralki bêben nie zosta³ prawid³owo odblokowany (patrz Instalacja).
Pralka nie jest w³aciwie wypoziomowana (patrz Instalacja).
Pralka, zainstalowana pomiêdzy meblami a cian¹, ma za ma³o miejsca
(patrz Instalacja).
Przewód doprowadzaj¹cy wodê nie jest dobrze przykrêcony (patrz Instalacja).
Szufladka na rodki pior¹ce jest zatkana (w celu jej oczyszczenia patrz
Utrzymanie i konserwacja).
Przewód odp³ywowy nie jest dobrze zamocowany(patrz Instalacja).
Wy³¹czyæ maszynê i wyj¹æ wtyczkê z gniazdka, odczekaæ oko³o 1
minuty, nastêpnie w³¹czyæ j¹ ponownie.
Jeli problem nie ustêpuje, nale¿y wezwaæ Serwis Techniczny.
rodek pior¹cy nie jest odpowiedni do pralek automatycznych (na
opakowaniu musi byæ umieszczony napis: do pralek, do prania
rêcznego i w pralce lub podobny).
U¿yto za du¿o rodka pior¹cego.
Wtyczka nie jest w³¹czona do gniazdka, lub jest wsuniêta niedostatecznie, tak
¿e nie ma kontaktu.
W domu brak jest pr¹du.
Drzwiczki nie s¹ dobrze zamkniête.
Zosta³o nastawione opónienie startu.
SUSZENIE znajduje siê w pozycji OFF.
23
Page 24

Serwis Techniczny
PL
Przed skontaktowaniem siê z Serwisem Technicznym:
Sprawdziæ, czy problemu nie mo¿na rozwi¹zaæ samodzielnie (patrzNieprawid³owoci w dzia³aniu i
sposoby ich usuwania);
Ponownie uruchomiæ program i sprawdziæ, czy problem nie znikn¹³;
Jeli nie, zwróciæ siê do autoryzowanego Serwisu Technicznego, dzwoni¹c pod numer podany w karcie
gwarancyjnej.
Nigdy nie wzywaæ nieautoryzowanych techników.
Nale¿y podaæ:
rodzaj nieprawid³owoci;
model maszyny (Mod.);
numer seryjny (S/N).
Informacje te znajduj¹ siê na tabliczce umieszczonej w tylnej czêci pralki oraz widocznej z przodu po
otwarciu drzwiczek.
24
Page 25

Használati utasítás
MOSÓGÉP
HU
Magyar
IWDE 7105
Összefoglalás
HU
Üzembe helyezés, 2627
Kicsomagolás és vízszintbe állítás
Víz- és elektromos csatlakozás
Elsõ mosási ciklus
Mûszaki adatok
A mosógép leírása, 28-29
Kezelõpanel
Kijelzõ
A mosási ciklusok, illetve a szárítás
végrehajtása, 30
Programok és funkciók, 31
Programtáblázat
Mosási funkciók
Mosószerek és mosandók, 32
Mosószer-adagoló fiók
A mosandó ruhák elõkészítése
Különleges programok
A bepakolt ruhák kiegyensúlyozására szolgáló
rendszer
Óvintézkedések és tanácsok, 33
Általános biztonság
Hulladékelhelyezés
Az ajtó kézi nyitása
Karbantartás és ápolás, 34
A víz elzárása és az elektromos áram kikapcsolása
A mosógép tisztítása
A mosószer-adagoló fiók tisztítása
Az ajtó és a forgódob ápolása
A szivattyú tisztítása
A vízbevezetõ csõ ellenõrzése
Rendellenességek és elhárításuk, 35
Szerviz, 36
#
Page 26

Üzembe helyezés
HU
Fontos, hogy megõrizze ezt a kézikönyvet, hogy
mindig kéznél legyen. Ha a mosógépet eladná,
átadná vagy másnál helyezné el, gondoskodjon
arról, hogy e kézikönyv a mosógéppel együtt
maradjon, hogy az új tulajdonos is megismerhesse
a készülék funkcióit és az ezekre vonatkozó
figyelmeztetéseket.
Figyelmesen olvassa el az utasításokat: fontos
információkat tartalmaznak az üzembe helyezésrõl,
a használatról és a biztonságról.
Kicsomagolás és vízszintbe állítás
Kicsomagolás
1. Csomagolja ki a mosógépet.
2. Ellenõrizze, hogy a mosógép nem sérült-e meg a
szállítás során. Ha a gépen sérülést talál, ne
csatlakoztassa, és forduljon a viszonteladóhoz.
3. Csavarozza ki a gép
hátsó részén található, a
szállításhoz szükséges
4 védõcsavart, és
távolítsa el a gumibakot
(lásd ábra).
A pontos vízszintezés biztosítja a gép stabilitását,
így az a mûködés során nem fog rezegni, zajt
okozni, illetve elmozdulni. Szõnyegpadló vagy
szõnyeg esetén a lábakat úgy állítsa be, hogy a
mosógép alatt elegendõ hely maradjon a
szellõzésre.
Víz- és elektromos csatlakozás
Vízbevezetõ csõ csatlakoztatása
1. A vízbevezetõ csõ
csatlakoztatásához
csavarozza fel a csövet
egy 3/4-os külsõ
menettel rendelkezõ
hidegvíz csapra (lásd
ábra).
A csatlakoztatás elõtt
eressze meg a csapot
addig, amíg a víz teljesen
átlátszóvá nem válik.
2. A vízbevezetõ csõ
csatlakoztatásához
csavarozza a csövet a
mosógép hátoldalán
jobbra fent található
vízbemeneti csonkra
(lásd ábra)!
4. Zárja le a furatokat a mellékelt mûanyag
dugókkal.
5. Minden darabot õrizzen meg: ha a mosógépet
szállítani kell, elõtte ezeket vissza kell szerelni.
A csomagolóanyag nem gyermekjáték!
Vízszintbe állítás
1. A mosógépet sík és kemény padlóra állítsa, úgy,
hogy ne érjen falhoz, bútorhoz vagy máshoz.
2. Ha a padló nem
tökéletesen vízszintes,
azt az elsõ lábak be-,
illetve kicsavarásával
kompenzálhatja (lásd
ábra). A gép felsõ
burkolatán mért dõlés
nem haladhatja meg a
2°-ot.
3. Ügyeljen arra, hogy a csövön ne legyen törés
vagy szûkület!
A csap víznyomásának a mûszaki adatok
táblázatában szereplõ határértékek között kell
lennie (lásd a szemben lévõ oldalt).
Amennyiben a vízbevezetõ csõ nem elég hosszú,
forduljon szaküzlethez vagy engedéllyel rendelkezõ
szakemberhez.
Soha ne használjon korábban már használt
csöveket.
Használja a készülékhez mellékelteket.
$
Page 27

A leeresztõcsõ csatlakoztatása
Csatlakoztassa a
leeresztõcsövet a
lefolyóhoz vagy a
padlótól 65 és 100cm
közötti magasságban
65 - 100 cm
lévõ fali szifonhoz
anélkül, hogy megtörné;
Ne használjon hosszabbítót vagy elosztót.
HU
A kábel ne legyen se megtörve, se összenyomva.
A tápkábelt csak engedéllyel rendelkezõ
szakember cserélheti.
Figyelem! A fenti elõírások figyelmen kívül hagyása
esetén a gyártó elhárít minden felelõsséget.
Elsõ mosási ciklus
illetve akassza a mosdó
vagy a kád szélére úgy,
hogy a mellékelt
csõvezetõ ívet a csaphoz
erõsíti (lásd ábra). A
leeresztõcsõ szabad
végének nem szabad
vízbe merülnie.
Toldások használata nem javasolt. Amennyiben
feltétlenül szükséges, a toldás átmérõje egyezzen
meg az eredeti csõével és semmiképpen se legyen
150cm-nél hosszabb.
Elektromos csatlakoztatás
Mielõtt a csatlakozódugót az aljzatba dugná,
bizonyosodjon meg arról, hogy:
az aljzat földelése megfelel a törvény által
elõírtnak;
az aljzat képes elviselni a készülék mûszaki
adatait tartalmazó táblázatban megadott maximális
teljesítményfelvételt (lásd szemben);
a hálózat feszültsége a mûszaki adatokat
tartalmazó táblázatban szereplõ értékek közé esik
(lásd szemben);
az aljzat kompatibilis a mosógép
csatlakozódugójával. Ellenkezõ esetben cserélje ki
az aljzatot vagy a csatlakozódugót!
A mosógép nem állítható fel nyílt téren, még akkor
sem, ha tetõ van fölötte, mivel nagyon veszélyes, ha
a gép esõnek vagy zivataroknak van kitéve.
A csatlakozódugónak a mosógép üzembe helyezett
állapotában is könnyen elérhetõ helyen kell lennie.
Üzembe helyezés után mielõtt a mosógépet
használni kezdené mosószerrel, mosandó ruha
nélkül futtassa le az 3-es mosási programot.
Mûszaki adatok
Modell
Méretek
Ruhatöltet:
Elektromos
csatlakozás
Vízcsatlakozások
Centrifuga
fordulatszám
EN 50229 szabvány
Szerinti
vezérlõprogramok
IWDE 7105
szélesség 59,5 cm
magasság 85 cm
mélység 53,5 cm
mosáshoz 1 és 7 kg között;
szárításhoz 1 és 5 kg között
lásd a készüléken található, muszaki
jellemzoket tartalmazó adattáblát!
maximális nyomás 1 MPa (10 bar)
minimális nyomás 0,05 MPa (0,5 bar)
dob ûrtartalma 52 liter
1000 fordulat/perc-ig
mosáshoz:
60°
szárítás:
ruhatöltettel végezze el és válassza ki
az A1 (VASALÁS) szárítási szintet;
a második szárítást 5 kg ruhanemûvel
végezze el, és válassza ki az
(EXTRA) szárítási szintet.
Ez a berendezés megfelel a következõ
Uniós Elõírásoknak:
- 89/05/03-i 89/336/CEE elõírás
(Elektromágneses összeférhetõség) és
annak módosításai
- 2002/96/CE
- 2006/95/CE (Alacsony feszültség)
2-as program; hõmérséklet
7 kg ruhatöltettel végezve.
C;
az elsõ szárítást 2 kg
A4
%
Page 28

A mosógép leírása
HU
Kezelõpanel
BEKAPCSOLÁS/
KIKAPCSOLÁS
Mosószer-adagoló fiók
Mosószer-adagoló fiók: a mosószerek és
adalékanyagok betöltésére szolgál (lásd
Mosószerek és mosandók).
BEKAPCSOLÁS/KIKAPCSOLÁS gomb
készülék be-, vagy kikapcsolásához nyomja meg
röviden ezt a gombot. Amennyiben az ELINDÍTÁS/
SZÜNETELTETÉS lámpa zöld fénnyel lassan villog,
a készülék be van kapcsolva. A mosógép mosás
közben történõ leállításához hosszan, kb. 2
másodpercig tartsa lenyomva a nyomógombot a
gomb rövid, vagy véletlen megnyomása nem
kapcsolja le a készüléket. A mosógép mosás
közben történõ leállítása magát a mosás programot
is törli. A kívánt programot újból be kell állítani.
PROGRAMOK tekerõgomb: a kívánt program
beállítására szolgálnak (lásd Programtáblázat).
FUNKCIÓ jelzõlámpás gombok: a lehetséges
funkciók kiválasztására szolgál. A kiválasztott
funkció jelzõlámpája égve marad.
CENTRIFUGÁLÁS
sebességének csökkentéséhez, vagy annak teljes
kikapcsolásához nyomja meg ezt a gombot az
érték megjelenik a kijelzõn.
gomb: a centrifugálás
gomb
PROGRAMOK
tekerõgomb
: a
HÕMÉRSÉKLET
gomb
CENTRIFUGÁLÁS
gomb
SZÁRÍTÁS
módosításához nyomja meg ezt a gombot a
szárítási szint, illetve szárítási idõ kiválasztott
értéke megjelenik a kijelzõn (lásd A mosási
ciklusok, illetve a szárítás végrehajtása).
ELINDÍTÁS/SZÜNETELTETÉS
gomb: ha a zöld jelzõlámpa lassan villog, a mosás
indításához nyomja meg ezt a gombot. A ciklus
elindításával a jelzõlámpa állandó fénnyel kezd
világítani. A mosás szüneteltetéséhez ismételten
nyomja meg ezt a gombot; a jelzõlámpa
narancssárga fénnyel kezd el villogni. Amennyiben a
szimbólum nem világít, az ajtót ki lehet nyitni. A
mosásnak a megszakítás idõpontjától való
folytatásához nyomja meg ismét ezt a gombot.
Készenléti üzemmód
Ez a mosógép az energiatakarékosságra
vonatkozó legújabb elõírásoknak megfelelõen
automatikus kikapcsolási (készenléti) rendszerrel
van ellátva, mely a használat megadott percnyi
szüneteltetése esetén bekapcsol. Nyomja meg
röviden a BEKAPCSOLÁS/KIKAPCSOLÁS gombot,
és várjon, amíg a készülék újrabekapcsol.
FUNKCIÓ
jelzõlámpás gombok
Kijelzõ
gomb: a szárítási beállítások
ELINDÍTÁS/
SZÜNETELTETÉS
jelzõlámpás gomb
SZÁRÍTÁS
gomb
jelzolámpás
HÕMÉRSÉKLET
csökkentéséhez vagy mellozéséhez nyomja meg
ezt a gombot - az érték megjelenik a kijelzon.
&
gomb: a homérséklet
Page 29

Kijelzõ
HU
*
)
A kijelzõ a készülék programozásához nyújt segítséget, és számos információt szolgáltat.
Az A feliratmezõben a rendelkezésre álló programok hossza, illetve elindított ciklus esetén a program végéig
hátralévõ maradékidõ látható. KÉSLELTETETT INDÍTÁS beállítása esetén a kiválasztott program elindulásáig
hátralévõ idõt jeleníti meg. Ezenkívül a vonatkozó gomb megnyomása esetén megjelenik a beállított
programhoz választható hõmérséklet, centrifugasebesség, szárítási szint, illetve szárítási idõ maximális értéke.
A B feliratmezõ a kiválasztott ciklus fázisait, elindított program esetén pedig az éppen folyamatban lévõ mosási
fázist, illetve adott esetben szárítási fázist jeleníti meg.
Mosás
Öblítés
Centrifugálás / Szivattyûzás
Szárítás
A C feliratmezoben föntrol lefelé a "homérséklet"
jelennek meg:
A világító
A szárítás beállítása közben a
A világító
szimbólum azt jelzi, hogy a kijelzo a beállított homérsékletet mutatja.
szimbólum világítani fog.
szimbólum azt jelzi, hogy a kijelzo a beállított centrifugasebességet mutatja.
, a "Szárítás" és a "centrifugálás" szimbólumai
+
Ajtózár szimbólum
A világító szimbólum azt jelöli, hogy az ajtó reteszelve van. A károk elkerülése érdekében az ajtó kinyitása
elott meg kell várni, hogy a szimbólum kialudjon.
Az ajtó menet közbeni kinyitásához nyomja meg az ELINDÍTÁS/SZÜNETELTETÉS gombot ha az
szimbólum kialudt, kinyithatja az ajtót.
AJTÓZÁR
'
Page 30

A mosási ciklusok, illetve a
szárítás végrehajtása
HU
1. A KÉSZÜLÉK BEKAPCSOLÁSA. Nyomja meg a
gombot, az ELINDÍTÁS/SZÜNETELTETÉS
lámpa pedig lassan, zöld fénnyel villogni kezd.
2. A MOSANDÓ RUHÁK BEPAKOLÁSA. Nyissa ki
az ajtót! Tegye be a mosandó ruhákat, ügyelve
arra, hogy ne lépje túl a következõ oldalon
található programtáblázatban feltüntetett
ruhatöltet-mennyiséget.
3. A MOSÓSZER ADAGOLÁSA. Vegye ki a fiókot, és
a Mosószerek és mosandók fejezetben leírtak
szerint öntse a mosószert a megfelelõ tégelybe.
4. CSUKJA BE AZ AJTÓT.
5. A PROGRAM KIVÁLASZTÁSA. A PROGRAMOK
tekerõgombbal állítsa be a kívánt programot.
Mindegyik programhoz tartozik egy hõmérséklet és
egy centrifugasebesség, melyek megváltoztatható
értékek. A kijelzõn megjelenik a ciklusidõ.
6. A MOSÁSI CIKLUS EGYÉNI BEÁLLÍTÁSAI.
Használja a megfelelõ gombokat:
A hõmérséklet és/vagy a
centrifugasebesség megváltoztatása. A
készülék automatikusan kijelzi az elindított
programhoz tartozó legmagasabb hõmérsékletet és
centrifugasebességet, vagy a legutóbb
kiválasztottakat, amennyiben azok kompatíbilisek a
kiválasztott programmal. A
a hõmérséklet fokozatosan csökkenthetõ egészen a
hidegmosásig OFF. A
centrifugasebesség fokozatosan csökkenthetõ
egészen annak kikapcsolásáig OFF. A gomb
legalsó értéken történõ megnyomásával visszatérhet
a maximális értékekhez.
A szárítás beállítása
A gomb elsõ megnyomása esetén a készülék a
kiválasztott programnak megfelelõen
automatikusan kiválasztja a maximális szárítási
szintet. A gomb minden egyes további
megnyomása esetén a készülék eggyel
alacsonyabb szintre állítja a szárítási szintet,
közvetetten pedig a szárítási idõt is, egészen
annak kikapcsolásáig, azaz az OFF értékig.
A szárítás beállítható:
A- a kívánt szárítási szint alapján:
Vasalás: Azon ruhadarabok mosására szolgál,
melyeket mosás után vasalni kell. A ruhában
maradt nedvesség puhává teszik a ráncokat, és
megkönnyíti azok eltávolítását. A kijelzon az "A1"
felirat látható.
Akasztó: Ideális a teljes szárítást nem igénylo
ruhadarabokhoz. A kijelzon az "A2" felirat látható.
Szekrény: Azon mosandó ruhák mosására szolgál,
melyeket mosás után vasalás nélkül a szekrénybe
lehet tenni. A kijelzon az "A3" felirat látható.
Extra: Azon ruhadarabok mosására szolgál,
melyek teljes szárítást igényelnek (pl.
frottírtörülközok és fürdoköpenyek). A kijelzon az
"A4" felirat látható.
B - az ido alapján: 30 - 180 percig.
gomb nyomogatásával
gomb nyomogatásával a
Ha a mosni és szárítani kívánt ruhanemû
mennyisége jóval több, mint a megengedett (lásd
az oldalsó táblázatot), végezze el a mosást, és a
program végeztével válasssza szét a ruhanemût
és egy részét tegye vissza a dobba. Ezután
kövesse a Csak szárítás végrehajtásához
megadott instrukciókat. Ismételje meg ugyanezt a
maradék ruhanemûvel is.
Megjegyzés: A szárítás végét mindig hûtési
folyamat követi.
Csak szárítás
A Programok tekerõgomb segítségével, a mosott
ruhanemûk anyagtípusa alapján válassza ki a
kívánt szárítást (11-12-13). A SZÁRÍTÁS gomb
segítségével a kívánt szárítási szint, illetve a
szárítási idõ is beállítható
A program tulajdonságainak
módosítása.
A funkció bekapcsolásához nyomja meg ezt a
gombot a gombon található jelzõlámpa világít.
A funkció kikapcsolásához ismételten nyomja
meg a gombot a lámpa kialszik.
.
! Ha a kiválasztott funkció a beállított programmal
nem kompatibilis, a jelzõlámpa villogni kezd, és a
funkció nem lesz bekapcsolva.
! Ha a kiválasztott funkció egy korábban beállított
programmal nem kompatibilis, az elsõként
kiválasztott funkció lámpája villogni kezd, és csak
a második funkció lesz bekapcsolva, a bekapcsolt
funkció lámpája folyamatosan világít.
! A funkciók megváltoztathatják az ajánlott
ruhatöltet-mennyiséget és/vagy a ciklusidõt.
7. A PROGRAM INDÍTÁSA. Nyomja meg az
ELINDÍTÁS/SZÜNETELTETÉS gombot. A
megfelelõ jelzõlámpa állandó zöld fénnyel
világítani kezd, és az ajtózár bekapcsol (az
AJTÓZÁR szimbólum világítani kezd). A program
menet közben történõ megváltoztatásához az
ELINDÍTÁS/SZÜNETELTETÉS gomb
megnyomásával szüneteltesse le a készülék
mûködését az ELINDÍTÁS/SZÜNETELTETÉS
lámpa narancssárga fénnyel lassan villogni kezd.
Ezután válassza ki a kívánt programot, és nyomja
meg újból az ELINDÍTÁS/SZÜNETELTETÉS
gombot. Az ajtó menet közbeni kinyitásához
nyomja meg az ELINDÍTÁS/SZÜNETELTETÉS
gombot ha az
kinyithatja az ajtót. A mosásnak a megszakítás
idõpontjától való folytatásához nyomja meg ismét
az ELINDÍTÁS/SZÜNETELTETÉS gombot.
8. A PROGRAM VÉGE. Ezt a kijelzõn megjelenõ End
felirat jelzi. Ha az AJTÓZÁR
ki lehet nyitni az ajtót. Nyissa ki az ajtót, szedje ki a
mosott ruhákat, és kapcsolja ki a készüléket.
AJTÓZÁR szimbólum kialudt,
szimbólum kialszik,
Amennyiben nullázni szeretne egy már elindított
programot, tartsa hosszan lenyomva a
program megszakad, és a készülék kikapcsol.
gombot. A
!
Page 31

Programok és funkciók
y
y
y
y
y
y
y
yapj
y
Programtáblázat
Max.
Max.
Programleírás
Programok
Hétköznapi programok
PAMUT ELOMOSÁS:
PAMUT:
PAMUT (1):
mosható színes ruhák.
PAMUT (2):
PAMUT:
!
mosható színes ruhák.
"
SZÍNES PAMUT (3):
SZINTETIKUS:
#
mosható színes ruhák.
Speciális programok
$
GYAPJÚ:
SELYEM/FÜGGÖNY:
%
fehérnemukhöz.
&
JEANS
'
Sport Light
Sport Shoes
Szárítás programok
Pamut
Szintetikus
!
Express Wash & Dry
Részleges programok
ÖBLÍTÉS
CENTRIFUGÁLÁS
SZIVATTYÚZÁS
A viszgálószervek számára:
1) EN50229 szabvány szerinti vezérlõprogramok: állítsa be a 2-os programot 60°C-ra.
2) Hosszú pamut program: állítsa be a 2-es programot 40°C-ra.
3) Rövid pamut program: állítsa be a 4-es programot 40°C-ra.
õ
Erosen szenn
õ
Erosen szenn
Erosen szenn
Erosen szenn
õ
G
û
Erosen szenn
õ
ezett fehér ruhák.
õõ
õ
Erosen szenn
ú, kasmír s tb. ruhanemuk mosásához.
ezett fehér és magasabb homérséklete n
ezett kényes fehér és színes ruhák.
ezett fehér és magasabb homérsékleten
En
hén szennyezett fehér és kényes színes ruhák.
õõ
Sel
em ruhanemukhöz, viszkózus anyagokhoz,
ezett fehér ruhák.
õ
ezett, magasabb homérsékleten
û
û
sebes-
hom.
ség
õ
(°C)
(ford./
perc)
90° 1000
90° 1000
60° 1000
40° 1000
60° 1000
40° 1000
60° 800
40° 800
30° 0
40° 800
30° 600
30° 600
- -
- -
30° 1000
1000
-
1000
-
-
0
Mosószerek
Szárítás
Elom-
õ
osás
Mosás
Fehérí-
toszer
õ
lll
l
l
l
l
l
l
- -
- -
l
- -
- -
l
l
l
l
l
lll
-
lll
-
lll
-
lll
-
lll
-
lll
-
l
l
l
-
l
l
- - - -
- - - -
l
-
- -
- - - -
- - - - -
A táblázatban szereplõ értékek tájékoztató jellegûek.
ruhamennyiség
Öblíto Normál
õ
l
-
l
-
l
-
l
-
l
-
l
-
l
-
ll
Max.
(kg)
Eco
Time
7
-
7
-
7
-
7
-
73,5
73,5
32
1,5
Max. 2
par
0,5
-
1
-
3
-
3
-
-
5
-
3
-
-
7
-
7
-
7
-
Progra-
mido
õ
A mosási programok mosási ideje leolvasható a kijelzõrõl.
HU
Mosási funkciók
Ennek az opciónak a kiválasztásakor a mechanikus
mozgás, a homérséklet és a vízhasználat kis, pamut és
muszálas holmikat tartalmazó töltetre van optimalizálva
(lásd "programtáblázat"). Az
rövidebb ido alatt, víz- és energiatakarékosan moshat.
Javasoljuk, hogy használjon folyékony mosószert a töltet
mennyiségéhez illo adagban.
Ez a funkció nem használható a 1, 2, 6, 7, 8, 9, 10,
11, 12, 13,
, , programok.
Folteltávolítás
Ez a funkció a legmakacsabb foltok eltávolítására
4
3
2
1
opció használatával
szolgál.
Tegye be a 4-es berakható
tartályt az 1-es rekeszbe.
A fehérítõszer betöltése
közben vigyázzon arra,
hogy az a központi csapon
jelzett max szintet ne
lépje túl (lásd ábra).
Amennyiben csak fehérítést
szeretne végezni, töltse be
a fehérítõt a 4-es berakható
rekeszbe, állítsa be a Öblítés
kapcsolja be a Folteltávolítás funkciót
programot, és
. Ha mosás
közben szeretne fehéríteni, tegye be a mosóport és az
adalékanyagokat, állítsa be a kívánt programot, és
kapcsolja be a Folteltávolítás funkciót
.
A 4-es berakható rekesz használata kizárja az elõmosást.
Ez a funkció nem használható a 1, 6, 7, 8, 9, 10, 11,
12, 13,
, programoknál.
Extra öblítés
Ezen opció alkalmazásával nõ az öblítés, valamint a
végsõ mosószereltávolítás hatékonysága.
Használata a különösen érzékeny bõrû embereknél
ajánlott.
Ez a funkció nem használható a 11,12, 13,
,
programoknál.
Késleltetett indítás
A kiválasztott program késleltetett indításához
nyomogassa a megfelelõ gombot addig, míg a késleltetés
kívánt értékét el nem éri. Amennyiben ez az opció be van
kapcsolva, a vonatkozó jelzõlámpa világít. A késleltetett
indítás törléséhez nyomogassa a gombot mindaddig, míg
a kijelzõn meg nem jelenik az OFF felirat.
Ez valamennyi program esetén bekapcsolható.
!
Page 32

Mosószerek és mosandók
HU
Mosószer-adagoló fiók
A mosás eredményessége függ a mosószer helyes
adagolásától is: ha túl sokat adagol belõle, a mosás
nem lesz hatékonyabb, de hozzájárul ahhoz, hogy
lerakódás képzõdjön a mosógépben, valamint a
környezetet is jobban szennyezi.
! Ne használjon kézi mosószert, mert túlzottan sok
hab képzõdik.
Húzza ki a mosószer-
4
3
adagoló fiókot, és a
következõk szerint tegye
bele a mosószert, illetve
az adalékot.
2
1
1-es rekesz: Mosószer elõmosáshoz (por)
A mosószer betöltése elõtt gyõzõdjön meg arról, hogy
a 4-es berakható rekesz nincs ebben a rekeszben.
2-es rekesz: Mosószer mosáshoz (por vagy folyadék)
A folyékony mosószert csak az indítás elõtt lehet
betölteni.
3-as rekesz: Adalékok (öblítõk stb.)
Az öblítõ ne érjen a rács fölé.
4-es berakható rekesz: Fehérítõszer
A mosandó ruhák elõkészítése
Osztályozza a mosandókat a következõk szerint:
- Szövet típusa / címkén lévõ szimbólum.
- Színek Válogassa külön a színes és fehér ruhákat.
Ürítse ki a zsebeket, és vizsgálja meg a gombokat.
Ne lépje túl a mosandók száraz súlyára
vonatkozóan megadott értékeket:
Magasabb hõmérsékleten mosható anyagok: max. 7kg
Mûszálas anyagok: max. 3kg
Kényes anyagok: max. 2kg
Gyapjú: max. 1,5kg
Selyem: max. 1kg
Milyen nehezek a mosandó ruhák?
Selyem: az összes selyem ruhadarab mosásához
használja az ehhez való, 7-es programot! A
kényesebb ruhanemûkhöz tanácsos speciálisan
rájuk kifejlesztett mosószert használni.
Függönyök: hajtogatva tegye párnahuzatba
(vászonzsákba) vagy hálós zacskóba. Használja a
7-es programot.
Jeans: A mosás elõtt fordítsa ki a ruhadarabokat,
és használjon folyékony mosószert. Használja a 8-
as programot.
A Sport Light programot (9-es program) az enyhén
koszos sportruházatok (melegítõk, rövid nadrágok
stb.) mosására tervezték. A legjobb eredmény
érdekében javasoljuk, hogy ne lépje túl a
programtáblázat-ban feltüntetett maximális töltetet.
Javasoljuk, hogy használjon folyékony mosószert
féladagnak megfelelõ adagban.
A Sport Shoes programot (10-as program) a
sportcipõk mosására tervezték. A legjobb eredmény
érdekében ne mosson egyszerre 2 párnál többet.
Az Express Wash & Dry (13-as program) enyhén
koszos ruhadarabok rövid ido alatt történo
kimosására lett kifejlesztve. E ciklussal akár 0,5 kg
mosandó ruhát is ki lehet mosni mindössze 40 perc
alatt. A legjobb eredmény elérése érdekében
használjon folyékony mosószert. A mandzsettákat,
gallérokat és foltokat kezelje elo.
A bepakolt ruhák kiegyensúlyozására
szolgáló rendszer
A túlzott zajhatás megelõzésére, valamint a
mosandók egyenletes eloszlása érdekében a
forgódob a centrifugafázis elõtt a mosási
centrifugasebességnél kicsit nagyobb sebességre
kapcsol. Amennyiben a töltet kiegyensúlyozására
irányuló próbálkozások nem vezetnek eredményre, a
készülék az elméleti centrifugasebességnél lassabb
centrifugálásra kapcsol. Jelentõs
kiegyensúlyozatlanság esetén a mosógép,
centrifugálás elõtt megpróbálja a töltetet
megfelelõen eloszlatni. A töltet megfelelõ
eloszlásának biztosítása érdekében ajánlatos a
nagy ruhanemûket a kicsikkel összekeverni.
1 lepedõ: 400500g
1 párnahuzat: 150200g
1 asztalterítõ: 400500g
1 fürdõköpeny: 9001200g
1 törölközõ: 150250g
Különleges programok
Gyapjú: A 6-os programmal gyapjúholmikat lehet
mosni, azokat is, melyek címkéjén a csak kézzel
mosható
elérése érdekében használjon speciális mosószert,
és ne lépje túl az 1,5 kg ruhatöltetet.
!
utasítás szerepel. A legjobb eredmény
Page 33

Óvintézkedések és
tanácsok
A mosógép a nemzetközi biztonsági
szabványoknak megfelelõen lett tervezve és gyártva.
Ezeket a figyelmeztetéseket biztonsági okokból
írjuk le, kérjük, olvassa el õket figyelmesen!
Általános biztonság
Ez a készüléket háztartási használatra lett
tervezve.
A mosógépet csak felnõtt használhatja, és csak
az e használati utasításban megadott utasítások
szerint.
Ne érjen a géphez mezítláb, illetve vizes vagy
nedves kézzel vagy lábbal!
A csatlakozódugót az aljzatból ne a kábelnél,
hanem a csatlakozónál fogva húzza ki!
Mûködés közben ne nyissa ki a mosószer-adagoló
fiókot.
Ne nyúljon a leeresztett vízbe, mert forró lehet!
Semmiképpen ne feszegesse az ajtót:
megsérülhet a véletlen nyitást megakadályozó
biztonsági retesz.
Hiba esetén semmiképpen se nyúljon a gép belsõ
részeihez, és ne próbálja megjavítani!
Mindig ügyeljen arra, hogy gyermekek ne
mehessenek a mûködõ gép közelébe.
A mosás során az ajtó meleg lehet.
Amennyiben a gépet át kell helyezni, az
áthelyezést két vagy három személy végezze,
maximális odafigyeléssel. Soha ne próbálja egyedül
elmozdítani, mert a készülék nagyon nehéz.
A mosandó berakása elõtt ellenõrizze, hogy a
forgódob üres-e.
A szárítási folyamat közben a készülék ajtaja
felmelegszik.
A készüléket ne használja olyan ruhanemûk
szárítására, melyek elõzetesen nyúlékony adalékokkal
lettek kezelve (például triklór-etilén, benzin).
A mosószárítógépben tilos habszivacsot vagy
gumírozott anyagokat szárítani.
Ellenõrízze, hogy a szárítási programnál a
vízcsap nyitva van-e.
csökkenteni lehessen az emberi egészségre és
környezetre gyakorolt hatásukat. Az áthúzott
szemeteskuka jele emlékezteti Önt arra, hogy
kötelessége ezeket a termékeket szelektíven
összegyûjteni.
A fogyasztóknak a helyi hatóságot vagy
kereskedõt kell felkeresniük a régi háztartási
gépek helyes elhelyezését illetõen.
Az ajtó kézi nyitása
Amennyiben ki akarja teregetni a mosott ruhanemût,
de áramhiány miatt nem tudja kinyitni a mosógép
ajtaját, tegye a következõket:
1. Húzza ki a dugót a
konnektorból.
2. Gyõzõdjön meg arról,
hogy a készülékben
20
maradt víz szintje az
ajtószint alatt van
ellenkezõ esetben eressze
le a fölösleges vizet a
leeresztõcsövön keresztül
egy vödörbe, ahogy azt az
ábra is mutatja.
3. Egy csavarhúzó
segítségével távolítsa el a
burkolópanelt a mosógép
elejérõl (lásd ábra).
HU
Hulladékelhelyezés
A csomagolóanyag megsemmisítése: tartsa be a
helyi elõírásokat, így a csomagolás
újrahasznosítható.
Az elektromos készülékek megsemmisítésérõl
szóló európai direktíva 2002/96/EC elõírja, hogy a
régi háztartási gépeket nem szabad a normál nem
szelektív hulladékgyûjtési folyamat során
összegyûjteni. A régi gépeket szelektíven kell
összegyûjteni, hogy optimalizálni lehessen a
bennük lévõ anyagok újrahasznosítását és
4. Az ábrán látható fülecske kihúzásával szabadítsa
ki a mûanyag húzókát; húzogassa lefelé, és ezzel
egyidejûleg nyissa ki az ajtót.
5. Szerelje vissza a panelt mielõtt a gép felé
nyomná, gyõzõdjön meg arról, hogy a horgok a
hozzájuk tartozó furatokba illeszkednek.
!!
Page 34

Karbantartás és ápolás
HU
A víz elzárása és az elektromos áram
kikapcsolása
Minden mosás után zárja el a vízcsapot. Így
kíméli a mosógép vízrendszerét és megszünteti
a vízszivárgás kockázatát.
A mosógép tisztításakor, illetve karbantartásakor
húzza ki a hálózati csatlakozódugót az aljzatból.
A mosógép tisztítása
A külsõ részeket és a gumirészeket langyos,
szappanos vizes ronggyal tisztíthatja. Ne
használjon oldószert vagy súrolószert!
A mosószer-adagoló fiók tisztítása
A fiók felemelésével és
kifelé húzásával vegye
ki a fiókot (lásd ábra).
Folyó víz alatt mossa
ki! Ezt a tisztítást
gyakran el kell
végezni.
Az ajtó és a forgódob ápolása
A szivattyú tisztítása
A mosógép öntisztító szivattyúval van felszerelve,
melynek nincs szüksége tisztítási és karbantartási
mûveletekre. Elõfordulhat azonban, hogy apró
tárgyak (aprópénz, gomb) esnek a szivattyú alsó
részén található szivattyúvédõ elõkamrába.
Gyõzõdjön meg róla, hogy a mosóprogram véget
ért, és húzza ki a hálózati csatlakozót.
Az elõkamrához való hozzáférés érdekében tegye a
következõket:
1. Egy csavarhúzó
segítségével távolítsa el
a burkolópanelt a
készülék elejérõl (lásd
ábra);
2. Órairánnyal
ellentétesen forgatva
csavarja le a fedelet
(lásd ábra).
Természetes, hogy egy
kevés víz kifolyik;
Az ajtót hagyja mindig résre nyitva, nehogy rossz
szagok keletkezzenek.
3. Gondosan tisztítsa ki az üreg belsejét;
4. Csavarja vissza a fedelet;
5. Szerelje vissza a panelt mielõtt a gép felé
nyomná, gyõzõdjön meg arról, hogy a horgok a
hozzájuk tartozó furatokba illeszkednek.
A vízbevezetõ csõ ellenõrzése
Évente legalább egyszer ellenõrizze a vízbevezetõ
csövet. Ha repedezett vagy hasadozott, ki kell
cserélni a mosás során a nagy nyomás hirtelen
szakadást okozhat.
Soha ne használjon korábban már használt
csöveket.
!"
Page 35

Rendellenességek és
elhárításuk
Elõfordulhat, hogy a mosógép nem mûködik. Mielõtt felhívná a szervizt (lásd Szerviz), ellenõrizze, hogy nem
olyan problémáról van-e szó, amely a következõ lista segítségével egyszerûen megoldható!
Rendellenességek:
A mosógép nem kapcsol be.
A mosási ciklus nem indul el.
A mosógép nem kap vizet (a
kijelzon a "H2O" felirat villog).
A mosógép folytonosan szívja, és
üríti a vizet.
A mosógép nem üríti le a vizet,
vagy nem centrifugál.
A mosógép nagyon rázkódik a
centrifugálás alatt.
A mosógépbõl elfolyik a víz.
Az opció lámpák és az
ELINDÍTÁS/SZÜNETELTETÉS
lámpa villog, a kijelzõ pedig a
hiba kódját mutatja (pl.: F-01, F-..).
Lehetséges okok / megoldás:
A hálózati csatlakozódugó nincs bedugva az aljzatba, vagy nem
eléggé ahhoz, hogy jól érintkezzen.
Nincs áram a lakásban.
A mosógép ajtaja nincs jól bezárva.
Nem nyomta meg a BEKAPCSOLÁS/KIKAPCSOLÁS gombot.
Nem nyomta meg az ELINDÍTÁS/SZÜNETELTETÉS gombot.
A vízcsap nincs nyitva.
Az indítás idõjelzõjén késletetés lett beállítva késleltetésidõzítõ.
A vízbevezetõ csõ nincs csatlakoztatva a csaphoz.
A csõ meg van törve.
A vízcsap nincs nyitva.
A lakásban nincs víz.
Nincs elegendõ nyomás.
Nem nyomta meg az ELINDÍTÁS/SZÜNETELTETÉS gombot.
A leeresztõcsõ nem a padlószinttõl 65 és 100cm közötti
magasságban van felszerelve (lásd Üzembe helyezés).
A leeresztõcsõ vége vízbe merül (lásd Üzembe helyezés).
A fali szifonnak nincs szellõzése.
Ha ezen vizsgálatok után a probléma nem oldódik meg, zárja el a
vízcsapot, kapcsolja ki a mosógépet, és hívja ki a szervizszolgálatot.
Ha a lakás egy épület legfelsõbb emeleteinek egyikén található,
lehetséges, hogy a csatornaszellõzõ eltömõdésének jelensége
(szivornyahatás) lépett fel, ezért a mosógép folytonosan szívja, és
leereszti a vizet. E kellemetlenség elkerülésére a kereskedelmi
forgalomban rendelkezésre állnak csatornaszellõzõ-szelepek.
A program nem ereszti le a vizet: néhány programnál a vizet kézileg
kell leereszteni (lásd Programok és funkciók).
A leeresztõcsõ meg van törve (lásd Üzembe helyezés).
A lefolyó el van dugulva.
Az üzembe helyezéskor a forgódob rögzítése nem lett eltávolítva (lásd
Üzembe helyezés).
A készülék nincs vízszintben (lásd Üzembe helyezés).
A mosógép bútorok és falak közé van szorítva (lásd Üzembe helyezés).
A vízbevezetõ csõ nincs jól felcsavarva (lásd Üzembe helyezés).
A mosószer-adagoló fiók eltömõdött (tisztításához lásd Karbantartás és ápolás).
A leeresztõcsõ nincs szorosan rögzítve (lásd Üzembe helyezés).
Kapcsolja ki a készüléket, és húzza ki a dugót a konnektorból, várjon
körülbelül 1percet, majd indítsa újra!
Ha a hiba továbbra is fennáll, forduljon a szervizhez!
HU
Sok hab képzõdik.
A Mosó-szárítógép nem szárít.
A mosószer nem mosógépekhez való (kell, hogy szerepeljen rajta,
hogy gépi, kézi vagy gépi mosáshoz, vagy hasonló).
Túl sok mosószert használt.
A hálózati csatlakozódugó nincs bedugva az aljzatba, vagy nem
eléggé ahhoz, hogy jól érintkezzen.
Nincs áram a lakásban.
Az ajtó nincs jól becsukva.
Az indítás késletetése van beállítva.
A SZÁRÍTÁS a OFF helyzetben van.
!#
Page 36

Szerviz
HU
Mielõtt a szervizhez fordulna:
Gyõzõdjön meg arról, hogy a hibát nem tudja saját maga is elhárítani (lásd Rendellenességek és
elhárításuk);
Indítsa újra a programot, hogy lássa, elhárította-e a hibát;
Ellenkezõ esetben forduljon az engedéllyel rendelkezõ szakszervizhez a garanciajegyen található
telefonszámon.
Soha ne forduljon engedéllyel nem rendelkezõ szerelõhöz!
Közölje:
a meghibásodás jellegét;
a mosógép típusát (Mod.);
a gyártási számot (S/N).
Ezek az adatok a mosógép hátoldalán, illetve az elülsõ oldalon az ajtó belsején elhelyezett adattáblán
találhatók.
!$
Page 37

Iнструкцiя з експлуатацi¿
ПРАЛЬНА МАШИНА
UCR
Укра¿нська
IWDE 7105
Çì³ñò
UCR
Встановлення, 38-39
Розпакування ³ вир³внювання
П³дключення води й електроенерг³¿
Перший цикл прання
Технiчнi данi
Опис прально¿ машини, 40-41
Панель керування
Дисплей
Як здiйснювати цикл прання або сушiння, 42
Програми й опц³¿, 43
Таблиця програм
Опц³¿ прання
Пральнi засоби та б³лизна, 44
Касета з пральним засобом
П³дготовка б³лизни
Спецiальнi програми
Система балансування завантаження
Заходи безпеки та поради, 45
Загальна безпека
Утилiзацiя
Ручне в³дкривання люку
Догляд та очищення, 46
В³дключення води й електричного живлення
Миття прально¿ машини
Чистка касети для пральних засоб³в
Догляд за люком та барабаном
Чищення насосу
Контроль труби подач³ води
Несправност³ та засоби ¿х усунення, 47
Допомога, 48
37
Page 38

Встановлення
Необх³дно збер³гати дану брошуру, щоб мати
нагоду звернутися до не¿ у будь-який момент. У
раз продажу, передач³ ³нш³й особ³ або пере¿зду
переконайтеся, що ³нструкц³я перебуваº разом ³з
пральною машиною й новий власник може
ознайомитися з ¿¿ принципами роботи й
в³дпов³дними запоб³жний заходами.
Уважно вивч³ть ³нструкц³ю: в н³й м³ститься
важлива ³нформац³я про встановлення,
використання та безпеку.
Розпакування та вир³внювання
Розпакування
1. Розпакування прально¿ машини
2. Вдоскональтеся, що машина не зазнала
ушкоджень пiд час транспортування. Якщо вона
маº пошкодження, не виконуйте нiяких
пiдключень та негайно зверн³ться до
постачальника.
3. Видал³ть 4 гвинти
для захисту п³д час
транспортування та
гумову шайбу з
в³дпов³дною
прокладкою, що
знаходяться у задн³й
частин³ (див. малюнок).
4. Закрийте отвори пластиковими заглушками з
комплекту постачання.
5. Збереж³ть ус³ детал³: якщо пральна машина
маº перевозитися, ¿х потр³бно встановити знову.
Належне вирiвнювання надаº стаб³льн³сть машин³
та запоб³гаº в³брац³¿, шуму та пересуванню п³д
час роботи. При встановленнi машини на
килимовому покритт³ або килимi в³дрегулюйте
н³жки таким чином, щоб залишити п³д пральною
машиною достатн³й прост³р для вентиляц³¿.
П³дключення води й електроенерг³¿
Пiдºднання труби подач³ води
1. П³дключити живлячий
трубопров³д,
прикрутивши його до
крану холодно¿ води за
допомогою штуцеру з
газовою р³зьбою 3/4
(див. малюнок).
Перед пiдключенням
спустiть воду, доки вона
не стане прозорою.
2. П³дключ³ть трубу
подач³ води до
прально¿ машини,
прикрутивши ¿¿ до
розºму для води, який
знаходиться угор³
праворуч на задньому
боцi машини (äèâ.
малюнок).
Забороняйте дiтям гратися з упаковками.
Вир³внювання
1. Встанов³ть пральну машину на рiвн³й та тверд³й
п³длоз³, не притуляючи ¿¿ до ст³н, мебл³в, тощо.
2. Якщо пiдлога не º
iдеально
горизонтальною,
компенсуйте нерiвностi
за допомогою переднiх
нiжок (див. малюнок)
розкручуючи чи
закручуючи ¿х; êóò
нахилу вiдносно робочо¿
поверхнi не повинен
перевищувати 2°.
38
3. Зверн³ть увагу, щоб труба не мала згин³в та
утиск³в.
Тиск води в кран³ маº в³дпов³дати значенням у
таблиц³ Техн³чних даних (див. стор³нку поруч).
Якщо довжини труби подачi води не вистачаº,
зверн³ться у спец³ал³зовану крамницю або до
уповноваженого фах³вця.
Не використовуйте н³коли труби, що вже були у
користуванн³.
Використовуйте труби з комплекту постачання
до машини.
Page 39

П³дключення зливного шланга
П³дключ³ть зливний
шланг, не згинаючи
його, до
канал³зац³йного каналу
або до входу до такого
65 - 100 cm
каналу на ст³н³, на
в³дстан³ в³д 65 до 100
см в³д п³длоги;
або поклад³ть його на
край вмивальника або
ванни, поºднавши
направляючу, яка
входить до комплекту
постачання, до крану
(див.малюнок). Не
залишайте в³льний
к³нець зливного шланга
зануреним у воду.
Використання подовжувача шланга не
рекомендоване. В разi необхiдностi використання
подовжувача шлангу, переконайтеся у тому, що
в³н маº той самий д³аметр та його довжина не
перевищуº 150 см.
Електричн³ п³дключення
Перш нiж вставити вилку в електричну розетку,
переконайтеся, що:
розетка маº заземлення у в³дпов³дност³ до
встановлених норм;
розетка розрахована на максимальне
навантаження у межах потужност³ машини,
зазначене у таблиц³ Техн³чних даних (див.
малюнок поруч);
напруга живлення перебуваº у межах,
зазначених у таблиц³ Техн³чних даних (див.
малюнок поруч);
розетка п³дходить до вилки прально¿ машини. В
³ншому випадку зам³н³ть розетку або вилку.
Машину не можна встановлювати поза
прим³щенням, нав³ть в захищених мiсцях, тому
що дуже небезпечно п³ддавати ¿¿ впливу дощу ³
грози.
Коли машину вже встановлено, забезпечте
в³льний доступ до електрично¿ розетки.
Не використовуйте подовжувач³ й тр³йники.
Шнур живлення не повинен мати згин³в або
утиск³в.
Проводити замiну шнуру живлення можуть
тiльки вповноваженi фахiвцi.
Увага! Компан³я зн³маº з себе в³дпов³дальн³сть за
умови недотримання вказаних норм.
Перший цикл прання
Пiсля встановлення та перш нiж розпочати
використання машини, виконайте цикл прання з
пральним засобом але не завантажуючи бiлизну,
встановивши програму 3.
Òåõí³÷í³ äàí³
Модель
Ðîçìiðè
Кiлькiсть
бiлизни
Електричн³
п³дключення
Водопровднi
пiдключення
Швидкiсть
центрифуги
Програми
контролю згiдно
з нормою
EN 50229
Цей прилад вiдповiдаº таким
IWDE 7105
ширина 59,5 см
висота 85 см
глибина 53,5 см
Вiд 1 до 7 кг для одного циклу
прання.
Вiд 1 до 5 кг для одного циклу
сушiння.
див. шильд³к з технiчними даними на
машинi
максимальний тиск 1 мПа (10 бар)
мiнiмальний тиск 0,05 мПа (0,5 бар)
Обºм баку – 52 лiтри
äî 1000 обертiв на хвилину
Прання:
60°C; виконуºться з завантаженням
у 7 êã.
Ñóøiííÿ: перше сушiння виконане з
2 кг завантаження, вибравши рiвень
сушiння A1 (ПРАСУВАТИ); друге
сушiння виконане з 5 êã
завантаження, вибравши рiвень
сушiння A4” (EXTRA).
ºвропейським директивам:
-89/336/CEE вiд 03/05/89
(Електромагн³тна сумiснiсть),
включаючи пiзнiшi внесення та змiни
- 2002/96/CE
- 2006/95/CE (Низька напруга)
програма 2; температура
UCR
39
Page 40

Опис прально¿ машини
Панель керування
Кнопка
УВIМКНЕННЯ/
ВИМКНЕННЯ
Касета для пральних засобiв
РУЧКА
ПРОГРАМ
Касета з пральним засобом: для завантаження
пральних засобiв та засобiв догляду (äèâ.
Пральнi засоби та бiлизна).
Кнопка УВIМКНЕННЯ/ВИМКНЕННЯ
натисн³ть ³ в³дпуст³ть кнопку для увiмкнення або
вимикання машини. Iндикаторна лампа ПУСК/
ПАУЗА блимаº зеленим свiтлом з пов³льними
³нтервалами, вказуючи на те, що машину
ввiмкнено. Для вимикання прально¿ машини п³д
час прання необх³дно утримувати кнопку
натиснутою довше, близько 3 сек.; короткочасне
або випадкове натискання не дозволить вимкнути
машину.
Вимикання машини п³д час прання скасовуº саме
прання.
: швидко
Кнопка
ТЕМПЕРАТУРА
Кнопка
ЦЕНТРИФУГА
Кнопка ÑÓØIÍÍß
або виключити взагалi сушiння; заданий рiвень
або час сушiння виводиться на дисплей (äèâ. ßê
здiйснювати цикл прання або сушiння).
Кнопка та ³ндикаторна лампа ПУСК/ПАУЗА
коли зелена ³ндикаторна лампа блимаº з
пов³льними ³нтервалами, натисн³ть на кнопку для
запуску прання. Якщо цикл розпочався,
³ндикаторна лампа горить пост³йно. Щоб ув³йти в
режим паузи п³д час прання, знову натисн³ть на
кнопку; ³ндикаторна лампа почне гор³ти
помаранчевим кольором. Якщо позначка
свiтиться, ви можете вiдкрити люк. Щоб
продовжити прання з м³сця, де воно було
перерване, знову натисн³ть на кнопку.
Кнопки з
iндикаторними
лампами ÎÏÖIß
ДИСПЛЕЙ
Кнопка
ÑÓØIÍÍß
: натиснiть, щоб зменшити
Кнопка та
iндикаторна лампа
ПУСК/ПАУЗА
:
íå
РУЧКА ПРОГРАМИ: для задання бажано¿
програми (див. Таблиця програм).
Кнопки та ³ндикаторн³ лампи ÎÏÖ²ß: для вибору
наявних опц³й. Iндикаторна лампа обрано¿ опцi¿
залишаºться увiмкненою.
Кнопка ЦЕНТРИФУГА
зменшення обертiв або виключення вiджиму
взагалi; значення вiдображаºться на диспле¿.
Кнопка ТЕМПЕРАТУРА
зменшення обертiв або виключення нагрiву;
значення вiдображаºться на диспле¿.
40
: натискання викликаº
: натискання викликаº
Режим очiкування
Вiдповiдно до норм, повязаних з заощадження
енергi¿, цю пральну машину оснащено системою
автовимкнення (stand by), яка активуºться через
декiлька секунд вiдсутностi роботи з боку
машини. Швидко натиснiть кнопку УВIМКНЕННЯ/
ВИМКНЕННЯ та зачекайте вiдновлення роботи
машини.
Page 41

Дисплей
UCR
B
A
Дисплей º зручним для програмування машини; вiн надаº рiзноманiтну iнформацiю.
У зон³ ) в³дображаºться тривал³сть р³зних наявних програм та, при запущеному цикл³, час, що залишився
до його зак³нчення; при ув³мкненому В²ДСТРОЧЕНОМУ ЗАПУСКУ там в³дображатиметься час, що
залишився до запуску вибрано¿ програми.
Крiм того, при натисканнi на вiдповiдну кнопку, зявляються максимальнi значення температури,
швидкостi центрифуги, а також рiвень або час сушiння, завданi машинi програмою.
 ñåêöi¿ B зявляються стадi¿, передбаченi для вибраного циклу, та пiд час роботи програми поточну
стадiю прання або сушiння.
Прання
Полоскання
Вiджимання / Злив
Сушiння
Ó çîí³ + представлен³, зверху вниз, символи, що в³дносяться до температури
вiджимання
Пiдсвiчена позначка
Позначка
Пiдсвiчена позначка
.
означаº, що на диспле¿ виведене значення задано¿ температури.
свiтиться пiд час регулювання сушiння.
означаº, що на диспле¿ виведене значення задано¿ к³лькост³ оберт³в центрифуги.
C
, äî Ñóøiííÿ òà äî
Позначка Люк заблоковано
Пiдсвiчена позначка означаº, що люк заблоковано. З метою запобiгання ушкоджень, перш нiж вiдкрити
люк, вдоскональтеся, що позначка не горить.
Щоб в³дкрити дверцята люку п³д час виконання циклу, натисн³ть на кнопку ПУСК/ПАУЗА; якщо позначка
ЛЮК ЗАБЛОКОВАНО
згасне, це означаº, що люк можна в³дкрити.
41
Page 42

Як здiйснювати цикл прання або
сушiння
1. ВВ²МКН²ТЬ МАШИНУ. Натисн³ть кнопку ;
³ндикаторна лампа ПУСК/ПАУЗА блимаº з
повiльними iнтервалами зеленим кольором.
2. ЗАВАНТАЖТЕ Б²ЛИЗНУ. В³дкрийте люк.
Завантажте б³лизну, звертаючи увагу, щоб не
перевищити норму завантаження, зазначену в
таблиц³ програм на наступн³й стор³нц³. .
3. ДОДАЙТЕ НАЛЕЖНУ К²ЛЬК²СТЬ ПРАЛЬНОГО
ЗАСОБУ. Витягн³ть касету ³ додайте пральний
зас³б у в³дпов³дн³ ванночки, як вказано в
роздiлi Пральнi засоби та бiлизна.
4. ЗАКРИЙТЕ ЛЮК.
5. ВИБЕР²ТЬ ПРОГРАМУ. Вибер³ть за допомогою
рукоятки ПРОГРАМИ бажану програму ; з нею
повязана температура та швидк³сть
центрифуги, як³ можуть бути зм³нен³. На
диспле¿ зявиться тривалiсть циклу.
6. НАЛАШТУЙТЕ ЦИКЛУ ПРАННЯ ПIД ВЛАСНI
ПОТРЕБИ. Скористайтеся в³дпов³дними кнопками:
Зм³нити температуру та/або швидк³сть
центрифуги. На диспле¿ автоматично
вiдображаºться максимальна температура i
швидкiсть центрифуги, передбаченi для задано¿
програми. Або останнi заданi параметри, якщо
вони º сумiсними з вибраною програмою.
Натискаючи на кнопку
температуру прання аж до прання у холодн³й
вод³ OFF. Натискаючи на кнопку
зменшують швидк³сть центрифуги, аж до ¿¿
вимикання OFF. Подальше натискання на
кнопки призводить до повернення до
максимальних передбачених значень.
Встановлення сушiння
При першому натисканнi на кнопку машина
автоматично вибираº максимальний рiвень
сушiння, сумiсний з заданою програмою. При
повторному натисканнi зменшуºться рiвень, а
потiм й час сушiння, аж до повного його
виключення - OFF.
Можна встановити сушiння:
A- залежно вiд бажаного рiвня сушiння:
Праска: для речей, якi мають прасуватися у
подальшому. Рiвень залишково¿ вологостi
помякшуº складки та полегшуº ¿хнº зникнення.
На диспле¿ зявляºться A1.
Вiшалка: iдеально для речей , якi не
потребують повного висушування. На диспле¿
зявляºться A2.
Øàôà: для випраних речей, якi мають
складатися у шафу без прасування. На диспле¿
зявляºться A3.
Extra: для речей, якi потребують повного
висушування, наприклад, рушникiв та банних
халатiв. На диспле¿ зявляºться A4.
B - За часом: вiд 30 äî 180 хвилин.
, поступово зменшують
, поступово
Якщо завантажена бiлизна перевищуº
передбаченi межi для прання та сушiння (äèâ.
Таблицю поряд), виконайте прання та пiсля
завершення програми роздiлiть бiлизну та
розташуйте одну частину у барабанi. Тепер
виконуйте iнструкцiю для Òiëüêè ñóøiííÿ.
Повтор ц ж операцi¿ для бiлизни, яка
залишилася.
Увага: наприкiнцi сушiння завжди
провадитеметься перiод охолодження.
Òiëüêè ñóøiííÿ
Встановити за допомогою ручки програм
сушiння (11-12-13), зважаючи на тип тканини. За
допомогою кнопки СУШIННЯ можна також
задати бажаний рiвень або час сушiння
Модифiкацiя характеристик
циклу.
Натиснiть кнопку для активацi¿ опцi¿;
увiмкнеться вiдповiдна iндикаторна лампа.
Натисн³ть знову цю ж кнопку, для вимикання
опц³¿; ³ндикаторна лампа згасне.
.
Якщо вибрана опц³я º несум³сною ³з
заданою програмою, ³ндикаторна лампа почне
блимати та опц³я не буде активована.
Якщо вибрана опц³я не º сум³сною з ³ншою
попередньо вибраною, ³ндикаторна лампа ,
що в³дноситься до першо¿ вибрано¿ функц³¿,
заблимаº та буде активована т³льки одну
секунду, ³ндикаторна лампа опц³¿
свiтитиметься.
Опцi¿можутьзмiнювати рекомендоване
завантаження та/або тривалiсть циклу.
7. ЗАПУСТ²ТЬ ПРОГРАМУ. Натисн³ть кнопку ПУСК/
ПАУЗА. Вiдповiдна iндикаторна лампа
засвiтиться зеленим свiтлом, при цьому люк
буде заблоковано (свiтитиметься позначка ЛЮК
ЗАБЛОКОВАНО
виконання циклу виведiть машину в режим
паузи, натиснувши на ПУСК/ПАУЗА (iндикаторна
лампа ПУСК/ПАУЗА блиматиме помаранчевим
кольором з повiльними iнтервалами); виберiть
бажаний цикл та знову натиснiть кнопку ПУСК/
ПАУЗА. Щоб в³дкрити дверцята люку п³д час
виконання циклу натисн³ть на кнопку ПУСК/
ПАУЗА; якщо позначка ЛЮК ЗАБЛОКОВАНО
згасне, це означаº, що люк можна в³дкрити.
Знову натисн³ть на кнопку ПУСК/ПАУЗА, щоб
запустити програму з того мiсця, де ¿¿ було
перервано.
8. ЗАВЕРШЕННЯ ПРОГРАМИ. На це вказуºнадпис
End на диспле¿; коли згасне позначка ЛЮК
ЗАБЛОКОВАНО
люк, витягн³ть б³лизну й вимкн³ть машину.
) Для змiни програми пiд час
, люк можна вiдкрити. В³дкрийте
Якщо необх³дно в³дм³нити вже розпочатий цикл,
натисн³ть та утримуйте кнопку
перервано, та машина зупиниться.
. Öèêë áóäå
42
Page 43

Програми й опц³¿
Таблиця програм
-
-
Ìàêñ.
øâèä êiñòü
(обертiв
çà
хвилину)
-
-
Ñóøiííÿ
Опис програми
Щоденнi (Daily)
1
2
2
2
3
4
5
Ñïåöiàëüíi (Special)
6
7
8 Jeans
9 Sport Light
10
Програми Ñóøiííÿ
11
12
13
Неповнi
Бавовна з попередн³м
пранням
: б³л³ надзвичайно
забруднен³.
Бавовна
: б³л³ надзвичайно
забруднен³.
бавовна (1)
м³цн³ с ильно забрудненi.
Бавовна (2)
дел³катн³ сильно забруднен³.
Бавовна
сильно забруднен³.
Бавовна кольоровi (3)
слабо забруднен³ та кольоров³
дел³катн³.
Синтетичн³
слабо забрудненi
Вовна
òîùî.
Шовк/Штори
вiскози, нижньо¿ бiлизни.
Sport Shoes
Ñóøiííÿ
Ñóøiííÿ
Express Wash & Dry
Полоскання - 1000
Вiджиманн я - 1000
Зливання - 0
: бiлi та кольоровi
: б³л³ та кольоров³
: б³л³ та кольоров³ м³цн³
: кольоровi мiцнi
: Для вовни, кашемiру,
: Для рече й з шовку,
Бавовна
Синтетичн ³
: á³ë³
Ìàêñ.
òåìï.
(°C)
90° 1000
90° 1000
60° 1000
40° 1000
60° 1000
40° 1000
60° 800
40° 800
30° 0
40° 800
30° 600
30° 600
30° 1000
åäíº
Макс.завантаження
Нормальне
Ìàêñ 2 ïàðè
Прання В³дб³лювач Помякшувач
Пральний зас³б
Попер
прання
• • - • •
• • • • -
• • • • -
• • • • -
• • • • -
• • • • -
• • • • -
- • - • -
- • - • -
• • - • -
- • - • -
- • - • -
• - - - -
• - - - -
• - - • •
• - • • -
• - - - -
- - - - -
(êã)
7 -
7 -
7 -
7 -
7 3,5
7 3,5
3 2
1,5 -
1 -
3 -
3 -
5 -
3 -
0,5 -
7 -
7 -
7 -
Åêî
Òàéì
-
Трива
ëiñòü
циклу
UCR
Тривал³сть програми прання на в³дображено на диспле¿.
Для всiх установ з проведення випробувань:
1) Програма контроля згiдно до норми EN 50229: встановiть програму 2 з температурою 60°C.
2) Довга програма бавовна: задайте програму 2 з температурою 40°C.
3) Коротка програма бавовна: задайте програму 4 з температурою 40°C.
Опц³¿ прання
При вибор³ ц³º¿ опц³¿ механ³чний рух, температура та
вода оптим³зуються п³д неповне завантаження
слабко забруднених бавовни та синтетичних тканин
(див. Таблицю програм).
За допомогою
скорочений час, заощаджуючи воду та енерг³ю.
Рекомендуºться застосовувати р³дкий зас³б для
прання, дозуючи його залежно в³д завантаження.
! Не працюº з програмами 1, 2, 6, 7, 8, 9, 10, 11, 12,
13,
, , .
Видалення плям
4
3
2
1
(див. малюнок). ßêùî âè áàæàºòå òiëüêè âiäáiëèòè
можна зд³йснити прання у
Ця функцiя º корисною
для видалення стiйких
плям. Вставте додаткову
ванночку 4 з комплекту
постачання у ванночку 1.
Пiд час дозування
вiдбiлювача не
перевищуйте
максимальний рiвень
max, зазначений на
центральному стрижн³
бiлизну, додайте вiдбiлювач у додаткову ванночку 4,
встановiть програму Полоскання
функцiю Видалення плям
прання додайте пральний засiб та засоби догляду,
встановiть бажану програму та активуйте опцiю
Видалення плям
Використання додатково¿ ванночки 4 виключаº
попереднº прання.
Не працюº з програмами 1, 6, 7, 8, 9, 10, 11, 12, 13, ,
, .
Додаткове полоскання
При вибор³ дано¿ опц³¿ зб³льшуºться ефективн³сть
полоскання й гарантуºться максимальне видалення
прального засобу. Вона º зручною для ос³б ³з дуже
чутливою шк³рою.
Не працюº з програмами 11,12, 13,
Вiдстрочений пуск
Для встановлення вiдстроченого пуску обрано¿
програми натискайте на вiдповiдну кнопку, доки не
зявиться необхiдний час вiдстрочки. Про активований
стан цiº¿ опцi¿ вказуº сигнальна лампа, яка горить
постiйним свiтлом. Щоб скасувати вiдстрочений пуск,
натискайте кнопку, доки на диспле¿ на зявиться OFF.
Може працювати з усiма програмами.
Дан³, наведен³ в таблиц³, º суто вказiвними.
та активуйте
. Для вiдбiлювання пiд час
.
, .
43
Page 44

Пральн³ засоби та б³лизна
Касета з пральним засобом
Добрий результат прання залежить також вiд
правильного дозування прального засобу: перевищення
не даº ефективного прання та призводить до налипання
прального засобу на внутр³шн³ детал³ прально¿ машини
та забруднюº довк³лля.
Не використовуйте засоби для ручного прання,
тому що вони утворюють надто багато п³ни.
Витягнiть касету для
4
3
пральних засобiв та
додайте пральнi засоби
або засоби з догляду,
як вказано нижче.
2
1
ванночка 1: Засiб для попереднього прання
(порошковий)
Перш нiж додати пральний зас³б, перев³рте, щоб не
була вставлена додаткова ванночка 4.
ванночка 2: Пральний засiб (порошковий чи рiдкий)
Рiдкий прпльний засiб наливайте безпосередньо
перед пуском машини.
ванночка 3: Засоби з догляду (помякшувач, тощо)
Помякшувач не маº вит³кати з реш³тки.
додаткова ванночка 4: В³дб³лювач
П³дготовка б³лизни
Роздiлiть бiлизну, враховуючи:
- тип тканини / позначку на етикетцi.
- кольори: вiдокремте кольоровi речi вiд бiлих.
Перев³рте кишен³ й ´удзики.
Не перевищуйте вказанi значення щодо ваги сухо¿ бiлизни:
Мiцнi тканини: макс 7 кг
Синтетичнi тканини: макс 3 кг
Делiкатнi тканини: макс. 2 кг
Вовна: макс. 1,5 кг
Шовк: макс. 1 кг
Ск³льки важить б³лизна?
1 простирадло 400-500 г
1 наволочка 150-200 г
1 скатертина 400-500 г
1 махровий халат 900-1200 г
1 рушник 150-250 г
Øîâê: використовуйте спец³альну програму 7 для
прання вс³х вироб³в ³з шовку. Рекомендуºться
використання спец³ального прального засобу для
дел³катних вироб³в.
Штори: рекомендуºться скласти й покласти у
наволочку або м³шечок з с³тки. Скористайтеся
програмою 7.
Jeans: виверн³ть навивор³т речi ще до
завантаження та скористайтеся р³дким засобом для
прання. Скористайтеся програмою 8.
Sport Light (програма 9) розрахована для прання не
дуже забрудненого спортивного одягу (спортивнi
костюми, шкарпетки, тощо); для отримання
найкращих результатiв не перевищуйте максимальне
завантаження, зазначене у Таблицi програм.
Використовуйте рiдкий пральний засiб та в³дм³ряйте
дозу для половинного завантаження.
Sport Shoes (програма 10) розрахована для прання
спортивного взуття; для отримання найкращих
результатiв не завантажуйте бiльше 2 пар взуття.
Express Wash & Dry (програма 13) розрахована для
прання та сушiння злегка забруднених речей за
короткий час. Вибравши цей цикл, можна випрати та
висушити до 0,5 кг речей лише за 40 хвилин.
Для отримання найкращих результатiв
скористуйтеся рiдким пральним засобом;
попередньо обробiть манжети, ком³р ³ плями.
Система балансування завантаження
До кожного в³джиму у центрифуз³, для запоб³гання
надм³рн³й в³брац³¿ та для р³вном³рного розпод³лу
завантаження, барабан зд³йснюº оберти на дещо
б³льш³й швидкост³, н³ж швидк³сть прання. Якщо по
зак³нченн³ дек³лькох спроб завантажен³ реч³ ще не
були правильно в³дбалансован³, машина запустить
центрифугу на швидкост³, менш³й за передбачену.
У випадку надм³рно¿ незбалансованост³ пральна
машина зд³йснюº розпод³л зам³сть в³джиму. З
метою оптимального розпод³лу завантаження та
його правильного балансування рекомендуºться
одночасне прання великих ³ малих речей.
Спецiальнi програми
Вовна: за допомогою програми 6 можна прати у
пральн³й машин³ вс³ вироби ³з вовни, нав³ть т³, що
мають ярлик т³льки ручне прання
отримати кращ³ результати, використовуйте
спец³альний пральний зас³б та не перевищуйте
завантаження в 1,5 кг.
44
. Ùîá
Page 45

Запоб³жн³ заходи та
поради
Пральну машину була спроектовано ³ вироблено
у в³дпов³дност³ з м³жнародними нормами безпеки.
Це попередження надаються задля вашо¿
безпеки, ³ тому ¿х треба уважно прочитати.
Загальна безпека
Даний прилад спроектований виключно для
побутового використання.
Пральна машина маº використовуватися т³льки
дорослими особами та зг³дно з ³нструкц³ями,
наведеними у дан³й брошур³.
Не торкайтеся до машини голими ногами або
мокрими чи вологими руками й ногами.
Не виймайте штепсель з електрично¿ розетки,
витягуючи його за шнур, тримайтеся т³льки за
самий штепсель.
Не вiдкривайте касету з пральними засобами
пiд час роботи машини.
Не торкайтеся води, що зливаºться, вона може
мати п³двищену температуру.
У жодному випадку не докладайте надм³рних
зусиль до люку: це може ушкодити запобiжний
механiзм проти випадкових вiдкривань.
Якщо машина не працюº у разi поломки, у
жодному випадку не роб³ть спроб самост³йно
виконати ремонт внутр³шн³х механ³зм³в.
Завжди слiдкуйте, щоб дiти не наближалися до
працюючо¿ машини.
Пiд час прання люк нагрiватиметься.
Пересування машини маº здiйснюватися двома
або трьома особами за умови надзвичайно¿
обережностi. Н³коли не перем³щуйте машину
самотужки, тому що вона дуже важка.
Перш н³ж завантажити б³лизну, перев³рте, щоб
барабан був порожн³й.
Пiд час сушiння люк нагрiватиметься.
Пiд час сушНе виконуйте сушiння випрано¿ бiлизни з
використанням горючих розчинникiв (напр., трiелiну).
Не сушiть мiкропористу гуму або подiбнi
еластомери.
Переконайтеся, що пiд час сушiння
водопровiдний кран вiдкрито.
оптим³зац³¿ в³дновлення та рециклу матер³ал³в,
що входять до ¿хнього складу, та з метою
усунення потенц³йно¿ шкоди для здоровя та
довк³лля. Символ перекресленого кошика,
зображений на вс³х виробах, нагадуº про
необх³дн³сть окремо¿ утил³зац³¿.
Для подальшо¿ ³нформац³¿ щодо правильно¿
утил³зац³¿ побутово¿ техн³ки, ¿хн³ власники можуть
звернутися до вiдповiдних мiських служб або до
постачальника.
Ручне в³дкривання люку
У випадку, якщо неможливо в³дкрити дверцята
люку через в³дключення електрично¿ енерг³¿, та
коли ви бажаºте витягти б³лизну, треба д³яти
таким чином:
1. витягн³ть штепсель з
електрично¿ розетки.
2. Перев³рте, щоб р³вень
води усередин³ машини не
20
досягав р³вня вiдкриття
люку; якщо це не так,
злийте надлишок води
через зливний шланг,
збираючи ¿¿ у в³др³, як
показано на малюнку.
3. зн³м³ть зовн³шню
панель на передньому
боц³ прально¿ машини за
допомогою викрутки
(див. малюнок).
UCR
Óòèë³çàö³ÿ
Утил³зац³я пакувального матер³алу:
додержуйтесь м³сцевих норм, так як пакування
може бути використане повторно.
ªвропейська директива 2002/96/CE з в³дход³в
електрично¿ й електронно¿ апаратури
передбачаº, що побутов³ електроприлади не
можуть перероблятися у звичайному порядку
для твердих м³ських в³дход³в. В³дпрацьован³
побутов³ прилади мають збиратися окремо для
4. За допомогою вказаного на малюнку язичка
тягнiть пластмасову тягу з упору назовнi, аж доки
¿¿ не буде звiльнено; потiм протягнiть ¿¿ донизу,
одночасно вiдкриваючи дверцята.
5. встанов³ть панель на м³сце, пересв³дч³ться у
тому, що гачки були вставлен³ у в³дповiдн³ петл³,
пiсля чого притиснiть ¿¿ до машини.
45
Page 46

Догляд та очищення
В³дключення води й електричного
живлення
Закривайте водопров³дний кран п³сля кожного
прання. У такий спос³б зменшуºться знос
г³дравл³чно¿ частини машини й усуваºться
небезпека прот³кання.
Виймайте штепсель з розетки п³д час миття
машини та п³д час роб³т з техн³чного
обслуговування.
Миття прально¿ машини
Зовн³шня частина ³ гумов³ детал³ можуть митися
тканиною, змоченою у тепл³й вод³ й мил³. Не
використовуйте розчинники або абразивнi
засоби.
Чищення касети для пральних
засоб³в
Виймiть касету,
пiднявши ¿¿ та
витягнувши назовнi
(див. малюнок).
Промийте ¿¿ п³д
проточною водою; ця
процедура маº
проводитися
регулярно.
Чищення насосу
Пральну машину обладнано насосом, який
здатний сам очищатися та не вимагаº техн³чного
обслуговування. Може трапитися так, що др³бн³
речi (монети, ´удзики) потраплять до попередньо¿
камери, яка захищаº насос та розташована в
його нижн³й частин³.
Переконайтеся у тому, що цикл прання
зак³нчено, ³ витягн³ть штепсель з розетки.
Як д³статися до попередньо¿ камери:
1. зн³м³ть зовн³шню
панель на передньому
боц³ прально¿ машини
за допомогою викрутки
(див. малюнок);
2. розгвинт³ть кришку,
обертаючи ¿¿ проти
годинниково¿ стр³лки
(äèâ. малюнок):
вит³кання незначно¿
кiлькостi води º
нормальним;
Догляд за люком та барабаном
Завжди залишайте люк напiвв³дкритим для
запоб³гання утворенню неприºмних запах³в.
46
3. акуратно очист³ть всереденi;
4. знову накрут³ть кришку;
5. встанов³ть панель на м³сце, пересв³дч³ться у
тому, що гачки були вставлен³ у в³дповiдн³ петл³,
пiсля чого притиснiть ¿¿ до машини.
Контроль труби подач³ води
Перев³ряйте трубу подач³ води не менше одного
разу на р³к. Якщо на н³й º тр³щини та щ³лини,
вона п³длягаº зам³н³: п³д час прання сильний тиск
може викликати непередбачен³ розриви.
Н³коли не використовуйте уживан³ труби.
Page 47

Несправност³ та засоби ¿х
усунення
Може так статися, що пральна машина не працюватиме. Перш н³ж зателефонувати до служби Допомоги
(див. Допомога), перев³рте можлив³сть легкого усунення проблеми за допомогою наступного списку.
UCR
Несправностi:
Пральна машина не вмикаºться.
Цикл прання не розпочинаºться.
В пральну машину не потрапляº
вода (на диспле¿ зявляºться
позначка H2O, що блимаº).
Пральна машина безперервно
завантажуº та зливаº воду.
Можлив³ причини/Р³шення:
Штепсель не вставлений у розетку, або в³дсутн³й контакт.
У будинку немаº електроенерг³¿.
Люк погано закрито.
Кнопку УВIМКНЕННЯ/ВИМКНЕННЯ не було натиснуто.
Кнопку ПУСК/ПАУЗА не було натиснуто.
Водопров³дний кран закритий.
Якщо вiдстрочення задане на час запуску.
Трубу подач³ води не п³дºднано до водопровiдного крану.
Перегин у трубi.
Водопров³дний кран закритий.
У водопровод³ немаº води.
Недостатн³й тиск.
Кнопку ПУСК/ПАУЗА не було натиснуто.
Зливний шланг не знаходиться на в³дстан³ в³д 65 до 100 см в³д
п³длоги (див. Встановлення).
К³нець зливного шланга занурений у воду (див. Встановлення).
Стiнний каналiзацiйний злив не маº в³ддушини для виходу пов³тря (вантуза).
Якщо п³сля таких перев³рок проблема залишаºться, закрийте
водопров³дний кран, вимкн³ть машину ³ зателефонуйте до служби
Допомоги. Якщо квартира знаходиться на верхн³х поверхах будинку,
можливо, в³дбуваºться сифонний ефект, при якому машина безперервно
завантажуº й зливаº воду. Щоб його л³кв³дувати, ³снують спец³альн³
антисифонн³ клапани, як³ можна придбати у торговельн³й мереж³.
Пральна машина не зливаº воду
або не вмикаº центрифугу.
Пральна машина дуже вiбруº п³д
час роботи центрифуги.
З прально¿ машини вит³каº вода.
Свiтлодiоди oпцiй та ПУСК/
ПАУЗА блимають, та на диспле¿
виводиться код аномал³¿
(напр.: F-01, F-..).
Утворюºться занадто багато п³ни.
Прально-сушiльна не призначена
суто для суш.
Програма не передбачаº зливання води: у деяких програмах це
потр³бно зробити вручну.
Перегин зливного шланга (див. Встановлення).
Засм³тився зливний шланг.
Барабан, у момент встановлення, не був правильно розблокований
(див. Встановлення).
Машина сто¿ть не на р³вн³й поверхн³ (див. Встановлення).
Машину затиснуто м³ж меблями ³ ст³ною (див. Встановлення).
Погано пригвинчено трубу подач³ води (див. Встановлення).
Забруднена касета для пральних засоб³в (як вимитидив. Догляд та очищення).
Погано закр³плений зливний шланг (див. Встановлення).
Вимкн³ть машину й витягн³ть штепсель з розетки, зачекайте
близько 1 хвилини й ув³мкн³ть ¿¿ повторно.
Якщо несправн³сть не усунено, зателефонуйте до служби
Допомоги.
Пральний засiб не п³дходить до прально¿ машини (повинен мати напис
для машинного прання, для ручного та машинного прання або под³бн³).
Перевищена доза прального засобу.
Штепсель не вставлений в електричну розетку або вставлений не до кiнця.
У будинку немаº електроенерг³¿.
Люк погано закрито.
Якщо вiдстрочення задане на час запуску.
СУШIННЯ в положеннi OFF.
47
Page 48

Допомога
195073841.00
10/2008 - Xerox Business Services
Перш н³ж звернутися по Допомогу:
Перев³рте, чи можна самост³йно вир³шити проблему (див. Несправност³ ³ засоби ¿х усунення);
Перезапуст³ть програму, щоб перев³рити, чи усунено несправн³сть;
У протилежному випадку, зверн³ться до авторизовано¿ служби техн³чно¿ Допомоги за телефонним
номером, вказаним на гарант³йному сертиф³кат³.
Звертайтеся виключно до уповноважених фах³вц³в.
Треба пов³домити:
тип несправност³;
модель машини (Мод.);
сер³йний номер (S/N).
Цю iнформацiю ви знайдете на шильдику на задн³й сторон³ прально¿ машини та на передн³й сторон³, якщо
вiдкрити люк.
48
 Loading...