

Indesit ISL65C, ISL66CX Installation

Instruction booklet
TUMBLE DRYER
GB
English, 1
I
Italiano, 13
D
Deutsch, 37EEspañol, 49
NL
Nederlands, 73
ISL66CX
ISL65C
F
Français, 25
P
Português, 61
Contents
Installation, 2
Door reversal instructions
Where to put your dryer
Ventilation
Water drain
Electrical connection
Before you start using your dryer
Dryer description, 3
To open the door
The features
Control panel
Start and programmes, 4-6
Choosing a programme
Table of programmes
The controls
Laundry, 7-8
Sorting your laundry
Wash care labels
Special clothing items
Drying times
GB
Warnings and Suggestions, 9
General safety
Disposal
Saving energy and respecting the environment
Maintenance and Care, 10
Switching off the electricity
Cleaning the filter after each cycle
Empty the water container after each cycle
Check the drum after each cycle
Cleaning the condenser unit
Cleaning the dryer
Troubleshooting, 11
Service, 12
Spare parts
1
Installation
GB
! Keep this instruction booklet on hand in order to refer to
it when necessary. Take it with you when you move, and
should you sell this appliance or pass it on to another
party, make sure that this booklet is supplied along
with the dryer so that the new owner may be informed
about warnings and suggestions on how the dryer
works.
! Read these instructions carefully; the following
pages contain important information on installation
and suggestions on how the appliance works.
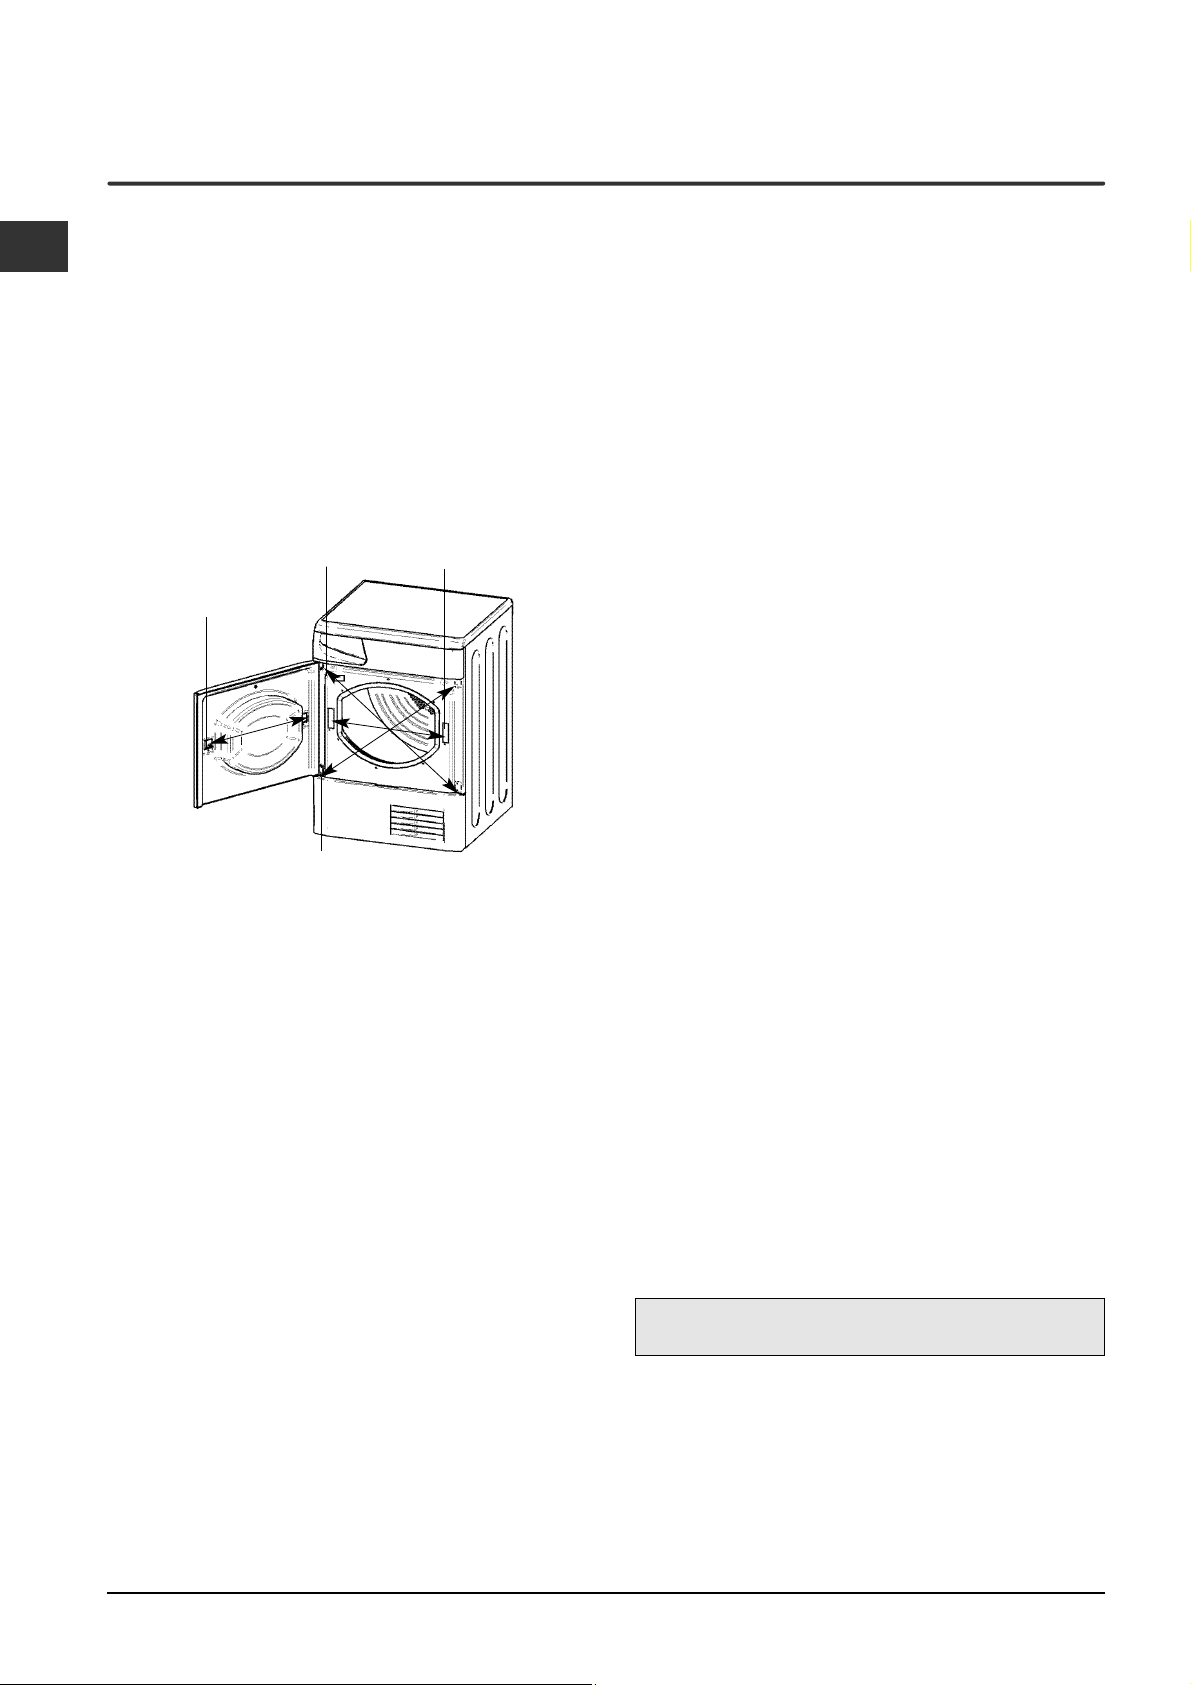
Door Reversal Instructions
Hinge
Door latch
Hinge
The door of your dryer is reversible and can easily be
changed. Exchange diagonally hinge brackets and
blanking screws. Exchange door latch and catch with
their opposite blanking plates (see diagram above).
Door catch
Where to put your dryer
●
Place your dryer at a distance from gas ranges,
stoves, heaters, or cook tops because flames can
damage the appliance.
●
If you are going to install the appliance under a
work counter, be sure to leave a 10mm space
between the top and any other objects on or
above the machine and a 15mm space between the
sides and lateral furnishings or walls. This is to ensure
proper air circulation. Make sure that the back vents
are not obstructed.
Ventilation
! We do not recommend that the dryer is installed in a
cupboard but the dryer must never be installed
behind a lockable door, a sliding door or a door with a
hinge on the opposite side to that of the dryer door.
! If using the dryer in a small or cold room some
condensation could be experienced.
Water drain
If your dryer is installed next to a drain the water can be
plumbed into this drain. This does away with the need to
empty the water container. Simply remove the top hose
from its top fitting at the rear of the dryer and plumb the
hose provided to the drain.
Electrical connections
Make sure of the following before you insert the plug
into the the electrical socket:
●
The socket must be grounded.
●
The socket must be able to sustain the machines
maximum power, which is indicated on the rating
label (see Dryer Description).
●
Power voltage must be within the values indicated
on the rating label (see Dryer Description).
●
The socket must be compatible with the dryers plug.
Should this not be the case, replace the plug or the
socket.
! The dryer must not be installed outdoors, even if the
space is sheltered. It can be very dangerous if it is
exposed to rain or storms.
! Once installed, the dryers electrical wire and plug
must be within easy reach.
! Do not use extension cords.
! The power cord must not be bent or squashed.
! The power cord supplied should be checked
periodically and replaced by a cord specially prepared
for this dryer and fitted only by authorised technicians
(see Service). New or longer power cords are supplied
at an extra charge by authorised dealers.
! The manufacturer denies any responsibility should any
of these rules not be followed.
! If in doubt about any of the above consult a qualified
electrician.
When the dryer is in use, there has to be adequate
ventilation. Make sure you put your dryer in an
environment that is not damp and has proper air
circulation throughout. Airflow around the dryer is
essential to condense the water produced during the
washing, the dryer will not operate efficiently in an
enclosed space or cupboard.
2
Before you start using your dryer
Once you have installed your dryer and before you
use it, clean the inside of the drum to remove any dust
that could have accumulated during transport.
Dryer Description
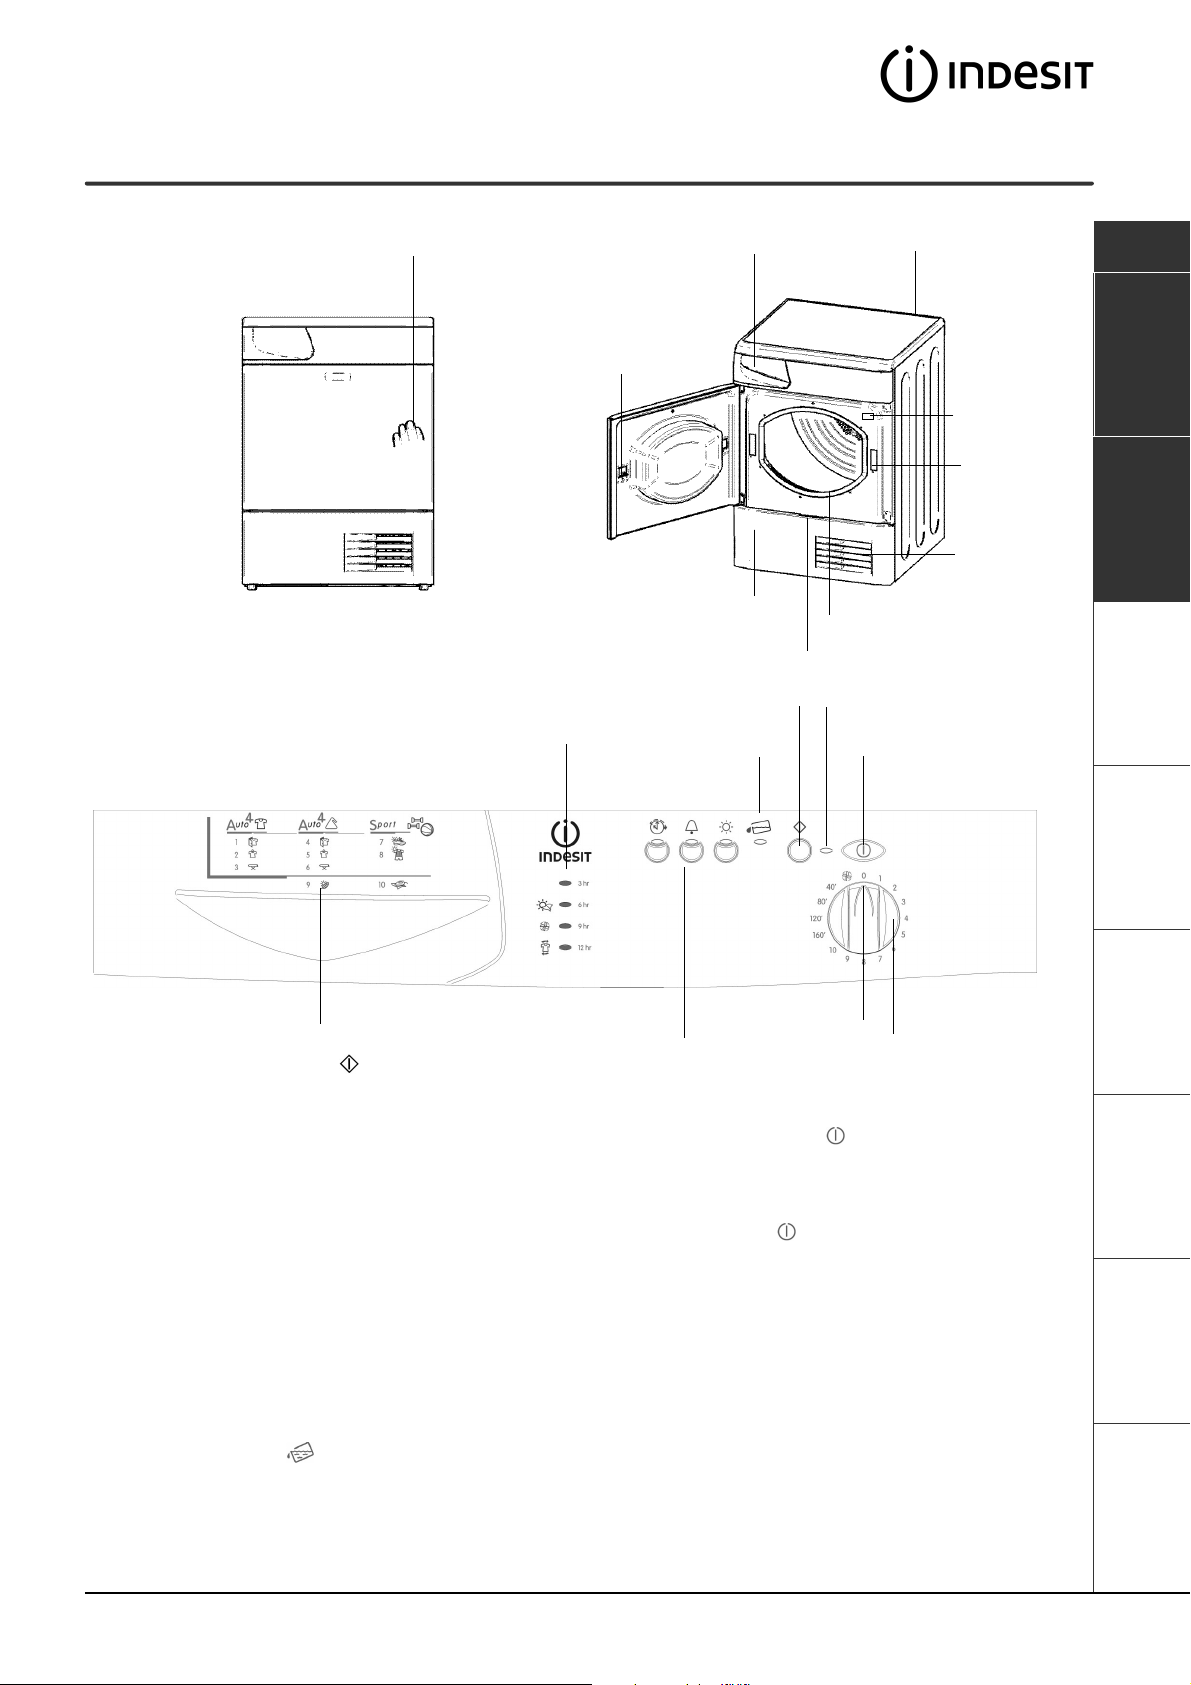
To open the door The features
Press and release the front
panel in position shown
Door latch
Condenser cover
Condenser cover handle
(Pull to open)
Control panel
START/CANCEL
Progress or Delay
Lights
Empty Water
Water container
Button
Light
Filter
On/Off
Light
ON/OFF
Button
Rating plate
Model &
Serial
numbers
Door catch
Air intake
grille
GB
Installation
Description
Programmes Laundry
Start and
Programmes Guide
The START/CANCEL button starts a selected
programme. When you press this button there will be
one beep and the progress lights will flash to confirm
the action. If you have not set a programme, the buzzer
will beep four times. When a programme is running,
holding this button in cancels the programme and
stops the dryer (see Start and Programmes).
The OPTION buttons/lights select available options
for your selected programme (see Start and
Programmes). The lights indicate that the option has
been selected.
The Programmes Guide allows you to consult a user
friendly table of the available programmes.
The Empty Water light signals that the water
container should be emptied. When it is flashing it
indicates that the container is full.
The light will take a few seconds to go out after
Buttons and lights
OPTION
replacing the empty container, the dryer must be
running for this to happen (see The Controls).
The On/Off indicator light signals that your dryer
is in use or ready to select a programme. If this light
flashes it indicates there is a fault (see Troubleshooting).
The ON/OFF button : If the dryer is running and
this button is pressed, the dryer stops. Press again,
the dryer restarts.
The Progress or Delay lights show you the status of
the programme, or the delay time when they flash.
During a delayed start the lights will flash to show the
delay selected. When (not flashing) they show each
stage of the programme by the corresponding light
turning on (see Start and Programmes).
The PROGRAMMES knob sets the programme:
rotate it until the indicator is pointing to the programme
you want to select (see Start and Programmes).
Indicator
PROGRAMMES
Knob
Warnings and
Suggestions
Maintenance and
Care Troubleshooting Service
3
Start and Programmes
GB
Choosing a programme
1. Plug the dryer into the electrical socket.
2. Sort your laundry according to fabric type (see
Laundry).
3. Open the door and make sure the filter is clean
and in place and the water container is empty
and in place (see Maintenance).
4. Load the machine and make sure items are not
in the way of the door seal. Close the door.
5. If the On/Off light is not lit: Press the ON/OFF
button .
6. Choose a programme by checking the Programmes
Guide (see Programmes) as well as the indications
for each type of fabric (see Laundry).
- Select a programme by rotating the
PROGRAMMES knob.
7. Set a delay time and other options if necessary.
8. If you wish to select the buzzer sound, at the end
of the progamme, press the ALARM Option button.
9. Press the START button to begin.
During the drying programme, you can check on
your laundry and take out items that are dry
while others continue drying. When you close
the door again, press the START button in order
to resume drying.
10. During the last few minutes of Drying
Programmes, before the programme is
completed, the final COOL TUMBLE phase is
entered (fabrics are cooled), this phase should
always be allowed to complete.
11. When the programme is complete. The buzzer
will sound, if this option selected.
Open the door, take the laundry out, clean the filter
and replace it. Empty the water container
and replace it (see Maintenance).
If you do not take out the laundry immediately,
the dryer will tumble occasionally for 10 hours
or until you open the door.
12. Unplug the dryer.
Easy Iron Programme
‘Easy Iron’ is a short 10 minute programme (8 minutes of heat followed by a 2 minute cool tumble period) which
fluffs the fibres of clothing that have been left in the same position/location for an extended period of time. The
cycle relaxes the fibres and makes them easier to iron and fold.
! ‘Easy Iron’ is not a drying programme and should not be used for wet articles of clothing.
For best results:
1. Do not load more than the maximum capacity. These numbers refer to the dry weight:
Fabric Maximum load
Cotton and Cotton mixtures 2.5kg
Synthetics 2kg
Denim 2kg
2. Unload the dryer immediately after the end of the programme, hang, fold or iron the articles and put
them away in the closet. Should this not be possible repeat the programme.
The ‘Easy Iron’ effect varies from one fabric to the next. It works well on traditional fabrics like Cotton or Cotton
mix, and less well on acrylic fibres and on materials such as Tencel®.
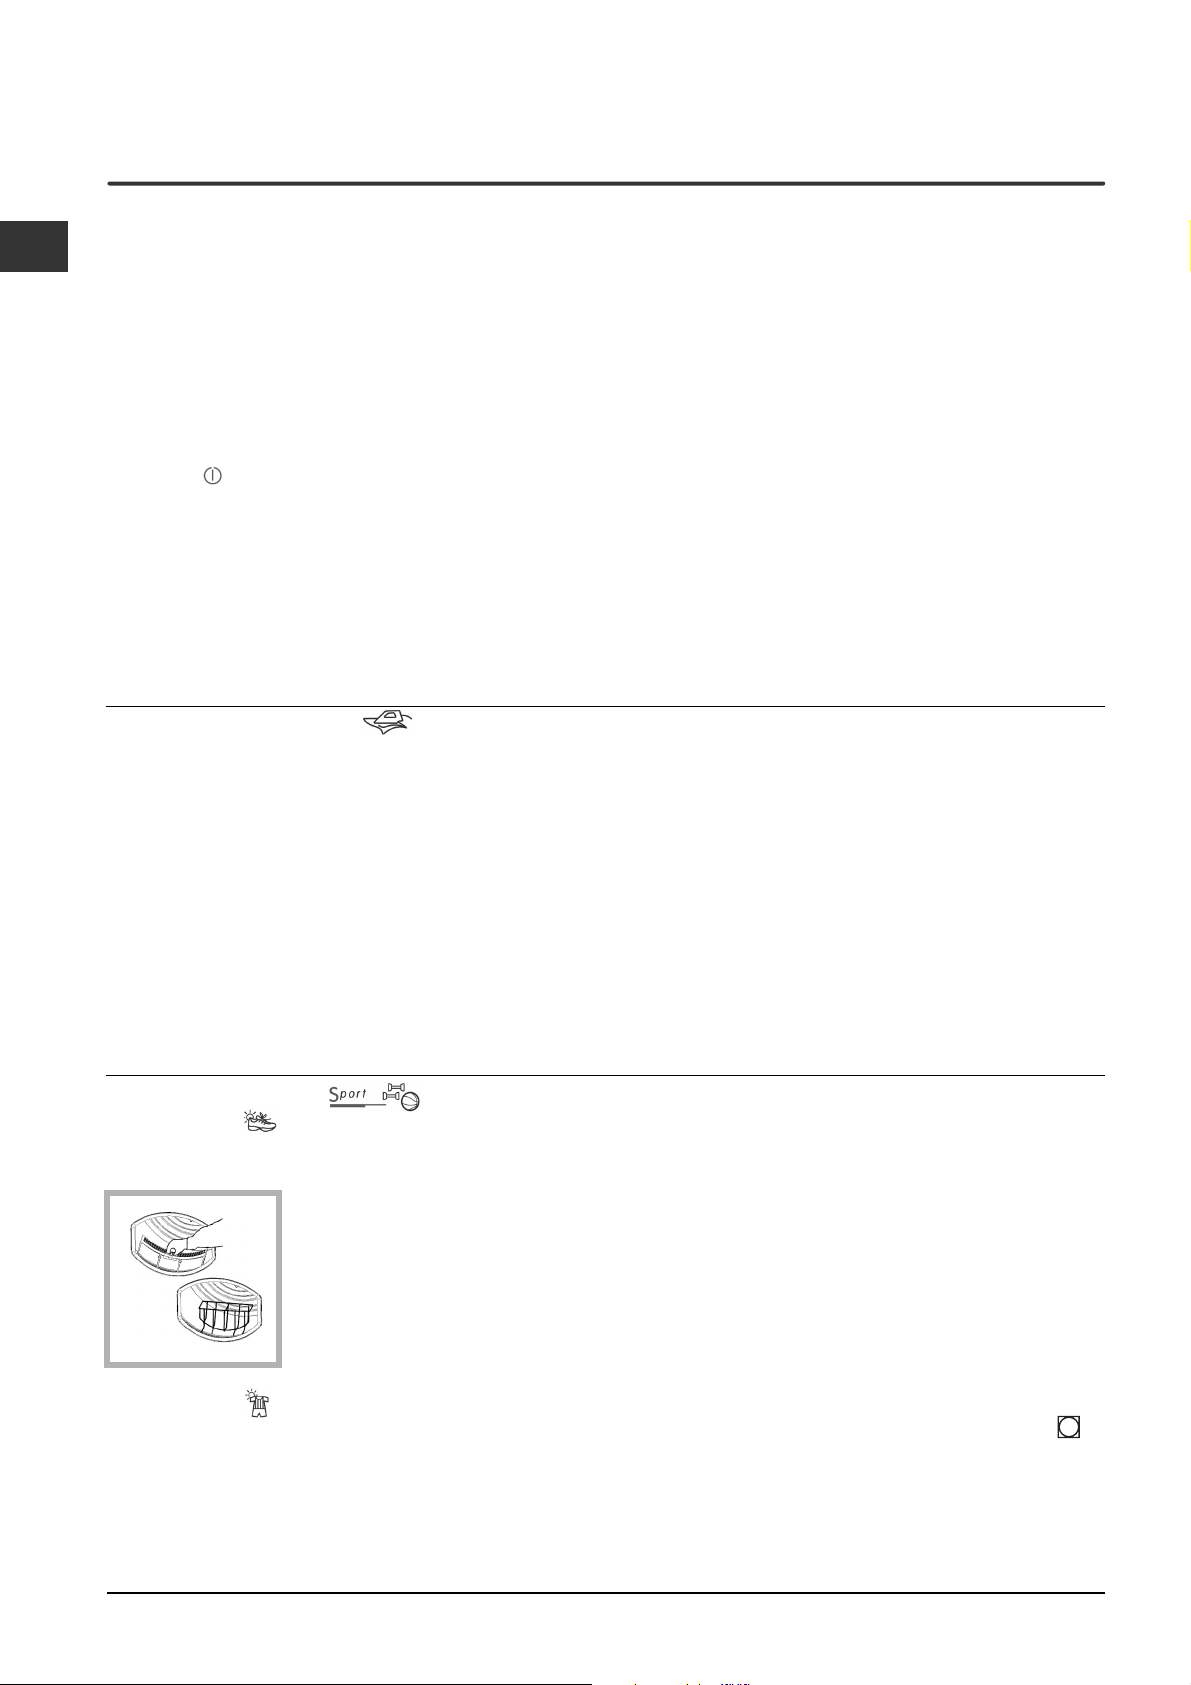
Sport programme
Special shoes
●
This is a programme to dry one pair of sports shoes sized 37-46 (4-11).
●
The shoes must have been washed and spun at a minimum spin speed of 400rpm.
●
They must be used with the shoe rack provided. If you tumble shoes in the drum
you will damage your dryer.
●
Remove the filter from its position in the front of the dryer and fit the rack.
●
Tuck the laces inside the shoes and load shoes with toes down and soles facing you.
●
Drying times will vary dependant on the size and style of shoe. If shoes are not
completely dry at the end of the programme, run the programme again.
! Do not dry shoes with Gel inserts or flashing lights.
! Only dry shoes made from Synthetics or Canvas materials.
Special sports
●
This is a programme for tumble dryer safe garments, such as Tracksuits and Shorts marked with the symbol .
●
It can be used for load sizes up to 1.5kg
●
We recommend that garments are turned inside out before drying.
●
This programme will take up to 130 minutes. The actual time will vary depending on the size and density of the
load and the spin speed used in your washer.
●
Loads dried using this programme are usually ready to wear, but on some heavier garments the edges may be
slightly damp.
4
! When finished remove shoe rack and replace the filter.
 Loading...