

Page 1

IS5V5CCW/EIS5V5CCW/EIS5V5CCW/E
Page 2

Manuel
Manuel
Manuel
FR
Cuisinière pose-libre
Cuisinière poseCuisinière pose libre libre libre
Table des
Consignes de sécurité
Consignes de sécurité
Consignes de sécurité
Consignes de sécurité
GUIDE D'UTILISATION QUOTIDIENNE
GUIDE D'UTILISATION QUOTIDIENNE
GUIDE D'UTILISATION QUOTIDIENNE
GUIDE D'UTILISATION QUOTIDIENNE
Installation
Installation
Installation
Installation
Bedienungsanleitungen
Bedienungsanleitungen
Bedienungsanleitungen
Bedienungsanleitungen
DE
HERD UND OFEN
HERD UND OFEN
HERD UND OFEN
HERD UND OFEN
Inhalt
Inhalt
Inhalt
Inhalt
Sicherheitshinweise
Sicherheitshinweise
Sicherheitshinweise
Sicherheitshinweise
KURZ
KURZ
KURZ
KURZ
ANLEITUNG
ANLEITUNG
ANLEITUNG
ANLEITUNG
Installation
Installation
Installation
Installation
Manuale d'usoManuale d'uso
Manuale d'usoManuale d'uso
Manuale d'usoManuale d'uso
Manuale d'usoManuale d'uso
Manuale d'uso
Manuale d'uso
Manuale d'uso
Manuale d'uso
IT
Piano di cottura a libera installazione
Piano di cottura a libera installazione
Piano di cottura a libera installazione
Piano di cottura a libera installazione
Sommario
Sommario
Sommario
Sommario
Norme di sicurezza
Norme di sicurezza
Norme di sicurezza
Norme di sicurezza
GUIDA RAPIDA
GUIDA RAPIDA
GUIDA RAPIDA
GUIDA RAPIDA
d’utilisation
d’utilisation
d’utilisation
matières
3
3
3
3
11
11
11
11
47
47
47
47
5
5
5
5
20
20
20
20
47
47
47
47
7
7
7
7
29
29
29
29
Installazione
Installazione
Installazione
Installazione
Operating Instructions
Operating Instructions
Operating Instructions
Operating Instructions
EN
COOKER AND OVEN
COOKER AND OVEN
COOKER AND OVEN
COOKER AND OVEN
Contents
Contents
Contents
Contents
Safety Instructions
Safety Instructions
Safety Instructions
Safety Instructions
DAILY REFERENCE
DAILY REFERENCE
DAILY REFERENCE
DAILY REFERENCE
DAILY REFERENCE
DAILY REFERENCE
DAILY REFERENCE
DAILY REFERENCE
DAILY REFERENCE
DAILY REFERENCE
DAILY REFERENCE
DAILY REFERENCE
DAILY REFERENCE
DAILY REFERENCE
DAILY REFERENCE
DAILY REFERENCE
DAILY REFERENCE
DAILY REFERENCE
DAILY REFERENCE
DAILY REFERENCE
DAILY REFERENCE
DAILY REFERENCE
DAILY REFERENCE
DAILY REFERENCE
GUIDE
GUIDE
GUIDE
GUIDE
GUIDE
GUIDE
GUIDE
GUIDE
GUIDE
GUIDE
GUIDE
GUIDE
GUIDE
GUIDE
GUIDE
GUIDE
GUIDE
GUIDE
GUIDE
GUIDE
GUIDE
GUIDE
GUIDE
GUIDE
Installation
Installation
Installation
Installation
47
47
47
47
38
38
38
38
47
47
47
47
9
9
9
9
2
Page 3

FR
CONSIGNES DE SÉCURITÉ
IMPORTANT - À LIRE ET À RESPECTER
Avant d’utiliser l’appareil, lire attentivement les
consignes de sécurité. Conservez-les à portée
pour consultation ultérieure.
Le présent manuel et l'appareil en question
contiennent des consignes de sécurité
importantes qui doivent être lues et observées
en tout temps. Le Fabricant décline toute
responsabilité si les consignes de sécurité ne sont
pas respectées, en cas de mauvaise utilisation
de l’appareil, ou d'un mauvais réglage des
commandes.
MISEENGARDE:L'appareil, ainsi que ses parties
accessibles, peuvent atteindre une température
élevée lors de l'utilisation. Évitez tout contact avec
les éléments chauffants. Les enfants de moins de
8 ans doivent être tenus à l'écart de l'appareil, à
moins d'être sous surveillance constante.
MISE EN GARDE : Ne pas utiliser la table de
cuisson si la surface est cassée ou fissurée - risque
de choc électrique.
MISE EN GARDE : Risque d'incendie : Ne rangez
aucun objet sur les surfaces de cuisson.
ATTENTION : La cuisson doit être supervisée.
Une cuisson de courte durée doit être supervisée
en tout temps.
MISE EN GARDE : Une cuisson sans surveillance
sur une table de cuisson contenant de la graisse
ou de l'huile peut s'avérer dangereuse - risque
d'incendie. N'essayez JAMAIS d'éteindre un feu
avec de l'eau, mais éteignez l'appareil puis couvrez
les flammes à l'aide d'un couvercle par ex. ou
d'une couverture antifeu.
N'utilisez pas la tablede cuisson comme surface
de travail ou support. Gardez les vêtements et
autres matières inflammables loin de l’appareil
jusqu’à ce que toutes les composantes soient
complètement refroidies - un incendie pourrait se
déclarer.
Les enfants en bas âge (0-3 ans) doivent être
tenus à l'écart de l'appareil. Les jeunes enfants
(3-8 ans) doivent être tenus à l'écart de l'appareil
sauf s'ils se trouvent sous surveillance constante.
Les enfants âgés de 8 ans et plus, ainsi que
les personnes présentant des capacités physiques,
sensoriellesou mentales réduites, ou ne possédant
ni l'expérience ni les connaissances requises,
peuvent utiliser cet appareil seulement s'ils sont
supervisés, ou si une personne responsable leur
a expliqué l'utilisation sécuritaire et les dangers
potentiels de l'appareil. Ne laissez pas les enfants
jouer avec l'appareil. Les enfants ne doivent pas
nettoyer, ni procéder à l'entretien de l'appareil
sans surveillance.
MISEENGARDE:L'appareil, ainsi que ses parties
accessibles, peuvent atteindre une température
élevée lors de l'utilisation. Évitez tout contact avec
les éléments chauffants. Les enfants de moins de
8 ans doivent être tenus à l'écart de l'appareil, à
moins d'être sous surveillance constante
Ne laissez jamais l'appareil sans surveillance
pendant le séchage des aliments. Si
une sonde peut être utilisée avec l’appareil,
utilisez uniquement la sonde de température
recommandée pour ce four - un incendie pourrait
se déclarer.
Gardez les vêtements et autres matières
inflammables loin de l’appareil jusqu’à ce que
toutes les composantes soient complètement
refroidies - un incendie pourrait se déclarer. Soyez
toujours vigilant lorsque vous faites cuire des
aliments riches en matièregrasse, huile, ou lorsque
vous ajoutez de l’alcool - un incendie pourrait se
déclarer. Utilisez des gants pour retirer les plats
et les accessoires. À la fin de la cuisson, ouvrez
la porte avec soin pour permettre à l'air chaud
ou la vapeur de s'évacuer graduellement avant
d'accéder la cavité - vous pourriez vous brûler.
Évitez d’obstruer les évents d’air chaud à l’avant
du four – un incendie pourrait se déclarer.
Prenez garde de ne pas frapper la porte du
four lorsque qu’elle est ouverte ou en position
abaissée.
UTILISATION AUTORISÉE
MISE EN GARDE : Cet appareil n'est pas
conçu pour fonctionner à l'aide d'un dispositif de
commutation externe, comme une minuterie ou
un système de télécommande.
Cet appareil est destiné à un usage domestique
et peut aussi être utilisé dans les endroits suivants
: cuisines pour le personnel dans les magasins,
bureaux et autres environnements de travail ; dans
les fermes; par les clients dans les hôtels, motels,
et autres résidences similaires.
Aucune autre utilisation n'est autorisée (p. ex.
pour chauffer des pièces).
Cet appareil n'est pas conçu pour un
usage professionnel. N'utilisez pas l'appareil en
extérieur.
N'entreposez pas de substances explosives ou
inflammables (p. ex. essence ou bombe aérosol) à
l'intérieur ou près de l'appareil - risque d'incendie.
INSTALLATION
Deux personnes minimum sont nécessaires
pour déplacer et installer l'appareil - risque de
blessure. Utilisez des gants de protection pour
le déballage et l'installation de l'appareil - vous
risquez de vous couper.
L'installation, incluant l'alimentation en eau
(selon le modèle), et les connexions électriques,
ainsi que les réparations, doivent être exécutées
par un technicien qualifié. Ne procédez à aucune
réparation ni à aucun remplacement de pièce
sur l'appareil autre que ceux spécifiquement
3
Page 4

indiqués dans le guide d'utilisation. Gardez
les enfants à l'écart du site d'installation. Après
avoir déballé l'appareil, assurez-vous qu'il n'a pas
été endommagé pendant le transport. En cas
de problème, contactez votre revendeur ou le
Service Après-Vente le plus proche. Une fois
installé, gardez le matériel d'emballage (sacs en
plastique, parties en polystyrène, etc.) hors de
la portée des enfants - ils pourraient s'étouffer.
L'appareil ne doit pas être branché à l'alimentation
électrique lors de l'installation - vous pourriez
vous électrocuter. Au moment de l'installation,
assurez-vous que le câble d'alimentation n'est pas
endommagé par l'appareil - risque d'incendie ou
de choc électrique. Allumez l’appareil uniquement
lorsque l’installation est terminée.
Retirez l'appareil de sa base en mousse
de polystyrène uniquement au moment de
l'installation.
N'installez pas l'appareil derrière une porte
décorative - un incendie pourrait se déclarer.
Si la grille est placée sur une base, elle
doit être nivelée et fixée à la paroi par la
chaîne de conservation fournie, pour éviter
l'appareil en glissant de la base.
MISE EN GARDE : Afin d'éviter l'appareil de
glisser, la chaîne de retenue fournie doit
être installée. Consultez les instructions
pour l'installation.
AVERTISSEMENTS ÉLECTRIQUES
La plaque signalétique se trouve sur le rebord
avant du four (visible lorsque la porte est ouverte).
Il doit être possible de débrancher l’appareil
de l’alimentation électrique en retirant la fiche de
la prise de courant si elle est accessible, ou à l’aide
d’un interrupteur multipolaire en amont de la prise
de courant, conformément aux règles de câblage
et l'appareil doit être mis à la terre conformément
aux normes de sécurité électrique nationales.
N'utilisez pas de rallonge, de prises multiples
ou d'adaptateurs. Une fois l'installation terminée,
l'utilisateur ne devra plus pouvoir accéder aux
composantes électriques. N'utilisez pas l'appareil
si vous êtes mouillé ou si vous êtes pieds nus.
N'utilisez pas l'appareil si le câble d'alimentation
ou la prise de courant est endommagé(e), si
l'appareil ne fonctionne pas correctement, ou s'il a
été endommagé ou est tombé.
Si le câble d'alimentation est endommagé, il
doit être remplacé avec un câble identique par le
fabricant, un représentant du Service Après-vente,
ou par toute autre personne qualifiée - vous
pourriez vous électrocuter.
Si le câble électrique doit être remplacé,
contactez un centre de maintenance agréé.
MISE EN GARDE : Pour éviter toute décharge
électrique, assurez-vous que l'appareil est éteint
avant de remplacer l'ampoule.
NETTOYAGE ET ENTRETIEN
AVERTISSEMENT : Assurez-vous que l'appareil
est éteint et débranchez de l'alimentation
électrique avant d'effectuer le nettoyage ou
l'entretien ; n'utilisez jamais un appareil de
nettoyage à vapeur - risque de choc électrique.
N'utilisez pas de produits abrasifs ou de
grattoirs métalliques pour nettoyer la vitre de la
porte, ils peuvent rayer la surface et, à la longue,
briser le verre.
N'utilisez en aucun cas de produits abrasifs
ou corrosifs, de produits chlorés ou de tampons à
récurer.
Assurez-vous que l’appareil a refroidi avant de
le nettoyer ou effectuer des travaux d’entretien. Risque de brûlures.
MISE EN GARDE : Éteignez l’appareil avant
de remplacer l’ampoule - vous pourriez vous
électrocuter.
ÉLIMINATION DES MATÉRIAUX D'EMBALLAGE
Lesmatériauxd'emballagesont entièrementrecyclablescommel'indique
le symbole de recyclage . Les différentes parties de l'emballage
doivent donc être jetées de manière responsable et en totale conformité
avec la réglementation des autorités locales régissant la mise au rebut
de déchets.
MISE AU REBUT DES APPAREILS
ÉLECTROMÉNAGERS
Cet appareil est fabriqué avec des matériaux recyclables ou pouvant
être réutilisés. Mettez-le au rebut en vous conformant à la
réglementation locale en matière d'élimination des déchets. Pour
toute information supplémentaire sur le traitement et le recyclage
des appareils électroménagers, contactez le service local compétent,
le service de collecte des déchets ménagers ou le magasin où vous
avez acheté l'appareil. Cet appareil est certifié conforme à la Directive
européenne 2012/19/UE relative aux déchets d'équipements électriques
et électroniques (DEEE). En s'assurant que ce produit est correctement
mis au rebut, vous contribuerez à empêcher toute conséquence nuisible
pour l'environnement et la santé. Le symbole sur le produit ou
sur la documentation qui l'accompagne indique qu'il ne doit pas être
traité comme un déchet domestique, mais doit être remis à un centre
de collecte spécialisé pour le recyclage des appareils électriques et
électroniques.
CONSEILS RELATIFS À L'ÉCONOMIE D'ÉNERGIE
Préchauffez le four uniquement si cela est spécifié dans le tableau de
cuisson ou dans votre recette. Utilisez des plaques de cuisson foncées,
laquées ou émaillées, car elles absorbent mieux la chaleur.
DÉCLARATIONS DE CONFORMITÉ
Cet appareil respecte les exigences d’écoconception du règlement
européen 66/2014 conformément à la norme européenne EN 60350-1.
Cet appareil respecte les exigences d’écoconception du règlement
européen 66/2014 conformément à la norme européenne EN 60350-2.
4
Page 5

DE
SICHERHEITSHINWEISE
DIESE MÜSSEN DURCHGELESEN UND
BEACHTET WERDEN
Diese Sicherheitsanweisungen vor dem Gebrauch
durchlesen. Diese Anweisungen zum
Nachschlagen leicht zugänglich aufbewahren.
In diesen Anweisungensowie auf demGerät selbst
werden wichtige Sicherheitshinweise angegeben,
die durchgelesen und stets beachtet werden
müssen. Der Hersteller übernimmt keine Haftung
fürdieNichtbeachtung dieserSicherheitshinweise,
für unsachgemäße Verwendung des Geräts oder
falsche Bedienungseinstellung.
WARNUNG: Das Gerät und die zugänglichen
Teile werden bei der Benutzung heiß. Das
Berühren heißer Teile ist unbedingt zu vermeiden.
Kinder unter 8 Jahren dürfen sich dem Gerät nur
unter Aufsicht nähern.
WARNUNG: Wenn die Kochfeldoberfläche
rissig ist, das Gerät nicht verwenden Stromschlaggefahr.
WARNUNG: Brandgefahr: Lagern Sie nichts auf
der Kochoberfläche.
VORSICHT: Das Garverfahren muss überwacht
werden. Ein kurzes Garverfahren muss
kontinuierlich überwacht werden.
WARNUNG: Das Kochfeld beim Garen mit Fett
oder Öl unbeaufsichtigt zu lassen kann gefährlich
sein - Brandgefahr. Versuchen Sie NIEMALS,
einen Brand mit Wasser zu löschen, sondern
schalten Sie das Gerät aus und decken Sie die
Flammen mit einem Deckel oder einer speziellen
Brandschutzdecke ab.
Benutzen Sie die Kochmulde nicht als
Arbeitsfläche oder Ablage. Kleidung oder andere
brennbare Materialien vom Gerät fernhalten, bis
alle Komponenten vollständig abgekühlt sind Brandgefahr.
Babys und Kleinkinder (0-3 Jahre) müssen vom
Gerät fern gehalten werden. Jüngere Kinder (3-8
Jahre) müssen vom Gerät fern gehalten werden,
es sei denn, sie werden ständig beaufsichtigt.
Dieses Gerät darf von Kindern ab 8 Jahren
sowie Personen mit herabgesetzten physischen,
sensorischen oder geistigen Fähigkeiten und
Mangel an Erfahrung und Kenntnissen nur unter
Aufsicht oder nach ausreichender Einweisung
durch eine für ihre Sicherheit verantwortliche
Person verwendet werden. Kinder dürfen nicht
mit dem Gerät spielen. Die Reinigung und Pflege
des Geräts darf von Kindern nicht ohne Aufsicht
durchgeführt werden.
WARNUNG: Das Gerät und die zugänglichen
Teile werden bei der Benutzung heiß. Das
Berühren heißer Teile ist unbedingt zu vermeiden.
Kinder unter 8 Jahren dürfen sich dem Gerät nur
unter Aufsicht nähern.
Lassen Sie das Gerät während des Dörrens
von Speisen niemals unbeaufsichtigt. Eignet
sich das Gerät für die Verwendung von Sonden,
ausschließlich für diesen Ofen empfohlene
Temperatursonden verwenden - Brandgefahr.
Kleidung oder andere brennbare Materialien
vom Gerät fernhalten, bis alle Komponenten
vollständig abgekühlt sind - Brandgefahr. Beim
Garen von fett- oder ölhaltigen Speisen
oder bei Zugabe von alkoholischen Getränken
besonders wachsam sein - Brandgefahr. Zum
Entnehmen von Töpfen und Zubehörteilen immer
Schutzhandschuhe verwenden. Nach Ende des
Garens die Tür vorsichtig öffnen, damit heißer
Dampf langsam entweichen kann, bevor in den
Backofen gelangt wird - Verbrennungsgefahr. Die
Warmluftklappen an der Vorderseite des Ofens
nicht abdecken - Brandgefahr.
Vorsichtig vorgehen, wenn die Ofentür
geöffnet oder heruntergeklappt ist, um zu
vermeiden, dass sie daran stoßen.
ZULÄSSIGE NUTZUNG
VORSICHT: Das Gerät ist nicht für den Betrieb
mit einer externen Schaltvorrichtung, z. B.
einem Timer oder einer separaten Fernbedienung,
ausgelegt.
Dieses Gerät ist für Haushaltsanwendungen
und ähnliche Anwendungen konzipiert, zum
Beispiel: Mitarbeiterküchen im Einzelhandel,
in Büros oder in anderen Arbeitsbereichen;
Gutshäuser; von Kunden in Hotels,
Motels, Frühstückspensionen und anderen
Wohneinrichtungen.
JeglicheandereArtderNutzung(z.B. Aufheizen
von Räumen) ist untersagt.
Dieses Gerät ist nicht für den professionellen
Gebrauch ausgelegt. Das Gerät ist nicht für die
Benutzung im Freien geeignet.
Keine explosiven oder entzündbaren Stoffe
(z.B. Benzin oder Sprühdosen) in dem oder in der
Nähe des Gerätes lagern - Brandgefahr.
INSTALLATION
Das Gerät muss von zwei oder mehr
Personen gehandhabt und aufgestellt werden
– Verletzungsgefahr. Schutzhandschuhe zum
Auspacken und zur Installation des Geräts
verwenden – Schnittgefahr.
Die Installation, einschließlich der
Wasserversorgung (falls vorhanden) und
elektrische Anschlüsse und Reparaturen müssen
von einem qualifizierten Techniker durchgeführt
werden. Reparieren Sie das Gerät nicht selbst
und tauschen Sie keine Teile aus, wenn dies
vom Bedienungshandbuch nicht ausdrücklich
vorgesehen ist. Kinder vom Installationsort
fern halten. Prüfen Sie das Gerät nach
dem Auspacken auf Transportschäden. Bei
auftretenden Problemen wenden Sie sich bitte
an Ihren Händler oder den Kundenservice.
Nach der Installation müssen Verpackungsabfälle
5
Page 6

(Kunststoff, Styroporteile usw.) außerhalb
der Reichweite von Kindern aufbewahrt
werden - Erstickungsgefahr. Das Gerät vor
Installationsarbeiten von der Stromversorgung
trennen - Stromschlaggefahr. Während der
Installation sicherstellen, das Netzkabel nicht mit
dem Gerät selbst zu beschädigen - Brand- oder
Stromschlaggefahr. Das Gerät erst starten, wenn
die Installationsarbeiten abgeschlossen sind.
Das Gerät erst unmittelbar vor der Installation von
der Polystyrolunterlage nehmen.
Das Gerät nicht hinter einer dekorativen Tür
installieren – Brandgefahr.
Wenn der Herd auf einen Sockel
gestellt wird, muss er nivelliert und
mit der mitgelieferten Haltekette an
der Wand befestigt werden, um ein
Herunterrutschen des Geräts vom Sockel
zu vermeiden.
WARNUNG: Um das Gerät vor dem
Kippen zu schützen, ist die mitgelieferte
Haltekette zu installieren. Siehe
Installationsanweisungen.
HINWEISE ZUR ELEKTRIK
Das Typenschild befindet sich an der
Vorderkante des Backofens (bei offener Tür
sichtbar).
Es muss gemäß den Verdrahtungsregeln
möglich sein, den Netzstecker des Gerätes zu
ziehen, oder es mit einem Trennschalter, welcher
der Steckdose vorgeschaltet ist, auszuschalten.
Das Gerät muss im Einklang mit den nationalen
elektrischen Sicherheitsbestimmungen geerdet
sein.
Verwenden Sie keine Verlängerungskabel,
Mehrfachstecker oder Adapter. Nach der
Installation dürfen Strom führende Teile für den
Benutzer nicht mehr zugänglich sein. Das Gerät
nicht bedienen, wenn Sie nasse Hände haben oder
barfuß sind. Das Gerät nicht in Betrieb nehmen,
wenn das Netzkabel oder der Stecker beschädigt
ist, wenn es nicht einwandfrei funktioniert,
herunter gefallen ist oder in irgendeiner Weise
beschädigt wurde.
Wenn das Netzkabel beschädigt ist, muss
es aus Sicherheitsgründen vom Hersteller, von
seinem Kundendienstvertreter oder einer ähnlich
qualifizierten Fachkraft mit einem identischen
Kabel ersetzt werden - Stromschlaggefahr.
Wenn das Netzkabel ausgetauscht
werden muss, einen autorisierten Kundendienst
kontaktieren.
WARNUNG: Stellen Sie vor Austausch der
Lampe sicher, dass das Gerät ausgeschaltet ist, es
besteht sonst die Gefahr eines Stromschlags.
REINIGUNG UND PFLEGE
WARNUNG: Vor der Durchführung von
Wartungsarbeiten, sicherstellen, dass das Gerät
ausgeschaltet und von der Stromversorgung
getrennt ist Verwenden Sie niemals Dampfreiniger
- Stromschlaggefahr.
Keine Scheuermittel oder Metallschaber
verwenden, um die Glasoberfläche in der Tür
zu reinigen. Hierbei kann die Oberfläche verkratzt
werden, was zu Glasbruch führen kann.
Verwenden Sie keine Scheuermittel oder
korrosiven Produkte, Reinigungsmittel auf
Chlorbasis oder Topfreiniger.
Vor dem Reinigen oder dem Ausführen von
Wartungsarbeiten sicherstellen, dass das Gerät
abgekühlt ist. - Verbrennungsgefahr.
WARNUNG: Das Gerät vor dem Austausch der
Lampe ausschalten - Stromschlaggefahr.
ENTSORGUNG VON VERPACKUNGSMATERIALIEN
Das Verpackungsmaterial ist zu 100 % wiederverwertbar und trägt das
Recycling-Symbol . Werfen Sie das Verpackungsmaterial deshalb
nicht einfach weg, sondern entsorgen Sie es gemäß den geltenden
örtlichen Vorschriften.
ENTSORGUNG VON HAUSHALTSGERÄTEN
Dieses Gerät wurde aus recycelbaren oder wiederverwendbaren
Werkstoffen hergestellt. Entsorgen Sie das Gerät im Einklang
mit den lokalen Vorschriften zur Abfallbeseitigung. Genauere
Informationen zu Behandlung, Entsorgung und Recycling von
elektrischen Haushaltsgeräten sind bei der örtlichen Behörde, der
Müllabfuhr oder dem Händler erhältlich, bei dem das Gerät gekauft
wurde. Dieses Gerät ist gemäß der Europäischen Richtlinie 2012/19/EU
für Elektro- und Elektronik-Altgeräte (WEEE) gekennzeichnet. Durch
Ihren Beitrag zur korrekten Entsorgung dieses Produkts schützen Sie
die Umwelt und die Gesundheit Ihrer Mitmenschen. Das Symbol
auf dem Gerät bzw. auf dem beiliegenden Informationsmaterial weist
darauf hin, dass dieses Gerät kein normaler Haushaltsabfall ist, sondern in
einer Sammelstelle für Elektro- und Elektronik-Altgeräte entsorgt werden
muss.
ENERGIESPARTIPPS
Heizen Sie den Backofen nur dann vor, wenn es in der Gartabelle oder
Ihrem Rezept so angegeben ist. Verwenden Sie dunkel lackierte oder
emaillierte Backbleche, da diese die Hitze besser aufnehmen.
KONFORMITÄTSERKLÄRUNG
Dieses Gerät erfüllt die Ökodesign-Anforderungen der EU-Verordnung
Nr. 66/2014 in Übereinstimmung mit der Europäischen Norm EN
60350-1.
Dieses Gerät erfüllt die Ökodesign-Anforderungen der EU-Verordnung
Nr. 66/2014 in Übereinstimmung mit der Europäischen Norm EN
60350-2.
6
Page 7

IT
NORME DI SICUREZZA
IMPORTANTE:DA LEGGERE E OSSERVARE
Prima di utilizzare l'apparecchio, leggere le
seguenti norme di sicurezza. Conservarle per
eventuali consultazioni successive.
Questo manuale e l'apparecchio sono corredati da
importanti avvertenze di sicurezza, da leggere e
rispettare sempre. Il fabbricante declina qualsiasi
responsabilità che derivi dalla mancata osservanza
delle presenti istruzioni di sicurezza, da usi
impropri dell'apparecchio o da errate impostazioni
dei comandi.
AVVERTENZA: L'apparecchio e i suoi
componenti accessibili possono diventare molto
caldi durante l'uso. Fareattenzionea nontoccare le
resistenze. Tenere lontani i bambini di età inferiore
agli 8 anni, a meno che non siano costantemente
sorvegliati.
AVVERTENZA: Se la superficie del piano cottura
è incrinata, non utilizzare l'apparecchio per evitare
il rischio di folgorazione.
AVVERTENZA: Pericolo di incendio: non
appoggiare oggetti sulle superfici di cottura.
ATTENZIONE: Il processo di cottura deve essere
sorvegliato. I processi di cottura brevi richiedono
una supervisione continua.
AVVERTENZA: La mancata sorveglianza del
piano di cottura durante preparazioni con l'uso
di grasso e olio può essere pericolosa e generare
incendi. Non tentare MAI di spegnere le fiamme
con l'acqua. Al contrario, spegnere l'apparecchio
e soffocare le fiamme con un coperchio o una
coperta ignifuga.
Non utilizzare il piano di cottura come
superficie di lavoro o di appoggio. Non avvicinare
all'apparecchio stoffe o altri materiali infiammabili
fino a che tutti i componenti non si siano
completamente raffreddati per evitare il rischio
di incendi.
Tenere l'apparecchio fuori dalla portata dei
bambini di età inferiore a 3 anni. Senza la
sorveglianza costante di un adulto tenere anche
l'apparecchio fuori dalla portata dei bambini di età
compresa tra 3 e 8 anni. I bambini di età superiore
agli 8 anni, le persone con ridotte capacità
fisiche, sensoriali o mentali e le persone che non
abbianoesperienza o conoscenzadell'apparecchio
potranno utilizzarlo solo sotto sorveglianza, o
quando siano state istruite sull'utilizzo sicuro
dell'apparecchio e siano consapevoli dei rischi del
suo utilizzo. I bambini non devono giocare
con l’apparecchio. I bambini non devono
eseguire operazioni di pulizia e manutenzione
dell'apparecchio senza la sorveglianza di un
adulto.
AVVERTENZA: L'apparecchio e i suoi
componenti accessibili possono diventare molto
caldi durante l'uso. Fareattenzionea nontoccare le
resistenze. Tenere lontani i bambini di età inferiore
agli 8 anni, a meno che non siano costantemente
sorvegliati
Non lasciare mai l'apparecchio incustodito
durante l'essiccazione degli alimenti. Se
l'apparecchio è predisposto per l'uso di una
termosonda, usare solo i tipi di termosonda
raccomandati per questo forno per evitare il
rischio di incendi.
Non avvicinare all'apparecchio stoffe o altri
materiali infiammabili fino a che tutti i componenti
nonsi siano completamenteraffreddati,per evitare
il rischio di incendi. Sorvegliare continuamente
la cottura degli alimenti ricchi di grasso o olio o
le cotture con aggiunta di alcolici, perché queste
preparazioni comportano un rischio di incendio.
Usare guanti da forno per estrarre tegami e
accessori. Alla fine della cottura, aprire lo sportello
con cautela, lasciando defluire gradualmente l'aria
o il vapore prima di accedere al vano del forno per
evitare possibili rischi di ustioni. Non ostruire le
aperture di sfiato dell'aria calda sul lato anteriore
del forno per evitare il rischio di incendi.
Porre la dovuta attenzione con la porta del
forno in posizione abbassata o di apertura, per
evitare di urtarla.
USO CONSENTITO
ATTENZIONE: l'apparecchio non è destinato ad
essere messo in funzione mediante un dispositivo
esterno o un sistema di comando a distanza
separato.
L'apparecchio è destinato all'uso domestico
e ad applicazioni analoghe, quali: aree di cucina
per il personale di negozi, uffici e altri contesti
lavorativi; agriturismi; camere di hotel, motel, bed
& breakfast e altri ambienti residenziali.
Non sono consentiti altri usi (ad esempio, il
riscaldamento di ambienti).
Questo apparecchio non è destinato all'uso
professionale. Non utilizzare l'apparecchio
all'aperto.
Non conservare sostanze esplosive oppure
infiammabili (ad es. taniche di benzina o
bombolette spray) all'interno o in prossimità
dell'apparecchio, per evitare il pericolo di incendi.
INSTALLAZIONE
Per evitare il rischio di lesioni personali,
le operazioni di movimentazione e installazione
dell'apparecchio devono essere eseguite da
almeno due persone. Per le operazioni di
disimballaggio e installazione utilizzare i guanti
protettivi per non procurarsi tagli.
L'installazione, comprendente anche eventuali
raccordi per l'alimentazione idrica e i collegamenti
elettrici, e gli interventi di riparazione
devono essere eseguiti da personale qualificato.
Non riparare o sostituire qualsiasi parte
7
Page 8

dell'apparecchio se non espressamente richiesto
nel manuale d'uso. Tenere i bambini a distanza dal
luogo dell'installazione. Dopo aver disimballato
l'apparecchio, assicurarsi che non sia stato
danneggiato durante il trasporto. In caso di
problemi, contattare il rivenditore o il Servizio
Assistenza. A installazione completata, conservare
il materiale di imballaggio (parti in plastica,
polistirolo, ecc.) fuori della portata dei bambini
per evitare il rischio di soffocamento. Per evitare
rischi di scosse elettriche, prima di procedere
all'installazione scollegare l'apparecchio dalla rete
elettrica. Durante l'installazione, accertarsi che
l'apparecchio non possa danneggiare il cavo di
alimentazione e causare così rischi di scosse
elettriche. Attivare l'apparecchio solo dopo avere
completato la procedura di installazione.
Non rimuovere l'apparecchio dalla base di
polistirolo fino al momento dell'installazione.
Non installare l'apparecchio dietro un pannello
decorativo - possibile rischio di incendio.
Se l'apparecchio è in appoggio su una
base, deve essere livellato e fissato alla
parete per mezzo della catena di tenuta
in dotazione, per impedire che possa
scivolare dalla base.
AVVERTENZA: per impedire il ribaltamento
dell'apparecchio è necessario installare
la catena di tenuta in dotazione. Fare
riferimento alle istruzioni di installazione.
AVVERTENZE ELETTRICHE
La targhetta matricola si trova sul bordo
anteriore del forno (visibile a porta aperta).
Deve essere possibile scollegare l'apparecchio
dalla rete elettrica disinserendo la spina, se questa
è accessibile, o tramite un interruttore multipolare
installato a monte della presa nel rispetto dei
regolamenti elettrici vigenti; inoltre, l'apparecchio
deve essere messo a terra in conformità alle norme
di sicurezza elettrica nazionali.
Non utilizzare cavi di prolunga, prese multiple
o adattatori. Al termine dell'installazione,
i componenti elettrici non dovranno più
essere accessibili all'utilizzatore. Non utilizzare
l'apparecchio quando si è bagnati oppure a piedi
nudi. Non accendere l'apparecchio se il cavo
di alimentazione o la spina sono danneggiati,
se si osservano anomalie di funzionamento o se
l'apparecchio è caduto o è stato danneggiato.
Se il cavo di alimentazione è danneggiato,
deve essere sostituito con uno dello stesso tipo dal
produttore, da un centro di assistenza autorizzato
o da un tecnico qualificato per evitare situazioni di
pericolo o rischi di scosse elettriche.
Se il cavo di alimentazione deve essere
sostituito, rivolgersi a un centro di assistenza
autorizzato.
AVVERTENZA: Per evitare il rischio di scossa
elettrica, assicurarsi che l'apparecchio sia spento
prima di sostituire la lampadina.
PULIZIA E MANUTENZIONE
ATTENZIONE: Per evitare rischi di folgorazione,
prima di qualsiasi intervento di manutenzione
accertarsi che l'apparecchio sia spento e scollegato
dall'alimentazione elettrica; inoltre, non usare in
nessun caso pulitrici a getto di vapore.
Non utilizzare detergenti abrasivi o raschietti
metallici per pulire il vetro della porta del forno,
in quanto potrebbero graffiare la superficie con il
rischio di rottura del vetro.
Non utilizzare prodotti abrasivi o corrosivi,
prodotti a base di cloro o pagliette.
Prima di eseguire qualsiasi operazione,
assicurarsi che l’apparecchio si sia raffreddato.
- Rischio di ustioni.
AVVERTENZA: Spegnere l'apparecchio prima
di sostituire la lampadina, per evitare il rischio di
scosse elettriche.
SMALTIMENTO DEL MATERIALE DI IMBALLAGGIO
Il materiale di imballaggio è riciclabile al 100% ed è contrassegnato
dal simbolo del riciclaggio . Le varie parti dell'imballaggio devono
pertanto essere smaltite responsabilmente e in stretta osservanza delle
norme stabilite dalle autorità locali.
SMALTIMENTO DEGLI ELETTRODOMESTICI
Questoprodotto è stato fabbricatocon materiale riciclabile oriutilizzabile.
Smaltire il prodotto rispettando le normative locali in materia. Per
ulteriori informazioni sul trattamento, il recupero e il riciclaggio degli
elettrodomestici, contattare l'ufficio locale competente, il servizio di
raccolta dei rifiuti domestici o il negozio presso il quale il prodotto è stato
acquistato. Questo apparecchio è contrassegnato in conformità alla
Direttiva Europea 2012/19/UE sui rifiuti di apparecchiature elettriche ed
elettroniche (RAEE). Provvedendo al corretto smaltimento del prodotto
si contribuirà ad evitare potenziali conseguenze negative sull'ambiente
e sulla salute umana. Il simbolo
di accompagnamento indica che questo prodotto non deve essere
trattato come rifiuto domestico, ma deve essere consegnato presso
l'idoneo punto di raccolta per il riciclaggio di apparecchiature elettriche
ed elettroniche.
CONSIGLI PER IL RISPARMIO ENERGETICO
Preriscaldare il forno solo se specificato nella tabella di cottura o nella
ricetta. Usare teglie laccate o smaltate in colori scuri, in quanto assorbono
il calore in modo più efficiente.
DICHIARAZIONI DI CONFORMITÀ
Questoapparecchio soddisfa i requisiti del regolamento europeo66/2014
in materia di progettazione ecocompatibile in conformità alla norma
europea EN 60350-1.
Questoapparecchio soddisfa i requisiti del regolamento europeo66/2014
in materia di progettazione ecocompatibile in conformità alla norma
europea EN 60350-2.
sul prodotto o sulla documentazione
8
Page 9

EN
SAFETY INSTRUCTIONS
IMPORTANT TO BE READ AND OBSERVED
Before using the appliance, read these safety
instructions. Keep them nearby for future
reference.
These instructions and the appliance itself provide
important safety warnings, to be observed at all
times. The manufacturer declines any liability for
failure to observe these safety instructions, for
inappropriate use of the appliance or incorrect
setting of controls.
WARNING: The appliance and its accessible
parts become hot during use. Care shoul be taken
to avoid touching heating elements. Children less
than 8 years of age must be kept away unless
continuously supervised.
WARNING : If the hob surface is cracked, do not
use the appliance – risk of electric shock.
WARNING : Danger of fire : Do not store items
on the cooking surfaces.
CAUTION : The cooking process has to be
supervised. A short cooking process has to be
supervised continuously.
WARNING: Leaving the hob unattended when
cooking with fat or oil can be dangerous – risk of
fire. NEVER try to extinguish a fire with water, but
switch off the appliance and then cover the flames
e.g. with a lid or a fire blanket.
Do not use the hob as a work surface or support.
Keep clothes or other flammable materials away
from the appliance, unitl all the components have
cooled down completely – risk of fire.
Very young children (0-3 years) should be kept
away from the appliance. Young children (3-8
years) should be kept away from the appliance
unless continuously supervised. Children from 8
years old and above and persons with reduced
physical, sensory or mental capabilities or lack of
experience and knowledge can use this appliance
only if they are supervised or have been given
instructions on safe use and understand the
hazards involved. Children must not play with the
appliance. Cleaning and user maintenance must
not be carried out by children without supervision.
WARNING: The appliance and its accessible
parts become hot during use. Care should be taken
to avoid touching heating elements. Children less
than 8 years of age must be kept away unless
continuously supervised
Never leave the appliance unattended during
food drying. If the appliance is suitable for
probe usage, only use a temperature probe
recommended for this oven - risk of fire.
Keep clothes or other flammable materials
away from the appliance, until all the components
have cooled down completely - risk of fire. Always
be vigilant when cooking foods rich in fat, oil or
when adding alcoholic beverages - risk of fire. Use
oven gloves to remove pans and accessories. At
the end of cooking, open the door with caution,
allowing hot air or steam to escape gradually
before accessing the cavity - risk of burns. Do not
obstruct hot air vents at the front of the oven - risk
of fire.
Exercise caution when the oven door is in the
open or down position, to avoid hitting the door.
PERMITTED USE
CAUTION: The appliance is not intended to
be operated by means of an external switching
device, such as a timer, or separate remote
controlled system.
This appliance is intended to be used in
household and similar applications such as: staff
kitchen areas in shops, offices and other working
environments; farm houses; by clients in hotels,
motels, bed & breakfast and other residential
environments.
No other useis permitted (e.g. heating rooms).
This appliance is not for professional use. Do
not use the appliance outdoors.
Do not store explosive or flammable
substances (e.g. gasoline or aerosol cans) inside or
near the appliance - risk of fire.
INSTALLATION
The appliance must be handled and installed
by two or more persons - risk of injury. Use
protective gloves to unpack and install - risk of
cuts.
Installation, including water supply (if any),
electrical connections and repairs must be carried
out by a qualified technician. Do not repair or
replace any part of the applianceunless specifically
stated in the user manual. Keepchildren away from
the installation site. Afterunpacking the appliance,
make sure that it has not been damaged during
transport. In the event of problems, contact the
dealer or your nearest Aftersales Service. Once
installed, packaging waste (plastic, styrofoam
parts etc.) must be stored out of reach of
children - risk of suffocation. The appliance must
be disconnected from the power supply before
any installation operation - risk of electric shock.
During installation, make sure the appliance does
not damage the power cable - risk of fire or electric
shock. Only activate the appliance when the
installation has been completed.
Do not remove the appliance from its polystyrene
foam base until the time of installation.
Donotinstall the appliance behind a decorative
door - risk of fire.
if the range is placed on a base, it must
be leveled and fixed to the wall by the
retention chain provided, to prevent the
appliance slipping from the base.
9
Page 10

WARNING: In order to prevent the
appliance from tipping, the retention chain
provided must be installed. Refer to the
instructions for installation.
ELECTRICAL WARNINGS
The rating plate is on the front edge of the
oven (visible when the door is open).
It must bepossible to disconnect the appliance
from the power supply by unplugging it if
plug is accessible, or by a multi-pole switch
installed upstream of the socket in accordance
with the wiring rules and the appliance must
be earthed in conformity with national electrical
safety standards.
Do not use extension leads, multiple sockets
or adapters. The electrical components must not
be accessible to the user after installation. Do not
use the appliance when you are wet or barefoot.
Do not operate this appliance if it has a damaged
power cable or plug, if it is not working properly,
or if it has been damaged or dropped.
If the supply cord is damaged, it must
be replaced with an identical one by the
manufacturer, its service agent or similarly
qualified persons in order to avoid a hazard risk of electric shock.
If the power cable needs to be replaced,
contact an authorized service center.
WARNING: Ensure that the appliance is
switched off before replacing the lamp to avoid
the possibility of electric shock.
CLEANING AND MAINTENANCE
WARNING: Ensure that the appliance is
switched off and disconnected from the power
supply before performing any maintenance
operation; never use steam cleaning equipment risk of electric shock.
Do not use harsh abrasive cleaners or metal
scrapers to clean the door glass since they can
scratch the surface, which may result in shattering
of the glass.
Do not use abrasive or corrosive products,
chlorine-based cleaners or pan scourers.
Make sure the appliance has cooled down
before cleaning or performing maintenance. - risk
of burns.
WARNING: Switch off the appliance before
replacing the lamp - risk of electric shock.
DISPOSAL OF PACKAGING MATERIALS
The packaging material is 100% recyclable and is marked with the
recycle symbol . The various parts of the packaging must therefore
be disposed of responsibly and in full compliance with local authority
regulations governing waste disposal.
DISPOSAL OF HOUSEHOLD APPLIANCES
This appliance is manufactured with recyclable or reusable materials.
Dispose of it in accordance with local waste disposal regulations.
For further information on the treatment, recovery and recycling
of household electrical appliances, contact your local authority, the
collection service for household waste or the store where you purchased
the appliance. This appliance is marked in compliance with European
Directive 2012/19/EU, Waste Electrical and Electronic Equipment (WEEE).
By ensuring this product is disposed of correctly, you will help prevent
negative consequences for the environment and human health. The
symbol
indicates that it should not be treated as domestic waste but must be
taken to an appropriate collection centre for the recycling of electrical
and electronic equipment.
on the product or on the accompanying documentation
ENERGY SAVING TIPS
Only preheat the oven if specified in the cooking table or your recipe. Use
dark lacquered or enamelled baking trays as they absorb heat better.
DECLARATIONS OF CONFORMITY
This appliance meets Ecodesign requirements of European Regulation
66/2014 in compliance with the European standard EN 60350-1.
This appliance meets Ecodesign requirements of European Regulation
66/2014 in compliance with the European standard EN 60350-2.
10
Page 11

GUIDE D'UTILISATION QUOTIDIENNE
Lire attentivement les Consignes de santé et de sécurité avant d'utiliser l'appareil.
DESCRIPTION DU PRODUIT
Plan de cuisson
1.
vitrocéramique
2.
Tableau de bord
3.
Support GRILLE
Support LECHEFRITE
4.
GLISSIERES
de coulissement
5.
niveau 5
niveau 4
6.
niveau 3
7.
8.
niveau 2
niveau 1
9.
10.
Pied de réglage
2
3
10
1
5
6
7
4
8
9
10
FR
PANNEAU DE COMMANDES
3
4
1
2
5
6
7
9
8
Manette de la plaque électrique
1.
Manette de la plaque électrique
2.
3.
Voyant lumineux thermostat
THERMOSTAT
4.
Lampe témoin
Manette du MINUTEUR
5.
6.
Manette PROGRAMMES
Manette de la plaque électrique
7.
8.
Manette de la plaque électrique
Voyant de fonctionnement de la plaque électrique
9.
11
Page 12

FR
Conseils d’installation
CARACTERISTIQUES TECHNIQUES
Tension et
fréquence
d'alimentation :
ÉTIQUETTE ÉNERGIE et
ÉCOCONCEPTION
voir plaquette signalétique
- Consommation énergie
convection naturelle.
Fonction four :
ECO
Pour les modèles équipés d’une grille de réduction,
n’utiliser cette dernière que pour le brûleur auxiliaire,
en cas d’utilisation de casseroles ayant moins de 12
cm de diamètre.
Utilisation du four
Lors de son premier allumage, faire fonctionner
le four à vide, porte fermée, pendant au moins une
heure en réglant la température à son maximum.
Puis éteindre le four, ouvrir la porte et aérer la pièce.
L’odeur qui se dégage est due à l’évaporation des
produits utilisés pour protéger le four.
Ne jamais poser d’objets à même la sole du four,
l’émail risque de s’abîmer.
1. Pour sélectionner le programme de cuisson
souhaité, tourner le bouton PROGRAMMES.
2. Choisir la température conseillée pour ce
programme ou celle qu’on préfère à l’aide du bouton
THERMOSTAT.
Un tableau de cuisson sert de guide et indique
notamment les températures conseillées pour
plusieurs préparations culinaires (voir tableau cuisson
au four).
*L’étiquette collée est à l’intérieur du portillon ou sur la
paroi intérieure gauche (visible après avoir sorti le tiroir
chauffe-plats).
Après avoir installé le câble d’alimentation, vissez
Après avoir installé le câble d’alimentation, vissez
Après avoir installé le câble d’alimentation, vissez
le couvercle métallique à l’aide de trois vis.
le couvercle métallique à l’aide de trois vis.
le couvercle métallique à l’aide de trois vis.
En cours de cuisson, il est possible à tout moment de :
• modifier le programme de cuisson à l’aide du
bouton PROGRAMMES;
• modifier la température à l’aide du bouton
THERMOSTAT;
• interrompre la cuisson en ramenant le bouton
PROGRAMMES sur “0”.
Il faut toujours enfourner les plats sur la grille fournie
avec l’appareil.
Voyant THERMOSTAT
Allumé, il signale la montée en chaleur du four. Il
s’éteint dès que la température sélectionnée est
atteinte. Le voyant s’allume et s’éteint tour à tour pour
indiquer que le thermostat fonctionne et maintient la
température au degré près.
Eclairage du four
Pour l’allumer, amenez le bouton PROGRAMMES sur
une position autre que la position “0”. Il reste allumé
tant que le four est en marche. Si vous amenez le
bouton sur
résistance.
, la lampe s’allume sans activer aucune
12
Page 13

Programmes de cuisson
Pour tous les programmes, vous pouvez sélectionner
une température comprise entre 50°C et MAX., sauf
pour :
• GRIL et DOUBLE GRIL (il est conseillé dans ce cas
de sélectionner MAX.);
• DOUBLE GRIL VENTILE (il est conseillé de ne pas
dépasser 200°C).
Programme “Décongélation”
Le ventilateur situé à l’arrière du four fait circuler
l’air à température ambiante autour des aliments.
Cette fonction est indiquée pour décongeler tout
type d’aliment, et plus particulièrement les aliments
délicats qui craignent la chaleur tels que, par exemple
: les gâteaux glacés, les gâteaux garnis de crème
pâtissière ou de crème fouettée, les gâteaux aux
fruits. Le temps de décongélation est réduit environ
de moitié. Vous pouvez également utiliser la fonction
“Multicuisson” pour décongeler rapidement de la
viande, du poisson ou du pain, en sélectionnant une
température de 80°C -100°C.
Programme FOUR STATIQUE
sans utiliser le tournebroche.
Les cuissons GRIL, DOUBLE GRIL et DOUBLE GRIL
VENTILE doivent avoir lieu porte fermée.
En cas de cuisson en mode GRIL ou DOUBLE GRIL,
placez la grille au gradin 5 et la lèchefrite au gradin 1
pour récupérer les jus de cuisson. En cas de cuisson
en mode DOUBLE GRIL VENTILE, placez la grill au
gradin 2 ou 3 et la lèchefrite au gradin 1 pour récupérer
les jus de cuisson.
Mode ECO
Pour cuire les rôtis farcis et les filets de viande sur
une seule grille. Pour utiliser le cycle ÉCO et optimiser
ainsi la consommation d’énergie, la porte du four ne
doit pas être ouverte avant la fin de la cuisson.
Mode PRÉCHAUFFAGE RAPIDE
Pour préchauffer le four rapidement. Attendre la fin
du préchauffage avant de placer les aliments dans
le four, puis sélectionner la fonction de cuisson
préférée.
Cuisson simultanée sur plusieurs niveaux
Mise en marche des résistances de voûte et de sole.
Pour cette cuisson traditionnelle, ne cuisez que sur
un seul niveau pour avoir une meilleure diffusion de la
chaleur.
Programme FOUR VENTILE
Activation, à tour de rôle, de la résistance de sole et
de la résistance de voûte ainsi que de la turbine. La
chaleur est constante et bien répartie à l’intérieur du
four, l’air cuit et dore de façon uniforme en tous points.
Vous pouvez cuire au maximum sur deux niveaux en
même temps.
Programme DOUBLE GRIL
Un gril plus grand que d’habitude et au design novateur
qui augmente de 50% les performances de cuisson et
qui supprime les zones d’angle où la chaleur n’arrive pas.
Utilisez ce gril pour dorer de façon uniforme.
Programme DOUBLE GRIL VENTILE
Mise en marche de la résistance de voûte, de la
turbine et du tournebroche (si l’appareil en est équipé).
L’irradiation thermique unidirectionnelle s’ajoute au
brassage de l’air pour une répartition uniforme de
la chaleur dans l’enceinte du four. Plus de risques
de brûler vos aliments en surface et plus grande
pénétration de la chaleur. Très utile pour des grillades
rapides ou pour griller de grosses pièces de viande
S’il vous avez besoin de deux grilles, utilisez le
programme FOUR VENTILE
vous permet de cuire sur deux niveaux. Mieux vaut en
outre :
• ne pas utiliser les gradins 1 et 5 : ils sont
directement frappés par l’air chaud qui pourrait
brûler vos mets délicats.
• utilisez surtout les gradins 2 et 4 et placez au gradin 2
les plats qui exigent davantage de chaleur.
• en cas de cuisson simultanée de plats dont les
temps et les températures de cuisson varient,
choisissez une température intermédiaire entre les
deux conseillées (voir Tableau cuisson au four) et
enfournez les plats plus délicats au gradin 4. Sortez
du four, avant les autres, le plat dont la cuisson est
plus rapide.
• lors de la cuisson de pizza sur plusieurs niveaux à
une température de 220°C, mieux vaut préchauffer
le four pendant 15 minutes. Normalement, la cuisson
au gradin 4 exige davantage de temps : il est par
conséquent conseillé de sortir du four d’abord la
pizza placée au niveau inférieur et de laisser cuire
celle du gradin 4 quelques minutes de plus.
• Placez la lèchefrite en bas et la grille en haut.
car c’est le le seul qui
13
Page 14

ATTENTION Le
four est équipé d’un
système d’arrêts de
grilles qui permet
de les retirer sans
que ces dernières
sortent entièrement
du four.(1)
Pour sortir
complètement les
grilles il suffit, comme
illustré, de les soulever en les saisissant par l’avant et de
les tirer (2).
Niche inférieure*
Une niche ménagée
au-dessous du four
peut être utilisée
pour entreposer des
accessoires ou des
casseroles. Pour ouvrir
le volet, faites-le pivoter
vers le bas (voir gure).
Ne pas stocker de
matériel inflammable dans la niche du bas.
Les surfaces intérieures du tiroir (s’il y en a un)
peuvent devenir chaudes.
Tournebroche
Pour actionner le
tournebroche, procédez
comme suit :
1. placez la lèchefrite au
gradin 1;
2. placez le berceau au
gradin 4 et encastrez le
bout arrière de la broche
dans le trou situé au fond
de l’enceinte (voir gure);
3. pour actionner le
tournebroche, sélectionnez
PROGRAMMES.
à l’aide du bouton
14
Page 15

FR
Fonctionnement de
l’horloge/Bip minute
Icône
PROCÉDURE DE CUISSON
AFFICHAGE
Icône
AUTO
Bouton RÉDUCTION
DE LA DURÉE
Réglage de l’horloge !
L’horloge peut être réglée lorsque le four est éteint ou quand il est
allumé, à condition que le délai d’un cycle de cuisson n’ait pas déjà
été programmé. Après avoir branché l’appareil au réseau électrique
principal,
ou après une coupure électrique, les chiffres 00:00
de l’afcheur commencent à clignoter.
1. Appuyez simultanément sur les boutons « + » et « - ».
Les deux points entre les chiffres des heures et ceux des minutes
clignotent.
2. Utilisez les boutons « + » et « - » pour régler la durée ; si vous
appuyez et maintenez enfoncé l’un de ces boutons, l’écran va dé
ler entre les valeurs très rapidement, ainsi le réglage de la valeur
souhaitée sera facile et rapide.
Modication de la fréquence de l’avertisseur
La fréquence de l’avertisseur sonore peut être modiée en ap
puyant plusieurs fois sur « - ».
Réglage du bip minute
Cette fonction n’interrompt pas la cuisson et ne modie pas le four ;
elle est simplement utilisée pour activer l’avertisseur à la n de la durée
réglée
1. Appuyez plusieurs fois sur le bouton
et les trois chiffres à l’écran commencent à clignoter.
2. Utilisez les boutons « + » et « - » pour régler la durée souhaitée ;
si vous appuyez et maintenez enfoncé l’un de ces boutons, l’écran
va déler entre les valeurs très rapidement, ainsi le réglage de la
valeur sera facile et rapide.
3. Patientez pendant 5 secondes, si vous appuyez à nouveau sur le
bouton, l’écran afche la durée et lance le compte à rebours. À la
n de cette période, l’avertisseur retentit.
A
•• ••
M
Bouton
MODE
Icône MINUTERIE
Bouton
AUGMENTATION
DE LA DURÉE
jusqu’à ce que l’icône
Programmation de la cuisson
Sélectionnez un mode de cuisson avant la programmation.
Programmation de la durée de cuisson
1. Appuyez plusieurs fois sur le bouton jusqu’à ce que l’icône et
les chiffres DUR sur l’écran commencent à clignoter.
2. Utilisez les boutons « + » et « - » pour régler la durée souhaitée ;
si vous appuyez et maintenez enfoncé l’un de ces boutons, l’écran
va déler entre les valeurs très rapidement, ainsi le réglage de la
valeur sera facile et rapide.
3. Patientez pendant 5 secondes, après cela l’icône AUTO s’afche
sur l’écran.
4. À la n de la durée réglée, le four arrête la cuisson et un avertis
seur sonore retentit. Appuyez sur n’importe quel bouton pour arrêter l’avertisseur.
• Par exemple : il est 9 h 00 et vous programmez une durée de1
heure et 15 minutes. Le programme s’arrête automatiquement à
10 h 15.
Réglage de l’heure de n du mode de cuisson
1. Suivez les étapes 1 à 3 pour régler la durée tel que détaillé cidessus.
2. Ensuite, appuyez sur le bouton
(FIN) sur l’écran commence à clignoter
-
3. Utilisez les boutons « + » et « - » pour régler l’heure de n de la cui
sson ; si vous appuyez et maintenez enfoncé l’un de ces boutons,
l’écran va déler entre les valeurs très rapidement, ainsi le réglage
de la valeur souhaitée sera facile et rapide.
4. Patientez pendant 5 secondes ou appuyez à nouveau sur le bou
ton
Lors du début de la cuisson, le symbole
5. À la n de la durée réglée, le four arrête la cuisson et un avertisseur
• Par exemple : Il est 9 h 00 et une durée de 1 heure a été program
.
sonore retentit. Appuyez sur n’importe quel bouton pour l’arrêter.
La programmation est lancée lorsque l’icône AUTO s’allume
mée. 12 h 30 est programmée comme heure de n. Le programme
démarre automatiquement à 11 h 30.
Annulation d’un programme
Pour annuler un programme :
• appuyez sur le bouton
réglage que vous souhaitez annuler et les chiffres à l’écran com
mencent à clignoter. Appuyez sur le bouton « - » jusqu’à ce que les
chiffres 00:00 s’afchent à l’écran.
• Appuyez et maintenez enfoncé les boutons « + » et « - » ; ceci
annule tous les réglages sélectionnés auparavant, y compris les
réglages de la minuterie.
jusqu’à ce que l’icône corresponde au
jusqu’à ce que le texte END
est visible à l’écran.
-
-
-
-
-
15
Page 16
FR
Utilisation du plan de
cuisson vitrocéramique
La colle utilisée pour les joints laisse des traces de
graisse sur le verre. Nous conseillons de les éliminer
avant d’utiliser l’appareil à l’aide d’un produit d’entretien
non abrasif. Une odeur de caoutchouc peut se dégager
au cours des premières heures d’utilisation, elle
disparaîtra très vite.
Allumer et éteindre les foyers
Pour allumer un foyer, tourner le bouton correspondant
dans le sens des aiguilles d’une montre.
Pour l’éteindre, tourner le bouton dans le sens inverse
des aiguilles d’une montre jusqu’à “0”.
L’allumage du voyant FONCTIONNEMENT FOYERS
signale qu’au moins un foyer du plan de cuisson est
allumé.
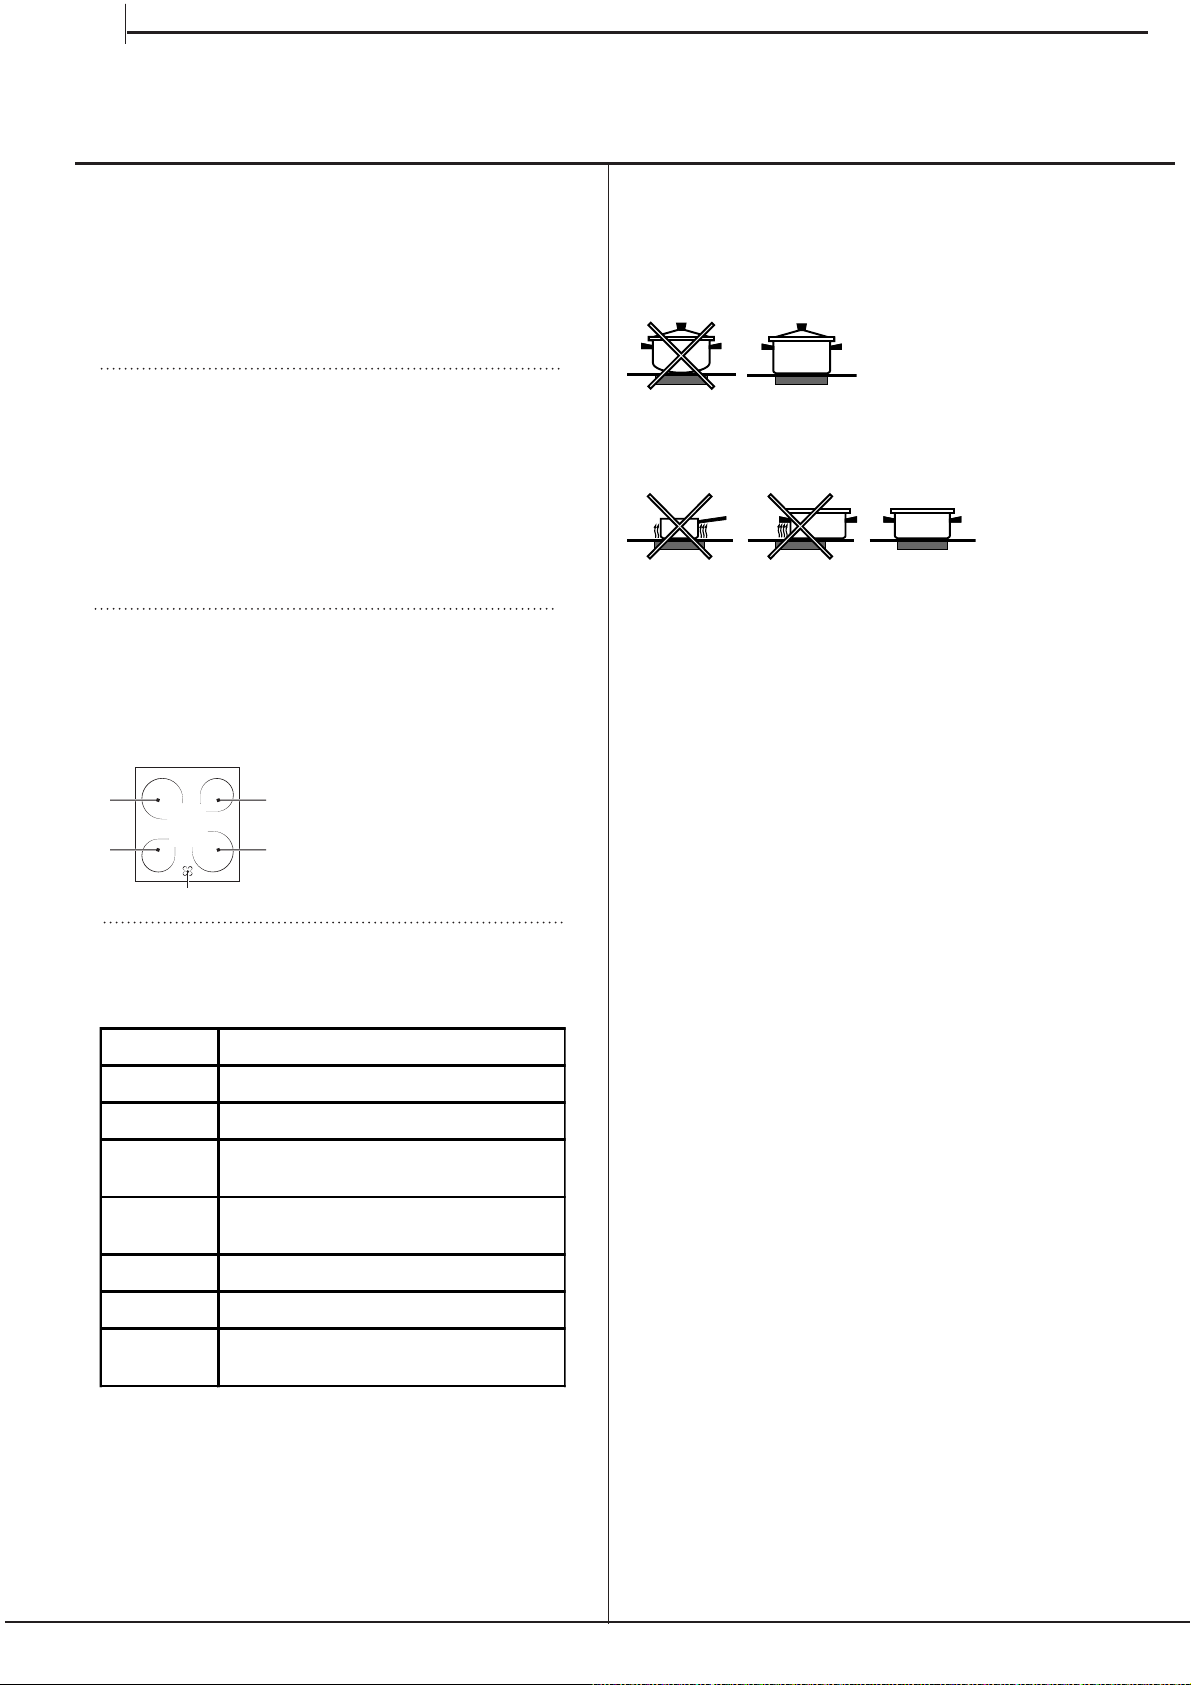
Les foyers
Le plan de cuisson est équipé d’éléments chauffants
électriques radiants. Ils deviennent rouges pendant leur
fonctionnement :
A. Foyers radiants
B. Voyant de chaleur
A
A
B
A
résiduelle : il signale une
température supérieure à 60°C
A
du foyer correspondant et ce
même après extinction de ce
dernier.
Conseils d’utilisation du plan de cuisson
• Utiliser des casseroles à fond plat et de forte épaisseur
pour qu’elles adhèrent parfaitement à la zone de
chauffe ;
• utiliser des casseroles dont le diamètre couvre
complètement la zone de chauffe de façon à exploiter
au mieux toute la chaleur disponible ;
• s’assurer que le fond des casseroles est parfaitement
sec et propre : l’adhérence aux foyers sera ainsi
optimale et tant les casseroles que le plan de cuisson
dureront plus longtemps ;
• éviter d’utiliser des casseroles qui sont aussi utilisées
sur les brûleurs à gaz : la concentration de chaleur des
brûleurs à gaz peut déformer le fond de la casserole
qui perd son adhérence ;
• ne jamais laisser un foyer allumé sans casserole, il
risque de s’endommager.
Foyers radiants
Les résistances circulaires des foyers radiants deviennent
rouges 10-20 secondes à peine après allumage.
Position Plaque normale ou rapide
0
1
2
3
4
5
6
Eteint
Cuisson de légumes verts, poissons
Cuisson de pommes de terre (à la
vapeur) soupes, pois chiches, haricots
Pour continuer la cuisson de grandes
quantités d'aliments, minestrone
Rôtir (moyen)
Rôtir (fort)
Rissoler ou rejoindre l'ébullition en peu
de temps
16
Page 17
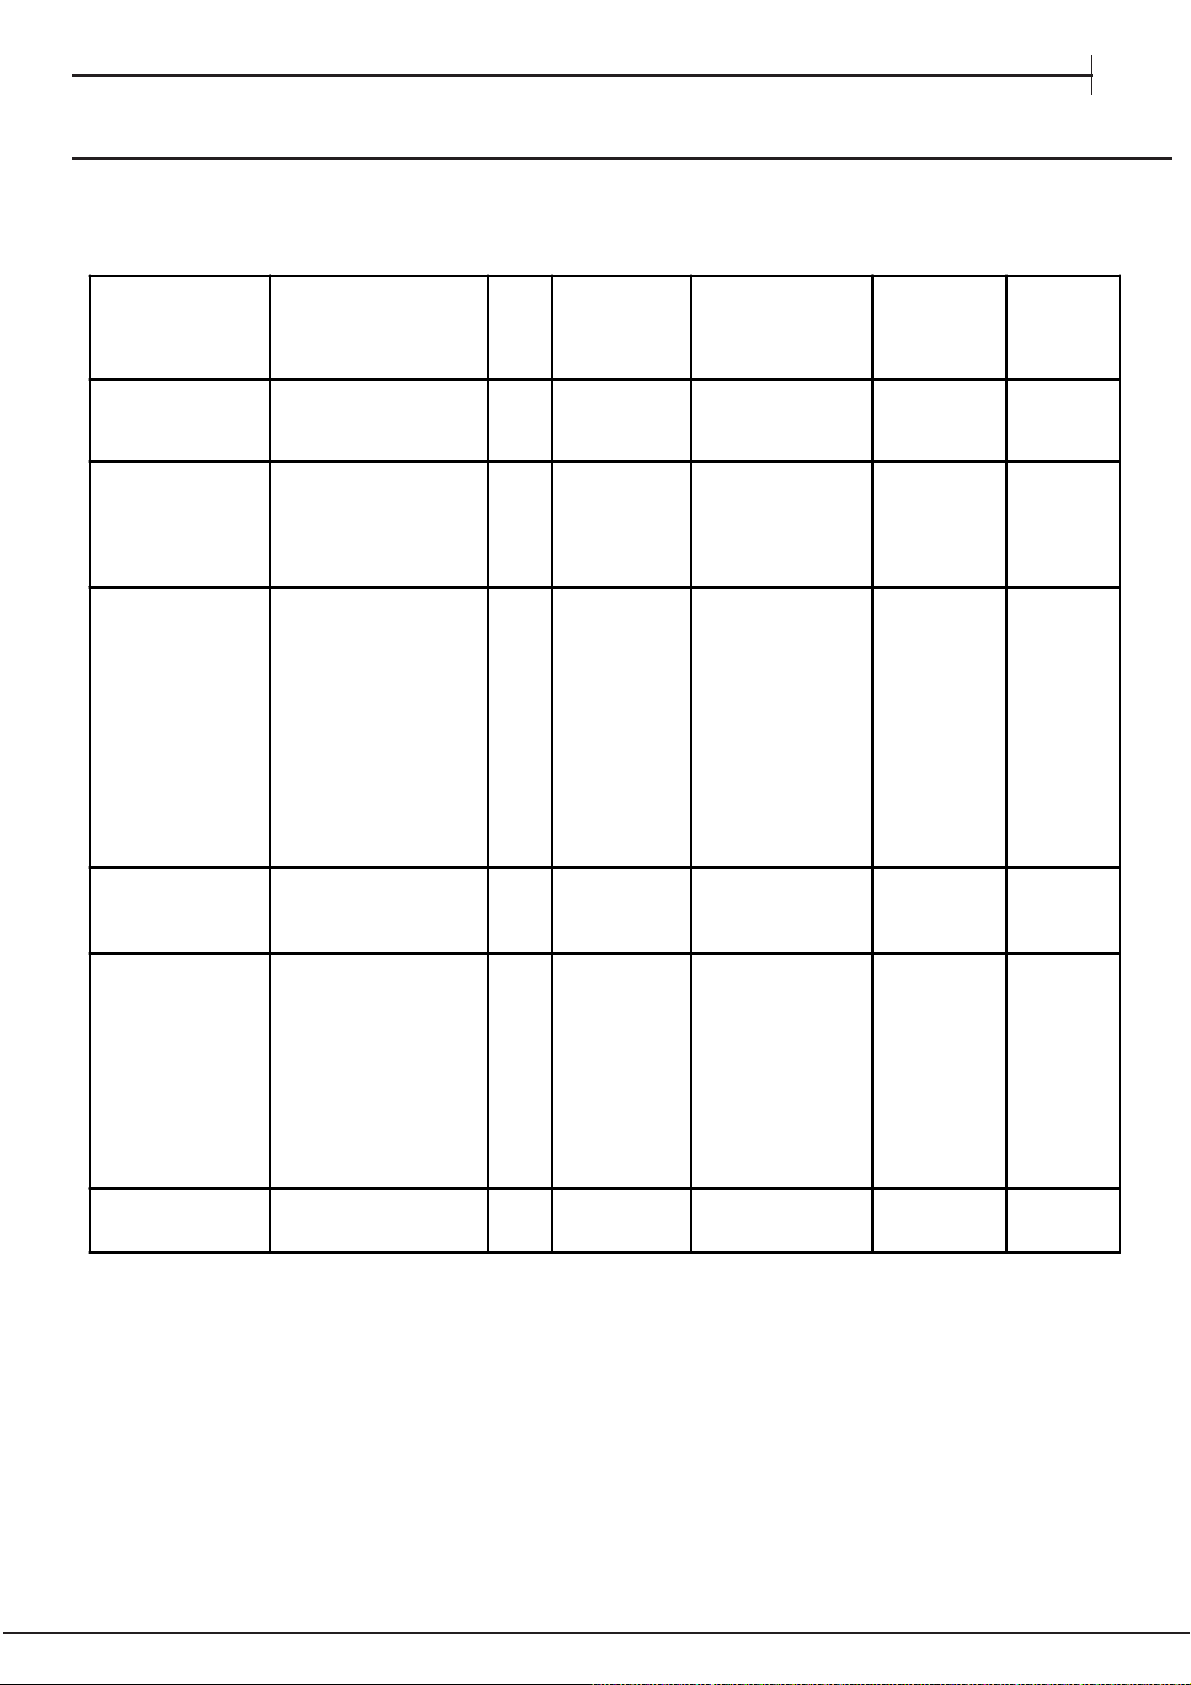
Tableau de cuisson
FR
Position du
sélecteur
Décongélation
Traditionnel
Ventilé
Résistance de
voûte
Aliments à cui re Poids
(Kg)
Décongeler t out type
d’aliment
Canard
Rôti de veau ou d
Rôti de porc
Biscuits (pâte br i s ée)
Tartes
Pizza (su 2 niveaux)
Lasagnes
Agneau
Poulet rôti + pommes de
terre
Maquereau
Cake
Choux (sur 2 niveaux)
Biscuits (sur 2 niveaux)
Génoise ( sur 1 niveau)
Génoise ( sur 2 n iveau x)
Quiches
Pour parfaire la cuisson - 3/4 15 220 -
e bœuf
1
1
1
1
1
1
1
1
1
1
0.5
0.5
0.5
1.0
1.5
Position
gradins en
partant du ba s
3
3
3
3
3
2-4
3
2
2-4
2
2
2-4
2-4
2
2-4
3
Temp s d e
préchauffage
(minutes)
15
15
15
15
15
15
10
10
10
10
10
10
10
10
10
15
Pos it i o n
sélecteur de
températures
200
200
200
180
180
220
200
180
180
180
170
190
180
170
170
200
Temp s d e
cuisson
(minutes)
65-75
70-75
70-80
15-20
30-35
15-20
30-35
50-60
60-75
30-35
40-50
20-25
10-15
15-20
20-25
25-30
Grill
Gril ventilé
N.B. : les temps de cuisson sont pur ement indica tifs et peuvent êtr e modif iés sel on l es goût s de chacun. En cas de cuisson
au gril ou au gril ventilé, placez toujours la lèchefrite sur le 1er gradin en partant du bas.
Soles et seiches
Brochettes de calmars et
crevettes
Tranches de colin
Légumes grillés
Côte de veau
Côtelettes
Hamburgers
Maquereaux
Croque-mons ieur
Poulet grillé
Seiches
1
1
1
1
1
1
1
1
n.° 4
1.5
1.5
4
4
4
3/4
4
4
4
4
4
3
3
5
5
5
5
5
5
5
5
5
5
5
Max
Max
Max
Max
Max
Max
Max
Max
Max
200
200
8-10
6-8
10
10-15
15-20
15-20
7-10
15-20
2-3
55-60
30-35
17
Page 18
FR
Nettoyage et entretien
Economies et respect de l’environnement
• Pour vos cuissons au Gratin, nous vous conseillons
de garder la porte du four fermée : Vous obtiendrez
de meilleurs résultats tout en faisant de sensibles
économies d’énergie (10% environ).
• Évitez, dans la mesure du possible, de préchauffer
le four et veuillez toujours le remplir. Ouvrez le moins
possible la porte de votre four, car chaque ouverture
laisse échapper la chaleur. Pour faire des économies
considérables d’énergie, éteignez le four cinq à dix
minutes avant la fin du temps de cuisson programmé
et utilisez la chaleur dégagée par le four.
• Gardez les joints propres et bien rangés afin d’éviter
toute perte d’énergie par la porte.
• Si vous avez souscrit un plan tarifaire particulier
auprès de la compagnie d’électricité, vous pouvez
économiser en faisant fonctionner votre appareil
lorsque l’énergie vous revient moins chère.
• La base de votre casserole ou de votre poêle doit
couvrir la plaque chauffante. Si elle est plus petite,
une quantité précieuse d’énergie sera perdue et
les casseroles qui débordent laisseront des résidus
incrustés qui peuvent être difficiles à enlever.
• Faites cuire vos aliments dans des casseroles ou des
poêles à couvercle et utilisez le moins d’eau possible.
Faire cuire les aliments dans des casseroles ouvertes
augmente considérablement la consommation
d’énergie.
• Utilisez exclusivement des casseroles et poêles à
fond plat.
• Si vous cuisinez un aliment qui nécessite beaucoup
de temps, il est préférable d’utiliser un autocuiseur
qui est deux fois plus rapide et économise un tiers
de l’énergie.
Mise hors tension
Avant toute opération de nettoyage ou d’entretien coupez
l’alimentation électrique de l’appareil.
Nettoyage du plan de cuisson
vitrocéramique
Ne jamais utiliser de détergents abrasifs ou corrosifs,
tels que des bombes aérosols pour grilloirs et fours, des
détacheurs et dérouilleurs, des poudres à récurer ou
des éponges à surface abrasive : ils risquent de rayer
irrémédiablement la surface.
• Pour un entretien courant, passer une éponge humide
sur la surface de la table et essuyer avec du papier
essuie-tout.
• Si la table est sale, frotter avec un produit d’entretien
adapté au verre vitrocéramique, rincer et essuyer.
• Pour enlever les salissures en relief, utiliser un grattoir
spécial (pas fourni avec l’appareil). Intervenir dès que
possible, ne pas attendre que l’appareil ait refroidi afin
d’éviter toute incrustation des salissures. L’utilisation
d’une éponge en fil d’acier inoxydable, spéciale verre
vitrocéramique, imprégnée d’eau savonneuse donne
d’excellents résultats.
• Tout objet, matière plastique ou sucre ayant
accidentellement fondu sur la table de cuisson doit être
aussitôt enlevé à l’aide du grattoir tant que la surface
est encore chaude.
• Une fois que la table est propre, elle peut être traitée
WWW
Les caractéristiques complètes de l’appareil, incluant les taux d’efficacité énergétique, peuvent être
téléchargées de notre site Web
18
www.indesit.comwww.indesit.comwww.indesit.comwww.indesit.com
avec un produit d’entretien et de protection spécial :
celui-ci forme un film invisible qui protège la surface en
cas de débordement accidentel. Opérer de préférence
quand l’appareil est tiède ou froid.
• Prendre soin de toujours bien rincer à l’eau claire et
d’essuyer la table : les résidus des produits pourraient
en effet s’incruster lors d’une prochaine cuisson.
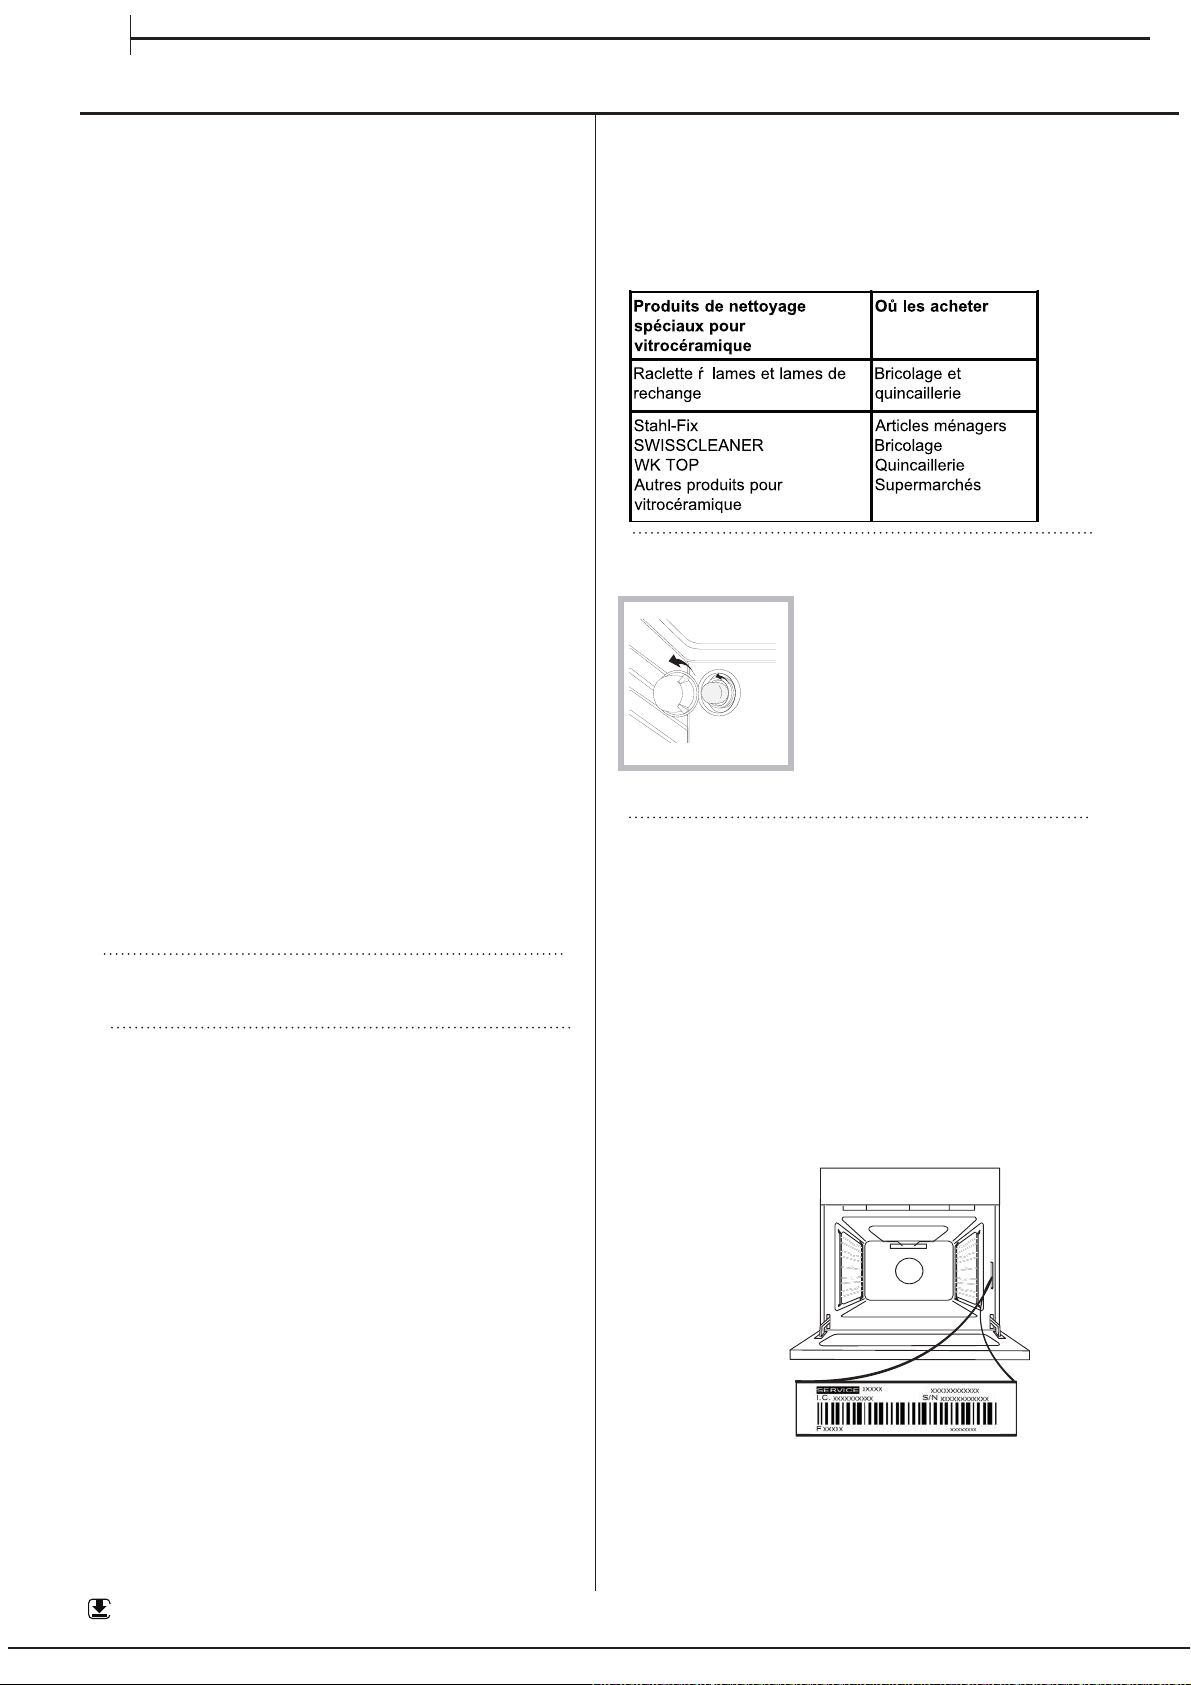
Remplacement de l’ampoule d’éclairage
du four
1. Débranchez le four, enlevez le
couvercle en verre du logement
de la lampe (voir figure).
2. Dévissez l’ampoule et
remplacez-la par une autre de
même type : tension 230 V,
puissance 25 W, culot E 14.
3. Remontez le couvercle et
rebranchez le four au réseau électrique.
Ne pas utiliser la lampe du four comme éclairage
de la pièce.
Pour obtenir de l'aide, appelez le numéro disponible
dans le livret de garantie fourni avec l'appareil, ou
suivez les directives sur notre site Web. Soyez prêt à
fournir :
• Une brève description du problème
• Le type et le modèle exact de l’appareil
• Le code d'aide (le nombre qui suit le mot SERVICE sur
la plaque signalétique PLACÉE sur l'appareil, qui est
visible sur le bord intérieur gauche lorsque la porte
est ouverte)
• Votre adresse complète
• Un numéro de téléphone où vous pouvez être
rejoint
Veuillez noter : Si des réparations sont nécessaires, veuillez
contacter un Service Après-vente autorisé pour garantir que
des pièces d'origines sont utilisées et que la réparation est
effectuée correctement.
Veuillez vous référer au livret de garantie pour plus
d'information sur la garantie.
Page 19
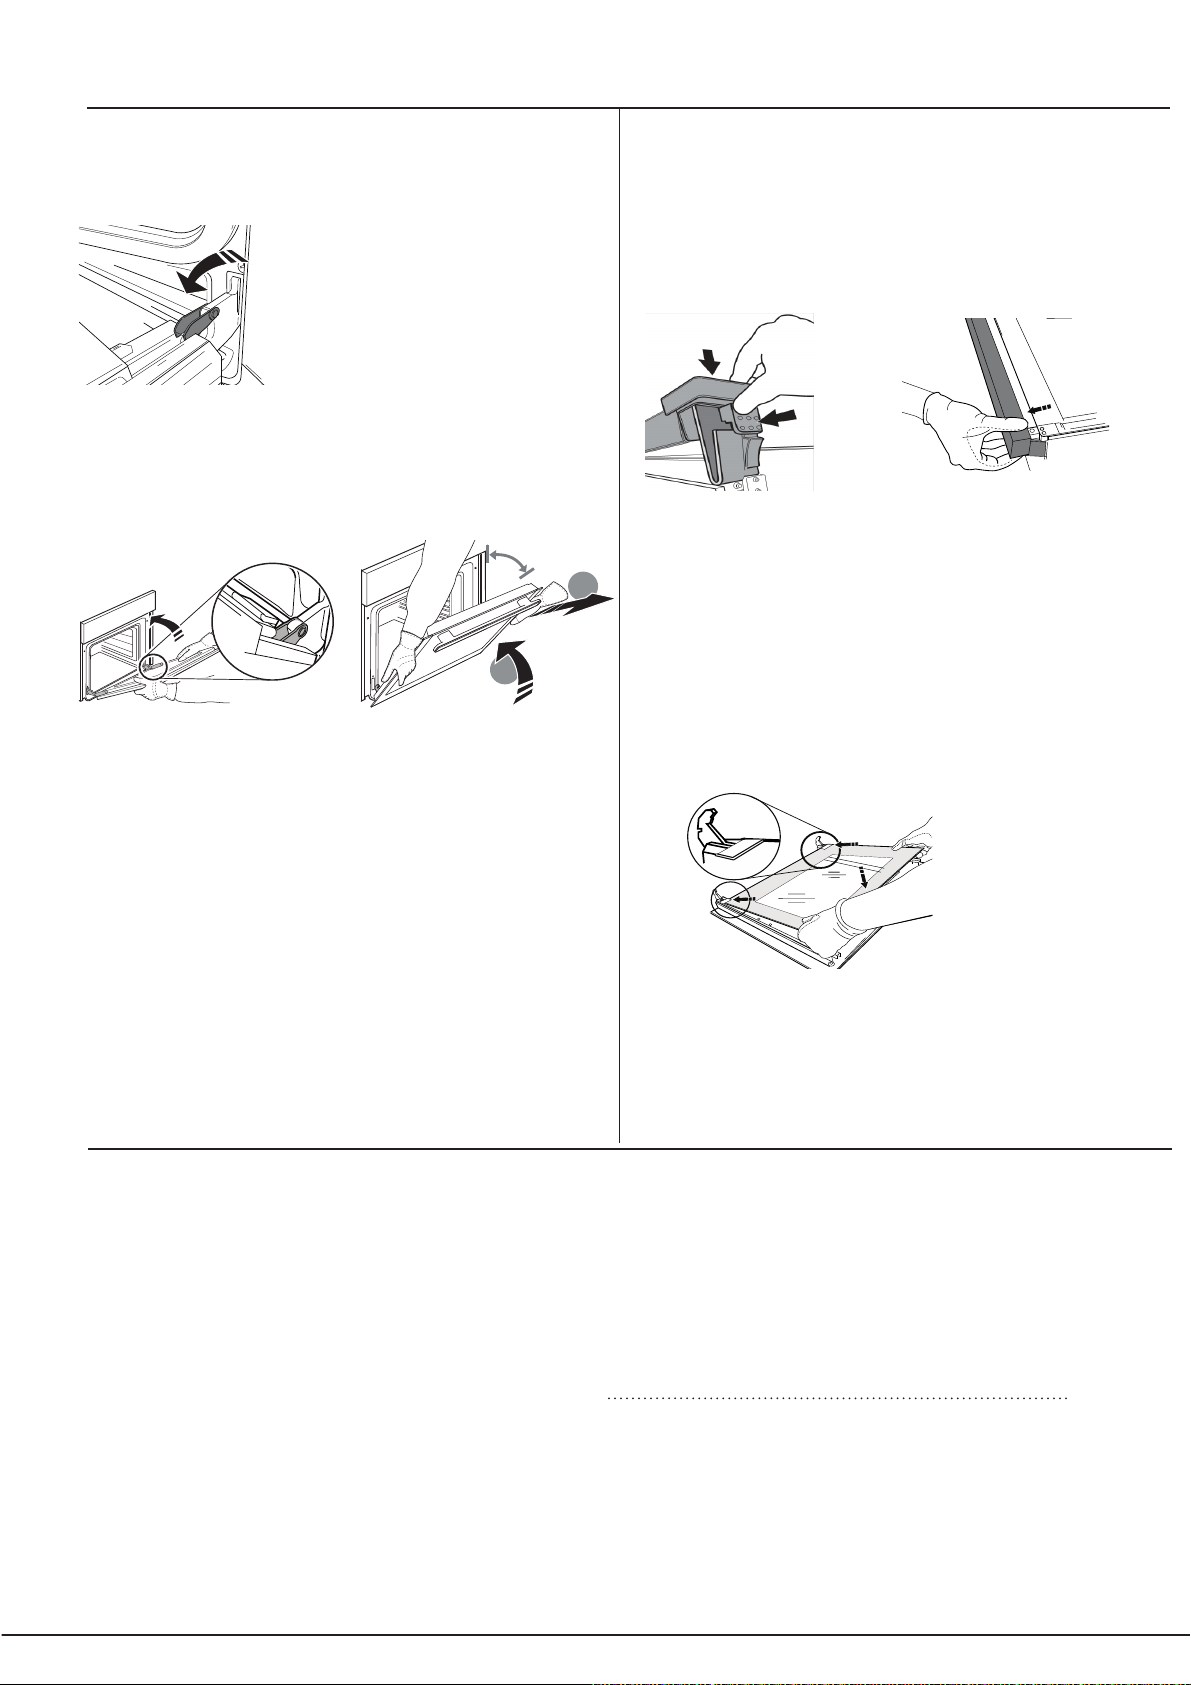
ENLEVER ET RÉINSTALLER LA PORTE
Pour enlever la porte, ouvrez-la complètement et
1.
abaissez les loquets jusqu'à qu'ils soient déverrouillés.
2.
Fermez le plus possible la porte.
Tenez la porte fermement avec les deux mains – ne la
tenez pas par la poignée.
Enlevez simplement la porte en continuant à la fermer
tout en la tirant vers le haut (a) jusqu'à ce qu'elle soit
dégagée de ses appuis (b).
~15°
b
~60°
a
Placez la porte de côté, l'appuyant sur une surface
souple.
CLICK & CLEAN - NETTOYER LA VITRE
Après avoir enlevé la porte et l'avoir placée sur une
1.
surface matelassée, les poignées vers le bas, appuyez
sur les deux fermetures en même temps et enlevez le
bord supérieur de la porte en la tirant vers vous.
2.
Soulevez et tenez fermement la vitre intérieure
avec les deux mains, enlevez-la et placez-la sur une
surface matelassée avant de la nettoyer.
Lors du remontage de la porte intérieure
3.
verre insérer le panneau de verre correctement,
de sorte que le texte écrit sur le panneau n’est
pas inversée et peuvent être facilement lisibles.
3.
Réinstallez la porte en la plaçant devant le four
pour aligner les crochets des charnières avec leurs
appuis, et insérez la partie supérieure sur son appui.
4.
Abaissez la porte pour ensuite l'ouvrir
complètement.
Abaissez les loquets dans leur position originale :
Assurez-vous de les abaisser complètement.
Essayez de fermer la porte et assurez-vous qu'elle
5.
est alignée avec le panneau de commande. Sinon,
répétez les étapes précédentes.
Nettoyage automatique du four par catalyse
Dans certains modèles de four, les parois verticales
intérieures sont revêtues d’un émail poreux dit émail
catalytique. Il a pour propriété de détruire les corps gras
sous l’effet de la chaleur. Ceci est possible quand la
température des parois dépasse 170°C.
En fin de cuisson, s’il y a encore des traces de graisse
sur les parois catalytiques, continuez à faire fonctionner le
four, à vide, porte fermée, en amenant le bouton FOUR sur
la position MAX, pendant un laps de temps compris entre
60 et 90 minutes selon le degré de salissure. Vous pouvez
accélérer le dégraissage en nettoyant les projections
alimentaires plus importantes avec un peu d’eau chaude
et une brosse souple.
4.
Replacez le bord supérieur : un déclic indique le
positionnement correct. Assurez-vous que le joint est
bien placé avant de replacer la porte.
L’émail catalytique est résistant mais il faut éviter :
de gratter l’émail avec des objets tranchants (couteaux …)
et d’utiliser des détergents ou des produits de nettoyage
abrasifs, les propriétés autonettoyantes de l’émail
risqueraient autrement d’être détruites irrémédiablement.
Assistance
Indiquez-lui :
• le modèle de votre appareil (Mod.)
• son numéro de série (S/N)
Ces informations figurent sur la plaquette signalétique
apposée sur votre appareil et/ou sur son emballage.
19
Page 20
DE
KURZ
ANLEITUNG
Lesen Sie vor Inbetriebnahme des Geräts sorgfältig die Sicherheitshinweise.
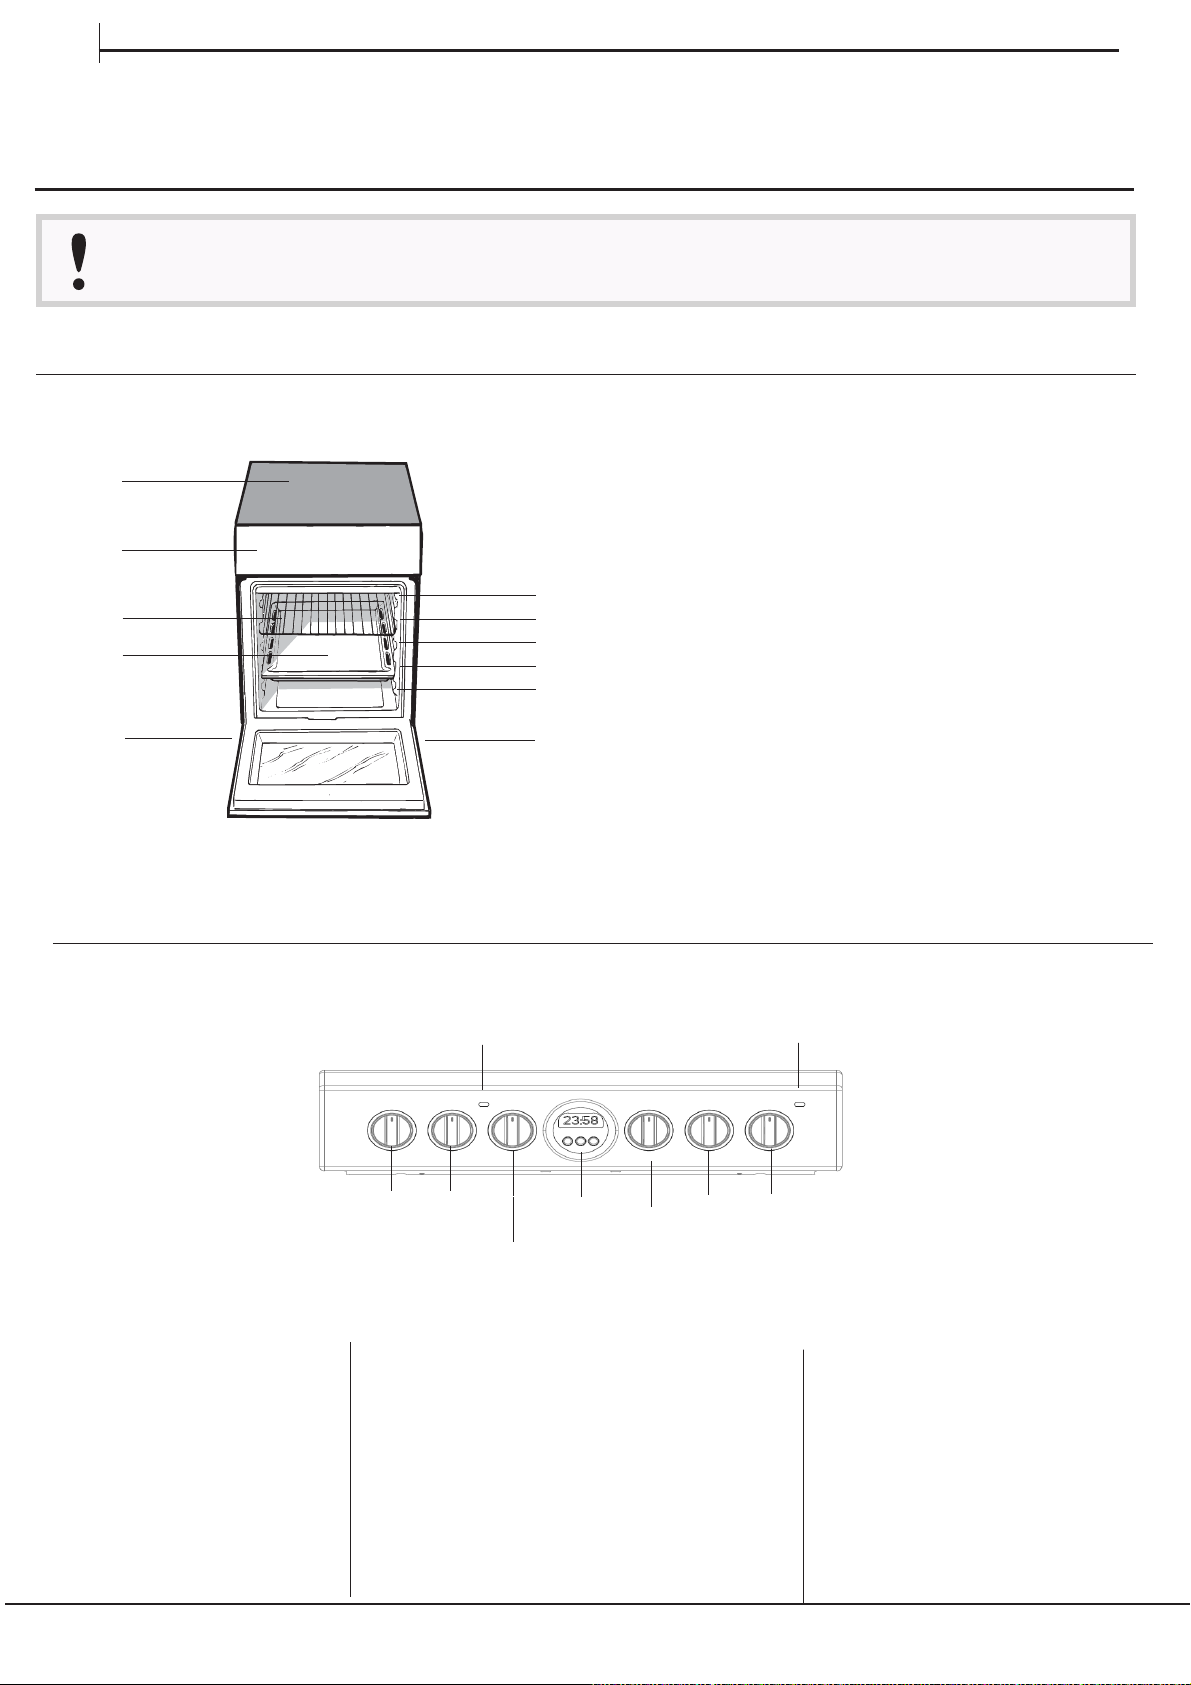
PRODUKTBESCHREIBUNG
1
2
3
4
10
5
6
7
8
9
10
1.
Glaskeramik-Kochfeld
2.
Bedienfeld
3.
Einschub BACKOFENROST
4.
Einschub FETTPFANNE
GLEITFÜHRUNGEN für die Einschübe
5.
position 5
6.
position 4
7.
position 3
8.
position 2
position 1
9.
10.
Höhenverstellbarer Stellfuß
BEDIENTAFEL
1.
Schalter zur Einstellung
der Kochfeld-Kochzonen
2.
Schalter zur Einstellung
der Kochfeld-Kochzonen
THERMOSTAT
3.
4
1
2
3
4.
Betriebskontrollleuchte THERMOSTAT
5.
6.
Schalter zur Wahl der Backofenfunktionen
5
6
9
7
8
Schalter zur Einstellung
7.
der Kochfeld-Kochzonen
8.
Schalter zur Einstellung
der Kochfeld-Kochzonen
9.
Kontrollleuchte
HERDPLATTEN
20
Page 21
Inbetriebsetzung und
Gebrauch
DE
TYPENSCHILD
Versorgungs
und -frequenz:
ENERGIELABEL
und ECODESIGN
spannung
siehe Typenschild
Typenschild, ist in der
Innenseite der Klappe
befindet, oder, nachdem der
Ofenkammer geöffnet worden
ist, auf der linken Wand im
Inneren des Ofens gezeigt
angepasst werden.
Energieverbrauch natürliche
Konvektion – Heizfunktion:
Ober/Unterhitze
ECO
Gebrauch des Ofens
Bei erstmaliger Inbetriebnahme sollte der
leere Backofen für etwa eine halbe Stunde bei
Höchsttemperatur und geschlossener Backofentür in
Betrieb genommen werden. Lüften Sie den Raum gut
durch, bevor Sie den Ofen ausschalten und öffnen. Es
kann ein leicht unangenehmer Geruch entstehen. Es
handelt sich hier um die Schutzmittel, die während der
Herstellung verwendet wurden und nun mit der Hitze
verbrennen.
Stellen Sie keine Gegenstände direkt auf den
Ofenboden, da die Emaillierung sonst beschädigt
werden kann.
1. Wählen Sie die gewünschte Garart mit dem
FUNKTIONSWÄHLER.
2. Wählen Sie die für die gewählte Garart empfohlene
oder die gewünschte Temperatur mit dem
TEMPERATURREGLER.
Eine Liste mit einer detaillierten Beschreibung der
Gararten und empfohlenen Temperaturen ist in der
entsprechenden Tabelle zu finden (siehe Praktische
Garhinweise).
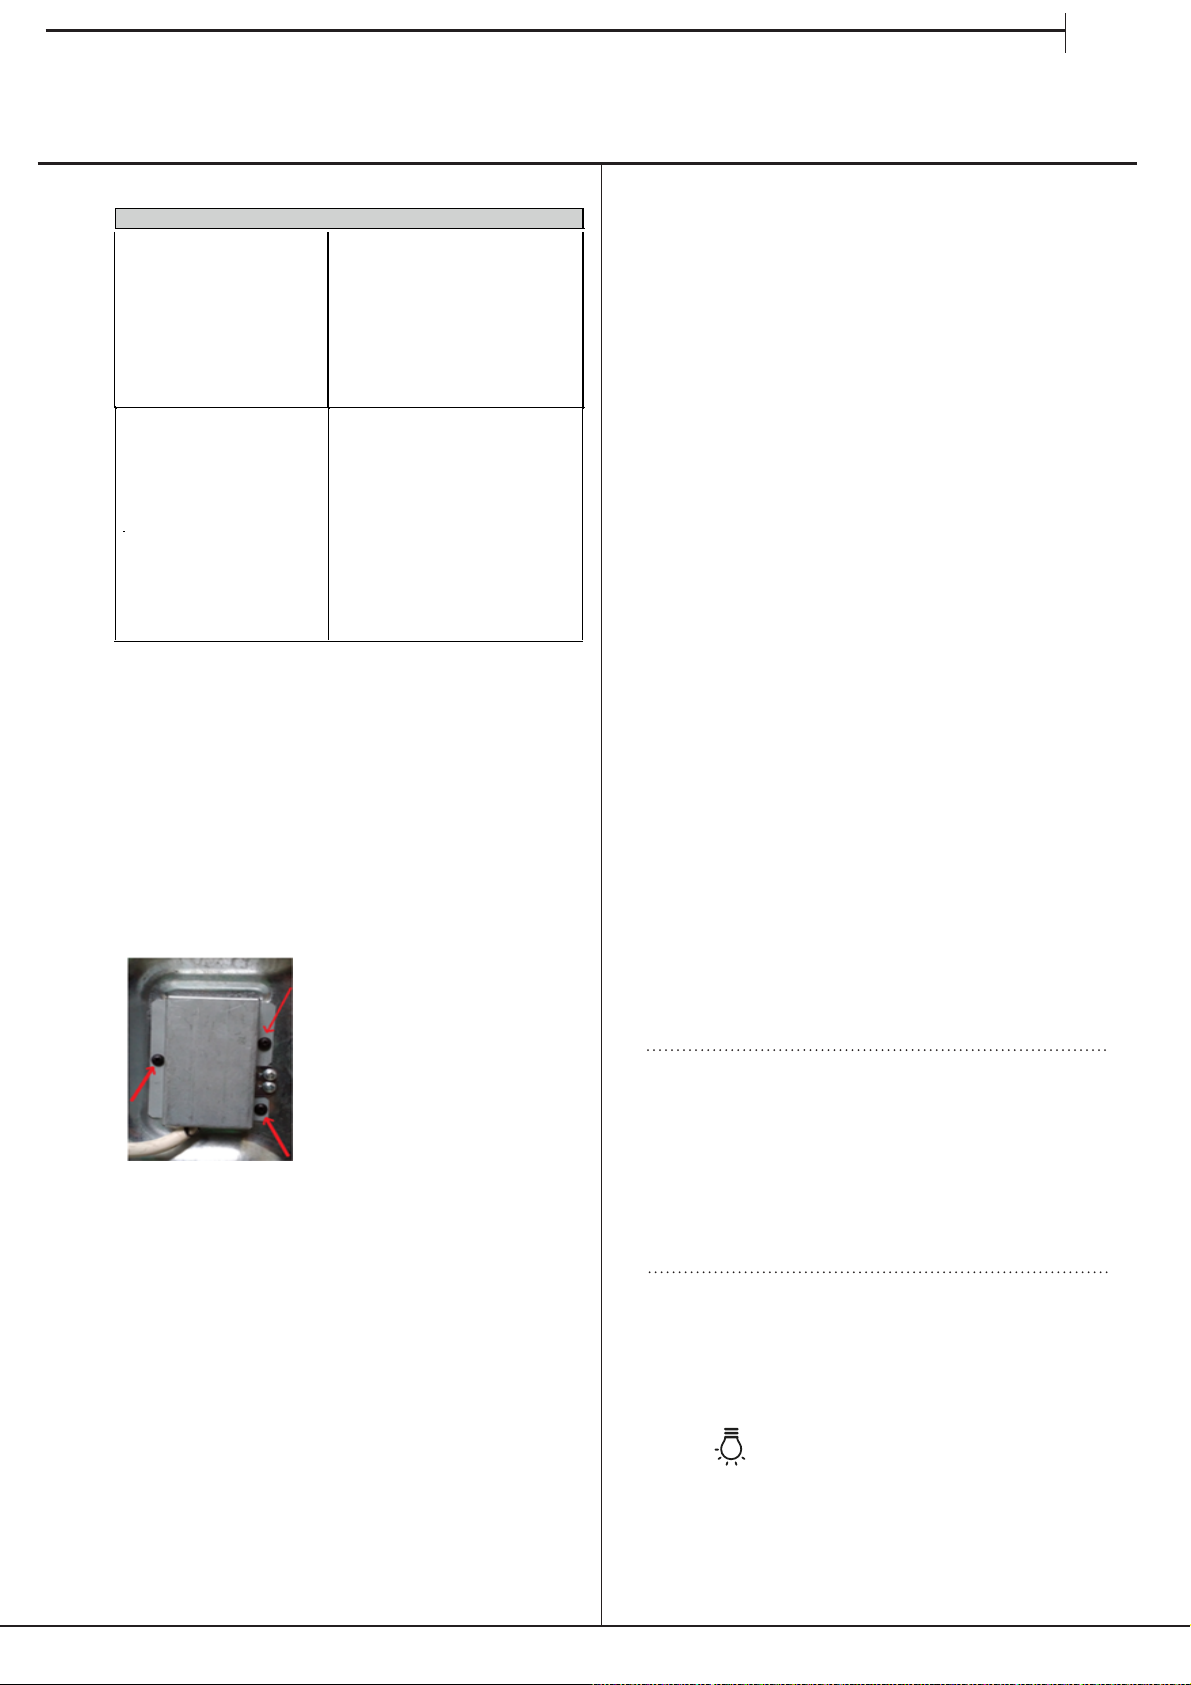
Nach der Installation des Stromkabels, schrauben
Sie die Metallabdeckung mit drei Schrauben fest.
Während des Garvorgangs kann man jederzeit
•
die Garart mit dem FUNKTIONSWÄHLER ändern.
• die Temperatur mit dem TEMPERATURREGLER
ändern.
• den Garvorgang anhalten. Drehen Sie hierzu den
FUNKTIONSWÄHLER auf die Position „0“.
Vor Gebrauch müssen unbedingt die seitlich am
Gerät angebrachten Kunststofffilme abgenommen
werden.
Kontrollleuchte THERMOSTAT
Wenn diese eingeschaltet ist, heizt der Ofen. Sobald im
Ofen die eingestellte Temperatur erreicht wird, erlöscht
die Leuchte. Jetzt schaltet sich die Kontrollleuchte
im Wechsel ein und aus und zeigt damit an, dass
das Thermostat in Funktion ist und die eingestellte
Temperatur konstant hält.
Backofenlicht
Sobald der FUNKTIONSWÄHLER auf eine andere
als die Position „0“ gestellt wird, schaltet sich das
Backofenlicht ein. Es bleibt eingeschaltet, solange
der Backofen in Betrieb ist. Wird der Schalter auf die
Position
dass der Backofen jedoch in Betrieb genommen wird.
gestellt, schaltet sich das Licht ein, ohne
21
Page 22
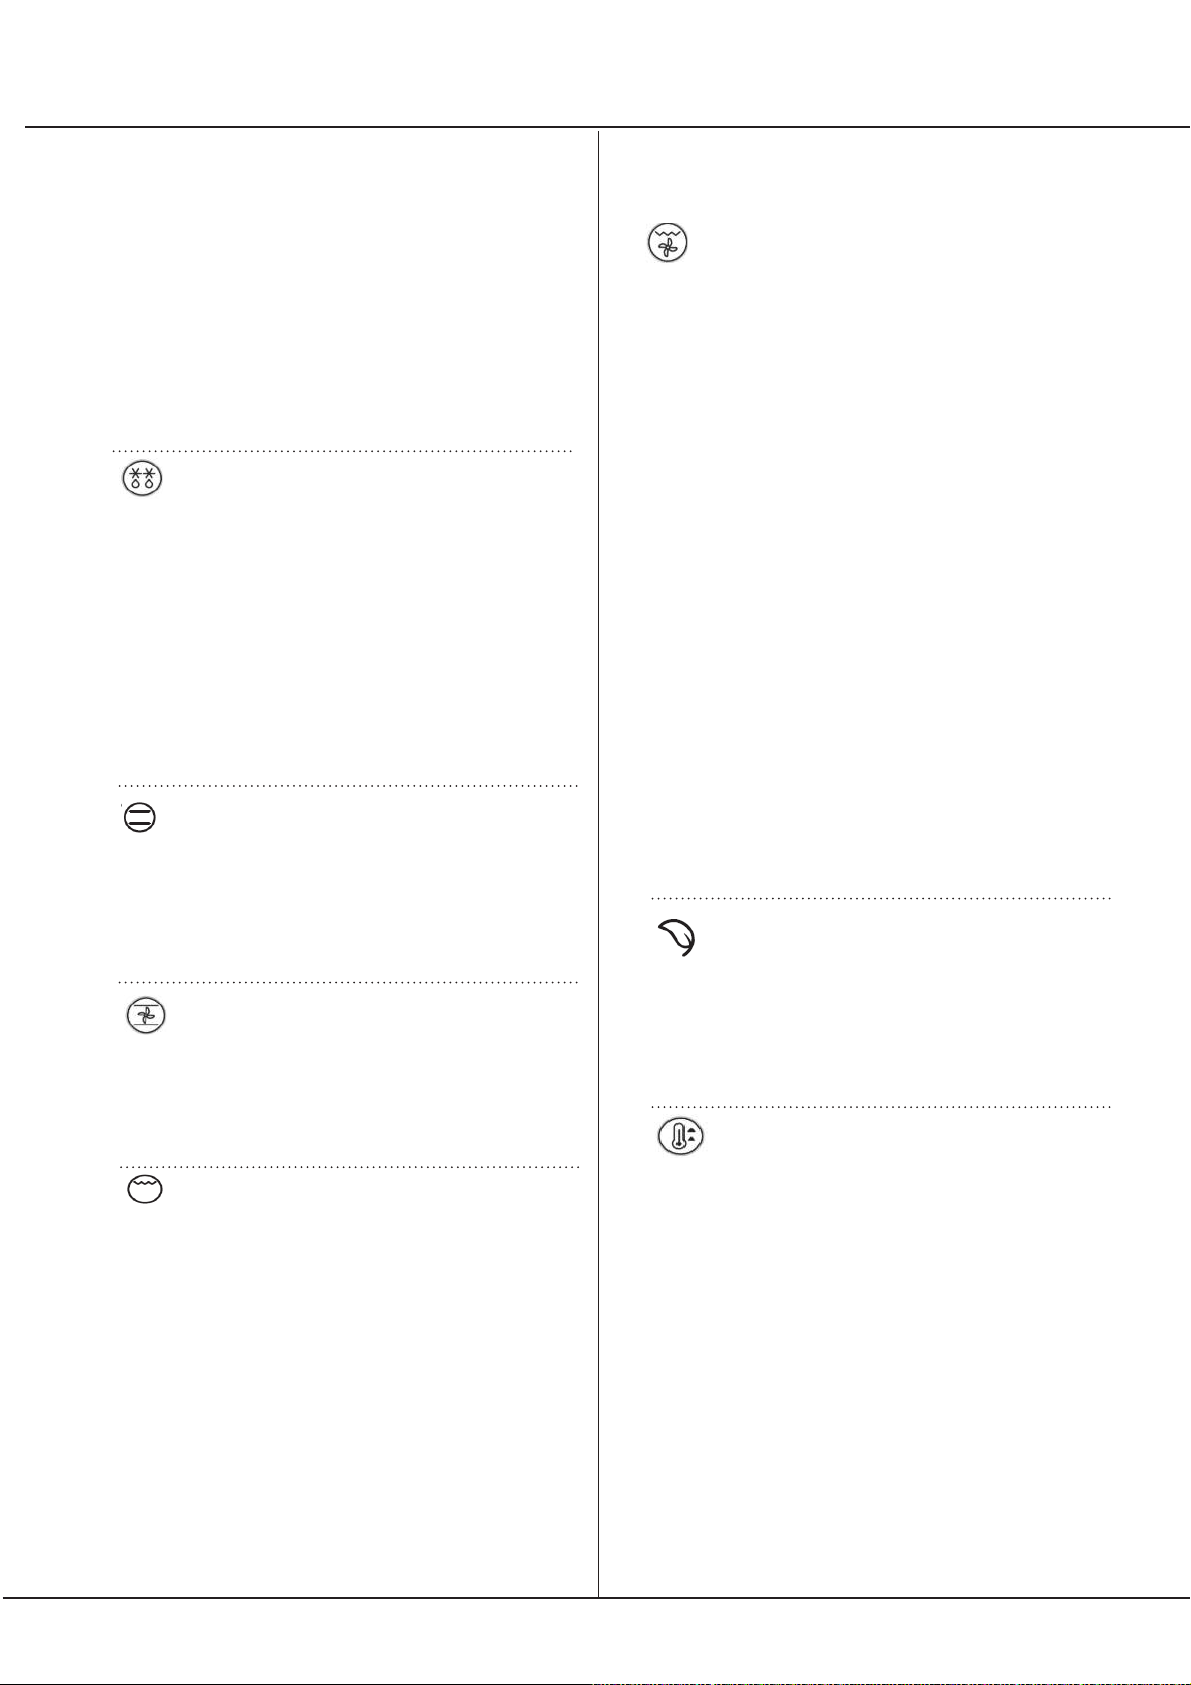
Garmethoden
Für alle Gararten zwischen 50°C und Max kann ein
Temperaturwert eingestellt werden, mit Ausnahme der
folgenden Modi
• DOPPELTER GITTER (empfohlen: nur
auf MAX. Leistungsstufe einstellen).
• Ventilatorgestützter Doppelgrill (empfohlen: 200°C
nicht überschreiten).
Abtaumodus
Der Ventilator auf der Unterseite des Ofens lässt die
Luft bei Raumtemperatur um die Speisen zirkulieren.
Dies wird für das Auftauen aller Arten von
Lebensmitteln empfohlen, insbesondere aber für
empfindliche Lebensmittel, die keine Wärme
benötigen, wie z.B.:Eiskuchen, Sahne- oder PuddingDesserts, Obstkuchen. Durch den Einsatz des
Ventilators wird die Abtauzeit etwa halbiert.
Bei Fleisch, Fisch und Brot ist es möglich, den Prozess
im Modus "Mehrfachgaren" zu beschleunigen und die
Temperatur auf 80° - 100°C einzustellen.
STATISCHER OVEN-Modus
Sowohl die oberen als auch die unteren
Heizelemente werden aktiviert. Wenn Sie diesen
traditionellen Kochmodus verwenden, ist es am
besten, nur ein Regal auf einmal zu verwenden, da
sonst die Wärme nicht gleichmäßig verteilt wird.
UMLUFTOFEN-Modus
Die oberen und unteren Heizelemente werden
eingeschaltet und der Ventilator beginnt zu arbeiten. Da
die Hitze im gesamten Ofen konstant bleibt, kocht die
Luft und bräunt die Speisen gleichmäßig. Es dürfen
maximal zwei Regale gleichzeitig verwendet werden.
GRILL-Modus
Der zentrale Teil des oberen Heizelements ist
eingeschaltet. Die hohe und direkte Temperatur des
Grills wird für Lebensmittel empfohlen, die eine hohe
Oberflächentemperatur erfordern (Kalb- und
Rindersteaks, Filetsteaks und Entrecôte). Dieser
Kochmodus verbraucht nur wenig Energie und ist ideal
zum Grillen von kleinen Gerichten. Legen Sie das Essen
in die Mitte des Racks, da es nicht richtig gegart wird,
wenn es in den Ecken platziert wird.
LÜFTERGESTEUERTER
DOPPELGRILL -Modus
Das obere Heizelement und der Drehspalt werden
aktiviert und der Ventilator nimmt seinen Betrieb auf.
Diese Kombination von Merkmalen erhöht die
Effektivität der unidirektionalen Wärmestrahlung der
Heizelemente durch Zwangsumwälzung der Luft im
gesamten Ofen. Dadurch wird verhindert, dass die
Speisen obenauf brennen, da die Wärme besser in die
Speisen eindringen kann; es ist daher eine ideale
Möglichkeit, Speisen schnell unter dem Grill zu kochen
oder große Fleischstücke zu grillen, ohne den
Drehspieß benutzen zu müssen.
Der Doppelgrill und die Ventilatorunterstützung
Die Gararten für DOPPELGRILL müssen bei
geschlossener Ofentür durchgeführt werden.
Wenn Sie die Betriebsarten DOPPELTER GRILL
verwenden, stellen Sie das Gestell in Position 5 und
die Auffangwanne in Position 1, um Garrückstände
(Fett und/oder Fett) aufzunehmen. Wenn Sie den
ventilatorgestützten Doppel-Grillkochmodus
verwenden, stellen Sie das Gestell in Position 2 oder
3 und die Tropfschale in Position 1, um
Garrückstände aufzufangen.
SPAREINSTELLUNG
Zum Garen von gefüllten Bratenstücken und
Fleischfilets auf einer Einschubebene. Um den ÖKOZyklus zu nutzen und damit den Stromverbrauch zu
optimieren, sollte die Ofentür erst geöffnet werden,
wenn die Speise vollständig gegart ist.
SCHNELLAUFHEIZ-Modus
Zum schnellen Vorheizen des Ofens. Das Ende der
Vorheizphase abwarten, bevor Speisen in den Ofen
gestellt werden, dann die gewünschte Kochfunktion
wählen.
22
Page 23
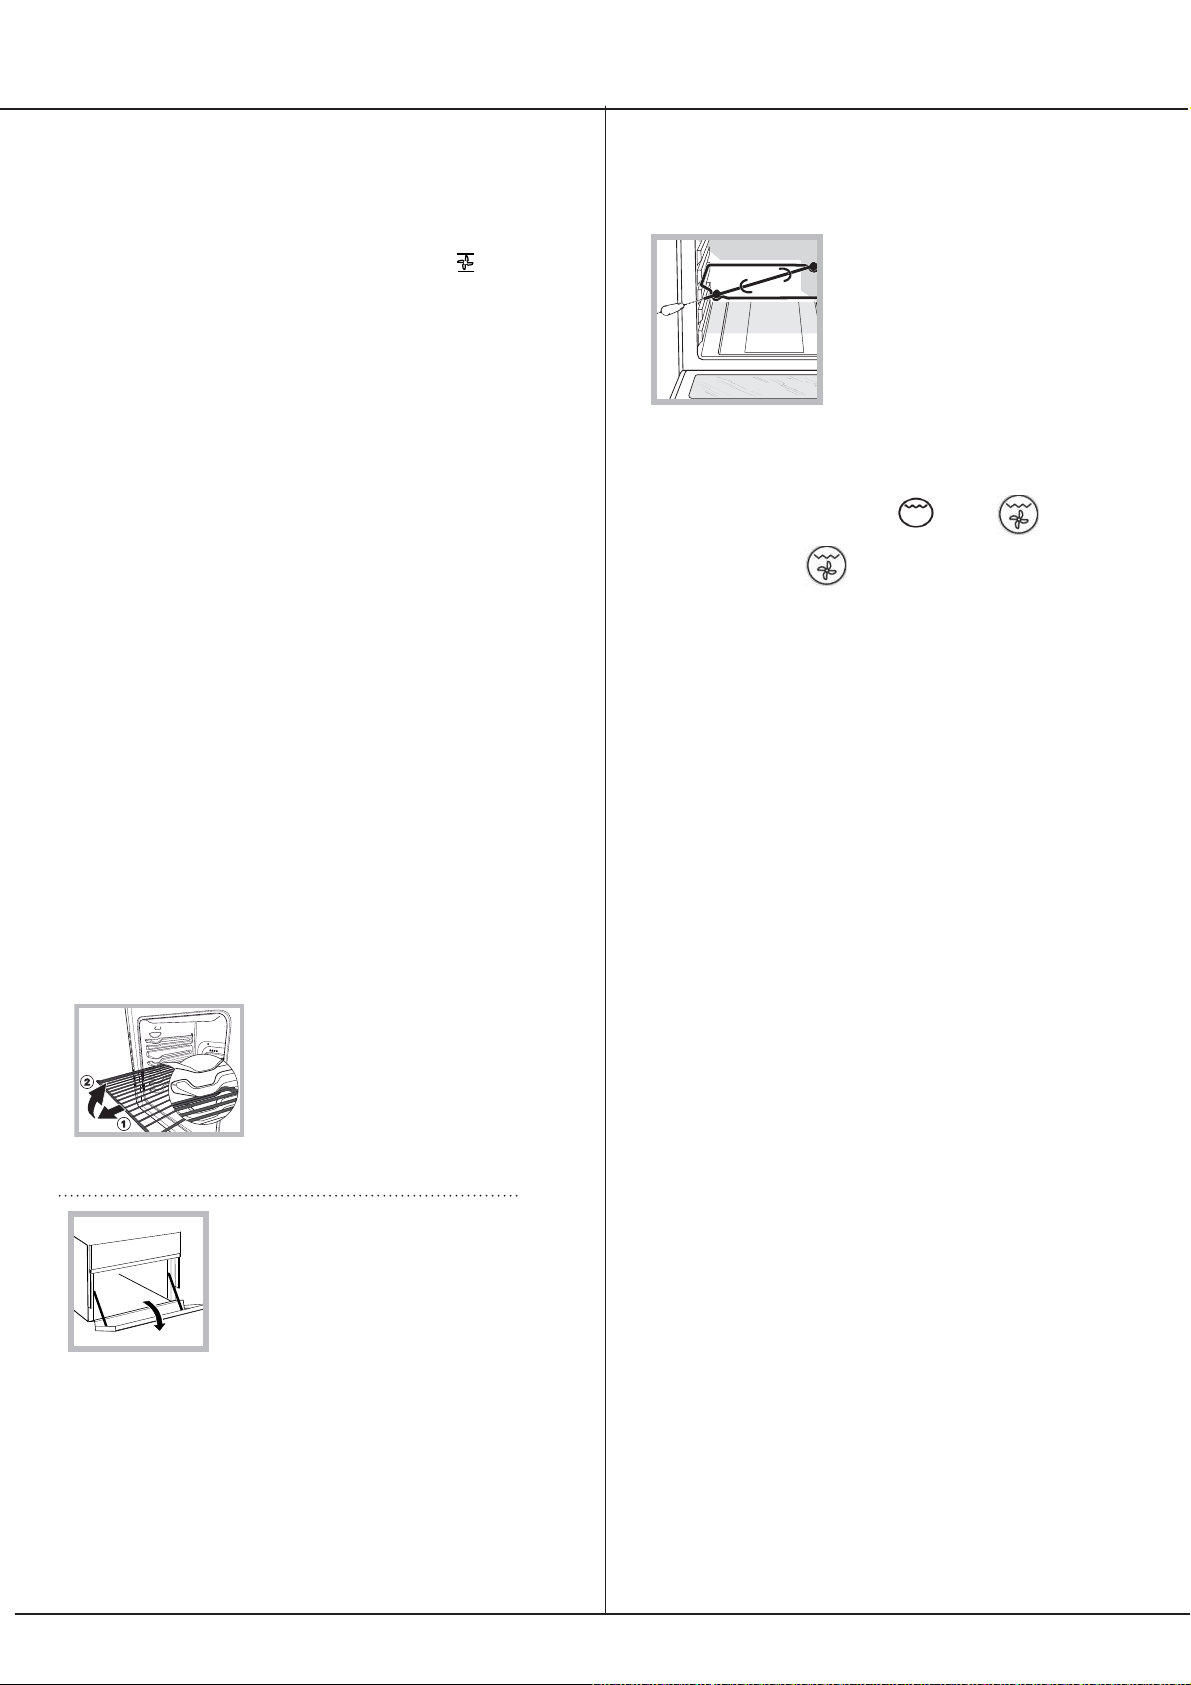
Kochen auf mehreren Regalen gleichzeitig
Drehspieß
Wenn es notwendig ist, zwei Racks zu verwenden,
verwenden Sie den Garmodus FAN OVEN , da
dies der einzige Garmodus ist, der für diese Art des
Garens geeignet ist. Wir empfehlen das auch:
• Die Positionen 1 und 5 werden nicht verwendet.
Denn übermäßige direkte Wärme kann
temperaturempfindliche Lebensmittel verbrennen.
• Die Positionen 2 und 4 werden verwendet und das
Essen, das mehr Wärme benötigt, wird in Position
2 auf das Gestell gestellt.
• Wenn Sie Lebensmittel garen, die unterschiedliche
Garzeiten und -temperaturen erfordern, stellen Sie
eine Temperatur ein, die auf halbem Weg zwischen
den beiden empfohlenen Temperaturen liegt (siehe
Tabelle mit den Garhinweisen für den Ofen) und legen
Sie die empfindlicheren Lebensmittel in Position 4
auf das Gestell. Entfernen Sie zuerst die Speisen,
die eine kürzere Garzeit erfordern.
• Beim Kochen von Pizzas auf mehreren Regalen mit
einer Temperatur von 220°C wird der Ofen für 15
Minuten vorgeheizt. Im Allgemeinen dauert das
Kochen auf dem Regal in Position 4 länger: wir
empfehlen, dass die auf der untersten
Regalposition gekochte Pizza zuerst entfernt wird,
gefolgt von der in Position 4 gekochten Pizza einige
Minuten später.
• Legen Sie die Tropfschale auf die Unterseite und
das Gestell auf die Oberseite.
Zur Inbetriebnahme des Drehspießes
(siehe Abbildung) verfahren Sie wie
folgt:
1. Schieben Sie die Fettpfanne
auf Einschubhöhe 1 ein;
2. Schieben Sie die
Drehspießhalterung auf
Einschubhöhe 3 ein und stecken Sie den Spieß in
die entsprechende Öffnung der Backofenrückwand;
3. Setzen Sie den Drehspieß in Betrieb, indem Sie den
Knopf PROGRAMME auf
Ist das Programm
eingeschaltet, stoppt der
oder
stellen.
Drehspieß, wenn die Tür geöffnet wird.
Die Innenflächen des Fachs (wenn vorhanden)
können heiß werden.
ACHTUNG! Der Ofen ist mit einem
Stopsystem ausgerüstet, um die Roste
herauszuziehen und zu verhindern,
dass sie aus dem Ofen kommen.(1)
Wie in der Zeichung gezeigt, müssen
Sie die Roste nur vorne anheben und
an ihnen ziehen, um sie komplett
heraus zu ziehen (2).
Aufbewahrungsbereich unter dem
Ofen
Unter dem Ofen befindet sich ein
Fach zur Aufbewahrung vonZubehör
oder großen Schüsseln. Ziehen Sie
die Tür zum Öffnen nach unten (siehe Abbildung).
! Stellen Sie keine entflammbaren Gegenstände in das
untere Ofenfach.
23
Page 24
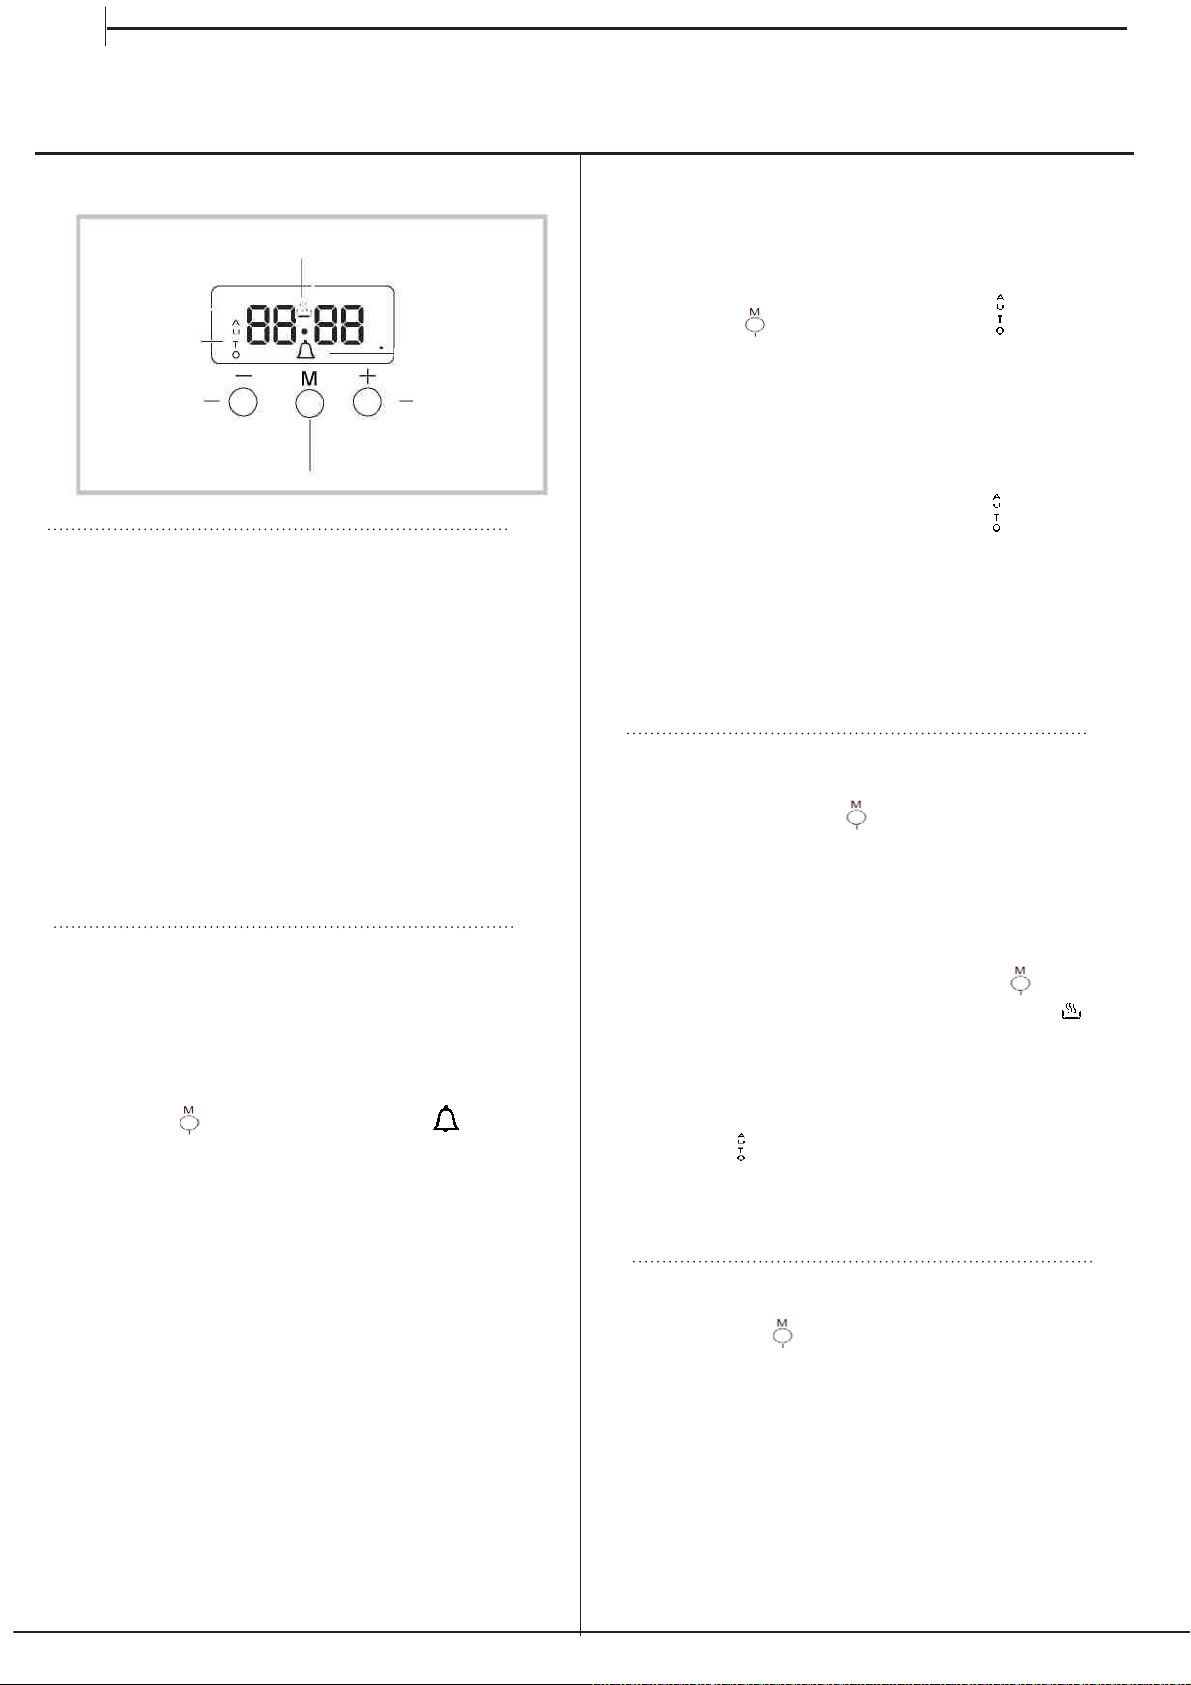
DE
Bedienung der
Uhr/Minutenzeitschalter
Programmierte Zubereitung
GARVORGANG
Icon
ANZEIGE
Vor der Programmierung muss ein Gar -
Modus eingestellt werden.
Programmierung der Zubereitungsdauer
AUTO
GARZEIT
VERRINGERN
Icon
MODU
S
Zeitschalter-Icon
GARZEIT
VERLÄNGERN
Einstellung der Uhr
Die Uhr kann bei ausgeschaltetem oder auch
eingeschaltetem Backofen eingestellt werden, sofern die
Endzeit für einen Garzyklus nicht zuvor programmiert
worden ist. Nachdem das Gerät an die Stromversorgung
angeschlossen wurde oder nach einer
Stromunterbrechung, wird die Anzeige automatisch auf die
Ziffern 00:00 zurückgestellt und die ANZEIGE beginnt zu
blinken.
1. Drücken Sie dazu gleichzeitig die „+“ und die „-“-Taste.
Der Doppelpunkt zwischen der Stunden- und Minutenanzeige
beginnt zu blinken.
2. Stellen Sie die Zeit mit Hilfe der „+“ und die „-“-Taste ein.
Wenn Sie dazu beide Tasten gedrückt halten, scrollt die
Anzeige die Werte schneller durch, sodass die Einstellung
einfacher und schneller vorgenommen werden kann.
Änderung der Alarmtonhäufigkeit
Kann die Alarmtonhäufigkeit durch mehrmaliges
Berühren der „-“-Taste berühren.
Zeitschalter einstellen
Diese Funktion unterbricht nicht den Backofenbetrieb,
sie dient nur dazu, den Alarmton zu aktivieren, wenn die
eingestellte Zeit abgelaufen ist.
1. Drücken Sie die Taste mehrmals, bis das Icon
und die drei Ziffern auf der Anzeige zu blinken anfangen.
2. Stellen Sie die gewünschte Zeit mit Hilfe der „+“ und die
„-“-Taste ein. Wenn Sie dazu beide Tasten gedrückt
halten, scrollt die Anzeige die Werte schneller durch,
sodass die Einstellung einfacher und schneller
vorgenommen werden kann.
3. Warten Sie 5 Sekunden. Wenn Sie die Taste noch einmal
drücken, erscheint die Zeit auf der Anzeige als Count-down.
Sobald diese Zeit abgelaufen ist, wird ertönt der Alarm.
1. Drücken Sie die Taste mehrmals, bis das Icon
und die DUR Ziffern auf der Anzeige zu blinken
anfangen.
2. Stellen Sie die gewünschte Dauer mit Hilfe der „+“ und
die „-“-Taste ein. Wenn Sie dazu beide Tasten gedrückt
halten, scrollt die Anzeige die Werte schneller durch,
sodass die Einstellung einfacher und schneller
vorgenommen werden kann.
3. Warten Sie 5 Sekunden, nachdem das Icon auf der
Anzeige sichtbar geworden ist.
4. Sobald die eingestellte Zeit abgelaufen ist und der Backofen sich
ausgeschaltet hat, ertönt der Alarmton. Drücken Sie eine beliebige
Taste, um den Alarm auszustellen
• Zum Beispiel: Es ist 9:00 Uhr morgens, und die Dauer
wurde auf eine 1 Stunde und 15 Minuten
programmiert. Das Programm wird automatisch um
10:15 Uhr stoppen.
Einstellen der Endzeit für einen Gar-Modus
1. Führen Sie die Schritte 1 bis 3 für Dauer so wie oben
beschrieben aus.
2. Drücken Sie als Nächstes die Taste, bis der Text END auf der
Anzeige zu blinken anfängt.
3. stellen Sie die Zubereitungsendzeit mit Hilfe der „+“ und die
„-“-Taste ein. Wenn Sie dazu beide Tasten gedrückt halten,
scrollt die Anzeige die Werte schneller durch, sodass die
Einstellung einfacher und schneller vorgenommen werden
kann.
4. Warten Sie 5 Sekunden, oder drücken Sie die die Taste
erneut. Wenn der Garvorgang startet, wird das Symbol auf
der Anzeige sichtbar.
5. Wenn die eingestellte Zeit abgelaufen ist, schaltet sich der
Backofen sich aus
und ein Alarmton ertönt.Drücken Sie eine beliebige Taste, um den
Alarm auszustellen.Die Programmierung ist eingestellt, wenn das
Icon leuchtet
• Zum Beispiel: Es ist 9:00 Uhr morgens, und die Dauer
wurde auf eine 1 Stunde programmiert. 12:30 Uhr
wurde als Endzeit eingestellt. Das Programm wird
automatisch um 11:30 Uhr starten.
Ein Programm abbrechen
Um ein Programm abzubrechen:
• Drücken Sie die Taste, bis das Icon für die
abzubrechende Einstellung und die Zahlen auf der
Anzeige zu blinken anfangen.Drücken Sie die „-“Taste, bis die Zahlen 00:00 auf der Anzeige
erscheinen.
• Halten Sie die „+“ und „-“-Tasten gedrückt. Dadurch werden
alle vor gewählten Einstellungen, einschließlich der
Zeitschalter-Einstellungen, gelöscht.
24
Page 25
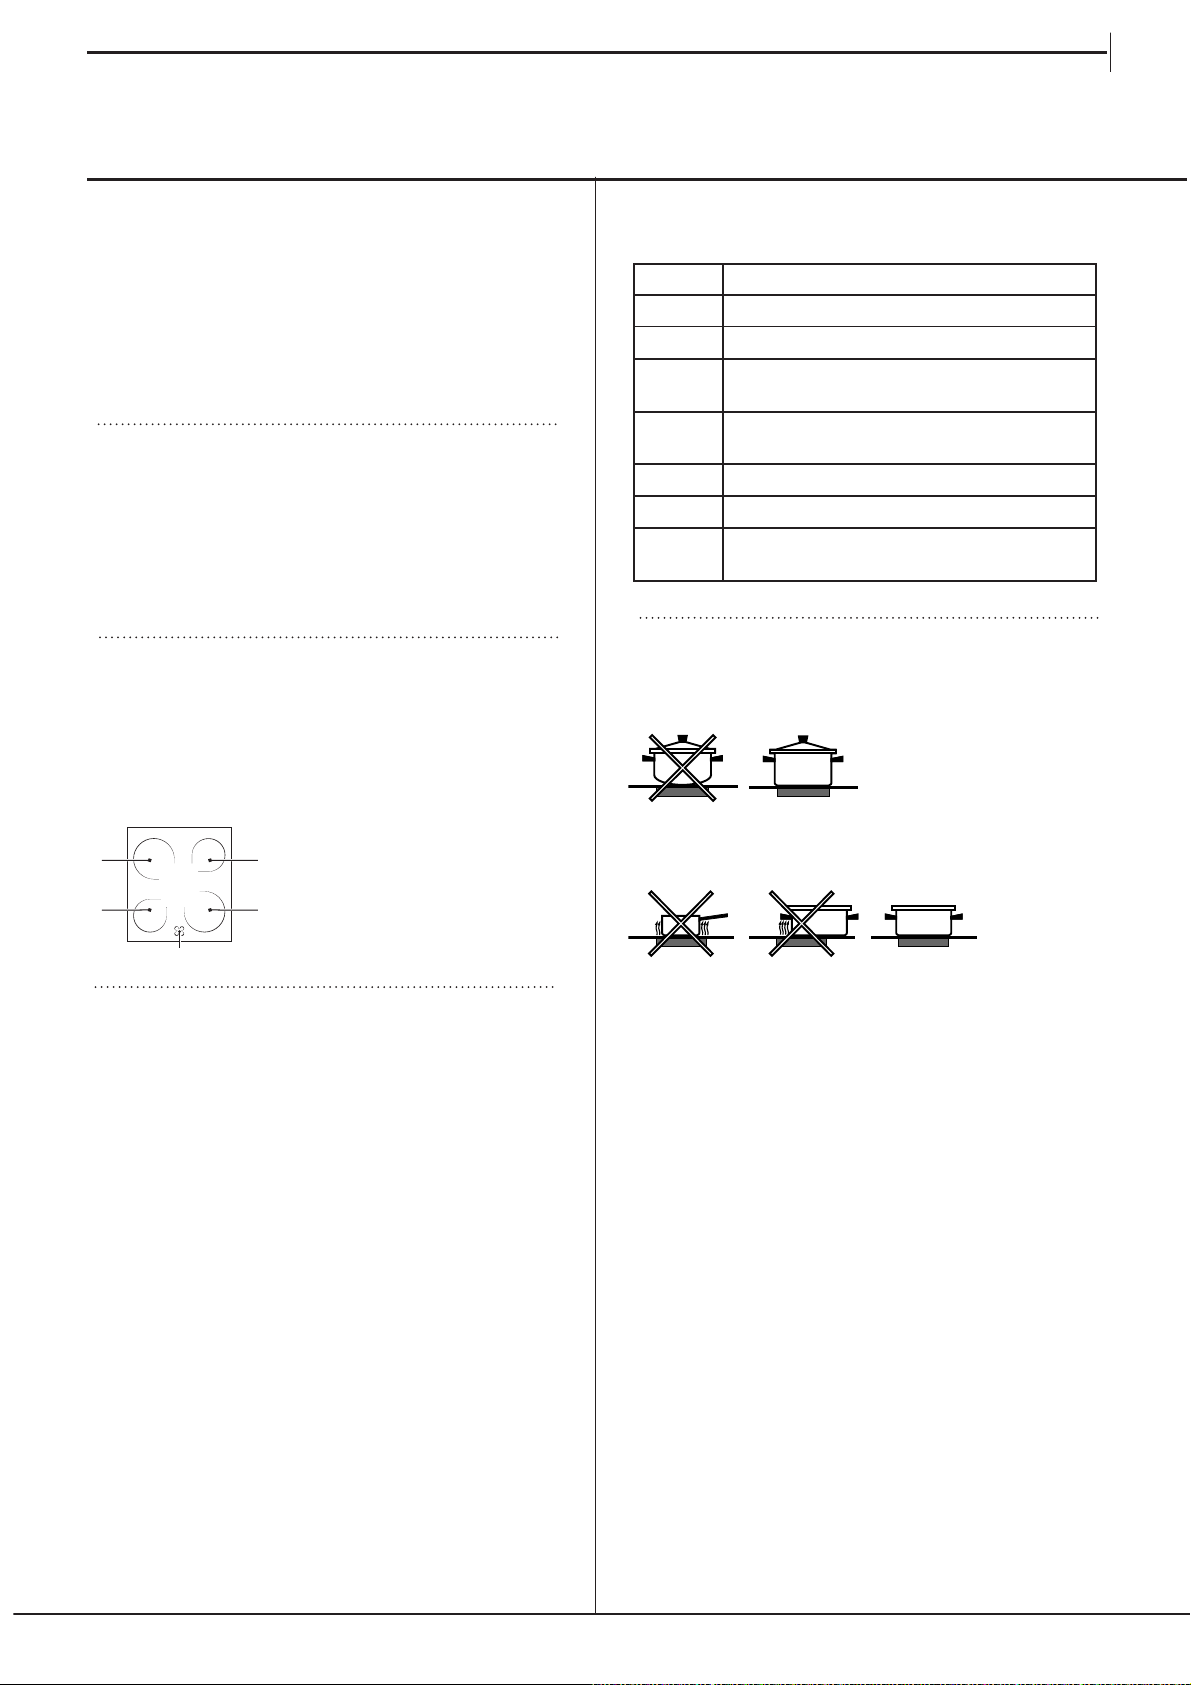
Nutzung des GlaskeramikKochfeldes
DE
Der auf die Dichtungen aufgetragene Leim hinterlässt
Fettspuren auf dem Glas. Wir empfehlen Ihnen, diese
vor Einsatz des Gerätes mit einem herkömmlichen
Reinigungsmittel (einer nicht scheuernden Poliercreme)
zu entfernen. Während der ersten Betriebsstunden kann
der Geruch verbrannten Gummis wahrzunehmen sein.
Dies wird sich nach kurzer Zeit geben.
Ein- und Ausschalten der Kochzonen
Zum Einschalten einer Kochzone drehen Sie den
entsprechenden Drehschalter nach rechts.
Zum Ausschalten drehen Sie den Drehschalter nach
links bis auf “0”.
Das Einschalten der Kontrollleuchte KOCHZONEN zeigt
an, dass mindestens eine Kochzone des Kochfeldes in
Betrieb ist.
Die Kochzonen
Auf dem Kochfeld befinden sich elektrische
Hilitebeheizungselemente. Diese werden während des
Betriebs rot:
A. Kochzone mit Strahlungsbeheizung:
A
A
B
Beschreibung der Heizelemente
Bei den Strahlerelementen handelt es sich um runde
Heizstrahler, die innerhalb von nur 10-20 Sekunden nach
dem Einschalten rot aufglühen.
Die Hilitebeheizung erfolgt mittels runder Heizelemente,
die, außer den bezeichnenden Vorteilen, die
Hilitebeheizungselemente bieten, auch eine gleichmäßige
Wärmeverteilung gewährleisten.
Die Hiliteelementen erzeugen unmittelbar eine äußerst
hohe Licht- und Wärmemenge, und bieten Ihnen
demzufolge praktische Vorteile:
· schnelle Hitzeerzeugung (im Vergleich zu Gasbrennern)
· schnelles Abkühlen
· gleichmäßige Wärmeverteilung auf der gesamten
Fläche (dank der runden Heizelemente)
B. Wärmeanzeige: zeigt
A
an, dass die Temperatur der
entsprechenden Kochzone
A
über 60°C liegt, auch wenn das
Element ausgeschaltet aber noch
warm ist.
Einstellung
Praktische Hinweise zum Gebrauch des Kochfeldes
• Verwenden Sie Kochgeschirr mit dickem und ebenem
Boden, um sicher zu sein, dass dieser perfekt auf der
Kochzone aufliegt;
• Benutzen Sie stets nur Kochgeschirr, dessen
Durchmesser mit dem der Kochzone übereinstimmt,
d.h. dessen Boden die Kochzone ganz bedeckt, und
somit die gesamte Wärme nutzt.
• Stellen Sie sicher, dass der Topfboden immer gut
trocken und sauber ist: die Haftung auf den Kochzonen
ist dann optimal und sowohl die Töpfe als auch das
Kochfeld halten länger;
• Vermeiden Sie den Einsatz von Kochgeschirr, das
auch auf Gasflammen verwendet wird: Die äußerst
hohe Hitzekonzentration der Gasbrenner könnte die
Topfböden leicht verformen und demnach die korrekte
Auflage beeinträchtigen.
• lassen Sie nie eine Kochzone eingeschaltet, ohne
einen Topf darauf zu stellen, da sie sich beschädigen
könnte.
normal oder schnelle Zubereitung
0 Aus
1 Zubereitung Gemüse, Fisch
Zubereitung Kartoffeln (mit Dampf)
2
Suppen, Bohnen
Die Zubereitung von grossen Mengen von
3
Essen, Minestrone fortsetzen
4 Für rösten (durchschnitt)
5
Für rösten (überdurchschnittlich)
Für braten und die Kochtemperatur
6
kurzzeitig zu erreichen
25
Page 26
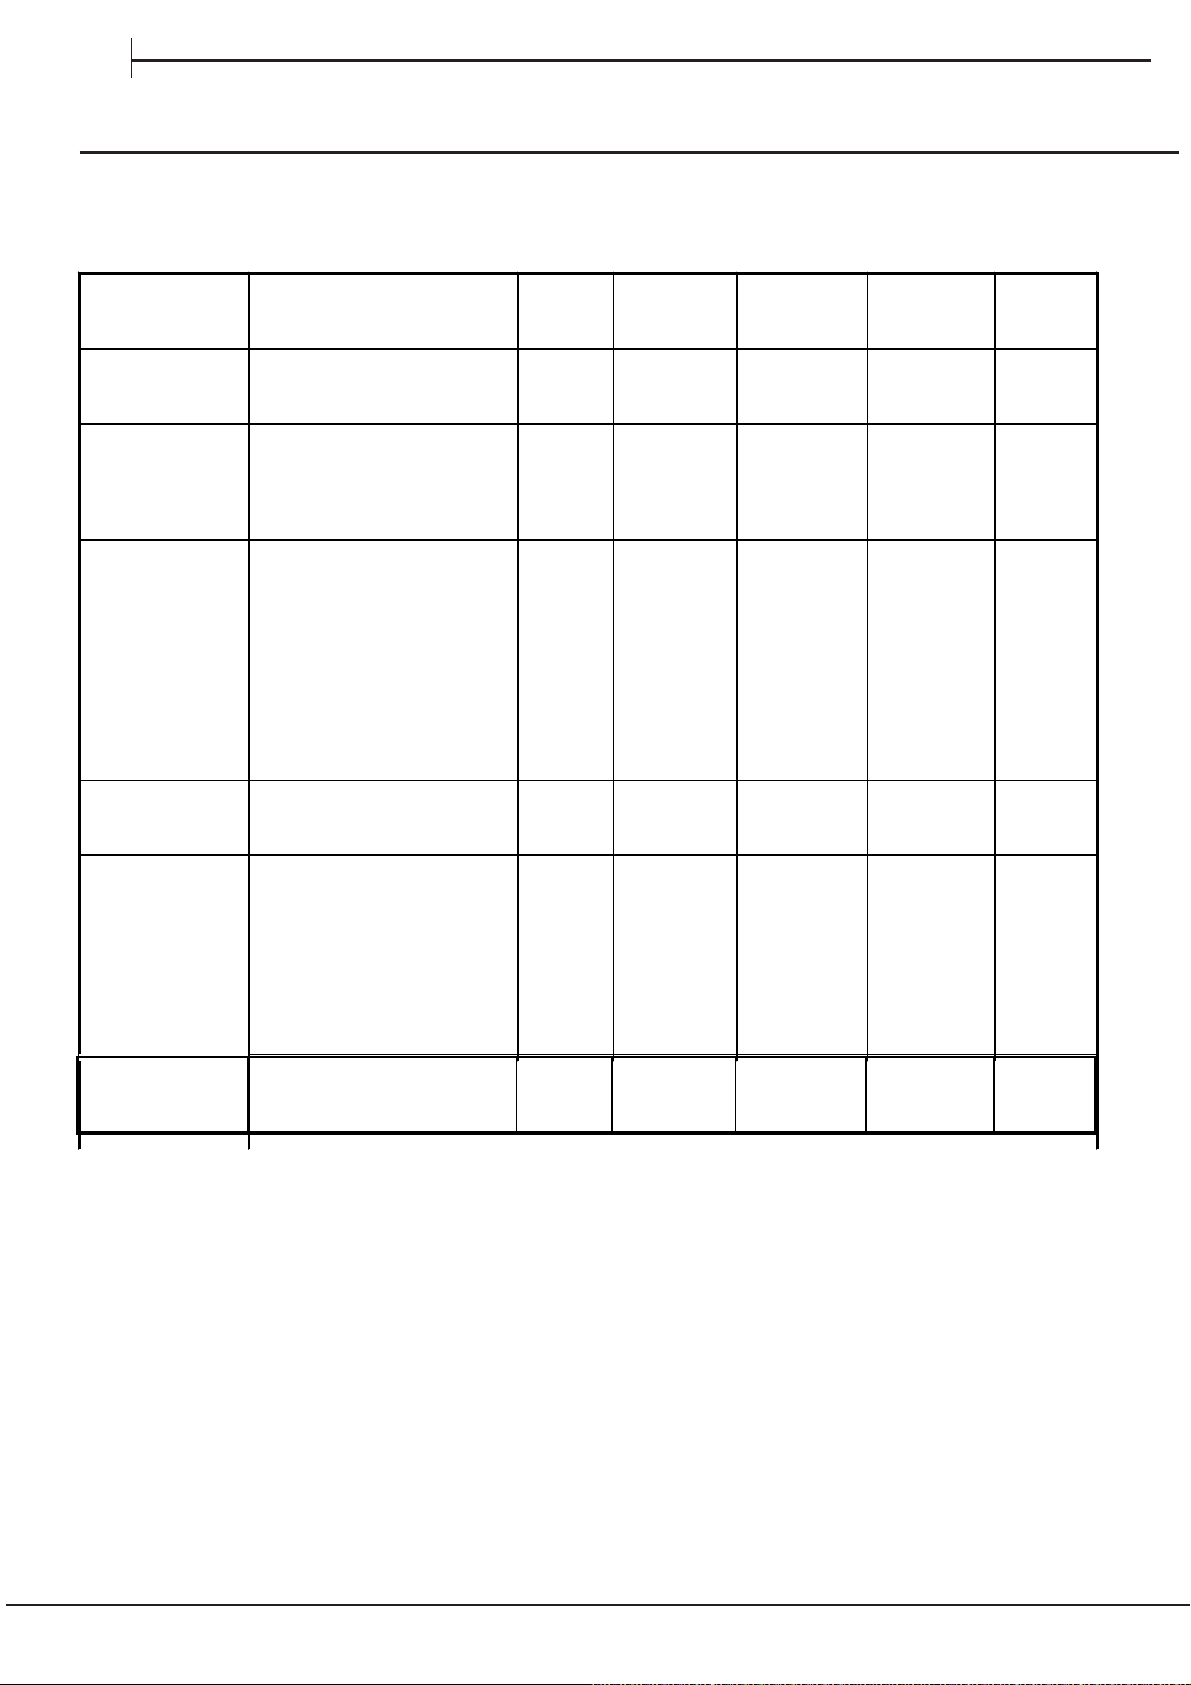
z
DE
Tabelle Garen im Backofen
Position
Funktionswähler
Auftauen
Tradition
Heißluft
Oberhitze
Grill
Gerichte Gewicht
kg
Alle tiefgefrohrenen Speisen
Ente
Kalbs- oder Rinderbraten
Schweinebraten
Gebäck
Torten
Pizza (auf 2 Ebenen)
Lasagne
Lamm
Brathähnchen + Kartoffeln
Makrelen
Plum Cake
Windbeutel (auf 2 Ebenen)
Gebäck (auf 2 Ebenen)
Biskuitböden (auf 1 Ebene)
Biskuitböden (auf 2 Ebenen)
Quiche
Nachgaren von Speisen - 3/4 15 220 -
Seezungen und Tintenf ische
Tintenfisch- und Krebsspieße
Kabeljaufilet
Gegrillte Gemüse
Kalbsteaks
Koteletts
Hamburger
Makrelen
Toasts
1
1
1
-
1
1
1
1
1
1
1
0.5
0.5
0.5
1.0
1.5
1
1
1
1
1
1
1
1
n.° 4
Einschub-
Höhe von
unten
3
3
3
3
3
2-4
3
2
2-4
2
2
2-4
2-4
2
2-4
3
4
4
4
3/4
4
4
4
4
4
Vorheizzeit
(Minuten)
15
15
15
15
15
15
10
10
10
10
10
10
10
10
10
15
5
5
5
5
5
5
5
5
5
Position
Temperatur-
Regler
200
200
200
180
180
220
200
180
180
180
170
190
180
170
170
200
Max
Max
Max
Max
Max
Max
Max
Max
Max
Garzeit
(Minuten)
65-75
70-75
70-80
15-20
30-35
15-20
30-35
50-60
60-75
30-35
40-50
20-25
10-15
15-20
20-25
25-30
8-10
6-8
10
10-15
15-20
15-20
7-10
15-20
2-3
26
Umluftgrill
NB: Bei den angegebenen Garzeiten handelt es sich um Richtwerte, die je nach Wunsch geändert werden können. Bei Einsat
des Grills oder des Umluftgrills ist die Fettpfanne auf die unterst e F ührung zu schieben.
Gegrilltes Hähnchen
Tintenfische
1.5
1.5
3
3
5
5
200
200
55-60
30-35
Page 27
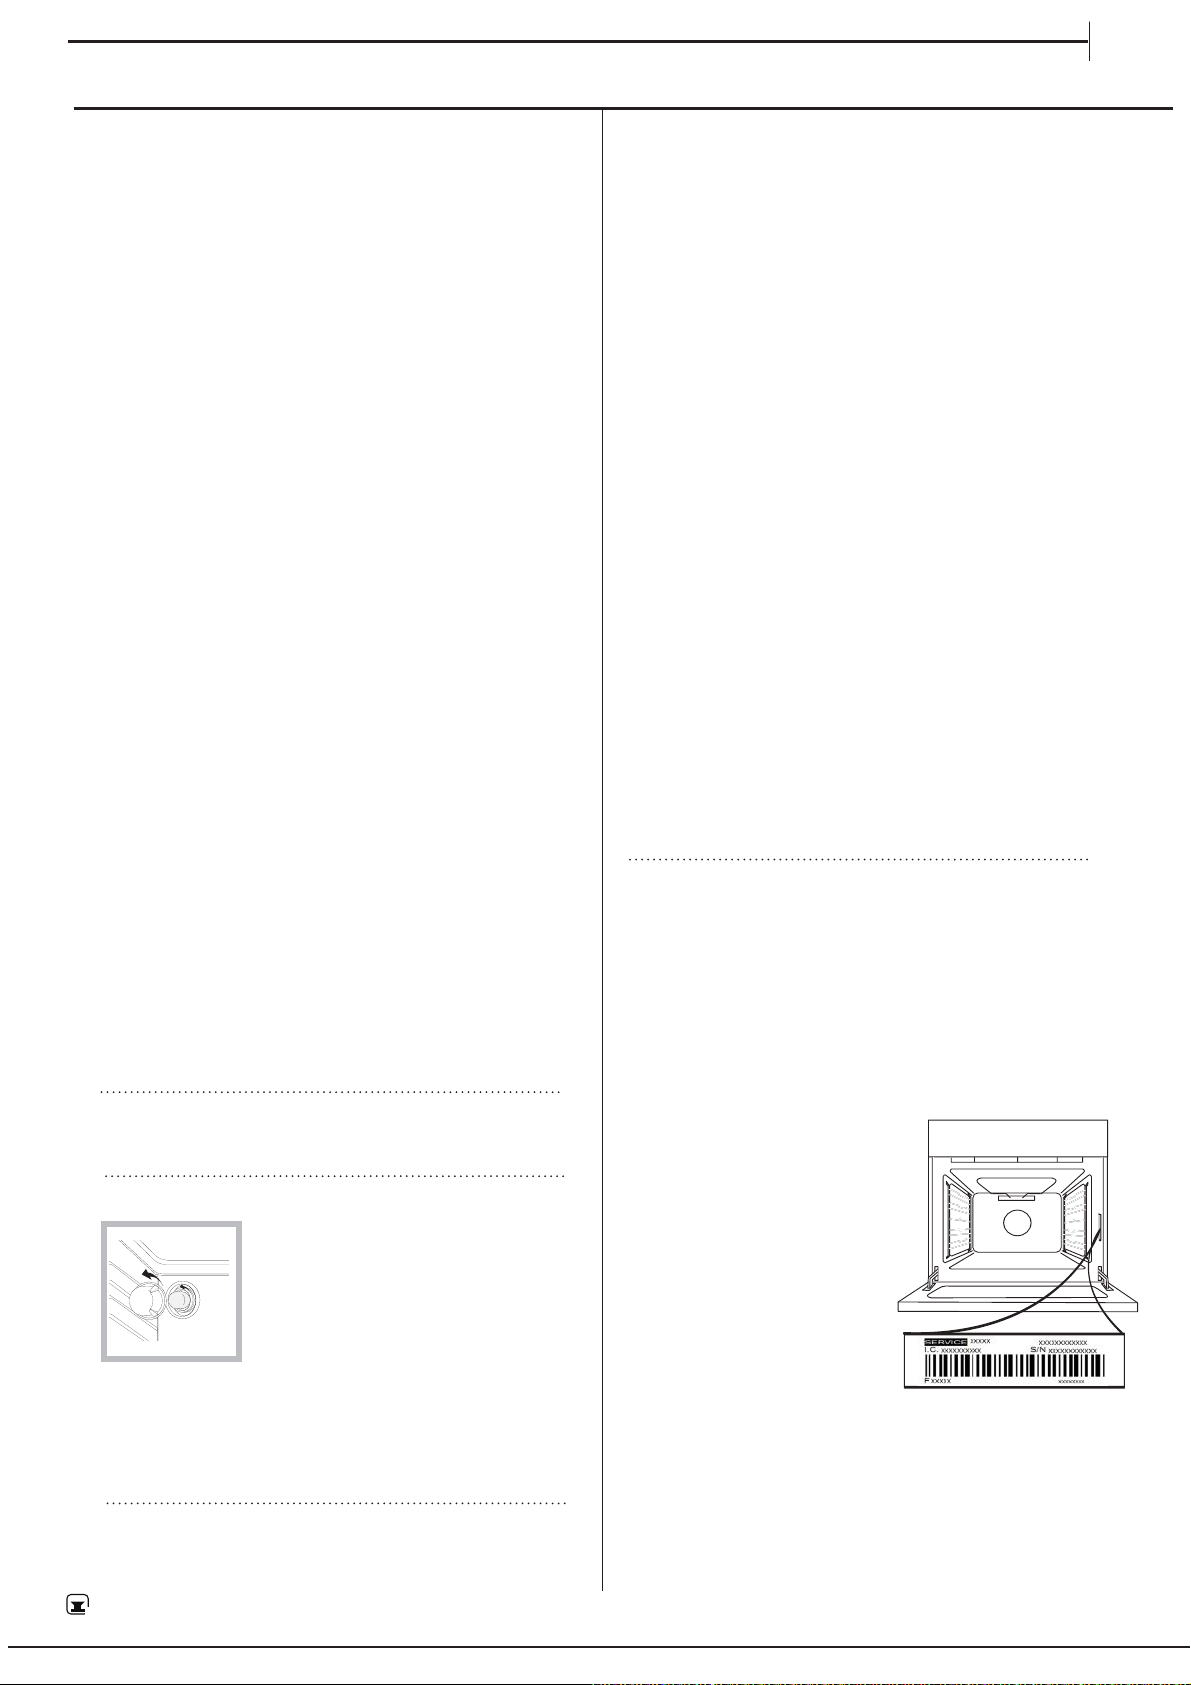
DE
Vorsichtsmaßregeln
und Hinweise
Energie sparen und Umwelt schonen
• Es empfiehlt sich, das Garprogramm GRILL stets bei
geschlossener Backofentür zu verwenden: Dadurch
erzielen Sie nicht nur optimale Ergebnisse, sondern
sparen auch Energie
(ca. 10%).
• Nutzen Sie die Restwärme Ihrer Kochplatten
indem Sie bei Gusseisen-Kochplatten 10 Minuten
und Glaskeramik-Kochplatten 5 Minuten vor dem
geplanten Ende der Kochzeit ausschalten.
• Der Boden Ihrer Kanne oder Ihres Topfes sollte die
Kochplatte abdecken. Falls diese kleiner ist, wird
kostbare Energie verschwendet und ein Überkochen
kann vorkommen und es könnte schwierig werden die
Restkrusten zu reinigen.
• Kochen Sie Ihre Nahrung in Töpfen und Pfannen mit
passend geschlossenen Deckeln und verwenden Sie
möglichst wenig Wasser. Ohne Deckel zu kochen führt
zu einem erheblichen Energieverbrauch
• Verwenden Sie möglichst flache Töpfe und Pfannen
• Falls Sie etwas kochen, dass eine längere Zeit benötigt,
ist es angebracht wenn Sie ein Schnellkochtopf
benutzen, welches zweimal so schnell ist und ein drittel
der Energie spart.
• Falls möglich, Vorwärmen des Backofens vermeiden
und immer versuchen es zu füllen. Öffnen Sie die Tür
des Backofens etwas, da die Hitze bei jedem Öffnen
verloren geht. Um eine erhebliche Menge an Energie
zu sparen, schalten Sie den Backofen 5 bis 10 Minuten
vor dem geplanten Ende der Backzeit aus und nutzen
Sie die Hitze im Backofen herzustellen.
• Automatische Programme basieren auf Standard
Nahrungsprodukte.
• Halten Sie die Türdichtungen sauber und ordentlich
um Energieverluste zu vermeiden.
• Wenn Sie einen zeitabhängigen Stromtarif haben, dann
macht die Option “verzögertes Kochen“ es einfacher,
Geld durch Vorgänge in günstigeren Zeiträumen
einstellen.
Abschalten des Gerätes vom Stromnetz
Vor jeder Reinigung und Pflege ist das Gerät vom
Stromnetz zu trennen.
Pulverform und Scheuerschwämme ist zu vermeiden:
sie können die Oberfläche des Kochfeldes dauerhaft
beschädigen.
• Zur täglichen Pflege genügt es, das Kochfeld mit einem
feuchten Schwamm abzuwischen und mit Küchenpapier
abzutrocknen.
• Bei besonders starker Verschmutzung sollte ein spezielles
Reinigungsmittel für Glaskeramik verwendet werden.
Das Kochfeld anschließend mit Wasser abspülen und
sorgfältig trocknen.
• Starke Verschmutzungen lassen sich mit einem
zweckmäßigen Schaber entfernen (nicht im Lieferumfang
enthalten). Verschmutzungen sollten so schnell wie möglich
- und nicht erst nach Abkühlen des Kochfeldes - entfernt
werden, um zu vermeiden, dass sich die Verschmutzungen
festsetzen. Gute Ergebnisse lassen sich auch mit einem
für Glaskeramik geeigneten Spezialschwamm aus
Edelstahlwolle und einer einfachen Spüllauge erzielen.
• Auf dem Kochfeld versehentlich geschmolzene Alufolie,
Plastikteile oder Kunststoffe, sowie Zuckerreste müssen
umgehend mit einem Schaber von der noch warmen
Oberfläche entfernt werden.
• Nach der Reinigung kann das Kochfeld mit einem
Pflegeprodukt nachbehandelt werden: Der unsichtbare
Schutzfilm, den ein solches Produkt hinterlässt, schützt
die Oberfläche vor eventuell überkochenden Speisen. Es
empfiehlt sich, diese Nachbehandlung bei lauwarmem
oder abgekühltem Gerät vorzunehmen.
• Achten Sie darauf, das Kochfeld nach der Reinigung
stets mit klarem Wasser abzuspülen und anschließend
abzutrocknen. Reinigungsmittelrückstände könnten sich
nämlich bei der nächsten Benutzung des Kochfeldes
ihrerseits festsetzen.
KUNDENDIENST
Rufen Sie die Nummer in dem Garantieheft des
Produktes an oder folgen Sie den Anweisungen auf
unserer Internetseite. Halten Sie bereit:
• Eine kurze Beschreibung des Problems
• Den genauen Gerätetyp Ihres Produktes
• Der Kundendienstcode (die Nummer auf die das
Wort SERVICE folgt, angebracht auf dem Kennschild
am Produkt, welches auf der linken Seite in der Ecke
gesehen werden kann, wenn der Ofen geöffnet ist)
•
Ihre vollständige Anschrift
•
Eine Kontaktnummer
Austausch der Backofenlampe
1. Nachdem Sie den Backofen
von der Stromversorgung
abgenommen haben, entfernen
Sie die Glasabdeckung der
Lampenhalterung (siehe Abbildung).
2. Schrauben Sie die Lampe heraus
und ersetzen Sie sie durch eine
neue Lampe desselben Typs:
Spannung 230V, Leistung 25 W, Sockel E 14.
3. Setzen Sie die Abdeckung wieder ein und schließen
Sie den Backofen erneut an die Stromversorgung an.
Die Offenlampe darf nicht als Raumlampe
verwendet werden.
Reinigen des Glaskeramik-Kochfelds
Die Verwendung von Scheuermitteln oder scharfen
oder chemischen Reinigungsmitteln wie Backofensprays,
Fleckenentferner, Rostentfernungsmittel, Reiniger in
WWW
Eine komplette Beschreibung des Produkts, einschließlich der Energieeffizienzbewertungen für diesen
Ofen, kann auf unserer Internetseite gelesen und runtergeladen werden
www.indesit.comwww.indesit.comwww.indesit.com
Bitte beachten: Im Reparaturfall bitte einen autorisierten
Kundendienst kontaktieren, der Original-Ersatzteile
verwendet und die Reparaturarbeiten korrekt durchführt.
Bitte lesen Sie das mitgelieferte Garantieheft für weitere
Informationen der Garantie.
27
Page 28
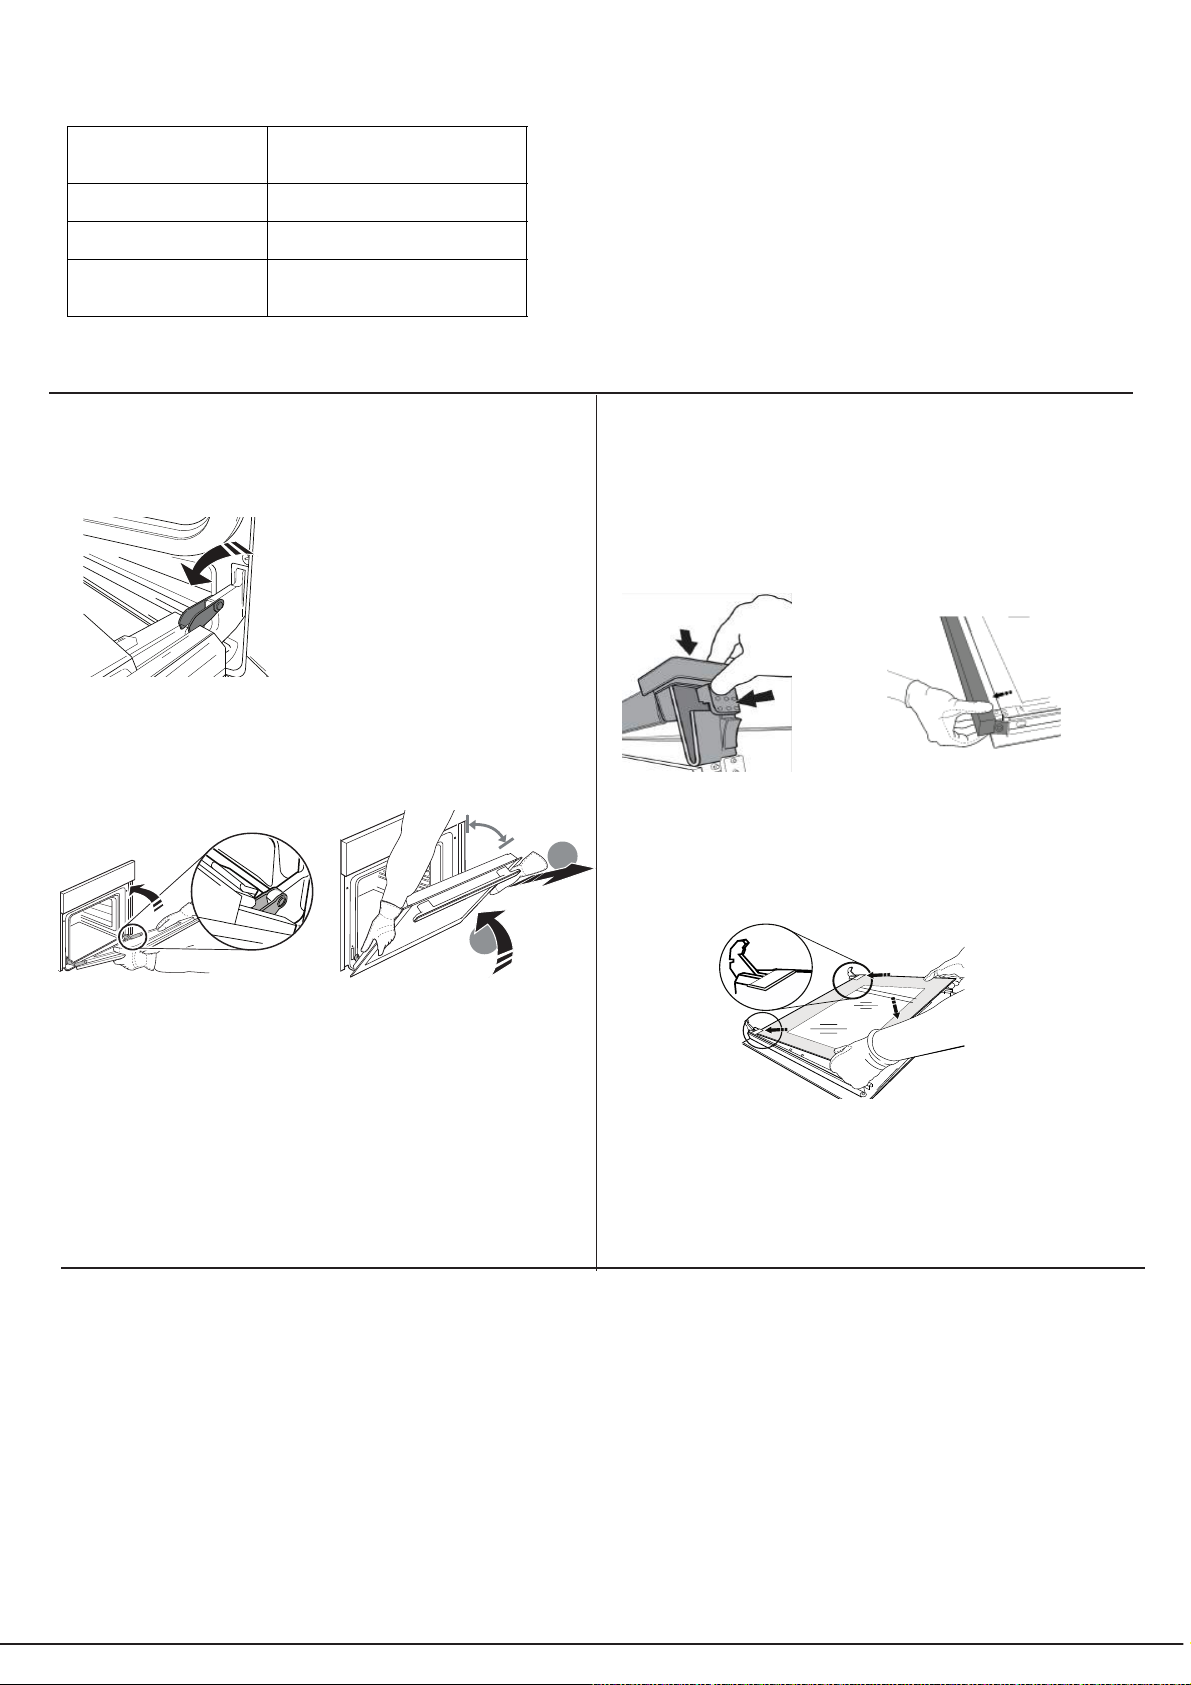
Reinigungsmittel für
GlaskeramikKochflächen
Fensterschaber
Rasierklingen Schaber
Ersatzklingen Baumärkte, Supermärkte,
COLLO lunetaHOB
BRITEHob
CleanSWISSCLEANER
Erhältlich bei
Baumärkten
Drogerien
Ständen, Co-op Läden,
Kaufhäusern, Läden der
Stromversorger, Supermärkte
AUSBAU UND ERNEUTES ANBRINGEN DER TÜR
1.
Zur Entfernung der Tür, diese vollständig önen und die Haken
senken, bis sie sich in entriegelter Position benden.
2.
Die Tür so weit wie möglich schließen.
Die Tür mit beiden Hände festhalten – diese nicht am Gri festhalten.
Die Tür einfach entfernen, indem sie weiter geschlossen und
gleichzeitig nach oben (a) gezogen wird, bis sie sich aus ihrem Sitz löst
(b).
~15°
b
~60°
a
Die Tür seitlich abstellen und auf eine weiche Oberäche legen.
Die Tür erneut anbringen, indem sie zum Ofen geschoben wird
3.
und die Haken der Scharniere auf ihre Sitze ausgerichtet werden, den
oberen Teil auf seinem Sitz sichern.
Die Tür senken und anschließend vollständig önen.
4.
Die Haken in ihre Ausgangsposition senken: Sicherstellen, dass die
Haken vollständig gesenkt werden.
Versuchen, die Tür zu schließen und sicherstellen, dass sie auf
5.
das Bedienfeld ausgerichtet ist. Ist dies nicht der Fall, die oben
aufgeführten Schritte wiederholen.
ZUM REINIGEN AUF - GLASREINIGUNG KLICKEN
1.
Nach dem Ausbau der Tür diese auf einer weichen Fläche mit dem
Gri nach unten abgelegen, gleichzeitig die zwei Halteklammern
drücken und die obere Kante der Tür zu sich ziehen und entfernen.
2.
Das Innenglas mit beiden Händen anheben und fest halten, es
entfernen und auf eine weiche Fläche legen, um es daraufhin zu
reinigen.
3.
Wenn Sie die innere Glastür wieder einbauen,
fügen Sie die Glasplatte korrekt ein, so das der auf der
Platte geschriebene Text nicht verdreht ist und leicht
erkennbar ist.
Die obere Ecke wieder anbringen: ein Klick bestätigt die richtige
4.
Positionierung. Sicherstellen, dass die Dichtung vor Wiedereinbau der
Tür befestigt wird.
Katalytische Reinigung
In einigen Modellen sind die am stärksten exponierten
vertikalen Innenseiten des Ofens mit porösem
Schmelz beschichtet, der als katalytischer Schmelz
bezeichnet wird. Beim Erhitzen zerstört dieser
Schmelz Fettpartikel, die von der Nahrung abgegeben
werden. Diese "Oxidation" der Fettpartikel tritt ein,
wenn die Temperatur der Seitenwände 170°C
überschreitet. Die poröse Qualität des katalytischen
Schmelzes vergrößert die Oberfläche, auf der der für
die Oxidation der Fette wichtige Austausch stattfindet.
28
Wenn sich nach Beendigung des Garprogramms noch
Schmutz auf den katalytischen Oberflächen befindet,
lassen Sie den leeren Ofen bei geschlossener Tür
eingeschaltet und drehen Sie den Temperaturregler auf
die maximale Einstellung. Lassen Sie den Ofen so für
eine Zeitspanne zwischen 60 und 90 Minuten stehen, je
nachdem, wie viel Schmutz im Inneren geblieben ist. Der
Reinigungsprozess für hartnäckigere
Lebensmittelrückstände kann durch heißes Wasser und
eine weiche Bürste beschleunigt werden.
Page 29
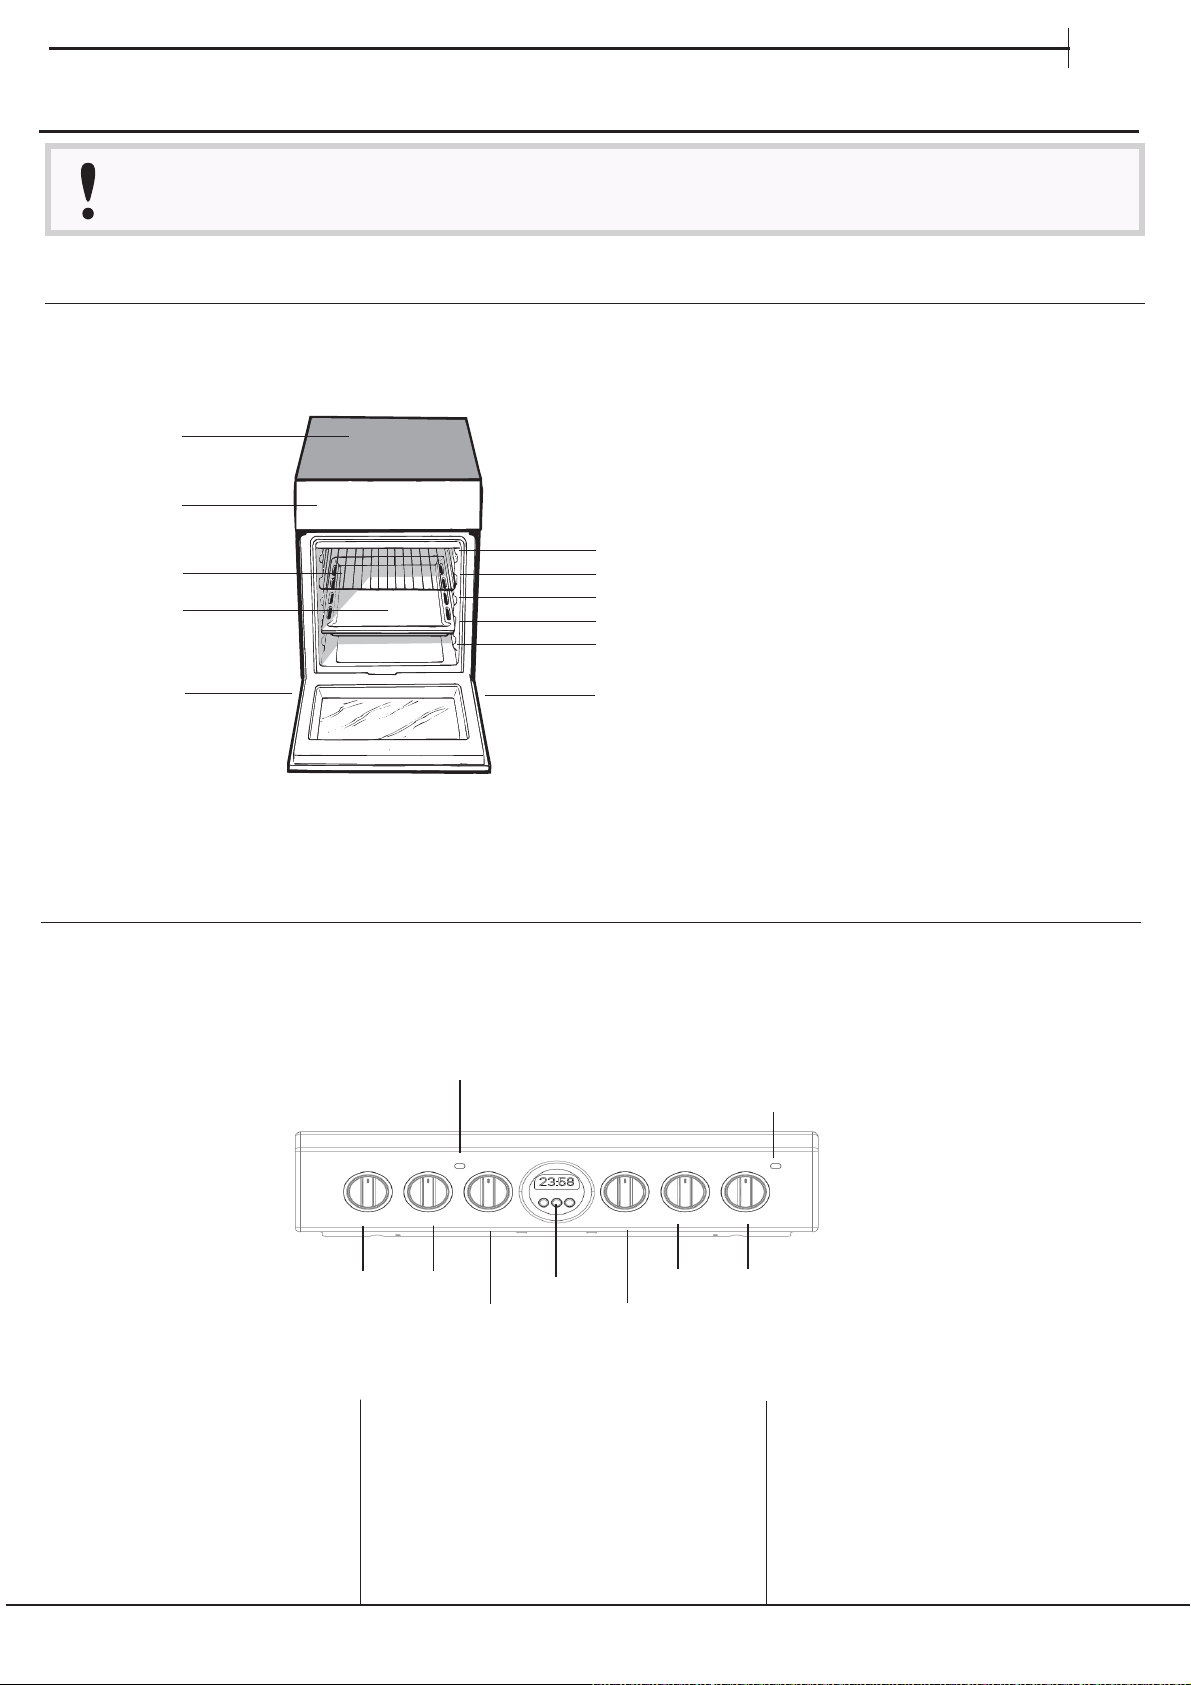
GUIDA RAPIDA
Leggere attentamente le istruzioni per la sicurezza prima di utilizzare il prodotto.
DESCRIZIONE PRODOTTO
IT
1
2
3
4
10
PANNELLO DEI COMANDI
5
6
7
8
9
10
Piano di cottura in vetroceramica
1.
Pannello di controllo
2.
3.
Vano griglia scvorrevole
4.
Leccarda
GUIDE per vani scorrevoli
5.
posizione 5
posizione 4
6.
posizione 3
7.
.posizione 2
8.
posizione 1
9.
Piedino regolabile
10.
Manopole di
1.
comando dei
BRUCIATORI
Manopole di
2.
comando dei
BRUCIATORI
Spia del
3.
TERMOSTATO
3
9
1
2
5
4
Manopola del
4.
TERMOSTATO
Manopola TIMER
5.
Manopola di
6.
SELEZIONE
7
6
8
Manopole di
7.
comando dei
BRUCIATORI
Manopole di
8.
comando dei
BRUCIATORI
Luce spia piastra di cottura elekttrica
9.
29
Page 30
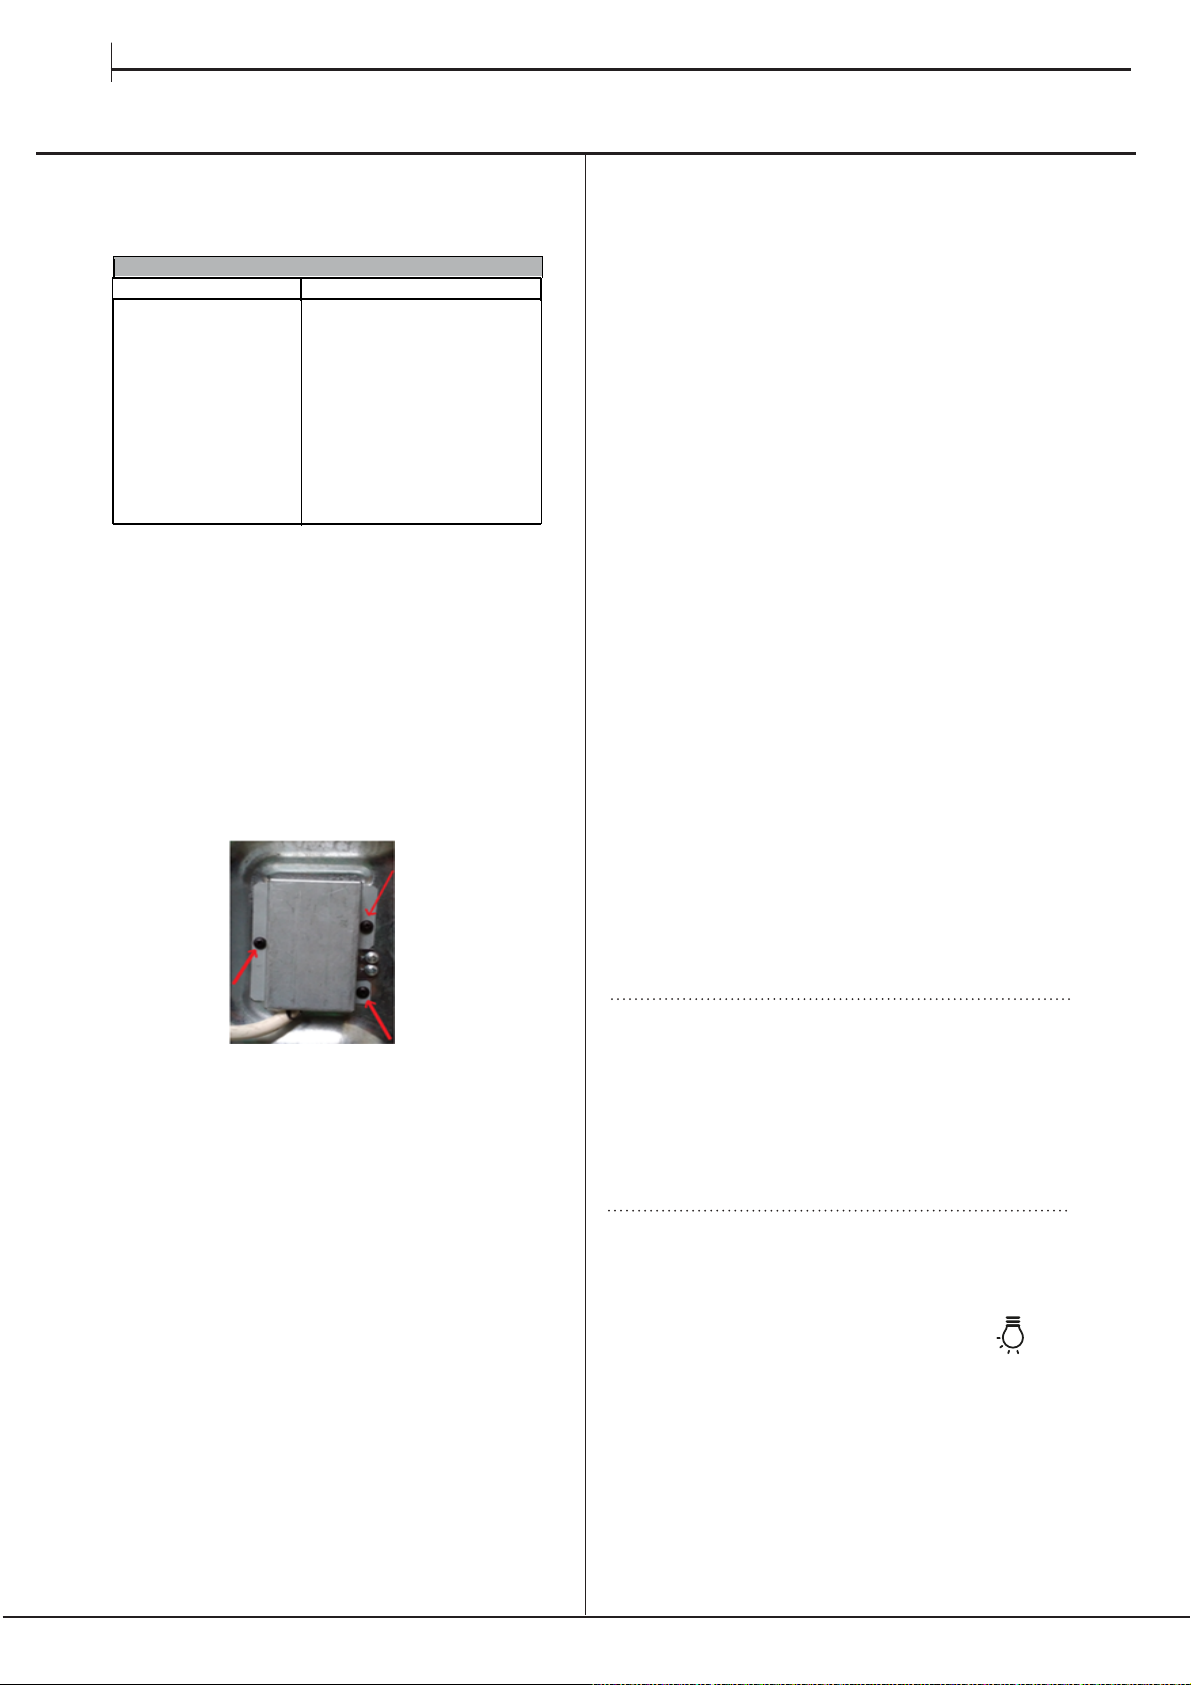
IT
Consigli per l'installazione
Uso del forno
TABELLA DELLE CARATTERISTICHE
Tensione e frequenza
ETICHETTA
ENERGETICA
e ECODESIGN
rimandiamo alla targhetta dei dati
Consumo energetico per
convezione naturale - modalità di
riscaldamento:
ECO
Alla prima accensione fare funzionare il forno a vuoto
per almeno un’ora con il termostato al massimo e a
porta chiusa. Poi spegnere, aprire la porta del forno
e aerare il locale. L’odore che si avverte è dovuto
all’evaporazione delle sostanze usate per proteggere il
forno.
1. Selezionare il programma di cottura desiderato
ruotando la manopola PROGRAMMI.
2. Scegliere la temperatura consigliata per il
programma o quella desiderata ruotando la manopola
TERMOSTATO.
Una lista con le cotture e le relative temperature
consigliate è consultabile nell’apposita tabella (vedi
Tabella cottura in forno).
Durante la cottura è sempre possibile:
• modifi care il programma di cottura agendo sulla
manopola PROGRAMMI;
• modifi care la temperatura agendo sulla manopola
TERMOSTATO;
• pianifi care la durata e l’ora di fi ne della cottura (vedi
sotto);
• interrompere la cottura riportando la manopola
PROGRAMMI in posizione “0”.
Dopo avere installato il cavo di alimentazione,
sare il coperchio metallico con tre viti.
fis
Non appoggiare mai oggetti sul fondo del forno perché
si rischiano danni allo smalto.
Porre sempre i recipienti di cottura sulla griglia in
dotazione.
Spia indicatore TERMOSTATO
Quando è illuminato, il forno sta producendo calore.
Si spegne quando l’interno del forno raggiunge la
temperatura selezionata. A questo punto la spia si illumina
e si spegne a intermittenza, indicando che il termostato
funziona e sta mantenendo la temperatura a un livello
costante.
Luce forno
Quando viene acceso ruotando la manopola SELETTORE
in qualsiasi posizione diversa da “0”. Rimane acceso
fintantoché il forno è in funzione. Selezionando
manopola, la luce si accende senza che vengano attivati
gli elementi della resistenza.
con la
30
Page 31
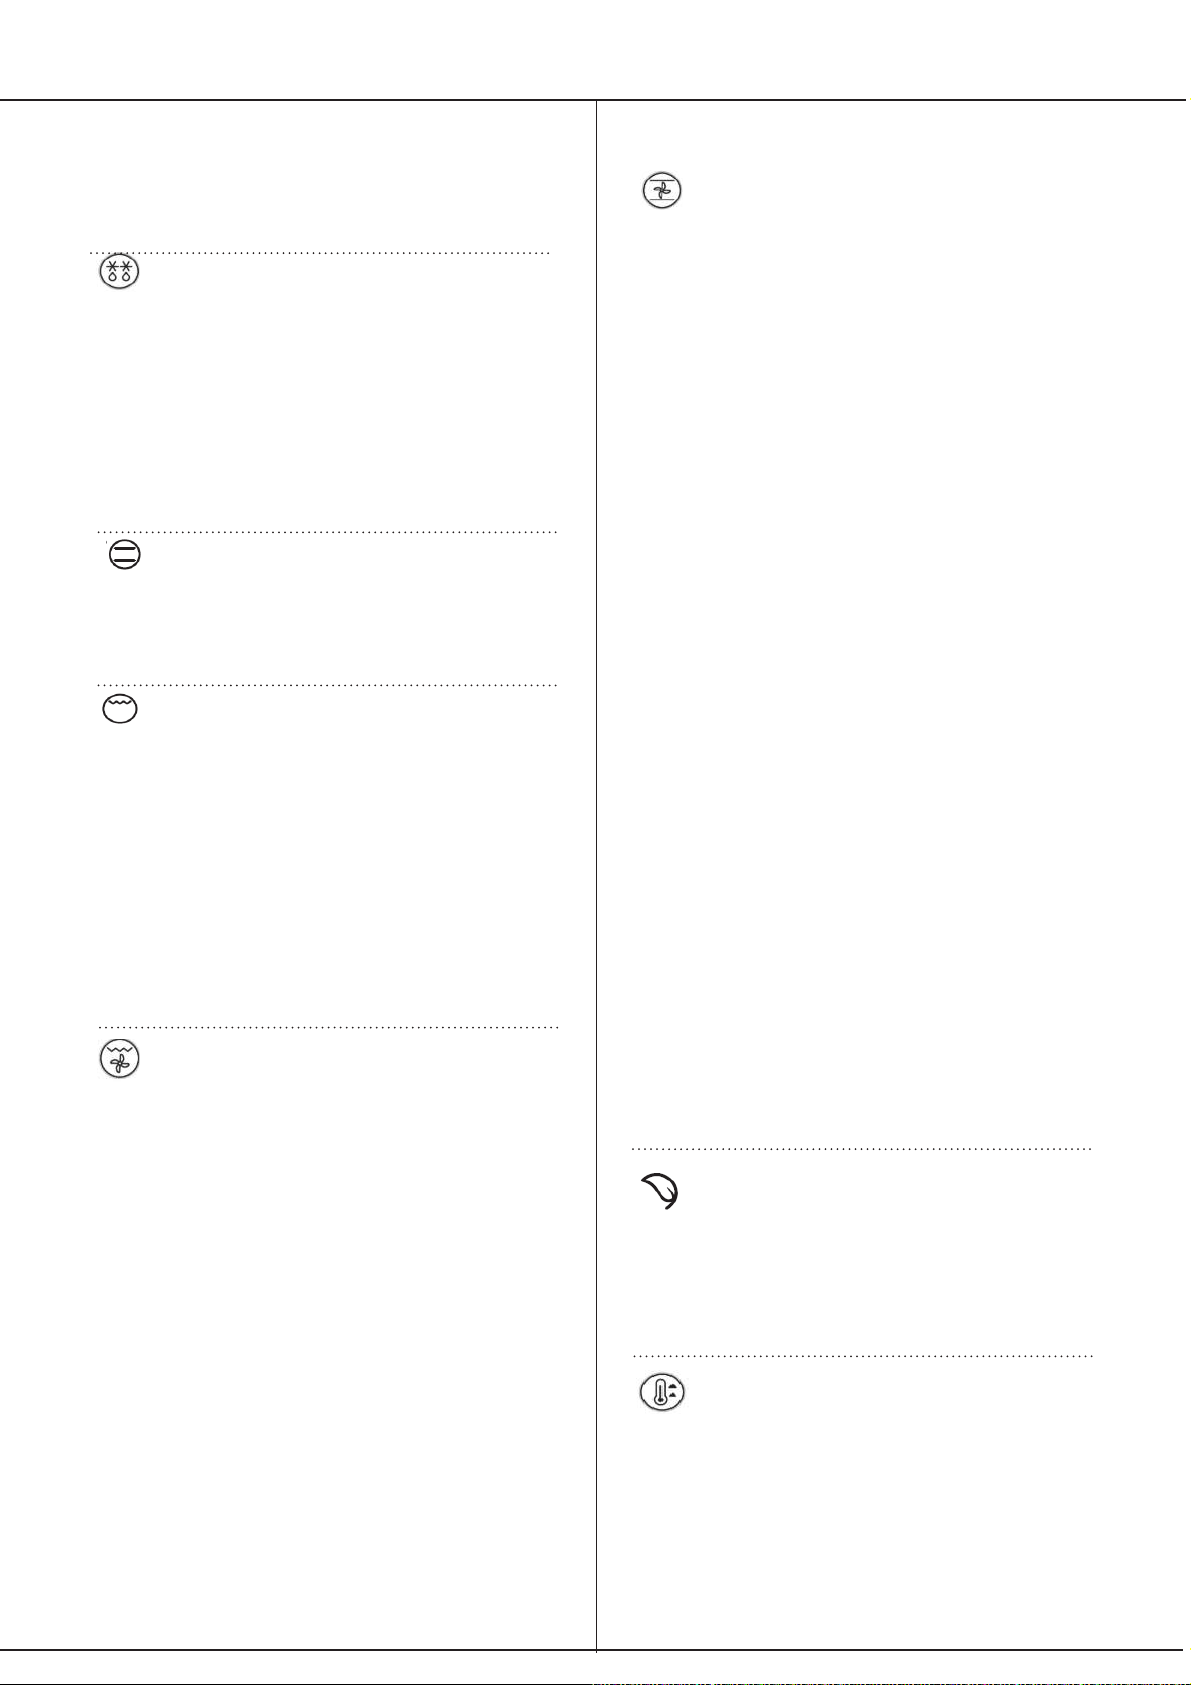
Programmi di cottura
Per tutti i programmi è impostabile una temperatura
tra 60°C e MAX, tranne per il programma GRILL, per
il quale si consiglia di impostare solo su MAX.
Programma SCONGELAMENTO
Posizione manopola termostato :qualunque
La ventola posta sul fondo del forno fa circolare l’aria
a temperatura ambiente attorno al cibo. E’ indicato
per lo scongelamento di qualsiasi tipo di cibo, ma in
particolare per cibi delicati che non vogliono calore
come ad esempio: torte gelato, dolci alla crema o con
panna, dolci di frutta. Il tempo di scongelamento viene
all’incirca dimezzato. Nel caso di carni pesci o pane è
possibile accelerare utilizzando la funzione “ventilato”
impostando una temperatura di 80° - 100°C.
Programma FORNO TRADIZIONALE
Si attivano i due elementi riscaldanti inferiore e
superiore. Con questa cottura tradizionale è meglio
utilizzare un solo ripiano: con più ripiani si ha una
cattiva distribuzione della temperatura.
Programma GRILL
Posizione manopola termostato: Max.
Si accende l’elemento riscaldante superiore centrale.
La temperatura assai elevata e diretta del grill
consente la immediata rosolatura superficiale dei
cibi che, ostacolando la fuoriuscita dei liquidi, li
mantiene più teneri internamente. La cottura al grill
è particolarmente consigliata per quei piatti che
necessitano di elevata temperatura superficiale:
bistecche di vitello e manzo, entrecôte, filetto,
hamburger etc...
Alcuni esempi di utilizzo sono riportati al paragrafo
“Consigli pratici per la cottura”.
Programma GRILL VENTILATO
Posizione manopola termostato: Tra 50°C e 200°C.
Si accende l’elemento riscaldante superiore centrale e si
mette in funzione la ventola.
Unisce all’irradiazione termica unidirezionale la
circolazione forzata dell’aria all’interno del forno. Ciò
impedisce la bruciatura superficiale degli alimenti
aumentando il potere di penetrazione del calore. Risultati
eccellenti si ottengono utilizzando il grill ventilato per
spiedini misti di carne e verdura, salsicce, costine di
maiale, costolette di agnello, pollo alla diavola, quaglie
alla salvia, filetto di maiale etc...
Fra i pesci il forno gratinante è insuperabile nella cottura
di tranci di cernia, di tonno, di pesce spada, seppioline
ripiene etc...
Programma “IL VENTILATO”
- Posizione manopola: a scelta fra 50°C e Max
Nel forno ventilato, a circolazione forzata d’aria calda,
il calore ruota attorno al cibo mosso continuamente
da una turbina posta sul fondo del forno. E’ l’aria
che cuoce e rosola così il cibo in modo uniforme e in
tutti i punti. E dato che nel forno ventilato il calore è
costante ed uniforme in tutto il forno, potete cuocere
contemporaneamente anche pietanze diverse tra
loro, purchè le temperature di cottura siano simili. E’
possibile utilizzare due ripiani contemporaneamente
seguendo le avvertenze riportate nel paragrafo
“Cottura contemporanea su più ripiani”. Alcuni
consigli sui cibi più indicati da cucinare nel ventilato:
ottimi risultati si ottengono con i primi piatti che
necessitano di gratinatura e cottura abbastanza
lunga ad esempio: lasagne, maccheroni pasticciati,
risotti soffiati, vol au vent etc...
Per le carni notevoli vantaggi si ottengono per la
cottura degli arrosti in quanto la migliore distribuzione
della temperatura consente di utilizzare temperature
più basse che riducono la dispersione degli
umori mantenendo così le carni più morbide e
riducono notevolmente il calo di peso. Il ventilato
è particolarmente apprezzato per la cottura dei
pesci che possono essere cucinati con pochissima
aggiunta di condimenti mantenendo così inalterato
l’aspetto e il sapore.Per i contorni eccellenti risultati
si ottengono nelle cotture di verdure brasate
quali cavoloverza, rape rosse, carote, zucchine,
melanzane, peperoni.
Desserts: risultati sicuri si ottengono cuocendo torte
lievitate come pan di spagna, brioches, croissants.
La funzione ventilato può anche essere usata per
scongelare carne bianca o rossa, pesce, pane,
impostando una temperatura di 80°-100°C. Per
scongelare cibi più delicati potete impostare 50°C o
usare la sola circolazione di aria fredda impostando
la manopola termostato a 0°C.
Modalità ECO
Per cuocere arrosti ripieni e filetti di carne su uno
stesso ripiano. Per utilizzare il ciclo ECO e ottimizzare
quindi i consumi energetici, la porta forno non deve
essere aperta fino a completamento della cottura del
cibo.
Modalità PRERISCALDAMENTO RAPIDO
Le cotture FORNO SOPRA, GRILL e GRATIN debbono
essere effettuate a porta chiusa.
Nelle cotture FORNO SOPRA e GRILL mettere la
griglia in posizione 5 e la leccarda in posizione 1 per
raccogliere i residui di cottura (sughi e/o grassi). Nella
cottura GRATIN mettere la griglia in posizione 2 o 3 e
la leccarda in posizione 1 per raccogliere i residui di
cottura.
Per riscaldare rapidamente il forno. Attendere il
termine del preriscaldamento prima di introdurre gli
alimenti nel forno, quindi selezionare la funzione di
cottura preferita.
31
Page 32
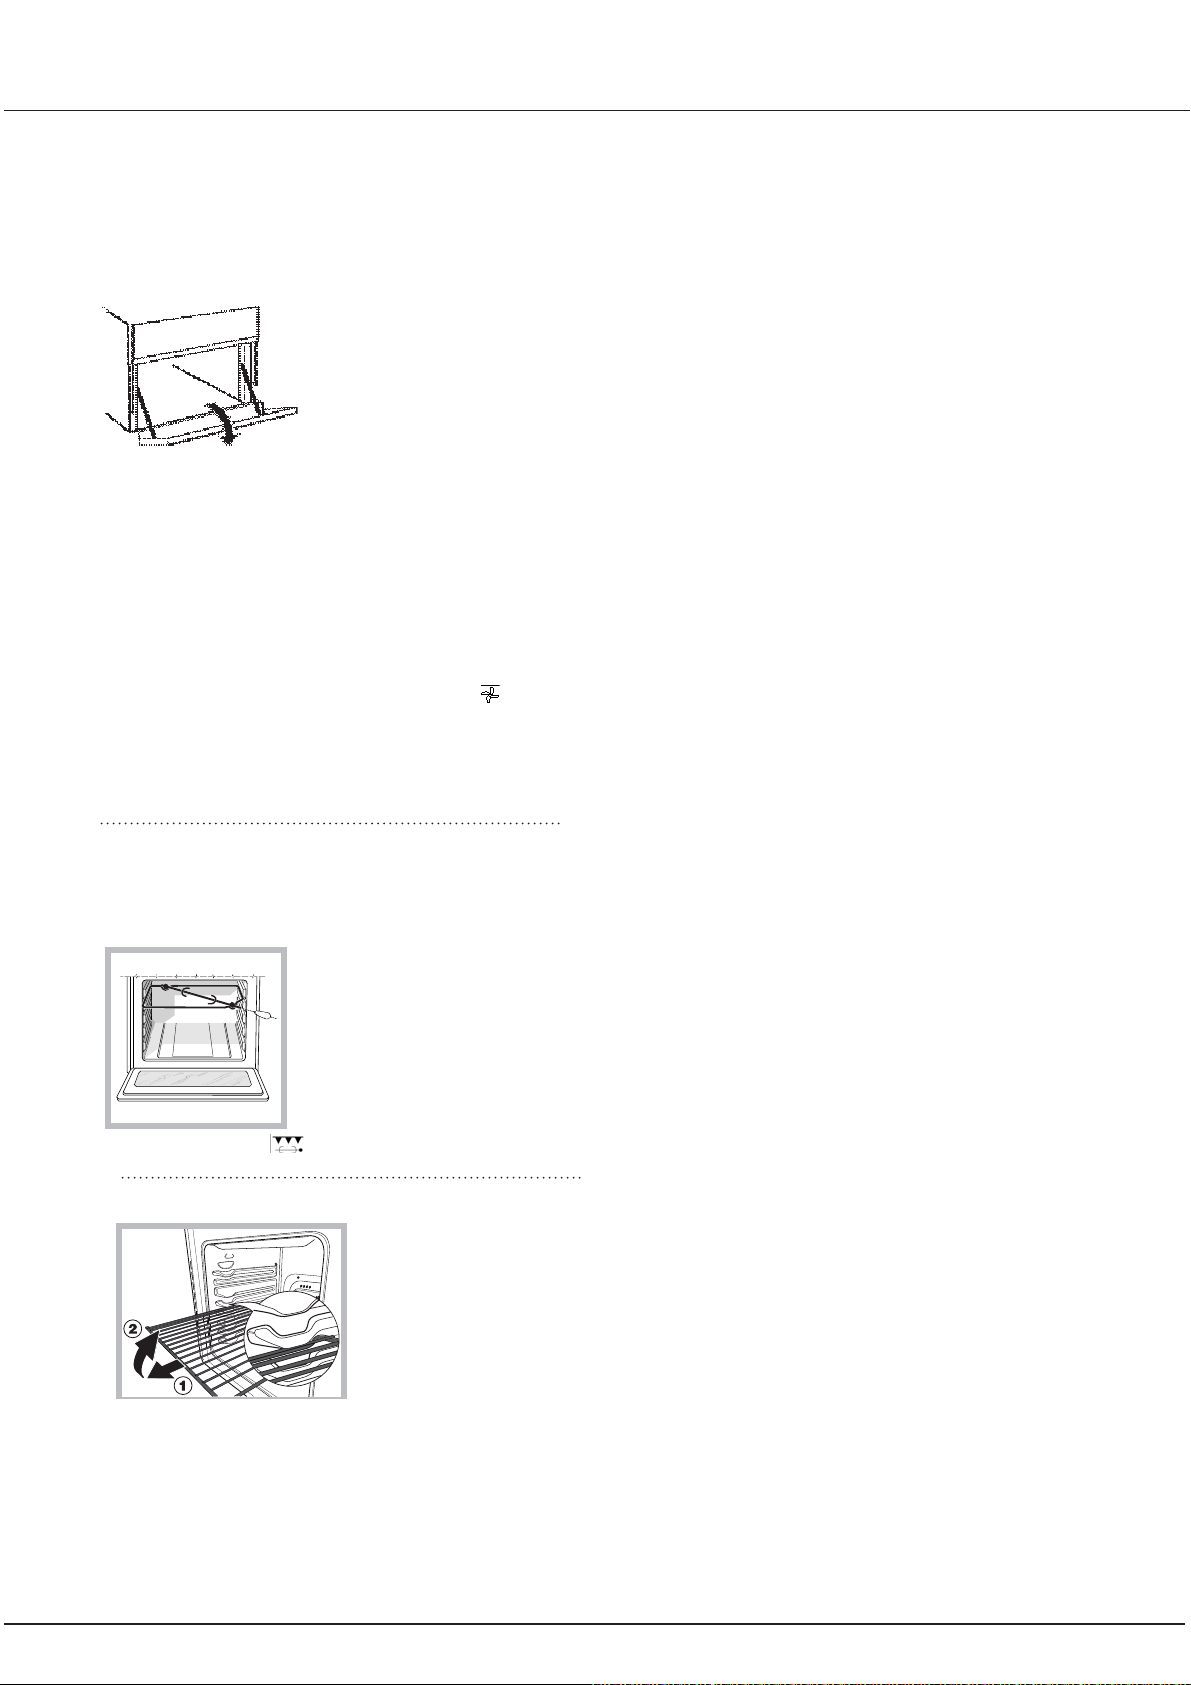
Vano inferiore*
Sotto il forno è presente un vano che può essere
utilizzato per il deposito di accessori o casseruole. Per
aprire lo sportello è necessario
farlo ruotare verso il basso.
Attenzione: non utilizzare
mai il vano per il deposito di
materiale infiammabile.
Il forno mette a vostra
disposizione una vasta gamma
di possibilità che consentono
di cuocere ogni cibo nella
maniera migliore. Con il tempo
potrete sfruttare al meglio questo versatile apparecchio
di cottura, pertanto le note riportate di seguito sono
solamente delle indicazioni di massima che potrete
ampliare con la vostra esperienza personale.
Preriscaldamento
Nel caso in cui sia necessario preriscaldare il forno,
in linea di massima tutte le volte in cui si cuocciano
cibi lievitati, è possibile utilizzare la funzione
“ventilato” che consente di raggiungere la temperatura
desiderata in breve tempo e con consumi ridotti.
Una volta infornato si può passare alla funzione di
cottura più indicata.
Il girarrosto
Per azionare il girarrosto procedere nel modo
seguente:
a) posizionare la leccarda al 1° ripiano;
b) inserire l’apposito sostegno
del girarrosto al 4° ripiano
e posizionare lo spiedo
inserendolo, attraverso l’apposito
foro, nel girarrosto posizionato nel
retro del forno;
c) azionare il girarrosto
selezionando con la manopola
forno la posizione
.
ATTENZIONE Il forno
e dotato di un sistema di
arresto griglie che consente di estrarle senza
che queste fuoriescano
dal forno. (1)
Per estrarre completamente le griglie e suf¿ -
ciente, come indicato sul
disegno, alzarle, prendendole dalla parte anteriore
e tirarle. (2)
32
*Solo in alcuni modelli
Page 33
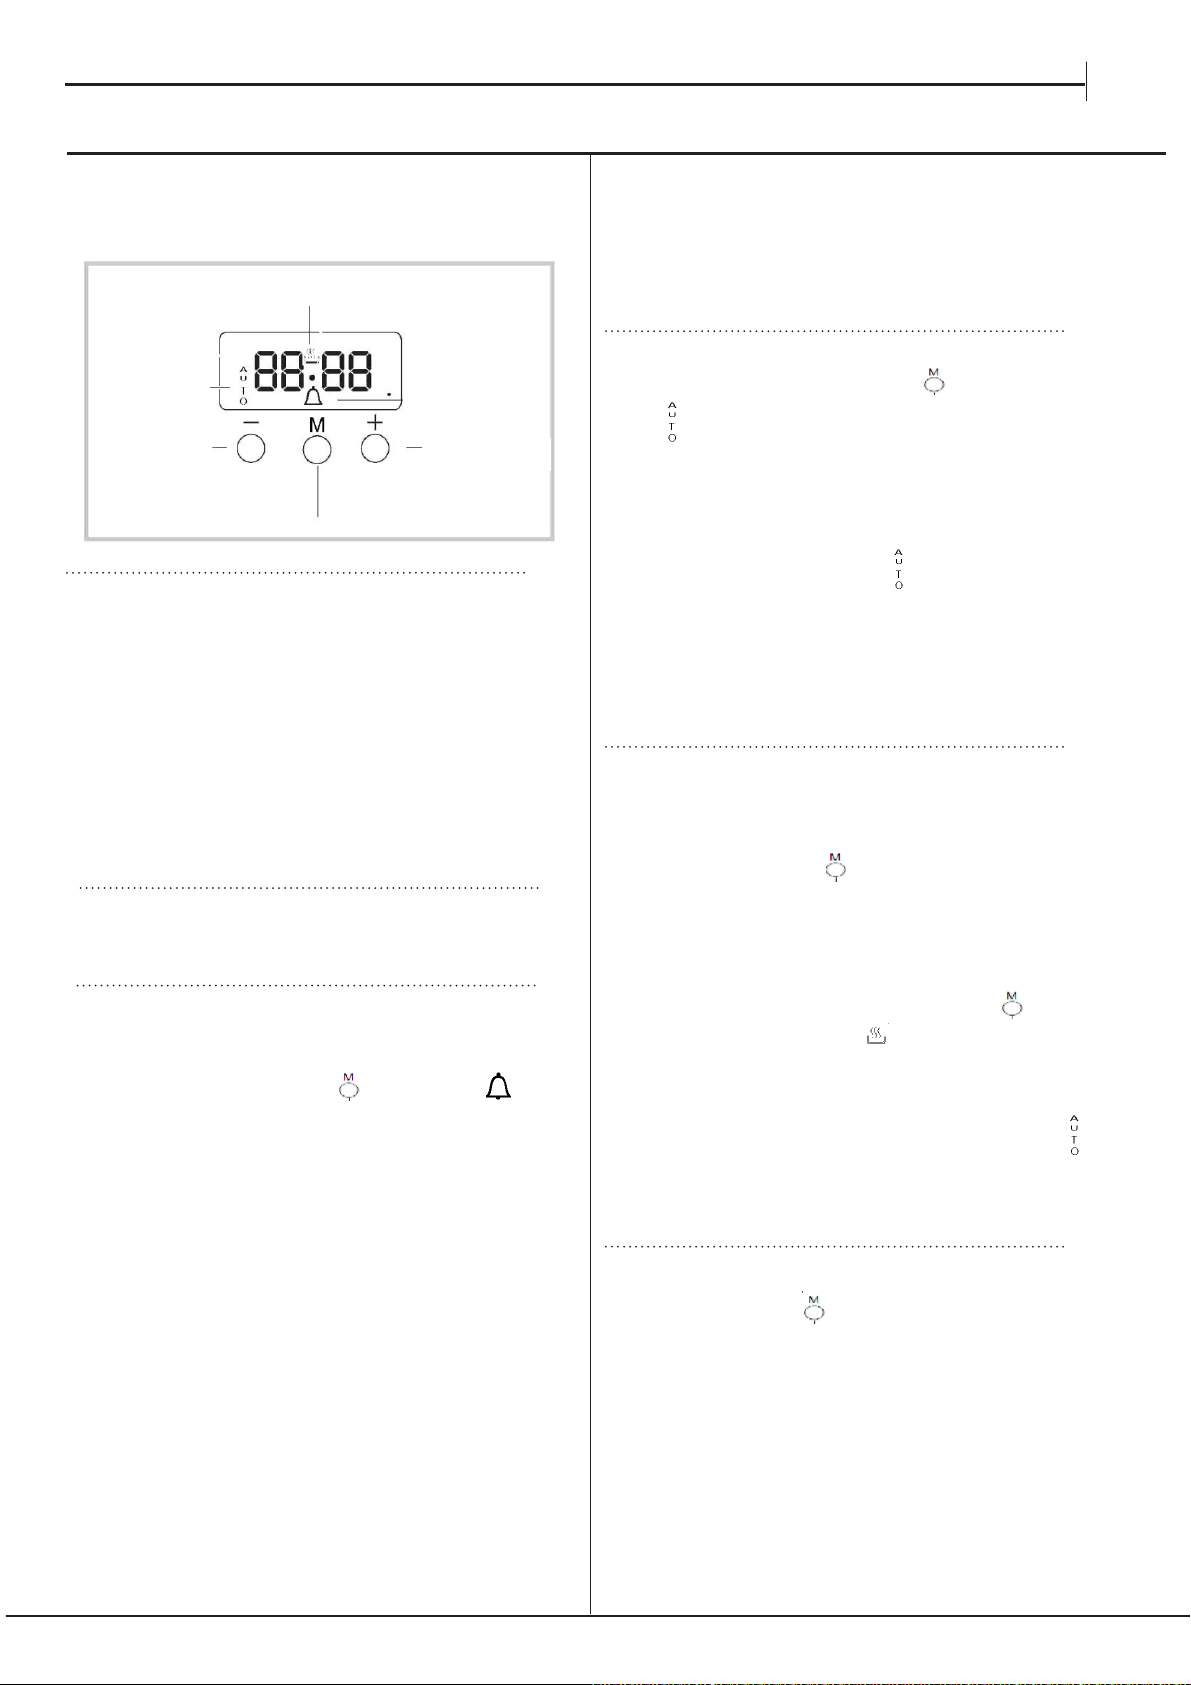
IT
Funzio
RIDUCI TEMPO
pulsante
Impostazione dell'orologio
L'orologio può essere impostato quando il forno è spento o quando
viene acceso, a condizione che il tempo di fine di un ciclo di cottura
non sia stato precedentemente programmato. Dopo aver collegato il
dispositivo alla presa di corrente,
o dopo un blackout, le cifre 00:00
sul DISPLAY iniziano a lampeggiare
1. Premere contemporaneamente i pulsanti "+" e "-"; i due punti fra
le ore e i minuti lampeggiano.
2. Usare i pulsanti "+" e "-" per impostare la durata desiderata;
premendo e tenendo premuto uno dei due pulsanti, si scorreranno
le varie opzioni più rapidamente, semplificando e velocizzando così
il processo di impostazione del valore.
Modificare la frequenza del cicalino
Quando si vede il testo "tonX" sarà possibile modificare la
frequenza del cicalino toccando ripetutamente il tasto "- ".
Avvio del contaminuti
Questa funzione non interrompe la cottura e non influisce sul
corretto funzionamento del forno; viene semplicemente usata per
attivare il cicalino quando è scaduto il tempo impostato.
1. Premere diverse volte il pulsante ' fino a che l'icona e le
tre cifre sul display non iniziano a lampeggiare.
2. Usare i pulsanti "+" e "-" per impostare il tempo desiderato;
premendo e tenendo premuto uno dei due pulsanti, si scorreranno
le varie opzioni più rapidamente, semplificando e velocizzando così
il processo di impostazione del valore.
3. Attendere 5 secondi, se viene premuto il pulsante un'altra volta
sul display compare il conto alla rovescia. Allo scadere del tempo il
cicalino viene attivato.
namento Orologio
PROCESSO DI
COTTURA
VISUALIZZAZIONE
AUTO
icona
AUMENTA TEMPO
pulsante
MODA
LITÀ
/ Contaminuti
Programmazione della cottura
Sarà necessario selezionare una modalità di cottura
prima di eseguire la programmazione.
Programmazione della durata di cottura
1. Premere diverse volte il pulsante fino a che
l'icona e le cifre DUR sul DISPLAY non iniziano a
lampeggiare
2. Usare i pulsanti "+" e "-" per impostare la durata desiderata; premendo e
tenendo premuto uno dei due pulsanti, si scorreranno le varie opzioni più
rapidamente, semplificando e velocizzando così il processo di impostazione
del valore.
3. Attendere 5 secondi, quindi l'icona sarà visibile sul display.
4. Quando il tempo impostato è scaduto e il forno interrompe la cottura si
sentirà il suono di un cicalino. Premere qualsiasi pulsante per interrompere il
cicalino.
• Ad esempio: sono le 9:00 a.m. ed è stato programmato un tempo di 1 ora
e 15 minuti. Il programma si interromperà automaticamente alle ore 10:15
a.m.
Impostazione del tempo di fine per una modalità di cottura
1. Seguire i passaggi dall'1 al 3 per impostare la durata secondo quanto
indicato sopra.
2. Quindi, premere il pulsante ' fino a che il testo END sul display non
inizia a lampeggiare
3. Usare i pulsanti “XX ” e “XX ” per regolare il tempo di fine cottura;
premendo e tenendo premuto uno dei due pulsanti, si scorreranno le varie
opzioni più rapidamente, semplificando e velocizzando così il processo di
impostazione del valore.
4. Attendere 5 secondi o premere ancora il pulsante , quando il
processo di cottura inizia, il simbolo è visibile sul display.
5. Quando il tempo impostato è scaduto, il forno interrompe la cottura si
sentirà il suono di un cicalino. Premete un tasto qualsiasi per disattivare il
segnale.
La programmazione è stata effettuata quando l'icona è illuminata.
• Ad esempio: Sono le ore 9:00 a.m. ed è stata programmata una durata di
1 ora. L'orario 12:30 è stato impostato come tempo di fine cottura. Il
programma si avvierà automaticamente alle ore 11:30 a.m.
Annullamento di un programma
Per annullare un programma:
• premere il pulsante fino a che l'icona corrispondente
all'impostazione che si desidera cancellare e le cifre sul display non
staranno lampeggiando. Premere il pulsante "-" fino a che sul display non
compaiono le cifre 00:00.
• Premere e tenere premuti i pulsanti "+" e "-"; in questo modo verranno
annullate tutte le impostazioni precedentemente selezionate, comprese le
impostazioni del timer.
33
Page 34
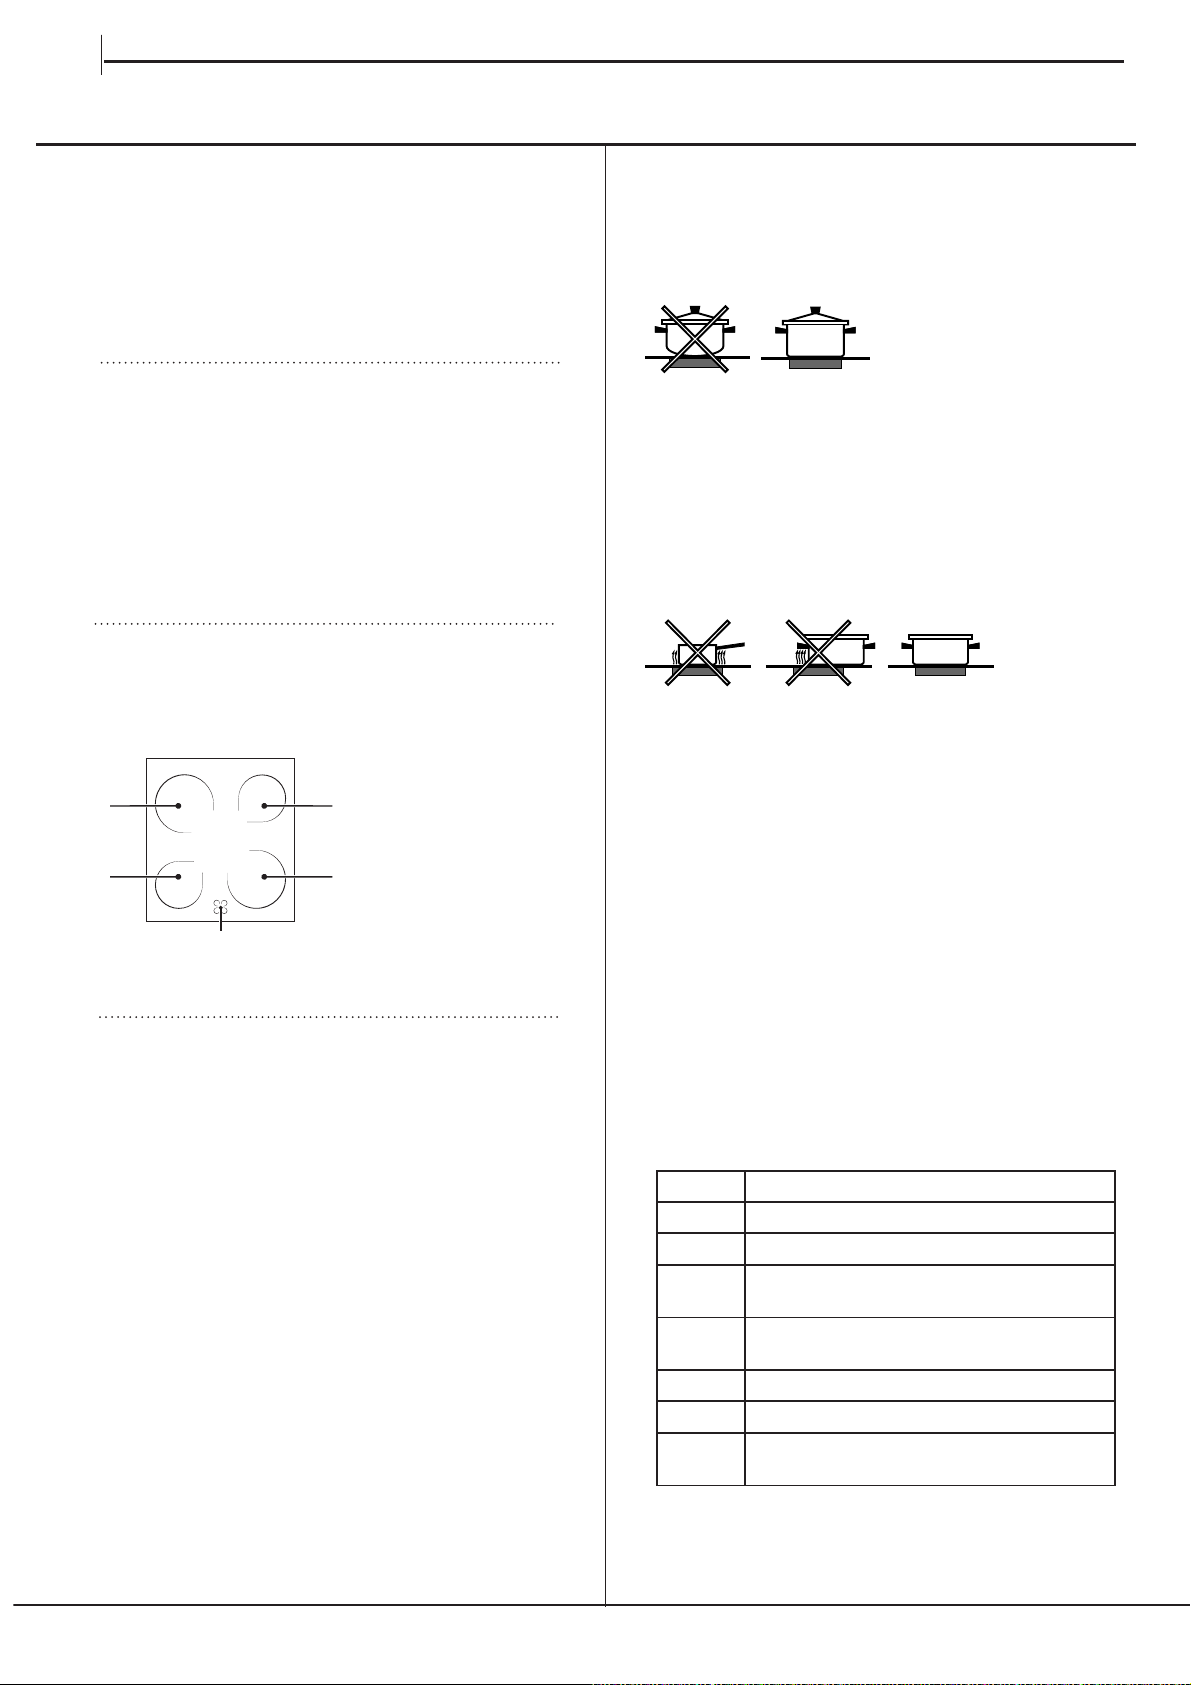
IT
Uso del piano di cottura in
La colla applicata sulle guarnizioni lascia tracce
di grasso sul vetro. Prima di usare il dispositivo,
consigliamo di rimuovere queste tracce con uno
speciale prodotto detergente non abrasivo. Nelle
prime ore di uso si potrebbe avvertire un odore di
gomma, che sparirà tuttavia in poco tempo.
Accensione e spegnimento delle zone di
cottura
Per accendere una zona di cottura, ruotare la manopola
corrispondente in senso orario.
Per spegnerlo nuovamente, ruotare la manopola in senso
anti-orario fino a che non si trova in posizione “0”.
Se l’indicatore ZONA DI COTTURA ON è acceso, ciò
indica che almeno una delle zone di cottura sul piano di
cottura è accesa.
Zone di cottura
vetroceramica
Suggerimento pratico sull’utilizzo della manopola
• Usare pentole con una base spessa a piatta per
assicurare una perfetta aderenza alla zona di cottura.
• Usare sempre pentole con un diametro sufficientemente
largo per coprire completamente la piastra di cottura
per usare tutto il calore prodotto.
Il piano di cottura è dotato di resistenze elettriche.
Quando sono in uso, i seguenti articoli sul piano cottura
diventano rossi.
A. La zona di cottura con
A
A
B
quando la resistenza è stata spenta ma è ancora calda.
Descrizione delle resistenze
Le resistenze circolari a emissione di calore diventano
rosse 10-20 secondi dopo essere state accese.
Le resistenze circolari a emissione di calore garantiscono
una distribuzione del calore omogenea in aggiunta
ai normali vantaggi che la resistenza a emissione di
calore comporta.
Le resistenze a emissione di calore producono elevati
quantitativi di calore non appena vengono accese,
offrendo i seguenti vantaggi sul piano pratico:
· riscaldamento rapido (in relazione al bruciatore a gas)
· raffreddamento rapido
· temperatura uniforme su tutta la superficie (a causa
delle resistenze circolari a emissione di calore)
resistenze a emissione
A
del calore.
B. La spina indicatore
del calore residuo: ciò
A
indica che la temperatura
della zona di cottura
corrispondente è
superiore a 60°C, anche
• Accertarsi sempre che la base della pentola sia
completamente pulita e secca: ciò garantisce che le
pentole aderiscano perfettamente alle zone di cottura
e che entrambe le pentole e il piano cottura restino in
funzione a lungo.
• Evitare di usare lo stesso pentolame usato per
bruciatori a gas: la concentrazione di calore sui
bruciatori a gas possono aver deformato la base della
pentola, impedendole di aderire correttamente alla
superficie.
• Non lasciare mai accesa una zona di cottura senza
una pentola sopra; questa operazione potrebbe
danneggiare la zona.
Impostazione
Normale o piastra rapida
0 Off
1 Cottura di verdura, pesce
Cottura di patate (vapore) zuppe,
2
ceci, fagioli
Continuazione della cottura di grandi
3
quantità di cibo, minestrone
4 Per arrostitura (media)
5
Per arrostitura (al di sopra della media)
Per rosolatura e per raggiungere la
6
temperatura di ebollizione in poco tempo
34
Page 35
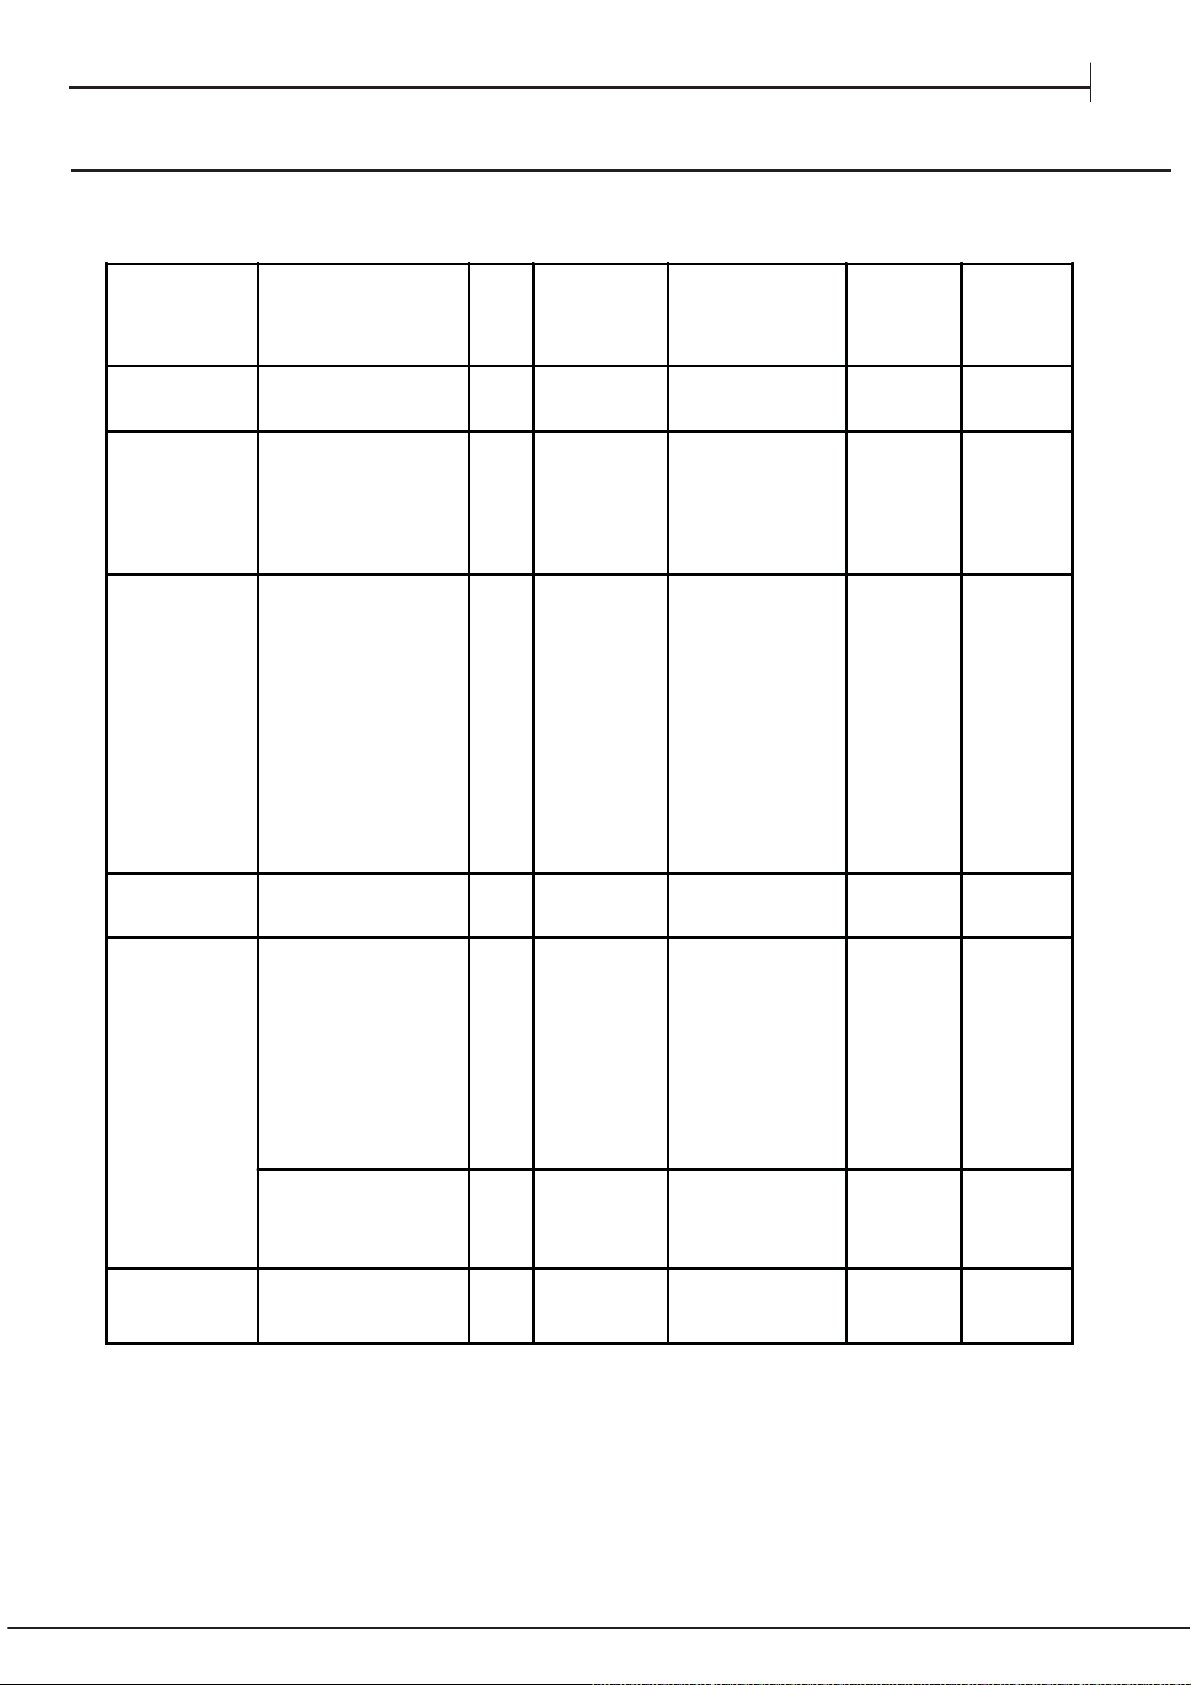
Tabella cottura in forno
IT
Posizione
manopola
selezione
Scongelamento
Statico
Ventilato
Forno Sopra
Cibo da cucinare Peso
(Kg)
Tutti i cibi surgelati
Anatra
Arrosto di vitello o
manzo
Arrosto di maiale
Biscotti (di frolla)
Crostate
(su 2 ripiani)
Pizza
Lasagne
Agnello
Pollo arrosto + patate
Sgombro
Plum-cake
(su 2 ripiani)
Bignč
Biscotti
(su 2 ripiani
Pan di spagna
ripiano
)
Pan di spagna
ripiani)
Tor t e sa la te
Ritocchi di cottura - 3/4 15 220 -
)
(su 1
(su 2
0.5
0.5
0.5
1.0
1.5
Posizione di
cottura ripiani
dal basso
1
1
1
1
1
1
1
1
1
1
3
3
3
3
3
2-4
3
2
2-4
2
2
2-4
2-4
2
2-4
3
Tempo di preriscaldamento
(minuti)
15
15
15
15
15
15
10
10
10
10
10
10
10
10
10
15
Posizione
manopola
termostato
200
200
200
180
180
220
200
180
180
180
170
190
180
170
170
200
Tempo di
cottura
(minuti)
65-75
70-75
70-80
15-20
30-35
15-20
30-35
50-60
60-75
30-35
40-50
20-25
10-15
15-20
20-25
25-30
Grill
Grill ventilato
NB: i tempi di cottura sono indicativi e possono essere modificati in base ai propri gusti personali. Nelle cotture al grill
o grill ventilato, la leccarda va posta sempre al 1° ripiano a partire dal basso.
Sogliole e seppie
Spiedini di calamari e
gamberi
Filetto di merluzzo
Verdure alla griglia
Bistecca di vitello
Cotolette
Hamburger
Sgombri
Toast
Con girarrosto
Vitello allo spiedo
Pollo allo spiedo
Agnello allo spiedo
Pollo alla griglia
Seppie
1
1
1
1
1
1
1
1
n.° 4
1.0
1.5
1.0
1.5
1.5
4
4
4
3/4
4
4
4
4
4
3
3
5
5
5
5
5
5
5
5
5
-
-
-
5
5
5
5
5
Max
Max
Max
Max
Max
Max
Max
Max
Max
Max
Max
Max
200
200
8-10
6-8
10
10-15
15-20
15-20
7-10
15-20
2-3
80-90
70-80
70-80
55-60
30-35
35
Page 36
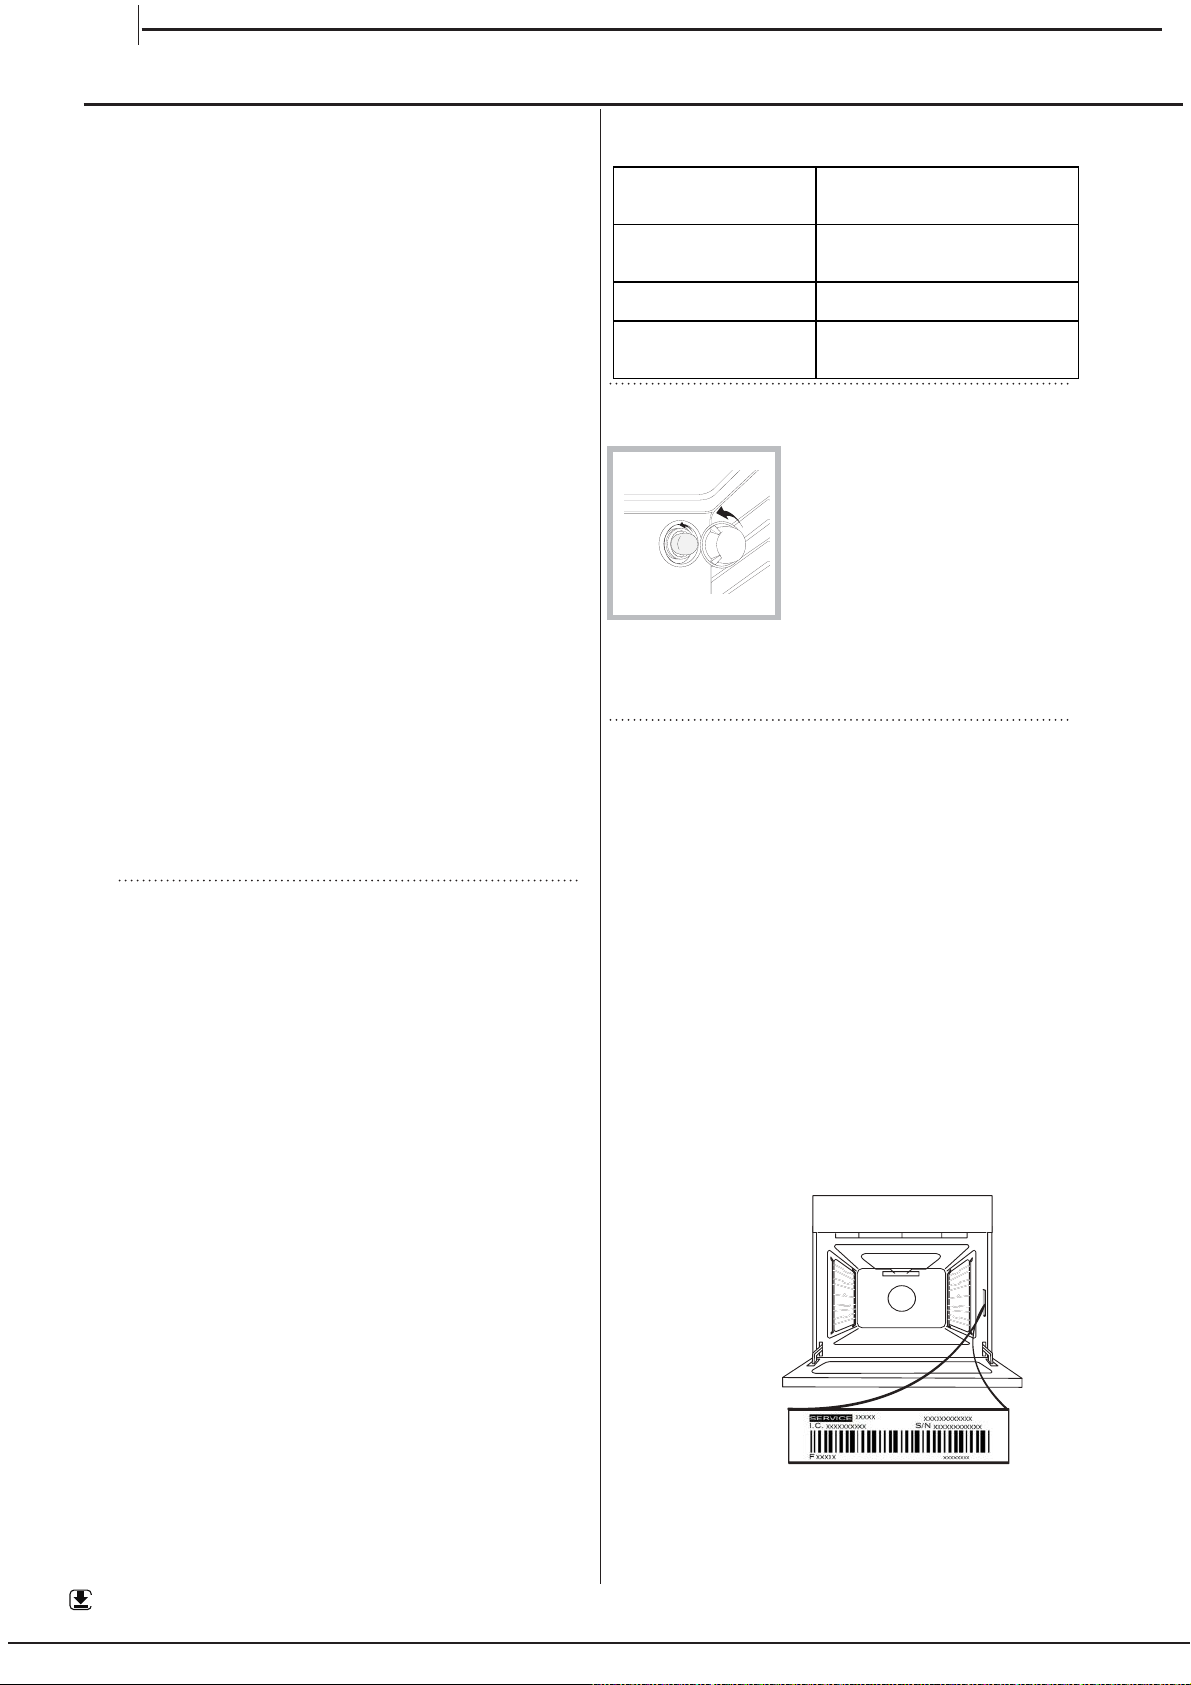
IT
Manutenzione e cura
Risparmiare e rispettare l’ambiente
• Si raccomanda di effettuare sempre le cotture
GRILL a porta chiusa: sia per ottenere migliori
risultati che per un sensibile risparmio di energia
(10% circa).
• Ove possibile, evitare di pre-riscaldare il forno e
• Ove possibile, evitare di pre-riscaldare il forno e
cercare sempre di riempirlo. Aprire la porta del forno
cercare sempre di riempirlo. Aprire la porta del forno
quanto necessario, perché vi sono dispersioni di calore
quanto necessario, perché vi sono dispersioni di calore
ogni volta che viene aperta. Per risparmiare molta
ogni volta che viene aperta. Per risparmiare molta
energia sarà sufficiente spegnere il forno dai 5 ai 10
energia sarà sufficiente spegnere il forno dai 5 ai 10
minuti prima della fine del tempo di cottura pianificato,
minuti prima della fine del tempo di cottura pianificato,
e servirsi del calore che il forno continua a generare.
e servirsi del calore che il forno continua a generare.
• Tenere le guarnizioni pulite e in ordine, per evitare
• Tenere le guarnizioni pulite e in ordine, per evitare
eventuali dispersioni di energia
eventuali dispersioni di energia
• Qualora si disponga di un contratto di fornitura elettrica
• Qualora si disponga di un contratto di fornitura elettrica
a tempo, l’opzione “ritarda cottura” semplificherà il
a tempo, l’opzione “ritarda cottura” semplificherà il
risparmio spostando il funzionamento nei periodi a
risparmio spostando il funzionamento nei periodi a
tariffa ridotta.
tariffa ridotta.
• La base della pentola dovrebbe coprire la piastra.
Qualora sia piccola, dell’energia preziosa andrà
persa,e le pentole in ebollizione presenteranno delle
incrostazioni difficili da rimuovere.
• Cucinare gli alimenti in pentole chiuse con coperchi
idonei e usare meno acqua possibile. Cucinare senza
coperchio aumenterà notevolmente il consumo in
termini di energia.
• Usare pentole e padelle piatte
• Se si stanno cucinando alimenti con un tempo di
cottura più lungo, consigliamo di usare una pentola a
pressione, che è due volte più rapida e consente di
salvare un terzo di energia.
Pulizia del piano di cottura in vetro
ceramica
Non usare detergenti abrasivi o corrosivi (ad esempio,
• Di norma basta lavare il piano cottura con una spugna
umida e asciugare con un rotolone da cucina.
• Se il piano di cottura è particolarmente sporco, strofinarlo
con un apposito prodotto per la pulizia del vetroceramica
e asciugare bene.
• Per rimuovere lo sporco più ostinato, usare un raschietto
adeguato (non fornito in dotazione col dispositivo).
Rimuovere eventuali perdite non appena possibile,
senza aspettare che il dispositivo si raffreddi, per evitare
che i residui formino depositi difficili da rimuovere.
Sarà possibile ottenere risultati eccellenti usando una
spugnetta “paglietta” progettata appositamente per le
superfici in vetro-ceramica, immersa in acqua saponata.
• Nel caso in cui si siano sciolte sostanze di plastica o
zucchero sul piano cottura, rimuoverle immediatamente
col raschietto, mentre la superficie è ancora calda.
• Quando è pulita, il piano cottura può essere trattato
con un apposito prodotto di manutenzione: la pellicola
invisibile lasciata dal prodotto protegge la superficie da
gocciolamenti in fase di cottura. Questa manutenzione
va eseguita mentre il dispositivo è tiepido (non caldo) o
freddo.
• Ricordare sempre di risciacquare il dispositivo con acqua
WWW
La scheda del prodotto comprensiva dei dati energetici di questo forno può essere consultata e scaricata
dal sito internet
36
prodotti in lattina per la pulizia di barbecue e forni),
prodotti per la rimozione di macchie, prodotti anti-ruggine,
detergenti in polvere o spugne con superfici abrasive:
questi prodotti potrebbero graffiare la superficie.
pulita e di asciugarlo completamente: i residui possono
www.indesit.comwww.indesit.comwww.indesit.comwww.indesit.com
formare delle croste durante i successivi processi di
cottura.
Detergenti per piani di
cottura in
vetroceramica
Raschietto vetro
Raschietti con lama
appuntita
Lame sostitutive Negozi di Fai da Te,
COLLO lunetaHOB
BRITEHob
CleanSWISSCLEANER
Disponibili da
Negozi di Fai Da Te
Supermercati, Farmacie
Boots, Negozi Co-op, grandi
magazzini, Negozi regionali della
Rete Elettrica, supermercati
Sostituire la lampadina di illuminazione
del forno
1. Dopo aver disinserito il forno
dalla rete elettrica, togliere il
coperchio in vetro del
portalampada (
2. Svitare la lampadina e
sostituirla con una analoga:
tensione 230V, potenza 25 W,
3. Rimontare il coperchio e ricollegare il forno alla rete
elettrica.
Non utilizzare la lampada forno per e come
illuminazione di ambienti.
Assistenza
AssistenzaAssistenza
attacco E 14.
vedi figura
).
Non ricorrere mai a tecnici non autorizzati.
Comunicare:
• Il tipo di anomalia;
• Il modello della macchina (Mod.)
• Il numero di serie (S/N)
Queste ultime informazioni si trovano sulla targhetta
caratteristiche posta sull’apparecchio
Per ricevere assistenza, telefonare al numero indicato
sul libretto di garanzia allegato al prodotto o seguire
le istruzioni presenti sul sito e prepararsi a fornire:
• una breve descrizione del guasto;
• il tipo e modello esatto del prodotto;
• il codice di assistenza (il numero che segue la parola
SERVICE sulla targhetta matricola applicata al
prodotto, visibile quando la porta del forno è aperta
sul bordo destro della cavità).
• il proprio indirizzo completo;
• un contatto telefonico.
Note: qualora si renda necessaria una riparazione, contattare
un servizio di assistenza autorizzato a garanzia dell’utilizzo di
pezzi di ricambio originali e di una corretta riparazione.
Per ulteriori informazioni sulla garanzia fare riferimento al
libretto delle garanzie allegato.
Page 37
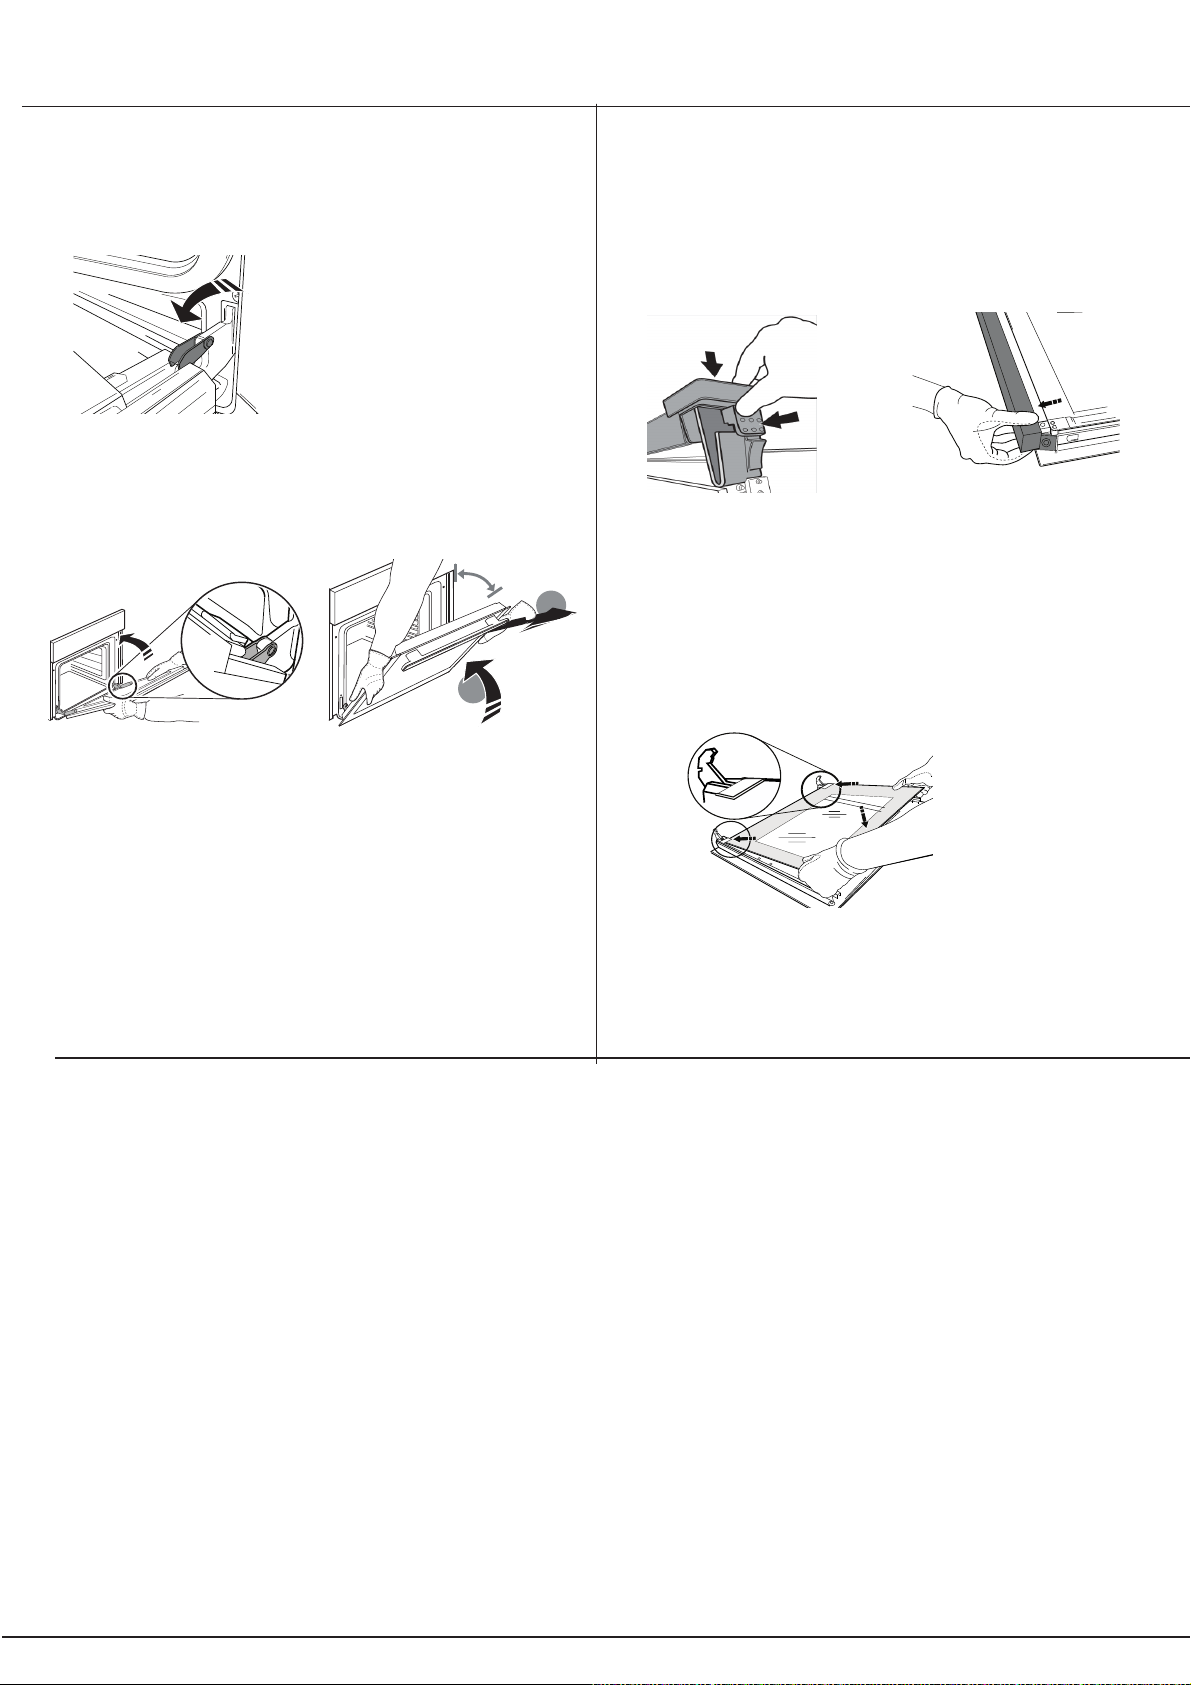
TOGLIERE E RIMONTARE LA PORTA
1.
Per rimuovere la porta, aprirla completamente e
abbassare i fermi fino alla posizione di sblocco.
2. Chiudere la porta fino a quando è possibile.
Prendere saldamente la porta con entrambe le mani,
evitando di tenerla per la maniglia.
Per estrarla facilmente, continuare a chiuderla e
contemporaneamente tirarla verso l’alto (a) finchè
non esce dalle sedi (b).
~15°
~60°
a
Togliere la porta e appoggiarla su un piano morbido.
b
CLICK TO CLEAN - PULIRE I VETRI
1.
Dopo aver smontato la porta e averla appoggiata
su un ripiano morbido con la maniglia verso il
basso, premere contemporaneamente le due clip di
fissaggio ed estrarre il profilo superiore della porta
tirandolo verso di sè.
2.
Sollevare e prendere saldamente il vetro interno
con due mani, rimuoverlo e appoggiarlo su un piano
morbido prima di eseguire la pulizia.
3.
Quando viene rimontato il vetro
nterno della porta, inserirlo correttamente, di modo
che il testo scritto sul vetro non sia invertito e possa
essere facilmente leggibile.
3.
Per rimontare la porta, avvicinarla al forno
allineando i ganci delle cerniere alle proprie sedi e
ancorare la parte superiore agli alloggiamenti.
4.
Abbassare la porta e poi aprirla completamente.
Abbassare i fermi nella posizione originale: fare
attenzione che siano completmente abbassati.
5.
Provare a chiudere la porta, verificando che sia
allineata al pannello di controllo. Se non lo fosse,
ripetere tutte le operazioni.
Pulizia catalitica
In alcuni modelli di forno, le pareti verticali interne più
esposte sono rivestite di uno smalto poroso, noto
come smalto catalitico. Quando viene riscaldato,
questo smalto distrugge le particelle di grasso
rilasciate dagli alimenti. Questa "ossidazione" delle
particelle di grasso si verifica quando la temperatura
delle pareti supera i 170°C. La natura porosa dello
smalto catalitico aumenta l'area superficiale in cui
avviene lo scambio essenziale per l'ossidazione dei
grassi.
4.
Rimontare il profilo superiore: un clic indica il
corretto posizionamento. Verificare che la tenuta sia
salda prima di rimontare la porta.
Se al termine del programma di cottura sono ancora
presenti residui sulle superfici catalitiche, lasciare il
forno vuoto con lo sportello chiuso e portare la
manopola di regolazione della temperatura alla
massima impostazione. Lasciare il forno in questo
stato per 60-90 minuti, in base alla quantità di sporco
rimasto all'interno.
Per i residui più tenaci, il processo di pulizia può essere
accelerato usando acqua calda e una spazzola morbida.
37
Page 38
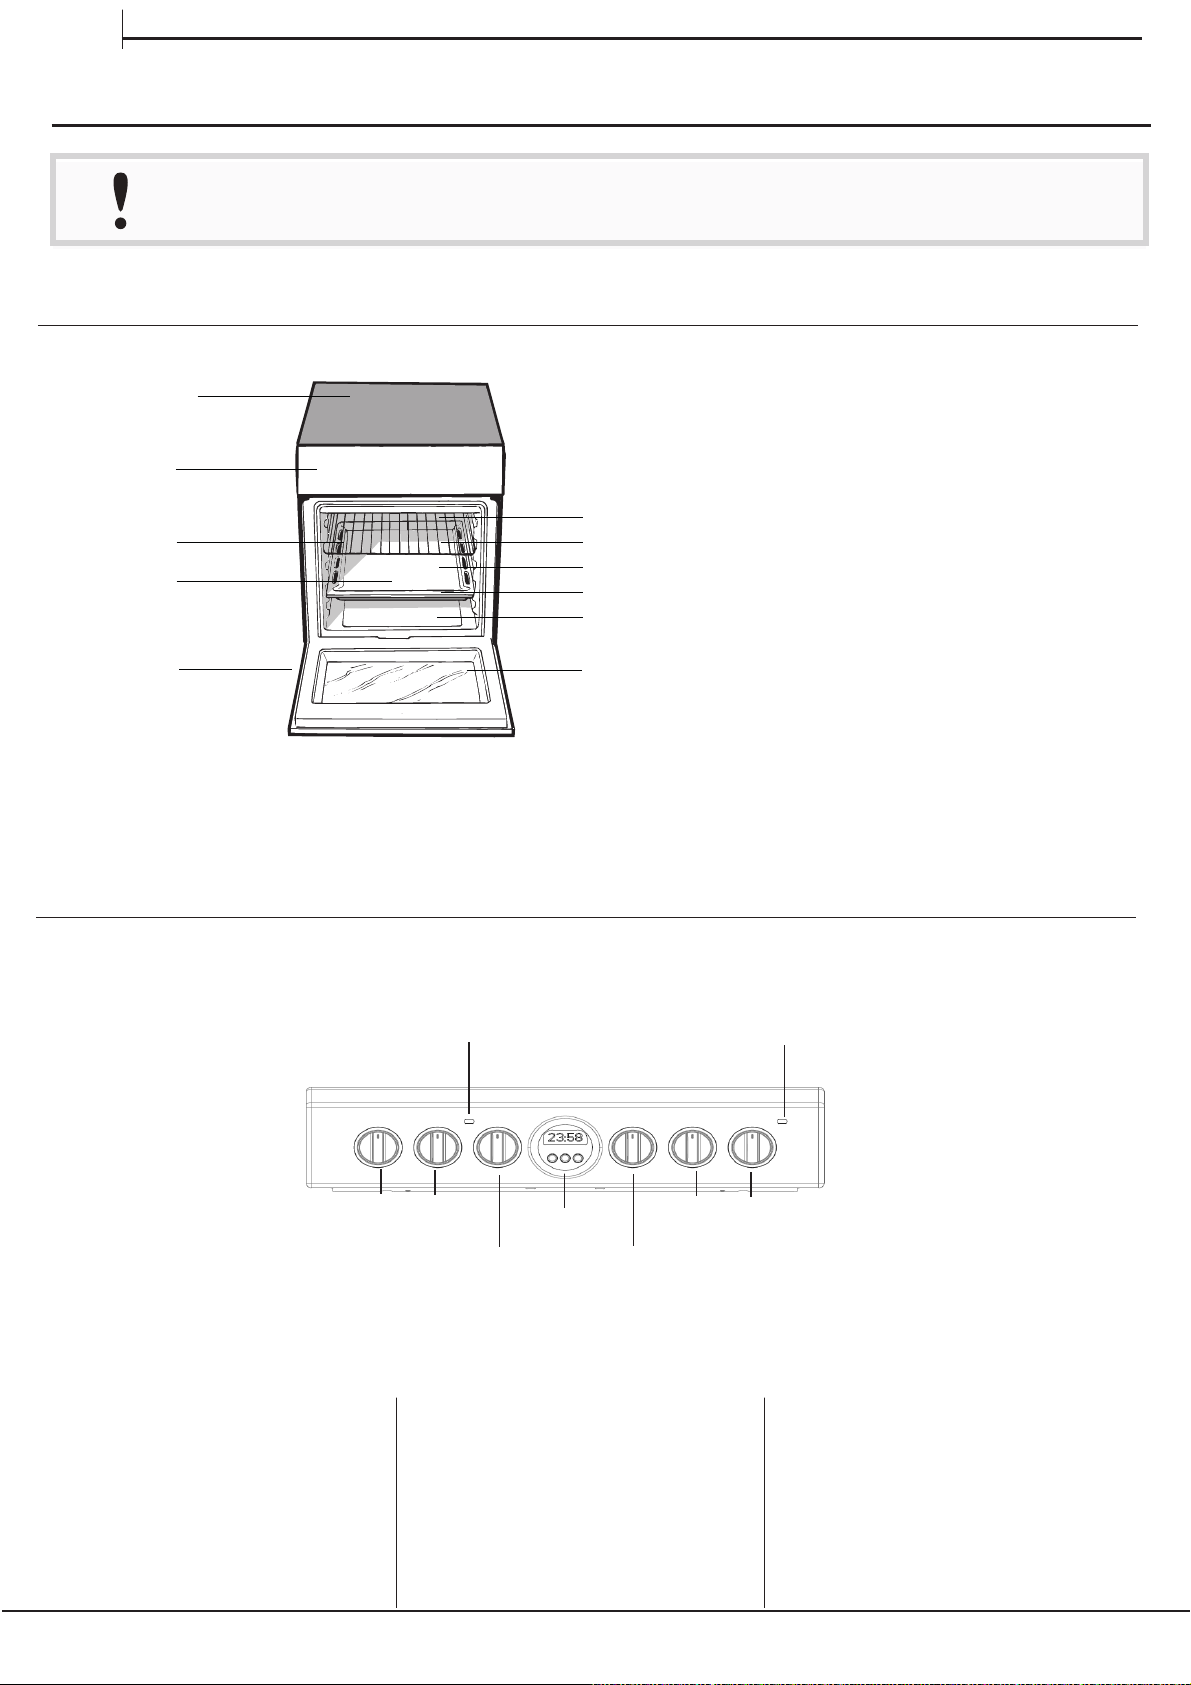
EN
DAILY REFERENCE
DAILY REFERENCE
DAILY REFERENCE
DAILY REFERENCE
DAILY REFERENCE
DAILY REFERENCE
GUIDE
GUIDE
GUIDE
GUIDE
GUIDE
GUIDE
ENEN
EN
Read the safety instructions carefully before using the product
PRODUCT DESCRIPTION
1
2
3
4
5
GB
6
7
8
9
10
11
5
1.Glass ceramic hob
2.Control panel
3.Sliding grill rack
4.DRIPPING pan
5.Adjustable foot
6.GUIDE RAILS for the sliding racks
7.position 5
8.position 4
9.position 3
10.position 2
11.position 1
CONTROL PANEL
1.
Electric HOTPLATE control knob
2.
Electric HOTPLATE control knob
3.
THERMOSTAT indicator light
3
1
2
4
4.
5.
6.
5
THERMOSTAT knob
TIMER knob
SELECTOR knob
7
6
9
8
7.
Electric HOTPLATE control knob
8.
Electric HOTPLATE control knob
HOTPLATE
9.
indicator light
38
Page 39
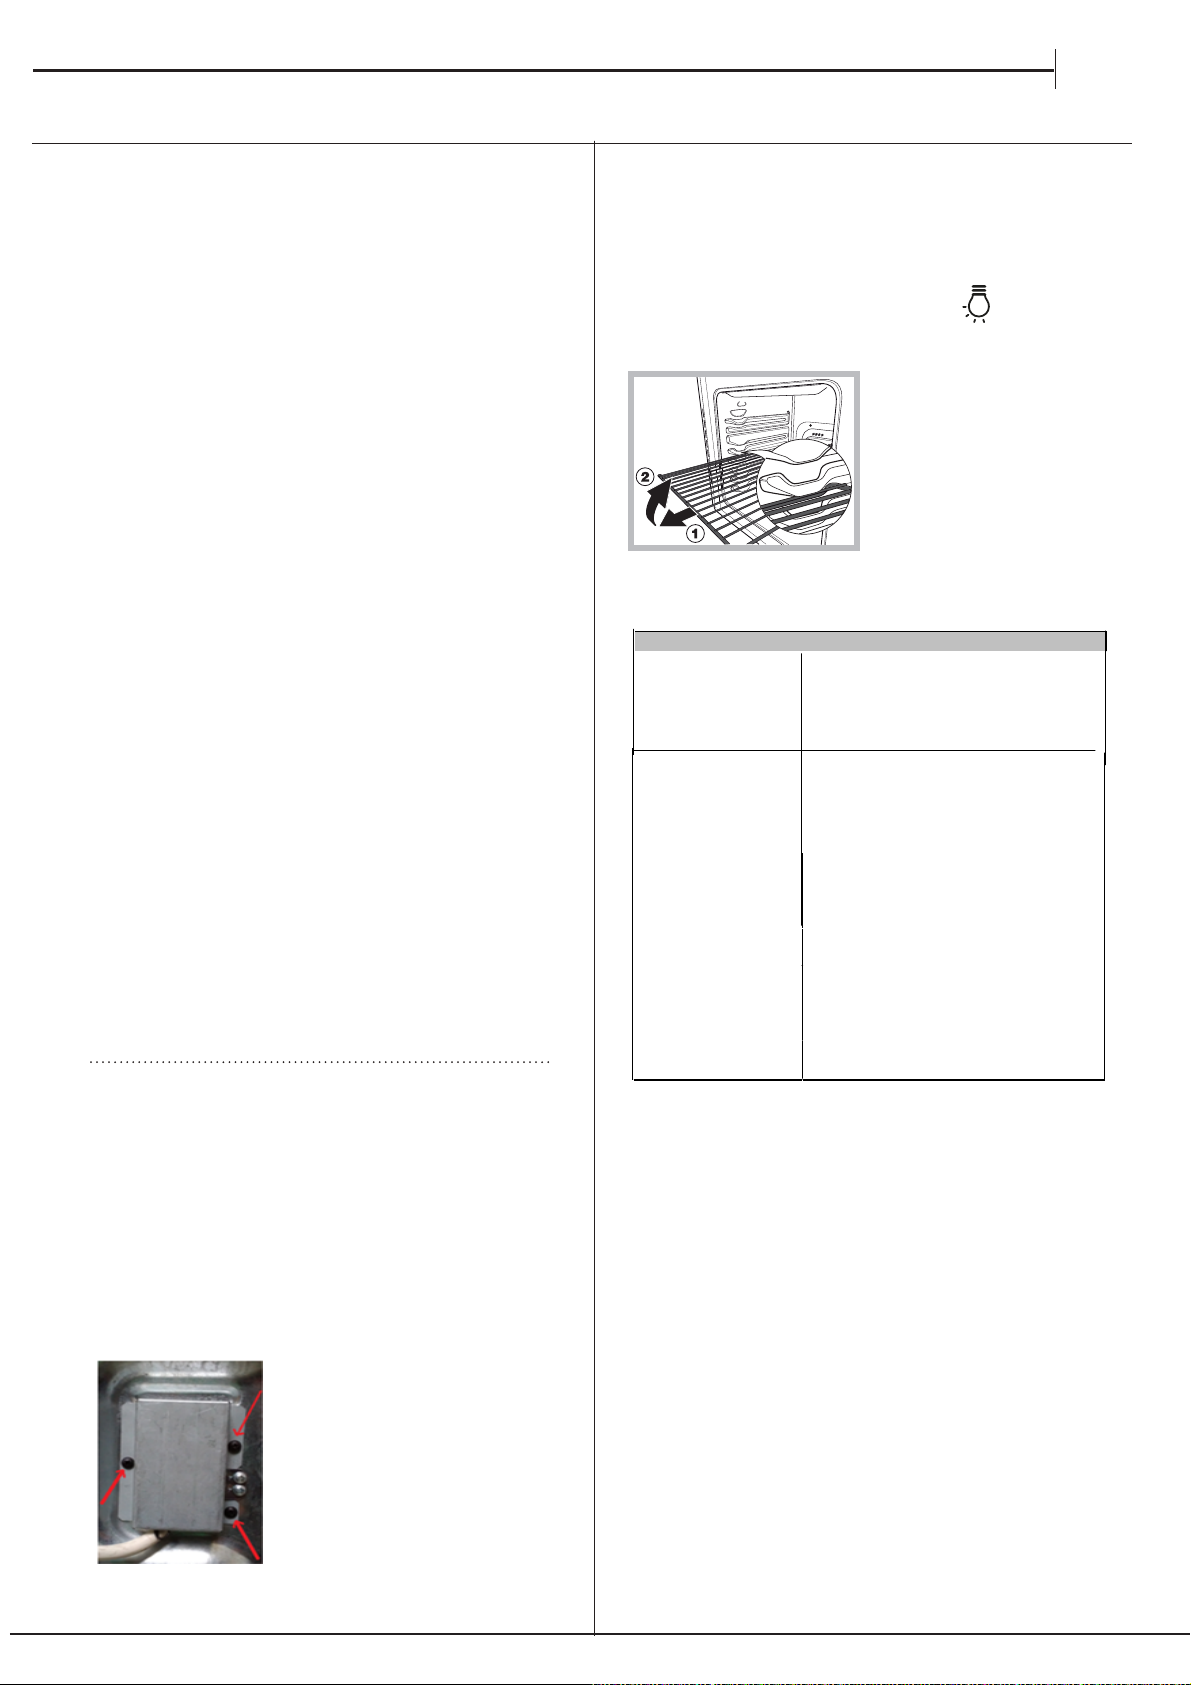
START-UP AND USE
EN
Using the oven
The first time you use your appliance, heat the
empty oven with its door closed at its maximum
temperature for at least half an hour. Ensure that the
room is well ventilated before switching the oven off
and opening the oven door. The appliance may emit
a slightly unpleasant odour caused by protective
substances used during the manufacturing process
burning away.
Before operating the product, remove all plastic
film from the sides of the appliance.
1. Select the desired cooking mode by turning the
SELECTOR knob.
2. Select the recommended temperature for the
cooking mode or the desired temperature by turning
the THERMOSTAT knob.
A list detailing cooking modes and suggested
cooking temperatures can be found in the relevant
table (
see Oven cooking advice table
During cooking it is always possible to:
• Change the cooking mode by turning the
SELECTOR knob.
• Change the temperature by turning the
THERMOSTAT knob.
• Set the total cooking time and the cooking end
see below
time (
• Stop cooking by turning the SELECTOR knob to
the “0” position.
Never put objects directly on the bottom of the
oven; this will avoid the enamel coating being
damaged.
Always place cookware on the rack(s) provided.
).
).
Oven light
This is switched on by turning the SELECTOR knob
to any position other than “0”. It remains lit as long
as the oven is operating. By selecting
knob, the light is switched on without any of the
heating elements being activated.
with the
WARNING! The oven is
provided with a stop system to extract the racks
and prevent them from
coming out of the oven.(1)
As shown in the drawing,
to extract them completely, simply lift the racks,
holding them on the front
part, and pull (2).
TABLE OF CHARACTERISTSICS
Voltage and
frequency
ENERGY LABEL
and ECODESIGN
see data plate
Energy consumpt ion for Natur al
convection – heating m ode:
ECO
THERMOSTAT indicator light
When this is illuminated, the oven is generating
heat. It switches off when the inside of the oven
reaches the selected temperature. At this point the
light illuminates and switches off alternately,
indicating that the thermostat is working and is
maintaining the temperature at a constant level.
After installing the power cable, screw the metal
After installing the power cable, screw the metal
After installing the power cable, screw the metal
cover with three screws.
cover with three screws.
cover with three screws.
Only available in certain models.
*
39
Page 40
Cooking modes
FAN ASSISTED DOUBLE GRILL mode
A temperature value can be set for all cooking modes
between 50°C and Max, except for the following modes
• GRILL and DOUBLE GRILL (recommended: set only
to MAX power level).
• FAN-ASSISTED DOUBLE GRILL (recommended: do
not exceed 200°C).
DEFROSTING mode
The fan located on the bottom of the oven makes the
air circulate at room temperature around the food.
This is recommended for the defrosting of all types of
food, but in particular for delicate types of food which
do not require heat, such as for example: ice cream
cakes, cream or custard desserts, fruit cakes. By using
the fan, the defrosting time is approximately halved.
In the case of meat, fish and bread, it is possible to
accelerate the process using the “multi-cooking” mode
and setting the temperature to 80° - 100°C.
STATIC OVEN mode
Both the top and bottom heating elements will be
activated. When using this traditional cooking mode,
it is best to use only one rack at a time, otherwise the
heat will not be distributed evenly.
FAN OVEN mode
The top and bottom heating elements will switch
on and the fan will begin to operate. Since the heat
remains constant throughout the oven, the air cooks
and browns food in a uniform manner. A maximum of
two racks may be used at the same time.
GRILL
The central part of the top heating element is switched
on. The high and direct temperature of the grill is
recommended for food that requires a high surface
temperature (veal and beef steaks, fillet steak and
entrecôte). This cooking mode uses a limited amount of
energy and is ideal for grilling small dishes. Place the
food in the centre of the rack, as it will not be cooked
properly if it is placed in the corners.
ECO
.
For cooking stuffed roasting joints and fillets of meat
on a single shelf.
mode
mode
To use the ECO cycle and therefore
optimize power consumption, the oven door should not
be opened
until the food is completely cooked.
The top heating element and the turnspit are activated
and the fan begins to operate. This combination of
features increases the effectiveness of the unidirectional
thermal radiation of the heating elements through
forced circulation of the air throughout the oven. This
prevents the food from burning on top by enabling heat
to penetrate into the food more effectively; it is therefore
an ideal way of cooking food quickly under the grill or
for grilling large pieces of meat without having to use the
turnspit.
The GRILL, DOUBLE GRILL and FAN-ASSISTED
DOUBLE GRILL cooking modes must be performed
with the oven door shut.
When using the GRILL and DOUBLE GRILL cooking
modes, place the rack in position 5 and the dripping
pan in position 1 to collect cooking residues (fat and/
or grease). When using the FAN-ASSISTED DOUBLE
GRILL cooking mode, place the rack in position 2 or
3 and the dripping pan in position 1 to collect cooking
residues.
Cooking on several shelves simultaneously
If it is necessary to use two racks, use the FAN OVEN
cooking mode
suited to this type of cooking. We also recommend
that:
• Positions 1 and 5 are not used. This is because
excessive direct heat can burn temperature
sensitive foods.
• Positions 2 and 4 are used and that food that
requires more heat is placed on the rack in position
2.
• When cooking foods that require different cooking
times and temperatures, set a temperature
that is halfway between the two recommended
temperatures (see Oven cooking advice table) and
place the more delicate food on the rack in position
4. Remove the food that requires a shorter cooking
time first.
• When cooking pizzas on several racks with the
temperature set to 220°C, the oven is preheated for
15 minutes. Generally speaking, cooking on the rack
in position 4 takes longer: we recommend that the
pizza cooked on the lowest rack position is removed
first, followed by the pizza cooked in position 4 a few
minutes later.
• Place the dripping pan on the bottom and the rack
on top.
, as this is the only cooking mode
40
FAST PREHEAT
mode
For preheating the oven quickly. Wait for preheating
to finish before placing food in the oven, then select
the preferred cooking function.
Page 41
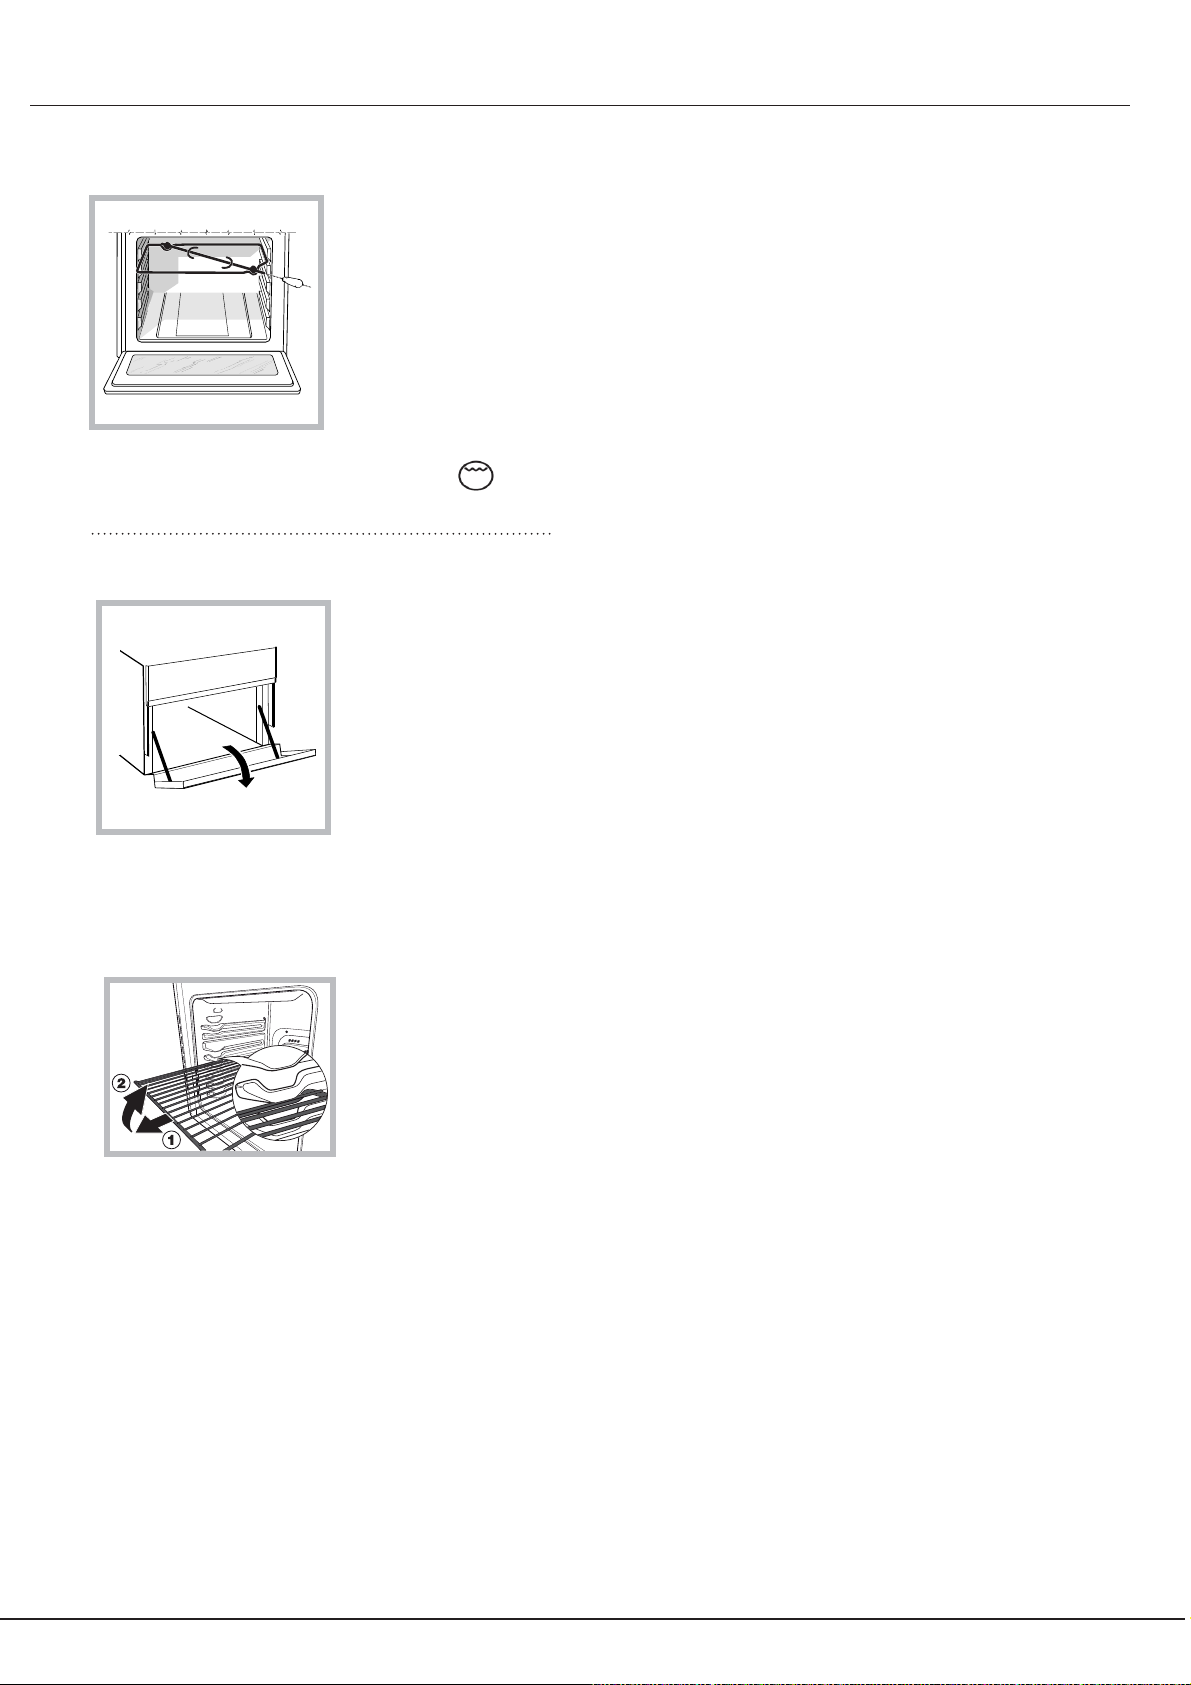
Rotisserie
the SELECTOR knob.
Lower compartment*
To operate the rotisserie
(see diagram) proceed as
follows:
1. Place the dripping
pan in position 1.
2. Place the rotisserie
support in position 4 and
insert the spit in the hole
provided on the back
panel of the oven.
3. Activate the rotisserie
by selecting
There is a compartment
underneath the oven that
may be used to store
oven accessories or deep
dishes. To open the door
pull it downwards (see
gure).
with
Do not place flammable
materials in the lower oven compartment.
The internal surfaces of the compartment (where
present) may become hot.
WARNING! The oven is
provided with a stop system to extract the racks
and prevent them from
coming out of the oven.(1)
As shown in the drawing,
to extract them completely, simply lift the racks,
holding them on the front
part, and pull (2).
41
Page 42
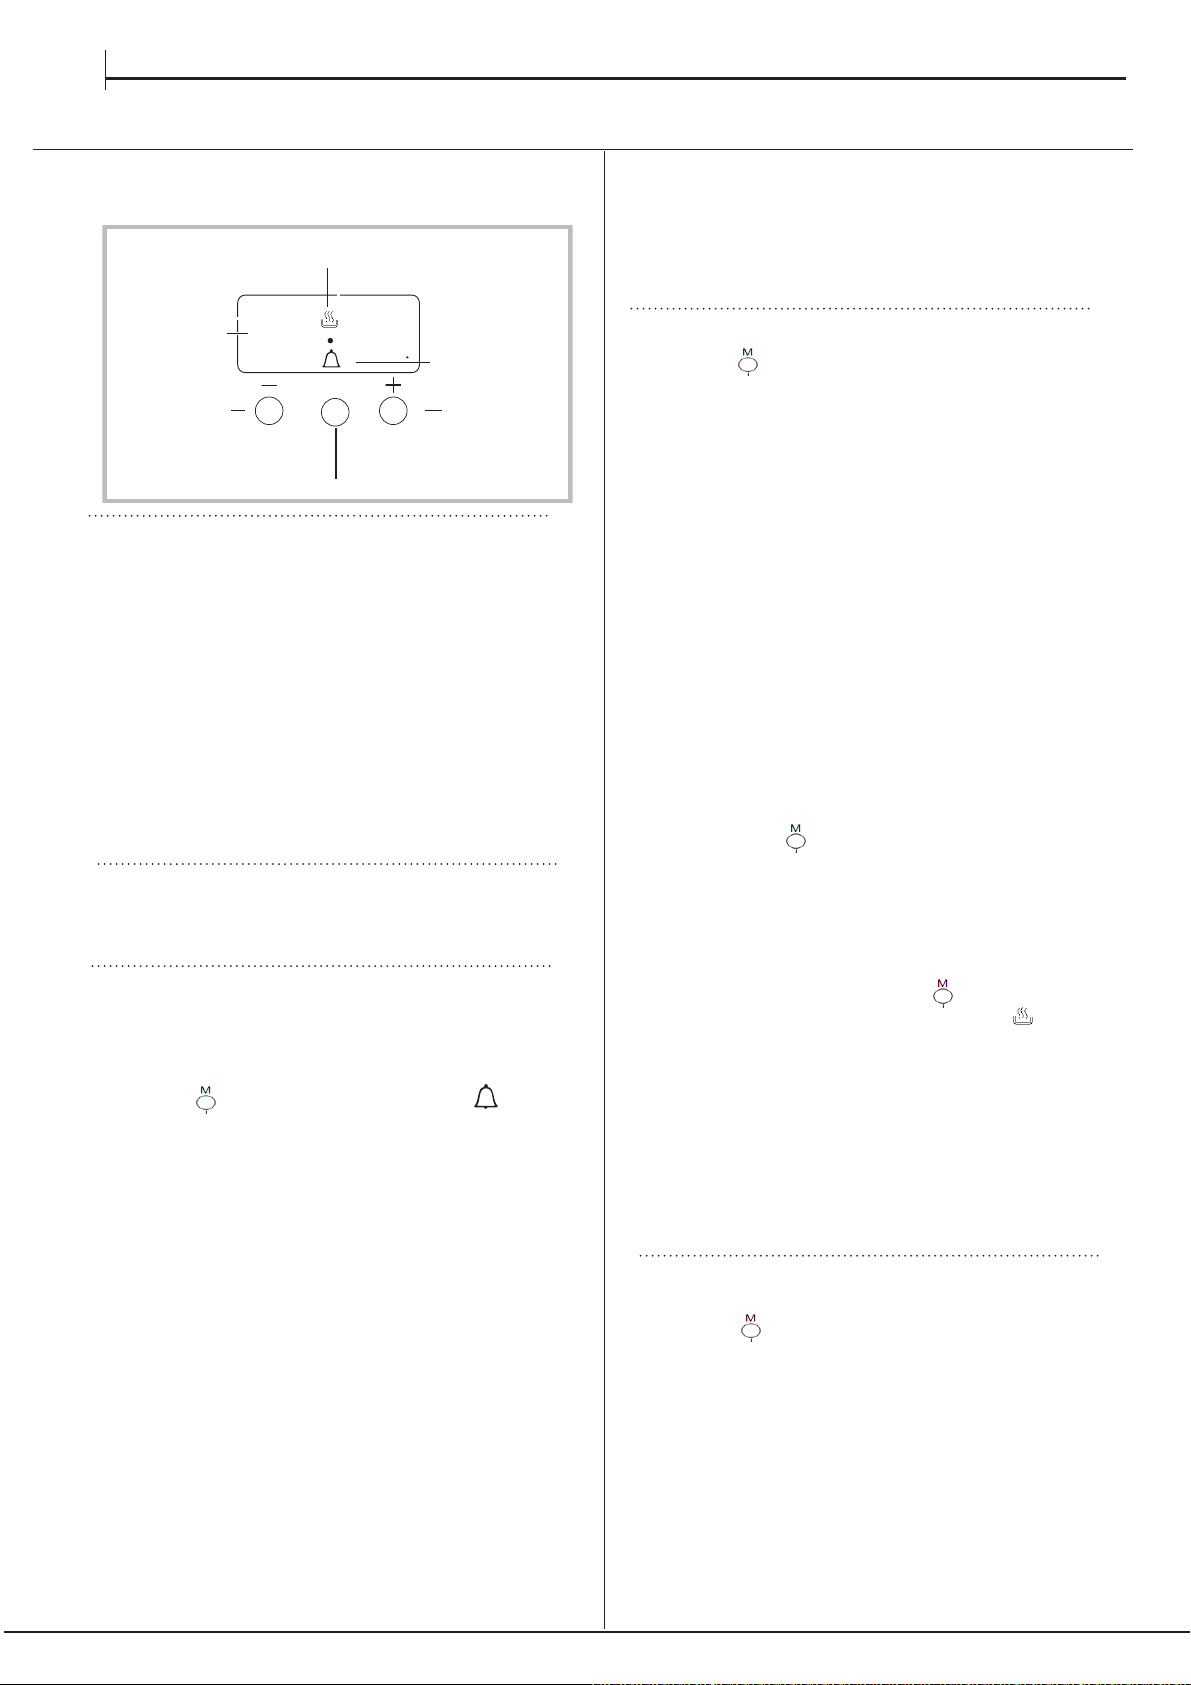
DISPLAY
MODE
button
AUTO
icon
TIMER icon
DECREASE TIME
button
INCREASE TIME
button
•• ••
COOKING PROCESS
icon
EN
Clock/Minute
A
Minder Operation
M
Setting the clock
The clock may be set when the oven is switched off
or when it is switched on, provided that the end time of
a cooking cycle has not been programmed previously.
After the appliance has been connected to the mains,
or after a blackout, the 00:00
digits on the DISPLAY will begin to flash.
Programming cooking
A cooking mode must be selected before
programming can take place.
Programming the cooking duration
1. Press the
button several times until
and the DUR digits on the DISPLAY begin to flash.
2. Use the “+” and “-” buttons to set the desired
duration; if you press and hold either button, the
display will scroll through the values more quickly,
making it quicker and easier to set the value.
3. Wait for 5 seconds, after that the icon will be visible
on the display.
4. When the set time has elapsed
and the oven will stop cooking
you will hear a buzzer sounds. Press any button to stop the
buzzer.
• For example: it is 9:00 a.m. and a time of 1 hour and
15 minutes is programmed. The programme will
stop automatically at 10:15 a.m.
icon
A
U
T
O
A
U
T
O
1. Press the
"+" and "-" button simultaneously
Than the colon between hours and minutes is flashing.
2. Use the “+” and “-” buttons to adjust the time; if you
press and hold either button, the display will scroll
through the values more quickly, making it quicker and
easier to set the desired value.
Changing the buzzer frequency
The buzzer signal frequency can be changed by
touching the "- " repeatedly.
Setting the minute minder
This function does not interrupt cooking and does not
affect the oven; it is simply used to activate the buzzer
when the set amount of time has elapsed.
1. Press the
button several times until the
and the three digits on the display begin to flash.
2. Use the “+” and “-” buttons to set the desired time; if
you press and hold either button, the display will scroll
through the values more quickly, making it quicker and
easier to set the value.
3. Wait for 5 seconds, If you press the buttom one more time
the display will then show the time as it counts down.
When this period of time has elapsed the buzzer will be
activated.
icon
Setting the end time for a cooking mode
1. Follow steps 1 to 3 to set the duration as detailed
above.
2. Next, press the
button until the
text END on the diplay
begin to flash.
3. use the “+” and “-” buttons to adjust the cooking end
time; if you press and hold either button, the display
will scroll through the values more quickly, making it
quicker and easier to set the desired value.
4. Wait for 5 seconds or press the
button again,
When the cooking process start, the symbol is visible
on the display.
5. When the set time has elapsed,
and a buzzer sounds.
Press any button to stop it.
Programming has been set when the
is illuminated.
the oven will stop cooking
A
U
icon
T
O
• For example: It is 9:00 a.m. and a duration of 1 hour
has been programmed. 12:30 is scheduled as the
end time. The programme will start automatically at
11:30 a.m.
Cancelling a programme
To cancel a programme:
• press the
button until the icon corresponding to
the setting you wish to cancel and the digits on the
display are flashing. Press the “-” button until the
digits 00:00 appear on the display.
• Press and hold the “+” and “-” buttons; this will
cancel all the settings selected previously, including
timer settings.
42
Page 43
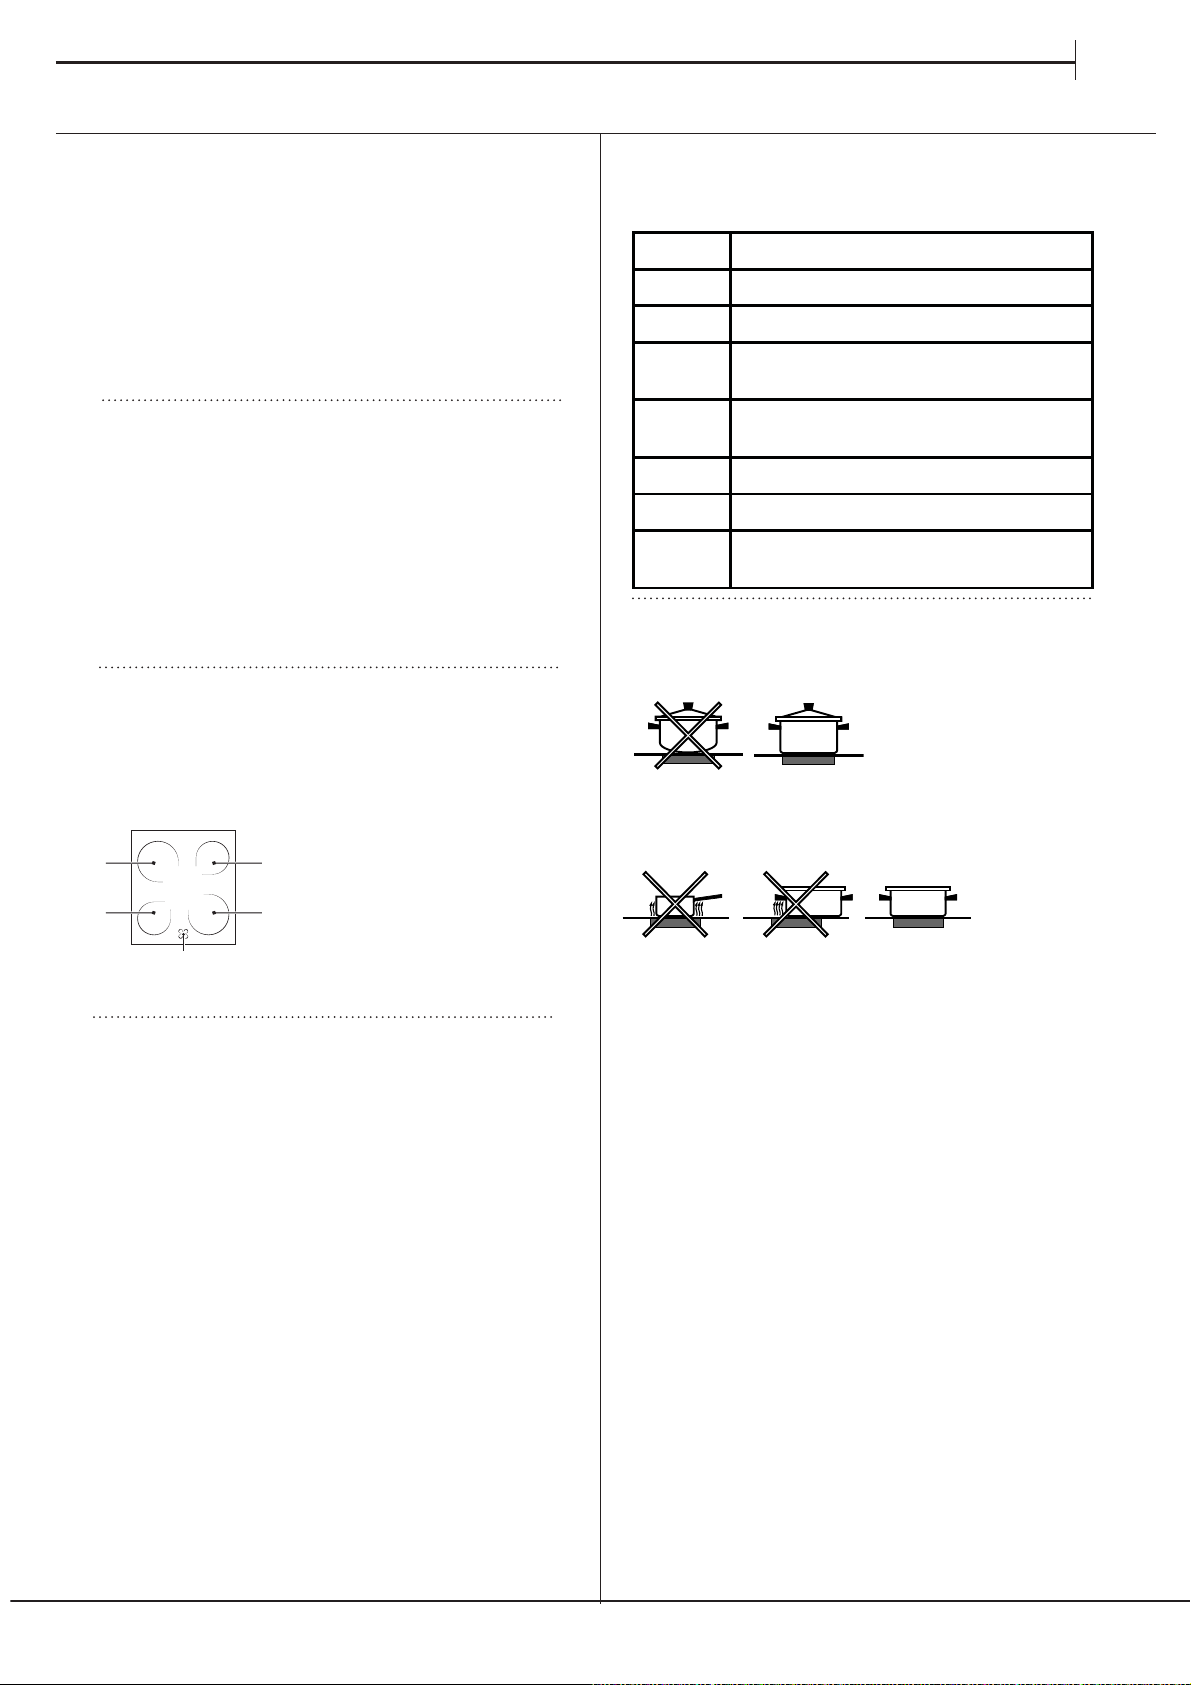
A
A
A
A
B
Using the glass ceramic hob
EN
The glue applied on the gaskets leaves traces of
grease on the glass. Before using the appliance, we
recommend you remove these with a special nonabrasive cleaning product. During the first few hours
of use there may be a smell of rubber which will
disappear very quickly.
Switching the cooking zones on and off
To switch on a cooking zone, turn the corresponding
knob in a clockwise direction.
To switch it off again, turn the knob in an anticlockwise
direction until it is in the “0” position.
If the ELECTRIC HOTPLATE ON indicator light is lit, this
shows that at least one hotplate on the hob is switched
on.
Cooking zones
The hob is equipped with electric radiant heating
elements. When they are in use the following items on
the hob become red.
A. The cooking zone.
B. The residual heat
indicator light: this indicates
that the temperature of the
corresponding cooking zone is
greater than 60°C, even when
the heating element has been
switched off but is still hot.
Cooking zones with radiant heating elements
They have similar properties to gas burners: they are
easy to control and reach set temperatures quickly,
allowing you to actually see the power they are
providing.
Turn the corresponding knob in a clockwise direction,
to a position between 1 and 6.
Setting Normal or Fast Plate
0
Off
1
Cooking vegetables, fish
Cooking potatoes (using steam) soups,
2
chickpeas, beans.
Continuing the cooking of large quantities
3
of food, minestrone
4
For roasting (average)
5
For roasting (above average)
For browning and reaching a boil in a
6
short time.
Practical advice on using the hob
• Use pans with a thick, flat base to ensure that they
adhere perfectly to the cooking zone.
• Always use pans with a diameter that is large
enough to cover the hotplate fully, in order to use all
the heat produced.
• Always make sure that the base of the pan is
completely clean and dry: this ensures that the pans
adhere perfectly to the cooking zones and that both
the pans and the hob last for a longer period of time.
• Avoid using the same cookware that is used on gas
burners: the heat concentration on gas burners may
have warped the base of the pan, causing it not to
adhere to the surface correctly.
• Never leave a cooking zone switched on without a
pan on top of it, as doing so may cause the zone to
become damaged.
43
Page 44
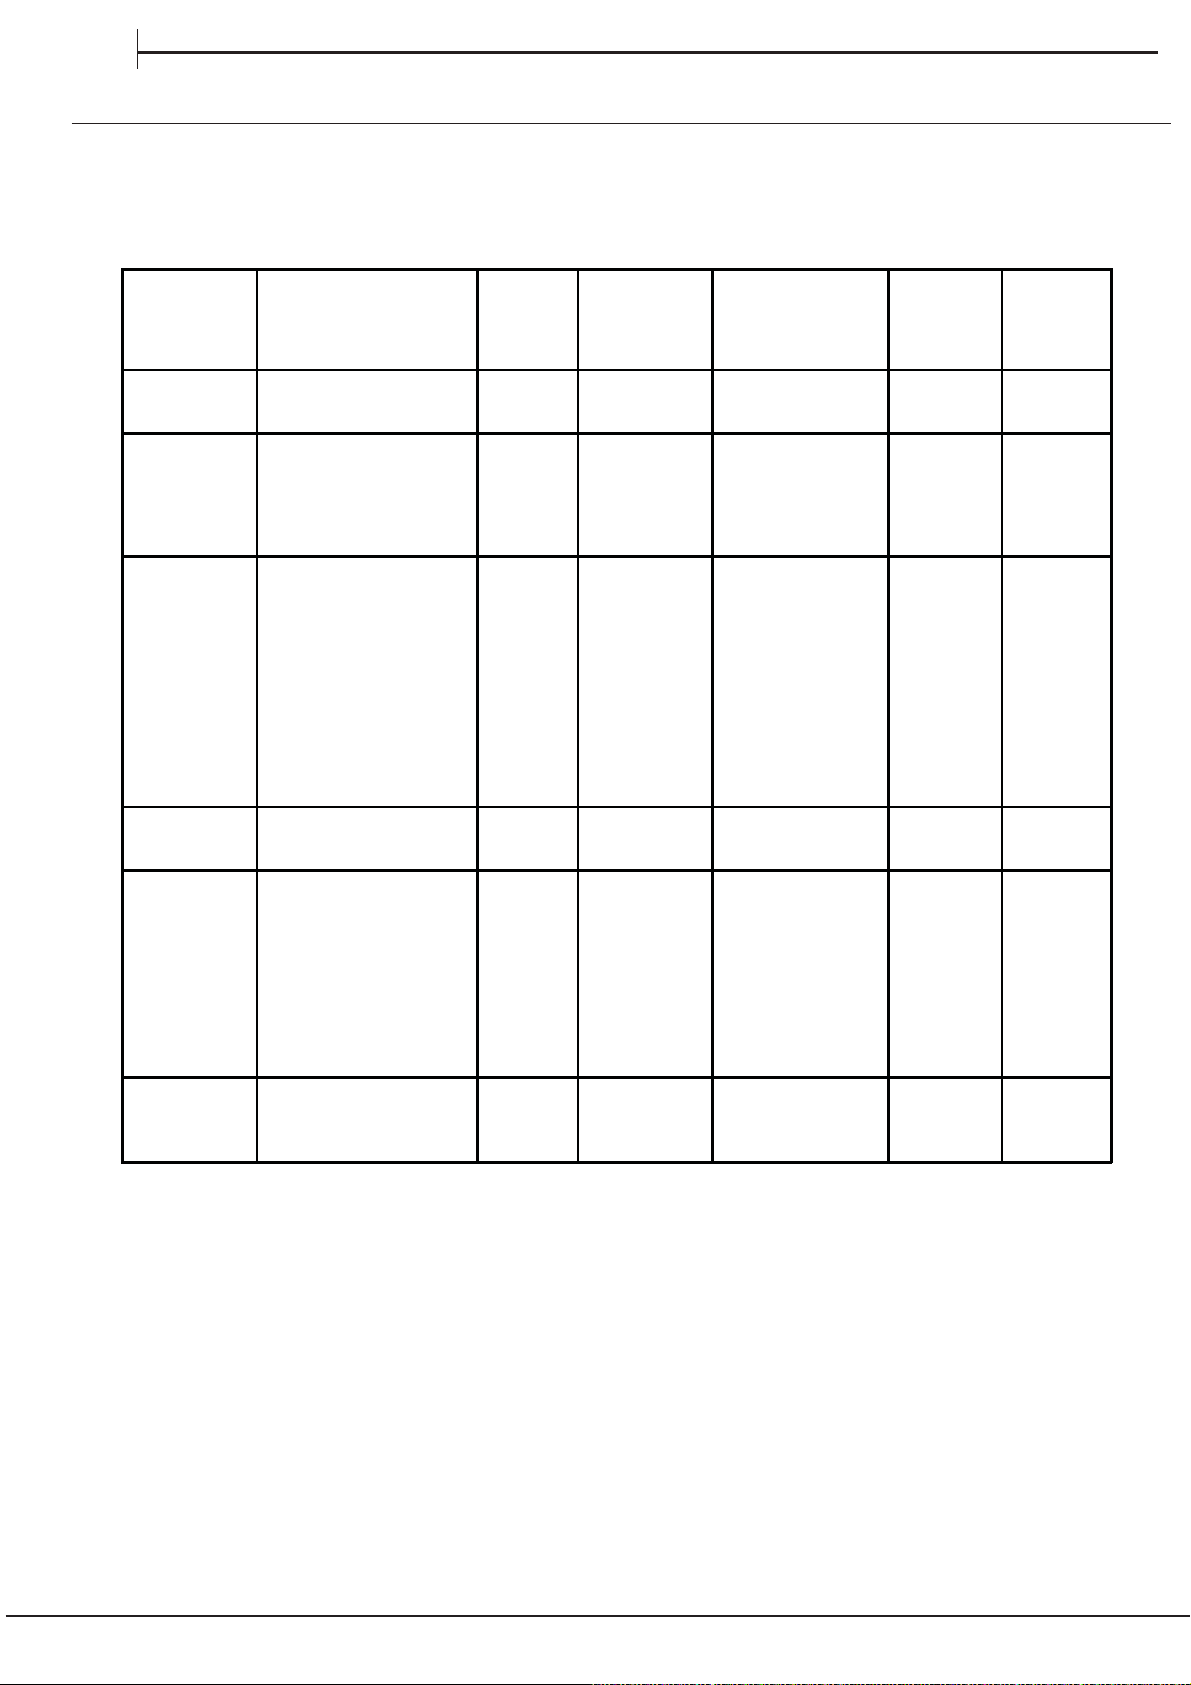
EN
Oven cooking advice table
Selector knob
setting
Defrosting
Convection
Fan assisted
Top Oven
Food to be cooked
All frozen food
Duck
Roast veal or beef
Pork roast
Biscuits (short pastry)
Tarts
Pizza (on 2 racks)
Lasagne
Lamb
Roast chicken + potatoes
Mackerel
Plum-cake
Cream puffs (on 2 racks)
Biscuits (on 2 racks)
Sponge cake (on 1 rack)
Sponge cake (on 2 racks)
Savoury pies
Browning food to perfect
cooking
Weight
(in kg)
1
1
1
-
1
1
1
1
1
1
1
0.5
0.5
0.5
1.0
1.5
- 3/4 15 220 -
Cooking rack
position from
bottom
3
3
3
3
3
2-4
3
2
2-4
2
2
2-4
2-4
2
2-4
3
Preheating time
(minutes)
15
15
15
15
15
15
10
10
10
10
10
10
10
10
10
15
Thermostat
knob
setting
200
200
200
180
180
220
200
180
180
180
170
190
180
170
170
200
Cooking
time
(minutes)
65-75
70-75
70-80
15-20
30-35
15-20
30-35
50-60
60-75
30-35
40-50
20-25
10-15
15-20
20-25
25-30
Grill
Fan assisted
grill
NB: cooking times are approximate and may vary according to personal taste. When cooking using the grill or fan
assisted grill, the dripping pan must always be placed on the 1st oven rack from the bottom.
Soles and cuttlefish
Squid and prawn kebabs
Cod filet
Grilled vegetables
Veal steak
Cutlets
Hamburgers
Mackerels
Toasted sandwiches
Grilled chicken
Cuttlefish
1
1
1
1
1
1
1
1
n.° 4
1.5
1.5
4
4
4
3/4
4
4
4
4
4
3
3
5
5
5
5
5
5
5
5
5
5
5
Max
Max
Max
Max
Max
Max
Max
Max
Max
200
200
10-15
15-20
15-20
15-20
55-60
30-35
8-10
6-8
10
7-10
2-3
44
Page 45
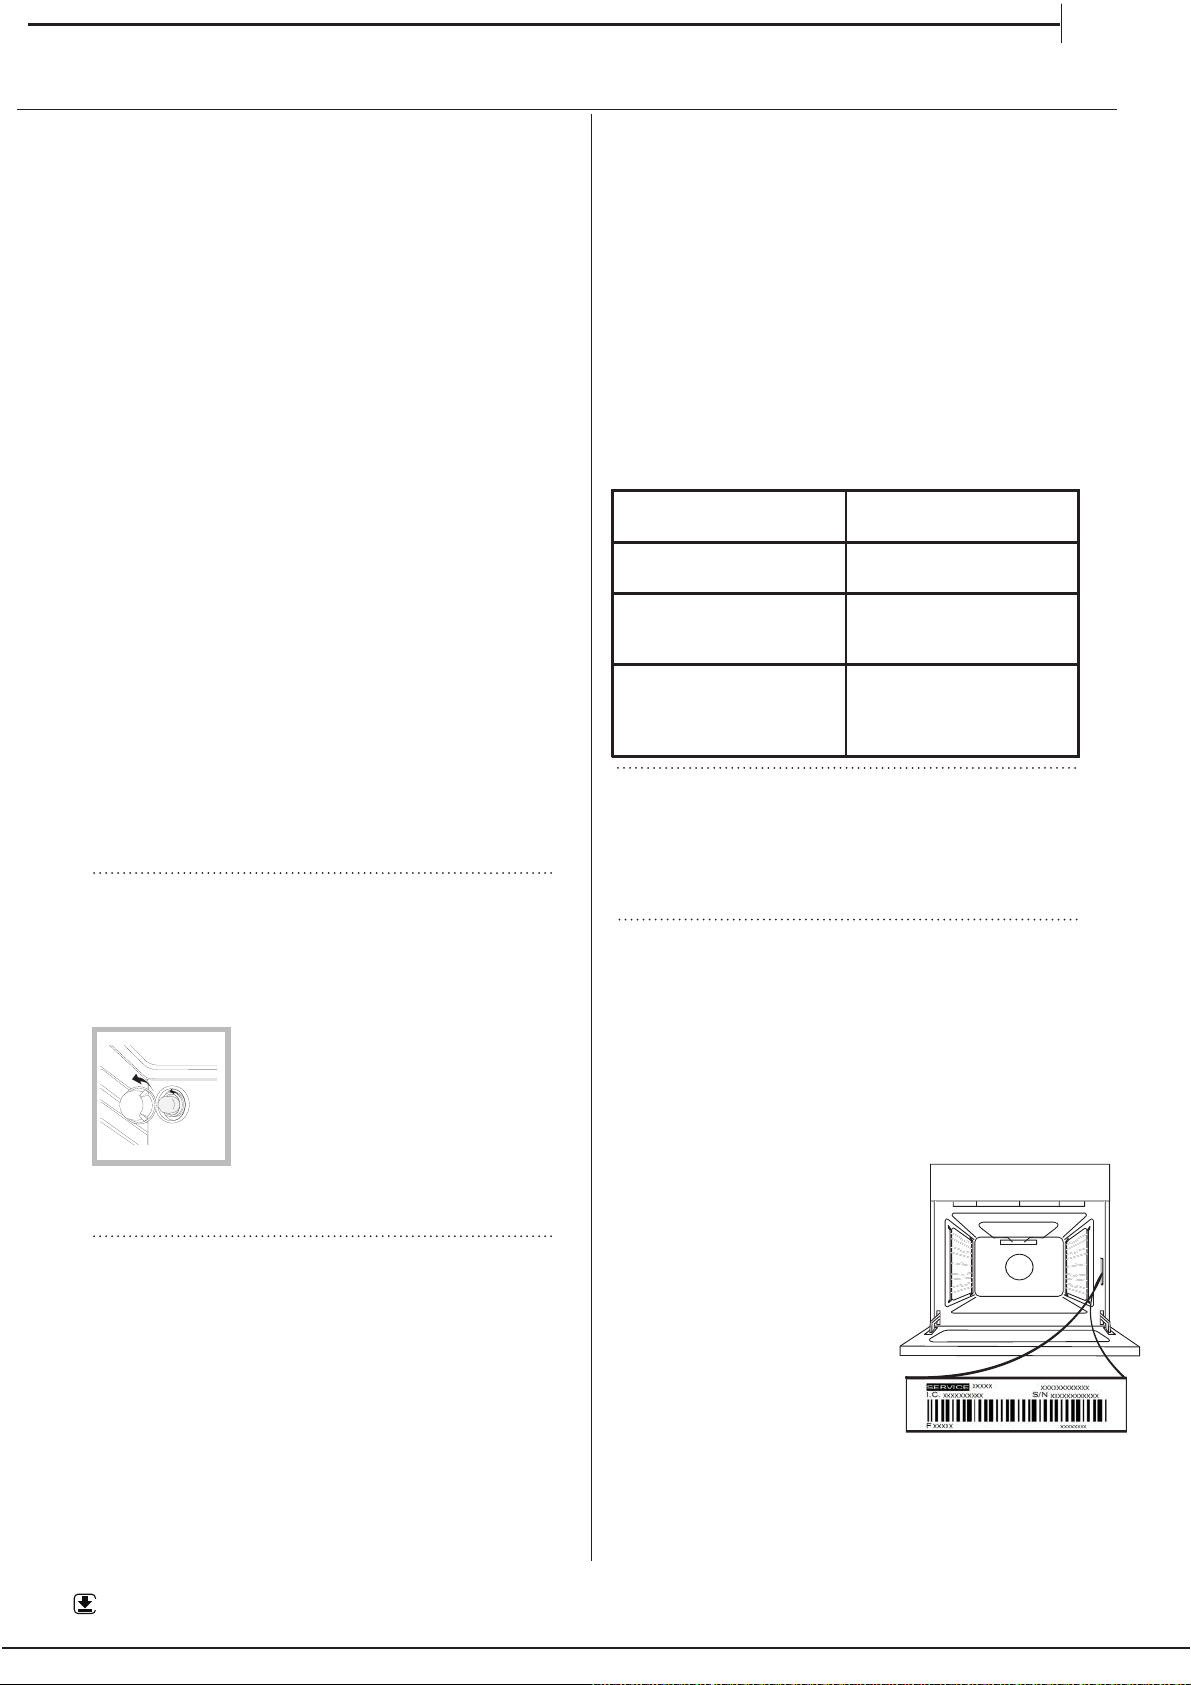
EN
CARE AND MAINTENANCE
Respecting and conserving the
environment
• Whenever possible, avoid pre-heating the oven
and always try to fill it. Open the oven door as little
as possible because heat is lost every time it is
opened. To save a substantial amount of energy,
simply switch off the oven 5 to 10 minutes before the
end of your planned cooking time and use the heat
the oven continues to generate.
• Automatic programmes are based on standard food
product.
• Keep gaskets clean and tidy to prevent any door
energy losses
• If you have a timed tariff electricity contract, the “delay
cooking” option will make it easier to save money by
moving operation to cheaper time periods.
• Make the most of your hot plate's residual heat by
switching off cast iron hot plates 10 minutes before the
end of your cooking time and glass ceramic hot plates
5 minutes before the end of cooking time.
• The base of your pot or pan should cover the hot plate.
If it is smaller, precious energy will be wasted and
pots that boil over leave encrusted remains that can
be difficult to remove.
• Cook your food in closed pots or pans with well-fitting
lids and use as little water as possible. Cooking with
the lid off will greatly increase energy consumption
• Use purely flat pots and pans
• If you are cooking something that takes a long time,
it's worth using a pressure cooker, which is twice as
fast and saves a third of the energy.
Switching the appliance off
Disconnect your appliance from the electricity supply
before carrying out any work on it.
Never use steam cleaners or pressure cleaners on the
appliance.
Replacing the oven light bulb
1. After disconnecting the oven from the
electricity mains, remove the glass lid
covering the lamp socket (see figure).
2. Remove the light bulb and replace
it with a similar one: voltage 230 V,
wattage 25 W, cap E 14.
3. Replace the lid and reconnect the
Do not use the oven lamp as/for ambient
lighting.
oven to the electricity supply.
Cleaning the glass ceramic hob
Do not use abrasive or corrosive detergents (for
example, products in spray cans for cleaning barbecues
and ovens), stain removers, anti-rust products, powder
detergents or sponges with abrasive surfaces: these
may scratch the surface beyond repair.
• It is usually sufficient simply to wash the hob using a
damp sponge and dry it with absorbent kitchen roll.
• If the hob is particularly dirty, rub it with a special
glass ceramic cleaning product, then rinse well and
dry thoroughly.
• To remove more stubborn dirt, use a suitable scraper
(this is not supplied with the appliance). Remove
spills as soon as possible, without waiting for the
appliance to cool, to avoid residues forming crusty
deposits. You can obtain excellent results by using a
rustproof steel wire sponge - specifically designed for
glass ceramic surfaces - soaked in soapy water.
• If plastic or sugary substances have accidentally
been melted on the hob, remove them immediately
with the scraper, while the surface is still hot.
• Once it is clean, the hob may be treated with a special
protective maintenance product: the invisible film left
by this product protects the surface from drips during
cooking. This maintenance should be carried out
while the appliance is warm (not hot) or cold.
• Always remember to rinse the appliance well with
clean water and dry it thoroughly: residues can
become encrusted during subsequent cooking
processes.
Glass ceramic hob cleaners Available from
Window scraper Razor blade
scrapers
Replacement blades DIY Stores,
COLLO luneta
HOB BRITE
Hob Clean
SWISSCLEANER
Cleaning stainless steel
Stainless steel can be marked by hard water that has
been left on the surface for a long time, or by aggressive
detergents that contain phosphorus. We recommend
that the steel surfaces are rinsed well then dried
thoroughly.
DIY Stores
supermarkets,
chemists
Boots, Co-op stores,
department stores, Regional
Electricity Company shops,
supermarkets
AFTER-SALES SERVICE
To receive assistance,
warranty
the
provide:
•
•
•
•
•
Please note: If repairs are required, contact an
authorised service centre that is guaranteed to use
original spare parts and perform repairs correctly.
Please refer to the enclosed warranty leaflet for more
information on the warranty.
leaflet enclosed with the product or follow
instructions on our website. Be prepared to
a brief description of the problem;
the exact model type of your product;
the assistance code (the number following the word
SERVICE on the identification plate attached to the
product, which can be seen on the inside edge when
the oven door is open);
your full address;
a contact telephone number.
call the number given on the
WWW
A complete product specification, including the energy efficiency ratings for this oven, can be read and
downloaded from our website
www.indesit.com
45
Page 46
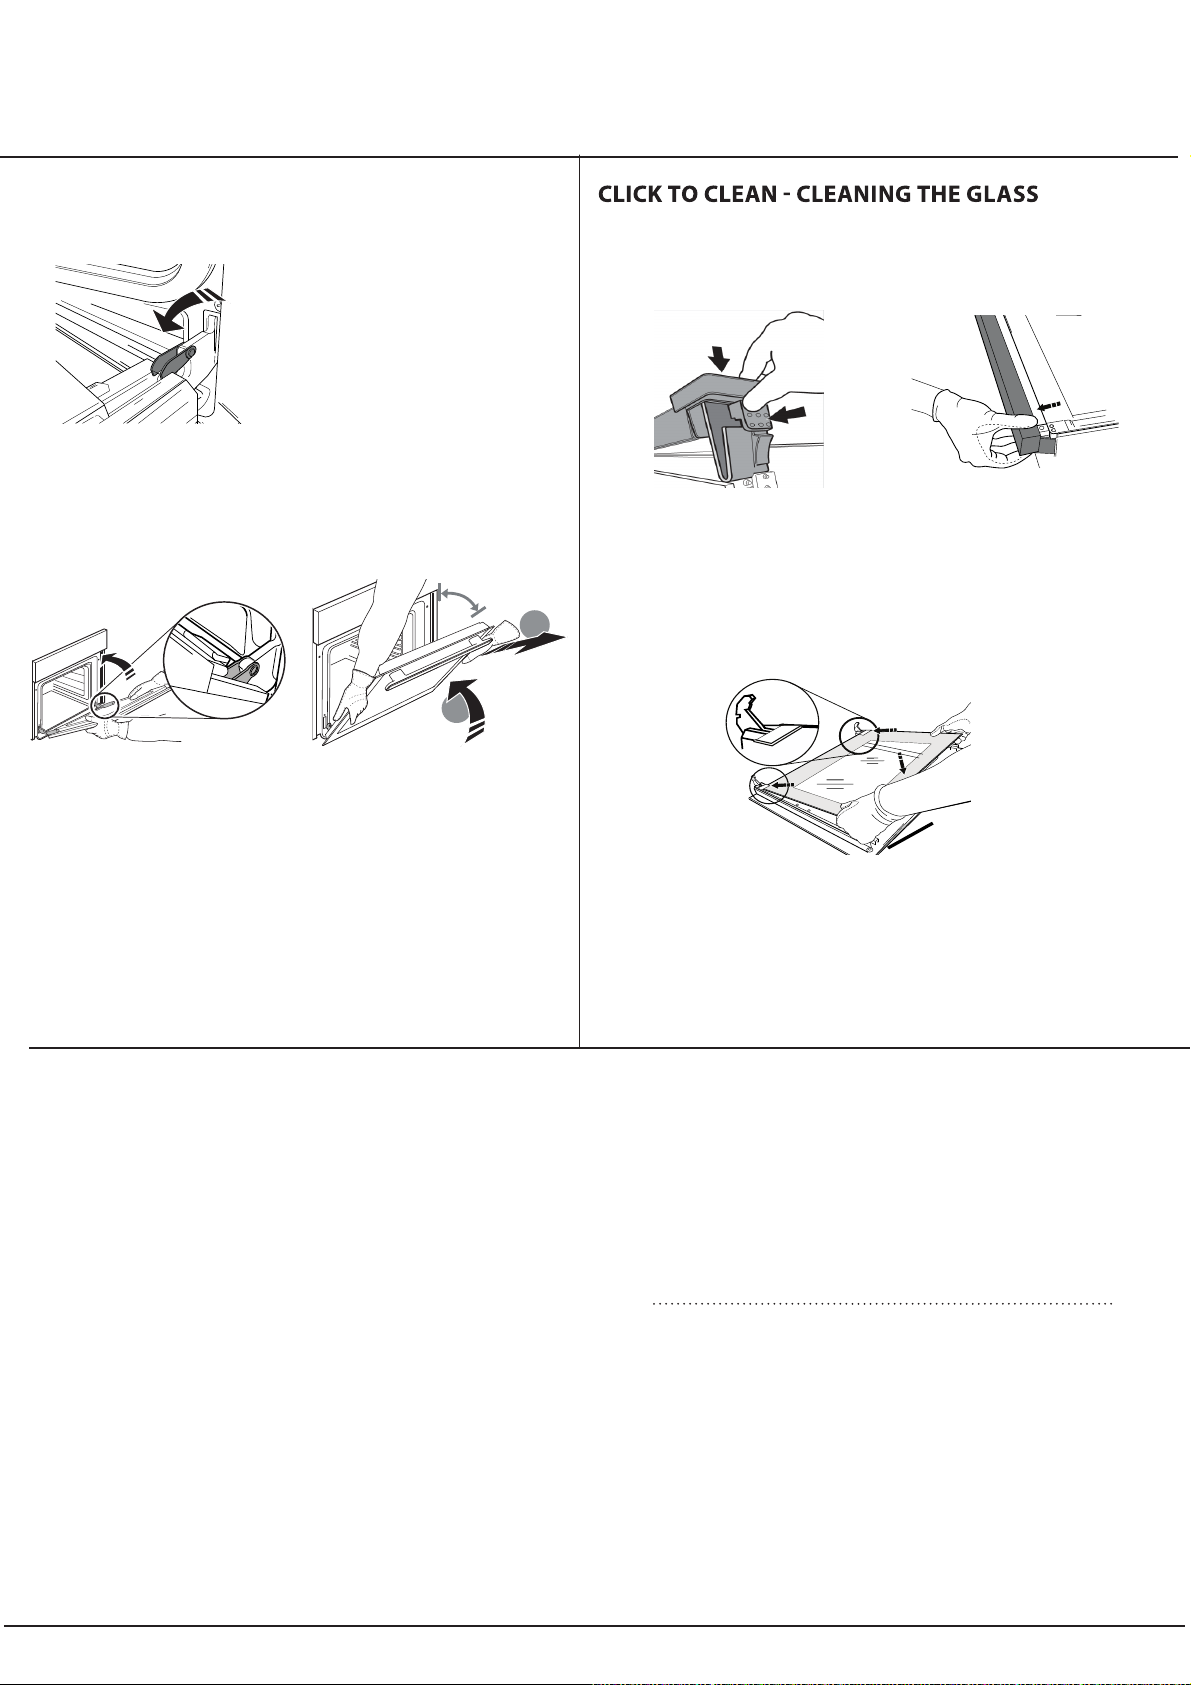
REMOVING AND REFITTING THE DOOR
1.
To remove the door, open it fully and lower the
catches until they are in the unlock position.
Close the door as much as you can.
2.
Take a rm hold of the door with both hands – do not
hold it by the handle.
Simply remove the door by continuing to close it
while pulling it upwards (a) at the same time until it is
released from its seating (b).
~15°
b
~60°
a
Put the door to one side, resting it on a soft surface.
1.
After removing the door and resting it on a soft
surface with the handle downwards, simultaneously
press the two retaining clips and remove the upper
edge of the door by pulling it towards you.
2.
Lift and rmly hold the inner glass with both
hands, remove it and place it on a soft surface before
cleaning it.
3.
When reassembling the inner door glass
insert the glass panel correctly so that the
text written on the panel is not reversed
and can be easily legible.
3.
Ret the door by moving it towards the oven,
aligning the hooks of the hinges with their seating
and securing the upper part onto its seating.
4.
Lower the door and then open it fully.
Lower the catches into their original position: Make
sure that you lower them down completely.
5.
Try closing the door and check to make sure that it
lines up with the control panel. If it does not, repeat
the steps above
Catalitic Cleaning
In some models, the most exposed internal vertical
sides of the oven are coated with porous enamel,
which is called catalytic enamel. When heated, this
enamel destroys fat particles given off by the food.
This „oxidation” of the fat particles occurs when the
temperature of the sides exceeds 170°C. The porous
quality of the catalytic enamel increases the surface
area where the exchange vital to the oxidation of the
fats takes place.
.
4.
Ret the upper edge: a click will indicate correct
positioning. Make sure the seal is secure before
retting the door
If there is still grime on the catalytic surfaces after
the cooking programme has ended, leave the empty
oven on with the door shut, turning the temperature
adjustment knob to its maximum setting. Leave the
oven like this for a period of time between 60 and 90
minutes, according to how much dirt was left inside.
The cleaning process for more stubborn food residues
may be quickened by using hot water and a soft brush.
Assistance
Please have the following information to hand:
• The appliance model (Mod.).
• The serial number (S/N).
This information can be found on the data plate
located on the appliance and/or on the packaging.
46
Page 47
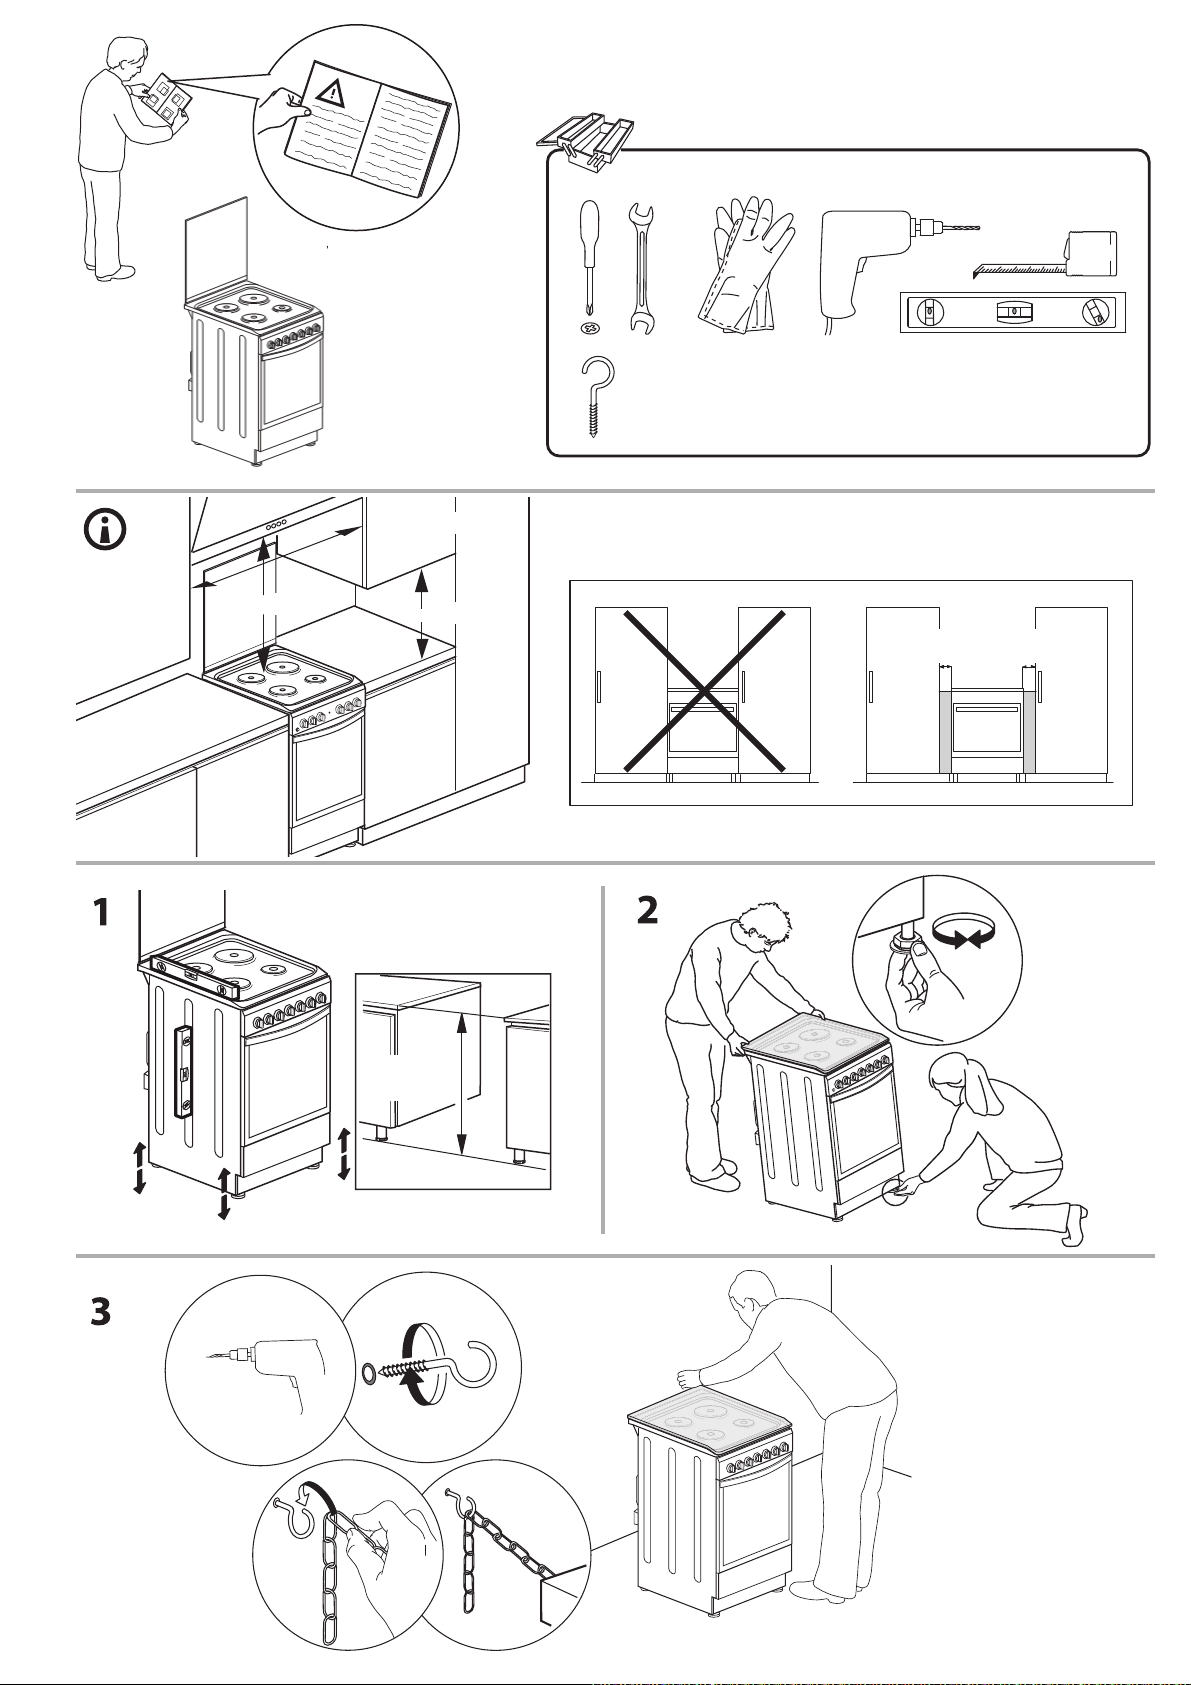
x1
Min. 200 mm
Min. 420 mm
Min. 600 mm
Min. 650 mm
= mm
17mm - 0,67inch
47
Page 48
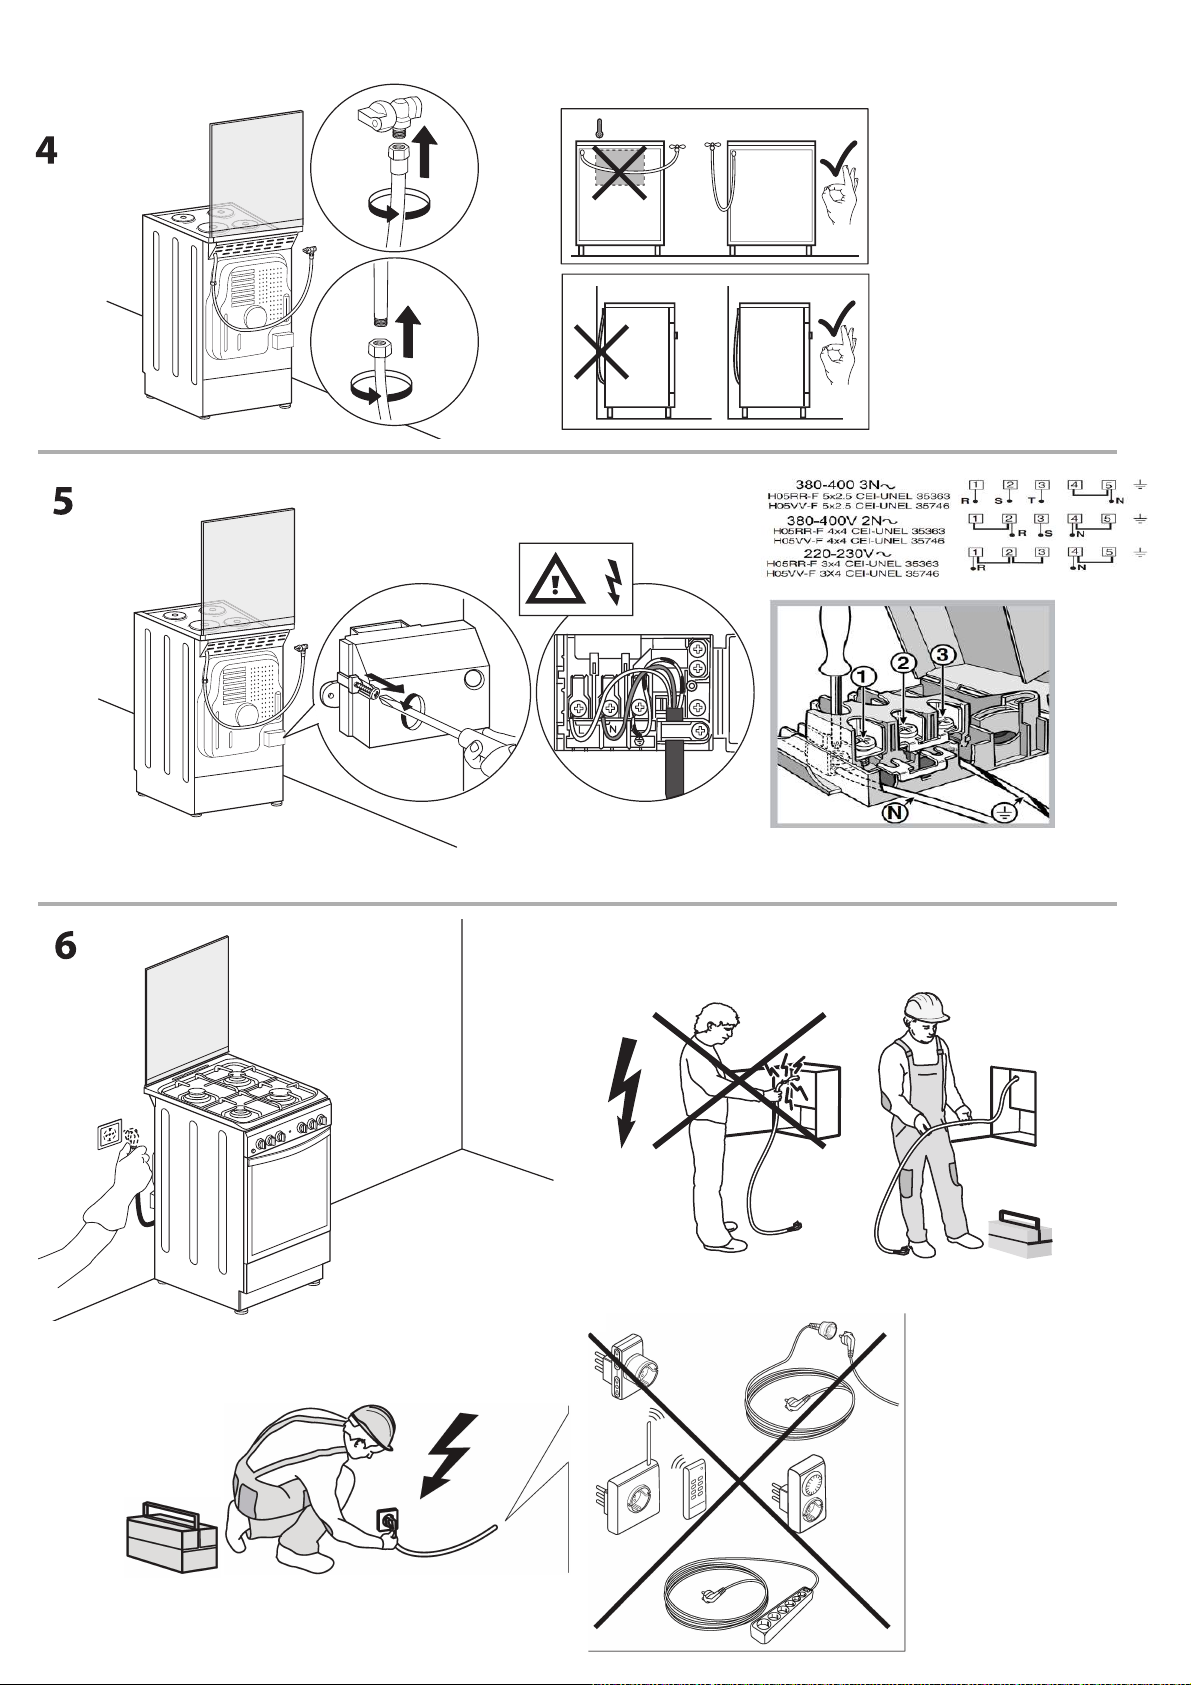
>50°C
Whirlpool EMEA S.p.A.
Via Carlo Pisacane n.1
20016 Pero (MI), Italy
VAT number: IT00693740425
www.indesit.com
09/2018-
W11282841W11282841W11282841
XEROX FABRIANO
48
 Loading...