

INDESIT IS 60 V (UK) User Manual
Important Information
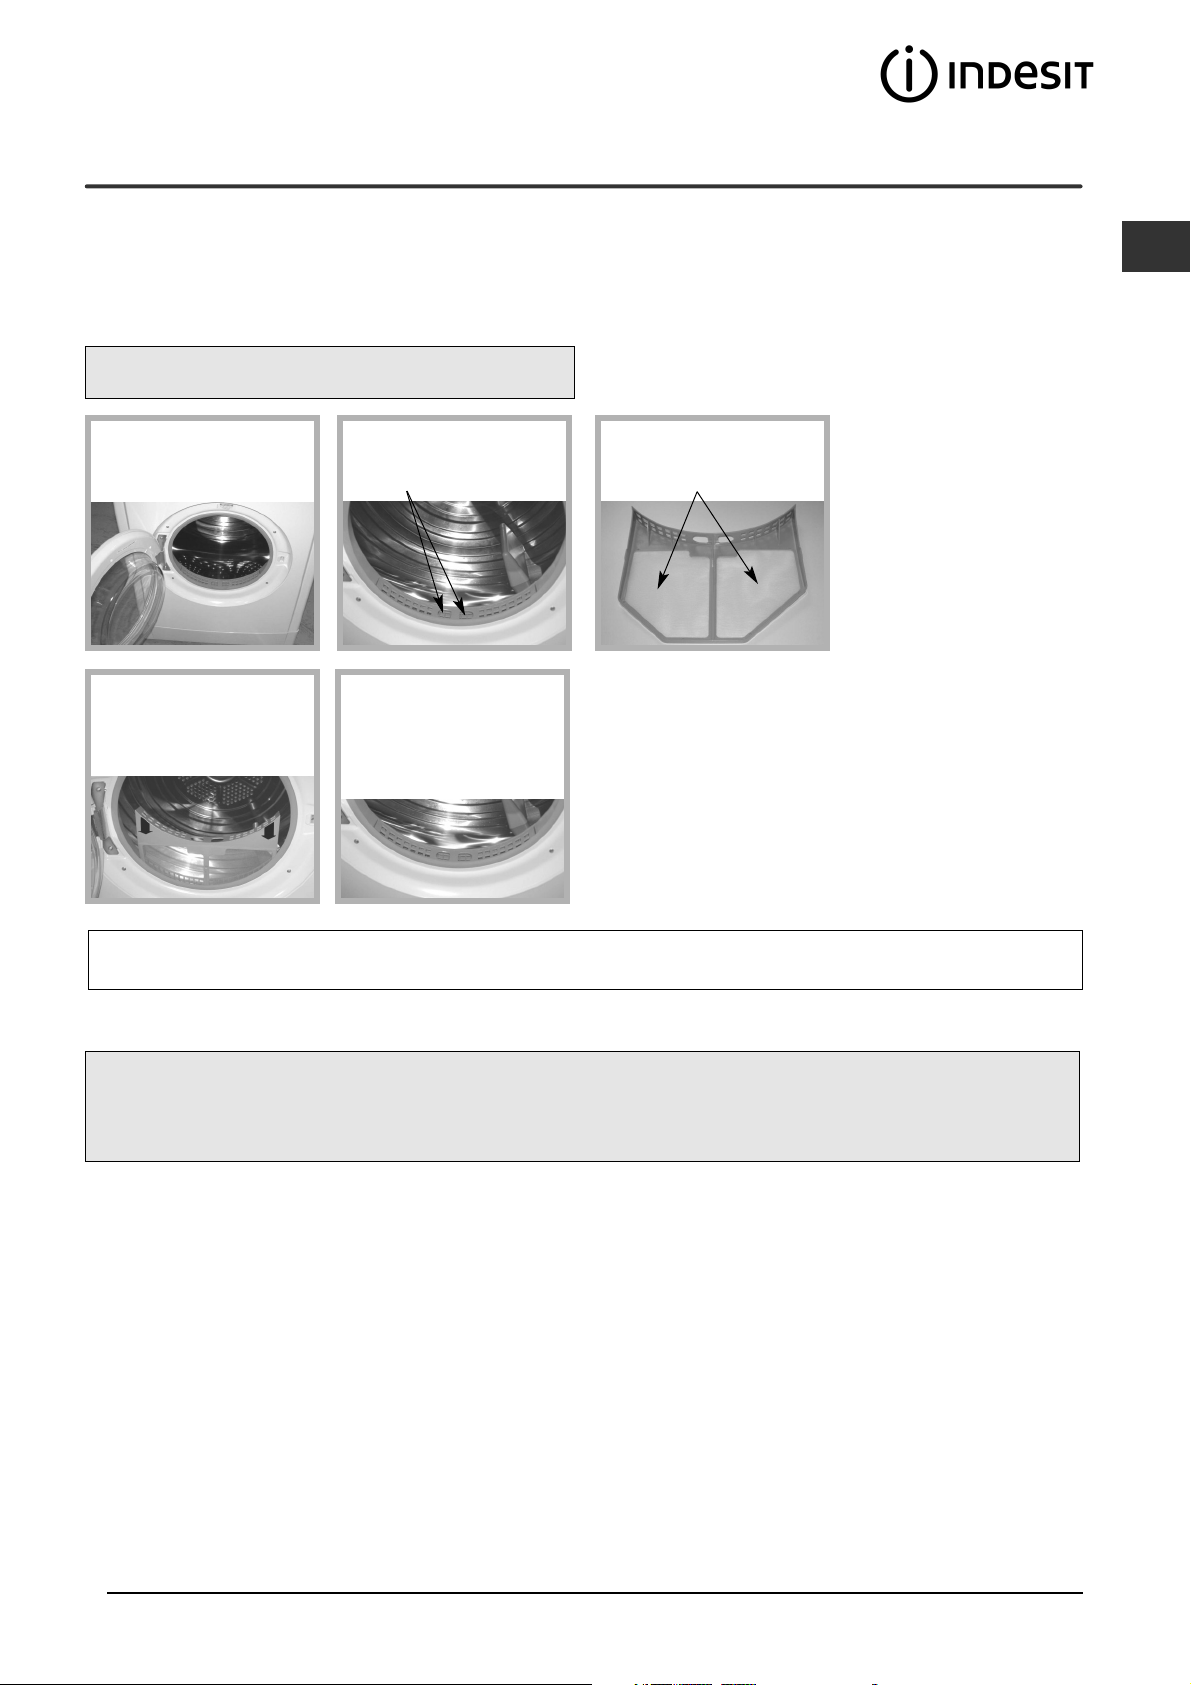
For your Venting dryer to operate efficiently, you must follow the regular maintenance schedule shown below:
Fluff Filter...
! You MUST clean the fluff filter after EVERY drying
cycle.
STEP 1.
Open the door of your
dryer.
STEP 4.
Refit the filter.
- Make sure the arrows
are facing you.
STEP 2.
Pull out the filter (using
the two finger grips).
STEP 5.
Make sure the filter is
pushed fully home.
- NEVER run the dryer
without the filter in position.
STEP 3.
Clean any fluff deposits
from the filter mesh.
GB
! Failure to clean the filter after EVERY drying cycle will affect the drying performance of your machine.
- It will take longer to dry and as a result will use more electricity during drying.
! You MUST clean fluff build up around the filter housing and the vent tube periodically, EVERY two or three months:
- Check the vent tube and any permanent venting fixture to make sure that there has been no accumulation
of fluff or lint, and remove it.
- Remove lint that collects around the filter and the outlet vents.
1

Instruction booklet
TUMBLE DRYER
GB
GB
English
IS60V
Contents
Installation, 3-4
Where to put your dryer
Ventilation
Electrical connection
Before you start using your dryer
Dryer description, 5
The front
The back
Control panel
Start and programmes, 6
Choosing a programme
Laundry, 7-8
Sorting your laundry
Wash care labels
Special clothing items
Drying times
Warnings and Suggestions, 9
General safety
Disposal
Saving energy and respecting the environment
Maintenance and Care, 10
Switching off the electricity
Cleaning the filter after each cycle
Check the drum after each cycle
Cleaning the dryer
Troubleshooting, 11
Service, 12
Spare parts
! Keep this instruction booklet on hand in order to refer to it when necessary. Take it with you when you move, and
should you sell this appliance or pass it on to another party, make sure that this booklet is supplied along with the
dryer so that the new owner may be informed about warnings and suggestions on how the appliance works.
! Read these instructions carefully; the following pages contain important information on installation and suggestions
on how the appliance works.
2
Installation
Where to put your dryer
●
Place your dryer at a distance from gas ranges,
stoves, heaters, or cook tops because flames can
damage the appliance.
●
Minimum gap 10mm
Minimum gaps
15mm
proper air circulation. Make sure that the back
vents are not obstructed.
●
Make sure you put your dryer in an environment
that is not damp and has proper air circulation
throughout, the dryer will not operate efficiently in
an enclosed space or cupboard.
! We do not recommend that the dryer is installed in a
cupboard but the dryer must never be installed
behind a lockable door, a sliding door or a door with a
hinge on the opposite side to that of the dryer door.
If you are going to install the
appliance under a work
counter, be sure to leave a
10mm space between the
top and any other objects on
or above the machine and a
15mm space between the
sides and lateral furnishings
or walls. This is to ensure
Ventilation
Permanent venting
In conjunction with the vent tube we recommend
using a Wall/Window Vent Kit, available at a retail
location or the nearest Spare Parts Dealer.
Wall mounting
1. Leave an opening in
the wall to the left of the
dryers proposed position.
2. Keep the tube as short
and straight as possible
to prevent condensed
moisture from backing up
into the dryer.
3. Similarly, the duct in
the wall should slope
downwards towards the
outside.
Window mounting
1. With a stacked dryer
the hole in the window
should ideally be made
below the vent.
2. The tube should be
kept as short as possible.
GB
The Dryer dries your laundry by drawing in cool, clean
and relatively dry air, heating it, and then distributing it
through the clothes as they are gently tumbled. For
optimum performance, the moist air is then blown out
through a vent tube at the back of the dryer.
When the dryer is in use, there has to be adequate
ventilation to avoid the back flow of gases into the room
from appliances burning other fuels, including open fires.
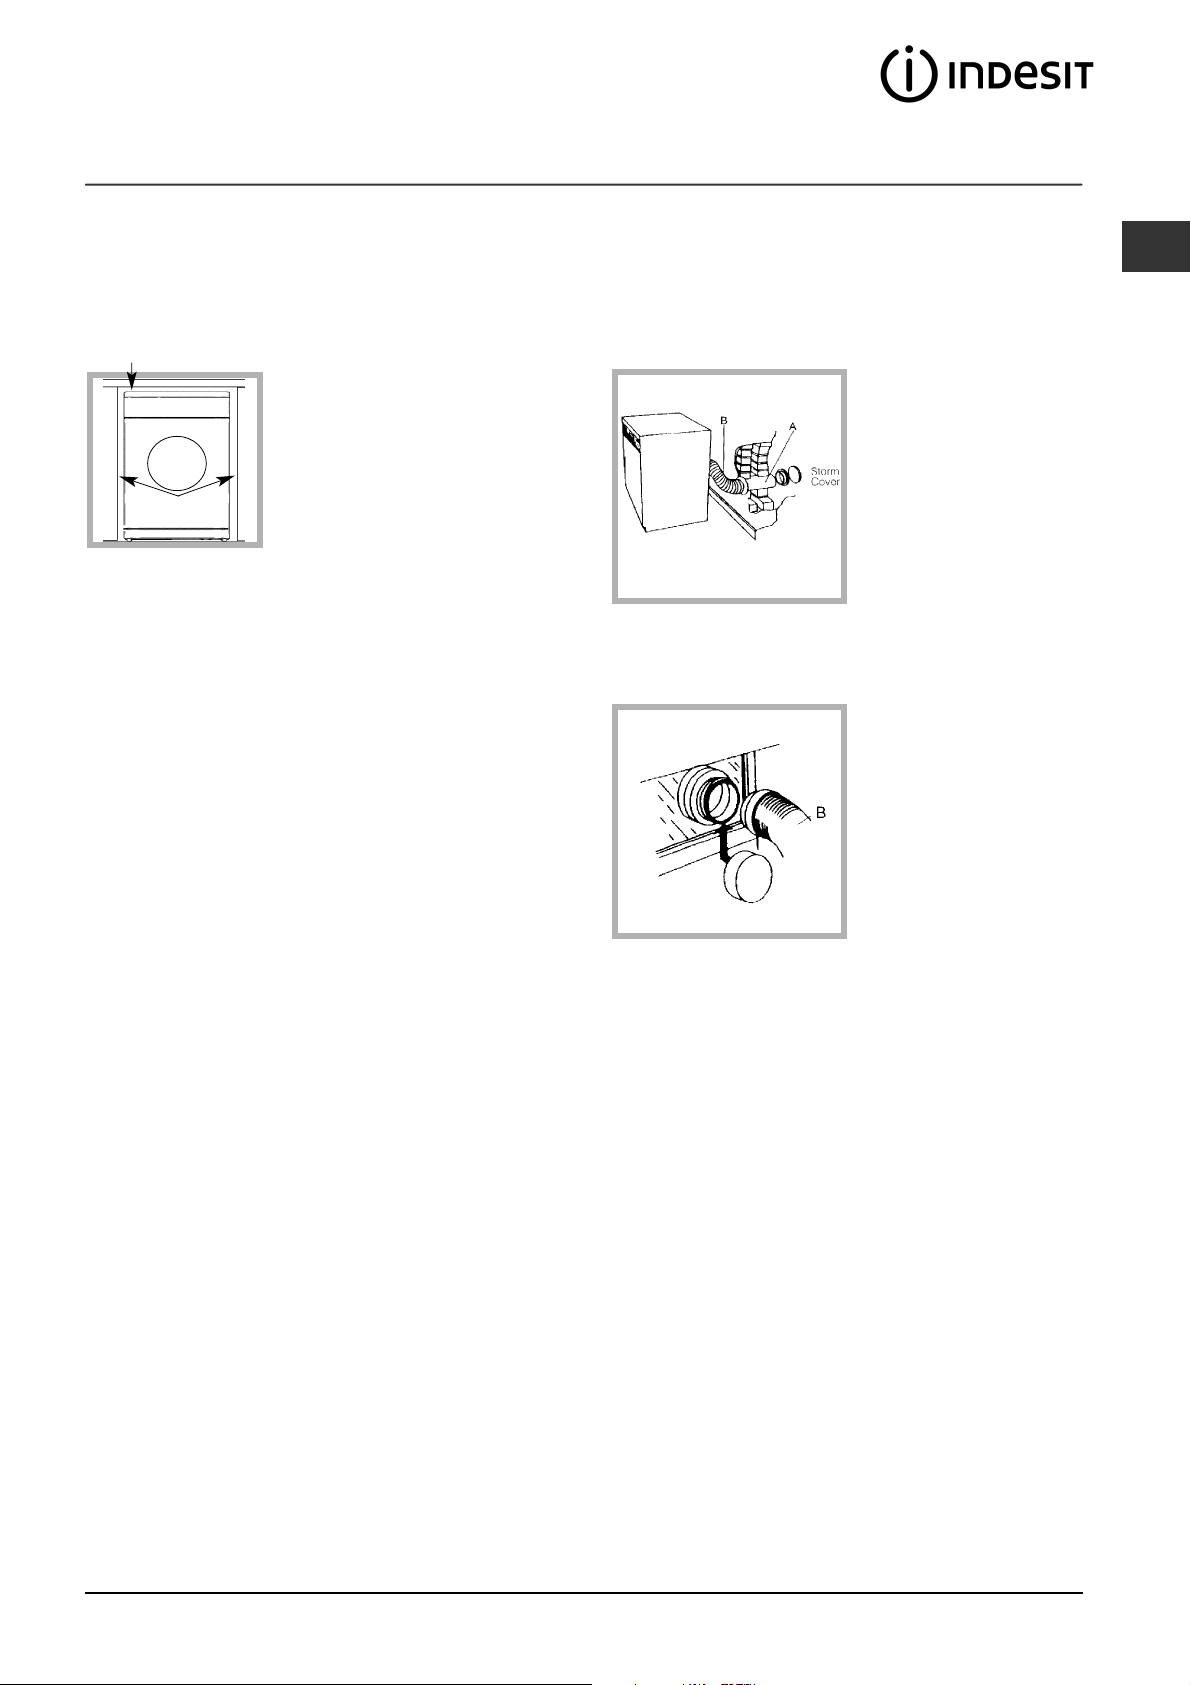
Mobile venting
A vent tube must always be fitted when the dryer is
used in conjunction with Mobile Venting.
The tube must be fitted securely into the back of the
dryer (see Dryer Description). If possible, it is always
best to connect the tube to a permanent
outlet close to the dryer. If permanent installation is
not possible, the dryer will work just as well with the
tube passing through a partly-opened window.
! Ensure that the end of the tube is not directed
toward the air intake vent at the rear of the dryer.
! The vent tube should not exceed 2.4 metres in
length and should be kept free of any possible
accumulation of fluff, lint and water by shaking it out
frequently. Always ensure that the tube is not
squashed.
Depending on how often you use your dryer, it is
essential that areas A and B are checked periodically
to remove lint or debris.
The vent tube adaptor must be fitted securely thus
preventing any humid air from being emitted back into
the room.
! The Dryer should not be pushed so far back that the
tube adaptor is pulled out of position or the tube is
squashed or bent.
! The tube should be kept clear of the air intake vent
and kinks or ‘U’ bends must be avoided as these will
obstruct the tube or trap condensation.
3
Installation
GB
Open window venting
The end of the tube
should be directed
downwards, to prevent
warm moist air from
condensing in the room or
in the dryer.
! Ensure that the dryer is adequately ventilated and
that the end of the vent tube is not directed towards
the air intake duct.
! The vent tube must always be fitted for optimum
performance.
! Make sure that the vent tube and air intake vents are
not obstructed or blocked.
! The dryer must not recycle exhaust air.
! Misusing a tumble dryer may create a fire hazard.
! Do not discharge exhaust air into a flue which is
used for exhaust fumes from other appliances that
burn gas or other fuels.
! Do not discharge exhaust air into an extraction
system or any duct with an extractor fan. This will
affect the way the thermal controls operate and can
result in a fire hazard.
Electrical connections
Make sure of the following before you insert the plug
into the the electrical socket:
●
The socket must be grounded.
●
The socket must be able to sustain the machines
maximum power, which is indicated on the rating
label (see Dryer Description).
●
Power voltage must be within the values indicated
on the rating label (see Dryer Description).
●
The socket must be compatible with the dryers
plug. Should this not be the case, replace the
plug or the socket.
Moulded plug
! The plug must not be used
without the fuse cover in place. If
a replacement fuse holder/cover is
required, it must be of the same
colour coding or wording as
shown on the base of the plug.
Replacements are available from
authorised dealers.
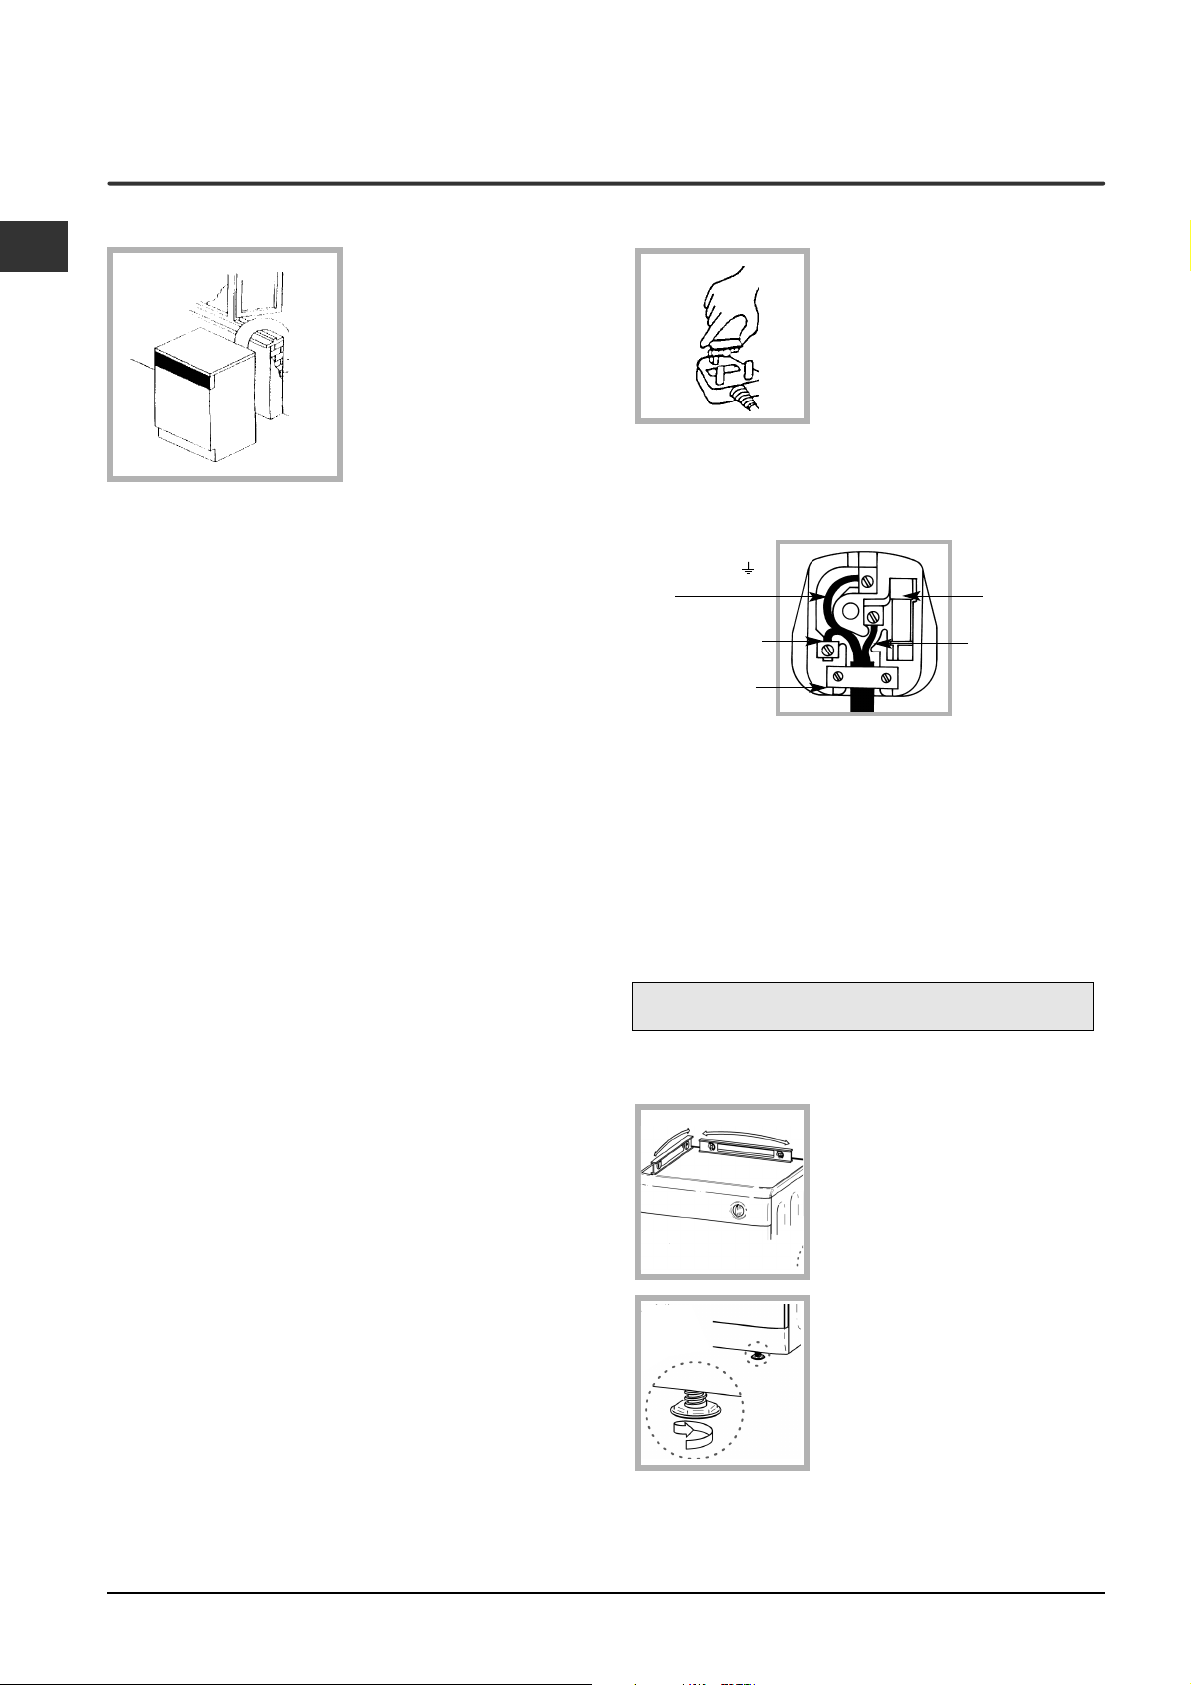
Changing the plug
The wires in the power cord are coloured in accordance
with the following:
Green and Yellow
(Earth) wire to terminal
marked ‘E’, symbol ,
or coloured green and
yellow.
Blue (Neutral) wire to
terminal marked ‘N’ or
coloured black.
Cord clamp
13A ASTA approved
fuse to BS1362.
Brown (Live) wire to
terminal marked ‘L’ or
coloured red.
! If the plug being replaced is a non-rewirable type,
then the cut-off plug must be disposed of safely. DO
NOT leave it where it can be inserted into a socket
and create a shock hazard.
! The power supply cord should be checked periodically
and replaced by a cord specially prepared for this
dryer and fitted only by authorised technicians (see
Service). New or longer power cords are supplied at
an extra charge by authorised dealers.
! The manufacturer denies any responsibility should
any of these rules not be followed.
! If in doubt about any of the above consult a qualified
electrician.
Levelling your dryer
The dryer must be installed level for correct operation.
When you have installed your
dryer in its final location check
that it is level first side to side,
then front to back.
! The dryer must not be installed outdoors, even if the
space is sheltered. It can be very dangerous if it is
exposed to rain or storms.
! Once installed, the dryers electrical wire and plug
must be within easy reach.
! Do not use extension cords.
! The power cord must not be bent or squashed.
! The power cord supplied is fitted with a BS1363 plug
and a 13 amp BS1362 fuse. If you need to replace the
fuse, use only those rated at 13 amp (13A) and ASTA
approved to BS1362.
4
If the dryer is not level, use a
wooden block to
support it while adjusting the two
front legs up or down, until your
dryer is level.
Before you start using your dryer
Once you have installed your dryer and before you
use it, clean the inside of the drum to remove any dust
that could have accumulated during transport.
 Loading...