

Page 1

IDE 1000
IDE 1005
Dishwasher
Installation and use
Page 2

Page 3
Safety Is a Good Habit to Get Into
NOTICE
Carefully read the instructions contained in this manual, as they
provide important information which is essential to safe and proper
installation, use and maintenance of the appliance.
This appliance complies with the following EEC directives:
- 73/23/EEC of 19/02/73 (Low Voltage) and subsequent
modifications;
- 89/336/EEC of 03/05/89 (Electromagnetic Compatibility)
and subsequent modifications.
- 97/17/EEC Labelling
1.Carefully dispose of the packing material.
2.After removing the packing, check to make sure that the appliance
is not damaged. If in doubt, contact a qualified professional.
3.The dishwasher must only be used by adults for the washing of
household dishes and cooking utensils.
4.Fundamental rules to follow when using the appliance:
- Never touch the dishwasher when barefoot or with wet hands or
feet;
- We discourage the use of extension cords and multiple sockets;
- During installation, the power supply cord must not be excessively
or dangerously bent or flattened;
- If the appliance is not operating properly or maintenance must
be performed, disconnect the appliance from the power supply.
5.Keep detergents out of the reach of children, who must also be
kept away from the dishwasher when it is open.
6.This appliance cannot be installed outdoors, not even if the area in
which it is installed is covered by a roof; it is also very dangerous to
leave it exposed to the rain and elements.
7.Do not touch the heating element during or after a wash cycle.
8.Do not lean or sit on the door when it is open, as this could overturn
the dishwasher.
9.If the appliance malfunctions, turn off water supply to the appliance
and disconnect the plug from the wall socket. Then, consult the
section entitled, "Troubleshooting." If you cannot resolve the
problem, contact a service centre.
10.Appliances which are no longer being used must be made
inoperable by cutting the power supply cord and removing the door
lock.
To maintain the EFFICIENCY and SAFETY of this
appliance, we recommend:
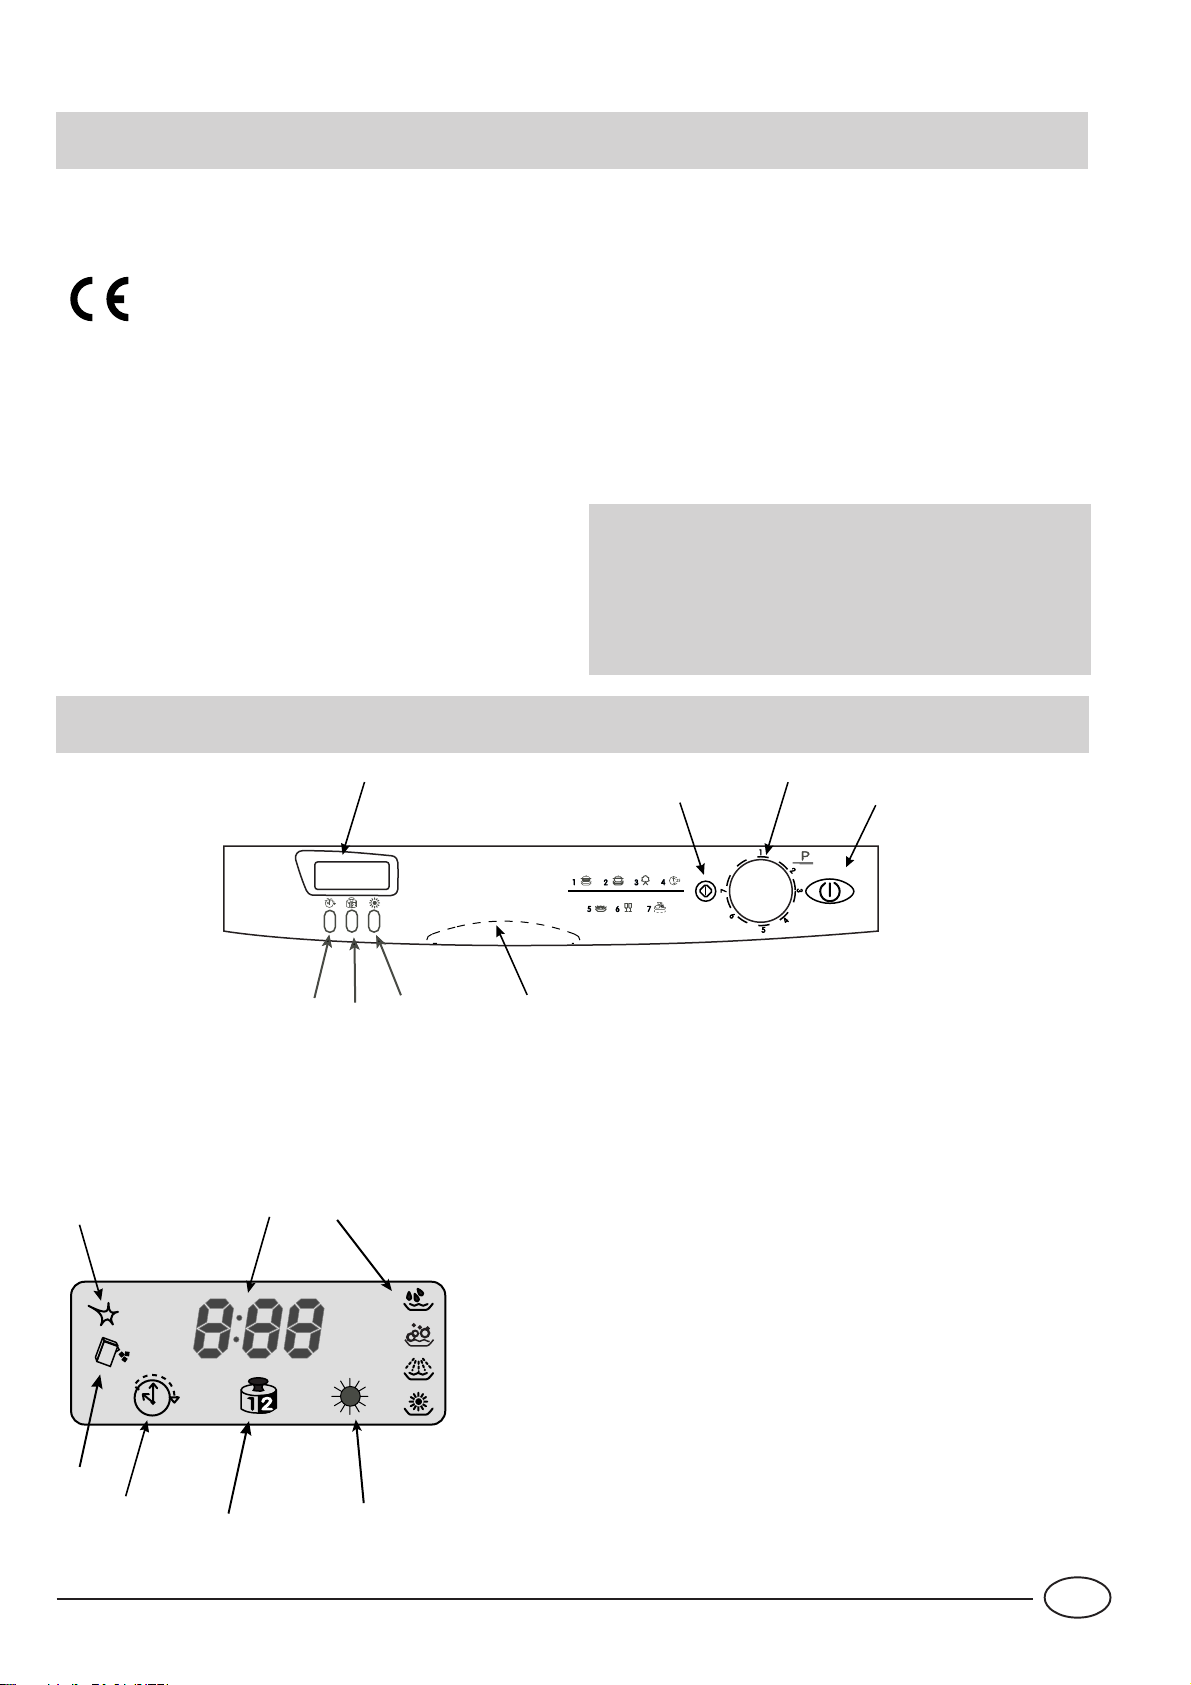
Close-up View (control panel)
H
l call only the Service Centers authorized
by the manufacturer
l always use original Spare Parts
R
D
A
A: ON-OFF button
C: Door handle
R: Start/Reset Button
T
L
S
I
N
G
H
Time 4 You
Rapid'25
Intensive
E
F
C
Eco
eco
Crystal Care
Soak
Just You
H: Display
E: "Extra drying" button
F: "Half load" button
G: Delayed start select button
G: "Extra drying" indicator light
H: Cycle phase indicator lights
L: Alphanumeric indicator
N: Half load indicator light
S: Low salt indicator light
T: Low rinse aid indicator light
I: Delayed start indicator light
G
1
GB
Page 4
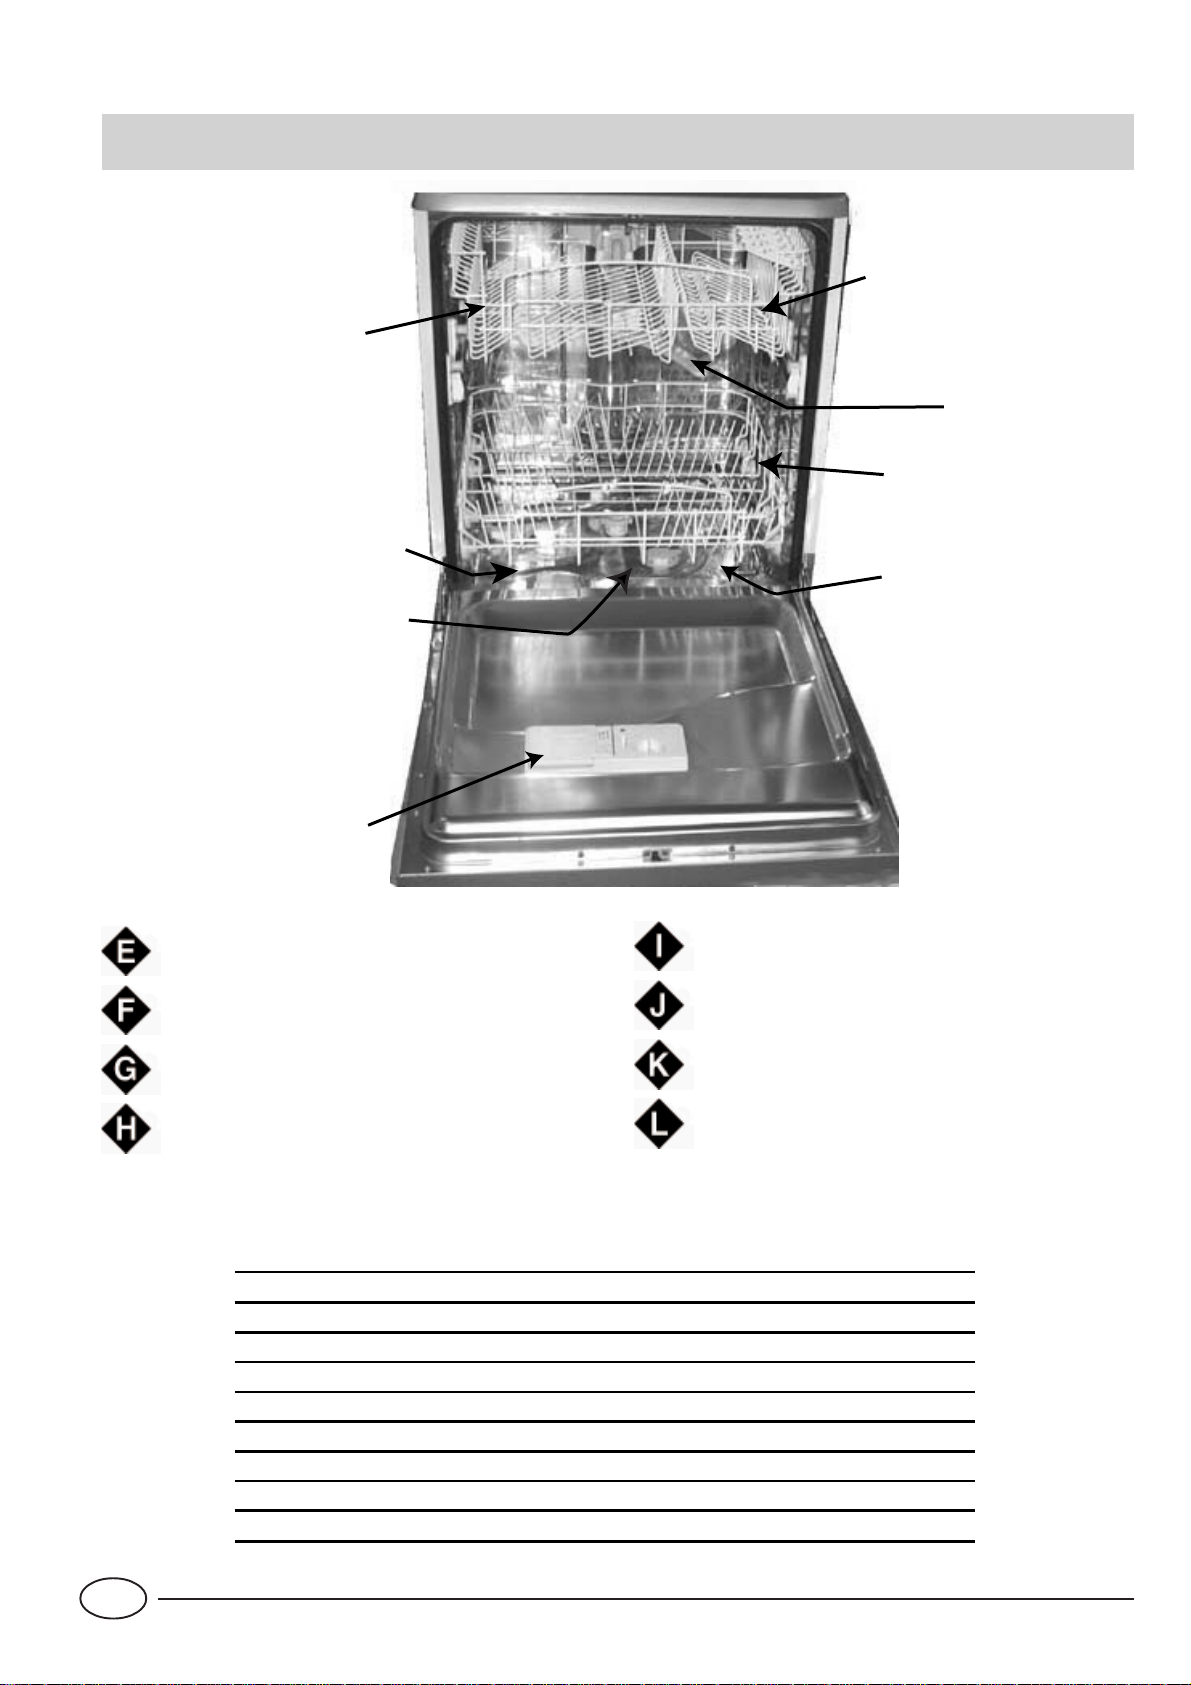
Close-up View (Interior)
G
J
I
E
F
H
K
Upper Rack
T op Sprayer Arm
Rack Height Adjustor
Lower Rack
Width cm. 60
Depth cm. 60
Height cm. 85
Capacity 12 standard place settings
Mains water pressure 4,3 psi - 145 psi (30 KPa÷ 1MP a) (0,3 ÷10 bar)
Power voltage See data plate
Total absorber power See data plate
Fuse See data plate
L
Bottom Sprayer Arm
Salt Container Cap
Washing Filter
Detergent and Rinse Aid Dispenser
7HFKQLFDO FKDUDFW HULVWLFV
GB
2
Page 5
Salt ......
Salt
The hardness of the water varies from place to place. If
hard water is used in the dishwasher, deposits will form on
the dishes and utensils.
The appliance is equipped with a special softener that uses
a salt specifically designed to eliminate lime and minerals
from the water.
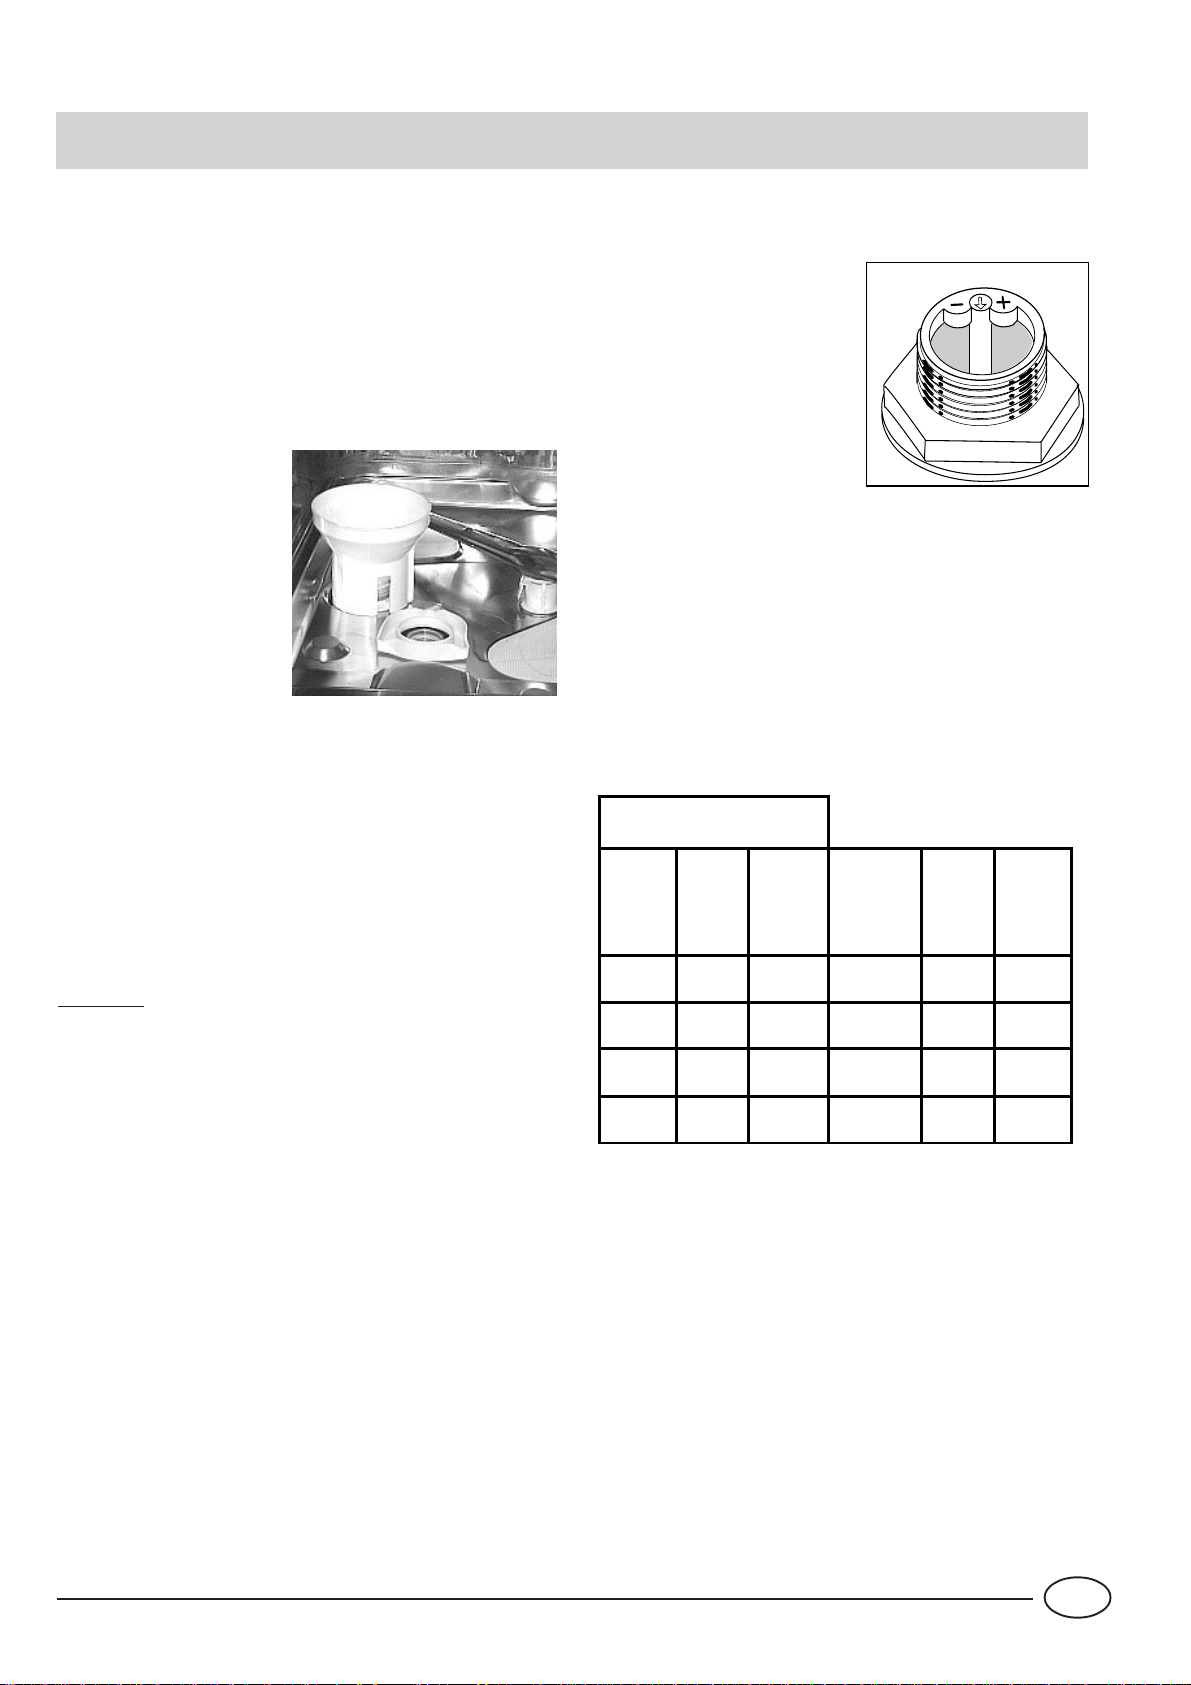
Loading the Salt into the Softener
Always use salt intended
for use with dishwashers.
The salt container is
located beneath the
lower rack and should be
filled as follows:
1. Remove the lower rack
and then unscrew and
remove the cap from the
salt container;
2. If you are filling the
container for the first
time, fill it with water;
3. Place the end of the funnel (supplied) into the hole and
introduce about 2 kg of salt. It is normal for a small amount
of water to come out of the salt container.
4. Carefully screw the cap back on.
The salt container should be filled up when the low
salt indicator light "S" flashes.
Once you have loaded the salt for the first time, it is normal
that the low salt indicator light stays on or flashes for about
5 consecutive cycles.
Warning: To prevent rust from forming, we advise you to
load the salt before starting a wash cycle.
Adjusting Salt Consumption
The dishwasher is designed to allow for adjusting the
amount of salt consumed based
on the harness of the water
used. This is intended to
optimize and customize the
level of salt consumption so that
it remains at a minimum.
Your Local Water Board can
supply the degree of hardness
of the water
in your area.
T o adjust salt consumption, proceed as follows:
1) Unscrew the cap from the salt container.
2) There is a ring on the container with an arrow on it (see
figure to the side), if necessary, rotate the ring in the anticlockwise direction from the "_" setting towards the "+"
sign, based on the hardness of the water being used.
It is recommended that adjustments be made in accordance with the following schema:
Water Hardness
Salt
Clarke
degrees
0 - 14 0 - 17 0 -1,7 / 0 /
14 - 36 18 - 44 1,8 - 4,4 "-" 20 60
°fH mmol/l
Selector
position
consumption
(grams/cycle)
Autonomy
(cycles\2kg)
36 - 71 45 - 89 4,5 - 8,9 MED 40 40
>71 > 89 > 8,9 "+" 60 25
3
GB
Page 6
Detergent and Rinse Aid ....
F
C
Detergent
Detergent specifically intended for use with dishwashers
must be used. The dispenser must be refilled before the
start of each wash cycle following the instructions provided
in the "Wash Cycle Table." The detergent dispenser is
located on the inside panel of the door.
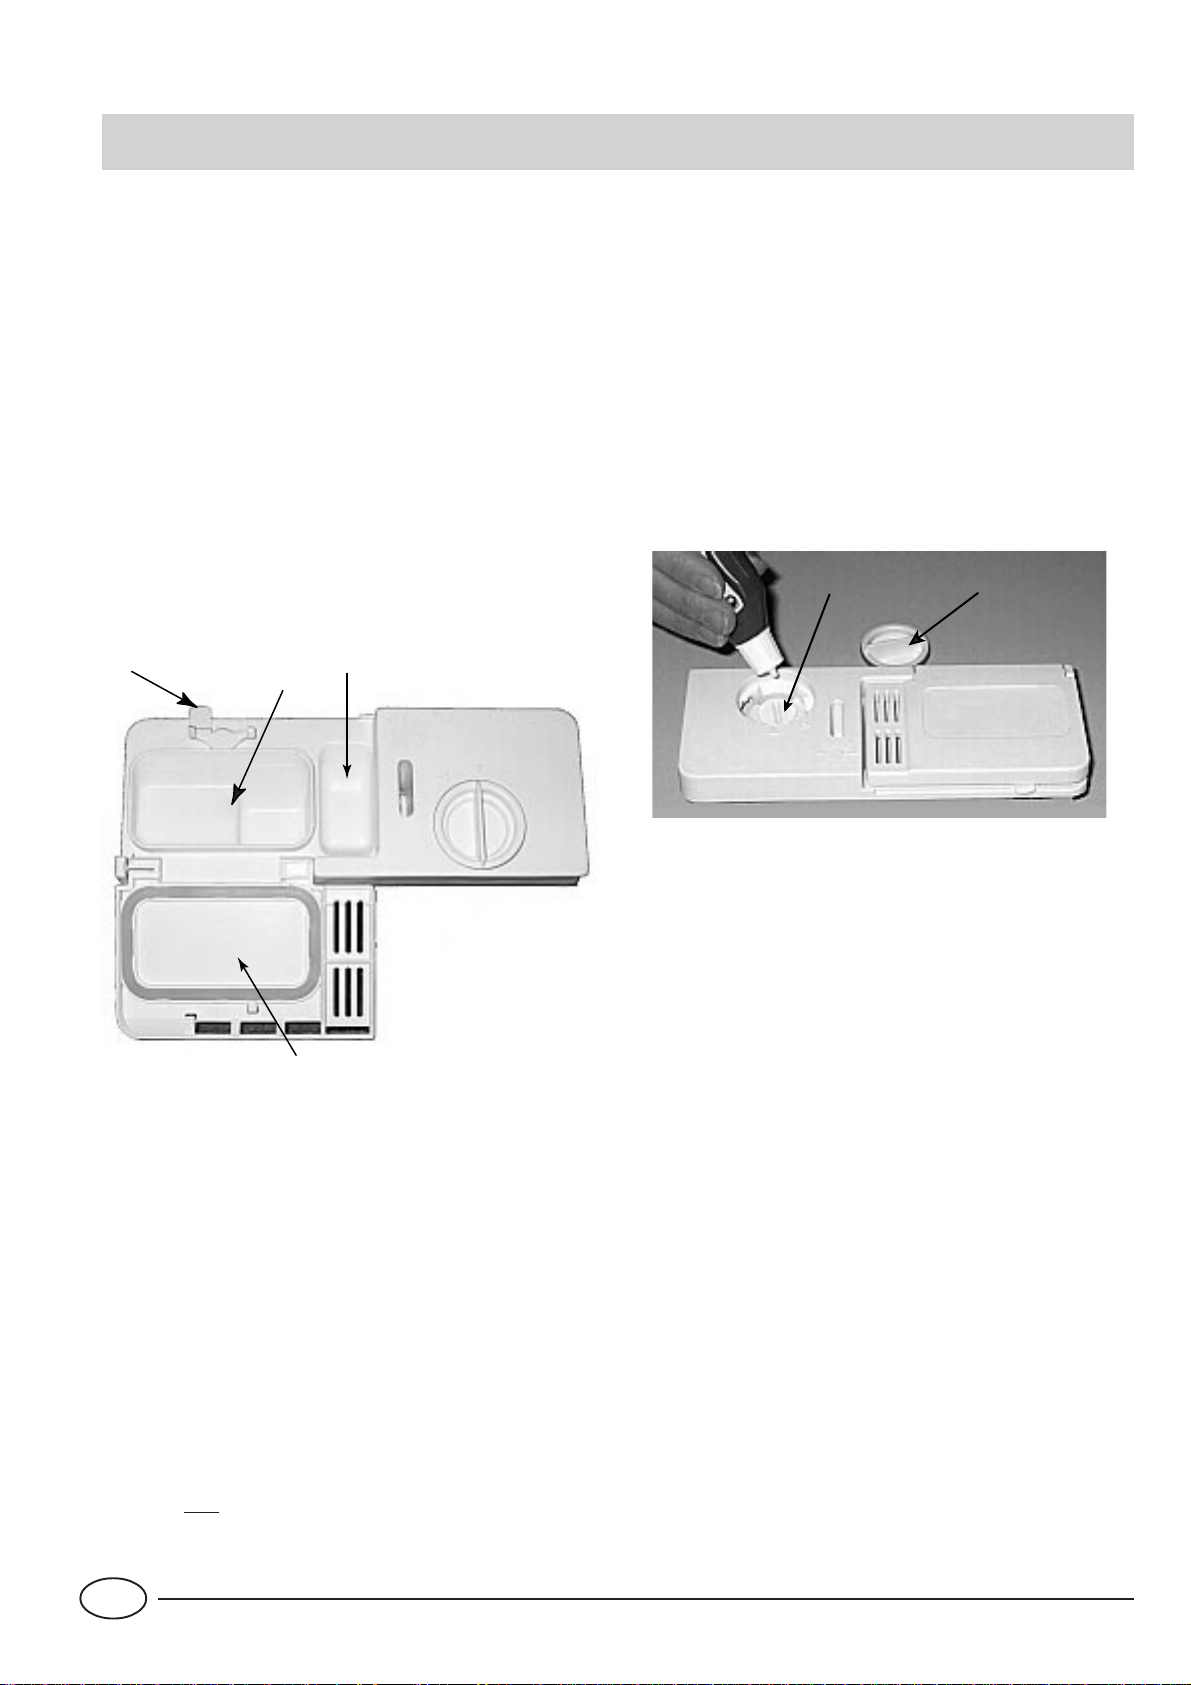
Loading the detergent
T o open lid "A", pr ess button "B". The cleaning detergent
should be introduced into the two containers "C"and
"D" up to the rim.
After pouring in the detergent, replace the lid, pressing
down until it clicks.
Dishwasher detergent in tablets is now available on the
market, in which case you should place one tablet into
container "D" and replace the lid.
B
D
C
Rinse Aid
This product makes dishes sparkle more as it improves their
drying. The rinse aid container is situated on the inside of
the appliance door; you should refill it when the low rinse
aid indicator light "T" flashes.
Loading the Rinse Aid
T o open the dispenser , turn the "C" cap in the anti-clockwise
direction and then pour in the rinse aid, making sure not to
overfill. The amount of rinse aid used for each cycle can be
regulated by turning the "F" dose adjustor , located beneath
the "C" cap, with a screwdriver. There are 6 different
settings; the normal dosage setting is 4.
Important:
Proper dosage of the rinse aid improves drying.
If drops of water remain on the dishes or spotting occurs,
the dosage adjustor should be turned to a higher setting. If
the dishes have white streaks, turn the dosage adjustor to
a lower setting.
A
Notice: To facilitate closing the cover, remove any
excess detergent on the edges of the dispenser.
Warning
Three-in-one dishwasher tablets are now available on the market, and combine detergent, salt and rinse aid all in one.
If the water in your area is hard or very hard, we still recommend you pour extra salt into the relevant dispenser to prevent the
formation of white streaks on your dishes or on the interior of the appliance.
Using a three-in-one product means it is no longer necessary to put rinse aid into the relevant container .
If you want to achieve perfectly dry dishes, you may add rinse aid as long as the dosage adjuster is set to no.2.
In any case, please read the manufacturer's instructions on the packet.
If you use only these products, it is normal for the salt and rinse aid indicator lights to flash permanently after a certain number
of cycles.
GB
4
Page 7
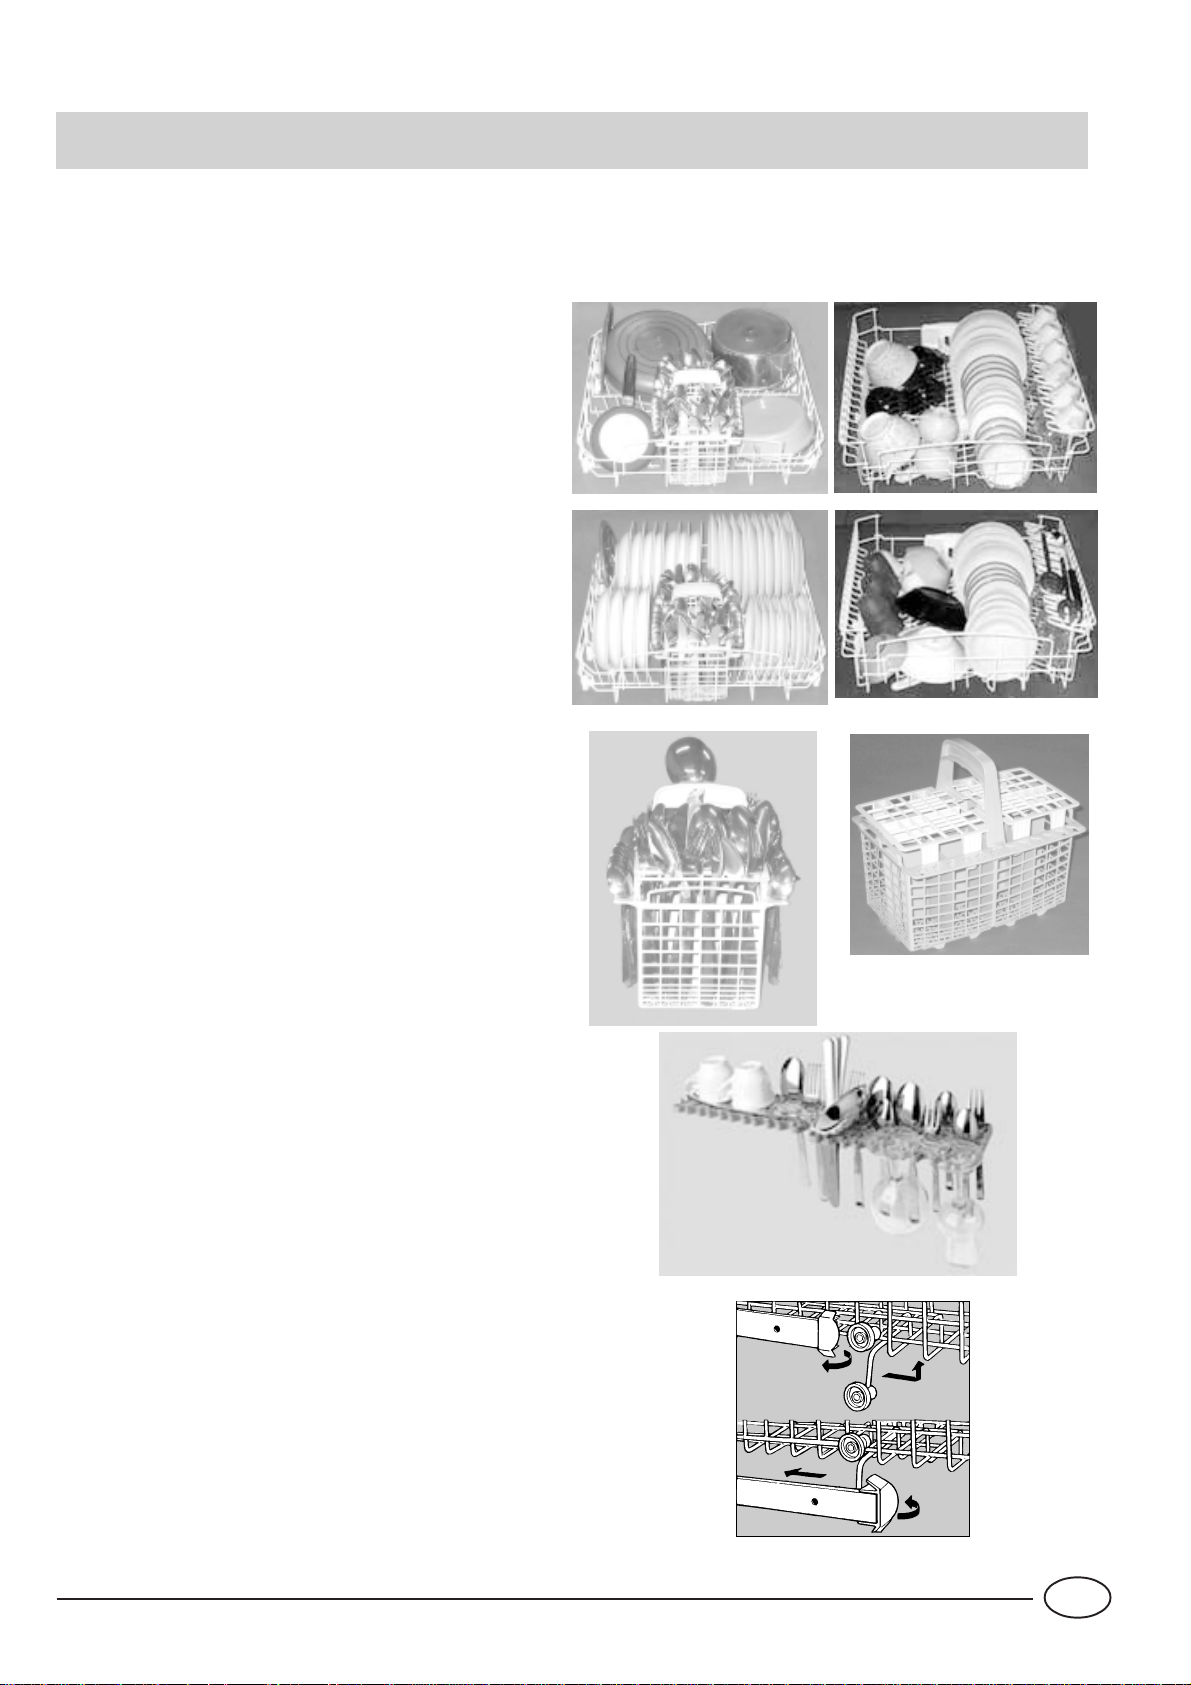
Loading the Dishwasher
Before placing the dishes in the racks, remove the largest
scraps of food left over on your plates, you will thus avoid
blocking the filter, which would reduce the efficacy of the
wash.
If the saucepans and frying pans are very dirty , allow them to
soak before being washed.
Y ou will thus avoid having to wash them again.
To make it easier to load your dishes, pull the racks out fully .
How to use the lower rack
We recommend you place the most difficult dishes to wash
into the lower rack: saucepans, lids, soup dishes and plates
(load examples are shown in the photo).
• Serving dishes and large lids: place them on the sides
of the rack.
• Saucepans, salad bowls: must always be placed upside
down.
• Very deep dishes: place them obliquely, thus allowing
water to run down them and cleaning them better.
The cutlery basket (Figures A)
Insert the cutlery into the basket: knives and utensils with
sharp blades or tips should be positioned with the sharp
parts at the bottom. Position all cutlery items so that they
don't touch.
If the rack has side baskets, the spoons should be loaded
individually into the appropriate slots (see fig. A).
- Especially long utensils should be placed in the horizontal position at the front of the upper rack.
lower rack
Load examples
A
upper rack
A
How to use the upper rack
Place delicate and lightweight dishes in the upper rack:
glasses, tea cups and coffee cups, saucers - but plates too
- shallow salad bowls, slightly dirty frying pans and shallow
pans (the photo illustrates a few examples).
Position lightweight dishes in such as way as to avoid their
being moved by the spray of water .
- The upper rack can be equipped with one or two special
tip-up compartments for mugs and cups, as well as spoons,
knives and forks, which should be fitted in the slots
provided. Stemmed glasses can be hooked onto these
compartments by threading the stems into the slots
provided (see fig. D).
After loading the dishes, remember to check that the blades
on the sprayer arms can turn freely without knocking
against any dishes.
How to adjust the upper rack ….
The upper rack can be set in a high or low position. To do
so, open the rail stop flaps and pull the rack out completely;
now place it with the back wheels in high or low position,
then slide it along the guide rails until the front wheels also
go in; now close the rail stop flaps (see fig. F).
fig. D
Fig. F
1
3
2
4
5
GB
Page 8
Turning on the Appliance
First of all
After performing all the operations described in the previous
paragraphs, turn the water tap on completely and press ONOFF button "A": you will hear a short beep, the display lights
up and the wash cycle time selected on the knob will flash.
Selecting and starting a wash cycle.
• Select the desired wash cycle by turning knob "D"
clockwise from wash cycle 1 to 7 and anticlockwise from 7
to 1; the display indicates the average duration of the wash
cycle and the cycle phases it consists of (consult the wash
cycle table contained on page 7, especially when first using
the appliance).
• Press the Start button "R" and the wash cycle starts up,
emitting a double beep; the approximate amount of time
left until the end of the wash cycle is displayed.
• If the time indicated at the start of the wash cycle does
not correspond to the actual duration of the cycle itself, this
could be for a number of reasons: the temperature of the
inlet water, the degree of soil, prolonged attempts by the
appliance to clean the wash filter from food residue clogging
it, etc.
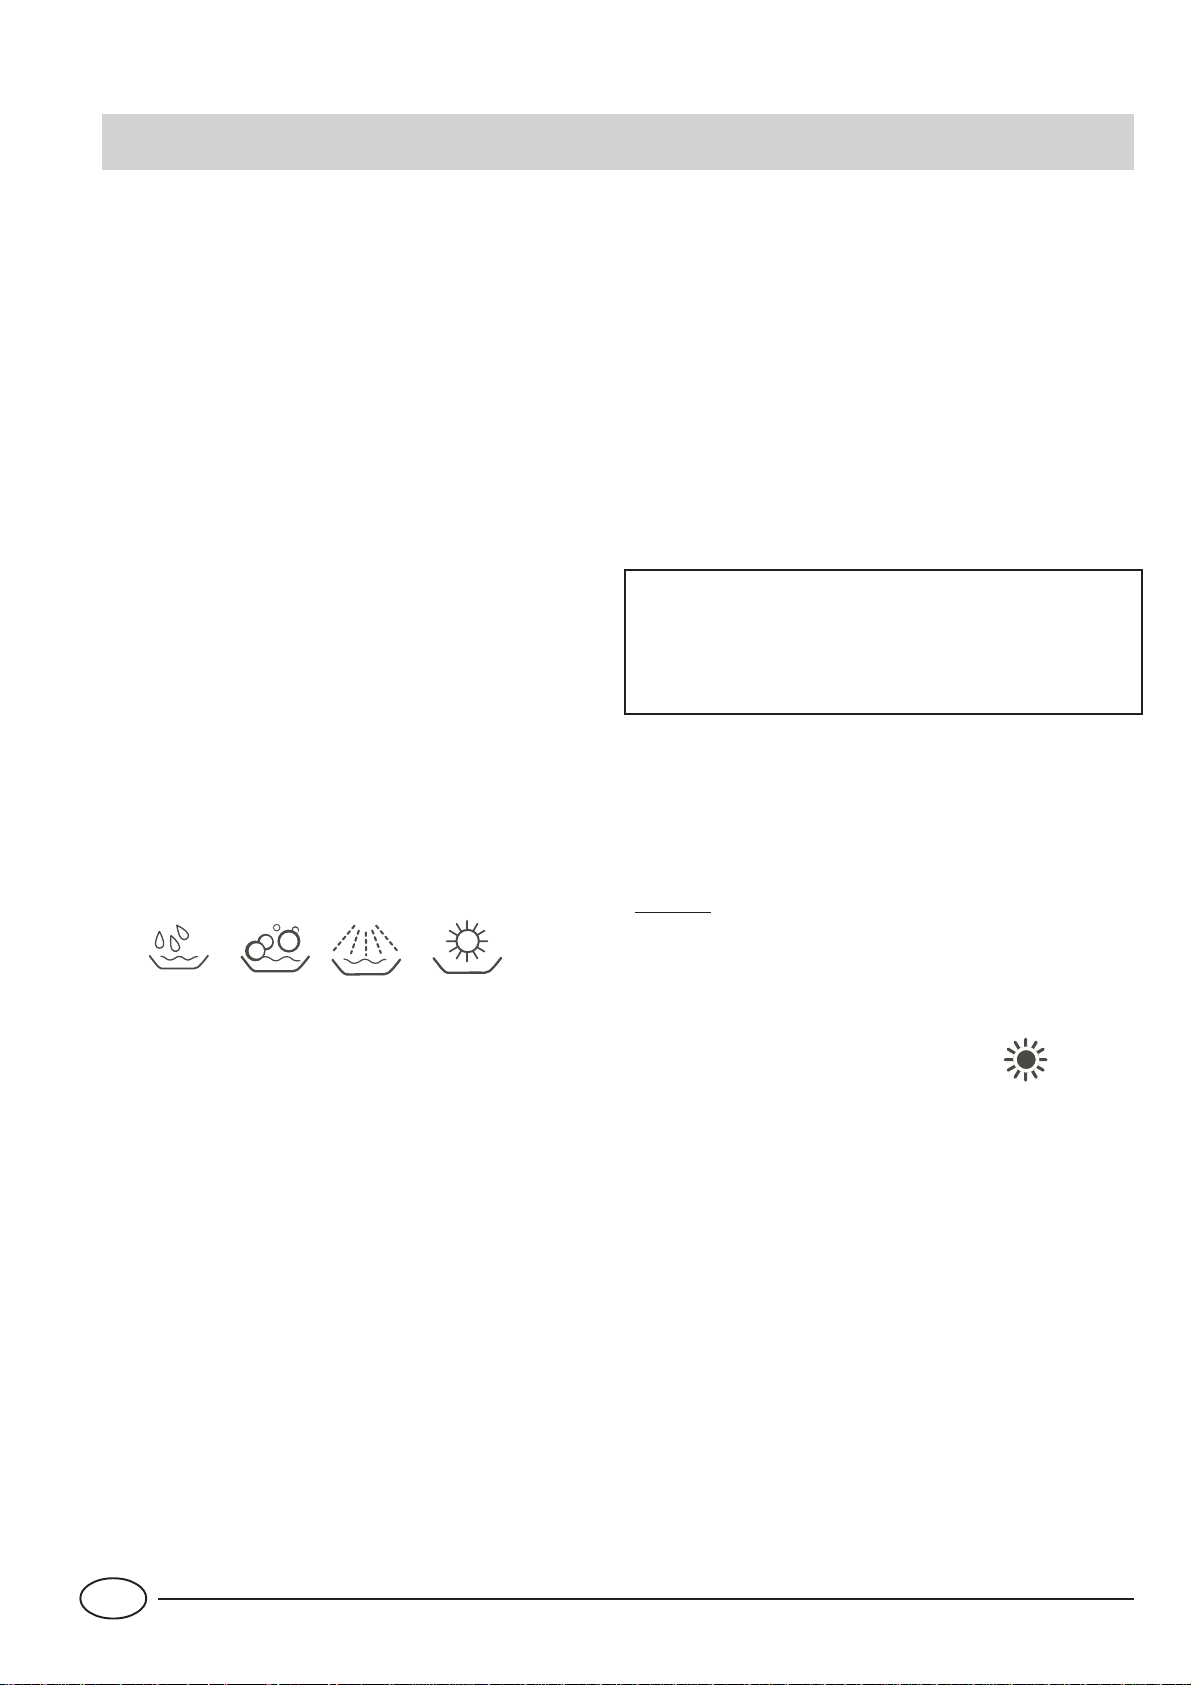
Cycle phase under way indicator
While the wash cycle is under way , the symbols corresponding
to the cycle phases light up in sequence.
Here are the symbols corresponding to each cycle phase:
You've left out a dish?
You can interrupt a wash cycle by pressing the "ON-OFF"
button, then place the forgotten dishes into the appliance,
which will start up, after approximately 10 seconds, from
where it was interrupted when you turn it back on.
There's been a power failure? Has the dishwasher door
been opened?
The wash cycle stops and 3 dashes appear on the display;
the cycle restarts as soon as the electricity comes back on or
when the door is shut.
At the end of the wash cycle
The end of the wash cycle is indicated by two short beeps
and the word "END" flashes on the display.
Warning:
T urn the appliance off by pressing button “A”, unplug
the appliance from the electricity socket to cut off the
power supply; the power supply cable should
consequently be easily accessible.
• T urn off the water tap.
• Empty the lower rack first.
Make sure the wash cycle has ended before removing the
dishes!
Warning: when you open the dishwasher door after the wash
cycle has just ended or is under way, take care not to scald
yourself with the hot steam.
Pre-wash Wash Rinses Drying
Cancelling and modifying a wash cycle in progress
Premise: a wash cycle in progress can only be modified if it
hasn't been running for long.
Keep the Reset button "R" pressed for about 3 seconds:
a prolonged beep will sound, followed by three short beeps.
The cancelled cycle time will flash on the display. Turn the
knob to select a new wash cycle.
How to set the extra drying
Press button "E". After a prolonged beep, indicator light
"G" lights up and the time corresponding to the wash cycle
selected on the knob will flash on the display.
Note: The time indicated on the display is extended due to
the extra drying time.
To disable the extra drying option, press the same button
and indicator light "G" will be turned off after a beep is
sounded.
This option is incompatible with the soak cycle.
GB
6
Page 9

Setting a half load and a delayed start
How to set a delayed start
When you have loaded the dishes, you can choose when to
start your dishwasher before setting the wash cycle desired.
• Press button "G" repeatedly to postpone the start of the
wash cycle from 1 hour to 24h.
• If you press the button again, the word "OFF" is displayed
(no selection made).
Once you have made your selection, make sure the appliance
door is shut and start the wash cycle by pressing the ST ART
button.
Symbol "I" lights up on the display and the countdown
begins.
• Once the countdown is up, the wash cycle begins and the
approximate amount of time left until the end of the wash
cycle is displayed.
Have you changed your mind?
• If you change your mind, you can set a shorter time delay:
press button "G" to select it. You need not reset the wash
cycle.
• If you have changed your mind and wish to start the wash
cycle immediately , press button "G" until the countdown is
fully reset. Indicator light "I" will turn off and the cycle will
start at the sound of a beep.
The indicator light corresponding to the cycle phase under
way will come up on the display and the countdown to the
estimated cycle end begins.
You want to wash on one rack only?
Remember to use half the amount of detergent.
When you only have little cutlery to wash, you can run just
half a load on the upper rack, saving on both water and
electricity.
• Press button "F"; you will hear a beep and the symbol
corresponding to the half load will light up.
Once you have made your setting, start the wash cycle by
pressing the START button.
- This option is available with all wash cycles.
- The Just You wash cycle is programmed to wash on the
upper rack only.
Warning: if the display indicates the word "dON" when you turn
your dishwasher on, this means the demo mode is in operation. This
mode is useful for exhibitors in that it simulates the wash cycles
without actually carrying them out.
To quit this mode, keep the START/RESET button "R" pressed for
approximately 4 seconds. The word "dOF" will be displayed once
you have quit the demo mode successfully.
7
GB
Page 10
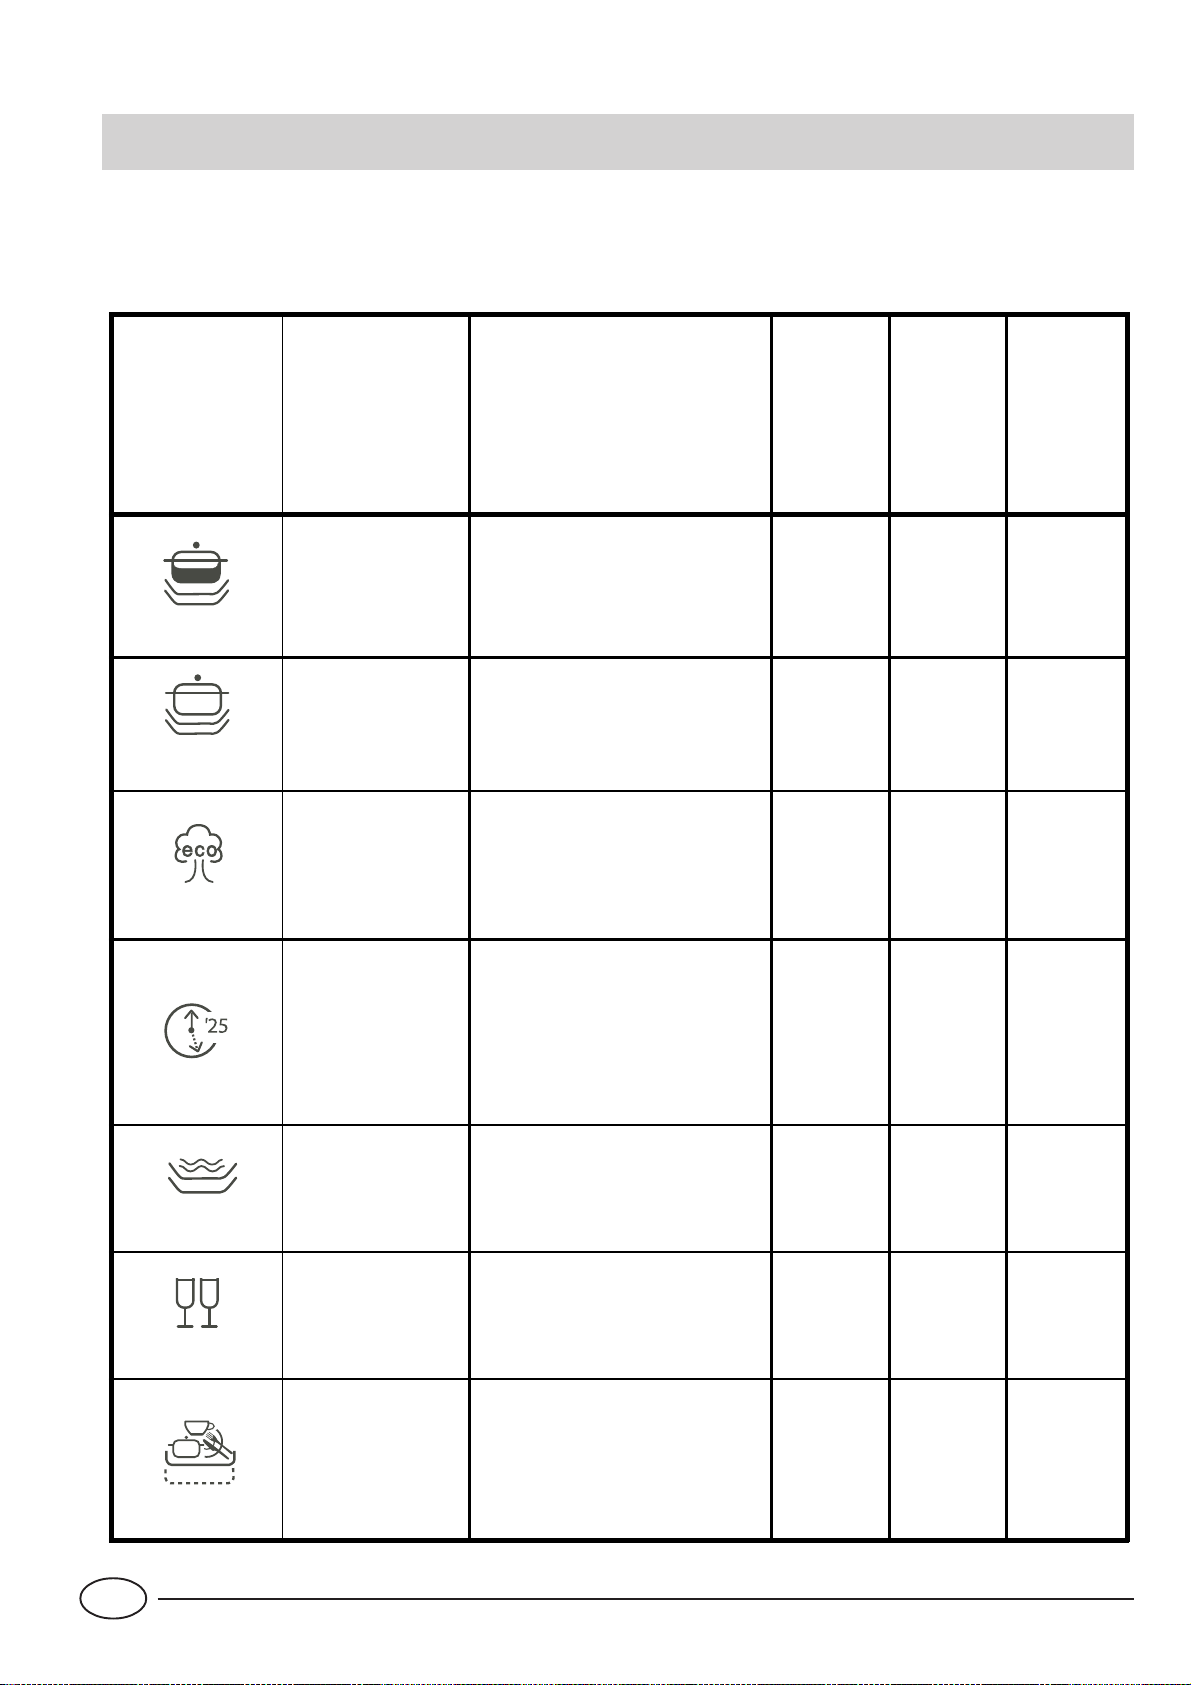
Wash Cycle Table
Dishwasher washing guarantees your dishes will be cleaned in a hygienic setting for
safer, cleaner results.
:DVKF\FOH
GXUDWLRQ
PDUJLQ
ZLW KR X W
H[WUD
GU\LQJ
&\FOH
&\FOH V H OHFWLRQ
LQVWUX FWLRQV
&\FOHGHVFULSWLRQ
'HWHUJHQW
IRUSU H
ZDVK
ZD V K
5LQVH $LG
,QWHQVLYH
7LPH <R X
(FR
5DSLG
Very di r ty d is he s a nd
pans (not to be used
for de licat e ite ms )
N o r mally dirt y p ans
and dishes. Standard
daily cycle.
Environme ntally-friendly c ycle, with low
energy consumption
le vels , s u itable for
no r ma lly d ir t y p ans
and dishes.
Economic and fast
cycle to be used for
sligh t ly d ir t y dis he s.
Run cycle immediately
after use. Without
drying except when
the extra drying option
has been selec ted.
Pre -was h with hot wa ter a t 4 0°C
Wash a t 6 5° C
2 cold rinses
Hot rinse at 65°C
Drying.
.
Wash a t 5 0° C.
Cold rinse
Hot rinse at 70°C
Drying.
2 pr e-wa shes with cold wate r
Wash a t 5 0° C
Hot rinse at 65°C
Drying
Short wash at 50°C
Rinse at 62°C
Drying o nly if selected
J
J
J
J
(with extra
drying)
&U\V W D O &D UH
GB
6RDN
-XVW <RX
Preliminary wash cycle
for dishes and pans
awaiting completion of
the load with the dishes
from the ne xt me a l.
S pecial cy cle to be
used for de lic a t e
items, which are more
se ns itive t o high
temperatures.
Quick and economic
was h for a d a ily lo a d
of dishes. This ma y
only be done on the
upper rack .
Short cold wash to prevent food from
drying o nt o t he d is h e s .
Wash a t 5 2° C
Rinse at 45°C
Hot rinse at 65°C
Drying
Wash a t 5 0° C
Hot rinse at 67°C
8
J
J
Page 11

Energy Saving Tips
- It is important to try and run the dishwasher when it is
fully loaded in order to save on energy. In order to prevent
odors from forming and food from caking onto the dishes,
you can run the hold cycle.
- Choose the right wash cycle: the choice of cycle depends
on the type of dishware, cookware and utensils being
washed and how dirty they are.
- Use the right amount of detergent: if you use too much
detergent, the result will not be cleaner dishes, but, rather,
a greater negative impact on the environment.
- There is no utility in rinsing dishes, cookware and utensils
before placing them in the dishwasher.
How to Keep Your Dishwasher in Shape
After Every Wash
After every wash, turn off the water supply to the appliance
and leave the door slightly ajar so that moisture and odors
are not trapped inside.
Remove the Plug
Before cleaning or performing maintenance, always remove
the plug from the socket. Do not run risks.
No Solvents or Abrasive Cleaning Products
To clean the exterior and rubber parts of the dishwasher,
do not use solvents or abrasive cleaning products. Rather,
use only a cloth and warm soapy water.
To remove spots or stains from the surface of the interior,
use a cloth dampened with water and a little white vinegar ,
or a cleaning product made specifically for dishwashers.
When You Go on Holiday
When you go on holiday , it is recommended that you run a
wash cycle with the dishwasher empty and then remove
the plug from the socket, turn off the water supply and
leave the door of the appliance slightly ajar. This will help
the seals last longer and prevent odors from forming within
the appliance.
Moving the Appliance
If the appliance must be moved, try to keep it in the vertical
position. If absolutely necessary, it can be positioned on its
back.
Seals
One of the factors that cause odors to form in the
dishwasher is food that remains trapped in the seals. Periodic
cleaning with a damp sponge will prevent this from occuring.
9
GB
Page 12
Cleaning and Special Maintenance
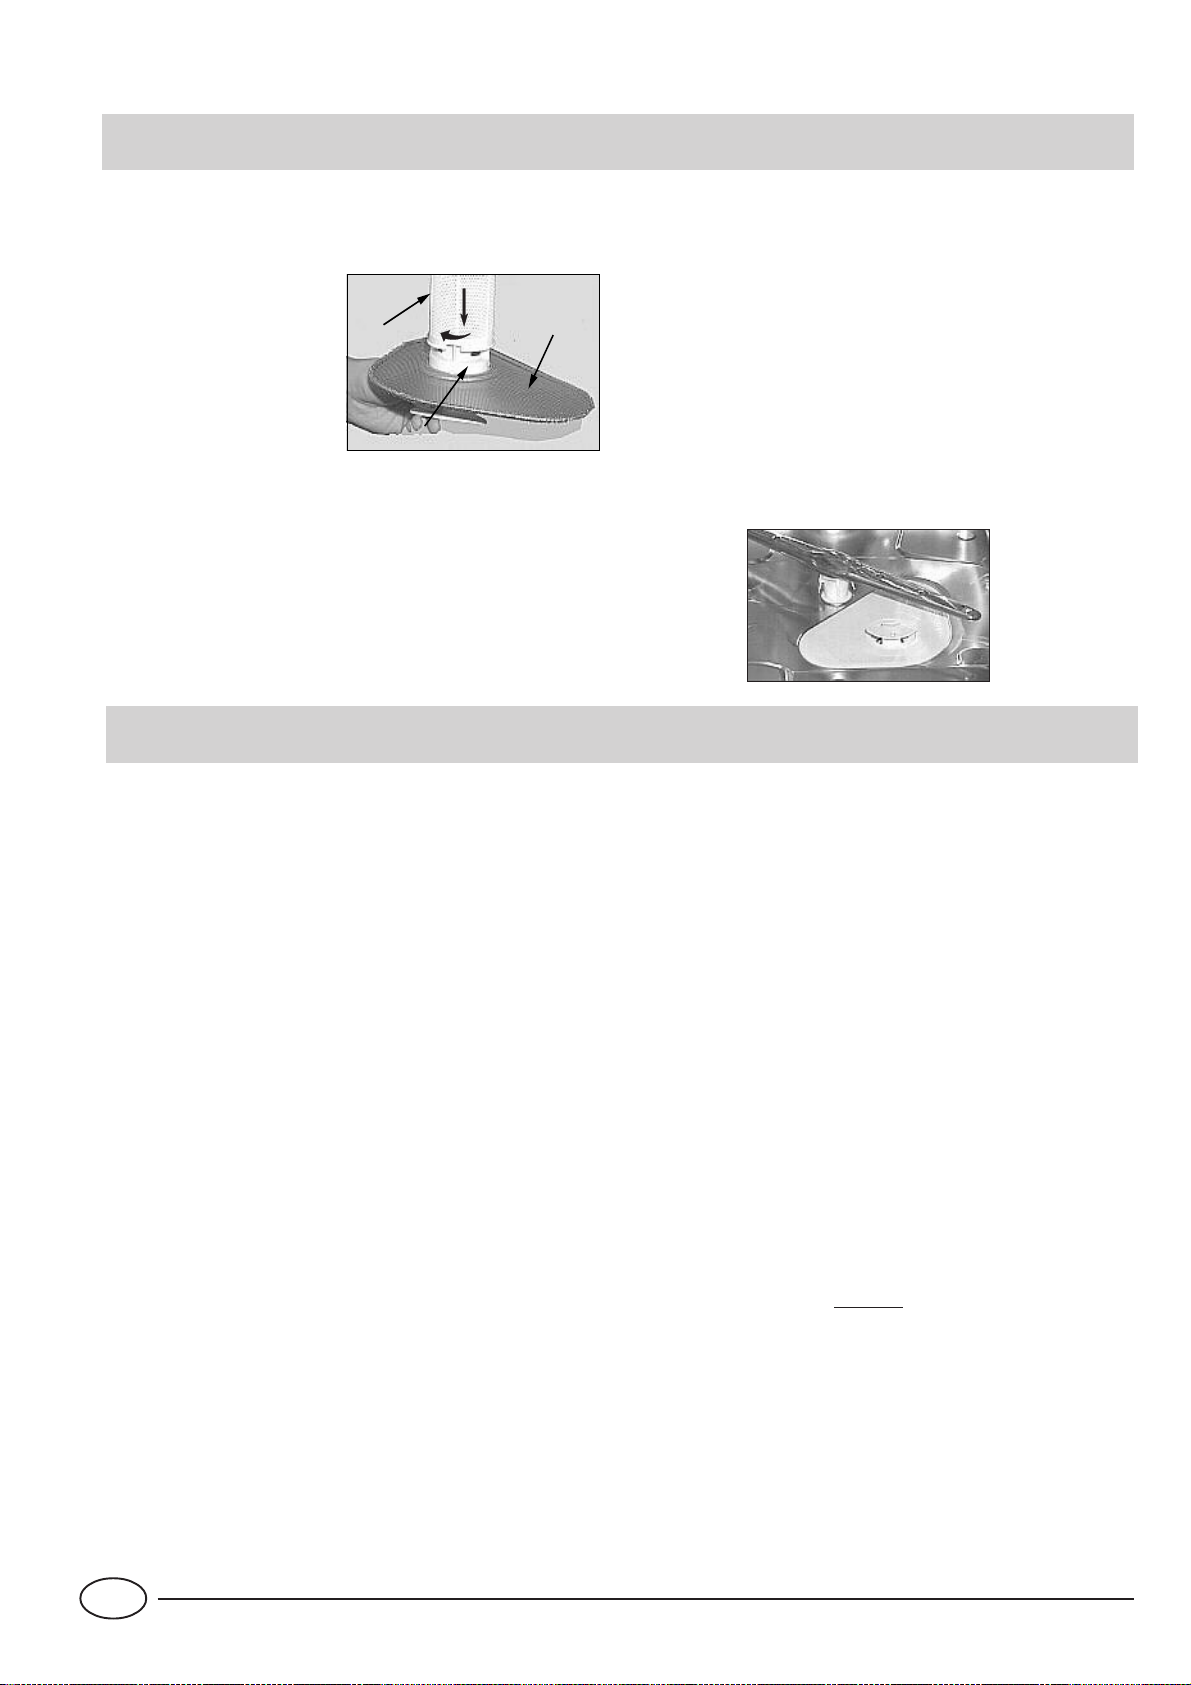
The filter assembly
If you want consistent good results from your dishwasher,
you need to clean the filter
assembly.
The food particles are
removed from the wash
B
1
2
A
water, allowing it to be
recirculated during the
cycle, filtered perfectly. For
this reason, it is a good idea
to remove the larger food
C
particles trapped inside the
cup “C” and the semi-circular filter A after each wash; pull
the cup handle upwards to remove them. Just rinse them
under running water .
The entire filter assembly should be cleaned thoroughly once
a month: cup C + semi-circular filter A + cylindrical filter B.
Rotate filter “B” anticlockwise to remove it.
Troubleshooting
For cleaning, use a non metallic brush.Reassemble the filter
parts (as shown in the figure) and reinsert the whole assembly
into the dishwasher. Position it into its housing and press
downwards.
The dishwasher is not to be used without filters. Improper
replacement of the filters may reduce the efficiency of the
wash and even damage your dishwasher .
Cleaning the Sprayer Arms
It may happen that food particle become encrusted on the
sprayer arms and block the holes (see "Close up view
(interior)", letters F-I). Check the sprayer arms periodically
and clean them when needed.
It may occur that the dishwasher does not function or does not
function properly. Before calling for assistance, let us see what can
be done first: have you forgot to press one of the buttons or to
perform an essential operation?
The Dishwasher Does Not Start
Have you checked whether:
- the plug is pushed into the socket correctly;
- the power is on in the house;
- the door is closed properly;
- the ON-OFF switch is on "ON";
- the water supply is turned on.
The Dishwasher Does Not Load Water
Have you checked whether:
- the water is turned on and the hose is connected properly;
- the water supply to the house is on and has sufficient
pressure;
- the water supply hose is crimped or bent;
- the filter for the water supply hose is clogged.
The Dishes Are Not Clean
Have you put the right amount of detergent into the dispenser?
Is the wash cycle suitable for the dishes you have placed inside the
appliance?
Are the filter and microfilter clean?
Can the sprayer arms turn freely?
The Dishwasher Does Not Drain
Have you checked whether:
- the drain hose is crimped or bent.
Lime Deposits or a White Film Form on the Dishes
Have you checked whether:
- the lid to the salt container is closed properly;
- the rinse aid dosage is correct.
If the display indicates the word "dON" when you turn your
dishwasher on, this means the demo mode is in operation.
Read the instructions on pages 7.
Error messages.
Your dishwasher is equipped with a safety system which is able to
detect any operating anomalies.
These anomalies or faults are signalled by several codes consisting of
letters and numbers that flash up on the display . Make a note of the
error code that appears, turn the appliance off, turn off the water
tap and call for technical assistance.
Tap off alarm
If you have forgotten to turn on the water tap, the appliance will
remind you with a series of prolonged beeps and the wording H2O
will flash up on the display. Turn the tap on and the wash cycle will
start up after a few minutes.
If you are not there when the H2O signal appears, the appliance will
switch to alarm mode and the code "A06" will flash on the display .
T urn the appliance off at button "A", turn on the water tap and wait
approximately 20 seconds before turning the appliance back on, the
wash cycle will start up again.
Clogged filter alarm
If the appliance is blocked and the code "A05" is flashing, this
means the filter is clogged by large particles of food residue. Turn
the appliance off at the ON-OFF button, clean the filter thoroughly
and reposition it in its seat, then turn the appliance back on. The
wash cycle will start up as normal after a few seconds.
Water load solenoid valve malfunction alarm
If the code "A02" flashes,
any flooding and then cut off the electricity supply and call for
assistance.
If, despite all these checks, the dishwasher still does not function
and/or the problem persists, contact the nearest authorised service
centre and provide them with the following information:
- the nature of the problem;
- the model type number (Mod. ...) and the serial number (S/N ....),
which are indicated on the plate located on the side of the inner part
of the door.
Never call on unauthorised technicians and refuse to allow
parts to be installed that are not original spare parts.
first of all turn off the water tap to avoid
GB
10
Page 13

Installation
Positioning the Appliance
Position the appliance in the desired location. The back
should rest against the wall behind it, and the sides, along
the adjacent cabinets or wall. The dishwasher is equipped
with water supply and drain hoses that can be positioned
to the right or the left to facilitate proper installation.
Levelling the Appliance
Once the appliance is positioned, adjust the feet (screwing
them in or out) to adjust the height of the dishwasher,
making it level. In any case, the appliance should not be
inclined more than 2°.
If the appliance is level, it will help ensure proper performance.
This dishwasher model can be built under a single worktop
(please read the relevant instruction sheet).
Cold Water Connection
This electric household appliance should be connected to
the water mains using the cold water supply hose provided
with the appliance only. Do not use a different hose. In the
event of replacements, use original spare parts only.
Connect the cold water supply hose to a threaded 3/4 (gas)
connector and making sure that it is fastened tightly in place.
If the water pipes are new or have not been used for an
extended period of time, let the water run to make sure that
the water is clear and free of impurities. If this precaution is
not taken, there is a risk that the water inlet can get blocked
and damage the appliance.
Drain Hose Connection
Fit the drain pipe into a drain
line with a minimum diameter
of 4 cm or place it over the
sink. Avoid restricting or
bending it. Use the special
plastic elbow provided (see figure) to position it in the best
possible way. The part of the
pipe marked with the letter A
should be between 40 and 100
cm above the ground.
The pipe should not be immersed in water.
Attention: The special plastic hose support must be solidly
fastened to the wall to prevent the drain hose from moving
and allowing water to spill outside the drain.
Electrical Connection
After making sure that the voltage and frequency values for
the current in the home correspond to those on the rating
plate (located on the stainless steel inner door of the
appliance) and that the electrical system is sized for the
maximum voltage on the rating plate, insert the plug into
an electrical socket which is earthed properly (the earthing
of the appliance is a safety requirement mandated by law).
If the electrical socket to which the appliance must be
connected is not appropriate for the plug, replace the plug,
rather than using adpators or the like as they could cause
overheating and burns.
A
Hot Water Connection
The water supply to the appliance can also be connected to
the house's hot water line (centralised system, heating
system), as long as it does not exceed a temperature of 60°
C.
In this case, the wash cycle time will be shortened by about
15 minutes and the wash efficiency slightly reduced.
The connection must be made to the hot water line following
the same procedures as those for the connection to the cold
water line.
Should the electricity supply cable be damaged, we
recommend that you only contact authorised Technical
Service Centres for the replacement.
The plug
The dishwasher plug must be accessible even when the
appliance is installed as a built-in unit so that maintenance
can be done safely.
11
GB
Page 14
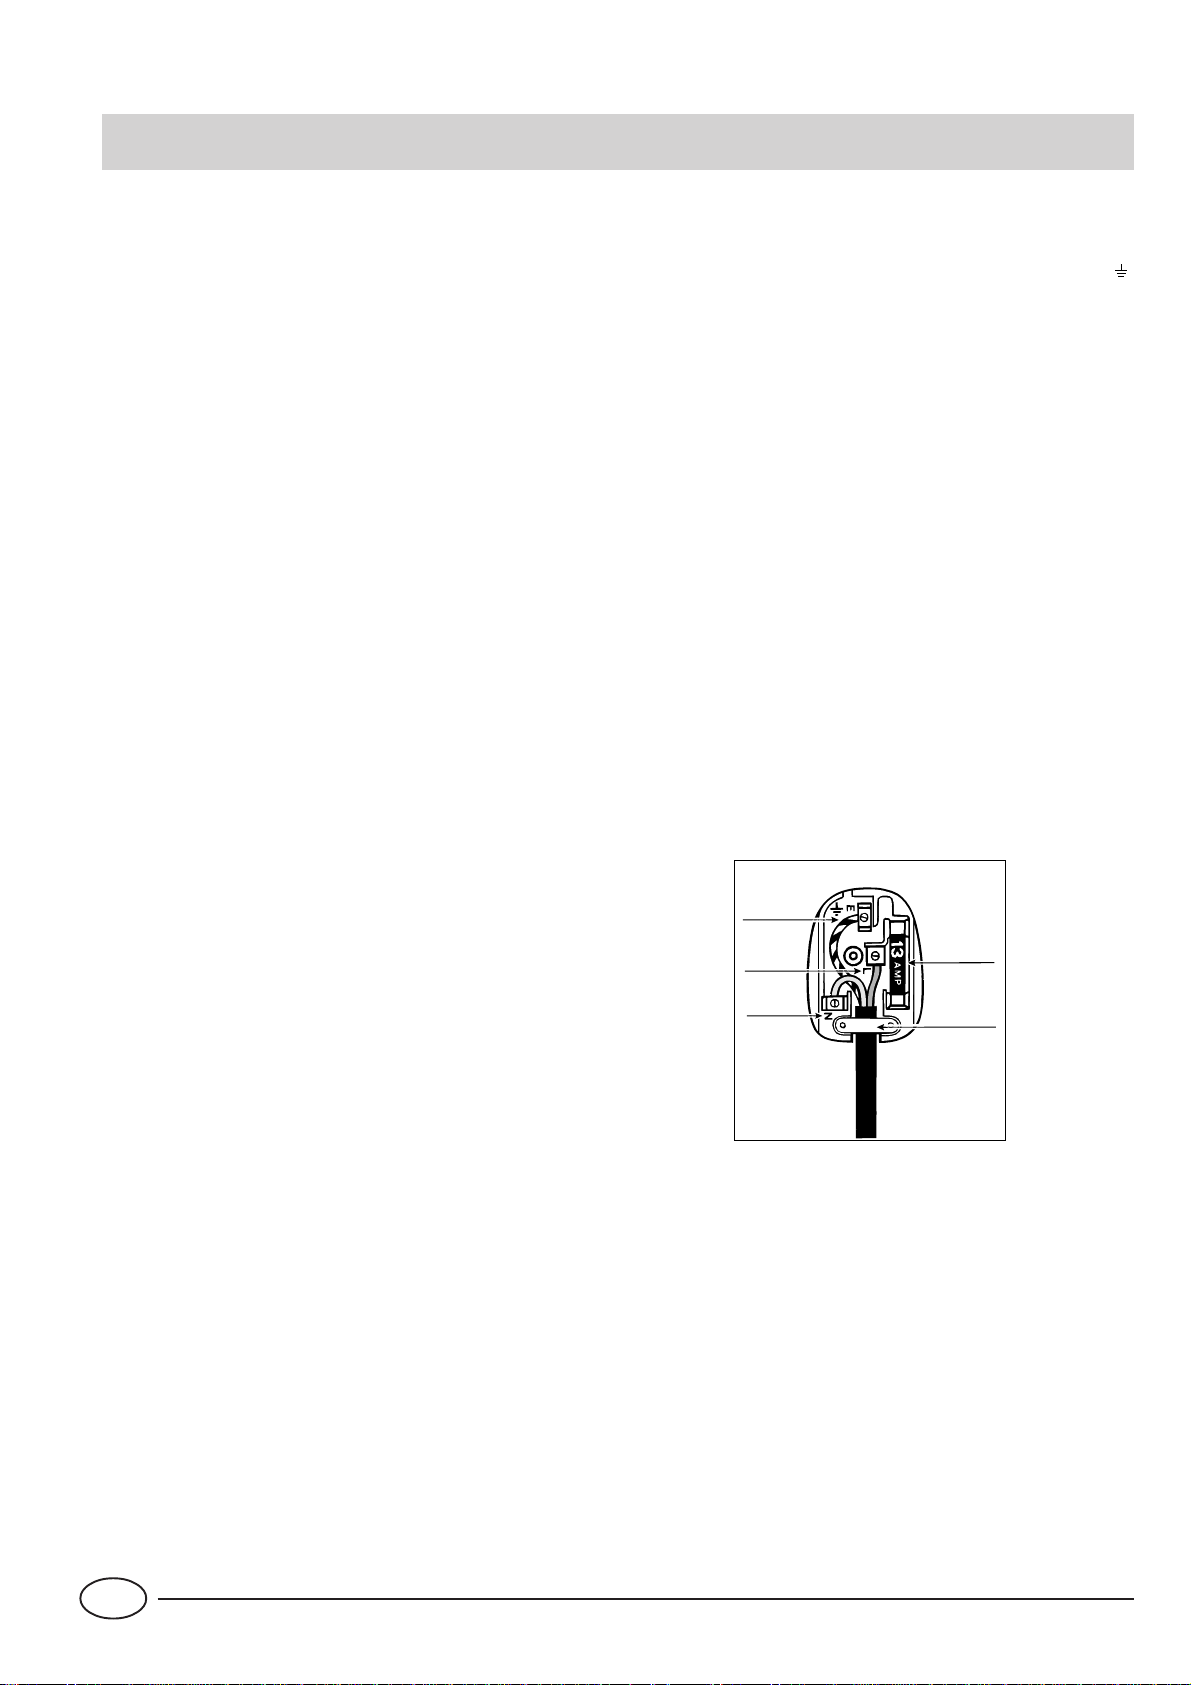
Electrical Connection
Electrical Connection
If your appliance is supplied with a 13 amp. fused plug it
can be plugged into a 13 amp socket for immediate use.
Before using the appliance please read the instruction below .
WARNING: THIS APPLIANCE MUST BE EARTHED.
THE FOLLOWING OPERATIONS SHOULD BE CARRIED
OUT BY A QUALIFIED ELECTRICIAN.
Replacing the fuse:
When replacing a faulty fuse, a 13 amp ASTA approved
fuse to BS 1362 should always be used, and the fuse cover
re-fitted. If the fuse cover is lost, the plug must not be used
until a replacement is obtained.
Replacemente fuse covers:
If a replacement fuse cover is fitted, it must be of the correct
colours as indicated by the coloured marking or the colour
that is embossed in words on the base of the plug.
Replacements can be obtained directly from your nearest
Service Depot.
Removing the plug:
Ifyour appliance has a non-rewireable moulded plug and
you should wish to remove it to re-route the mains cable
through partitions, units etc., please esure that either:
- the plug is replaced by a fused 13 amp re-wireable plug
bearing the BSI mark of approval
- or:
- the mains cable is wired directly into a 13 amp cable outlet,
controlled by a switch, (in compliance with BS 5733) which
is accessible without moving the appliance.
As the colours of the wires in the mains lead may not
correspond with the coloured markings identifying the
terminal in your plug, proceed as follows:
connect Green & Yellow wire to terminal market “E” or
coloured Green or Green & Yellow.
Connect Brown wire to terminal marked “L” or colour ed
Red.
Connect Blue wire to terminal marked “N” or coloured
Black.
If a 13 amp plug (BS 1363) is used it must be fitted with a
13 amp fuse. A15 amp plug must be protected by a 15
amp fuse, either in the plug or adaptor or at the
distribution board.
If you are in any doubt about the electrical supply to your
machine, consult a qualified electrician before use.
How to connect an alternative plug:
The wires in this mains lead are coloured in accor dance
with the following code:
BLUE “NEUTRAL” (“N”)
BROWN “LIVE” (“L”)
GREEN AND YELLOW “EARTH” (“E”)
GREEN &
YELLOW
BROWN
13 amp fuse
Disposing of the plug:
Ensure that before disposing of the plug itself, you make
the pins unusable so that it cannot be accidentally inserted
into a socket.
Instruction for connecting cable to an altenative plug:
Important: the wires in the mains lead are coloured in
accordance with the following code:
Green & Yellow - Earth
Blue - Neutral
Brown - Live
CAUTION:
The dishwasher plug must be accessible even when the
appliance is installed as a built-in unit so that maintenance
can be done safely.
BLUE
CROSS-BAR
CORD GRIP
Disposing of the appliance:
When disposing of the appliance please remove the plug
by cutting the mains cable as close as possible to the plug
body and dispose of it as described above
GB
12
Page 15

Page 16

Merloni Elettrodomestici
Viale Aristide Merloni 47
60044 Fabriano
Italy
Tel +39 0732 6611
Fax +39 0732 662501
www.merloni.com
OM - 10/2004 - 195046995.01 - Xerox Business Services - DocuTech
 Loading...