

INDESIT IDC 85 K (UK) User Manual

Instruction manual
TUMBLE DRYER
EN
English, 1
IDC 85
IDC 85 S
IDC 85 K
Contents
Important information, 2-3
Installation, 4
Where to install the tumble dryer
Ventilation
Electrical connections
Preliminary information
Description of the tumble dryer, 5
Features
Control panel
How to carry out a drying cycle, 6
Starting a drying programme
Drying settings, 7
Drying times
Drying programmes and options
Laundry, 8
Sorting laundry
Care labels
Special items
Warnings and suggestions, 9
General safety
Saving energy and respecting the environment
EN
! This symbol reminds you to read this instruction manual.
! Keep this manual at hand for immediate reference whenever
necessary. Always store this manual close to the tumble dryer and
remember to pass it on to any new owners when selling or tran-
sferring the appliance, so they may familiarise with the warnings
and suggestions herein contained.
! Read these instructions carefully: the following pages contain
important information on installation and useful suggestions for
operating the appliance.
Care and maintenance, 10
Disconnecting the power supply
Cleaning the filter after each cycle
Checking the drum after each cycle
Emptying the water container after each cycle
Cleaning the condenser unit
Cleaning the tumble dryer
Troubleshooting, 11
Assistance and Guarantee, 12-13-14
Spare parts
Information on recycling and disposal
1
Important information
2
EN
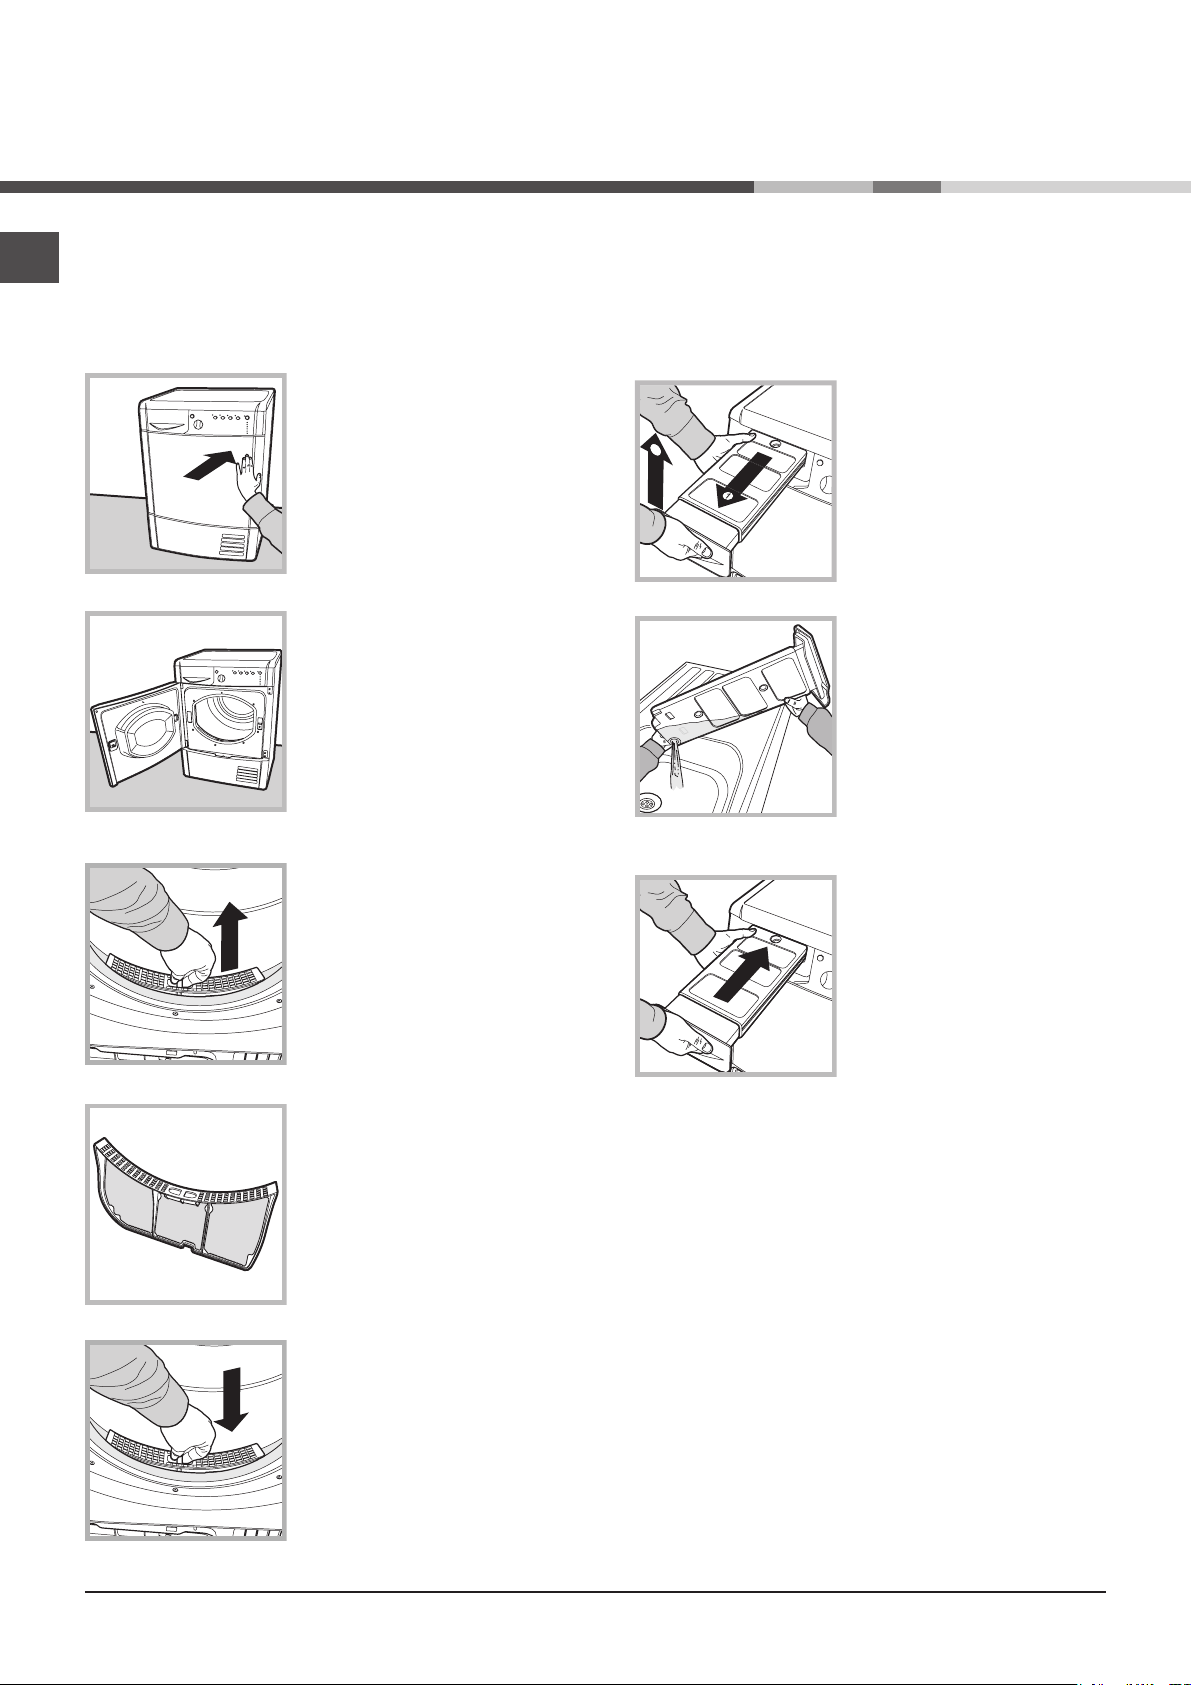
To ensure that the condenser dryer functions
efficiently, the following routine maintenance
procedures must be carried out:
Fluff filter – CLEAN off any fluff build-up on the
filter after each drying cycle.
Step 1
Open the dryer door by pressing
it as shown in the picture.
Failure to clean the filter after each drying cycle
can undermine drying performance as the machine
takes longer to dry and thus consumes more
energy.
Water container – empty the water container after
each drying cycle.
Step 1
Pull the water container towards
you and remove it completely
from the dryer.
Step 2
Empty all the water in the water
container.
Step 2
Pull out the filter (using two
fingers).
Step 3
Clean off any fluff build-up on the
internal surface of the filter.
Step 4
Replace the filter – never operate
the dryer without the filter in
place.
Step 3
Replace the water container
making sure that it is securely
fixed.
Failure to empty the water container may cause the
following:
- The dryer stops heating (thus the load may still be
damp at the end of the drying cycle).
- The “Empty water container” LED activates to
show that the water container is full.
Filling of the Water Container
When the dryer is first used water will not
immediately enter the water container as the pump
needs to be primed. This is done automatically
and will take a few minutes, during this period the
efficiency of the drying process is not affected.
2
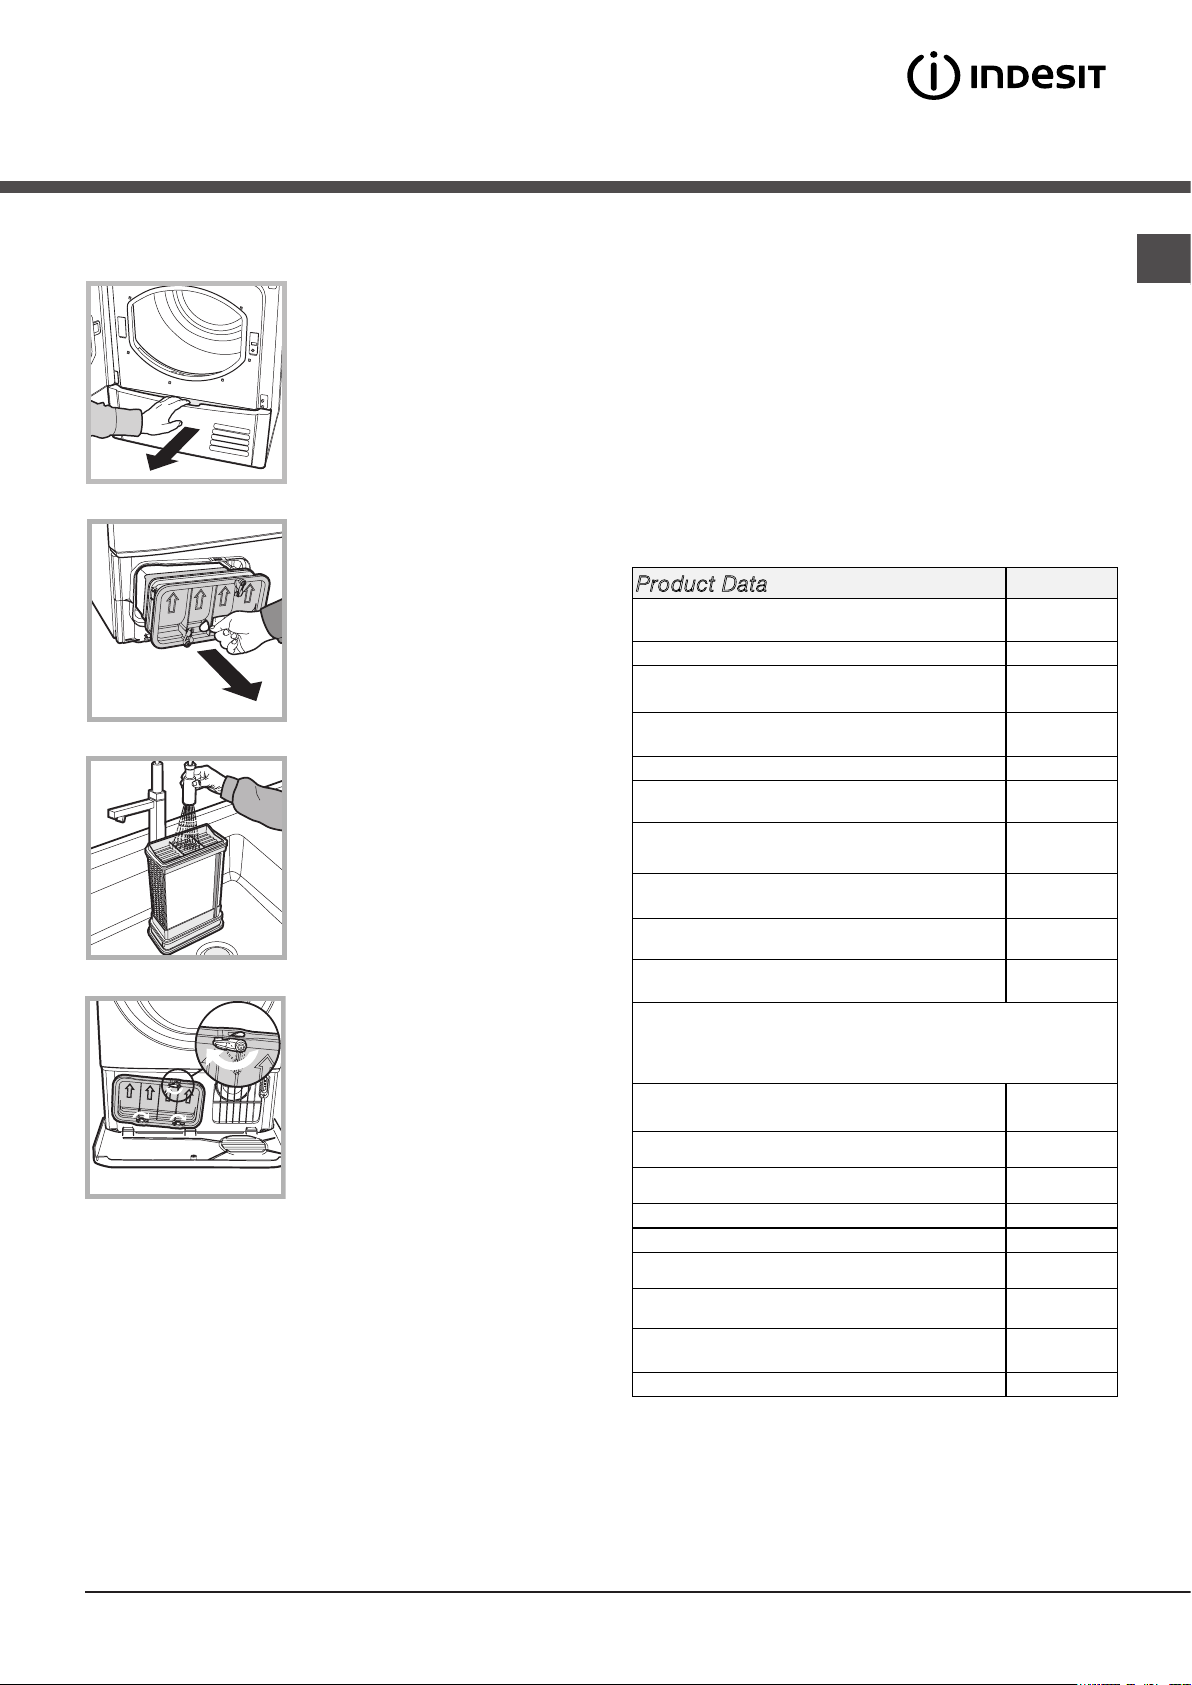
Condenser unit - remove any fluff build-up
This is the test cycle in accordance with Regulation 392/2012.
from the condenser on a monthly basis.
Step 1
Open the condenser cover
- grip the handle and pull
towards you.
Step 2
Remove the condenser by
turning the 3 catches, then pull
the condenser towards you. (It is
normal for some residual water
to be left in the tubes).
Step 3
Clean the condenser with
running water over the rear side
to remove any fluff deposits.
Product Data
Rated capacity of cotton laundry for the "standard
cotton programme" at full load - kg
Energy efficiency class C
The weighted Annual Energy Consumption (AEc)*
kWh
This household tumble drier is an
This household tumble drier is a Condenser
Energy consumption full load; Edry - kWh 5,38
Energy consumption partial load; Edry½ - kWh 2,83
8
627,7
Non-
automatic
EN
Step 4
Replace the condenser unit;
make sure that the unit is
securely in place, that all 3
catches are fixed and that the
position arrows on the front end
of the condenser are pointing
upwards.
Failure to clean the condenser unit may cause
premature failure of the dryer.
Power consumption: off-mode (Po) - Watts 0,06
Power consumption: left-on mode (Pl) - Watts N/A
Duration of the 'left-on mode' for power
management system - minutes
The Standard Cotton Programme** suitable for drying normal wet
cotton landry that it is the most efficient programme in terms of
energy consumption for cotton used at full and partial load.
Prog. Time - weighted (Tt) full & partial load minutes
Full load (Tdry) - minutes 154
Partial load (Tdry½) - minutes 80
Condensation efficiency class C
Average condensation efficiency - %
full load (Cdry) 72
partial load (Cdry½) 71
weighted (Ct) full & partial load 71
Airbone acoustical noise emissions - dB(A) re 1 pW 69
N/A
112
See our website for all product fiche data:
http://www.indesit.com/indesit/.
*Consumption per year is based on 160 drying cycles of the
standard cotton programme at full and partial looad, and
the consumption of the low-power modes.
sumption per cycle will depend on how the appliance is used.
Actual energy con-
**The Standard Cotton Programme is Hight Heat
3
m
Installation
EN
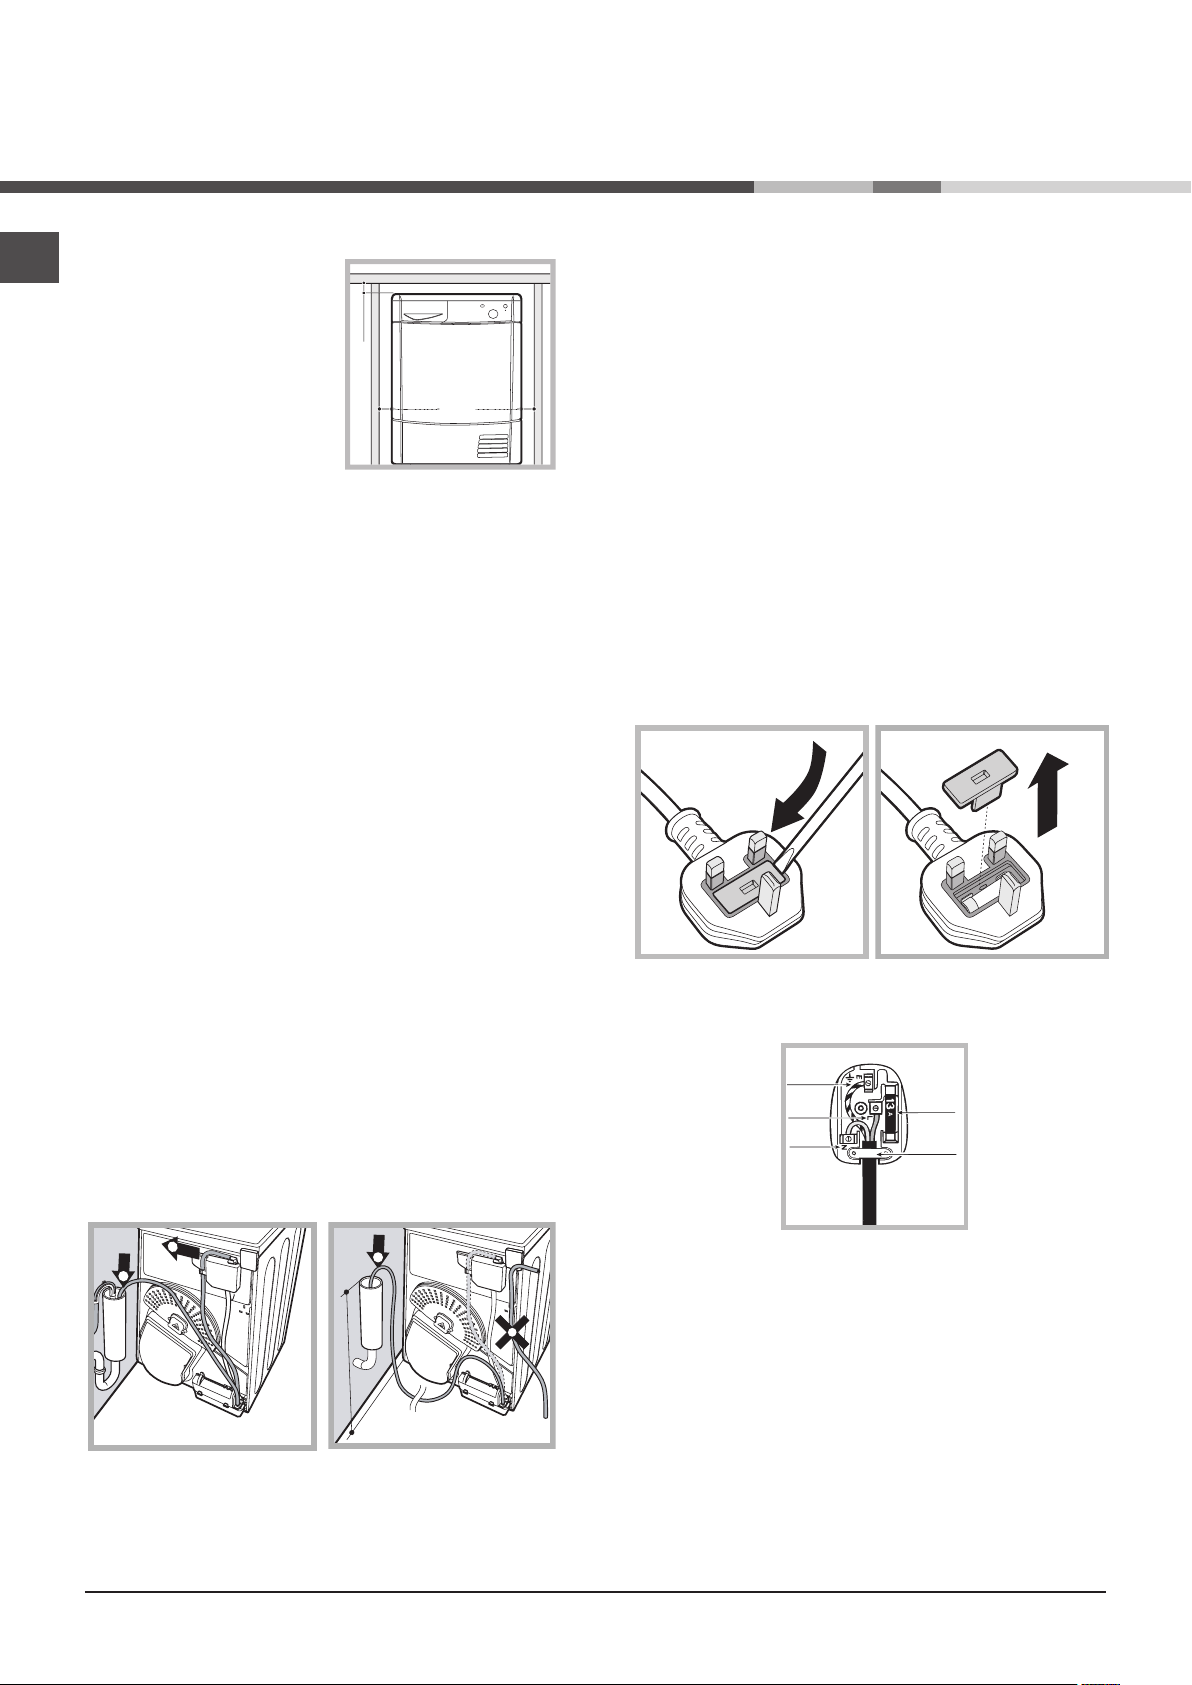
Where to install the tumble dryer
• Install the dryer far from gas
ranges, stoves, radiators or
hobs, as flames may damage it.
If the dryer is installed below a
worktop, ensure there are 10
mm between the upper panel of
the dryer and any objects above it, and 15 mm between the
sides of the machine and the
walls or furniture units adjacent
to it. This ensures adequate air
circulation.
Ventilation
• The room must be adequately ventilated while the dryer is
running. Make sure that the dryer is installed in a room free
of humidity and with adequate air circulation. The flow of
air around the dryer is essential to allow water to condense
during drying; the dryer will not function properly if it is placed
in an enclosed space or inside a cabinet.
! Some condensation may form if the dryer is used in a small
or cold room.
! We do not recommend that the dryer is installed in a cupbo-
ard but the dryer must never be installed behind a lockable
door, a sliding door or a door with a hinge on the opposite
side to that of the dryer door.
Electrical connections
Before plugging the appliance into the socket, check the following:
• Make sure your hands are dry.
• The socket must have an earth connection.
• The socket must be able to withstand the machine’s ma-
ximum power output as indicated on the rating plate (see
Description of the tumble dryer).
• The power supply voltage must fall within the values indica-
ted on the data plate (see Description of the tumble dryer).
• The socket must be compatible with the dryer’s plug.
Should this not be the case, replace the plug or the socket.
! Do not use extension cords.
! The dryer must not be installed outdoors, even if the space is
sheltered. It can be very dangerous if exposed to rain or storms.
! Once installed, the dryer’s electrical wire and plug must be
within reach.
! The power cord must not be bent or squashed.
! The power cord is supplied fitted with a BS1363 plug and with
a 13 amp BS1362 fuse. If it is necessary to fit a replacement
fuse, it must be a 13 Amp ASTA approved to BS1362 type.
WARNING: The plug must not be used without a fuse cover. If a
replacement fuse holder/cover is required, it must be of the same
colour coding or wording as shown on the base of the plug.
Replacements are available from authorised dealers.
Moulded plug
Water drain
If your dryer is installed next to a drain the water can be
plumbed into this drain. This does away with the need to
empty the water container. If the dryer is stacked onto or
installed next to a washing machine it can share the same
drain. The height of the drain must be less than 3’ (1 m)
from the bottom of the dryer.
Remove existing hose from position shown in picture A
and fit a suitable length of hose and connect as shown
in picture B.
! Make sure that the hose is not squashed or kinked
when the dryer is in its final location.
1
2
Picture A Picture B
2
1
Less than 1m
Changing the plug
The wires in the power cord are coloured in accordance with
the following.
Green and Yellow (Earth)
wire to terminal marked
“E”, symbol x, or coloured
green and yellow.
Blue (Neutral) wire to
terminal marked ”N” or
coloured black.
GREEN &
YELLOW
BROWN
BLUE
13 ampere fuse
CROSS-BAR
CORD GRIP
13A ASTA approved fuse
to BS 1362.
Brown (live) wire to
teminal marked “L” or
coloured red.
! If the plug being replaced is a non-rewirable type, then the
cut-off plug must be disposed of safely. DO NOT leave it where
it can be inserted into a socket and create a shock hazard.
! The power cord should be checked periodically and replaced
by a cord specially prepared for this dryer and fitted only by
authorized technicians (see Service). New or longer power
cords are supplied at an extra charge by authorized dealers.
! The manufacturer denies any responsibility should any of
these rules not be followed.
! If in doubt about any of the above consult a qualified
electrician.
Preliminary information
Once the tumble dryer is installed, clean the inside of the
drum before operating it and remove any dirt accumulated
during transportation.
4
Description of
the tumble dryer
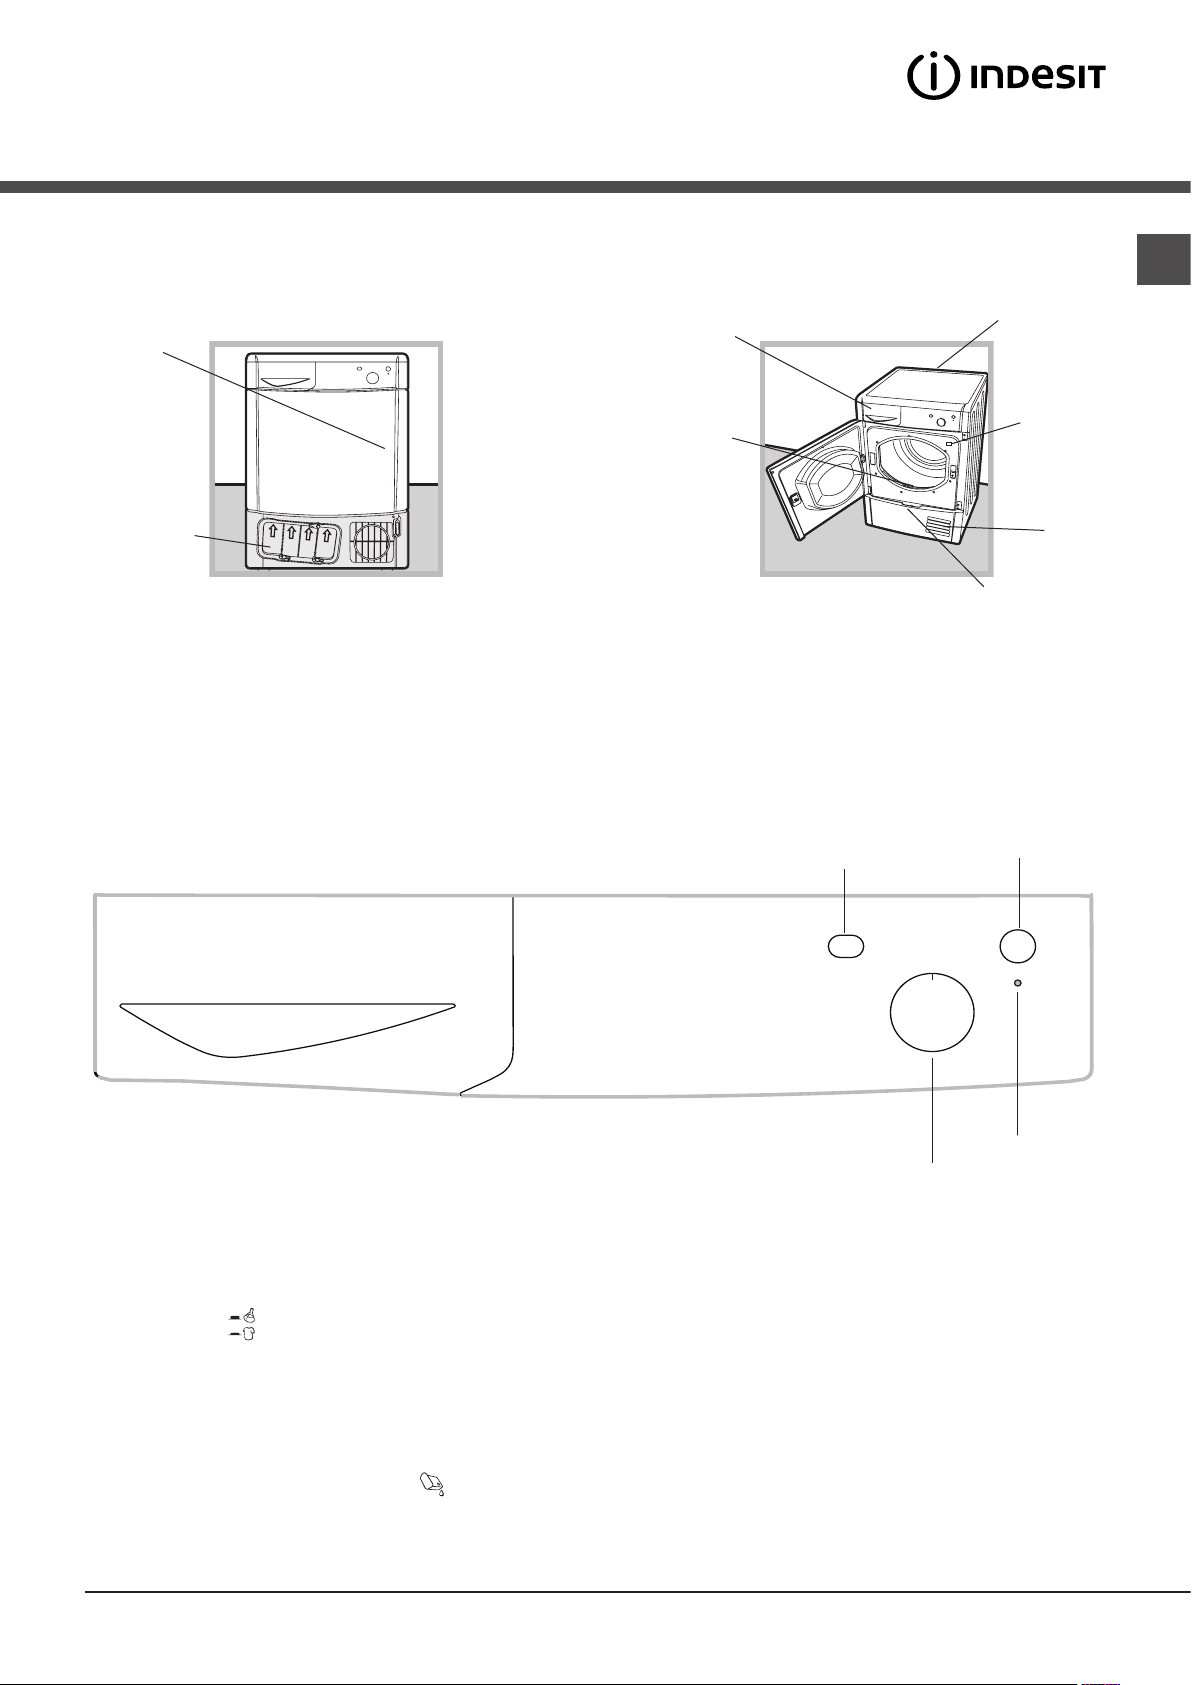
Opening the door
Press the
door
Condenser
unit (cover
open)
Control panel
Features
Water container
Filter
High Heat
button
EN
Rating plate
Model
& Serial
Numbers
Air
intake
grille
Condenser cover
handle (pull to
open)
Start
button
Drying time
selector knob
Drying time selector knob
This is used to set the drying time: turn the knob in a clockwise direction until the indicator is set to the desired drying time (see
Drying settings). Do not attempt to turn the knob anticlockwise.
High Heat button
It can be used to customise the selected programme in accordance with your own requirements.
START button
Press the button to begin drying.
Empty water container indicator light
The “Empty water container” indicator light signals that the water container must be emptied.
If the container becomes full during the programme, the tumble dryer will automatically start the cold air cycle.
In order to avoid this procedure, always empty the water container after using the tumble dryer (see Care and maintenance).
Empty water
container
indicator light
5
 Loading...