How it Works
Log In / Sign Up
Buy Points
How it Works
FAQ
Contact Us
Questions and Suggestions
Users
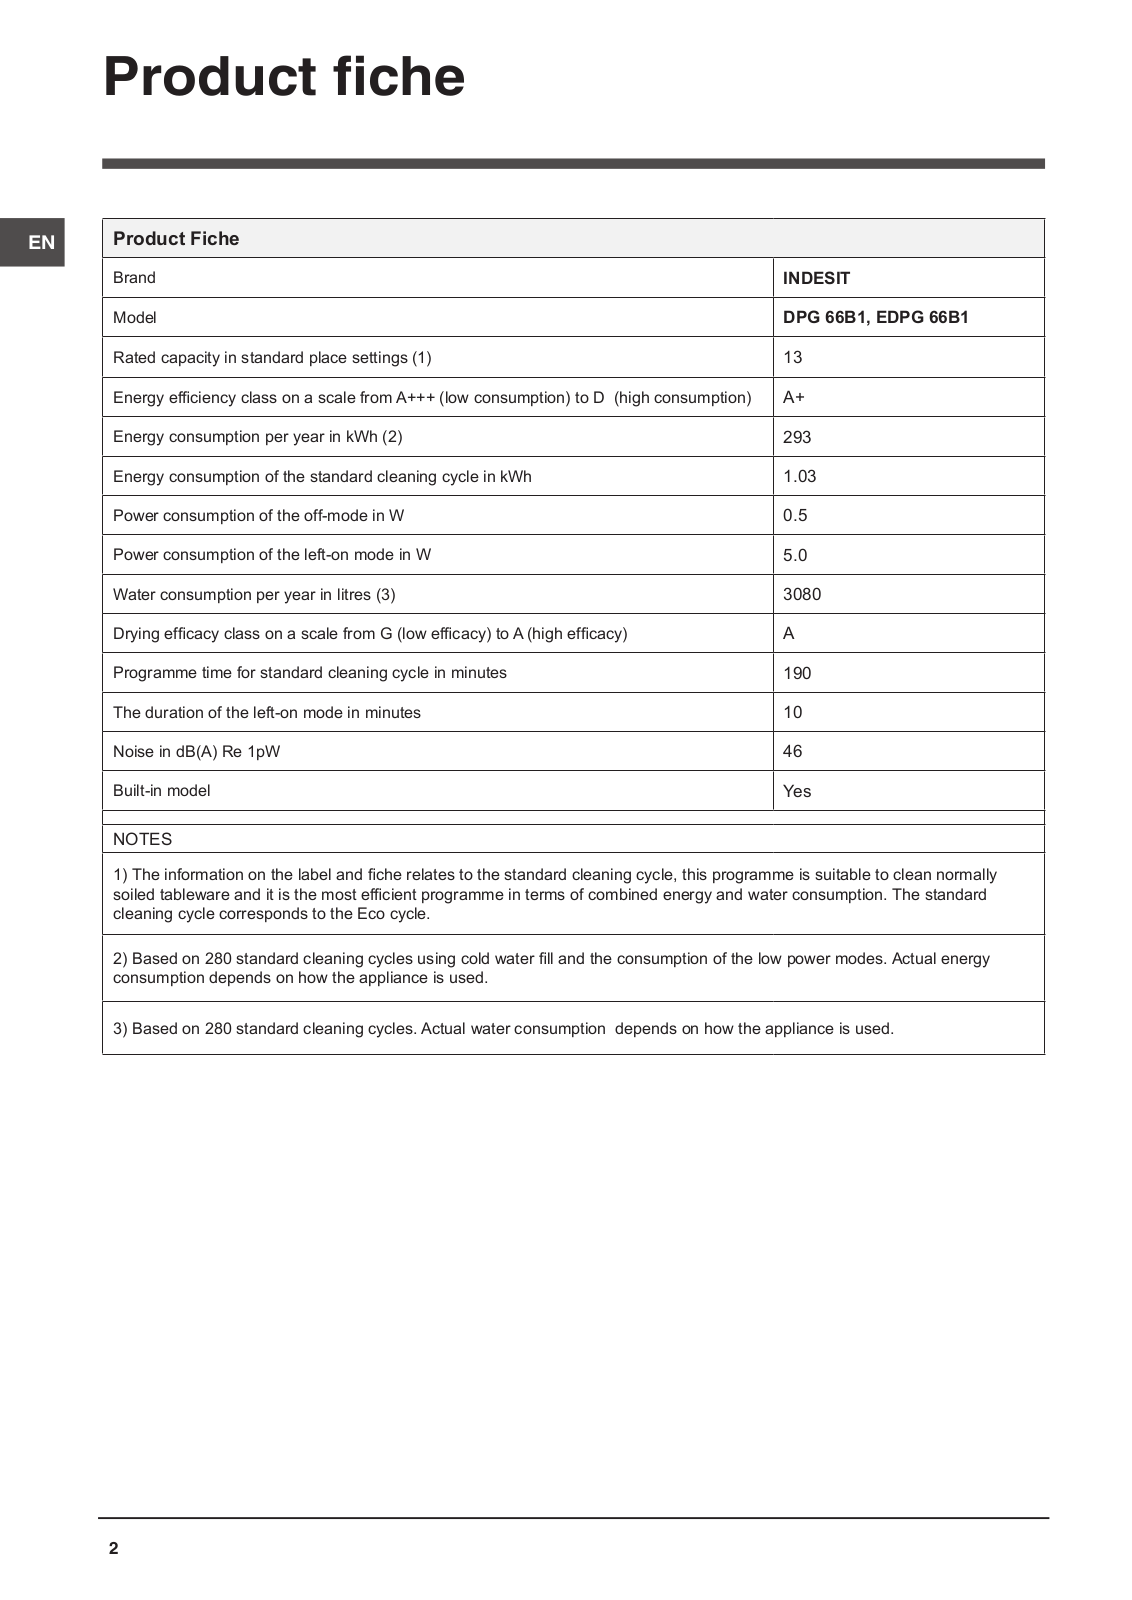
INDESIT
Loading...
E
E2BY 19*** F O3
E2BY 19*** F O3 TK
E2BYH 19*** F O3
E2BYH 19*** F O3 TK
E2SB 1160A UA
2
E2SB 1160B B
E2SB 1160B B UA
2
E2SB 2160B B UA
E2SC 1160 W UA
2
E2SC 2150 W UA
3
E2SC 2160 W UA
4
E2SD 1160A B UA
E2SD 1160B B
E2SD 1160B B UA
E2SD 1160C B UA
E2SD 2160A B EU
4
E2SD 2160A B UA
E2SD 2270 A
E2SE 2150 W UA
4
E2SE 2160 W UA
4
EC 1824H
2
ECO8F 1292
EDCE 85 B TM (UK)
EDCE G45 B H
EDCE G45 B H (EU)
7
EDCE H G45 B
EDCE H G45 B (FR)
EDFG 26B16 K FR
EDIFP 28T9 A EU
6
EDIFP68B1AEU
4
EDPA 745 A1 ECO (EU)
15
EDPA 745 A ECO
EDPA 745 A ECO (EU)
2
EDPA 745 A ECO (IT)
EDPA 945 A1 ECO
EDPA 945 A1 ECO (EU)
3
EDPE 745 A2 ECO EU
2
EDPE 745 A2 ECO IT
EDPE 845 A1 ECO (UK)
Edpe 945 A2
EDPE 945 A2 ECO (EU)
3
EDPE G45 A
EDPE G45 A1 Eco
2
EDPE G45 A1 ECO (EU)
3
EDPE G45 A1 ECO (FR)
2
EDPE G45 A1 ECO (IT)
EDPE G45 A2
EDPE G45 A2 ECO (EU)
EDPE G45 A2 ECO (IT)
EDPE G45 A ECO (EU)
EDPG 66B1 NX EU
EF 16
2
EF 16 D
2
EF 18
EF 18 D
3
EF 18 S
EF 20
2
EF 20 D
EF 20 D Whit
EI5VMC5A(W)/FR
EI631MP6AWFR
EI6GGCAEW
EI6GGCAEWFR
EIS5G0KMX/FR
ENTLH 18xxx F
ES 15
2
ES 16
2
ES 18
2
ES 20
2
ESB 1150B UA
ESB 1160B C ECO UA
ESB 1850A UA
ESC 1150A
ESC 1150B
ESC 1160A C ECO UA
ESC 1160B C ECO UA
EVOLUTION WE 10
EWC 51451 W EU N
6
EWC 61051 S EG
EWC 61051 W IT N
EWC 61052 B
EWC 61052 B CIS
EWC 61052 W NA
EWC 61081 W DE
EWC 61251 W SPT N
2
EWC 61252 S FR
EWC 61252 W FR
2
EWC 61252 W FR M
2
EWC 61281 W DE
EWC 71052 W IT N
EWC 71252 S FR
EWC 71252 W EE N
6
EWC 71252 W FR
3
EWC 71252 W FR.C
EWC 71252 W FR M
2
EWC 71252 W IT N
EWC 71252 W NA
EWC 71452
EWC 71452 W FR
EWC 81251 W EU N
2
Loading...
Loading...
Nothing found
EDPG 66B1 NX EU
User Manual
32 pgs
4.49 Mb
0
Table of contents
Loading...
INDESIT EDPG 66B1 NX EU User Manual
...
INDESIT User Manual
Download
Specifications and Main Features
Frequently Asked Questions
User Manual
Download
Loading...
+
22
hidden pages
Unhide
You need points to download manuals.
1 point = 1 manual.
You can buy points or you can get point for every manual you upload.
Buy points
Upload your manuals
 Loading...