

Indesit E2BLH 19***F, E2BL 19***F O3, E2BL 19***F, E2BLH 19***F TK, E2BLH 19***F O3 Operating Instructions Manual
...Page 1
E2BLH 19xx F (TK)
E2BL 19xx F (TK)
E2BLH 19xxx F O3 (TK)
E2BL 19xxx x F O3 (TK)
Contents
Operating Instructions, 1
Assistance, 2
Description of the appliance, 3
Description of the appliance, 4
Reversible doors, 5
Installation, 6
Start-up and use, 7
Maintenance and care, 7
Precautions and tips, 8
Troubleshooting, 9
English
Operating Instructions
REFRIGERATOR/FREEZER COMBINATION
Türkçe Türkçe
Türkçe Türkçe
Türkçe
Kullaným talimatlarýKullaným talimatlarý
Kullaným talimatlarýKullaným talimatlarý
Kullaným talimatlarý
KOMBÝNE SOÐUTUCU/DONDURUCUKOMBÝNE SOÐUTUCU/DONDURUCU
KOMBÝNE SOÐUTUCU/DONDURUCUKOMBÝNE SOÐUTUCU/DONDURUCU
KOMBÝNE SOÐUTUCU/DONDURUCU
ÝçindekilerÝçindekiler
ÝçindekilerÝçindekiler
Ýçindekiler
Kullaným talimatlarý, 1
Teknik Servis, 3
Cihazýn tanýmý, 4
Cihazýn tanýmý,5
Kapýlarýn açýlýþ yönünün deðiþtirilmesi, 5
Montaj, 10
Çalýþtýrma ve kullaným, 11
Bakým ve özen,11
Önlemler ve öneriler, 12
Arýzalar ve onarýmlar, 13
Page 2
Assistance
Before calling for Assistance:
•
Check if the malfunction can be solved on your own (
see
Troubleshooting
).
• If after all the checks, the appliance still does not operate or the
problem persists, call the nearest Service Centre
Communicating:
• type of malfunction
• appliance model (Mod.)
• serial number (S/N)
This information can be found on the data plate located on the bottom
left side of the refrigerator compartment.
Never call on unauthorized technicians and always refuse spare
parts which are not originals.
TT
TT
T
eknik Serviseknik Servis
eknik Serviseknik Servis
eknik Servis
TT
TT
T
eknik Servis ile irtibata geçmeden önce:eknik Servis ile irtibata geçmeden önce:
eknik Servis ile irtibata geçmeden önce:eknik Servis ile irtibata geçmeden önce:
eknik Servis ile irtibata geçmeden önce:
• Servise baþvurmadan çözülebilecek bir arýza olup olmadýðýný
kontrol ediniz (
Arýza ve Onarým bölümüne bakýnýz
).
• Sonucun olumsuz olmasý durumunda, en yakýn Teknik Servis ile
irtibata geçiniz.
Aþaðýdaki bilgileri bildiriniz:Aþaðýdaki bilgileri bildiriniz:
Aþaðýdaki bilgileri bildiriniz:Aþaðýdaki bilgileri bildiriniz:
Aþaðýdaki bilgileri bildiriniz:
• arýza tipi
• cihazýn modeli (Mod.)
• seri numarasý (S/N)
Bu bilgiler, soðutucu bölmesi içinde aþaðýda solda bulunan teknik veriler
etiketi üzerinde bulunmaktadýr.
Kesinlikle sadece yetkili teknik elemanlara baþvurunuz veKesinlikle sadece yetkili teknik elemanlara baþvurunuz ve
Kesinlikle sadece yetkili teknik elemanlara baþvurunuz veKesinlikle sadece yetkili teknik elemanlara baþvurunuz ve
Kesinlikle sadece yetkili teknik elemanlara baþvurunuz ve
her zaman orijinal yedek parçalarý kullanýnýz.her zaman orijinal yedek parçalarý kullanýnýz.
her zaman orijinal yedek parçalarý kullanýnýz.her zaman orijinal yedek parçalarý kullanýnýz.
her zaman orijinal yedek parçalarý kullanýnýz.
Cihazýn ömrü 10 yýldýrCihazýn ömrü 10 yýldýr
Cihazýn ömrü 10 yýldýrCihazýn ömrü 10 yýldýr
Cihazýn ömrü 10 yýldýr
. (Ürünün fonksiyonunu yerine. (Ürünün fonksiyonunu yerine
. (Ürünün fonksiyonunu yerine. (Ürünün fonksiyonunu yerine
. (Ürünün fonksiyonunu yerine
getirebilmesi için gerekli yedek parça bulundurmagetirebilmesi için gerekli yedek parça bulundurma
getirebilmesi için gerekli yedek parça bulundurmagetirebilmesi için gerekli yedek parça bulundurma
getirebilmesi için gerekli yedek parça bulundurma
süresi).süresi).
süresi).süresi).
süresi).
- model
- model - model
- model - model
- model
- serial number
- seri numarasý - seri numarasý
- seri numarasý - seri numarasý
- seri numarasý
INDESIT COMPANY BEYAZ EÞYA SANAYÝ VE
TÝCARET A.Þ.
Organize Sanayi Bölgesi 45030 / MANÝSA
TEL
::
::
: (+90) 236 233 19 05 – 233 18 20
FAKS
::
::
: (+90) 236 233 16 52
INDESIT COMPANY BEYAZ EÞYA PAZARLAMA
A.Þ.
Karahasan Sok. No:1
1 Balmumcu 34349
Beþiktaþ/Ýstanbul
TEL: (+90) 212 355 53 00
FAKS: (+90) 212 212 95 59
WEB: www.indesit.com.tr
Page 3
3
Description of the appliance
Control panel
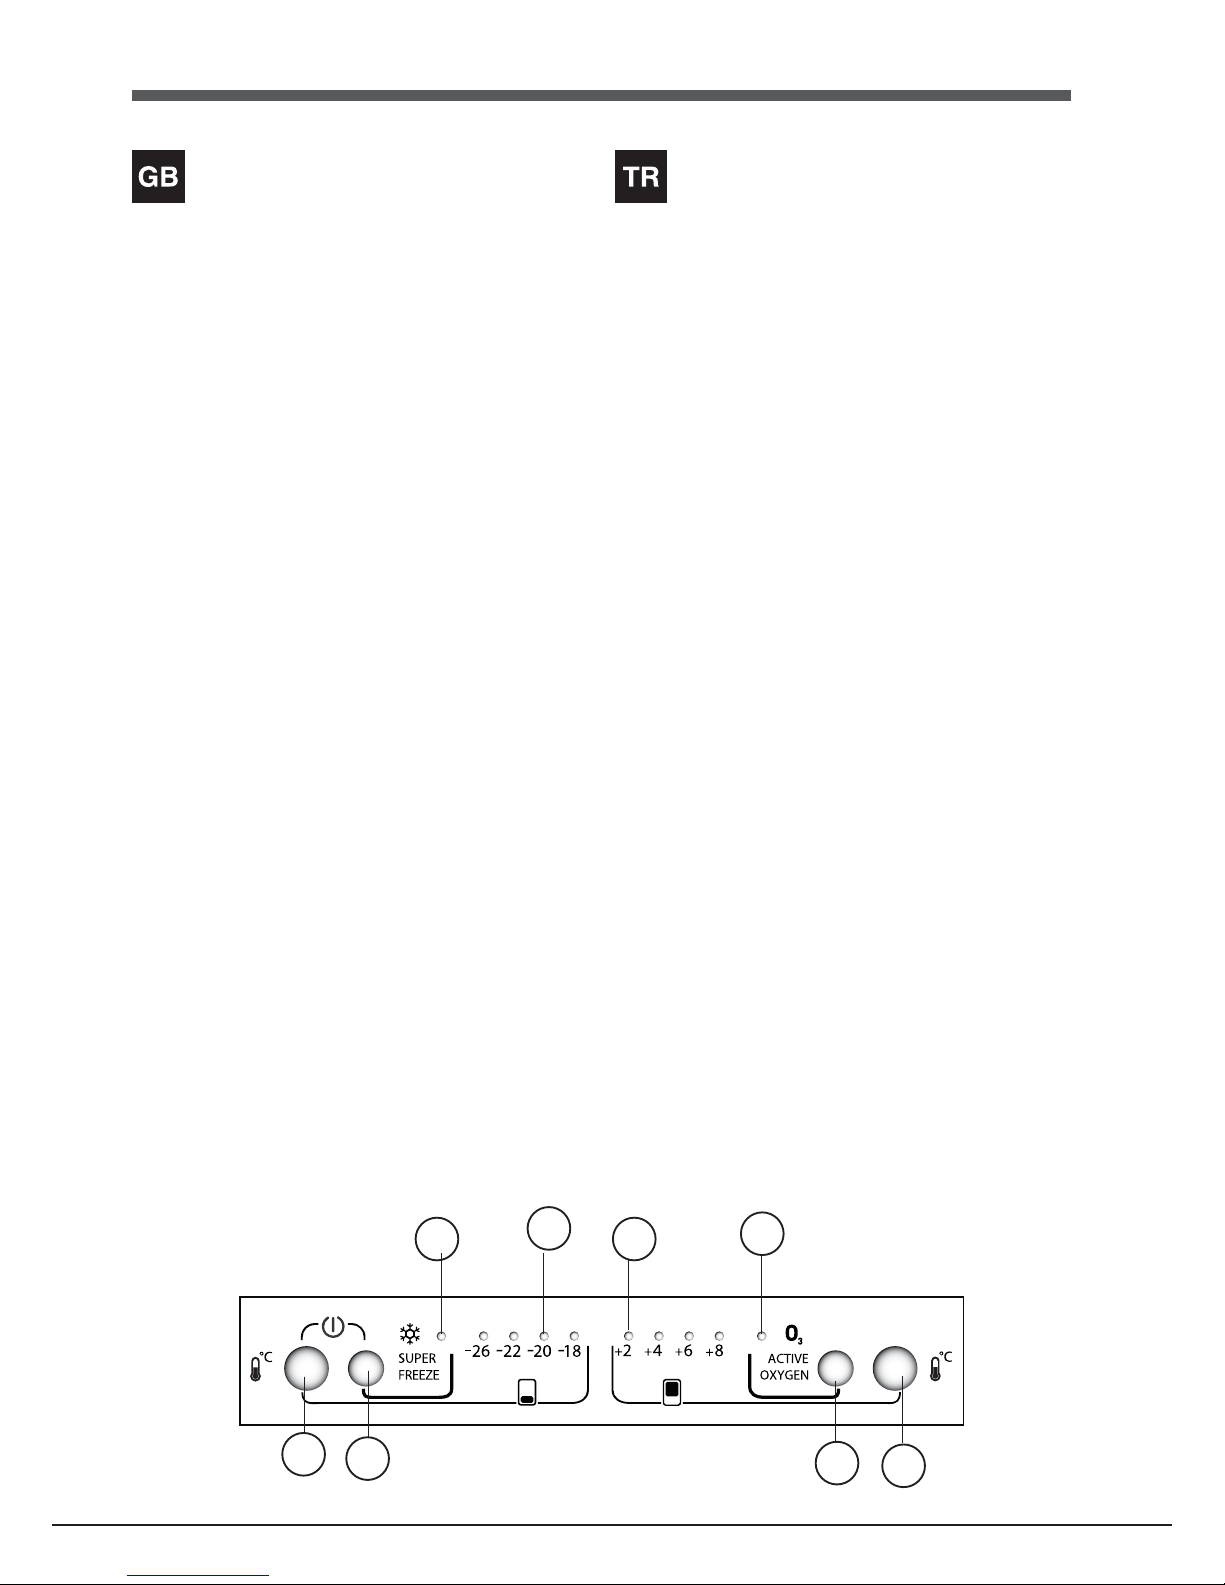
1 FREEZER OPERATION Button to regulate the temperature the
freezer compartment. Button is used with
SUPER FREEZE SUPER FREEZE
SUPER FREEZE SUPER FREEZE
SUPER FREEZE Button
to switch on/switch off the product by pressing both 3 seconds
2 SUPER FREEZE Button (rapid freezing) to freeze fresh food.
Press button for 3 seconds to switch on the product while it is
switched off
3 SUPER FREEZE Blue light illuminates when SUPER FREEZE button
is pressed.
4 FREEZER TEMPERATURE Yellow light The temperature of the
Freezer is consisted with 4 levels as indicated on serigraphy
5 FRIDGE TEMPERATURE Yellow light The temperature of the Fridge
is consisted with 4 levels as indicated on serigraphy
6 When the ACTIVE OXYGEN button is pushed , the blue light of the
ACTIVE OXYGEN
lights up.
7 Activate or deactivate ACTIVE OXYGEN function.
8 REFRIGERATOR OPERATION button to regulate the temperature
of the refrigerator compartment.
!The indicator lights are also used to indicate an unusual temperature
increase in the freezer compartment (
see Troubleshooting
).
Cihazýn tanýmýCihazýn tanýmý
Cihazýn tanýmýCihazýn tanýmý
Cihazýn tanýmý
Kontrol paneliKontrol paneli
Kontrol paneliKontrol paneli
Kontrol paneli
1 Dondurucu bölmesi sýcaklýðýný düzenlemek için
DONDURUCUDONDURUCU
DONDURUCUDONDURUCU
DONDURUCU
ÇALIÞTIRMA ÇALIÞTIRMA
ÇALIÞTIRMA ÇALIÞTIRMA
ÇALIÞTIRMA düðmesi. Düðme, her ikisine de 3 saniye basarak
ürünü kapatmak/açmak için
SÜPER DONDUR SÜPER DONDUR
SÜPER DONDUR SÜPER DONDUR
SÜPER DONDUR Dügmesi ile
birlikte kullanýlýr.
2 Taze besini dondurmak için
SÜPER DONDUR SÜPER DONDUR
SÜPER DONDUR SÜPER DONDUR
SÜPER DONDUR (hýzlý dondurma)
düðmesi. Kapalýyken ürünü açmak için düðmeye 3 saniye basýn
3
SÜPER DONDUR SÜPER DONDUR
SÜPER DONDUR SÜPER DONDUR
SÜPER DONDUR düðmesine basýldýgýnda Mavi
SÜPERSÜPER
SÜPERSÜPER
SÜPER
DONDURDONDUR
DONDURDONDUR
DONDUR эюэрэ yanar.
4 Sarý
DONDURUCU SICAKLIÐIDONDURUCU SICAKLIÐI
DONDURUCU SICAKLIÐIDONDURUCU SICAKLIÐI
DONDURUCU SICAKLIРI эюэрэ, Dondurucu sэcaklэрэ
serigrafide belirtildiði gibi 4 seviyeden oluþur
5 Sarý
BUZDOLABI SICAKLIGIBUZDOLABI SICAKLIGI
BUZDOLABI SICAKLIGIBUZDOLABI SICAKLIGI
BUZDOLABI SICAKLIGI iþigi, Buzdolabý sýcaklýgý serigrafide
belirtildiði gibi 4 seviyeden olusur
6
ACTIVE OXYGENACTIVE OXYGEN
ACTIVE OXYGENACTIVE OXYGEN
ACTIVE OXYGEN butonuna basýldýðý zaman mavi aktif oksijen
эюэрэ yanar.
7
ACTIVE OXYGENACTIVE OXYGEN
ACTIVE OXYGENACTIVE OXYGEN
ACTIVE OXYGEN iþlevini aktifleþtirir ya da pasifleþtirir.
8 Buzdolabý bölmesinin sýcaklýðýný düzenlemek için
BUZDOLABIBUZDOLABI
BUZDOLABIBUZDOLABI
BUZDOLABI
ÇALIÞTIRMA ÇALIÞTIRMA
ÇALIÞTIRMA ÇALIÞTIRMA
ÇALIÞTIRMA düðmesi.
!!
!!
! Uyarý lambalarý dondurucu bölmesinde ýsýnýn anormal bir þekilde
arttýðýný belirtmek için kullanýlýr (Ariza ve onarým bölümüne bakýnýz).
2
7
8
1
4
53
6
Page 4
4
Description of the appliance
Overall view
The instructions contained in this manual are applicable to different
model refrigerators. The diagrams may not directly represent the
appliance purchased. For more complex features, consult the following
pages.
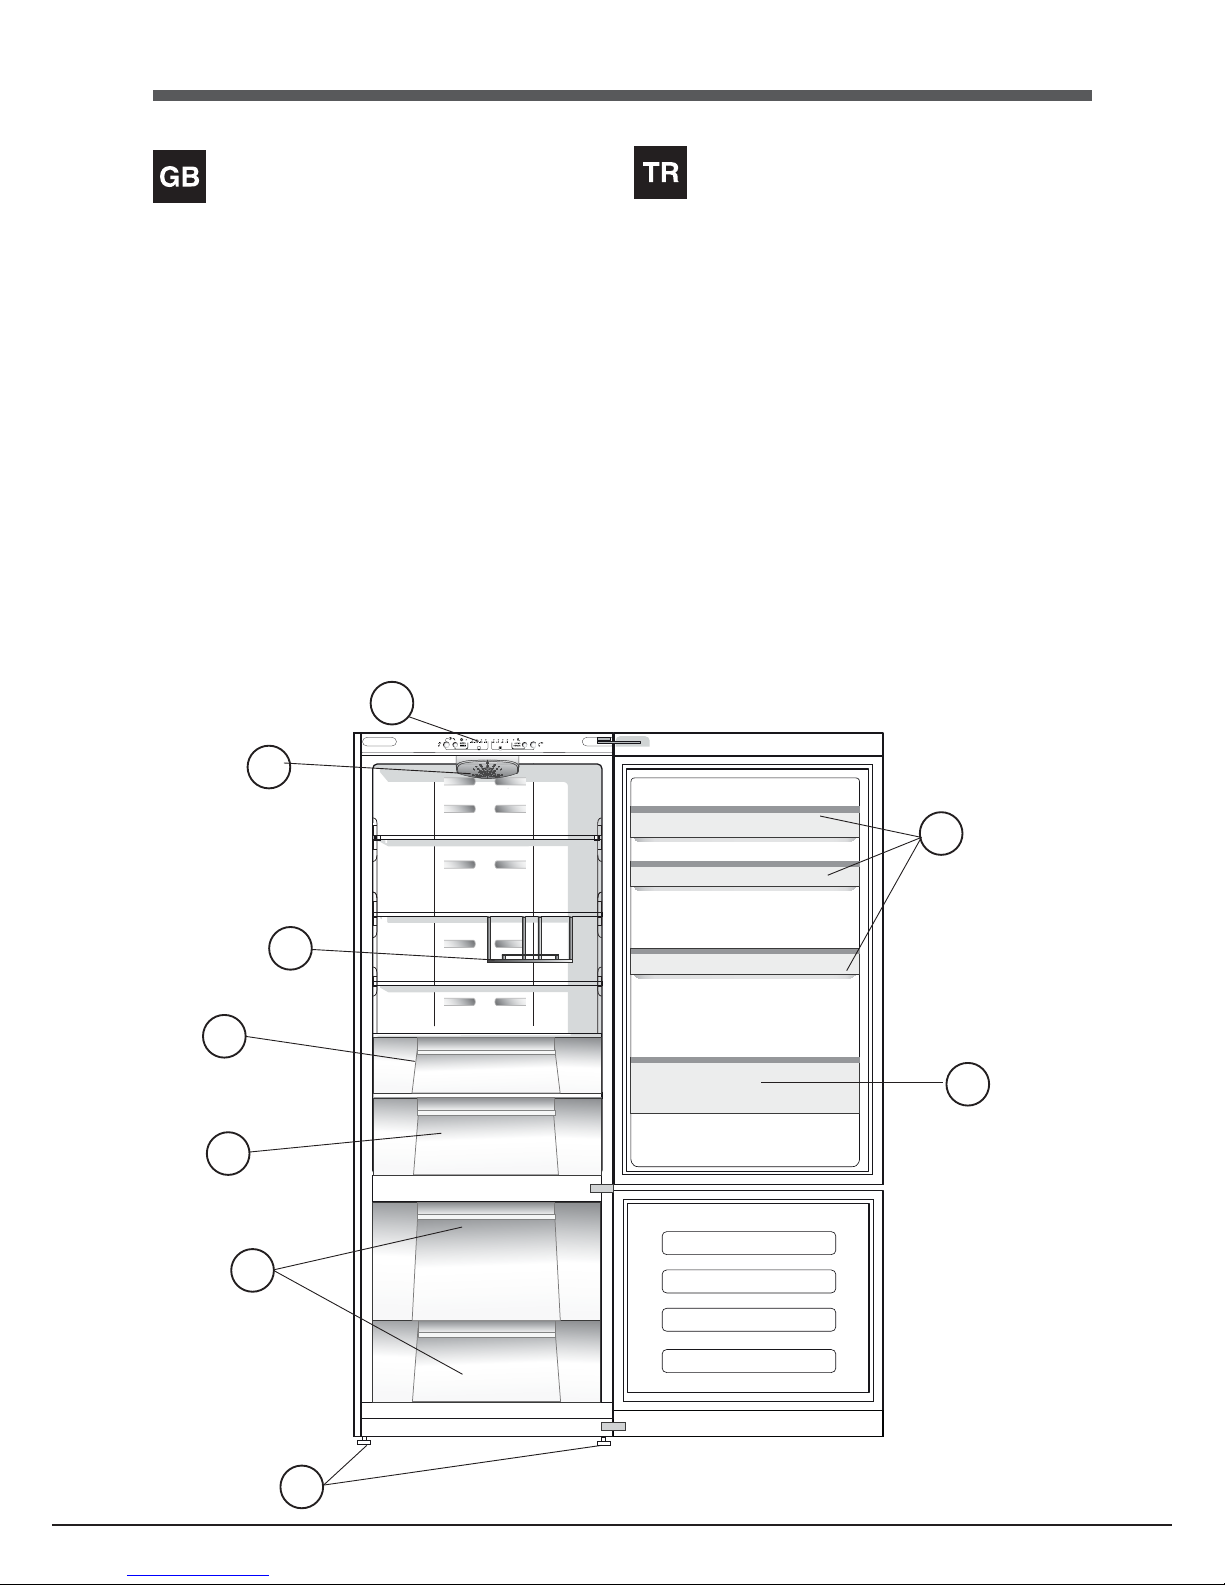
1 Levelling FEET
2 FREEZER and STORAGE compartment
3
BOTTLE shelf
*
4 Food Care Zone / Food Care Zone 0°C / Safe Defrost*
5 FRUIT and VEGETABLE bin
*
6 Removable multipurpose SHELVES*
7 Control panel.
8 WINE RACK*
9 ACTIVE OXYGEN
* Varies by number and/or position, available only on certain models.
Cihazýn tanýmýCihazýn tanýmý
Cihazýn tanýmýCihazýn tanýmý
Cihazýn tanýmý
Genel görünümGenel görünüm
Genel görünümGenel görünüm
Genel görünüm
Kullaným talimatlarý birkaç model için geçerli olduðu için þekil satýn
aldýðýnýz cihazda olmayandeðiþik ayrýntýlarý gösterebilir.
Sonraki sayfalarda en karýþýk cisimler açýklanmýþtýr.
11
11
1 Ayarlanabilir
AA
AA
A
YY
YY
Y
AKLARAKLAR
AKLARAKLAR
AKLAR
22
22
2
DONDURMADONDURMA
DONDURMADONDURMA
DONDURMA ve
SAKLAMASAKLAMA
SAKLAMASAKLAMA
SAKLAMA bölmesi
33
33
3
SISESISE
SISESISE
SISE Tutucusu
4 Food Care Zone / Food Care Zone 0°C / Safe Defrost*
55
55
5
MEYVEMEYVE
MEYVEMEYVE
MEYVE ve
SEBZESEBZE
SEBZESEBZE
SEBZE çekmecesi
66
66
6
KAPIKAPI
KAPIKAPI
KAPI rafý
••
••
•
77
77
7
Kontrol panosuKontrol panosu
Kontrol panosuKontrol panosu
Kontrol panosu
88
88
WINE RACKWINE RACK
WINE RACKWINE RACK
WINE RACK*
9 ACTIVE OXYGEN
* Sayýsý ve/veya pozisyonu deðiþebilir,Sadece bazý modellerde
mevcuttur.
6
1
3
4
5
2
8
9
7
Page 5
5
Reversible doors
If it is necessary to change the direction in which the doors open,
please contact the Technical Assistance Centre.
Kapýlarýn açýlýþ yönününKapýlarýn açýlýþ yönünün
Kapýlarýn açýlýþ yönününKapýlarýn açýlýþ yönünün
Kapýlarýn açýlýþ yönünün
deðiþtirilmesideðiþtirilmesi
deðiþtirilmesideðiþtirilmesi
deðiþtirilmesi
Kapýlarýn açýlýþ yönünün deðiþtirilmesi gerekirse Teknik Servise
baþvurunuz.
Page 6
6
GB
Installation
! Before placing your new appliance into operation please read these
operating instructions carefully. They contain important information for safe
use, for installation and for care of the appliance.
! Please keep these operating instructions for future reference. Pass
them on to possible new owners of the appliance.
Positioning and connection
Positioning
1. Place the appliance in a well-ventilated humidity-free room.
2. Do not obstruct the rear fan grills. The compressor and condenser
give off heat and require good ventilation to operate correctly and
save energy.
3. Leave a space of at least 10 cm between the top part of the
appliance and any furniture above it, and at least 5 cm between
the sides and any furniture/side walls.
4. Ensure the appliance is away from any sources of heat (direct
sunlight, electric stove, etc.).
5. In order to maintain the correct distance between the appliance
and the wall behind it, fit the spacers supplied in the installation kit,
following the instructions provided.
Levelling
1. Install the appliance on a level and rigid floor.
2. If the floor is not perfectly horizontal, adjust the refrigerator by
tightening or loosening the front feet.
Electrical connections
After the appliance has been transported, carefully place it vertically
and wait at least 3 hours before connecting it to the electricity mains.
Before inserting the plug into the electrical socket ensure the following:
• The appliance is earthed and the plug is compliant with the law.
• The socket can withstand the maximum power of the appliance,
which is indicated on the data plate located on the bottom left side
of the fridge (e.g. 150 W).
• The voltage must be in the range between the values indicated on
the data plate located on the bottom left side (e.g. 220-240V).
• The socket is compatible with the plug of the appliance. If the
socket is incompatible with the plug, ask an authorised technician
to replace it (
see Assistance
). Do not use extension cords or
multiple sockets.
! Once the appliance has been installed, the power supply cable and
the electrical socket must be easily accessible.
! The cable must not be bent or compressed.
! The cable must be checked regularly and replaced by authorised
technicians only (see Assistance).
!
The manufacturer declines any liability should these safety
measures not be observed.
Start-up and use
Starting the appliance
! Before starting the appliance, follow the installation instructions
(
see Installation
).
! Before connecting the appliance, clean the compartments and
accessories well with lukewarm water and bicarbonate.
! The appliance comes with a motor protection control system which
makes the compressor start approximately 8 minutes after being switched
on. The compressor also starts each time the power supply is cut off
whether voluntarily or involuntarily (blackout).
1. Insert the plug into the socket and switch on the product using the
appropriate button, ensure that yellow refrigerator and freezer
temperature lights illuminates
2. After a few hours you will be able to put food in the refrigerator.
3. Press the SUPER FREEZE button (rapid freezing): the SUPER
FREEZE indicator light will illuminate. Once the refrigerator has
reached the optimal temperature, the indicator light goes out and
you can begin food storage.
Chiller system
NO FROST
The No Frost system circulates cold air continuously to collect humidity
and prevent ice and frost formation. The system maintains an optimal
humidity level in the compartment, preserving the original quality of
the food, preventing the food from sticking together and making
defrosting a thing of the past. Do not block the aeration cells by
placing food or containers near the refrigerating back panel.
!!
!!
! Close bottles and wrap food tightly.
ACTIVE OXIGEN
This device releases ozone molecules inside the refrigerator; ozone
is a natural substance which combats bacteria and microorganisms,
reducing their proliferation while limiting unpleasant
odours.Automatically defines the amount of ozone required for
prolonging the freshness of foodstuffs, eliminating odours and
preventing bacteria build-up.There may be a slight distinctive odour
inside the refrigerator. The very same smell can sometimes be detected
during a storm, due to the ozone produced as the charge in the
lightning bolts is released; this is completely normal. The amount
produced by the device is very small and abates quickly as the
antibacterial action takes place.Device is activated by pressing the
dedicated key on the control pannel .With the Active Oxigen switched
on, the device will operate a repeted cycle until the key is pressed
again. There will be an Ozone emission noticed by the switching on of
the green led located on the Active Oxigen device located in the
fridge compartment and a stand-by cicle (without zone emission)
noticed by blue light.
Using the refrigerator to its full potential
• Use the REFRIGERATOR OPERATION button to adjust the
temperature (
see Description
).
• Place only cold or lukewarm foods in the compartment, not hot
foods (
see Precautions and tips
).
• Remember that cooked foods do not last longer than raw foods.
• Do not store liquids in open containers. They will increase humidity
in the refrigerator and cause condensation to form.
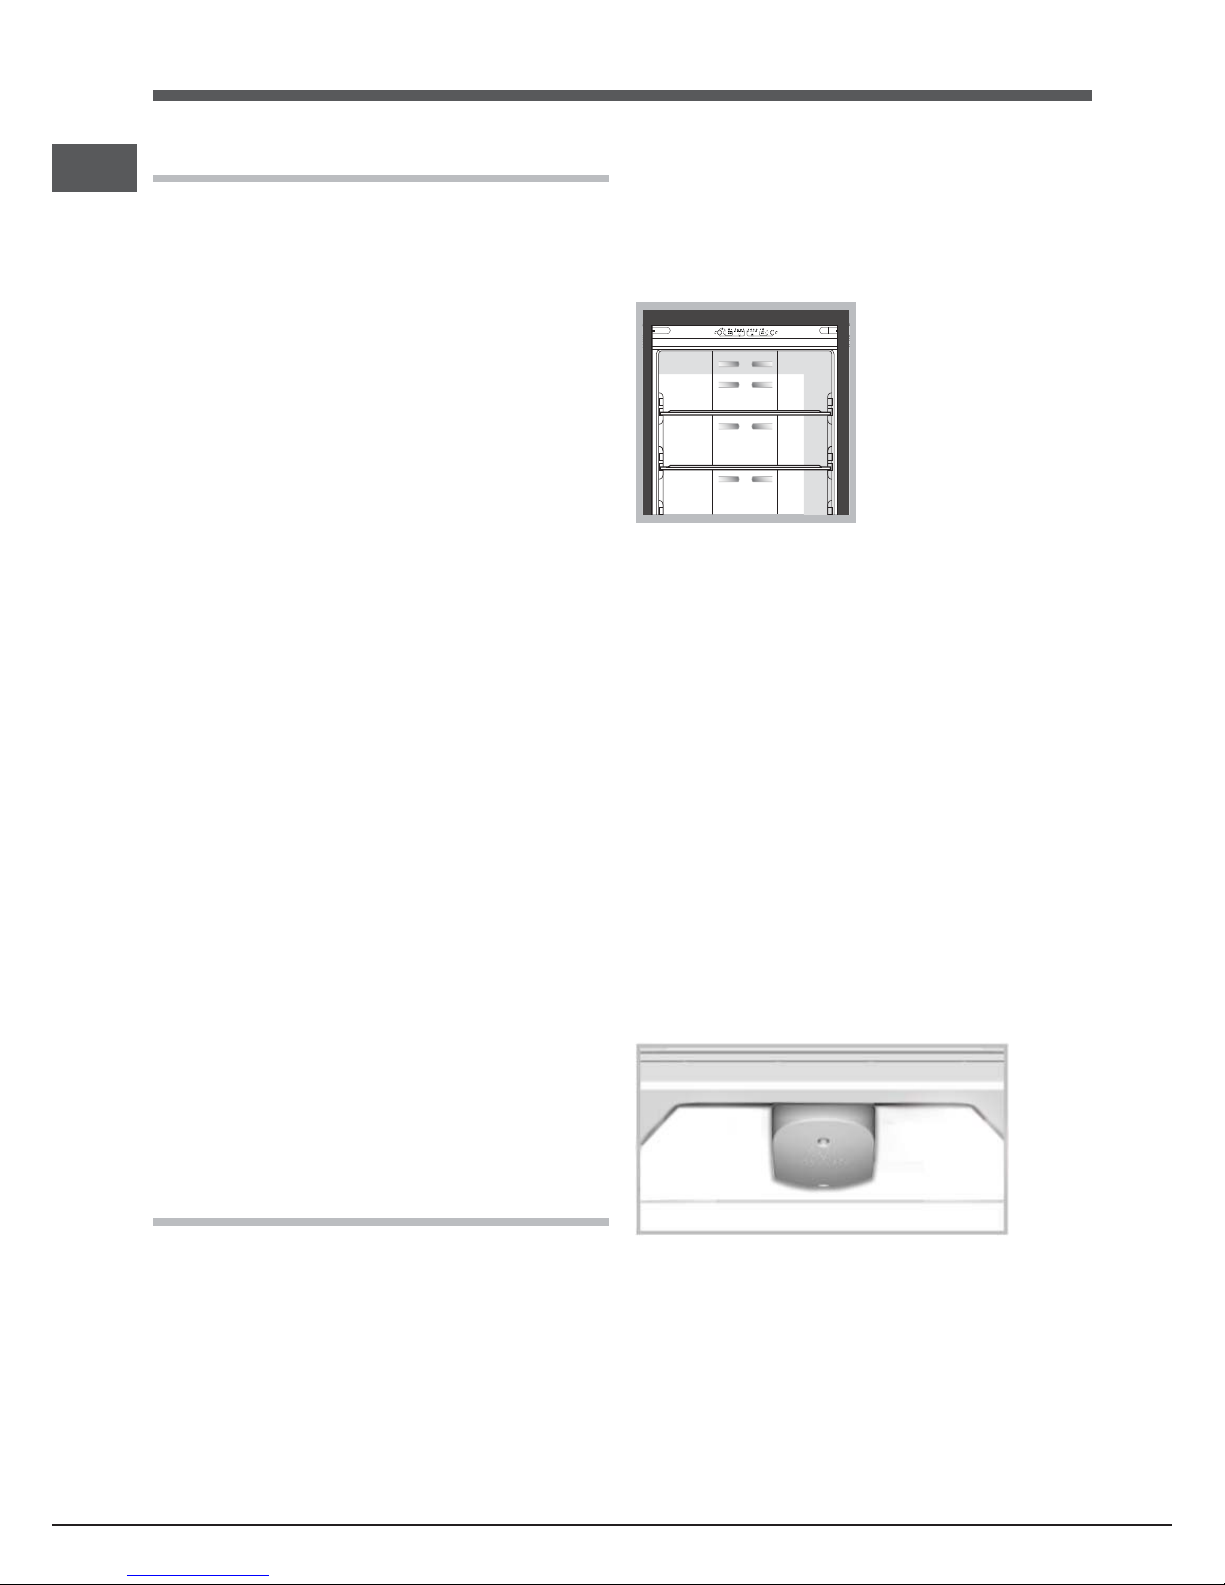
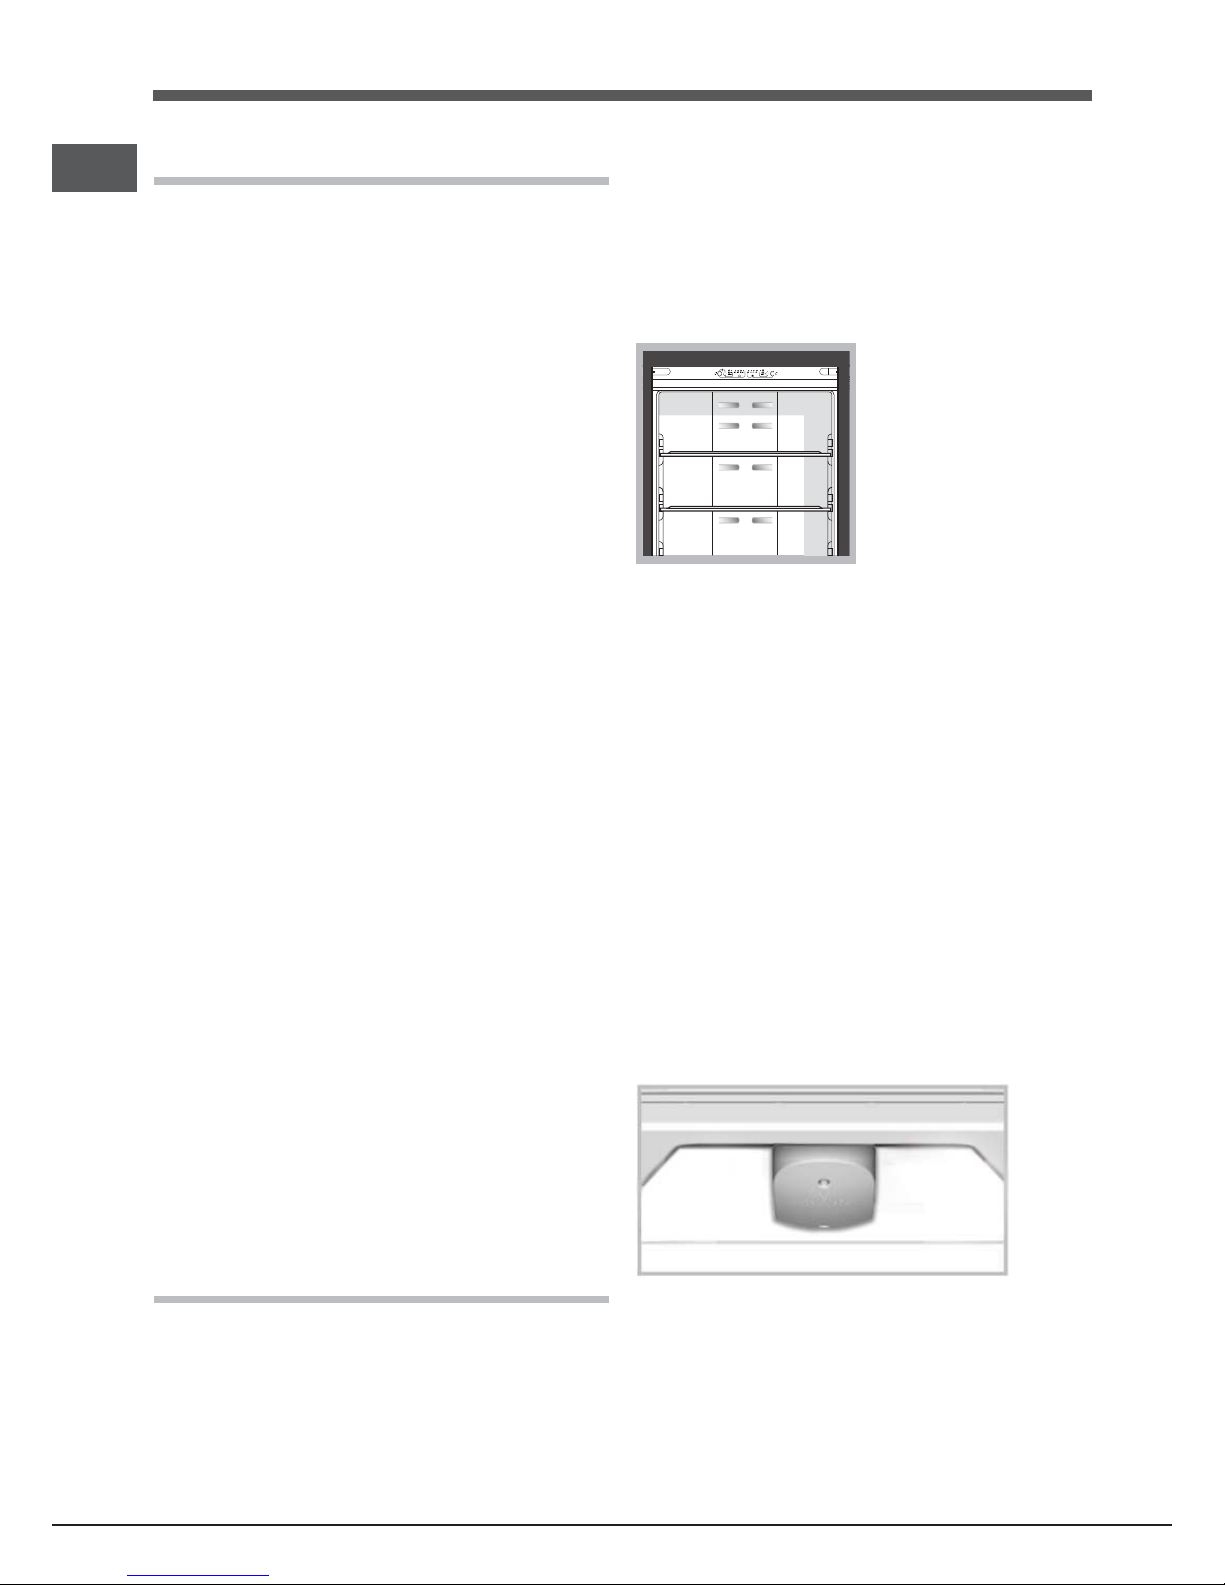
SHELVES: Due to the special guides the shelves are removable and
the height is adjustable, allowing easy storage of large containers
and food.
Page 7
GB
7
* Varies by number and/or position, available only on certain models.
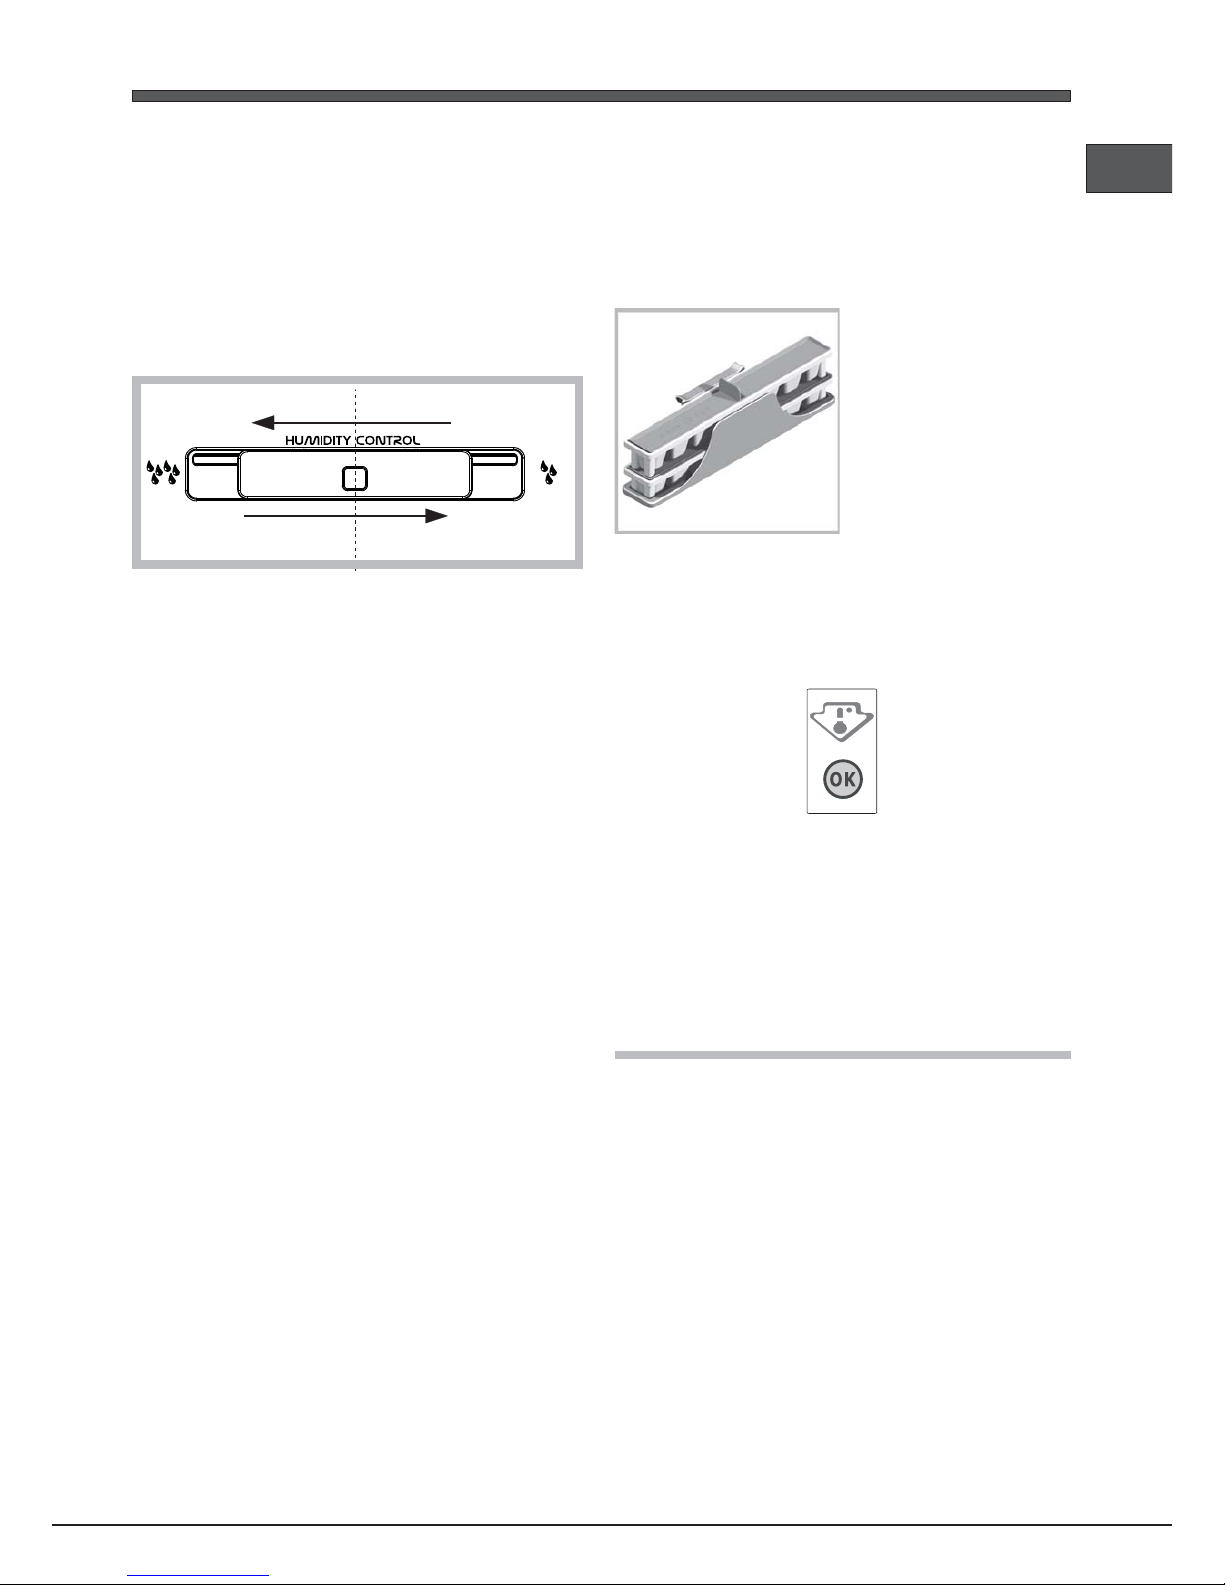
FRUIT and VEGETABLE bin
*
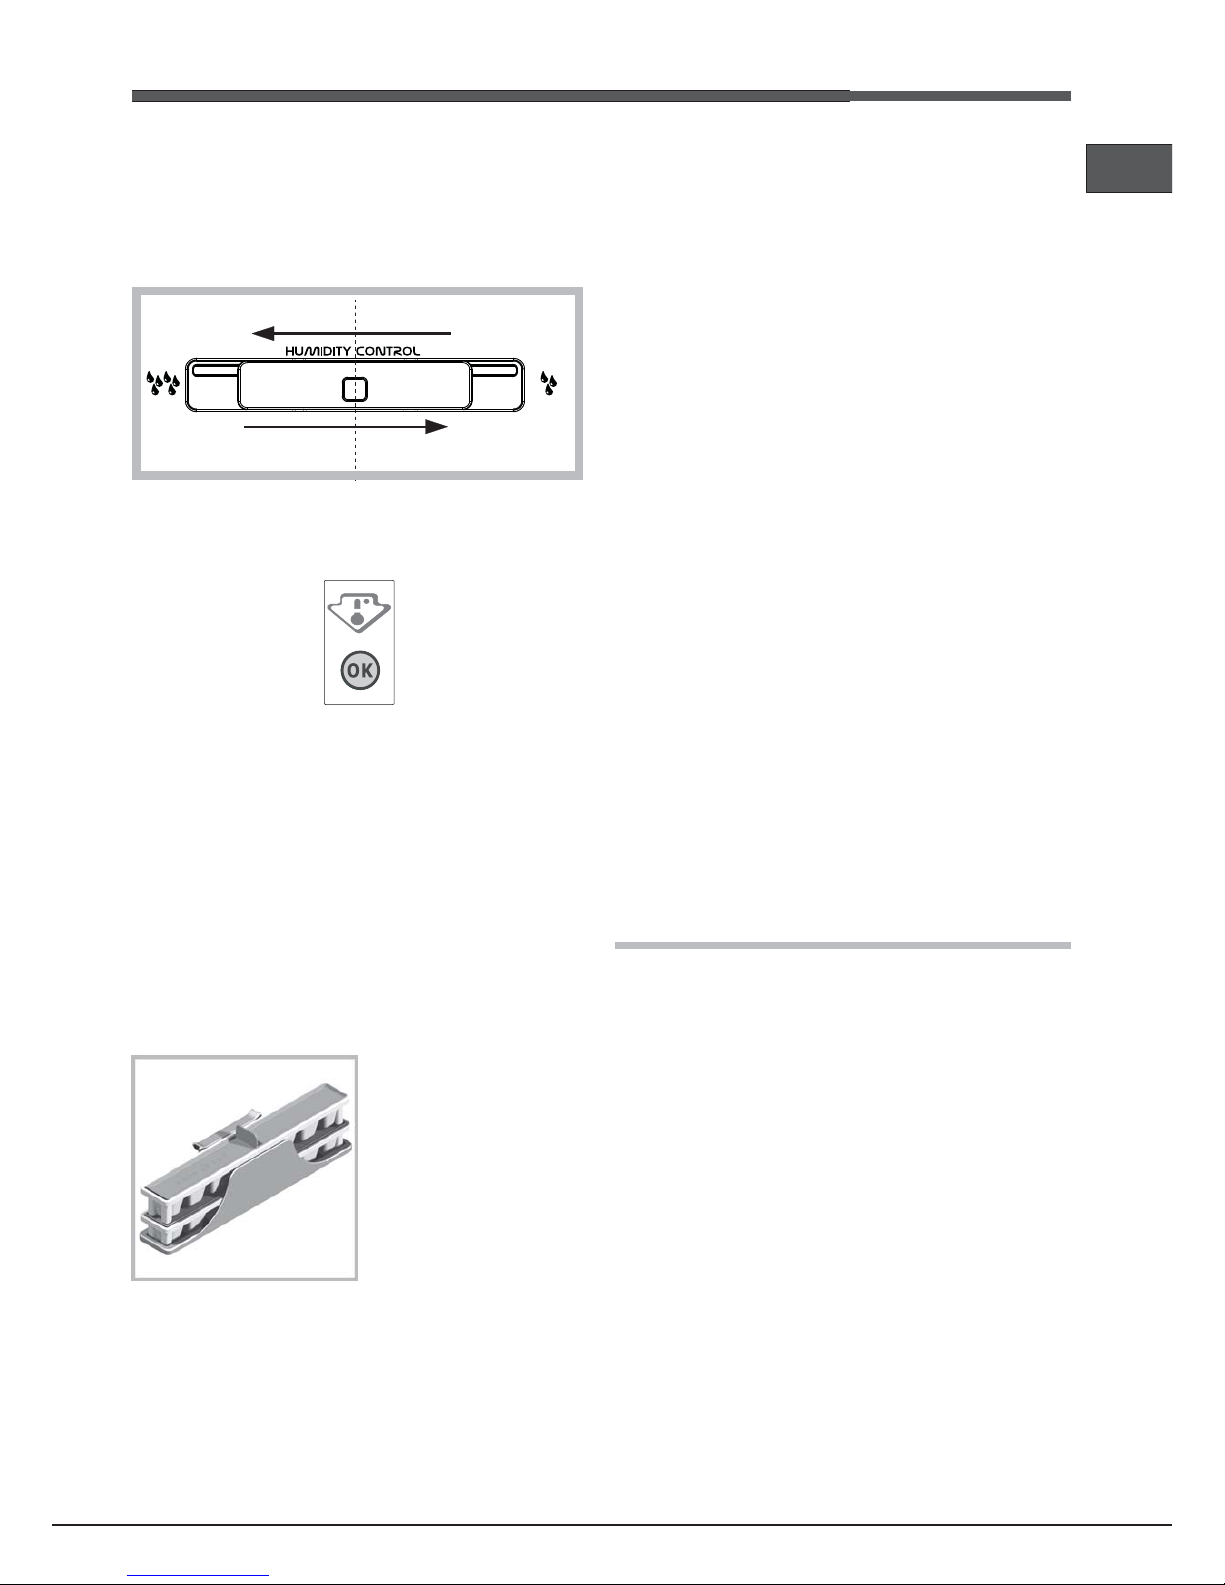
The salad crispers fitted inside the fridge have been specially
designed for the purpose of keeping fruit and vegetables fresh and
crisp. Open the humidity regulator (position B) if you want to store
food in a less humid environment like fruit, or close it (position A) to
store food in a more humid environment like vegetable.
A
B
TEMPERATURE Indicator light*: to identify the coldest area in the
refrigerator.
1. Check that OK appears clearly on the indicator light (
see diagram
).
2. If the word “OK” does not appear it means that the temperature is
too high: set a lower temperature and wait approximately 10 hours
until the temperature has been stabilised.
3. Check the indicator light again: if necessary, readjust it following
the initial process. If large quantities of food have been added or if
the refrigerator door has been opened frequently, it is normal for
the indicator not to show OK. Wait at least 10 hours before adjusting
the REFRIGERATOR OPERATION knob to a higher setting.
Easy Ice
*
The double tub was designed to optimise space in the freezer
compartment and to ensure that ice is always readily available. The
trays can be stacked or filled and used separately.
Furthermore, the special fastening system makes Easy Ice an
extremely flexible solution, as it can be positioned in the right or left
part of the top drawers.
Using the freezer to its full potential
• Use the FREEZER OPERATION button to adjust the temperature
(see Description).
• Do not re-freeze food that is defrosting or that has already been
defrosted. These foods must be cooked and eaten (within 24
hours).
• Fresh food that needs to be frozen must not come into contact with
food that has already been defrosted.
• Do not place glass bottles which contain liquids, and which are
corked or hermetically sealed in the freezer because they could
break.
• The maximum quantity of food that may be frozen daily is indicated
on the plate containing the technical properties located on the
bottom left side of the refrigerator compartment (for example: Kg/
24h: 4).
• To freeze (if the freezer is already operating): press the rapid
freezing SUPER FREEZE button (corresponding blue indicator
light illuminates), insert the food and close the door. The function is
disabled automatically after 24 hours or when optimal temperatures
have been reached (indicator light goes out)
! Do not store food too large in the upper freezer drawer if is present
the ‘Ice Device”.
! Do not open the door during freezing.
! If there is a power cut or malfunction, do not open the freezer door.
This will help maintain the temperature inside the freezer, ensuring
that foods are conserved for at least 9 -14 hours.
Food Care Zone Food Care Zone
Food Care Zone Food Care Zone
Food Care Zone
**
**
*
Area dedicated to the storage of fresh food, such as meat and
fish. Thanks to the low temperature inside the compartment, the
Food Care Zone extends the period of time for which the food can
be stored, keeping it fresh for up to a week.
Food Care Zone 0°C / Safe Defrost* :Food Care Zone 0°C / Safe Defrost* :
Food Care Zone 0°C / Safe Defrost* :Food Care Zone 0°C / Safe Defrost* :
Food Care Zone 0°C / Safe Defrost* :
A compartment designed to keep delicate food such as meat and
fish fresh. The low temperature in the compartment (-2 / +3° C)
makes it possible to store the food for up to one week - tests
performed on meat products - without changing its nutrients,
appearance and flavour.
The compartment is also very suitable for healthy food defrosting,
as low-temperature defrosting prevents any proliferation of
microorganisms, while protecting its taste and organoleptic
properties.
It is not suitable for fruit, vegetables and green salad. But it can be
used for fresh or very fresh dairy products and milk, stuffed fresh
pasta and even cooked food or leftovers.
Maintenance and care
Switching the appliance off
During cleaning and maintenance it is necessary to disconnect the
appliance from the electricity supply:
1. press the FREEZER OPERATION Button and SUPER FREEZE
Button for 3 seconds to switch off the product
2. pull the plug out of the socket
! If this procedure is not followed, the alarm may sound. This alarm
does not indicate a malfunction. To restore normal operation insert the
plug into the socket, press the FREEZER OPERATION and SUPER
FREEZE button and set the FREEZER OPERATION button on the
desired value.To disconnect the appliance, follow point 1 and 2.
Cleaning the appliance
• The external and internal parts, as well as the rubber seals may be
cleaned using a sponge that has been soaked in lukewarm water
and bicarbonate of soda or neutral soap. Do not use solvents,
abrasive products, bleach or ammonia.
• The removable accessories may be soaked in warm water and
soap or dishwashing liquid. Rinse and dry them carefully.
• The back of the appliance may collect dust which can be removed
by delicately using the hose of a vacuum cleaner set on medium
power. The appliance must be switched off and the plug must be
pulled out before cleaning the appliance.
• During the cleaning of the slide rails for the drawers in the freezer
compartment, it may happen that the automatic drawer closure
Page 8
8
GB
mechanism is deactivated. To reactivate it, simply close the drawer
a little more forcefully than is usually necessary.
Avoiding mould and unpleasant odours
• The appliance is manufactured with hygienic materials which are
odour free. In order to maintain an odour free refrigerator and to
prevent the formation of stains, food must always be covered or
sealed properly.
• If you want to switch the appliance off for an extended period of
time, clean the inside and leave the doors open.
I Care function
The I Care function can be enabled to optimise energy consumption.
Press and hold down the ACTIVE OXYGEN and REFRIGERATOR
OPERATION buttons simultaneously for at least 6 seconds to enable
this function.
On enabling the function, 4 indicator lights will go on for 2 seconds:
ACTIVE OXYGEN light, SUPER FREEZE light and two temperature
lights - one for the refrigerator and one for the freezer.
After 5 seconds the interface will enter the energy saving mode and
the indicator lights will go off. The interface stays off even when the
door is opened. Just press any button to switch it on again. Press the
adjustment buttons to change the temperature.
Consumption will be optimised 48h after the function was enabled. To
disable the I Care function, switch off the product (see description).
The product can be switched on again for normal operation.
In humid environments, when the I Care function is enabled, slight
condensation may form on the doors; normal operating conditions
are restored when the function is disabled.
Replacing the light bulb
Thanks to the powerful light it emits, the new LED lighting system
offers a clear view of all foods, with no shadowy areas. If the LED
needs to be replaced, please contact the Technical Assistance Service.
Precautions and tips
! The appliance was designed and manufactured in compliance with
international safety standards. The following warnings are provided
for safety reasons and must be read carefully.
This appliance complies with the following Community Directives:
- 73/23/EEC of 19/02/73 (Low Voltage) and subsequent amendments;
-89/336/EEC of 03.05.89 (Electromagnetic Compatibility) and
subsequent amendments;
- 2002/96/CE..
General safety
• The appliance was designed for domestic use inside the home
and is not intended for commercial or industrial use.
• The appliance must be used to store and freeze food products by
adults only and according to the instructions in this manual.
• The appliance must not be installed outdoors, even in covered
areas. It is extremely dangerous to leave the appliance exposed
to rain and storms.
• Do not touch the appliance with bare feet or with wet or moist
hands and feet.
• Do not touch the internal cooling elements: this could cause skin
abrasions or frost/freezer burns.
• When unplugging the appliance always pull the plug from the mains
socket, do not pull on the cable.
• Is not sufficient to switch-off of the product to eliminate all the
electrical connections.
• In the case of a malfunction, under no circumstances should you
attempt to repair the appliance yourself. Repairs carried out by
inexperienced persons may cause injury or further malfunctioning
of the appliance.
•
Do not use any sharp or pointed utensils or electrical equipment -
other than the type recommended by the manufacturer - inside the
frozen food storage compartments.
• Do not put ice cubes taken directly from the freezer into your
mouth.
• This appliance is not intended for use by persons (including
children) with reduced physical, sensory or lack of experience
and knowledge unless they have been given supervision or
instruction concerning use of the appliance by a person
responsible for their safety. Children should be supervised to
ensure that they do not play with the appliance.
• Keep packaging material out of the reach of children! It can become
a choking or suffocation hazard.
Disposal
• Observe local environmental standards when disposing packaging
material for recycling purposes.
• The European Directive 2002/96/EC on Waste Electrical and
Electronic Equipment (WEEE), requires that old household electrical
appliances must not be disposed of in the normal unsorted municipal
waste stream.Old appliances must be collected separately in order
to optimise the recovery and recycling of the materials they contain
and reduce the impact on human health and the environment.
The crossed out “wheeled bin” symbol on the product reminds
you of your obligation, that when you dispose of the appliance it
must be separately collected. Consumers should contact their
local authority or retailer for information concerning the correct
disposal of their old appliance.
Respecting and conserving the environment
• Install the appliance in a fresh and well-ventilated room. Ensure
that it is protected from direct sunlight and do not place it near heat
sources.
• Try to avoid keeping the door open for long periods or opening the
door too frequently in order to conserve energy.
• Do not fill the appliance with too much food: cold air must circulate
freely for food to be preserved properly. If circulation is impeded,
the compressor will work continuously.
• Do not place hot food directly into the refrigerator. The internal
temperature will increase and force the compressor to work harder
and will consume more energy.
Troubleshooting
If the appliance does not work, before calling for Assistance (see
Assistance), check for a solution from the following list.
Any indicator lights do not illuminate.
• If the function I Care is not active (see section), the plug has not
been inserted into the electrical socket, or not far enough to make
contact, or there is no power in the house.
The motor does not start.
• The appliance comes with a motor protection control (
see Start-up
and use
).
Page 9
GB
9
The indicator lights are on but the light is dim.
• Pull out and reverse the plug before putting it back in the socket.
a) The alarm sounds.
• The refrigerator door has remained open for more than two
minutes (the buzzer will stop sounding when you shut the door) or the
correct switching-off procedure was not followed (
see Maintenance
).
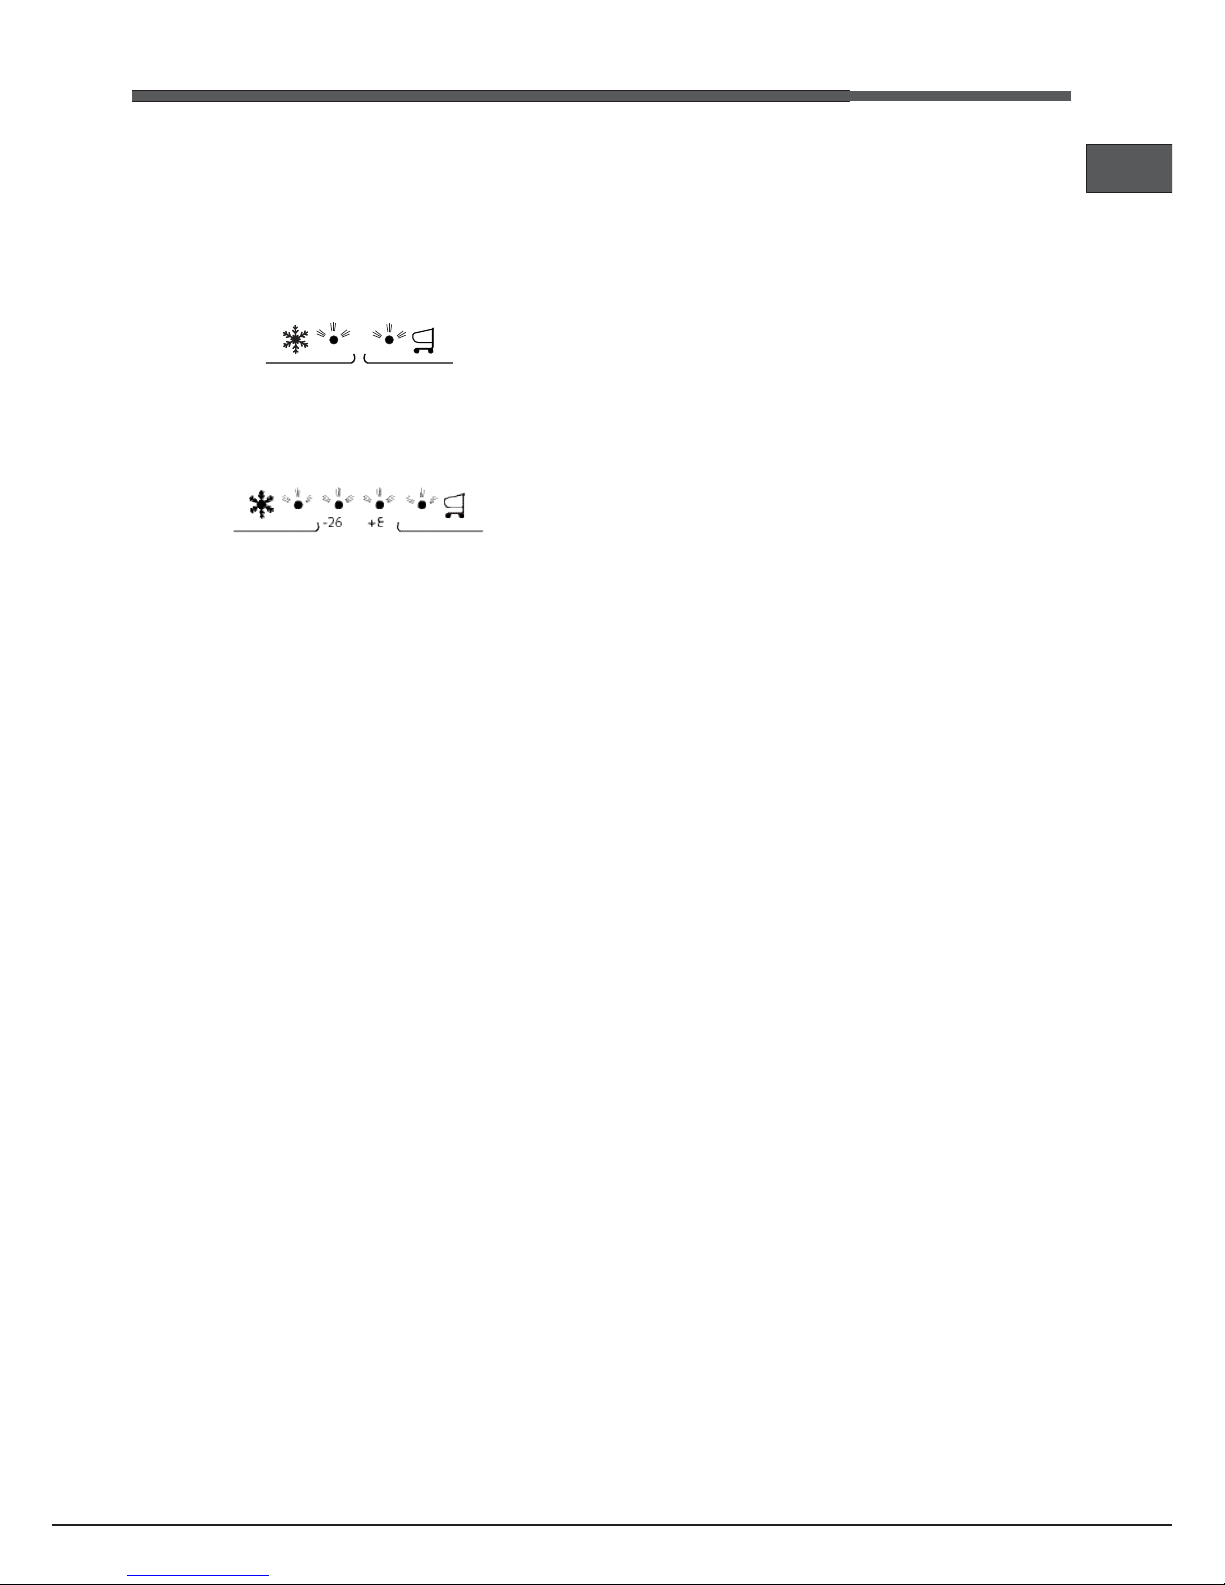
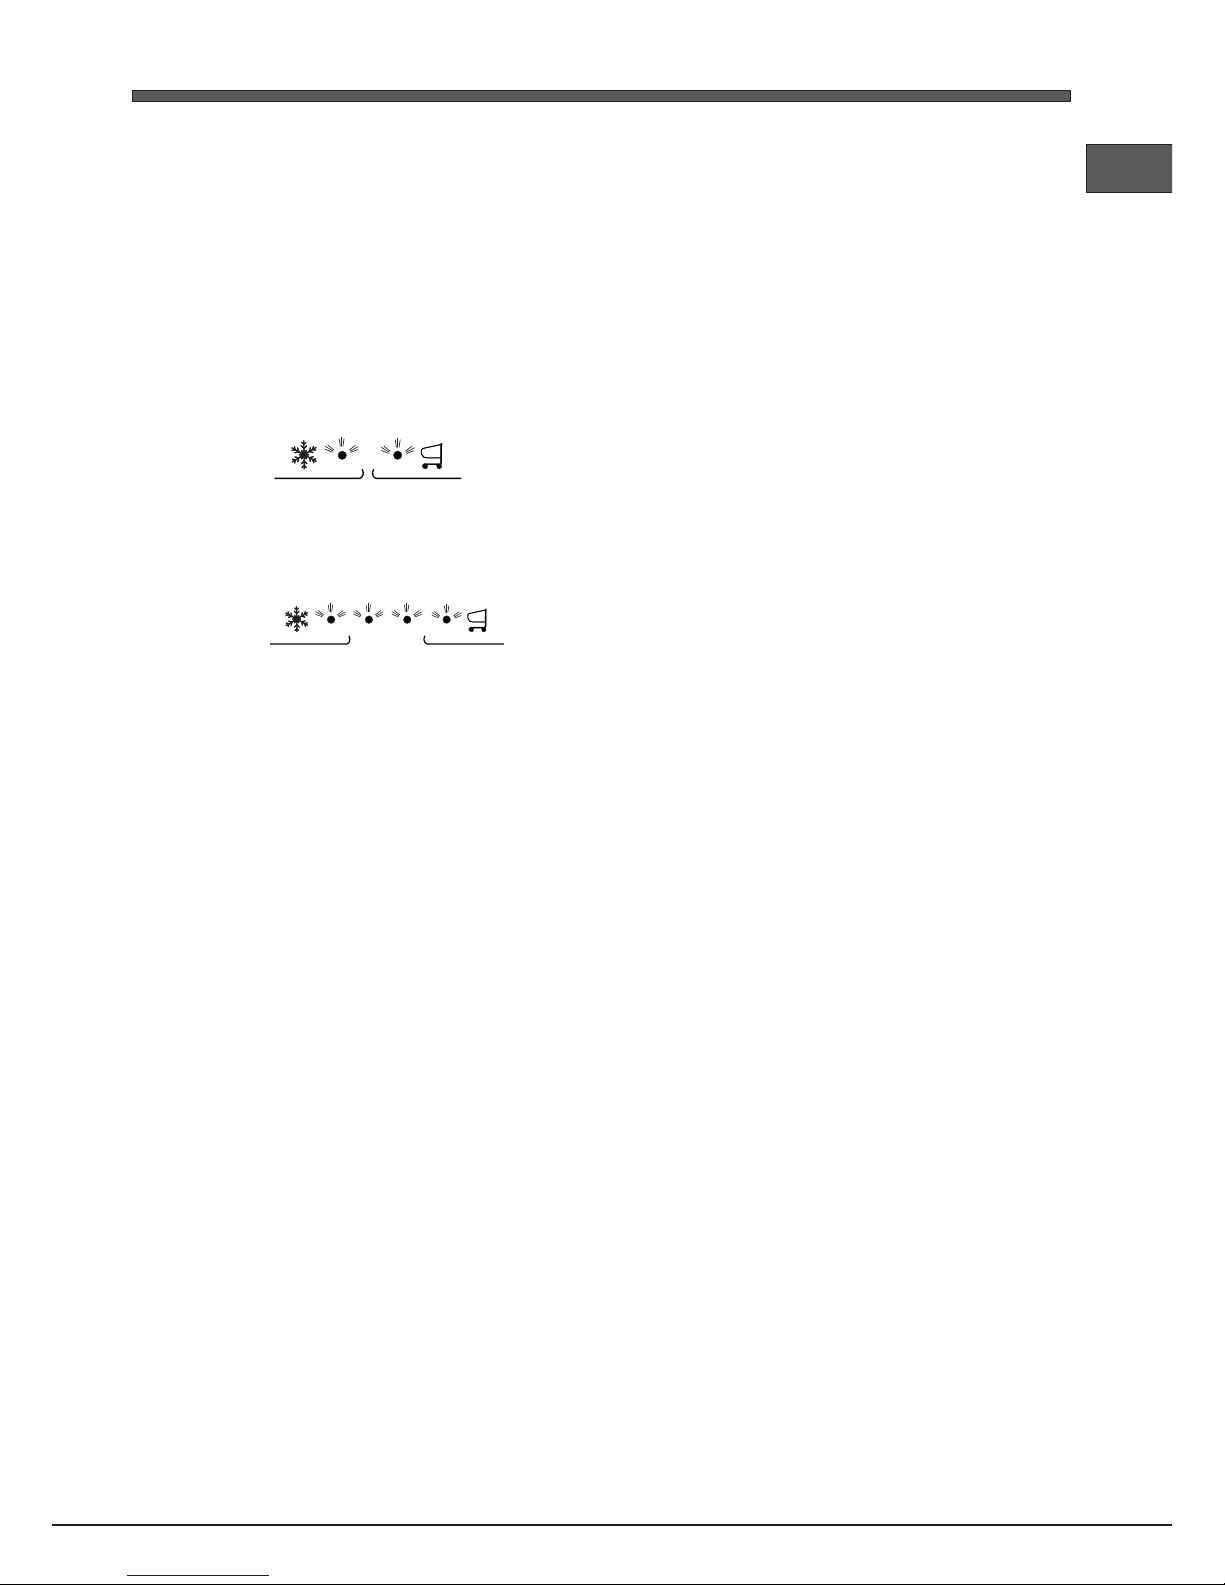
b) The alarm sounds and the two blue indicator lights flash.
• The temperature in the freezer is too high. Check the quality of
the food products and dispose if necessary.
+ buzzer = Heating is excessive
c) The alarm sounds and the two blue indicator and green
one lights flash.
• The temperature in the freezer has reached a dangerous level.
The food must be disposed immediately.
+ buzzer = Heating danger
b/c)
In both these cases the freezer will maintain a temperature of
about 0°C so that the food does not re-freeze.
To turn off the acoustic signal open and close the refrigerator door.
restore normal operation product should be switched off and switched
on by buttons from control panel (See the description)
The refrigerator and the freezer do not cool well.
• The doors do not close properly or the seals are damaged.
• The doors are opened too frequently.
• The refrigerator or the freezer have been over-filled.
The food inside the refrigerator is beginning to freeze.
• The temperature is not adjusted properly (see description)
• The food is near the back inside wall of the refrigerator.
The motor runs continuously.
• The SUPER FREEZE button has been pressed (rapid freezing):
the blue SUPER FREEZE light is on (
see Description
).
• The door is not closed properly or is continuously opened.
• The outside ambient temperature is very high.
The appliance makes a lot of noise.
• The appliance has not been installed on a level surface (
see
Installation).
• The appliance has been installed between cabinets that vibrate
and make noise.
• The internal refrigerant makes a slight noise even when the
compressor is off. This is not a defect, it is normal.
.
Page 10
10
TR
MontajMontaj
MontajMontaj
Montaj
!!
!!
! Bu kitapçýðý gerektiði her an danýþabilmeniz için özenle saklayýnýz.
Satýþ, devir yada taþýnma halinde, çalýþma sistemi ve bununla ilgili
uyarýlar konusunda cihazýn yeni sahibinin bilgilenmesi için bu kitapçýðýn
cihazla birlikte kalmasýný saðlayýnýz.
! !
! !
! Talimatlarý dikkatlice okuyunuz: montaj, kullaným ve güvenliðe iliþkin
önemli bilgiler içermektedir.
Cihazýn yerleþtirilmesi ve baðlanmasýCihazýn yerleþtirilmesi ve baðlanmasý
Cihazýn yerleþtirilmesi ve baðlanmasýCihazýn yerleþtirilmesi ve baðlanmasý
Cihazýn yerleþtirilmesi ve baðlanmasý
KonumlandýrmaKonumlandýrma
KonumlandýrmaKonumlandýrma
Konumlandýrma
1. Cihazý nemsiz ve havadar bir yere yerleþtiriniz.
2. Arkadaki havalandýrma ýzgaralarýný kapatmayýnýz: kompresör ve
kondenser ýsý yayar, bu yüzden cihazýn iyi çalýþmasýný ve tüketiminin
azalmasýný saðlamak için iyi bir havalandýrma gerektirirler.
3. Cihazýn üst kýsmý ile üstüne konacak mobilya arasýnda en az 10
cm, mobilya/duvar yanýna yerleþtirilmesi durumunda ise en az 5
cm açýklýk býrakýnýz
4. Cihazэ эsэ kaynaklarэndan uzak tutunuz (цr. doрrudan gьneю эюэрэ,
elektrikli ocak).
5. Ürünün arka kýsmýyla duvar arasýnda uygun bir mesafe býrakmak
için, verilen belge üzerinde bulunan kullaným talimatlarýna uygun
olarak montaj kitinde mevcut olan uzaklaþtýrýcý çubuklarý monte
ediniz.
Cihazýn ayný seviyeye getirilmesiCihazýn ayný seviyeye getirilmesi
Cihazýn ayný seviyeye getirilmesiCihazýn ayný seviyeye getirilmesi
Cihazýn ayný seviyeye getirilmesi
1. Buzdolabýnýzý düz ve sert bir zemin üzerine yerleþtiriniz.
2. Zeminin düz olmamasý durumunda ayarlanabilir ön ayaklarý
gevþeterek veya sýkarak cihazýn tamamen zemine oturmasýný
saðlayýnýz.
Elektrik baðlantýsýElektrik baðlantýsý
Elektrik baðlantýsýElektrik baðlantýsý
Elektrik baðlantýsý
Taþýma sonrasýnda cihazý dik olarak yerleþtiriniz ve elektrik tesisatýna
baðlamadan önce en az 3 saat bekleyiniz. Fiþi prize takmadan önce
aþaðýdaki hususlara dikkat ediniz:
• Prizin topraklamasý yürürlükteki normlara uygun olmalýdýr;
• elektrik prizi, soðutucu bölmesinin sol tarafýnýn aþaðýsýnda bulunan
özellik etiketinde belirtilen makinenin maksimum güç yükünü
çekebilmelidir (örn. 150 W);
• besleme gerilimi, soðutucu bölmesinin sol tarafýnýn aþaðýsýnda
bulunan özellik etiketinde belirtilen deðerler kapsamýnda olmalýdýr
(ör. 220-240 V);
• priz ve cihazýn fiþi, birbiriyle uyumlu olmalýdýr.
Aksi takdirde fiþin yenisi ile deðiþtirilmesi için yetkili Servise (
Teknik
Servis bölümüne bakýnýz
) baþvurmanýz gerekir; uzatma kablosu
ya da çoklu priz kullanmayýnýz.
!!
!!
! Cihaz monte edildikten sonra elektrik kablosu ve priz kolay bir þekilde
eriþilebilir olmalýdýrlar.
!!
!!
! Kablo kývrýlmalara veya ezilmelere maruz kalmamalýdýr.
!!
!!
! Kablonun periyodik olarak kontrol edilmesi ve sadece yetkili teknik
personel tarafýndan deðiþtirilmesi gerekir (Teknik Servis bölümüne
bakýnýz).
! Üretici firma yukarýdaki normlarýn dikkate alýnmamasý! Üretici firma yukarýdaki normlarýn dikkate alýnmamasý
! Üretici firma yukarýdaki normlarýn dikkate alýnmamasý! Üretici firma yukarýdaki normlarýn dikkate alýnmamasý
! Üretici firma yukarýdaki normlarýn dikkate alýnmamasý
durumunda hiçbir sorumluluk kabul etmeyecektirdurumunda hiçbir sorumluluk kabul etmeyecektir
durumunda hiçbir sorumluluk kabul etmeyecektirdurumunda hiçbir sorumluluk kabul etmeyecektir
durumunda hiçbir sorumluluk kabul etmeyecektir
..
..
.
Çalýþtýrma ve kullanýmÇalýþtýrma ve kullaným
Çalýþtýrma ve kullanýmÇalýþtýrma ve kullaným
Çalýþtýrma ve kullaným
Cihazýn çalýþtýrýlmasýCihazýn çalýþtýrýlmasý
Cihazýn çalýþtýrýlmasýCihazýn çalýþtýrýlmasý
Cihazýn çalýþtýrýlmasý
! Cihazý çalýþtýrmadan önce, kurulum talimatlarýný yerine! Cihazý çalýþtýrmadan önce, kurulum talimatlarýný yerine
! Cihazý çalýþtýrmadan önce, kurulum talimatlarýný yerine! Cihazý çalýþtýrmadan önce, kurulum talimatlarýný yerine
! Cihazý çalýþtýrmadan önce, kurulum talimatlarýný yerine
getiriniz (Montaj bölümüne bakýnýz).getiriniz (Montaj bölümüne bakýnýz).
getiriniz (Montaj bölümüne bakýnýz).getiriniz (Montaj bölümüne bakýnýz).
getiriniz (Montaj bölümüne bakýnýz).
!!
!!
! Cihazý elektrik þebekesine baðlamadan önce, tüm bölmeleri ve
aksesuarlarý bikarbonat kullanarak ýlýk su ile iyice temizleyiniz.
!!
!!
! Cihaz, çalýþmaya baþladýktan yaklaþýk 8 dakika sonra kompresörü
devreye sokan aþýrý yüklemeyi devreden çýkarma kontrolüne sahiptir.
Ýstenilen ya da istenilmeyen (black out) sebeplerden dolayý, elektrik her
kesildikten sonra da ayný iþlem tekrarlanýr.
1. Fiþi prize takýp uygun düðmeyle ürünü açýn, sarý buzdolabý ve
dondurucu sýcaklýk ýþýklarýnýn yandýðýndan emin olun
2. Birkaç saat sonra, buzdolabýna besin koyabilirsiniz.
3. SЬPER DONDUR (hэzlэ dondurma) dьрmesine basэn: SЬPER
DONDUR gцsterge эюэрэ yanacaktэr. Buzdolabэ optimum sэcaklэрa
ulastэрэnda, gцsterge эюэрэ sцner ve besin depolamaya
baюlayabilirsiniz.
Soðutma sistemiSoðutma sistemi
Soðutma sistemiSoðutma sistemi
Soðutma sistemi
No FrostNo Frost
No FrostNo Frost
No Frost
No frost sistemi ile devamlý soðuk hava dolaþýmý saðlanýr. Böylece
nem toplanýr, buz ve çiy oluþmasý engellenir: soðutucu bölmesinde
gerekli olan nem oraný saðlanýr ve çiy oluþmasýný engellediði için
gýdalarýn besin özelliklerinin korunmasý saðlanýr; dondurucu bölmesinde
ise buz çözme iþlemine gerek kalmadan ve gýdalarýn birbiriyle
yapýþmamasý saðlanarak buz oluþmasý engellenir. Besin veya kaplari
buzdolabi arka paneli yakinina yerlestirerek havalandirma hücrelerini
engellemeyin. Havalandýrma deliklerinin kapatýlmasý kondens suyu
oluþmasýna sebep olur. Þiþeleri kapatýnýz ve gýdalarý sarýnýz.
AKTIF OKSIJENAKTIF OKSIJEN
AKTIF OKSIJENAKTIF OKSIJEN
AKTIF OKSIJEN
Bu cihaz buzdolabýnýzýn içinde ozon molekülleri oluþturur; ozon
baktarilerle ve mikroorganizmalarla savaþan, bunlarýn çoðalmasýný
engelleyerek kötü kokularýn oluþumunu engelleyen doðal bir maddedir.
Bakterilerin oluþumunu ve kötü kokularý engelleyecek, yiyeceklerin
taze kalma süresini uzatan ozon miktarýný otomatik olarak oluþturur.
Soðutucuda çok hafif bir koku oluþabilir. Ayný koku fýrtýnalý havalarda
þimþek çakmasýnda ozon oluþumuyla ortaya çýkar ve tamamen
normaldir. Cihaz tarafýndan oluþturulan miktar çok küçüktür ve hýzlýca
antibakteriyel özelliði oluþturmaktadýr. Cihaz kontrol panelindeki
düðmeyle aktif edilebilir. Aktif oksijen fonksiyonunun çalýþmaya
baþlamasýyla, cihaz fonksiyon ekrandan tekrar durdurulana kadar
tekrarlanan çevrimlerle çalýþmaya devam eder. Ozon oluþumu sýrasýnda
aktif oksijen cihazýnýn üzerindeki led ýþýk yeþil renkte yanar ve standby
konumunda (ozon oluþumuna ara verildiði zaman aralýðýnda) ise bu
ýþýk mavi olur.
Buzdolabýnýzý en iyi þekilde kullanýnýzBuzdolabýnýzý en iyi þekilde kullanýnýz
Buzdolabýnýzý en iyi þekilde kullanýnýzBuzdolabýnýzý en iyi þekilde kullanýnýz
Buzdolabýnýzý en iyi þekilde kullanýnýz
• Isý derecesini ayarlamak için SOÐUTUCU KONTROL ayar tuþunu
kullanýnýz (
Açýklama bölümüne bakýnýz
).
• Sadece soðuk veya ýlýk, sýcak olmayan gýdalarý yerleþtiriniz
(
Önlemler ve öneriler bölümüne bakýnýz
).
• Piþmiþ gýdalar, çið gýdalardan daha uzun süre saklanmaz.
• Sývýlarý, kapaksýz kaplara koymayýnýz: nem oranýnýn yükselmesine
ve kondens suyunun oluþmasýna sebep olurlar.
Page 11
TR
11
•
RAFLAR:RAFLAR:
RAFLAR:RAFLAR:
RAFLAR:Büyük kaplar veya fazla yer kaplayan gýdalarýn
yerleþtirilmesi için mevcut olan kýlavuzlar sayesinde çýkarýlabilir ve
yüksekliði ayarlanabilir .
MEYVE VE SEBZEMEYVE VE SEBZE
MEYVE VE SEBZEMEYVE VE SEBZE
MEYVE VE SEBZE çekmecesi
Buzdolabýnda mevcut olan meyve ve sebze çekmeceleri içerde
saklanan meyve ve sebzeleri taze ve kokulu saklamak üzere
tasarlanmýþtýr. Gýdalarý daha az nemli bir ortamda saklamak için nem
ayarýný
B B
B B
B konumuna getiriniz, meyve gibi besinleri daha az nemli
ortamda depolamak isterseniz açin ya da sebze gibi besinleri daha
nemli bir ortamda depolamak isterseniz kapatin
(konum A)
.
A
B
Food Care Zone *
( Besin Koruma Bölgesi) : Et ve balýklarý taze
tutmak için tasarlanmýþ bir bölme. Bölmenin sýcaklýgý düþük
olduðundan besinleri bir haftaya kadar depolanabilir. Ayrýca "soðuk
yemekler" için de kullanýlabilir. Meyve, sebze ve salatalar için uygun
deðildir.
Food Care Zone / Food Care Zone 0°C
/ Safe Defrost*
Et ve balýk gibi hassas yiyecekleri taze tutmak için tasarlanmýþ
bölüm.Bölümdeki düþük sýcaklaýkta(-2 / +3° C) yiyecekler 1 haftaya
kadar besin deðeri, görünümü ve tadý bozulmaksýzýn
depolanabilmektedir.( testler etler üzerinde yapýlmýþtýr.)Bu bölüm
ayný zamanda, besinlerin tadýný ve organoleptik özelliklerini
korurken, buzun düþük sýcaklýkta çözülmesinin
mikroorganizmalarýn üremesini engellemesinden ötürü de besinlerin
saðlýklý bir þekilde eritilmesi için çok uygundur. Bu bölüm meyve,
sebze ve yeþillik için uygun deðildir fakat taze veya çok taze günlük
ürünler, süt, dondurulmuþ taze makarna ve piþirilmiþ yemekler ya da
artmýþ yemekler için dahi kullanýlabilir.
Dondurucunun en iyi þekilde kullanýlmasýDondurucunun en iyi þekilde kullanýlmasý
Dondurucunun en iyi þekilde kullanýlmasýDondurucunun en iyi þekilde kullanýlmasý
Dondurucunun en iyi þekilde kullanýlmasý
• Isý derecesini ayarlamak için DONDURUCU KONTROL ayar
tuþunu kullanýnýz (
Açýklama
bölümüne bakýnýz).
• Erimiþ veya erimek üzere olan yiyecekleri bir daha dondurmayýnýz,
bu gýdalar (24 saat içinde) tüketilmesi için piþirilmelidir.
• Dondurulacak taze yiyecekler, daha önce donmuþ olanlarla temas
etmemelidir.
• Dondurucuya içinde sývý olan kapaðý kapatýlmýþ þiþe koymayýnýz,
patlayabilir.
• Günlük en fazla yiyecek dondurma miktarý soðutucu içinde aþaðýda
saðda bulunan teknik veriler etiketi üzerinde yazýlýdýrlar (örneðin:
4Kg/24h).
• Dondurmak için (dondurucu çalýþýr vaziyetteyken): SUPER
FREEZE (hýzlý dondurma) tuþuna basýp (ilgili sarý lamba yanar)
gýdalarý yerleþtiriniz ve kapaðý kapatýnýz. 24 saat geçtikten sonra
veya en uygun ýsý derecesine ulaþýnca fonksiyon otomatik olarak
kapanýr (uyarý lambasý yanmýyor).
• Dondurmak için (dondurucu zaten çalisiyorsa): SÜPER DONDUR
hizli dondurma dügmesine basin (buna bagli olarak mavi gösterge
isigi yanar), besini yerlestirin ve kapiyi kapatin. 24 saat sonra veya
optimum sicakliga ulasildiginda islev otomatik olarak devre disi kalir
(gösterge söner).
!
"Bu Aygiti" varsa, üst dondurucu çekmecede çok büyük besinler
depolamayin.
!!
!!
! Dondurma iþlemi sýrasýnda kapaðý açmamaya özen gösteriniz.
!!
!!
! Elektrik kesintisi veya arýza durumunda kapaðý açmayýnýz:
dondurulmuþ gýdalar 9-14 saate kadar, hiç bir degisikliðe uðramadan
korunurlar.
Easy Ice
*
Dondurucu bölmesindeki alani optimize etmek ve her zaman buz
bulunmasini saglamak için çift tekne tasarlanmistir. Tepsiler ayri
olarak istif edilebilir veya doldurulup kullanilabilir.
Ayrica, üst çekmecelerin sag veya sol kismina
yerlestirilebileceginden özel baglama sistemi Kolay Buzu oldukça
esnek bir çözüm haline getirir.
ISI DERECEISI DERECE
ISI DERECEISI DERECE
ISI DERECE göstergesi
**
**
*: soðutucunun en soðuk bölümünü
belirlemek için kullanýlýr.
1. Gösterge üzerinde OK yazýsýnýn net bir þekilde okunup okunmadýðýný
kontrol ediniz (
þekile bakýnýz
).
2. "Tamam" sözcügü görünmezse, sicaklik çok yüksek demektir: daha
düsük sicakliga ayarlayin ve sicaklik dengeleninceye kadar yaklasik
olarak 10 saat bekleyin.
3. Göstergeyi tekrar kontrol ediniz: gerekirse bir daha ayarlayýnýz.
Büyük miktarda yemek yerleþtirilmesi veya kapý sýk sýk açýlmasý
durumunda göstergede ok yazýsýnýn olmamasý normaldýr.
SOÐUTUCU KONTROL düðmesini daha yüksek konuma
ayarlamak için en az 10 saat bekleyiniz.
Bakým ve özenBakým ve özen
Bakým ve özenBakým ve özen
Bakým ve özen
Elektrik akýmýný kesinizElektrik akýmýný kesiniz
Elektrik akýmýný kesinizElektrik akýmýný kesiniz
Elektrik akýmýný kesiniz
Temizlik ve bakým iþlemleri sýrasýnda, cihazýn elektrik baðlantýsýný
kesiniz:
1. ürünü kapatmak için, DONDURUCU ÇALISTIRMA Düðmesi ve
SÜPER DONDUR Dügmesine 3 saniye basin
2. fiþi prizden çekiniz.
!!
!!
! Bu prosedürün uygulanmamasý durumunda alarm çalabilir: bu alarm
bir anormallik belirtisi deðildir. Normal çalismaya geri döndürmek için,
fisi prize takin, DONDURUCU ÇALISTIRMA ve SÜPER DONDUR
dügmesine basin ve DONDURUCU ÇALISTIRMA dügmesini istenilen
degere ayarlayin. Aygit baglantisini kesmek için nokta 1 ve 2'yi
uygulayin.
Cihazý temizleyinizCihazý temizleyiniz
Cihazý temizleyinizCihazý temizleyiniz
Cihazý temizleyiniz
• Buzdolabýnýn dýþ, iç duvarlarýný ve contalarýný karbonat (yemek
sodasý) veya nötr sabun eklenmiþ ýlýk su ile ýslatýlmýþ yumuþak bir
sünger ile temizleyiniz. Aþýndýrýcý maddeler ve çözücü, amonyak,
beyazlatýcý türü maddeleri kesinlikle kullanmayýnýz.
• Sökülebilen aksesuarlarý deterjan veya sabun eklenmiþ ýlýk su içine
batýrýnýz. Çalkalayýnýz ve dikkatlice kurulayýnýz.
Page 12
12
TR
• Buzdolabýnýzýn arkasý toz dolu ise, cihazý kapatýp elektrik baðlantýsýný
kestikten sonra elektrik süpürgesini orta watt’a ayarlayarak uzun
ucu ile arkasýndaki tozlarý iyice alýnýz.
• Derin dondurucu bölmesindeki çekmecelerin sürgülü raylarýnýn
temizlenmesi sýrasýnda otomatik çekmece kapanma mekanizmasý
devre dýþý kalabilir. Yeniden etkin hale getirmek için, çekmeceyi
normalde gerekli olandan biraz daha sert kapatýn.
Ýstenmeyen kokularý ve küfü önleyinizÝstenmeyen kokularý ve küfü önleyiniz
Ýstenmeyen kokularý ve küfü önleyinizÝstenmeyen kokularý ve küfü önleyiniz
Ýstenmeyen kokularý ve küfü önleyiniz
• Cihaz, kokularý önleyici hijyenik malzemelerle üretilmiþtir. Bu özelliði
kaybetmemek için gýdalarýn her zaman iyice sarýlýp kapatýlmasý
gerekir. Böylece leke oluþmasý engellenecektir.
• Cihazýn uzun süre devre dýþý býrakýlmak istenmesi durumunda,
içini iyice temizleyiniz ve kapýlarýný açýk býrakýnýz.
I Care function (Koruyorum islevi)I Care function (Koruyorum islevi)
I Care function (Koruyorum islevi)I Care function (Koruyorum islevi)
I Care function (Koruyorum islevi)
Enerji tüketimini optimize etmek için Koruyorum islevi etkinlestirilebilir.
Bu islevi etkinlestirmek için, AKTÝF OKSIJEN ve BUZDOLABI
ÇALISTIRMA dügmelerini ayni anda en az 6 saniye basili tutun.
Islev etkinlestirildiginde, 4 gösterge isigi 2 saniye yanacaktir: AKTÝF
OKSIJEN isigi, SÜPER DONDUR isigi ve iki sicaklik isigi - biri buzdolabi
ve digeri dondurucu için.
5 saniye sonra, arabirim enerji tasarrufu moduna girer ve gösterge
isiklari söner. Kapi açildiginda bile arabirim kapali kalir. Yeniden açmak
için herhangi bir dügmeye basmaniz yeterlidir. Sicakligi degistirmek
için, ayar dügmelerine basin.
Tüketim, islev etkinlestirildikten 48 saat sonra optimize edilir. Koruyorum
islevini devre disi birakmak için ürünü kapatin (açiklamaya baki). Ürün
tekrar normal çalisacak sekilde açilabilir.
Nemli ortamlarda, Koruyorum islevi etkinlestirildiginde, kapilarda hafif
yogusma olusabilir; islev devre disi birakildiginda normal çalisma
kosullarina geri dönülür.
Ampulün degistirilmesiAmpulün degistirilmesi
Ampulün degistirilmesiAmpulün degistirilmesi
Ampulün degistirilmesi
Güçlü isik yaymasi sayesinde, yeni LED aydinlatma sitemi gölgeli alanlar
olmadan tüm besinlerin net olarak görünmesini saglar. LED'in
degistirilmesi gerekirse, lütfen Teknik Yardim Servisi ile irtibata geçin.
Önlemler ve önerilerÖnlemler ve öneriler
Önlemler ve önerilerÖnlemler ve öneriler
Önlemler ve öneriler
!Cihaz, uluslararasý güvenlik normlarýna uygun olarak tasarlanýp
üretilmiþtir. Aþaðýdaki bilgiler, güvenliði saðlamak amacýyla verilmiþtir.
Bu yüzden dikkatlice okunmasý gerekir.
Bu cihaz aþaðýdaki AB Yönergeleri ile uyumludur:
- 2006/95/AT Belirli Gerilim Sýnýrlarý Dahilinde Kullanýlmak Üzere
Tasarlanmýþ Elektrikli Teçhizat Ýle Ýlgili Yönerge
- 2004/108/AT Elektromanyetik Uyumluluk Yönergesi
- 96/57/AT Ev tipi elektrikli soðutucular , dondurucular ve
kombinasyonlarýnýn enerji verimlilik þartlarý ile ilgili yönerge
Atýk Elektrikli ve Elektronik Eþyalarýn (AEEE) Kontrolü
Yönetmeliðine uygundur.
Genel güvenlik uyarýlarýGenel güvenlik uyarýlarý
Genel güvenlik uyarýlarýGenel güvenlik uyarýlarý
Genel güvenlik uyarýlarý
• Cihaz, meskenlerde kullanýlmak üzere tasarlanmýþ olup profesyonel
kullaným amaçlý deðildir.
• Cihaz, sadece yetiþkin kiþiler tarafýndan ve bu kitapçýkta aktarýlan
talimatlara göre, gýdalarý saklamak ve dondurmak için kullanýlmalýdýr.
• Cihaz, üzeri kapalý bile olsa açýk alanlara monte edilmemelidir, çünkü
yaðmur ve fýrtýnaya maruz kalmasý son derece tehlikelidir.
• Cihaza ayaklarýnýz çýplakken yada elleriniz veya ayaklarýnýz ýslak
yada nemliyken dokunmayýnýz.
• Buzdolabýnýn soðutma yapan iç kýsýmlarýna dokunmayýnýz: yanma
veya yaralanma tehlikesi vardýr.
• Fiþi prizden çekerken kablosundan deðil fiþin kendisinden tutarak
çekiniz.
• Ürünün kapatilmasi tüm elektrik baglantilarini önlemeye yeterli olmaz.
• Arýza halinde, onarmak amacýyla iç mekanizmalarý hiçbir þekilde
kurcalamayýnýz.
• Dondurulmuþ gýda saklama kaplarýnda üretici tarafýndan tavsiye
edilen tip hariç ucu sivri ve keskin aletleri kullanmayýnýz.
• Buz küplerini dondurucu bölmesinden çýkarýr çýkarmaz aðzýnýza
sokmayýnýz.
• Bu cihaz fiziksel, duyumsal veya mental kapasite azlýðýna sahip,
veya tecrübe ve bilinçten yoksun kiþilerin (çocuklar dahil) kullanýmý
için uygun deðildir, emniyetlerinden sorumlu bir kiþi tarafýndan cihazýn
kullanýmý konusunda eðitim almamýþ kiþiler tarafýndan da kullanýma
uygun olarak amaçlanmamýþtýr. Çocuklar, cihaz ile oynamamalarý
saðlanarak, denetlenmelidirler.
• Ambalajlar çocuklar için oyuncak deðildir.
Atýklarýn tasfiye edilmesiAtýklarýn tasfiye edilmesi
Atýklarýn tasfiye edilmesiAtýklarýn tasfiye edilmesi
Atýklarýn tasfiye edilmesi
• Ambalaj malzemelerinin tasfiye edilmesi: yerel yasalara uyunuz, bu
þekilde ambalajlarýn geri dönüþümü saðlanabilecektir.
• Elektrik ve elektronik cihazlarýn atýklarý hakkýndaki 2002/96/CE sayýlý
Avrupa Konseyi yönetmeliðinde (RAEE); beyaz eþyalarýn kentsel
katý atýk genel yöntemi ile tasfiye edilmemesi öngörülmüþtür.
Kullanýlmayan cihazlarýn, madde geri kazaným ve geri dönüþüm
oranýný en yüksek seviyeye yükseltmek, çevre ve insan saðlýðýna
olasý zararlarý engellemek amacýyla ayrý ayrý toplanmasý gerekir.
Tüm ürünlerin üzerinde; ayrý toplama hükümlerini hatýrlatmak
amacýyla üstünde çarpý iþareti olan sepet sembolü aktarýlmaktadýr.
Elektrikli ev aletlerinin doðru bir þekilde tasfiye edilmesi konusunda
daha geniþ bilgi almak için, cihaz sahipleri mevcut müþteri hizmetine
veya satýþ noktalarýna baþvurabilirler.
TT
TT
T
asarrufa yöneliniz ve çevreye saygýlýasarrufa yöneliniz ve çevreye saygýlý
asarrufa yöneliniz ve çevreye saygýlýasarrufa yöneliniz ve çevreye saygýlý
asarrufa yöneliniz ve çevreye saygýlý
olunuzolunuz
olunuzolunuz
olunuz
• Buzdolabэnэ doрrudan gьneю эюэрэna maruz kalmayacak, serin ve
havadar uygun bir yere yerleюtiriniz. Ayrэca, эsэ kaynaklarэndan
uzakta olmalэdэr.
• Gýdalarý yerleþtirmek ya da çýkarmak için, cihazýn kapýlarýný mümkün
olduðu kadar az açýk tutunuz. Buzdolabýnýn kapýlarý her açýldýðýnda
büyük ölçüde enerji tüketilir.
• Cihazý fazla miktarda gýda ile doldurmayýnýz: gýdalarýn iyi saklanmasý
için soðuk hava serbest bir þekilde dolaþmalýdýr. Hava dolaþýmýnýn
engellenmesi durumunda, kompresör devamlý çalýþacaktýr.
• Buzdolabýnýn içine sýcak gýda koymayýnýz: dahili ýsý derecesini
yükseltir, kompresör yoðun çalýþmak zorunda kalýr ve elektrik
enerjisi büyük miktarda tüketilir.
Arýzalar ve onarýmlarArýzalar ve onarýmlar
Arýzalar ve onarýmlarArýzalar ve onarýmlar
Arýzalar ve onarýmlar
Buzdolabýnýz bazen çalýþmayabilir. Teknik Servis ile irtibata geçmeden
önce (
Teknik Servis bölümüne bakýnýz
), aþaðýdaki liste yardýmýyla
kolaylýkla çözülebilecek bir problem olup olmadýðýný kontrol ediniz.
YY
YY
Y
anmayan gösterge isiklari.anmayan gösterge isiklari.
anmayan gösterge isiklari.anmayan gösterge isiklari.
anmayan gösterge isiklari.
• Koruyorum islevi etkin degilse (bölüme bakin), fis elektrik prizine
takilmamistir veya temas saglamaya yeterli degildir ya da evde
elektrik yoktur.
Page 13
TR
13
Motor çalýþmaya baþlamýyorMotor çalýþmaya baþlamýyor
Motor çalýþmaya baþlamýyorMotor çalýþmaya baþlamýyor
Motor çalýþmaya baþlamýyor
..
..
.
• Cihaz, aþýrý yüklemeyi devreden çýkarma kontrolüne sahiptir
(
Çalýþtýrma ve kullanma bölümüne bakýnýz
).
Uyarý lambalarý zayýf bir þekilde yanýyorUyarý lambalarý zayýf bir þekilde yanýyor
Uyarý lambalarý zayýf bir þekilde yanýyorUyarý lambalarý zayýf bir þekilde yanýyor
Uyarý lambalarý zayýf bir þekilde yanýyor
..
..
.
• Fiþi prizden çekiniz ve tersine çevirip tekrar prize takýnýz.
a) a)
a) a)
a)
Alarm çalýyorAlarm çalýyor
Alarm çalýyorAlarm çalýyor
Alarm çalýyor
..
..
.
a) Soðutucu kapýsý, iki dakikadan fazla açýk kalmýþ.
Kapý kapandýðýnda sesli alarm durur.
b) b)
b) b)
b)
Alarm çalýyor ve iki adet mavi uyarý lambasý yanýpAlarm çalýyor ve iki adet mavi uyarý lambasý yanýp
Alarm çalýyor ve iki adet mavi uyarý lambasý yanýpAlarm çalýyor ve iki adet mavi uyarý lambasý yanýp
Alarm çalýyor ve iki adet mavi uyarý lambasý yanýp
sönüyorsönüyor
sönüyorsönüyor
sönüyor
..
..
.
b)b)
b)b)
b ) Cihaz, dondurucunun fazla ýsýnmýþ olduðunu belirtir.
Gýdalarýn durumunun kontrol edilmesi tavsiye edilir: çöpe atmanýz
gerekebilir.
+ sesli sinyal =
Aþýrý ýsýnmaAþýrý ýsýnma
Aþýrý ýsýnmaAþýrý ýsýnma
Aþýrý ýsýnma
c) c)
c) c)
c)
Alarm sesi duyulur ve iki adet mavi gösterge veAlarm sesi duyulur ve iki adet mavi gösterge ve
Alarm sesi duyulur ve iki adet mavi gösterge veAlarm sesi duyulur ve iki adet mavi gösterge ve
Alarm sesi duyulur ve iki adet mavi gösterge ve
yesil isiklar yanip söneryesil isiklar yanip söner
yesil isiklar yanip söneryesil isiklar yanip söner
yesil isiklar yanip söner
..
..
.
c) Cihaz, dondurucunun tehlikeli olacak þekilde fazlasýyla ýsýnmýþ
olduðunu belirtir: gýdalar çöpe atýlmalýdýr.
-26
+8
+ sesli sinyal =
TT
TT
T
ehlikeli ýsýnmaehlikeli ýsýnma
ehlikeli ýsýnmaehlikeli ýsýnma
ehlikeli ýsýnma
b/c)
Bu iki durumda gýdalarý tekrar dondurmamak için dondurucu
bölmesi içerisinde ýsý derecesi 0°C civarýnda olacaktýr. Sesli sinyali
kapatmak için: buzdolabýnýn kapýsýný açýp kapatýnýz.
Normal çalismaya geri dönüldügünde kontrol panelinden dügmelerle
kapatilip açilmalidir (Açiklamaya bakin)
Soðutucu ve dondurucu az soðutma yapýyorSoðutucu ve dondurucu az soðutma yapýyor
Soðutucu ve dondurucu az soðutma yapýyorSoðutucu ve dondurucu az soðutma yapýyor
Soðutucu ve dondurucu az soðutma yapýyor
..
..
.
• Kapýlar tamamen kapanmýyor veya contalar bozuk.
• Kapýlar sýk sýk açýlýyor.
• Soðutucu veya dondurucu fazla doldurulmuþ.
Soðutucu bölmesinde gýdalar donuyorSoðutucu bölmesinde gýdalar donuyor
Soðutucu bölmesinde gýdalar donuyorSoðutucu bölmesinde gýdalar donuyor
Soðutucu bölmesinde gýdalar donuyor
..
..
.
• Sicaklik dogru ayarlanmamis (açiklamaya bakin)
• Besin, buzdolabi arka iç duvarina yakin.
Motor sürekli bir þekilde çalýþýyorMotor sürekli bir þekilde çalýþýyor
Motor sürekli bir þekilde çalýþýyorMotor sürekli bir þekilde çalýþýyor
Motor sürekli bir þekilde çalýþýyor
..
..
.
• SUPER FREEZE (hýzlý dondurma) tuþuna basýlmýþ: SUPER
FREEZE sarý uyarý lambasý yanýyor (
Açýklama bölümüne bakýnýz
).
• Kapý tam kapalý deðil veya sürekli olarak açýlýyor.
• Dýþ ortam sýcaklýðý çok yüksek.
Cihaz çok gürültü yapýyorCihaz çok gürültü yapýyor
Cihaz çok gürültü yapýyorCihaz çok gürültü yapýyor
Cihaz çok gürültü yapýyor
..
..
.
• Cihaz tamamen düz bir zemine montaj edilmemiþ (
Montaj bölümüne
bakýnýz).
• Cihaz sarsýntý yapan ve gürültü çýkaran mobilya veya eþyalar
arasýna yerleþtirilmiþ.
• Dahili soðutucu gaz, kompresör çalýþmadýðý zaman bile, hafif bir
ses çýkarýyor: bu bir arýza deðildir, normaldir.
Page 14

14
TR
Page 15

TR
15
Page 16

16
TR
19510854702
01/2013
 Loading...