

INDESIT DIFP 48 M, DIFP48 User Manual [fr]

Istruzioni per luso
LAVASTOVIGLIE
IT
Italiano, 1
DE
Deutsch, 34
PT
Português, 67
DIFP 48
EN
English,12
Nederland, 45
FR
Français, 23
ESNL
Español, 56
Sommario
Installazione, 2-3
Posizionamento e livellamento
Collegamenti idraulici ed elettrici
Avvertenze per il primo lavaggio
Dati tecnici
Descrizione dellapparecchio, 4
Vista dinsieme
Pannello comandi
Caricare i cestelli, 5
Cestello inferiore
Cestello delle posate
Cestello superiore
Avvio e utilizzo, 6
Avviare la lavastoviglie
Caricare il detersivo
Opzioni di lavaggio
Programmi, 7
Tabella dei programmi
Brillantante e sale rigenerante, 8
Caricare il brillantante
Caricare il sale rigenerante
Manutenzione e cura, 9
Escludere acqua e corrente elettrica
Pulire la lavastoviglie
Evitare i cattivi odori
Pulire gli irroratori
Pulizia filtro entrata acqua
Pulire i filtri
Se ci si assenta per lunghi periodi
Precauzioni e consigli, 10
Sicurezza generale
Smaltimento
Risparmiare e rispettare lambiente
Anomalie e rimedi, 11
Installazione
16
È importante conservare questo libretto per poterlo
consultare in ogni momento. In caso di vendita, di
cessione o di trasloco, assicurarsi che resti insieme
allapparecchio.
Leggere attentamente le istruzioni: ci sono importanti
informazioni sullinstallazione, sulluso
e sulla sicurezza.
In caso di trasloco tenere lapparecchio in posizione
verticale; se fosse necessario, inclinarlo sul lato
posteriore.
Posizionamento e livellamento
1. Disimballare lapparecchio e controllare che
non abbia subìto danni durante il trasporto.
Se fosse danneggiato non collegarlo e contattare
il rivenditore.
2. Sistemare la lavastoviglie facendo aderire i fianchi o
lo schienale ai mobili adiacenti o alla parete.
Lapparecchio può anche essere incassato sotto a un
piano di lavoro continuo
3. Posizionare la lavastoviglie su un pavimento piano e
rigido. Compensare le irregolarità svitando o avvitando i
piedini anteriori finché lapparecchio non sia
orizzontale. Un accurato livellamento dà stabilità ed
evita vibrazioni, rumori e spostamenti.
4.
* Per regolare laltezza del piedino posteriore, agire
sulla boccola esagonale di colore rosso presente nella
parte inferiore, frontale, centrale della lavastoviglie, con
una chiave a bocca esagonale apertura 8 mm., girando
in senso orario per aumentare laltezza e in senso
antiorario per diminuirla. (vedere foglio istruzioni
incasso allegato alla documentazione)
* (vedi foglio di Montaggio).
Collegamenti idraulici ed elettrici
Ladattamento degli impianti elettrici e idraulici
per linstallazione deve essere eseguito solo
da personale qualificato.
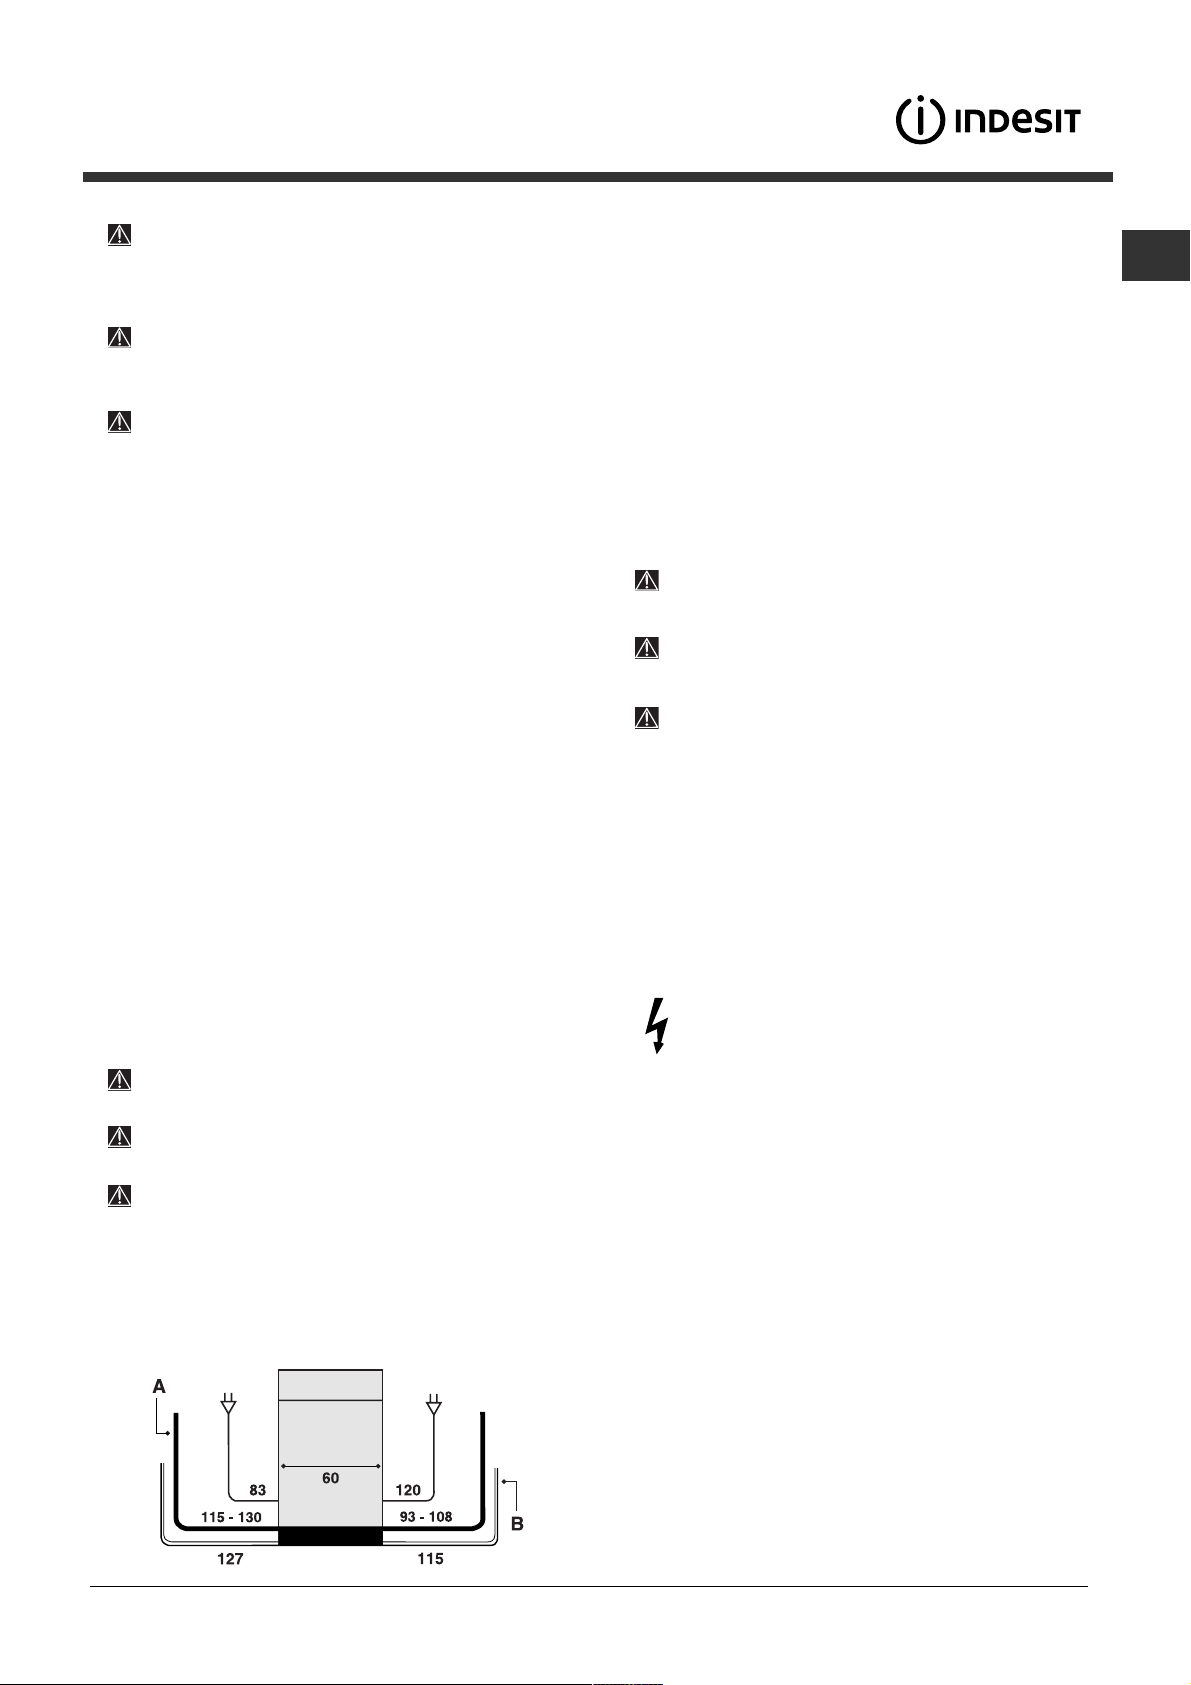
Collegamento del tubo di carico dellacqua
A una presa dacqua fredda: avvitare bene il tubo di
carico a un rubinetto con bocca filettata da 3/4 gas;
prima di avvitare, far scorrere lacqua finché non sia
limpida affinché le eventuali impurità non intasino
lapparecchio.
A una presa dacqua calda: nel caso di impianto
centralizzato di termosifoni, la lavastoviglie può
essere alimentata con acqua calda di rete purché
non superi la temperatura di 60°C.
Avvitare il tubo al rubinetto come descritto per la
presa dacqua fredda.
Se la lunghezza del tubo di carico non è sufficiente,
rivolgersi a un negozio specializzato
o a un tecnico autorizzato (vedi Assistenza).
La pressione dellacqua deve essere compresa nei
valori riportati dalla tabella Dati tecnici (vedi a lato).
Fare attenzione che nel tubo non ci siano né pieghe
né strozzature.
Sicurezza antiallagamento
Per garantire che non si generino allagamenti,
la lavastoviglie:
- è dotata di un sistema che interrompe lingresso
dellacqua nel caso di anomalie o di perdite dallinterno.
La lavastoviglie non deve appoggiare sui tubi
o sul cavo di alimentazione elettrica.
Lapparecchio deve essere collegato alla rete di
distribuzione dellacqua utilizzando tubi nuovi.
Non riutilizzare i vecchi tubi.
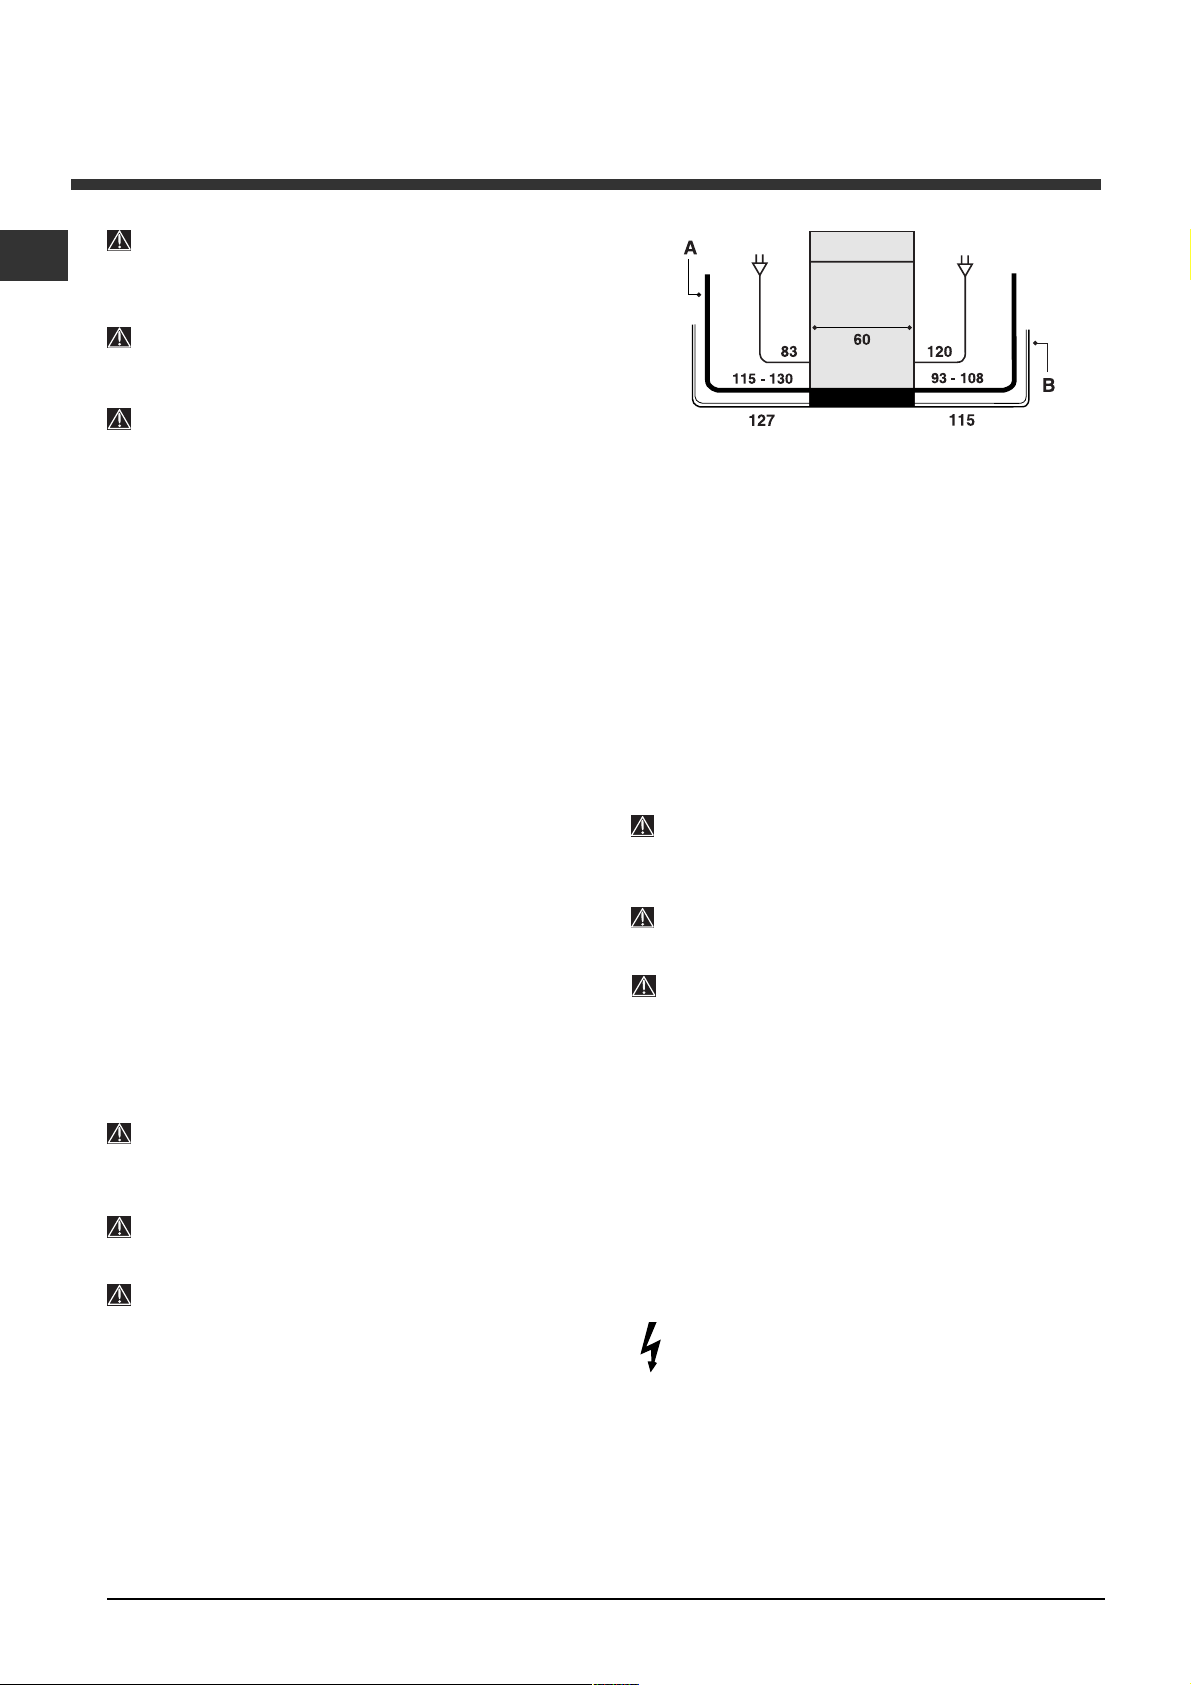
I tubi di carico (A) e di scarico (B) dellacqua
e il cavo di alimentazione elettrica possono essere
orientati verso destra o sinistra per consentire
la migliore installazione (vedi figura).
Alcuni modelli sono dotati di un dispositivo
supplementare di sicurezza New Acqua Stop
garantisce lantiallagamento anche in caso di rottura del
tubo di alimentazione.
*, che
ATTENZIONE: TENSIONE PERICOLOSA!
Il tubo di carico dellacqua, non deve in nessun caso,
essere tagliato in quanto contiene parti sotto tensione.
* Presente solo su alcuni modelli.
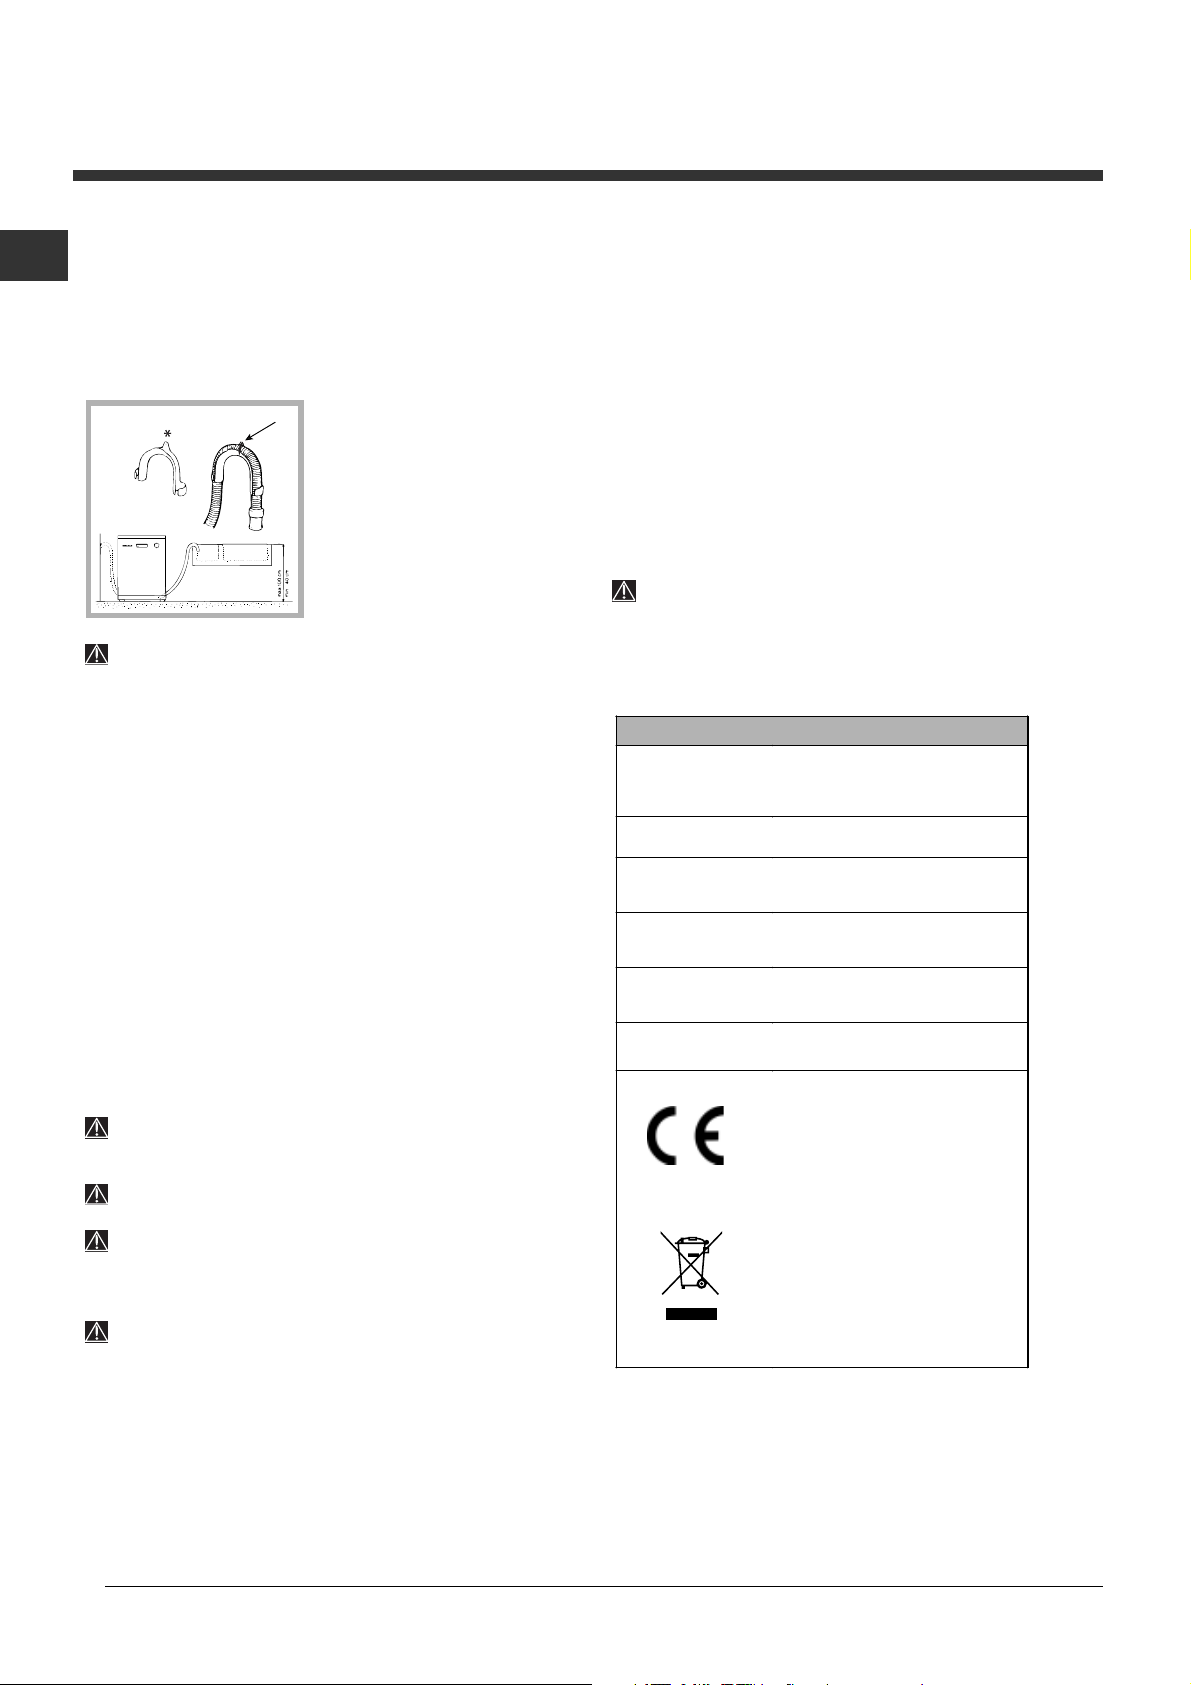
Collegamento del tubo di scarico dellacqua
Collegare il tubo di scarico, senza piegarlo, a una
conduttura di scarico con diametro minimo di 4 cm.
Oppure appoggiarlo al bordo di un lavandino o di una
vasca; lestremità libera del tubo di scarico non deve
rimanere immersa nellacqua.
Lo speciale gomito
A
plastica agevola una
sistemazione ottimale:
fissare saldamente il gomito
al muro per evitare che il
tubo si muova e versi
lacqua fuori dallo scarico.
La parte del tubo
contrassegnata con la
lettera A deve essere a
unaltezza compresa tra 40
e 100 cm da terra (vedi figura).
È sconsigliato usare tubi di prolunga.
* in
Collegamento elettrico
Prima di inserire la spina nella presa della corrente,
accertarsi che:
la presa abbia la messa a terra e sia a norma di
legge;
la presa sia in grado di sopportare il carico massimo
di potenza della macchina, indicato nella targhetta
caratteristiche sulla controporta
(vedi capitolo Descrizione della lavastoviglie);
la tensione di alimentazione sia compresa nei valori
indicati nella targhetta caratteristiche sulla
controporta;
la presa sia compatibile con la spina
dellapparecchio. In caso contrario richiedere la
sostituzione della spina a un tecnico autorizzato (vedi
Assistenza); non usare prolunghe o prese multiple.
Ad apparecchio installato, il cavo di alimentazione
elettrica e la presa della corrente devono essere
facilmente raggiungibili.
Il cavo non deve subire piegature o compressioni.
Se il cavo di alimentazione è danneggiato, deve
essere sostituito dal costruttore o dal suo Servizio di
Assistenza Tecnica, in modo da prevenire ogni rischio.
(Vedi Assistenza)
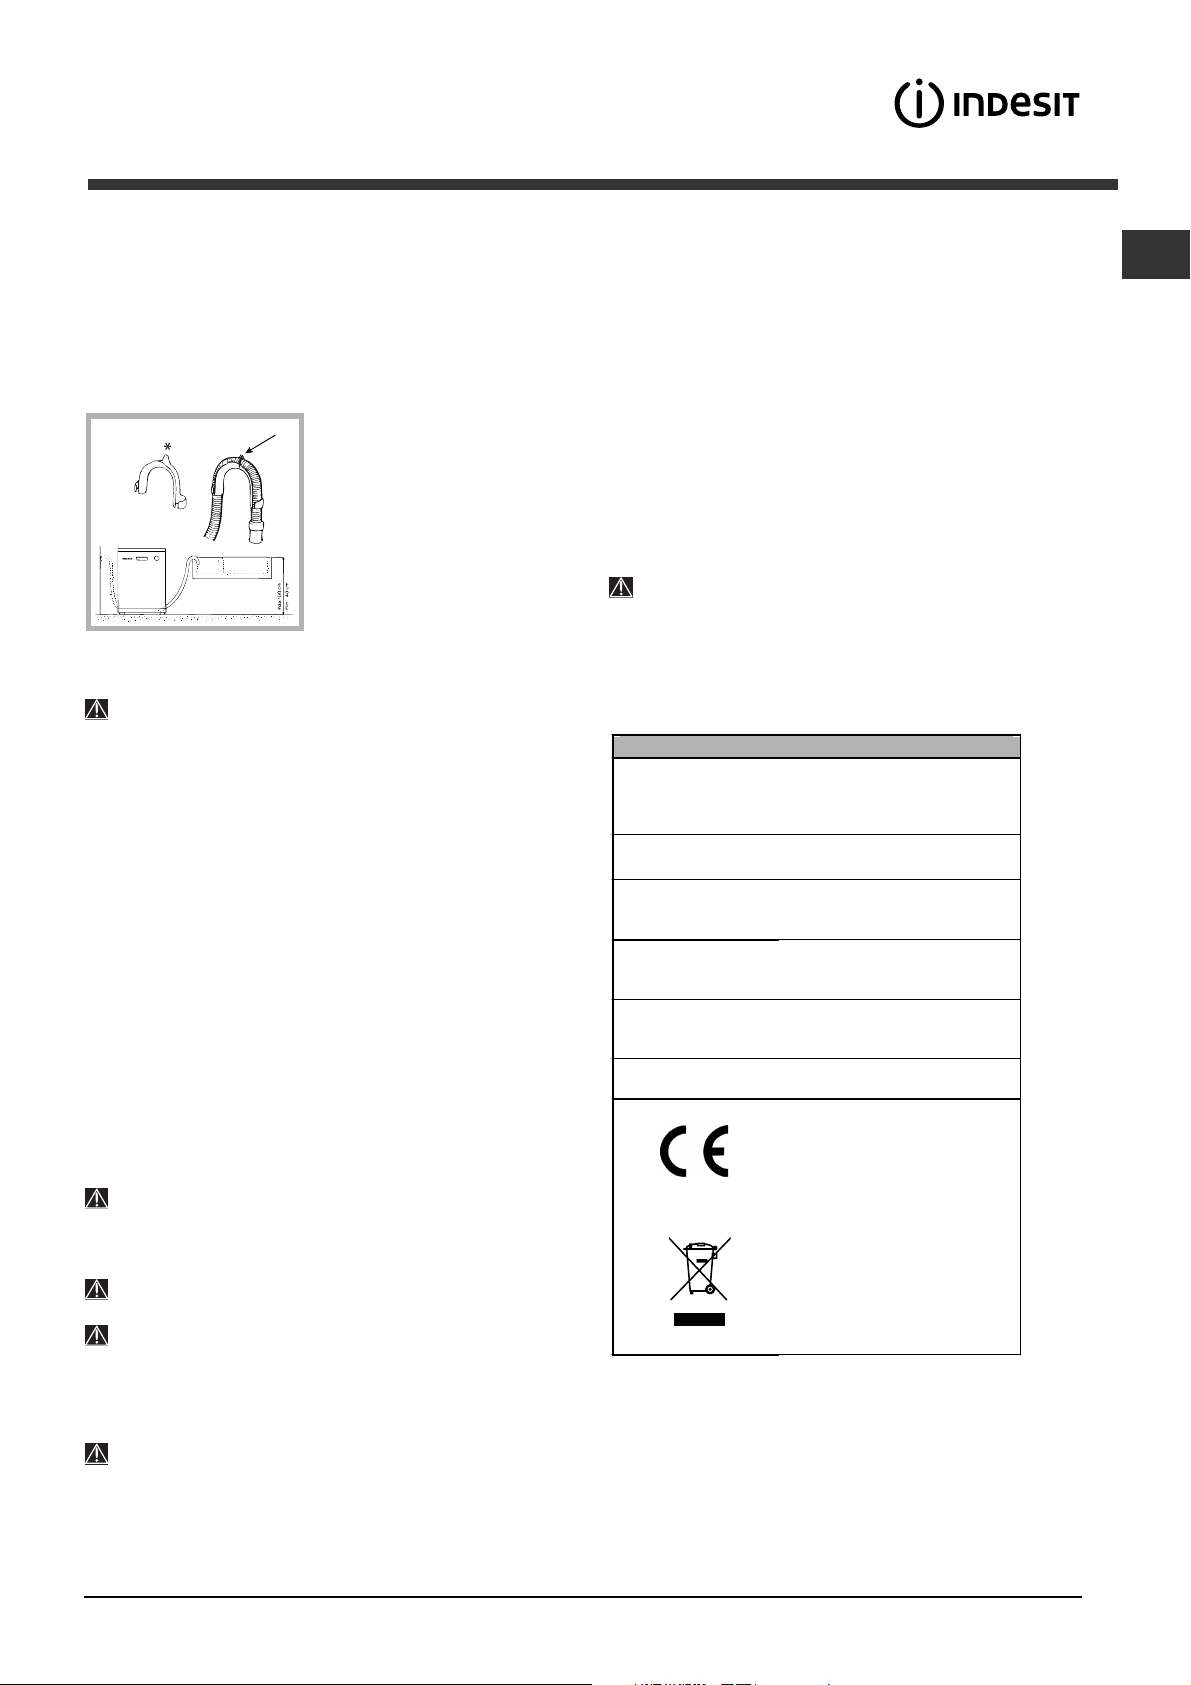
Striscia anticondensa*
Dopo aver incassato la lavastoviglie aprire la porta e
incollare la striscia adesiva trasparente sotto al ripiano
in legno per proteggerlo dalla eventuale condensa.
Avvertenze per il primo lavaggio
Dopo linstallazione, immediatamente prima del primo
lavaggio, riempire completamente dacqua il serbatoio
del sale e solo dopo aggiungere circa 1 Kg di sale (vedi
capitolo Brillantante e sale rigenerante): è normale che
lacqua trabocchi. Selezionare il grado di durezza
dellacqua (vedi capitolo Brillantante e sale
rigenerante). Dopo il caricamento del sale la spia
MANCANZA SALE
Il mancato riempimento del contenitore del sale, può
provocare il danneggiamento del dolcificatore
dellacqua e dellelemento riscaldante.
Dati Tecnici
Dimensioni
Capacità
Pressione acqua
alimentazione
Tensione di
alimentazione
Potenza totale
assorbita
Fusibile
* si spegne.
Larghezza cm. 59,5
Altezza cm. 82
Profondità cm. 57
12 coperti standard
0,05 ÷ 1MPa (0.5 ÷ 10 bar)
7,25 – 145 psi
vedi targhetta caratteristiche
vedi targhetta caratteristiche
vedi targhetta caratteristiche
Questa apparecchiatura è
conforme alle seguenti
Direttive Comunitarie:
-2006/95/CE del 16/01/2007
(Bassa Tensione) e
successive modifiche
-89/336/EEC del 03/05/89
(Compatibilità
Elettromagnetica) e
successive modificazioni
-97/17/EC (Etichettatura)
-2002/96/CE
16
LAzienda declina ogni responsabilità qualora
queste norme non vengano rispettate.
* Presente solo su alcuni modelli.
!
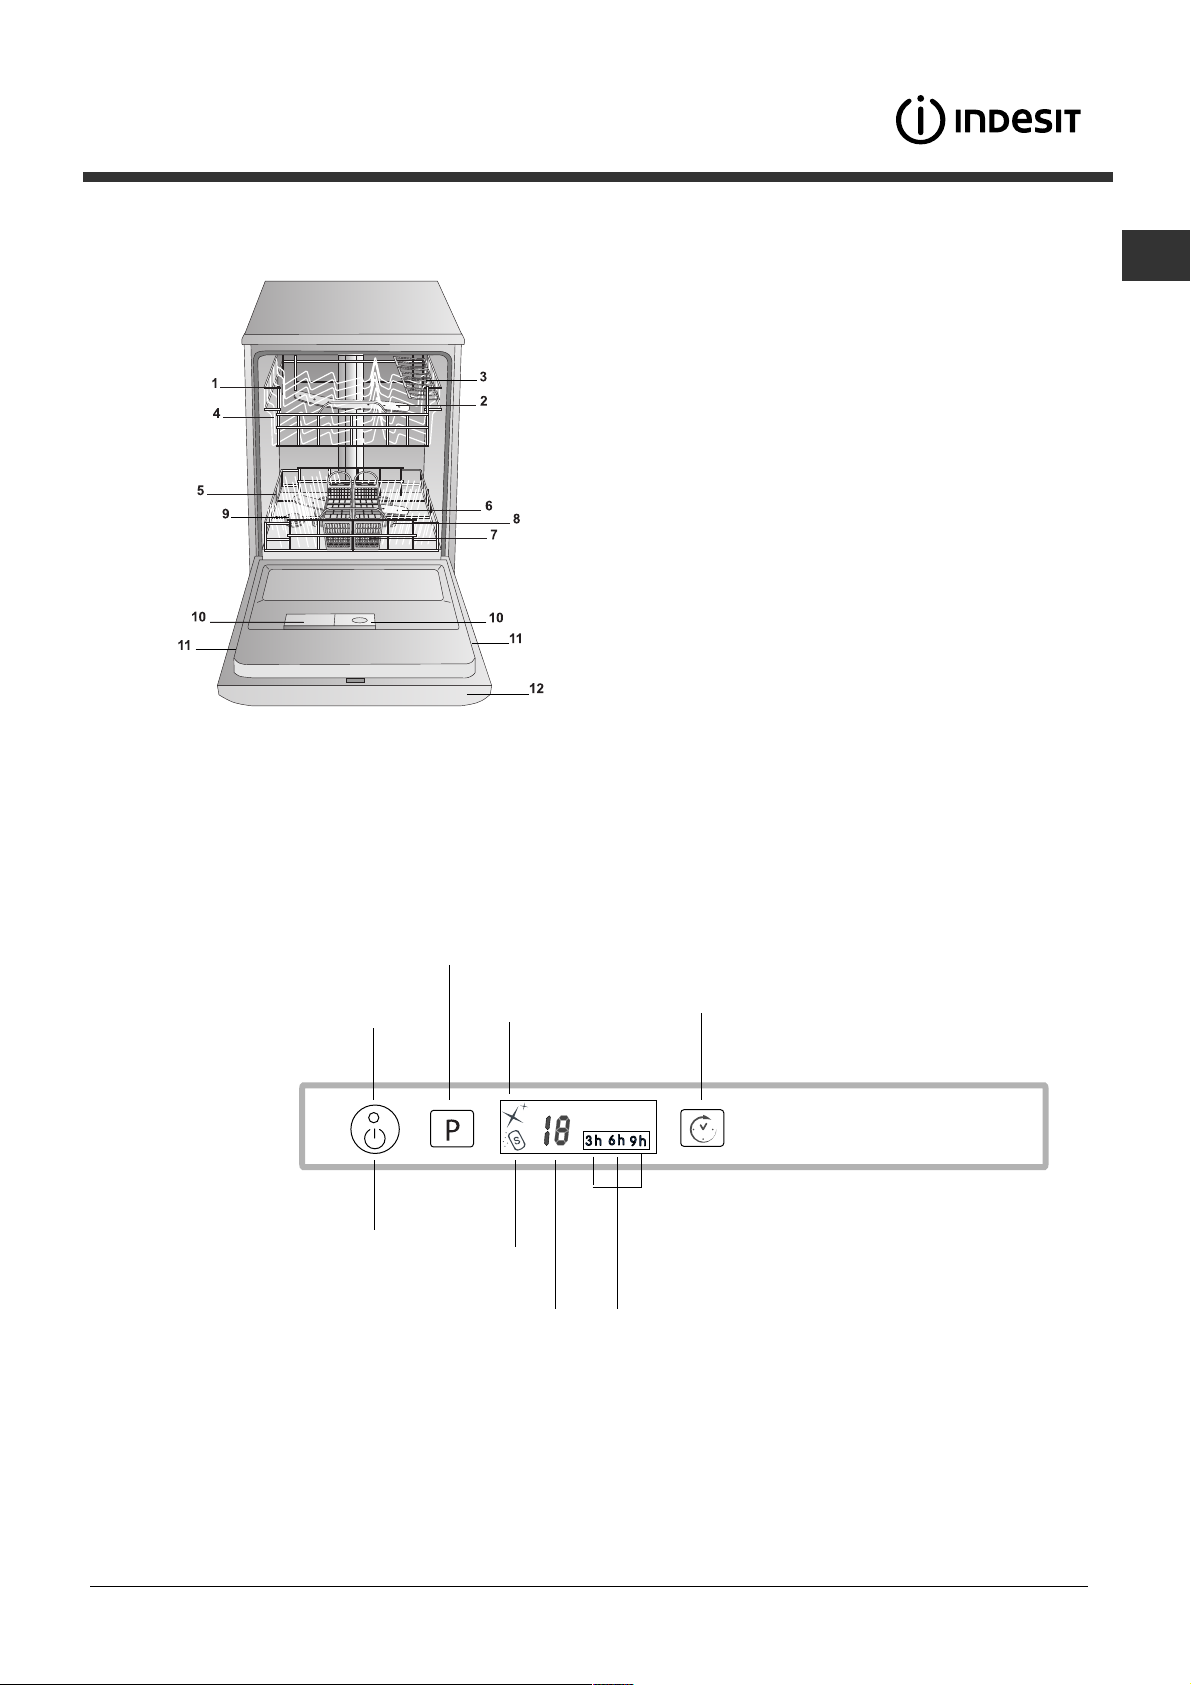
Descrizione
dellapparecchio
16
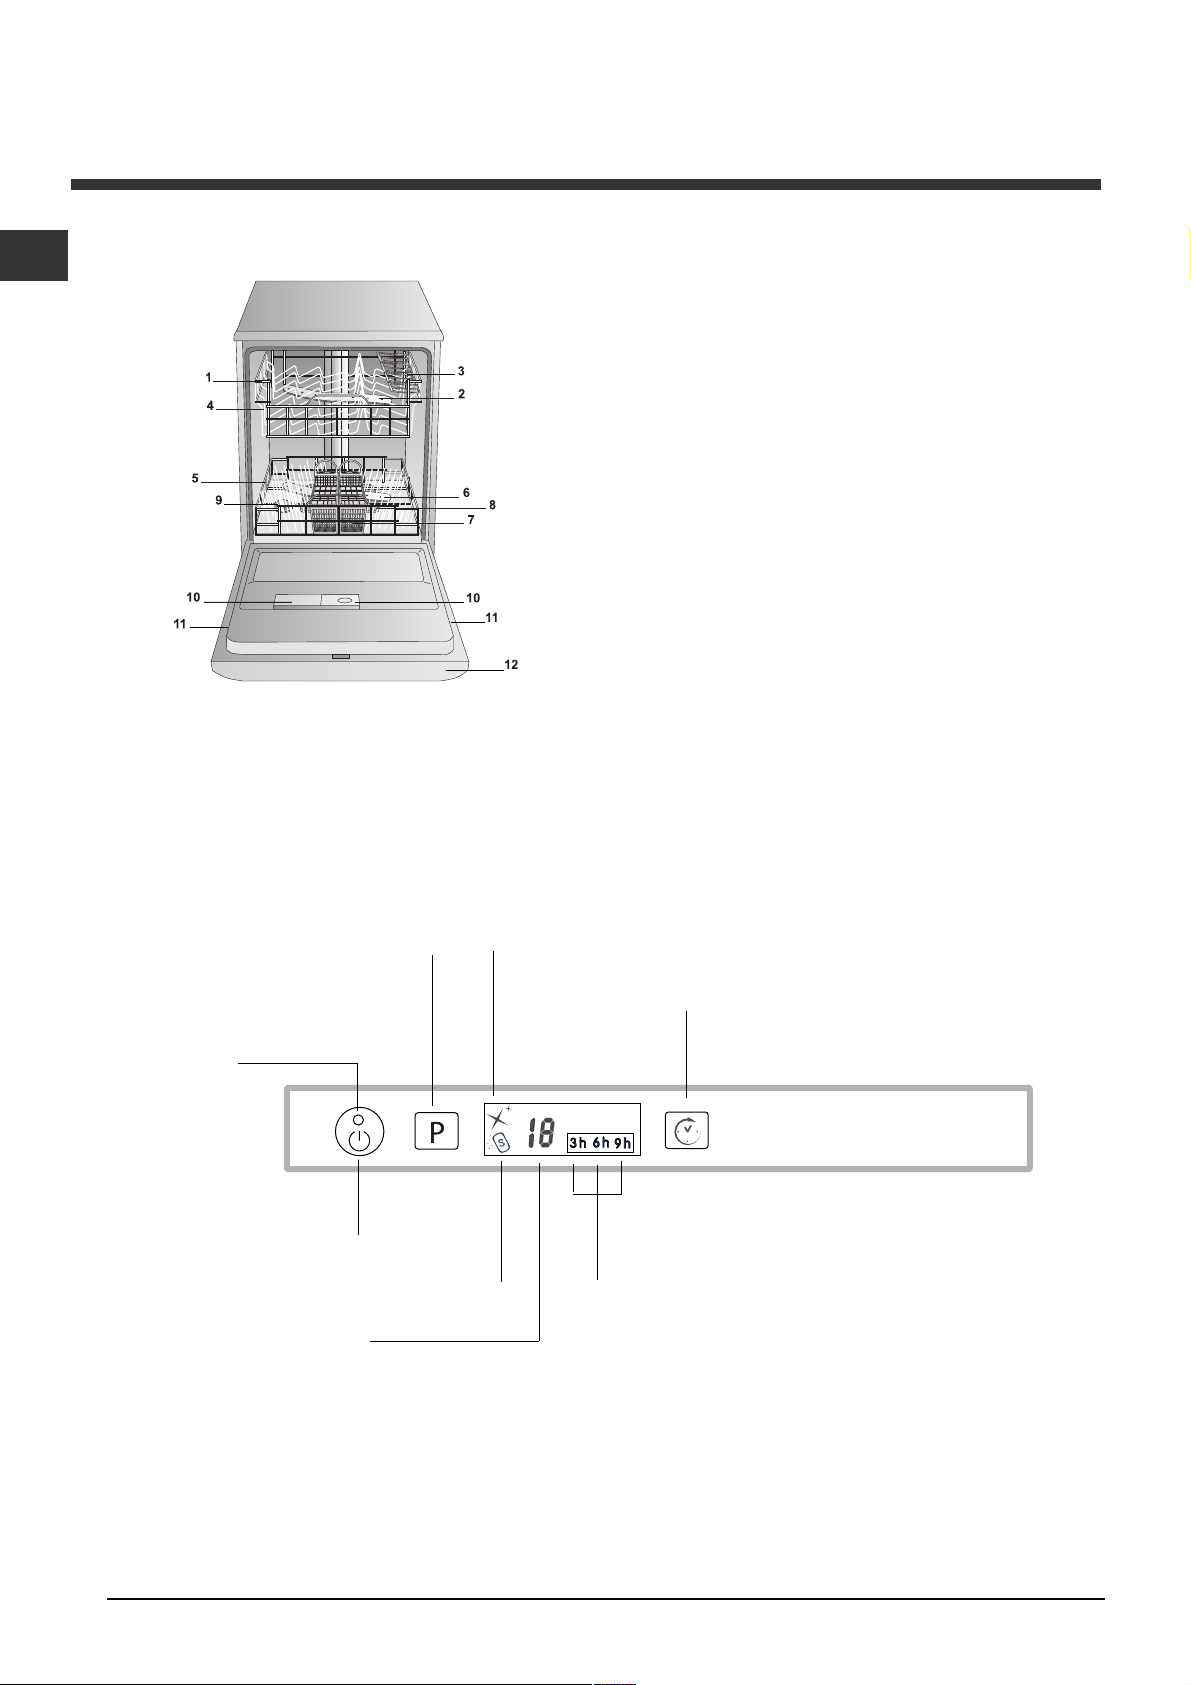
Vista dinsieme
1. Cestello superiore
2. Irroratore superiore
3. Ribaltine
4. Regolatore altezza cestello
5. Cestello inferiore
6. Irroratore inferiore
7. Cestello posate
8. Filtro lavaggio
9. Serbatoio sale
10. Vaschette detersivo e serbatoio brillantante
11. Targhetta caratteristiche
12. Pannello comandi
***
Pannello comandi
Spia ON-OFF
Tasto
On-Off/Reset
Tasto
Selezione
Programma
Mancanza Sale*
Indicatore luminoso
numero programma
Spia
Spia
Mancanza
Brillantante*
Tasto
Avvio Ritardato*
Spie Avvio
Ritardato*
*** Solo sui modelli ad incasso totale
* Presente solo su alcuni modelli.
Il numero e il tipo di programmi ed opzioni variano in base al modello di lavastoviglie.
"
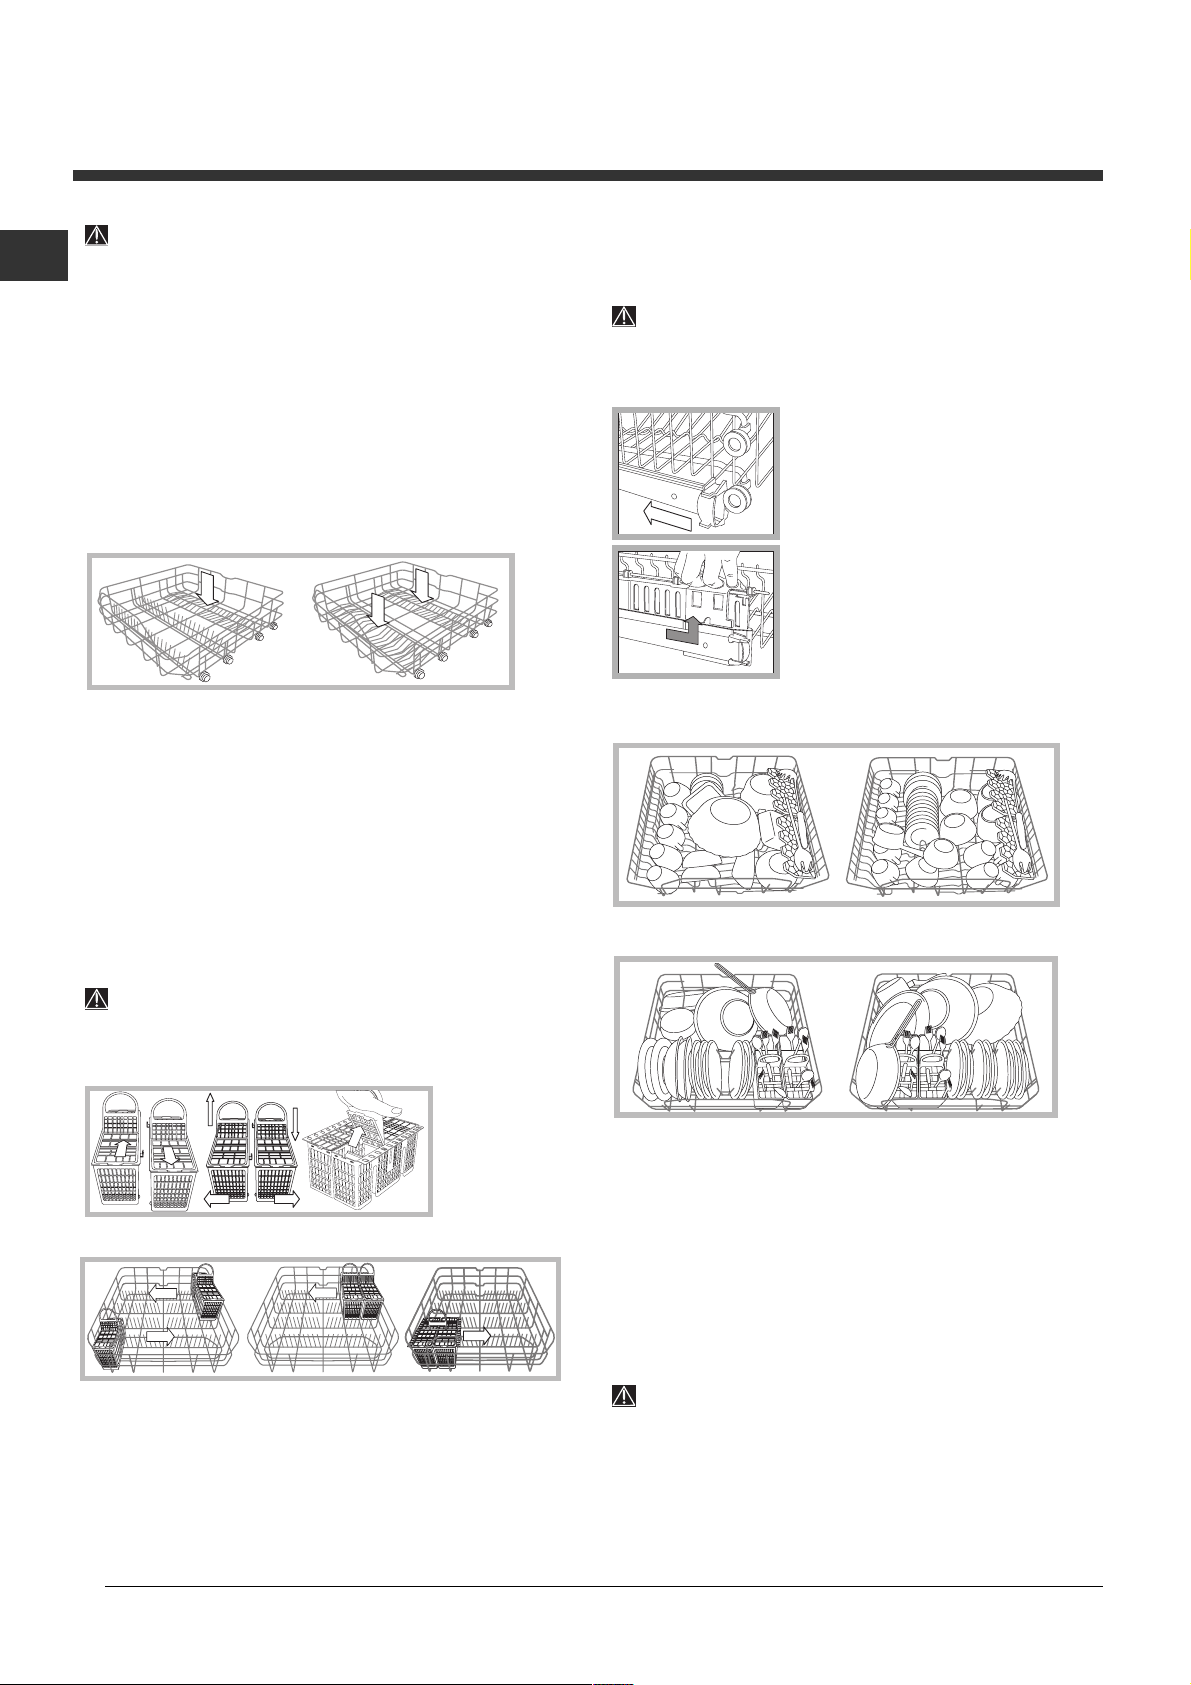
Caricare i cestelli
Prima di caricare i cesti, eliminare dalle stoviglie i residui
di cibo e vuotare bicchieri e coppe dei liquidi rimasti.
Dopo aver caricato, controllare che gli irroratori ruotino
liberamente.
Cesto inferiore
Il cesto inferiore può contenere pentole, coperchi, piatti,
insalatiere, posate ecc..secondo gli Esempi di caricamento.
Piatti e coperchi grandi vanno sistemati di preferenza ai lati
del cesto, facendo attenzione a non bloccare la rotazione
dellirroratore superiore.
Alcuni modelli di lavastoviglie, dispongono di settori
reclinabili
per la sistemazione dei piatti oppure in posizione orizzontale
per sistemare pentole e insalatiere.
*, gli stessi si possono usare in posizione verticale
Cestino delle posate
Il cestino delle posate può essere di tipo diverso a seconda dei
modelli di lavastoviglie: non scomponibile, scomponibile,
scorrevole. Il cestino non scomponibile deve essere posizionato
solo nella parte anteriore del cesto inferiore.
Il cestino scomponibile può essere separato in due parti,
soluzione indicata quando si esegue un lavaggio a mezzo carico
(sui mod. provvisti di tale opzione), può essere scorrevole, cioè
posizionato in qualsiasi punto del cesto inferiore facendolo
scorrere tra gli inserti fissi o reclinabili.
- Entrambi sono muniti di ribaltine scorrevoli che consentono una
sistemazione migliore delle posate.
Regolare laltezza del cesto superiore
Per agevolare la sistemazione delle stoviglie, è possibile
sistemare il cesto superiore in posizione alta o bassa.
E preferibile regolare laltezza del cesto superiore a CESTO
VUOTO.
Non sollevare o abbassare MAI il cesto su un solo lato.
Aprire i fermi delle guide del cesto a
destra e a sinistra ed estrarre il cesto;
sistemarlo in alto o in basso, farlo
scivolare lungo le guide fino a far entrare
anche le rotelle anteriori e chiudere i fermi
(vedi figura).
Se il cesto è dotato di maniglie Dual
Space
* (vedi figura), estrarre il cesto
superiore a fine corsa, impugnare le
maniglie ai lati del cesto e muovere verso
lalto o verso il basso; lasciare ricadere il
cesto accompagnandolo.
Esempi di caricamento cesto superiore
Esempi di caricamento cesto inferiore
16
I coltelli e gli utensili con punte taglienti devono essere
sistemati nel cestino delle posate con le punte rivolte verso il
basso o sistemati sulle ribaltine del cesto superiore in
posizione orizzontale.
Esempi di posizionamento del cestino posate
Cesto superiore
Caricarvi le stoviglie delicate e leggere: bicchieri, tazze da tè
e caffè, piattini, insalatiere basse, padelle, pentole basse
poco sporche, secondo gli Esempi di caricamento.
Tazze e tazzine: posizionarli sulle ribaltine
Coltelli lunghi e acuminati, posate di servizio: posizionarli
sulle ribaltine
**.
**.
Stoviglie non adatte al lavaggio in lavastoviglie
Oggetti di legno, con impugnatura in legno
o in corno o con parti incollate.
Oggetti di alluminio, rame, ottone, peltro o stagno.
Stoviglie di plastica non termoresistente.
Porcellane antiche o dipinte a mano.
Argenteria antica. Largenteria non antica può invece essere
lavata con un programma delicato e accertandosi che non
sia a contatto con altri metalli.
Si consiglia lutilizzo di stoviglie idonee al lavaggio in
lavastoviglie.
* Presente solo in alcuni modelli.
** Variabili per numero e posizione.
#
Avvio e utilizzo
16
Avviare la lavastoviglie
1. Aprire il rubinetto dellacqua.
2. Aprire la porta e premere il tasto ON-OFF: si sente un breve
bip, la spia ON/OFF, il display e le spie opzioni si illuminano.
3. Dosare il detersivo (vedi sotto).
4. Caricare i cestelli (vedi Caricare i cestelli).
5. Selezionare il programma in base alle stoviglie e al loro
grado di sporco (vedi tabella dei programmi) premendo il
tasto P.
6. Selezionare le opzioni di lavaggio (vedi a lato).
7. Avviare chiudendo la porta: un lungo bip avvisa dellinizio
del programma.
8. Alla fine due bip brevi e uno lungo segnalano la fine del
programma e lampeggia il numero del programma sul display.
Aprire la porta, spegnere lapparecchio premendo il tasto ONOFF, chiudere il rubinetto dellacqua e staccare la spina dalla
presa di corrente.
9. Aspettare alcuni minuti prima di togliere le stoviglie, per
evitare di scottarsi. Scaricare i cestelli iniziando da quello
inferiore.
Lordine di visualizzazione dei programmi si aggiornerà in
base alla frequenza del loro utilizzo.
PROGRAMMI AUTO
dotato di un particolare sensore che può valutare il grado di
sporco e impostare il lavaggio più efficiente ed economico.
La durata dei programmi auto potrà variare per lntervento
del sensore.
Se le stoviglie sono poco sporche o sono state sciacquate
precedentemente sotto lacqua, ridurre sensibilmente la dose
del detersivo.
Modificare un programma in corso
Se si è selezionato un programma sbagliato è possibile
modificarlo, purché appena iniziato: aprire la porta facendo
attenzione alla fuoriuscita di vapore, con una pressione
prolungata premere il tasto ON/OFF, la macchina si spegne
con un bip lungo. Riaccendere la macchina con il tasto ON/
OFF e selezionare il nuovo programma e le eventuali opzioni;
avviare chiudendo la porta.
Aggiungere altre stoviglie
Senza spegnere la macchina, aprire la porta facendo
attenzione alla fuoriuscita di vapore e inserire le stoviglie.
Chiudere la porta: il ciclo riprende.
Interruzioni accidentali
Se durante il lavaggio si apre la porta o si verifica
uninterruzione di corrente, il programma si interrompe.
Riprende dal punto in cui si era interrotto quando si chiude la
porta o torna la luce.
*:questo modello di lavastoviglie è
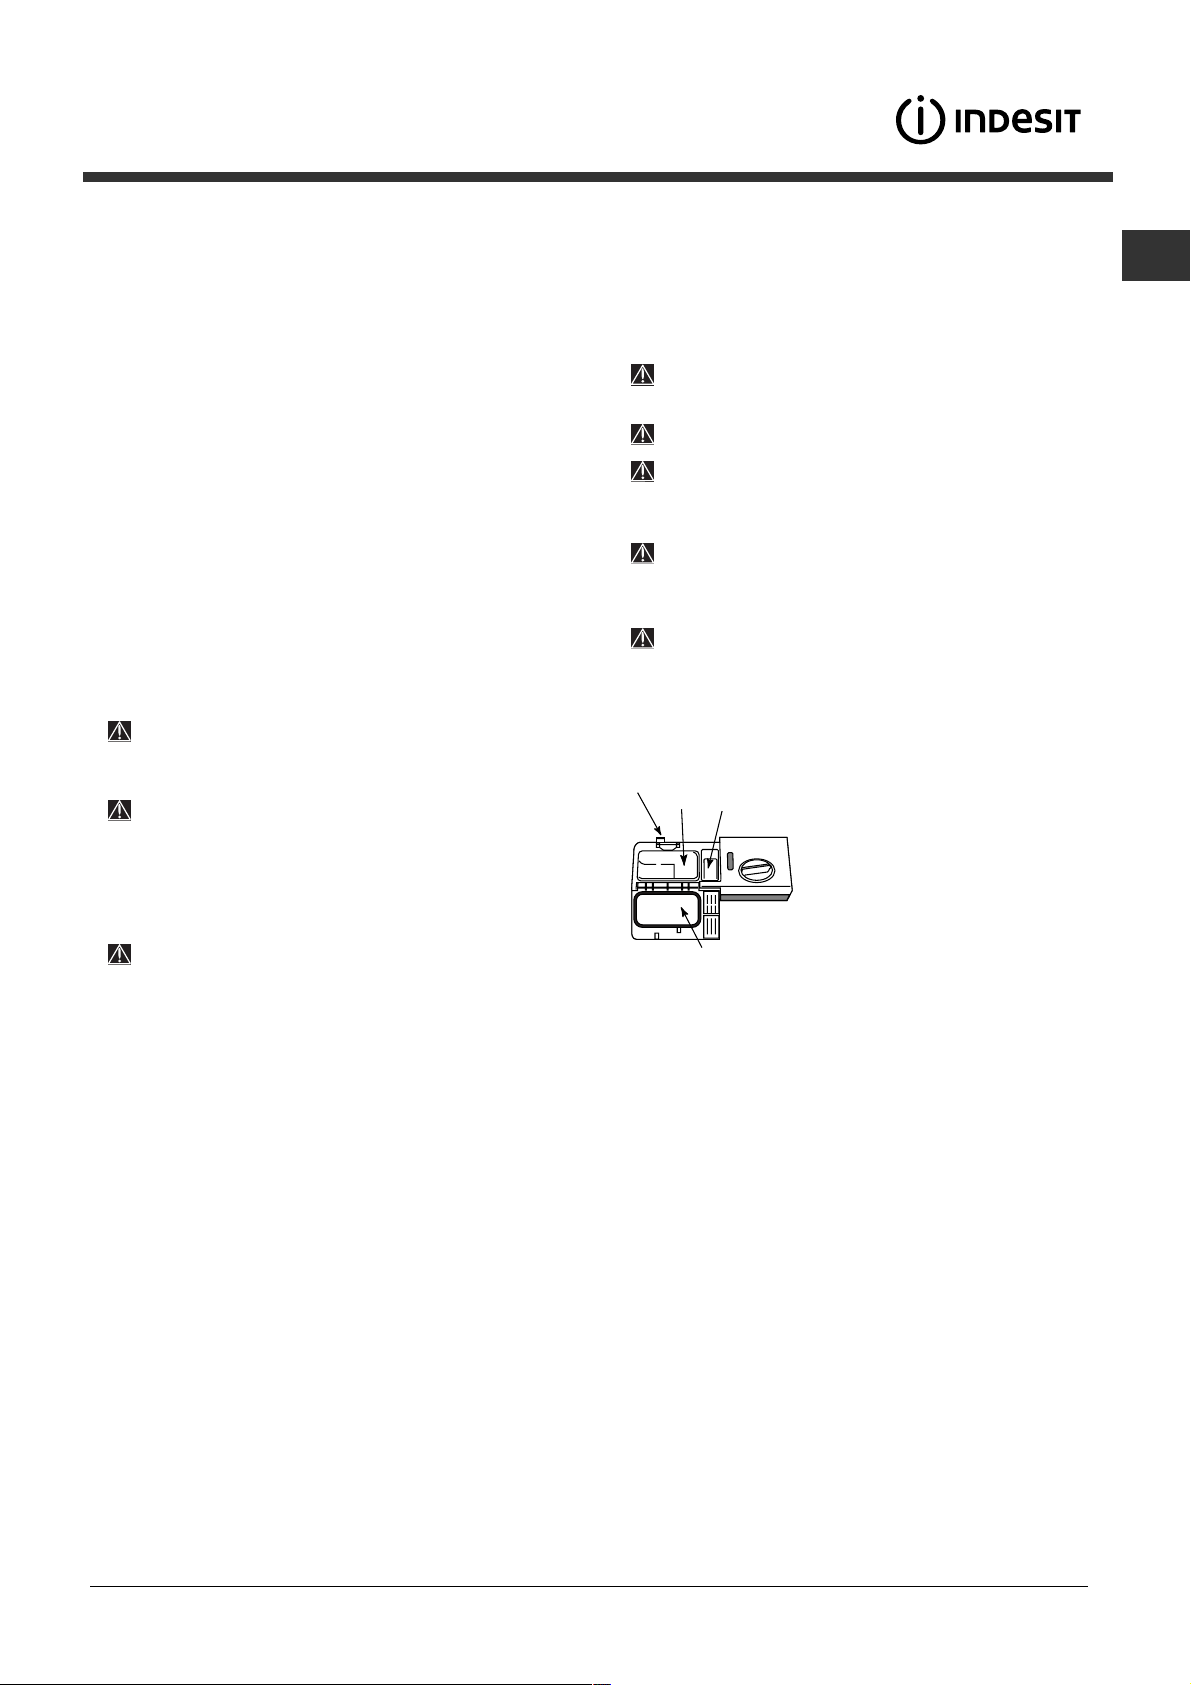
Caricare il detersivo
Il buon risultato del lavaggio dipende anche dal
corretto dosaggio del detersivo, eccedendo non
si lava in modo più efficace e si inquina
lambiente.
Utilizzare solo detersivo per lavastoviglie.
NON UTILIZZARE detergenti per lavaggio a
mano.
Un utilizzo eccessivo di detersivo può
lasciare residui di schiuma a fine ciclo.
Lutilizzo delle pastiglie è consigliato solo
nei modelli dove è presente lopzione PASTIGLIE
MULTIFUNZIONE.
Le migliori prestazioni di lavaggio ed
asciugatura, si ottengono solo con lutilizzo di
detersivo in polvere, brillantante liquido e sale.
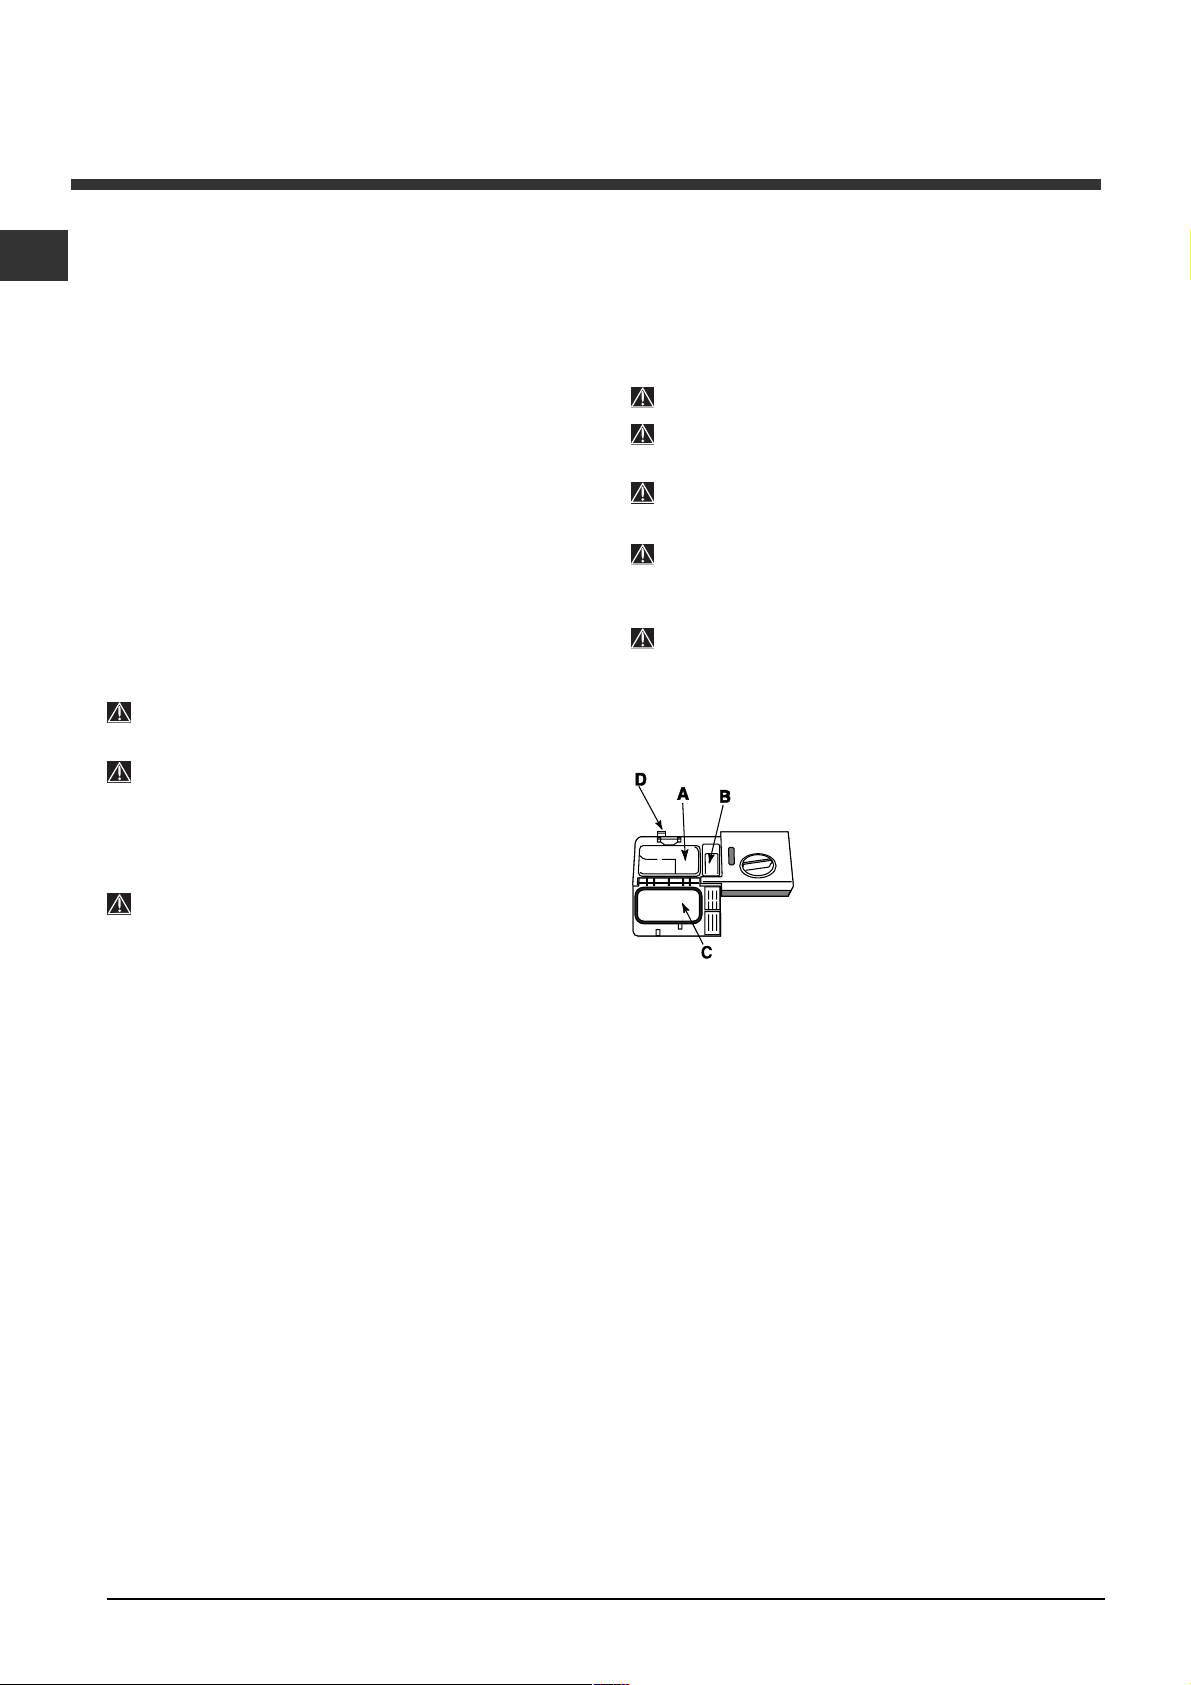
vaschetta A: Detersivo per lavaggio
vaschetta B: Detersivo per prelavaggio
1. Aprire il coperchio C premendo il
pulsante D.
2. Dosare il detersivo consultando
la Tabella dei programmi:
in polvere: vaschette A e B.
pastiglie: quando il programma
ne richiede 1, metterla nella
vaschetta A e chiudere il coperchio;
quando ne richiede 2, mettere la
seconda sul fondo della vasca.
3. Eliminare i residui di detersivo dai bordi della vaschetta e
chiudere il coperchio fino allo scatto.
Opzioni di lavaggio
Se unopzione non è compatibile con il programma
selezionato, (vedi tabella programmi) il led relativo
lampeggia velocemente 3 volte e si sentono 2 bip brevi.
Avvio ritardato
È possibile posticipare di 3, 6, 9 ore lavvio
del programma:
1. Premere il tasto AVVIO RITARDATO: a ogni pressione si
sente un segnale acustico e viene visualizzato il tempo
selezionato;
2. Selezionare il programma e chiudere la porta: dopo il bip
inizia il conto alla rovescia;
3. A tempo scaduto, la spia si spegne e il programma si avvia.
Per modificare il ritardo e selezionare un tempo inferiore
premere il tasto AVVIO RITARDATO. Per annullarlo premere il
tasto in successione finché non si spegne la spia del ritardo
selezionato. Il programma si avvia alla chiusura della porta.
* Presente solo su alcuni modelli.
$

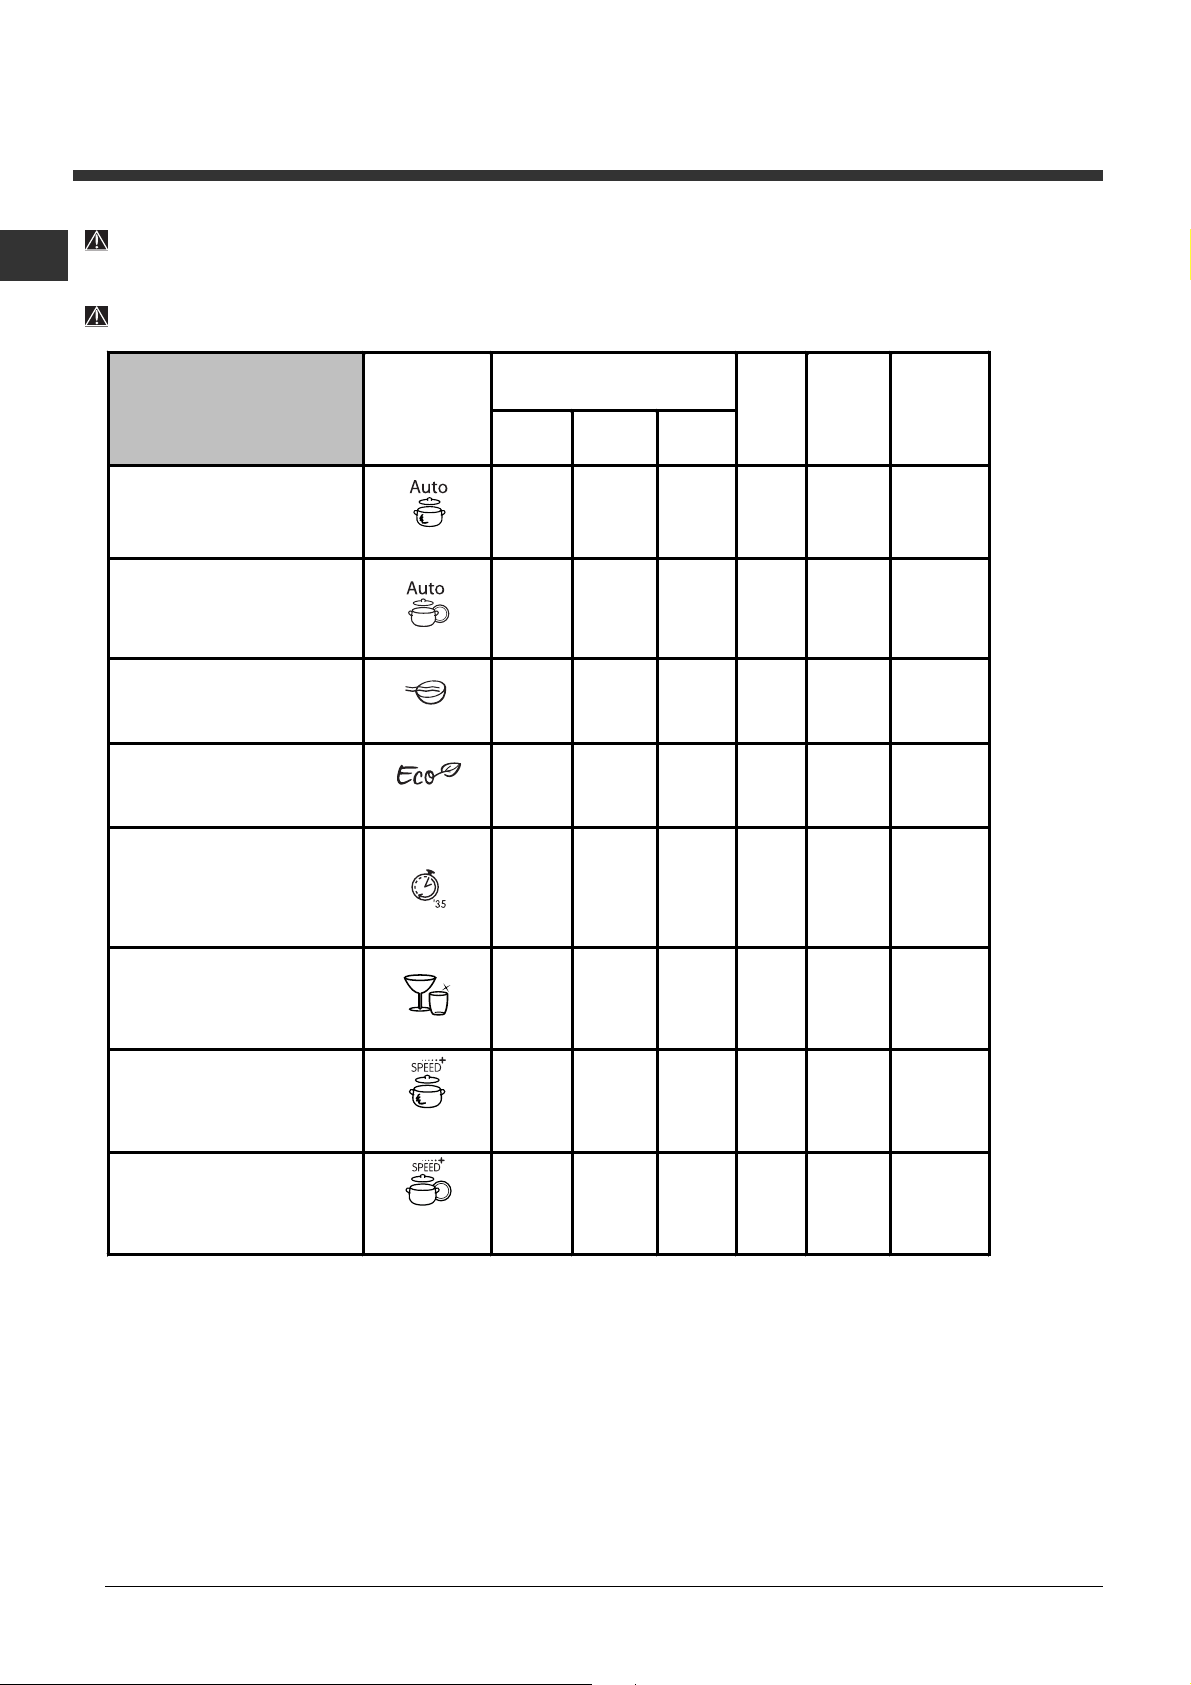
Programmi
Se le stoviglie sono poco sporche o sono state sciacquate precedentemente sotto lacqua, ridurre
sensibilmente la dose del detersivo.
Il numero e il tipo di programmi ed opzioni variano in base al modello di lavastoviglie.
Detersivo
Indicazioni per la scelta
dei programmi
Stoviglie e pentole molto
sporche (da non usare
per pezzi delicati).
Stoviglie e pentole
normalmente sporche.
Programma standard
giornaliero.
Lavaggio preliminare in
attesa di completare
il carico al pasto
successivo.
Lavaggio ecologico a
bassi consumi energetici,
adatto a stoviglie e
pentole.
Ciclo economico e veloce
da utilizzare per stoviglie
poco sporche, subito
dopo l'uso. (2 piatti +2
bicchieri +4 posate+1
pentola + 1 padellino) 5. Rapido
Ciclo economico e veloce
per stoviglie delicate, più
sensibili alle alte
temperature, subito dopo
l'uso. (12 calici + piatti
delicati). 6. Cristalli
Ciclo di lavaggio e
asciugatura veloce,
adatto a stoviglie e
pentole molto sporche.
(non adatto a stoviglie
delicate)
Ciclo di lavaggio e
asciugatura veloce,
adatto a stoviglie e
pentole normalmente
sporche.
Programma
1. Super Wash
2. Normale
3. Ammollo
*
4. Eco
7. Intensive
Speed+
8. Normal
Speed+
polvere liquido pastiglie
30 g (A)
25 g (A)
5 g (B)
25 g (A)
5 g (B)
25 g (A) 25 ml (A) 1 (A)
30 g (A) 30 ml (A) 1 (A)
30 g (A) 30 ml (A) 1 (A)
25 g (A)
5 g (B)
(A) = vaschetta A
(B) = vaschetta B
30 ml (A)
25 ml (A)
5 ml (B)
No
25 ml (A)
5 ml (B)
25 ml (A)
5 ml (B)
No
Programmi
che
prevedono
l’asciugatura
1 (A)
1 (A)
No
1 (A)
1 (A)
Si
Si
No
Si
No
Si
Si
Si
Opzioni
Avvio
Ritardato
Avvio
Ritardato
Avvio
Ritardato
Avvio
Ritardato
Avvio
Ritardato
Avvio
Ritardato
Avvio
Ritardato
Avvio
Ritardato
Durata del
programma
(tolleranza
±10%)
Hrs. Min.
2:15’
1:45’
0:08’
2:35’
0:35’
1:30’
1:40’
1:20’
16
Note:
le migliori prestazioni del programma Rapido, si ottengono preferibilmente rispettando il numero di coperti
specificati.
* Il programma Eco, rispetta la norma EN-50242, dura più a lungo rispetto ad altri programmi ma presenta un
minor consumo di energia ed in più è rispettoso con lambiente.
Nota per i laboratori di Prove: per informazioni sulle condizioni della prova comparativa EN, farne richiesta
allindirizzo: ASSISTENZA_EN_LVS@indesitcompany.com
Per facilitare il dosaggio del detersivo è bene sapere che:
1 cucchiaio da cucina = 15 gr. di polvere = 15 ml di liquido circa - 1 cucchiaino da cucina = 5 gr. di polvere = 5
ml di liquido circa
%
Brillantante e sale
rigenerante
16
Usare solo prodotti specifici per lavastoviglie.
Non usare sale alimentare o industriale nè
detersivi per il lavaggio a mano.
Seguire le indicazioni riportate sulla
confezione.
Se si usa un prodotto multifunzione, non è necessario
aggiungere brillantante, si consiglia invece di aggiungere
sale, specie se lacqua è dura o molto dura. Seguire le
indicazioni riportate sulla confezione.
Non aggiungendo né sale né brillantante è
normale che le spie MANCANZA SALE
MANCANZA BRILLANTANTE
* rimangano accese.
* e
Caricare il brillantante
Il brillantante facilita lasciugatura delle stoviglie facendo
scivolare lacqua dalla superficie, così che non rimangano
striature o macchie.
Il serbatoio del brillantante va riempito:
quando sul pannello si accende la spia MANCANZA
BRILLANTANTE
Regolare la dose di brillantante
Se non si è soddisfatti del risultato dellasciugatura, è possibile
regolare la dose di brillantante. Con un cacciavite girare il
regolatore (F) scegliendo tra 6 posizioni (la regolazione di
fabbrica è sul 4):
se sulle stoviglie ci sono striature, girare verso i numeri
bassi (1-3).
se ci sono gocce dacqua o macchie di calcare girare
verso i numeri alti (4-6).
Impostazione durezza dellacqua
Ogni lavastoviglie è corredata di un dolcificatore dellacqua
che, utilizzando del sale rigenerante specifico per lavastoviglie, fornisce acqua priva di calcare per il lavaggio delle
stoviglie.
Questa lavastoviglie, consente una regolazione che riduce
linquinamento ed ottimizza le prestazioni di lavaggio in
funzione della durezza dellacqua. Il dato è reperibile presso
lEnte erogatore dellacqua potabile.
-- Aprire la porta ed accendere la macchina premendo il tasto
ON/OFF.
- Premere il tasto P per circa 5 secondi; si sentono due bip
brevi e lampeggia lentamente sul display il numero di
regolazione di durezza impostato (Il decalcificatore è
impostato di fabbrica sul n° 3).
- Premere il tasto P in successione fino al raggiungimento della
durezza desiderata (1-2-3-4-5 Vedi tabella durezza acqua).
*;
1. Aprire il serbatoio ruotando il
tappo (G) in senso antiorario.
2. Versare il brillantante evitando
che fuoriesca. Se accade, pulire
subito con un panno asciutto.
F
3. Riavvitare il tappo.
Non versare MAI il brillantante
G
direttamente allinterno della
vasca.
- Per uscire dalla funzione attendere 30 secondi circa o
premere un altro tasto delle opzioni o spengenere la
macchina con il tasto ON/OFF.
Se si utilizzano le pastiglie multifunzione, riempire comunque il
serbatoio del sale.
Tabella Durezze Acqua
°dH °fH mmol/l livello
0 6 0 10 0 1 1
6 11 11 20 1,1 2 2
12 17 21 30 2,1 3 3
17 34 31 60 3,1 6 4
34 50 61 90 6,1 9
Da 0°f a 10°f si consiglia di non utilizzare sale.
*
con questa impostazione la durata dei cicli
può lievemente prolungarsi.
(°dH = durezza in gradi tedeschi - °fH = durezza in gradi
francesi - mmol/l = millimol/litro)
*
5
Caricare il sale rigenerante
Per avere buoni risultati di lavaggio è indispensabile verificare
che il serbatoio del sale non sia mai vuoto. Il sale rigenerante
elimina il calcare dallacqua, evitando che si depositi sulle
stoviglie. Il serbatoio del sale è posto nella parte inferiore della
lavastoviglie (vedi Descrizione) e va riempito:
quando il galleggiante verde
tappo del sale;
quando sul pannello si accende la spia MANCANZA SALE
4. Togliere limbuto
sciacquare il tappo sotto lacqua corrente prima di avvitarlo,
disponendolo a testa in giù e facendo defluire lacqua dalle
quattro fessure disposte a stella nella parte inferiore del tappo.
(tappo con galleggiante verde
E consigliabile effettuare questa operazione ad ogni
caricamento del sale.
Chiudere bene il tappo, affinché nel serbatoio non entri
detersivo durante il lavaggio (potrebbe danneggiarsi
irrimediabilmente il dolcificatore).
Quando si rende necessario, caricare il sale prima di un
ciclo di lavaggio in modo da eliminare la soluzione salina
traboccata dal contenitore del sale.
*, eliminare i residui di sale dallimbocco;
* non è visibile osservando il
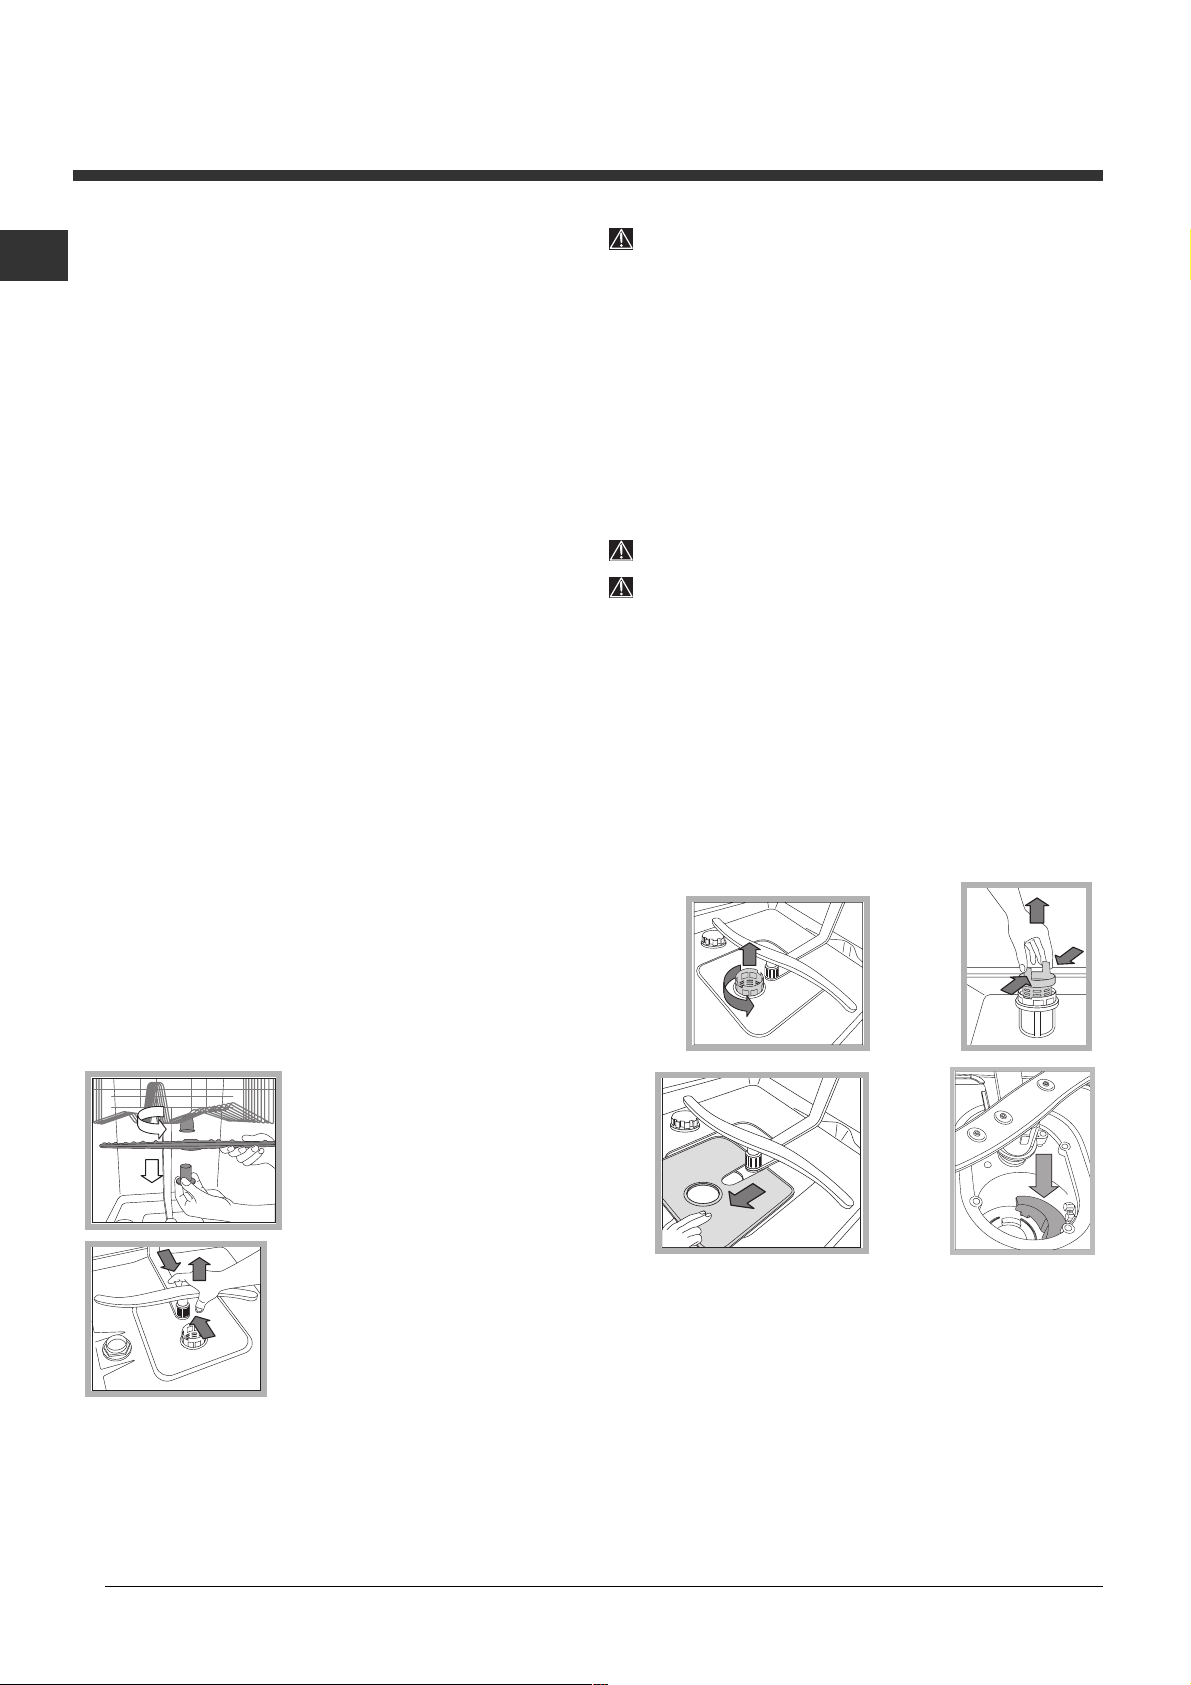
1. Estrarre il cesto inferiore e svitare
il tappo del serbatoio in senso
antiorario.
2. Solo per il primo utilizzo: riempire
il serbatoio di acqua fino al bordo.
3. Posizionare limbuto
e riempire il serbatoio di sale fino al
bordo (circa 1 kg); è normale che
trabocchi un po dacqua.
* (vedi figura)
*)
* Presente solo su alcuni modelli.
*;
&
Manutenzione e cura
Escludere acqua e corrente elettrica
Chiudere il rubinetto dellacqua dopo ogni lavaggio
per eliminare il pericolo di perdite.
Staccare la spina dalla presa di corrente quando si
pulisce la macchina e durante i lavori di
manutenzione.
Pulire la lavastoviglie
La superficie esterna e il pannello di controllo
possono essere puliti con un panno inumidito con
acqua non abrasivo. Non usare solventi
o abrasivi.
La vasca interna può essere pulita da eventuali
macchie con un panno imbevuto di acqua e poco
aceto.
Evitare i cattivi odori
Lasciare sempre socchiusa la porta per evitare il
ristagno di umidità.
Pulire regolarmente le guarnizioni perimetrali di
tenuta della porta e delle vaschette detersivo con una
spugnetta umida. Si eviteranno così ristagni di cibo,
principali responsabili del cattivo odore.
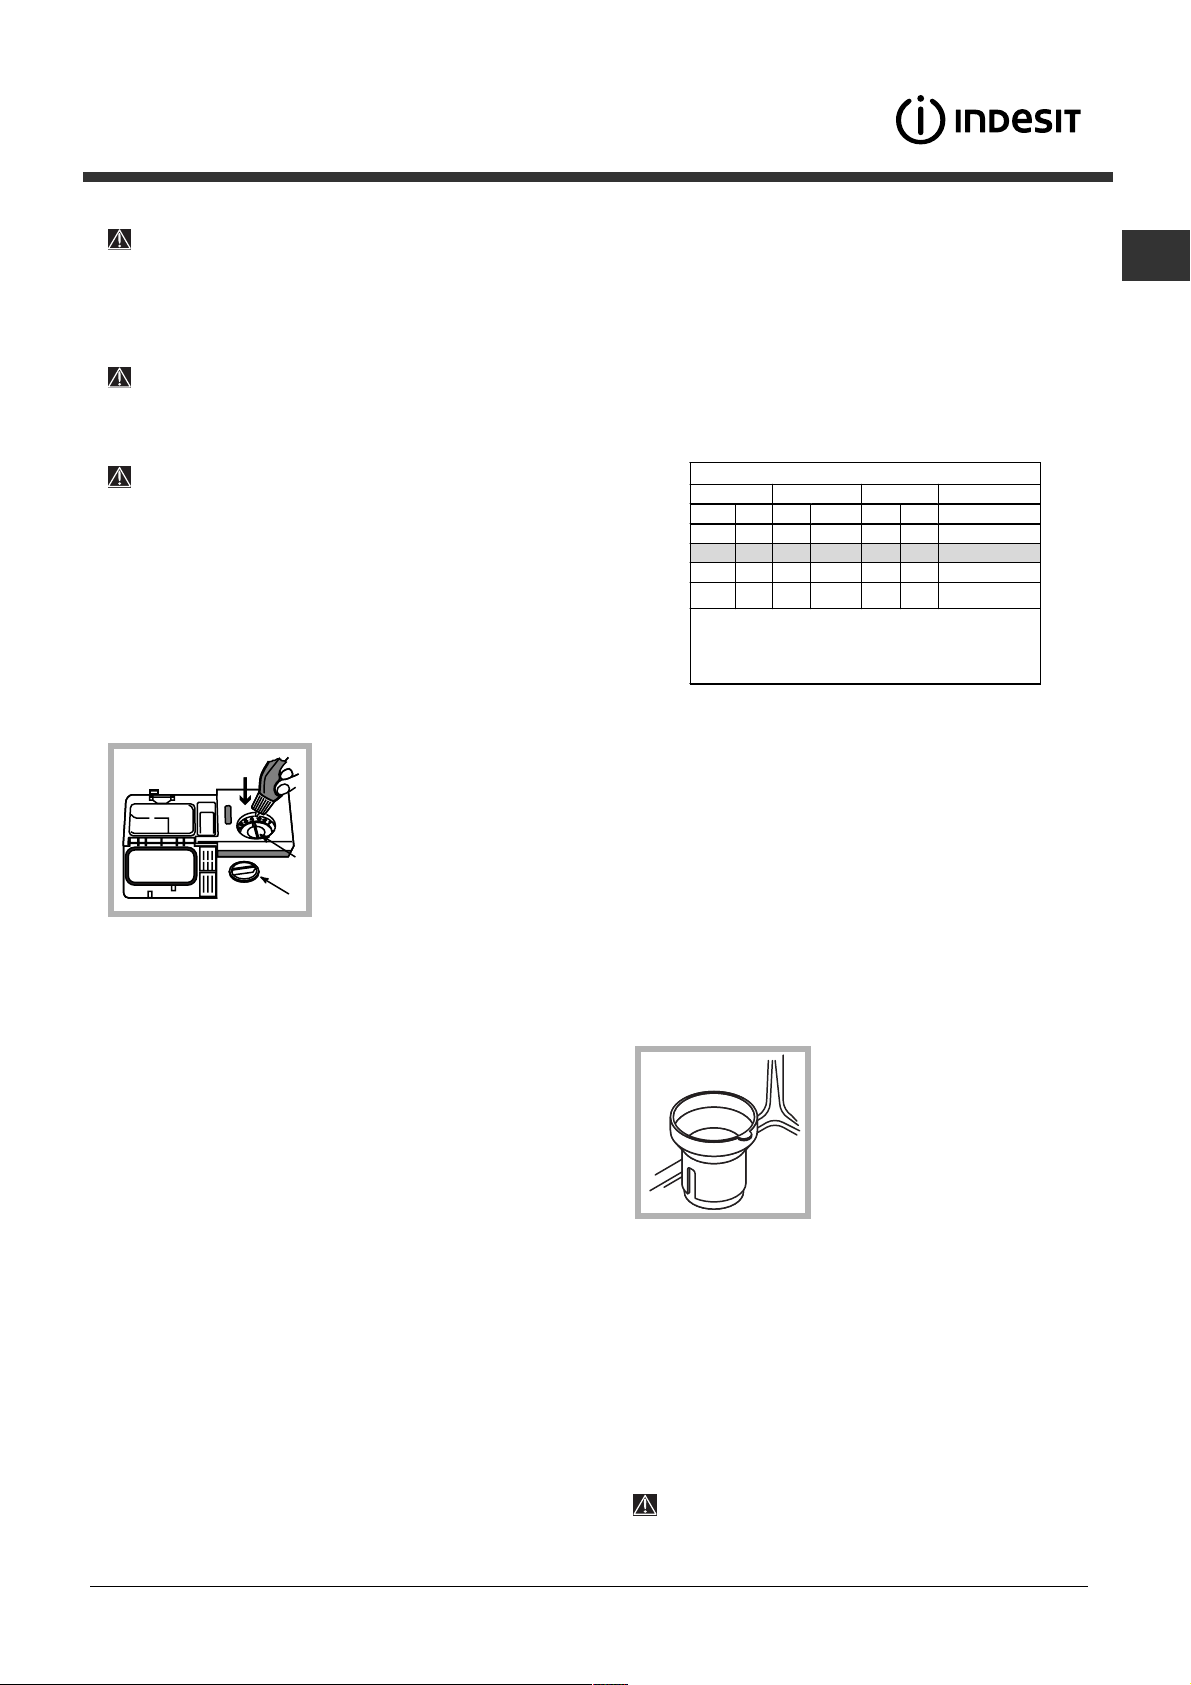
Pulire gli irroratori
Può succedere che residui di cibo si attacchino agli
irroratori e ostruiscano i fori da cui esce lacqua: di tanto
in tanto è bene controllarli e pulirli con uno spazzolino
non metallico.
I due irroratori, sono entrambi smontabili.
Per smontare lirroratore
superiore, occorre svitare
girando in senso antiorario la
ghiera di plastica.Lirroratore
superiore, va rimontato con la
parte con il maggior numero
di fori rivolta verso lalto.
Periodicamente, pulire il filtro entrata acqua posizionato
alluscita del rubinetto.
- Chiudere il rubinetto dellacqua.
- Svitare lestremità del tubo di carico acqua, togliere il filtro e
pulirlo delicatamente sotto un getto di acqua corrente.
- Inserire nuovamente il filtro e avvitare il tubo.
Pulire i filtri
Il gruppo filtrante è formato da tre filtri che puliscono lacqua
di lavaggio dai residui di cibo e la rimettono in circolo: per
avere buoni risultati di lavaggio è necessario pulirli.
Pulire i filtri con regolarità.
La lavastoviglie non deve essere usata senza filtri o con
filtro sganciato.
Dopo alcuni lavaggi, controllare il gruppo filtrante e se
necessario pulirlo accuratamente sotto acqua corrente,
aiutandosi con uno spazzolino non metallico, seguendo le
istruzioni sotto riportate:
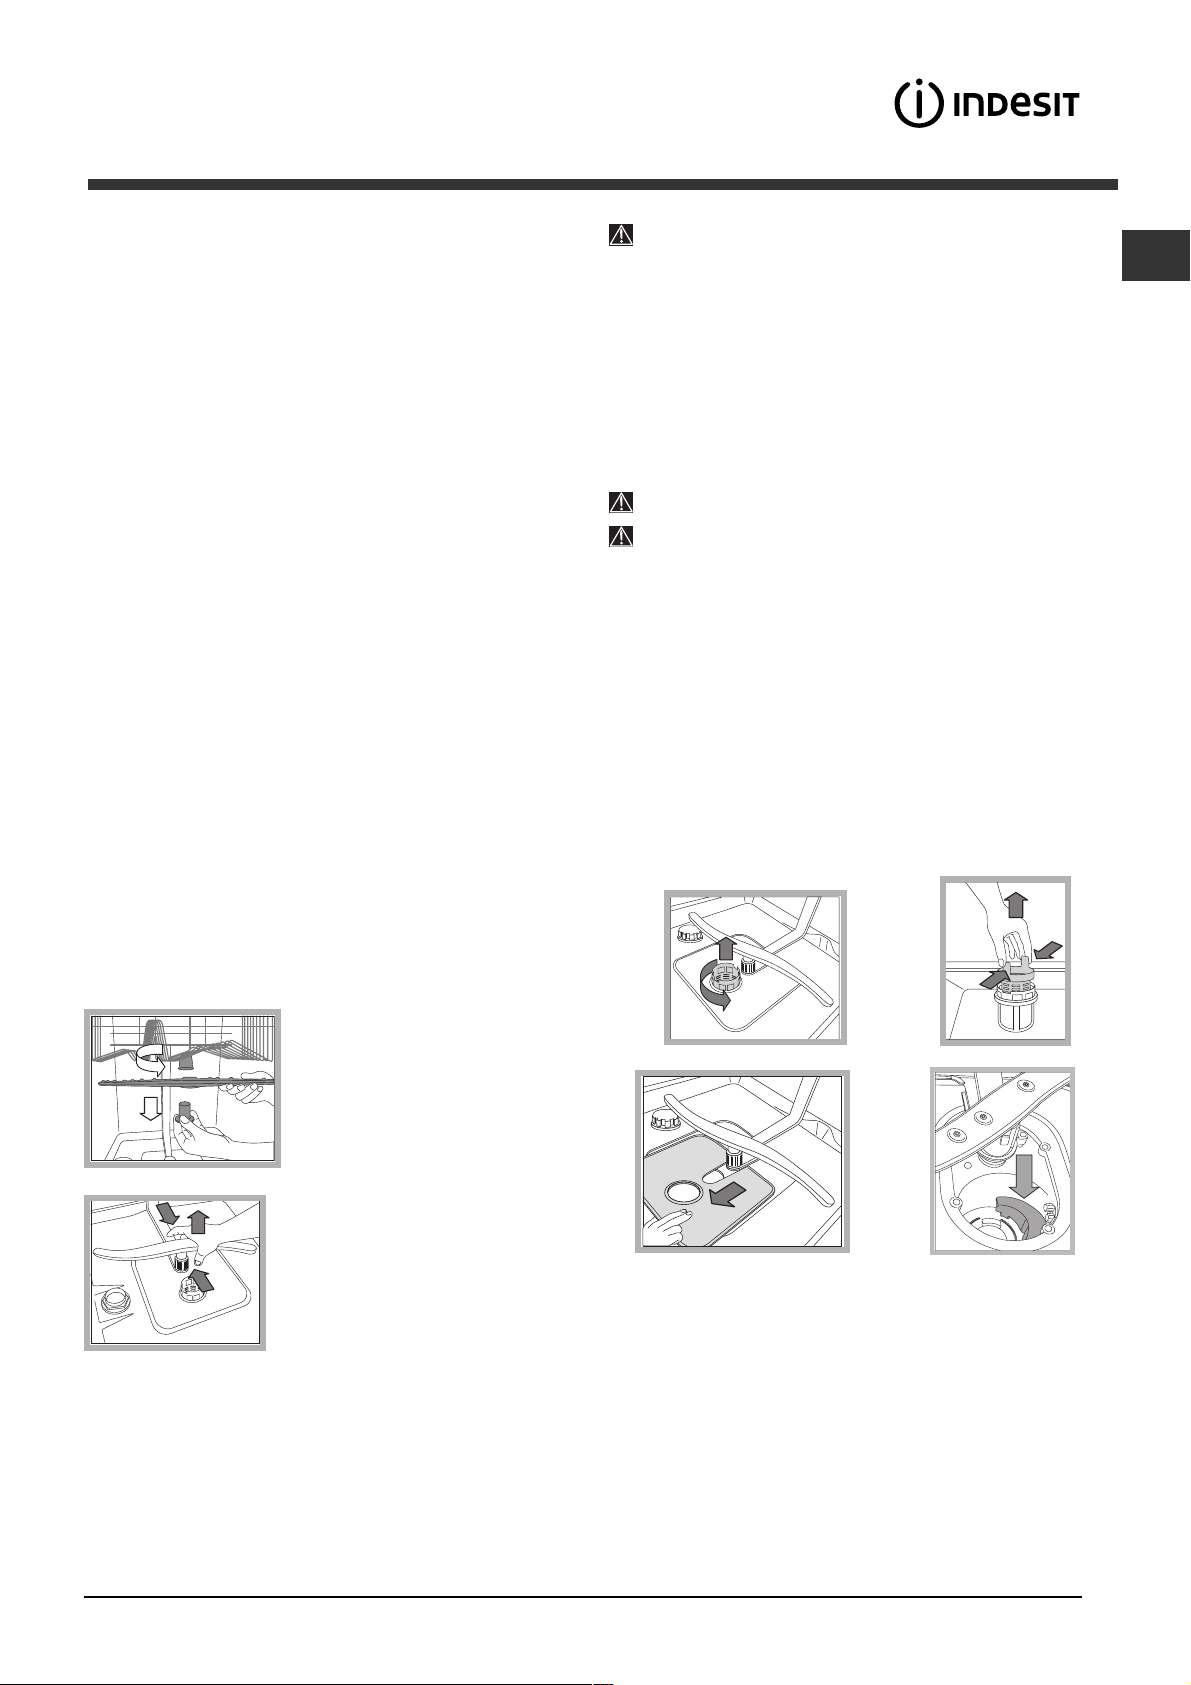
1. ruotare in senso antiorario il filtro cilindrico C ed estrarlo
(fig. 1).
2. Estrarre il bicchiere filtro B facendo una leggera pressione
sulle alette laterali (Fig. 2);
3. Sfilare il piatto filtro inox A. (fig. 3).
4. Ispezionare il pozzetto ed eliminare eventuali residui di
cibo. NON RIMUOVERE MAI la protezione della pompa di
lavaggio (particolare di colore nero) (fig.4).
*
+
)
+
16
Lirroratore inferiore si smonta
facendo pressione sulle
linguette poste ai lati e tirandolo
verso lalto.
Pulizia del filtro entrata acqua*
Se i tubi dellacqua sono nuovi o sono rimasti per lungo
tempo inattivi, prima di fare lallacciamento, far scorrere
lacqua fino a che diventi limpida e sia priva di impurità.
Senza questa precauzione, cè il rischio che il punto
dove entra lacqua si intasi, danneggiando la
lavastoviglie.
!
Dopo la pulizia dei filtri, rimontare il gruppo filtrante e
ricollocarlo correttamente nella sua sede; è fondamentale
per un buon funzionamento della lavastoviglie.
"
Se ci si assenta per lunghi periodi
Staccare i collegamenti elettrici e chiudere il rubinetto
dellacqua.
Lasciare socchiusa la porta.
Al rientro, fare un lavaggio a vuoto.
* Presente solo su alcuni modelli.
'

Precauzioni e consigli
16
Lapparecchio è stato progettato e costruito in
conformità alle norme internazionali di sicurezza.
Queste avvertenze sono fornite per ragioni di sicurezza
e devono essere lette attentamente.
Sicurezza generale
Lapparecchio è stato concepito per un uso di tipo
non professionale allinterno dellabitazione.
Lapparecchio deve essere usato per il lavaggio delle
stoviglie a uso domestico, solo da persone adulte e
secondo le istruzioni riportate in questo libretto.
Lapparecchio non va installato allaperto, nemmeno
se lo spazio è riparato, perché è molto pericoloso
lasciarlo esposto a pioggia e temporali.
Non toccare la lavastoviglie a piedi nudi.
Non staccare la spina dalla presa della corrente
tirando il cavo, bensì afferrando la spina.
È necessario chiudere il rubinetto dellacqua e
staccare la spina dalla presa della corrente prima di
effettuare operazioni di pulizia e manutenzione.
In caso di guasto, in nessun caso accedere ai
meccanismi interni per tentare una riparazione.
Non toccare mai la resistenza.
Non appoggiarsi o sedersi sulla porta aperta:
lapparecchio potrebbe ribaltarsi.
La porta non deve essere tenuta nella posizione
aperta perchè può rappresentare il pericolo di
inciampare.
Tenere il detersivo e il brillantante fuori dalla portata
dei bambini.
Gli imballaggi non sono giocattoli per bambini.
Smaltimento
Smaltimento del materiale di imballaggio: attenersi
alle norme locali, così gli imballaggi potranno essere
riutilizzati.
La direttiva Europea 2002/96/CE sui rifiuti di
apparecchiature elettriche ed elettroniche (RAEE),
prevede che gli elettrodomestici non debbano essere
smaltiti nel normale flusso dei rifiuti solidi urbani. Gli
apparecchi dismessi devono essere raccolti
separatamente per ottimizzare il tasso di recupero e
riciclaggio dei materiali che li compongono e
impedire potenziali danni per la salute e lambiente. Il
simbolo del cestino barrato è riportato su tutti i
prodotti per ricordare gli obblighi di raccolta separata.
Risparmiare e rispettare lambiente
Risparmiare acqua ed energia
Avviare la lavastoviglie solo a pieno carico. In attesa
che la macchina sia piena, prevenire i cattivi odori
con il ciclo Ammollo (vedi Programmi).
Selezionare un programma adatto al tipo di stoviglie e
al grado di sporco consultando la Tabella dei
programmi:
- per stoviglie normalmente sporche utilizzare il
programma Eco, che garantisce bassi consumi
energetici e di acqua.
- se il carico è ridotto attivare lopzione Mezzo carico
(vedi Avvio e utilizzo).
Se il proprio contratto di erogazione dellenergia
elettrica prevede fasce orarie di risparmio energetico,
effettuare i lavaggi negli orari a tariffa ridotta.
Lopzione Avvio ritardato* (vedi Avvio e utilizzo) può
aiutare a organizzare i lavaggi in tal senso.
Detersivi senza fosfati, senza cloro
e contenenti enzimi
Si consiglia vivamente di usare i detersivi senza
fosfati e senza cloro che sono i più indicati per la
tutela dellambiente.
Gli enzimi sviluppano unazione particolarmente
efficace con temperature prossime ai 50°C, per cui
con i detersivi con enzimi si possono impostare
lavaggi a basse temperature e ottenere gli stessi
risultati che si avrebbero a 65°C.
Dosare bene il detersivo in base alle indicazioni del
produttore, alla durezza dellacqua, al grado di
sporco e alla quantità di stoviglie per evitare
sprechi. Pur biodegradabili, i detersivi contengono
elementi che alterano lequilibrio della natura.
*
Per ulteriori informazioni, sulla corretta dismissione
degli elettrodomestici, i detentori potranno rivolgersi
al servizio pubblico preposto o ai rivenditori.
* Presente solo su alcuni modelli.

Anomalie e rimedi
Può accadere che lapparecchio non funzioni. Prima di telefonare allAssistenza controllare che non si tratti
di un problema facilmente risolvibile aiutandosi con il seguente elenco.
Qualora il problema persista chiamare il Servizio Assistenza Tecnico Autorizzato: Numero Unico Nazionale
199.199.199 (costo massimo al minuto per chiamate da rete fissa Euro 0,1426).
Anomalie: Possibili cause / Soluzione:
La lavastoviglie non parte.
La lavastoviglie non scarica
acqua.
La lavastoviglie fa rumore.
Su stoviglie e bicchieri ci sono
depositi calcarei o una patina
biancastra.
• La spina non è ben inserita nella presa di corrente oppure in casa non
c’è corrente.
• La porta della lavastoviglie non è ben chiusa.
• Si è impostato un Avvio ritardato (vedi Avvio e utilizzo).
• Il programma non è ancora terminato.
• Il tubo di scarico dell’acqua è piegato (vedi Installazione).
• Lo scarico del lavello è ostruito.
• Il filtro è intasato da residui di cibo.
• Le stoviglie sbattono tra loro o contro gli irroratori.
• Eccessiva presenza di schiuma: il detersivo non è dosato
adeguatamente o non è idoneo al lavaggio in lavastoviglie. (vedi Avvio
e utilizzo).
• Manca il sale rigenerante o la sua regolazione non è adeguata alla
durezza dell’acqua (vedi Brillantante e sale).
• Il tappo del serbatoio del sale non è chiuso bene.
• Il brillantante è esaurito o il dosaggio è insufficiente.
• Le stoviglie sono in materiale antiaderente.
16
Su stoviglie e bicchieri ci sono
striature o sfumature bluastre.
Le stoviglie sono poco
asciutte.
Le stoviglie non sono pulite.
La lavastoviglie non carica
acqua – Allarme rubinetto
chiuso.
(si sentono dei brevi bip)
(lampeggia la spia ON/OFF e sul
display viene visualizzato il numero 6).
Allarme guasto elettrovalvola
di carico dell’acqua
(lampeggia la spia ON/OFF e sul
display viene visualizzato il numero 2).
Allarme al tubo di carico
dell’acqua/Filtrino entrata acqua
intasato.
(lampeggia la spia ON/OFF e il display
visualizza il N° 7)
• Il dosaggio del brillantante è eccessivo.
• È stato selezionato un programma senza asciugatura.
• Il brillantante è esaurito o il dosaggio è insufficiente (vedi Brillantante e
sale).
• La regolazione del brillantante non è adeguata.
• I cestelli sono troppo carichi (vedi Caricare i cestelli).
• Le stoviglie non sono sistemate bene.
• Gli irroratori non sono liberi di ruotare.
• Il programma di lavaggio è troppo blando (vedi Programmi).
• Eccessiva presenza di schiuma: il detersivo non è dosato
adeguatamente o non è idoneo al lavaggio in lavastoviglie. (vedi Avvio
e utilizzo).
• Il tappo del brillantante non è stato chiuso correttamente.
• Il filtro è sporco o intasato (vedi Manutenzione e cura).
• Manca il sale rigenerante (vedi Brillantante e sale).
• Manca l’acqua nella rete idrica.
• Il tubo di carico dell’acqua è piegato (vedi Installazione).
• Aprire il rubinetto e l’apparecchio si avvia dopo pochi minuti.
• L’apparecchio si è bloccato perché non si è intervenuti al suono dei bip.
Spegnere la macchina con il tasto ON/OFF, aprire il rubinetto e dopo
20 secondi riaccendere premendo lo stesso tasto. Riprogrammare la
macchina e riavviare.
• Spegnere la macchina con il tasto ON/OFF e riaccendere dopo un
minuto. Se l’ allarme permane chiudere il rubinetto dell’acqua per
evitare allagamenti, staccare la spina della corrente e chiamare
l’Assistenza.
• Spegnere la macchina premendo il tasto ON/OFF. Chiudere il rubinetto
dell’acqua per evitare allagamenti, staccare la spina della corrente.
Controllare che il filtro entrata acqua non sia intasato da impurità.
(vedere capitolo "Manutenzione e Cura")

Operating instructions
DISHWASHER
EN
English, 12
DIFP 48
Contents
Installation, 13-14
Positioning and levelling
Connecting the water and electricity supplies
Advice regarding the first wash cycle
Technical data
Description of the appliance, 15
Overall view
Control panel
Loading the racks, 16
Lower rack
Cutlery basket
Upper rack
Start-up and use, 17
Starting the dishwasher
Measuring out the detergent
Wash options
Wash cycles, 18
Table of wash cycles
Rinse aid and refined salt, 19
Measuring out the rinse aid
Measuring out the refined salt
Care and maintenance, 20
Shutting off the water and electricity supplies
Cleaning the dishwasher
Preventing unpleasant odours
Cleaning the sprayer arms
Cleaning the water inlet filter
Cleaning the filters
Leaving the machine unused for extended periods
Precautions and advice, 21
General safety
Disposal
Saving energy and respecting the environment
Troubleshooting, 22
Installation
Keep this instruction manual in a safe place for future
reference. If the appliance is sold, given away or moved,
please ensure the manual is kept with the machine, so that the
new owner may benefit from the advice contained within it.
Please read this instruction manual carefully: it contains
important information regarding the safe installation, use and
maintenance of the appliance.
If the appliance must be moved at any time, keep it in an
upright position; if absolutely necessary, it may be tilted onto
its back.
Positioning and levelling
1. Remove the appliance from all packaging and check that it
has not been damaged during transportation.
If it has been damaged, contact the retailer and do not
proceed any further with the installation process.
2. Check the dishwasher by placing it so that its sides or back
panel are in contact with the adjacent cabinets or even with the
wall. This appliance can also be recessed under a single
worktop
3. Position the dishwasher on a level and sturdy floor. If the
floor is uneven, the front feet of the appliance may be adjusted
until it reaches a horizontal position. If the appliance is levelled
correctly, it will be more stable and much less likely to move or
cause vibrations and noise while it is operating.
4
appliance
a hexagonal spanner (red color) with an opening of 8 mm in a
clockwise direction to increase the height or in an
anticlockwise direction to decrease the height.
* (see the Assembly instruction sheet).
*. Adjust the height of the rear foot from the front of the
* on the central lower part of the dishwasher, turning
Connecting the water inlet hose
To a suitable cold water connection point: before attaching
the hose, run the water until it is perfectly clear so that any
impurities that may be present in the water do not clog the
appliance; after performing this operation, screw the inlet
hose tightly onto a tap with a ¾ gas threaded connection.
To a suitable hot water connection point: your dishwasher
may be supplied with hot water from the mains supply (if
you have a central heating system with radiators) provided
that it does not exceed a temperature of 60°C.
Screw the hose to the tap as described for connection to a
cold water supply.
If the inlet hose is not long enough, contact a specialist
store or an authorised technician (see Assistance).
The water pressure must be within the values indicated in
the Technical data table (see adjacent information).
The hose should not be bent or compressed.
Anti-flooding protection
To ensure floods do not occur, the dishwasher:
- is provided with a special system which blocks the water
supply in the event of anomalies or leaks from inside the
appliance.
Some models are also equipped with the supplementary
safety device New Acqua Stop
flooding protection even in the event of a supply hose rupture.
*, which guarantees anti-
EN
Connecting the water and electricity
supplies
Connection to the water and electricity supplies should
only be performed by a qualified technician.
The dishwasher should not stand on top of the water
hoses or the electricity supply cable.
The appliance must be connected to the water supply
network using new hoses.
Do not use old hoses.
The water inlet (A) and outlet (B) hoses and the electricity
supply cable may be positioned towards the right or the left in
order to achieve the best possible installation (see figure).
WARNING: HAZARDOUS VOLTAGE!
Under no circumstance should the water inlet hose be cut as it
contains live electrical parts.
* Only available in selected models.
13
Connecting the water outlet hose
EN
Connect the outlet hose (without bending it) to a drain duct
with a minimum diameter of 4 cm. Alternatively, rest it over a
sink or tub; the free end of the hose should not remain
immersed in water.
The special plastic elbow
A
makes it easier to find the best
layout: fix the elbow to the wall
securely in order to prevent the
outlet hose from moving and
spilling the dirty water.
The part of the hose marked
with the letter A should be
between 40 and 100 cm above
the ground (see figure).
We advise against the use of hose extensions.
Electrical connection
Before inserting the plug into the electrical socket, make sure
that:
The socket is earthed and complies with current
regulations.
The socket can withstand the maximum load of the
appliance, which is indicated on the data plate located on
the inside of the door (see chapter entitled Description of
the appliance).
The power supply voltage falls within the values indicated
on the data plate on the inside of the door.
The socket is compatible with the plug of the appliance. If
this is not the case, ask an authorised technician to replace
the plug (see Assistance); do not use extension cables or
multiple sockets.
Once the appliance has been installed, the power supply
cable and the electrical socket should be easily accessible.
The cable should not be bent or compressed.
If the power supply cable is damaged, it must be replaced
by the manufacturer or its Technical Assistance Service in order
to prevent all potential hazards. (See Assistance)
The Company shall not be held responsible for any
incidents that occur if these regulations are not observed.
Anti-condensation strip*
After installing the dishwasher, open the door and stick the
adhesive transparent strip under the wooden shelf in order to
protect it from any condensation which may form.
Advice regarding the first wash cycle
*
After the appliance has been installed, immediately before
running the first wash cycle, completely fill the salt dispenser
with water and add only then approximately 1 kg of salt (see
chapter entitled Rinse aid and refined salt). The water may
overflow: this is normal and is not a cause for concern. Select
the water hardness value (see chapter entitled Rinse aid and
refined salt).
machine, the LOW SALT indicator light
If the salt container is not filled, the water softener and the
heating element may be damaged as a result.
- After the salt has been poured into the
* switches off.
Technical data
width 59.5 cm
Dimensions
height 82 cm
depth 57 cm
Capacity
Water supply
pressure
Power supply
voltage
Total absorbed
power
Fuse
12 standard place-settings
0,05 ÷ 1MPa (0.5 ÷ 10 bar)
7,25 – 145 psi
See appliance data plate
See appliance data plate
See appliance data plate
This dishwasher conforms to
the following European
Community Directives:
-2006/95/CE dated
16/01/2007 (Low Voltage) and
subsequent modifications
-89/336/EEC dated 03/05/89
(Electromagnetic
Compatibility)
and subsequent modifications
-97/17/EC (Labelling)
-2002/96/ CE (Waste
Electrical and Electronic
Equipment WEEE)
14
* Only available in selected models.
Description of the
appliance
Overall view
1. Upper rack
2. Upper sprayer arm
3. Tip-up compartments
4. Rack height adjuster
5. Lower rack
6. Lower sprayer arm
7. Cutlery basket
8. Washing filter
9. Salt dispenser
10. Detergent and rinse aid dispensers
11. Data plate
12. Control Panel
***
EN
Control panel
Select wash
cycle button
ON/OFF
indicator light
ON/OFF/Reset
button
Low rinse aid
indicator light*
Low salt
indicator
light*
Wash cycle number
light-up indicator
Delayed start
button*
Delayed start
indicator lights*
***Only in completely built-in models.
* Only available in selected models.
The number and type of wash cycles and options may vary depending on the dishwasher model.
15
Loading the racks
EN
Before loading the racks, remove all food residues from
the crockery and empty liquids from glasses and cups.
After loading the appliance, check that the sprayer arms
can rotate freely.
Lower rack
The lower rack can hold pans, lids, plates, salad bowls,
cutlery, etc. as seen in the Loading examples.
Plates and large covers should be placed at the sides of the
rack, ensuring that they do not block the rotation of the upper
sprayer arm.
Some dishwasher models are fitted with tip-up sections
which can be used in a vertical position when arranging
plates or in a horizontal position when arranging pans and
salad bowls.
Cutlery basket
The type of cutlery basket may vary according to the
dishwasher model: it may be modular, non-modular or a sliding
version. The non-modular basket must only be positioned at
the front of the lower rack.
The modular basket may be separated into two parts, a solution
which is recommended when performing a half load wash (only
in models offering this option), is available in a sliding version
(positioned at any point on the lower rack by sliding it between
the fixed or tip-up inserts.
- Both versions are fitted with a collapsible sliding system which
means the cutlery can be arranged in the best possible way.
Adjusting the height of the upper rack
In order to make it easier to arrange the crockery, the upper
rack may be moved to a higher or lower level. (in models which
The height of the upper rack should ideally be adjusted
WHEN THE RACK IS EMPTY.
Never lift or lower the rack on one side only.
Open the left and right guide rail stops
and pull out the rack; position it higher or
*,
lower as required, slide it along the guide
rails until the front wheels are in place
and close the stops (see figure).
If the rack is fitted with Dual Space
handles
rack until it reaches its stop point, grip the
handles at the sides of the rack and move
it upwards or downwards, then slowly let it
fall back into place.
* (see figure), pull out the upper
Loading examples for the upper rack
Loading examples for the lower rack
Knives and other utensils with sharp edges must be
placed in the cutlery basket with the points facing
downwards, or they must be positioned horizontally in the tipup compartments on the upper rack.
Cutlery basket positioning examples
Upper rack
Load this rack with delicate and lightweight crockery:
glasses, tea and coffee cups, saucers, small salad bowls,
saucepans and small saucepans which are not too soiled,
using the Loading examples as a guide.
Mugs and cups: place these on the tip-up compartments**.
Long sharp knives and serving utensils: place these on the
tip-up compartments
**.
Items which should not be washed in the
dishwasher
Wooden items, objects with wooden or horn handles or
glued-on parts.
Items made from aluminium, copper, brass, pewter or tin.
Items made from plastic material which is not heat-resistant.
Antique or hand-painted porcelain.
Antique silver. Silver which is not antique may, however, be
washed in the dishwasher using a delicate wash cycle,
provided that it does not come into contact with other metals.
We recommend the use of crockery which is dishwasher
safe.
*Only available in selected models.
** The number and position may vary.
16
Start-up and use
Starting the dishwasher
1. Turn the water tap on.
2. Open the door and press the ON/OFF button: you will hear
a short beep and the display and option indicator lights switch
on.
3. Measure out the detergent (see below).
4. Load the racks (see Loading the racks).
5. Select the wash cycle in accordance with the type of
crockery and its soil level (see Table of wash cycles),
pressing the P button.
6. Select the wash options (see adjacent information).
7. Start the wash cycle by shutting the door: a long beep
signals the start of the wash cycle.
8. Two short beeps and one long one indicate the end of the
wash cycle and the wash cycle number flashes on the display.
Open the door, switch off the appliance by pressing the ON/
OFF button, shut off the water tap and unplug the appliance
from the electricity socket.
9. Wait for a few minutes before removing the crockery, in
order to avoid burns. Unload the racks, beginning with the
lower level.
The order in which the different wash cycles are displayed
will change according to the frequency with which each cycle
is used.
AUTO WASH CYCLES
equipped with a special sensor which can be used to assess
the level of soiling and automatically select the most efficient
and economic wash cycle accordingly.
The duration of the auto wash cycles may vary due to the
operation of the sensor.
If the crockery is only lightly soiled or if it has been rinsed
with water before being placed in the dishwasher, reduce the
amount of detergent used accordingly.
*: this model of dishwasher is
by
Modifying a wash cycle in progress
If a mistake was made during the wash cycle selection
process it is possible to change the cycle, provided that it has
only just begun: open the door, avoiding the escaping steam,
and press and hold the ON/OFF button; the machine will
switch off with a long beep. Switch the machine back on using
the ON/OFF button and select the new wash cycle and any
options desired; start the cycle by closing the door.
Adding extra crockery
Without switching off the machine, open the door, taking care
to avoid the escaping steam, and place the crockery inside
the dishwasher. Close the door: the cycle starts from the point
at which it was interrupted.
Accidental interruptions
If the door is opened during the wash cycle, or if there is a
power cut, the cycle stops. It starts again from the point at
which it was interrupted once the door has been shut or once
the electricity supply is restored.
* Only available in selected models.
Measuring out the detergent
A good wash result also depends on the correct
amount of detergent being used; exceeding the stated
amount does not result in a more effective wash and
increases environmental pollution.
Only use detergent which has been
specifically designed for dishwashers.
DO NOT USE washing up liquid.
Using excessive detergent may result in foam
residue remaining in the machine after the cycle
has ended.
The use of tablets is only recommended for
models which offer the MULTI-FUNCTIONAL
TABLETS option.
To achieve the best results from each washing and
drying cycle, powder detergent, rinse aid liquid and
salt should be used.
Compartment A: Washing detergent
Compartment B: Pre-wash detergent
D
A
B
C
when the cycle requires 1 tablet, place it in compartment
A and close the cover; when it requires 2, place the
second tablet at the bottom of the appliance.
3. Remove detergent residues from the edges of the
compartment and close the cover until it clicks.
1. Open cover C by pressing
button D.
2. Pour in the detergent after
consulting the Table of wash
cycles:
For powder detergent use
compartments A and B.
For detergent in tablet form:
Wash options
If an option is not compatible with the selected was cycle
(see Table of wash cycles), the corresponding LED flashes
rapidly 3 times and 2 short beeps will sound.
Delayed start
It is possible to delay the start time of the cycle by 3, 6 or 9
hours.
1. Press the DELAYED START button: every time it is pressed
a buzzer sounds and the selected period of time is displayed.
2. Select the wash cycle and shut the door: after the beep
sounds, the timer begins counting down.
3. Once this time has elapsed, the indicator light switches off
and the wash cycle begins.
To adjust the delay time and select a smaller period of time,
press the DELAYED START button. To cancel it, press the
button repeatedly until the selected delayed start indicator light
switches off. The wash cycle will start automatically as soon as
the door is shut.
EN
17
Wash cycles
EN
If the crockery is only lightly soiled or if it has been rinsed with water before being placed in the
dishwasher, reduce the amount of detergent used accordingly.
The number and type of wash cycles and options may vary depending on the dishwasher model.
Wash cycle selection
instructions
Heavily soiled dishes and pans
(not to be used for delicate
items).
Normally soiled pans and dishes.
Standard daily wash cycle.
Pre-wash for dishes while
awaiting completion of the load
with the dishes from the next
meal.
Environmentally-friendly wash
cycle with low energy
consumption levels, suitable for
pans and dishes.
Economic and fast wash to be
used for lightly soiled dishes.
(Run cycle immediately after use)
(2 plates + 2 glasses + 4 pieces
of cutlery + 1 saucepan + 1 small
frying pan). 5. Rapide
Economic and fast wash for
delicate items which are sensitive
to high temperatures. (Run cycle
immediately after use) (12
glasses + delicate plates). 6. Crystal
Quick wash and dry cycle,
suitable for heavily soiled
crockery and pans (not suitable
for delicate items).
Quick wash and dry cycle,
suitable for crockery and pans
with a normal soil level.
Wash cycle
1. Super Wash
2. Normal
3. Soak
*
4. Eco
7. Intensive
Speed+
8. Normal
Speed+
(A) = compartment A
(B) = compartment B
Powder Liquid Tablets
30 g (A)
25 g (A)
5 g (B)
No
25 g (A)
5 g (B)
25 g (A) 25 ml (A) 1 (A)
30 g (A) 30 ml (A) 1 (A)
30 g (A) 30 ml (A) 1 (A)
25 g (A)
5 g (B)
Detergent
30 ml (A)
25 ml (A)
5 ml (B)
No
25 ml (A)
5 ml (B)
25 ml (A)
5 ml (B)
Wash
cycles
which
include
drying
1 (A)
1 (A)
No
1 (A) Yes
1 (A) Yes
Yes
Yes
No
No
Yes
Yes
Options
Delayed
start
Delayed
start
Delayed
start
Delayed
start
Delayed
start
Delayed
start
Delayed
start
Delayed
start
Wash
cycle
duration
(tolerance
±10%)
Hrs. Min.
2:15’
1:45’
0:08’
2:35’
0:35’
1:30’
1:40’
1:20’
Notes:
Optimum performance levels when using the "Rapide wash" cycles can be achieved by observing the maximum amounts of crockery
specified.
To make it easier to measure out the detergent, it is worth remembering that:
1 tablespoon = 15 gr. of powder = approximately 15 ml of liquid - 1 teaspoon = 5 gr. of powder = approximately 5 ml of liquid
* The Eco wash cycle adheres to the regulation EN-50242. Although it has a longer duration than other wash cycles it uses less
energy and is les harmful to the environment.
Note for Test Laboratories: for information relating to comparative EN testing conditions, please send an email to the following
address: ASSISTENZA_EN_LVS@indesitcompany.com
18
Rinse aid and refined salt
Only use products which have been
specifically designed for dishwashers.
Do not use table salt or industrial salt, or
washing up liquid.
Follow the instructions given on the packaging.
If using a multi-functional product it is not necessary to
add rinse aid; however, we recommend that you add salt,
especially if you live in an area where the water is hard or
very hard. Follow the instructions given on the packaging.
If you do not add salt or rinse aid, the LOW
* and LOW RINSE AID* indicator lights
SALT
remain lit.
Measuring out the rinse aid
Rinse aid makes it easier for the crockery to dry, as water
runs off surfaces more readily and therefore does not leave
streaks or marks.
The rinse aid dispenser should be filled:
When the LOW RINSE AID* indicator light on the control
panel is illuminated;
1. Open the dispenser by turning
the lid (G) in an anticlockwise
direction.
2. Pour in the rinse aid, making
sure it does not overflow from the
dispenser. If this happens, clean
F
the spill immediately with a dry
G
cloth.
3. Screw the lid back on.
NEVER pour the rinse aid directly into the appliance tub.
Adjusting the amount of rinse aid
If you are not completely satisfied with the drying results,
you may adjust the quantity of rinse aid used. Use a
screwdriver to turn the dosage adjuster (F) to one of the 6
pre-set positions (the default position is set to 4):
If there are streaks on the crockery, set the adjustment
device to a lower number (1-3).
If drops of water remain on the crockery or if there are
limescale marks present after the cycle has finished, set
the adjuster to a higher number (4-6).
Setting the water hardness
Every dishwasher is equipped with a water softener which, by
using refined salt designed especially for this type of
appliance, supplies water without limescale which is then used
to wash the crockery.
This dishwasher offers a setting which helps to reduce
pollution and optimises washing performance in accordance
with the water hardness level in your area. This information can
be obtained from the organisation which supplies your
household with water.
- Open the door and switch on the machine by pressing the
ON/OFF button.
- Press the P button and hold for approximately 5 seconds;
two short beeps will sound and the set hardness number will
flash slowly on the display (the water softening system is set
to number 3).
- Press the P button repeatedly until the desired hardness
level has been reached (1-2-3-4-5
table).
- To exit the function, wait approximately 30 seconds or press
another option button, or switch off the machine using the ON/
OFF button.
Even if using multi-functional tablets, the salt dispenser should
still be filled.
Water Hardness Table
°dH °fH mmol/l level
0 6 0 10 0 1 1
6 11 11 20 1.1 2 2
12 17 21 30 2.1 3 3
17 34 31 60 3.1 6 4
34 50 61 90 6.1 9
For values between 0°f and 10°f, we do not
recommend the use of salt.
* this setting may cause a slight increase in the
duration of the cycle.
(°dH = hardness measured in German degrees - °f =
hardness measured in French degrees - mmol/l = millimoles
per litre)
* see Water hardness
*
5
Measuring out the refined salt
In order to achieve the best possible results using a wash
cycle, make sure that the dispenser is never empty.
Refined salt removes limescale from the water, thus
avoiding the formation of deposits on crockery.
The salt dispenser is located in the lower part of the
dishwasher (see Description) and should be filled:
When the green float
the cap of the salt dispenser.
When the LOW SALT
illuminated;
leak out.
4. Remove the funnel* and wipe any salt residue away from the
opening; rinse the cap under running water and then screw it
on, the head facing downwards so as to let the water flow out
of the four cracks which are arranged in a star shape on the
lower part of the cap. (Salt cap with green float
It is advisable to perform this procedure every time you
add salt to the container.
Make sure the cap is screwed on tightly, so that no detergent
can get into the container during the wash cycle (this could
damage the water softener beyond repair).
When necessary, measure out the salt before a wash
cycle so that any saline solution which has leaked out of the
salt dispenser is removed.
* cannot be seen by simply looking at
* indicator light on the control panel is
1. Remove the lower rack and
unscrew the container cap
(anticlockwise).
2. The first time you do this: fill the
water tank right up to its edge.
3. Position the funnel
and fill the salt container right up to its
edge (this should hold approximately
1 kg); it is not unusual for a little water to
* (see figure)
*)
EN
* Only available in selected models.
19
Care and maintenance
Shutting off the water and electricity
EN
supplies
Turn off the water tap after every wash cycle to avoid
leaks.
Always unplug the appliance when cleaning it and
when performing maintenance work.
Cleaning the dishwasher
The external surfaces of the machine and the control
panel may be cleaned using a non-abrasive cloth
which has been dampened with water. Do not use
solvents or abrasive products.
Any marks on the inside of the appliance may be
removed using a cloth dampened with water and a
little vinegar.
Preventing unpleasant odours
Always keep the door of the appliance ajar in order to
avoid moisture from forming and being trapped inside
the machine.
Clean the seals around the door and detergent
dispensers regularly using a damp sponge. This will
avoid food becoming trapped in the seals, which is
the main cause behind the formation of unpleasant
odours.
Clean the water inlet filter at the tap outlet regularly.
- Turn off the water tap.
- Unscrew the end of the water inlet hose, remove the filter and
clean it carefully under running water.
- Replace the filter and screw the water hose back into
position.
Cleaning the filters
The filter assembly consists of three filters which remove food
residues from the washing water and then recirculate the
water. They should be cleaned if you wish to achieve the best
results in every wash.
Clean the filters regularly.
The dishwasher should not be used without filters, or if the
filter is loose.
After several washes, check the filter assembly and if
necessary clean it thoroughly under running water, using a
non-metallic brush and following the instructions below:
1. Turn the cylindrical filter C in an anti-clockwise direction
and pull it out (fig. 1).
2. Remove the cup filter B by exerting a slight pressure on the
side flaps (fig. 2).
3. Slide out the stainless steel plate filter A (fig. 3).
4. Inspect the trap and remove any food residue. NEVER
REMOVE the wash cycle pump (black detail) (fig. 4).
Cleaning the sprayer arms
Food residue may become encrusted onto the sprayer
arms and block the holes used to spray the water. It is
therefore recommended that the arms are checked from
time to time and cleaned with a small non-metallic
brush.
The two sprayer arms may both be removed.
To remove the upper sprayer
arm, rotate the locking ring in
an anti-clockwise direction.
The upper sprayer arm should
be replaced with the holes
facing upwards.
The lower sprayer arm can be
removed by pressing on the
side tabs and pulling it
upwards.
Cleaning the water inlet filter*
If the water hoses are new or have not been used for an
extended period of time, let the water run to make sure it
is clear and free of impurities before performing the
necessary connections. If this precaution is not taken,
the water inlet could become blocked and damage the
dishwasher.
B
C
C
1
2
A
3
After cleaning the filters, replace the filter assembly and fix it in
position correctly; this is essential for maintaining the efficient
operation of the dishwasher.
4
Leaving the machine unused for extended
periods
Disconnect the appliance from the electricity supply and
shut off the water tap.
Leave the door of the appliance ajar.
When you return, run a wash cycle when the dishwasher is
empty.
20
* Only available in selected models.

Precautions and advice
This appliance was designed and manufactured in
compliance with current international safety standards. The
following information has been provided for safety reasons
and should therefore be read carefully.
General safety
The appliance was designed for domestic use inside the
home and is not intended for commercial or industrial use.
The appliance must be used by adults only, to wash
domestic crockery in accordance with the instructions in
this manual.
The appliance must not be installed outdoors, even in
covered areas. It is extremely dangerous to leave the
machine exposed to rain and storms.
Do not touch the appliance when barefoot.
When unplugging the appliance always pull the plug from
the mains socket, do not pull on the cable.
The water supply tap must be shut off and the plug should
be removed from the electrical socket before cleaning the
appliance or carrying out any maintenance work.
If the appliance breaks down, do not under any
circumstances touch the internal parts in an attempt to
perform the repair work yourself.
Never touch the heating element.
Do not lean or sit on the open door of the appliance: this
may cause the appliance to overturn.
The door should not be left open as it may create a
dangerous obstacle.
Keep detergent and rinse aid out of reach of children.
The packaging material should not be used as a toy.
Disposal
Disposal of packaging materials: observe local legislation
so that the packaging may be reused.
The European Directive 2002/96/EC relating to Waste
Electrical and Electronic Equipment (WEEE) states that
household appliances should not be disposed of using the
normal solid urban waste cycle. Exhausted appliances
should be collected separately in order to optimise the cost
of re-using and recycling the materials inside the machine,
while preventing potential damage to the atmosphere and
to public health. The crossed-out dustbin is marked on all
products to remind the owner of their obligations regarding
separated waste collection.
Saving energy and respecting the
environment
Saving water and energy
Only begin a wash cycle when the dishwasher is full. While
waiting for the dishwasher to be filled, prevent unpleasant
odours using the Soak cycle (see Wash cycles).
Select a wash cycle which is suited to the type of crockery
and to the soil level of the crockery using the Table of wash
cycles:
- For dishes with a normal soil level, use the Eco wash
cycle, which guarantees low energy and water
consumption levels.
- If the load is smaller than usual activate the Half load
option
* (see Start-up and use).
If your electricity supply contract gives details of electricity
saving time bands, run wash cycles during the periods
when a lower tariff is applied. The Delayed start
(see Start-up and use) helps you organise the wash cycles
accordingly.
Phosphate-free and chlorine-free detergents
containing enzymes
We strongly recommend that you use detergents that do
not contain phosphates or chlorine, as these products are
harmful to the environment.
Enzymes provide a particularly effective action at
temperatures around 50°C, and as a result detergents
containing enzymes can be used in conjunction with lowtemperature wash cycles in order to achieve the same
results as a normal 65°C wash cycle.
To avoid wasting detergent, use the product in appropriate
quantities based on the manufacturers recommendations,
the hardness of the water and the soil level and quantity of
crockery to be washed. Even if they are biodegradable,
detergents contain substances which may alter the balance
of nature.
* button
EN
For further information relating to the correct disposal of
household appliances, owners may contact the relevant
public authority or the local appliance dealer.
* Only available in selected models.
21

Troubleshooting
Whenever the appliance fails to work, check for a solution from the following list before calling for
EN
Assistance.
Malfunction: Possible causes / Solutions:
The dishwasher does not start.
• The plug has not been inserted into the electrical socket properly, or there is
no power in the house.
• The dishwasher door has not been shut properly.
• A delayed start has been programmed (
see Start-up and use
).
No water drains out from the
dishwasher.
The dishwasher makes
excessive noise.
The dishes and glasses are
covered in a white film or
limescale deposits.
The dishes and glasses are
streaked or have a bluish
tinge.
The crockery has not been
dried properly.
The dishes are not clean.
• The dishwasher cycle has not yet finished.
• The water outlet hose is bent (
• The drain duct is blocked.
• The filter is clogged up with food residues.
• The dishes are rattling against each other or against the sprayer arms.
• An excessive amount of foam has been produced: the detergent has not
been measured out correctly or it is not suitable for use in dishwashers
(see Start-up and use).
• The level of the refined salt is low or the dosage setting is not suited to the
hardness of the water (
• The lid on the salt dispenser is not closed properly.
• The rinse aid has been used up or the dosage is too low.
• The crockery is made from non-stick material.
• The rinse aid dosage is too high.
• A wash cycle without a drying programme has been selected.
• The rinse aid has been used up or the dosage is too low (
salt).
• The rinse aid dispenser setting is not high enough.
• The racks are overloaded (see Loading the racks).
• The crockery has not been arranged well.
• The sprayer arms cannot move freely.
• The wash cycle is too gentle (see Wash cycles).
• An excessive amount of foam has been produced: the detergent has not
been measured out correctly or it is not suitable for use in dishwashers
(see Start-up and use).
• The lid on the rinse aid compartment has not been shut correctly.
• The filter is dirty or blocked (see Care and maintenance).
• The refined salt level is low (see Rinse aid and salt).
see Installation
see Rinse aid and salt
).
).
see Rinse aid and
The dishwasher does not take
any water in/Tap shut-off
alarm.
(several short beeps are emitted)
(the ON/OFF indicator light flashes and
the number 6 appears on the display).
Water intake solenoid valve
malfunction alarm
(the ON/OFF indicator light flashes and
the number 2 appears on the display).
Water inlet hose alarm/Water inlet
filter blocked.
(the ON/OFF indicator light flashes and
the number 7 appears on the display).
* Only available in selected models.
22
• There is no water in the mains supply.
• The water inlet hose is bent (
• Turn on the tap and the appliance will start after a few minutes.
• The appliance lock has been activated because no action was taken when
the beeps sounded. Switch off the machine using the ON/OFF button, turn
on the tap and switch the machine back on after 20 seconds by pressing
the same button. Re-programme the machine and restart the wash cycle.
• Switch off the appliance by pressing the ON/OFF button and switch it back
on after one minute. If the alarm continues, shut off the water tap to
eliminate the risk of flooding, remove the plug from the electrical socket
and contact Assistance.
• Switch off the appliance by pressing the ON/OFF button. Shut off the water
tap to eliminate the risk of flooding and remove the plug from the electrical
socket. Make sure the water inlet filter has not become blocked by various
impurities. (see “Care and maintenance” chapter).
see Installation).

Mode demploi
LAVE-VAISSELLE
FR
Français, 23
DIFP 48
Sommaire
FR
Installation, 24-25
Mise en place et mise à niveau
Raccordements eau et électricité
Conseils pour le premier lavage
Caractéristiques techniques
Description de lappareil, 26
Vue densemble
Tableau de bord
Charger les paniers, 27
Panier inférieur
Panier à couverts
Panier supérieur
Mise en marche et utilisation, 28
Mettre en marche le lave-vaisselle
Charger le produit de lavage
Options de lavage
Programmes, 29
Tableau des programmes
Produit de rinçage et sel régénérant, 30
Charger le produit de rinçage
Charger le sel régénérant
Entretien et soin, 31
Coupure de larrivée deau et de courant
Nettoyer le lave-vaisselle
Eviter les mauvaises odeurs
Nettoyer les bras de lavage
Nettoyage du filtre dentrée deau
Nettoyer les filtres
En cas dabsence pendant de longues périodes
Précautions et conseils, 32
Sécurité générale
Mise au rebut
Economies et respect de lenvironnement
Anomalies et remèdes, 33
23
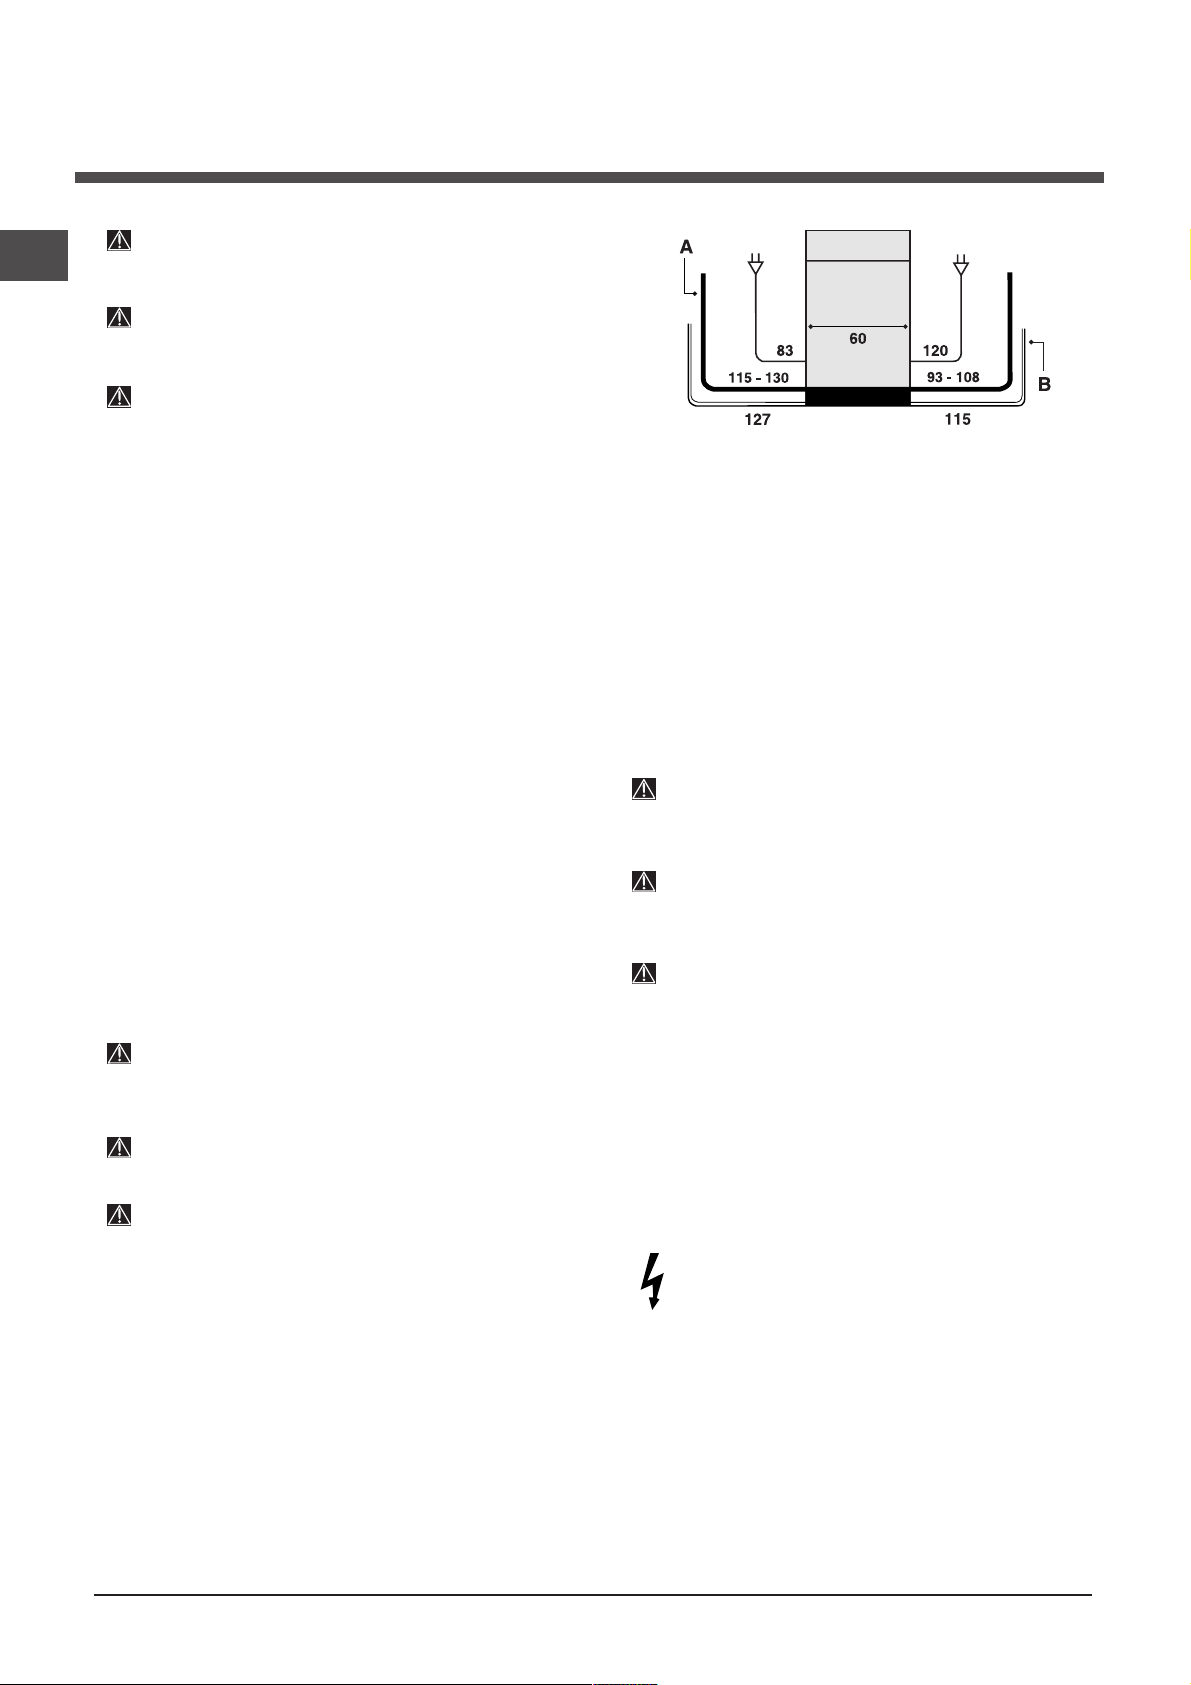
Installation
FR
Conserver ce mode demploi pour pouvoir le consulter à
tout moment. En cas de vente, de cession ou de
déménagement, sassurer quil accompagne bien lappareil.
Lire attentivement les instructions : elles contiennent des
conseils importants sur linstallation, lutilisation
et la sécurité de lappareil.
En cas de déménagement, transporter lappareil
verticalement; si besoin est, lincliner sur le dos.
Mise en place et mise à niveau
1. Déballer lappareil et sassurer quil na pas été endommagé
pendant le transport.
Sil est abîmé, ne pas le raccorder et contacter le revendeur.
2. Installer le lave-vaisselle de manière à ce que les côtés et la
paroi arrière touchent aux meubles adjacents ou au mur.
Lappareil peut être encastré sous un plan de travail continu
(voir feuille de Montage).
3. Installer le lave-vaisselle sur un sol plat et rigide.
Compenser les irrégularités en vissant ou en dévissant les
pieds avant jusquà ce que lhorizontalité de lappareil soit
parfaite. Une bonne horizontalité garantit la stabilité de
lappareil et supprime tout risque de vibrations, bruits et
déplacements.
*. Pour régler la hauteur du pied arrière, agir sur la douille
4
rouge à six pans située dans la partie avant du lave-vaisselle,
en bas et au milieu, à laide dune clé mâle à six pans,
ouverture 8 mm. Tourner dans le sens des aiguilles dune
montre pour augmenter la hauteur et dans le sens inverse
pour la diminuer. (consulter la notice dinstructions encastré
jointe à la documentation)
*
Raccord du tuyau damenée de leau
A une prise deau froide: bien visser le tuyau damenée à un
robinet à embout fileté 3/4 gaz; avant de visser, faire couler
leau jusquà ce quelle devienne limpide et dépourvue
dimpuretés qui pourraient engorger lappareil.
A une prise deau chaude: en cas dinstallation de
chauffage centralisé (radiateurs), le lave-vaisselle peut être
alimenté avec de leau chaude de réseau ne dépassant
pas 60°C.
Visser le tuyau au robinet en procédant comme pour la
prise deau froide.
Si la longueur du tuyau damenée ne suffit pas, sadresser
à un magasin spécialisé ou à un technicien agréé (voir
Assistance).
La pression de leau doit être comprise entre les valeurs
reportées dans le tableau des Caractéristiques techniques (voir
ci-contre).
Faire attention à ce que le tuyau ne soit ni plié ni écrasé.
Raccordements eau et électricité
Ladaptation des installations électriques et les travaux de
plomberie de linstallation doivent être effectués par du
personnel qualifié.
Le lave-vaisselle ne doit pas écraser les tuyaux ou le
câble dalimentation électrique.
Utiliser des tuyaux neufs pour effectuer le raccordement
de lappareil au réseau de distribution de leau.
Ne pas réutiliser les anciens tuyaux.
Les tuyaux damenée (A) et dévacuation (B) de leau et le
câble dalimentation électrique peuvent être orientés vers la
droite ou vers la gauche pour simplifier linstallation (voir
figure).
Sécurité anti-fuite
Pour éviter tout risque dinondation, le lave-vaisselle :
- est équipé dun dispositif qui coupe larrivée de leau en cas
danomalie ou de fuite à lintérieur de lappareil.
Quelques modèles sont équipés dun dispositif de sécurité
supplémentaire New Acqua Stop
risque dinondation même en cas de rupture du tuyau
damenée de leau.
ATTENTION : TENSION DANGEREUSE!
Il ne faut en aucun cas couper le tuyau damenée de leau car il
contient des parties sous tension.
* qui garantit contre tout
* Présent uniquement sur certains modèles.
24
 Loading...