

Page 1

Fridge-freezer
Combined
Instructions for installation and use
C 239 NF UK
Page 2

GB
Fridge-freezer combined
Instructions for installation and use
To maintain the EFFICIENCY and SAFETY of this appliance, we recommend:
- use only the MANUFACTURER Service
- use only ORIGINAL Spare Parts
Page 3

Safety - a good habit to get into.
ATTENTION
Read your manual carefully since it contains instructions
which will ensure safe installation, use and maintenance of
your appliance.
Your Refrigerator is built to International safety standards
(EN60) ans has been awarded the European approval mark
(IMQ) for compliance with UK electrical safety requirements.
It also meets the EC standards on the prevention and elimination of readio interference (EC directive 87/308 - 02.06.89).
1. This appliance must not be installed outdoors - not even in
an area protected by a roof. It is extremely dangerous to leave
it exposed to rain or storms.
2. It must only be used by adults and exclusively to refrigerate
and freeze foodstuffs, following the instructions for use contained in this manual.
3. Do not ever touch or handle the appliance with bare feet or
with wet hands or feet.
4. It is highly recommended that you do not use extension
cords or multiple socket adapters. If the refrigerator is installed
between cabinets, make sure that the cord is not bent or dangerously pinched or compressed.
5. Never pull on the cord or the refrigerator to remove the plug
from the wall socket - this is very dangerous.
6. Never touch the cooling components within the appliance,
especially with wet hands because this could result in injury.
Never put ice cubes just removed from the freezer into your
mouth because they could stick to your mouth and cause burns.
7. Do not carry out any cleaning or maintenance operations
without first having disconnected your appliance from the mains
power supply (by unplugging it or turning off the cut-out switch
in your home); turning the thermostat knob to " " is not
enough to eliminate all electric contacts.
8. Before having your old refrigerator picked up for disposal,
remove or make inoperable any locking devices to prevent children who might play in or around the appliance from being
locked inside.
9. Before calling for service/assistance in the case of malfunction, consult the chapter entitled “Is There a Problem? to determine whether it is possible to eliminate the problem. do not
try to repair the problem by trying to access the internal components of the appliance.
10. If damaged, the power supply cord on this appliance
must necessarily be replaced by our service centre because
special tools are required for replacement.
11. Do not use electric appliances inside the compartment for
food storage, if these are not those recommended by the
manufacturer.
12. At the end of the functional life of your appliance –
containing cyclopentane gas in the insulation foam and perhaps
gas R600a (isobutane) in the refrigeration circuit – the latter
should made safe before being sent to the dump.
For this operation, please contact your dealer or the Local
Organisation in charge of waste disposal.
Installation
Proper installation of the appliance is essential to ensure the best and most efficient performance of your
appliance.
Ventilation
The compressor and condenser generate heat and, therefore, need to be ventilated properly. Rooms with less than
perfect ventilation are not very suited for installation of the
appliance. Therefore, it should be installed in a room with
an opening (window or French window) that provide the
appropriate amount of air re-circulation. It is also important
that the room not be too humid.
During installation, make sure not to cover or obstruct the
grates that allow for proper ventilation of the appliance.
For proper ventilation of the appliance, you must leave:
- a space of at least 10 cm between the top part and any
cabinets above it;
- a space of at least 5 cm between the sides of the appliance
and any adjacent cabinets/walls.
Away from Heat
Avoid positioning the appliance in a place where it is directly
exposed to sunlight or near an oven, cook top or the like.
Levelling
The floor should be perfectly level; if not, you can adjust the
feet at the front of the appliance.
Earthing
Before making the electrical connection, check that the voltage shown on the data plate, that you will find on the bottom left hand side of the appliance next to the crisper, corresponds to that of your home and that the socket is earthed
in compliance with all current electrical regulations. If the
system is not earthed, the manufacturer declines all liability
for consequent damages or losses. Do not use adapters or
multiple sockets.
Position the appliance in such a way that you can access
the socket where it is plugged in.
Check the power load
The electrical socket must support the maximum power load
of the appliance shown on the data plate (on the bottom
left hand side of the appliance next to the crisper).
Before plugging the appliance to the mains
Stand the appliance upright and wait at least 3 hours before
plugging the appliance into the mains to ensure proper performance.
1
GB
Page 4
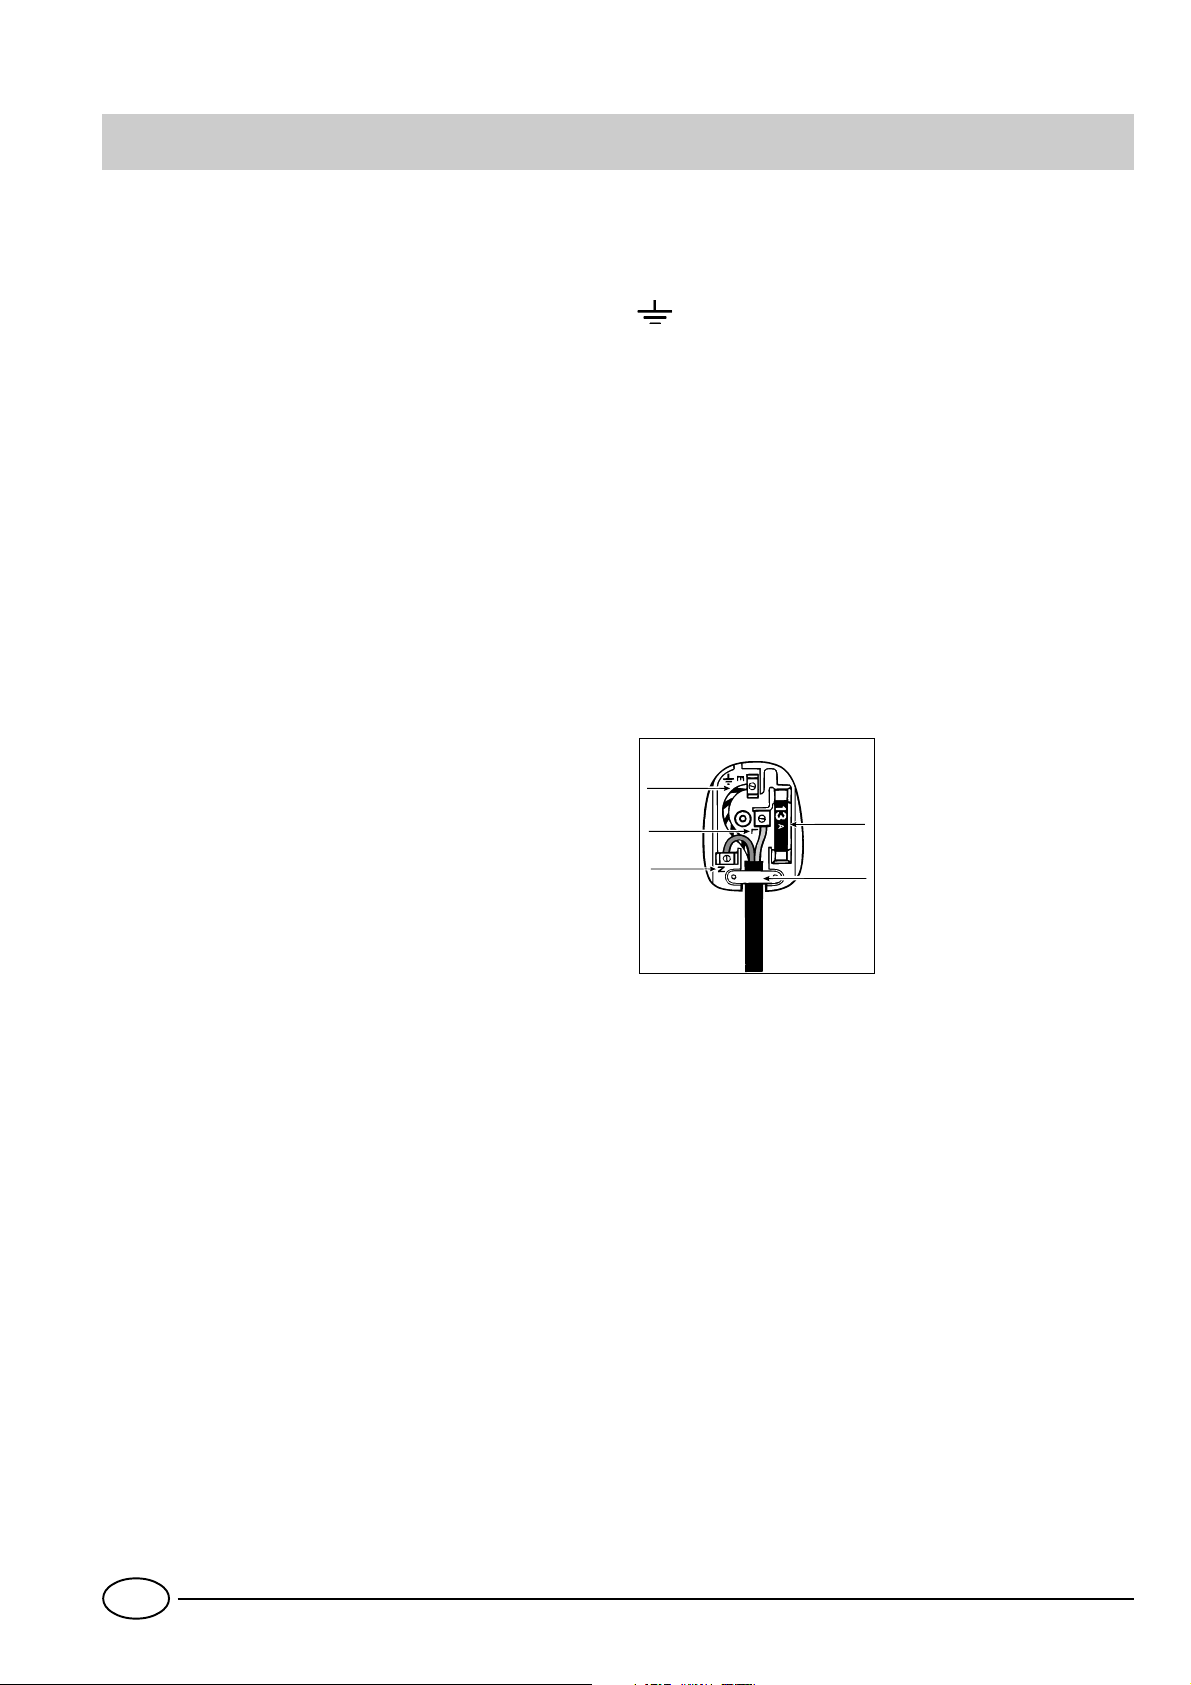
Electrical connection
Your appliance is now supplied with a 13 amp fused plug that
can be plugged into a 13 amp socket for immediate use. Before
using the appliance please read the instructions below.
WARNING - THIS APPLIANCE MUST BE EARTHED.
THE FOLLOWING OPERATIONS SHOULD BE CARRIED
OUT BY A QUALIFIED ELECTRICIAN.
Replacing the fuse:
When replacing a faulty fuse, a 13 amp ASTA approved fuse
to BS 1362 should always be used, and the fuse cover refitted. If the fuse cover is lost, the plug must not be used
until a replacement is obtained.
As the colours of the wires in the mains lead may not
correspond with the coloured markings identifying the
terminals in your plug, proceed as follows:
Connect Green & Yellow wire to terminal marked “E” or
or coloured Green or Green & Yellow.
Connect Brown wire to terminal marked “L” or coloured
Red.
Connect Blue wire to terminal marked “N” or coloured Black.
If a 13 amp plug (BS 1363) is used it must be fitted with a 13
amp fuse. A 15 amp plug must be protected by a 15 amp
fuse, either in the plug or adaptor or at the distribution board.
If you are in any doubt about the electrical supply to your
machine, consult a qualified electrician before use.
Replacement fuse covers:
If a replacement fuse cover is fitted, it must be of the correct
colour as indicated by the coloured marking or the colour that
is embossed in words on the base of the plug. Replacements
can be obtained directly from your nearest Service Depot.
Removing the plug:
If your appliance has a non-rewireable moulded plug and
you should wish to remove it to add a cable extension or to
re-route the mains cable through partitions, units etc., please
ensure that either:
- the plug is replaced by a fused 13 amp re-wireable plug
bearing the BSI mark of approval
or:
- the mains cable is wired directly into a 13 amp cable outlet,
controlled by a switch, (in compliance with BS 5733) which
is accessible without moving the appliance.
Disposing of the plug:
Ensure that before disposing of the plug itself, you make
the pins unusable so that it cannot be accidentally inserted
into a socket. Instructions for connecting cable to an
alternative plug:
Important: the wires in the mains lead are coloured in
accordance with the following code:
Green & Yellow - Earth
Blue - Neutral
Brown - Live
How to connect an alternative plug:
The wires in this mains lead are coloured in accordance with
the following code:
BLUE “NEUTRAL” (“N”)
BROWN “LIVE” (“L”)
GREEN AND YELLOW “EARTH” (“E”)
GREEN &
YELLOW
BROWN
BLUE
13 ampere fuse
CROSS-BAR
CORD GRIP
Disposing of the appliance:
When disposing of the appliance please remove the plug by
cutting the mains cable as close as possible to the plug body
and dispose of it as described above.
GB
2
Page 5
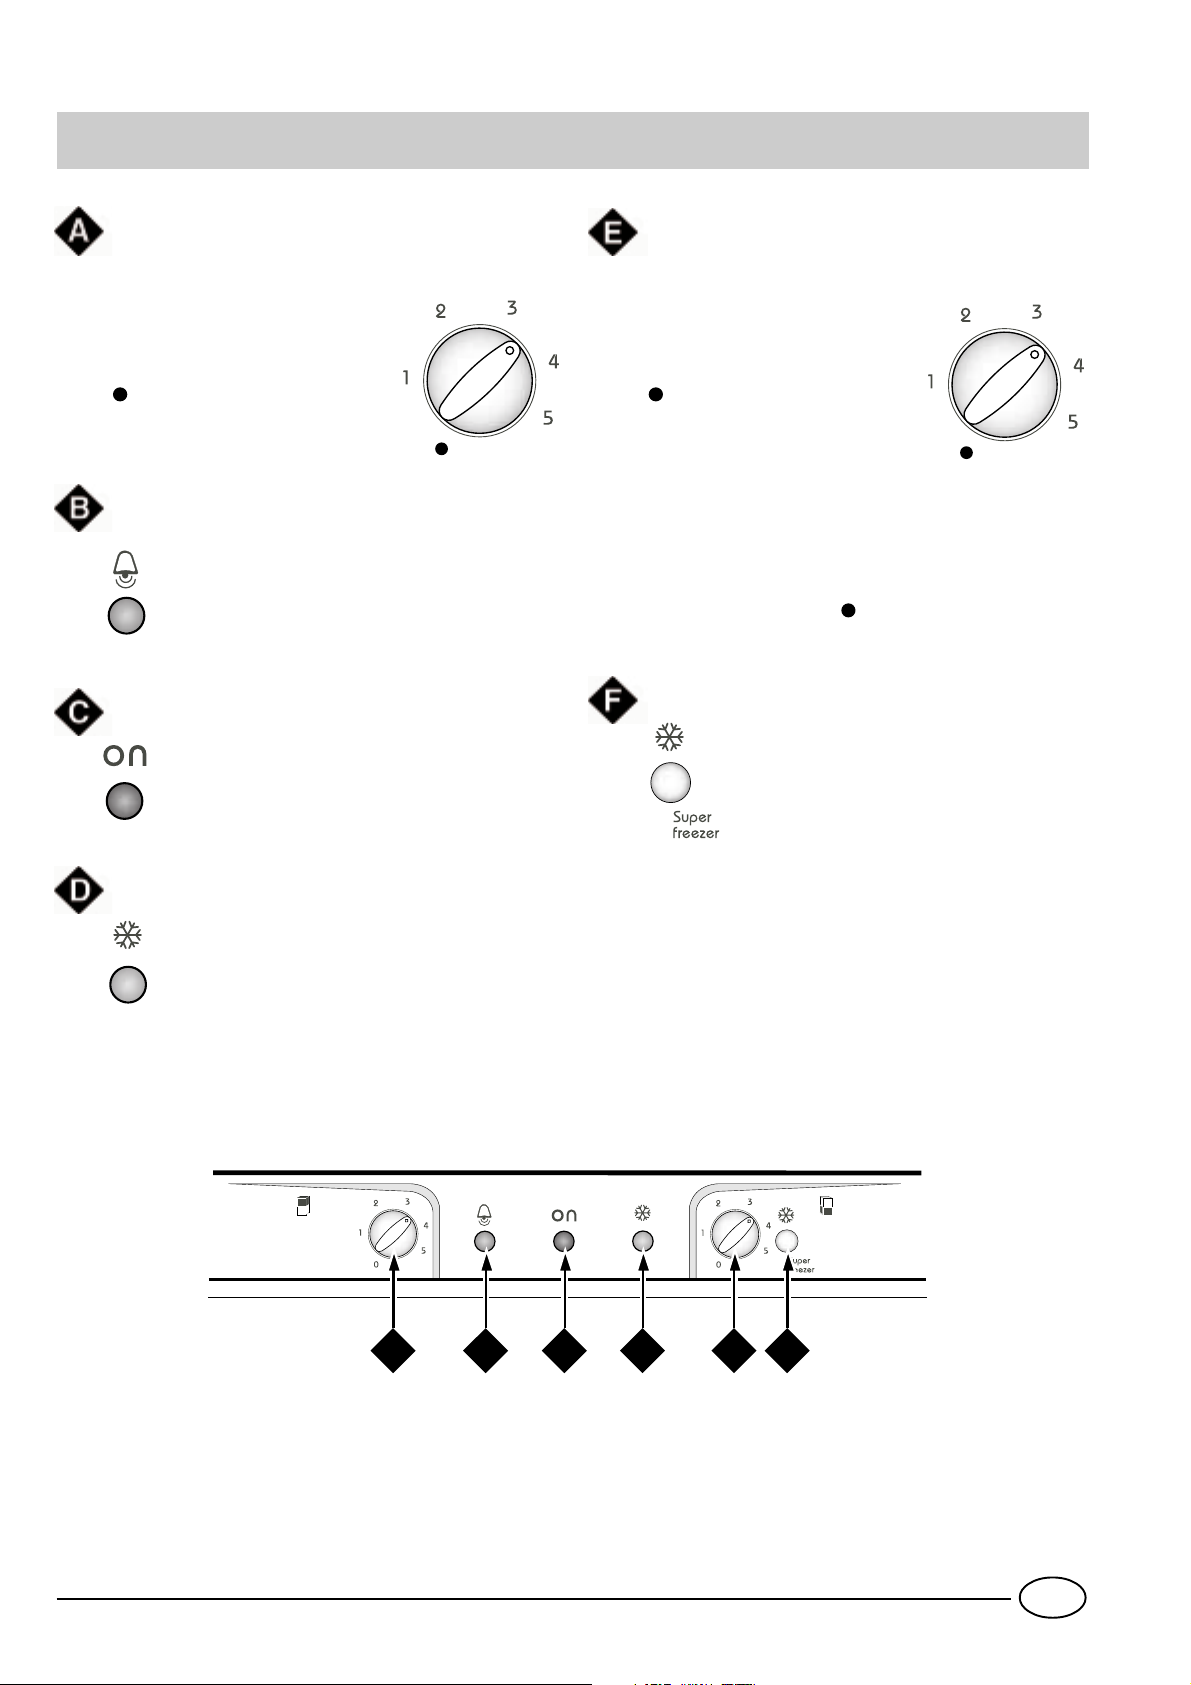
A Closer Look
Temperature regulator knob for the fridge
compartment
This knob allows you to adjust
the fridge temperature on different positions;
the fridge is off;
1 least cold;
5 coldest
Red alarm lamp
When this red pilot lamp comes on, the
freezer is not operating correctly and the
temperature is rising too much
Green lamp
When lit, it indicates that the appliance is connected to the electricity network
Temperature regulator knob for the freezer
compartment
This knob allows you to adjust
the freezer temperature on different positions:
the fridge and freezer are
off;
1 least cold;
5 coldest
You can adjust the knob from position "1" to position "5" according to your requirments.
Remember that you can also interrupt the operation
of the whole appliance (fridge included) by setting
the knob on position " ".
Rapid freezing button
When pressed (the yellow "D" pilot
lamp comes on), it allows you to freeze
fresh food
Rapid freezing lamp
This yellow pilot lamp comes on when you
press the rapid freezing button "F"
A
B C
D
E
F
3
GB
Page 6
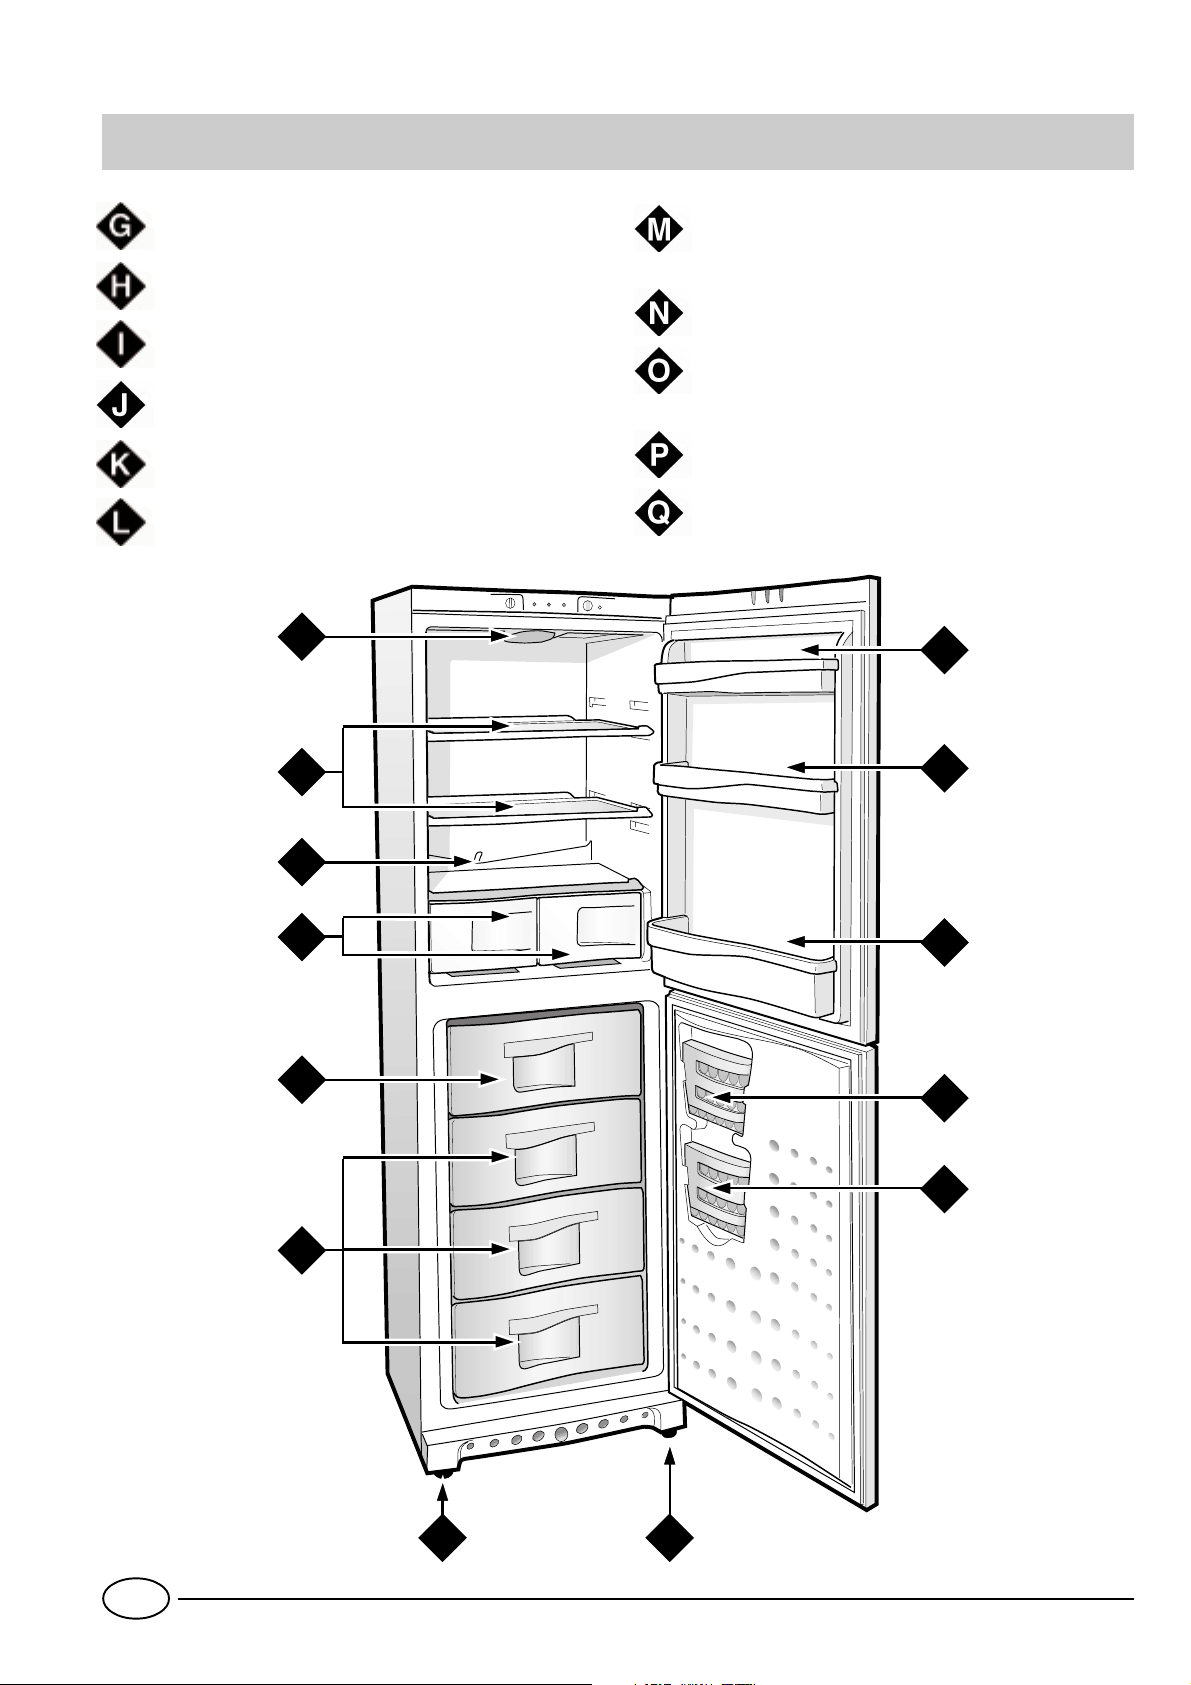
Removable shelf with egg compartment
Removable door shelf for food products
Removable door shelf for bottles
Ice tray
Compartment for freezing fresh foods and
storing frozen foods
Fruit and Vegetable Crispers
Drain system for the elimination of defrost
water
Adjustable feet
Compartment for storing frozen foods
Q
P
O
N
Removable/Adjustable Shelves
Light for refrigerator compartment
G
H
I
GB
M
L
K
J
J
K
4
Page 7
How to Start the Appliance
NOTICE
After the appliance has been delivered, stand it in the
upright position and wait approximately 3 hours before connecting it to the electrical outlet to guarantee
that it operates properly.
Before placing foodstuffs in the refrigerator or freezer, clean
the interior well with warm water and baking soda.
Motor protection delay
This model is provided with a motor protection control
system. Therefore, if the compressor does not start
immediately upon installation, do not worry as it will
start automatically after approximately 8 minutes.
This is also what will happen every time the power
supply is interrupted, both due to a power failure or
should you switch it off yourself (to clean or defrost
your freezer, for example).
After having plugged the appliance in, make sure that pilot
lamp "C" is lit. If not, make sure that the freezer knob "E" is not
on position "
Refrigerator compartment
Set knob "A" onto a medium position (3) and you can place
food in the fridge after only a few hours.
Freezer compartment
Set knob "E" onto a medium position (3) and press button
"F" for rapid freezing (yellow pilot lamp "D" will come on).
When the freezer has reached the optimum temperature, the
red alarm lamp "B" will come off. Press button "F" again;
yellow lamp "D" off. Now you can place frozen food in the
freezer.
".
How to use the refrigerator compartment...
Storing Food in the Refrigerator Compartment
Food Storage Time Location in the Refrigerator
Wrapped meat and cleaned fish
(use plastic wrap or pack in plastic bags)
Fresh cheese 3 or 4 days
Eggs 1 month In special egg rack on door.
Butter, margarine On any shelf.
Cooked or precooked food
(placer in air-tight containers and when cool store
in refrigerator)
Sausages, salami, sandwich meats in general, fresh
pasta, custards,puddings, chocolates, cream
pastries, bread, dry pastries, red tomatoes
Bottled products, milk, drinks, yoghurt On special door shelves.
Fruits and legumes In vegetable crisper.
2 or 3 days
3 or 4 days On any shelf.
3 or 4 days On any shelf.
On the shelf above the vegetable crisper
(which is the coldest area).
On the shelf above the vegetable crisper
(which is the coldest area).
What Not to Store in the Refrigerator
Garlic (transmits odour), onions and leeks.
Bananas (they will turn black).
Citrus fruits.
Potatoes and root vegetables (store in dark, dry places).
5
GB
Page 8
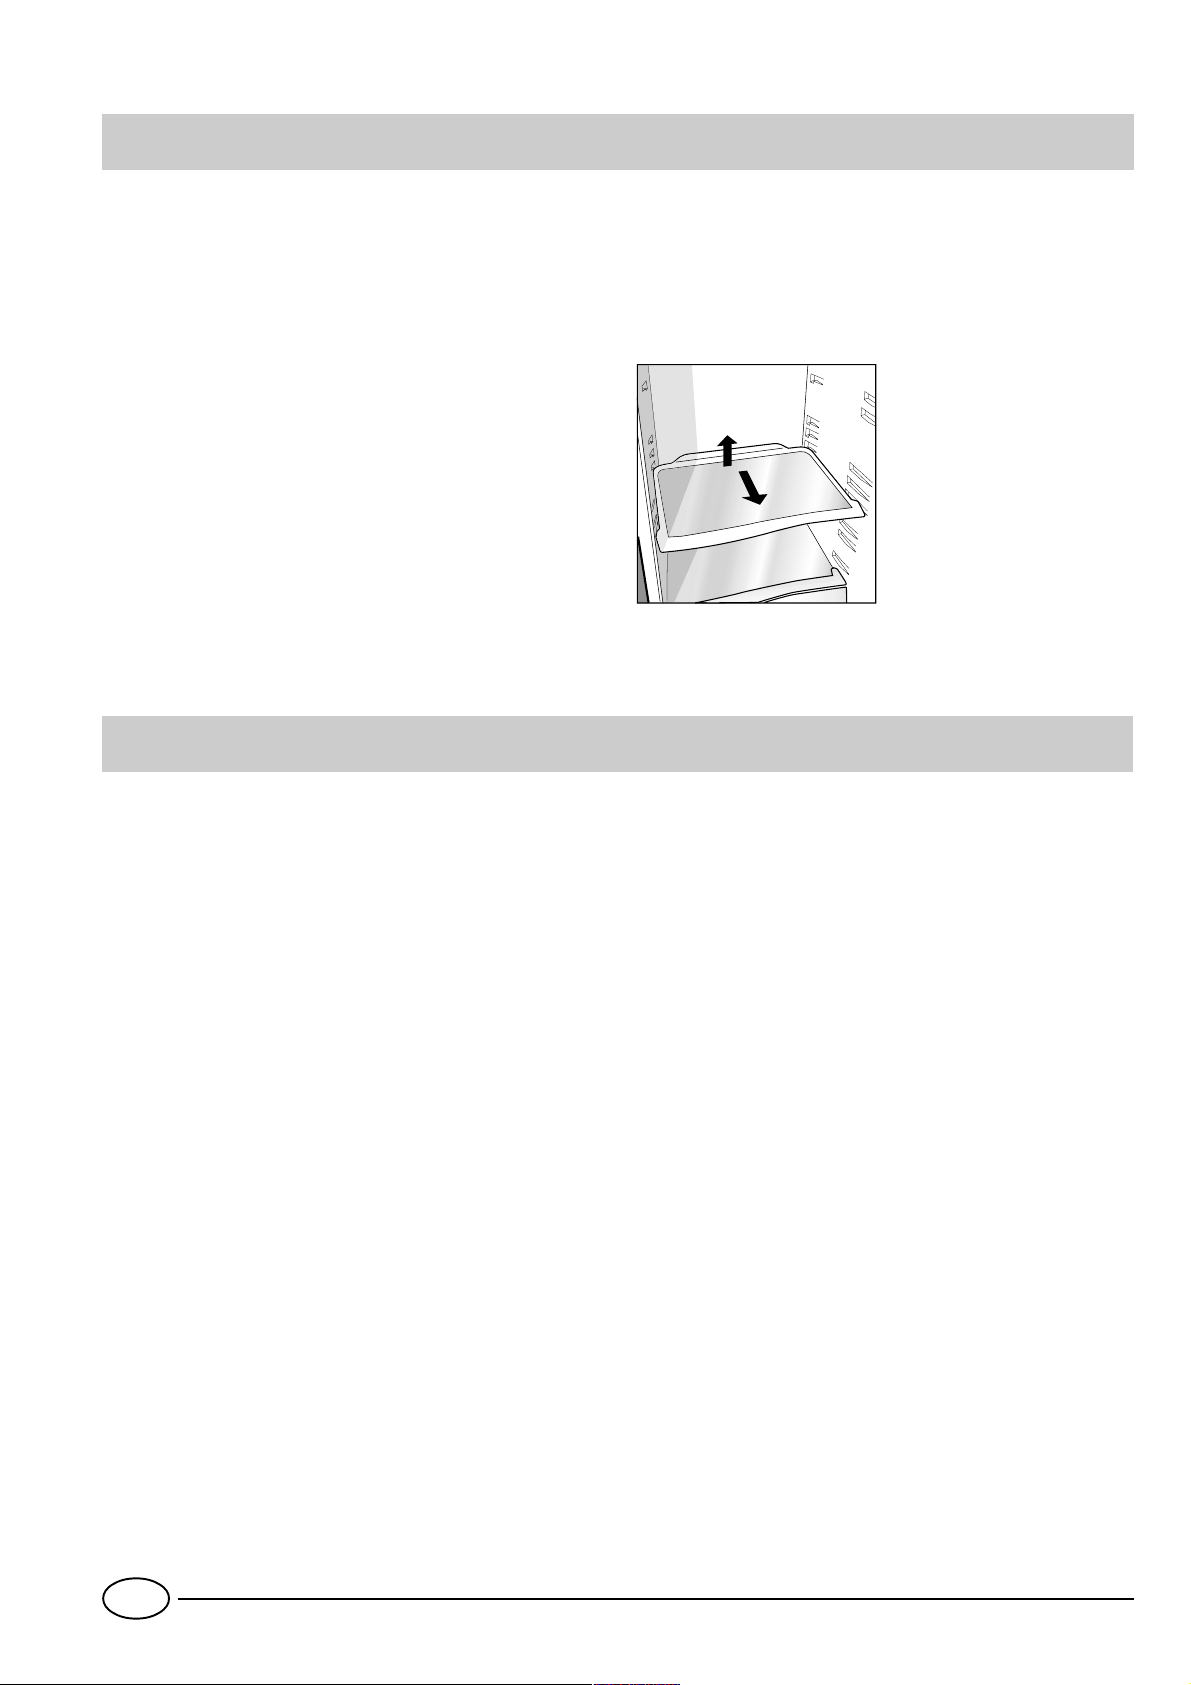
The temperature inside the refrigerator compartment auto-
1
2
matically adjusts itself according to the position of the temperature regulator knob.
1 = least cold 5 = coldest
We recommend, however, a medium position.
Air in the refrigerator circulates naturally so that colder,
heavier air tends to descend towards the bottom. This is
why meat and cheese should be stored just above the crisper.
Please follow our instructions carefully on maximum storage time: any food, even the freshest, will not remain edible
for any extended amount of time.
Contrary to popular belief, cooked foods do not store any
longer than raw food.
The practical removable shelves (Fig. 1), whose height can
be adjusted thanks to special guides, allow you to insert
even large containers and larger sized foods. The innovative
shape of the shelves allows you to adjust their height without having to remove them completely.
Remember to cool hot food before storing, otherwise the
temperature inside the appliance will increase, causing the
compressor to work harder and use more energy.
Do not place liquids in containers without covering them
because this will lead to an increase in the level of moisture
within the refrigerator, causing the formation of frost.
Fig. 1
How to use the freezer compartment...
For the preparation of food to be frozen, please consult a specialized manual.
There is no need to defrost the freezer since the “ventilated
cold air” cooling system prevents the formation of frost and
ice on the walls. Moreover, frost does not form on the packets
of frozen foods which will therefore not stick together and
will be easy for you to recognise.
Food that has be thawed, even partially, must not be refrozen: you must cook it in order to consume it (within 24
hours) or to freeze it once again.
When freezing fresh foods, remember that they should not
touch other previously frozen or deep frozen foods. Place
the food that you wish to freeze in the top compartment
"M" where the temperature will fall below -18°C, which is
ideal for freezing food properly. Remember that proper conservation depends on the speed of freezing.
The maximum amount of food you can freeze per day is
indicated on the data plate situated inside the refrigerator
compartment.
The first time, or after the freezer has been inactive, you can
only freeze food after having let the appliance function at
maximum and the red lamp "B" has come off.
When the appliance is already on, freezing can be done in
two ways:
1. for small quantities, less than the maximum capacity
indicated on the data plate, just press the freezing button
“F” (yellow lamp “D” lit) and insert the food to be frozen.
After 24 hours, or once the optimum temperatures have
been reached, the rapid freezing function will switch itself
off automatically (yellow lamp “D” off).
2. For large quantities of food to be frozen (up until the
maximum load indicated on the data plate), keep the freezing
button “F” pressed down until the yellow lamp starts flashing
quickly. After 24 hours, the yellow lamp will stop flashing
(permanently lit); you can now insert the food to be frozen.
After 24 hours, the button will switch itself off automatically
(yellow lamp off).
During the freezing process, avoid opening the door of the
freezer.
In order to freeze and then thaw foods optimally, it is recommended that you divide food into small portions so that
they freeze quickly and uniformly. The packages should be
clearly marked with the content and the date they were
frozen.
In order to obtain a larger amount of space in the freezer
compartment, you can remove the central drawer, and place
the food directly onto the evaporator plate. Make sure that,
after having inserted the load, the door closes correctly.
Do not open the freezer door in the event of a power failure
or malfunction. This precaution will slow the rise in temperature within the compartment. If the door is not opened,
frozen and fast-frozen foods will remain in their current state
for approximately 9-14 hours.
Do not place full bottles in the freezer: they could easily
burst because all liquids increase in volume when they freeze.
GB
6
Page 9
Ice trays
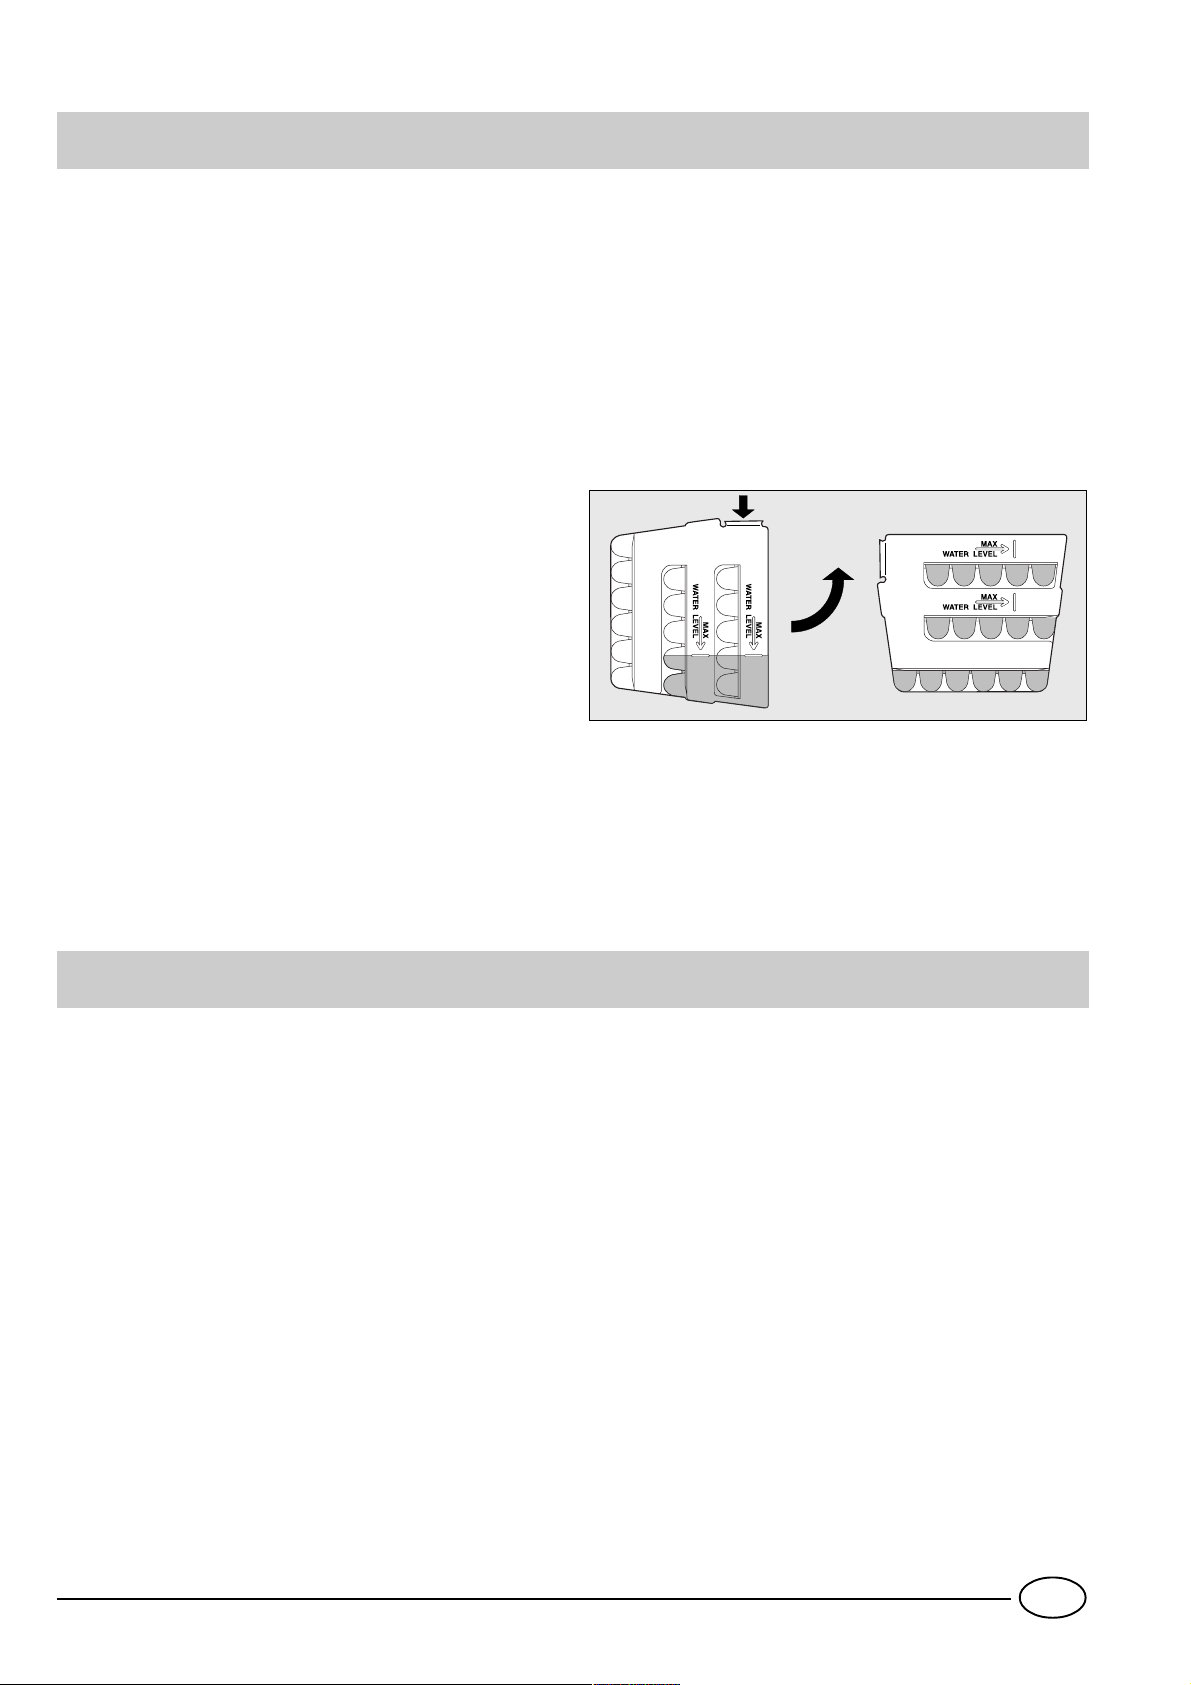
This new concept of ice trays is an exclusive Merloni patent.
The fact that they are situated on the inner door of the
freezer compartment ensures greater ergonomics and
cleanliness: the ice no longer comes into contact with the
food placed inside the freezer compartment; furthermore,
the dripping of the water during filling is avoided (a lid to
cover up the hole after filling with water is also provided).
Instructions for use (Fig. 2)
Fill up the tray with water via the special hole up to the level
indicated (MAX WATER LEVEL), taking care not to exceed it:
inserting more water than is necessary will lead to the
formation of ice which could obstruct the exit of the ice
cubes.
If you have used an excessive amount of water, you will
have to wait until the ice has melted, empty out the tray
and re-fill it with water.
Once you have filled the ice tray up with water through the
hole indicated, turn it by 90 °. Thanks to the connected
compartments, the water fills up the special shapes, after
which you can cover the hole up with the special cap and
place the ice tray in the inner door of the freezer
compartment.
Once the ice has formed, all you need to do is to knock the
tray against a hard surface so that the ice cubes come away
from their housing and come out of the same hole used to
fill the tray with water. To make it easier for the ice cubes to
come out, wet the outside of the tray.
WARNING: every time you fill up the ice tray with water ,
make sure that the same is completely empty and that there
are no traces of ice left inside it.
The minimum time required for ice to form well is
approximately 8 hours.
Fig. 2
Tips on Saving Energy
- Install it well
And therefore far from heat sources, from direct sunlight, in
a well aired place and according to the distances indicated
in the section on "Installation/Aeration".
- Just the right cold
Too cold a compartment increases energy consumption.
- Do not Overfill
To conserve food properly, the cold air must circulate freely
within the refrigerator. If it is overfilled, this will prevent proper
air circulation, forcing the compressor to work continuously.
- Close the Doors
Open your refrigerator as little as possible because each time
you do so you loose much of the cold air. To raise the temperature to the proper level again, the motor must work for
a long time, consuming energy.
- Keep an Eye on the Seals
Keep the seals clean and make sure that they adhere well to
the door. This alone will ensure that no cold air escapes.
- No Hot Foods
A hot pot or pan placed in the refrigerator immediately raises
the temperature several degrees. Let hot cookware and food
cool to ambient temperature before placing them in the refrigerator.
7
GB
Page 10
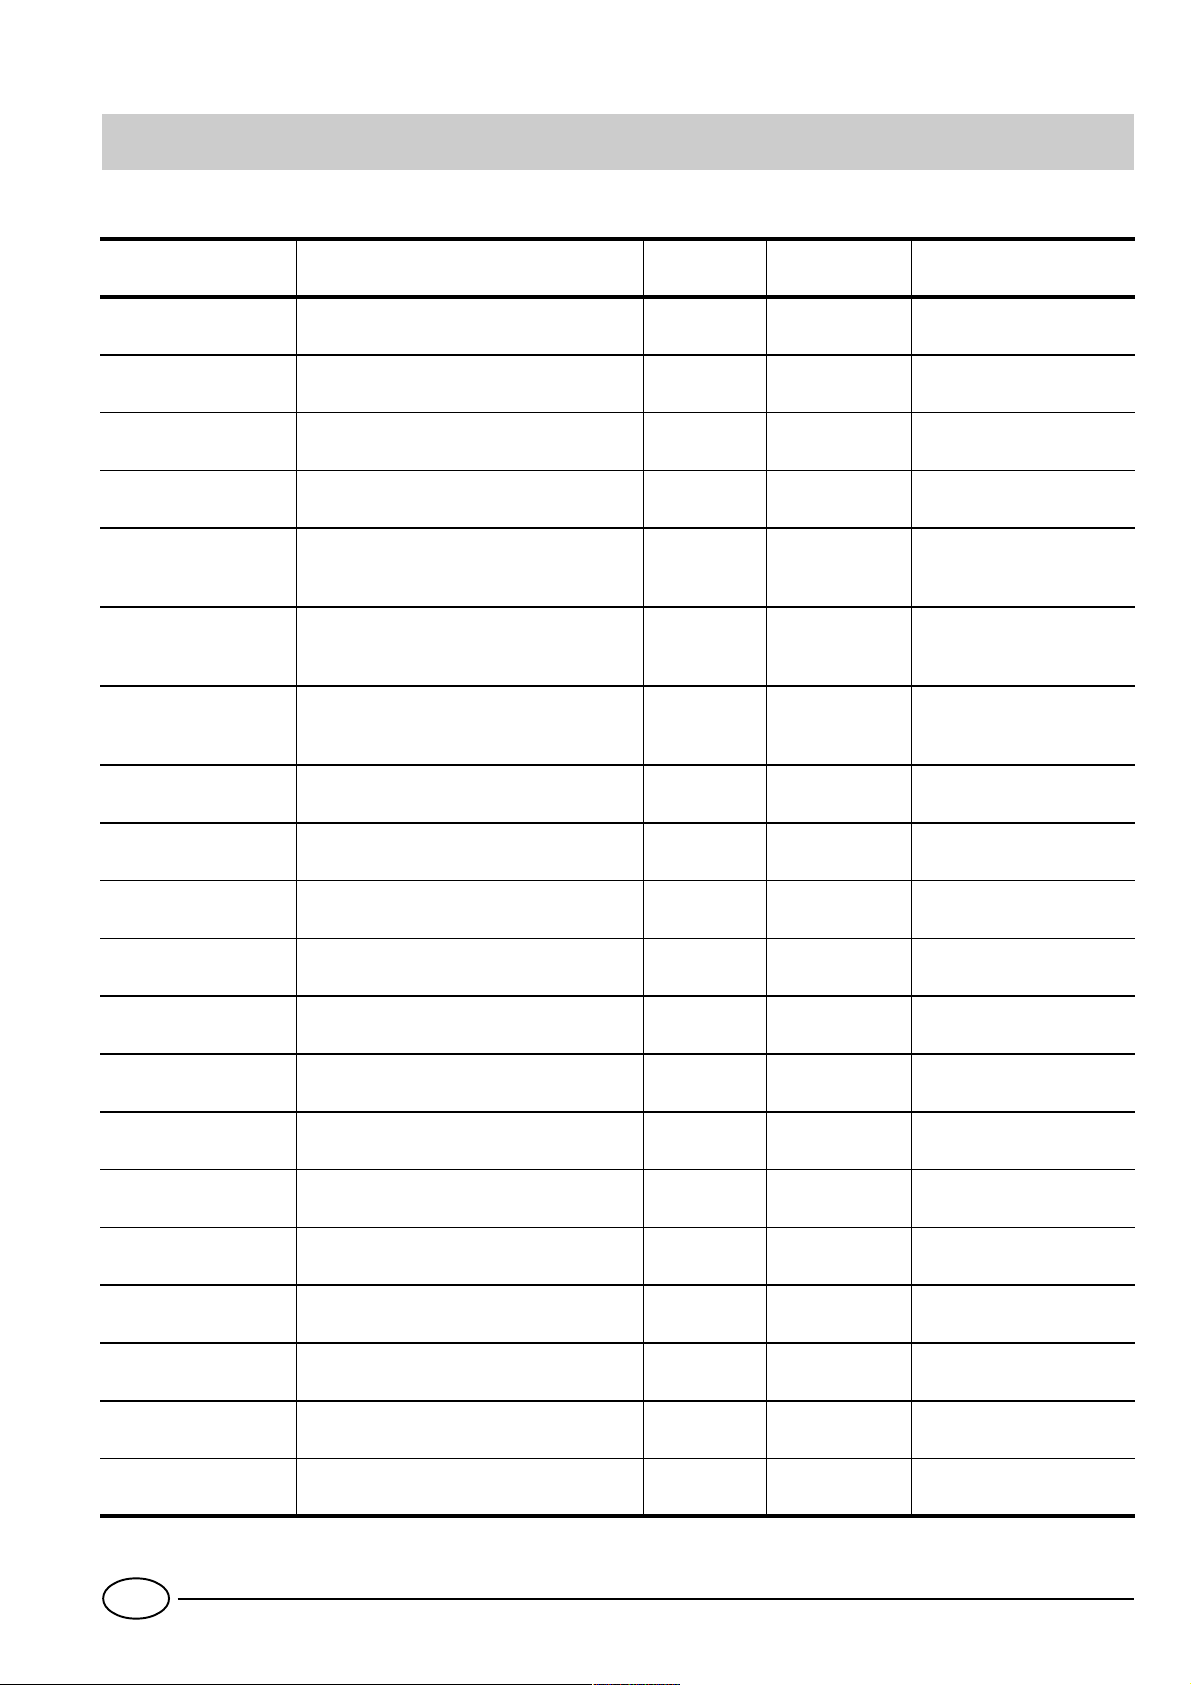
Guide to Using the Freezer
Meat and Fish
Food Wrapping
Beef Roast Tinfoil 2 / 3 9 / 10 Not required.
Lamb Tinfoil 1 / 2 6 Not required.
Pork Roast Tinfoil 1 6 Not required.
Veal Roast Tinfoil 1 8 Not required.
Veal/Pork Chops
Veal/Lamb Cutlets
Minced Meat
Heart and Liver Plastic Baggies 3 Not required.
Each piece wrapped in cling wrap and then
in tinfoil (4 to 6 slices)
Each piece wrapped in cling wrap and then
in tinfoil (4 to 6 slices)
In aluminium containers covered with cling
wrap.
Tenderising
(days)
Freshly
minced
Storage
(months)
6 Not required.
6 Not required.
2 Slowly in refrigerator.
Thawing Time
Sausages Cling Wrap or Tinfoil 2 As necessary.
Chicken and Turkey Tinfoil 1 / 3 9 Very slowly in refrigerator.
Duck and Goose Tinfoil 1 / 4 6 Very slowly in refrigerator.
Pheasant, Partrige and
Wild Duck
Hare and Rabbit Tinfoil 3 / 4 6 Very slowly in refrigerator.
Venison Tinfoil or Cling Wrap 5 / 6 9 Very slowly in refrigerator.
Large Fish Tinfoil or Cling Wrap 4 / 6 Very slowly in refrigerator.
Small Fish Plastic Baggies 2 / 3 Not required.
Crustaceans Plastic Baggies 3 / 6 Not required.
Shellfish
Boiled Fish Tinfoil or Cling Wrap 12 In hot water.
Tinfoil 1 / 3 9 Very slowly in refrigerator.
Store in salted water in aluminium
containers or plastic containers.
3 Very slowly in refrigerator.
Fried Fish Plastic Baggies 4 / 6 Directly in pan.
GB
8
Page 11
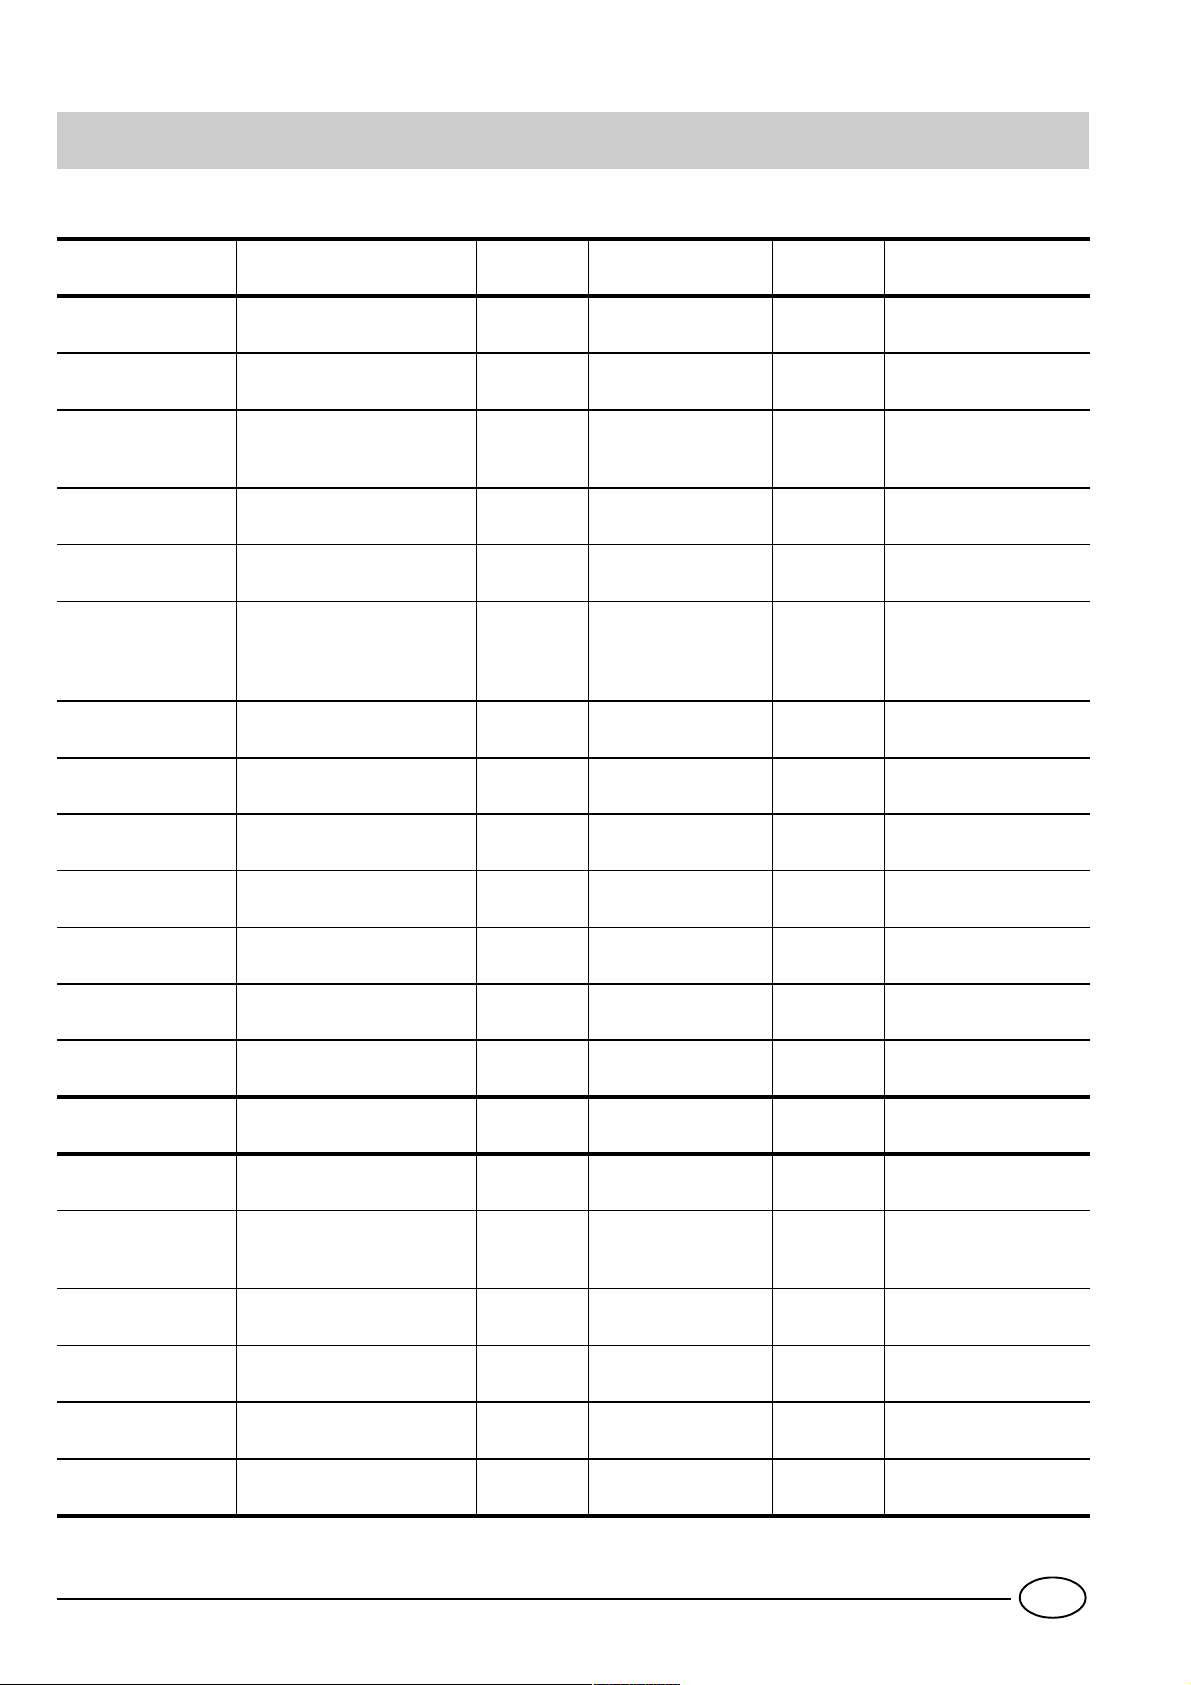
Fruits and Vegetables
Food Preparation
Apples and Pears Peel and cut into slices. 2'
Apricots, Peaches,
Cherries and Plums
Strawberries
Blackberries and
Raspberries
Cooked Fruit Cut, cook and strain.
Fruit Juice Wash, cut and crush.
Cauliflower
Cabbage and Brussel
Sprouts
Peas Shell and wash. 2' Plastic Baggies 12 Not required.
Peel and pit. 1' / 2'
Rinse and fry.
Remove leaves, cut head into
small pieces and blanch in
water and a little lemon
juice.
Wash and cut into small
pieces.
Blanching
Time
2' Plastic Baggies 12 Not required.
1' / 2' Plastic Baggies 10 / 12 At room temperature.
Wrapping
In Containers (cover
with syrup)
In Containers (cover
with syrup)
In Containers (cover
with sugar)
In Containers (add
10% sugar)
In Containers (sugar
to taste)
Storage
(months)
12
12
10 / 12
12
10 / 12
Thawing Time
In refrigerator very
slowly.
In refrigerator very
slowly.
In refrigerator very
slowly.
In refrigerator very
slowly.
In refrigerator very
slowly.
French Beans Wash and slice if required. 2 Plastic Baggies 10 / 12 Not required.
Carrots, Peppers and
Turnips
Mushrooms and
Asparagus
Spinach Wash and mince. 2' Plastic Baggies 12 At room temperature.
Vegetable for Soups
Various Foods Preparation
Bread Plastic Baggies 4
Cakes Plastic Baggies 6
Cream Plastic Containers 6
Butter
Boiled Food or
Vegetable Soup
Peel, wash and slice if
necessary.
Wash, peel and cut up. 3' / 4'
Wash and cut up in small
pieces.
3' / 4' Plastic Baggies 12 Not required.
3'
Blanching
Time
Plastic Baggies or
Containers
Plastic Baggies or
Containers
Wrapping
In original wrapping
or tinfoil
Plastic or Glass
Containers
6 At room temperature.
6 / 7 Not required.
Storage
(months)
6 In refrigerator.
3 / 6
Thawing time
At room temperature
and in the oven.
About 10 minutes at
room temperature, cook
at 100/200°C.
At room temperature or
in refrigerator.
At room temperature or
in hot water.
Eggs
Freeze without shells
in small containers
9
10
At room temperature or
in refrigerator.
GB
Page 12
Keeping Your Appliance in Shape
Before doing any cleaning, disconnect the appliance
from the electricity (by pulling out the plug or turning
off the general switch in your home).
Defrosting
WARNING: do not damage the refrigeration circuit.
Do not use mechanical devices or other tools to speed
up the defrosting process, unless they have been recommended by the manufacturer.
How to Defrost the Refrigerator
This appliance defrosts automatically and the water is channeled to the back toward the
drain installed for this purpose
(fig. 3). Here, the heat produced by the compressor will
make it evaporate. The only
thing you must do is to periodically check and clean the
hole of the drain, which is located behind the vegetable
crispers, so that the water
drains properly.
How to defrost the freezer compartment.
There is no need to defrost the freezer since the “ventilated
cold air” cooling system prevents the formation of frost and
ice on the walls.
Fig. 3
Cleaning and maintenance
Always unplug the appliance from the mains before
cleaning.
- Your appliance is manufactured with hygienic odourless
materials. To preserve these characteristics, always use sealed
containers for strong smelling foods to avoid the formation
of odours that are difficult to remove.
- Use only a water and bicarbonate solution: Clean the
internal and exterior of your appliance with a sponge soaked
with a warm water and sodium bicarbonate solution, which
is also a good disinfectant. If you do not have any sodium
bicarbonate at home, use neutral detergent.
- What not to use: Do not use abrasive detergents, bleach or
detergents containing ammonia. Never use solvent based
products.
- Dishwashable: All the removable parts can be cleaned by
soaking in hot soapy water or detergent. If you own a
dishwasher, you may wash these parts in the dishwasher.
Remember to dry thoroughly before replacing them.
- What about the back panel? Dust may deposit on the back
panel and affect the proper running of the appliance. To
remove dust, vacuum away the dust very carefully using the
appropriate vacuum cleaner accessory.
- Discontinued use of the appliance: If the appliance is not in
use for any length of time, remember to clean the interior
and dry thoroughly, leaving the doors open to prevent the
formation of bad odours and mould.
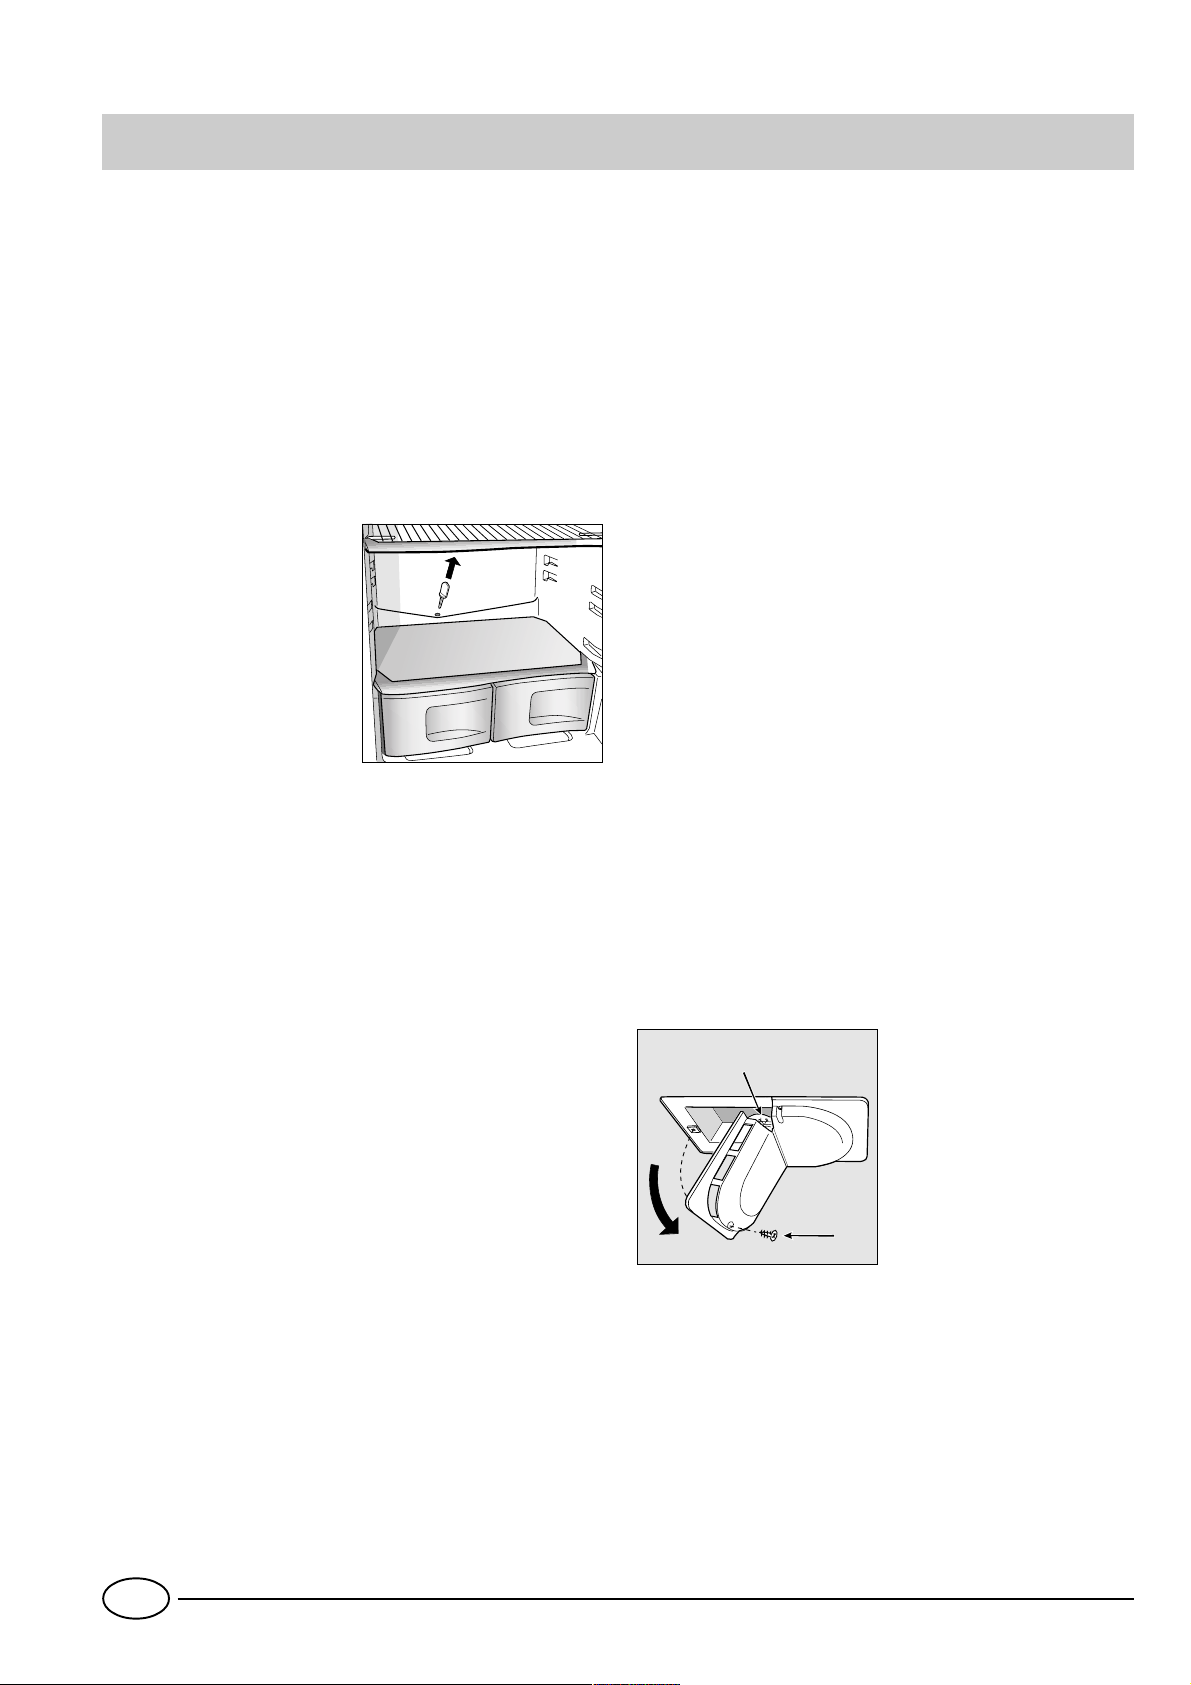
- Replacing the light bulb.
When replacing the light of the refrigerator compartment
unplug the unit from the power supply and chang the used
lamp with another one of not more than 15 W.
For access ti lamp "A", remove the centre screw "B" at the
back of the lamp cover, as indicated in fig. 4.
GB
A
B
Fig. 4
10
Page 13
Is There a Problem?
The refrigerator does not function.
Have you checked whether:
• The main switch for the electricity to the apartment or
home has been turned off;
• The plug is properly inserted in the outlet;
• The outlet is adequate; try inserting the plug into another
outlet in the room.
The motor does not start
Have you checked whether:
••
• 8 minutes have passed since you switched the
••
appliance on?
This model is in fact provided with a motor protection
control system which means that it will only start
approximately 8 minutes after being switched on.
The refrigerator and the freezer do not cool
properly.
Have you checked whether:
• The doors do not close well or the seals are faulty;
• The doors are left open too long;
• The thermostat knob is not on the proper setting;
• The refrigerator or freezer is overfilled.
There is water on the bottom of the refrigerator.
Have you checked whether:
• The hole for draining the water from the frost is clogged
(see fig. 3).
If after all the checks, the appliance still does not operate or
the problem persists, call the nearest Service Centre and
inform them of: the type of problem, the abbreviation of
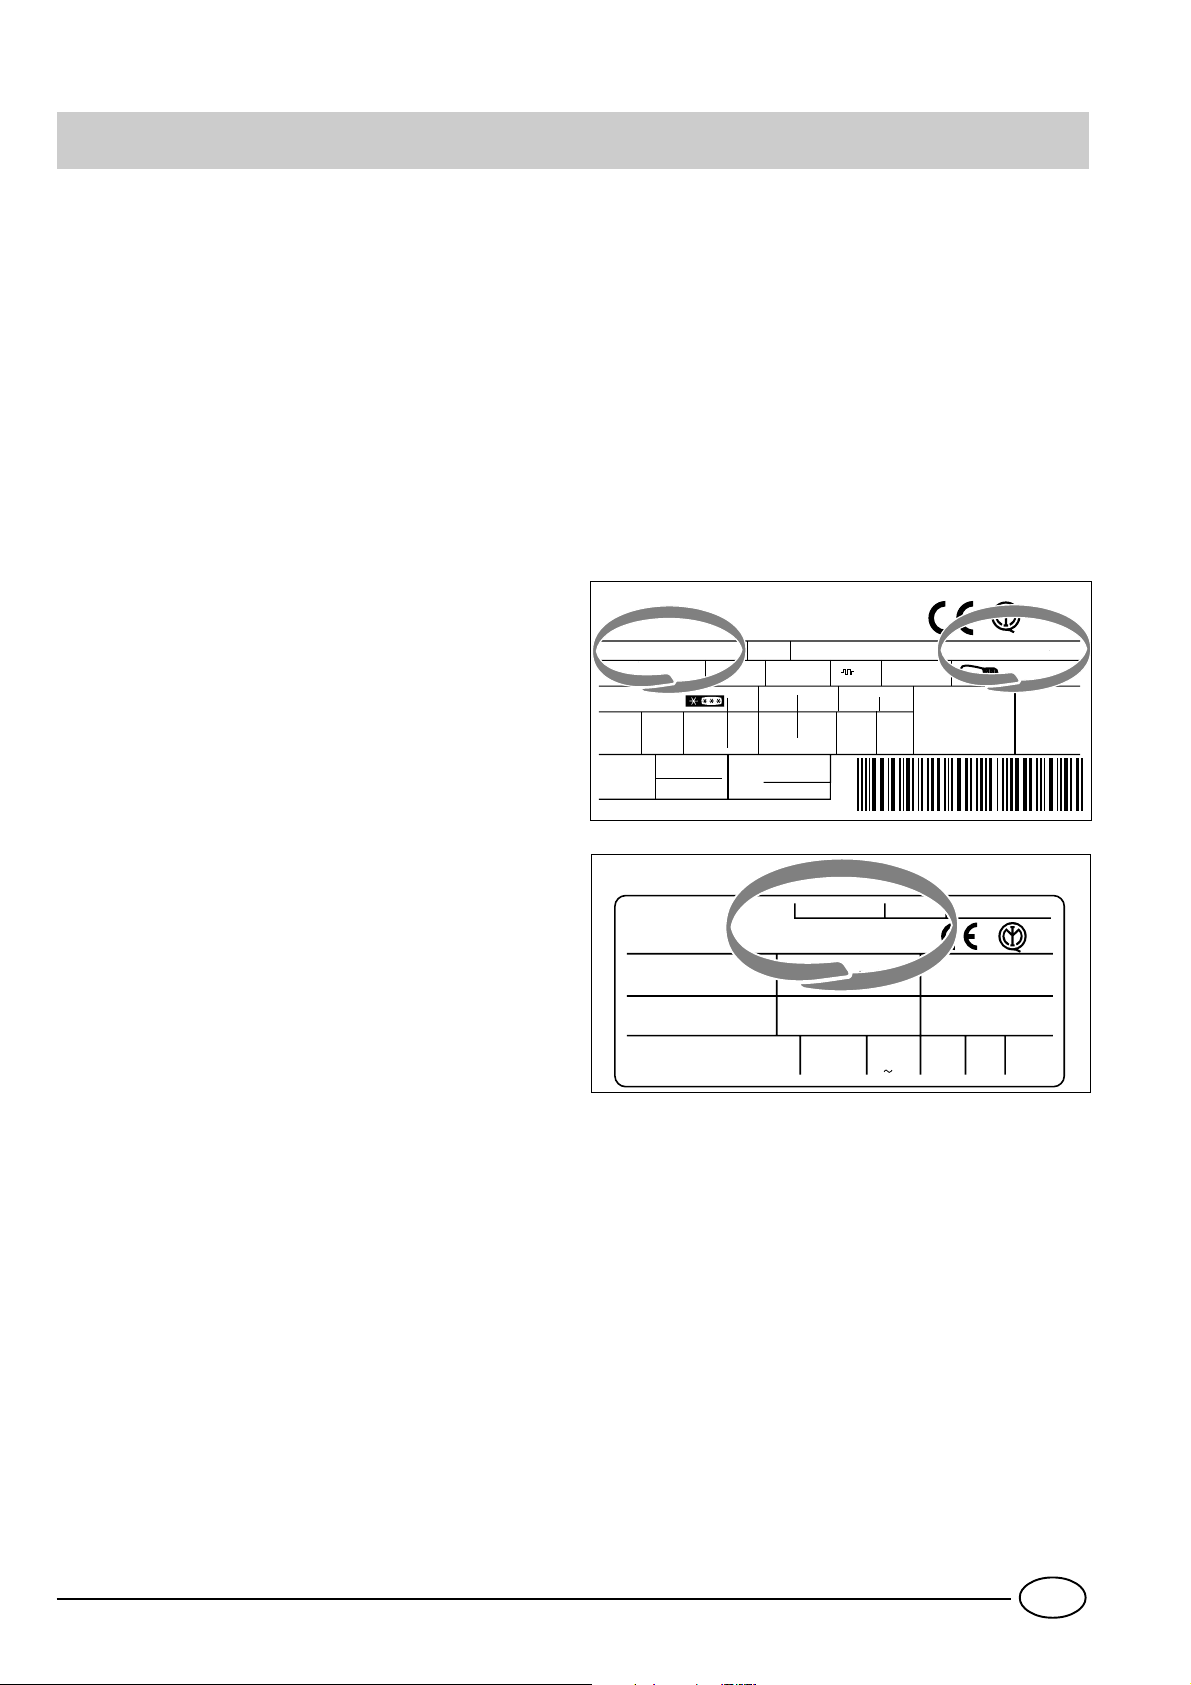
the model name (Mod.) and the relative numbers (S/N) written on the rating plate located at the bottom left next to
the vegetable crisper (see examples in the figures below).
75
Test
P.S-I.
TI
Net
Util
Utile
Pressure
HIGH-235
LOW 140
RG 2330
Mod.
220 - 240 V- 50 Hz 150 W
340
Total
Gross
Bruto
Brut
Compr.
Syst.
Kompr.
Made in Italy 13918
Gross
Bruto
Brut
R 134 a
kg 0,090
93139180000 S/N 704211801
Cod.
Gross
Bruto
Brut
W
Fuse
A
Freez. Capac
Poder de Cong
kg/24 h
4,0
Max 15 w
Class
Clase
N
Classe
The food in the refrigerator becomes too cold.
Have you checked whether:
• The thermostat knob is on the proper setting;
• The food is in contact with the back wall - which is the
coldest part.
The motor runs continuously.
Have you checked whether
••
• the freezer switch has been pressed (yellow lamp lit or
••
flashing);
• The doors are not closed well or have remained open too
long;
• The ambient temperature is too high;
• The thermostat knob is not on the proper setting.
The appliance makes too much noise.
The gas refrigerant produces a slight noise even when the
compressor is not running (this is not a defect).
“No Frost” refrigerators have a fan which circulates cold air
in the appliance. This fan makes a slight noise which is quite
normal for this “No-frost” refrigerators.
Have you checked whether:
• The refrigerator is level.
• The appliance was installed between cabinets or objects
that vibrate and make noise.
RG 1145 WEU 47133980001
MADE IN ITALY S/N
VOL. BRUT
GROSS VOL.
VOL. BRUTO
SYSTEME A COMPRESSION
SYSTEM
SISTEMA
POUVOIR DE CONGEL. kg/24h
FREEZING CAPACITY
PODER DE CONGELACION
135
K
l.
cu. fl.
704045585
REFRIGERATEUR
REFRIGERATOR
FRIGORIFICO
REFRIGERATEUR
REFRIGERATOR
FRIGORIFICO
FUSE LINK
l.
225
cu. fl.
R134 A
0,080
kg.
220-240
VA
CONGELATEUR
FREEZER
CONGELADOR
CONGELATEUR
FREEZER
CONGELADOR
HZ W
50 110
l.
cu. fl.
R134 A
CLASSE
CLASS
CLASE
kg
N
Never call on unauthorized technicians and always
refuse spare parts which are not originals.
11
GB
Page 14
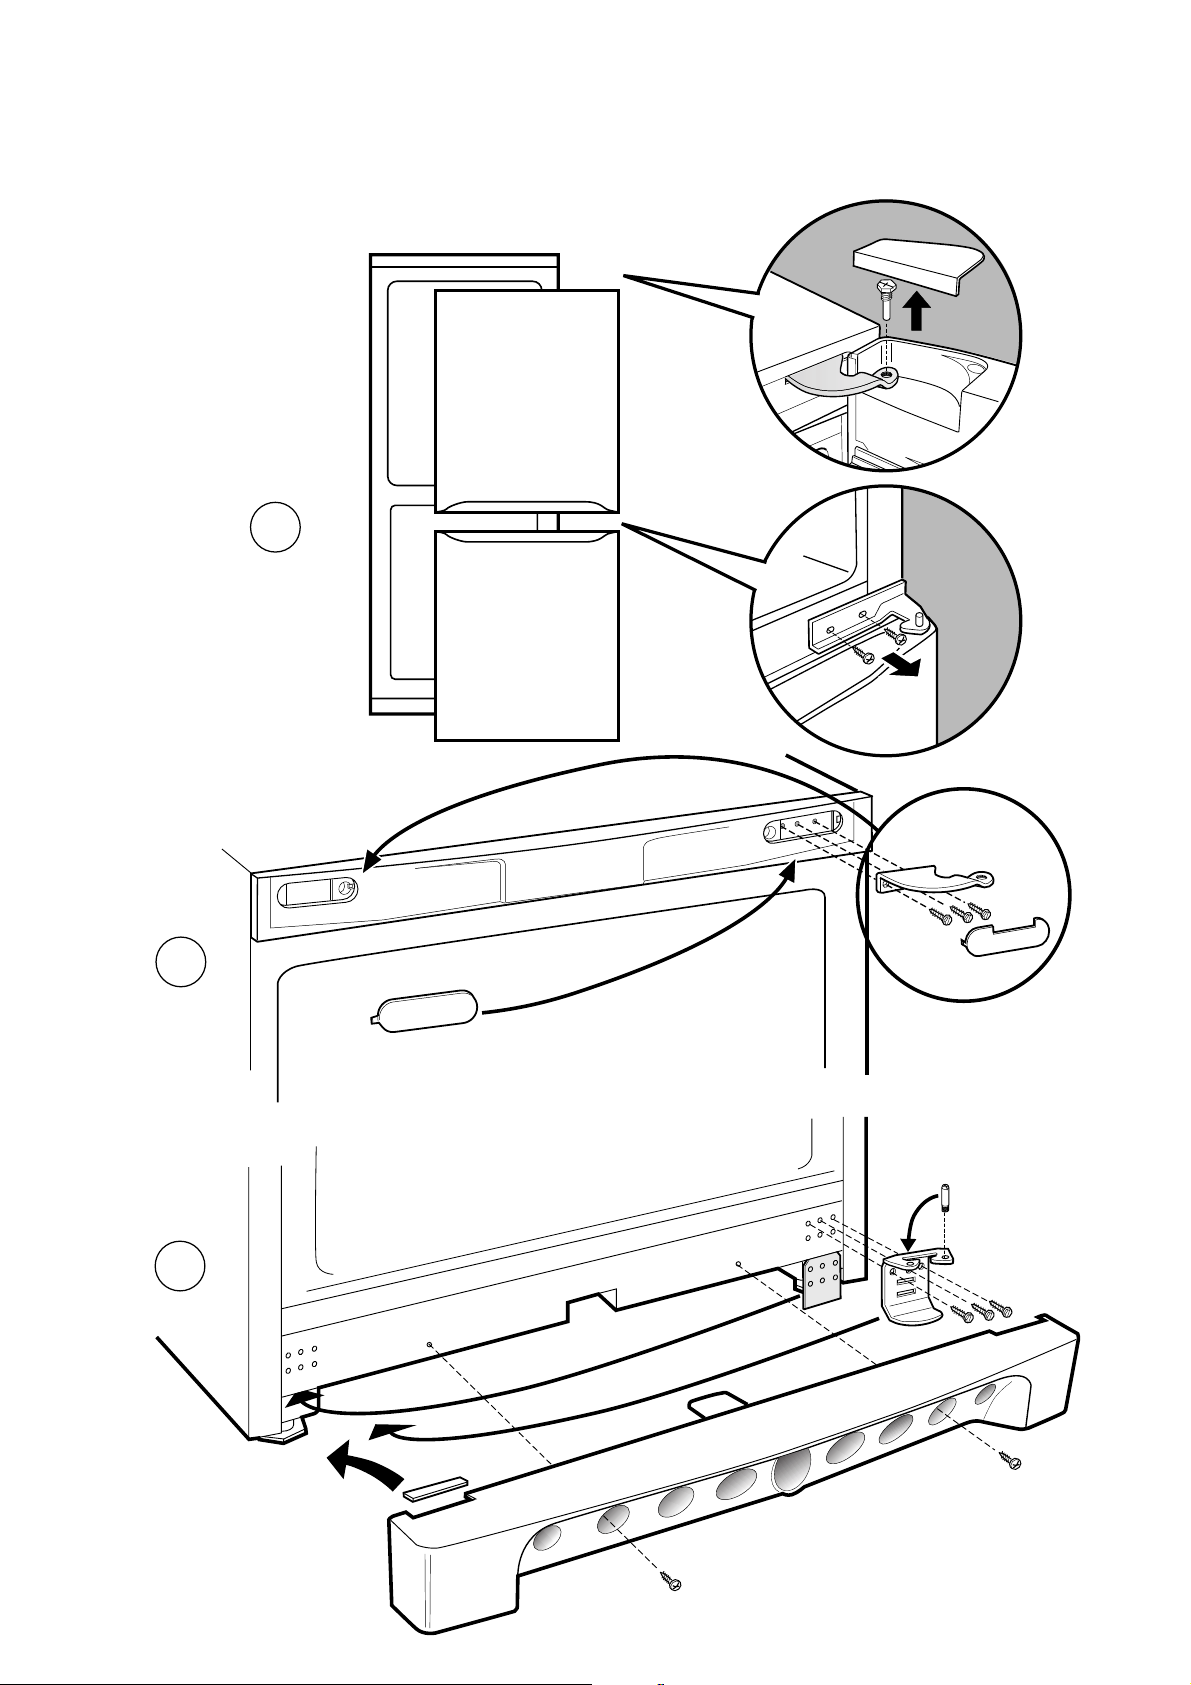
Reversing the door opening
1
3
2
Page 15
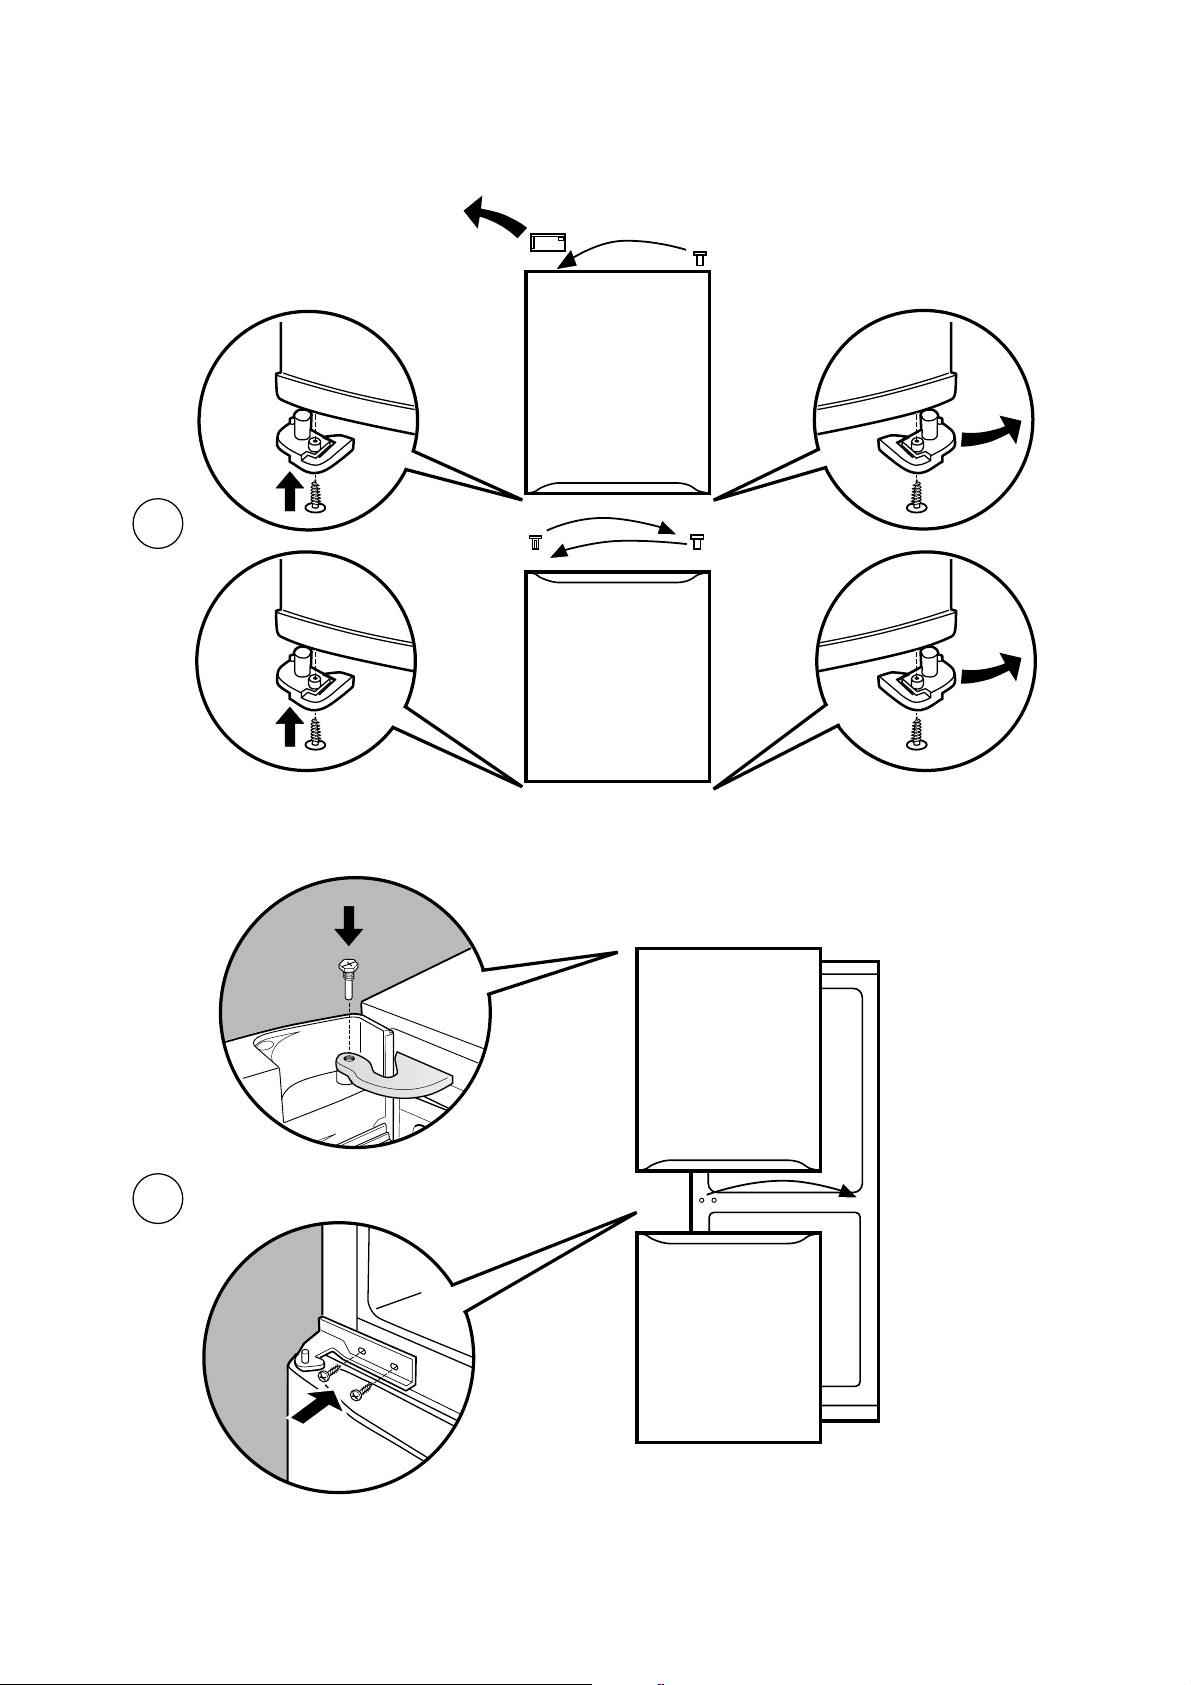
4
5
Page 16

Merloni Elettrodomestici
Viale Aristide Merloni 47
60044 Fabriano
Italy
Tel +39 0732 6611
Fax +39 0732 662501
www.merloni.com
07/2000 - 195027654.00 - Xerox Business Services - DocuTech
 Loading...