

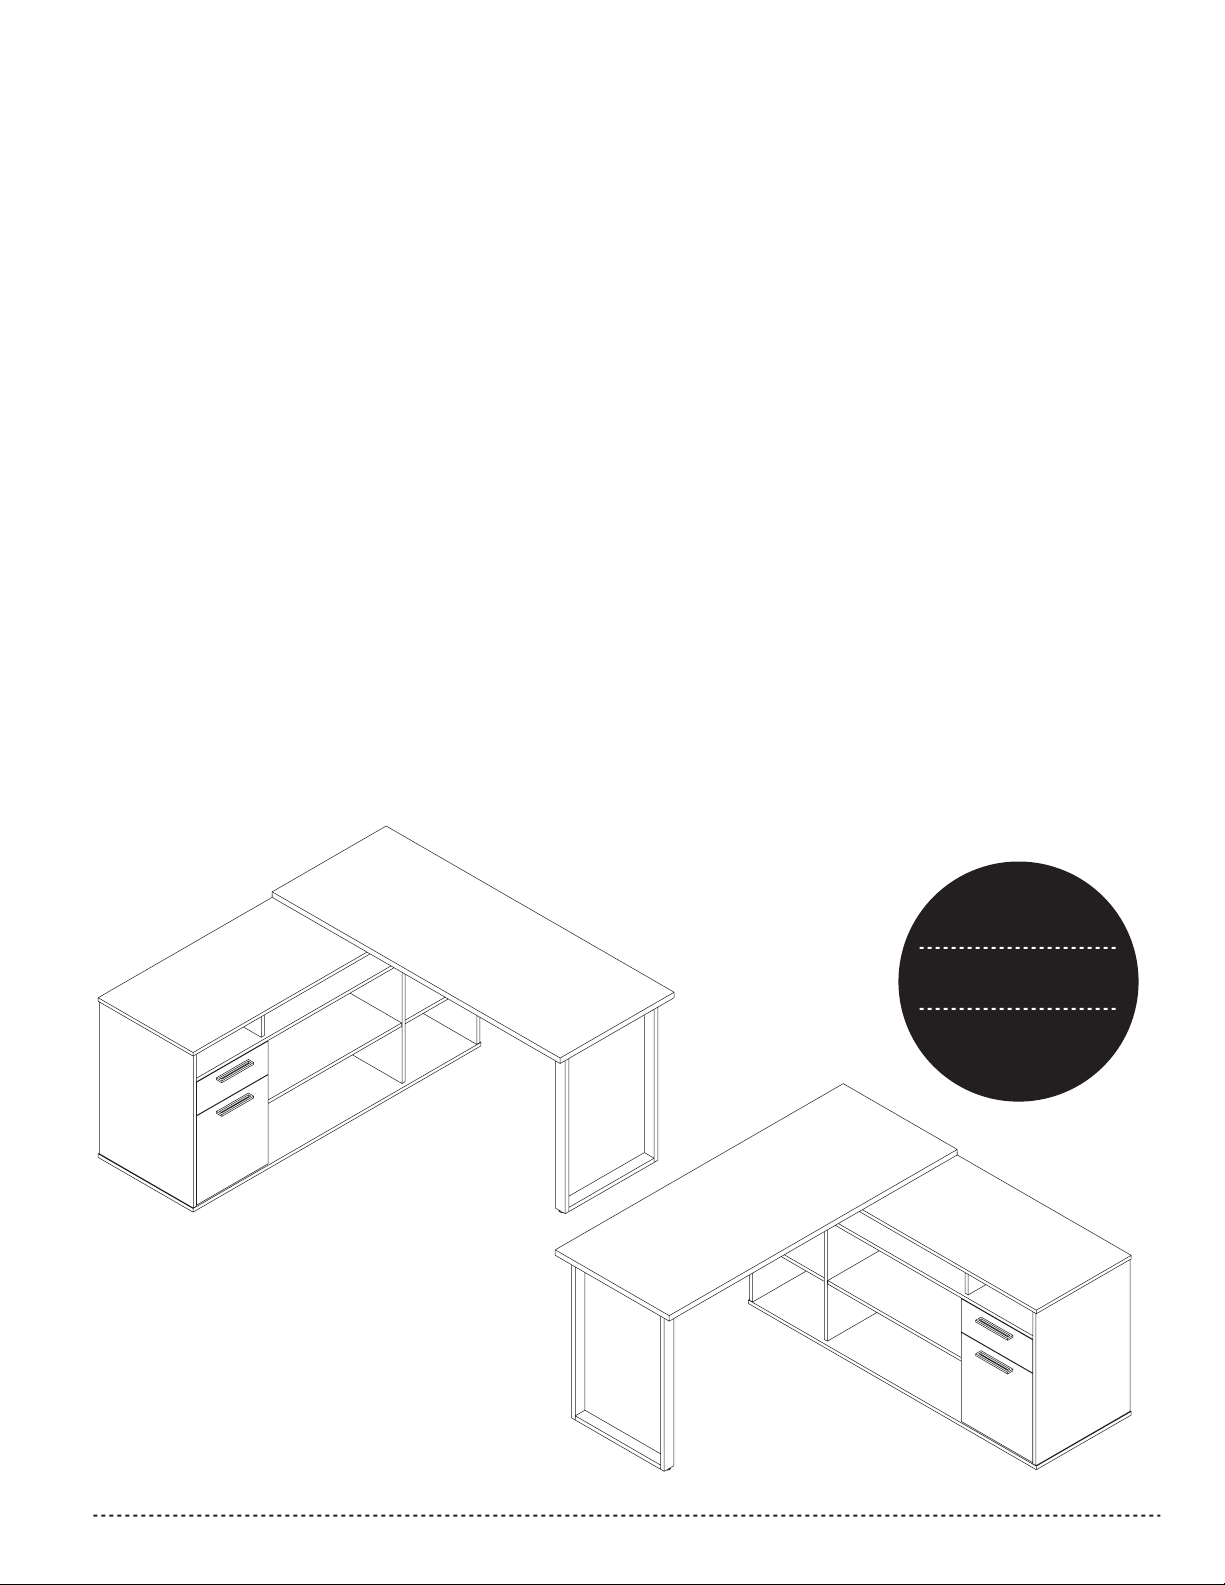
WHITE : BLANC: BLANCO
DEEP GREY : GRIS PROFOND : GRIS PROFONDO
BARK GREY : GRIS ÉCORCE : CORTE ZA GRIS
CHOCOLATE : CHOCOLAT : CHOCOLATE
ASSEMBLY
INSTRUCTIONS
INSTRUCTIONS
D’ASSEMBLAGE
INSTRUCCIONES DE
ENSAMBLAJE

Thank you for choosing our product.
Your total satisfaction is our #1 priority.
Customer Service and warranty information
Should you have a problem or need more information concerning the warranty, do not call to the place of purchase.
Please call our customer service department for immediate assistance.
Please have your assembly instruction manual on hand when you call. Our products are warranted to the original purchaser against defects in material or
workmanship in the furniture. Defects as mentioned in this warranty refer to any imperfections which may impair the use of the product. Our warranty is expressly
limited to the replacement of furniture parts and components for ten years following the date of purchase. We will replace any part that is defective. This warranty
applies under conditions of normal use. Our furniture products are not intended for outdoor use. The warranty does not cover defects caused by improper assembly or
disassembly, defects occurring after purchase due to product modications, intentional damage, accident, misuse, exposure to the elements and labor or assembly
costs. We reserve the right to request proof of purchase to document a warranty claim. In no event shall we liable for incidental or consequent damages resulting from
the misuse of the product.
This warranty is not transferable and is valid only in Canada and the United States excluding Alaska, Hawaii and Puerto Rico.
PROBLEMS
OR INFORMATION
POUR TOUT PROBLÈME
OU INFORMATION
PROBLEMA O
INFORMACION

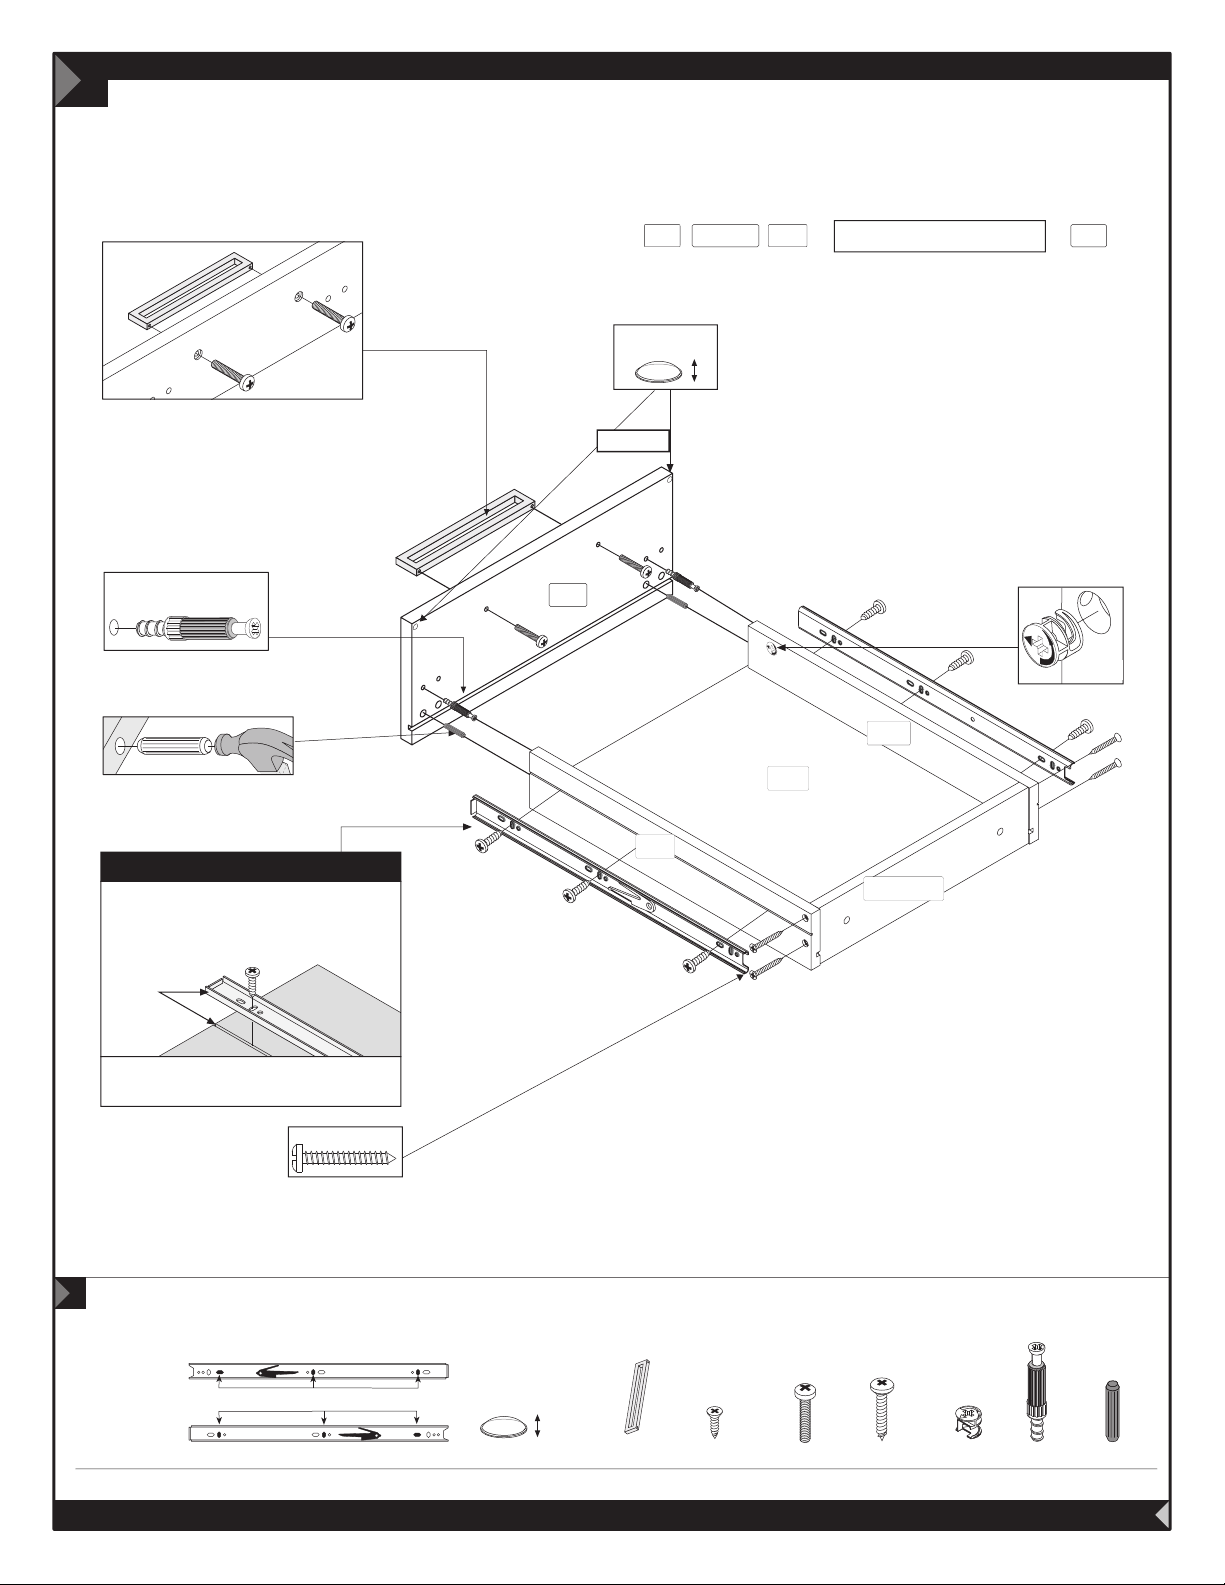
PART S / PIÈCES / PIEZAS
CODE / CÓDIGO
01 1
QTY / QTÉ / CANT.
CODE / CÓDIGO
20 2
QTY / QTÉ / CANT.
CODE / CÓDIGO
42 1
QTY / QTÉ / CANT.
CODE / CÓDIGO
67 1
QTY / QTÉ / CANT.
02 1
09 1
10 1
bottom / fond / fondo
15
16” x 12 1/2” (406 mm x 316 mm)
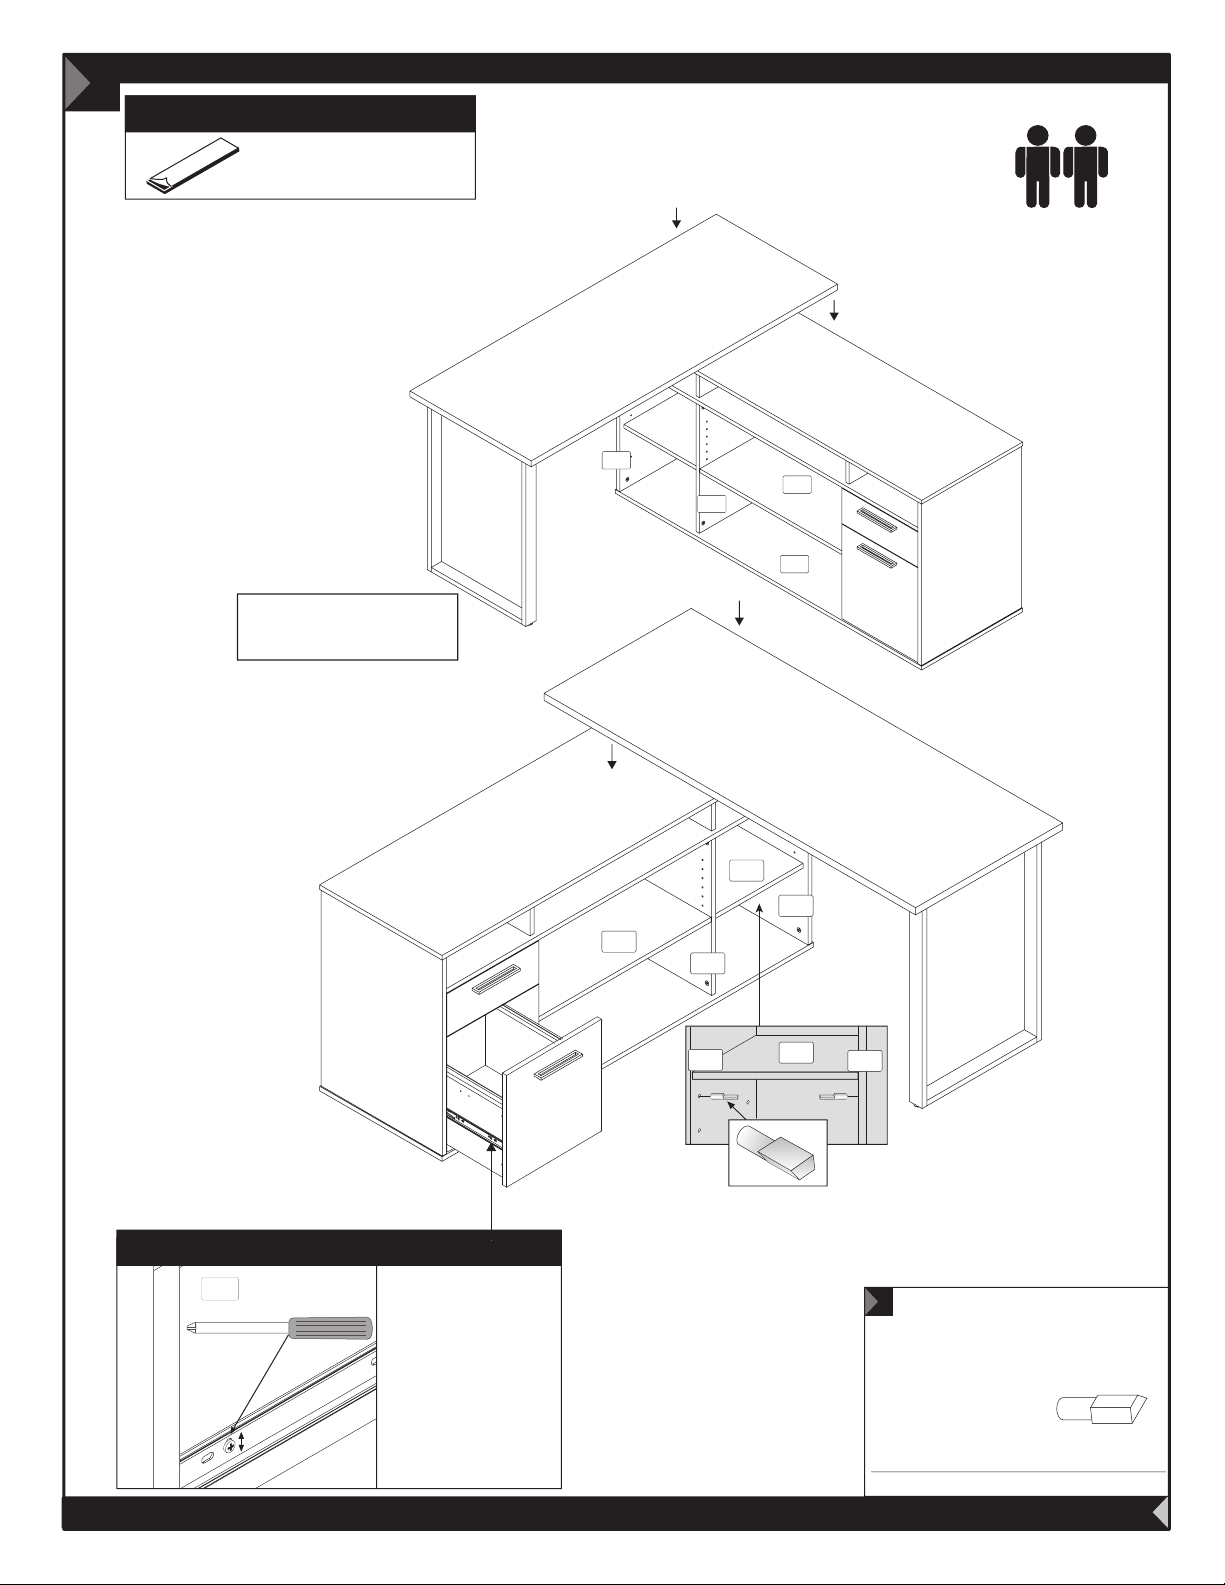
two people are required to assemble
and move this model.
deux personnes sont requises pour
assembler et déplacer ce modèle.
se necesitan dos personas para ensamblar y
desplazar este mueble.
2
21 2
30 2
40 1
41 1
the use of electric tools must be made with
vigilance.
l’utilisation d’outils électriques doit être faite
avec vigilance.
las herramientas eléctricas deben utilizarse
con sumo cuidado.
43 1
44 1
45 1
66 1
70 1
CA05A 1
CA13A 1
tools required
outils requis
herramientas necesarias
#3
1/4” (7 mm)
30
41
20
45
43
70
40
44
66
30
67
3

HARDWARE / QUINCAILLERIES / ARTÍCULOS DE FERRETERÍA
CODE / CÓDIGO QTY / QTÉ / CANT. CODE / CÓDIGO QTY / QTÉ / CANT. CODE / CÓDIGO QTY / QTÉ / CANT. CODE / CÓDIGO QTY / QTÉ / CANT.
AM-182 2
1/16” (2 mm)
CA-99 20
runners 406 mm (16”)
CO-249 2
EX-743 2
coulisseaux 406 mm
correderas 40,6 cm
11 15/16” (30,3 cm)
16 3/16” (41,1 cm)
GO-796 2
green / vert / verde
H-03 30
H-36 26
H-04 10
H-991 6
REAL SIZE / GRANDEUR RÉELLE / TAMAÑO REAL
CODE / CÓDIGO
VE-244 8
3/8” (10 mm)
QTY / QTÉ / CANT. CODE / CÓDIGO
PA-7392 1
PA-97 6
PO-778 2
TI-683 1
11 5/8” (295 mm)
3500-501627 2
TI-452 8
RU-420 1
SU-682 2
VR-212 8
1” (25 mm)
VF-232 4
VR-207 12
7/8” (22 mm)
1/2” (13 mm)
VR-213 4
1 1/4” (32 mm)
QTY / QTÉ / CANT.
4

pull out
retirez
retire
B
turn
tournez
haga
girar
A
IMPORTANT NOTICE / NOTE IMPORTANTE / NOTA IMPORTANTE
Duly complete the self-adhesive sticker.
/
Assurez-vous de bien remplir l’autocollant.
ASSEMBLY
INSTRUCTIONS
INSTRUCTIONS
D’ASSEMBLAGE
INSTRUCCIONES DE
ENSAMBLAJE
/
Asegúrese de completar correctamente la etiqueta.
Important/Importante
Please retain the self-adhesive sticker which you will nd
at step 9 of the instruction manual.
Conservez l’autocollant qui sera collé seulement
à l’étape 9 du feuillet d’instructions.
Conserve la etiqueta que será pegada sólo en la
etapa 9 de la hoja de instrucciones.
IMPORTANT NOTICE / NOTE IMPORTANTE / NOTA IMPORTANTE
Main hardware system / Système de quincaillerie principal / Sistema principal de quincalla
arrow
èche
2
echa
H-03
Insert the cam with the arrow pointing
towards the hole in the edge.
Insérez la rondelle en pointant la èche
vers le trou de la bordure.
Inserte la arandela apuntando la echa
hacia el oricio cercano el borde.
1
H-36
push down
enfoncez
presione
hacia
abajo
proper position
bonne position
buena posición
If needed / En cas de nécessité
En caso de necesidad
How to remove a misplaced assembly bolt (H-36).
Comment retirer un boulon (H-36) mal situé.
Cómo retirar un perno (H-36) mal ubicado.
5

Storage Unit / Unité de rangement / Unidad de almacenado
H-04
screw in
vissez
atornillar
Important
Importante
1
Assembling sequence
Séquence d’assemblage
Secuencia de ensamblaje
Parts / Pièces / Piezas:
443070 30
H-04
H-03
H-36
1
Code / Código
Qty / Qté / Cant.
H-03
H-03
x 16
H-36
x 4
H-04
x 4
30
44
70
When you have completed the
assembly of your new furniture,
install plastic caps.
Lorsque vous avez complété
l’assemblage de votre meuble,
installez les capuchons de
plastique.
Una vez que haya ensamblado
el mueble, coloque los
capuchones de plástico.
H-03
30
CA-99
23/32”
18mm
6

Table or Return Table / Table ou table retour / Mesa o mesa angular
PA-97
2
Assembling sequence
Séquence d’assemblage
Secuencia de ensamblaje
Parts / Pièces / Piezas:
30 44 30 20 20 43
+
H-36
30
20
44
Bottom
Dessous
Debajo
H-36
H-03
20
30
43
2
Code / Código
Qty / Qté / Cant.
H-03
x 8
H-36
x 12
PA-97
6
7

Hardware installation and assembly / Installation de la quincaillerie et assemblage / Instalación de las quincallas
3
Assembling sequence
Séquence d’assemblage
Secuencia de ensamblaje
Parts / Pièces / Piezas:
30 44 30 21 21 40
H-36
+
H-03
40
21
44
Top
Dessus
Encima
21
3
Code / Código
Qty / Qté / Cant.
8
H-03
x 6
H-36
x 10

Hardware installation and assembly / Installation de la quincaillerie et assemblage / Instalación de las quincallas
4
Important/Importante
RU-420
Remove paper on one side
only of RU-420.
Retirez le papier sur seulement
une des faces du RU-420.
Retire el papel de sólo uno de los
costados del RU-420.
PA-7392
VR-213
41
PA-7392
41
4
Code / Código
Qty / Qté / Cant.
1 1/4” (32 mm)
VR-213
x 4
PA-7392
x 1
3500-501627
x 2
RU-420
x 1
9
Hardware installation and assembly / Installation de la quincaillerie et assemblage / Instalación de las quincallas
5
Important/Importante
RU-420
RIGHT ASSEMBLY INSTRUCTIONS P.11-12-13
INSTRUCTIONS D’ASSEMBLAGE DROIT P.11-12-13
INSTRUCCIONES DE ENSAMBLAJE DERECHO P.11-12-13
Remove paper from RU-420.
Retirez le papier du RU-420.
Retire el papel del RU-420.
30
45
20
43
or / ou / o
LEFT ASSEMBLY INSTRUCTIONS P.14-15-16
INSTRUCTIONS D’ASSEMBLAGE GAUCHE P.14-15-16
INSTRUCCIONES DE ENSAMBLAJE IZQUIERDO P.14-15-16
Important / Importante
45
20
20
42
30
42
TI-452
30
10
09
Use screw for
vertical adjustment.
Utilisez la vis pour
l’ajustement vertical.
Utilice el tornillo para
el ajuste vertical.
5
Code / Código
Qty / Qté / Cant.
TI-452
x 8

Hardware installation and assembly / Installation de la quincaillerie et assemblage / Instalación de las quincallas
6
Important/Importante
2 possibilities / 2 possibilités / 2 posibilidad
Installation of drawers to the left or to the right
Installation des tiroirs à gauche ou à droite
Instalación de cajones a la izquierda o a la derecha
Attention / Attención
Refer to page 14 for the left assembly.
Référez-vous à la page 14 pour l’assemblage gauche.
Vea la paje 14 para el ensamblaje izquierdo.
RIGHT ASSEMBLY INSTRUCTIONS
INSTRUCTIONS D’ASSEMBLAGE DROIT
INSTRUCCIONES DE ENSAMBLAJE DERECHO
30
CO-249
Use these holes / Utilisez ces trous / Utilice estos orificios
VE-244
20
Push plastic lever and slide out piece to be used in step 5
Soulever pour dégager et séparer la section qui servira à l’étape 5
Levantar para soltar y separar la sección que servirà a la etapa 5
6
Code / Código
Qty / Qté / Cant.
CO-249
x 2
3/8” (10 mm)
VE-244
x 8
11

Assembly / Assemblage / Ensamblaje
align
aligner
alinear
without pre-drilled hole
sans pré-perçage
sin perforación previa
VR-207
7
Assembling sequence
Séquence d’assemblage
Secuencia de ensamblaje
Parts / Pièces / Piezas:
CA13A
EX-681
bottom / fond / fondo
PO-778
09 10
VF-232
H-04
EX-702 EX-702
+
67
RIGHT ASSEMBLY INSTRUCTIONS
INSTRUCTIONS D’ASSEMBLAGE DROIT
INSTRUCCIONES DE ENSAMBLAJE DERECHO
AM-182
1/16” (2 mm)
or / ou / o
TI-683
11 5/8” (295 mm)
67
SU-682
TI-683
EX-743
16 3/16“ (411 mm)
10
H-991
EX-743
10
EX-743
11 7/8“ (303 mm)
important / importante
CO-249
Use the remaining piece from step 4
Utilisez la section restante de l’étape 4
Utilizar la sección restante de la etapa 4
7
09
VR-212
15
CA13A
filing / rangement / orden
CA13A
10
Letter / Lettre / Carta Legal / Oficio
* File not included / Filière non-incluse / Archivo no incluido
09
67 67
CA13A
10
TI-683
09
Code / Código
Qty / Qté / Cant.
12
screws / vis / tornillos
CO-249
x 2
16 1/8” (411 mm)
EX-743
x 1
11 7/8” (303 mm)
H-991
x 4
H-04
x 4
PO-778
x 1
SU-682
x 2
TI-683
x 1
VR-207
x 6
1/2” (13 mm)
VF-232
x 2
7/8” (22 mm)
VR-212
x 4
1/16” (2 mm)
1” (25 mm)
AM-182
x 1
Assembly / Assemblage / Ensamblaje
align
aligner
alinear
without pre-drilled hole
sans pré-perçage
sin perforación previa
VR-207
8
RIGHT ASSEMBLY INSTRUCTIONS
INSTRUCTIONS D’ASSEMBLAGE DROIT
INSTRUCCIONES DE ENSAMBLAJE DERECHO
PO-778
VF-232
H-04
66
01 02
AM-182
or / ou / o
CA05A
1/16” (2 mm)
Assembling sequence
Séquence d’assemblage
Secuencia de ensamblaje
Parts / Pièces / Piezas:
+
bottom / fond / fondo
+
66
H-991
GO-796
important / importante
CO-249
Use the remaining piece from step 4
Utilisez la section restante de l’étape 4
Utilizar la sección restante de la etapa 4
8
02
15
01
CA05A
VR-212
Code / Código
Qty / Qté / Cant.
29420-11-12
screws / vis / tornillos
CO-249
x 2
1/16” (2 mm)
AM-182
x 1
PO-778
x 1
VR-207
x 6
1/2” (13 mm)
VF-232
7/8” (22 mm)
x 2
VR-212
x 4
1” (25 mm)
H-991
x 2
H-04
x 2
GO-796
x 2
13

Hardware installation and assembly / Installation de la quincaillerie et assemblage / Instalación de las quincallas
6
LEFT ASSEMBLY INSTRUCTIONS
INSTRUCTIONS D’ASSEMBLAGE GAUCHE
INSTRUCCIONES DE ENSAMBLAJE IZQUIERDO
Important/Importante
2 possibilities / 2 possibilités / 2 posibilidad
Installation of drawers to the left or to the right
Installation des tiroirs à gauche ou à droite
Instalación de cajones a la izquierda o a la derecha
Attention / Attención
Refer to page 11 for the right assembly.
Référez-vous à la page 11 pour l’assemblage droit.
Vea la paje 11 para el ensamblaje derecho.
30
CO-249
20
Use these holes / Utilisez ces trous / Utilice estos orificios
VE-244
Push plastic lever and slide out piece to be used in step 5
Soulever pour dégager et séparer la section qui servira à l’étape 5
Levantar para soltar y separar la sección que servirà a la etapa 5
6
Code / Código
Qty / Qté / Cant.
14
CO-249
x 2
3/8” (10 mm)
VE-244
x 8

Assembly / Assemblage / Ensamblaje
align
aligner
alinear
without pre-drilled hole
sans pré-perçage
sin perforación previa
VR-207
7
Assembling sequence
Séquence d’assemblage
Secuencia de ensamblaje
Parts / Pièces / Piezas:
CA13A
EX-681
bottom / fond / fondo
PO-778
09 10
VF-232
H-04
EX-702 EX-702
+
67
LEFT ASSEMBLY INSTRUCTIONS
INSTRUCTIONS D’ASSEMBLAGE GAUCHE
INSTRUCCIONES DE ENSAMBLAJE IZQUIERDO
AM-182
1/16” (2 mm)
or / ou / o
TI-683
11 5/8” (295 mm)
67
SU-682
TI-683
EX-743
16 3/16“ (411 mm)
10
H-991
EX-743
10
EX-743
11 7/8“ (303 mm)
important / importante
CO-249
Use the remaining piece from step 4
Utilisez la section restante de l’étape 4
Utilizar la sección restante de la etapa 4
7
09
VR-212
15
CA13A
filing / rangement / orden
CA13A
10
Letter / Lettre / Carta Legal / Oficio
* File not included / Filière non-incluse / Archivo no incluido
09
67 67
CA13A
10
TI-683
09
Code / Código
Qty / Qté / Cant.
screws / vis / tornillos
CO-249
x 2
16 1/8” (411 mm)
EX-743
x 1
11 7/8” (303 mm)
H-991
x 4
H-04
x 4
PO-778
x 1
SU-682
x 2
TI-683
x 1
VR-207
x 6
1/2” (13 mm)
VF-232
x 2
7/8” (22 mm)
VR-212
x 4
1/16” (2 mm)
1” (25 mm)
AM-182
x 1
15

Assembly / Assemblage / Ensamblaje
align
aligner
alinear
without pre-drilled hole
sans pré-perçage
sin perforación previa
VR-207
8
LEFT ASSEMBLY INSTRUCTIONS
INSTRUCTIONS D’ASSEMBLAGE GAUCHE
INSTRUCCIONES DE ENSAMBLAJE IZQUIERDO
PO-778
VF-232
H-04
66
01 02
AM-182
or / ou / o
CA05A
1/16” (2 mm)
Assembling sequence
Séquence d’assemblage
Secuencia de ensamblaje
Parts / Pièces / Piezas:
+
bottom / fond / fondo
+
66
H-991
GO-796
important / importante
CO-249
Use the remaining piece from step 4
Utilisez la section restante de l’étape 4
Utilizar la sección restante de la etapa 4
8
02
15
01
CA05A
VR-212
Code / Código
Qty / Qté / Cant.
16
screws / vis / tornillos
CO-249
x 2
1/16” (2 mm)
AM-182
x 1
PO-778
x 1
VR-207
x 6
1/2” (13 mm)
VF-232
7/8” (22 mm)
x 2
VR-212
x 4
1” (25 mm)
H-991
x 2
H-04
x 2
GO-796
x 2
Problems and Solutions / Problèmes et solutions / Problemas y Soluciones
You are at a step of hardware installation and some H-36 are missing:
Before calling to order your missing bolts (H-36), please make sure you have not installed any bolts (H-36) in the wrong
place. To remove a bolt (H-36) which is not in the correct place, please refer to your instruction manual.
Vous êtes à une étape d’installation de quincaillerie et il vous manque des H-36 :
Avant d’appeler pour commander des boulons (H-36), assurez-vous de ne pas avoir installé des boulons (H-36) au mauvais
endroit. Pour enlever un boulon (H-36) mal situé, consultez le feuillet d’instructions.
Usted está en alguna etapa de la instalación de quincallas y le faltan las H-36 :
Antes de llamar para pedir los pernos (H-36), asegúrese de que no los haya instalado en el lugar equivocado.
Para retirar un perno (H-36) mal puesto, consulte el folleto de instrucciones.
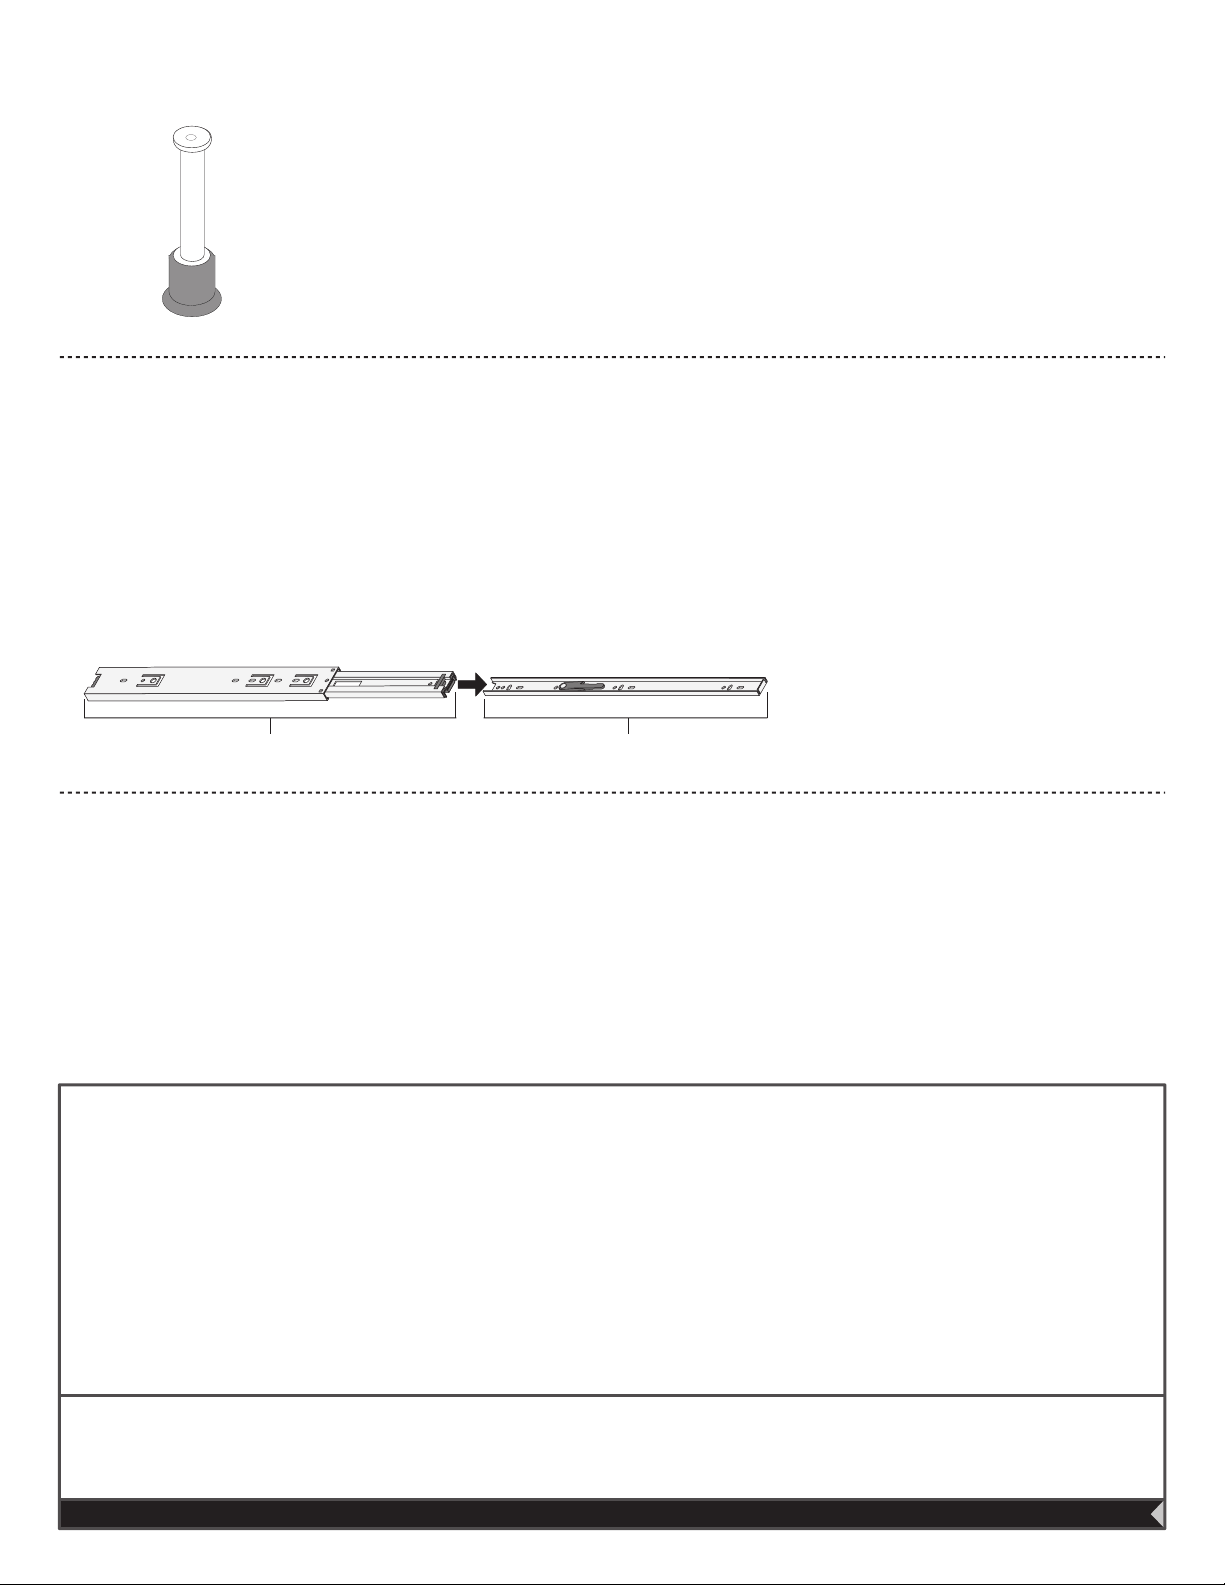
How to separate and install your CO-249 and CO-684 slides:
The CO-249 & CO-684 slides consist of two sections which you must separate. To separate the slides, please refer to your
instruction manual. The slides are installed on distinct parts which will be re-grouped only when the drawers are
installed on the furniture.
Comment séparer et installer les coulisseaux CO-249 et CO-684 :
Les coulisseaux CO-249 et CO-684 sont constitués d’une partie que vous devez séparer en deux sections. Pour séparer le
coulisseau, référez-vous au feuillet d’instructions. Les coulisseaux sont installés sur deux pièces distinctes et seront regroupés
seulement lors de l’installation des tiroirs dans le meuble.
Cómo separar y instalar las guías correderas CO-249 y CO-684 :
Las guías correderas CO-249 y CO-684 están constituidas por una parte que usted debe separar en dos secciones. Para separar las guías
correderas, consulte el folleto de instrucciones. Las guías correderas se instalan en dos piezas distintas y sólo serán reagrupadas una vez
que se instalen los cajones en el mueble.
Part B / Partie B / Parte BPart A / Partie A / Parte A
PRODUCT CARE / ENTRETIEN DU PRODUIT / MANTENIMIENTO DEL PRODUCTO
Avoid placing the furniture in the sunlight or near a source of heat. Use a soft dry cloth for dusting. To clean heavy dirt, use a cloth
dipped in a solution of mild detergent and water. Avoid leaving wet objects on the surface or using commercial chemical cleaning
products.
Évitez d'exposer le meuble au soleil ou près de toute source de chaleur. Pour le nettoyage, utilisez un chion doux et sec. Pour la grosse
saleté, utilisez un chion humidié avec un peu de détergent dilué dans l'eau. Évitez de laisser des objets mouillés sur la surface de votre
meuble ou d'utiliser des nettoyants chimiques.
Evite exponer el mueble al sol o las fuentes de calor. Para limpiarlo, utilice un paño suave y seco. Para limpiar las manchas rebeldes, utilice un trapo
húmedo con un poco de detergente diluido en agua. No deje objetos mojados encima del mueble ni utilice limpiadores que contengan productos
químicos.
CONGRATULATIONS! YOU ARE NOW THE OWNER OF A QUALITY PRODUCT
FÉLICITATIONS! VOUS AVEZ MAINTENANT EN VOTRE POSSESSION UN PRODUIT DE QUALITÉ
IFELICIDADES! AHORA ES USTED DUEÑO DE UN PRODUCTO DE CALIDAD.

For more information or to discover our new products
Pour toute information ou pour découvrir nos nouveaux produits
Para obtener más información o para obtener nuevos productos
YOU
and
US
USTEDES
VOUS
et
NOUS
y
NOSOTROS
FOR LONG TIME
POUR LONGTEMPS
POR MUCHO TIEMPO
OUR FURNITURE IS GARANTEED FOR 10 YEARS. NO MATTER THE PROBLEM,
OUR CUSTOMER SERVICE IS THERE FOR YOU.
NOS MEUBLES SONT GARANTIS POUR 10 ANS. PEU IMPORTE LE PROBLÈME,
N’HÉSITEZ PAS À COMMUNIQUER AVEC NOTRE SERVICE À LA CLIENTÈLE.
NUESTROS MUEBLES TIENEN UNA GARANTIA DE 10 AÑOS. NO IMPORTA EL PROBLEMA,
COMUNIQUE CON NUESTRO SERVICIO À CLIENTE.
 Loading...