

Page 1
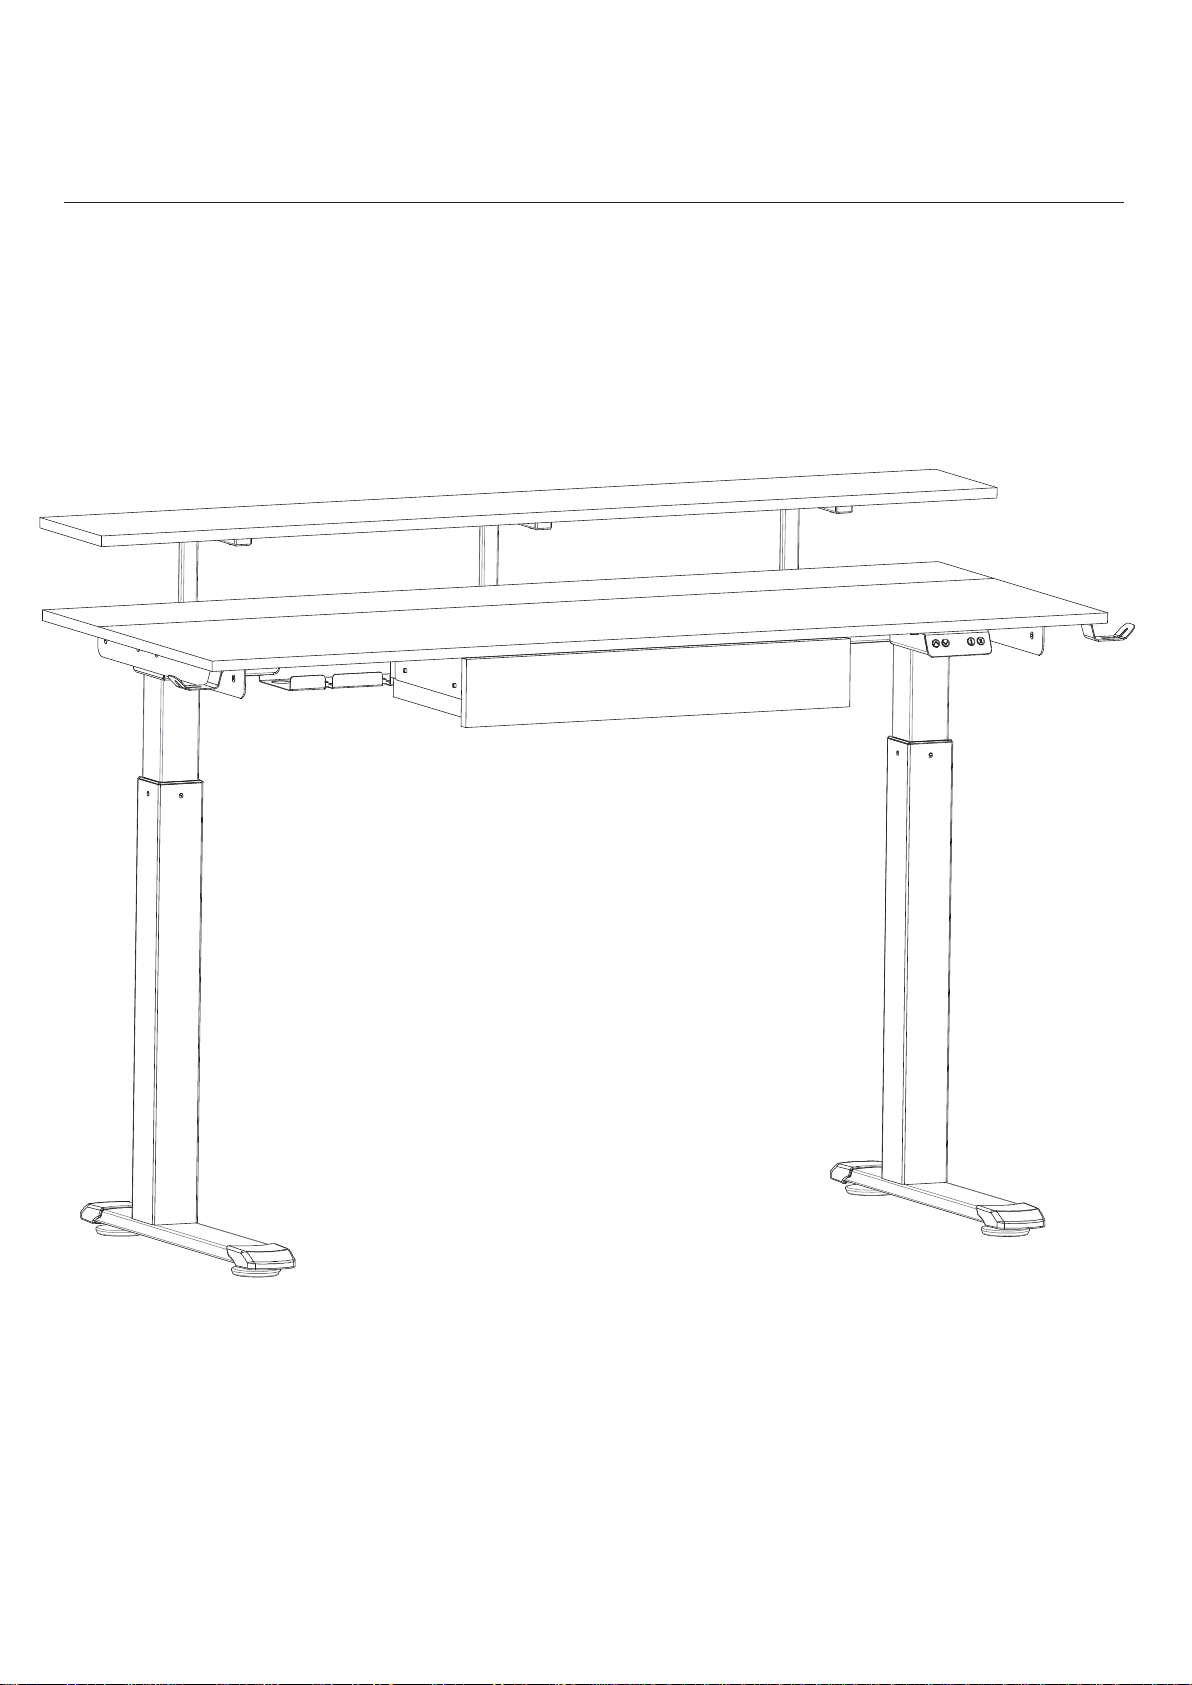
HEIGHT ADJUSTABLE DESK
Page 2
1
Page 3
2
Page 4
3
Page 5
4
Page 6
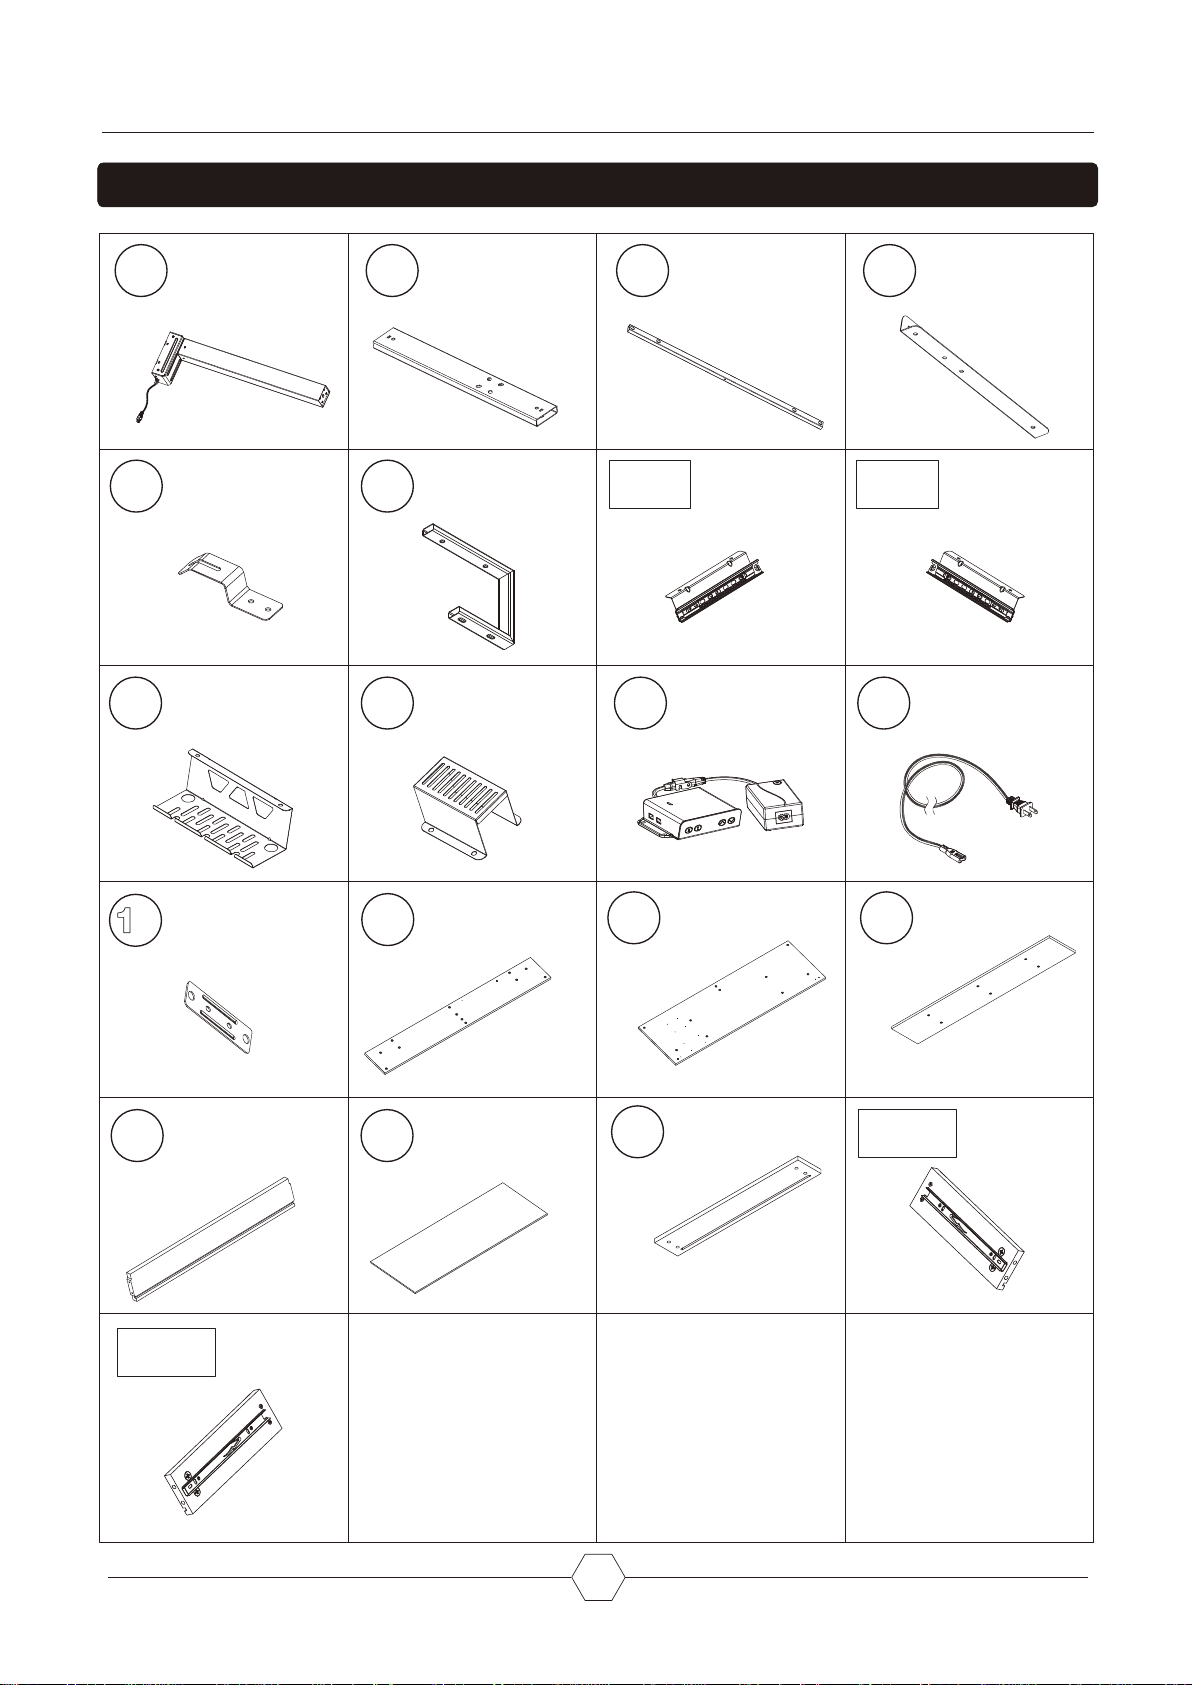
ACCESSORIES LIST
1
5
8
x2
x2
x1
2
6
9
x2
x3
x1
3
7-L
10
x2
x1
x1
4
7-R
11
x2
x1
x1
12
x3
16
x1
56cm/22in
19-R
x1
8cm/3.1in
3
1
17
x1
140cm/55in
x1
53cm/20.9in
18cm/7.1in
25.7cm/10.1in
14
x1
140cm/55in
37cm/14.6in
18
x1
60cm/23.6in
8.8cm/3.5in
15
x1
140cm/55in
19cm/7.5in
19-L
x1
5
Page 7
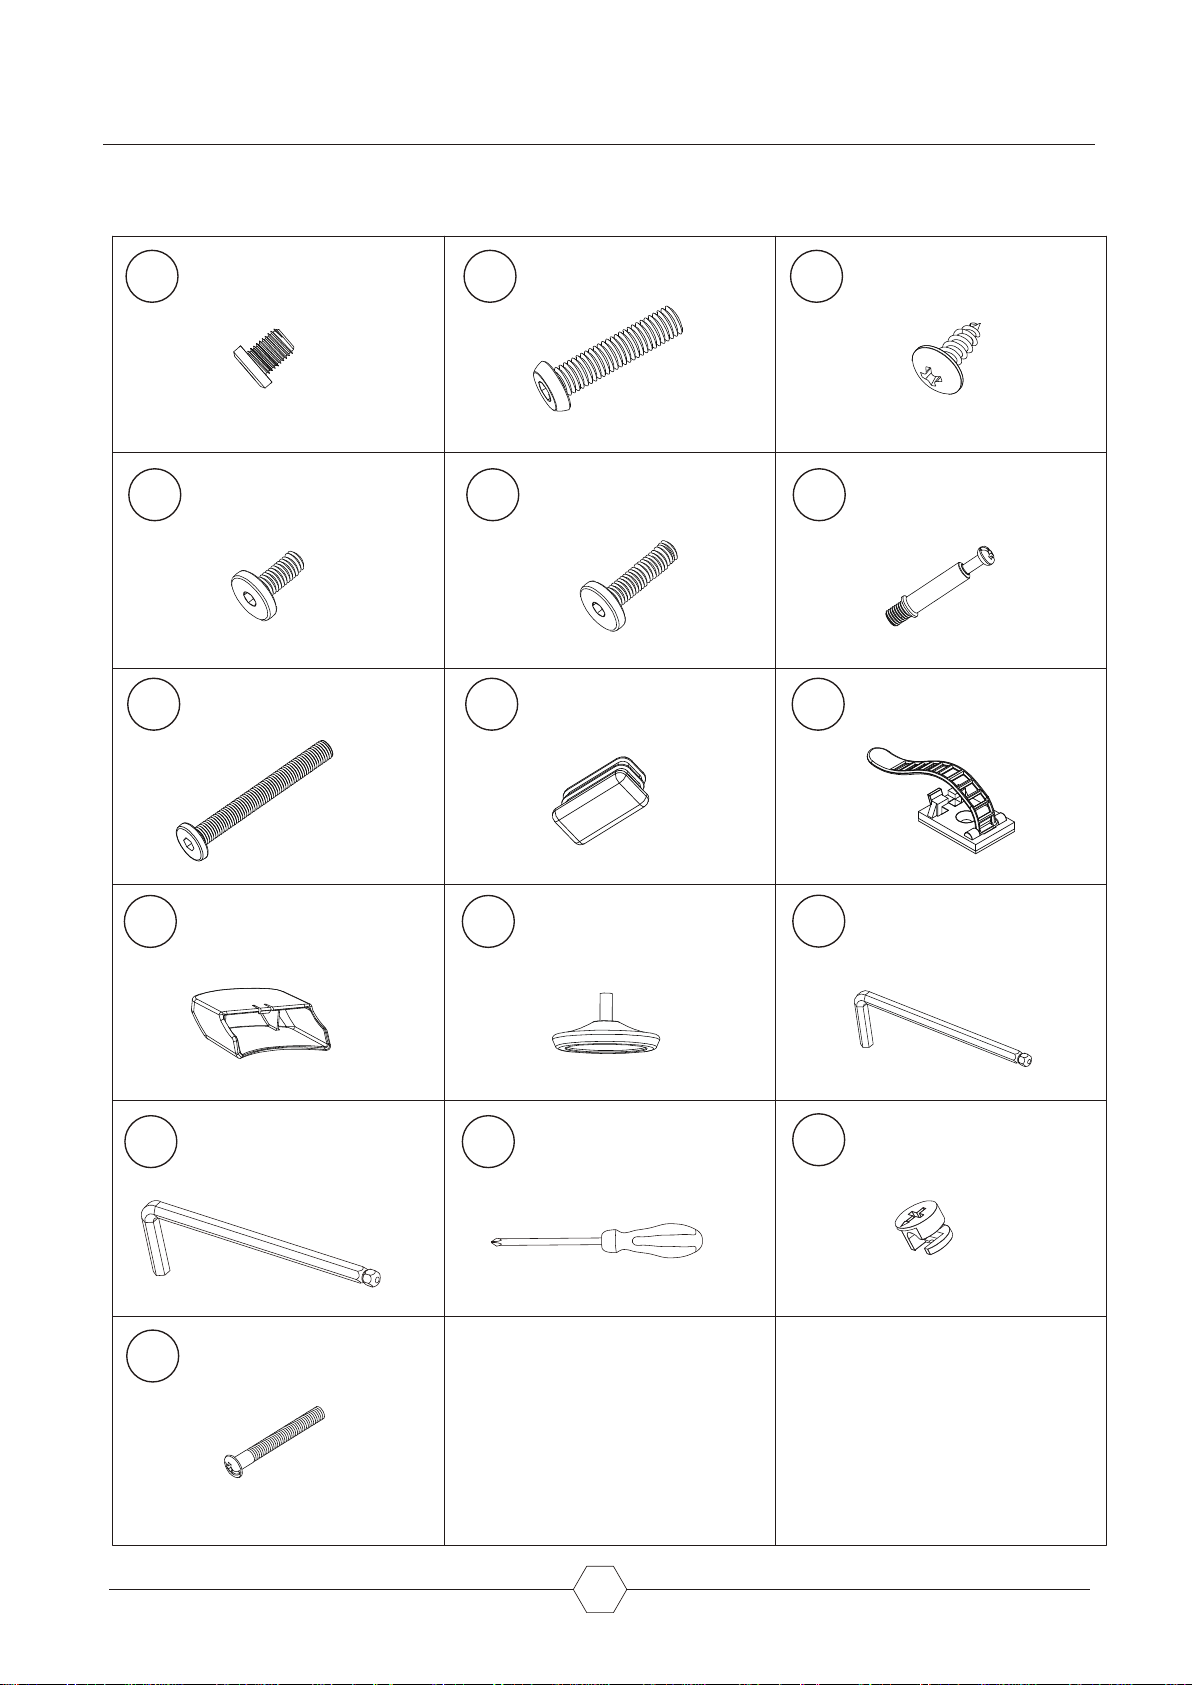
A
x12+1
B
x8+1
M8*10mm M8*35mm ST4.8*12mm
C
x14+1
D
G
J
x14+1
x2+1
x4
1/4*12mm
1/4*51mm
E
H
K
x12+1
x6
x4
1/4*24mm
13*25mm
F
I
L
x4
x5
x1
K4
M
P
x1
x4+1
K5
5*35mm
N
x1
6
O
x4
assembled
Page 8
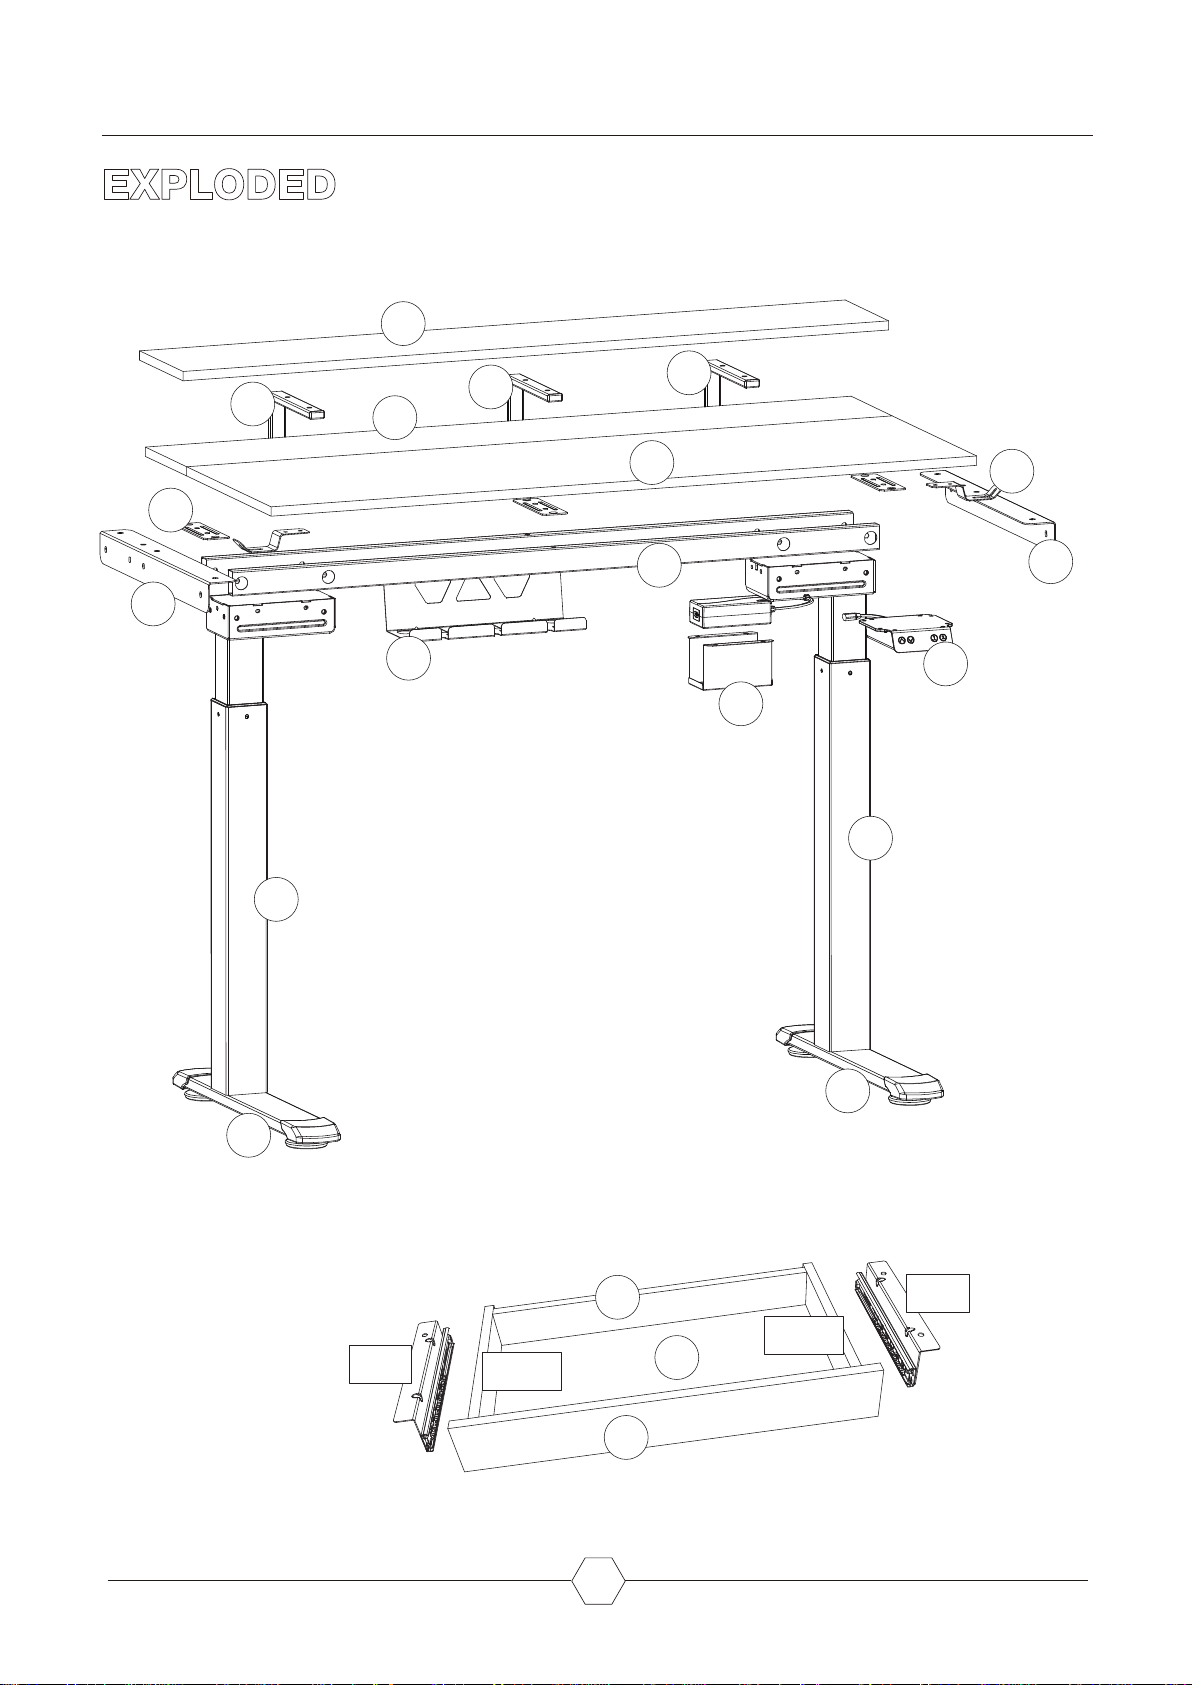
EXPLODED
15
12
4
6
1
13
8
6
14
3
6
5
4
10
9
1
2
7-L
19-L
16
18
7
2
7-R
19-R
17
Page 9
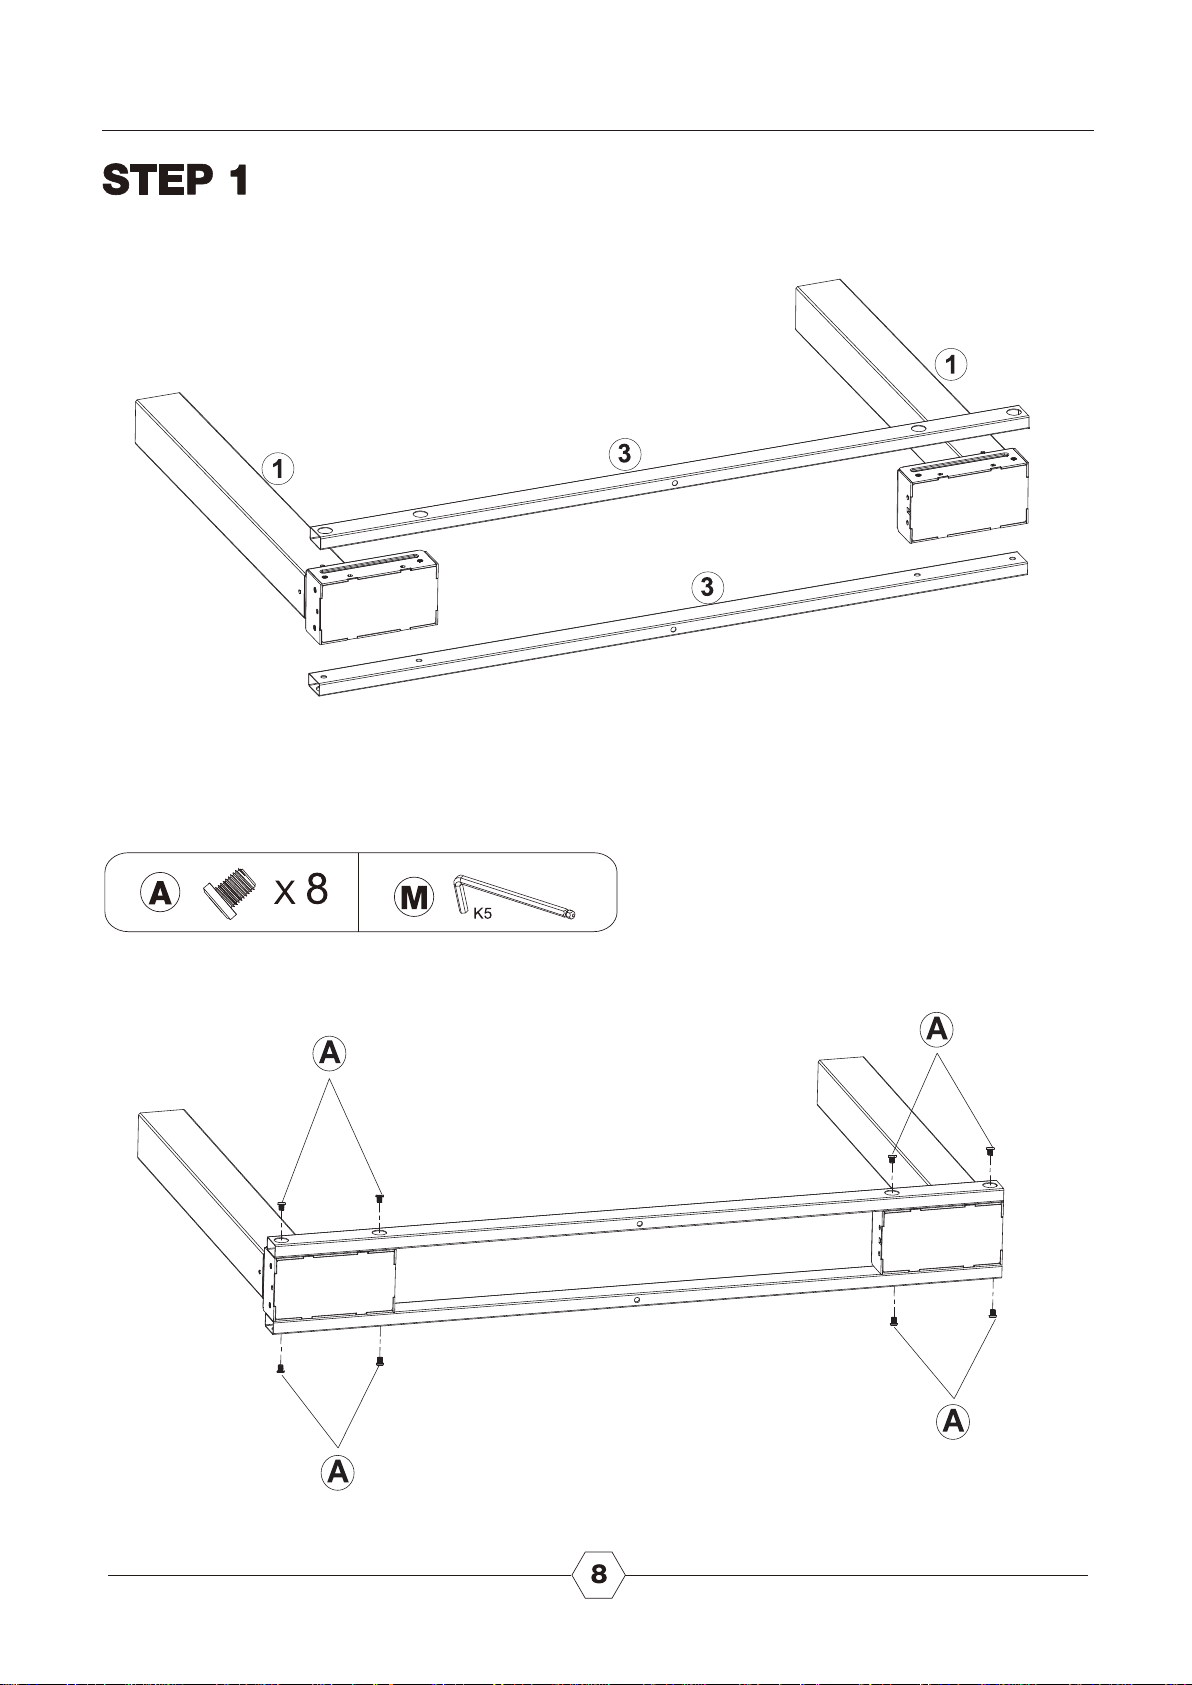
Page 10
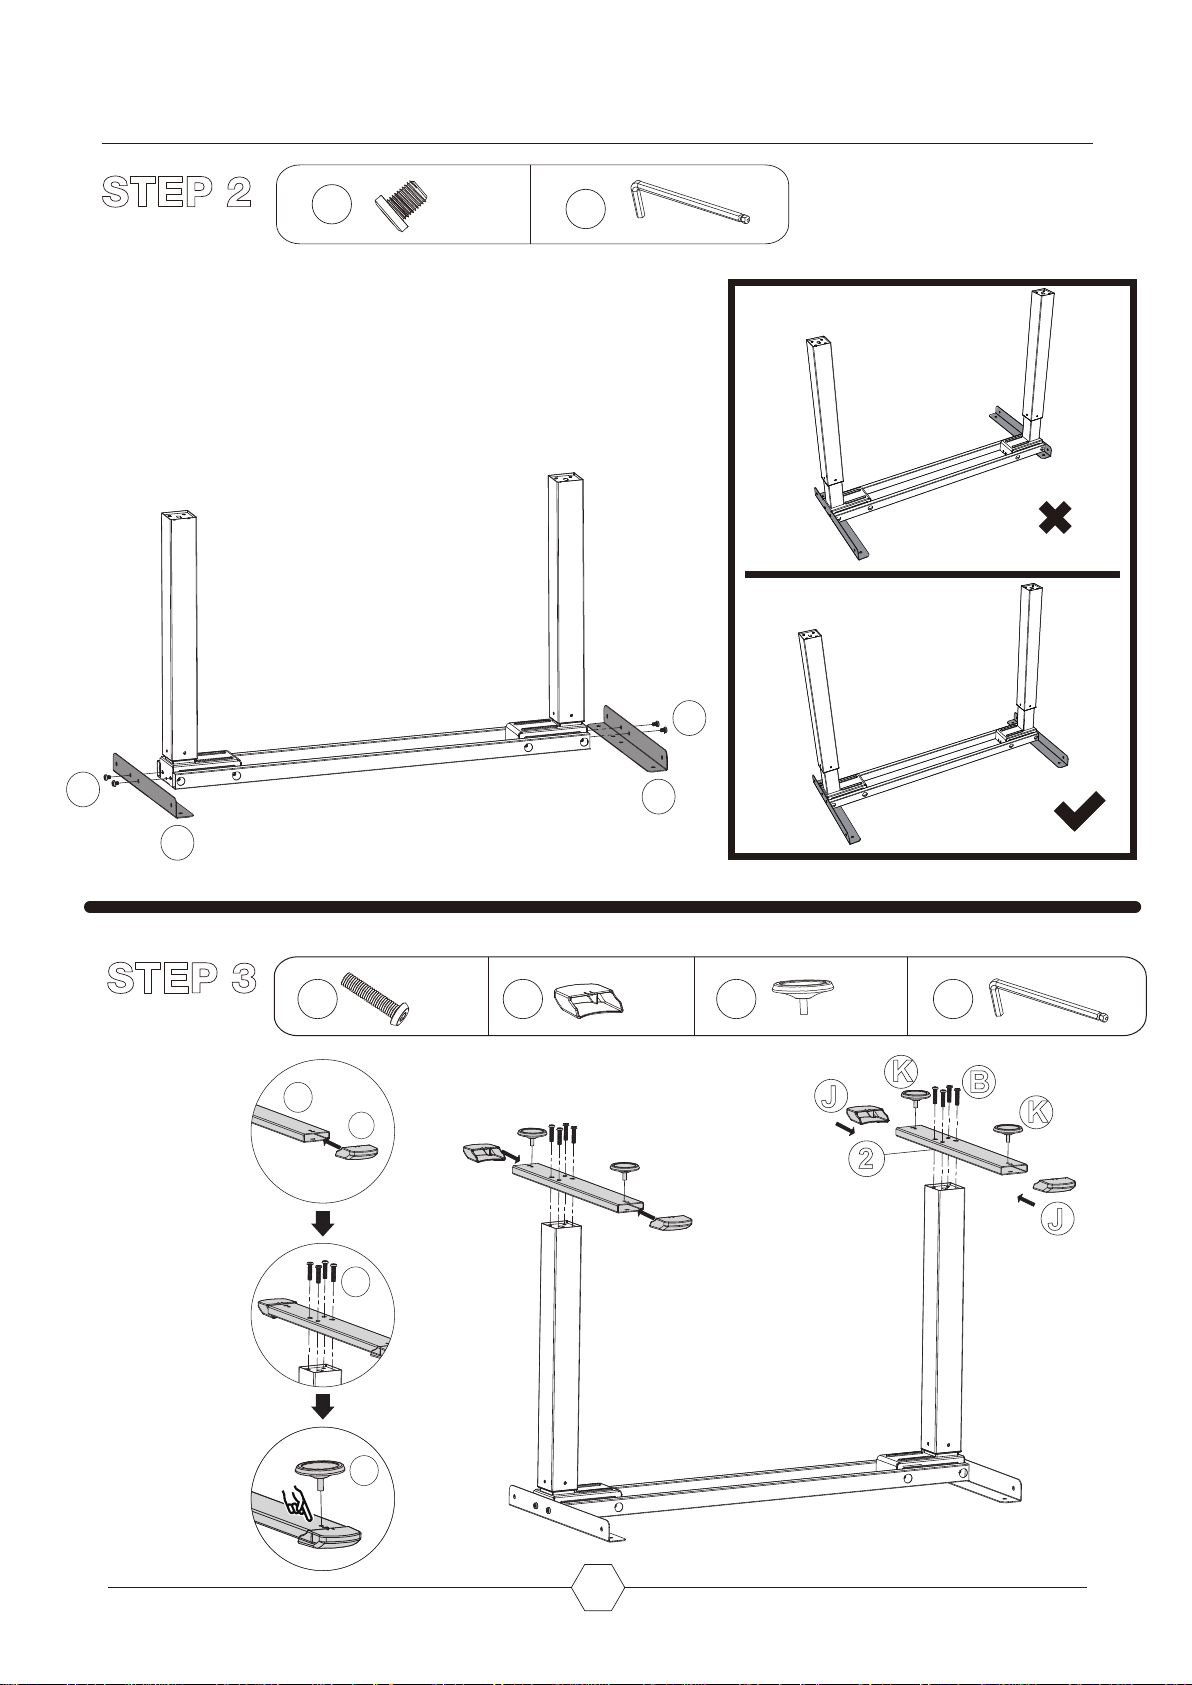
STEP 2
A
X 4
M
K5
A
A
4
STEP 3
3-1
3-2
4
B
2
J
B
X
8
J
X
4
K M
J
X
4
K
2
K5
B
K
J
3-3
K
9
Page 11
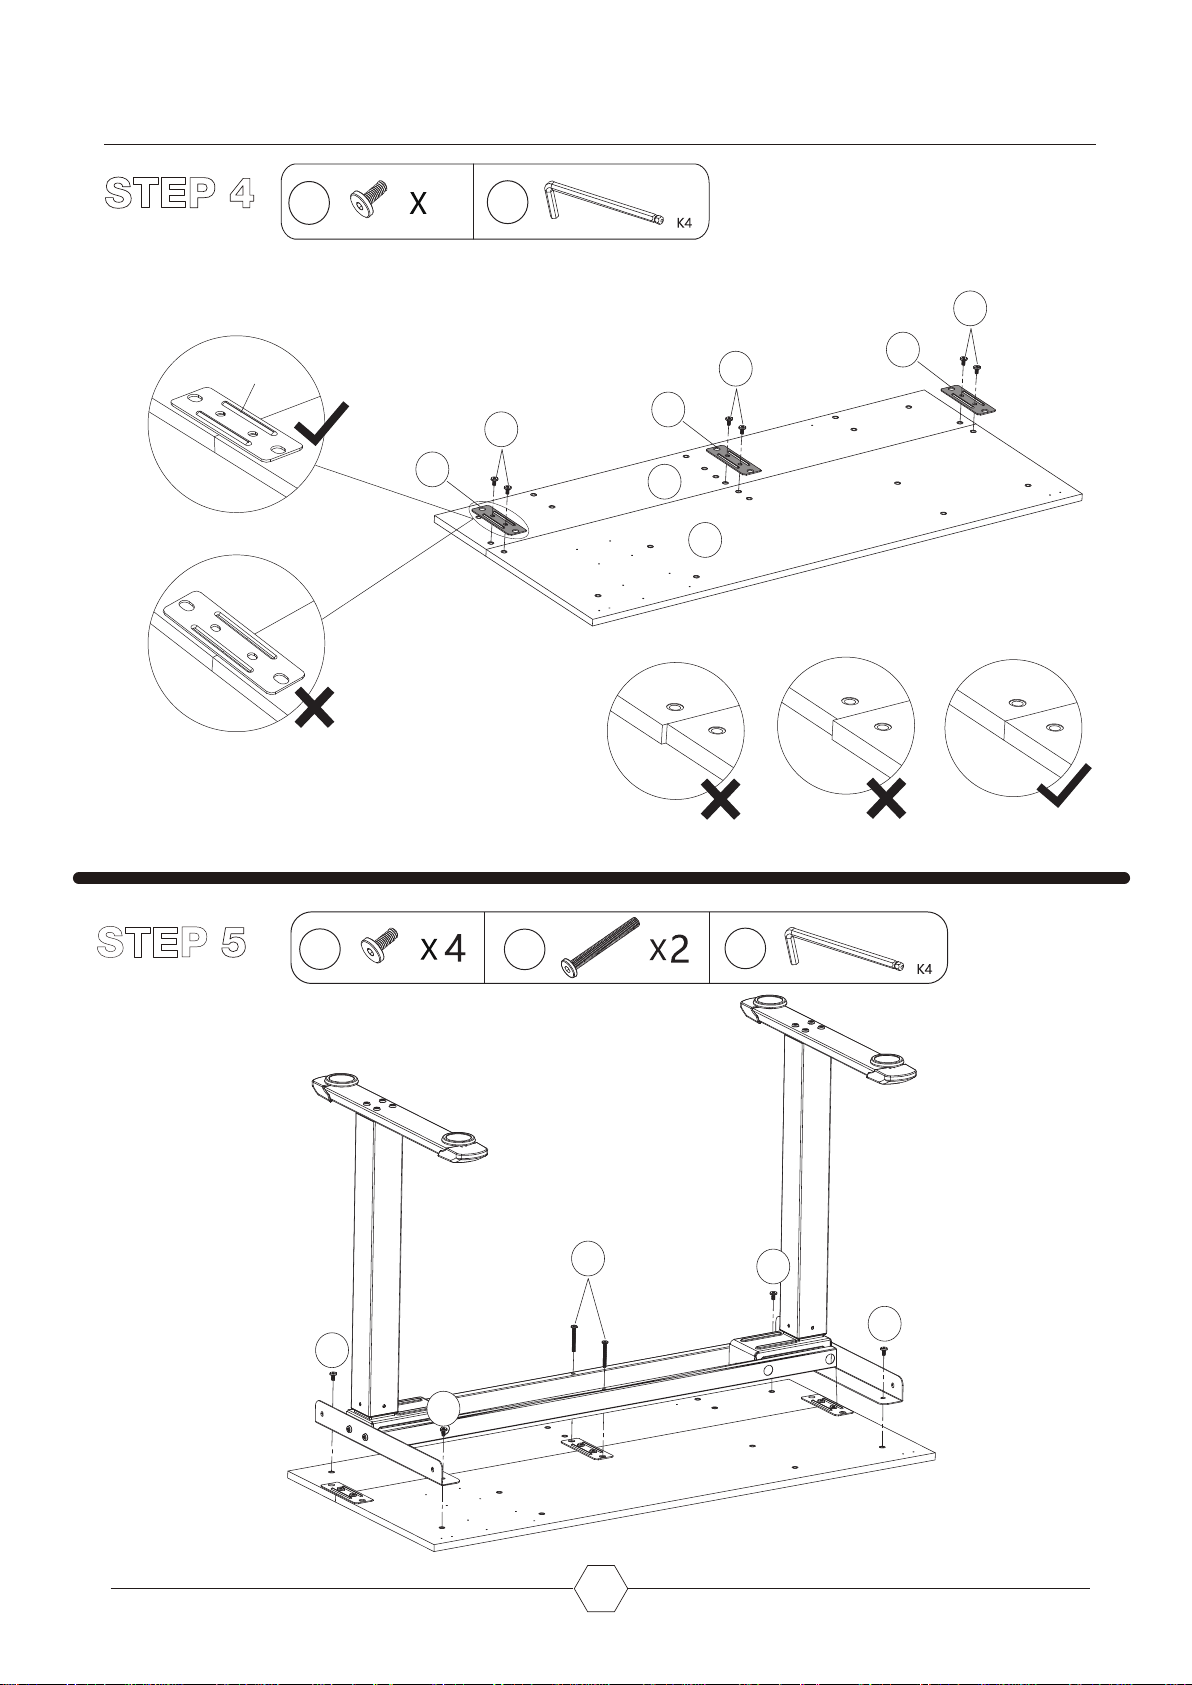
STEP 4
D L
6
D
UP
12
D
12
12
D
13
14
STEP 5
D L
D
D
G
G
D
D
10
Page 12
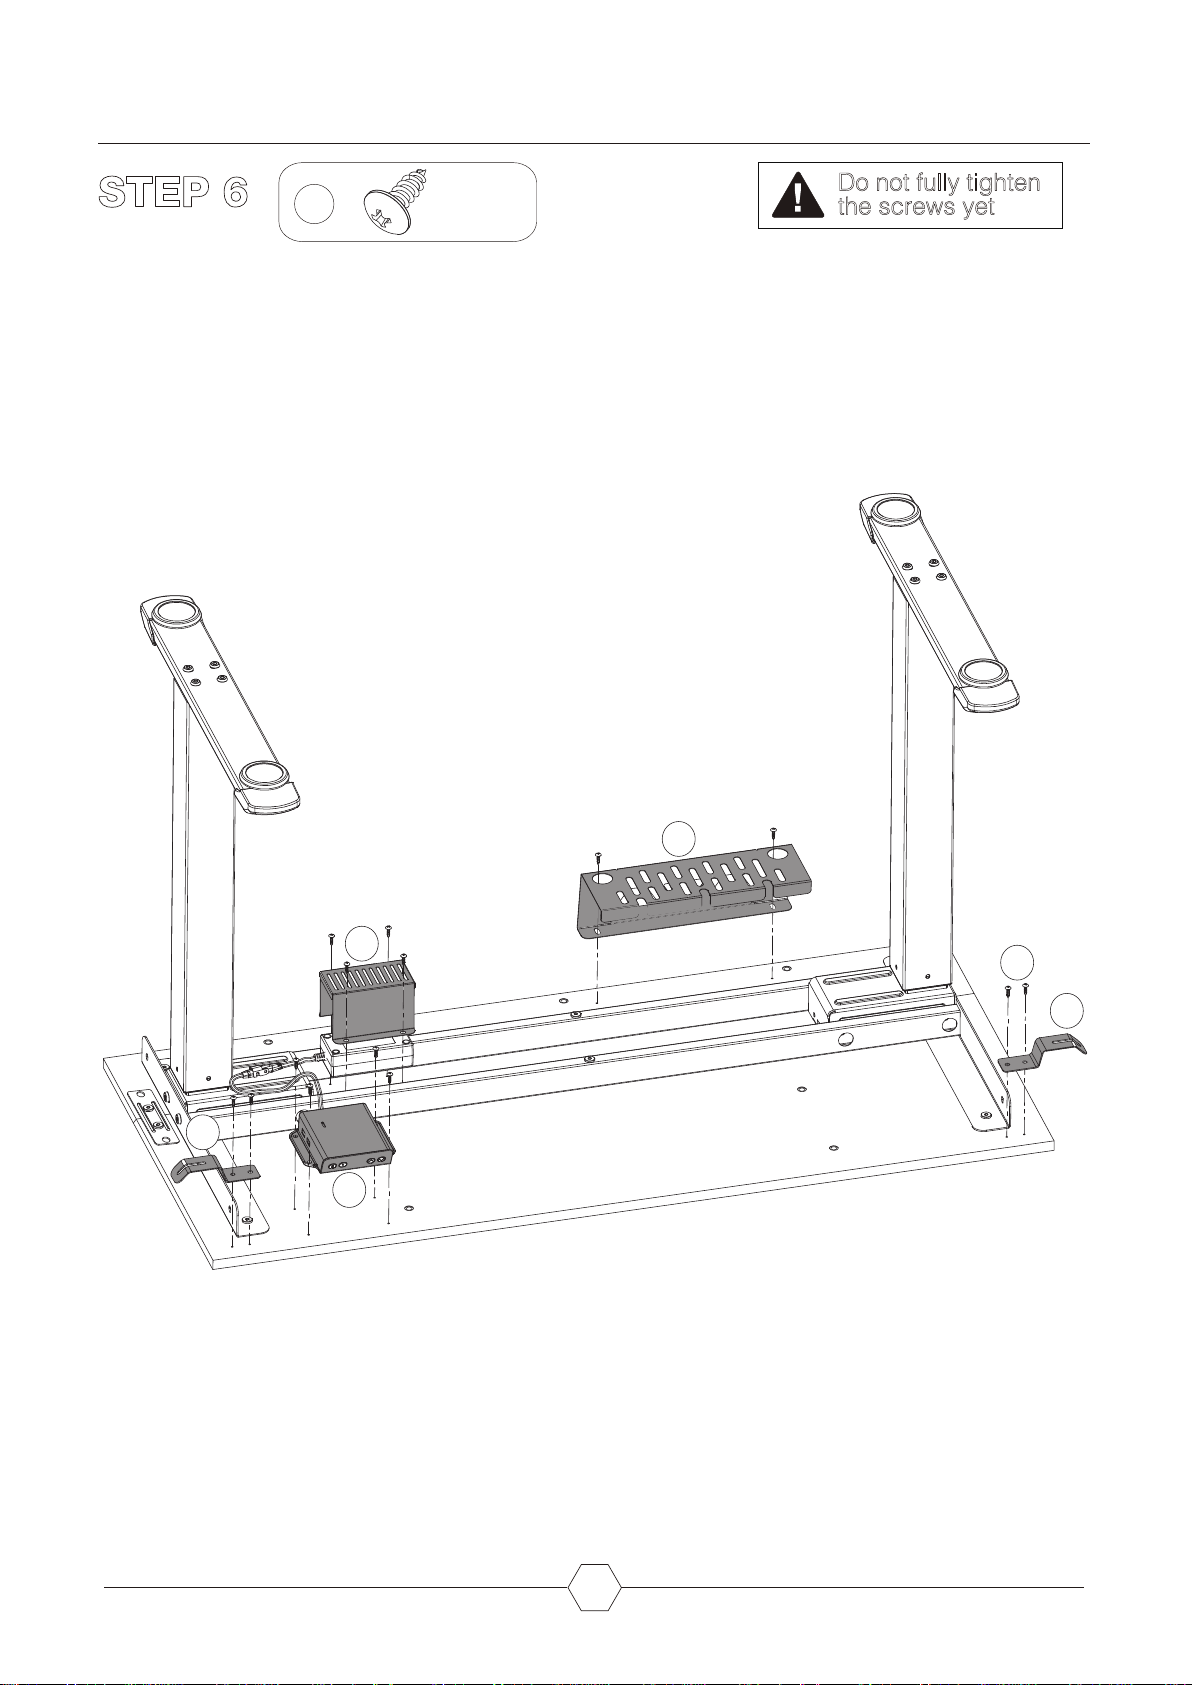
STEP 6
C
X
14
Do not fully tighten
the screws yet
5
8
9
C
5
10
11
Page 13
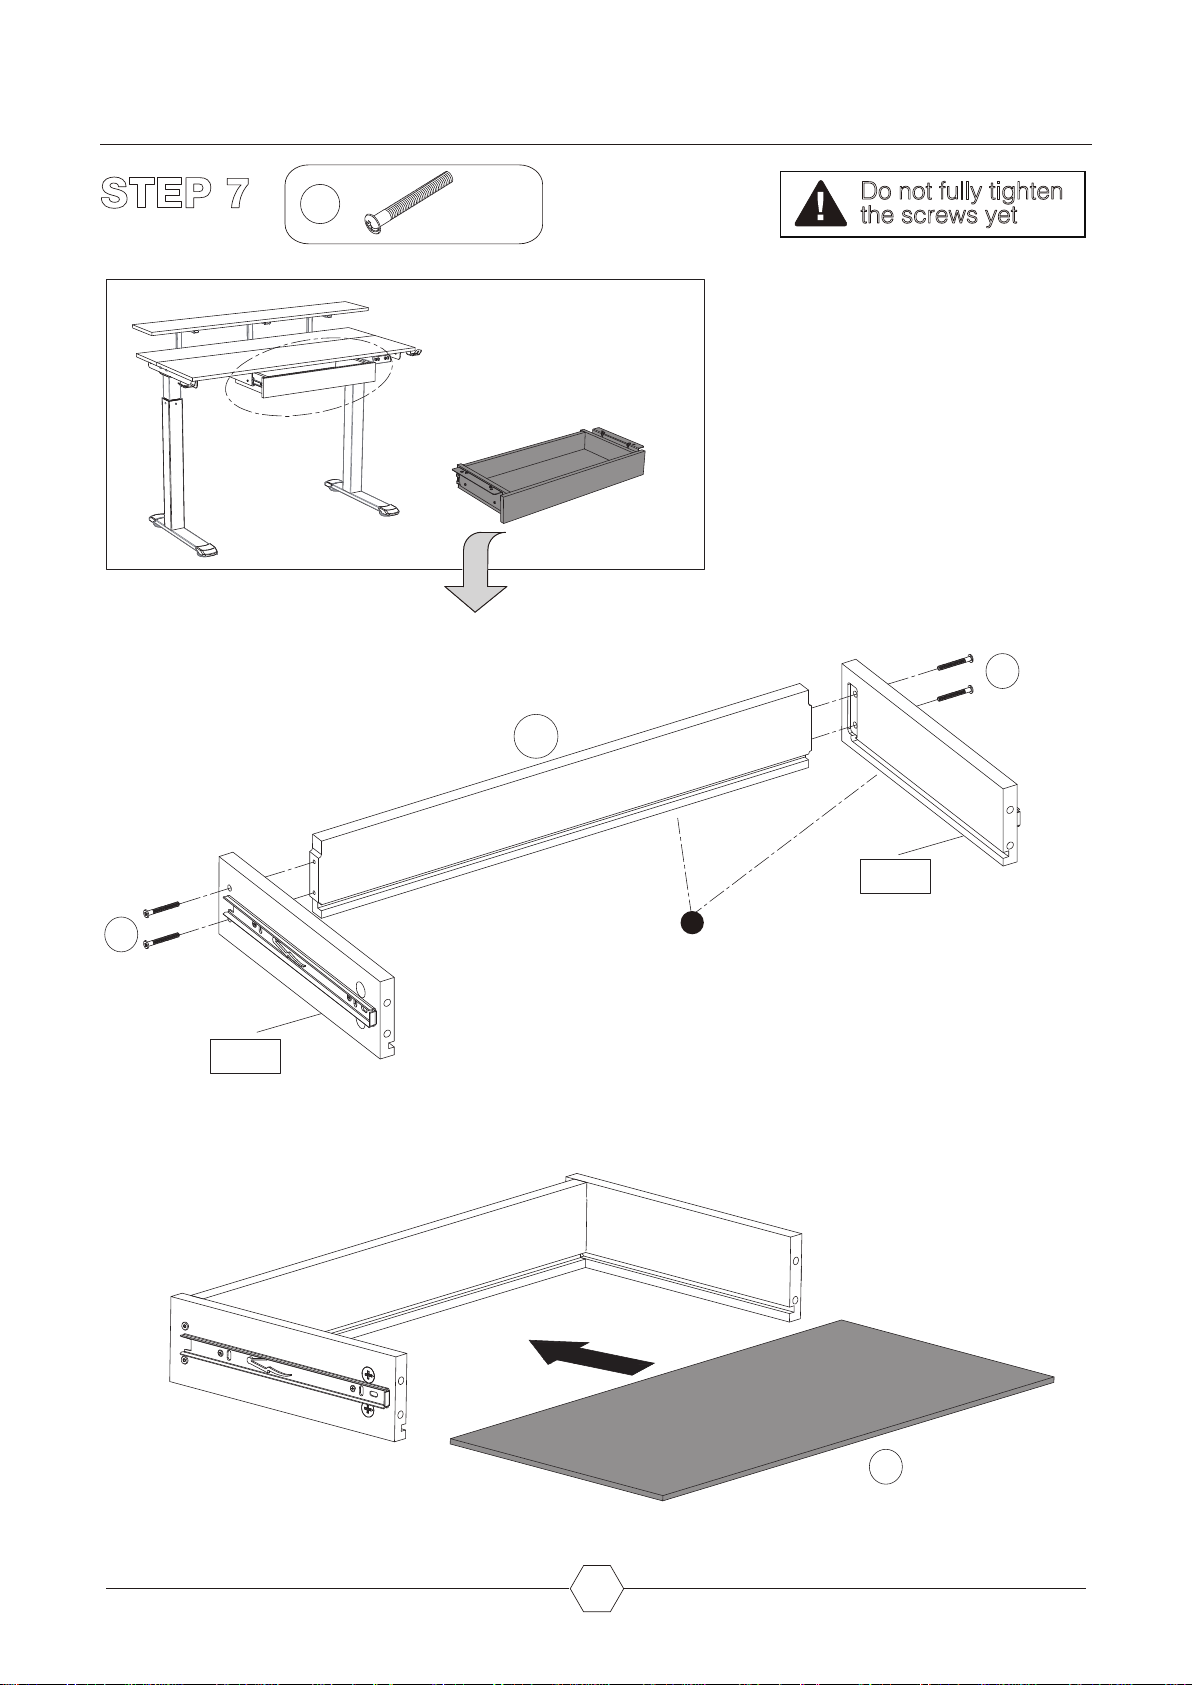
STEP 7
P
X
4
Do not fully tighten
the screws yet
×1
P
16
P
19-R
Note
Grooves downward
19-L
12
17
Page 14
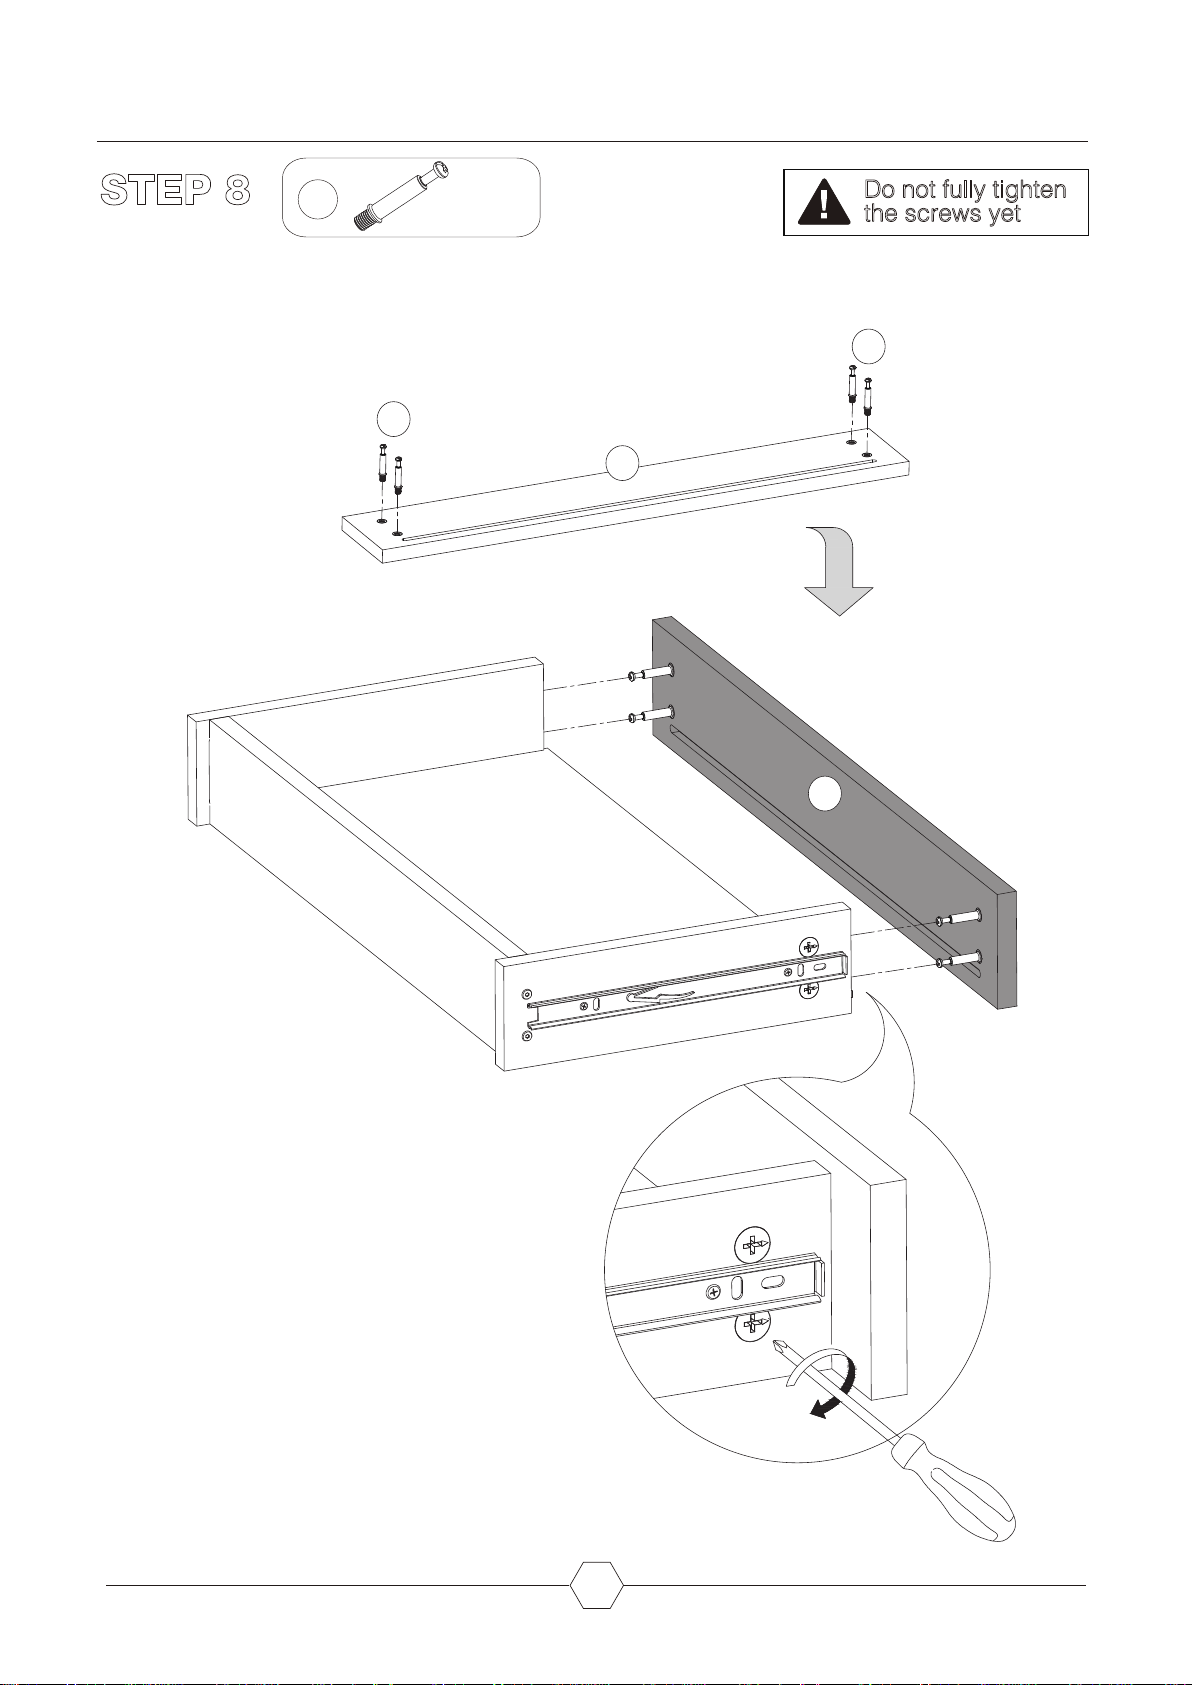
STEP 8
F
F
X
4
Do not fully tighten
the screws yet
F
18
18
13
Tighten the screws
Page 15
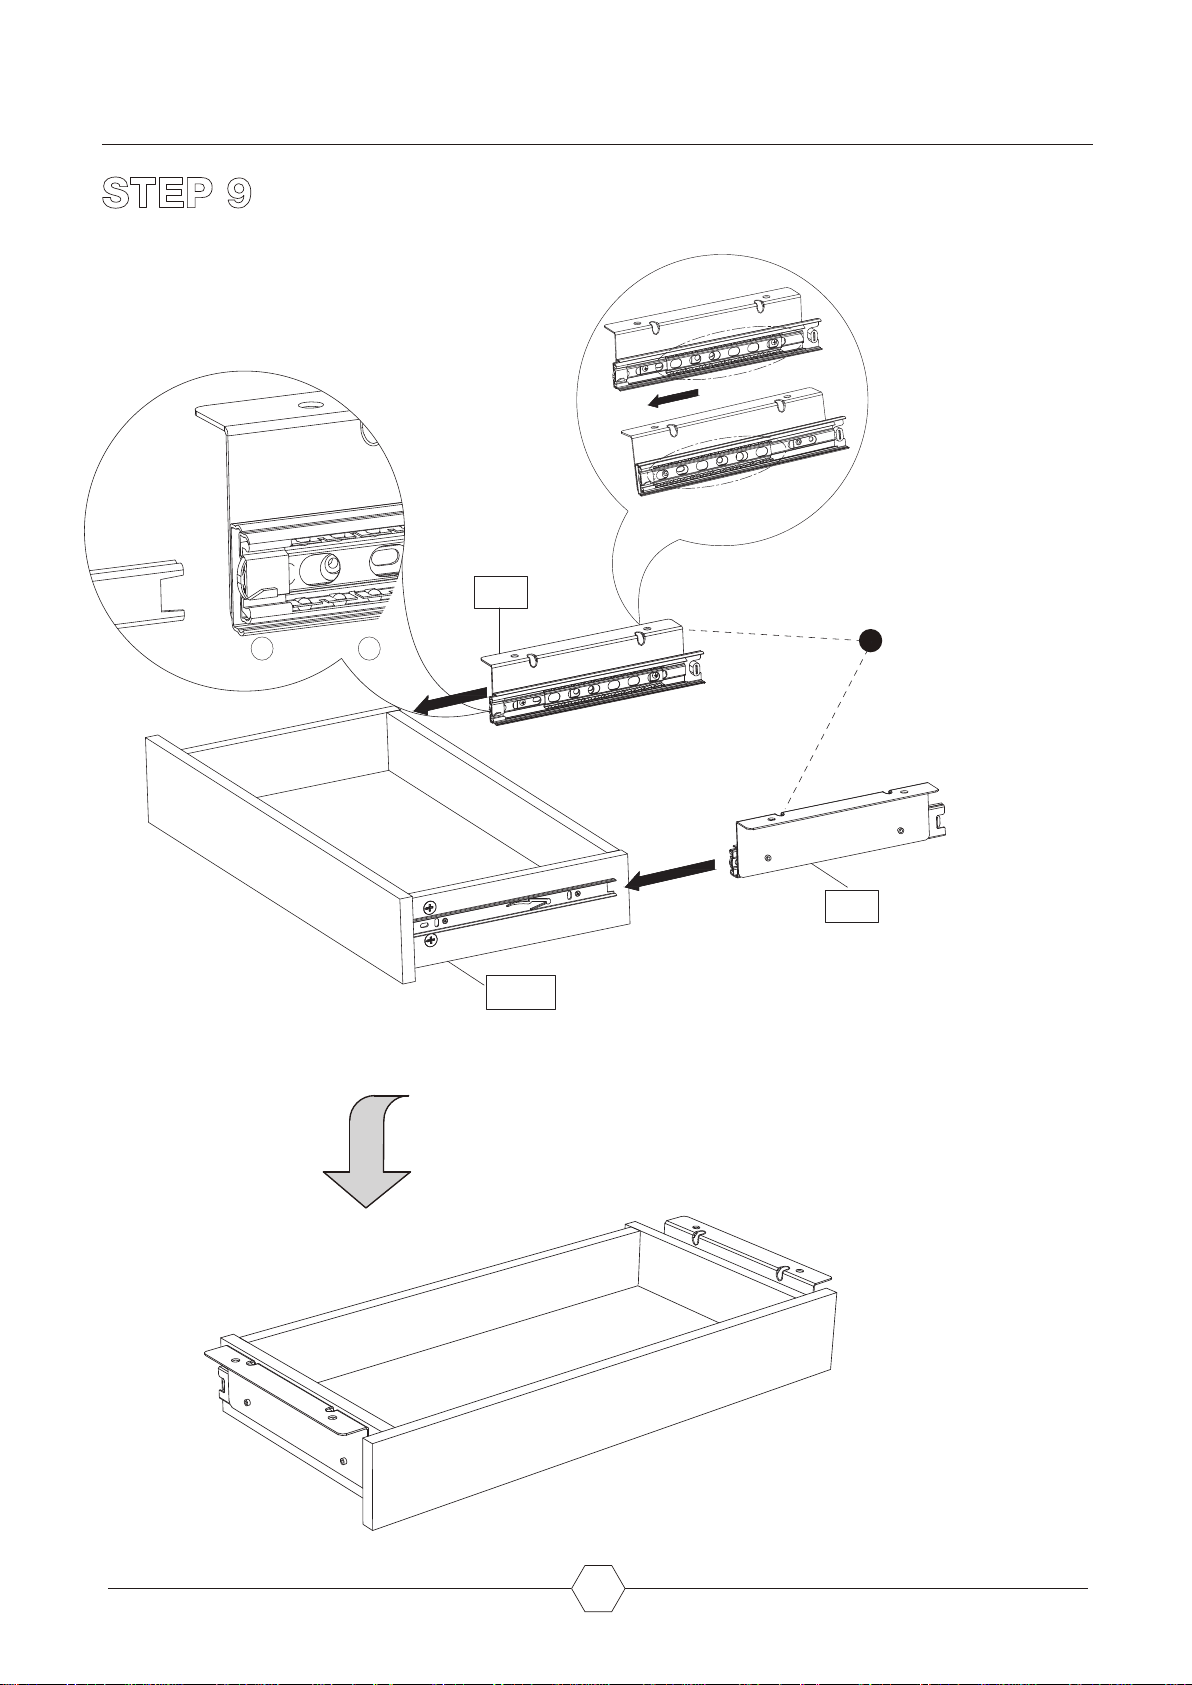
STEP 9
Slide to the forefront,
like photos.
7-L
Push pate into part
7 19
Note
This part upward.
7-R
19-R
14
Page 16
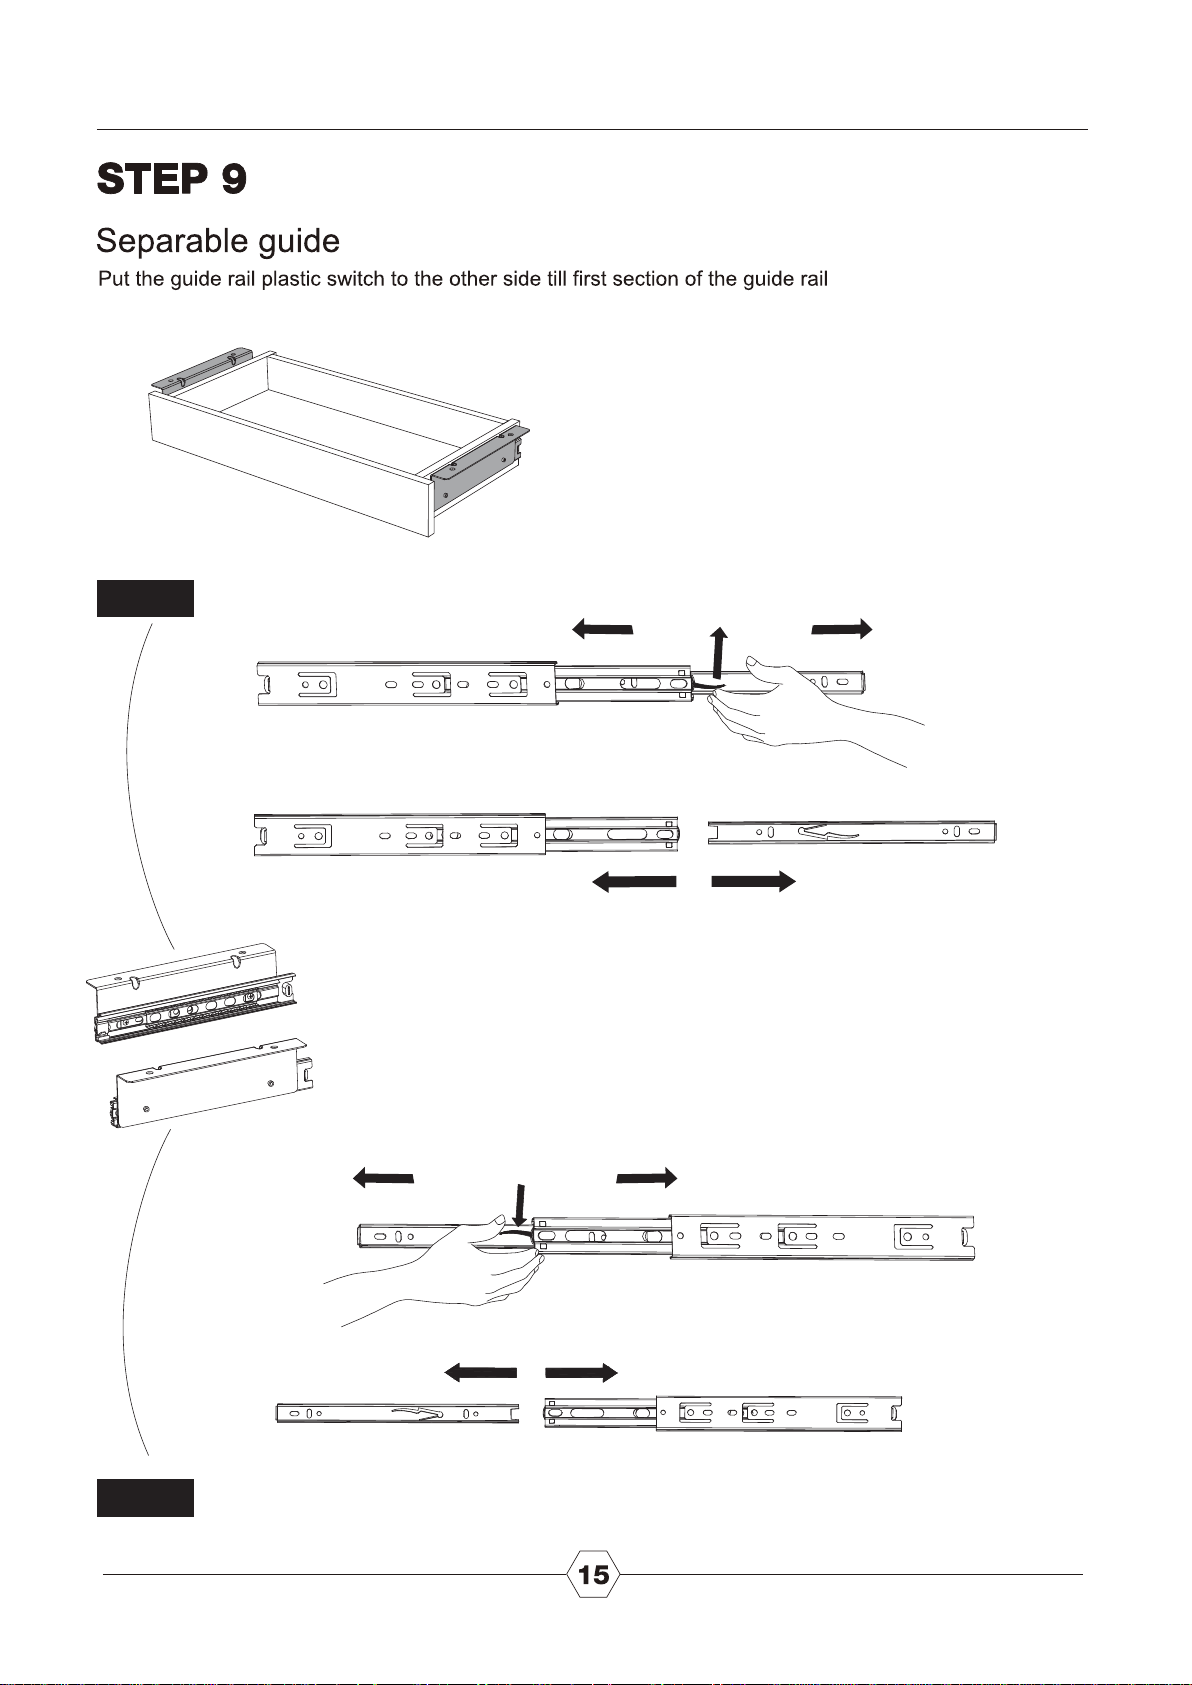
Left
UP
DOWN
Right
Page 17
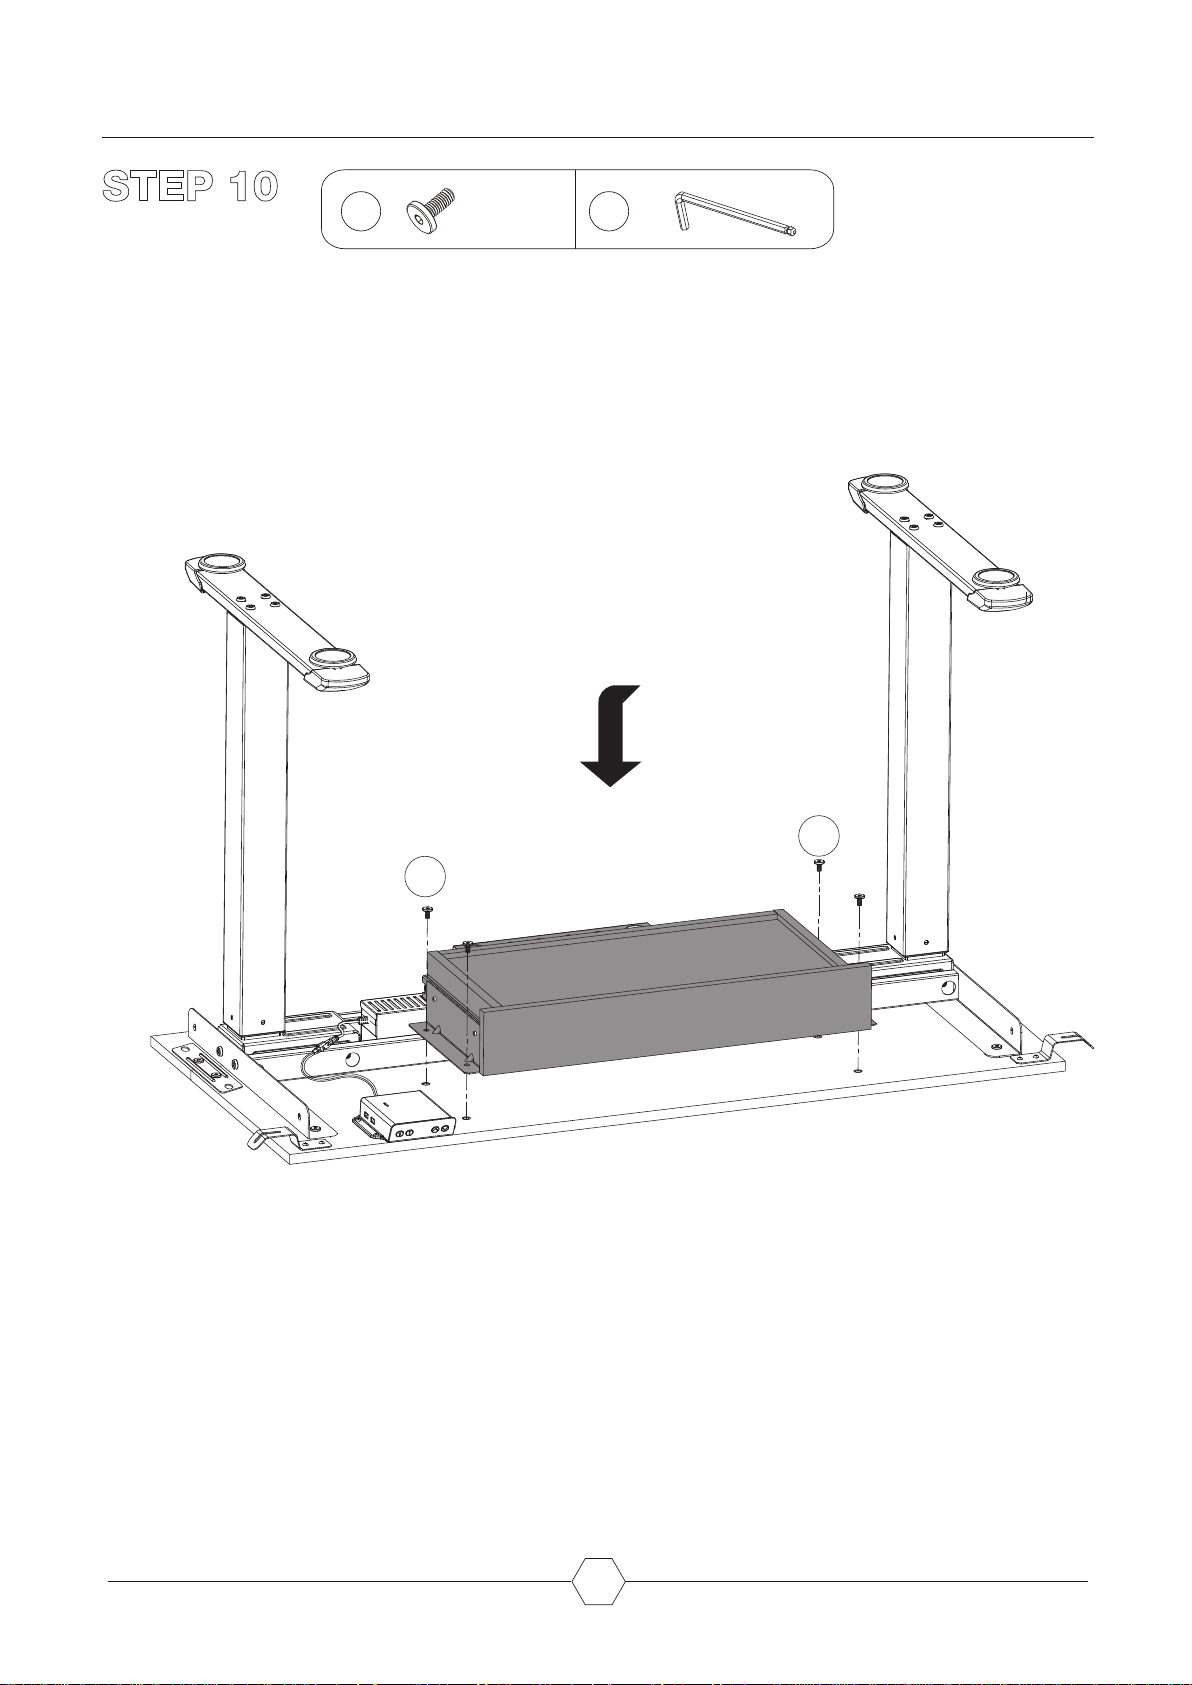
STEP 10
D
X
4
L
K4
D
D
16
Page 18
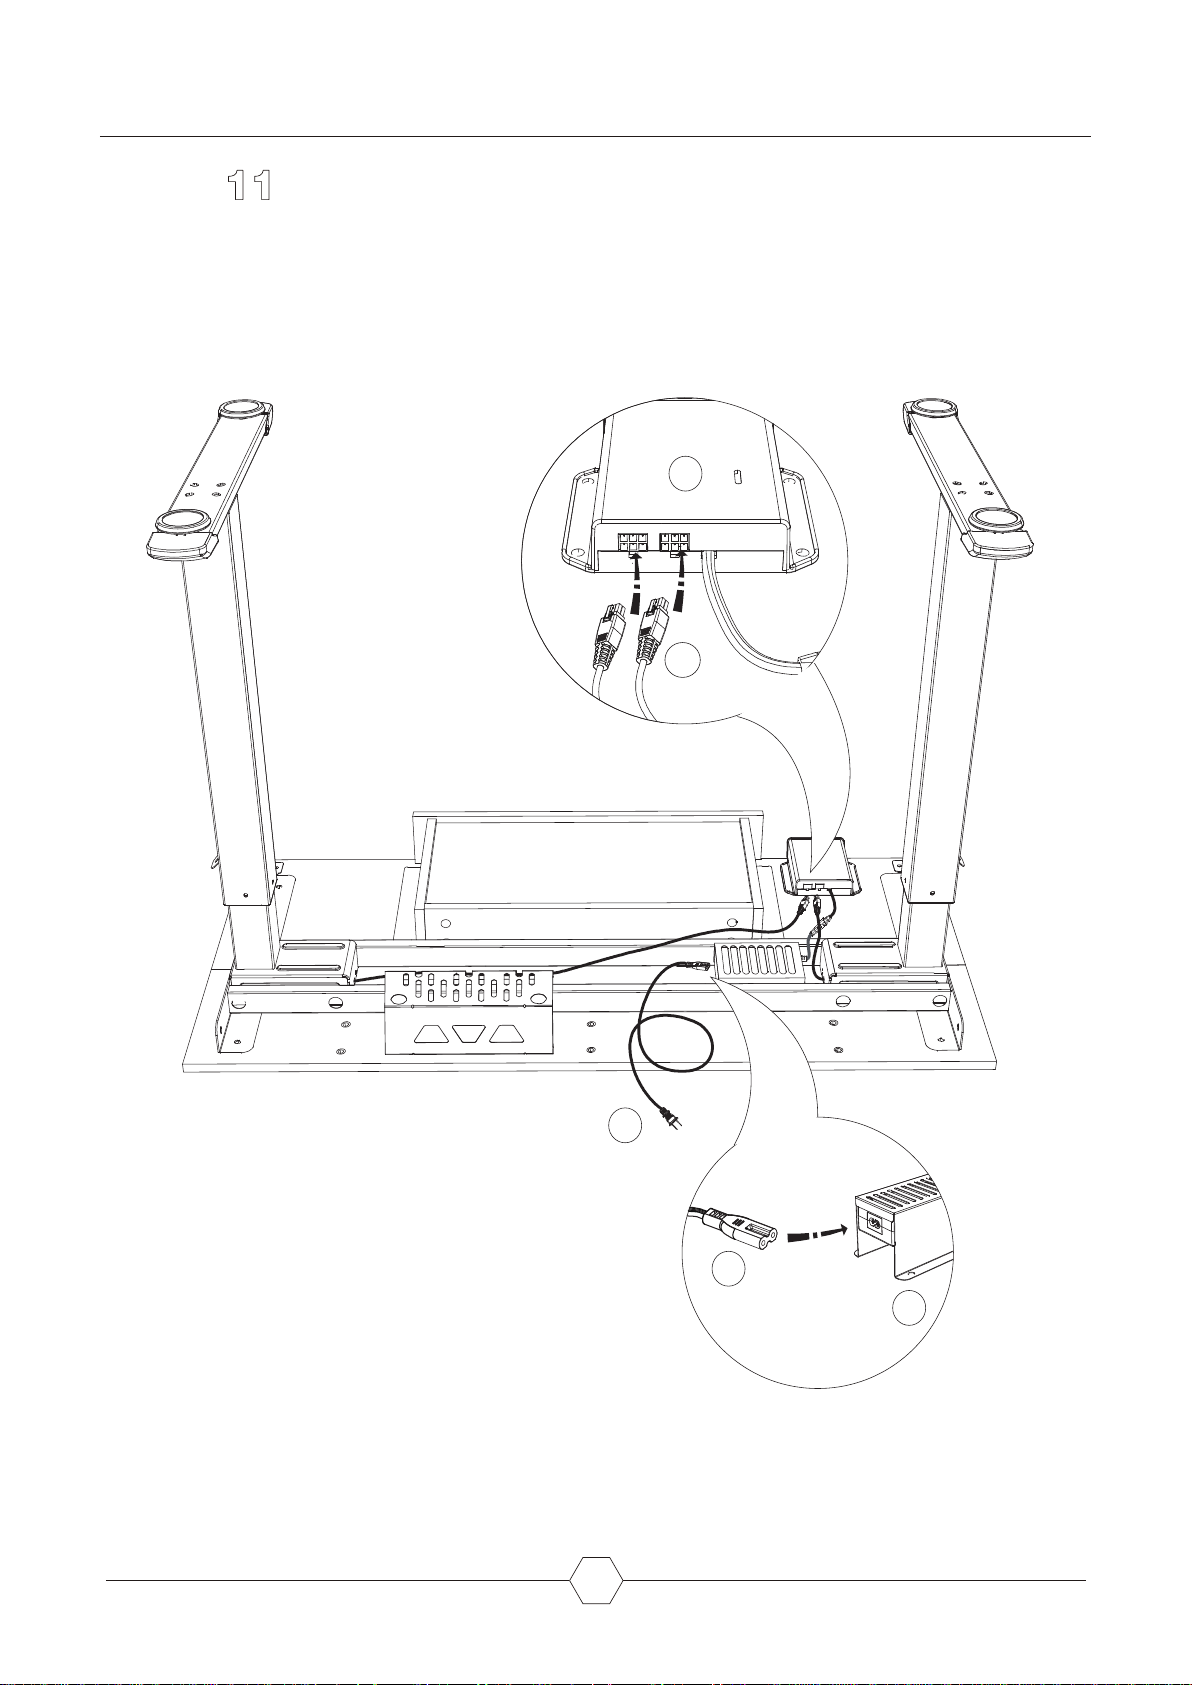
STEP 11
10
11
17
11
11
Plug In
9
Page 19
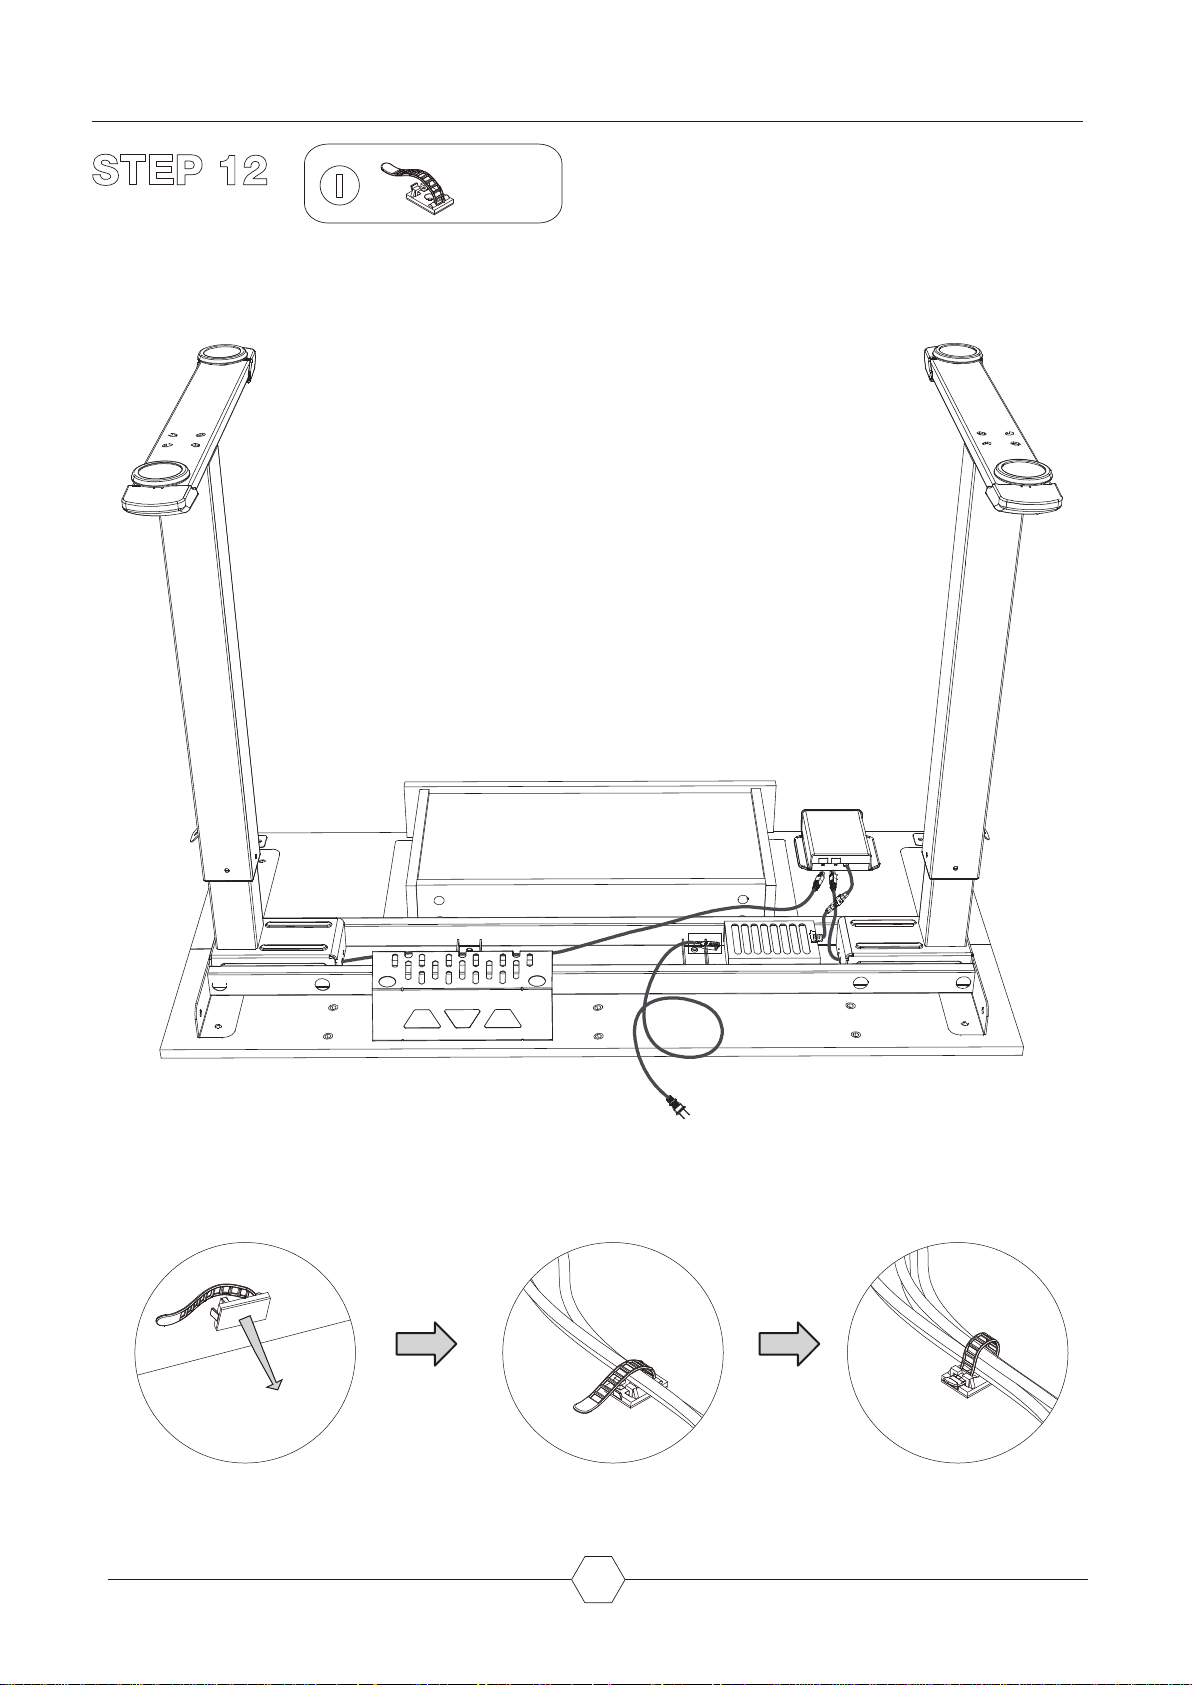
STEP 12
I
X
5
STICK
TIGHTEN
18
Page 20
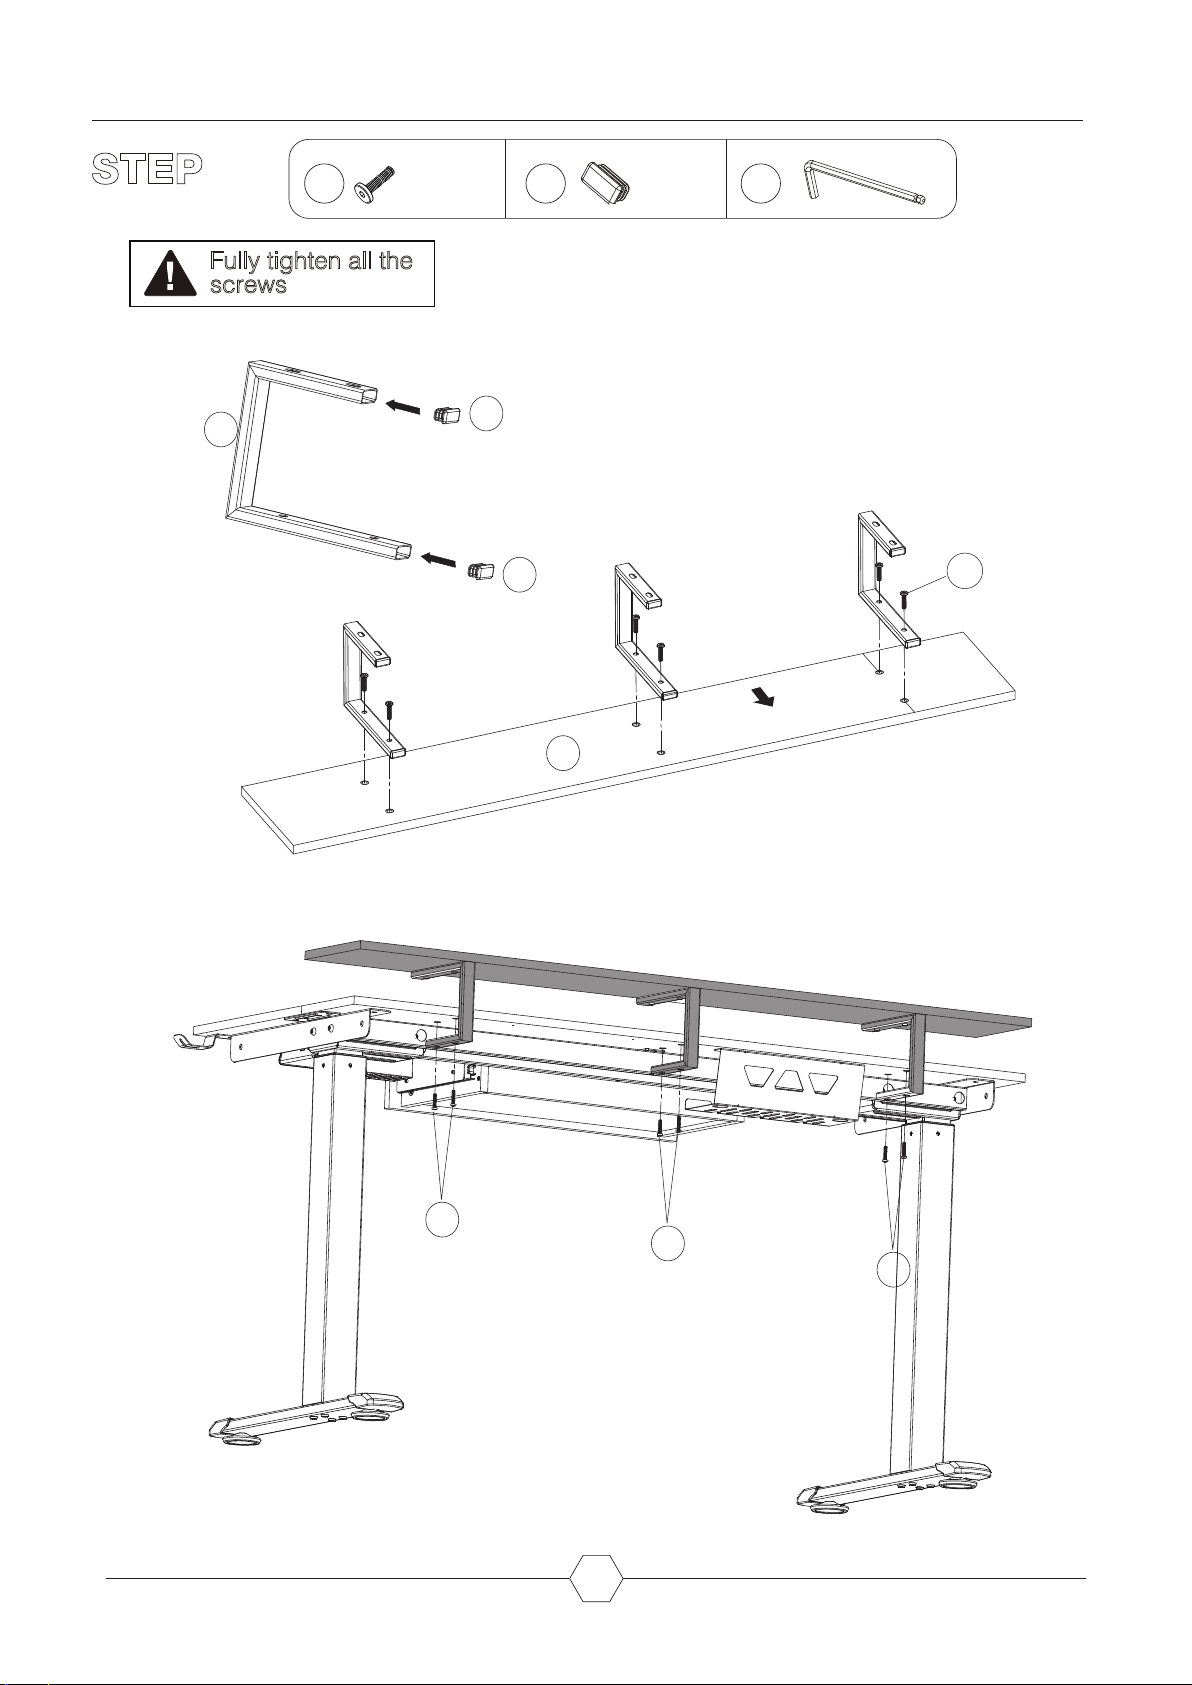
STEP 13
Fully tighten all the
screws
X
E H L
12
X
6
K4
6
H
H
E
5.5cm/2.2in
3.9cm/1.5in
15
E
E
E
19
Page 21
STEP 14
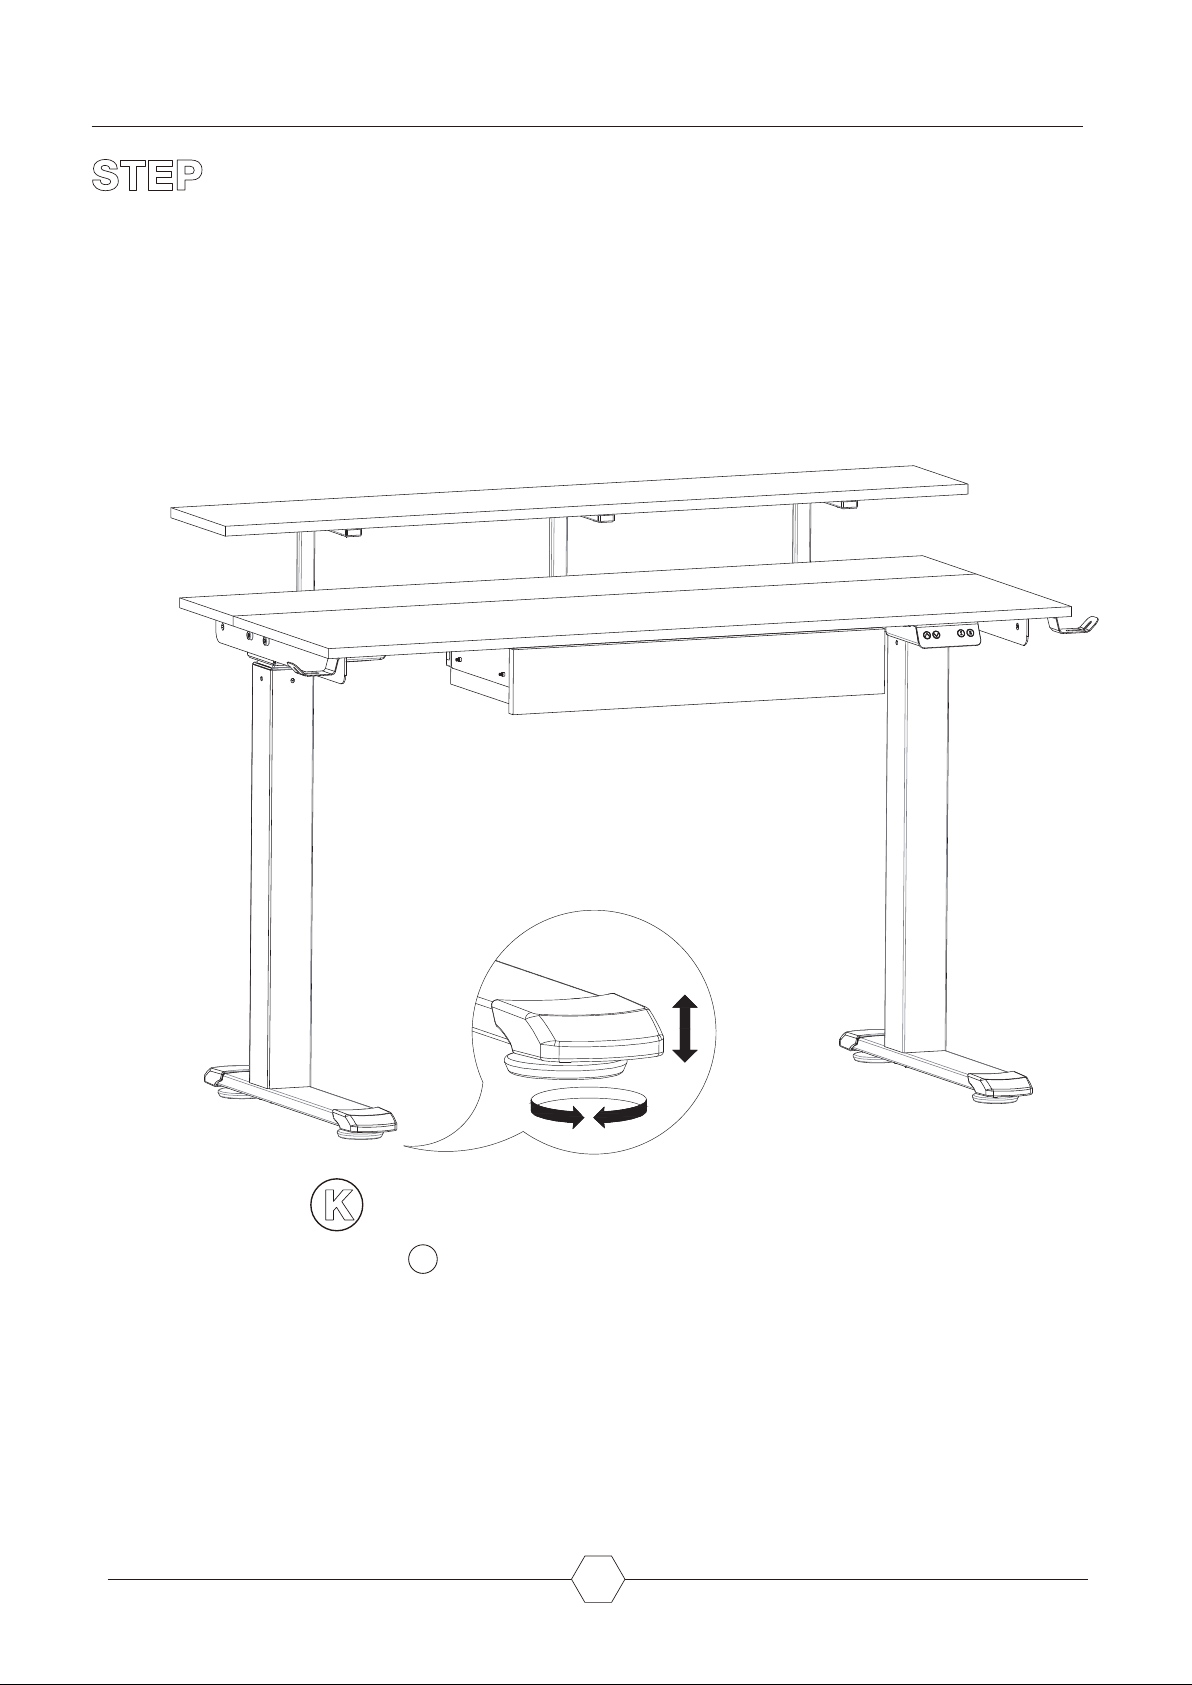
K
Adjust K to make the desk
steady
20
Page 22
OPERATION INSTRUCTIONS
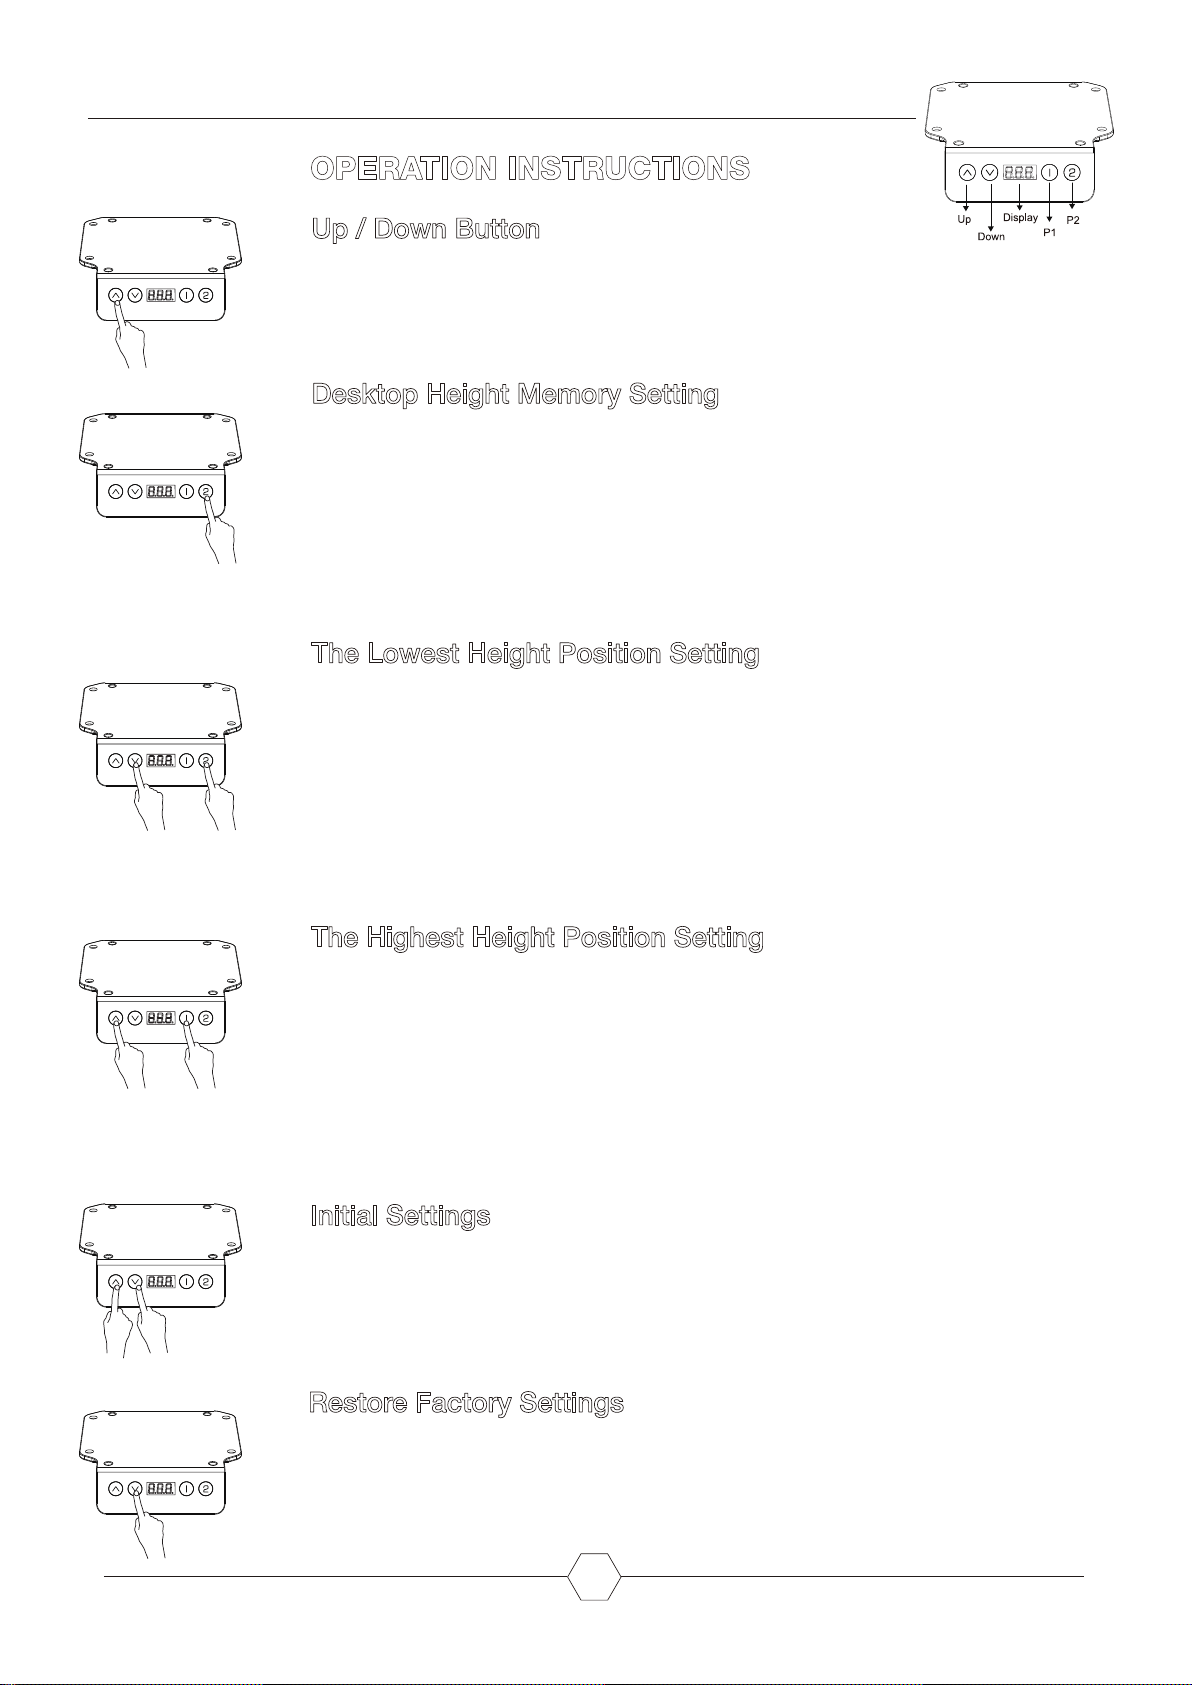
Up / Down Button
Press the ∧ to raise the desk, when you release the button it will stop. Press the ∨ to
lower the desk, when you release the button it will stop. When pressing the ∧ / ∨, the
desk travels a very short distance, so that users can fine-tune the desk height according
to preference.
Desktop Height Memory Setting
POSITION SETTING: Can set up two memories. Adjust the desktop to the appropriate
height with ∧ or ∨ buttons. And then press "1 or 2" button, about 4 seconds until the
display flashes "S -1 or S-2 ", indicating that memory setting is successful.
LOCATION QUERY: In the run mode, press any of the 1 / 2 keys to flash the height of
the key memory.
POSITION REACHING: In the run mode, when the desktop stops, press any of the 1 /
2 keys twice to adjust to the desktop height of the key memory. When desktop is moving,
pressing any button can stop it.
The Lowest Height Position Setting
POSITION SETTING: Please adjust the desktop to the appropriate height; and then
hold both "2" and "∨" button for 5 seconds; when the display appears "- d o", the
lowest height is memorized successfully. Once the desktop is dropped to its lowest
height position, the display shows "- L o".
POSITION CANCELLATION:
Option 1 - Refer to the initial setting process.
Option 2 - Adjust the desktop to the lowest height where the display shows
"- L o", hold both "2" and the down button for 5 seconds; at this time, the display will
show "- d o" indicating the set lowest height position has been successfully canceled.
The Highest Height Position Setting
POSITION SETTING: Please adjust the desktop to the appropriate height; and then
hold both "1" and the up button for 5 seconds; when the display appears "- u p", the highest height is memorized successfully. Once the desktop is raised to its highest height
position, the display shows "- h I".
POSITION CANCELLATION:
Option 1 - Refer to the initial setting process.
Option 2 - Adjust the desktop to the highest height where the display shows "- h I", hold
both "1" and the up button for 5 seconds; at this time, the display will show "- u p" indicating the set highest height position has been successfully canceled..
Initial Settings
(Under normal state, can be operated at any time; Or replace the controller for the first
time)
Press and hold both the ∧ and ∨ until the display appears " - - - ", release the keys,
then the tabletop will automatically move up and down. When the top stop moving, the
initial setting process succeeds.
Restore Factory Settings
When the display appears error code "rST" or "E16", press and hold the “V” button for 5
seconds until the display flashes " - - - "; release the key, then the adjustable desk legs
will automatically move down to its mechanical lowest point, and move up and stop at a
factory-preset position. Finally, the desk can work normally.
21
Page 23
AUTOMATED EXERCISE REMINDER
Once the desktop stays at a same height position over 45 mins, the display shows “Chr”.
The flash of “Chr”will disappears when you press any of button or after 1 minute without any operation. The reminder will
work for 3 times in a row.
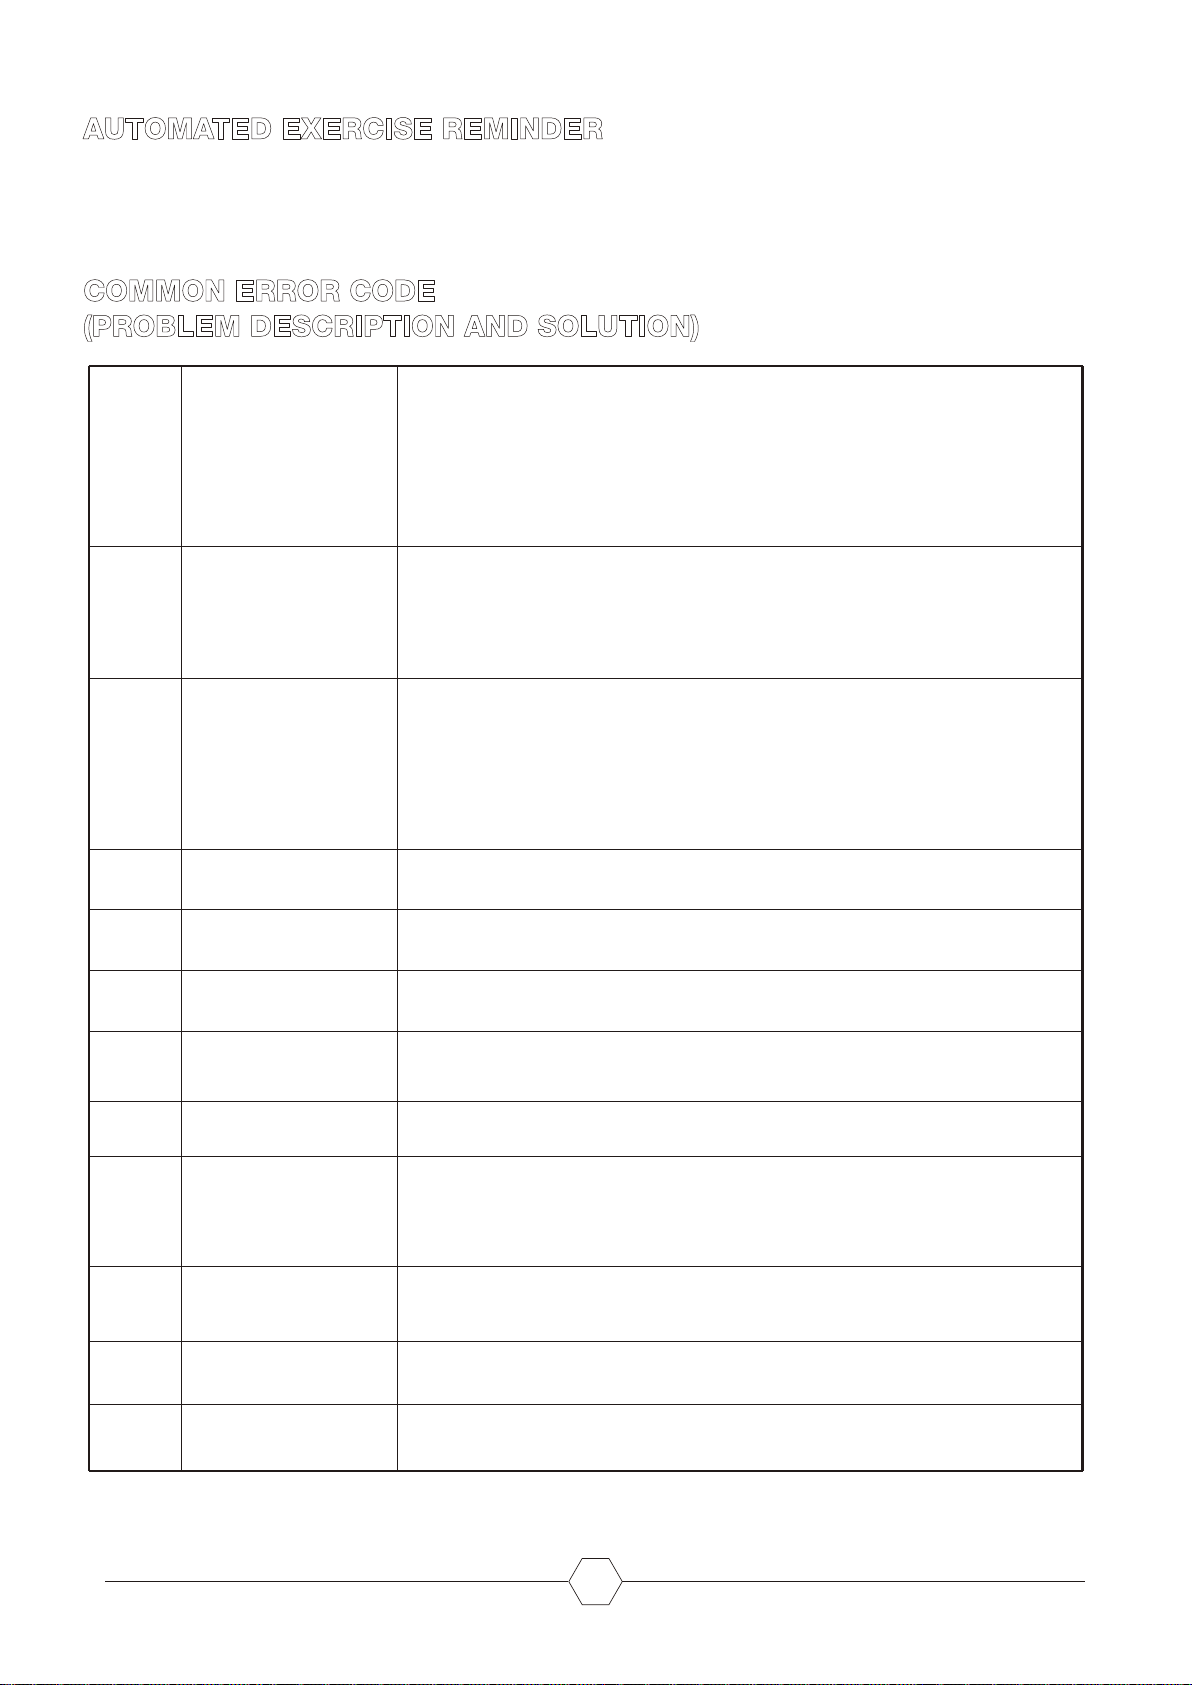
COMMON ERROR CODE
(PROBLEM DESCRIPTION AND SOLUTION)
1. press UP or DOWN button, if still display E1 OR E2, check all of plugs and wires .
Check whether motors fail connected with control unit , please connect the main cable
again .
2. after operation 1 is not work, then switch the motor plug line, if the error code remains,
it is the control box breaking down.
If the error code changes after switch, that is the desk legs problem
( for example, the error code is E01, after switching the motor line remains E01, then
control box breaks down. If it changes into E02, then it is desk legs fault.)
Remove the load on desktop till It less than 180 lbs for furture operation , switch the motor
plug line, if the error code remains, it is the control box breaking down.
If the error code changes after switch, the it is the desk legs problem
( for example, the error code is E03, after switching the motor line remains E03, then
control box breaks down. If it changes into E04, then it is desk legs fault.)
1. Re-press UP or DOWN button, if still display E5 OR E6, please check the plug wire of
the table leg.
2. after operation 1 is not work, then switch the motor plug line, if the error code remains,
it is the control box breaking down.
If the error code changes after switch, the it is the desk legs problem
( for example, the error code is E05, after switching the motor line remains E05, then
control box breaks down. If changes into E06, then it is desk legs fault.)
E01、E02
E03、E04
E05、E06
connection between desk
legs and control box is
loose
desk leg(s) is overloaded
or motor fault
sensor abnormal in the
desk leg(s)
E07
E08、E09
E10、E11
E12
E13
E14、E15
E16
RST
light of control
box
isn't working
power abnormal of the
control box
desk leg(s) break down if the error code still remains after power to reboot, replace the control box
controller failure
desk leg(s) malposition
thermal shutdown
protection
desk leg(s) is stuck or not
work properly
desk leg(s) unbalanced
abnormal power down
power abnormal of the
control box
Remove the main cable (10s) ,Then connect main cable again .if the error code still
remains after power to reboot, replace the control box
if the error code still remains after power to reboot, replace the control box
press up & down button at the same time until display "---", then release button and refer
to the initial setting process
Make the desk rest around 20 mins for furnitue operation , let the temperature drop.
switch the motor plug line, if the error code remains, it is the control box breaking down.
If the error code changes after switch, the it is the desk legs problem
( for example, the error code is E14, after switching the motor line remains , then control
box breaks down. If it changes into E15, then it is desk legs fault.)
press down button until display "---"(10s ), then release button and refer to the initial
setting process
press down button until display "---", then release button and refer to the factory initial
setting process
check all of plugs and wires . Check whether motors fail connected with control unit ,
please connect the main cable again .If the light isn't working .replace the control box .
22
 Loading...