Impact VSD-160, VSD-300 User manual

VSD Series Monolight
INSTRUCTIONS
Thank you for purchasing an Impact VSD Series Monolight. This device is proof that highly-functional monolights can be affordable. The VSD Series Monolight provides enough stored power to light a portrait or small still-life setup and offers features found on monolights costing twice as much. We expect that you will get many years of trouble-free service and enjoyment from your Impact VSD Monolight. Please read these operating instructions and safety precautions carefully before operating this equipment.
Features
•Four-stop range – full power to 1/16 power in .10 f/stop increments
•Large LCD screen
•Built-in optical slave
•“Auto-Dump” feature automatically fires the flash when you step down power
•Modeling lamp can be set proportionally or independently of flash power
•Cushioned “touch-pad” function control buttons
•Tactile, “grippy” feel that resists slipping and shock damage
•Accepts Bowen-style reflectors and head accessories (7-inch grid reflector included)
•User-replaceable flashtube
•Commonly available 1/8˝ mini-plug sync input
Power Requirements
This light is designed for use with 110/120V AC power only and is supplied with a three-prong, grounded plug. Do not attempt to defeat this safety feature. If necessary, use only grounded extension cords rated for 6 amps or greater.
Warning
There are no user-serviceable parts inside the unit. Only qualified service engineers should access the inside of the case (Danger – high-voltage parts inside). Avoid damage to both the flashtube and modeling lamp. If the modeling lamp or flashtube become cracked or damaged in any way, they should be replaced immediately. Do not use your flash unit in an environment where moisture or flammable vapor is likely to come in contact with the unit. Turn the power off and unplug the power cord when the unit is not in use. Always remove the modeling lamp and replace the protective cap when transporting the unit.
All images in this manual are for illustrative purposes only. Your unit may differ slightly from the one pictured.
2

Preparing Your Monolight for Use
Contents of carton
Carefully remove the monolight from the box. You should have the following:
•110-120V monolight with protective cap and flashtube installed
•100W modeling lamp (60W with VSD-160 model)
• |
7˝ grid reflector |
• |
sync cable |
• |
power cable |
• |
user manual |
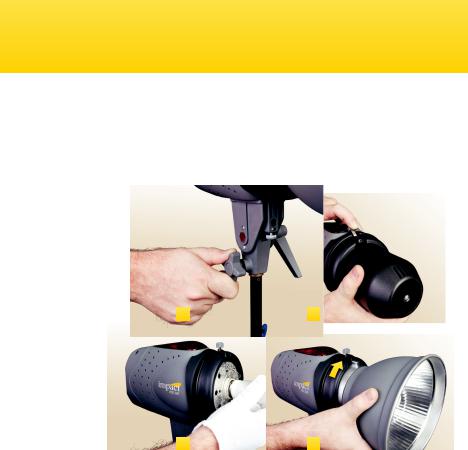
Mount on a stand
(1) Select a stand or support system of suitable weight and dimensions to ensure stable operation of the unit.
Install Reflector & |
1 |
2 |
Modeling Lamp |
(2)Depress the latch on top of the monolight, pressing it toward the back of the unit.
Rotate the protective cap counter-clockwise. Pull the cap off and set aside.
(3)Install the modeling lamp by screwing it into the
threaded socket. |
3 |
4 |
|
|
CAUTION: Do not touch the lamp with your bare hands. Oil residue from your fingers can cause the surface of the lamp to heat unevenly and explode. Use white cotton gloves or a clean cloth. (4) Install the reflector where the protective cap was before. Align the three pegs on the reflector with the three slots, press the reflector in and rotate clockwise until it locks in place.
Note: Take care when tting or removing re ectors or softboxes to not damage theashtube assembly. The ashtube is very delicate. Always switch off the unit and disconnect the power before tting or changing lamps, ashtubes, re ectors, or softboxes.
3

T
A
B
F G
D E
H
I
J P
Q
R
S
C
K
L
N M
O
4

Operating Instructions
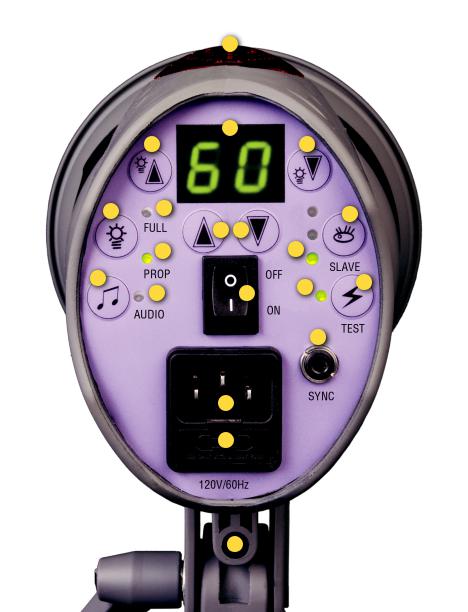
Legend
A – Digital Power Readout |
K |
– Photo Slave Control |
B – Modeling Light Control – Up |
L |
– Photo Slave LED |
C – Modeling Light Control – Down |
M – Test Fire Button |
|
D – Flash Power Control – Up |
N – Full Recycle Status LED |
|
E – Flash Power Control – Down |
O – Mini-plug Sync Jack |
|
F – Modeling Lamp Control |
P |
– On/Off Switch |
G – Modeling Lamp LED – Free |
Q |
– Power Socket |
H – Modeling Lamp LED – Proportional |
R |
– Fuse Holder |
I – Recycle Tone Control |
S |
– Umbrella Holder |
J – Recycle Tone LED |
T |
– Photocell |
Power Supply
Plug the power cord into the back of the ash unit. Before plugging the power cord into the wall socket, make certain that the power switch is set to the OFF (circle) position. The VSD is designed to automatically ash, if necessary, when turned off. The resistive dump will continue to reduce any remaining energy while the unit is off. This is a safety feature and cannot be disabled.
Note: The VSD flash unit is designed to work on 110-120V 50/60Hz AC current.
Power Switch
Turn the power switch to the ON (line) position. The flash will sound a beep and the LCD will show the current ash power setting. We recommend charging the flash unit for one hour prior to its initial use and after an extended period of inactivity (more than two weeks). If the unit is left unused for a few months, or the unit has been used predominantly at low power settings, we recommend that the power be increased to the maximum and the unit left switched on (with the modeling lamp OFF) for at least 30 minutes, to help preserve the life of the capacitors.
5
 Loading...