

Page 1

FROSTKALL
GB
DE
Page 2

Page 3

ENGLISH 4
DEUTSCH 29
Page 4
ENGLISH
Contents
4
Safety information 4
Safety instructions 5
Installation 7
Product description 9
Operation 10
Daily Use 14
Subject to change without notice.
Hints and tips 18
Care and cleaning 19
Troubleshooting 21
Technical information 24
ENVIRONMENT CONCERNS 25
IKEA GUARANTEE 26
Safety information
Before the installation and use of the appliance, carefully read
the supplied instructions. The manufacturer is not responsible if
an incorrect installation and use causes injuries and damages.
Always keep the instructions with the appliance for future
reference.
Children and vulnerable people safety
• This appliance can be used by children aged from 8 years
and above and persons with reduced physical, sensory or
mental capabilities or lack of experience and knowledge if
they have been given supervision or instruction concerning
use of the appliance in a safe way and understand the
hazards involved.
• Do not let children play with the appliance.
• Cleaning and user maintenance shall not be made by
children without supervision.
• Keep all packaging away from children.
General Safety
• This appliance is intended to be used in household and
similar applications such as:
– Farm houses; staff kitchen areas in shops, offices and other
working environments
Page 5

ENGLISH 5
– By clients in hotels, motels, bed and breakfast and other
residential type environments
• Keep ventilation openings, in the appliance enclosure or in
the built-in structure, clear of obstruction.
• Do not use mechanical devices or other means to accelerate
the defrosting process, other than those recommended by the
manufacturer.
• Do not damage the refrigerant circuit.
• Do not use electrical appliances inside the food storage
compartments of the appliance, unless they are of the type
recommended by the manufacturer.
• Do not use water spray and steam to clean the appliance.
• Clean the appliance with a moist soft cloth. Only use neutral
detergents. Do not use abrasive products, abrasive cleaning
pads, solvents or metal objects.
• Do not store explosive substances such as aerosol cans with a
flammable propellant in this appliance.
• If the supply cord is damaged, it must be replaced by the
manufacturer, its Authorised Service Centre or similarly
qualified persons in order to avoid a hazard.
• If the appliance is equipped with an Ice maker or a water
dispenser, fill them with potable water only.
• If the appliance requires a water connection, connect it to
potable water supply only.
• The inlet water pressure (minimum and maximum) must be
between 1 bar (0,1 MPa) and 10 bar (1 MPa)
Safety instructions
Installation
Warning! Only a qualified
person must install this
appliance.
• Remove all the packaging.
• Do not install or use a damaged
appliance.
• Obey the installation instruction supplied
with the appliance.
• Always be careful when you move the
appliance because it is heavy. Always
wear safety gloves.
• Make sure the air can circulate around
the appliance.
Page 6
ENGLISH
6
• Wait at least 4 hours before connecting
the appliance to the power supply. This
is to allow the oil to flow back in the
compressor.
• Do not install the appliance close to
radiators or cookers, oven or hobs.
• The rear of the appliance must stand
against the wall.
• Do not install the appliance where there
is direct sunlight.
• Do not install this appliance in areas that
are too humid or too colds, such as the
construction appendices, garages or
wine cellars.
• When you move the appliance, lift it by
the front edge to avoid scratching the
floor.
Electrical connection
Warning! Risk of fire and
electrical shock.
• The appliance must be earthed.
• Make sure that the electrical information
on the rating plate agrees with the
power supply. If not, contact an
electrician.
• Always use a correctly installed
shockproof socket.
• Do not use multi-plug adapters and
extension cables.
• Make sure not to cause damage to the
electrical components (e.g. mains plug,
mains cable, compressor). Contact the
Authorised Service Centre or an
electrician to change the electrical
components.
• The mains cable must stay below the
level of the mains plug.
• Connect the mains plug to the mains
socket only at the end of the installation.
Make sure that there is access to the
mains plug after the installation.
• Do not pull the mains cable to disconnect
the appliance. Always pull the mains
plug.
Use
Warning! Risk of injury, burns,
electrical shock or fire.
• Do not change the specification of this
appliance.
• Do not put electrical appliances (e.g. ice
cream makers) in the appliance unless
they are stated applicable by the
manufacturer.
• Be careful not to cause damage to the
refrigerant circuit. It contains isobutane
(R600a), a natural gas with a high level
of environmental compatibility. This gas
is flammable.
• If damage occurs to the refrigerant
circuit, make sure that there are no
flames and sources of ignition in the
room. Ventilate the room.
• Do not let hot items to touch the plastic
parts of the appliance.
• Do not put soft drinks in the freezer
compartment. This will create pressure
on the drink container.
• Do not store flammable gas and liquid in
the appliance.
• Do not put flammable products or items
that are wet with flammable products in,
near or on the appliance.
• Do not touch the compressor or the
condenser. They are hot.
• Do not remove or touch items from the
freezer compartment if your hands are
wet or damp.
• Do not freeze again food that has been
thawed.
• Obey the storage instructions on the
packaging of frozen food.
Care and cleaning
Warning! Risk of injury or
damage to the appliance.
• Before maintenance, deactivate the
appliance and disconnect the mains plug
from the mains socket.
Page 7
ENGLISH 7
• This appliance contains hydrocarbons in
the cooling unit. Only a qualified person
must do the maintenance and the
recharging of the unit.
• Regularly examine the drain of the
appliance and if necessary, clean it. If
the drain is blocked, defrosted water
collects in the bottom of the appliance.
Disposal
Warning! Risk of injury or
suffocation.
• Disconnect the appliance from the mains
supply.
Installation
Warning! Refer to Safety
chapters.
Positioning
This appliance should be installed in a dry,
well ventilated indoor where the ambient
temperature corresponds to the climate
class indicated on the rating plate of the
appliance:
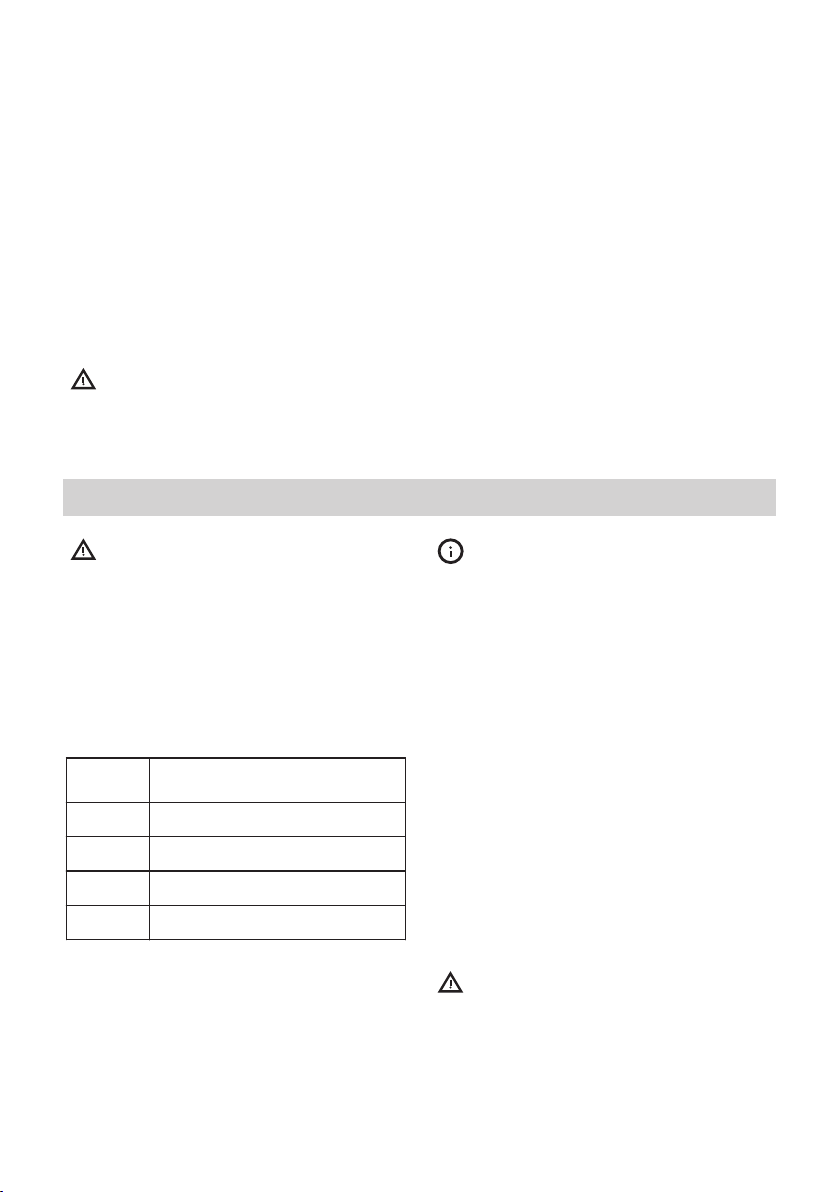
Climate
class
SN +10°C to + 32°C
N +16°C to + 32°C
ST +16°C to + 38°C
T +16°C to + 43°C
Ambient temperature
• Cut off the mains cable and discard it.
• Remove the door to prevent children and
pets to be closed inside of the appliance.
• The refrigerant circuit and the insulation
materials of this appliance are ozonefriendly.
• The insulation foam contains flammable
gas. Contact your municipal authority for
information on how to discard the
appliance correctly.
• Do not cause damage to the part of the
cooling unit that is near the heat
exchanger.
Some functional problems might
occur for some types of models
when operating outside of that
range. The correct operation can
only be guaranteed within the
specified temperature range. If
you have any doubts regarding
where to install the appliance,
please turn to the vendor, to our
customer service or to the
nearest Authorised Service
Centre.
Location
To ensure best performance, install the
appliance well away from sources of heat
such as radiators, boilers, direct sunlight etc.
Make sure that air can circulate freely
around the back of the cabinet.
Caution! In order to guarantee
proper functioning in ambient
temperature above 38°C, it is
advised to have a 30mm
separation between the sides of
the appliance and surrounding
furniture.
Page 8

ENGLISH 8
Electrical connection
Before plugging in, ensure that the voltage
and frequency shown on the rating plate
correspond to your domestic power supply.
The appliance must be earthed. The power
supply cable plug is provided with a contact
for this purpose. If the domestic power
supply socket is not earthed, connect the
appliance to a separate earth in
compliance with current regulations,
consulting a qualified electrician.
The manufacturer declines all responsibility
if the above safety precautions are not
observed.
This appliance complies with the E.E.C.
Directives.
Page 9
101112
7 91 2
64 5
3 8
ENGLISH 9
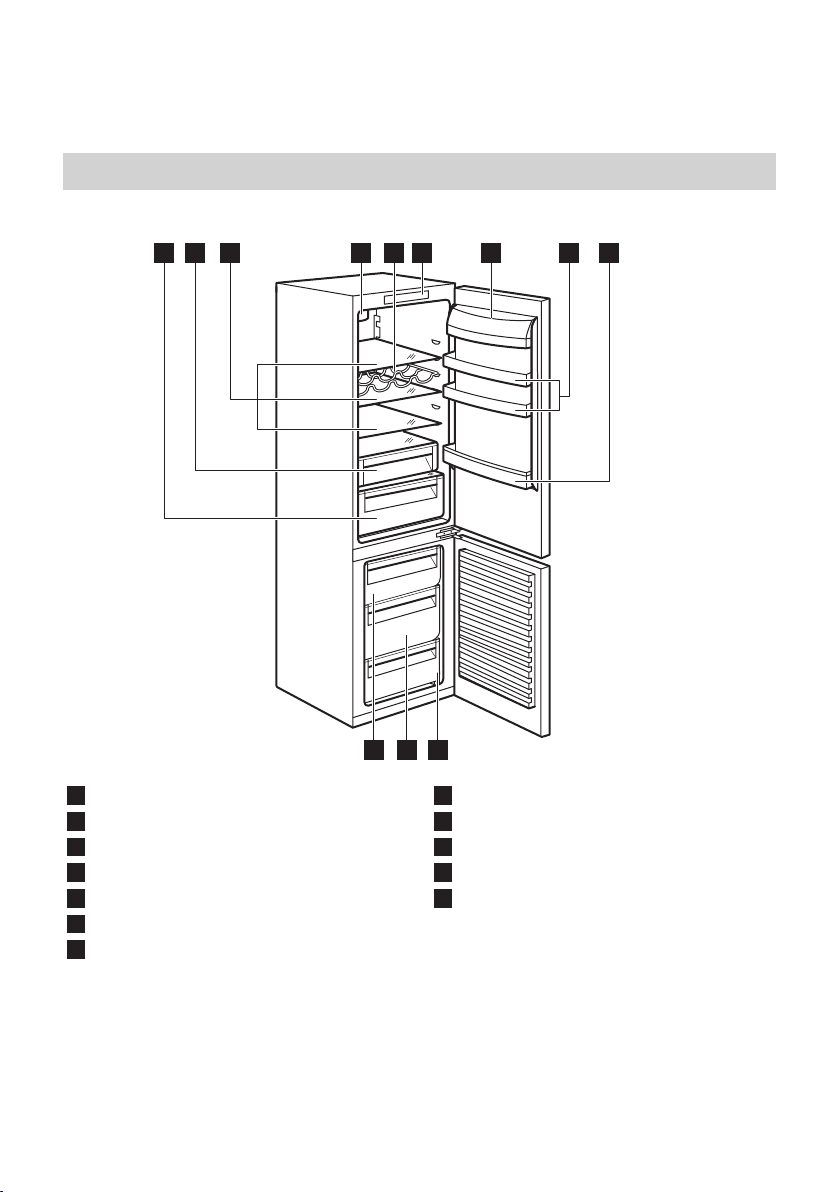
Product description
Product overview
Vegetable drawer
1
Low temperature compartment
2
Glass shelves
3
No-Frost cooling
4
Bottle rack
5
Control panel
6
Dairy compartment with lid
7
Door balconies
8
Bottle balcony
9
Freezer drawer
10
Freezer drawer
11
Freezer drawer
12
Page 10
1
567 3 24
A B C D E F G H I J
KLM
ENGLISH 10
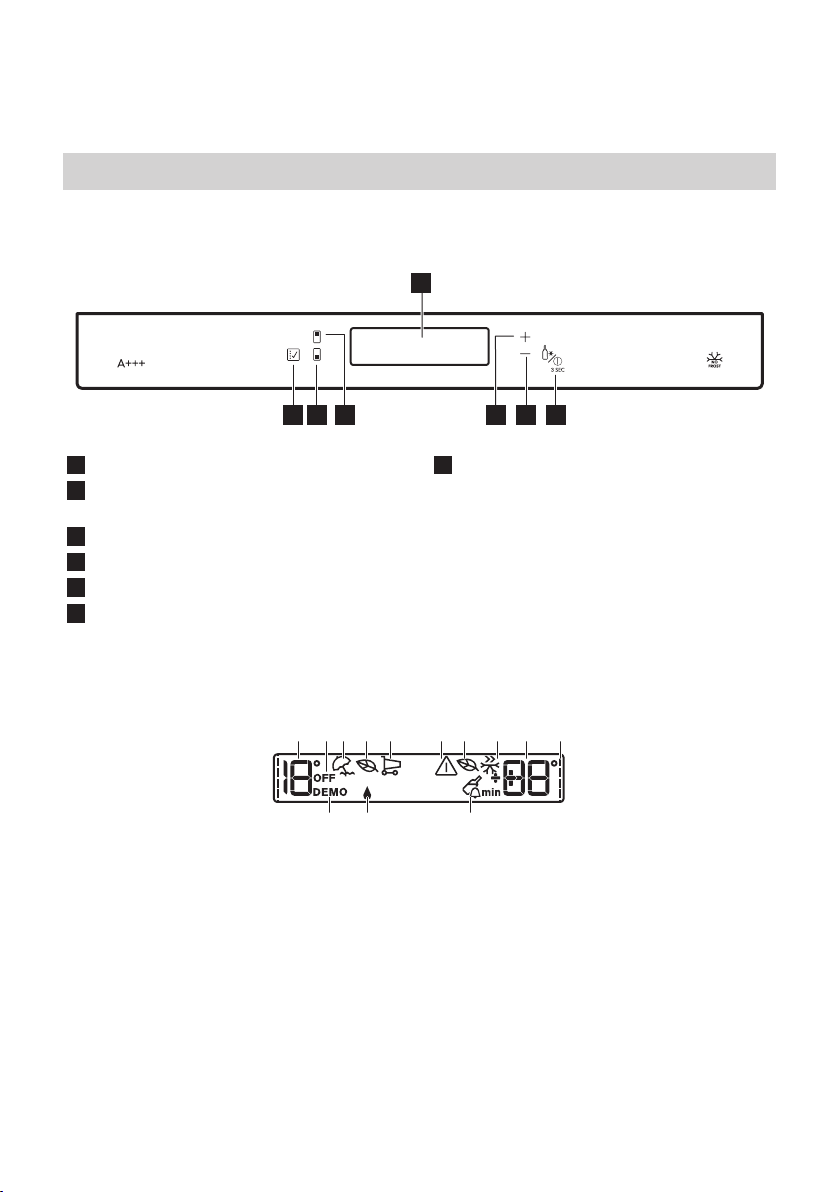
Operation
Control panel
Display
1
Bottle Chill and Appliance ON/OFF
2
button
Temperature colder button
3
Temperature warmer button
4
Fridge compartment button
5
Freezer compartment button
6
Display
A) Fridge temperature indicator
B) Fridge OFF mode
C) Vacation function
D) Fridge Eco Mode
E) Shopping Function
F) Alarm indicator
G) Freezer Eco Mode
Mode button
7
It is possible to change the predefined
sound of buttons to a louder one by
pressing together Mode button and
Temperature colder button for
approximately 5 seconds. Change is
reversible.
H) Fast Freezing function
I) Freezer temperature indicator
J) Bar indicators
K) Bottle Chill function
L) Extra Humidity function
M) Demo mode
Page 11
ENGLISH
11
After selection of the fridge or
freezer compartment the
animation starts
After selection of the
temperature the animation
flashes for a few minutes.
Bar indicators
The bars guide the user when interacting
with the unit and indicate at what level the
unit is performing. The bars indicate:
• which compartment is in focus (active),
when animation stops
• the desired temperature on the scale
• whether the set temperature is higher or
lower than the previous one (increasing
or decreasing animation).
Switching on
Connect the mains plug to the power socket
1. Press the ON/OFF if the display is off.
The temperature indicators show the set
default temperature.
2. The alarm buzzer may sound after a
few seconds.
To reset the alarm refer to "High
temperature alarm".
If "DEMO" appears on the display, the
appliance is in demonstration mode.
Refer to "Troubleshooting...".
To select a different set
temperature refer to
"Temperature regulation".
Switching off
Press ON/OFF for 3 seconds.
The display switches off.
To disconnect the appliance from the
power, disconnect the mains plug from the
power socket.
Switching on the fridge
To switch on the fridge press the fridge
compartment button.
The fridge OFF indicator goes off.
To select a different set
temperature refer to
"Temperature regulation".
Switching off the fridge
To switch off the fridge press the fridge
compartment button for few seconds.
The fridge OFF indicator is shown.
Temperature regulation
1. Select the fridge or freezer
compartment.
2. Press the temperature button to set the
temperature.
3. Set default temperature: +4°C for the
fridge and -18°C for the freezer.
The set temperature will be reached
within 24 hours.
The temperature indicators show the set
temperature.
After power failure the set
temperature remains stored.
High temperature alarm
An increase in the temperature in the
freezer compartment (for example due to
an earlier power failure or opening of the
door) is indicated by:
• flashing the alarm and freezer
temperature indicators;
• sounding of buzzer.
To reset the alarm press any button.
The buzzer switches off.
The freezer temperature indicator shows
the highest temperature reached for a few
seconds. Then show again the set
temperature.
The alarm indicator continues to flash until
the normal conditions are restored.
Page 12
ENGLISH 12
When the alarm has returned the
alarm indicator goes off.
Door open alarm
An acoustic alarm will sound if the door is
left open for approximately 5 minutes. The
door open alarm conditions are indicated
by:
• flashing alarm indicator;
• acoustic buzzer.
When normal conditions are restored (door
closed), the alarm will stop. During the
alarm, the buzzer can be switched off by
pressing any button.
Shopping Function
If you need to insert a large amount of
warm food, for example after doing the
grocery shopping, we suggest activating
the Shopping Function to cool the products
more rapidly and to avoid warming food
already stored in the refrigerator.
The Shopping Function shuts off
automatically after approximately 6 hours.
1. To switch on the function:
a. Select the fridge compartment if it is
not already selected.
b. Press Mode until the corresponding
icon appears.
The Shopping Function indicator is shown.
2. To switch off the function before it
deactivates automatically:
a. Select the fridge compartment if it is
not already selected.
b. To deactivate the function, press
Mode to select another function or
until no function icon is visible on the
display.
The Shopping Function indicator goes off.
The function switches off by
selecting a different fridge set
temperature.
Fast Freezing function
This function stops automatically after 52
hours.
1. To switch on the function:
a. Select the freezer compartment.
b. Press Mode until the corresponding
icon appears.
The Fast Freezing indicator is shown.
2. To switch off the function before it
deactivates automatically:
a. Select the freezer compartment.
b. To deactivate the function, press
Mode to select another function or
until no function icon is visible on the
display.
The Fast Freezing indicator goes off.
The function switches off by
selecting a different freezer set
temperature.
Eco Mode
For optimal food storage select the Eco
Mode.
1. To switch on the function:
a. Select the fridge/freezer
compartment.
b. Press Mode until the corresponding
icon appears.
The temperature indicator shows the set
temperature for the fridge: +4°C and for the
freezer: -18°C.
The Eco Mode indicator is shown.
2. To switch off the function:
a. Select the fridge/freezer
compartment.
b. To deactivate the function, press
Mode to select another function or
until no function icon is visible on the
display.
The Eco Mode indicator goes off.
The function switches off by
selecting a different set
temperature.
Page 13
ENGLISH 13
Extra Humidity function
If you notice that the food stored in the
fridge compartment is drying out too
quickly, you can stop this process by
increasing humidity in the cabinet by
activating Extra Humidity function.
Extra Humidity can function
simultaneously with Shopping
Function and Eco Mode.
1. To switch on the function press Mode
until the corresponding icon appears.
The Extra Humidity indicator goes on.
2. To deactivate the function, press Mode
to select another function or until no
function icon is visible on the display.
The Extra Humidity indicator goes off.
Bottle Chill function
Bottle Chill function is to be used to set an
acoustic alarm at the preferred time, useful
for example when a recipe requires to cool
down a mixture for a certain period of time,
or when a reminder is needed in order not
to forget the bottles placed in the freezer
for fast cooling.
1. To switch on the function press Bottle
Chill.
Bottle Chill indicator appears.
Wait until the timer shows the set value (30
minutes).
2. Press the temperature colder button and
temperature warmer button to change
the timer set value from 1 to 90 minutes.
The timer indicator is shown (min).
At the end of the countdown Bottle Chill
indicator flashes and an audible alarm
sounds
3. Remove any bottle stored in the freezer
compartment.
4. Press Bottle Chill to switch off the sound
and terminate the function.
It is possible to deactivate the
function at any time during
the countdown by pressing
Bottle Chill. Bottle Chill
indicator goes off
It is possible to change the
time during the countdown
and at the end by pressing
the temperature colder
button and the temperature
warmer button.
Vacation Function
This function allows you to keep the
refrigerator closed and empty during a long
holiday period without the formation of a
bad smell.
Remove all food from fridge
compartment before activating
Vacation Function.
1. To switch on the function press Mode
until the corresponding icon appears.
Vacation Function indicator goes on.
The fridge temperature indicator shows the
set temperature.
2. To deactivate the function, press Mode
to select another function or until no
function icon is visible on the display.
Vacation Function indicator goes off.
The function switches off by
selecting a different fridge set
temperature.
Page 14
3-6
1-2
10-12
3-4
10-12
3-6
10-12
3-6
10-12
3-6
x1
x1
x2
ENGLISH
Daily Use
14
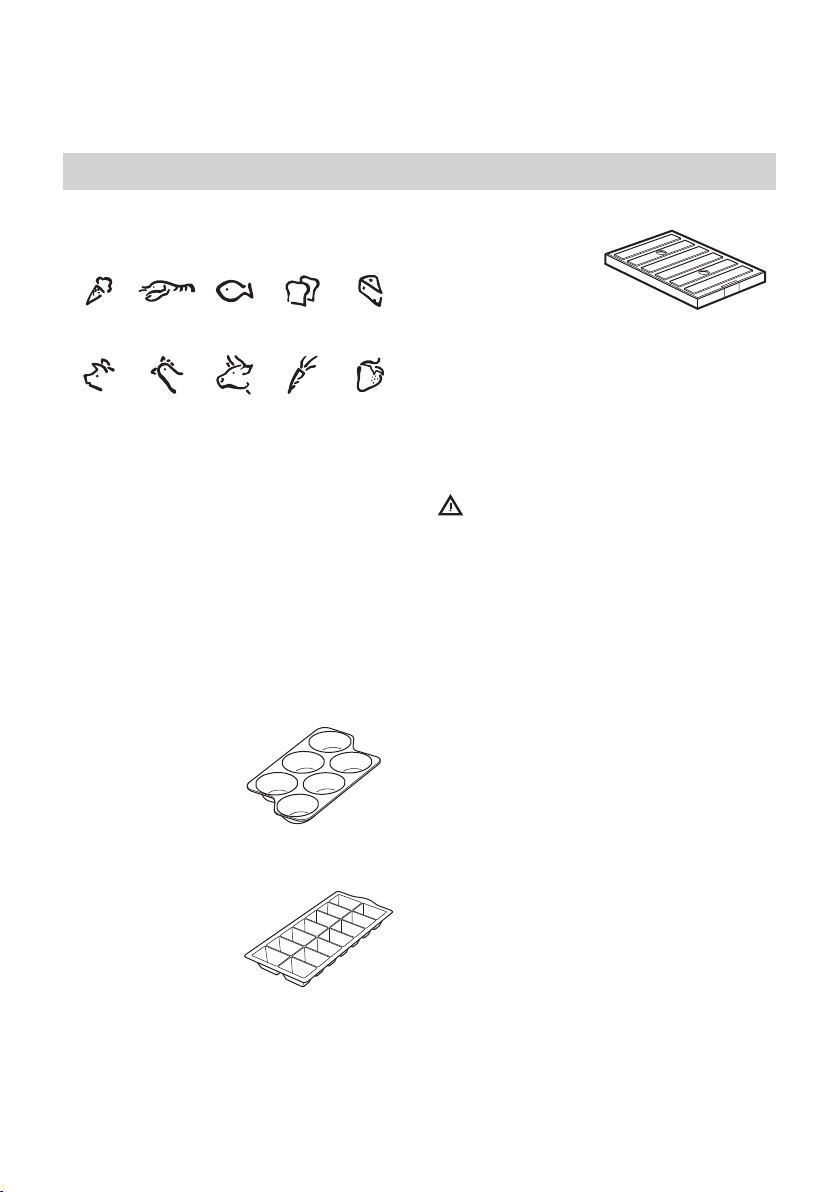
Freezing Calendar
The symbols show different types of frozen
goods.
The numbers indicate storage times in
months for the appropriate types of frozen
goods. Whether the upper or lower value of
the indicated storage time is valid depends
on the quality of the foods and treating
before freezing.
Accessories
Egg tray
Ice tray
Freezer blocks
Ice-cube production
This appliance is equipped with tray for the
production of ice-cubes.
1. Fill the tray with water.
2. Put the tray in the freezer compartment
Caution! Do not use metallic
instruments to remove the tray
from the freezer.
Freezer blocks
Two freezer blocks are supplied in the
freezer; this increase the length of time for
which food will keep in the event of a
power failure or breakdown.
Freezing fresh food
The freezer compartment is suitable for
freezing fresh food and storing frozen and
deep-frozen food for a long time.
To freeze small amount of fresh foods it is
not necessary to change the present setting.
To freeze fresh food activate the Fast
Freezing function at least 24 hours before
placing the food to be frozen in the freezer
compartment.
Place the fresh food to be frozen in the top
compartment.
The maximum amount of food that can be
frozen in 24 hours is specified on the rating
plate, a label located on the inside of the
appliance.
Page 15
ENGLISH 15
The freezing process lasts 24 hours: during
this period do not add other food to be
frozen.
When the freezing process is completed,
return to the required temperature (see
"Fast Freezing function").
In this condition, the refrigerator
compartment temperature might
drop below 0°C. If this occurs
reset the temperature regulator
to a warmer setting.
Storage of frozen food
When activating an appliance for the first
time or after a period out of use, before
putting the products in the compartment let
the appliance run at least 2 hours with the
Fast Freezing function turned on.
The freezer drawers ensure that it is quick
and easy to find the food package you
want. If large quantities of food are to be
stored, remove all drawers except for the
bottom drawer which needs to be in place
to provide good air circulation. Keep the
food on all shelves no closer than 15 mm
from the door.
Warning! In the event of
accidental defrosting, for
example due to a power failure,
if the power has been off for
longer than the value shown in
the technical characteristics chart
under "rising time", the defrosted
food must be consumed quickly
or cooked immediately, cooled
and then re-frozen.
depending on the time available for this
operation.
Small pieces may even be cooked still
frozen, directly from the freezer: in this case,
cooking will take longer.
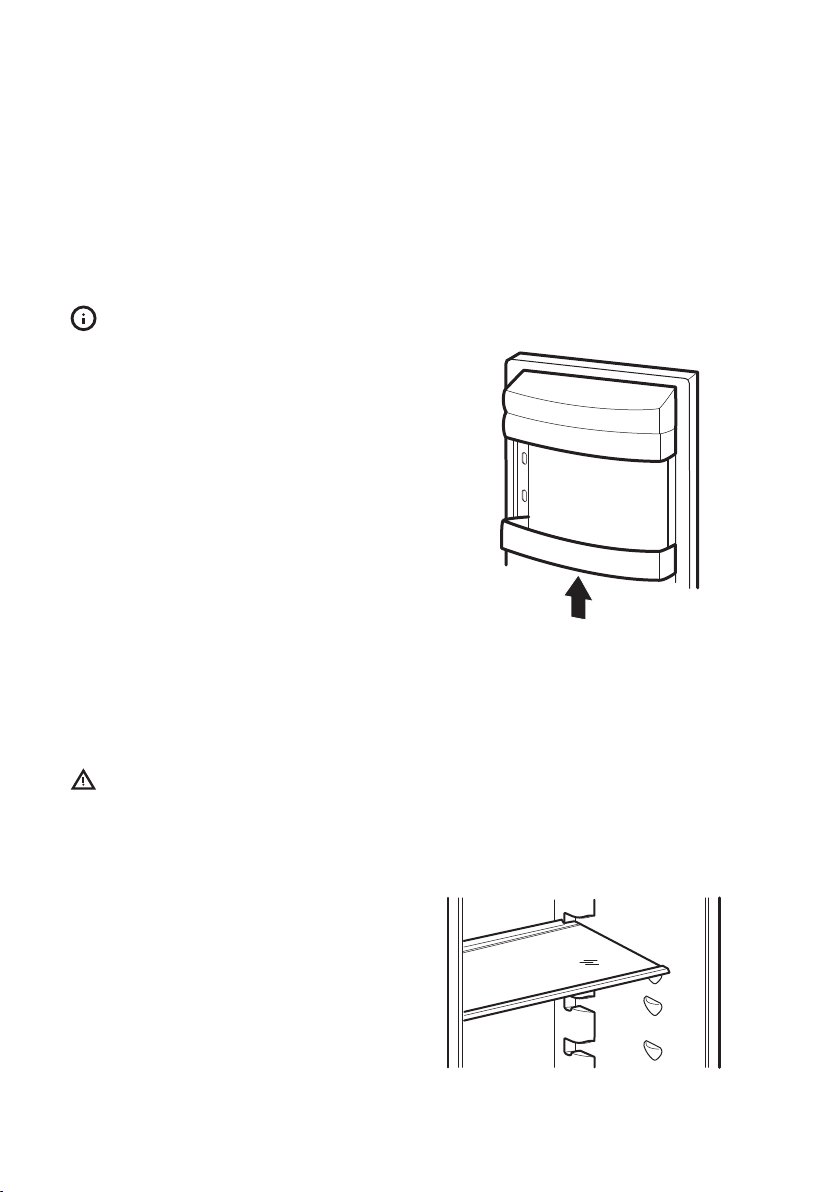
Positioning the door balconies
To permit storage of food packages of
various sizes, the door balconies can be
placed at different heights.
To make these adjustments proceed as
follows: gradually pull upwards the balcony
until it comes free, then reposition as
desired.
Movable shelves
Thawing
Deep-frozen or frozen food, prior to being
used, can be thawed in the refrigerator
compartment or at room temperature,
Page 16

1
2
ENGLISH
16
The walls of the refrigerator are equipped
with a series of runners so that the safety
glass shelves can be positioned as desired.
Caution! Do not move the glass
shelf above the vegetable
drawer to ensure correct air
circulation.
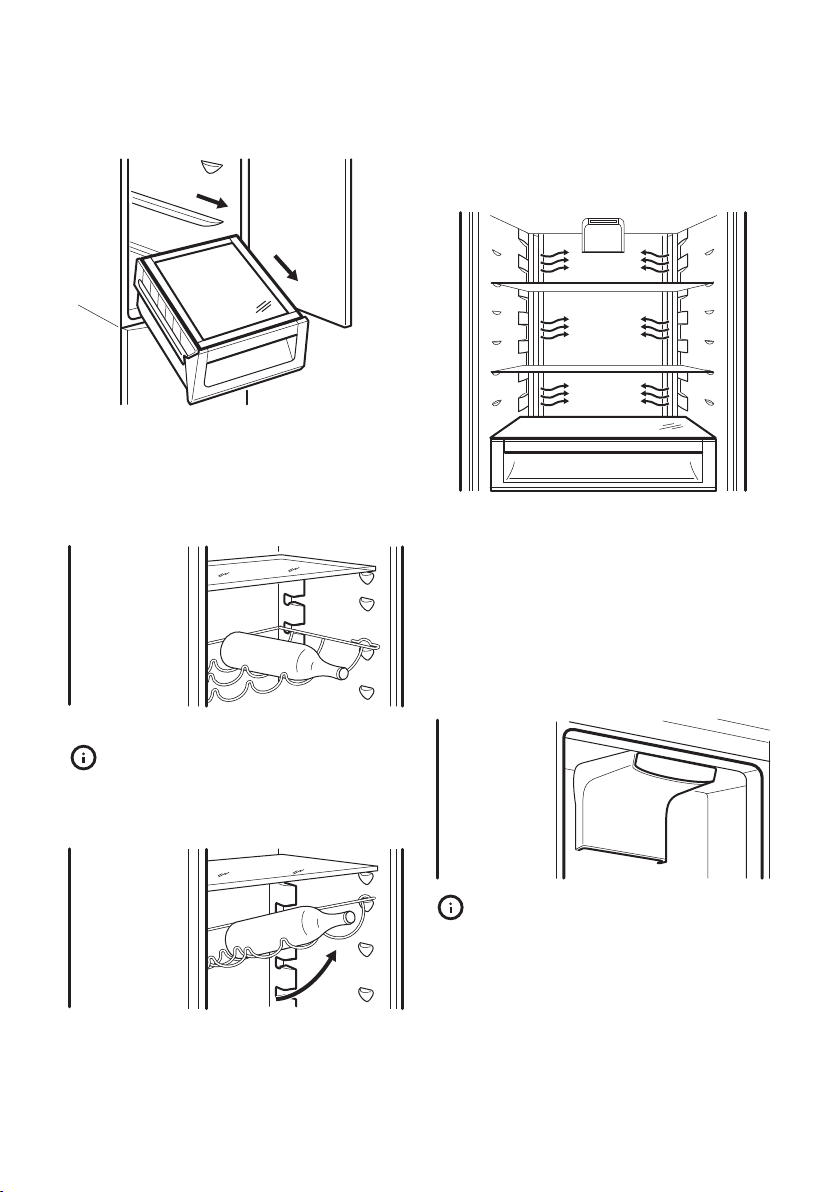
Removal of freezing baskets from the freezer
The freezing baskets have a limit stop to
prevent their accidental removal or falling
out.
At the time of its removal from the freezer,
pull the basket towards yourself (1) and,
upon reaching the end point, remove the
basket by tilting its front upwards (2).
At the time of putting it back, slightly lift the
front of the basket to insert it into the
freezer. Once you are over the end points,
push the baskets back in their position.
The drawer is suitable for storing fruit and
vegetables.
There is a grille on the bottom of the drawer
to separate the fruit and vegetables from
any humidity that may form on the bottom
surface.
Low Temperature Compartment
The drawer is suitable for storing fresh food
like fish, meat, seafood, because the
temperature is lower here than in the rest of
the fridge.
Caution! Before placing or
removing the Low Temperature
Compartment inside the
appliance, pull out the vegetable
drawer and glass cover.
The Low Temperature Compartment is
equipped with runners. To remove it from
the fridge compartment, pull the drawer
towards yourself and remove the module
by tilting its front downwards.
Vegetable Drawer
Page 17
ENGLISH
Bottle rack
Place the bottles (with the opening facing
front) in the pre-positioned rack.
17
No-Frost Cooling
No-Frost cooling allows rapid cooling of
food and keeps a more uniform
temperature in the appliance.
The refrigerator compartment is equipped
with a fan that activates by itself when
needed, for example for a quick
temperature recovery after door opening or
when the ambient temperature is high.
If the rack is positioned
horizontally, place only closed
bottles.
This bottle rack can be tilted to store
unsealed bottles. To obtain this result, place
front hooks of the rack one level higher than
the rear hooks.
The fan stops when you open the
door and restarts immediately
when you close it.
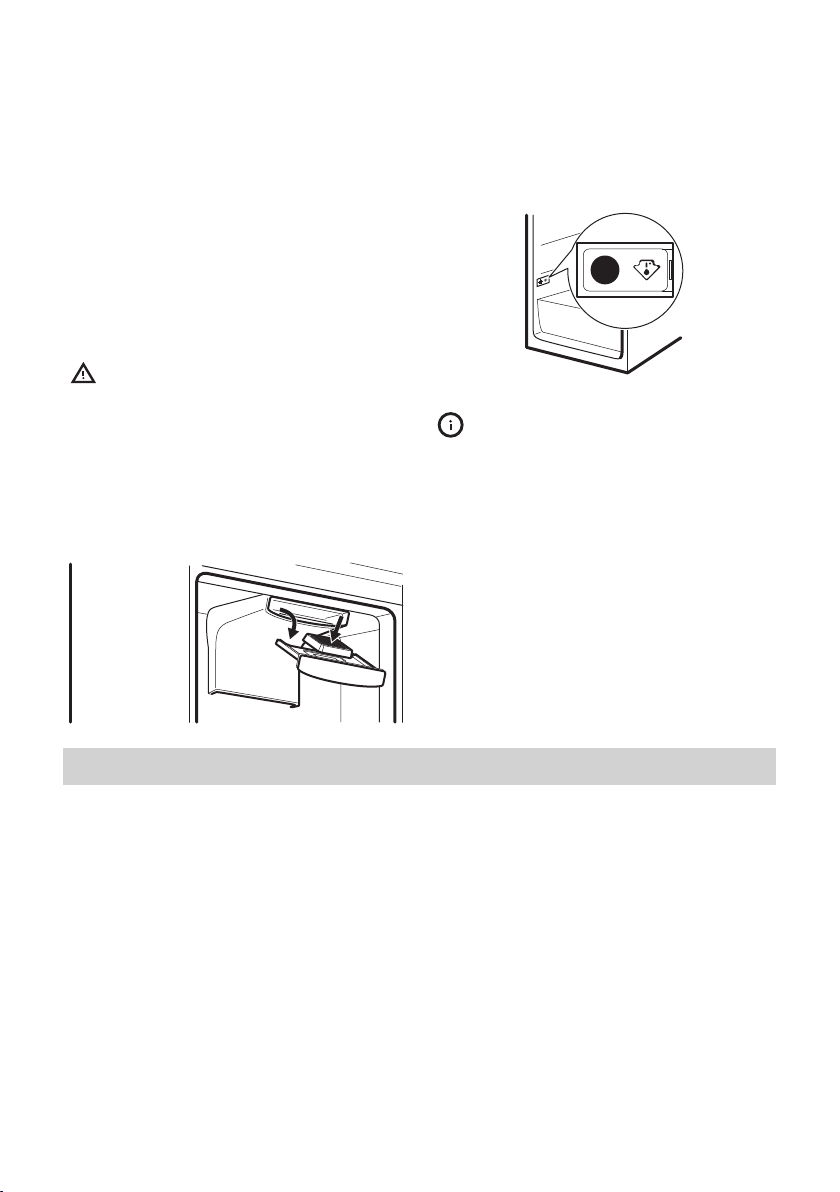
Carbon Air Filter
The appliance is equipped with a Carbon
Air Filter situated in an air lever drawer of a
fan-cooling device. The filter purifies the air
from unwanted odours meaning that the
Page 18
ENGLISH 18
storage quality will be further improved. On
delivery the carbon filter is in a plastic bag
to preserve performance. The filter should
be placed in the air lever drawer before the
appliance is turned on. To get the best
performance the filter should be replaced
once every year. In order to obtain
information on the new filter purchase,
contact the Authorised Service Centre.
Caution! Make sure that the air
lever drawer is closed to obtain
proper functioning. Handle the
filter carefully so that fragments
do not loosen from the surface.
1. Open the air lever drawer.
2. Remove the filter from the plastic bag.
3. Insert the filter in the drawer.
4. Close the drawer.
Temperature indicator
This appliance is sold in France.
In accordance with regulations
valid in this country it must be
provided with a special device
(see figure) placed in the lower
compartment of the fridge to
indicate the coldest zone of it.
Hints and tips
Normal operating sounds
The following sounds are normal during
operation:
• A faint gurgling and bubbling sound
from coils sound when refrigerant is
pumped.
• A whirring and pulsating sound from the
compressor when refrigerant is pumped.
• A sudden cracking noise from inside
appliance caused by thermic dilatation
(a natural and not dangerous physical
phenomenon).
• A faint click noise from the temperature
regulator when the compressor switches
on or off.
Hints for energy saving
• Do not open the door frequently or leave
it open longer than absolutely necessary.
• If foreseen, do not remove the cold
accumulators from the freezer basket.
Hints for fresh food refrigeration
To obtain the best performance:
• do not store warm food or evaporating
liquids in the refrigerator
• do cover or wrap the food, particularly if
it has a strong flavour
• position food so that air can circulate
freely around it
Page 19

ENGLISH 19
Hints for refrigeration
Useful hints:
• Meat (all types) : wrap in polythene
bags and place on the glass shelf above
the vegetable drawer.
• For safety, store in this way only one or
two days at the most.
• Cooked foods, cold dishes, etc. : these
should be covered and may be placed
on any shelf.
• Fruit and vegetables: these should be
thoroughly cleaned and placed in the
special drawer(s) provided.
• Butter and cheese: these should be
placed in special airtight containers or
wrapped in aluminium foil or polythene
bags to exclude as much air as possible.
• Bottles: these need a cap and should be
stored on the door bottle shelf, or (if
equipped) on the bottle rack.
• Bananas, potatoes, onions and garlic, if
not packed, must not be kept in the
refrigerator.
Hints for freezing
To help you make the most of the freezing
process, here are some important hints:
• the maximum quantity of food which can
be frozen in 24 hours is shown on the
rating plate;
• the freezing process takes 24 hours no
further food to be frozen should be
added during this period;
• freeze only top quality, fresh and
thoroughly cleaned, foodstuffs;
• prepare food in small portions to enable
it to be rapidly and completely frozen
and to make it possible subsequently to
thaw only the quantity required;
• wrap up the food in aluminium foil or
polythene and make sure that the
packages are airtight;
• do not allow fresh, unfrozen food to
touch food which is already frozen, thus
avoiding a rise in temperature of the
latter;
• lean foods store better and longer than
fatty ones; salt reduces the storage life of
food;
• water ices, if consumed immediately
after removal from the freezer
compartment, can possibly cause the skin
to be freeze burnt;
• it is advisable to show the freezing in
date on each individual pack to enable
you to keep tab of the storage time.
Hints for storage of frozen food
To obtain the best performance from this
appliance, you should:
• make sure that the commercially frozen
foodstuffs were adequately stored by the
retailer;
• be sure that frozen foodstuffs are
transferred from the foodstore to the
freezer in the shortest possible time;
• not open the door frequently or leave it
open longer than absolutely necessary;
• once defrosted, food deteriorates
rapidly and cannot be refrozen;
• do not exceed the storage period
indicated by the food manufacturer.
Care and cleaning
Warning! Refer to Safety
chapters.
General warnings
Caution! Unplug the appliance
before carrying out any
maintenance operation.
Page 20

ENGLISH 20
This appliance contains
hydrocarbons in its cooling unit;
maintenance and recharging
must therefore only be carried
out by authorized technicians.
The accessories and parts of the
appliance are not suitable for
washing in a dishwasher.
Cleaning the interior
Before using the appliance for the first time,
the interior and all internal accessories
should be washed with lukewarm water
and some neutral soap to remove the
typical smell of a brand-new product, then
dried thoroughly.
Caution! Do not use detergents
or abrasive powders, as these
will damage the finish.
Initial power on
Caution! Before inserting the
power plug in to the outlet and
switching on the cabinet for the
first time, leave the appliance
standing upright for at least 4
hours. This will assure a sufficient
amount of time for the oil to
return to the compressor.
Otherwise the compressor or
electronic components may
sustain damage.
Periodic cleaning
Caution! Do not pull, move or
damage any pipes and/or
cables inside the cabinet.
Caution! Do not damage the
cooling system.
Caution! When moving the
cabinet, lift it by the front edge to
avoid scratching the floor.
The equipment has to be cleaned regularly:
1. Clean the inside and accessories with
lukewarm water and some neutral soap.
2. Regularly check the door seals and wipe
clean to ensure they are clean and free
from debris.
3. Rinse and dry thoroughly.
4. If accessible, clean the condenser and
the compressor at the back of the
appliance with a brush.
This operation will improve the
performance of the appliance and save
energy consumption.
The lowest shelf, dividing the cooler
compartment from the rest of the cabinet,
can be removed only for cleaning. Pull out
the shelf straight to remove it. The cover
plates above the drawers in the
compartment can be taken out for cleaning.
To ensure the best performance
of Low Temperature
Compartment, the lowest shelf
and cover plates must be put
back in their original position
after cleaning.
Periods of non-operation
When the appliance is not in use for long
periods, take the following precautions:
1. Disconnect the appliance from electricity
supply.
2. Remove all food.
3. Clean the appliance and all accessories.
4. Leave the door/doors open to prevent
unpleasant smells.
Warning! If the cabinet will be
kept on, ask somebody to check
it once in a while to prevent the
food inside from spoiling in case
of a power failure.
Page 21

ENGLISH 21
Defrosting of the refrigerator
Frost is automatically eliminated from the
evaporator of the refrigerator compartment
every time the motor compressor stops,
during normal use. The defrost water drains
out through a trough into a special
container at the back of the appliance, over
the motor compressor, where it evaporates.
Defrosting the freezer
The freezer compartment is frost free. This
means that there is no build up of frost
Troubleshooting
Warning! Refer to Safety
chapters.
What to do if...
Problem Possible cause Solution
The appliance does not operate.
The appliance does not operate.
The appliance is switched
off.
The mains plug is not connected to the mains socket
correctly.
when it is in operation, neither on the
internal walls nor on the foods.
The absence of frost is due to the continuous
circulation of cold air inside the
compartment, driven by an automatically
controlled fan.
Switch on the appliance.
Connect the mains plug to the
mains socket correctly.
The appliance does not operate.
The appliance is noisy. The appliance is not sup-
Audible or visual alarm is
on.
Audible or visual alarm is
on.
There is no voltage in the
mains socket.
ported properly.
The cabinet has been recently switched on or the
temperature is still too
high.
The cabinet has been recently switched on or the
temperature is still too
high.
Connect a different electrical
appliance to the mains socket.
Contact a qualified electrician.
Check if the appliance stands
stable.
Refer to "Door Open Alarm".
Refer to "High Temperature
Alarm".
Page 22

ENGLISH 22
Problem Possible cause Solution
Audible or visual alarm is
on.
The door is left open. Close the door.
Audible or visual alarm is
on.
A square symbol is shown
instead of numbers on the
temperature display.
The lamp does not work. The lamp is in stand-by
The lamp does not work. The lamp is defective. Contact the nearest Author-
The compressor operates
continually.
The compressor operates
continually.
The compressor operates
continually.
The compressor operates
continually.
The compressor operates
continually.
The temperature in the appliance is too high.
Temperature sensor problem.
mode.
Temperature is set incorrectly.
Many food products were
inserted at the same time.
The room temperature is
too high.
Food products placed in
the appliance were too
warm.
The door is not closed correctly.
Contact a qualified electrician
or contact the nearest Authorised Service Centre.
Contact the nearest Authorised Service Centre (the cooling system will continue to
keep food products cold, but
temperature adjustment will
not be possible).
Close and open the door.
ised Service Centre.
Refer to "Operation" chapter.
Wait a few hours and then
check the temperature again.
Refer to climate class chart on
the rating plate.
Allow food products to cool to
room temperature before storing.
Refer to "Closing the door".
The compressor operates
continually.
The compressor operates
continually.
The Fast Freezing function
is switched on.
The Shopping Function is
switched on.
Refer to "Fast Freezing function".
Refer to "Shopping Function ".
Page 23

ENGLISH 23
Problem Possible cause Solution
The compressor does not
start immediately after
pressing Fast Freezing, or
after the change of the temperature.
This is normal, no error has
occurred.
The compressor starts after
some time.
The compressor does not
start immediately after
pressing Shopping Function,
or after the change of the
temperature.
Water flows inside the refrigerator.
Water flows on the floor. The melting water outlet is
Temperature cannot be set. The Shopping Function is
Temperature cannot be set. The Fast Freezing function
DEMO appears on the display.
This is normal, no error has
occurred.
Food products prevent
water from flowing into the
water collector.
not connected to the evaporative tray above the
compressor.
switched on.
is switched on.
The appliance is in demonstration mode.
The compressor starts after
some time.
Make sure that food products
do not touch the rear plate.
Attach the melting water outlet
to the evaporative tray.
Switch off Shopping Function
manually, or wait until the
function resets automatically
to set the temperature. Refer
to " Shopping Function".
Switch off Fast Freezing function manually, or wait until the
function resets automatically
to set the temperature. Refer
to "Fast Freezing function".
Keep the Mode pressed for
approximately 10 seconds until a long sound is heard and
display shuts off for a short
time.
The temperature in the appliance is too low/too high.
The temperature in the appliance is too low/too high.
The temperature regulator
is not set correctly.
The door is not closed correctly.
Set a higher/lower temperature.
Refer to "Closing the door".
Page 24

ENGLISH 24
Problem Possible cause Solution
The temperature in the appliance is too low/too high.
The food products temperature is too high.
Let the food products temperature decrease to room temperature before storage.
The temperature in the appliance is too low/too high.
The temperature in the appliance is too low/too high.
The temperature in the appliance is too low/too high.
The temperature in the appliance is too low/too high.
The temperature in the appliance is too low/too high.
If your appliance is still not
working properly after making
the above checks, contact the
Authorised Service Centre. You
can find the list at the end of this
manual.
Closing the door
1. Clean the door gaskets.
2. If necessary, adjust the door. Refer to
the assembly instructions.
Many food products were
inserted at the same time.
The door has been
opened too often.
The Fast Freezing function
is switched on.
The Shopping Function is
switched on.
There is no cold air circulation in the appliance.
Technical information
Insert less food products at the
same time.
Open the door only if necessary.
Refer to "Fast Freezing function".
Refer to "Shopping Function".
Make sure that there is cold
air circulation in the appliance.
3. If necessary, replace the defective door
gaskets. Contact the Authorised Service
Centre.
Replacing the lamp
The appliance is equipped with a longlife
LED interior light.
Only service is allowed to replace the
lighting device. Contact your Authorised
Service Centre.
Technical data
Product category
Appliance Type Refrigerator - Freezer
Product dimensions
Height 2000 mm
Page 25

ENGLISH 25
Width 595 mm
Depth 677 mm
Net volume
Fridge 258 Litre
Freezer 92 Litre
Defrost system
Fridge auto
Freezer auto
Star rating
Rising time 20 hours
Freezing capacity 13 kg/24h
Energy consumption 0,458 kWh/24h
Noise level 41 dB (A)
Energy class A+++
Voltage 230 - 240 V
Frequency 50 Hz
The technical information is situated in the
rating plate on the internal left side of the
appliance and in the energy label.
ENVIRONMENT CONCERNS
Recycle the materials with the symbol .
Put the packaging in applicable containers
to recycle it. Help protect the environment
and human health and to recycle waste of
electrical and electronic appliances. Do not
dispose appliances marked with the symbol
Page 26

ENGLISH
with the household waste. Return the
product to your local recycling facility or
contact your municipal office.
26
IKEA GUARANTEE
How long is the IKEA guarantee valid?
This guarantee is valid for five (5) years
from the original date of purchase of Your
appliance at IKEA, unless the appliance is
named LAGAN in which case two (2) years
of guarantee apply. The original sales
receipt is required as proof of purchase. If
service work is carried out under guarantee,
this will not extend the guarantee period for
the appliance,
Which appliances are not covered by the
IKEA five (5) years guarantee?
The range of appliances named LAGAN
and all appliances purchased in IKEA
before 1st of August 2007
Who will execute the service?
IKEA service provider will provide the
service through its own service operations
or authorized service partner network.
What does this guarantee cover?
The guarantee covers faults of the
appliance, which have been caused by
faulty construction or material faults from
the date of purchase from IKEA. This
guarantee applies to domestic use only. The
exceptions are specified under the headline
“What is not covered under this
guarantee?” Within the guarantee period,
the costs to remedy the fault e.g. repairs,
parts, labour and travel will be covered,
provided that the appliance is accessible
for repair without special expenditure. On
these conditions the EU guidelines (Nr.
99/44/EG) and the respective local
regulations are applicable. Replaced parts
become the property of IKEA.
What will IKEA do to correct the problem?
IKEA appointed service provider will
examine the product and decide, at its sole
discretion, if it is covered under this
guarantee. If considered covered, IKEA
service provider or its authorized service
partner through its own service operations,
will then, at its sole discretion, either repair
the defective product or replace it with the
same or a comparable product.
What is not covered under this
guarantee?
• Normal wear and tear.
• Deliberate or negligent damage,
damage caused by failure to observe
operating instructions, incorrect
installation or by connection to the
wrong voltage, damage caused by
chemical or electro-chemical reaction,
rust, corrosion or water damage
including but not limited to damage
caused by excessive lime in the water
supply, damage caused by abnormal
environmental conditions.
• Consumable parts including batteries
and lamps.
• Non-functional and decorative parts
which do not affect normal use of the
appliance, including any scratches and
possible color differences.
• Accidental damage caused by foreign
objects or substances and cleaning or
unblocking of filters, drainage systems or
soap drawers.
• Damage to the following parts: ceramic
glass, accessories, crockery and cutlery
Page 27

ENGLISH
27
baskets, feed and drainage pipes, seals,
lamps and lamp covers, screens, knobs,
casings and parts of casings. Unless such
damages can be proved to have been
caused by production faults.
• Cases where no fault could be found
during a technician’s visit.
• Repairs not carried out by our appointed
service providers and/or an authorized
service contractual partner or where
non-original parts have been used.
• Repairs caused by installation which is
faulty or not according to specification.
• The use of the appliance in a nondomestic environment i.e. professional
use.
• Transportation damages. If a customer
transports the product to their home or
other address, IKEA is not liable for any
damage that may occur during transport.
However, if IKEA delivers the product to
the customer's delivery address, then
damage to the product that occurs
during this delivery will be covered by
this guarantee.
• Cost for carrying out the initial
installation of the IKEA appliance.
However, if an IKEA service provider or
its authorized service partner repairs or
replaces the appliance under the terms
of this guarantee, the service provider or
its authorized service partner will reinstall the repaired appliance or install
the replacement, if necessary.
This restriction do not apply to fault-free
work carried out by a qualified specialist
using our original parts in order to adapt
the appliance to the technical safety
specifications of another EU country.
How country law applies
The IKEA guarantee gives You specific legal
rights, which covers or exceed local
demands. However these conditions do not
limit in any way consumer rights described
in the local legislation
Area of validity
For appliances which are purchased in one
EU country and taken to another EU
country, the services will be provided in the
framework of the guarantee conditions
normal in the new country. An obligation to
carry out services in the framework of the
guarantee exists only if the appliance
complies and is installed in accordance
with:
• the technical specifications of the country
in which the guarantee claim is made;
• the Assembly Instructions and User
Manual Safety Information;
The dedicated After Sales Service for
IKEA appliances:
Please do not hesitate to contact IKEA After
Sales Service to:
1. make a service request under this
guarantee;
2. ask for clarification on installation of the
IKEA appliance in the dedicated IKEA
kitchen furniture. The service won’t
provide clarifications related to:
• the overall IKEA kitchen installation;
• connections to electricity (if machine
comes without plug and cable), to
water and to gas since they have to
be executed by an authorized
service engineer.
3. ask for clarification on user manual
contents and specifications of the IKEA
appliance.
To ensure that we provide you with the best
assistance, please read carefully the
Assembly Instructions and/or the User
Manual section of this booklet before
contacting us.
How to reach us if You need our service
Page 28

ENGLISH
Please refer to the last page of this manual
for the full list of IKEA appointed contacts
and relative national phone numbers.
28
In order to provide You with a
quicker service, we recommend
that You use the specific phone
numbers listed at the end of this
manual. Always refer to the
numbers listed in the booklet of
the specific appliance You need
an assistance for. Before calling
us, assure that You have to hand
the IKEA article number (8 digit
code) for the appliance of which
you need our assistance.
SAVE THE SALES RECEIPT! It is
Your proof of purchase and
required for the guarantee to
apply. Note that the receipt
reports also the IKEA article
name and number (8 digit code)
for each of the appliances you
have purchased.
Do You need extra help?
For any additional questions not related to
After Sales of your appliances, please
contact our nearest IKEA store call centre.
We recommend you read the appliance
documentation carefully before contacting
us.
Page 29

DEUTSCH
29
Inhaltsverzeichnis
Sicherheitsinformationen 29
Sicherheitsanweisungen 31
Montage 32
Gerätebeschreibung 34
Betrieb 35
Täglicher Gebrauch 39
Änderungen vorbehalten.
Tipps und Hinweise 44
Reinigung und Pflege 46
Fehlersuche 47
Technische Daten 51
UMWELTTIPPS 52
IKEA Garantie 52
Sicherheitsinformationen
Lesen Sie vor der Montage und dem Gebrauch des Geräts
zuerst die Gebrauchsanleitung. Der Hersteller übernimmt keine
Verantwortung für Verletzungen und Beschädigungen durch
unsachgemäße Montage. Bewahren Sie die
Gebrauchsanleitung griffbereit auf.
Sicherheit von Kindern und schutzbedürftigen Personen
• Das Gerät kann von Kindern ab 8 Jahren und Personen mit
eingeschränkten physischen, sensorischen oder geistigen
Fähigkeiten oder mit mangelnder Erfahrung und/oder
mangelndem Wissen nur dann verwendet werden, wenn sie
durch eine für ihre Sicherheit zuständige Person beaufsichtigt
werden oder in die sichere Verwendung des Geräts
eingewiesen wurden und die mit dem Gerät verbundenen
Gefahren verstanden haben.
• Kinder dürfen nicht mit dem Gerät spielen.
• Wartung oder Reinigung des Geräts dürfen nicht von Kindern
ohne Aufsicht erfolgen.
• Alle Verpackungsmaterialien von Kindern fernhalten.
Allgemeine Sicherheit
• Dieses Gerät ist für die Verwendung im Haushalt und
ähnliche Zwecke vorgesehen, wie z. B.:
Page 30

DEUTSCH
– Bauernhöfe, Personalküchenbereiche in Geschäften, Büros
30
und anderen Arbeitsumfeldern
– Für Gäste in Hotels, Motels, Pensionen und anderen
wohnungsähnlichen Räumlichkeiten
• Achten Sie darauf, dass die Belüftungsöffnungen im Gehäuse,
um das Gerät und in der Einbaunische nicht blockiert sind.
• Versuchen Sie nicht, den Abtauvorgang durch andere als
vom Hersteller empfohlene mechanische oder sonstige
Hilfsmittel zu beschleunigen.
• Beschädigen Sie nicht den Kältekreislauf.
• Betreiben Sie in den Lebensmittelfächern des Geräts keine
anderen als die vom Hersteller empfohlenen Elektrogeräte.
• Reinigen Sie das Gerät nicht mit einem Wasser- oder
Dampfstrahl.
• Reinigen Sie das Gerät mit einem weichen, feuchten Tuch.
Verwenden Sie ausschließlich Neutralreiniger. Benutzen Sie
keine Scheuermittel, scheuernde Reinigungsschwämmchen,
Lösungsmittel oder Metallgegenstände.
• Bewahren Sie in dem Gerät keine explosiven Substanzen, wie
Spraydosen mit entzündlichen Treibgasen auf.
• Wenn das Netzkabel beschädigt ist, muss es vom Hersteller,
seinem autorisierten Kundenservice oder einer
gleichermaßen qualifizierten Person ausgetauscht werden,
um Gefahrenquellen zu vermeiden.
• Ist das Gerät mit einem Eiswürfelbereiter oder einem
Wasserspender ausgestattet, füllen Sie diese nur mit
Trinkwasser.
• Wenn ein Wasseranschluss vorgesehen ist, verbinden Sie das
Gerät nur mit dem Trinkwasseranschluss.
• Der Wasserdruck am Einlass (Mindest- und Höchstdruck)
muss zwischen 1 bar (0,1 MPa) und 10 bar (1 MPa) liegen
Page 31

DEUTSCH
31
Sicherheitsanweisungen
Montage
WARNUNG! Nur eine
qualifizierte Fachkraft darf den
elektrischen Anschluss des Geräts
vornehmen.
• Entfernen Sie das Verpackungsmaterial.
• Stellen Sie ein beschädigtes Gerät nicht
auf und benutzen Sie es nicht.
• Halten Sie sich an die mitgelieferte
Montageanleitung.
• Seien Sie beim Umsetzen des Geräts
vorsichtig, denn es ist schwer. Tragen Sie
stets Sicherheitshandschuhe.
• Stellen Sie sicher, dass die Luft um das
Gerät zirkulieren kann.
• Warten Sie mindestens 4 Stunden, bevor
Sie das Gerät an das Stromnetz
anschließen. Dies ist erforderlich, damit
das Öl in den Kompressor zurückfließen
kann.
• Stellen Sie das Gerät nicht in der Nähe
von Heizkörpern, Herden, Backöfen oder
Kochfeldern auf.
• Die Geräterückseite muss gegen die
Wand gestellt werden.
• Stellen Sie das Gerät nicht dort auf, wo
es direktem Sonnenlicht ausgesetzt sein
könnte.
• Stellen Sie das Gerät nicht an zu
feuchten oder kalten Orten auf, wie z. B.
in Nebengebäuden, Garagen oder
Weinkellern.
• Wenn Sie das Gerät verschieben
möchten, heben Sie es bitte an der
Vorderkante an, um den Fußboden nicht
zu verkratzen.
Elektrischer Anschluss
WARNUNG! Brand- und
Stromschlaggefahr.
• Das Gerät muss geerdet sein.
• Stellen Sie sicher, dass die elektrischen
Daten auf dem Typenschild den Daten
Ihrer Stromversorgung entsprechen.
Wenden Sie sich andernfalls an eine
Elektrofachkraft.
• Schließen Sie das Gerät nur an eine
ordnungsgemäß installierte
Schutzkontaktsteckdose an.
• Verwenden Sie keine
Mehrfachsteckdosen oder
Verlängerungskabel.
• Achten Sie darauf, elektrische Bauteile
(wie Netzstecker, Netzkabel und
Kompressor) nicht zu beschädigen.
Wenden Sie sich an den autorisierten
Kundendienst oder einen Elektriker, um
die elektrischen Bauteile auszutauschen.
• Das Netzkabel muss unterhalb des
Netzsteckers verlegt werden.
• Stecken Sie den Netzstecker erst nach
Abschluss der Montage in die Steckdose.
Stellen Sie sicher, dass der Netzstecker
nach der Montage noch zugänglich ist.
• Ziehen Sie nicht am Netzkabel, wenn Sie
das Gerät von der Stromversorgung
trennen möchten. Ziehen Sie stets am
Netzstecker.
Verwendung
WARNUNG! Es besteht
Verletzungs-, Verbrennungs-,
Stromschlag- und Brandgefahr.
• Nehmen Sie keine technischen
Änderungen am Gerät vor.
• Stellen Sie keine elektrischen Geräte (z.
B. Eisbereiter) in das Gerät, wenn solche
Geräte nicht ausdrücklich vom Hersteller
für diesen Zweck zugelassen sind.
• Achten Sie darauf, den Kältekreislauf
nicht zu beschädigen. Er enthält Isobutan
(R600a), ein Erdgas mit einem hohen
Grad an Umweltverträglichkeit. Dieses
Gas ist brennbar.
Page 32

DEUTSCH 32
• Wird der Kältekreislauf beschädigt,
stellen Sie bitte sicher, dass es keine
Flammen und Zündquellen im Raum gibt.
Belüften Sie den Raum.
• Stellen Sie keine heißen Gegenstände
auf die Kunststoffteile des Geräts.
• Legen Sie Erfrischungsgetränke nicht in
das Gefrierfach. Dadurch entsteht Druck
auf den Getränkebehälter.
• Bewahren Sie keine entzündbaren Gase
und Flüssigkeiten im Gerät auf.
• Platzieren Sie keine entflammbaren
Produkte oder Gegenstände, die mit
entflammbaren Produkten benetzt sind,
im Gerät, auf dem Gerät oder in der
Nähe des Geräts.
• Berühren Sie nicht den Kompressor oder
den Kondensator. Sie sind heiß.
• Nehmen Sie keine Gegenstände aus
dem Gefrierfach bzw. berühren Sie diese
nicht, falls Ihre Hände nass oder feucht
sind.
• Frieren Sie aufgetaute Lebensmittel nicht
wieder ein.
• Befolgen Sie die Hinweise auf der
Verpackung zur Aufbewahrung
tiefgekühlter Lebensmittel.
Reinigung und Pflege
WARNUNG! Verletzungsgefahr
sowie Risiko von Schäden am
Gerät.
• Schalten Sie das Gerät immer aus und
ziehen Sie den Netzstecker aus der
Steckdose, bevor Reinigungsarbeiten
durchgeführt werden.
• Der Kältekreis des Gerätes enthält
Kohlenwasserstoffe. Das Gerät muss von
einer qualifizierten Fachkraft gewartet
und nachgefüllt werden.
• Prüfen Sie regelmäßig den
Wasserabfluss des Geräts und reinigen
Sie ihn gegebenenfalls. Bei verstopftem
Wasserabfluss sammelt sich das
Abtauwasser am Boden des Geräts an.
Entsorgung
WARNUNG! Verletzungs- und
Erstickungsgefahr.
• Trennen Sie das Gerät von der
Stromversorgung.
• Schneiden Sie das Netzkabel ab, und
entsorgen Sie es.
• Entfernen Sie die Tür, um zu verhindern,
dass sich Kinder oder Haustiere in dem
Gerät einschließen.
• Der Kältekreislauf und die
Isolierungsmaterialien dieses Gerätes
sind ozonfreundlich.
• Die Isolierung enthält entzündliches Gas.
Für Informationen zur korrekten
Entsorgung des Gerätes wenden Sie sich
an Ihre kommunale Behörde.
• Achten Sie darauf, dass die Kühleinheit
in der Nähe des Wärmetauschers nicht
beschädigt wird.
Montage
WARNUNG! Siehe Kapitel
Sicherheitshinweise.
Standort
Installieren Sie dieses Gerät in einem
trockenen, gut belüfteten Raum, an dem die
Umgebungstemperatur mit der Klimaklasse
übereinstimmt, die auf dem Typenschild des
Geräts angegeben ist:
Klima-
klasse
SN +10 °C bis +32 °C
N +16 °C bis +32 °C
Umgebungstemperatur
Page 33

DEUTSCH
33
Klima-
klasse
ST +16 °C bis +38 °C
T +16 °C bis +43 °C
Bei einigen Modellen können
Funktionsstörungen auftreten,
wenn sie außerhalb dieses
Temperaturbereichs betrieben
werden. Der ordnungsgemäße
Betrieb wird nur innerhalb des
angegebenen
Temperaturbereichs
gewährleistet. Bei Fragen zum
Aufstellungsort des Geräts
wenden Sie sich an den
Verkäufer, unseren Kundendienst
oder nächstgelegenen
autorisierten Service-Partner.
Standort
Damit das Gerät die optimale Leistung
bringen kann, sollte es weit entfernt von
Wärmequellen wie Heizungskörpern,
Boilern, direktem Sonnenlicht usw.
aufgestellt werden. Die Luft muss frei an der
Rückseite des Gerätes zirkulieren können.
Umgebungstemperatur
ACHTUNG! Um einen
einwandfreien Betrieb bei
Umgebungstemperaturen über
38 °C zu gewährleisten, muss
zwischen den Geräteseiten und
den angrenzenden
Küchenmöbeln ein Abstand von
30 mm eingehalten werden.
Elektrischer Anschluss
Kontrollieren Sie vor der ersten Benutzung
des Geräts, ob die Netzspannung und frequenz Ihres Hausanschlusses mit den auf
dem Typenschild angegebenen
Anschlusswerten übereinstimmen.
Das Gerät muss geerdet sein. Zu diesem
Zweck ist der Netzstecker mit einem
Schutzkontakt ausgestattet. Falls die
Steckdose Ihres Hausanschlusses nicht
geerdet sein sollte, lassen Sie das Gerät
gemäß den geltenden Vorschriften von
einem qualifizierten Elektriker erden.
Der Hersteller übernimmt keinerlei Haftung
bei Missachtung der vorstehenden
Sicherheitshinweise.
Das Gerät entspricht den EWG-Richtlinien.
Page 34

101112
7 91 2
64 5
3 8
DEUTSCH 34
Gerätebeschreibung
Geräteübersicht
Obst-/Gemüseschublade
1
Niedertemperaturfach
2
Glasablagen
3
No-Frost-Kühlung
4
Flaschenhalter
5
Bedienfeld
6
Fach für Milchprodukte mit Deckel
7
Türablagen
8
Flaschenablage
9
Gefrierschublade
10
Gefrierschublade
11
Gefrierschublade
12
Page 35

1
567 3 24
A B C D E F G H I J
KLM
DEUTSCH 35
Betrieb
Bedienfeld
Display
1
Taste Flaschenkühlung und ON/OFF
2
Taste zum Senken der Temperatur
3
Taste zum Erhöhen der Temperatur
4
Kühlraum-Taste
5
Gefrierraum-Taste
6
Display
A) Kühlraum-Temperaturanzeige
B) Kühlschrankmodus OFF
C) Urlaubsfunktion
D) Ökomodus des Kühlschranks
E) Funktion Einkauf
F) Alarmanzeige
G) Ökomodus des Gefriergeräts
Taste Mode
7
Der voreingestellte Tastenton lässt sich
lauter einstellen. Halten Sie dazu die
Taste Mode und die Taste zum Senken
der Temperatur etwa 5 Sekunden
gedrückt. Die Änderung lässt sich
rückgängig machen.
H) Funktion Schnelles Einfrieren
I) Gefrierraum-Temperaturanzeige
J) Balkenanzeigen
K) Flaschenkühlfunktion
L) Funktion Extra Feuchtigkeit
M) Demo-Modus
Page 36

DEUTSCH
36
Nach der Auswahl des Kühloder Gefrierraums wird die
Animation gestartet.
Nach der Auswahl der
Temperatur blinkt die Animation
einige Minuten lang.
Balkenanzeigen
Die Balken führen Sie bei der Bedienung
des Geräts und zeigen den Gerätezustand
an. Die Balken geben an:
• welcher Kühlraum eingeschaltet ist, wenn
die Animation stoppt
• die gewünschte Temperatur auf der
Skala
• ob die eingestellte Temperatur höher
oder niedriger als die zuvor eingestellte
Temperatur ist (Animation steigend oder
abnehmend)
Einschalten des Geräts
Stecken Sie den Netzstecker in die
Netzsteckdose
1. Drücken Sie ON/OFF, wenn das Display
ausgeschaltet ist.
Die Temperaturanzeigen zeigen die jeweils
eingestellte Standardtemperatur an.
2. Nach ein paar Sekunden ertönt
möglicherweise ein akustisches
Alarmsignal.
Wie Sie den Alarm ausschalten,
erfahren Sie unter
„Temperaturwarnung“.
Wenn auf dem Display "DEMO"
angezeigt wird, befindet sich das Gerät
im Demo-Modus. Siehe hierzu
„Fehlersuche“.
Informationen zur Auswahl einer
anderen Temperatur finden Sie
unter „Temperaturregelung“.
Ausschalten des Geräts
Halten Sie ON/OFF 3 Sekunden gedrückt.
Das Display wird ausgeschaltet.
Ziehen Sie den Gerätestecker aus der
Steckdose, um das Gerät vom Netz zu
trennen.
Einschalten des Kühlschranks
Drücken Sie zum Einschalten des
Kühlschranks die Taste des Kühlraums.
Die Kühlraumanzeige OFF erlischt.
Informationen zur Auswahl einer
anderen Temperatur finden Sie
unter „Temperaturregelung“.
Ausschalten des Kühlschranks
Drücken Sie zum Ausschalten des
Kühlschranks die Taste des Kühlraums
einige Sekunden.
Die Kühlraumanzeige OFF erscheint.
Temperaturregelung
1. Wählen Sie den Kühl- oder Gefrierraum
aus.
2. Drücken Sie die Temperaturtaste, um
die Temperatur einzustellen.
3. Stellen Sie die Standardtemperatur ein:
+4 °C für den Kühlschrank und -18 °C
für das Gefriergerät.
Die eingestellte Temperatur wird
innerhalb von 24 Stunden erreicht.
Die Temperaturanzeigen zeigen die
eingestellten Temperaturen an.
Nach einem Stromausfall bleibt
die eingestellte Temperatur
gespeichert.
Temperaturwarnung
Ein Anstieg der Temperatur im Gefrierraum
(zum Beispiel aufgrund eines früheren
Stromausfalls oder einer geöffneten
Gerätetür) wird wie folgt angezeigt:
• Blinkende Alarm- und
Temperaturanzeige des Gefriergeräts.
Page 37

DEUTSCH 37
• Ertönen eines Summers.
Drücken Sie eine beliebige Taste, um den
Alarm auszuschalten.
Der Summer wird abgeschaltet.
Die Temperaturanzeige des Gefriergeräts
zeigt die höchste erreichte Temperatur ein
paar Sekunden lang an. Danach zeigt sie
wieder die eingestellte Temperatur an.
Die Alarmanzeige blinkt so lange, bis die
normalen Bedingungen wiederhergestellt
sind.
Danach erlischt die
Alarmanzeige.
Alarm Tür offen
Es ertönt ein Alarmsignal, wenn die Tür
etwa 5 Minuten lang offen steht. Der Alarm
Tür offen wird wie folgt angezeigt:
• blinkende Alarmanzeige
• akustisches Signal.
Sobald der Normalzustand wieder
hergestellt ist (Tür geschlossen), wird der
Alarm ausgeschaltet. In der Alarmphase
kann das akustische Alarmsignal durch
Drücken einer beliebigen Taste
ausgeschaltet werden.
Funktion Einkauf
Wenn Sie zum Beispiel nach einem Einkauf
größere Mengen warmer Lebensmittel
einlegen möchten, empfehlen wir die
Funktion Funktion Einkauf einzuschalten, um
die Produkte schneller zu kühlen und um zu
vermeiden, dass die bereits im Kühlschrank
befindlichen Lebensmittel erwärmt werden.
Die Funktion Funktion Einkauf wird nach
etwa 6 Stunden automatisch abgeschaltet.
1. Einschalten der Funktion:
a. Wählen Sie den Kühlraum, wenn er
nicht bereits ausgewählt ist.
b. Drücken Sie Mode, bis das
entsprechende Symbol angezeigt
wird.
Die Funktion Einkauf-Anzeige erscheint.
2. Zum Ausschalten der Funktion vor ihrer
automatischen Abschaltung:
a. Wählen Sie den Kühlraum, wenn er
nicht bereits ausgewählt ist.
b. Drücken Sie zum Ausschalten der
Funktion Mode, um eine andere
Funktion zu wählen oder drücken
Sie die Taste wiederholt, bis kein
Funktionssymbol angezeigt wird.
Die Funktion Einkauf-Anzeige erlischt.
Die Funktion wird durch die
Auswahl einer anderen
Temperatur für den Kühlraum
ausgeschaltet.
Funktion Schnelles Einfrieren
Diese Funktion endet automatisch nach 52
Stunden.
1. Einschalten der Funktion:
a. Wählen Sie den Gefrierraum aus.
b. Drücken Sie Mode, bis das
entsprechende Symbol angezeigt
wird.
Die Schnelles Einfrieren-Anzeige erscheint.
2. Zum Ausschalten der Funktion vor ihrer
automatischen Abschaltung:
a. Wählen Sie den Gefrierraum aus.
b. Drücken Sie zum Ausschalten der
Funktion Mode, um eine andere
Funktion zu wählen oder drücken
Sie die Taste wiederholt, bis kein
Funktionssymbol angezeigt wird.
Die Schnelles Einfrieren-Anzeige erlischt.
Die Funktion wird durch die
Auswahl einer anderen
Gefriertemperatur ausgeschaltet.
Page 38

DEUTSCH 38
Ökomodus
Wählen Sie für die optimale
Nahrungsmittellagerung den Ökomodus.
1. Einschalten der Funktion:
a. Wählen Sie den Kühl- oder
Gefrierraum aus.
b. Drücken Sie Mode, bis das
entsprechende Symbol angezeigt
wird.
Die Temperaturanzeige zeigt die für den
Kühlschrank eingestellte Temperatur an: +4
°C und für das Gefriergerät: -18 °C.
Die Ökomodus-Anzeige erscheint.
2. Ausschalten der Funktion:
a. Wählen Sie den Kühl- oder
Gefrierraum aus.
b. Drücken Sie zum Ausschalten der
Funktion Mode, um eine andere
Funktion zu wählen oder drücken
Sie die Taste wiederholt, bis kein
Funktionssymbol angezeigt wird.
Die Ökomodus-Anzeige erlischt.
Die Funktion wird durch die
Auswahl einer anderen
Temperatur ausgeschaltet.
Funktion Extra Feuchtigkeit
Wenn Sie feststellen, dass die im
Kühlschrank eingelagerten Lebensmittel zu
schnell austrocknen, können Sie dies durch
Erhöhung der Feuchtigkeit verhindern.
Schalten Sie hierzu die Funktion Extra
Feuchtigkeit ein.
Extra Feuchtigkeit kann
zusammen mit Funktion Einkauf
und dem Energiesparmodus
eingeschaltet werden.
1. Drücken Sie zum Einschalten der
Funktion Mode, bis das entsprechende
Symbol leuchtet.
Die Anzeige Extra Feuchtigkeit leuchtet.
2. Drücken Sie zum Ausschalten der
Funktion Mode, um eine andere
Funktion zu wählen oder drücken Sie die
Taste wiederholt, bis kein
Funktionssymbol angezeigt wird.
Die Anzeige Extra Feuchtigkeit erlischt.
Flaschenkühlfunktion
Mit der Funktion Flaschenkühlung lässt sich
ein Alarmton einstellen, der zu der
gewünschten Zeit ertönt. Dies ist zum
Beispiel praktisch, wenn ein Gericht eine
gewisse Zeit abkühlen muss oder Sie die
Flaschen, die Sie für eine schnellere Kühlung
in den Gefrierraum gelegt haben, nicht
vergessen möchten.
1. Drücken Sie zum Einschalten der
Funktion die Taste Flaschenkühlung.
Die Anzeige Flaschenkühlung erscheint.
Warten Sie, bis der Timer die eingestellte
Zeit (30 Minuten) anzeigt.
2. Drücken Sie die Tasten zur Erhöhung
bzw. Verringerung der Temperatur, um
den Timer auf 1 bis 90 Minuten
einzustellen.
Die Timer-Anzeige (min). erscheint.
Nach Ablauf des Countdowns blinkt die
Anzeige Flaschenkühlung und es ertönt ein
Alarmsignal.
3. Nehmen Sie die Flaschen aus dem
Gefrierraum.
4. Schalten Sie den Alarmton und die
Funktion mit der Taste Flaschenkühlung
aus.
Diese Funktion kann während
des Countdowns jederzeit
durch Drücken der Taste
Flaschenkühlung
ausgeschaltet werden. Die
Anzeige Flaschenkühlung
erlischt.
Die Zeit kann während des
Countdowns geändert
werden, indem Sie die Tasten
zur Erhöhung und
Verringerung der Temperatur
drücken.
Page 39

3-6
1-2
10-12
3-4
10-12
3-6
10-12
3-6
10-12
3-6
x1
x1
x2
DEUTSCH 39
Urlaubsfunktion
Mit dieser Funktion können Sie den
Kühlschrank über längere Zeit mit
geschlossener Tür leer stehen lassen, ohne
dass sich ein unangenehmer Geruch
entwickelt.
Nehmen Sie alle Lebensmittel
aus dem Kühlschrank, bevor Sie
die Urlaubsfunktion einschalten.
1. Drücken Sie zum Einschalten der
Funktion Mode, bis das entsprechende
Symbol leuchtet.
Täglicher Gebrauch
Gefrierkalender
Die Anzeige der Urlaubsfunktion leuchtet.
Die Kühlraum-Temperaturanzeige zeigt die
eingestellte Temperatur an.
2. Drücken Sie zum Ausschalten der
Funktion Mode, um eine andere
Funktion zu wählen oder drücken Sie die
Taste wiederholt, bis kein
Funktionssymbol angezeigt wird.
Die Anzeige der Urlaubsfunktion erlischt.
Die Funktion wird durch die
Auswahl einer anderen
Temperatur für den Kühlraum
ausgeschaltet.
Zubehör
Eierablage
Eiswürfelschale
Die Symbole zeigen verschiedene Arten
gefrorener Lebensmittel an.
Die Zahlen geben die Lagerzeiten in
Monaten für das entsprechende Gefriergut
an. Es hängt von der Qualität der
Lebensmittel und ihrer Behandlung vor dem
Einfrieren ab, ob der obere oder der untere
Wert für die angezeigte Lagerzeit gilt.
Kälteakkus
Page 40

DEUTSCH 40
Herstellen von Eiswürfeln
Dieses Gerät ist mit einer Schale für die
Herstellung von Eiswürfeln ausgestattet.
1. Füllen Sie die Schale mit Wasser.
2. Stellen Sie die Schale in das Gefrierfach.
ACHTUNG! Bitte verwenden Sie
zum Entnehmen der Schale aus
dem Gefrierfach keine
Gegenstände aus Metall.
Kälteakkus
Im Gefrierraum befinden sich zwei
Kälteakkus. Diese verlängern die Zeitdauer,
in der die Lebensmittel bei einem
Stromausfall oder einem Ausfall des Geräts
gekühlt werden.
Einfrieren frischer Lebensmittel
Der Gefrierraum eignet sich zum Einfrieren
von frischen Lebensmitteln und zum
längerfristigen Lagern von bereits
gefrorenen und tiefgefrorenen
Lebensmitteln.
Für das Einfrieren einer kleinen Menge
frischer Lebensmittel ist keine Änderung der
Einstellung erforderlich.
Um frische Lebensmittel einzufrieren,
schalten Sie die Funktion Schnelles
Einfrieren mindestens 24 Stunden ein, bevor
Sie die einzufrierenden Lebensmittel in das
Gefrierfach legen.
Legen Sie die frischen, einzufrierenden
Lebensmittel in das oberste Fach.
Die maximale Menge an Lebensmitteln, die
in 24 Stunden eingefroren werden kann, ist
auf dem Typenschild angegeben, das sich
im Innern des Gerätes befindet.
Der Gefriervorgang dauert 24 Stunden:
Legen Sie während dieses Zeitraums keine
weiteren einzufrierenden Lebensmittel in
das Gerät.
Stellen Sie nach Abschluss des
Gefriervorgangs wieder die gewünschte
Temperatur ein (siehe Funktion „Schnelles
Einfrieren“).
Unter diesen Umständen kann
die Temperatur im Kühlschrank
unter 0 °C fallen. Ist dies der Fall,
drehen Sie den Temperaturregler
auf eine wärmere Einstellung.
Lagern von gefrorenen Lebensmitteln
Lassen Sie das Gerät vor der ersten
Inbetriebnahme oder nach einer Zeit, in der
das Gerät nicht benutzt wurde, mindestens
zwei Stunden lang mit eingeschalteter
Funktion Schnelles Einfrieren laufen, bevor
Sie Lebensmittel in das Fach legen.
Die Gefrierschubladen sorgen dafür, dass
Sie die Lebensmittel schnell und einfach
finden. Wenn große Mengen an
Lebensmitteln gelagert werden sollen,
entfernen Sie die Schubladen,
ausgenommen die untere Schublade, die an
ihrem Platz bleiben muss, um eine gute
Luftzirkulation zu garantieren. Lagern Sie
die Lebensmittel auf allen Ablagen mit
einem Mindestabstand zur Tür von 15 mm.
WARNUNG! Kam es zum
Beispiel durch einen Stromausfall,
der länger dauerte als der in der
Tabelle mit den technischen
Daten angegebene Wert (siehe
"Lagerzeit bei Störung") zu
einem ungewollten Abtauen,
dann müssen die aufgetauten
Lebensmittel sehr rasch
verbraucht oder sofort gekocht
und nach dem Abkühlen erneut
eingefroren werden.
Page 41

1
2
DEUTSCH
41
Abtauen
Tiefgefrorene oder gefrorene Lebensmittel
können vor der Verwendung je nach der
zur Verfügung stehenden Zeit im
Kühlschrank oder bei Raumtemperatur
aufgetaut werden.
Kleinere Gefriergutteile können sogar direkt
aus dem Gefriergerät entnommen und
anschließend sofort gekocht werden. In
diesem Fall dauert der Garvorgang
allerdings etwas länger.
Positionierung der Türablagen
Verstellbare Ablagen
Die Wände des Kühlschranks sind mit einer
Reihe von Führungsschienen ausgestattet,
die verschiedene Möglichkeiten für das
Einsetzen der Ablagen bieten.
ACHTUNG! Die Glasablage über
der Gemüseschublade sollte
jedoch nicht verstellt werden, um
eine korrekte Luftzirkulation zu
gewährleisten.
Entnehmen von Gefrierkörben aus dem Gefriergerät
Die Türablagen können in verschiedener
Höhe positioniert werden; damit
ermöglichen sie das Lagern verschieden
großer Lebensmittelpackungen.
Gehen Sie dazu wie folgt vor: Ziehen Sie
die Ablage langsam nach oben, bis sie sich
herausnehmen lässt, und schieben Sie sie in
die gewünschte Position ein.
Die Gefrierkörbe sind mit einem Anschlag
ausgestattet, der ein versehentliches
Herausziehen oder ein Herausfallen
verhindert.
Um einen Gefrierkorb aus dem
Gefrierschrank zu nehmen, ziehen Sie den
Page 42

DEUTSCH
42
Korb zu sich her (1), bis er den Anschlag
erreicht, und kippen den Korb mit der
Vorderseite nach oben (2), bis er sich
herausnehmen lässt.
Wenn Sie den Gefrierkorb wieder in das
Gerät einschieben möchten, heben Sie die
Vorderseite des Korbs leicht an und setzen
Sie ihn in das Gefriergerät ein. Sobald der
Gefrierkorb über den Anschlag hinweg ist,
schieben Sie ihn wieder in seine
ursprüngliche Position.
Obst-/Gemüseschublade
Die Schublade eignet sich zum
Aufbewahren von Obst und Gemüse.
Am Boden der Schublade befindet sich ein
Gitter, um Obst und Gemüse vor
Feuchtigkeit zu schützen, die sich auf dem
Boden bilden kann.
Niedertemperaturfach
Aufbewahrung von frischen Lebensmitteln
wie Fisch, Fleisch und Meeresfrüchten.
ACHTUNG! Bevor Sie das
Niedertemperaturfach aus dem
Gerät nehmen oder wieder
einsetzen, nehmen Sie die Obst-/
Gemüseschublade und die
Glasplatte heraus.
Das Niedertemperaturfach besitzt
Führungsschienen. Um es aus dem
Kühlraum zu entfernen, ziehen Sie das Fach
zu sich und kippen Sie seine Vorderseite
nach unten.
Flaschenhalter
Im voreingestellten Flaschenhalter können
Flaschen (mit der Öffnung nach vorn)
gelagert werden.
Aufgrund der in dieser Schublade im
Vergleich zum restlichen Kühlraum
niedrigeren Temperatur eignet sie sich zur
Page 43

DEUTSCH
43
In horizontaler Stellung ist der
Flaschenhalter nur für
geschlossene Flaschen geeignet.
Der Flaschenhalter kann gekippt werden,
um geöffnete Flaschen zu lagern. Stellen Sie
hierfür die vorderen Haken des Halters eine
Ebene höher als die hinteren Haken ein.
No-Frost-Kühlung
nachdem die Tür geöffnet wurde, oder
wenn die Umgebungstemperatur hoch ist.
Der Ventilator schaltet sich aus,
wenn die Tür geöffnet wird und
schaltet sich wieder ein, sobald
die Tür geschlossen wird.
Kohlefilter
Das Gerät ist mit einem Kohlefilter
ausgestattet, der sich in einer
Lüftungsschublade der Kühlventilatoreinheit
befindet. Der Filter reinigt die Luft von
unerwünschten Gerüchen und verbessert so
die Aufbewahrungseigenschaften. Der Filter
ist dem Gerät in einem Kunststoffbeutel
beigelegt, damit seine Leistungsfähigkeit
nicht beeinträchtigt wird. Der Filter muss in
die Schublade eingesetzt werden, bevor
das Gerät eingeschaltet wird. Die beste
Leistung wird erzielt, wenn der Filter einmal
jährlich ausgetauscht wird. Falls Sie
Informationen zum Kauf eines neuen Filters
benötigen, wenden Sie sich an den
autorisierten Kundendienst.
Die No-Frost-Kühlung sorgt für eine rasche
Kühlung der Lebensmittel und eine
gleichmäßigere Temperatur im Innenraum.
Der Kühlraum ist mit einem Ventilator
ausgestattet, der sich bei Bedarf selbsttätig
einschaltet, z. B. zur raschen
Wiederherstellung der Temperatur,
Page 44

DEUTSCH 44
ACHTUNG! Achten Sie darauf,
dass die Lüftungsschublade
geschlossen ist, um eine
einwandfreie Funktion zu
gewährleisten. Behandeln Sie
den Filter sorgfältig, damit sich
keine Partikel von der
Oberfläche ablösen.
1. Öffnen Sie die Lüftungsschublade.
2. Entnehmen Sie den Filter aus der
Kunststoffverpackung.
3. Setzen Sie den Filter in die Schublade.
4. Schließen Sie die Schublade.
Tipps und Hinweise
Normale Betriebsgeräusche
Folgende Geräusche sind während des
normalen Gerätebetriebs normal:
• Ein leichtes Gurgeln und Blubbern, wenn
das Kältemittel durch die Leitungen
gepumpt wird.
• Ein Surren und ein pulsierendes
Geräusch vom Kompressor, wenn das
Kältemittel durch die Leitungen gepumpt
wird.
• Ein plötzliches Knackgeräusch aus dem
Geräteinneren, verursacht durch
thermische Ausdehnung (eine natürliche
und nicht gefährliche physikalische
Erscheinung).
• Leises Klicken des Temperaturreglers,
wenn sich der Kompressor ein- oder
ausschaltet.
Temperaturanzeige
Das Gerät wird in Frankreich
verkauft.
Entsprechend den Vorschriften in
diesem Land muss das Gerät mit
einer speziellen Vorrichtung
ausgestattet sein (siehe
Abbildung), die im unteren Fach
des Kühlraums angebracht ist,
und den kältesten Bereich des
Kühlraums anzeigt.
Energiespartipps
• Öffnen Sie die Tür nicht zu häufig, und
lassen Sie diese nicht länger offen als
notwendig.
• Nehmen Sie die Kälteakkus (falls
vorhanden) nicht aus dem Gefrierkorb.
Hinweise für die Kühlung frischer Lebensmittel
So erzielen Sie die besten Ergebnisse:
• Legen Sie keine warmen Lebensmittel
oder dampfende Flüssigkeiten in den
Kühlschrank.
• Decken Sie die Lebensmittel ab oder
verpacken Sie diese entsprechend,
besonders wenn sie stark riechen.
• Legen Sie die Lebensmittel so hinein,
dass um sie Luft frei zirkulieren kann.
Page 45

DEUTSCH
45
Hinweise für die Kühlung
Tipps:
• Fleisch (alle Sorten): Verpacken Sie
Fleisch in einem Frischhaltebeutel und
legen Sie diesen auf die Glasablage
über der Gemüseschublade.
• Bitte lagern Sie Fleisch aus
Sicherheitsgründen nur einen oder
maximal zwei Tage auf diese Weise.
• Gekochte Lebensmittel, kalte Gerichte
usw.: Diese sollten abgedeckt auf eine
der Ablagen gelegt werden.
• Obst und Gemüse: Gründlich reinigen
und in die dafür vorgesehene(n)
Schublade(n) legen.
• Butter und Käse: Diese sollten stets in
speziellen luftdichten Behältern verpackt
sein oder in Aluminiumfolie bzw. in
lebensmittelechte Tüten eingepackt
werden, um so wenig Luft wie möglich in
der Verpackung zu haben.
• Flaschen: Sie sollten mit Deckel in der
Flaschenablage in der Tür oder im
Flaschenhalter (falls vorhanden)
aufbewahrt werden.
• Bananen, Kartoffeln, Zwiebeln und
Knoblauch sollten im Kühlschrank nicht
unverpackt aufbewahrt werden.
Hinweise zum Einfrieren
Im Folgenden finden Sie einige wertvolle
Tipps für einen optimalen Gefriervorgang:
• Die maximale Menge an Lebensmitteln,
die in 24 Stunden eingefroren werden
kann, ist auf dem Typschild angegeben.
• Der Gefriervorgang dauert 24 Stunden,
legen Sie während dieses Zeitraums
keine weiteren einzufrierenden
Lebensmittel in das Gerät.
• Frieren Sie ausschließlich frische und
gründlich gewaschene Lebensmittel von
sehr guter Qualität ein.
• Teilen Sie die Lebensmittel in kleinere
Portionen ein, damit diese schnell und
vollständig gefrieren und Sie später nur
die Menge auftauen müssen, die Sie
benötigen.
• Verpacken Sie die einzufrierenden
Lebensmittelportionen stets luftdicht in
Alufolie oder in Gefrierbeuteln und
achten Sie darauf, dass die Verpackung
so wenig Luft wie möglich enthält.
• Achten Sie beim Hineinlegen von
frischen, noch ungefrorenen
Lebensmitteln darauf, dass sie keinen
Kontakt mit Gefriergut bekommen, da
dieses sonst antauen könnte.
• Magere Lebensmittel lassen sich besser
und länger als fetthaltige lagern; durch
Salz wird die maximale Lagerungsdauer
verkürzt.
• Wird Wassereis direkt nach der
Entnahme aus dem Gefrierfach verzehrt,
kann dies zu Frostbrand auf der Haut
führen.
• Es empfiehlt sich, das Einfrierdatum auf
jeder einzelnen Packung zu notieren, um
einen genauen Überblick über die
Lagerzeit zu haben.
Hinweise zur Lagerung gefrorener Lebensmittel
So erzielen Sie die besten Ergebnisse mit
Ihrem Gerät:
• Vergewissern Sie sich, dass die
gefrorenen Lebensmittel vom Händler
angemessen gelagert wurden.
• Achten Sie unbedingt darauf, die
eingekauften gefrorenen Lebensmittel in
der kürzest möglichen Zeit zum
Gefriergerät zu bringen.
• Öffnen Sie die Tür nicht zu häufig, und
lassen Sie die Tür nicht länger offen als
notwendig.
• Aufgetaute Lebensmittel verderben sehr
schnell und eignen sich nicht für ein
erneutes Einfrieren.
• Das Haltbarkeitsdatum auf der
Tiefkühlkostverpackung darf nicht
überschritten werden.
Page 46

DEUTSCH
46
Reinigung und Pflege
WARNUNG! Siehe Kapitel
Sicherheitshinweise.
Allgemeine Warnhinweise
ACHTUNG! Ziehen Sie vor jeder
Wartungsmaßnahme immer den
Netzstecker aus der Steckdose.
Dieses Gerät enthält
Kohlenwasserstoffe in seinem
Kältekreislauf. Aus diesem Grund
dürfen die Wartung und das
Nachfüllen ausschließlich durch
autorisiertes Fachpersonal
erfolgen.
Das Zubehör des Geräts und die
Innenteile eignen sich nicht für
die Reinigung im Geschirrspüler.
Reinigen des Innenraums
Bevor Sie das Gerät in Betrieb nehmen,
beseitigen Sie den typischen Neugeruch am
besten durch Auswaschen der Innenteile mit
lauwarmem Wasser und einer neutralen
Seife. Sorgfältig nachtrocknen.
ACHTUNG! Verwenden Sie
keine Reinigungsmittel oder
Scheuerpulver, da diese die
Oberfläche beschädigen.
Erstes Einschalten
ACHTUNG! Bevor Sie den
Stecker in die Wandsteckdose
stecken und das Gerät zum
ersten Mal einschalten, lassen Sie
es mindestens 4 Stunden aufrecht
stehen. Diese Zeit ist
ausreichend, damit das Öl in den
Kompressor zurückfließen kann.
Anderenfalls können der
Kompressor oder elektronische
Bauteile beschädigt werden.
Regelmäßige Reinigung
ACHTUNG! Ziehen Sie nicht an
Leitungen und/oder Kabeln im
Innern des Geräts und achten Sie
darauf, diese nicht zu
verschieben oder zu
beschädigen.
ACHTUNG! Beschädigen Sie
nicht das Kühlsystem.
ACHTUNG! Wenn Sie das Gerät
verschieben möchten, heben Sie
es an der Vorderkante an, um
den Fußboden nicht zu
verkratzen.
Das gesamte Gerät muss regelmäßig
gereinigt werden:
1. Reinigen Sie die Innenseiten und die
Zubehörteile mit lauwarmem Wasser
und etwas Neutralseife.
2. Prüfen und säubern Sie die
Türdichtungen in regelmäßigen
Abständen, um zu gewährleisten, dass
Page 47

DEUTSCH 47
diese sauber und frei von Fremdkörpern
sind.
3. Spülen und trocknen Sie diese sorgfältig
ab.
4. Reinigen Sie den Kondensator und den
Kompressor auf der Geräterückseite,
falls diese zugänglich sind, mit einer
Bürste.
Dieser Vorgang verbessert die Leistung
des Geräts und senkt den
Stromverbrauch.
Die unterste Ablage trennt den Kühlraum
vom restlichen Innenraum und sollte nur zur
Reinigung entfernt werden. Ziehen Sie die
Ablage gerade heraus. Die Abdeckungen
über den Schubladen können zur Reinigung
entfernt werden.
Für eine optimale Leistung des
Niedertemperaturfachs müssen
die untere Ablage und die
Abdeckungen nach der
Reinigung wieder korrekt
eingesetzt werden.
Stillstandszeiten
Bei längerem Stillstand des Geräts müssen
Sie folgende Vorkehrungen treffen:
1. Trennen Sie das Gerät von der
Netzstromversorgung.
2. Entnehmen Sie alle Lebensmittel.
3. Reinigen Sie das Gerät und alle
Zubehörteile.
4. Lassen Sie die Tür(en) offen, um das
Entstehen unangenehmer Gerüche zu
vermeiden.
WARNUNG! Möchten Sie bei
einer längeren Abwesenheit das
Gerät weiterlaufen lassen, bitten
Sie jemanden, gelegentlich die
Temperatur zu prüfen, damit das
Kühlgut bei einem möglichen
Stromausfall nicht im Innern des
Geräts verdirbt.
Abtauen des Kühlschranks
Bei normalem Betrieb wird Reif bei jedem
Anhalten des Kompressors automatisch vom
Verdampfer des Kühlschranks entfernt. Das
Tauwasser sammelt sich in einer
Auffangrinne und läuft durch eine
Abflussöffnung in einen speziellen Behälter
an der Rückseite des Geräts über dem
Kompressor, wo es verdampft.
Abtauen des Gefriergeräts
Das Gefrierfach ist ein NoFrost-Fach. Das
bedeutet, dass sich während des Betriebs
weder an den Innenwänden noch an
Lebensmitteln Reif bilden kann.
Die Reifbildung wird durch die
kontinuierliche, von einem automatisch
geregelten Ventilator gesteuerte
Luftzirkulation im Inneren des Gefrierraums
verhindert.
Fehlersuche
WARNUNG! Siehe Kapitel
Sicherheitshinweise.
Page 48

DEUTSCH 48
Was tun, wenn ...
Störung Mögliche Ursache Abhilfe
Das Gerät funktioniert nicht. Das Gerät ist ausgeschal-
tet.
Schalten Sie das Gerät ein.
Das Gerät funktioniert nicht. Der Netzstecker wurde
nicht richtig in die Steckdose gesteckt.
Das Gerät funktioniert nicht. Es liegt keine Spannung an
der Steckdose an.
Das Gerät erzeugt Geräusche.
Es wird ein akustisches oder
optisches Alarmsignal ausgelöst.
Es wird ein akustisches oder
optisches Alarmsignal ausgelöst.
Es wird ein akustisches oder
optisches Alarmsignal ausgelöst.
Es wird ein akustisches oder
optisches Alarmsignal ausgelöst.
Das Gerät ist nicht ordnungsgemäß aufgestellt.
Das Gerät wurde erst kürzlich eingeschaltet oder
die Temperatur ist noch zu
hoch.
Das Gerät wurde erst kürzlich eingeschaltet oder
die Temperatur ist noch zu
hoch.
Die Tür ist geöffnet. Schließen Sie die Tür.
Die Temperatur im Gerät
ist zu hoch.
Stecken Sie den Netzstecker
korrekt in die Steckdose.
Testen Sie, ob ein anderes
Gerät an dieser Steckdose
funktioniert. Wenden Sie sich
an eine Elektrofachkraft.
Kontrollieren Sie, ob das Gerät stabil steht.
Siehe hierzu Alarm „Tür offen“.
Siehe hierzu „Temperaturwarnung“.
Wenden Sie sich an einen
qualifizierten Elektriker oder
die nächste autorisierte Kundendienststelle.
In der Temperaturanzeige
ist ein quadratisches Symbol
anstatt der Zahlen zu sehen.
Die Lampe funktioniert nicht. Die Lampe befindet sich im
Problem mit dem Temperaturfühler.
Stand-by-Modus.
Bitte wenden Sie sich an die
nächste autorisierte Kundendienststelle (das Kühlsystem
hält zwar die eingelagerten
Lebensmittel weiterhin kühl,
doch eine Temperatureinstellung ist nicht mehr möglich).
Schließen und öffnen Sie die
Tür.
Page 49

DEUTSCH 49
Störung Mögliche Ursache Abhilfe
Die Lampe funktioniert nicht. Die Lampe ist defekt. Wenden Sie sich an die
nächste autorisierte Kundendienststelle.
Der Kompressor arbeitet
ständig.
Der Kompressor arbeitet
ständig.
Der Kompressor arbeitet
ständig.
Der Kompressor arbeitet
ständig.
Der Kompressor arbeitet
ständig.
Der Kompressor arbeitet
ständig.
Der Kompressor arbeitet
ständig.
Der Kompressor schaltet sich
nicht sofort ein, nachdem Sie
Schnelles Einfrieren gedrückt
oder die Temperatur geändert haben.
Der Kompressor schaltet sich
nicht sofort ein, nachdem Sie
Funktion Einkauf gedrückt
oder die Temperatur geändert haben.
Die Temperatur ist nicht
richtig eingestellt.
Es wurden zu viele Lebensmittel gleichzeitig eingelegt.
Die Raumtemperatur ist zu
hoch.
In das Gerät eingelegte
Lebensmittel waren noch
zu warm.
Die Tür ist nicht richtig geschlossen.
Die Funktion Schnelles Einfrieren ist eingeschaltet.
Funktion Einkauf ist eingeschaltet.
Dies ist normal, keine Störung.
Dies ist normal, keine Störung.
Siehe Kapitel „Betrieb“.
Warten Sie einige Stunden
und prüfen Sie dann die Temperatur erneut.
Siehe Klimaklasse auf dem
Typenschild.
Lassen Sie die Lebensmittel
vor dem Einlagern auf Raumtemperatur abkühlen.
Siehe „Schließen der Tür“.
Siehe „Funktion Schnelles Einfrieren“.
Siehe „Funktion Einkauf“.
Der Kompressor schaltet sich
nach einiger Zeit ein.
Der Kompressor schaltet sich
nach einiger Zeit ein.
Wasser fließt in den Kühlschrank.
Die eingelagerten Lebensmittel verhindern, dass
das Wasser zum Wassersammler fließt.
Stellen Sie sicher, dass die
Lebensmittel nicht die Rückwand berühren.
Page 50

DEUTSCH 50
Störung Mögliche Ursache Abhilfe
Wasser läuft auf den Boden. Der Tauwasserablauf ist
nicht mit der Verdampferschale über dem Kompressor verbunden.
Verbinden Sie den Tauwasserablauf mit der Verdampferschale.
Eine Temperatureinstellung
ist nicht möglich.
Eine Temperatureinstellung
ist nicht möglich.
Das Display zeigt DEMO an. Das Gerät befindet sich im
Die Temperatur im Gerät ist
zu hoch/niedrig.
Die Temperatur im Gerät ist
zu hoch/niedrig.
Die Temperatur im Gerät ist
zu hoch/niedrig.
Funktion Einkauf ist eingeschaltet.
Die Funktion Schnelles Einfrieren ist eingeschaltet.
Demo-Betrieb.
Der Temperaturregler ist
nicht richtig eingestellt.
Die Tür ist nicht richtig geschlossen.
Die Temperatur der zu
kühlenden Lebensmittel ist
zu hoch.
Schalten Sie die Funktion
Funktion Einkauf manuell aus,
oder warten Sie mit dem Einstellen der Temperatur, bis die
Funktion automatisch ausgeschaltet wird. Siehe „Funktion
Einkauf“.
Schalten Sie die Funktion
Schnelles Einfrieren manuell
aus, oder warten Sie mit dem
Einstellen der Temperatur, bis
die Funktion automatisch ausgeschaltet wird. Siehe „Funktion Schnelles Einfrieren“.
Halten Sie Mode etwa 10 Sekunden gedrückt, bis ein langer Signalton ertönt und das
Display für kurze Zeit ausgeschaltet wird.
Stellen sie eine höhere/niedrigere Temperatur ein.
Siehe „Schließen der Tür“.
Lassen Sie die Lebensmittel
auf Raumtemperatur abkühlen, bevor Sie sie in das Gerät
stellen.
Die Temperatur im Gerät ist
zu hoch/niedrig.
Die Temperatur im Gerät ist
zu hoch/niedrig.
Es wurden zu viele Lebensmittel gleichzeitig eingelegt.
Die Tür wurde zu häufig
geöffnet.
Legen Sie weniger Lebensmittel gleichzeitig ein.
Öffnen Sie die Tür nur, wenn
es notwendig ist.
Page 51

DEUTSCH 51
Störung Mögliche Ursache Abhilfe
Die Temperatur im Gerät ist
zu hoch/niedrig.
Die Funktion Schnelles Einfrieren ist eingeschaltet.
Siehe „Funktion Schnelles Einfrieren“.
Die Temperatur im Gerät ist
zu hoch/niedrig.
Die Temperatur im Gerät ist
zu hoch/niedrig.
Wenn Ihr Gerät noch immer nicht
korrekt arbeitet, nachdem Sie die
oben genannten Prüfungen
durchgeführt haben, kontaktieren
Sie bitte den autorisierten
Kundendienst. Hinten im
Handbuch finden Sie eine Liste
mit den Kontaktdaten.
Schließen der Tür
1. Reinigen Sie die Türdichtungen.
2. Stellen Sie die Tür nach Bedarf ein.
Siehe die Montageanleitung.
Funktion Einkauf ist eingeschaltet.
Die Kaltluft kann im Gerät
nicht zirkulieren.
3. Ersetzen Sie die defekten Türdichtungen,
falls erforderlich. Wenden Sie sich an
den autorisierten Kundendienst.
Austauschen der Lampe
Das Gerät ist mit einer langlebigen LEDInnenbeleuchtung ausgestattet.
Die Beleuchtung darf nur von einer
Fachkraft ausgetauscht werden. Wenden
Sie sich an Ihren autorisierten Kundendienst.
Siehe „Funktion Einkauf“.
Kaltluftzirkulation im Gerät sicherstellen.
Technische Daten
Technische Daten
Produktkategorie
Gerätetyp Kühl-Gefrierschrank
Geräteabmessungen
Höhe 2000 mm
Breite 595 mm
Tiefe 677 mm
Nutzinhalt (netto)
Kühlschrank 258 Liter
Gefriergerät 92 Liter
Page 52

DEUTSCH 52
Abtau-System
Kühlschrank automatisch
Gefriergerät automatisch
Sternekennzeichnung
Lagerzeit bei Störung 20 Stunden
Gefriervermögen 13 kg/24 Std.
Energieverbrauch 0,458 kWh/24 Std.
Geräuschpegel 41 dB (A)
Energieeffizienzklasse A+++
Spannung 230 - 240 V
Frequenz 50 Hz
Die technischen Daten befinden sich auf
dem Typenschild innen links im Gerät sowie
auf der Energieplakette.
UMWELTTIPPS
Recyceln Sie Materialien mit dem Symbol
. Entsorgen Sie die Verpackung in den
entsprechenden Recyclingbehältern.
Recyceln Sie zum Umwelt- und
Gesundheitsschutz elektrische und
elektronische Geräte. Entsorgen Sie Geräte
IKEA Garantie
Wie lang ist die IKEA Garantie gültig?
mit diesem Symbol nicht mit dem
Hausmüll. Bringen Sie das Gerät zu Ihrer
örtlichen Sammelstelle oder wenden Sie sich
an Ihr Gemeindeamt.
Page 53

DEUTSCH
53
Diese Garantie ist für (5) fünf Jahre gültig
ab dem Originalkaufdatum Ihres Gerätes
bei IKEA; sollte das Gerät die Bezeichnung
"LAGAN" tragen, gilt die Garantie in
diesem Fall nur (2) zwei Jahre. Als
Kaufnachweis ist der Originalkassenbon
oder die Originalrechnung erforderlich.
Werden im Rahmen der Garantie Arbeiten
ausgeführt, so verlängert sich dadurch die
Garantiezeit weder für das Gerät noch für
die neuen Teile.
Welche Geräte sind nicht durch die IKEA
(5) Fünfjahresgarantie abgedeckt?
Die Geräte-Serie LAGAN und alle Geräte,
die vor dem 1. August 2007 bei IKEA
gekauft wurden.
Wer übernimmt den Kundendienst?
Der IKEA Kundendienst wird diesen Service
über seinen eigenen Kundendienst oder
über ein autorisiertes Partner-Netzwerk
durchführen lassen.
Was deckt die Garantie ab?
Die Garantie deckt Material- und
Produktionfehler ab. Sie gilt ab dem Datum,
an dem das Elektrogerät bei IKEA gekauft
wurde. Diese Garantie gilt nur für private
Haushalte. Die Ausnahmen sind unter der
Rubrik “Was ist nicht durch diese Garantie
abgedeckt?” beschrieben. Innerhalb des
Garantiezeitraums werden die Kosten zur
Behebung eines Fehlers wie Reparaturen,
Ersatzteile, Arbeitszeit und Fahrtkosten
abgedeckt, vorausgesetzt, dass das Gerät
ohne besonderen Kostenaufwand für die
Reparatur zugänglich ist und dass der
Fehler direkt auf einen Konstruktionsfehler
oder einen Materialfehler zurückgeht, der
durch die Garantie abgedeckt ist. Bei
diesen Bedingungen gelten die EURichtlinien (Nr. 99/44/EG) und die
entsprechenden gesetzlichen Vorschriften.
Teile, die ersetzt wurden, gehen in das
Eigentum von IKEA über.
Was wird IKEA zur Lösung des Problems
tun?
IKEA hat Kundendienste, die das Produkt
untersuchen und eigenständig entscheiden,
ob das Problem durch die Garantie
abgedeckt ist oder nicht. Wenn entschieden
wird, dass der Fall unter die Garantie fällt,
repariert der IKEA Kundendienst oder ein
autorisierter Service-Partner über seinen
eigenen Service eigenständig das defekte
Produkt, oder sie ersetzen es durch ein
gleiches oder durch ein gleichwertiges
Produkt.
Was ist nicht durch diese Garantie
abgedeckt?
• Der normale Verschleiß.
• Bewusste oder durch Fahrlässigkeit
entstandene Schäden, die durch eine
Missachtung der Bedienungsanweisung,
eine unsachgemäße Installation oder
durch den Anschluss an eine falsche
Spannung, sowie Schäden, die durch
eine chemische oder elektrochemische
Reaktion (Rost, Korrosion oder
Wasserschäden eingeschlossen - aber
nicht darauf beschränkt) - Schäden, die
durch übermäßigen Kalk in der
Wasserzuleitung entstanden sind, und
Schäden, die durch ungewöhnliche
Umweltbedingungen entstanden sind.
• Verbrauchsgüter wie Batterien und
Lampen.
• Nicht-funktionale und dekorative Teile,
die den normalen Betrieb des Gerätes
nicht beeinträchtigen, einschließlich
Kratzer und möglicher Farbunterschiede.
• Versehentliche Beschädigung durch
Fremdobjekte der Substanzen und
Reinigung oder Loslösen von Filtern,
Drainagesystemen oder
Reinigungsmittel-Schubladen.
• Beschädigung folgender Teile:
Glaskeramik, Zubehör, Geschirr und
Page 54

DEUTSCH
54
Besteckkörbe, Zuleitungen und
Drainageschläuche-/rohre, Lampen und
Lampenabdeckungen, Knöpfe/
Wählschalter, Gehäuse und Teile des
Gehäuses; es sei denn, es kann
nachgewiesen werden, dass diese
Schäden durch Produktionsfehler
verursacht wurden.
• Fälle, in denen bei einem Besuch des
Kundendienstes kein Fehler gefunden
werden konnte.
• Reparaturen, die nicht durch unser
autorisiertes Kundendienstpersonal und/
oder das autorisierte
Kundendienstpersonal unserer
Vertragspartner ausgeführt wurden,
oder Fälle, in denen keine Originalteile
verwendet wurden.
• Reparaturen, die durch fehlerhafte und
nicht gemäß der Anleitung durchgeführte
Installation verursacht wurden.
• Die Nutzung des Gerätes in einer
professionellen Art und Weise, d.h. nicht
im privaten Haushalt.
• Transportschäden. Wenn ein Kunde das
Produkt nach Hause oder an eine
andere Adresse transportiert, haftet
IKEA nicht für Schäden, die während
dieses Transports entstehen. Liefert IKEA
das Produkt an die Lieferadresse des
Kunden aus, dann sind Schäden, die
während der Auslieferung des Produktes
entstehen, von der Garantie abgedeckt.
• Die Kosten zur Durchführung der
Erstinstallation des IKEA Gerätes. Falls
der IKEA Kundendienst oder sein
autorisierter Service-Partner das Gerät
als Garantiefall instandsetzt oder ersetzt,
installiert der Kundendienst oder sein
autorisierter Service-Partner bei Bedarf
das Gerät auch wieder oder er installiert
das Ersatzgerät.
Diese Einschränkung gilt nicht für fehlerfreie
Arbeiten, die von qualifiziertem
Fachpersonal durchgeführt wurden, um das
Gerät an den technischen
Sicherheitsstandard eines anderen EULandes anzupassen.
Wie gilt die geltende Gesetzgebung des
Landes
Die IKEA Garantie gibt Ihnen spezielle
gesetzliche Rechte, die alle lokalen
gesetzlichen Anforderungen abdecken oder
übertreffen, die einer Änderung von Land
zu Land unterworfen sind.
Gültigkeitsbereich
Für Geräte, die in einem EU-Land gekauft
und in ein anderes EU-Land mitgenommen
werden, stehen die Kundendienstleistungen
im Rahmen der Garantiebedingungen
bereit, die im neuen Land gültig sind. Eine
Verpflichtung, Dienstleistungen im Rahmen
der Garantie auszuführen, besteht nur
dann, wenn:
• das Gerät den technischen
Spezifikationen des Landes, in dem der
Garantieanspruch gemacht wird,
entspricht, und es in Übereinstimmung
mit diesen technischen Spezifikationen
des Landes installiert wurde;
• das Gerät in Übereinstimmung mit den
Montageanleitungen und den
Sicherheitsinformationen im
Benutzerhandbuch installiert wurde und
diesen Anleitungen und Informationen
entspricht.
Der spezielle Kundendienst (Service) für
IKEA Geräte:
Bitte zögern Sie nicht, den speziellen IKEA
Kundendienst (Service) zu kontaktieren für:
1. einen Anspruch unter dieser Garantie;
2. die Bitte um Klärung von Fragen zur
Installation des IKEA Gerätes im
speziellen IKEA Küchenmöbel. Der
Kundendienst kann keine Fragen
beantworten zu:
• der gesamten IKEA
Kücheninstallation;
• Anschlüsse an die Elektrik (falls das
Gerät ohne Netzkabel und Stecker
Page 55

DEUTSCH 55
kommt), Anschlüsse an Wasser und
Gas, da diese Arbeiten von einem
autorisierten Kundendiensttechniker
ausgeführt werden müssen.
3. die Bitte um Klärung von Fragen zu
Inhalten des Benutzerhandbuchs und zu
Spezifikationen des IKEA Geräts.
Um sicherzustellen, dass wir Sie stets
optimal unterstützen, lesen Sie bitte die
Montageanleitung und/oder den
Bedienungsanleitungsabschnitt dieser
Broschüre durch, bevor Sie sich an uns
wenden.
Wie können Sie uns erreichen, wenn Sie
uns benötigen?
Auf der letzten Seite dieser Broschüre
finden Sie eine vollständige Liste mit
offiziellen IKEA Kundendienststellen und
den jeweiligen nationalen Telefonnummern.
Damit Sie bei Fragen rasch die
zuständige Stelle erreichen,
empfehlen wir Ihnen, die am
Ende dieser Broschüre
aufgelisteten speziellen
Telefonnummern zu benutzen.
Beziehen Sie sich bitte stets auf
die Telefonnummern, die in der
Broschüre zu dem jeweiligen
Gerät aufgelistet sind, zu dem
Sie Fragen haben. Bevor Sie uns
anrufen, sollten Sie die IKEAArtikelnummer (den 8-stelligen
Zifferncode) Ihres Gerätes zur
Hand haben.
BITTE BEWAHREN SIE DEN
KAUFBELEG AUF! Er ist Ihr
Kaufnachweis und für einen
Garantieanspruch unerlässlich.
Bitte beachten Sie, dass auf
diesem Kaufbeleg auch die IKEA
Artikelbezeichnung und die
Nummer (der 8-stellige
Zifferncode) für jedes der
Geräte, die Sie gekauft haben,
vermerkt sind.
Benötigen Sie zusätzlich Hilfe?
Für alle weiteren Fragen, die sich nicht auf
den Kundendienst Ihres Gerätes beziehen,
wenden Sie sich bitte an das Call Center
der nächsten IKEA-Einrichtung. Wir
empfehlen Ihnen, die Dokumentation des
Geräts sorgfältig durchzulesen, bevor Sie
uns kontaktieren.
Page 56

emit gninepOeeF llaCrebmun enohPyrtnuoC
België
070 246016
Binnenlandse gesprekskosten 8 tot 20 Weekdagen
eniames nE .02 à 8 xuanoitan sleppa sed firaT euqigleB
България
00359888164080
0035924274080
Такса за повикване от страната От 9 до 18 ч в работни дни
Česká republika 246 019721 Cena za místní hovor 8 až 20 v pracovních dnech
Danmark 70 15 09 09 Landstakst
man. - fre. 09.00 - 20.00
lør. 09.00 - 16.00
1 søndag pr. måned, normalt første
søndag i måneden
Deutschland
+49 1806 33 45
32*
* 0,20 €/Verbindung aus dem Festnetz
max. 0,60 €/Verbindung
aus dem Mobilfunknetz
8 bis 20 Werktage
Ελλάδα 211 176 8276 Υπεραστική κλήση 8 έως 20 κατά τις εργάσιμες ημέρες
España 91 1875537 Tarifa de llamadas nacionales De 8 a 20 en días laborables
France 0170 36 02 05 Tarif des appels nationaux 9 à 21. En semaine
Hrvatska 00385 1 6323 339 Trošak poziva 27 lipa po minuti
radnim danom od ponedjeljka
do petka od 08:00 do 16:00
Ireland 0 14845915 National call rate 8 till 20 Weekdays
Ísland 5880503 Innanlandsgjald fyrir síma 9 til 18. Virka daga
Italia 02 00620818
Tariffa applicata
alle chiamate nazionali
dalle 8 alle 20 nei giorni feriali
Κυπρος 22 030 529 Υπεραστική κλήση 8 έως 20 κατά τις εργάσιμες ημέρες
Lietuva 5 230 06 99 Nacionalinių pokalbių tarifai
Pr. - Ketv.: 8:00 - 12:00, 12:45 - 17:00
Pnkt.: 8:00 - 12:00, 12:45 - 15:45
Magyarország 061 998 0549 Belföldi díjszabás Hétköznap 8 és 10 óra között
Nederland
0900 235 45 32
en/of
0900 BEL IKEA
15 cent/min., starttarief 4.54 cent
en gebruikelijke belkosten
ma - vr 08.00 - 20.00,
zat 09.00 - 20.00
(zondag gesloten)
regadeku 02 lit 8 dnalnni tskaT 25022 518 egroN
Österreich 0810 300486 max. 10 Cent/min. Mo - Fr 8.00 - 20.00 Uhr
Polska 012 297 8787 Stawka wg taryfy krajowej Od 8 do 20 w dni robocze
Portugal 211557985 Chamada Nacional
9 às 21. Dias de Semana
*excepto feriados
România 021 211 08 88 Tarif apel naţional 8 - 20 în zilele lucrătoare
Россия 8 495 6662929 Действующие телефонные тарифы
с 8 до 20 по рабочим дням
Время московское
Schweiz
031 5500 324
Tarif für Anrufe im Bundesgebiet 8 bis 20 Werktage
eniames nE .02 à 8 xuanoitan sleppa sed firaT essiuS
Svizzera
Tariffa applicata
alle chiamate nazionali
dalle 8 alle 20 nei giorni feriali
Slovensko (02) 3300 2554 Cena vnútroštátneho hovoru 8 až 20 v pracovných dňoch
Suomi 030 6005203
Lankapuhelinverkosta
0,0835 €/puhelu + 0,032 €/min
Matkapuhelinverkosta 0,192 €/min
arkipäivisin 8.00 - 20.00
Sverige 0775 700 500 lokalsamtal (lokal taxa)
mån-fre 8.30 - 20.00
lör-sön 9.30 - 18.00
Türkiye 212 244 0769 Ulusal arama ücreti Hafta içi saat 09:00’dan 18:00’a kadar
Україна 044 586 2078 Міжміськи дзвінки платні 9 - 21 В робочі дні
United Kingdom 020 3347 0044 National call rate 9 till 21. Weekdays
moc.aeki.wwwajinevolS
moc.aeki.wwwајибрС
56
*
Page 57

57
Page 58

58
Page 59

59
Page 60

280155386-A-172015
21552
© Inter IKEA Systems B.V. 2015
AA-1456924-1
 Loading...