

Page 1
SMART FIREBOX
User’s Manual
Installation Instructions
Page 2

What’s in the box:
Firebox 1pc
Smart Burner 1pc
Remote Control 1pc
Power Supply 1pc
Filling Hose 1pc
Glass 1pc
Glass Brackets 4pcs
User’s Manual 1pc
Preparations
Remove all packaging materials prior to installing the burner.
Power adapter connects from the left side of the burner. Please make all
preparations for electrical wiring prior to installation.
www.ignisproducts.com
Page 3
Smart Firebox - User’s Manual
Installation Instructions
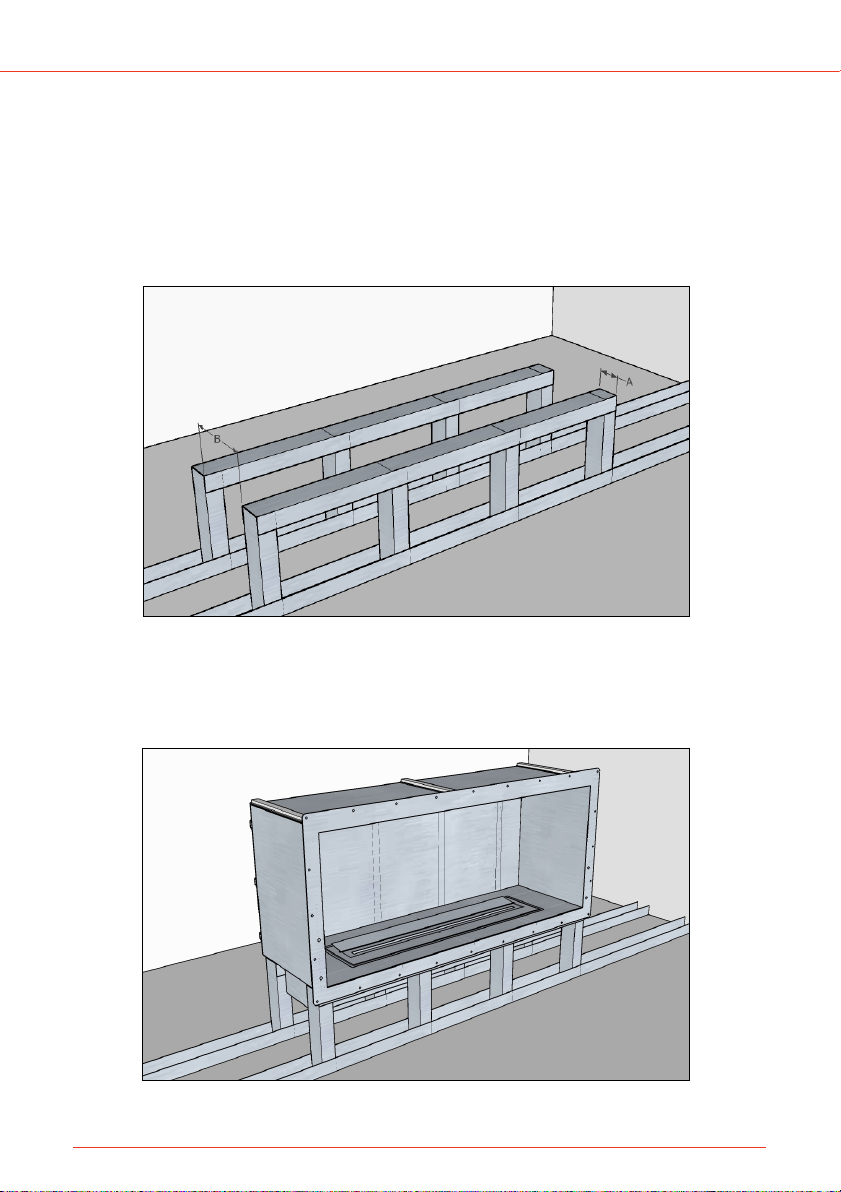
1. Build a base for the Firebox to sit on. (use 2x3 studs)
2. Base may be built of any material.
3. Make sure base is level on all sides.
Base width should be NOT more than Firebox body width.
Size A should be NOT more than 3 inches.
Size B should be at least 8.5 inches.
4. Insert your Firebox into the base.
5. Make sure the Firebox is centered.
www.ignisproducts.com
Page 4
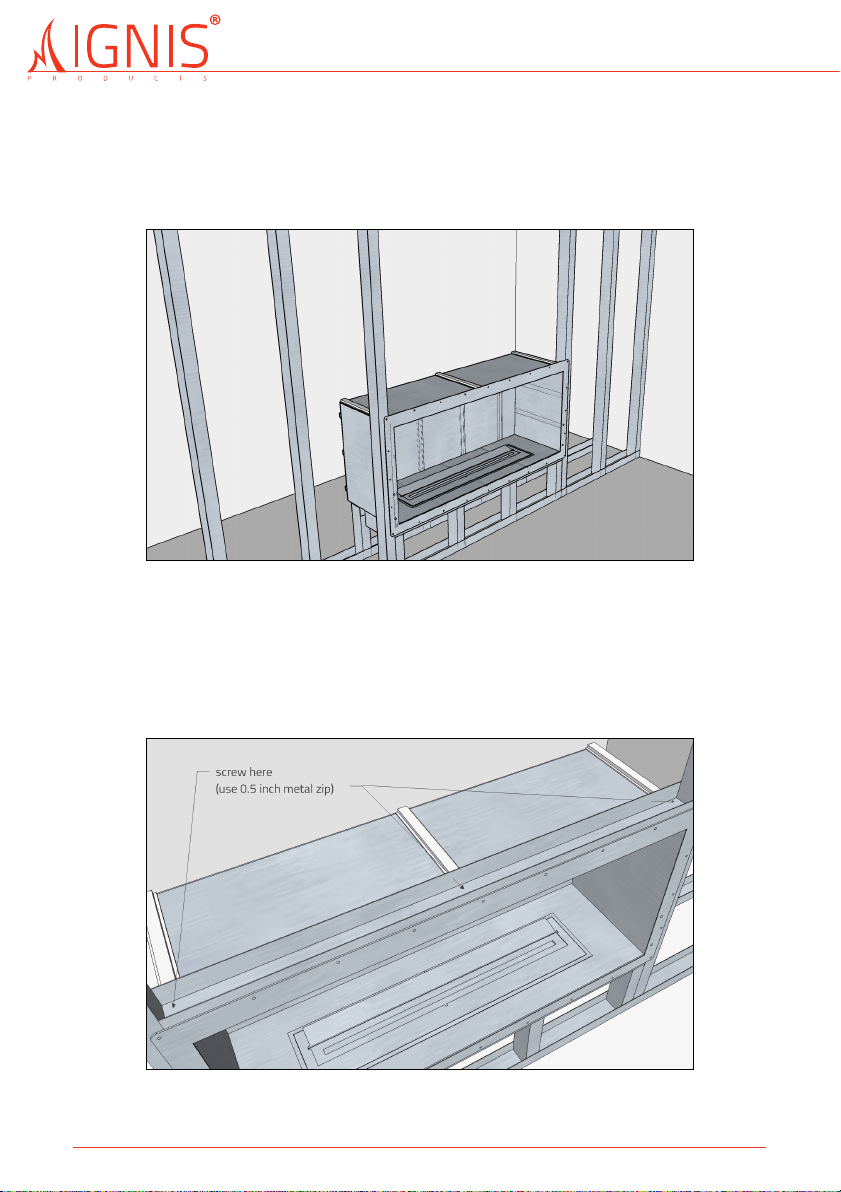
6. Continue building the wall.
7. First stud on either side of the Firebox must be flush with
the Firebox and flange.
8. Install a stud horizontally on top of the firebox to be able to
continue with the wall.
9. Screw the top horizontal stud directly to the Firebox bracket.
(use 0.5 inch metal zip)
www.ignisproducts.com
Page 5
Smart Firebox - User’s Manual
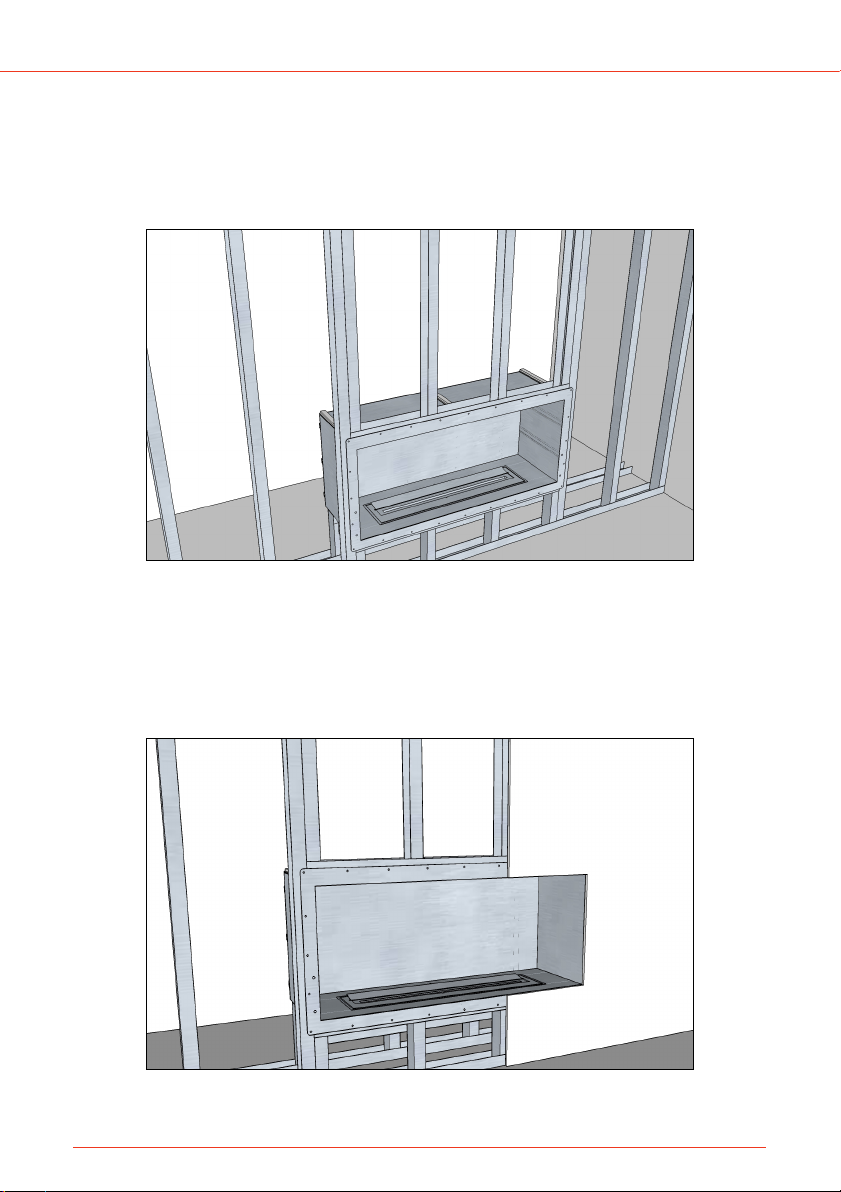
10. Continue building the wall.
11. Support the Firebox with screws around the flange into the
studs for support.
12. Measure and mark placement of glass brackets.
13. Cover the Firebox with sheetrock, wonderboard, stone, etc...
14. Drill in finish materials for glass installation.
www.ignisproducts.com
Page 6

Before Filling
• Before filling your burner, it is important that you follow the step-by-step instructions that follow on the next two pages.
DO NOT PRESS THE POWER BUTTON MORE THAN INSTRUCTED.
• When you press the power button once, it only initiates the burner itself - not the
flames.
• When you press the power button a second time (when instructed), it initiates the
pilot and fuel flow.
NEVER PRESS THE POWER BUTTON A THIRD TIME.
• During the initial use, you will notice the pilot become red and fuel begin to drip
into the combustion tray. Fuel will continue to flow for approximately two (2)
minutes, as the pumps are being primed. During this time, DO NOT PRESS THE
POWER BUTTON.
• Please Note: This burner is equipped with a ten (10) minute safety feature, indicated by the power and both arrow buttons flashing. Once the burner is powered off,
you must wait ten (10) minutes prior to using again.
Manual Fill
• Open the fuel door located on the right-hand side as you face the burner.
• Remove the gold-colored cap that is located on the far left.
• Insert a funel in order to safely pour the liquid fuel into the fuel tank.
• Pour the fuel from the bottle into the funnel, not exceeding maximum capacity, but
in accordance to the burner’s minimum (found on page 6)
• Once you’ve filled the fuel tank to the desired level, shake the funnel before removing to ensure that excess fuel isn’t spilled. Wipe up any fuel that may have dripped.
• Replace the gold cap on the fuel tank.
• Close the fuel door.
• Press power button once. Press power button again after two seconds.
Note: Both green arrows will be flashing. This indicates that the fuel tank is empty.
www.ignisproducts.com
Page 7

Smart Firebox - User’s Manual
Automatic Fill
• Turn the burner’s power on by pressing the power button once.
• Open the fuel door located on the front right-hand side as you face the burner
• Insert one end of the fuel hose into the fuel tank nipple.
• Insert the opposite end into the bottle of liquid ethanol fireplace fuel.
• Press button illuminated in blue, located to the right of the nipple.
• Continue filling until process automatically stops.
• Carefully remove the hose from both the nipple and the bottle, clean up any fuel
that has spilled.
• Close the fuel door.
• Press power button once to ignite.
Note: Both green arrows will be flashing. This indicates that the fuel tank is empty.
Remote Control Battery
• Open the removable panel on the back of the remote control.
• Place battery inside ensuring that the positive (+) is facing you.
• Ensure that the stainless steel ground is ON TOP of the battery.
• Close removable panel.
See illustration.
www.ignisproducts.com
Page 8

Flame Adjustment
Once the flame reaches the entire length of the combustion tray, you may adjust
its intensity at your discretion. Simply press the “UP” arrow on the burner casing
or remote control device for a more intense flame; The “DOWN” arrow for a less
intense flame. The Smart Burner Series is equipped with four (4) intensity levels.
Extinguishing Flame
• To extinguish the flame, simply press the power button on the burner casing or
remote control one time.
• Once power button hgas been pressed, the pump will cease introducing fuel
into the combustion tray.
• As confirmation that the burner has been powered off, the green power button
and arrows will be illuminated.
• The remaining fuel in the combustion tray will burn off. This may take a few
minutes after powering the burner off.
Refilling
Allow the burner to cool down for at least 30 minutes before refilling.
Warning: Never refill the burner when the fireplace is operating or still hot. Never
pour fuel into a burning flame.
Cleaning
1. The burner surface must be cleaned regularly. Use warm water and soap.
2. Check the cover of burner for warping or damage before using.
3. Marks can be best removed with a soft cloth and a mixture of lukewarm water
and a small amount of cleaning liquid (ph-neutral). We recommend cleaning
the stainless steel items regularly to prevent contamination.
CAUTION: Never use chemical, steel-wool or scrubbing sponges to clean the fireplace. It can damage the surface.
The manufacturer cannot be held responsible for any damages resulting out of
improper use and/or cleaning of the products.
www.ignisproducts.com
Page 9

Smart Firebox - User’s Manual
WiFi Integration
• To install the app scan the barcode above or search for “Ignis Smart Burner” in
the App Store.
• After installing the app search for the “IGNIS SMART BURNER” WiFi network
and connect to it. When prompted, enter following password: “0123456789”.
• Click the ON/OFF button twice to ignite the fireplace.
• To extinguish the burner click the ON/OFF button once.
• To change flame intensity use “+” and “-” buttons accordingly.
Minimum Fuel Capacity
18 inch - 1 Liter, 24 inch - 2 Liters, 30 inch - 3 Liters, 36 inch - 4 Liters
48 inch - 5 Liters, 60 inch - 6 Liters, 72 inch - 7 Liters
Fuel Information
• USE ONLY APPROVED BIO-ETHANOL LIQUID FUEL FOR INDOOR FIREPLACES.
• Bio-Ethanol Liquid Fuel for fireplaces burns clean without emitting any toxins
into the air. Only harmless water vapor and CO2 are produced as byproducts.
• Choose a location 4 feet away from flammable objects or materials (drapes,
fabrics, furniture, etc.).
• Be sure to remove all packing materials, cardboard, etc. except for white clothlike material in burner.
• The fireplace is intended to be placed on a floor or sturdy surface.
• If you choose to leave fireplace outside, wait until fireplace and burner are cool
and either cover the burner or bring the burner indoors to avoid water, leaves,
and debris from getting into it.
www.ignisproducts.com
Page 10

Warnings
1. Fireplace and burner get hot while in operation. Do not touch the fireplace
while burning. Please allow at least 30 minutes to cool down before touching
the product after flame is extinguished.
2. Risk of burns. Do not operate the ethanol fireplace without completed assembly.
3. Never pour fuel into an open flame or into the burner reservoir unless it has
cooled down for at least 30 minutes after use.
4. Do not place any flammable material within 1 meter/ 40 inches around the
fireplace. A safety distance of at least 2 meters/80 inches should be kept from
any window or curtain.
5. Do not burn under over hanging items.
6. Do not smoke while handling the fuel.
7. Avoid heavy airflow ( fans high breeze…) in the room where the fireplace is
operated.
8. Risk of Explosion
i. Never use any fuel other than Bio Ethanol that is specifically intended for use
with indoor vent less ethanol fireplaces. Never use gasoline.
ii. Never use the appliance in areas where flammable vapors or gas may be
present.
iii. Never store or transport the fuel in other than a metal or plastic container that
is acceptable for use with the specified fuel in accordance with the Consumer
Chemicals and Containers Regulations 2001 and is the original container for
the specified fuel.
iv. Never store fuel in the living space or in the same location as the appliance.
2. Do not use the appliance to heat or boil water or use as a cooking appliance.
3. Due to high surface temperatures, keep children, clothing, and furniture away.
4. Risk of Indoor Air Pollution - Use ethanol fireplace only in well-ventilated
areas and with doors of adjacent room open. Do not obstruct air flow to the
burner by piling logs over the burner, but only around it and do not obstruct
the burner in any other way or with any other material. People with breathing
problems should consult a physician before using the ethanol fireplace.
5. THIS APPLIANCE HAS NOT BEEN TESTED WITH DOORS OR AN UNVENTEDGAS LOG SET. TO REDUCE RISK OF FIRE OR INJURY, DO NOT INSTALL DOORS
OR AN UNVENTED GAS LOG SET INTO THIS APPLIANCE.
www.ignisproducts.com
Page 11

Smart Firebox - User’s Manual
Warranty
1. Our fireplaces are guaranteed 3 year, parts and labor. Warranty begins on the
date of purchase.
2. Warranty will be applied on presentation of a dated cash receipt and is strictly
limited to factory service repair of the piece or pieces that are found to be
defective.
3. Installations costs will not be reimbursed in any case as damages for any
reason whatsoever.
4. Manufacturer will not be held responsible for any incidental or consequential
defects, on goods or individuals.
5. The warranty will not be applied if devices have been subjected to abnormal
use or if used under other conditions of use than the ones they were intended
for.
6. The warranty will not apply in case of deterioration or accident due to negligence, damages caused by failing to maintain and service the device or resulting from an alteration of material.
www.ignisproducts.com
Page 12

Warranty Claim
You can use any of the following options to file a claim:
1. Fill out all the fields on the previous page and mail it to the following address:
Ignis Products - Warranty Department
409 Joyce Kilmer Avenue, Unit 3
New Brunswick, NJ 08901
2. Fill out all the fields on the form below, scan it and email it to:
warranty@ignisproducts.com
3. Submit claim form online at:
www.ignisproducts.com/warranty-and-returns
Warranty Claim Form
*Please fill out all the fields
Name
Address:
Purchased from: Order Number:
Model Name / Number: Date of Purchase:
Description of Your Claim:
www.ignisproducts.com
Page 13

Smart Firebox - User’s Manual
Contact Us
If you have any questions please don’t hesitate to contact us
phone: 1-855-MY-IGNIS
1-855-694-4647
email: general questions: info@ignisproducts.com
technical support: support@ignisproducts.com
warranty questions: warranty@ignisproducts.com
return questions: returns@ignisproducts.com
address: Ignis Development, Inc.
409 Joyce Kilmer Avenue, Unit 3
New Brunswick, NJ 08901
www.ignisproducts.com
Page 14

1-855-MY-IGNIS
1-855-694-4647
info@ignisproducts.com
www.ignisproducts.com
 Loading...