

Igloohome Deadbolt 2S Metal Grey Installer/user Manual

Installers &
User guide
Deadbolt 2S
Metal Grey.
Version 0.1 05/19
1

Welcome!
This guide will get you up and running with your igloohome
Deadbolt 2S Metal Grey. In the meantime, you should follow
igloohome on Facebook and Youtube!
Visit our YoutubeLike us on Facebook
As our igloohome app is frequently updated, there may be changes to this manual.
Please refer to our website igloohome.co/support for the latest version of the manual.

Table of Contents
What’s Included 4
Specifications 5
Installation Guide
Requirements 6
Prepare Door for Installation 7
Prepare Lock for Installation 9
Installation Instructions 10
Test Lock 16
Prepare the Door Frame 17
User Guide
Lock Anatomy 18
Features 19
Unlocking and Locking 21
App Onboarding 22
Managing Access in App 23
Lock Behaviour 24
9V Jumpstart 26
Airbnb Connect 27
Audio and LED Indications 28
Troubleshooting 29
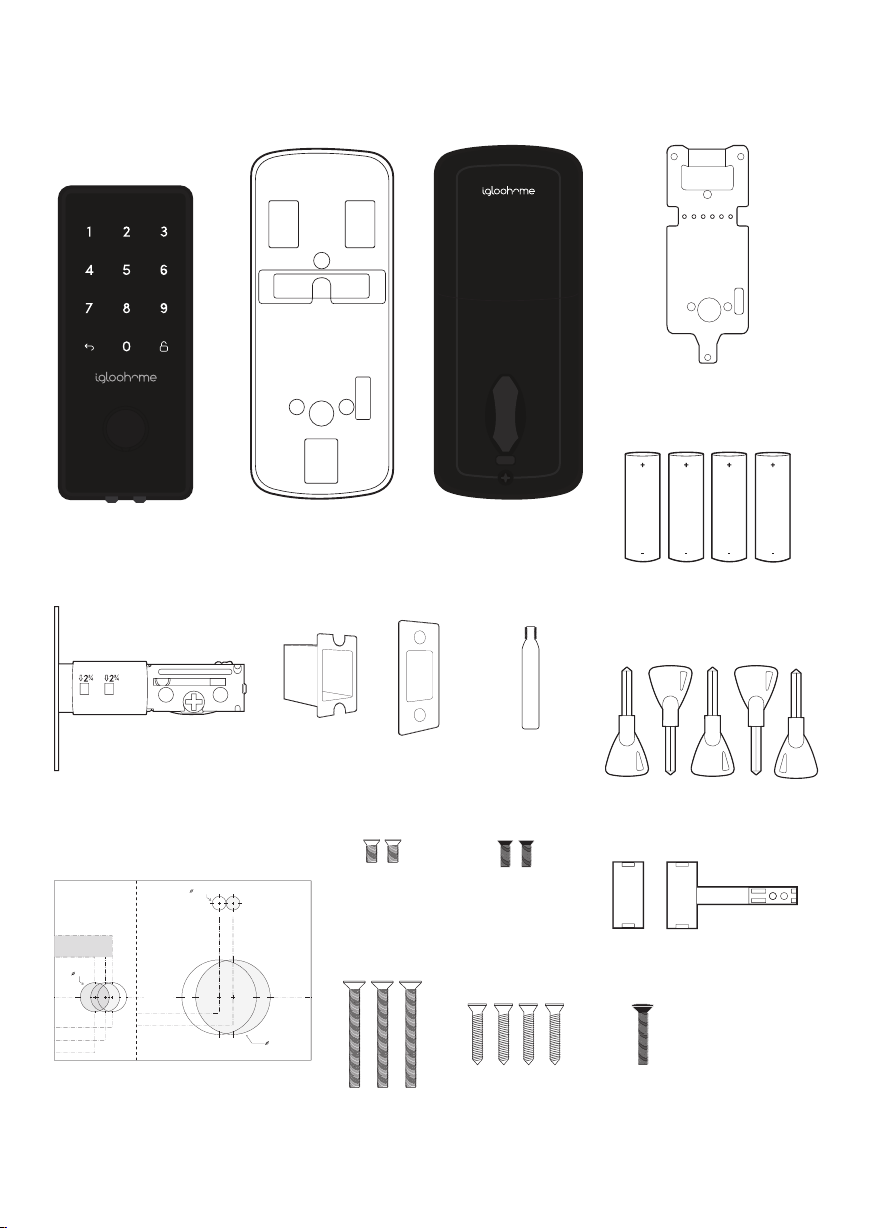
What’s Included
Back Plate
Front Assembly
& Rubber Gasket
Bolt Assembly
Edge of the door
Drill a 25mm (1”) hole at the center
of door edge based on your
Door Thickness measurements
25mm
Door Thickness
Drill for:
35mm (1-3/8”)
Drill for:
45mm (1-3/4”)
Drill for:
60mm (2-3/8”)
Fold this line
Face of the door
Centerline
Drill for:
60mm (2-3/8”) backset
Drill for:
70mm (2-3/4”) backset
Drill Sheet 43mm (1.69”)
10mm (Optional)
Drill for: Drill for:
Back Assembly
Rubber Gasket
Strike Plate Housing &
Strike Plate
70mm (2-3/4”) backset60mm (2-3/8”) backset
Version 0.2 03/18
Drill Sheet
54mm
5mm (0.019”)
Bolt Screw x2
Bolt Screw x3
Back Assembly
Screw Holder
8mm (0.03”)
Bolt Screw x2
15mm (0.59”)
Wood Screw x4
AA Alkaline Batteries x4
Keys x5
Door Sensor & Magnet
20mm (0.78”)
Bolt Screw
4
Specifications
Model igloohome Smart Deadbolt 2S Metal Grey
Battery Type 4 x AA* Alkaline
Battery Life Up to 1 Year
Emergency Power 9V Alkaline Battery
Operation Temp -20°C to 50°C
Storage Temp -30°C to 60°C
IP Rating IP65
Material AI, Zinc Alloy, ABS
Weight Net: 450g, Gross: 550g
Unlock Mechanism Bluetooth, PIN code, Physical Keys, Thumbturn
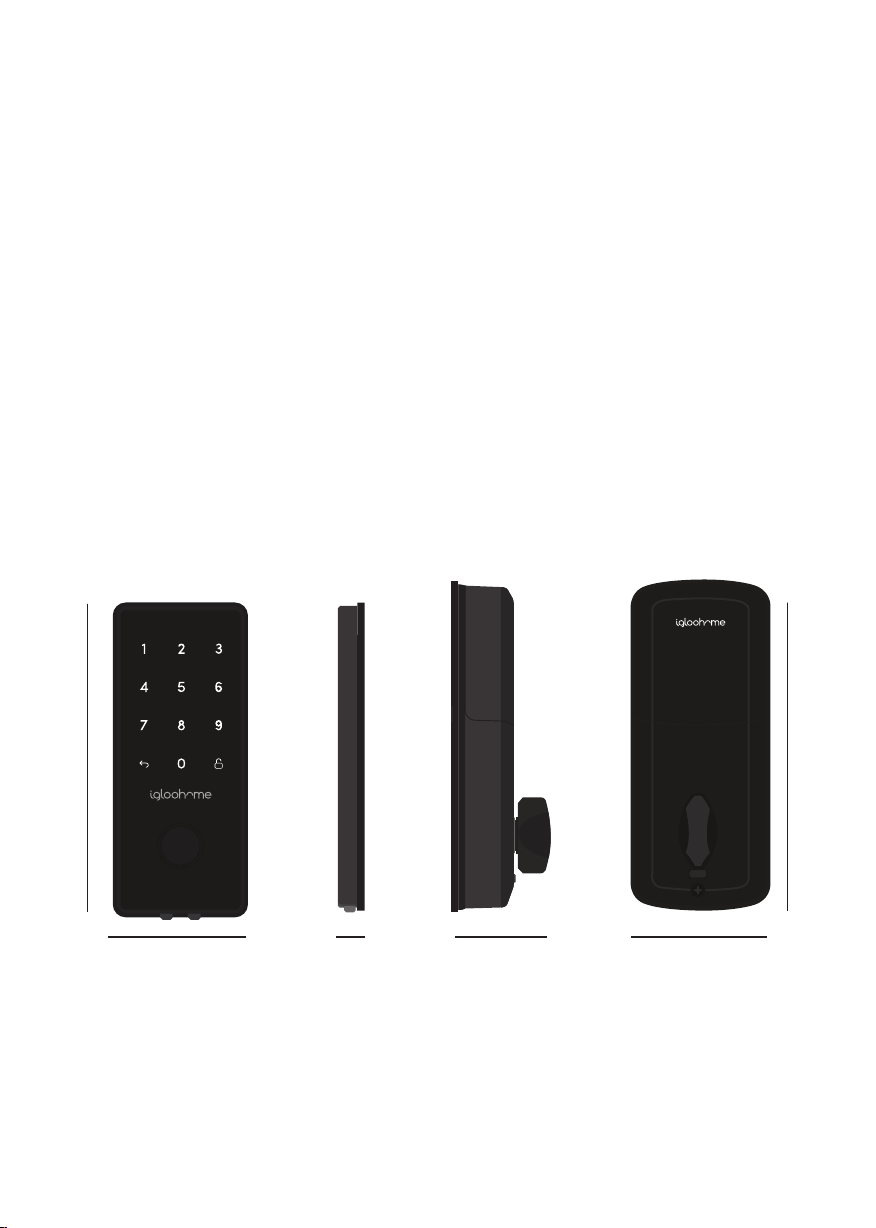
Front BackSide
145mm (5.70”)
60mm (2.36”) 11mm (0.43”) 30mm (1.18”) 65mm (2.55”)
* DO NOT USE: Heavy Duty, Eveready, GP, or rechargeable batteries. Please note that using recommended
battery brands such as Panasonic, Duracell, or Energizer will improve the performance and lifespan of the lock.
160mm (6.29”)
5
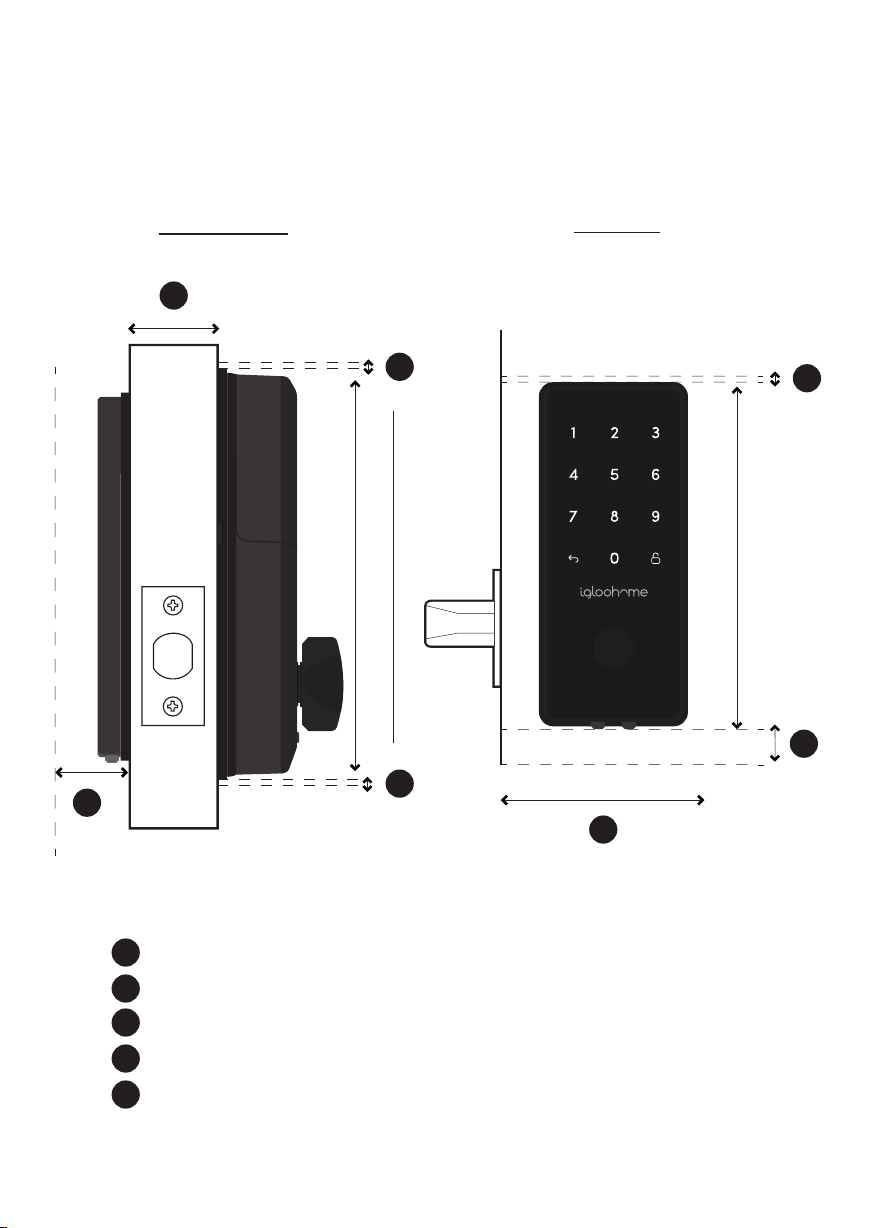
Installation Guide
Requirements
Door Thickness
Clearance
a
b
160mm (6.29”)
b
145mm (5.70”)
e
b
c
d
Measurements
35mm (1.37”) to 60mm (2.36”)
a
10mm (0.39”)
b
c
20mm (0.78”)
>110mm (4.33”) for 60mm (2.36”) / >120mm (4.72”) for 70mm (2.75”) backset
d
e
50mm (1.96”)
6
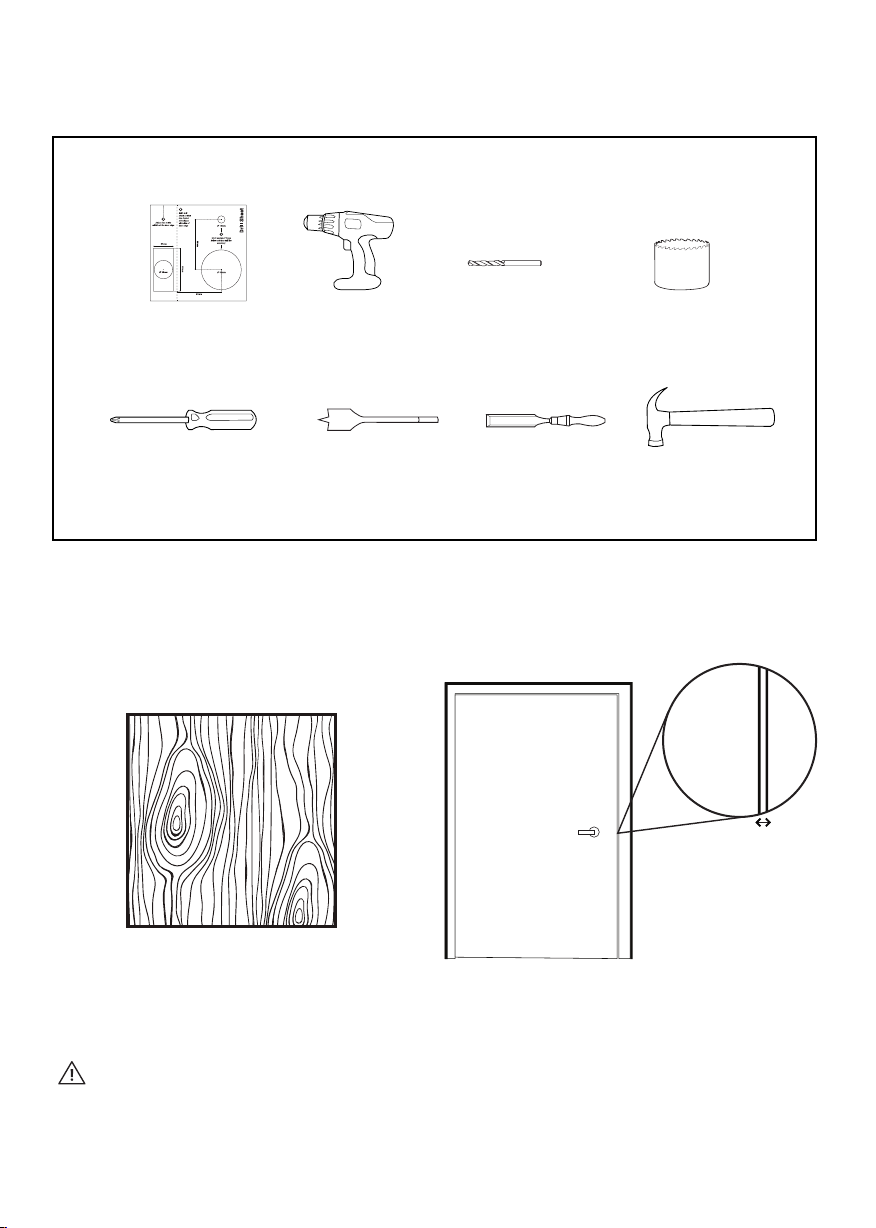
Prepare Door for Installation
Items needed:
#2 Phillips Screw Driver
Recommended
Door and door frame material : Wood
DrillDrill Sheet 10mm (0.39”)
25mm (0.98”)
Spade Bit
Drill Bit
20mm (0.78”)
Recommended
Gap between door and door frame: <3mm (0.01”)
Chisel
54mm (2.12”)
Hole Saw
Hammer
Please ensure that there is an existing handle on your door for push - pull access.
Not for: metal gates, glass doors or sliding doors.
If you are unsure if your door is suitable, send us web links to your door pictures to info@igloohome.co
7
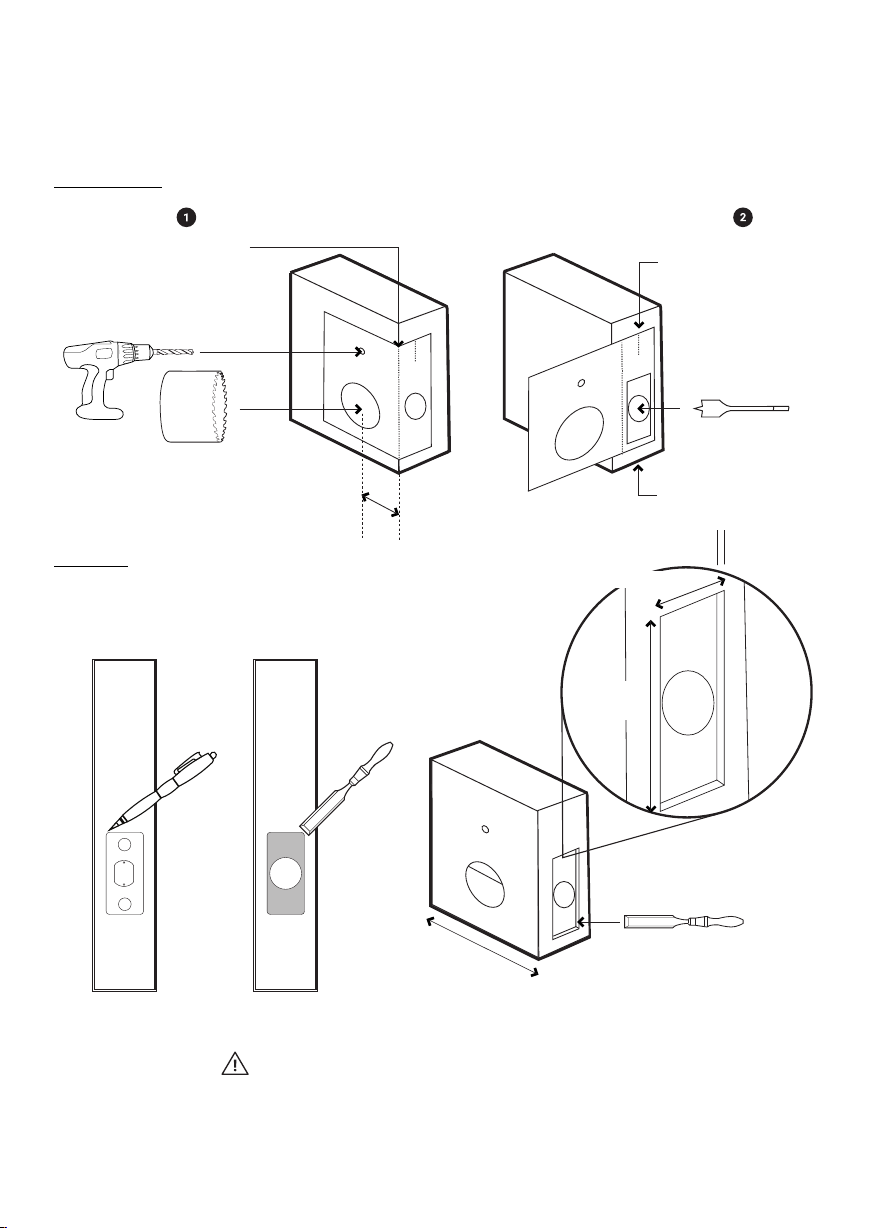
How to use the Drill Sheet
Drilling (Door)
10mm (0.39“)
Drill Bit
Chiselling
Fold here
before drilling
holes for side
54mm (2.12”)
Hole Saw
Put the bolt tongue in &
chisel around the edge
54mm (2.12”)
Make sure this is
aligned to the centre
of door edge
25mm (0.98”)
Spade Bit
Door edge
54mm (2.12”)
Deep
25mm (0.98”)
57mm
(2.25”)
20mm
(0.78”)
Chisel
20mm (0.78”)
Chisel
Mark the center of the holes and then drill for accuracy.
8
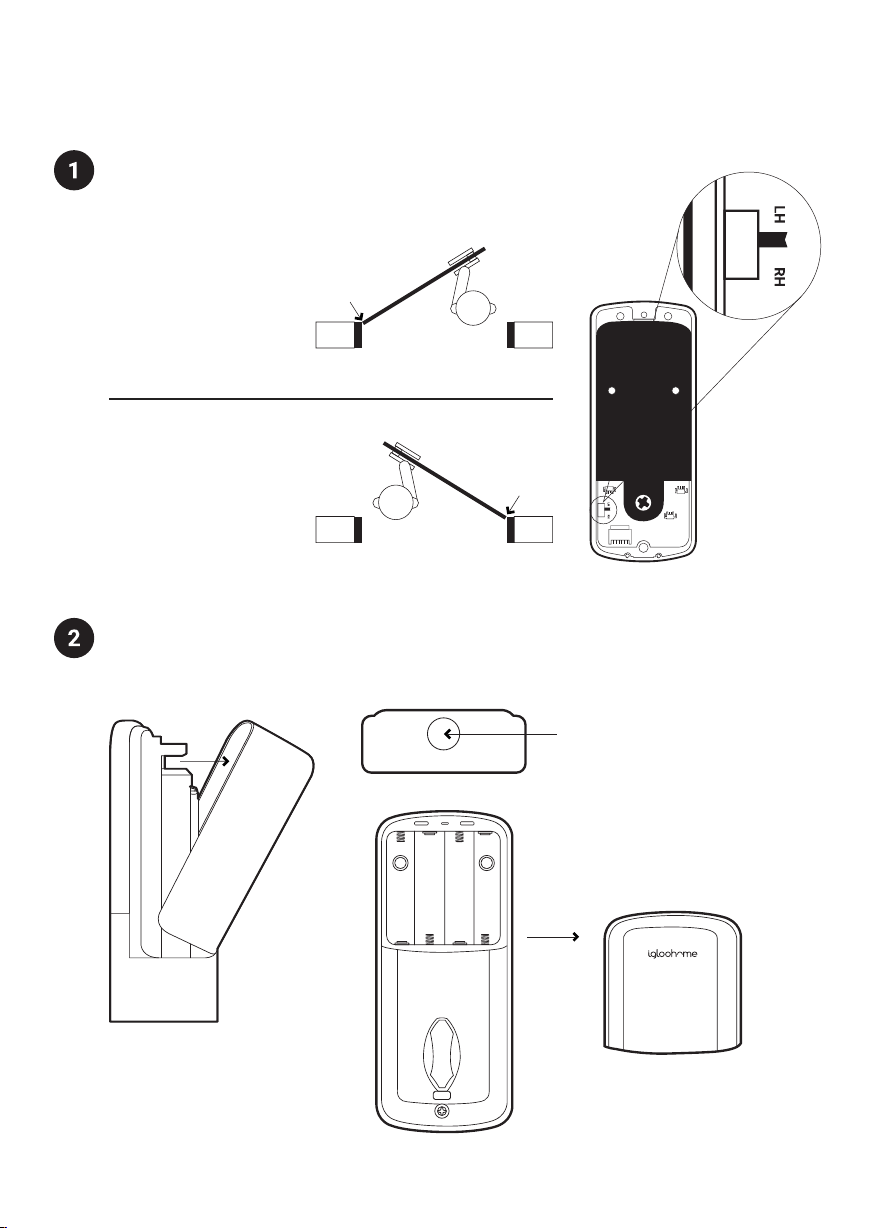
Prepare Lock For Installation
Set Back Assembly for Left / Right Hand Installation
Left Hand Installation
Set the toggle to ‘LH’ for
left-hand installation
* Hinge is on your left.
Right Hand Installation
Set the toggle to ‘RH’ for
right-hand installation
* Hinge is on your right.
Remove Battery Cover from the Back Assembly
Hinge
Outside
Hinge
Outside
Top View of Battery Cover
Press the button on the
top of the battery cover,
and pull outwards.
9
 Loading...