

Page 1

Thank you for choosing this Icom product.
INSTRUCTIONS
TERMINAL MODE/ACCESS POINT MODE SOFTWARE
RS-MS3W
The RS-MS3W is a software application for
Windows, designed for using the DV Gateway
function of the Icom D-STAR® transceivers. These
instructions are made based on using Windows 10.
READ ALL INSTRUCTIONS carefully and
completely before using this product.
SYSTEM REQUIREMENTS
The following are required to use the RS-MS3W. (As of March 2019)
Operating system
Microsoft® Windows® 10 (32/64 bit)
Microsoft® Windows® 8.1 (32/64 bit)
Microsoft® Windows® 7 (32/64 bit)
NOTE: Before using this software application, you must have your call sign registered to the gateway server
that has the RS-RP3C installed.
Ask the gateway repeater administrator for details.
USB port
A USB 1.1 or USB 2.0
COMPATIBLE TRANSCEIVERS AND CABLES
The following transceivers are compatible with the RS-MS3W. (As of March 2019)
• ID-31A PLUS/ID-31E PLUS
• ID-51A (PLUS2)/ID-51E (PLUS2)
• ID-4100A/ID-4100E
• IC-9700
The OPC-2350LU data cable is needed to connect the transceiver to the RS-MS3W.
NOTE: See “About the DV Gateway function*” on the Icom website for connection details.
http://www.icom.co.jp/world/support/download/manual/
* When using the IC-9700, see the transceiver’s Advanced manual.
Icom, Icom Inc. and the Icom logo are registered trademarks of Icom Incorporated (Japan) in Japan, the United States, the United Kingdom, Germany, France,
Spain, Russia, Australia, New Zealand, and/or other countries.
Microsoft and Windows are registered trademarks of Microsoft Corporation in the United States and/or other countries.
Adobe, Acrobat, and Reader are either registered trademarks or trademarks of Adobe Systems Incorporated in the United States and/or other countries.
All other products or brands are registered trademarks or trademarks of their respective holders.
– 1 –
Page 2
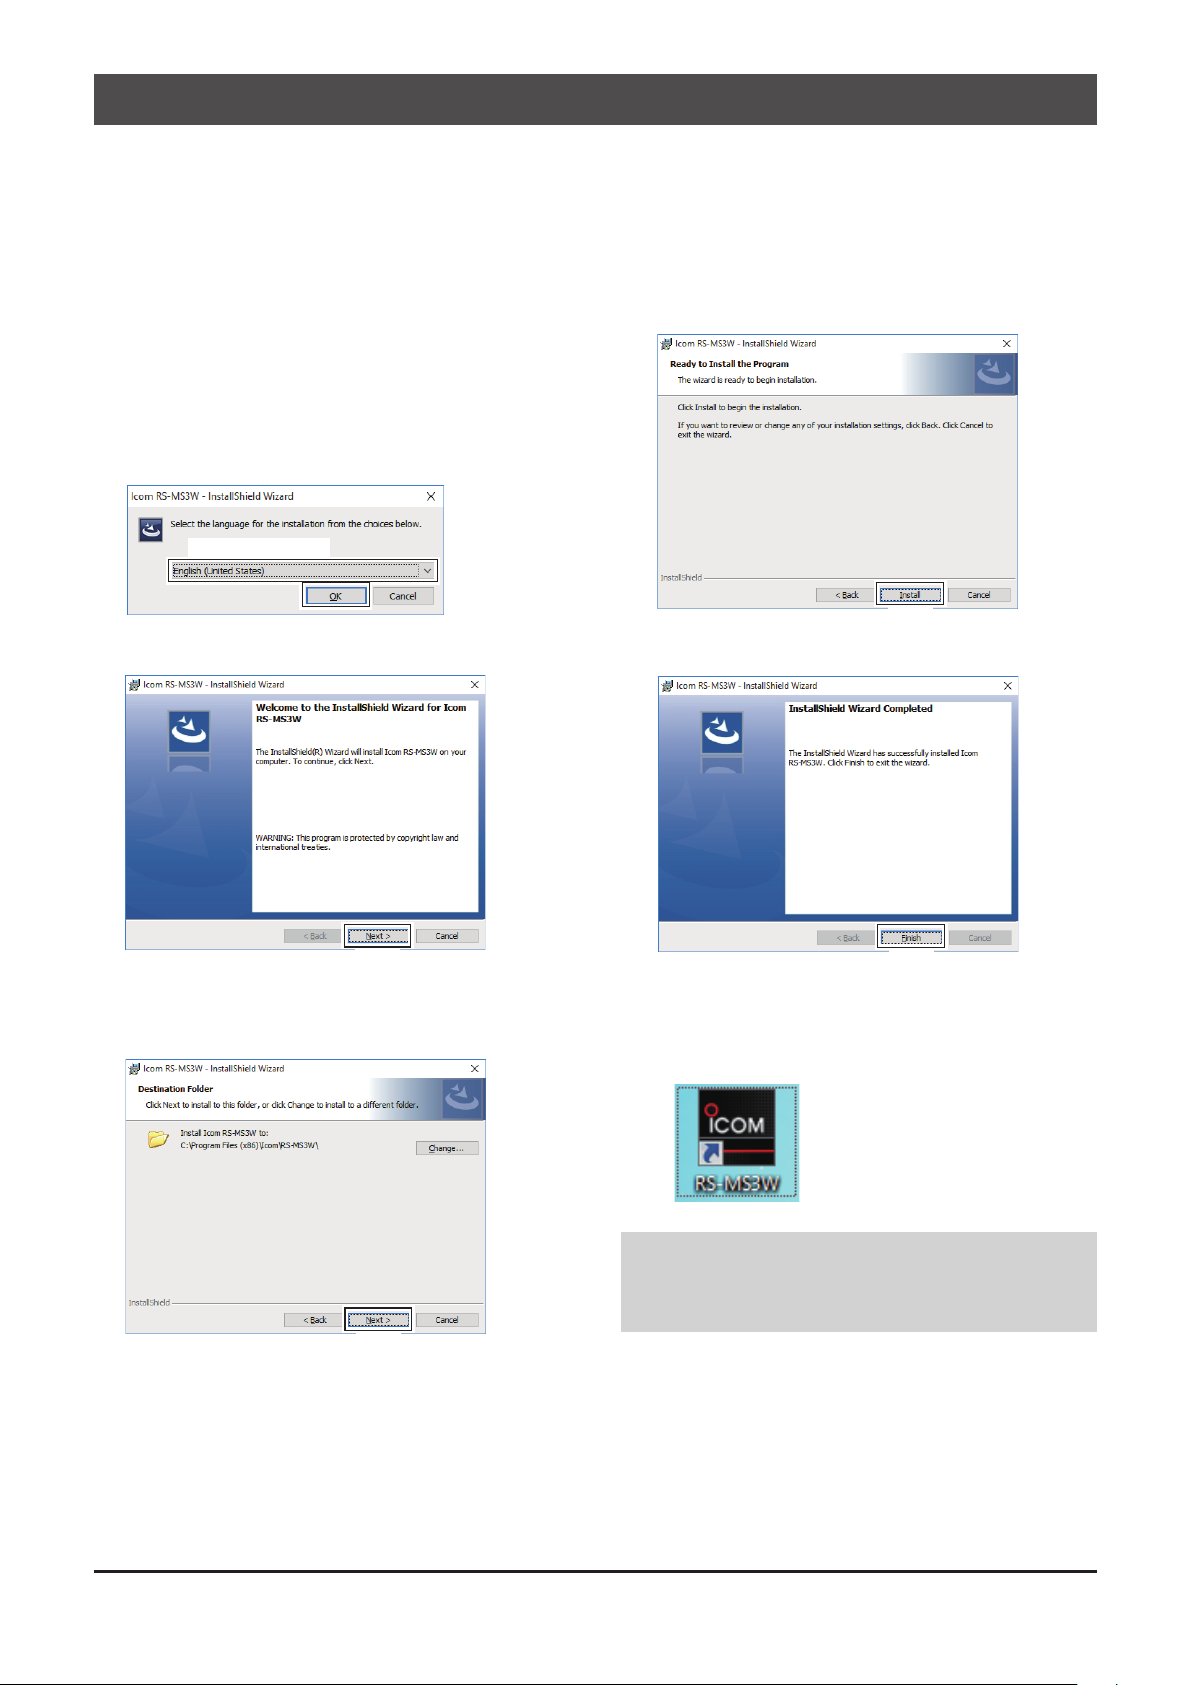
INSTALLATION
To install:
• Conrm Windows has completed its startup.
• Log in as the administrator.
• Be sure no other applications are running.
LThese instructions are based on using Microsoft
®
Windows® 10.
1. Unzip the file downloaded from the Icom website.
(http://www.icom.co.jp/world/support/download/rm/)
2. Double click the executable file in the unzipped
fo l der.
L When “User Account Control” is displayed, click <Yes>
to continue.
3. Select a language, and then click <OK>.
Select a language
Click
4. Click <Next >>.
6. Click <Install>.
Click
7. Click <Finish>.
Click
5. Click <Next >>.
L To select another destination folder, click
<Change...> before clicking <Next >>.
Click
Click
L The “RS-MS3W” le is created in the Windows Start
menu, and a shortcut icon is created on the desktop.
LDouble click the icon to open the RS-MS3W.
NOTE: To uninstall, use the “Apps & features” in the
“System” menu.
To get started, click on Start > Settings > System >
Apps & features.
– 2 –
Page 3

MAIN SCREEN
q w e
r
t
q File
Exit: Closes the application.
w Settings
Com Port: Displays the COM port number that the
data communication cable is connected to.
L Click “▼” to display the COM ports on a drop-down list.
L See the data cable’s “Installation Guide” on the Icom
website for details on checking the COM port number.
e Help
About: Opens the information window and
displays the version number.
r Start
Click to start the connection to the destination.
TIP: You can access the data cable’s Installation
Guide by entering the cable name on the URL below.
http://www.icom.co.jp/world/support/download/manual/
t Stop
Click to stop the connection to the destination.
– 3 –
Page 4

!1
MAIN SCREEN (Continued)
y
u
i
o
!0
!2
!3
y Gateway Repeater (Server IP/Domain)
Enter the RS-RP3C’s gateway repeater address or
domain name.
LThe address consists of up to 64 characters.
NOTE: You must have your call sign registered
to the gateway server that has the RS-RP3C
installed.
Ask the gateway repeater administrator for details.
u Terminal/AP Call sign
Enter the Terminal/AP call sign that is registered
as the access point on the RS-RP3C’s Personal
Information screen.
LThe call sign consists of 8 characters.
• Enter My Call sign of the connected transceiver.
• Enter a space for the 7th character.
• Enter a desired ID sufx between A to F for the 8th
character.
L If the call sign is entered in lowercase letters, the
letters are automatically changed to uppercase letters
when you click <Apply>.
i Gateway Type
Select the gateway type.
LSelect “Global” when operating outside of Japan.
!0 Allowed Call sign List
Enter the call sign of the stations are allowed to
transmit through the internet while “Enabled” is
selected for o “Allowed Call sign.”
L You can add up to 30 call signs.
Adding a call sign
1. Enter the call sign to allow transmitting.
2. Click <Add>.
Deleting a call sign
1. In the call sign eld !2, click on the call sign to
delete.
• The selected call sign is displayed in the entry eld.
2. Click <Delete>.
!1Callsigninformationeld
Displays the information of call signs that are
transmitted from the PC or received from the
Internet.
(Example)
o Allowed Call sign
Select to use the call sign restriction for the Access
Point mode. When ‘Enable’ is selected, this allows
the station of the assigned call sign to transmit
through the Internet.
Disabled: Allow any call signs to transmit.
Enabled:
Allow only the call sign displayed in
!2 to transmit.
L When using the Terminal mode, select ‘Disabled.’
1-1-32 Kamiminami, Hirano-ku, Osaka 547-0003, Japan
Mar. 2019
!2Callsigneld
Displays the call signs that are allowed to transmit
while “Enabled” is selected for o “Allowed Call sign.”
!3 Apply button
Click to save the entered data or settings.
L The button turns red when you have changed the data
or settings.
LThe changes are not saved until you click this button.
– 4 –
A7333-1EX-3
© 2016–2019 Icom Inc.
 Loading...