

Page 1

INSTRUCTION MANUAL
SEPARATION KIT
RMK-5
DUAL-HEAD SEPARATION KIT
RMK-7
Page 2
Thank you for choosing this Icom product.
This product is designed and built with Icom’s state of the art
technology and craftsmanship. With proper care, this product
should provide you with years of trouble-free operation.
IMPORTANT
READ ALL INSTRUCTIONS carefully and completely
before using the product.
SAVE THIS INSTRUCTION MANUAL—This instruction
manual contains important operating instructions for the
RMK-5 and RMK-7.
DISPOSAL
The crossed-out wheeled-bin symbol on your
product, literature, or packaging reminds you
that in the European Union, all electrical and
electronic products, batteries, and
accumulators (rechargeable batteries) must be
taken to designated collection locations at the
end of their working life. Do not dispose of
these products as unsorted municipal waste. Dispose of
them according to the laws in your area.
Refer to the transceiver’s INSTRUCTIONS for details on the
basic operations.
For the IC-F5400D and IC-F6400D series
To use the RMK-5 or RMK-7 with the IC-5400D and
IC-6400D series, the transceivers’ rmware revision must
be 1.6 or later.
Icom, Icom Inc. and the Icom logo are registered trademarks of Icom
Incorporated (Japan) in Japan, the United States, the United Kingdom, Germany,
France, Spain, Russia, Australia, New Zealand, and/or other countries.
EXPLICIT DEFINITIONS
WORD DEFINITION
CAUTION
NOTE
Icom is not responsible for the destruction, damage to, or
performance of any Icom or non-Icom equipment, if the
malfunction is because of:
• Force majeure, including, but not limited to, res, earthquakes,
storms, oods, lightning, other natural disasters, disturbances,
riots, war, or radioactive contamination.
• The use of Icom products with any equipment that is not
manufactured or approved by Icom.
Equipment damage may occur.
If disregarded, inconvenience only. No risk of
personal injury, re or electric shock.
i
Page 3

PRECAUTIONS
TABLE OF CONTENTS
CAUTION: DO NOT use harsh solvents such as Benzine or
alcohol when cleaning, as they will damage the separation
kit’s surfaces.
CAUTION: DO NOT place or leave the transceiver (with
the separation kit) in areas with temperatures below –30°C
(–22°F) or above +60°C (+140°F), or in areas subject to
direct sunlight, such as the dashboard.
CAUTION: DO NOT operate the transceiver (with the
separation kit) if it becomes hot after transmitting for long
periods of time. This may damage the transceiver.
CAUTION: BE SURE that all connectors and jacks are dry
and clean before attachment. Exposing them to dust or
water will result in serious damage to the transceiver and the
separation kit.
BE SURE the transceiver power is OFF and the DC power
cable is disconnected before attaching the separation kits.
USE the specied microphone only. Other, or non-Icom
microphones have different pin assignments and may
damage the transceiver and the separation kit.
IMPORTANT .......................................................................... i
EXPLICIT DEFINITIONS ....................................................... i
DISPOSAL ............................................................................. i
PRECAUTIONS .................................................................... ii
SUPPLIED ACCESSORIES .................................................iii
1. ATTACHMENT .............................................................1–8
Attachment images ......................................................1
■
Opening the transceiver ............................................... 2
■
Detaching the control head from the transceiver .........3
■
Attachment ................................................................... 3
■
2. DUAL-HEAD OPERATION ....................................... 9–11
Individual settings ........................................................9
■
Control Head settings ................................................10
■
3. SPECIFICATIONS AND OPTIONS ...............................12
Specications ............................................................. 12
■
Options ....................................................................... 12
■
4. MOUNTING ...................................................................13
ii
Page 4
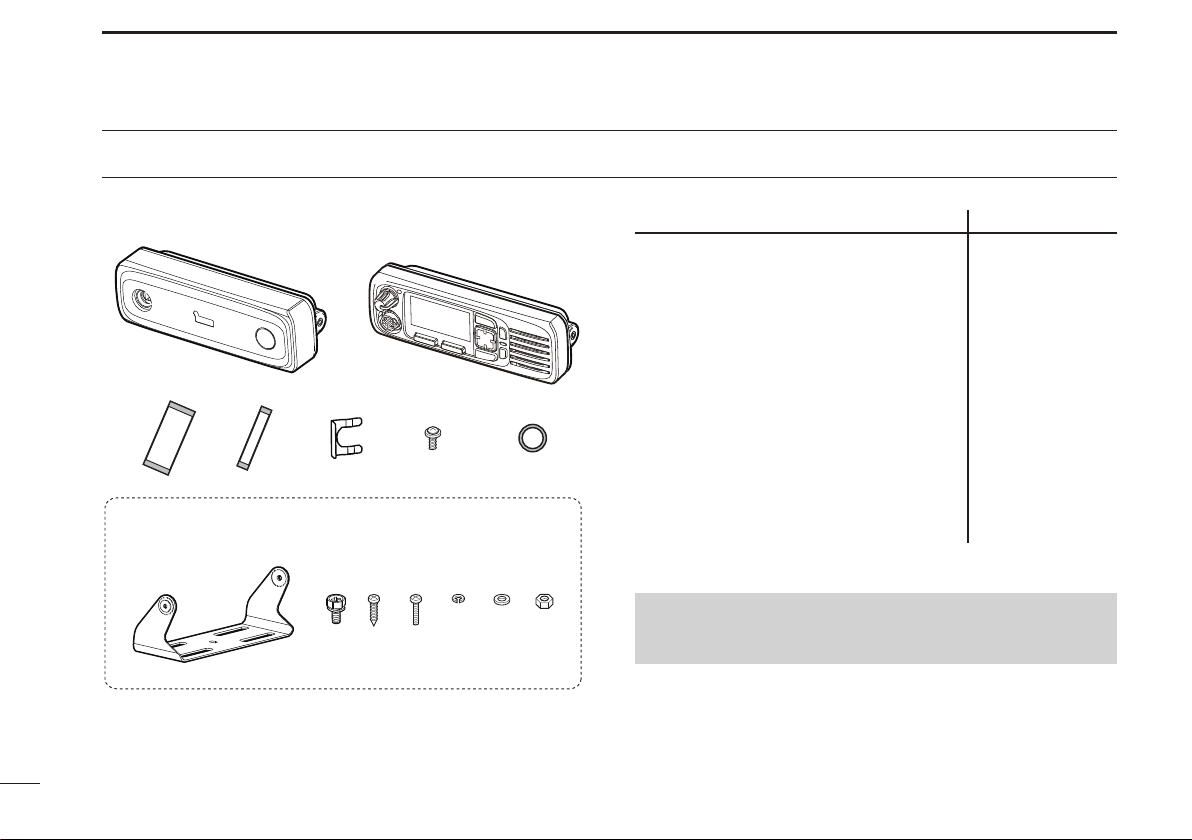
SUPPLIED ACCESSORIES
Separation kit accessories
q w
e r t y
Mounting bracket accessories
i o !0u!1 !2 !3 !4
RMK-5 (Qty.) RMK-7 (Qty.)
q RMK-5/RMK-7
w Control head
e Flat cable (wide)
r Flat cable (narrow)
t Cable bracket
Grounding screw
y
u Connector O-ring
i Mounting bracket
o Bracket screw
!0 Self-tapping screw
!1 Mounting screw
!2 Spring washer
!3 Flat washer
!4 Nut
NOTE:
You need to purchase a separation cable separately.
See page 12 for details on the separation cables.
1 1
Not supplied
1 2
1 1
2 4
2 2
3 4
1 2
2 4
4 8
4 8
4 8
4 8
4 8
1
iii
Page 5
ATTACHMENT
1
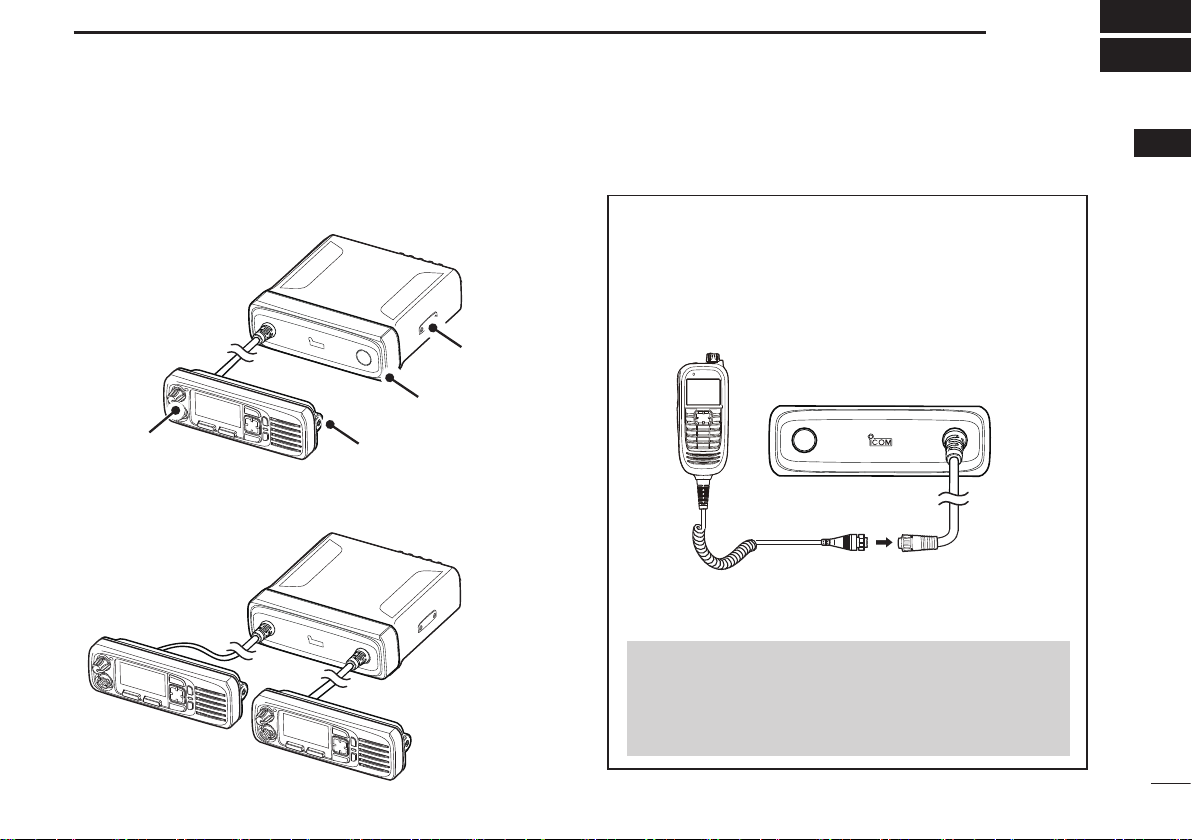
■ Attachment images
RMK-5
Control head
RMK-7
Front panel
Rear panel
Main unit
About the HM-218 hand microphone for the rmK-5:
You can use the HM-218
RMK-5.
L Ask your dealers for details on the microphone.
HM-218
* OPC-2373 or OPC-2374 separation cable for command
microphone is required to connect the HM-218.
NOTE:
• You can only attach the HM-218 to the RMK-5’s front
panel.
• You cannot attach the HM-218 to the transceiver’s
control head.
hand microphone with the
RMK-5
Separation
cable*
1
2
3
4
5
6
7
8
9
10
11
12
13
14
15
16
1
Page 6
ATTACHMENT
1
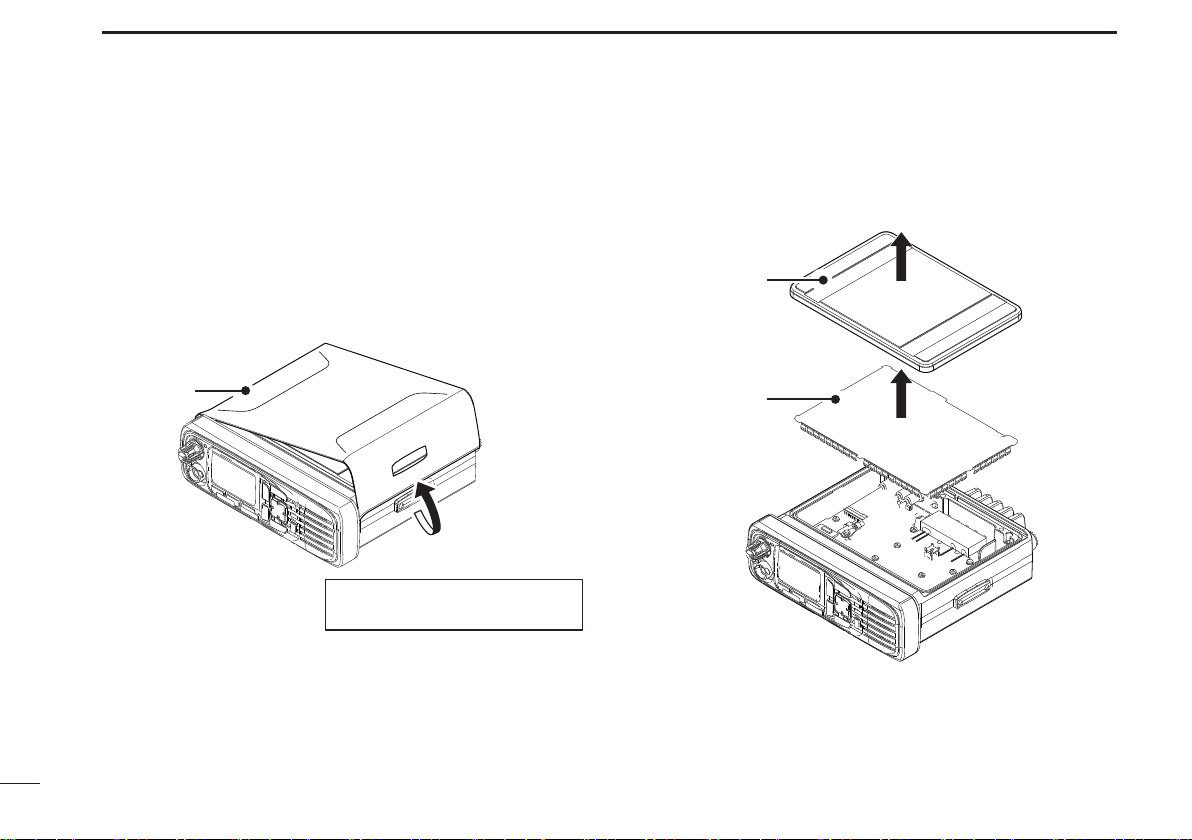
■ Opening the transceiver
1. Turn OFF the transceiver and disconnect the DC power
cable.
2. Carefully pull out the side of the top cover in the
direction of the arrow, and then lift off the top cover.
3. Take out the rubber cover and the shield cover.
Rubber cover
Top cover
Be careful!
Do not break your ngernails.
2
Shield cover
Page 7

ATTACHMENT
1
■ Detaching the control head
from the transceiver
1. Disconnect the speaker cable [J803] from the
transceiver’s main unit.
2. Disconnect the flat cable from the transceiver’s control
head.
3. Detach the control head from the main unit.
[J803]
Flat
cable
Main unit
Control head
■ Attachment
D Opening the separation kit
NOTE: The separation kit is supplied with the front panel
and rear panel attached. First you need to open the
separation kit in order to attach the control head to the
separation kit’s rear panel.
Hold the tabs on the separation kit’s front panel, and then
pull out in the directions of the arrows.
Rear panel
1
2
3
4
5
6
7
8
9
10
11
12
13
14
15
16
Front panel
3
Page 8

ATTACHMENT
1
■ Attachment (Continued)
D Connecting the separation cable
L The separation cables are purchased separately.
1. Pass the separation cable’s control connector and
ground wire through the supplied connector O-ring.
2. Slide the connector O-ring into the groove.
4. Firmly slide the cable bracket in place to lock the cable
inside the rear panel.
Connector O-ring
3. Pass the separation cable’s control connector and
ground wire through the cable hole from the back of the
rear panel.
Rear panel
Ground wire
Slide
Control connector
Separation
cable
Cable bracket
5. Unfasten the grounding screw from screw hole [3], and
then using the same screw, firmly fasten the ground
wire’s terminal to ground.
6. Connect the control connector to connector [J5].
[3]
[J5]
4
Page 9

D Attaching the control head
1. Insert the flat cable into connector [11] on the
separation kit’s inside panel.
[11]
Recommendation for
easy attachment:
Loosely bend the
at cable as shown
below.
ATTACHMENT
3. Firmly attach the control head to the separation kit’s
rear panel.
1
1
2
3
4
5
6
7
8
9
2. Connect the flat cable on the transceiver’s front panel,
and then connect the speaker cable you disconnected
from the transceiver’s main unit to [J2] on the
separation kit’s rear panel.
[J2]
Speaker cable
Flat cable
10
11
12
13
14
15
16
5
Page 10

ATTACHMENT
1
■ Attachment (Continued)
D Attaching the front panel
1. Pass the separation cable’s control connector and
ground wire through the supplied connector O-ring and
cable hole of the front panel from the front side.
L If you are connecting another separation cable, pass
that cable through the other cable hole.
Control connector
Separation
cable
3. Firmly fasten the ground wire terminal to the front panel
using the supplied grounding screw.
4. Connect the control connector to connector [J4].
Ground wire terminal
[J4]
Front panel
2. Firmly slide the cable bracket in place to lock the cable
inside the front panel.
O-ring
Ground wire
Important for easy attachment:
• Lift the control connector and ground wire upward.
Lift upward
Cable
bracket
6
Page 11

L If you are connecting another control head, connect
that ground wire terminal, and then connect the other
control connector to connector [J3].
Ground wire
terminal here
[J3]
5. Connect the narrow flat cable to connector [J1].
ATTACHMENT
6. Connect the flat cable
transceiver’s main unit
Recommendation for easy attachment:
• Loosely bend the narrow at cable.
LThe wide at cable is originally bent.
you disconnected from the
to connector [J2].
[J2]
1
1
2
3
4
5
6
7
8
9
10
11
12
13
14
15
[J1]
16
Loosely Bend
7
Page 12

ATTACHMENT
1
D Attaching the front panel (Continued)
7. Pass the flat cables through the opening in the main unit, and then attach the separation kit’s front panel to the main unit
by pushing it in place.
8. Connect the narrow flat cable to connector [J409], and
then connect the wide flat cable to connector [J400].
[J409] [J400]
9. Put the shield cover and rubber cover back in the main
unit.
10. Put the main unit’s top cover back on.
8
Page 13

DUAL-HEAD OPERATION
2
This section describes the operations that can be made when two control heads are connected to the transceiver’s main unit.
For the operations and functions that are not mentioned in this section, see the transceiver’s instruction manual.
“Other Head is in use”
Except for the Power key, [VOL], and [Emer] keys, all
keys are locked while one control head is being used, and
“Other Head is in use” is displayed as shown below.
Other Head
is in use
The [PTT] button is also locked while [PTT] is being
pushed on the other control head. This means that you
can only transmit from one control head at a time.
■ Individual settings
You can individually set the following items in each control
head, and also in the HM-218.
L See the transceiver’s instruction manual for details on
setting these items.
Item Options
Audio level
Head SP Out ON/OFF (See page 11 for details)
Backlight ON/Auto OFF/OFF
Brightness 0~7
Dimmer 0~7
LCD Mode Day/Night
NOTE: Except for the audio level setting, you can only set
the items using one control head at a time. While setting
an item on another control head “Other Head is in use” is
displayed.
—
1
2
3
4
5
6
7
8
9
10
11
12
13
14
15
16
9
Page 14

DUAL-HEAD OPERATION
2
■ Control Head settings
When two control heads are connected, the “Control Head”
category is added to the Menu screen. Select “Control
Head’’ to set the following items.
D Intercom
The Intercom function enables you to communicate between
the control heads.
1. Select “Intercom,” and then push [OK].
LThe Intercom function is ON.
2. Hold down or release [PTT] to communicate.
3. Push [OK] to turn the Intercom function OFF.
L While communicating using the Intercom function, you
can use only [PTT], [VOL] and [Emer].
D Hanger
(Options: HEAD 1 & HEAD 2, HEAD 1, HEAD 2)
Select which control head, or simply select both control
heads, to automatically start scanning after putting the
microphone in the hanger (on-Hook).
L To use this function, turn the Hook Scan function ON in
the “Functions” category.
HEAD 1 & HEAD 2: Automatically starts scanning after
putting both microphones in their
hangers.
HEAD 1: Automatically starts scanning
after putting the microphone in the
CONTROL HEAD 1 hanger.
HEAD 2: Automatically starts scanning
after putting the microphone in the
CONTROL HEAD 2 hanger.
D TX AF Monitor
(Options: OFF, ON)
The TX AF Monitor function enables you to monitor the
audio that is transmitted on the other control head, when ON
is set.
L While receiving, the received audio can be heard on both
control heads.
10
Page 15

DUAL-HEAD OPERATION
2
1
D SP Link
(Options: OFF, HEAD 1, HEAD 2)
The SP Link function enables you to link the audio volume
settings between the two control heads. Select which control
head controls the audio volume.
OFF: The audio volume settings are not linked, and are
individually set at each control head.
HEAD 1: The audio volume settings are linked, and are
equally set on CONTROL HEAD 1.
HEAD 2: The audio volume settings are linked, and are
equally set on CONTROL HEAD 2.
D Primary Mic
(Options: HEAD 1, HEAD 2)
Select which control head’s microphone to use when
transmitting without pushing [PTT], such as when using the
Auto TX function or PC commands.
HEAD 1: CONTROL HEAD 1’s microphone is used.
HEAD 2: CONTROL HEAD 2’s microphone is used.
D Head SP out
(Options: HEAD 1, HEAD 2)
Select whether or not to output the audio from the control
head.
L You can individually set to each control head, and also the
HM-218.
OFF: The audio is not output.
ON: The audio is output from the control head’s front
speaker or from the HM-218.
■ Updating the rmware
For the IC-F5400D and IC-F6400D series, the rmware of
the control heads are automatically updated when they are
not up-to-date to the transceiver’s main unit.
When the control heads are not up-to-date:
The control head automatically starts updating when you
turn ON the power at the control head.
2
3
4
5
6
7
8
9
10
11
12
13
14
15
16
11
Page 16

3
SPECIFICATIONS AND OPTIONS
■ Specications
• Audio output power: 3.5 W with a 4 Ω load
(at 5% distortion)
•
Operating temperature range:
• Power supply requirement: 13.6 V DC nominal
• Dimensions:
Front panel: 177 (W) x 55 (H) x 25 (D) mm
7 (W) x 2.2 (H) x 1 (D) in
Rear panel:
6.7 (W) x 2.2 (H) x 1 (D) in
Control head with rear panel:
6.7 (W) x 2.2 (H) x 2.2 (D) in
• Weight (approximately):
Front panel: 100 g / 3.5 oz
Rear panel: 110 g / 3.9 oz
Control head with rear panel:
–30°C ~ +60°C
(–22°F ~ +140°F)
170 (W) x 55 (H) x 26 (D) mm
170 (W) x 55 (H) x 55 (D) mm
250 g / 8.8 oz
■ Options
• OPC-2364, OPC-2365, OPC-2366, and OPC-2367
separation cables
OPC-2364: 1.9 m / 6.3 ft
OPC-2365: 3 m / 9.9 ft
OPC-2366: 5 m / 16.4 ft
OPC-2367: 8 m / 26.3 ft
• HM-218
separation cable for RMK-5
HM-218: Command microphone with a built-in speaker
OPC-2373: Separation cable for command microphones
OPC-2374: Separation cable for command microphones
Some options may not be available in some countries.
Ask your dealer for details.
hand microphone + OPC-2373 or OPC-2374
(1.9 m/ 6.3 ft)
(8 m / 26.3 ft)
12
Page 17

MOUNTING
4
D Mounting on a wall
Securely mount the control head on a wall, using the
following supplied accessories.
• Mounting bracket ......................1
• Bracket screw ...........................2
• Self-tapping screw ....................4
• Spring washer ..........................4
• Flat washer ...............................4
Bracket screw
Self-tapping screw
Spring washer
Flat washer
Mount bracket
D Mounting on a board
Securely mount the control head on a board, using the
following supplied accessories.
• Mounting bracket ......................1
• Bracket screw ...........................2
• Mounting screw ........................4
• Spring washer ..........................4
• Flat washer ...............................4
• Nut ............................................4
Mounting screw
Spring washer
Flat washer
Nut
1
2
3
4
5
6
7
8
9
10
11
12
13
14
15
16
13
Page 18

MEMO
Page 19

MEMO
1
2
3
4
5
6
7
8
9
10
11
12
13
14
15
16
Page 20

A7341D-1EX-1
Printed in Japan
© 2016–2017 Icom Inc.
1-1-32 Kamiminami, Hirano-ku, Osaka 547-0003, Japan
 Loading...