

Page 1
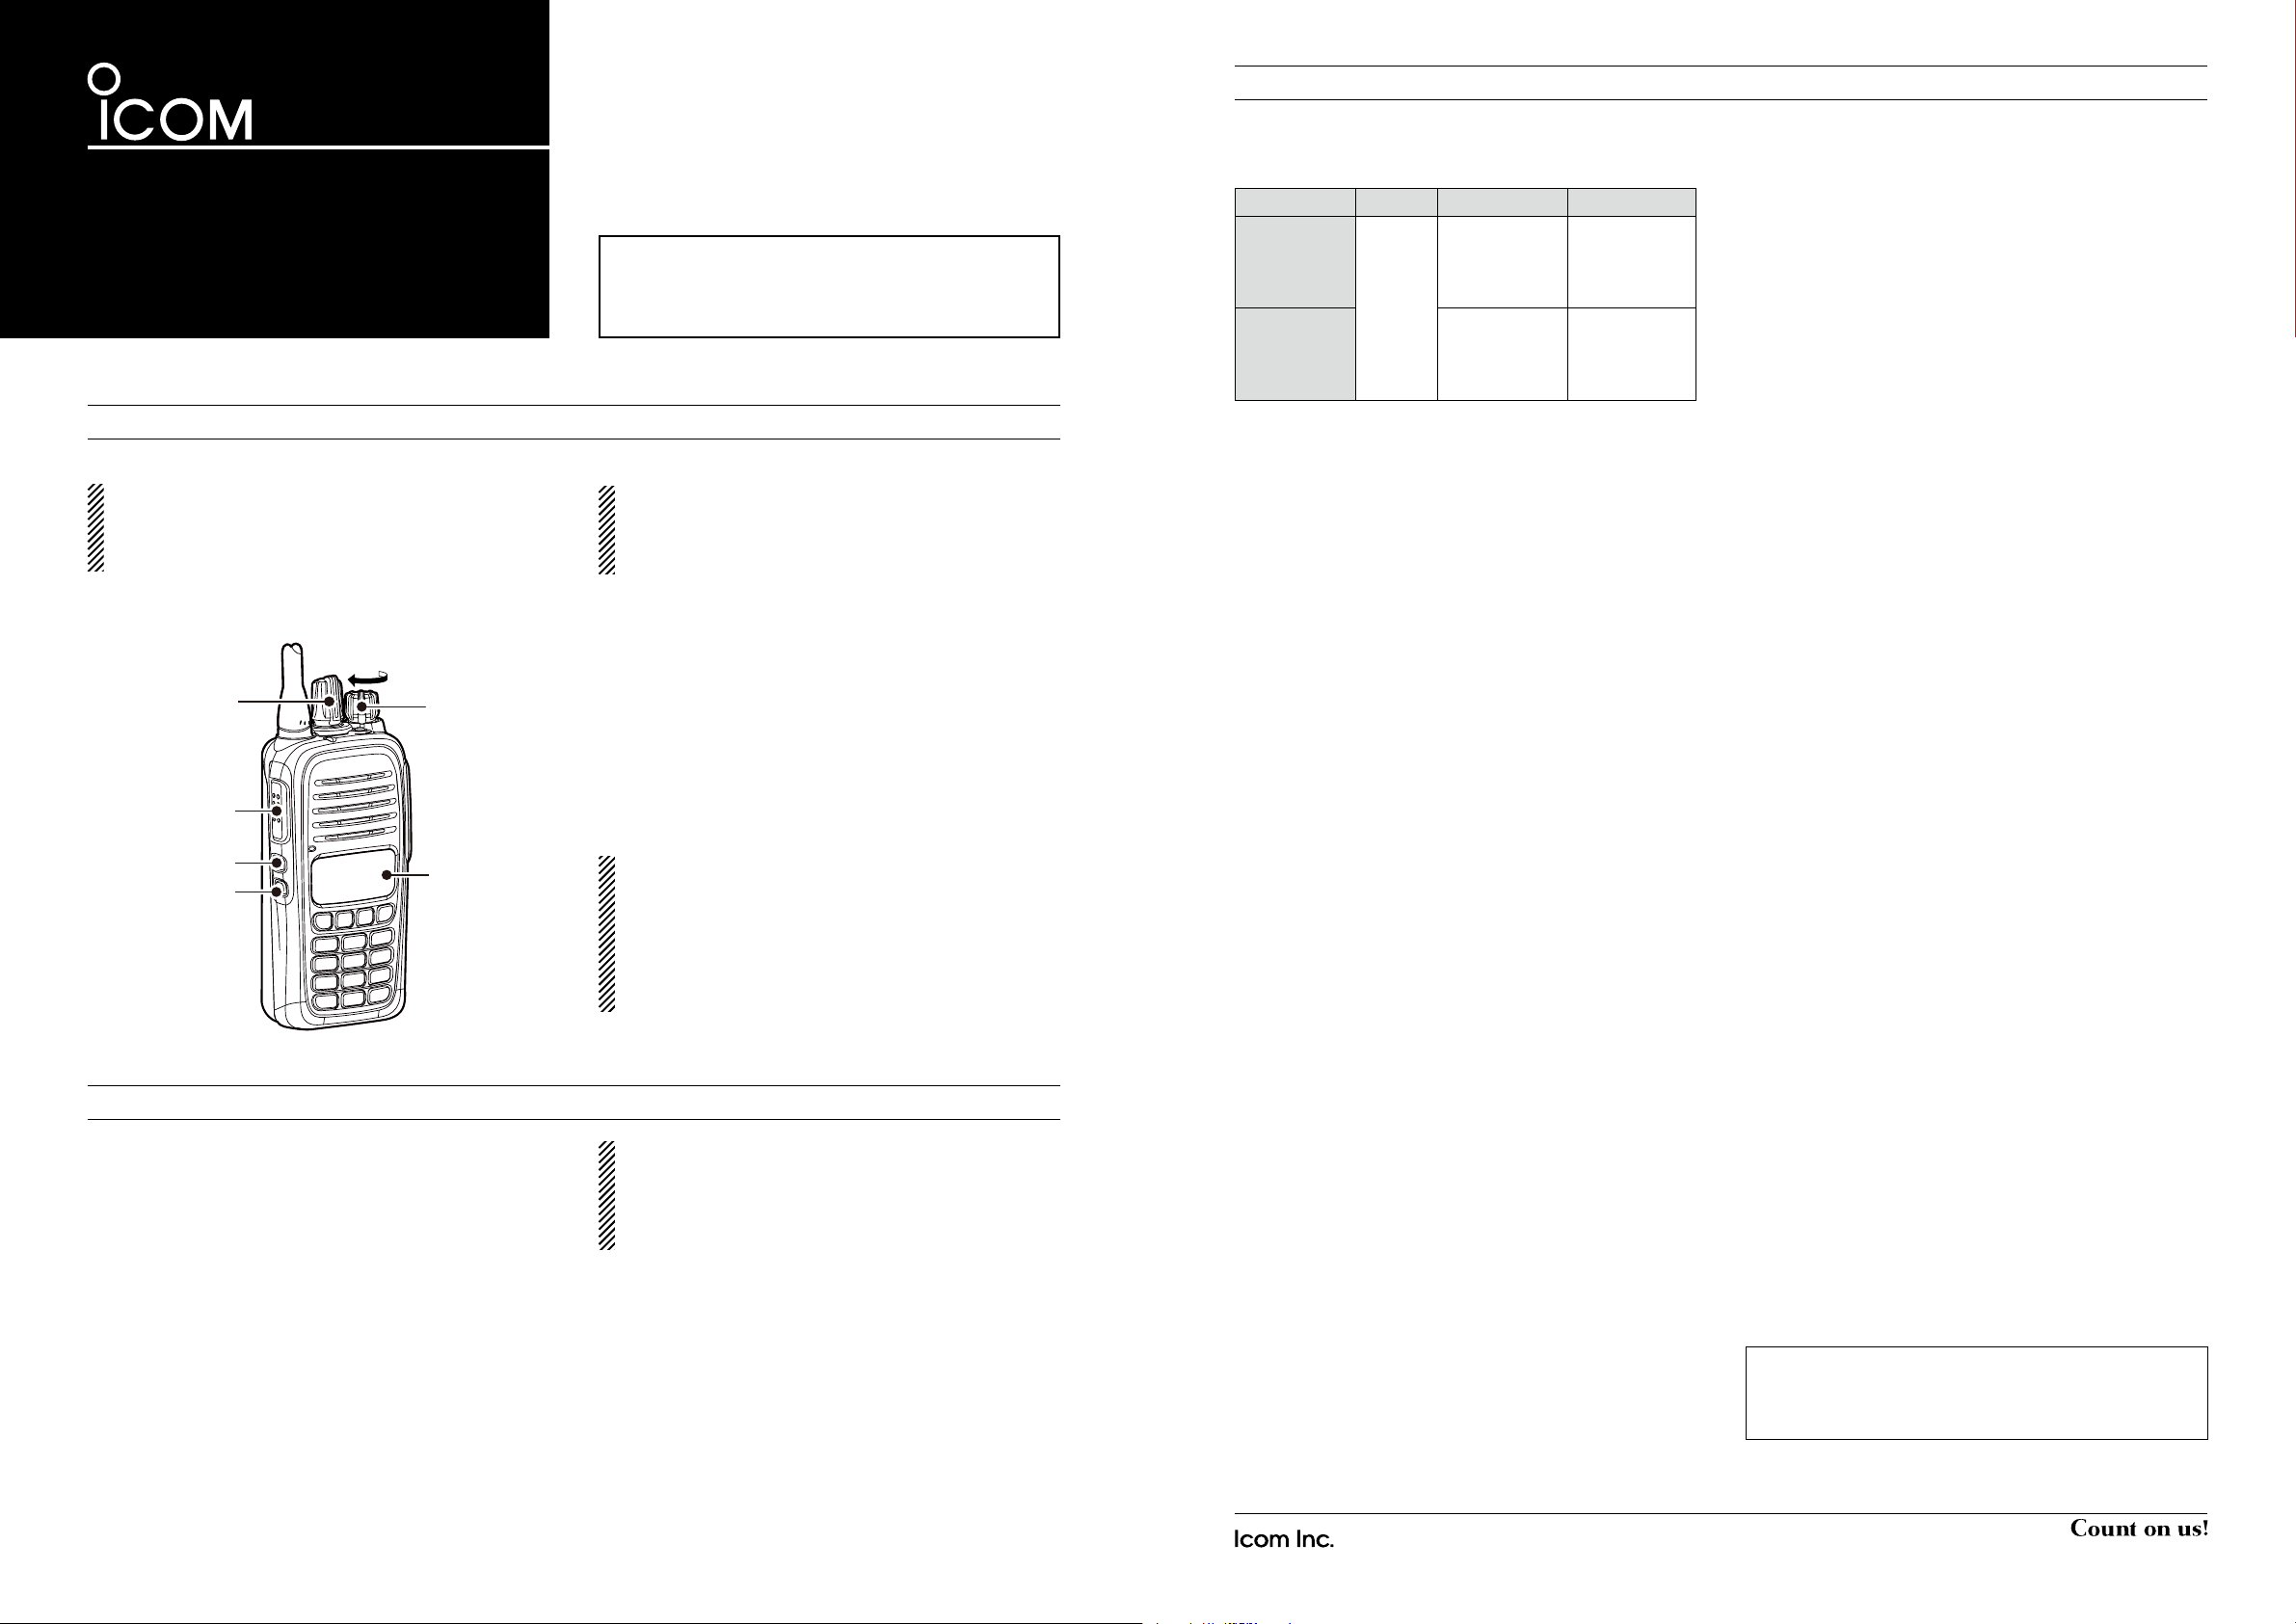
[UP]
[PTT]
[DOWN]
[VOL]
[ROTARY
SELECTOR]
Function
Display
(LCD)
OPTIONS
INSTRUCTIONS w
VHF TRANSCEIVER
I ç-V 8 8
UHF TRANSCEIVER
I ç-U 8 8
BASIC OPERATION
Turning power ON D
Before using the transceiver for the first time, the
battery must be fully charged for optimum life and
operation. See BATTERY CHARGING described in
INSTRUCTIONS q.
Rotate [VOL] to turn ON the power.
Thank you for choosing the IC-V88 v h f t r a n s c e i v e r
or IC-U88 u h f t r a n s c e i v e r .
READ ALL INSTRUCTIONS carefully and completely before using the transceiver.
Receiving and Transmitting D
CAUTION:
Attach an antenna before transmitting.
Transmitting without an antenna may damage the
transceiver.
Receiving:
Rotate q [ROTARY SELECTOR] to select a channel.
When receiving a call, rotate w [VOL] to adjust the au-
dio output level to a comfortable listening level.
BATTERY PACKS D
BP-278/BP-279• b a t t e r y p a c k
Battery pack Voltage Capacity Battery life*
1130 mAh
BP-278
7.2 V
BP-279
* When the power save function is turned ON, and the op-
erating periods are calculated under the following conditions:
TX:RX:standby = 5:5:90
(minimum)
1190 mAh
(typical)
1485 mAh
(minimum)
1570 mAh
(typical)
10 hours
14 hours
CHARGERS D
BC-213 • d e s k t o p c h a r g e r + BC-123S a c a d a p t e r
To rapid charge a battery pack.
BC-214 • m u l t i c h a r g e r + BC -157S a c a d a p t e r
To rapid simultaneously charge up to 6 battery packs.
FA-SC01U/FA-SC02U •
FA-SC01U: 350–400 MHz
FA-SC02U: 330–380 MHz
FA-SC61UC • u h f c u t a n t e n n a
FA-SC61UC: 380–520 MHz
u h f a n t e n n a s
OTHERS D
MB -130 • m o b i l e b r a c k e t
Mounts the BC-213 d e s k t o p c h a r g e r in a variety of
places in your vehicle.
MB -133 • b e l t c l i p
HM-158LA/HM-159LA/HM-168LWP •
s p e a k e r m i c r o p h o n e
Combination speaker-microphone that provides
convenient operation while the transceiver is hanging
on your belt.
HM-153LA/HM-166LA • e a r p h o n e -m i c r o p h o n e
Ideal for hands-free operation. Clip the HM-153LA or
HM-166LA (with integrated ptt s w i t c h ) to your lapel
or breast pocket.
The following settings can be changed in the Front
Panel Programming mode without a PC. This is a convenient function to immediately change some settings
when you operate the transceiver in the field.
RX and TX frequencies•
RX and TX CTCSS tone frequencies•
RX and TX DTCS codes•
Channel name•
Transmitting:
Wait until the channel is clear to avoid interference.
While holding down q [PTT], speak at a normal voice
level.
Release w [PTT] to receive.
IMPORTANT:
To maximize the readability of your signal:
1. After pushing [PTT], pause briefly before you
start speaking.
2. Hold the microphone 5 to 10 cm (2 to 4 inches)
from your mouth, then speak at a normal voice
level.
ABOUT THE FRONT PANEL PROGRAMMING
NOTE:
•While you are in the Front Panel Programming
mode, you cannot receive or transmit.
•Toexit the FrontPanel Programming mode, turn
OFF the transceiver, and then turn it ON again.
See the back page for details.
DC CABLES D
CP-23L• c i g a r e t t e l i g h t e r c a b l e
Use when charging the battery pack from a 12 V cig-
arette lighter socket. (Use with the BC-213)
OPC-656 • d c p o w e r c a b l e
Use with a 13.8 V power source instead of a power
adapter. (Use with the BC-214
)
ANTENNAS D
FA- SC25V/FA-SC55V/•
FA-SC62V/FA-SC63V v h f a n t e n n a s
FA-SC25V: 136–150 MHz
FA-SC55V: 150–174 MHz
FA-SC62V: 150–160 MHz
FA-SC63V: 155–165 MHz
FA-SC56VS/FA-SC57VS • v h f s t u b b y a n t e n n a s
FA-SC56VS: 150–162 MHz
FA-SC57VS: 160–174 MHz
FA-SC61VC • v h f c u t a n t e n n a
FA-SC61VC: 136–174 MHz
HS-94/HS-95/HS-97• h e a d s e t
+ VS-4LA p t t s w i t c h c a b l e
HS-94: Ear-hook type
HS-95: Neck-arm type
HS-97: Throat microphone
VS-4LA: To connect to headsets
Some options may not be available in some countries.
Ask your dealer for details.
Approved Icom optional equipment is designed
for optimal performance when used with an Icom
transceiver. Icom is not responsible for the destruction
or damage to an Icom transceiver in the event the
Icom transceiver is used with equipment that is not
manufactured or approved by Icom.
Icom, Icom Inc. and the Icom logo are registered trademarks of Icom Incorporated (Japan) in Japan, the United States, the United Kingdom, Germany, France, Spain, Russia and/or other countries.
All other products or brands are registered trademarks or trademarks of
their respective holders.
1-1-32 Kamiminami, Hirano-ku, Osaka 547-0003, Japan
A-7140H-2EX Printed in Japan
© 2014 Icom Inc.
Page 2
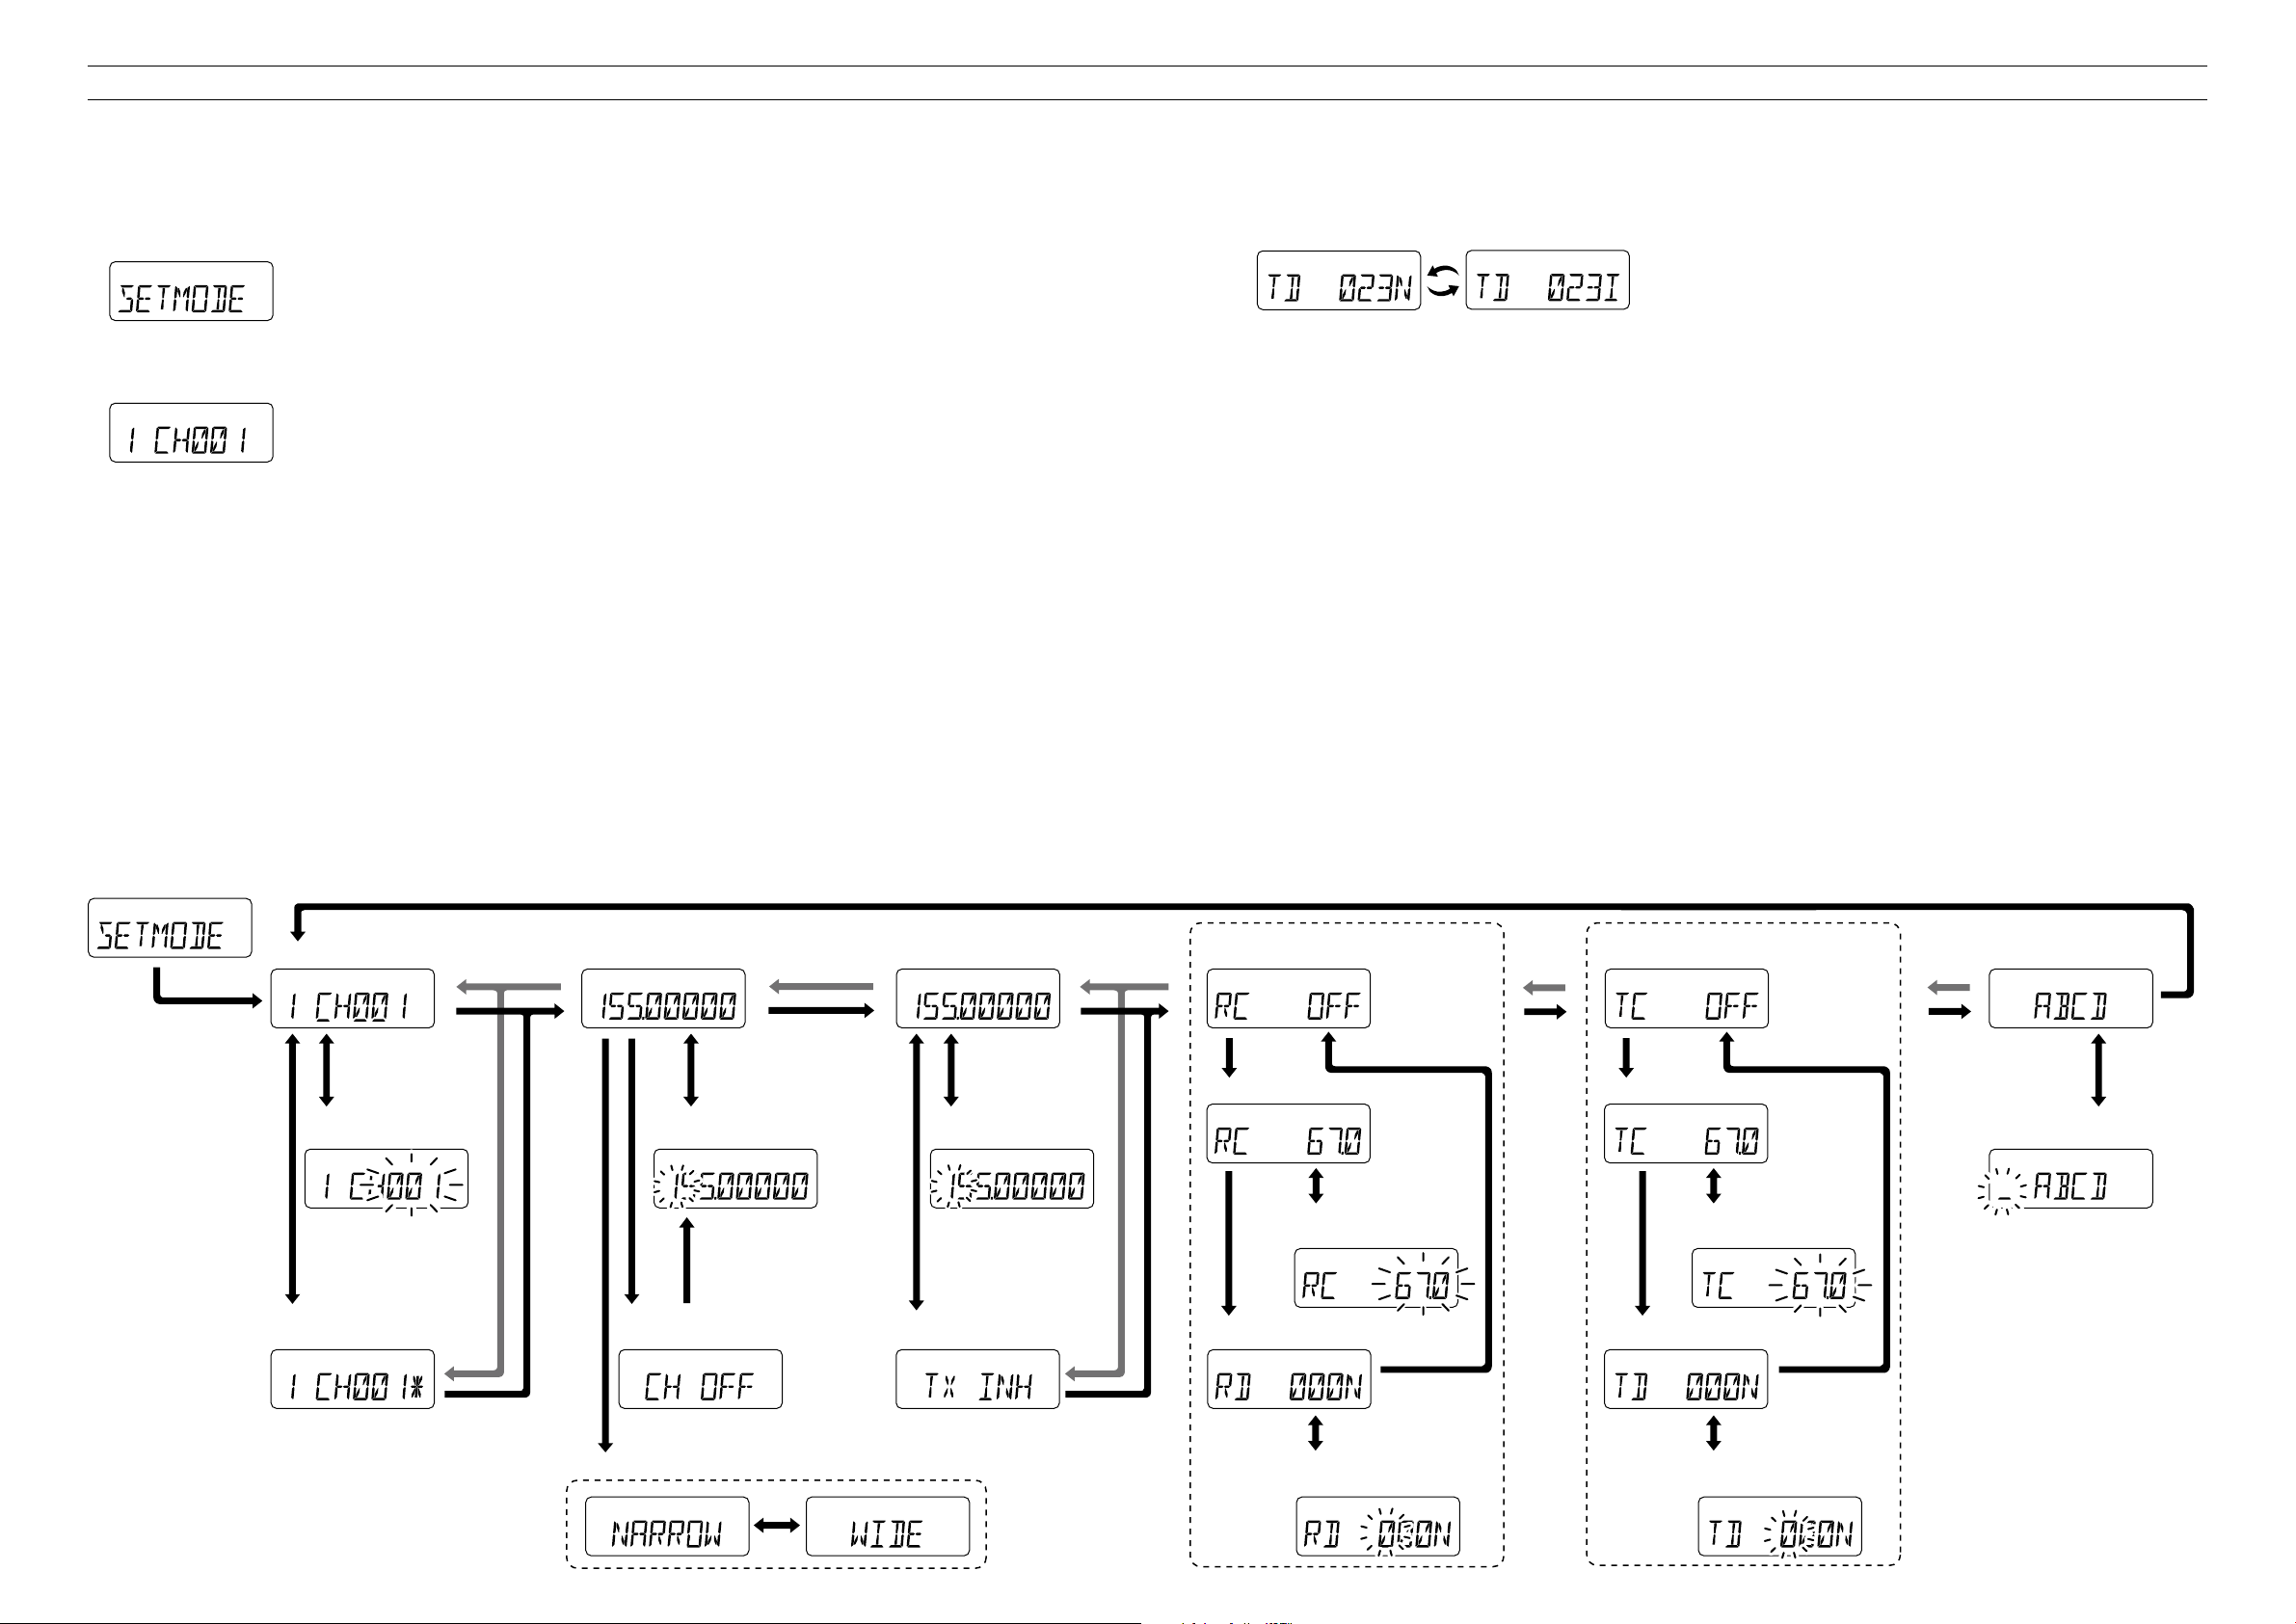
FRONT PANEL PROGRAMMING
Normal lnverse
[P3]
[P2]
[P1] [P2] [P2] [P2]
*1
[P0]
[DOWN] [DOWN]
[UP]
[P2]
[UP]
[DOWN]
[UP]
[DOWN]
[UP]
[UP]
[P3] [P3] [P3]
[P2]
[P2]
[P2] [P2]
[P3]
[P2]
[P3]
[P3] [P3]
*3
*3 *3
*2
*2
*2
*2
*2 *2
[DOWN]
[UP]
• Channel Selection
mode (Step 2)
• Frequency Edit
mode (Step 3)
• Frequency Edit
mode (Step 3)
• Deactivating or activating
channel (Step 6)
• Clearing the RX frequency
memory (Step 6)
• Inhibiting or allowing
transmission (Step 6)
• Channel Name Edit
mode (Step 5)
• Zone and Channel • RX frequency • TX frequency
• DTCS Code Selection mode
(Step 4)
• CTCSS Tone Frequency
Selection mode (Step 4)
• CTCSS Tone Frequency
Selection mode (Step 4)
• DTCS Code Selection mode
(Step 4)
• RX CTCSS tone frequency OFF screen • TX CTCSS tone frequency OFF screen • Channel name
• RX CTCSS tone frequency screen • TX CTCSS tone frequency screen
• RX DTCS code screen • TX DTCS code screen
Entering the Front Panel Programming mode (Step 1)
• Toggling the channel passband width
Entering the Front Panel Programming mode D
(Step 1)
Rotate q [VOL] to turn OFF the transceiver.
While pushing w [P0] and [UP] at the same time, turn
ON the transceiver.
“SET MODE” is displayed.•
Push e [P0] to enter the Front Panel Programming
mode.
A zone number and a channel number are displayed.•
To Exit the Front Panel Programming mode and return to normal operation:
Turn OFF the transceiver, and then turn it ON ➥
again.
Selecting a channel to program (Step 2) D
Push q [P3] to enter the Channel Selection mode.
The channel number blinks.•
Push w [P1] to select a zone.
Push e [UP] or [DOWN] to select a channel you want
to program.
Push r [P3] again to set the channel.
The cursor stops blinking.•
Programming outline D
Editing the RX and TX frequencies (Step 3) D
Push q [UP] to first select the RX frequency, or push
again to select the TX frequency.
•
The LED indicator lights green when you select the RX frequency, and lights red when you select the TX frequency.
Push w [P3] to enter the Frequency Edit mode.
The cursor blinks at the first digit.•
Enter a desired frequency by pushing the keys on e
the 10-key pad.
After you finish entering all digits, the frequency will r
automatically be saved.
The cursor stops blinking.•
Selecting the RX and TX tones (Step 4) D
Push q [UP] to first select the RX tones or push again
to select the TX tones.
The LED indicator lights green when you select the RX •
tones, and lights red when you select the TX tones.
Push w [P2] to select the CTCSS OFF, CTCSS tone
frequency, or DTCS code screen.
Push e [P3] to enter the CTCSS Tone Frequency or
DTCS Code Selection mode.
The frequency or the first digit code blinks.•
Setting the CTCSS tone frequency:
Push r [UP] or [DOWN] to select the frequency.
Push t [P3] again to set the frequency.
The frequency stops blinking.•
Setting the DTCS code:
Push r [UP] or [DOWN] to select the code.
Push t [P3] to move the cursor to the next digit.
Repeat steps y r and t until you finish selecting the
code.
Push u [P1] to toggle the DTCS code's polarity while
the cursor is blinking.
You can select Normal or Inverse polarity.•
Push i [P3] again to save the code.
The cursor stops blinking.•
Editing the channel name (Step 5) D
You can display the name instead of the channel number.
Push q [UP] to display the channel name.
•
If no channel name is programmed, nothing is displayed.
Push w [P3] to enter the Channel Name Edit mode.
The cursor blinks at the first digit.•
Enter a character by pushing e [UP] or [DOWN], or
the keys on the 10-key pad.
When using the 10-key pad:
Repeatedly pushing ➥ [2], for example, first selects
the number “2.” Continuing to push it selects capital
letters “A,” then “B,” then “C,” and then selects lower
case letters “a,” then “b,” then “c.”
To enter a space, push • [1] twice. The cursor blinks, and
then push [P3] to move to the next digit.
•[0] and [1] also select other symbols.
•[✱] and [#] are used to move the cursor to the left or to
the right.
Push r [P3] to move the cursor to the next digit.
Repeat steps e and r until you finish entering the
t
name.
Push y [P3] again to save the channel name.
The cursor stops blinking.•
Other settings (Step 6) D
To deactivate or activate the channel:
Select a desired zone and the channel to deactivate ➥
and then push [P2].
“• ” is displayed.
The channel cannot be used until you re-activate it.•
To activate the channel, push ➥ [P2].
To toggle between Wide and Narrow channel passband width:
Select a RX frequency, and then push ➥ [P1]. (You
cannot toggle if the cursor is blinking.)
“WIDE” or “NARROW” is briefly displayed.•
To clear the RX frequency memory:
Select a RX frequency, and then push ➥ [P2]. (You
cannot clear the RX frequency memory if the cursor
is blinking.)
The channel will be cleared and you have to set the RX •
frequency again to use the channel.
To Inhibit or allow transmission:
Select a TX frequency, and then push ➥ [P2]. (You
cannot inhibit transmission if the cursor is blinking.)
“TX INH” is displayed.•
To allow transmission, push ➥ [P2].
NOTE:
*1: Once you cle ar the RX freq uency
memory, you have to set the RX frequency again to use the channel.
*2: Settable in the same way for both
RX and TX.
*3: T he CTCSS O FF, a CT CSS t o ne
frequency or a DTCS code screen is
displayed.
 Loading...