

Page 1
q
w
k
QUICK GUIDE
Thank you for purchasing the IC-U80L UHF
UHF TRANSCEIVER
iU80L
This sheet describes only basic operations. For more detailed instructions, go to our web
site (URL: http://www.icom.co.jp/world/) to view or download the full instruction manual.
In the instruction manual, some options or some functions may not be available for your
version. Please ask your dealer for details.
TRANSCEIVER with Icom’s state of the art
technology.
Please read all instructions carefully before
using.
■ Precautions
RDANGER! USE the battery only
with the transceiver for which it is specifi ed.
Never use a battery with any other equipment, or for any purpose that is not specifi ed in the instruction manual.
RDANGER!
minals
of the battery pack.
RWARNING!
transceiver so that the antenna is very close
to, or touching exposed parts of the body, especially the face or eyes, while transmitting.
The transceiver will perform best if the microphone is 5 to 10 cm away from the lips and
the transceiver is vertical.
NEVER short the ter-
NEVER hold the
RWARNING! NEVER operate the
transceiver with a headset or other audio
accessories at high volume levels. Hearing experts advise against continuous high
volume operation. If you experience a ringing in your ears, reduce the volume level or
discontinue use.
RWARNING! NEVER operate the
transceiver while driving a vehicle. Safe
driving requires your full attention—anything less may result in an accident.
RWARNING! NEVER operate or
touch the transceiver with wet hands. This
may result in an electric shock or damage
the transceiver.
DO NOT operate the transceiver near
unshielded electrical blasting caps or in an
explosive atmosphere.
DO NOT push [PTT] when not actually
intending to transmit.
DO NOT use or place the transceiver in
direct sunlight or in areas with temperatures below –20°C or above +60°C.
DO NOT
benzine or alcohol when cleaning, as they
will damage the transceiver's surfaces.
use harsh solvents such as
DO NOT disassemble or modify the
transceiver for any reason.
KEEP
rain, and never immerse it in the water. The
transceiver meets IP54* requirements for
dust-protection and splash resistance.
However, once the transceiver has been
dropped, dust-protection and splash resistance cannot be guaranteed because of
possible damage to the transceiver’s case
or the waterproof seal.
* Only when the battery pack or case, antenna
and jack cover are attached.
the transceiver away from heavy
KEEP the transceiver out of the reach of
children.
BE CAREFUL! The transceiver will
become hot when operating it continuously
for long periods of time.
Even when the transceiver power is OFF, a
slight current still flows in the circuits. Remove the battery pack or case from the
transceiver when not using it for a long
time. Otherwise, the battery pack or installed dry cell batteries will become exhausted.
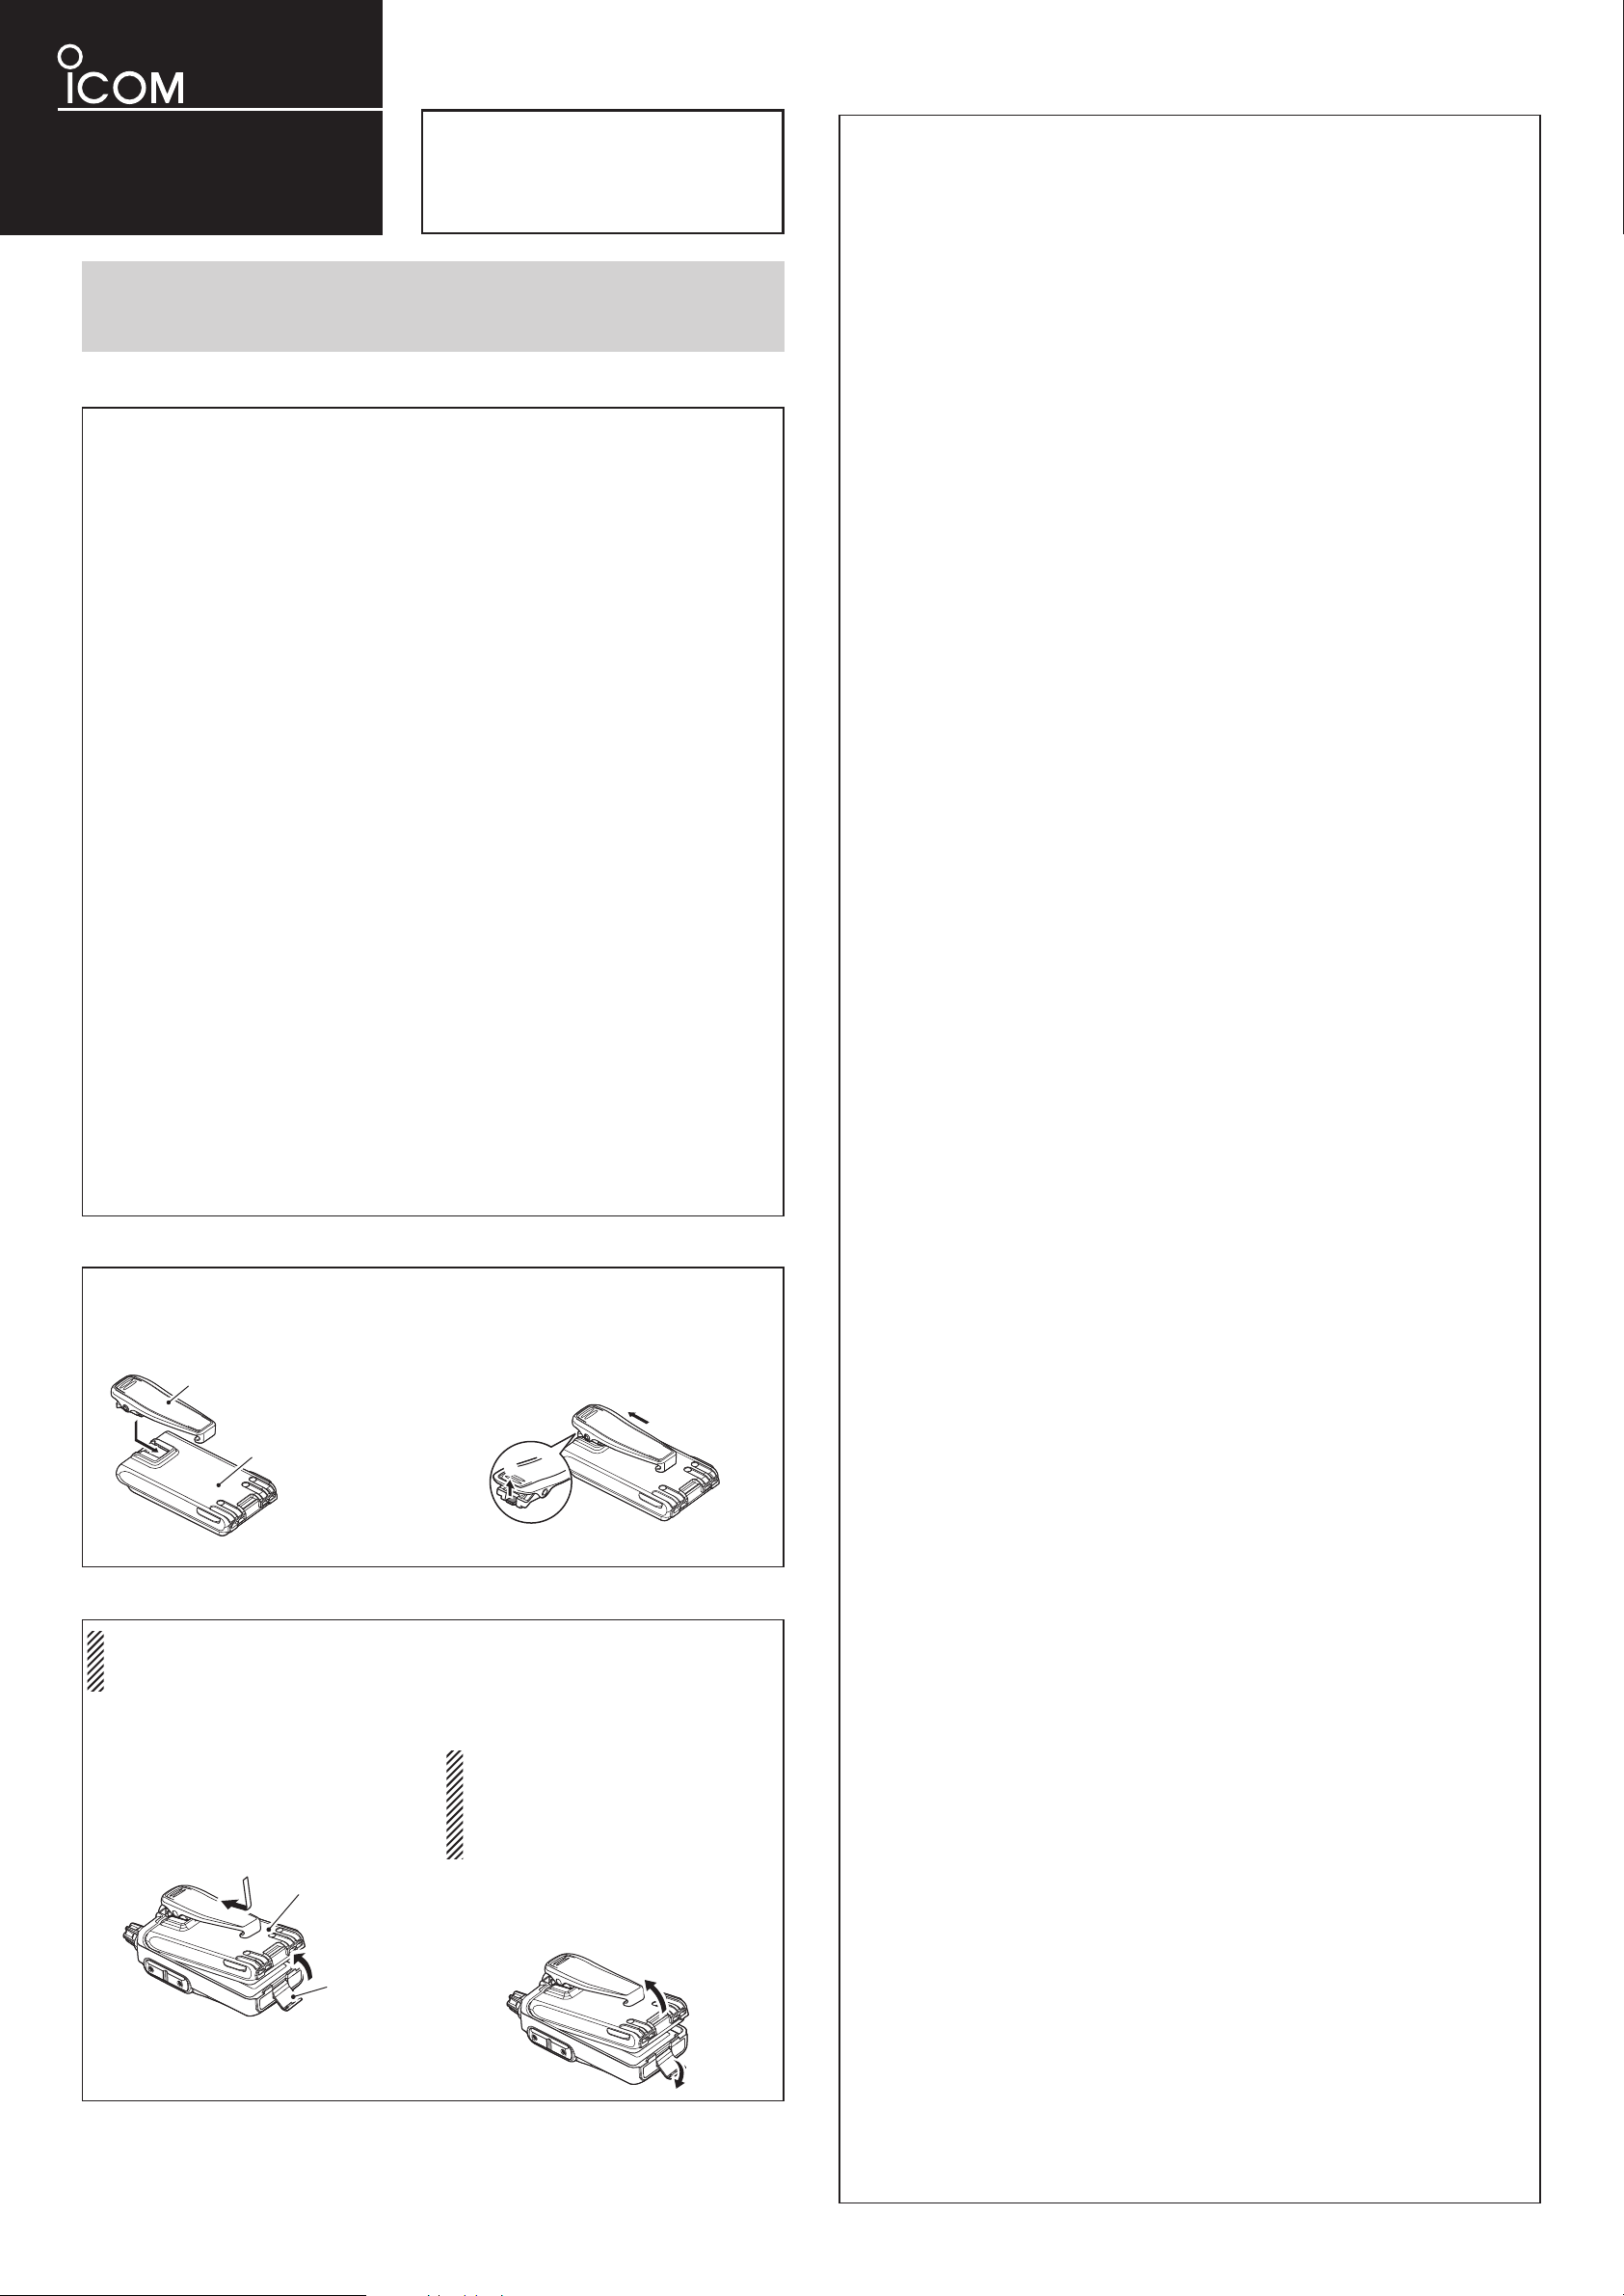
■ Belt clip
To attach the belt clip:
Slide the belt clip in the direction of the
arrow until the belt clip locks in place, and
makes a ‘click’ sound.
Belt clip
Battery pack/case
To detach the belt clip:
q Remove the battery pack or case from
the transceiver, if it is attached.
w Lift the tab up (q), and slide the belt clip
in the direction of the arrow (w).
■ Battery pack or case
NEVER remove or attach the battery pack or case when the transceiver is wet or soiled.
This may result in water or dust getting into the transceiver or the battery pack or case,
and may result in them being damaged.
To attach the battery pack or case:
q Fit the battery pack or case in the
direction of the arrow (q), and then
close it.
w Hook the latch until it makes a ‘click’
sound (w).
Battery pac
q
or
battery case
w
Latch
To remove the battery pack or case:
Be careful! The latch is tightly locked,
so use caution when releasing it. DO
NOT use your fingernail. Use the edge
of a coin or screwdriver tip to carefully
release it.
➥ Unhook the latch (z), and then lift
up the battery pack or case in the
direction of the arrow (x).
x
z
■ Battery cautions
D
For the BP-264 Ni-MH battery
R DANGER! NEVER incinerate used bat-
tery packs. Internal battery gas may cause
an explosion.
R DANGER! NEVER immerse the battery
pack in water. If the battery pack becomes
wet, be sure to wipe it dry BEFORE attaching it to the transceiver.
CAUTION: Always use the battery within
the specified temperature range, –5˚C to
+60˚C. Using the battery out of its specifi ed
temperature range will reduce the battery’s
performance and battery life.
CAUTION: Shorter battery life could occur
if the battery is left completely discharged,
or in an excessive temperature environment (above +55˚C) for an extended period
of time. If the battery must be left unused
for a long time, it must be detached from
the radio after charging. Keep it safely in a
cool dry place at the following temperature
range:
–20˚C to +45˚C (up to a month)
–20˚C to +35˚C (up to six months)
–20˚C to +25˚C (up to a year*)
* We recommend charging the battery pack
every 6 months.
Clean the battery terminals to avoid rust or
bad contact.
Keep battery terminals clean. It’s a good
idea to occasionally clean them.
If your Ni-MH battery pack seems to have
no capacity, even after being charged, completely discharge it by leaving the power
ON overnight. Then, fully charge the battery
pack again. If the battery pack still does not
retain a charge (or only very lit
new battery pack must be purchased.
Prior to using the transceiver for the
first time, the battery pack must be fully
charged for optimum life and operation.
• Recommended temperature range for
charging:
between +10°C and +40°C (rapid charge:
with BC-191) or between 0°C and +45°C
(regular charge: with BC-192)
• Use only the supplied charger or optional
charger (BC-191 for rapid charging, BC192 for regular charging).
NEVER use other manufacturers’ chargers.
The battery pack contains a rechargeable
battery.
Charge the battery pack before first operating the transceiver, or when the battery
pack becomes exhausted.
If you want to prolong the battery life, the
following points should be observed:
• Avoid over charging. The charging time
period should be less than 48 hours.
• Use the battery pack until it becomes almost completely exhausted, under normal conditions. We recommend battery
charging just when transmitting becomes
impossible.
D For the BP-265 Li-ion battery
R DANGER! Use and charge only spec-
ified Icom battery packs with Icom radios or Icom chargers. Only Icom battery
packs are tested and approved for use with
Icom radios or charged with Icom chargers. Using third-party or counterfeit battery packs or chargers may cause smoke,
fi re, or cause the battery to burst.
R DANGER!
pact the battery. Do not use the battery if it
has been severely impacted or dropped, or if
the battery has been subjected to heavy pressure. Battery damage may not be visible on
the outside of the case. Even if the surface of
the battery does not show cracks or any other
damage, the cells inside the battery may rupture or catch fi re.
R DANGER! NEVER use or leave bat-
tery pack in areas with temperatures above
+60˚C. High temperature buildup in the
battery, such as could occur near fires or
stoves, inside a sun heated car, or in direct
sunlight may cause the battery to rupture or
catch fi re. Excessive temperatures may also
degrade battery performance or shorten
battery life.
DO NOT hit or otherwise im-
tle charge), a
R DANGER! DO NOT expose the battery
to rain, snow, seawater, or any other liquids.
Do not charge or use a wet battery. If the
battery gets wet, be sure to wipe it dry before using.
R DANGER! NEVER incinerate a used
battery pack since internal battery gas may
cause it to rupture, or may cause an explosion.
R DANGER! NEVER solder the battery
terminals, or NEVER modify the battery
pack. This may cause heat generation, and
the battery may burst, emit smoke or catch
fi re.
R DANGER! If fl uid from inside the battery
gets in your eyes, blindness can result.
Rinse your eyes with clean water, without
rubbing them, and see a doctor immediately.
R WARNING! Immediately stop using the
battery if it emits an abnormal odor, heats
up, or is discolored or deformed. If any of
these conditions occur, contact your Icom
dealer or distributor.
R WARNING! Immediately wash, using
clean water, any part of the body that
comes into contact with fl uid from inside the
battery.
R
WARNING!
microwave oven, high-pressure container,
or in an induction heating cooker. This
could cause a fire, overheating, or cause
the battery to rupture.
CAUTION: Always use the battery within
the specifi ed temperature range, –20˚C to
+60˚C. Using the battery out of its specifi ed
temperature range will reduce the battery’s
performance and battery life.
CAUTION:
if the battery is left fully charged, completely
discharged, or in an excessive temperature
environment (above +50˚C) for an extended
period of time. If the battery must be left unused for a long time, it must be detached
from the radio after discharging. You may
use the battery until the battery icon shows
half-capacity, and then keep it safely in a
cool dry place at the following temperature
range:
–20˚C to +50˚C (up to a month)
–20˚C to +35˚C (up to three months)
–20˚C to +20˚C (up to a year)
NEVER put the battery in a
Shorter battery life could occur
D Charging caution
R DANGER! NEVER charge the battery
pack in areas with extremely high temperatures, such as near fi res or stoves, inside
a sun-heated vehicle, or in direct sunlight.
In such environments, the safety/protection
circuit in the battery will activate, causing
the battery to stop charging.
R
WARNING! DO NOT charge or leave
the battery in the battery charger beyond
the specified time for charging. If the battery is not completely charged by the specified time, stop charging and remove the
battery from the battery charger. Continuing to charge the battery beyond the
specifi ed time limit may cause a fi re, overheating, or the battery may rupture.
R
WARNING! NEVER insert the trans-
ceiver (battery attached to the transceiver)
into the charger if it is wet or soiled. This
could corrode the battery charger terminals
or damage the charger. The charger is not
waterproof.
CAUTION:
side of the specifi ed temperature range: BC193 (+10˚C to +40˚C). Icom recommends
charging the battery at +20˚C. The battery
may heat up or rupture if charged out of the
specified temperature range. Additionally,
battery performance or battery life may be
reduced.
The supplied battery pack, charger, and
AC adapter differ, or no supplied depending on the version.
Prior to using the transceiver for the
first time, the battery pack must be fully
charged for optimum life and operation.
DO NOT charge the battery out-
Page 2

■ Panel description— Front panel
Weak RX Signal level Strong
Low Mid High
D
D
Set the microphone sensitivity.
Set the VOX Delay.
Set the VOX time-out timer.
To turn OFF the function, select “Vto.OF.”
Select the method to transmit a DTMF code sequence.
Set the time between when the Function mode is entered,
and how long it remains activated after you push the keypad key
to activate its second function.
Select the LCD Backlight function.
Set the VOX gain.
To turn OFF the VOX function, select “VOX.OF.”
• LCD backlight
• Function key timer
Set mode items
• Scan resume setting
Select the scan pause and resume setting.
• VOX time-out timer
• Microphone gain
• VOX delay
• DTMF TX key
• VOX gain
:
:
q
w
e
r
t
y
u
i
Function
display
Keypad
Microphone
Speaker
u
i
o
q w e r
yt
!2
!1
!0
Basic operation ■
FRONT PANEL D
q PTT SWITCH [PTT]
➥
Hold down to transmit, release to receive.
➥
While in the DTMF memory mode, push
to save the DTMF memory channel.
w ANTENNA CONNECTOR
Connect an antenna here.
e CONTROL DIAL [VOL]
➥ Adjust the audio level.
➥
While in the Set mode, rotate to select
the desired item, option or value.
r EXTERNAL SP/MIC JACKS [SP MIC]
Accepts an optional speaker-microphone,
plug adapter cable or cloning cable connector. The internal microphone and speaker will
not function when an option is connected.
CAUTION: Be sure to turn OFF the
transceiver power, before connecting
or disconnecting optional equipment
to or from the [SP/MIC] jack.
t MONITOR KEY [MONI]
➥ Hold down to temporarily open the squelch
to monitor the operating channel.
➥ While holding down the key, push [Y]
or [Z] to adjust the squelch level.
➥
Enters or transmit the DTMF code ‘A.’
y POWER KEY [ ]
Hold down for 1 second to turn the power
ON or OFF.
u UP/DOWN KEYS [Y]/[Z]
➥ Push to select a channel.
➥ While scanning, push to change the
scanning direction.
➥ While holding down [MONI], push to ad-
just the squelch level.
➥ While in the Set mode, push to select
a setting item.
➥
[Y] enters or sends the DTMF code ‘B.’
➥
[Z] enters or sends the DTMF code ‘C.’
i
VFO/MEMORY/CALL KEY [VFO/MR/CALL]
➥ Push to exit the DTMF memory mode.
➥
Enters or sends the DTMF code ‘D.’
KEYPAD D
[1]
➥
➥ Numeric i
➥ After pushing [FUNC](M), turns the
* Only when an optional headset
➥
➥
➥
➥
➥
➥
➥
➥ After pushing [FUNC](M), enters
➥
➥ After pushing [FUNC](M), selects
➥
➥ After pushing [FUNC](M), enters
➥
➥ Push to access the second func-
➥
➥ Push to exit the Set mode.
➥ After pushing [FUNC](M), hold
DTMF code: ‘1’DTMF code: ‘1’
[2] • [VOX](2)
nput nput forfor DTMF code: ‘2’ DTMF code: ‘2’
VOX function ON or OFF*
and plug adapter are connected.
[3]
DTMF code: ‘3’DTMF code: ‘3’
[4]
DTMF code: ‘4’DTMF code: ‘4’
[5] • [SCAN](5)
DTMF code: ‘5’DTMF code: ‘5’
After pushing [FUNC](M), starts a scan.
[6]
DTMF code: ‘6’DTMF code: ‘6’
[7]
DTMF code: ‘7’DTMF code: ‘7’
[8] • [SET](8)
DTMF code: ‘8’DTMF code: ‘8’
the Set mode.
[9] • [H/M/L](9)
DTMF code: ‘9’DTMF code: ‘9’
high, mid or low output power.
[0] • [DTMF-M](0)
DTMF code: ‘0’DTMF code: ‘0’
the DTMF memory mode.
[M] • [FUNC](M)
DTMF code: ‘DTMF code: ‘M (indication: E)’ ’
tion of other keys.
[# ENT] • [ ](# ENT)
DTMF code: ‘DTMF code: ‘# (indication: F)’’
down for 1 second to turn the Key
Lock function ON or OFF.
.
D Turning power ON/OFF
➥ Hold down [ ] for 1 second to turn the
power ON or OFF.
D Selecting a channel
➥
Push [Y] or [Z] to select the desired channel.
•
Only programmed channels can be selected.
D Adjusting the audio level
➥ Rotate [VOL] to adjust the audio level.
• The audio level is displayed while adjusting.
• If the squelch is closed, hold down [MONI]
while adjusting the audio level.
D Adjusting the squelch level
➥ While holding down [MONI], push [Y] or [Z]
several times to adjust the squelch level.
• “SqL 1” is loose squelch (for weak signals)
and “SqL10” is tight squelch (for strong signals). “SqL 0” is open squelch.
D Monitor function
This function is used to listen to weak signals, or to manually open the squelch. You
can use it without disturbing the squelch
setting, even when mute functions such as
the tone squelch are in use.
➥ Hold down [MONI] to open the squelch.
• Release [MONI] to cancel the function.
D Selecting output power
Set the output power level to suit your operating requirements. Lower output powers during
short-distance communications may reduce
the possibility of interference to other stations
and will reduce current consumption.
➥
Push [FUNC](M), and then push [H/M/L](9)
several times to select the output power.
• “H,” “M,” or “L” appears, depending on the selected output power.
• When you change the operating channel, the
output power is automatically returned to the
original level set in the operating channel.
D Key Lock function
Use the Key Lock function to prevent accidental channel change and unnecessary
function access.
➥ Push [FUNC](
[
](# ENT) for 1 second to turn the Key
Lock function ON or OFF.
• “ ” appears while the Key Lock function
is ON.
• [ ], [VOL], [MONI], [PTT] and [FUNC](M) +
[ ](# ENT) are still operable while the Key
Lock function is ON.
■ Scan operation
A scan automatically searches for signals.
CH 1
CH 0
CH 199
CH 2 CH 3 CH 4
CH8
CH 7 CH 6
CH 5
Starting a scan D
Repeatedly scans all channels.
Push [FUNC](M), and then push [SCAN](5)
q
to start the scan.
•
To change the scan direction, push [Y] or [Z].
w To cancel the scan, push any key except
[
], [Y]/[Z], [MONI] or [FUNC](M).
D Scan resume setting
Various pause and timer options can be selected with the Scan Resume function.
q Push [FUNC](M), and then push [SET](8)
to enter the Set mode.
w Push [Y] or [Z] to select the scan pause
timer item (SCt, or SCP).
e Rotate [VOL] to select the desired scan
resume option.
•
“SCt. 5/10/15” :
The scan pauses for 5 to
•
“SCP. 2” :
The scan pauses, then re-
r Push [# ENT] to exit the Set mode.
■ Set mode programming
• Set mode operation
q Push [FUNC](M), and then push [SET](8) to enter the Set mode.
w Push [Y] or [Z] to select the desired item.
e Rotate [VOL] to select an option or value.
r Push [# ENT] to exit the Set mode.
M
), and then hold down
Timer scan
15 seconds, when a signal
is received.
Pause scan
sumes 2 seconds after the
signal disappears.
■ Panel description— Function display
q BUSY ICON
➥ Appears when a signal is being re-
ceived, or the squelch is open.
➥
Blinks when the Monitor function is ON.
w SIGNAL ICON
➥ Shows the strength of the received signal.
➥ While transmitting, shows the output
power level.
e TONE ICONS
Indicate which Tone function is pro-
grammed to the channel.
“
“
“ ” and “D”
“ ”
” and “ ”
“
“
” and “ ”
Repeater tone encoder
DTCS encoder (Only TX)
CTCSS squelch function
”
DTCS squelch function
”
CTCSS Pocket beep function
DTCS Pocket beep function
r MEMORY ICON
Blinks during a scan.
t CHANNEL NUMBER READOUT
Displays the selected channel number,
Set mode contents and a variety of other
information.
y BATTERY ICONS
➥ “
”
appears when the battery pack
or case is attached.
➥
“ ” appears when the battery is nearing
exhaustion. (Charging the battery pack,
or replacing the batteries is necessary.)
u KEY LOCK ICON
Appears when the Key Lock function is ON.
i VOX ICON
Appears when the VOX function is ON.
o POWER ICON
➥ “H” appears when high power is selected.
➥ “M” appears when mid power is selected.
➥ “L” appears when low power is selected.
!0 DUPLEX ICON
➥
“+” appears when plus duplex is programmed to the channel
.
➥ “–” appears when minus duplex is pro-
grammed to the channel.
• No icon is displayed when simplex is programmed.
■
Resetting
CAUTION: Resetting returns the Set modes contents to their default settings.
!1 FUNCTION ICON
Appears when a second function can be
accessed.
q Hold down [
] for 1 second to turn OFF the power.
w While holding down [VFO/MR/CALL], hold down [
] for 1 second to turn ON the power.
!2 TRANSMIT ICON
Appears while transmitting.
1-1-32 Kamiminami, Hirano-ku, Osaka 547-0003, Japan
Printed on recycled paper with soy ink.
A-7033H-2EX
Printed in Japan
© 2012 Icom Inc.
 Loading...