

Page 1

INSTRUCTION MANUAL
PROGRAMMING SOFTWARE
CS-IP501H
The CS-IP501H is a software application to setup the IP501H and the IP503H from your PC.
To use the software, a computer system and some items described in “System requirements” are required.
L The instructions are based on using Microsoft
®
Windows® 10.
Thank you for choosing this Icom product. READ
ALL INSTRUCTIONS carefully and completely
before using this product.
System requirements (As of May 2019)
• Operating System (OS)
Microsoft
(32/64bit, Service Pack 1 or later)
Microsoft® Windows
Microsoft® Windows® 10 (32/64bit)
* Except for Microsoft® Windows® RT.
• USB port
A USB 1.1 or 2.0 port
L Icom is not responsible for problems using a PC with
an above OS installed.
®
Windows
®
7
®
8.1 (32/64bit)*
Operation note
• The contents of this sheet, the software associated
with the CS-IP501H, and the appearance of the
CS-IP501H are all subject to change without notice.
Procedure outline
• Cables
OPC-478UC cloning cable
OPC-2144 plug adapter cable
NOTE:
There are two different OPC-478UCs:
• One has no marks on the label. (previous)
• One has a “B” marked on the label.
(See the illustration below.)
The previous (unmarked) OPC-478UC is NOT
usable with Microsoft® Windows® 8.1 and 10.
• The displays, indications, or operations may differ
slightly, depending on your system settings, type of
OS, and its service pack level.
To setup from a PC, follow the steps described below rst.
Step 1 Preparations
Conrm the system requirements in these instructions.
Step 2 CS-IP501H installation
Install the CS-IP501H following these instructions.
Step 3 USB driver installation
Install the USB driver following the OPC-478UC installation guide.
Step 4 Connection
Connect the transceiver and a PC following these instructions, and then turn ON the transceiver.
– 1 –
Page 2
Installing the programming software
1. Log in as the administrator.
L BE SURE no other applications are running.
2. Download and unzip the file.
L If “Security Warning” is displayed, click <Yes> to
continue.
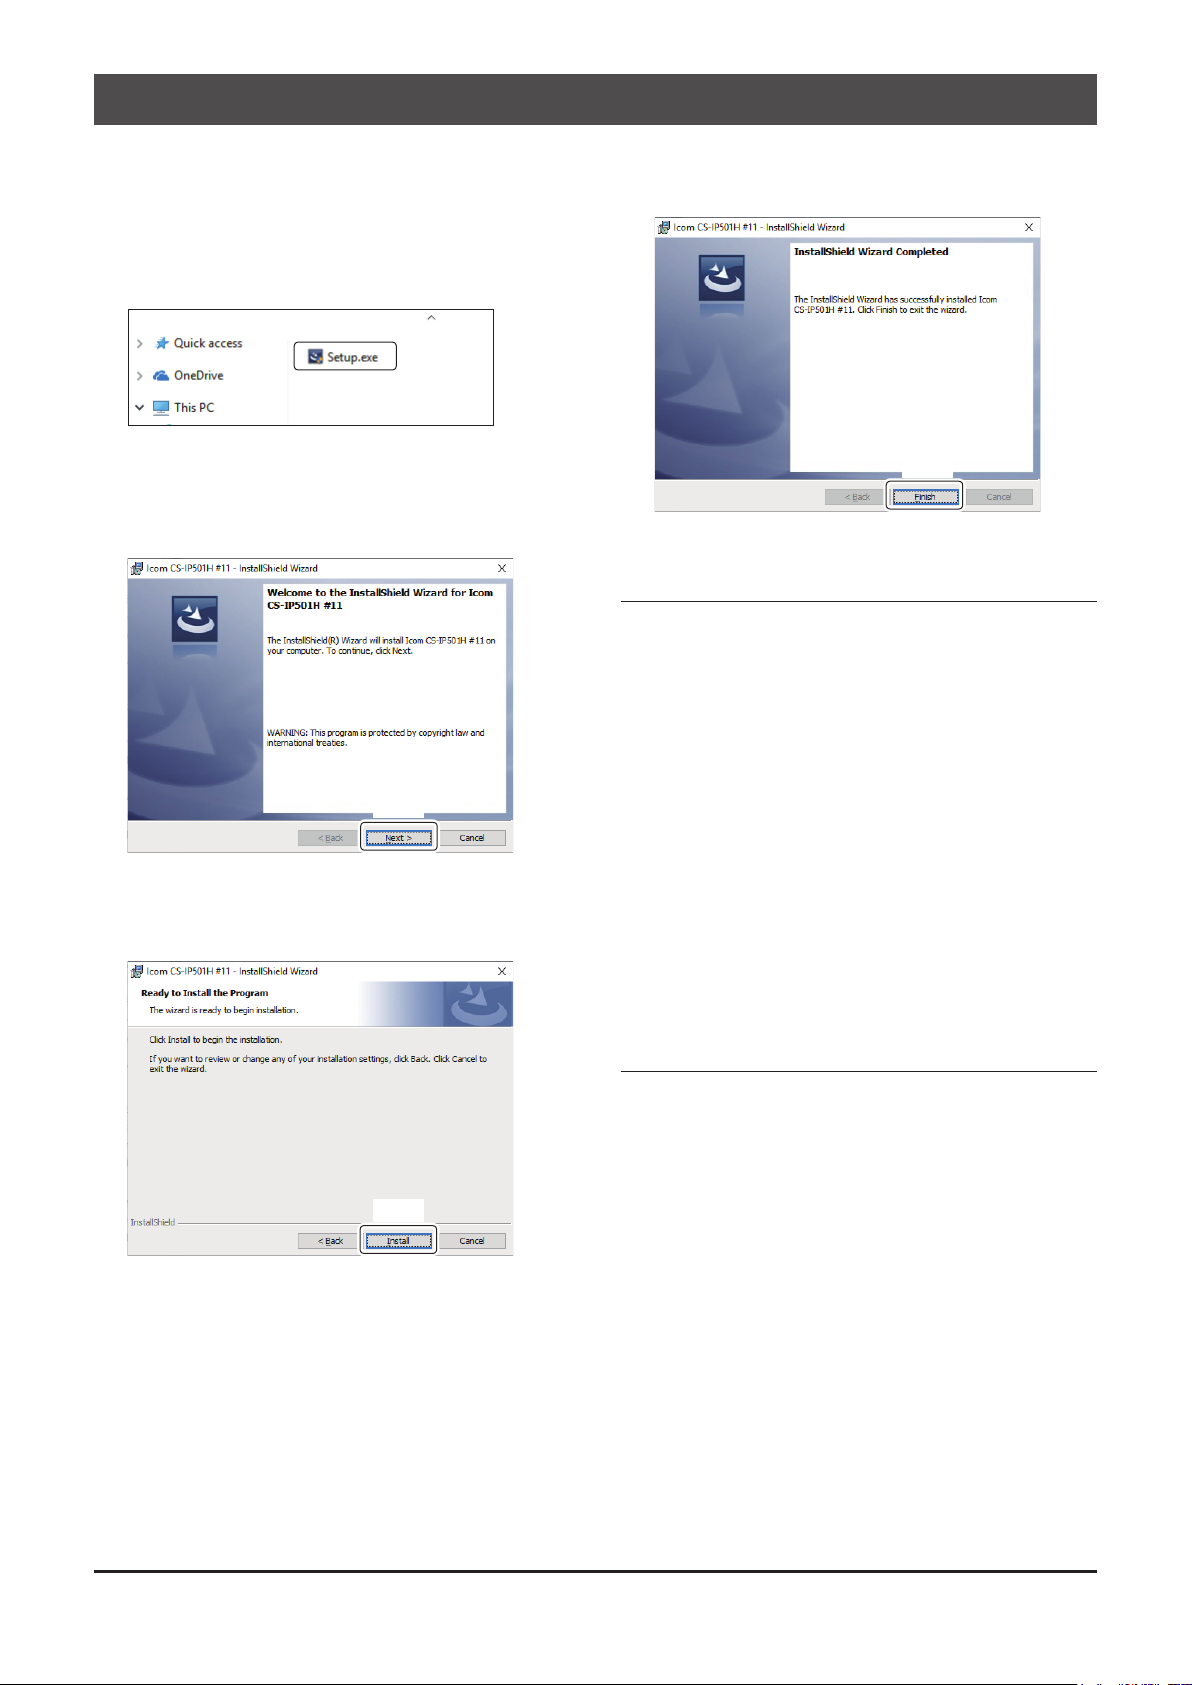
3. Double-click “setup.exe” contained in the
unzipped folder.
Double-Click
L If “User Account Control” is displayed, click <Yes> to
continue.
4. “Welcome to the InstallShield Wizard for Icom
CS-IP501H #11” is displayed, and then click
<Next>>.
Click
L If your PC already has the software installed, the
uninstallation or update screen is displayed.
5. “Ready to Install the Program” is displayed, and
then click <Install>.
6. After the installation is completed, “InstallShield
Wizard Completed” is displayed, and then click
<Finish>.
Click
Uninstalling the software
Before uninstalling the software, conrm the
CS-IP501H is closed.
1. Log in as the administrator.
2. Click the <Start> button, then click the “Settings”
icon, and then click “Apps.”
• Microsoft® Windows® 8.1:
Place the mouse pointer in the bottom right corner of
the screen.
Click the “Settings” charm, then click “Control Panel,”
and then click “Uninstall a program.”
• Microsoft
Click the <Start> button, then click “Control Panel,”
and then click “Uninstall a program.”
®
Windows® 7:
3. Click “Icom CS-IP501H #11,” and then click
“Uninstall.”
L If “User Account Control” is displayed, click <Yes> to
continue.
4. Follow the instructions on the screen to uninstall.
Click
Reinstalling the software
Once the uninstalling is complete, you can reinstall
the CS-IP501H by following the steps in “Installing
the programming software.”
– 2 –
Page 3

Transceiver
Before connecting the cable to your PC
Before you use the OPC-478UC cloning cable, you must install its USB driver. The latest USB driver and
installation guide can be downloaded from the “Options” section towards the bottom of the rmware page on the
Icom website.
Carefully read the guide, before installing the driver.
http://www.icom.co.jp/world/support/download/rm/
Connection
NOTE: Before connecting or disconnecting the cables, turn OFF the transceiver.
Connect the OPC-478UC cloning cable and OPC-2144 plug adapter cable between the transceiver and the PC,
as shown below. After connecting, turn ON the transceiver.
OPC-2144
To φ3.5mm jack
To the [MIC/SP] jack
OPC-478UC
Starting the CS-IP501H
1. Click “Icom” in the Start menu, and then click
“CS-IP501H #11” to start the software.
• Microsoft® Windows® 8.1:
<Start> ➔
• Microsoft
<Start> ➔ All Programs ➔ Icom ➔ CS-IP501H #11 ➔
CS-IP501H #11
L You can also start the software by simply double-
clicking the CS-IP501H #11 short cut on the
desktop.
2. Edit necessary settings for each function.
TIP: See the Help le of the software for assistance
with the functions or settings.
To open the Help le, click “Help” in the <Help>
menu of the software.
➔ CS-IP501H #11
®
Windows® 7:
To [USB] port
USB cable
(comes with the OPC-478UC)
PC
NOTE:
• Select the connected transceiver in the <Model>
menu.
• To prevent data loss, you should rst read all the
transceiver’s setting data into the programming
software. Before editing or entering, make a
backup le onto your PC. A backup le enables
easy restoring even if the setting data in the
transceiver is accidentally deleted. After that,
enter or edit parameters using the programming
software. If you write the setting data into your
transceiver before reading, the settings are
overwritten.
See page 5 to read the data from the
transceiver settings and to save the settings le.
• DO NOT turn OFF the transceiver or the PC, and
DO NOT disconnect the cable while reading or
writing setting data. Otherwise, the data could be
lost or deleted.
– 3 –
Page 4

D COM Port Searching
For your reference
NOTE: Before searching for the COM port, conrm
the transceiver is turned ON and the transceiver and
the PC are correctly connected together.
Select “Search” in the <COM Port> menu to
automatically set the COM port number that the cable
is connected to.
L You can also conrm the COM port number in the
Device Manager screen.
To Conrm the COM port number
1. Click the folder icon on the taskbar.
Click
2. Right-click “This PC,” and then click “Properties.”
• Microsoft® Windows® 7:
Right-click “Computer,” and then click “Properties.”
1Right-click
2Click
3. Click [Device Manager].
Click
• The “Device Manager” screen is displayed.
4. Double-click “Ports (COM & LPT).”
1Double-click
2Conrm
– 4 –
Page 5

For your reference (Continued)
D About basic operation
To read the data from the transceiver
Click
menu.
To save the settings le to a folder on your PC
Click
menu.
To write the setting data into the transceiver
Click
menu.
, or select “Read ← TR” in the <Clone>
or select “Save” or “Save As...” in the <File>
, or select “Write → TR” in the <Clone>
D Firmware updating
Basically, the transceiver’s rmware is automatically
updated through the mobile network.
See the transceiver’s Instruction manual about
updating the rmware.
If you need to update the transceiver’s rmware
ofine, select “Update...” in the <Firmware> menu.
L You cannot download the rmware le from the Icom
website.
If the dealer orders you to update the transceiver ofine,
use the CS-IP501H to update it.
NOTE:
• Before updating, conrm the transceiver is turned
ON and the transceiver and the PC are correctly
connected together.
• While updating, NEVER turn OFF the transceiver
or the PC, and NEVER disconnect the cables.
Otherwise, the transceiver rmware will be
corrupted.
CAUTION: Firmware is important for the basic
system control of your equipment. An interruption
or a malfunction during downloading may cause
a failure in the data rewriting, and your equipment
may stop functioning normally. If such a failure of
the rmware rewriting results in your equipment not
functioning normally, Icom Inc. expressly denies
any and all responsibility arising from the result of
damage from such an event.
1-1-32 Kamiminami, Hirano-ku, Osaka 547-0003, Japan
May. 2019
Icom, Icom Inc., and the Icom logo are registered
trademarks of Icom Incorporated (Japan) in Japan, the
United States, the United Kingdom, Germany, France,
Spain, Russia, Australia, New Zealand, and/or other
countries.
Microsoft and Windows are registered trademarks of
Microsoft Corporation in the United States and/or other
countries.
All other products or brands are registered trademarks or
trademarks of their respective holders.
– 5 –
A7433-1EX-1
© 2017–2019 Icom Inc.
 Loading...