

Page 1

TN5250 Terminal
Emulation
User’ s Guide
Page 2

TN5250 Terminal Emulation
User’s Guide
Page 3

Contents
Overview
Introduction . . . . . . . . . . . . . . . . . . . . . . . . . . . . . . . . . . . . . . . . . . . . . v
About This Guide. . . . . . . . . . . . . . . . . . . . . . . . . . . . . . . . . . . . . . . . . v
About TN5250 Terminal Emulation. . . . . . . . . . . . . . . . . . . . . . . . . . . v
Product Features . . . . . . . . . . . . . . . . . . . . . . . . . . . . . . . . . . . . . v
The TN5250 Connection. . . . . . . . . . . . . . . . . . . . . . . . . . . . . . . . vi
Guide Format Conventions . . . . . . . . . . . . . . . . . . . . . . . . . . . . . . . . . vi
Text Format . . . . . . . . . . . . . . . . . . . . . . . . . . . . . . . . . . . . . . . . . vi
Command and Key Sequence Format . . . . . . . . . . . . . . . . . . . . .vii
1 Getting Started
Downloading TN5250 Option Firmware . . . . . . . . . . . . . . . . . . . . . .1-1
TN5250 Server Connection Definitions. . . . . . . . . . . . . . . . . . . . . . .1-1
Preexisting Connection Definitions. . . . . . . . . . . . . . . . . . . . . . .1-1
New Connection Definitions . . . . . . . . . . . . . . . . . . . . . . . . . . . .1-2
TN5250 Command Options . . . . . . . . . . . . . . . . . . . . . . . . . . . .1-3
Sessions . . . . . . . . . . . . . . . . . . . . . . . . . . . . . . . . . . . . . . . . . . . . . .1-4
Emulator-Opened Sessions . . . . . . . . . . . . . . . . . . . . . . . . . . . .1-5
User-Opened Sessions. . . . . . . . . . . . . . . . . . . . . . . . . . . . . . . .1-5
Ending a Session . . . . . . . . . . . . . . . . . . . . . . . . . . . . . . . . . . . .1-6
2 The Menu System
Main Menu. . . . . . . . . . . . . . . . . . . . . . . . . . . . . . . . . . . . . . . . . . . . .2-1
Menu Control Keys . . . . . . . . . . . . . . . . . . . . . . . . . . . . . . . . . . .2-2
Sessions Menu . . . . . . . . . . . . . . . . . . . . . . . . . . . . . . . . . . . . . . . . .2-3
Open Session Menu . . . . . . . . . . . . . . . . . . . . . . . . . . . . . . . . . . . . .2-5
About TN5250 Menu . . . . . . . . . . . . . . . . . . . . . . . . . . . . . . . . . . . . .2-7
Utilities Menu. . . . . . . . . . . . . . . . . . . . . . . . . . . . . . . . . . . . . . . . . . .2-8
Remapping Local Parameter Keys. . . . . . . . . . . . . . . . . . . . . . .2-9
Screen Attributes Menu. . . . . . . . . . . . . . . . . . . . . . . . . . . . . . . . . .2-10
Keyboard Mapping Menu . . . . . . . . . . . . . . . . . . . . . . . . . . . . . . . .2-11
Edit Keys Menu . . . . . . . . . . . . . . . . . . . . . . . . . . . . . . . . . . . . . . . .2-13
Auto Key Entry Menu . . . . . . . . . . . . . . . . . . . . . . . . . . . . . . . . . . .2-14
Page 4

ii Contents
Edit Key Conflict Menu . . . . . . . . . . . . . . . . . . . . . . . . . . . . . . . . . .2-15
Help Menu. . . . . . . . . . . . . . . . . . . . . . . . . . . . . . . . . . . . . . . . . . . .2-16
3 Terminal Keyboard
Keyboard Layouts . . . . . . . . . . . . . . . . . . . . . . . . . . . . . . . . . . . . . . .3-1
5250 Keyboard . . . . . . . . . . . . . . . . . . . . . . . . . . . . . . . . . . . . . .3-1
Terminal Keyboard . . . . . . . . . . . . . . . . . . . . . . . . . . . . . . . . . . .3-2
Keys . . . . . . . . . . . . . . . . . . . . . . . . . . . . . . . . . . . . . . . . . . . . . . . . .3-2
TN5250 Key Definitions . . . . . . . . . . . . . . . . . . . . . . . . . . . . . . .3-2
Host Function Keys. . . . . . . . . . . . . . . . . . . . . . . . . . . . . . . . . . .3-4
Cursor Control Keys . . . . . . . . . . . . . . . . . . . . . . . . . . . . . . . . . .3-6
Screen Control Keys. . . . . . . . . . . . . . . . . . . . . . . . . . . . . . . . . .3-6
Local Function Keys . . . . . . . . . . . . . . . . . . . . . . . . . . . . . . . . . .3-7
Text Assist Keys . . . . . . . . . . . . . . . . . . . . . . . . . . . . . . . . . . . . .3-8
TypeAhead Buffering. . . . . . . . . . . . . . . . . . . . . . . . . . . . . . . . . . . . .3-9
Locked Keyboard . . . . . . . . . . . . . . . . . . . . . . . . . . . . . . . . . . . .3-9
A Error Messages
Telnet Errors . . . . . . . . . . . . . . . . . . . . . . . . . . . . . . . . . . . . . . . . . . A-1
TN5250 Internal Errors . . . . . . . . . . . . . . . . . . . . . . . . . . . . . . . . . . A-2
The Status Line . . . . . . . . . . . . . . . . . . . . . . . . . . . . . . . . . . . . . . . . A-3
Status Line Errors. . . . . . . . . . . . . . . . . . . . . . . . . . . . . . . . . . . A-3
B Troubleshooting Aids
Network Information . . . . . . . . . . . . . . . . . . . . . . . . . . . . . . . . . . . . B-1
Terminal Information . . . . . . . . . . . . . . . . . . . . . . . . . . . . . . . . . . . . B-1
Problem Description . . . . . . . . . . . . . . . . . . . . . . . . . . . . . . . . . . . . B-1
List of Figures
1 The TN5250 Connection . . . . . . . . . . . . . . . . . . . . . . . . . . . . vi
1-1 Connection Properties Dialog Box . . . . . . . . . . . . . . . . . . . .1-2
1-2 Pass Through Screen. . . . . . . . . . . . . . . . . . . . . . . . . . . . . .1-5
2-1 Main Menu - Emulator-Opened Sessions . . . . . . . . . . . . . .2-2
2-2 Main Menu - User-Opened Sessions. . . . . . . . . . . . . . . . . .2-2
2-3 Sessions Menu. . . . . . . . . . . . . . . . . . . . . . . . . . . . . . . . . . .2-4
2-4 Open Session Menu. . . . . . . . . . . . . . . . . . . . . . . . . . . . . . .2-6
2-5 About TN5250 Menu . . . . . . . . . . . . . . . . . . . . . . . . . . . . . .2-7
2-6 Utilities Menu . . . . . . . . . . . . . . . . . . . . . . . . . . . . . . . . . . . .2-8
2-7 Screen Attributes Menu . . . . . . . . . . . . . . . . . . . . . . . . . . .2-10
2-8 Keyboard Mapping Menu . . . . . . . . . . . . . . . . . . . . . . . . . .2-11
Page 5

Contents iii
2-9 Edit Keys Menu . . . . . . . . . . . . . . . . . . . . . . . . . . . . . . . . .2-13
2-10 Auto Key Entry Menu . . . . . . . . . . . . . . . . . . . . . . . . . . . . .2-14
2-11 Edit Key Conflict Menu. . . . . . . . . . . . . . . . . . . . . . . . . . . .2-15
2-12 Main Menu - TN5250 - Help. . . . . . . . . . . . . . . . . . . . . . . .2-16
3-1 IBM-Style 5250 Keyboard Layout. . . . . . . . . . . . . . . . . . . . .3-1
3-2 Terminal Keyboard Layout . . . . . . . . . . . . . . . . . . . . . . . . . .3-2
A-1 Status Line . . . . . . . . . . . . . . . . . . . . . . . . . . . . . . . . . . . . . A-3
List of Tables
1 Text Format Conventions. . . . . . . . . . . . . . . . . . . . . . . . . . . . vi
2 Command and Key Sequence Format Conventions . . . . . . .vii
1-1 TN5250 Command Options . . . . . . . . . . . . . . . . . . . . . . . . .1-3
2-1 Menu Control Keys. . . . . . . . . . . . . . . . . . . . . . . . . . . . . . . .2-3
2-2 Sessions Menu Functions . . . . . . . . . . . . . . . . . . . . . . . . . .2-5
2-3 Open Session Menu Functions . . . . . . . . . . . . . . . . . . . . . .2-6
2-4 Set Local Parameters Functions . . . . . . . . . . . . . . . . . . . . .2-9
2-5 Keyboard Mapping Functions. . . . . . . . . . . . . . . . . . . . . . .2-12
3-1 TN5250 Keys . . . . . . . . . . . . . . . . . . . . . . . . . . . . . . . . . . . .3-2
3-2 Host Function Keys . . . . . . . . . . . . . . . . . . . . . . . . . . . . . . .3-4
3-3 Cursor Control Keys. . . . . . . . . . . . . . . . . . . . . . . . . . . . . . .3-6
3-4 Screen Control Keys . . . . . . . . . . . . . . . . . . . . . . . . . . . . . .3-6
3-5 Local Function Keys. . . . . . . . . . . . . . . . . . . . . . . . . . . . . . .3-7
3-6 Text Assist Keys. . . . . . . . . . . . . . . . . . . . . . . . . . . . . . . . . .3-8
A-1 Telnet Errors. . . . . . . . . . . . . . . . . . . . . . . . . . . . . . . . . . . . A-1
A-2 TN5250 Internal Errors. . . . . . . . . . . . . . . . . . . . . . . . . . . . A-2
A-3 Status Line . . . . . . . . . . . . . . . . . . . . . . . . . . . . . . . . . . . . . A-3
A-4 Status Line Errors. . . . . . . . . . . . . . . . . . . . . . . . . . . . . . . . A-4
Page 6

Copyright Notice
© 1998 ALL RIGHTS RESERVED.
This manual and the software and firmware described in it are copyrighted.
You may not reproduce, transmit, transcribe, store in a retrieval system, or
translate into any language or computer language, in any form or by any
means, electronic, mechanical, magnetic, optical, chemical, manual or
otherwise, any part of this publication without express written permission.
Trademarks
Restricted Rights
Legend
IBM is a registered trademark of International Business Machines.
Microsoft and Windows are registered trademarks of Microsoft Corporation.
All other products are trademarks and/or registered trademarks of their
respective companies.
Specifications subject to change without notice.
Use, duplication, or disclosure by the Government is subject to restrictions as
set forth in subparagraph (c)(1)(ii) of the Rights in Technical Data and
Computer Software clause at 252.227-7013.
Page 7

Control No. 075B
License Agreement
Grant
Disclaimer of Warranty
YOU SHOULD CAREFULLY READ THE FOLLOWING TERMS AND CONDITIONS BEFORE
USING THIS SO FT WARE (TOGET HE R WI TH AN Y S UPP L IE D D OCU MEN TAT IO N, HE REA F TER
“SOFTWARE”), WHICH IS COPYRIGHTED BY LICENSOR. USING THIS SOFTWARE
INDICATES YOUR ACCEPTANCE OF THE FOLLOWING TERMS AND CONDITIONS.
You may use the Software only in or in conjunction with Your hardware (Terminal). You have the right to
use this Software by loading it onto a computer containing the capability of transferring the Software (in
whole or in part) to Your Terminal. You may use the Software in this f ashion as many times as is
necessary and as permitted by your paid-up license fees, so long a such use is always in conjunction with
Your Terminal. You may transfer ownership of the Terminal and equipment, including the r ight to use the
Software to another party, so long as that party agrees to accept these terms and conditions.
YOU MAY NOT USE, COPY, MODIFY, TRANSLATE OR TRANSFER THE SOFTWARE, OR
MODIFICATION THEREOF, IN WHOLE OR IN PART, EXCEPT AS EXPRESSL Y PROVIDED FOR
IN THIS LICENSE. YOU MAY NOT DECOMPILE, REVERSE ENGINEER, OR OTHERWISE
DECODE OR ALTER THE SOFTWARE.
The software is provided “AS IS”, and is delivered with no warranties, either express or implied.
LICENSOR MAKES AND YOU RECEIVE NO WARRANTIES ON THE SOFTWARE, EXPRESS,
IMPLIED, OR STATUTORY, OR IN ANY OTHER PROVISION OF THIS AGREEMENT TO OR
COMMUNICATION WITH YOU, AND LICENSOR DISCLAIMS ANY IMPLIED W ARRANTIES OF
MERCHANTABILITY, NON-INFRINGEMENT AN D FITNE SS FOR ANY PARTICU LAR PURPO SE.
LICENSOR DOES NOT WARRANT THAT THE FUNCITONS CONTAINED IN THE PRODUCT
WILL MEET YOUR REQUIREMENTS OR THAT THE OPERATION WILL BE UNINTERRUPTED
OR ERROR FREE.
SOME STATES DO NOT ALLOW LIMITATIONS ON HOW LONG AN IMPLIED WARRANTY
LASTS SO THE ABOVE LIMITATION MAY NOT APPLY TO YOU. THIS WARRANTY GIVES
YOU SPECIFIC LEGAL RIGHTS. YOU MAY ALSO HAVE OTHER RIGHTS WHI C H VARY FROM
STATE TO STATE.
Limit of liability
Export Restrictions
U.S. Gover n ment Restricted
Rights
UNDER NO CIRCUMSTANCES SHALL LICENSOR BE LIABLE FOR LOSS OF DATA, COST OF
COVER, OR ANY INCIDENTAL OR CONSEQUENTIAL DAMAGES, HOWEVER CAUSED AND
ON ANY THEORY OF LIABILITY. THESE LIMIT ATIONS SHALL APPL Y EVEN IF LICENSOR OR
ITS RESELLER HAS BEEN ADVISED OF THE POSSIBIL IT Y OF SUCH DAMAGES, AND
NOTWITHSTANDING ANY FAILURE OF ESSENTIAL PURPOSE OF ANY LIMITED REMEDY
PROVIDED HEREIN.
YOU AGREE THAT THESE ARE THE ONLY APPLICABLE TERMS OF AGREEMENT BETWEEN
US COVERING SOFTWARE AND THAT THEY SUPERSEDE ANY OTHER COMMUNIC ATIONS
(ORAL OR WRITTEN) BETWEEN US RELATING TO THE SOFTWARE.
You agree You will not export or transmit the Software to any country to which export is restricted by
applicable U.S. law or regulation without the written approval of the appropriate U.S. Government
organization.
The Software is provided with RESTRICTED RIGHTS. Use, duplication or disclosure by the
Government is subject to restrictions as set forth in subparagraph (c)(1)(ii) of the Rights in Technological
Data and computer software clause at DFARS 252. 227-7013 or in subparagraphs (c) (1) and (2) of the
Commercial Computer Software-Restricted Rights at 8 C.F.R. 52-227-19 as applicable.
Page 8

Overview
Introduction
About This Guide
About TN5250
Terminal
Emulation
The TN5250 T er minal Emulation User’ s Guide, explains ho w to configure and
use the TN5250 emulation on your terminal. This emulation is an option for
terminals.
This guide is organized into three chapters and two appendixes:
◆
Chapter 1, “Getting Started,” explains TN5250 terminal emulation
connection definitions, connections, and emulator sessions.
◆
Chapter 2, “The Menu System,” e x plains the TN525 0 onlin e menu sy stem
including keyboard mapping, and how to navigate through the menu
system.
◆
Chapter 3, “Terminal Keyboard,” compares TN5250 and terminal keys,
and outlines t he terminal’s keyboard feat ures.
◆
Appendix A, “Error Messages,” lists error messages and solutions to
problems reported by those error messages.
◆
Appendix B, “Troubleshooting Aids,” provides a short guide for
preparation in troubleshooting your terminal.
TN5250 terminal emulation provides the protocol to connect a terminal to
IBM midrange systems (AS/400 servers). Once connected, the user can access
and use legacy applications such as database and word processing through a
terminal.
Product Features
TN5250 terminal emulation includes these easy-to-use features:
◆
Interactive keyboard mapping
◆
TN5250-style screen attributes, including color and attribute settings
◆
Multiple sessions
◆
Telnet protocol
◆
Color terminal support
Page 9
vi Overview
The TN5250
Connection
Guide Format
Conventions
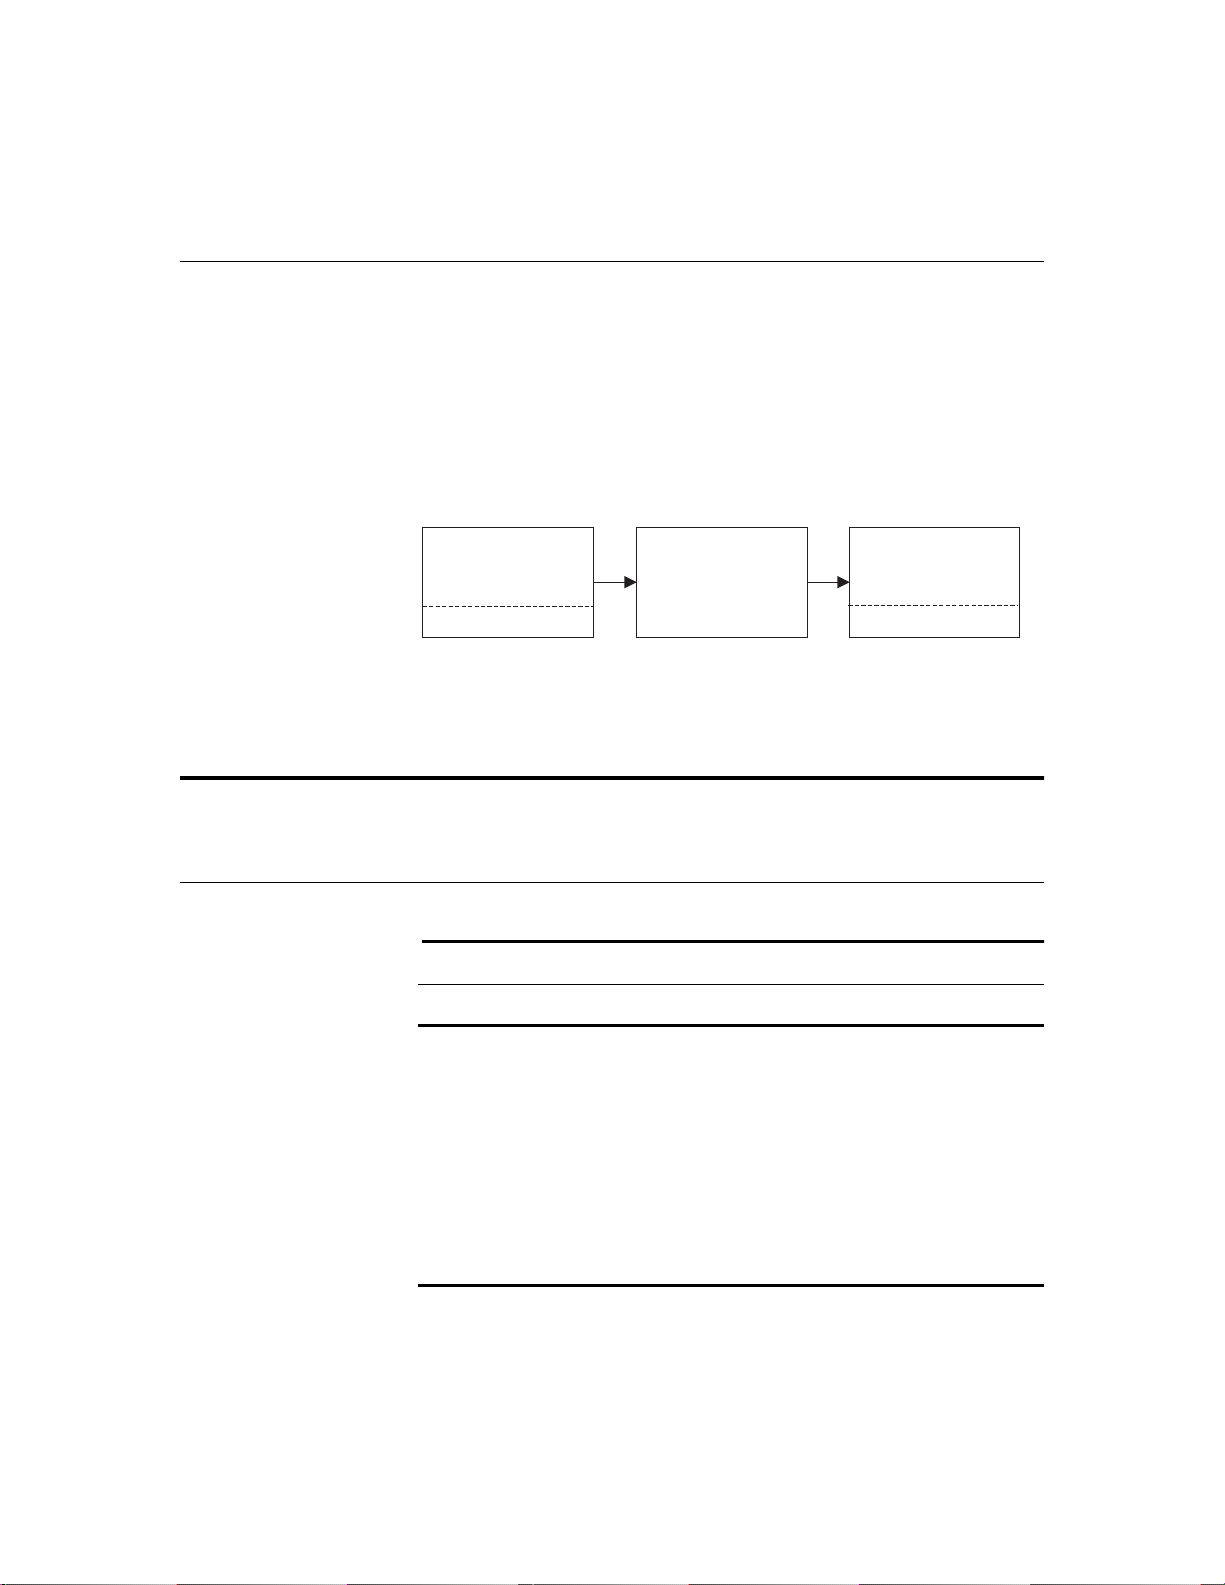
To operate TN5250 emulation, you must connect to an AS/400 server
operating with OS/400 V ersion 1, release level 3.0 or higher . Additionally , you
must be operating the emulator across a TCP/IP network, using an IBM 8209
or equivalent TCP/IP attachment. When you use TN5250 terminal emulation,
you are communicating directly with the AS/400 server. This communication
is accomplished with the IBM AS/400 system internet protocol. Figure 1
shows the TN5250 connection related to a terminal.
Figure 1 The TN5250 Connection
TN5250 Terminal
Emulation
Windows Terminal
❖
Note TN5250 terminal emulation software is downloaded, stored, and
TCP/IP Network TN5250 Server
AS/400
operated on your terminal.
This section describes the format conventions used in this guide.
Text Format
Ta ble 1 lists the text format conventions used in this document.
Table 1 Text Format Conventions
Convention Description
Bold Indicates a factory default.
Italic Indicates emphasis, a new term, or book
title.
Keycaps
Indicates a key on the keyboard.
San Serif Compressed Indicates screen display.
Monospace Indicates user input.
Monospace Italic
Indicates user input variables.
Page 10

Overview vii
Command and Key
Sequence Format
Table 2 lists the command and key sequence formats used in this guide.
Table 2 Command and Key Sequence Format Conventions
Convention Description
command <
xxx
> Command format.
The right and left angle brackets
indicate the boundaries of the
parameter list.
Alt + x
or
Alt + X
Key sequence format.
To enter this type of key sequence,
press the keys sim ultaneousl y in the
sequence shown. The operation is
performed only when the last key is
pressed.
Ctrl
(right)
key on the right side of the
Ctrl
keyboard in contrast to the one on
the left side.
Page 11

1
Getting Started
This chapter discusses how to initiate TN5250 terminal emulation and
explains:
◆
Downloading the TN5250 terminal emulation option.
◆
Defining and using TN5250 connections.
◆
Opening and exiting sessio ns .
Read this chapter carefully before attempting to connect to a TN5250 server.
Downloading
TN5250 Option
Firmware
TN5250 Server
Connection
Definitions
Preexisting
Connection
Definitions
The downloading of the TN5250 is similar to a flash download, and is done
through the serial port, the parallel port, the Remote Administratio n tool, or
the PCMCIA card.
❖
Note TN5250 terminal emulation can be downloaded only to some
terminals. Contact your system administrator or see the Terminal Firmware
Download Instructions for options available for your terminal.
When your terminal is first turned on, the Connections dialog box dis plays. In
this dialog box you will see the Connections list box. It is a list of preexisting
connections. You can use one of these preexisting connections to connect to
and start TN5250 emulation, or you can define a new TN5250 connection.
❖
Note See your terminal’s connectivity guide for more information about
connection definitions and the Connections dialog box.
To use a preexisting connection definition:
1 Click on an appropriate connection name in the Connections list box (see
Figure 1-1).
2 Click on the Connect command button.
Page 12

1-2 Chapter 1
You will connect to the host you specified in the connection definition
selected. Connection definitions appearing in the Connections list can be
edited. To edit:
1 Select the connection that you want to edit from the Connections list.
2 Click on the Setup command button in the Connections dialog box.
3 Click on the Properties command button in Connection Setup dialog box.
The Connection Properties dialog box displays. Use this dialog box to edit
your preexisting connection de finition.
New Connection
Definitions
If the connection def initio n you w ant does no t already e xist in t he Connections
list, you can create one by:
1 Click on the Setup command button in th e Connections dialog box.
2 Click on the New command button in the Connection Setup dialog box.
3 Click on the Terminal Emulation radio button, then the OK command button
in the New Connection dialog box.
❖
Note See your terminal’s connectivity guide for more information about
instructions 1 throu gh 3 ab o ve. Refer to Figure 1-1, the Connection Properties
dialog box, while executing instructions 4 through 8.
Figure 1-1 Connection Properties Dialog Box
4 Click on the TN5250 radio button in the Terminal Type group box.
5 Enter a connection description (a name you choose) in the Description
entry field.
Page 13

Getting Started 1-3
6 Enter a server name and any command options (see Table 1-1, TN5250
Command Options), in the Server Name entry field.
❖
Note The port command option (for example 5250) should be included in
the server name entry.
❖
Note If the TN5250 terminal type is grayed out, check with your
Administrator to see if the TN5250 application firmware has been
downloaded to your terminal.
7 If you wish to activate the reverse video display, click the Reverse Screen
button. This effects reverse video in all the subsequent displays of the
session.Click on the OK command button.
8 Click on the Close command button in the Connection Setup dialog box.
After you click on the Close command button, a dial og box appears di splaying
the message:
Flash Write In Progress, Do Not Power Down Unit
This message indicates that your new connection definition is being stored in
the terminal’s memory.
When the flash write is finished, the new connection appears in the
Connections list in the Connections dialog box. To connect, highlight the
connection, then click on the Connect command button in the Connections
dialog box. A message displays:
TN5250 Command
Options
Trying to connect to XXX.XXX.XX.XX.
Connected to XXX.XXX.XX.XX.
Table 1-1 lists the command options that can be included in the Server Name
field.
Table 1-1 TN5250 Command Options
Option Description
-escape <character> Sets the escape character for escaping
from a session.
Specify character as:
A single character.
◆
A key combination.
◆
hostname Lets you specify a host name for
immediately di splaying a session. The
host name is the name of your AS/400
host.
Page 14

1-4 Chapter 1
Table 1-1 TN5250 Command Options, Continued
Option Description
-terminal <terminal type> Specifies the type of terminal format
for the data you receive from the host.
Specify terminal type as:
◆
IBM 3179-2
◆
IBM 5251-11
◆
IBM 3196-A1
◆
PC-XT
◆
NVT
This option overrides terminal
negotiations.
-port <#> Specifies the host port you want to use.
-? Displays the command option
summary.
-version Displays the version number and
environment variable settings.
❖
Note The default command options are:
Host Name: OCS_Gateway.
◆
◆
Port Number: 23.
❖
Note Pressing
when the cursor is positioned next to any field listed in
F4
Table 1-1 displays a list of choices for that function.
Sessions
If you connect to a TN5250 server using a definition that contains an IP
address, the emulator will open up an initial TN5250 ses sio n (emulatoropened session) using that IP address. That session will be placed in the
Sessions list in the Sessions menu, as the initial open session (see Chapter 2,
“The Menu System,” for more information).
If you try to connect to a server using a definition that does not contain an IP
address, you will not connect. Instead, the emulator will display the TN5250
menu system, allowing you to create a session (user-opened session). Once a
session is created, you can then connect and run your session.
A session must be opened to use TN5250 terminal emulation. This section
discusses both emulator-opened sessions and user-opened sessions.
Page 15

Getting Started 1-5
Emulator-Opened
Sessions
If you have specified an IP address in your connection definition, then once
connected the Pass Through Screen displays (see Figure 1-2).
Figure 1-2 Pass Through Screen
Pass Through Screen
Type choices, Press Enter.
Remote location name AS400A
Mode name LU62APPC
Virtual controller QPACTL00
Virtual display device ___________
Remote network identifier ___________
Local PU name MKPTU3
Local LU name ___________
An initial session has been opened by the emulator. From the Pass Through
Screen, press
sessions, press
(right) to go to the first open session. To open subsequent
Ctrl
. The main menu will display. Use the Sessions menu to
Alt + ?
open more sessions.
User-Opened
Sessions
If you have not specified an IP address in your connection definition, then
Main Menu - TN5250 displays (the main menu of the TN5250 user interface).
Use this menu to open your initial sessi on. You will need to open a session to
continue.
❖
Note See Chapter 2, “The Menu System,” for further instructions about
navigating through the TN5250 terminal emulation menu system.
To open a session:
1 Position the cursor at Open Session.
2 Press
Ctrl
.
Page 16

1-6 Chapter 1
Ending a Session
3 In the Open Session menu with the
key select:
Tab
a Session: Enter a name for your session.
b Host Name: (skipping Auto Start) Enter the address of the server.
c Port Number: Specify 23 or other appropriate number.
4 Skip IBM Terminal Type, and press
Ctrl
.
Your initial ses sion will be opened.
❖
Note The maximum number of simultaneous open sessions is three.
You can end a session in one of two ways:
1 Press
, while a session is displayed:
Alt + x
a Terminal emulation ends.
b The terminal user interface displays.
If other sessions are active, the Open Session menu displays. You can end
all open sessions by repeating the steps in 1 for each session, or resume a
previous session. The terminal user interface will display only after all
active sessions are ended.
2 Use Main Menu - TN5250:
a Press
+ ?, displaying Main Menu - TN5250.
Alt
b Position the cursor at Exit TN5250.
c Press
Ctrl
.
The terminal user interface displays. See Chapter 2, “The Menu System,”
for more information about ending TN5250 sessions.
Page 17

2
The Menu System
The TN5250 menu system is used to:
◆
Control sessions
◆
Invoke utility functions
◆
Map keyboards
Additionally, the TN5250 menu system includes a help section. The help
section is discussed in Help Menu at the end of this chapter, and presents
additional information about emulator menus and functions.
Main Menu
Figure 2-1 shows the TN5250 Main Menu that displays after connecting with
an emulator-opened session. From this menu, you can access any TN5250
function.
In the Main Menu TN5250 displays the top-level menus of the system:
◆
Sessions/Open Sessions
◆
About TN5250
◆
Utilities
◆
Screen Attributes
◆
Keyboard Mapping
◆
Exit TN5250
These menus, except Exit TN5250, are discussed in the following sections. Exit
TN5250 is an exit function only, and is discussed in “Ending a Session” in
Chapter 1.
Figure 2-2 sho ws t h e TN525 0 mai n men u t hat di s pla ys afte r trying to connect
with a connection definition that does not contain an IP address (user-opened
session). From this menu, you must open a session to continue.
Page 18

2-2 Chapter 2
Figure 2-1 Main Menu - Emulator-Opened Sessions
Main Menu - TN5250
Sessions
About TN5250
Utilities
Screen Attributes
Keyboard Mapping
Exit TN5250
Right Ctrl:Current Selection
Tab:Next Field F1:Help
F3:Exit Menu
>>
>>
>>
>>
>>
Figure 2-2 Main Menu - User-Opened Sessions
Main Menu - TN5250
Open Session
About TN5250
Utilities
Screen Attributes
Keyboard Mapping
Exit TN5250
Right Ctrl:Current Selection
Tab:Next Field F1:Help
F3:Exit Menu
>>
>>
>>
>>
>>
Menu Control Keys
Menus are invoked by positioning the cursor next to a menu selection, then
pressing the
key. Menu functions are selected by using a combination of
Ctrl
control keys and alphanumeric keys (key sequences). The control keys used
are
Ctrl
and
. See Table 1 “Text Format Conventions” in the Overview.
Alt
Page 19

The Menu System 2-3
The keys that appear at the bottom of each menu allow you to navigate
through the menus. These are menu control keys, and are described in
Table 2-1.
Table 2-1 Menu Control Keys
Key Description
Sessions Menu
F1
F2
F3
F4
F5
F6
F12
Page Up
Page Down
Tab
Ctrl
(right)
Invokes the help system.
Edits a key.
Exits to the menu.
Displays a list of current information.
Refreshes the connection information.
Saves a connection definition.
Returns to the previously viewed menu.
Moves to the previous page.
Moves to the next page.
Moves the cursor to the next field.
Selects the current selection or the next menu.
Depending on the way you configure your connection, one of two sessions’
menus displays:
◆
If you connect t o a server using an IP address, the emulator will open with
a session. Once you return to the main menu, the first choice on the main
menu will be Sessions. Use this method to connect with preexisting
connection definitions.
◆
If you connect to a server without using an IP address (simply typing
5250 in the Description field of the Connection Properties dialog box), a
session will not be opened, but the main menu will display. In this menu
the first choice will be Open Session. Use this menu to open your initial
session. Use this method to create new connection definitions.
Page 20

2-4 Chapter 2
Invoke the Sessions menu by:
1 Position the cursor next to Sessions.
2 Press
Figure 2-3 shows the Sessions menu. The menu displays a list of preexisting
connection definitions.
Figure 2-3 Sessions Menu
1=Create 2=Copy 3=Switch 4=Display 5=Close 6=Options
Session Names Host Names Server IP Address Operating Mode
____________________________
Right Ctrl:Current Selection Tab:Next Field
(right). The Sessions menu displays.
Ctrl
Sessions
F1:Help F3:Exit Menu
F4:List
The functions displayed in this menu are numbered 1 through 6. To use:
1 Position the cursor to the left of the appropriate data field, and enter the
appropriate number.
2 Perform the required action (see Table 2-2 for more details).
3 Press
to exit the menu.
F3
Page 21

The Menu System 2-5
Table 2-2 describes the functions in the Sessions menu.
Table 2-2 Sessions Menu Functions
Function Description
1=Create Use this function to create a new session. New
sessions are created in the Open Session menu
(refer to Open Session). Once the data is entered
in the Open Session menu, press
. A new
F3
session will display in the Sessions menu.
2=Copy Copy duplicates a session. Press
(right). The
Ctrl
emulator will create and connect to a new
session, using the parameters of the chosen
session. The number of the new session is an
increment of one.
3=Switch This function switch es f rom one ses sion to
another session. Press
(right) to switch to the
Ctrl
selected session.
4=Display Display lists the status of a session. Press
Ctrl
(right). The Session Status menu appears, listing
the status of the selected session.
5=Close This function deletes a session from the Session
Names list. Press
(right) to delete sessions.
Ctrl
More than one session can be deleted, by
entering 5 next to each session to be deleted.
6=Options The Options function displays a list of Telnet
responses. They are:
◆
Are You There?
◆
Abort Output
◆
Interrupt Process
Enter x before each order that you want to use,
then press
Ctrl
(right)
Open Session
Menu
This menu displays only in a user-opened session. It is used for creating new
sessions.You invoke t he Open Session menu by:
1 Position the cursor next to Open Session in the main menu.
2 Press
Ctrl
(right)
Figure 2-4 shows the Open Session menu.
Page 22

2-6 Chapter 2
Figure 2-4 Open Session Menu
*Session ______________________________
Auto Start no____
*Host Name *DFLT__________________________ OCS_Gateway
Port Number *DFLT 23
*IBM Terminal Type *CALC____________ IBM-5251-11
Right Ctrl:Current Selection Tab:Next Field
The parameters displayed in this menu appear as data entry fields. To use
these fields:
1 Position the cursor to the left of each field in the menu, and enter the
appropriate data.
Open Session
[Default Values]
F1:Help F3:Exit Menu F4:List
F5:Refresh F6:Save F12:Prev Menu
2 Press
to save your data and exit the menu.
F6
Table 2-3 describes the data fields in the Open Session menu.
Table 2-3 Open Session Menu Functions
Field Description
Session Type the name of your session in this field.
Auto Start Type a yes or a no in this field. Yes prompts
the emulator to start the session immediately
after exiting this menu.
Host Name Enter the name of the host to which you want to
connect.
Port Number In t his f ield, type th e number of the port to which
you want to connect. The reco mmended entry for
TN5250 is 23.
IBM Terminal Type Enter the type of terminal to which you are
connecting.
Page 23

The Menu System 2-7
❖ Note For the Session, Auto Start, Host Name, and IBM Terminal Type data
fields, user-selectable lists are available. To inv o ke a list, position the cur sor at
the appropriate field, then press
F4
.
About TN5250
Menu
The About TN5250 menu displays the release information for your terminal
emulator software. Invoke this menu by:
1 Position the cursor next to About TN5250 in the Main menu.
2 Press
Ctrl
(right).
Figure 2-5 shows the About TN5250 menu.
Figure 2-5 About TN5250 Menu
About TN5250
Copyright © 1986, 92 OpenConnect Systems, Inc.
Windows Terminal Version 1.2
Copyright © 1997 Wyse Technology, Inc.
F3:Exit Menu
Page 24

2-8 Chapter 2
Utilities Men u
The Utilities menu displays the Set Local Parameters function. Invoke this
menu by:
1 Position the cursor next to Utilitie s in the Main menu.
2 Press
Ctrl
(right).
Figure 2-6 shows the Utilities menu.
Figure 2-6 Utilities Menu
Utilities
Set Local Parameters
Right Ctrl:Current Selection F1:Help
F3:Exit Menu F12:Prev Menu
>>
Set Local Parameters lets you control some additional local terminal features.
Table 2-4 describes the functions of the Set Local Parameters menu.
Page 25

The Menu System 2-9
Table 2-4 Set Local Parameters Functions
Key
Function
Sequence Description
Remapping Local
Parameter Keys
Echo Char
Ctrl + E
Echoes a character. This function sets
the local echoing (local display) of
characters that you enter at the
keyboard. You can set the emulator to
either display or not display entered
characters.
Session Escape
Ctrl + ]
Escapes a session. This function lets
you escape from your current session.
When invoked, the main menu
displays. Your session continues
running in the background. See Open
Session in this chapter for further
information about sessions.
Session Toggle
Ctrl + T
Toggles between sessions. This
function lets you toggle sessions.
The key sequences listed in Table 2-4 can be remapped by:
1 Position the cursor at the key sequence you want to remap.
2 Press the
key to display the available key sequences.
F4
3 Position the cursor at the key sequence you want, and press
The Set Local Parameters menu reappears, displaying the new key
sequence for that parameter.
Ctrl
(right).
Page 26

2-10 Chapter 2
Screen Attributes
Menu
The terminal emulator will display IBM TN5250-style screen attributes,
depending on the local terminal type setting and application that you are
using. The Screen Attributes menu displays these TN5250-style attributes.
Invoke the menu by:
1 Position the cursor next to Screen Attributes in the Main menu.
2 Press
Ctrl
(right).
Figure 2-7 shows the Screen Attributes menu.
Figure 2-7 Screen Attributes Menu
Screen Attributes
[20] Normal [Green]
[21] Reverse Image [Green/Reverse Image]
[22] High Intensity [White]
[23] High Intensity/Reverse Image [White/Reverse Image]
[24] Underscore_[Green/Underscore]
[25] Underscore/Reverse_Image_[Green,_Underscore,_Reverse_Image]
[26] Underscore/High_Intensity_[White,_Underscore]
[28] Blink [Red]
[29] Blink, Reverse Image [Red, Reverse Image]
[2a] Blink, High Intensity [Red, Blink]
[2b] Blink, High Intensity, Reverse Image [Red, Reverse Image, Blink]
[2c] Blink,_Underscore_[Red,_Underscore]
[2d] Blink,_Underscore,_Reverse_Image [Red,_Underscore,_Reverse_Image]
[2E] Blink,_Underscore,_High_Intensity [Red,_Underscore,_Blink]
Right Ctrl:Next Menu F1:Help F3:Exit Menu
F12:Prev Menu Page Down:Next Page Page Up:Prev Page
More...
Each displayed screen attribute includes the associated IBM 5250 attribute
code and text description. The following is an example:
[20] Normal [Green]
where [20] is the IBM 5250 attribute code, and Normal [Green] is normal
green text.
❖
Note The menu displayed in Figure 2-7 is one of two menus. As shown,
pressing the
(right) key takes you to the second attribute menu.
Ctrl
Page 27

The Menu System 2-11
Keyboard
Mapping Menu
You can view your emulator’s current key mappings (sequences) by accessing
the Keyboard Mapping menu. Invoke this menu by:
1 Position the cursor next to Keyboard Mapping in the Main menu.
2 Press
Ctrl
(right).
Figure 2-8 shows the Keyboard Mapping menu.
Figure 2-8 Keyboard Mapping Menu
Keyboard Mapping
Host Function Keys
Cursor Control Keys
Screen Control Keys
Local Function Keys
Text Assist Keys
Key Map Verification
Save Keyboard Mapping
Restore Default Mapping
Right Control:Current Selection
Tab:Next Field F1:Help
F3:Exit Menu F12:Prev Menu
>>
>>
>>
>>
>>
>>
Page 28

2-12 Chapter 2
Table 2-5 describes the functions of the Keyboard Mapping menu.
Table 2-5 Keyboard Mapping Functions
Function Description
Host Function Keys Lists the host system control keys.
Cursor Control Keys Lists the keys that control cursor movement.
Screen Control Keys Lists the keys that control the terminal screen.
Local Function Keys Lists the local session control keys.
Text Assist Keys Lists the keys that control text.
Key Map Verification V erif ies terminal emulator keys. When in vok ed, the
5250 Key Verification menu appears. Enter a key:
◆
If you entered an alpha numeric key, its
mapping will appear following 5250 EBCDIC
Key.
◆
If you entered a control key, its mapping will
appear beneath 5250 Key. The key sequence
you entered will display under Key Cap.
Save Keyboard
Mapping
Restore Default
Mapping
Saves the current key mappi ngs.
Restores the defaul t key mappings.
Page 29

The Menu System 2-13
Edit Keys Menu
Keys can be edited or cha nged by using the F2 key, entered in the Keyboard
Mapping menu. Position the cursor next to the key you want to edit, in any of
the key mapping menus, and press
F2. This key invokes the Edit Keys menu.
With this menu, you can change or remap any of the emulator keys displayed
in the Keyboard Mapping menu. Figure 2-9 shows the Edit Keys menu.
Figure 2-9 Edit Keys Menu
Edit Keys
5250 Key: Backward Tab
Key Sequence: ___________________________________________
Description: ___________________________________________
Key Sequence: ___________________________________________
Description: ___________________________________________
Key Sequence: ___________________________________________
Description: ___________________________________________
Key Sequence: ___________________________________________
Description: ___________________________________________
Right Ctrl:Current Selection
Tab:Next Field F1:Help F2:Auto Key Entry
F3:Exit Menu F12:Prev Menu
To edit a key:
1
When you select a key in the Keyboard Mapping menu for editing and
press the
F2 key as explained in “Edit Keys Menu”, the default octal value
of the key and its description are displayed in the Edit Keys menu.
2
You can then overwrite the value and description to remap the key.
3
Press
Ctrl (right).
The new key value and description are displayed.
Note
❖
Up to four key sequences can be remapped at once.
Page 30

2-14 Chapter 2
Auto Key Entry
Menu
Key sequences can be entered automatically. To do this, enter the Auto Key
Entry mode by pressing
F2 in the Edit Keys menu. The Auto Key Entry menu
appears. Figure 2-10 shows the Auto Key Entry menu.
Figure 2-10 Auto Key Entry Menu
Auto Key Entry
\ Exit Auto Key Entry
To use this menu:
1
Position the cursor next to the key you want to remap.
2
Press
F2.
3
Type in your change.
4
Press the
5
Select Save, then press
\ key.
Ctrl (right).
The Edit Keys menu now displays the new key mapping. The Auto Key Entry
function is helpful if you are mapping ke ys su ch as
F1. TN5250 automatically
enters the appropriate octal values for the mapped keys.
Note
❖
If the Edit Key Conflict menu appears, see “Edit Key Conflict Menu” in
the next section.
New keyboard mappings are saved by selecting Save in the Edit Key Response
menu. From this menu, you can also:
Cancel
◆
Add
◆
Note
❖
If you want to use the default values, use Restore Default Mapping, in
the Keyboard Mapping menu.
Page 31

The Menu System 2-15
Edit Key Conflict
Menu
If you attempt to map two functions to the same key, the Edit Key Conflict
menu appears. See Figure 2-11.
Figure 2-11 Edit Key Conflict Menu
Edit Key Conflict
Please select key to DELETE:
Right Ctrl:Open Selection F1:Help
Tab:Next Field F12:Prev Menu
F3:Exit Menu
The Edit Key Conflict menu displays both the key function that you are
attempting to map, and the key that is currently mapped to the key sequence.
To resolve conflicts:
1 Select the key that you want to delete.
2 Press
(right); the Edit Keys menu reappears.
Ctrl
3 Select a different key.
◆
Caution Primary key mappings should not be altered or deleted. This may
cause unstable terminal operation.
Page 32

2-16 Chapter 2
Help Menu
The Help menu can be invoked from all top level and secondary menus by
pressing
F1. Figure 2-12 shows the Main Menu - TN5250 - Help menu.
Figure 2-12 Main Menu - TN5250 - Help
Main Menu - TN5250 - Help
The Main Menu lists commands for operating and navigating
in TN5250. Operating commands are displayed near the top of
the window. The operating commands allow you to perform
tasks, such as opening sessions, mapping your keyboard, or
exiting the terminal emulator:
Open Sessions
Select this option to open a session. Specify a host name,
port number, IBM terminal type, and a server.
About TN5250
Select this option to view information about TN5250 and
command usage.
Page Down:Next Page Page Up:Prev Page
F3:Exit Menu F12:Prev Menu
More...
Note
❖
The menu displayed in Figure 2-12 is the first page of Help. Three
more pages follow, and are accessed by the
Page Down key.
Page 33

3
Terminal Ke yboard
The TN5250 emulation automatically remaps the terminal keyboard to the
IBM 5250 terminal functionality. “Terminal Keyboard” discusses:
◆
The differences between the IBM 5250 keyboard and your terminal’s
keyboard.
◆
Terminal keyboard features.
Keyboar d Layouts
This section compares the layout of the IBM 5250 keyboard with your
terminal’s keyboard.
5250 Keyboard
Figure 3-1 shows the IBM-style 5250 keyboard layout.
Figure 3-1 IBM-Style 5250 Keyboard Layout
Sys Rq
Attn
Print Help
TestReq
Er Inp
F13
F1
~
!
1234567890
#@$%
QWE R T YU I OP
ASDFGHJKL
>
ZXCVBNM
>
Reset
Quit
F17F15 F19 F21 F23F14 F18F16 F20 F22 F24
F5F3 F7 F9 F11F2 F6F4 F8 F10 F12
¬
&
*
Back Fwd
()
.
,,.
_
!|
¢\
:
;
?
/
Alt
+
=
}
{
EnterAlt
Field
Exit
Dup
Insert
Roll
Roll
Roll
Jump
Delete
7
89
456
1023
.
Field
-
Field
+
Page 34

3-2 Chapter 3
Terminal Keyboard
Figure 3-2 shows the terminal keyboard layout.
Figure 3-2 Terminal Keyboard Layout
Esc
~
Tab
Caps Lock Enter
Ctrl
Keys
F1 F2 F3 F4 F5 F6 F7 F8 F9 F10 F11 F12
,<.
>
_
{}
[]
:
;
?
/
+
=
CtrlAlt
!
1234567890
#$%
^
&
*
()
QWE R T YU I OP
ASDFGHJKL
Shift Shift
ZXCVBNM
Alt
The following section compares the TN5250 key def initions with the terminal
key definitions.
TN5250 Key
Definitions
The IBM 5250 keyboard key definitions (refer to Figure 3-1) are listed in
Table 3-1. The purpose of this table is to enable you to compare your old
terminal’s k eyboard with your ne w terminal’ s keyboar d. Where applicable, the
TN5250 keys are presented as they are on the keyboard. Otherwise, only the
key definitions are given. These might not be identical with your keyboard.
Back Space
|
\
Print
Scroll
Lock
Pause
Break
Up
Down
Screen
Sys Rq
Insert Home Page
Delete End Page
Num
Caps
Lock
/
Scroll
Lock
*
Lock
Num
Lock
789
Home Pg Up
456
123
End Pg Dn
0
Ins Del
.
Select
±
+
Enter
Table 3-1 TN5250 Keys
TN5250 Key Function
Atten
Alerts the host that a requested function is not
being honored.
Clear
through
Cmd1
↓ Moves the cursor down.
←
Cmd24
Clears the terminal display.
The
Cmd1
through
Cmd24
function keys.
Moves the cursor to the left.
↑ Moves the cursor up.
→ Moves the cursor to the right.
Page 35

Terminal Keyboard 3-3
Table 3-1 TN5250 Keys, Continued
TN5250 Key Function
Delete
Deletes a character where the cursor is
positioned.
Double Speed Left Moves cursor four positions to the left.
Double Speed Right Moves cursor four positions to the right.
Dup
Enter
Duplicates the last field.
Executes commands, or accepts data and/or
selected options currently on the screen.
Er Inp
Clears all modified fields. The cursor mov es to
the insert cursor address specified in the
previous di sp l ay command.
Reset
Restores the original data and resets the
terminal.
Field +
Field -
Field Exit
Moves the cursor to the start of the next field.
Moves the cursor to a previous field.
Deletes any characters at the cursor and to the
right of the cursor, then moves the cursor to the
next field.
Help
◆
If this key is used in a no error state, the
help information displayed is abo ut the
currently executing software.
◆
If this key is used in an error state, the help
information that is displayed is about that
error.
Home
Moves the cursor to the address specified by
the insert cursor address.
Insert
Sets the insert state for the field in which the
operator is located.
New Line
Moves the cursor to the beginning of the next
line.
Roll ↑ or Roll ↓ Pages up one p age.
Pages down one page.
Page 36

3-4 Chapter 3
Table 3-1 TN5250 Keys, Continued
TN5250 Key Function
Host Function Keys
Sys Req
Allows the display to enter the system request
state.
Test Req
Gives you access to the terminal’s set-up and
diagnostic routines.
❖
Note For a more detailed description about IBM 5250 keys, refer to the IBM
5250 Information Display System Functions Reference Manual.
T able 3-2 lists the host function k eys and your terminal’s equivalent ke y or ke y
sequence. See “Keyboard Mapping” in the TN5250 main menu (discussed in
Chapter 2) for further information.
Table 3-2 Host Function Keys
Alternate Terminal
TN5250 Key Terminal Key(s)
Atten Esc
Enter/Rec Adv
Error Reset
Ctrl
Enter
Ctrl
Keypad
(right)
(left) none
Key(s)
none
(keypad)
Enter
Field +
Field -
Cmd1 F1
Cmd2 F2
Cmd3 F3
Cmd4 F4
Cmd5 F5
Cmd6 F6
Cmd7 F7
Keypad
Keypad -
none
+
none
none
none
none
none
none
none
none
Page 37

Terminal Keyboard 3-5
Table 3-2 Host Function Keys, Continued
Alternate Terminal
TN5250 Key Terminal Key(s)
Key(s)
Cmd8 F8
Cmd9 F9
Cmd10 F10
Cmd11 F11
Cmd12 F12
Cmd13
Cmd14
Cmd15
Cmd16
Cmd17
Cmd18
Cmd19
Cmd20
Cmd21
Cmd22
(shift) F1 none
(shift) F2 none
(shift) F3 none
(shift) F4 none
(shift) F5 none
(shift) F6 none
(shift) F7 none
(shift) F8 none
(shift) F9 none
(shift) F10 none
none
none
none
none
none
Cmd23
Cmd24
Help Scroll Lock
Sys Req Alt Pr tsc
Tst Req Alt Pause
(shift) F11 none
(shift) F12 none
none
none
none
Page 38

3-6 Chapter 3
Cursor Control Keys
Table 3-3 lists the TN5250 cursor control keys and your terminal’s equivalent
cursor control key or key sequence. See “Keyboard Mapping” in the TN5250
main menu (discussed in Chapter 2) for further information.
Table 3-3 Cursor Control Keys
Alternate Terminal
TN5250 Key Terminal Key(s)
Back Space
Double Speed R
tAlt
Double Speed Lt
↓↓ (keypad) ↓
Field Exit
Home
←
Back Space
→ none
Alt
←
Enter
Home
←
Key(s)
none
none
none
(keypad)
Home
(keypad) ←
→→(keypad) →
↑↑(keypad) ↑
Screen Control Keys
Table 3-4 lists the TN5250 screen control keys and your terminal’s equivalent
key or key sequence. See “Keyboard Mapping” in the TN5250 main menu
(discussed in Chapter 2) for further information.
Table 3-4 Screen Control Keys
Alternate Terminal
TN5250 Key Terminal Key(s)
Backward Tab
Clear
Delete
Dup
Erase Input
Shift Tab
Pause
Delete
(pad)
1
Alt End
Key(s)
none
none
(keypad)
none
none
Del
Page 39

Terminal Keyboard 3-7
Table 3-4 Screen Control Keys, Continued
Alternate Terminal
TN5250 Key Terminal Key(s)
Key(s)
Local Function Keys
Forward Tab
Insert Insert
Tab
none
(keypad) Ins
Roll Down Pg Up (keypad) PgUp
Roll Up
Pg Dn
(keypad) PgDn
Table 3-5 lists the IBM 5250 session keys, and your terminal emulation’s
equivalent key. See “Keyboard Mapping” in the TN5250 main menu
(discussed in Chapter 2) for further details.
Table 3-5 Local Function Keys
Alternate Terminal
TN5250 Key Terminal Key(s)
Exit Session
Exit TN5250
Command Mode
Repaint Screen
Alt X
Alt Z
Alt ?
Alt <
Key(s)
none
none
none
none
Session Escape
Session Toggle
TypeAhead Toggle
Alt >
Alt T
Alt :
none
none
none
Page 40

3-8 Chapter 3
Text Assist Keys
Table 3-6 lists the TN5250 text assist keys and your terminal’s equivalent key
sequence. See “Keyboard Mapping” in the TN5250 main menu (discussed in
Chapter 2) for further details.
Table 3-6 Text Assist Keys
Alternate Terminal
TN5250 Key Terminal Key(s)
Cmd A Alt a
Cmd B Alt b
Cmd C Alt c
Cmd D Alt d
Cmd H Alt h
Cmd J Alt j
Cmd N Alt n
Cmd P Alt p
Cmd S Alt s
Cmd U Alt u
Key(s)
none
none
none
none
none
none
none
none
none
none
Cmd W Alt w
Cmd Y Alt y
Cmd Field + Alt e
Cmd Field - Alt f
Cmd Field Exit Alt g
↓
Cmd
↑
Cmd
Cmd
←
→
Cmd
Cmd Spacebar Alt m
Alt i
Alt k
Alt l
Alt r
none
none
none
none
none
none
none
none
none
none
Page 41

Terminal Keyboard 3-9
Table 3-6 Text Assist Keys, Continued
Alternate Terminal
TN5250 Key Terminal Key(s)
Key(s)
TypeAhead
Buffering
Cmd T ab Alt o
Shift Tab Alt q
none
none
Applications such as data processing and word processing programs normally
accept keystrokes as you enter information. However, these applications can
lock your keyb oard when data i s being pro cessed. When a k ey boa rd locks, the
II (Input Inhibited) indicator appears on the status line (see Appendix A).
Keystrokes that you enter when the keyboard is locked (typing ahead) are not
executed as you enter them.
To avoid reentering keystrokes, you can use the emulator’s TypeAhead
Buffering (a terminal default). TypeAhead Buffering allows you to store
additional keystrokes temporarily. When your keyboard unlocks, all stored
keystrokes are automatically sent to the host and appear on the screen.
The TypeAhead key sequence is found in Keyboard Mapping/Local Function
Keys (Alt :).
If you are operating your terminal in a data processing mode, keyboard
buffering is normally inactive. If you are operating your terminal in a word
processing mode, keyboard buffering is normally active.
Locked Keyboard
The system request, Alt Prtsc, and the error reset Ctrl (left), key sequences
allow you to interrupt the keyboard’s locked state:
◆ Alt Prtsc
This is the system request key sequence. When you press this, the
keyboard buffer is cleared and the terminal displays the System Request
screen. The host will then process keystrokes normally, until you exit this
screen by pressing either
Ctrl (right) key, or the Alt Prtsc key sequence.
Additional keystrokes are then stored in the keyboard buffer as needed.
◆ Ctrl
(left)
This is the error reset key. When you press this, the keyboard buffer is
cleared and the buffer full mode is reset. Then your session returns, and
keystrokes are processed normally. If keyboard buffering is active,
keystrokes are stored as needed.
Page 42

A
Error Messa ges
This section describes the error messages that might disp lay on your terminal
screen during a TN5250 session. These error messages are grouped into three
categories:
◆
Telnet errors
◆
TN5250 internal errors
◆
Status Line errors
Telnet Errors
Table A-1 Telnet Errors
Message Cause Resolution
Unable to allocate memory for
xxxxxx.key
Memory allocation failure while
installing multiple key
Memory allocation failure for
session
Memory allocation failure for
general work area
TELNET: tcp/telnet: unknown
service
TELNET: select() failed errno =
Error-Number
Telnet errors are generated by Telnet communications software within a
TN5250 terminal. These errors are related to initialization, start up, or
connections during a session. They are normally due to operator error,
incorrect command syntax, or network failures, and can usually be corrected
by the system administrator. Table A-1 lists Telnet error messages.
Unable to allocate memory. See your system administrator.
Unable to allocate memory. See your system administrator.
Unable to allocate memory. See your system administrator.
Unable to allocate memory. See your system administrator.
The TCP/Telnet service is not
supported for the current host.
An internal error within the
TN5250 client. Possible TCP/IP
network problem.
See your system administrator.
Try the connection again.
Page 43

A-2 Appendix A
Table A-1 Telnet Errors, Continued
Message Cause Resolution
TELNET: socket connection failed Unable to create a socket for the
TELNET: Unable to connect to
remote host
Host name must be supplied if
port number is specified
<Host>: Host name lookup failure Telnet cannot resolve the host
<Port-Number>: bad po rt num ber The port number specified is
MAIN: error initializing socket
library
TN5250 Internal
Table A-2 lists TN5250 internal errors.
TCP/IP client. Possible TCP/IP
network problem.
Unable to make connection to
the specified host. Either the
supplied host name and the port
number is not correct, or the host
is unable to respond.
The host name is missing on the
command line.
name specified.
invalid.
This is an internal error. T elnet is
unable to initialize the socket
API routines.
Errors
See your system administrator.
Verify the host name and port
number by exec uting telnet or
ping.
The host name must be supplied
if the port number is specif ied on
the command line.
Ensure that the host name is
spelled correctly.
Ensure that the port number that
you have typed is correct
See your system administrator.
Table A-2 TN5250 Internal Errors
Message Cause
* * * * * DSPT LOGICAL ERROR <index> * * * * *
SYSERR 29: TN5250: DSPT ERROR
SYSERR 16: TN5250: Message buffer is shorter
than message
SYSERR 28: TN5250: LOGICAL ERROR An internal error within the TN5250 terminal.
SYSERR 0: TN5250: UNKNOWN ERROR An internal error within the TN5250 terminal.
This error message indicates that the TN5250
client received invalid data from the server.
An internal error within the TN5250 terminal.
Page 44

Error Messages A-3
The Status Line
The Status Line displays real-time system messages that appear during
terminal emulation. This field resides at the bottom of your terminal screen,
and consists of seven separate sections. Figure A-1 shows the Status Line.
Figure A-1 Status Line
SA MW IM II TN_5250-n HOST HELP: ALT?
Table A-3 describes each section of the Status Line.
Table A-3 Status Line
Section Description
SA System Available
MW Message Waiting
IM Insert Mode
II Input Inhibited
TN_5250-n Telnet 5250 Emulation-Session N umber
Status Line Errors
Host Host name
Help: Alt ? Help screen key sequence
When an error occurs, error messages are sent from the host. They appear on
the Status Line as numbers followed by a message. To respond to Status Line
errors:
◆
Press the reset key sequence
◆
Ensure that the action being undertaken is appropriate.
◆
Ensure that the field into which data is being entered is the appropriate
Ctrl
(left ).
field.
◆
Ensure that the data being entered into the field is valid.
Page 45

A-4 Appendix A
Status errors and their descriptions are listed in Table A-4. Refer to the IBM
5394 Remote Control Unit Functions Reference Manual for further
information.
Table A-4 Status Line Errors
Error Description
0000 Help key not allowed Either no system reference code appears, or the
application does not support the key you pressed.
0001 Last keystroke not recognized The terminal cannot keep up with the rate of
information entered. As a result, the last character
entered is not recognized.
0002 Last keystroke not recognized The terminal received an invalid key code from the
keyboard. Either the code is incorrect for the
keyboard at the terminal, or an error occurred in
translating the keystroke.
0003 Invalid CMDx or Fx key You pressed an invalid
F
or
Alt
key sequence.
0005 Cursor in protected area of display The cursor is not in an input field, but in a
protected area of the display.
0006 Invalid key followed SYS REQ key You pressed an invalid key after pressing the
Alt Prtsc
(right) or
key sequence, and b efore pressing the
(left) keys.
Ctrl
Ctrl
0007 Mandatory enter field, must enter data There is at least one mandatory entry field on the
screen that you must enter data into before the
screen can be changed or processed.
0008 This field requires alphabetic characters You tried to enter nonalphabetic characters into a
field designated alphabetic. Valid characters here
are:
◆
A through Z.
◆
Blank ( ), comma (,), period (.), hyphen (-), and
apostrophe (’).
◆
(pad) 1 key.
The (pad)
key is used to duplicate these
1
characters in the field.
Page 46

Error Messages A-5
Table A-4 Status Line Errors, Continued
Error Description
0009 This field requires numeric characters Y ou attempted to en ter non-numeric characters into
a field designated numeric. Valid characters for this
field are:
◆
Zero (0) through nine (9).
◆
Blank ( ), comma (,), period (.), plus (+), and
minus (-).
◆
(pad) 1 key.
The (pad)
1 key is used to duplicate these
characters in the field.
0010 Only characters 0-9 allowed The key pressed is not valid for a signed numeric
field. Valid entries are:
◆
Zero (0) through nine (9).
◆
(pad) 1 key sequence.
0011 Invalid key for sign position of field You tried to enter data into the last position of a
signed numeric field.
0012 Insert mode, no room to insert data There is no room to insert data into this field.
Either there is no more space in the field, or the
cursor is in the last position of the field. Do not use
the insert mode to change data, or to enter the last
character in this field.
0013 Insert mode-only data keys allowed You tried to exit a field while the terminal is still in
the insert mode.
0014 Mandatory fill field-must fill to exit You pressed a function key that moves the cursor
out of the fill field. A fill field must be completely
filled or left blank.
0015 Check digit error You entered data into a self-check field, and the
number entered and the check digit do not
compare.
016 FIELD- key invalid with this field You pressed a field
key when the cursor was not in
a numeric, digit, or signed numeric field.
0017 Mandatory fill field key is used invalidly You pressed a fill field key sequence. A mandatory
fill field must be completely filled, unless you exit
it from the first position of the field.
0018 Invalid key used to exit this field Yo u pressed a dat a ke y when the curs or is in a right
adjust field or exit field.
Page 47

A-6 Appendix A
Table A-4 Status Line Errors, Continued
Error Description
0019 Dup key not allowed in this field You pressed the (pad)
1 key when it is not allowed
in this field.
0020 Function Ctrl key invalid in this field You pressed a function key that is not allowed in
this field. Press an escape key sequence (field ke ys)
to exit this field, before pressing any more function
keys or key sequences .
0021 Mandatory enter field, must enter data The cursor is positioned in a mandatory exit field.
You must enter data in a mandatory entry field
before exiting that field.
0022 Status of field not known A system error occurred. The status of the current
field is not known. This type of error can occur
during an insert or delete operation.
0024 Entry not valid in entry field You pressed a key that is not valid. Only characters
zero (0) through nine (9) and the (pad)
1 key (if
specified in the field format word) are allowed in
this field.
0026 Character entered invalid for this field You pressed a field
key to exit a numeric-only
field, but the last position of the field will not
accept a zero (0) through nine (9) character.
0027 Key not defined-key cannot be used You pressed a key that is either blank or not
defined for this terminal.
0029 Invalid international character set The second key pressed in a two-key sequence did
not produce a valid diacritic character.
0099 Key not valid at this time You pressed an invalid key sequence.
Page 48

Network
Information
Terminal
Information
Problem
Description
B
Tr oub leshooting Aids
Answer the following questions and record the information bef ore you contact
technical support. This information can then be used by support engineers, to
help you with your problem.
◆
Have software or hardware changes been made to your network?
◆
Are you using Domain Name Service or a hosts file?
◆
Can you run a separate executable program, such as ping or telnet?
◆
What is the version number of your operating system?
◆
Have changes been made to your terminal’s configuration?
◆
What operation were you performing when the problem occurred?
◆
When did the problem begin to occur?
◆
Did the terminal emulator operate satisfactorily before the problem
appeared?
◆
Was an error message displayed at your terminal? If so, include the
message’s text (and case) as it appeared.
◆
Did other information appear on your terminal’s screen when the problem
occurred?
◆
How often does the problem occur?
◆
Have you attempted to isolate the problem?
◆
Have you created a temporary solution to the problem? If so, is it
documented?
◆
Have trace files been created that wer e active when the problem occurred?
For example, have you created LAN traces?
◆
Do you have other information that might assist us in diagnosing your
problem? For example, do you have printouts and sample screen prints?
Page 49

Index
Index-1
A
About this guide vii
About TN5250 vii
Auto key entry menu 2-14
C
Command options 1-3
Connection properties dialog box 1-2
Connections viii
command options 1-3
definitions, preexisting 2-4
new 1-2
preexisting 1-1
Conventions viii
Creating sessions 2-5
Cursor control keys 3-6
D
Downloading
firmware 1-1
E
Edit key conlict menu 2-14
Edit keys menu 2-13
Emulator-opened sessions 1-5
Ending a session 1-6
Errors
status line A-3
Telnet A-1
TN5250 A-2
F
Features vii
Firmware viii
downloading 1-1
to
Format conventions viii
ix
G
Guide viii
H
Help menu 2-16
I
IBM-style 5250 keyboard layout 3-1
Introduction vii
K
Keyboard mapping functions 2-11
Keyboard mapping menu 2-11
Keyboards
IBM-style 5250 3-1
Keys
5250 3-2
cursor control 3-6
local function 3-7
menu control 2-2
screen control 3-6
text assist 3-8
L
Local function keys 3-7
Locked keyboard 3-9
M
Menu control keys 2-2
Menu system
auto key entry menu 2-14
edit key conflict 2-15
edit key conflict menu 2-14
edit keys menu 2-13
help 2-16
keyboard mapping 2-11
to
main menu 2-1
2-2
Page 50

Index-2
open session menu 2-5
screen attributes menu 2-10
sessions menu 2-3
TN5250 menu 2-7
utilities 2-8
O
Open session menu 2-5
functions 2-6
P
Pass through screen 1-5
R
Remapping local parameter keys 2-9
Requirements viii
S
Screen attributes menu 2-10
Screen control keys 3-6
Sessions 2-3
emulator-opened 1-5
ending 1-6
menu 2-3
menu functions 2-5
starting 1-4
user-opened 1-5
Set local parameters functions 2-9
Status line A-3
errors A-3
Summary
menu system 2-1
sessions 2-3
T
Telnet errors A-1
Terminal keyboard layout 3-2
Text assist keys 3-8
Text format viii
TN5250 viii
internal errors A-2
Troubleshooting tips
network information B-1
problem description B-1
terminal inf ormation B-1
Type ahead buffering 3-9
U
User-opened sessions 1-5
Page 51

883554-02 Rev. A
June 1998
Printed in U.S.A.
 Loading...