

Page 1

Ink Manager® Pro 1.0
and
ThinkScribe™ Digital Notepad
User’s Guide
Page 2

Printed in the USA
First Edition (January 2001)
Note:
Before using this information and the product it supports, be sure to read the general
information under “Safety information” and “Notices” in the IBM (R) ThinkPad (R) TransNote
(R) Service and Troubleshooting Guide.
© Copyright International Business Machines Corporation, 2000.
All rights reserved.
Note to U.S. Government Users -- Documentation related to restricted rights -- Use,
duplication, or disclosure is subject to restrictions set forth in GSA ADP Schedule Contract
with IBM Corp.
Page 3

Contents
Welcome.........................................................................................................................1
Chapter 1: Digital Notepad and Pen Features...............................................................5
Pre-assigning pages to ink files.....................................................................................................7
Marking actions as you write ........................................................................................................8
Turning pages............................................................................................................................... 10
Status display messages............................................................................................................... 11
Changing the notepad................................................................................................................. 12
Caring for the digital pen............................................................................................................ 14
Changing the pen battery ........................................................................................................... 15
Changing the ink refill................................................................................................................. 16
Ordering supplies ........................................................................................................................ 16
Finding help for Ink Manager Pro............................................................................................ 17
Chapter 2: Ink Manager Pro Setup .............................................................................. 17
Setting up ink files ....................................................................................................................... 18
Setting preferences for Ink Manager Pro................................................................................. 20
Application tab...................................................................................................................... 21
Ink Display tab...................................................................................................................... 22
Actions tab............................................................................................................................. 23
Writing Style tab.................................................................................................................... 24
Setting properties on the digital notepad................................................................................. 25
Opening ThinkScribe Notepad Properties....................................................................... 25
Graphics Tablet Mode tab .................................................................................................. 26
Inking tab............................................................................................................................... 28
Device tab.............................................................................................................................. 30
Ink File Selector tab ............................................................................................................. 31
Actions Selector tab ............................................................................................................. 33
Enabling Keyword transcription............................................................................................... 34
Enabling Ink Calendar Support................................................................................................. 35
Chapter 3: Ink Manager Pro Window.......................................................................... 37
Navigation panel.......................................................................................................................... 39
Viewing window .......................................................................................................................... 40
Toolbar buttons........................................................................................................................... 40
Page 4

Menu bar ....................................................................................................................................... 42
Thumbnail view ........................................................................................................................... 46
Full-page view .............................................................................................................................. 47
List view ........................................................................................................................................48
Chapter 4: Current Notepad Pages ..............................................................................51
Working with current pages.......................................................................................................52
Erasing ink in the archive........................................................................................................... 53
Fixing overwritten ink.................................................................................................................53
Filing pages into My Ink Files....................................................................................................61
Replacing pages............................................................................................................................62
Chapter 5: Managing Ink Files ....................................................................................65
Creating a new ink file................................................................................................................. 65
Removing or restoring an ink file..............................................................................................67
Renaming an ink file....................................................................................................................68
Copying pages from one file to another...................................................................................69
Saving an ink file.......................................................................................................................... 70
Printing an ink file ....................................................................................................................... 72
Adding names to the ThinkScribe menu .................................................................................73
Chapter 6: Editing Pages .............................................................................................75
Adding a blank page.................................................................................................................... 75
Deleting a page.............................................................................................................................76
Editing ink .................................................................................................................................... 76
Selecting ink........................................................................................................................... 76
Changing ink appearance..................................................................................................... 77
Cutting, copying, and pasting ink....................................................................................... 77
Adding or moving ink on a page........................................................................................78
Rotating a page.............................................................................................................................79
Saving a page ................................................................................................................................ 79
Printing a page..............................................................................................................................80
Chapter 7: Working with Actions .................................................................................83
What are actions?......................................................................................................................... 83
Marking Keywords, To Do items, and Messages on the computer ....................................84
Searching for a page .................................................................................................................... 85
Managing To Do items and Messages...................................................................................... 86
Narrowing the search.................................................................................................................. 88
Verifying Keywords..................................................................................................................... 89
ii
Contents
Page 5

Creating a Post-it note ................................................................................................................ 90
Chapter 8: Sharing Ink .................................................................................................93
Using the Ink Clipboard Viewer ............................................................................................... 93
Using the Ink Clipboard menus ......................................................................................... 94
Using the Ink Clipboard toolbar........................................................................................ 95
Saving selected ink....................................................................................................................... 96
Using the Windows clipboard ................................................................................................... 97
Send Mail ...................................................................................................................................... 97
Chapter 9: Special Features.......................................................................................... 99
Ink Calendar Support.................................................................................................................. 99
Lotus Notes calendar ......................................................................................................... 101
Lotus Organizer.................................................................................................................. 103
Microsoft Outlook..............................................................................................................105
Graphics Tablet Mode.............................................................................................................. 107
IBM Ink Viewer......................................................................................................................... 108
IBM Ink Transfer ...................................................................................................................... 110
Editing ink types................................................................................................................. 110
Maintaining applications.................................................................................................... 112
Chapter 10: Problem Solving.......................................................................................113
Digital notepad problems......................................................................................................... 113
Ink Manager Pro problems...................................................................................................... 116
Ink Manager Pro questions......................................................................................................121
Appendix A................................................................................................................. 125
Glossary ...................................................................................................................... 129
Index .......................................................................................................................... 137
Contents
iii
Page 6

iv
Contents
Page 7
Welcome
Congratulations on your purchase of the TransNote™ system that
includes the ThinkPad™ computer, ThinkScribe™ digital
notepad and Ink Manager ® Pro software. The Ink Manager Pro
is a unique software program that communicates with the
ThinkPad computer, ThinkScribe digital notepad, and the IBM
digital pen. This is a tool for mobile professionals, people whose
business and personal needs require total portability and efficiency
in managing their handwritten notes.
With the TransNote, you can write the way you always do, while
capturing electronic notes with the digital notepad at the same
time. You can write while the computer is turned on, in suspend
mode, or turned off. When the computer is turned on, your
electronic notes upload automatically to Ink Manager Pro. When
you start Ink Manager Pro, your notes appear in the viewing
window, where you can file the pages into ink files, search for
pages, manage your tasks, edit and format the pages, and share
your pages with others.
With ThinkScribe digital notepad and Ink Manager Pro, you can:
• Write notes and sketch naturally on the digital notepad.
• Mark words as Keywords, To Do's, and Messages.
• Transfer your notes and sketches to the computer.
• View and edit your ink on the computer screen.
Page 8

• Preserve the archive pages of your original ink.
• Organize, sort, and store notes and sketches in ink files.
• Edit, format, store, and print your pages and ink files.
• Search your notes by the date you wrote them or by words
you marked as Keywords.
• List and manage your To Do’s and Messages.
• Copy your ink into e-mails or documents as a graphic
• Share your ink with others.
• Add links to your personal calendar system for handwritten
notes taken during scheduled meetings.
• Use the digital pen as a mouse pointer as a graphics input
device or to activate toolbar buttons and menus.
Reference information
In addition to this book, TransNote includes many sources of
information to help you get the most out of your product.
Visit our Web site for further updates. To do this, press the
ThinkPad button on the right side of the computer to open
Access ThinkPad, and select the Service & Support icon. On the
Web site, you can do the following:
• · Find product information.
• · Order supplies and accessories.
• · Get technical support, troubleshooting tips, and much,
much more.
User Reference Includes… Where to Find It…
Getting Started Guide Basic instructions for using
the ThinkScribe notepad
Quick Reference Card Toolbars and menus
Frequently used tasks
On the digital notepad.
Last page of this guide.
2
Welcome
Page 9

User Reference Includes… Where to Find It…
Ink Manager Pro Help Detailed task help
Reference help
Techniques and tips
Troubleshooting & FAQ’s
Index and Search tabs
Glossary
In Ink Manager Pro, press
Help > Help topics, or F1.
Or from the computer
screen, open Access
ThinkPad and then open
ThinkPad Assistant. Select
“Everyday uses.”
Readme Release notes Press Start > Programs >
IBM Ink Manager Pro >
Utilities > Documents.
Select “Readme.”
Welcome
3
Page 10

4
Welcome
Page 11

Digital Notepad and Pen Features
This chapter provides basic information about using the
ThinkScribe digital notepad and digital pen, including:
• Getting started
• Pre-assigning pages to ink files
• Marking actions as you write
• Turning pages
• Understanding the status display messages
• Viewing ink on the computer
• Changing the notepad
• Caring for the digital pen
• Ordering supplies
1
Getting started
After 30 minutes of idle
time, the digital notepad
turns off (the status display
goes blank) to conserve
the battery. Push the
power button to turn it back
on.
The best way to get started is to complete the Getting Started Guide,
located on the digital notepad. The booklet provides guided
practice for using the digital notepad to take notes, turn pages,
mark words or phrases as a To Do or Message, and view your first
pages in the Ink Manager Pro viewing window. In addition:
• Lift the notepad to see the ThinkScribe reference label that
contains useful information about the digital notepad.
• Remove the Quick Reference Card, the last page in this
book, and take it with you as a handy reminder of shortcuts
and other important information.
The digital notepad turns on automatically when you open your
TransNote. When you are ready to start writing, check the status
display to see if it contains information about the current page.
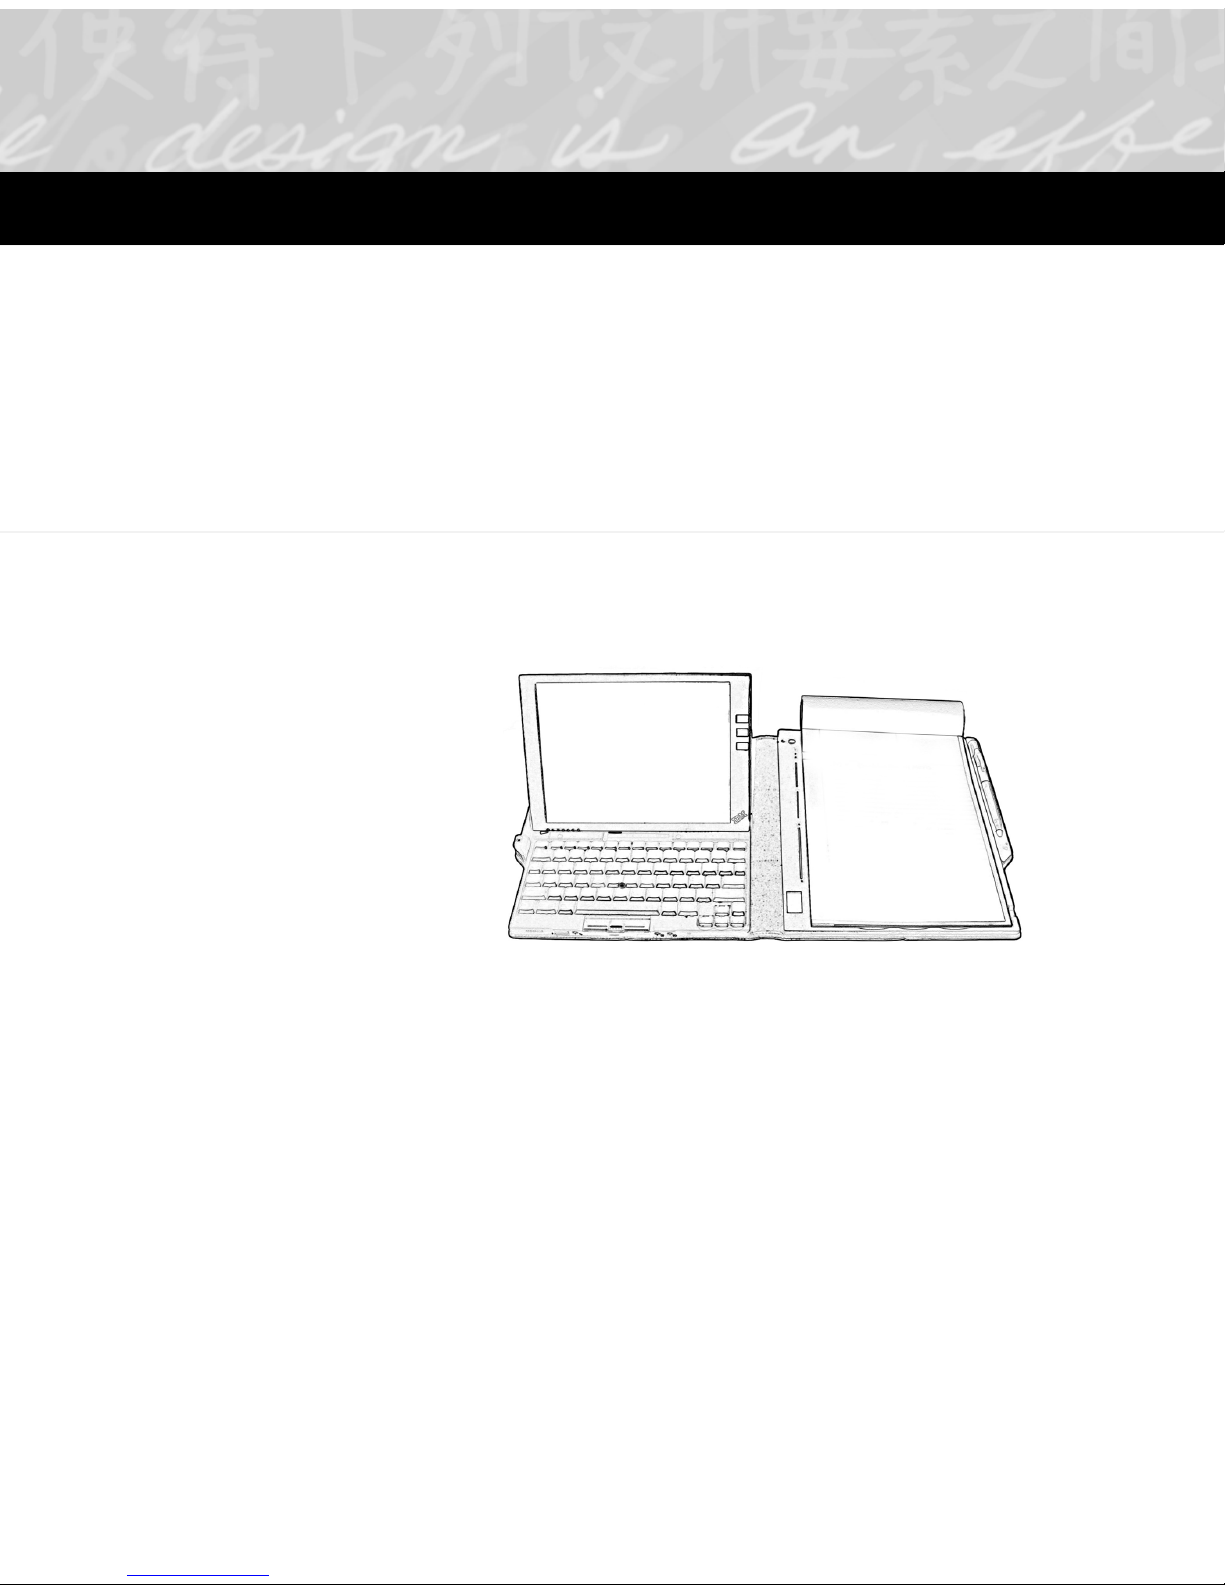
If the status display is blank, turn on the digital notepad by
pressing the power button, located at the top of the ThinkScribe.
Page 12
Press the power
button to turn on
the digital notepad.
When the digital notepad turns on, the status display lights up and
shows information about your current page.
If you do not see the pen
symbol, your digital pen
might need a new battery,
described later in this
chapter.
Now you can start writing. Remember to use only the digital pen
on the notepad—other pens will not record your ink.
Press the ink tip firmly on the paper. When the digital notepad
detects the ink tip, the pen icon appears in the status display, and
the green Activity indicator blinks at the top of the digital
notepad.
Write notes on the digital notepad anytime, regardless of whether
the computer is turned on, turned off, or in standby mode.
Although both the computer and notepad sides of your system
use the same battery, there are two power buttons. This feature
enables you to turn off your computer when you are not using it,
to save power, and then continue taking notes with your digital
notepad for several hours.
6
Chapter 1
Page 13
Pre-assigning pages to ink files
Ink Manager Pro helps you organize your notes into “ink files,”
files that contain your handwritten notes. The Ink File selector on
the digital notepad contains 19 names of ink files, which can be
renamed or reordered in Ink Manager Pro, plus a reserved
location for General pages.
Use the Ink File selector to pre-assign pages to ink files as you
write. That way, you can quickly organize and file your notes later
in Ink Manager Pro.
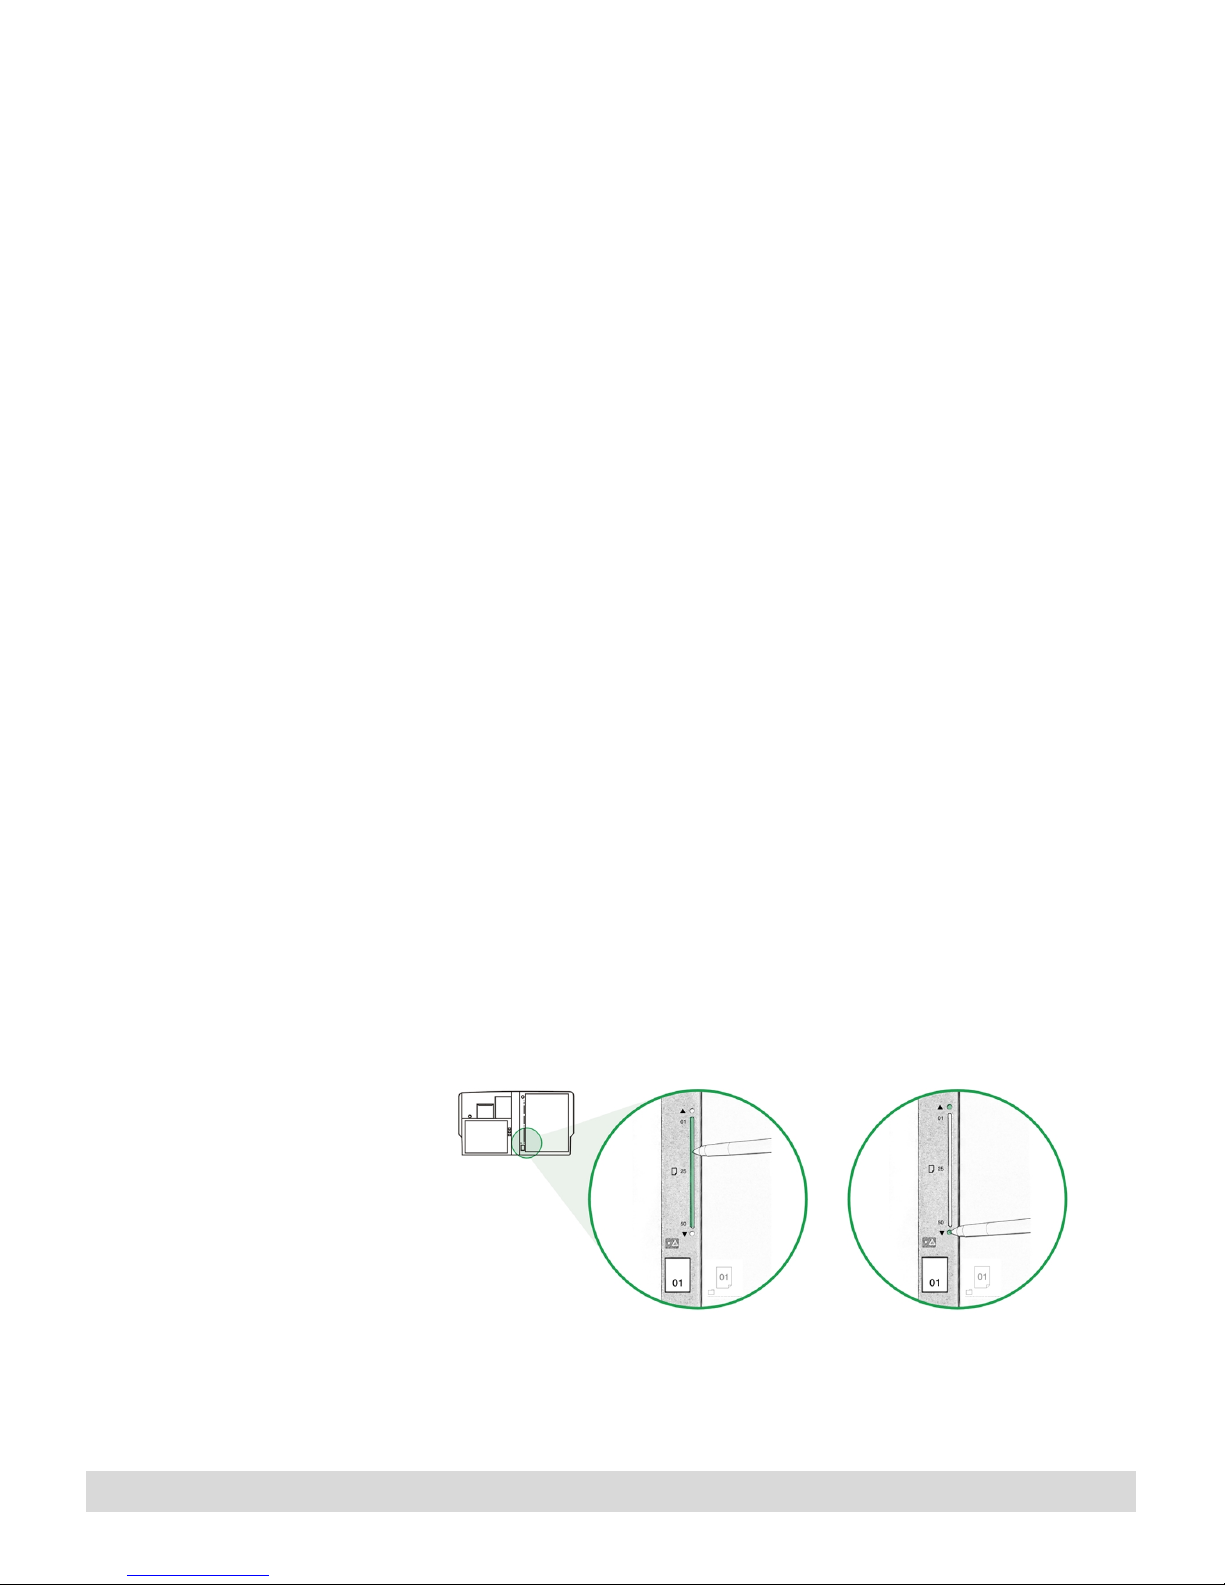
To pre-assign a page to an ink file:
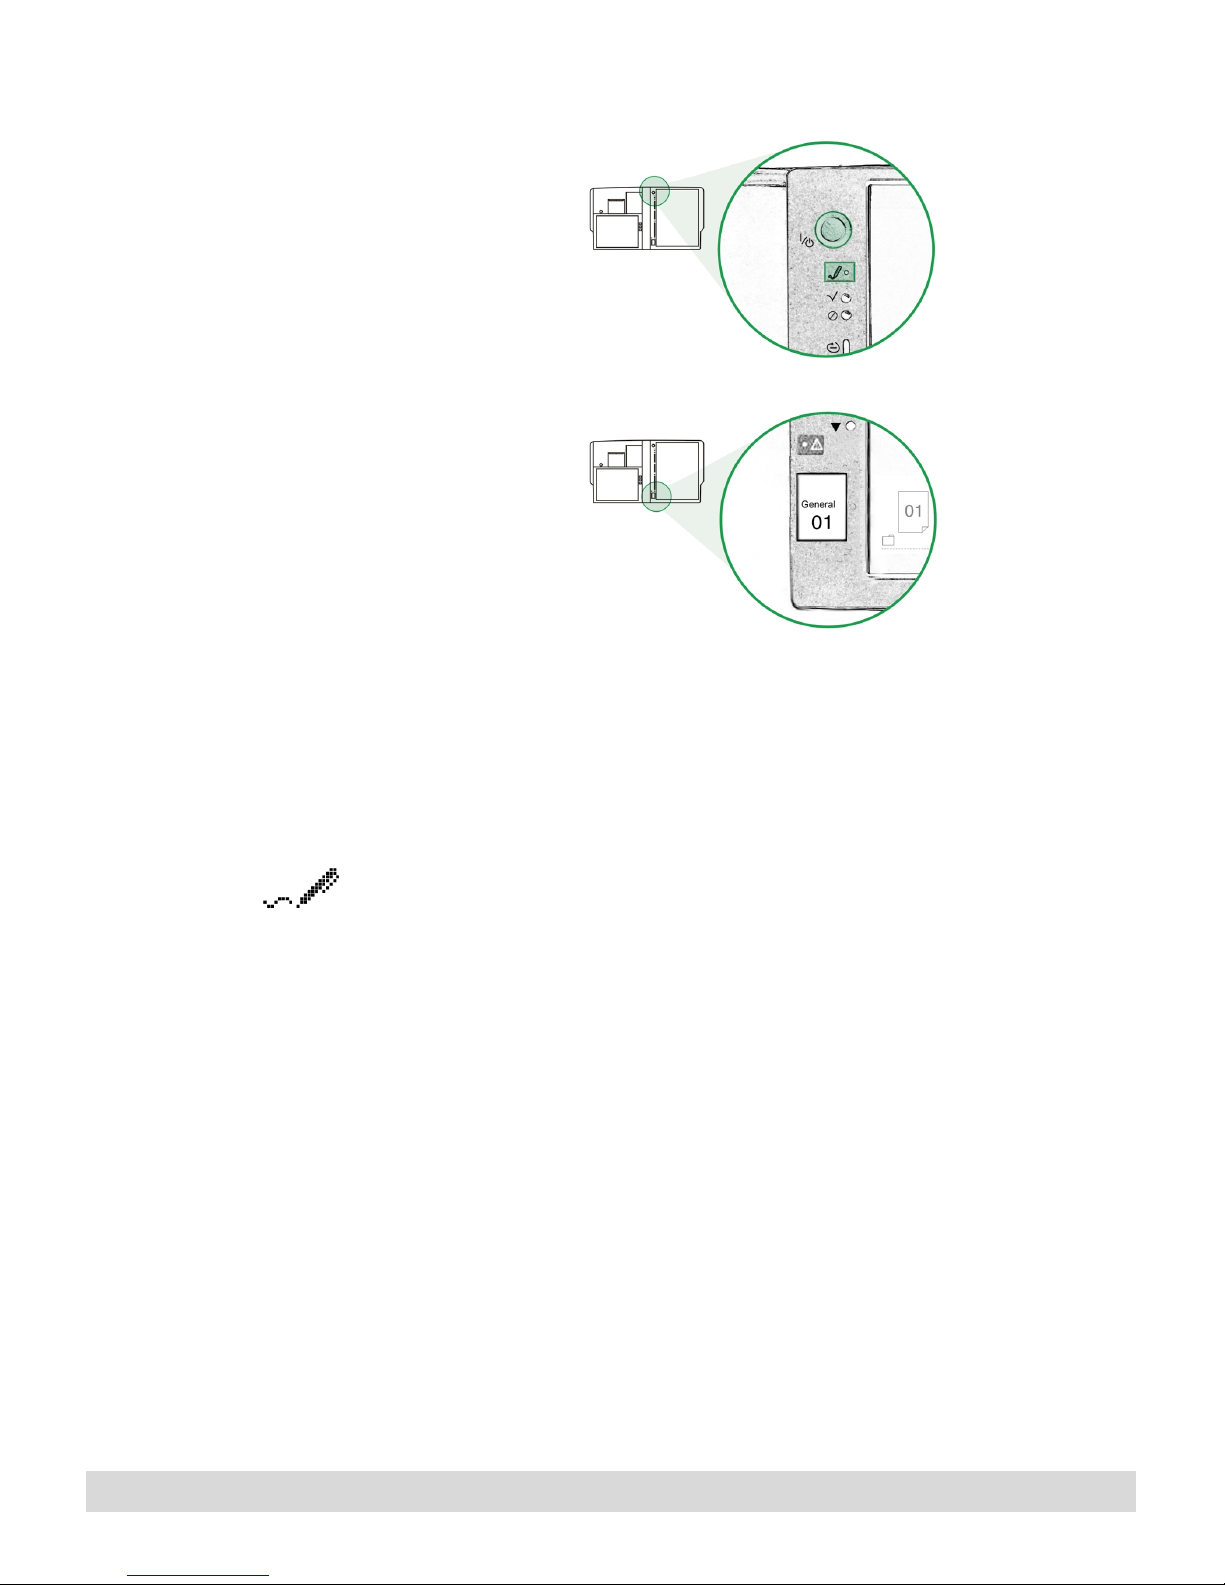
1. With the digital notepad turned on, slide the ink tip slowly in
the Ink File selector. Hold the pen perpendicular to the slot
for best results.
Slide the ink tip in the Ink
File selector to pre-assign
an ink file.
2. Watch the names that appear in the status display. Lift the pen
3. Later, when you start writing notes on a new topic or at
to select the highlighted name, such as Ink File 1. The name is
now assigned to the current page and to all following pages
until you select another name. Keep the same name for all the
notes you plan to add to the same ink file.
another meeting, turn the page (and tap Page Forward), and
select a different name from the Ink File selector, such as Ink
File 2. This keeps your pages organized for quick filing into
separate ink files in Ink Manager Pro.
Digital Notepad and Pen Features
7
Page 14

You can change the pre-assigned name at any time, even after the
page transfers to the computer.
To change the pre-assigned ink file for a previous page, tap Page
Backward until the page number appears in the status display, and
select the name from the Ink File selector. The new name appears
in the status display. You must change the file name for each prior
page individually.
For more information about ink files, refer to the following
chapters:
• Chapter 2 describes how to customize the names of ink files
on the Ink Files selector
• Chapter 3 describes how the Ink Manager Pro window
displays your transferred pages.
• Chapter 4 describes how to view and file your transferred
pages into My Ink Files.
Marking actions as you write
Ink Manager Pro provides a powerful tool called “actions” to help
Keyword icon
To D o ico n
Message icon
Copy icon
you search, retrieve, and act on your notes. Mark words and
phrases as actions while you write notes so that, later, you can
quickly search for a page, manage actions, and share your ink with
others.
Use the Action selector located on the left side of digital notepad
to identify and mark actions in your notes. Ink Manager Pro
includes four types of actions: Keyword, To Do, Message, and
Copy. You can change the upload speed or selection method using
ThinkScribe Notepad Properties, described in Chapter 2.
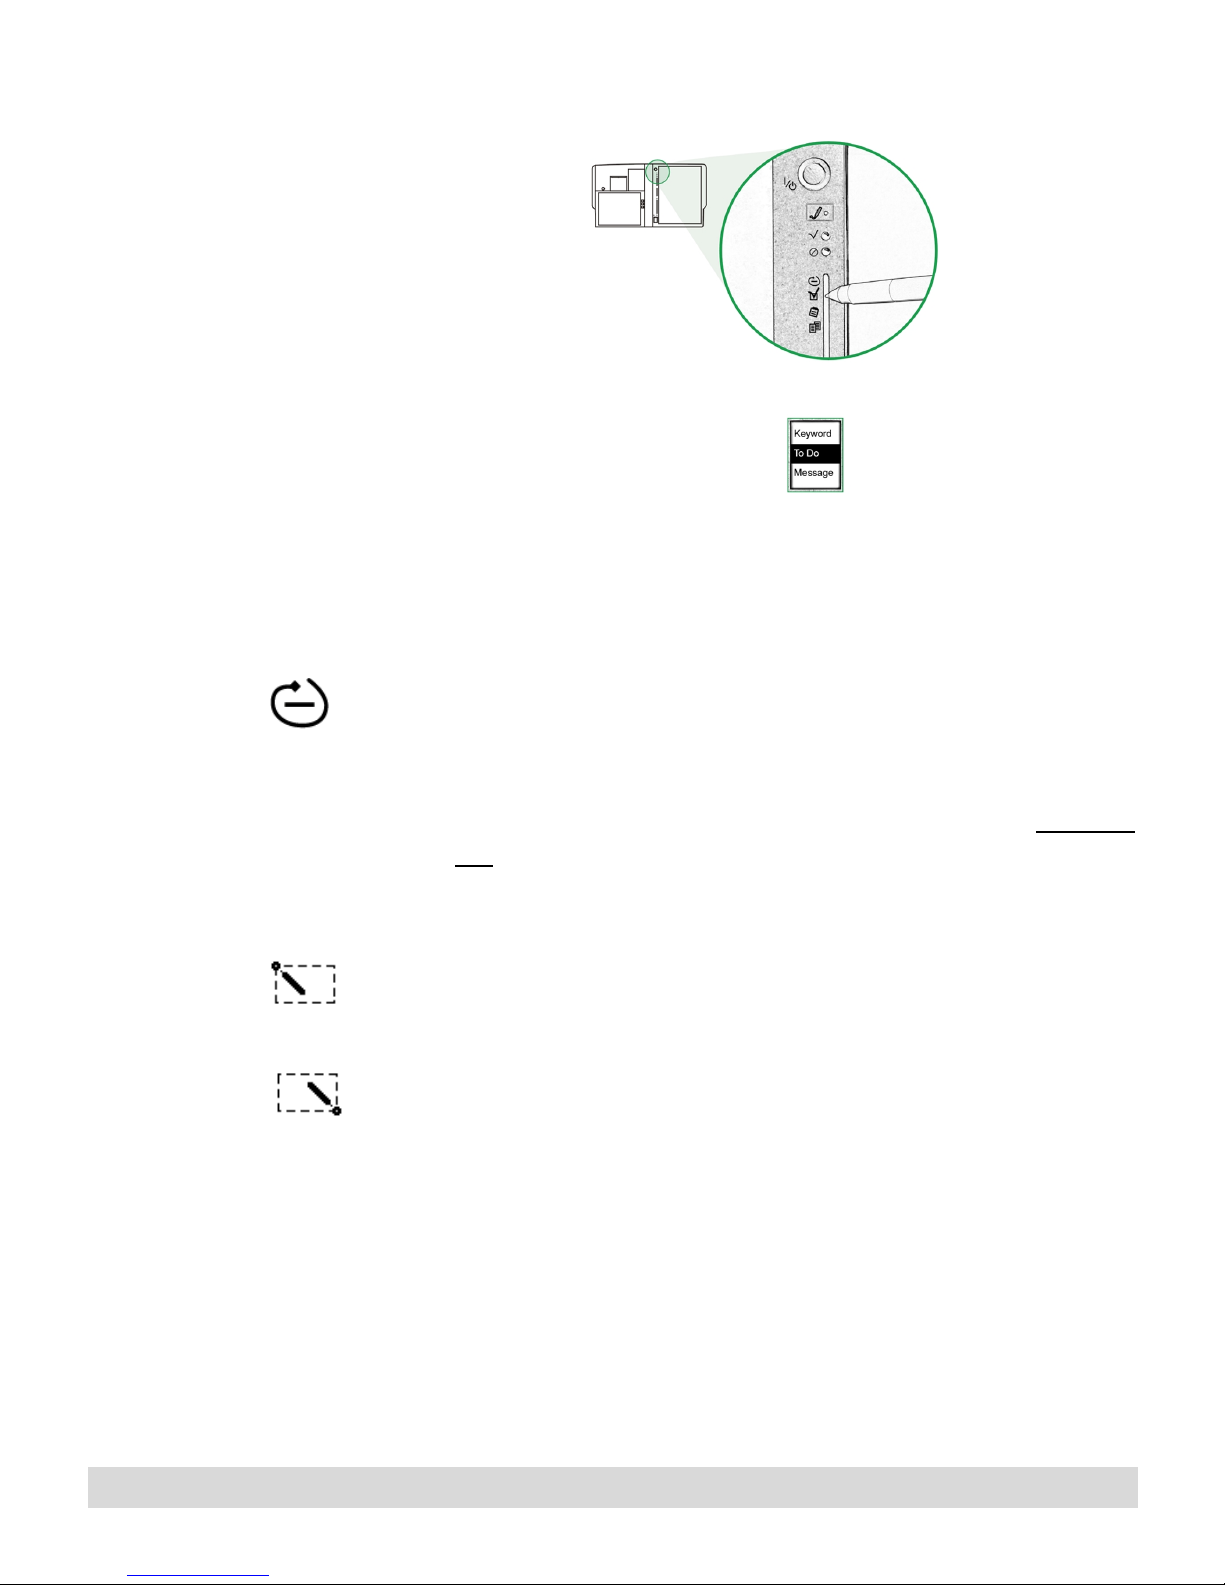
To mark words or phrases as actions as you write:
1. Tap the ink tip next to an action symbol, or slide the ink tip
slowly in the Action selector. Hold the pen perpendicular to
the slot for best results.
2. Watch the action names as they appear in the status display:
8
Chapter 1
Keyword, To Do, Message, or Copy. Lift the pen to select the
highlighted action.
Page 15
3. If you select the wrong one, tap Cancel and start over.
4. Select the ink to mark. To do this, look at the icon in the status
display:
• Circle method. If you see the circle icon in the display panel,
draw a circle (or any enclosed shape) with one, smooth
stroke around the word or phrase, similar to the rectangular
box that you use to mark actions on the computer screen.
Circle all the ink for the word or phrase, and avoid ink from
other words. Br especially careful to circle the entire first and
last strokes of ink. By default, use the circle method to mark
a Keyword, To Do, or Message.
• Two-tap method. If you see the tap icon in the display panel,
tap one corner of the area to select, such as the upper-left
corner.
Then tap the opposite, diagonal corner, such as the lowerright corner. Make sure the taps are wide enough to include
all the ink strokes of the ink to select. By default, use the
two-tap method to apply the Copy action.
For more tips, see the
problem “When I mark
actions on the digital
notepad, the marked ink is
not correct on the screen
or in my lists” in Chapter
10: Problem Solving.
On the computer screen, the marked words appear in different
colors, without the circles: Keywords are blue, To Do items are
red, and Messages are green.
Copied ink opens in the Ink Clipboard Viewer. See Chapter 8:
Sharing Ink for more information.
You can mark ink on the digital notepad as multiple actions. For
example, mark a To Do as a Message, or mark a word in a To Do
Digital Notepad and Pen Features
9
Page 16
Turning pages
as a Keyword. On the computer, the transferred ink changes to
the color of the most recent action. If you hold the mouse pointer
over the ink, the annotated text for the most recent action appears
in the fly-over window. When you view lists, the marked ink shows
up in the list for each action.
For more information about actions, see the following chapters:
• Chapter 2: Ink Manager Pro Setup describes how to change
the appearance of marked ink (using Preferences > Actions
tab) and how to change the selection methods for actions
(using ThinkScribe Notebook Properties > Actions Selector
tab).
• Chapter 7: Working with Actions describes how to mark
actions and change or remove actions in your ink using Ink
Manager Pro.
To order pre-numbered
notepads, go to the IBM
Web site by pressing the
ThinkPad control button on
your computer, which
opens Access ThinkPad.
Then select the Service &
Support icon.
To make sure your paper and digital pages match, number each
paper page. Then you can move back and forth in your pages by
matching the page number in the display panel with the number
of the paper page.
When you turn the paper page, always use the ink tip to turn the
“digital” page on the digital notepad. This transmits an electronic
signal that changes the digital page in Ink Manager Pro. The digital
notepad also records the time and date you start each page, called
a time stamp.
10
Chapter 1
Page 17

When you want to change
the pre-assigned ink file,
first turn the page, and
then change the name of
the ink file.
To turn a page:
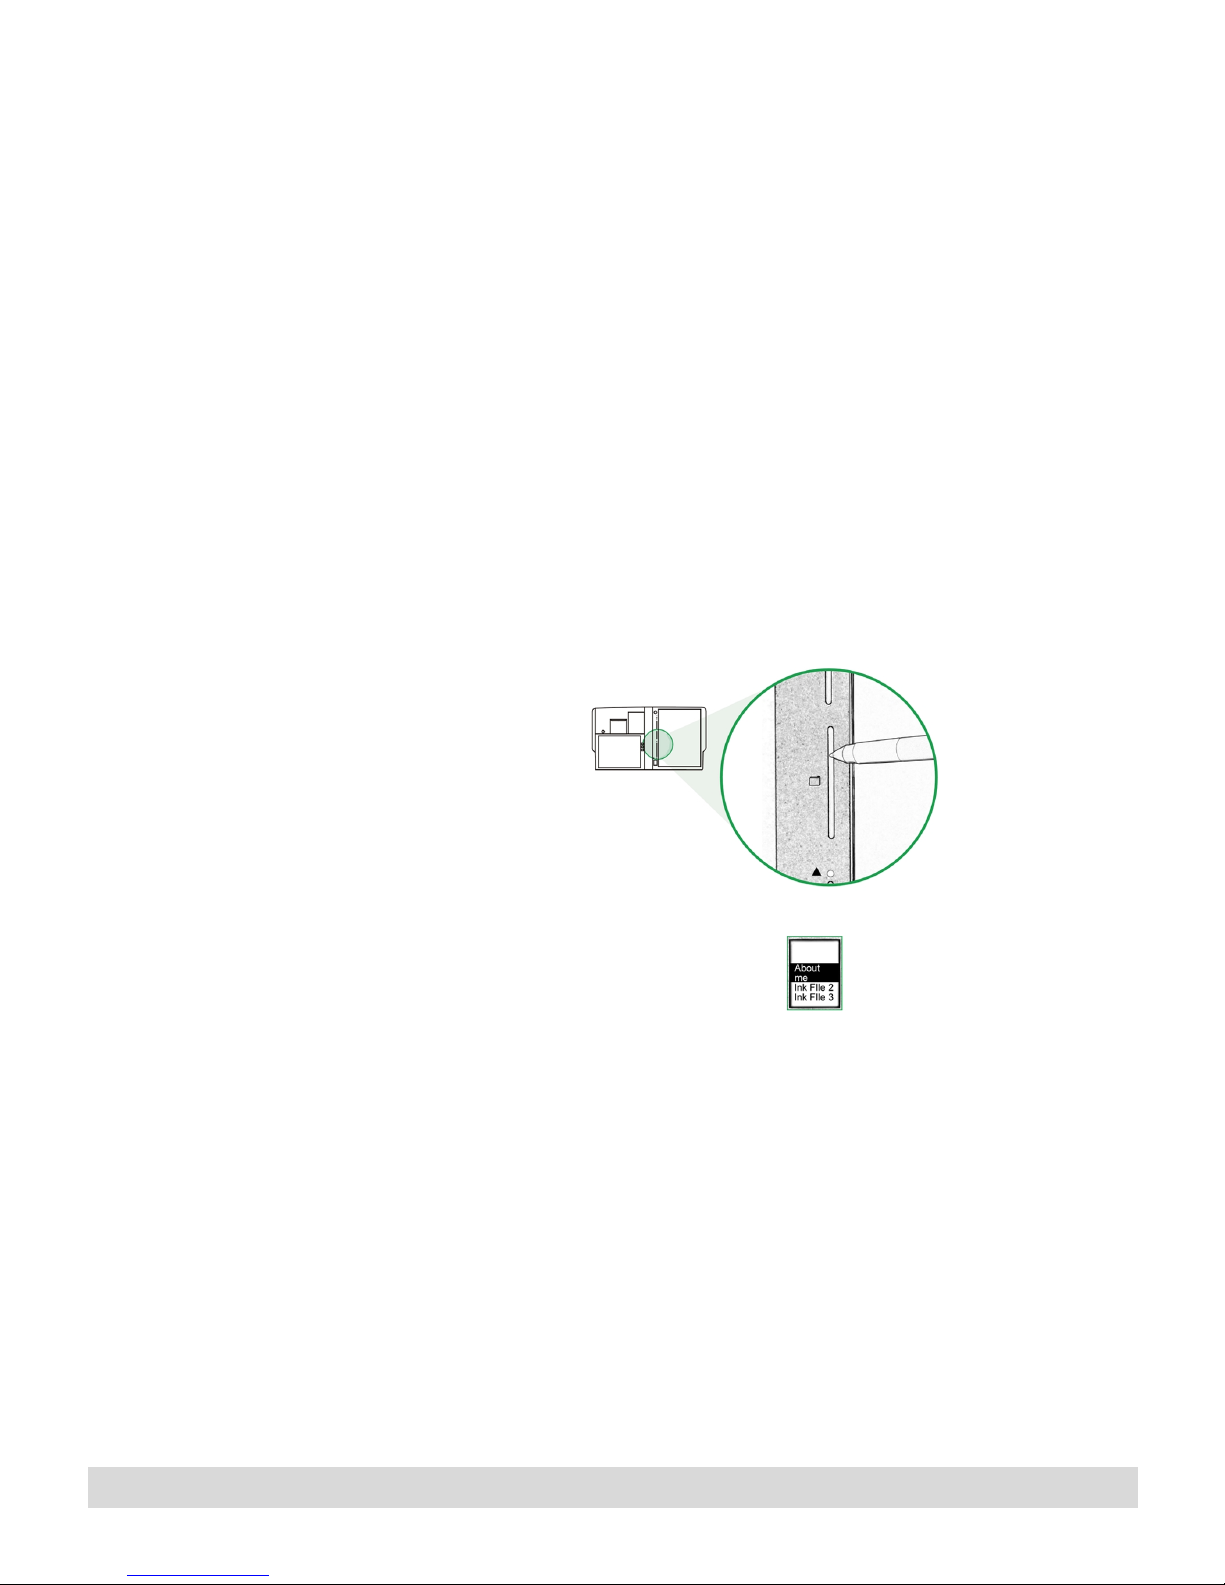
• When you turn the paper page, tap the ink tip in the Page
Forward button on the digital notepad.
• Slide the pen point slowly in the Page selector and lift the
pen to select the page number highlighted in the status
display. Make sure the page number matches the page
number on the paper page.
To edit or add notes to a previous page:
If you throw away a paper
page after writing on it,
keep the page numbers in
sync, and you can delete
the digital page later in Ink
Manager Pro.
Tap Page Backward or Page Forward or use the Page selector until
the status display shows the same page number as the page you
want to edit. The new ink updates in the Current Notepad pages
on the computer screen.
If you forget to tap Page Forward, the new digital page appears on
top of the previous page. But you can quickly fix overwritten ink
in Ink Manager Pro, described in Chapter 4: Current Notepad
Pages.
Status display messages
The status display shows information about the current page,
including the following:
• System messages, such as if your ink is transmitting to the
computer
• Pre-assigned ink file for the current page
System messages
System messages display when you use the selectors and buttons,
such as:
• Current page number
• The names of ink files when you use the Ink File selector.
• The page numbers when you use the Page selector.
• The action types when you use the Actions selector.
• Prompts for how to select ink as an action, either with the
circle or two-tap method, described earlier in this chapter.
Digital Notepad and Pen Features
11
Page 18
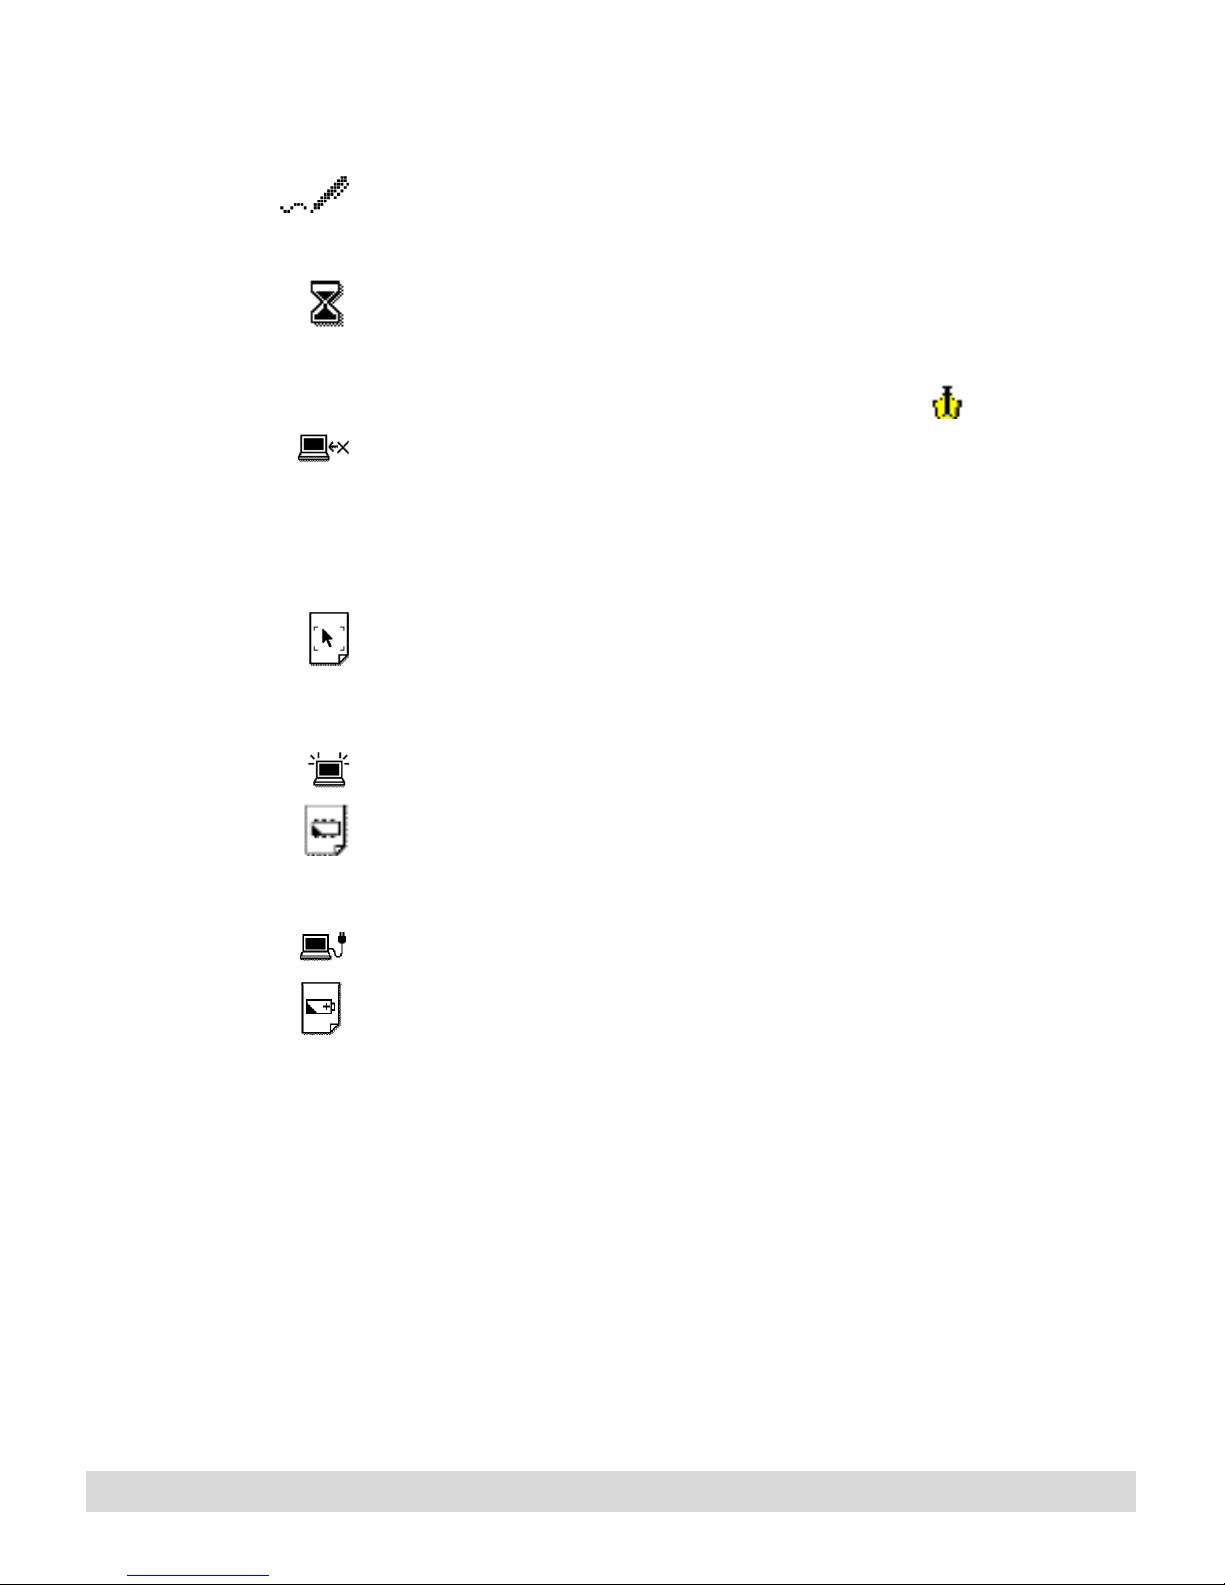
Other status display symbols
Pen. Ink is being recorded. It appears whenever you touch the
digital pen on the digital notepad. If it does not appear, it might be
time to change the pen battery, described later in this chapter.
Hourglass. Ink is transferring to the computer. Wait until the
hourglass disappears before you resume writing. If Ink Manager
Pro is running, the Current Notepad focus changes to the
thumbnail with the most recent ink.
Disconnected (or a blinking Ink Transfer icon in the status
tray). Ink is not transferring to the computer. If the Ink Transfer
icon does not appear in the status tray, start the utility using Start
> Programs > IBM Ink Manager Pro > Utilities > IBM Ink
Transfer. Or see Chapter 10: Troubleshooting.
Graphics Tablet Mode enabled. Your ink is not being recorded.
Instead, your digital pen is enabled as a graphics input device. For
more information, see Chapter 9: Special Features. To disable
Graphics Tablet Mode, tap OK.
Low memory (and the amber Error indicator light illuminates).
The memory in the digital notepad is full. To clear the memory,
turn on the computer and let your recorded ink transfer to the
computer. After the hourglass disappears, you can turn off the
computer again, and continue writing on the digital notepad.
Low battery (and the amber Error indicator light illuminates).
The computer battery is too low for the digital notepad to
operate. The digital notepad will shut down in one minute unless
you either use the AC adaptor or replace the computer battery.
Changing the notepad
To order pre-numbered
notepads and other
supplies, visit our Web site
by pressing the ThinkPad
button on the computer.
Then select the Service &
Support link.
Use any regular notepad, such as letter size (8-1/2” X 11") or A4
(8” X 11-1/2”), as long as the cardboard backing fits snugly in the
notepad slot. Or use the pre-numbered notepads especially
designed for the ThinkScribe.
For correct alignment, make sure that the lower, left corner of the
pad is seated in the lower-left corner of the recessed area on the
digital notepad.
12
Chapter 1
Page 19
A4 spacer inserted on the
p
left side of the note
ad slot.
For A4 pads (commonly used in European countries), insert the
A4 spacer (included in the TransNote package) on the right side
of the notepad slot. This aligns the notepad correctly to the left
side of the notepad slot.
When you change the notepad, remember to change the
electronic notepad, also. This resets the page counter in the status
display so you can match the page numbers.
To change the notepad:
1. Make sure all pages on the current pad have uploaded to the
computer. To check, start Ink Manager Pro, and then turn on
the digital notepad. Wait a few minutes to let any remaining
new ink upload (indicated by the hourglass in the status
display).
2. Remove the old notepad, and insert the cardboard backing
into the notepad slot, aligning the pad to the lower-left corner
recessed area on the digital notepad.
The previous notepad,
identified by a number and
date range, is added to the
Archive menu in the
navigation panel.
3. Use one of the following methods to reset the digital notepad:
• Touch the Flip Touch control button on the computer
(middle button on the right side of the screen), and select the
Changing Pads icon on the menu. This opens ThinkScribe
Notepad Properties to the Inking tab.
• From the Control Panel (Start > Control Panel), select the
ThinkScribe Properties icon, and then select the Inking tab.
4. On the Inking tab, select Changing Pads, and select the Pad
Type: Letter (“8-1/2 X 11”) or A4 (8” X 11-1.2”)
5. Select OK.
A warning reminds you that you cannot undo this action. If the
button is depressed (clicked), and you change your mind, just
press it again to de-select it, but after you select Apply or OK, you
cannot change the page count back to the previous count.
Check the status display to see that the page count is set to “01.”
Digital Notepad and Pen Features
13
Page 20

Caring for the digital pen
The digital pen writes in traditional ink on the paper, while
simultaneously transmitting digital ink to the Ink Manager Pro
program. The digital pen is a precision instrument and should be
handled with care:
• Replace the pen cap when you finish writing. This protects
the ink tip from damage. With the cap on, you can store the
pen in any position.
• When you finish writing, replace the pen in the pen holder,
or lay it next to the digital notepad. Do not rest the pen on
the digital notepad or hold it poised just above the notepad
for long periods of time. Doing so might prevent your ink
from transferring to the computer.
• Because the pen draws power when the tip is depressed, do
not store the pen in a position that would continuously
depress the pen tip. Also, do not let the pen tip rest on a
surface that might wick out the ink, such as a cloth or tissue.
• With the cap on the front section, you can store the digital
pen in any position.
• If you have more than one digital pen, store only one with
the ThinkScribe. Keep the other pens stored in another
location so the transmitters do not interfere with the
working pen.
14
Chapter 1
Page 21
Changing the pen battery
With normal use, the pen’s single AAAA alkaline battery lasts an
average of 6 to 12 months. This is a standard battery available
from a local retailer.
When the pen battery gets low, you will notice that the pen
symbol does not appear in the display panel, and your ink does
not transfer to the computer.
To conserve battery power, the digital pen shuts down after 5
minutes of inactivity. To wake it up, simply tap the ink tip on the
paper once.
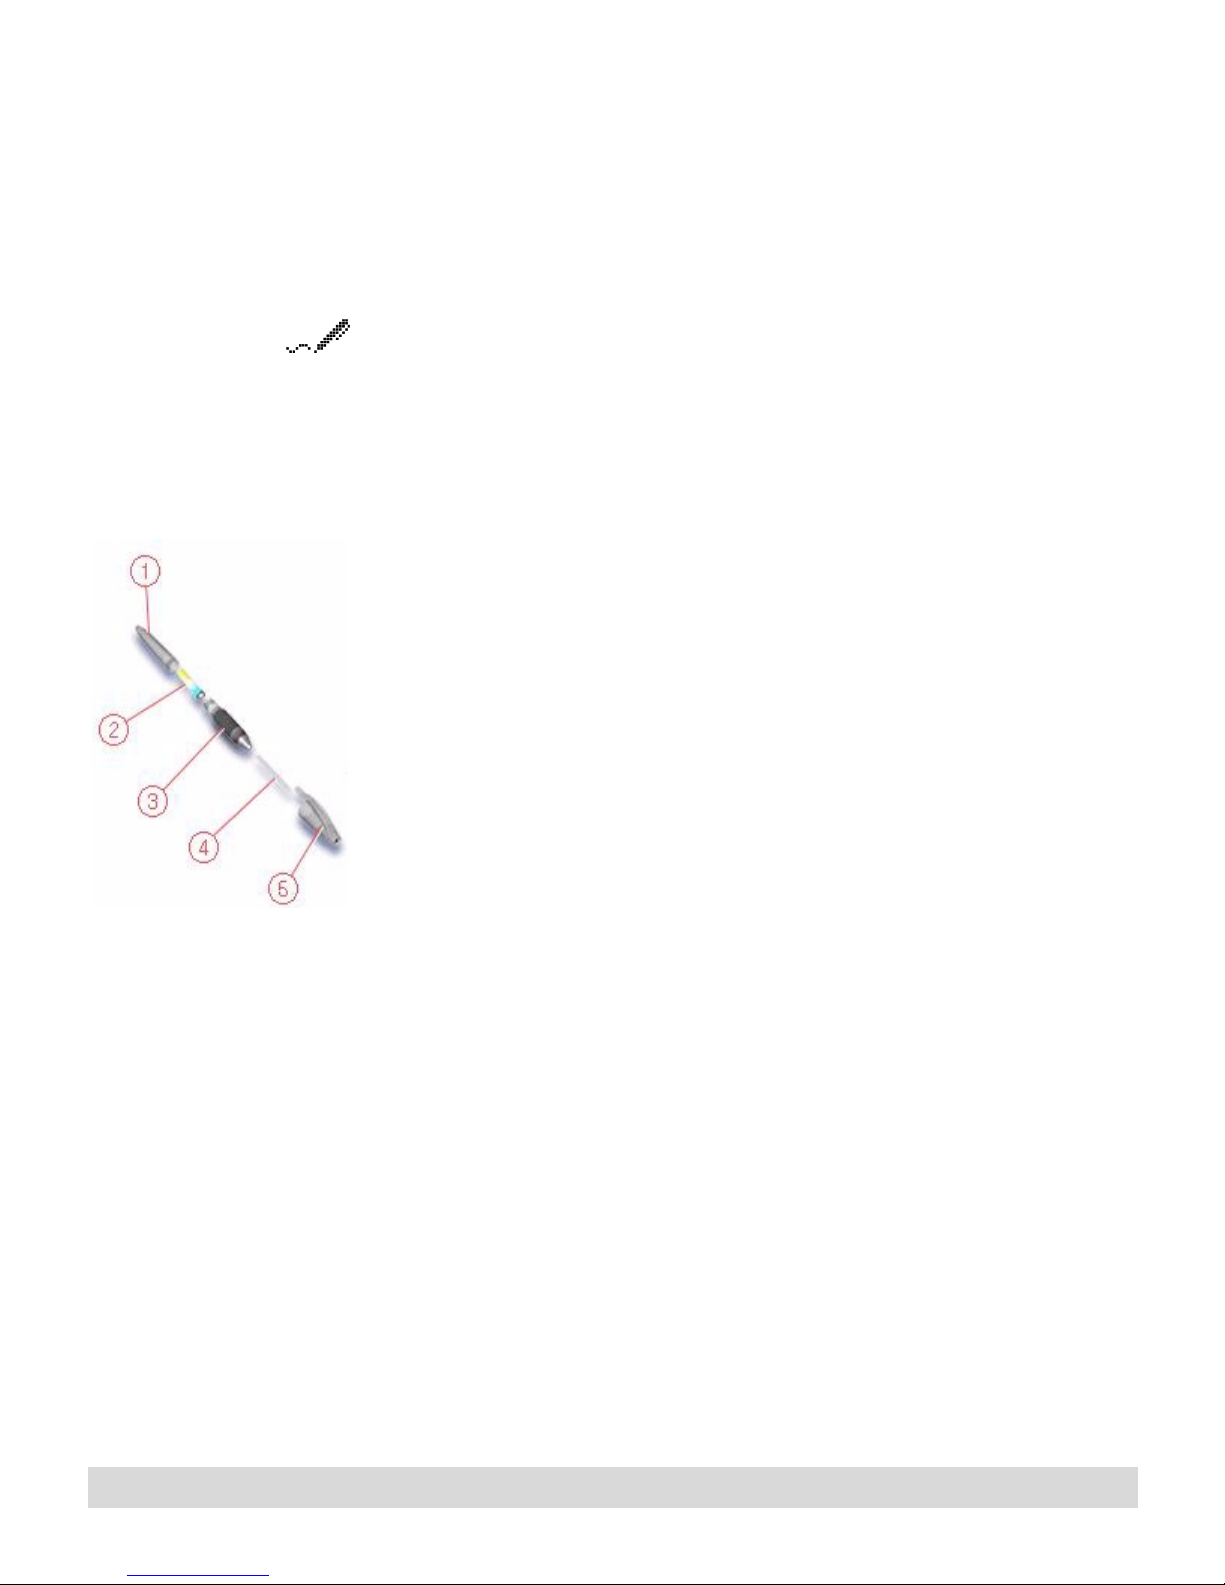
To change the pen battery:
1. Unscrew the barrel [1], the lower end of the pen, counterclockwise from the front section [3].
2. Remove the old battery from the barrel [2].
3. Place a new AAAA battery into the barrel with the positive
(+) end facing the front section of the pen [3].
4. Screw the barrel clockwise onto the front section until tight.
5. Confirm that the pen is working by turning on the digital
notepad and tapping the pen on the tablet. The green Activity
indicator blinks and the pen symbol appears in the status
display if the notepad receives a signal from the pen.
When the front section is unscrewed from the barrel, do not
touch the piece of metal (an electronic transmitter) that extends
beyond the edge of the front section. Doing so might damage the
pen and adversely affect its performance.
Digital Notepad and Pen Features
15
Page 22

Changing the ink refill
Your digital notepad includes four ink refills for your convenience.
They are located in two trays on the right edge of the case.
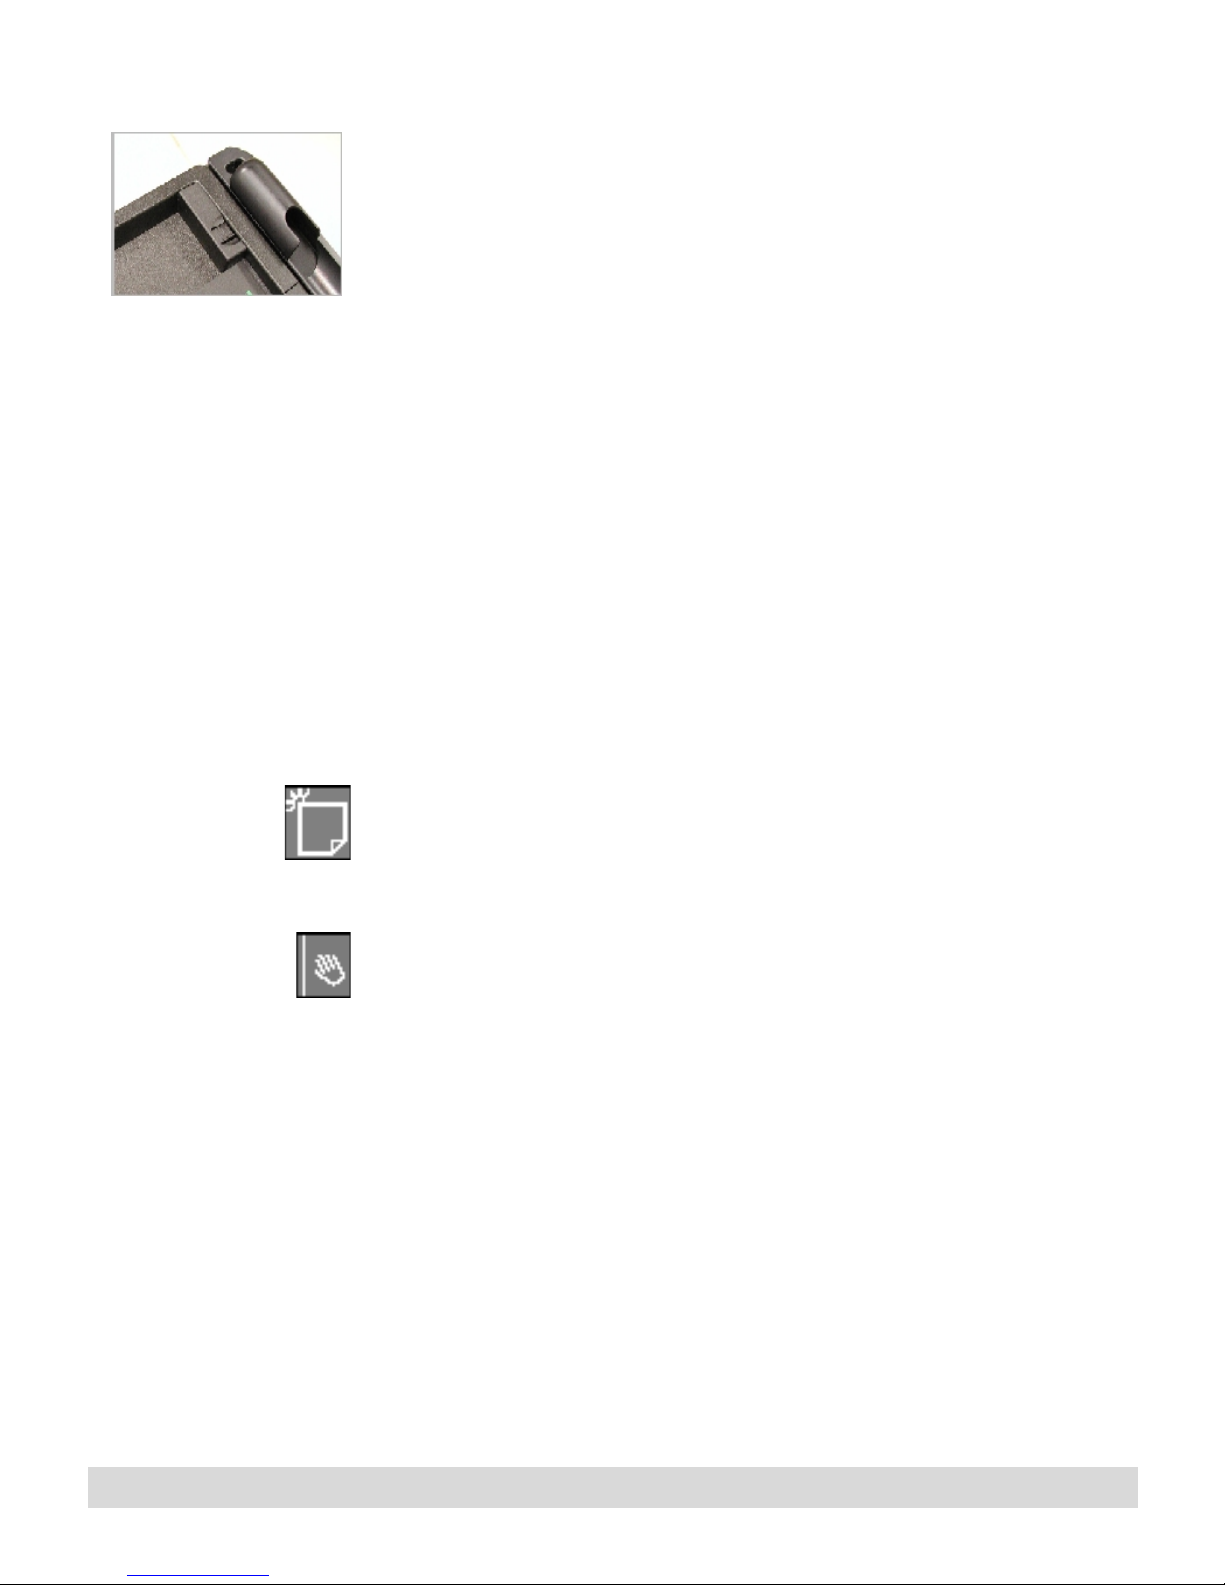
To change the ink refill:
1. Open the refill cover on the right edge of the digital notepad.
To do this, push the cover slightly toward the digital notepad,
and then lift it up.
2. Insert the ink tip [4] into the keyhole slot in the pen holder,
and pull up on the pen to remove the ink tip.
3. Insert the ink refill into the front section [3].
4. Press the ink tip gently on a hard surface until it snaps into
place.
Ordering supplies
To order supplies, go to the IBM Web site by pressing the
ThinkPad control button on your computer, which opens Access
ThinkPad. Then select the Service & Support icon.
IBM provides a full selection of replacement supplies and
accessories for the TransNote, such as the following:
• Pre-numbered notepads, made especially for the digital
notepad.
• Ink refills, made especially for the digital pen.
16
Chapter 1
Page 23

Ink Manager Pro Setup
The IBM Ink Manager Pro software displays your handwritten ink
on the computer. This chapter discusses settings that you might
want to set before you begin writing on the digital notepad:
• Finding help for Ink Manager Pro
• Setting up ink files
• Setting preferences for Ink Manager Pro
• Setting properties for the digital notepad
• Enabling keyword transcription
• Enabling Ink Calendar Support
Finding help for Ink Manager Pro
2
When using Ink Manager Pro, find help anytime by selecting Help
> Help Topics, or pressing the F1 key. Select the Back button to
return to a previous topic.
• Select the Contents tab to view the Table of Contents. Select
the underlined hyperlinks to jump to a related topic.
• Select the Index tab to view index entries. Double-click an
index entry, or click the entry and click Display, to view the
help page on that topic.
• Select the Search tab to enter a word or short phrase to
search for among all the topics. Double-click a title, or select
a title from the list and select Display, to view the topic.
• If a window has a button in the upper right corner,
click the button, and then click an area of the screen for
field-level help. Or right-click an area to open the help, if
available.
Page 24

Setting up ink files
One of the main features of the digital notepad is the ability to
store and, later, access handwritten ink efficiently in Ink Manager
Pro. To best use this feature:
• Decide up-front how you want to access your ink files.
• Create the ink file names in “My Ink Files” in the navigation
panel in Ink Manager Pro.
At the same time, replace the existing ink file names on the digital
notepad with the new names to match those on the navigation
panel so that the names you want to pre-assign are available in
both locations. Ink Manager Pro provides several methods to
create these ink files.
When you file pages, you
are filing a copy of the
original page into the ink
file, which you can then reorder and edit. The original
page stays preserved in
the Current Notepad or
archive view for you to
access at any time.
After your handwritten notes transfer to Ink Manager Pro, they
appear in the Current Notepad view in the order in which you
wrote them. You can leave them there, in their original state, or
you can “file” (copy) them into “My Ink Files.” Most users prefer
to organize their notes into ink files, just as they prefer to save
their documents in folders to find the documents more easily
later.
For example, you might want to access your ink based only on
date and month. If so, you can create ink file names for each
month of the year. Or you might want to create ink files for
individual projects, customers, or departments for which you will
write notes, and later, want to access by topic.
To create ink files in Ink Manager Pro, right-click a name in the
“My Ink Files” section of the navigation panel to see the following
options, or find these options in the File menu:
18
Chapter 2
Page 25
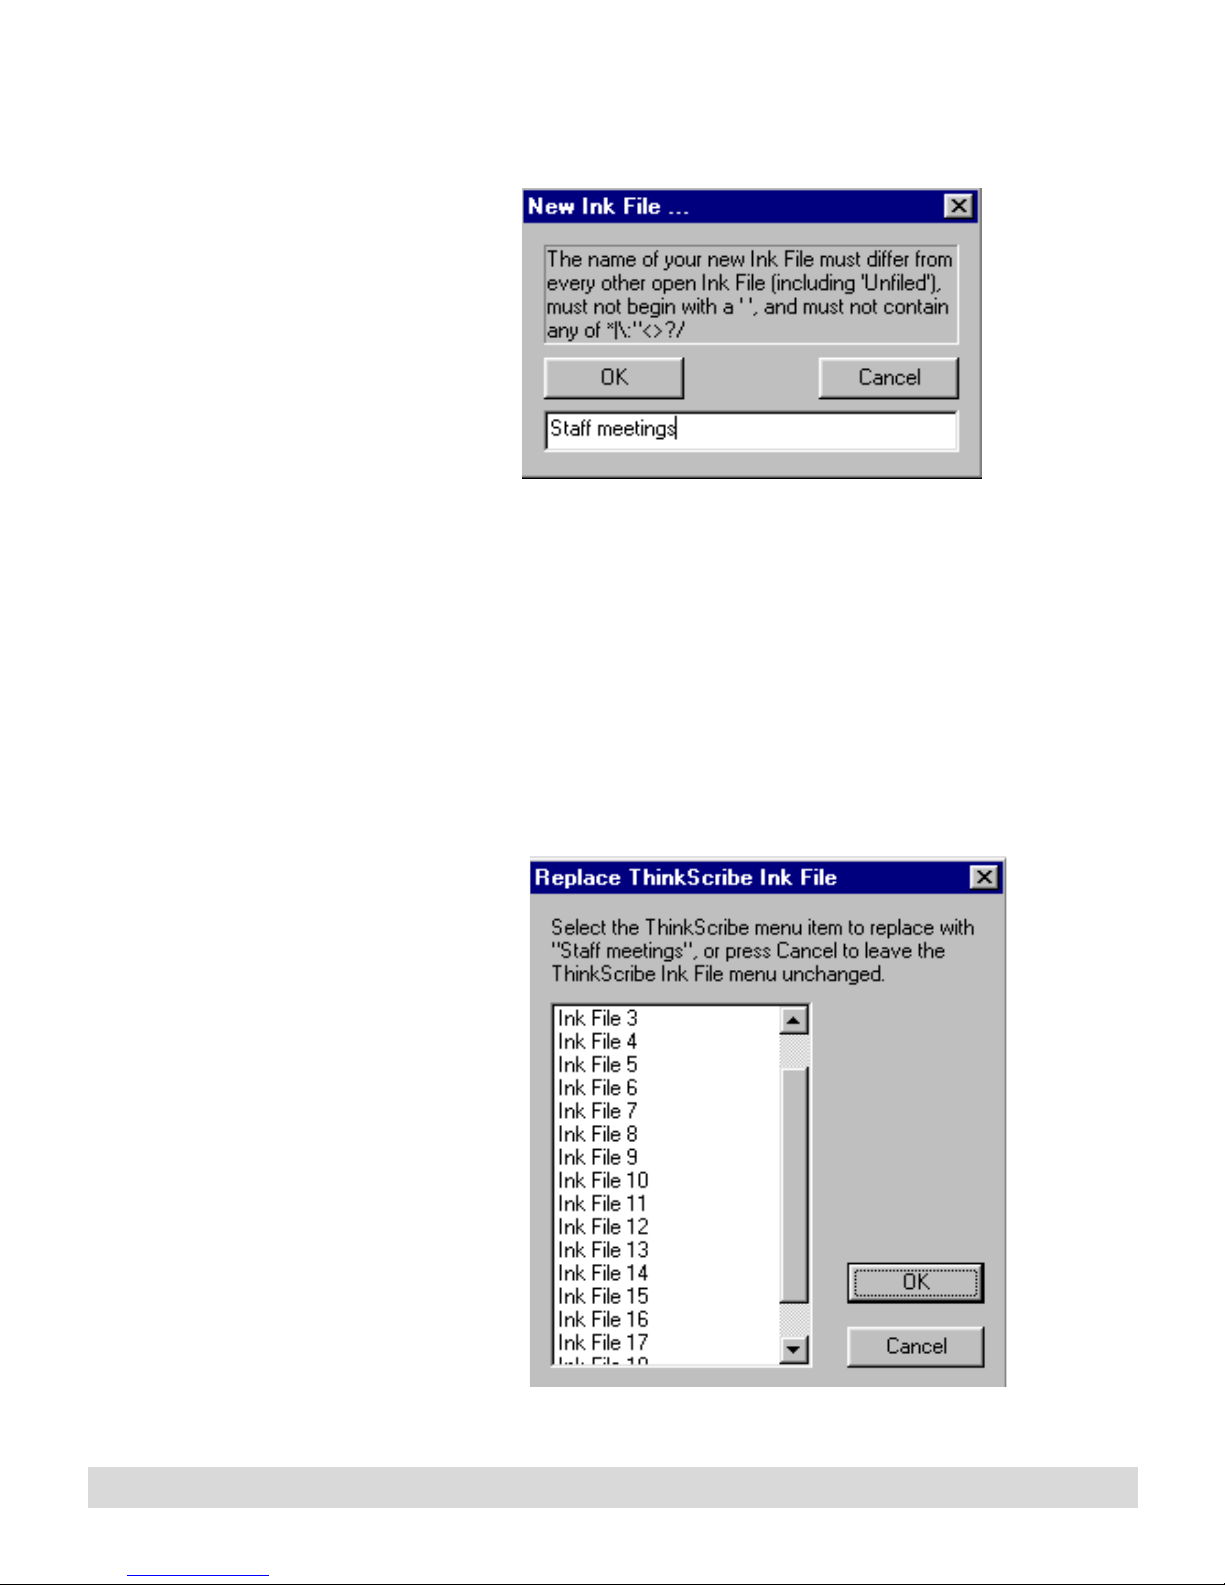
Select New Ink File to open the New Ink File window.
Type a name, up to 16 characters (14, if all upper-case). It is best
to use common letters and numbers for names and avoid using
any special characters.
When you create a new ink file in the navigation panel (and the
digital notepad is turned on), the Replace ThinkScribe Ink File
window opens. If you want the new name to appear on the Ink
File selector menu on the digital notepad, select an existing name
to replace.
Ink Manager Pro Setup
19
Page 26

Or later, you can right-click an ink file and select Add to
ThinkScribe Menu to add the name to the Ink File selector menu.
If the names match those on the navigation panel, you can preassign the correct file name as you write, and then file the pages
more quickly into “My Ink Files.” For more information on
creating or managing ink files, see Chapter 5: Managing Ink Files.
For more information on reordering names on the digital
notepad, use the Ink Files Selector tab of ThinkScribe Notebook
Properties, discussed later in this chapter.
Setting preferences for Ink Manager Pro
Use the Preferences window to customize the default settings and
appearance of ink in Ink Manager Pro. This section explains the
options in the Preferences tabbed windows.
1. To open the window, select File > Preferences.
20
Chapter 2
Page 27

2. After making selections on a tabbed window, select OK to
save your changes and close the window.
Application tab
Use the Application tab, shown on the previous page, to
customize application settings and clear disk space.
• Undo Levels. Type the number of actions you want to be
able to undo in the Undo Levels box, from 1-25. The default
value is 10. (The higher the setting, the more memory your
system requires to store previous actions.)
• Auto Save Interval. Select the interval between auto-saves,
from 0-100 minutes. The default value is 5 minutes.
• Erase Thumbnail Cache. Select this option to erase all
internally stored bitmap-images of thumbnails to free up
disk space. However, the next time you view thumbnails, it
might take longer to display them.
Ink Manager Pro Setup
21
Page 28
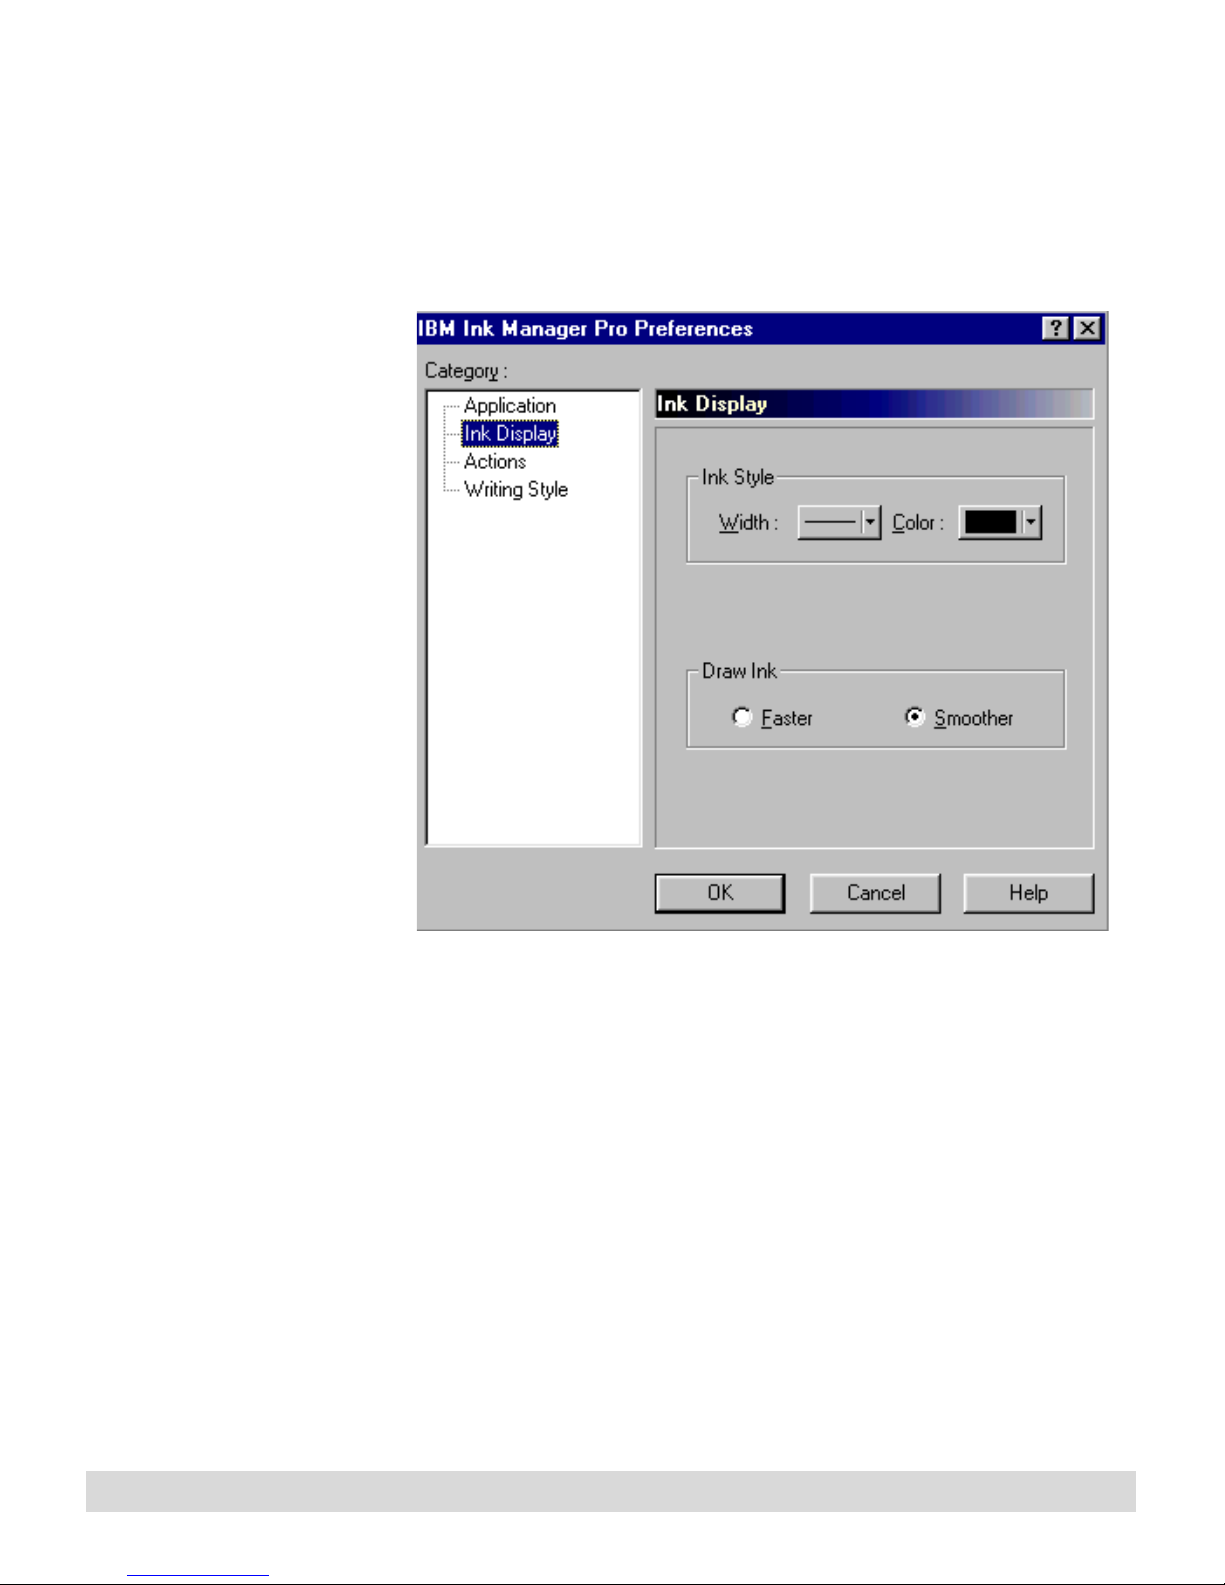
Ink Display tab
Select the Ink Display tab to change the way your uploaded ink
appears on the computer. (You can still modify individual
selections of text using the toolbar buttons.)
It's a good idea to try the
Smoother option first. Then
if you decide it takes too
long to display ink, change
the setting to Faster.
22
Chapter 2
The new settings change the appearance of all ink, unless you
marked it as an action or applied a color or width to an individual
selection.
• Ink Style. To change the default appearance of all ink, select
the Ink Width arrow or the Ink Color arrow and select a
different setting from the list. (The defaults ares black, thin
ink).
• Draw Ink. Adjust the Draw Ink speed, if needed. The
Smoother option (default selection) requires more memory
(which can slow the system performance), but the ink
appears smoother. If your computer does not have a lot of
memory or is slow, select the Faster option. With this setting,
ink appears faster, but with rougher edges.
Page 29
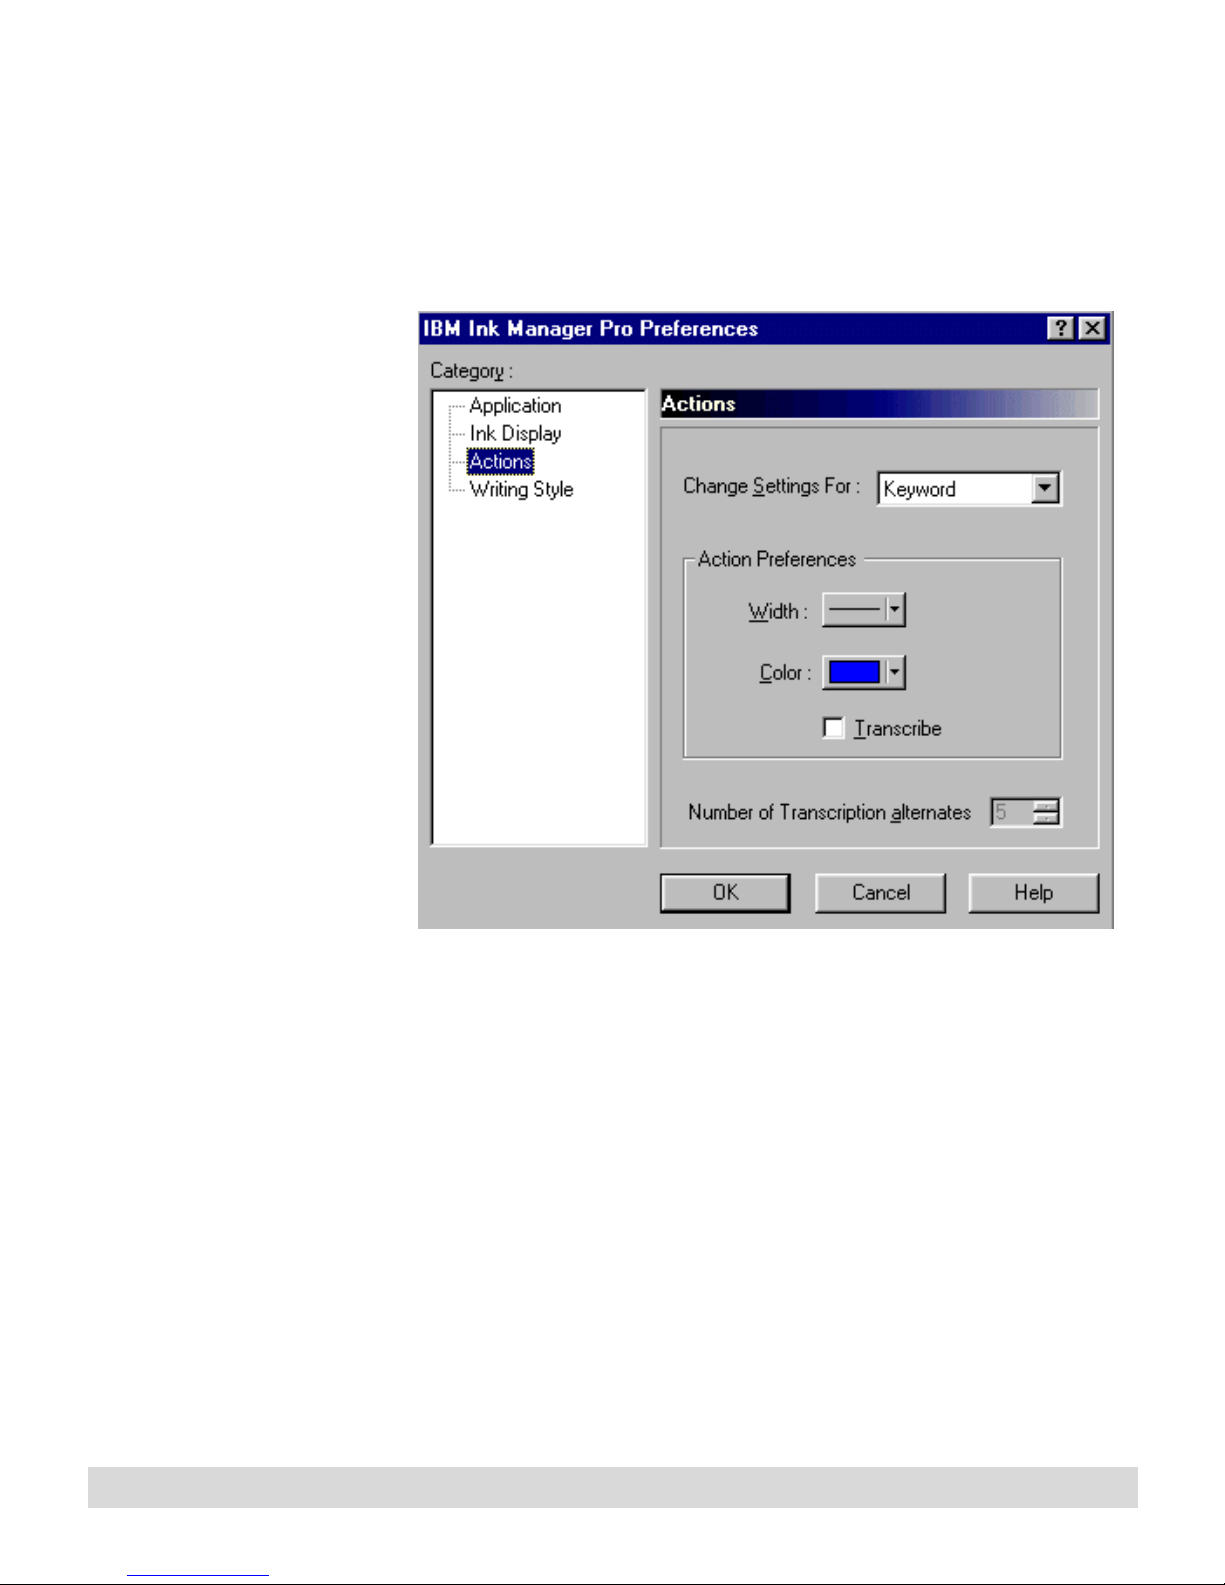
Actions tab
Select the Actions tab to change the way labeled ink appears on
the computer. You can still change individual selections of ink
using the toolbar buttons.
For information about
Keyword transcription, see
the section “Enabling
Keyword transcription,”
later in this chapter.
• Select the type of action to change. In the Change Settings
For list box, select the action.
• Action Preferences. To change the appearance of the action
type, select the Ink Width arrow or the Ink Color arrow and
select a setting from the list.
• Transcribe. Select the Transcribe checkbox to enable
Keyword transcription. When enabled, this feature attempts
to convert the words you mark as Keywords into text words.
• Number of Transcription Alternates. Alternative words
appear when you verify Keywords. This setting controls the
number of alternative words the program provides. Select
from 1-10 (default is 5).
Ink Manager Pro Setup
23
Page 30
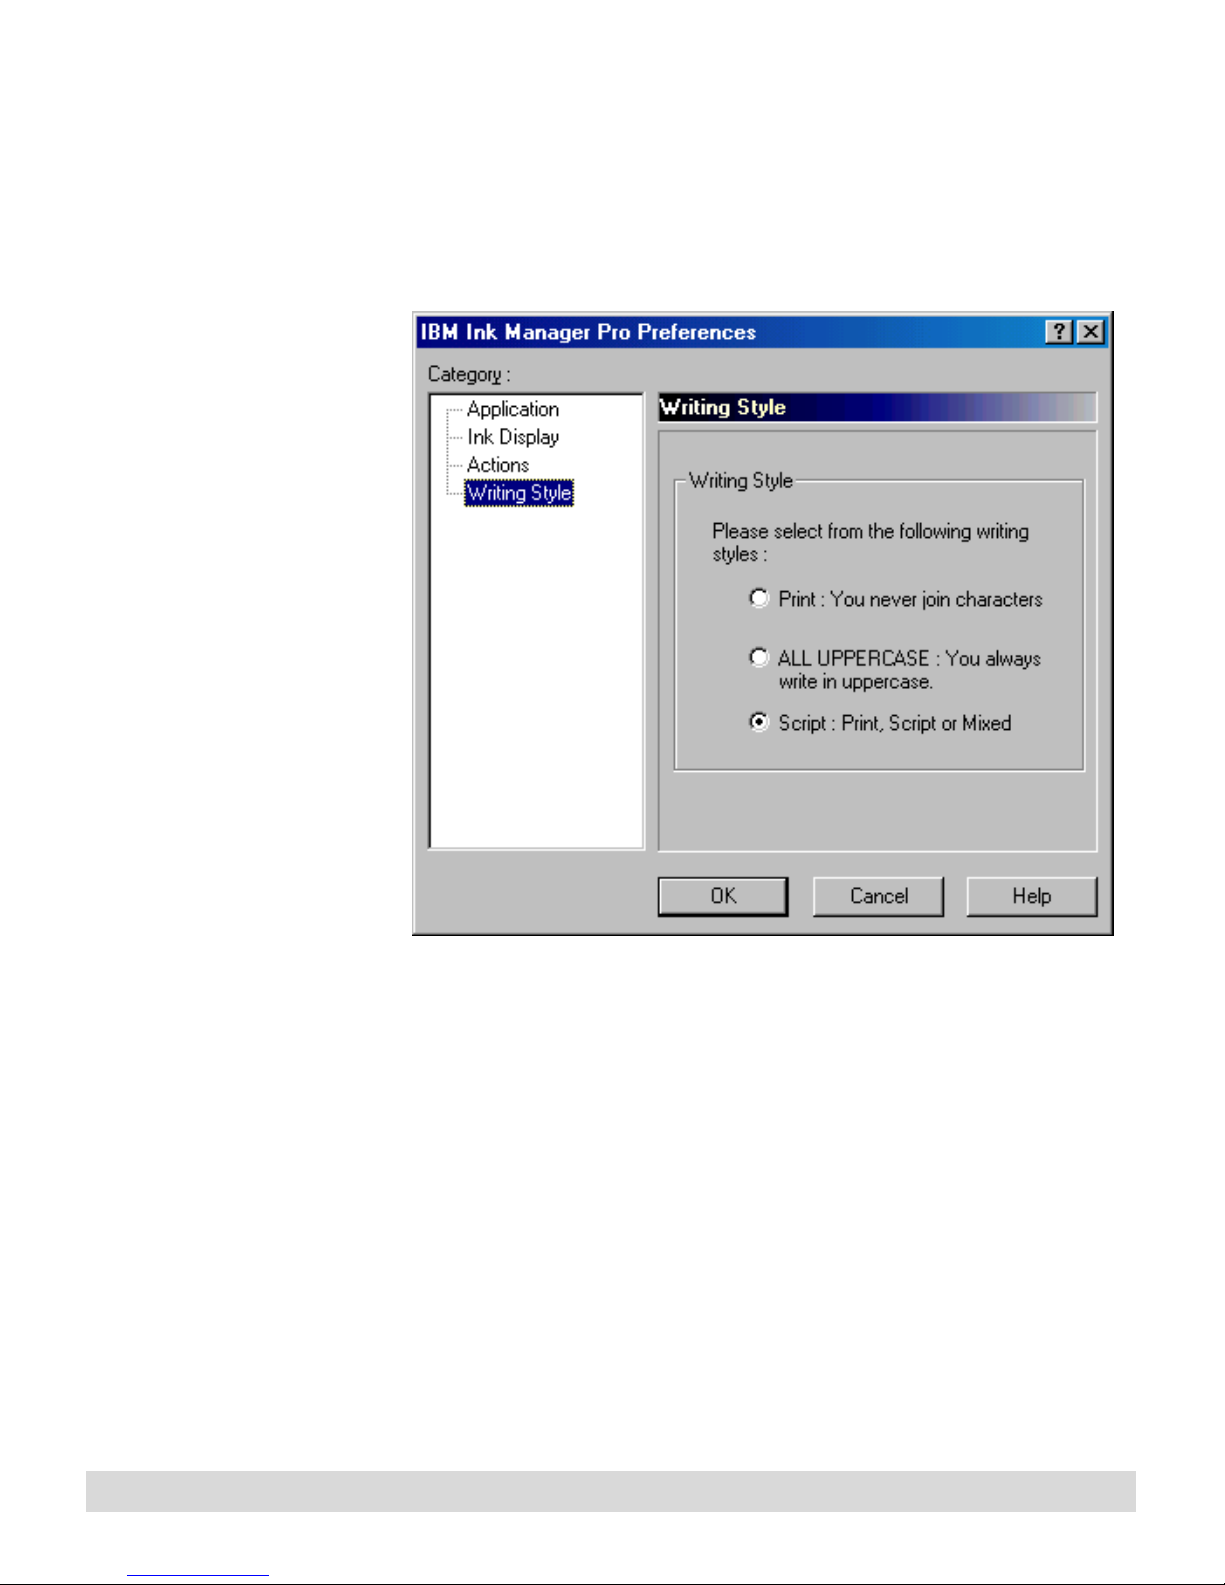
Writing Style tab
When you enable Keyword transcription (on the Actions tab), use
the Writing Style tab to specify your type of handwriting and
increase transcription accuracy.
24
• Select Print if you always print and your letters do not touch.
• Select ALL UPPERCASE if you always write in all
uppercase letters.
• Select Script for all other types of writing (default).
Chapter 2
Page 31

Setting properties on the digital notepad
Occasionally, you might want to change or set properties for the
digital notepad. To do this, open ThinkScribe Notepad Properties
from the Control Panel (described below). This is a utility
program that contains five tabbed windows. Each tabbed window
includes controls and options to synchronize events between the
digital notepad and the computer. Select one the following tabs:
• To set the mouse as a graphics input device, select Graphics
Tablet Mode.
• To check information about the digital notepad, select
Device.
• To reset the inking properties, select Inking.
• To modify the names of ink files, select Ink File Selector.
• To modify the actions, select Actions Selector.
Opening ThinkScribe Notepad Properties
To create a shortcut on
your Windows desktop,
open the Control Panel,
and right-click the IBM
ThinkScribe icon. From the
menu, click Create
Shortcut. Click Yes to put
the shortcut on the
desktop.
Be patient—it might take a few seconds for the program to make
the connection and read the current settings.
1. Turn on the digital notepad and start Ink Manager Pro if you
intend to change any settings. If the digital notepad is turned
off, you can check settings, but not change them. If you do
not have Ink Manager Pro running, changes will not transfer
to the software.
2. Open ThinkScribe Notepad Properties using one of the
following methods:
• From the Windows Start menu, select Settings > Control
Panel. Select the IBM ThinkScribe icon.
• Or, from the Windows Start menu, select Programs > IBM
Ink Manager Pro > Utilities > ThinkScribe Notepad
Properties.
Ink Manager Pro Setup
25
Page 32

Graphics Tablet Mode tab
If you do not want to
change the settings, you
can enable Graphics
Tablet mode more quickly
by using the Flip Touch
control button on the
computer.
This tabbed window sets the feature that lets you use the digital
pen as a graphics input device in Ink Manager Pro or other
graphics programs, such as Microsoft Paint. For more
information about using Graphics Tablet Mode, see Chapter 10:
Special Features.
26
Chapter 2
• In the Pen Modes section, select Graphics Tablet Mode to
enable it. (To disable Graphics Tablet Mode and resume
writing, tap the OK button on the digital notepad, or select
Inking Mode on the Graphics Tablet Mode tab.)
• The pen is mapped to the left-mouse button by default,
meaning a single tap is the same as a left-mouse click. To
Page 33

change it, click the Pen-Down is mapped to arrow. Select
which mouse button you want to map the pen to: Left,
Center, or Right mouse button. For example, if you select
Right, a tap acts as a right-mouse click.
When Graphics Tablet Mode is enabled, adjust the following
settings for your pen taps:
• Move the Double-Click Speed slider from left (Slow) to right
(Fast) to increase or decrease the speed at which the doubleclick happens.
• Move the Double-Click Area slider from left (Small) to right
(Large) to increase the area of the double-click range.
• Double-click in the green Test area to see if your doubleclick is recognized. If it is, the area turns yellow. Double-click
it again to turn it back to green. If the program does not
recognize the double-click, follow steps 4 and 5 to adjust the
Speed and Area settings until it does.
Ink Manager Pro Setup
27
Page 34

If you plan to change the
timestamp and change the
notepad, complete one
action, select OK to close
ThinkScribe NotePad
Properties, and then
reopen it to complete the
second action.
Inking tab
Select the Inking tab to reset or synchronize digital notepad
settings. Make sure the digital notepad is turned on.
If you change the system
clock on the computer, turn
on the digital notepad and
wait a few seconds for the
change to transfer to the
digital notepad before you
start writing notes.
For more information on
changing the notepad, see
Chapter 1: Digital Notepad
and Pen Features.
28
Chapter 2
1. Check the Ink Timestamp to confirm the digital notepad date
2. Select the Changing Pads button , and then select the Pad
and time. The clock automatically synchronizes itself with the
computer settings when you run them both. If the clock is not
correct, click the Ink Timestamp button to reset the digital
notepad clock to match the system clock.
Type, such as Letter (8-1/2” x 11”) or A4 (8” x 11-1/2”),
whenever you change the pad of paper on the digital notepad.
Page 35

This resets the electronic page counter back to page “01.” If
the button is depressed (clicked), and you change your mind,
just press it again to de-select it (but once you select Apply or
OK, you cannot change the page count back to the previous
count).
3. Select Clean up to delete any empty notepads from the
Archive section of the navigation panel.
4. Reset the Upload Policy to control the speed that ink
transmits to the computer (when the computer is turned on).
Select your preferred setting:
• Low—Upload after 10 seconds of idle time if at least one
pen stroke is recorded.
• Medium—Upload after 3 seconds of idle time and about 5
pen strokes are recorded, or after 10 seconds of idle time if
any ink is recorded.
• High—Upload after 2 seconds of idle time if any ink is
recorded (default).
The upload speed affects
the overall system
performance and battery
life. If the computer’s
performance seems slow
or the battery seems to
drain fast, try reducing the
upload speed to Medium or
Low.
A low upload speed allows more ink to accumulate on the
notepad between uploads; a fast upload speed allows less ink to
accumulate, but might interrupt your work in Ink Manager Pro.
“Idle time” means that you lift the pen from the digital notepad,
and wait for the transmission to take place. When the transmission
begins, the hourglass symbol appears in the status display.
Ink Manager Pro Setup
29
Page 36

Device tab
Select the Device tab to check device information.
30
Chapter 2
• Bootcode and Firmware versions. The versions will change
if you ever update the firmware.
• Identification. To edit the User name, select Edit User
Name, and type the correct name in the Identification box.
When you finish, press Enter, or select the Edit User Name
checkbox again. The name is uploaded when you select
Apply or OK.
• LCD contrast. Adjust the slider and apply the change until
you can see messages in the status display clearly.
Page 37

• Defaults. Select Restore to restore the original factory
settings for any properties you have changed. Select Save
Current Settings as Defaults to set your current settings as
the permanent settings.
Ink File Selector tab
Select the Ink File Selector tab to rename or reorder the names on
the Ink File selector menu. The General ink file is reserved and
cannot be renamed or reordered.
Ink Manager Pro Setup
31
Page 38

You can also rename the
ink files from the navigation
panel, described in
Chapter 5: Managing Ink
Files.
To rename a file on the Ink Files selector:
1. Select the ink file you want to rename.
2. In the Enter Name box, type the new name, up to 16
characters, or 14 characters if all uppercase. Do not use any
special characters such as *:”<>/?\| or NLS characters such
as ü ® ™ or any other character created by pressing the Alt
key and a number pad sequence.
3. In the Choose Type box, select IncInk.
When you make a change, the Update checkbox appears.
Select it to change the window list. Select OK or Apply to
transfer the changes to the Ink File selector.
Reorder the ink files names on the digital notepad so the names
you use most frequently appear first on the list.
To reorder the Ink File selector:
1. Select the Reorder Items? button.
The title bar prompts you to "Choose First Item." Select the
ink file you want to appear first on the list. A "1:" appears
before the ink file name. Then, as prompted, click the ink file
you want to be second, and so on.
2. When you start to reorder ink files, the Uncheck to Cancel
checkbox appears. If you make a mistake, click it, and then
start over by selecting Reorder Items? again.
3. When you start to reorder ink files, the Set Order checkbox
appears. When the order is correct, select Set Order to save
the list, and the names reorder on the window list. Select OK
or Apply to transfer the changes to the Ink Files selector.
32
Chapter 2
Page 39

Actions Selector tab
Use the Actions Selector tab to change the selection method and
upload speed when marking ink on the digital notepad.
The ability to create new
action types is provided
only for programmers
creating new applications
for the ThinkScribe
notepad.
• Name—Keyword, To Do, Message, and Copy.
• Type—By default, “Label.”
• Mode—The selection method used when marking ink on
the digital notepad, either circle or two-tap.
• mmediate? —By default, ink that you mark as an action
uploads immediately to your computer. Unchecked, it
uploads at the regular transfer interval determined by the
Upload Policy (see the Inking tab in this section).
Ink Manager Pro Setup
33
Page 40

To modify an action:
Do not change the name of
the existing actions, such
as Keyword, To Do,
Message, or Copy. Doing
so causes unpredictable
behavior when identifying
actions.
1. For programmers developing custom applications, to create
an action, type the name in the Enter Name box. Then in the
Choose Type box, select the ink type. The action type will
appear in the Action selector on the digital notepad, but not in
Ink Manager Pro.
2. To change the selection method, select the action, and then in
the Selection Mode area, click the method you want to use
when marking ink on the digital notepad, Circle or TwoTap.
3. To change the upload speed, de-select the Immediate Upload?
checkbox. If not checked, the marked words transfer at the
rate determined by the Upload Policy (see the Inking tab, in
this section).
4. Click Update to change the settings in the list. When you click
OK or Apply, the change transfers to the digital notepad.
The functions to remove or create new action types are meant
only for programmers who are developing custom applications.
General users should NOT use them.
Enabling Keyword transcription
Ink Manager Pro can automatically transcribe the words and
phrases you mark as keywords into text words (up to 100
characters). You must enable the option before the engine
transcribes your keywords. To do this, follow these steps:
1. Open the Preferences menu (File > Preferences), and select
the Actions tab, described earlier in this chapter.
2. Select (check) the Transcribe checkbox to enable keyword
transcription.
3. Note the number of transcription alternates. Alternate words
appear when you verify Keywords in a list, or when you mark
keywords in Ink Manager Pro. This setting controls the
number of alternative words the program provides. Select
from 1 to 10. Adjust the setting to increase or reduce the
number if desired. Remember that increasing the number
might require more computer resources. Also, if you prefer,
34
Chapter 2
Page 41

you can reduce the number, and simply type the correct words
if the original transcription attempt is not correct.
4. Select the Writing Style tab. By default, the Script style is
selected. This provides the broadest match of your
handwriting to text. If you always print or always print in
uppercase, check the selection to increase your transcription
accuracy.
5. Select OK to save the selections and close the Preferences
window. To disable keyword transcription, select Transcribe
again to remove the check.
Enabling Ink Calendar Support
When you enable Ink Calendar Support for a calendar system, the
program shows a link on calendar pages if you write notes on that
day. Select the link to open Ink Manager Pro and read the notes.
Or open the entry to see and select a link.
In addition, you can choose to show a link for notes taken within
the time-frame of activities (such as appointments or meetings)
scheduled on the calendar.
By default, the Ink Calendar Support button appears in your
taskbar. Select the button to open the menu.
• Update now—Refresh the links immediately (instead of at
the regular upload interval).
• Properties—Open the Application Properties window.
• About—Identify the version number of the utility.
• Exit—Close the Ink Calendar Support utility. This removes
the button from the status tray, and no links will be created
until you enable the utility again.
To re-enable the utility, select elect Start > Programs > IBM Ink
Manager Pro > Utilities > Ink Calendar Support. The Ink
Calendar Support button reappears in your status tray.
Ink Manager Pro Setup
35
Page 42

To enable Ink Calendar Support for appointments:
1. Select the Ink Calendar Support button in the Windows status
bar (lower-right corner of the computer display), and select
Properties from the menu.
2. From the Application Properties window, select one, two or
all three calendar systems from the tabbed window, and
complete the set-up steps:
• Lotus Notes® calendar, version 5 or higher
• Lotus Organizer®, version 5.02 or higher
• Microsoft Outlook®, version 2000
For more information about Ink Calendar Support, see Chapter 9:
Special Features.
36
Chapter 2
Page 43

Ink Manager Pro Window
The IBM Ink Manager Pro software displays your handwritten
notes and sketches on the ThinkPad computer. Review the topics
in this section for a quick overview of the application window and
its easy-to-use features.
This section describes the Ink Manager Pro window.
• Ink Manager Pro window
• Navigation panel
• Viewing window
• Toolbar buttons and menu bar
• Thumbnail view
• Full-page view
3
•List view
Use the program window to file, access, view, and edit your
handwritten notes and sketches on the computer screen.
IBM Ink Manager Pro displays your uploaded notes and pages in
several ways, called views. For example, the program initially
displays your uploaded notes in Current Notepad view, which is
the original ink, exactly as you wrote it on the notepad, shown in
the example below.
Page 44

The application window has two main areas:
• Navigation panel on the left, which lets you select views.
• Viewing area on the right.
In addition, the window contains menus, toolbars, and other
features to help you view, organize, and store your handwritten
ink. Many of these features are described in detail in later chapters.
To enlarge the viewing area of the window:
• ·Hide (collapse) the navigation panel. To do this, click the
triangular arrow at the top of the navigation panel. To
show the navigation panel, click the arrow again. Or select
View > Navigation Panel, and select Show or Hide.
• ·Hide the toolbar. To do this, select View > Toolbar. To
show the toolbar, make the menu selection again.
38
Chapter 3
Page 45

Navigation panel
The navigation panel is on the left side of the window. It includes
menus of views, such as ink files and lists. Click or tap the menu
item to select a view. Or select a view using the View menu.
• The navigation panel is divided into sections. Select the
triangular arrow to expand or collapse a section.
• The Current Notepad view shows the pages that you have
written in the pad on the digital notepad.
• The Archive menu includes previous notepads, identified by
pad number and creation date.
• The My Ink Files menu includes the ink files you have
opened or created, shown in alphabetical order.
• The Search menu includes two types of lists that can help
you locate your notes: Search All (search by date) and
Keyword Index (search by Keywords).
• The Actions menu includes three tasks that can help manage
your day-to-day activities: To Do List, Messages, or Verify
Keywords.
Later chapters describe how to use and manage each of these
views and lists.
Ink Manager Pro Window
39
Page 46

Viewing window
The viewing window is the area that shows the thumbnails, pages,
or lists that you select from the navigation panel. You can see your
handwriting in three types of views. Select the Views arrow
and select a view from the drop-down menu:
Tap the Views icon (not the
arrow) to toggle between
full-page and thumbnail
views, or, when viewing a
list, between the list and
thumbnails of pages
included on the list.
Toolbar buttons
Some toolbar buttons are
available only with certain
views.
• Select Full Page to see the full-page view. (Or double-click a
thumbnail, or select View > View By > Full Page.)
• Select Thumbnail to see pages in miniaturized thumbnails.
(Or select View > View By > Thumbnail.)
• Select List (if viewing a list) to toggle back from viewing
thumbnails of pages in the list.
Use the toolbar buttons for quick access to editing and formatting
options:
• Use the Open button to open existing ink files.
• Use the Save button to save changes you have make to
your ink files.
40
• Use the Print button to print the open page, ink file, or
selected thumbnails.
• Use the Cut button to cut and save the selected ink in
the Windows clipboard.
• Use the Copy button to save the selected ink into the
Windows clipboard.
• Use the Paste button to paste the contents of the
Windows clipboard at the cursor position.
• Use the Undo button to undo the last action.
• Use the Redo button to redo the last Undo.
Chapter 3
Page 47

• Use the Views button and drop-down menu to
change the views between Thumbnail and Full Page. When
viewing a list, the button toggles between List and
Thumbnail.
When you view a full page, the following toolbar buttons appear,
depending on the view:
• Use the Page buttons to page forward
(Next) or backward (Previous), or to select or type a page
number.
• Use the Zoom controls to enlarge or
reduce the selected ink or page.
• Use the Ink Selection Mode button to disable Ink
Annotation mode (described below), and change the mouse
pointer to its typical state.
• Use the Ink Annotation Mode button to disable Ink
Selection Mode (described above), and change the state of
the digital pen. In this mode, the mouse pointer acts as a
“pencil.” To disable Ink Annotation, select the Ink Selection
Mode button (described above).
• Use the Highlight button to change the background of
the selected ink to yellow.
• Use the Ink Width button to change the thickness of
the selected ink.
• Use the Ink Color button to change the color of the
selected ink.
• Use the Action List box to apply, change,
or remove labels from selected words.
Ink Manager Pro Window
41
Page 48

Menu bar
Use the menus to control your pages, ink files, and other actions.
Menus change depending on the current view.
File menu
• New Ink File—Create a new ink file by typing the name in
the text window.
• Open My Ink Files—Display a list of ink files that you
removed from the navigation panel. Select a name to reopen it.
• Open Other Ink Files—Browse to open ink files stored in
other locations on your system (the extension is .NBK).
(Ctrl+O)
• Remove Ink File—Remove the selected ink file from the
navigation panel. To restore it, select File > Open My Ink
Files. Check “Delete the file, too?” to delete the ink file
permanently from your computer.
• Rename Ink File—Change the name of the selected ink file.
If the ThinkScribe is turned on, and the original name exists
on the Ink File selector, that name is renamed, also.
• Save—Save the changes made to the open ink file. (Ctrl + S)
• Save As—Save the open ink file with a new file name or in
another file format.
• Save Page As—Save the open page with a new file name or
in another file format.
• Preferences—Open the Preferences window to set or adjust
Ink Manager Pro settings.
• Print—Print the open page, ink file, or selected thumbnails.
(Ctrl+P)
• Print Preview—Display each page as it will look when
printed.
• Print Setup—Set page preferences for the printer.
• Send—Open the Send Mail window. Select a file format and
attach the file or selected thumbnails to your e-mail carrier.
This function requires a MAPI-compliant e-mail client.
42
Chapter 3
• [Recent Files]—Display the last four files you opened.
Page 49

• Exit—Exit the program.
Edit menu
On a Current Notepad or
Archive page, you must
select Edit > Edit Original
Ink before you can Erase
Ink or Fix Overwritten Ink.
• Undo—Undo the previous action. (Ctrl + Z)
• Redo—Redo the previous action. (Ctrl + Y)
• Cut—Remove the selected ink and save it in the Windows
clipboard. (Ctrl + X)
• Copy—Save the selected ink in the Windows clipboard. (Ctrl
+ C)
• Paste—Insert the clipboard contents at the cursor position.
(Ctrl + V)
• Delete—Remove selected ink from a page. (Del)
• Copy to Ink Clipboard Viewer—Copy the selected ink into
the ink clipboard. (Ctrl + K)
• Copy to Ink Files—Copy (file) the selected page or pages
into their pre-assigned ink files. If a pre-assigned name does
not exist in the navigation panel, you can choose another ink
file, create the ink file, or copy the pages to the Unassigned
ink file. (Ctrl + F)
• Copy All to Ink Files—Copy (file) all unfiled pages into their
pre-assigned ink files in the navigation panel. If the preassigned name does not exist in the navigation panel, you
can choose another ink file, create the ink file, or copy the
pages to the Unassigned ink file.
• Edit Original Page—Check this menu item if you want to
edit the Current Notepad or Archive page, such as when you
want to fix overwritten pages. This step prevents accidental
editing of archive pages. Check it again to disable accidental
editing of archive pages.
• Erase Ink in Archive—Permanently remove the ink from an
archive page (cannot be undone).
• Refresh From Original—Transfer new handwriting from the
digital notepad to a page already filed in an ink file. This
option is available only when you open the filed page.
• Fix Overwritten Ink—Open the Fix Overwritten Ink
window to separate two pages of digital ink that were
overwritten on one page. (Ctrl + W)
Ink Manager Pro Window
43
Page 50

• Select All—Select the contents in the viewing window (all
the ink on a full page, or all the thumbnails). (Ctrl + A)
• Clear Selection—De-select the selected ink.
View menu
• Toolbar—Show or hide the Ink Manager Pro toolbar.
• Refresh from ThinkScribe—Update the viewing window
immediately with changes made on the digital notepad. Be
patient. The system cannot process other actions while a
Refresh is in process.
• Navigation Panel—Show, Collapse (hide), or Expand the
navigation panel. Collapsing the panel makes the viewing
window bigger.
• Current Notepad—Open the original (archive) pages
transferred from the current notepad.
• Pads—Open a previous notepad to see the archive pages.
For more information about
Keyword transcription, see
Chapter 2: Ink Manager
Pro Setup.
• My Ink Files—Open an ink file from a list on the navigation
panel.
• Search All—Create a list of all your handwritten pages in
order of the date you started them
• Keyword Index—Create a list of all the Keywords you
marked in your notes, in alphabetical order of the
transcribed text.
• To Do List—Create a list of all To Do's you marked in your
notes.
• Messages—Create a list of all Messages you marked in your
notes.
• Verify Keywords—Create a list of all the Keywords you
marked in your notes so that you can verify (confirm or
change) the transcribed text.
• View By—Select a view: Full Page, Thumbnail, List
(available only if you opened a list, and toggled to the
thumbnail view of pages in the list), Show (select whether to
show only complete or incomplete items on the list,
depending on the type of list), or Sort By (select a column
heading in the list to sort the list).
44
Chapter 3
Page 51

Page menu
• New Page—Create a new, blank page. Choose the
orientation: Portrait (vertical, Ctrl + Shift + N) or Landscape
(horizontal).
• Delete Page—Delete the current page. (Ctrl + D)
• Rotate Page—Some pages are viewed more easily when
rotated. Choose to rotate page Left (90°), Right (90°), or
Turn Over (180°).
• Zoom In—Enlarge view by about 25%.
• Zoom Out—Reduce view by about 30%.
• Zoom Factor—Choose a page view: Fit Height, Fit Width,
or a specific degree.
Press Fn + NumLk to turn
on number lock before
using the keyboard
shortcuts for First,
Previous, Next, or Last.
• First—Open the first page. (Fn + Ctrl + Home)
• Prev—Open the previous page. (Fn + Ctrl + PgUp)
• Next—Open the next page. (Fn + Ctrl + PgDn)
• Last—Open the last page. (Fn + Ctrl + End)
• Go to Page—Select or type a page number. (Ctrl + G)
Help menu
• Help Topics—Open online help in HTML format. Click and
double-click topics in the Contents tab, or select topics using
the Index and Search tabs. (F1)
• About Ink Manager Pro—Identify the version of IBM Ink
Manager Pro.
• To find help for Ink Manager Pro, press F1 or Help > Help
Topics. Or select Help buttons on dialog boxes for
information about the topic.
• Hold the mouse pointer over buttons for fly-over help for
the button.
• For context-sensitive help for a dialog box or entry field,
select the What's This? button in the upper-right corner
of dialog boxes, and then click an area of the window for
context-sensitive help about that field.
• To open the help for the TransNote, press the Access
ThinkPad button on the computer. Select ThinkPad
Ink Manager Pro Window
45
Page 52

Thumbnail view
Assistant for information on using the computer and the
software loaded on the computer.
The thumbnail view shows miniaturized views of each page. Use
the thumbnail view to preview your newly transferred pages, to
drag pages into ink files, and to reorder pages within an ink file.
To open pages into thumbnail view:
• Select the Views arrow and select Thumbnail.
• Or, select View > Thumbnail.
Each thumbnail contains information about the page, as shown in
the example:
Thumbnail of new page
• Current notepad (or pad number) and page number
• Time and date the page was started
Symbols indicating whether the page contains actions:
for Keywords
for To Do's
for Messages
On Current Notepad or Archive thumbnails only, the ink file
name that you pre-assigned on the digital notepad appears next to
the Ink File symbol.
46
Chapter 3
Page 53

Thumbnail of filed page
Full-page view
When you file a thumbnail into My Ink Files, the checked Ink File
symbol appears and the thumbnail color changes to light green.
(You can file the page into additional ink files, but no additional
information appears on the thumbnail.)
If you write more notes on a page that you have filed, the checked
Folder symbol goes away and the thumbnail color changes back to
white, indicating you should re-file (replace) the original page in
the ink file. For more information on filing pages, see Chapter 4:
Current Notepad Pages. For more information on creating and
managing My Ink Files, see Chapter 5: Managing Ink Files.
View your handwriting by opening pages into full-page view. Use
the toolbar buttons and menus to edit and format filed pages.
To open a page into full-page view:
• Double-click a thumbnail.
• Select the Views arrow and select Full Page.
• Or, select View > Full Page.
The following illustration shows an example of full-page view.
Ink Manager Pro Window
47
Page 54

List view
Change pages using the page-selection arrows, drop-down list, or
keyboard keys.
• When you open a filed page into full-page view, toolbar
icons appear so that you can edit and format the filed page.
See Chapter 6: Editing Pages.
• Find pages quickly by creating a list of your pages by date or
a list of ink marked as Keywords, To Do's, and Messages.
• Select the type of list from the navigation panel. For
example, select your choice from the Search section of the
navigation panel: Search All or Keyword Index to see a list
of all your pages or keywords.
• Or in the Actions section, select To Do List or Messages to
list the To Do’s or Messages you marked in your writing. Or
select Verify Keywords to check the transcribed text for each
keyword.
48
Chapter 3
Page 55

The following illustration shows an example of a To Do List.
The default view of To Do
and Message lists shows
only Not Done items. To
see All, change the View
option.
• If you create a list using Search or Actions in the navigation
panel, select the View arrow, and select List to see the list.
• Select the View menu, and select the type of list you want to
view: Search All, Keyword Index, To Do List, Messages, or
Verify Keywords.
• Select View > View By. Then select your preferred view: Full
Page, Thumbnail, List, Sort By (select a column heading as
the method to sort the list).
• Select View > View By > Show, and select how to sort the
list, such as Done or Not Done action items, or Verified or
Unverified Keywords.
• Narrow your search by entering criteria in the search bar,
located above the list.
For more information on creating lists, see Chapter 7: Working
with Actions.
Ink Manager Pro Window
49
Page 56

50
Chapter 3
Page 57

Current Notepad Pages
When you open Ink Manager Pro, you see the pages you have
written in thumbnail view, which are miniaturized pages with page
information. (These pages also appear when you select Current
Notepad in the navigation panel.)
All your ink strokes are time-stamped (GMT), and pages are saved
in the exact order in which you wrote them. You can fix
overwritten pages or erase unnecessary ink on current notepad
pages, but you cannot edit or reformat the ink until you file the
pages into My Ink Files.
This chapter contains information on how to work with current
notepad pages and archive pages:
• Working with current pages
4
• Erasing ink in the archive
• Fixing overwritten ink
• Filing pages into My Ink Files
• Replacing pages
What are archives?
When you change the notepad, your previous pad is moved to the
Archive section. Archive notepads are identified by the pad
number and date. Ink Manager Pro saves and protects your
original handwritten pages, called archive pages. Some industries
rely on archive pages for legal reasons. Or you might want to
retrieve an archive page if you mistakenly delete the filed page
from an ink file.
Page 58

Working with current pages
Before you file pages into ink files, take a few minutes to review
the pages. With your current pages, you can:
• Review information on the thumbnail of each page. It
contains the time and date you started the page, the file
name you pre-assigned, and symbols indicating whether the
page contains Keywords, Messages, or To Do's.
• See the full-page by double-clicking the thumbnail. (Then
use the Views button to toggle back to the
thumbnail view.)
• Copy an area of ink to another (filed) page or other
application by selecting the ink (drag the mouse pointer) and
using the Copy button. On the target page, Paste the ink and
reposition it by dragging it with the mouse pointer.
• Print the original page. Select File > Print to send the
selected page to the printer.
Take a few minutes to review the newly uploaded pages before
you file them into ink files.
To work with current pages:
1. Select Edit > Edit Original Page one time before you can
perform any type of editing to archive pages. (Select it again to
block further editing of original pages). This step prevents
accidental editing of archive pages.
• Erase unnecessary ink.
• Fix overwritten pages, which occur if you forget to tap Page
Forward when you turn the paper page.
2. When you finish reviewing pages, file them into My Ink Files,
where you can organize, edit, and access your notes in ink
files.
3. Continue to add ink to previous pages on the current notepad,
even if you have already filed them, and then replace the page
in the ink file when you file the updated page.
The sections in this chapter provide more information on these
operations.
52
Chapter 4
Page 59

Erasing ink in the archive
If you want to remove personal notes or unnecessary ink on a
Current Notepad or Archive page, erase the digital ink before you
file a copy of the page into an ink file.
To erase ink on an archive page:
1. To delete ink from the page, select Edit > Edit Original Page,
and then select OK when prompted.
You cannot restore or
Undo erased ink. If
needed, you can re-write
the ink on the original page
and upload it. Be careful to
page back to the exact
digital page when you do
this.
2. Use the mouse pointer to draw a box around the ink. If
needed, use the zoom controls to reduce or enlarge the view
so you can accurately select ink to erase.
3. When the correct ink is inside the box, select Edit > Erase Ink
in Archive. An empty box remains on the page to indicate that
ink was erased from the location.
Fixing overwritten ink
Sometimes you will see two (or more) pages of handwriting show
up on the same uploaded page. This happens if you forget to turn
the electronic page (tap Page Forward) when you turn the paper
page.
It is best to separate
overwritten pages on the
Current Notepad so they
are already separated
when you file them into My
Ink Files. However, if the
Fix Overwriting window
cannot separate your
Current Notepad page
correctly, try filing the page
into My Ink Files, and then
fixing the filed page using
the second set of
scenarios.
As you take notes on the digital notepad, it records the time of
each stroke of the pen. Ink Manager Pro uses these time-stamps
to help you fix the overwritten pages.
Fixing overwritten pages in the Current Notepad
• Separate two overwritten pages in the Current Notepad.
• Separate three or more overwritten pages in the Current
• Move an area of ink from one page to another page in the
Notepad.
Current Notepad.
To separate two overwritten pages in the Current Notepad:
For example, you might write ink on pages 1 and 2 of your
notepad, but forget to tap Page Forward when you turned the
paper page. On the computer in Current Notepad view, page 1 is
Current Notepad Pages
53
Page 60

overwritten with ink from page 2, and page 2 is either blank or
does not exist. To correct it, separate the overwritten ink and
move it to page 2.
1. With the Current Notepad (or archive) page in full-page view,
select Edit --> Edit Original Page, and select OK to confirm.
Then select Edit --> Fix Overwritten Ink, and the Fix
Overwriting window opens.
The window contains the following areas:
• Page—The current page number.
• Slider bar—Use the arrows and bar to adjust the separation.
• Destination page—In the text box, select a destination page
number. The separated ink (showing on the right side) will
be added on selected page number.
• Help—Open the help window with more information on
this topic.
• Cancel—Cancel the separation and close the window.
• Apply—Apply the separation and close the window.
2. In the text box, select the destination page for the overwritten
ink (most recent ink). When you do, the program estimates
the separation based on time stamps, leaving the older ink on
the left side, and the newer ink on the right side.
If the separation is correct, select Apply.
If it is NOT correct, click a page (to change focus) try one of the
following methods:
• For fine adjustments, use the keyboard right- and left-arrow
keys to move ink one ink stroke at a time. Pen strokes
appearing in magenta (red) on the screen indicate the next
strokes to be moved to the other page.
54
Chapter 4
• Or click the tic marks on the slider bar, which represent
other likely separation points, or drag the slider to bar to
separate the pages.
Page 61

• Or drag the slider to the far right or click the right slider
arrow to move all the ink to the left side. Then click the
left slider arrow to try the next tic mark until the right
and left sides are correct.
To separate three or more pages in the Current Notepad:
Fix one page at a time, starting with the oldest page. For example,
if you overwrote pages 1, 2, and 3, first, separate page 1 correctly
by selecting a destination page for overwritten pages 2 and 3, and
apply the change. Then open the page with overwritten pages 2
and 3, and separate page 2, and so on.
1. With the Current Notepad (or archive) page in full-page view,
select Edit --> Edit Original Page, and select OK to confirm.
Then select Edit --> Fix Overwritten Ink, and the Fix
Overwriting window opens.
2. In the text box "Add gold ink to page," select the destination
page for the overwritten ink. The program makes an initial
separation based on time stamps, leaving the oldest ink on the
left side, and moving the more recent ink on the right side
(colored in gold).
3. Make any adjustments needed to correct the oldest page is
correct on the left side, using the steps described for
separating two pages above, and select Apply to close the
window and make the separation.
4. Then re-open the page with the remaining overwritten ink.
For example, change the view to thumbnails to locate the page
with the remaining overwritten ink, double-click the
thumbnail to open it in full-page view.
5. Separate ink again so that the left side is correct (oldest page),
and, select Apply. Repeat the process until all the pages are
separated correctly.
To move an area of ink from one page to another page in the Current Notepad:
For example, while writing notes on page 3, you quickly turn back
to notepad page 1 to add a comment, but you forget to tap Page
Backward to match pages. At the next transfer, the comment is
Current Notepad Pages
55
Page 62

overwritten on page 3, and you want to separate the comment and
move it to page 1.
1. In advance, locate the destination page for the overwritten ink
so you can enter it in Step 3.
2. With the Current Notepad (or archive) page in full-page view,
select Edit > Edit Original Page, and select OK to confirm.
Then select Edit > Fix Overwritten Ink, and the Fix
Overwriting window opens.
3. Select the destination page for the area of ink, which opens
that page on the right side.
4. Click the right slider arrow or drag the slider to the far right,
which moves all the ink to the left side.
5. Drag the mouse pointer to draw a rectangle around the area of
the left page that contains the overwritten ink. The program
separates the selected ink into green (newer) and blue (older)
ink based on time stamps. Press the colored button to toggle
between the two colors, which alternately moves the colored
ink to the destination page.
If you are separating a filed
page, click Undo if the
separated pages are not
correct in full-page view.
Your pages will go back to
being overwritten. Click
Redo to see the former
separation again.
6. When the separation is correct, select Apply (or Enter) to
close the window and make the separation.
Fixing overwritten pages in My Ink Files
In some cases, you might prefer to separate overwritten pages
after you file the page into My Ink Files. The main advantage is
that you can continue to edit the separated pages, using the
toolbar buttons and Ink Clipboard Viewer to delete, add, edit, and
move ink on the filed page.
• Separate two overwritten pages in the My Ink Files.
• Separate three or more overwritten pages in the My Ink
Files.
• Move an area of ink from one page to another page in My
Ink Files.
To separate two overwritten pages in My Ink Files:
For example, you might write ink on pages 1 and 2 of your
notepad, but forget to tap Page Forward when you turned the
paper page. If the pages do not separate correctly in the Current
56
Chapter 4
Page 63

Notepad (see the first set of scenarios), file the page into My Ink
Files, and try alternative methods to separate the page. If needed,
continue to correct the pages using the editing toolbar or Ink
Clipboard Viewer to delete, add, or move ink on the page.
1. In advance, decide on a destination page for the overwritten
ink. The program can automatically create a new page,
described in Step 3, or you can enter an existing page number,
described in Step 4. (If desired, you can create a new, blank
page in the ink file using the Page menu.)
2. Open the overwritten page in full-page view (double-click the
thumbnail), and select Edit --> Fix Overwritten Ink. The Fix
Overwriting window opens, and the program makes an
estimate of how to separate the two pages.
The window contains the following areas:
• Page—The current page number.
• Slider bar—Use the arrows and bar to adjust the separation.
• Destination page—Select to move the separated ink
(showing on the right side) to a new page inserted Before or
After the current page. Or click the page button to select an
existing destination page for the separated ink.
• Help—Open the help window with more information on
this topic.
• Cancel—Cancel the separation and close the window.
• Apply—Apply the separation and close the window.
3. Select the destination page for the separated ink, shown on
the left side.
4. If the program detects the overwriting, the New Page button
is selected, and the separated ink will become a new page
added immediately After the current page. Or, select Before to
create a new page before the current page.
Current Notepad Pages
57
Page 64

5. Or, to add the ink to an existing page in the ink file, click the
New Page button to de-select it, and select the
destination page number.
If the separation is correct, select Apply.
If it is NOT correct, or the New Page button does not appear,
click a page (to change focus), and try one of the following
methods:
• For fine adjustments, use the keyboard right- and left-arrow
keys to move ink one ink stroke at a time. Pen strokes
appearing in magenta (red) on the screen indicate the next
strokes to be moved to the other page.
• Move the slider to the far left, which puts all the ink on the
right side. Press the right-arrow keyboard key to move the
older ink back to the left side, one ink stroke at a time. Then
select the Before or After button to create a new page for
the ink on the right side.
Continue to add, delete, or
move ink on the filed page
using the toolbar buttons.
• Or click the tic marks on the slider bar, which represent
other likely separation points, or drag the slider bar to
separate the pages.
• Or, drag the slider to the far right or click the right slider
arrow to move all the ink to the left side. Then click the
left slider arrow to try the next likely separation point,
marked by tics on the slider bar, until the right and left sides
are correct.
Select Apply to close the window and apply the separation.
To separate three or more overwritten pages in My Ink Files:
Fix one page at a time, starting with the oldest page. For example,
if you overwrote pages 1, 2, and 3, first, separate page 1 correctly
by selecting a destination page for overwritten pages 2 and 3, and
apply the change. Then open the page with overwritten pages 2
and 3, and separate page 2, and so on.
1. In advance, decide on destination pages for the overwritten
58
Chapter 4
ink, using the methods listed above.
Page 65

2. Open the overwritten page in full-page view (double-click the
thumbnail), and select Edit --> Fix Overwritten Ink. The Fix
Overwriting window opens, and the program makes an
estimate of how to separate the two pages.
3. Make any adjustments needed so that the left page is correctly
separated, using the methods described above for separating
two pages, and select Apply to close the window and make the
separation.
4. Then re-open the page with the remaining overwritten ink.
For example, change the view to thumbnails to locate the page
with the remaining overwritten ink, double-click the
thumbnail to open it in full-page view.
5. Separate ink again so that the left side is correct, and, select
Apply. Repeat the process until all the pages are separated
correctly.
To move overwritten ink from one page to another page in My Ink
Files:
For example, while writing notes on page 3, you turn back to
notepad page 1 to add a comment, but you forget to tap Page
Backward to match pages. At the next transfer, you file the page
into My Ink Files, and then notice that comment is overwritten on
page 3. You want to separate the comment and move it to page 1.
1. In advance, locate the destination page for the overwritten ink.
The program can automatically create a new page, or you can
enter an existing page number in Step 4. (If desired, you can
create a new, blank page using the Page menu.)
2. Open the overwritten page in full-page view (double-click the
thumbnail), and select Edit --> Fix Overwritten Ink. The Fix
Overwriting window opens, and the program makes an
estimate of how to separate the two pages.
3. Drag the slider to the far right, which moves all the ink to the
left side.
4. Select the destination page for the area of ink, which opens
that page on the right side.
5. Drag the mouse pointer to draw a rectangle around the area of
the left page that contains the overwritten ink. The program
Current Notepad Pages
59
Page 66

separates the selected ink into green (newer) and blue (older)
ink based on time stamps. Press the colored button to toggle
between the two colors, which alternately moves the colored
ink to the destination page.
6. Select Apply to close the window and apply the separation.
Continue to add, delete, or move ink on the filed page using
the toolbar buttons.
60
Chapter 4
Page 67

Filing pages into My Ink Files
The My Ink Files section of the navigation panel contains your
handwritten notes and sketches, organized into topics or subjects
so you can quickly access your notes. After you file pages into an
ink file (a simple Edit menu command), you can arrange, edit, and
format the pages. The page that you file is actually a copy of the
original page. The original page remains in the Current Notepad
Thumbnail of an
unfiled page
or Archive as a protected, permanent record.
To file pages into My Ink Files:
1. Use the Edit menu to copy (file) all your unfiled pages,
indicated by the white thumbnails in Current Notepad view.
• Select one or more thumbnails, and select Edit > Copy to
Ink Files to file the selected pages into the their pre-assigned
ink file (the name appearing at the bottom of the thumbnail).
• Select Edit > Copy All to Ink Files to file all pages into the
pre-assigned ink file. (Pages without a pre-assigned ink file
remain unfiled.)
To select multiple
thumbnails, hold down the
Shift key and tap the first
and last of sequential
pages, or hold down the
Ctrl key while you tap
individual pages.
• If the pre-assigned name does not appear in the navigation
panel, you can choose another ink file, create a new ink file,
or file the pages into General ink file.
2. Or, use the mouse pointer to drag one or more thumbnails to
an ink file in the navigation panel.
To file pages into ink files with long path names (such as those
opened using “Open Other Ink Files”), you must drag the
pages into the ink file.
Current Notepad Pages
61
Page 68

Thumbnail of a
filed page
Replacing pages
3. After you file a page, the thumbnail (in Current Notepad
view) changes to a light green shade, and the Filed symbol
appears.
4. If you continue to write on a page that has been, the
thumbnail turns white again when the ink transfers to the
computer. When you file the page again, the Replace Page
window lets you choose how to update the page in the ink file,
as described in the next section.
Filed pages are added at the end of the ink file.
For more information on ink files, see Chapter 5: Managing Ink
Files. For more information on editing and formatting filed pages,
see Chapter 6: Editing Pages.
Continue to add ink to existing pages, even after you copy them
into ink files. Ink Manager Pro lets you replace (refresh) original
pages with the updated pages.
If you add ink to a page that you already filed, the thumbnail of
the page becomes white again, reminding you that you have
updated ink.
To replace original pages with updated pages:
When you file an updated page into an ink file, the program
detects whether the page already exists in the ink file.
The Replace Page window opens for each matched pair, showing
the original page on the left side, and the updated page on the
right.
62
Chapter 4
Page 69

Choose one of the following:
• Keep Both—Adds the updated page as an additional page,
and leaves the earlier page in the ink file.
• Keep All—Add all updated pages as additional pages, and
leaves the earlier pages in the ink file.
• Replace—Replace the earlier page (shown on left side) with
the updated page (shown on the right side).
• Replace All—Replace all earlier pages with updated pages.
• Skip—Defer a decision on this pair of pages. The updated
page does not get filed into an ink file. The window then
shows the next pair of pages.
• Cancel—Cancel the copy/replacement of all pages preassigned to this ink file, and open the set of pages assigned
to the next ink file, or, if none, close the window.
Current Notepad Pages
63
Page 70

Pages might appear as matched pairs when they do not look alike.
This can happen for several reasons, including accidentally
selecting a page using the Page selector, which automatically
assigns a unique identifier to the page and transfers this
information to the software. Later when you write on the page
and the ink transfers, the software might detect the matched
identifier.
In cases where you might lose information by replacing the page,
a second window opens to recommend that you to “Keep Both.”
For example, if you mark a Keyword on a filed page in Ink
Manager Pro, and then you add ink to the original page on the
digital notepad and opt to replace the page, the Keyword will be
lost.
64
Chapter 4
Page 71

Managing Ink Files
This chapter provides information about basic tasks for managing
your ink files:
• Creating a new ink file
• Removing or restoring an ink file
• Renaming an ink file
• Copying pages from one file to another
• Saving an ink file
• Printing an ink file
• Adding names to the ThinkScribe menu
Creating a new ink file
5
The navigation panel contains 20 ink files, which you can rename.
You can also create an unlimited number of new ink files. Because
the Ink File selector on the digital notepad can contain only 19
names, add the names you use most frequently to the digital
notepad, renaming existing names, so that the names are available
to pre-assign to pages as you write.
You can also divide an ink file into smaller ink files if it improves
your organization. To do this, you will first create the second ink
file and then drag pages to it.
To create a new ink file:
1. Select File > New Ink File. Or right-click the navigation panel,
and select New Ink File from the menu. The New Ink File
window appears.
Page 72

2. Type a unique name in the File Name box, up to 16 characters
(or 14 if all uppercase). Do not use any special characters such
as *:”<>/?\| or NLS characters such as ü ® ™ or any other
character created by pressing the Alt key and a number pad
sequence.
3. Select OK. The new name appears on the navigation panel. If
the digital notepad is turned on, you can replace an ink file on
the digital notepad so that you can pre-assign pages to it as
you write.
66
Chapter 5
Page 73

Removing or restoring an ink file
Remove ink files from the navigation panel when you no longer
need them. You can re-open the ink file at another time, if needed.
To remove an ink file:
1. Select the ink file in the navigation panel, and then right-click
the name.
2. Select Remove Ink File from the menu to open the Remove
window.
3. To delete the file permanently from your computer, select the
Delete the file, too? check box. Leave it clear to keep the file
on your computer with the rest of your ink files.
4. Select OK. The ink file disappears from the navigation panel.
Managing Ink Files
67
Page 74

To restore a removed ink file to the navigation panel:
To find ink files stored in
the default location,
double-click the My Ink
Files folder on your
Windows desktop.
• For ink files that you removed, right-click in the Ink Files
section of the navigation panel, and select Open Ink File to
open the Open Ink File window.
Select the ink file from the list, which includes all ink files
stored in the default location. The name appears in the
navigation panel, and the pages open in the viewing window.
If the digital notepad is turned on, you can add the new
name to the Ink File selector by replacing an existing file
name.
Renaming an ink file
Use the Rename feature to change the name of an ink file.
1. In the navigation panel, right-click the ink file, and select
• Select the Open button , or select File > Open Other
Ink Files, and browse to find the location of the existing ink
file or notebook (the extension will be .nbk). When you
open it, the name appears in the navigation panel, and the
pages open in the viewing window. If the digital notepad is
turned on, you can add the new name to the Ink File selector
by replacing an existing name.
• Locate the .nbk file in the Windows directory. Double-click
it to open the ink file in Ink Manager Pro (you can open only
one ink file at a time).
Rename Ink File from the menu.
68
Chapter 5
Page 75

2. Type the new name in the name field, up to 16 characters (or
14 if all uppercase). Do not use any special characters such as
*:”<>/?\| or NLS characters such as ü ® ™ or any other
character created by pressing the Alt key and a number pad
sequence.
You can also edit the Ink
File selector menu by
opening ThinkScribe
Notepad Properties to the
Ink File Selector tab. See
Chapter 2: Ink Manager
Pro Setup.
3. Select OK, and the new name appears in the navigation panel.
When the digital notepad is turned on, if the original file name
also appeared on the Ink File selector, that name is
automatically renamed, too. If not, you can add the new name
to the Ink File selector by renaming an existing name.
Copying pages from one file to another
Pages appear in the ink file in the order you add them. You can
reorder the pages or move a page from one ink file to another.
And you can copy a single page to more than one ink file.
To reorder pages within an ink file:
1. Open the ink file in thumbnail view (you cannot reorder
Current Notepad or Archive pages). Then select the page to
move by clicking it once.
2. Select Cut , or right-click the thumbnail and select Cut
3. Tap the target thumbnail that you want to follow the inserted
from the menu.
page.
Managing Ink Files
69
Page 76

4. Select Paste , or right-click the thumbnail and select Paste
from the menu. The page you cut now precedes the target
page, and the page numbers change to reflect the new order.
To copy pages from one location to another:
1. Open the ink file with the pages to move, and change them to
thumbnail view.
If the Shift key selects
vertical rather than
sequential pages, clear the
selection (tap outside the
pages) and re-select the
individual pages by holding
down the Ctrl key while
you tap each page.
2. Select the thumbnail page to copy (click it once). To select
multiple thumbnails, hold down the Shift key and tap the first
and last of sequential pages, or hold down the Ctrl key while
you tap individual pages.
3. To insert the pages, use one of the following methods:
• Drag the page or group of pages to the target ink file in the
navigation panel. Open the target ink file. The new pages
appear at the end of the ink file, and they are removed from
the original file.
• Select Cut to remove the pages from the original ink file,
or select Copy to leave the pages in the original ink file.
Open the target file, and tap the thumbnail you want to
follow the new pages. Select Paste , and the new pages
precede the thumbnail you selected.
Saving an ink file
It is a good habit to periodically save changes as you work on your
ink files. Ink Manager Pro prompts you to save changes when you
exit the program.
To save changes to an ink file:
1. Select , or select File > Save.
2. Ink Manager Pro saves your ink files with the name and the
70
Chapter 5
extension .NBK. (To save in another format, see the
instructions below.)
Page 77

Do not save your ink files in the same directory as the Ink
Manager Pro application (C:\Program Files\IBM\IBM Ink
Manager Pro). If you do, and you install an upgrade to the
program in the future, your ink files will be overwritten.
To save an ink file in another format:
Save an ink file in another file format to share the contents with
people who do not have Ink Manager Pro.
1. Select the ink file in the navigation panel. To do this, click the
ink file name one time.
2. Select File > Save As. The Save As dialog box appears.
3. In the Save In box, select a location for storing the ink file.
4. In the File Name box, type a name for the ink file.
5. Select the Save as type arrow, and select a file format from the
6. Select OK.
Available Formats for Saving Ink Files
Choose a file format for saving your ink files:
list shown.
Managing Ink Files
71
Page 78

Printing an ink file
• Ink file (.nbk)—Viewed in Ink Manager Pro.
• Portable Document Format (.pdf)—Adobe Portable
Document Format file using the Adobe Acrobat Reader.
Download a free copy from www.adobe.com.
• Postscript (.ps)—Printed or distilled using only Adobe
Acrobat to create a .pdf file.
• Tagged Image File Format (.tif)—Viewed in most advanced
graphics and viewer programs, such as Microsoft Imaging
for Windows (select Start > Programs > Accessories >
Imaging). This graphics format cannot be viewed in
Microsoft Paint.
Chapter 6 describes how to save an individual page. The available
formats are different from the formats for saving ink files.
Print your ink files as you typically print documents.
To print an ink file:
1. Open the ink file by selecting it in the navigation panel. Open
the first page in full-page view. If the ink file is open in
thumbnail view, double-click the first page to open it in fullpage view.
2. Select the Print button on the toolbar, or select File > Print.
The Print dialog box appears.
3. Select the options for printing.
4. Select OK to send the ink file to the printer.
5. Select Print Preview to see what the pages will look like when
printed.
6. Use the Print Setup dialog box to change your printer settings
without printing anything. The settings you select here are
used for the current session. When you change printer settings
from the Print dialog box, they apply only to the current
session.
Chapter 6 describes how to print single pages from your ink files.
72
Chapter 5
Page 79

Adding names to the ThinkScribe menu
Add the names of ink files on the navigation panel to the Ink File
selector on the digital notepad using the right-click menu in the
navigation panel. If you have the same names on the digital
notepad as on the navigation panel, you can pre-assign the correct
ink file as you write notes.
You can also rename ink
files on the digital notepad
as you create or rename
ink files or by opening
ThinkScribe Notepad
Properties to the Ink File
Selector tab.
To add a name to the digital notepad:
1. Turn on the digital notepad, if it is not already on.
2. Right-click on the name in the navigation panel, and select
Add to ThinkScribe Menu.
3. The Replace ThinkScribe Ink File window opens, showing the
current names of 19 ink files on the digital notepad.
4. Select which name to replace, and select OK. The new name
transfers to the digital notepad and appears in the Ink File
selector.
You cannot add ink files with long file names (such as those
opened using “Open Other Ink Files”) to the digital notepad.
Instead, create a new ink file in the navigation panel so that you
can add the name to the digital notepad. Later, copy the pages
from the old ink file into the new ink file.
Managing Ink Files
73
Page 80

74
Chapter 5
Page 81
Editing Pages
This chapter explores the different things you can do with the
pages of notes in My Ink Files:
Adding a blank page
Add new pages to ink files when you want to paste ink selections
or other graphics into your notes.
6
• Adding a blank page
• Deleting a page
• Editing ink
• Rotating a page
•Saving a page
• Printing a page
To add a new, blank page:
1. Make sure the pages are in thumbnail view (if needed, select
the View arrow on the toolbar, and select Thumbnail).
2. Select the page that you want to follow the new blank page
(the new page will be inserted before this page).
3. Select Page > New Page. Choose Portrait (vertical) or
Landscape (horizontal). A blank page now appears before the
page you selected. If needed, use the mouse to drag it to its
correct position in the ink file.
Now paste or draw ink on the new page. For example, to insert
ink that you copied or cut from another page, use the Paste
button to insert the contents of the clipboard on the new
page. To re-position the inserted ink, select it, and use the mouse
pointer to move the selection.
Page 82

Deleting a page
To select multiple
thumbnails, hold down the
Shift key and tap the first
and last of sequential
pages, or hold down the
Ctrl key while you tap
individual pages.
Editing ink
Remove unneeded pages from your ink file. Recover accidentally
deleted pages by reopening the archive page.
To delete a page in an ink file:
1. While in thumbnail or full-page view, select the page you want
to delete.
2. Select Page > Delete Page to remove the page from the ink
file.
To recover a deleted page:
1. In the navigation panel, select Current Notepad or the
Archive pad in which the page was written. The thumbnail
pages appear in the viewing window.
2. Locate the page, drag the it to the target ink file.
You cannot edit Current
Notepad or Archive pages.
You can edit only pages
opened from My Ink Files.
You can edit the ink of any page you open from an ink file. Open
the page in full-page view. For example, double-click a thumbnail,
or select the Views arrow and select Full Page.
To restore an edited page to its original format, select the
thumbnail, and select Edit > Refresh from Original. Or use the
Undo or Redo icons on the toolbar.
Ink Manager Pro provides toolbar buttons and menu items for
adding ink, adding or changing actions, changing the appearance
of ink, or moving ink on a page, all described in the following
sections of this chapter.
Selecting ink
Make sure the page is in full-page view.
To select ink to edit:
• Drag the mouse pointer across the ink.
76
Chapter 6
• To select the entire page, select Edit > Select All.
Page 83

Right-click a selection of
ink, and use the editing
options on the menu.
A dotted line appears around the selection. Now use the toolbar
buttons or Edit menu to edit the ink.
Changing ink appearance
Use the toolbar buttons to change the appearance of a selection.
To change the ink appearance:
1. Drag the mouse pointer to select the ink to highlight, or select
Edit > Select All to select the contents of the current page.
2. Use the toolbar icons:
To change the default ink
color and line width for all
your ink, select File >
Preferences, and select
the Ink Display tab. For
more information, see
Chapter 2: Ink Manager
Pro Setup.
Another way of sharing or
copying ink is to copy
selected ink into the Ink
Clipboard Viewer.(Edit >
Copy to Ink Clipboard
Viewer), and use the ink
clipboard menus to save
the selection as a graphic.
• Select the Highlight button to change the background
of the selected ink to yellow. Select the button again to
remove the highlight.
• Use the Ink Color button to change the ink color.
Select the arrow, and choose a color from the palette.
• Use the Ink Width button to change the width of the
selected ink. Select the arrow, and choose a line width from
the list.
Cutting, copying, and pasting ink
Use the Cut, Copy, and Paste editing tools to interact with the
Windows clipboard.
To move a paragraph from one page to another page, drag the
mouse pointer to select the paragraph, and select Copy . Then
open the target page (make sure the target page is in full-page
view), and select Paste .
To reposition the paragraph, hold the mouse pointer over the
selected ink until you see the crossed-arrows, and then drag the
selection to the correct position on the page.
To cut, copy, or paste ink:
• Select the Cut button on the toolbar, or select Edit >
Cut (or use the right-click menu on a page), to cut and save
Editing Pages
77
Page 84

the selected ink in the Windows clipboard. (You cannot cut
ink from Current Notepad pages or Archive pages.)
• Select the Copy button or select Edit > Copy to copy
the selected ink in the Windows clipboard.
• Select the Paste button on the toolbar or select Edit >
Paste to insert the contents of the clipboard at the cursor
position (the page must be in full-page view). Or select Edit
> Paste Special in another application to insert the
clipboard's contents into the existing format.
Adding or moving ink on a page
If you want to add more ink to a page, you can use the mouse or
the pen's stylus tip as a pencil. For example, you can finish
sketches or change handwritten words. Open the page in full-page
view.
To draw more ink on a page:
1. Click the Ink Annotation Mode button to enable
annotation mode.
2. Hold down the mouse button to draw on the page. Or touch
the stylus tip on the screen. (To prevent ink marks on the
screen, do not use the ink tip.)
3. To disable annotation mode, click the Ink Selection Mode
button .
To move ink from one page to another page:
1. Drag the mouse to highlight the area of ink to move. When
the box appears around the ink, use the Cut button or
Copy button to copy the selected ink into the clipboard.
2. Open the new page, and select the Paste button . To
reposition the inserted ink, click the inserted ink one time to
select it, and drag it to the right location on the page.
78
Chapter 6
Page 85

Rotating a page
To move ink on the page:
Drag the mouse pointer to select the area of ink to move.
When the box appears around the ink, drag the selection to
the new location on the page.
Sometimes a sketch or other information looks better when
viewed in a different orientation than your written notes.
For example, you may have taken several pages of written notes in
portrait mode (tall). Then you drew a graph you saw in a
presentation in landscape orientation (wide). When you view your
notes on the computer, you can rotate the page with the graph to
make it easier to read.
To rotate a page:
Saving a page
1. Open the page, or select the thumbnail of the page, and select
Page > Rotate Page.
2. Select the direction you want to rotate the page: Left (90°),
Right (90°), or Turn Over (180°, upside down).
Share a page with others or insert your handwritten page in
another application by first saving the page as a graphic, and then
inserting it into the application the way you insert any graphic. For
example, save a page as a bitmap, and then insert it into an e-mail
message or document to send to others.
To save a page:
1. Open the page in full-page view (double-click a thumbnail).
2. Select File > Save Page As. The Save Page As dialog box
appears.
3. In the Save In box select a location for the file.
4. In the File Name box, type a name.
5. Select the Save as type arrow and select a file format from the
list shown.
Editing Pages
79
Page 86

6. Click OK.
Formats for saving pages
Choose a file format for saving your individual pages:
• Bitmap (.bmp)—Viewed in Microsoft Paint and some other
graphics programs.
• Joint-photo Experts Group (.jpg)—Viewed in any Web
browser and most advanced graphics programs.
• Portable Document Format (.pdf)—Viewed in Adobe
Portable Document Format file using the Adobe Acrobat
Reader. Download a free copy from www.adobe.com.
• Portable Network Graphics (.png)—Viewed in most
advanced graphics programs.
• Postscript (.ps)—Printed or distilled using only Adobe
Acrobat to create a .pdf file.
• Tagged Image File Format (.tif)—Viewed in most advanced
graphics and viewer programs, such as Microsoft Imaging
for Windows (select Start > Programs > Accessories >
Imaging). This graphics format cannot be viewed in
Microsoft Paint.
Printing a page
For information on printing
an entire ink file, see
Chapter 5: Managing Ink
Files.
Print individual pages to share with others or store with other
documents.
To print a page:
1. With the page in full-page view, select the Print button on the
toolbar, or select File > Print. The Print dialog box appears.
2. Select the Pages option and specify the page you want to print.
3. Click OK to send the page to the printer.
• Select Print Preview to see what the page will look like when
printed.
• Use the Print Setup dialog box to change your printer
settings without printing anything. The settings you select
here are used for the current session. When you change
80
Chapter 6
Page 87

printer settings from the Print dialog box, they apply only to
the current session.
Editing Pages
81
Page 88

82
Chapter 6
Page 89

Working with Actions
In the Getting Started Guide and in Chapter 1 of this book, you
learned how to mark words as a Keyword, To Do item, or
Message on the digital notepad.
This chapter explains how to mark actions in Ink manager Pro
and how to create lists of your actions to locate pages and follow
up on tasks:
• What are actions?
• Marking a Keyword, To Do, or Message on the computer
• Searching for a page
• Managing To Do items and Messages
• Narrowing the search
• Verifying Keywords
7
What are actions?
•Creating a Post-it Note
Ink Manager Pro supports the following actions:
• Keyword—Identify terms or topics that will help you search
for pages in your notes. Keywords appear in blue on the
screen.
• To Do—Identify items “to do,” such as assignments or
action items. Create an To Do list and assign priorities and
due dates for yourself. To Do items appear in red on the
screen.
• Message—Identify words and phrases that you jot down
from phone conversations or voice mail. Create a Message
list and assign priorities and due dates. Messages appear in
green on the screen.
To change the default appearance (color and line width) of actions
on the computer screen, select File > Preferences, and then select
the Actions tab, described in Chapter 2.
Page 90

To customize or modify actions available on the Actions selector,
open ThinkScribe Notepad Properties, and select the Actions
Selector tab, described in Chapter 2.
Marking Keywords, To Do items, and Messages on the
computer
As you view your ink files on the computer screen, continue to
mark actions, including a Keyword, To Do, or Message. You can
change or delete actions from words. If you annotate the marked
ink, view the annotation by holding the mouse pointer over the
ink on the page, and you can enter the text words in the Search
Text box when searching for pages.
To mark actions on the
digital notepad, see
Chapter 1: Digital Notepad
and Digital Pen.
You cannot mark actions in
Current Notepad or archive
pages on the computer.
Instead, you must open the
filed page from My Ink
Files, and then you can
add or change actions to
your notes.
On the screen, you can include a Keyword in words that you mark
as a Message or To Do. The marked ink shows up in both the
Keyword Index and the Message or To Do list. If you hold the
mouse pointer over the ink, the annotated text for the most recent
action appears in the fly-over window. Keywords remain blue, and
the rest of the marked words change to the color of the Message
or To Do.
To mark (or change or remove) an action in Ink Manager Pro:
1. Use the mouse to draw a rectangle around the word or phrase,
carefully including all the ink used to write the words.
2. Select the Action List box arrow on the toolbar
to choose an action type. If an action is already applied to the
selection, it appears in the box.
3. To mark or change an action, select the arrow, and choose a
new action from the list. To remove an action, click None.
• For Keywords, the Verify Keyword window appears.
If the text for the Keyword
is longer than the Verify
Keyword field allows, start
the transcription, and then
complete it when you open
a Keyword Index or Verify
Keywords list.
84
Chapter 7
Page 91

Type or correct the text words for the selected ink, select the
Verified checkbox, and select OK. This enables you to sort
your Keywords in alphabetical order when using Keywords
to search for pages.
• For a To Do or Message, the Annotate To Do or Message
window opens.
By default, the Message
and To Do lists show only
the Not Done actions. To
see all the items, change
the view using the View
menu.
4. On the page, ink marked as a Keyword, To Do, or Message
Searching for a page
Locating notes can't get much simpler than this! Create lists of
your pages by date or by Keywords that you identified, and select
the link to open the page.
To search for pages by date:
1. While in full page or thumbnail view, in the Search section of
2. A list appears in the viewing window showing each page you
Assign a priority or due date, and type annotations to add
more information to the action, if needed. Select the Done
checkbox only if the action is already completed.
changes to the default color for the selected action.
the navigation panel, select Search All. Or select View >
Search All.
have written, based on the time and date you started it, as
shown in the example below:
Working with Actions
85
Page 92

The locations are in
alphabetical order, and
pages appear by created
date within each location.
• Created—The date you started writing the original page.
• Location--Double-click the location to open the page.
To search for pages using Keywords:
1. In the Search section of the navigation panel, select Keyword
Index. Or select View > Keyword Index. A list appears in the
viewing window showing each page on which you identified
Keywords.
2. If you have converted your Keywords to text (verified
Keywords), use the Search Bar, described later in this section,
to select Keywords or narrow your search based on location
or a date range.
A list appears in the viewing window showing the search
results, as shown in the example below:
• Text—Click in the text box to correct the text for the
Keyword. The Keyword list is sorted in alphabetical order
based on the text.
Select any column heading
to sort the list by that
column. Select it again
reverse the sort order
again. You cannot sort by
the Ink column.
• Ink—Double-click the ink to open the page.
• Verified—Click the checkbox after you correct the text.
• Created—The date you started writing the original page.
• Location—Double-click the location to open the page.
Managing To Do items and Messages
Use the powerful action-management feature to create lists of To
Do items and Messages in your notes. When you mark a To Do or
Messages in your notes, you can assign a priority and due date to
86
Chapter 7
Page 93

each item. In addition, you can regularly verify your Keywords so
that you can locate your notes more quickly.
To list your To Do items or Messages:
1. In the Actions section of the navigation panel, select To Do
List or Messages. Or select View > To Do List or View >
Messages.
2. A list appears showing all your open To Do items or
Messages, as shown in the example of a To Do list below.
• Status—Check the checkbox when you complete the action
(or right-click the row and select Complete). By default,
completed actions are removed immediately from the list.
Select any column heading
to sort the list by that
column. Select it again
reverse the sort order
again. You cannot sort by
the Ink column.
• Priority—Click the column to assign a priority, which rotates
between 1, 2, and 3.
• Due date—Click inside the column to enter a due date and
press Enter.
• Ink—Double-click the ink to open the page.
• Created—The date you started writing the original page.
• Location—Double-click the location to open the page.
To see all your actions:
• Or select View > View By > Show > All. The list shows
open and completed actions.
To annotate the action:
1. When viewing a To Do or Message list, click the Text
Annotation button in the Ink column to open the Text
Annotation window.
Working with Actions
87
Page 94

2. Click inside the box to type comments about the action, such
as additional or follow-up information.
3. Select OK to save the comments and close the box.
To view the text in your notes, hold the mouse pointer over the
ink marked as a Message or To Do.
To narrow a Message or To Do list, select or type annotated text
in the Search Text box. To do this, use the Search Bar, described
next.
Narrowing the search
Use the Search Bar to narrow your search results for pages
specific Keywords or annotated text, date, and/or location.
Select the Reset to
Defaults button to start a
new search.
1. With the list in view, enter one or more criteria in the Search
Bar to narrow the search:
• To specify a date range, click inside the Start Date or End
Date box, and select or type a date.
• To specify a location, click the Location icon , and select
a location:
– All Ink (all pages in My Ink Files, as well as any unfiled
pages in the Current Notepad)
88
Chapter 7
Page 95

– Archive (all Current Notepad and archive pages)
– All Ink Files (all pages in My Ink Files)
– An individual ink file or archive pad
Select OK.
For information on
converting Keywords to
text, see the next section.
For information on
annotating text, see the
previous section.
2. Select the Search button .
Verifying Keywords
If you enable Keyword
Transcription, Ink Manager
Pro automatically
transcribes your Keywords.
See Chapter 2: Ink
Manager Pro Setup.
Verifying Keywords is the process of going through your list of
Keywords and making sure the text matches the ink you selected.
To list your Keywords, follow the instructions for Listing
Keywords, in the previous section.
To verify a Keyword:
• To specify a text word, click the Select Text icon and
select a word from the list, or type a word (use exact spelling
and case). Or type the word or a few letters to see all text
words beginning with those letters. For Keyword lists, the
text list includes Keywords that have been converted to text.
For To Do or Message lists, the text list includes words that
you typed in the Annotate Text box. Select OK.
1. In the Actions section of the navigation panel, select Verify
Keywords, or select View > Verify Keywords.
2. A Keyword list appears, as described earlier in this chapter. To
see the Keywords you have not verified, click the Verified
column heading. Click it again to reverse the sort. Or select
View > View By > Show > Unverified.
3. Review the text for each Keyword. If it is missing or incorrect,
click inside the Text column. Select an alternative word from
the list, or type the correct words, and press Enter.
4. If prompted, you can add the words to the Keyword
dictionary to improve future transcription. The Keyword is
immediately re-alphabetized based on the corrected text.
5. When you finish, check the Verified checkbox, or right-click
the row, and select Verified.
Working with Actions
89
Page 96

After you verify Keywords, click the Text column heading to sort
the entire Keyword Index into alphabetical order. If needed,
change the setting back to View > View By > Show > All.
Creating a Post-it note
Post your ink into a 3M Post-it (R) Software Lite note on your
Windows desktop.
To create a Post-it note:
• On a page in full-page view, drag your mouse pointer to
draw a rectangle around the words to include in the note.
Select Edit > Copy to Ink Clipboard. The selected ink
appears in the ink clipboard. Then select exactly the ink to
include in the note, and select the Post-it icon on the
toolbar.
The first time you click the
Post-it button, the icon is
added to the computer’s
system tray, and the Post-it
program is added to the
StartUp menu.
For best results, keep ink
selections for a Post-it note
to a sentence or two. If the
ink that you select is wide
or spread out, the outer
edges or even the entire
contents might be missing
from the note.
• On a To Do or Message list, select the Post-it icon in the Ink
column.
The ink appears in a yellow note that stays open on your Windows
desktop after you close Ink Manager Pro.
The ink appears in a yellow note showing from your Windows
desktop. By default, when you click outside the Post-it note, the
note goes to the desktop, behind other open applications, and it
stays open even after you close Ink Manager Pro. Position it on
the desktop by dragging it with the mouse pointer.
Or, to keep the note visible, right-click the title bar, select "Always
on Top," and drag it on the Ink Manager Pro window to position
it.
90
Chapter 7
Page 97

To close the note, click the title bar, and select Trash Note from
the menu.
For information about additional features in Post-it Software
Notes Lite, right-click the Notepad menu button or the Post-it
icon in the system tray, and select Help.
To disable the Post-it program, right-click the icon, and select
Exit. This removes all Post-it notes from the screen until you start
the program again.
To enable it, select Start > Programs > Post-it Software Notes
Lite.
Working with Actions
91
Page 98

92
Chapter 7
Page 99

Sharing Ink
This chapter explains how to share your ink with other users, even
those who do not have Ink Manager Pro.
• Using the Ink Clipboard Viewer
• Saving selected ink
• Using the Windows clipboard
• Sending Mail
Using the Ink Clipboard Viewer
When you apply the Copy action to a selection of ink, the
selection is copied to the Ink Clipboard Viewer, a special
clipboard in Ink Manager Pro. Use the ink clipboard toolbar
buttons and menus to edit and reformat the selection of ink, if
needed, and then save the selection as a graphic to insert into
other applications or e-mail messages.
8
This action also copies the
selected ink into the
Windows clipboard, and
you can Paste it into
another application.
Copying ink to the Ink Clipboard Viewer
1. Use your mouse or stylus tip to draw a rectangle around an
area of ink.
2. Select Edit > Copy to Ink Clipboard Viewer. The selected ink
appears in the ink clipboard.
Page 100

3. Open as many selections in the ink clipboard as you like.
Select the title bar of a window to make it the active window.
Select the Close button X on the window when you are
finished with it to delete its contents from the ink clipboard.
Using the Ink Clipboard menus
To change the default
method for Copying ink on
the digital notepad into the
Ink Clipboard, select File >
Preferences, and select
the Actions tab.
Use the menus in the Ink Clipboard to file, edit, and format
selected ink.
File menu
• Save As—Save the selected ink as an ink file (.NBK) or a
graphic, either a bitmap (.BMP) or Joint-Photo Experts
Group (.JPG).
• Close—Close the active window in the ink clipboard.
• Exit—Close the ink clipboard.
Edit menu
• Cut—Cut the selected ink and save it in the Windows
clipboard.
• Copy—Save selected ink in the Windows clipboard.
• Paste—Insert the clipboard contents into the current ink
clipboard.
94
Chapter 8
 Loading...