

Page 1

Please check out our eBay auctions for more great
deals on Factory Service Manuals:
Page 2

i
Page 3

Note
Before using this information and the product it supports, be sure to read the general information under
Appendix E, “Product Warranties and Notices” on page 255.
First Edition (March 1995)
The following paragraph does not apply to the United Kingdom or any country where such provisions are
inconsistent with local law:
INTERNATIONAL BUSINESS MACHINES CORPORATION PROVIDES THIS PUBLICATION “AS IS” WITHOUT ANY
WARRANTY OF ANY KIND, EITHER EXPRESS OR IMPLIED, INCLUDING, BUT NOT LIMITED TO, THE LIMITED
WARRANTIES OF MERCHANTABILITY OR FITNESS FOR A PARTICULAR PURPOSE. Some states do not allow
disclaimer or express or implied warranties in certain transactions, therefore, this statement may not apply to you.
This publication could include technical inaccuracies or typographical errors. Changes are periodically made to the
information herein; these changes will be incorporated in new editions of the publication. IBM may make
improvements or changes in the products and the programs described in this publication at any time.
It is possible that this publication may contain references to, or information about, IBM products (machines and
programs), programming, or services that are not announced in your country. Such references or information must not
be construed to mean that IBM intends to announce such IBM products, programming, or services in your country.
Requests for technical information about IBM products should be made to your IBM authorized dealer or your IBM
marketing representative.
IBM may have patents or pending patent applications covering subject matter in this document. The furnishing of this
document does not give you any license to these patents. You can send license inquiries, in writing, to the IBM
Director of Licensing, IBM Corporation, 500 Columbus Avenue, Thornwood, NY 10594, U.S.A.
Copyright International Business Machines Corporation 1995. All rights reserved. Note to US Government
Users – Documentation related to restricted rights – Use, duplication or disclosure is subject to restrictions set forth in
GSA ADP Schedule Contract with IBM Corp.
Page 4
Thank You for Selecting
an IBM ThinkPad 755CX Computer
The IBM ThinkPad 755CX
is one of the most advanced and versatile notebook computers.
With such innovative features as audio, telephony,
infrared ports, a long-life battery,
and a brilliant color display,
the ThinkPad 755CX will satisfy
all of your mobile computing needs.
iii
Page 5

Distinctive System Features
1
Mwave DSP Audio, Telephony, and
Data/Fax Modem Features
11
Long-Life Battery Pack
2
10
PCMCIA Support
Infrared Communication
Support
9
TrackPoint III
3
ThinkPad Features
8
Easy-Setup
Config
Restart
7
TFT Color LCD Screen
6
Fn Key Function
Program
Thinkpad Features
4
Power Management
5
Security Features
iv IBM ThinkPad 755CX User's Guide
Page 6

1 Mwave DSP audio, telephony, and fax/modem features
The ThinkPad Mwave digital signal processor (DSP) provides high-quality audio, telephony and modem/fax
functions. With a built-in speaker and a microphone, they complete your multimedia computing solution.
(See page 75.)
Note: In some countries, the Mwave telephony functions are available only after the DAA/Telephony Kit
option is installed.
2 Infrared communication support
Two infrared ports supplied with your computer make wireless serial communication possible.
(See page 72.)
3 ThinkPad Features program
The ThinkPad Features program allows you to set various parameters either with a graphical user interface
or with commands. (See page 35.)
4 Power management
Power management sets the computer to different modes to save battery power when you are not using the
computer. It also provides a resume function, which quickly returns you to your previous operation. (See
page 50.)
5 Security features
The computer provides security passwords for the computer and hard disk drive. Lock security and a
personalization utility are also provided. (See Chapter 5.)
6 Fn key function
The combination of this Fn key and a function key controls display modes, battery power-saving modes, or
other functions. (See page 48.)
7 TFT color LCD screen
A brilliant TFT color LCD screen supports 65536 colors with the following display resolution for each model:
The 755CX SVGA model supports SVGA (800-by-600 resolution) video mode besides VGA (640-by-480)
mode.
The 755CX VGA model supports VGA (640-by-480) mode.
8 Easy-Setup
The built-in system programs in Easy-Setup makes the basic setup of your computer easy.
(See page 42.)
9 TrackPoint III
With TrackPoint III, pointing, selecting, and dragging all become part of a single process without your lifting
your hands from the keyboard. (See page 23.)
1 PCMCIA** support
The computer provides two Personal Computer Memory Card Association (PCMCIA) slots. PCMCIA
software is also provided, so that you can use PC Card** more easily and conveniently. (See page 61.)
11 Long-life battery pack
The operating time of the computer is extended with the long-life battery pack.
(See page 20.)
v
Page 7

vi IBM ThinkPad 755CX User's Guide
Page 8

About This Book
This
User's Guide
IBM ThinkPad 755CX computer (hereafter called
computer
Chapter 1, “Getting Started,” describes the Product Map and
explains how to set up your computer.
Chapter 2, “Getting Familiar with Your Computer,” acquaints you
with additional features of your computer.
Chapter 3, “Operating Your Computer,” explains how to use the
various features of your computer.
Chapter 4, “Using Battery Power,” provides battery information
and describes how to operate your computer with the battery pack.
Chapter 5, “Protecting Your Computer,” provides information on
how you can secure your computer and internal devices against
unauthorized use.
Chapter 6, “Installing and Removing Options,” describes how to
install or remove IBM options.
Chapter 7, “Installing Software,” explains how to install operating
systems, device drivers, and other support software.
Chapter 8, “Solving Computer Problems,” describes what to do if
you detect a problem.
Appendix A, “Avoiding Hardware Conflicts,” describes how you
can avoid problems when you add or remove options.
Appendix B, “Advanced Information for PC Cards,” provides
advanced technical information when using PC Cards.
Appendix C, “Additional Information for Mwave DSP Features,”
provides technical information about the ThinkPad Mwave DSP
functions, audio, and telephony.
Appendix D, “Features and Specifications,” describes the
features and specifications associated with your computer.
Appendix E, “Product Warranties and Notices,” contains the
warranty statements of your computer and notices for this book.
“Glossary,” includes terms appearing in this
definitions.
).
contains information that will help you operate the
755CX
User's Guide
or
and their
Copyright IBM Corp. 1995 vii
Page 9
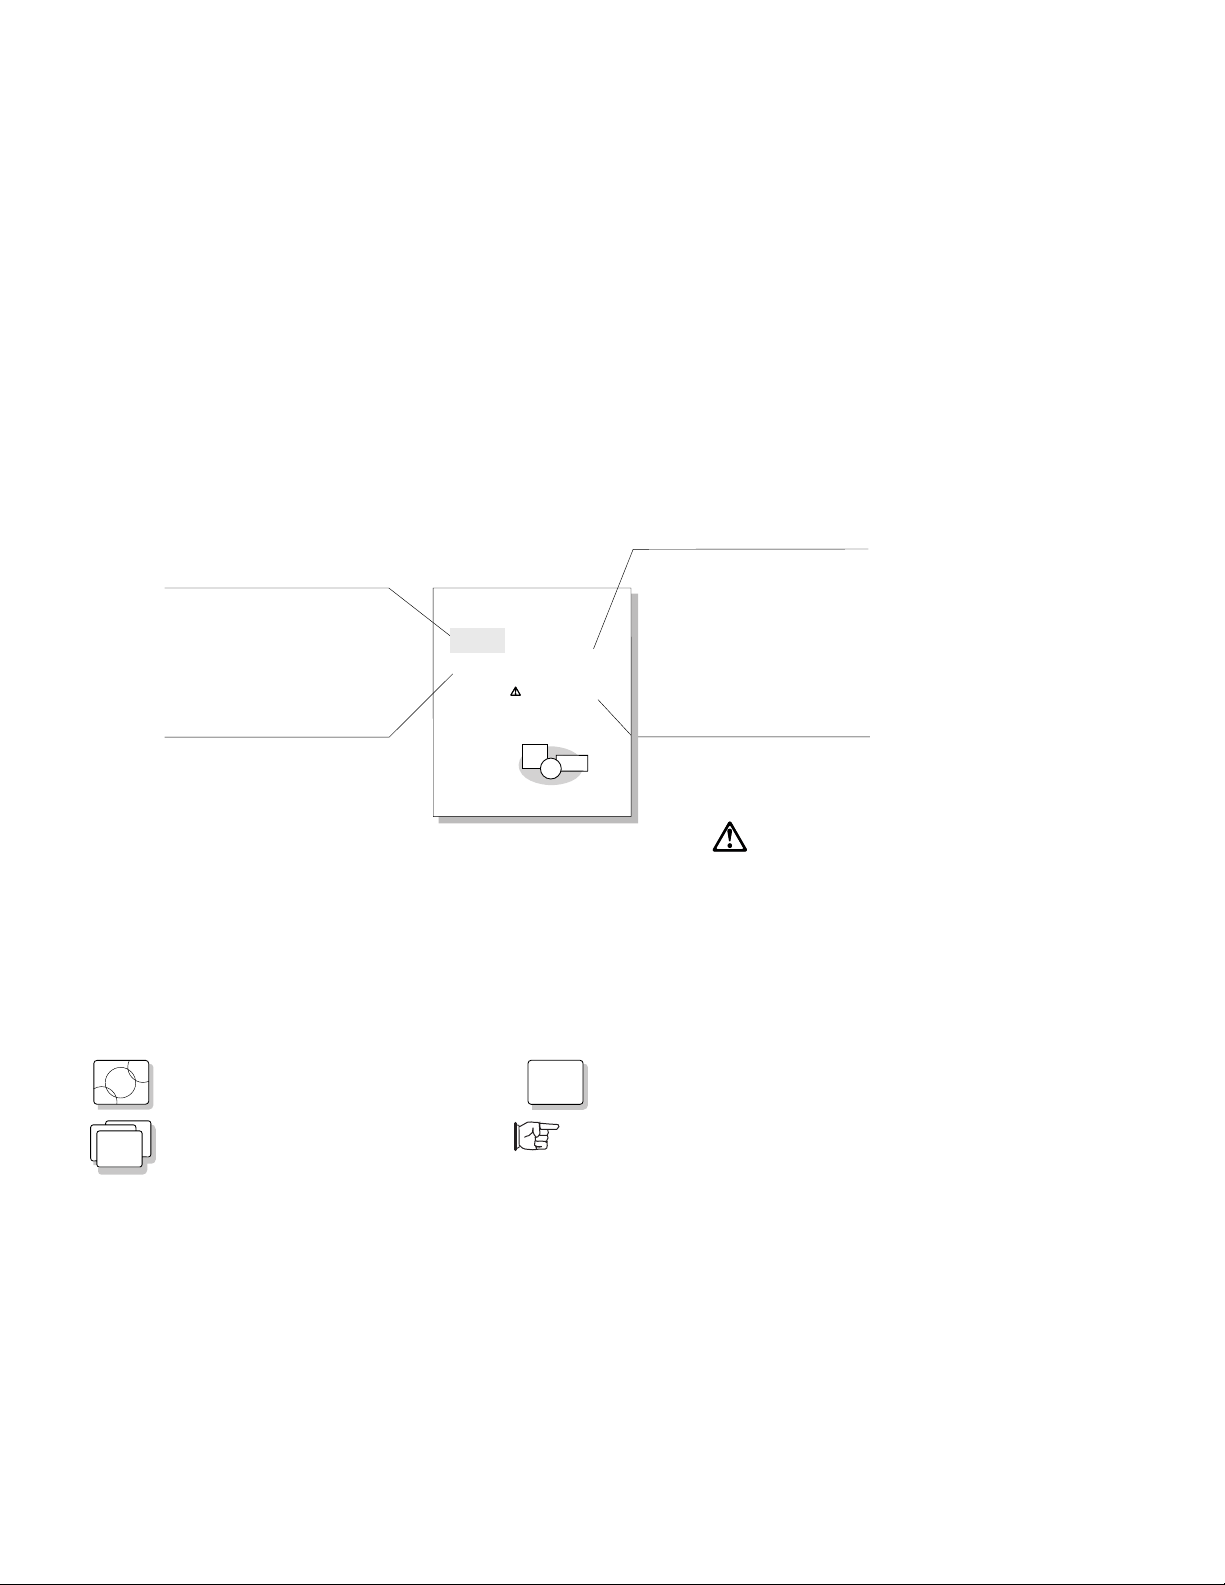
Information Notices
This
User's Guide
contains notices that relate to specific information or text.
Note:
Provides important hints,
tips, guidance, or advice.
Warning:
Indicates possible damage
to programs, devices,
system, or data. It appears
before the related instruction
or situation in which possible
damage could occur.
Providing Power
Note:
Rlkefldsksokdfskj
Nkfjelkaselkdsfi,
kjfadslkejfsa.
Warning:
Oilekalksadkjsf ke.
Dksjfelksd,ksjf ek
kjsfylkefsdfoisefl.
Usild Lke Sejk
Tlkelk jrlij rfo ijeljc oijf, lekjr soifei jfs
lkjf aliejlk sf. Hlkj lkjera sfie jrlksf j
lksf leifjas elk,oir lkej fasifj.
Tjhasfladkeaoiufsaleaf.Easd jek:
-Lkjesalkiaoue.
-Yoeksfalkjeslasdjea.
Danger:
Lklksd aeilsadd asfijelkj safdydfsa . Tka
lksadfdi ylekjassf adfoiuasf .
Olkesaduyelksfaksayoisdalkjsfoiudlfek.
sakjeoialkfsdoiueksafdlkjefasdoiy:
Tklksfoialkthkeselksdfkoiasfue.
1
Caution:
Indicates situations that
are potentially hazardous
to you. It appears in text
before the instruction or
situation that could be
hazardous.
Danger:
Indicates situations that
are potentially lethal or
extremely hazardous to you.
109Chapter2. YoekfBlksdLekjf
It is indicated by the
symbol and appears
in text before the instruction
or situation that could be
dangerous.
Treatment of Icons
This
User's Guide
to the operating system installed in your computer, or pointing you to other information.
OS/2
WIN
viii IBM ThinkPad 755CX User's Guide
contains the following icons (symbols) representing procedures or information unique
Information for IBM Operating
System/2 (OS/2) users.
Information for Microsoft**
Windows** users.
DOS
Information for DOS users.
Where to go for other information.
Page 10
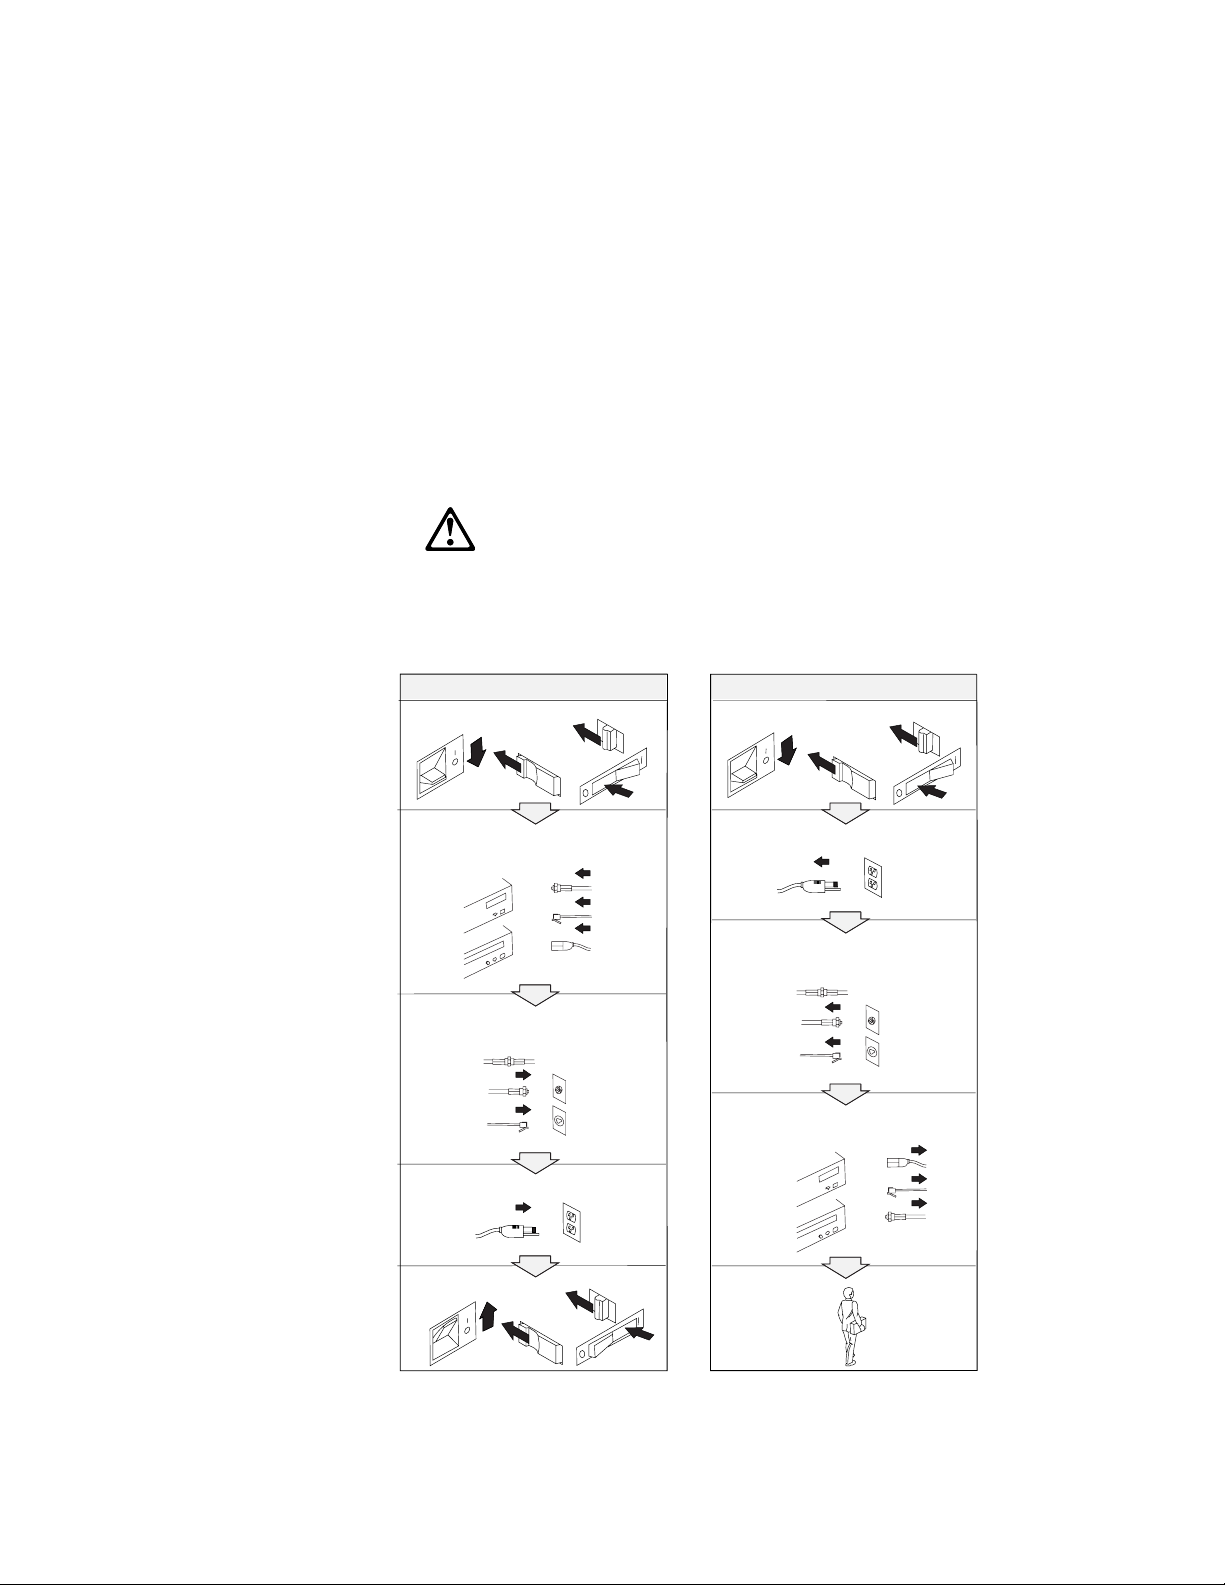
Electrical Safety Notice
DANGER:
Electrical current from power, telephone, and communication
cable is hazardous. To avoid shock hazard, connect and
disconnect cables as shown below when installing, moving, or
opening the covers of this product or attached the devices.
The power cord must be used with a properly grounded outlet.
To Connect
Turn everything OFF.
First, attach all cables to devices.
Attach the signal cables to
receptacles.
Attach the power cord to an outlet.
To Disconnect
Turn everything OFF.
First, remove the power cord from
the outlet.
Remove signal cables from
receptacles.
Remove all cables from devices.
Turn the device ON.
Note: In the U.K., by law, the
telephone line cable must be
connected after the power cord.
About This Book ix
Note: In the U.K., by law, the
power cord must be disconnected
after the telephone line cable.
Page 11

CAUTION:
Do not disassemble, incinerate, or short-circuit the rechargeable
battery pack. Do not put it in refuse that is disposed of in
landfills. Dispose of it as required by local ordinances or
regulations.
CAUTION:
The lithium battery (IBM P/N 84G6426, UL** recognized
component—File No. MH12210), attached by the speaker under
the keyboard can be replaced only by your IBM authorized
reseller or IBM marketing representative. It contains lithium and
can explode if not properly used, handled, or disposed of. Do
not: (1) throw or immerse into water, (2) heat to more than
100°C (212°F), or (3) repair or disassemble. Dispose of it as
required by local ordinances or regulations.
CAUTION:
The nickel metal hydride rechargeable battery attached under
the diskette drive, can be replaced only by your IBM authorized
reseller or IBM marketing representative. Do not disassemble,
incinerate, or short-circuit it. The battery can cause burns or
release toxic chemicals. Do not put it in refuse that is disposed
of in landfills. Dispose of it as required by local ordinances and
regulations.
CAUTION:
The fluorescent lamp in the liquid crystal display (LCD) contains
mercury. Do not put it in refuse that is disposed of in landfills.
Dispose of it as required by local ordinances or regulations.
The LCD is made of glass, and rough handling or dropping the
computer can cause the LCD to break. If the LCD breaks and
the internal fluid gets into your eyes or on your hands,
immediately wash the affected areas with water for at least 15
minutes; then get medical care if any symptoms are present
after washing.
x IBM ThinkPad 755CX User's Guide
Page 12

Contents
About This Book ........................... vii
Information Notices . . . . . . . . . . . . . . . . . . . . . . . . . . viii
Treatment of Icons .......................... viii
Electrical Safety Notice ........................ ix
Chapter 1. Getting Started . . . . . . . . . . . . . . . . . . . . . 1
About the Product Map ........................ 2
Checking Your Items .......................... 2
Other Symbols on the Product Map ................. 4
Setting Up Your Computer ...................... 6
Chapter 2. Getting Familiar with Your Computer ...... 11
Locations and Functions ....................... 12
System-Status Indicators . . . . . . . . . . . . . . . . . . . . . . 16
Providing Power . . . . . . . . . . . . . . . . . . . . . . . . . . . 18
AC Adapter . . . . . . . . . . . . . . . . . . . . . . . . . . . . . 18
Battery Pack . . . . . . . . . . . . . . . . . . . . . . . . . . . . 20
Car Battery Adapter ........................ 22
Operating with the TrackPoint III .................. 23
Changing the Cap ......................... 25
Operating the Numeric Keypad ................... 26
Using the Display ........................... 27
Using a DOS Application with Your 755CX SVGA Model .. 28
Using the Online Book ........................ 29
Starting for OS/2 or Windows .................. 29
Starting for DOS .......................... 29
Keeping the Computer from Being Damaged ........... 30
Carrying the Computer ........................ 31
Chapter 3. Operating Your Computer ............. 33
What Happens When Power Is Turned On? ........... 34
Using the ThinkPad Features Program .............. 35
Using the Program for OS/2 and Windows .......... 36
Using the PS2 Program ..................... 41
Using Easy-Setup . . . . . . . . . . . . . . . . . . . . . . . . . . 42
Starting Easy-Setup . . . . . . . . . . . . . . . . . . . . . . . . 42
Using the Selectable Drive-Startup Sequence ......... 47
Using the Fn Key Function ..................... 48
Using Power Management ..................... 50
Standby Mode . . . . . . . . . . . . . . . . . . . . . . . . . . . 52
Suspend Mode . . . . . . . . . . . . . . . . . . . . . . . . . . 53
Hibernation Mode . . . . . . . . . . . . . . . . . . . . . . . . . 57
Using PC Cards ........................... 61
About PC Cards .......................... 61
Limitations of Operation during Suspend and Hibernation
Modes . . . . . . . . . . . . . . . . . . . . . . . . . . . . . . . 61
Copyright IBM Corp. 1995 xi
Page 13

Using the PC Card Director Program .............. 62
Using the Infrared Communication Feature ............ 72
Considerations for Communication ............... 74
Using the Mwave DSP Features .................. 75
Using the Audio Function .................... 78
Using the Telephony Function .................. 84
Chapter 4. Using Battery Power ................. 91
Operating Time with the Battery Pack ............... 92
Charging the Battery Pack ..................... 92
Charging with the AC Adapter .................. 93
Charging with the Travel Quick Charger ............ 94
Replacing the Battery Pack ..................... 95
Monitoring the Battery-Power Status ................ 96
Using the Battery-Power Status Indicator ........... 96
Using the Fuel-Gauge Program ................. 98
Preserving Battery-Pack Life .................... 103
Maximizing Battery-Powered Operation .............. 104
Using Advanced Power Management ............. 104
Decreasing LCD Brightness ................... 105
Using Power-Saving Modes ................... 106
Chapter 5. Protecting Your Computer ............. 109
Using Passwords . . . . . . . . . . . . . . . . . . . . . . . . . . . 110
Power-On Password . . . . . . . . . . . . . . . . . . . . . . . 110
Hard-Disk Password . . . . . . . . . . . . . . . . . . . . . . . 114
Supervisor Password . . . . . . . . . . . . . . . . . . . . . . . 118
Using the Hard-Disk and Power-On Passwords ........ 122
Using the Supervisor and Hard-Disk Passwords ....... 122
Using Several Hard Disk Drives with the Supervisor
Password . . . . . . . . . . . . . . . . . . . . . . . . . . . . . 123
Using the Personalization Utility Program ............. 125
Using Locks . . . . . . . . . . . . . . . . . . . . . . . . . . . . . . 130
Using the Lock on the Hard Disk Drive ............. 130
Using the Security Lock ..................... 131
Using the PC Card Lock ..................... 132
Chapter 6. Installing and Removing Options ......... 133
Installing and Removing PC Cards ................. 134
Inserting the PC Card ....................... 134
Removing the PC Card ...................... 136
Increasing Memory Capacity .................... 137
Installing an IC DRAM Card and DIMM ............ 138
Removing the IC DRAM Card and DIMM ........... 143
Replacing the Hard Disk Drive ................... 148
Installing Options in the Diskette Drive Compartment ...... 150
xii IBM ThinkPad 755CX User's Guide
Page 14

Reinstalling the Option Cover and Front Bezel ........ 153
Installing the DAA/Telephony Kit .................. 155
Attaching an External Numeric Keypad or a Mouse ....... 159
Using the Mouse and Other Pointing Devices ......... 160
Using a Mouse on the IBM ThinkPad Space Saver Keyboard 161
Attaching an External Keyboard .................. 163
Attaching a Printer .......................... 164
Attaching an External Display .................... 165
Changing the Display Mode ................... 166
Setting the Monitor Type and the Display Driver ....... 167
Connecting the External Display to the Computer ...... 169
Changing the Screen Resolution or Color Depth ....... 170
Using SVGA Display Drivers ................... 171
Attaching the IBM Dock I or Dock II ................ 172
Chapter 7. Installing Software . . . . . . . . . . . . . . . . . . 173
What You Need for Your Computer ................ 174
Installing the Operating System .................. 176
IBM OS/2 Warp or Version 2.11 ................ 176
IBM DOS Version 7.0 or Later .................. 176
Microsoft Windows Version 3.11 or Later ........... 177
Installing the ThinkPad Features Program ............ 180
Installing for OS/2 ......................... 180
Installing for DOS ......................... 181
Installing for Windows ...................... 182
Installing the PCMCIA Device Driver ................ 183
Installing for OS/2 ......................... 185
Installing for DOS ......................... 186
Installing for Windows ...................... 187
Installing the ThinkPad Display Driver ............... 188
Installing for OS/2 Warp ..................... 189
Installing for OS/2 V.2.11 ..................... 189
Installing for Windows ...................... 191
Installing the Mwave Support Software .............. 192
Installing for OS/2 ......................... 192
Installing for DOS ......................... 194
Installing for Windows ...................... 195
Installing the Infrared Device Driver ................ 196
Installing for OS/2 ......................... 196
Installing for Windows ...................... 197
Chapter 8. Solving Computer Problems ............ 199
Commonly Asked Problems and Actions ............. 200
Testing the Computer ........................ 202
Troubleshooting Charts . . . . . . . . . . . . . . . . . . . . . . . 204
LCD Problems . . . . . . . . . . . . . . . . . . . . . . . . . . . 204
Contents xiii
Page 15

Screen Messages . . . . . . . . . . . . . . . . . . . . . . . . . 206
Error Codes . . . . . . . . . . . . . . . . . . . . . . . . . . . . 208
General Problems . . . . . . . . . . . . . . . . . . . . . . . . . 210
What If Testing Cannot Find the Problem? ............ 211
Battery Power Problems ..................... 211
Diskette Drive Problems ..................... 213
Mwave DSP Feature Problems ................. 213
Infrared Communication Problems ............... 214
Software Problems . . . . . . . . . . . . . . . . . . . . . . . . 215
Option Problems . . . . . . . . . . . . . . . . . . . . . . . . . . 215
Keyboard, External Numeric Keypad, and Pointing Device
Problems . . . . . . . . . . . . . . . . . . . . . . . . . . . . . 216
External Display Problems .................... 218
Printer Problems . . . . . . . . . . . . . . . . . . . . . . . . . . 220
Intermittent Problems . . . . . . . . . . . . . . . . . . . . . . . 220
Listing Installed Options ....................... 221
Recording Identification Numbers ................. 222
Getting Service . . . . . . . . . . . . . . . . . . . . . . . . . . . . 223
The IBM HelpClub: Another Great Choice (for European
Countries) . . . . . . . . . . . . . . . . . . . . . . . . . . . . . 224
Appendix A. Avoiding Hardware Conflicts .......... 227
Appendix B. Advanced Information for PC Cards ...... 231
Auto Configurator for the PC Card Director Program ...... 231
Example When a Modem Card Is Used ............ 232
Example When the Auto Configurator Is Not Used ...... 232
Example of the Memory Area for the Card Services and 3270 233
Operational Considerations for PCMCIA ............. 234
Software Considerations for OS/2 ................ 234
Software Considerations for DOS ................ 235
Software Considerations for Windows ............. 242
Appendix C. Additional Information for Mwave DSP
Features . . . . . . . . . . . . . . . . . . . . . . . . . . . . . . . 243
Audio Information . . . . . . . . . . . . . . . . . . . . . . . . . . . 243
Sound . . . . . . . . . . . . . . . . . . . . . . . . . . . . . . . . 243
Mwave MIDI Overview ...................... 244
Telephony Information . . . . . . . . . . . . . . . . . . . . . . . . 247
Appendix D. Features and Specifications ........... 249
Features . . . . . . . . . . . . . . . . . . . . . . . . . . . . . . . . 249
Specifications . . . . . . . . . . . . . . . . . . . . . . . . . . . . . 251
IBM Power Cords ........................... 252
Diskette Standards . . . . . . . . . . . . . . . . . . . . . . . . . . 254
xiv IBM ThinkPad 755CX User's Guide
Page 16

Appendix E. Product Warranties and Notices ........ 255
Notices . . . . . . . . . . . . . . . . . . . . . . . . . . . . . . . . . 261
Trademarks . . . . . . . . . . . . . . . . . . . . . . . . . . . . 261
Electronic Emission Notice ..................... 263
Glossary . . . . . . . . . . . . . . . . . . . . . . . . . . . . . . . 269
Index . . . . . . . . . . . . . . . . . . . . . . . . . . . . . . . . . . 273
Contents xv
Page 17

xvi IBM ThinkPad 755CX User's Guide
Page 18

Chapter 1. Getting Started
Welcome to the world of ThinkPad computers!
The IBM ThinkPad 755CX is one of the most advanced computers
for your mobile computing needs. It can used both inside and
outside your office.
This chapter describes the
the computer.
About the Product Map ........................ 2
Checking Your Items .......................... 2
Other Symbols on the Product Map ................. 4
Setting Up Your Computer ...................... 6
Product Map
and the steps for setting up
Copyright IBM Corp. 1995 1
Page 19
Getting Started
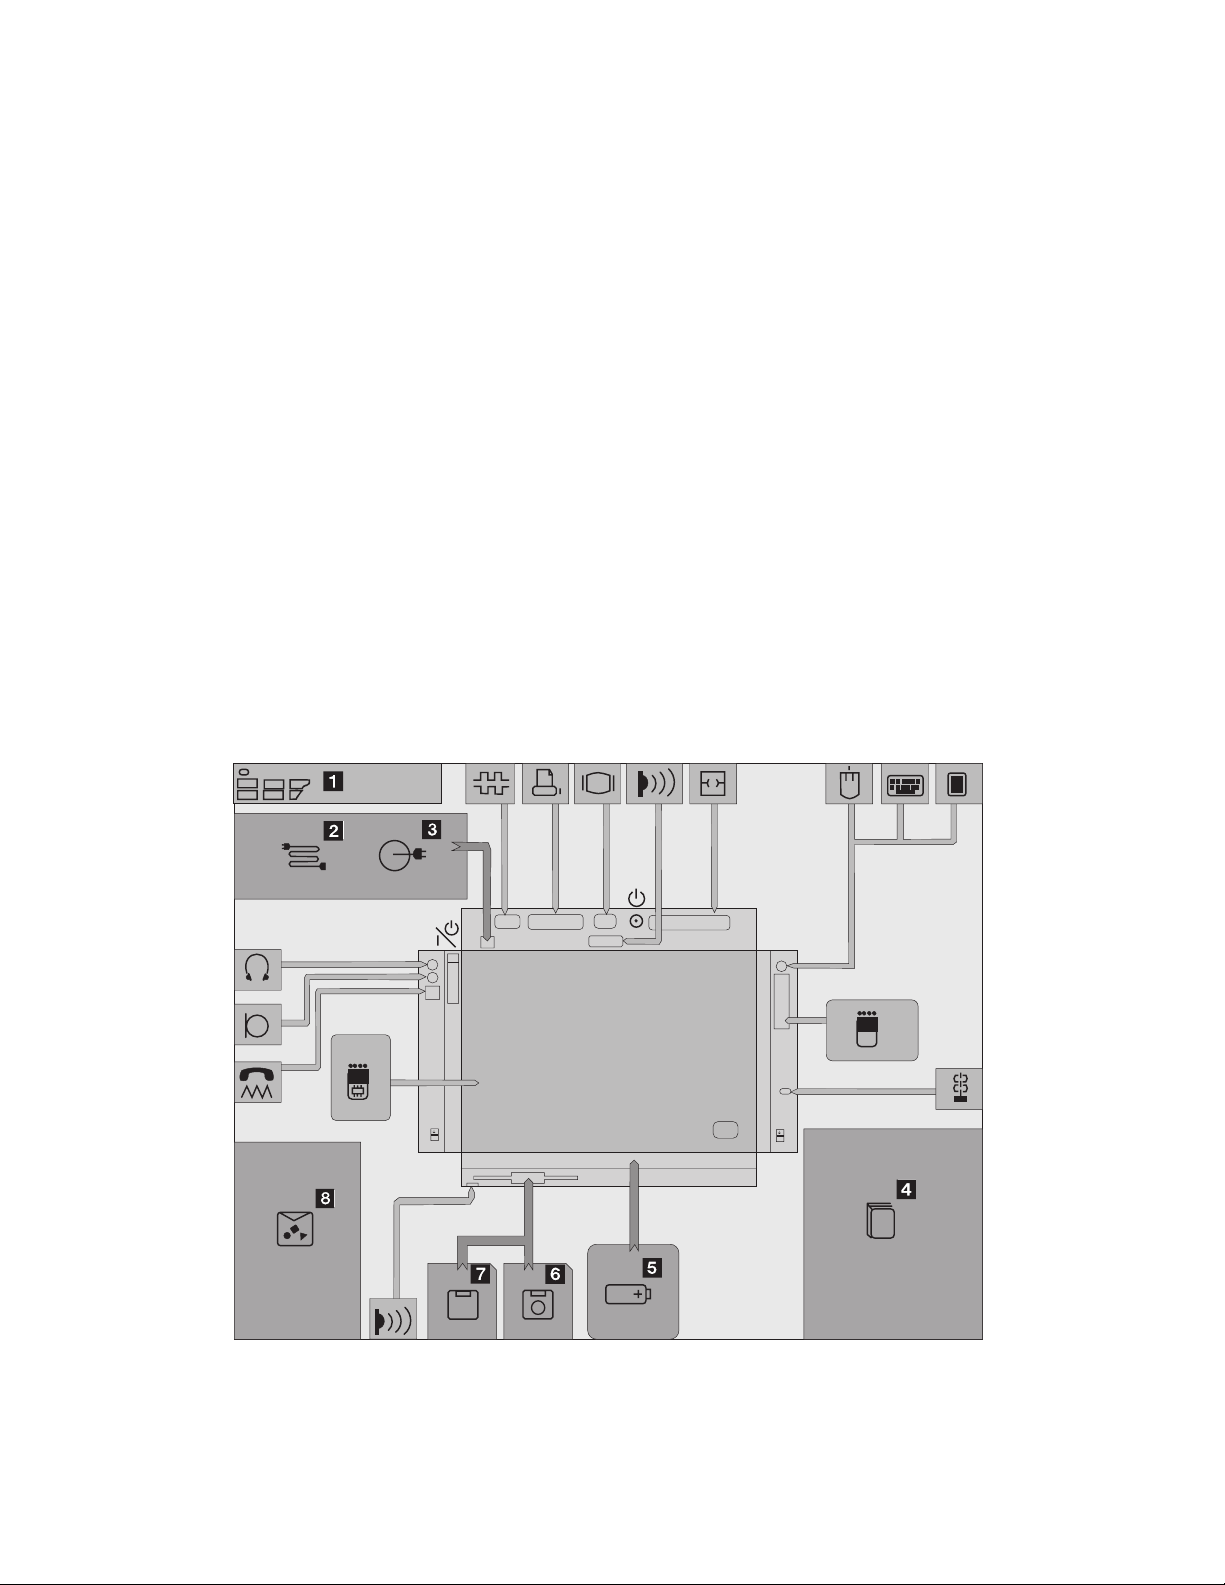
About the Product Map
The Product Map is a foldout diagram that you will see first when
you unpack the computer. Using the Map will help you become
familiar with your computer. When you physically place the shipping
items and options on the Map, you will be able to check that all items
were shipped to you.
Checking Your Items
Remove the Product Map from the box and spread it on a desk or
flat surface. Next, remove each item and place it on the Map in the
position indicated by the numbers in the following figure. If any item
is missing or damaged, contact your place of purchase.
2 IBM ThinkPad 755CX User's Guide
Page 20
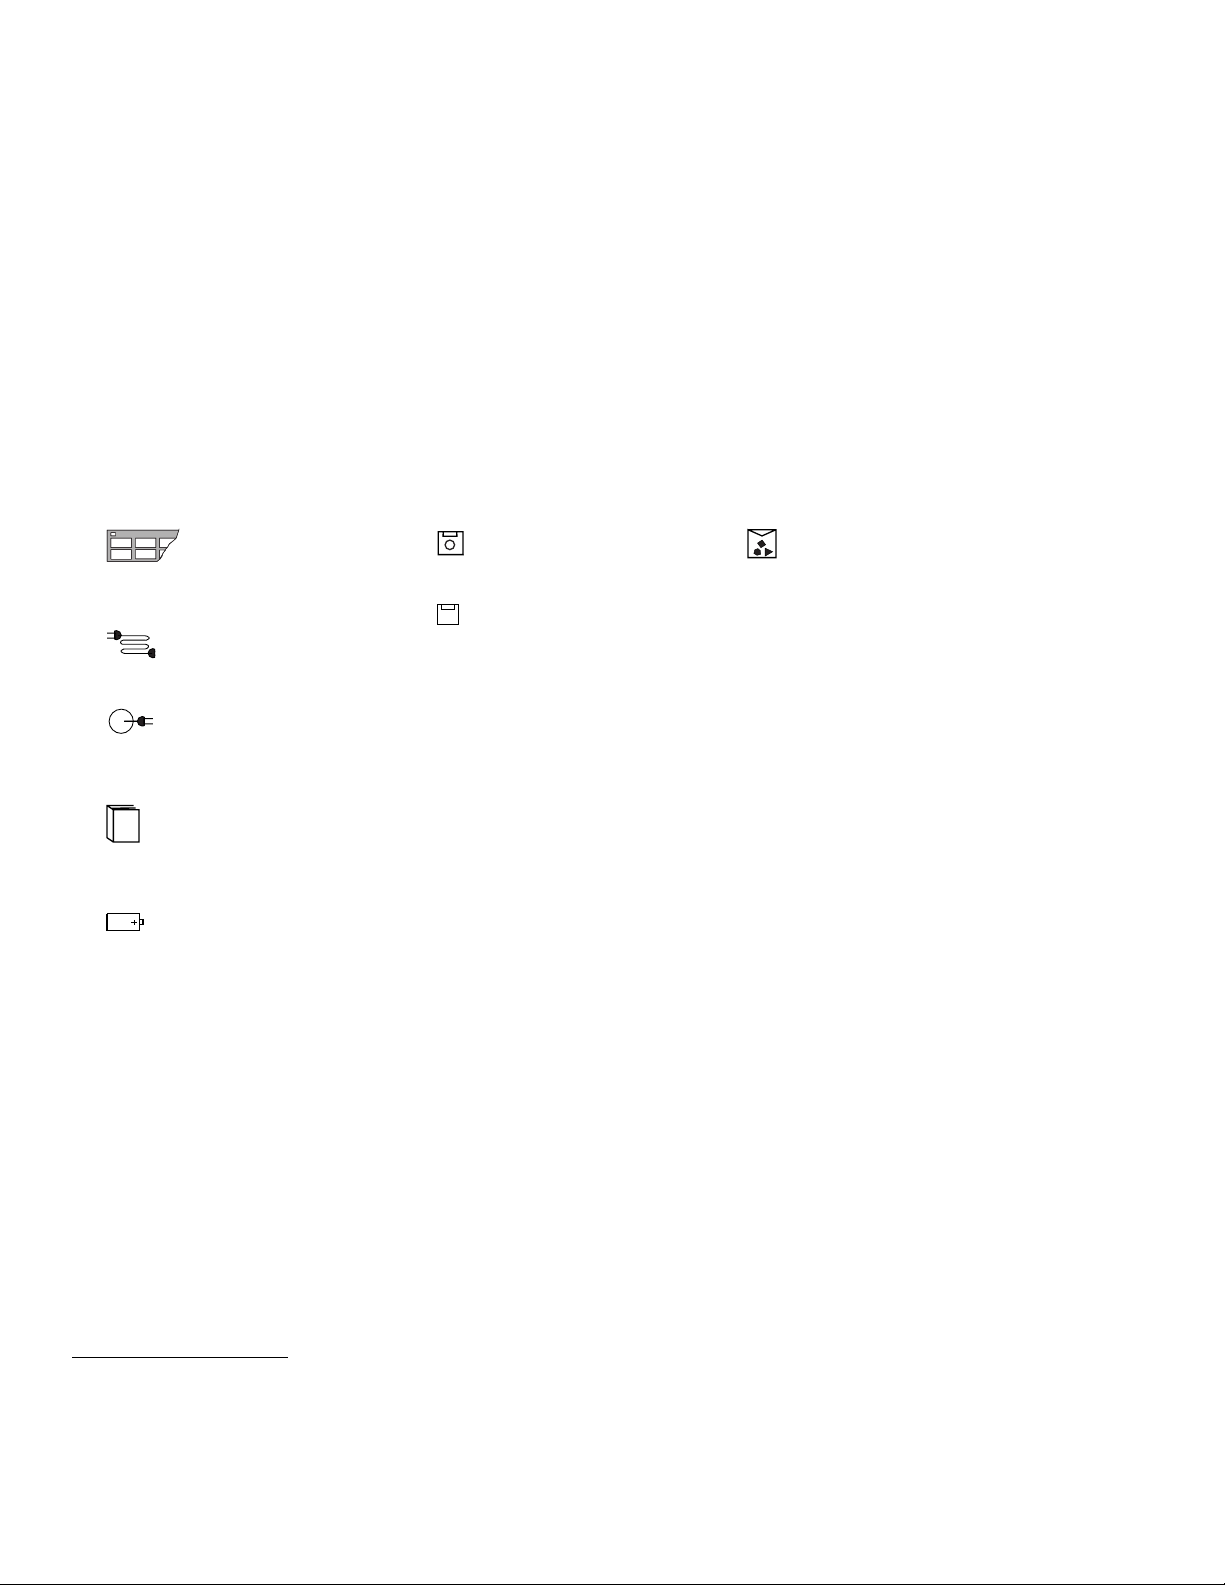
1
The keyboard template shows
function-key assignments when
placed on the keyboard.
2
The power cord connects the AC
Adapter to the electrical outlet.
3
The AC Adapter plugs into an
electrical outlet and supplies power
to the computer.
4
The User's Guide is this book. It
provides the installing and operating
information about your computer.
5
The battery pack supplies power to
the computer for mobile operation.
†
6
The Utility Diskette contains the
various system programs.
†
7
The PCMCIA Features
Diskette contains the
programs for the PCMCIA
function.
The Video Features Diskette
for OS/2 and Video Features
Diskette for Windows
contain the video system
programs for the different
operating systems.
The Infrared Features
Diskette contains the infrared
communication support
programs.
The Mwave DSP Features
Diskettes contain the DSP
(digital signal processor)
support programs.
Getting Started
8
Miscellaneous items are supplied
in an envelope that contains:
Spare caps for TrackPoint III
Wallet for telephone cable
PCMCIA slot cover with cable
opening
PC Card lock
Adhesive strap
Application envelope (for some
countries)
Other items
†
For some countries, the shipment contains no diskettes.
Therefore, you cannot place items on the diskette icons when checking the items shipped with your computer.
You can either create the diskettes yourself or you can purchase them. You can create diskettes with the Diskette Factory program, which is
preinstalled in your computer. Follow the prompts that appear when the computer is turned on for the first time. You can also purchase the
diskettes; call 1-800-772-2227 for purchasing information in the U.S., or contact your IBM authorized reseller or IBM marketing representative.
Follow the instructions on “Building System Diskettes” in the
Chapter 1. Getting Started 3
Preload Guide
.
Page 21
Getting Started
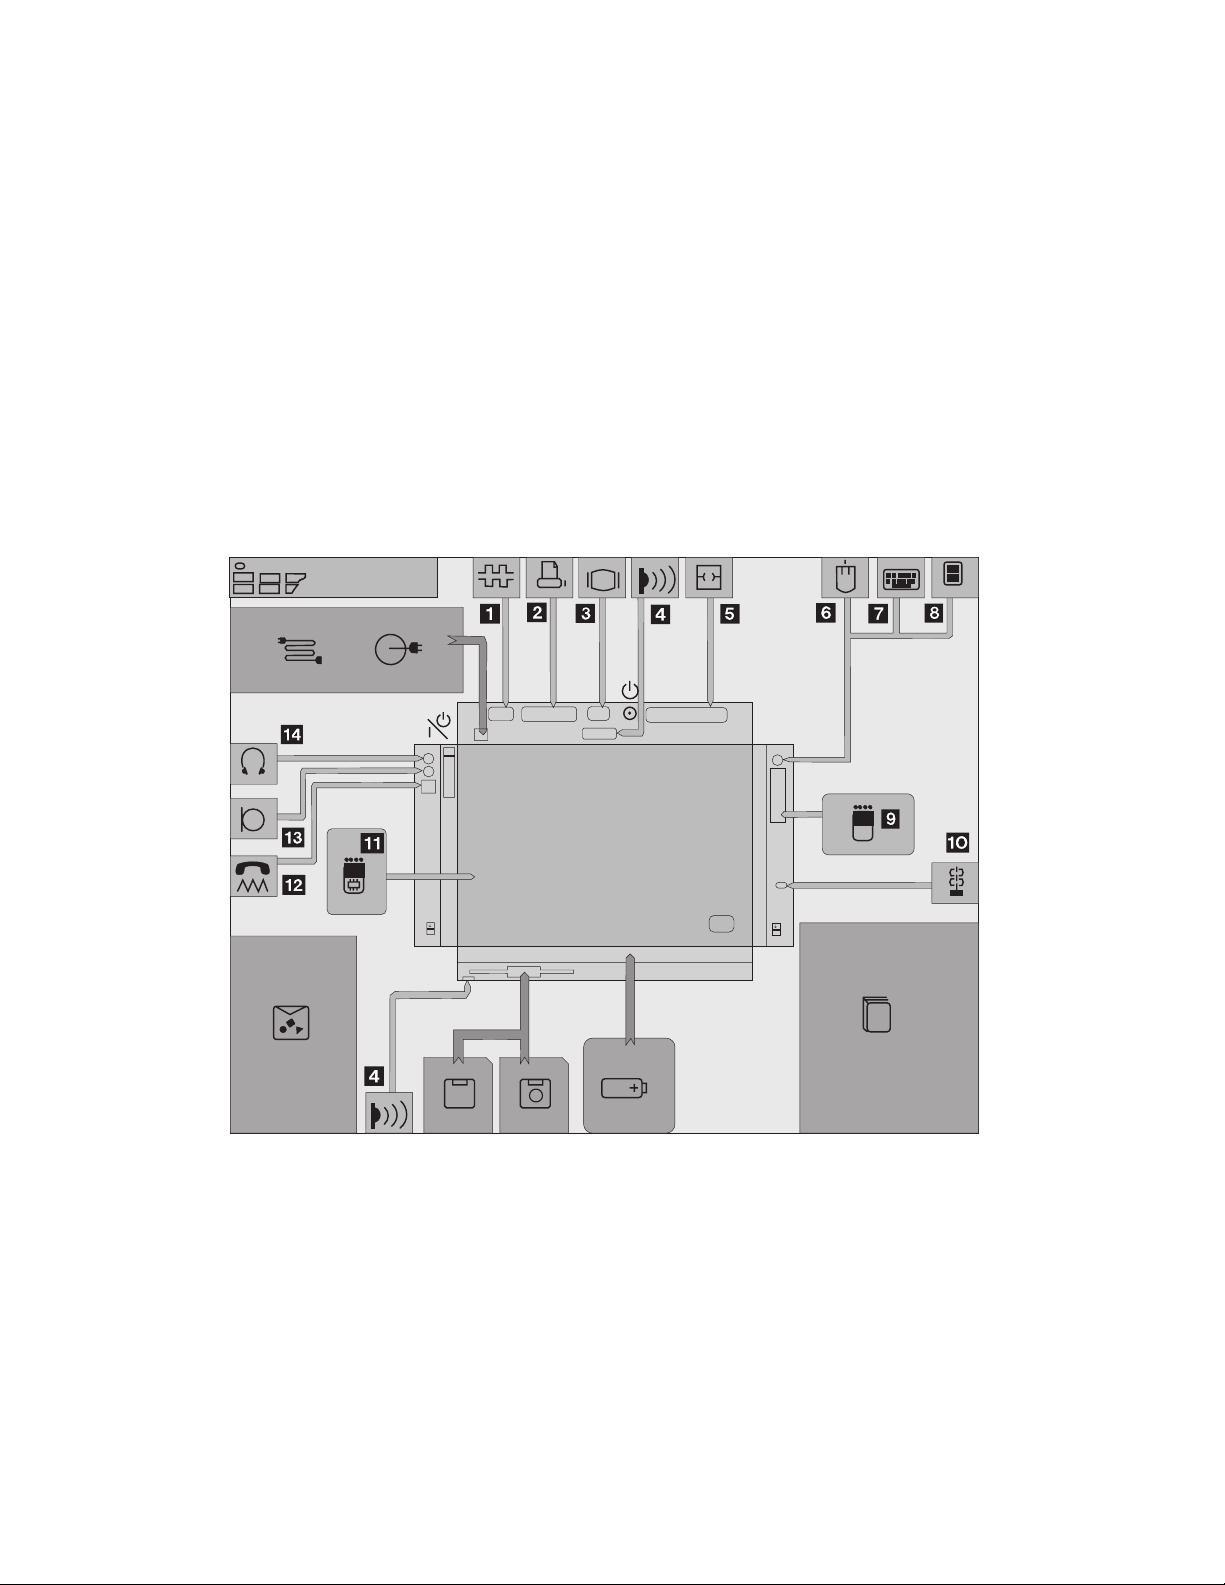
Other Symbols on the Product Map
This section describes the slots, connectors, and options that are
shown on the Product Map. To install options, refer to Chapter 6.
4 IBM ThinkPad 755CX User's Guide
Page 22
Getting Started
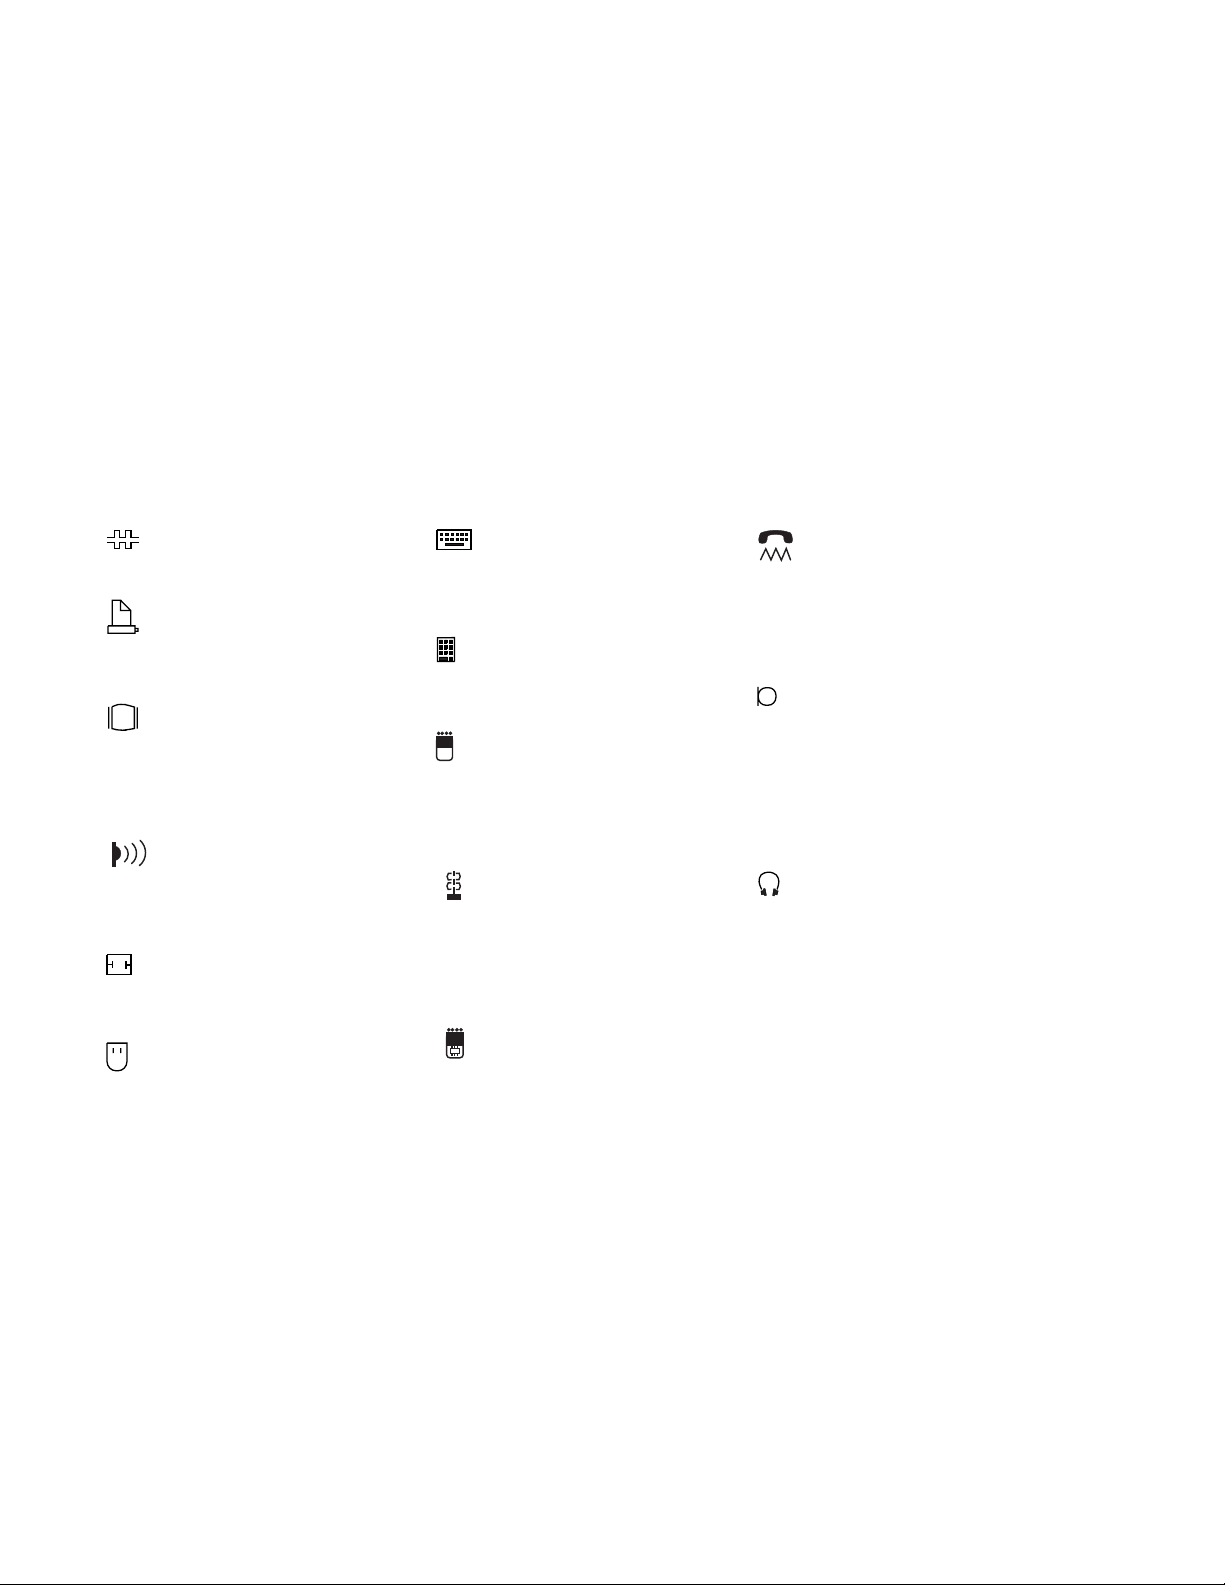
1
The serial connector is where you
connect a 9-pin, serial-device cable.
2
The parallel connector is where
you usually connect a
parallel-printer signal cable.
3
The external-display connector is
where you connect the signal cable
of a video graphics adapter (VGA),
super video graphics adapter
(SVGA), or compatible display.
4
The infrared ports are used to
make point-to-point communication
with other devices with an infrared
port.
5
The system expansion connector
is used to connect the Dock I, Dock
II, or Port Replicator option.
6
The mouse connects directly to the
external input-device connector or is
used with the external numeric
keypad.
7
The external keyboard connects
to the external input-device
connector through the
keyboard/mouse connector.
8
The external numeric keypad
connects to the external
input-device connector.
9
The PCMCIA slots accept one or
two cards based on Personal
Computer Memory Card
International Association
(PCMCIA).
1
The security keyhole is used
with the Kensington**
MicroSaver** Security System
(hereafter called
or a compatible lock to protect the
devices inside of the computer.
11
The memory slot, which is under
the removable diskette drive,
accepts an integrated-circuit
dynamic random-access memory
(IC DRAM) card or a dual inline
memory module (DIMM) adapter
with one or two DIMM memory
options.
Kensington lock
12
The modem/fax port is where you
connect a telephone connector or
attachment.
Note: This is offered as an option
The microphone/line-in jack, a
1/8-inch (3.5-mm) diameter jack, is
where a stereo microphone or
external audio device is connected.
An externally powered dynamic
microphone or condenser
microphone, or an equivalent audio
device, can be used.
The headphone jack, a 1/8-inch
(3.5-mm) diameter jack, is where
you connect a stereo headphone or
external speakers.
)
Warning:
To avoid possible loss of
hearing, do not put on the
headphones until after you have
turned on the computer or
connected the headphones to
this jack.
in some countries.
13
14
Chapter 1. Getting Started 5
Page 23

Getting Started
Setting Up Your Computer
You are now ready to assemble and start your computer. The
following steps will guide you through the process.
The following conventions are used in the illustrations appearing in
this chapter:
1
Indicates a main sequence of actions.
Indicates a subsequence of actions in a main action. An arrow
accompanying the number shows the direction of movement.
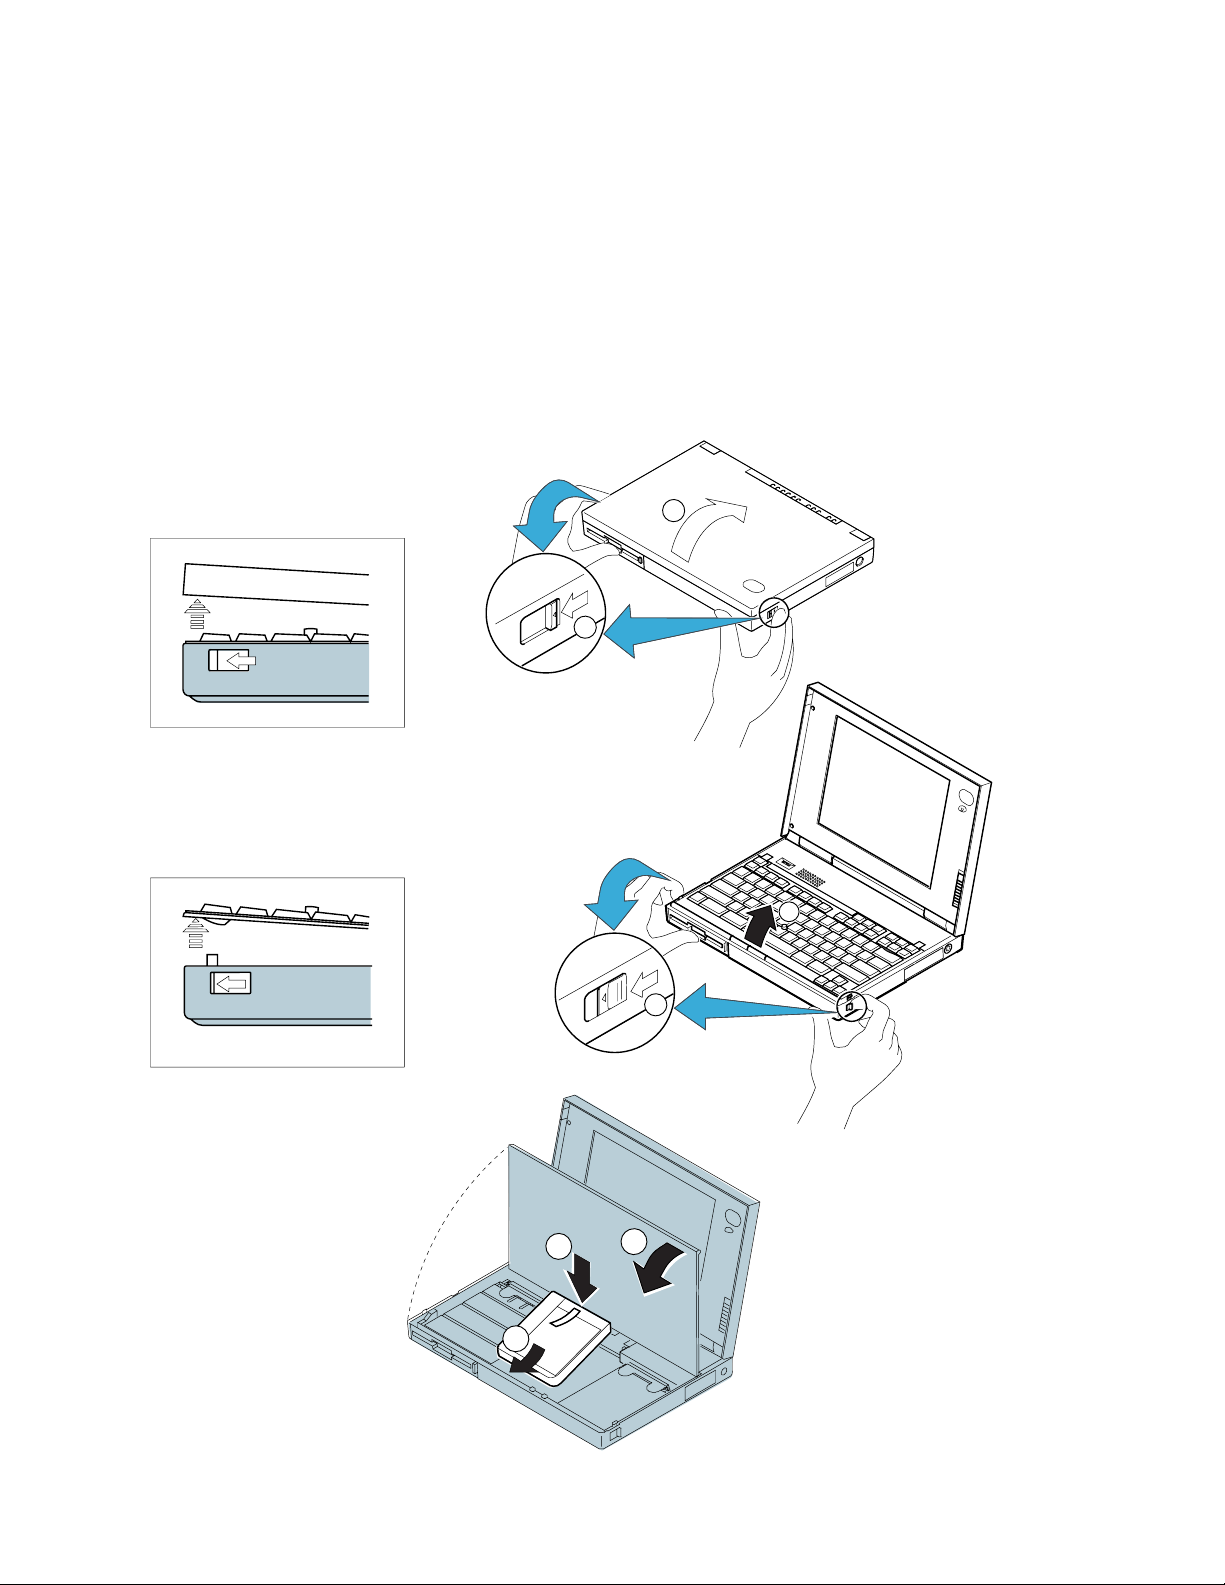
1
Slide the latches on the sides of the computer
halfway toward the front; then open the liquid crystal
display (LCD).
2
Slide the same two latches forward again all the way
toward the front; then raise the keyboard.
Some pressure might be needed to slide these latches if they
are tight.
3
Install the battery pack into the middle compartment
and firmly press it in to make sure of the electrical
connection; then close the keyboard.
Sliding the latches forward while closing the keyboard makes it
easier to close the keyboard.
CAUTION:
The battery pack provided with your computer contains a
small amount of harmful substances. To avoid possible
injury:
Do not touch the battery terminals to any metal
objects.
Keep the battery pack away from fire.
Do not soak the battery pack in water or expose it to
rain.
Do not attempt to disassemble the battery pack.
Avoid mechanical shocks to the battery.
Always use battery packs recommended by IBM.
Keep the battery pack away from children.
6 IBM ThinkPad 755CX User's Guide
Page 24
Getting Started
RightSideView
1
2
2
1
2
1
3
2
1
Chapter 1. Getting Started 7
3
Page 25
Getting Started
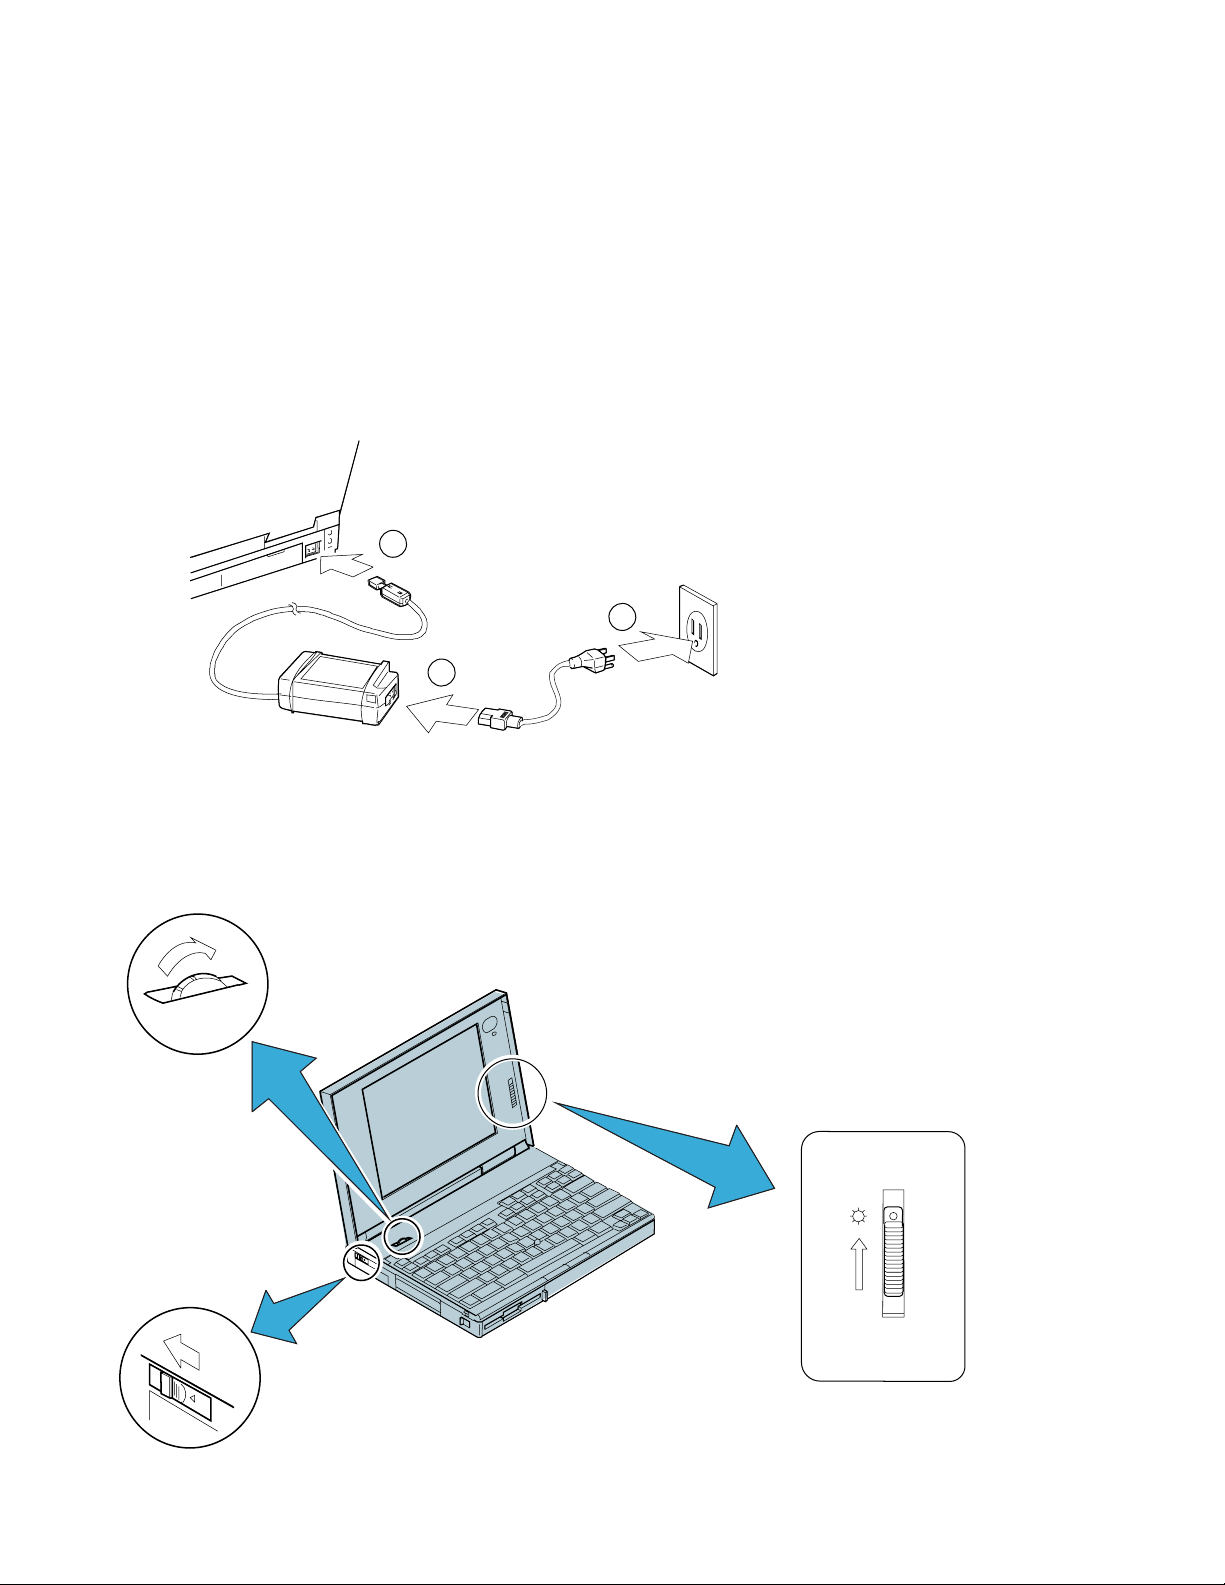
4
Connect the AC Adapter as shown.
5
Position the speaker volume control to “3.”
6
Push and release the power switch to turn on the
computer.
The power switch automatically returns to its original position
after you push and release it.
7
Position the LCD so that it is convenient for viewing;
then position the brightness (
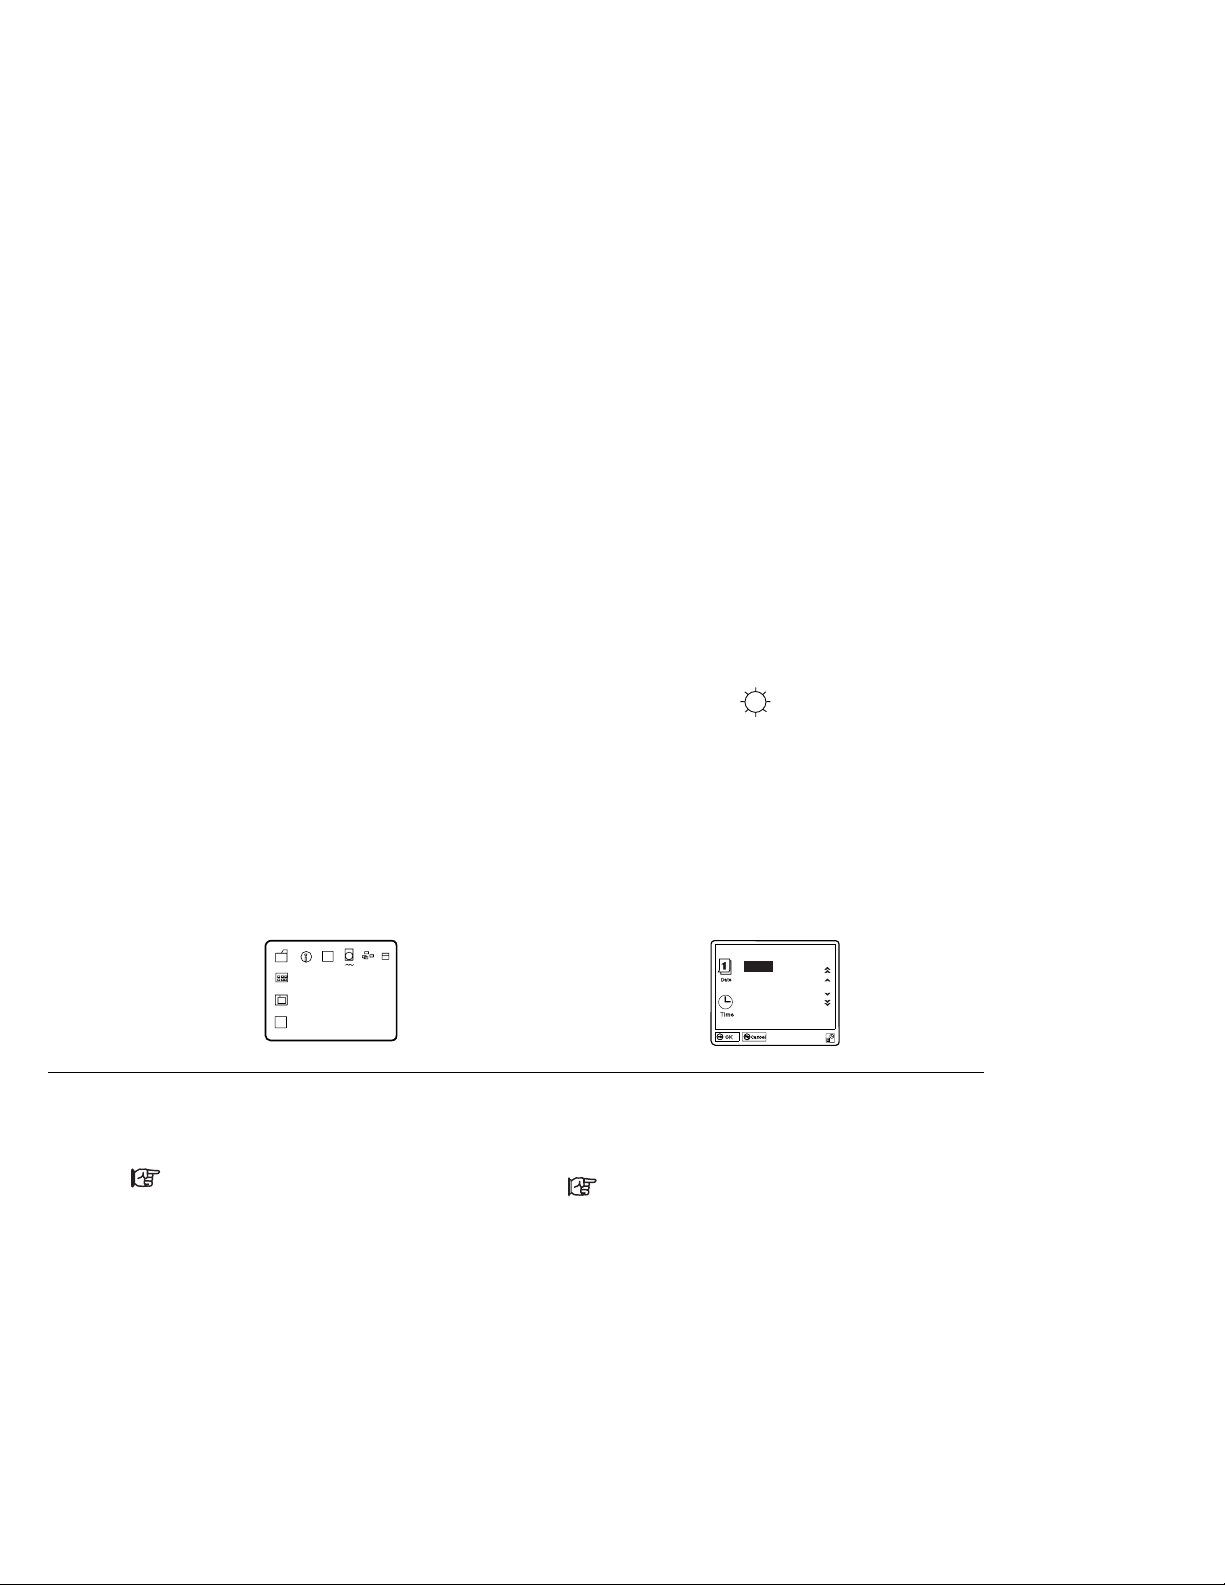
8
After a single beep, one of the following screens
appears, confirming that the system is operating
correctly.
(In some countries, the demonstration program runs
automatically and its associated screen appears.) If any other
screen appears, see “Screen Messages” on page 206.
An Operating System screen
If you purchased a computer with a preinstalled
operating system, the startup screen of the
operating system appears. (The screen shown is
an example of an operating system screen.)
Install your application programs by following
the instructions in the documentation that
came with the programs.
This screen instructs you to set the initial date and
time.
Note: For the 755CX SVGA model, the screen
image might look smaller than this sample.
To set the date and time, see “Using
Easy-Setup” on page 42.
Date and Time
1995
Year
23:59:59
Congratulations!
You have successfully completed the basic setup of your computer!
) as shown.
menu
.03.31
Month Day
Hour Month Second
8 IBM ThinkPad 755CX User's Guide
Page 26
5
Getting Started
4
1
3
2
6
7
Chapter 1. Getting Started 9
Page 27

Getting Started
10 IBM ThinkPad 755CX User's Guide
Page 28

Chapter 2. Getting Familiar with Your Computer
This chapter provides general information about your computer.
Locations and Functions ....................... 12
System-Status Indicators . . . . . . . . . . . . . . . . . . . . . . 16
Providing Power . . . . . . . . . . . . . . . . . . . . . . . . . . . 18
AC Adapter . . . . . . . . . . . . . . . . . . . . . . . . . . . . . 18
Battery Pack . . . . . . . . . . . . . . . . . . . . . . . . . . . . 20
Car Battery Adapter ........................ 22
Operating with the TrackPoint III .................. 23
Changing the Cap ......................... 25
Operating the Numeric Keypad ................... 26
Using the Display ........................... 27
Using a DOS Application with Your 755CX SVGA Model .. 28
Using the Online Book ........................ 29
Starting for OS/2 or Windows .................. 29
Starting for DOS .......................... 29
Keeping the Computer from Being Damaged ........... 30
Carrying the Computer ........................ 31
Copyright IBM Corp. 1995 11
Page 29
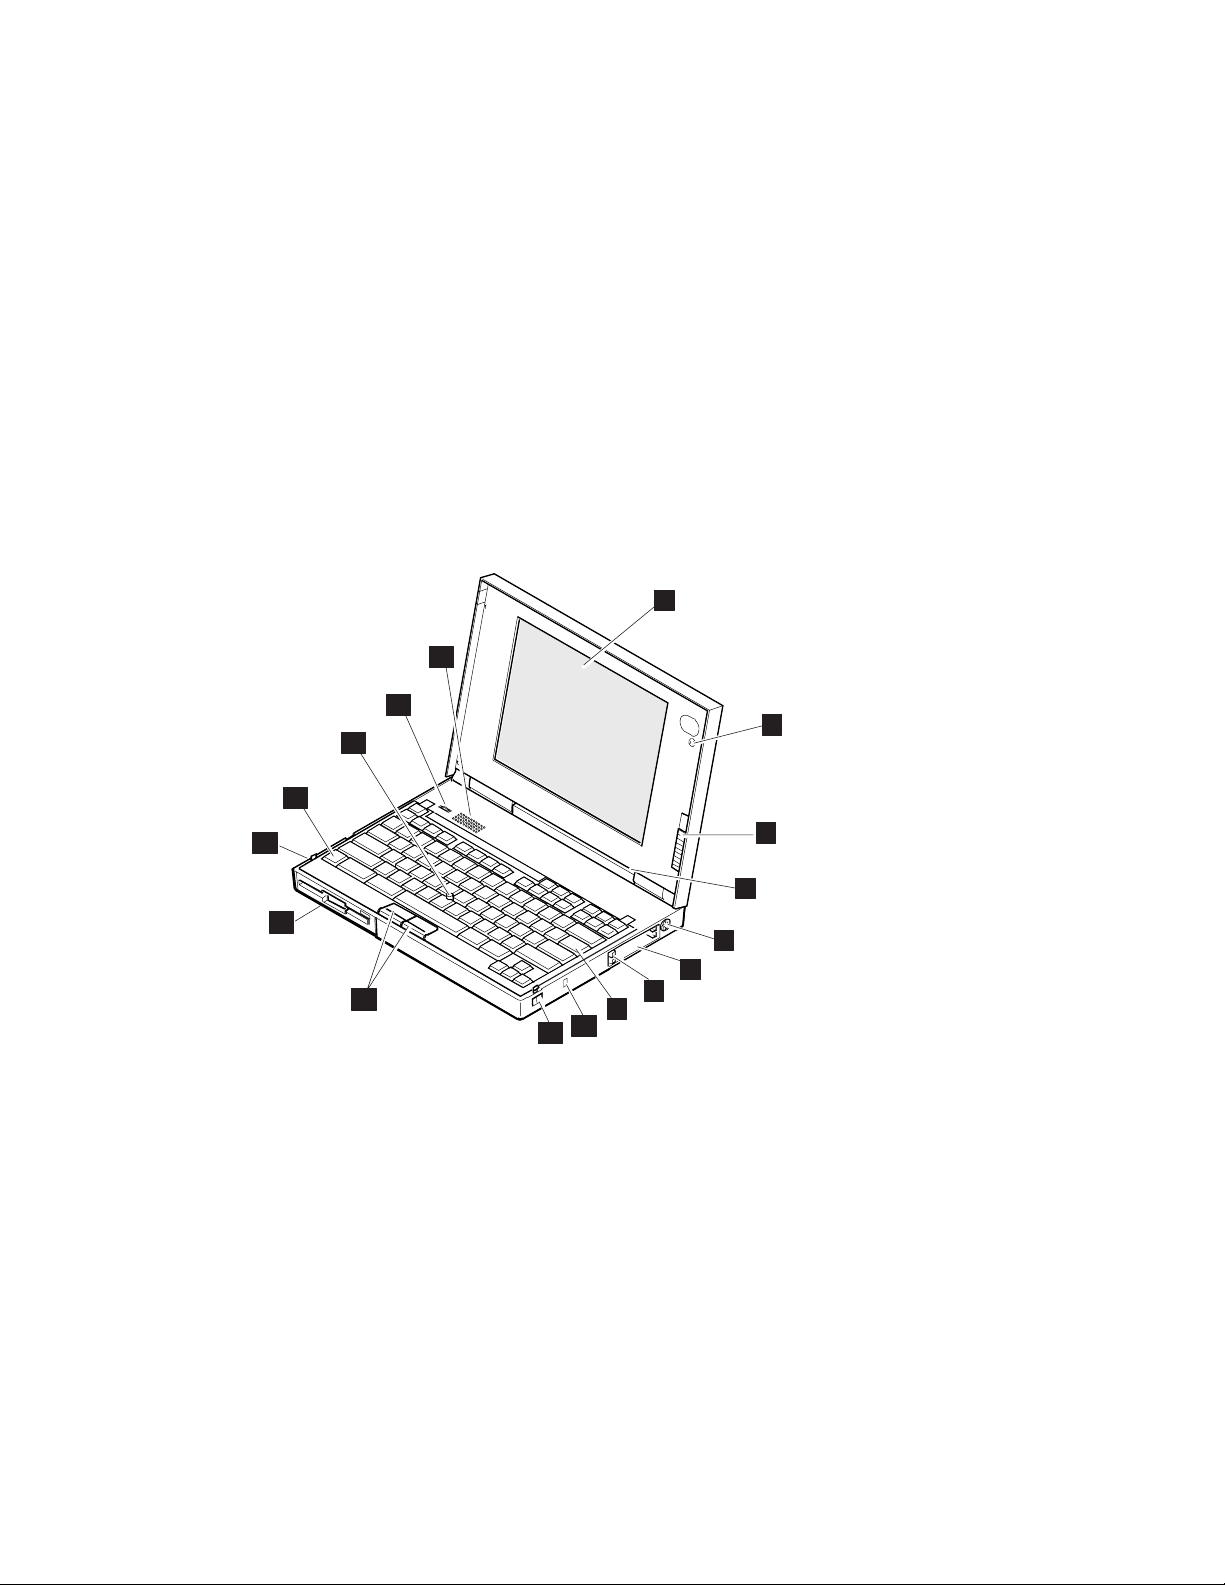
Locations and Functions
Locations and Functions
This section provides additional useful information about your
computer.
FrontView
14
13
10
12
11
15
16
10
1
2
3
4
5
6
7
8
9
12 IBM ThinkPad 755CX User's Guide
Page 30

Locations and Functions
1 The color LCD screen, which
uses a thin film transistor (TFT)
technology, displays the
computer output and can be
moved to any desired viewing
angle.
755CX SVGA model
supports SVGA
(800-by-600 resolution)
video mode besides VGA
(640-by-480) with 65536
colors.
755CX VGA model
supports only VGA mode
with 65536 colors.
A 1024-by-768 resolution video
at maximum can be produced
on any attached external
display that supports the
resolution mode.
(See page 165.)
2 The built-in microphone
captures sound and voice
when it is used with an
application program capable of
handling an audio or telephony
function.
(See page 75.)
3 The brightness control moves
up or down to adjust the
brightness of the display.
4 The indicator panel consists
of the system-status indicators
and their associated symbols.
These indicators show the
current status of the computer.
(See page 16.)
5 The external input-device
connector is used to attach a
mouse, external keyboard, or
external numeric keypad to the
computer.
(See page 159–163.)
6 PCMCIA slots accept one or
two PC Cards.
(See page 134.)
7 The PC Card eject buttons
eject the PC Card from the
upper or lower PCMCIA slot.
8 The keyboard is used to enter
data into the computer. To use
the numeric keypad, see 26.
9 The security keyhole is used
with a Kensington lock or a
compatible lock to protect your
computer.
(See page 131.)
1 The release latches release
the LCD or keyboard so they
can be opened.
11 The click buttons are used
with the TrackPoint III.
12 The front infrared port allows
the computer to communicate
with other devices that have
the same capability.
(See page 72.)
13 The Fn key is used to activate
the Fn key functions.
(See page 48.)
14 TrackPoint III is a built-in
pointing device that provides a
function similar to that of a
mouse.
(See page 23.)
15 The volume control adjusts
the sound level for the built-in
speaker.
16 The built-in speaker
reproduces computer sounds
such as beeps, music, or
voices.
(See page 75.)
Chapter 2. Getting Familiar with Your Computer 13
Page 31

Locations and Functions
InsideView
BottomView
6
RearView
14 IBM ThinkPad 755CX User's Guide
Page 32

Locations and Functions
Inside View
1 The modem/fax port release
latch releases the modem/fax
port from the computer.
(See page 155.)
2 The removable diskette drive
reads data from or writes data
to a diskette. One 3.5-inch,
1.44MB or 2.88MB diskette
drive can be installed.
The 2.88MB drive supports
the following diskettes (the
formatted capacities are
shown in parentheses):
1MB (720KB), 1.6MB
(1.2MB), 2MB (1.44MB), or
4MB (2.88MB).
The 1.44MB drive supports
the following diskettes:
1MB (720KB) or 2MB
(1.44MB).
(For installing options in the
diskette drive compartment:
see page 150.)
3 The memory slot, which is
under the removable diskette
drive, accepts an IC DRAM
card or a dual inline memory
module (DIMM) adapter with
one or two DIMM memory
options.
(See page 137.)
4 The diskette-eject button
ejects a diskette from the
diskette drive.
5 The battery pack allows you
to operate the computer when
ac power is not available.
(See page 20.)
6 The removable hard disk
drive can be replaced with one
with a different capacity.
(See page 148.)
Rear View
1 The rear door covers the
connectors at the rear of the
computer.
2 The connector door allows
the connection of a cable to
the system-expansion
connector when the rear
door is closed.
3 The power switch turns the
computer on and off.
4 The headphone jack, a
1/8-inch (3.5-mm) diameter
jack, is where you connect a
stereo headphone or external
speakers.
(See page 76.)
5 The microphone/line-in
jack, a 1/8-inch (3.5-mm)
diameter jack, is where a
stereo microphone or
external audio device is
connected.
(See page 76.)
6 The modem/fax port is
where you connect a
telephone connector or
attachment. This is offered
as an option in some
countries.
(For using: see page 76. For
installing: see page 155.)
7 The option cover can be
removed when options are
used in the diskette-drive
compartment.
(See page 153.)
8 The system-expansion
connector is used to
connect the IBM Dock I,
Dock II, or Port Replicator.
(See page 172.)
9 The power shutdown switch
is used to turn the computer off
when the application locks up
or the computer will not accept
any input. Use the tip of a pen
to press this switch.
1 The rear infrared port
(See “Front Infrared Port” on
page 13.)
11 The external-display
connector is where you
connect the signal cable of a
video graphics adapter (VGA),
super video graphics adapter
(SVGA), or compatible display.
(See page 165.)
12 The parallel connector is
where you usually connect a
parallel-printer signal cable.
(See page 164.)
13 The serial connector is where
you connect a 9-pin,
serial-device cable.
14 The power jack is where the
AC Adapter cable is
connected.
Bottom View
1 The locking lever is used with
a chain to lock and prevent the
keyboard from being opened.
It secures the internal devices
under the keyboard.
(See page 130.)
2 The legs are used to adjust
the keyboard angle.
Chapter 2. Getting Familiar with Your Computer 15
Page 33

System-Status Indicators
System-Status Indicators
The system-status indicators show the current status of your
computer by their on or off states or by their colors (green, yellow,
and orange). Each indicator is identified by a symbol.
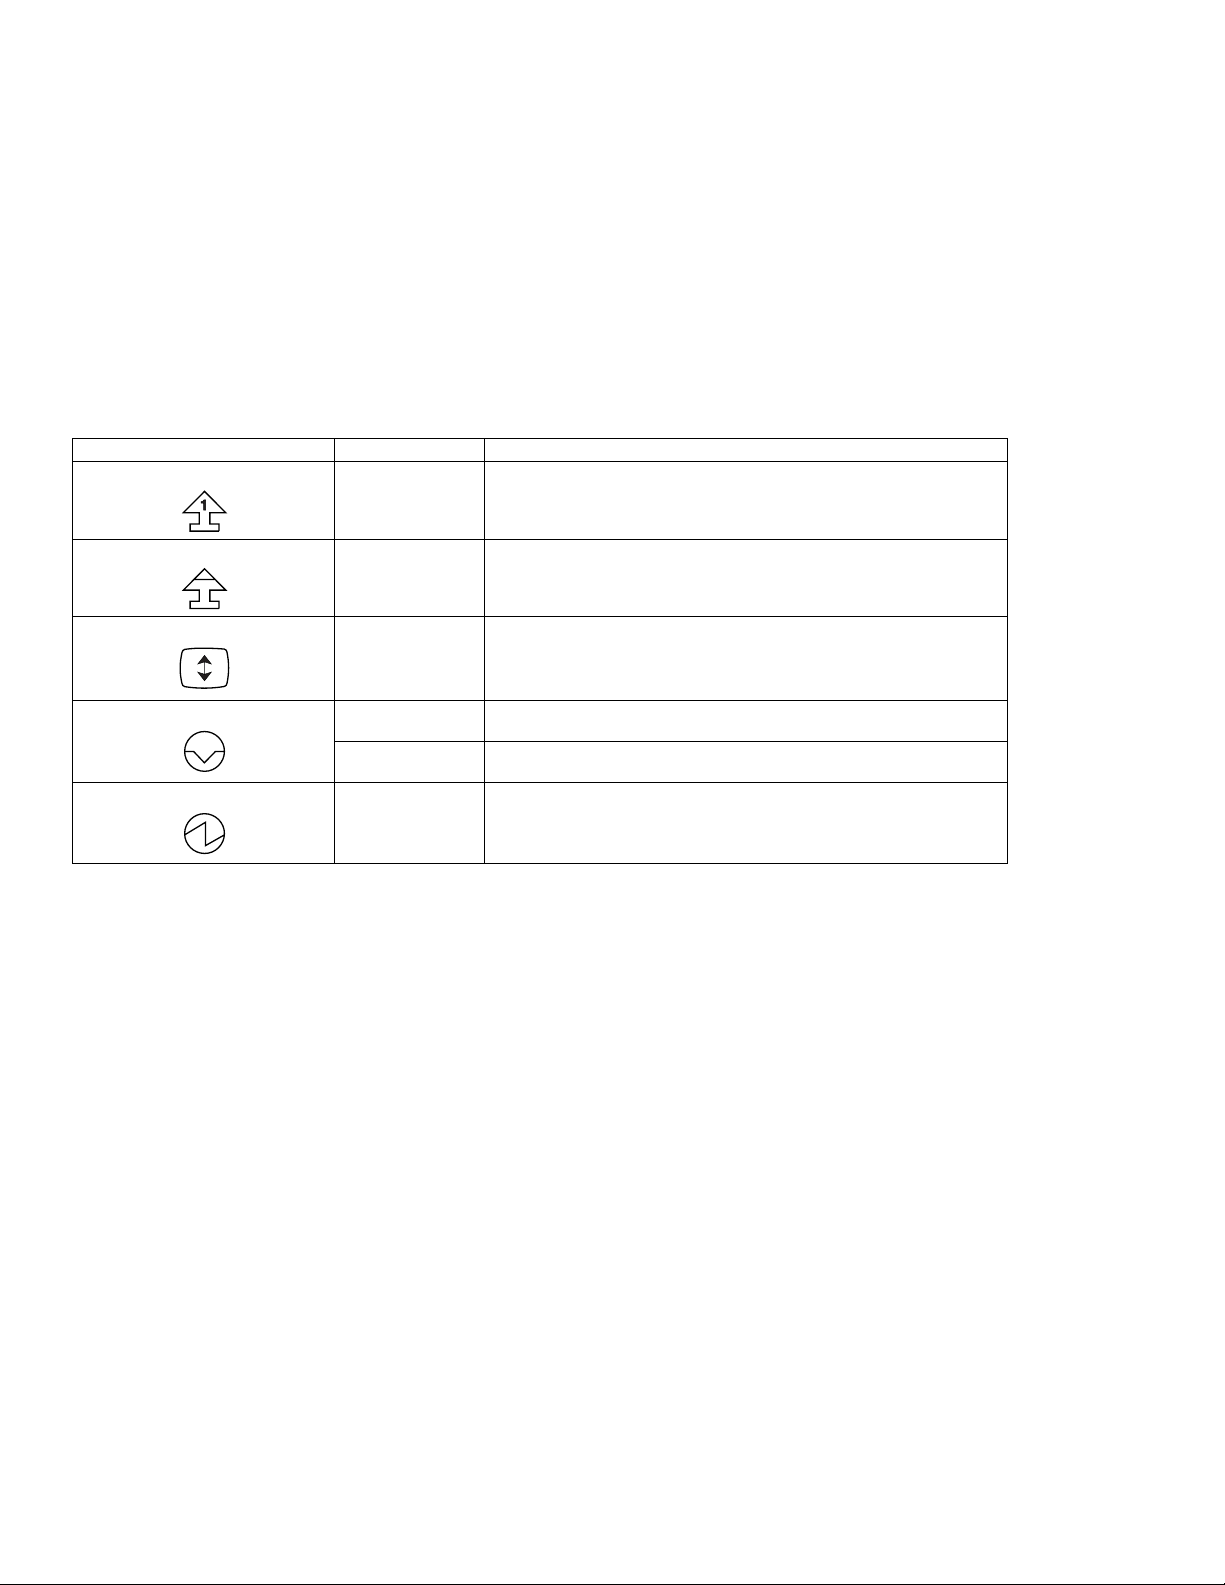
The following figure and table show the location of each symbol and
the meaning of each indicator:
Symbol Color Meaning
1 Speaker Blinking green When enabled by the ThinkPad Features program, this indicator
2 Battery power status Green Shows the condition of the battery pack.
Yellow
Orange
Blinking orange
3 Battery charging Green Indicates that the battery pack is being charged.
Blinking green Indicates that the battery pack is being discharged before being
4 PC card active Orange Turns on when power is supplied to the PCMCIA slot. Refer to the
blinks when the speaker sounds. It turns off when any key is
pressed. (To enable this indicator, see “Using the ThinkPad
Features Program” on page 35.)
Green or yellow Enough power remains for operation.
Orange Some power remains for operation.
Blinking orange The battery pack needs charging.
charged.
PC Card manual to see if the PC Card can be removed without
turning the computer off.
5 Diskette drive in use Orange Turns on when data is read from or written to a diskette. Do not
6 Hard disk in use Orange Turns on when data is read from or written to the hard disk. Do not
enter suspend mode or eject the diskette when this indicator is on.
enter suspend mode or turn off the computer when this indicator is
on.
16 IBM ThinkPad 755CX User's Guide
Page 34
System-Status Indicators
Symbol Color Meaning
7 Numeric lock Green Indicates that the numeric keypad on the keyboard is enabled. The
8 Caps lock Green Indicates that the Caps Lock mode is enabled. All alphabetic
9 Scroll lock Green Alternately turns on and off each time the ScrLk key is pressed.
1 Suspend mode Green Indicates that the computer is in suspend mode. See page 50 for
Blinking green Indicates that the computer is entering suspend or hibernation
11 Power on Green Indicates that the computer is operational. This indicator is on
keypad is enabled and disabled by pressing and holding the Shift
key, and pressing the NumLk key. For more information about the
numeric keypad, see “Operating the Numeric Keypad” on page 26.
characters (A-Z) are entered in capital letters without the use of the
Shift key. The Caps Lock mode is enabled and disabled by
pressing the Caps Lock key.
While this indicator is on, the Arrow keys are used as screen-scroll
function keys. In this state, the cursor cannot be moved with the
Arrow keys. Not all application programs support this function.
more information about suspend mode.
mode, or is resuming normal operation.
when the computer is on and not in suspend mode.
Chapter 2. Getting Familiar with Your Computer 17
Page 35

Providing Power
Providing Power
Note:
When the AC Adapter is connected,
and the remaining power of the
installed battery pack is less than a
certain amount, discharging and
then charging of the battery pack
starts automatically.
Warning:
Always use the AC Adapter
certified by IBM in the country
where you will be using the
computer. Operating the
computer with an incorrect AC
Adapter can cause damage to the
battery pack and to the computer.
Your computer can be operated with the AC Adapter, battery pack,
or Car Battery Adapter (available as an option).
AC Adapter
The AC Adapter is an alternating-current-to-direct-current (ac-to-dc)
converter that supplies power for the computer. The AC Adapter
also charges the battery pack when the battery pack is installed in
the computer. The input rating for the AC Adapter is 100–240 V ac,
50/60 Hz.
CAUTION:
Do not attempt to open the AC Adapter case. The AC Adapter
is permanently sealed and cannot be repaired.
If you turn on the computer when the battery pack is installed, you
will hear a short beep when you connect or disconnect the AC
Adapter from the computer. This short beep means that the power
source has been changed.
When the AC Adapter cable is disconnected from the computer with
a battery pack installed, the LCD brightness decreases slightly to
conserve battery power.
18 IBM ThinkPad 755CX User's Guide
Page 36

Providing Power
To Wrap and Fasten the AC Adapter Cable
When you carry the AC Adapter with your computer, you can
wrap and fasten the cable as follows:
1
1
2
3
Chapter 2. Getting Familiar with Your Computer 19
Page 37

Providing Power
Note:
* The operating time depends on
the options used with the computer,
the frequency of key input,
applications, and the configuration
of the system, so it might be shorter
or longer than the following time.
Battery Pack
The battery pack is an internal power source for the computer when
the AC Adapter is not available. The battery pack can be recharged
with the AC Adapter or the battery charger (available as an option).
Battery packs are shipped from the factory in an almost discharged
state, so you
To operate your computer with the battery pack, see Chapter 4.
You can use the following battery packs for the ThinkPad 755CX.
Lithium Ion Battery Pack
The following table shows the operating time of the computer with a
fully charged lithium ion battery pack:
Model Battery Operating Time
755CX SVGA model 3.0 — 9.0 hours *
755CX VGA model 3.2 — 10.0 hours *
must charge
them before use.
20 IBM ThinkPad 755CX User's Guide
Page 38

Note:
* The operating time depends on
the options used with the computer,
the frequency of key input,
applications, and the configuration
of the system, so it might be shorter
or longer than the following time.
Providing Power
Nickel Metal Hydride Battery Pack
The following table shows the operating time of the computer with a
fully charged nickel metal hydride battery pack (hereafter called
NiMH battery pack
):
Model Battery Operating Time
755CX SVGA model 2.4 — 7.0 hours *
755CX VGA model 2.6 — 8.0 hours *
Before Using the NiMH Battery Pack
This battery pack has an internal microprocessor to send the
battery status to the computer. The
storage switch
1 on the
battery pack sets this microprocessor on or off. When you use
this battery pack for the first time, set the switch to the on ( | )
position.
Do not slide the storage switch to the off position ( O ) after you
set it to the on position at the time of purchase. If you set this
switch to the off position by mistake, slide the switch to the on
position ( | ); then discharge and recharge it to make sure the
microprocessor sends the correct status of the battery to the
computer.
Chapter 2. Getting Familiar with Your Computer 21
Page 39

Providing Power
For Your Information
Standby Battery:
battery, called the
power to save data when a battery pack is replaced during
suspend mode. The standby battery can be replaced only by
your IBM authorized reseller or IBM marketing representative. To
charge the standby battery, connect the AC Adapter to the
computer. When using the computer for the first time, let the
battery charge for at least 8 hours to allow it to become fully
charged.
Car Battery Adapter
The Car Battery Adapter, available as an option, plugs into the
cigarette lighter socket of a car and supplies power to your computer.
See the manual supplied with the Car Battery Adapter for more
information.
Your computer has another rechargeable
standby battery.
It supplies the necessary
22 IBM ThinkPad 755CX User's Guide
Page 40

Operating with the TrackPoint III
Using the TrackPoint III
Note:
No other software is required for the
TrackPoint III; it works with the
PS/2 mouse driver.
The keyboard contains a unique cursor-pointing device called the
TrackPoint III
a single process, without moving your fingers from their typing
position.
The TrackPoint III consists of a stick 1 on the keyboard and a pair
of click buttons 2 below the keyboard. The motion of the cursor
on the screen is controlled by the amount of pressure applied to the
nonslip cap stick in any direction parallel to the keyboard; the stick
does
not
to the amount of pressure on the stick. The function of the click
buttons depends on the software that is used.
. Pointing, selecting, and dragging all become part of
move. The speed at which the cursor moves corresponds
Chapter 2. Getting Familiar with Your Computer 23
Page 41

Using the TrackPoint III
If you are not familiar with the TrackPoint III, these instructions will
help you get started:
Note:
Remember that the stick does not
move, and your finger should not
move on it.
Note:
The mouse cursor may drift in some
computer conditions. It is not a
defect. Do not use the TrackPoint
III until the pointer stops moving.
1
Place your hands in the typing position and press gently
on the stick with either index finger in the direction in
which you want the cursor to move.
Pressing the stick away from you moves the cursor up the
screen; pressing it toward you moves the cursor down the
screen. You can also move the cursor side to side by
pressing sideways.
2
Press the click buttons with either thumb to select and
drag as required by your software, as with any other
pointing device.
Hints and Tips
You can easily drag an item across the screen without constantly
pressing the click buttons of the TrackPoint III. To drag and drop an
object, press the click button and slide it toward the front of the
computer. The click button locks in place; you can now drag the object
across the screen with the TrackPoint III stick without holding down the
click button.
To release the latch, press it from the front side of the click button.
24 IBM ThinkPad 755CX User's Guide
Page 42

Changing the Cap
The cap 1 on the end of the TrackPoint III is removable. You can
replace it with one of the spares shipped with your computer.
Using the TrackPoint III
Chapter 2. Getting Familiar with Your Computer 25
Page 43

Operating the Numeric Keypad
Operating the Numeric Keypad
The keyboard has some keys that, when enabled, work as if they
were a 10-key numeric keypad. (The numeric keypad on the
keyboard is not active when the external numeric keypad is attached
to the computer.)
To enable the numeric keypad, press and hold Shift and then press
NumLk.
NumLk
Note:
The keys are functional, but the
function of the key is not printed on
the keytop.
7 8 9
4 5 6
1 2 3
0
/
*
-
.
+
When the keypad is enabled, press and hold Shift to temporarily
use the cursor- and screen-control keys.
NumLk
End
PgUp
PgDn
/
*
-
DelIns
+
Home
To disable the numeric keypad, press and hold Shift; then press
NumLk again.
26 IBM ThinkPad 755CX User's Guide
Page 44

Using the Display
To attach the external
display:
Page 165.
To change the display mode:
Page 166.
Using the Display
The LCD of your computer supports the following video mode for
each model:
The 755CX SVGA model supports VGA (640-by-480 resolution)
video mode and SVGA (800-by-600) video mode.
The 755CX VGA model supports VGA (640-by-480) video mode
only.
Both models can display the computer output with up to 65536
colors.
When you attach the external display that supports higher resolution
than VGA, you can get a 1024-by-768 resolution video at maximum.
To display the computer output on the external display, you need to
set the
following display modes:
display mode
LCD only:
CRT only
attached external display.
When no external display is attached to the computer, the
output is displayed on the LCD.
Both
the external display.
When no external display is attached to the computer, the
output is displayed only on the LCD.
: The computer output is displayed only on the
: The computer output is displayed on both the LCD and
appropriately. You can select one of the
The computer output is displayed only on the LCD.
Chapter 2. Getting Familiar with Your Computer 27
Page 45

Using the Display
Using a DOS Application with Your 755CX SVGA Model
Note:
* When you select Both, do not
attach the external display that
supports only VGA mode
(640-by-480 resolution). Otherwise,
the screen of the external display is
disordered and the output is not
displayed.
When you use a DOS application that supports only VGA mode
(640-by-480 resolution) with your 755CX SVGA model, the screen
image might appear smaller than the display size shown in the
following table. This is to maintain compatibility with DOS
applications.
Display Mode
Both
LCD only CRT only
640 x 480
640 x 480
On the LCD
640 x 480
On the
external
display *
640 x 480
The screen
image appears
in the center
of LCD and
looks smaller
than the actual
LCD size.
The screen
image is the
same size as
the actual
screen size.
The screen
image appears
in the center
of LCD and
looks smaller
than the actual
LCD size.
—or—
640 x 480
28 IBM ThinkPad 755CX User's Guide
Page 46

Using the Online Book
Using the Online Book
Notes:
The online book is not available
in all countries.
The online book is available
only when the operating system
is installed at the time of
purchase.
OS/2
WIN
DOS
You can view this
the hardcopy book is not available. The
easy way of getting needed information when you are traveling.
User's Guide
online to retrieve information when
online book
provides a very
Starting for OS/2 or Windows
Click on the Online Book icon.
Starting for DOS
1
Type CD\READIBM at the command prompt and press
Enter.
2
Type READIBM and press Enter.
The menu for the online book appears. Choose any subject
from the menu.
Hints and Tips
You can leave a “bookmark” or write notes as you read through the
online book:
To leave the book with a bookmark, select Place closing bookmark
when you exit the online book.
To write notes:
1.
Position the cursor at the place where you want to write a note.
2.
Select Notes from the action bar; then select Create... from the
pull-down menu.
3.
Write any note; then save it.
A symbol (>) is placed next to where you left the note. To read the
note, select Display/Edit... from the Note pull-down menu.
Chapter 2. Getting Familiar with Your Computer 29
Page 47

Keeping the Computer from Being Damaged
Keeping the Computer from Being Damaged
Your computer is a delicate device that requires careful handling. To
keep it from being damaged, keep these precautions in mind:
Do not apply shock to your computer.
Do not place anything heavy on your computer.
Do not pour liquid into your computer.
Do not leave any objects (especially metal objects) in the
computer.
Keep the computer at least 13 cm (5 in.) away from any
electrical appliance that generates a strong magnetic field such
as a motor, magnet, TV, refrigerator, or large audio speakers.
Use your computer when temperatures are between 5°C to 35°C
(41°F to 95°F).
Do not disassemble the computer.
Do not scratch, twist, hit, or push the surface of the LCD.
Remove the battery pack and keep it in a cool place if you will
not be using the computer for a long period of time.
The removable hard disk drive and diskette drive are also very
delicate devices that need careful handling. To avoid damage, do
not press on them, drop them, or apply any shock to them when they
are removed from the computer.
Do not press on the middle part of the diskette drive.
Insert a diskette straight into the diskette drive. Inserting it at an
angle can damage the front of the diskette drive.
Do not place more than one diskette label on a diskette. Two or
more labels can cause a label to tear apart inside the drive and
cause damage to the diskette drive.
Occasionally clean your computer as follows:
Use a soft cloth moistened with nonalkaline detergent to wipe the
exterior of the computer.
Gently wipe the LCD with a dry, soft cloth. Do not use alcohol or
detergent.
30 IBM ThinkPad 755CX User's Guide
Page 48

Carrying the Computer
When carrying your computer, follow these instructions to prevent
possible damage to your computer and data:
Carrying the Computer
Note:
To reduce the weight of the
computer when traveling, remove
the diskette drive if you will not be
using it.
To remove the diskette drive:
Page 150.
1
Remove any diskette from the diskette drive.
2
Turn off all attached devices.
3
Turn off the computer and close the LCD.
4
Unplug all external cables and cords connected to the
computer.
5
Make sure all computer doors and covers are closed.
For Your Information
1.
You should occasionally back up data from the hard disk to
diskettes or tapes.
2.
To use the AC Adapter outside your home country, you need
an ac power cord that is certified for the country you are
visiting. You can purchase one through IBM authorized
reseller or IBM marketing representative in that country. For
information about power cords, see “IBM Power Cords” on
page 252.
3.
A carrying case is available from your IBM authorized reseller
or IBM marketing representative.
Chapter 2. Getting Familiar with Your Computer 31
Page 49

Carrying the Computer
32 IBM ThinkPad 755CX User's Guide
Page 50

Chapter 3. Operating Your Computer
This chapter provides information about the use of your computer.
What Happens When Power Is Turned On? ........... 34
Using the ThinkPad Features Program .............. 35
Using the Program for OS/2 and Windows .......... 36
Using the PS2 Program ..................... 41
Using the Batch File ...................... 41
Using Easy-Setup . . . . . . . . . . . . . . . . . . . . . . . . . . 42
Starting Easy-Setup . . . . . . . . . . . . . . . . . . . . . . . . 42
Selecting Easy-Setup Items ................. 42
Using the Selectable Drive-Startup Sequence ......... 47
Changing the Startup Sequence ............... 47
Using the Fn Key Function ..................... 48
Using Power Management ..................... 50
Standby Mode . . . . . . . . . . . . . . . . . . . . . . . . . . . 52
Suspend Mode . . . . . . . . . . . . . . . . . . . . . . . . . . 53
Safe Suspend . . . . . . . . . . . . . . . . . . . . . . . . . 54
Considerations for Suspend Mode .............. 55
Hibernation Mode . . . . . . . . . . . . . . . . . . . . . . . . . 57
Creating the Hibernation File ................. 59
Considerations for Hibernation Mode ............ 60
Using PC Cards ........................... 61
About PC Cards .......................... 61
Limitations of Operation during Suspend and Hibernation
Modes . . . . . . . . . . . . . . . . . . . . . . . . . . . . . . . 61
Using the PC Card Director Program .............. 62
Understanding the Meaning of Icons ............ 63
Starting PC Card Director for OS/2 ............. 65
Starting PC Card Director for DOS ............. 69
Starting PC Card Director for Windows ........... 70
Using the Infrared Communication Feature ............ 72
Considerations for Communication ............... 74
Using the Mwave DSP Features .................. 75
Using the Audio Function .................... 78
For OS/2 . . . . . . . . . . . . . . . . . . . . . . . . . . . . 78
For DOS . . . . . . . . . . . . . . . . . . . . . . . . . . . . . 79
For Windows or WIN-OS/2 .................. 80
Using the Telephony Function .................. 84
Connecting the Telephone Cable .............. 84
Using the Mwave Modem ................... 85
Mwave Data Modem ...................... 87
Using the Country Selection ................. 88
Mwave Call Discriminator ................... 88
Mwave Fax Modem ...................... 89
Mwave Telephone Answering Machine ........... 90
Copyright IBM Corp. 1995 33
Page 51

What Happens after Power-On?
What Happens When Power Is Turned On?
One of the following prompts appears when the computer is turned on:
An operating system screen appears when the computer is operating
correctly. The screen appearance may differ depending on your operating
system.
An operating system screen
This screen appears when an operating system is not found. It instructs you
to insert a self-starting diskette into the diskette drive and press F1 to start
the diskette. The order in which the computer checks the drives for an
F1
F2
1995
Year
23:59:59
Hour Month Second
.03.31
Month Day
F10
operating system is set in the drive-startup sequence. See “Using the
Selectable Drive-Startup Sequence” on page 47 for more information.
This screen instructs you to set the date and time for the first time. Enter the
date and time (see page 44); then press Enter.
This screen indicates that a failure occurred during the power-on self-test
(POST). See page 207 for the necessary actions.
This icon appears when a power-on password is set. To start the computer,
enter the correct password.
This icon appears when a hard-disk password is set. To unlock the hard disk
drive, enter the correct password.
34 IBM ThinkPad 755CX User's Guide
Page 52

Using the ThinkPad Features Program
Using the ThinkPad Features Program
To install the ThinkPad
Features program:
Page 180.
Power Mode
Settings...
ThinkPad Features is a program that allows you to select various
features for your computer. The following shows the structure of the
ThinkPad Features program:
Power
Device Power
Suspend/Hibernation
ThinkPad Features
XXXXXXX
XXX XXX
Monitor
Display
Device
Driver
Fuel
ThinkPadSetup
SystemInformation
IRQ/DMA/Memory
Assignment
Personalization
Other Devices
Alarm
More...
/Resume Options
The way you start the ThinkPad Features program depends on which
operating system is installed.
Chapter 3. Operating Your Computer 35
Page 53

Using the ThinkPad Features Program
OS/2
WIN
Note:
The screen might be different from
the actual one.
Using the Program for OS/2 and Windows
When you use OS/2 or Windows, a graphical presentation is
available in the ThinkPad Features program.
ThinkPad Features
PC Card Director
Power
Personalization
XXXXXXX
XXX XXX
Display Alarm
?
ThinkPad
Features Help
Hints and Tips
You also can use ThinkPad Features Program through the PS2
program from the DOS full-screen command prompt in OS/2 or
Windows. For more information, see “Using the PS2 Program” on
page 41.
ThinkPad
Setup
Docking
Control
Fuel
?
Docking
Control Help
A Help button is available on most menu screens. For additional
information on each menu item, click on this button.
36 IBM ThinkPad 755CX User's Guide
Page 54

Power Menu
Using the ThinkPad Features Program
Power
Note:
* The values for both High
Performance mode and Automatic
mode are preset and cannot be
changed.
Suspend, hibernation, and
resume functions:
Page 50.
When you select this icon, you can set power-saving options:
Power Mode for battery operation and AC Adapter operation.
You can select one of the following power modes:
Power-Saving
Option
Standby timer 0 0
Suspend timer 60 minutes 15 minutes
Screen off
timer
HDD stop
timer
Processor
speed
High
Performance*
60 minutes 5 minutes
20 minutes 10 minutes
Maximum Automatic
Power Mode
Automatic* Customized
Your choice.
Your choice.
Your choice.
Your choice.
Your choice.
clock control
Customizing power mode
To customize the power mode, such as the processor speed,
select Settings.... The power mode settings window appears
on the screen. The values can be customized for each the
battery-powered operation and the AC Adapter operation.
Power for devices
When you do not use such internal devices as the serial port or
infrared port, you can save power by deleting the X in front of
the device list.
Suspend, hibernation, and resume options
You can select suspend, hibernation, or resume options by
clicking on the More... button.
Chapter 3. Operating Your Computer 37
Page 55

Using the ThinkPad Features Program
Display Menu
Display
Note:
When the color depth is set to
65536 or 32 768, the available
virtual screen size is 800-by-600
resolution at maximum. To get a
virtual screen with a 1024-by-768
resolution, set the color depth to
256.
The display menu allows you to make selections for the computer
display.
Display devices
You can select the LCD, an external display, or both to use with
the computer.
Device driver
You can select display resolution and color depth. You can also
use the following function:
Virtual screen on the LCD and the external display:
When
you are using Windows, the virtual screen function is
available. You can use it to display a part of the
high-resolution screen image that is produced by the
computer. Other parts can be seen by moving the screen
using the TrackPoint III or another pointing device.
755CX SVGA model 755CX VGA model
1024x768
800x600
1024x768
640x480
Monitor
You can select the display type and refresh rate of the external
display.
For more information, see “Attaching an External Display” on
page 165.
Alarm Menu
Alarm
Note:
You can adjust the volume with the
volume control. See page 12.
You can set the speaker to sound when the power status or the
power mode is changed, or when battery power is low. You can
also enable or disable the speaker indicator (see page 16) when the
speaker sounds.
38 IBM ThinkPad 755CX User's Guide
Page 56

ThinkPad Setup Menu
Using the ThinkPad Features Program
ThinkPad
Setup
Note:
You cannot use more than two
serial devices at the same time.
Serial devices include a device
connected to the serial port, a
modem in the diskette drive
compartment, the infrared ports, the
Mwave modem/fax (available as an
option in some countries), and
PCMCIA modem cards.
This menu allows you to view or set the following:
System Info
This shows you the system specifications and assigned
resources (interrupt levels, DMA channel, and memory
assignment) in the system.
Keyboard/Pointing Device
This allows you to enable the TrackPoint III. It also enables the
sticky Fn key function
, so Fn key functions are entered without
your pressing and holding the Fn key.
For Windows users:
You can also select the repeat-action
speed of the keyboard and have a trailing cursor or select the
shape and color of the pointing cursor.
Parallel
This allows you to enable the parallel port, select the port
address (LPT1–LPT3), or set the direction of transfer and
operating mode and view the interrupt levels.
Serial
This allows you to enable the serial port, select the port address
(COM1–COM4), and view the interrupt levels.
DSP
This allows you to enable the DSP device for the Mwave
functions, or view the I/O address, IRQ level, or DMA channel.
Infrared
This allows you to enable the infrared port or set the operating
mode.
Video Controller
This allows you to set the memory address for the video BIOS.
Option Devices
This allows you to set I/O address, IRQ level, DMA channel,
and memory address of the adapter information in the Dock I or
II or other options.
Chapter 3. Operating Your Computer 39
Page 57

Using the ThinkPad Features Program
The Fuel-Gauge program shows you the following battery-power
information:
Fuel
Fuel-Gauge program:
Page 98.
Discharge options
The Personalization Utility program allows you to display personal
data, such as your name and address, on the screen when the
computer is turned on. These appear only when a password is set.
Personalization
Personalization Utility
program:
Page 125.
The Docking Control Utility program allows you to attach the IBM
Dock II to the computer without turning off the power.
Docking
Control
Note:
For more information about the
Docking Control Utility program,
refer to the
Dock II User's Guide
.
Remaining power percentage
Current power mode
40 IBM ThinkPad 755CX User's Guide
Page 58

Using the ThinkPad Features Program
OS/2
DOS
WIN
Note:
To use the PS2 program in OS/2,
you need to install the program
using the same procedure as when
installing for DOS. See page 181.
Note:
The screen might be different from
the actual one.
Note:
Refer to the manuals supplied with
the operating system for more
information on batch files.
Using the PS2 Program
To start the PS2 program, type PS2 or PS2 ? at the command
prompt; the press Enter. The following help screen appears:
C:\> PS2 ?
(C)Copyright IBM Corp. 1993,1995. All rights reserved.
US Government Users Restricted Rights - Use, duplication
or disclosure restricted by GSA ADP Schedule Contract
with IBM Corp.
Command Syntax: PS2 [Parameter1] [Parameter2] [Parameter3]
Following are available [Parameter1].
For the complete command syntax, type 'PS2 ? [Parameter1]'.
1.Power Management related
PMode, SErial, DDC, CARD, DSP,
IR, POwer, LCd, DISK,
SPeed, STandby, DISCHARGE, DEFAULT, Cover,
You can select an item from the menu and follow the instructions on
the screen to set any of the features.
Using the Batch File
You also can specify features by entering appropriate commands, or
you can create a batch file and set your unique operational
environment with the commands.
The following sample batch file would provide an operational
environment suitable for traveling, and could result in a
longer-battery operation time.
@Echo Off
Rem SAMPLE: Set the parameters to provide maximum power utilization.
Rem ================================================================
Chapter 3. Operating Your Computer 41
PS2 PMode Custom > Nul
PS2 LCd 3 minutes > Nul
PS2 DISK 3 minutes > Nul
PS2 POwer 5 minutes > Nul
PS2 SPeed Fixed MIN > Nul
PS2 IR OFf > Nul
PS2 CARD OFf > Nul
PS2 DDC OFf > Nul
Page 59

Using Easy-Setup
Using Easy-Setup
Warning:
Do not enter suspend mode when
using Easy-Setup.
Starting Easy-Setup
Note:
You can change the screen color of
the
Easy-Setup
Ctrl+PgUp or Ctrl+PgDn. Use
Ctrl+Home to restore the original
screen color.
menu with
The computer has a built-in system setup function called
Easy-Setup
passwords, the startup sequence of the drives, and various
hardware configurations, such as keyboard speed and serial- and
parallel-port addresses. Easy-Setup also runs the diagnostics.
To start Easy-Setup, do the following:
1
2
3
. Easy-Setup allows you to set the date and time,
Turn off the computer.
Remove any diskette from the diskette drive.
Press and hold F1; then turn on the computer. Hold F1
until the
Easy-Setup
menu appears.
Easy-Setup
Config
Date/Time
Password
Start
Test
Restart
Selecting Easy-Setup Items
To select an item from the
a pointing device to the item and click on the item or use the
keyboard as follows:
Arrow keys (↑↓←→ ): Highlight the item from the menu.
Spacebar: Selects the item.
Enter key: Enters the next menu, or saves the changes and
exits the menu.
Esc key: Returns to the previous menu, or cancels the
changes.
42 IBM ThinkPad 755CX User's Guide
Easy-Setup
menu, move the pointer with
Page 60

Config
Memory
Keyboard
Serial
Using Easy-Setup
Config contains the following:
SystemBoard
Memory Keyboard S er ia l
Initialize
Exit
Parallel
Memory shows the amount of installed memory and available
memory remaining.
Keyboard enables you to set the repeat-action (typematic) speed
and enables or disables the TrackPoint III.
Serial enables you to select the port address for a serial device
connected to the serial port, or for the internal serial device in the
diskette-drive compartment.
Parallel enables you to select the port address for a device, such
as a printer, that is connected to the parallel connector. When you
Parallel
select Bidirectional, the data transfer between the selected port
and the device is in both directions. When you select
Unidirectional, the data transfer is in only one direction: from the
computer to the device.
SystemBoard provides information about the installed system
board.
System
Board
Initialize sets all items in the Config menu to their original values.
Initialize
Chapter 3. Operating Your Computer 43
After verifying the selections, click on OK or press Enter. To cancel
the selections, press Esc.
Page 61

Using Easy-Setup
Date/Time is used to set the current date and time.
Date/Time
Password
1995
.03.31
23:59:59
Select any field (Year, Month, Date, Hour, Minute, or Second) with
the Arrow key or pointing device; then type or click on the or
icon to change the setting. Clicking on the or icon changes
the setting more quickly.
After verifying the selection, click on OK or press Enter. To cancel
the setting, click on Cancel or press Esc.
Password is used to set:
Power-on password
Hard-disk password
Supervisor password
Power-On Hard-Disk Supervisor
OK Cancel
For more information about the passwords, see Chapter 5.
44 IBM ThinkPad 755CX User's Guide
Page 62
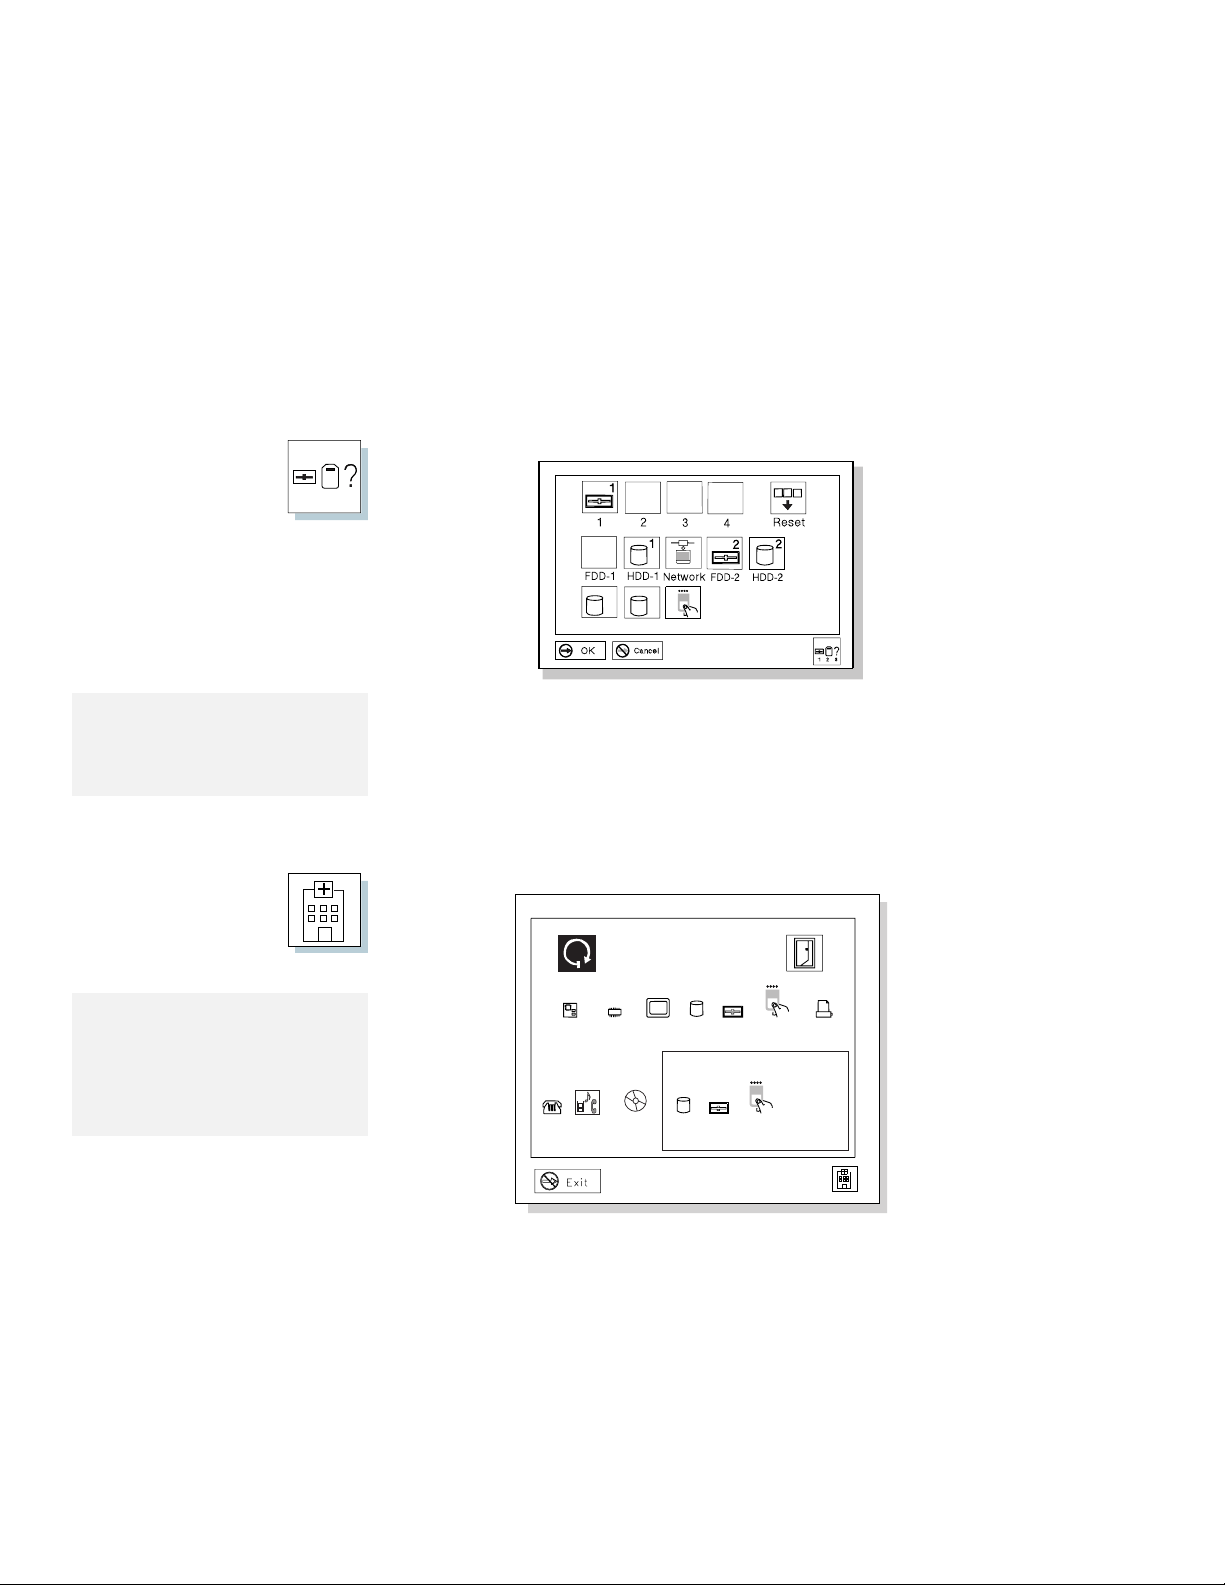
123
Start
Using Easy-Setup
Start up is used to change the startup sequence of your computer.
34
HDD-3 HDD-4
PCMCIA
Note:
For more information about the
startup sequence, see “Using the
Selectable Drive-Startup Sequence”
on page 47.
Test
Note:
The FDD-1 and HDD-1 icons
represent the diskette drive and
hard disk drive of the computer,
respectively. Other numbered icons
are the diskette drive and hard disk
drives of external devices.
The HDD-1 icon represents the internal hard disk drive of the
computer. The other numbered HDD icons are the hard disk drives
of external devices. FDD-1 represents the first diskette drive found
during system startup. When no diskette drive is installed and the
attached expansion unit (Dock I or II) has a diskette drive, the
diskette drive in the Dock I or Dock II will be the first drive.
Select Test to test the computer hardware.
SystemBoard Memory Display
CD-ROMSerial DSP
1
HDD-1 FDD-1
2
HDD-2
FDD-2
2
PCMCIA-1
2
PCMCIA-2
RestartStart
11
Parallel
For more information, see “Testing the Computer” on page 202.
Chapter 3. Operating Your Computer 45
Page 63

Using Easy-Setup
Click on Restart to restart the computer after you have made your
selections. Then press Enter or click on OK.
Restart
46 IBM ThinkPad 755CX User's Guide
Page 64

Using the Selectable Drive-Startup Sequence
Using Easy-Setup
Warning:
If you change your startup
sequence, you must be extremely
careful when you do write
operations (such as copying,
saving, or formatting). Your data
or programs can be overwritten if
you select the wrong drive.
Changing the Startup Sequence
To start Easy-Setup:
Page 42.
Note:
You cannot set a hard disk drive
before the PC Card in the startup
sequence.
Selectable drive startup (
startup sequence of the drives in your computer. The order in
which the computer searches the drives for your operating system is
the
drive-startup sequence
operating systems, you might want to change the drive-startup
sequence to load the operating system from the hard disk or the PC
Card without checking the diskette drive, or to do a remote program
load (RPL).
To change the startup sequence, do the following:
1
Start Easy-Setup and select the Start up icon.
2
Move the cursor to the Reset icon; then press the
selectable boot
. If you are working with multiple
) allows you to control the
Spacebar.
The sequence is reset, and all available device icons appear
at the bottom of the screen. For the meaning of icons, see
page 45.
3
Move the cursor to the icon of the first device for the
startup sequence; then press the Spacebar.
Repeat this step to set the other devices for the startup
sequence. You can set up to four devices.
4
Click on OK or press Enter to save the change.
Chapter 3. Operating Your Computer 47
Page 65

Using the Fn Key Function
Using the Fn Key Function
The Fn key function allows you to change operational features
instantly. When you use the following functions, press and hold the
Fn key 1 ; then press the appropriate function key 2 .
Note:
To use the sticky Fn key function,
select Keyboard/Pointing Device
from the
Setup
menu of the
ThinkPad Features program window
Hints and Tips
Using Sticky Fn Key Function
same effect as when you press and hold the Fn key until you press any
function key.
or PS2 FNS E command.
Key Combination Feature Meaning
Fn
Fn
Fn
Fn
Fn
Fn
Fn
F1
+
F2
+
F3
+
F4
+
F5
+
F6
+
F7
+
Reserved —
Fuel-Gauge
program display on
or off
Standby mode Places the computer in standby mode. For more information about this
Suspend mode Places the computer in suspend mode. For more information about this
Reserved —
Reserved —
LCD/external
display switching
The Fuel-Gauge program must be activated before you can use this key
combination.
When the this key combination is pressed:
mode, see page 52.
mode, See page 53.
Displays the computer output in the following order when an external display
is attached.
External Both
Display
LCD
: Once you press the Fn key, you get the
For OS/2 or Windows users: The window for the battery-power status
appears or disappears. Parameters for power status can be set.
For DOS users: Power status information appears or disappears at the
top-right corner of the screen.
48 IBM ThinkPad 755CX User's Guide
Page 66

Key Combination Feature Meaning
Fn
F8
Reserved —
+
Fn
F9
Reserved —
+
Fn
Reserved —
+
Fn
+
Power mode
switching
When this key combination is pressed during battery-power operation, the
power-management (power-saving) mode changes as follows. See page 37.
High Auto
Customize
The AC mode is used when the AC Adapter is attached. The Fuel-Gauge
program displays the current-power option.
Fn
+
Hibernation mode Places the computer in hibernation mode. See “Hibernation Mode” on
page 57 for more information.
Using the Fn Key Function
Fn
Fn
+
+
PgUp
PgDn
Dock I speaker
volume up
Dock I speaker
volume down
Increases the speaker volume of the Dock I attached to the computer.
Decreases the speaker volume of the Dock I attached to the computer.
Chapter 3. Operating Your Computer 49
Page 67

Using Power Management
Using Power Management
To use the ThinkPad
Features program:
Page 35.
Note:
When installing the operating
system, install the ThinkPad
Features program to use Power
Management.
To install the ThinkPad
Features program:
Page 180.
The computer supports the following power-saving modes as a
built-in power-saving functions:
Operation Mode
You can choose one of the following to operate your computer.
(See page 37 for more information.)
– High Performance
The computer performance is considered first, although
power is automatically saved.
– Automatic
The power-saving parameters are automatically set to save
as much power as possible.
– Customized
You can customize all parameters to save power.
Standby Mode
Enter standby mode for short idle times—for example, when you
are having a short conversation with someone. (See page 52
for more information.)
Suspend Mode
Enter suspend mode for short periods of time away from your
computer. (See page 53 for more information.)
Hibernation Mode
Enter hibernation mode when you leave your office and then
return the following day. (See page 57 for more information.)
In addition to these, you can use the resume function. When
resuming normal operation from one of the power-saving modes
such as standby mode, suspend mode, or hibernation mode, the
computer returns to where it was when it entered the mode.
Because the operating system is already loaded, the resume
function is faster than when turning on power.
A comparison of the power conserved and the time required to return
to operation mode is shown in the following figure:
50 IBM ThinkPad 755CX User's Guide
Page 68
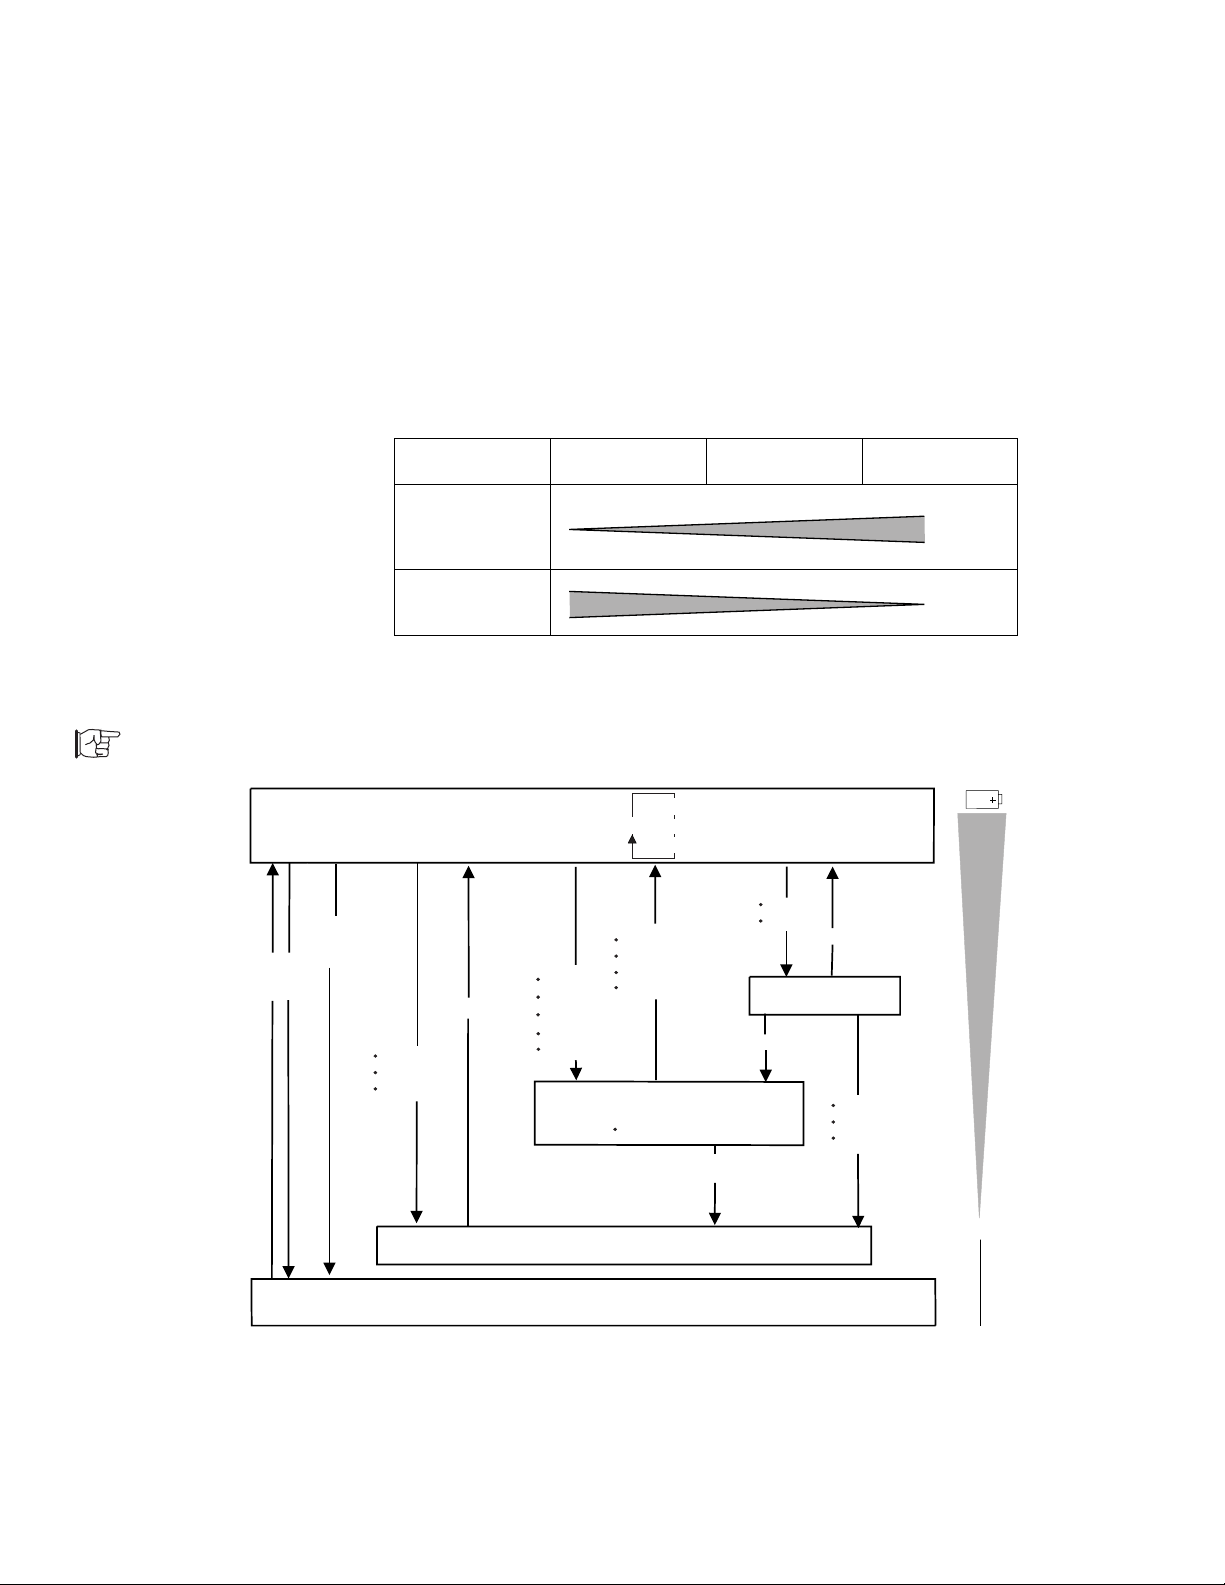
Using Power Management
To set the timer:
Page 35.
Power
Switch
Power
Shutdown
Switch
Power-saving-
modes→
Standby Suspend Hibernation
Time required
to return to
normal
operation.
Amount of
power
consumption.
The following figure shows the operations required when the
computer moves from a power-off condition to an operational mode,
and vice versa. The battery shows the amount of battery power
used in each stage.
High Performance
+
F11
Operation Mode
Power Switch
Fn+F12
Low Battery
Timer
Fn
Fn+F4
Timer
Low Battery
CloseLCD
Open Keyboard
Suspend Mode
Automatic
Customized
Fnkey
Timer
Open LCD
Close Keyboard
Safe Suspend
Timer
Fn+F3
Timer
Anykey
Standby Mode
Fn+F4
Fn+F12
Timer
Low Battery
HibernationMode
0%
Power-off
Chapter 3. Operating Your Computer 51
Page 69

Using Power Management
Standby Mode
In standby mode, the hard disk drive stops and the LCD turns off to
save power. When any key is pressed, the computer immediately
resumes normal operation.
The following shows what causes the computer to enter standby
mode and resume normal operation:
Fn key function:
Page 48.
ThinkPad Features program:
Page 35.
To Standby Mode
Fn+F3 key combination is
pressed.
No activity occurs during
the time specified by the
Standby timer
ThinkPad Features
program.
of the
To Normal Operation
Any key is pressed.
Pointing device activity
occurs.
52 IBM ThinkPad 755CX User's Guide
Page 70

Suspend Mode
Using Power Management
In suspend mode, all tasks are stopped and stored in memory to
save power. When the computer resumes normal operation, the
tasks are automatically restored.
The following shows what causes the computer to enter suspend
mode and to resume normal operation:
Fn key function:
Page 48.
ThinkPad Features program:
Page 35.
PS2 command:
Page 41.
To Suspend Mode
The Fn+F4 key
combination is pressed.
The LCD is closed.
The PS2 command to
enter suspend mode is
used.
The suspend button is
pressed in the
Fuel-Gauge program.
No activity occurs during
the time specified by the
Suspend timer
of the
ThinkPad Features
program.
A low-battery condition is
detected.
The keyboard is opened.
To Normal Operation
The Fn key is pressed.
Any key is pressed when
the AC Adapter is being
used.
The LCD is opened.
The PS2 command to
resume is used.
The Resume on timer
option is set in the
ThinkPad Features
program.
The ring indicator is
received through the
communication interface.
The keyboard is closed.
Chapter 3. Operating Your Computer 53
Page 71

Using Power Management
Safe Suspend
The current status of the computer is shown by the following
indicators:
Indicators
Current Status
Suspend Mode Power-On
In suspend mode Green Off
Entering or resuming
suspend
Normal operation Off Green
Blinking green Off
Warning:
Do not move the computer when
it is entering safe suspend mode.
Note:
Before using safe suspend mode,
you need to create a hibernation
file. See page 59.
ThinkPad Features program:
Page 35.
OS/2
WIN
If battery power is exhausted during suspend mode, the indicated
status before entering suspend mode will be lost. To avoid this, you
can use
computer enters suspend mode the current memory data is stored
on the hard disk, so that you can get the same status after
resuming normal operation. And if battery power is exhausted
during suspend mode, you can get the same status by turning on
the computer. To use this function, do the following:
For OS/2 or Windows:
safe suspend
1
Start the ThinkPad Features program.
2
Select Power; then select the More... button.
3
If a hibernation file has not been created, click the
. In safe suspend mode, whenever the
Enable hibernation button and create the file on the
internal hard disk.
4
Click on the Safe suspend box.
5
Select the OK button.
54 IBM ThinkPad 755CX User's Guide
Page 72

Using Power Management
PS2 command:
Page 41.
DOS
For DOS:
1
If a hibernation file has not been created on the hard
disk, type PS2 HFILE X; then press Enter to create a
hibernation file.
2
Type PS2 SA E at the command prompt; then press
Enter to enter safe suspend mode.
Considerations for Suspend Mode
Consider the following before using suspend mode:
Attached devices, such as a printer or serial device, stop
running when the computer enters suspend mode. When
normal operation is resumed, the output can differ from what
you expect, because the device might be reset or lose its
configuration settings.
When a power-on or hard-disk password is set, you must enter
your password to resume normal operation.
The computer can enter suspend mode when used with the
following operating systems:
– DOS Version 7.0 or later
– OS/2 Version 2.11 or later
– Microsoft Windows Version 3.11 with DOS Version 7.0 or
later
Important
When you use Windows Version 3.11, ensure that Advanced
Power Management (APM) is installed according to the
instructions in “Microsoft Windows Version 3.11 or Later” on
page 177.
Note:
When the computer enters standby
mode, you will hear a beep that is
different from the one that sounds
when entering suspend mode.
Chapter 3. Operating Your Computer 55
When the computer is powered with ac power and is using one
of the following IBM PC Cards, it enters standby mode:
– IBM 3270 Emulation Credit Card Adapter
– IBM 5250 Emulation Credit Card Adapter
– IBM Token-Ring 16/4 Credit Card Adapter
– IBM Credit Card Adapter for Ethernet
When other PC Cards are used, all application programs stop,
and for some of these PC Cards the power to the PC Cards
might also turn off.
Page 73

Using Power Management
When the computer is powered with battery power, it turns
power off to the PC Card, so the duration of suspend mode is
longer. When resuming normal operation, if the PC Card or
computer does not operate, restart the application or computer.
When the computer is using one of the following IBM modem
cards and detects an incoming call while in suspend mode, it
automatically resumes normal operation:
– IBM PCMCIA Data/FAX Modem
– IBM High Speed PCMCIA Data/FAX Modem
While the communication link is active, the computer will not
enter suspend mode.
56 IBM ThinkPad 755CX User's Guide
Page 74

Hibernation Mode
Using Power Management
Note:
Using the Dock I, Dock II or a
particular PC Card disables
hibernation mode.
Note:
The time to enter or exit hibernation
mode depends on the size of
computer memory.
Before using hibernation mode, you must create a
hibernation file
.
See page 59 for instructions.
During hibernation mode, all tasks are stopped, and memory data
and the current status of the computer are stored on the hard disk
drive; then the power is turned off. When power is turned on again,
the computer automatically restores the tasks and resumes normal
operation. No battery power is used when the computer is in
hibernation mode.
It takes approximately 10 seconds to enter hibernation mode, and
18 seconds to resume normal operation (with a base memory of
8MB). When the computer is entering hibernation mode, you
receive a screen message, the computer sounds one short beep,
and the suspend indicator blinks. You also will hear one short beep
when the hibernation process is completed.
Chapter 3. Operating Your Computer 57
Page 75

Using Power Management
The following shows what causes the computer to enter hibernation
mode and to resume normal operation:
Fn key function:
Page 48.
ThinkPad Features program:
Page 35.
PS2 command:
Page 41.
To Hibernation Mode
The Fn+F12 key
combination is pressed.
The PS2 HIB command is
used.
The hibernation button is
pressed in the
Fuel-Gauge program.
The time specified by the
hibernate option after the
expiration of suspend
mode.
No activity occurs during
the time specified by the
Suspend timer
of the
ThinkPad Features
program.
A low-battery condition is
detected.
The power switch is
pressed, when the
Hibernate by power
switch option is set.
To Normal Operation
The power switch is
pressed.
58 IBM ThinkPad 755CX User's Guide
Page 76

Creating the Hibernation File
Using Power Management
Warning:
The hibernation file must not be
created in a compressed data
area of the hard disk or external
drive.
OS/2
To start the ThinkPad
Features Program:
Page 36.
PS2 command:
Page 41.
WIN
DOS
When installing the operating system, or if you have expanded the
computer memory, you must create a hibernation file on the hard
disk drive to use hibernation mode.
The size of the hibernation file will be greater than total memory.
For example, if base memory is 8MB and you have installed an
optional 4MB IC DRAM card, the hibernation file is 13MB: (8MB
plus 4MB) plus 1MB.
The following describes how to create a hibernation file for your
operating system.
For OS/2 or Windows:
1.
Turn on the computer and start the ThinkPad Features program.
2.
Select Power; then select More....
3.
Click on the Enable Hibernation button in the
Suspend Options
menu.
4.
Make sure the hard disk drive in the computer is selected; then
click on the OK button to create the hibernation file.
The computer can now enter hibernation mode.
For DOS:
1.
Turn on the computer.
2.
Type PS2 HFILE C at the command prompt and press Enter.
C can be any drive letter up to Z.
The computer can now enter hibernation mode.
Chapter 3. Operating Your Computer 59
Page 77

Using Power Management
Considerations for Hibernation Mode
Note:
If communication does not restart
automatically, remove the PC Card
and insert it again; then restart the
application or computer.
Consider the following before using hibernation mode:
Do not run any tasks while the hibernation file is being created.
Create the hibernation file only on the hard disk drive installed
in the computer.
The hibernation file is hidden and cannot be accessed.
The computer uses battery power to enter hibernation mode.
Therefore, it reserves some battery power when it is set to enter
hibernation mode at a low-battery condition. This can cause the
battery operating time to be shorter than the time shown on
page 20 and 21.
When the computer is powered with ac power and is using one
of the following IBM PC Cards, it does not enter hibernation
mode:
– IBM PCMCIA Data/FAX Modem
– IBM High Speed PCMCIA Data/FAX Modem
– IBM 3270 Emulation Credit Card Adapter
– IBM 5250 Emulation Credit Card Adapter
– IBM Token-Ring 16/4 Credit Card Adapter
– IBM Credit Card Adapter for Ethernet
This prevents possible problems from occurring with
communication application programs after the computer returns
to normal operation.
When the computer is powered with battery power, it turns
power off to the PC Card. When you resume normal operation,
if the PC Card or computer does not operate, restart the
application or computer.
60 IBM ThinkPad 755CX User's Guide
Page 78

Using PC Cards
Using PC Cards
To insert the PC Card:
Page 134.
About PC Cards
PC Card Director:
Page 62.
Your computer has two slots that allow you to install one or two
credit-card-size PC Cards. With a PC Card, you can communicate
via a network, or you can store data.
The slots conform to PCMCIA Standard Release 2.1 (or later), which
is defined as the hardware layer of the PCMCIA standard. Your
computer comes with the following basic set of device drivers for PC
Card support:
Socket Services Release 2.1
Card Services Release 2.1
PC Card Director
Card Services and Socket Services are the basic drivers required
for all PC Cards. The PC Card Director sets up the PC Cards so
they are ready to be used as soon as you insert them in the
PCMCIA slot of the computer.
The PCMCIA slots support
You can use two Type I or Type II PC Cards or one Type III PC
Card in the PCMCIA slots. However, because the Type III PC Card
is thicker than Type I or Type II PC Cards, you cannot use other
types of PC Cards when using the Type III PC Card. Ask your IBM
authorized reseller or IBM marketing representative for more
information about the different types of PC Cards.
Type I, Type II,
and
Type III
PC Cards.
For more information about PC Cards, see Appendix B.
Limitations of Operation during Suspend and Hibernation
Modes
Suspend mode:
Page 53.
Hibernation mode:
Page 57.
Chapter 3. Operating Your Computer 61
Some PC Cards can be installed or removed without turning off the
computer (refer to the instructions that came with the PC Card), but
you
cannot
Some PC Card types do not support hibernation mode.
remove or install PC Cards during suspend mode.
Page 79

Using PC Cards
Using the PC Card Director Program
Auto Configurator:
Page 231.
To install PC Card Director:
Page 183.
The PC Card Director is an advanced IBM program that makes it
easy to use PC Cards by:
Turning on and setting up a PC Card when you plug it in (by
using
Auto Configurator
program).
Showing what types of PC Cards are in your computer.
Notifying you with a pop-up message, a beep, or icons
whenever a card is inserted or removed.
Allowing you to register an application program for a particular
PC Card and starting the program automatically when the card
is inserted.
PC Card Director is on the PCMCIA Features Diskette and must be
installed before you can use it.
PC Card Director requires the Socket Services and Card Services
drivers.
Note:
The PCMCIA.CRD file does not
always list the latest PC Cards. If
your PC Card is not listed, try using
it with PC Card Director anyway.
Some PC Cards come with their own drivers that will set the cards
up just as PC Card Director does. However, if these cards are
supported by PC Card Director, you will not need their drivers. The
supported PC Cards are listed in the PCMCIA.CRD file on the
PCMCIA Features Diskette.
If your PC Card is not supported by PC Card Director, you must
install the driver that came with your card. The card driver must be
compatible with PCMCIA Card Services Standard, Release 2.0 or
2.1. Follow the instructions in the card driver's manual to install the
driver.
62 IBM ThinkPad 755CX User's Guide
Page 80

Understanding the Meaning of Icons
The PC Card Director uses various icons to show you the status of
the PCMCIA slots and the type of PC Card installed.
A Help button is available on most PC Card Director menu screens.
To obtain additional information for each screen, click on this button.
Status Icons
Icon DOS Message Meaning
Empty No PC Card is installed in the
— A PC Card is installed.
Using PC Cards
slot.
OK
Ready The PC Card in the slot is ready
to be used.
Not Ready The PC Card is not ready and
cannot be used.
Non Removal The PC Card cannot be removed.
Chapter 3. Operating Your Computer 63
Page 81

Using PC Cards
Card-Type Icons
Icon DOS Message Meaning
Memory Memory card
Hard Disk Hard disk card
LAN Communication card
Modem Modem card
DOS
OS2
(Depends on
the type of
your PC Card.)
Boot DOS was booted from the PC
Boot OS/2 was booted from the PC
I/O card
Card that is installed.
Card that is installed.
64 IBM ThinkPad 755CX User's Guide
Page 82

Using PC Cards
OS/2
Starting PC Card Director for OS/2:
Click on the PC Card Director icon on the OS/2 Desktop.
PCCardDirector
The following screen appears. “No. 1” is for the upper PCMCIA
slot, and “No. 2” is for the lower slot.
Descriptions of the icons are on page 63.
PC CardDirector
Options Help
View
PCMCIA Socket-DetailView
No.
Status CardType Card Information
1
2
OK
X:XXXXXXXXXX,XXXXX-XX-XX XX
>
To view the details of a PC Card, select the slot with a pointing
device, or use the Arrow keys and press Enter.
Chapter 3. Operating Your Computer 65
Page 83

Using PC Cards
The following choices appear in the View pull-down menu:
PC CardDirector
Options
View
Details
Icon
Status Card Type
No.
Help
PCMCIA Socket- DetailView
CardInf orm
Details shows the current status of the PCMCIA slots and
provides information about the installed PC Cards.
Icon shows the slot information with the slot number and the PC
Card type. You can minimize the screen and keep it on the
OS/2 Desktop to view the slot information.
PC CardDirector
Options Help
View
1
2
Modem
>
If you select Options, the following choices appear:
PC CardDirector
Options Help
View
Customize...
Register...
No.
Status CardType
PCMCIA Socket- DetailView
Card Inform
Customize... sets beeps on or off or activates pop-up windows
when a PC Card is inserted or removed.
Register... registers, updates, or deletes the PCMCIA
application program installed for the PC Card.
66 IBM ThinkPad 755CX User's Guide
Page 84

Using PC Cards
Register Object
Selectacardtype
Memory
ObjectList
Drag anddropWorkplaceobjectsbelow.
IBMAntiVirus/2
Program
Launch...
Automatically ascard isinserted,
Automatically ascard isready.
Bym anualoperation.
V
OK
Help
Launch
Remove
After you register an application program, you can set it to start
automatically when you insert the PC Card by selecting
Automatically as card is inserted. You can register more than
one application program for a PC Card. When you insert the
card, the application programs are listed on the screen so you
can select the one you want.
Chapter 3. Operating Your Computer 67
Page 85

Using PC Cards
To register a PCMCIA application program, do the following:
1.
Select the type of PC Card on which the application program is
to run.
2.
Type the application name in the Object List box or
drop
the icon of a program in the workplace of the Object List.
Register Object
Select aCardType
Memory
Object List
Drag &DropWorkplaceObjectbelow.
Launch...
Automatically asCard isReady.
Automatically asCard isInserted.
ByManualOperation.
V
drag and
OK
Help
Launch
Remove
3.
Select a choice from the Launch... box to run the application
program automatically or manually.
Help is available on most menu screens for additional information.
68 IBM ThinkPad 755CX User's Guide
Page 86

Using PC Cards
DOS
Starting PC Card Director for DOS
To start PC Card Director, type C:\THINKPAD\EZPLAY at the DOS
prompt; then press Enter. The following screen appears. “Socket
1” is for the upper PCMCIA slot, and “Socket 2” is for the lower one.
(c) Copyright IBM Corp. 1995, Version x.xx
Card Services DOS Card Services Driver, Version x.xx PCMCIA Card Services
Release x.xx Revision x.xx
Socket Information
Socket Status Card Type Card Information
1 Empty
-> 2 Ready Memory x:xxxx xxxx, xxx xx-xx-xx xx
To view more information about an installed PC Card, highlight the
item with the Arrow keys (↑ , ↓ ); then press Enter.
PC Card Director
Chapter 3. Operating Your Computer 69
Page 87

Using PC Cards
WIN
Note:
PC Card Director for Windows runs
only in Enhanced mode of Windows
3.11 or later version.
Starting PC Card Director for Windows
Select PC Card Director in the ThinkPad window.
ThinkPad Features
PC Card Director
Power
Personalization
XXXXXXX
XXX XXX
Display Alarm
?
ThinkPad
Features Help
The following screen appears. “No. 1” is for the upper PCMCIA
slot, and “No. 2” is for the lower one.
PC CardDirector
Options Help
PC CardsSummary
No.
Status
Card Type
Card Information
ThinkPad
Setup
Docking
Control
Fuel
?
Docking
Control Help
1
Empty
OK
2
Ready Memory
Card Info...
X:XXXXX XXXXX, XXXXX-XX-XX XX
Appl.R egister...
PCCard Director
Card Info... shows details of a PC Card installed in a PCMCIA
slot. To view information about a PC Card, highlight the item
with the Arrow keys (↑ , ↓ ) or pointing device; then click on this
button. You also can register a PC Card type, when a card type
appears as unknown.
Appl. Register... registers, changes, or deletes a PC Card
application program. An application can run automatically
according to the PC Card type, if you specify the Run Automatic
70 IBM ThinkPad 755CX User's Guide
Page 88

Using PC Cards
option. If you register more than one application for each type of
PC Card, select the application you want to run from the list that
appears when the PC Card is installed.
If you select Options from the menu bar, the following choices
appear:
Options Help
Customize...
Register...
Customize... sets beeps on or off or activates pop-up windows
when the details of an installed PC Card change. It also sets
whether a single icon or multiple icons are used when the PC Card
Director screen is minimized. The following shows the two types of
minimized PC Card Director icons:
Single icon
This icon temporarily changes when a PC
Card is removed or installed if the Pop up
Main Window option is not specified.
PC CardDirector
Multiple icons
1
2
These icons show the card status of both PC
Cards installed in the slots.
The icon for each slot temporarily changes
PC CardDirector
when a PC Card is removed or inserted if
the Pop up Main Window option is not
specified.
Register... does the following:
Register Applications
registers, changes, or deletes an
application program according to the PC Card type, even when a
PC Card is not installed in the slot.
Change Card Type
changes a registered PC Card type to
another type.
Help is available on most menu screens for additional information.
Chapter 3. Operating Your Computer 71
Page 89

Communicating with the Infrared Port
Using the Infrared Communication Feature
Note:
When installing an operating
system, you must install the infrared
device driver to use the ThinkPad
mode.
To install infrared device
driver:
Page 196.
Notes:
Mbps
: Million bits per second
Kbps
: Kilobits per second
PS2 command:
Page 41.
Your computer is equipped with an infrared (IR) communication
feature that allows point-to-point communication with other ThinkPad
computers or systems equipped with an infrared port. The
computer has two infrared ports, one in the front of the computer
below the diskette drive and another on the rear of the computer.
The infrared feature supports three modes with the following
communication speed in bits per second (bps):
ThinkPad (1.15 Mbps)
This mode is used when communicating with another 755
series computer with an infrared port or other systems
supporting ThinkPad mode.
Generic (up to 115 Kbps)
This mode is used when communicating with other IBM
ThinkPad computers, Hewlett-Packard** 100LX**, 200LX**,
Omnibook**, or other systems with infrared ports supporting
Generic mode.
Sharp (9600 bps)
This mode is used when communicating with the Sharp**
Wizard** or other systems with infrared ports supporting
Sharp mode.
The ThinkPad Features program contains a utility program that
enables the front or rear infrared port and the communication speed.
If you are using OS/2 or Windows: See page 39.
If you are using DOS: Type PS2 ? IR at the command prompt;
then press Enter for more information.
72 IBM ThinkPad 755CX User's Guide
Page 90

Communicating with the Infrared Port
During communication with rear infrared ports, the infrared ports
must face directly with each other at a communicating distance.
It is recommended that the communicating ThinkPad computers
use their rear infrared port to communicate with each other.
When communicating between a front infrared port and an
infrared port on another computer, the infrared ports on the
computers must face directly each other at a communicating
distance.
Chapter 3. Operating Your Computer 73
Page 91
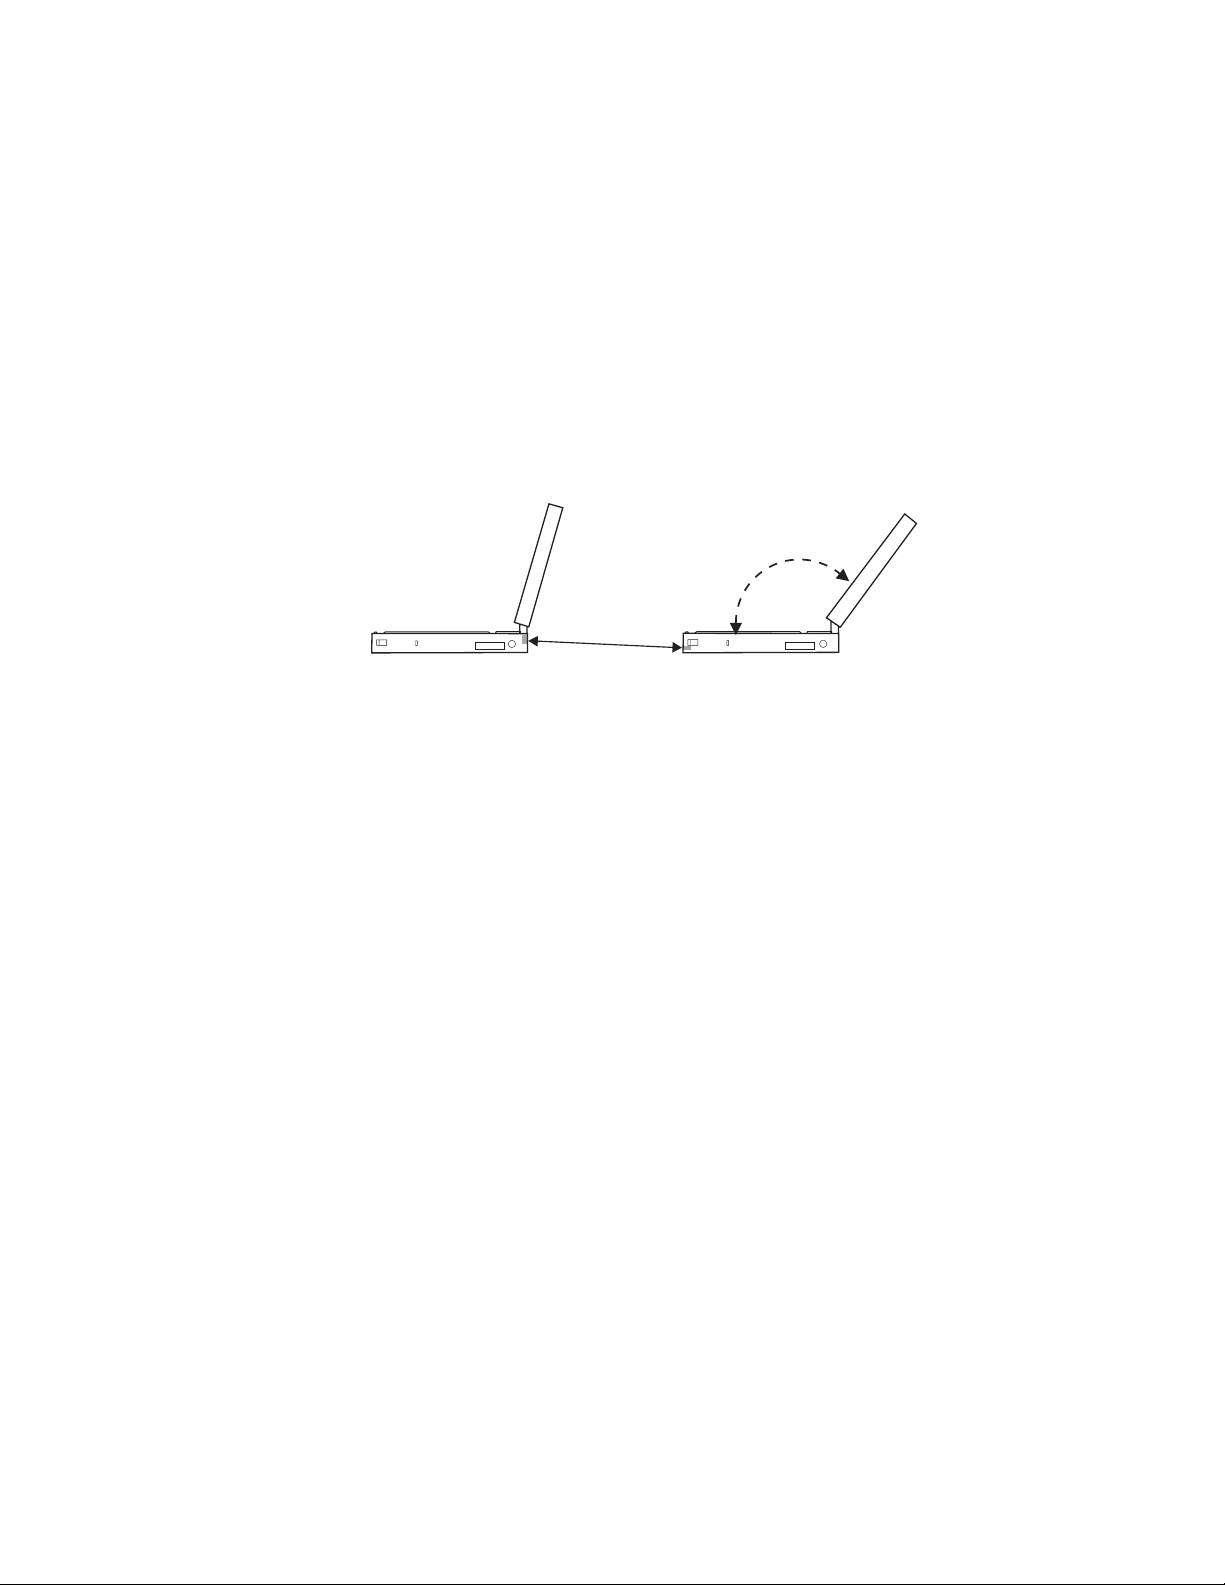
Communicating with the Infrared Port
Communication can be affected by the light from the LCD of the
computer. To avoid this, open the LCD of the computer to a wide
angle:
Considerations for Communication
Consider the following when communicating with the infrared ports.
Side View
You need to run the same communication application to
communicate between your computer and the other computer or
device. Refer to the application manuals for more information.
Run only one application at a time to communicate with the
infrared ports.
When using applications that use a conventional serial port and
serial cable to exchange data, your computer infrared ports are
used as a replacement for the serial port and cable. In this
case, the ThinkPad mode cannot be used.
The communicating distance might be less if:
– The other system is not the same model as your computer.
– There is interference from the ambient light. It is
recommended not to use infrared communication during
bright sunshine or artificial light conditions.
– The infrared port is not directly facing the other
communicating port.
74 IBM ThinkPad 755CX User's Guide
Page 92

Using the Mwave DSP Features
Using the Mwave DSP Audio Features
Note:
In some countries, the Mwave
telephony functions are available
only after the DAA/Telephony Kit
option is installed.
Note:
You can use an electric condenser
microphone (with battery) for sound
recording.
Note:
For more information about MIDI,
see “Mwave MIDI Overview” on
page 244.
The computer provides an Mwave system, which is based on the
digital signal processor (DSP).
It gives you the best performance
when you use it for audio and telephony functions, and it supports a
more natural way of communicating with your computer.
The Mwave DSP system supports a full complement of audio and
telephony functions including the following:
Audio functions:
– Supports the wave audio record and playback up to 16-bit,
stereo and 44 kHz sampling
– Provides a high-quality MIDI wave table synthesizer with
128 instruments and up to 32 voices
– Supports DOS games by using the Sound Blaster**
interface
Telephony functions:
– Supports data modem up to 14 400 bps
– Supports fax modem up to 14 400 bps
– Supports speaker phone function
– Supports telephone answering machine function
Chapter 3. Operating Your Computer 75
Page 93

Using the Mwave DSP Audio Features
Note:
In some countries, the Mwave
telephony functions are available
after the DAA/Telephony Kit option
is installed.
Headphone
Jack
Headset
The following shows the connection between the computer and the
external cables or devices:
Microphone/Line-in
Jack
Modem/Fax Port
Headphone
Jack
Microphone/Line-in
Jack
Modem/Fax Port
WhentheDAA/TelephonyOptionKitisinstalled:
Microphone/Line-in
Jack
Modem/Fax Port
Note:
The headset is available as an option
in some countries.
Headphone
Jack
Data Access
Arrangement
76 IBM ThinkPad 755CX User's Guide
Page 94

Using the Mwave DSP Audio Features
To install the Mwave DSP
support software:
Page 192.
OS/2
DOS
WIN
The Mwave DSP supports the following functions for each operating
system.
For OS/2:
– Wave audio record and playback
– MIDI synthesizer
– Sound Blaster support in the DOS session
– Data modem
For DOS:
– Sound Blaster support
– Data modem
For Windows:
– Wave audio record and playback
– MIDI synthesizer
– Sound Blaster support in the DOS session
– Data modem
– Fax modem
– Speaker phone
– Telephone answering machine
Chapter 3. Operating Your Computer 77
Page 95

Using the Mwave DSP Audio Features
Using the Audio Function
Use the Mwave audio functions according to your operating system.
OS/2
For OS/2
The Mwave feature supports the audio function in the OS/2
environment through Multimedia Presentation Manager/2 (MMPM/2).
To use the Mwave audio functions with OS/2, refer to the MMPM/2
manuals.
For Your Information
To play the audio files in the MMPM/2 environment:
When you play the wave audio files, select the Digital
Audio icon.
When you play the MIDI sequencer files, select the MIDI
icon.
78 IBM ThinkPad 755CX User's Guide
Page 96

Using the Mwave DSP Audio Features
DOS
Note:
If you have exited Windows and
returned to DOS, you might have to
run MWGAMES ON again to enable
the Sound Blaster support.
For DOS
The Mwave feature supports the audio for DOS games through the
Sound Blaster
To enable Sound Blaster support for DOS games:
To disable the Sound Blaster support for DOS games:
Creating a Boot Diskette
To have enough memory for your games, you should make a
diskette
do the following:
1.
Turn on the computer and start DOS.
2.
Insert a blank diskette into the diskette drive.
3.
Type MAKEBOOT at the DOS prompt; then press Enter.
A boot diskette has started to be created. Before starting your
games, restart your computer with this boot diskette inserted
into the diskette drive.
Some sample files, such as CONFIG.SYS file, will be created on the
boot diskette. You might need to modify these files by referring to
the manuals that came with your game.
support.
Type MWGAMES ON at the DOS prompt; then press
Enter.
Type MWGAMES OFF at the DOS prompt; then press
Enter.
boot
before starting the DOS games. To make a boot diskette,
Default Values for DOS Games Audio
Most games automatically determine the I/O address, interrupt level
(IRQ), and DMA channel settings for the audio for DOS games. If
the game asks for this information, specify the default settings of the
Sound Blaster as follows:
I/O Address 220
Interrupt Level (IRQ) 5
DMA Channel 1
PS2 command:
Page 41.
ThinkPad Features setup
menu:
Page 39.
Chapter 3. Operating Your Computer 79
If you need to change these settings, do the following:
For DOS, use the PS2 command (PS2 SB command).
For the DOS session of OS/2 and Windows, select DSP from
the ThinkPad Setup window.
Page 97

Using the Mwave DSP Audio Features
WIN
Note:
To use the Mwave audio features in
WIN-OS/2, install the Mwave DSP
support software for Windows in the
full-screen WIN-OS/2 session.
To install Mwave support
software:
Page 195.
Recorder
For Windows or WIN-OS/2
To use Mwave audio functions in Windows or WIN-OS/2,
double-click on the Mwave ThinkPad icon in the Windows Program
Manager.
A window similar to the following appears:
Mwave ThinkPad
FAX
Modem
Modem 14400
Recorder Audio C ontrol
Discriminator
Country
Selection
MIDI
Select
Synthesizer
Record and Playback the Wave Audio Files
When you double-click on the Recorder icon, the following window
appears:
Mwave Recorder
File Edit Options Help
Mono 11.025 kHz 8 Bit 0 bytes
Position: 00:00.00 Length: 00:00.00
Marker A ClearA MarkerB ClearB
Command
Reference
View
Connectors
Record Play Rewind Fast-F Stop
This window allows you to record and playback the wave audio files.
Note:
You can use an electric condenser
microphone (with battery) for sound
recording.
This window is similar to the
Windows Sound Recorder
, which
provides wave recording and playback functions; however, this
window has additional features for controlling the record quality and
file size.
80 IBM ThinkPad 755CX User's Guide
Page 98

Audio Control
Using the Mwave DSP Audio Features
Audio Control
When you double-click on the Audio Control icon, the following
window appears:
Mwave AudioControl
Record Control Output Control
Source
Mic
Line
CD+Line
Level Aux
MIDISynth
Wave Audio Master
Audio
Options..
LR
Mute Mute
LR
LR
Mute
LR
Mute
LR
Mute
This window allows you to control the audio volume as follows:
Record control
This section enables you to select which source you want to
use, adjust the record level, monitor the input signal, and select
an options menu for additional control.
Output control
This section allows you to adjust the balance and sound levels,
and control the mute. And, it can be considered a stereo
amplifier with three input signals, controls to mix the input
signals, and a volume control for the output.
Audio button
This is used to enable the following audio features:
– Audio/Image Synch in the Options menu
– Aux Source
Important
Disable the Audio button before you use a speaker phone
application.
If the Audio button is enabled, the speaker phone
application does not operate correctly and displays an error
message on the screen.
Chapter 3. Operating Your Computer 81
Page 99

Using the Mwave DSP Audio Features
Note:
Selecting the Audio/Image Synch
on the
Options
response speed; however, the
increase in DSP resources can
effect your ability to concurrently
use some Mwave applications.
Note:
If you enable Aux Source, the
computer will consume more battery
power. Disable Aux Source when
you do not use it.
Note:
When you play the MIDI files in the
WIN-OS/2 environment, see
“Considerations for the WIN-OS/2
Environment” on page 83.
menu improves the
Options button
– Audio Mode
If you are using some applications with sounds and
animation (for example, games or screen saver programs),
try this option to make the application work more quickly.
– Aux Source
Select the source you want to listen to by the computer
speaker or headphones.
Playing the MIDI Sequencer Files
To play the MIDI sequencer files in Windows, use the Windows
Media Player as follows:
1
Start Windows; then open the Accessories group.
2
Double-click on the Media Player icon.
3
When the Media Player window appears, select the
Device on the menu bar; then select MIDI Sequencer...
from the pull-down menu.
MediaPlayer
File Device Scale Help
Sound...
MIDISequencer...
4
Click on the File on the menu bar; then select Open...
from the pull-down menu.
5
Highlight your favorite MIDI file with your pointing
device; then click on OK.
6
To begin playing the MIDI file, click on the Play ( )
button.
82 IBM ThinkPad 755CX User's Guide
Page 100

Note:
When you use wave audio and
at the same time, select 24 voices
(the default value).
Note:
Volume of the Sound Blaster sound
can be controlled by using the
following key combinations:
Ctrl+Alt+U (volume up) and
Ctrl+Alt+D (volume down).
Aux
Using the Mwave DSP Audio Features
Select Synthesizer
MIDI
When you select the
icon in the
Mwave ThinkPad
window,
you can change the number of voices supported by the MIDI
synthesizer.
Sound Blaster support
For Windows, Mwave supports the Sound Blaster support in a DOS
session. It is not necessary to type MWGAMES ON to enable the
support, this is done automatically. Simply open a DOS session
and start the game.
Considerations for the WIN-OS/2 Environment
Note:
When you use the WIN-OS/2
environment, see “For Windows or
WIN-OS/2” on page 80.
The following are considerations when playing MIDI files in the
WIN-OS/2 environment.
To play MIDI files in the WIN-OS/2 environment
Desktop
, the Audio Mode in the
Mwave Audio Options
from the OS/2
menu
must be set to Normal (not Audio/Image Synch).
The MWS.EXE program must be running in the same session
as the program that runs the MIDI file. If you use multiple
WIN-OS/2 sessions, MWS.EXE must be started in each
session. To run MWS.EXE, migrate it to the OS/2 Desktop and
start it before starting the MIDI application programs. To
migrate MWS.EXE to the OS/2 Desktop, refer to the OS/2
manuals.
Chapter 3. Operating Your Computer 83
 Loading...