

Page 1

Please check out our eBay auctions for more great
deals on Factory Service Manuals:
Page 2

i
Page 3

Note
Before using this information and the product it supports, be sure to read the general information under Notices on
page E-1.
First Edition (August 1997)
This publication could include technical inaccuracies or typographical errors. Changes are periodically made to the information herein;
these changes will be incorporated in new editions of the publication. IBM may make improvements or changes in the products or the
programs described in this publication at any time.
It is possible that this publication may contain reference to, or information about, IBM products (machines and programs), programming,
or services that are not announced in your country. Such references or information must not be construed to mean that IBM intends to
announce such IBM products, programming, or services in your country.
Requests for technical information about IBM products should be made to your IBM Authorized Dealer or your IBM Marketing
Representative.
No part of this publication may be reporduced or distributed in any form or by any means without prior permission in writing from the
International Business Corporation.
© Copyright International Business Machines Corporation 1997. All rights reserved.
ii
Page 4

Thank You for Selecting
an IBM ThinkPad 310E or 310ED Computer
The IBM ThinkPad 310E or 310ED computer
is designed to be convenient for
your mobile computing needs.
We hope you enjoy its fast processing power,
brilliant and colorful DSTN or TFT LCD display,
and multimedia capabilities.
iii
Page 5
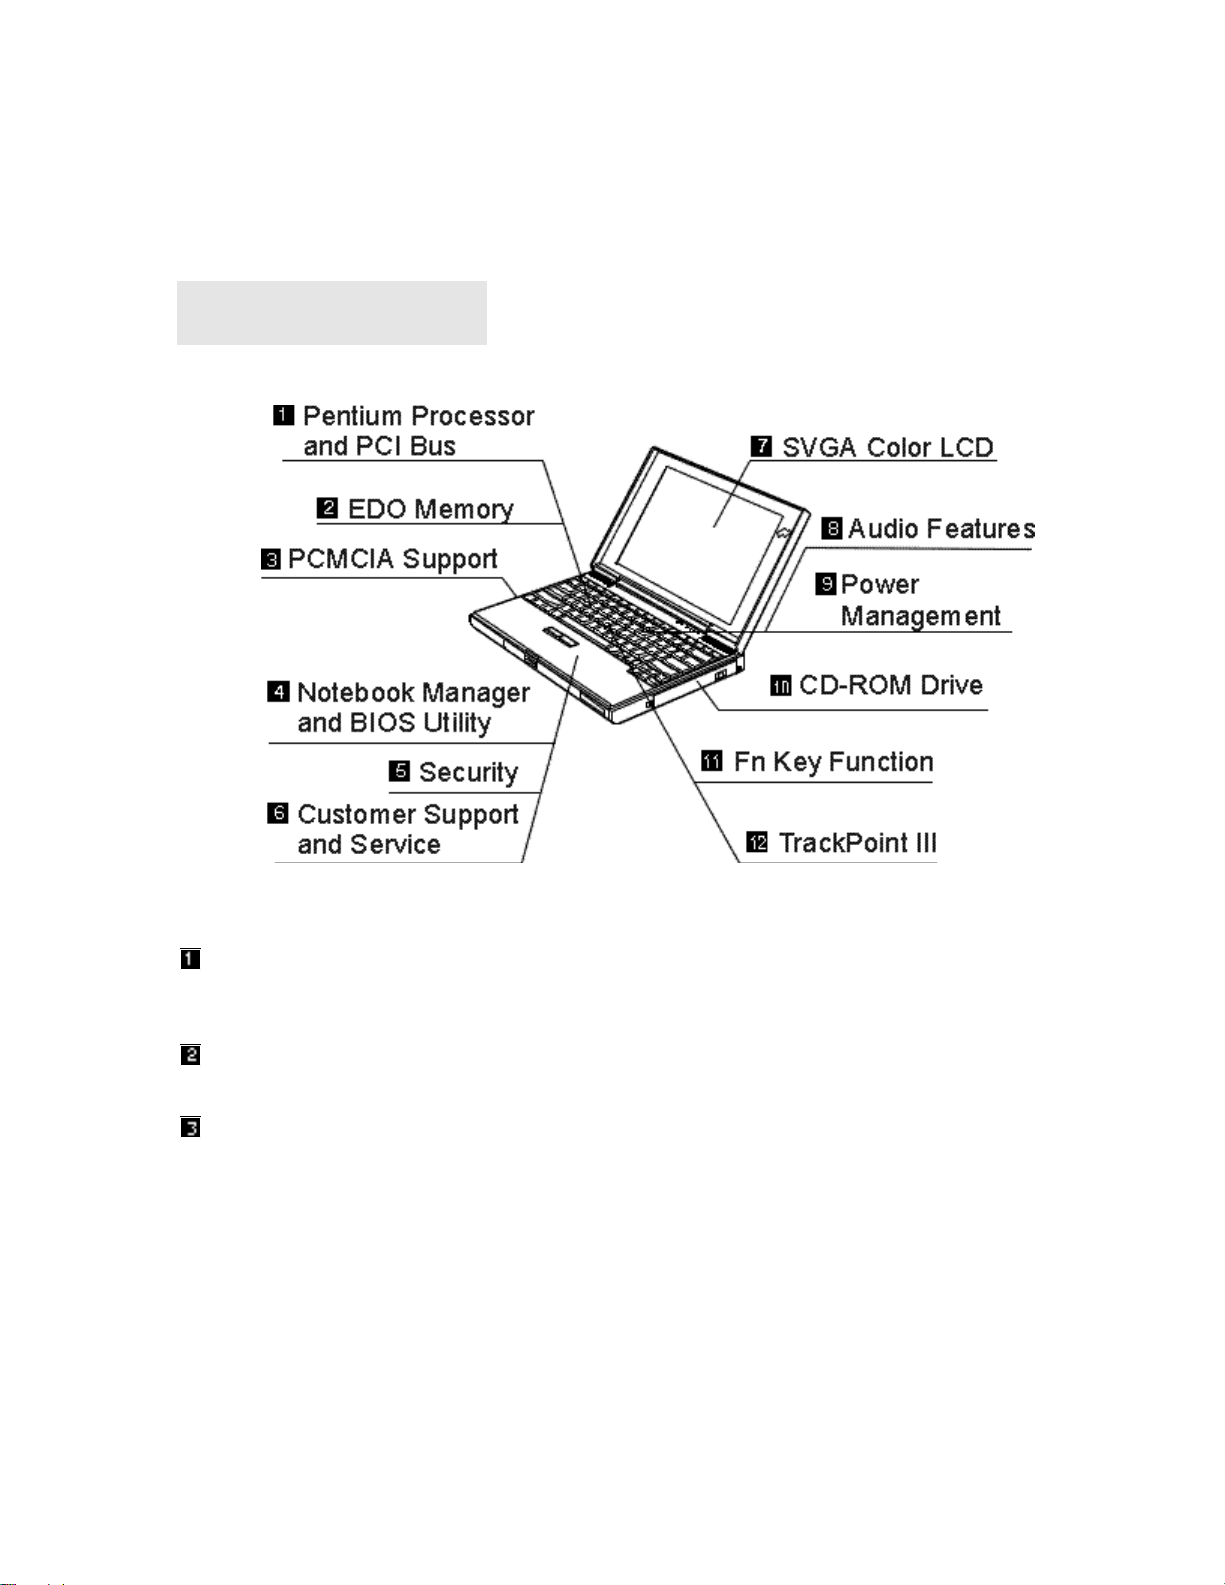
Distinctive System Features
Note:
Not all models support all the
features shown here.
The following are the distinctive system features of the IBM
ThinkPad 310E or 310ED computer:
Pentium Processor and PCI Bus.
The fast Intel** Pentium** processor with MMX** technology and PCI bus combine to give your
computer optimal speed and performance.
EDO Memory.
The built-in extended data out (EDO) memory chip enhances performance with fast memory access.
PCMCIA** Support: + Page 3-18.
The computer provides two Personal Computer Memory Card International Association (PCMCIA)
slots. PCMCIA software also is provided so that you can use PC Cards more easily and
conveniently.
iv
Page 6

Notebook Manager: + Page 3-3.
The Notebook Manager program allows you to set various parameters by using a graphical user
interface.
BIOS Utility: + Page C-1.
The built-in BIOS Utility let you configure hardware settings for your computer.
Security: + Page 5-1.
The computer provides security passwords for the computer. Locking capability is provided for the
computer. Personalization is also provided to make it easy to identify your computer.
Customer Support and Service: + Page 8-13.
Comprehensive service and support packages for your IBM ThinkPad 310E or 310ED computer are
available in most countries.
SVGA Color LCD: + Page 3-13.
The DSTN (dual-scan super-twisted nematic) display models offer 256 colors at 800-by-600 SVGA
resolution. The TFT (thin-film transistor) display models offer 65,536 colors at 800-by-600
resolution.
Audio Features: + Page 3-20.
The system-integrated Yamaha** Sound Chip provides stereo business audio (8 bit to 16 bit) with
Sound Blaster** Pro compatibility.
Power Management: + Page 4-12.
Power Management sets the computer to different modes to save battery power when you are not
using the full power of your computer. It also provides a resume function, which quickly returns you
to where you left off.
CD-ROM Drive: + Page 3-22.
The built-in CD-ROM model affords access to large databases and multimedia applications. It can
even play your favorite music CDs.
Fn Key Functions: + Page 2-13.
The combination of this Fn key with a function key is used to control display modes and battery
power-saving modes.
TrackPoint III: + Page 2-10.
Pointing and selecting all become part of a single process with no need to lift your hands from the
keyboard with the TrackPoint III.
v
Page 7

About This Book
Note:
The illustrations in this book may be
slightly different from your computer.
Be sure to read Chapter 1 and
Chapter 2 before using the computer.
Read the following chapters
whenever you need to.
This book contains information that will help you operate the IBM
ThinkPad 310E or 310ED computer (hereafter called the 310E,
310ED, or computer).
Chapter 1, “Getting Started,” provides information about how to
set up your computer.
Chapter 2, “Getting Familiar with Your Computer,” acquaints
you with the basic features of your computer.
Chapter 3, “Operating Your Computer,” provides information on
using your computer’s different features.
Chapter 4, “Using Battery Power,” provides power management
information and describes how to operate your computer with the
battery pack.
Chapter 5, “Protecting Your Computer,” provides information for
protecting your computer and internal devices.
Chapter 6, “Installing and Removing Options,” describes how to
install or remove IBM options.
Chapter 7, “Installing Software,” provides procedures for
installing operating systems and device drivers in your computer.
vi
Chapter 8, “Solving Computer Problems,” describes what to do
when you have a computer problem.
Appendix A, “Avoiding Hardware Conflicts,” lists some steps you
can take to avoid problems when you add or remove options.
Appendix B, “Advanced Information for PC Cards,” provides
additional information when using PC Cards.
Appendix C, “BIOS Utility,” describes how to use the BIOS utility.
Page 8
Appendix D, “Features and Specifications,” describes the
features and specifications associated with your computer.
Appendix E, “Product Warranties and Notices,” contains the
warranty statements for your computer and notices for this book.
This book also includes a glossary, for the meaning of terms and
acronyms used in this book, and an index.
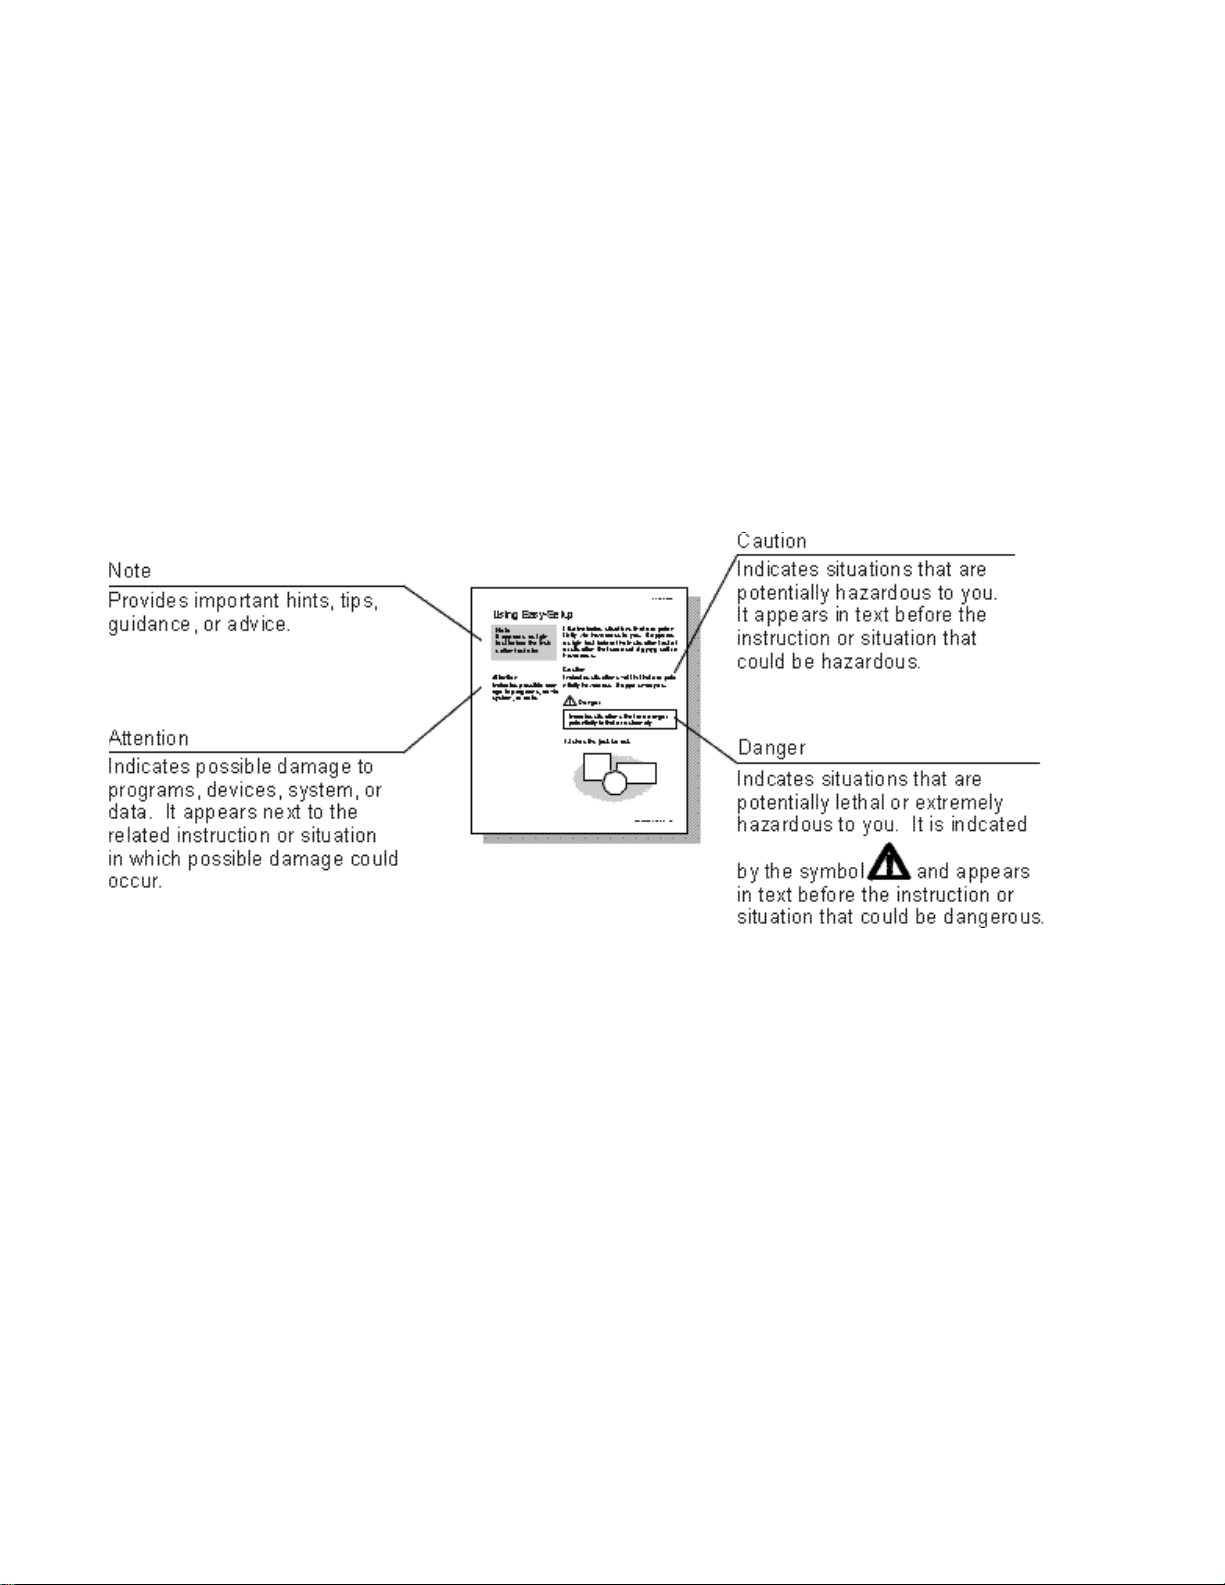
Information Notices
This book contains notices that relate to specific information or text.
vii
Page 9
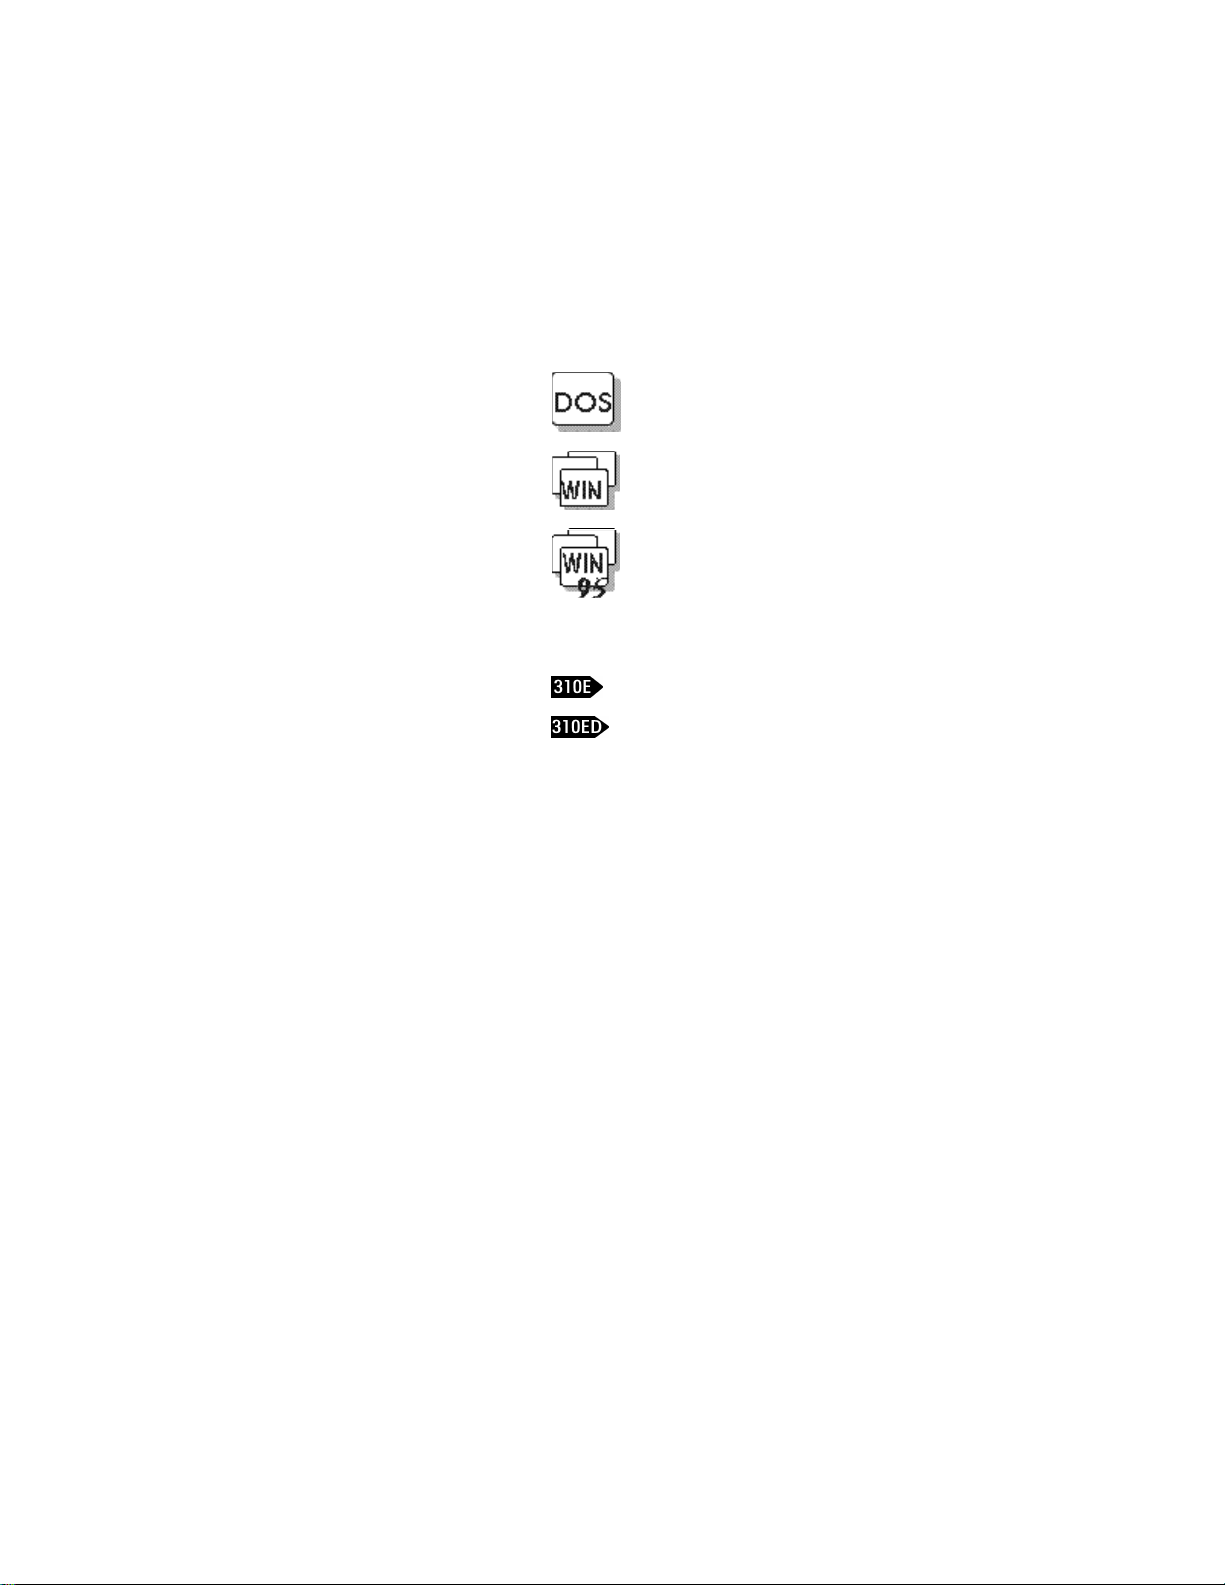
Treatment of Icons
This book contains the following icons (symbols):
• For procedures or information unique to the operating system
installed in your computer:
Information for IBM DOS users.
Information for Microsoft Windows Version 3.11 users.
Information for Microsoft Windows 95 users.
• For procedures or information unique to the computer model or
type:
Information only for 310E models.
Information only for 310ED models.
• For information referred to:
+
Where to go for more information
viii
Page 10
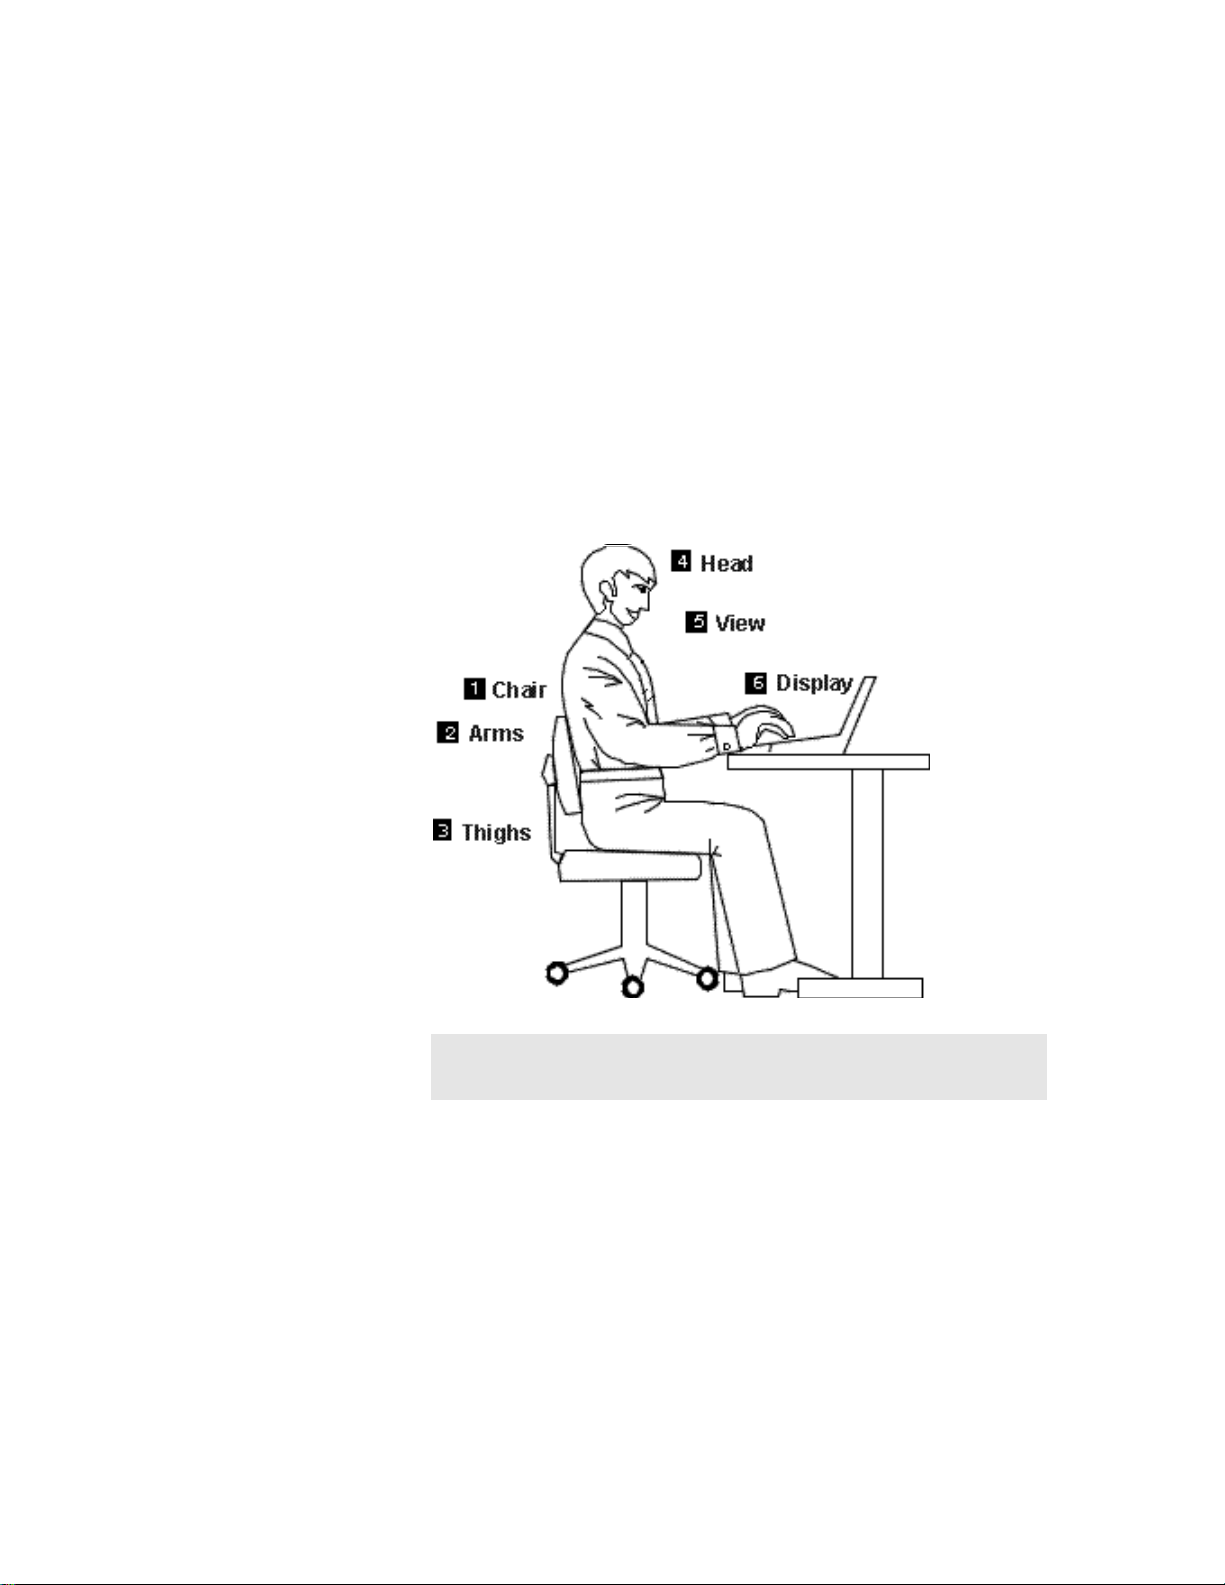
Ergonomics Information
This is important information to read before using your ThinkPad
computer in the virtual office.
Working in the Virtual Office may mean adapting to frequent
changes in your environment. Following some simple “rules of the
road” will make things easier and bring you the maximum benefits of
your ThinkPad computer. Keeping in mind such basics as good
lighting and proper seating, for example, can go a long way in
helping you enhance your performance and achieve greater comfort
wherever you are.
Note: The example shown here of someone in a traditional setting. Even
when not in such a setting, you can follow many of these tips. Develop
good habits and they will serve you well.
ix
Page 11

Chair
Use a chair that gives you
good back support.
Arms
Keep your forearms, wrists,
and hands in a relaxed and
neutral position. Don’t
pound the keys; type with a
soft touch.
Thighs
Keep your thighs parallel to
the floor and your feet flat on
the floor or on a footrest.
What if I am traveling?
It may not be possible to observe the best ergonomic practices when
you are using the ThinkPad computer while on the move or in a
“casual” setting, such as the seashore or on a mountaintop.
Sometimes, your lap may be the only “desk” around. Regardless of
the setting, try to observe as many of the tips for proper usage as
possible. Sitting properly and using adequate lighting, for example,
will help you maintain desirable comfort and performance levels.
Head
Keep your head in a
comfortable and vertical
position.
View
Maintain a comfortable
viewing distance of 20-30
inches.
Display
Position the display to avoid
glare or reflections from
overhead lighting or outside
sources of light.
Keep the display screen
clean and set the contrast
and brightness to levels that
allow you to see the screen
clearly.
Questions about vision?
IBM’s visual display screens are designed to meet the highest
standards and to provide you with clear, crisp images and large,
bright displays that are easy to see, yet easy on the eyes. Of
course, any concentrated and sustained visual activity can be tiring.
If you have questions on eye fatigue or visual discomfort, consult a
vision care specialist for advice.
x
Page 12

Safety Notice
!
DANGER
Do not disassemble, incinerate, or short-circuit the
rechargeable battery pack. Do not put it in refuse that is
disposed of in landfills. Dispose of it as required by local
ordinances and regulations.
CAUTION:
The lithium battery can be replaced only by your dealer or an
IBM service representative. It contains lithium and can explode
if not properly used, handled, or disposed of. Do not: (1) throw
or immerse into water, (2) heat to more than 100°C (212°F), or
(3) repair or disassemble. Dispose of it as required by local
ordinances or regulations.
CAUTION:
The fluorescent lamp in the liquid crystal display (LCD)
contains mercury. Do not put it in refuse that is disposed of in
landfills. Dispose of it as required by local ordinances and
regulations.
The LCD is made of glass, and rough handling or dropping the
computer can cause the LCD to break. If the LCD breaks and
the internal fluid gets into your eyes or on your hands,
immediately wash the affected areas with water for at least 15
minutes; then get medical care if any symptoms are present
after washing.
xi
Page 13

Laser Compliance Statement (for the 310ED Only)
The CD-ROM drive in the IBM ThinkPad 310ED is a laser
product. The CD-ROM drive’s classification label (shown below) is
located on the top of the drive.
CLASS 1 LASER PRODUCT
LASER KLASSE 1
LUOKAN 1 LASERLAITE
APPAREIL A LASER DE CLASSE 1
KLASS 1 LASER APPARAT
The CD-ROM drive is certified in the U.S. to conform to the
requirements of the Department of Health and Human Services 21
Code of Federal Regulations (DHHS 21 CFR) Subchapter J for
Class I laser products.
In other countries, the drive is certified to conform to the
requirements of EN60825.
!
CAUTION:
Do not open the CD-ROM drive; no user adjustments or
serviceable parts are inside.
xii
Use of controls, adjustments or the performance of procedures
other than those specified may result in hazardous radiation
exposure.
Class I (1) laser products are not considered to be hazardous. The
CD-ROM drive has an internal, Class I (1), 0.5-milliwatt, aluminum
gallium-arsenide laser that operates at a wavelength of 760 to 810
nanometers. The design of the laser system and the CD-ROM drive
ensures that there is no exposure to laser radiation above a Class I
(1) level during normal operation, user maintenance, or servicing
conditions.
Page 14

Contents
Distinctive System Features ........................................................... iv
About This Book.............................................................................vi
Information Notices........................................................................vii
Treatment of Icons........................................................................viii
Ergonomics Information..................................................................ix
Safety Notice.................................................................................. xi
Laser Compliance Statement (for the 310ED Only) .................xii
Chapter 1. Getting Started ........................................................1-1
Overall Setup Procedures.............................................................1-2
Checking Your Items ....................................................................1-4
Setting Up Your Computer ............................................................1-6
Chapter 2. Getting Familiar with Your Computer ....................2-1
Locations......................................................................................2-2
System Status Indicators..............................................................2-6
Providing Power ...........................................................................2-8
Operating the TrackPoint III Pointing Device ..............................2-10
Cleaning the Cap..................................................................2-12
Using the Fn Key Function..........................................................2-13
Operating the Numeric Keypad ...................................................2-15
Keeping the Computer from Being Damaged.............................. 2-16
Carrying the Computer ............................................................... 2-18
Chapter 3. Operating Your Computer.......................................3-1
What Happens When Power Is Turned On? .................................3-2
Using Notebook Manager .............................................................3-3
Starting Notebook Manager....................................................3-3
Using the Computer LCD or the External Monitor .......................3-13
Display Output Type.............................................................3-13
Points to Consider When Using the DOS Screen on the LCD....3-14
Attaching a Monitor ..............................................................3-14
Using SVGA Video Mode .....................................................3-16
Using PC Cards..........................................................................3-18
About CardBus PC Cards.....................................................3-19
About Zoomed Video Port Cards.......................................... 3-19
Audio Features...........................................................................3-20
Using the External Diskette Drive ...............................................3-21
Using the CD-ROM Drive ........................................................... 3-22
Handling Compact Discs ......................................................3-23
xiii
Page 15

Chapter 4. Using Battery Power...............................................4-1
Charging the Battery Pack............................................................4-2
Charging with the AC Adapter................................................4-2
Battery Pack Maintenance .....................................................4-4
Replacing the Battery Pack..........................................................4-5
Monitoring the Battery-Power Status ............................................4-7
Using the Battery-Power Status Indicator...............................4-7
Using the Fuel-Gauge Icon ....................................................4-8
Preserving Battery-Pack Life ........................................................4-9
Maximizing Battery-Powered Operation .......................................4-9
Using Advanced Power Management.....................................4-9
Decreasing LCD Brightness .................................................4-11
Using the Battery Power-Management Function...................4-12
Chapter 5. Protecting Your Computer .....................................5-1
Using the Power-On Password.....................................................5-2
Setting the Power-On Password.............................................5-2
Changing the Power-On Password .........................................5-3
Removing the Power-On Password........................................5-3
Entering the Power-On Password...........................................5-3
Using the Setup Password............................................................5-5
Setting the Setup Password...................................................5-5
Changing the Setup Password ...............................................5-6
Removing a Setup Password.................................................5-6
Entering the Setup Password.................................................5-6
Using Locks .................................................................................5-8
Using Locking Devices...........................................................5-8
Affixing a Nameplate....................................................................5-9
xiv
Chapter 6. Installing and Removing Options..........................6-1
Upgrading the Hard Disk Drive.....................................................6-2
Installing PC Cards ......................................................................6-4
Removing PC Cards ....................................................................6-7
Increasing Memory Capacity........................................................6-8
Installing a DIMM...................................................................6-8
Removing a DIMM...............................................................6-10
Attaching an External Numeric Keypad or a Mouse .................... 6-11
Attaching an External Keyboard................................................. 6-12
Attaching a Printer ..................................................................... 6-13
Page 16

Chapter 7. Installing Software ..................................................7-1
What You Need for Your Computer..............................................7-2
Installing the Operating System and Device Drivers .....................7-3
Accessing Remote Software Services...........................................7-4
Creating Installation Diskettes.......................................................7-5
Installing Software for DOS ..........................................................7-6
Installing IBM PC DOS Version 7.0 ........................................7-7
Installing the CD-ROM Device Driver for DOS .......................7-7
Installing the Sleep Manager Program for DOS......................7-7
Installing the Audio Device Driver for DOS.............................7-8
Installing the PC Card Driver for DOS ....................................7-8
Installing Software for Windows 3.11............................................7-9
Installing Microsoft Windows 3.11.........................................7-10
Installing the Display Driver for Windows 3.11......................7-11
Installing the PC Card Program for DOS and Windows 3.11. 7-12
Installing the Audio Support Software for Windows 3.11.......7-13
Installing Software for Windows 95.............................................7-14
Installing Microsoft Windows 95 ........................................... 7-15
Installing the Display Driver for Windows 95 .........................7-15
Updating the PC Card Driver with Zoomed Video Support....7-16
Installing the Audio Support Software for Windows 95..........7-17
Installing the Sleep Manager Program for Windows 95......... 7-18
Installing the Notebook Manager Program............................7-18
Installing the SafeOFF Program........................................... 7-18
Installing the TDial Program.................................................7-19
Chapter 8. Solving Computer Problems....................................8-1
Frequently Asked Questions and Problems...................................8-2
Troubleshooting Charts.................................................................8-6
POST Error Codes .................................................................8-6
Runtime Error Codes ..............................................................8-9
Getting Service...........................................................................8-10
Recording your Computer Problem.......................................8-11
Listing Installed Options ....................................................... 8-12
Recording Identification Numbers .........................................8-12
How to Receive Customer Support and Service ......................... 8-13
Purchasing Additional Services ............................................8-16
Obtaining IBM Operating System Updates ........................... 8-19
About Your Warranty ............................................................8-19
xv
Page 17

Appendix A. Avoiding Hardware Conflicts..............................A-1
Avoiding System Resource Conflicts ............................................A-1
List of System Resources .............................................................A-2
Appendix B. Advanced Information for PC Cards.................. B-1
Phoenix Card Manager ................................................................ B-2
PCMSetup For Windows..............................................................B-3
Adding Options......................................................................B-3
Specifying a Fax/Modem Communications Port .....................B-3
Specifying the Flash File System Path...................................B-4
Setting Advanced Options......................................................B-5
Event Processor Daemon (EPD) Utility ........................................B-7
PCMRman For DOS ....................................................................B-8
Displaying Resources.............................................................B-8
Modifying Resources..............................................................B-8
CardAgent Utility........................................................................B-10
Viewing the Client Driver List...............................................B-10
Viewing the Event Log.........................................................B-11
Performing PC Card Diagnostics..........................................B-12
Configuring PC Cards..........................................................B-13
Resolving PC Card Conflicts ................................................B-14
Understanding Event-Triggered Associations.......................B-15
Appendix C. BIOS Utility.......................................................... C-1
When to Use the BIOS Utility...................................................... C-2
Entering the BIOS Utility ............................................................. C-3
Using the BIOS Utility ................................................................. C-4
Exiting the BIOS Utility................................................................ C-4
Basic System Settings................................................................. C-5
System Security.......................................................................... C-7
Power Management Settings......................................................C-13
Load Setup Default Settings .......................................................C-16
xvi
Appendix D. Features and Specifications .............................. D-1
Specifications.............................................................................. D-3
Diskette Standards...................................................................... D-4
IBM Power Cords........................................................................ D-5
Page 18

Appendix E. Notices.................................................................E-1
Notices........................................................................................E-4
Trademarks...........................................................................E-4
Electronic Emission Notices.........................................................E-5
Energy Star Logo Statement ................................................. E-6
Glossary.....................................................................................G-1
Index............................................................................................ I-1
xvii
Page 19

Chapter 1. Getting Started
Welcome to the world of ThinkPad computers!
The IBM ThinkPad 310E/310ED computer is designed to meet many
multimedia and mobile computing needs. Its various features,
unique to IBM products, can help your everyday work go easily and
smoothly. You can use your IBM ThinkPad 310E/310ED computer
in the office or at home as a desktop computer by attaching an
external keyboard, display, or other external devices. And, of
course, your computer can be easily carried wherever you need a
computer “on the go.”
This chapter provides step-by-step instructions to help you set up
your new computer.
Overall Setup Procedures.............................................................1-2
Checking Your Items ....................................................................1-4
Setting Up Your Computer ............................................................1-6
Copyright IBM Corp. 1997 1-1
Page 20
Getting Started
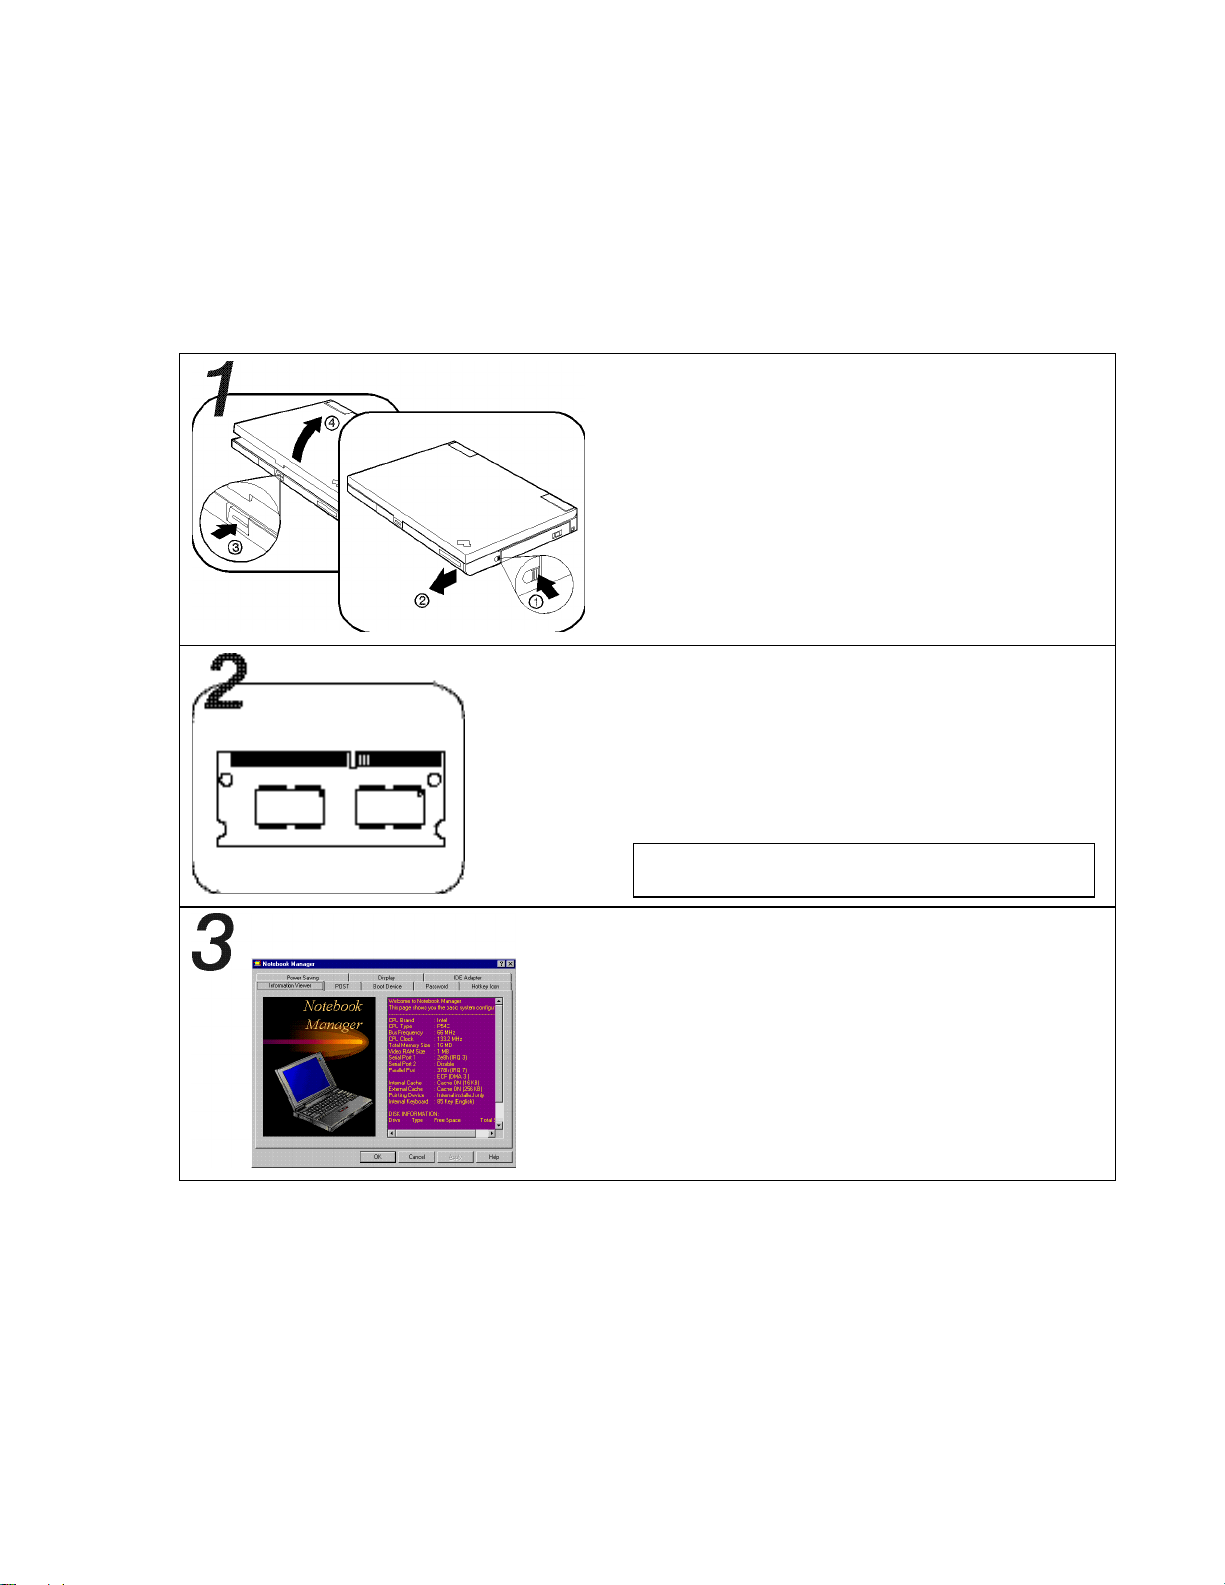
Overall Setup Procedures
Before using the computer for the first time, review these overall setup procedures:
Set Up the Computer
First, check whether you have all the necessary
items with your computer.
+ Page 1-4.
Then, install the battery pack in the computer. Now
you are ready to turn on the computer.
+ Page 1-6.
Install Options
If you have any options, such as memory cards,
install them now.
1-2 IBM ThinkPad 310E/310ED: User’s Guide
+ Chapter 6.
Caution
Do not use any memory cards other than the IBM
ThinkPad 310 memory cards.
Customize Your Computer
You can use Notebook Manager, a built-in system
function, to set passwords to prevent your computer
from unauthorized use, or use its other features to
customize your computer.
+ Chapter 3.
Page 21
Getting Started
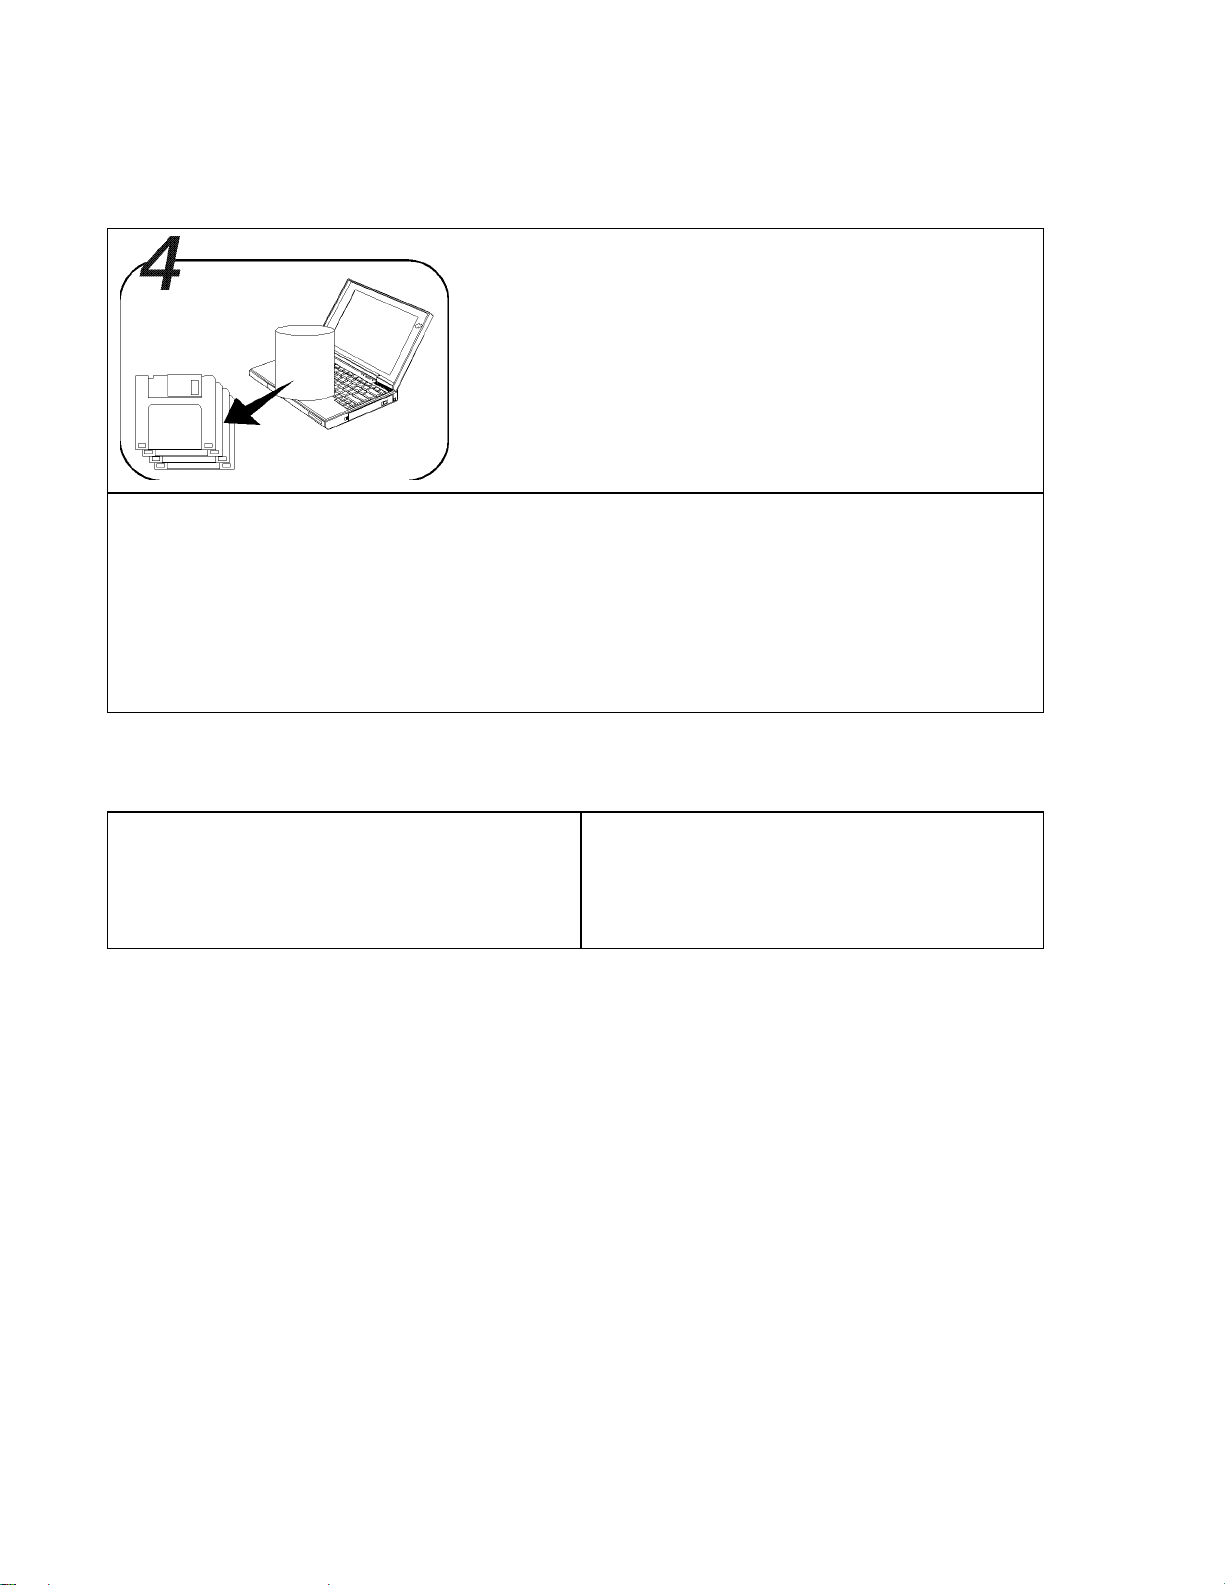
Make a Backup of Your System
Some computers come with the necessary software
already installed for you to use the computer right
out of the box. Or, you may have installed the
operating system and software yourself. Whichever
is the case for you, remember to make a backup
copy of your hard disk drive software.
Do you need more hard disk space?
If your computer did not come with the utility and device driver diskettes, and you have already made
a backup copy of all necessary software using a backup program, you can delete any preinstalled
software you do not want to use to have more free hard disk space.
Run the backup program; then follow the instructions on the screen.
You can delete the demonstration program.
ò ò
You are ready to use your computer.
If you have any application programs to install,
follow the instructions in the documentation that
came with those programs.
+ If you have any problems after you have customized your computer, refer to Chapter 8, “Solving
Computer Problems” for troubleshooting help.
If you are reinstalling the operating system…
If you are reinstalling the operating system to
customize your computer, follow the instructions
in Chapter 7, “Installing Software”.
Chapter 1. Getting Started 1-3
Page 22
Getting Started
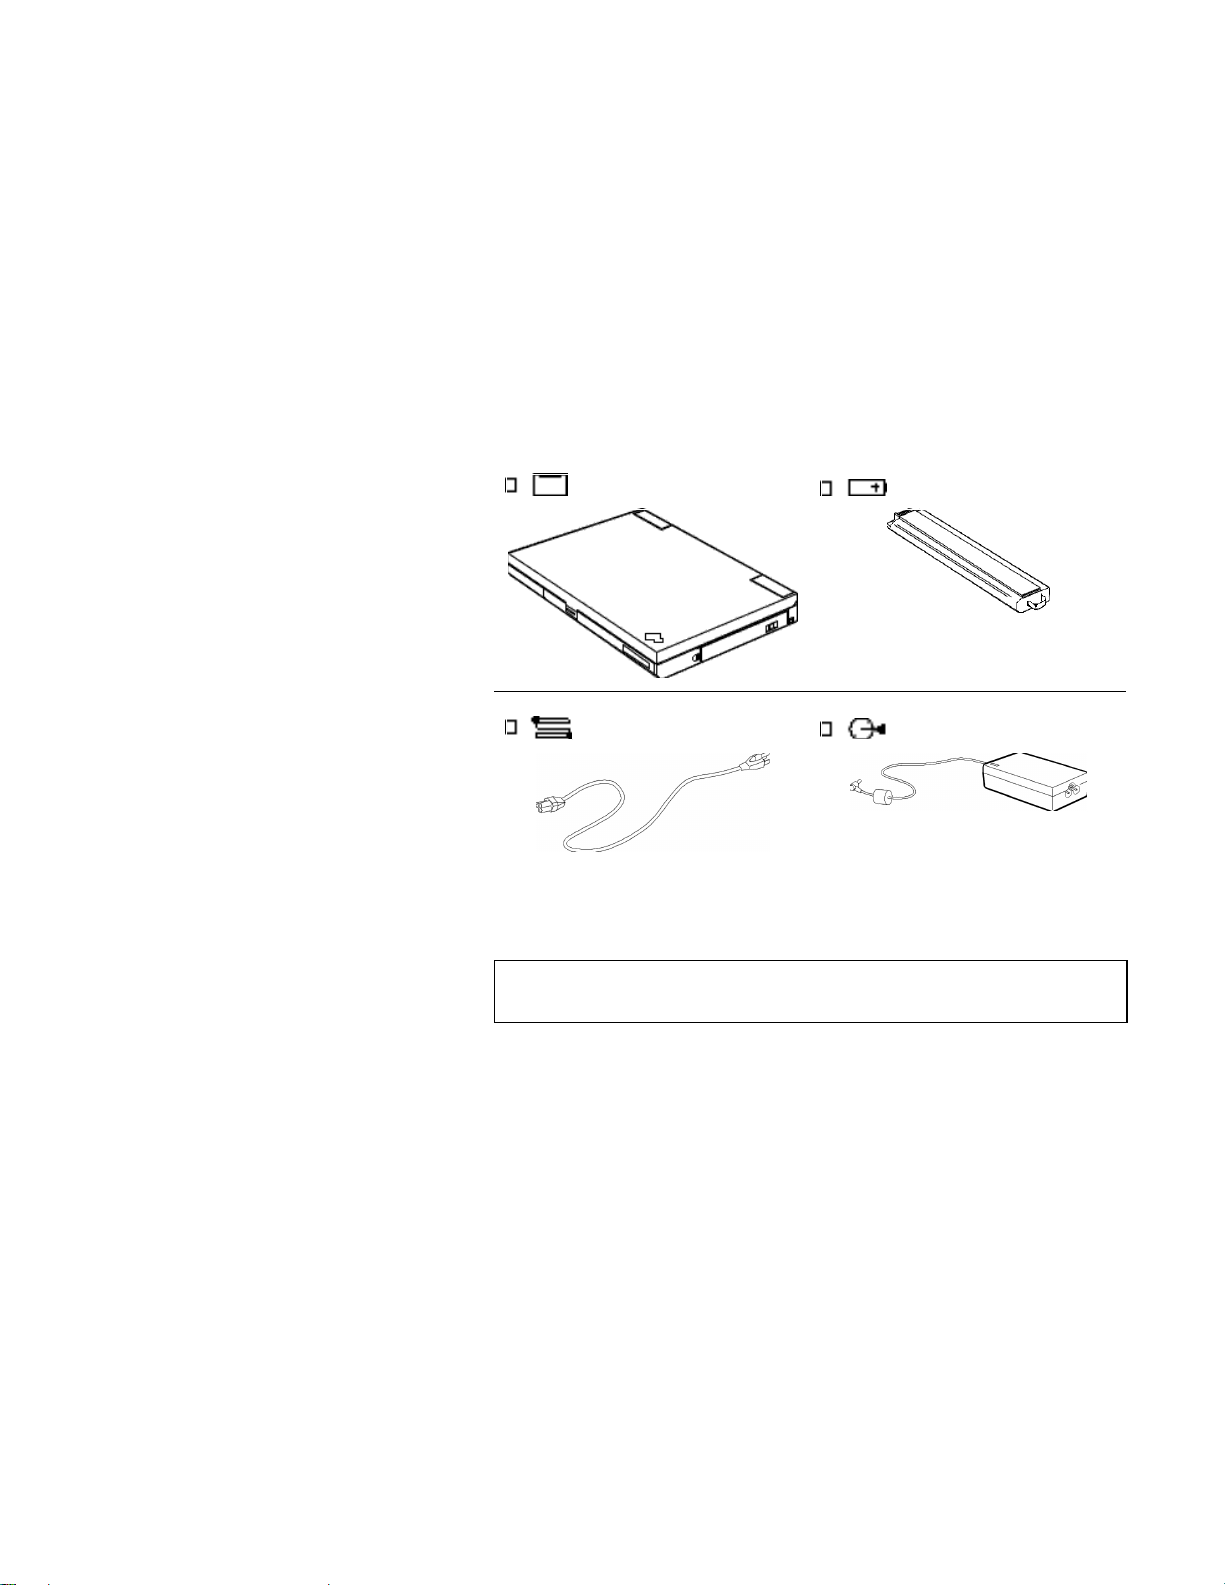
Checking Your Items
Remove everything from the shipping box and check that all
necessary items were shipped with your computer.
1 Match the items, one by one, with the following figures.
If any item is missing or damaged, contact your place of
purchase.
Computer Battery Pack
Caution
Do not use any batteries and AC Adapters other than the IBM
ThinkPad 310 battery and the IBM ThinkPad 310 AC Adapter.
1-4 IBM ThinkPad 310E/310ED: User’s Guide
Power Cord AC Adapter
Page 23
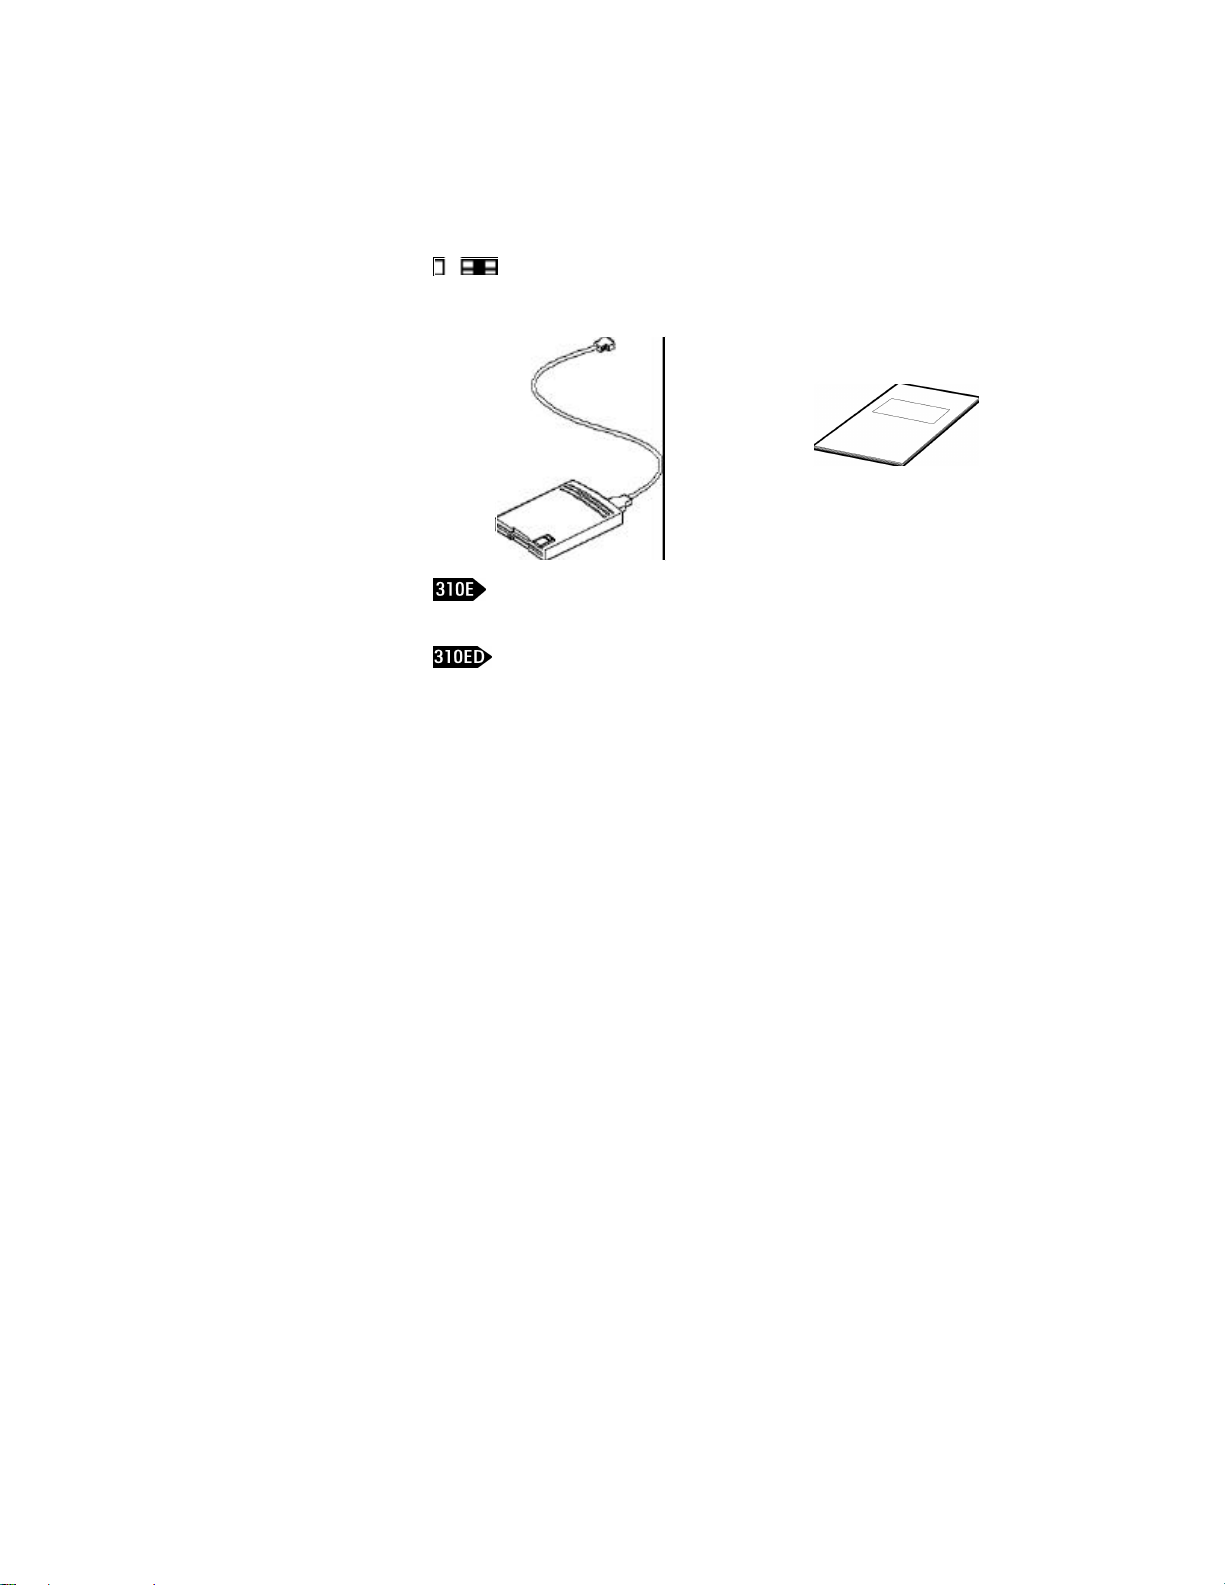
Diskette Drive
Getting Started
oo
Windows 95 User’s Guide with
the Certificate of Authenticity
The internal diskette drive
is installed in the computer.
To use the external
diskette drive and the CD-ROM
drive at the same time, use the
external diskette drive.
In some countries, the Certificate
of Authenticity of Windows 95 is
on the front cover of the
Windows 95 user’s guide. The
product ID number (ten digits)
is in the Certificate. Keep it in
a safe place in case you
reinstall Windows 95.
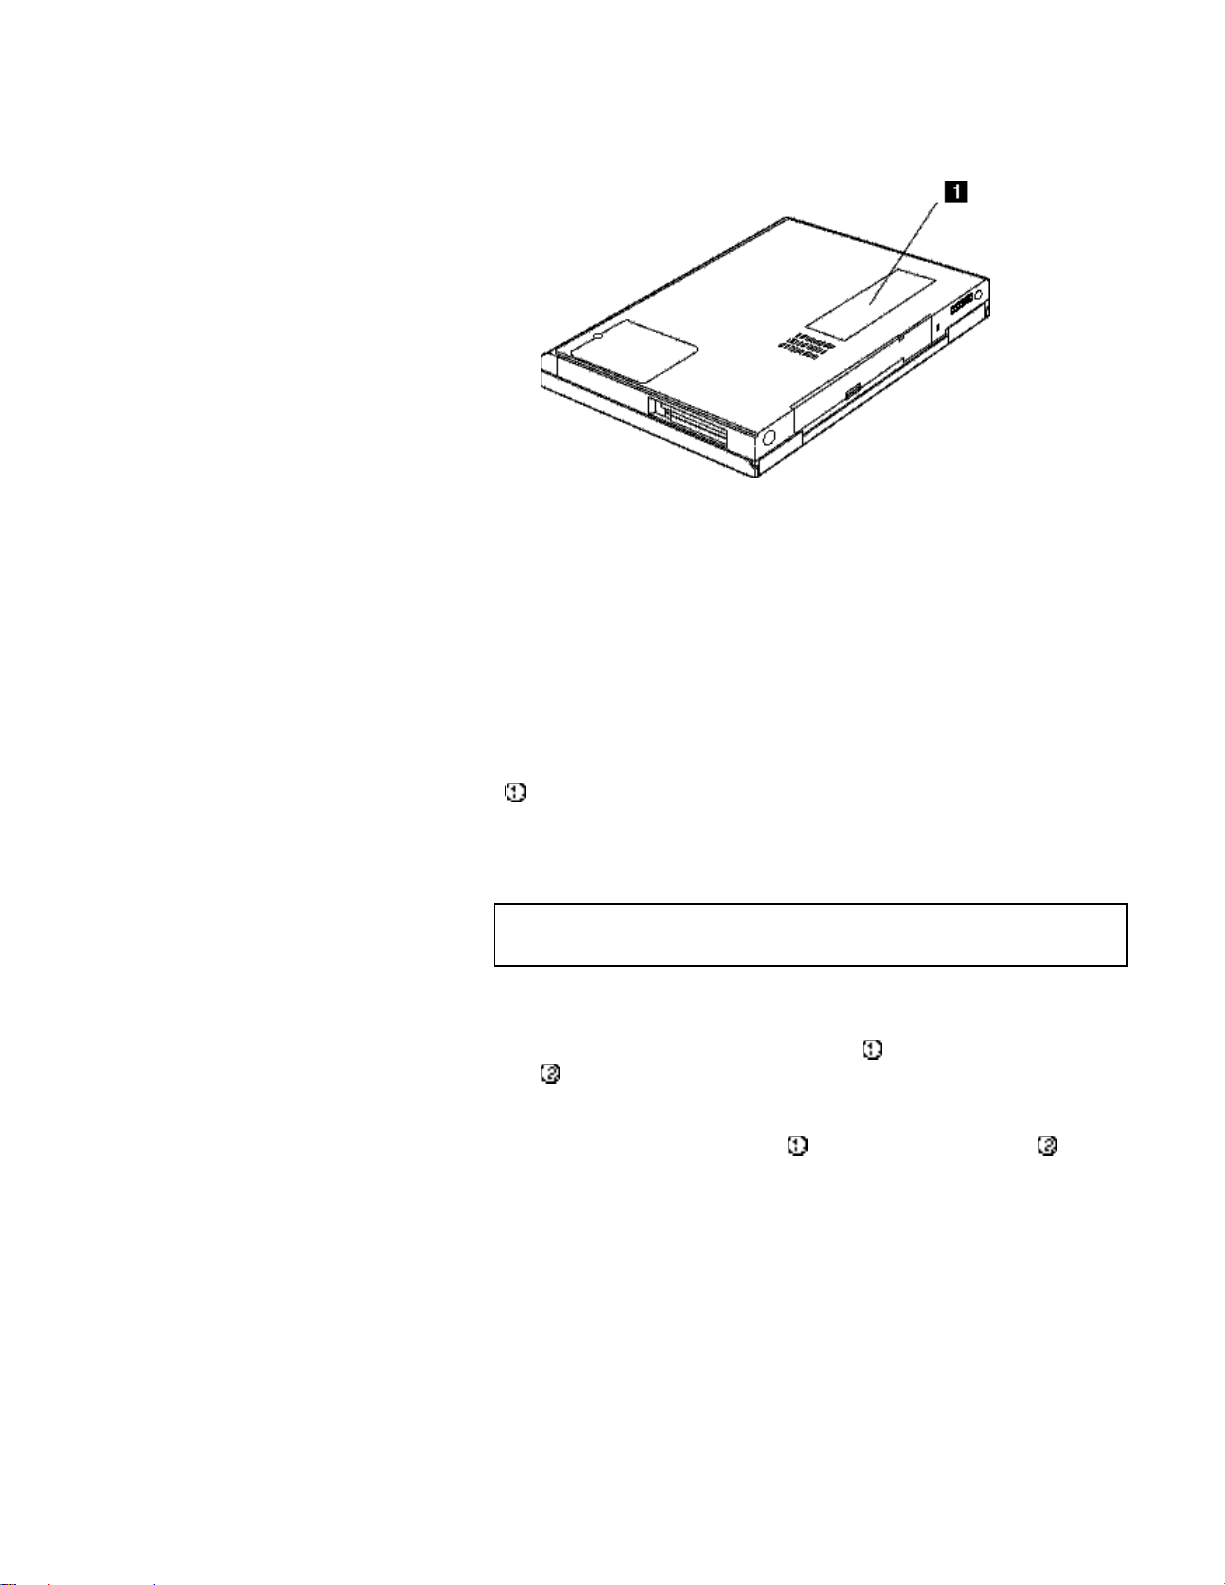
2 Turn the computer upside down and record the identification
numbers on page 8-12.
• The machine type has a prefix of Type.
• The serial number has a prefix of S/N.
Chapter 1. Getting Started 1-5
Page 24
Getting Started
Setting Up Your Computer
You are now ready to assemble and start your computer. The steps
on the next few pages guide you through the process. The following
conventions are used in the steps and illustrations that appear in this
book.
1 Indicates a main sequence of actions. This refers to the same
Note
Battery packs shipped from the factory are in an almost-discharged
state, so you must charge them fully before use.
To install the battery pack:
1 Press the latch on the battery cover , and slide out the cover
2 Slide the battery pack into the battery compartment until you
1-6 IBM ThinkPad 310E/310ED: User’s Guide
number in the figure.
Indicates a sequence of actions within a main action. An arrow
accompanying a circled number shows the direction of
movement.
.
feel the connectors engage . Then replace the cover .
Page 25

1
Getting Started
2
Chapter 1. Getting Started 1-7
Page 26

Getting Started
!
DANGER
The battery pack provided with your computer contains a
small amount of harmful substances. To avoid possible
injury:
• Keep the battery pack away from fire.
• Do not expose the battery pack to water or rain.
• Do not attempt to disassemble the battery pack.
• Avoid mechanical shocks to the battery.
• Always use battery packs recommended by IBM.
• Keep the battery pack away from children.
When disposing of the battery, comply with local
ordinances or regulations or your company’s safety
standards.
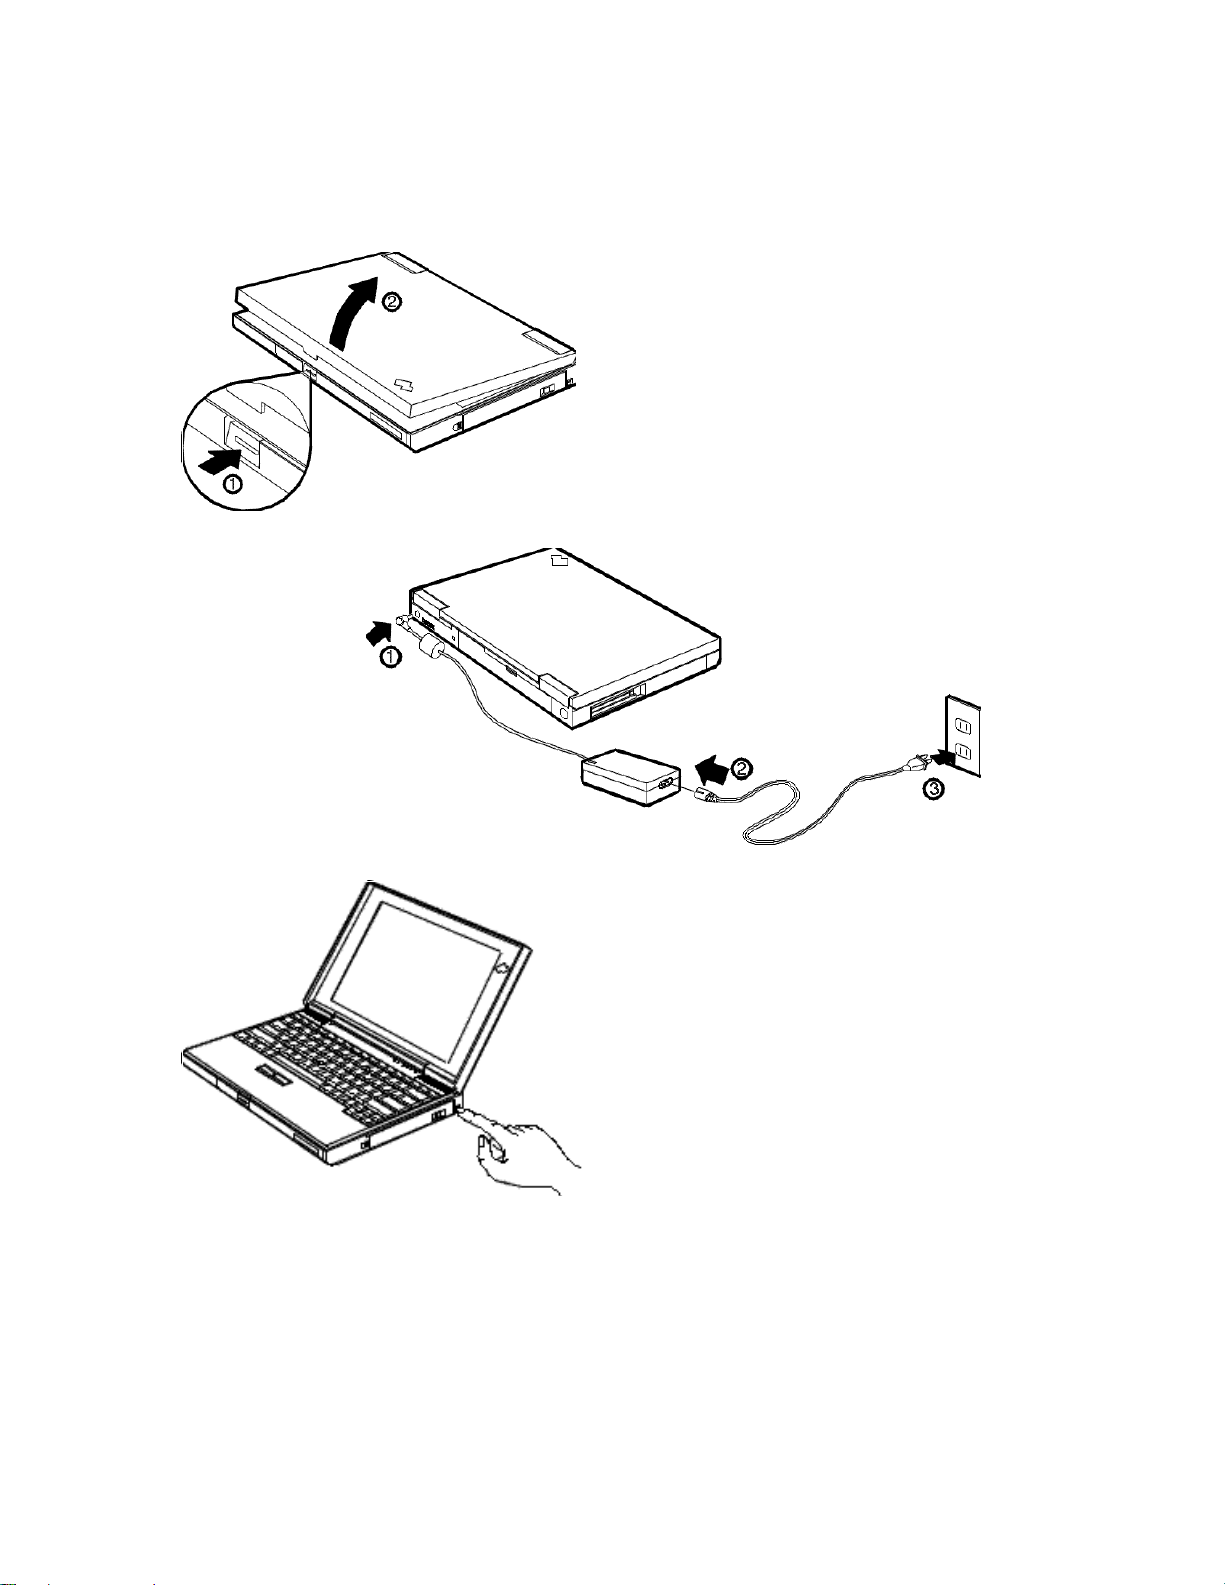
3 Press the latch on the front of the computer, and open the liquid
crystal display (LCD).
4 Connect the AC Adapter as shown.
5 Push and release the power switch to turn on the computer.
6 After a single beep, a screen appears, confirming that the
If an error code and corresponding message shows on-screen, a
problem might have occurred in the computer. See Chapter 8,
“Solving Computer Problems”.
1-8 IBM ThinkPad 310E/310ED: User’s Guide
(Connect , , and then .)
system is operating correctly.
Page 27
3
Getting Started
4
5
Chapter 1. Getting Started 1-9
Page 28
Getting Started
Congratulations! You have successfully completed the basic setup of your computer.
Important!
It is recommended that you make a backup copy of
the files on the hard disk drive, in case you
accidentally erase preinstalled software or
intentionally modify the hard disk drive. You can use
the backup copy to restore your computer to the way
it was at the time when you made the backup copy.
In some countries, you can create the device driver
diskettes you need to install all necessary software
using the backup program. For more information,
refer to Chapter 7, “Installing Software”.
1-10 IBM ThinkPad 310E/310ED: User’s Guide
Page 29

Chapter 2. Getting Familiar with Your Computer
This chapter provides general information for getting acquainted
with your computer.
Locations......................................................................................2-2
System Status Indicators..............................................................2-6
Providing Power ...........................................................................2-8
Operating the TrackPoint III Pointing Device ..............................2-10
Cleaning the Cap..................................................................2-12
Using the Fn Key Function..........................................................2-13
Operating the Numeric Keypad ...................................................2-15
Keeping the Computer from Being Damaged.............................. 2-16
Carrying the Computer ............................................................... 2-18
Copyright IBM Corp. 1997 2-1
Page 30
Locations
Locations
To use the CD-ROM drive:
+ Page 3-22.
To replace the battery:
+ Page 4-5.
To use the TrackPoint III:
+ Page 2-10.
To upgrade the hard disk drive:
+ Page 6-2.
To use Fn functions:
+ Page 2-13.
To install PC Cards:
+ Page 6-4.
This section describes additional features of your computer.
Front View
2-2 IBM ThinkPad 310E/310ED: User’s Guide
Page 31

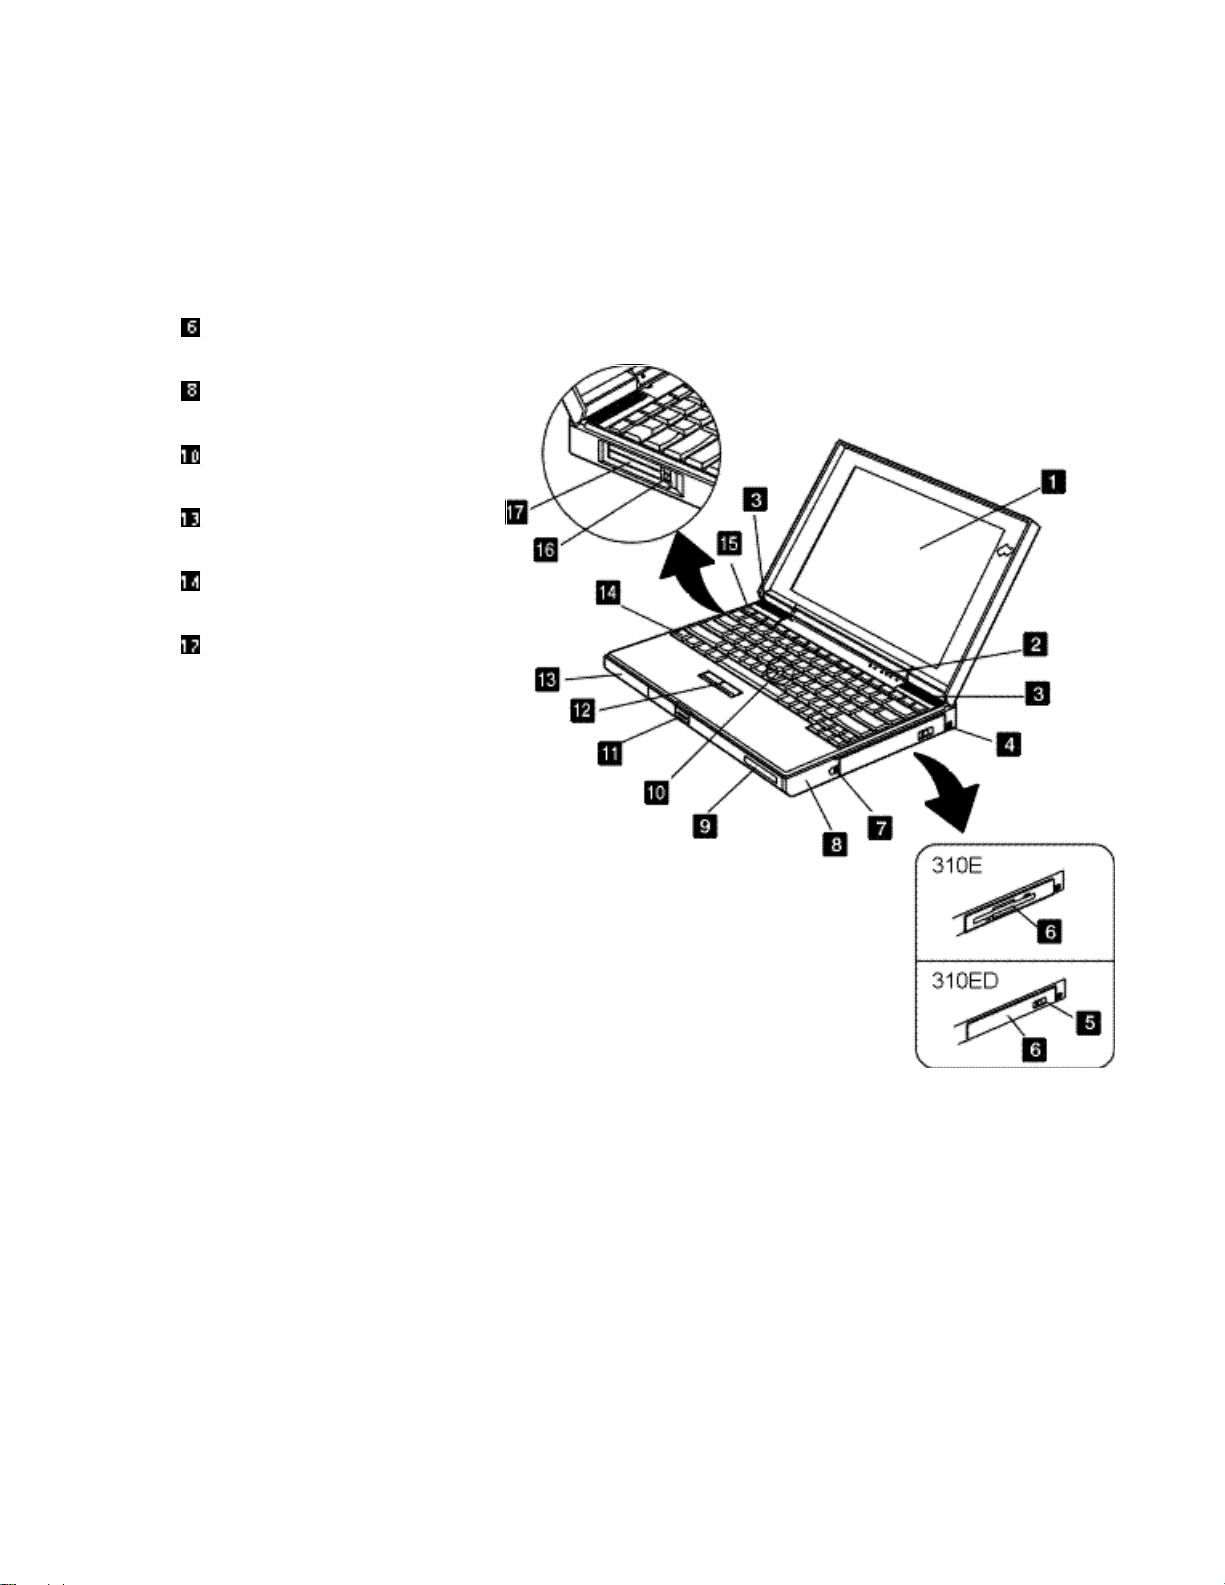
Front View
Locations
The color LCD screen, use
either thin-film transistor
(TFT) or dual-scan supertwisted nematic crystal
(DSTN) technology
(depending on the model) to
display computer output in
800-by-600 resolution. Highresolution display modes
can be used on the LCD or
with an attached external
display (See page 3-13.)
The indicator panel consists
of the system status
indicators and their related
symbols. These indicators
show the current status of
the computer.
The speakers (left and right)
provides sound for your
application programs.
The power switch turns the
computer on and off.
The battery cover release
latch releases the battery
cover for installing and
removing the battery pack.
The battery bay holds the
battery pack. The battery
pack allows you to operate
the computer when ac power
is not available.
Personalization nameplate.
(See page 5-9.)
The TrackPoint III is a builtin pointing device that is as
easy to use as a mouse
without adding external
devices to the system.
The LCD release latch
releases the LCD screen so
it can be opened.
The click buttons are used
with the TrackPoint III.
The function keys can be
used with or without the Fn
key to activate various
functions.
The PC Card eject buttons
eject the PC Card from the
upper or lower PCMCIA
slots.
PC Card slots. (See page
3-18.)
The CD-ROM eject
button releases the CDROM tray for inserting,
removing, or replacing a
compact disc.
The CD-ROM drive or
diskette drive.
The hard disk drive bay.
houses the hard disk drive.
(See page 6-2.)
The Fn key is used with a
function key or other keys to
activate certain functions.
(See page 2-13.)
Chapter 2. Getting Familiar with Your Computer 2-3
Page 32

Locations
To connect the AC Adapter:
+ Page 1-8.
To secure your computer:
+ Page 5-8.
To attach an external diskette
drive:
+ Page 3-21.
To attach a printer:
+ Page 6-13.
To attach a display:
+ Page 3-14.
To attach an external keyboard,
mouse, or numeric keypad:
+ Pages 6-11 to 6-12.
To install an optional memory
module (DIMM):
+ Page 6-8.
Rear View
Bottom View
2-4 IBM ThinkPad 310E/310ED: User’s Guide
Page 33

Rear View
Locations
The rear door covers the
connectors on the rear of the
computer.
The power jack is where the
AC Adapter cable is
connected.
The security keyhole is
used when securing the
ThinkPad with a Kensington
MicroSaver Security System
lock (hereafter called a
Kensington lock) or
compatible lock.
The microphone-in jack, a
1/8-inch (3.5-mm) diameter
jack, is where a stereo
microphone is connected.
The line-in jack, a 1/8-inch
(3.5-mm) diameter jack, is
where an external audio
device is connected.
The external diskette drive
connector is where you
connect the cable of the
external diskette drive. (See
page 3-21.)
The line-out/headphone
jack, a 1/8-inch (3.5-mm)
diameter jack, is where you
connect a stereo headphone
or external speakers.
The serial connector is
where you connect a 9-pin,
serial-device cable.
The fan keeps the inside of
the computer cool.
The parallel connector is
where you usually connect a
parallel-printer signal cable.
(See page 6-13.)
The external display
connector is where you
attach an external monitor.
(See page 3-14.)
The external input device
connector is where a
mouse, an external numeric
keypad, or the
keyboard/mouse connector is
plugged in. An external
keyboard can also be
connected through the
keyboard/mouse connector.
Bottom View
The memory door covers
the dual-inline memory
module (DIMM) slots.
Optional DIMM increases
system memory capacity.
Caution
Do not use any memory cards
other than the IBM ThinkPad 310
memory card.
Chapter 2. Getting Familiar with Your Computer 2-5
Page 34

System Status Indicators
System Status Indicators
The system status indicators show the current status of your
computer by their on or off states or colors (green and orange).
Each indicator is identified with a symbol.
The following shows the location of each symbol and the meaning of
each indicator.
2-6 IBM ThinkPad 310E/310ED: User’s Guide
Page 35

Symbol Color Meaning
System Status Indicators
Battery
Hard disk or CD-ROM in use
Numeric lock
Caps lock
Scroll lock
Green Enough battery power remains for operation.
Orange The battery pack is being charged.
Blinking
orange
The battery pack needs charging. When the lamp starts
blinking orange, the computer beeps four times.
Orange Appears when data is read from or written to the hard
disk or read from the CD-ROM. Do not enter
hibernation mode or turn off the computer when this
indicator is on.
Green Indicates that the numeric keypad on the keyboard is
enabled. The keypad is enabled and disabled by
pressing and holding the Shift key, and pressing the
NumLk key. For details, see “Operating the Numeric
Keypad” on page 2-15.
Green Indicates that the Caps Lock mode is enabled. All
alphabetic characters (A-Z) are entered in capital letters
without using the Shift key. The Caps Lock mode is
enabled and disabled by pressing the Caps Lock key.
Green
Alternately turns on and off each time the ScrLk key is
pressed. While this indicator is on, the Arrow keys are
used as screen-scroll function keys. In this state, the
cursor cannot be moved with the Arrow keys. Not all
application programs support this function.
Power on
Green Indicates that the computer is operational. This
indicator is on when the computer is on.
Chapter 2. Getting Familiar with Your Computer 2-7
Page 36

Providing Power
Providing Power
Attention:
Always use the AC Adapter certified
by IBM in the country where you will
be using the computer. Operating the
computer with an incorrect AC Adapter
can cause damage to the battery pack
and to the computer.
You can use your computer almost anywhere: at home, in the office,
or on the road. Different power sources can be used for different
conditions: the AC Adapter, or the battery pack. When you have
access to an electrical outlet, you can use the AC Adapter for
continuous power. Otherwise, you can use the battery pack.
AC Adapter
The AC Adapter is an alternating current (ac) to direct current (dc)
converter that supplies power for the computer. The AC Adapter
also charges the battery pack when it is installed in the computer.
The input voltage is 100 — 240 V ac, 50/60 Hz. Refer to the label
on your AC Adapter for the input voltage, and make sure you use
the AC Adapter with the stated input voltage.
Do not attempt to open the AC Adapter case. The AC Adapter is
permanently sealed and cannot be repaired.
2-8 IBM ThinkPad 310E/310ED: User’s Guide
!
DANGER
Page 37

Providing Power
Battery Pack
The battery pack is an internal power source for the computer when
no electrical outlets are available. The battery pack can be
recharged with the AC Adapter.
The approximate operating time of the computer with a fully charged
battery pack depends on the applications used, whether power
management is used, the frequency of keystrokes, and the
configuration of the system.
To ensure the longest possible battery life, in terms of both length of
use per charge and number of charge and discharge cycles before
wearing out, please observe these guidelines:
• Battery packs shipped from the factory are in an almostdischarged state, so you must charge them fully before use.
• When charging, always charge the battery pack fully. Even if
you only need to run on battery power for a fraction of the
battery’s capacity, you should not try to give the battery a partial
charge.
• Normal charging causes the battery pack to heat up slightly. Let
it cool for 15 minutes before you use it.
• Immediately after the battery pack has been drained of power, it
may be warm to the touch. This is normal. However it should
be set aside to cool for 15 minutes before recharging.
Chapter 2. Getting Familiar with Your Computer 2-9
Page 38

Operating the TrackPoint III Pointing Device
Operating the TrackPoint III Pointing Device
Note:
No other software is required for the
TrackPoint III; it works with the PS/2
mouse driver.
The keyboard contains a unique cursor-pointing device called
TrackPoint III. Pointing, selecting, and dragging all become part of
a single process, so you need not move your fingers from their
normal typing position.
The TrackPoint III consists of a stick on the keyboard and a pair
of click buttons in front of the keyboard. The motion of the
cursor is controlled by pressure applied to the stick in any direction
within the plane of the keyboard; the stick does not move. The
speed at which the cursor moves corresponds to the amount of
pressure on the stick. The click buttons are similar in function to
those on other pointing devices; what they do depends on the
software that is used.
2-10 IBM ThinkPad 310E/310ED: User’s Guide
Page 39

Operating the TrackPoint III
If you are new to the TrackPoint III, these instructions will help you
get started.
Note:
Remember that the stick does not
move.
Note:
The mouse pointer may drift. This is
not a defect. Do not use the
TrackPoint III until the pointer stops
moving.
Note:
Either thumb can be used.
1 Place your hands in the typing position and press gently with
either index finger in the direction in which you want the cursor
to move.
Pressing the stick away from you moves the cursor up the
screen; pressing it toward you moves the cursor down the
screen.
2 Use the click buttons to select and drag as required by your
software, in the same way as for any other pointing device.
Chapter 2. Getting Familiar with Your Computer 2-11
Page 40

Operating the TrackPoint III Pointing Device
Cleaning the Cap
The cap on the end of the TrackPoint III is removable. You can
replace it with one of the spares shipped with your computer when
the cap is worn out.
To maintain a smooth pointing operation, occasionally clean the cap
with a soft cloth moistened with a nonalkaline detergent.
2-12 IBM ThinkPad 310E/310ED: User’s Guide
Page 41

Using the Fn Key Function
The Fn key function allows you to change operational features
instantly. When you use the following functions, press and hold the
Fn key ; then press the appropriate key (Esc, cursor left ←←
and right →→ keys, function keys F1 to F8.)
Using the Fn Key Function
Key Combination Feature Meaning
Close Hotkey Icon
+
Closes the current pop-up icon.
Esc
Key Combination Help Displays the key combination help screen. Press Esc to exit.
+
+
+
Brightness / Contrast Displays the brightness and/or contrast pop-up icons; toggles
between the brightness and contrast pop-up icons. Use the scale
key combinations Fn+→→, Fn+←← to adjust the brightness or
contrast.
Contrast adjustment is only available for DSTN models.
LCD/external monitor
switching
Displays the computer output in the following order when an
external monitor is attached.
Chapter 2. Getting Familiar with Your Computer 2-13
Page 42

Using the Fn Key Function
Key Combination Feature Meaning
+
+
+
+
Fuel-Gauge display on
or off
Speaker volume Displays the speaker volume pop-up icon. Use the scale key
Power Management
Settings and System
Information
Standby mode Places the computer in standby mode. For more information
Displays the fuel-gauge pop-up icon.
combinations Fn+→→, Fn+←← to adjust the volume.
Note: To save the speaker volume level in the computer, use the
volume control function of the operating system or the audio
support software (Yamaha Station**) shipped with your computer.
Displays the Power Management Settings and System
Information screens.
The Power Management Settings screen contains items used for
power management. See page C-13.
The System Information screen shows information about your
computer by listing a summary of the BIOS Utility settings. The
Notebook Manager shows the same information in the Information
Viewer tab. See page 3-4.
about this mode, see page 4-14.
+
Hibernation mode Places the computer in hibernation mode. For more information
Scale up
+
Scale down
+
2-14 IBM ThinkPad 310E/310ED: User’s Guide
about this mode, see page 4-15.
Increases the level of the current pop-up icon. Refer to Fn+F2
and Fn+F5.
Decreases the level of the current pop-up icon. Refer to Fn+F2
and Fn+F5.
Page 43

Operating the Numeric Keypad
The keyboard has some keys that, when enabled, work as a 10-key
numeric keypad.
To enable the numeric keypad, press and hold Shift, then press
NumLk.
Operating the Numeric Keypad
While in this mode, press and hold Shift to temporarily use the
cursor and screen control keys.
To disable the numeric keypad, press and hold Shift; then press
NumLk again.
Chapter 2. Getting Familiar with Your Computer 2-15
Page 44

Keeping the Computer from Being Damaged
Keeping the Computer from Being Damaged
Your computer is a delicate device that requires careful handling.
To keep it from being damaged, keep these precautions in mind:
• Do not place anything heavy on your computer.
• Do not scratch, twist, hit, or press the surface of the LCD.
• Keep the computer at least 130 mm (5 in.) away from any
electrical appliance that generates a strong magnetic field (for
example, magnets, motors, TVs, refrigerators, or large audio
speakers).
• Use your computer when the temperature is from 10°C to 35°C
(50°F to 95°F).
• Remove the battery pack and keep it in a cool place if you do
not plan to use the computer for a long period of time.
• Do not disassemble the computer.
• Do not leave any objects (especially metal objects) in the
• Do not pour liquids into the computer.
• Do not drop or apply shock to your computer.
The hard disk drive, CD-ROM drive, and diskette drive are very
delicate devices that need careful handling. To avoid damage, do
not press on, drop, or apply any shock to them.
• Do not press on the middle part of the CD-ROM drive or the
• Do not touch the lens on the CD-ROM tray.
• Do not use benzene, thinners, or other cleaners to clean the lens
• Do not place more than one diskette label on a diskette. Two or
• Insert a diskette straight into the diskette drive. Inserting it at an
2-16 IBM ThinkPad 310E/310ED: User’s Guide
computer.
diskette drive at any time.
on the CD-ROM tray. Use a CD-ROM cleaner kit.
more labels can cause a label to tear apart inside the drive and
cause damage to the diskette drive.
angle can damage the front of the diskette drive.
Page 45

Keeping the Computer from Being Damaged
Occasionally clean your computer as follows:
• Use a soft cloth moistened with a nonalkaline detergent to wipe
the exterior of the computer.
• Gently wipe the LCD with a dry, soft cloth. Avoid using alcohol
or detergent to clean the LCD.
Chapter 2. Getting Familiar with Your Computer 2-17
Page 46

Carrying the Computer
Carrying the Computer
When carrying the computer, follow these instructions to prevent
possible damage to your computer and data.
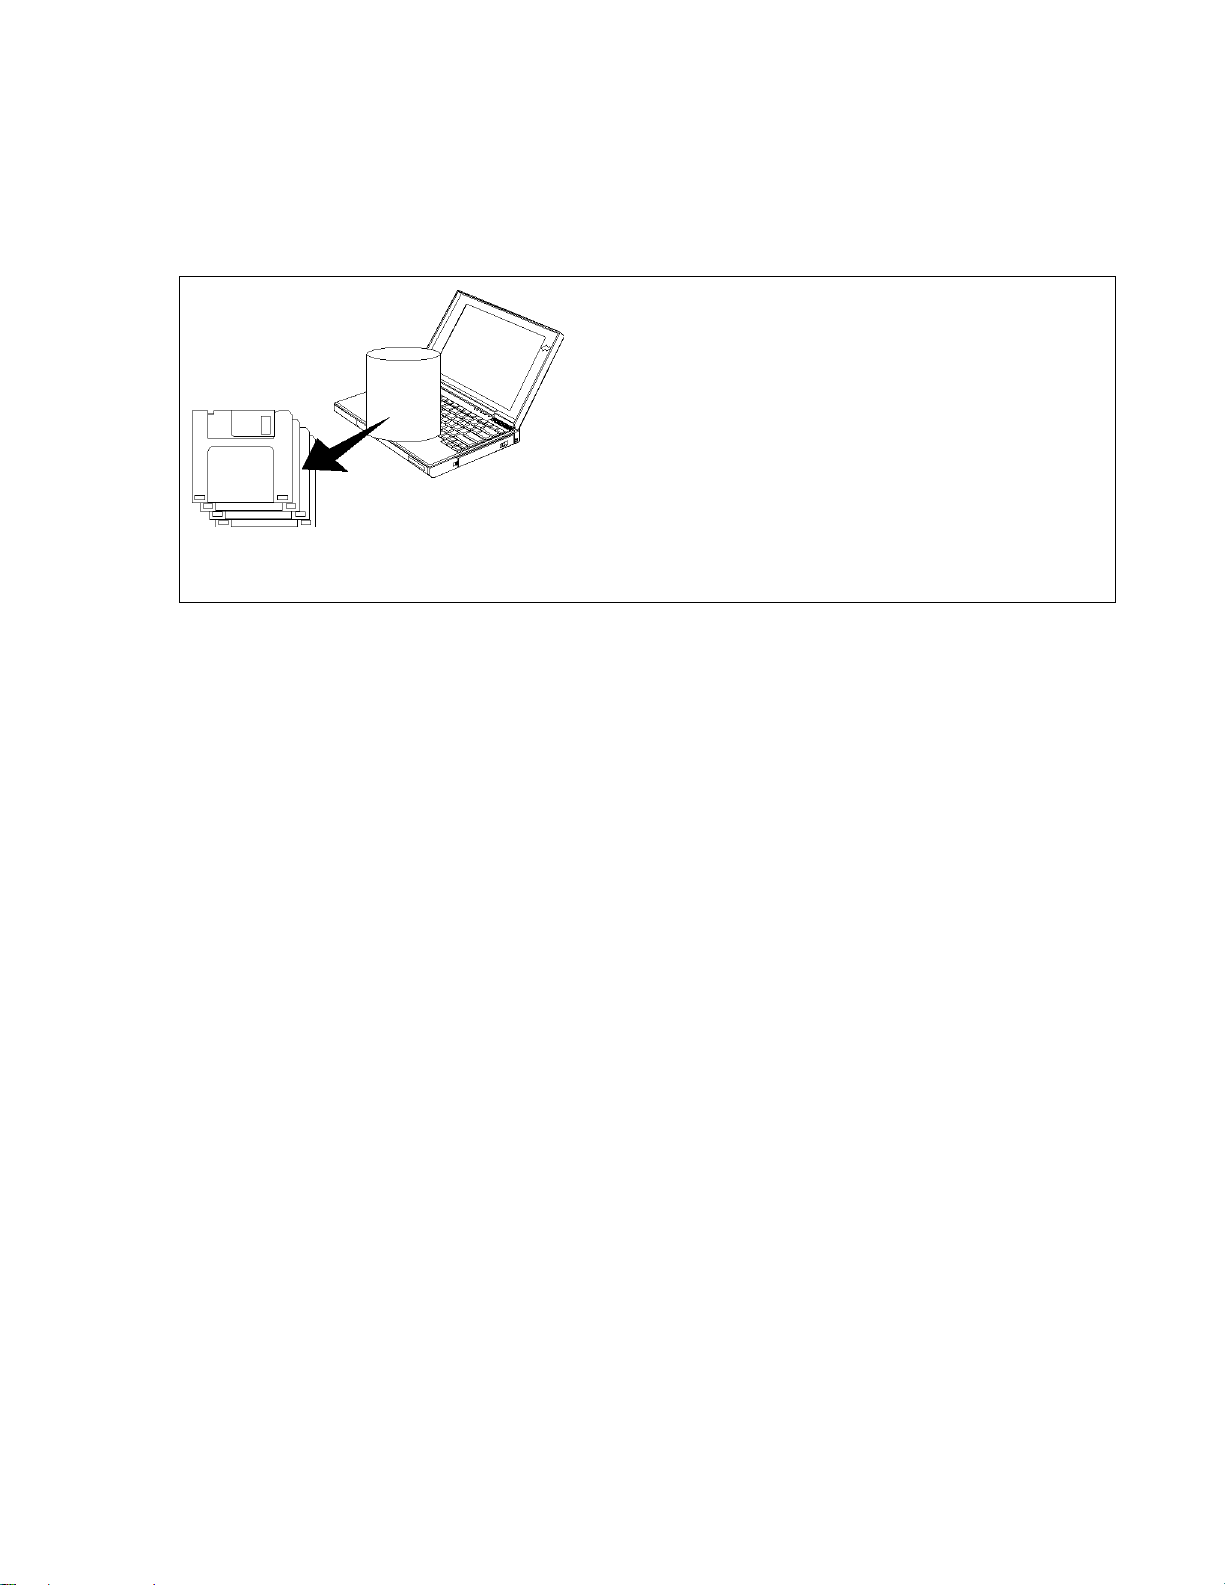
1 Remove any CD-ROM from the CD-ROM drive or any diskette
from the diskette drive.
2 Turn off all attached devices.
3 Turn off the computer and close the LCD.
4 Unplug all external cables and cords connected to the computer.
5 Make sure all computer doors and covers are closed.
For Your Information
1. You should occasionally back up data from the hard disk to
diskettes or tapes.
2. To use the AC Adapter outside your home country, you need
3. A carrying case is available from IBM or an IBM authorized
2-18 IBM ThinkPad 310E/310ED: User’s Guide
an ac power cord that is certified for the country you are
visiting. You can purchase one through IBM or an IBM
authorized dealer in that country. For more information about
power cords, see page D-5.
dealer.
Page 47

Chapter 3. Operating Your Computer
This section provides information about using your computer.
What Happens When Power Is Turned On?..................................3-2
Using Notebook Manager .............................................................3-3
Starting Notebook Manager....................................................3-3
Information Viewer ...........................................................3-4
POST...............................................................................3-5
Boot Device......................................................................3-6
Password.........................................................................3-7
Hotkey Icon......................................................................3-8
Power Saving ...................................................................3-9
Display...........................................................................3-11
IDE Adapter ...................................................................3-12
Using the Computer LCD or the External Monitor........................3-13
Display Output Type.............................................................3-13
Points to Consider When Using the DOS Screen on the LCD..... 3-14
Attaching a Monitor...............................................................3-14
Setting the Monitor Type and the Display Driver .............3-15
Connecting an External Monitor to the Computer............ 3-16
Using SVGA Video Mode......................................................3-16
Using PC Cards..........................................................................3-18
About CardBus PC Cards.....................................................3-19
About Zoomed Video Port Cards ..........................................3-19
Audio Features ...........................................................................3-20
Using the External Diskette Drive ................................................3-21
Using the CD-ROM Drive............................................................ 3-22
Handling Compact Discs.......................................................3-23
Copyright IBM Corp. 1997 3-1
Page 48

What Happens When Power Is Turned On?
What Happens When Power Is Turned On?
You see one of the following prompts when the computer is turned on:
An operating system screen appears when the computer is operating
correctly. The screen you see may differ depending on your operating
system.
This screen indicates that a failure occurred during the power-on self-test
(POST). See Chapter 8, “Solving Computer Problems” for the necessary
actions.
This icon appears when a Power-On password is set. To start the
computer, enter the correct password.
3-2 IBM ThinkPad 310E/310ED: User’s Guide
Page 49

Using Notebook Manager
Using Notebook Manager
Note:
Certain Fn key functions are disabled
when you access the notebook
manager, because these functions
are also found in the notebook
manager.
Starting Notebook Manager
Note:
Making changes to most settings in
the Notebook Manager take effect the
next time the computer restarts. If
you make changes in the Hotkey
Icon, Power Saving and Display
screens, these changes take effect
immediately.
The computer has a built-in system setup program called Notebook
Manager. The Windows 95-based Notebook Manager allows you to
set passwords, the startup sequence of the drives and power
management settings. It also shows current hardware
configurations.
To start the Notebook Manager:
1 Click on the Start button.
2 Select the Programs folder.
3 Select the Notebook Manager folder.
4 Select the Notebook Manager application to run the program.
Notebook Manager consists of eight sections:
• Information Viewer
• POST
• Boot Device
• Password
• Hotkey Icon
• Power Saving
• Display
• IDE Adapter
To select a section, click on the tab of the section you want to view.
Chapter 3. Operating Your Computer 3-3
Page 50

Using Notebook Manager
Information Viewer
Infoviewer summarizes and lists information about the specifications
and settings of the different components of your computer.
Note:
Items in this table may differ slightly
from the ones onscreen.
Information Viewer Items
Item Description
CPU Brand Brand of the CPU.
CPU Type Type of the CPU.
Bus Frequency Bus frequency of the CPU.
CPU Clock Clock speed of the CPU.
Total Memory Size Total amount of main memory.
Video RAM Size Total amount of video memory.
Serial Ports Settings (I/O address and IRQ) of the serial port(s).
3-4 IBM ThinkPad 310E/310ED: User’s Guide
Page 51

Using Notebook Manager
Item Description
Parallel Port Settings (I/O address and IRQ) of the parallel port.
Internal Cache Total amount of internal cache (CPU cache)
memory and if it is enabled or not.
External Cache Total amount of external cache (L2 cache) memory
and if it is enabled or not.
Pointing Device Type of the pointing device detected.
Internal Keyboard Type of the internal keyboard
Disk Information Information on drive type, free size and total size by
logical drive
POST
POST is used to define how you want your computer to boot up
(startup). Enable Bypass memory test during POST to bypass the
memory test to speed up booting. Then click on Apply to accept.
Chapter 3. Operating Your Computer 3-5
Page 52

Using Notebook Manager
Boot Device
Boot Device is used to defines the boot sequence to follow when
your computer boots up. The Boot Device screen displays the
following items:
• Set CD-ROM as a Bootable Device. When enabled, the
• Boot Device and Boot Sequence. This controls the startup
3-6 IBM ThinkPad 310E/310ED: User’s Guide
computer checks from the CD-ROM drive first for a bootable CDROM disc. If there is no bootable CD-ROM disc or no CD-ROM
is present, the computer follows the selected Boot Sequence
setting.
sequence of the drives in your computer. The four settings are:
Page 53

Item Description
Using Notebook Manager
Drive A
then C
Drive A The computer boots from the diskette drive. If no system
Drive C The computer boots from the hard disk drive. If the hard disk
Drive C
then A
The computer boots from the diskette drive. If no system
diskette is found in the diskette drive, the computer boots from
the hard disk drive. If the hard disk drive is not a system disk,
an error message displays.
diskette is present in the diskette drive, an error message
displays.
drive is not a system disk, an error message displays.
The computer boots from the hard disk drive. If the hard disk
drive is not a system disk, the computer boots from diskette
drive. If no system disk is present in the diskette drive, an
error message displays.
Click on the drop-down list box and select the desired sequence,
then click on Apply to accept.
Password
Chapter 3. Operating Your Computer 3-7
Page 54

Using Notebook Manager
Password is used to set, modify or delete the password(s) for your
computer. There are two passwords used in the system:
• Power-On Password. The power-on password prevents
unauthorized access to your computer at system startup and at
resume from hibernation mode.
• Setup Screen Password. The setup password prevents
unauthorized access to the Notebook Manager and BIOS Utility.
For more information on passwords, see Chapter 5.
Hotkey Icon
HotKey Icon is used to set the position where hotkey icons should
pop-up.
Move your cursor inside the monitor to select the position where you
want hotkey icons to pop-up, then double-click the right button to set.
Click on Apply to accept.
3-8 IBM ThinkPad 310E/310ED: User’s Guide
Page 55

Power Saving
Using Notebook Manager
Power Saving is used to set various settings related to power
management. This includes the power-saving time-outs, the powersaving mode to enter, and other special power-saving features:
• Enable Power Management. Select to enable power
management based on the settings in this screen.
• Timer Settings. Sets the time-out values for four power-saving
timers — display, hard disk, standby and hibernation.
• Enable Modem Ring Resume Indicator. Select to allow the
computer to wake-up from standby mode when an incoming
modem ring is detected.
• Enable Battery Low Warning Beep. Select to allow the computer
to give off warning beeps when the computer runs low on
battery.
• Enable Sleep Upon Battery Low. Select to allow the computer to
enter standby or hibernation mode when the computer runs low
on battery.
Chapter 3. Operating Your Computer 3-9
Page 56

Using Notebook Manager
• Enable System Resume Timer. Select to allow the computer to
wake-up from standby mode if the resume timer is set and
matched.
• System Resume Timer. (When Enable System Resume Timer is
selected) click to set the System Resume Timer.
Select the desired item by clicking on the checkbox of the desired
item, then click on Apply to accept.
Setting the Power Management Timer Settings
To modify Timer Settings for each individual power management
timer, use the spinner controls.
Setting the System Resume Timer
To set the alarm time, click on the System Resume Timer button,
then set the desired date and time using the pop-up calendar and
clock.
3-10 IBM ThinkPad 310E/310ED: User’s Guide
Page 57

Display
Using Notebook Manager
Note:
Make sure an external monitor is
connected before External Monitor is
selected.
Note:
TFT active-matrix LCDs have fixed
and optimized contrast levels.
Display is used to control various settings related to display, such as
the display device, and display brightness/contrast levels. The items
in this screen include:
• Boot Display Device. Sets the default display device on boot-up.
• Switching Display Device. Sets the current display device.
• Brightness for LCD Panel/Contrast for LCD Panel. Click and
drag to set the LCD screen brightness and contrast levels.
Select the desired item by clicking on the radio button of the desired
item, then click on Apply to accept. To modify the brightness and/or
contrast levels, click and hold the slider control and move to the right
to increase, move to the left to decrease the setting. You can also
click on the item, and use the cursor keys to set the desired level.
Chapter 3. Operating Your Computer 3-11
Page 58

Using Notebook Manager
IDE Adapter
IDE Adapter shows information on the IDE drives (hard disk drive
and/or CD-ROM drive) installed on your computer.
• IDE Drive. Selects the IDE drive you want to view information
• Current Setting of IDE Device. Shows the IDE device and type
• Hard Disk Type. Shows information on the hard disk drive.
Select the desired item to view by clicking on the drop-down list box
of the desired item.
3-12 IBM ThinkPad 310E/310ED: User’s Guide
on.
of the currently-selected IDE device.
Page 59

Using the Computer LCD or the External Monitor
Using the Computer LCD or the External Monitor
This section provides information about using the computer display
and an external monitor. It also provides tips to consider when using
DOS applications.
The LCD in your computer displays computer output with SVGA
(800-by-600 resolution). On some models, thin-film-transistor (TFT)
technology is used, providing up to 65,536 colors. On some models,
dual-scan super twisted nematic (DSTN) technology is used,
providing up to 256 colors.
Display Output Type
To attach an external monitor:
+ Page 3-16
When you attach an external monitor that supports higher resolution
than VGA mode, you can get a maximum of 1024x768 video
resolution.
To display your computer output on an external monitor, you need to
set the appropriate display output type (where to display the
computer output). You can select one of the following display out
types:
• LCD: The computer output is displayed only on the LCD of the
computer.
• CRT: The computer output is displayed only on the attached
external monitor.
If no external monitor is attached to the computer and the display
output type is set to CRT, the output is displayed on the LCD.
• Both: The computer output is displayed on both the LCD and the
external monitor.
Chapter 3. Operating Your Computer 3-13
Page 60

Using the Computer LCD or the External Monitor
You can select where to display the computer output by using the
following commands:
• Using the Fn key function: Press and hold the Fn key; then
press F3 key. The setting toggles sequentially between LCD,
CRT and Both.
• Using the Notebook Manager function: Click on the Display tab;
then select LCD Panel Only, External monitor or Both as the
switching display device.
Points to Consider When Using the DOS Screen on the LCD
When you use a DOS application that supports only VGA mode
(640-by-480 resolution) with your computer, the screen image might
look slightly distorted or might appear smaller than the display size.
This is to maintain compatibility with DOS applications.
Attaching a Monitor
Note:
When installing an operating system,
you must install the display driver
before you can use an external
monitor.
Your computer supports the following color depth and resolution on
an attached monitor:
Color Resolution
256 colors 800 by 600
65,536 640 by 480
16,777,216 colors 640 by 480
3-14 IBM ThinkPad 310E/310ED: User’s Guide
640 by 480
1024 by 768
800 by 600
Page 61

Using the Computer LCD or the External Monitor
Attention:
When you select Both, do not attach
an external monitor that supports only
VGA mode (640-by-480 resolution).
Otherwise, the external monitor
screen will be scrambled and the
output will not be displayed, or the
screen might be damaged.
Note:
Refer to the specifications for your
external monitor to determine its
supported resolutions and refresh
rates.
To attach an external monitor:
1 Change the display output type to CRT or Both. (See “Display
Output Type” on page 3-13.)
2 Set your monitor type and display device driver. (See “Setting
the Monitor Type and the Display Driver” on page 3-15.)
3 Attach the external monitor to the computer. (See “Connecting
an External Monitor to the Computer” on page 3-16.)
Setting the Monitor Type and the Display Driver
Before attaching the external monitor to your computer, set the
appropriate monitor type and device driver type as follows:
1 In the Control Panel, double-click on the Display icon.
2 Select the Settings tab.
3 Click on Advanced Properties.
4 Select the Monitor tab; then click on Change….
5 Change the Manufacturers and Models to the appropriate
settings.
6 Click on OK.
1 In the Control Panel, double-click on the ChipsCPL icon.
2 Select item (your monitor) from the Monitor Selection list.
3 Click on OK.
Chapter 3. Operating Your Computer 3-15
Page 62

Using the Computer LCD or the External Monitor
Connecting an External Monitor to the Computer
To attach an external monitor to the computer:
1 Turn off the computer.
2 Attach the external monitor to the external monitor connector and
then to the electrical outlet.
3 Turn on the external monitor and the computer.
Using SVGA Video Mode
Note:
When installing an operating system,
you must install the display driver
supplied with the computer to use
SVGA mode.
The IBM ThinkPad 310E/310ED models have an LCD screen that
supports an SVGA video mode with 800-by-600 resolution. You can
also display information in higher resolutions by attaching an
external monitor to your computer that supports higher resolutions.
The table shows the various display modes available with your
computer.
Display Modes TFT (1 MB) DSTN (1 MB)
Resolution and Color Depth (LCD only)
640x480 (full screen) 16,777,216 65,536
800x600 (full screen) 65,536 256
1024x768 (virtual screen) 256 256
External Resolution and Color Depth (CRT only)
640x480 16,777,216 16,777,216
800x600 65,536 65,536
1024x768 256 256
1280x1024 16 16
3-16 IBM ThinkPad 310E/310ED: User’s Guide
Page 63

Using the Computer LCD or the External Monitor
Simultaneous Display (LCD/CRT)
640x480 16,777,216 (LCD) /
16,777,216 (CRT)
800x600 65,536 / 65,536 256 / 256
1024x768 (virtual screen) 256 / 256 256 / 256
1280x1024 (virtual screen) 16 / 16 16 / 16
65,536 (LCD) /
65,536 (CRT)
Chapter 3. Operating Your Computer 3-17
Page 64

Using PC Cards
Using PC Cards
Your computer has two slots that allow you to install 68-pin, 85.6 mm
x 54.0 mm (credit-card-size) PC Cards. With a PC Card, you can
send and receive faxes, communicate via a network, or store data.
The PC Card slots of the computer conform to the PCMCIA Standard
release 2.01 or later that is defined as the hardware layer of the PC
Card standard. You computer also comes with a basic set of drivers:
• Socket Services
• Card Services
The PC Card slots operate at 5V or 3.3V and support the following:
• Type I, Type II, and Type III PC Cards.
• 16-bit PC Card (PCMCIA 2.0, 2.1 / JEIDA 4.1, 4.2).
• 32-bit PC Card (CardBus PC Card).
• Zoomed Video Port PC Cards (only lower slot).
Important!
Before using CardBus PC Cards or Zoomed Video port PC Cards,
you must change CardBus Support to Enabled in the BIOS Utility.
See Appendix C.
Note that the PC Card slots do not support 8-bit or 16-bit slave DMA
PC Cards. Ask IBM or an IBM authorized dealer for more
information about the different types of PC Cards.
Before you can use PC Cards under DOS and Windows, you first
need to install the PC Card program. (See pages 7-8 and 7-12).
Then refer to the documentation that came with your PC Card to use
the card.
For more information about PC Cards, see Appendix B.
3-18 IBM ThinkPad 310E/310ED: User’s Guide
Page 65

About CardBus PC Cards
Using PC Cards
Note:
CardBus PC Cards are supported by
Windows 95 only.
A newly inserted CardBus PC Card might not be recognized
correctly by Windows 95 (that is, Windows 95 might mistake it for a
previously installed CardBus PC Card). If this happens, do the
following
1 Open My Computer, Control Panel and then System.
2 Click on the Device Manager tab.
3 Select a device that is no longer being used. You can select
4 Remove the device (or devices).
5 Restart the system.
About Zoomed Video Port Cards
Note:
CardBus Support needs to be
enabled in the BIOS Utility to use the
ZV port. See page C-12.
Only the lower PC Card slot supports
ZV PC Cards.
Support for ZV (Zoomed Video) port allows your computer to accept
ZV PC Cards such as one with hardware MPEG capability. A ZV
card should be inserted into the lower slot.
more than one.
Chapter 3. Operating Your Computer 3-19
Page 66

Audio Features
Audio Features
The built-in audio features let you record and playback sound from
various sources.
These features include:
• A built-in sound chip on the system board, providing 16-bit stereo
audio that supports Microsoft Windows 3.1, Windows 95,
Microsoft Sound System, and most programs that use the Sound
Blaster/Sound Blaster Pro standard.
• The ability to perform real-time recording.
• Scalable sampling rate (from 4 to 44.1 kHz) and compression
ratio that give complete control of record time to required storage
ratio.
• Digitally controlled volume with muting.
• Microphone line-in jack, line-in jack, and line-out/headphone jack
for maximum flexibility.
• Built-in stereo speakers to enhance portability.
To adjust the volume of your internal speaker, speakers attached to
the line-out port on the computer, follow these instructions:
1 Press the Fn+F5 key combination to bring up the volume control
2 Press the Fn+→→ and Fn+←← key combinations to increase and
3 Press the Fn+Esc key combination to close the icon and save
3-20 IBM ThinkPad 310E/310ED: User’s Guide
icon.
decrease the volume level respectively.
the setting.
Page 67

Using the External Diskette Drive
IBM ThinkPad 310ED models come with a built-in CD-ROM drive
and an external diskette drive.
IBM ThinkPad 310E (those without a built-in CD-ROM drive) come
with the diskette drive already installed internally.
To install the external diskette drive, simply plug the diskette drive
cable into the diskette drive port, located on the rear panel of the
computer. The ThinkPad automatically senses the presence of the
drive and configures itself accordingly.
Power to the diskette drive is provided through this connecting cable.
The diskette drive does not have its own internal power source. It
draws its power from the ThinkPad.
Using the External Diskette Drive
Chapter 3. Operating Your Computer 3-21
Page 68

Using the CD-ROM Drive
Using the CD-ROM Drive
IBM ThinkPad 310ED models come with a built-in CD-ROM drive, so
you can use compact discs (CDs).
The following CDs are supported by the computer:
• Music CDs
• Photo CDs
• CD-ROM or CD-ROM XA discs
Attention:
Hold the CD by the edges. Do not
touch the surface of the CD.
To use the CD-ROM drive, do the following:
1 Turn on the computer.
2 Push the CD-ROM eject button on the right side of the computer;
then pull out the CD-ROM tray.
3 Carefully insert your CD-ROM onto the CD-ROM tray; then push
the tray into the computer until it fully closes.
4 The way you access the data on the CD-ROM depends on what
type of CD it is:
− Music CDs can be played using the CD Player application
program.
− Data CDs can be read just like normal discs.
− Photo CDs require specific application software.
3-22 IBM ThinkPad 310E/310ED: User’s Guide
Page 69

Handling Compact Discs
Using the CD-ROM Drive
Compact discs are high-density media that must be handled with
care and kept clean to ensure that they remain readable. Keep in
mind the following to maintain reliability:
Attention:
Wiping the compact disc in a circular
direction can cause loss of data.
• Hold the compact disc by the edges. Do not touch the surface of
the compact disc.
• To remove dust or fingerprints, wipe the compact disc from the
center to the outside of the disc.
• Do not write on the surface.
• Do not store or place the compact disc in direct sunlight.
• Do not use benzene, thinner, or other cleaners to clean the
compact disc. Use a CD-ROM cleaner kit.
• Do not flex or bend the compact disc.
Chapter 3. Operating Your Computer 3-23
Page 70

Chapter 4. Using Battery Power
This chapter describes the battery-pack operations.
Charging the Battery Pack............................................................4-2
Charging with the AC Adapter ................................................4-2
Battery Pack Maintenance ......................................................4-4
Replacing the Battery Pack...........................................................4-5
Monitoring the Battery-Power Status .............................................4-7
Using the Battery-Power Status Indicator................................4-7
Low Battery Condition......................................................4-8
Using the Fuel-Gauge Icon.....................................................4-8
Preserving Battery-Pack Life ........................................................4-9
Maximizing Battery-Powered Operation........................................4-9
Using Advanced Power Management.....................................4-9
Decreasing LCD Brightness ..................................................4-11
Using the Battery Power-Management Function................... 4-12
Display Standby Mode ................................................... 4-14
Hard Disk Standby Mode................................................4-14
Standby Mode................................................................4-14
Hibernation Mode ...........................................................4-15
Copyright IBM Corp. 1997 4-1
Page 71

Charging the Battery Pack
Charging the Battery Pack
Note:
For more information on maintaining
your battery packs, see page 4-4.
Charging with the AC Adapter
Note:
Battery packs shipped from the
factory are in an almost-discharged
state, so you must charge them fully
before use.
If the battery pack is new or has not been used for a long period of
time, it does not reach full charge with only one charging. This is
normal. When used regularly (at least once per week) and properly
(as described on page 4-4), the battery pack will work its way back
up to full capacity within five or six charge and discharge cycles.
The battery pack can be charged with the AC Adapter. You must
charge the battery pack in any of the following situations:
• A new battery pack was purchased.
• The battery status indicator (orange) is blinking, and the
computer beeps four times.
• The battery status indicator (orange) blinks for less than 1
minute.
The following table shows the approximate charging times for the
battery pack:
Conditions Charging Time
Operational charging 6 to 8 hours
Power-off charging 2 hours
4-2 IBM ThinkPad 310E/310ED: User’s Guide
Page 72

Charging the Battery Pack
The following procedure describes how to recharge the battery pack
with the AC Adapter when the computer is turned off.
1 Turn off the computer; open the battery cover; and install the
new or discharged battery pack into the computer.
2 Close the battery cover.
3 Connect the AC Adapter to the computer.
The system status indicators show the following:
Color Meaning
Orange The battery pack is being charged.
Green The battery pack is fully charged.
Chapter 4. Using Battery Power 4-3
Page 73

Charging the Battery Pack
Battery Pack Maintenance
Many users are familiar with the phenomenon known as battery
memory, where after repeated partial charging and discharging the
battery pack appears to lose some of all of its original capacity. The
nickel/metal-hydride (NiMH) battery packs used by the ThinkPad are
less susceptible to memory development than are the more
common nickel/cadmium (NiCd) batteries. However, to ensure the
longest possible battery life, in terms of both length of use per
charge and number of charge and number of charge and discharge
cycles before wearing out, please observe the following guidelines:
• Battery packs shipped from the factory are in an almost
discharged state, so you must charge them fully before use.
• When charging, always charge the battery pack fully. Even if
you only need to run on battery power for a fraction of the
battery’s capacity, you should not try to give the battery a partial
charge.
• Normal charging causes the battery pack to heat up slightly. Let
it cool for 15 minutes before you use it.
• Immediately after the battery pack has been drained of power, it
4-4 IBM ThinkPad 310E/310ED: User’s Guide
may be warm to the touch. This is normal. However, for longer
battery life, it should be set aside to cool for 15 minutes before
recharging.
Page 74

Replacing the Battery Pack
When the AC Adapter is connected, you can replace the battery
pack whenever it is low in power. Without the AC Adapter, the
battery pack can be replaced when the computer power is off, or
when the computer is in hibernation mode. To replace the battery
pack during hibernation mode and without turning off the computer,
follow these instructions.
Important!
• If you are using PC Cards, either connect the AC Adapter or
To create the hibernation file:
+ Page 4-15
• Make sure you have created the hibernation file before doing
1 Enter hibernation mode by pressing the Fn+F8 key combination.
Replacing the Battery Pack
stop the PC Card application and remove the PC Card before
doing the following.
the following steps. Otherwise, you cannot enter hibernation
mode. (See page 4-15.)
Make sure the power-on indicator is off before you open the
battery bay door.
2 Press the battery cover release latch and slide out the
battery cover.
Chapter 4. Using Battery Power 4-5
Page 75

Replacing the Battery Pack
3 Locate the pull tab of the battery; pull the tab to remove the
battery out of the battery bay.
4 Insert the fully charged battery into the battery bay (with its
connector side up) until you feel the contacts engage.
5 Replace the battery bay door.
6 Press the power switch.
4-6 IBM ThinkPad 310E/310ED: User’s Guide
The computer resumes normal operation from hibernation
mode.
Page 76

Monitoring the Battery-Power Status
The battery condition can be determined through the battery-power
status indicator and the Fuel-Gauge icon.
Using the Battery-Power Status Indicator
The battery-power status indicator shows the current status of the
battery pack. Observe the battery-power status indicator and
compare it with the following status list to determine the battery
condition:
Status Condition Action Required
Monitoring the Battery-Power Status
Green Fully charged or
partially discharged
Blinking
Orange
Off The battery pack is
Approximately 5
minutes of power
left. The orange
indicator blinks until
power fails or this
low-battery condition
is remedied.
not installed, the
computer is turned
off, or the computer
is in hibernation
mode.
Continue your work.
Take either of the following actions
within 1 minute:
• Connect the AC Adapter to the
computer.
• Replace the battery pack with a
fully charged spare.
If standby mode is caused by a lowbattery condition, data in memory can
be lost. Do either of the following
immediately.
• To continue your work with the
AC Adapter: connect the AC
Adapter to the computer and
press the Fn key.
• To continue your work with a fully
charged battery pack: connect the
AC Adapter to the computer,
replace the battery pack with a
fully charged one. Then
disconnect the AC Adapter from
the computer.
Chapter 4. Using Battery Power 4-7
Page 77

Monitoring the Battery-Power Status
Low Battery Condition
Attention:
Do not leave the computer in this
condition for an extended period of
time. Data in memory will be lost.
For necessary actions:
+ Page 4-7.
Using the Fuel-Gauge Icon
When the battery pack is low in power, the battery-power status
indicator turns amber and begins to blink. At this point, you should
complete all disk access operations before the battery runs out of
power.
The battery pack needs to be charged immediately. If corrective
actions are not taken within 1 minute, the computer enters standby
mode or hibernation mode.
The Fuel-Gauge icon is another way you can monitor the battery
pack status. To bring up the Fuel-Gauge icon, press the Fn+F4 key
combination.
The Fuel-Gauge icon shows the current battery charge left in the
battery pack. Press the Fn+Esc key combination to close the icon.
4-8 IBM ThinkPad 310E/310ED: User’s Guide
Page 78

Preserving Battery-Pack Life
To preserve the life of the battery pack:
Maximizing Battery-Powered Operation
Attention:
Make sure the battery pack power is
completely used before you recharge
it. Recharging a battery pack that is
not completely discharged can
shorten battery life.
• Do not charge the battery pack until all of its power is used.
• Once you have started charging the battery pack, do not use
it until it is fully charged.
• Discharge the battery pack occasionally.
• Turn off the computer whenever it is not in use.
Maximizing Battery-Powered Operation
To save battery power:
• Use Advanced Power Management (APM)
• Decrease the LCD brightness
• Use the Battery Power-Management function
Using Advanced Power Management
Note:
If you have purchase this computer
with a preinstalled operating system,
APM is already installed correctly.
The computer has power-management functions built in. No special
power-management drivers have to be installed before you use the
computer. However, the computer is able to conserve more power
when Advanced Power Management (APM) is used.
APM allows you to reduce power consumption when your
applications and devices are idle. Each operating system comes
with its own APM.
Chapter 4. Using Battery Power 4-9
Page 79

Maximizing Battery-Powered Operation
If you are using DOS, you can verify if the computer has APM
installed correctly by typing POWER at the command prompt and
pressing Enter. If a screen similar to the following appears, APM is
successfully installed.
If not, add the following line to your CONFIG.SYS file, using a text
editor such as the DOS Editor.
DEVICE=C:\DOS\POWER.EXE
If you are using Windows, follow these instructions to check and
install APM for Windows:
1. Start the system. Make sure that the current directory is
2. Type SETUP at the command prompt and press Enter. The
4-10 IBM ThinkPad 310E/310ED: User’s Guide
Windows (usually C:\WINDOWS>).
following screen appears:
Page 80

Maximizing Battery-Powered Operation
Note:
If “MS-DOS System with APM”
appears for the item “Computer:”,
APM is already installed. Press F3 to
exit the setup.
Decreasing LCD Brightness
3. Using the Arrow keys (↑↑,↓↓), position the highlighted cursor on
MS-DOS System and press Enter.
4. Position the highlighted cursor over MS-DOS System with
APM and press Enter.
5. Verify that the item Computer has changed to MS-DOS System
with APM on the screen. If not, return to step 3.
6. Press Enter to install APM.
7. Restart the system to make APM effective.
Adjust the brightness of the LCD to the lowest level possible that
allows you to comfortably view the screen. This is an effective way
of conserving battery power.
Note:
Contrast can be adjusted only for the
DSTN models.
To adjust the brightness, follow these steps:
1 Press the Fn+F2 key combination to bring up the Contrast pop-
up icon.
2 Pressing Fn+F2 again brings up the Brightness pop-up icon.
The Fn+F2 key combination toggles between Brightness and
Contrast controls.
3 Press the Fn+←← key combination to decrease the brightness.
4 Press the Fn+Esc key combination to close the Brightness pop-
up icon.
Chapter 4. Using Battery Power 4-11
Page 81

Maximizing Battery-Powered Operation
Using the Battery Power-Management Function
Note:
Sleep Manager needs to be installed
to use Hibernation. If Sleep Manager
is not yet installed on your computer,
see page 7-8 and 7-19 for
instructions on how to install Sleep
Manager.
Your computer has built-in battery power-saving functions to save
power when you use the battery pack or AC Adapter.
When resuming normal operation from one of the modes, use the
resume function to return to where you were when you entered that
mode. Because the operating system is already loaded, the resume
function is faster than turning on the power.
The following are the two power-saving modes:
• Standby mode (Fn+F7). You can enter standby mode for short
idle times, such as when you are taking a short break from work.
• Hibernation mode (Fn+F8). You can enter hibernation mode
when you leave your office for the day.
It takes more time to return to normal operation from hibernation
mode than to return from standby mode, but the computer does not
use power.
4-12 IBM ThinkPad 310E/310ED: User’s Guide
Page 82

Using Power Management
The following figure shows the operations required when the
computer moves from a power-off condition to operation mode, and
vice versa.
Chapter 4. Using Battery Power 4-13
Page 83

Using Power Management
Display Standby Mode In display standby mode, the computer shuts off the LCD backlight
and turns off the CRT video as well, if there is no activity from the
keyboard, TrackPoint III or external mouse within the period
specified by the Display Standby Timer. To turn the display back
on, press a key, move the TrackPoint or external mouse.
Hard Disk Standby Mode In this mode, the hard disk drive spins down and enters a standby
state if there are no disk read/write operations within the period
specified by the Hard Disk Standby Timer. The hard disk drive
automatically powers back on when accessed.
Standby Mode In standby mode, the hard disk drive stops and the LCD turns off.
The computer immediately resumes normal operation when you
press any key or use any pointing device. Also, if a power-saving
monitor (Energy Star monitor) is in use when the computer enters
standby mode, the computer activates the monitor’s low-power
mode.
Points to Consider When Using Standby Mode
Consider the following before using standby mode:
• The computer enters standby mode if the LCD is closed.
• Pressing the power switch when the computer is in standby
• When entering standby mode or resuming normal operation with
• When a PC Card is installed, the computer may not enter
4-14 IBM ThinkPad 310E/310ED: User’s Guide
mode will not turn off the computer. To turn off the computer,
you need to press and hold the power switch for more than 3
seconds.
a PC Card, if the application or the computer does not does not
operate, restart the application or the computer.
standby mode.
Page 84

Hibernation Mode
Using Power Management
Notes:
1. Before using hibernation, Sleep
Manager (the hibernation utility)
must be installed and run.
2. Using a particular PC card can
disable hibernation mode.
3. With a base memory of 16MB, it
takes approximately 20 seconds
to enter hibernation mode and
36 seconds to resume normal
operation. (The time to enter or
exit hibernation mode depends
on the computer memory size.)
Attention:
The hibernation file must not be
created in a compressed data area of
the hard disk.
In hibernation mode, all tasks are stopped and memory data and the
current status of the computer are stored on the hard disk drive;
then power is turned off. No battery power is used. When power is
turned on again, the computer automatically restores the tasks and
resumes normal operation. When the computer enters hibernation
mode, you hear one short beep. A graphical message appears;
then a short beep sounds again to inform you that the computer has
entered hibernation mode.
Creating the Hibernation File
When installing an operating system or installing additional
computer memory, you must create a hibernation file on the hard
disk drive to use the hibernation mode. (You only need to create
the hibernation file once after installing an operating system or
additional memory.)
The Sleep Manager program, once installed, automatically creates
and manages the hibernation file for you.
The size of the hibernation file will be greater than total memory.
For example, if base memory is 16MB and you have installed an
optional 16MB memory module (DIMM), the hibernation file is
33MB:
(16MB + 16MB) + 1MB = 33MB
The following describes how to create a hibernation file for your
operating system.
Chapter 4. Using Battery Power 4-15
Page 85

Using Power Management
Note:
To verify if the hibernation file is
valid, you can rest your cursor on the
Sleep Manager icon on the taskbar.
If the file is valid, the icon displays
Save-to-disk feature valid. If the
file is invalid, you need to create the
hibernation file again.
If you using Windows 95
1 Turn on the computer.
2 Click on the Start button.
3 Select the Programs folder.
4 Select Sleep Manager icon.
5 Click on the Create button.
The computer can now enter hibernation mode.
4-16 IBM ThinkPad 310E/310ED: User’s Guide
Page 86

If you are using DOS or Windows
Using Power Management
Note:
Sleep Manager for DOS/Windows
3.11 is required. Refer to page 7-8
for instructions on how to install.
Note:
If the communication links are still
not reestablished, remove and then
reinstall the PC Card before
restarting the system or application
program.
1 Turn on the computer.
2 Type SLEEPMGR /C at the command prompt; then press
Enter.
The hibernation file is created on drive C.
Points to Consider When Using Hibernation Mode
Consider the following before using hibernation mode:
• Do not turn off the computer while the hibernation file is being
created.
• Create the hibernation file only on the hard disk drive installed in
the computer. The hibernation file is read-only.
• The computer reserves some battery power when it is set to
enter hibernation mode when a low-battery condition occurs.
This can cause the battery operating time to be reduced.
• When entering hibernation mode or resuming normal operation
with a PC Card, if the application or the computer does not
operate, restart the application or the computer.
• When a PC Card is installed, the computer may not enter
hibernation mode.
Chapter 4. Using Battery Power 4-17
Page 87

Chapter 5. Protecting Your Computer
This chapter provides information about how to protect your
computer and its internal devices.
Using the Power-On Password......................................................5-2
Setting the Power-On Password.............................................5-2
Changing the Power-On Password .........................................5-3
Removing the Power-On Password........................................5-3
Entering the Power-On Password...........................................5-3
Using the Setup Password............................................................5-5
Setting the Setup Password....................................................5-5
Changing the Setup Password ................................................5-6
Removing a Setup Password..................................................5-6
Entering the Setup Password..................................................5-6
Using Locks..................................................................................5-8
Using Locking Devices...........................................................5-8
Affixing a Nameplate....................................................................5-9
Copyright IBM Corp. 1997 5-1
Page 88

Using the Power-On Password
Using the Power-On Password
Note:
If the Setup password is set, you
need to enter the Setup password to
gain access to the Notebook
Manager or BIOS Utility in order to
set, change or delete the power-on
password.
The Power-On password helps protect your computer form being
used by unauthorized persons. If the Power-On password is set, the
password prompt appears on the screen whenever you turn on the
computer and reminds you to enter the password.
Setting the Power-On Password
If you are using DOS or Windows 3.11, the Power-On password can
be set using the BIOS Utility. Refer to “Appendix C, BIOS Utility” for
instructions.
If you are using Windows 95, do the following to set the Power-On
password:
1 Start the Notebook Manager program.
2 Select the Password tab.
3 Click on the checkbox before the Power-On password.
4 Type a password into the Password text box and press Enter.
Note:
When you type a wrong key, use the
Backspace key to erase it and then
type the correct key.
You can use any combination of up to 7 characters. Use a
combination of any letters or numbers (A to Z, 0 to 9) in
uppercase (A) or lowercase (a). Uppercase and lowercase
letters (for example, A and a) are treated the same.
5 Type your password again to verify it; then press Enter.
6 Click on OK to accept.
5-2 IBM ThinkPad 310E/310ED: User’s Guide
Page 89

Do Not Forget Your Password!
Note the password and keep it in a safe place.
If you forget your password, you cannot reset it. You have to take
the computer to an IBM authorized reseller or IBM marketing
representative to have the password canceled. Proof of purchase
is required, and an additional charge might be required for the
service.
Changing the Power-On Password
To change the Power-On password, follow the same steps used in
setting a password. The new password will be available the next
time you turn on the computer.
Removing the Power-On Password
Using the Power-On Password
To delete the Power-On password, leave the Power-On password
and confirm text boxes blank; then click on OK.
Entering the Power-On Password
Note:
If the return to normal operation is
caused by a preset timer or an
incoming call through the modem,
the password prompt does not
appear. To display the prompt, press
any key or move your pointing
device.
If the Power-On password is set, the password prompt reminds you
to enter the password when:
• Turning on the computer.
• Returning to normal operation from hibernation mode.
When the password prompt appears, do the following:
1 Type your Power-On password.
• Each time you press a key, the symbol z appears.
• When typing your password, release each key quickly. If
you hold a key down too long, the same letter can be
entered repeatedly.
Chapter 5. Protecting Your Computer 5-3
Page 90

Using the Power-On Password
2 Press the Enter key.
• When the password is entered correctly, the computer starts
normal operation.
• When you enter the password incorrectly, X appears. Enter
the correct password.
If you fail to enter the correct password after three tries, you
must turn the computer off, wait at least 5 seconds, and turn
it on to try again.
5-4 IBM ThinkPad 310E/310ED: User’s Guide
Page 91

Using the Setup Password
Using the Setup Password
Note:
If the Setup password is set, you
need to enter the Setup password to
gain access to the Notebook
Manager or BIOS Utility in order to
change or delete the Setup
password.
Setting the Setup Password
The Setup password helps you protect classified information. A
setup password:
• Secures the system information stored in Notebook Manager
and the BIOS Utility.
• Prohibits modification to the hardware.
• Stops the computer after a POST error to restrict access to the
system information.
If you are using DOS or Windows 3.11, the Setup password can be
set using the BIOS Utility. Refer to “Appendix C, BIOS Utility” for
instructions.
If you are using Windows 95, do the following to set the Setup
password:
1 Start the Notebook Manager program.
2 Select the Password tab.
3 Click on the checkbox before the Setup password.
Note:
When you type a wrong key, use the
Backspace key to erase it and then
type the correct key.
4 Type a password into the Password text box and press Enter.
You can use any combination of up to 7 characters. Use a
combination of any letters or numbers (A to Z, 0 to 9) in
uppercase (A) or lowercase (a). Uppercase and lowercase
letters (for example, A and a) are treated the same.
5 Type your password again to verify it; then press Enter.
6 Click on OK to accept.
Chapter 5. Protecting Your Computer 5-5
Page 92

Using the Setup Password
Changing the Setup Password
To change the Setup password, follow the same steps used in
setting a password. The new password will be available the next
time you turn on the computer.
Removing a Setup Password
Do Not Forget Your Password!
Note the password and keep it in a safe place.
If you forget your password, you cannot reset it. You have to take
the computer to an IBM authorized reseller or IBM marketing
representative to have the password canceled. Proof of purchase
is required, and an additional charge might be required for the
service.
To delete the Setup password, leave the Setup password and
confirm text boxes blank; then click on OK.
Entering the Setup Password
If the Setup password is set, the password prompt reminds you to
enter the password when:
• Accessing the Notebook Manager.
• Accessing the BIOS Utility (pressing F2 during POST).
When the password prompt appears, do the following:
1 Type the Setup password.
5-6 IBM ThinkPad 310E/310ED: User’s Guide
• Each time you press a key, the symbol z appears if you are
accessing the BIOS Utility. If you are accessing the
Notebook Manager, the symbol * appears.
Page 93

Using the Setup Password
• When typing your password, release each key quickly. If
you hold a key down too long, the same letter can be
entered repeatedly.
2 Press the Enter key.
• When the password is entered correctly, the computer starts
normal operation.
• When you enter the password incorrectly, X appears. Enter
the correct password.
If you fail to enter the correct password after three tries, the
Notebook Manager exits or the computer freezes (if you are
accessing the BIOS Utility). Run the Notebook Manager to
try again.
Chapter 5. Protecting Your Computer 5-7
Page 94

Using Locks
Using Locks
Note:
You are responsible for the
evaluation, selection, and
implementation for the locking
devices and security features. IBM
makes no comments, judgments, or
warranties about the functions,
quality, or performance regarding
locking devices and security features.
Using Locking Devices
You can protect your computer by attaching locks or a chain, so it
cannot be removed without your permission. You can use a lock,
such as a Kensington lock, to protect your computer from being
removed.
To prevent the removal of your computer, you can purchase a
Kensington lock or a compatible lock. Attach the lock to the keyhole
on the rear of the computer; then secure the chain on the lock to a
stationary object.
5-8 IBM ThinkPad 310E/310ED: User’s Guide
Page 95

Affixing a Nameplate
Affixing a Nameplate
On the front of the ThinkPad, a space is provided for a metal
nameplate that can be custom engraved with any name, initials, or
company name up to 20 characters in length. Among the various
materials packaged with your computer, you will find a nameplate
brochure card. To receive your nameplate, simply fill out this card
and send it in. In a few weeks, the engraved nameplate will be
delivered to you.
To affix the nameplate to your ThinkPad, peel off the paper backing
to expose the adhesive layer, and press the nameplate firmly into
place on the ThinkPad’s front panel.
Chapter 5. Protecting Your Computer 5-9
Page 96

Chapter 6. Installing and Removing Options
This chapter provides information on how to install or remove
external or internal devices and IBM options.
Upgrading the Hard Disk Drive .....................................................6-2
Installing PC Cards.......................................................................6-4
Removing PC Cards.....................................................................6-7
Increasing Memory Capacity.........................................................6-8
Installing a DIMM ...................................................................6-8
Removing a DIMM ...............................................................6-10
Attaching an External Numeric Keypad or a Mouse ....................6-11
Attaching an External Keyboard..................................................6-12
Attaching a Printer......................................................................6-13
Note
For instructions on installing and removing the battery pack, see
page 4-5.
Copyright IBM Corp. 1997 6-1
Page 97

Upgrading the Hard Disk Drive
Upgrading the Hard Disk Drive
The ThinkPad 310E/310ED offers you the option to upgrade your
existing hard disk drive to a larger capacity drive. This section
contains detailed instructions for removing and installing the hard
disk drive.
To remove the existing hard disk drive from your computer, do the
following:
1 Turn off the computer.
2 Close the LCD.
3 Take out the battery pack, if it is installed.
4 Turn the computer over on its base.
5 Remove the screw
6 Slide out and pull out to remove the hard disk drive bay
6-2 IBM ThinkPad 310E/310ED: User’s Guide
place.
cover.
that holds the hard disk drive bay cover in
Page 98

Upgrading the Hard Disk Drive
7 Pull the hard disk drive out of the hard disk drive bay using the
pull tab.
To install the new hard disk drive, do the following:
1 Slide the new drive into its bay until you feel the connectors
engage.
2 Reinstall the hard disk drive bay cover.
3 Reinstall the screw that holds the bay cover.
4 Turn on the computer.
Caution
The hard disk drive is not designed for frequent removal and
insertion. This operation is limited to upgrading the hard disk drive
capacity.
Chapter 6. Installing and Removing Options 6-3
Page 99

Installing PC Cards
Installing PC Cards
Your computer has two slots that allow you to plug in credit-card-size
PCMCIA cards (called PC cards) that support the PCMCIA Standard
release 2.01 or later..
There are different types of PC Cards. Your ThinkPad 310E/310ED
supports Type I, Type II, and Type III cards. The PCMCIA slots can
be used for the following combinations:
• One or two Type I
• One or two Type II
• One Type I and one Type II
• One Type III
Before Installing PC Cards
Be sure to read “Using PC Cards” on page 3-18.
For information about the type of PC Cards to install, see Appendix
B, “Advanced Information for PC Cards”.
To install a PC Card in your computer, follow these steps:
1 Insert the PC Card into one of the available slots. There is a
6-4 IBM ThinkPad 310E/310ED: User’s Guide
gentle click when the PC Card has been fully inserted.
Page 100

Installing PC Cards
Insert the PC Card with the long row of pin sockets facing the
computer and the label on the PC Card facing up. If the PC
Card will not fit into the slot, turn the card over. The PC Card
can fit into the slot only when inserted the correct way. Do not
try to force the card into the slot.
You can insert a Type I or Type II PC Card into either available
slot. A Type III PC Card occupies both slots. However, when
you insert a Type III card, aim its bottom ridges at the lower PC
Card slot.
2 You can now attach the appropriate devices and cables to your
installed PC Card.
To insert an additional Type I or Type II card when one is already
installed, follow the same direction, placing the new card into the
available slot.
Once you have installed the PC Card, Windows 95 recognizes that a
card has been installed and beeps or displays the PC Card window
on your screen. From the PC Card icon in the Control Panel, you
can configure your PC Card by choosing various settings to be used
each time you insert any PC Card or use this particular PC Card.
For more information about configuring your PC Card, see “Using
PC Cards” on page 3-18.
Chapter 6. Installing and Removing Options 6-5
 Loading...