

Page 1
APTARE StorageConsole Data Collector
Installation Guide for IBM Tivoli Storage
Manager
6.5
Page 2

Page 3

Copyrights and Trademarks
Copyright © 2008 APTARE, Inc., All rights reserved.
The information contained in this book is subject to change without notice.
Reproduction, adaptation or translation without prior written permission is prohibited,
except as allowed under the copyright laws.
APTARE® and StorageConsole® are registered trademarks of APTARE, Inc. and/or its
affiliates in the U.S. and certain other countries.
Hitachi is a trademark of Hitachi Data Systems.
Acrobat and the Acrobat logo are trademarks of Adobe Systems Incorporated.
Microsoft, Microsoft Windows and Microsoft Internet Explorer are registered
trademarks of Microsoft Corporation in the United States and/or other countries.
Macintosh, Mac, Apple, Safari, and Mac OS are trademarks of Apple Computer, Inc.,
registered in the U.S. and other countries.
EMC Legato NetWorker is a registered trademark of EMC Corporation.
NetBackup and Backup Exec are registered trademarks of Symantec Corporation.
Other company and product names mentioned herein can be trademarks or registered
trademarks of their respective companies.
Publication Change Record
The following table records all revisions to this publication. This first entry is always
the publication’s initial release. Each entry indicates the date of the release and the
number of the system release to which the revision corresponds.
Doc ID Date System Release
MK-95APT010-05 February 2008
May 2008
August 2008
APTARE StorageConsole v6.5
APTARE StorageConsole v6.5.23
APTARE StorageConsole v6.5.25
Copyrights and Trademarks iii
Page 4

iv APTARE StorageConsole Data Collector Installation Guide for IBM Tivoli Storage Manager
Page 5

Contents
Preface 1
About This Book . . . . . . . . . . . . . . . . . . . . . . . . . . . . . . . . 1
Contacting APTARE . . . . . . . . . . . . . . . . . . . . . . . . . . . . . .1
Chapter 1
Introduction to Data Collection 3
Data Collection Overview . . . . . . . . . . . . . . . . . . . . . . . . . . . 3
Architecture Overview . . . . . . . . . . . . . . . . . . . . . . . . . . . . . 5
Chapter 2
Pre-Installation Setup 7
Before You Install the Data Collector. . . . . . . . . . . . . . . . . . . . . .7
Updating the Local Hosts File . . . . . . . . . . . . . . . . . . . . . . . . . 7
Adding TSM Host Servers to StorageConsole . . . . . . . . . . . . . . . . . 9
Configuring Data Collector Policies in the Portal . . . . . . . . . . . . . . . 11
Chapter 3
Data Collector Installation 15
Installing the Data Collector . . . . . . . . . . . . . . . . . . . . . . . . . 15
Installing from the Data Collector CD . . . . . . . . . . . . . . . . . . . 15
Installing via the Internet . . . . . . . . . . . . . . . . . . . . . . . . . 17
GUI Deployment of the Data Collector . . . . . . . . . . . . . . . . . . 19
Console Installation Instructions . . . . . . . . . . . . . . . . . . . . . 22
Chapter 4
Validating the Data Collector Installation 27
Validating the Installation . . . . . . . . . . . . . . . . . . . . . . . . . . . 27
Checkinstall for a Meta Collector - Advanced Usage . . . . . . . . . . . 29
List Data Collector Configurations . . . . . . . . . . . . . . . . . . . . . . 30
Example Output . . . . . . . . . . . . . . . . . . . . . . . . . . . . . . 30
Chapter 5
Starting the Data Collector 33
Data Collector Manual Startup . . . . . . . . . . . . . . . . . . . . . . . . 33
Chapter 6
Un-installing the Data Collector 35
Un-install the Data Collector on UNIX . . . . . . . . . . . . . . . . . . . . 35
Un-install the Data Collector on Windows . . . . . . . . . . . . . . . . . . 36
Appendix A - Troubleshooting 37
Verify the Data Collector Configuration. . . . . . . . . . . . . . . . . . . . 37
Check the Configuration File . . . . . . . . . . . . . . . . . . . . . . . 37
Verify Connectivity . . . . . . . . . . . . . . . . . . . . . . . . . . . . . . 38
Appendix B - Data Collector Pre-Installation Worksheet 39
v v
Page 6

vi APTARE StorageConsole Data Collector Installation Guide for IBM Tivoli Storage Manager
Page 7

About This Book
This document provides detailed step-by-step instructions for the installation of the
APTARE Data Collector for IBM Tivoli Storage Manager. This install guide is valid for
Portal version 6.5 onward.
This document assumes either:
• The Portal has already been successfully installed in your enterprise, and that the reader of
this document is aware of the password for the StorageConsole admin user (e.g.
admin@
• The Portal, hosted by APTARE or a third-party service provider, will serve as your portal.
This option typically applies only to evaluation or hosted customers and is referred to as a
HOSTED installation.
yourdomain.com). This is referred to as an IN-HOUSE installation. Or,
Separate instructions are provided as necessary for Windows and UNIX.
Contacting APTARE
If at any time during the install you encounter a problem, or if you simply want to verify
a step or have a question about the installation, please contact the APTARE Customer
Care Group which will be happy to assist you:
Chapter 0
Preface
Technical Support:
Customer Care Group
• support@aptare.com or
• 1-408-871-9848
• 1-866-9-APTARE, Option #1, 6:00am - 5:30pm
Pacific Time
Sales:
• sales@aptare.com or
• 1 866-9-APTARE, Option
#2
About This Book 1
Page 8

2 APTARE StorageConsole Data Collector Installation Guide for IBM Tivoli Storage Manager
Page 9

Application Administrator’s Guide
This chapter covers the following topics:
• Data Collection Overview
• Architecture Overview
Data Collection Overview
The Data Collector is a centralized and remotely managed data collection mechanism.
This Java application is responsible for interfacing with backup servers and storage
arrays, gathering information related to storage backup and recovery, and capacity
management.
The Data Collector continuously collects data and sends this data, using an http or https
connection, to another Java application, the Data Receiver. The Data Receiver runs on
the Portal Server and stores the data that it receives in the Reporting Database. When
you use the Portal to generate a report, the Portal requests this information from the
Reporting Database, then returns the results in one of the many available reports.
1
Chapter 0
Introduction to Data Collection
The Data Collector obtains all of its monitoring rules from a Data Collector
Configuration File. This file resides in the Reporting Database in XML format. When
the Data Collector first starts, it downloads this file from the Reporting Database. The
Data Collector uses this file to determine the list of backup servers, hosts, or storage
arrays that are to be monitored and included in its data collection process. For details on
how host names are processed, see “Host Name Processing - Filters and Aliases” in
Application Administrator’s Guide.
Data Collector Terminology
Data Collector - This software component interfaces with each of the supported
backup and recovery software systems to extract meta-data about the underlying
backup and recovery environment. For example, data can include backup job details
and tape inventory information. In the case of Capacity Manager, the Data Collector
communicates with the storage arrays in your SAN (Storage Area Network).
Data Collection by Backup Product
The following collection mechanisms are used for the particular backup products:
• EMC Legato NetWorker - The Data Collector uses the Legato administration commandline utilities, such as mminfo, nsradmin, and nsrinfo.
• IBM Tivoli Storage Manager - The Data Collector interfaces with TSM using the TSM
utility, dsmadmc, collecting data from the underlying TSM databases, including TSM
Archives for LAN-free backups.
Data Collection Overview 3
Page 10

• Symantec Backup Exec - The Data Collector uses database commands to obtain
information from each Backup Exec server.
Note: Veritas NetBackup is the only backup product that does not require a Data Collector
because an agent is used to obtain information from NetBackup.
Data Collection by Storage Array
• Capacity Manager - The Data Collector communicates with the storage array’s system
service processor (SSP) and hosts to gather storage capacity data.
Data Collector Server - This is the physical server on which the Data Collector is
installed. It can be any server within your network that is Java 1.5 compatible.
For Backup Manager, where you install the Data Collector depends on your backup
solution. NetBackup is the only backup solution that requires that the Data Collector
reside on each Master Server. For all other backup solutions, the Data Collector can run
on a standalone server, the Portal Server, or any Backup Server.
In the case of Capacity Manager, the Data Collector can run on a stand-alone server or
the Portal server. In some cases—such as EMC Symmetrix arrays—the Data Collector
must reside on the system that is running the SAN management software.
A single installation of the Data Collector supports any number of servers. The only real
limitation is the memory and CPU processing power of the server on which the Data
Collector resides.
Planning Data Collector Deployment
In most cases, a single instance of the Data Collector can support any number of backup
servers or storage arrays. However, each environment has its own unique deployment
configuration requirements, so it is important to understand where the Data Collector
software must be installed so that you can determine how many Data Collectors must be
installed and which servers are best suited for the deployment.
Use the following guidelines to plan the installation of Data Collectors.
Backup Manager:
• One Data Collector for each backup product—EMC Legato NetWorker, Tivoli Storage
Manager, VERITAS Backup Exec, and HP Data Protector.
Capacity Manager:
• One Data Collector for each storage array type—EMC or Hitachi
• Host Resources do not require a dedicated Data Collector for each resource. If you have a
Storage Array Data Collector, the Host Resources collector is inherently part of that Data
Collector. However, if for some reason you do not have a Storage Array Data Collector, you
can install a Host Resources Data Collector.
Refer to the Pre-Installation Setup chapter for specific requirements and a worksheet
for assembling the details needed for Data Collector installation.
4 APTARE StorageConsole Data Collector Installation Guide for IBM Tivoli Storage Manager
Page 11

Architecture Overview
The following diagram provides an example of how the IBM Tivoli Storage Manager
Data Collector could be deployed in your environment.
Figure 1.1 Data Collector in an IBM Tivoli Storage Manager Environment
For each TSM Instance, the Data Collector will establish connections to the database
using the command, dsmadmc. The Data Collector Configuration file contains all the
connection information for each TSM Instance including such parameters as the TSM
user name and password for login, the TSM Instance name, IP address of the TSM Host
Server, and the TSM Port.
The Data Collector will use various QUERY and SELECT commands via dsmadmc to
obtain its information from each separate TSM Instance. The information is then sent
via http(s) to the Portal. A user can then launch a web-browser to use the Portal to see a
global view of all of their TSM Host Servers and TSM Instances.
IBM Tivoli Storage Manager Terminology
TSM Host Server - The TSM Host Server is the physical system that is running the
IBM Tivoli Storage Manager server software. This system will be known by its
hostname or IP address.
TSM Instance- The TSM Instance is a separate instance of the TSM server software
that is running on a TSM Host Server. A single TSM Host Server can run multiple TSM
Instances. This is normally implemented by setting up a separate set of client and
administration ports for each TSM Instance. In the architecture example in Figure 1.1,
there are two TSM Host Servers—one has a single TSM Instance running on it and the
other Host Server has two TSM Instances running on it.
Architecture Overview 5
Page 12

6 APTARE StorageConsole Data Collector Installation Guide for IBM Tivoli Storage Manager
Page 13

Application Administrator’s Guide
This chapter covers the following topics:
• Before You Install the Data Collector
• Updating the Local Hosts File
• Adding TSM Host Servers to StorageConsole
• Configuring Data Collector Policies in the Portal
Before You Install the Data Collector
In preparation for Data Collector installation, take the steps described in this chapter.
Note: These steps apply only if you are performing an IN-HOUSE installation. If a third-party
service provider is hosting your Portal—that is, a HOSTED installation (perhaps for a product
evaluation)—skip this section and contact your hosting organization’s representative to
configure the hosted portal for your Data Collector.
2
Chapter 1
Pre-Installation Setup
Requirement: Data Collector Server
The Data Collector Server is the physical server on which the Data Collector is
installed. It can be any server within your network that is Java 1.5 compatible and with
dsmadmc installed.
Updating the Local Hosts File
1. Add the Portal IP Address to the Local Hosts file on the Data Collector Server or on any
available client with web-browsing capabilities.
Note: Only edit the local hosts file if a DNS entry hasn’t already been set up in your
enterprise to resolve both http://aptareportal.yourdomain.com and http://
aptareagent.yourdomain.com to the Portal IP address.
a. Login to the Data Collector Server.
b. On a UNIX server:
edit /etc/hosts
Add entries for aptareportal.yourdomain.com and aptareagent.yourdomain.com,
both resolving to the Portal server IP address.
On a Windows server:
edit C:\WINNT\System32\drivers\etc\hosts
Before You Install the Data Collector 7
Page 14

Add entries for aptareportal.yourdomain.com and aptareagent.yourdomain.com,
both resolving to the Portal server IP address.
8 APTARE StorageConsole Data Collector Installation Guide for IBM Tivoli Storage Manager
Page 15

Adding TSM Host Servers to StorageConsole
Repeat these steps for each TSM Host Server.
1. Open a browser window and point it to your instance of the Portal
(for example: http://aptareportal.yourdomain.com).
2. Login as an admin user (e.g. admin@
3. In the Portal toolbar at the top of the window, select:
Admin Æ Servers & Server Groups Admin
The Server Groups Administration window displays.
4. Click on the first server group folder (The default group name when the Portal is first
installed is APTARE).
Note: If a server group hierarchy has already been established in the application, you can
drilldown to the server group to which you would like the TSM Host Server
although we recommend adding the TSM Host Server
5. In the Server Groups Administration window, under the Members pane, click Add.
The Server Administration window displays.
yourdomain.com).
to belong,
to the top-level APTARE folder.
Adding TSM Host Servers to StorageConsole 9
Page 16

6. Enter values for all of the required fields (denoted by an *) in the Server Administration
window and click OK. The field, Internal Name, needs to match the host name of the TSM
Server. Ensure you select TSM Server as the Type. The fields External Name, Make and
Model are not used by the application for anything other than display purposes.
7. The server will be added to the server group. The Server Group window will load in the
content pane, and the TSM Host Server should now be included in the list of servers
belonging to the group.
Note: For Unix platforms, this TSM server must be added to dsm.sys in order for the data
collector to connect to the dsmadmc command.
10 APTARE StorageConsole Data Collector Installation Guide for IBM Tivoli Storage Manager
Page 17
Configuring Data Collector Policies in the Portal
The key parameters that the Data Collector uses to connect to the data source are
contained in Data Collector Policies. These policies are maintained via the Portal and
stored in the database. Prior to installing the Data Collector, you must create and
configure a new policy. Once the Data Collector is installed, you can create additional
policies.
When you configure a Data Collector Policy in the Portal, you first create a Data
Collector folder and then add child policies to it. The child policies are configured by
product type—that is, Symantec Backup Exec, NetWorker, TSM, HP DataProtector,
Host Resources, and for Capacity Manager Storage Arrays (Hitachi, EMC CLARiiON,
EMC Symmetrix).
The process for creating a policy is described below:
1. Login as an Admin user.
The Admin user ID and password was specified during the Portal installation.
2. In the Portal toolbar at the top of the window, select:
Admin Æ Data Collector Policies
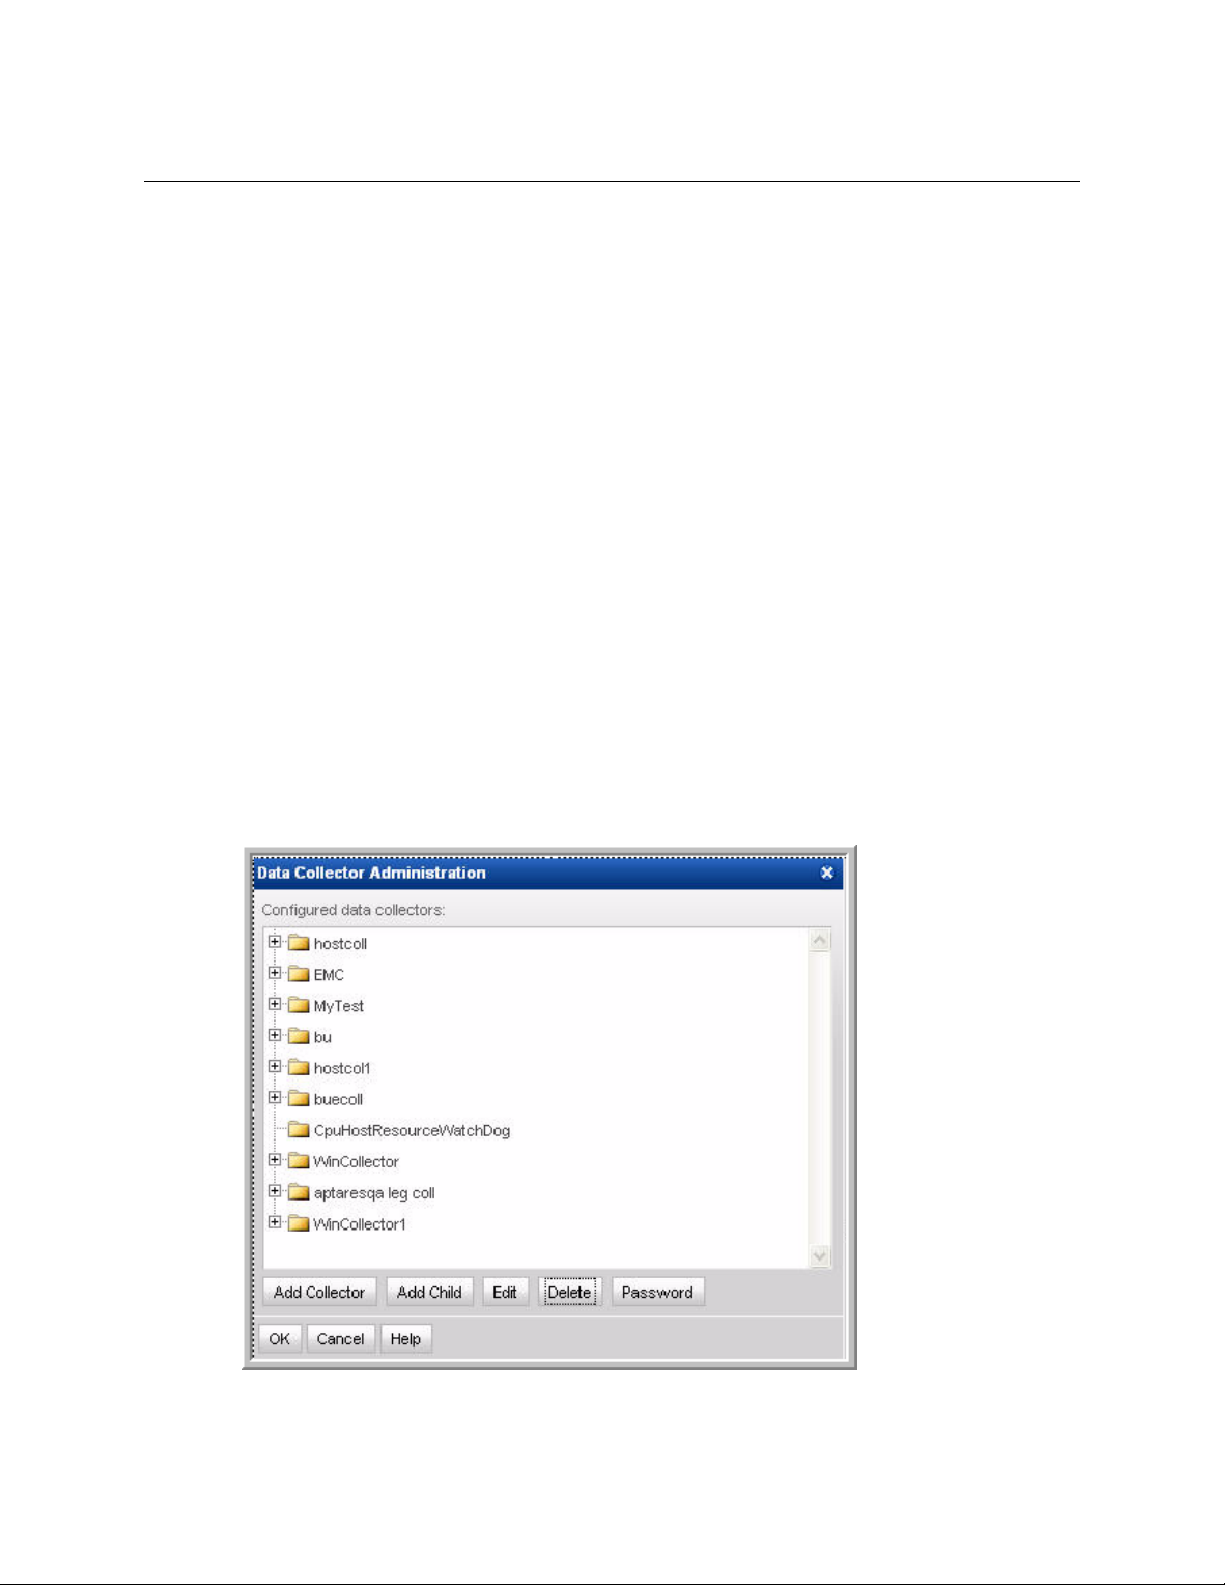
You can use this Data Collector Administration window either to declare a new Data
Collector or to add child policies to an existing Data Collector.
Note: Upon completion of configuring Data Collector Policies, there should be one entry
in this window for each Data Collector installed in your environment.
Configuring Data Collector Policies in the Portal 11
Page 18

3. If adding a new data collector, in the Data Collector Administration window, click Add
Collector to display the Data Collector Properties window, as shown below.
Create a relevant Collector Name and Passcode, to be used when accessing the Data
Collector that you are configuring.
:
Field Description Sample Values
Collector Name* A unique name assigned to this Data Collector.
The Data Collector will use this value for
authentication purposes.
Passcode* A passcode assigned to this Data Collector. It can
BUEdc1
LEGdc1
TSMdc1
HRdc1
Password1
be any character sequence.
Note: Unlike other StorageConsole passwords (which
are encrypted and then saved) this Data Collector
passcode is not encrypted prior to saving in the
StorageConsole database and may appear in clear case
in certain files. It simply is intended as a “handshake”
identification between the data collector and the policy.
Click OK. Once you have added the Data Collector, you will configure the policy by
adding children, as described in the next step.
4. If you are adding a child to an existing policy, make sure that the collector name is selected
in the Data Collector Administration window and then click Add Child.
5. Select Product Type—in this case, TSM—and then click Next.
6. Specify Child Data Collector Properties.
12 APTARE StorageConsole Data Collector Installation Guide for IBM Tivoli Storage Manager
Page 19

Note: If you have more than one TSM Host Server to configure, you can add additional
Child Collector Policy records upon completing the setup of this record.
Add or select the parameters. Mandatory parameters are denoted by an asterisk (*)::
Field Description
Domain The domain identifies the top level of your server
group hierarchy. The name was supplied during the
installation process. All newly discovered servers are
added to the root server group associated with this
domain. If you are a Managed Services Provider,
each of your customers will have a unique domain
with its own server group hierarchy.
Configuring Data Collector Policies in the Portal 13
Sample
Value
yourdomain
Page 20

Field Description
Backup
Management
Server*
Select the backup product management server (i.e.,
TSM Host Server) with which the Data Collector will
communicate. The TSM Host Servers that you will
add during Data Collector installation should all be
listed here. Select the one you want the Data
Collector to communicate with and verify that the IP
address and OS information are correct.
Note: For Unix platforms, this TSM server must be added
to dsm.sys in order for the data collector to connect to the
dsmadmc command.
Instance Name* This field is applicable only for UNIX TSM Host
Servers. For Windows, the IP address will be used.
Server Port* Port used by dsmadmc to communicate with the TSM
Host Server
Backup s/w
Location*
The home directory of the TSM Admin Client
software—that is, the dsmadmc command on the
Data Collector Server.
Typically C:\Program Files\Tivoli\TSM\baclient for
Windows, or /opt/tivoli/tsm/client/ba/bin for Unix
User Id* TSM ID with Analyst privileges, as noted in the
worksheet - TSM Host Server Details
Password* TSM administrator password
Sample
Value
TSMSERVER
1500
TSMAdmin
Pwd1
7. Click OK to save the Policy and return to the Child Collector Configuration screen where
the Child Policy will be listed. From here, you can add an additional Child Policy record
(for example, if the data collector needs to communicate with other TSM Host Servers), or
make changes to the Child Policy you just created.
14 APTARE StorageConsole Data Collector Installation Guide for IBM Tivoli Storage Manager
Page 21

Application Administrator’s Guide
This chapter includes the instructions for installing the Data Collector on the Data
Collector Server.
Installing the Data Collector
Follow the steps in the following sections to install the Data Collector on the Data
Collector Server. The particular sequence of instructions depends on your environment.
The majority of installations are initiated from the Data Collector Installation CD,
however, if you are installing remotely or your Portal is being HOSTED by a service
provider, you may need to download the Data Collector software via the Internet.
In addition to the GUI version, the installer supports a console (command line) interface
for UNIX systems that do not have X-Windows installed. You will be directed to the
console interface instructions, if appropriate.
3
Chapter 1
Data Collector Installation
Note: Log in as a Local Administrator in order to have the necessary permissions for this
installation.
Installing from the Data Collector CD
1. Installation should be performed as user root, or as an Administrator user on Windows.
2. Note the Platform/OS of the Data Collector Server on which you want to install the Data
Collector.
3. Mount the APTARE StorageConsole Data Collector CD.
• On Windows:
• ActiveX controls must be allowed.
• The installer should load automatically. If not, navigate to the file CD_DRIVE/
install.htm and open it in a browser and click Start Installer.
• Proceed to “
• On UNIX:
If the Data Collector Server has X-Windows:
Open the file CD_DRIVE/install.htm in a browser.
• Proceed to “
GUI Deployment of the Data Collector” on page 19.
GUI Deployment of the Data Collector” on page 19.
If the Data Collector Server does not have X-Windows:
• Copy the file CD_DRIVE/InstData/{OS}/VM/aptareagentinstall.bin
to a temporary directory on the Data Collector Server.
Installing the Data Collector 15
Page 22

• Proceed to the Console Installation Instructions.
16 APTARE StorageConsole Data Collector Installation Guide for IBM Tivoli Storage Manager
Page 23

Installing via the Internet
Follow these instructions if you do not have a CD and you are installing on a Data
Collector Server that has Internet access and a web browser.
Note: If your Data Collector Server does not have Internet access or web browser access—for
example, X-Windows not available), proceed to the next section, Internet Access
from the Data Collector Server, for the relevant installation steps.
1. Start the web browser on the Data Collector Server.
2. Use the following URL to access the Data Collector installer web page:
http://www.aptare.com/agent65/install.htm
The following web page will be displayed:
Not Available
3. Click on the Start Installer for <Platform>… button.
4. Proceed to “
GUI Deployment of the Data Collector” on page 19.
Internet Access Not Available from the Data Collector Server
Use these instructions if you are installing via the Internet where Internet access is not
available from the data collector server.
1. Note the Platform/OS of the Data Collector Server on which you want to install the Data
Collector.
2. Open a browser on a client with web access (you will download the installer to this client,
and then copy it to the Data Collector Server).
3. Use the following URL to access the Data Collector installer web page:
http://www.aptare.com/agent65/install.htm
The following web page will be displayed:
Installing the Data Collector 17
Page 24

4. Click on the download link that corresponds to the platform of the Data Collector Server.
5. At the prompt, save the Data Collector Installer to a directory on the client.
6. Copy the Data Collector Installer to the Data Collector Server where the Data Collector is
to be installed.
7. Go to the Data Collector Server and run the installer.
• On Windows:
Execute
• Proceed to “
aptareagentinstall.exe.
GUI Deployment of the Data Collector” on page 19.
• On UNIX:
If the Data Collector Server has X-Windows:
chmod +x aptareagentinstall.bin
sh ./aptareagentinstall.bin –i swing
• Proceed to “GUI Deployment of the Data Collector” on page 19.
If the Data Collector Server does not have X-Windows:
• Proceed to the Console Installation instructions.
18 APTARE StorageConsole Data Collector Installation Guide for IBM Tivoli Storage Manager
Page 25
GUI Deployment of the Data Collector
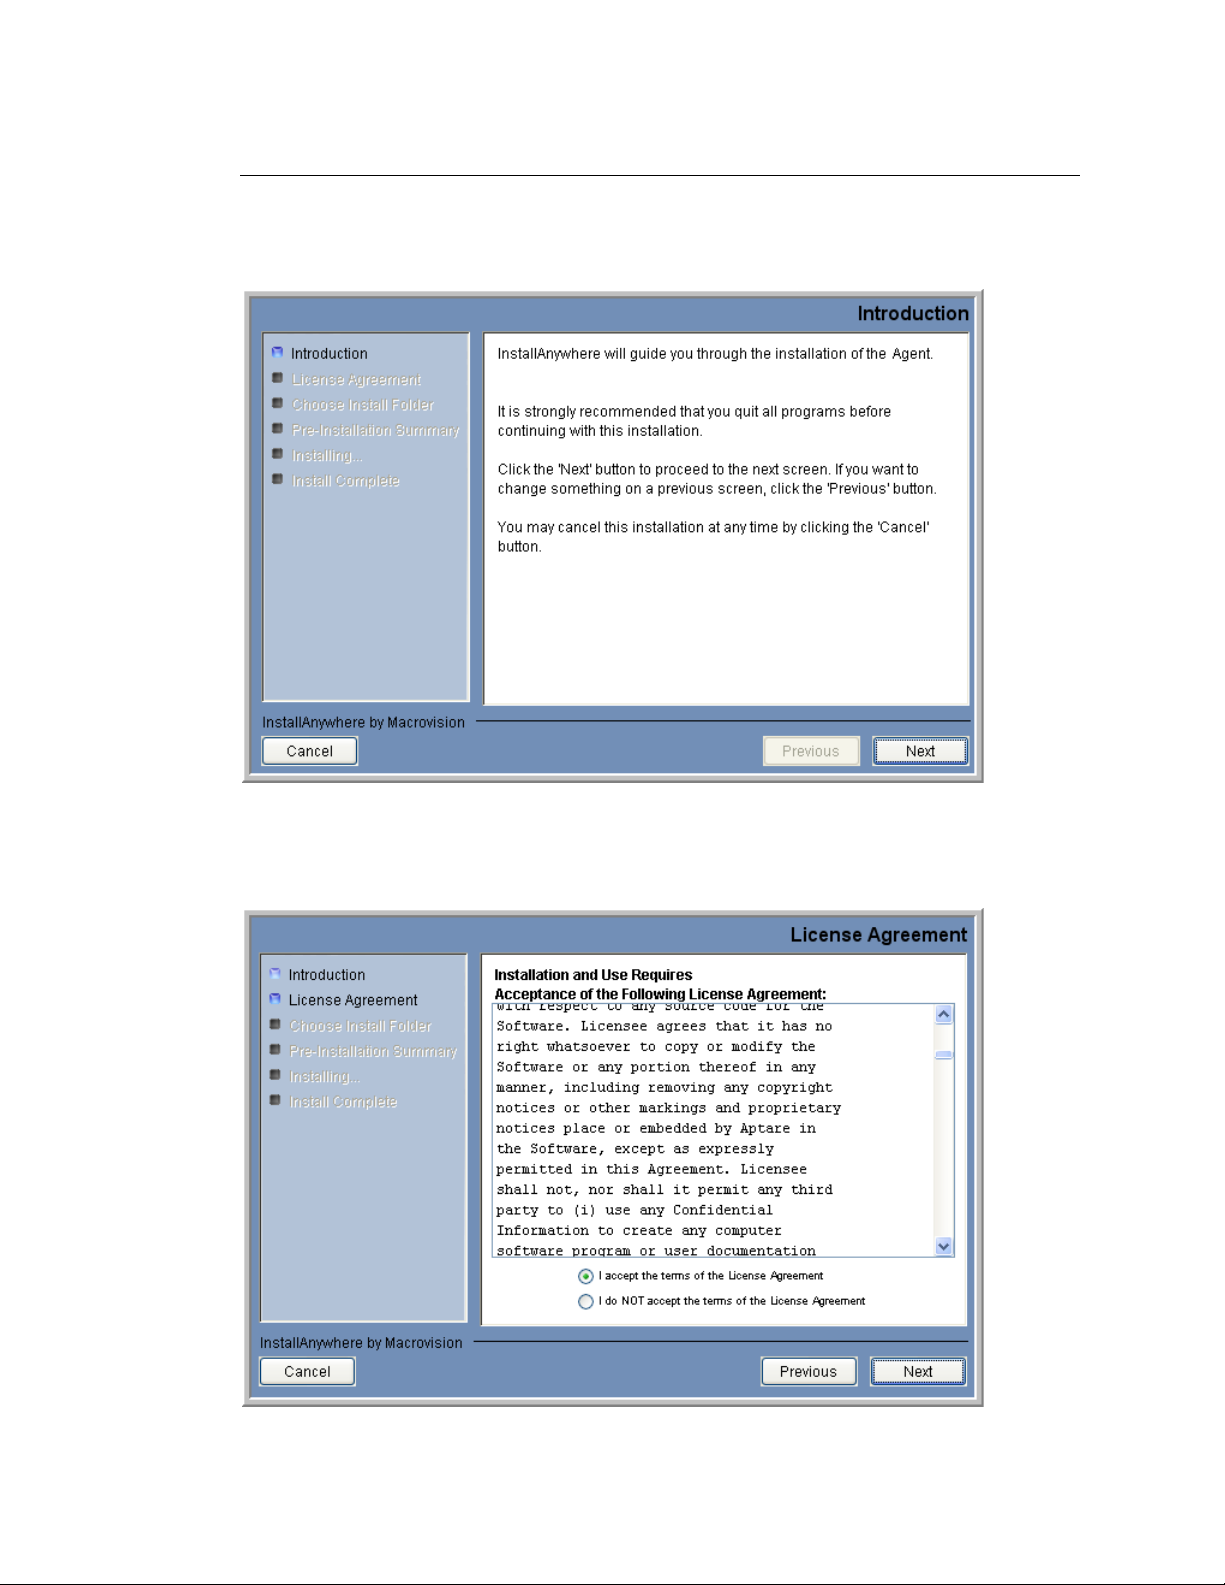
InstallAnywhere will prepare to install the Data Collector software. After checking the
available disk space and downloading the installer, an introduction dialogue window
outlines the installation process.
1. Review the installation process and click Next.
The License Agreement displays for your acknowledgement.
Installing the Data Collector 19
Page 26

2. Read the agreement and click the “I accept” radio button and then Next.
The installer will display a window, which prompts you for an Install Folder.
3. Specify the directory where you would like to install the Data Collector software.
Accepting the default paths is recommended.
Windows default directory:
C:\Program Files\Aptare
UNIX default directory: /opt/aptare
4. Click Next to display the Pre-Installation Summary.
20 APTARE StorageConsole Data Collector Installation Guide for IBM Tivoli Storage Manager
Page 27

5. Review the summary and click Install.
6. The dialogue will track the installation as it progresses.
7. A Configuration Settings window will prompt you to select a Data Collection Task from the
following list: Veritas NetBackup, IBM Tivoli Storage Manager, EMC Legato NetWorker,
Symantec Backup Exec, HP Data Protector, Hitachi Storage Arrays, EMC Storage Arrays,
Host Resources, and WMI Proxy Server.
Note: When you select a backup product, if you are installing on a Windows server, the WMI
Proxy Server is automatically included with the installation. When you select a storage array,
the Host Resources setup is automatically included in the installation. Both the WMI Proxy
Server and the Host Resources also can be installed individually.
8. When prompted to select a Backup Product, select IBM Tivoli Storage Manager and click
Next.
9. The following dialogue captures the configuration settings for your particular environment.
Complete the configuration fields, as described below:
Installing the Data Collector 21
Page 28

Field Description
Data Collector
Name
A unique name assigned to this Data Collector. This is the name
that you used during the Pre-Installation setup. The Data Collector
will use this value for authentication purposes.
Password
Data Receiver
URL
The password assigned to this Data Collector.
Note: The password is encrypted prior to saving in the StorageConsole
database and is never visible in any part of the application.
This is the URL the Data Collector uses to communicate to the
Portal server. The format of this URL should be:
http://aptareagent.yourdomain.com
It is similar to the URL you use to access the web-based Portal
(http://aptareportal.yourdomain.com).
IMPORTANT NOTE: Be sure to enter the URL with the prefix
aptareagent and NOT aptareportal!
10. After entering the configuration settings, click Finish.
11. In the Install Complete window, click Done.
The InstallAnywhere portion of the installation is now complete.
12. Continue using the instructions in “
Validating the Installation” on page 27.
Console Installation Instructions
Follow these instructions when installing on a UNIX master server that does not have
X-Windows. The Installer will guide you through the sequence of steps to install and
configure the Data Collector. If at any time you need to go back a step, simply type
‘back’ at the prompt.
Note: The StorageConsole Data Collector installer does not support console-based installation
for the Windows operating system.
1. From your telnet session cd to the location where the
saved.
chmod +x aptareagentinstall.bin
sh ./aptareagentinstall.bin –i console
2. InstallAnywhere will prepare to install the Data Collector software.
=====================================================
(created with InstallAnywhere by Macrovision)
-----------------------------------------------------
Introduction
------------
aptareagentinstall.bin
file has been
22 APTARE StorageConsole Data Collector Installation Guide for IBM Tivoli Storage Manager
Page 29

InstallAnywhere will guide you through the installation of the APTARE
StorageConsole
It is strongly recommended that you quit all programs before continuing with this
installation.
Respond to each prompt to proceed to the next step in the installation. If you want
to change something on a previous step, type 'back'.
You may cancel this installation at any time by typing 'quit'.
PRESS <ENTER> TO CONTINUE:
Data Collector
.
3. The License Agreement will be displayed.
License Agreement
-----------------
Installation and use of APTARE StorageConsole requires acceptance of the following
License Agreement:
PLEASE READ THIS SOFTWARE LICENSE AGREEMENT CAREFULLY. BY DOWNLOADING, INSTALLING OR
USING THE SOFTWARE YOU INDICATE ACCEPTANCE OF AND AGREE TO THETERMS AND CONDITIONS OF
THIS AGREEMENT….<etc.>
4. Read the agreement and type Y to accept it.
5. The installer will prompt for the installation location:
Choose Install Folder
---------------------
Where would you like to install?
Default Install Folder: /opt/aptare
ENTER AN ABSOLUTE PATH, OR PRESS <ENTER> TO ACCEPT THE DEFAULT
: /opt/aptare
INSTALL FOLDER IS: /opt/aptare
IS THIS CORRECT? (Y/N): y
6. A Pre-Installation Summary will be displayed.
==================================================
Pre-Installation Summary
------------------------
Please Review the Following Before Continuing:
Product Name:
Installing the Data Collector 23
Page 30

APTARE StorageConsole
Install Folder:
/opt/aptareagent
Link Folder:
/tmp/install.dir.30662/Do_Not_Install
Product Components:
APTARE StorageConsole Agent,
Help
Java VM Installation Folder:
/opt/aptareagent/jre
Disk Space Information (for Installation Target):
Required: 136,083,162 bytes
Available: 3,786,149,888 bytes
PRESS <ENTER> TO CONTINUE:
7. The installation process will track the progress:
==================================================
Installing...
-------------
[==================|==================|=============]
[------------------|------------------|-------------]
8. You will be prompted to select a Backup Product.
Enter Backup Product
(Choose the Backup Product for which you want to install the Agent/Data Collector.)
(Required Field)
->1- VERITAS NetBackup
2- IBM Tivoli Storage Manager
3- EMC LEGATO NetWorker
4- SYMANTEC Backup Exec
5- HP Data Protector
6- Hitachi Storage Arrays
7- EMC Storage Arrays
8- Host Resources
ENTER THE NUMBER FOR YOUR CHOICE, OR PRESS <ENTER> TO ACCEPT THE DEFAULT:
24 APTARE StorageConsole Data Collector Installation Guide for IBM Tivoli Storage Manager
Page 31

:
Note: Enter the number for the backup product Data Collector you are installing.
9. The installer will prompt for the Data Collector Name. This is the ID that will be used on
the Portal side to authenticate the Data Collector. This value should be the same value you
configured on the Portal for the field “ID” during the Pre-Installation step.
Enter Data Collector Name
(Required Field)
Data Collector Name (DEFAULT: ):
10. The installer will prompt for the Data Collector Password. This is the password that will
be used on the Portal side to authenticate the Data Collector. This value should be the same
value you configured on the Portal for the field “passcode” during the Pre-Installation step.
Configuration Settings - 2
--------------------------
Enter Data Collector Password:
(Please enter the Password, which will be used to authenticate the Data
Collector with the Data Receiver)
(Required)
Data Collector Password: password1
11. The installer will prompt for the Data Receiver URL. This is the URL the Data Collector
uses to communicate to the Portal server. This is the URL the Data Collector uses to
communicate to the Portal server. The format of this URL should be:
http://aptareagent.yourdomain.com
It is similar to the URL you use to access the web-based Portal (http://
aptareportal.yourdomain.com).
IMPORTANT NOTE: Be sure to enter the URL with the prefix aptareagent
and NOT
aptareportal!
Configuration Settings - 3
--------------------------
Enter Data Receiver URL
(Required Field)
Data Receiver URL (DEFAULT: ): http://aptareagent.yourdomain.com
The installer will perform a post-install validation:
The installer will now configure and validate the installation.
This may take a few minutes.
Installing the Data Collector 25
Page 32

PRESS <ENTER> TO CONTINUE:
===================================
Installation Complete
-----------------------------------
Congratulations! the APTARE StorageConsole Agent for IBM Tivoli Storage Manager has
been successfully installed to: /opt/aptare
12. Press ENTER to exit the installer.
13. Continue with “
Validating the Installation” on page 27.
26 APTARE StorageConsole Data Collector Installation Guide for IBM Tivoli Storage Manager
Page 33

Application Administrator’s Guide
Chapter 1
Validating the Data Collector Installation
This chapter includes the instructions for validating the Data Collector installation on
the Data Collector Server.
Validating the Installation
The following directions assume that the Data Collector files have been installed in
their default location:
Windows (C:\Program Files\Aptare) or UNIX (/opt/aptare).
If you have installed the files in a different directory, please make the necessary path
translations as you follow these testing instructions.
Note: Running some of these commands can take up to several hours depending on the size of
your enterprise.
4
1. Open a session.
Windows: Open a command prompt window.
UNIX: Open a telnet session logged in as root to the Data Collector Server.
2. Change to the directory where you’ll run the validation script.
Windows: At the command prompt, type:
cd C:\Program Files\Aptare\mbs\bin <enter>
UNIX: In the telnet session, type:
cd /opt/aptare/mbs/bin <enter>
3. Execute the validation script.
Windows: At the command prompt, type:
UNIX: In the telnet session. type: ./
4. Check for output similar to the following:
The Java version is --> 1.6.0-b105
Version information for datarcvr, aptare.jar and aptarebootstrap.jar at
http://aptareagent.laurentdroin
datarcvr Version
Version: 6.5.12.01
aptare.jar Version
Minimum Version: 6.5.12.01
Current Version: 6.5.12.07
Build Number: 05162008-1420
checkinstall.sh <enter>
checkinstall.bat <enter>
Validating the Installation 27
Page 34

aptarebootstrap.jar Version
Minimum Version: 6.5.1.03
Current Version: 6.5.1.03
Build Number: 05162008-1420
Version information for aptare.jar and aptarebootstrap.jar at
/opt/build65/IBM_TSM/lib/ on this server aptaredev3.corp
aptare.jar Version
Minimum Version: 6.5.12.01
Current Version: 6.5.12.08
Build Number: 05222008-1627
aptarebootstrap.jar Version
Minimum Version: 6.5.1.03
Current Version: 6.5.1.03
Build Number: 05222008-1627
Validating aptare.jar Version Compatibility - SUCCESS
Meta Collectors
---------------
1. Meta Collector Id: META_INSTANCE_1
Product Type: IBM Tivoli Storage Manager
Device to probe: aptaredev3
Software Home: /opt/tivoli/tsm/client/ba/bin
2. Meta Collector Id: META_INSTANCE_2
Product Type: IBM Tivoli Storage Manager
Device to probe: aptaredev3
Software Home: /opt/tivoli/tsm/client/ba/bin
Choose the Meta Collector you want to check [0 for All, 1 - 2 for individual
Meta Collector]: 2
Validating Data Collector: META_INSTANCE_2
Validating TSM Instance: aptaredev3:1500
Attempting to contact URL --> http://aptareagent.laurentdroin/servlet/util - SUCCESS
Validating Server Group Setup - SUCCESS
Validation starting...
Going to Register with the DriverManager.
Validating Job --> com.storage.mbs.tsmcore.InventoryDetailsChildThread -
SUCCESS_PERSISTING_INVENTORYDETAILS
28 APTARE StorageConsole Data Collector Installation Guide for IBM Tivoli Storage Manager
Page 35

Validating Job --> com.storage.mbs.tsmcore.StoragePoolChildThread -
SUCCESS_PERSISTING_STORAGEPOOLDETAILS
Validating Job --> com.storage.mbs.tsmcore.TapeDetailsChildThread -
SUCCESS_PERSISTING_TAPEDETAILS
Validating Job --> com.storage.mbs.tsmcore.ClientNodesChildThread -
SUCCESS_PERSISTING_CLIENTNODEDETAILS
Validating Job --> com.storage.mbs.tsmcore.PolicyChildThread -
SUCCESS_PERSISTING_POLICIES
Validating Job --> com.storage.mbs.tsmcore.DriveStatusChildThread -
SUCCESS_PERSISTING_TAPESTATUS
Installation of APTARE StorageConsole Agent has been successfully validated.
5. If the output in the above steps contain the word FAILED, then refer to Appendix A -
Troubleshooting. If you exhaust the tips provided in the troubleshooting sections, then
contact the APTARE Customer Care Group and have the following files ready for review:
<install_dir>/mbs/logs/metadata.log
<install_dir>/mbs/logs/watchdog.log
Checkinstall for a Meta Collector - Advanced Usage
The checkinstall utility can be used to manually validate a specific Meta Collector or
multiple TSM instances. By default, if there is more than one Meta Collector, the basic
checkinstall utility will prompt you to specify a Meta Collector.
Usage:
./checkinstall.[sh|bat]
To specifically check a Meta Collector and optionally, TSM instances, use the following
parameters:
./checkinstall.[sh|bat] META_COLLECTOR_ID
./checkinstall.[sh|bat] META_COLLECTOR_ID [TSMInstance1|TSMInstance2|...]
Where:
META_COLLECTOR_ID is an internal ID for the collector for a specific TSM
instance.
TSMInstance[1..n] is the name of the TSM instance for which data is being collected.
Note: Multiple TSM instances are separated with a pipe ( | ) character.
Validating the Installation 29
Page 36

List Data Collector Configurations
Use this utility to list the various child threads and their configurations encapsulated
within a data collector configuration. This utility can be used in conjunction with other
scripts, such as checkinstall.[sh|bat].
On Unix:
On Windows:
./listcollectors.sh
listcollectors.bat
Example Output
[root@aptarelab1 bin]# ./listcollectors.sh
Below are the list of Data Collectors defined in
/opt/build65/EMC/mbs/conf/collectorconfig.xml
Collector Id: aptarelab1_emc_clariion
Collector Passcode: aptare
URL: http://aptareagent.aptaredev2
==== Meta Collectors ====
Meta Collector Id: META_hostResource_10
Domain: aptaredev2
Group Id: 100000
Active: true
Active: true
Task:
com.aptare.core.hostResource.HostResourceChildThread|172.16.1.13,172.16.1.152|Capacity
Payload Id: Windows
Schedule: */30 * * * *
Active: true
Task: com.aptare.core.hostResource.HostResourceChildThread|172.16.1.15|Capacity
Payload Id: Unix
Schedule: */30 * * * *
Meta Collector Id: META_172.16.1.22_8
Domain: aptaredev2
Group Id: 100000
Server Id: 100003
Active: true
30 APTARE StorageConsole Data Collector Installation Guide for IBM Tivoli Storage Manager
Page 37

Software Home: /opt/Navisphere/bin
Server Address: 172.16.1.22
User Id: UjZzW0CS8Ks=
Active: true
Task: com.aptare.core.emcStorage.EmcStorageArrayChildThread
Schedule: 240
List Data Collector Configurations 31
Page 38

32 APTARE StorageConsole Data Collector Installation Guide for IBM Tivoli Storage Manager
Page 39

Application Administrator’s Guide
The installer configures the Data Collector to start automatically, however, it does not
actually start it upon completion of the installation because you must first validate the
installation.
Data Collector Manual Startup
Follow these steps, for the relevant operating system, to manually start the Data
Collector service:
On Windows
The installer configures the Data Collector process as a Service.
To view the Data Collector Status:
5
Chapter 1
Starting the Data Collector
1. Click Start > Settings > Control Panel
2. Click Administrative Tools.
3. Click Services.
The Microsoft Services Dialogue will be displayed. It should include entries for “Aptare
Agent”. Start this service if it is not running.
On UNIX
The installer automatically copies the Data Collector “start” and “stop” scripts to the
appropriate directory, based on the vendor operating system.
To start the data collector (agent), use the following command for the respective
platforms:
OS Command
Linux/Solaris /etc/init.d/aptare_agent start
AIX /etc/aptare_agent start
HP-UX /sbin/init.d/aptare_agent start
Data Collector Manual Startup 33
Page 40

34 APTARE StorageConsole Data Collector Installation Guide for IBM Tivoli Storage Manager
Page 41

Application Administrator’s Guide
Chapter 1
Un-installing the Data Collector
Use the procedures in this chapter to un-install a Data Collector.
Un-install the Data Collector on UNIX
1. Login to the Data Collector Server as root.
2. Stop the Data Collector service, using the command appropriate for the operating system.
:
OS Command
Linux/Solaris
/etc/init.d/aptare_agent stop
6
AIX
HP-UX
3. Delete the following files, using the relevant command.
:
OS Command
AIX
HP-UX
4. Delete the Data Collector directory structure (default installation path is
rm –rf /opt/aptare/installlogs /opt/aptare/jre /opt/aptare/lib /opt/aptare/mbs
/opt/aptare/UninstallerData
/etc/aptare_agent stop
/sbin/init.d/aptare_agent stop
find /etc -name aptare_agent -print | xargs rm
find /sbin -name aptare_agent -print | xargs rm
/opt/aptare
):
Un-install the Data Collector on UNIX 35
Page 42

Un-install the Data Collector on Windows
1. Login to the Data Collector Server. (User should have Administrator privileges.)
2. Stop the Data Collector (agent) services.
• Click Start > Settings > Control Panel
• Click Administrative Tools.
• Click Services.
3. Click on “Un-install APTARE StorageConsole Agent” in “Start Menu/Programs/APTARE
StorageConsole Agent”
4. Follow the prompts in the un-install windows.
Note: The un-installer may not delete the entire Data Collector directory structure. Sometimes
new files, created after the installation, along with their parent directories, are not removed. You
may need to manually remove the root install folder (default C:\Program Files\Aptare) and its
sub-folders after the un-installer completes.
36 APTARE StorageConsole Data Collector Installation Guide for IBM Tivoli Storage Manager
Page 43

Chapter 1
Appendix A - Troubleshooting
If the post-installation validation failed, this often is due to some simple configuration
issues that can be fairly easily resolved. This appendix lists some of the common
configuration issues. If the issue cannot be resolved by following the steps in this
section, contact the Customer Care Group. Be sure to include the log files that were
generated during the installation process.
Verify the Data Collector Configuration
The Data Collector configuration file contains key information captured during the
installation process. If the information was entered incorrectly, this may be the cause of
the failure.
Check the Configuration File
1. Edit the configuration file.
Windows:
edit “C:\Program Files\Aptare\mbs\conf\wrapper.conf”
UNIX:
edit “/opt/aptare/mbs/bin/startup.sh” and "/opt/aptare/mbs/bin/updateconfig.sh"
2. Verify the values of the following parameters and update them, if necessary.
wrapper.app.parameter.2 Should match the Collector Name you specified in
Configuring Data Collector Policies in the Portal” on
“
page 11.
wrapper.app.parameter.3 Should match the Passcode you specified in “Configuring
Data Collector Policies in the Portal” on page 11.
wrapper.app.parameter.4 For IN-HOUSE installations:
http://aptareagent.yourdomain.com
where: yourdomain.com has the appropriate value.
For APTARE HOSTED installations:
http://agent.storageconsole.com
For third-party HOSTED installations:
http://aptareagent.domain.com
where: domain.com has the appropriate value.
3. If you changed any of the configuration file parameters, you’ll need to:
• Restart the Data Collector service, as described in “
page 33.
• Re-run the installation validation utility, as described in “
page 27.
Data Collector Manual Startup” on
Validating the Installation” on
Verify the Data Collector Configuration 37
Page 44

Verify Connectivity
Take the following steps to verify that the Data Collector Server can access the Portal
Server:
1. Ping the Data Collector URL:
ping http://aptareagent.yourdomain.com
2. Verify that the URL has been set up correctly in DNS or in the local hosts file, to resolve to
the Portal Server.
38 APTARE StorageConsole Data Collector Installation Guide for IBM Tivoli Storage Manager
Page 45
Chapter 1
Appendix B - Data Collector Pre-Installation
Worksheet
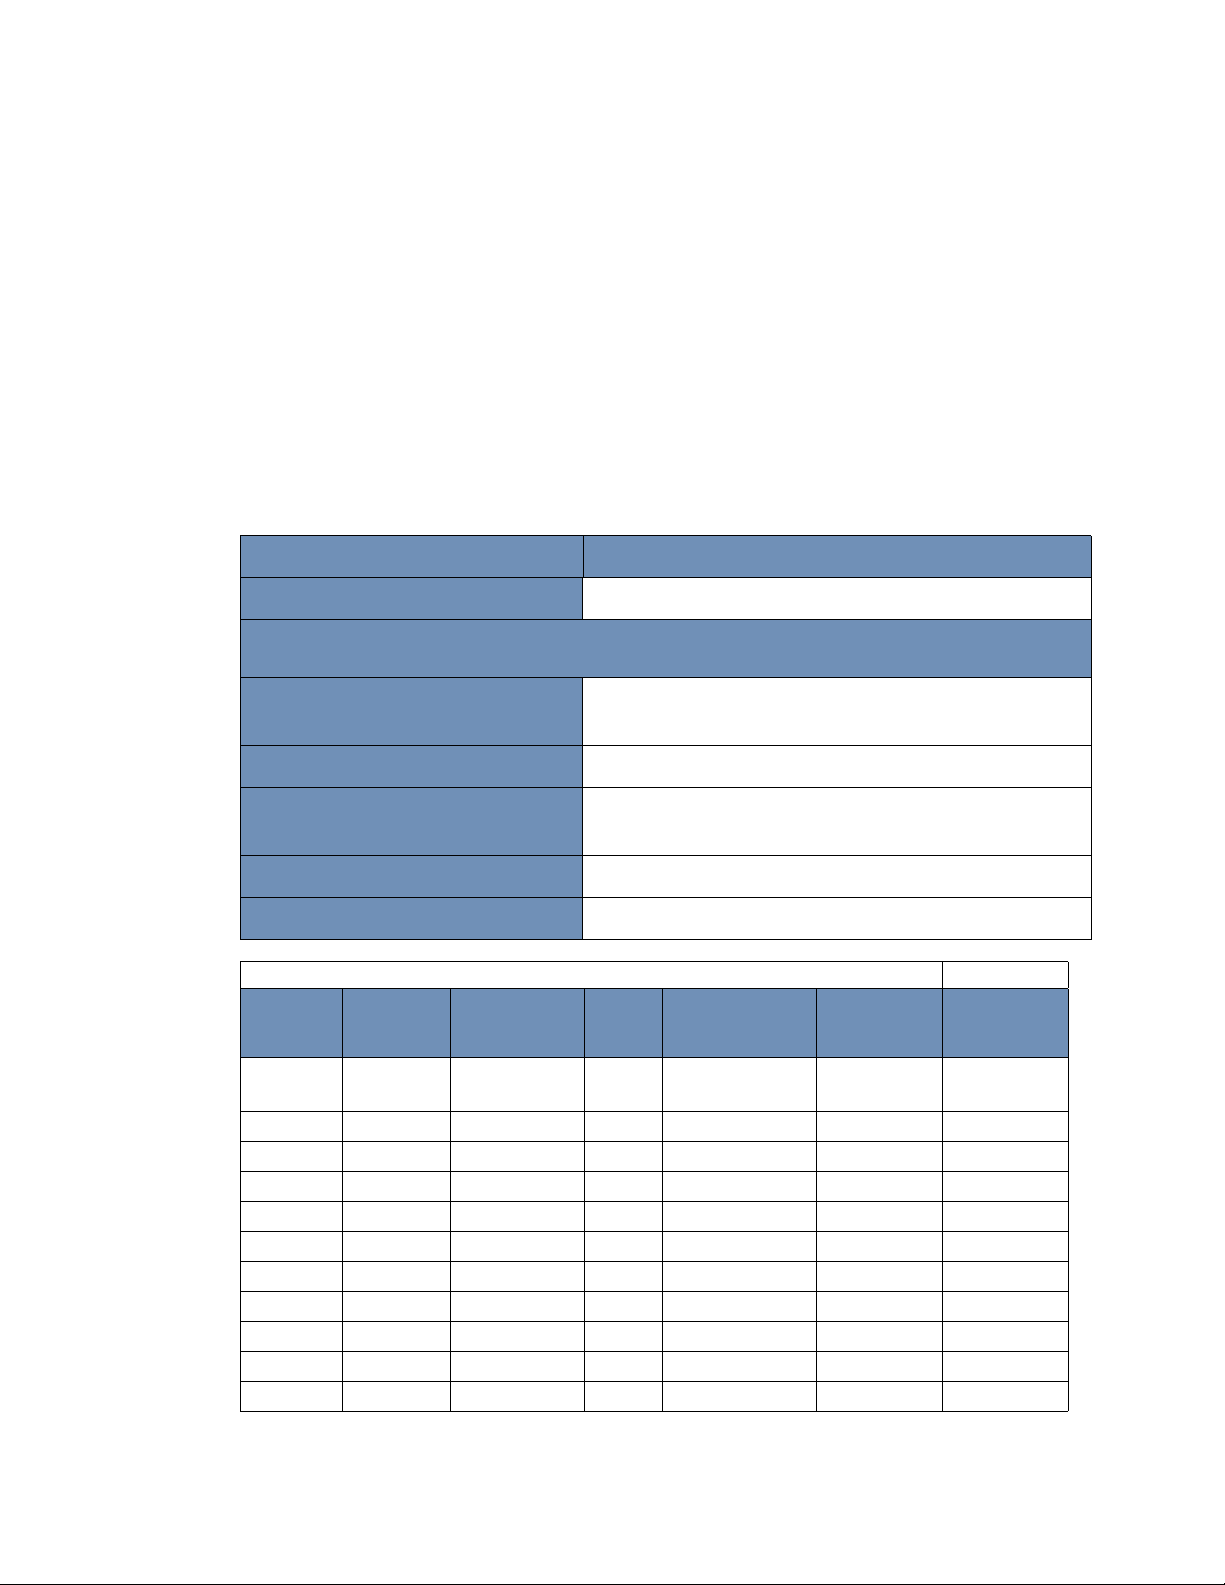
Complete the worksheet below for each of the TSM Host Servers and the TSM
Instances on the TSM Host Servers being polled by the Data Collector. The TSM
Instance name referenced below is the value of the Server Name field returned by the
dmadmc
command “q status” for the instance to which you are connected.
Make additional copies of this page for each TSM Host Server in your enterprise for
which APTARE StorageConsole will collect data.
TSM Host Server Details
Field
Internal Name (server host name)
Note: The following five fields are not used by the application for anything other than display
purposes.
External Name (Display Server
name used in reports)
IP Address
Make (Unknown, Sun, Dell, HP,
IBM, Other)
Model (e.g., P650)
Operating System (e.g., AIX 5.1)
TSM Instances:
#
Example
Instance
1
2
3
4
5
6
7
8
9
10
TSM
Instance
Name
TSMSERVER
TCP Server
Address
203.23.10.10
TCP
Server
Port
TSM User ID
1500 Administrator adminpass Analyst
Value
TSM User
Password
TSM User
Privileges
39
Page 46

40 APTARE StorageConsole Data Collector Installation Guide for IBM Tivoli Storage Manager
 Loading...